lab 2: numerical solution of magnetostatic problems
TRANSCRIPT

Lab 2: Numerical Solution of Magnetostatic Problems
ELEC 3105 Updated ANSYS Lab
1. Before You Start
• You will need to obtain an account on the network if you do not already have one from another course
• Write your name in the sign in sheet when you arrive for the lab
• You can work alone or with a partner
• One stapled lab write-up per group (type-written or hand-written), or an individual lab write-up must be handed in by the end of the lab period
• Show units in all calculations, all graphs require a legend.
2. Objectives In this lab you will use the finite-element program Maxwell to analyze two basic magnetic structures: 1. a magnetic dipole and 2. a solenoid. The lab will run in the Department of Electronics undergraduate laboratory, room ME4275. The software package we will use is ANSYS Electronics Desktop - Maxwell 2D/3D Solver from Ansys
Corporation. This software will enable you to visualize the electric fields and the voltage equipotential in
cross sections of structures consisting of conductors and insulators.
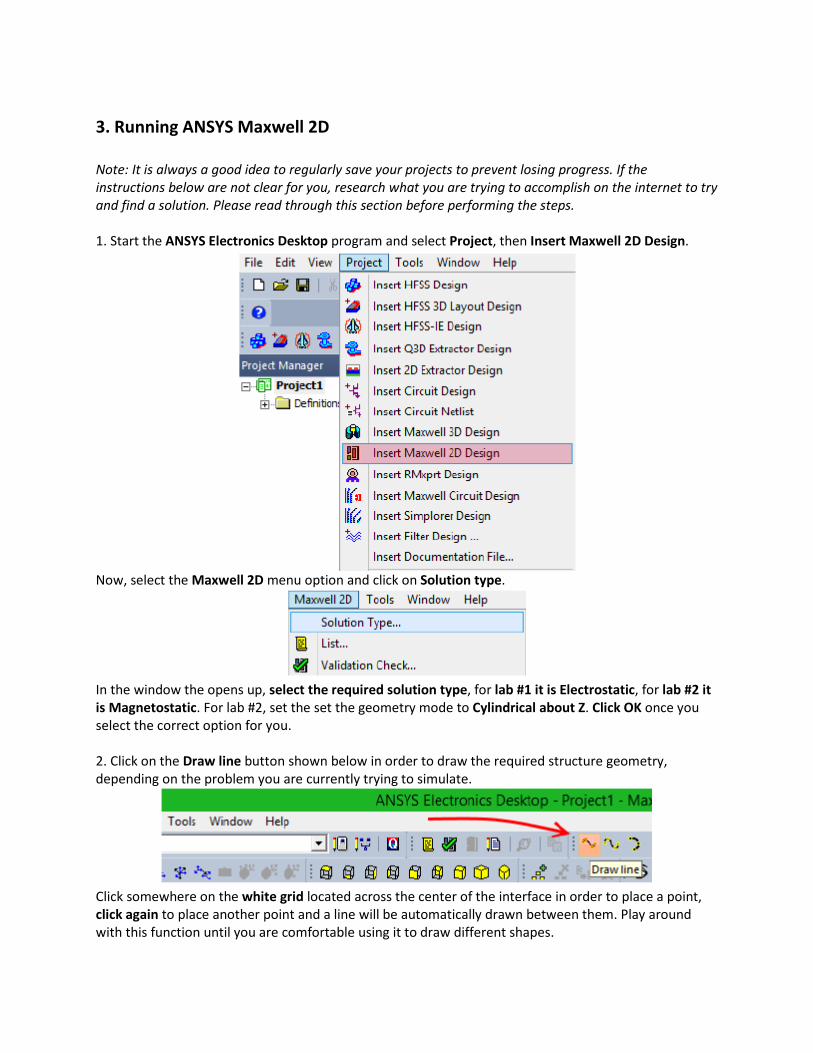
3. Running ANSYS Maxwell 2D Note: It is always a good idea to regularly save your projects to prevent losing progress. If the instructions below are not clear for you, research what you are trying to accomplish on the internet to try and find a solution. Please read through this section before performing the steps. 1. Start the ANSYS Electronics Desktop program and select Project, then Insert Maxwell 2D Design.
Now, select the Maxwell 2D menu option and click on Solution type.
In the window the opens up, select the required solution type, for lab #1 it is Electrostatic, for lab #2 it is Magnetostatic. For lab #2, set the set the geometry mode to Cylindrical about Z. Click OK once you select the correct option for you. 2. Click on the Draw line button shown below in order to draw the required structure geometry, depending on the problem you are currently trying to simulate.
Click somewhere on the white grid located across the center of the interface in order to place a point, click again to place another point and a line will be automatically drawn between them. Play around with this function until you are comfortable using it to draw different shapes.

It is also possible to use the rectangle and circle functions in order to draw shapes. Familiarize yourself with how these functions work as well. You can zoom in and out by holding the control key and scrolling with your mouse, this may help in the case where you need a finer grid size. (Zoom in for a finer grid spacing).
3. Once the required shapes are drawn according to the problem, click on a shape in order to select it. Once it is selected it will change color and its properties will be displayed in the properties pane on the left side of the interface. Select the property box containing the material value and click on Edit and a window will open. In the “Search by name” box, type in the name of the material you would like to simulate, select it from the list below the box, and click OK.
Do this for each different shape using the required material. 4. Once the geometries are drawn and have had materials assigned to them, draw a large rectangle around them and set the material of this rectangle to air. You may also change the transparency of this rectangle by changing the “Transparent” value located in the Properties pane. Note that if you are working with a cylindrical about Z axis, you should draw the rectangle in the positive x and positive z region only. Once this rectangle is drawn, press the E key, and then while holding the control key, select all four edges of the large rectangle you just drew that encapsulates the rest of the shapes. Now right click anywhere on the white grid and from the right click menu, navigate to Assign Boundary, and click on Charge (if you get a boundary error try carefully repeating this process). Set the Balloon type as Charge in the window that opens up, and click OK. You may now press the O key to return to object selection mode (as opposed to edge selection mode). It is also possible to hide or show the different geometries that you have drawn by clicking on the eye icon in the upper toolbar and selecting which shapes you want to remain visible in the

window that opens. This is shown in the figure below. Note that if a shape is not visible, it will still be included within the simulation.
5. In order to assign voltages to materials, right click on the material that you wish to assign an excitation (for example a voltage), navigate to Assign Excitation in the right click menu, and click on Voltage. Set the voltage value required and click ok. 6. Verify that the shapes drawn have the correct size ratios. You should now change the scale by navigating to the top Modeler menu and clicking on it, then select Units and click it. On the window that appears check the Rescale to new units box and select cm or the proper unit for your drawing. Play around with this until your units are correct, you may verify if they are correct by using the scale located at the bottom of the white grid workspace interface shown below in the example for problem 1. (The circle diameter is set to 0.5cm in this figure.)
You can zoom in and pan the view to verify the scale like in this close up cross-section of the circle:

7. In order to simulate this project you must first add a solution setup by navigating to the following menu shown below and clicking on Add Solution Setup.
Click OK on the window that opens and then save your project by pressing down on the control key and S key at the same time. Choose a suitable location to save your project if required. 8. In order to simulate the project, navigate to the Project menu and click on Analyze All, as shown below. You must repeat this if you make any changes.

9. To plot the results, select the large air rectangle and right click on “Field Overlays” within the Project Manager pane on the left side of the interface as shown below. Select the type of result you would like to plot and a window will open. Click Done on the window and your plot will be visible.
10. In order to plot 2D results, draw a line after the project is analyzed. (If there is a popup click yes). You can then plot values along the distance of this line by right clicking on Results from within the Project Manager pane and choose Create Fields Report then select Rectangular plot.
In the window the opens up, select the line you want to plot data along in the Geometry option. Set the category as Calculator Expressions, and choose the quantity you want to plot. Leave Function set to <none>. Click on New Report to plot. You may change these settings and click Add trace to plot another value on the same plot.

Below is an example plot for values Mag_B and Mag_H along a line.
11. Explore the Project Manager pane as it contains lots of useful information. You can modify field overlays by right clicking on Field Overlays and clicking on Modify Plot Attributes. This is useful for changing the resolution, color, and scale of the legend. You may also see your excitations and boundaries along with other parameters. If you right click on one of your plot reports within the Results tree, you may edit your 2D plots by clicking Modify Report. Explore the Properties pane for useful settings too. You can rename shapes that you’ve created to custom names for easier identification if needed. This brief tutorial on using the ANSYS Maxwell Solver should be enough to get you started, there is plenty
of documentation available on the internet as well as built into the program itself.
11. In order to create surface plot of Mag_B and B_vector follow these steps:
- Select a geometry
- Right-click on ‘Field Overlays’ in Project Manager
- Select Fields->B->Mag_B or B_Vector


4. Problem 1: A Magnetic Dipole
A wire of cross-sectional diameter d and radius a is located in the xy-plane (i.e. it rotates around the z-axis). The wire carries current I. The structure is shown in Figure 1. As d becomes infinitesimally small, this structure becomes a structure known as the ”magnetic dipole”. Use diameter d = 7 mm, and radius a = 70 mm away from the z-axis (or V). The material of the loop is copper and everything around it is air or vacuum. To draw the model, use the Circle. The current supplied to the loop is 10 Amp. (So, one circle with 10 A away from the z axis by 70 mm and the program will rotate it to model the loop.)
Figure 1: Magnetic Dipoles
1) Add ”Line 1” and ”Line 2” shown in Figure 1 (b) as described in section 3.2 of this document. You will make 2D line plots for values of the magnetic field at each point along these lines.
2) Plot the value of Mag_B along each of these lines. Follow the instructions in section 3.10 of this document.
3) Perform a surface plot of Mag_B and B_vector as described in section 3.11 of this document.
In your lab report provide the following:
1) Sketch of the shape of the magnetic field lines.
2) Plot of the magnitude of B along the z-axis at r = x = 0 (Line 1)
3) Plot the magnitude of B as a function of radius r at z = a (Line 2).
4) What is the strength of the magnetic dipole (also known as magnetic moment) ? 5) Compare your results with those for the ideal magnetic dipole at two points:
Point A on Line1: x = 0, z = 2a Point B on Line2: x = 2a, z = a
To calculate magnetic field B for ideal magnetic dipole use the following formula:

( ) ( )( )3
2
4
ˆsinˆcos2r
rIaBfafieldθθθµο +
= , (1)
where
r – radial distance from the center of the loop (x = 0, z = a)
θ - polar angle from the z-axis
For further details related to this problem see your textbook.
5. Problem 2: The Solenoid This problem models a solenoid consisting of a helix of radius a and length l tightly wound with N turns of insulated wire carrying current I, as a stack of N loops similar to the loop used in Problem 1. Each loop has a cross-sectional diameter d =10 mm and radius a = 70 mm. Use N = 15 loops so that l ≈ 15d = 150 mm. Use a current 10 Amp for each loop. The set of loops are to be centered along z axis, that is a distance a = 70 mm away. When drawing the model the circles must be very close to each other but not touching (use about 1 mm spacing.) The end result should look as shown below.
Figure 2: Solenoid
5.1 Solenoid with air core First draw the bottom circle then select it and open the right click menu: edit, duplicate, along line in order to make 15 cross-sections total. Afterwards select them all and set the current excitation to 10 A, and the material to copper. The boundary rectangle should be set to air.
In your lab report provide the following:
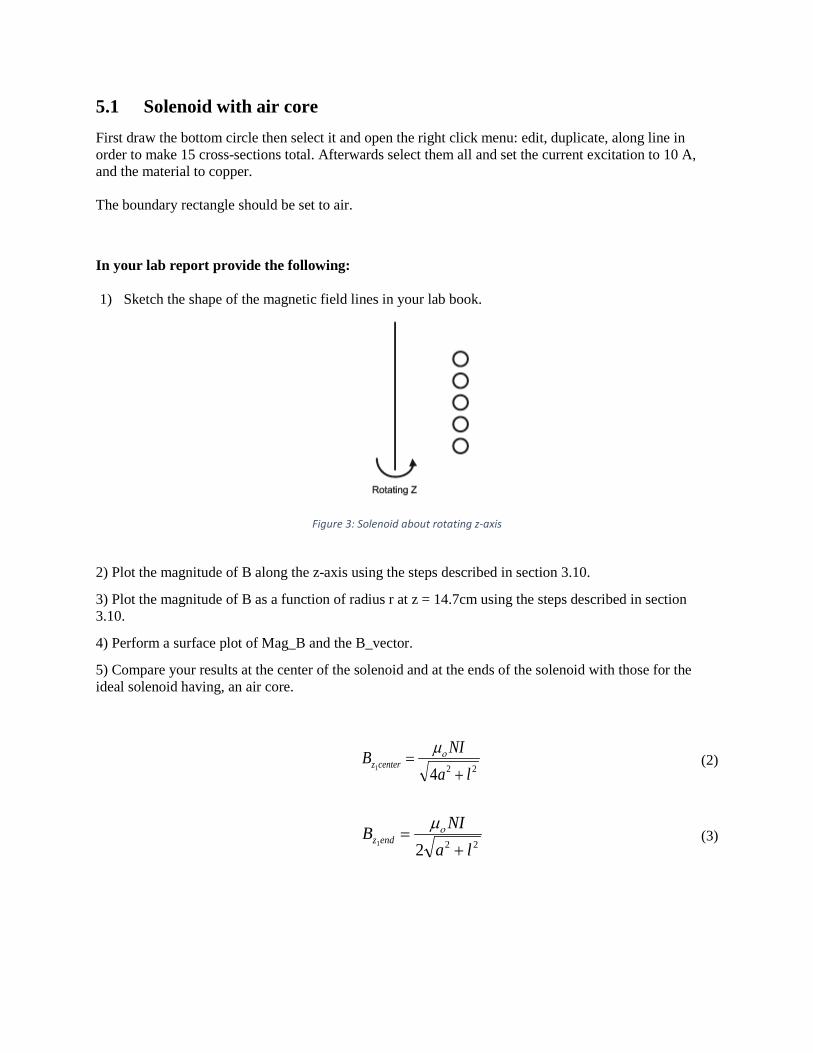
1) Sketch the shape of the magnetic field lines in your lab book.
Figure 3: Solenoid about rotating z-axis
2) Plot the magnitude of B along the z-axis using the steps described in section 3.10.
3) Plot the magnitude of B as a function of radius r at z = 14.7cm using the steps described in section 3.10.
4) Perform a surface plot of Mag_B and the B_vector.
5) Compare your results at the center of the solenoid and at the ends of the solenoid with those for the ideal solenoid having, an air core.
2241 la
NIB centerz+
= οµ (2)
2221 laNIB endz+
= οµ (3)

5.2 Solenoid with magnetic core Create an iron rectangle inside air boundary rectangle with a cut-out around the coil as shown below:
Figure 4: Solenoid rotating about the z-axis with an iron core
In your lab report provide the following: 1) Sketch the shape of the magnetic field lines. What changes do you observe in the magnetic field lines when you use a magnetic core instead of an air core? 2) Plot the magnitude of B along the z-axis using the steps described in section 3.10. 3) Plot the magnitude of B as a function of radius r at z = 14.7cm using the steps described in section 3.10. 4) Perform a surface plot of Mag_B and the B_vector. 5) Compare your results at the center of the solenoid and at the ends of the solenoid with those for the ideal solenoid having an iron core. Explain the reason for the difference.
6) Compare your results with those for the solenoid surrounded by air. Explain the reason for the difference.

6. Helmholtz Coil
Follow the steps in Problem 1, while taking into account the following modifications: Draw geometry to look like the figure below. The radius of each circle should be 6 mm. Select both circle
cross-sections and set the current to 100A. (In 3D they are actually two loops, forming a Helmholtz Coil.)
Helmholtz Coil is formed when Sep = R, which minimizes the nonuniformity of the field at the center of
the coils. In addition to this case we will consider two other cases for comparison: Sep = 0.5R and Sep =
1.5R.
Figure 5: Helmholtz coil layout
1) Draw a line along the Z-axis.
2) Plot magnetic field Mag_B along this line.
In your lab report provide the following:
1) Plot of magnetic field Mag_B along Z-axis for three cases of Sep = 1.5R, Sep = R and Sep = 0.5R on
the same 2D plot.
2) A surface plot of Mag_B and the B_vector.

3) Seen in the following graph is how the relationship between the separation and the magnetic field
should look for any given position. Explain why the relative magnitudes of the lines in your graph
differ from those in the one below?