lab - basic pentesting: 1 ctf walkthrough · lab - basic pentesting: 1 ctf walkthrough this small...
TRANSCRIPT

Lab - Basic Pentesting: 1 CTF Walkthrough
This small boot2root VM contains multiple remote vulnerabilities and multiple privilege escalation vectors. The validation for this walkthrough used VirtualBox, which is the recommended platform. It may also work with VMware.
Hardware Requirements
• Installation of VirtualBox • One virtual install of Kali Linux • One virtual install of the Basic Pentesting OVA file which can be downloaded from here.
Ensure the network adapter for both machines to set to either bridged or NAT.
This VM will not boot until you go into the settings and disable the USB controller.
This CTF is specifically intended for those new to penetration testing. If you’re a beginner, you should hopefully find the difficulty of the VM to be just right.
Your goal is to attack this VM and gain root privileges remotely.
Organization
Create a folder on the desktop of your Kali machine. Name the folder, pentest. When using a terminal, change directory to the pentest folder and run all your commands from this location. Save any downloads or captured files to this location.

Enumeration
We begin with the basics (always) by enumerating the machine for it’s IP address and any open ports and services that are running.
There’s no harm is getting the network ranges by doing an IFCONFIG from your Kali terminal.
Once we have our network range, we can discover the target machine’s IP address by using netdiscover, Nmap or ARP.
Using netdiscover
Nnetdiscover -r 10.0.0.8/8
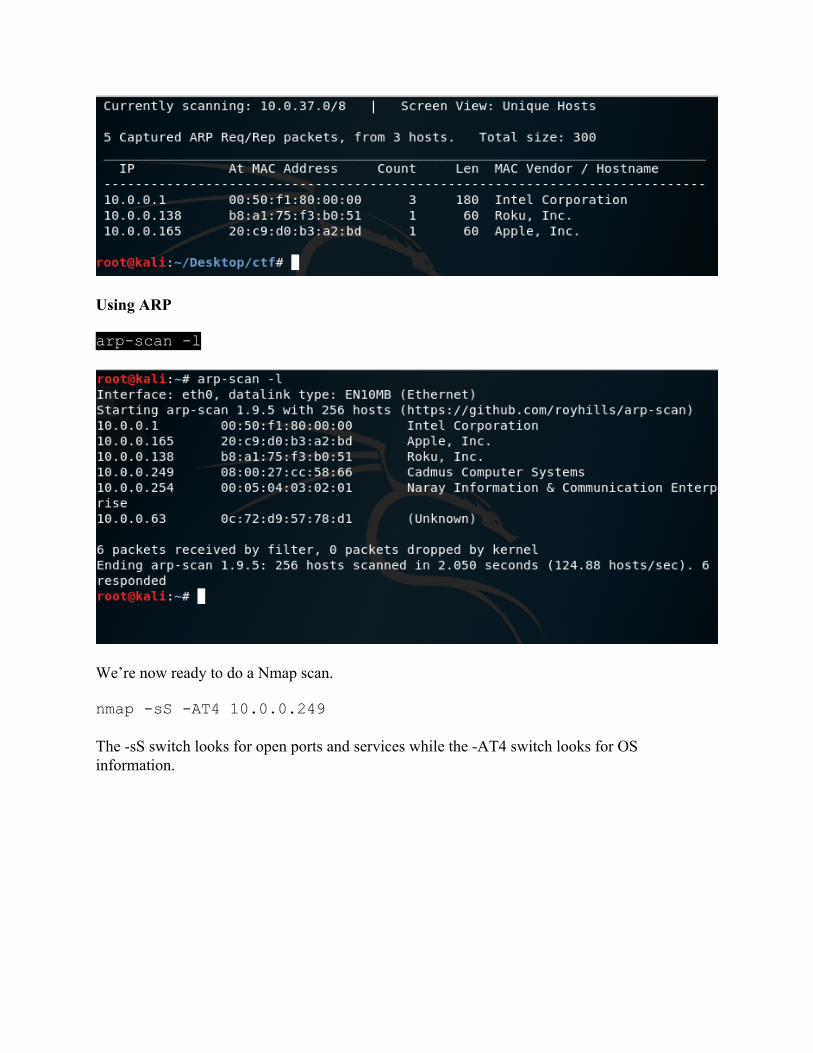
Using ARP
arp-scan -l
We’re now ready to do a Nmap scan.
nmap -sS -AT4 10.0.0.249
The -sS switch looks for open ports and services while the -AT4 switch looks for OS information.

Port: 21
There is an ftp server listening on port 21. Nmap informs us that the ftp service is likely ProFTPD 1.3.3c.
Port: 22
There is an ssh service listening on port 22. Nmap informs us that is likely OpenSSH 7.2p2 Ubuntu 4ubuntu 2.2.
Port: 80
There is an HTTP server listening on port 80. It is likely Apache httpd 2.4.18.
Since we have HTTP running on port 80, let’s conduct a web server scan using Nikto and dirb.
nikto -host 10.0.0.249

DIRB is a Web Content Scanner. It looks for existing or hidden Web Objects. It works by launching a dictionary-based attack against a web server and analyzing the response.
Nikto and dirb both indicate the existence of a secret directory at /secret/. Furthermore, the files and directories discovered by dirb suggest that /secret/ is a WordPress site. Visiting the page confirms this, so we will run a scan to enumerate the site.
Using our browser and the IP address of the target, we get the default page for the site.

Appending/secret to the front of the IP address gives up the hidden page.
The website is distorted, but we now know this is a WordPress site. Let’s add the domain name to our Kali host file to see if we can get the theme page.
echo "10.0.0.249 vtcsec" >> /etc/hosts
Using the same IP and URL for the /secret/ page and we now get the WordPress theme page properly rendered.

Scroll down the page until to you come to link for the login.
Nearly all well know applications, and networking devices come preconfigured with a default username and password. We should always try the well-known default username password when attempting to guess the login information. For example, for a Cisco appliance out of the box, the default username, and password are cisco: cisco, and for a WordPress site it is, admin: admin.
We attempt to login into the word press site using the default username and password of admin: admin.

And we are in! We now have complete administrative access to the WordPress site. This is more common than you might think. As a pentester or hacker, you will find plenty of default usernames and passwords being used.
We need not waste our times trying to guess login credentials. These can be discovered using any number vulnerability scanners which will have a signature file that will attempt to login using the default credentials.
For a WordPress, we can use wpscan scan to brute-force the login credentials for a WordPress site.
wpscan -u http://10.0.0.249/secret/ --enumerate u
o-banner

We can now use wpscan with a wordlist to try and brute force the password.
wpscan --url 10.0.0.249/secret --wordlist /usr/share/wordlists/dirb/big.txt --threads 2
Reading the scan results it seems we did not recover a password, but there is an error message “We received an unknown response for login: admin and password: admin.” So we did brute-force the site and recovered admin: admin as the username and password.
Back to our WordPress login page, we type in admin as the username and admin as the password. Success!
We have logged onto the WordPress site with full administrative access; this will allow us to upload and run files on the server.
Vulnerability Analysis

We have two additional ports to examine. Using searchsploit, we can look for any known exploit that might be used against the FTP service and version running on the server, ProFTPD 1.3.3c
FTP
searchsploit ProFTPD 1.3.3c
Searchsploit indicates that this version of ProFTPD can be backdoored and there is a Metasploit module for the exploit. We will return to this opportunity later.
SSH
searchsploit OpenSSH 7.2p2
We find a vulnerability in this version of OpenSSH that allows username enumeration, but since we are likely to get a shell through either FTP or HTTP, we can mark this as the last chance for romance type possibility.
Exploitation We can search Metasploit for the FTP exploit we found earlier using searchsploit.

We found our exploit, and it is rated as excellent. We next need to load the exploit. Use the show options command to see what setting to configure.
For this exploit all we need to set is the IP address of the remote host which is our target IP address.
Type in the exploit command.

We’re not going to see a prompt, but it’s there. We next need to use a bit of Python coding to improve our situation. python -c 'import pty; pty.spawn("/bin/bash")'
We have root access to the machine!
Summary –
This was an easy CTF to complete. There are plenty of walkthroughs for this CTF on the Internet. I tried may of them and ended up taking bits and pieces for two or three of the best to get one that would work with the latest version of Kali and the software. We exploited FTP, HTTP, and WordPress.
You were shown how to use wpscan to brute-force a username and password on WordPress site. You were introduced to a bit of Python code to take a limited shell to full root access. This lab had something for everyone and used the hacking methodology to gain root access.
Get used to building and organizing your attack. You don’t want files scattered all over your desktop. For every step that was shown in the walkthrough, there are 3 or 4 others that will get you the same result.
Everything shown is reusable and overtime, and with enough practice, you will start to recall some of your favorite exploits.
End of the Walkthrough!