labview dsc 7.1 course manual.pdf
DESCRIPTION
Labview DSC en version 7.1TRANSCRIPT

LabVIEWTM Datalogging and Supervisory Control Course Manual
Course Software Version 7.1July 2004 EditionPart Number 321367G-01LabVIEW DSC Module Course Manual
Copyright
© 1999–2004 National Instruments Corporation. All rights reserved. Under the copyright laws, this publication may not be reproduced or transmitted in any form, electronic or mechanical, including photocopying, recording, storing in an information retrieval system, or translating, in whole or in part, without the prior written consent of National Instruments Corporation.In regards to components used in USI (Xerces C++, ICU, and HDF5), the following copyrights apply. For a listing of the conditions and disclaimers, refer to the USICopyrights.chm.
TrademarksCitadel™, CVI™, DataSocket™, FieldPoint™, LabVIEW™, Lookout™, National Instruments™, National Instruments Alliance Program™, NI™, ni.com™, NI-DAQ™, NI Developer Zone™, and TestStand™ are trademarks of National Instruments Corporation.
Product and company names mentioned herein are trademarks or trade names of their respective companies.
PatentsFor patents covering National Instruments products, refer to the appropriate location: Help»Patents in your software, the patents.txt file on your CD, or ni.com/legal/patents.

Worldwide Technical Support and Product Informationni.com
National Instruments Corporate Headquarters11500 North Mopac Expressway Austin, Texas 78759-3504 USA Tel: 512 683 0100
Worldwide OfficesAustralia 1800 300 800, Austria 43 0 662 45 79 90 0, Belgium 32 0 2 757 00 20, Brazil 55 11 3262 3599, Canada (Calgary) 403 274 9391, Canada (Ottawa) 613 233 5949, Canada (Québec) 450 510 3055, Canada (Toronto) 905 785 0085, Canada (Vancouver) 604 685 7530, China 86 21 6555 7838, Czech Republic 420 224 235 774, Denmark 45 45 76 26 00, Finland 385 0 9 725 725 11, France 33 0 1 48 14 24 24, Germany 49 0 89 741 31 30, India 91 80 51190000, Israel 972 0 3 6393737, Italy 39 02 413091, Japan 81 3 5472 2970, Korea 82 02 3451 3400, Malaysia 603 9131 0918, Mexico 01 800 010 0793, Netherlands 31 0 348 433 466, New Zealand 0800 553 322, Norway 47 0 66 90 76 60, Poland 48 22 3390150, Portugal 351 210 311 210, Russia 7 095 783 68 51, Singapore 65 6226 5886, Slovenia 386 3 425 4200, South Africa 27 0 11 805 8197, Spain 34 91 640 0085, Sweden 46 0 8 587 895 00, Switzerland 41 56 200 51 51, Taiwan 886 2 2528 7227, Thailand 662 992 7519, United Kingdom 44 0 1635 523545
For further support information, refer to the Additional Information and Resources appendix. To comment on the documentation, send email to [email protected].

National Instruments Corporation LabVIEW DSC Module Course Manual iii
Contents Student Guide................................................................................................................................................ 5 A. NI Certification.................................................................................................................................. 6 B. Course Description ............................................................................................................................ 7 C. What You Need to Get Started .......................................................................................................... 7 D. Installing Course Software ................................................................................................................ 8 E. Course Goals ...................................................................................................................................... 8 F. Course Conventions ........................................................................................................................... 9 Lesson 1: Datalogging and Supervisory Control (DSC) Module Overview..............................................1-1 A. Introduction to the DSC Module ....................................................................................................1-2 B. How the DSC Module Improves Your Applications ......................................................................1-4 C. Rapid Development ......................................................................................................................1-11 D. Understanding the Data Transfer Process.....................................................................................1-15 E. Setting Up FieldPoint....................................................................................................................1-16 Exercise 1-1.......................................................................................................................................1-22
Lesson 2: Getting Started with the LabVIEW DSC Module .....................................................................2-1 A. The Basic Steps of DSC Development...........................................................................................2-2 B. Adding Hardware............................................................................................................................2-3 C. Tags and Your Hardware................................................................................................................2-7
D. What Is the Tag Engine? ..............................................................................................................2-17 Exercise 2-1.......................................................................................................................................2-20
Lesson 3: Designing Your LabVIEW DSC Application ...........................................................................3-1 A. Understanding the Client/Server Relationship ...............................................................................3-2
B. How Do I Use HMI Wizard to Speed Development?.....................................................................3-5 C. Viewing Connections....................................................................................................................3-11 D. Elements of an Effective User Interface.......................................................................................3-13 E. Panel Wizard.................................................................................................................................3-14 Exercise 3-1.......................................................................................................................................3-20 Exercise 3-2.......................................................................................................................................3-25 Exercise 3-3A ....................................................................................................................................3-29 Exercise 3-3B ....................................................................................................................................3-33
Lesson 4: Handling and Logging Your Data .............................................................................................4-1 A. Logging Data Using the LabVIEW DSC Module..........................................................................4-2 B. Alarms in LabVIEW DSC ............................................................................................................4-13 Exercise 4-1A ....................................................................................................................................4-23 Exercise 4-1B ....................................................................................................................................4-24 Exercise 4-1C ....................................................................................................................................4-25

LabVIEW Real-Time Course Manual iv ni.com
Exercise 4-1D ....................................................................................................................................4-27 Exercise 4-1E ....................................................................................................................................4-29 Exercise 4-2.......................................................................................................................................4-30
Lesson 5: Advanced Database Management .............................................................................................5-1 A. What Is a Data Set? ........................................................................................................................5-3
B. Keeping Your Database Slim .......................................................................................................5-10 C. Importance of Archiving and Backing Up Data ...........................................................................5-13 D. Merging and Restoring Databases ................................................................................................5-17 Exercise 5-1.......................................................................................................................................5-20
Lesson 6: Maximizing Tag Effectiveness..................................................................................................6-1 A. The Importance of Tag Management .............................................................................................6-2
B. Setting Default Parameters for Tags ...............................................................................................6-8 C. Using the Tag Monitor..................................................................................................................6-13
D. Changing Tag Attributes Programmatically.................................................................................6-22 Exercise 6-1.......................................................................................................................................6-25 Exercise 6-2.......................................................................................................................................6-28 Exercise 6-3.......................................................................................................................................6-32
Lesson 7: Networking with DSC ...............................................................................................................7-1 A. Client/Server Architecture..............................................................................................................7-2
B. Server Philosophy�Review...........................................................................................................7-4 C. Client Philosophy�Review ...........................................................................................................7-9 D. DSC Module Clients.....................................................................................................................7-11 E. Client/Server Architecture � Network System..............................................................................7-12 Exercise 7-1.......................................................................................................................................7-28 Exercise 7-2A ....................................................................................................................................7-32 Exercise 7-2B ....................................................................................................................................7-38 Exercise 7-3.......................................................................................................................................7-41
Lesson 8: Advanced Topics .......................................................................................................................8-1 A. LabVIEW DSC Security ................................................................................................................8-2
B. Programmatically Controlling Security ........................................................................................8-16 C. VI-Based Servers ..........................................................................................................................8-18 Exercise 8-1.......................................................................................................................................8-22 Exercise 8-2.......................................................................................................................................8-27 Exercise 8-3.......................................................................................................................................8-28 Exercise 8-4.......................................................................................................................................8-30
Appendix A: Additional Information and Resources................................................................................A-1
Course Evaluation

© National Instruments Corporation v LabVIEW DSC Module Course Manual
Student Guide
Thank you for purchasing the LabVIEW Datalogging and Supervisory Control course kit. This course manual and the accompanying software are used in the 2-day, hands-on LabVIEW Datalogging and Supervisory Control course.
You can apply the full purchase price of this course kit toward the corresponding course registration fee if you register within 90 days of purchasing the kit. Visit ni.com/training to register for a course and to access course schedules, syllabi, and training center location information.

Student Guide
LabVIEW DSC Module Course Manual vi ni.com
A. NI CertificationThe LabVIEW Datalogging and Supervisory Control Module course is part of a series of courses designed to build your proficiency with LabVIEW and help you prepare for exams to become an NI Certified LabVIEW Developer and NI Certified LabVIEW Architect. The following illustration shows the courses that are part of the LabVIEW training series. Refer to ni.com/training for more information about NI Certification.
LabVIEWBasics I:
Introduction
LabVIEWBasics II:
Development
LabVIEW Intermediate I: Successful
Development Practices
LabVIEW Dataloggingand SupervisoryControl Module
LabVIEW Real-TimeApplication
Development
LabVIEWInternet Applications
Motion ControlFundamentals
Machine Vision andImage Processing
Data Acquisition andSignal Conditioning
LabVIEW Advanced:Application
Development
LabVIEWInstrument Control
LabVIEW Intermediate II: Performance and
Connectivity
LabVIEW Series

Student Guide
© National Instruments Corporation vii LabVIEW DSC Module Course Manual
B. Course DescriptionThe LabVIEW Datalogging and Supervisory Control Module course teaches you to use the LabVIEW Datalogging and Supervisory Control Module to develop datalogging and supervisory control applications.
This course assumes you have a level of experience with LabVIEW equivalent to completing the material in the LabVIEW Basics I: Introduction course. In addition, you should be familiar with the Windows operating system and computer components such as the mouse, keyboard, connection ports, and plug-in slots, and have experience writing algorithms in the form of flowcharts or block diagrams.
The course is divided into lessons, each covering a topic or a set of topics. Each lesson consists of the following parts:
• An introduction that describes what you will learn.
• A discussion of the topics.
• A set of exercises that reinforces the topics presented in the discussion.
• A summary that outlines important concepts and skills taught in the lesson.
C. What You Need to Get StartedBefore you use this course manual, make sure you have the following items:
❑ Computer running Windows 2000/XP
❑ LabVIEW Full Development System version 7.1 or later
❑ LabVIEW Datalogging and Supervisory Control Module version 7.1 or later
❑ One of the following Real-Time target computers:
– FieldPoint-2000 or 2010 network module with a FieldPoint-PWM-520 module and terminal block and a FieldPoint-TC-120 module and terminal block
❑ LabVIEW Datalogging and Supervisory Control Course Manual

Student Guide
LabVIEW DSC Module Course Manual viii ni.com
❑ LabVIEW Datalogging and Supervisory Control Course CD, which contains the following files:
D. Installing the Course SoftwareComplete the following steps to install the course software.
1. Insert the course CD.
2. Copy the contents to the top level of the C:\ directory.
E. Course GoalsThis course presents the following topics:
• Using LabVIEW to build high-channel count applications
• Developing network applications for distributed control
• Implementing security within LabVIEW applications
• Developing applications with automatic datalogging, full alarm management, and event logging
• Developing a human machine interface (HMI) for your application
• Logging and extracting historical data
This course does not present any of the following topics:
• Information and concepts covered in LabVIEW Basics I: Introduction course
• Control, PID, and/or Fuzzy Logic theory
• Analog-to-digital (A/D) theory
• Operation of GPIB, RS-232, Motion, CAN, or VISA
• Every built-in LabVIEW object, function, or library VI; refer to the LabVIEW Help for more information about LabVIEW features not described in this course
• Development of a complete application for any student in the class; refer to the NI Example Finder, available by selecting Help»Find Examples for example VIs you can use and incorporate into VIs you create
Filename Description
Exercises a folder containing all files needs to complete the exercises
Solutions a folder containing the solutions to each exercise

Student Guide
© National Instruments Corporation ix LabVIEW DSC Module Course Manual
F. Course ConventionsThe following conventions are used in this course manual:
» The » symbol leads you through nested menu items and dialog box options to a final action. The sequence File»Page Setup»Options directs you to pull down the File menu, select the Page Setup item, and select Options from the last dialog box.
This icon denotes a tip, which alerts you to advisory information.
This icon denotes a note, which alerts you to important information.
This icon denotes a caution, which advises you of precautions to take to avoid injury, data loss, or a system crash.
bold Bold text denotes items that you must select or click in the software, such as menu items and dialog box options. Bold text also denotes parameter names, controls and buttons on the front panel, dialog boxes, sections of dialog boxes, menu names, and palette names.
italic Italic text denotes variables, emphasis, a cross reference, or an introduction to a key concept. This font also denotes text that is a placeholder for a word or value that you must supply.
monospace Text in this font denotes text or characters that you enter from the keyboard, sections of code, programming examples, and syntax examples. This font also is used for the proper names of disk drives, paths, directories, programs, subprograms, subroutines, device names, functions, operations, variables, filenames, and extensions.
monospace Italic text in this font denotes text that is a placeholder for a word or valueitalic that you must supply.


Lesson 1: Datalogging and Supervisory Control (DSC) Module Overview
TOPICSA. Introduction to the DSC ModuleB. How the DSC Module Improves Your ApplicationsC. Rapid DevelopmentD. Understanding the Data Transfer ProcessE. Setting Up FieldPoint
By the end of this lesson, you will be able to answer the following questions:� What can the DSC Module help me accomplish?� How can the DSC Module simplify my development?� How can I design a simple application with the DSC Module?� How does data go from my hardware to my VI with the DSC Module?� Why is it important to keep my source of data abstract?
© National Instruments Corporation 1-1 LabVIEW DSC Module Course Manual

What is the LabVIEW DSC Module?
� Interfaces between your VI and your Hardware� Designed to extend the functionality of your
applications� Creates a common format for hardware access
and manipulation� Made to simplify your program and your design
process
What is the DSC Module?The LabVIEW Datalogging and Supervisory Control (DSC) Module greatly extends the functionality of LabVIEW. The DSC Module integrates with LabVIEW. In addition to creating applications with the DSC Module from the beginning, you also can incorporate the DSC Module into existing applications.The DSC Module simplifies applications and maximizes their performance. Acting as an interface between your VI and your hardware, the DSC Module allows you to design your application without concerning yourself with the hardware implementation of acquiring your real-world data. The DSC Module also is made to extend the development options available to you when designing your VIs. It gives you access to many features that are useful even in environments where no hardware is involved.
LabVIEW DSC Module Course Manual 1-2 ni.com

LabVIEW as a HMI/SCADA System
DSC Module
SecurityNetworking
Alarms
Trends
Data Logging
The LabVIEW DSC Module as a HMI/SCADA InterfaceThe DSC Module provides a variety of powerful tools for creating a Human Machine Interface (HMI)/Supervisory Control and Data Acquisition (SCADA) system. These features are robust and powerful enough to customize to your exact specifications. DSC Module features include the following:� Data Logging�Write your data to a database automatically with DSC.� Trends�Examine logged data from a few minutes to several years.� Alarms and Events�Analyze data to watch for conditions of interest.� Networking�Share data across a network.� Security�Add restrictions on who can modify or use applications.
© National Instruments Corporation 1-3 LabVIEW DSC Module Course Manual

Why Use the DSC Module?
� Develop and deploy HMI/SCADA systems quickly� Maintain and adapt VIs to changing specifications� Abstract the hardware so that users need not be
hardware experts to retrieve data� Provides tools to quickly log, secure, or provide your
data over a network
Why Use the DSC Module In Your ApplicationsThe DSC Module is powerful enough to be the backbone of many applications, specifically HMI/SCADA systems. The DSC Module provides tools to design a VI without having to place a single element on a block diagram. Because the DSC Module abstracts the hardware, you need not worry about the details of the hardware setup while you create your software application. You can set up the hardware later or let an expert configure it.Logging your data to a database, preventing unauthorized users from accessing your data, and sharing your data across a network can all be cumbersome tasks. However, the DSC Module provides features to handle this in your applications, which reduces the work needed to a few mouse clicks.
LabVIEW DSC Module Course Manual 1-4 ni.com

Typical Use Cases
� Control and monitoring applications
� Programs that communicate with a variety of hardware
� VIs must be maintained over time
� Quick, flexible design required DAQ Board FieldPoint
ModulesThird-Party
PLCs
Typical Use CasesWhile the DSC Module can be effectively used in any VI to extend features of the VIs orto adapt the VI to hardware, most uses for the DSC Module fall under at least one of thefollowing types: � HMI/SCADA Systems�You can quickly set up data analysis and indicators/controls
linked to your hardware.� Programs that communicate with a variety of hardware�The DSC Module allows
you to interface with all hardware the same, simplifying development and maintenance of your system.
� VIs needing to be maintained over multiple revisions�Because hardware is kept abstract in the DSC Module, you can add and remove features without affecting your hardware, and change your hardware implementation without affecting how you manage your data.
� Quick, flexible designs�The DSC Module is designed to allow users to complete applications quickly and also customize their features to meet their needs.
© National Instruments Corporation 1-5 LabVIEW DSC Module Course Manual

FieldPointModules
Where the DSC Module Fits in LabVIEWLabVIEW VIsYour Program
DSC ModuleTag Engine
DSC ModuleCitadel
FieldPointDriver
NI-DAQDriver
NI or Third-Party Drivers
Log Dataand Alarms
Send Historical Data
Third-PartyPLCsDAQ Board
OPC
Where the DSC Module Fits in LabVIEWExamine this slide. Concentrate on how data flows between elements. The DSC Module integrates with LabVIEW and is a go-between for LabVIEW and your hardware. This enables an application to be indifferent to the actual choice of hardware.As you can see, the Tag Engine handles the majority of the work, while Citadel stores and passes data back to LabVIEW when requested. The Tag Engine handles requests to read or write to the hardware and obtains the results of those operations, making them available to the program. Thus, you can read your hardware values in much the same way you would read a variable.
LabVIEW DSC Module Course Manual 1-6 ni.com

High-Speed Solutions
� Use the DSC Module with high-speed acquisitions� Use one environment for DAQ, FieldPoint, and OPC
Data Acquisition with DAQ VIs Data Acquisition with FieldPoint VIs
Data Acquisition with DSC VIs
High-Speed SolutionsFor applications that require high-speed, efficient data transfers, DAQ and FieldPoint VIs provide a powerful solution. With the DSC Module, you can maintain your DAQ, FieldPoint, and DSC Module code within one environment. Use the DSC Module to easily communicate with any hardware using OPC in the same application containing your high-speed FieldPoint and DAQ programming.
© National Instruments Corporation 1-7 LabVIEW DSC Module Course Manual

The DSC Module Advantage
� Same set of VIs control all hardware in same manner
� Easy to use, easy to understand
� Changes in hardware do not affect your VI
Data Acquisition With DSC VIs
The DSC AdvantageUse the DSC Module VIs to interface with all of your hardware through OPC using the same DSC Module VIs. A single set of VIs simplifies programming regardless of the type of hardware you are using.
LabVIEW DSC Module Course Manual 1-8 ni.com

Exercise 1-1
Exploring the DSC Module Documentation and Help
Approximate time to complete: 10 min. Page 1-22
Become familiar with the documentation available for the LabVIEW DSC module and locate the example programs that ship with LabVIEW DSC.
OBJE
CTIV
E
© National Instruments Corporation 1-9 LabVIEW DSC Module Course Manual

How We Apply the DSC Module Advantage
� Tags � Represent I/O points on your hardware� Hides details from your VI � the VI uses only the
name and type� Also can be used as global variables or to share
information over a network
How We Apply the DSC Module AdvantageTags are the key to using the DSC Module effectively. Tags assign a name to an input or output point on your hardware, allowing you to access those points by simply using the tag names in your VIs. Thus, you can effectively hide unnecessary details about your hardware from your VIs. The following example describes this.You have a piece of hardware that reads a temperature. With the DSC Module, you simply assign a tag to that temperature and give it a descriptive name, in this case Temperature. In the DSC Module VI, you need only to reference that tag name to read the temperature from that device.In addition to accessing your hardware, tags also can read and write values to memory. This is useful for two reasons�trying to share data over a network and when testing VIs. Tags allow you to simulate your hardware without it being installed. You simply write to and read from memory instead of to and from your hardware.
LabVIEW DSC Module Course Manual 1-10 ni.com

Rapid Development with Wizards
Wizards simplify creating tag connections� HMI Wizard � Allows you to automatically connect
a control/indicator to a tag� Tag Configuration Wizard � Simplifies the process
of creating a tag� Panel Wizard � Allows you to easily integrate
multiple windows into your application
Rapid DevelopmentThe DSC Module includes wizards that streamline and simplify development. While the wizards are designed to be easy to use, they also allow access to advanced characteristics.
© National Instruments Corporation 1-11 LabVIEW DSC Module Course Manual

HMI Wizard
� HMI � Human Machine Interface� Gives instant access to values you need to read
or write� Generates code on the block diagram to allow you
to customize the behavior of the control/indicator� Good for simple applications or for a starting point
for advanced applications
HMI WizardIncluded in the HMI Wizard are features for both the novice and advanced user. The wizard is designed to help you make clear, effective controls and indicators for your program.The HMI wizard will create fully functional code. However, the generated code is editable so that you can add functionality to your VI.The HMI wizard connects a control or indicator on the front panel to a tag. For instance, assume you have a tag labeled Tank Level that you want to monitor in LabVIEW. After you place a Tank Numeric Indicator on the front panel, the HMI Wizard quickly can create a VI that displays the value of Tank Level.
LabVIEW DSC Module Course Manual 1-12 ni.com

Tag Configuration Wizard
� Easiest and fastest tag creation� Automatically add multiple items or ranges of items� Wizard determines the type of tag for you� Wizard creates a tag name to match item name on
the server
Tag Configuration WizardThe Tag Configuration Wizard is the quickest and easiest way to create tags. The wizard lets you pick tags from multiple sources. For example, you could select a tag from your own computer or from across a network. The wizard also allows you to select a single channel or a whole range of channels from your hardware. The wizard takes care of determining all the proper data types of the channels involved. It also names the tags to match the channels from the selected hardware so that you can easily identify your data and rename it if desired.
© National Instruments Corporation 1-13 LabVIEW DSC Module Course Manual

Panel Wizard
� Multiple panels organize and simplify the user interface for large applications
� Wizard attaches the appearance of a new panel to a button � no programming required
� Same behavior achieved by programming with subVIs in LabVIEW
Panel WizardMany large applications require the use of many windows for the operator to navigate. For example, a large SCADA system for a water treatment facility might monitor many unique water control systems around the city. Rather than squeeze all of the system monitoring onto one panel, you can create a separate panel to view each unique system, making the user interface less confusing.With traditional LabVIEW programming, you must program the appearance of new panels by manually creating subVIs and manipulating the visual properties of the panel to achieve the desired panel appearance. With the Panel Wizard, the DSC Module generates the code to achieve the desired panel navigation.
LabVIEW DSC Module Course Manual 1-14 ni.com

How Does Data Get to the Tag?
DSC ModuleTag Engine
Real-world data is sampled by your
hardware
DSC Module Tag Engine reads values from your hardware
Tag Engine updates tags in your VIs
FieldPointModules
Third PartyPLCs
DAQ Board
How Does Data Get to My Tag?Examine this diagram. Data travels from the real world to the tag in your VI in the following way: � The hardware collects data from the real world. � The DSC Module Tag Engine reads values associated with tags from the hardware. � The Tag Engine then updates the values in your VI. This can occur upon changes in the
value or based on user-defined timings. � The reverse process is used when updating write tags.
© National Instruments Corporation 1-15 LabVIEW DSC Module Course Manual

NI FieldPoint Overview
Modular Distributed I/O System� Modular� Industrial� Easy-to-Use
� Network, Wireless, Stand-Alone� Environmentally Rugged
NI FieldPoint is a modular distributed I/O system with industrial-grade performance and unmatched software integration. The system gives you the ability to quickly and easily place I/O and measurement nodes near sensors and signal sources. FieldPoint also gives you the flexibility to choose a standard networking technology such as Ethernet, serial, wireless, or Foundation Fieldbus, that best suits your application. The [c]FP-20xx Ethernet control modules can store and run embedded LabVIEW Real-Time programs. This allows intelligent NI FieldPoint systems to communicate with other network nodes to publish and share data, or act as a reliable stand-alone node.
LabVIEW DSC Module Course Manual 1-16 ni.com

FieldPoint Architecture
Network Modules
Terminal Bases
I/O Modules
FieldPoint features a modularized architecture consisting of the following components: network modules, connector blocks in CompactFieldPoint, terminal bases, and I/O modules.Network modules provide connectivity between the FieldPoint system and your computer or network.The terminal bases, and connector blocks provide field wiring connections for your signals, power to the I/O modules, and the FieldPoint backplane bus for communications. You can hotswap an I/O module with an identical I/O module and acquire signals without having to reconfigure the module. You can hotswap FieldPoint I/O modules, but not terminal bases. Therefore, do not try to hotswap the terminal bases.The I/O modules are available in two standard types: eight- and 16-channel modules and dual-channel modules for regular FieldPoint. I/O modules provide isolated analog and discrete inputs and outputs for a wide variety of signal types. The I/O modules are installed on terminal bases, which allow you to plug and unplug your modules without disconnecting your field wiring.
© National Instruments Corporation 1-17 LabVIEW DSC Module Course Manual

Compact FieldPoint
Controller
Smart I/O Modules
Terminal Connector Blocks
Rugged Metal Backplane
Compact FieldPoint modules offer the most rugged platform for embedded control and network distributed measurements. All compact FieldPoint modules are built to last including a solid metal back plate, steel screw fasteners, and flexible wiring and cabling options. Because of these rugged features, Compact FieldPoint modules are rated to 50 g shock and 5 g vibration as well as an operating range of �25 to 60 °C. Furthermore, they are expandable with removable CompactFlash storage and contain multiple RS-232/RS-485 serial ports.
LabVIEW DSC Module Course Manual 1-18 ni.com

FieldPoint Communication
WIRELESS
ETHERNET
FOU
ND
ATIO
N FIELD
BU
S
LabVIEW Real-Time
RS-232RS-485
RS-232
10BaseT100BaseT
H1
SER
IAL
FieldPoint communication options include the following:� Serial�FP-1000 RS-232/485 and FP-1001 RS-485� Wireless�SRM6000 Spread-Spectrum Radio Modem connected to FP-1000 RS-232 Network
Module� Ethernet�FP-20xx (for use with LabVIEW RT) and FP-16xx 10BaseT or 100BaseTX� H1 Fieldbus�FP-3000� Wireless Ethernet
© National Instruments Corporation 1-19 LabVIEW DSC Module Course Manual

Demo
PID Temperature Controller
Preview of Exercise 7-2
Develop an understanding of what can be done with the DSC Module.
OBJE
CTIV
E
Open the PID Server.vi located in the Solutions folder on your computer. This VI monitors and controls the temperature in the temperature chamber using FieldPoint modules. The temperature inside the chamber is monitored with a thermocouple. The light on the chamber has variable intensity to add heat to the chamber as needed, while the speed of the fan can be used to cool off the chamber as needed. Click the run arrow to start the VI. Experiment with different values for the Setpoint control. Click the PID Output tab and notice that the light intensity and the fan speed will change according to the value of the temperature setpoint. Notice the graphics on the front panel also simulate the speed of the fan and the intensity of the light.
LabVIEW DSC Module Course Manual 1-20 ni.com

Lesson Summary
� What is the DSC Module?� Designed to be quick, powerful, flexible
� The DSC Module handles hardware and software separately� Using Wizards
� HMI Wizard� Tag Configuration Wizard� Panel Wizard
� FieldPoint Introduction
Lesson SummaryThis lesson introduced you to the DSC Module. You designed a basic application and can start learning how to build more applications.Because you used wizards to build VIs, you can extend the VIs in the following lessons to build upon the code generated by the wizards. You also have learned how to set up FieldPoint devices, and know where you can find more information on that topic.
© National Instruments Corporation 1-21 LabVIEW DSC Module Course Manual

LabVIEW DSC Module Course Manual 1-22 ni.com
Exercise 1-1: Exploring the DSC Module Documentation and Help Objective: Locate and browse the available DSC Module documentation, examples, and palette.
DSC Module Documentation 1. Select Start»Programs»National Instruments»LabVIEW 7»LabVIEW to launch LabVIEW 7
Express.
2. Select Help»Search the DSC Module Bookshelf to view the documentation for the DSC Module.
3. Take a few minutes to browse the available documentation.
DSC Module Examples 1. In LabVIEW, select Help»Find Examples to launch the Example Finder.
2. Navigate to Toolsets and Modules»Datalogging and Supervisory Control to find the LabVIEW DSC examples.
3. Take a few minutes to browse through the examples that ship with the LabVIEW DSC Module.
DSC Module VIs 1. Open a blank VI and select Window»Show Block Diagram to open the block diagram. Press the
<Ctrl-H> keys to open the Context Help window if it is not already displayed.
2. Right-click the block diagram to open the Functions palette if it is not already displayed.

© National Instruments Corporation 1-23 LabVIEW DSC Module Course Manual
3. Use the Context Help as you explore the DSC Module VIs on the Functions palette.
.
4. Close the VI when you are finished. Do not save changes.
End of Exercise 1-1

LabVIEW DSC Module Course Manual 1-24 ni.com
Notes

Lesson 2: Getting Started with the LabVIEW DSC Module
TOPICSA. The Basic Steps of DSC DevelopmentB. Choosing the Proper HardwareC. Tags and Your HardwareD. What Is the Tag Engine?
By the end of this lesson, you will be able to answer the following questions:� What hardware is best for my applications?� What is a tag?� Why are tags important?� How do I adjust the attributes of my tags to my liking?� How can I organize tags for differing uses?� What is the Tag Engine? What does the Tag Engine do for my programs?
© National Instruments Corporation 2-1 LabVIEW DSC Module Course Manual

The Basics of LabVIEW DSC Development
1. Choose the proper hardware.
2. Configure your tags.
3. Customize your VI.
The Basic Steps of DSC DevelopmentSince DSC will take care of many frequent issues, the design process with DSC becomes simple. When you know what data you need to interpret, complete the following steps:
1. Choose the right hardware.An important factor in choosing hardware is finding a device capable of making your desired measurements. That is why it is important to know what data you are seeking to gather. Another factor is choosing the right hardware for what you plan to do with the data you receive. For example, if you need to sample data only once per second, then hardware that samples at a high frequency is not likely necessary.
2. Configure your tags.Not only can you assign a tag to represent a data channel available on your hardware, but you also can configure tags to maximize their effectiveness. By properly configuring tags, you can do things such as filter out some types of noise automatically, change how the Tag Engine updates the values of a tag, and other properties as well.
3. Customize your VI.While the wizards provide you needed functionality for your simpler applications, as you grow more comfortable with DSC you might want to modify the code of a wizard and use it as a base for your own to create versatile applications. Refer to Lesson 3, Designing Your LabVIEW DSC Application, for more information about customizing VIs.
LabVIEW DSC Module Course Manual 2-2 ni.com

Choosing the Proper Hardware� Analyze Your Needs
� Decide what you want to measure and control� Choose Appropriate Sensors and Outputs
� Determine the sensors and output signals you need � Choose the Hardware
� Select hardware that can measure and output appropriate signals� FieldPoint � Compact, rugged PACs for distributed data acquisition� Data Acquisition Cards � Computer-based hardware for data acquisition near PC� PLCs � Third-party controllers
� Contact a National Instruments Technical Representative for help
Choosing the Proper HardwareComplete the following steps for selecting the proper hardware.1. Analyze Your Needs. What phenomena do you want to measure and control? Is it
temperature, humidity, distance, and so on? Make a list of each signal to be monitored or process to be controlled.
2. Choose Appropriate Sensors and Controls.� Inputs�Determine what type of sensor you need to measure each of your inputs. For
each type of signal, write down the output of the sensor, which is usually a voltage, a current, or a digital pulse.
� Outputs�Determine what type of outputs you need to control each process. List all the output signals that you need to control the process.
3. Choose Proper Hardware. Find proper hardware to input and output voltages, currents, and digital signals. Some common choices include the following:� FieldPoint�Compact, rugged Programmable Automation Controllers (PACs) that can
easily be distributed throughout a factory and monitored over a network � Data Acquisition Boards�Computer-based hardware that is best for high-speed data
acquisition near a PC� PLCs�Third-party Programmable Logic Controllers
© National Instruments Corporation 2-3 LabVIEW DSC Module Course Manual

OPC � Interface to the Hardware
� Forms backbone of DSC, allowing tags to access data
� OLE for Process Control (OPC)� Industry standard for compatibility� Multi-vendor interoperability
� Uses client-server architecture� OPC server provided by hardware
vendor� Tag Engine acts as OPC client
Your Computer
OPC Drivers
OPC Enabled Device
OPC � Interface to the HardwareThe DSC Module is an OPC client. All hardware that communicates with the DSC Module must have an OPC server. While deeply understanding OPC is not necessary when using the DSC Module, you must know how the technology is used to provide functionality to you. OPC stands for OLE for Process Control, OLE stands for Object Linking and Embedding, and is a set of driver specifications that is actively developed and maintained by a network of individuals and corporations. The technology allows any piece of hardware to communicate with your computer in the same fashion, regardless of how it actually behaves.This flexibility allows a developer to be totally unaware of the intended hardware of a system, simply using OPC to communicate where needed. DSC takes this functionality and builds upon it to allow even greater flexibility through the use of tags.As an end user, OPC means that you have interoperability with different hardware vendors. All of your hardware that supports OPC can be used from the LabVIEW DSC module, even if it is not National Instruments hardware. OPC is set up as a client-server architecture. The server�s job is to talk to the hardware and provide data items to the clients. The server is a complete piece of software that is generally provided by the hardware manufacturer. You will need to configure the server correctly, but you generally will not need to program the server. The LabVIEW DSC Tag Engine is already written as an OPC client. You will have to configure the DSC Module communicates with the OPC server, but it will not necessarily require programming.
LabVIEW DSC Module Course Manual 2-4 ni.com

Verifying OPC ConnectionsVerify proper readings with Server Explorer
using Wizards
1. Use OPC Wizard with the server.2. Connect to the server and name its group.3. Choose the channels to test.
Verifying OPC ConnectionsWhen connecting your hardware, it often is useful to verify that your hardware is reading data correctly and that it is being properly sent to the computer. Doing this early in your development ensures that an improper setup does not cause hard-to-detect bugs in your VIs.The easiest way to check your hardware is to use the Server Explorer. Server Explorer is a generic OPC client that is designed to allow you to check that your hardware is connected properly and that you are reading the correct data from it.After launching Server Explorer, a list of OPC servers appear representing the hardware. Select the proper server, right-click, and choose Wizard. The OPC Wizard appears. Click Next to connect to the server. Upon connecting, the OPC Wizard prompts you for a Group Name and Update Rate. For testing, you usually can leave these values at their defaults.From there, you will see two lists of items. The list Selected OPC Items represents the data in which you are interested in testing. The left list indicates the remaining items that you may add. In general, you should only select those items you are interested in testing, as your hardware will frequently have more items available than you are interested in.Instructor Note: Demonstrate the Server Explorer by using the Wizard on the OPCDemoserver.Note (Self-Paced): Explore the Server Explorer by using the Wizard on the OPCDemoserver. Verify you can read data from the server.
© National Instruments Corporation 2-5 LabVIEW DSC Module Course Manual

LabVIEW DSC and OPC
Tag Engine
NI-DAQ FieldPoint
DAQ Board FieldPoint I/O Modules
IA OPCDrivers or Third-
Party Server
Third-Party PLCs
OPC
PCI/PXI/PCMCIA Serial/Ethernet Serial/Ethernet
OPC OPC
LabVIEW DSC and OPCThis slide shows how the Tag Engine communicates to the OPC servers and how the OPC servers talk to the hardware. The Tag Engine does not directly talk to the hardware without a driver. However, if new hardware is released, only the driver needs to be updated. Thus, new DAQ boards, FieldPoint modules, and so on, only require installation of new driver software instead of another version of the DSC Module. Additionally, if you had a serial FieldPoint system configured, you could change to an Ethernet system and reconfigure the driver without changing the configuration of the Tag Engine.
LabVIEW DSC Module Course Manual 2-6 ni.com

Tags and Your Hardware
� Tag Configuration Editor (TCE) � Provides tag setup� Tag Engine � Loads various groups of tags and
updates tag values from hardware
You can launch both these utilities and others using the Tag Utilities Toolbar by selecting Tools»DSC Module»ShowToolbar
Tags and Your HardwareTags are the most basic element of LabVIEW DSC. Tags are directly connected to your real-world measurements through OPC Servers and make the collection and management of your data much simpler.DSC provides powerful utilities to enable and optimize your usage of tags in your VIs: the Tag Configuration Editor (TCE) and the Tag Engine.The TCE allows you to determine which channels of your hardware connect to which tags, and how the channels connect. Like other frequently used DSC features, the TCE includes a wizard to speed your development and simplify the tag creation process. The wizard allows you to list your hardware items, create tags, and then save lists of tags in SCF files.The Tag Engine runs in the background. The tags that are configured in the Tag Engine get updated and read by the OPC Servers. The application then can read and write directly from the Tag Engine. The Tag Engine provides direct access to hardware values of multiple OPC Servers all in one place.
© National Instruments Corporation 2-7 LabVIEW DSC Module Course Manual

Using the Tag Configuration Editor (TCE)The Three Most Important TCE Tools
� Load, Save, or Create a New SCF File
� Configuration Wizard� Create New Tags
Using the Tag Configuration EditorBecause the TCE provides to you the ability to define and customize your tags, you understand must what it does and how to use it.You can launch the TCE in one of two ways. You can display the Tag Utility toolbar by selecting Tools»DSC Module»Show Toolbar. You also can open it directly by selecting Tools»DSC Module»Configure Tags. The TCE loads the most recently opened SCF file created, and then displays all tags in that file. From there, the Configuration Wizard is the quickest and easiest way to create tags. For more advanced users, you also can use the Create New Tags button to manually define the attributes of the tag.
LabVIEW DSC Module Course Manual 2-8 ni.com

Tag Configuration Wizard
� Quickly creates tags� Automatically adds multiple
items� Adds range of addresses� Determines the type of tag
for you� Creates a tag name to match
item name from the server
Tag Configuration WizardThe Tag Configuration Wizard is the quickest way to create tags. The Tag Configuration Wizard also allows you to customize the configuration of your tags, so that you can maximize their functionality.The wizard will list all the servers installed on the local computer. Underneath the server, there also may be a list of folders. These folders contain the channel items. The wizard allows you to add a single channel, a range of addresses, all channels in a folder, or all of the channels on a server.The Tag Configuration Wizard automatically determines the data type for the tags as well as giving the tags a name that matches the item name read from the server. You also can rename tags.
© National Instruments Corporation 2-9 LabVIEW DSC Module Course Manual

Tag Properties
� Tags are identified by a descriptive name� Five Important Tag Attributes
� Type (Analog, Discrete, Bit Array, String)� Access (Input, Output, I/O, Memory)� Value (The data you want)� Status (Is the data good?)� Timestamp (When was this data acquired?)
Tag PropertiesBecause tags are the way to receive data that is both simplified and enhanced, it makes sense that a variety of properties exist for your data. These allow you to better understand and evaluate your data.The most obvious and important property of a tag is its name. Whether you have one source of data or several thousand, a descriptive name is very important. Frequently, your hardware refers to available data as a number, an I/O point, or another vague name. However, a tag does not need to retain that same name. Therefore, a tag called Temperature can read from a data source with a less descriptive name.In addition, the tag contains five important properties. Much like a variable, each tag has a specific data type. You can access each tag in different ways. Some tags can be both read and written to, but others you can only read or write to, not both. Each tag also has the desired data on it. Depending on that value, several different status values can be generated to indicate the condition of your data. Finally, each data point has an associated timestamp, indicating when a measurement was acquired.
LabVIEW DSC Module Course Manual 2-10 ni.com

Tag Types
The LabVIEW DSC module supports the following tag types:� Analog: double-precision numeric
floating point � Discrete: Boolean value� Bit Array: up to 32 discrete values� String: ASCII string
Tag TypesAnalog�Represent continuous values within a range. Numerical controls or indicators should connect to analog tags. Discrete�Represent two state values, that is, true/false or on/off or 0/1. Boolean controls and indicators can represent discrete tags.Bit Array�Multi-bit values up to 32 discrete values, represented by an array of Booleans.String�ASCII or binary character representations of values. A tag not fitting the previous tag types could be processed as a string tag, for example, bar codes.
© National Instruments Corporation 2-11 LabVIEW DSC Module Course Manual

Tag Access
� Input � You may only read values from the tag
� Output � You may only write values to the tag
� Input/Output � You may both read and write values to the tag
� Memory � An Input/Output tag that is not connected to any hardware device
There are four different ways to access a tag:
Tag Permissions and AccessDepending on your hardware, you will be able to read from a hardware register, write to a hardware register, or read and write from a hardware register. For example, a hardware device reading a temperature might not allow a user to write a temperature value to the instrument. Similarly, a channel may allow a write but not a read, for example, an output channel generating a voltage. Finally, other data sources may allow reading and writing to the register. Data representing a system status that you could read or set manually would be an example of this.The type of access that a tag has will match the type of access that is appropriate for that hardware register. If you have not already done so, take a moment to review the Tag Access types shown in this slide.The input, output, and I/O tag access types all behave as expected, from the VI point of view. Thus, while a piece of hardware might generate output, this data is input into your VI and is then the Input type. It causes an error to attempt to write a value to an Input or to attempt to read data from an Output. However, with the Input/Output type, you may do both.The Memory type is a special form of an I/O tag. The memory type allows any operation that a standard I/O tag does, except that it is a value stored in the computer memory rather than retrieved from hardware. This is useful for implementing an enhanced global variable or for testing your VI with control values before using real-world data.
LabVIEW DSC Module Course Manual 2-12 ni.com

Organizing Tags
Especially useful in situations with extremely large tag counts or with many pieces of hardware connected� Tag Groups help keep tags logically grouped and can save
time in applying some common features� Separate SCF files keep unneeded tags from being loaded
and used
Organizing TagsAs you continue to grow more familiar with DSC and develop VIs, you will inevitably encounter a situation with many tags. If you just kept all the tags for all of your VIs in a single file, it would be very difficult to keep track the purpose for each tag. Tag Groups and SCF files help combat this problem and assist in making logical sense of your information in addition to implementing some time-saving features.Tag Groups are set up in the TCE, and allow you to place active tags in logical groups. You can then control certain group attributes and fine-tune the behavior of many tags simultaneously. Placing tags in separate SCF files will help preserve system resources and only enable particular tags. As you have more VIs that use the DSC Module, the VIs use different tags and pairing a VI with an SCF file can be a very powerful organizational tool.
© National Instruments Corporation 2-13 LabVIEW DSC Module Course Manual

Exercise 2-1
Using the Tag Configuration Wizard to Generate Tags
Approximate time to complete: 20 min. Page 2-20
Discover how you can add and manipulate tags in your VIs.
OBJE
CTIV
E
LabVIEW DSC Module Course Manual 2-14 ni.com

Tag Attributes: General
� Tag name� Group � Lets you categorize tags,
good for dealing with large numbers of tags
� Description � Explains function of tag
� Security � User-based read/write access
Tag Attributes: GeneralTo access the General Attributes of a tag, either create a new tag or double-click a tag in the TCE. A tag configuration dialog box appears with five tabs. The General tab appears up front by default.Use the General tab to create or modify the Tag Name, Tag Group, or Tag Description. Make the Tag Name a name that operators can easily relate to. For example, use a name such as Tank Level, instead of sensor1. Then, when action needs to take place, an operator can easily separate that individual tag from a list of possibly hundreds. You also can group a set of tags, using the Tag Group selection, but keep in mind that only one level of hierarchy is supported. Use grouping to keep your tags organized or to apply certain operations to many tags simultaneously. The Tag Description can list specifics of what a tag is being used for and what it is connected to.
© National Instruments Corporation 2-15 LabVIEW DSC Module Course Manual

Tag Attributes: Connection
� Tag Access � Input, Output, Input/Output, Memory
� Server � Where data is coming from� I/O Group � How often to get data
from server� Item � Which item on the server� Access Path � Choosing
communications hardware
Tag Attributes: ConnectionNote: The Tag Configuration Wizard (TCW) configures this information for you when you create the tags. In general, you need to work with this tab only if you need to make modifications to the defaults of the TCW.The Connection tab associates a tag name with an item from a server. Notice that if the tag access is Memory, the Engine does not make any kind of connection to or from the tag. When you create a memory tag, the VI places values there. For other tag access, the Engine automatically connects to an item on a server. To make this connection, the tag needs several pieces of information: Which server are you talking to? How fast do you want to get information from the server? Which is handled by the I/O group? On that server, what item should be read/write for this tag? If you do not want to type the item in manually, you can browse to it. Finally, some servers require an access path to be specified. The access path can tell the server to use a particular type of communication to talk to the hardware, that is, Ethernet versus serial. NI servers do not use access paths, so there is no need to specify one for our exercises. You can use the menu rings to display and select the registered servers, devices, and items. Tags are associated with a real-world I/O point through the Connection tab.Note: Refer to Lesson 6, Maximizing Tag Effectiveness, for information on advanced Tabs of the Tag Configuration menu.
LabVIEW DSC Module Course Manual 2-16 ni.com

What is the Tag Engine?
� Manages Tags� Handles and monitors tags
efficiently� Runs as a separate
process� Independent of LabVIEW
What is the Tag Engine?The Tag Engine runs as a separate application, independent of the LabVIEW application. Both the device servers and the LabVIEW application communicate with the Tag Engine. This insures an extra degree of reliability for your system, as the Tag Engine can continue running even if your LabVIEW application experiences problems. Select Tools»DSCModule»Launch Engine to start the Tag Engine.
© National Instruments Corporation 2-17 LabVIEW DSC Module Course Manual

Using the Tag Engine
Start the Engine Stop the Engine
You can change the SCF loaded at the Default SCF at Tools»DSC Module»Options
The Tag Engine will start and stop automaticallyas your VI requires it � Thesecontrols are not needed in thosecases.
Using the Tag EngineUsing the Tag Engine is quite simple. LabVIEW will, by default, run the Tag Engine when a VI containing tags is run. For normal usage, you never must manually start and stop the VI. However, occasionally situations arise where you must control the Tag Engine.In addition to starting and stopping the Tag Engine, you might also need to change the SCF files. This can be done by selecting Tools»DSC Module»Options and then changing the default SCF file.
LabVIEW DSC Module Course Manual 2-18 ni.com

Summary
� DSC developing basics� Understanding hardware� Tags
� What are they?� How do you use them?
Lesson SummaryWith this lesson, you have gained a better understanding the DSC Module. You now know how to configure tags, both for testing and for your own hardware. You also have the knowledge to begin designing your VI and use tags to improve interoperability. You know how to use Tag Groups and SCF files to keep tags separate and how to manipulate the two.
© National Instruments Corporation 2-19 LabVIEW DSC Module Course Manual
LabVIEW DSC Module Course Manual 2-20 ni.com
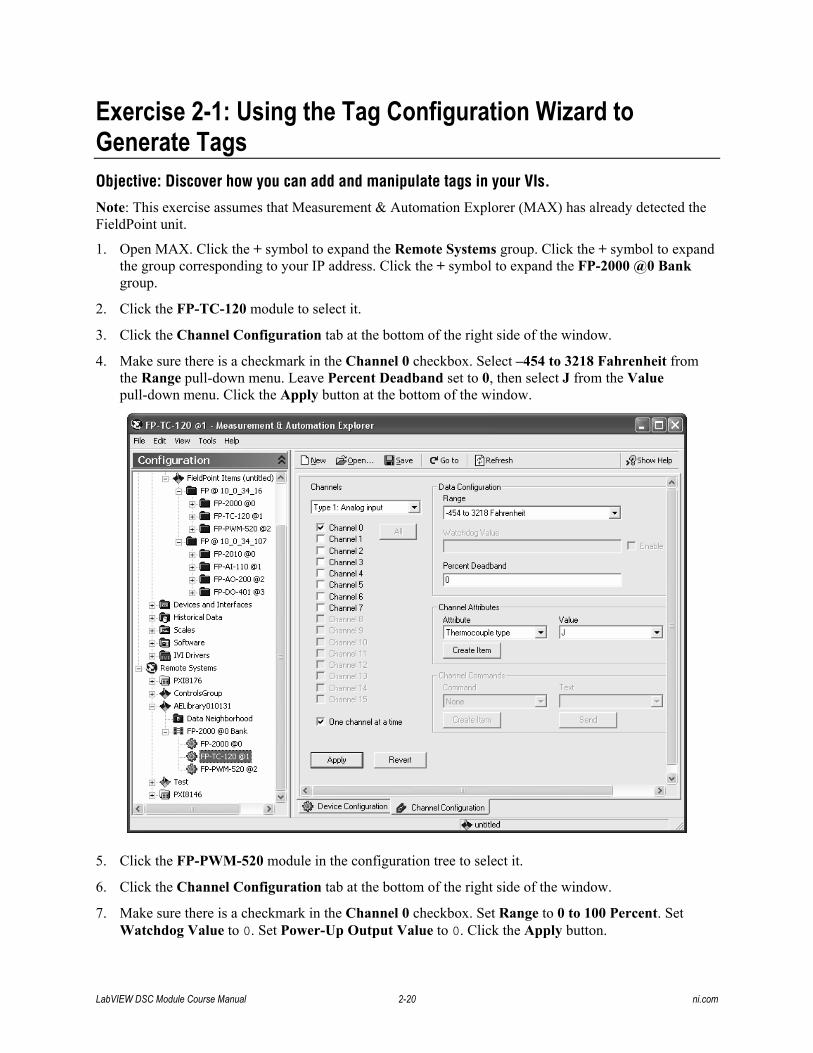
Exercise 2-1: Using the Tag Configuration Wizard to Generate Tags Objective: Discover how you can add and manipulate tags in your VIs.
Note: This exercise assumes that Measurement & Automation Explorer (MAX) has already detected the FieldPoint unit.
1. Open MAX. Click the + symbol to expand the Remote Systems group. Click the + symbol to expand the group corresponding to your IP address. Click the + symbol to expand the FP-2000 @0 Bank group.
2. Click the FP-TC-120 module to select it.
3. Click the Channel Configuration tab at the bottom of the right side of the window.
4. Make sure there is a checkmark in the Channel 0 checkbox. Select �454 to 3218 Fahrenheit from the Range pull-down menu. Leave Percent Deadband set to 0, then select J from the Value pull-down menu. Click the Apply button at the bottom of the window.
5. Click the FP-PWM-520 module in the configuration tree to select it.
6. Click the Channel Configuration tab at the bottom of the right side of the window.
7. Make sure there is a checkmark in the Channel 0 checkbox. Set Range to 0 to 100 Percent. Set Watchdog Value to 0. Set Power-Up Output Value to 0. Click the Apply button.

© National Instruments Corporation 2-21 LabVIEW DSC Module Course Manual
8. Place a checkmark in the Channel 1 checkbox and duplicate the settings in step 7 for this channel.
9. Click the + symbol to expand the Data Neighborhood group in the configuration tree. Click the + symbol to expand the FieldPoint Items group. Click the + symbol to expand the FP @ YOUR_IP_ADDRESS group.
10. Click the TC-120 to select it. Click the Start button at the top of the window. Notice the value for Channel 0. It should be in the range of normal room temperature (60�80 °F). If it is not, notify your instructor.
11. Click the PWM-520 and then click Channel 0. Click the Write button at the top of the window. On the pop-up menu, enter a value of 20 and click the Update button. The light should turn on inside your temperature chamber. Enter 100 and click the Update button. The light should get brighter. After you verify that the light responds, enter a value of 0 and click the Update button to turn the light off. If your light does not behave correctly, notify your instructor.
12. Click Channel 1. Click the Write button at the top of the window. On the pop-up menu, enter a value of 20 and click the Update button. The fan should turn on inside your temperature chamber. Enter 100 and click the Update button. The fan should start spinning faster. Changes in fan speed can be difficult to see. You can listen to the fan to verify the behavior. After you verify that the fan responds, enter a value of 0 and click the Update button to stop the fan. If your fan does not behave correctly, notify your instructor.
13. Select Tools»FieldPoint»Save As from the MAX menu. Name the file Fieldpoint Temperature Chamber.iak and save it.

LabVIEW DSC Module Course Manual 2-22 ni.com
14. Close MAX.
15. Open LabVIEW.
16. Click the New Button, select Blank VI from the menu, and click the OK button.
17. Select Tools»DSC Module»Configure Tags to open the Tag Configuration Editor.
18. Select File»New and click the OK button to create a new file in the Tag Configuration Editor.
19. Select Edit»Configuration Wizard, or click the Configuration Wizard button on the toolbar to open the Configuration Wizard.
20. Click the + symbol to expand the National Instruments. OPCFieldPoint group. Click the + symbol to expand the FP @ YOUR_IP_ADDRESS group. Click the + symbol to expand the FP-TC-120 group. Select Channel 0 and click the Add Item(s)» button to add the channel.
21. Click the + symbol to expand the FP-PWM-520 group. Repeat the steps 4�20 to add Channel 0 and Channel 1.
22. Click the OK button in the Wizard. The names of your FieldPoint channels should appear in the Tag Configuration Editor.
23. Highlight the FP-TC-120 Channel 0 in the Tag Configuration Editor and select Edit»Edit Tag or click the Edit Tag button on the toolbar.

© National Instruments Corporation 2-23 LabVIEW DSC Module Course Manual
24. Delete the current Tag Name and enter Chamber Temperature in its place. Click the OK button.
25. Repeat steps 21 and 22 for the other two tags, using the following names:
• FP-PWM-520 Channel 0 � Heat Lamp Control
• FP-PWM-520 Channel 1 � Cooling Fan Control
26. Select File»Save As, name the file Temp Chamber.scf, and click the OK button. If prompted to restart the Tag Engine, select Yes to restart the Engine. The black diamonds preceding your tags should disappear, indicating that the tags are saved in memory.
27. Close the Tag Configuration Editor.
End of Exercise 2-1

LabVIEW DSC Module Course Manual 2-24 ni.com
Notes

Lesson 3: Designing Your LabVIEW DSC Application
TOPICSA. Understanding the Client/Server RelationshipB. How Do I Use the HMI Wizard to Speed Development?C. Viewing Connections D. Elements of an Effective User InterfaceE. Panel Wizard
By the end of this lesson, you will be able to answer the following questions:� Why does DSC use a server/client architecture?� How does a server/client architecture speed up development of a LabVIEW DSC
program?� When must you expand the functionality of the Tag Engine and create your own server?
© National Instruments Corporation 3-1 LabVIEW DSC Module Course Manual

Understanding the Client/Server Relationship
� Server performs analysis and control� Server provides access to data� Client(s) and server are not necessarily on separate
machines� Client/server relationship is present in
LabVIEW DSC Module
Understanding the Client/Server RelationshipThe client/server design process is a key component of using the DSC Module. The server consists of two parts�the Tag Engine and a VI that contains additional programming foradvanced analysis or control. In many cases, the Tag Engine provides all the functionality necessary for a server. Even the simplest of applications use this functionality to some extent. Generally, a server acquires data from hardware through an OPC Server, performs analysis and control, and then makes it available to clients. Clients receive the data and make it transparently available to users. In some applications, the VI that is the client may then return this data back to the server. Whether you design a VI intended to function distributed across several computers or are just developing an application for a quick one time use, you must use these design patterns for programming with the DSC Module.Do not associate the DSC Module concept of clients and servers with those used in networking. In DSC, a Client and Server can and often do run on the same machine; however, you also can distribute clients and servers over a network.
LabVIEW DSC Module Course Manual 3-2 ni.com

A Good LabVIEW DSC Server
� The Tag Engine is the main part of your server.� Servers are stand-alone and do not require a
client process to run.� Perform analysis and control on the server.� Servers deliver data to interested clients through
the Tag Engine.
A Good LabVIEW DSC ServerThe Tag Engine is the main component of any server in the DSC Module. In some cases, when you do not need analysis and control, the Tag Engine is all that is necessary for a LabVIEW DSC Server. The main component of any DSC Module server application is the Tag Engine. By adding a server VI to a DSC Module application, you can add advanced control or analysis to the DSC Module server. The server passes data back and forth between client(s), connects to the hardware through OPC, and performs control or analysis, if necessary. The server should operate stand-alone and should not require that the client be connected to run properly. Displaying data on the Front Panel of a server is unnecessary. This is the job of the client and can be helpful to display some information for debugging.
© National Instruments Corporation 3-3 LabVIEW DSC Module Course Manual

What Makes a Good Client?
� Clean, clear design of relevant values and their meanings
� Intuitive descriptions of what data means, not necessarily where it comes from
What Makes a Good Client?Many of the principles for creating a good client include clean and clear design of the user interface for displaying relevant values. Keep data clearly organized and available. One of the most powerful ways to do this is to group data onto separate panels and use features of LabVIEW such as the tab control. You also can organize data onto separate Front Panels. The DSC Module provides a powerful wizard to automate this process for you.Equally important is ensuring that your data includes intuitive descriptions of what the data means. This can sometimes involve just a descriptive name, such as Engine Temperature, or creating an intuitive front panel that mimics the real-world application that you are collecting data from or controlling. LabVIEW DSC includes an Image Navigator that contains pictures to help you create a more advanced user interface for your applications.
LabVIEW DSC Module Course Manual 3-4 ni.com

Using HMI Wizard to Speed DevelopmentView Data in Two Steps:1. Right-click a control or
indicator and select HMI Wizard
2. A. Select an existing tag or
B. Create a new tag, and the control/indicator link to that tag
1
2A2B
1
How Do I Use HMI Wizard to Speed Development?You can use the HMI Wizard to connect to your data in two easy steps. After you have a control or indicator for the desired tag type, right-click it and select HMI Wizard. Then, simply select the desired tag or create your own.This is all that is required to quickly connect a front panel control or indicator to a tag. The HMI wizard is a critical component of the DSC Module speeds up your development time and is used throughout the development of DSC applications.
© National Instruments Corporation 3-5 LabVIEW DSC Module Course Manual

How the HMI Wizard Works
� HMI Wizard connects you to your tags� Automatically generates code� Reduces development time in DSC � Either matches Control label to
Tag�s name or allows user to add descriptive labels
How the HMI Wizard WorksThe HMI Wizard handles much of the client development for you and provides a code base from which you can begin the remaining development. HMI functionality is not does not appear hidden from the user; instead, the HMI Wizard uses only DSC Module functions that the user has access to as well. This makes the HMI Wizard an excellent tool not only for speeding development, but also for understanding the DSC development process. The code generated is a great starting point for more advanced applications and the HMI wizard reduces development time.The HMI Wizard takes Owned labels and either renames them to match the tag you connect them with, or allows the user to add descriptive Control labels (Owned Labels) independently. In addition, the HMI Wizard is built on top of the front panel DataSocket and includes a Boolean LED to indicate whether the component is actively connected to the Tag value. Owned Label�An owned label represents the name of a Front Panel variable in LabVIEW.
LabVIEW DSC Module Course Manual 3-6 ni.com

Unlocking and Modifying the Generated Code
� HMI Wizard locks code to prevent accidental modification
� Unlock code by right-clicking the lock icon
� To add code, unlock the code and modify
Unlocking and Modifying the Generated CodeCode generated by the HMI Wizard is initially locked on the block diagram. Locking code allows users the opportunity to examine the code without the worry of accidental modification. However, to unlock the code of the HMI Wizard, simply right-click the lock and select Release Wizard Lock. The ability to generate code allows new DSC Module users to quickly create applications. The ability to unlock and modify code reduces development time for experienced users. Code generated by HMI Wizard serves as a starting point for advanced applications. Important Note: After you unlock code, you cannot relock it. The HMI Wizard modifies code that has not been unlocked. Also, using the HMI Wizard to modify unlocked code is not recommended, because it recreates the code.
© National Instruments Corporation 3-7 LabVIEW DSC Module Course Manual

Image Navigator
� Image navigator provides a set of graphics for LabVIEW DSC
� Import pictures onto the front panel to represent the real-world environment
Select Tools»DSC Module»Image Navigator to open the image navigator. Inside the Image Navigator, you can select individual pictures and import those to the front panel of your VI. You also can paste images from the Image Navigator onto Boolean controls to customize the look and feel of the application.
LabVIEW DSC Module Course Manual 3-8 ni.com

(Optional) Exercise 3-1
Creating an Effective User Interface
Approximate time to complete: 15 min. Page 3-20
To use LabVIEW and the Image navigator to create an advanced application that simulates the real-world application of the Temperature Chamber.
OBJE
CTIV
E
© National Instruments Corporation 3-9 LabVIEW DSC Module Course Manual

Exercise 3-2
Generating Code with HMI Wizard
Approximate time to complete: 15 min. Page 3-25
To use the Tag Wizard to connect to FieldPoint Tags, and then with the HMI wizard, to generate code that acquires data.
OBJE
CTIV
E
LabVIEW DSC Module Course Manual 3-10 ni.com

Viewing Connections
� Select Tools»Control Connections� Shows all Front Panel DataSocket connections� Only available in LabVIEW DSC
Viewing ConnectionsIn addition to creating owned labels that either have descriptive names or actually reflect the Tag that a DSC Module control is connected to, the Control Connections tool allows users to monitor connections. The Control Connections tool allows users to view the front panel DataSocket connections for all loaded VIs. The information displayed is the URL that the controls are linked with, their current status, and their DataSocket Mode. You can modify the view fields displayed and save the results to a text file for debugging or documentation.
© National Instruments Corporation 3-11 LabVIEW DSC Module Course Manual

Understanding Front Panel DataSocket
� Direct connection from front panel to source of data� HMI Wizard functionality is based on technology of
Front Panel DataSocket� Designed to simplify and streamline the process of
accessing remote dataDisconnected Connected
Understanding Front Panel DataSocketIn LabVIEW, traditional usage of a DataSocket requires additional programming. However for programs that require simple DataSocket connectivity, using the Front Panel DataSocket can reduce development time. The front panel DataSocket allows a VI to make direct connections to resources elsewhere on the computer or across a network. A small square LED, which turns from grey to green to show when it is connected, signifies the front panel DataSocket. The HMI Wizard derives its functionality from usage of a Front Panel DataSocket. To use the HMI Wizard, you must not fully understand DataSocket. However, prior knowledge of DataSocket and Front Panel DataSocket helps increase your understanding of the HMI Wizard. Refer to the LabVIEW Advanced course or the LabVIEW User Manual for more information about DataSocket.
LabVIEW DSC Module Course Manual 3-12 ni.com

Elements of an Effective User Interface
� Usage of the appropriate type of indicator/control
� Clear, intuitive label names
� Appropriate usage of graphics to illustrate process or system
Example ofIneffective Design
Example ofEffective Design
Elements of an Effective User InterfaceWhen designing a DSC Module Client, one of the most important yet overlooked considerations is ensuring that your application uses an effective user interface. One important choice is choosing the appropriate kind of control or indicator. When monitoring a level of volume, for instance, a tank indicator is usually a better choice than a regular numeric indicator. Similarly, for an input that may only take a certain range of values, consider using a slider rather than a numeric control so that the range is clearly marked. When you decide on the proper component, make sure that you give the component a descriptive name. Many users initially leave component names unchanged, but this makes the function and correct usage difficult to discern. DSC also provides Image Navigator, accessible from the DSC Module Toolbar, to provide meaningful graphics for your VI. If a value is related to a particular hardware element, you likely can find a graphical representation of that element in Image Navigator to use in your VI. This also gives meaning to data and the overall purpose of a VI.
© National Instruments Corporation 3-13 LabVIEW DSC Module Course Manual

Panel Wizard
� Allows you to design VIs that call other VIs, switch users, or examine the values of the tags directly
� Simplifies the process of switching from one VI front panel to another VI front panel during run-time
� Creates layouts that more intuitive to use
What is the Panel Wizard?The Panel Wizard is a tool designed to eliminate much of the programming associated with incorporating multiple VIs or behaviors into one application. When using the Panel Wizard, create a button on your VI and the Panel Wizard can attach the desired behavior to that button. The Panel Wizard generates standard LabVIEW code to implement that behavior.Designing an application that can switch the current VI while running is normally complicated and a drain upon development resources. Switching users during run-time and launching the Historical Viewer also are useful. However, the Panel Wizard develops the code for you, so that it behaves just as you want it without the need of programming it yourself.Though code generated by the Panel Wizard is like that of the HMI Wizard in that it can be unlocked and modified by right-clicking the lock icon, modifying code created by the Panel Wizard is not recommended. The code generated by the Panel Wizard is complicated, and modifying the can cause undesirable behavior in your VI. Avoid unlocking the code unless you have a specific reason to do so.
LabVIEW DSC Module Course Manual 3-14 ni.com

When and How To Use the Panel Wizard
1
2
1. Right-click button and select Panel Wizard.
2. Select the desired action of the button, and a VI, if applicable. Set any other desired behavior on additional tabs.
When and How To Use the Panel WizardWhile the Panel Wizard might not apply to all applications, the Panel Wizard can add functionality to your programs. Any time you want to incorporate another VI, view previous tag values over a period of time, or change the current user, then the Panel Wizard is a good choice.To use the Panel Wizard, place any button on the front panel and right-click it. Select Panel Wizard, and a menu appears that allows you to determine the behavior of the button and the way the button handles that behavior.
© National Instruments Corporation 3-15 LabVIEW DSC Module Course Manual

Panel Wizard Launches Historical Data Viewer
Panel Wizard Launches Historical Data ViewerYou also can use the Panel Wizard to launch the Historical Data Viewer that is available in MAX. Refer to Lesson 4, Handling and Logging Your Data, for more information about the historical data viewer.
LabVIEW DSC Module Course Manual 3-16 ni.com

Understanding Code Generated by the Panel Wizard
� Code on block diagram comes locked � just like HMI Wizard
� To unlock, right-click the lock symbol
� Avoid unlocking code generated by the Panel Wizard
Understanding Code Generated by the Panel WizardThe Panel Wizard code uses VI Server, a LabVIEW Advanced topic, to make sure a VI is running and open or view its Front Panel. With the HMI Wizard, you must not fully understand the code generated by the Panel Wizard. Rather, only a general concept of how the Panel Wizard works is needed to fully leverage the advantage given to you by the Panel Wizard. The code generated by the Panel Wizard is initially locked, to prevent accidental modification of the code. To unlock the code, right-click the lock icon for the code. After you unlock, you cannot relock the code.Generally, you should unlock the code only if you have a specific reason to do so. Unlike the HMI Wizard, is it not as convenient or immediately useful to modify the code generated by the Panel Wizard.
© National Instruments Corporation 3-17 LabVIEW DSC Module Course Manual

Exercise 3-3
Using the Panel Wizard
Approximate time to complete: 15 min. Page 3-29
To use the Panel Wizard to generate panels to view historical traces and also generate code that launches a subVI from LabVIEW DSC.
OBJE
CTIV
E
LabVIEW DSC Module Course Manual 3-18 ni.com

Summary
� Client/Server relationships� Design a Server to supplement Tag Engine� Client retrieves Data from Server
� HMI Wizard � Automatic Code Generation� Front panel DataSockets � Used to connect Tags� Elements of effective user interface � Image Navigator� Using the Panel Wizard � Programmatically open VIs
Lesson SummaryYou now have the knowledge necessary to maximize the effectiveness of many applications. You have gained an understanding of when you need to design a Server and when you can allow the Tag Engine alone act as a server.You also can use various wizards to make powerful applications. The HMI Wizard can connect with your data, and the Panel Wizard can organize and streamline the analysis of that data.
© National Instruments Corporation 3-19 LabVIEW DSC Module Course Manual

LabVIEW DSC Module Course Manual 3-20 ni.com
(Optional) Exercise 3-1: Creating an Effective User Interface Objective: To learn how to use LabVIEW to create custom controls and indicators to enhance the end user experience.
Complete the following steps to build a VI that programmatically varies the light intensity of a front panel Boolean and graphically simulates fan speed.
Front Panel 1. Create the following front panel.
a. Place two raised box decorations located on the Controls»All Controls»Decorations palette on the front panel and resize appropriately.
b. Place a pointer slider control located on the Controls»Numeric Controls palette on each raised box decoration and label one Light Intensity % and one Fan Speed %.
c. Place a tab control located on the Controls»All Controls»Containers palette on the front panel and resize the tab control.
d. Place a Stop button located on the Controls»Buttons and Switches palette on the front panel and resize the button.

© National Instruments Corporation 3-21 LabVIEW DSC Module Course Manual
2. Create the tank using the Image Navigator.
a. Select Tools»DSC Module»Image Navigator to open the Image Navigator.
b. Select NI Tanks»Tank #1 from the Image Navigator. c. Drag the tank from the Image Navigator to the front panel to place the tank on the front panel. d. Use the Positioning tool to resize the tank to an appropriate size.
3. Modify a round LED to fit on top of the tank. You will modify the color later to simulate light intensity.
a. Place a round LED located on the Controls»LEDs palette on the front panel. b. Resize the LED to appropriate size and place it over the top of the tank.
4. Create the spinning fan custom control.
a. Place a square LED located on the Controls»LEDs» palette on the front pane and resize it appropriately.
b. Right-click the square LED and select Advanced»Customize from the shortcut menu to open the Control Editor.

LabVIEW DSC Module Course Manual 3-22 ni.com
c. From the Image Navigator, select Blowers Etc. from Categories. Then right-click Cool Fan (animation Frame #1) and select Copy from the shortcut menu.
d. In the Control Editor, right-click the square LED and select Import Picture»False from the shortcut menu to customize the false picture of the LED.
e. From the Image Navigator, select Cool fan (animation frame #2), right-click, and select Copy from the shortcut menu.
f. In the Control Editor, right-click the square LED and select Import Picture»True from the shortcut menu to customize the true picture of the LED.
5. Save the custom control as Spinning Fan.ctl in the C:\Exercises\LabVIEW DSC directory.
6. Select File»Apply Changes and then arrange the Tank, Spinning Fan, and Light Intensity Boolean controls on the front panel.

© National Instruments Corporation 3-23 LabVIEW DSC Module Course Manual
Block Diagram 1. Create the following block diagram.
2. Place two While Loops located on the Functions»Execution Controls palette on the block diagram.
3. In the top While Loop, create the code to adjust the brightness of the Light Intensity indicator.
a. Right-click the Light Intensity indicator and select Create»Property Node from the shortcut menu.
b. Click the Light Intensity Property Node and select the Colors [4] property. c. Right-click the input to the Property Node and select Create»Constant from the shortcut menu.
Replace the numbers in the cluster with a color box constant located on the Functions»All Functions»Numeric»Additional Numeric Constants palette.
d. Place an Index Array function and a Build Array function located on the Functions»All Functions»Array palette on the block diagram.
e. Place an Unbundle function and a Bundle function located on the Functions»All Functions» Cluster palette on the block diagram.
f. Place a Subtract function located on the Functions»Arithmetic and Compare»Numeric palette on the block diagram.
g. Add a local variable to the block diagram. Right-click the Light Intensity % control and select Create»Local Variable from the shortcut menu. This will reserve the control for use with the HMI Wizard in the next exercise.

LabVIEW DSC Module Course Manual 3-24 ni.com
4. Arrange the functions and complete the wiring necessary to complete the top While Loop. Add a Wait Function located on the Functions»All Functions»Time and Dialog palette to the While Loop.
5. In the bottom While Loop, create code necessary to adjust the speed of the Spinning Fan indicator.
a. Right-click the Spinning Fan % indicator and select Create»Local Variable from the shortcut menu to create a local variable.
b. Place a Subtract function located on the Functions»Arithmetic & Comparison»Numeric palette on the block diagram.
c. Place an Equal to 0? function located on the Functions»Arithmetic & Comparison» Comparison palette on the block diagram.
d. Place a Wait function located on the Functions»All Functions»Time & Dialog palette on the block diagram.
e. Place a Select function located on the Functions»Arithmetic & Comparison»Comparison palette on the block diagram.
f. Right-click the While Loop and select Add Shift Register from the shortcut menu. g. Right-click the Stop button in the top While Loop and select Create»Local Variable from the
shortcut menu. Delete the Stop button from the bottom While Loop and replace it with the Stop local variable. This allows one Stop button to control both While Loops.
6. Select the Stop local variable, then press and hold down the <Ctrl> key and drag the Stop local variable to create a copy of it.
7. Place a Sequence Structure and wire a Boolean constant to the Stop local variable.
a. Place a Sequence Structure located on the Functions»Execution Control palette on the block diagram.
b. Place a false Boolean constant located on the Functions»Arithmetic & Comparison»Express Boolean palette on the block diagram and wire it to the Stop local variable.
8. Complete the wiring and save the VI as Temp Chamber Ex. 3-1.vi in the C:\Exercises\ LabVIEW DSC directory.
End of Exercise 3-1

© National Instruments Corporation 3-25 LabVIEW DSC Module Course Manual
Exercise 3-2: Generating Code with HMI Wizard Objective: To connect to LabVIEW DSC Tags and use the HMI Wizard to generate code.
Complete the following steps to build a VI that connects to the FieldPoint I/O tags for the Temperature Chamber and uses these tags to control the fan speed and light intensity. The HMI Wizard will generate code.
Front Panel 1. Open the Temp Chamber Template VI in the C:\Solutions\LabVIEW DSC directory. If you
completed Exercise 3-1, open the Temp Chamber Ex. 3-1 VI in the C:\Exercises\LabVIEW DSC directory.
2. Open and examine the block diagram.
a. The top While Loop controls the color of the Light Intensity indicator. As the value of the Light Intensity % control changes, the color of the Light Intensity indicator changes from white to dark yellow. This simulates the real world environment of the Temperature Chamber.
b. The bottom While Loop controls the Spinning Fan control created in the optional Exercise 3-1. If you are using the Temperature Chamber Template VI, the Spinning Fan indicator corresponds to the fan on the front panel. As the Fan Speed % slider increases, the time sent to the Wait function decreases and the While Loop updates faster, causing the Spinning Fan control to alternate between true and false at a faster rate. This simulates the speed of the actual spinning fan.

LabVIEW DSC Module Course Manual 3-26 ni.com
3. Create the HMI Wizard Code for Light Intensity.
a. Open the front panel. Right-click the Light Intensity % slider and select HMI Wizard from the shortcut menu to open the HMI Wizard.
b. Select the appropriate tag from Tag Value pull-down menu. For Light Intensity %, select Channel 0 of PWM. If the wire connections on the Temperature Chamber are reversed, you can select a different channel or change the connections.
c. Remove the checkmark from the Match control label to tag name checkbox and click the OK button to generate code with the HMI Wizard.
d. Repeat steps a through c For Fan Speed % control. Select Channel 1 of the FieldPoint PWM. 4. Open the block diagram and notice the code created by the HMI Wizard.
Each control created a Sequence Structure that includes a DataSocket URL to the tag selected in the HMI Wizard. In addition to the two Sequence Structures for two input tags, a While Loop is created that monitors the Tag Engine.

© National Instruments Corporation 3-27 LabVIEW DSC Module Course Manual
5. Use the HMI Wizard to add necessary code for temperature in chamber.
a. Add a waveform chart to the front panel. b. On the front panel, right-click the waveform chart and select HMI Wizard from the shortcut
menu. c. Select Channel 0 on the TC-120 module and click the Add button.
d. Click the OK button. The HMI Wizard generates the necessary code. 6. Review the code the HMI Wizard generates.
a. Open the block diagram. The HMI Wizard created code for each Tag Connection and a While Loop that monitors the Tag Engine Status.
b. The conditional terminal is connected to the Tag Engine Status of the Get Engine Status VI. c. Code generated by HMI Wizard is locked. To edit the code, right-click and select Release
Wizard Lock from the shortcut menu.

LabVIEW DSC Module Course Manual 3-28 ni.com
7. Build the following block diagram.
8. Modify the code generated by the HMI Wizard that monitors Tag Engine. This will give the user control to stop the program, independent of the Tag Engine.
a. Copy the Stop Button local variable from the top While Loop. b. Insert an Or function located on the Functions»All Functions»Boolean palette. Connect the
Stop local variable and the Engine Status to the Or function. This will allow either the Stop button or a true returned from Engine status to stop the While Loop.
9. Modify the code generated by the HMI Wizard for temperature output on Waveform Chart.
a. Right-click Wizard Lock on the Sequence Structure created by the HMI Wizard and select Release Wizard Lock from the shortcut menu.
b. Add an Or function and another copy of Stop local variable to the While Loop that is located inside this Sequence Structure.
c. Remove the Not from the While Loop. Connect Shutdown from the Trend Tags VI to the bottom of the Or function.
d. Right-click the While Loop conditional terminal and select Stop if True from the shortcut menu. e. Wire both loop terminals to the edge of the Sequence Structure that reinitializes the value of the
Stop Boolean. 10. Save the VI as Temp Chamber Ex. 3-2 in the C:\Exercises\LabVIEW DSC directory.
End of Exercise 3-2

© National Instruments Corporation 3-29 LabVIEW DSC Module Course Manual
Exercise 3-3: Using the Panel Wizard Objective: To demonstrate the features of Panel Wizard.
Complete the following steps to use the Panel Wizard in LabVIEW DSC to programmatically launch the Historical Data Viewer. Use the Panel Wizard to generate code that launches a subVI that you will use in the next exercise.
Part A: Historical Data Viewer 1. Open the Temp Chamber Ex 3-2 VI that you built in Exercise 3-2.
2. Create the Historical Data Viewer button shown above by placing an OK button located on the Controls»Buttons & Switches palette on the front panel.
3. Right-click the button, select Visible Items»Label from the shortcut menu, and click Label to turn off the label. The Panel Wizard names the button Historical Data Viewer by default.

LabVIEW DSC Module Course Manual 3-30 ni.com
4. Use the Panel Wizard to generate code.
a. Right-click the Historical Data Viewer button and select Panel Wizard from the shortcut menu to open the Panel Wizard. The following screen appears.
b. Select Historical Data Viewer. c. Click the Polling tab and select Always.
d. Click the OK button. The Panel Wizard generates code.

© National Instruments Corporation 3-31 LabVIEW DSC Module Course Manual
5. Open the block diagram and view the code generated by the Panel Wizard.
6. Modify the code to allow the user to stop the While Loop
a. Right-click the While Loop and select Release Wizard Lock from the shortcut menu. b. Copy the Stop local variable from another While Loop and replace the True/False constant with
this local variable. c. Right-click the conditional terminal and select Stop if True from the shortcut menu.
7. Save the VI as Temp Chamber Ex 3-3.vi in the C:\Exercises\LabVIEW DSC directory.
Run the VI 8. Display the front panel and run the VI.
9. Change the Light Intensity % and Fan Speed %.
10. After a few data points are collected, click the Historical Data Viewer button. This will use the code generated by Panel Wizard to open the Historical Data Viewer in MAX.
View Historical Data 11. View the Historical Data in MAX.
a. Expand Historical Data and select Citadel 5 Universe. b. In the Databases tab, expand My Computer. In the computer name folder, select the trace that
you want to view.

LabVIEW DSC Module Course Manual 3-32 ni.com
c. Click the View Data button on the toolbar. d. Click the Start/Stop Logging control circled in the following figure to make sure the Green
Light for Logging is selected. e. Make changes to the Fan Speed % or Light Intensity % on the Temp Chamber Ex 3-3 VI and
view the data in MAX.

© National Instruments Corporation 3-33 LabVIEW DSC Module Course Manual
Part B: Launch VI with Panel Wizard 1. Open the front panel from Part A.
2. Modify the front panel by adding an OK button for the Historical Trend button shown in the following figure.
a. Place an OK button located on the Controls»Buttons & Switches palette on the front panel. Change the text of the button to Historical Trend, and change the owned label to Historical Trend.
b. Right-click the Historical Trend button, select Visible Items»Label from the shortcut menu, and deselect Label.

LabVIEW DSC Module Course Manual 3-34 ni.com
3. Use the Panel Wizard to generate code.
a. Right-click the Historical Trend button and select Panel Wizard from the shortcut menu to open the Panel Wizard.
b. Select the Panel tab and select VI. c. Click the Browse button and navigate to the Historical Trend (Simulation) VI located in the
C:\Exercises\LabVIEW DSC directory. d. In the Polling tab, select Always.

© National Instruments Corporation 3-35 LabVIEW DSC Module Course Manual
e. Click the OK button. The Panel Wizard generates the following code.
4. Open the block diagram and modify the code.
a. Delete the True constant. Replace it with a copy of the Stop local variable. b. Change the conditional terminal to Stop if True.
5. Save the VI.
End of Exercise 3-3

LabVIEW DSC Module Course Manual 3-36 ni.com
Notes

Lesson 4: Handling and Logging Your Data
TOPICSA. Logging Data Using the LabVIEW DSC Module
1. Logging to a Database2. Viewing Historical Data
B. Alarms in LabVIEW DSC1. Creating Alarms2. Programmatic Access to Data and Alarms
By the end of this lesson, you will be able to answer the following questions:� Why is it important to log my data?� What is Citadel?� How does Citadel help me manage my data?� How can I view and analyze previous values of my data?� What is an Alarm?� How can I configure Alarms to automatically perform basic analysis of data?� How can I incorporate Historical Data and Alarms directly into my program?
© National Instruments Corporation 4-1 LabVIEW DSC Module Course Manual

Logging to a Database
1. Tag Engine acquires data from OPC Server.2. Tag Engine sends data to Citadel database.3. Citadel determines location and stores the data.4. Citadel then makes this database available to
various LabVIEW tools (Historical Data Viewerand MAX).
Note: Steps 1, 2 and 3 are transparent to the user. They are handled by the DSC module.
Logging to a DatabaseDSC logs data in the following manner: First, the Tag Engine acquires the value of a tag and updates it. This values appears in the VI and is also sent to the Citadel database. Citadel then determines the appropriate location in the database to store the data.Citadel can accumulate and store this data. These stored data points, often referred to as Historical Data, are available for use by other programs at any time. This includes the Historical Data Viewer and MAX.
LabVIEW DSC Module Course Manual 4-2 ni.com

Where Does Citadel Fit In?
DSC
Security
Networking
Alarms
Trends
Data Logging
Where Does Citadel Fit In?Examine this diagram that we introduced in Lesson 1, Datalogging and Supervisory Control (DSC) Module Overview. Observe that the Citadel database is responsible for logging data and storing historical trends.
© National Instruments Corporation 4-3 LabVIEW DSC Module Course Manual

Citadel, LabVIEW, and Your Data
FieldPointModules
LabVIEW VIsYour Program
DSCTag Engine
DSC Citadel
FieldPointDriver
NI-DAQDriver
NI or Third-Party Drivers
Log Dataand Alarms
Send Historical Data
OPC
Third-PartyPLCsDAQ Board
Citadel, LabVIEW, and Your DataExamine this diagram again to better understand how Citadel integrates with LabVIEW and DSC. Citadel is a stand-alone component, and as such it can log events even without any LabVIEW components running. Citadel will log data and alarms from the DSC tag engine and make that data available directly to LabVIEW, like MAX, without going through other DSC components.
LabVIEW DSC Module Course Manual 4-4 ni.com

Storing Data with Citadel
� Logs data (tag values) from tags that are configured to log values
� Logs tag events (alarms, and so on) from tags that are configured to log events
� Stores data only on change � quicker and requires fewer system resources
What Does Citadel Store?Citadel stores a variety of information in its database. Of course, for tags that are configured to log their values, Citadel will keep those in its database. Events are logged in the same manner. Events logged include any alarm state changes and any tag values changes made by the operator.Citadel does not store data at selected intervals; rather, Citadel stores data only when it changes. This allows Citadel to conserve disk space, as storing the value of every point of data that changes only once a day would be rather inefficient. You can configure how sensitive Citadel is to changes by adjusting deadbands, which we will discuss later.Data is logged with a timestamp of when it changes. Logging data in this manner makes it easy to determine the value at any point in time. It is important to notice that data logging using LabVIEW DSC is more event driven than time driven. This is evident in the manner in which data is logged based on significant change.
© National Instruments Corporation 4-5 LabVIEW DSC Module Course Manual

Defining Where Citadel Stores Your Data
� While you should never modify Citadel files, you can select the directories where you store your files
� Can be a local directory or accessed across a network
� Historical Data and Events can be logged to the same or separate directories
Defining Where Citadel Stores Your DataCitadel is a networked, multi-client database. So multiple programs may log to the same Citadel directory. You can specify the logging directory in the Historical Logging Configuration dialog. This dialog can be accessed when the SCF file is first saved from the Tag Configuration Editor (TCE). When saving the SCF file, click Configure in the SCF Summary dialog to open the Historical Logging Configuration dialog. You also can change these directories from the TCE under the Configure»Historical and Configure»Eventsmenus.
LabVIEW DSC Module Course Manual 4-6 ni.com

Configuring Your Logging Options
To log data:1. A tag must be set to Log
Data (by editing it in the Tag Configuration Editor)
2. The engine also must be logging data
Configuring Your Logging OptionsTo log data, you first must specify which tags will and will not have their values logged by using the Tag Configuration Editor. You also must then ensure that the Engine is set to Log Data when it is running. This can be done in the Engine Manager by double-clicking the Tag Engine icon on the taskbar. Log Deadband will be discussed in a later lesson.
© National Instruments Corporation 4-7 LabVIEW DSC Module Course Manual

Viewing Historical Data
View Historical Data in one of three ways:� Use the HMI Wizard to connect to Historical Data� Place an NI HyperTrend on front panel to view data� Use MAX to view historical data
Viewing Historical DataThere are three ways of viewing your Historical Data. The first is by using the HMI Wizard to connect to your Historical Data. This is good for situations where you would prefer to view a few tags� data over a period of time in a simple fashion.Another option is to use a NI HyperTrend. This feature allows you to display several tags� values over time, and gives you additional tools that you can access while a VI is running. This is slightly more complicated than using an HMI Wizard but provides much more functionality. The NI HyperTrend is an ActiveX control and therefore cannot be used with Remote Panels.Finally, you can avoid using a VI entirely and view the Historical Data in MAX.
LabVIEW DSC Module Course Manual 4-8 ni.com

Using the HMI Wizard to View Historical Data
� Right-click a Waveform Chart on the front panel and select HMI Wizard
� Select the tags you want to be displayed and configure the other options as desired
Using the HMI Wizard to View Historical DataUsing the HMI Wizard is very simple, like other tasks involving the DSC Wizards. Simply place a Waveform Chart upon your VI front panel, right-click it, and select HMI Wizard. You then can select which tags you would like to add to your chart, and what scale and update rate you would prefer. After you click OK, your Chart is ready.Like other code generated by the Wizards, this code does come �locked.� However, it is not generally necessary to modify this code. This is because modifying this code does not tend to yield the productive results that come with modifying code generated by other applications of the HMI Wizard.
© National Instruments Corporation 4-9 LabVIEW DSC Module Course Manual

Using the NI HyperTrend� Located in the Controls Palette: All Controls»DSC
Module»Trends� Right-click and select NI HyperTrend»Properties to add
traces, and so on
Using the HMI Wizard to View Historical DataThe NI HyperTrend control allows you to easily view historical data from Citadel databases. In order to display traces from the database, place an NI HyperTrend control from All Controls»DSC Module»Trends. Right-click the control and select NI HyperTrend»Properties to display traces. Next, click Add in the Channels/Traces section of the Properties dialog box. Select the database version (Citadel 5 or Citadel 4) in the next dialog box and then browse to the particular trace that need to be displayed. Click OK.If desired, a more recognizable name may be assigned to the trace. Also, ensure that the �Minimum� and �Maximum� fields of the Properties dialog box match the range of the data being displayed. Click Apply and then OK. Click Start/Stop Plotting in the top right corner of the NI HyperTrend control. The historical data from the Citadel database should now be visible.Notice that no code is generated when using this control as is the case with the HMI Wizard. The NI HyperTrend is an ActiveX object. It is a separate program running inside of an ActiveX container in a LabVIEW front panel.
LabVIEW DSC Module Course Manual 4-10 ni.com

Viewing Data Sets in MAXOpen MAX or go to Tools»DSC Module»View Historical Data
Viewing Data Sets in MAXHistorical data can be viewed in Measurement & Automation Explorer (MAX). In order to do so, MAX can be opened from the Windows Start Menu or by going to Tools»DSC Module»View Historical Data in LabVIEW. Under Historical Data in MAX, right-click Citadel 5 Universe»New»Trace View. Click the Add/Remove button on the top of the new view window. This will bring up the Add/Remove Traces and Data Set Runs dialog where you can navigate to the data you want to view in the database. Unless changed, this will generally be under My Computer»Name of database»Username/Computer Name»LabVIEW. Click the data that need to be displayed and click Add. Notice that all the traces added to the trace view are listed below. Click OK. The Display tab in MAX will show all the traces that you have selected to be viewed. Click Add/Remove to add or remove traces.
© National Instruments Corporation 4-11 LabVIEW DSC Module Course Manual
Exercise 4-1
Logging and Viewing Data SetsApproximate time to complete: 30�45 min. Page 4-23
Explore various options available to view your logged data.
OBJE
CTIV
E
LabVIEW DSC Module Course Manual 4-12 ni.com

Alarms in LabVIEW DSC
� Allows you to generate events based on particular values of data
� Useful for having DSC perform basic analysis for you
DSC
Security
Networking
AlarmsTrends
Logs
Alarms in LabVIEW DSCTrue to its nature, the Alarm is a convenient way to quickly analyze your tags. An Alarm evaluates the current value of the tag and can notify your VIs if they fall within certain predefined ranges.
© National Instruments Corporation 4-13 LabVIEW DSC Module Course Manual

Alarms � Giving Meaning to Your Data
� Provide a simple way to handle predefined thresholds that occur in the data from tags
� Can be logged, making your Citadel database more informative and complete
� Can be set to monitor one tag or entire groups� Flexible and easy to alter and maintain
Alarms � Giving Meaning to Your DataWhen you are designing your own VIs using DSC, there are many times when you will be interested in every point of data that is available. However, there also are many situations where you only care about maintaining a value within a specific range, or only take steps when the data has reached a particular threshold. Alarms are then the tool of choice in these situations.Alarms, like many other DSC components, can be logged to the Citadel database. This provides a way to better understand the histories of your data and interpret significant patterns. You also can configure an Alarm for one tag or for an entire group, allowing you to easily make changes on the fly to whole portions of your VI. Groups allow your VI to remain flexible and is easier to alter and maintain. This is especially true as the program grows to encompass multiple VIs.
LabVIEW DSC Module Course Manual 4-14 ni.com

Creating Alarms
In the TCE, select Edit Tagunder the Alarms Tab:� Check this box to enable alarms� Check which of the Alarms you
would like enabled, the limit, and the priority (0�15)
� Check here and enter a priority if you want an alarm generated if the tag read from the server has a bad status
Creating AlarmsIf the Enable Alarms box is unchecked, then this tag will not generate any alarms, and all other fields will be grayed out. Alarms can automatically acknowledge themselves when the values return to the normal range, or the alarm can persist until a user acknowledges the alarm. Which is appropriate? That depends on your application, although a serious alarm should generally require user acknowledgement so that you can be sure someone has been warned that an alarm has occurred. The alarm deadband is used to prevent an alarm from cycling on and off if the tag value is oscillating about an alarm limit. The actual alarms available vary depending on the tag type. The dialog box in this slide shows the alarm for an analog tag. String tags do not support alarms. Discrete tags can generate an alarm if the tag is high or if the tag is low. Bit arrays allow you to generate an alarm based on the status of multiple bits in the array. For analog tags, there are four possible alarms: HI, HI_HI, LO, and LO_LO. It is assumed that LO_LO < LO < HI < HI_HI.The Priority is used only to document how important the alarm is. 15 is considered high priority and 1 is considered low priority.
© National Instruments Corporation 4-15 LabVIEW DSC Module Course Manual

Viewing Alarms � Using the HMI Wizard
1. Select DSC Module»Alarms and Events»Alarm Summary Display Listbox from the Control Palette
2. Apply the HMI Wizard to the indicator, and set to use the Alarm Summary
3. Add desired tags and click OK
Using the HMI Wizard to View AlarmsTo view current alarms or a summary of events, place an Alarm Summary Display Listbox indicator on the front panel. Right-click the indicator and select HMI Wizard. Specify which tags to monitor for alarms in the Tags tab. You also can set different colors, format the alarm display table, and filter out certain alarms in the Colors, Format and Filters tabs, respectively. Finally, click OK to accept the parameters and have the wizard generate code.Alarms can be acknowledged programmatically using the Acknowledge Alarm.vi. Details on this VI are covered in a later slide. You also can acknowledge alarms using the Alarms & Events Display.Note: Alternative methods exist for viewing alarms, including the Alarm & Event Display, Tag Monitor, and the Historical Data Viewer�s Alarm & Event View.
LabVIEW DSC Module Course Manual 4-16 ni.com

Viewing Alarms � Using Alarm & Event Display
� Select Controls Palette»DSC Module»Alarms and Events»Alarm & Event Display
� The Alarms & Events Display allows you to view andacknowledge alarms and events
� You can view alarms and events on a local computer or a remote computer
Viewing Alarms � Using Alarm & Event DisplayUse the Alarm & Event Display control on the front panel to view events as well as view and acknowledge alarms. Unlike the HMI Wizard, this ActiveX based control displays all tags configured to log alarms for a particular process. As alarms occur, they will be displayed in the control. Right-click any particular alarm to acknowledge it. You also can set filter options by right-clicking the Alarm & Event Display control while it is running.You can connect this control to alarms and events on your local computer, or on other computers on the network. Right-click the control while the VI is running and choose Select Processes. Go to Universe»Network and navigate to the process on the network computer that you would like to monitor.The Alarm & Event Display is the recommended method of viewing alarms and events since it is more powerful. It can be used to view and acknowledge alarms and events on local and remote computers.
© National Instruments Corporation 4-17 LabVIEW DSC Module Course Manual

Exercise 4-2
Using Alarms
Approximate time to complete: 20 min. Page 4-30
Configuring alarms and viewing them in LabVIEW.
OBJE
CTIV
E
LabVIEW DSC Module Course Manual 4-18 ni.com

Programmatic Access to Data and Alarms
� Why? Allows you to define your VIs� behavior based on current data values and alarm states
� When? When you need to view data or alarms in ways beyond the standard methods, or you need enhanced functionality based upon that data
� How? VIs provided with DSC that you use in your applications
Programmatic Access to Data and AlarmsTo maximize the potential power of using DSC in your applications, you will eventually want to obtain the values of data and the statuses of alarms within your VI. While this is more complicated than the standard methods of working with your tag values and alarms, the rewards from mastering these abilities of DSC are numerous.Accessing these values will allow your VIs to react to the alarms and values, and also will allow you to present this information in a manner precisely of your choosing. Since this is more involved and prone to error than using the Wizards, it is advised that you should access values and alarms programmatically only when the basic functionality will not work. You can do so with the VIs provided as part of the DSC Module.
© National Instruments Corporation 4-19 LabVIEW DSC Module Course Manual
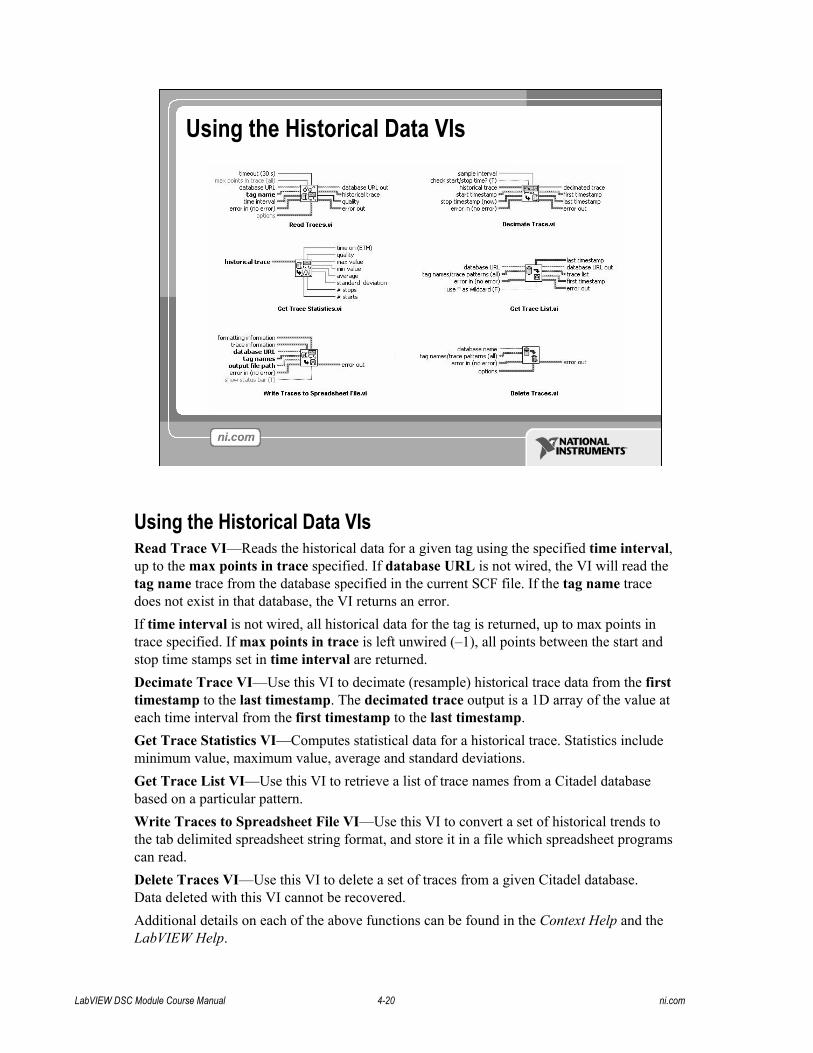
Using the Historical Data VIs
Using the Historical Data VIsRead Trace VI�Reads the historical data for a given tag using the specified time interval, up to the max points in trace specified. If database URL is not wired, the VI will read the tag name trace from the database specified in the current SCF file. If the tag name trace does not exist in that database, the VI returns an error.If time interval is not wired, all historical data for the tag is returned, up to max points in trace specified. If max points in trace is left unwired (�1), all points between the start and stop time stamps set in time interval are returned.Decimate Trace VI�Use this VI to decimate (resample) historical trace data from the first timestamp to the last timestamp. The decimated trace output is a 1D array of the value at each time interval from the first timestamp to the last timestamp.Get Trace Statistics VI�Computes statistical data for a historical trace. Statistics include minimum value, maximum value, average and standard deviations.Get Trace List VI�Use this VI to retrieve a list of trace names from a Citadel database based on a particular pattern. Write Traces to Spreadsheet File VI�Use this VI to convert a set of historical trends to the tab delimited spreadsheet string format, and store it in a file which spreadsheet programs can read.Delete Traces VI�Use this VI to delete a set of traces from a given Citadel database. Data deleted with this VI cannot be recovered. Additional details on each of the above functions can be found in the Context Help and the LabVIEW Help.
LabVIEW DSC Module Course Manual 4-20 ni.com

Using the Alarm and Events VIs
Using the Alarm and Events VIsRead Tag Alarm VI�Use this VI to read detailed alarm status for a tag from the TagEngine. This VI indicates if a tag is in alarm, which alarm state it is in, when the alarm occurred, at which value it occurred, and whether it has been acknowledged. Alarm & Event Query VI�Use this VI to extract data from a historical alarm and event database. If you also supply a valid control reference to a table or multicolumn listbox, the query results will be sent to the control. Get Alarm Summary Status VI�Use this VI to check the status of alarms in the system. The information returned includes whether any tag is in alarm, how many tags are in alarm, how many of these alarms are unacknowledged, and if any tag has an unacknowledged alarm.Acknowledge Alarm VI�Use this VI to acknowledge alarms from your application. You can acknowledge the alarm condition of a single tag or a group of tags. For example, you can call it when a button is pressed in your HMI. Read Event History VI�Use this VI to display all the alarms and events that have occurred since the Tag Engine started for a set of tags or tag groups within a given alarm priority range. You also can filter out acknowledged alarms.Additional details on each of the above functions can be found in the Context Help and the LabVIEW Help.
© National Instruments Corporation 4-21 LabVIEW DSC Module Course Manual

Summary
� How do I make sure that tag data and events are logged?
� When is a tag logged?� How is Deadband calculated?� What are some methods of viewing historical data,
alarms and events from the database?
Summary� How do I make sure that tag data and events are logged?− Log Events must be checked in the Engine Manager− Tags must be configured to log data in TCE
� When is a tag logged?− When its value changes more than the deadband
� How is deadband calculated?− As a percentage of the scale in the tag�s Scale tab
� What are some methods of viewing historical data, alarms and events from the database?− HMI Wizard, HyperTrend, MAX, Historical Data VIs, Alarms & Events VIs, and
Alarm & Event Display front panel control
LabVIEW DSC Module Course Manual 4-22 ni.com

© National Instruments Corporation 4-23 LabVIEW DSC Module Course Manual
Exercise 4-1: Logging and Viewing Data Sets Objective: Explore various options available to view your logged data.
Part A: Configure tags and engine to log data 1. Open a blank VI and select Tools»DSC Module»Configure Tag to open the Tag Configuration
Editor.
2. Double-click the Chamber Temperature tag and select the Operations tab in the Tag Configuration Editor. In the Operations tab, make sure there is a checkmark in the Log Data checkbox to ensure that the specified tag will be logged in the database. Leave the Log Deadband and Log Resolution as default and click the OK button.
3. Repeat step 2 if you also want to log the Fan and Light tags.
4. Open the Engine Manager. If it is not already running in the taskbar, select Tools»Launch Engine in the Tag Configuration Editor to start the Engine Manager. If it is running in the taskbar, double-click the icon in the taskbar to open the Engine Manager.

LabVIEW DSC Module Course Manual 4-24 ni.com
5. Make sure there is a checkmark in the Log Data checkbox in the Engine Manager. Minimize the Engine Manager.
6. In the Tag Configuration Editor, select Configure»Historical. Notice the name and path of the database. By default, the database is stored in the data folder in the same directory as the SCF file. You can change this to any other location or database name. Notice that the default name is derived from the database path.
7. In Tag Configuration Editor, select File»Save to save the SCF file. If prompted, shutdown and restart the Tag Engine.
8. Close the Tag Configuration Editor.
Part B: View Historical Data using HMI Wizard 1. Create a new VI. Place a Historical Trend indicator located on the Controls Palette»All
Controls»DSC Module»Trends palette on the front panel.
2. Right-click the Historical Trend indicator and select HMI Wizard from the shortcut menu. In the wizard, select the Chamber Temperature tag from the drop down list under Tag List and click the Add button. Add the light and fan tags to the tag list if you also want them to be displayed.
3. Set the Historical Trend to automatically update every 10 seconds.
4. Set the Time Axis parameters to display relative time and display the last 30 minutes of data. Click the OK button.
5. Return to the front panel and examine the LabVIEW code that has been generated in the block diagram.

© National Instruments Corporation 4-25 LabVIEW DSC Module Course Manual
6. Modify the block diagram as shown in Figure 4-1a. Notice that you are not able to edit the block diagram because it is locked. Right-click the lock icon in the top right corner of the While Loop and select Release Wizard Lock from the shortcut menu to disable the lock from the HMI Wizard. Add a Stop button to the While Loop to enable you to stop the VI without aborting it.
7. Right-click the y-axis of the trend and enable the autoscale option. Save the VI as Ex 4-1 - Historical Trend.vi in the C:\Exercises\LabVIEW DSC directory.
8. Open and run the Exercise 3-7 VI in the C:\Exercises\LabVIEW DSC directory for a minute. Change the heat lamp and fan settings to induce a noticeable pattern in the thermocouple readings.
9. Stop the Exercise 3-7 VI and run the Ex 4-1 - Historical Trend VI. Notice that the historical data for the tags you specified is displayed. You can add or remove any tags from the historical trend view in the HMI Wizard.
10. (Optional) Run the Exercise 3-7 VI again. Notice that the Historical Trend updates every 10 seconds with new data that is logged.
Part C: Using Panel Wizard 1. Open the Exercise 3-7 VI if it is not already open, and save it as Exercise 4-1 VI. Click the
Historical Data tab on the tab control on the front panel.
2. Place a text button or any other Boolean control on this tab page.
1
2
Figure 4-1a. Block diagram of Historical Trend VI

LabVIEW DSC Module Course Manual 4-26 ni.com
3. Right-click the Boolean control and select Panel Wizard from the shortcut menu. Configure the Panel Wizard as shown in Figure 4-1b. Click the Browse button and navigate to C:\Exercises\LabVIEW DSC\Ex 4-1 - Historical Trend.vi. Click the OK button.
4. Open the block diagram and examine the code generated by the Panel Wizard. Modify the block diagram as shown in Figure 4-1c so you can stop this loop with the same stop button that stops the other loops.
1
2
Figure 4-1c. Edit Block Diagram to Stop VI with One Stop Button
Figure 4-1b. Configuring the Panel Wizard

© National Instruments Corporation 4-27 LabVIEW DSC Module Course Manual
5. On the front panel of the Exercise 4-1 VI, notice that the button�s name and label are same as the VI that you specified earlier. Move the text button to a corner of the tab page.
6. Run the Exercise 4-1 VI and modify the Light Intensity and Fan Speed to obtain varying results for Temperature in Chamber. After approximately one minute, switch to the Historical Data tab page and click the text button.
7. The Ex 4-1 - Historical Trend VI opens and displays the historical data of the configured tags. Change the Light Intensity and the Fan Speed in the Exercise 4-1 VI to see the temperature change accordingly in the Historical Trend indicator.
8. Stop and close the Ex 4-1 - Historical Trend VI. Stop the Exercise 4-1 VI.
Part D: View Historical Data using NI HyperTrend 1. Open the Exercise 4-1 VI if it is not already open. Click the Historical Data tab on the front panel.
2. Place an NI HyperTrend indicator located on the Controls Palette»All Controls»DSC Module» Trends palette on the front panel. Resize the plot to fit the tab page. Move the text button to one corner of the tab page so it is still visible.
3. Right-click the NI HyperTrend indicator and select NI HyperTrend»Properties from the shortcut menu.
4. Click Add in the Channels/Traces section. Make sure Citadel 5 is selected. Next, click the Browse button on the top of the Trace Properties page. Navigate under My Computer to the name and location of your database. Select the Chamber Temperature tag and click the OK button.

LabVIEW DSC Module Course Manual 4-28 ni.com
5. In the Trace Properties page, change the trace name to Chamber Temperature and the min and max to 0 and 100, respectively, as shown in the following figure. Click the OK button.
6. Add other tags by following the previous steps and rename them accordingly. On the NI HyperTrend Properties page, click the Apply button then click the OK button.
7. Click the Start/Stop Plotting switch on the top right corner of the NI HyperTrend indicator. The hypertrend is enabled when the switch is green. The plot(s) should now appear in the hypertrend.
8. Run the VI to see more recent historical data as it is logged. Vary the light intensity and the fan speed and notice the temperature change. Also notice that a trace is not logged if the value does not change. This is the due to the deadband. Tag values are logged only when they change by at least the amount of the deadband.
9. Stop the Exercise 4-1 VI. Notice that the hypertrend continues logging. Click the Start/Stop Plotting switch on the top right corner to stop logging. Also notice that no block diagram code is generated for this object.
10. Save the VI.

© National Instruments Corporation 4-29 LabVIEW DSC Module Course Manual
Part E: View Historical Data using MAX 1. Open MAX. Select Historical Data and right-click Citadel 5 Universe. Click New»Trace View to
create a new trace view under Citadel 5 in MAX.
2. Right-click New Trace View and select Add/Remove from the shortcut menu to add or remove traces from this view.
3. Under My Computer, navigate to the database name where you are storing logged data from the temperature chamber. Select the Chamber Temperature tag and click Add. Add other tags if you want to see their historical data. You also can select the database name and click Add to view all the data stored in it. Click the OK button.
4. Notice the tags are listed in the Trace Properties tab. Click the Display tab to display historical data for all the tags. Click the Start/Stop Plotting switch on the top right corner to view the data.
5. To view more recent data, run the Exercise 4-1 VI and change the fan and light settings. Notice that this display behaves and looks similar to the NI HyperTrend indicator in LabVIEW.
6. Stop the Exercise 4-1 VI. Notice that MAX continues logging. Click the Start/Stop Plotting switch on the top right corner to stop logging.
Challenge: View Historical Data using ActiveX Use an ActiveX container located on the Controls Palette»All Controls»Containers»ActiveX Containers palette to view historical data logged by Citadel.
Hint: The NI HyperTrend indicator in LabVIEW is actually an ActiveX object.
End of Exercise 4-1
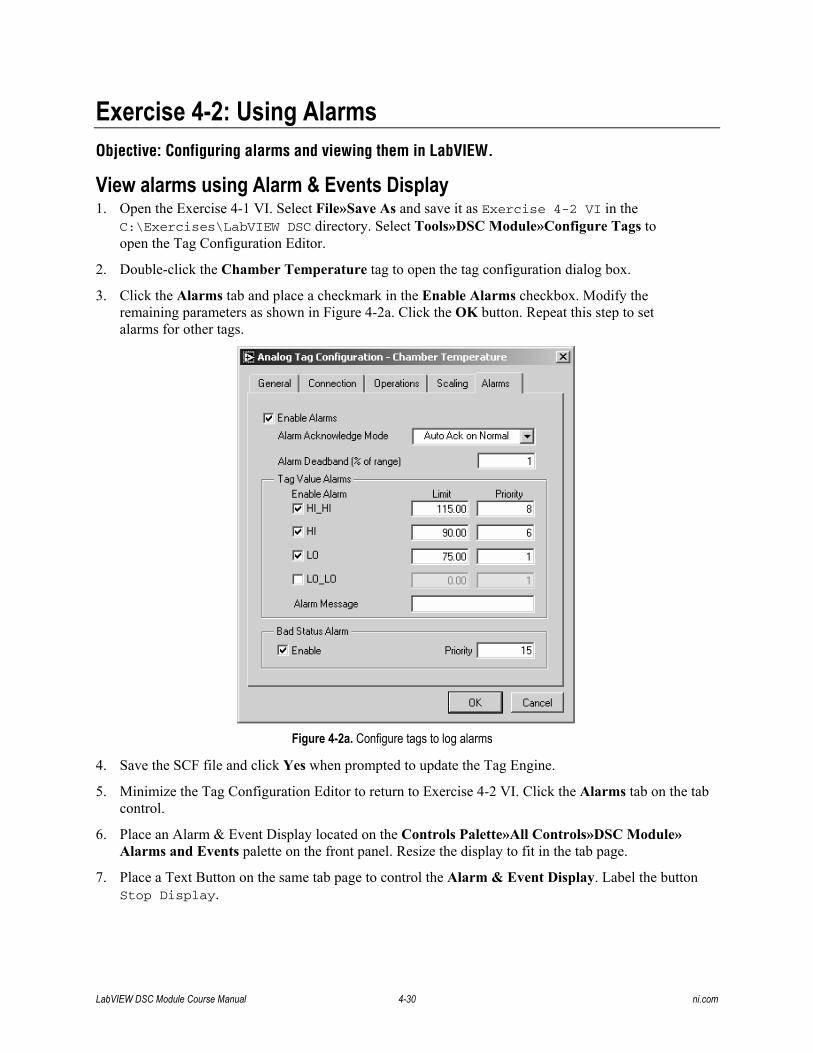
LabVIEW DSC Module Course Manual 4-30 ni.com
Exercise 4-2: Using Alarms Objective: Configuring alarms and viewing them in LabVIEW.
View alarms using Alarm & Events Display 1. Open the Exercise 4-1 VI. Select File»Save As and save it as Exercise 4-2 VI in the
C:\Exercises\LabVIEW DSC directory. Select Tools»DSC Module»Configure Tags to open the Tag Configuration Editor.
2. Double-click the Chamber Temperature tag to open the tag configuration dialog box.
3. Click the Alarms tab and place a checkmark in the Enable Alarms checkbox. Modify the remaining parameters as shown in Figure 4-2a. Click the OK button. Repeat this step to set alarms for other tags.
4. Save the SCF file and click Yes when prompted to update the Tag Engine.
5. Minimize the Tag Configuration Editor to return to Exercise 4-2 VI. Click the Alarms tab on the tab control.
6. Place an Alarm & Event Display located on the Controls Palette»All Controls»DSC Module» Alarms and Events palette on the front panel. Resize the display to fit in the tab page.
7. Place a Text Button on the same tab page to control the Alarm & Event Display. Label the button Stop Display.
Figure 4-2a. Configure tags to log alarms

© National Instruments Corporation 4-31 LabVIEW DSC Module Course Manual
8. Open the block diagram and notice the code that is generated. Modify the code as shown in Figure 4-2b so you can control the start and stop the Alarm & Event Display.
9. Run the Exercise 4-2 VI and modify the light intensity and fan speed to vary the chamber temperature. Switch to the Alarms tab to view the alarms. Notice that the alarms display in red, based on the level specified in the Tag Configuration Editor. Right-click the alarms to Acknowledge them from the shortcut menu. You also can right-click the display to set the Filter Options from the shortcut menu. This allows you to limit which alarms are displayed.
10. The Stop Alarm & Event Display button stops and clears the alarm display. To stop this VI completely, click the main STOP button and the Stop Alarm & Event Display button.
(Optional) View Alarms Using Alarm Summary Display Listbox You also can use the Alarm Summary Display Listbox located on the Controls Palette»All Controls» DSC Module»Alarms and Events palette to display alarms. The HMI Wizard must be used to display alarms. Notice that not all the tags configured to log alarms are automatically displayed, unlike the Alarm & Event Display. Instead, you must specify which of the tags� alarms you want to display.
End of Exercise 4-2
Figure 4-2b. Modify Block Diagram to Allow More Control over Alarm & Events Display

LabVIEW DSC Module Course Manual 4-32 ni.com
Notes

Lesson 5: Advanced Database Management
TOPICSA. What Is a Data Set?B. Keeping Your Database SlimC. Importance of Archiving and Backing Up DataD. Merging and Restoring Databases
By the end of this lesson, you will be able to answer the following questions:� What are data sets? How do you create them and view them?� What are some ways to minimize disk space used by databases?� How do you compact and archive data in databases?� How do you merge databases together?
© National Instruments Corporation 5-1 LabVIEW DSC Module Course Manual

The Importance of Database Management
� Simplifies finding and retrieving data� Keeps database size manageable� Keeps databases organized� Archives and backs up data
Why is Database Management Important?When logging data continuously for a long period of time to the Citadel database, you might want to organize the recorded data. If you are recording to one database, it may get large in size, making it harder to manage and back up. Storing in a different database periodically or using the archiving tools allows you to back up the databases more easily. Also, using one database to store data for a smaller amount of time allows you to find data faster, instead of having to parse through one big database that contains all the data.Some methods of managing databases include the following: using data sets, managing database size, backing up or archiving databases, merging databases, and so on.
LabVIEW DSC Module Course Manual 5-2 ni.com

Data Set� Group of tag values that are logged together for a finite period of time� Useful for organizing historical data
What is a Data Set?The DSC Module has a feature that allows you to organize your historical data into data sets. A data set is a group of tag values that are logged together during some finite period of time. Since they are logged together for same amount of time, a data set might contain tag values for a certain test. For example, in this slide, three tests were performed on a motor to measure the motor response to a triangle-like setpoint function. The white line is the motor response to the setpoint value represented by the other line.The Data Set Logger marks the beginning and the end of each test with special markers. The data between the start and end points is called a run. Each run is identified by its ID. In the motor example, one test corresponds to one run. As you can see from the picture, the database stores three runs. The IDs are Run 1, Run 2, and Run 3. The DSC Module provides functionality to retrieve data from the database based on a run ID, which means that you do not have to remember what time the tests were executed or how many tests have been executed. The Data Set Logger logs all this additional information to the historical database. With a single VI, the List Data Set Runs.VI, you can retrieve the list of runs. With another VI, the Read Data Set Run by ID.vi, you can retrieve data from that run.
© National Instruments Corporation 5-3 LabVIEW DSC Module Course Manual

Setting Up a Data Set
1 2
3
1. Create tags in Tag Configuration Editor (save SCF and restart Tag Engine) � To open the TCE from LabVIEW select Tools»DSC Module»Configure Tags
2. Add tags to data set using Data Set Logger Configuration � from within the TCE select Servers»Data Set Logger Configuration
3. Create a tag connected to one of the items in the Data Set Logger
Setting Up a Data SetIn order to set up a data set, first the desired tags must be configured using the Tag Configuration Editor. After the tags have been configured, save the SCF file and restart the Tag Engine. Then select Servers»Data Set Logger Configuration. In the Definition tab, create a set with a unique Data Set Name. The ID Tag stores the ID of each run of data set that is stored. The Start when and the Stop when parameters are the control parameters that dictate when the data set is logged and when the logging is stopped. You can configure this to be based on a control tag (usually a Boolean tag). Whenever the control tag is ON, the Data Set Logger logs the start marker and logs the end marker when it goes OFF. You must specify tags to be included in this data set need in the Tags tab.
Note: If the tags from the TCE do not appear in the Data Set Logger Configuration dialog box, resave the SCF file and restart the Tag Engine.
After you create and configure the data set, you can log it programmatically. You also can toggle the control tag programmatically to begin and end logging the data set. Each time the data set is logged, they will be assigned a unique ID Tag. If five runs are made, each run has its own ID stored in the ID Tag.
Caution: Data Set Logger is what makes sure that tags configured for data set are logged to the respective data set. You must make sure the Data Set Logger gets launched when you start the Tag Engine. The most elegant way to ensure the Tag Engine starts the Data Set Logger is to include at least one Data Set Logger item in the SCF file. So when the Tag Engine is started, the Data Set Logger item included invokes the Data Set Logger to start.
LabVIEW DSC Module Course Manual 5-4 ni.com

Logging Data Sets
1. Generates unique Run ID and writes it to the ID Tag. 2. Writes ON to the control tag. This will start the run.
3. Generates waveform of Setpoints. 4. Writes OFF to the control tag. This will end the run.
Logging Data SetsThis slide shows how to log data sets using LabVIEW. Notice that you do not specify the data set name when logging to a data set. Because certain tags are associated with a particular data set, writing to the tag automatically logs to the data set. Thus, you can associate a tag with multiple data sets. In such a case, when writing data to that tag, all the data sets associated also are logged.First, the ID Tag for the data set is specified. Next, the Run Tag is enabled. This ensures that logging is enabled for that particular data set. In the next frame, data is written to the tag, and thus logged to the data set. Finally, the Run Tag is disabled by passing a FALSE constant to it. You can toggle the Run Tag programmatically or even with a hardware trigger. You can do this by configuring a tag for the hardware trigger you want to use.
© National Instruments Corporation 5-5 LabVIEW DSC Module Course Manual

Retrieving Data Sets
Retrieving Data SetsThe LabVIEW DSC module includes VIs that allow retrieving data sets. They are located in Functions Palette»DSC Module VIs»Historical Data»Data Set Logger VIs.List Data Sets VI�Based on specified database URL, this VI returns all data sets stored in that particular database.List Data Set Runs VI�Based on specified data set, this VI returns all the data runs stored for that particular data set.Read Data Set Run By ID�Based on the specified run ID(s) or internal ID(s), this VI extracts and returns all the data for the run matching the specified ID in a particular data set.
LabVIEW DSC Module Course Manual 5-6 ni.com

Viewing Data Sets in MAX (Part 1 of 2)Open MAX or select Tools»DSC Module»View Historical Data
Data set runs
Viewing Data Sets in MAXLike alarms, events and other historical data, you also can view data sets Measurement & Automation Explorer (MAX). To do so, open MAX from the Start Menu or by selecting Tools»DSC Module»View Historical Data in LabVIEW. Under Historical Data in MAX, right-click Citadel 5 Universe»New»Trace View. Click the Add/Remove button. In the Add/Remove Traces and Data Set Runs dialog box, you can navigate to the data sets. Unless changed, this will generally be under My Computer»Name of database»DataSetsif the database is on the local computer. Click the data sets that you desire to display and click Add. Notice that all the traces in the data set along with all the runs are listed following. Click OK.The Trace Properties tab now displays all the traces in the data set along with all the runs of the data set. Click Add/Remove to add or remove traces and data sets. Click View Data Set Run and select the run which you want displayed. The data set run appears in the Display tab.
© National Instruments Corporation 5-7 LabVIEW DSC Module Course Manual

Viewing Data Sets in MAX (Part 2 of 2)
Zoom out to see rest of the data in the data set
View other runs in the data set
Tags configured for this data set
Add additional tags, traces or data sets to this view
Select the Display tab to view the data set runs
The Display tab displays particular data set runs. Use the Zoom feature to view the entire data set and other runs. To view other runs individually, click View Data Set Run.Right-click the graph legend to disable certain plots, and so on. You can access graph and plot properties by right-clicking the plot area.
LabVIEW DSC Module Course Manual 5-8 ni.com

Exercise 5-1
Logging and Viewing Data SetsApproximate time to complete: 30 min. Page 5-20
To set up a data set and view it using several methods.
OBJE
CTIV
E
© National Instruments Corporation 5-9 LabVIEW DSC Module Course Manual

Keeping Your Database Slim
� When configuring tags to be logged, set the Log Deadband value to be high and set the Log Resolution to a value that will minimize memory usage
� Compact your database� Reduce the Historical data lifespan
Keeping Your Database SlimAs discussed in Lesson 4, Handling and Logging Your Data, Citadel logs data quite efficiently by logging data only on change. Therefore, when a tag value changes a certain percentage, the new value is logged. This is called Log Deadband. If the Log Deadband is set to a small percentage, smaller changes in value are considered significant. More data points are logged, taking up more time and hard drive space. Having a high Log Resolutioncan slightly decrease database size. A Log Resolution of 0.0 means that the exact value is stored. A resolution of 0.1 is more efficient. Resolution is based on the precision of logged data required for your application.Backing up, compressing, and archiving a database regularly also is recommended to reduce the hard drive space used by databases. This also prevents complete data loss upon any kind of failure. Database management can be automated using LabVIEW VIs and ensures that the database is backed up, compressed, or archived regularly.
LabVIEW DSC Module Course Manual 5-10 ni.com

How Long to Keep Your Data
� Historical data lifespan parameter for historical logging specifies how long the data is valid in a database
� After specified period of time, old data is overwritten with new data
� Ensures that database size does not get too big if data is logged continuously for long periods of time
How Long to Keep Your DataIf the application being logged is rerun on a regular basis, or if the database is backed up regularly, then set the Historical data lifespan parameter in the Historical Logging Configuration to a reasonable value. Also, if only recently logged data is necessary instead of old data, the data lifespan can be reduced. For instance, if data more than one day old is unnecessary and inconsequential and only new data is desired, set the Historical data lifespan to be about one day so that every 24 hours, the database is overwritten and no data over one-day-old is logged.Restructuring the Historical data lifespan ensures that if you are logging data continuously for weeks, the database is only as big as one of logged data day of instead of being as big as one week of data. To set this parameter, open the Tag Configuration Editor from LabVIEW by selecting Tools»DSC Module»Configure Tags. In TCE, you can open the Historical Logging Configuration dialog box by selecting Configure»Historical. The Historical data lifespan parameter can be set here.
© National Instruments Corporation 5-11 LabVIEW DSC Module Course Manual

Compacting Your Database
� Compress databases regularly to free extra space and reduce amount of disk space used
� Use the Compact Database VI located in Functions Palette»DSC Module VIs»Historical Data
Compacting Your DatabaseCompact Database VI�Use this VI to compact a Citadel database. Compacting a databasefrees extra room in the database that was created by deleted, archived, or lifespan-expired trace data. Deleting or archiving traces usually leaves empty disk space that is still taken up by the database. Compacting the database eliminates the empty space. Compact the database before backing it up or merging databases. This is similar to defragmenting the hard drive for your PC.
LabVIEW DSC Module Course Manual 5-12 ni.com

Importance of Archiving and Backing Up Data
� Prevents against complete loss of logged data due to computer problems or corrupted databases
� Promotes redundancy to reduce vulnerability of lost data
� Stores data on a remote hard drive or other storage devices
� Accesses more disk space if necessary for storing logged data
Importance of Archiving and Backing Up DataArchiving or backing up data is essential when dealing with data logging. Because you can log data over long periods of time, you might need to back it up frequently to protect it against unforeseen computer failures or hard disk corruptions. You also can store data on a remote location or storage device, such as a floppy disk, a tape drive, and so on.Remote storage of data ensures that a redundancy is in place to protect data against unexpected vulnerabilities.
© National Instruments Corporation 5-13 LabVIEW DSC Module Course Manual

How to Archive Data Using MAXUse MAX to archive entire databases, data sets, or individual traces
How to Archive Data Using MAXMAX can be used to backup/archive databases, data sets or even individual traces. Select MAX»Historical Data»Citadel 5 Universe to view all the databases stored. Right-click the database or data item to be archived and select Archive. In the Archive Data dialog box, add or remove databases, data sets, traces, and so on that need to be archived. Then click Next. Next, specify the destination database by navigating to it if it already exists. Notice that a database on the network computer may also be selected. If archive database does not exist, you can create a new one by clicking the Create/Attach Database. Again, you can create the new database on a network computer, if proper permissions exist. After specifying the destination archive, click Next.Select a Time Interval only if a specific interval of data is to be archived. An option also exists to destroy source data after it has been archived. You can enable the option when logging from a local computer. This is an important option, if you wish to delete the archived data from the source database�destructive archiving as opposed to nondestructive archiving�to reduce the size of the source database.
LabVIEW DSC Module Course Manual 5-14 ni.com

How to Backup Data Programmatically
� Programmatically archive data using the DSC Module VIs� Destructive or nondestructive archiving options
How to Backup Data ProgrammaticallyArchive Traces VI�Use this VI to perform an archival operation on a Citadel database. Use the Alarm and Event Archive VI to archive alarm and event data by selecting Functions Palette»DSC Module VIs»Historical Data.
© National Instruments Corporation 5-15 LabVIEW DSC Module Course Manual

Backing Up Data RemotelyFor databases on remote computers, the source and destination database URL path need to be in the following format:
\\computer_name\local_drive\path
When you use the Path Control to browse to the directory, you receive the computer name and the directory name.
Backing Up Data RemotelyWhen backing up databases to a remote computer on a network, you must format the database URL properly. In the case depicted in this slide, \\backup is the remote computer that the local database is to be archived to. This network computer has a shared folder called Shared containing a database called day1. If you browse to the remote computer on the network and point to the shared folder, the URL will be \\backup\Shared\day1.This is incorrect because it does not specify the location of the remote database on the hard drive. Use the following computer name and the directory path:\\backup\c\Documents and Settings\user\Desktop\Shared\day1
The backup database must already exist in the remote computer to be able to backup to it. You can use MAX to navigate to the shared folder on the remote computer on the network and create the database, before archiving to it.
LabVIEW DSC Module Course Manual 5-16 ni.com

Merging and Restoring Databases
� Same method as archiving databases� Use archiving method described previously for MAX� Use Archive Traces VI in the DSC Module
TRUE if source database is to be deleted after the merge/restore/archive task has completed
Merging and Restoring DatabasesIn the DSC Module, use the same tools for merging databases as used for archiving databases. In the LabVIEW code in this slide, Database_1 and Database_2 are merged into Database_2. Database_1 is deleted after merging the two databases together. Deleting the first database is an option. In MAX, this same method should be used to merge two databases. Simply archiving one database into another existing one merges the databases together.You can restore databases using this method. For example, Database_1 is the backed up database and Database_2 has data missing that you would like to replace from the backup. If the Archive Traces VI is used as above, only data that is different or missing in Database_2 is replaced by data from Database_1. Thus, this fills up any holes that may exist. To restore the entire database, you would create a new database and archive the backed up database back to the new database created to copy all the data over.
© National Instruments Corporation 5-17 LabVIEW DSC Module Course Manual

Deleting Data
� Delete individual tag values, data sets or entire databases � Use LabVIEW DSC VIs or use MAX
Deleting DataDelete Traces VI�Use this VI to delete a set of traces from a given Citadel database. You cannot recover data deleted with this VI cannot be recovered.In MAX, right-click the tag, data set run, data set, or database you want to delete. SelectDetach/Delete, and in the next dialog box, select Delete and click OK.
LabVIEW DSC Module Course Manual 5-18 ni.com

Summary� What is a data set? What is a run? What are some
methods to read a data set?� What are some methods to reduce the amount of disk
space used by a database?� What are some methods for backing up data?
SummaryA data set is a group of tag values that are logged together for some finite amount of time. You can log data sets by simply logging to any one of the tags that is contained in a data set. Because a data set logs all the tags in it for a fixed amount of time, each time that data is logged for a certain period of time to the data set, it is called a Run. Each run has its own ID Tag that can be used to retrieve data from that run directly. Data logged in a data set can be displayed and read using the DSC Module VIs or using Historical Data in MAX.You can reduce the database size by making sure that the Logging Deadband is not too small. If it is too small, then data is logged more often, thus taking up more space. Also, ensure that Log Resolution is set to something reasonable and not 0.0. Compacting the database often gets rid of any empty spaces that may have been created from deleting, archiving, and so on. Based on your application, a smaller value may be used for the Historical data lifespan.Back up data when logging to a database. You can do this by archiving using DSC Module VIs or using MAX. You can use the same tools to merge databases and also restore them. It also is a good idea to compact data before archiving it. The Archive Traces VI in LabVIEW DSC has an option to compact the database before archiving it. You can archive entire databases, individual tags, and data sets, not only locally, but also on a remote computer on the network. The same method merges or restores databases.
© National Instruments Corporation 5-19 LabVIEW DSC Module Course Manual

LabVIEW DSC Module Course Manual 5-20 ni.com
Exercise 5-1: Logging and Viewing Data Sets Objective: To set up a data set and view it using several methods.
Configuring Data Set Logger 1. Select Tools»DSC Module»Configure Tags to open the Tag Configuration Editor. Select File»New
to create a new SCF file. Click the OK button.
2. Select Edit»Configuration Wizard to launch the Configuration Wizard.
3. Navigate to National Instruments.OPCDemo»NI OPC Demo Server»Simulation. Select the MotorRPMSensor and MotorRPMSetPoint tags as shown in Figure 5-1a. Click the Add Item(s) button to add the tags, then click the OK button.
Note: You will use the OPCDemo to simulate the device. The OPCDemo reads the value of the setpoint and tries to adjust the sensor value to it, with some time delay. The delay creates an impression of a real device.
Figure 5-1a. Add Simulated Tags to SCF File

© National Instruments Corporation 5-21 LabVIEW DSC Module Course Manual
4. Create two additional tags (the Chamber Temperature, Heat Lamp Control, and Cooling Fan Control tags should already exist):
a. Create a string memory tag and name it RPM Data Set ID Tag. In this example you will identify each run by a string with the following format: 'Test HH24:MM:SS' (for example, 'Test 14:58:33'). The timestamp is taken when the test starts. The ID can be anything, but in this case you add the timestamp to the field to make it unique and identifiable. You could have simply set the ID for each run to be 'Test 1', 'Test 2', and so on. An ID tag is a string or analog tag in your active SCF file. When you start logging a data set, the value of the ID tag at that time becomes the identifier of that data set run.
b. Similarly, create a discrete memory tag and name it RPM Data Set Run Tag. This control tag determines the start and end timestamps of a run. When a condition is met, the Data Set Logger logs the start or end marker. When the start condition is met, a new run starts, provided that the previous run has ended. When the end condition is met, the run ends.
The complete list of tags is shown in Figure 5-1b.
Figure 5-1b. List of Tags in TCE

LabVIEW DSC Module Course Manual 5-22 ni.com
5. Save your SCF file as dataset.scf in the C:\Exercises\LabVIEW DSC directory If prompted, stop and restart the Tag Engine. If you do not save the SCF file, you will not see the changes in the Data Set Logger configuration window.
6. Select Servers»Data Set Logger Configuration. Select the Definition tab and modify it as shown in Figure 5-1c. The Data Set Name identifies the data set. The ID Tag in this case is RPM Data Set ID Tag. Your control tag is RPM Data Set Run Tag. When its value is ON, the Data Set Logger logs the start marker. When its value is OFF, the Data Set Logger logs the end marker, thus marking off one run.
7. Click the Tags tab and click the Add button to select the tags you want to include in your data set. All tags/traces to which a data set refers must be logged in the same database. For this exercise, add the MotorRPMSetPoint and MotorRPMSensor tags to the set.
8. Click the OK button and save changes when prompted. Read the following caution regarding the dialog that appears next. Click the OK button.
Caution: At this point the configuration itself is done. However, you must make sure the Data Set Logger gets launched when you start the Tag Engine. The most efficient way to ensure the Tag Engine will start the Data Set Logger is to include at least one Data Set Logger item in the SCF file, as in Figure 5-1d.
9. Select Edit»Configuration Wizard to launch the Configuration Wizard.
Figure 5-1c. Data Set Logger Configuration
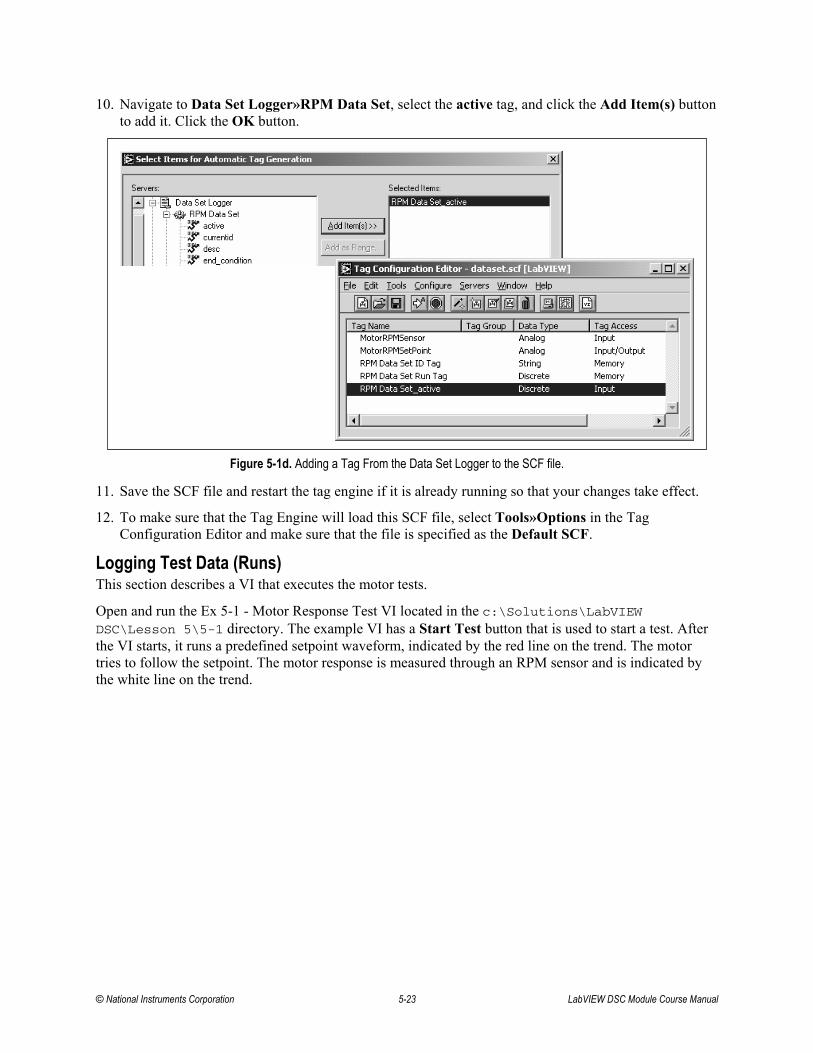
© National Instruments Corporation 5-23 LabVIEW DSC Module Course Manual
10. Navigate to Data Set Logger»RPM Data Set, select the active tag, and click the Add Item(s) button to add it. Click the OK button.
11. Save the SCF file and restart the tag engine if it is already running so that your changes take effect.
12. To make sure that the Tag Engine will load this SCF file, select Tools»Options in the Tag Configuration Editor and make sure that the file is specified as the Default SCF.
Logging Test Data (Runs) This section describes a VI that executes the motor tests.
Open and run the Ex 5-1 - Motor Response Test VI located in the c:\Solutions\LabVIEW DSC\Lesson 5\5-1 directory. The example VI has a Start Test button that is used to start a test. After the VI starts, it runs a predefined setpoint waveform, indicated by the red line on the trend. The motor tries to follow the setpoint. The motor response is measured through an RPM sensor and is indicated by the white line on the trend.
Figure 5-1d. Adding a Tag From the Data Set Logger to the SCF file.

LabVIEW DSC Module Course Manual 5-24 ni.com
The complete test runs for about 10 seconds. After the test completes, you can start the next one.
The core part of the VI is a Sequence Structure. The Sequence Structure executes when the user clicks the Start Test button. Frame 0, shown in Figure 5-1f, generates a unique string with the following format: 'Test HH24:MM:SS' (for example, 'Test 14:58:33'). The string becomes a run ID when it is written to the ID tag (RPM Data Set ID Tag).
Frame 1, shown in Figure 5-1g, starts a new run by writing ON to the control tag (RPM Data Set Run Tag). At this time, the Data Set Logger creates the start marker in the database. The Run ID is whatever the current ID tag value is, which is why it is important to initialize the ID tag before the run starts.
Figure 5-1e. Motor Response Test VI Front Panel
Figure 5-1f. Frame 0 - Write the ID Tag as 'Test HH24:MM:SS'
Figure 5-1g. Frame 1 - Write ON to the Control Tag to Start the Run
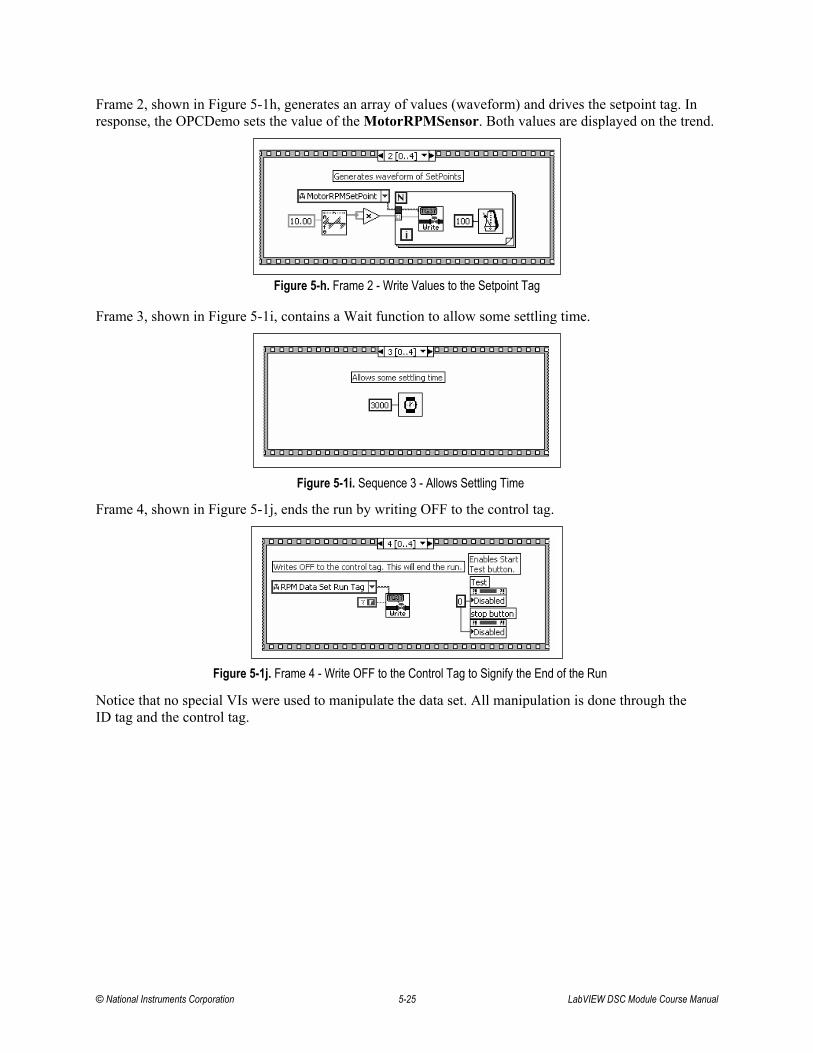
© National Instruments Corporation 5-25 LabVIEW DSC Module Course Manual
Frame 2, shown in Figure 5-1h, generates an array of values (waveform) and drives the setpoint tag. In response, the OPCDemo sets the value of the MotorRPMSensor. Both values are displayed on the trend.
Frame 3, shown in Figure 5-1i, contains a Wait function to allow some settling time.
Frame 4, shown in Figure 5-1j, ends the run by writing OFF to the control tag.
Notice that no special VIs were used to manipulate the data set. All manipulation is done through the ID tag and the control tag.
Figure 5-h. Frame 2 - Write Values to the Setpoint Tag
Figure 5-1j. Frame 4 - Write OFF to the Control Tag to Signify the End of the Run
Figure 5-1i. Sequence 3 - Allows Settling Time
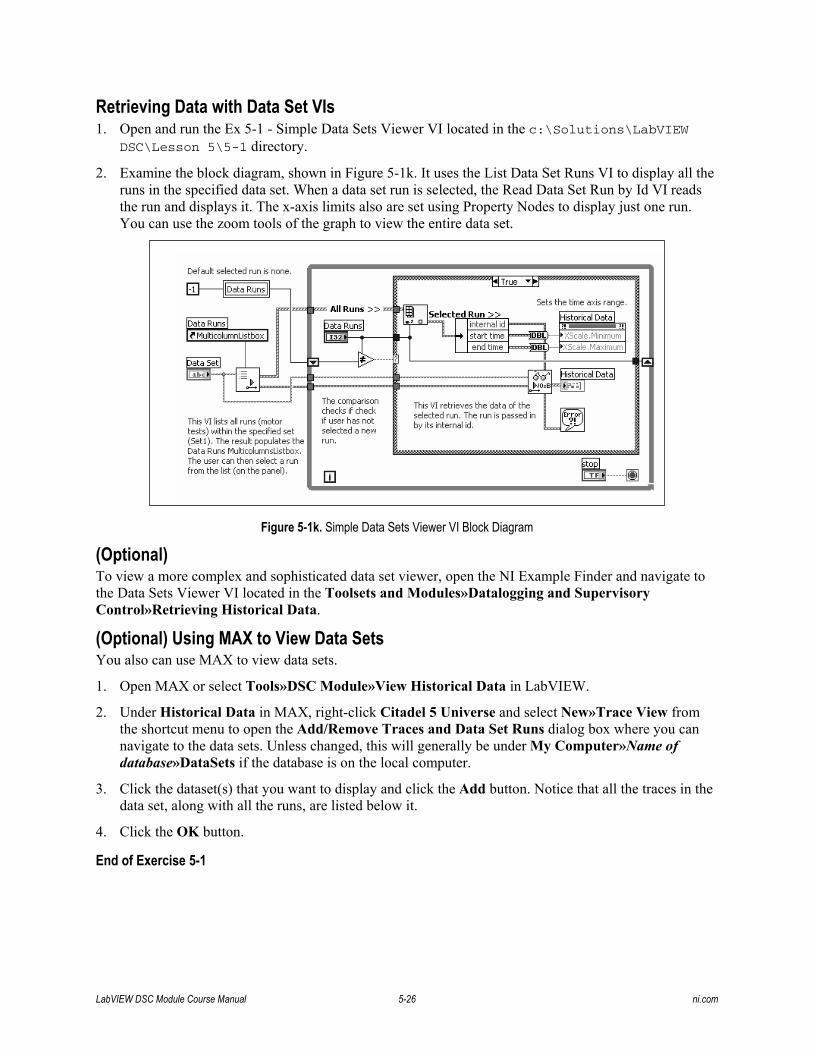
LabVIEW DSC Module Course Manual 5-26 ni.com
Retrieving Data with Data Set VIs 1. Open and run the Ex 5-1 - Simple Data Sets Viewer VI located in the c:\Solutions\LabVIEW
DSC\Lesson 5\5-1 directory.
2. Examine the block diagram, shown in Figure 5-1k. It uses the List Data Set Runs VI to display all the runs in the specified data set. When a data set run is selected, the Read Data Set Run by Id VI reads the run and displays it. The x-axis limits also are set using Property Nodes to display just one run. You can use the zoom tools of the graph to view the entire data set.
(Optional) To view a more complex and sophisticated data set viewer, open the NI Example Finder and navigate to the Data Sets Viewer VI located in the Toolsets and Modules»Datalogging and Supervisory Control»Retrieving Historical Data.
(Optional) Using MAX to View Data Sets You also can use MAX to view data sets.
1. Open MAX or select Tools»DSC Module»View Historical Data in LabVIEW.
2. Under Historical Data in MAX, right-click Citadel 5 Universe and select New»Trace View from the shortcut menu to open the Add/Remove Traces and Data Set Runs dialog box where you can navigate to the data sets. Unless changed, this will generally be under My Computer»Name of database»DataSets if the database is on the local computer.
3. Click the dataset(s) that you want to display and click the Add button. Notice that all the traces in the data set, along with all the runs, are listed below it.
4. Click the OK button.
End of Exercise 5-1
Figure 5-1k. Simple Data Sets Viewer VI Block Diagram

© National Instruments Corporation 5-27 LabVIEW DSC Module Course Manual
Notes

LabVIEW DSC Module Course Manual 5-28 ni.com
Notes

Lesson 6: Maximizing Tag Effectiveness
TOPICSA. The Importance of Tag ManagementB. Setting Default Parameters for TagsC. Using the Tag MonitorD. Changing Tag Attributes Programmatically
Lesson 6: Maximizing Tags EffectivenessAt the end of this lesson, you will be able to answer the following questions:� Why is tag management important?� What is deadbanding?� How to edit specific attributes of tags?� How to programmatically read and write to tags in LabVIEW?� How to start the Tag Engine from LabVIEW?
© National Instruments Corporation 6-1 LabVIEW DSC Module Course Manual

Well Managed Tags
Simplifies Programming
The Importance of Tag Management
Managing your tags properly simplifies programming and managing your application
Simplifies Editing
Faster Program Execution
The Importance of Tag ManagementWhen you create and work with only a few tags, you can keep track of the tags that you are using. However, when you develop a full application, in many cases you work with hundreds or even thousands of tags. Creating and keeping track of that many tags is difficult and time consuming. Using proper tag management techniques allows you to quickly find and use the tags that you are interested in, and also allows you to create and edit tags very quickly.This lesson focuses on how to create multiple tags quickly and easily, set the default properties of those tags, change specific attributes of individual tags, and group tags for organizational purposes. This lesson also shows how to use the Tag Monitor, read and write to tags in LabVIEW, and start the Tag Engine from your LabVIEW program.
LabVIEW DSC Module Course Manual 6-2 ni.com

What is a Deadband?
Deadband ExampleInput Range = 0�50 VoltsInitial Value = 10.0 VoltsDeadband = 1.0 (1.0% = 0.5 Volts)Actual Values = 10,10.2, 9.7, 9.6, 9.3Recorded Values = 10, 9.3
� Region where value changes DO NOT update value on the engine� Reduces processor usage
and network traffic� Ignores signal noise
Deadband
What is a DeadbandA deadband is a region where values can change, but it does not update the output value. In the example in the slide, the input range is 0�50 V and the deadband value is 1.0%. Therefore, the value does not update until value changes by at least 1.0% of the total input range (0.5 V in this example). In this case, the initial value is 10.0 V, so the value must rise above 10.5 V or fall below 9.5 V before the value will update. The values between 9.5 and 10.5 are a band of numbers that are essentially dead. Keep in mind that the deadband moves with each new updated point. For example, in this slide, after the 9.3 is recorded, the new deadband is between 9.8 and 8.8.
Why Use Deadbanding?Deadbanding prevents unnecessary processing of tag values. When you use deadbanding, the value updates only when the value changes more than the deadband. This prevents unnecessary network traffic and datalogging due to noise in the signal value.
© National Instruments Corporation 6-3 LabVIEW DSC Module Course Manual

Deadbands in the DSC Module
There are four places in the DSC Module where Deadbanding is used:� I/O Group Deadband (% of range)� Update Deadband (% of range)� Alarm Deadband (% of range)� Log Deadband (% of range)
There are four separate deadband settings in the DSC Module. Each is important in eliminating unnecessary data processing and data logging. � I/O Group Deadband (% of range)�This deadband is applied to the OPC Server itself.
I/O group deadband is a percentage of the total range defined by the OPC Server. When set, the OPC Server does not send an interrupt to the Tag Engine to update a value unless the value change is greater than the deadband. The I/O Group Deadband is a part of the OPC Server subscription that is defined in the I/O Group. Like other settings in the I/O Group, the I/O group deadband is a request that is sent to the OPC Server. The OPC Server can ignore the I/O group deadband. For example, it is ignored by the FieldPoint OPC Server.
� Update Deadband (% of range)�This deadband is similar to the I/O Group Deadband, but it is applied to the Tag Engine. The update deadband is a percentage of the Engineering Scale. When this is set, the Tag Engine ignores updates from the OPC Server if the value change is not greater than the deadband.
� Alarm Deadband (% of range)�This deadband is also a percentage of the engineering scale. The alarm deadband acts like a hysteresis in that the tag does not return to a normal state until it has left the alarm condition by at least Alarm Deadband. For example, if the range is 0�100 and the Alarm Deadband is 1% and you have a HI Alarm set at 75, if the tag value goes above 75, the tag is in alarm. After the tag is in alarm, the value must drop below 74 to go out of alarm. This eliminates the problem of causing multiple alarms, while a noisy signal hovers about the alarm value.
� Log Deadband (% of range)�This deadband allows you to limit the data that is being logged to the database. To get the most efficient use of hard drive space, the Citadel database only logs data on change. If a log deadband is set, then Citadel only logs data if it changes by more than the deadband.
LabVIEW DSC Module Course Manual 6-4 ni.com

Tag Attributes � Operations
Engine� Set deadband for updating
values on the engine� Set initial value on the engine
Tag Attributes � OperationsUpdate Deadband (% of range)�Determines when the Engine updates the tag with a new value. For analog tags, the Update Deadband is a percent of the full scale defined on the Scaling tab. Use 0% if you want each value read for the tag to always update the database. For discrete, string, and bit array tags, Update Deadband is expressed as either Always or On Change. With Always, the value is treated as new, and the timestamp is updated each time it is read. On Change requires the value to be different than the last value in order for it to be recorded. The deadband is important when trying to create event-based code. Note: If you have the wrong scale defined in the Scaling tab, it affects the deadband. If the data is changing, but the LabVIEW DSC module tag value is constant, check the scale and adjust the deadband if necessary.Logging Data and Events�You must specify which tags to log to the database. A checkbox for logging data is on this dialog box. When this checkbox is checked and the Tag Engine is set to log data, the tag values will be logged to the database. By default the Tag Engine starts logging data on startup. You can stop the Engine from logging any data in the Engine Manager window. If the Log Data checkbox is empty, this tag is not logged to the database, although other tags may be logged. The Log Deadband field specifies the smallest percentage change from the previous value that is treated as a new value. If you have a low deadband, you log more data points, which uses more space on your hard drive. Therefore, choose your deadband carefully.
© National Instruments Corporation 6-5 LabVIEW DSC Module Course Manual

Tag Attributes � Scaling� Converts raw data into engineering
units� For example, voltage to temperature� Allows for linear and square root
scaling models� Critical to set accurate units
� Used by the engine to set ranges� Non-analog tags
� Discrete tags can only be inverted� String tags do not have scaling
Tag Attributes � ScalingThe scaling converts the raw data read from the server into engineering units suitable for operators. Engineering units are standard measurement units, such as °C, °F, and liters. This is how the actual physical quantity is represented. An example of scaling is to take a 4-20 mA current measurement from a pressure sensor and scale it into PSI. The following lists types of analog scaling:� Linear: y = m(raw measurement) + b
b = engineering min, m = (engineering max � engineering min)/(raw max � raw min)
� Square root: b + m * sqrt(raw measurement)b = engineering min, m = (engineering max � engineering min)/sqrt(raw max � raw min)
The raw scale is the range of values read from the server. If the server already performs scaling, then additional scaling might not be necessary. The engineering scale determines the range of values used by the Tag Engine and your application. When no engineering scales are defined, the DSC module does not perform scaling.Discrete tags support only inverting the value. Bit array tags allow you to select which bits are inverted and which bits are always 0. String tags have no scaling available.
LabVIEW DSC Module Course Manual 6-6 ni.com

Exercise 6-1
The Effects of Deadbanding
Approximate time to complete: 20 min. Page 6-25
To view the effects of deadbanding on data update rates.
OBJE
CTIV
E
© National Instruments Corporation 6-7 LabVIEW DSC Module Course Manual

Setting Default Parameters for Tags
� Set the defaults for the configuration wizard and manual tag creation
� No need to change most values, saves time and work
Default Tag ParametersNotice that when you begin configuring tags, many fields are already set to certain default values. If you would like to have these fields default to different values, go into Configure»Default Parameters in the Tag Configuration Editor, and you can change the defaulted values.If you are going to be creating a large number of tags, this is a good way to save time. If you have different sets of tags that need different default values, set the default values and create the first set of tags. Then, change the defaults and create the second set of tags.
Tip: If you need to know what some of the terminology means within this window, use the Online Help feature <Ctrl-H> to launch the Help window. You then can view information for each field as you hold the cursor over a field.
LabVIEW DSC Module Course Manual 6-8 ni.com
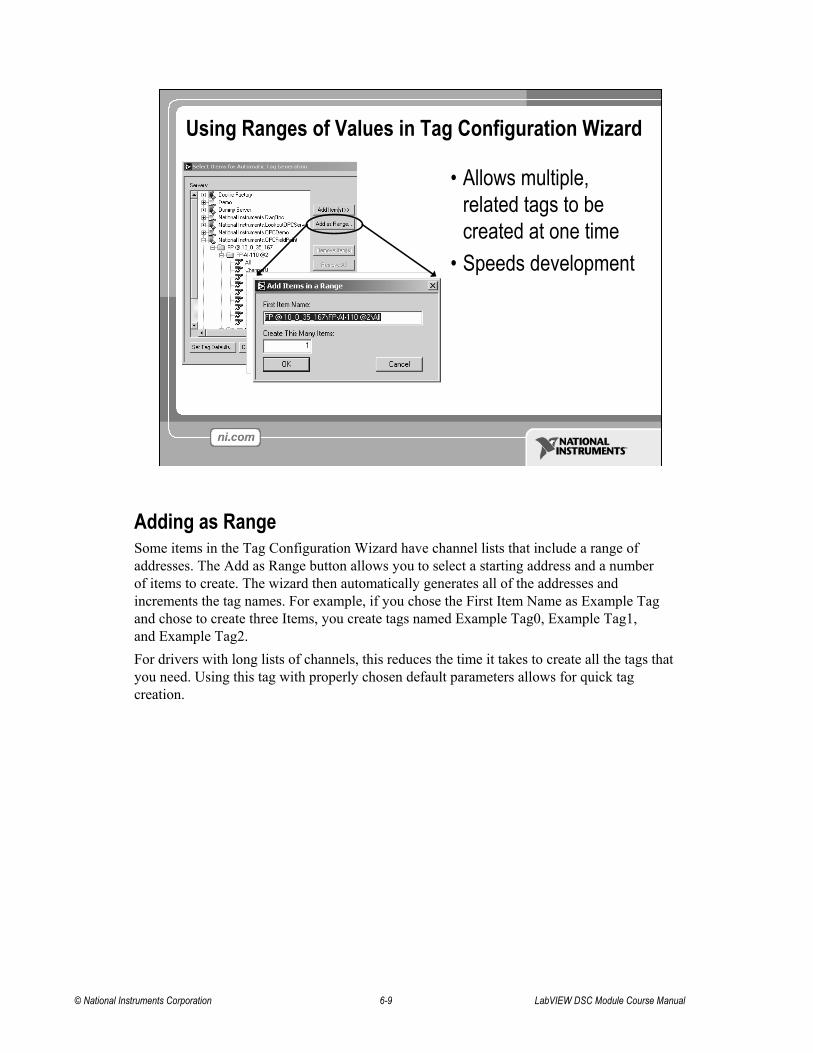
Using Ranges of Values in Tag Configuration Wizard
� Allows multiple, related tags to be created at one time
� Speeds development
Adding as RangeSome items in the Tag Configuration Wizard have channel lists that include a range of addresses. The Add as Range button allows you to select a starting address and a number of items to create. The wizard then automatically generates all of the addresses and increments the tag names. For example, if you chose the First Item Name as Example Tag and chose to create three Items, you create tags named Example Tag0, Example Tag1, and Example Tag2. For drivers with long lists of channels, this reduces the time it takes to create all the tags that you need. Using this tag with properly chosen default parameters allows for quick tag creation.
© National Instruments Corporation 6-9 LabVIEW DSC Module Course Manual

Why Would I Use I/O Groups?
� I/O Groups control update rates� Allows different channels to
update at different rates� Less processor usage� More efficient programs
I/O GroupsIn the DSC Module, I/O Groups define how fast items are read from the server and when a value is considered to be changed by the OPC server, if the server supports deadbanding. By default, the DSC Module creates one group for each server. You may have multiple groups for a single server, but you should not have one group include two different servers. The typical use for multiple groups would be to have one group of tags read at a slow rate and one group of tags that is read at a faster rate.
What should I choose for my update rate?To some extent this will be system specific, but generally Windows cannot reliably do anything faster than once every 0.05 seconds, because this is how long your program may not receive CPU cycles from the operating system. Giving some additional time for overhead, 0.1 second update rates are about as fast as you can expect. The group update rate is how fast the server updates the Tag Engine. Both the update rate and the deadband are requests for a subscription from the OPC server. The Tag Engine does not poll the OPC server. Instead, when a value changes more than the deadband, the OPC server sends updates (as interrupts) to the Tag Engine at the requested rate. It is not the rate of which the server reads values from the hardware. You should not have your group update rate be faster than the sample rate or poll rate of the hardware. If you do, then you read the same value multiple times, wasting the processor time of the computer.
LabVIEW DSC Module Course Manual 6-10 ni.com

Handling Large Tag Counts
� Import/export spreadsheet files� Tab-delimited text (.txt) files� Can be edited with any spreadsheet
application (MS Excel, Lotus 123, and so on)
� Import DAQ channels� Use existing virtual channels
Handling Large Tag CountsSometimes, you do not want to add each tag used in your system manually. Using the Import and Export functions provides the mechanism to import and export spreadsheet files containing tag configuration.
Exporting Tags to a FileYou can export the SCF file to a tab-delimited ASCII file using the export feature. You can choose which fields are exported and the order in which they are exported.You can use this feature as a documentation tool as well as making changes in a spreadsheet application and import the tags back into the TCE.
Importing TagsAfter you have edited your tags in a spreadsheet, you can import them back into the TCE. You can combine two SCF files by exporting the contents of both SCF files and combining their data in a spreadsheet. If you have a large SCF file that you are working with, keep a backup file, because debugging errors in a large spreadsheet file can be difficult.
Note: The import option does not work if the tag name and data type fields are missing from the spreadsheet file.
Importing DAQ Memory TagsAllows you to import existing DAQ Virtual Channels and create tags for them.
© National Instruments Corporation 6-11 LabVIEW DSC Module Course Manual

(Optional) Exercise 6-2
Exercise 6-2: Edit a Large SCF File
Approximate time to complete: 15 min. Page 6-28
To demonstrate how to export a large file of tags, to edit the file in a spreadsheet editor, and to import it back into the Tag Configuration Editor.
OBJE
CTIV
E
LabVIEW DSC Module Course Manual 6-12 ni.com

Using the Tag Monitor� Can read or write tags locally or over a network
� Drag and drop tags into the monitoring window� Tags automatically update when added� Right-click a tag to write a new value (write tags only)
� Great for debugging
Tag MonitorUse the Tag Monitor to debug your application. The Tag Monitor allows you to view all the tag values without having to do any programming. You can start the Tag Monitor from the TCE by clicking the Start Tag Monitor button in the toolbar. After the Monitor is running, you can drag and drop tags from the left-hand window pane into the right-hand window pane. After tags appear in the right-hand window pane, the values of those tags update automatically. You also can write values to tags (write tags only) in the Tag Monitor by right-clicking and choosing Write from the shortcut menu.
© National Instruments Corporation 6-13 LabVIEW DSC Module Course Manual

Programmatically Accessing Tags
� Allows you to use data from the tags in calculations� Allows for feedback loop control
� Access tag data� Process tag data� Output data to tags
� Can access and change tag attributes while the program is running
Programmatically Accessing TagsAs an advanced user of DSC, you might want to programmatically access tags on the block diagram of your VI. By programmatically accessing your tags, you can accomplish many things in your program that you could not do with the HMI Wizard method of accessing data that you learned in Lesson 2, Getting Started with the LabVIEW DSC Module. The two most common reasons for programmatically accessing tags are for feedback control and for manipulating tag attributes.By accessing your tags from the block diagram of your VI, you can use their current values in control loop calculations. For example, you could control a heater based on the temperature of a room, or control the intensity of a light based on the ambient light level of the surroundings. Another use of programmatic control is programmatically changing tag attributes. This allows you to turn alarms on and off and change deadband values while your programming is running.The next few pages will discuss the implementation of programmatic access in your VIs.
LabVIEW DSC Module Course Manual 6-14 ni.com

Programmatically Reading Tags� Tag Read VI
� Inputs:� Tag to read, timeout
� Outputs:� Value, timestamp, status, error,
shutdown
� Example� Read from thermocouple tag� Wait no more than 30 seconds� Stop when engine shuts down
Programmatically Reading TagsTo read a tag value, you must specify which tag to use. An optional timeout parameter specifies the amount of time to wait for a new tag value. This timeout parameter allows you to easily create event-driven code. If you put a �1 in the timeout, then the Read Tag VI does not return until the tag values change more than the Engine deadband or until the Engine is shut down. If you do not wire the timeout or wire a 0 in the timeout, then the VI returns the current tag value. The outputs of the Read VIs are the tag value, the timestamp of the value, an integer representing the status of the tag, and a Boolean that indicates whether an error occurred. The shutdown output indicates that the Engine is shutting down. In this case, the Read Tag VI no longer waits for the tag to be updated and immediately returns with shutdown TRUE. It is advisable to use the shutdown output to halt your loops.
Simple Tag Read ExampleThis slide reads the FP Thermocouple Tag and updates the display either when the tag value changes or every 30 seconds. The While Loop stops when the Engine is shut down. Because we use a non-zero timeout, this loop is both event based and polling. The While Loops does nothing until either the tag value changes or our thirty second timeout has elapsed. Remember that event-driven programs use much less CPU, because they do not have to perform any work when the values are not changing. However, if you have a finite timeout, your VI does not wait forever for the value to change.
© National Instruments Corporation 6-15 LabVIEW DSC Module Course Manual

Programmatically Writing Tags� Tag Write VI
� Inputs:� Tag name, value, generate event?,
write on value change?� Outputs:
� Value status, error
� Example� Write to analog output tag� Write a value of 2.5 volts� Write value only when changed
Programmatically Writing TagsThe Write Tag VI updates the value of an output tag. It can be setup to write the value every time or only when the value to write changes. The VI has a shutdown output, just like the read, so that the While Loop can be stopped when the Engine is shutting down.
Sample VI Using Tag Read and Write VIsThis VI writes to the FP Analog Output Tag. The loop runs once every second, and is set up to only write a new value if the value to write has changed. In this slide, the loop writes out 2.5 V once and then never writes again because the value to write would never change.If the Generate Event input is true and event logging is turned on, then an event is logged each time a new value is written to the tag.
LabVIEW DSC Module Course Manual 6-16 ni.com

How Timeouts Affect Tag VIsTimeout Choices Affect Program Execution
� Timeout = 0� Tag is read immediately, regardless of value change
� Timeout = �1� Tag is only read on value change
� Timeout = X� Tag is read on value change or after XX seconds
How Timeouts Affect Your VIsThe choice that you make for your timeout values affects how your system functions. The effect that the different choices will have is described below:
Timeout = 0With the timeout set to zero, the tag is read immediately. Regardless of what has happened to this value, the value is read. This increases network traffic because it requires the value to be read frequently, even if the value has not changed at all.
Timeout = -1With the timeout set to �1, the tag is read only when the value changes more than the deadband. This drastically reduces network traffic because the value is only updated when there is a different value to record. This choice is referred to as event-based.
Timeout = XWith the timeout set to an integer value X (integer value X = 30, in this slide), the tag read occurs every time the value changes more than the deadband or every X seconds, whichever occurs first. It is a combination of the previous two methods.
© National Instruments Corporation 6-17 LabVIEW DSC Module Course Manual

Tag Read and Write Example
� Read the value of the thermocouple when it changes or every 30 seconds
� Check if the value is above 80 °F� If Not, Output a Value of 2.5 V to the FP Analog Output Tag
Sample VI Using Tag Read and Write VIsThis VI reads a value from the FP Thermocouple Tag when the value has changed or after 30 seconds, whichever comes first. If the value read from the thermocouple was less than 80 °F, then 2.5 V are output to the FP Analog Output Tag. If the value read from the thermocouple is greater than 80 °F, then a value of 0.0 V is output to the FP Analog Output Tag. There is a Tag Write VI in the True case of the case structure that you cannot see in the illustration above. The loop stops running if the Tag Engine stops running.While simple, the example in the slide above shows you how you can control the temperature of an environment, assuming that the FP Analog Output Tag powered a heater. This VI is partially event-based and partially time-based, so that it takes CPU time either when the temperature changes or every thirty seconds, whichever occurs first.
LabVIEW DSC Module Course Manual 6-18 ni.com

Polling Example� Checks all values at consistent intervals
� Advantage: Allows proper calculations between multiple tags� Disadvantage: Increases network traffic
Polling ExampleThis VI reads a value from three different temperature sensor tags every 0.5 seconds (500 milliseconds) and averages their values. If the average value for the three sensors is less than 80°, then a heat lamp is turned on. If the average value read from the temperature sensors is greater than 80°, then the heat lamp is turned off. There is a Tag Write VI in the True case of the case structure that cannot be seen in the illustration in this slide. The loop stops running if the Tag Engine stops running.This example is similar to other examples in this lesson, except the example is purely a polling driven example. Nothing about the previous example is event-driven. The values are read from the tags every time the loop iterates, regardless of whether they have changed. In this slide, the tags get read every 0.5 seconds (500 milliseconds) due to the wait time in the loop. In this example, three measurements are being averaged, if they were event driven tag reads, then the average would only change when one of the tags changed by more than its deadband. However, you could average one new value with two stale values. Those stale values could have changed, just not by more than their deadbands. This results in an average that could differ significantly from the actual average temperature. If you poll the tags, you avoid this problem, because you read the current tag value on every iteration. There are no stale values to worry about. The drawback is that polling increases the amount of network traffic, even when the tag values are not changing. Use polling only when it is truly necessary.
© National Instruments Corporation 6-19 LabVIEW DSC Module Course Manual

Event-Based Example
� Reads the value of the thermocouple only when the value changes� Drastically reduces the amount of processing and network traffic� Accomplishes the same task as a timeout-based loop� Recommended method for this type of operation
Event-Based ExampleThe example in this slide is nearly identical to the Tag Read and Write example, with one small change. The timeout value has been changed from 30 to -1. This turns the example into a purely event-based example. This means that the loop iterates only when the thermocouple value changes more than the deadband. If the deadband is selected appropriately, this allows for a reduction of network traffic, while still accomplishing the same task as the polling example.
LabVIEW DSC Module Course Manual 6-20 ni.com

Exercise 6-3
Reading and Writing to Tags in LabVIEW
Approximate time to complete: 15 min. Page 6-32
To use LabVIEW VIs to read from and write to your tags.
OBJE
CTIV
E
© National Instruments Corporation 6-21 LabVIEW DSC Module Course Manual

Changing Tag Attributes Programmatically
� Change any attribute of an existing tag while the program is running
� Retrieve the current configuration details of any tag programmatically
Changing Tag Attributes ProgrammaticallyWhen using the DSC Module, one of the most powerful features is the ability to change tag attributes programmatically. Using the VIs on the Tag Attributes Palette allows you to change almost any aspect of a tag while your program is running. For example, this allows you to change limit levels, to turn alarms on and off, and to control data logging without any human interaction.In addition to changing attributes programmatically, you also can retrieve attribute information programmatically. You can implement features that allow users to bring up the current tag configuration while the program is running.
LabVIEW DSC Module Course Manual 6-22 ni.com

Examples of Programmatic Changes� Front panel control example
� User can choose the tag, the tag attribute, and the new value
� Can be done while the program is running� Block diagram control example
� The programmer can set new attribute values from the block diagram
� Changes can happen automatically, with no user interaction
� Three examples turn data logging on/off, turn alarms on/off, and adjust the update deadband of a tag
FrontPanel
Control
BlockDiagramControl
Examples of Programmatic ChangesIn the example in this slide, the first allows the user to select the Tag, the Tag Attribute, and the value that they would like to set. By exposing all these controls on the front panel, the user has virtually unlimited control to change the settings of all the tags. This helps if the operator really needs that much control. The following examples are more limited. All three of these examples have block diagram constants, which the user cannot change, that select the tag and the tag attribute to be changed. They only offer a user control to set the new value. Here it allows the user to turn datalogging on and off, to turn the alarms on and off, and to change the deadband value. This example still offers the program a large amount of functionality while limiting your ability to alter programs.
© National Instruments Corporation 6-23 LabVIEW DSC Module Course Manual

Summary
� Proper tag management reduces development time� Deadbanding can improve program execution� Tag Configuration Wizard, I/O groups, and default
parameters help with large tag counts� Reading and writing from the block diagram is
necessary to create feedback loops� Tag attributes can be changed programmatically
LabVIEW DSC Module Course Manual 6-24 ni.com

© National Instruments Corporation 6-25 LabVIEW DSC Module Course Manual
Exercise 6-1: The Effects of Deadbanding Objective: To view the effects of deadbanding on data update rates.
1. Start LabVIEW and open a blank VI.
2. Select Tools»DSC Module»Configure Tags to open the Tag Configuration Editor.
3. Make sure that the Temp Chamber.scf file that you created in Exercise 2-1 is loaded. If it is not, select File»Open and open the Temp Chamber.scf file located in the C:\Exercises\LabVIEW DSC directory.
4. In the Tag Configuration Editor, highlight the Temperature Chamber tag and select Edit»Copy to create a copy of the tag.
5. In the menu that displays, enter Deadband 0 for the Tag Name. Click the Operations tab and enter a value of 0.00 as the Update Deadband (% of Range). Click the OK button to accept the changes.
6. Repeat steps 4 and 5 using the following settings:
• Tag Name: Deadband 1
• Update Deadband (% of Range): 1.00
• Tag Name: Deadband 5
• Update Deadband (% of Range): 5.00
7. Select File»Save As and save the file as Temp Chamber61.scf in the C:\Exercises\LabVIEW DSC directory.
8. Close the Tag Configuration Editor.

LabVIEW DSC Module Course Manual 6-26 ni.com
9. In LabVIEW, build the following front panel.
10. On the front panel, idle the mouse over the Numeric control and right-click it. Select HMI Wizard from the shortcut menu. In the dialog box that displays, select Deadband 0 from the Tag pull-down menu and click the OK button.

© National Instruments Corporation 6-27 LabVIEW DSC Module Course Manual
11. Repeat step 10 for the three remaining front panel controls, and select the appropriate tags from the Tag pull-down menu according to the following list:
• Numeric 2: Deadband 1
• Numeric 3: Deadband 5
• Slide: Cooling Fan Control
12. Select File»Save As and save the file as Deadband.vi in the C:\Exercises\LabVIEW DSC directory.
13. Run the VI. Adjust the cooling fan speed with the slider, and watch the values update on the front panel. Notice that Deadband 0 updates every second or two, Deadband 1 updates a couple of times a minute and Deadband 5 rarely updates. This VI demonstrates the importance of selecting a proper deadband. If you use the 0% deadband, you generate network traffic of 30�60 updates per minute and generate traffic even when the value has only changed by only a fraction of a degree, which is wasteful. Whereas if you use too large a deadband, such as 5%, you can miss large changes in temperature, which makes for an ineffective control system. Deadband 1 is a better choice in this case, because it updates on small temperature movements, but not on insignificant changes in temperature.
14. In the bottom right corner of the screen, right-click the Engine Manager and select Stop from the shortcut menu as shown in the following figure.
15. Stopping the Engine stops the VI.
16. Close the VI. Do not save changes.
End of Exercise 6-1

LabVIEW DSC Module Course Manual 6-28 ni.com
(Optional) Exercise 6-2: Edit a Large SCF File Objective: To create a large SCF file, then edit the tag parameters using Excel.
1. If the Tag Engine is currently running, double-click the Tag Engine Icon in the taskbar to display the Engine Manager window. In the Engine Manager, click the Stop icon to stop the Engine.
2. Select Tools»DSC Module»Configure Tags to open the Tag Configuration Editor. Select File»New to create a new SCF file and click the OK button.
3. Select Edit»Configuration Wizard to open the Tag Configuration Wizard.
4. Expand the National Instruments.OPCLookoutDrivers server, Lookout Protocol Drivers, and Modbus1 so that the addresses are visible.
5. Select the address range 40001�49999 and click the Add as Range button. Change the value in the Create This Many Items: field to 1000 and click the OK button.
6. Select the address range 1�9999 and click the Add as Range button. Change the value in the Create This Many Items: field to 1000 and click the OK button.
7. Click the OK button to automatically generate the tags. It will take a minute or two to process all 2,000 tags.
8. In the Tag Configuration Editor, select File»Save As and save the file as large.scf in the C:\Exercises\LabVIEW DSC directory.
9. Select File»Export, enter large.txt as the filename to export to, and click the OK button to export.

© National Instruments Corporation 6-29 LabVIEW DSC Module Course Manual
10. Select Start»Programs»Microsoft Excel to launch Excel.
11. In Excel, select File»Open, change the Files of type field to Text, and navigate to large.txt and click the OK button to open the file.

LabVIEW DSC Module Course Manual 6-30 ni.com
12. The file is tab delimited by default, so click the Finish button to load the file.
13. For tags 40500� 41000, change the Raw Full Scale to 20 and the Raw Zero Scale to 4, the Eng Full Scale to 100 and the Eng Zero Scale to 100, and change the Scaling field to Linear. Edit the first tag and then use copy and paste. Notice that Window»Split can be useful when working with such a large spreadsheet.
14. For tags 50�100, invert the logical scaling by changing the scaling from none to Invert. The resulting spreadsheet should be similar to the following figure.
15. Select File»Save As and save the file as Modified_large.txt in the C:\Exerices\LabVIEW DSC directory. Select Yes when prompted with the following dialog box. The LabVIEW DSC Module requires the text format for imported files.

© National Instruments Corporation 6-31 LabVIEW DSC Module Course Manual
16. Select File»Exit to close Excel.
17. In the Tag Configuration Editor, select File»New, then File»Import. Navigate to Modified_large.txt in the C:\Exercises\LabVIEW DSC directory and click the OK button to import the file.
18. Double-click one of the tags in the range 40500�41000, then click the Scaling tab. Check that linear scaling occurs from 4�20 to 0�100. Click the OK button when you are finished.
19. Double-click one of the tags in the range 50�100, then click the Scaling tab to confirm that these lines are inverted. Click the OK button when you are finished.
20. Close the Tag Configuration Editor.
End of Exercise 6-2

LabVIEW DSC Module Course Manual 6-32 ni.com
Exercise 6-3: Reading and Writing to Tags in LabVIEW Objective: To use LabVIEW VIs to read from and write to your tags.
Front Panel 1. Launch LabVIEW and open a blank VI.
2. Select Tools»DSC Module»Configure Tags to open the Tag Configuration Editor.
3. Make sure that the Temp Chamber.scf file you created in Exercise 2-1 is loaded. If it is not loaded, select File»Open in the Tag Configuration Editor, navigate to the Temp Chamber.scf file in the C:\Exercises\LabVIEW DSC directory and click the OK button to open the file.
4. Close the Tag Configuration Editor.
5. Build the following front panel.

© National Instruments Corporation 6-33 LabVIEW DSC Module Course Manual
6. Open the block diagram and build the following block diagram.
• Place a While Loop located on the Functions»Structures palette on the block diagram.
• Place a Read Tag VI located on the Functions»DSC Module VIs»Tags palette on the block diagram. Right-click the tag name input and select Create»Constant from the shortcut menu to create the input constant. Repeat these steps for the timeout input.
• Place a Greater? function located on the Functions»Comparison palette on the block diagram. Wire it as shown in the previous figure.
• Place a Select function located on the Functions»Comparison palette on the block diagram. Right-click the t and f inputs and select Create»Constant from the shortcut menu. Set the values of the constants to 0 and 50 for the t and f respectively.
• Place a Write Tag VI located on the Functions»DSC Module VIs»Tags palette on the block diagram. Create constants for the tag name and write value on change? inputs as shown in the previous figure.
7. Select File»Save and save the VI as Simple Loop.vi in the C:\Exercises\LabVIEW DSC directory.
8. Run the VI and adjust the desired temperature. Watch as the temperature moves to the desired temperature and then hovers there.
9. Stop and close the VI. Do not save changes.
End of Exercise 6-3

LabVIEW DSC Module Course Manual 6-34 ni.com
Notes

Lesson 7: Networking with DSC
TOPICSA. Client/Server ArchitectureB. Server Philosophy�Review C. Client Philosophy�ReviewD. DSC Module ClientsE. Client/Server Architecture�
Network System
© National Instruments Corporation 7-1 LabVIEW DSC Module Course Manual

Client/Server Architecture
� Tag Engine accesses I/O hardware using tags � For example, FieldPoint, PLCs, NI-DAQ
� Server VIs, client VIs, and the database can access the Tag Engine for data
� Local system � client and server VIs access local Tag Engine
The client/server architecture allows you to create programs that can access tags (hardware) to collect data from all different types of local and remote devices. NI provides a full range of hardware solutions that integrate with the DSC Module to allow you to collect data. With the NI Compact FieldPoint product line, you can quickly use the DSC Module to configure I/O tags to connect directly to analog or digital lines on the hardware. With the DSC Module, server VIs, client VIs, or the historical database can access the Tag Engine for data. With a DSC architecture deployed on a local system the client and server VIs both access the same local DSC Module Tag Engine.
LabVIEW DSC Module Course Manual 7-2 ni.com

Client/Server Architecture � Local System
Read/Write Tags
DSC Module
I/O Hardware
CitadelClient VIsRead/Write
Tags(HMI Wizard)
Server VIs
Client and Server VIsaccess the same Tag
Engine
Server Tag EngineOPC Server
The Tag Engine provided by DSC serves data to each component of the DSC Module architecture. The Tag Engine acquires data from multiple I/O sources both local and remote. The Tag Engine is a built-in server for the DSC Module. For more advanced applications, a server you create can add control and management capabilities to a DSC Module application. The HMI Wizard is a tool that increases a developer�s efficiency by quickly creating code used to communicate with the LabVIEW DSC Tag Engine. In this lesson, you will expand on the exercises from Lesson 3, Designing your LabVIEW DSC Application, and create a server for PID control for the temperature chamber. This PID Server accesses the Server Engine through the DSC Module to read and write to tags that control the inputs and acquire responses from FieldPoint hardware. Then, you create a client that can read and write to the same tags that the server accesses. The HMI Wizard increases development efficiency considerably.
© National Instruments Corporation 7-3 LabVIEW DSC Module Course Manual

Server Philosophy � Review
� Servers should be stand-alone and not require a client process � Analysis and Control should be done on the Server VI� Servers should deliver data to interested clients through
Tag Engine� Tag Engine accepts connections from multiple clients
In Lesson 3, Designing Your LabVIEW DSC Application, you learned the qualities of a good server for the DSC Module. Remember that creating a server VI is adding additional advanced features to the basic services provided by the Tag Engine in Lookout. The main component of a DSC Module server application is the Tag Engine. By adding a server VI to a DSC Module application, you can add advanced control or analysis to the DSC application. The main role of a server is to pass data back and forth between clients and hardware. The Server VI should be stand-alone, and perform analysis and control for the system. Something often overlooked when designing a server is that there is often limited need to view the values of the data in the server VI. This is more in-line with the role of a client VI. The server VI can transparently provide data to several clients. The clients are then used by the operators to view results and update set points on the server VI.
LabVIEW DSC Module Course Manual 7-4 ni.com
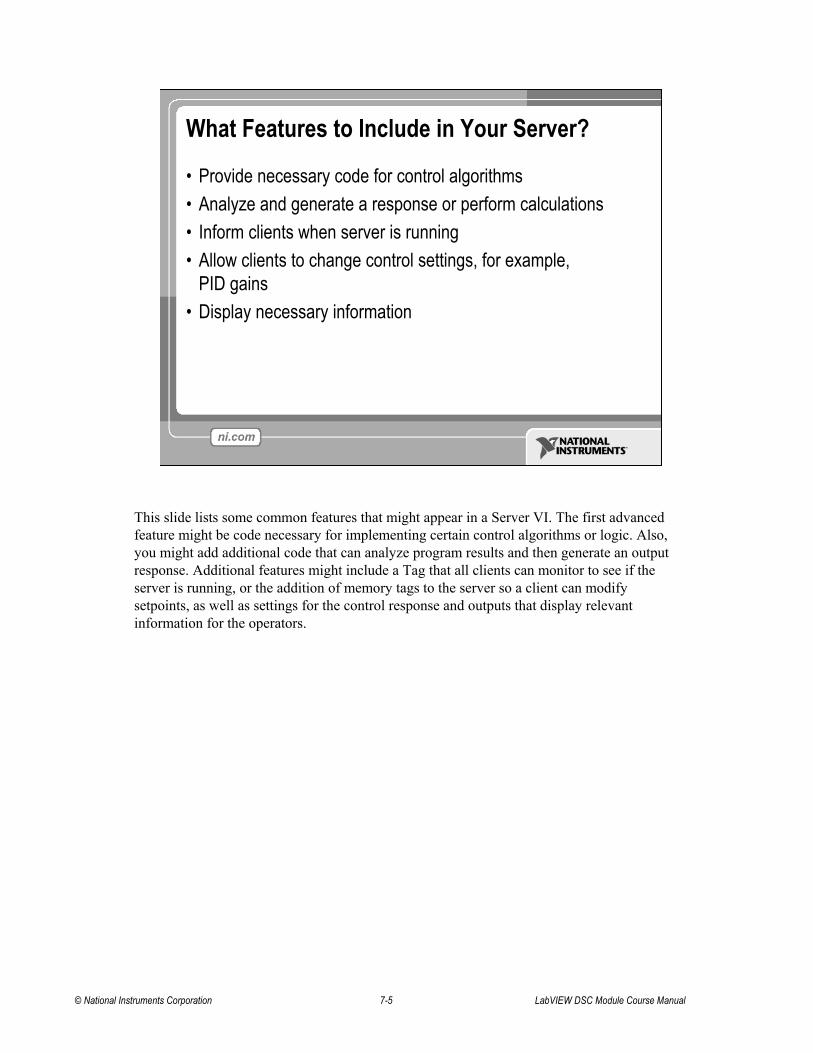
What Features to Include in Your Server?
� Provide necessary code for control algorithms� Analyze and generate a response or perform calculations� Inform clients when server is running� Allow clients to change control settings, for example,
PID gains� Display necessary information
This slide lists some common features that might appear in a Server VI. The first advanced feature might be code necessary for implementing certain control algorithms or logic. Also, you might add additional code that can analyze program results and then generate an output response. Additional features might include a Tag that all clients can monitor to see if the server is running, or the addition of memory tags to the server so a client can modify setpoints, as well as settings for the control response and outputs that display relevant information for the operators.
© National Instruments Corporation 7-5 LabVIEW DSC Module Course Manual

PID Control Toolkit
� Integrates with DSC Module applications
� Included with Professional Control Edition
� Features include the following:� Autotuning to improve
performance of PID control � Fuzzy logic tools for complex
systems � Fuzzy logic control designer � P, PI, PD, and PID control
algorithms � Graphical development of control
algorithms
The proportional, integral, derivative (PID) Toolkit is an add-on toolkit for LabVIEW that adds PID and fuzzy logic control VIs. The PID Toolkit integrates easily with the DSC Module to allow users to add advanced control features to a DSC Module server application. The PID Toolkit offers a set of PID Toolkit VIs that include the control algorithms for the classic PID control setup. The toolkit also offers Fuzzy Logic control tools.The PID Control Toolkit is used in Exercise 7-1, Creating a Server for Control, to implement a control algorithm with the DSC Module. A PID loop controls the temperature in the chamber based on a setpoint.
LabVIEW DSC Module Course Manual 7-6 ni.com

Introduction to PID Toolkit
� PID Control Toolkit� PID Control� Fuzzy Logic� Advanced Control
Now review the PID Control Toolkit that will be used in the next exercise. On the Functions palette, open and view the palettes available in the PID Control Toolkit. The specific VI that is used in this example is the PID.vi. This VI employs a PID algorithm for simple PID applications or high-speed control applications.
© National Instruments Corporation 7-7 LabVIEW DSC Module Course Manual

Exercise 7-1
PID Control Server
Approximate time to complete: 20 min. Page 7-28
To use the DSC Module and PID Toolkit to control the response of the temperature chamber with a setpoint.
OBJE
CTIV
E
This exercise uses the PID Toolkit.
LabVIEW DSC Module Course Manual 7-8 ni.com

Client Philosophy � Review
� Clean, clear design of relevant values and their meanings� Use HMI Wizard to establish connections� Use Panel Wizard to connect panels
� Intuitive descriptions of what data means, not necessarily where it comes from� Use descriptive and consistent tag names� Image Navigator
Review of Client BasicsIn Lesson 3, Designing Your LabVIEW DSC Application, you learned the basics of a good client design. The DSC Module includes tools like the HMI and Panel Wizard that speed the development of DSC Module clients. Create descriptive tags when setting up tags in the Tag Engine in the DSC Module. Using descriptive tags makes creating clients easier. Another feature of the DSC Module is the Image Navigator, which allows you to add various images to the front panel that help users understand the real-world environment.
© National Instruments Corporation 7-9 LabVIEW DSC Module Course Manual

What Features to Include in Your Client?
� Ability to change setpoints or basic inputs� Display outputs and necessary information� Analysis and control still performed on the server
For a normal client application you might want to include features such as the ability to modify a setpoint that controls the algorithms on the Server VI. You also might want to display relevant information about the system being controlled by the DSC Module. The key piece to remember is that analysis and control is still performed on the server.
LabVIEW DSC Module Course Manual 7-10 ni.com

Exercise 7-2
PID Control Client
Approximate time to complete: 25 min. Page 7-32
To create a client that can write to the setpoint for the PID Server and read values from the DSC Module Tag Engine.
OBJE
CTIV
E
In Exercise 7-2, you create a DSC Module client that can access tags and serve as a remote client in your DSC Module application.
© National Instruments Corporation 7-11 LabVIEW DSC Module Course Manual

Client/Server Architecture � Network System
Read/Write TagsTransparent
Access to Server Tags
DSC Module (Server Machine)DSC Module (Client Machine)
Must Have DSC Module Runtime system installed!
Client Tag Engine
I/O Hardware
CitadelClient VIsRead/Write
Tags(HMI Wizard)
Server VIs
Server Tag Engine
LabVIEW DSC Module Network ArchitectureIn a networked environment with multiple computers, the DSC Module architecture is similar to the architecture for a stand-alone system. The major difference in the setup is that a clientis running on a different machine on the network. Communication between the Server machine Tag Engine and the client machine Tag Engine is transparent to the DSC Module. The Tag Engine of the client uses network tags to communicate with the server Tag Engine. The client uses the HMI Wizard to read or write to the same tag names that were configured for the local system. The client system also can access the database files of the server, although it requires modifying the block diagram. Because the client uses the Tag Engine, you must have a DSC Module run-time system installed. You can build an executable with the Application Builder, but it must be placed in the DSC module run-time folder with DSCengine.exe on the client PC.
LabVIEW DSC Module Course Manual 7-12 ni.com
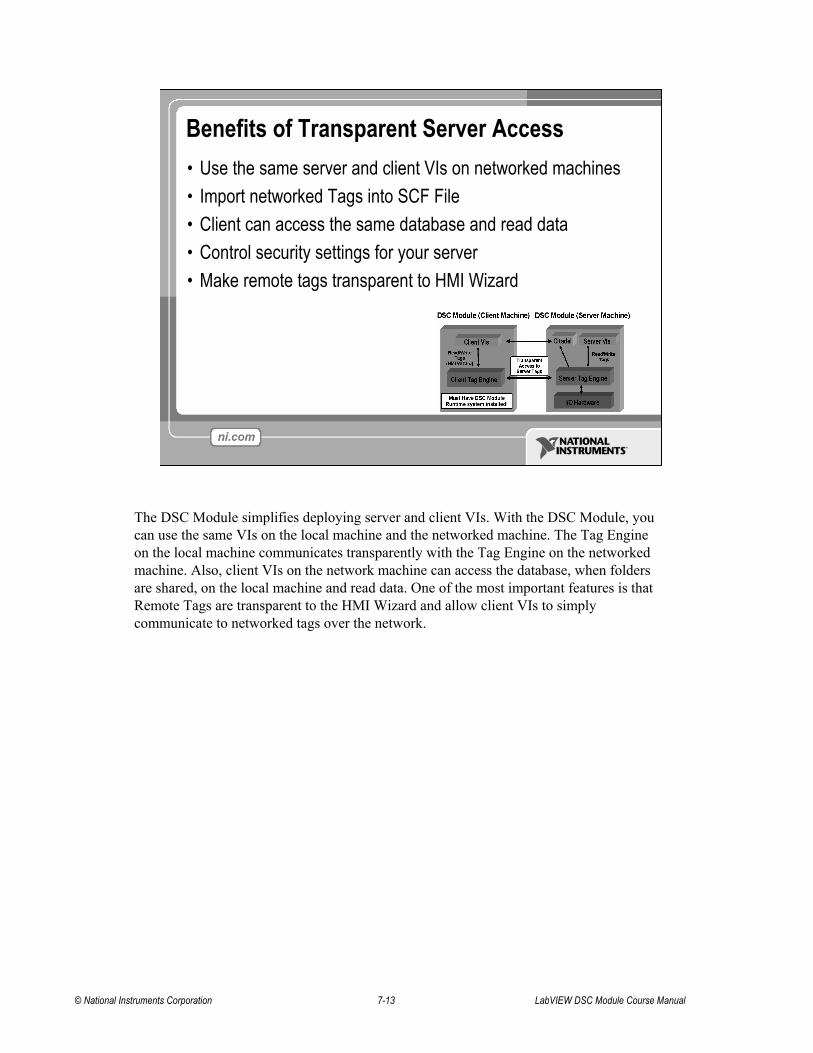
Benefits of Transparent Server Access � Use the same server and client VIs on networked machines� Import networked Tags into SCF File� Client can access the same database and read data� Control security settings for your server� Make remote tags transparent to HMI Wizard
The DSC Module simplifies deploying server and client VIs. With the DSC Module, you can use the same VIs on the local machine and the networked machine. The Tag Engine on the local machine communicates transparently with the Tag Engine on the networked machine. Also, client VIs on the network machine can access the database, when folders are shared, on the local machine and read data. One of the most important features is that Remote Tags are transparent to the HMI Wizard and allow client VIs to simply communicate to networked tags over the network.
© National Instruments Corporation 7-13 LabVIEW DSC Module Course Manual

Configuring Client Machine
� Install LabVIEW DSC Run-Time Engine on Client� Test the Network� Browse for Available Network Tags� Synchronize Windows clocks� Share Windows directories� Import Network Tags
There are three major steps for configuring client VIs. The details are outlined in the following slides. The LabVIEW DSC Module Run-Time Engine is required. After installing the Run-Time engine, synchronize the clocks on the two computers, and then share the Windows folders used for database access. Finally, import network tags from the local machine.
LabVIEW DSC Module Course Manual 7-14 ni.com

Install DSC Run-Time Engine
� The DSC Module Run-Time Engine is required� Configure networked tags on a client� Quickly deploy the client to a networked machine
� Executables built with LabVIEW Application Builder� Place in the DSC Module Run-Time folder� Ensure correct tags before deploying
The first step when deploying DSC Module clients to networked machines is to install the DSC Module Run-Time Engine on the client machine. This is not a free Run-Time license. Visit ni.com and for more information. You can build an executable with the Application Builder, but you must place it in the LabVIEW DSC Module Run-Time folder with DSCengine.exe on the client PC.
© National Instruments Corporation 7-15 LabVIEW DSC Module Course Manual

Testing the Network� Can you ping from
one machine to another? If not, talk to your network administrator.
� Try using Tag Monitor to view network tags.
Testing the NetworkBefore using the LabVIEW Datalogging and Supervisory Control module network functionality, you should ensure that you have a correctly functioning network. The easiest way to test the network is to try the ping command. To try pinging a machine, start at an MS-DOS prompt and type ping <hostname>. Ping is a program that sends a test packet to the host and checks how long it takes to reply. If you get no response, then your network is incorrectly configured. You must have a network setup that supports the TCP/IP protocol. You might want to talk with your network administrator department for additional help. If you can ping hosts on the network, then you can try using the Tag Monitor to read/write network tags from those machines. The following slide details using the Tag Monitor to check network tags.
LabVIEW DSC Module Course Manual 7-16 ni.com

View available Network Tags
Monitoring Network TagsWhen you expand the Network Neighborhood in the Tag Monitor, you see a list of all registered computers. The purpose for registering computers is so that the DSM Module does not have to check every computer on a network to find those that are using the DSC module. You can register a computer by right-clicking the Network Neighborhood and selecting Register Computer. The Register Computer dialog box appears. The Register Computerdialog box lets you browse the Windows Network Neighborhood or enter an IP address into the Computer Name field. You might not be able to browse to computers that are not on the local network or to devices without an assigned host name like the FP-1600. If you cannot browse the machine, you can enter the IP address or host name of the device. After you select the name, push the register button to register the computer. After you register the machine, you can expand the entry in the network neighborhood and add tags to the monitoring window just as if they were on the local system.
© National Instruments Corporation 7-17 LabVIEW DSC Module Course Manual

Synchronizing System Clocks
1. Select Options»Advanced tab
2. Click Time Synchronization
3. Click Add4. Find server name from
network5. Click OK for all
dialog boxes
1
2
4
3
5
4
LabVIEW DSC Module Network ClientTo configure a client application correctly on the network requires some changes. First, you have the DSC Module synchronize the clocks between the two computer systems. This feature ensures that timestamps from the server are consistent with the system time of the client. You must modify the SCF file so that it reads the tag values for the server machine. A single machine client VI requires a few changes to run on the network to ensure that the display of logged data performs correctly. If you are not displaying logged data, then you can use the non-networked client without changes. Also, copy lookout.sec from the Windows directory of the server to the Windows directory of the client system, so that you have the same accounts on both machines.
Synchronizing System ClocksNote: You must log on to the DSC Module as an Administrator.
To synchronize the system clock between your client machine and the server, select Tools»DSC Module»Options. Click the Advanced tab and click Time Synchronization. Click Add to add a machine to synchronize time with. Select your server from the machines on the network, and click OK on the remaining dialog boxes. The times for the two machines are synchronized.
LabVIEW DSC Module Course Manual 7-18 ni.com

Sharing Windows Directories1. Double-click
My Computer2. Right-click folder to
share and select Sharing and Security
3. Click Share this Folder4. Click Permissions;
add users and access rights
5. Click OK
1
3
4
5
2
Sharing Windows DirectoriesTo use remote networked clients, you must share the directory where the SCF file exists so that you can import network tags. Importing Network tags is explained in the coming slides. To share a Windows directory, double-click My Computer and find the folder you would like to share. Then, right-click the folder and select Sharing from the shortcut menu. If this menu is not available, you must enable sharing in the Windows network control panel. You then can enable sharing by clicking the Share As tab. You also need to add users and access rights, so that you can control who can read/write to the shared folder. Click Add to add users or groups of users and their access rights. After you have added all of the users for the folder, click OK. Depending on your network configuration, you might have a slightly different properties screen that only allows you to specify one password for read only and one for full access. You can still enable sharing, but you cannot have as much control over which users can access the system.
© National Instruments Corporation 7-19 LabVIEW DSC Module Course Manual

Importing Network Tags
1. File»ImportNetwork Tags
2. Browse to SCF file of server
3. Add All tags4. Click Import5. Save SCF file
15
4
3
2
Importing Network TagsIn order to create network tags, you must go to the Tag Configuration Editor and create a new SCF file. Then, select File»Import Network Tags. Use the Browse button to browse to your SCF file. Click Add All to create network tags for all of the tags of the server. ClickImport to create the selected tags. Save the SCF file. Do not save over the SCF file of the server. Even though you have a file with the same tag names, the SCF file of the network client is different from the SCF file of the server.
LabVIEW DSC Module Course Manual 7-20 ni.com

Exercise 7-3
Deploying a Client to a Remote Machine
Approximate time to complete: 15 min. Page 7-41
To distribute the client created in Exercise 7-2 to another computer and control the setpoint on the server machine.
OBJE
CTIV
E
© National Instruments Corporation 7-21 LabVIEW DSC Module Course Manual

Application Specifics for DSC Module Clients
� Details of LabVIEW Client� Details for a Lookout Client� Remote Citadel
The following slides cover the application specifics of integrating the DSC Module with regular LabVIEW applications or with Lookout applications. In the setup discussed, the DSC Module functions as the server and either a LabVIEW or Lookout client accesses data from the DSC Module server. The LabVIEW client without the DSC Module installed uses the functionality of front panel DataSocket, but the advanced features of the DSC Module are not available in this setup.
LabVIEW DSC Module Course Manual 7-22 ni.com

LabVIEW Client Architecture
Server Tag Engine
Citadel I/O Hardware
Server VIs
Read/Write Tags
LabVIEW Client Machine
Can be a LabVIEW executable!
LabVIEW
Client Process Server Tag Engine
Citadel I/O Hardware
Server VIsRead/Write
Tags
VI connects to Engine using Front Panel DataSocket. No LabVIEW interface to Citadel.
LV DSC Module Server Machine
LOGOS
LabVIEW Client ArchitectureYou also can make a client using LabVIEW without using the DSC Module. In this type of client, you cannot use the HMI Wizard, the security features, or any of the other LabVIEW DSC module specific VIs such as the Trend.VI. However, you can make connections between client controls/indicators and the server tags using the front panel DataSocket. The advantage of using a strictly LabVIEW client is that you can build the client using the Application Builder. And you can install this application on the client machines without requiring a DSC Module run-time system. The disadvantage is that creating the client application becomes harder because you do not have any of the DSC Module wizards. Also, you cannot view historical data because Citadel is not installed without the run-time system.
© National Instruments Corporation 7-23 LabVIEW DSC Module Course Manual

Lookout Client Architecture (Optional)
Server Tag Engine
Citadel I/O Hardware
Server VIsRead/Write
TagsLOGOS
LV DSC Module Server MachineLookout Client Machine
Lookout(Does not require
an I/O Point License)
Client Process
LV DSC Server looks just like a Lookout server process. Lookout Client can easily access read/write tags.
Lookout Client ArchitectureIf you use both the DSC Module and Lookout�the database, networking protocol, and security systems are identical between the two packages. This assumes that you use the same versions of Citadel. Lookout and the DSC Module need to either both use Citadel 4 or Citadel 5. Interoperability is easy between Lookout and the DSC Module. When creating a Lookout client program, it is as if the DSC Module server was a Lookout server with the process name LabVIEW. You can even browse to the tag entries for the DSC Module in Lookout. Because the DSC Module is performing the data acquisition, you do not need an I/O point license for Lookout. You need a Lookout development system to create the client process, but you can run the client process using the runtime client version or the Lookout Web client. Refer to ni.com/lookout, for more information on Lookout.
LabVIEW DSC Module Course Manual 7-24 ni.com

Remote Citadel � Logging
Select Configure»Historical or Events
Remote Citadel � LoggingThe DSC Module can now log data to a remote database located on another computer on your network. This is achieved by going to the Configure menu in the Tag Configuration Editor and choosing Historical or Events. Browse to the remote computer and type in an existing directory for the data to be logged to. The remote computer must have Citadel and the NI Logos Services installed. NI Logos is installed with Lookout and with the DSC Module. Citadel 5 is installed with either the run-time or development environment.
© National Instruments Corporation 7-25 LabVIEW DSC Module Course Manual

Remote Citadel � Retrieval
Historical VIs accept network pathMake Network Database Path.vi
Remote Citadel � RetrievalYou must add the network path to the Citadel directory to be able to read the remote data. Use the Make Network Database Path VI to form the correct directory for historical data VIs.
LabVIEW DSC Module Course Manual 7-26 ni.com

Summary� What changes do you need to make to your server?
None; just share the database and SCF directories.� How can you test network connections? The ping command� What changes do you need to make to a DSC Module client?� New SCF file with network tags and edit wizard code for
historical trends� How can you ensure your client and server machines have
the same time?� Use the time synchronization server
© National Instruments Corporation 7-27 LabVIEW DSC Module Course Manual

LabVIEW DSC Module Course Manual 7-28 ni.com
Exercise 7-1: PID Control Server Objective: To demonstrate the use of LabVIEW DSC as a server for control.
Complete the following steps to create code for controlling the temperature in the Temperature Chamber based on a setpoint and a PID algorithm for controlling output to the light intensity and fan speed.
Front Panel 1. Open the Temp Chamber Ex 3-3 VI located in the C:\Exercises\LabVIEW DSC directory.
2. Rename the second and third tabs on the tab control to PID Settings, and PID Output, respectively. Modify the front panel as shown in the following figure.

© National Instruments Corporation 7-29 LabVIEW DSC Module Course Manual
3. Right-click the Light Intensity % control and select Replace»Functions»Numeric Indicators»Gauge from the shortcut menu to replace the existing control with a gauge control. Repeat this step to replace the Fan Speed % control with a gauge control.
a. Right-click the Light Intensity % gauge and select Change to Indicator from the shortcut menu.
b. When prompted, click the OK button to allow the modification of the wizard connection.
c. Repeat step b for the Fan Speed % gauge. 4. Add a waveform chart to the PID Control tab.
a. Right-click the waveform chart and select Visible Items»Digital Display from shortcut menu. b. Expand the Plot Legend to display two plots.
5. Create a control for the Setpoint.
a. Place a vertical pointer slide located on the Controls»Numeric Controls palette on the front panel.
b. Name the slide Setpoint.
c. Resize the Setpoint control and change the range from 60 to 200.
Block Diagram 1. Open the block diagram and notice the code generated to read the Setpoint tag.
2. Modify the block diagram as shown in the following figure.

LabVIEW DSC Module Course Manual 7-30 ni.com
a. Place a While Loop located on the Functions»Execution Control palette on the block diagram. b. Place a DSC Read Tag VI located on the Functions»All Functions»DSC Module VIs»Tags
palette on the block diagram. Right-click the Tag Name input and select Create»Constant from shortcut menu to create a tag constant.
c. Click the Tag Constant and select Chamber Temperature Tag. d. Place a PID VI located on the Functions»All Functions»Control»PID palette on the block
diagram. Right-click the VI and select Create»Control from the shortcut menu to create controls for the PID Gains and Output Range inputs.
e. Place a Wait Until Next ms Multiple function located on the Functions»All Functions»Time and Dialog palette on the block diagram. Right-click the input to Wait until Next ms Multiple and select Create»Constant from the shortcut menu. Change the value to 1000 to set a wait of 1,000 ms.
f. Press and hold down the <Ctrl> key, then click and drag the Numeric Constant to create a copy of it.
g. Place a Divide function located on the Functions»Arithmetic and Numeric»Express Numeric palette on the block diagram.
h. Place a Greater? Function located on the Functions»Arithmetic and Compare»Comparison palette on the block diagram.
i. Right-click the output of the PID VI and select Create»Indicator from the shortcut menu. 3. Place a Case structure located on the Functions»Execution Control palette on the block diagram.
a. Create a DSC Write tag for Heat Lamp Control Tag and Cooling Fan Control Tag. (1) Place two Write Tag VIs located on the Functions»All Functions»DSC Module VIs»Tags
palette on the block diagram. (2) Right-click the Tag Name input of each Write Tag VI and select Create»Constant from
the shortcut menu to create a constant for each tag. (3) Select Heat Lamp Control for the first tag and Cooling Fan Control for the second tag.
b. Place a Merge Signals Express VI located on the Function»Signal Manipulation palette on the block diagram.
c. In the True case of the Case structure, connect the PID Output from the PID VI to the value for the Tag Write VI that goes to the Heat Lamp Control Tag. Create a constant with a value of 0 and wire it to the value for the Cooling Fan Control Tag.
d. In the False case of the Case structure, connect a constant with a value of 0 to the Write Tag VI for the Heat Lamp Control. Use an Absolute Value function located on the Functions»All Functions»Numeric palette to send the absolute value of the PID VI output to the value for the Cooling Fan Control Tag Write Tag VI.
e. Create a local variable from the Light Intensity Control While Loop, and replace the Stop Button in the PID control While Loop.
f. Connect the value from the Stop local variable to the Sequence Structure that reinitializes the Stop Boolean to false.
g. Finish wiring the block diagram.

© National Instruments Corporation 7-31 LabVIEW DSC Module Course Manual
4. On the front panel, set the default values for PID Control.
a. Place the PID Gains control and the Output Range control on the PID Settings tab. b. Trial and error will generate acceptable values for the Proportional, Integral, and Derivative
values for the PID control. Start with the following values and see if you can improve performance.
Run the VI 1. Save the VI as PID Server Ex 7-1 VI in the C:\Exercises\LabVIEW DSC directory.
2. Display the front panel and run the VI. Change the PID gains settings on the PID Settings tab.
3. Change the Setpoint and watch the system respond.
End of Exercise 7-1

LabVIEW DSC Module Course Manual 7-32 ni.com
Exercise 7-2: PID Control Client Objective: To expand functionality of DSC server so that a Tag can monitor server status and also a client VI can access the Setpoint on the server and update the value.
Part A: Modify PID Server VI Complete the following steps to modify the PID Server VI from Exercise 7-1. Add a memory tag that will update the DSC Tag Engine with server status and use the HMI wizard to add code necessary to monitor the Setpoint value from the PID Server VI.
Front Panel 1. Open the PID Server Ex. 7.1 VI located in the C:\Exercises\LabVIEW DSC directory.
2. Use the HMI Wizard to create a memory Tag for Setpoint.
a. On the front panel, right-click the Setpoint control and select HMI Wizard from the shortcut menu.
b. Click the Create New Tag button.

© National Instruments Corporation 7-33 LabVIEW DSC Module Course Manual
c. Click the Memory Tag button.
d. Select Analog for Tag Data Type and click the OK button.

LabVIEW DSC Module Course Manual 7-34 ni.com
e. On the Scaling Tab in the Scaling section, set Full Scale to 200 and Zero Scale to 60.
3. Repeat the process for a second memory tag using instead the Tag Configuration Editor to create the Server Running tag.
a. Select Tools»DSC Module»Configure Tags to open the Tag Configuration Editor.

© National Instruments Corporation 7-35 LabVIEW DSC Module Course Manual
b. Click the Create Tag icon and create a discrete memory tag named Server Running.
c. The following tags should appear in the Tag Configuration Editor.
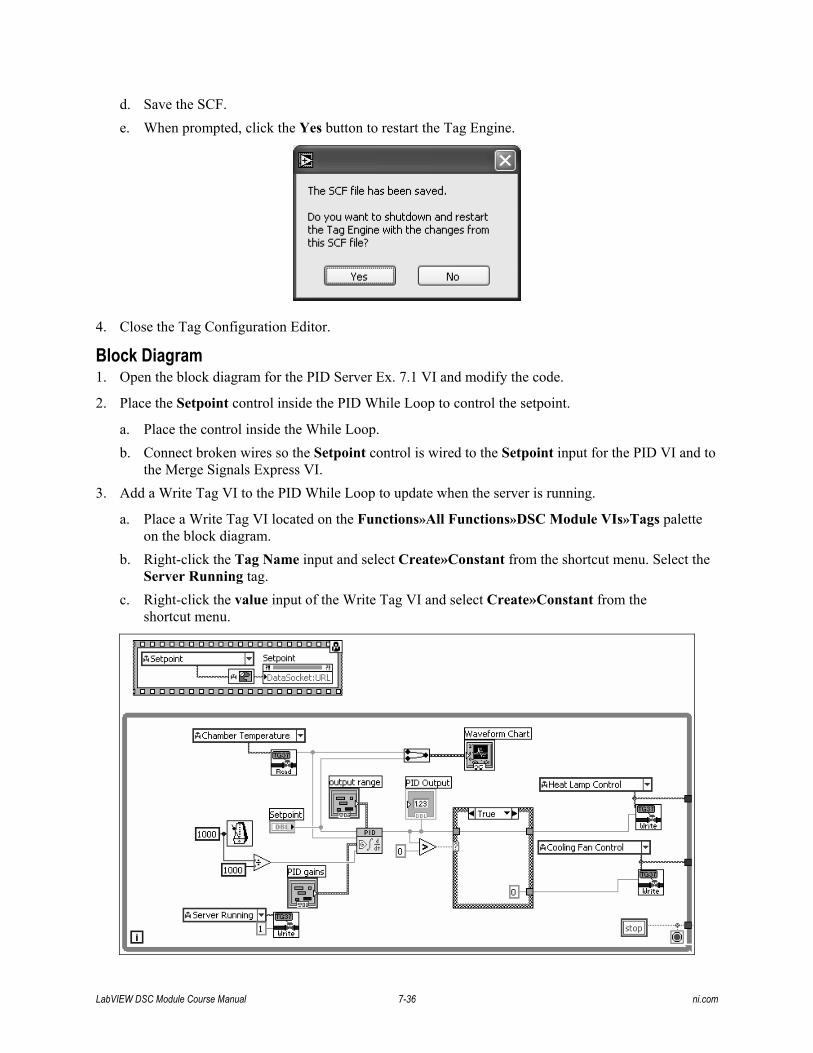
LabVIEW DSC Module Course Manual 7-36 ni.com
d. Save the SCF. e. When prompted, click the Yes button to restart the Tag Engine.
4. Close the Tag Configuration Editor.
Block Diagram 1. Open the block diagram for the PID Server Ex. 7.1 VI and modify the code.
2. Place the Setpoint control inside the PID While Loop to control the setpoint.
a. Place the control inside the While Loop. b. Connect broken wires so the Setpoint control is wired to the Setpoint input for the PID VI and to
the Merge Signals Express VI. 3. Add a Write Tag VI to the PID While Loop to update when the server is running.
a. Place a Write Tag VI located on the Functions»All Functions»DSC Module VIs»Tags palette on the block diagram.
b. Right-click the Tag Name input and select Create»Constant from the shortcut menu. Select the Server Running tag.
c. Right-click the value input of the Write Tag VI and select Create»Constant from the shortcut menu.

© National Instruments Corporation 7-37 LabVIEW DSC Module Course Manual
4. Add a VI to the sequence structure to update that the server is not running.
a. Place a Write Tag VI located on the Functions»All Functions»DSC Module VIs»Tags palette on the block diagram.
b. Right-click the Tag Name input and select Create»Constant from the shortcut menu. Select the tag Server Running.
c. Right-click the value input of the Write Tag VI and select Create»Constant from the shortcut menu.
5. Select File»Save As and save the VI as PID Server Ex 7.2. VI in the C:\Exercises\LabVIEW DSC directory.
6. Open the Tag Monitor, Tools»DSC Module»Monitor Tags.
7. Add each Tag to the Tag Window by double-clicking the Tag.
8. Run the VI and notice the Tag values update.

LabVIEW DSC Module Course Manual 7-38 ni.com
Part B: Create the PID Client Front Panel 1. Create the following front panel.
2. Create the necessary controls and indicators.
a. Place a vertical pointer slide located on the Controls»Numeric Controls palette on the front panel.
b. Place a square LED located on the Controls»LED palette on the front panel. c. Place three numeric indicators located on the Controls»Numeric Indicators palette on the front
panel. d. Place a STOP button located on the Controls»Buttons & Switches palette on the front panel.
You will use this button later in the exercise. 3. Use the HMI Wizard to make appropriate connections.
a. Connect the vertical slider to the Setpoint tag. (1) Right-click the vertical slider and select HMI Wizard from the shortcut menu. (2) Select Setpoint tag and click the OK button.

© National Instruments Corporation 7-39 LabVIEW DSC Module Course Manual
b. Repeat step a for the other indicators. (1) Connect the square LED to Server Running. (2) Connect each of the three numeric indicators to Heat Lamp Control, Cooling Fan
Control, and Chamber Temperature.
4. Connect the STOP button on the block diagram.
a. Place a Not function located on the Functions»Arithmetic & Comparison»Express Boolean palette on the block diagram.
b. Place an Or function located on the Functions»Arithmetic & Comparison»Express Boolean palette on the block diagram.
5. Connect the Stop button to the top input for the Or function.

LabVIEW DSC Module Course Manual 7-40 ni.com
6. Connect the Running output from the Engine Status VI to the Not function and then to the bottom input for the Or function.
7. Save the VI as PID Client Ex 7-2.vi in the C:\Exercises\LabVIEW DSC directory.
8. Run the Client VI and change Setpoint value. Watch it also update the server.
9. Notice the operation of Server Running when you start and stop the PID Server.VI.
End of Exercise 7-2

© National Instruments Corporation 7-41 LabVIEW DSC Module Course Manual
Exercise 7-3: Deploying a Client to a Remote Machine Objective: To deploy the PID client created in the previous exercise to a networked machine.
In this exercise you will work with a colleague. Using the Client you created and a networked SCF file you will control the Temperature Chamber on the Server computer (partner�s machine) from the client machine (your computer).
Test IP Address 1. To determine the IP address of your computer, click Start»Run and type cmd. At the command
prompt type ipconfig.
IP Address ______________ 2. Exchange IP Addresses with your neighbor.
3. On your computer type ping <ip address of neighbor’s computer>.
Configure the Client Machine 4. From LabVIEW, select Tools»DSC Module»Monitor Tags to open the Tag Monitor.
5. Expand My Network Places and locate the server machine (your partner�s computer).

LabVIEW DSC Module Course Manual 7-42 ni.com
6. Expand LabVIEW and double-click each Network Tag to add it to the Full Name field in the Tag Monitor.
7. Now you can monitor the value of Tags on the server machine.
Synchronizing System Clocks 8. Confirm that you are the Administrator for LabVIEW DSC.
a. Select Tools»User Name to open the User Login dialog box.
b. Enter Administrator for Username, and select Administrator from the Accounts pull-down menu. Leave the Password textbox blank.
c. Select User and then Exit to leave the Account Manager.

© National Instruments Corporation 7-43 LabVIEW DSC Module Course Manual
9. Select Tools»DSC Module»Options to open the Options dialog box.
10. Select the Advanced tab.
11. Click the Time Synchronization button to open the Time Synchronization Settings dialog box.

LabVIEW DSC Module Course Manual 7-44 ni.com
12. Click the Add button.
13. Find the Server machine from the list of computers.
Hint: Expand the tree for My Network Places.
14. Select the server computer and click the OK button.
15. The server computer name will appear in the Time Server Search Order section.
16. Click the OK button to close each open dialog box.

© National Instruments Corporation 7-45 LabVIEW DSC Module Course Manual
On the Server Computer 17. On the local (C:) drive navigate to the folder where the SCF file is saved and right-click it.
18. Select Sharing and Security from the shortcut menu.

LabVIEW DSC Module Course Manual 7-46 ni.com
19. Select Share this Folder in the Sharing tab.
20. Click the Permissions button and verify that Everyone is present. For a secured system you can add selected users.
21. Select Full Control and click the OK button.
22. Click the Apply button in the Permissions dialog box and then click the Apply button for the Exercise Properties dialog box.

© National Instruments Corporation 7-47 LabVIEW DSC Module Course Manual
23. On the Client computer (your machine) access the shared folder of your neighbor.
24. Right-click My Computer and select Map Network Drive from the shortcut menu.
25. Select the computer for the Server (your partner�s) and then add the folder that is shared.

LabVIEW DSC Module Course Manual 7-48 ni.com
Importing Network Tags on the Client Machine 26. Select Tools»DSC Module»Configure Tags to open the Tag Configuration Editor.
27. Select File»Import Network Tags and navigate to the SCF file shared on the networked folder.
28. The tags from the SCF file on the Server machine will appear in the Selected Tags section.
29. Click the Import button.
30. On the Tag Configuration Editor, select File»Save to save the SCF file in the LabVIEW directory. The SCF file on the Client is different from the SCF file on the Server. Make sure to not replace the Server SCF file with the one for the Client.
Deploy Client 31. Run the PID Client VI located in the C:\Exercises\LabVIEW DSC directory.
32. Make sure the PID Server VI is running on the server (partner�s machine). Notice which Temperature Chamber you are controlling with the PID Client VI on the client machine.
End of Exercise 7-3

© National Instruments Corporation 7-49 LabVIEW DSC Module Course Manual
Notes

LabVIEW DSC Module Course Manual 7-50 ni.com
Notes

Lesson 8: Advanced Topics
TOPICSA. LabVIEW DSC SecurityB. Programmatically Controlling SecurityC. VI-Based Servers
Lesson 8: Advanced TopicsThe LabVIEW Data Logging and Supervisory Control (DSC) Module provides features such as user management and security, programmatic Tag Engine Control, and VI-Based Servers.
© National Instruments Corporation 8-1 LabVIEW DSC Module Course Manual

LabVIEW DSC SecurityApply security to your VIs, the TCE, individual tags, and the Tag Monitor
Security components:1. User Account Manager2. Security Wizard3. Login Settings4. Tools Access Control5. TCE Settings6. Programmatic Control
User Account Manager
Security Wizard Login settings& tools access TCE Settings
Programmatic Control
LabVIEW DSC SecurityThere are two areas of security in the DSC Module. The first area is the LabVIEW environment itself. Here you can restrict access to controls and indicators to certain users or groups of users by using the Security Wizard. The second area is in the Tag Configuration Editor (TCE). You can implement security so that certain users cannot change the SCF file by adding/removing tags or changing any of the other settings in the TCE. You also can implement network security to restrict tag access to specified computers or IP addresses.
LabVIEW DSC Module Course Manual 8-2 ni.com

The User Account Manager
The User Account Manager is where new user accounts are created and added to groups, and their security privileges managed.
Groups make it easy to apply security settings to a whole set of users simultaneously.
The User Account ManagerThe first step to using security is creating user accounts and organizing them into groups through the User Account Manager. To use the User Account Manager, select Tools»DSC Module»Security Edit User Accounts. Here you can create and modify accounts for all users of the application and set the security level for users or groups of users. To create a new user choose User»New User Account.When you first install the DSC Module, the following lists several built-in accounts and groups:� Administrator�always has full access, can change security settings� Guest� Nobody�default when there is not a user logged on, always has level 0 accessYou cannot delete these accounts.You can create as many accounts or groups as you need. Using groups helps make managing security easier and avoids repetition.There are four built-in groups: Administrator, Guests, Operators, and System Operators.
© National Instruments Corporation 8-3 LabVIEW DSC Module Course Manual

Creating New Accounts
User can then log into LabVIEW
User can be added to a group by clicking here
Creating New AccountsTo create a new account in the User Account Manager, complete the following steps:1. Select User»New User Account.2. Enter the basic information about the account: Username, Password, Security level,
and so on.3. Optionally, click Groups and select the group(s) that the user should be a member of,
and click Add.
Note: A user receives the privileges of any groups in which they are a member. So adding a user to the Administrators group and the Guests group would grant all the privileges for both groups. Be careful who you add to the Administrators group�they have full access to all the DSC Module features, including the User Account Manager.
LabVIEW DSC Module Course Manual 8-4 ni.com

Startup OptionsYou can configure LabVIEW DSC to automatically log in or prompt a specific user to log in at startup
Startup OptionsOften, you would like to control which user gets logged in when LabVIEW initially starts up. For example, if you are developing a system, you may want to have the system automatically log you back in the next time you restart. You can implement this using the Security Preferences settings. Here you can configure the DSC module to automatically log in or prompt a specific user to log in at startup.
© National Instruments Corporation 8-5 LabVIEW DSC Module Course Manual

Tools AccessYou can restrict access to any of the DSC tools to certain users or groups
Tools AccessThe LabVIEW DSC module allows you to control who can use the development tools like the Tag Configuration Editor, the Tag Monitor, and so on. By default, all users have full access to all tools.
LabVIEW DSC Module Course Manual 8-6 ni.com

Exercise 8-1
Creating Accounts and Security Options
Approximate time to complete: 15 min. Page 8-22
To create user accounts and configure security settings.
OBJE
CTIV
E
Exercise 8-1The following are the objectives of this exercise: � To familiarize yourself with the applying security to the tools of the DSC Module.� Add a password to the Administrator account.� Make an additional group, Engineers, which has access to level 8.� Add two users to your system: an operator named Guy and an engineer named Rick.� Prevent operators from accessing the Tag Monitor.� Start the system with the login window when LabVIEW is launched.
© National Instruments Corporation 8-7 LabVIEW DSC Module Course Manual

Securing Your SCF File� These settings apply to
ALL tags� Set control over SCF file
� Who can configure logging� Who can create/edit tags
� Control which users can read or write tags
� Determine which machines on the network can read/write tags
Security for the SCF FileThe settings for the SCF file apply to all tags in the SCF file. In other words, you can grant access to some tags, but not to others. In order to control security for specific tags, use individual tag security (discussed in the following pages), or the Security Wizard on front panel controls or indicators. Because these changes are going to apply to an SCF file, the configuration is done from the Tag Configuration Editor (TCE). In the TCE, select Configure»Security to open the Access Rights Configuration dialog box. This dialog box has tabs for different security areas. Network Data Access includes both network users and network machine names. After you edit the area of interest, another dialog box appears that allows you to modify the access of users or groups, as well as an option to add new users or groups.
LabVIEW DSC Module Course Manual 8-8 ni.com

Securing Your SCF File � Individual Tags
Double-click a tag and choose Security from the configuration window.
Add additional users or groups and set their access.
Securing Your SCF File � Individual TagsYou also can set the security on a tag-by-tag basis. If you go to the TCE and edit a tag, you will see that the General tab has a Security button, which accesses the Tag Data Access Rights dialog box. From this dialog box you can add additional users or groups and set their access privileges.
© National Instruments Corporation 8-9 LabVIEW DSC Module Course Manual

The Security Wizard
� The Security Wizard makes it easy to implement security at any time during your development
� You do not need to change anything on the diagram
The Security WizardThe DSC Module provides an easy way to implement security within your applications through the Security Wizard. The Security Wizard allows you to restrict access on controls and indicators to specific groups or users. To use the Security Wizard, right-click a control or indicator and choose Security. Then configure the access rights for the users or groups that you wish. The security wizard makes it easy to implement security at any time during the development of your application. You can easily add security to a standard LabVIEW VI without having to change the code of your VI.
LabVIEW DSC Module Course Manual 8-10 ni.com

Exercise 8-2
Incorporating Interface Security into a VI
Approximate time to complete: 15 min. Page 8-27
To add security to an existing VI using the Security Wizard.
OBJE
CTIV
E
Exercise 8-2The following are the objectives of this exercise:� To familiarize yourself with the addition of security to a pre-existing VI� To load a client VI� To prevent operators from changing a switch, but allow them to see the switch� To allow all engineers or administrators full control over the switch
© National Instruments Corporation 8-11 LabVIEW DSC Module Course Manual

Programmatically Controlling SecurityThese VIs allow you to do the following:� Login/Logout� Change passwords� List users� List user account info� List groups� List group info� Check user privileges
Interface Security for VIsYou can use the VIs on the DSC Module Security palette to do a variety of tasks. You can login programmatically or have the DSC Module open a login dialog box. You also can have your VI log the current user off the system. You can check whether a user has access to a particular DSC Module tool or you can get information on the currently logged in user.
LabVIEW DSC Module Course Manual 8-12 ni.com

Programmatic Control ExamplesLogin/Logout
Checking for privileges
Using the DSC Module security VIs, you can programmatically login or logout of LabVIEW or can check various security settings and privileges. This allows the developer to implement customized security settings and policies for the application.The Login/Logout example uses NI SEC Programmatic Login.vi and NI SEC Programmatic Logout.vi to log a user in and then out following some operation.The Checking for privileges example programmatically checks to see if the currently logged in user has access to start or stop the tag engine.
© National Instruments Corporation 8-13 LabVIEW DSC Module Course Manual

(Optional) Exercise 8-3
Programmatically Controlling User Access
Approximate time to complete: 20 min. Page 8-28
To examine a VI that uses programmatic login and logout.
OBJE
CTIV
E
Exercise 8-3The objective of this exercise is to modify Temp Chamber.vi to programmatically log a user in and logout when the VI finishes.
LabVIEW DSC Module Course Manual 8-14 ni.com

Controlling the Engine� Engine Manager Window
� Start/stop engine� Enable/disable logging� View system events
Controlling the EngineThere are two ways to control the Engine. The first is to manually select options as in the Tag Configuration Editor. An interface exists for the Engine itself called the Engine Manager window. In the Engine Manager window, you have controls to stop or start the Engine, enable or disable logging features, and view a log of system events.
Note: To access the Engine Manager window, double-click the Engine Manager icon in the Taskbar. This icon can be found in the lower right corner of the screen, next to the clock. Clicking the Show Events checkbox opens the System Events window, which lists all of the system events that have occurred.
© National Instruments Corporation 8-15 LabVIEW DSC Module Course Manual

Programmatic Engine Control� System VIs
� Start/stop engine� Enable/disable event logging� Enable/disable historical data
logging� Load/unload SCF files
Controlling the EngineThe Engine also can be controlled programmatically using the System VIs. These VIs allow your application to programmatically launch or shutdown the Engine, modify the logging behavior of the Engine, or load another SCF file.
LabVIEW DSC Module Course Manual 8-16 ni.com

Sample Engine Control VI
Launch the Engine with one SCF file, wait, shutdown Engine, switch SCF files, and re-launch
Sample Engine Control VIThe most common reason for using the system VIs to programmatically control the tag engine is to change SCF files. In this example, the first thing this VI does is launch the Engine with a particular SCF file. It is recommended that you have your program launch the Engine with a specific SCF file so that you are sure the correct SCF file is loaded. It then waits five seconds to allow the engine to begin running. This is where the code would execute that uses the first SCF file. Then, the Engine shuts down. It waits for the shutdown to complete by using the Running? output of the Engine Status VI. After the Engine is no longer running, it switches the SCF file. This slide displays a dialog box to select the SCF file. After selecting the new SCF file, it restarts the Engine.
Note: In order to switch SCF files, you must stop the Engine. You receive an error message if the Engine is still running. You should not switch between SCF files frequently. If you need to change SCF files, the best time to do so is when the program is first starting.
Note: Presently you cannot add or remove tags from an SCF file programmatically. However, you may load/unload different SCF files with different numbers of tags. You must also stop and then relaunch the Tag Engine to change the SCF file.
© National Instruments Corporation 8-17 LabVIEW DSC Module Course Manual

VI-Based Servers
The tag engine can connect to different types of servers, such as OPC servers or VI-Based servers
These are OPC serversThese are VI-Based servers
For example:
A VI-based server is a data server that is written in LabVIEW, unlike an OPC server, which is typically written in Visual Basic or C++.Like any server, a VI-based server can be a real I/O server for a device, a simulation server, or a computational server doing complex computation for your application and serving the results as items. The Tag Engine can interface with any server that uses the Tag Engine Server interface.
LabVIEW DSC Module Course Manual 8-18 ni.com

VI-Based Servers
Tag Engine VI-Based Server VI
VI-Based Server Registration VICCDB
Real world I/O
LabVIEWDSC Data
Server VIs Registration VIsA VI-Based Server consists of two parts:� Server VI� Registration VI
All Functions»DSC Module»DSC Module Server development
A VI-Based server consists of two parts: a server VI and a registration VI. The Registration VI only needs to run once. It�s purpose is to create an entry in a CCDB (Common Configuration Database file) that is accessible to the tag engine and inserts information such as the data items and the path to the server VI. When the Tag Engine starts, it launches the Server VI, which then communicates between the engine and the I/O points (real-world I/O or other I/O points). For more information on using VI-Based servers refer to the following:� zone.ni.com (search for VI-Based server)� Shipping examples in LabVIEW�select Example Finder»Toolkits and Modules»
Datalogging and Supervisory Control»Servers.� VI-Based Server Development Toolkit Reference Manual�National Instruments\
LabVIEW 7.0\manuals.
© National Instruments Corporation 8-19 LabVIEW DSC Module Course Manual

(Optional) Exercise 8-4
Using a VI-Based Server to Create a New Tag
Approximate time to complete: 30 min. Page 8-30
To modify and run a VI-based server example to create a new I/O tag. Create a VI that writes and reads from this tag.
OBJE
CTIV
E
(Optional) Exercise 8-4The following are the objectives of this exercise:� To become familiar with the DSC Module Server Registration VIs to add a new tag to an existing
VI-based server.� To read and write from the new tag added to the VI-based server.
LabVIEW DSC Module Course Manual 8-20 ni.com

Summary
� LabVIEW DSC provides the capability to easily incorporate security into your application, such as creating and managing user accounts, controlling tools access, and SCF file access.
� Security for the user interface is implemented using the Security Wizard.
� You can programmatically control the Tag Engine using the system VIs.
� You can create your own servers using the VI-based server development VIs.
© National Instruments Corporation 8-21 LabVIEW DSC Module Course Manual

LabVIEW DSC Module Course Manual 8-22 ni.com
Exercise 8-1: Creating Accounts and Security Options Objective: To become familiar with applying security to the tools of the LabVIEW DSC module.
Add a password to the Administrator account. By default, the Administrator account does not have a password. In the next few steps you will define an Administrator�s password. The recommended password for this course is dsc, lower case.
1. Start LabVIEW and open a blank VI.
2. Make sure you are logged on as Administrator; otherwise, select Tools»User Name and log on as Administrator (no password).
3. Select Tools»DSC Module»Security»Change Password.
4. Enter a new password for Administrator. Enter the same password in the Verify textbox. Make sure you remember the password, taking into account it is case sensitive. Click the OK button.
5. Select Tools»DSC Module»Security»Logout to log out.
6. Select Tools»User Name and log back on with the Administrator password.
7. Select Tools»DSC Module»Security»Edit User Accounts to launch the User Account Manager to edit user security.
8. Select User»New Local Group to create a new group called Engineers.
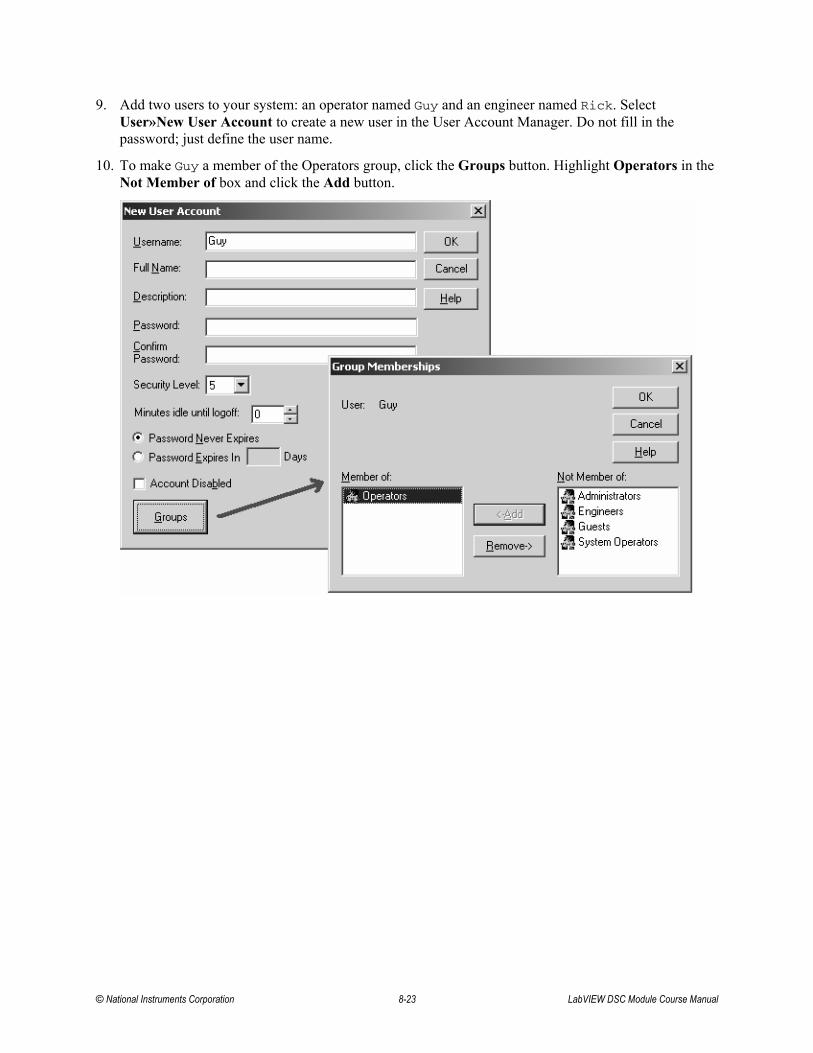
© National Instruments Corporation 8-23 LabVIEW DSC Module Course Manual
9. Add two users to your system: an operator named Guy and an engineer named Rick. Select User»New User Account to create a new user in the User Account Manager. Do not fill in the password; just define the user name.
10. To make Guy a member of the Operators group, click the Groups button. Highlight Operators in the Not Member of box and click the Add button.
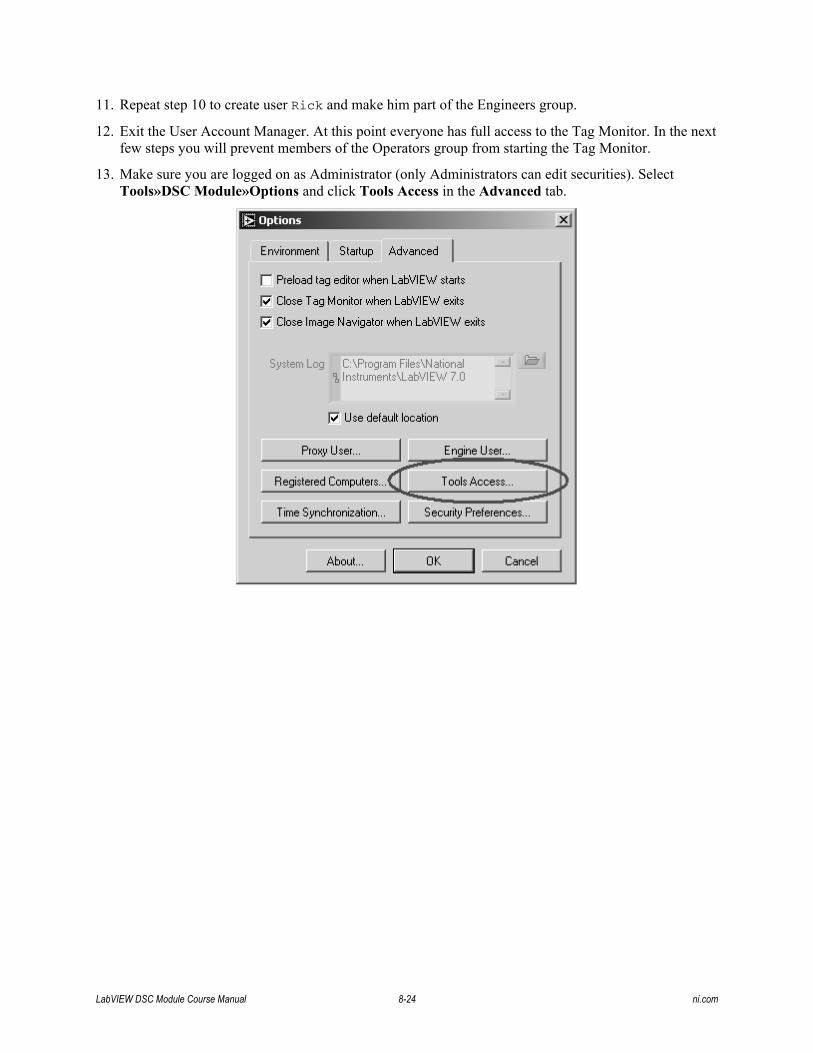
LabVIEW DSC Module Course Manual 8-24 ni.com
11. Repeat step 10 to create user Rick and make him part of the Engineers group.
12. Exit the User Account Manager. At this point everyone has full access to the Tag Monitor. In the next few steps you will prevent members of the Operators group from starting the Tag Monitor.
13. Make sure you are logged on as Administrator (only Administrators can edit securities). Select Tools»DSC Module»Options and click Tools Access in the Advanced tab.

© National Instruments Corporation 8-25 LabVIEW DSC Module Course Manual
14. Select the Tag Monitor tab in the new dialog box. Notice that Everyone has access to the Tag Monitor. You will allow Everyone to have access, but you will exclude the Operators group.
15. Click the Edit button.
16. In the Access Rights dialog box, click the Add button.
17. The Add Users and Groups dialog box lists all available user and group accounts in the Names section. Highlight Operators and click the Add button. Make sure the Access Rights listbox shows No Access. Click the OK button four times to close the open dialog boxes and return to LabVIEW.
18. Select Tools»DSC Module»Monitor Tags to launch the Tag Monitor. Because you are logged on as Administrator, you should be able to launch the Tag Monitor successfully. Close the Tag Monitor and log on as Guy. Because Guy is a member of the Operators group, the access should be denied.

LabVIEW DSC Module Course Manual 8-26 ni.com
When you restarted LabVIEW, you were automatically logged on as an Administrator. In this section, you will configure LabVIEW to always launch with a login window.
19. Select Tools»DSC Module»Options and click Security Preferences on the Advanced tab to open the Security System Settings dialog box.
20. Make sure Show the login prompt at LabVIEW startup time is selected. Click the OK button twice to close the dialog boxes and return to LabVIEW.
21. Restart LabVIEW and notice that after a short delay, it automatically displays the login dialog box when you try to open a VI.
End of Exercise 8-1

© National Instruments Corporation 8-27 LabVIEW DSC Module Course Manual
Exercise 8-2: Incorporating Interface Security into a VI Objective: Add front panel security to your client VI.
1. Load the Temp Chamber VI from Exercise 3-2.
2. Right-click the Light Intensity % slider and select Security from the shortcut menu.
3. Select the User or Group Everyone and select Disabled & Grayed Out from the Access pull-down menu.
4. Click the Add button to add a new user group. Set the access rights of the new group to Full Access. Double-click the Engineers group and the Administrators group and click the OK button. The Access Rights dialog box should be similar to the following figure. Click the OK button to accept these security settings.
5. Repeat steps 2 through 4 for the Fan Speed % slider.
6. Right-click the Historical Data Viewer button and select Security from the shortcut menu.
7. Select the User or Group Everyone and select Disabled (View Only) from the Access pull-down menu.
8. Click the Add button to add a new user group. Change the access rights to Full Access and then double-click the Administrators group and click the OK button. Click the OK button to accept these security settings.
9. Repeat steps 5 through 7 for the Historical Trend button.
10. Save the VI as Temp Chamber with Security VI in the C:\Exercises\LabVIEW DSC directory.
11. Try logging in as Guy using Tools»User Name from any VI. Can you change the Light Intensity or Fan Speed sliders?
12. Try logging in as Rick using Tools»User Name from any VI. Can you launch the Historical Data Viewer or the Historical Trend?
End of Exercise 8-2

LabVIEW DSC Module Course Manual 8-28 ni.com
(Optional) Exercise 8-3: Programmatically Controlling User Access Objective: To modify an existing VI to add the ability to programmatically login.
1. Open the Temp Chamber VI located in the C:\Exercises\LabVIEW DSC directory.
2. Add a button on the front panel and change the Boolean text to Log in.
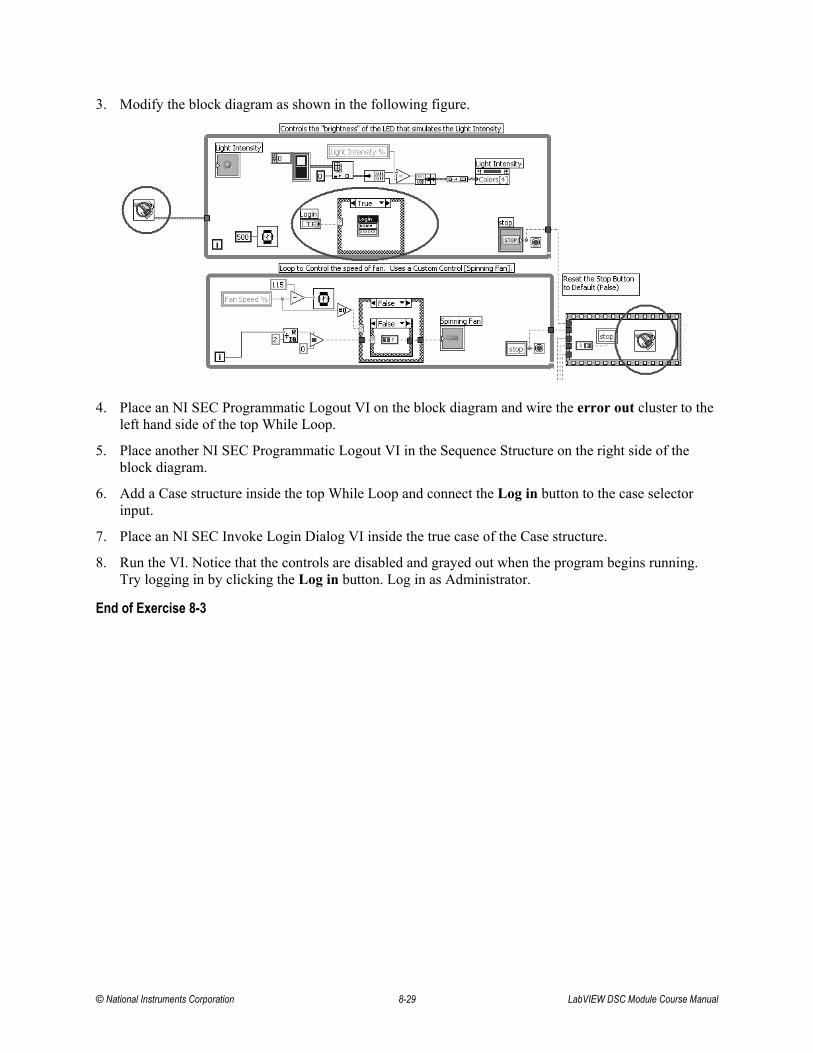
© National Instruments Corporation 8-29 LabVIEW DSC Module Course Manual
3. Modify the block diagram as shown in the following figure.
4. Place an NI SEC Programmatic Logout VI on the block diagram and wire the error out cluster to the left hand side of the top While Loop.
5. Place another NI SEC Programmatic Logout VI in the Sequence Structure on the right side of the block diagram.
6. Add a Case structure inside the top While Loop and connect the Log in button to the case selector input.
7. Place an NI SEC Invoke Login Dialog VI inside the true case of the Case structure.
8. Run the VI. Notice that the controls are disabled and grayed out when the program begins running. Try logging in by clicking the Log in button. Log in as Administrator.
End of Exercise 8-3

LabVIEW DSC Module Course Manual 8-30 ni.com
(Optional) Exercise 8-4: Using a VI-Based Server to Create a New Tag Objective: To modify and run a VI-based server example to create a new I/O tag. Create a VI that writes and reads from this tag.
1. Select Help»Find Examples to open the NI Example Finder.
2. Make sure you are on the Browse tab and select Toolsets and Modules»Datalogging and Supervisory Control»Servers and open the Register Dummy Server VI.
3. Open the block diagram and examine the code. This VI writes to the CCDB (Common Configuration Database) that the Tag Configuration Editor accesses to determine which tags are available.
4. On the front panel, the array labeled Item Info currently has three items in it�dummy_input, dummy_output, and dummy_IO. Add another element to the array so that your VI-Based server contains four tags. Increment the array to element 3 and enter the information as shown in the following figure.

© National Instruments Corporation 8-31 LabVIEW DSC Module Course Manual
5. Run the VI and close it when it is finished.
6. Select Tools»DSC Module»Configure Tags to open the Tag Configuration Editor.
7. Select File»New to create a new SCF file. Accept the default values on the next window.
8. Save the SCF file as VI_Based Server.scf and accept the default settings.
9. Click the Configuration Wizard, select the item called My Temp from the Dummy Server, and click the Add Items(s) button to add a tag.
10. Click the OK button to finish the Configuration Wizard.
11. Save the SCF file and click the OK button if prompted to restart the Tag Engine.
12. Close the Tag Configuration Editor.

LabVIEW DSC Module Course Manual 8-32 ni.com
Front Panel 13. Create a new VI and build the following front panel.
14. Place a knob located on the Controls»Numeric Controls palette on the front panel and label it Write Value.
15. Place a vertical fill slide located on the Controls»Numeric Controls palette on the front panel and label it Read Value.
16. Place a stop button located on the Controls»Buttons & Switches palette on the front panel.

© National Instruments Corporation 8-33 LabVIEW DSC Module Course Manual
Block Diagram 17. Complete the block diagram as shown in the following figure.
18. Place a While Loop located on the Functions»All Functions»Structures palette on the block diagram and connect the stop button to the conditional terminal.
19. Place a Write Tag VI on the block diagram. Right-click the tag name input and select Create»Constant from the shortcut menu to create a constant. Select the My Temp tag.
20. Place a Read Tag VI on the block diagram and wire the tag constant into the tag name input.
21. Place a Wait function in the While Loop and wire a constant with a value of 500 to the input.
22. Run the VI and try adjusting the Write value knob.
23. Close the VI.
When this VI runs, the Tag Engine dynamically launches the VI-Based server called Dummy Server but the user does not see this happening because it is all handled transparently.
End of Exercise 8-4

LabVIEW DSC Module Course Manual 8-34 ni.com
Notes

© National Instruments Corporation A-1 LabVIEW DSC Module Course Manual
AAdditional Information and Resources
This appendix contains additional information about National Instruments technical support options and LabVIEW resources.
National Instruments Technical Support OptionsVisit the following sections of the National Instruments Web site at ni.com for technical support and professional services.
• Support—Online technical support resources at ni.com/support include the following:
– Self-Help Resources—For answers and solutions, visit the award-winning National Instruments Web site for software drivers and updates, a searchable KnowledgeBase, product manuals, step-by-step troubleshooting wizards, thousands of example programs, tutorials, application notes, instrument drivers, and so on.
– Free Technical Support—All registered users receive free Basic Service, which includes access to hundreds of Application Engineers worldwide in the NI Developer Exchange at ni.com/exchange. National Instruments Application Engineers make sure every question receives an answer.
For information about other technical support options in your area, go to ni.com/services or contact your local branch at ni.com/contact.
• System Integration—If you have time constraints, limited in-house technical resources, or other project challenges, National Instruments Alliance Partner members can help. The NI Alliance Partners joins system integrators, consultants, and hardware vendors to provide comprehensive service and expertise to customers. The program ensures qualified, specialized assistance for application and system development. To learn more, call your local NI office or visit ni.com/alliance.
If you searched ni.com and could not find the answers you need, contact your local office or NI corporate headquarters. Phone numbers for our worldwide offices are listed at the front of this manual. You also can visit the Worldwide Offices section of ni.com/niglobal to access the branch office Web sites, which provide up-to-date contact information, support phone numbers, email addresses, and current events.

Appendix A Additional Information and Resources
LabVIEW DSC Module Course Manual A-2 ni.com
Other National Instruments Training CoursesNational Instruments offers several training courses for LabVIEW users. These courses continue the training you received here and expand it to other areas. Visit ni.com/training to purchase course materials or sign up for instructor-led, hands-on courses at locations around the world.
National Instruments CertificationEarning an NI certification acknowledges your expertise in working with NI products and technologies. The measurement and automation industry, your employer, clients, and peers recognize your NI certification credential as a symbol of the skills and knowledge you have gained through experience. areas. Visit ni.com/training for more information about the NI certification program.
LabVIEW ResourcesThis section describes how you can receive more information regarding LabVIEW.
LabVIEW PublicationsThe following publications offer more information about LabVIEW.
LabVIEW Technical Resource (LTR) NewsletterSubscribe to LabVIEW Technical Resource to discover tips and techniques for developing LabVIEW applications. This quarterly publication offers detailed technical information for novice users and advanced users. In addition, every issue contains a disk of LabVIEW VIs and utilities that implement methods covered in that issue. To order the LabVIEW Technical Resource, contact LTR publishing at (214) 706-0587 or visit www.ltrpub.com.
LabVIEW BooksMany books have been written about LabVIEW programming and applications. The National Instruments Web site contains a list of all the LabVIEW books and links to places to purchase these books.

Appendix A Additional Information and Resources
© National Instruments Corporation A-3 LabVIEW DSC Module Course Manual
info-labview Listserveinfo-labview is an email group of users from around the world who discuss LabVIEW issues. The list members can answer questions about building LabVIEW systems for particular applications, where to get instrument drivers or help with a device, and problems that appear.
To subscribe to info-labview, send email to:
To subscribe to the digest version of info-labview, send email to:
To unsubscribe to info-labview, send email to:
To post a message to subscribers, send email to:
To send other administrative messages to the info-labview list manager, send email to:
You might also want to search previous email messages at:
www.searchVIEW.net
• The info-labview web page is available at www.info-labview.org


Course Evaluation
Course _______________________________________________________________________________________
Location _____________________________________________________________________________________
Instructor _________________________________________ Date ____________________________________
Student Information (optional)Name ________________________________________________________________________________________
Company _________________________________________ Phone ___________________________________
InstructorPlease evaluate the instructor by checking the appropriate circle. Unsatisfactory Poor Satisfactory Good Excellent
Instructor’s ability to communicate course concepts ❍ ❍ ❍ ❍ ❍
Instructor’s knowledge of the subject matter ❍ ❍ ❍ ❍ ❍
Instructor’s presentation skills ❍ ❍ ❍ ❍ ❍
Instructor’s sensitivity to class needs ❍ ❍ ❍ ❍ ❍
Instructor’s preparation for the class ❍ ❍ ❍ ❍ ❍
CourseTraining facility quality ❍ ❍ ❍ ❍ ❍
Training equipment quality ❍ ❍ ❍ ❍ ❍
Was the hardware set up correctly? ❍ Yes ❍ No
The course length was ❍ Too long ❍ Just right ❍ Too short
The detail of topics covered in the course was ❍ Too much ❍ Just right ❍ Not enough
The course material was clear and easy to follow. ❍ Yes ❍ No ❍ Sometimes
Did the course cover material as advertised? ❍ Yes ❍ No
I had the skills or knowledge I needed to attend this course. ❍ Yes ❍ No If no, how could you have been
better prepared for the course? ____________________________________________________________________
_____________________________________________________________________________________________
What were the strong points of the course? __________________________________________________________
_____________________________________________________________________________________________
What topics would you add to the course? ___________________________________________________________
_____________________________________________________________________________________________
What part(s) of the course need to be condensed or removed? ____________________________________________
_____________________________________________________________________________________________
What needs to be added to the course to make it better? ________________________________________________
_____________________________________________________________________________________________
How did you benefit from taking this course? ________________________________________________________
_____________________________________________________________________________________________
Are there others at your company who have training needs? Please list. ____________________________________
_____________________________________________________________________________________________
_____________________________________________________________________________________________
Do you have other training needs that we could assist you with? _________________________________________
_____________________________________________________________________________________________
How did you hear about this course? ❍ NI Web site ❍ NI Sales Representative ❍ Mailing ❍ Co-worker
❍ Other _____________________________________________________________________________________
