lacdmh managed care fee-for-service 2 end user...
TRANSCRIPT
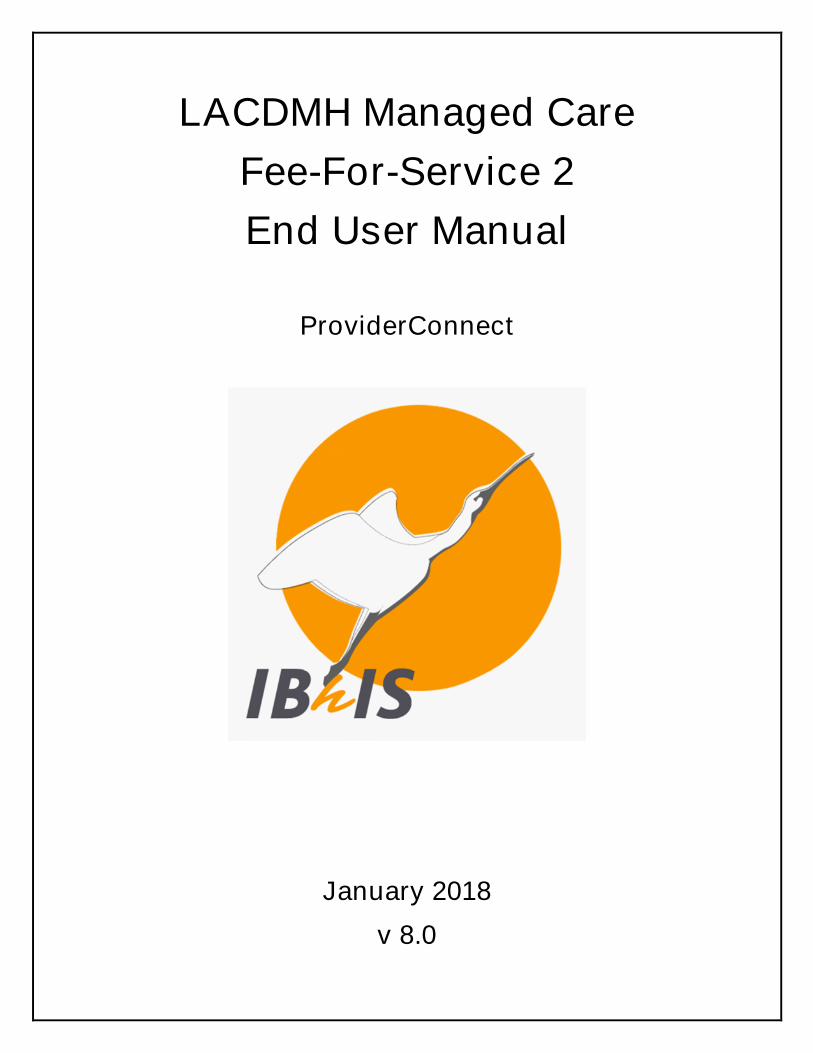
LACDMH Managed Care
Fee-For-Service 2
End User Manual
ProviderConnect
January 2018
v 8.0
1/16/2018 ProviderConnect - End User Training v8.0 Page 1 of 45
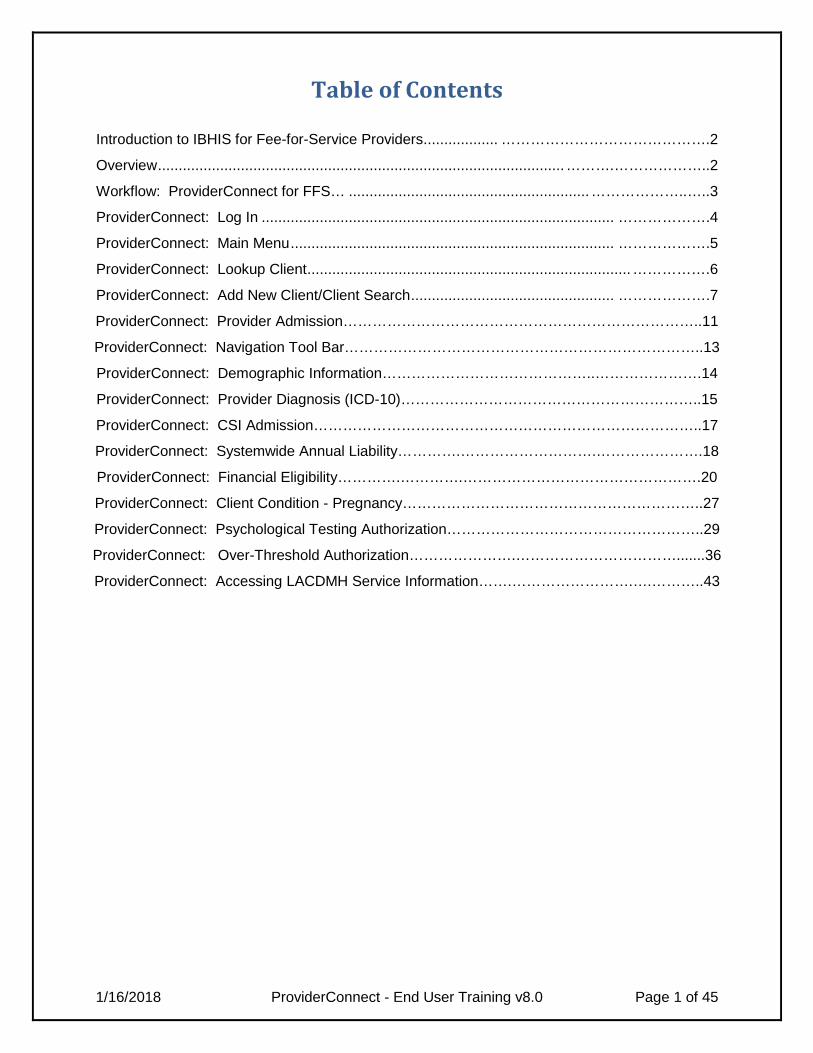
Table of Contents
Introduction to IBHIS for Fee-for-Service Providers.................. …………………………………….2
Overview..................................................................................................……….………………..2
Workflow: ProviderConnect for FFS… ..........................................................………………..…..3
ProviderConnect: Log In ..................................................................................... ……………….4
ProviderConnect: Main Menu.............................................................................. ……………….5
ProviderConnect: Lookup Client..............................................................................…………….6
ProviderConnect: Add New Client/Client Search................................................. ……………….7
ProviderConnect: Provider Admission………………………………………………………………..11
ProviderConnect: Navigation Tool Bar………………………………………………………………..13
ProviderConnect: Demographic Information……………………………………..………………….14
ProviderConnect: Provider Diagnosis (ICD-10)……………………………………………………..15
ProviderConnect: CSI Admission……………………………………………………………………..17
ProviderConnect: Systemwide Annual Liability………….……………………….………………….18
ProviderConnect: Financial Eligibility………….………….………………………………………….20
ProviderConnect: Client Condition - Pregnancy……………………………………………………..27
ProviderConnect: Psychological Testing Authorization……………………………………………..29
ProviderConnect: Over-Threshold Authorization………………….…………………………….......36
ProviderConnect: Accessing LACDMH Service Information…….…………………….….………..43

1/16/2018 ProviderConnect - End User Training v8.0 Page 2 of 45
Introduction to IBHIS for Fee-for-Service Providers
Overview
Integrated Behavioral Health Information System (IBHIS) is the Electronic Health Record System (EHRS) thatwas implemented by Los Angeles County Department of Mental Health (LACDMH). ProviderConnect is a web-based interface used to communicate with IBHIS. ProviderConnect is a standard browser based applicationand can be launched from any web browsing application such as Internet Explorer, Chrome, or Firefox, andhas real time communication with IBHIS. Hence any information submitted into ProviderConnect is directlyentered or updated into the IBHIS system immediately.
Fee-For-Service 2 (FFS2) outpatient providers will use the ProviderConnect system to:
1. Search for clients:
A. If client is not found in search result, this means the client does not have an existingadmission and the admission will need to be created for the client.
B. If client is found in search result and with an existing FFS2 admission episode, thismeans no additional FFS2 admission episode will need to be created for the client. AllFFS2 providers will use the same admission episode.
2. Complete the client demographic information or update this information for an existing client.
3. Complete the client diagnosis (ICD-10) record or update this information for an existing client.
4. Complete the CSI admission.
5. Complete the client’s annual liability record:
A. If client does not have an annual liability record, the record will need to be created for theclient.
B. If client does have an existing annual liability record, the annual liability record will run for365 days (366 days for leap years) from the client’s admission date. There can only beone annual liability record for this duration regardless of the number of providers ofservice. The annual liability record for a client must be renewed every twelve-monthperiod.
6. Complete the client financial eligibility information or update this information for an existingclient.
7. Complete the client’s pregnancy status, if applicable.
8. Submit psychological testing authorizations.
9. Submit over-threshold authorizations.
10. Attach supporting documentation to authorization requests.
11. View attached documents.
12. Check the status of authorization requests and view authorization responses from the CentralAuthorization Unit (CAU).
13. Print (using your desktop print functions/Right-click).
1/16/2018 ProviderConnect - End User Training v8.0 Page 3 of 45
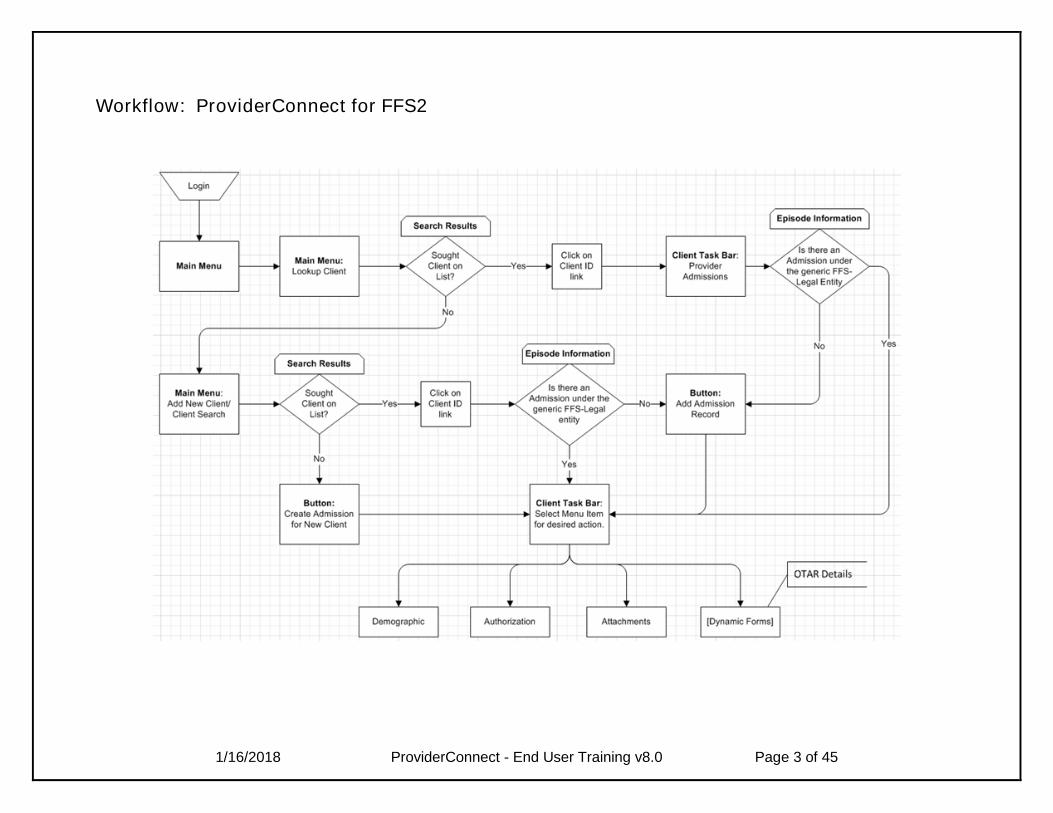
Workflow: ProviderConnect for FFS2

1/16/2018 ProviderConnect - End User Training v8.0 Page 4 of 45
ProviderConnect: Log In
1. Start the web browser (IE, Chrome) in your system. Type in the following web address in the addressline https://lapconn.netsmartcloud.com/la.
The following login screen will appear:
2. Type in your user ID and password then click the button.
A screen will be displayed with a Confidentiality/Security statement. You must accept and agree beforecontinuing.
Once you have clicked continue, you will be directed to ProviderConnect-News alerts. The News screen willprovide you with alerts and updates regarding the system.
3. Click to continue to the Main Menu.
1/16/2018 ProviderConnect - End User Training v8.0 Page 5 of 45
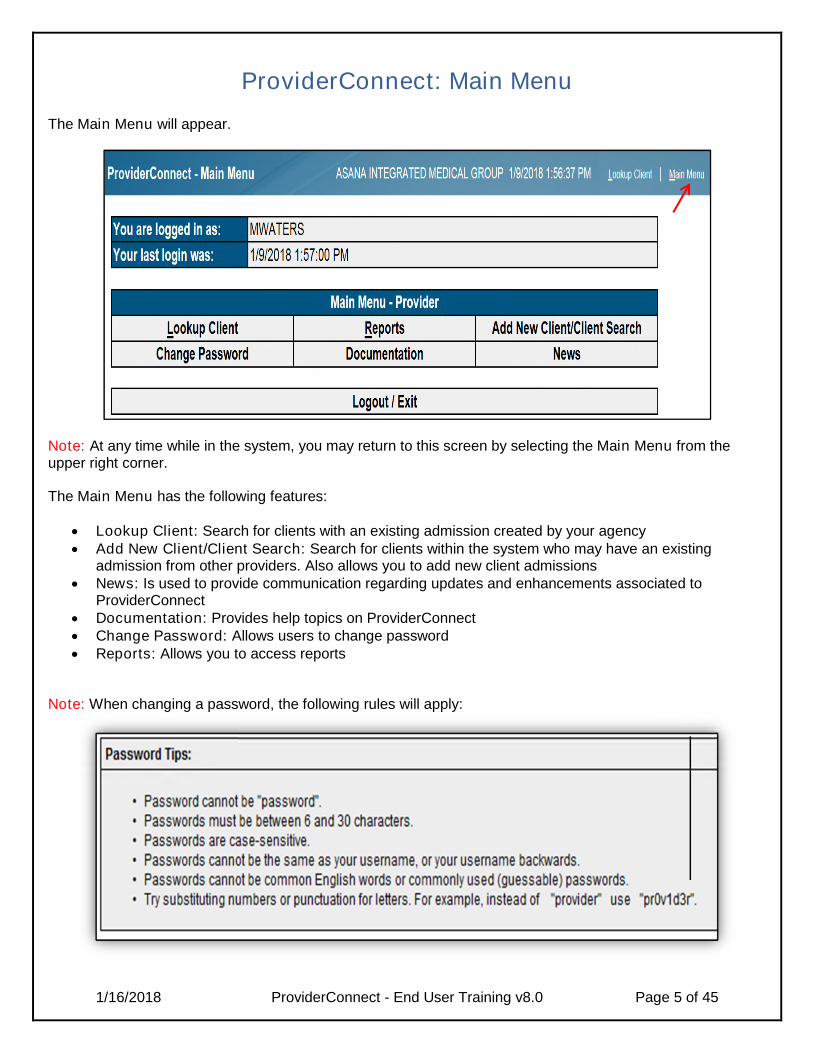
ProviderConnect: Main Menu
The Main Menu will appear.
Note: At any time while in the system, you may return to this screen by selecting the Main Menu from theupper right corner.
The Main Menu has the following features:
• Lookup Client: Search for clients with an existing admission created by your agency• Add New Client/Client Search: Search for clients within the system who may have an existing
admission from other providers. Also allows you to add new client admissions• News: Is used to provide communication regarding updates and enhancements associated to
ProviderConnect• Documentation: Provides help topics on ProviderConnect• Change Password: Allows users to change password• Reports: Allows you to access reports
Note: When changing a password, the following rules will apply:

1/16/2018 ProviderConnect - End User Training v8.0 Page 6 of 45
ProviderConnect: Lookup Client
ProviderConnect has two distinct features to search for clients:
• The Lookup Client feature is used when the client has an existing authorization within your agency.
• The Add New Client/Client Search feature is used to generate a search for clients that exist within the
system from other providers.
Note: Unless certain, an initial search for a client should begin with the Lookup Client feature prior to
the Add New Client/Client Search for a client.
1. From the Main Menu, click on Lookup Client to search for an existing client from your agency.
The Lookup Client form will appear.
2. You may search for clients using the following parameters:• Member ID (for quick access)• Social Security Number (for quick access); or• Last Name, First Name and Date of Birth
3. Click Search by Criteria.
1/16/2018 ProviderConnect - End User Training v8.0 Page 7 of 45
ProviderConnect: Lookup Client
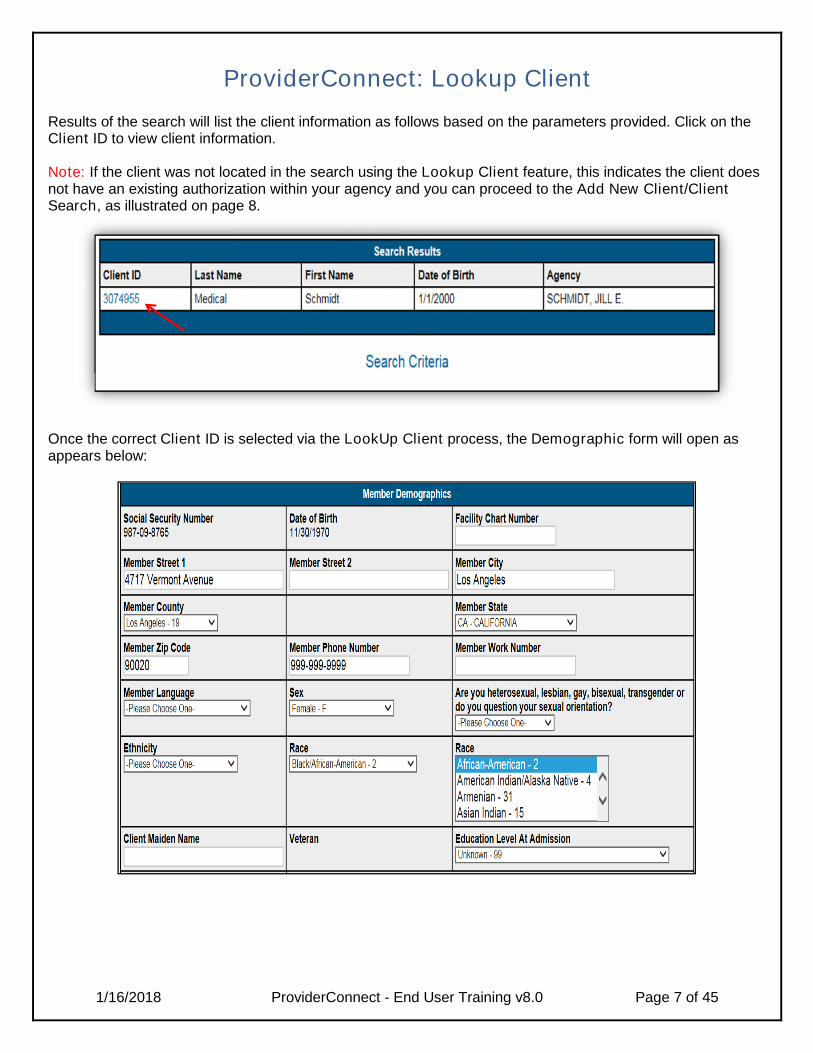
Results of the search will list the client information as follows based on the parameters provided. Click on theClient ID to view client information.
Note: If the client was not located in the search using the Lookup Client feature, this indicates the client doesnot have an existing authorization within your agency and you can proceed to the Add New Client/ClientSearch, as illustrated on page 8.
Once the correct Client ID is selected via the LookUp Client process, the Demographic form will open asappears below:
1/16/2018 ProviderConnect - End User Training v8.0 Page 8 of 45
ProviderConnect: Add New Client/Client Search
The Add New Client /Client Search feature is used to search for a client who may have an existing admissionwithin the system.
Note: To prevent duplication of client records and before adding a new client, it is always best toperform a search to ensure an admission does not already exist in the system. Review the clientinformation for accuracy in the search result before proceeding. This will also help to prevent claimingissues.
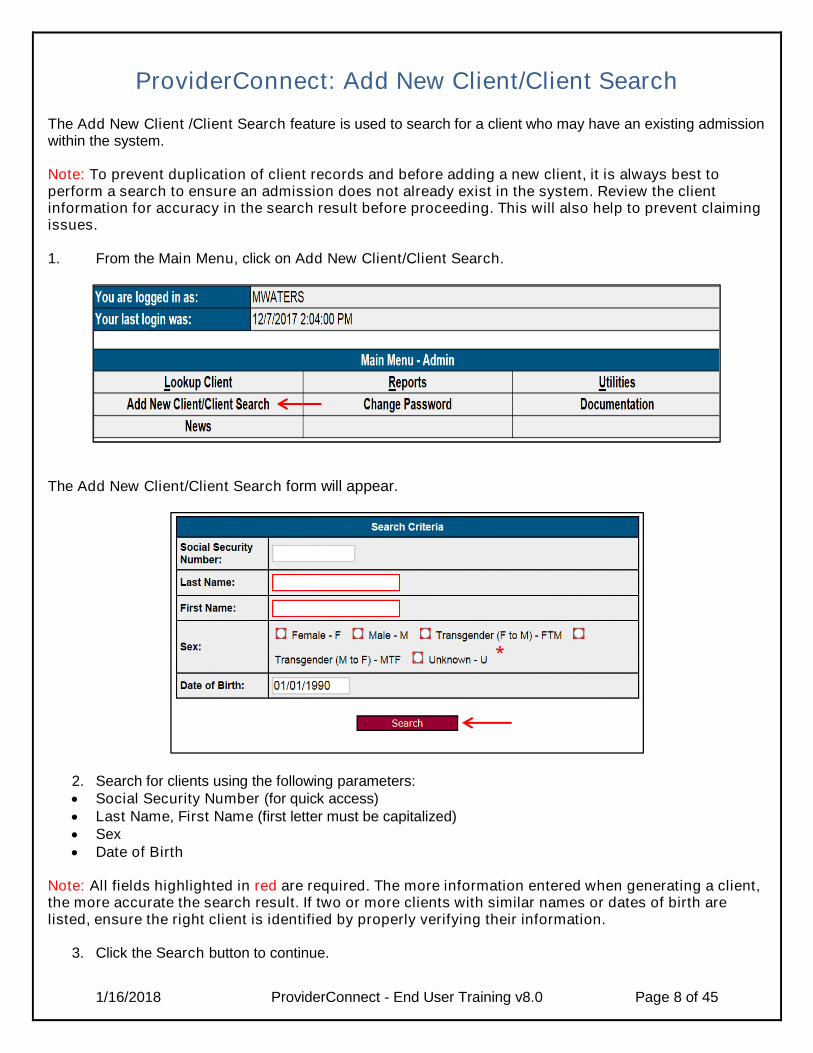
1. From the Main Menu, click on Add New Client/Client Search.
The Add New Client/Client Search form will appear.
2. Search for clients using the following parameters:• Social Security Number (for quick access)• Last Name, First Name (first letter must be capitalized)• Sex• Date of Birth
Note: All fields highlighted in red are required. The more information entered when generating a client,the more accurate the search result. If two or more clients with similar names or dates of birth arelisted, ensure the right client is identified by properly verifying their information.
3. Click the Search button to continue.
1/16/2018 ProviderConnect - End User Training v8.0 Page 9 of 45
ProviderConnect: Add New Client/Client Search
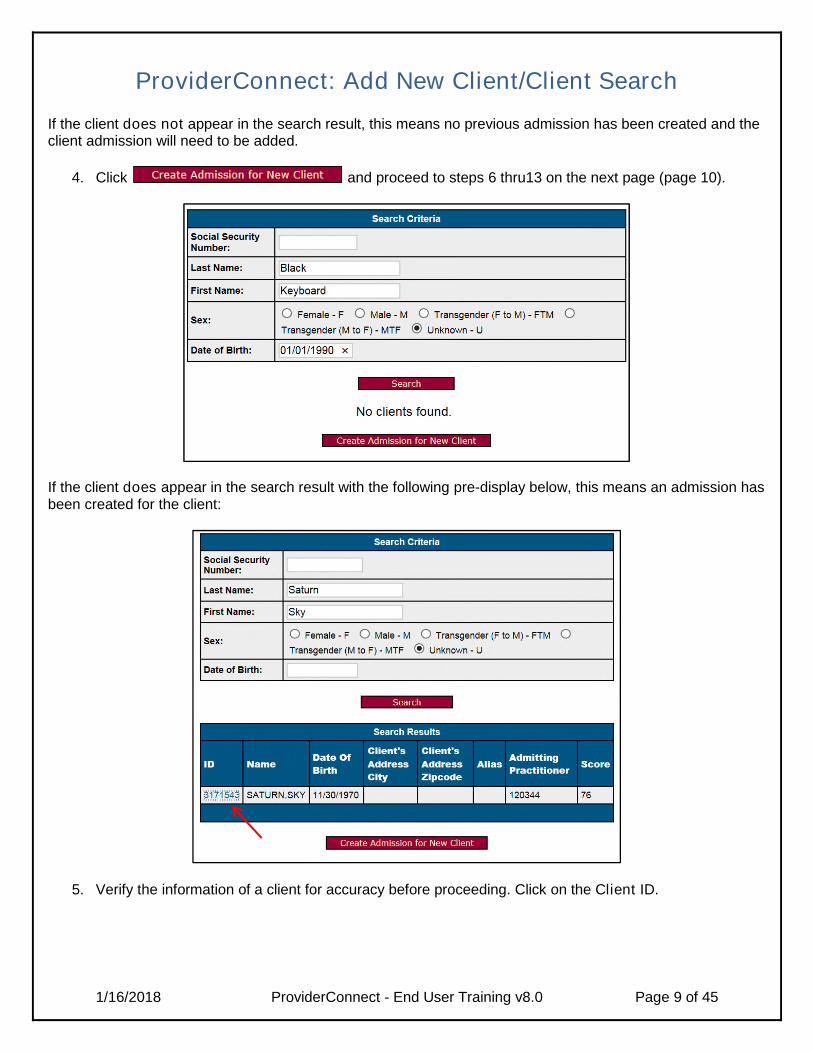
If the client does not appear in the search result, this means no previous admission has been created and theclient admission will need to be added.
4. Click and proceed to steps 6 thru13 on the next page (page 10).
If the client does appear in the search result with the following pre-display below, this means an admission hasbeen created for the client:
5. Verify the information of a client for accuracy before proceeding. Click on the Client ID.
1/16/2018 ProviderConnect - End User Training v8.0 Page 10 of 45
ProviderConnect: Add New Client/Client Search
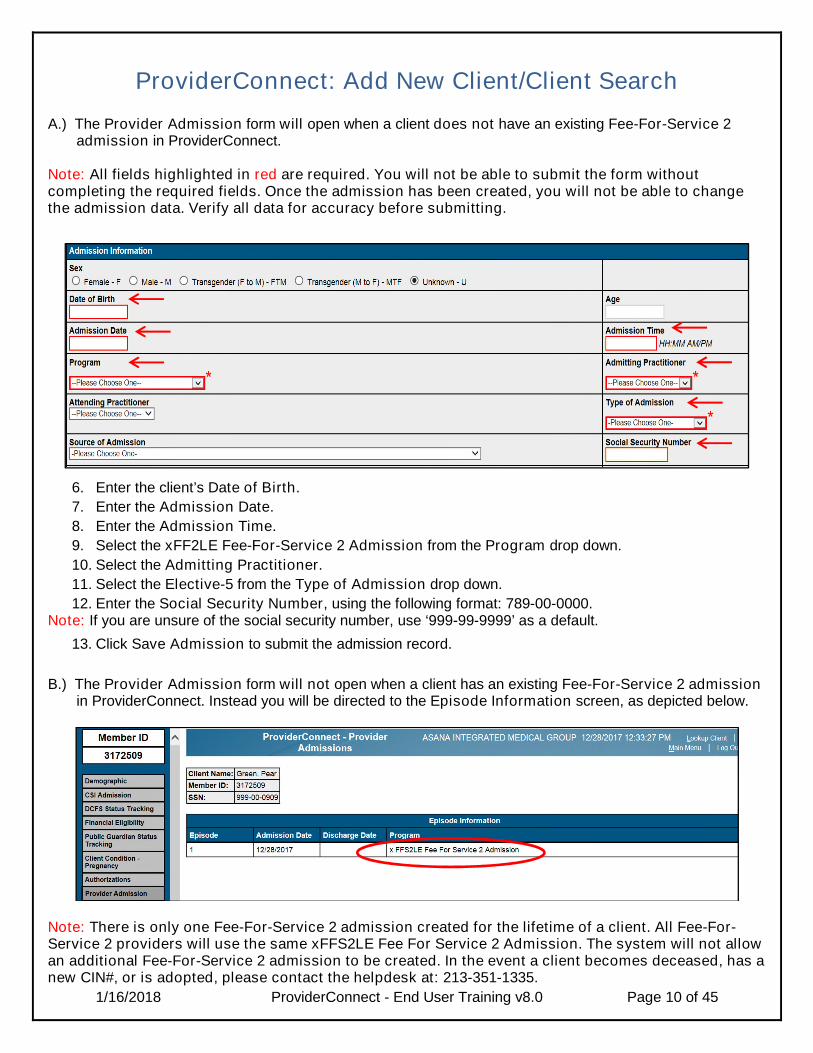
A.) The Provider Admission form will open when a client does not have an existing Fee-For-Service 2admission in ProviderConnect.
Note: All fields highlighted in red are required. You will not be able to submit the form withoutcompleting the required fields. Once the admission has been created, you will not be able to changethe admission data. Verify all data for accuracy before submitting.
6. Enter the client’s Date of Birth.
7. Enter the Admission Date.
8. Enter the Admission Time.
9. Select the xFF2LE Fee-For-Service 2 Admission from the Program drop down.
10. Select the Admitting Practitioner.
11. Select the Elective-5 from the Type of Admission drop down.
12. Enter the Social Security Number, using the following format: 789-00-0000.Note: If you are unsure of the social security number, use ‘999-99-9999’ as a default.
13. Click Save Admission to submit the admission record.
B.) The Provider Admission form will not open when a client has an existing Fee-For-Service 2 admissionin ProviderConnect. Instead you will be directed to the Episode Information screen, as depicted below.
Note: There is only one Fee-For-Service 2 admission created for the lifetime of a client. All Fee-For-Service 2 providers will use the same xFFS2LE Fee For Service 2 Admission. The system will not allowan additional Fee-For-Service 2 admission to be created. In the event a client becomes deceased, has anew CIN#, or is adopted, please contact the helpdesk at: 213-351-1335.

1/16/2018 ProviderConnect - End User Training v8.0 Page 11 of 45
ProviderConnect: Provider Admission
The Provider Admission is used to create an episode for a client to record the episode number, the
admission date and the program.
Note: For the lifetime of a client, only one Fee-For-Service 2 admission can exist in ProviderConnect.
Once this admission has been created, all Fee-For-Service 2 providers will use the same admission.
When a client appears in the Add New Client/Client Search and you select the Client ID, the Provider
Admission form will open when a client does not have an existing Fee-For-Service 2 admission in
ProviderConnect. The Provider Admission will need to be completed, as illustrated on page 10.
After the Fee-For-Service 2 admission has been created and for view of all the admission episodes that may
exist within the system for a client, you begin:
1. From the Main Menu and click on Add New Client/Client Search.
2. Enter the client’s data into the following fields and click the Search button.
3. Verify the information for accuracy before proceeding. Click on the Client ID.
1/16/2018 ProviderConnect - End User Training v8.0 Page 12 of 45
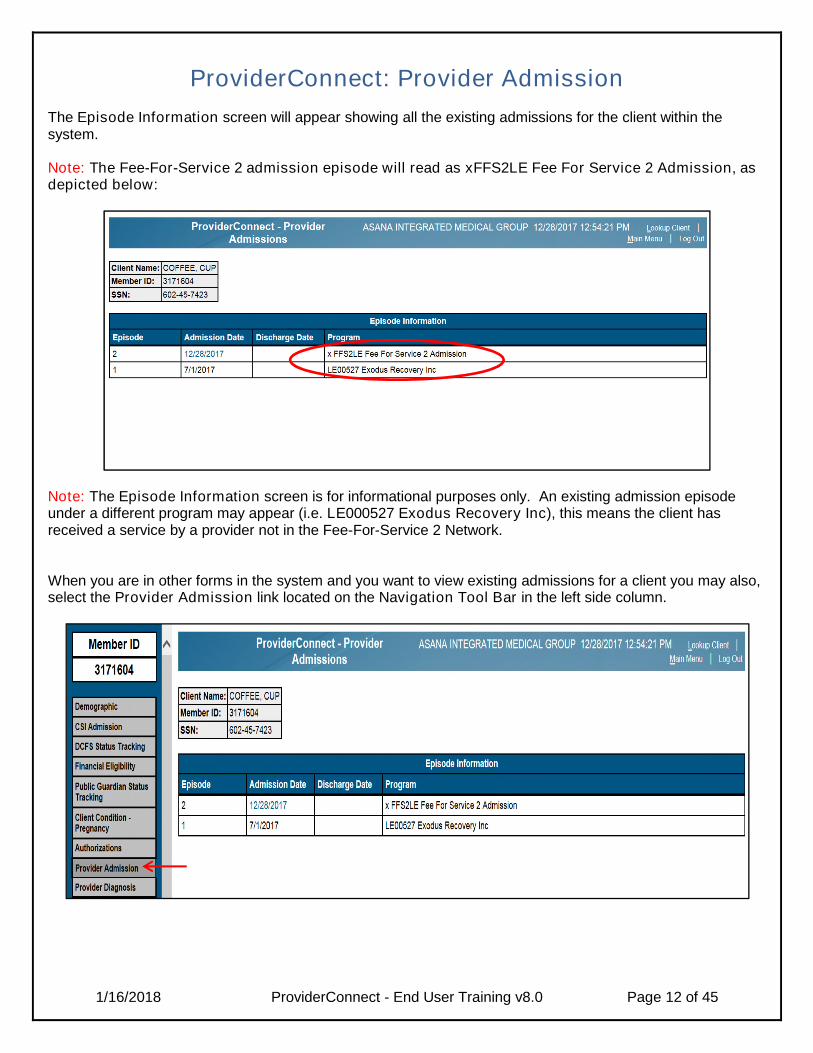
ProviderConnect: Provider Admission
The Episode Information screen will appear showing all the existing admissions for the client within thesystem.
Note: The Fee-For-Service 2 admission episode will read as xFFS2LE Fee For Service 2 Admission, asdepicted below:
Note: The Episode Information screen is for informational purposes only. An existing admission episodeunder a different program may appear (i.e. LE000527 Exodus Recovery Inc), this means the client hasreceived a service by a provider not in the Fee-For-Service 2 Network.
When you are in other forms in the system and you want to view existing admissions for a client you may also,select the Provider Admission link located on the Navigation Tool Bar in the left side column.

1/16/2018 ProviderConnect - End User Training v8.0 Page 13 of 45
ProviderConnect: Navigation Tool Bar
Note: The Navigation Tool Bar on the left side column allows you the ability to access different forms.
Note: All other forms not identified with arrows are not applicable to Fee For Service 2 providers (e.g.DCFS Status Tracking, Public Guardian Status Tracking, Day Treatment/MHS Authorization Details,Outpatient Treatment Auth. Request, Plan Communication).
Complete or updateDemographics
CompleteCSI Admission
Complete or viewExisting Admissions
Allows you to attachdocuments you wish to
share with LACDMH
Complete or viewAuthorizations
Complete or updateFinancial Eligibility
Complete ClientCondition –Pregnancy,
if applicable
Complete or updateProvider Diagnosis
(ICD-10)
Complete or viewSystemwide Annual
Liability
1/16/2018 ProviderConnect - End User Training v8.0 Page 14 of 45
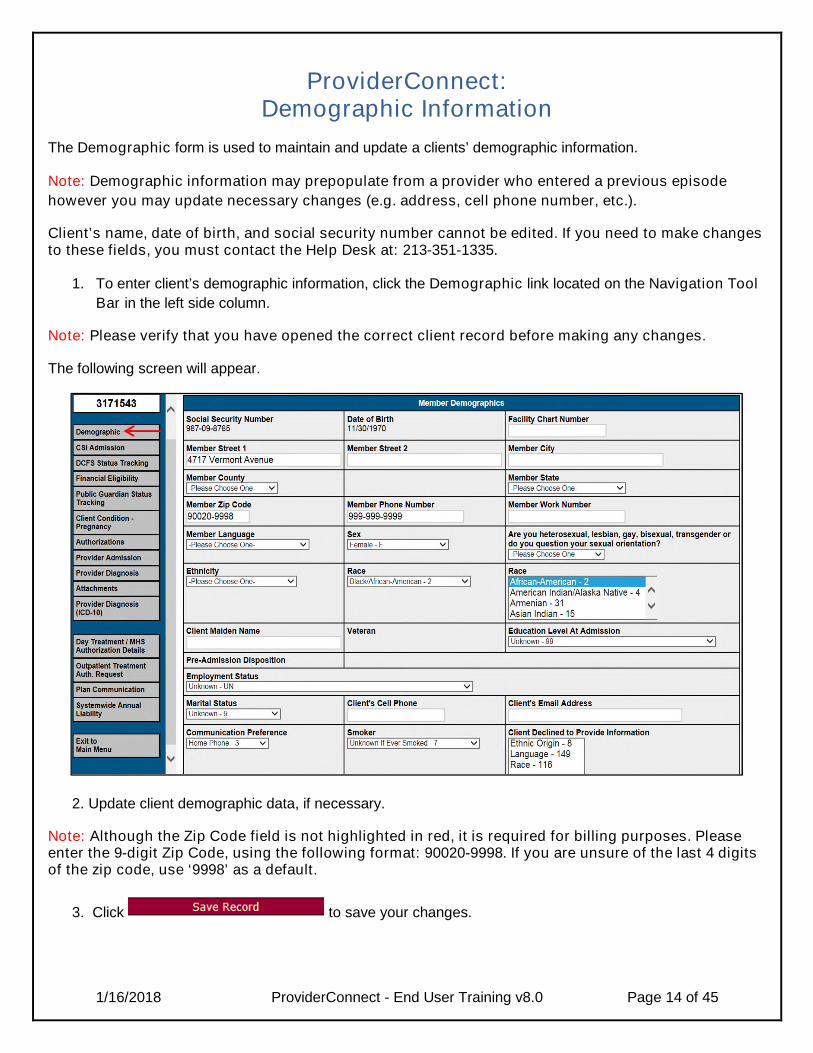
ProviderConnect:Demographic Information
The Demographic form is used to maintain and update a clients’ demographic information.
Note: Demographic information may prepopulate from a provider who entered a previous episode
however you may update necessary changes (e.g. address, cell phone number, etc.).
Client’s name, date of birth, and social security number cannot be edited. If you need to make changesto these fields, you must contact the Help Desk at: 213-351-1335.
1. To enter client’s demographic information, click the Demographic link located on the Navigation Tool
Bar in the left side column.
Note: Please verify that you have opened the correct client record before making any changes.
The following screen will appear.
2. Update client demographic data, if necessary.
Note: Although the Zip Code field is not highlighted in red, it is required for billing purposes. Pleaseenter the 9-digit Zip Code, using the following format: 90020-9998. If you are unsure of the last 4 digitsof the zip code, use ‘9998’ as a default.
3. Click to save your changes.
1/16/2018 ProviderConnect - End User Training v8.0 Page 15 of 45
ProviderConnect:
Provider Diagnosis (ICD10)
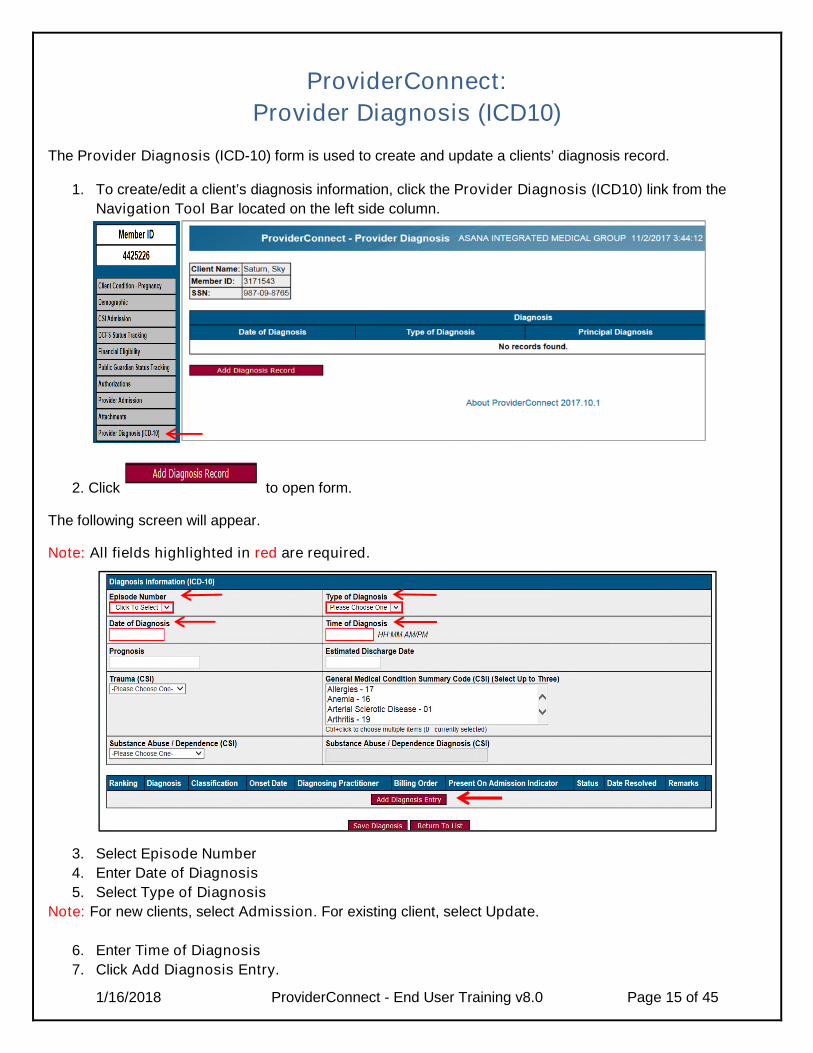
The Provider Diagnosis (ICD-10) form is used to create and update a clients’ diagnosis record.
1. To create/edit a client’s diagnosis information, click the Provider Diagnosis (ICD10) link from the
Navigation Tool Bar located on the left side column.
2. Click to open form.
The following screen will appear.
Note: All fields highlighted in red are required.
3. Select Episode Number
4. Enter Date of Diagnosis
5. Select Type of Diagnosis
Note: For new clients, select Admission. For existing client, select Update.
6. Enter Time of Diagnosis
7. Click Add Diagnosis Entry.
1/16/2018 ProviderConnect - End User Training v8.0 Page 16 of 45
ProviderConnect:Provider Diagnosis (ICD10)
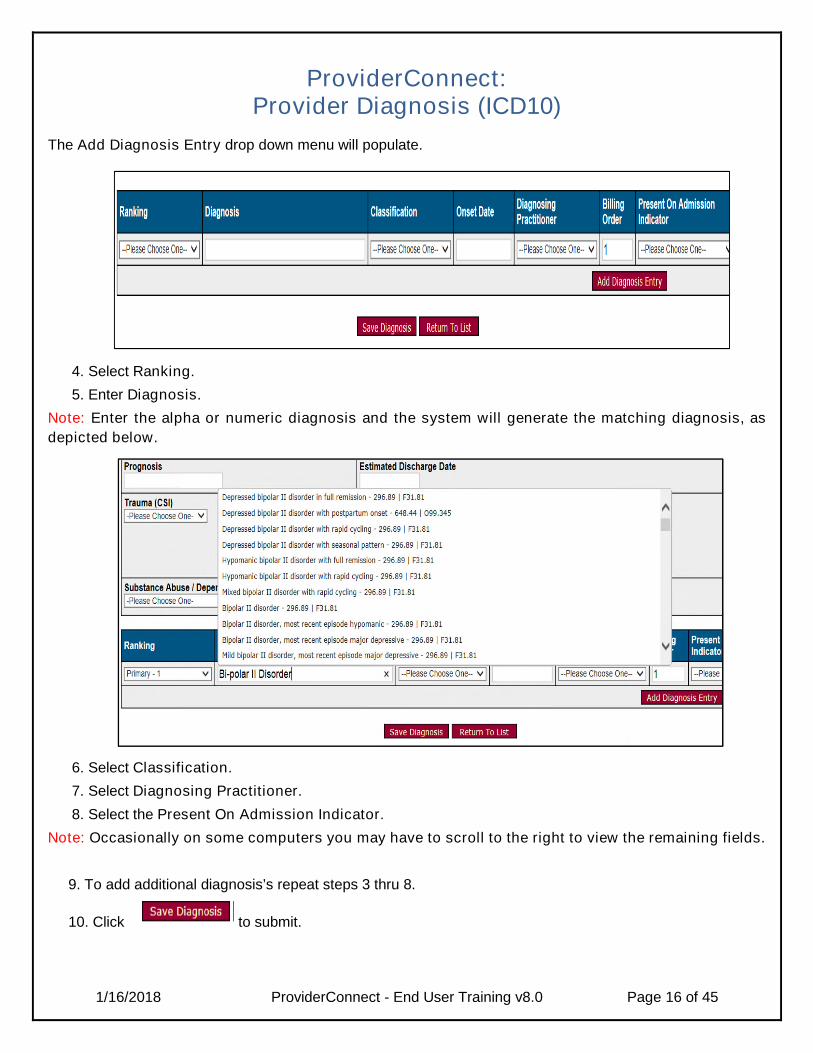
The Add Diagnosis Entry drop down menu will populate.
4. Select Ranking.
5. Enter Diagnosis.
Note: Enter the alpha or numeric diagnosis and the system will generate the matching diagnosis, as
depicted below.
6. Select Classification.
7. Select Diagnosing Practitioner.
8. Select the Present On Admission Indicator.
Note: Occasionally on some computers you may have to scroll to the right to view the remaining fields.
9. To add additional diagnosis’s repeat steps 3 thru 8.
10. Click to submit.
1/16/2018 ProviderConnect - End User Training v8.0 Page 17 of 45
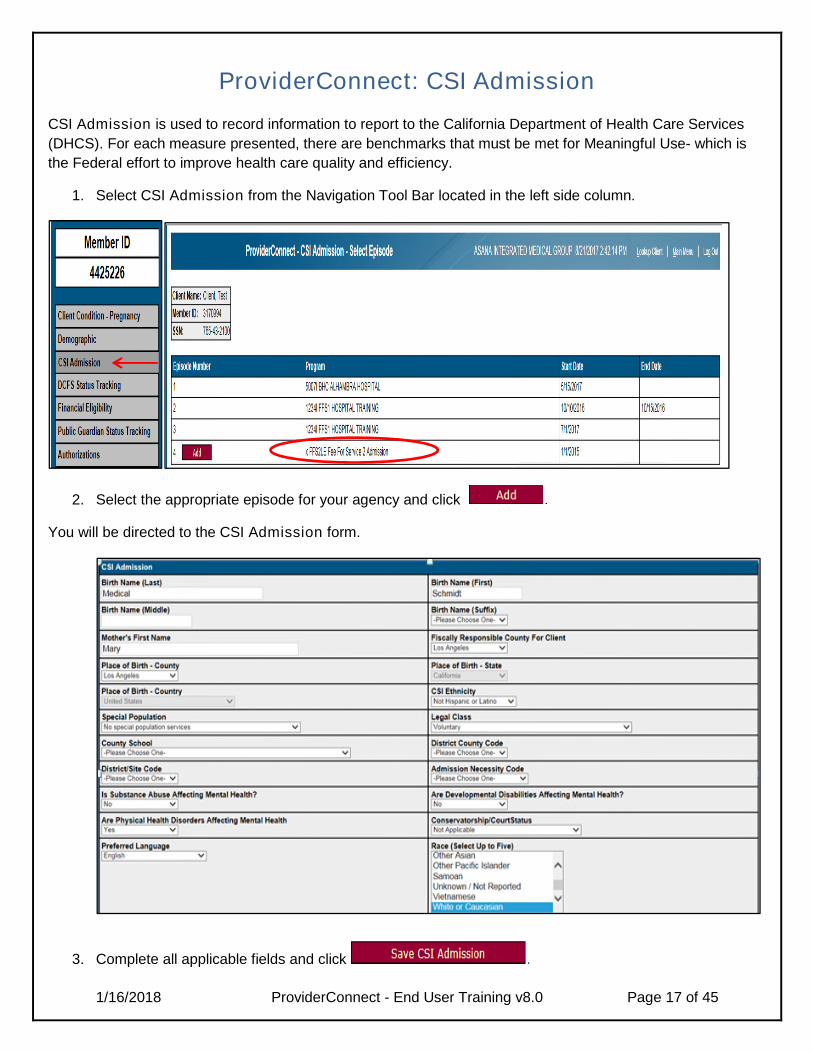
ProviderConnect: CSI Admission
CSI Admission is used to record information to report to the California Department of Health Care Services
(DHCS). For each measure presented, there are benchmarks that must be met for Meaningful Use- which is
the Federal effort to improve health care quality and efficiency.
1. Select CSI Admission from the Navigation Tool Bar located in the left side column.
2. Select the appropriate episode for your agency and click .
You will be directed to the CSI Admission form.
3. Complete all applicable fields and click .
1/16/2018 ProviderConnect - End User Training v8.0 Page 18 of 45
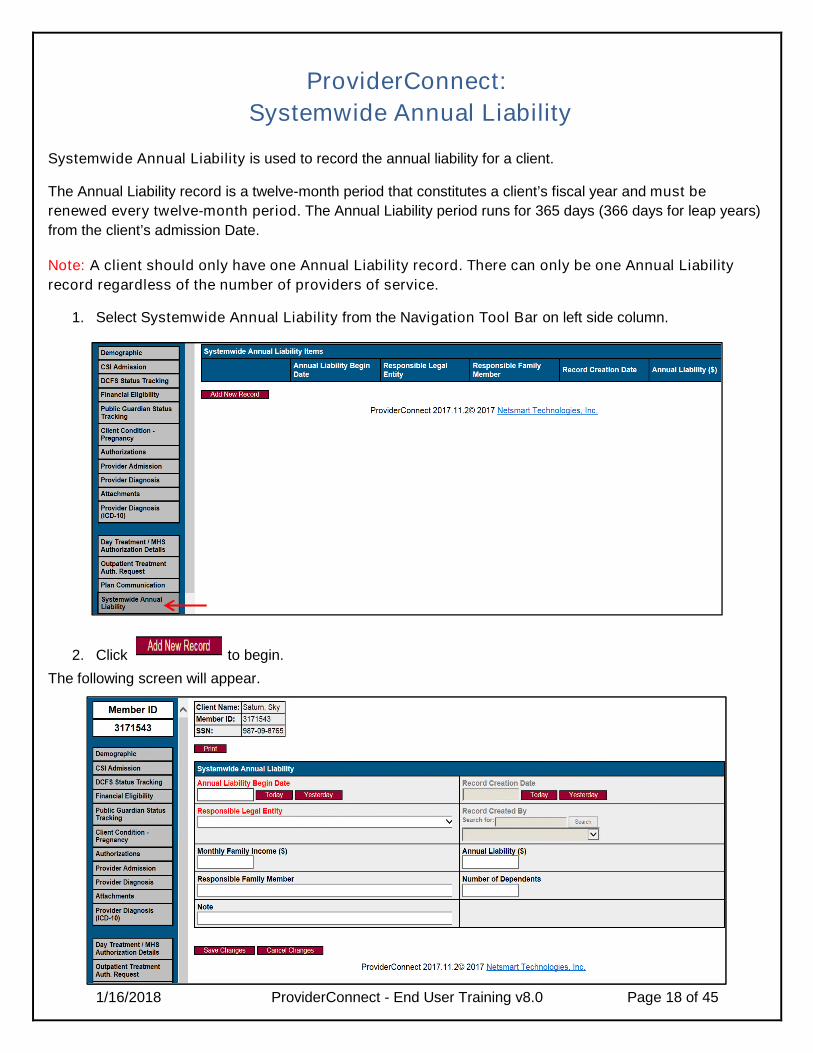
ProviderConnect:
Systemwide Annual Liability
Systemwide Annual Liability is used to record the annual liability for a client.
The Annual Liability record is a twelve-month period that constitutes a client’s fiscal year and must be
renewed every twelve-month period. The Annual Liability period runs for 365 days (366 days for leap years)
from the client’s admission Date.
Note: A client should only have one Annual Liability record. There can only be one Annual Liability
record regardless of the number of providers of service.
1. Select Systemwide Annual Liability from the Navigation Tool Bar on left side column.
2. Click to begin.
The following screen will appear.
1/16/2018 ProviderConnect - End User Training v8.0 Page 19 of 45
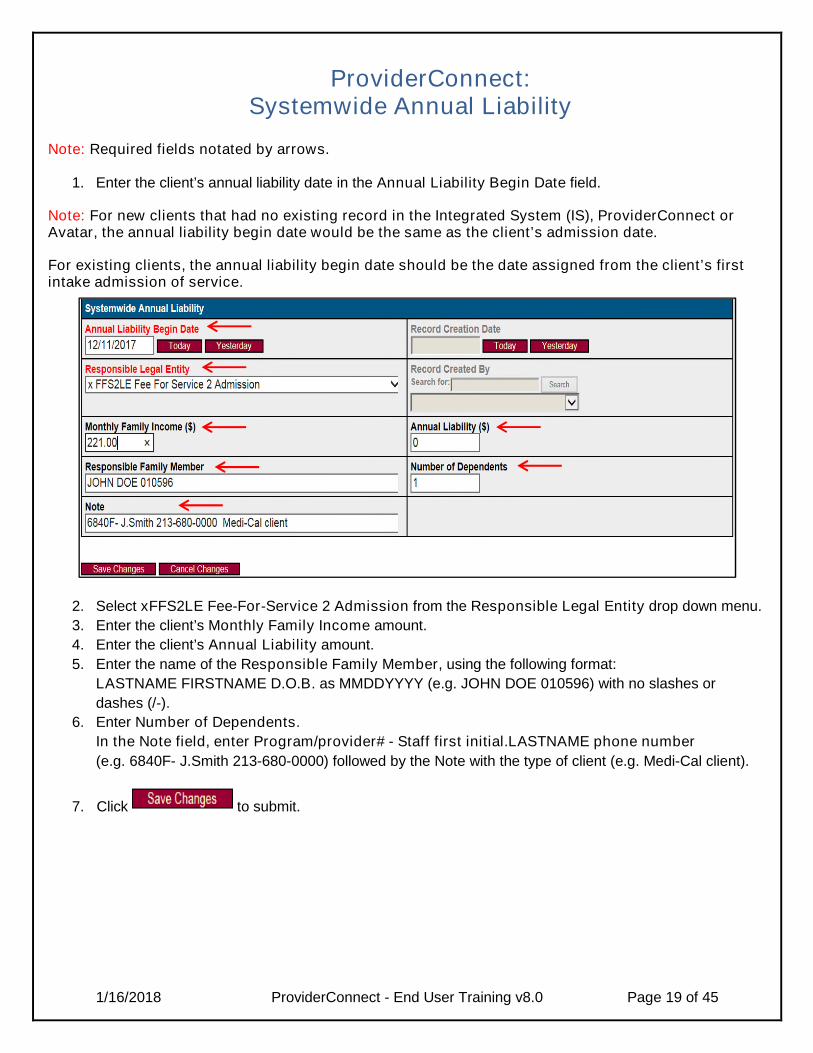
ProviderConnect:Systemwide Annual Liability
Note: Required fields notated by arrows.
1. Enter the client’s annual liability date in the Annual Liability Begin Date field.
Note: For new clients that had no existing record in the Integrated System (IS), ProviderConnect orAvatar, the annual liability begin date would be the same as the client’s admission date.
For existing clients, the annual liability begin date should be the date assigned from the client’s firstintake admission of service.
2. Select xFFS2LE Fee-For-Service 2 Admission from the Responsible Legal Entity drop down menu.
3. Enter the client’s Monthly Family Income amount.
4. Enter the client’s Annual Liability amount.
5. Enter the name of the Responsible Family Member, using the following format:
LASTNAME FIRSTNAME D.O.B. as MMDDYYYY (e.g. JOHN DOE 010596) with no slashes or
dashes (/-).
6. Enter Number of Dependents.
In the Note field, enter Program/provider# - Staff first initial.LASTNAME phone number
(e.g. 6840F- J.Smith 213-680-0000) followed by the Note with the type of client (e.g. Medi-Cal client).
7. Click to submit.
1/16/2018 ProviderConnect - End User Training v8.0 Page 20 of 45
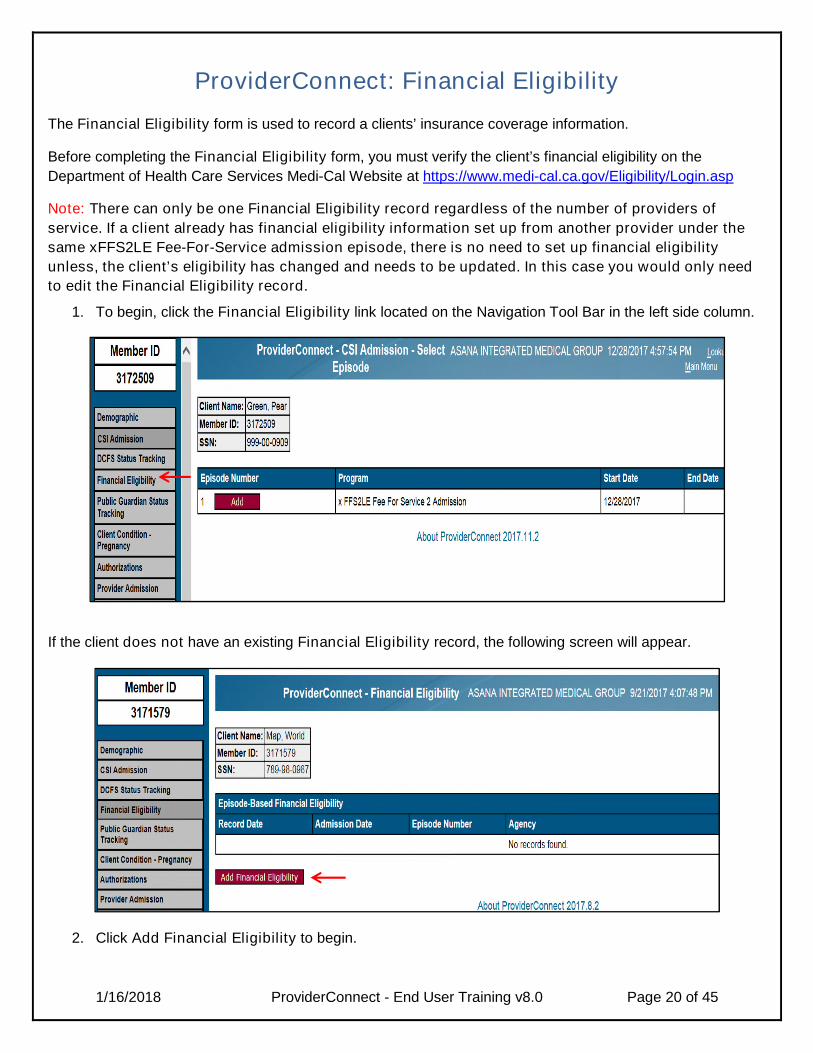
ProviderConnect: Financial Eligibility
The Financial Eligibility form is used to record a clients’ insurance coverage information.
Before completing the Financial Eligibility form, you must verify the client’s financial eligibility on the
Department of Health Care Services Medi-Cal Website at https://www.medi-cal.ca.gov/Eligibility/Login.asp
Note: There can only be one Financial Eligibility record regardless of the number of providers of
service. If a client already has financial eligibility information set up from another provider under the
same xFFS2LE Fee-For-Service admission episode, there is no need to set up financial eligibility
unless, the client’s eligibility has changed and needs to be updated. In this case you would only need
to edit the Financial Eligibility record.
1. To begin, click the Financial Eligibility link located on the Navigation Tool Bar in the left side column.
If the client does not have an existing Financial Eligibility record, the following screen will appear.
2. Click Add Financial Eligibility to begin.
1/16/2018 ProviderConnect - End User Training v8.0 Page 21 of 45
ProviderConnect: Financial Eligibility
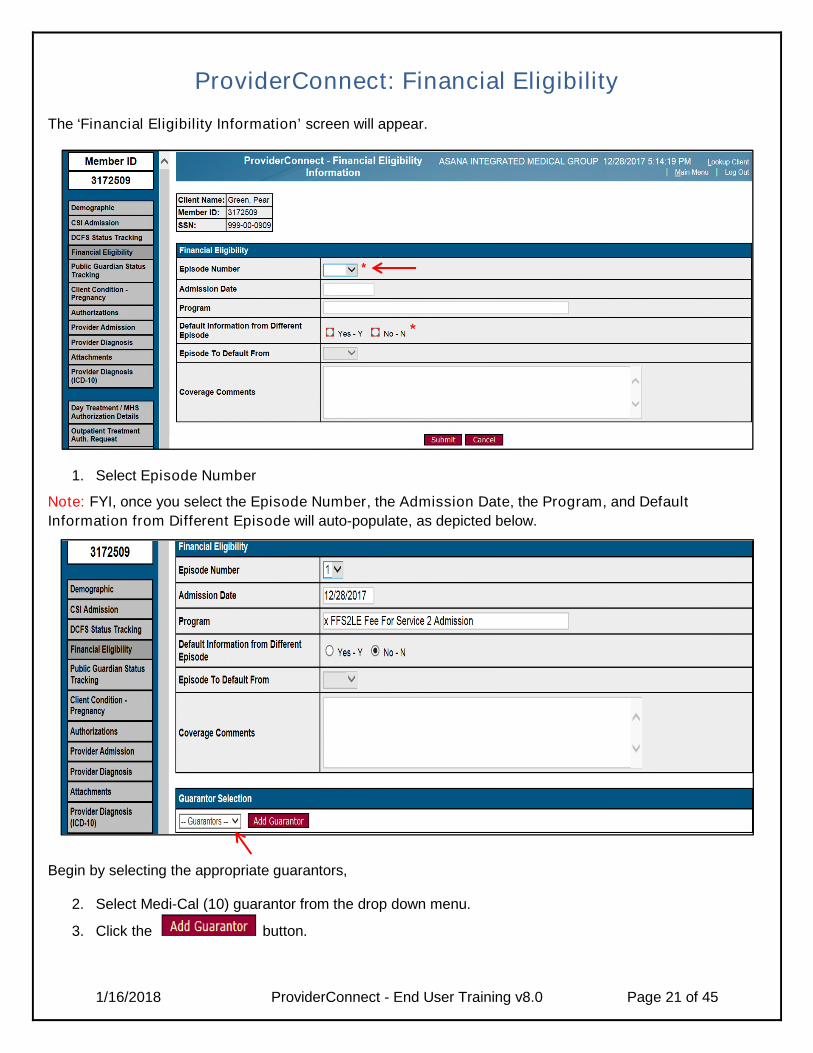
The ‘Financial Eligibility Information’ screen will appear.
1. Select Episode Number
Note: FYI, once you select the Episode Number, the Admission Date, the Program, and Default
Information from Different Episode will auto-populate, as depicted below.
Begin by selecting the appropriate guarantors,
2. Select Medi-Cal (10) guarantor from the drop down menu.
3. Click the button.
1/16/2018 ProviderConnect - End User Training v8.0 Page 22 of 45
ProviderConnect: Financial Eligibility
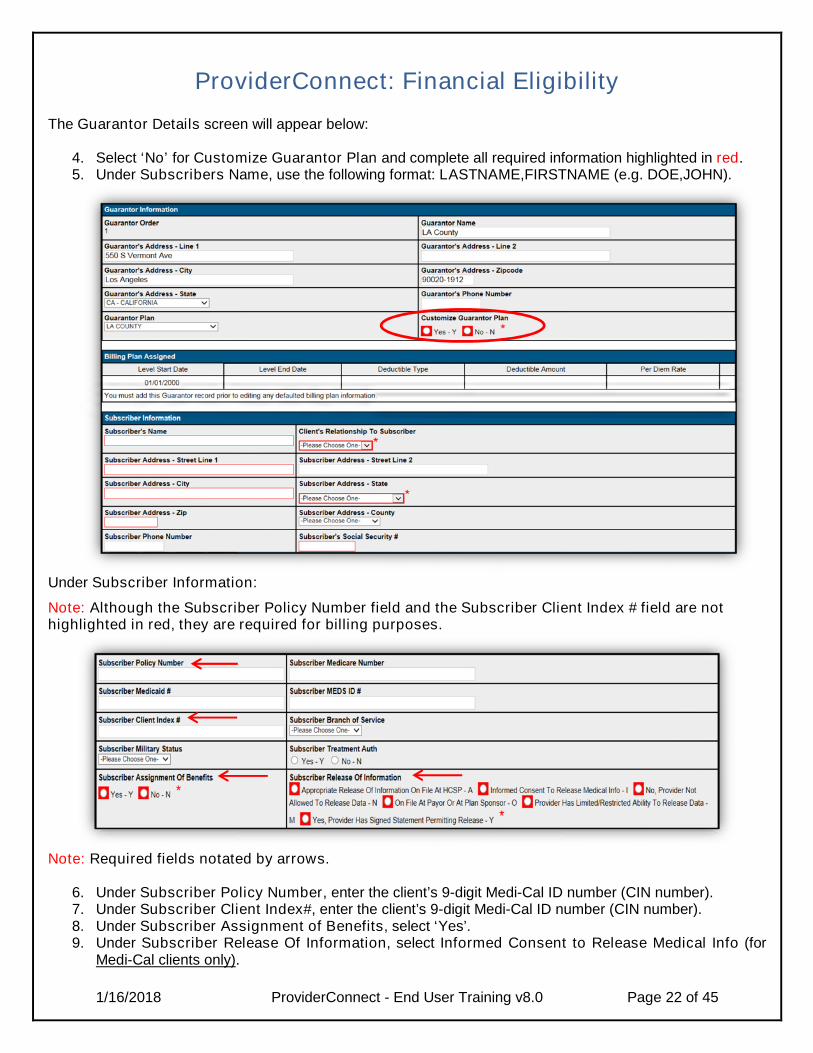
The Guarantor Details screen will appear below:
4. Select ‘No’ for Customize Guarantor Plan and complete all required information highlighted in red.5. Under Subscribers Name, use the following format: LASTNAME,FIRSTNAME (e.g. DOE,JOHN).
Under Subscriber Information:
Note: Although the Subscriber Policy Number field and the Subscriber Client Index # field are nothighlighted in red, they are required for billing purposes.
Note: Required fields notated by arrows.
6. Under Subscriber Policy Number, enter the client’s 9-digit Medi-Cal ID number (CIN number).7. Under Subscriber Client Index#, enter the client’s 9-digit Medi-Cal ID number (CIN number).8. Under Subscriber Assignment of Benefits, select ‘Yes’.9. Under Subscriber Release Of Information, select Informed Consent to Release Medical Info (for
Medi-Cal clients only).
1/16/2018 ProviderConnect - End User Training v8.0 Page 23 of 45
ProviderConnect: Financial Eligibility
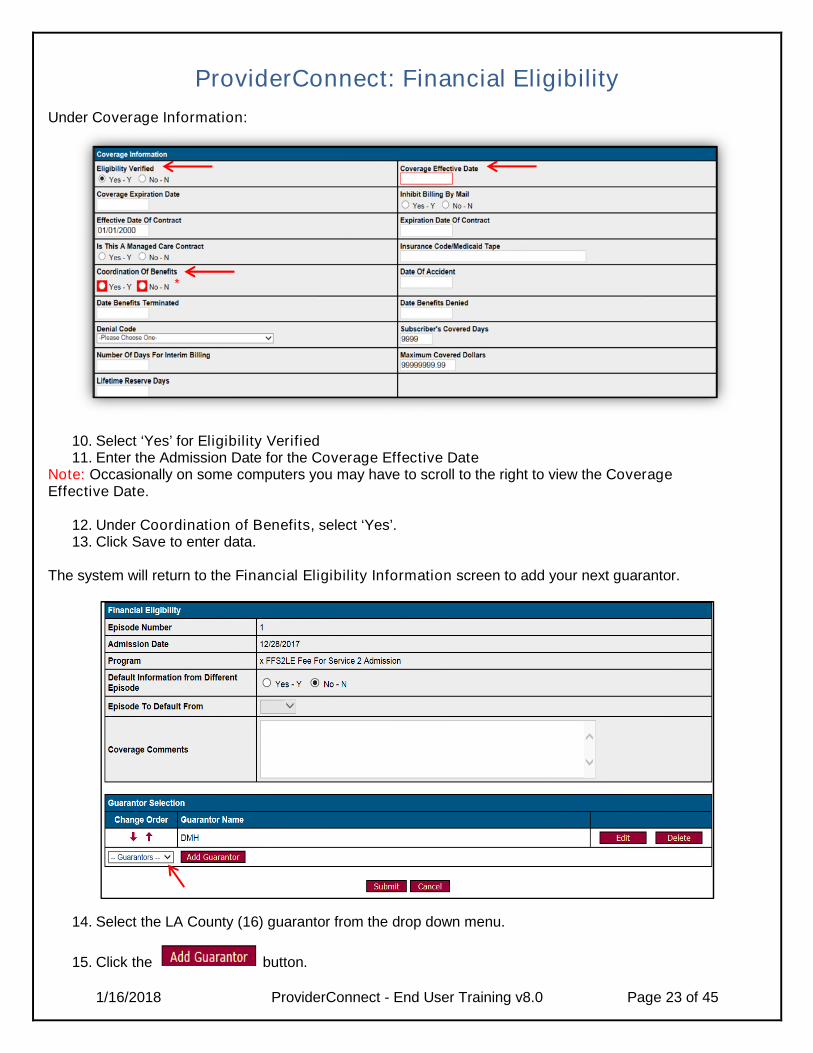
Under Coverage Information:
10. Select ‘Yes’ for Eligibility Verified11. Enter the Admission Date for the Coverage Effective Date
Note: Occasionally on some computers you may have to scroll to the right to view the CoverageEffective Date.
12. Under Coordination of Benefits, select ‘Yes’.13. Click Save to enter data.
The system will return to the Financial Eligibility Information screen to add your next guarantor.
14. Select the LA County (16) guarantor from the drop down menu.
15. Click the button.

1/16/2018 ProviderConnect - End User Training v8.0 Page 24 of 45
ProviderConnect: Financial Eligibility
The Guarantor Details screen will appear.
16. Select ‘No’ for Customize Guarantor Plan and complete all required information highlighted in red.17. Under Subscribers Name, use the following format: LASTNAME,FIRSTNAME (e.g. DOE,JOHN).
Under Subscriber Information:
Note: Although the Subscriber Policy Number field is not highlighted in red, it is required for billingpurposes.
Note: Required fields notated by arrows.
18. Under the Subscriber Policy Number, enter the client’s social security number (for LA Countyguarantor only).
Note: If you are unsure of the social security number, use ‘999-99-9999’ as a default.
19. Under Subscriber Assignment of Benefits, select ‘Yes’.20. Under the Subscriber Release of Information, select Yes, Provider Has Signed Statement Permitting
Release-Y (for LA County guarantor only).
1/16/2018 ProviderConnect - End User Training v8.0 Page 25 of 45
ProviderConnect: Financial Eligibility
Under Coverage Information:
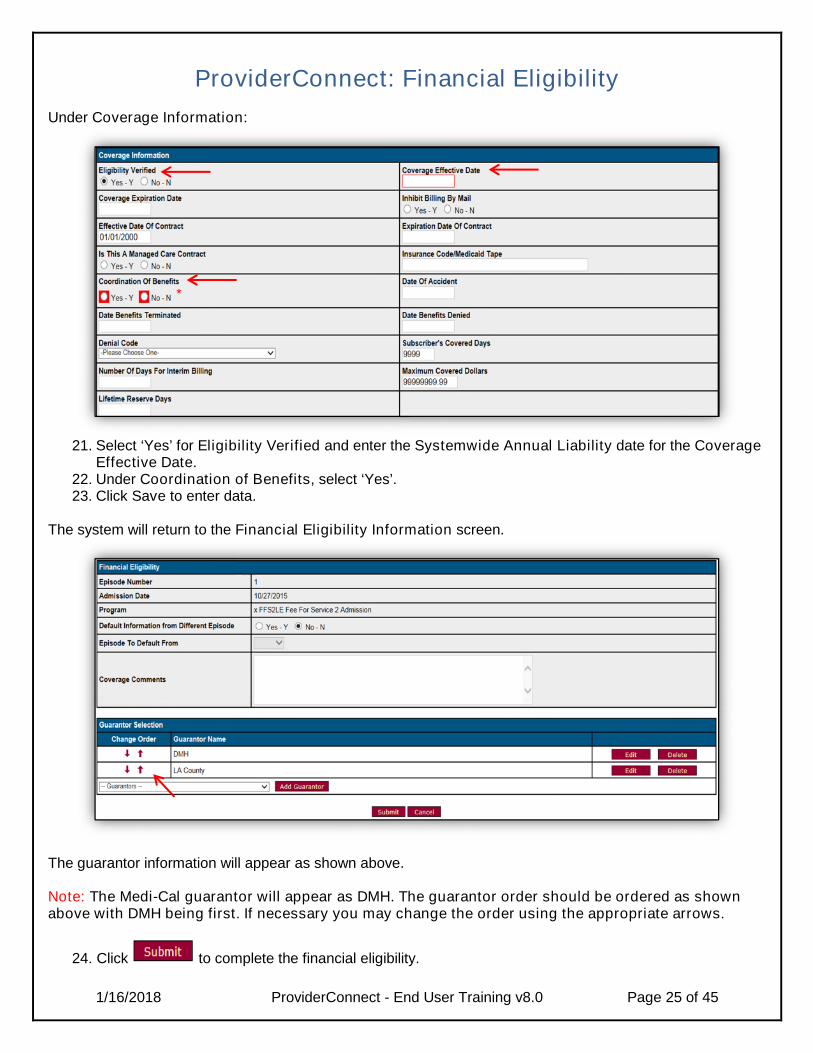
21. Select ‘Yes’ for Eligibility Verified and enter the Systemwide Annual Liability date for the CoverageEffective Date.
22. Under Coordination of Benefits, select ‘Yes’.23. Click Save to enter data.
The system will return to the Financial Eligibility Information screen.
The guarantor information will appear as shown above.
Note: The Medi-Cal guarantor will appear as DMH. The guarantor order should be ordered as shownabove with DMH being first. If necessary you may change the order using the appropriate arrows.
24. Click to complete the financial eligibility.
1/16/2018 ProviderConnect - End User Training v8.0 Page 26 of 45
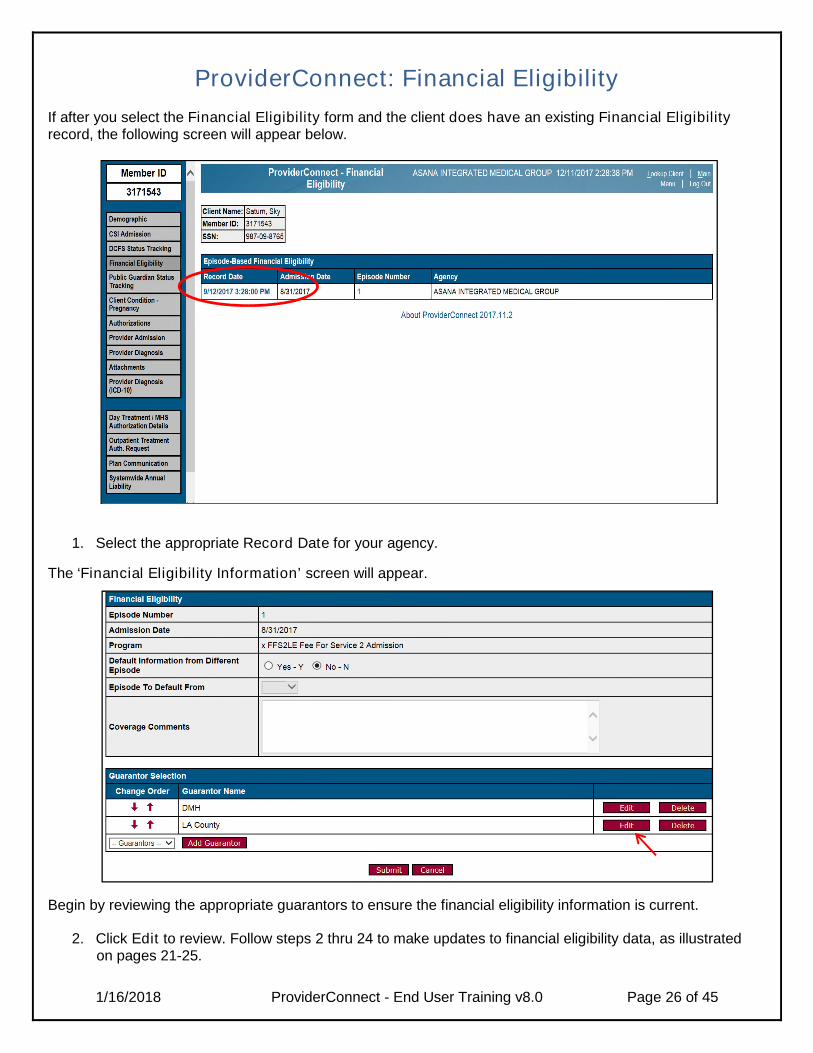
ProviderConnect: Financial Eligibility
If after you select the Financial Eligibility form and the client does have an existing Financial Eligibilityrecord, the following screen will appear below.
1. Select the appropriate Record Date for your agency.
The ‘Financial Eligibility Information’ screen will appear.
Begin by reviewing the appropriate guarantors to ensure the financial eligibility information is current.
2. Click Edit to review. Follow steps 2 thru 24 to make updates to financial eligibility data, as illustratedon pages 21-25.
1/16/2018 ProviderConnect - End User Training v8.0 Page 27 of 45
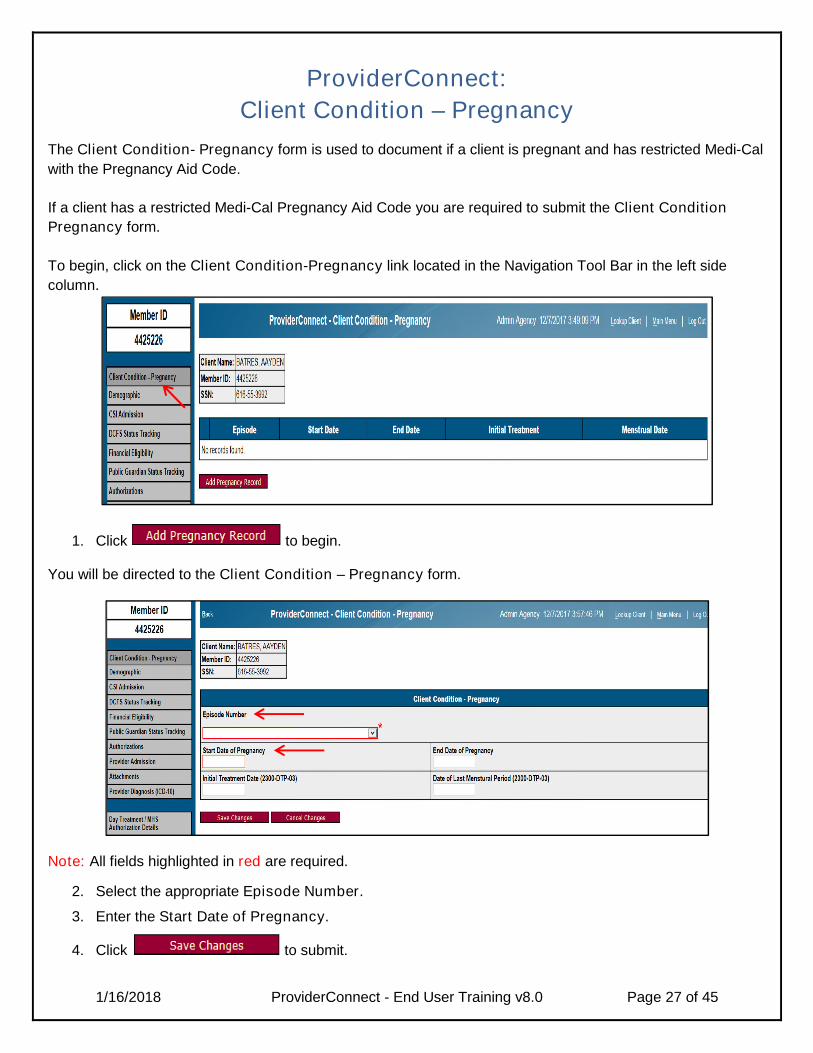
ProviderConnect:
Client Condition – Pregnancy
The Client Condition- Pregnancy form is used to document if a client is pregnant and has restricted Medi-Cal
with the Pregnancy Aid Code.
If a client has a restricted Medi-Cal Pregnancy Aid Code you are required to submit the Client Condition
Pregnancy form.
To begin, click on the Client Condition-Pregnancy link located in the Navigation Tool Bar in the left side
column.
1. Click to begin.
You will be directed to the Client Condition – Pregnancy form.
Note: All fields highlighted in red are required.
2. Select the appropriate Episode Number.
3. Enter the Start Date of Pregnancy.
4. Click to submit.
1/16/2018 ProviderConnect - End User Training v8.0 Page 28 of 45
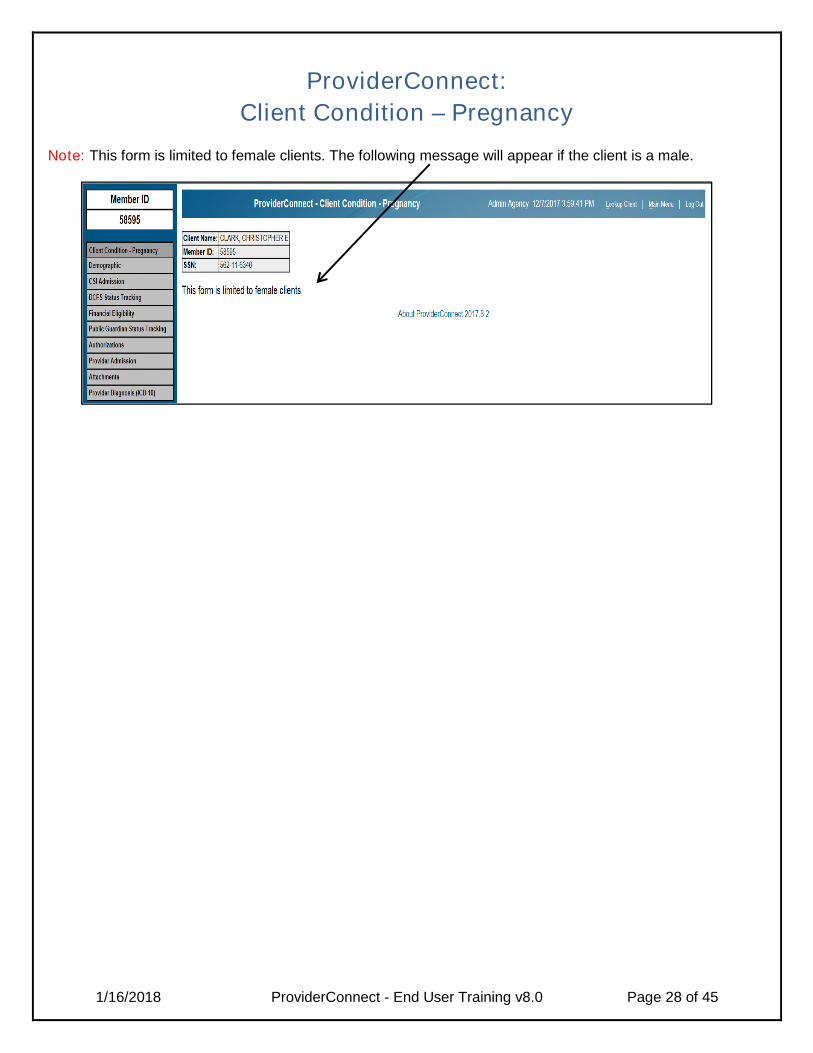
ProviderConnect:
Client Condition – Pregnancy
Note: This form is limited to female clients. The following message will appear if the client is a male.
1/16/2018 ProviderConnect - End User Training v8.0 Page 29 of 45
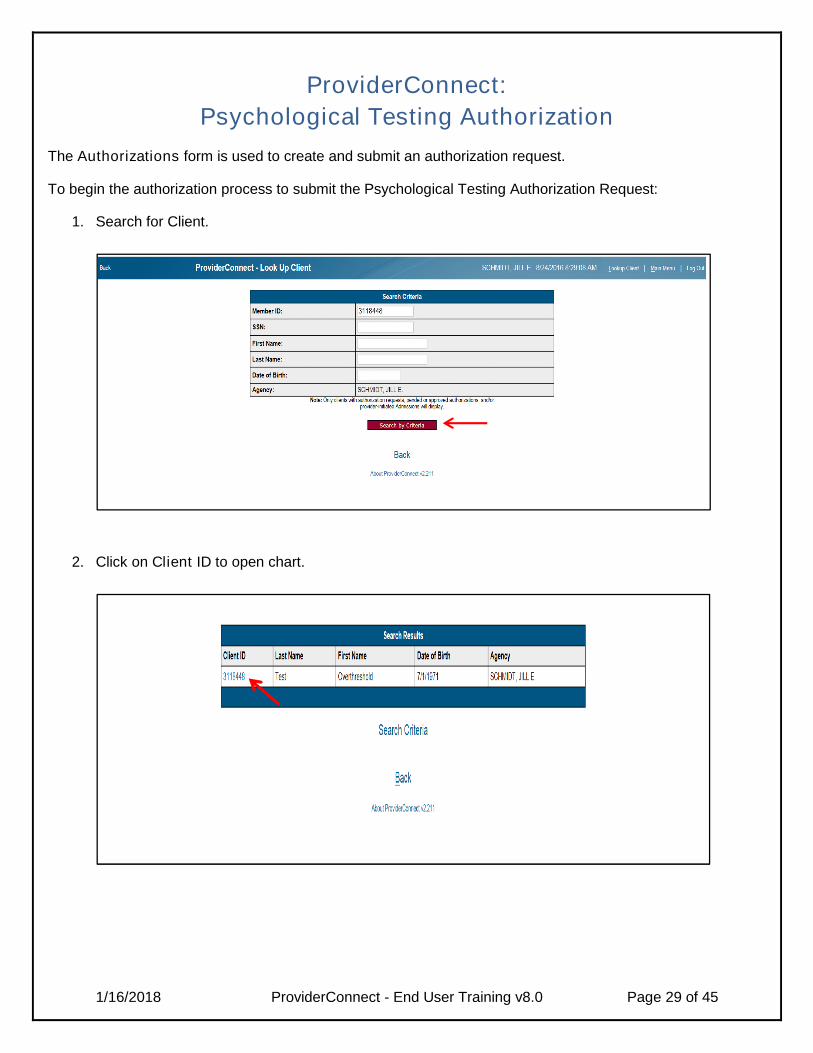
ProviderConnect:
Psychological Testing Authorization
The Authorizations form is used to create and submit an authorization request.
To begin the authorization process to submit the Psychological Testing Authorization Request:
1. Search for Client.
2. Click on Client ID to open chart.
1/16/2018 ProviderConnect - End User Training v8.0 Page 30 of 45
ProviderConnect:Psychological Testing Authorization
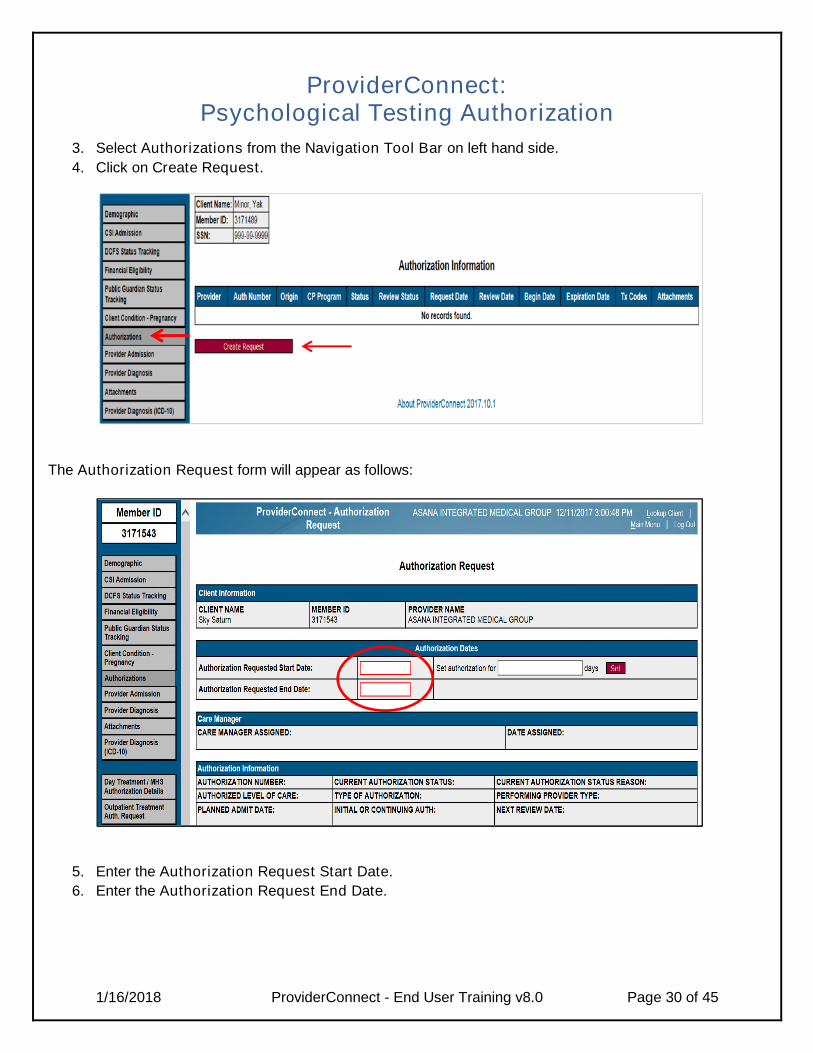
3. Select Authorizations from the Navigation Tool Bar on left hand side.
4. Click on Create Request.
The Authorization Request form will appear as follows:
5. Enter the Authorization Request Start Date.
6. Enter the Authorization Request End Date.
1/16/2018 ProviderConnect - End User Training v8.0 Page 31 of 45
ProviderConnect:
Psychological Testing Authorization
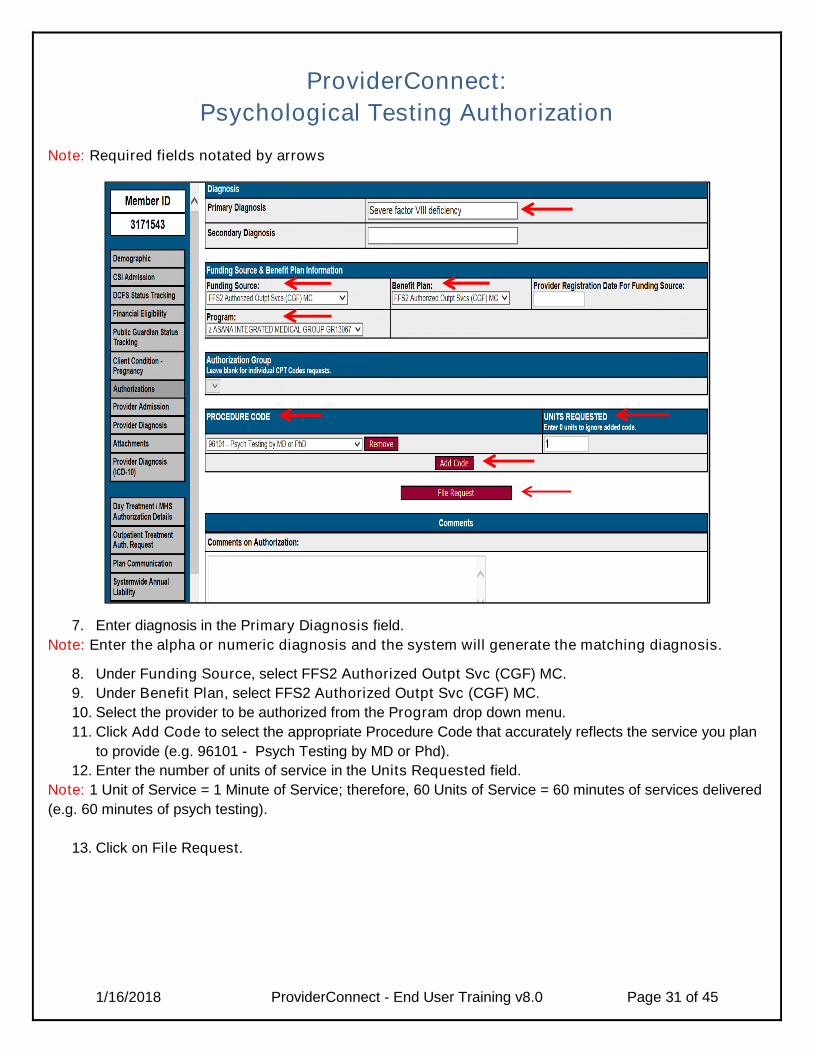
Note: Required fields notated by arrows
7. Enter diagnosis in the Primary Diagnosis field.
Note: Enter the alpha or numeric diagnosis and the system will generate the matching diagnosis.
8. Under Funding Source, select FFS2 Authorized Outpt Svc (CGF) MC.
9. Under Benefit Plan, select FFS2 Authorized Outpt Svc (CGF) MC.
10. Select the provider to be authorized from the Program drop down menu.
11. Click Add Code to select the appropriate Procedure Code that accurately reflects the service you plan
to provide (e.g. 96101 - Psych Testing by MD or Phd).
12. Enter the number of units of service in the Units Requested field.
Note: 1 Unit of Service = 1 Minute of Service; therefore, 60 Units of Service = 60 minutes of services delivered
(e.g. 60 minutes of psych testing).
13. Click on File Request.
1/16/2018 ProviderConnect - End User Training v8.0 Page 32 of 45
ProviderConnect:Psychological Testing Authorization
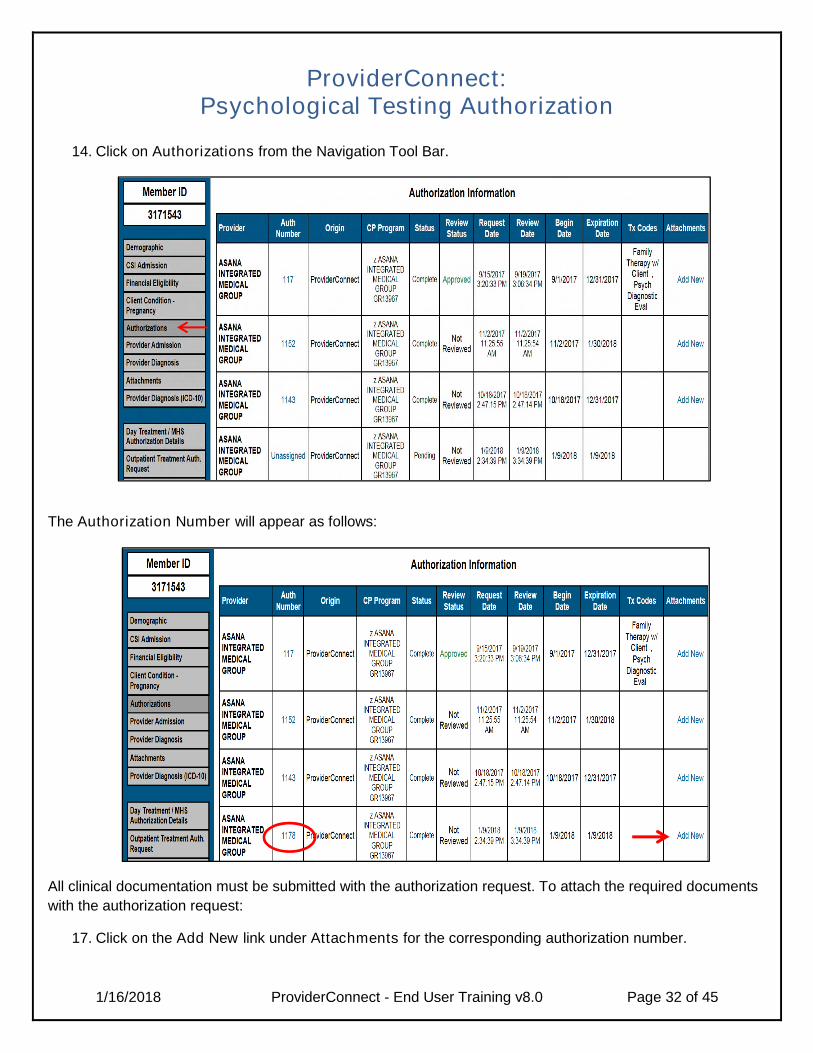
14. Click on Authorizations from the Navigation Tool Bar.
The Authorization Number will appear as follows:
All clinical documentation must be submitted with the authorization request. To attach the required documents
with the authorization request:
17. Click on the Add New link under Attachments for the corresponding authorization number.
1/16/2018 ProviderConnect - End User Training v8.0 Page 33 of 45
ProviderConnect:Psychological Testing Authorization
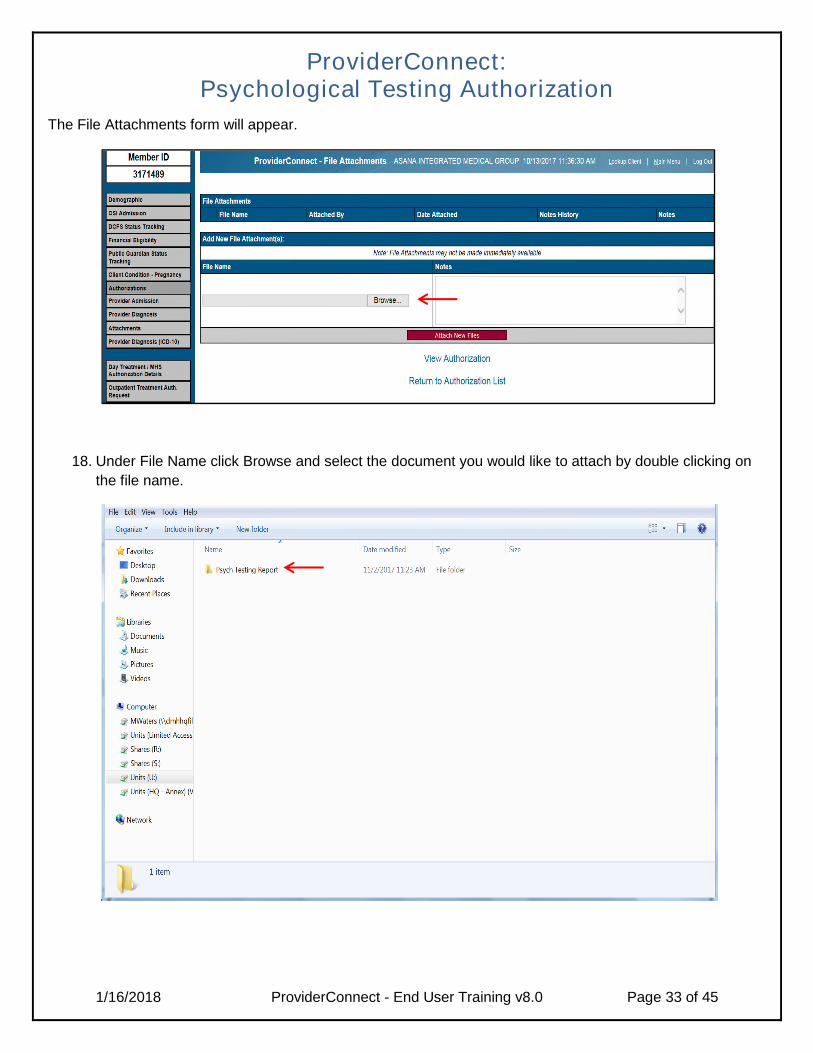
The File Attachments form will appear.
18. Under File Name click Browse and select the document you would like to attach by double clicking on
the file name.
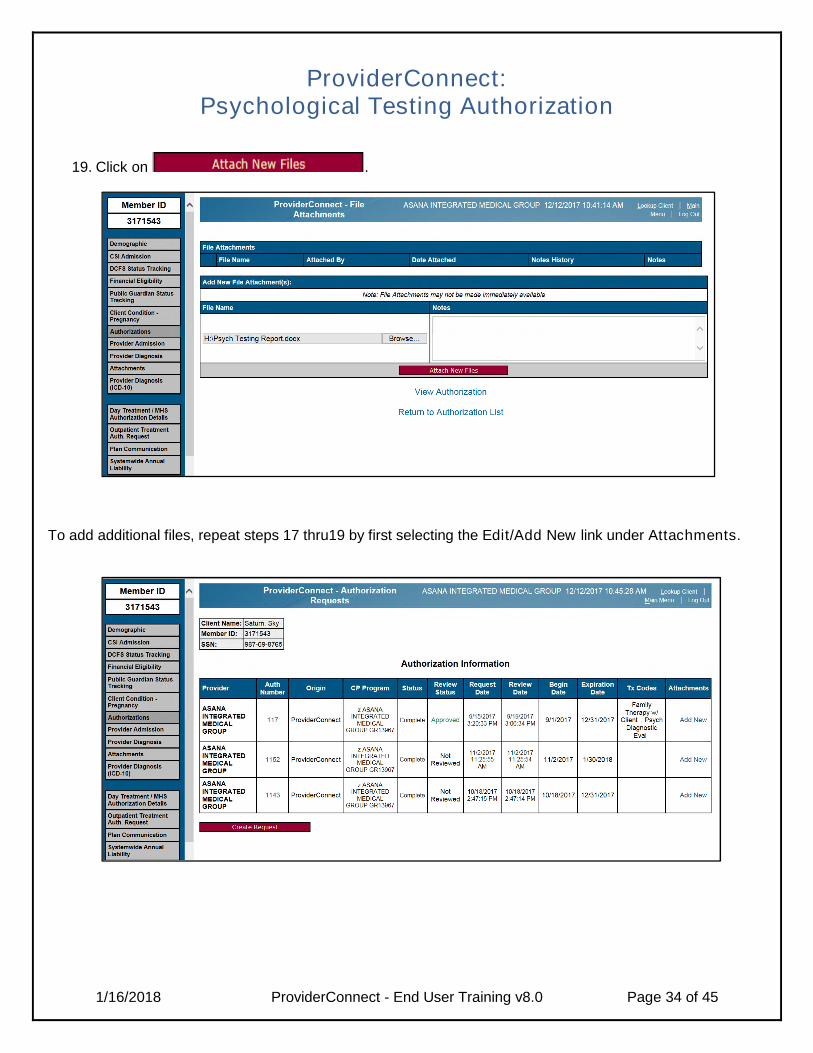
1/16/2018 ProviderConnect - End User Training v8.0 Page 34 of 45
ProviderConnect:Psychological Testing Authorization
19. Click on .
To add additional files, repeat steps 17 thru19 by first selecting the Edit/Add New link under Attachments.
1/16/2018 ProviderConnect - End User Training v8.0 Page 35 of 45
ProviderConnect:Psychological Testing Authorization
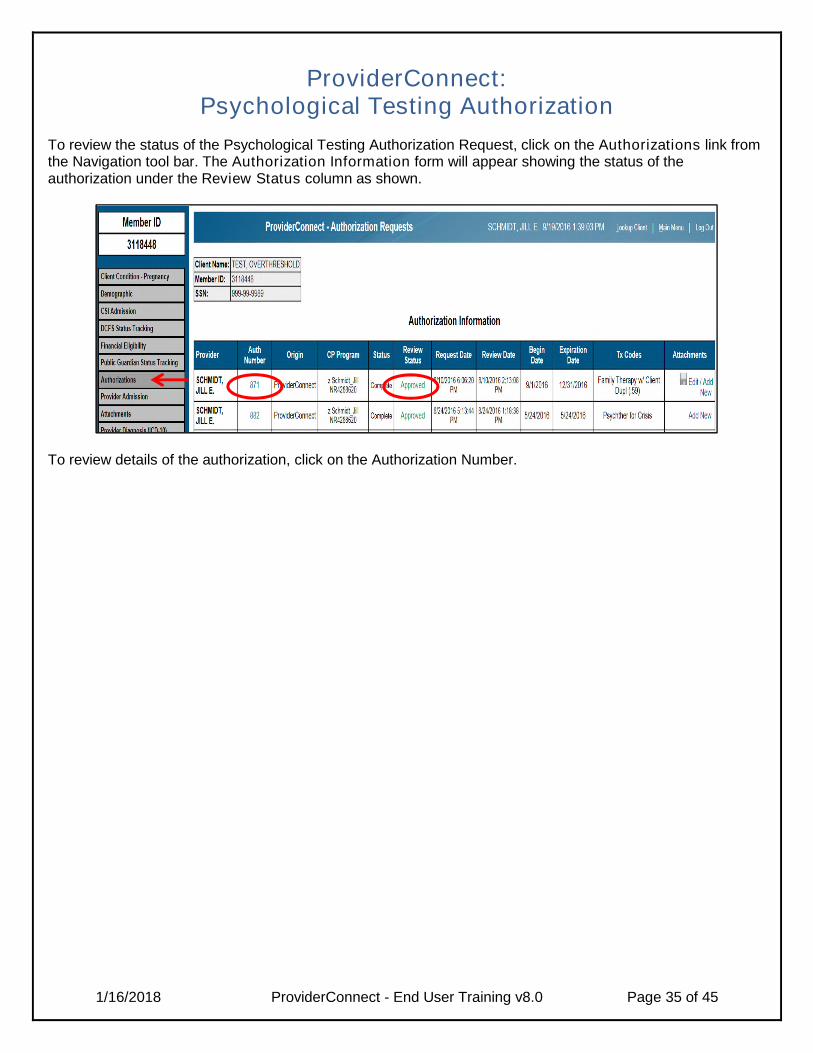
To review the status of the Psychological Testing Authorization Request, click on the Authorizations link fromthe Navigation tool bar. The Authorization Information form will appear showing the status of theauthorization under the Review Status column as shown.
To review details of the authorization, click on the Authorization Number.
1/16/2018 ProviderConnect - End User Training v8.0 Page 36 of 45
ProviderConnect:Over-Threshold Authorization
The Authorizations form is used to create and submit an authorization request.
Note: At the beginning of each trimester, the client starts over with 8 threshold services available.Providers should submit a request for Over-Threshold services as soon as they know the client willneed additional services for the trimester period. Trimesters are: January through April, May throughAugust, and September through December.
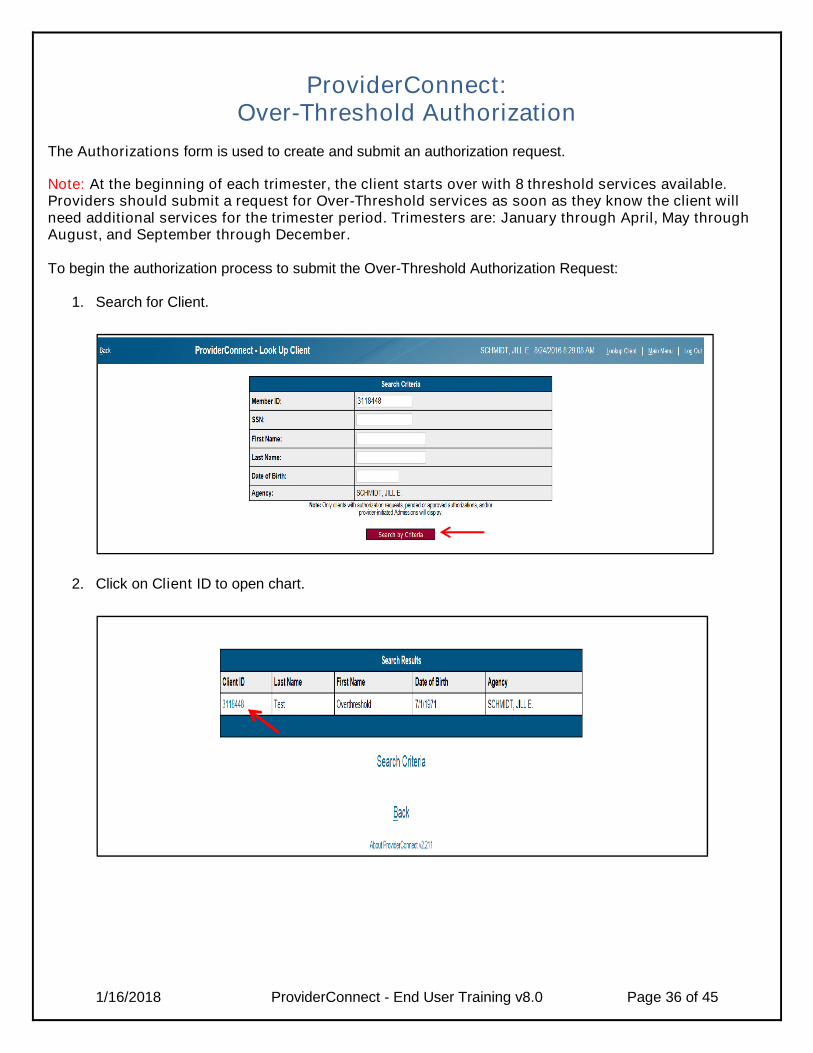
To begin the authorization process to submit the Over-Threshold Authorization Request:
1. Search for Client.
2. Click on Client ID to open chart.
1/16/2018 ProviderConnect - End User Training v8.0 Page 37 of 45
ProviderConnect:Over-Threshold Authorization
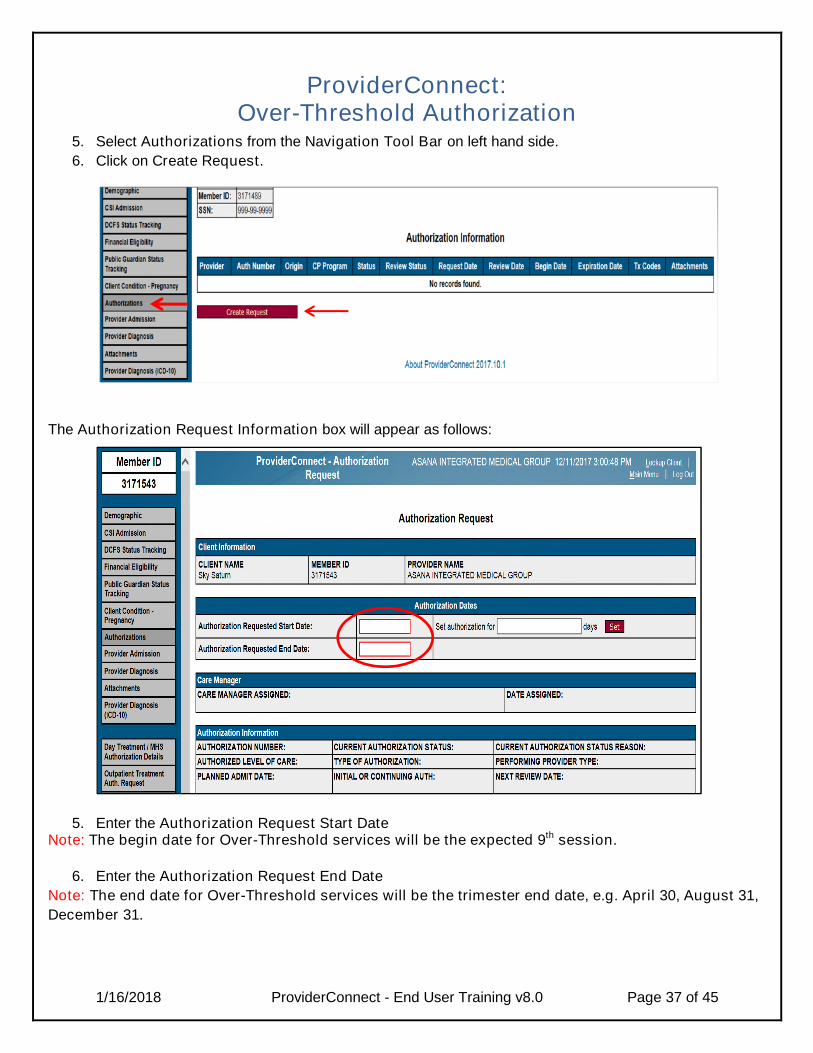
5. Select Authorizations from the Navigation Tool Bar on left hand side.
6. Click on Create Request.
The Authorization Request Information box will appear as follows:
5. Enter the Authorization Request Start DateNote: The begin date for Over-Threshold services will be the expected 9th session.
6. Enter the Authorization Request End Date
Note: The end date for Over-Threshold services will be the trimester end date, e.g. April 30, August 31,
December 31.
1/16/2018 ProviderConnect - End User Training v8.0 Page 38 of 45
ProviderConnect:
Over-Threshold Authorization
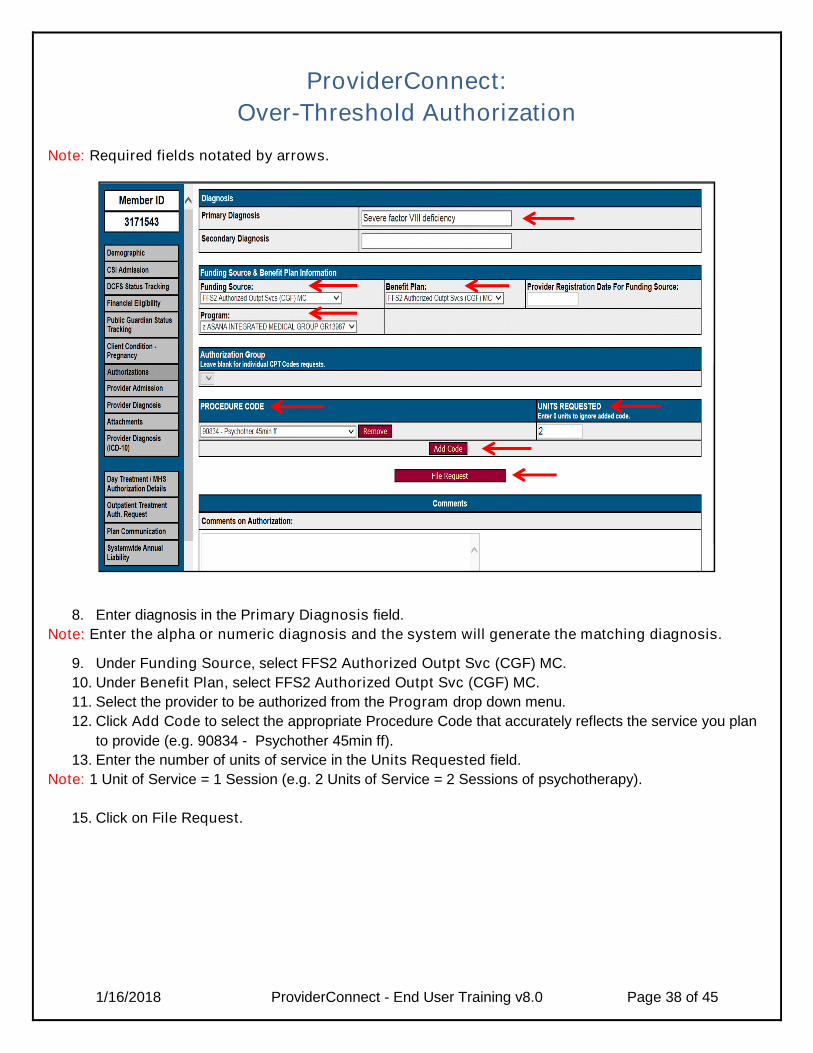
Note: Required fields notated by arrows.
8. Enter diagnosis in the Primary Diagnosis field.
Note: Enter the alpha or numeric diagnosis and the system will generate the matching diagnosis.
9. Under Funding Source, select FFS2 Authorized Outpt Svc (CGF) MC.
10. Under Benefit Plan, select FFS2 Authorized Outpt Svc (CGF) MC.
11. Select the provider to be authorized from the Program drop down menu.
12. Click Add Code to select the appropriate Procedure Code that accurately reflects the service you plan
to provide (e.g. 90834 - Psychother 45min ff).
13. Enter the number of units of service in the Units Requested field.
Note: 1 Unit of Service = 1 Session (e.g. 2 Units of Service = 2 Sessions of psychotherapy).
15. Click on File Request.
1/16/2018 ProviderConnect - End User Training v8.0 Page 39 of 45
ProviderConnect:Over-Threshold Authorization
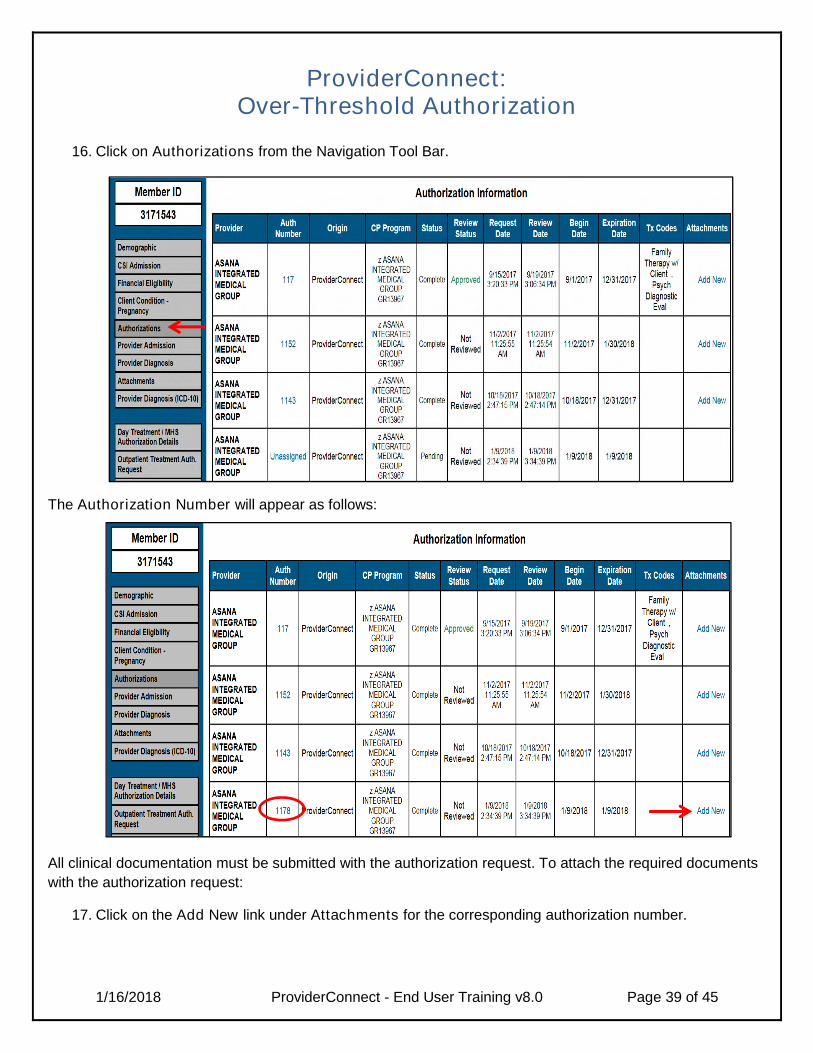
16. Click on Authorizations from the Navigation Tool Bar.
The Authorization Number will appear as follows:
All clinical documentation must be submitted with the authorization request. To attach the required documents
with the authorization request:
17. Click on the Add New link under Attachments for the corresponding authorization number.
1/16/2018 ProviderConnect - End User Training v8.0 Page 40 of 45
ProviderConnect:Over-Threshold Authorization
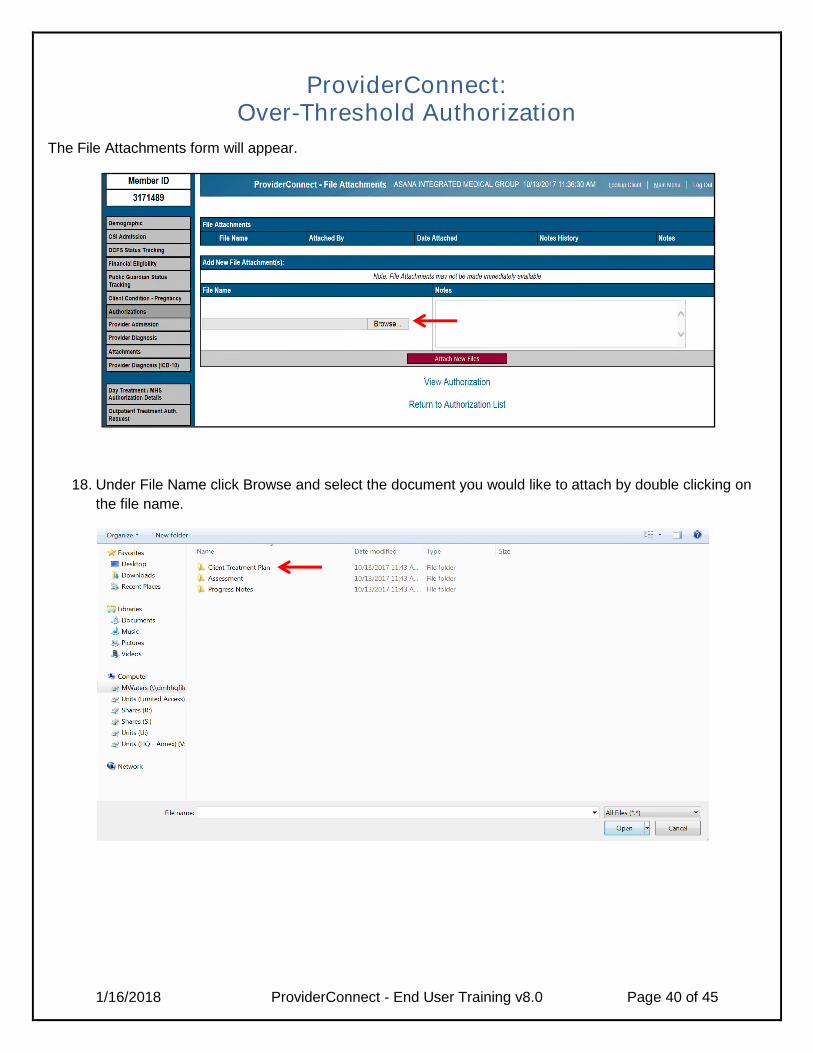
The File Attachments form will appear.
18. Under File Name click Browse and select the document you would like to attach by double clicking on
the file name.
1/16/2018 ProviderConnect - End User Training v8.0 Page 41 of 45
ProviderConnect:Over-Threshold Authorization
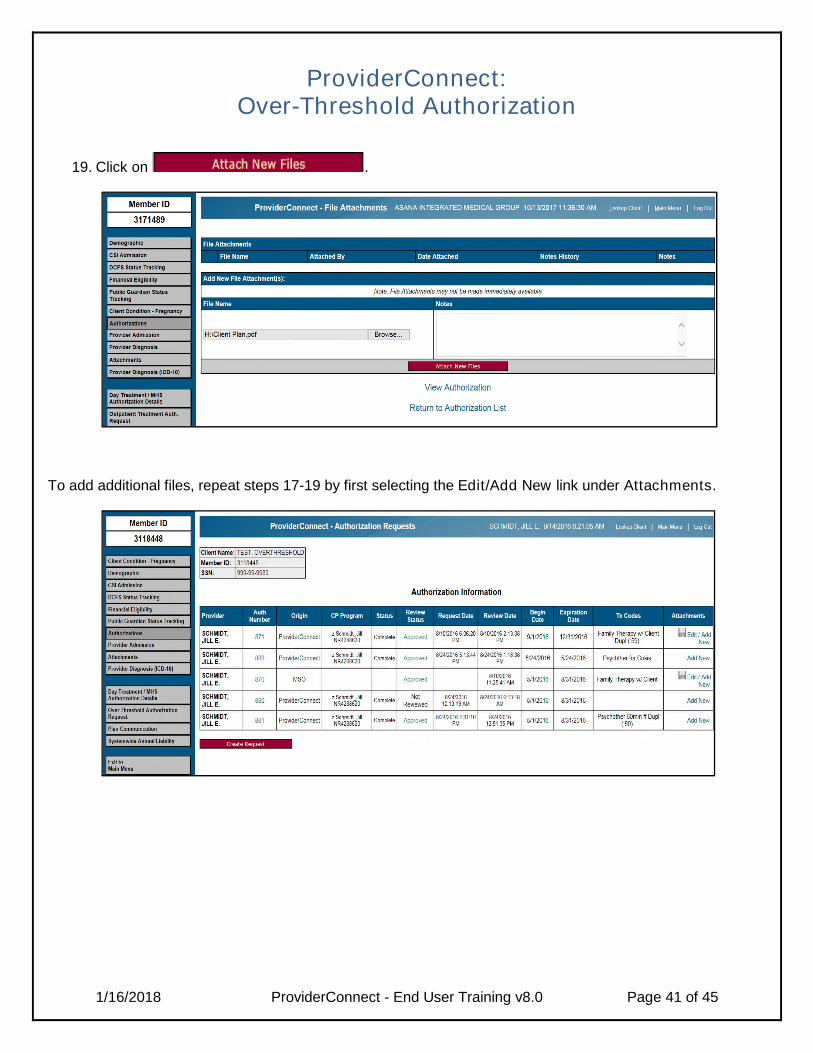
19. Click on .
To add additional files, repeat steps 17-19 by first selecting the Edit/Add New link under Attachments.
1/16/2018 ProviderConnect - End User Training v8.0 Page 42 of 45
ProviderConnect:Over-Threshold Authorization
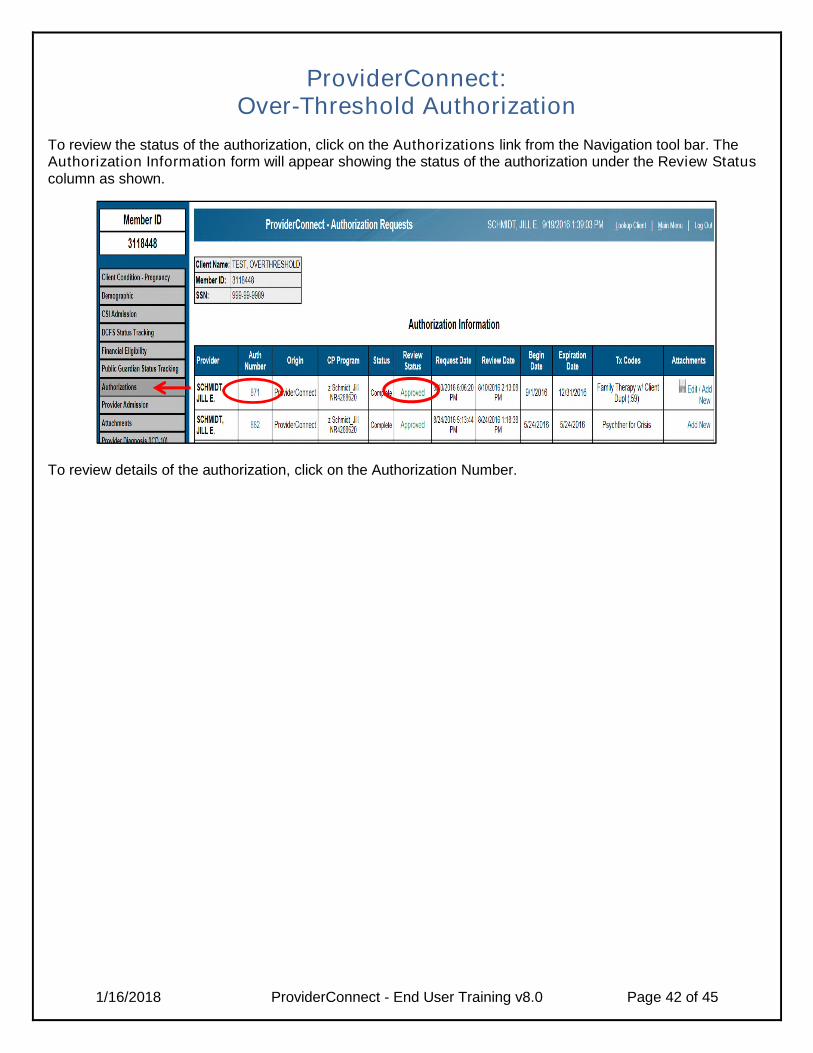
To review the status of the authorization, click on the Authorizations link from the Navigation tool bar. TheAuthorization Information form will appear showing the status of the authorization under the Review Statuscolumn as shown.
To review details of the authorization, click on the Authorization Number.
1/16/2018 ProviderConnect - End User Training v8.0 Page 43 of 45
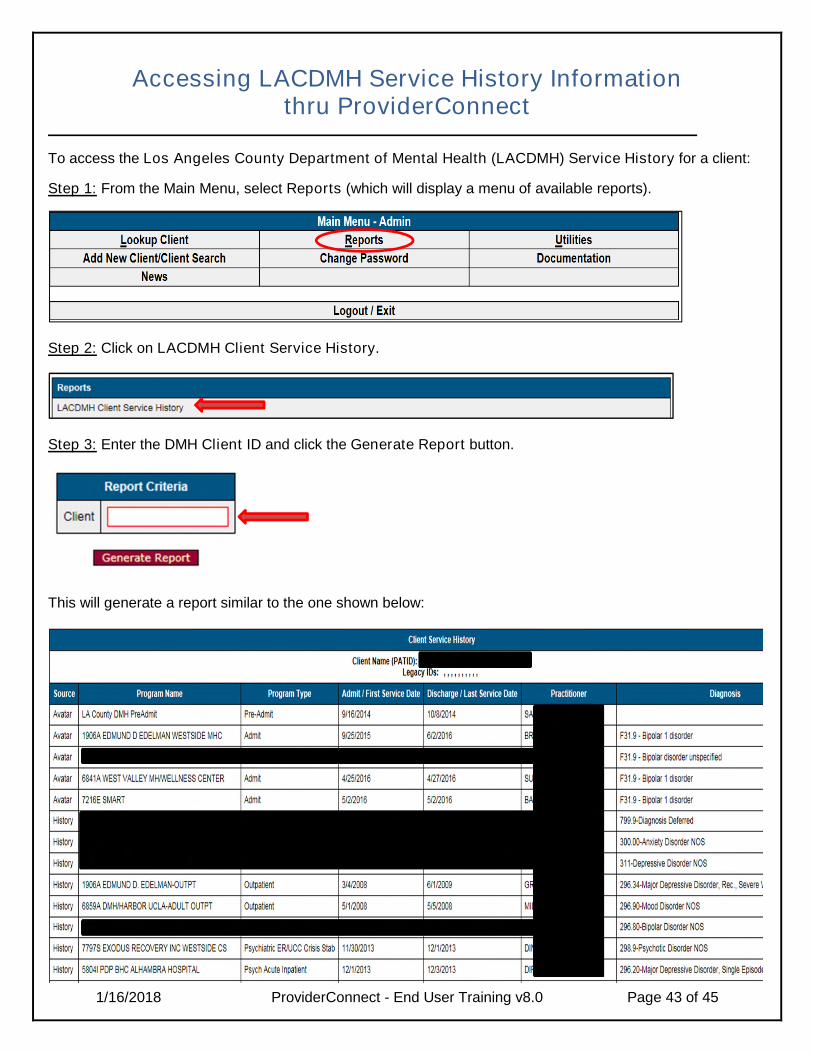
Accessing LACDMH Service History Informationthru ProviderConnect
To access the Los Angeles County Department of Mental Health (LACDMH) Service History for a client:
Step 1: From the Main Menu, select Reports (which will display a menu of available reports).
Step 2: Click on LACDMH Client Service History.
Step 3: Enter the DMH Client ID and click the Generate Report button.
This will generate a report similar to the one shown below:
1/16/2018 ProviderConnect - End User Training v8.0 Page 44 of 45
Accessing LACDMH Service History Information
thru ProviderConnect
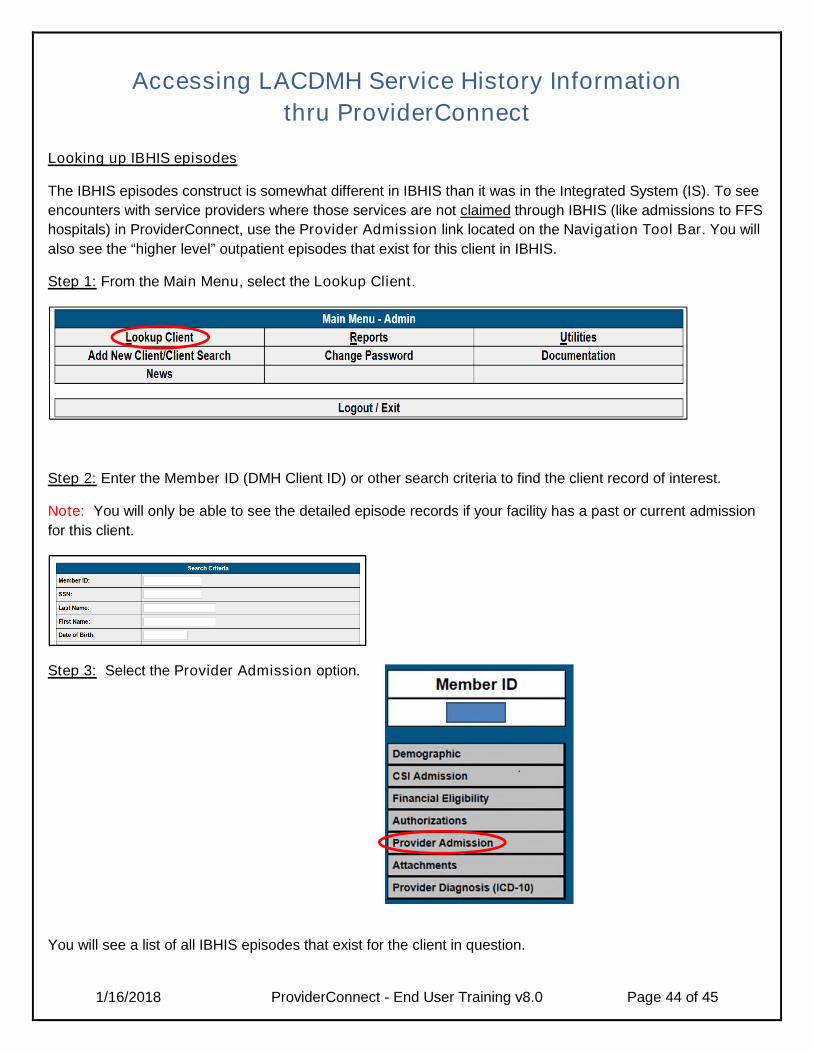
Looking up IBHIS episodes
The IBHIS episodes construct is somewhat different in IBHIS than it was in the Integrated System (IS). To see
encounters with service providers where those services are not claimed through IBHIS (like admissions to FFS
hospitals) in ProviderConnect, use the Provider Admission link located on the Navigation Tool Bar. You will
also see the “higher level” outpatient episodes that exist for this client in IBHIS.
Step 1: From the Main Menu, select the Lookup Client.
Step 2: Enter the Member ID (DMH Client ID) or other search criteria to find the client record of interest.
Note: You will only be able to see the detailed episode records if your facility has a past or current admission
for this client.
Step 3: Select the Provider Admission option.
You will see a list of all IBHIS episodes that exist for the client in question.
1/16/2018 ProviderConnect - End User Training v8.0 Page 45 of 45
Accessing LACDMH Service History Information
thru ProviderConnect
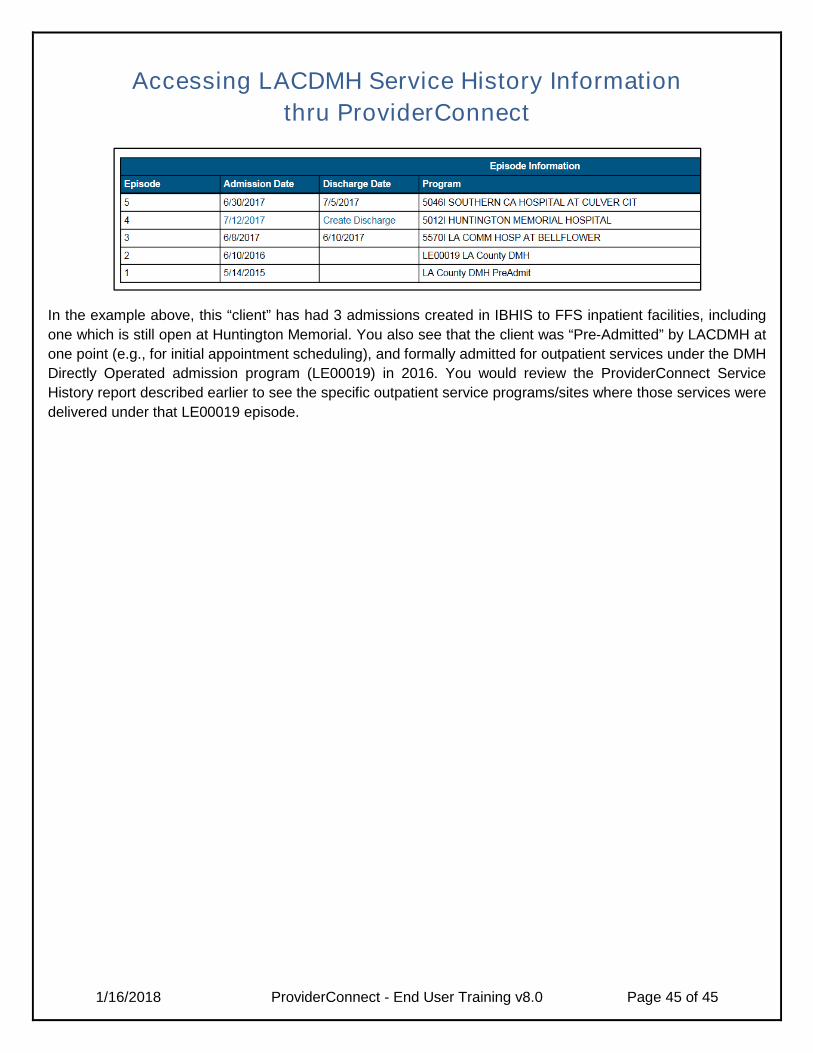
In the example above, this “client” has had 3 admissions created in IBHIS to FFS inpatient facilities, including
one which is still open at Huntington Memorial. You also see that the client was “Pre-Admitted” by LACDMH at
one point (e.g., for initial appointment scheduling), and formally admitted for outpatient services under the DMH
Directly Operated admission program (LE00019) in 2016. You would review the ProviderConnect Service
History report described earlier to see the specific outpatient service programs/sites where those services were
delivered under that LE00019 episode.