lanteria hr 2013 - time&attendance - zendesk · the lanteria hr time & attendance module...
TRANSCRIPT

Copyright © 2015 Lanteria
Lanteria HR 2013 - Time&Attendance User's Guide for version 4.2.0
User’s Guide: Lanteria HR 2013 - Time&Attendance
Copyright © 2015 Lanteria
Table of Contents 1 Introduction ......................................................................................................... 3
1.1 Time & Attendance Overview ...................................................................................... 3 1.2 Terminology List ...................................................................................................... 3
2 Set up Work Patterns .............................................................................................. 4
3 Absence Types ...................................................................................................... 7
3.1 Set up Absence Sub Types .......................................................................................... 7
4 Absence Plans ....................................................................................................... 9
4.1 Create Absence Plan ................................................................................................. 9 4.2 Set up Annual Vacation Allowance ................................................................................ 9
4.2.1 Set up Annual Vacation Allowance Parameters ........................................................... 9 4.2.2 Create Vacation Allowance Rules .......................................................................... 12 4.2.3 Create Vacation Allowance Extra Days Rules ............................................................ 14 4.2.4 Create Vacation Type Allowance Rules ................................................................... 15
4.3 Set up Annual Sickness Allowance ............................................................................... 17
4.3.1 Set up Annual Sickness Allowance Parameters .......................................................... 17 4.3.2 Create Sickness Allowance Generation Rules............................................................ 18 4.3.3 Create Sickness Allowance Generation Special Rules .................................................. 18
4.4 Set up Annual Other Absence Allowance ....................................................................... 19
4.4.1 Set up Annual Other Absence Allowance Parameters .................................................. 19 4.4.2 Create Other Absence Allowance Generation Rules ................................................... 20
4.5 Assign Absence Plan................................................................................................ 21
5 Company Holidays ................................................................................................. 23
6 Plan Absences ...................................................................................................... 25
6.1 Request Vacation ................................................................................................... 25 6.2 Approve a Holiday .................................................................................................. 28 6.3 Manage Vacations Requests ...................................................................................... 30 6.4 Vacation Statistic Report ......................................................................................... 32 6.5 Carried Over Vacation Days ...................................................................................... 32
6.5.1 Carried Over Settings ........................................................................................ 32 6.5.2 View and Use Carried Over Days ........................................................................... 32
7 Other Absence Types ............................................................................................. 34
7.1 Absences ............................................................................................................. 34 7.2 Sicknesses ............................................................................................................ 35
8 Reports .............................................................................................................. 38
8.1 Absence Records Report .......................................................................................... 38 8.2 Employee Absence Summary ..................................................................................... 38 8.3 Vacation Statistic................................................................................................... 39 8.4 Absence Schedule .................................................................................................. 39 8.5 Pending Absence Requests ........................................................................................ 40 8.6 Out of Office Calendar ............................................................................................ 40
9 Timesheets.......................................................................................................... 42
9.1 Setup ................................................................................................................. 42
9.1.1 Create Activities .............................................................................................. 42 9.1.2 Create Projects ............................................................................................... 42
9.2 Register Time ....................................................................................................... 44 9.3 Check Time .......................................................................................................... 44
9.3.1 Timesheet Calendar .......................................................................................... 45 9.3.2 Timesheet Report............................................................................................. 45
User’s Guide: Lanteria HR 2013 - Time&Attendance
Copyright © 2015 Lanteria Page 3 of 48
1 Introduction Lanteria HR is a human resource management system that provides the central storage for all HR information, supports HR processes, as well as competence framework and learning. This User’s Guide describes the Time & Attendance module of Lanteria HR.
The target audience is HR specialists, employees and managers who will be working with absences in Lanteria HR. As a prerequisite to this guide, it is recommended that you get acquainted with the Introduction and Initial Setup guide.
1.1 Time & Attendance Overview
The Lanteria HR Time & Attendance module enables managing various types of employee absences,
including vacations (holidays), sicknesses, etc. The employees can request the absences and managers approve them. The HR team has all the absence statistics and can record and modify the absences, approve and reject them.
1.2 Terminology List
Term Definition
Vacation Annual leave the employee is entitled to take rest and recreation.
Sickness Employee absence due to being sick.
Business Trip Employee absence due to travelling on business.
Absence Employee absence other than vacation, sickness or business trip.
Allowance The number of vacation, sickness or absence days the employee is entitled to in the current period.
Extra Day Additional vacation days added to the main allowance to compensate the overtime work or as bonus vacation days.
Carried over Vacation or sickness days that are carried over from the previous period.
Absence Plan A set of rules for generating the vacation, sickness and absence allowances.
Company Holiday A public or another holiday that is an official day off in the company.
User’s Guide: Lanteria HR 2013 - Time&Attendance
Copyright © 2015 Lanteria Page 4 of 48
2 Set up Work Patterns The work patterns are used to define the schedule of employee work. This feature is used for the employee absence allowance generation and calculation.
To create a work pattern:
1. Go to Core HR > Settings > Work Patterns.
2. Click New item.
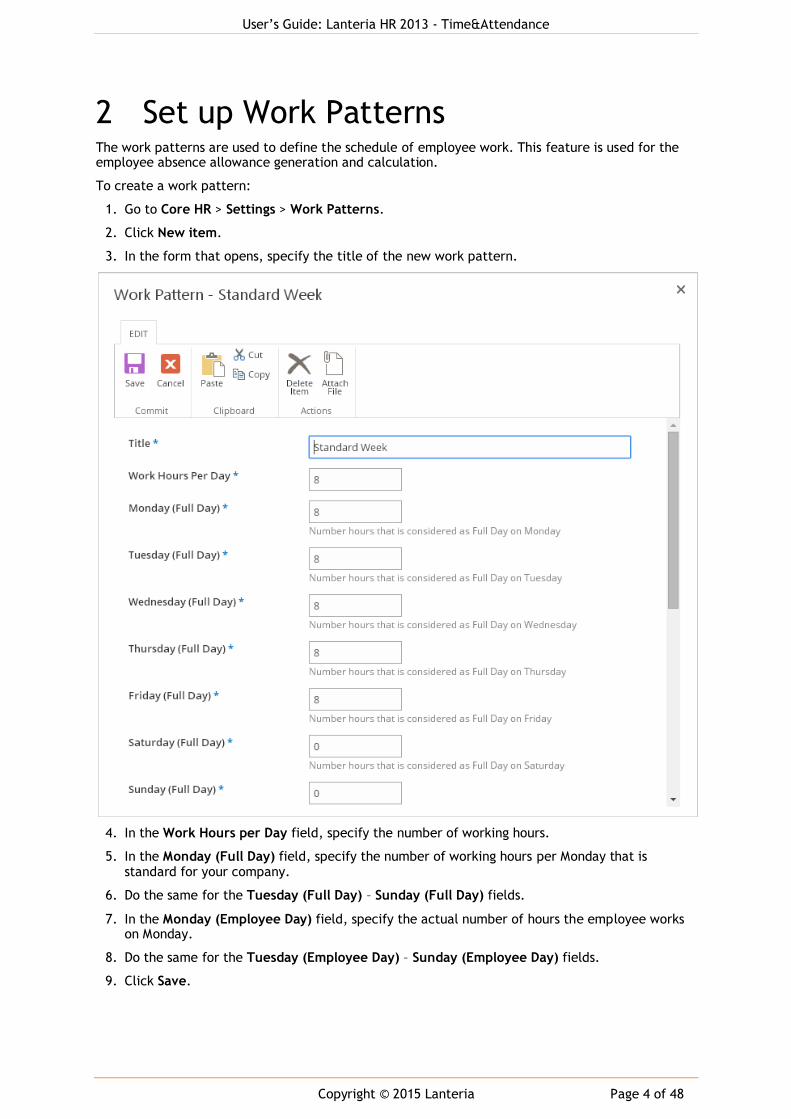
3. In the form that opens, specify the title of the new work pattern.
4. In the Work Hours per Day field, specify the number of working hours.
5. In the Monday (Full Day) field, specify the number of working hours per Monday that is standard for your company.
6. Do the same for the Tuesday (Full Day) – Sunday (Full Day) fields.
7. In the Monday (Employee Day) field, specify the actual number of hours the employee works on Monday.
8. Do the same for the Tuesday (Employee Day) – Sunday (Employee Day) fields.
9. Click Save.
User’s Guide: Lanteria HR 2013 - Time&Attendance
Copyright © 2015 Lanteria Page 5 of 48
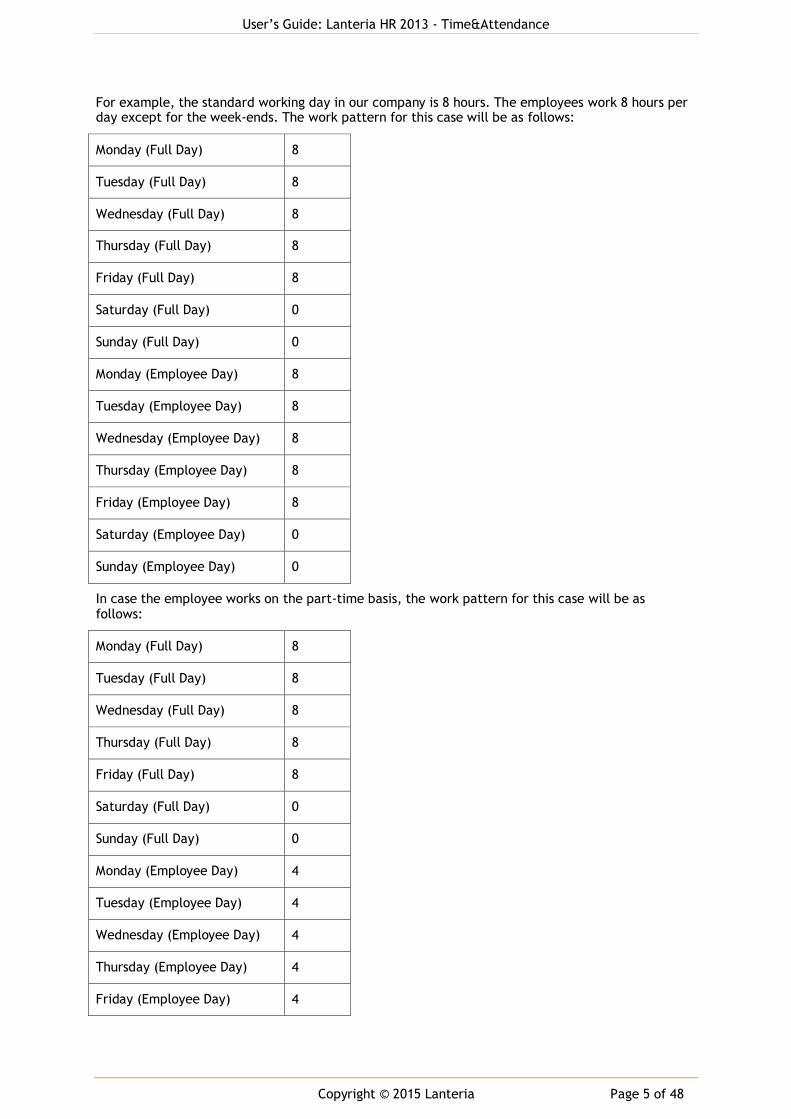
For example, the standard working day in our company is 8 hours. The employees work 8 hours per day except for the week-ends. The work pattern for this case will be as follows:
Monday (Full Day) 8
Tuesday (Full Day) 8
Wednesday (Full Day) 8
Thursday (Full Day) 8
Friday (Full Day) 8
Saturday (Full Day) 0
Sunday (Full Day) 0
Monday (Employee Day) 8
Tuesday (Employee Day) 8
Wednesday (Employee Day) 8
Thursday (Employee Day) 8
Friday (Employee Day) 8
Saturday (Employee Day) 0
Sunday (Employee Day) 0
In case the employee works on the part-time basis, the work pattern for this case will be as follows:
Monday (Full Day) 8
Tuesday (Full Day) 8
Wednesday (Full Day) 8
Thursday (Full Day) 8
Friday (Full Day) 8
Saturday (Full Day) 0
Sunday (Full Day) 0
Monday (Employee Day) 4
Tuesday (Employee Day) 4
Wednesday (Employee Day) 4
Thursday (Employee Day) 4
Friday (Employee Day) 4
User’s Guide: Lanteria HR 2013 - Time&Attendance
Copyright © 2015 Lanteria Page 6 of 48
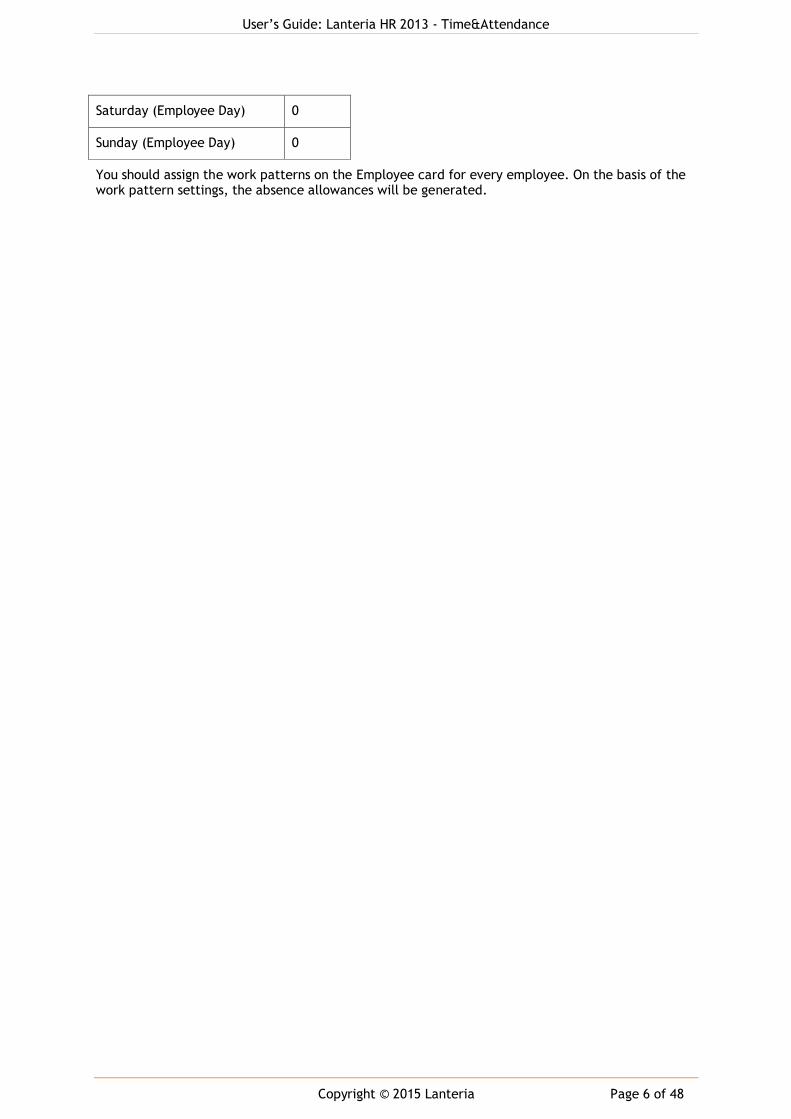
Saturday (Employee Day) 0
Sunday (Employee Day) 0
You should assign the work patterns on the Employee card for every employee. On the basis of the work pattern settings, the absence allowances will be generated.
User’s Guide: Lanteria HR 2013 - Time&Attendance
Copyright © 2015 Lanteria Page 7 of 48
3 Absence Types Lanteria HR allows working with the four main absence types:
Vacations
Sicknesses
Business Trips
Absences
For each of these types, the user can define any subtypes. Allowance generation rules can be created for any absence types and subtypes, excluding business trips.
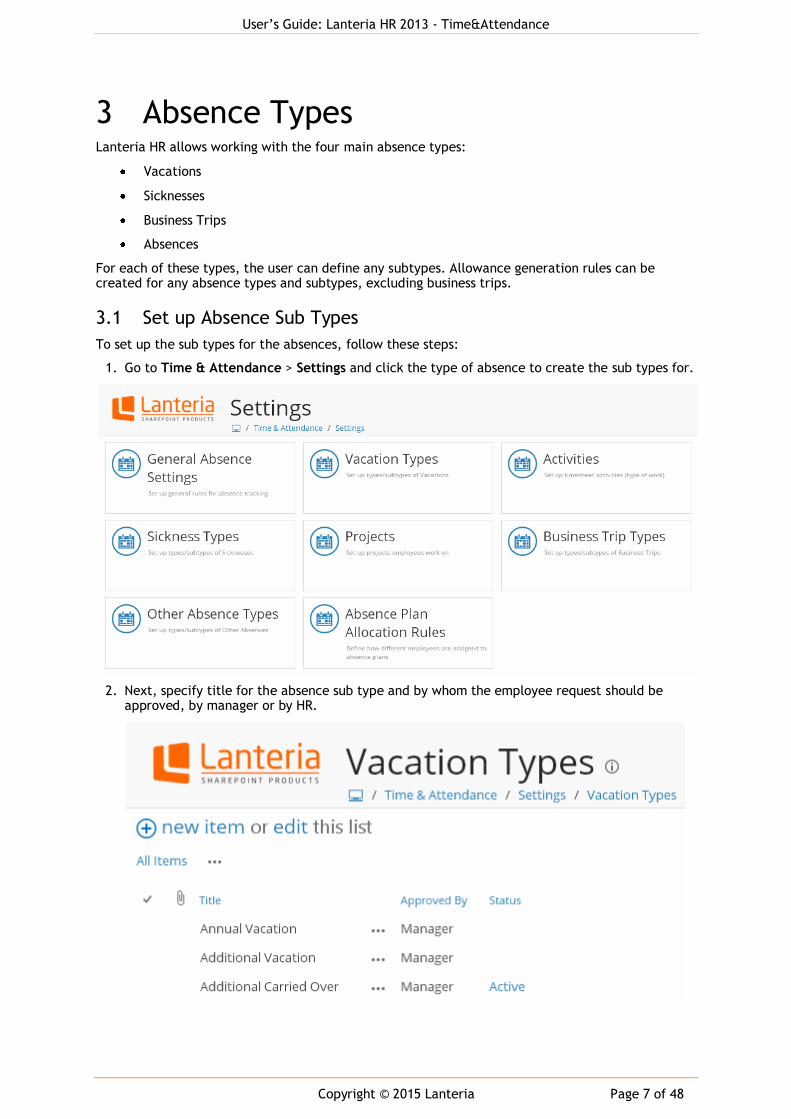
3.1 Set up Absence Sub Types
To set up the sub types for the absences, follow these steps:
1. Go to Time & Attendance > Settings and click the type of absence to create the sub types for.
2. Next, specify title for the absence sub type and by whom the employee request should be approved, by manager or by HR.
User’s Guide: Lanteria HR 2013 - Time&Attendance
Copyright © 2015 Lanteria Page 8 of 48
3. If you want the employee status to change during the absence, select the new status in the Status field. If you do that, on the first day of absence of the current type, employee’s status
will change to the selected one. On the return date, it will automatically change back. This functionality can be used to automatically change status for the employees on the long-term leave to Temporarily Inactive or similar.
User’s Guide: Lanteria HR 2013 - Time&Attendance
Copyright © 2015 Lanteria Page 9 of 48
4 Absence Plans Absence plans define how allowance is generated for the absence types and subtypes. Usually different countries have different absence rules, and you can create and apply absences plans per country.
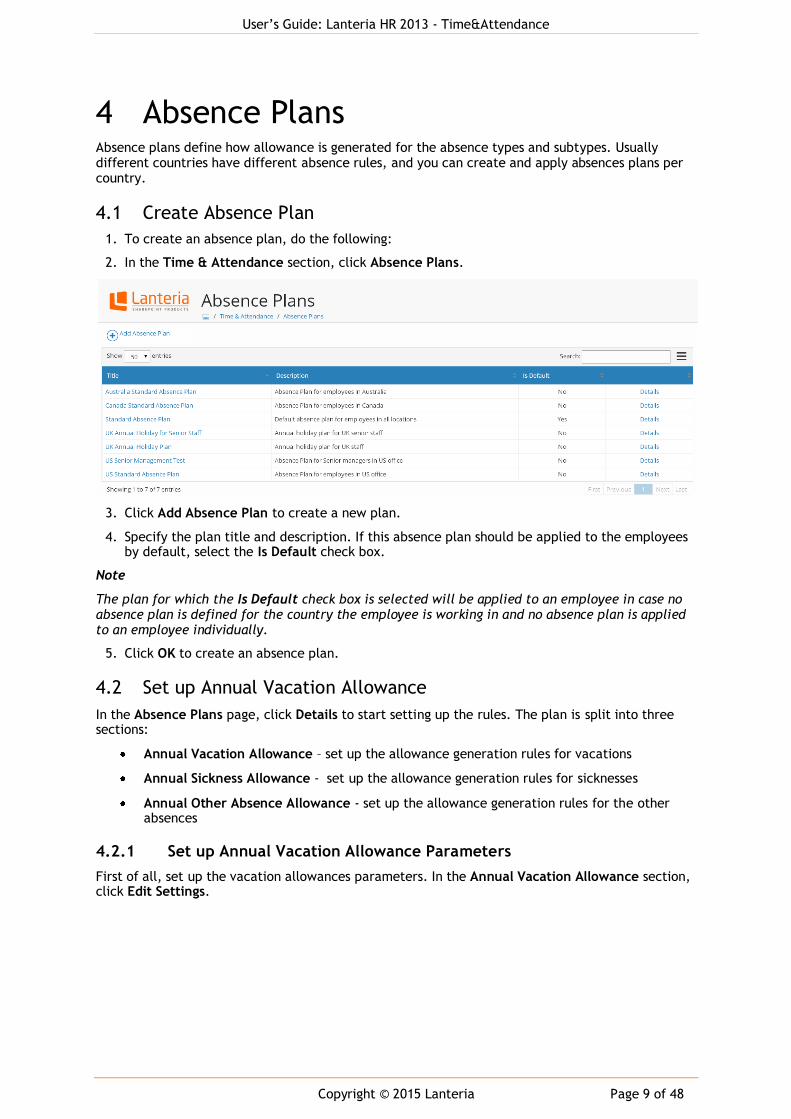
4.1 Create Absence Plan
1. To create an absence plan, do the following:
2. In the Time & Attendance section, click Absence Plans.
3. Click Add Absence Plan to create a new plan.
4. Specify the plan title and description. If this absence plan should be applied to the employees by default, select the Is Default check box.
Note
The plan for which the Is Default check box is selected will be applied to an employee in case no absence plan is defined for the country the employee is working in and no absence plan is applied to an employee individually.
5. Click OK to create an absence plan.
4.2 Set up Annual Vacation Allowance
In the Absence Plans page, click Details to start setting up the rules. The plan is split into three sections:
Annual Vacation Allowance – set up the allowance generation rules for vacations
Annual Sickness Allowance - set up the allowance generation rules for sicknesses
Annual Other Absence Allowance - set up the allowance generation rules for the other absences
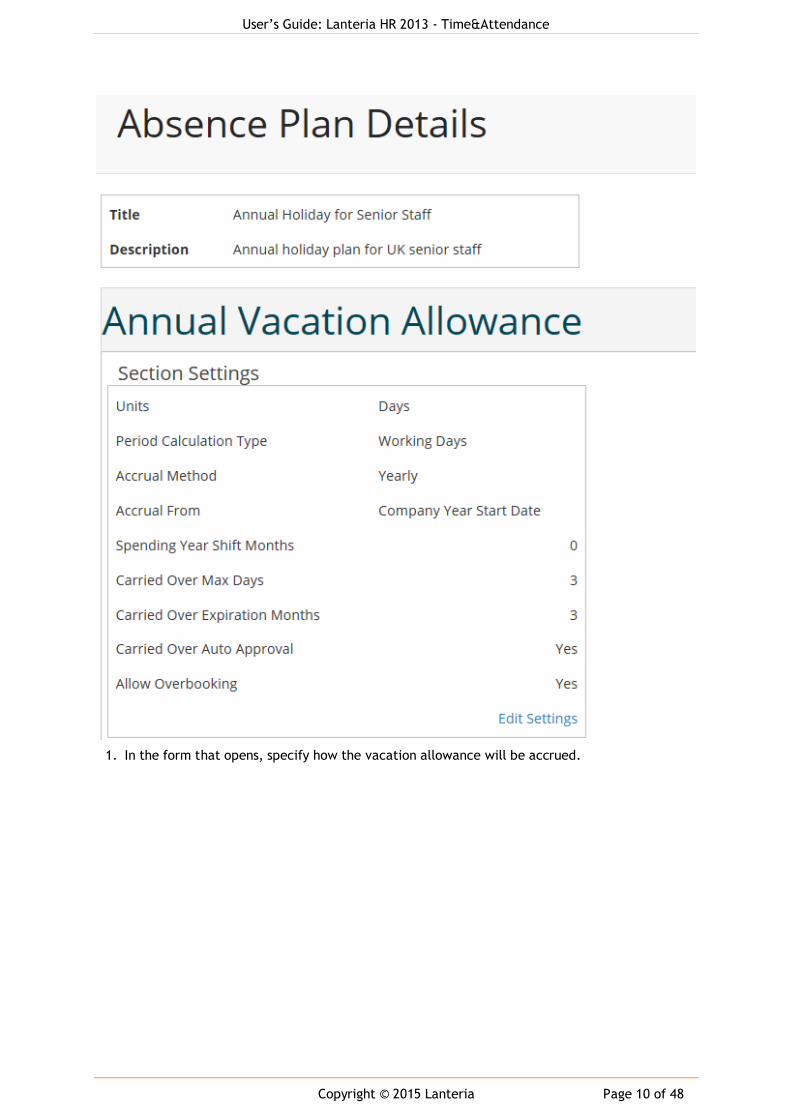
4.2.1 Set up Annual Vacation Allowance Parameters
First of all, set up the vacation allowances parameters. In the Annual Vacation Allowance section, click Edit Settings.
User’s Guide: Lanteria HR 2013 - Time&Attendance
Copyright © 2015 Lanteria Page 10 of 48
1. In the form that opens, specify how the vacation allowance will be accrued.

User’s Guide: Lanteria HR 2013 - Time&Attendance
Copyright © 2015 Lanteria Page 11 of 48
2. In the Accrual Period field, select when the vacation allowance will be granted:
Yearly – all the allowance days or hours will be granted in the beginning of the vacation year
Note: Vacation year start date is specified under Settings > General Settings > Year Start Date.
User’s Guide: Lanteria HR 2013 - Time&Attendance
Copyright © 2015 Lanteria Page 12 of 48
Monthly Start – the allowance will be accrued monthly and will be granted at the beginning of the month. For example, the employee’s annual allowance is 12 days and the company vacation year starts on January 1. On Jan 1, the employee’s vacation allowance will be 1 day, on Dec 1 – 2 days and so on
Monthly End - the allowance will be also accrued monthly, but will be granted at the end of the month. If the employee’s annual allowance is 12 days and the company vacation year starts on January 1, on Jan 31, the employee’s vacation allowance will be 1 day, on Dec 31 – 2 days and so on
Bi-Weekly Start – the allowance will be accrued every 14 days and will be granted at the beginning of the 2 weeks period.
Bi-Weekly End – the allowance will be accrued every 14 days and will be granted at the end of the 2 weeks period.
Note: at the end of the period, for the cases when Monthly End and Bi-Weekly End accrual method are used the system will add allowances in advance.
3. Use the Accrual From field to define whether the employees’ allowance will be generated
based on the company vacation year or based on the employment date. The following options are available:
Company Year Start Date – all the employees assigned to this absence plan will have the same vacation year, which starts on the company Year Start Date (defined under Settings > General Settings) and lasts for 12 months. The employees’ allowance will be generated on the first date of the company year and on the last date of the company year, the allowed
number of unused days will be carried over to the next year. With this scheme, the employment date is taken into account. If the employee joined the company in the middle of the vacation year, he or she will be entitled only to a half of allowance.
For example, the company vacation year is Jan 1 – Dec 31. The vacation allowance for all employees is 24 days. The Accrual Method is Yearly. An employee joined July 1. He or she will be entitled to 12 days of vacation. On December 31, a new allowance of 24 days will be generated.
Service Date – each employee will have his or her own vacation year that starts on the service (employment) date and lasts for 12 months, when as new allowance will be generated and unused days will be carried over
4. If the company policy allows using the vacation allowance only starting from some specific date, use the Spending Year Shift Months field to set this up. If the company (vacation) year starts on Jan 1 and employees start accruing the vacation allowance on that date, but can
start using the accumulated vacation allowance only from May 1, specify 4 in the Spending Year Shift Months field.
5. In the Carried Over Max Units field, specify the maximum number of unused days or hours that can be carried over to the following vacation period.
6. If the carried over days or hours expire at some point, specify the number of months in which the carried overs expire.
7. Select the Allow Overbooking check box if the employees are allowed to book more days or hours than their vacation allowance. In case overbooking is allowed, the number of allowance days will get negative and the overused days will be taken from the next year’s allowance.
8. In the Units field, select whether vacation allowance will be generated and tracked in days or hours.
9. Click Save.
4.2.2 Create Vacation Allowance Rules
After that, you can proceed to the allowance rules creation.
1. Click Add Allowance Rule to add a new rule for the vacation allowance generation.

User’s Guide: Lanteria HR 2013 - Time&Attendance
Copyright © 2015 Lanteria Page 13 of 48
2. In the form that opens, specify how the vacation allowance will be generated.
3. In the Number of Units field, specify the quantity of days/hours that will be that will be allowed to take as a vacation.
4. In the Range Start field, specify the start of the period to which this rule will be applicable.
5. In the Range End field, specify the end of the period to which this rule will be applicable.
6. In the Calculation Type field, select the basis the allowances will be calculated of. There are two possible options:
Age – the allowances will be generated on the basis of employee age
Seniority – the allowances will be generated on the basis of number of years an employee works in the company.
7. Click Save to create the rule.
You can set up as many rules as you need.
For example, in a company all employees who work less than 5 years have 25 vacation days. All employees who work more than 5 years have 30 vacation days. We need to create two rules:
Number of Units = 25
Range Start = 0 Range End = 5 Calculation Type = Seniority
Number of Units = 30 Range Start = 6
Range End = 100 Calculation Type = Seniority
User’s Guide: Lanteria HR 2013 - Time&Attendance
Copyright © 2015 Lanteria Page 14 of 48
Note Please note that if the Accrual From field is set to Company Year Start Date, the generated
vacation allowance will be prorated based on the employee’s start date. For example, the company rules provide for 20 days of vacation for employees who have been working for less than 2 years and 24 days for those who have been with the company for more than 2 years. The company vacation year begins on January 1. An employee joined the company on July 1, 2010. In
2012 the employee will have the 2 years’ anniversary. The vacation allowance generated for this employee on January 1, 2012 will be 22 years (6 months of 20 days allowance and 6 months of 24 days allowance make up the annual allowance of 22 days).
4.2.3 Create Vacation Allowance Extra Days Rules
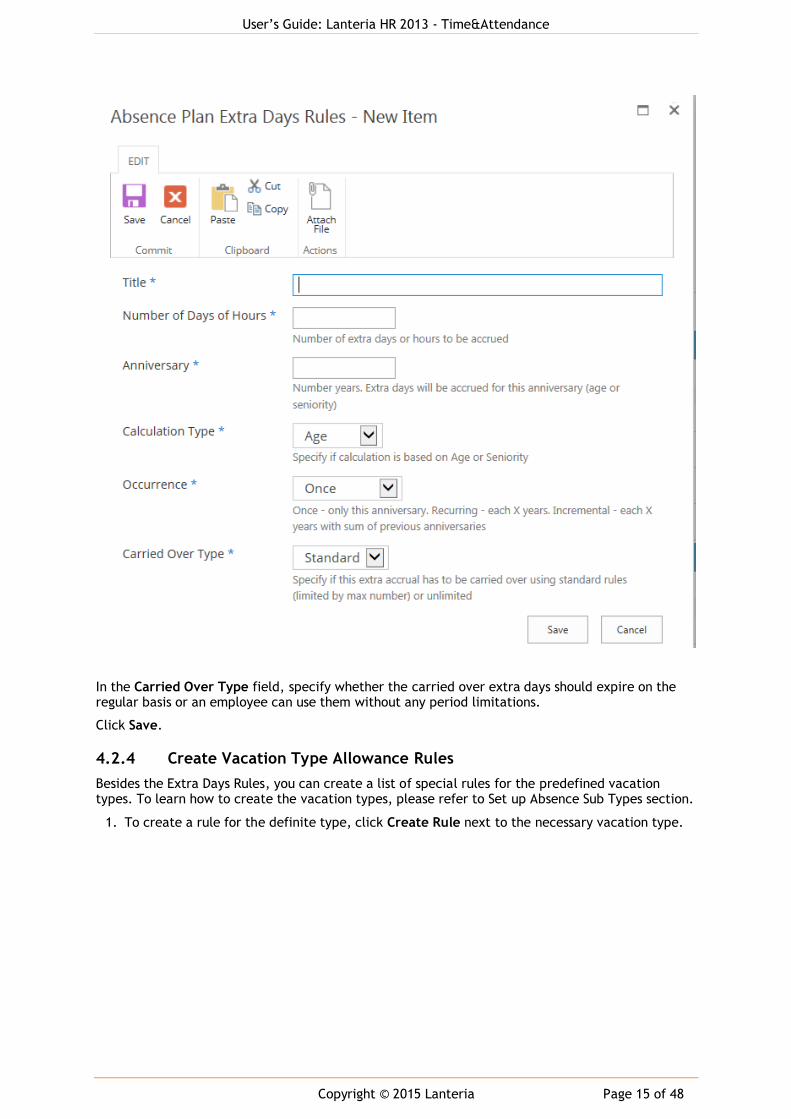
After you created the general rules for the vacation period accrual, you can set up some additional rules. To do this, click Add Extra Days Rules.
1. In the Title field, specify the title of the extra days rule.
2. In the Number of Units field, specify the number of days/hours that will be added as an extra vacation allowance.
3. In the Anniversary field, specify the number of years the rule will be applicable for.
4. In the Calculation Type field, select the basis the allowances will be calculated of. There are two possible options:
Age – the allowances will be generated on the basis of employee age
Seniority – the allowances will be generated on the basis of number of years an employee works in the company.
5. In the Occurrence field, select the periodicity of the extra days’ generation. There are the following options:
Once – the extra days will be added once
Recurring - the extra days will be added on the recurring basis (the extra days will be added once every specified number of years)
Incremental- the extra days will be added on the incremental basis (the number of extra days will be increased every specified number of years)
For example, in a company an employee has 20 days but he/she receives 5 extra days every 5th year of work in the company (every 5th year of work an employee has 25 vacation days). On the 6th year an employee has 20 vacation days. We need to create a following rule:
Number of Units = 5 Anniversary = 5 Calculation Type = Seniority Occurrence = Recurring
User’s Guide: Lanteria HR 2013 - Time&Attendance
Copyright © 2015 Lanteria Page 15 of 48
In the Carried Over Type field, specify whether the carried over extra days should expire on the regular basis or an employee can use them without any period limitations.
Click Save.
4.2.4 Create Vacation Type Allowance Rules
Besides the Extra Days Rules, you can create a list of special rules for the predefined vacation types. To learn how to create the vacation types, please refer to Set up Absence Sub Types section.
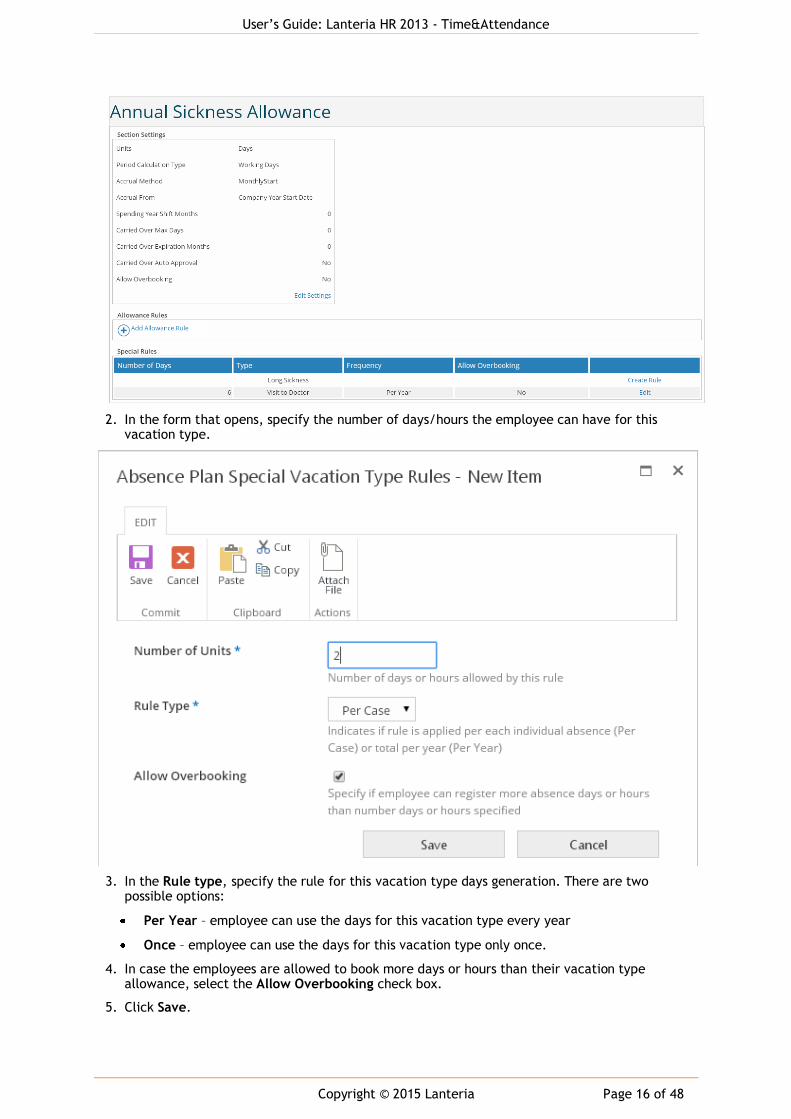
1. To create a rule for the definite type, click Create Rule next to the necessary vacation type.
User’s Guide: Lanteria HR 2013 - Time&Attendance
Copyright © 2015 Lanteria Page 16 of 48
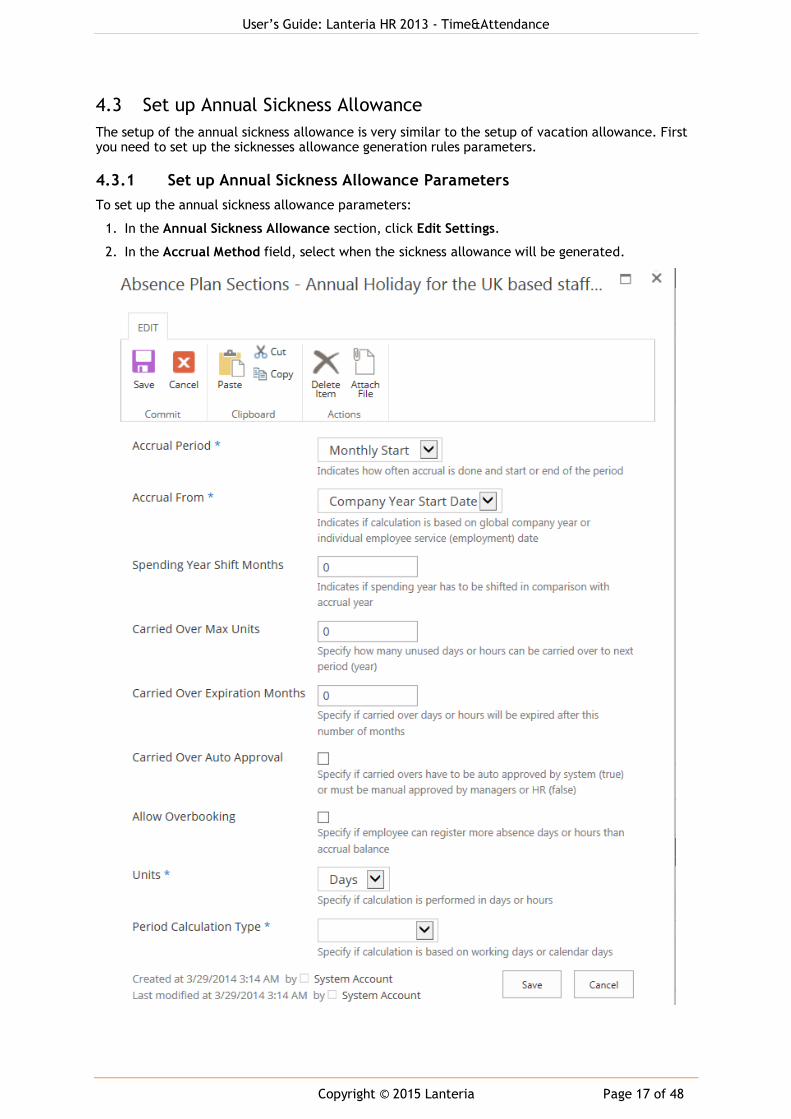
2. In the form that opens, specify the number of days/hours the employee can have for this vacation type.
3. In the Rule type, specify the rule for this vacation type days generation. There are two possible options:
Per Year – employee can use the days for this vacation type every year
Once – employee can use the days for this vacation type only once.
4. In case the employees are allowed to book more days or hours than their vacation type allowance, select the Allow Overbooking check box.
5. Click Save.
User’s Guide: Lanteria HR 2013 - Time&Attendance
Copyright © 2015 Lanteria Page 17 of 48
4.3 Set up Annual Sickness Allowance
The setup of the annual sickness allowance is very similar to the setup of vacation allowance. First you need to set up the sicknesses allowance generation rules parameters.
4.3.1 Set up Annual Sickness Allowance Parameters
To set up the annual sickness allowance parameters:
1. In the Annual Sickness Allowance section, click Edit Settings.
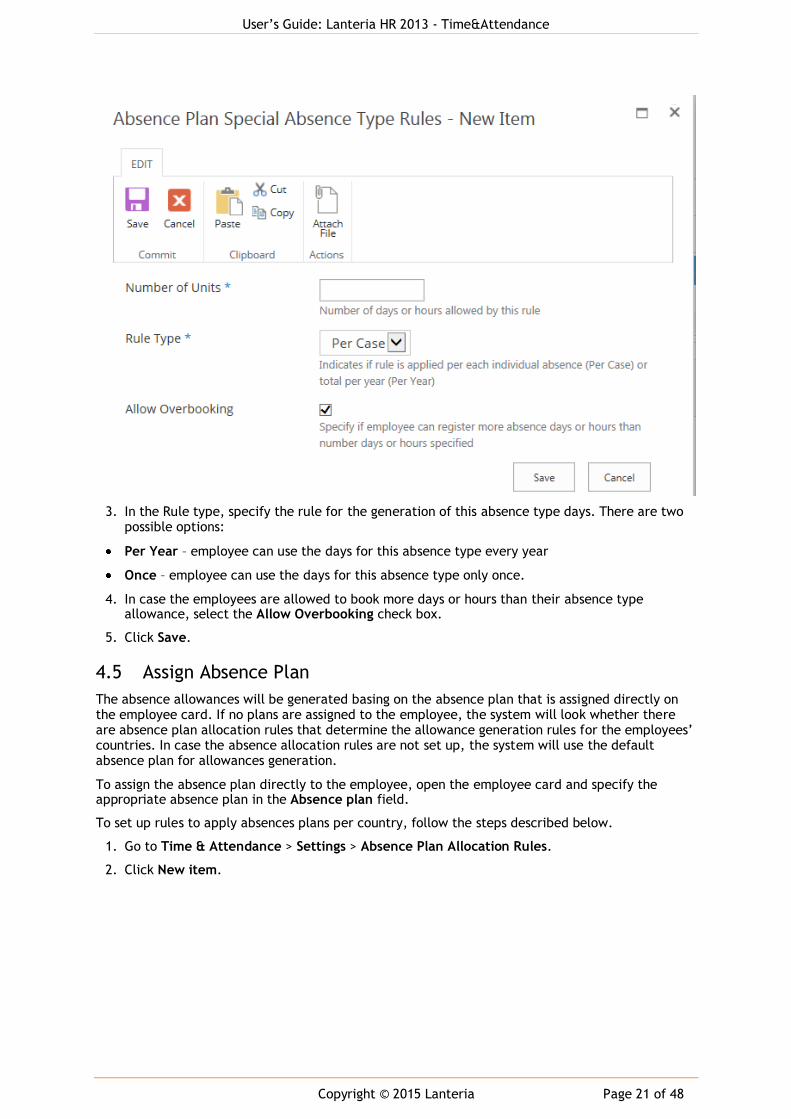
2. In the Accrual Method field, select when the sickness allowance will be generated.

User’s Guide: Lanteria HR 2013 - Time&Attendance
Copyright © 2015 Lanteria Page 18 of 48
3. In the Accrual From field select whether the employees’ allowance will be generated based on the company year start date or based on the employment date.
4. If the company policy allows using the sickness allowance only starting from some specific date, use the Spending Year Shift Months field to set this up.
5. In the Carried Over Max Units field, specify the maximum number of unused days or hours that can be carried over to the following sickness period.
6. Use the Carried Over Expiration Months field to define the number of months after which the sickness carried over days will expire.
7. Select the Carried Over Auto Approval check box if the carried over days in your company shouldn’t be approved by HR or manager before they become active and available for the employee.
8. Select the Allow Overbooking check box if the employees are allowed to book more days or hours than their sickness allowance.
9. In the Units field, select whether sickness allowance will be generated and tracked in days or hours.
10. Click Save.
4.3.2 Create Sickness Allowance Generation Rules
To create sickness allowance generation rules:
1. Click Add Allowance Rule.
2. In the Number of Units field, specify the quantity of days/hours that will be that will be allowed to take as a sickness.
3. In the Range Start field, specify the start of the period to which this rule will be applicable.
4. In the Range End field, specify the end of the period to which this rule will be applicable.
5. In the Calculation Type field, select the basis the allowances will be calculated of. There are two possible options:
Age – the allowances will be generated on the basis of employee age
Seniority – the allowances will be generated on the basis of number of years an employee works in the company.
6. Click Save to create the rule.
4.3.3 Create Sickness Allowance Generation Special Rules
You can create a list of special rules for the predefined sickness types. To learn how to create the sickness types, please refer to Set up Absence Sub Types section.
1. To create a rule for the definite type, click Create Rule next to the necessary sickness type.
2. In the form that opens, specify the number of days/hours the employee can have for this sickness type.

User’s Guide: Lanteria HR 2013 - Time&Attendance
Copyright © 2015 Lanteria Page 19 of 48
3. In the Rule Type, specify the rule for the generation of this sickness type days. There are two possible options:
Per Year – employee can use the days for this sickness type every year
Once – employee can use the days for this sickness type only once.
4. In case the employees are allowed to book more days or hours than their sickness type allowance, select the Allow Overbooking check box.
5. Click Save.
4.4 Set up Annual Other Absence Allowance
The setup of the annual other absence allowance is very similar to the setup of vacation or sickness allowance. First you need to set up the other absence allowance generation rules parameters.
4.4.1 Set up Annual Other Absence Allowance Parameters
To set up the annual other absence allowance parameters:
1. In the Annual Other Absence Allowance section, click Edit Settings.
2. In the Accrual From field, select when the absence allowance will be generated.

User’s Guide: Lanteria HR 2013 - Time&Attendance
Copyright © 2015 Lanteria Page 20 of 48
3. In the Accrual From field select whether the employees’ allowance will be generated based on the company start year date or based on the employment date.
4. If the company policy allows using the sickness allowance only starting from some specific date, use the Spending Year Shift Months field to set this up.
5. In the Units field, select whether absence allowance will be generated and tracked in days or hours.
6. Click Save.
4.4.2 Create Other Absence Allowance Generation Rules
You can create a list of special rules for the predefined types of other absences. To learn how to create the absence types, please refer to Set up Absence Sub Types section.
1. To create a rule for the definite type, click Create Rule next to the necessary absence type.
2. In the form that opens, specify the number of days/hours the employee can have for this vacation type.
User’s Guide: Lanteria HR 2013 - Time&Attendance
Copyright © 2015 Lanteria Page 21 of 48
3. In the Rule type, specify the rule for the generation of this absence type days. There are two possible options:
Per Year – employee can use the days for this absence type every year
Once – employee can use the days for this absence type only once.
4. In case the employees are allowed to book more days or hours than their absence type allowance, select the Allow Overbooking check box.
5. Click Save.
4.5 Assign Absence Plan
The absence allowances will be generated basing on the absence plan that is assigned directly on the employee card. If no plans are assigned to the employee, the system will look whether there are absence plan allocation rules that determine the allowance generation rules for the employees’ countries. In case the absence allocation rules are not set up, the system will use the default absence plan for allowances generation.
To assign the absence plan directly to the employee, open the employee card and specify the appropriate absence plan in the Absence plan field.
To set up rules to apply absences plans per country, follow the steps described below.
1. Go to Time & Attendance > Settings > Absence Plan Allocation Rules.
2. Click New item.
User’s Guide: Lanteria HR 2013 - Time&Attendance
Copyright © 2015 Lanteria Page 22 of 48
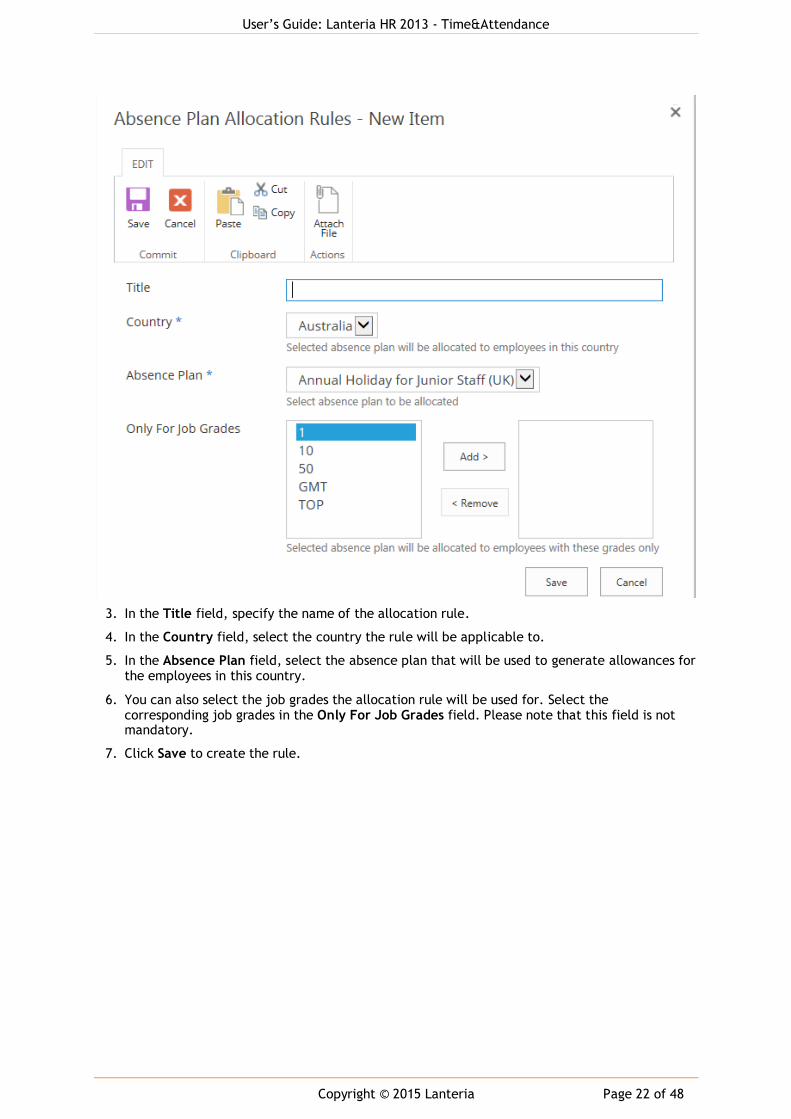
3. In the Title field, specify the name of the allocation rule.
4. In the Country field, select the country the rule will be applicable to.
5. In the Absence Plan field, select the absence plan that will be used to generate allowances for the employees in this country.
6. You can also select the job grades the allocation rule will be used for. Select the corresponding job grades in the Only For Job Grades field. Please note that this field is not mandatory.
7. Click Save to create the rule.
User’s Guide: Lanteria HR 2013 - Time&Attendance
Copyright © 2015 Lanteria Page 23 of 48
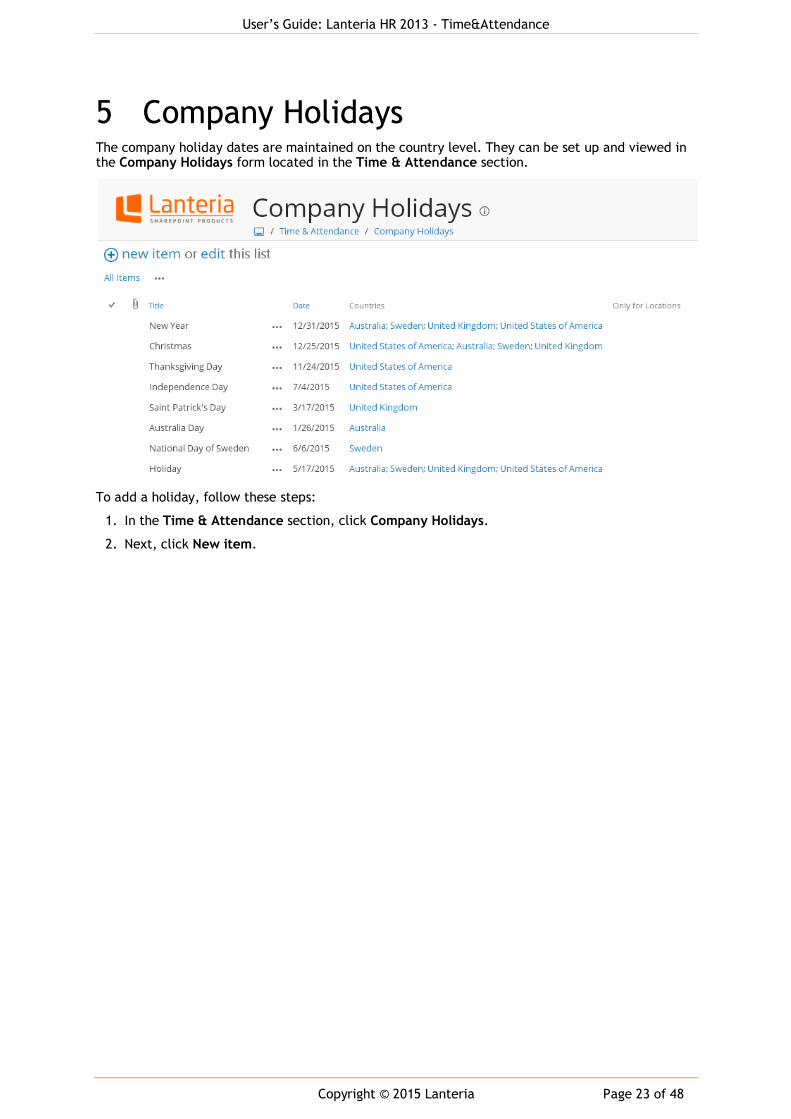
5 Company Holidays The company holiday dates are maintained on the country level. They can be set up and viewed in the Company Holidays form located in the Time & Attendance section.
To add a holiday, follow these steps:
1. In the Time & Attendance section, click Company Holidays.
2. Next, click New item.

User’s Guide: Lanteria HR 2013 - Time&Attendance
Copyright © 2015 Lanteria Page 24 of 48
3. In the Title field, type the holiday name.
4. Use the Date field to specify when the holiday is celebrated and thus, when the employees are entitled for a day off.
5. Under Countries, use the Add button to add the countries for which the holiday is relevant.
Note: The country list is managed under Core HR > Settings > Countries.
6. If the holiday is valid not for the whole country, but only for specific locations of the currently selected country(ies), additionally select these locations in the Only for Locations field.
7. Click Save.
When an employee requests vacation for a period that includes a company holiday, the company holiday is not counted as a vacation day and not deducted from the employee holiday allowance.
Note: The system doesn’t support company holidays recurrency, therefore you need to create the set of holidays for each year.
User’s Guide: Lanteria HR 2013 - Time&Attendance
Copyright © 2015 Lanteria Page 25 of 48
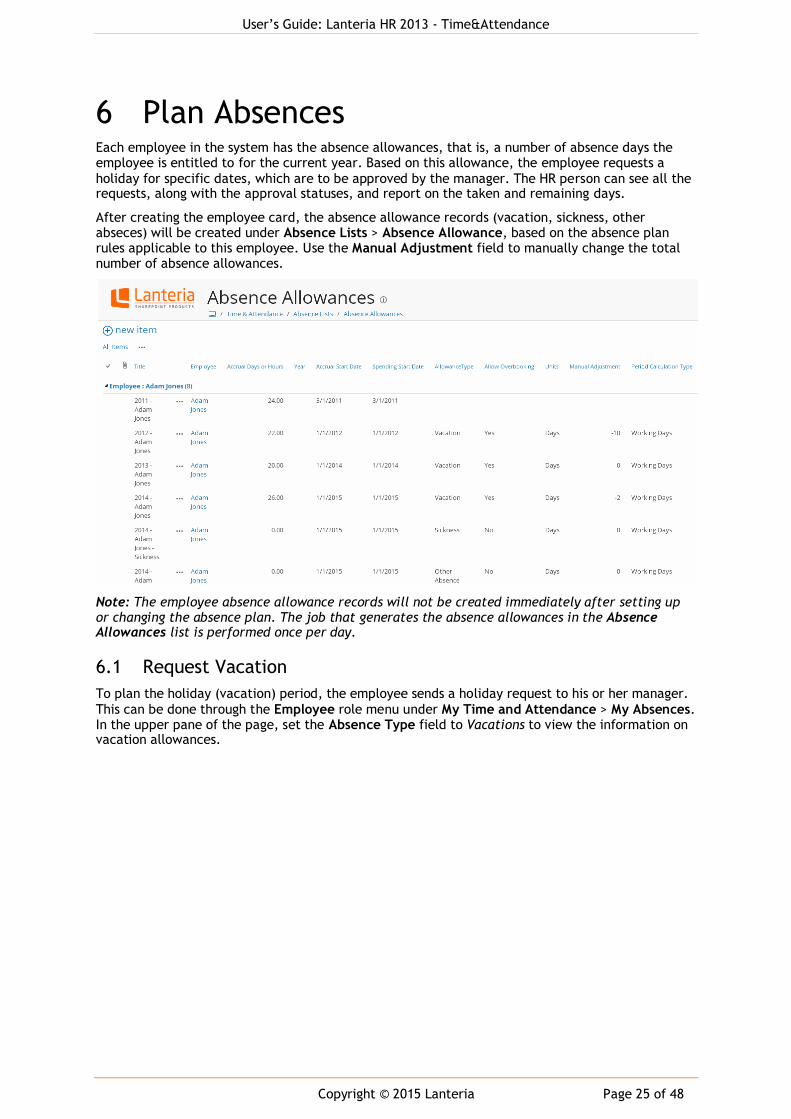
6 Plan Absences Each employee in the system has the absence allowances, that is, a number of absence days the employee is entitled to for the current year. Based on this allowance, the employee requests a
holiday for specific dates, which are to be approved by the manager. The HR person can see all the requests, along with the approval statuses, and report on the taken and remaining days.
After creating the employee card, the absence allowance records (vacation, sickness, other abseces) will be created under Absence Lists > Absence Allowance, based on the absence plan rules applicable to this employee. Use the Manual Adjustment field to manually change the total number of absence allowances.
Note: The employee absence allowance records will not be created immediately after setting up or changing the absence plan. The job that generates the absence allowances in the Absence Allowances list is performed once per day.
6.1 Request Vacation
To plan the holiday (vacation) period, the employee sends a holiday request to his or her manager.
This can be done through the Employee role menu under My Time and Attendance > My Absences. In the upper pane of the page, set the Absence Type field to Vacations to view the information on vacation allowances.

User’s Guide: Lanteria HR 2013 - Time&Attendance
Copyright © 2015 Lanteria Page 26 of 48
This page allows the employee to see his or her vacation allowance, along with the taken and remaining vacation days, carried over days, expired carried over days, etc. From My Absences, the employee can also request vacation, absences, and sicknesses that will be sent to the manager for
approval. All such requests and their current approval statuses are available in the My Absences page.
To send a vacation request, follow these steps:
1. Select the Employee role and click My Time & Attendance > My Absences. Next, click Add Vacation Request.

User’s Guide: Lanteria HR 2013 - Time&Attendance
Copyright © 2015 Lanteria Page 27 of 48
2. Specify a vacation type for this request.
3. Select the Start Date and Start Time. This is the date from which the allowance is counted.
4. Specify the Return to Work Date and Return to Work Time. This is the date till which the allowance is counted.
5. In the Notes section, type any notes to your request.
6. In the Acting Person field, specify the name of the person who will provide absence approvals
on behalf of you during your vacation period. Please note that this person should have a Manager’s role in the system if you want the Acting person to approve absences on behalf of the employee.
7. Optionally, click Calculate Duration to check how the system calculates the days or hours that will be requested. Please note that if you plan to attach a file to the record, this should be done after calculating the duration.
8. Click Save.
The request will appear in your requests with the status Pending, meaning that it’s awaiting
approval from the manager. In the Acting Person field, you can see the status of the acting person request (pending, approved, or rejected).
For the future requests, the Request Change button is available. For the request with the dates in the past, only the Request Cancellation button is available.
User’s Guide: Lanteria HR 2013 - Time&Attendance
Copyright © 2015 Lanteria Page 28 of 48
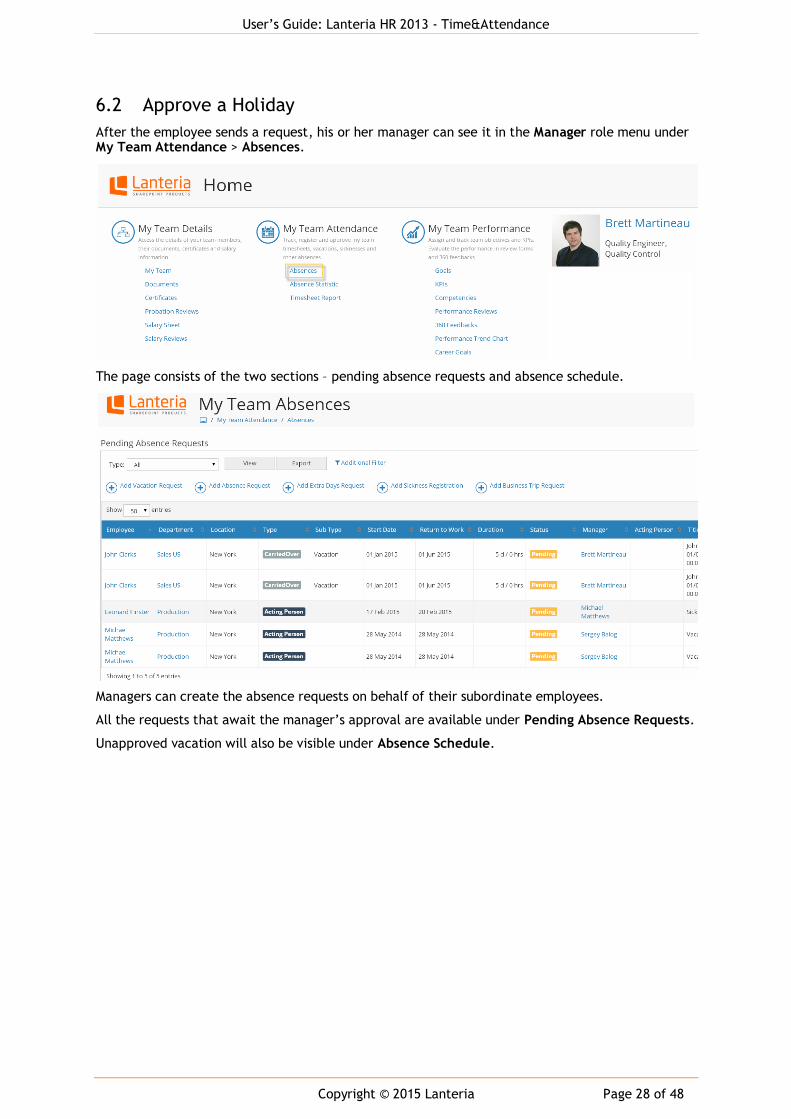
6.2 Approve a Holiday
After the employee sends a request, his or her manager can see it in the Manager role menu under My Team Attendance > Absences.
The page consists of the two sections – pending absence requests and absence schedule.
Managers can create the absence requests on behalf of their subordinate employees.
All the requests that await the manager’s approval are available under Pending Absence Requests.
Unapproved vacation will also be visible under Absence Schedule.
User’s Guide: Lanteria HR 2013 - Time&Attendance
Copyright © 2015 Lanteria Page 29 of 48
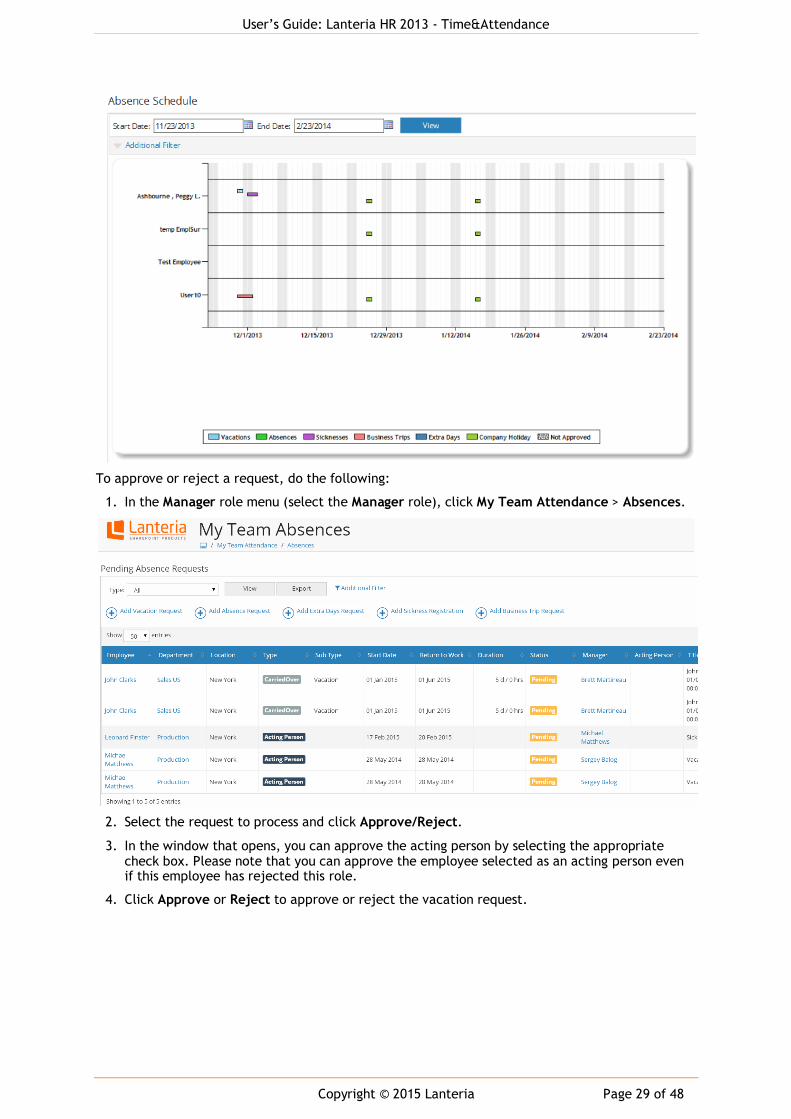
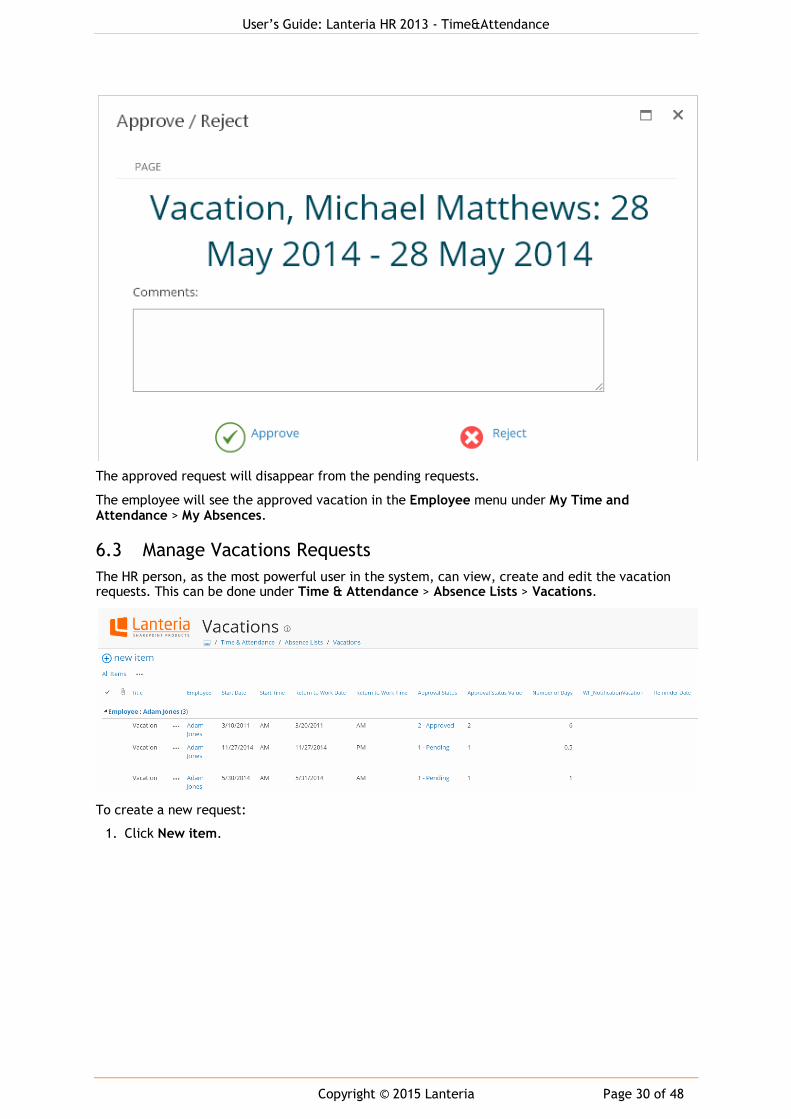
To approve or reject a request, do the following:
1. In the Manager role menu (select the Manager role), click My Team Attendance > Absences.
2. Select the request to process and click Approve/Reject.
3. In the window that opens, you can approve the acting person by selecting the appropriate check box. Please note that you can approve the employee selected as an acting person even if this employee has rejected this role.
4. Click Approve or Reject to approve or reject the vacation request.
User’s Guide: Lanteria HR 2013 - Time&Attendance
Copyright © 2015 Lanteria Page 30 of 48
The approved request will disappear from the pending requests.
The employee will see the approved vacation in the Employee menu under My Time and Attendance > My Absences.
6.3 Manage Vacations Requests
The HR person, as the most powerful user in the system, can view, create and edit the vacation requests. This can be done under Time & Attendance > Absence Lists > Vacations.
To create a new request:
1. Click New item.

User’s Guide: Lanteria HR 2013 - Time&Attendance
Copyright © 2015 Lanteria Page 31 of 48
2. Specify the title of the vacation request.
3. In the Employee field, select an employee who is entitled to the current absence allowance.
4. Specify a vacation type for this request.
5. Select the Start Date and Start Time. This is the date from which the allowance is counted.
6. Specify the Return to Work Date and Return to Work Time. This is the date till which the allowance is counted.
7. Select whether the vacation is paid.
8. Specify an approval status.
9. Select the reminder date the notification will be sent on.
User’s Guide: Lanteria HR 2013 - Time&Attendance
Copyright © 2015 Lanteria Page 32 of 48
10. In the Acting Person field, select the name of the employee who will perform the acting person role. The acting person will be able to provide absence approvals on behalf of person on leave.
11. In the Notes section, type any notes to your request and click Save.
To edit the item, click its title and then Edit Item.
You can also add absence requests using the Absence Records and Pending Absence Requests reports.
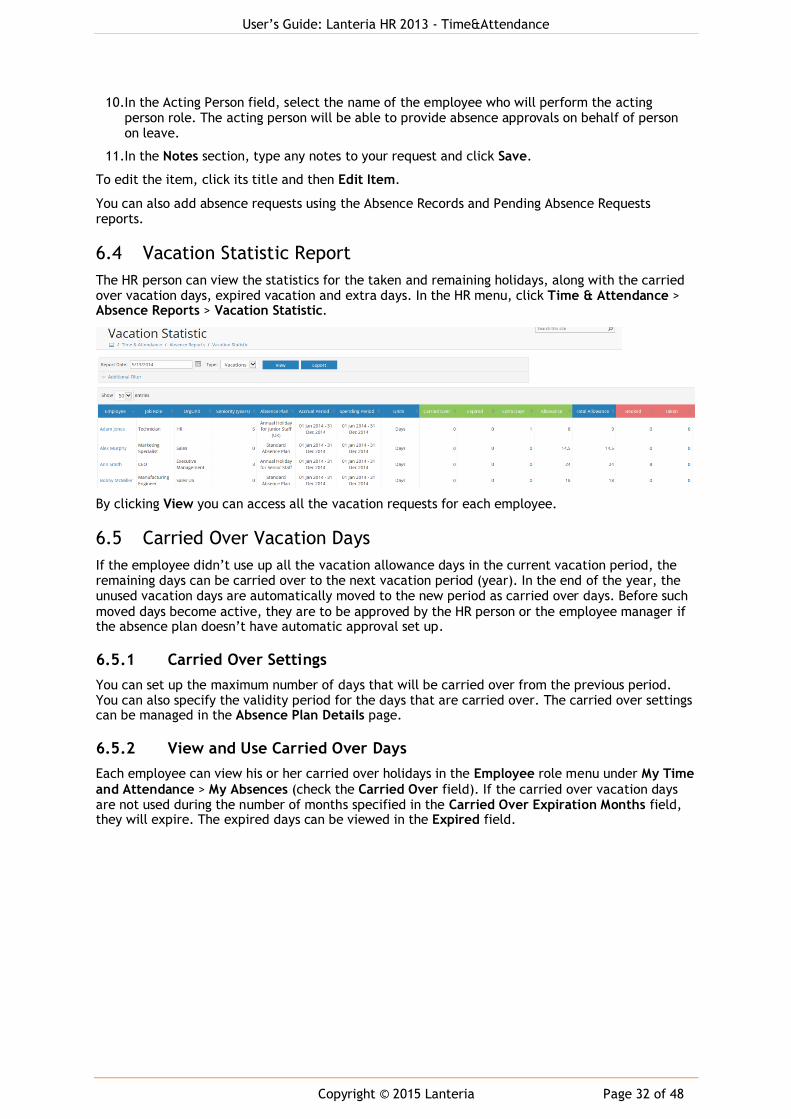
6.4 Vacation Statistic Report
The HR person can view the statistics for the taken and remaining holidays, along with the carried over vacation days, expired vacation and extra days. In the HR menu, click Time & Attendance > Absence Reports > Vacation Statistic.
By clicking View you can access all the vacation requests for each employee.
6.5 Carried Over Vacation Days
If the employee didn’t use up all the vacation allowance days in the current vacation period, the remaining days can be carried over to the next vacation period (year). In the end of the year, the unused vacation days are automatically moved to the new period as carried over days. Before such
moved days become active, they are to be approved by the HR person or the employee manager if the absence plan doesn’t have automatic approval set up.
6.5.1 Carried Over Settings
You can set up the maximum number of days that will be carried over from the previous period. You can also specify the validity period for the days that are carried over. The carried over settings can be managed in the Absence Plan Details page.
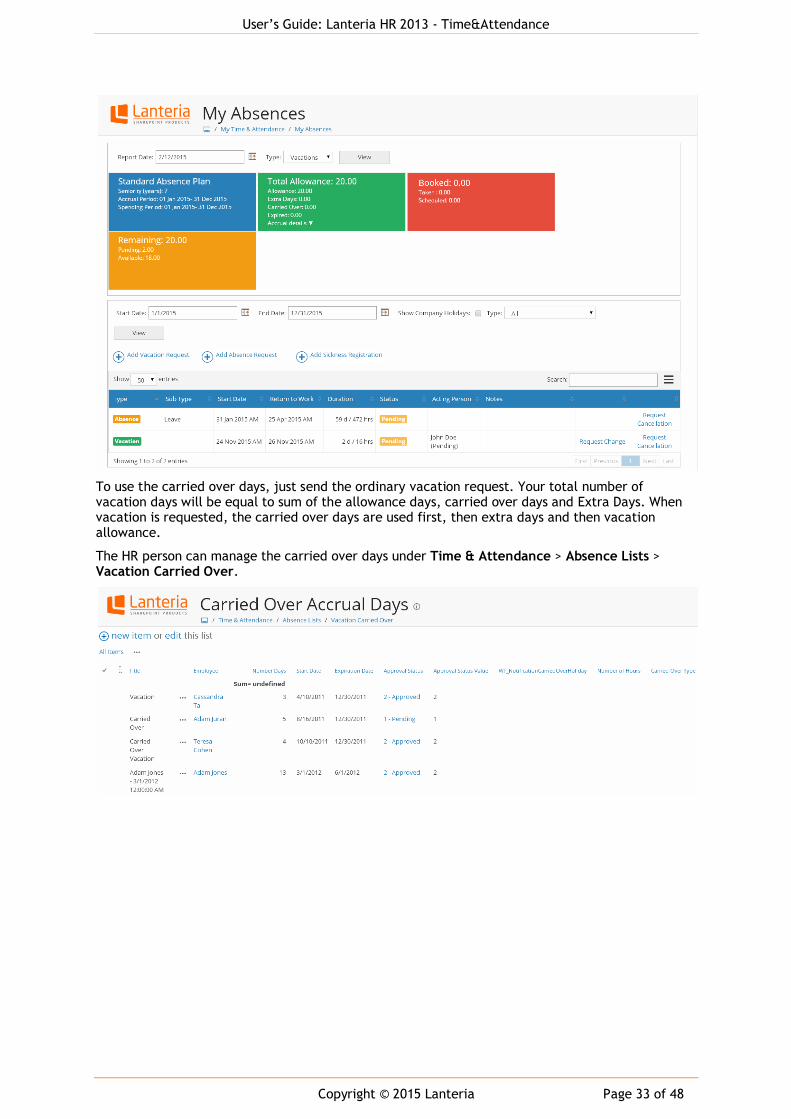
6.5.2 View and Use Carried Over Days
Each employee can view his or her carried over holidays in the Employee role menu under My Time
and Attendance > My Absences (check the Carried Over field). If the carried over vacation days are not used during the number of months specified in the Carried Over Expiration Months field, they will expire. The expired days can be viewed in the Expired field.
User’s Guide: Lanteria HR 2013 - Time&Attendance
Copyright © 2015 Lanteria Page 33 of 48
To use the carried over days, just send the ordinary vacation request. Your total number of vacation days will be equal to sum of the allowance days, carried over days and Extra Days. When vacation is requested, the carried over days are used first, then extra days and then vacation allowance.
The HR person can manage the carried over days under Time & Attendance > Absence Lists > Vacation Carried Over.

User’s Guide: Lanteria HR 2013 - Time&Attendance
Copyright © 2015 Lanteria Page 34 of 48
7 Other Absence Types In addition to vacation, Lanteria HR allows managing other cases when the employee is out of office – sicknesses, business trips and other types of absences.
7.1 Absences
When the employee needs to be out of office due to some personal or work related reasons, the employee is to request the absence approval from his or her manager. As vacation days, the absences are requested from the Employee menu, My Time and Attendance > My Absences.
Just click Add Absence Request and specify the start date and end date for the absence. When the request is sent, the manager will see the request in the Manager menu under My Team Attendance > Absences and approve or reject it.
The HR person has access to all the absences and can manage them under Time & Attendance > Absence Lists > Other Absences.
User’s Guide: Lanteria HR 2013 - Time&Attendance
Copyright © 2015 Lanteria Page 35 of 48
To add a new absence record, click New item. To modify an existing request, click its title and then Edit Item. By default, the absences are created as paid absences, but the HR person can change this by setting the Is Paid field to No.
7.2 Sicknesses
The sicknesses are registered and managed by the HR person or employees depending on the system configuration.
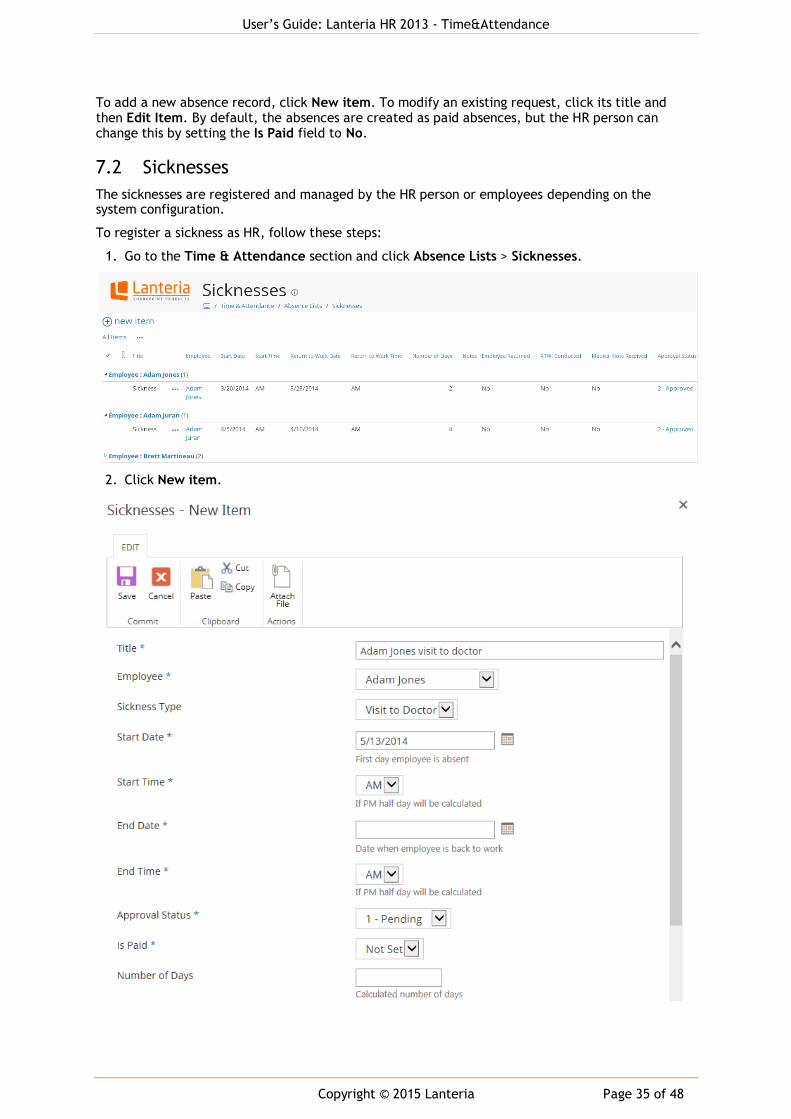
To register a sickness as HR, follow these steps:
1. Go to the Time & Attendance section and click Absence Lists > Sicknesses.
2. Click New item.
User’s Guide: Lanteria HR 2013 - Time&Attendance
Copyright © 2015 Lanteria Page 36 of 48
3. Specify the title for the sickness record.
4. In the Employee field, select the employee the sickness is being recorded for.
5. In the Sickness Type field, select the sickness subtype, if relevant.
6. In the Start Date, enter the date when the employee left the office due to this sickness. Use the Start Time field to specify whether the employee left in the first part of the day or in the second.
7. In the End Date and End Time fields, specify when the employee returned to work.
8. Use the Is Paid check box to specify whether the sickness is paid or not.
9. The number of days will be calculated automatically based on the start and end date and time. However, you can override this value by specifying the value in the Number of Days field.
10. Type the notes into the Notes field.
11. If the employee already returned from the sickness leave, select the Employee Returned check box.
12. If the return meeting was conducted upon the employee return, select the RTWI Conducted check box. Such meeting can be relevant if it was a long sickness leave, for example.
13. Next, specify whether the medical note on the sickness has been provided.
14. In the Confirmation Document field, specify the name of the document or medical note that was received.
15. Click Save.
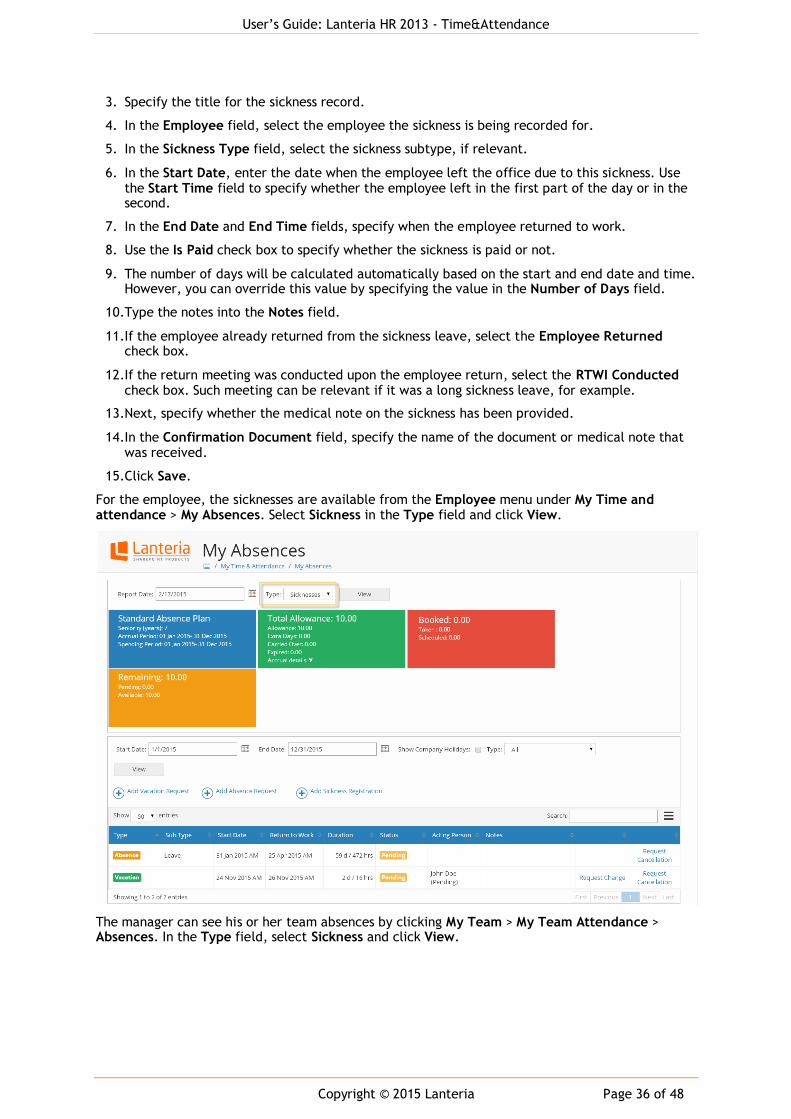
For the employee, the sicknesses are available from the Employee menu under My Time and attendance > My Absences. Select Sickness in the Type field and click View.
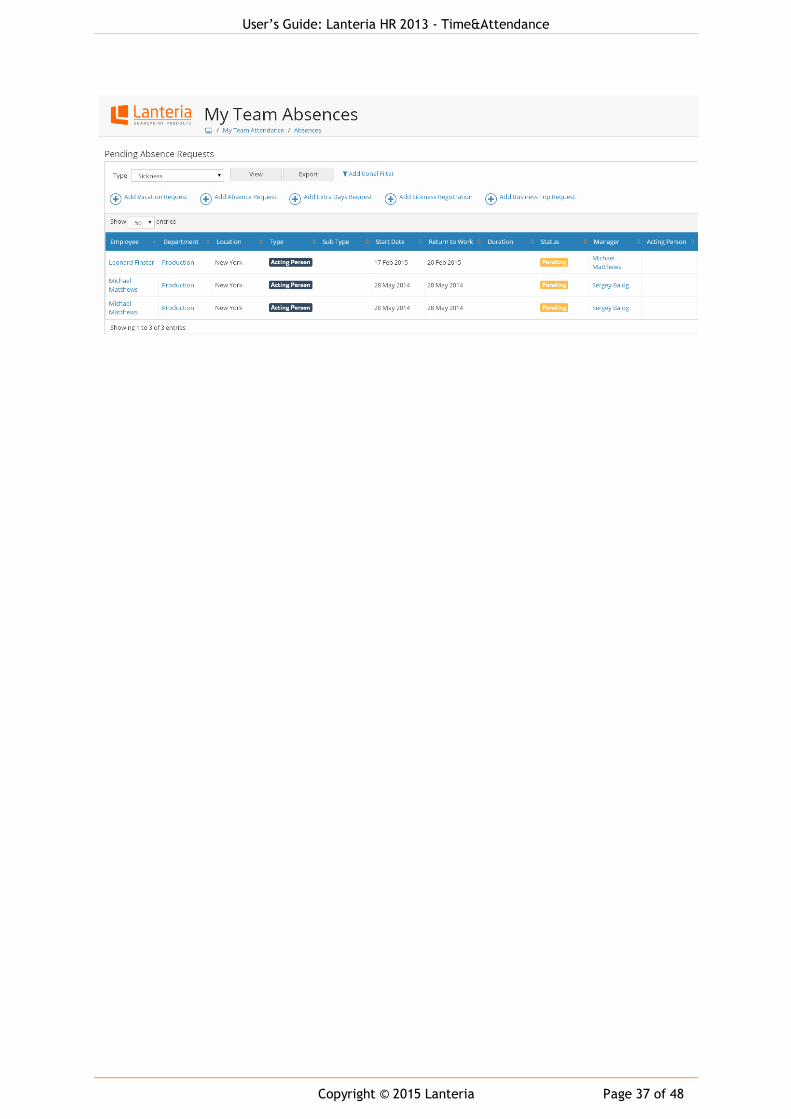
The manager can see his or her team absences by clicking My Team > My Team Attendance > Absences. In the Type field, select Sickness and click View.
User’s Guide: Lanteria HR 2013 - Time&Attendance
Copyright © 2015 Lanteria Page 37 of 48
User’s Guide: Lanteria HR 2013 - Time&Attendance
Copyright © 2015 Lanteria Page 38 of 48
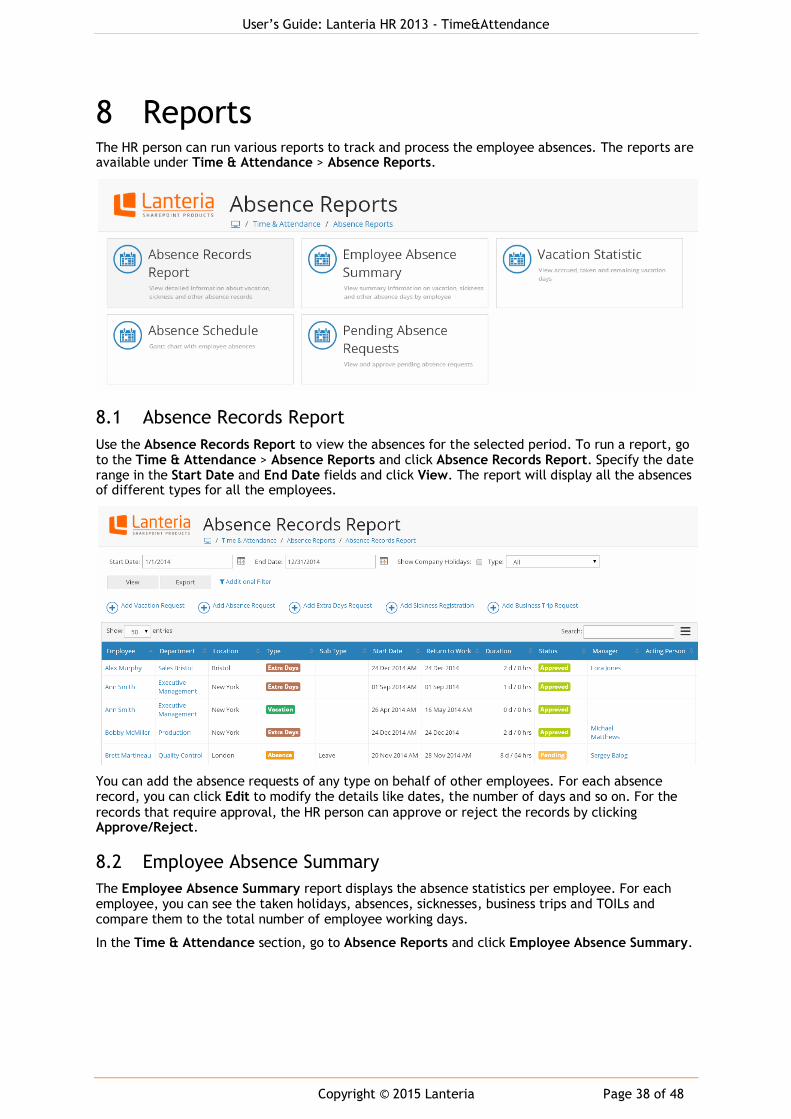
8 Reports The HR person can run various reports to track and process the employee absences. The reports are available under Time & Attendance > Absence Reports.
8.1 Absence Records Report
Use the Absence Records Report to view the absences for the selected period. To run a report, go to the Time & Attendance > Absence Reports and click Absence Records Report. Specify the date range in the Start Date and End Date fields and click View. The report will display all the absences of different types for all the employees.
You can add the absence requests of any type on behalf of other employees. For each absence record, you can click Edit to modify the details like dates, the number of days and so on. For the
records that require approval, the HR person can approve or reject the records by clicking Approve/Reject.
8.2 Employee Absence Summary
The Employee Absence Summary report displays the absence statistics per employee. For each employee, you can see the taken holidays, absences, sicknesses, business trips and TOILs and compare them to the total number of employee working days.
In the Time & Attendance section, go to Absence Reports and click Employee Absence Summary.
User’s Guide: Lanteria HR 2013 - Time&Attendance
Copyright © 2015 Lanteria Page 39 of 48
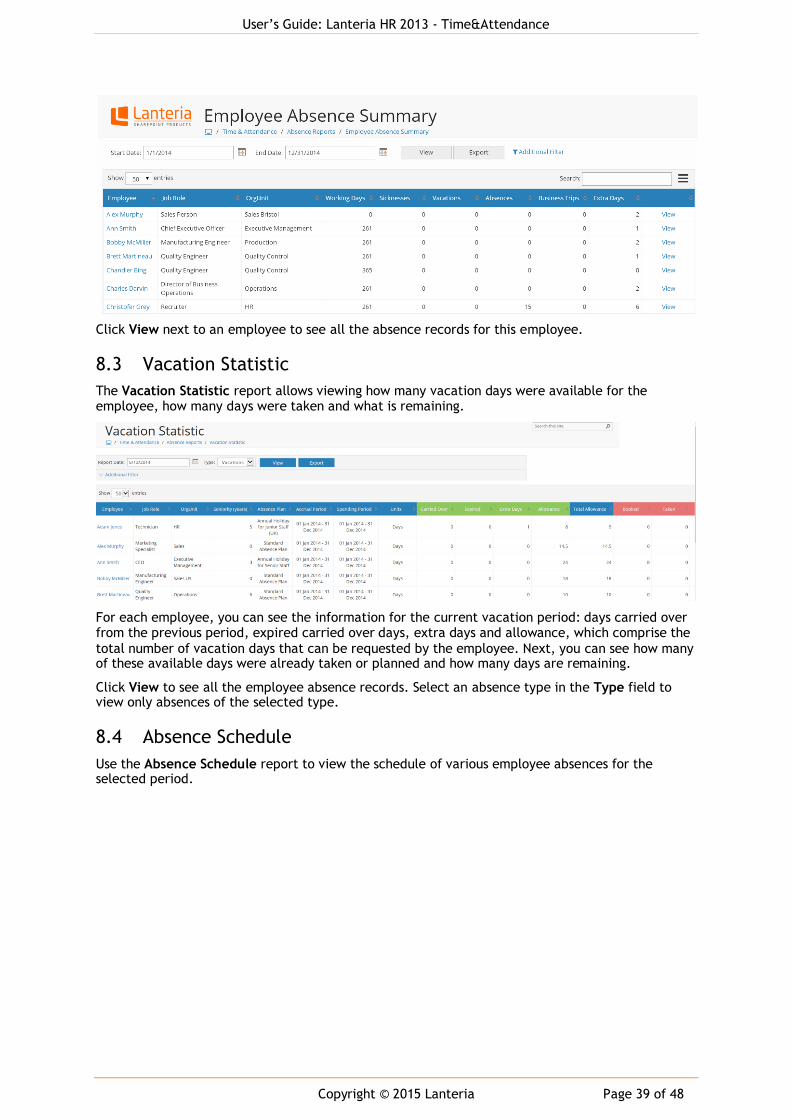
Click View next to an employee to see all the absence records for this employee.
8.3 Vacation Statistic
The Vacation Statistic report allows viewing how many vacation days were available for the employee, how many days were taken and what is remaining.
For each employee, you can see the information for the current vacation period: days carried over from the previous period, expired carried over days, extra days and allowance, which comprise the
total number of vacation days that can be requested by the employee. Next, you can see how many of these available days were already taken or planned and how many days are remaining.
Click View to see all the employee absence records. Select an absence type in the Type field to view only absences of the selected type.
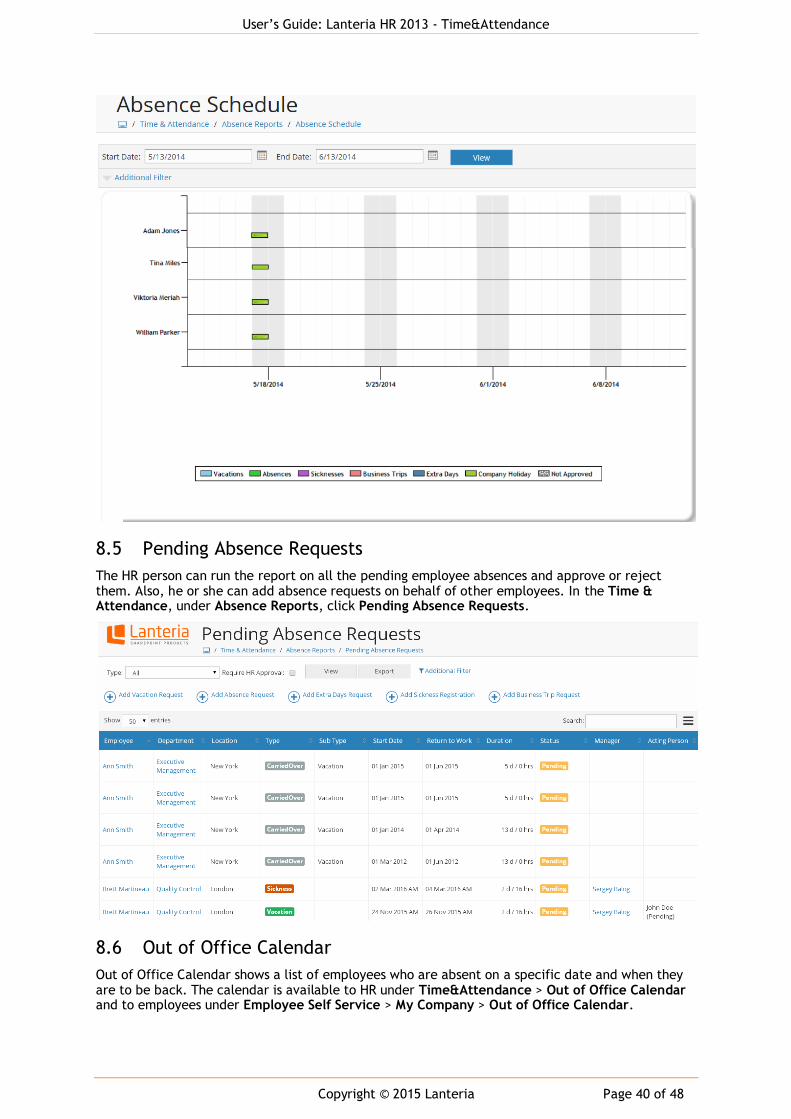
8.4 Absence Schedule
Use the Absence Schedule report to view the schedule of various employee absences for the selected period.
User’s Guide: Lanteria HR 2013 - Time&Attendance
Copyright © 2015 Lanteria Page 40 of 48
8.5 Pending Absence Requests
The HR person can run the report on all the pending employee absences and approve or reject them. Also, he or she can add absence requests on behalf of other employees. In the Time & Attendance, under Absence Reports, click Pending Absence Requests.
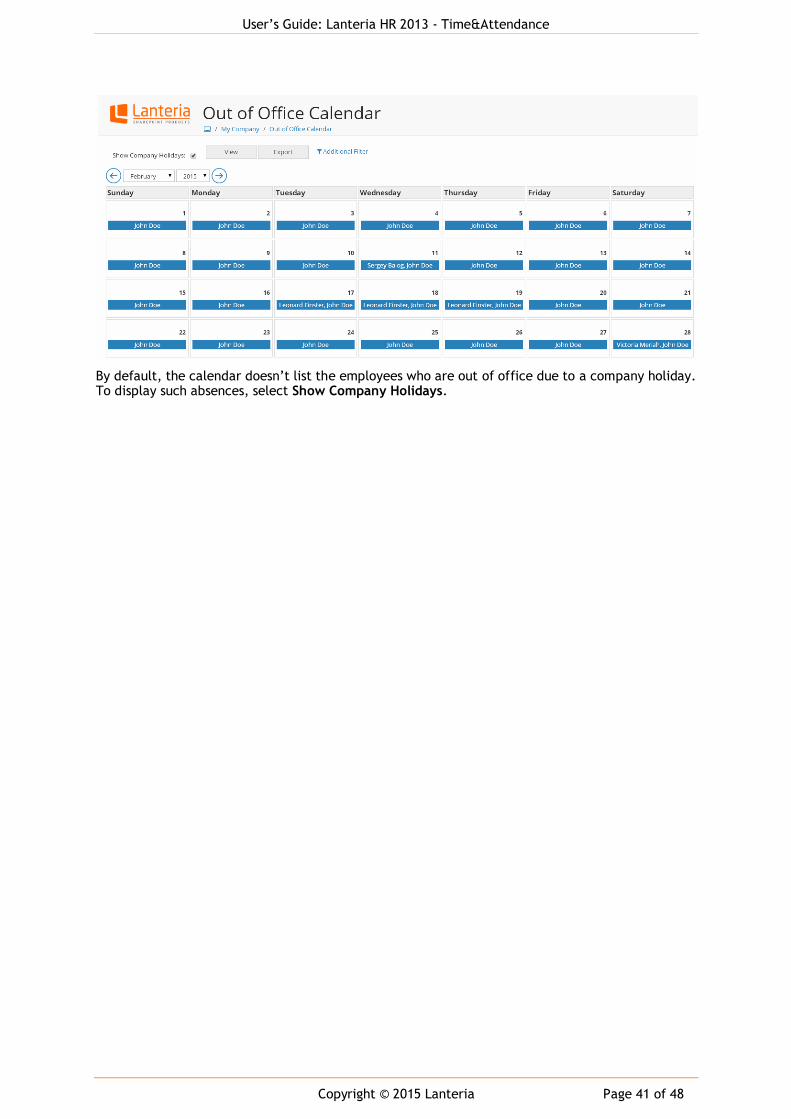
8.6 Out of Office Calendar
Out of Office Calendar shows a list of employees who are absent on a specific date and when they are to be back. The calendar is available to HR under Time&Attendance > Out of Office Calendar and to employees under Employee Self Service > My Company > Out of Office Calendar.
User’s Guide: Lanteria HR 2013 - Time&Attendance
Copyright © 2015 Lanteria Page 41 of 48
By default, the calendar doesn’t list the employees who are out of office due to a company holiday. To display such absences, select Show Company Holidays.
User’s Guide: Lanteria HR 2013 - Time&Attendance
Copyright © 2015 Lanteria Page 42 of 48
9 Timesheets Use the Timesheets module to track the time employees spend during the working day. HR can plan the projects for the employees, the employees can register the time for projects they are assigned to and the results can be analyzed by managers and HR.
9.1 Setup
The time can be registered against the project activities. Create the activities for projects, then create the projects and assign them to the employees. After that, the project activities will be available for the employee time posting.
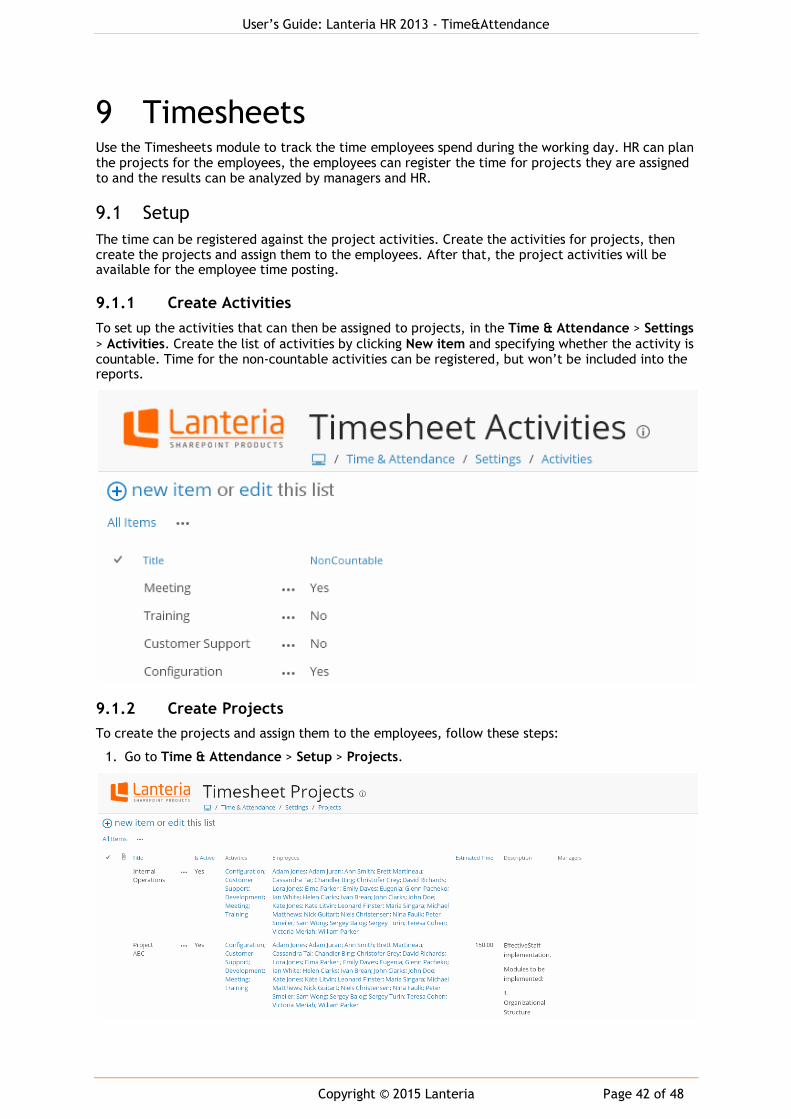
9.1.1 Create Activities
To set up the activities that can then be assigned to projects, in the Time & Attendance > Settings
> Activities. Create the list of activities by clicking New item and specifying whether the activity is countable. Time for the non-countable activities can be registered, but won’t be included into the reports.
9.1.2 Create Projects
To create the projects and assign them to the employees, follow these steps:
1. Go to Time & Attendance > Setup > Projects.

User’s Guide: Lanteria HR 2013 - Time&Attendance
Copyright © 2015 Lanteria Page 43 of 48
2. Click New item.
3. In the Title field, type the project name.
4. Select whether the project is currently active, that is, whether it is to be displayed in the employee timesheets.
5. Use the Managers field to select the project managers. The project managers will have access to the timesheets registered for their projects, but not to the employee information if these are not their direct subordinates.
6. Under Activities, select the activities to be available for time posting for this project.
7. In the Employees field, select the employees to which this project will be assigned. The selected employees will be able to post time for the project activities.
8. The project time budget can be specified in the Estimated Time field.
9. In the Description field, type the project description.
10. Save the project.

User’s Guide: Lanteria HR 2013 - Time&Attendance
Copyright © 2015 Lanteria Page 44 of 48
9.2 Register Time
The employees can register time in the My Timesheets page available to them under My Time & Attendance.
It displays the current week, and the employee can register time for each day of the week. The days are formatted depending on the hours entered:
Red formatting – no data entered for the day
Yellow formatting – hours are partly registered. The system compares the number of entered hours to the employee’s work pattern.
Green formatting – the required number of hours is entered for the day
Grey formatting – this day is a day off or an employee has a registered absence for this day
To register the time, do the following:
1. In My Timesheets, select the day to register time for. By default, the current week is
displayed. To enter time for another week day, select this day next to the Go to date button and then click the button.
2. In the Project field, select the project to which the time is posted.
3. Next, select the project activity the time was spent for.
4. Use the Time (hrs) field to specify how much time was spent for the current activity.
5. In the Notes field, provide notes to the record.
6. Add as many records as needed for the day. By default, the four records are available. Add more records with the help of the Add record button.
7. After the hours are entered, check the total hours entered in the Total field. Please note that the hours for the non-countable activities are not included into this amount.
8. If the day is similar to one of the previously posted days, select this day and use the Copy from date button. The activities and times from the selected day will be copied to the current day.
9.3 Check Time
Time registration can be monitored with the help of the two tools – Timesheet Calendar and Timesheet Report. This can be done by the employee, manager or HR.
User’s Guide: Lanteria HR 2013 - Time&Attendance
Copyright © 2015 Lanteria Page 45 of 48
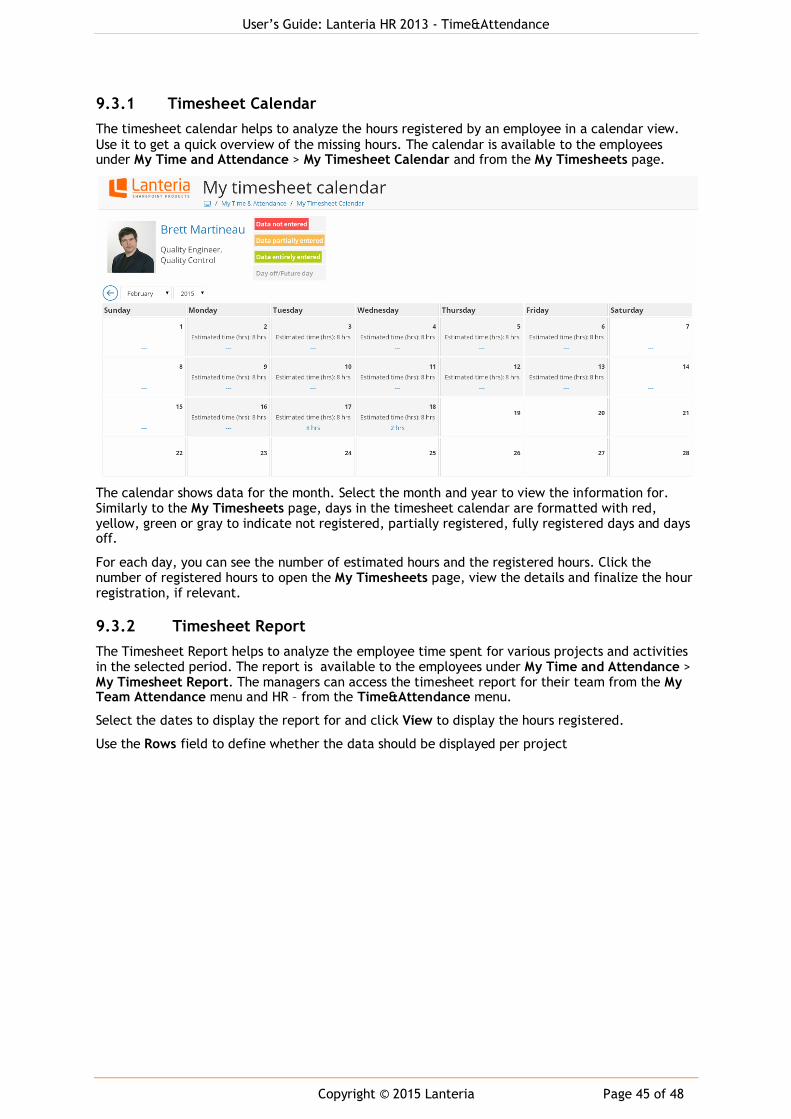
9.3.1 Timesheet Calendar
The timesheet calendar helps to analyze the hours registered by an employee in a calendar view.
Use it to get a quick overview of the missing hours. The calendar is available to the employees under My Time and Attendance > My Timesheet Calendar and from the My Timesheets page.
The calendar shows data for the month. Select the month and year to view the information for. Similarly to the My Timesheets page, days in the timesheet calendar are formatted with red, yellow, green or gray to indicate not registered, partially registered, fully registered days and days off.
For each day, you can see the number of estimated hours and the registered hours. Click the number of registered hours to open the My Timesheets page, view the details and finalize the hour registration, if relevant.
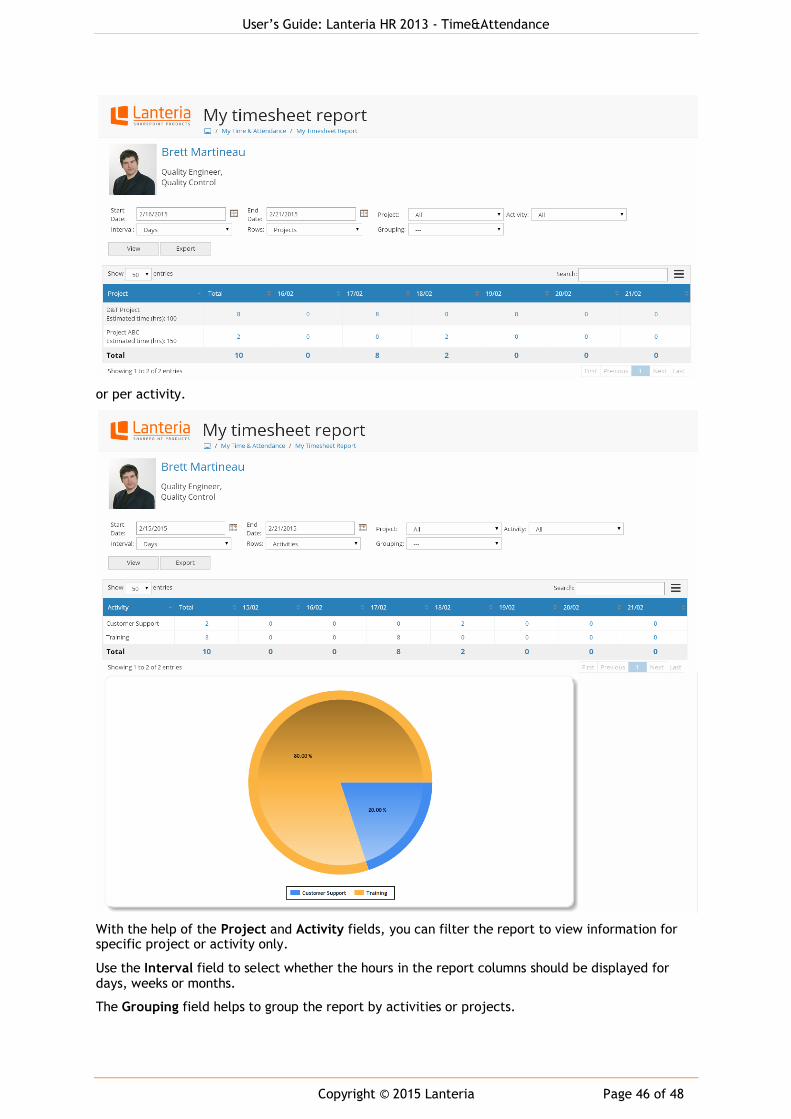
9.3.2 Timesheet Report
The Timesheet Report helps to analyze the employee time spent for various projects and activities in the selected period. The report is available to the employees under My Time and Attendance > My Timesheet Report. The managers can access the timesheet report for their team from the My Team Attendance menu and HR – from the Time&Attendance menu.
Select the dates to display the report for and click View to display the hours registered.
Use the Rows field to define whether the data should be displayed per project
User’s Guide: Lanteria HR 2013 - Time&Attendance
Copyright © 2015 Lanteria Page 46 of 48
or per activity.
With the help of the Project and Activity fields, you can filter the report to view information for specific project or activity only.
Use the Interval field to select whether the hours in the report columns should be displayed for days, weeks or months.
The Grouping field helps to group the report by activities or projects.
User’s Guide: Lanteria HR 2013 - Time&Attendance
Copyright © 2015 Lanteria Page 47 of 48
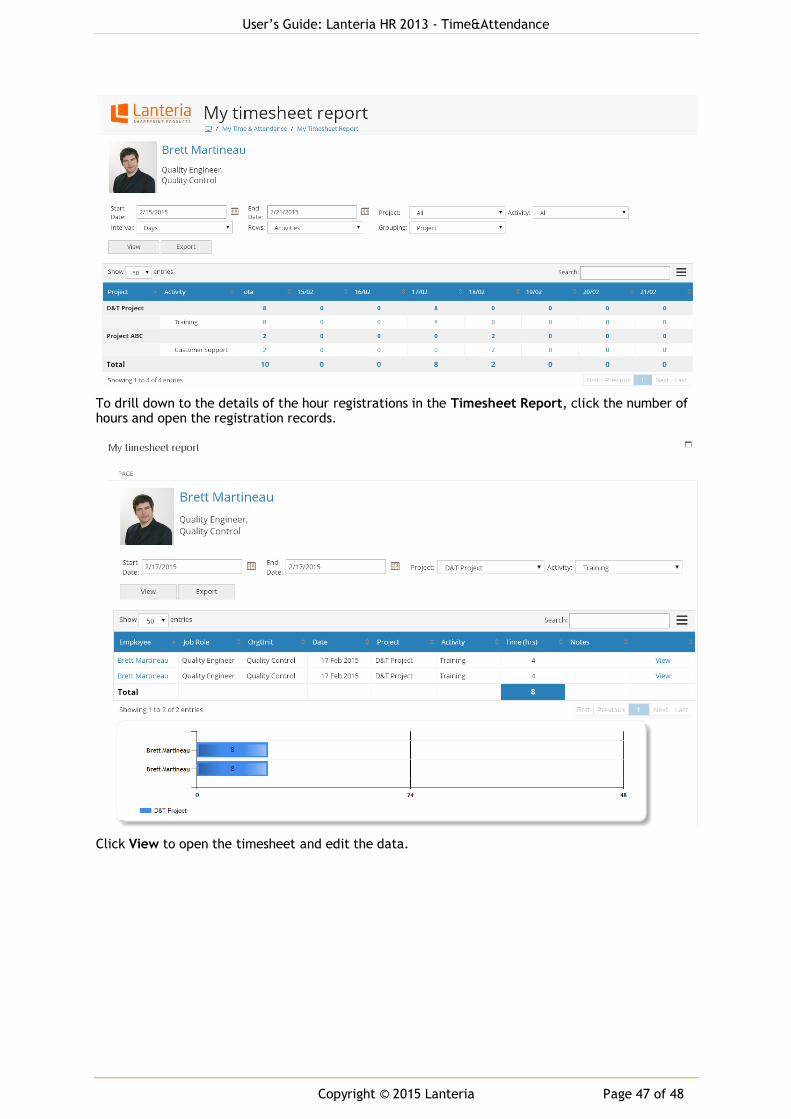
To drill down to the details of the hour registrations in the Timesheet Report, click the number of hours and open the registration records.
Click View to open the timesheet and edit the data.
User’s Guide: Lanteria HR 2013 - Time&Attendance
Copyright © 2015 Lanteria Page 48 of 48
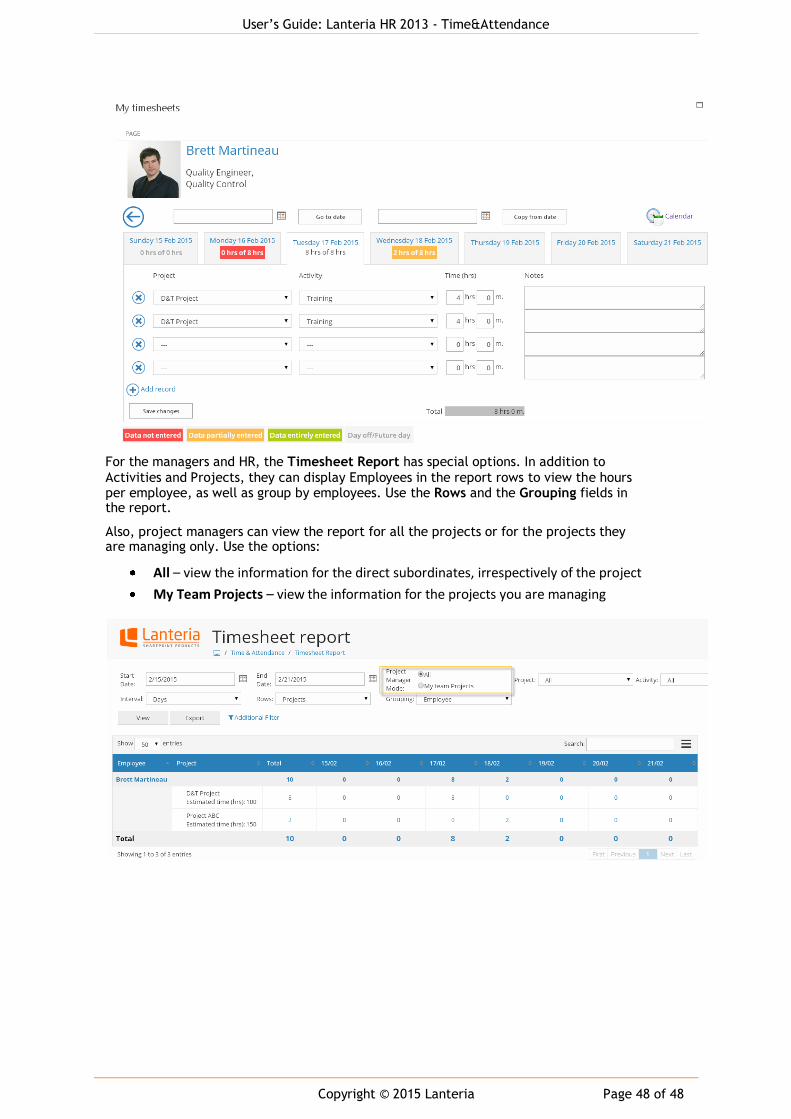
For the managers and HR, the Timesheet Report has special options. In addition to
Activities and Projects, they can display Employees in the report rows to view the hours per employee, as well as group by employees. Use the Rows and the Grouping fields in the report.
Also, project managers can view the report for all the projects or for the projects they are managing only. Use the options:
All – view the information for the direct subordinates, irrespectively of the project
My Team Projects – view the information for the projects you are managing