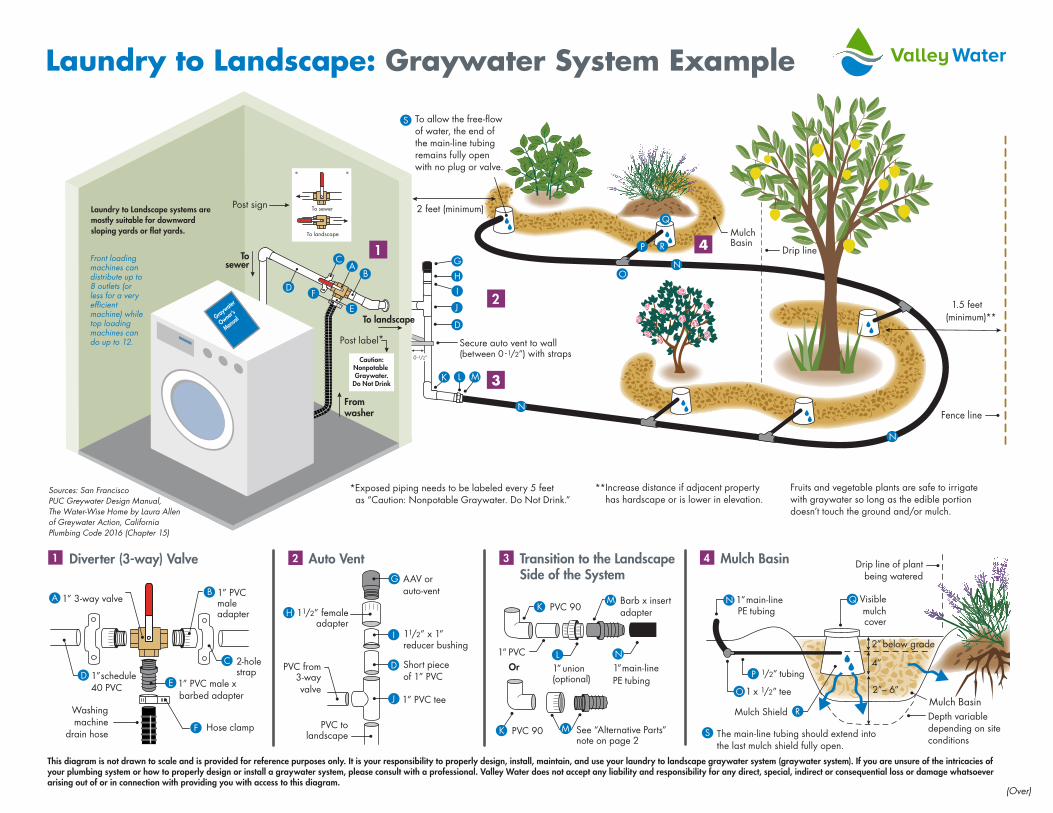
laundry to landscape: graywater system example
TRANSCRIPT
Tosewer
4”
Drip line of plant being watered
2”– 6”Mulch Basin
2” below grade
Visiblemulchcover
1/2” tubing
1 x 1/2” tee
Drip line
1
1
3
Auto Vent2 Mulch Basin4
1.5 feet (minimum)**
Fence line
B
The main-line tubing should extend into the last mulch shield fully open.
2 feet (minimum)
Diverter (3-way) Valve
To landscape
A
AAV or auto-vent
1 1/2” femaleadapter
1 1/2” x 1” reducer bushing
Short piece of 1” PVC
1” PVC tee
PVC tolandscape
PVC from3-wayvalve
1” 3-way valve
1” PVC male x barbed adapter
2-holestrap1”schedule
40 PVC
1” PVC maleadapter
Hose clamp
Washingmachine
drain hose
O
E
N
H1” main-line PE tubing
Laundry to Landscape: Graywater System Example
MulchBasin4
PVC 90
1” PVC
AB
C
D
C
DF
F
G
H
I
D
I
D
J
J
Transition to the LandscapeSide of the System
3
2
K
PVC 90K M
R
Q
P
K
M
1” main-line PE tubing
1” union (optional)
L N
L M
N
S
S
N
O
Mulch Shield R
P
N
Fromwasher
Secure auto vent to wall (between 0 - 1/2”) with straps
Post sign To sewer
To landscape
Post label*
G
0 - 1/2”
E
Q
Fruits and vegetable plants are safe to irrigate with graywater so long as the edible portion doesn’t touch the ground and/or mulch.
*Exposed piping needs to be labeled every 5 feet as “Caution: Nonpotable Graywater. Do Not Drink.”
**Increase distance if adjacent property has hardscape or is lower in elevation.
Laundry to Landscape systems are mostly suitable for downward sloping yards or �at yards.
Front loading machines can distribute up to 8 outlets (or less for a very ef�cient machine) while top loading machines can do up to 12.
Sources: San FranciscoPUC Greywater Design Manual,The Water-Wise Home by Laura Allenof Greywater Action, California Plumbing Code 2016 (Chapter 15)
Graywater
Owner’s
Manual
Caution:Nonpotable Graywater.
Do Not Drink
This diagram is not drawn to scale and is provided for reference purposes only. It is your responsibility to properly design, install, maintain, and use your laundry to landscape graywater system (graywater system). If you are unsure of the intricacies of your plumbing system or how to properly design or install a graywater system, please consult with a professional. Valley Water does not accept any liability and responsibility for any direct, special, indirect or consequential loss or damage whatsoever arising out of or in connection with providing you with access to this diagram.
To allow the free-�ow of water, the end of the main-line tubing remains fully open with no plug or valve.
Depth variable depending on site conditions
Barb x insert adapter
See “Alternative Parts”note on page 2
(Over)
Or
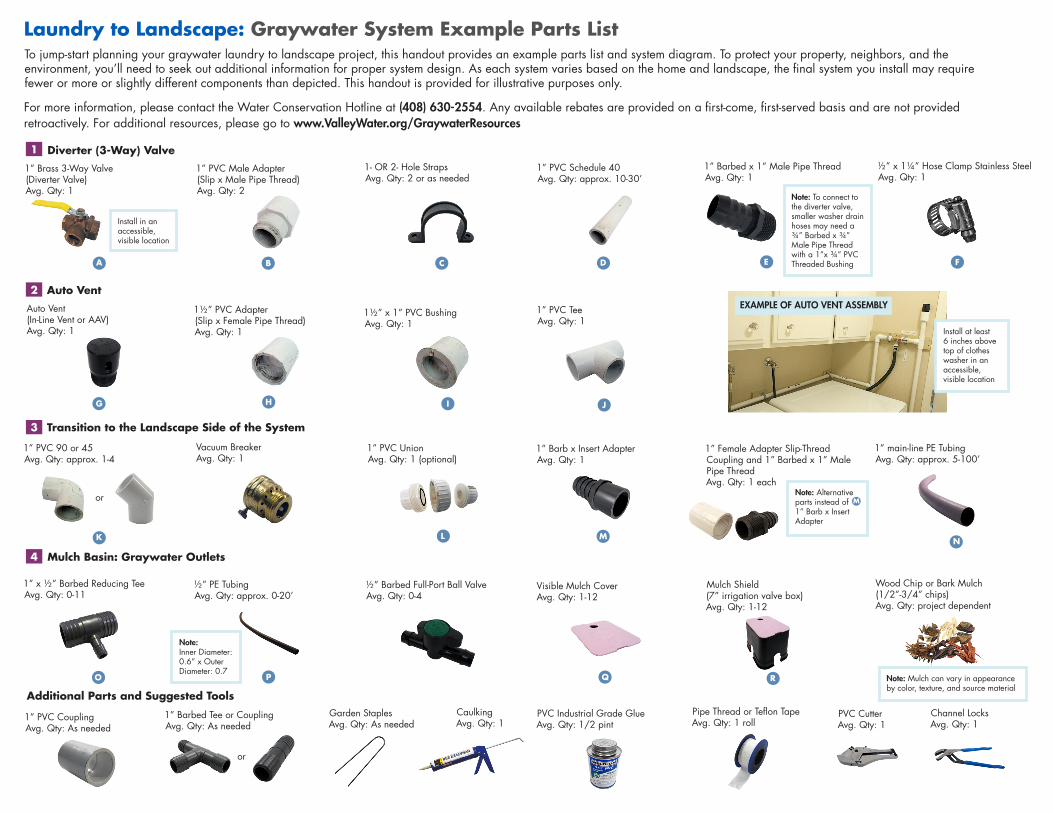
Additional Parts and Suggested Tools
1” PVC CouplingAvg. Qty: As needed
PVC Industrial Grade GlueAvg. Qty: 1/2 pint
Garden StaplesAvg. Qty: As needed
1 Diverter (3-Way) Valve
1” Brass 3-Way Valve(Diverter Valve)Avg. Qty: 1
A
1” PVC Schedule 40Avg. Qty: approx. 10-30’
D
1- OR 2- Hole StrapsAvg. Qty: 2 or as needed
C
1” PVC Male Adapter(Slip x Male Pipe Thread)Avg. Qty: 2
B
½” x 1¼” Hose Clamp Stainless SteelAvg. Qty: 1
F
1” Barbed x 1” Male Pipe ThreadAvg. Qty: 1
E
2 Auto Vent
1½” x 1” PVC BushingAvg. Qty: 1
I
1” PVC TeeAvg. Qty: 1
J
1½” PVC Adapter(Slip x Female Pipe Thread)Avg. Qty: 1
H
Auto Vent(In-Line Vent or AAV)Avg. Qty: 1
G
½” Barbed Full-Port Ball ValveAvg. Qty: 0-4
CaulkingAvg. Qty: 1
Pipe Thread or Teflon TapeAvg. Qty: 1 roll
4 Mulch Basin: Graywater Outlets
½” PE TubingAvg. Qty: approx. 0-20’
P
Mulch Shield (7” irrigation valve box)Avg. Qty: 1-12
R
Visible Mulch Cover Avg. Qty: 1-12
Q
1” x ½” Barbed Reducing TeeAvg. Qty: 0-11
O
Wood Chip or Bark Mulch (1/2”-3/4” chips)Avg. Qty: project dependent
1” Barbed Tee or CouplingAvg. Qty: As needed
or
Laundry to Landscape: Graywater System Example Parts List
For more information, please contact the Water Conservation Hotline at (408) 630-2554. Any available rebates are provided on a first-come, first-served basis and are not provided retroactively. For additional resources, please go to www.ValleyWater.org/GraywaterResources
EXAMPLE OF AUTO VENT ASSEMBLY
3 Transition to the Landscape Side of the System
1” PVC 90 or 45Avg. Qty: approx. 1-4
or
K
Vacuum BreakerAvg. Qty: 1
1” main-line PE TubingAvg. Qty: approx. 5-100’
N
1” PVC UnionAvg. Qty: 1 (optional)
L
1” Barb x Insert AdapterAvg. Qty: 1
1” Female Adapter Slip-Thread Coupling and 1” Barbed x 1” Male Pipe ThreadAvg. Qty: 1 each
M
PVC CutterAvg. Qty: 1
Channel LocksAvg. Qty: 1
Install at least 6 inches above top of clothes washer in an accessible, visible location
Install in an accessible, visible location
Note: Alternative parts instead of 1” Barb x Insert Adapter
Note: Mulch can vary in appearance by color, texture, and source material
To jump-start planning your graywater laundry to landscape project, this handout provides an example parts list and system diagram. To protect your property, neighbors, and the environment, you’ll need to seek out additional information for proper system design. As each system varies based on the home and landscape, the final system you install may require fewer or more or slightly different components than depicted. This handout is provided for illustrative purposes only.
Note: To connect to the diverter valve, smaller washer drain hoses may need a ¾” Barbed x ¾” Male Pipe Thread with a 1”x ¾” PVC Threaded Bushing
Note: Inner Diameter: 0.6” x Outer Diameter: 0.7
M