lcd tv - lg.com · tv to direct air conditioning. as long as this unit is connected to the ac wall...
TRANSCRIPT

OWNER’S MANUAL
LCD TVPlease read this manual carefully before operating your set and retain it for future reference.
P/NO : SAC34134301 (1007-REV02) www.lg.com
1-800-243-00001-888-865-30261-888-542-2623
USA, Consumer User
USA, Commercial User
CANADA
LG Customer Information Center
The model and serial number of the TV is located on the back and one side of the TV. Record it below should you ever need service.
MODEL
SERIAL
32LG710H37LG710H42LG710H
32LD650H37LD650H42LD650H47LD650H55LD650H
This product qualifies for ENERGY STAR in the “factory default” setting.Changing the factory default settings or enabling other features may increase power consumption that could exceed the limits necessary to quality for ENERGY STAR.
32LD655H37LD655H42LD655H

2
WARNING / CAUTION
WARNING / CAUTION
To prevent fire or shock hazards, do not expose
this product to rain or moisture.
FCC NOTICE
Class B digital device
This equipment has been tested and found to complywith the limits for a Class B digital device, pursuant toPart 15 of the FCC Rules. These limits are designedto provide reasonable protection against harmfulinterference in a residential installation. This equipmentgenerates, uses and can radiate radio frequency energyand, if not installed and used in accordance with theinstructions, may cause harmful interference to radiocommunications. However, there is no guarantee thatinterference will not occur in a particular installation.If this equipment does cause harmful interference toradio or television reception, which can be determinedby turning the equipment off and on, the user isencouraged to try to correct the interference by oneor more of the following measures:
- Reorient or relocate the receiving antenna.
- Increase the separation between the equipment andreceiver.
- Connect the equipment to an outlet on a circuitdifferent from that to which the receiver is connected.
- Consult the dealer or an experienced radio/TVtechnician for help.
This device complies with part 15 of the FCC Rules.
Operation is subject to the following two condi-tions: (1) This device may not cause (harmful)interference, and (2) this device must accept anyinterference received, including interference thatmay cause undesired operation (of the device).
Any changes or modifications in construction of thisdevice which are not expressly approved by the partyresponsible for compliance could void the user’sauthority to operate the equipment.
CAUTION
Do not attempt to modify this product in any waywithout written authorization from LG Electronics.Unauthorized modification could void the user’sauthority to operate this product
WARNINGRISK OF ELECTRIC SHOCK DO NOT OPEN
The lightning flash with arrowheadsymbol, within an equilateral triangle, isintended to alert the user to the presence
of uninsulated “dangerous voltage” within theproduct’s enclosure that may be of sufficientmagnitude to constitute a risk of electric shock topersons.
The exclamation point within an equilateraltriangle is intended to alert the user tothe presence of important operating
and maintenance (servicing) instructions in theliterature accompanying the appliance.
TO REDUCE THE RISK OF ELECTRIC SHOCK
DO NOT REMOVE COVER (OR BACK). NO
USER SERVICEABLE PARTS INSIDE. REFER TO
QUALIFIED SERVICE PERSONNEL.
WARNING/CAUTION
TO REDUCE THE RISK OF FIRE AND ELECTRIC
SHOCK, DO NOT EXPOSE THIS PRODUCT TO
RAIN OR MOISTURE.
NOTE TO CABLE/TV INSTALLER
This reminder is provided to call the CATV systeminstaller’s attention to Article 820-40 of the NationalElectric Code (U.S.A.). The code provides guidelines forproper grounding and, in particular, specifies that thecable ground shall be connected to the grounding systemof the building, as close to the point of the cable entryas practical.

3
SAFETY INSTRUCTIONS
Read these instructions.
Keep these instructions.
Heed all warnings.
Follow all instructions.
Do not use this apparatus near water.
Clean only with a dry cloth.
Do not block any ventilation openings. Install inaccordance with the manufacturer’s instructions.
Do not install near any heat sources such as radia-tors, heat registers, stoves, or other apparatus(including amplifiers)that produce heat.
Do not defeat the safety purpose of the polarized orgrounding-type plug. A polarized plug has two bladeswith one wider than the other. A grounding type plughas two blades and a third grounding prong, Thewide blade or the third prong are provided for yoursafety. If the provided plug does not fit into your out-let, consult an electrician for replacement of theobsolete outlet.
Protect the power cord from being walked on orpinched particularly at plugs, convenience recepta-cles, and the point where they exit from the appara-tus.
Only use attachments/accessories specified by themanufacturer.
Use only with the cart, stand, tripod, bracket, or tablespecified by the manufacturer, or sold with the appa-ratus. When a cart is used, use caution when movingthe cart/apparatus combination to avoid injury fromtip-over.
Unplug this apparatus during lighting storms orwhen unused for long periods of time.
Refer all servicing to qualified service personnel.Servicing is required when the apparatus has beendamaged in any way, such as power-supply cord orplug is damaged, liquid has been spilled or objectshave fallen into the apparatus, the apparatus hasbeen exposed to rain or moisture, does not operatenormally, or has been dropped.
Never touch this apparatus or antenna during athunder or lighting storm.
When mounting a TV on the wall, make sure not toinstall the TV by the hanging power and signal cableson the back of the TV.
Do not allow an impact shock or any objects to fallinto the product, and do not drop onto the screenwith something.
IMPORTANT SAFETY INSTRUCTIONS
1
2
3
4
5
7
8
9
10
11
12
13
6

4
CAUTION concerning the Power Cord :It is recommend that appliances be placed upon adedicated circuit; that is, a single outlet circuit whichpowers only that appliance and has no additionaloutlets or branch circuits. Check the specificationpage of this owner's manual to be certain.Do not connect too many appliances to the sameAC power outlet as this could result in fire or elec-tric shock.Do not overload wall outlets. Overloaded wall out-lets, loose or damaged wall outlets, extension cords,frayed power cords, or damaged or cracked wireinsulation are dangerous. Any of these conditionscould result in electric shock or fire. Periodicallyexamine the cord of your appliance, and if itsappearance indicates damage or deterioration,unplug it, discontinue use of the appliance, andhave the cord replaced with an exact replacementpart by an authorized servicer. Protect the powercord from physical or mechanical abuse, such asbeing twisted, kinked, pinched, closed in a door, orwalked upon. Pay particular attention to plugs, walloutlets, and the point where the cord exits theappliance. Do not make the TV with the power cord pluggedin. Do not use a damaged or loose power cord. Besure do grasp the plug when unplugging the powercord. Do not pull on the power cord to unplug theTV.
WARNING - To reduce the risk of fire or electricalshock, do not expose this product to rain, moistureor other liquids. Do not touch the TV with wethands. Do not install this product near flammableobjects such as gasoline or candles or expose theTV to direct air conditioning.
As long as this unit is connected to the AC wall out-let, it is not disconnected from the AC powersource even if you turn off this unit by SWITCH.
Do not expose to dripping or splashing and do notplace objects filled with liquids, such as vases, cups,etc. on or over the apparatus (e.g. on shelves abovethe unit).
GGRROOUUNNDDIINNGG
Ensure that you connect the earth ground wire toprevent possible electric shock. (i.e. a TV with athree-prong grounded AC plug must be connectedto a three-prong grouned AC outlet) If groundingmethods are not possible, have a qualified electri-cian install a separate circuit breaker.
Do not try to ground the unit by connecting it totelephone wires, lightening rods, or gas pipes.
DDIISSCCOONNNNEECCTTIINNGG DDEEVVIICCEE FFRROOMM MMAAIINNSS
Mains plug is the disconnecting device. The plugmust remain readily operable.
DDoott DDeeffeecctt
The Plasma or LCD panel is a high technologyproduct with resolution of two million to six millionpixels. In a very few cases, you could see fine dotson the screen while you’re viewing the TV. Thosedots are deactivated pixels and do not affect theperformance and reliability of the TV.
GGeenneerraatteedd SSoouunndd
“Cracking” noise: A cracking noise that occurswhen watching or turning off the TV is generatedby plastic thermal contraction due to tempera-ture and humidity. This noise is common for prod-ucts where thermal deformation is required.
Electrical circuit humming/panel buzzing: A lowlevel noise is generated from a high-speed switch-ing circuit, which supplies a large amount of cur-rent to operate a product. It varies dependingon the product.
This generated sound does not affect the per-formance and reliability of the product.
Owner Manual
Owner Manual
14 17
18
19
Power Supply
Short-circuitBreaker
20
15
16
21

5
AANNTTEENNNNAASS
OOuuttddoooorr aanntteennnnaa ggrroouunnddiinngg
If an outdoor antenna is installed, follow the precau-tions below. An outdoor antenna system should notbe located in the vicinity of overhead power lines orother electric light or power circuits, or where it cancome in contact with such power lines or circuits asdeath or serious injury can occur.
Be sure the antenna system is grounded so as to pro-vide some protection against voltage surges andbuilt-up static charges.
Section 810 of the National Electrical Code (NEC) inthe U.S.A. provides information with respect to prop-er grounding of the mast and supporting structure,grounding of the lead-in wire to an antenna dis-charge unit, size of grounding conductors, location ofantenna discharge unit, connection to groundingelectrodes and requirements for the grounding elec-trode.
AAnntteennnnaa ggrroouunnddiinngg aaccccoorrddiinngg ttoo tthheeNNaattiioonnaall EElleeccttrriiccaall CCooddee,, AANNSSII//NNFFPPAA 7700
Cleaning
When cleaning, unplug the power cord and scrubgently with a soft cloth to prevent scratching. Do notspray water or other liquids directly on the TV aselectric shock may occur. Do not clean with chemi-cals such as alcohol, thinners or benzene.
Moving
Make sure the product is turned off, unpluggedand all cables have been removed. It may take 2 ormore people to carry larger TVs. Do not pressagainst or put stress on the front panel of the TV.
Ventilation
Install your TV where there is proper ventilation. Donot install in a confined space such as a bookcase.Do not cover the product with cloth or other mate-rials (e.g.) plastic while plugged in. Do not install inexcessively dusty places.
Take care not to touch the ventilation openings.When watching the TV for a long period, the venti-lation openings may become hot.
If you smell smoke or other odors coming from theTV, unplug the power cord contact and authorizedservice center.
Do not press strongly upon the panel with a hand orsharp object such as nail, pencil or pen, or make ascratch on it.
Keep the product away from direct sunlight.
FFoorr LLCCDD TTVV
If the TV feels cold to the touch, there may bea small “flicker” when it is turned on. This isnormal, there is nothing wrong with TV.
Some minute dot defects may be visible on thescreen, appearing as tiny red, green, or bluespots. However, they have no adverse effect onthe monitor's performance.
Avoid touching the LCD screen or holding yourfinger(s) against it for long periods of time.Doing so may produce some temporary dis-tortion effects on the screen.
24
22
Antenna Lead in Wire
Antenna Discharge Unit(NEC Section 810-20)
Grounding Conductor(NEC Section 810-21)
Ground Clamps
Power Service GroundingElectrode System (NECArt 250, Part H)
Ground Clamp
Electric ServiceEquipment
NEC: National Electrical Code
25
26
27
28
23
ON DISPOSAL
(Only Hg lamp used LCD TV)
The fluorescent lamp used in this product containsa small amount of mercury. Do not dispose ofthis product with general household waste.Disposal of this product must be carried out inaccordance to the regulations of your local authority.
29
30

6
CONTENTS
WARNING / CAUTION . . . . . . . . . . . . . . . . . . . . . . . . . . . . 2
SAFETY INSTRUCTIONS . . . . . . . . . . . . . . . . . . . . . . . . . . 3
FEATURES OF THIS TV . . . . . . . . . . . . . . . . . . . . . . . . . . . . . 8
PREPARATION
Accessories . . . . . . . . . . . . . . . . . . . . . . . . . . . . . . . . . . . . . . . . . . . . . . . . . . . . . . 9
Front Panel Information . . . . . . . . . . . . . . . . . . . . . . . . . . . . . . . . . . . 10
Back Panel Information . . . . . . . . . . . . . . . . . . . . . . . . . . . . . . . . . . . . 12
Stand Instuctions . . . . . . . . . . . . . . . . . . . . . . . . . . . . . . . . . . . . . . . . . . . . 15
Cable Management . . . . . . . . . . . . . . . . . . . . . . . . . . . . . . . . . . . . . . . . . 17
Desktop Pedestal Installation . . . . . . . . . . . . . . . . . . . . . . . . . . . 19
Swivel Stand . . . . . . . . . . . . . . . . . . . . . . . . . . . . . . . . . . . . . . . . . . . . . . . . . . . . 19
Attaching the TV to a desk . . . . . . . . . . . . . . . . . . . . . . . . . . . . . . 20
VESA Wall Mounting . . . . . . . . . . . . . . . . . . . . . . . . . . . . . . . . . . . . . . . . 21
Securing the TV to the wall to prevent falling
When the TV is used on a stand . . . . . . . . . . . . . . . . . . . . . . . . . . 23
Antenna or Cable Connection . . . . . . . . . . . . . . . . . . . . . . . . . . 24
MPI Card Slot / PPV Card Installation . . . . . . . . . . . . . . 25
EXTERNAL EQUIPMENT SETUP
HD Receiver Setup . . . . . . . . . . . . . . . . . . . . . . . . . . . . . . . . . . . . . . . . . . 26
DVD Setup . . . . . . . . . . . . . . . . . . . . . . . . . . . . . . . . . . . . . . . . . . . . . . . . . . . . . 29
VCR Setup . . . . . . . . . . . . . . . . . . . . . . . . . . . . . . . . . . . . . . . . . . . . . . . . . . . . . 30
Other A/V Source Setup . . . . . . . . . . . . . . . . . . . . . . . . . . . . . . . . . 31
Audio Out Connection . . . . . . . . . . . . . . . . . . . . . . . . . . . . . . . . . . . . 31
PC Setup . . . . . . . . . . . . . . . . . . . . . . . . . . . . . . . . . . . . . . . . . . . . . . . . . . . . . . . . 32
WATCHING TV / CHANNEL CONTROL
Remote Control Functions . . . . . . . . . . . . . . . . . . . . . . . . . . . . . . . 38
Turning On The TV . . . . . . . . . . . . . . . . . . . . . . . . . . . . . . . . . . . . . . . . . 40
Channel Selection . . . . . . . . . . . . . . . . . . . . . . . . . . . . . . . . . . . . . . . . . . . 40
Volume Adjustment . . . . . . . . . . . . . . . . . . . . . . . . . . . . . . . . . . . . . . . . . 40
On-Screen Menus Selection . . . . . . . . . . . . . . . . . . . . . . . . . . . . . 41
Channel Setup
- Auto Scan (Auto Tuning) . . . . . . . . . . . . . . . . . . . . . . . . . . . 42
- Add / Delete Channel (Manual Tuning) . . . . . . 43
- Channel Editing . . . . . . . . . . . . . . . . . . . . . . . . . . . . . . . . . . . . . . . . 44
Channel Label . . . . . . . . . . . . . . . . . . . . . . . . . . . . . . . . . . . . . . . . . . . . . . . . . 44
Input List . . . . . . . . . . . . . . . . . . . . . . . . . . . . . . . . . . . . . . . . . . . . . . . . . . . . . . . . 45
Example Electronic Program Guide . . . . . . . . . . . . . . . . . . . 46
USB
Entry Modes . . . . . . . . . . . . . . . . . . . . . . . . . . . . . . . . . . . . . . . . . . . . . . . . . . . 47
Photo List . . . . . . . . . . . . . . . . . . . . . . . . . . . . . . . . . . . . . . . . . . . . . . . . . . . . . . . 49
Music List . . . . . . . . . . . . . . . . . . . . . . . . . . . . . . . . . . . . . . . . . . . . . . . . . . . . . . . 53
Extra Contents . . . . . . . . . . . . . . . . . . . . . . . . . . . . . . . . . . . . . . . . . . . . . . . . 55
PICTURE CONTROL
PIP (Picture-In-Picture) . . . . . . . . . . . . . . . . . . . . . . . . . . . . . . . . . . . . 56
Picture Size (Aspect Ratio) Control . . . . . . . . . . . . . . . . . . 58
Preset Picture Settings (Picture Mode) . . . . . . . . . . . . . 61
Manual Picture Adjustment - User Mode . . . . . . . . . . 62
Picture Improvement Technology . . . . . . . . . . . . . . . . . . . . . 63
Picture Reset . . . . . . . . . . . . . . . . . . . . . . . . . . . . . . . . . . . . . . . . . . . . . . . . . 65
Demo mode . . . . . . . . . . . . . . . . . . . . . . . . . . . . . . . . . . . . . . . . . . . . . . . . . . . . 66
SOUND & LANGUAGE CONTROL
Auto Volume Leveler (Auto Volume) . . . . . . . . . . . . . . . . . 67
Preset Sound Settings (Sound Mode) . . . . . . . . . . . . . . 68
Sound Setting Adjustment - User Mode . . . . . . . . . . . 69
- SRS TruSurround XT . . . . . . . . . . . . . . . . . . . . . . . . . . . . . . . . . 70
- Infinite Sound . . . . . . . . . . . . . . . . . . . . . . . . . . . . . . . . . . . . . . . . . . . 70
Clear Voice ll . . . . . . . . . . . . . . . . . . . . . . . . . . . . . . . . . . . . . . . . . . . . . . . . . . . 71
Balance . . . . . . . . . . . . . . . . . . . . . . . . . . . . . . . . . . . . . . . . . . . . . . . . . . . . . . . . . . 72
TV Speakers On/Off Setup . . . . . . . . . . . . . . . . . . . . . . . . . . . . . . 73
Audio Reset . . . . . . . . . . . . . . . . . . . . . . . . . . . . . . . . . . . . . . . . . . . . . . . . . . . 74
Stereo/SAP Broadcast Setup . . . . . . . . . . . . . . . . . . . . . . . . . . . 75
Audio Language . . . . . . . . . . . . . . . . . . . . . . . . . . . . . . . . . . . . . . . . . . . . . . 76
On-Screen Menus Language Selection . . . . . . . . . . . . . . 77
Caption Mode
- Analog Broadcasting System Captions . . . . . . . 78
- Digital Broadcasting System Captions . . . . . . . . 79
- Caption Option . . . . . . . . . . . . . . . . . . . . . . . . . . . . . . . . . . . . . . . 80

7
TIME SETTING
Clock Setting
- Auto Clock Setup . . . . . . . . . . . . . . . . . . . . . . . . . . . . . . . . . . . . . 81
- Manual Clock Setup . . . . . . . . . . . . . . . . . . . . . . . . . . . . . . . . . 82
Auto On/Off Time Setting . . . . . . . . . . . . . . . . . . . . . . . . . . . . . . 83
Sleep Timer Setting . . . . . . . . . . . . . . . . . . . . . . . . . . . . . . . . . . . . . . . . . 84
PARENTAL CONTROL / RATINGS
Set Password & Lock System . . . . . . . . . . . . . . . . . . . . . . . . . . . 85
Channel Blocking . . . . . . . . . . . . . . . . . . . . . . . . . . . . . . . . . . . . . . . . . . . . 88
Movie & TV Rating . . . . . . . . . . . . . . . . . . . . . . . . . . . . . . . . . . . . . . . . . 89
Downloadable Rating . . . . . . . . . . . . . . . . . . . . . . . . . . . . . . . . . . . . . . 94
External Input Blocking . . . . . . . . . . . . . . . . . . . . . . . . . . . . . . . . . . . . 95
COMMERCIAL MODE SETUP
Interactive TV Setup . . . . . . . . . . . . . . . . . . . . . . . . . . . . . . . . . . . . . . . . 96
Installer Overview . . . . . . . . . . . . . . . . . . . . . . . . . . . . . . . . . . . . . . . . . . . . 97
Interactive TV Overview . . . . . . . . . . . . . . . . . . . . . . . . . . . . . . . . . . . 98
Commercial Mode Setup for Master TV . . . . . . . . . . . 99
Master TV Profile Setup Learning/Teaching withUSB Memory Card . . . . . . . . . . . . . . . . . . . . . . . . . . . . . . . . . . . . . . . . 100
TLL-1100A Cloning Connections/Learning Setup
. . . . . . . . . . . . . . . . . . . . . . . . . . . . . . . . . . . . . . . . . . . . . . . . . . . . . . . . . . . . . . . . . . . . 102
LT2002 Cloning Connections/Learning Setup 103
LT2002 Cloning Learning Setup . . . . . . . . . . . . . . . . . . . . . 104
Cloning Connections/Teaching Setup . . . . . . . . . . . . . 105
Installer Menu . . . . . . . . . . . . . . . . . . . . . . . . . . . . . . . . . . . . . . . . . . . . . . . 106
Reference: Detailed Instructions For Making AMaster TV . . . . . . . . . . . . . . . . . . . . . . . . . . . . . . . . . . . . . . . . . . . . . . . . . . . . . . 112
Reference: Procedures for adding Channel LabelIcons/Custom Channel Labels (2-5-4 + MENUMode) . . . . . . . . . . . . . . . . . . . . . . . . . . . . . . . . . . . . . . . . . . . . . . . . . . . . . . . . . . . 113
Reference: Clonable Menu Features . . . . . . . . . . . . . . . . . 114
Reference: Power Saving Setup . . . . . . . . . . . . . . . . . . . . . . . . 115
TV Camport Auto Sense Operation . . . . . . . . . . . . . . . . 117FTG Operation Setup . . . . . . . . . . . . . . . . . . . . . . . . . . . . . . . . . . . .118FTG Channel Map Overview . . . . . . . . . . . . . . . . . . . . . . . . . . .119FTG Installer Menu Overview . . . . . . . . . . . . . . . . . . . . . . . . .120FTG Operation Troubleshooting . . . . . . . . . . . . . . . . . . . .121
TV Aux Input Configuration . . . . . . . . . . . . . . . . . . . . . . . . . . . .121B-LAN Setup and Overview . . . . . . . . . . . . . . . . . . . . . . . . . . .122
APPENDIX
Troubleshooting . . . . . . . . . . . . . . . . . . . . . . . . . . . . . . . . . . . . . . . . . . . . 123
Reference: LT2002 Cloning ProcedureTroubleshooting . . . . . . . . . . . . . . . . . . . . . . . . . . . . . . . . . . . . . . . . . . . . 125
Troubleshooting Flow Chart . . . . . . . . . . . . . . . . . . . . . . . . . . . 126
Commercial Mode Check . . . . . . . . . . . . . . . . . . . . . . . . . . . . . . . 127
Reference: RJP model list and input hierarchy . . 127
Glossary of Terms . . . . . . . . . . . . . . . . . . . . . . . . . . . . . . . . . . . . . . . . . . 128
Maintenance . . . . . . . . . . . . . . . . . . . . . . . . . . . . . . . . . . . . . . . . . . . . . . . . . 129
Product Specifications . . . . . . . . . . . . . . . . . . . . . . . . . . . . . . . . . . . 130
Programming the Remote Control . . . . . . . . . . . . . . . . . . . 132
IR Codes . . . . . . . . . . . . . . . . . . . . . . . . . . . . . . . . . . . . . . . . . . . . . . . . . . . . . . . 135
Open Source License . . . . . . . . . . . . . . . . . . . . . . . . . . . . . . . . . . . . . 137

8
FEATURES OF THIS TV
When a fixed image (e.g. logos, screen menus, video game, and computer display) is displayed on the TVfor an extended period, it can become permanently imprinted on the screen. This phenomenon is knownas “image burn” or “burn-in.” Image burn is not covered under the manufacturer’s warranty.
In order to prevent image burn, avoid displaying a fixed image on your TV screen for a prolonged period(2 or more hours for LCD, 1 or more hours for Plasma).
Image burn can also occur on the letterboxedareas of your TV if you use the 4:3 aspectratio setting for an extended period.
IMPORTANT INFORMATION TO PREVENT “IMAGE BURN/ BURN-IN” ON YOUR TV SCREEN
Automatically enhances and amplifies the sound of
human voice frequency range to help keep dialogue
audible when background noise swells.
LG TV include a unique invisible speaker system,
tuned by renowned audio expert, Mr. Mark Levinson.
Speakers are embedded in strategic spots behind the
front cabinet and use minute vibrations to turn the
entire front bezel into the speaker system. The result
is a clean, polished look, and enhanced audio by
increasing the “sweet spot”, giving a wider and richer
sound field.
HDMI, the HDMI logo and High-Definition
Multimedia Interface are trademarks or registered
trademarks of HDMI Licensing LLC."
is a trademark of SRS Labs, Inc.
TruSurround XT technology is incorporated under
license from SRS Labs, Inc.
Manufactured under license from Dolby Laboratories.
“Dolby “and the double-D symbol are trademarks of
Dolby Laboratories.
High-definition television. High-resolution digital
television broadcast and playback system composed
of roughly a million or more pixels, 16:9 aspect-ratio
screens, and AC3 digital audio. A subset of digital
television, HDTV formats include 1080i and 720p
resolutions.
Unlike other sensors which can only sense brightness
of ambient light, LG’s “Intelligent Sensor” uses 4,096
sensing steps to evaluate its surroundings. Using a
sophisticated algorithm, the LG processes picture
quality elements including brightness, contrast, color,
sharpness and white balance. The result is a picture
optimized for it’s surroundings, more pleasing to
watch and which can also save up to 50% in power
consumption.
Matches the original frame rate of the film for a more
film-like experience
View videos and photos and listen to music on your
TV through USB 2.0 (‘videos’ dependent on model).
This feature is not available for all models.

PR
EPA
RA
TIO
N
9
PREPERATION
ACCESSORIESEnsure that the following accessories are included with your TV. If an accessory is missing, please contact the
dealer where you purchased the TV.
The accessories included may differ from the images below.
Owner’s Manual
Power Cord
CD Manual
Protective Bracket andScrew for Power Cord (Refer to P.17, P.18)
Cable Holder(Refer to P.17)
* Wipe spots on the exterior only with the pol-
ishing cloth.
* Do not wipe roughly when removing stains.
Excessive pressure may cause scratches or
discoloration.
Polishing Cloth(Not included with all
models.)
OOppttiioonnaall EExxttrraass
D-sub 15 pin Cable
When using the VGA (D-sub 15 pin
cable) PC connection, the user
must use shielded signal interface
cables with ferrite cores to maintain
standards compliance.
x 2
Torx plus Star head screw
(Refer to P.15, P.16)
Screw forstand fixing
(Refer to P.20)
Screws for standassembly
(Refer to P.15)
x 4 x 4
1.5V 1.5V
Remote Control,Batteries
MUTE
RETURN
CC
TVPOWER
GUIDEPORTAL
ENTER
VOL
CH1
2
3
4
5
6
7
8
0 9
FLASHBK
VCR
DVD
INPUT
MENU
INFOi
STB
PA
GE
PIP
SAP
PIP CH-PIP CH+
PIP SWAPPIP INPUT
ALPHA/NUM
REMOVE
RATIOTIMER
ABC
DEF
GHI
WXYZ
TUV
PQRS
MNO
JKL
&@
.:/,
Protection Cover(Refer to P.15)
Plug-in type Holder(Refer to P.17)
FFoorr 3322//3377//4422LLGG771100HH
(For 32LG710H)
Screws for standfixing
(Refer to P.20)
Washers for standfixing
(Refer to P.20)
x 2
Cable Holder(Refer to P.18)
Plug-in type Holder(Refer to P.18)
(For 32/37/42LD650H, 32/37/42LD655H)
Screw for stand fixing(Refer to P.20)
Screws for stand assembly(Refer to P.16)
x 8
(M4 x 20)
Protection Cover(Refer to P.16)
FFoorr 3322//3377//4422//4477//5555LLDD665500HH,, 3322//3377//4422LLDD665555HH
Nuts for standfixing
(Refer to P.20)
x 2 x 2
Rubber for standfixing
(Refer to P.20)
x 4

PR
EPA
RA
TIO
N
10
PREPARATIONPREPARATION
FRONT PANEL INFORMATION Image shown may differ from your TV.
POWER Button
Power/Standby Indicator
Illuminates red in standby mode.
Illuminates blue when the set isswitched on.
CH
VOL
MENU
INPUT
ENTER
VOLUME (+, -)
Buttons
ENTER Button
MENU Button
INPUT Button
Remote Control Sensor
CHANNEL( , )
Buttons
Intelligent SensorAdjusts picture according tothe surrounding conditions.
32/37/42LG710H

PR
EPA
RA
TIO
N
11
Intelligent Sensor
Adjusts picture according to the surrounding condi-tions.
Power/Standby Indicator
Illuminates red in standby mode.
Illuminates blue when the set isswitched on.
Remote Control Sensor
SPEAKER
CH
VOL
ENTER
INPUT
MENU
VOLUME (+, -)
Buttons
ENTER Button
MENU Button
INPUT Button
POWER Button
CHANNEL( , )
Buttons
32/37/42/47/55LD650H, 32/37/42LD655H

PR
EPA
RA
TIO
N
12
PREPARATION
Image shown may differ from your TV.
BACK PANEL INFORMATION
R
/
AV IN 2
L/M
ONO
RA
UD
IOVI
DEO
USB
IN
/
RREMOTE
CONTROL OUT
OPTICALDIGITAL
AUDIO OUT
AV
IN 1
AUDIO VIDEOMONO /
UPDATERESET
LAN(SERVICE ONLY)
COMPONENT INVIDEO AUDIO
HDMI/DVI IN
2
1(DVI)
RJPINTERFACE
SPEAKER OUT8
RGB(PC) AUDIO(RGB/DVI)
RGB
IN
RS-232C IN(SERVICE ONLY)
/
TV-LINKCFG
GAMECONTROL
10
3 8
R
( )
ANTENNA INANTENNA IN M.P.I.M.P.I.
7
1
4 92
13
14
15
665
32/37/42LG710H
12 11
11
16

PR
EPA
RA
TIO
N
13
R
( )
ANTENNA INANTENNA IN M.P.I.M.P.I.
14 6
32/37/42LD650H, 32/37/42LD655H
R
REMOTECONTROL
OUT
OPTICALDIGITAL
UPDATERESETLAN
HDMI/DVI IN
2
1
RJPINTERFACE
SPEAKER OUT8
RGB IN (PC) AUDIO IN(RGB/DVI)
/
TV-LINK CFG
GAME CONTROL
RS-232C IN(SERVICE ONLY)
AUDIO OUT
AV
IN 1
AUDIOVIDEO MONO /
CO
MP
ON
EN
T IN
L R
AC IN
1
13
3 4
2 10
965 8
AV IN 2
L/M
ONO
RA
UD
IOVI
DEO
USB
IN
/
15
7
47/55LD650H
R
REMOTECONTROL
OUT
OPTICALDIGITAL
UPDATERESETLAN
HDMI/DVI IN
2
1
RJPINTERFACE
SPEAKER OUT8
RGB IN (PC) AUDIO IN(RGB/DVI)
/
TV-LINK CFG
GAME CONTROL/ M.P. I.
RS-232C IN(SERVICE ONLY)
AUDIO OUT
AV
IN 1
AUDIOVIDEO MONO /
CO
MP
ON
EN
T IN
L R
ANTENNAIN
1
13
3 4
2 10
65 8
7
9
1411
11
AC IN
AV IN 2
L/M
ONO
RA
UD
IOVI
DEO
USB
IN
/
15
12
12
11
16
16
11

PR
EPA
RA
TIO
N
14
PREPARATION
HDMI/DVI INDigital Connection. Supports HD video and Digitalaudio. Accepts DVI video using an adapter or HDMI to DVIcable (not included)
RGB (PC) Analog PC Connection. Uses a D-sub 15 pin cable(VGA cable).
AUDIO (RGB/DVI) 1/8” headphone jack for analog PC audio input.
LAN (SERVICE ONLY)For connecting to a control network.
RESETPerforms a hardware reset.UPDATEEnables/disables software downloads and debug mode.
TV - LINK CFG
Computer input for programming Free To Guest ser-vices.
GAME CONTROLInput port for third party game Controllers.M.P. I.Allows VOD/PPV devices or set-top boxes to controlthe TV.
RS-232C IN (SERVICE ONLY) Used for software updates.
OPTICAL DIGITAL AUDIO OUT Optical digital audio output for use with amps andhome theater systems. Note: In standby mode, this port doesn’t work.
SPEAKER OUT 8ΩFor use with external speakers.
REMOTE CONTROL OUTIR output for controlling an auxiliary device.
AV (Audio/Video) IN 1/2 Analog composite connection. Supports standarddefinition video only (480i).
COMPONENT IN Analog Connection. Supports HD. Uses a red, green, and blue cable for video & a redand white cable for audio.
RJP INTERFACE (REMOTE JACK PACK PORT)Connect this to an LG remote jack pack system.
ANTENNA INConnect an antenna to receive over-the-air (OTA)signals.
Power Cord SocketAC power input. Caution: Never attempt to operate the TV on DCpower.
USB INUsed for viewing multimedia files.
1
2
3
4
5
6
8
7
9
11
12
13
14
15
10
16

PR
EPA
RA
TIO
N
15
STAND INSTRUCTIONS
Carefully place the TV screen side down on acushioned surface to protect the screen fromdamage.
Assemble the parts of the SSTTAANNDD BBOODDYY
with the SSTTAANNDD BBAASSEE of the TV.
1
2
Insert the stand as shown.3
SSTTAANNDD BBOODDYY
SSTTAANNDD BBAASSEE
Image shown may differ from your TV.
GG When assembling the desk type stand, make surethe screws are fully tightened (If not tightenedfully, the TV can tilt forward after the protuctinstallation). Do not over tighten.
NOTE!
DETACHMENT
Carefully place the TV screen side down on acushioned surface to protect the screen fromdamage.
1
Remove the four screws that hold the base on.2
Detach the stand from the TV.3
INSTALLATION
4
or
x 4
Tighten the stand with thefour screws (provided as partsof the TV).
Tighten the two of these four screwsand the two Torx plus star head screws
(provided as parts of the TV) to secure the TV. Tightenthe two Torx plus star head screws with a star head dri-ver bit (not provided as parts of the TV).
x 2 x 2
After removing the stand, install the includedpprrootteeccttiioonn ccoovveerr over the hole for the stand.
Press the PPRROOTTEECCTTIIOONN CCOOVVEERR into the TVuntil you hear it click.
PROTECTION COVER
32/37/42LG710H

PR
EPA
RA
TIO
N
16
PREPARATION
32/37/42/47/55LD650H, 32/37/42LD655H
AC IN
CABLE MANAGEMEN T
Carefully place the TV screen side down on acushioned surface to protect the screen fromdamage.
Assemble the parts of the SSTTAANNDD BBOODDYY
with the SSTTAANNDD BBAASSEE of the TV.
1
2
Assemble the TV as shown.3AC IN
CABLE MANAGEMENT
SSTTAANNDD BBOODDYY
SSTTAANNDD BBAASSEE
GG When assembling the desk type stand, make surethe screws are fully tightened (If not tightenedfully, the TV can tilt forward after the protuctinstallation). Do not over tighten.
NOTE!
DETACHMENT
AC IN
CABLE MANAGEMENT
Carefully place the TV screen side down on acushioned surface to protect the screen fromdamage.
1
Remove the screws that hold the stand on.2
Detach the stand from TV.3
AC IN
CABLE MANAGEMENT
INSTALLATION
After removing the stand, install the includedpprrootteeccttiioonn ccoovveerr over the hole for the stand.
Press the PPRROOTTEECCTTIIOONN CCOOVVEERR into the TVuntil you hear it click.
PROTECTION COVER
AC IN
CABLE MANAGEMENT
M4 x 20
4
or
x 4
Tighten the stand with thefour screws (provided as partsof the TV).
Tighten the two of these four screwsand the two Torx plus star head screws
(provided as parts of the TV) to secure the TV. Tightenthe two Torx plus star head screws with a star head dri-ver bit (not provided as parts of the TV).
x 2 x 2

PR
EPA
RA
TIO
N
17
CABLE MANAGEMENT Image shown may differ from your TV.
Connect the cables as necessary.
To connect additional equipment, see theEXTERNAL EQUIPMENT SETUP section.To help prevent the power cable from beingremoved by accident, secure the powercable with the included PPROTECTIVE
BRACKET /SCREW. The 32LG710H use aPlug-in type Holder instead of using ascrew.
Open the CABLE MANAGEMENT CLIP asshown.
If a CABLE HOLDER was included with yourTV, install it as shown.
1
2
Put the cables inside the CABLE MANAGEMENT
CLIP and snap it closed.3
GG Do not hold the CABLE MANAGEMENT CLIP
when moving the TV.
- If the TV is dropped, you may be injured or theproduct may be broken.
GG With some TVs, the PLUG-IN TYPE HOLDER
and the CABLE HOLDER are included. If theseholders are inserted into the hole provided onback of the TV, they cannot be removed.
NOTE!
CABLE MANAGEMENT CLIP
CABLE HOLDER
PROTECTIVE BRACKET/SCREW
PLUG-IN TYPE HOLDER
(For 32LG710H model)
Or
32/37/42LG710H

PR
EPA
RA
TIO
N
18
PREPARATION
32/37/42/47/55LD650H, 32/37/42LD655H
Connect the cables as necessary.
To connect additional equipment, see theEXTERNAL EQUIPMENT SETUP section.To help prevent the power cable from beingremoved by accident, secure the power cablewith the included PPROTECTIVE BRACKET
/SCREW. The 32/37/42LD650H,32/37/42LD655H use a Plug-in type
Holder instead of using a screw.
1
AC IN
Open the CABLE MANAGEMENT CLIP asshown.
If a CABLE HOLDER was included with yourTV, install it as shown.
2
AC IN
Put the cables inside the CABLE MANAGE-
MENT CLIP and snap it closed.3
AC IN
PROTECTIVE BRACKET/SCREW
PLUG-IN TYPE HOLDER
(For 32/37/42LD650H,
32/37/42LD655H model)
Or
GG Do not hold the CABLE MANAGEMENT CLIP
when moving the TV.
- If the TV is dropped, you may be injured or theproduct may be broken.
GG With some TVs, the PLUG-IN TYPE HOLDER
and the CABLE HOLDER are included. If theseholders are inserted into the hole provided onback of the TV, they cannot be removed.
NOTE!
CABLE MANAGEMENT CLIP
CABLE HOLDER
(For 32/37/42LD650H,
32/37/42LD655H model)

PR
EPA
RA
TIO
N
19
PREPARATION
DESKTOP PEDESTAL INSTALLATION
For proper ventilation, allow a clearance of 4 inches on all four sides from the wall.
Image shown may differ from your TV.
4 inches
4 inches
4 inches
4 inches
SWIVEL STAND After installing the TV, you can adjust the TV set manually to the left or right direction to suit your viewing posi-tion.
GG Ensure adequate ventilation by following the clearance recommendations.
GG Do not mount near or above any type of heat source.
CAUTION
20°: 47/55LD650H
90°: Other Models

PR
EPA
RA
TIO
N
20
PREPARATION
ATTACHING THE TV TO A DESKThe TV should be attached to a desk so it cannot be pulled in a forward/backward direction, potentially causinginjury or damaging the product.
GG To prevent TV from falling over, the TV should be securely attached to the floor/wall per installationinstructions. Tipping, shaking, or rocking the TV may cause injury.
WARNING
1-Screw(provided as parts of the product) Desk
Stand
4-Screws(not provided as parts of the product)
GG Recommended screw size: M5 x L (*L: Table depth + 8~10mm)
ex) Table depth: 15mm, Screw: M5 x 25
Desk
Stand
32/37/42LD650H, 32/37/42LD655H
Stand
Desk
32/37/42LG710H
47/55LD650HStand
Desk4-Screws(not provided as parts of the product)
2-Screws, 2-Washers, 2-Nuts, 4-Rubber(provided as parts of the product)
GG You can select any type of attachment (Type 1 or Type 2)
GG Do not over tighten.
Type 1 Type 2
2-Screws(not provided as parts of the product)

PR
EPA
RA
TIO
N
21
VESA WALL MOUNTING
Install your wall mount on a solid wall perpendicular to the floor. When attaching to other building materials, pleasecontact an installer. If installed on a ceiling or slanted wall, it may fall and result in severe personal injury.
We recommend that you use an LG brand wall mount when mounting the TV to a wall.
LG recommends that wall mounting be performed by a qualified professional installer.
AA
BB
Model
VESA (A * B)
Standard Screw QuantityWall Mounting Bracket
(sold separately)
32LG710H
37LG710H,42LG710H
32LD650H,32LD655H
37LD650H,37LD655H,42LD650H,42LD655H,47LD650H
55LD650H
200 * 100 M4 4
200 * 100 M4 4
200 * 200 M6 4
400 * 400 M6 4
200 * 200 M6 4
AABB
AW-47LG30M
LSW100B, LSW100BG
LSW200B, LSW200BG
LSW400B, LSW400BG,DSW400BG
RW230 AW-47LG30M

PR
EPA
RA
TIO
N
22
PREPARATION
GG Do not install your wall mount kit while the TV is plugged in. It may result in personal injury due to electric shock.
CAUTION
GG Screw length needed depends on the wall mountused. For further information, refer to the instruc-tions included with the mount.
GG Standard dimensions for wall mount kits are shownin the table.
GG When purchasing our wall mount kit, a detailedinstallation manual and all parts necessary forassembly are provided.
GG Do not use screws longer then the standard dimen-sion, as they may cause damage to the inside ofthe TV.
GG For wall mounts that do not comply with the VESAstandard screw specifications, the length of the
screws may differ depending on their specifica-tions.
GG Do not use screws that do not comply with theVESA standard screw specifications.Do not use fasten the screws too strongly, this maydamage the TV or cause the TV to a fall, leading topersonal injury. LG is not liable for these kinds ofaccidents.
GG LG is not liable for TV damage or personal injurywhen a non-VESA or non specified wall mount isused or the consumer fails to follow the TV installa-tion instructions.
NOTE!

PR
EPA
RA
TIO
N
23
SECURING THE TV TO THE WALL TO PREVENT FALLINGWHEN THE TV IS USED ON A STAND
We recommend that you set up the TV close to a wall so it cannot fall over if pushed backwards.
Additionally, we recommend that the TV be attached to a wall so it cannot be pulled in a forward direction,potentially causing injury or damaging the product.
Caution: Please make sure that children don’t climb on or hang from the TV.
Insert the eye-bolts (or TV brackets and bolts) to tighten the product to the wall as shown in the pic-ture.
* If your product has the bolts in the eye-bolts position before inserting the eye-bolts, loosen the bolts.
* Insert the eye-bolts or TV brackets/bolts and tighten them securely in the upper holes.
Secure the wall brackets with the bolts (sold separately) to the wall. Match the height of the bracketthat is mounted on the wall to the holes in the product.
Ensure the eye-bolts or brackets are tightened securely.
Use a sturdy rope (sold separately) to tie the product. It is safer totie the rope so it becomes horizontal between the wall and the prod-uct.
You should purchase necessary components to prevent the TV from tipping over (when not using a wall mount). Image shown may differ from your TV.
GG Use a platform or cabinet strong enough and large enough to support the size and weight of the TV.
GG To use the TV safely make sure that the height of the bracket on the wall and the one on the TV are the same.
NOTE!

PR
EPA
RA
TIO
N
24
PREPARATION
R
( )
ANTENNA INANTENNA IN M.P.I.
PREPARATION
ANTENNA OR CABLE CONNECTION
1. Antenna (Analog or Digital)
This image refers to using a Wall Antenna Socket or OutdoorAntenna without a Cable Box Connection.
2. Cable
WallAntennaSocket
OutdoorAntenna(VHF, UHF)
Cable TVWall Jack
Multi-family Dwellings/Apartments(Connect to wall antenna socket)
RF Coaxial Wire (75 Ω)
RF Coaxial Wire (75 Ω)
Single-family Dwellings /Houses(Connect to wall jack for outdoor antenna)
Be careful not to bend the copper wirewhen connecting the antenna.
Copper Wire
- For optimum picture quality, adjust the antenna direction if needed. To improve the picture quality in a poor signal area, please purchase a signal amplifier and install properly. If the antenna needs to be split for two TV’s, install a 2-Way Signal Splitter. If the antenna is not installed properly, contact your dealer for assistance.
To prevent damage, do not connect to the power outlet until all connections are made between the devices.
R
( )
ANTENNA INANTENNA IN M.P.I.
This image refers to using a cable connection without a cable box.
- If you experience a poor signal when using cable, make sure the RF cable is screwed in completely.
Contact your cable company is a poor signal persists.

PR
EPA
RA
TIO
N
25
MPI CARD SLOT / PPV CARD INSTALLATION (Except 47/55LD650H)
1. Remove the two MPI card retainer screws.2. Pull out current MPI card far enough so that the RF cable can be detached from the old card.3. Detach RF cable.4. Place new PPV card into slot and slide it in far enough to reconnect RF cable.5. Insert card all the way into the slot making sure it is fully seated into back plane connector.6. Replace the two card retainer screws.
The MPI card is equipped with an RF jack for antenna/cable signal source connection. This card can be removed and replaced with a third-party PPV (Pay-Per-View) card.
MPI Card Removal / PPV Card Installation
RF CABLE
ANTENNA IN M.P.I.
M.P. I.Card Slot
GG There is an RF cable connected to the back of the card. Remove the card slowly.
WARNING

EX
TE
RN
AL E
QU
IPM
EN
T S
ET
UP
26
HD RECEIVER SETUP
EXTERNAL EQUIPMENT SETUP
This TV can receive Digital Over-the-air or Digital Cable signals without an external digital set-top box. However,
if you do receive digital signals from a digital set-top box or other digital external device, refer to the figure as
shown below.
Component Connection
1. How to connect
Connect the video outputs (Y, PB, PR) of the digital set-top box to the CCOOMMPPOONNEENNTT IINN VVIIDDEEOO jacks onthe TV. Match the jack colors (Y = green, PB = blue, andPR = red).
Connect the audio output of the digital set-top box to
the CCOOMMPPOONNEENNTT IINN AAUUDDIIOO jacks on the TV.2
1
2. How to use Turn on the digital set-top box.
(Refer to the owner’s manual for the digital set-top box.)
Select CCoommppoonneenntt input source using the IINNPPUUTT buttonon the remote control.
To prevent the equipment damage, never plug in any power cords until you have finished connecting all equipment.
Image shown may differ from your TV.
URESET
LAN(SERVICE ONLY)
COMPONENT INVIDEO AUDIO
R(S
/VIDEO AUDIOCOMPONENT IN
RGB(PC) AUDIO(RGB/DVI)
RGB
IN
TV-LINKCFG
Y L RPB PR
1 2
Y, CB/PB, CR/PRSupported Resolutions
Horizontal Vertical Frequency(kHz) Frequency(Hz)
15.73 59.9415.73 60.00
31.47 59.9431.47 60.00
44.96 59.9445.00 60.00
33.72 59.9433.75 60.00
67.50 60.00
Resolution
720x480i
720x480p
1280x720p
1920x1080i
Signal
480i
480p
720p
1080i
1080p
Component
Yes
Yes
Yes
Yes
Yes
HDMI
No
Yes
Yes
Yes
Yes
For 37/42/47/55LD650H, 37/42LD655H
1920x1080p
For 37/42/47/55LD650H, 37/42LD655H

EX
TE
RN
AL E
QU
IPM
EN
T S
ET
UP
27
HDMI Connection
Connect the digital set-top box to HHDDMMII//DDVVII IINN 11((DDVVII)) or 22 jack on the TV.
No separate audio connection is necessary.
HDMI supports both audio and video.
1. How to connect
2. How to use Turn on the digital set-top box.
(Refer to the owner’s manual for the digital set-top box.)
Select HHDDMMII11 or HHDDMMII22 input source with using the IINNPPUUTT
button on the remote control.
2
1
HDMI-DTV
RESETUPDATE
HDMI/DVI IN
2
1(DVI)
RJPINTERFACE
VID
RG
B
/
HDMI/DVI IN
2
1(DVI)
HDMI-DTV OUTPUT
1
Horizontal Vertical Frequency(kHz) Frequency(Hz)
31.47 59.9431.47 60.00
44.96 59.9445.00 60.00
33.72 59.9433.75 60.00
26.97 23.9427.00 24.0033.71 29.9733.75 30.0067.432 59.93967.50 60.00
Resolution
720x480p
1280x720p
1920x1080i
GG If the HDMI cables don’t support High SpeedHDMI, it can cause flickers or no screen display. Inthis case use the latest cables that support HighSpeed HDMI.
GG HDMI mode supports PCM, Dolby Digital audioformat.
NOTE!
1920x1080p
For 37/42/47/55LD650H, 37/42LD655H

EX
TE
RN
AL E
QU
IPM
EN
T S
ET
UP
28
EXTERNAL EQUIPMENT SETUPEXTERNAL EQUIPMENT SETUP
DVI to HDMI Connection
RGB(PC) AUDIO(RGB/DVI)
RGB
IN
UPDARESET
LAN(SERVICE ONLY)
RJPINTERFACE
COMPONENT INVIDEO AUDIO
R(S
/
HDMI/DVI IN
2
1(DVI)
L RDVI-DTV OUTPUT L R
TV-LINKCFG
CO
1
2
GG A DVI to HDMI cable or adapter is required for thisconnection. DVI doesn't support audio, so a separateaudio connection is necessary.
NOTE!
Connect the DVI output of the digital set-top box tothe HHDDMMII//DDVVII IINN 11 ((DDVVII)) jack on the TV.
Connect the audio output of the digital set-top box tothe AAUUDDIIOO ((RRGGBB//DDVVII)) jack on the TV.
1. How to connect
2. How to use Turn on the digital set-top box. (Refer to the owner’s man-
ual for the digital set-top box.)
Select the HHDDMMII11 input source on the TV using theIINNPPUUTT button on the remote control.
2
1
EX
TE
RN
AL E
QU
IPM
EN
T S
ET
UP
29
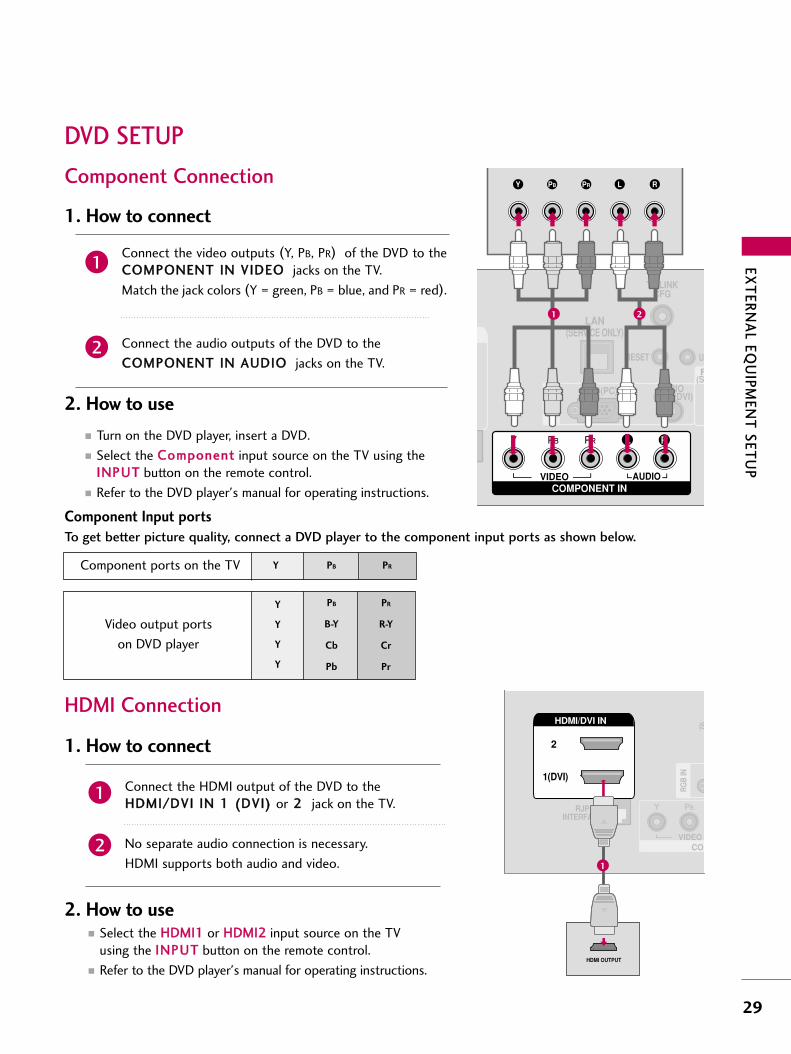
DVD SETUP
Component Connection
Component Input ports
To get better picture quality, connect a DVD player to the component input ports as shown below.
Component ports on the TV Y PB PR
Video output ports
on DVD player
Y
Y
Y
Y
PB
B-Y
Cb
Pb
PR
R-Y
Cr
Pr
Connect the video outputs (Y, PB, PR) of the DVD to theCCOOMMPPOONNEENNTT IINN VVIIDDEEOO jacks on the TV.
Match the jack colors (Y = green, PB = blue, and PR = red).
Connect the audio outputs of the DVD to the
CCOOMMPPOONNEENNTT IINN AAUUDDIIOO jacks on the TV.
1. How to connect
2. How to use
Turn on the DVD player, insert a DVD.
Select the CCoommppoonneenntt input source on the TV using theIINNPPUUTT button on the remote control.
Refer to the DVD player's manual for operating instructions.
2
1
URESET
LAN(SERVICE ONLY)
COMPONENT INVIDEO AUDIO
R(S
/VIDEO AUDIOCOMPONENT IN
RGB(PC) AUDIO(RGB/DVI)
RGB
IN
TV-LINKCFG
Y L RPB PR
1 2
HDMI Connection
Connect the HDMI output of the DVD to theHHDDMMII//DDVVII IINN 11 ((DDVVII)) or 22 jack on the TV.
No separate audio connection is necessary.
HDMI supports both audio and video.
1. How to connect
2. How to use Select the HHDDMMII11 or HHDDMMII22 input source on the TV
using the IINNPPUUTT button on the remote control.
Refer to the DVD player's manual for operating instructions.
2
1
(SHDMI/DVI IN
2
1(DVI)
RJPINTERFACE
COMVIDEO /
HDMI/DVI IN
2
1(DVI)
HDMI OUTPUT
RGB
IN
1

EX
TE
RN
AL E
QU
IPM
EN
T S
ET
UP
30
EXTERNAL EQUIPMENT SETUPEXTERNAL EQUIPMENT SETUP
VCR SETUP
Antenna Connection
To avoid picture noise (interference), leave an adequate distance between the VCR and TV.
/
L RS-VIDEO VIDEO
OUTPUTSWITCH
ANT IN
ANT OUT
ANTENNA INANTENNA IN M.P.I.
Wall Jack
Antenna
1
2
Connect the RF antenna out socket of theVCR to the AANNTTEENNNNAA IINN socket on theTV.
Connect the antenna cable to the RFantenna in socket of the VCR.
1. How to connect
2. How to use
Set VCR output switch to 3 or 4 and thentune TV to the same channel number.
Insert a video tape into the VCR and pressPLAY on the VCR. (Refer to the VCR owner’smanual.)
2
1
Composite (RCA) Connection
Connect the AAUUDDIIOO/VVIIDDEEOO jacks between TV andVCR. Match the jack colors (Video = yellow, Audio Left= white, and Audio Right = red)
1. How to connect
2. How to use
Insert a video tape into the VCR and press PLAY on theVCR. (Refer to the VCR owner’s manual.)
Select the AAVV11 input source on the TV using the IINNPPUUTT
button on the remote control.
If connected to AAVV IINN 22, select AAVV22 input source on the TV.
1
GG If you have a mono VCR, connect the audio cablefrom the VCR to the AAUUDDIIOO LL//MMOONNOO jack of theTV.
NOTE!
LR S-VIDEOVIDEO
OUTPUTSWITCH
ANT IN
ANT OUT
OPTICALDIGITAL
AUDIO OUT
UPDATE
AV
IN 1
AUDIO VIDEO/
REMOTECONTROL
OUT
SPEAKER OUT8
RS-232C IN(SERVICE ONLY)
MONO /AV
IN 1
AUDIO VIDEOMONO /
GAMECONTROL
ANTENNA IN M.P.I.
1

EX
TE
RN
AL E
QU
IPM
EN
T S
ET
UP
31
OTHER A/V SOURCE SETUP
AV IN 2
L/M
ONO
RA
UD
IOVI
DEO
USB
IN
L RVIDEO
Camcorder
Video Game Set
Connect the AAUUDDIIOO/VVIIDDEEOO jacksbetween TV and external equipment.Match the jack colors.
(Video = yellow, Audio Left = white, andAudio Right = red)
1. How to connect
2. How to use
Select the AAVV22 input source on the TV using theIINNPPUUTT button on the remote control.
If connected to AAVV IINN 11 input, select the AAVV11
input source on the TV.
Operate the corresponding external equipment.
1
1
Connect one end of the optical cable to the TV’s OOPPTTII--CCAALL DDIIGGIITTAALL AAUUDDIIOO OOUUTT.
Connect the other end of the optical cable to the digitalaudio input on the audio equipment.
Set the “TV Speaker option - Off” in the AUDIO menu. (GGpp..7733). See the external audio equipment instruction manu-al for operation.
AUDIO OUT CONNECTIONSend the TV’s audio to external audio equipment via the Audio Output port.
UPDATE
AV
IN 1
AUDIO VIDEO/
REMOTECONTROL
OUT
SPEAKER OUT8
RS-232C IN(SERVICE ONLY)
MONO /
OPTICALDIGITAL
AUDIO OUT
GAMECONTROL
1
2
GG When connecting with external audio equipment, such asamplifiers or speakers, you can turn the TV speakers off inthe menu. (GG pp..7733)
NOTE!
G Do not look into the optical output port. Looking at thelaser beam may damage your vision.
GG Audio with ACP(Audio Copy Protection) function myblock digital audio output.
CAUTION
1. How to connect
2
3
1

EX
TE
RN
AL E
QU
IPM
EN
T S
ET
UP
32
EXTERNAL EQUIPMENT SETUP
PC SETUP This TV provides Plug and Play capability, meaning that the PC adjusts automatically to the TV's settings.
VGA (D-Sub 15 pin) ConnectionUPDATERESET
( )
COMPONENT INVIDEO AUDIO A
V IN
1
AU
RS-232C IN(SERVICE ONLY
/
AUDIORGB OUTPUT
RGB(PC) AUDIO(RGB/DVI)
RGB
IN
1 2
2. How to use Turn on the PC and the TV.
Select the RRGGBB--PPCC input source on the TV using theIINNPPUUTT button on the remote control.
Connect the VGA output of the PC to the RRGGBB ((PP CC))
jack on the TV.
Connect the PC audio output to the AAUUDDIIOO ((RRGGBB//DDVVII))
jack on the TV.
1. How to connect
2
1
DVI to HDMI Connection
UPRESET
LAN(SERVICE ONLY)
RJPINTERFACE
COMPONENT INVIDEO AUDIO
(S
/
HDMI/DVI IN
2
1(DVI)
DVI-PC OUTPUT AUDIO
RGB(PC) AUDIO(RGB/DVI)
RGB
IN
TV-LINKCFG
1
2
2. How to use
Turn on the PC and the TV.
Select the HHDDMMII11 input source on the TV using theIINNPPUUTT button on the remote control.
Connect the DVI output of the PC to the HHDDMMII//DDVVII IINN11 ((DDVVII)) jack on the TV.
Connect the PC audio output to the AAUUDDIIOO ((RRGGBB//DDVVII))
jack on the TV.
1. How to connect
2
1

EX
TE
RN
AL E
QU
IPM
EN
T S
ET
UP
33
GG To get the best picture quality, adjust the PC graph-ics card to 11336600xx776688 (32/37/42LG710H,32LD650H, 32LD655H) or 11992200xx11008800(37/42/47/55LD650H, 37/42LD655H).
GG Depending on the graphics card, DOS mode maynot work if a HDMI to DVI Cable is in use.
GG In PC mode, there may be noise associated withthe resolution, vertical pattern, contrast or bright-ness. If noise is present, change the PC output toanother resolution, change the refresh rate toanother rate or adjust the brightness and contraston the PICTURE menu until the picture is clear.When you use too long RGB-PC cable, there might
be a noise on the screen.
GG Avoid keeping a fixed image on the screen for along period of time. The fixed image could becomepermanently imprinted on the screen.
GG The synchronization input form for Horizontal andVertical frequencies is separate.
GG Depending on the graphics card, some resolutionsettings may not allow the image to be positionedon the screen properly.
NOTES!
Supported Display Specifications
Resolution
720x400
1360x768
640x480
800x600
1024x768
1280x768
1280x1024
1920x1080
Horizontal Vertical Frequency(kHz) Frequency(Hz)
31.469 70.08
31.469 59.94
35.156 56.25 37.879 60.31
48.363 60.00
47.776 59.87
47.712 60.015
63.981 60.02
67.50 60.00
Resolution
720x400
1360x768
640x480
800x600
1024x768
1280x768
1280x1024
1920x1080
Horizontal Vertical Frequency(kHz) Frequency(Hz)
31.469 70.08
31.469 59.9437.861 72.80
37.879 60.3148.077 72.18
48.363 60.0056.476 70.06
47.776 59.87060.289 74.893
47.712 60.015
63.981 60.02079.976 75.025
66.587 59.934
HDMI-PCRGB-PC
For 37/42/47/55LD650H, 37/42LD655H
For 37/42/47/55LD650H, 37/42LD655H

EX
TE
RN
AL E
QU
IPM
EN
T S
ET
UP
34
EXTERNAL EQUIPMENT SETUP
Screen Setup for PC mode
Selecting Resolution
When using RGB-PC input, change the resolution in the menus to match the PC’s.
The PPoossiittiioonn, PPhhaassee, and SSiizzee can also be adjusted.
Select PPIICCTTUURREE.
Select RReessoolluuttiioonn.
1 MENU
3ENTER
4
Select SSccrreeeenn ((RRGGBB--PPCC)).2
ENTER
5
Select the desired resolution.ENTER
ENTER
Auto Config.
Resolution
Position
Size
Phase
Reset
SCREEN Move Prev.EnterMovePICTURE
E
R G
• Brightness 50
• Sharpness 50
• Color 50
• Tint 0
• Advanced Control
• Picture Reset
Screen (RGB-PC)
1024 x 768
1280 x 768
1360 x 768

EX
TE
RN
AL E
QU
IPM
EN
T S
ET
UP
35
Auto Configure
Automatically adjusts picture position and minimizes image instability. After adjustment, if the image is still
not correct, try using the manual settings or a different resolution or refresh rate on the PC.
• If the position of the image is still notcorrect, try Auto adjustment again.
• If picture needs to be adjusted againafter Auto adjustment in RGB-PC, youcan adjust the PPooss ii tt ii oonn, SS ii zzee orPPhhaassee.
Select PPIICCTTUURREE.
Select AAuuttoo ccoonnff iigg...
1 MENU
3ENTER
4
Select SSccrreeeenn ((RRGGBB--PPCC)).2
ENTER
5ENTER Start Auto Configuration.
Select YYeess.ENTER
Auto Config.
Resolution
Position
Size
Phase
Reset
SCREEN Move Prev.
To Set
Yes No
EnterMovePICTURE
E
R G
• Brightness 50
• Sharpness 50
• Color 50
• Tint 0
• Advanced Control
• Picture Reset
Screen (RGB-PC)

EX
TE
RN
AL E
QU
IPM
EN
T S
ET
UP
36
EXTERNAL EQUIPMENT SETUP
Adjustment for screen Position, Size, and Phase
If the picture is not clear after auto adjustment and especially if characters are still trembling, adjust the picture
phase manually.
This feature operates only in RGB-PC mode.
PPoossiitt iioonn: This function is to adjust pic-ture to left/right and up/down as youprefer.
SSiizzee: This function is to minimize anyvertical bars or stripes visible on thescreen background. And the horizontalscreen size will also change.
PPhhaassee: This function allows you toremove any horizontal noise and clear orsharpen the image of characters.
Select PPIICCTTUURREE.
Select PPoossiitt iioonn, SSiizzee, or PPhhaassee.
1 MENU
3ENTER
4
Select SSccrreeeenn ((RRGGBB--PPCC)).2
ENTER
5ENTER
Make appropriate adjustments.ENTER
Auto Config.
Resolution
Position
Size
Phase
Reset
GF
D
E
SCREEN Move Prev.EnterMovePICTURE
E
R G
• Brightness 50
• Sharpness 50
• Color 50
• Tint 0
• Advanced Control
• Picture Reset
Screen (RGB-PC)

EX
TE
RN
AL E
QU
IPM
EN
T S
ET
UP
37
Screen Reset (Reset to original factory values)
Returns PPoossiitt iioonn, SSiizzee, and PPhhaassee to the default factory settings.
This feature operates only in RGB-PC mode.
Select PPIICCTTUURREE.
Select RReesseett.
1 MENU
3ENTER
4
Select SSccrreeeenn ((RRGGBB--PPCC)).2
ENTER
5ENTER
Select YYeess.ENTER
Auto config.
Position
Resolution
Size
Phase
Reset
SCREEN Move Prev.
To Set
Yes No
EnterMovePICTURE
E
R G
• Brightness 50
• Sharpness 50
• Color 50
• Tint 0
• Advanced Control
• Picture Reset
Screen (RGB-PC)

WA
TC
HIN
G T
V / C
HA
NN
EL C
ON
TR
OL
38
REMOTE CONTROL FUNCTIONSWhen using the remote control, aim it at the remote control sensor on the TV.
MUTE
RETURN
CC
TV POWER
GUIDE PORTAL
ENTER
VOL CH
1 2 3
4 5 6
7 8
0
9
FLASHBK
VCR
DVD
INPUTMENU
INFO i
STB
PAGE
PIP SAP
PIP CH- PIP CH+ PIP SWAP PIP INPUT
ALPHA/NUM
REMOVE
RATIO TIMER
ABC DEF
GHI
WXYZTUVPQRS
MNOJKL
&@
.:/,
POWER
TV/STB/DVD/VCR
GUIDE
PORTAL
INFO
Turns your TV or any other programmed equipment onor off, depending on mode.
Selects the remote’s operating mode: TV, STB, DVD, orVCR.
Displays and removes the electronic channel guide.
Displays and removes the hotel interactive menu.
Displays information about the selected or current events.
NUMBER button
— (DASH)
FLASHBK
VCR/DVD/USB control buttons
PIP
RATIO
TIMER
SAP
PIP CH +/-
PIP SWAP
PIP INPUT
Enters channel numbers or other numbers required. Alsosupports characters.
Selects a program number for multiple program channelssuch as 2-1, 2-2, etc.
Tunes to the last channel or input viewed.
Controls video cassette recorders or DVD players or USB.
Toggles through picture-in-picture options.
Changes the aspect ratio. GG pp..5588
Turns the TV off in a set amount o f time. GG pp..8844
Analog mode: Selects MTS sound (Mono, Stereo, or aSAP) GG pp..7755
DTV mode: Changes the audio language.
Changes the PIP channel.
Exchanges the main/sub images.
Selects the connected input source for the sub-picture.
WATCHING TV / CHANNEL CONTROL

WA
TC
HIN
G T
V / C
HA
NN
EL C
ON
TR
OL
39
Installing Batteries
Open the battery compartment cover on the back side and installthe batteries with the correct polarity (+with +,-with -).
Install two 1.5V AAA batteries. Don’t mix old or used batteries withnew ones.
Close cover.
THUMBSTICK(Up/Down/Left
Right/ENTER)
RETURN
MENU
INPUT
Navigates the on-screen menus and adjusts the system settings to your preference.
Clears all on-screen displays and returns to TV viewing from any menu.
Displays the main menu.
Rotates through inputs.
Also switches the TV on from standby.
VOLUME UP/DOWN
CC
MUTE
CHANNELUP/DOWN
PAGEUP/DOWN
Adjusts the volume.
Selects a closed caption. GG pp..7788
Switches the sound on or off. GG pp..4400
Selects available channels.
Moves from one full set of screen information to the next one.

WA
TC
HIN
G T
V / C
HA
NN
EL C
ON
TR
OL
40
WATCHING TV / CHANNEL CONTROLWATCHING TV / CHANNEL CONTROL
NOTE!
GG If you intend to be away on vacation, disconnect the power plug from the wall power outlet.
Press the CCHH(( or )) or NNUUMMBBEERR buttons to select a channel number.1
VOLUME ADJUSTMENT
CHANNEL SELECTION
Press the VVOOLL ((++ or --)) button to adjust the volume.
If you want to switch the sound off, press the MMUUTTEE button.
You can cancel the Mute function by pressing the MMUUTTEE or VVOOLL ((++ or --))
button.
Adjust the volume to suit your personal preference.
1
2
3
TURNING ON THE TV
First, connect the power cord correctly.
At this moment, the TV switches to standby mode.
In standby mode to turn TV on, press the button on the TV or pressthe PPOOWWEERR button on the remote control.
Select the viewing source by using the IINNPPUUTT button on the remote control.
When finished using the TV, press the PPOOWWEERR button on the remote control.The TV reverts to standby mode.
1
2
3

WA
TC
HIN
G T
V / C
HA
NN
EL C
ON
TR
OL
41
ON-SCREEN MENUS SELECTION
Your TV's OSD (On Screen Display) may differ slightly from that shown in this manual.
Display each menu.
Select a menu item.
Accept the current selection.
1MENU
3
2ENTER
ENTER
Return to TV viewing.
4MENU
EnterMove
Auto Tuning
Manual Tuning
Channel Edit
Channel Label
CHANNEL
CHANNEL
OPTION
PICTURE
LOCK
AUDIO
INPUT
TIME
USB
EnterMove
Auto Volume : On
Clear Voice II : On
• Level 3
Balance 0
Sound Mode : Standard
• SRS TruSurround XT: Off
• Treble 50
• Bass 50
AUDIO
E
EnterMove
Clock
Off Time : Off
On Time : Off
Sleep Timer : Off
TIME
EnterMove
Photo List
Music List
Extra Contents
Eject
USBEnterMove
TV
AV1
AV2
Component
RGB-PC
HDMI1
HDMI2
INPUTEnterMove
Lock System : Off
Set Password
Block Channel
Movie Rating
TV Rating-Children
TV Rating-General
Downloadable Rating
Input Block
LOCK
EnterMove
Menu Language : English
Audio Language : English
Caption : Off
Set ID : 1
Demo Mode : Off
Data Broadcasting
OPTION
L R
- +
EnterMove
Aspect Ratio : 16:9
Picture Mode : Standard
• BackLight 90
• Contrast 90
• Brightness 50
• Sharpness 60
• Color 60
• Tint 0
PICTURE
E
NOTE!
GG IInnffiinniittee SSoouunndd: For 32/37/42/47/55LD650H,32/37/42LD655H
For USA For CANADA
Lock System : Off
Set Password
Block Channel
TV Rating-English
TV Rating-French
Downloadable Rating
Input Block

WA
TC
HIN
G T
V / C
HA
NN
EL C
ON
TR
OL
42
WATCHING TV / CHANNEL CONTROL
EnterMoveCHANNEL
Auto Scan (Auto Tuning)
Automatically finds all channels available through antenna or cable inputs and stores them in memory on the
channel list.
Run Auto Tuning again after any Antenna/Cable connection changes.
Select CCHHAANNNNEELL.
Select AAuuttoo TTuunniinngg.
Select YYeess.
Run AAuuttoo ttuunniinngg.
1 MENU
3
2ENTER
ENTER
4ENTER
A password is required to gain access toAuto Tuning menu if the Lock System isturned on.
5RETURN
Return to the previous menu.
MENUReturn to TV viewing.
CHANNEL SETUP
Auto Tuning
Manual Tuning
Channel Edit
Channel Label
EnterMoveCHANNEL
Auto Tuning
Manual Tuning
Channel Edit
Channel Label
Check your antenna connection.The previous channel informationwill be updated during Auto Tuning.
Yes
No

WA
TC
HIN
G T
V / C
HA
NN
EL C
ON
TR
OL
43
Select CCHHAANNNNEELL.1 MENU
2ENTER
If selecting DIGITAL input signal, you can view the on-screen signal strength monitor to see the quality of the
signal being received.
Add/Delete Channel (Manual Tuning)
Select MMaannuuaall TTuunniinngg.
Select DDIIGGIITTAALL or AANNAALLOOGG.
Select channel you want to addor delete.
3ENTER
4
Select AAdddd or DDeelleettee.5
ENTER
A password is required to gain access toManual Tuning menu if the Lock Systemis turned on.
6RETURN
Return to the previous menu.
MENUReturn to TV viewing.
EnterMoveCHANNEL EnterMoveCHANNEL
Channel
Select channel type and RF-channel number.
FF DIGITAL GG
2
Close
Delete
DIGITAL 2-1
Bad Normal Good
Auto Tuning
Manual Tuning
Channel Edit
Channel Label
Auto Tuning
Manual Tuning
Channel Edit
Channel Label

WA
TC
HIN
G T
V / C
HA
NN
EL C
ON
TR
OL
44
WATCHING TV / CHANNEL CONTROL
CHANNEL LABEL
Select a channel.
Select channel you want to add or delete.
3ENTER
4BLUE
The channels in the Channel Edit List are displayed in black and the channels deleted from the Channel Edit
List are displayed in blue. When a channel number is deleted, it means that you will be unable to select it usingCCHH button during TV viewing.
If you wish to select the deleted channel, directly enter the channel number with the NUMBER buttons or select
it in the CChhaannnneell EEddiitt menu.
Channel Editing
Select CCHHAANNNNEELL.1
MENU
2ENTER Select CChhaannnneell EEddiitt.
MENU Return to TV viewing.
Return to the previous menu.5
RETURN
Choose preset labels for your channels.
If a channel label is provided on the signal from the broadcasting station, the TV displays a short name for a
channel even if you didn't preset a label for the channel.
Select CCHHAANNNNEELL.
Select CChhaannnneell LLaabbeell.
Select a Channel.
1MENU
3
2ENTER
ENTER
Select the appropriate logo for thechannel.
5
Select a channel to set logo.4
6RETURN
Return to the previous menu.
MENUReturn to TV viewing.
EnterMoveCHANNEL
Auto Tuning
Manual Tuning
Channel Edit
Channel Label
Ch. Change Page ChangeCHNavigation Previous
Add/Delete
EnterMoveCHANNEL
Auto Tuning
Manual Tuning
Channel Edit
Channel Label
EnterMoveCHANNEL
Auto Tuning
Manual Tuning
Channel Edit
Channel LabelLogo FF Disney GG
Channel ANALOG 2-0
Close

WA
TC
HIN
G T
V / C
HA
NN
EL C
ON
TR
OL
45
INPUT LIST
Select the desired input source.1 INPUT
TV AV1 AV2
ComponentHDMI1 RGB-PC
TV AV1 AV2 Component RGB-PC
ENTER
TT VV: Select it to watch over-the-air, cableand digital cable broadcasts.
AAVV11--22: Select them to watch a VCR orother external equipment.
CCoommppoonneenntt: Select them to watchDVD or a Digital set-top box.
RRGGBB--PPCC: Select it to view PC input.
HHDDMMII11--22: Select them to watch highdefinition devices.
HDMI2

WA
TC
HIN
G T
V / C
HA
NN
EL C
ON
TR
OL
46
WATCHING TV / CHANNEL CONTROL
EXAMPLE ELECTRONIC PROGRAM GUIDEThis is an example of a typical TV electronic program guide showing available programming.
On The Political Scene
Kids Movies
Top Fashions
World Events Today
Channel 01:30 AM 2:30 AM 2:45 AM 3:00 AM
Kids ... Kids ...
Kids MoviesK&M
17 XYZ
18 K&M
19 PQX
20 WBD
Mon. 29 May 2009 11:07
New Release
Greatest Hits
Kids
EVENT CHANNEL SELECTION PORTAL INFOENTER
PROGRAMMING GRID
Program listings arranged intime slots.
CHANNEL LIST
Shows availablechannels in numericalorder.
DATE/TIME OSD
Shows current Date/Time.
CHANNEL INDICATORCurrently tuned channeland program.
PROGRAM TITLES
Highl ight a t it le and pressEnter to display addit ionalprogram information.
FEATURED ATTRACTION
Highlight and click to getexpanded information.
TV PROGRAM
Current program on select-ed channel.
Select GGUUIIDDEE button to shows available TV programs.1
GUIDE
Select a Channel.
2ENTER

US
B
47
USBU
SB IN
R
Memory Key
Connect the USB device to the UUSSBB IINN jackon the side of TV.
3
Select PPHHOOTTOO LLIISSTT or MMUUSSIICC LLIISSTT or EEXXTTRRAA CCOONNTTEENNTTSS.
1
2
This TV supports playback of JPG pictures and MP3audio.
When you connect a USB device, this pop-up menu is displayed automatically.
When the Pop-Up menu does not appear, you can select Photo List or Music List on Extra contents.
On a USB device, you can not add a new folder or delete an existing folder.
or
ENTRY MODES
ENTER
Image shown may differ from your TV.
EnterMoveUSB
Select UUSSBB.
Select EEjjeecctt.
1 MENU
3
2ENTER
ENTER
4RETURN
Return to the previous menu.
MENUReturn to TV viewing.
When removing the USB device
Photo List
Music List
Extra Contents
Eject
EnterMoveUSB
Photo List
Music List
Extra Contents
Eject
Close
Now you can eject USB.i
Close
Choose the media you want.
Fl
ii
Photo List
Music List
Extra Contents

US
B
48
USB
Precautions with USB devices.
GG Only a USB storage device is recognizable.
GG If the USB storage device is connected through a USB hub, the device is not recognizable.
GG A USB storage device using an automatic recognition program may not be recognized.
GG A USB storage device which uses its own driver may not be recognized.
GG The recognition speed of a USB storage device may depend on each device.
GG In case of a card reader, up to four memory cards are concurrently recognizable.
GG Please do not turn off the TV or unplug the USB device when the connected USB storage device is working.When such device is suddenly separated or unplugged, the stored files or the USB storage device may be dam-aged.
GG Only use a USB storage device which has normal music, image or movie files.
GG Please connect power to a USB storage device (over 0.4A) which requires an external power supply. If not, thedevice may not be recognized.
GG Please connect a USB storage device with cable is offered by USB maker. If connected with cable is not offeredby USB maker or an excessively long cable, the device may not be recognized.
GG Some USB storage devices may not be supported or operate properly.
GG File alignment method of USB storage device is similar to Window XP and filename can recognize up to 100English characters.
GG Please backup important files because data on the USB device may be damaged. Data management is the con-sumer's responsibility and as a result, the manufacturer does not cover data damage.
GG Please use only a USB storage device which was formatted as a FAT32, NTFS file system provided with the Windowsoperating system. In case of a storage device formatted as a different utility programme which is not supported byWindows, it may not be recognized.
GG Data in a USB storage device cannot be deleted in the NTFS file system.
GG If your USB memory device has multiple partitions, or if you use a USB multi-card reader, you can use up to 4partitions or USB memory devices.
GG The recommended capacity is 1TB or less for a USB external hard disk and 32GB or less for USB memory.
GG Any device with more than the recommended capacity may not work properly.
GG When using a USB HDD via the USB extensing cable, connect a support electric power source.

US
B
49
PHOTO LIST
This TV only supports picture in JPEG(.jpg) format.
The On-Screen Display on your model may be slightly different.
Screen Components
Moves to upper level folder
Preview: Displays the
thumbnail/folder name of
the photo in the selected
folder
Current page/Total pages
Total number of marked photos
Corresponding buttons on
the remote control
Select UUSSBB. Select PPhhoottoo LLiisstt.21 MENU
1
2
3
4
5
Navigation Popup Menu Exit
5
Page 2/3 No MarkedPhoto List
Up Folder
1366x768, 125KB
KY101 06/10/2008
KY102 04/03/2008
JMJ001 01/01/2000
JMJ002 06/15/2008
JMJ003 04/03/2008
JMJ004 02/18/2008
KY103 03/30/2008
KY104 06/19/2008
KY105 01/31/2008
JMJ005 05/13/2008
JMJ006 05/26/2008
JMJ007 02/18/2008
JMJ008 02/18/2008
Up FolderDrive1JMJ001
3 4
2
1
Supported photo file: *.JPG
• You can view JPG files only.
• Only baseline scan is supported among JPG.
• Supported JPG size: 64 pixel (width) x 64 pixel (height) to 15360 pixel (width) x 8640 pixel (height)
ENTER ENTER

US
B
50
USB
Photo Selection and Pop-up Menu
Select the target folder or drive.
Select the desired photos.2
Show the Pop-up menu.3
1
When one or more photos are marked, you canview individual photos or a slide show of themarked photos. If no photos are marked, youcan view all photos individually or all photos inthe folder in a slide show.
4 Select the desired Popup menu.
Page 2/3 No MarkedPhoto List
Up Folder
1366x768, 125KB
KY101 06/10/2008
KY102 04/03/2008
JMJ001 01/01/2000
JMJ002 06/15/2008
JMJ003 04/03/2008
JMJ004 02/18/2008
KY103 03/30/2008
KY104 06/19/2008
KY105 01/31/2008
JMJ005 05/13/2008
JMJ006 05/26/2008
JMJ007 02/18/2008
JMJ008 02/18/2008
Up Folder
Page 2/3 No MarkedPhoto List
Up Folder
1366x768, 125KB
KY101 06/10/2008
KY102 04/03/2008
JMJ001 01/01/2000
JMJ002 06/15/2008
JMJ003 04/03/2008
JMJ004 02/18/2008
KY103 03/30/2008
KY104 06/19/2008
KY105 01/31/2008
JMJ005 05/13/2008
JMJ006 05/26/2008
JMJ007 02/18/2008
JMJ008 02/18/2008
Up Folder
Drive1
Drive1
JMJ001
JMJ001 1366x768, 125KB
View
Mark
Mark All
Delete
Close
Navigation ExitPopup Menu
Navigation ExitPopup Menu
When you select a file (not folder), this Pop-Upmenu is displayed.
GG VViieeww: Display the selected item.
GG MMaarrkk: Use to mark a photo.
GG UUnnmmaarrkk: Use to unmark a photo.
GG MMaarrkk AAllll: Mark all photos on the screen.
GG UUnnmmaarrkk AAll ll: Deselect all marked photos.
GG DDeelleettee or DDeelleettee MMaarrkkeedd: Delete the selectedphoto item.
GG CClloossee: Close the pop-up menu.
ENTER
ENTER
ENTER

US
B
51
Full Screen Menu
You can change the Photo List view so that it fills the screen. More operations are available in full
screen mode.
Use the CCHH button to navigate in thephoto page.
Select the target folder or drive.
Select the desired photos.
Show the Pop-up menu.
5
Select VViieeww.
The selected photo is displayed infull size.
2
3
1
4
Page 2/3 No MarkedPhoto List
Up Folder
1366x768, 125KB
KY101 06/10/2008
KY102 04/03/2008
JMJ001 01/01/2000
JMJ002 06/15/2008
JMJ003 04/03/2008
JMJ004 02/18/2008
KY103 03/30/2008
KY104 06/19/2008
KY105 01/31/2008
JMJ005 05/13/2008
JMJ006 05/26/2008
JMJ007 02/18/2008
JMJ008 02/18/2008
Up Folder
Page 2/3 No MarkedPhoto List
Up Folder
1366x768, 125KB
KY101 06/10/2008
KY102 04/03/2008
JMJ001 01/01/2000
JMJ002 06/15/2008
JMJ003 04/03/2008
JMJ004 02/18/2008
KY103 03/30/2008
KY104 06/19/2008
KY105 01/31/2008
JMJ005 05/13/2008
JMJ006 05/26/2008
JMJ007 02/18/2008
JMJ008 02/18/2008
Up Folder
Drive1
Drive1
JMJ001
JMJ001
Navigation ExitPopup Menu
Navigation ExitPopup Menu
The aspect ratio of a photo may change the size of the
photo displayed on the screen in full size.
Press the RREETTUURRNN button to move to the previous menu
screen.
1/17
Slideshow BGM Delete Option Hide
1366x768, 125KB
View
Mark
Mark All
Delete
Close
ENTER
ENTER
ENTER

US
B
52
USB
Press FF GG to set the time interval between slides.
Slide Speed Fast
Cancel
...Music Album
Enter
Select the SSlliiddeesshhooww, BBGGMM,((RRoottaattee)), DDeelleettee, OOppttiioonn,
or HHiiddee..
Use button to select the previous ornext photo.
Use button to select and controlthe menu on the full-sized screen.
6
1/17
Slideshow BGM Delete Option Hide
GG SSll iiddeesshhooww: Selected photos are displayed during theslide show. If no photo is selected, all photos in the cur-rent folder are displayed during slide show. Set the time interval of the slide show in OOppttiioonn.
GG BBGGMM: Listen to music while viewing photos in full size. Set the BGM device and album in OOppttiioonn.
GG ((RRoottaattee)): Rotate photos. Rotates the photo 90°, 180°, 270°, 360° clockwise.
GG DDeelleettee: Delete photos.
GG OOppttiioonn: Set values for SSll iiddee SSppeeeedd and MMuussiiccAAllbbuumm. Use button and EENNTTEERR button to set
values. Then go to and press EENNTTEERR to savethe settings.
You cannot change MMuussiicc AAllbbuumm while BGM isplaying.
GG HHiiddee : Hide the menu on the full-sized screen. To see the menu again on the full-sized screen, press
EENNTTEERR button to display.
ENTER

US
B
53
MUSIC LIST
You can use the Music List menu to play MP3 files from a USB storage device.
This TV cannot play back copy-protected files.
The On-Screen Display on your model may be slightly different.
Screen Components
Moves to upper level folder
Preview: If a supported pic-
ture of the album jacket is
in the file, it will be dis-
played here.
Current page/Total pages
Total number of marked files
Corresponding buttons on
the remote control
1
3
4
5
2
Select UUSSBB. Select MMuussiicc LLiisstt.1 2
MENU
Music List
Up Folder
Title Duration
3 4
2
1
Page 2/3 No Marked
Drive1
Navigation Popup Menu Exit
5
AA 00:00 / 04:16
Up Folder
Supported music file: *.MP3
Bit rate range 32 Kbps - 320 Kbps
• Sampling rate (Sampling Frequency)
MPEG1 layer 3: 32 kHz, 44.1 kHz, 48 kHz
MPEG2 layer 3: 16 kHz, 22.05 kHz, 24 kHz
MPEG2.5 layer 3: 8 kHz, 11.025 kHz, 12 kHz
ENTER ENTER

US
B
54
USB
Music Selection and Pop-up Menu
Use the CCHH button to navigate in themusic page.
If no music is marked, all the music in the fold-er will be played in sequence. When one ormore music files are marked, the marked musicfiles will be played in sequence. If you want tolisten to only one song repeatedly, just markthat one file and play.
Select the target folder or drive.
Select the desired musics.
Show the Pop-up menu.
Select the desired Pop-up menu.
2
3
1
4
5RETURN Return to TV viewing.
Navigation ExitPopup Menu
Navigation Popup Menu
Page 2/3 No MarkedMusic List
Up Folder
AA 00:00 / 04:16
Up Folder
Drive1 Title Duration
Page 2/3 No MarkedMusic List
Up Folder
AA 00:00 / 04:16
Up Folder
Drive1 Title Duration
3945 KB128 Kbps
Play
Play with Photo
Mark
Mark All
Delete
Close
GG PPllaayy (During stop): Play the selected file.
Once a song finishes playing, the next selectedone will be played. When there are no selectedfiles to play, the next one in the current folderwill be played. If you go to a different folder andpress the EENNTTEERR button, the current song inplayback will stop.
GG PPllaayy MMaarrkkeedd: Play the selected files. Once afile finishes playing, the next selected one willbe played automatically.
GG SSttoopp PPllaayy (During playback): Stop the play-ing files.
GG PPllaayy wwiitthh PPhhoottoo: Start playing the selectedfiles and then move to the Photo List.
GG MMaarrkk:: Use to mark a file.
GG UUnnmmaarrkk:: Use to unmark a file.
GG MMaarrkk AAll ll: Mark all files in the folder.
GG UUnnmmaarrkk AAll ll: Deselect all marked files.
GG DDeelleettee or DDeelleettee MMaarrkkeedd: Delete the selectedfiles.
GG CClloossee: Close the pop-up menu.
ENTER
ENTER
ENTER

US
B
55
The play information box (as shown below) will automaticallymove across the screen when there is no user input to pre-vent a fixed image remaining on the screen for a extendedperiod of time.
NOTE!
GG When music is playing, is displayed in front of the music play time.
GG A damaged or corrupted music file that does not play displays 00:00 as the play time.
GG Files downloaded from a paid service with copyright protection are not supported and will not play.
GG Press EENNTTEERR, AA or RREETTUURRNN button to stop the screen saver.
EXTRA CONTENTS
Extra Contents will be activated when Data Channel service is available.
Select UUSSBB.
Select EExxttrraa CCoonntteennttss.
1
2
MENU
ENTER ENTER
NOTE!
GG Pro:Centric contents in USB memory stick can be played.
GG For more information. contact to Customer Support.(www.lgcommercial.com)
Close
Choose the media you want.
Fl
ii
Photo List
Music List
Extra Contents

PIC
TU
RE
CO
NT
RO
L
56
PICTURE CONTROL
PIP (PICTURE-IN-PICTURE)PIP enables the end user to view two sources on the screen at the same time. The end user can switch
between the Main and Sub picture sizes.
7 8 9
0
PQRS TUV WXYZ
PIP CH- PIP CH+ PIP SWAP PIP INPUT
PIP SAP
FLASHBK
TIMER
&@
RATIO
PIP INPUTSelects viewing source for PIPwindow.
PIP SWAPSwitches Main screen andPIP window sources.
PIP CH+Selects next higher channel
for PIP window.
PIP CH-Selects next lower channel
for PIP window.
PIP Operation1. Connect auxiliary source(s) to TV
connections panel.2. Enter Installer menu to be sure
source(s) is enabled.3. Use the interactive remote provided
in the room to operate PIP.4. Press PIP on remote.
Use the PIP function keys to operate the available PIP features.
5. To exit PIP mode, simply press PIP.
PIPTurns PIP mode on and off.
Note: Actual size of Main screen and PIP inset may be different thanshown above.

PIC
TU
RE
CO
NT
RO
L
57
AV1, AV2, HDMI1, HDMI2TV
TV, AV1or AV2, HDMI1, HDMI2AV1or AV2
Main Picture Source Available Sub Picture Sources
HDMI1or HDMI2
Component, RGB-PC
TV, AV1, AV2, HDMI1or HDMI2
TV, AV1, AV2, HDMI1, HDMI2

PIC
TU
RE
CO
NT
RO
L
58
PICTURE CONTROL
PICTURE SIZE (ASPECT RATIO) CONTROL
This feature lets you choose the way an analog picture with a 4:3 aspect ratio is displayed on your TV.
RGB-PC input source can only use 4:3 or 16:9 aspect ratio.
Press the RRAATTIIOO button repeatedly to select the picture options
: SSeett BByy PPrrooggrraamm,, 44::33,, 1166::99,, ZZoooomm,, JJuusstt SSccaann.
1RATIO
2RETURN
Return to TV viewing.
1166::99
You can also adjust AAssppeecctt RRaattiioo inthe PPIICCTTUURREE menu.

PIC
TU
RE
CO
NT
RO
L
59
Set by program
Selects the proper picture proportion to matchthe source’s image.
4:3
Choose 4:3 when you want to view a picturewith an original 4:3 aspect ratio.
16:9
Adjust the picture horizontally, in a linear pro-portion to fill the entire screen.
(4:3 4:3)
(16:9 16:9)
Set By Program
Set By Program

PIC
TU
RE
CO
NT
RO
L
60
PICTURE CONTROL
Zoom
Choose Zoom when you want to view the picturewithout any alteration. However, the top andbottom portions of the picture will be cropped.
Just Scan
Normally the edges of video signals are cropped1-2%. Just Scan turns off this cropping andshows the complete video.
Notes: If there is noise on the edges of the originalsignal, it will be visible when Just Scan is activated.
JJuusstt SSccaann operates only withDTV/CADTV/HDMI-DTV/DVI-DTV(720p/1080i), Component(720p/1080i) inputsources.

PIC
TU
RE
CO
NT
RO
L
61
EnterMovePICTURE
E
Aspect Ratio : 16:9
Picture Mode : Standard
• Backlight 70
• Contrast 90
• Brightness 50
• Sharpness 70
• Color 60
• Tint 0
PRESET PICTURE SETTINGS (PICTURE MODE)There are factory presets for picture settings available in the user menus. You can use a preset, change each
setting manually, , or use the Intelligent Sensor.
Select PPIICCTTUURREE.
Select IInntteellll iiggeenntt SSeennssoorr, VViivviidd,SSttaannddaarrdd, NNaattuurraall, CCiinneemmaa, SSppoorrtt orGGaammee.
1 MENU
3ENTER
Select PPiiccttuurree MMooddee.2
ENTER
4RETURN
Return to the previous menu.
MENUReturn to TV viewing.
EnterMovePICTURE
E
Aspect Ratio : 16:9
Picture Mode : Standard
• Backlight 70
• Contrast 90
• Brightness 50
• Sharpness 70
• Color 60
• Tint 0
When selecting IInntteell ll iiggeenntt SSeennssoorr ischanged to AAuuttoo automatically.
When selecting IInntteell ll iiggeenntt SSeennssoorr, itis changed contrast, brightness, sharp-ness, color and tint automatically.
VViivv iidd, SSttaannddaarrdd, NNaattuurraall, CCiinneemmaa,SSppoorrtt, and GGaammee Settings are presetfor the optimum picture quality at thefactory.
IInntteell ll iiggeenntt SSeennssoorr: The most suitablepicture is automatically adjusted accord-ing to the surrounding conditions.
VViivv iidd: This is the mode to maximize theeffect of the video in the retail store.Strengthen the contrast, brightness,color and sharpness for vivid picture.
SSttaannddaarrdd: This is the mode to realizeoptimum viewing condition for the gen-eral user.
NNaattuurraall: This is the mode to display themost natural screen status.
CCiinneemmaa: This mode optimizes video forwatching movies.
SSppoorr tt: This is the video mode toemphasize dynamic video and primarycolor (e.g, white, uniform, grass, sky blueetc.) by realizing the optimal screen forsports.
GGaammee: This is the mode to realize fastresponse speed in a fast gaming screen.
R G R G
Intelligent Sensor
Vivid
Standard
Natural
Cinema
Sport
Game

PIC
TU
RE
CO
NT
RO
L
62
PICTURE CONTROL
MANUAL PICTURE ADJUSTMENT - USER MODE
Adjust the picture appearance to suit your preference and viewing situations.
This feature is disable in “PPiiccttuurree MMooddee--IInntteell ll iiggeenntt SSeennssoorr”.
Select PPIICCTTUURREE.
Make appropriate adjustments.
Select BBaacckklliigghhtt,, CCoonnttrraasstt,,BBrriigghhttnneessss,, SShhaarrppnneessss,, CCoolloorr,,
or TTiinntt..
1 MENU
Select PPiiccttuurree MMooddee.
2ENTER
Select VViivviidd, SSttaannddaarrdd, NNaattuurraall,CCiinneemmaa, SSppoorrtt or GGaammee.
3ENTER
4ENTER
5ENTER
6RETURN
Return to the previous menu.
Return to TV viewing.
• Back Light 70
EE
EE
EE
EE
Enter
MENU
EnterMovePICTURE
E
Aspect Ratio : 16:9
Picture Mode : Standard
• Backlight 70
• Contrast 90
• Brightness 50
• Sharpness 70
• Color 60
• Tint 0
BBaacckkll iigghhtt: This function adjusts thebrightness of LCD panel, to control thebrightness of the screen. Adjusting thebacklight is recommended when settingthe brightness of the set. When decreas-ing the backlight, the brightness of theblack becomes darker without any loss invideo signal and the power consumptionis reduced.
CCoonnttrraasstt: Increase or decrease the gra-dient of the video signal. You may useContrast when the bright part of pictureis saturated.
BBrriigghhttnneessss: Adjusts the base level ofthe signal in the picture. You may useBrightness when the dark part of the pic-ture is saturated.
SShhaarrppnneessss: Adjusts the level of crisp-ness in the edges between the light anddark areas of the picture. The lower thelevel, the softer the image.
CCoolloorr: Adjusts intensity of all colors.
TTiinntt: Adjusts the balance between redand green levels.
R G

PIC
TU
RE
CO
NT
RO
L
63
PICTURE IMPROVEMENT TECHNOLOGY
You can calibrate the screen for each Picture Mode or set the video value according to the special video screen.
You can set the video seeing differently for each input.
To reset to the factory default after making adjustments to each input source, execute the PPiiccttuurree RReesseett
function for each Picture Mode.
Select PPIICCTTUURREE.
Select AAddvvaanncceedd CCoonnttrrooll.
Select your desired options.
1 MENU
3
2ENTER
ENTER
5RETURN
Return to the previous menu.
Return to TV viewing.
Make appropriate adjustments.
4
MENU
EnterMovePICTURE
E
EnterMovePICTURE
E
Picture Mode : Standard
• Backlight 70
• Contrast 90
• Brightness 50
• Sharpness 70
• Color 60
• Tint 0
• Advanced Control
R G
Color Temperature Medium
Dynamic Contrast FF Medium GG
Dynamic Color Low
Noise Reduction Medium
Gamma Medium
Black Level Low
Eye Care Off
Close
Real Cinema OffE
R G
Picture Mode : Standard
• Backlight 70
• Contrast 90
• Brightness 50
• Sharpness 70
• Color 60
• Tint 0
• Advanced Control

PIC
TU
RE
CO
NT
RO
L
64
PICTURE CONTROL
Set to warm to enhance hotter colors such as red, or set to cool to enhance coolercolors such as blue.
Adjusts the contrast to keep it at the best level according to the brightness of thescreen. The picture is improved by making bright parts brighter and dark parts darker.
Adjusts screen colors so that they look livelier, richer and clearer. This featureenhances hue, saturation and luminance so that red, blue, green and white lookmore vivid.
Reduces screen noise without compromising video quality.
Low : Make dark and middle gray level area of the picture brighter.Medium: Express original picture levels.High: Make dark and middle gray level area of the picture darker. You can adjust brightness of dark area and middle gray level area of the picture.
Low: The reflection of the screen gets darker.
High: The reflection of the screen gets brighter. Set black level of the screen to proper level.
This function enables to select 'Low' or 'High' in the following mode: AV (NTSC-M),HDMI or Component.
Adjust the brightness of the screen to prevent the screen from being too bright.Dims extremely bright pictures.
This feature is disabled in “PPiiccttuurree MMooddee--IInntteelllliiggeenntt SSeennssoorr, VViivviidd,, CCiinneemmaa”.
Makes video clips recorded in film look more natural by eliminating judder effect.
Dynamic Contrast
Dynamic Color
Noise Reduction
Gamma
Black Level
Eye Care
Real Cinema
Color Temperature
Standard: Displays standard set of colors.
Wide: Increase number of colors used. Maximize the utilization of color to increase color quality.
Color Gamut

PIC
TU
RE
CO
NT
RO
L
65
PICTURE RESETSettings of the selected picture modes return to the default factory settings.
EnterMovePICTURE
E
EnterMovePICTURE
• Backlight 70
• Contrast 90
• Brightness 50
• Sharpness 70
• Color 60
• Tint 0
• Advanced Control
• Picture Reset
Screen (RGB-PC)
E
Select PPIICCTTUURREE.
Select PPiiccttuurree RReesseett.
Initialize the adjusted value.
1MENU
2ENTER
Select YYeess.
3ENTER
5MENU
Return to TV viewing.
4ENTER
• Backlight 70
• Contrast 90
• Brightness 50
• Sharpness 70
• Color 60
• Tint 0
• Advanced Control
• Picture Reset
Screen (RGB-PC)
R GNoYes
All picture settings will be resetted.Continue?
?
R GResetting video configuration...ii

PIC
TU
RE
CO
NT
RO
L
66
PICTURE CONTROL
DEMO MODE
Select OOPPTTIIOONN.
Select DDeemmoo MMooddee.
1MENU
2ENTER
Select OO nn to show the variousfeature of the TV.
3ENTER
4MENU Return to TV viewing.
After a while, DDeemmoo MMooddee starts.
If you want to stop the demo, press any button(Except VOL +, - and MUTE button).
EnterMoveOPTION
Menu Language : English
Audio Language : English
Caption : Off
Set ID : 1
Demo Mode : Off
Data Broadcasting
EnterMoveOPTION
Menu Language : English
Audio Language : English
Caption : Off
Set ID : 1
Demo Mode : Off
Data Broadcasting
Off
On
Displays a slide show to explain the various feature of this TV.

SO
UN
D &
LAN
GU
AG
E C
ON
TR
OL
67
SOUND & LANGUAGE CONTROL
AUTO VOLUME LEVELER (AUTO VOLUME)Auto Volume makes sure that the volume level remains consistent whether you are watching a commercial or a
regular TV program.
Because each broadcasting station has its own signal conditions, volume adjustment may be needed every
time the channel is changed. This feature allows users to enjoy stable volume levels by making automatic
adjustments for each program.
Select AAUUDDIIOO.
Select AAuuttoo VVoolluummee.
Select OO nn or OOff ff.
1 MENU
3
2ENTER
ENTER
4RETURN
Return to the previous menu.
MENUReturn to TV viewing.
EnterMoveAUDIO
E
L R
- +
EnterMoveAUDIO
E
L R
- +
Auto Volume : On
Clear Voice II : On
• Level 3
Balance 0
Sound Mode : Standard
• SRS TruSurround XT: Off
• Treble 50
• Bass 50
Auto Volume : Off
Clear Voice II : On
• Level 3
Balance 0
Sound Mode : Standard
• SRS TruSurround XT: Off
• Treble 50
• Bass 50
Off
On

SO
UN
D &
LAN
GU
AG
E C
ON
TR
OL
68
SOUND &LANGUAGE CONTROL
PRESET SOUND SETTINGS (SOUND MODE)
Sound Mode lets you enjoy the best sound without any special adjustment as the TV sets the appropriate
sound options based on the program content.
SOUND &LANGUAGE CONTROL
Select AAUUDDIIOO.
Select SSoouunndd MMooddee.
1MENU
2ENTER
Select SSttaannddaarrdd, MMuussiicc,CCiinneemmaa, SSppoorrtt, or GGaammee.
3ENTER
4RETURN
Return to the previous menu.
MENUReturn to TV viewing.
EnterMoveAUDIO
E
L R
EnterMoveAUDIO
E
L R
Auto Volume : Off
Clear Voice II : Off
• Level 3
Balance 0
Sound Mode : Standard
• SRS TruSurround XT: Off
• Treble 50
• Bass 50
Auto Volume : Off
Clear Voice II : Off
• Level 3
Balance 0
Sound Mode : Standard
• SRS TruSurround XT: Off
• Treble 50
• Bass 50
Standard
Music
Cinema
Sport
Game
- + - +
SSttaannddaarrdd, MMuussiicc, CCiinneemmaa, SSppoorrtt,and GGaammee are preset for optimumsound quality at the factory.
SSttaannddaarrdd: Offers standard-qualitysound.
MMuussiicc: Optimizes sound for listening tomusic.
CCiinneemmaa: Optimizes sound for watchingmovies.
SSppoorrtt: Optimizes sound for watchingsports events.
GGaammee: Optimizes sound for playinggames.

SO
UN
D &
LAN
GU
AG
E C
ON
TR
OL
69
SOUND SETTING ADJUSTMENT - USER MODE
Adjust the sound to suit your taste and room situations.
Select AAUUDDIIOO.
Select SSoouunndd MMooddee.
Select TTrreebbllee or BBaassss.
1 MENU
4
2ENTER
Select SSttaannddaarrdd, MMuussiicc,CCiinneemmaa, SSppoorrtt, or GGaammee.
3ENTER
ENTER
Make appropriate adjustments.5
ENTER
6RETURN
Return to the previous menu.
MENUReturn to TV viewing.
EnterMoveAUDIO
L R
E
Auto Volume : Off
Clear Voice II : Off
• Level 3
Balance 0
Sound Mode : Standard
• SRS TruSurround XT: Off
• Treble 50
• Bass 50
EnterMoveAUDIO
L R
E
Auto Volume : Off
Clear Voice II : Off
• Level 3
Balance 0
Sound Mode : Standard
• SRS TruSurround XT: Off
• Treble 50
• Bass 50
Close
EE
EE
• Treble 50
• Bass 50
• SRS TruSurround XT Off
- + - +

SO
UN
D &
LAN
GU
AG
E C
ON
TR
OL
70
SOUND &LANGUAGE CONTROL
SRS TRUSURROUND XT / INFINITE SOUND
Select AAUUDDIIOO.
Select SSRRSS TTrruuSSuurrrroouunndd XXTTor IInnff iinniittee SSoouunndd.
Select OO nn or OOff ff.
1MENU
3
2ENTER
ENTER
4RETURN
Return to the previous menu.
MENUReturn to TV viewing.
Takes advantage of any multi-channel format without needing to add extra speakers or equipment. Dialogclarity, bass enrichment, and the addition of stereo audio enhancement produces an immersive sound experi-ence from standard stereo material.
If sound quality or volume is not at thelevel you want, it is recommended to use aseparate home theater system or amp tocope with different user environments.
If you select “CClleeaarr VVooiiccee II II--OOnn”, SSRRSSTTrruuSSuurrrroouunndd XXTT feature will not work.
SSRRSS TTrruuSSuurrrroouunndd XXTT: TruSurround XTis a patented SRS technology that solvesthe problem of playing 5.1 multichannelcontent over two speakers.
IInnff iinnii ttee SSoouunndd: Infinite Sound is apatented LG proprietary sound process-ing technology that strives immersive 5.1surround sound with just two front speak-ers. (For 32/37/42/47/55LD650H,32/37/42LD655H)
EnterMoveAUDIO
L R
E
Auto Volume : Off
Clear Voice II : Off
• Level 3
Balance 0
Sound Mode : Standard
• SRS TruSurround XT: Off
• Treble 50
• Bass 50
EnterMoveAUDIO
L R
E
Auto Volume : Off
Clear Voice II : Off
• Level 3
Balance 0
Sound Mode : Standard
• SRS TruSurround XT: Off
• Treble 50
• Bass 50
Close
• Treble 50
• Bass 50
• SRS TruSurround XT Off
- + - +
EnterMoveAUDIO
L R
E
Auto Volume : Off
Clear Voice II : Off
• Level 3
Balance 0
Sound Mode : Standard
• Infinite Sound: Off
• Treble 50
• Bass 50
EnterMoveAUDIO
L R
E
Auto Volume : Off
Clear Voice II : Off
• Level 3
Balance 0
Sound Mode : Standard
• Infinite Sound: Off
• Treble 50
• Bass 50
Close
• Treble 50
• Bass 50
• Infinite Sound Off
- + - +
32/37/42LG710H
32/37/42/47/55LD650H, 32/37/42LD655H

SO
UN
D &
LAN
GU
AG
E C
ON
TR
OL
71
CLEAR VOICE II
By differentiating the human sound range from others, it improves the sound quality of voices.
EnterMoveAUDIO
E
L R
EnterMoveAUDIO
E
L R
Auto Volume : Off
Clear Voice II : On
• Level 3
Balance 0
Sound Mode : Standard
• SRS TruSurround XT: Off
• Treble 50
• Bass 50
Auto Volume : Off
Clear Voice II : On
• Level 3
Balance 0
Sound Mode : Standard
• SRS TruSurround XT: Off
• Treble 50
• Bass 50
- + - +
Off
On
Select AAUUDDIIOO.
Select CClleeaarr VVooiiccee II II.
Select OO nn or OOff ff.
1MENU
3
2ENTER
ENTER
6RETURN
Return to the previous menu.
MENUReturn to TV viewing.
Select LLeevveell.4
ENTER
Make appropriate adjustments.5
ENTER
Adjustment for Clear Voice ll Level With selecting OO nn

SO
UN
D &
LAN
GU
AG
E C
ON
TR
OL
72
SOUND &LANGUAGE CONTROL
BALANCE
Select AAUUDDIIOO.
Select BBaallaannccee.
Make appropriate adjustments.
1 MENU
3
2ENTER
ENTER
Adjust the left/right sound of speaker to suit your taste and room situations.
4RETURN
Return to the previous menu.
MENUReturn to TV viewing.
EnterMoveAUDIO EnterMoveAUDIO
L R
E
Auto Volume : Off
Clear Voice II : Off
• Level 3
Balance 0
Sound Mode : Standard
• SRS TruSurround XT: Off
• Treble 50
• Bass 50
L R
E
Auto Volume : Off
Clear Voice II : Off
• Level 3
Balance 0
Sound Mode : Standard
• SRS TruSurround XT: Off
• Treble 50
• Bass 50
Close
EE
EE
Balance 0 L R
- + - +

SO
UN
D &
LAN
GU
AG
E C
ON
TR
OL
73
TV SPEAKERS ON/OFF SETUP
If you wish to use an external Hi-Fi system or a SRS System, turn off the TV’s internal speakers.
In AA VV, CCoommppoonneenntt, RRGGBB and HHDDMMII with HDMI to DVI cable, the TV speaker can be operational even when
there is no video signal.
Turn the TV speakers off if using external audio equipment.
Select AAUUDDIIOO.
Select TTVV SSppeeaakkeerr.
Select OO nn or OOff ff.
1MENU
3
2ENTER
ENTER
4RETURN
Return to the previous menu.
MENUReturn to TV viewing.
EnterMoveAUDIO
E
• Level 3
Balance 0
Sound Mode : Standard
• SRS TruSurround XT: Off
• Treble 50
• Bass 50
• Reset
TV Speaker : On
L R
EnterMoveAUDIO
E
• Level 3
Balance 0
Sound Mode : Standard
• SRS TruSurround XT: Off
• Treble 50
• Bass 50
• Reset
TV Speaker : On
L R
Off
On
- + - +

SO
UN
D &
LAN
GU
AG
E C
ON
TR
OL
74
SOUND &LANGUAGE CONTROL
E
AUDIO RESET
Settings of the selected Sound Mode return to the default factory settings.
Select AAUUDDIIOO.
Select RReesseett.
1MENU
2ENTER
Initialize the adjusted value.
3ENTER
MENUReturn to TV viewing.
4
EnterMoveAUDIO
E
• Level 3
Balance 0
Sound Mode : Standard
• SRS TruSurround XT: Off
• Treble 50
• Bass 50
• Reset
L R
EnterMoveAUDIO
E
• Level 3
Balance 0
Sound Mode : Standard
• SRS TruSurround XT: Off
• Treble 50
• Bass 50
• Reset
L R
Resetting audio configuration...ii
- + - +
E

SO
UN
D &
LAN
GU
AG
E C
ON
TR
OL
75
Each time you press the SSAAPP button,
MMoonnoo, SStteerreeoo, or SSAAPP appear in turn.
Return to TV viewing.
1SAP
2
STEREO/SAP BROADCAST SETUP
For Analog only: This TV can receive MTS stereo programs and any SAP (Secondary Audio Program) that accom-
panies the stereo program if the station transmits an additional sound signal. Mono sound is automatically used
if the broadcast is only in Mono.If other languages are available on the digital signal,select them with the SSAAPP button.
RETURN
MONO SAPSTEREO

SO
UN
D &
LAN
GU
AG
E C
ON
TR
OL
76
SOUND &LANGUAGE CONTROL
AUDIO LANGUAGE
Other languages may be available if a digital signal is provided by the broadcasting station.
This feature operates only in DTV mode.
EnterMoveOPTION EnterMoveOPTION
Menu Language : English
Audio Language : English
Caption : Off
Set ID : 1
Demo Mode : Off
Data Broadcasting
Menu Language : English
Audio Language : English
Caption : Off
Set ID : 1
Demo Mode : Off
Data Broadcasting
English
Spanish
French
Select OOPPTTIIOONN.
Select AAuuddiioo LLaanngguuaaggee.
Select your desired language.
1MENU
3
2ENTER
ENTER
4RETURN
Return to the previous menu.
MENUReturn to TV viewing.

SO
UN
D &
LAN
GU
AG
E C
ON
TR
OL
77
ON-SCREEN MENUS LANGUAGE SELECTION
The menus can be shown on the screen in the selected language.
EnterMoveOPTION EnterMoveOPTION
Menu Language : English
Audio Language : English
Caption : Off
Set ID : 1
Demo Mode : Off
Data Broadcasting
Menu Language : English
Audio Language : English
Caption : Off
Set ID : 1
Demo Mode : Off
Data Broadcasting
English
Español
Français
Select OOPPTTIIOONN.
Select MMeennuu LLaanngguuaaggee.
Select your desired language.
From this point on, the on-screen menus willbe shown in the selected language.
1MENU
3
2ENTER
ENTER
4RETURN
Return to the previous menu.
MENUReturn to TV viewing.

SO
UN
D &
LAN
GU
AG
E C
ON
TR
OL
78
SOUND &LANGUAGE CONTROL
CAPTION MODE
Captions are provided to help the hearing impaired watch TV. Select a caption mode for displaying captioning
information if provided on a program. Analog caption displays information at any position on the screen and is
usually the program's dialog. Caption/Text, if provided by the broadcaster, would be available for both digital
and analog channels on the Antenna/Cable. This TV is programmed to memorize the caption/text mode which
was last set when you turned the power off. This function is only available when CCaappttiioonn Mode is set OO nn.
Select OOPPTTIIOONN.
Select CCaappttiioonn.
Select OO nn.
1MENU
3
2ENTER
ENTER
Select CCCC11-44 or TTeexxtt11-44.
4
Analog Broadcasting System Captions
When selecting OOff ff, Sub-menus forAnalog, DTV, and Digital Option becomedisabled.
CCAAPPTTIIOONN
The term for the words that scrollacross the bottom of the TV screen;usually the audio portion of the pro-gram provided for the hearing impaired.
TTEEXXTT
The term for the words that appear in alarge black frame and almost cover theentire screen; usually messages provid-ed by the broadcaster.5
RETURNReturn to the previous menu.
MENUReturn to TV viewing.
EnterMoveOPTION EnterMoveOPTION
Menu Language : English
Audio Language : English
Caption : Off
Set ID : 1
Demo Mode : Off
Data Broadcasting
Menu Language : English
Audio Language : English
Caption : CC1
Set ID : 1
Demo Mode : Off
Data Broadcasting
Mode CC1
Close
Digital Option
FF On GG

SO
UN
D &
LAN
GU
AG
E C
ON
TR
OL
79
Digital Broadcasting System Captions
Choose the language you want the DTV/CADTV Captions to appear in.
Other Languages can be chosen for digital sources only if they are included on the program.
This function in only available when Caption Mode is set On.
Select OOPPTTIIOONN.
Select CCaappttiioonn.
Select OO nn.
1MENU
3
2ENTER
ENTER
Select CCCC11-44, TTeexxtt11-44, orSSeerrvviiccee11 - 66.
4
5RETURN
Return to the previous menu.
MENUReturn to TV viewing.
EnterMoveOPTION EnterMoveOPTION
Menu Language : English
Audio Language : English
Caption : Off
Set ID : 1
Demo Mode : Off
Data Broadcasting
Menu Language : English
Audio Language : English
Caption : CC1
Set ID : 1
Demo Mode : Off
Data Broadcasting
Mode CC1
Close
Digital Option
FF On GG

SO
UN
D &
LAN
GU
AG
E C
ON
TR
OL
80
SOUND &LANGUAGE CONTROL
Customize the DTV captions that appear on your screen.
This function in only available when Caption Mode is set On.
Caption Option
Select OOPPTTIIOONN.
Select CCaappttiioonn.
Select OO nn.
1 MENU
3
2ENTER
ENTER
Select CCuussttoomm.5
ENTER
Customize the SSiizzee, FFoonntt, etc., to yourpreference. A preview icon is provided atthe bottom of the screen, use it to see thecaption language.
6
Select DDiiggiittaall OOppttiioonn.4
SSiizzee: Set the word size.
FFoonntt: Select a typeface for the text.
TTeexxtt CCoolloorr: Choose a color for thetext.
TTeexxtt OOppaacciittyy: Specify the opacityfor the text color.
BBgg ((BBaacckkggrroouunndd)) CCoolloorr: Select abackground color.
BBgg ((BBaacckkggrroouunndd)) OOppaacciittyy: Selectthe opacity for the background color.
EEddggee TTyyppee: Select an edge type.
EEddggee CCoolloorr: Select a color for theedges.
7RETURN
Return to the previous menu.
MENUReturn to TV viewing.
Size A Standard
Font Font 1
Text Color White
Text Opacity Solid
Edge Type None
Edge Color Black
Bg Color Black
Bg Opacity Solid
Close
FF Custom GGEnterMoveOPTIONEnterMoveOPTION
Menu Language : English
Audio Language : English
Caption : Off
Set ID : 1
Demo Mode : Off
Data Broadcasting
Menu Language : English
Audio Language : English
Caption : Off
Set ID : 1
Demo Mode : Off
Data Broadcasting
Mode CC1
Close
Digital Option
On

TIM
E S
ET
TIN
G
81
TIME SETTING
CLOCK SETTING
Auto Clock Setup
The time is set automatically from a digital channel signal.
The digital channel signal includes information for the current time provided by the broadcasting station.
Set the clock manually if the current time is set incorrectly by the auto clock function.
EnterMoveTIME EnterMoveTIME
Clock
Off Time : Off
On Time : Off
Sleep Timer : Off
Clock
Off Time : Off
On Time : Off
Sleep Timer : Off
Month
Date 21
Year 2009
Hour 10 AM
02
Minute 10
Time Zone Eastern
DaylightSaving Auto
Close
FF Auto GG
Select TTIIMMEE.
Select CClloocckk.
Select AAuuttoo.
1MENU
3
2ENTER
ENTER
Select your viewing area time zone.
• U.S.A: EEaasstteerrnn, CCeennttrraall, MMoouunnttaaiinn,PPaaccii ff iicc, AAllaasskkaa, or HHaawwaaii ii.
• Canada: EEaasstteerrnn, CCeennttrraall, MMoouunnttaaiinn,PPaaccii ff iicc, NNeeww FF.. llaanndd, or AAttllaannttiicc.
4
Select AAuuttoo, OOff ff, or OO nn (depending onwhether or not your viewing area observesDaylight Saving time).
5
6RETURN
Return to the previous menu.
MENUReturn to TV viewing.

TIM
E S
ET
TIN
G
82
TIME SETTINGTIME SETTING
Manual Clock Setup
If the current time setting is wrong, reset the clock manually.
EnterMoveTIME EnterMoveTIME
Clock
Off Time : Off
On Time : Off
Sleep Timer : Off
Clock
Off Time : Off
On Time : Off
Sleep Timer : Off
Select TTIIMMEE.
Select CClloocckk.
Select MMaannuuaall.
1MENU
3
2ENTER
ENTER
Select the Year, Month, Date, Hour, or Minutesoption.
4
Set the Year, Month, Date, Hour, or Minutesoption.
5
6RETURN
Return to the previous menu.
MENUReturn to TV viewing.
Month
Date 21
Year 2009
Hour 10 AM
02
Minute 10
Time Zone Eastern
DaylightSaving Auto
Close
FF Manual GG

TIM
E S
ET
TIN
G
83
AUTO ON/OFF TIME SETTING
This function operates only if the current time has been set.
The OOffff TTiimmee function overrides the OOnn TTiimmee function if they are both set to the same time.
The TV must be in standby mode for the OOnn TTiimmee to work.
EnterMoveTIME EnterMoveTIME
Clock
Off Time : Off
On Time : Off
Sleep Timer : Off
Clock
Off Time : Off
On Time : 6:30 AM (Once)
Sleep Timer : Off
Select TTIIMMEE.
Select OOffff TTiimmee or OOnn TTiimmee.
Select RReeppeeaatt.
1MENU
3
2ENTER
ENTER
Select OOff ff, OOnnccee, DDaaii llyy, MMoonn..~FFrr ii ..,MMoonn..~SSaatt .., SSaatt ..~ SSuunn.., or SSuunn...
4
Select and set HHoouurr or MMiinnuuttee.5
6RETURN
Return to the previous menu.
MENUReturn to TV viewing.
Repeat FF Once GG
Hour 6 AM
Minute 30
Close
Feb. 21, 2009 10:10 AM

TIM
E S
ET
TIN
G
84
TIME SETTINGTIME SETTING
SLEEP TIMER SETTING
The Sleep Timer turns the TV off at the preset time.
Note that this setting is cleared when the TV is turned off.
To cancel the SSlleeeepp TTiimmeerr, select OOff ff.
Press the SSLLEEEEPP button repeatedly toselect the number of minutes.
EnterMoveTIME EnterMoveTIME
Clock
Off Time : Off
On Time : Off
Sleep Timer : Off
Clock
Off Time : Off
On Time : Off
Sleep Timer : Off
Select TTIIMMEE.
Select SSlleeeepp TTiimmeerr.
Make appropriate adjustments.
1MENU
3
2ENTER
ENTER
4RETURN
Return to the previous menu.
MENUReturn to TV viewing.
Off
10 min.
20 min.
30 min.
60 min.
90 min.
120 min.
180 min.
240 min.

PARENTAL CONTROL / RATINGSPA
RE
NTA
L CO
NT
RO
L / RA
TIN
G
85
Parental Control can be used to block specific channels, ratings and other viewing sources.
The Parental Control Function (V-Chip) is used to block program viewing based on the ratings sent by the broad-casting station. The default setting is to allow all programs to be viewed. Viewing can be blocked by choosing thetype of the program and the categories. It is also possible to block all program viewing for a time period. To usethis function, the following must be done :
1. Set ratings and categories to be blocked.
2. Specify a password
3. Enable the lock
V-Chip rating and categoriesRating guidelines are provided by broadcasting stations. Most television programs and television movies can beblocked by TV Rating and/or Individual Categories. Movies that have been shown at the theaters or direct-to-video movies use the Movie Rating System (MPAA) only.
Ratings for Television programs including made-for-TV movies : TV-G (General audience)
TV-PG (Parental guidance suggested)
TV-14 (Parents strongly cautioned)
TV-MA (Mature audience only)
TV-Y (All children)
TV-Y7 (Children 7 years older)
SET PASSWORD & LOCK SYSTEM
Set up blocking schemes to block specific channels, ratings, and external viewing sources.
A password is required to gain access to this menu.
Setting up Your Password
Close
Enter Password
* * * *
Select LLOOCCKK.1 MENU
ENTER
Input the password.21 2 3
4 5 6
7 8
0
9
ABC DEF
GHI
WXYZTUVPQRS
MNOJKL
&@
.:/,
When you select OO nn, the Lock Systemis enable.
The TV is set up with the initial pass-word “0-0-0-0”.
EnterMoveLOCK
Lock System : On
Set Password
Block Channel
Movie Rating
TV Rating-Children
TV Rating-General
Downloadable Rating
Input Block

PAR
EN
TAL C
ON
TR
OL / R
AT
ING
86
PARENTAL CONTROL /RATINGS
Enables or disables the blocking scheme you set up previously.
Lock System
EnterMoveLOCK
Lock System : Off
Set Password
Block Channel
Movie Rating
TV Rating-Children
TV Rating-General
Downloadable Rating
Input Block
Select LLoocckk SSyysstteemm.
Select OO nn or OOff ff.
3
2
ENTER
EnterMoveLOCK
Lock System : On
Set Password
Block Channel
Movie Rating
TV Rating-Children
TV Rating-General
Downloadable Rating
Input Block
Off
On
When you select OO nn, the Lock Systemis enable.
Select LLOOCCKK.1
MENUENTER
4RETURN
Return to the previous menu.
MENUReturn to TV viewing.

PAR
EN
TAL C
ON
TR
OL / R
AT
ING
87
Set up blocking schemes to block specific channels, ratings, and external viewing sources.
A password is required to gain access to this menu.
Set Password
EnterMoveLOCK
Lock System : Off
Set Password
Block Channel
Movie Rating
TV Rating-Children
TV Rating-General
Downloadable Rating
Input Block
Select SSeett PPaasssswwoorrdd.
Choose any 4 digits for your new password.
As soon as the 4 digits are entered, re-enterthe same 4 digits on the CCoonnff ii rrmm.
4
3
ENTER
1 2 3
4 5 6
7 8
0
9
ABC DEF
GHI
WXYZTUVPQRS
MNOJKL
&@
.:/,
EnterMoveLOCK
Lock System : Off
Set Password
Block Channel
Movie Rating
TV Rating-Children
TV Rating-General
Downloadable Rating
Input Block
Close
New * * * *
Confirm * * * *
Select LLOOCCKK.1
MENUENTER
Input the password.21 2 3
4 5 6
7 8
0
9
ABC DEF
GHI
WXYZTUVPQRS
MNOJKL
&@
.:/,
5RETURN
Return to the previous menu.
MENUReturn to TV viewing.

PAR
EN
TAL C
ON
TR
OL / R
AT
ING
88
PARENTAL CONTROL /RATINGS
CHANNEL BLOCKING
EnterMoveLOCK
Lock System : Off
Set Password
Block Channel
Movie Rating
TV Rating-Children
TV Rating-General
Downloadable Rating
Input Block
Select BBlloocckk CChhaannnneell.
Select a channel to block or unblock.
4
3
ENTER
Block or unblock a channel.5
Blocks any channels that you do not want to watch or that you do not want your children to watch.
Select LLOOCCKK.1
MENUENTER
Input the password.2 1 2 3
4 5 6
7 8
0
9
ABC DEF
GHI
WXYZTUVPQRS
MNOJKL
&@
.:/,
6RETURN
Return to the previous menu.
MENUReturn to TV viewing.
Ch. Change Page ChangeCHNavigation Previous
Block/Unblock

PAR
EN
TAL C
ON
TR
OL / R
AT
ING
89
MOVIE & TV RATING
Movie Rating (MPAA) - For USA
Blocks movies according to the movie ratings limits specified, so children cannot view certain movies. You can
set the ratings limit by blocking out all the movies with the ratings above a specified level. Keep in mind that
the movie ratings limit only applies to movies shown on TV, not TV programs, such as soap operas.
EnterMoveLOCK
Lock System : Off
Set Password
Block Channel
Movie Rating
TV Rating-Children
TV Rating-General
Downloadable Rating
Input Block
Select MMoovviiee RRaattiinngg.
Select GG, PP GG, PPGG--1133, RR, NNCC--1177,XX, or BBlloocckkiinngg OOffff.
4
3
ENTER
EnterMoveLOCK
Lock System : Off
Set Password
Block Channel
Movie Rating
TV Rating-Children
TV Rating-General
Downloadable Rating
Input Block
Blocking off : Permits all programs
G
PG
PG-13
R
NC-17
X
Blocking Off
G (General audience)
PG (Parental guidance suggested)
PG-13 (Parents strongly cautioned)
R (Restricted)
NC-17 (No one 17 and under admitted)
X (Adult only)
Blocking Off (Permits all programs)
GG If you set PG-13: G and PG movies willbe available, PG-13, R, NC-17 and X willbe blocked.
Select LLOOCCKK.1
MENUENTER
Input the password.21 2 3
4 5 6
7 8
0
9
ABC DEF
GHI
WXYZTUVPQRS
MNOJKL
&@
.:/,
5RETURN
Return to the previous menu.
MENUReturn to TV viewing.

Select TTVV RRaattiinngg--CChhii llddrreenn.
Select AAggee or FFaannttaassyy VViioolleennccee.4
3
ENTER
Select block options.
5ENTER
Age (applies to TV-Y, TV-Y7)
Fantasy Violence (applies to TV-Y7)
TV Rating Children - For USA
Prevents children from watching certain children's TV programs, according to the ratings limit set. The children
rating does not apply to other TV programs. Unless you block certain TV programs intended for mature audi-
ences in the TV Rating - sub menu, your children can view those programs.
Select LLOOCCKK.1 MENU
ENTER
Input the password.2 1 2 3
4 5 6
7 8
0
9
ABC DEF
GHI
WXYZTUVPQRS
MNOJKL
&@
.:/,
6RETURN
Return to the previous menu.
MENUReturn to TV viewing.
EnterMoveLOCK
Lock System : Off
Set Password
Block Channel
Movie Rating
TV Rating-Children
TV Rating-General
Downloadable Rating
Input Block
EnterMoveLOCK
Lock System : Off
Set Password
Block Channel
Movie Rating
TV Rating-Children
TV Rating-General
Downloadable Rating
Input BlockClose
Age
Fantasy Violence
PAR
EN
TAL C
ON
TR
OL / R
AT
ING
90
PARENTAL CONTROL /RATINGS

PAR
EN
TAL C
ON
TR
OL / R
AT
ING
91
TV Rating General - For USA
Based on the ratings, blocks certain TV programs that you and your family do not want to view.
Select AAggee, DDiiaalloogguuee, LLaanngguuaaggee,SSeexx or VViioolleennccee.
4
3
ENTER
Select block options.
5
Age (applies to TV-G,TV-PG,TV-14,TV-MA).
Dialogue-sexual dialogue (applies toTV-PG,TV-14).
Language-adult language (applies toTV-PG, TV-14, TV-MA).
Sex-sexual situations (applies to TV-PG,TV-14, TV-MA).
Violence (applies to TV-PG, TV-14, TV-MA).
Select LLOOCCKK.1 MENU
ENTER
Input the password.2 1 2 3
4 5 6
7 8
0
9
ABC DEF
GHI
WXYZTUVPQRS
MNOJKL
&@
.:/,
6RETURN
Return to the previous menu.
MENUReturn to TV viewing.
Select TTVV RRaattiinngg--GGeenneerraall.
EnterMoveLOCK
Lock System : Off
Set Password
Block Channel
Movie Rating
TV Rating-Children
TV Rating-General
Downloadable Rating
Input Block
EnterMoveLOCK
Lock System : Off
Set Password
Block Channel
Movie Rating
TV Rating-Children
TV Rating-General
Downloadable Rating
Input Block
Close
Age
Dialogue
Language
Sex
Violence

PAR
EN
TAL C
ON
TR
OL / R
AT
ING
92
PARENTAL CONTROL /RATINGS
TV Rating English - For CANADA
Selecting Canadian English rating system.
EnterMoveLOCK
Lock System : Off
Set Password
Block Channel
TV Rating-English
TV Rating-French
Downloadable Rating
Input Block
Select TTVV RRaattiinngg--EEnnggll iisshh.
Select EE, CC, CC88++, GG, PPGG,1144++, 1188++, or BBlloocckkiinngg OOffff.
4
3
ENTER
EnterMoveLOCK
Lock System : Off
Set Password
Block Channel
TV Rating-English
TV Rating-French
Downloadable Rating
Input Block
Blocking off : Permits all programs
E
C
C8+
G
PG
14+
18+
Blocking Off
If TTVV RRaattiinngg--EEnnggll iisshh or TTVV RRaattiinngg--FFrreenncchh is locked, enter the passwordto unlocked it temporarily.
E (Exempt)
C (Children)
C8+ (Children eight years and older)
G (General programming, suitable forall audiences)
PG (Parental Guidance)
14+ (Viewers 14 years and older)
18+ (Adult programming)
Blocking Off (Permits all programs)
Select LLOOCCKK.1
MENUENTER
Input the password.2 1
4 5 6
7 8
0
9
2 3
5RETURN
Return to the previous menu.
MENUReturn to TV viewing.

PAR
EN
TAL C
ON
TR
OL / R
AT
ING
93
TV Rating French - For CANADA
Selecting Canadian French rating system.
EnterMoveLOCK
Lock System : Off
Set Password
Block Channel
TV Rating-English
TV Rating-French
Downloadable Rating
Input Block
Select TTVV RRaattiinngg--FFrreenncchh.
Select EE, GG, 88aannss++, 1133aannss++,1166aannss++, 1188aannss++, or BBlloocckkiinngg ooffff.
4
3
ENTER
EnterMoveLOCK
Lock System : Off
Set Password
Block Channel
TV Rating-English
TV Rating-French
Downloadable Rating
Input Block
Blocking off : Permits all programs
E
G
8ans+
13ans+
16ans+
18ans+
Blocking Off
E (Exempt)
G (General)
8ans+ (General-Not convenient for lit-tle children)
13ans+ (Not convenient for children of13 years and younger)
16ans+ (Not convenient for children of16 years and younger)
18ans+ (This programs is only foradults)
Blocking off (Permits all programs)
Select LLOOCCKK.1
MENUENTER
Input the password.2 1
4 5 6
7 8
0
9
2 3
5RETURN
Return to the previous menu.
MENUReturn to TV viewing.

PAR
EN
TAL C
ON
TR
OL / R
AT
ING
94
PARENTAL CONTROL /RATINGS
DOWNLOADABLE RATING
This function is available only for digital channels.
This function operates only when TV has received Region5 Rating data.
EnterMoveLOCK
Lock System : Off
Set Password
Block Channel
Movie Rating
TV Rating-Children
TV Rating-General
Downloadable Rating
Input Block
EnterMoveLOCK
Lock System : Off
Set Password
Block Channel
Movie Rating
TV Rating-Children
TV Rating-General
Downloadable Rating
Input Block
Close
E
E
Select DDoowwnnllooaaddaabbllee RRaattiinngg.
Select desired DDoowwnnllooaaddaabblleeRRaattiinngg option.
4
3
ENTER
Select desired option and block it.5
ENTER
Select LLOOCCKK.1
MENUENTER
Input the password.2 1 2 3
4 5 6
7 8
0
9
ABC DEF
GHI
WXYZTUVPQRS
MNOJKL
&@
.:/,
6RETURN
Return to the previous menu.
MENUReturn to TV viewing.
Based on rating table, your TV's OSD(On Screen Display) may differ slightlyfrom what is shown in this manual.
Humor
Sport
Cruelty
Language
Sadness
Genre
Age
Humor

PAR
EN
TAL C
ON
TR
OL / R
AT
ING
95
EXTERNAL INPUT BLOCKING
Enables you to block an input.
Select IInnppuutt BBlloocckk.
Select input source.4
3
Select OO nn or OOff ff.5
ENTER
Select LLOOCCKK.1
MENUENTER
Input the password.2 1 2 3
4 5 6
7 8
0
9
ABC DEF
GHI
WXYZTUVPQRS
MNOJKL
&@
.:/,
6RETURN
Return to the previous menu.
MENUReturn to TV viewing.
EnterMoveLOCK
Lock System : Off
Set Password
Block Channel
Movie Rating
TV Rating-Children
TV Rating-General
Downloadable Rating
Input Block
EnterMoveLOCK
Lock System : Off
Set Password
Block Channel
Movie Rating
TV Rating-Children
TV Rating-General
Downloadable Rating
Input Block
AV1 FF Off GG
AV2 Off
Component Off
HDMI1 Off
RGB-PC Off
Close
HDMI2 Off

COMMERCIAL MODE SETUP
CO
MM
ER
CIA
L MO
DE
SE
TU
P
96
INTERACTIVE TV SETUP
Channel GuideHotel Information
HelpExit
PPV GEM-TV Setup1. Make all connections as required of PPV system.2. Set TV to default condition. 3. Configure all relevant installer menu items and TV features.4. Install PPV card. In most cases the PPV card is preprogrammed with the PPVprovider master TV setup.
GEM-TV Setup Without PPV CardRefer to Commercial Mode Setup on page 98.1. See installer menu pages and make settings as required for Gem operation.2. Specify a Gem Start Channel for item 119 that will tell the TV which channelto tune in for Gem operation.3. Set TV features on TV Channel, Picture, Audio etc. menus as indicated onpage 98.
Gem Operation Interactive Menu FeaturesUse the Gem remote provided in the room to operate both interactive menu andthe regular TV features.
Channel GuideShows available TV programs. Indicates channel, program start and finish timeand identifies the TV network.
Hotel InformationShows typical hotel information. Such as photos of Guestroom, Dining, BusinessCenter, Fitness, Pool, and Facility. And any contributing Partners such as localschools in co-operation programs with the lodge.
HelpProvides help for the interactive menus.
ExitRemoves the interactive menu from the screen.
Note: The TV clock must be set before Gem data can be downloaded.
1 2 3
4 5 6
7 8 9
0
ABC DEF
GHI JKL MNO
PQRS TUV WXYZ
PIP CH- PIP CH+ PIP SWAP PIP INPUT
PIP SAP
FLASHBK
REMOVE
ALPHA/NUMPAGE
MUTE
TIMER
MENURETURN
VOL CH
POWER
GUIDE
INPUT
CC
ENTER
TV DVD
VCRSTB
&@
.:/,
RATIO
PORTAL INFO i
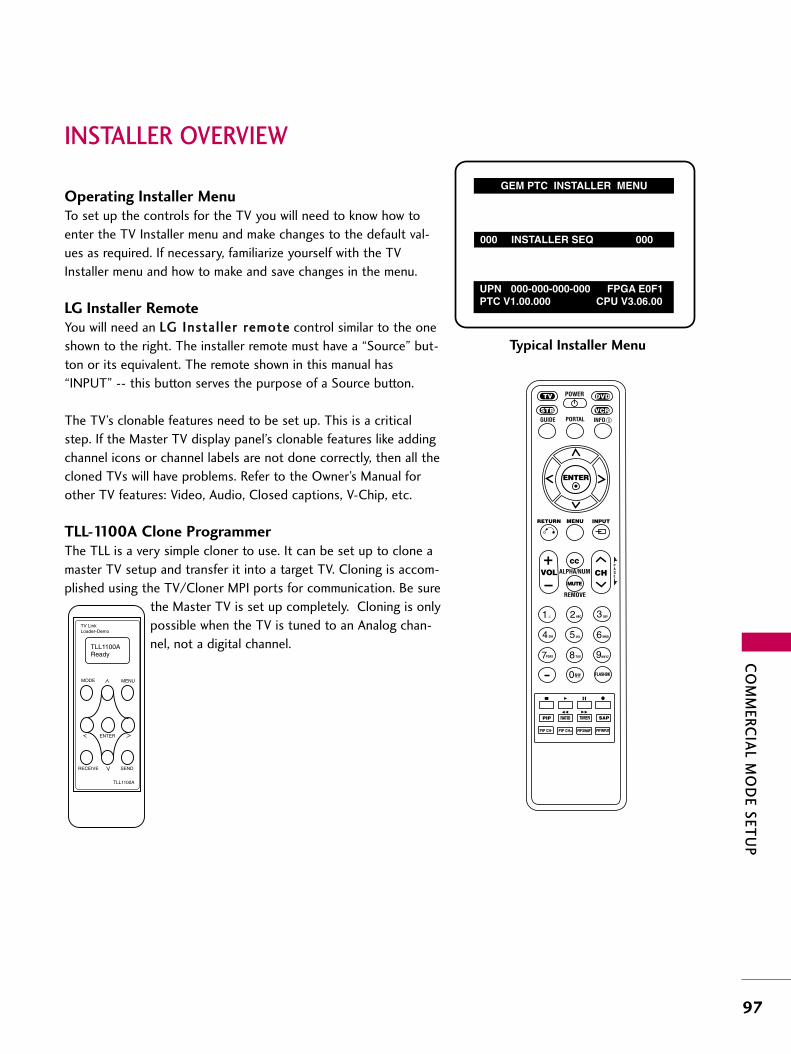
CO
MM
ER
CIA
L MO
DE
SE
TU
P
97
INSTALLER OVERVIEW
Operating Installer MenuTo set up the controls for the TV you will need to know how to
enter the TV Installer menu and make changes to the default val-
ues as required. If necessary, familiarize yourself with the TV
Installer menu and how to make and save changes in the menu.
LG Installer RemoteYou will need an LLGG IInnssttaall lleerr rreemmoottee control similar to the one
shown to the right. The installer remote must have a “Source” but-
ton or its equivalent. The remote shown in this manual has
“INPUT” -- this button serves the purpose of a Source button.
The TV’s clonable features need to be set up. This is a critical
step. If the Master TV display panel’s clonable features like adding
channel icons or channel labels are not done correctly, then all the
cloned TVs will have problems. Refer to the Owner’s Manual for
other TV features: Video, Audio, Closed captions, V-Chip, etc.
TLL-1100A Clone ProgrammerThe TLL is a very simple cloner to use. It can be set up to clone a
master TV setup and transfer it into a target TV. Cloning is accom-
plished using the TV/Cloner MPI ports for communication. Be sure
the Master TV is set up completely. Cloning is only
possible when the TV is tuned to an Analog chan-
nel, not a digital channel.
Typical Installer Menu
TV LinkLoader-Demo
TLL1100AReady
TLL1100A
ENTER
RECEIVE SEND
MENUMODE
000 INSTALLER SEQ 000
UPN 000-000-000-000 FPGA E0F1PTC V1.00.000 CPU V3.06.00
GEM PTC INSTALLER MENU
1 2 3
4 5 6
7 8 9
0
ABC DEF
GHI JKL MNO
PQRS TUV WXYZ
PIP CH- PIP CH+ PIP SWAP PIP INPUT
PIP SAP
FLASHBK
REMOVE
ALPHA/NUMPAGE
MUTE
TIMER
MENURETURN
VOL CH
POWER
GUIDE
INPUT
CC
ENTER
TV DVD
VCRSTB
&@
.:/,
RATIO
PORTAL INFO i

CO
MM
ER
CIA
L MO
DE
SE
TU
P
98
COMMERCIAL MODE SETUP
INTERACTIVE TV OVERVIEW
Through the interactive TV, the lodging guest is offered a more completevenue of lodge services and amenities. Using the TV in the comfort of thehotel room, the guest can browse the lodge resources available and makeselections quickly. Charges for these offerings are billed at the time of order.The Prp:Centric TV is connected to the lodge’s billing computer.After the interactive TV is installed, the following hotel and other resourcesmay be available to the hotel guest, assuming that they are provided by thelodge.
Interactive Amenities may include the following Hotel Information, News and Events.
Directory Services, (Tourist attractions, Restaurants, etc.)
Reservation Service (Business Meetings, Fitness, SPA, etc.)
Weather, Traffic Information.
Shopping Services (Delivery to Guest Room)
Room Service (Menu Ordering, Memo Service, Morning Wake Up Call, Laundry, etc.)
Ticketing Services.
Check Out Service (in the Guest Room).
Gaming Services.
Email resources, guest can access an email account, etc.
Other offerings as they become available.....
Channel GuideHotel Information
HelpExit
Pro:Centric Interactive TVNotesPPrroo::CCeennttrr iicc--TTVV SSeettuupp ffoorrPPPPVV ((PPaayy--ppeerr--vviieeww))OOppeerraatt iioonnA PPV card usually has a chan-nel lineup included with themaster TV setup. If this is thecase, reset TV to default con-dition, set any TV features andinstaller menu items asrequired and then insert thePPV pre-programmed card intothe MPI slot.
After TV setup, remove the ACpower cord for 15 seconds.
IImmppoorrttaanntt!!
The TV will take a few minutesto load electronic programinformation. If enough timehas not elapsed for the TV toacquire EPG data, the TV mayoperate erratically; menusmay not work or TV will notrespond to IR remote keypresses.

CO
MM
ER
CIA
L MO
DE
SE
TU
P
99
COMMERCIAL MODE SETUP FOR MASTER TV
NNoottee 11: Disconnect all Aux inputs. Under certain conditions, AutoTuning (Channel search) is disabled if there is an Aux input active.
Commercial Mode Setup Procedure1. Set Installer Menu Items(Enter TV Installer Menu, see Installer menus for detailed instructions.)a. Set Installer menu item 111177 FFAACCTT DDEEFFAAUULLTT, to 000011 and press
EENNTTEERR on Installer remote. (This clears all installer menu customsettings, channel labels / icons etc. and reloads the factory defaultsettings.)
b. Set Item 000033 BBAANNDD//AAFFCC.- BBrrooaaddccaasstt: set to 000000. - HHRRCC: set to 000022- CCAATTVV: set to 000011. - IIRRCC: set to 000033
c. Set item 002288 CCHH OOVVEERRIIDDEE to 000011. This allows access to chan-nel search, Auto Tuning and Channel List/Edit options in theChannel Menu.
d. Set other particular installer items that affect your TV programmingnetwork. Enable/Disable Aux sources, set a GGeemm SSttaarrtt CChhaannnneell etc.
e. After all required installer menu item settings have been adjusted,press ENTER on the remote to remove Installer Menu.
2. Set Up TV Features(Channel, Picture, Audio, Lock, Time, Option, Digital Captions etc.See TV Clonable options list and TV menus pages.)
3. Run Auto Tuning (Channel Search)(Search for all available channels.) Go to the Channel menu andaccess the Auto Tuning option, follow onscreen instructions. a. Edit Channel Scan. In the Channel Menu, access Channel Editoption.
Add/Delete channels per your system requirements. Note: Physical channel numbers are used to identify Virtual channels.
Add familiar channel trademarks/logos like ABC, CBS, NBC etc. tothe Channel-Time onscreen display. In the Channel menu, select theChannel Label option. Add identifiable labels (logos) for the enduser to readily know what common networks are available.
4. Transfer TV Setup to Internal TV Controller: 2-5-5 + Menu ModeAfter the TV channel scan has been edited and channel label iconsadded, enter the Installer menu. Once in the Installer menu, press 2-5-5 and MENU on the remote. This transfers the TV setup to the inter-nal controller box.
5. Add Custom Channel Labels for Analog Channels: 2-5-4 + Menu ModeEnter Installer menu, press 2-5-4 and MENU. Add your own customtext labels to channel onscreen displays. Note: Digital Channels oftenhave a broadcaster generated label. (See 2-5-4+Menu pages.) When finished, to exit 2-5-4+Menu mode, press MMEENNUU.
Verify TV SetupAt this point, verify that the channel lineup, channel icons and customlabels are correct. Make sure the TV features are set per your require-ments. Set item 002288 CChh OOvveerriiddee to 000000 to lock the channel scan.After the preceding has been completed, the Master TV setup is readyto be copied to a Clone Programmer, see cloning options pages.
003 BAND/AFC 00X
028 CH. OVERIDE 001
117 FACT DEFAULT 00X
Typical TV Installer Menu
Adjust the settings forthese Installer Menu Items
DIGITAL 19-3
WXYZ
MONO STEREO SAP
Custom Text Label ‘WXYZ’ created in 2-5-4 + Menu (Add Channel Label)
Mode
028 CH. OVERIDE 000
After Master TV setup has beencompleted, set item 028 Ch
Overide to 000.
000 INSTALLER SEQ 000
UPN 000-000-000-000 FPGA E0F1PTC V1.00.000 CPU V3.06.00
xxLG710H PTC INSTALLER MENU
093 RJP AVAILABLE 001
Set 093 RJP Available to 001 ifusing a remote jack pack
This page provides an overview of a Master TV configuration.
000 INSTALLER SEQ 000
UPN 000-000-000-000 FPGA E0F1PTC V1.00.000 CPU V3.06.00
xxLD650H PTC INSTALLER MENU
For 32/37/42LG710H
For 32/37/42/47/55LD650H
000 INSTALLER SEQ 000
UPN 000-000-000-000 FPGA E0F1PTC V1.00.000 CPU V3.06.00
xxLD655H PTC INSTALLER MENU
For 32/37/42LD655H

CO
MM
ER
CIA
L MO
DE
SE
TU
P
100
COMMERCIAL MODE SETUP
On Master TV, Create Profile and Learn1. Set up all Master TV features on the menus and do
a Channel Search. Add Channel and Aux Labels etc.Do 255+menu on Installer Menu to save current TVinto flash memory.
2. Plug a USB memory drive into the USB In port onthe master TV.
3. Press the Menu key to open the Main menu.Highlight the Option icon.
4. Press the Left arrow key once, the Option icon onleft side of menu will be highlighted.
5. Press number key ‘7’ a total of 7 times.6. Gain access to “Learn From TV”.
A. First, the Expert Download Menu page will notshow the “Learn From TV” option. In order to makeit available, key in the password which is used to
enter Installer Menu. Example 9-8-7-6. B. By pressing the up/down arrow keys(if there areother menus), place the cursor on Learn From TV,then press the Enter Key.
7. Using the Up/Down arrow keys, highlight “LearnFrom TV” and then press Enter.
8. To identify this profile from others, you can changethe last 5 digits. Key in a custom file name andthen press the Enter key.
9. The Learning status will be shown in the progressbar. As soon as learning is complete, a message willappear on the screen indicating the learning processis done.
10. Remove the USB memory card.
NOTES!
GG Do not remove TV power cord or USB memorycard while Learning, doing so might harm yourUSB memory card.
GG Do not remove TV power cord or USB memorycard while Teaching, doing so may cause the TVto malfunction.
GG You are allowed to edit the file name, however, afile with edited contents will not be recognized.
GG Since clock data is copied into USB memory cardas numeric data, the time difference betweenteaching and learning is not automatically adjust-ed. Either set the clock manually, or use AutoClock set on TV main menu.
Optional: Edit/Change File NameIf necessary, the file name can be edited or changed.
MASTER TV PROFILE SETUP LEARNING/TEACHING WITH USBMEMORY CARD
USB Download Menu
Upgrade TV Software
Upgrade TV Software
Teach To TV
Learn From TVLearn From TV
Learn From TV
xxLG710H-UA00001.TLL
Select the file name and press OK to start
E
E
Previous Enter
UPGRADING...
100%
Do not unplug!
!! Learn From TV
Learn From TV
xxLD650H-UA00001.TLL
Select the file name and press OK to start
E
E
Previous Enter
For 32/37/42LG710H
For 32/37/42/47/55LD650H
For 32/37/42LD655H
Learn From TV
xxLD655H-UA00001.TLL
Select the file name and press OK to start
E
E
Previous Enter

1. Plug the USB memory card with the Master TVProfile setup into the Target TV’s USB input port.
2. Press Menu key to open the Main menu and thenhighlight the Option Menu icon.
3. Press the Left arrow key once, this will highlight theOption icon on left side of menu.
4. Press the number key ‘7’, a total of 7 times.5. Using the Up/Down arrow key, select ‘Teach to TV’,
then press Enter key.6. Use the Up/Down arrow keys to navigate through
profiles. Select the profile that you want to install byhighlighting it and pressing the Enter key.
7. Teaching progress will be shown on the progress bar.As soon as teaching is done, a message will appearindicating that the teaching process has been com-pleted.
8. When the Teaching is done, Remove the USB memo-ry card and unplug TV power cord.
9. Reconnect the TV’s power cord. Power the TV Onand the master setup should be resident on the TV.
CO
MM
ER
CIA
L MO
DE
SE
TU
P
101
On Target TV, Teach Master TV Profile
Teach To TV
Previous Enter
xxLG710H-UA00001.TLL
UPGRADING...
40%
Do not unplug!
Teach To TV!!
For 32/37/42LG710H
For 32/37/42/47/55LD650H
Teach To TV
Previous Enter
xxLD650H-UA00001.TLL
For 32/37/42LD655H
Teach To TV
Previous Enter
xxLD655H-UA00001.TLL

CO
MM
ER
CIA
L MO
DE
SE
TU
P
102
COMMERCIAL MODE SETUP
TLL-1100A CLONING CONNECTIONS/LEARNING SETUPConnections for the TLL-1100A Clone Programmer to Learn the TV Master TV Setup
On Master TVSet up all Master TV features in themenus and do a Channel Search.Add Channel and Aux labels etc. Seeprevious page. Insert an MPI cableinto the TV’s MPI port.
On TLL-1100A1. Turn On the TLL-1100A. 2. Use the Mode button to select
Clone Mode.3. Use the Left/Right arrow to
select the CBank (1 - 8) to storethe master setup in.
4. Plug the other end of the MPIcable into the MPI port on thebottom of the TLL.
5. With the Installer remote control,select item 1 on TLL menu.
6. Press Enter, to transfer theMaster setup into CBankX on theTLL. The TLL will copy the mastersetup.
7. When learning is done, discon-nect MPI cable from Master TV.
8. Reconnect TV power cord. Powerthe TV On and the master setupshould be resident on the TV.
On Target TV1. Connect MPI cable from the TLL
to the MPI port on the TargetTV. Assure that the correctCBank(X) is selected on TLL..
2. With the Installer remote controlselect item 2, to Teach the targetTV the master TV setup.
3. Press Enter to begin teaching. 4. When Teaching is done, discon-
nect MPI cable and power the TVOff. Unplug TV power cord.
5. Reconnect TV power cord. Powerthe TV On and the master setupshould be resident on the TV.
Antenna(or CATV)
Antenna(or CATV)
TV LinkLoader-Demo
TLL1100AReady
TLL1100A
ENTER
RECEIVE SEND
MENUMODE
CLONE SELECTION MENUSelected Bank: CBank X Saved(1) LEARN FROM TV(2) TEACH TO TV(3) SET CLONE CLOCK FROM TV(4) SET TV CLOCK FROM CLONE(5) DISPLAY TV SETUP(6) DISPLAY CLONE SETUP
CLONE CLOCK = 00:00TV CLOCK = 00:00THE CLONE IS VERSION V2.2.2-To change menu items, Press channel keys or digits.-To execute item, Press ENTER.
CLONE SELECTION MENUSelected Bank: CBank X Saved
(1) LEARN FROM TV(2) TEACH TO TV(3) SET CLONE CLOCK FROM TV(4) SET TV CLOCK FROM CLONE(5) DISPLAY TV SETUP(6) DISPLAY CLONE SETUP
CLONE CLOCK = 00:00TV CLOCK = 00:00THE CLONE IS VERSION V2.2.2-To change menu items, Press channel keys or digits.-To execute item, Press ENTER.
M.P.I. Learning Setup
M.P.I. Teaching Setup
TV LinkLoader-Demo
TLL1100AReady
TLL1100A
ENTER
RECEIVE SEND
MENUMODE
NOTE!
GG It is assumed that the TV is connected to a signal source, the TVsource selected is Antenna (RF) In, the signal is from an Analogchannel, not a digital channel, all equipment is connected to powerand turned on and the TLL Cloner main menu is displayed on theTV screen, see above.
GG If an analog channel is not available, tune the TV to an Aux sourcelike AV-1 for cloning purposes.
G Do not use the TLL-1100A while any PPV card is installed in the TVor the clone programmer device will be damaged.
Warning

CO
MM
ER
CIA
L MO
DE
SE
TU
P
103
LT2002 CLONING CONNECTIONS/LEARNING SETUP
Connections for the LT2002 Clone Programmer to Learn the TV Master TV Setup
Before you begin cloning... The Master TV should be connected to a good, stable
signal from an over-the-air antenna or cable serviceAnalog channel and connected to power. (See above.)
Teaching and Learning is only possible between iden-tical model devices. (However, the LT2002 Clone pro-grammer can store up to 3 different ‘master’ setups.)WARNING: Copying a blank or incorrect memory intoa TV, STB or other device will cause the TV, STB orother device to operate erratically or become inopera-ble.
Use an Installer’s remote to operate Learning andTeaching menus.
Make sure that the batteries in the Clone programmerare fresh.
If batteries are removed, the Clone Clock time will belost.
Decide if you want to set the time from the Cloneprogrammer or copy the time to the Clone program-mer; from a compatible TV which has the clock set tothe current time.
Setting the time and transferring it to the Clone orother device is a separate procedure.
Follow the connection diagram above to connect theClone to a Master TV TV display panel. After learningis complete, to another identical TV TV display panelto “teach” it the master setup.
See the Clone Troubleshooting section to resolveproblems.
Turn to the next page to continue Cloning Setup.
QuickSet II ProgrammerLT2002
Ferrite Core(TDK, ZCAT2035-0930)
• heartbeat power on communications ok
• slow power on no communications
• green battery ok• red battery low
Blink pattern
ColorReset
StatusIndicator
Connect cable toTV MPI Jack andfollow on screeninstructions
MPI
THE CLONE HAS CONTROL OF THE TV
THE CLONE IS VERSION XXTHE TV IS VERSION XXTHE SW IS REVISION XX
CLONE CLOCK = XX:XXTV CLOCK = XX:XX
-PRESS ANY KEY TO CONTINUE.
-DISCONNECT CLONE WHEN DONE.
Antennaor CATV
Master TV
Clone Programmer
G Do not use LT2002 while any PPV card is installed in TV or the clone programmer device will be damaged.
Warning
NOTE!
GG It is assumed that the TV is connected to a signal source, the source selected is Antenna (RF) In, thesignal is from an Analog channel, not a digital channel, all equipment is connected to power and turnedon and the LT2002 Clone Programmer main menu (THE CLONE HAS CONTROL OF THE TV) menu isdisplayed on the TV screen, see above and next page.
GG If an analog channel is not available, tune TV to an Aux source like AV-1 for cloning purposes.

CO
MM
ER
CIA
L MO
DE
SE
TU
P
104
COMMERCIAL MODE SETUP
LT2002 CLONING LEARNING SETUP
Learning the Master TV Setup
Use MPI Cable to Connect LT2002 CloneProgrammer to Master TV MPI PortIf there is a good connection, “THE CLONE HASCONTROL OF TV” message will appear. Press any key on the Installer remote.
Learn Setup from Master TVPress 1 to select the “LEARN FROM TV” option, thenpress ON/OFF, POWER, or ENTER to go to the MemoryBank Selection Menu. Pick the Memory ”Bank” you want tostore the master TV’s setup in by pressing either Channelkey repeatedly to choose Memory 1, 2 or 3. (If youchoose a Memory “Bank” that has a master device’s setupprogrammed into it, that setup will be overwritten by thenew master TV’s setup.) Once the Clone memory bank isselected, press ON/OFF, POWER, or ENTER. The Clonememory bank you have selected will be shown. PressON/OFF or POWER to begin copying the master TV’ssetup.
Set the Clock (Optional)Set the time on a Master TV’s Clock. (If the time hasalready been copied from a TV into the Clone programmer,you can set a master TV’s clock by copying the time fromthe Clone programmer.) The Clone Programmer can copythe current time to both a master TV and to the Clone’sinternal clock; accurate to within one minute. (Another rea-son that the Clone programmer should be equipped withfresh, high-quality alkaline batteries, is for it to keep thetime as accurately as possible.)
Since the Clone Programmer’s time cannot be set directly,the current time needs to be copied from a Zenith/LG TVequipped with M.P.I. input capability.
After the time is copied to the Clone programmer, the cur-rent time can then be transferred to another TV. (This canbe a master TV, or another TV which has already had thefeatures set up.)
LT2002 Clone Programmer CommunicationProblems A slow flashing green light indicates there are
communication problems between the TV and the LT2002 clone programmer. If this is the case, check for a damaged cable, poor contacts,or other connection troubles.
If the status indicator is red, the programmer batteries are low and should be replaced. Install4 high-quality alkaline AA batteries.
THE CLONE HAS CONTROL OF THE TV
THE CLONE IS VERSION XXTHE TV IS VERSION XXTHE SW IS REVISION XX
CLONE CLOCK= XX:XXTV CLOCK= XX:XX
-PRESS ANY KEY TO CONTINUE.
-DISCONNECT CLONE WHEN DONE.
CLONE SELECTION MENU
(1) LEARN FROM TV(2) TEACH TO TV(3) SET CLONE CLOCK FROM TV(4) SET TV CLOCK FROM CLONE(5) DISPLAY TV SETUP(6) DISPLAY CLONE SETUP
-TO CHANGE MENU ITEMS, PRESS CHANNEL KEYS OR DIGITS.-TO EXECUTE ITEM, PRESS ON/OFF, POWER, OR ENTER
This menu should appear by itself afterthe LT2002 is connected to the TV MPIport.
This menu should appear after any key ispressed on the Installer remote.
Instructions for the Clone Programmer to Learn the Master TV Setup

CO
MM
ER
CIA
L MO
DE
SE
TU
P
105
CLONING CONNECTIONS/TEACHING SETUP
Teaching the Master Setup to Another TV
Connections for the LT2002 to Teach another TV the Master Setup
Teach Master TV’s Setup to the target TVAfter learning is complete, remove the M.P.I. cable from the mas-ter TV and connect it to the target TV that you want to copythe master TV’s setup into. With “THE CLONE HAS CONTROLOF TV” message displayed, press 2 or use either Channel key togo to the “TEACH TO TV” option, press ON/OFF, POWER, orENTER. Select the LT2002 memory that the new setup is in.Press On/Off to transfer the new setup and other information tothe new TV. Teaching usually takes 2-3 minutes.After the “TEACHING COMPLETE” message is displayed, pressany key to return to the Clone menu, then press ON/OFF,POWER, or ENTER. If finished, detach M.P.I. cable from the target, newly-cloned TV.
Disconnect TV Power for 15 SecondsUnplug the AC power cord of the newly-cloned TV from thepower outlet for about 15 seconds to activate the newly-copiedsetup.
QuickSet II ProgrammerLT2002
• heartbeat power on communications ok
• slow power on no communications
• green battery ok• red battery low
Blink pattern
ColorReset
StatusIndicator
Connect cable toTV MPI Jack andfollow on screeninstructions
MPI
Ferrite Core(TDK, ZCAT2035-0930)
THE CLONE HAS CONTROL OF THE TV
THE CLONE IS VERSION XXTHE TV IS VERSION XXTHE SW IS REVISION XX
CLONE CLOCK = XX:XXTV CLOCK = XX:XX
-PRESS ANY KEY TO CONTINUE.
-DISCONNECT CLONE WHEN DONE.
Antennaor CATV
Target TV Clone Programmer
TEACHING IN PROGRESS,
PLEASE WAIT
TEACHING COMPLETE
This display will appearafter Teaching is complete.
This display will appearduring Teaching function.
CLONE SELECTION MENU
(1) LEARN FROM TV(2) TEACH TO TV(3) SET CLONE CLOCK FROM TV(4) SET TV CLOCK FROM CLONE(5) DISPLAY TV SETUP(6) DISPLAY CLONE SETUP
-TO CHANGE MENU ITEMS, PRESS CHANNEL KEYS OR DIGITS.-TO EXECUTE ITEM, PRESS ON/OFF, POWER, OR ENTER
This menu should appearafter any key is pressedon the Installer remote.
NOTE!
GG If an analog channel is not available, tune TV to an Aux source like AV-1 for cloning purposes.

CO
MM
ER
CIA
L MO
DE
SE
TU
P
106
COMMERCIAL MODE SETUP
INSTALLER MENUUse the Installer’s Menu to set up or change operational settings.
See more detailed descriptions of the Installer menu items on the following pages...
Using the Installer’s MenuItems 000 ~ 119 are immediately accessible only upon entering theInstaller’s Menu. Their numbers, descriptions, ranges, factory defaultsettings, and a place for listing any changes made on-site are givenbelow and on the following pages.
Typical Installer Menu
Menu Item Function Value Range Default Value Brief Description of Function and Comments
000 INSTALLER SEQ 0 ~ 3 0 Leave default set to 0.
001 POWER MANAGE 0 ~ 7 0 Sets number of hours of no activity before auto shut Off.
002 AC ON 0 / 1 0 Set to 1 to enable auto turn On at power up.
003 BAND/AFC 0 ~ 3 1 Selects Tuning Band: 0=Broadcast, 1=CATV, 2=HRC, 3=IRC
004 STRT CHANNEL 0 ~ 127, 255 255 Channel at turn-on (Set to 255 to tune in last channel before power Off).
005 CHAN LOCK 0 / 1 0 If set to 1, cannot tune from current channel.
007 STRT VOLUME 0 ~ 63, 255 255 Sets Volume level at TV turn-on (Set 255 to retain last volume level).
008 MIN VOLUME 0 ~ 63 0 Sets minimum allowable volume setting.
009 MAX VOLUME 0 ~ 63 63 Sets maximum allowable volume setting.
010 MUTE DISABLE 0 / 1 0 Set to 1 to disable mute function.
011 KEY DEFEAT 0 / 1 0 Set to 1 to disable menu navigation keys on display panel.
015 SLEEP TIMER 0 / 1 1 Set to 1 to enable Sleep Timer.
016 EN TIMER 0 / 1 0 Set to 1 to enable On/Off Timers.
017 ALARM 0 / 1 1 Set to 1 to enable Alarm.
021 V-CHIP 0 / 1 1 Set to 1 to enable V-Chip functions.
022 MAX BLK HRS 0 ~ 99 12 Sets number of V-Chip (Parental Control) blocking hours.
023 CAPTION LOCK 0 / 1 0 Set to 1 to retain caption setting at power Off.
028 CH. OVERIDE 0 / 1 1 If set to 0, limits direct access to favorite channels.
029 OLD OCV 0 / 1 0 Set to 1 to change M.P.I. operation to OCV.
030 ACK MASK 0 / 1 0 If set to 1, changes M.P.I. for some OCV boxes.
031 POLL RATE 20 ~ 169 94 Selects poll rate for M.P.I.
032 TIMING PULSE 186 ~ 227 207 Sets baud rate for M.P.I.
034 CAMPORT EN 0 / 1 1 Set to 1 to enable Video 2 input.
000 INSTALLER SEQ 000
UPN 000-000-000-000 FPGA E0F1PTC V1.00.000 CPU V3.06.00
xxLG710H PTC INSTALLER MENU
Activating changes made to the Installer’s Menu
After exiting the Installer menu, power the TV off and then back on to activate changes to the Installer menu.
Installer Menu Items 000 through 034
Accessing the Installer’s MenuMake sure TV is on. Installer’s menu items can be accessed by usingan installer’s remote control. Just press MENU repeatedly until theTV seems to stop responding, then press 9, 8, 7, 6, then ENTER toaccess the Installer’s menu. To remove the Installer’s menu, pressENTER again. Any changes you make will be stored in nonvolatilememory. (The menu also disappears automatically.)
The Installer’s menu opens with item 000 INSTALLER SEQ 000.Use the Up/Down arrow keys to sequence through the availablemenu items. Or, access an item directly by keying in the line number,then pressing MENU. For example, to access the Sleep Timer optionwhich is item 015, press 0-1-5, then MENU. To change a setting,use the Left/Right arrow keys. Or, enter a value directly.
000 INSTALLER SEQ 000
UPN 000-000-000-000 FPGA E0F1PTC V1.00.000 CPU V3.06.00
xxLD650H PTC INSTALLER MENU
For 32/37/42LG710H
For 32/37/42/47/55LD650H
000 INSTALLER SEQ 000
UPN 000-000-000-000 FPGA E0F1PTC V1.00.000 CPU V3.06.00
xxLD655H PTC INSTALLER MENU
For 32/37/42LD655H

Menu Item Function Value Range Default Value Brief Description of Function and Comments
035 COMPPORT EN. 0 / 1 1 Note 1. Set to 0 to disable HDMI 1. Set to 1 to enable HDMI 1.
038 YPrPb EN. 0 / 1 1 Set to 1 to enable display panel Component Video 1 input jacks.
039 REAR AUX EN 0 / 1 1 Set to 1 to enable display panel Video 1 input jack.
040 AUTO CAMPORT 0 / 1 1 Set to 1 to automatically switch to Camport. If set to 1, STRT AUX SRCE cannot be set to 2.
046 STRT AUX SRCE 1 ~ 6, 255 6 Sets the starting AUX source.
047 AUX STATUS 0 / 1 0 Set to 1 for M.P.I. AUX source to be reported as a channel number instead of Channel 0.
053 DIS. CH-TIME M. 0 / 1 0 Set to 1 to disable Channel-Time display.
069 EN. CH-T COL. 0 / 1 1 Set to 1 to enable custom color for the Channel-Time display.
070 FOR. CH-TIME 0 ~ 7 2 Chooses custom foreground color for the Channel-Time display.
071 BCK. CH-TIME 0 ~ 7 2 Chooses custom background color for the Channel-Time display.
073 CH NOT AVBLE 0 / 1 0 If set to 1 and channel override is 0, “NOT AVAILABLE” message is displayed when directly accessing a channel not in the favorite channel list.
075 REVERT CH 0 / 1 0 If set to 1 and loss of M.P.I. communication occurs, TV tunes to Start Channel.
078 UPN MSB 0 ~ 255 0 User programmable number, most significant byte.
079 UPN MSB-1 0 ~ 255 0 User programmable number, most significant byte - 1.
080 UPN MSB-2 0 ~ 255 0 User programmable number, most significant byte - 2.
081 UPN LSB 0 ~ 255 0 User programmable number, least significant byte.
082 CHKSM ERROR 0 / 1 1 Enforces rigid M.P.I. checksum.
083 HANDSHK TIME 0 ~ 5 5 Relaxes M.P.I. timing to be compatible with PC based Windows-controlled systems.
084 PERMANENT BLK 0 / 1 0 Removes block hours setting for Parental Control and makes block permanent.
087 REAL BGB EN. 0 / 2 / 18 (For LG710H) 2 (For LG710H) Note 1. Set to 0 to disable RGB1. Set to 2 for PC. 0 / 1 / 17 (For LD650H, 1 (For LD650H, Note 1. Set to 0 to disable RGB. Set to 1 to enable RGB.
LD655H) LD655H)
088 EN NOISE MUTE 0 / 1 1 If set to 1, mutes audio if no signal is present.
090 KEY LOCK 0 / 1 0 If set to 1, keyboard is locked out, IR is still functional.
091 YPrPb2 0 / 1 1 Set to 0 to disable HDMI 2. Set to 1 to enable HDMI 2.
093 RJP AVAILABLE 0, 1, 2, 5, 6 0 Set to 0 to disable. Set to 1, 2, 5 or 6 for HDMI or DVI mode. (See detailed descriptions)
094 SAP MENU EN 0 / 1 1 Set to 0 to disable feature on Function menu. Set to 1 to enable featureon Function menu.
096 DEF. ASP. RATIO 0 ~ 4 2 Sets default aspect ratio at power up. See detailed descriptions and item 106.
099 BACK LIGHTING 1 ~ 100 Sets the brilliance of the TV picture backlighting.101 ~ 200 202 Settings above 101 control dynamic back lighting and enable
201, 202, 255 power saving mode.
102 ATSC BAND 0 ~ 4 4 Selects ATSC band.
103 ATSC TUNE MODE 0 / 1 1 Default 01 for physical channel scan. Set to 0 for Virtual Channel scan.
104 START MINOR CH 0 ~ 255 0 Selects Minor start channel. Set 0 for NTSC. Not 0, sets Minor channel number.
106 ASP RATIO LOCK 0 / 1 0 To retain set aspect ratio on power cycle, set to 1. Set to 0 for default ratio on power cycle.
116 VIDEO MUTE EN 0 / 1 0 Set to 0 for normal, set to 1 for Blank.
117 FACT DEFAULT 0 / 1 0 0=Normal. 1=Loads presets of all above settings.
118 POWER SAVING 1, 3, 7 3 Set to 1 to be powered at b-Lan module. Set to 3 to bo powered at b-Lan module only when TV is powered
on. Set to 7 to be not powered at b-Lan module.
119 DATA CHANNEL 0 ~ 135 0 Sets the DATA Channel.
CO
MM
ER
CIA
L MO
DE
SE
TU
P
107
Installer Menu Items 035 through 119
NNoottee 11: Dependent on item 093 RJP Available setting.

CO
MM
ER
CIA
L MO
DE
SE
TU
P
108
COMMERCIAL MODE SETUP
Detailed Descriptions of Installer Menu Items
000 - INSTALLER SEQUENCE Specifies entry sequence to the Installer Menu.
0 = 9876 1 = 4321 2 = 1478 3 = 3698
001 - POWER MANAGE (Power Management)Determines hours of no activity before automatic shutoff.The POWER MANAGE function is for saving energy. Ifset to 0, Power Manage is Off. Settings range from 0 ~ 7,with 1 ~ 7 representing the hours that the unit willremain On, unless there has been activity from either thecontrol panel or remote control.
002 - AC ON (AC Power Switchable)If set to 1, allows the TV to turn On just by applyingAC power. Pressing the On button is not necessary. Thisis desirable if the TV is plugged into a cable box or apower outlet controlled by a wall switch. Use ADJLeft/Right arrow to choose 0 or 1 where 0 is thedefault is Off, and 1 is On.NOTE: If set to 1 (On), the TV does not respond toOn/Off commands from either the remote or the dis-play control panel, and the SLEEP TIMER is also non-functional.
003 - BAND/AFC (Band/Automatic FrequencyControl)There are 4 possible settings for this option:
0 = Broadcast 1 = CATV 2 = HRC 3 = IRC
If some channels were not found by Auto Tuning(Channel Search), select the appropriate Band settinghere and add the channels using the Channel Editoption in the Channel Menu.
004 - STRT CHANNEL (Start Channel)If active, this function allows you to determine the initialchannel number when the TV is turned On. This featureis useful for an in-house information channel, since theTV would always select that channel when it is turnedOn. Setting this to 255 causes the last channel viewedwhen the TV was turned Off, to be the tuned to chan-nel when the TV is turned On again. Note: For a digitalStart Channel, always remember to set item 104 to theMinor Start Channel number.
255 = Last channel 1 ~ 125 = Ch X 0 = Aux 126 Map to Channel 3. 127 Map to Channel 4.
005 - CHAN LOCK (Channel Lock)CHAN LOCK is ideal if the system must always be onthe same channel. Changing channels with ChannelUp/Down or keypad numbers is impossible. ChannelLock is inactive if set to 0 (default).
Generally, this feature is used in connection with STARTCHANNEL (Installer item 004) where the start channelmay, for example, be set to 3 or 4. If the start channelis 3, then the TV will remain locked on Channel 3.
NOTE: For Items 007, 008 and 009For legacy reasons, the scale used is 0 - 63. The PTCsoftware will translate this to the 0 - 100 scale used bythe TV.
To translate a TV volume level to the installer menuvalue, use the following formula:
Installer Value = TV Value x 63100
Enter only the whole number (disregard fractions).
007 - STRT VOLUME (Start Volume)This function allows the Installer to determine the initialvolume level setting when the TV is turned On. This fea-ture is useful for an in-house information channel, sincethe TV would always select that volume level when it isturned On. The range of values are 0 - 63, 255. If 255is selected, the current volume level will be retained inmemory when the TV is turned Off; at turn On, the vol-ume level will be automatically set at the previous orlast level.
008 - MIN VOLUME (Minimum Volume)This function determines the minimum volume levelallowable with the VOLUME (VOL) Up/Down control. Inthis way, for example, someone cannot set the volumetoo low to hear. The value range is from 0 to 63 —change values with ADJ Left/Right arrow. The factorydefault is 0, which provides the full range of volumecontrol, if item 009 MAX VOLUME is also set to 63. Itmay be best to set the same value on every TV. NOTE: The minimum volume level cannot have a valuesetting higher than the MAX VOLUME level (describedbelow).

CO
MM
ER
CIA
L MO
DE
SE
TU
P
109
023 - CAPTION LOCKSet to 1 to restore previous caption On/Off state afterturn Off. If set to 0, captions are always Off at turnOn.
028 - CH. OVERIDE (Channel Override)If set to 1, the user can select channels with eitherChannel up/down or by direct keypad entry. If set to0, only those channels that are entered for scanningcan be selected.
029 - OLD OCV (On Command VideoTM)Set to 1 for operation with systems from OnCommand Corporation.
030 - ACK MASKM.P.I. Communication Parameter. Leave at default set-ting unless changed by Pay-Per-View provider. When setto 1, changes M.P.I. for some OCV boxes.
031 - POLL RATEM.P.I. Communication Parameter. Selects Poll Rate forM.P.I. Leave at default setting unless changed by Pay-Per-View provider. Step size of 16 ms.
032 - TIMING PULSEM.P.I. Communication Parameter. Leave at default set-ting unless changed by Pay-Per-View provider. Setsbaud rate. Step size of 4.3 uS.
034 - CAMPORT EN. (Camera Port Enable)Set to 1 to enable Video 2 input on display panel. Ifset to 0, Video 2 input on display panel is not func-tional. NOTE: S-Video overrides Video jack.
035 - COMPPORT EN. (Computer Port Enable)Enable/disables display panel HDMI1 input jack. Set to0 to disable, set to 1 to enable.NOTE: The setting above is ignored if Installer item093 RJP AVAILABLE, is set to 1.
038 - YPrPb EN. (Rear Component Video Enable)Set to 1 to enable display panel rear ComponentVideo input jacks. Set to 0 to disable display panel rear ComponentVideo input jacks.
039 - REAR AUX EN. (Rear Aux Enable)Set to 1 to enable display panel rear AUX (Video 1) input. Set to 0 to disable display panel rear AUX (Video 1)input. Note: S-Video overrides Video.
009 - MAX VOLUME (Maximum Volume)This function determines the maximum volume levelallowable with the VOLUME (VOL) Up/Down controls.In this way, for example, someone can not set the vol-ume level high enough to disturb others. The valuerange is 0 to 63, with 63 as the default, which gives theuser the full range of volume control, if item 008 MINVOLUME is also set at 0. Change values with ADJLeft/Right arrow keys. It may be best to set the samevalue on every TV. NOTE: The maximum volume level cannot have a valuesetting lower than the MIN VOLUME level (describedpreviously).
010 - MUTE DISABLEEnables or disables sound mute function. If set to 1,sound cannot be muted. If set to 0, sound can bemuted.
011 - KEY DEFEAT (Keyboard Defeat)If set to 1, key defeat prevents the end user fromaccessing the on-screen menus with the display frontpanel—MENU, SELECT, and Left / Right arrow keys donot function. If set to 0, those keys do function.NOTE: The menus can always be accessed by pressingMENU on the remote.
015 - SLEEP TIMERIf set to 1, the SLEEP TIMER feature may be used. Ifset to 0, the Sleep Timer is not available.
016 - EN TIMER (Enable On/Off Timers) If set to 1, Timer function is available to user andenabled continuously. Set to 0 to disable On/OffTimers. (Clock must be set in order to use Timers.)
017 - ALARM *Gives the installer the option of making the Alarmfunction available to the end user. If set to 1, Alarmfunction is available to end user. Set to 0 to disablethe Alarm function. NOTE: Clock must be set before the Alarm functionwill work.
021 - V-CHIP (Parental Control) *Set to 1 to activate V-Chip (Parental Control); have itavailable to end user to filter and control or otherwiserestrict programming content that can appear. Set to 0to turn V-Chip feature Off, not available to user; noprogramming restrictions can be set.
022 - MAX BLK HRS (Maximum Block Hours) *Sets hours from 0 to 99 for the maximum V-Chip(Parental Control) block hours. Default setting is for12 blocking hours.
** OOnnllyy aaffffeeccttss FFuunnccttiioonn MMeennuu ii ff eennaabblleedd bbyyssoommee PPPPVV pprroovviiddeerrss..

CO
MM
ER
CIA
L MO
DE
SE
TU
P
110
COMMERCIAL MODE SETUP
073 - CH NOT AVBLE (Channel Not Available)If set to 1 and item 028 CHANNEL OVERRIDE is set to 0,“NOT AVAILABLE” message is displayed when directlyaccessing a channel not in the channel scan list available inmemory.
075 - REVERT CH (Revert to Start Channel)If set to 1 and loss of M.P.I. communication occurs, TV auto-matically tunes to the specified Start Channel.
078 - UPN MSB (UPN Most Significant Byte)User programmable number, most significant byte readableby M.P.I. command. Note: Not linked to serial number.
079 - UPN MSB-1 (UPN Most Significant Byte-1)User programmable number, most significant byte-1 read-able by M.P.I. command. Not linked to serial number.
080 - UPN MSB-2 (UPN Most Significant Byte-2)User programmable number, most significant byte-2 read-able by M.P.I. command. Not linked to serial number.
081 - UPN LSB (UPN Least Significant Byte)User programmable number, least significant byte readableby M.P.I. command. Not linked to serial number.
082 - CHKSM ERROR (Checksum Error)Enforces rigid M.P.I. checksum validation.Set to 1 for validation. Set to 0 to disable (does not check checksum on M.P.I.async port). SPI is always checked.
083 - HANDSHK TIME (Handshake Time)Adds an additional delay to the handshake time which is 64msec, thus relaxing M.P.I. timing requirements to be compati-ble with PC based Windows controlled systems, range is 0 -5. (Timeout = 25.5MS + [25.5 MS* Handshake time]).
084 - PERMANENT BLK (Permanent Block)Allows Lock (Parental Control) blocking schemes to be per-manent by disabling the blocking hours function. Set to 1 to install Parental Control restrictions permanently. Set to 0 for user-specified hours control of blockingschemes.
087 - REAR RGB EN. (Rear RGB Enable)Controls access to rear RGB input on TV. Set to 0 to disable RGB input. Set to 2 for PC for STB RGB input. (For 32/37/42LG710H)Set to 1 for PC for STB RGB input. (For 32/37/42/47/55LD650H,32/37/42LD655H)Set to 18 for Auto Configure one time only with powercord removal and reinsertion. (For 32/37/42LG710H)Set to 17 for Auto Configure one time only with powercord removal and reinsertion.(For 32/37/42/47/55LD650H,32/37/42LD655H)
088 - EN NOISE MUTE (Enable Noise Mute)If set to 1, audio mutes if no signal is present.
040 - AUTO CAMPORTSet to 1 to automatically switch to Camport when equip-ment is connected to front Video input.Set to 0 to disable front Video automatic source selection.NOTE: If set to 1, 093 RJP Available is automatically set to 0.
046 - STRT AUX SRCE (Start Aux Source)Sets the starting AUX source. At power up, TV will tune tostarting Aux source if item 004 Start Channel is set to 0.If item 093 RJP Available is set to 0 and item 040 Auto Camport is set to 0:1 = Video 1 4 = RGB 255 = Last Aux2 = Video 2 5 = HDMI 23 = HDMI 1 6 = Component
If item 093 RJP Available is set at 1:2 = Video 2 5 = HDMI 2 6 = Component
If item 040 Auto Camport is set to 1:1 = Video 1 5 = HDMI 23 = HDMI 1 6 = Component4 = RGB
047 - AUX STATUSSet to 1 for M.P.I. AUX source to be reported as a channelnumber instead of channel 0. Set to 0 to disable AUX iden-tification change. Controls M.P.I. status channel response forAUX inputs.
053 - DIS. CH-TIME (Disable Channel-Time)Set to 1 to disable the Channel-Time display, Channel-Timedisplay will not appear.Set to 0 to enable the Channel-Time display.
069 - EN. CH-T COL. (Enable Channel-Time CustomColor)Set to 1 to enable custom color for the Channel-Time dis-play.Set to 0 to disable custom color for the Channel-Time dis-play.
070 - FOR. CH-TIME (Channel-Time Display ForegroundColor)Set according to Color Chart.0 = Black 3 = Yellow 6 = Cyan1 = Red 4 = Blue 7 = White2 = Green 5 = VioletNOTE: If foreground and background color are the same,menu background is transparent.
071 - BCK. CH-TIME (Channel-Time DisplayBackground Color)Set according to Color Chart.0 = Black 3 = Yellow 6 = Cyan1 = Red 4 = Blue 7 = White2 = Green 5 = VioletNOTE: If foreground and background color are the same,menu background is transparent.

090 - KEY LOCK If set to 1, display panel keyboard is locked out, notavailable to end user. IR receiver remains functional.
091 - YPrPb2 (HDMI2 Enable)Set to 0 to disable display panel HDMI2 input.Set to 1 to enable DTV mode. Set to 2 to enable PCmode.
093 - RJP AVAILABLE (Remote Jack Pack Available)0 = Remote jack pack is not available or disabled.1 = Legacy Model RJPs: HDMI ModeEnables RJP when an HDMI cable is inserted into RJP.Video is from HDMI. Audio stream is expected from HDMIsource. If no audio is present, no audio will be heard.2 = Legacy Model RJPs, DVI ModeEnables RJP when an HDMI cable is inserted into RJP.Video is from HDMI however, Audio is from selected audiosource, based on the RJP’s audio hierarchical priority.5 = Scaler Model RJPs, HDMI ModeEnables RJP when an HDMI cable is inserted into RJP.VIdeo is from HDMI. Audio stream is expected from HDMIsource. If no audio is present, no audio will be heard.6 = Scaler Model RJPs, DVI ModeEnables RJP when an HDMI cable is inserted into RJP.Video is from HDMI however, Audio is from selected audiosource, based on the RJP’s audio hierarchical priority.
Notes : See Reference section, RJP Input Hierarchy and RJPModels page. If set to 1, 2, 5 or 6, item 040 Auto Camport is auto-matically set to 0.Settings 1, 2, 5 and 6 allow the lodge staff to customizeeach TV’s RJP setup based on customer requirements.
094 - SAP MENU EN (2nd Audio Program)Set to 1 to enable SAP feature on Function menu, ifFunction menu is available. Set to 0 to disable SAP feature on Function menu, ifFunction menu is available.
096 - DEF. ASP. RATIO (Default Aspect Ratio)Selects default aspect ratio at power up, see settingsbelow.
Set to 0 “Set By System”. Set to 1 for 4:3.Set to 2 for 16:9 (Factory Default). Set to 3 for ‘Just Scan’Set to 4 for Zoom
099 - BACK LIGHTINGSets the TV screen brightness at power up, see settingsbelow. Default setting value is 202.1 - 100 Static Backlighting.(1 = Dimmest picture, 100 = Brightest picture.)101 - 200 Dynamic Backlighting.(101 = Dimmest picture, 200 = Brightest picture.)
201 Automatic Static Backlighting.202 Automatic Dynamic Backlighting.Set to between 101 and 200, TV automatically controlsbacklighting depending upon the picture level of the cur-rent program.Set to 201, TV automatically controls backlightingdepending upon external spectral sensitivity.Set to 202, TV automatically controls backlightingdepending upon external spectral sensitivity and picturelevel of the current program.Set to 255, to disable power saving mode.
102 - ATSC BANDSets up TV to receive different types of incoming signals: 0=Broadcast, 1=CATV, 2=HRC, 3=IRC, 4=Same as NTSC.
103 - ATSC TUNE MODESets ATSC tuning mode: Default set to 1 for Physical chan-nel scan. Set to 0 for Virtual Channel scan.
104 - START MINOR CHANNELSets XX-XX minor start channel number at power up:0=NTSC. If not 0, number selected is the Minor startchannel number.
106 - ASP RATIO LOCK (Aspect Ratio Lock)Set to 1 to retain previous aspect ratio with power Off. Set to 0 to retain default aspect ratio with power Off. Seeitem 96 Default Aspect Ratio above.
116 - VIDEO MUTE EN (Video Mute Enable)Set to 0 for normal. Set to 1 for blank.
117 - FACT DEFAULT (Factory Default)Set to 0 for normal. Set to 1 to load presets to all of the previous item settings.
WARNING: Setting this to 1 will reload the fac-tory defaults and clear the channel list includ-ing erasing any assigned Channel Icons andcustom channel Labels.
118 - POWER SAVINGDefault is set to 3. When TV is in Standby mode, MPI cardslot is powered by Standby power supply and embeddedBLAN is not powered. When TV is in Power On mode, MPIcard slot is powered by main 12V power supply andembedded BLAN is powered. Note, TV must be poweredon in order to communicate with the embedded BLANmodule for configuration and control.
Notes : See Reference section, B-LAN SETUP AND OVERVIEWpage.
119 - DATA CHANNEL Sets the Data channel. Set the channel number that willprovide data to the TV at turn on. Initially the TV may takeseveral minutes to load program data from AC power offstate.
CO
MM
ER
CIA
L MO
DE
SE
TU
P
111

CO
MM
ER
CIA
L MO
DE
SE
TU
P
112
COMMERCIAL MODE SETUP
REFERENCE: DETAILED INSTRUCTIONS FOR MAKING AMASTER TVIMPORTANT INSTALLER SETUP INFORMATION! PLEASE READ THE FOLLOWING...
To set up a master TV you will need to knowhow to enter the TV Installer menu and makechanges to the default values as required. Ifnecessary, familiarize yourself with the TV
Installer menu and how to make and save changes in themenu, before attempting to clone the TV Master TVsetup.
You will also need an LLGG IInnssttaalllleerr rreemmoottee ccoonnttrroollsimilar to the one shown in the front of this manual. Theinstaller remote must have a “Source” button or its equiv-alent. The remote shown in this manual has a “INPUT”button -- this button serves the purpose of a Source but-ton.
Finally, the TV’s clonable features need to be set up. This
is a critical step. If the Master TV display panel’s clonablefeatures like adding channel icons or channel labels, digi-tal font options etc., are not correctly added, then thecloned TVs will all have problems.
As the cloning procedure is being performed, specificsteps need to be done at the indicated times to achievethe desired result. Be sure to do each task as indicated. Ifa procedure or step is left out or not performed com-pletely, cloning may not work. At each step, pay attentionto assure the TV screen shows the proper message whencloning. If the message indicated does not appear, thereis a problem with that step and cloning may not be suc-cessful. Cloning is only possible when the signal source isan Analog channel, not a digital channel.
Detailed InstructionsThe following describes the procedure for preparing aMaster TV for cloning and the procedure for addingChannel Icons and/or Labels.Note 1: Disconnect all Aux inputs. Under certain condi-tions, Auto Tuning Channel Search is disabled if there is anAux input active.Note 2: Under certain conditions, changes to the inputmode of the RGB inputs will not take effect until the poweris cycled (TV is turned Off and On). To avoid confusion, dis-connect all RGB inputs before entering the Installer menu.1. Enter the TV installer menu.
a. Reset the internal controller to factory default byaccessing installer menu item 117 FACT DEFAULT, set itto 1 and press “ENTER”. The value will change back to 0after the TV’s internal controller has been restored tofactory default condition. This step will ensure that theTV channel memory will be the active channel list. Checkthe Status LED. If it is blinking rapidly then the TV chan-nel map is in use. b. Within the Installer menu, set the Installer menu itemsto the configuration required of your institution. c. It is important to set the tuning band at this time, seeInstaller menu item 03 BAND/AFC. d. Set Installer menu item 28 – CH OVERIDE to 001 toallow access to the Auto Tuning and Ch. Edit features inthe Channel Menu. Exit the Installer menu.
2. Access the Master TV menus and set the clonableoptions on the menus to the desired configuration.Refer to the Clonable Menu Features Chart in this man-ual.
3. Run Auto Tuning to find analog and digital channels.4. Enter the Channel Edit menu and edit the channel lineup
to include the Free-To-Guest Channels only. 5. Assign ICONs to the channels using the Channel Label
Menu. Note: You can add Channel ICONS typically networklogos like ABC, NBC, PBS etc. in this step. Or, in Step 7,add Channel ICONS or labels for channels without Icons.
6. Transfer the TV setup: Enter the TV installer menu. Press‘2’, ‘5’, ‘5’, ‘MENU’ to start the transfer of the TV’s setupto the internal controller. Once the transfer is complete,the system will exit the Installer menu. Check the StatusLED inside the TV. It should be blinking slowly (1 blinkper second).
7. Edit/Add Channel ICONs and Channel Labels as needed. Enter Installer menu. With menu displayed, press 2-5-4+ MENU. See next page for detailed instructions:- Editing/Adding Channel ICON and Labels on
Master TV- Changing a Channel’s ICON on Master TV- Changing/Adding Channel Labels on Master TV- Changing Source Labels on Master TV
8. Verify Master TV setup and feature configuration: Did you add Channel ICONS? Did you add Channel Labels? Did you add Source Labels? Did you adjust all TV menu options as required? After verifying master setup, enter the TV Installer menuand set Installer menu item 28 CH OVERIDE to 000.Press ENTER to remove and exit the Installer menu.
Making a Master TV

CO
MM
ER
CIA
L MO
DE
SE
TU
P
113
REFERENCE: PROCEDURES FOR ADDING CHANNEL LABELICONS/CUSTOM CHANNEL LABELS (2-5-4 + MENU MODE)Adding Channel Icons and Labels in the 2-5-4 + Menu ModeEditing/Adding Channel ICONs and/orLabelsIf there is no pre-assigned ICON, you can make a cus-tom channel label of up to 7 characters to help inidentifying the channel or network. At your option,channel labels can also be added in addition to a pre-assigned ICON. You may also add labels for the Auxinput sources to clearly identify the devices that areconnected to the Aux inputs.
Editing and adding the labels can only be done if thereare channels entered into the TV’s channel map eitherby using the method described in item 6, by cloning orby the use of the master remote control from the PPVprovider. Note: A blank letter space is available between ‘Z’ and‘!’.
To Do Channel Editing/Labeling, Proceed asFollows1. Enter TV Installer menu.
2. Once the installer menu appears, press ‘2’, ‘5’, ‘4’,
‘MENU’. This enters the channel label editing mode.
Add your channel icons and channel labels in this
menu, see below. (You can do this more than once.)
3. To exit the menu when done press “MENU”.1 2 3 4 5 6 7
XYZXYZ
XYZ
NETWORK
(Icon)
(Label)
Changing a Channel’s ICON onMaster TV1. With Channel Up/Down, select the
channel you want to change theIcon for.
2. With the Right or Left ADJ arrow, select the thin letter ‘I’ on the
channel ID display.3. With the Up or Down arrow, select the desired ICON you want to
appear to identify the channel. (If you know the ICON number, enter
the number followed by Enter / Select.)
4. Proceed with Changing/Adding Labels or go to the next channel.
Changing/Adding ChannelLabels on Master TV1. Channel Up/Down to select the
desired channel. 2. Press the Right or Left ADJ arrow
repeatedly until the numbers 1 to7 show up. The number shows theposition of the character that canbe changed. Number 1 is the firstcharacter, number 2 the secondcharacter and so on.
3. With the Up or Down arrow, selectthe desired character.
4. Proceed to the next number posi-tion or use Channel Up/Down togo to the next channel.
Changing Source Labels onMaster TV1. Press “INPUT” to select the desired
Aux input source; A/V 1, A/V 2,HDMI Component, RGB etc.
2. Press the Right or Left arrowrepeatedly until the numbers 0 to 9shows up. The number shows theposition of the character that canbe changed.
3. Use the Up or Down arrows toselect the desired character.
4. Press “INPUT” for the next Auxsource or proceed with ChangingIcon or Changing/Adding Labels.Press Ch Up/Down to return tochannels.
CHANNEL Up/Down - Tunes in the next channel inscan.
Left/Right Arrows - Select the item to change. If “I”is shown, the ICON can be changed. If a number isshown, it indicates the position of the character thatcan be changed.
Up/Down Arrows - Select the ICON or the charac-ter to be displayed. Tip: Arrows can be held down forfast scrolling.
0 – 9 - Use to enter the index number of the ICON,if known.
ENTER/SELECT - Changes the ICON after thenumber has been entered.
INPUT - Changes the Aux input label. (“Source” onthe remote shown in this manual is INPUT.)
MENU - Exits the editing process.
Installer Remote Control Key Functions for Master TV ChannelEditing/Labeling Menu

CO
MM
ER
CIA
L MO
DE
SE
TU
P
114
COMMERCIAL MODE SETUP
REFERENCE: CLONABLE MENU FEATURES
Menu /Sub Menu Features
Installer MenuInstaller Item settings
ChannelAuto Tuning (Channel Lineup)Channel Edit Channel label
PictureAspect Ratio Picture Mode Advanced Control
AudioAuto Volume Clear Voice ll Sound Mode Balance
Clonable Menu Features
Audio Contd.Treble Bass SRS TruSoundXT Infinite Sound TV Speaker
OptionLanguageCaption Caption Mode DTV Captions Style - Style DTV Captions Style - Size DTV Captions Style - Font DTV Captions Style - Text Color DTV Captions Style - Text Opacity DTV Captions Style - BG Color DTV Captions Style - BG Opacity DTV Captions Style - Edge Type DTV Captions Style - Edge Color
LockMovie Rating TV Rating – Children Age TV Rating – Children Fantasy
Violence TV Rating – General Age Input Block
TimeAuto ClockManual ClockOff TimeOn TimeAuto Off
Procedure for Checking Software Version
The software version of the TV may be checked by accessing the INSTALLER MENU. To do this, press the MENU button repeatedly until the menu display ceases to respond to MENU key presses. Then, press "9", "8", "7", "6", "ENTER/SELECT". Press ENTER/SELECT again to remove the installer menu fromscreen.
Typical Installer Menu
000 INSTALLER SEQ 000
UPN 000-000-000-000 FPGA E0F1PTC V1.00.000 CPU V3.06.00
xxLG710H PTC INSTALLER MENU
NOTE!
GG Picture Menu and other menu settings shown above are not clonable on all TVs.
End user has access to Picture, Sound and Ratio on user remote control.
GG Menu options vary between Analog / Digital channels and Aux Sources.
For 32/37/42LG710H For 32/37/42/47/55LD650H
000 INSTALLER SEQ 000
UPN 000-000-000-000 FPGA E0F1PTC V1.00.000 CPU V3.06.00
xxLD650H PTC INSTALLER MENU
For 32/37/42LD655H
000 INSTALLER SEQ 000
UPN 000-000-000-000 FPGA E0F1PTC V1.00.000 CPU V3.06.00
xxLD655H PTC INSTALLER MENU

CO
MM
ER
CIA
L MO
DE
SE
TU
P
115
REFERENCE: POWER SAVING SETUPPower Savings SetupInstaller Item 118 Power Saving: set to 003, enabled (Default).Installer Item 099 Backlighting: value set as shown below. (Default value is 202)
Note: Values are results of controlled experiments under laboratory conditions.
Item 099 Picture Power Power Item 099 Picture Power PowerBacklighting Lumin. Consumption Savings Backlighting Lumin. Consumption Savings
(Static) (Watts) Rating (Dynamic) (Watts) Rating100 206 104 0 % 200 103 74 28.85 %90 204 103.5 0.48 % 190 96 73 29.81 %80 203 103 0.96 % 180 84 69.5 33.17 %70 172 93 10.58 % 170 73 65.5 37.02 %60 147 85 18.27 % 160 64 62 40.38 %50 127 79 24.04 % 150 57 60 42.31 %40 108 73.5 29.33 % 140 51 57.5 44.71 %30 86 67 35.58 % 130 44 55 47.12 %20 66 60 42.31 % 120 38 52.5 49.52 %10 50 55.5 46.63 % 110 33 50.5 51.44 %1 39 51.5 50.48 % 101 29 49 52.88 %
For 32LG710H
Note: Values are results of controlled experiments under laboratory conditions.
Item 099 Picture Power Power Item 099 Picture Power PowerBacklighting Lumin. Consumption Savings Backlighting Lumin. Consumption Savings
(Static) (Watts) Rating (Dynamic) (Watts) Rating100 258 151.5 0 % 200 93 91.5 39.60 %90 230 136.5 9.90 % 190 79 85.5 43.56 %80 201 122.5 19.14 % 180 67 80 47.19 %70 170 111 26.73 % 170 58 74.8 50.63 %60 145 101.3 33.14 % 160 50 70.8 53.27 %50 120 91.5 39.60 % 150 44.5 67.5 55.45 %40 95 81.3 46.34 % 140 38 63.5 58.09 %30 72 71 53.14 % 130 31.5 59.3 60.86 %20 54 63.5 58.09 % 120 27 56.5 62.71 %10 41 58 61.72 % 110 23.5 54.5 64.03 %1 31 53 65.02 % 101 21 52.8 65.15 %
For 37LG710H
Note: Values are results of controlled experiments under laboratory conditions.
Item 099 Picture Power Power Item 099 Picture Power PowerBacklighting Lumin. Consumption Savings Backlighting Lumin. Consumption Savings
(Static) (Watts) Rating (Dynamic) (Watts) Rating100 286 185 0% 200 113 109 41.08 %90 250 164.5 11.08 % 190 108 103 44.32 %80 216 147.5 20.27 % 180 96 96.4 47.89 %70 185.5 133.5 27.84 % 170 83 89.7 51.51 %60 159 121.3 34.43 % 160 73.8 84.5 54.32 %50 133.5 109.5 40.81 % 150 65.2 80.2 56.65 %40 107.5 97 47.57 % 140 55.8 75.2 59.35 %30 81 84 54.59 % 130 46.13 69.9 62.22 %20 61 75 59.46 % 120 39.6 66.1 64.27 %10 46.5 67.5 63.51 % 110 34.4 63.5 65.68 %1 35 61.5 66.76 % 101 29.85 61.4 66.81 %
For 42LG710H

CO
MM
ER
CIA
L MO
DE
SE
TU
P
116
COMMERCIAL MODE SETUP
Note: Values are results of controlled experiments under laboratory conditions.
Item 099 Picture Power Power Item 099 Picture Power PowerBacklighting Lumin. Consumption Savings Backlighting Lumin. Consumption Savings
(Static) (Watts) Rating (Dynamic) (Watts) Rating100 290.2 96.1 0 % 202 105.1 56.1 58.38 %90 258.2 90.9 94.59 % 200 85.5 51.5 53.59 %80 220.2 84.8 88.24 % 190 80.0 50.5 52.55 %70 189.1 80.2 83.45 % 180 75.7 49.7 51.72 %60 166.6 75.5 78.56 % 170 70.6 48.6 50.57 %50 145.2 69.1 71.90 % 160 67.1 48.0 49.95 %40 126.4 63.9 66.49 % 150 63.2 47.1 49.01 %30 108.2 58.8 61.19 % 140 60.0 46.3 48.18 %20 90.2 53.2 55.36 % 130 56.6 45.7 47.55 %10 72.1 48.6 50.57 % 120 52.5 44.7 46.51 %1 57.5 44.0 45.79 % 110 49.2 44.1 45.89 %
For 32LD650H, 32LD655H
Note: Values are results of controlled experiments under laboratory conditions.
Item 099 Picture Power Power Item 099 Picture Power PowerBacklighting Lumin. Consumption Savings Backlighting Lumin. Consumption Savings
(Static) (Watts) Rating (Dynamic) (Watts) Rating100 193.5 113.4 0 % 202 116.4 82.7 72.93 %90 178.5 106.5 93.92 % 200 94.1 72.1 63.58 %80 163.1 100.1 88.27 % 190 88.6 70.1 61.82 %70 149.0 93.8 82.72 % 180 83.1 67.7 59.70 %60 134.6 88.0 77.60 % 170 77.5 65.3 57.58 %50 118.9 81.5 71.87 % 160 71.9 63.0 55.56 %40 104.1 75.2 66.31 % 150 67.1 61.5 54.06 %30 89.1 69.2 61.02 % 140 61.4 59.0 52.03 %20 72.6 62.5 55.11 % 130 55.8 56.4 49.74 %10 57.1 56.1 49.47 % 120 50.2 54.1 47.71 %1 41.5 49.7 43.83 % 110 44.3 51.8 45.68 %
For 37LD650H, 37LD655H
Note: Values are results of controlled experiments under laboratory conditions.
Item 099 Picture Power Power Item 099 Picture Power PowerBacklighting Lumin. Consumption Savings Backlighting Lumin. Consumption Savings
(Static) (Watts) Rating (Dynamic) (Watts) Rating100 212.8 96.1 0% 202 109.8 98.2 68.15 %90 195.8 135.0 93.68 % 200 90.1 85.8 59.54 %80 177.9 125.7 87.23 % 190 84.2 82.8 57.46 %70 160.0 117.5 81.54 % 180 78.6 79.7 55.31 %60 143.7 109.1 75.71 % 170 72.5 76.6 53.16 %50 124.7 100.1 69.47 % 160 66.6 73.6 51.08 %40 107.6 91.8 63.71 % 150 62.2 71.2 49.41 %30 90.8 83.4 57.88 % 140 56.3 68.2 47.33 %20 72.6 74.2 51.49 % 130 50.7 65.2 45.25 %10 55.3 65.7 45.59 % 120 45.1 62.1 43.10 %1 39.4 57.5 39.90 % 110 39.5 59.8 41.50 %
For 42LD650H, 42LD655H

CO
MM
ER
CIA
L MO
DE
SE
TU
P
117
TV CAMPORT AUTO SENSE OPERATIONThe CAMPORT Auto Sense function is enabled when:1. Installer Menu Item 34, CAMPORT EN is set to 1 AND2. Installer Menu Item 40, AUTO CAMPORT is enabled (1).
Selectable= Can be accessed with INPUT key, direct access,etc.Auto Sense= Switches to this input when connector is insert-ed.The camport (Side Video) has the highest priority and willoverride any commands including tuning to the Start Channel.
CAMPORT (Front Video) Functionality ControlItem 34 Item 40 Front Video
CAMPORT EN AUTO CAMPORT Operation0 0 Disabled0 1 Disabled1 0 Selectable1 1 Auto Sense
CAMPORT Operation (Stand-Alone)When Camport Auto Sense is enabled as above, the TV’ssource will switch to the side video aux source whenever aplug is inserted into any of the side video panel inputs(either composite Video or S-Video).
When the plug is removed, the TV will switch back to theprevious channel or input source that the TV was usingbefore the plug was inserted. However, if any direct accessto an RF channel or Aux channel is requested while the cam-port is active, then, when the camport plug is removed, theTV will switch to the last requested channel. Source changesusing any Source Keys (INPUT) are ignored. ChannelUp/Channel Down and Flashback Commands are not directaccess tuning commands and they are also ignored.
Previous State Operation State
Before Inserting While CAMPORT Upon RemovalCAMPORT Is Active Of CAMPORT
Aux or RF Channel None Previous Auxor RF Channel
Aux or RF Channel Direct Access Last RequestedRF or Aux Channel
Aux or RF Channel Ch Up/Down, Previous AuxFlashback or RF Channel
and TV/AV Keys
CAMPORT Operation (PPV)The operation will be similar to that of the Stand-Alone mode. However, the PPV providers may send dif-ferent commands to the TV for the same user com-mands. For instance, some providers will always send adirect tune command when it receives a channelup/down or a flashback command while other PPVproviders will just send a key command.
Previous State Operation StateBefore Inserting While CAMPORT Upon Removal
CAMPORT Is Active Of CAMPORTAux or RF Channel None Previous Aux
or RF ChannelAux or RF Channel Direct Access Last Requested RF
or Aux ChannelAux or RF Channel Ch Up/Down, Last Requested
Flashback Channel if PPVand TV/AV Keys translates it to
direct access tuningcommand. Otherwise,goes to Previous Aux
or RF Channel

CO
MM
ER
CIA
L MO
DE
SE
TU
P
118
FTG OPERATION SETUP
COMMERCIAL MODE SETUP
CHANNEL PICTURE AUDIO TIME
INPUT USBOPTION LOCK
Typical TV/STB Setup MenuShows that the Z7 card is in pass-through mode. Thismenu can also be accessed by turning IR remote access‘On’ in the FTG Configuration Application, while the TV/STBis in FTG mode.
End User ‘Aspect Ratio’ or Function MenuShows that the Z7 card is in FTG mode. While this menu ispresent on-screen, the only way the Installer menu can beaccessed is by the FTG Configuration Application.
Communications Setup MenuSets up the communications link between the FTG ConfigurationApplication and the Z7 card installed in a TV/STB.
Network Icon Selection MenuSelect channel icons like ABC, NBC etc., to add to the channelOSDs to identify common networks for the end user.
ABC
Move EnterASPECT RATIO
Set By Program
4:3
16:9
Zoom
Just Scan

CO
MM
ER
CIA
L MO
DE
SE
TU
P
119
FTG CHANNEL MAP OVERVIEW
DELETERemoves channel from lineup.
ADDAfter inputting a new channel’sdata, press to add channel to list.
CHANNEL MAP EDITORShows both channel dataand logical channel lineup.
EXIT Exits menu and returns to logicalchannel listing.
LOGICAL CHANNEL NUMBERSChannels appear in numerical order.Select logical, Major and Minor num-bers on menu.
CUSTOM CHANNEL LABELS/ICONSSet custom labels and select icons onmenu.
SET CHANNEL ATTRIBUTESSet encrypted, OSD on or off orblank video only.
UPDATEAfter editing a channel’s data, pressto include the changes in the chan-nel list.
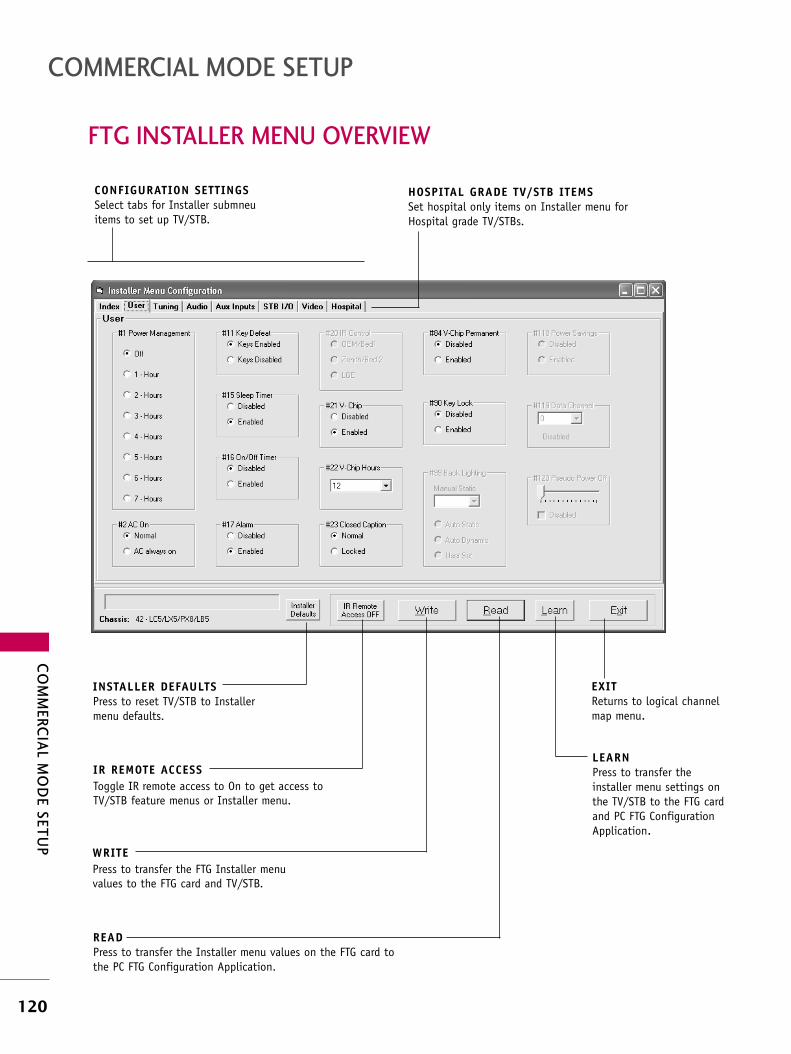
CO
MM
ER
CIA
L MO
DE
SE
TU
P
120
FTG INSTALLER MENU OVERVIEW
COMMERCIAL MODE SETUP
LEARNPress to transfer theinstaller menu settings onthe TV/STB to the FTG cardand PC FTG ConfigurationApplication.
INSTALLER DEFAULTSPress to reset TV/STB to Installermenu defaults.
READPress to transfer the Installer menu values on the FTG card tothe PC FTG Configuration Application.
WRITEPress to transfer the FTG Installer menuvalues to the FTG card and TV/STB.
EXITReturns to logical channelmap menu.
IR REMOTE ACCESSToggle IR remote access to On to get access toTV/STB feature menus or Installer menu.
CONFIGURATION SETTINGSSelect tabs for Installer submneuitems to set up TV/STB.
HOSPITAL GRADE TV/STB ITEMSSet hospital only items on Installer menu forHospital grade TV/STBs.

CO
MM
ER
CIA
L MO
DE
SE
TU
P
121
TV AUX INPUT CONFIGURATION
LMT7Z7 Configured Card in FTG Mode of Operation
Error Messages
Problem Probable Cause Solution
Cannot contact FTG application Close extra FTG application on computer. target. already open.
Cable(s) not Check and connect communication cables.connected.
TV off. Turn TV on.
Wrong Communication port. Select correct Comm port on computer.
OLD_OCV=0
OLD_OCV=1
Source Input Source Mode Number Labeling Value Labeling Value Labeling
130 90 Video2 (Side) CV/SVIDEO 34 CAMPORT_EN 0x01Video Front (Camport)
0Video Front (Camport)
0 (VIDE0) 2
131 91 Video1 (Rear) CV/SVIDEO 39 REAR_AUX_EN 0x02Rear Video
(Aux)1
Rear Video (Aux)
0 (VIDE0) 1
DTV 91 YPrPb2 EN = 1 0x04S-Video
Rear2
S-Video Rear
0 (VIDE0) 5
PC 91 YPrPb2 EN = 2 0x04S-Video
Rear2
S-Video Rear
2 (COMPUTER)
5
DTV 35 COMPPORT EN = 1 0x08Front
Computer3
Front Computer
0 (VIDE0) 3
PC 35 COMPPORT EN = 2 0x08Front
Computer3
Front Computer
2 (COMPUTER)
3
PC 87 REAR RGB EN = 2 0x10SVGA Rear Computer
4SVGA Rear Computer
2 (COMPUTER)
4
136 96 Component 38 YPrPb EN 0x40Y/UV
Component6
Rear Y/PrPb
Componen
t
video
0 (VIDE0) 6
Installer MenuTVDIRECT ACCESS
TuningSTART AUX
SOURCE ASSIGNMENT
DATA STATUS
TYPE 0X0D AUX SOURCE
(R)
ENABLE MPI DATA
DATA STATUS TYPE 0xD2
CURRENT AV SOURCE (R)
MPI DATA STATUS TYPE 0x41 SOURCES ENABLED (R/W)
132 92 HDMI2
134 94 RGB
133 93 HDMI1/DVI
137 97 USB 121 USB Options 0x80 Y/C FrontVideo
6 FrontS-Video
2 (Comp) NA
FTG OPERATION TROUBLESHOOTING

CO
MM
ER
CIA
L MO
DE
SE
TU
P
122
COMMERCIAL MODE SETUP
B-LAN Setup and Overview
Power to the B-LAN module is controlled by Installer Menu Item 118 Power savings. By default, value 003, the B-LAN module is only powered on when the TV is powered on. There are two bits in the Power Savings item to controlpower to the B-LAN module, one for power during TV Standby mode and one for power during TV Power On mode.When the bit is 0, the B-LAN module is powered. When the bit is 1, the B-LAN module is not powered (PowerSavings is Enabled).
The B-LAN module is internal to the TV. It allows the Hotel/Institution headend equipment to communicate with theTV for configuration and control. This communication is via the institution’s RF distribution system. The controldevice at the headend (ex FMA-LG101) can control multiple TVs. When the TV is first installed, it must be poweredon in order for the headend to be able to communicate with the B-LAN. At this point, if it is desired for the BLANto always be powered on, particularly during Standby mode, the BLAN Standby Power Saving mode setting should bedownloaded as Disabled. The new settings will not be active until the BLAN actually downloads the configurationdata to the PTC and the PTC is reset.
If it known that the application requires only using the MPI card slot and not the embedded BLAN, the installer cango into the Installer Settings menu and enable the BLAN Power Savings mode, in both Standby and TV power on.
Power Saving
1
3
7
TV Power On State
Standby
Standby
Standby
TV Standby State
On
Off
Off
BLAN Power MPI Slot Power BLAN Power MPI Slot Power
On
On
Off
Main
Main
Main
B-LAN SETUP AND OVERVIEW

AP
PE
ND
IX
123
TROUBLESHOOTING
APPENDIX
AAbbnnoorrmmaall OOppeerraattiioonn
VViiddeeoo PPrroobblleemmss
No picture &No sound
No or poor color
or poor picture
Poor reception on
some channels
Lines or streaks
in pictures
No picture
when connecting HDMI
Horizontal/vertical bars
or picture shaking
Picture appears slowly
after switching on
The remote control
doesn’t work
Power is suddenly
turned off
Check to see if there is any object between the product and the remote controlcausing obstruction. Ensure you are pointing the remote control directly at the TV.
Ensure that the batteries are installed with correct polarity (+ to +, - to -).
Ensure that the correct remote operating mode is set: TV, VCR etc.
Install new batteries.
Is the sleep timer set?
Check the power control settings. Power interrupted.
Check whether the product is turned on.
Try another channel. The problem may be with the broadcast.
Is the power cord inserted into wall power outlet?
Check your antenna direction and/or location.
Test the wall power outlet, plug another product’s power cord into the outletwhere the product’s power cord was plugged in.
This is normal, the image is muted during the product startup process. Pleasecontact your service center, if the picture has not appeared after five minutes.
Adjust Color in menu option.
Try unplugging any others electronics that are near by to see if interference iscausing the problem.
Try another channel. The problem may be with the broadcast.
Are the video cables installed properly?
Activate any function to restore the brightness of the picture.
Check for local interference such as an electrical appliance or power tool.
Station or cable product experiencing problems, tune to another station.
Station signal is weak, reorient antenna.
Check for sources of possible interference.
Check antenna (Change the direction of the antenna).
If the HDMI cables don’t support High Speed HDMI, it can cause flickers or noscreen display. In this case use the latest cables that support High Speed HDMI.

AP
PE
ND
IX
APPENDIX
124
PPCC MMooddee PPrroobblleemmss
Adjust resolution, horizontal frequency, or vertical frequency.
Check the input source.
Work the Auto configure or adjust clock, phase, or H/V position. (Option)
Check the signal cable.
Update video card drivers.
The signal is out of range
Screen color is unstableor single color
Vertical bar or stripe on
background &Horizontal Noise &Incorrect position
Picture OK but No sound
Unusual sound frominside the product
No sound when connecting HDMI
or USB
No output from one
of the speakers
AAuuddiioo PPrroobblleemmss
Press the VOL or VOLUME button.
Sound muted? Press the MUTE button.
Try another channel. The problem may be with the broadcast.
Are the audio cables installed properly?
Adjust Balance in menu option.
A change in ambient humidity or temperature may result in an unusual noisewhen the product is turned on or off and does not indicate a fault with theproduct.
Check High Speed HDMI cable.
Check USB cable over version 2.0.
Use normal MP3 file. *This feature is not available for all models.
EErrrraattiicc OOppeerraattiioonn
Installer menu setup Adjust Installer menu settings as required.
PPoowweerr
No Power See troubleshooting flow chart.
SSooffttwwaarree PPrroobblleemmss
Cannot direct enter chan-nel number or “No Signal”
appears
After 2-5-5 + MENU, only channels included in TV controller will appear. If chan-nel is available it can be added to channel scan, rescan channels. If it is not avail-able, the ‘No Signal’ message appears on the TV screen.
NOTE!
GG For other problems not caused by the TV, refer to other devices’ operating guides.

AP
PE
ND
IX
125
REFERENCE: LT2002 CLONING PROCEDURETROUBLESHOOTING
Reset Clone After Static ShockAfter replacing exhausted batteries, or if the program-mer behaves strangely after a static shock, use a paperclip or similar instrument inserted through the smallhole marked ”RESET” to activate the internal resetswitch and restore normal operation. After a reset,check the real-time clock setting. It may be necessaryto reset the Clone Programmer clock from a TV con-taining the correct time.
NoteThe LT2002 programmer is designed to be used withTVs containing the 221-01006 and later processors.Use with earlier TV sets may give unpredictable results.Processors used before the 221-01006-04 have a lim-ited screen display capability. They cannot displayentire screens as shown in the quick setup instructionsaccompanying the LT2002 clone programmer. Use theprinted menu illustrations on the quick setup sheetsupplied with the Clone as an aid to making your pro-gramming choices. (Although the menus are not all dis-played, the clone functions all operate normally.)
Clone Programmer Troubleshooting
Warning: Do not use the LT2002 while any PPV cardis installed in the TV or the clone programmer will bedamaged.
32LG3DCH(32LG3DCH-UA)
32LG3DC
(32LG3DC-UA)
After cloning operations are complete, just unplug the LT2002 from the TV. If the TV does not display a picture on the TV (blank screen) after a few seconds, just change channels.
CClloonnee PPrrooggrraammmmeerr
Press Reset on clone programmer, redo teach/learn. (Teach/Learn should take a minimum of 1 minute.)
Only use an LG Installer remote to operate the clone programmer with the TV.
Connect the M.P.I. cord properly, assure a good connection.
TV must be powered On for the clone to work.
Install 4 fresh AA high-quality alkaline batteries.
Connect the TV to a reliable Analog channel signal source.
Set the time on a TV and then copy the time to the Clone Programmer.
Try a different LT2002 Clone programmer.
Reset the Clone Programmer.
Retry cloning again.
Clone copies Setup in lessthan 30 seconds
LED does not blink
Remote does not operateclone
Clone menu hard to read
No time set
Clone not working
Clone Scans Channelsmore than once
32LG3DCH(32LG3DCH-UA)
32LG3DC
(32LG3DC-UA)
MMaasstteerr aanndd OOtthheerr TTVVss
Wait until procedure complete message is displayed.
Cloning is only possible with identical model TVs.
Reread cloning pages to be sure all tasks were performed.
Batteries must remain installed to retain time settings.
Disconnect newly-cloned TV from power for 5 seconds.
Cloning did not work
New Setup not present
Clone time disappeared

AP
PE
ND
IX
APPENDIX
126
ControllerQuickCheck
Is'STATUS'LED on
Analog BoardBlinking
?
Pluginto AC
Power Outlet
IsTV
Connected toAC Power
?
DefectiveTV
Yes
No No
Yes
IsRed LED
on TVLit?
1. Defective Analog Board.2. Defective Digital Board.
No
Cycle the power by removingand re-connecting the ACpower cord. Observe the'POWER' LED and TV screenas soon as AC power is re-applied.
DefectiveTV
DidAnalog
Board 'POWER'LED Turn OnMomentarily
?
No
Check to see if TVis in Commercial Mode.See Commercial ModeCheck chart.
Did TVTurn On
Momentarily?
No
Yes
Yes
Yes
DidTV Turn
On?
Yes
No
Press 'POWER' or 'ON/OFF'key on TV
1. Defective TV
Press 'POWER' or 'ON/OFF'or 'VOLUME UP/DOWN' or
'MUTE' key on InstallerRemote
DidTV
Respond?
No1. Defective TV2. Go to Remote Control Checklist
Yes
Press 'POWER' or 'ON/OFF'or 'VOLUME UP/DOWN'
or 'MUTE' key onUser-Supplied Remote
DidTV
Respond?
No1. Defective PPV Card2. Go to Remote Control Checklist
Yes
End
TROUBLESHOOTING FLOW CHART

AP
PE
ND
IX
127
COMMERCIAL MODE CHECK
Press the "On/Off" key on the front panel.
The On/Off key is always operational.
Didyou get
a response?
Defective TV
Yes
No
DidTV stop
respondingor continue to respond
?
TV is inCommercial
Mode.
Stopped
responding
TV is not in Commercial ModeCall Technical Support for
Assistance
Continuedtorespond
Leavethe
TV set On
Go to Installer menuby pressing "MENU" untilthe TV stops responding.
REFERENCE: RJP MODEL LISTAND INPUT HIERARCHY
RJP Model List
Legacy Models Scaler Models
Not Support PCB
Not Support PCB
RJP-210F
RJP-210FW
RJP-210W
RJP-210WBR
RJP-210S
RJP-220G
RJP-220T
RJP-301B
RJP-302B
RJP-101M
RJP-101ML
RJP-110F
RJP-110FW
RJP-110W
RJP-110WBR
RJP-110S
RJP-120G
RJP-120T
RJP-201B
RJP-202B
RJP Input Hierarchy
Priority Video Audio
HDMI/DVI
RGB
Composite
TV (RF of Aux)
1st. (Highest)
2nd.
3rd.
4th. (Lowest)
3.5mm Mini Jack
L/R Audio In
HDMI/DVI
TV (RF or Aux)

AP
PE
ND
IX
APPENDIX
128
GLOSSARY OF TERMS
75 OHM RF CABLE
The wire that comes from an off-airantenna or cable service provider. Theend looks like a hex-shaped nut with awire sticking through the middle. Itscrews onto the Antenna/Cable thread-ed jack on the back of the TV.
300 TO 75 OHM ADAPTER
A small device that connects atwo-wire 300 ohm antenna to a 75ohm RF jack. They are usually about aninch long with two screws on one endand a round opening with a wire stickingout on the other end.
ANALOG TELEVISION
Standard television broadcasting formatin 4:3 picture aspect ratio.
A/V CABLES
Audio/Video cables. Three cablesbunched together—right audio (red),left audio (white), and video (yellow).A/V cables are used for stereo play-back of videocassettes and other A/Vdevices.
A/V DEVICE
Any device that produces video orsound (VCR, DVD, cable box, or televi-sion).
AMPLIFIER
An electronic device that amplifiessound from a television, CD player, VCR,DVD, or other Audio/Video device.
ANTENNA
The physical receiver of television signalssent over the air. A large metal piece ofequipment does not always have to bevisible to be using an antenna.
CABLE
Cable service box. Refers to thedescrambler box cable subscribers useto receive cable programming signals.
CABLE TELEVISION
Programming provided by a cable ser-vice.
DIGITAL TELEVISION
Televisions signals that are transmitteddigitally.
DVI
Digital Video InterfaceAccommodates analog and digital inter-faces with a single connector.
COMPOSITE VIDEO
Typical video jack, uses one wire fortransporting three-color video signals.
COMPONENT VIDEO
Uses three wires for transporting three-color video signals. Supports higherquality video.
DELETED
Lets you remove channels from the listthat the end user can scroll throughusing CH (Channel) Up/Down.
HDMI
High-definition multi-media interface.
HDTV
High-definition television. Refers to tele-vision signals that have higher resolutionthan ordinary analog TV signals.
HDSTB
High-definition set top box. Refers to atuner device that receives high-defini-tion television signals which have higherresolution than ordinary analog TV sig-nals.
INPUT
Refers to the input jack that receives asignal from a TV, VCR, DVD Player orother Audio/Video device.
JACK
An input or output connector on theback of a TV, VCR, DVD Player orother Audio/Video device.
MONO SOUND
Mono (monaural) sound is one channelof sound. On more than one speaker, allthe speakers play the same audio.
OUTPUT
Refers to the output jack that sends asignal out of a VCR, DVD, or other A/Vdevice.
PHYSICAL CHANNEL NUMBER
The actual channel number. Analogchannels use the physical channel num-ber and digital channels can use a virtualchannel number.
RGB (Red, Green, Blue)
Connection input or output port avail-able for producing a video image usingthree separate colors: Red, Green, andBlue.
RS-232
Serial communication port throughwhich firmware is downloaded.
2ND AUDIO PROGRAMMING/SAP
Second Audio Programming (SAP) isanother, separate audio channel availablewith some programming. Choosing SAPoften refers to listening to audio inanother language, such as Spanish orFrench.
SIGNAL
Picture and sound traveling through acable, or over the air, to the TV.
STEREO SOUND
Stereo (Stereophonic) sound refers toaudio that’s divided into right and leftsides.
TUNER
Device that picks up the broadcast sig-nal and turns it into picture and sound.
VIRTUAL CHANNEL NUMBER
A re-mapped channel number. Analogchannels use the actual channel number,but digital channels use a virtual(orfake) channel number.
XDS
Extended Data Service: Additional pro-gram information included on the signalprovided at the discretion of the broad-caster.
A list of definitions for some of the words found in this guide

AP
PE
ND
IX
129
MAINTENANCE
Early malfunctions can be prevented. Careful and regular cleaning can extend the amount of time you canenjoy your new TV. Caution: Be sure to turn the power off and unplug the power cord before you begin any cleaning.
Cleaning the ScreenHere’s a great way to keep the dust off your screen for a while. Wet a soft cloth in a mixture of lukewarm water and alittle fabric softener or dish washing detergent. Wring the cloth until it’s almost dry, and then use it to wipe the screen.
Make sure the excess water is off the screen, and then let it air-dry before you turn on your TV.
GG If you expect to leave your TV dormant for a long time (such as a vacation), it’s a good idea to unplugthe power cord to protect against possible damage from lightning or power surges.
CAUTION
2
1
GG Do not use window/glass cleaner or anything with ammonia to clean the screen.
WARNING!
Cleaning the Cabinet To remove dirt or dust, wipe the cabinet with a soft, dry, lint-free cloth. Please be sure not to use a wet cloth.
Extended Absence

AP
PE
ND
IX
APPENDIX
130
The specifications shown above may be changed without prior notice for quality improvement.
MODELS
AC100-240V ~ 50/60Hz
NTSC-M, ATSC, 64 & 256 QAM
VHF 2-13, UHF 14-69, CATV 1-135, DTV 2-69, CADTV 1-135
75 ohm
32 ~ 104°F (0 ~ 40°C)
Less than 80%
-4 ~ 140°F (-20 ~ 60°C)
Less than 85%
Dimensions
(Width
x Height
x Depth)
Weight
Power requirement
Television System
Program Coverage
External Antenna Impedance
Environment
condition
With stand
Without stand
With stand
Without stand
Operating Temperature
Operating Humidity
Storage Temperature
Storage Humidity
42LG710H(42LG710H-UA)
1026.2 x 734.1 x 293.4 mm
40.4 x 28.9 x 11.5 inch
1026.2 x 687.9 x 111.8 mm
40.4 x 27.0 x 4.4 inch
21.10 kg / 46.51 lbs
18.48 kg / 40.74 lbs
37LG710H(37LG710H-UA)
918.6 x 684.8 x 293.4 mm
36.1 x 26.9 x 11.5 inch
918.6 x 635.8 x 111.7 mm
36.1 x 25.0 x 4.39 inch
17.97 kg / 39.61 lbs
15.41 kg / 33.97 lbs
32LG710H(32LG710H-UA)
797 x 597 x 232.5 mm
31.3 x 23.5 x 9.15 inch
797 x 558.7 x 109.3 mm
31.3 x 21.9 x 4.3 inch
12.89 kg / 28.41 lbs
11.41 kg / 25.15 lbs
MPI card
(Width x Height x Depth)3.1 x 0.9 x 6.3 inch
80.0(+0.6/-0.2) x less than 23.0(including pcb thickness) x less than 162.0(excluding cover thickness) mm
PRODUCT SPECIFICATIONS
3.7 x 1.1 inch
94.7(±0.5) x 28.3(±0.5) mm
Card Bracket Cover
(Width x Height )
Cable Card

AP
PE
ND
IX
131
The specifications shown above may be changed without prior notice for quality improvement.
MODELS
AC100-240V ~ 50/60Hz
NTSC-M, ATSC, 64 & 256 QAM
VHF 2-13, UHF 14-69, CATV 1-135, DTV 2-69, CADTV 1-135
75 ohm
32 ~ 104°F (0 ~ 40°C)
Less than 80%
-4 ~ 140°F (-20 ~ 60°C)
Less than 85%
Dimensions
(Width x Height
x Depth)
Weight
Power requirement
Television System
Program Coverage
External Antenna Impedance
Environment
condition
With stand
Without stand
With stand
Without stand
Operating Temperature
Operating Humidity
Storage Temperature
Storage Humidity
32LD650H (32LD650H-UA)32LD655H (32LD655H-UA)
37LD650H (37LD650H-UA)37LD655H (37LD655H-UA)
797.0 mm x 557.7 mm x 207.0 mm
(31.3 inch x 21.9 inch x 8.1 inch)
797.0 x 495.0 x 97.1 mm
(31.3 inch x 19.4 inch x 3.8 inch)
11.1 kg (24.4 lbs)
9.4 kg (20.7 lbs)
916.0 mm x 626.0 mm x 261.0 mm
(36.0 inch x 24.6 inch x 10.2 inch)
916.0 mm x 560.0 mm x 88.9 mm
(36.0 inch x 22.0 inch x 3.5 inch)
14.6 kg (32.1 lbs)
12.0 kg (26.4 lbs)
Dimensions
(Width x Height
x Depth)
Weight
With stand
Without stand
With stand
Without stand
1024.0 mm x 686.6 mm x 261.0 mm
(40.3 inch x 27.0 inch x 10.2 inch)
1024.0 mm x 621.0 mm x 87.1 mm
(40.3 inch x 24.4 inch x 3.4 inch)
17.7 kg (39.0 lbs)
15.1 kg (33.2 lbs)
1137.0 mm x 758.0 mm x 270.0 mm
(44.7 inch x 29.8 inch x 10.6 inch)
1137.0 mm x 685.0 mm x 76.8 mm
(44.7 inch x 26.9 inch x 3.0 inch)
20.3 kg (44.7 lbs)
18.3 kg (40.3 lbs)
MODELS 42LD650H (42LD650H-UA)42LD655H (42LD655H-UA)
Dimensions
(Width x Height
x Depth)
Weight
With stand
Without stand
With stand
Without stand
1329.0 mm x 872.0 mm x 330.0 mm
(52.3 inch x 34.3inch x 12.9 inch)
1329.0 mm x 796.0 mm x 96.5 mm
(52.3 inch x 31.3 inch x 3.7 inch)
33.0 kg (72.7lbs)
29.8 kg (65.6 lbs)
MODELS 55LD650H(55LD650H-UA)
47LD650H(47LD650H-UA)

AP
PE
ND
IX
APPENDIX
132
PROGRAMMING THE REMOTE CONTROLThe provided universal remote control can be programmed to operate most remote-controllable devices.
Note that the remote may not control all models of other brands.
Programming a code into a remote mode
Testing your remote control.
To find out whether your remote control can operate other components without programming, turn on acomponent such as a STB(Set-Top Box) and press the corresponding mode button (such as a SSTTBB) on theremote control, while pointing at the component. Test the PPOOWWEERR and CC HH buttons to see if the com-ponent responds correctly. If the component does not operate correctly, the remote control requires pro-gramming to operate the device.
Turn on the component to be programmed, then press the corresponding mode button (such as SSTTBB) onthe remote control. The remote control button of the desired device is illuminated.
Press the MMEENNUU and MMUUTTEE buttons simultaneously, and the remote control is ready to be programmed withthe code.
Enter a code number using the number buttons on the remote control. Programming code numbers for thecorresponding component can be found on the following pages. If the code is correct, the device will turnoff.
Press the MMEENNUU button to store the code.
Test the remote control functions to see if the component responds correctly. If not, repeat from step 2.
2
3
4
5
6
1

AP
PE
ND
IX
133
Remote Control Code
Brand Codes Brand Codes Brand Codes
AIWA 034
AKAI 016 043 046 124
125 146
AMPRO 072
ANAM 031 033 103
AUDIO DYNAMICS 012 023 039 043
BROKSONIC 035 037 129
CANON 028 031 033
CAPEHART 108
CRAIG 003 040 135
CURTIS MATHES 031 033 041
DAEWOO 005 007 010 064
065 108 110 111
112 116 117 119
DAYTRON 108
DBX 012 023 039 043
DYNATECH 034 053
ELECTROHOME 059
EMERSON 006 017 025 027
029 031 034 035
036 037 046 101
129 131 138 153
FISHER 003 008 009 010
FUNAI 034
GE 031 033 063 072
107 109 144 147
GO VIDEO 132 136
HARMAN KARDON 012 045
HITACHI 004 018 026 034
043 063 137 150
INSTANTREPLAY 031 033
JCL 031 033
JCPENNY 012 013 015 033
040 066 101
JENSEN 043
JVC 012 031 033 043
048 050 055 060
130 150 152
KENWOOD 014 034 039 043
047 048
LG (GOLDSTAR) 001 012 013 020
101 106 114 123
LLOYD 034
LXI 003 009 013 014
017 034 101 106
MAGIN 040
MAGNAVOX 031 033 034 041
067 068
MARANTZ 012 031 033 067
069
MARTA 101
MATSUI 027 030
MEI 031 033
MEMOREX 003 010 014 031
033 034 053 072
101 102 134 139
MGA 045 046 059
MINOLTA 013 020
MITSUBISHI 013 020 045 046
049 051 059 061
151
MTC 034 040
MULTITECH 024 034
NEC 012 023 039 043
048
NORDMENDE 043
OPTONICA 053 054
PANASONIC 066 070 074 083
133 140 145
PENTAX 013 020 031 033
063
PHILCO 031 034 067
PHILIPS 031 033 034 054
067 071 101
PILOT 101
PIONEER 013 021 048
PORTLAND 108
PULSAR 072
QUARTZ 011 014
QUASAR 033 066 075 145
RCA 013 020 033 034
040 041 062 063
107 109 140 144
145 147
REALISTIC 003 008 010 014
031 033 034 040
053 054 101
RICO 058
RUNCO 148
SALORA 014
SAMSUNG 032 040 102 104
105 107 109 112
113 115 120 122
125
SANSUI 022 043 048 135
SANYO 003 007 010 014
102 134
SCOTT 017 037 112 129
131
SEARS 003 008 009 010
013 014 017 020
031 042 073 081
101
SHARP 031 054 149
SHINTOM 024
SONY 003 009 031 052
056 057 058 076
077 078 149
SOUNDESIGN 034
STS 013
SYLVANIA 031 033 034 059
067
SYMPHONIC 034
TANDY 010 034
TATUNG 039 043
TEAC 034 039 043
TECHNICS 031 033 070
TEKNIKA 019 031 033 034
101
THOMAS 034
TMK 006
TOSHIBA 008 013 042 047
059 082 112 131
TOTEVISION 040 101
UNITECH 040
VECTOR RESEARCH 012
VICTOR 048
VIDEO CONCEPTS 012 034 046
VIDEOSONIC 040
WARDS 003 013 017 024
031 033 034 040
053 054 131
YAMAHA 012 034 039 043
ZENITH 034 048 056
058 072 080 101
VCR

AP
PE
ND
IX
APPENDIX
134
Brand Codes Brand Codes Brand Codes
HDSTB
ALPHASTAR DSR 123AMPLICA 050ASTRO PHILIPS(ML) 159ASTRO THOMPSON(ML) 160ASTRO NOKIA(ML) 161
BIRDVIEW 051 126 129CHANNEL MASTER 013 014 015 018
036 055CHAPARRAL 008 009 012 077CITOH 054CURTIS MATHES 050 145DRAKE 005 006 007 010
011 052 112 116141
DX ANTENNA 024 046 056 076ECHOSTAR 038 040 057 058
093 094 095 096097 098 099 100122
ELECTRO HOME 089EUROPLUS 114FUJITSU 017 021 022 027
133 134GENERAL INSTRUMENT 003 004 016 029
031 059 101HITACHI 139 140HOUSTON TRACKER 033 037 039 051
057 104
HUGHES 068HUMAX(SL) 158JANIEL 060 147JERROLD 061KATHREIN 108LEGEND 057LG 001LUTRON 132LUXOR 062 144MACOM 010 059 063 064
065MEMOREX 057NEXTWAVE 028 124 125NORSAT 069 070PACE SKY SATELLITE 143PANASONIC 060 142PANSAT 121PERSONAL CABLE 117PHILIPS 071PICO 105PRESIDENT 019 102PRIMESTAR 030 110 111PROSAT 072PSI(TH) 157RCA 066 106REALISTIC 043 074SAMSUNG 123
SATELLITE SERVICE CO 028 035 047 057085
SCIENTIFIC ATLANTA 032 138SKY LIFE 150SONY 103STARCAST 041SUPER GUIDE 020 124 125SAMART(TH) 156TEECOM 023 026 075 087
088 090 107 130137
TOSHIBA 002 127TRUE VISION(TH) 155UNIDEN 016 025 042 043
044 045 048 049078 079 080 086101 135 136
UBC(TH) 153UBC/SAMART(TH) 154VIEWSTAR 115VTC(VN) 162WINEGARD 128 146ZENITH 081 082 083 084
091 120
DVD
Brand Codes Brand Codes Brand Codes
APEX DIGITAL 022
DENON 020 014
GE 005 006
HARMAN KARDON 027
JVC 012
LG 001 010 016 025
MAGNAVOX 013
MARANTZ 024
MITSUBISHI 002
NAD 023
ONKYO 008 017
PANASONIC 003 009
PHILIPS 013
PIONEER 004 026
PROCEED 021
PROSCAN 005 006
RCA 005 006
SAMSUNG 011 015
SONY 007
THOMPSON 005 006
TOSHIBA 019 008
YAMAHA 009 018
ZENITH 010 016 025

AP
PE
ND
IX
135
IR CODES
Configuration of frame
1st frame
Repeat frame
Lead code
Repeat code
BBiitt ddeessccrriippttiioonn
FFrraammee iinntteerrvvaall :: TTff
The waveform is transmitted as long as a key is depressed.
C0 C1 C2 C3 C4 C5 C6 C7 C0 C1 C2 C3 C4 C5 C6 C7 D0 D1 D2 D3 D4 D5 D6 D7 D0 D1 D2 D3 D4 D5 D6 D7
Lead code Low custom code High custom code Data code Data code
Repeat codeTf
4.5 ms
9 ms
0.56 ms
1.12 ms
0.56 ms
2.24 ms
Tf Tf
Tf=108ms @455KHz
Bit ”0” Bit ”1”
1. How to Connect
Connect your wired remote control to the Remote Control port on the TV.
2. Remote Control IR Codes
Output waveform
Single pulse, modulated with 37.917KHz signal at 455KHz
T1
Tc Carrier frequency
FCAR = 1/TC = fOSC/12
Duty ratio = T1/TC = 1/3
2.25 ms 9 ms
0.55 ms

AP
PE
ND
IX
APPENDIX
136
Code Function Note(Hexa)Code Function Note(Hexa)
D6 TV Discrete IR Code (TV Input Selection)
5A AV1 Discrete IR Code (AV1 Input Selection)
D0 AV2 Discrete IR Code (AV2 Input Selection)
BF COMPONENT Discrete IR Code (COMPONENT Input Selection)
D5 RGB-PC Discrete IR Code (RGB Input Selection)
CE HDMI1 Discrete IR Code (HDMI1 Input Selection)
CC HDMI2 Discrete IR Code (HDMI2 Input Selection)
76 Ratio 4:3 Discrete IR Code (Only 4:3 Mode)
77 Ratio 16:9 Discrete IR Code (Only 16:9 Mode)
AF Ratio Zoom Discrete IR Code(Only Zoom Mode)
C4 POWER ON Discrete IR Code (Only Power On)
C5 POWER OFF Discrete IR Code (Only Power Off)
08 POWER Remote control Button (Power On/Off)
0F TV Remote control Button
0B INPUT Remote control Button
0A SAP Remote control Button
79 FF RATIO Remote control Button
AB GUIDE Remote control Button
OC PORTAL Remote control Button
AA INFO Remote control Button
10-19 Number Key 0-9 Remote control Button
4C - (Dash) Remote control Button
1A FLASHBK Remote control Button
02 VOL + Remote control Button
03 VOL - Remote control Button
00 CH Remote control Button
01 CH Remote control Button
0E GG TIMER Remote control Button
39 CC Remote control Button
09 MUTE Remote control Button
43 MENU Remote control Button
5B RETURN Remote control Button
40 Remote control Button
41 Remote control Button
07 Remote control Button
06 Remote control Button
44 ENTER Remote control Button
60 PIP Remote control Button
71 PIP CH + Remote control Button
72 PIP CH- Remote control Button
63 PIP SWAP Remote control Button
61 PIP INPUT Remote control Button
C1 A Stop Remote control Button
C0 G Play Remote control Button
C2 ll ll Pause Remote control Button
C3 Ô (Record) Remote control Button

AP
PE
ND
IX
137
OPEN SOURCE LICENSE
Copyright (C) 1989, 1991 Free Software Foundation, Inc., 51Franklin Street, Fifth Floor, Boston, MA 02110-1301 USA
Everyone is permitted to copy and distribute verbatim copies ofthis license document, but changing it is not allowed.
Preamble
The licenses for most software are designed to take away yourfreedom to share and change it. By contrast, the GNU GeneralPublic License is intended to guarantee your freedom to shareand change free software - to make sure the software is free forall its users. This General Public License applies to most of theFree Software Foundation's software and to any other programwhose authors commit to using it. (Some other free softwarefoundation software is covered by the GNU Lesser General PublicLicense instead.) You can apply it to your programs, too.
When we speak of free software, we are referring to freedom, notprice. Our General Public Licenses are designed to make sure thatyou have the freedom to distribute copies of free software (andcharge for this service if you wish), that you receive source codeor can get it if you want it, that you can change the software oruse pieces of it in new free programs; and that you know you cando these things.
To protect your rights, we need to make restrictions that forbidanyone to deny you these rights or to ask you to surrender therights. These restrictions translate to certain responsibilities foryou if you distribute copies of the software, or if you modify it.
For example, if you distribute copies of such a program, whethergratis or for a fee, you must give the recipients all the rights thatyou have. You must make sure that they, too, receive or can getthe source code. And you must show them these terms so theyknow their rights.
We protect your rights with two steps: (1) copyright the soft-ware, and (2) offer you this license which gives you legal permis-sion to copy, distribute and/or modify the software.
Also, for each author's protection and ours, we want to make cer-tain that everyone understands that there is no warranty for thisfree software. If the software is modified by someone else andpassed on, we want its recipients to know that what they have isnot the original, so that any problems introduced by others willnot reflect on the original authors' reputations.
Finally, any free program is threatened constantly by softwarepatents. We wish to avoid the danger that redistributors of a freeprogram will individually obtain patent licenses, in effect making
the program proprietary. To prevent this, we have made it clearthat any patent must be licensed for everyone's free use or notlicensed at all.
The precise terms and conditions for copying, distribution andmodification follow.
GNU GENERAL PUBLIC LICENSETERMS AND CONDITIONS FOR COPYING, DISTRIBUTIONAND MODIFICATION
0. This license applies to any program or other work which con-tains a notice placed by the copyright holder saying it may bedistributed under the terms of this General Public License. The"Program", below, refers to any such program or work, and a"work based on the Program" means either the Program or anyderivative work under copyright law: that is to say, a work con-taining the Program or a portion of it, either verbatim or withmodifications and/or translated into another language.(Hereinafter, translation is included without limitation in theterm "modification".) Each licensee is addressed as "you".
Activities other than copying, distribution and modificationare not covered by this license; they are outside its scope.The act of running the Program is not restricted, and the out-put from the program is covered only if its contents constitutea work based on the program (independent of having beenmade by running the program). Whether that is true dependson what the program does.
1. You may copy and distribute verbatim copies of the program'ssource code as you receive it, in any medium, provided thatyou conspicuously and appropriately publish on each copy anappropriate copyright notice and disclaimer of warranty; keepintact all the notices that refer to this license and to theabsence of any warranty; and give any other recipients of theprogram a copy of this license along with the Program.
You may charge a fee for the physical act of transferring acopy, and you may at your option offer warranty protection inexchange for a fee.
2. You may modify your copy or copies of the program or anyportion of it, thus forming a work based on the Program, andcopy and distribute such modifications or work under theterms of section 1 above, provided that you also meet all ofthese conditions:
a) You must cause the modified files to carry prominentnotices stating that you changed the files and the date ofany change.
GNU GENERAL PUBLIC LICENSEVersion 2, June 1991

AP
PE
ND
IX
APPENDIX
138
b) You must cause any work that you distribute or publish,that in whole or in part contains or is derived from theProgram or any part there of, to be licensed as a whole atno charge to all third parties under the terms of thislicense.
c) If the modified program normally reads commands interac-tively when run, you must cause it, when started runningfor such interactive use in the most ordinary way, to printor display an announcement including an appropriatecopyright notice and a notice that there is no warranty (orelse, saying that you provide a warranty) and that usersmay redistribute the program under these conditions, andtelling the user how to view a copy of this license.(Exception: if the Program itself is interactive but does notnormally print such an announcement, your work based onthe Program is not required to print an announcement.)
These requirements apply to the modified work as a whole. Ifidentifiable sections of that work are not derived from theProgram, and can be reasonably considered independent andseparate works in themselves, then this license, and its terms,do not apply to those sections when you distribute them asseparate works. But when you distribute the same sections aspart of a whole which is a work based on the Program, the dis-tribution of the whole must be on the terms of this license,whose permissions for other licensees extend to the entirewhole, and thus to each and every part regardless of whowrote it.
Thus, it is not the intent of this section to claim rights or con-test your rights to work written entirely by you; rather, theintent is to exercise the right to control the distribution ofderivative or collective works based on the program.
In addition, mere aggregation of another work not based onthe program with the Program (or with a work based on theprogram) on a volume of a storage or distribution mediumdoes not bring the other work under the scope of this license.
3. You may copy and distribute the program (or a work based onit, under section 2) in object code or executable form underthe terms of sections 1 and 2 above provided that you alsodo one of the following:a) Accompany it with the complete corresponding machine-
readable source code, which must be distributed under theterms of sections 1 and 2 above on a medium customarilyused for software interchange; or,
b) Accompany it with a written offer, valid for at least threeyears, to give any third party, for a charge no more thanyour cost of physically performing source distribution, acomplete machine-readable copy of the correspondingsource code, to be distributed under the terms of sections1 and 2 above on a medium customarily used for softwareinterchange; or,
c) Accompany it with the information you received as to theoffer to distribute corresponding source code. (This alter-native is allowed only for noncommercial distribution andonly if you received the program in object code or exe-cutable form with such an offer, in accord with Subsectionb above.)
The source code for a work means the preferred form of thework for making modifications to it. For an executable work,complete source code means all the source code for all mod-ules it contains, plus any associated interface definition files,plus the scripts used to control compilation and installationof the executable. However, as a special exception, the sourcecode distributed need not include anything that is normallydistributed (in either source or binary form) with the majorcomponents (compiler, kernel, and so on) of the operatingsystem on which the executable runs, unless that componentitself accompanies the executable.
If distribution of executable or object code is made by offer-ing access to copy from a designated place, then offeringequivalent access to copy the source code from the sameplace counts as distribution of the source code, even thoughthird parties are not compelled to copy the source along withthe object code.
4. You may not copy, modify, sublicense, or distribute the Programexcept as expressly provided under this license. Any attemptotherwise to copy, modify, sublicense or distribute theProgram is void, and will automatically terminate your rightsunder this license. However, parties who have received copies,or rights, from you under this license will not have their licens-es terminated so long as such parties remain in full compli-ance.
5. You are not required to accept this license, since you have notsigned it. However, nothing else grants you permission tomodify or distribute the Program or its derivative works.These actions are prohibited by law if you do not accept thislicense. Therefore, by modifying or distributing the program(or any work based on the program), you indicate your accep-tance of this license to do so, and all its terms and conditionsfor copying, distributing or modifying the program or worksbased on it.
6. Each time you redistribute the program (or any work based onthe Program), the recipient automatically receives a licensefrom the original licensor to copy, distribute or modify theProgram subject to these terms and conditions. You may notimpose any further restrictions on the recipients' exercise ofthe rights granted herein. You are not responsible for enforc-ing compliance by third parties to this license.

AP
PE
ND
IX
139
7. If, as a consequence of a court judgment or allegation ofpatent infringement or for any other reason (not limited topatent issues), conditions are imposed on you (whether bycourt order, agreement or otherwise) that contradict the con-ditions of this license, they do not excuse you from the con-ditions of this license. If you cannot distribute so as to satis-fy simultaneously your obligations under this license and anyother pertinent obligations, then as a consequence you maynot distribute the program at all. For example, if a patentlicense would not permit royalty-free redistribution of theprogram by all those who receive copies directly or indirectlythrough you, then the only way you could satisfy both it andthis license would be to refrain entirely from distribution ofthe program.
If any portion of this section is held invalid or unenforceableunder any particular circumstance, the balance of the sectionis intended to apply and the section as a whole is intended toapply in other circumstances.
It is not the purpose of this section to induce you to infringeany patents or other property right claims or to contest valid-ity of any such claims; this section has the sole purpose ofprotecting the integrity of the free software distribution sys-tem, which is implemented by public license practices. Manypeople have made generous contributions to the wide rangeof software distributed through that system in reliance onconsistent application of that system; it is up to theauthor/donor to decide if he or she is willing to distributesoftware through any other system and a licensee cannotimpose that choice.
This section is intended to make thoroughly clear what isbelieved to be a consequence of the rest of this license.
8. If the distribution and/or use of the program is restricted incertain countries either by patents or by copyrighted inter-faces, the original copyright holder who places the programunder this license may add an explicit geographical distributionlimitation excluding those countries, so that distribution ispermitted only in or among countries not thus excluded. Insuch case, this license incorporates the limitation as if writtenin the body of this license.
9. The Free Software Foundation may publish revised and/ornew versions of the General Public License from time to time.Such new versions will be similar in spirit to the present ver-sion, but may differ in detail to address new problems or con-cerns.
Each version is given a distinguishing version number. If theprogram specifies a version number of this license whichapplies to it and "any later version", you have the option offollowing the terms and conditions either of that version or of
any later version published by the Free Software Foundation.If the program does not specify a version number of thislicense, you may choose any version ever published by theFree Software Foundation.
10.If you wish to incorporate parts of the program into other freeprograms whose distribution conditions are different, write tothe author to ask for permission. For software which is copy-righted by the Free Software Foundation, write to the FreeSoftware Foundation; we sometimes make exceptions for this.Our decision will be guided by the two goals of preserving thefree status of all derivatives of our free software and of pro-moting the sharing and reuse of software generally.
NO WARRANTY
11. BECAUSE THE PROGRAM IS LICENSED FREE OF CHARGE,THERE IS NO WARRANTY FOR THE PROGRAM, TO THEEXTENT PERMITTED BY APPLICABLE LAW. EXCEPT WHENOTHERWISE STATED IN WRITING THE COPYRIGHT HOLD-ERS AND/OR OTHER PARTIES PROVIDE THE PROGRAM "ASIS" WITHOUT WARRANTY OF ANY KIND, EITHEREXPRESSED OR IMPLIED, INCLUDING, BUT NOT LIMITEDTO, THE IMPLIED WARRANTIES OF MERCHANTABILITYAND FITNESS FOR A PARTICULAR PURPOSE. THE ENTIRERISK AS TO THE QUALITY AND PERFORMANCE OF THEPROGRAM IS WITH YOU. SHOULD THE PROGRAM PROVEDEFECTIVE, YOU ASSUME THE COST OF ALL NECESSARYSERVICING, REPAIR OR CORRECTION.
12.IN NO EVENT UNLESS REQUIRED BY APPLICABLE LAW ORAGREED TO IN WRITING WILL ANY COPYRIGHT HOLDER,OR ANY OTHER PARTY WHO MAY MODIFY AND/ORREDISTRIBUTE THE PROGRAM AS PERMITTED ABOVE, BELIABLE TO YOU FOR DAMAGES, INCLUDING ANY GENERAL,SPECIAL, INCIDENTAL OR CONSEQUENTIAL DAMAGESARISING OUT OF THE USE OR INABILITY TO USE THE PRO-GRAM (INCLUDING BUT NOT LIMITED TO LOSS OF DATAOR DATA BEING RENDERED INACCURATE OR LOSSES SUS-TAINED BY YOU OR THIRD PARTIES OR A FAILURE OF THEPROGRAM TO OPERATE WITH ANY OTHER PROGRAMS),EVEN IF SUCH HOLDER OR OTHER PARTY HAS BEENADVISED OF THE POSSIBILITY OF SUCH DAMAGES.

AP
PE
ND
IX
APPENDIX
140
END OF TERMS AND CONDITIONS
How to apply these terms to your new programs
If you develop a new program, and you want it to be of the great-est possible use to the public, the best way to achieve this is tomake it free software which everyone can redistribute and changeunder these terms.
To do so, attach the following notices to the program. It is safestto attach them to the start of each source file to most effective-ly convey the exclusion of warranty; and each file should have atleast the "copyright" line and a pointer to where the full notice isfound.
one line to give the program's name and a brief idea of what itdoes.Copyright (C) <year> <name of author>
This program is free software; you can redistribute it and/ormodify it under the terms of the GNU General Public License aspublished by the Free Software Foundation; either version 2 ofthe license, or (at your option) any later version.
This program is distributed in the hope that it will be useful, butWITHOUT ANY WARRANTY; without even the implied warrantyof MERCHANTABILITY or FITNESS FOR A PARTICULAR PUR-POSE. See the GNU General Public License for more details.
You should have received a copy of the GNU General PublicLicense along with this program; if not, write to the Free SoftwareFoundation, Inc., 51 Franklin Street, Fifth Floor, Boston, MA02110-1301 USA.
Also add information on how to contact you by electronic andpaper mail.
If the program is interactive, make it output a short notice likethis when it starts in an interactive mode:
Gnomovision version 69, Copyright (C) year name of authorGnomovision comes with ABSOLUTELY NO WARRANTY; fordetails type ‘show w’. This is free software, and you are welcometo redistribute it under certain conditions; type ‘show c’ fordetails.
The hypothetical commands ‘show w’ and ‘show c’ should showthe appropriate parts of the General Public License. Of course,the commands you use may be called something other than‘show w’ and ‘show c’; they could even be mouse-clicks or menuitems-whatever suits your program.
You should also get your employer (if you work as a programmer)or your school, if any, to sign a “copyright disclaimer” for the pro-gram, if necessary. Here is a sample; alter the names:
Yoyodyne, Inc., hereby disclaims all copyright interest in the pro-gram ‘Gnomovision’ (which makes passes at compilers) written byJames Hacker.
signature of Ty Coon, 1 April 1989Ty Coon, President of Vice
This General Public License does not permit incorporating yourprogram into proprietary programs. If your program is a subrou-tine library, you may consider it more useful to permit linking pro-prietary applications with the library. If this is what you want todo, use the GNU Lesser General Public License instead of thislicense.
AP
PE
ND
IX
141
Copyright (C) 1991, 1999 Free Software Foundation, Inc. 51Franklin Street, Fifth Floor, Boston, MA 02110-1301 USAEveryone is permitted to copy and distribute verbatim copies ofthis license document, but changing it is not allowed.
[This is the first released version of the Lesser GPL. It alsocounts as the successor of the GNU Library Public License, ver-sion 2, hence the version number 2.1.]
Preamble
The licenses for most software are designed to take away yourfreedom to share and change it. By contrast, the GNU GeneralPublic Licenses are intended to guarantee your freedom to shareand change free software - to make sure the software is free forall its users.
This license, the Lesser General Public License, applies to somespecially designated software packages - typically libraries - ofthe Free Software Foundation and other authors who decide touse it. You can use it too, but we suggest you first think careful-ly about whether this license or the ordinary General PublicLicense is the better strategy to use in any particular case, basedon the explanations below.
When we speak of free software, we are referring to freedom ofuse, not price. Our General Public Licenses are designed to makesure that you have the freedom to distribute copies of free soft-ware (and charge for this service if you wish); that you receivesource code or can get it if you want it; that you can change thesoftware and use pieces of it in new free programs; and that youare informed that you can do these things.
To protect your rights, we need to make restrictions that forbiddistributors to deny you these rights or to ask you to surrenderthese rights. These restrictions translate to certain responsibilitiesfor you if you distribute copies of the library or if you modify it.
For example, if you distribute copies of the library, whether gratisor for a fee, you must give the recipients all the rights that wegave you. You must make sure that they, too, receive or can getthe source code. If you link other code with the library, you mustprovide complete object files to the recipients, so that they canrelink them with the library after making changes to the libraryand recompiling it. And you must show them these terms so theyknow their rights.
We protect your rights with a two-step method: (1) we copyrightthe library, and (2) we offer you this license, which gives you legalpermission to copy, distribute and/or modify the library.
To protect each distributor, we want to make it very clear thatthere is no warranty for the free library. Also, if the library is mod-ified by someone else and passed on, the recipients should knowthat what they have is not the original version, so that the origi-nal author's reputation will not be affected by problems thatmight be introduced by others.
Finally, software patents pose a constant threat to the existenceof any free program. We wish to make sure that a company can-not effectively restrict the users of a free program by obtaining arestrictive license from a patent holder. Therefore, we insist thatany patent license obtained for a version of the library must beconsistent with the full freedom of use specified in this license.
Most GNU software, including some libraries, is covered by theordinary GNU General Public License. This license, the GNULesser General Public License, applies to certain designatedlibraries, and is quite different from the ordinary General PublicLicense. We use this license for certain libraries in order to per-mit linking those libraries into non-free programs.
When a program is linked with a library, whether statically orusing a shared library, the combination of the two is legallyspeaking a combined work, a derivative of the original library. Theordinary General Public License therefore permits such linkingonly if the entire combination fits its criteria of freedom. TheLesser General Public License permits more lax criteria for linkingother code with the library.
We call this license the "Lesser" General Public License becauseit does Less to protect the user's freedom than the ordinaryGeneral Public License. It also provides other free software devel-opers Less of an advantage over competing non-free programs.These disadvantages are the reason we use the ordinary GeneralPublic License for many libraries. However, the Lesser license pro-vides advantages in certain special circumstances.
For example, on rare occasions, there may be a special need toencourage the widest possible use of a certain library, so that itbecomes a de-facto standard. To achieve this, non-free programsmust be allowed to use the library. A more frequent case is thata free library does the same job as widely used non-free libraries.In this case, there is little to gain by limiting the free library to freesoftware only, so we use the Lesser General Public License.
In other cases, permission to use a particular library in non-freeprograms enables a greater number of people to use a large bodyof free software. For example, permission to use the GNU CLibrary in non-free programs enables many more people to usethe whole GNU operating system, as well as its variant, theGNU/Linux operating system.
GNU LESSER GENERAL PUBLIC LICENSEVersion 2.1, February 1999

AP
PE
ND
IX
APPENDIX
142
Although the Lesser General Public License is Less protective ofthe users' freedom, it does ensure that the user of a program thatis linked with the Library has the freedom and the wherewithal torun that program using a modified version of the Library.
The precise terms and conditions for copying, distribution andmodification follow. Pay close attention to the difference betweena "work based on the library" and a "work that uses the library".The former contains code derived from the library, whereas thelatter must be combined with the library in order to run.
GNU LESSER GENERAL PUBLIC LICENSETERMS AND CONDITIONS FOR COPYING, DISTRIBUTIONAND MODIFICATION
0. This license agreement applies to any software library or otherprogram which contains a notice placed by the copyright hold-er or other authorized party saying it may be distributedunder the terms of this Lesser General Public License (alsocalled “this license”). Each license is addressed as "you".
A “library” means a collection of software functions and/ordata prepared so as to be conveniently linked with applicationprograms (which use some of those functions and data) toform executables.
The “Library”, below, refers to any such software library or workwhich has been distributed under these terms. A “work basedon the Library” means either the Library or any derivative workunder copyright law: that is to say, a work containing thelibrary or a portion of it, either verbatim or with modificationsand/or translated straightforwardly into another language.(Hereinafter, translation is included without limitation in theterm “modification”.)
“Source code” for a work means the preferred form of thework for making modifications to it. For a library, completesource code means all the source code for all modules it con-tains, plus any associated interface definition files, plus thescripts used to control compilation and installation of thelibrary.
Activities other than copying, distribution and modificationare not covered by this license; they are outside its scope.The act of running a program using the Library is not restrict-ed, and output from such a program is covered only if its con-tents constitute a work based on the library (independent ofthe use of the Library in a tool for writing it). Whether that istrue depends on what the library does and what the programthat uses the library does.
1. You may copy and distribute verbatim copies of the library'scomplete source code as you receive it, in any medium, pro-vided that you conspicuously and appropriately publish on
each copy an appropriate copyright notice and disclaimer ofwarranty; keep intact all the notices that refer to this licenseand to the absence of any warranty; and distribute a copy ofthis license along with the Library.
You may charge a fee for the physical act of transferring acopy, and you may at your option offer warranty protection inexchange for a fee.
2. You may modify your copy or copies of the Library or anyportion of it, thus forming a work based on the Library, andcopy and distribute such modifications or work under theterms of section 1 above, provided that you also meet all ofthese conditions:a) The modified work must itself be a software library.b) You must cause the files modified to carry prominent
notices stating that you changed the files and the date ofany change.
c) You must cause the whole of the work to be licensed at nocharge to all third parties under the terms of this license.
d) If a facility in the modified Library refers to a function or atable of data to be supplied by an application program thatuses the facility, other than as an argument passed whenthe facility is invoked, then you must make a good faitheffort to ensure that, in the event an application does notsupply such function or table, the facility still operates, andperforms whatever part of its purpose remains meaningful.
(For example, a function in a library to compute square rootshas a purpose that is entirely well-defined independent of theapplication. Therefore, Subsection 2d requires that any appli-cation-supplied function or table used by this function must beoptional: if the application does not supply it, the square rootfunction must still compute square roots.)
These requirements apply to the modified work as a whole. Ifidentifiable sections of that work are not derived from thelibrary, and can be reasonably considered independent andseparate works in themselves, then this license, and its terms,do not apply to those sections when you distribute them asseparate works. But when you distribute the same sections aspart of a whole which is a work based on the library, the dis-tribution of the whole must be on the terms of this license,whose permissions for other licenses extend to the entirewhole, and thus to each and every part regardless of whowrote it.Thus, it is not the intent of this section to claim rights or con-test your rights to work written entirely by you; rather, theintent is to exercise the right to control the distribution ofderivative or collective works based on the library.
In addition, mere aggregation of another work not based onthe library with the library (or with a work based on thelibrary) on a volume of a storage or distribution medium doesnot bring the other work under the scope of this license.

AP
PE
ND
IX
143
3. You may opt to apply the terms of the ordinary GNU GeneralPublic License instead of this License to a given copy of theLibrary. To do this, you must alter all the notices that refer tothis License, so that they refer to the ordinary GNU GeneralPublic License, version 2, instead of to this License. (If a newerversion than version 2 of the ordinary GNU General PublicLicense has appeared, then you can specify that versioninstead if you wish.) Do not make any other change in thesenotices.Once this change is made in a given copy, it is irreversible forthat copy, so the ordinary GNU General Public License appliesto all subsequent copies and derivative works made from thatcopy.This option is useful when you wish to copy part of the codeof the library into a program that is not a library.
4. You may copy and distribute the library (or a portion or deriv-ative of it, under Section 2) in object code or executable formunder the terms of Sections 1 and 2 above provided that youaccompany it with the complete corresponding machine-readable source code, which must be distributed under theterms of sections 1 and 2 above on a medium customarilyused for software interchange.If distribution of object code is made by offering access tocopy from a designated place, then offering equivalent accessto copy the source code from the same place satisfies therequirement to distribute the source code, even though thirdparties are not compelled to copy the source along with theobject code.
5. A program that contains no derivative of any portion of theLibrary, but is designed to work with the Library by beingcompiled or linked with it, is called a “work that uses theLibrary”. Such a work, in isolation, is not a derivative work ofthe Library, and therefore falls outside the scope of thislicense.
However, linking a “work that uses the library” with the Librarycreates an executable that is a derivative of the Library(because it contains portions of the library), rather than a“work that uses the library”. The executable is therefore cov-ered by this license. Section 6 states terms for distribution ofsuch executable.
When a “work that uses the library” uses material from a head-er file that is part of the library, the object code for the workmay be a derivative work of the library even though the sourcecode is not.Whether this is true is especially significant if the work can belinked without the library, or if the work is itself a library. Thethreshold for this to be true is not precisely defined by law.
If such an object file uses only numerical parameters, datastructure layouts and accessories, and small macros and smallinline functions (ten lines or less in length), then the use of
the object file is unrestricted, regardless of whether it is legal-ly a derivative work. (Executable containing this object codeplus portions of the library will still fall under Section 6.)
Otherwise, if the work is a derivative of the library, you maydistribute the object code for the work under the terms ofSection 6. Any executable containing that work also fall underSection 6, whether or not they are linked directly with thelibrary itself.
6. As an exception to the sections above, you may also combineor link a "work that uses the library" with the library to pro-duce a work containing portions of the library, and distributethat work under terms of your choice, provided that the termspermit modification of the work for the customer's own useand reverse engineering for debugging such modifications.
You must give prominent notice with each copy of the workthat the library is used in it and that the Library and its useare covered by this license. You must supply a copy of thislicense. If the work during execution displays copyrightnotices, you must include the copyright notice for the libraryamong them, as well as a reference directing the user to thecopy of this license. Also, you must do one of these things:
a) Accompany the work with the complete correspondingmachine-readable source code for the library includingwhatever changes were used in the work (which must bedistributed under Sections 1 and 2 above); and, if the workis an executable linked with the Library, with the completemachine-readable “work that uses the Library”, as objectcode and/or source code, so that the user can modify thelibrary and then relink to produce a modified executablecontaining the modified library. (It is understood that theuser who changes the contents of definitions files in thelibrary will not necessarily be able to recompile the appli-cation to use the modified definitions.)
b) Use a suitable shared library mechanism for linking with thelibrary. A suitable mechanism is one that (1) uses at run timea copy of the library already present on the user’s computersystem, rather than copying library functions into the exe-cutable, and (2) will operate properly with a modified versionof the library, if the user installs one, as long as the modifiedversion is interface-compatible with the version that thework was made with.
c) Accompany the work with a written offer, valid for at leastthree years, to give the same user the materials specified inSubsection 6, above, for a charge no more than the cost ofperforming this distribution.
d) If distribution of the work is made by offering access tocopy from a designated place, offer equivalent access tocopy the above specified materials from the same place.
e) Verify that the user has already received a copy of thesematerials or that you have already sent this user a copy.

AP
PE
ND
IX
APPENDIX
144
For an executable, the required form of the "work that usesthe library" must include any data and utility programs need-ed for reproducing the executable from it. However, as a spe-cial exception, the materials to be distributed need notinclude anything that is normally distributed (in either sourceor binary form) with the major components (compiler, kernel,and so on) of the operating system on which the executableruns, unless that component itself accompanies the exe-cutable.
It may happen that this requirement contradicts the licenserestrictions of other proprietary libraries that do not normal-ly accompany the operating system. Such a contradictionmeans you cannot use both them and the library together inan executable that you distribute.
7. You may place library facilities that are a work based on thelibrary side-by-side in a single library together with otherlibrary facilities not covered by this license, and distributesuch a combined library, provided that the separate distribu-tion of the work based on the Library and of the other libraryfacilities is otherwise permitted, and provided that you dothese two things:
a) Accompany the combined library with a copy of the samework based on the Library, uncombined with any otherlibrary facilities. This must be distributed under the termsof the sections above.
b) Give prominent notice with the combined library of thefact that part of it is a work based on the library, andexplaining where to find the accompanying uncombinedform of the same work.
8. You may not copy, modify, sublicense, link with, or distributethe library except as expressly provided under this license.Any attempt otherwise to copy, modify, sublicense, link with,or distribute the library is void, and will automatically termi-nate your rights under this license. However, parties who havereceived copies, or rights, from you under this license will nothave their licenses terminated so long as such parties remainin full compliance.
9. You are not required to accept this license, since you have notsigned it. However, nothing else grants you permission to mod-ify or distribute the library or its derivative works. Theseactions are prohibited by law if you do not accept this license.Therefore, by modifying or distributing the library (or any workbased on the library), you indicate your acceptance of thislicense to do so, and all its terms and conditions for copying,distributing or modifying the library or works based on it.
10.Each time you redistribute the library (or any work based onthe Library), the recipient automatically receives a licensefrom the original licensor to copy, distribute, link with or mod-ify the library subject to these terms and conditions. You maynot impose any further restrictions on the recipients' exercise
of the rights granted herein.You are not responsible for enforcing compliance by thirdparties with this license.
11. If, as a consequence of a court judgment or allegation ofpatent infringement or for any other reason (not limited topatent issues), conditions are imposed on you (whether bycourt order, agreement or otherwise) that contradict the con-ditions of this license, they do not excuse you from the con-ditions of this license. If you cannot distribute so as to satis-fy simultaneously your obligations under this license and anyother pertinent obligations, then as a consequence you maynot distribute the library at all. For example, if a patent licensewould not permit royalty-free redistribution of the library byall those who receive copies directly or indirectly throughyou, then the only way you could satisfy both it and thislicense would be to refrain entirely from distribution of thelibrary.If any portion of this section is held invalid or unenforceableunder any particular circumstance, the balance of the sectionis intended to apply, and the section as a whole is intended toapply in other circumstances.It is not the purpose of this section to induce you to infringeany patents or other property right claims or to contest valid-ity of any such claims; this section has the sole purpose ofprotecting the integrity of the free software distribution sys-tem which is implemented by public license practices. Manypeople have made generous contributions to the wide rangeof software distributed through that system in reliance onconsistent application of that system; it is up to theauthor/donor to decide if he or she is willing to distributesoftware through any other system and a license cannotimpose that choice.This section is intended to make thoroughly clear what isbelieved to be a consequence of the rest of this license.
12.If the distribution and/or use of the library is restricted in cer-tain countries either by patents or by copyrighted interfaces,the original copyright holder who places the library under thislicense may add an explicit geographical distribution limitationexcluding those countries, so that distribution is permittedonly in or among countries not thus excluded. In such case,this license incorporates the limitation as if written in the bodyof this license.
13.The Free Software Foundation may publish revised and/ornew versions of the Lesser General Public License from time totime. Such new versions will be similar in spirit to the presentversion, but may differ in detail to address new problems orconcerns.Each version is given a distinguishing version number. If thelibrary specifies a version number of this license which appliesto it and “any later version”, you have the option of followingthe terms and conditions either of that version or of any laterversion published by the Free Software Foundation.

AP
PE
ND
IX
145
If the library does not specify a license version number, youmay choose any version ever published by the Free SoftwareFoundation.
14.If you wish to incorporate parts of the library into other freeprograms whose distribution conditions are incompatible withthese, write to the author to ask for permission. For softwarewhich is copyrighted by the Free Software Foundation, writeto the Free Software Foundation; we sometimes make excep-tions for this. Our decision will be guided by the two goals ofpreserving the free status of all derivatives of our free softwareand of promoting the sharing and reuse of software generally.
NO WARRANTY
15.BECAUSE THE LIBRARY IS LICENSED FREE OF CHARGE,THERE IS NO WARRANTY FOR THE LIBRARY, TO THEEXTENT PERMITTED BY APPLICABLE LAW. EXCEPT WHENOTHERWISE STATED IN WRITING THE COPYRIGHT HOLD-ERS AND/OR OTHER PARTIES PROVIDE THE LIBRARY "ASIS" WITHOUT WARRANTY OF ANY KIND, EITHEREXPRESSED OR IMPLIED, INCLUDING, BUT NOT LIMITEDTO, THE IMPLIED WARRANTIES OF MERCHANTABILITYAND FITNESS FOR A PARTICULAR PURPOSE. THE ENTIRERISK AS TO THE QUALITY AND PERFORMANCE OF THELIBRARY IS WITH YOU. SHOULD THE LIBRARY PROVEDEFECTIVE, YOU ASSUME THE COST OF ALL NECESSARYSERVICING, REPAIR OR CORRECTION.
16.IN NO EVENT UNLESS REQUIRED BY APPLICABLE LAW ORAGREED TO IN WRITING WILL ANY COPYRIGHT HOLDER,OR ANY OTHER PARTY WHO MAY MODIFY AND/ORREDISTRIBUTE THE LIBRARY AS PERMITTED ABOVE, BELIABLE TO YOU FOR DAMAGES, INCLUDING ANY GENERAL,SPECIAL, INCIDENTAL OR CONSEQUENTIAL DAMAGESARISING OUT OF THE USE OR INABILITY TO USE THELIBRARY (INCLUDING BUT NOT LIMITED TO LOSS OF DATAOR DATA BEING RENDERED INACCURATE OR LOSSES SUS-TAINED BY YOU OR THIRD PARTIES OR A FAILURE OF THELIBRARY TO OPERATE WITH ANY OTHER SOFTWARE),EVEN IF SUCH HOLDER OR OTHER PARTY HAS BEENADVISED OF THE POSSIBILITY OF SUCH DAMAGES.
END OF TERMS AND CONDITIONS
How to apply these terms to your new libraries
If you develop a new library, and you want it to be of the great-est possible use to the public, we recommend making it free soft-ware that everyone can redistribute and change. You can do soby permitting redistribution under these terms (or, alternatively,under the terms of the ordinary General Public License).
To apply these terms, attach the following notices to the library.It is safest to attach them to the start of each source file to mosteffectively convey the exclusion of warranty; and each file shouldhave at least the “copyright” line and a pointer to where the fullnotice is found.
one line to give the library's name and a brief idea of what it does.Copyright (C) <year> <name of author>
This library is free software; you can redistribute it and/or modifyit under the terms of the GNU Lesser General Public License aspublished by the Free Software Foundation; either version 2.1 ofthe license, or (at your option) any later version.
This library is distributed in the hope that it will be useful, butWITHOUT ANY WARRANTY; without even the implied warrantyof MERCHANTABILITY or FITNESS FOR A PARTICULAR PUR-POSE. See the GNU Lesser General Public License for moredetails.
You should have received a copy of the GNU Lesser GeneralPublic License along with this library; if not, write to the FreeSoftware Foundation, Inc., 51 Franklin Street, Fifth Floor, Boston,MA 02110-1301 USA
Also add information on how to contact you by electronic andpaper mail.
You should also get your employer (if you work as a programmer)or your school, if any, to sign a “copyright disclaimer” for thelibrary, if necessary. Here is a sample; alter the names:
Yoyodyne, Inc., hereby disclaims all copyright interest in thelibrary ‘Frob’ (a library for tweaking knobs) written by JamesRandom Hacker.
signature of Ty Coon, 1 April 1990Ty Coon, President of Vice

AP
PE
ND
IX
APPENDIX
146
1.Definitions.
1.0.1. “Commercial use” means distribution or otherwise makingthe covered code available to a third party.
1.1. “Contributor” means each entity that creates or con-tributes to the creation of modifications.
1.2. “Contributor version” means the combination of the orig-inal code, prior modifications used by a contributor, andthe modifications made by that particular contributor.
1.3. “Covered code” means the original code or modificationsor the combination of the original code and modifications,in each case including portions thereof.
1.4. “Electronic distribution mechanism” means a mechanismgenerally accepted in the software development communi-ty for the electronic transfer of data.
1.5. “Executable” means covered code in any form other thansource code.
1.6. “Initial developer” means the individual or entity identifiedas the initial Developer in the Source Code notice requiredby exhibit A.
1.7. “Larger work” means a work which combines covered codeor portions thereof with code not governed by the termsof this License.
1.8. “License” means this document.
1.8.1. “Licensable” means having the right to grant, to the maxi-mum extent possible, whether at the time of the initialgrant or subsequently acquired, any and all of the rightsconveyed herein.
1.9. “Modifications” means any addition to or deletion fromthe substance or structure of either the original code orany previous modifications. When covered code isreleased as a series of files, a modification is:
A. Any addition to or deletion from the contents of a filecontaining original code or previous modifications.
B. Any new file that contains any part of the original codeor previous modifications.
1.10. “Original code” means source code of computer software
code which is described in the source code noticerequired by exhibit as original code, and which, at the timeof its release under this license is not already coveredcode governed by this license.
1.10.1.“Patent claims” means any patent claim(s), now owned orhereafter acquired, including without limitation, method,process, and apparatus claims, in any patent licensable bygrantor.
1.11. “Source code” means the preferred form of the coveredcode for making modifications to it, including all modulesit contains, plus any associated interface definition files,scripts used to control compilation and installation of anexecutable, or source code differential comparisonsagainst either the original code or another well known,available covered code of the contributor's choice. Thesource code can be in a compressed or archival form, pro-vided the appropriate decompression or de-archiving soft-ware is widely available for no charge.
1.12. “You” (or “Your”) means an individual or a legal entityexercising rights under, and complying with all of the termsof, this license or a future version of this license issuedunder section 6.1.For legal entities, “You” includes any entity which controls,is controlled by, or is under common control with You. Forpurposes of this definition, “control” means (a) the power,direct or indirect, to cause the direction or management ofsuch entity, whether by contract or otherwise, or (b) own-ership of more than fifty percent (50%) of the outstand-ing shares or beneficial ownership of such entity.
2. Source Code License.
2.1. The initial developer grant.The initial developer hereby grants You a world-wide, roy-alty-free, non-exclusive license, subject to third party intel-lectual property claims:
a) under intellectual property rights (other than patent ortrademark) licensable by initial developer to use, repro-duce, modify, display, perform, sublicense and distrib-ute the original code (or portions thereof) with or with-out modifications, and/or as part of a larger work; and
(b) under patents claims infringed by the making, using orselling of original code, to make, have made, use, prac-tice, sell, and offer for sale, and/or otherwise disposeof the original code (or portions there of).
MOZILLA PUBLIC LICENSEVersion 1.1
---------------

AP
PE
ND
IX
147
(c) the licenses granted in this section 2.1(a) and (b) areeffective on the date Initial developer first distributesoriginal code under the terms of this license.
(d) Notwithstanding section 2.1(b) above, no patentlicense is granted: 1) for code that You delete from theoriginal Code; 2) separate from the original code; or3) for infringements caused by: i) the modification ofthe original code or ii) the combination of the originalcode with other software or devices.
2.2. Contributor Grant.Subject to third party intellectual property claims, eachcontributor hereby grants You a world-wide, royalty-free,non-exclusive license
(a) under intellectual property rights (other than patentor trademark) licensable by contributor, to use,reproduce, modify, display, perform, sublicense anddistribute the modifications created by such contribu-tor (or portions thereof) either on an unmodifiedbasis, with other modifications, as covered codeand/or as part of a larger work; and
(b) under patent claims infringed by the making, using, orselling of modifications made by that contributoreither alone and/or in combination with its contributorversion (or portions of such combination), to make,use, sell, offer for sale, have made, and/or otherwisedispose of: 1) modifications made by that contributor(or portions thereof); and 2) the combination of mod-ifications made by that contributor with its contributorversion (or portions of such combination).
(c) the licenses granted in sections 2.2(a) and 2.2(b) areeffective on the date contributor first makes commer-cial use of the covered code.
(d) Notwithstanding section 2.2(b) above, no patentlicense is granted: 1) for any code that contributor hasdeleted from the contributor version; 2) separate fromthe contributor version; 3) for infringements causedby: i) third party modifications of contributor versionor ii) the combination of modifications made by thatcontributor with other software (except as part of thecontributor version) or other devices; or 4) underpatent claims infringed by covered code in theabsence of modifications made by that contributor.
3. Distribution Obligations.
3.1. Application of license.The modifications which You create or to which you con-tribute are governed by the terms of this license, includingwithout limitation section 2.2. The source code version ofcovered code may be distributed only under the terms ofthis license or a future version of this license releasedunder section 6.1, and you must include a copy of thislicense with every copy of the source code you distribute.
You may not offer or impose any terms on any source codeversion that alters or restricts the applicable version ofthis license or the recipients' rights hereunder. However,you may include an additional document offering theadditional rights described in section 3.5.
3.2. Availability of source code.Any modification which you create or to which you con-tribute must be made available in source code form underthe terms of this license either on the same media as anexecutable version or via an accepted electronic distribu-tion mechanism to anyone to whom you made an exe-cutable version available; and if made available via elec-tronic distribution mechanism, must remain available for atleast twelve (12) months after the date it initially becameavailable, or at least six (6) months after a subsequentversion of that particular modification has been madeavailable to such recipients. You are responsible for ensur-ing that the source code version remains available even ifthe electronic distribution mechanism is maintained by athird party.
3.3. Description of modifications.You must cause all covered code to which you contribute tocontain a file documenting the changes You made to createthat covered code and the date of any change. You mustinclude a prominent statement that the modification isderived, directly or indirectly, from original code provided bythe initial developer and including the name of the initialdeveloper in (a) the source code, and (b) in any notice in anexecutable version or related documentation in which youdescribe the origin or ownership of the covered code.
3.4. Intellectual property matters(a) Third party claims.If contributor has knowledge that a license under a thirdparty's intellectual property rights is required to exercisethe rights granted by such contributor under sections 2.1or 2.2, contributor must include a text file with the sourcecode distribution titled "LEGAL" which describes the claimand the party making the claim in sufficient detail that arecipient will know whom to contact. If contributor obtainssuch knowledge after the modification is made available asdescribed in section 3.2, contributor shall promptly modi-fy the LEGAL file in all copies contributor makes availablethereafter and shall take other steps (such as notifyingappropriate mailing lists or newsgroups) reasonably calcu-lated to inform those who received the covered code thatnew knowledge has been obtained.(b) Contributor APIs.If contributor's modifications include an applicationprogramming interface and contributor has knowledge ofpatent licenses which are reasonably necessary to implementthat API, contributor must also include this information inthe LEGAL file.

AP
PE
ND
IX
APPENDIX
148
(c) Representations.contributor represents that, except as disclosed pursuantto section 3.4(a) above, contributor believes that contributor'smodifications are contributor's original creation(s)and/or contributor has sufficient rights to grant the rightsconveyed by this license.
3.5. Required notices.You must duplicate the notice in exhibit A in each file ofthe source code. If it is not possible to put such notice ina particular source code file due to its structure, then Youmust include such notice in a location (such as a relevantdirectory) where a user would be likely to look for such anotice. If You created one or more modification(s), youmay add your name as a contributor to the noticedescribed in exhibit A. you must also duplicate this licensein any documentation for the source code where Youdescribe recipients' rights or ownership rights relating tocovered code. You may choose to offer, and to charge afee for, warranty, support, indemnity or liability obligationsto one or more recipients of covered code. However, youmay do so only on your own behalf, and not on behalf ofthe Initial developer or any contributor. You must make itabsolutely clear than any such warranty, support, indemni-ty or liability obligation is offered by you alone, and Youhereby agree to indemnify the Initial developer and everycontributor for any liability incurred by the Initial develop-er or such contributor as a result of warranty, support,indemnity or liability terms you offer.
3.6. Distribution of executable versions.You may distribute covered code in executable form only ifthe requirements of section 3.1-3.5 have been met forthat covered code, and if you include a notice stating thatthe source code version of the covered code is availableunder the terms of this license, including a description ofhow and where you have fulfilled the obligations of section3.2. The notice must be conspicuously included in anynotice in an executable version, related documentation orcollateral in which you describe recipients' rights relatingto the covered code. You may distribute the executableversion of covered code or ownership rights under alicense of your choice, which may contain terms differentfrom this license, provided that you are in compliance withthe terms of this license and that the license for the exe-cutable version does not attempt to limit or alter the recip-ient's rights in the source code version from the rights setforth in this license. If you distribute the executable ver-sion under a different license you must make it absolutelyclear that any terms which differ from this license areoffered by you alone, not by the Initial developer or anycontributor. You hereby agree to indemnify the initialdeveloper and every contributor for any liability incurredby the initial developer or such contributor as a result ofany such terms You offer.
3.7. Larger works.You may create a larger work by combining covered codewith other code not governed by the terms of this licenseand distribute the larger work as a single product. In sucha case, you must make sure the requirements of thislicense are fulfilled for the covered code.
4. Inability to comply due to statute or regulation.If it is impossible for you to comply with any of the termsof this license with respect to some or all of the coveredcode due to statute, judicial order, or regulation then youmust: (a) comply with the terms of this license to the max-imum extent possible; and (b) describe the limitations andthe code they affect. Such description must be included inthe LEGAL file described in section 3.4 and must beincluded with all distributions of the source code. Exceptto the extent prohibited by statute or regulation, suchdescription must be sufficiently detailed for a recipient ofordinary skill to be able to understand it.
5. Application of this license.This license applies to code to which the initial developer hasattached the notice in exhibit A and to related covered code.
6. Versions of the license.
6.1. New versions.Netscape communications corporation (“Netscape”) maypublish revised and/or new versions of the license fromtime to time. Each version will be given a distinguishingversion number.
6.2. Effect of new versions.Once covered code has been published under a particularversion of the license, you may always continue to use itunder the terms of that version. You may also choose touse such covered code under the terms of any subsequentversion of the license published by netscape. No oneother than netscape has the right to modify the termsapplicable to covered code created under this license.
6.3. Derivative works.If You create or use a modified version of this license(which you may only do in order to apply it to code whichis not already covered code governed by this license), Youmust (a) rename Your license so that the phrases"Mozilla", "MOZILLAPL", "MOZPL", "Netscape", "MPL","NPL" or any confusingly similar phrase do not appear inyour license (except to note that your license differs fromthis license) and (b) otherwise make it clear that Yourversion of the license contains terms which differ from theMozilla Public license and netscape Public License. (Fillingin the name of the initial developer, original code or con-tributor in the notice described in exhibit A shall not ofthemselves be deemed to be modifications of this license.)

AP
PE
ND
IX
149
7. DISCLAIMER OF WARRANTY.COVERED CODE IS PROVIDED UNDER THIS LICENSEON AN “AS IS” BASIS, WITHOUT WARRANTY OF ANYKIND, EITHER EXPRESSED OR IMPLIED, INCLUDING,WITHOUT LIMITATION, WARRANTIES THAT THE COV-ERED CODE IS FREE OF DEFECTS, MERCHANTABLE, FITFOR A PARTICULAR PURPOSE OR NON-INFRINGING.THE ENTIRE RISK AS TO THE QUALITY AND PERFOR-MANCE OF THE COVERED CODE IS WITH YOU.SHOULD ANY COVERED CODE PROVE DEFECTIVE INANY RESPECT, YOU (NOT THE INITIAL DEVELOPER ORANY OTHER CONTRIBUTOR) ASSUME THE COST OFANY NECESSARY SERVICING, REPAIR OR CORRECTION.THIS DISCLAIMER OF WARRANTY CONSTITUTES ANESSENTIAL PART OF THIS LICENSE. NO USE OF ANYCOVERED CODE IS AUTHORIZED HEREUNDER EXCEPTUNDER THIS DISCLAIMER.
8. TERMINATION.
8.1. This license and the rights granted hereunder will terminateautomatically if you fail to comply with terms herein andfail to cure such breach within 30 days of becoming awareof the breach. All sublicenses to the covered code whichare properly granted shall survive any termination of thislicense. Provisions which, by their nature, must remain ineffect beyond the termination of this license shall survive.
8.2. If you initiate litigation by asserting a patent infringementclaim (excluding declatory judgment actions) against ini-tial developer or a contributor (the initial developer orcontributor against whom you file such action is referredto as “Participant”) alleging that:
(a) such participant's contributor version directly or indi-rectly infringes any patent, then any and all rightsgranted by such participant to you under sections 2.1and/or 2.2 of this license shall, upon 60 days noticefrom Participant terminate prospectively, unless if within60 days after receipt of notice you either: (i) agree inwriting to pay participant a mutually agreeable reasonableroyalty for your past and future use of modificationsmade by such participant, or (ii) withdraw your litigationclaim with respect to the contributor version againstsuch participant. If within 60 days of notice, a reasonableroyalty and payment arrangement are not mutuallyagreed upon in writing by the parties or the litigationclaim is not withdrawn, the rights granted by partici-pant to you under sections 2.1 and/or 2.2 automati-cally terminate at the expiration of the 60 day noticeperiod specified above.
(b) any software, hardware, or device, other than such par-ticipant's contributor Version, directly or indirectlyinfringes any patent, then any rights granted to You by
such participant under sections 2.1(b) and 2.2(b) arerevoked effective as of the date you first made, used,sold, distributed, or had made, modifications made bythat participant.
8.3. If you assert a patent infringement claim against partici-pant alleging that such participant's contributor versiondirectly or indirectly infringes any patent where such claimis resolved (such as by license or settlement) prior to theinitiation of patent infringement litigation, then the rea-sonable value of the licenses granted by such participantunder sections 2.1 or 2.2 shall be taken into account indetermining the amount or value of any payment orlicense.
8.4. In the event of termination under sections 8.1 or 8.2above, all end user license agreements (excluding distributorsand resellers) which have been validly granted by you orany distributor hereunder prior to termination shall survivetermination.
9. LIMITATION OF LIABILITY.UNDER NO CIRCUMSTANCES AND UNDER NO LEGALTHEORY, WHETHER TORT (INCLUDING NEGLIGENCE),CONTRACT, OR OTHERWISE, SHALL YOU, THE INITIALDEVELOPER, ANY OTHER CONTRIBUTOR, OR ANY DIS-TRIBUTOR OF COVERED CODE,OR ANY SUPPLIER OFANY OF SUCH PARTIES, BE LIABLE TO ANY PERSON FORANY INDIRECT, SPECIAL, INCIDENTAL, OR CONSEQUEN-TIAL DAMAGES OF ANY CHARACTER INCLUDING, WITH-OUT LIMITATION, DAMAGES FOR LOSS OF GOODWILL,WORK STOPPAGE, COMPUTER FAILURE OR MALFUNC-TION, OR ANY AND ALL OTHER COMMERCIAL DAM-AGES OR LOSSES, EVEN IF SUCH PARTY SHALL HAVEBEEN INFORMED OF THE POSSIBILITY OF SUCH DAM-AGES. THIS LIMITATION OF LIABILITY SHALL NOT APPLYTO LIABILITY FOR DEATH OR PERSONAL INJURY RESULT-ING FROM SUCH PARTY'S NEGLIGENCE TO THE EXTENTAPPLICABLE LAW PROHIBITS SUCH LIMITATION. SOMEJURISDICTIONS DO NOT ALLOW THE EXCLUSION ORLIMITATION OF INCIDENTAL OR CONSEQUENTIAL DAM-AGES, SO THIS EXCLUSION AND LIMITATION MAY NOTAPPLY TO YOU.
10. U.S. GOVERNMENT END USERS.The covered code is a "commercial item," as that term isdefined in 48 C.F.R. 2.101 (Oct. 1995), consisting of"commercial computer software" and "commercial computersoftware documentation," as such terms are used in 48C.F.R. 12.212 (Sept. 1995). Consistent with 48 C.F.R.12.212 and 48 C.F.R. 227.7202-1 through 227.7202-4(June 1995), all U.S. Government end users acquire cov-ered code with only those rights set forth herein.

AP
PE
ND
IX
APPENDIX
150
11. MISCELLANEOUS.This license represents the complete agreement concerningsubject matter hereof. If any provision of this license isheld to be unenforceable, such provision shall be reformedonly to the extent necessary to make it enforceable. ThisLicense shall be governed by California law provisions(except to the extent applicable law, if any, provides oth-erwise), excluding its conflict-of-law provisions. Withrespect to disputes in which at least one party is a citizenof, or an entity chartered or registered to do business inthe united states of america, any litigation relating to thisLicense shall be subject to the jurisdiction of the federalcourts of the northern district of california, with venuelying in santa clara county, california, with the losing partyresponsible for costs, including without limitation, courtcosts and reasonable attorneys' fees and expenses. Theapplication of the united nations convention on contractsfor the International sale of goods is expressly excluded.Any law or regulation which provides that the language ofa contract shall be construed against the drafter shall notapply to this license.
12. RESPONSIBILITY FOR CLAIMS.As between initial developer and the contributors, eachparty is responsible for claims and damages arising, directlyor indirectly, out of its utilization of rights under thislicense and you agree to work with initial developer andcontributors to distribute such responsibility on an equitablebasis. Nothing herein is intended or shall be deemed toconstitute any admission of liability.
13. MULTIPLE-LICENSED CODE.Initial developer may designate portions of the coveredcode as "Multiple-Licensed". "Multiple-Licensed" meansthat the initial developer permits you to utilize portions ofthe covered code under your choice of the NPL or thealternative licenses, if any, specified by the initial developerin the file described in exhibit A.
EXHIBIT A -Mozilla Public License.
The contents of this file are subject to the Mozilla Public LicenseVersion 1.1 (the “license”); you may not use this file except incompliance with the License. You may obtain a copy of thelicense at http://www.mozilla.org/MPL/
Software distributed under the license is distributed on an "ASIS" basis, WITHOUT WARRANTY OF ANY KIND, either expressor implied. See the license for the specific language governingrights and limitations under the License.
The Original Code is ______________________________________.
The Initial Developer of the Original Codeis___________________.Portions created by ______________________ are Copyright (C)_______________________. All Rights Reserved.
Contributor(s): ______________________________________.
Alternatively, the contents of this file may be used under theterms of the _____ license (the "[___] License"), in which casethe provisions of [______] license are applicable instead of thoseabove. If you wish to allow use of your version of this file onlyunder the terms of the [____] license and not to allow others touse your version of this file under the MPL, indicate your decisionby deleting the provisions above and replace them with thenotice and other provisions required by the [___] license. If youdo not delete the provisions above, a recipient may use your versionof this file under either the MPL or the [___] license."
NOTE: The text of this exhibit A may differ slightly from the textof the notices in the source code files of the original code. Youshould use the text of this exhibit A rather than the text found inthe original code/source code for Your modifications.

OWNER’S MANUAL
LCD TVPlease read this manual carefully before operating your set and retain it for future reference.
P/NO : SAC34134301 (1007-REV02) www.lg.com
1-800-243-00001-888-865-30261-888-542-2623
USA, Consumer User
USA, Commercial User
CANADA
LG Customer Information Center
The model and serial number of the TV is located on the back and/or on one side of the TV. Record these numbers below should you ever need service.
MODEL
SERIAL
32LG710H37LG710H42LG710H
32LD650H37LD650H42LD650H47LD650H55LD650H
This product qualifies for ENERGY STAR in the “factory default” setting.Changing the factory default settings or enabling other features may increase power consumption that could exceed the limits necessary to quality for ENERGY STAR.
32LD655H37LD655H42LD655H