lead & breed's swat 4 tactics
TRANSCRIPT
7/28/2019 Lead & Breed's SWAT 4 Tactics
http://slidepdf.com/reader/full/lead-breeds-swat-4-tactics 1/25
Lead & Breed's
SWAT4 Tactics
written by Breed
© 2010

7/28/2019 Lead & Breed's SWAT 4 Tactics
http://slidepdf.com/reader/full/lead-breeds-swat-4-tactics 2/25
Foreword
This is not a manual of how to play SWAT 4. This is not the holy bible for tactical gamers.And we are not the one and only professional team in this game. We do not understand
the term "professional" as a rank that you achieve by gaining gaming experience. Being"professional" is more than this.It is a thinking. It is an attitude. The attitude to work on yourself and your methods. Thewillingness to change your approved ways in order to make it better. The endeavour tofind other solutions and to develop new techniques.
"It is not enough to form a special forces squad and lean back. You have to ask yourself 'How can we make it better? How can we improve?'" (U. Wegener, founder of the GSG9)
And that is what we are trying to do. We are trying to perfect what we learned byplaying with other people. We constantly question everything we do and work on every
single movement we figured out. We change and add details if we think, that it could bedone in any better way and go through it over and over again.
Our aim is to strike a middle way between safety, realism, and fun without breaking therules of the game itself. This tactical guide constitutes a snapshot of our work at a levelwhere we believe, that it is worth being shared with other people. With people who areinterested in new techniques. With people who do not want to stop at a certain pointbut move on to the next stage.
We do not want to convince anybody of using these tactics. You are free to like or dislike
them. The content of this document is what SWAT4 is all about in our opinion. And weare proud to present ourselves.

7/28/2019 Lead & Breed's SWAT 4 Tactics
http://slidepdf.com/reader/full/lead-breeds-swat-4-tactics 3/25
TABLE OF CONTENTS
1. Positions & movements
1.1 Stacking1.1.1 Single & double1.1.2 Using tools
1.1.2.1 Communication – Using tools
1.2 Room clearing1.2.1 The Split1.2.2 The Train1.2.3 Communication – Room clearing1.2.4 Throwing grenades
1.3 Corners – Scanning1.3.1 Communication – Corners
1.4 Hallways1.4.1 General Movement1.4.2 Turn-offs1.4.3 Crossroads1.4.4 Communication – Hallways
1.5 Open doors – Mirroring1.5.1 Communication – Open doors
1.6 Stairs1.6.1 Communication – Stairs
1.7 The basic essentials
2. Training scenarios
2.1 Room clearing2.1.1 Straight in2.1.2 Hostage situations2.1.3 Throwing grenades2.1.4 Hide & seek2.1.5 Target identification
2.2 Hallways2.2.1 Moving & cornering2.2.2 Sudden contact
2.3Target practice – Suicidal civilian

7/28/2019 Lead & Breed's SWAT 4 Tactics
http://slidepdf.com/reader/full/lead-breeds-swat-4-tactics 4/25
1. Positions & movements
referring to a team of 2 officers
1.1 Stacking
1.1.1 Stacking – Single & double
There are three possible stack up positions: a single stacking on the doorknob side, asingle stacking on the hinge side, and the double stacking on both sides of the door.
If the team reaches a door and the situation behind it is unknown, the most reasonableand safe stacking would be the single on the doorknob side.
– The team gets least exposed when it opens the door.
– It is the easiest position to drop a Flashbang for a dynamic Breach, Bang & Clearentry.
– If a contact would try to leave the room, both officers would immediately have aclear shot on him.
Once you mirrored the door, you might find reasons not to stack on the doorknob side
(only).

7/28/2019 Lead & Breed's SWAT 4 Tactics
http://slidepdf.com/reader/full/lead-breeds-swat-4-tactics 5/25
For example a hostile contact, armed and ready to shoot, hiding behind the door. Hemight have a weapon that could pierce through the door and shoot you if you stack up inhis line of fire.As a result, both officers should stack up on the hinge side.
The double stacking is useful in especially one case: Breaching with the BSG or C2. Thiswill be explained in the following chapter.
1.1.2 Stacking – Using tools
When the team is about to enter a room, it has the options of using the optiwand,breaching charges, and grenades.In general: The officer using a tool, is the one who enters in second!As a result, he would always be behind the first officer in the single stackings.
Example: The SWAT team reaches an unknown door. A stacks on the doorknob side, Bmirrors the door, covered overhead by his fellow (Note: The first one reaching the doorshould be the one providing cover). If there is a suspect that can be stunned with agrenade, B (as the one who mirrored the door and knows the room) would stack behindhis fellow and be in the best position to throw in a Flashbang.

7/28/2019 Lead & Breed's SWAT 4 Tactics
http://slidepdf.com/reader/full/lead-breeds-swat-4-tactics 6/25
Now, if you want to breach a door with the shotgun, you need to be close to the lock.But since you have a tool in your hands, you are not the first one to enter the room. Yourfellow, who enters first, can not stack behind you (as in the single stacking on thedoorknob side), because he would have to move around you and that is not acceptable.The solution is a double stacking: A, as the armed officer, positionates himself on thehinge side and B with the BSG on the lock side. Now B will be covered by the breacheddoor and A has got a clear view and no obstacles when entering the room.
If you want to use a C2 charge, you do not need to be close to the lock, but still a
double stacking can be useful. By stacking on both sides of the door your teammate isalways in your field of view. This way you can see him count down the seconds till thedoor is being blown up.
7/28/2019 Lead & Breed's SWAT 4 Tactics
http://slidepdf.com/reader/full/lead-breeds-swat-4-tactics 7/25
1.1.2.1 Communication – Using tools
Voice commands: "On it", "I'll cover you"
Whenever you are about to use a tool and put your gun in its holster, you should let yourteammate know with a short "On it". It does not matter if you are about to mirror a door,use a grenade, or even just to handcuff a contact. If you are unarmed and need to becovered, your fellow has got to know that.
Same thing the other way round: If you want your teammate to use any kind of tool, tellhim by saying "I'll cover you". This voice command means, that you will stay where youare, providing cover, and that it is safe for your wingman to equip a tool.
We are now stacked up on the door and ready to enter and clear it.At this we have two possibilities:
1.2 Room clearing
1.2.1 Room clearing – The Split
A enters first and moves in to the open side of the room, meaning away from the door.
For two reasons: The "open" side carries its demand in the name. Enemies on this side of the room have clear sight on the opening and are most dangerous for the entry team inthe moment of passing the door. So it should be covered first.
Another reason would be, that Officer A is covered by the open door itself if he staysvery close to the wall. And that is what he should do.As he moves in, he sticks to the wall immediately and holds right beneath, providingcover from 12:00 to 09:00 (the open side in this example).
B moves in and should not even waste one glimpse at the open side of the room. Hisresponsibility is the area from 12:00 to 03:00.
While he passes the opening, he checks 12:00. If making contact, he should deal with itwithout moving into the room any further. After 12:00 is clear, he proceeds by checkingthe area behind the door and sticks to the wall immediately.

7/28/2019 Lead & Breed's SWAT 4 Tactics
http://slidepdf.com/reader/full/lead-breeds-swat-4-tactics 8/25
Close the door or leave it open? Depends. If there are more officers waiting to enter, Bshould of course leave the door open. If not and the area behind the door is 100% clearand does not hide any threats for Officer A, he may aswell close it.
Now both officers move along their walls, either till the room is reported to be clear ortill they stop at the next door/opening.
Note: In case that your team consists of more than two officers, the following oneswould enter the room in an alternate manner. So the 3rd follows the 1st, the 4th followsthe 2nd, and so on.
You might find rooms where there is no "open side" due to confined space conditions.Officer A would have to move straight at 12:00, not covered by the door, and interfere inOfficer B's sector. That would somehow be possible in some situations, but it wouldoverrule our basic tactics.The solution is that A does not enter first. He just checks 12:00 while staying in the doorand his fellow moves around him and into his sector. So Officer A is the first to act, butnot the first to enter.

7/28/2019 Lead & Breed's SWAT 4 Tactics
http://slidepdf.com/reader/full/lead-breeds-swat-4-tactics 9/25
1.2.2 Room clearing - The Train
This movement is very useful when entering a narrow area or a room, where it is toodangerous for Officer B to expose himself by moving around the door.
There is not a big difference for Officer A but him leaving some space between the doorand his holding position.
B moves in, still checking 12:00 while passing the door. But now he would not movearound the door as in the Split. He moves backwards in A's direction in a back-to-backpostition with his teammate.Now he is able to close the door, clear the area behind it, and either move in thedirection he is facing or stay with A in his back-to-back position. He may also open thedoor again for more officers to come in. They would follow the same path as their pointmen.

7/28/2019 Lead & Breed's SWAT 4 Tactics
http://slidepdf.com/reader/full/lead-breeds-swat-4-tactics 10/25
Then move along your walls and clear it.
Note: By closing the door to clear the area behind it, B takes away A's cover at 03:00. Heprovides cover with his own body though, but be aware.
During room clearings in general, the last man of the team should stay at the door tomake sure that his comrades will not get shot from behind. But only if the rest of theteam can do it without him!

7/28/2019 Lead & Breed's SWAT 4 Tactics
http://slidepdf.com/reader/full/lead-breeds-swat-4-tactics 11/25
1.2.3 Communication – Room clearing
Voice commands: "With you", "Stay close", "Let's move", "Clear"
Train or Split? Who decides? And how to tell your fellow?
It is always Officer B, the second one in the row, who mirrored the door and knows thesituation. Therefore, he decides what to do. His movement differentiates the most so itis his choice which way is possible and most safe for him in this specific room.
If he wants to do the Split, he says "With you" while stacked up on the door. If he wantsto do the Train, the voice command would be "Stay close".
Each officer reports his side to be "Clear" when all threats are neutralized.
7/28/2019 Lead & Breed's SWAT 4 Tactics
http://slidepdf.com/reader/full/lead-breeds-swat-4-tactics 12/25
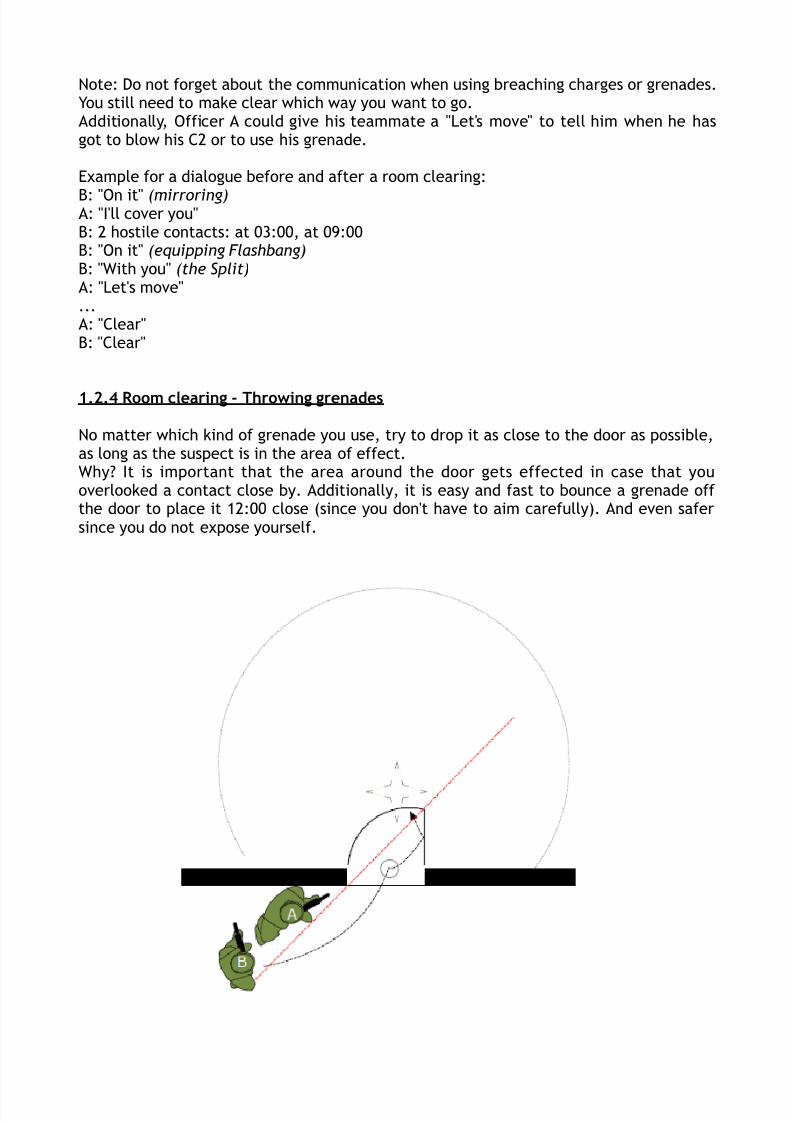
Note: Do not forget about the communication when using breaching charges or grenades.You still need to make clear which way you want to go.Additionally, Officer A could give his teammate a "Let's move" to tell him when he hasgot to blow his C2 or to use his grenade.
Example for a dialogue before and after a room clearing:
B: "On it" (mirroring)A: "I'll cover you"B: 2 hostile contacts: at 03:00, at 09:00B: "On it" (equipping Flashbang)B: "With you" (the Split)A: "Let's move"...A: "Clear"B: "Clear"
1.2.4 Room clearing - Throwing grenades
No matter which kind of grenade you use, try to drop it as close to the door as possible,as long as the suspect is in the area of effect.Why? It is important that the area around the door gets effected in case that youoverlooked a contact close by. Additionally, it is easy and fast to bounce a grenade off the door to place it 12:00 close (since you don't have to aim carefully). And even safersince you do not expose yourself.

7/28/2019 Lead & Breed's SWAT 4 Tactics
http://slidepdf.com/reader/full/lead-breeds-swat-4-tactics 13/25
If you are sure, that the area behind the door is clear and you have to throw it far to gethim blinded/coughing, you should of course do that. But assuming that the radius of theeffected area using Flashbangs is around eight meters, you will hardly find rooms whereyou have to throw them far.
1.3 Corners – Scanning
At corners in general, the team should perform a short scan.The first officer stops at the edge, staying close to the wall. The second one checks thearea around the corner by moving sideways till he can see all the way down the wall. If making contact, he deals with it whereby it is his decision to use his weapon or agrenade. If it is clear, he falls in on Officer A and they move on.
Note: The SWAT team may aswell decide to go dynamic and not spend any time on a scan(for example if there are indications for a hostage situation nearby). In this case, theyjust move around the corner, Officer A in the lead, B following.
1.3.1 Communication – Corners
Voice commands: "I'll cover you", "Clear", "Let's move"
Actually, the scan itself does not necessarily need any kind of voice command. If OfficerA stops at the corner, B should know what he has to do. But to make it more clear, theone in the lead should say "I'll cover you", which means that he will hold his position.
More important is the "Clear"-command once the scan is done. Do NOT rely on thehelmet camera only! Officer B might have seen something you could have overlooked onthe small screen. Wait for his "Clear" under all circumstances!

7/28/2019 Lead & Breed's SWAT 4 Tactics
http://slidepdf.com/reader/full/lead-breeds-swat-4-tactics 14/25
Also pretty important is the command "Let's move" to tell your fellow, that you want togo dynamic around the corner. Otherwise, there could be crossings of firelines and evendead officers.
Note: Officer A has the veto in this situation! He is the one who could end up in friendlyfire so it is his decision whether to scan or to move dynamic.
1.4 Hallways
1.4.1 Hallways – General movement
Especially in wide hallways it is important that you stay close to eachother and do notsplit up on the opposite walls. Now, the problem is that the second in the row can notassist his fellow covering 12:00 if he sticks to the wall.
Solution #1 would be that Officer B moves slightly sideways from Officer A who is
"leaning" against the wall all the time. But only so far, that his haircross is right beneathhis leader. This way he is covered by A at the 12:00 but can fire some shots in thisdirection at the same time.
But moving along the wall in a straight line can be difficult if there are obstacles such as
lamps and plants. Therefore, solution #2 provides that the point man would duck downimmediately in case of a hostile visual to ensure that his fellow has a clear line of fire.
Note: Use accurate weapons here! The first in the row may take out his assault rifle, butthe following one should use his most accurate option to avoid friendly fire.
1.4.2 Hallways – Turn-offs
While moving down a hallway, you might reach a point where another way opens to oneof the sides. You could either follow your path ahead or go on around the corner.
In the latter case, just act as a if it was a normal corner. Perform a short scan and move,but make sure that A always covers the hallway at 12:00 during B's scan.
7/28/2019 Lead & Breed's SWAT 4 Tactics
http://slidepdf.com/reader/full/lead-breeds-swat-4-tactics 15/25
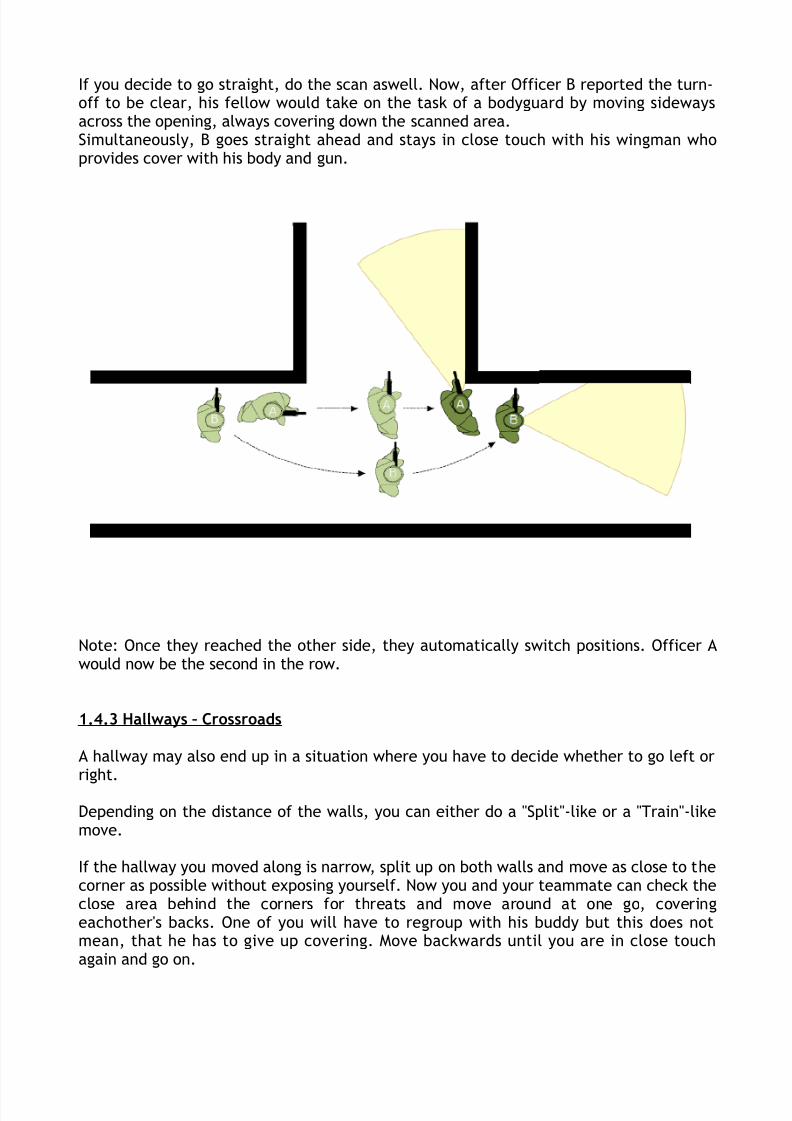
If you decide to go straight, do the scan aswell. Now, after Officer B reported the turn-off to be clear, his fellow would take on the task of a bodyguard by moving sidewaysacross the opening, always covering down the scanned area.Simultaneously, B goes straight ahead and stays in close touch with his wingman whoprovides cover with his body and gun.
Note: Once they reached the other side, they automatically switch positions. Officer Awould now be the second in the row.
1.4.3 Hallways – Crossroads
A hallway may also end up in a situation where you have to decide whether to go left orright.
Depending on the distance of the walls, you can either do a "Split"-like or a "Train"-likemove.
If the hallway you moved along is narrow, split up on both walls and move as close to thecorner as possible without exposing yourself. Now you and your teammate can check theclose area behind the corners for threats and move around at one go, coveringeachother's backs. One of you will have to regroup with his buddy but this does notmean, that he has to give up covering. Move backwards until you are in close touchagain and go on.

7/28/2019 Lead & Breed's SWAT 4 Tactics
http://slidepdf.com/reader/full/lead-breeds-swat-4-tactics 16/25
In a wide hallway, we recommend to stay close. Move as described above in the chapter'1.4.1 Hallways – General movement' until you reach a corner.The point man would now check the opposite side (without exposing himself) before hemoves around his corner. The task of Officer B would be to follow him in a back-to-backposition as his rear-guard.

7/28/2019 Lead & Breed's SWAT 4 Tactics
http://slidepdf.com/reader/full/lead-breeds-swat-4-tactics 17/25
1.4.4 Communication – Hallways
Voice commands: "I'll cover you", "Clear", "Take point", "Let's move", "Stay close"
The communication when you turn matches the voice commands at a corner at 100% due
to it being the same movement.
We have one addition when passing a turn-off. Still there is the scan with the "I'll coveryou" and the "Clear", but now the first in the row has got to announce, that he wants togo straight ahead and will cover his fellow's flank.He should do that with the voice command "Take point". It includes the switching of positions that this movement possesses.
For the simultaneous move at a narrow crossroad the team needs that one go. Anybodyof the team (or even both officers) should just say "Let's move" and check there sides.
To turn around a corner at a wide crossroad, we use the same commands like in theTrain at a door. Officer B tells his fellow that he is ready to go with a "Stay close" andthe team moves.
1.5 Open doors – Mirroring
Open doors to uncleared areas should always be closed if possible. "Possible" means thatyou are not exposing yourself to the contacts inside the room.
If you could not avoid getting spotted, leave it open and mirror it as explained below.
When mirroring an open door two things are essential:
– Crouch all the time.
– Stay at the wall, not infront of the opening.
This is necessary if you want your teammate to be able to provide cover. He needs aclear shot over your head and not you as a human shield between his gun and theenemy.

7/28/2019 Lead & Breed's SWAT 4 Tactics
http://slidepdf.com/reader/full/lead-breeds-swat-4-tactics 18/25
You might only be able to mirror the area to one side and at 12:00, but it should beenough to decide if it is safe to close it and mirror under the door.If it is not, find a way to clear the area with the information you already got.
1.5.1 Communication - Open doors
Voice commands: "On it", "I'll cover you"
The voice commands for this action are equivalent to the ones you use, when you aremirroring a closed door.
1.6 Stairs
We only use a particular move on a two-flight staircase, especially if there is a door half way up. Now, as the point man you would have a big security gap if you move backwardsalong the wall and cover the upper floor. Someone needs to face the door and protectyou from any threat coming through there.Therefore you and your fellow cover eachother. Remember the bodyguard-move inchapter '1.4.2 Hallways – Turn-offs'. We do a similar thing here. Officer A's path leadsalong the inside of the stairs, covering up, parallel to Officer B who moves along thewall straight to the door.
If there is no door to take care of, Officer A may still move like described above. By
doing this, it is safe for his teammate to run a few steps until he reaches a point fromwhere he can cover Officer A. This approach speeds up the team's movement onstaircases.

7/28/2019 Lead & Breed's SWAT 4 Tactics
http://slidepdf.com/reader/full/lead-breeds-swat-4-tactics 19/25
1.6.1 Communication – Stairs
Voice commands: "Take point"
Again I am referring to the 'Turn-off'-chapter. We used the voice command "Take point"
for the one who provides cover with his body in motion. And we do the same thing in thiscase aswell. The talking Officer would be Officer A.

7/28/2019 Lead & Breed's SWAT 4 Tactics
http://slidepdf.com/reader/full/lead-breeds-swat-4-tactics 20/25
The basic essentials
"There aren’t that many different situations in life, and there aren’t that many different ways of dealingwith them — have a few, simple principles, and, when in doubt, refer to them." (P. Blaber, ex-Delta Force)
1. Put mind in gear before opening fire – aim, ID, shoot!
2. Only move as fast as your weapon remains accurate!
3. Go along walls and avoid central positions!
4. Do not skip unsecured doors!
5. Never act alone in any situation!
6. Be disciplined, pay attention, and trust your teammates!

7/28/2019 Lead & Breed's SWAT 4 Tactics
http://slidepdf.com/reader/full/lead-breeds-swat-4-tactics 21/25
2. Training scenarios
referring to the SSF Trainingcenter
General advices:
- Enable "Arrest only" when setting up a server.- Always use the helmet-cameras.- Always pretend that you are in a uncleared area and keep covering.- Do not fear to spam the radio. It is the best way to make your fellow know what youare doing.
2.1 Room Clearing
2.1.1 Room clearing – Straight in
Includes: Stacking, movement, reaction, communication
A very good opportunity to practice the movements we figured out are the first rooms inSector A of the 'SSF Trainingcenter'-map.
Choose one of the empty rooms with the red crosses on the walls and see if you and yourwingman can rely on eachother by practicing a Breach & Clear:Mirror the door, decide if you want to do the Train or the Split, and move in. Respecteachother's sectors of responsibility and fire single shots on the red crosses, pretendingthem to be aiming hostiles. When you are done with your side, report it to be "Clear".
Note: Do NOT interfere in a firefight in your wingman's sector! If you do, you do not trust
him. And that is unacceptable.
The empty rooms might seem boring but in our opinion it is a great thing to warm up.And if you move on, the rooms will have more obstacles and get little more complicatedanyway. Make sure that you never forget to check any corner!
2.1.2 Room clearing - Hostage situations
Includes: Stacking, movement, reaction, identification, accuracy, communication
We all love them and the creators of the SSF Trainingcenter gave us the chance toexercise.

7/28/2019 Lead & Breed's SWAT 4 Tactics
http://slidepdf.com/reader/full/lead-breeds-swat-4-tactics 22/25
There are two different kinds of targets: The red crosses and the black/white figures.Decide which kind stands for the suspects and which for the civilians (for example: b/wfigure = suspect --> They drop, so you can see if you really hit them).Again practice Breach & Clear. And watch your fire!
Note: You might also use grenades and C2 to get the right feeling. Make clear who
throws the grenade and in which position he is.
Challenge: Once you are done you might want to do it again without mirroring.
2.1.3 Room Clearing – Throwing grenades
Includes: Stacking, grenades, movements
If you are not sure where to throw a grenade to achieve a good result, get one of yourwingmen in a room and let him be a suspect for a moment.
He positionates somewhere in there (you might wanna choose one of the more complexrooms with some nasty spots --> Sector B, SSF Trainingcenter), you mirror the door, anddecide where to stack to be out of harm and where to throw your grenade.Breach, Bang & Clear! If the "suspect" gets effected, punch him or use any kind of lesslethal option on him and report the room to be "Clear". If you dropped the grenade in abad place and he does not get effected, he shoots you to show that you failed.
Note: Use different kinds of head protection, depending on the grenades you use, tostun your wingman.
If you are alone on the SWAT side of the door, just act as if you were the officer in the2nd stacking position. In a live situation you should be as the nading one. Also clear yoursector first and pretend that there is an Officer A going for his sector of responsibility.If the hostile contact is not in your sector, don't worry. The stunning effect on players ispretty long. Once your checked your sector switch to Officer A and get that guy.
2.1.4 Room clearing – Hide & seek
Includes: Movement, reaction, completeness
Again your wingman changes sides and hides somewhere in a more complex environmentas a steady suspect. When he found a proper hide-out he gives you a "Go!" and the SWATteam enters and clears the area.
Once you spotted him, shoot him before he can shoot you.Whoever gets hit should make this clear with a "Roger".
Note: Go stealth as if you would do in a live situation just knowing that there is someonearound but not where. If you find him with his back on you, you could aswell use lesslethal options or even grenades.
Challenge: To make it more dangerous for the SWAT officer, the "suspect" could also be patroling around.

7/28/2019 Lead & Breed's SWAT 4 Tactics
http://slidepdf.com/reader/full/lead-breeds-swat-4-tactics 23/25
2.1.5 Room clearing – Target identification
Includes: Movement, reaction, accuracy, completeness
This exercise is pretty much the same as "Room clearing – Hide & seek" but with one
crucial difference: The suspect is not necessarily a hostile contact.
The one hiding inside has the possibility of equipping a weapon to present himself as anarmed suspect or to equip his handcuffs to show that he is a civilian. You, as the SWATofficer, have to identify him very quickly. Decide whether he is dangerous or not andshoot him or just report "Clear".
Note: You must be 100 % SURE about the identity of your target before you pull thetrigger! If he has turned his back on you or is covered by an object and you are not sure,make him turn or expose himself before you shoot him.If you play versus bots, the shouts may differentiate between suspect and civilian and
you have got some other hints that you might not have here. But it still is a greatexercise and schools your attention.
Challenge: Integrate hostage situations! The one hiding inside could positionate himself close to a b/w figure. If your wingman is armed, the figure is the civilian that needs tobe rescued. If he has his handcuffs equipped, shoot down the figure immediately and report "Clear".
2.2 Hallways
2.2.1 Hallways – Moving & cornering
Includes: Movement, communication
Move down hallways and around their corners for a while. You might meet problems of different kinds that need to be solved. Examples: Doors (opened or closed), crossinghallways that need to be passed, covering your teammate, etc.
If you do this from time to time, you will recognize some routine in your movements.
2.2.2 Hallways – Sudden contact
Includes: Movement, reaction, accuracy
Once in a while when you move along a hallway, you or your wingman may pretend, thatyou suddenly have a suspect in sight, aiming, and ready to shoot. See if both of youwould be able to deal with him and are not in eachothers firelines.Fire a few shots, report "Clear", and move on.
Note: In this case, keybindings can help to simulate the visual.

7/28/2019 Lead & Breed's SWAT 4 Tactics
http://slidepdf.com/reader/full/lead-breeds-swat-4-tactics 24/25
2.3 Target practice – Suicidal civilian
Includes: Accuracy
To perform this exercise, you need a small shooting gallery with targets in different
positions and one fellow officer.
Your teammate gets out his handcuffs and simulates a frightened civilian that runsaround and always seems to cross your fireline.The task of you, as the SWAT officer, is to take out all of the targets without hitting the"civilian" once.Your fellow should of course try to get in your way on purpose.
Note: This is also a very good opportunity to check which weapons are reliable andwhich not, talking about accuracy.
Challenge: Try this exercise aswell when you are moving and toggle crouch sometimesto get a feeling for your gun.

7/28/2019 Lead & Breed's SWAT 4 Tactics
http://slidepdf.com/reader/full/lead-breeds-swat-4-tactics 25/25
This is it. This is what we do. This is what we are.But there will be more to write about what we become.
Special thanks go out to the members of the former Pro Coop Squad who helped us
eleborating the details, and gave us the opportunity to test and train these tactics in thefield.
Respectfully,
Lead and Breed
For it is about teamwork.