learn how to make quick and efficient base station
TRANSCRIPT
Quick Reference Guide
Create your own NetGuide!
Create customized test procedures
Set measurement pass/fail limits
Create step-by-step dialogs, with pictures and diagrams for troubleshooting assistance
Save test results and test setups for later analysis
Easily modify and expand existing test procedures
Create multiple versions of test setups or help menus catered to specific base station manufacturers.
Learn How to Make Quick and Efficient Base Station Measurement Routines using NetGuide “It is 6AM and you have alarms at two separate cell sites. They are 50 miles apart and you also have to do preventive maintenance on a third site. Meanwhile you have another site that has had intermittent problems for three weeks now and your supervisor wants to know why it keeps dropping calls. You just checked your e-mail and engineering is getting ready to upgrade three of your sites to handle 3G data service, but nobody has explained to you what must be done to properly test the service. You ask two other technicians and they both tell you something completely different. You ask your manager and he explains that RF Engineering will provide more information.” Introducing NetGuide NetGuide is an innovative software application that can be used with the Y400 NetTek base station field tester. It is designed to provide a helpful and efficient testing solution for base station field technicians who are balancing increasing workloads and heavy time constraints. A NetGuide procedure is a customizable software application that walks a technician through a complete test procedure, through each individual test, and offers customized results analysis to verify whether a test passed or failed. A NetGuide procedure also can store and report test setups and test results for later analysis, trending or verification of proper cabling and test setup. This is not a generic procedure designed by someone in a lab with no practical testing experience. NetGuide is a flexible application that allows the company’s senior technicians or engineers the ability to customize and add notes or information that is available to anyone running the test, resulting in more accurate and repeatable test results. Also, as more tips on testing are discovered and documented, the NetGuide measurement routine can be easily modified and improved learning as you learn. With the NetGuide, gone are the days of the field technician wasting valuable time searching for information that was never documented, setting up a test incorrectly, interpreting the wrong results, or forgetting to run a particular test altogether.

2
NetGuide is designed into two parts • NetGuide Editor is a GUI based interface
used to design the test procedures and can be loaded on a standard PC or Y400 NetTek Analyzer
• NetGuide Player is a GUI based
interface that runs the procedure on the Y400 NetTek Analyzer
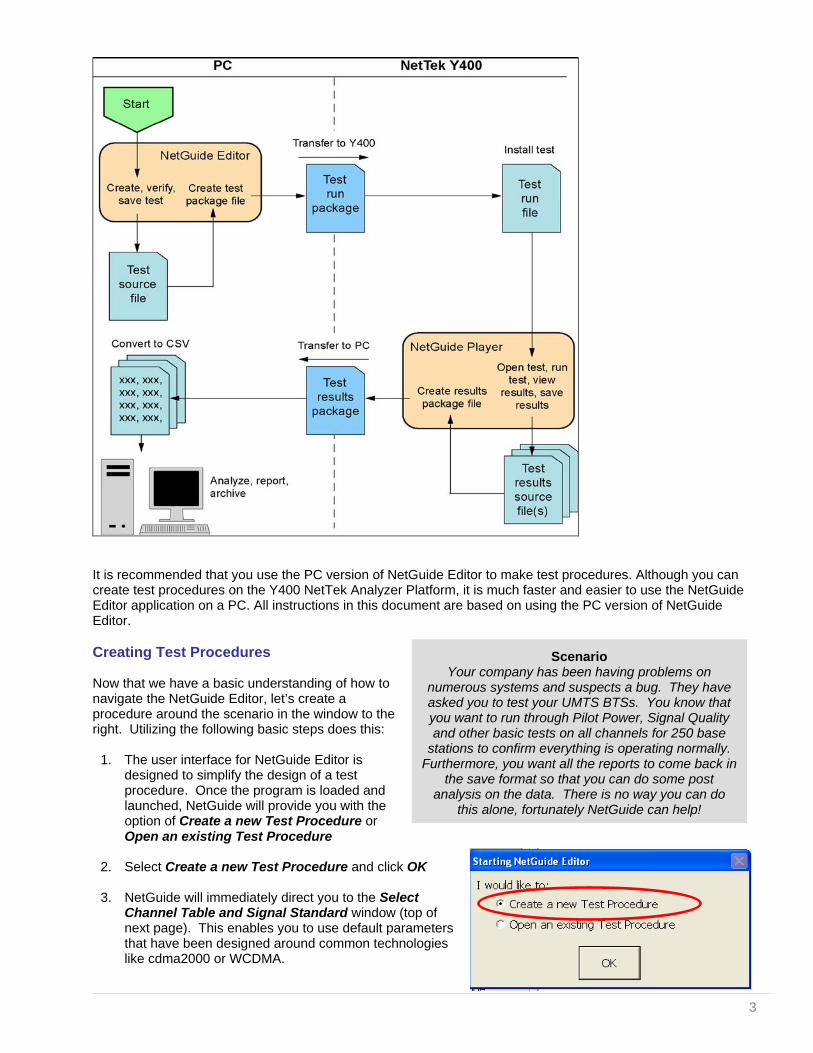
The following sections will discuss the general flow of creating and using a NetGuide testing procedure. Following that, a specific example using the NetGuide Editor and NetGuide Player will be discussed. NetGuide Architecture and General Flow The complete system architecture is shown in the diagram below. The process begins with the NetGuide Editor. Once you have designed and tested the procedure it is then transferred to a NetTek Analyzer. This file transfer can be done via numerous methods including direct connection, flash memory card, or posting and downloading from a company server. Once the file has been transferred to the NetTek Analyzer, the user simply double clicks the file and it installs on the NetTek platform. Now you have a test procedure that can guide any technician through testing integrated directly into their test set via the NetGuide Player. Tests are run while in the field and results are saved. These results can than be reviewed in the player application or packaged and transferred to a PC. Once on the PC, the results file may be expanded into an easy to use CSV (Comma Separate Value) file format. This file format is a standard industry accepted format commonly utilized and can be imported into common programs like Microsoft Excel. NetGuide Editor The NetGuide Editor program enables a company’s technicians and engineers the ability to create test procedures. No other embedded help system allows the ability to design a customized script that combines company specific content with key knowledge. All other help systems provide generic information that typically does not help a technician perform testing and analysis of results. Additionally, the troubleshooting tips within a generic system may not pertain to your actual system or network architecture.
3
Scenario Your company has been having problems on
numerous systems and suspects a bug. They have asked you to test your UMTS BTSs. You know that you want to run through Pilot Power, Signal Quality and other basic tests on all channels for 250 base
stations to confirm everything is operating normally. Furthermore, you want all the reports to come back in
the save format so that you can do some post analysis on the data. There is no way you can do
this alone, fortunately NetGuide can help!
It is recommended that you use the PC version of NetGuide Editor to make test procedures. Although you can create test procedures on the Y400 NetTek Analyzer Platform, it is much faster and easier to use the NetGuide Editor application on a PC. All instructions in this document are based on using the PC version of NetGuide Editor. Creating Test Procedures Now that we have a basic understanding of how to navigate the NetGuide Editor, let’s create a procedure around the scenario in the window to the right. Utilizing the following basic steps does this:
1. The user interface for NetGuide Editor is designed to simplify the design of a test procedure. Once the program is loaded and launched, NetGuide will provide you with the option of Create a new Test Procedure or Open an existing Test Procedure
2. Select Create a new Test Procedure and click OK
3. NetGuide will immediately direct you to the Select
Channel Table and Signal Standard window (top of next page). This enables you to use default parameters that have been designed around common technologies like cdma2000 or WCDMA.
4
a
b
d
e
ca
b
d
e
c
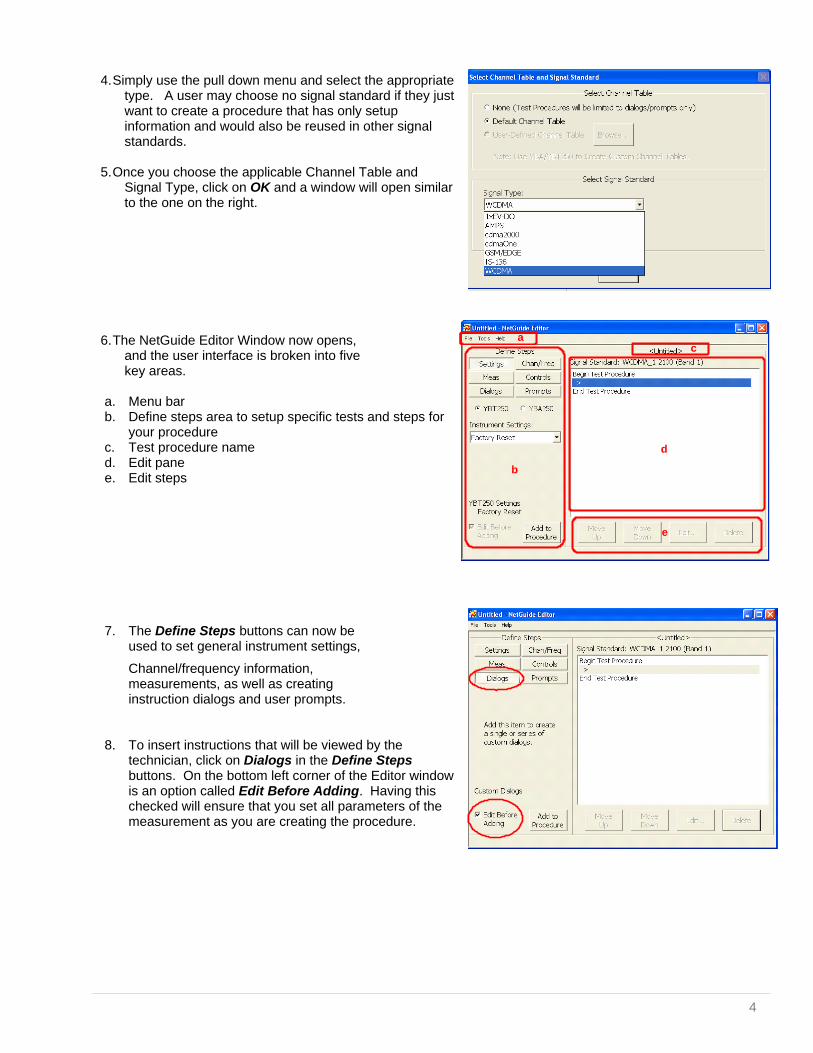
4. Simply use the pull down menu and select the appropriate
type. A user may choose no signal standard if they just want to create a procedure that has only setup information and would also be reused in other signal standards.
5. Once you choose the applicable Channel Table and
Signal Type, click on OK and a window will open similar to the one on the right.
6. The NetGuide Editor Window now opens, and the user interface is broken into five key areas.
a. Menu bar b. Define steps area to setup specific tests and steps for
your procedure c. Test procedure name d. Edit pane e. Edit steps
7. The Define Steps buttons can now be used to set general instrument settings,
Channel/frequency information, measurements, as well as creating instruction dialogs and user prompts.
8. To insert instructions that will be viewed by the technician, click on Dialogs in the Define Steps buttons. On the bottom left corner of the Editor window is an option called Edit Before Adding. Having this checked will ensure that you set all parameters of the measurement as you are creating the procedure.

5
9. Click on Add to Procedure and the Edit Custom Dialog window opens. Type your title in the Caption box at the top, fill in any text information and add a picture by clicking Add Picture. You can choose how the window will appear by selecting one of the options on the right side. Press Add Dialog to add more dialogs
10. Click OK when you’re complete and the dialog series will be added to the procedure.
11. Now click on Chan/Freq to request the user to enter the channel at run time. As with previous settings, ensure that you have Edit Before Adding selected. Click on Add to Procedure. Once you have completed your settings, click OK on Chan/Freq window
12. Select Meas to select the type of measurements to run. A pull down menu will now appear that contains a list of common measurements.
13. For this procedure, RF Pilot Power is required, so you will simply select Pilot Power as shown on the right.
14. Click Add to Procedure and if you have Edit Before Adding selected, the window to the right will appear.
6
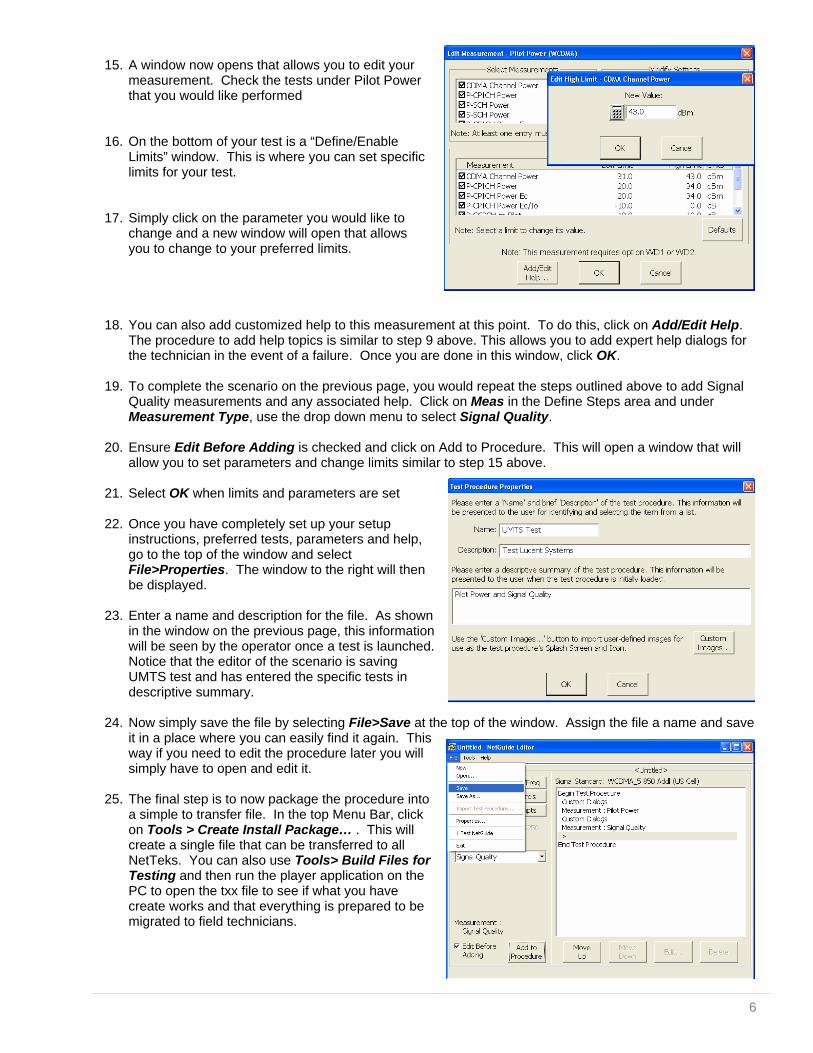
15. A window now opens that allows you to edit your measurement. Check the tests under Pilot Power that you would like performed
16. On the bottom of your test is a “Define/Enable Limits” window. This is where you can set specific limits for your test.
17. Simply click on the parameter you would like to change and a new window will open that allows you to change to your preferred limits.
18. You can also add customized help to this measurement at this point. To do this, click on Add/Edit Help. The procedure to add help topics is similar to step 9 above. This allows you to add expert help dialogs for the technician in the event of a failure. Once you are done in this window, click OK.
19. To complete the scenario on the previous page, you would repeat the steps outlined above to add Signal
Quality measurements and any associated help. Click on Meas in the Define Steps area and under Measurement Type, use the drop down menu to select Signal Quality.
20. Ensure Edit Before Adding is checked and click on Add to Procedure. This will open a window that will
allow you to set parameters and change limits similar to step 15 above.
21. Select OK when limits and parameters are set
22. Once you have completely set up your setup instructions, preferred tests, parameters and help, go to the top of the window and select File>Properties. The window to the right will then be displayed.
23. Enter a name and description for the file. As shown
in the window on the previous page, this information will be seen by the operator once a test is launched. Notice that the editor of the scenario is saving UMTS test and has entered the specific tests in descriptive summary.
24. Now simply save the file by selecting File>Save at the top of the window. Assign the file a name and save
it in a place where you can easily find it again. This way if you need to edit the procedure later you will simply have to open and edit it.
25. The final step is to now package the procedure into
a simple to transfer file. In the top Menu Bar, click on Tools > Create Install Package… . This will create a single file that can be transferred to all NetTeks. You can also use Tools> Build Files for Testing and then run the player application on the PC to open the txx file to see if what you have create works and that everything is prepared to be migrated to field technicians.

7
The easiest and fastest way to transfer
information is through a PCMCIA compact
flash card
Note: The PC version of the NetGuide and NetTek applications should be configured with the same options as the actual Y400 NetTek Analyzer to be used (same modules enabled, options enabled, etc.) before running a test simulation on the PC.
26. You are now ready to transfer this file to your technicians Moving NetGuide Procedure to NetTek Migrating information to and from the Y400 NetTek analyzer can be done through numerous methods. Basically the NetTek functions as a standard PC and Tektronix has made every attempt to provide options for our customers. Whether you are initially loading a procedure or saving test results, choose the method below that best fits your scenario.
Developer posts updated testing modules on company web page for downloading to PC or even directly to the NetTek
Probably the easiest and fastest way to transfer information is to use a PCMCIA compact flash card
Through these easy methods of loading information into the NetTek test analyzer, the technician becomes armed with more information and becomes more efficient with testing and troubleshooting. Test results can be saved and moved to a PC for storage or later viewing. There may be times when a technician is simply stumped on a difficult problem. With the NetGuide program, all results and measurements can be saved, shown or sent to someone that can remotely provide guidance and instruction. Note: It is important to make sure each of procedure is saved with a unique and easy to remember file name when they were designed in the NetGuide Editor. For example, file names may be “Ericsson 2106 EDGE”, “Lucent cdma2000” or something similar so that a technician can easily recognize the correct procedure.
NetGuide Player Once a test procedure has been designed, it is loaded into the player program and resides on the Y400. This can then be incorporated as the company testing procedure. When testing is required, the technician simply launches the appropriate test application based on the specific BTS equipment or other parameters. Installing and Opening NetGuide Player Procedures There are several ways to load the NetGuide Player procedures onto your NetTek Analyzer including PCMCIA memory card, RS-232, USB or by directly loading from a web server). The files for a specific test procedure are installed onto the NetTek analyzer into the file location below: BuiltInDisk:\\Tektronix\NetTek\Test Package Steps to install a test procedure:
1. Open My NetTek on the NetTek 2. Locate and double click on the .txq package.
The package will install to BuiltInDisk:\\ Tektronix \NetTek\Test Package
3. Double-tapping on the NetGuide Player Icon or by clicking Start, then Programs, NetTek then selecting NetGuide Player to start the
program 4. Click File Open in the Player application to load
the text procedure. Note: If only installing a test procedure then only follow steps 1 and 2.

8
1
2
3
4
5
8
9
10
11
7
6
1
2
3
4
5
8
9
10
11
7
6
Navigating NetGuide Player Before we start a procedure, the user interface for NetGuide Player is designed to simplify the testing process while a technician is on site at a base station. Once the program is loaded and launched, a window will open similar to the one below Major Buttons of the NetGuide Player
1. Menu Bar 2. Test Procedure Name 3. Test information 4. Results Pane 5. Test Control Buttons
6. Status 7. Test Pass/Fail Indicator8-10.
Test Run Parameters 11. Go To Measurement
Running Tests The NetGuide Player has the ability to use multiple test procedures. This can be extremely important when dealing with multiple types of radios or base stations. Technicians can simply load the proper test procedure for the current base station and type of test.
Let’s take the UMTS scenario one step further. You are a new
technician in the same company and you have been handed a NetTek and asked to utilize the built-in procedure
to test all BTS’ in your area.

9
Running a Test on the NetTek
1. After turning on your NetTek analyzer, you can launch the NetGuide Player by double-tapping on the icon or by going to Start>Programs>NetTek>NetGuide Player
2. This will launch NetGuide Player and a window similar to the one on the right will appear. Notice that before you open a file, the NetGuide Player is completely empty.
3. Locate the Menu Bar in the upper left hand corner
4. Select File by tapping on the screen and go to Open
5. Select a procedure from the Open Test Procedure dialog box
6. You were told to run the UMTS BTS Test, so choose that test application and then click on OK to close the dialog box
Note: As a shortcut, you can also double-click the txx file or create a shortcut to the txx file. Double-clicking that will launch the player and load the procedure.
You are now ready to run your selected Test
7. On the bottom of the NetGuide window are the “Test Control Buttons” which are from left to right, Run, pause, single step and stop the test.
Push the Run/Play button and the test begins
Run/Play Step Stop

10
bc
d
a
bc
d
a
8. Depending on the creation of the test a window similar to the right appears and you are provided with pictures and dialog on how to connect the NetTek to the BTS. To your surprise, the picture is accurate and not a generic diagram. The instructions even have the exact wording that appears on the BTS.
9. You connect the cables exactly as shown and explained and hit “Next”
10. You are asked what channel to run the test on, you enter the requested data and now you are running a test…that was easy!
Interpreting Test Results While a test is running, the technician can watch the tests through the results pane. This records the specific tests that are running, and the measurements and results of the test.
a. General Status information
b. Help Icon
c. Measurement Type
d. Test Fail Icon Continuing on with our scenario, let’s see how the test is progressing
11. As you are running the test, the test set beeps and you notice that the red “FAIL” Icon has come up in the upper right hand corner of NetGuide Player. You also notice that there are also measurements highlighted in red on the results screen.
12. You notice that there are several items that appear to be failing and you decide to scroll through the results. As you are scrolling, you notice an “i” symbol on the left. You click on this box and it gives tips and information about what to check.
Note: Depending on how you have set the On Failure check box (bottom right of NetGuide Player), the test will either pause or just beep and continue to run when the test has encountered an error.

11
When a test fails, the problem is addressed and fixed immediately.
Customized directions on potential next stepsPossible
problems
Customized directions on potential next stepsPossible
problems
13. If a test fails, the technician can follow the built-in procedure for troubleshooting the problem. This is done by hitting the <i> icon. Since this information is designed by a company employee who understands the details of the job, it will provide extremely valid and valuable information.
14. You follow the on-screen instructions and find that there is a problem with this BTS. You fix the problem and save your test results and take them back to the RF Engineer who requested you test your system. To your surprise, nobody questions you and the Engineer asks if you have any advice on improving the process so that you can test the remaining radios in your area.
Note: It is advised to save the results to a compact flash card to avoid filling up the NetTek hard drive. This will also allow easy transfer of test reports to the PC. This can be done via the Preference> Default menu option on the Player. In a scenario like this, there is no chance of missing a specific test. All tests are done consistently and the results are compared against acceptable company parameters. The key to a successful implementation of the NetGuide program also depends on the technician providing feedback to his supervisor, management, or engineers. This means that anytime the technician does not understand the testing dialog or finds differences or problems during actual testing, they can request or recommend changes. Since this does not require a complete rewrite, modifications can be made quickly and efficiently. Summary The NetGuide is an innovative productivity enhancement application for the NetTek base station analyzer that helps field technicians test base stations more efficiently – with accurate and repeatable results. The NetGuide is a flexible and easy-to-use application that gives you the power to control all aspects of the testing process with the ability to document and note key aspects of the tests being performed. With the NetGuide, expensive programmers or consultants are not required – you will have everything you need to get you up-and-running as quickly as possible defining your own testing procedure that are sure to increase you and your teams productivity and effectiveness in the field.

12
Copyright © 2006, Tektronix. All rights reserved. Tektronix products are covered by U.S. and foreign patents, issued and pending. TEKTRONIX and TEK are registered trademarks of Tektronix, Inc. All other trade names referenced are the service marks, trademarks or registered trademarks of their respective companies 03/06 DV/WOW 2EW-19545-0