learn i · let is part of the ecmascript 6 standard, but for maximum browser compatibility, ......
TRANSCRIPT

LEARN WITH
INTRODUCTION TO TYPESCRIPT
By Jeffry Houser
http://www.learn-with.com
http://www.jeffryhouser.com
https://www.dot-com-it.com
Copyright © 2017 by DotComIt, LLC
Contents Title Page ...................................................................................................................................................... 2
Introduction to TypeScript ............................................................................................................................ 5
Setup the Project ...................................................................................................................................... 5
Install Dependencies ............................................................................................................................. 5
Create your first TypeScript File ............................................................................................................ 6
Test the Application in your Browser.................................................................................................... 7
Creating Variables ..................................................................................................................................... 9
Create a Variable ................................................................................................................................... 9
Define the Variable with Let instead of Var ........................................................................................ 10
Add Typing to Variables ...................................................................................................................... 13
A List of Types ..................................................................................................................................... 14
Use a Constant ........................................................................................................................................ 15
Enums ...................................................................................................................................................... 17
Create a Number based Enum ............................................................................................................ 17
Creating a String based Enum ............................................................................................................. 19
Loops and Arrays ..................................................................................................................................... 21
Create an Array ................................................................................................................................... 21
For-in Loop .......................................................................................................................................... 21
For-of Loop .......................................................................................................................................... 22
Creating Your First Class.......................................................................................................................... 24
Create your First Class ......................................................................................................................... 24
Review the generated code ................................................................................................................ 26
Interfaces ................................................................................................................................................ 27
Create the Interface ............................................................................................................................ 27
Rework the Echo Class ........................................................................................................................ 27
Implement the Interface with a Class ................................................................................................. 28
Create a name Array ........................................................................................................................... 29
Modules ...................................................................................................................................................... 31
Create Interface Module ..................................................................................................................... 31
Create Class Modules ......................................................................................................................... 31
Rework Main Application .................................................................................................................... 32
Setup Module Loader .......................................................................................................................... 33

Final Thoughts ......................................................................................................................................... 34
Introduction to TypeScript TypeScript is a strongly typed language which can be used to build web applications. It come with a
special compiler that converts the strongly typed language into JavaScript so it can run in a traditional
browser. Since TypeScript is strongly typed, it can offer better tooling around it than can be done with
simple JavaScript. Angular 2 and above were built in TypeScript and I use it heavily in my Angular 4
books. This article is intended to give you an introduction to TypeScript.
Setup the Project This section will show you how to setup and compile a TypeScript project from scratch
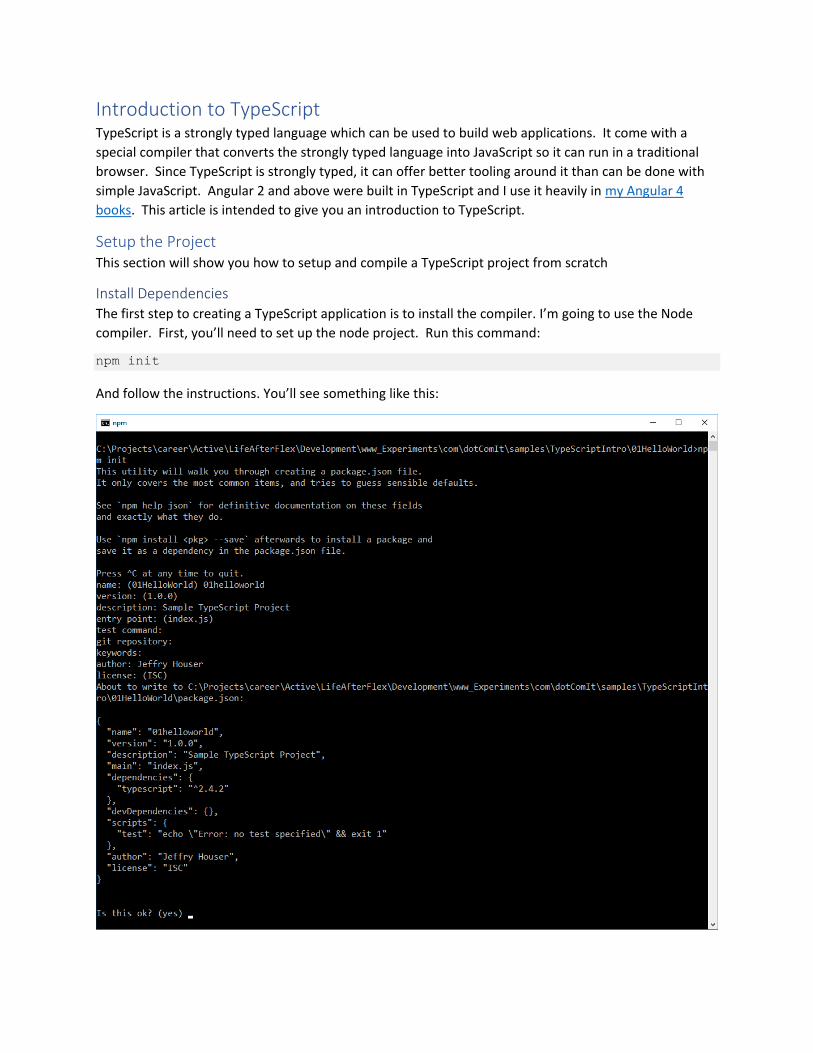
Install Dependencies The first step to creating a TypeScript application is to install the compiler. I’m going to use the Node
compiler. First, you’ll need to set up the node project. Run this command:
npm init
And follow the instructions. You’ll see something like this:

This will create a package.json file that will look something like this:
{
"name": "01helloworld",
"version": "1.0.0",
"description": "Sample TypeScript Project",
"main": "index.js",
"scripts": {
"test": "echo \"Error: no test specified\" && exit 1"
},
"author": "Jeffry Houser",
"license": "ISC"
}
Now install the TypeScript compiler:
npm install -g typescript
You’ll see this:
You’re ready to write your first TypeScript.
Create your first TypeScript File Create a file named hello.ts:
function echo(message) {
return message;
}
document.body.innerHTML = echo("Hello World");
The purpose of this code is to echo a Hello Word message. The function accepts a string, and returns it.
The innerHTML of the document’s body tag is set to the results of the function call.
This file would be valid JavaScript, but it works fine since TypeScript is a Superset of JavaScript. We can
use JavaScript inside of TypeScript easily. We’ll improve on this throughout the article as we introduce
more TypeScript specific concepts.
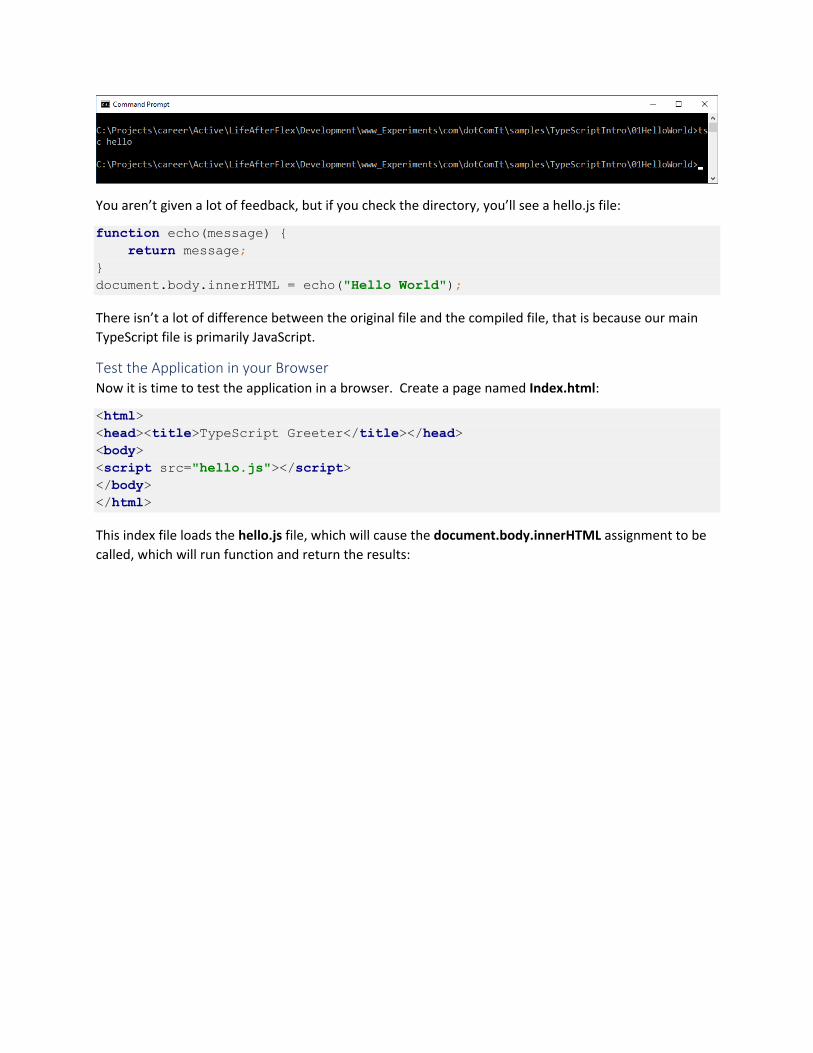
You can compile this file by running this command line:
tsc hello
You’ll see something like this:
You aren’t given a lot of feedback, but if you check the directory, you’ll see a hello.js file:
function echo(message) {
return message;
}
document.body.innerHTML = echo("Hello World");
There isn’t a lot of difference between the original file and the compiled file, that is because our main
TypeScript file is primarily JavaScript.
Test the Application in your Browser Now it is time to test the application in a browser. Create a page named Index.html:
<html>
<head><title>TypeScript Greeter</title></head>
<body>
<script src="hello.js"></script>
</body>
</html>
This index file loads the hello.js file, which will cause the document.body.innerHTML assignment to be
called, which will run function and return the results:

Congratulations! You’ve created your first TypeScript application.

Creating Variables An important part of programming is the ability to create variables. Let’s turn our “Hello World” Variable
into a variable. First, we’ll do it the Javascript way and then we’ll modify it with some TypeScript.
Create a Variable This is the original demo from the previous section:
function echo(message) {
return message;
}
document.body.innerHTML = echo("Hello World");
We can easily add a variable in here. First, create the variable, named message:
var message ="Hello World"
The var keyword is the normal way to create a variable in JavaScript. Now, modify the echo() call to
pass the variable instead of the string:
document.body.innerHTML = echo(message);
Recompile the code and it will work just as the previous sample:
So far so good.
Define the Variable with Let instead of Var TypeScript includes a secondary way to create a variable, using the let keyword instead of the var
keyword:
let message ="Hello World";
This simple replaces the var command with the let command. Recompile and you’ll see the same
results. Let is part of the ECMAScript 6 standard, but for maximum browser compatibility, you probably
want to stick to ECMAScript 5 or lower compatibility.
The reason to use the let command instead of var is because the two scope differently. When you use
var the new variable is created as part of the function block. If the variable is not part of the function
block it is added to the global scope of the page. This is why it is considered a best practice for a lot of
code to be included in an IIFE. This can cause unexpected results in some cases, such as when you
access loop counters inside nested for loops, or have one function embedded in another. The let
keyword always scopes at the block level, so each for loop would be considered its’ own block.
Consider this code:
function scopedemovar(){
for(var i = 0; i <10; i++){
console.log('outer i: ' + i);
for(var i = 0; i <10; i++){
console.log('inner i: ' + i);
}
}
}
scopedemovar();
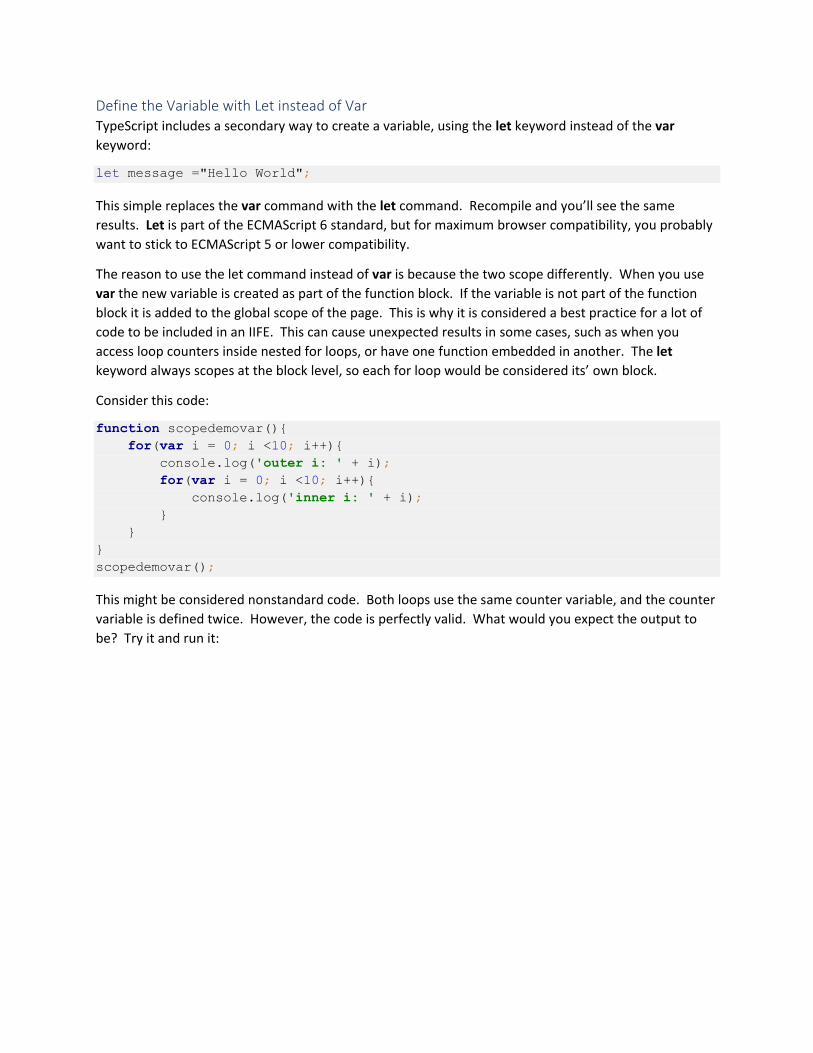
This might be considered nonstandard code. Both loops use the same counter variable, and the counter
variable is defined twice. However, the code is perfectly valid. What would you expect the output to
be? Try it and run it:
You may expect the outer loop to loop 10 times, but it only loops once. That is because the inner loop
changes the value of the counter variable and the stop condition triggers the second time the outer loop
tries to run.
Change the var to let:
function scopedemolet(){
for(let i = 0; i <10; i++){
console.log('outer i: ' + i);
for(let i = 0; i <10; i++){
console.log('inner i: ' + i);
}
}
}
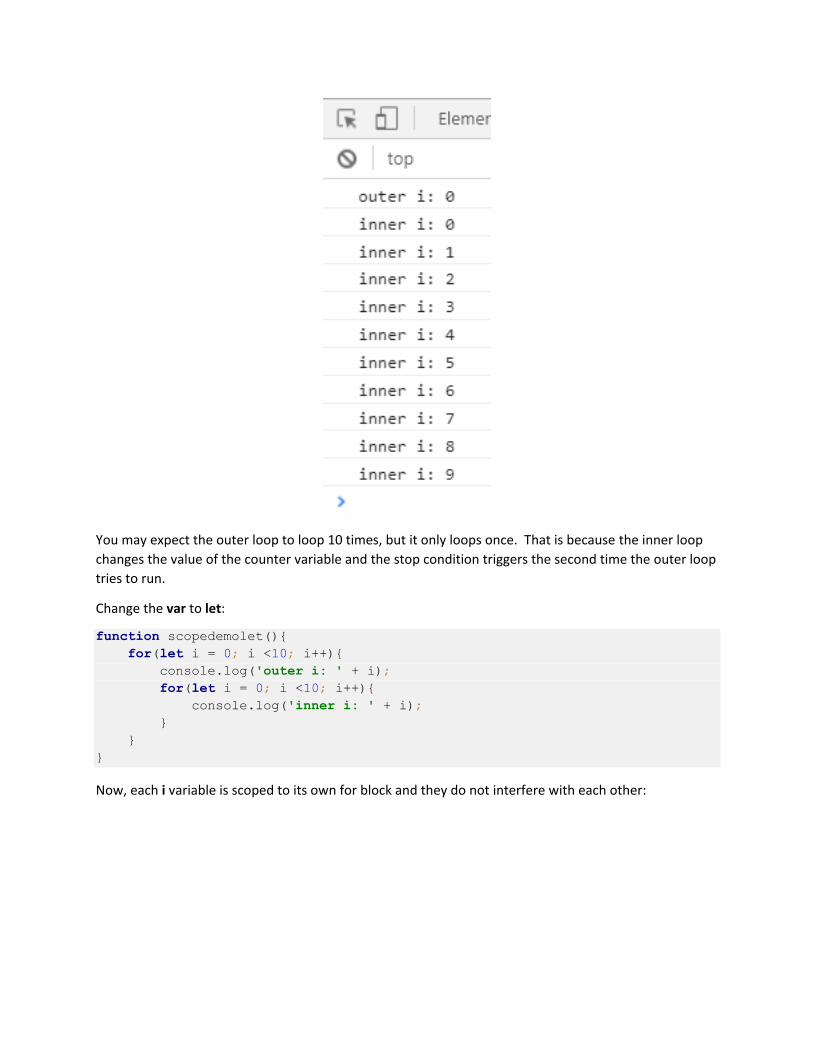
Now, each i variable is scoped to its own for block and they do not interfere with each other:

I cut off the full output since it was very long, but you can run the code to see that both the inner and
outer loop both execute a full 10 times using let to define the variable instead of var.
Add Typing to Variables An important decision for using TypeScript is to make variables statically typed instead of dynamically
typed. We can add a type to the variable definition, like this:
let message : string ="Hello World";
We can change the function definition too:
function echo(message:string ):string {
return message;
}
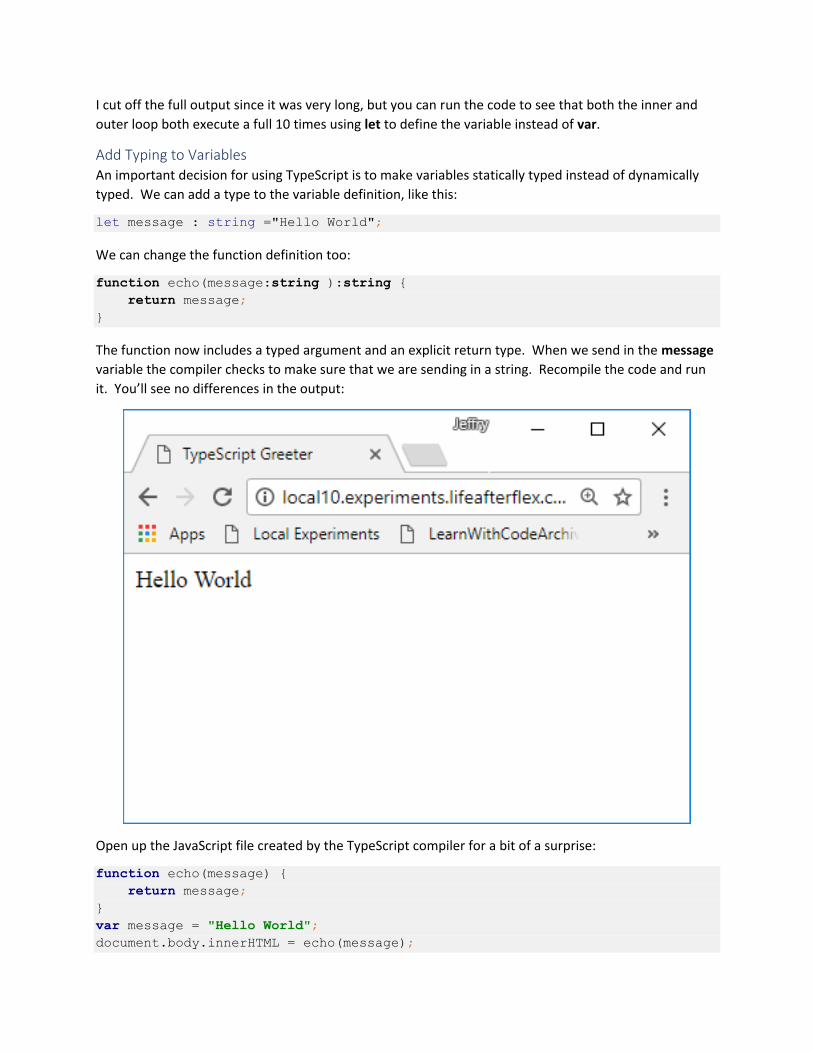
The function now includes a typed argument and an explicit return type. When we send in the message
variable the compiler checks to make sure that we are sending in a string. Recompile the code and run
it. You’ll see no differences in the output:
Open up the JavaScript file created by the TypeScript compiler for a bit of a surprise:
function echo(message) {
return message;
}
var message = "Hello World";
document.body.innerHTML = echo(message);

All your type statements were stripped out. That is because these types are part of TypeScript, but not
JavaScript. They allow for compile time checking of values, but do not change the underlying language
or how things run in the browser. This is an important distinction to remember as you learn TypeScript.
The language is all about improved tooling and compile time validation; not about a new language in the
browser.
A List of Types TypeScript offers you these types:
• Boolean: A Boolean value holds two states, either true of false.
• Number: A Number represents any numerical value.
• String: A string represents any textual, alphanumeric data.
• Array: An array is a collection of multiple types. We’ll discuss Array’s in more detail in the
next section.
• Tuple: A Tuple is an array with a fixed number of elements. Since they have a fixed number
of elements, they may be more memory efficient. You might use this for a list of states in
the US, as one example.
• Enum: An Enum type is like a numerical array, but allows you to provide descriptive names
to each number value. We’ll cover Enum’s in more detail in a later section.
• Any: The any type means that this variable can contain any type. This is how we are used to
dealing with values in JavaScript. Generally, I try to avoid using this, however it can be
useful in certain situations such as dynamic function arguments or an array that contains
mixed type values.
• Void: The void type is the opposite of any. It represents the absence of a type. You wouldn’t
use this for the value of a variable, but may use it as the return type of a function.
• Your Class Here: You can create your own custom class if you need to. We’ll show you more
in this later.

Use a Constant TypeScript supports the use of constants. A constant is like a variable that will never change. JavaScript
does not have any native support for constants. This is easy to setup. Instead of using the let keyword
you can use the const keyword. Let’s change how our hello world is created:
const messageIntro = "Hello"
let messageSubject : string ="World";
This creates a constant named messageIntro and gives it the value of “Hello”. Then we have our
messageSubject, with the value of “World”. Put them together when we make the call:
document.body.innerHTML = echo(messageIntro + " " + messageSubject);
Our code operates identically even though the implementation is different:
The JavaScript code behind this looks like this:
function echo(message) {
return message;
}
var messageIntro = "Hello";
var messageSubject = "World";
document.body.innerHTML = echo(messageIntro + " " + messageSubject);

Both const and let transpile to var statements in the final code. The use of these new constructs is
primarily to help with tooling and to catch possible errors during compile time instead of by testing code
in a browser.

Enums Enums are a data type I have not come across in most other languages, but they are inspired by C#. An
enum is a way to give friendly names to numerical values. They are like an array with indexes, but more
specific. I can envision using something like this with a view stack style component and using an enum
to handle which view is currently displayed. Or, I might use it with an event class instance to determine
what type of event occurred. Or it could be used to determine what color style to apply to certain text.
Create a Number based Enum I’m going to start by creating a simple sample with a number based enum:
enum MyNumbers {
First,
Second,
Third
}
The MyNumbers enum contains four values each one representing a number. Since enums are sort of
like arrays, the First item is at the 0 index, the second item will have the value of 1, and so on. We can
use MyNumbers like it is own variable type:
let myNum :MyNumbers = MyNumbers.First;
Output this value.
console.log(myNum);
What do you think you’ll get? Since it is the value of MyNumbers.First and that is the first element of
the zero-based index, you’ll get number 0:
A benefit of enums is that we can control the number scheme:
enum MyNumbers {
First = 1,
Second,
Third
}
We specified the First item is equal to the number 1. Turn each element into a variable:
let myNum1 :MyNumbers = MyNumbers.First;
let myNum2 :MyNumbers = MyNumbers.Second;
let myNum3 :MyNumbers = MyNumbers.Third;
Then output them:
console.log(myNum1);
console.log(myNum2);
console.log(myNum3);
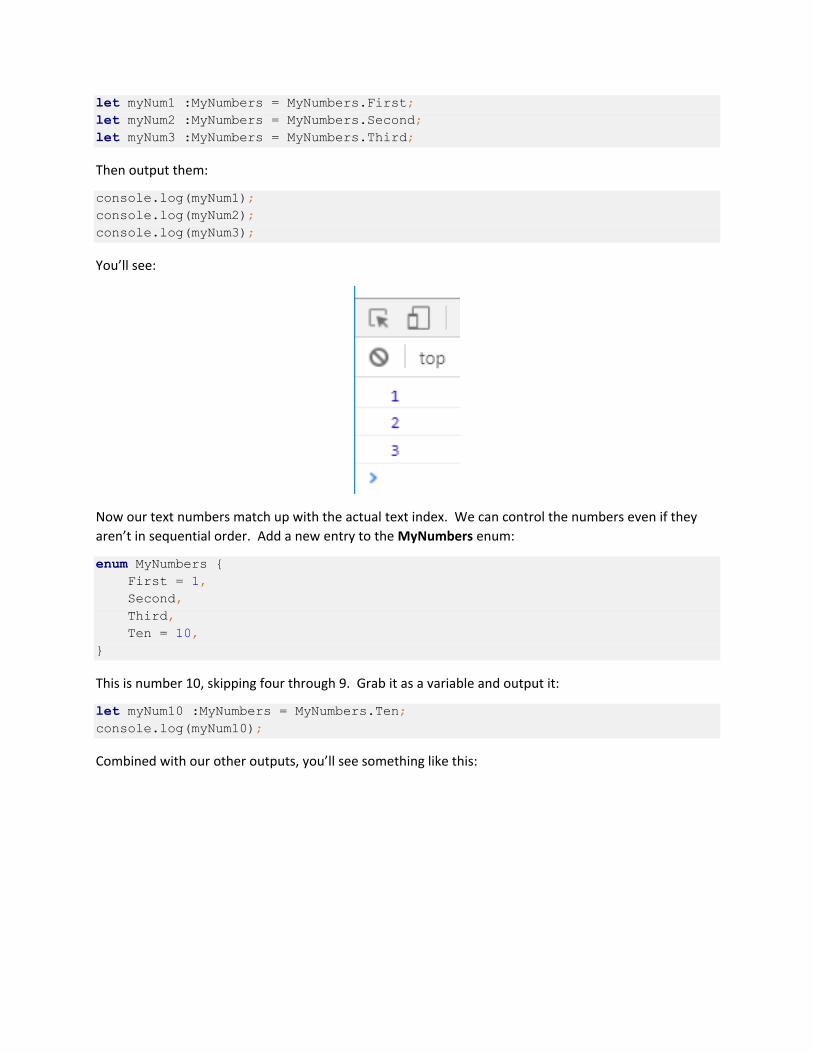
You’ll see:
Now our text numbers match up with the actual text index. We can control the numbers even if they
aren’t in sequential order. Add a new entry to the MyNumbers enum:
enum MyNumbers {
First = 1,
Second,
Third,
Ten = 10,
}
This is number 10, skipping four through 9. Grab it as a variable and output it:
let myNum10 :MyNumbers = MyNumbers.Ten;
console.log(myNum10);
Combined with our other outputs, you’ll see something like this:
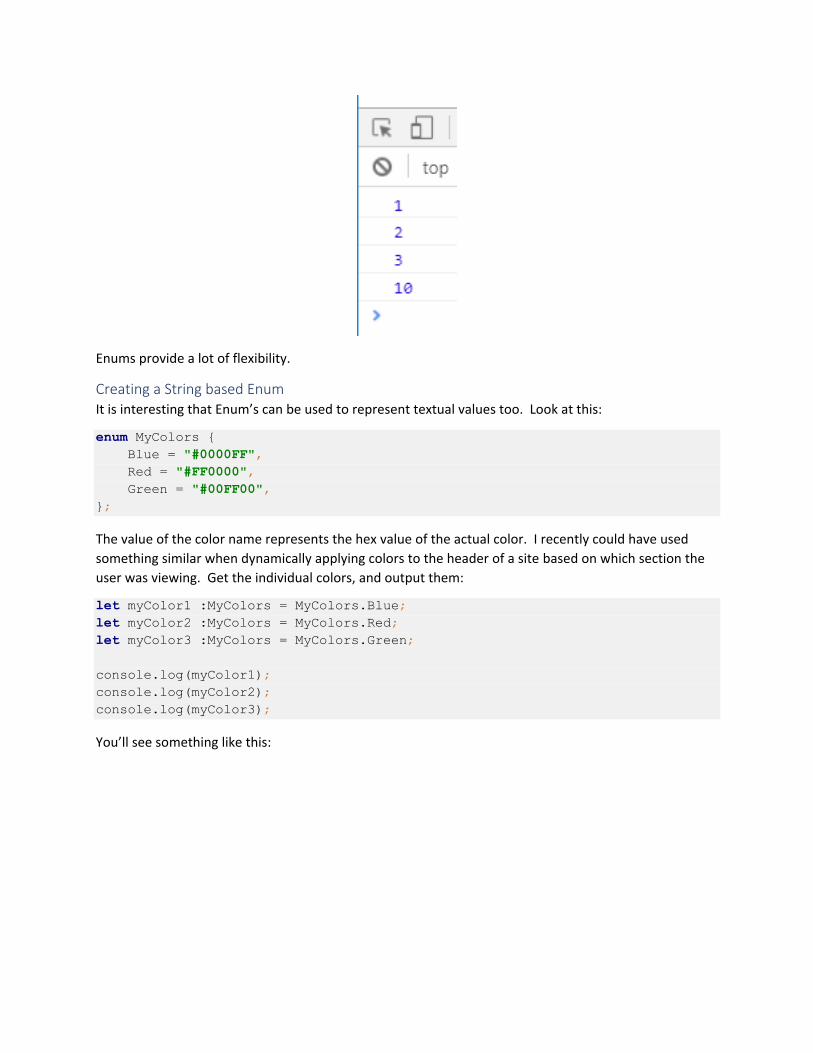
Enums provide a lot of flexibility.
Creating a String based Enum It is interesting that Enum’s can be used to represent textual values too. Look at this:
enum MyColors {
Blue = "#0000FF",
Red = "#FF0000",
Green = "#00FF00",
};
The value of the color name represents the hex value of the actual color. I recently could have used
something similar when dynamically applying colors to the header of a site based on which section the
user was viewing. Get the individual colors, and output them:
let myColor1 :MyColors = MyColors.Blue;
let myColor2 :MyColors = MyColors.Red;
let myColor3 :MyColors = MyColors.Green;
console.log(myColor1);
console.log(myColor2);
console.log(myColor3);
You’ll see something like this:

Enums are an interesting data type, caught somewhere between an array and a class.
Loops and Arrays This section will show you how to create an array and loop over it. We’ll create an array of strings, and
then loop over them with our echo function to welcome multiple people in our HTML page.
Create an Array The first step is to create an array. You can use this syntax:
let personArray : string[] = ["Jeffry", "Tom", "John"];
This creates a variable just like other variables we had seen. The key differentiator is that after the
variable type, I added square brackets. This is what tells the compiler we are creating an array of strings.
You can define arrays with any of the native types, such as numbers or Boolean, or with your own
custom types.
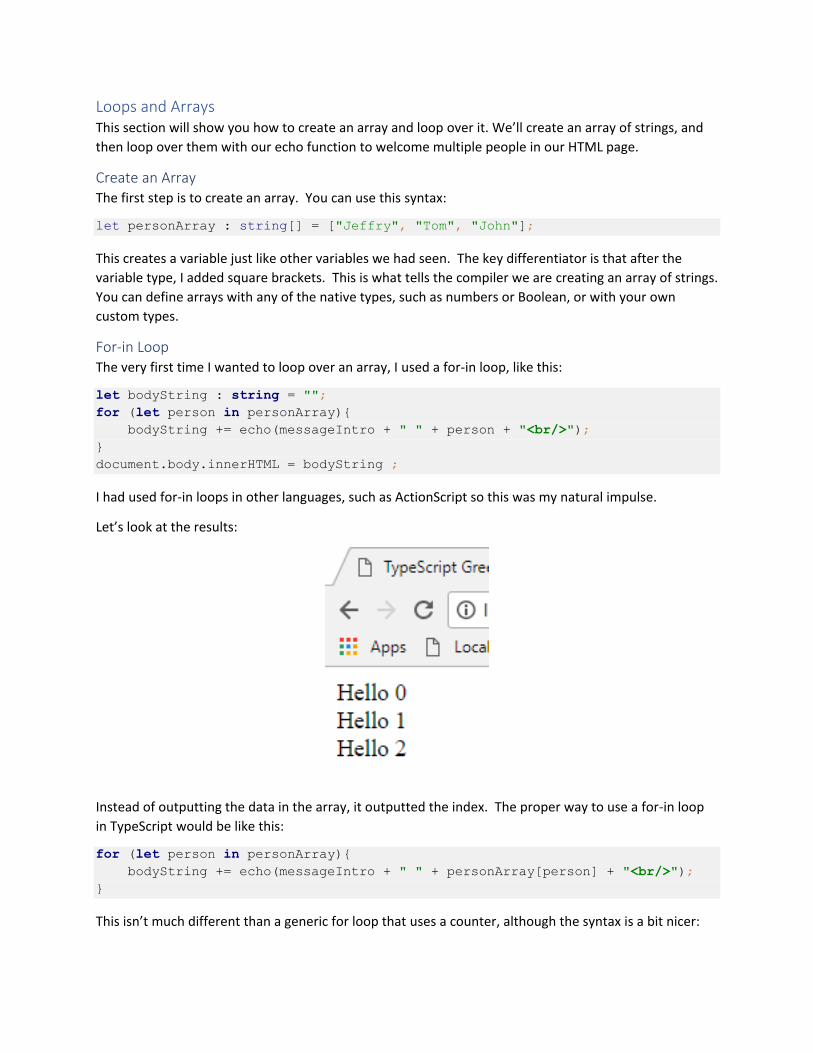
For-in Loop The very first time I wanted to loop over an array, I used a for-in loop, like this:
let bodyString : string = "";
for (let person in personArray){
bodyString += echo(messageIntro + " " + person + "<br/>");
}
document.body.innerHTML = bodyString ;
I had used for-in loops in other languages, such as ActionScript so this was my natural impulse.
Let’s look at the results:
Instead of outputting the data in the array, it outputted the index. The proper way to use a for-in loop
in TypeScript would be like this:
for (let person in personArray){
bodyString += echo(messageIntro + " " + personArray[person] + "<br/>");
}
This isn’t much different than a generic for loop that uses a counter, although the syntax is a bit nicer:
All version of ECMAScript after 2015 support for-in loops the same way that TypeScript does. This is
supported by most browsers and in fact that generated JS Code uses for-in loops:
for (var person in personArray) {
bodyString += echo(messageIntro + " " + person + "<br/>");
}
But, this result wasn’t quite what I was after. Thankfully TypeScript includes another option, the for-of
loop.
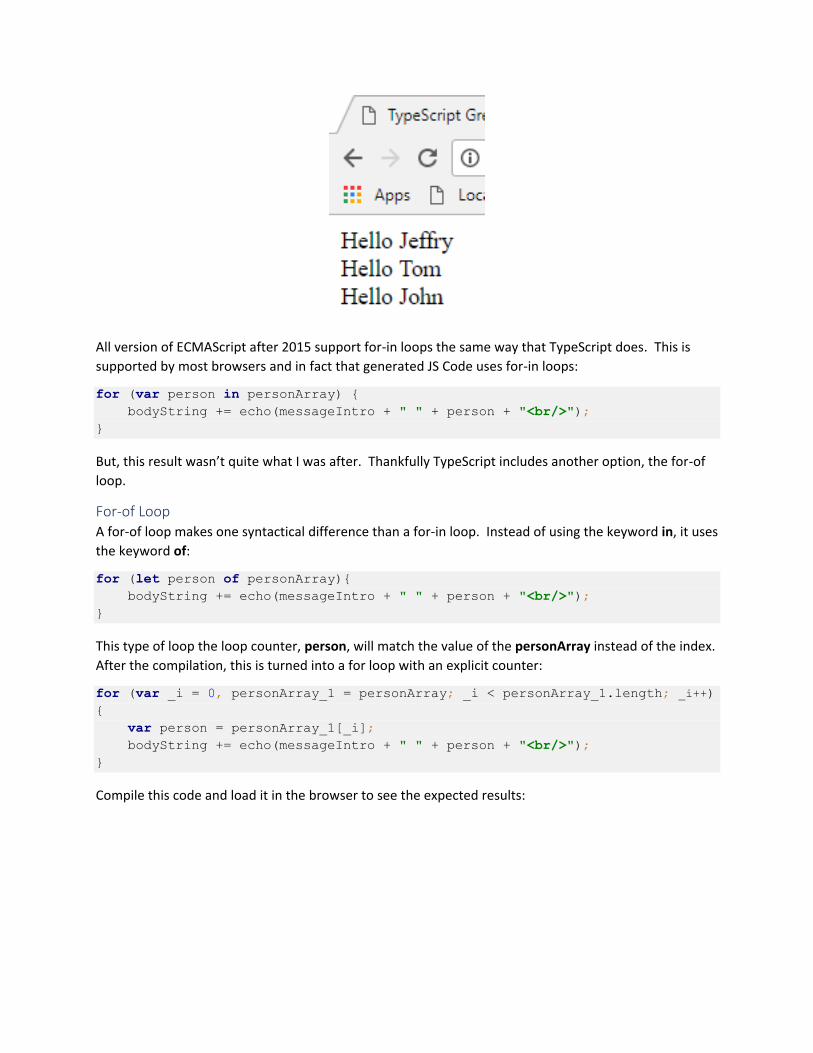
For-of Loop A for-of loop makes one syntactical difference than a for-in loop. Instead of using the keyword in, it uses
the keyword of:
for (let person of personArray){
bodyString += echo(messageIntro + " " + person + "<br/>");
}
This type of loop the loop counter, person, will match the value of the personArray instead of the index.
After the compilation, this is turned into a for loop with an explicit counter:
for (var _i = 0, personArray_1 = personArray; _i < personArray_1.length; _i++)
{
var person = personArray_1[_i];
bodyString += echo(messageIntro + " " + person + "<br/>");
}
Compile this code and load it in the browser to see the expected results:

Looping in TypeScript is not much different than looping in other languages.

Creating Your First Class As with many languages, TypeScript allows you to create your own classes. A class is like your own data
type with data and functions to process that data.
Create your First Class Create your class stub:
class Echo {
}
This creates a class named Echo. The purpose of this class is to create and store our welcome message.
Let’s start by creating some properties on the class:
static readonly messageIntro : string = "Hello"
subject : string;
private message : string;
The subject is a relatively normal variable. It is a string that contains the subject of our welcome
message. The message variable is similar, but has the private distinguisher. This means that the
message variable is private to the local message. It will contain the final message once it is put together,
but is only accessible inside the class, not from code accessing an instance of the class.
The messageIntro is a bit different. We are not able to define constants inside of a TypeScript class, so
instead I used the readonly keyword. This means the value will not be changeable, like a constant. I
also define the messageIntro as a static property, which means it exists on the class and not on an
instance of the class. A big difference between constants and readonly properties is that readonly
properties can be set in the constructor of an instance of a class.
Every class needs a constructor, so create one:
constructor(subject : string){
this.subject = subject;
}
The constructor will be called automatically when we create a new instance of the class with the new
keyword. This constructor accepts one argument, the subject. The code just saves the subject
argument into the subject variable.
Now, add a createMessage() function:
createMessage():void{
this.message = Echo.messageIntro + " " + this.subject + "<br/>";
}
This concatenates the read only messageIntro variable with the subject. It puts a space in between and
a HTML line break at the end. We had similar code in previous samples, but not encapsulated into a
class function. The return type of this function is void, meaning nothing is returned.
We’ll add one final function to our class:
echo():string{
return this.message;
}
This function returns the complete message. The message value could be blank if the createMessage()
function as not called yet, however this will still work.
Now, create an instance of the Echo class:
var echoInstance : Echo = new Echo('World')
This uses the new keyword to create the new instance. You may have seen this in other languages.
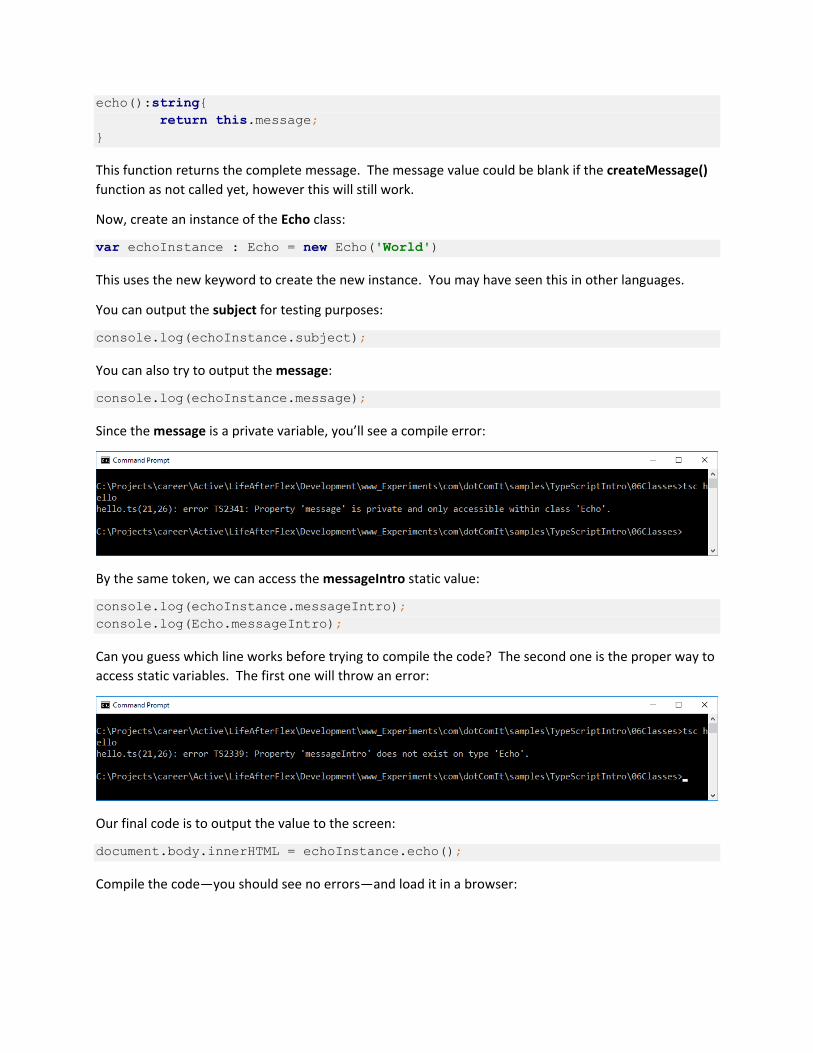
You can output the subject for testing purposes:
console.log(echoInstance.subject);
You can also try to output the message:
console.log(echoInstance.message);
Since the message is a private variable, you’ll see a compile error:
By the same token, we can access the messageIntro static value:
console.log(echoInstance.messageIntro);
console.log(Echo.messageIntro);
Can you guess which line works before trying to compile the code? The second one is the proper way to
access static variables. The first one will throw an error:
Our final code is to output the value to the screen:
document.body.innerHTML = echoInstance.echo();
Compile the code—you should see no errors—and load it in a browser:

In a non-sample application, I might try to make my classes more discrete. Since this one adds a line
break at the end of the message, it is conflating data processing and display code, something which is
undesirable in real world applications.
Review the generated code This is the generated code:
var Echo = (function () {
function Echo(subject) {
this.subject = subject;
}
Echo.prototype.createMessage = function () {
this.message = Echo.messageIntro + " " + this.subject + "<br/>";
};
Echo.prototype.echo = function () {
return this.message;
};
Echo.messageIntro = "Hello";
return Echo;
}());
var echoInstance = new Echo('World');
echoInstance.createMessage();
document.body.innerHTML = echoInstance.echo();
The Echo class is created using an immediately invoked function expression. The static class property.
MessageIntro, is created as an instance variable inside the class—remember that JavaScript doesn’t
have the concept of readonly or static properties. The subject and message variables are not defined
since they do not have default values. They’ll be created on the class when they are needed. For the
subject that is inside the constructor, and for the message that is inside the createMessage() function.
Although beyond the scope of this tutorial, inheritance is supported with TypeScript, so one class can
inherit from another.

Interfaces This section will talk about interfaces. It is not going to talk about User interfaces, but rather object-
oriented interfaces. An interface is a definition of properties and methods that must be supported by a
class which implements this interface. You can think of an interface as the contract between a class
instance and a method argument or variable. If they both match the interface they are interchangeable.
Create the Interface For this sample, we’re going to create a name interface. This interface will represent the name of a
person and will contain a first name and last name. It will have an optional middle initial and also a
method to retrieve the name.
Here is the interface:
interface name {
firstName: string;
middleInitial? : string;
lastName: string;
getName() : string;
}
The interface is set up similar to a class or enum. It uses the keyword interface, and the name of the
interface—in this case name. The firstName and lastName properties are as normal properties on an
object. The middleInitial is an optional property, and that is distinguished by a question mark. Finally, a
single method is defined by the interface, getName(). This will be used to return the name. The
interface does not contain an implementation, just a definition of the method. That means different
classes which extend the interface can have different implementations.
Rework the Echo Class Let’s rework the Echo class to use the interface instead of strings. First create the method stub with the
instance variables:
class Echo {
static readonly messageIntro : string = "Hello"
subjectArray : name[];
private message : string;
}
The main change here is that the subject string was replaced with a subjectArray of name types. The
constructor:
constructor(subjects : name[]){
this.subjectArray = subjects;
}
The constructor now accepts an array of name instead of a single string.
The createMessage() function now loops over the array:
createMessage():void{
this.message = '';

for (let person of this.subjectArray){
this.message += Echo.messageIntro + " " + person.getName() + "<br/>";
}
}
Inside the loop, the interface’s getName() function is used to add an element to the output.
Finally, the echo() function:
echo():string{
return this.message;
}
The echo() function has not changed, it just returns the object instance variable, message.
Implement the Interface with a Class I’m going to create two classes which implement our name interface contract. One will be for a Person
and another for a Pet. First, the Person class:
class Person implements name {
firstName: string;
middleInitial : string;
lastName: string;
getName(): string {
return this.firstName + ' ' + this.middleInitial + ' ' + this.lastName;
}
}
The Person class is defined with the class keyword followed by the name of the class. Then comes the
implements keyword followed by the name of the interface. If you wanted you could list multiple
interfaces here, each separated by a comma.
The firstName, middleInitial, and lastName are created properties on the object, not much different
than how they were with the interface definition. The getName() method includes a definition. It
concatenates the firstName, middleInitial, And lastName, returning a single string.
Now, let’s create another class that implements name. This one is called Pet:
class Pet implements name {
firstName: string;
lastName: string;
type : string;
getName(): string {
return this.firstName + ' ' + this.lastName + ", " + this.type;
}
}
This includes the firstName and lastName defined as variables on the class object. A new property is
named type, this will represent the type of pet we have. A class can implement properties or methods
not included in an interface. The middleInitial is left out, which is okay because that is marked as an

optional property in the interface—and my pets don’t have middle initials. The getName() method puts
together the firstName and lastName, but appends the type to the end.
Create a name Array We have an interface and two classes that extend it. Let’s put all together. Start by creating a names
array:
let nameArray : name[] = [];
Now create a new Person instance. This one represents me:
let jeffryInstance : Person = new Person();
jeffryInstance.firstName = "Jeffry";
jeffryInstance.middleInitial = "A";
jeffryInstance.lastName = "Houser";
nameArray.push(jeffryInstance);
The new jeffryInstance of the Person class is added to the nameArray.
Create two pets:
let hercInstance : Pet = new Pet();
hercInstance.firstName = "Hercules";
hercInstance.lastName = "Houser";
hercInstance.type = "Dog";
nameArray.push(hercInstance);
let zeusInstance : Pet = new Pet();
zeusInstance.firstName = "Isadora";
zeusInstance.lastName = "Houser";
zeusInstance.type = "Dragon";
nameArray.push(zeusInstance);
One is for my pet dog, Hercules, and the other is for my pet dragon, Isadora. Both are added to the
same nameArray value without issue even though they have different types. The implementation of the
interfaces tells the compiler that the nameArray can accept both Pet and Person instances.
Now, create an instance of the Echo class:
let echoInstance : Echo = new Echo(nameArray);
Create the message:
echoInstance.createMessage();
And output the message:
document.body.innerHTML = echoInstance.echo();
Recompile the app and load it in a browser:

It works as expected.

Modules When writing a real-world application, it does not make sense to include all the code in a single file.
TypeScript supports that by allowing you to expand different functionality into modules.
Create Interface Module The first thing we’re going to do is create a module for the name interface. I put this in a file named
IFile.ts:
export interface name {
firstName: string;
middleInitial? : string;
lastName: string;
getName() : string;
};
This looks exactly like the Interface created in the previous exception with the one addition of the
export keyword. Export tells the compiler that this class is available for use inside other classes.
Create Class Modules Now create the person class:
export class Person implements name {
firstName: string;
middleInitial : string;
lastName: string;
getName() : string {
return this.firstName + ' ' + this.middleInitial + ' ' + this.lastName;
}
}
This also puts the export keyword in front of the class definition. If you try this you’ll notice an
immediate error. The name is not defined. To define it we’ll need to add an import statement:
import {name} from "./IName";
The import statement tells you that the name entity is imported from the IName file and can be used
within this class. The path I used, ‘./IName’, tells us that the files are in the same directory, however we
can use a more elaborate package setup, and most likely you will do that for main applications.
We can create the Pets.ts module in the same manner:
import {name} from "./IName";
export class Pet implements name {
firstName: string;
lastName: string;
type : string;
getName() : string {
return this.firstName + ' ' + this.lastName + ", " + this.type;

}
}
This code mirrors the Person module, with the primary changes being the use of the export keyword
before the class definition and the import of the name interface.
The Echo class needs a similar rework:
import {name} from "./IName";
export class Echo {
static readonly messageIntro : string = "Hello"
subjectArray : name[];
private message : string;
constructor(subjects : name[]){
this.subjectArray = subjects;
}
createMessage():void{
this.message = '';
for (let person of this.subjectArray){
this.message += Echo.messageIntro + " " + person.getName() + "<br/>";
}
}
echo():string{
return this.message;
}
}
The functionality remains unchanged. Like the previous classes it uses an export statement to make the
class available elsewhere, and an import statement to make use of the name interface.
Rework Main Application With all the classes stored in separate files, our primary app has become a lot simpler. First, import all
the classes:
import {name} from "./IName";
import {Person} from "./Person";
import {Pet} from "./Pet";
import {Echo} from "./Echo";
Then, create the nameArray:
let nameArray : name[] = [];
Now, populate the nameArray:
let jeffryInstance : Person = new Person();
jeffryInstance.firstName = "Jeffry";
jeffryInstance.middleInitial = "A";
jeffryInstance.lastName = "Houser";
nameArray.push(jeffryInstance);

let hercInstance : Pet = new Pet();
hercInstance.firstName = "Hercules";
hercInstance.lastName = "Houser";
hercInstance.type = "Dog";
nameArray.push(hercInstance);
let zeusInstance : Pet = new Pet();
zeusInstance.firstName = "Isadora";
zeusInstance.lastName = "Houser";
zeusInstance.type = "Dragon";
nameArray.push(zeusInstance);
Create an instance of the Echo class:
let echoInstance : Echo = new Echo(nameArray);
Call the createMessage() function:
echoInstance.createMessage();
Finally, output the results:
document.body.innerHTML = echoInstance.echo();
The changes to the main file consisted of removing the class and interface definitions and replacing
them with imports.
Setup Module Loader The import statement is not a native JavaScript statement and does not have an easy parallel. To make
code like this work in the browser we’ll need to use a module loader. There are a few different types of
module loaders such as RequireJS or SystemJS. Many people use code tools like Browserify or WebPack
to encapsulate away the complexity.
For the purposes of this sample, I’m going to use RequireJS. Open up the index.html file and add this
script statement:
<script data-main="requireconfig"
src="//cdnjs.cloudflare.com/ajax/libs/require.js/2.3.4/require.min.js">
</script>
This loads the RequireJS library from a remote CDN. Note that I have completely removed the script tag
that loads the hello.js file.
The script tag also has a different attribute named data-main with a value of “requireconfig”. This
property tells Require that whenever it has completed loading it should look for the requireconfig.js file.
Create that file next:
requirejs.config({
baseUrl: '',
paths: {
app: ''

}
});
This sets up the baseUrl and the paths to the app. Since all our code is in the main dev directory, I set
these values to blank. Now, tell RequireJS to load our main application file:
requirejs(['hello']);
Since there are a few different methods of creating modules, we have to tell our TypeScript compiler
which one to use. We want it to use the amd approach. When you compile your application add the
module flag and specify amd. Use this at the command line:
tsc –module amd hello
You’ll see this:
The response is as boring as expected. Now load the app in the browser:
Congratulations; you’ve created a TypeScript application with multiple classes and interfaces!
Final Thoughts This series should have given you all the information you need to know to start using TypeScript in your
applications. Check out our book on Angular 4 which uses TypeScript heavily.