learning android google maps - sample chapter
TRANSCRIPT
C o m m u n i t y E x p e r i e n c e D i s t i l l e d
Integrate Google Maps with your Android application to offer feature-rich and interactive maps
Learning Android Google MapsR
aj Am
al W.
Learning Android Google MapsGoogle Maps is a map service developed and owned by Google Inc. Learning Android Google Maps helps you to create enthralling and captivating map-based applications for the domains of distribution, logistics/warehousing and transportation, retail, and more.
This book helps you to overcome the most common problems faced by users and helps you create a successful map application without any hassle.
The book starts with a brief description of how to set up an environment and obtain an API key to create your map application. This book will teach you about adding markers, overlays, and information windows to the map in detail. You will then dive deep into customizing various types of map and working with location data and Google Street View.
By the end of this book, you will be able to create succinct map applications in Android using Google Maps effi ciently.
Who this book is written forIf you are an Android developer and want to integrate maps into your application, then this book is defi nitely for you. This book is intended for novice Android application developers who would like to get up and running with map-rich applications using Google Maps. Some basic development experience would be helpful but this is not a necessity.
$ 49.99 US£ 31.99 UK
Prices do not include local sales tax or VAT where applicable
Raj Amal W.
What you will learn from this book Get to know about the basic development
environment setup needed to create a successful map application
Generate an SHA1 fi ngerprint, obtain an API key, and create a basic map application
Detect different types of maps and implement them in your application
Add information to your map such as markers, overlays, information windows, and shapes
Explore interactions with maps and work with gestures
Change the different camera views in your map application
Work with real-time GPS location data and implement it in your application
Apply Street View and integrate the StreetViewPanorama fragment into your application
Employ the native Google Maps application to solve some tasks using intents
Create a cutting-edge Google Maps application by implementing all the concepts learned
Learning Android G
oogle Maps
P U B L I S H I N GP U B L I S H I N G
community experience dist i l led
Visit www.PacktPub.com for books, eBooks, code, downloads, and PacktLib.
Free Sample
In this package, you will find: The author biography
A preview chapter from the book, Chapter 1 'Setting Up the
Development Environment'
A synopsis of the book’s content
More information on Learning Android Google Maps

About the Author
Raj Amal W. has almost three years of real-time working experience with Android technology and has helped many developers complete their projects on time with high-quality standards as an Android developer for a private company. Raj is an open source evangelist and encourages others to use open source software. He writes about Android and Linux at http://www.learn2crack.com.
PrefaceThis book completely covers the Android Google Maps API, which helps users to integrate the Google Map functionalities with their Android applications. This book also has real-time examples, which makes the learning process simpler and smoother.
What this book coversChapter 1, Setting Up the Development Environment, shows you how to install Android Studio and Eclipse IDE; confi gure Android SDK; create an Android virtual device in Windows, Mac, and Linux; and download the Google Play services.
Chapter 2, Confi guring an API Key and Creating Our First Map Application, explains you how to obtain an API key from Google Cloud Console. It also helps you create your fi rst Map application.
Chapter 3, Working with Different Map Types, helps you learn about the different map types, such as hybrid, terrain, and indoor as well as the lite mode.
Chapter 4, Adding Information to Maps, helps you understand how to add markers, overlays, and information windows to the map.
Chapter 5, Interacting with a Map, explains how to add custom controls, toolbars, gestures, and events to the map.
Chapter 6, Working with Custom Views, helps you change different camera views and animate the camera. It also helps you with map padding.
Chapter 7, Working with Location Data, helps you learn how to work with real-time location data (GPS data) and integrate it with an Android application.
Chapter 8, Knowing about the Street View, explains you how to add Street View to the map and use custom location in it.

Preface
Chapter 9, Google Maps Intents, explains you how to complete certain tasks using the native Google Maps application and Google Maps Intents.
Chapter 10, Creating a Custom Map Application, helps you create a real-time full fl edged Android application using the map concepts learned in the previous chapters.
Appendix, Answers to Self-test Questions, covers the answers to all the self-test questions that appear at the end of every chapter.
[ 1 ]
Setting Up the Development Environment
Android is the most popular mobile operating system and it has a market share of more than 80 percent. Over 1 million Android devices are shipped each day. Android can run on low-end hardware with 512 MB RAM as well as high-end hardware with 4 GB RAM. It is based on the open source Linux kernel. Due to its open source nature, OEMs prefer Android over other operating systems. The Google Play store now has over a million applications. This makes Android the favorite operating system for users and developers. Some of the unique features that differentiate Android from the others are:
• You can develop Android apps on any platform, whether it is Mac, Linux,or Windows
• Android has top-notch documentation, which makes it the mostdeveloper-friendly platform
• Android apps can be easily published in Google Play compared to thelengthy review process in the iOS app store
Development environment setup is the fi rst and most important step in the software development process. Improper setup will lead to build errors.
Setting Up the Development Environment
[ 2 ]
In this chapter, we will cover the following topics:
• The importance of Android Google Maps• Integrated Development Environment (IDE) to develop Android
applications• Setting up Android Studio• Setting up Eclipse with the ADT plugin• Setting up an Android Virtual Device (AVD) for testing• Exploring Android Studio• Additional helpful stuff
The importance of Android Google MapsIn this section, you will learn the importance of Android Google Maps. It helps to seamlessly integrate Maps with your Android application. It provides location data in a graphical form that enhances the user experience while helping you to create real-time, map-based applications similar to Waze and Uber. Google Maps is superior in comparison to all the other maps. You can display a label or marker over the map. You can provide turn-by-turn navigation and get directions between two locations. These are the some of the points that make Android Google Maps special.
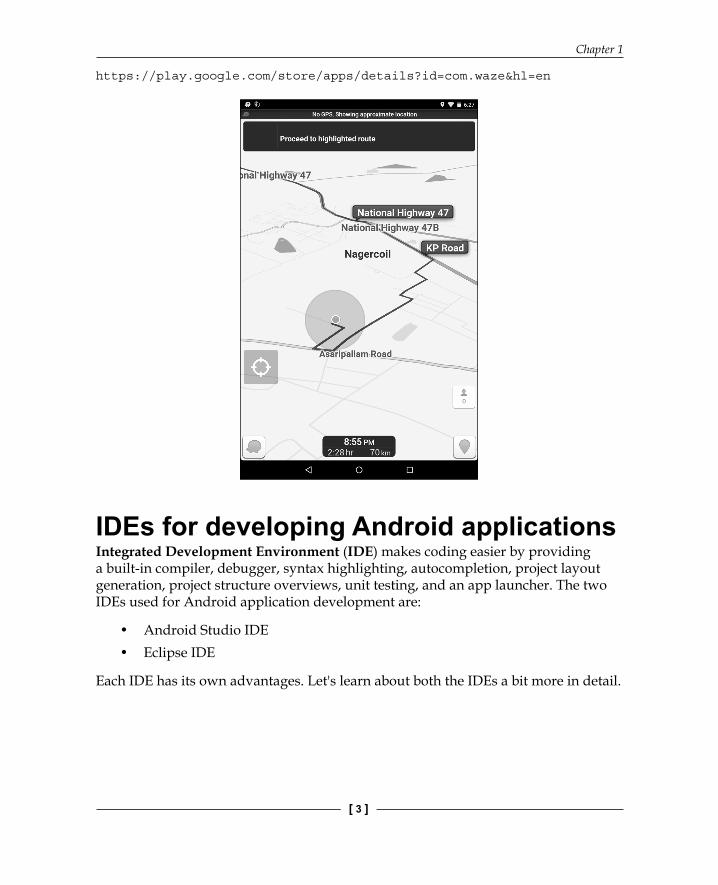
An example of a map applicationOne of the great examples of a map-based application is Waze. It is a GPS-based, social map application and was developed by two Israeli software engineers. It was bought by Google in 2013 for an amazing 1.2 billion USD. Waze now has more than 50 million active users. Users who want to try Waze can download it from the following link:
Chapter 1
[ 3 ]
https://play.google.com/store/apps/details?id=com.waze&hl=en
IDEs for developing Android applicationsIntegrated Development Environment (IDE) makes coding easier by providing a built-in compiler, debugger, syntax highlighting, autocompletion, project layout generation, project structure overviews, unit testing, and an app launcher. The two IDEs used for Android application development are:
• Android Studio IDE• Eclipse IDE
Each IDE has its own advantages. Let's learn about both the IDEs a bit more in detail.
Setting Up the Development Environment
[ 4 ]
Android StudioAndroid Studio is Google's offi cial IDE to develop Android applications. It was introduced by Google in 2013 at their annual developer conference Google I/O. After over a year and a half of active development, Android Studio hit its offi cial stable release 1.0 in December 2014. It was based on IntelliJ IDEA software. Let's see how it differs from Eclipse:
• It provides a live layout editor with real-time rendering (WYSIWYG)• It uses the Gradle build system against the traditional Apache ant
build system• It provides advanced code completion• It has inbuilt template-based wizards for common Android designs• It offers built-in support for Google Cloud Platform, which helps integrate
Google Cloud Messaging (GCM) and the App Engine seamlessly• It provides support for Android Wear
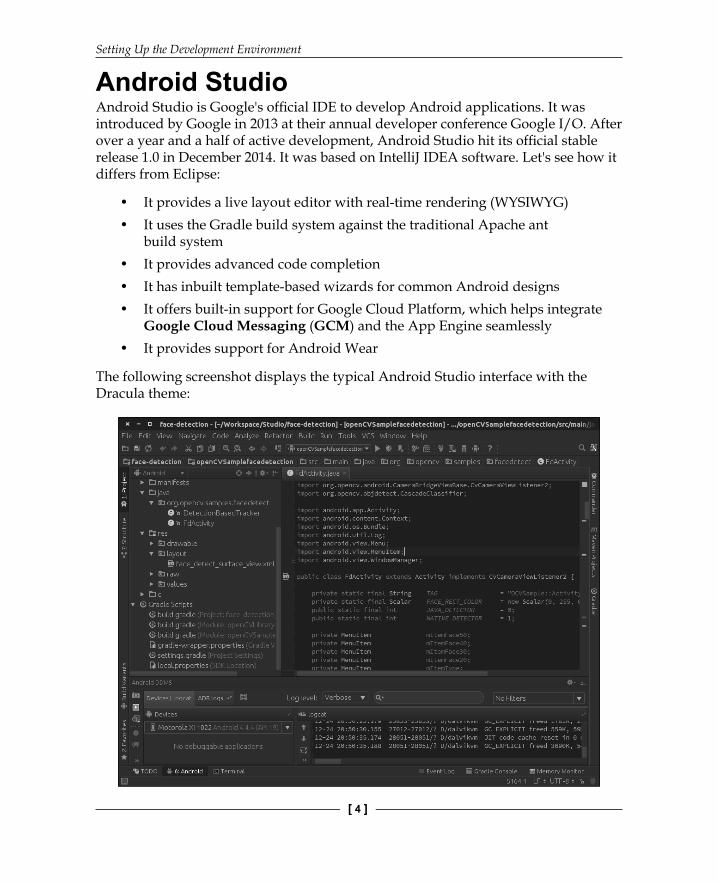
The following screenshot displays the typical Android Studio interface with the Dracula theme:

Chapter 1
[ 5 ]
System requirements for Android StudioThe system requirements for Android Studio for various operating systems are listed in the following table:
Windows OS X LinuxMicrosoft Windows 8/7/Vista/2003 (32 or 64 bit)
Mac OS X 10.8.5 or higher, up to 10.9 (Mavericks)
GNOME or KDE or Unity desktop
2 GB RAM minimum, 4 GB RAM recommended
2 GB RAM minimum, 4 GB RAM recommended
2 GB RAM minimum, 4 GB RAM recommended
400 MB hard disk space plus at least 1 GB for Android SDK, emulator system images, and caches
400 MB hard disk space plus at least 1 GB for Android SDK, emulator system images, and caches
400 MB hard disk space plus at least 1 GB for Android SDK, emulator system images, and caches
Java Development Kit (JDK) 7
Java Runtime Environment (JRE) 6Java Development Kit (JDK) 7
Oracle Java Development Kit (JDK) 7
Optional for accelerated emulator: Intel processor with support for Intel VT-x, Intel EM64T (Intel 64), and Execute Disable (XD) Bit functionality
Optional for accelerated emulator: Intel processor with support for Intel VT-x, Intel EM64T (Intel 64), and Execute Disable (XD) Bit functionality
GNU C Library (glibc) 2.11 or later
Setting Up the Development Environment
[ 6 ]
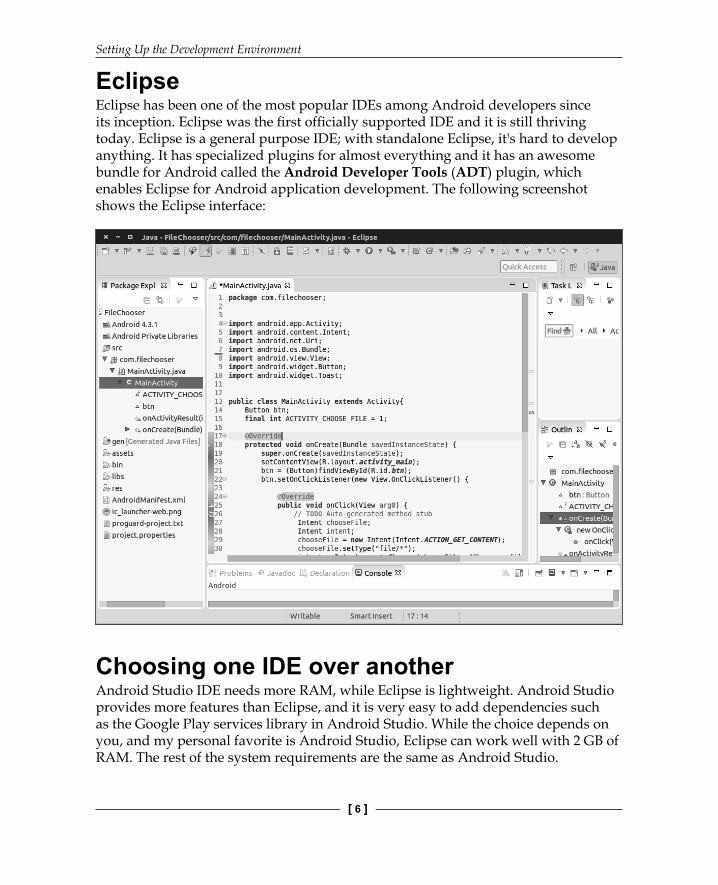
EclipseEclipse has been one of the most popular IDEs among Android developers since its inception. Eclipse was the fi rst offi cially supported IDE and it is still thriving today. Eclipse is a general purpose IDE; with standalone Eclipse, it's hard to develop anything. It has specialized plugins for almost everything and it has an awesome bundle for Android called the Android Developer Tools (ADT) plugin, which enables Eclipse for Android application development. The following screenshot shows the Eclipse interface:
Choosing one IDE over anotherAndroid Studio IDE needs more RAM, while Eclipse is lightweight. Android Studio provides more features than Eclipse, and it is very easy to add dependencies such as the Google Play services library in Android Studio. While the choice depends on you, and my personal favorite is Android Studio, Eclipse can work well with 2 GB of RAM. The rest of the system requirements are the same as Android Studio.
Chapter 1
[ 7 ]
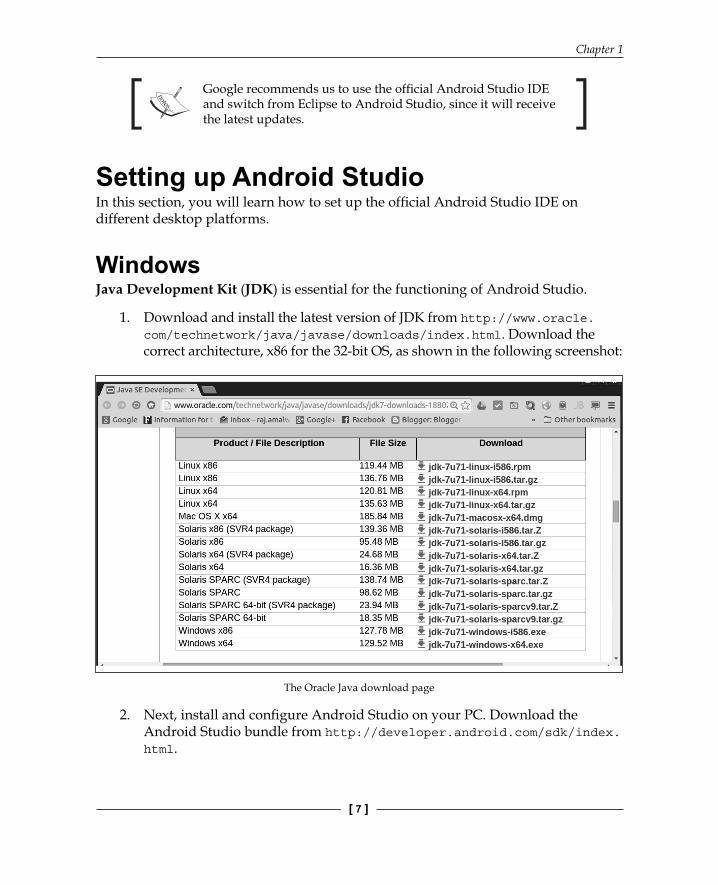
Google recommends us to use the offi cial Android Studio IDE and switch from Eclipse to Android Studio, since it will receive the latest updates.
Setting up Android StudioIn this section, you will learn how to set up the offi cial Android Studio IDE on different desktop platforms.
WindowsJava Development Kit (JDK) is essential for the functioning of Android Studio.
1. Download and install the latest version of JDK from http://www.oracle.com/technetwork/java/javase/downloads/index.html. Download the correct architecture, x86 for the 32-bit OS, as shown in the following screenshot:
The Oracle Java download page
2. Next, install and confi gure Android Studio on your PC. Download the Android Studio bundle from http://developer.android.com/sdk/index.html.

Setting Up the Development Environment
[ 8 ]
3. Run the downloaded executable and follow the onscreen instructions, as shown in the following screenshot:
4. Next, we will see the following screen:
Chapter 1
[ 9 ]
It may take some time for it to install. It may download some of the required components. Now, you have successfully installed Android Studio with SDK.
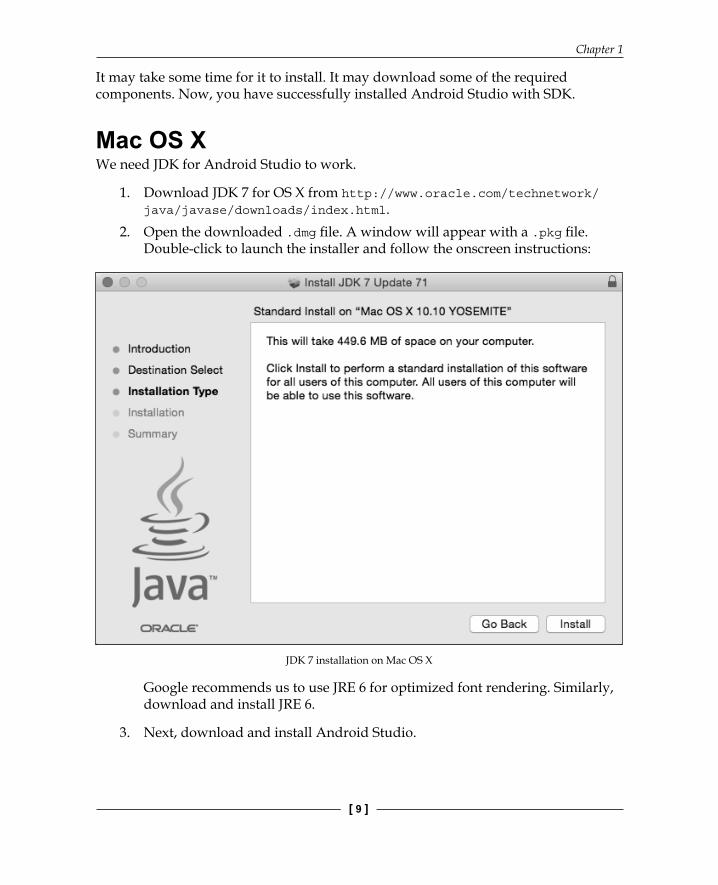
Mac OS XWe need JDK for Android Studio to work.
1. Download JDK 7 for OS X from http://www.oracle.com/technetwork/java/javase/downloads/index.html.
2. Open the downloaded .dmg fi le. A window will appear with a .pkg fi le. Double-click to launch the installer and follow the onscreen instructions:
JDK 7 installation on Mac OS X
Google recommends us to use JRE 6 for optimized font rendering. Similarly, download and install JRE 6.
3. Next, download and install Android Studio.
Setting Up the Development Environment
[ 10 ]
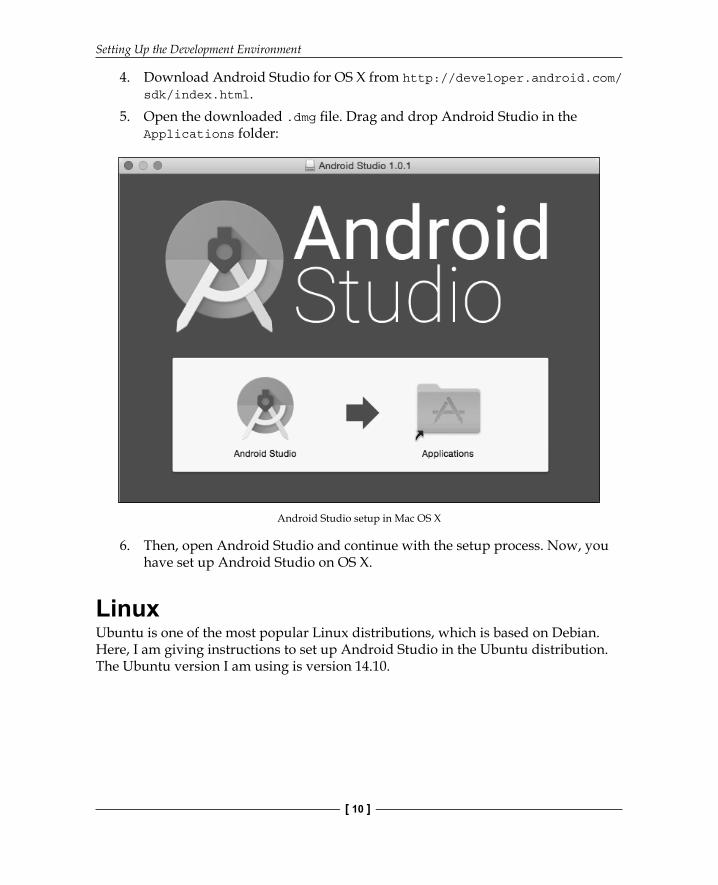
4. Download Android Studio for OS X from http://developer.android.com/sdk/index.html.
5. Open the downloaded .dmg fi le. Drag and drop Android Studio in the Applications folder:
Android Studio setup in Mac OS X
6. Then, open Android Studio and continue with the setup process. Now, you have set up Android Studio on OS X.
LinuxUbuntu is one of the most popular Linux distributions, which is based on Debian. Here, I am giving instructions to set up Android Studio in the Ubuntu distribution. The Ubuntu version I am using is version 14.10.
Chapter 1
[ 11 ]
The fi rst major requirement is the installation of Oracle Java. It is not available in the offi cial Ubuntu PPA repository. So, we are going to download and install it from a third-party PPA repository.
1. Open the Terminal or use the shortcut key Ctrl + Alt + T. Install Oracle Java 7 using the following commands. Enter it one by one:sudo add-apt-repository ppa:webupd8team/java
sudo apt-get update
sudo apt-get install oracle-java7-installer
2. You can install Oracle Java 8 by replacing the last command with the following:sudo apt-get install oracle-java8-installer
3. Now, let's check whether we have setup Android Studio correctly. Enter the following command in the Terminal:java -version
It should return an output similar to the following:java version "1.8.0_25"
Java(TM) SE Runtime Environment (build 1.8.0_25-b17)
Java HotSpot(TM) 64-Bit Server VM (build 25.25-b02, mixed mode)
If you are using the 64-bit distribution of Ubuntu, you need to install some packages to get the 32-bit applications supported. If you are using version 13.10 or above, use these commands in the Terminal:sudo dpkg --add-architecture i386
sudo apt-get update
sudo apt-get install libncurses5:i386 libstdc++6:i386 zlib1g:i386
For the earlier versions of Ubuntu, use the following command:sudo apt-get install ia32-libs
4. Now, our initial setup is done. Download Android Studio for Linux from http://developer.android.com/sdk/index. html.
5. Extract the downloaded ZIP package. Navigate to the android-studio/bin directory and execute the studio.sh shell script. Android Studio will start. Follow the onscreen instructions.
Now, you have set up Android Studio on Linux.
Setting Up the Development Environment
[ 12 ]
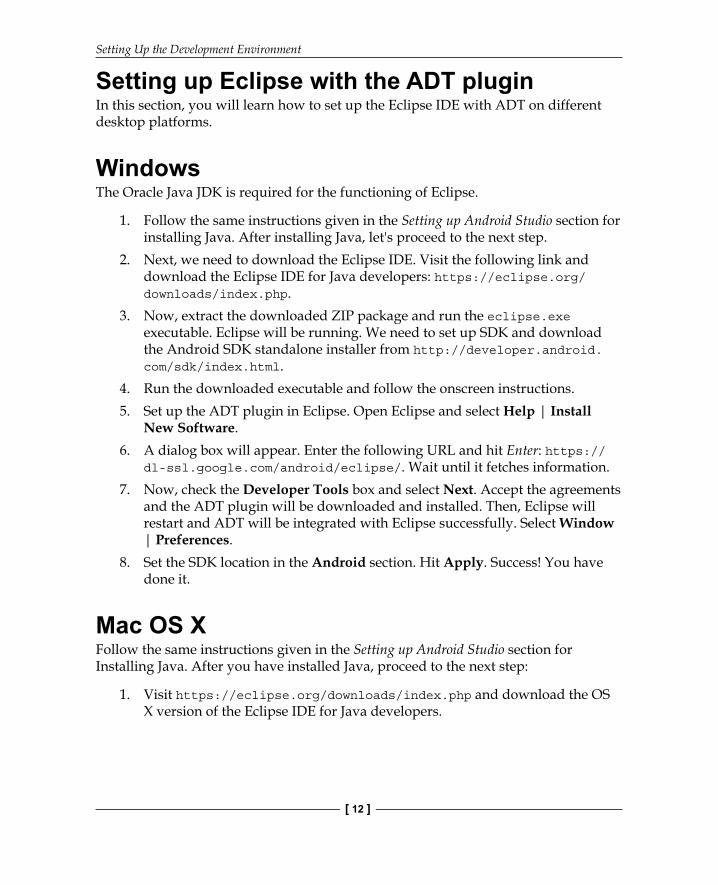
Setting up Eclipse with the ADT pluginIn this section, you will learn how to set up the Eclipse IDE with ADT on different desktop platforms.
WindowsThe Oracle Java JDK is required for the functioning of Eclipse.
1. Follow the same instructions given in the Setting up Android Studio section for installing Java. After installing Java, let's proceed to the next step.
2. Next, we need to download the Eclipse IDE. Visit the following link and download the Eclipse IDE for Java developers: https://eclipse.org/downloads/index.php.
3. Now, extract the downloaded ZIP package and run the eclipse.exe executable. Eclipse will be running. We need to set up SDK and download the Android SDK standalone installer from http://developer.android.com/sdk/index.html.
4. Run the downloaded executable and follow the onscreen instructions.5. Set up the ADT plugin in Eclipse. Open Eclipse and select Help | Install
New Software.6. A dialog box will appear. Enter the following URL and hit Enter: https://
dl-ssl.google.com/android/eclipse/. Wait until it fetches information.7. Now, check the Developer Tools box and select Next. Accept the agreements
and the ADT plugin will be downloaded and installed. Then, Eclipse will restart and ADT will be integrated with Eclipse successfully. Select Window | Preferences.
8. Set the SDK location in the Android section. Hit Apply. Success! You have done it.
Mac OS XFollow the same instructions given in the Setting up Android Studio section for Installing Java. After you have installed Java, proceed to the next step:
1. Visit https://eclipse.org/downloads/index.php and download the OS X version of the Eclipse IDE for Java developers.
Chapter 1
[ 13 ]
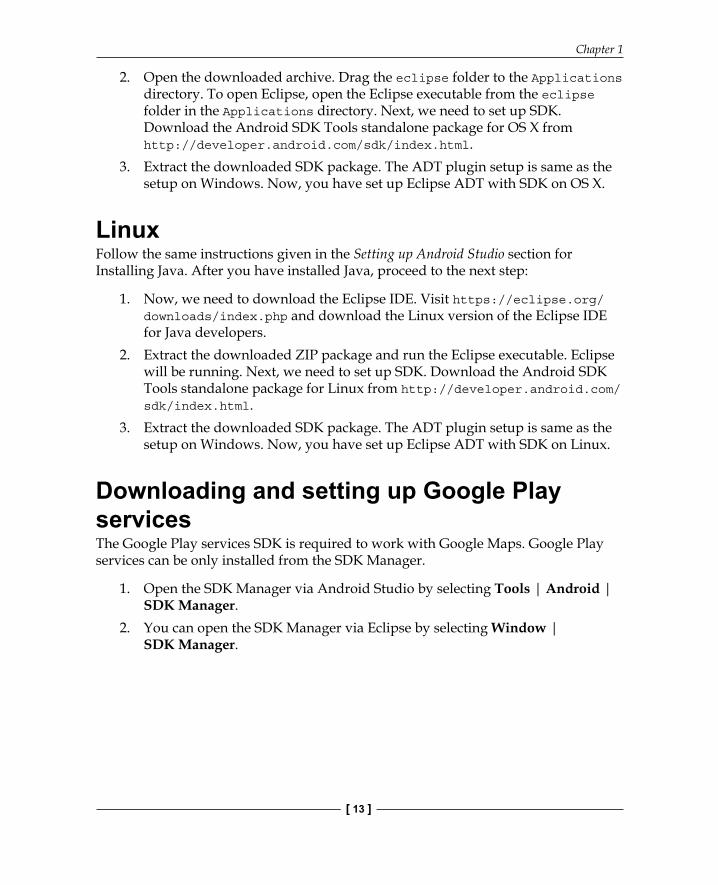
2. Open the downloaded archive. Drag the eclipse folder to the Applications directory. To open Eclipse, open the Eclipse executable from the eclipse folder in the Applications directory. Next, we need to set up SDK. Download the Android SDK Tools standalone package for OS X from http://developer.android.com/sdk/index.html.
3. Extract the downloaded SDK package. The ADT plugin setup is same as the setup on Windows. Now, you have set up Eclipse ADT with SDK on OS X.
LinuxFollow the same instructions given in the Setting up Android Studio section for Installing Java. After you have installed Java, proceed to the next step:
1. Now, we need to download the Eclipse IDE. Visit https://eclipse.org/downloads/index.php and download the Linux version of the Eclipse IDE for Java developers.
2. Extract the downloaded ZIP package and run the Eclipse executable. Eclipse will b e running. Next, we need to set up SDK. Download the Android SDK Tools standalone package for Linux from http://developer.android.com/sdk/index.html.
3. Extract the downloaded SDK package. The ADT plugin setup is same as the setup on Windows. Now, you have set up Eclipse ADT with SDK on Linux.
Downloading and setting up Google Play servicesThe Google Play services SDK is required to work with Google Maps. Google Play services can be only installed from the SDK Manager.
1. Open the SDK Manager via Android Studio by selecting Tools | Android | SDK Manager.
2. You can open the SDK Manager via Eclipse by selecting Window | SDK Manager.

Setting Up the Development Environment
[ 14 ]
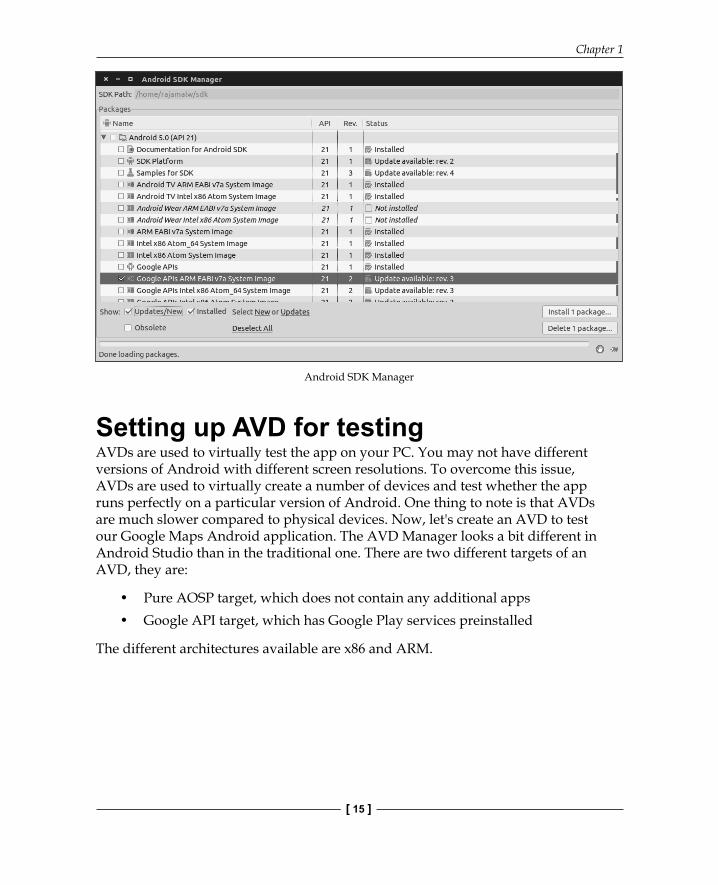
The following screenshot shows the Android SDK Manager:
Android SDK Manager
3. Scroll down to the bottom. Under the Extras section, check Google Play services and select Install packages. The Google Play services package will then be downloaded and installed. If it is successfully installed, it will show the status as Installed.
Downloading the Google APIs System ImageWe need the Google APIs System Image to test the Google Maps application on our PC. These system images have Google Play services preinstalled, which helps us test our Maps application. Open SDK Manager. Under each Android API section, you will fi nd a Google APIs system image. You can use the ARM image or x86 image as per your own requirements. Now, select and install the system image.
Chapter 1
[ 15 ]
Android SDK Manager
Setting up AVD for testingAVDs are used to virtually test the app on your PC. You may not have different versions of Android with different screen resolutions. To overcome this issue, AVDs are used to virtually create a number of devices and test whether the app runs perfectly on a particular version of Android. One thing to note is that AVDs are much slower compared to physical devices. Now, let's create an AVD to test our Google Maps Android application. The AVD Manager looks a bit different in Android Studio than in the traditional one. There are two different targets of an AVD, they are:
• Pure AOSP target, which does not contain any additional apps• Google API target, which has Google Play services preinstalled
The different architectures available are x86 and ARM.
Setting Up the Development Environment
[ 16 ]
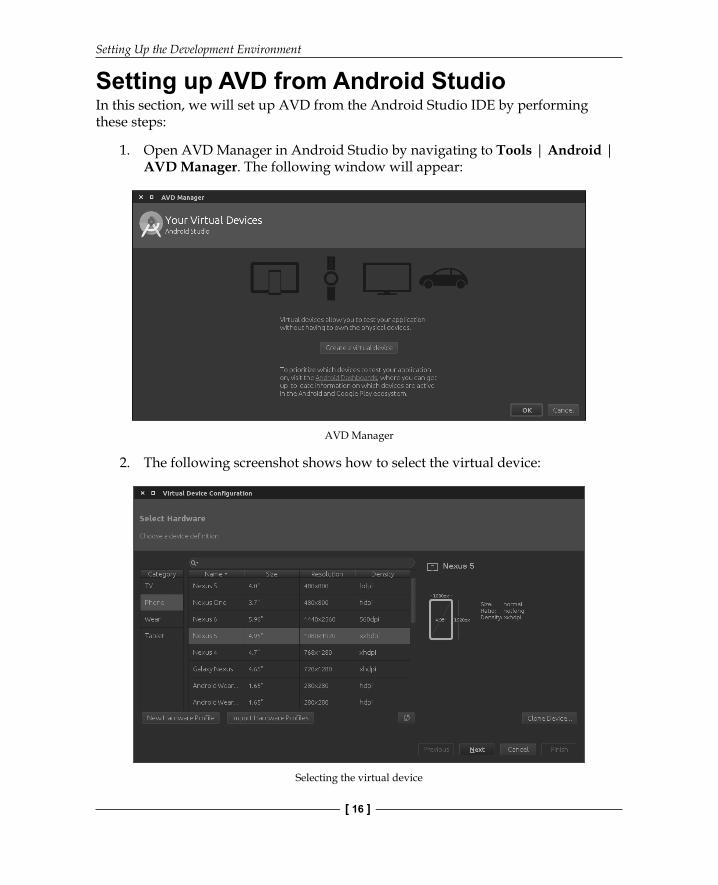
Setting up AVD from Android StudioIn this section, we will set up AVD from the Android Studio IDE by performing these steps:
1. Open AVD Manager in Android Studio b y navigating to Tools | Android | AVD Manager. The following window will appear:
AVD Manager
2. The following screenshot shows how to select the virtual device:
Selecting the virtual device
Chapter 1
[ 17 ]
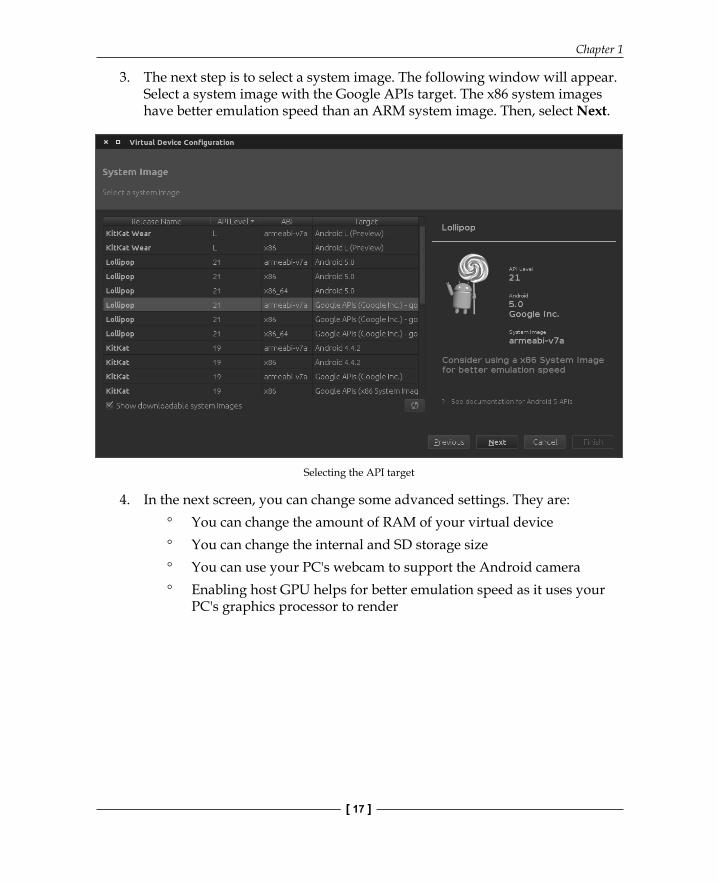
3. The next step is to select a system image. The following window will appear. Select a system image with the Google APIs target. The x86 system images have better emulation speed than an ARM system image. Then, select Next.
Selecting the API target
4. In the next screen, you can change some advanced settings. They are: You can change the amount of RAM of your virtual device You can change the internal and SD storage size You can use your PC's webcam to support the Android camera Enabling host GPU helps for better emulation speed as it uses your
PC's graphics processor to render
Setting Up the Development Environment
[ 18 ]
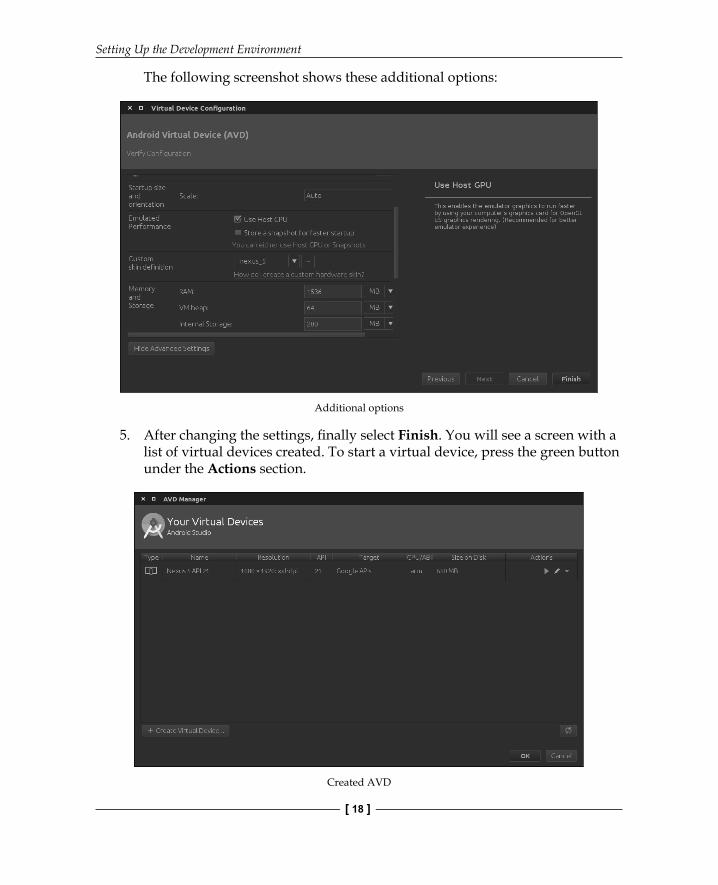
The following screenshot shows these additional options:
Additional options
5. After changing the settings, fi nally select Finish. You will see a screen with a list of virtual devices created. To start a virtual device, press the green button under the Actions section.
Created AVD

Chapter 1
[ 19 ]
It may take some time for the emulator to start according to the speed of your PC.
The preceding screenshot shows an emulator running Android Lollipop 5.0 with the Google API.
Setting up AVD from EclipseIn this section, we will set up AVD from the Eclipse IDE by performing these steps:
1. Let's see how to create an AVD from the Eclipse IDE. Open the AVD manager in Eclipse by navigating to Window | Android Virtual Device Manager.
Setting Up the Development Environment
[ 20 ]
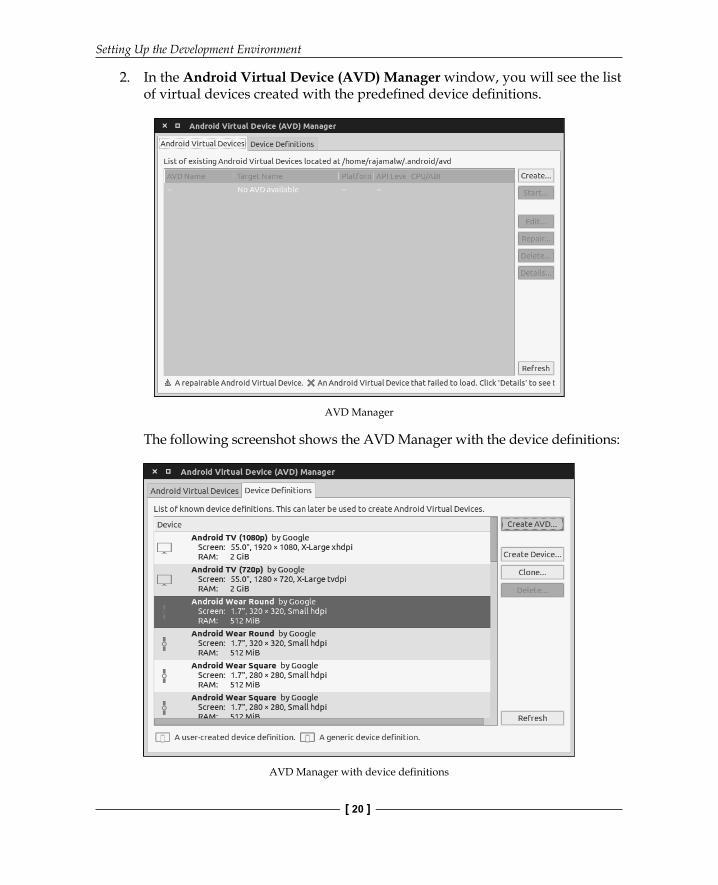
2. In the Android Virtual Device (AVD) Manager window, you will see the list of virtual devices created with the predefi ned device defi nitions.
AVD Manager
The following screenshot shows the AVD Manager with the device definitions:
AVD Manager with device definitions

Chapter 1
[ 21 ]
3. To create a new virtual device, select a device confi guration and click on the Create AVD button. The following window will appear. You can change the advanced confi gurations, amount of RAM, and so on.
Creating a new virtual device
Setting Up the Development Environment
[ 22 ]
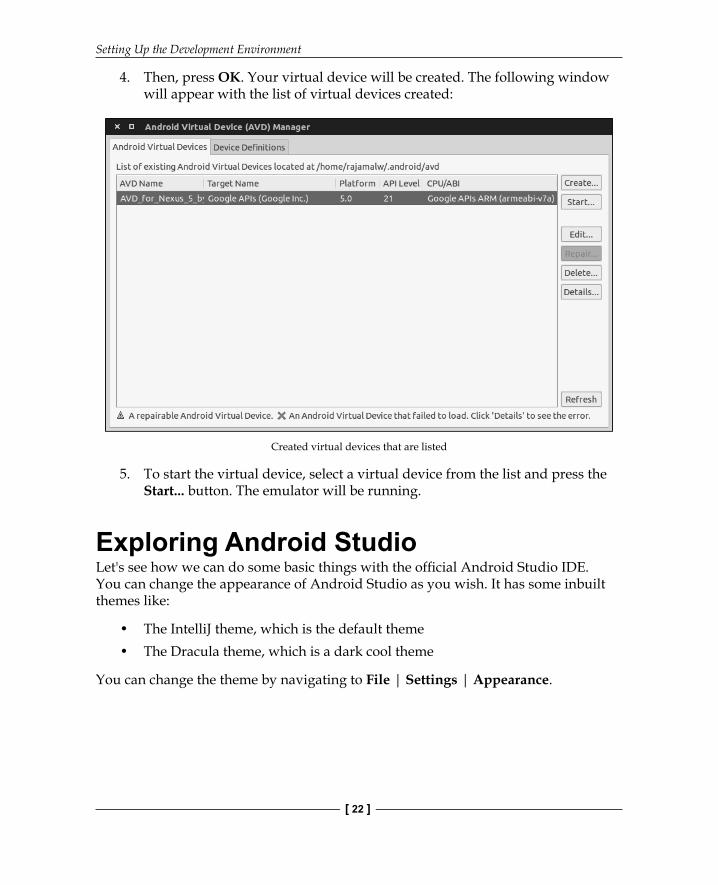
4. Then, press OK. Your virtual device will be created. The following window will appear with the list of virtual devices created:
Created virtual devices that are listed
5. To start the virtual device, select a virtual device from the list and press the Start... button. The emulator wi ll be running.
Exploring Android StudioLet's see how we can do some basic things with the offi cial Android Studio IDE. You can change the appearance of Android Studio as you wish. It has some inbuilt themes like:
• The IntelliJ theme, which is the default theme• The Dracula theme, which is a dark cool theme
You can change the theme by navigating to File | Settings | Appearance.

Chapter 1
[ 23 ]
Creating a sample applicationLet's create our fi rst sample Android application using Android Studio.
1. To create a new project, select File | New Project. The following window will appear:
The wizard for creating a new project
2. Enter the values in Application name:, Company Domain:, and Package name:. Then, select the project location.
3. In the next screen, you need to select the minimum SDK version that your application supports. Targeting your application for a lower SDK version ensures that your application runs on a maximum number of devices. As of now, KitKat has a market share of 34 percent.
Setting Up the Development Environment
[ 24 ]
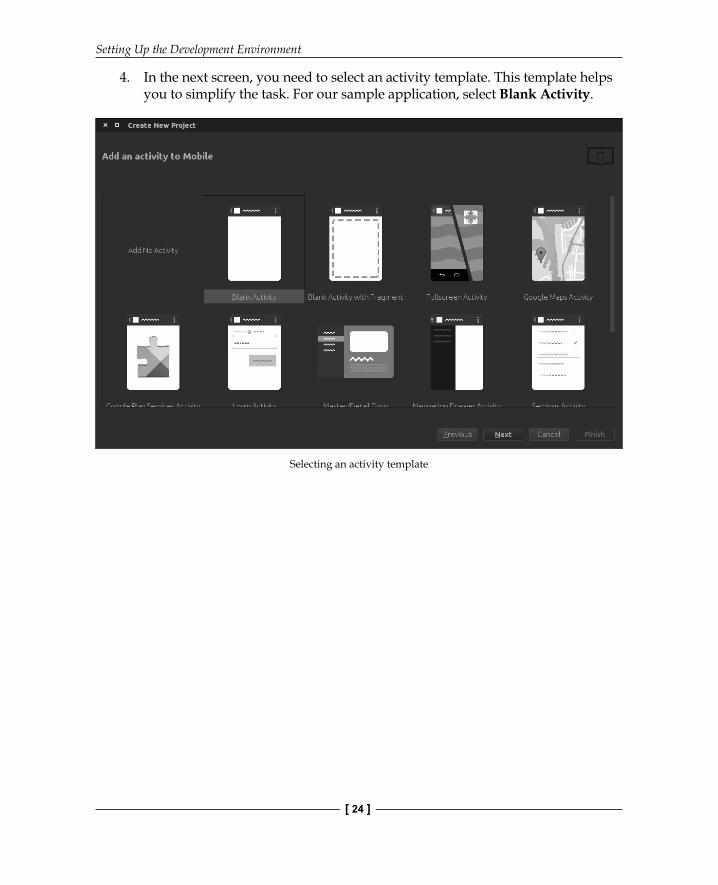
4. In the next screen, you need to select an activity template. This template helps you to simplify the task. For our sample application, select Blank Activity.
Selecting an activity template
Chapter 1
[ 25 ]
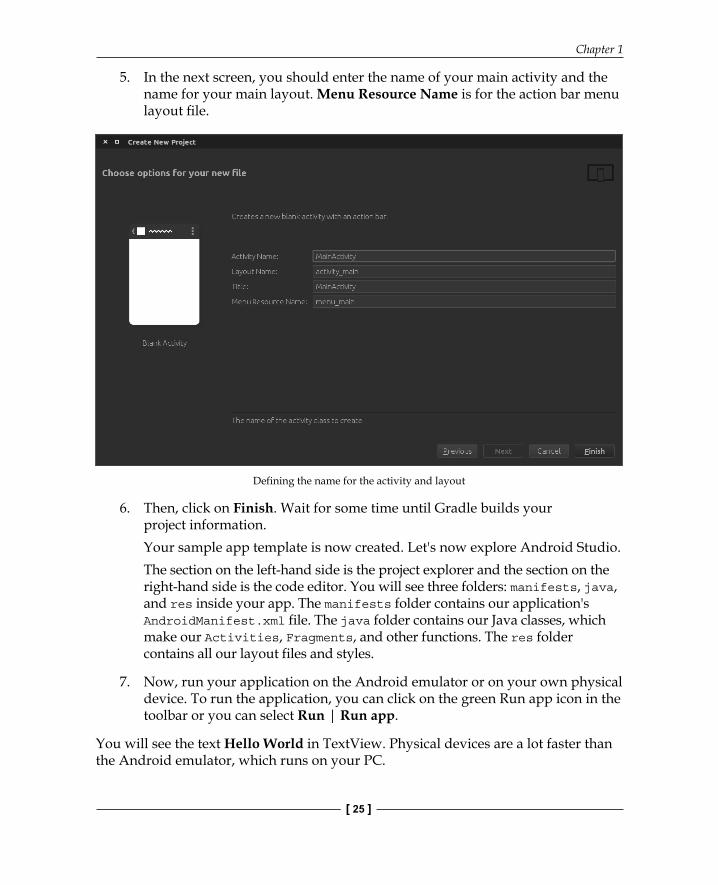
5. In the next screen, you should enter the name of your main activity and the name for your main layout. Menu Resource Name is for the action bar menu layout fi le.
Defining the name for the activity and layout
6. Then, click on Finish. Wait for some time until Gradle builds your project information.Your sample app template is now created. Let's now explore Android Studio.The section on the left-hand side is the project explorer and the section on the right-hand side is the code editor. You will see three folders: manifests, java, and res inside your app. The manifests folder contains our application's AndroidManifest.xml file. The java folder contains our Java classes, which make our Activities, Fragments, and other functions. The res folder contains all our layout files and styles.
7. Now, run your application on the Android emulator or on your own physical device. To run the application, you can click on the green Run app icon in the toolbar or you can select Run | Run app.
You will see the text Hello World in TextView. Physical devices are a lot faster than the Android emulator, which runs on your PC.
Setting Up the Development Environment
[ 26 ]
Exporting the Android application as APKYour Android app should be exported as APK and signed to be able to publish it in the Google Play store and install it on your device. In order to sign an APK, you need to create a key store. Let's see how to export in Android Studio.
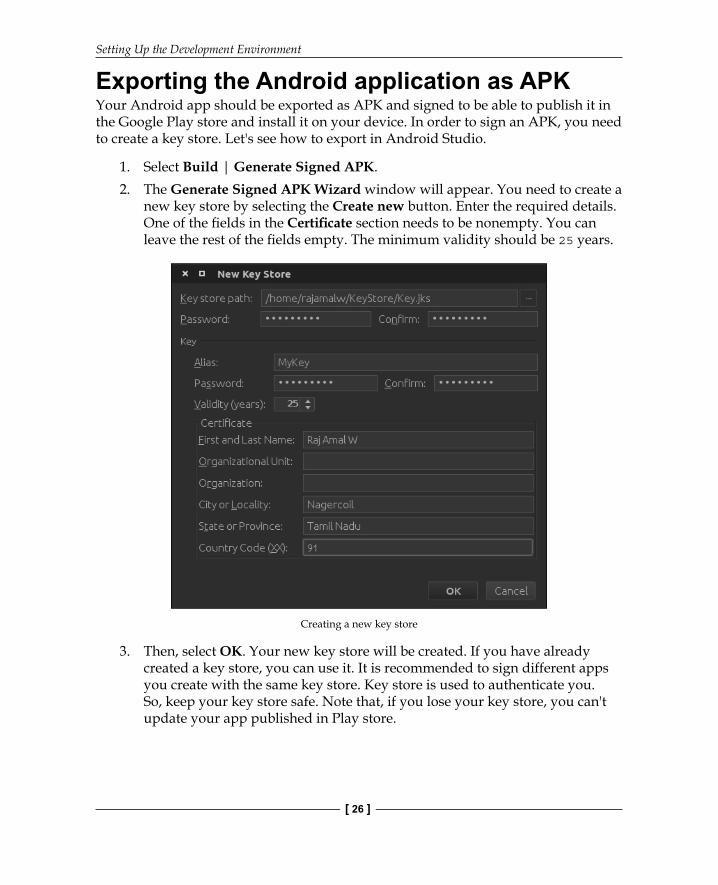
1. Select Build | Generate Signed APK.2. The Generate Signed APK Wizard window will appear. You need to create a
new key store by selecting the Create new button. Enter the required details. One of the fi elds in the Certifi cate section needs to be nonempty. You can leave the rest of the fi elds empty. The minimum validity should be 25 years.
Creating a new key store
3. Then, select OK. Your new key store will be created. If you have already created a key store, you can use it. It is recommended to sign different apps you create with the same key store. Key store is used to authenticate you. So, keep your key store safe. Note that, if you lose your key store, you can't update your app published in Play store.
Chapter 1
[ 27 ]
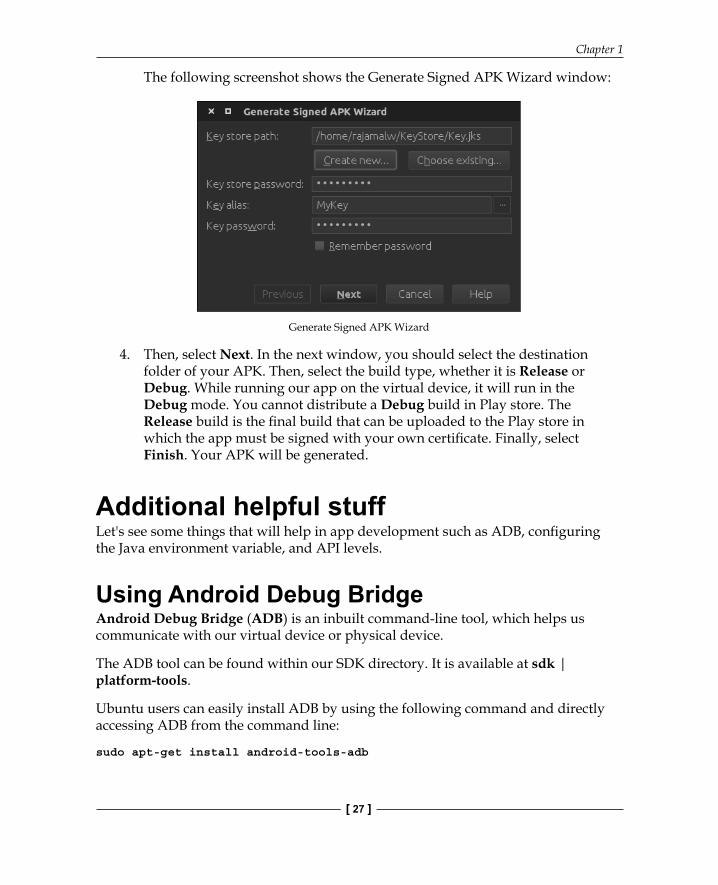
The following screenshot shows the Generate Signed APK Wizard window:
Generate Signed APK Wizard
4. Then, select Next. In the next window, you should select the destination folder of your APK. Then, select the build type, whether it is Release or Debug. While running our app on the virtual device, it will run in the Debug mode. You cannot distribute a Debug build in Play store. The Release build is the fi nal build that can be uploaded to the Play store in which the app must be signed with your own certifi cate. Finally, select Finish. Your APK will be generated.
Additional helpful stuffLet's see some things that will help in app development such as ADB, confi guring the Java environment variable, and API levels.
Using Android Debug BridgeAndroid Debug Bridge (ADB) is an inbuilt command-line tool, which helps us communicate with our virtual device or physical device.
The ADB tool can be found within our SDK directory. It is available at sdk | platform-tools.
Ubuntu users can easily install ADB by using the following command and directly accessing ADB from the command line:
sudo apt-get install android-tools-adb
Setting Up the Development Environment
[ 28 ]
To access ADB from any directory, if you are using older versions, you need to export the path of the adb directory. It can be done by using the following command:
export PATH=${PATH}:/home/rajamalw/sdk/platform-tools/
Here, I have given the path of my adb directory. To validate it for all the terminal sessions, you can add this line in the .bashrc fi le located in your home directory.
For detailed information on ADB, refer to the offi cial documentation at http://developer.android.com/tools/help/adb.html.
Let's see some of the adb commands we mostly use:
adb devices
This command displays all the devices that are attached to your PC. It would return an output similar to the following:
List of devices attached
ZX1B325BRZ device
To work with your own physical device, you must enable the USB Debugging option in the Developer options.
To install an APK on my device via ADB, I used the following command. Replace myappname with the name of the APK:
adb install myappname.apk
The following adb command can be used to copy the image.png fi le from the SD card to your PC:
adb pull /sdcard/image.png
The following command can be used to copy the image.png fi le from your PC to the root of your SD card:
adb push image.png /sdcard/
The following is the most important command for Android developers, which helps them to debug the app, and to know why and when it is crashing. This displays the logs from the device. The IDE shows the logcat messages too, both in Android Studio and Eclipse with the ADT plugin:
adb logcat
Chapter 1
[ 29 ]
The following command lands you in the shell using which you can execute some common Linux commands on your device:
adb shell
Confi guring JAVA environment variablesWhile starting Android Studio, you may get a JAVA_HOME is not set error. Let me show you how to fi x this error.
1. Open Control Panel and select System.2. Then, go to System protection | Advanced | Environment Variables... |
System variables.3. Then, create a new variable and provide a variable name as JAVA_HOME and a
variable value as a path to your Java installation.
Android API levelsThis is just for reference and to give you an idea about API levels. Each API level corresponds to each framework revision of Android, starting from API level 1 to API level 22. Android Lollipop 5.1, which is the latest API level, corresponds to API level 22. KitKat 4.4 corresponds to API level 19, while Gingerbread corresponds to API level 8 and 9.
Self-test questionsQ1. What is Google's offi cial IDE for Android app development?
1. Android Studio2. Eclipse
Q2. Android Studio uses the Apache ant build system.
1. True2. False
Q3. Name an Android app that uses Map.
1. Waze2. Duolingo3. Evernote
Setting Up the Development Environment
[ 30 ]
Q4. ADB can be used to debug your Android application.
1. True2. False
Q5. What are the architectures that AVD supports?
1. ARM2. x863. MIPS4. Both 1 and 2
SummaryIn this chapter, we have seen some basic things that are required to kick start our app development. This will help us to avoid errors that may be due to some misconfi gurations.
You have learned how to set up Android Studio and Eclipse on various platforms. Then, you have learned about the advantages of each IDE over the other, and how to create an AVD. You created a sample application. Finally, you learned about some additional stuff such as ADB and setting Java environment variables.
In the next chapter, we will see how to obtain the API key, SHA1 fi ngerprint and develop our fi rst Maps application.
Where to buy this book You can buy Learning Android Google Maps from the Packt Publishing website.
Alternatively, you can buy the book from Amazon, BN.com, Computer Manuals and most internet
book retailers.
Click here for ordering and shipping details.
www.PacktPub.com
Stay Connected:
Get more information Learning Android Google Maps