lecture 24 graphical user interface (gui) · tkinter is a set of wrappers which 'talk' to...
TRANSCRIPT

COMPSCI 101Principles of ProgrammingLecture 24 Graphical User Interface (GUI)

Learning outcomes At the end of this lecture, students should be able to: understand what a GUI is start using TkInter in Python use a Canvas object to draw ovals, rectangles, lines, text, polygons
and arcs.
2 L24

What is a GUI? A Graphical User Interface (GUI) is a type of interface which
allows users to interact with electronic devices through graphical icons and visual indicators, i.e., the visual components of an application or website which aid usability through (hopefully) easily understood graphics and icons.
GUI as opposed to text-based interfaces (which require commands to be typed at the keyboard).
3
Gui's, gui's everywhere
gui's
L24

The Behaviour of Terminal-Based Programs and GUI-Based Programs
Two different versions of a program from a user’s point of view: Terminal-based user interface
Display a menu Get the choice Perform the required task
Graphical user interface
Both programs perform exactly the same function However, their behaviour, or look and feel, from a user’s perspective
are quite different
4
Wearable Devices
Smart Refrigerator
Smart Home
Smart Car
Smart "Things"
Touchscreens
L24

Terminal-Based Problems: User is constrained to reply to a definite sequence of prompts for
inputs Once an input is entered, there is no way to change it
To obtain results for a different set of input data, user must wait for the command menu to be displayed again At that point, the same command and all of the other inputs must be re-
entered
User can enter an unrecognized command
5 L24

GUI-Based Uses a window that contains various components Called window objects or widgets
Solves problems of terminal-based version
A command button
labels
An entry field
Can be dragged to resize window
6
Wearable Devices
L24

Python – tkinter Most programs include a GUI and all major programming
languages support one or more packages to develop GUIs. There are many libraries and toolkits of GUI components available
to the Python programmer tkinter is not the only GUI-programming toolkit for Python
but it is the most commonly used one. tkinter includes classes for windows and numerous types of
window objects tkinter gives you the ability to create windows with widgets in
them A widget is a graphical component on the screen (button, text label, drop-
down menu, scroll bar, picture, etc…)
GUIs are built by arranging and combining different widgets on the screen
7 L24

Check that tkinter is installed Before starting, check that tkinter is properly installed on
your system by typing the following in the command line window:
8
This command should open a window demonstrating a simple tkinter interface.
Testing for tkinter on the MAC Terminal window (usually no
problem)
python -m tkinter
L24

A first tkinter program A first program using tkinter.
Note: This window is the top level window to which we will add other
components (widgets). In this program, the variable, root, represents the top level
window.
9
from tkinter import * #import the tkinter module
def main():root = Tk() #Create an empty window
root.mainloop() #Pause the code and do nothing #until the window is closed
main()
L24

What is Tk? Tk is a robust and platform independent windowing toolkit,
and it is available to Python programmers through the tkinterpackage. Tk provides the definitions of many widgets (labels, buttons, text
boxes, menus – the components of a GUI).
In Python, the tkinter package is the interface for Tk. tkinter is a set of wrappers which 'talk' to the Tk widgets and wrap
them up as Python objects.
10
from tkinter import * #import the tkinter module
def main():
root = Tk() #Create an empty window
root.mainloop() #Pause the code and do nothing
#until the window is closed
main()
L24

Steps to create the tkinter program Create the parent window All applications have a “root” window. This is the parent of all other
widgets. You should create only one!
Start the event loop ( root.mainloop() ) Windows go into an “event loop” where they wait for things to
happen (buttons pushed, etc…). You must tell the root window to enter its event loop or the window won’t be displayed!
root = Tk()root.mainloop()
11 L24

Background Colour & Title A background colour for the window can be defined: a title for the window can be defined:
The 'config' method is used to set a variety of different window features, such as the background colour.
12
from tkinter import *def main():
root = Tk() root.title("My first Window") root.config(background='blue') root.mainloop()
main()
DEMOExample01.py
L24

The size and position of the window We would like to control the width, height and position of
the top level window. The geometry() method sets a size for the window and positions it
on the screen. The first two arguments are the width and the height of the window. The
last two arguments are the x and y screen position coordinates of the top left hand corner of the window.
13
from tkinter import *def main():
root = Tk() root.geometry("750x200+10+30") root.title("My first Window") root.config(background='purple') root.mainloop()
main()
L24

Named colours There are lots of 'named colours' which can be used. Look at the website, http://wiki.tcl.tk/37701
Some examples light slate gray ‐ gray ‐ light grey ‐midnight blue ‐ navy ‐ cornflower blue ‐ dark slate blue ‐ slate blue ‐medium slate blue ‐ light slate blue ‐medium blue ‐ royal blue – blue ‐ dodger blue ‐ deep sky blue ‐ sky blue ‐ light sky blue ‐ steel blue ‐ light steel blue ‐ light blue ‐ powder blue
14
from tkinter import *def main():
root = Tk() root.title("My first Window") root.config(background='powder blue') root.geometry("750x200+10+30") root.mainloop()
main()
L24

Widgets GUIs are built by arranging and combining different widgets in
the window. Widgets are objects which can be added to our top level window.
These will allow the user to interact with the program. Some widget examples:
With tkinter we are able to create windows with widgets inside them
15
Buttons, Checkbuttons, Radiobuttons, Menubuttons, Entry (for text field entries)Message (for displaying text messages to the user) Labels (text captions, images)Frames (a container for other widgets) Scale, ScrollbarCanvas (for drawing shapes, …)Text (for displaying and editing text) and others..
In CompSci 101 we will quickly look at the Label widget and then use a Canvas widget to draw some shapes. L24

Adding a Label widget A Label widget holds text. Steps: Create the parent window (root)
Widgets are placed inside parent windows. In our case the parent of all our widgets is the top level window.
Create a label When creating the Label widget we need to pass the top level windows,
root, (in which the label will be placed) as the first argument. We also need to pass the text which is to be displayed inside the Label.
Define the position of the label ( hello.pack() ) Tell the label to place itself into the root window and display.
Start the event loop ( root.mainloop() )
16
root = Tk()hello = Label(root, text="Hello world!")hello.pack()root.mainloop()
L24

Some Label properties Label objects can be configured (background colour,
foreground colour, font). Properties:
bg: The normal background colour displayed fg: specifies the colour of the text font: specifies in what font that text will be displayed
17
a_label = Label(root, text = "A Label widget \nin a window")a_label.config(bg="blue", fg="magenta")a_font = ("Times", 40, "bold")a_label.config(font=a_font)
DEMOExample02_2.py
L24

Layout Management Most windowing toolkits (such as tkinter) have layout
management systems which have the job of arranging the widgets in the window! When we pack widgets into the window they always go under the
previous widget
18
root = Tk()a_label1 = Label(root, text = "A Label widget in a window")a_label2 = Label(root, text = "Another one")a_label3 = Label(root, text = "And more!")a_label1.pack()a_label2.pack()a_label3.pack()
Place label widgets on top of each other and centre them
DEMOExample02_3.py
L24
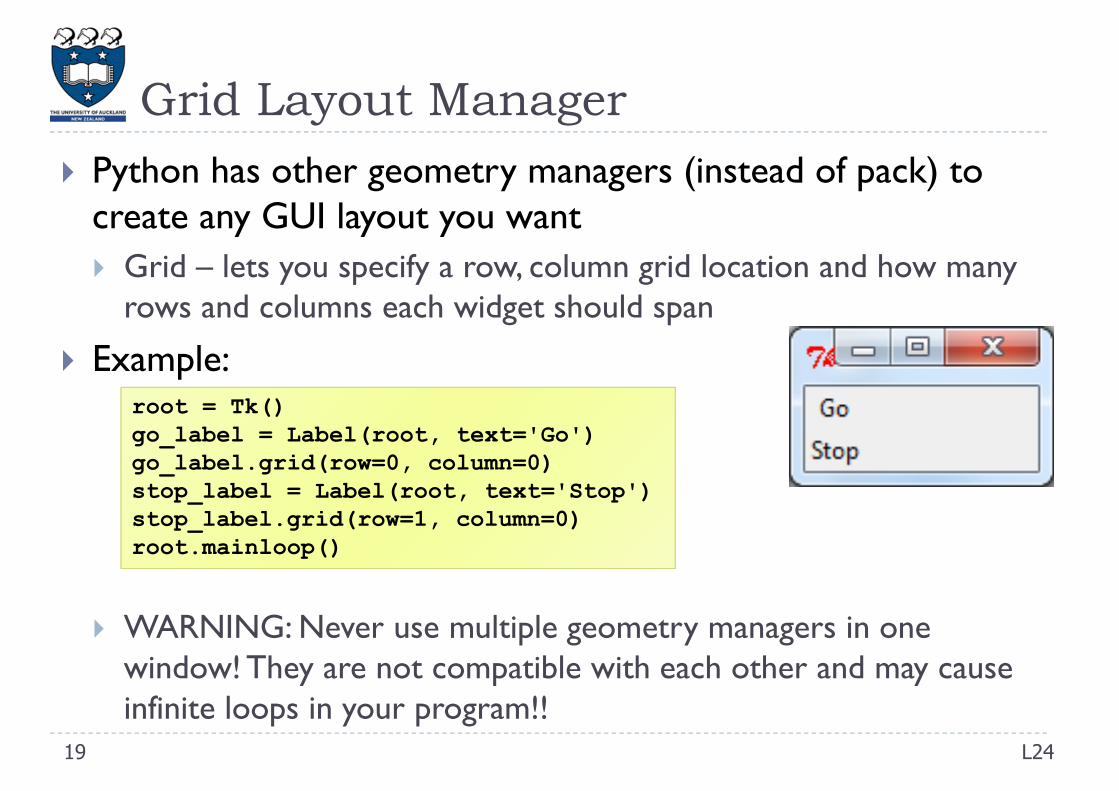
Grid Layout Manager Python has other geometry managers (instead of pack) to
create any GUI layout you want Grid – lets you specify a row, column grid location and how many
rows and columns each widget should span
Example:
WARNING: Never use multiple geometry managers in one window! They are not compatible with each other and may cause infinite loops in your program!!
root = Tk()go_label = Label(root, text='Go')go_label.grid(row=0, column=0)stop_label = Label(root, text='Stop')stop_label.grid(row=1, column=0)root.mainloop()
19 L24

Exercise 1Creating a number pad
Task: Complete the following program which creates 9 labels as shown in
the above picture
Code:
root = Tk()labels = ['1', '2', '3', '4', '5', '6', '7', '8', '9']for i in range(len(labels)):
#create and add a label each time
root.mainloop()
20 L24

Grid Layout Manager
Algorithm 1st label: row = 0, col = 0 2nd label: row = 0, col = 1 3rd label: row = 0, col = 2 4th label: row = 1, col = 0 5th label: row = 1, col = 1 6th label: row = 1, col = 2 … Row=0,
column = 0
Row=0, column = 2
labels = ['1', '2', '3', '4', '5', '6', '7', '8', '9']
21 L24

Creating a Canvas widget A Canvas widget provides a rectangular area in which shapes
(lines, ovals, polygons, rectangles, arcs, text) can be drawn. (The Canvas object can also contain images or bitmaps.) As well as drawing shapes in the Canvas area, the Canvas object can
contain other widgets and frames. When creating a Canvas widget we need to pass the top level widget, root,
(in which the canvas will be placed) as the first argument
22
root = Tk()a_canvas = Canvas(root)a_canvas.config(background="blue", width=200, height=100)a_canvas.pack()root.mainloop()
DEMOExample03.2.py
L24

Expand and Fill Sometimes it is useful to make a widget as big as the parent
window and to make the widget resizable when the parent window is resized. The pack() method has optional parameters which control this.
expand: When set to True, the widget expands to fill any space not otherwise used in the
widget's parent.
fill: Determines whether the widget fills any extra space allocated to it by the
packer, or keeps its own minimal dimensions: NONE (default), X (fill only horizontally), Y (fill only vertically), or BOTH (fill both horizontally and vertically).
23 L24

Examples Case 1:
The pack method tells Tk to fit the size of the window to the given canvas. The canvas remains unchanged (top, centre) after resizing.
Case 2:
Set the size of the window to 400x200 Canvas: centred and aligned to the top
24
root = Tk()a_canvas = Canvas(root)a_canvas.config(background="blue", width=200, height=100)a_canvas.pack()
resize
root = Tk()root.geometry("400x200+10+30")a_canvas = Canvas(root)a_canvas.config(background="blue", width=200, height=100)a_canvas.pack()
resize
L24
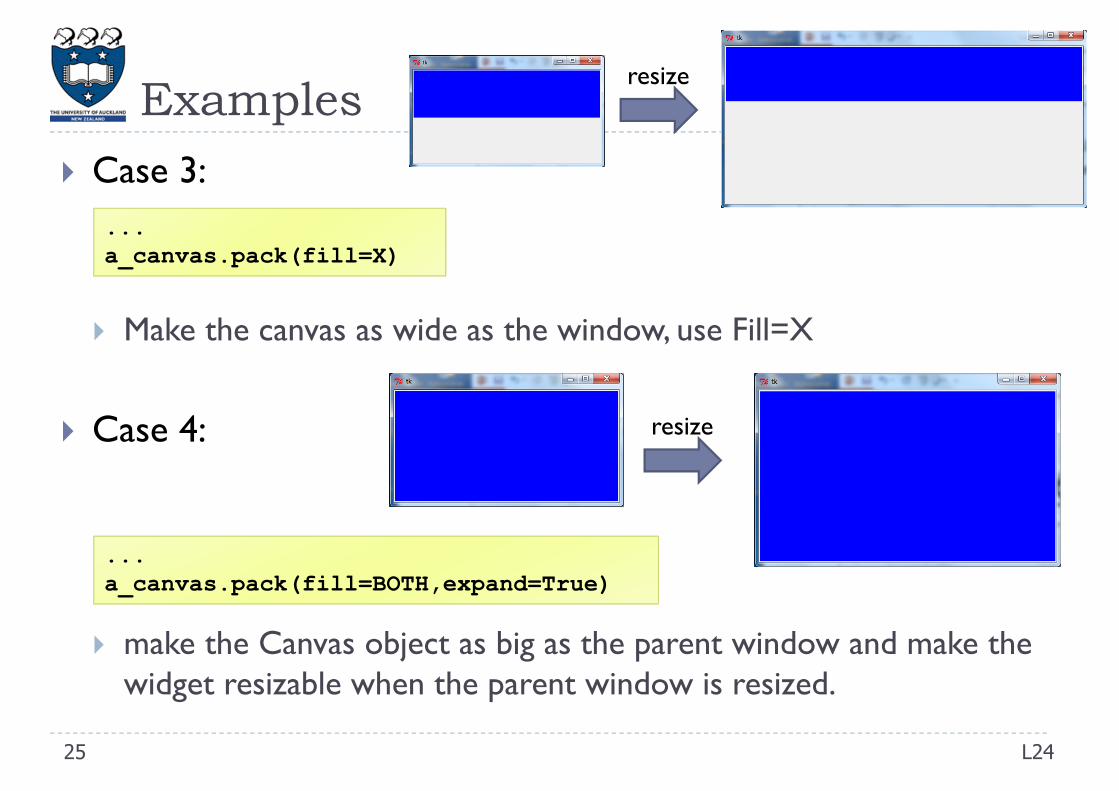
Examples Case 3:
Make the canvas as wide as the window, use Fill=X
Case 4:
make the Canvas object as big as the parent window and make the widget resizable when the parent window is resized.
25
...a_canvas.pack(fill=X)
...a_canvas.pack(fill=BOTH,expand=True)
resize
resize
L24

Canvas coordinate system Each pixel in the Canvas area has an x position (across the
canvas) and a y position (down the canvas). Position (0, 0) is the top left corner of the canvas.
26
(0, 0) X value increases (going right)
Y value increases (going down)
L24

Drawing What can be done with a Canvas object? Drawing shapes
Lines Rectangles Ovals Polygons
Drawing text Drawing Arcs
27 L24

Drawing Lines The method create_line(coords, options) is used to draw
a straight line. The coordinates "coords" are given as four integer numbers: x1, y1,
x2, y2. This means that the line goes from the point (x1, y1) to the point (x2, y2).
Note that the line object does not include the end pixel, e.g., the line defined by the coordinates: (0,2,5,2) only includes the 5 pixels: (0,2), (1,2), (2,2), (3,2), (4,2)
28
a_canvas.create_line(0, 50, 100, 50)
(0, 0)
DEMOExample04.py
L24

Line Options Some line options fill (line colour, default is black) width (line width, default is 1.0) dash e.g., dash = (4, 8) 4 pixels drawn followed by 8 pixels blank
29
a_canvas.create_line(0, 0, 100, 200, fill="blue")a_canvas.create_line(200, 0, 200, 300, fill="purple", width="3.0")a_canvas.create_line(30, 0, 130, 200, fill="magenta", width="10.0", dash = (4, 8))
(0, 0)
L24

Drawing Rectangles The method create_rectangle(x0,y0,x1,y1, options) is
used to draw a rectangle. The rectangle is defined by two points: (x0, y0) the top left position
and (x1, y1) the bottom right position.
Note that the rectangle object does not include the right hand border or the bottom border, e.g., the rectangle with coordinates: (100,100,102,103,…) is 2 pixels by 3
pixels including the 6 pixels:
30
a_canvas.create_rectangle(10, 50, 100, 100)
(0, 0)
(100, 100), (101, 100),(100, 101), (101, 101),(100, 102), (101, 102),
DEMOExample04_2.py
L24

Rectangle Options Some rectangle options fill (colour, default is no fill) outline (The colour of the border), default is outline='black’) dash (dashed border)
…
31
a_canvas.create_rectangle(20, 20, 100, 150, fill="yellow")a_canvas.create_rectangle(200, 150, 250, 250, fill="blue", dash = (4, 8), outline="white")a_rect = (300, 30, 320, 50)a_canvas.create_rectangle(a_rect, fill="magenta")
L24

Drawing Ovals The method create_oval(x0,y0,x1,y1, options) is used to
draw a circle or an oval(ellipse). The oval drawn fits into a rectangle defined by the coordinates:
(x0, y0) of the top left corner and (x1, y1) of a point just outside of the bottom right corner.
32
a_canvas.create_oval(10, 50, 100, 100)
DEMOExample04_3.py
L24

Oval Options Some oval options: fill (colour, default is no fill) outline (The colour of the border. Default is outline='black’) dash (dashed border)
33
a_canvas.create_oval(20, 20, 100, 150, fill="white", outline="red")a_canvas.create_oval(200, 150, 250, 250, fill="blue", dash = (4, 8), outline="white")a_box = (300, 30, 320, 50)a_canvas.create_oval(a_box, fill="magenta")
L24

Drawing Polygons The method create_polygon(coords, options) is used to
draw a polygon where the parameter, coords, is a series of points.
Note: The createPolygon method requires at least three (x, y) coordinate pairs The createPolygon method connects the first point to the last point to
enclose the area.34
points = [150, 100, 200, 120, 240, 180] a_canvas.create_polygon(points)
points = [10,10,100,20,70,40,90,50,80,80,180,270…]
p1 p2 p3
(150, 100) (200, 100)
(240, 180)
DEMOExample04_4.py
L24

Polygon Options Some Polygon Options: fill (colour, default is no fill) outline (The colour of the border. Default is outline='black’) dash (dashed border)
35
points = [10, 10, 100, 20, 70, 40, 90, 50, 80, 80, 180, 270] a_canvas.create_polygon(points, fill="white", outline="red")coords = [80,200, 100, 100, 150, 150, 200, 100, 250, 150, 300, 200]a_canvas.create_polygon(coords, fill="red", outline="white")
L24

Exercise 2 Complete the following code to draw the following shapes on
a canvas:
36
from tkinter import *def main():
root = Tk()a_canvas = Canvas(root, width=200, height=100)a_canvas.pack(fill=BOTH, expand=True)
root.mainloop()main()
L24
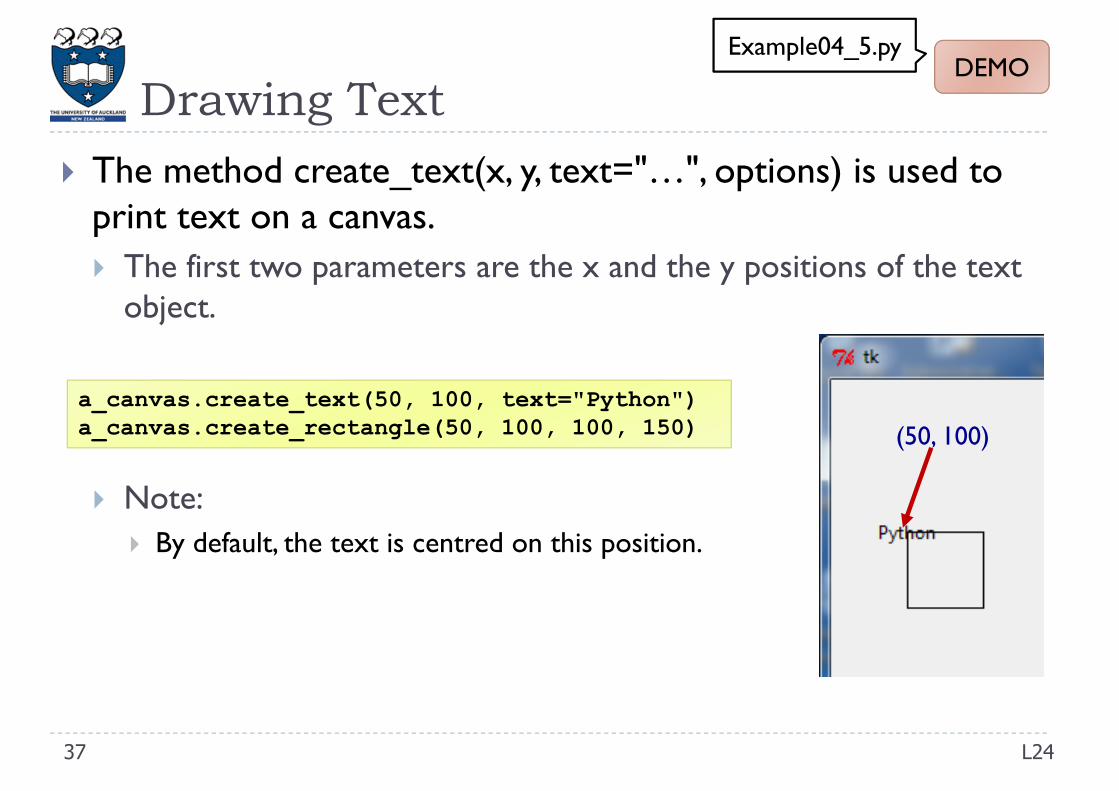
Drawing Text The method create_text(x, y, text="…", options) is used to
print text on a canvas. The first two parameters are the x and the y positions of the text
object.
Note: By default, the text is centred on this position.
37
a_canvas.create_text(50, 100, text="Python")a_canvas.create_rectangle(50, 100, 100, 150) (50, 100)
DEMOExample04_5.py
L24

Text Options Some other Text Options fill (colour, default is black) font (The font used to display the text) anchor (controls where the text is displayed with respect to x, y)
By default, the text is centred on this position. You can override this with the anchor option.
38
a_canvas.create_line(50, 40, 150, 40)a_font = ("Times", 20, "bold")a_canvas.create_text(50, 40, text="NW", anchor=NW, font=a_font)
SW:the text will be positioned so its
lower left corner is at point (x, y).
L24

Drawing Arcs The method create_arc(x0, x1, y0, y1, start=…, extent=…, options)
is used to draw an arc on a canvas. An arc object is a wedge-shaped slice taken out of an ellipse. This includes whole ellipses and circles as special cases Point (x0, y0) is the top left corner and (x1, y1) the lower right corner of
the bounding rectangle start : Starting angle for the slice, extent : Width of the slice in degrees. (extends counterclockwise)
39
a_canvas.create_rectangle(50,50,150,200) a_canvas.create_arc(50,50,150,200,start=225,extent=90))
(50, 50)
(150, 200)90
the arc starts at an angle 225 degrees counterclockwise from the positive x-direction, and
extends counterclockwise for 90 degrees.
DEMOExample04_6.py
L24

Arc Options Some arc options fill (colour, default is no fill) outline (The colour of the border. Default is outline='black’) dash (dashed border)
40
start: 0extend: 90
90
start: 0extend: 45
start: 120extend: 90
start: 120extend: 45
90
start: 0 degree
120
L24

Example: create_arc(x0, y0, x1, y1, start=…, extent=…,
**other_options)
41
start1_degrees = 45extent_degrees = 100enclosing_oval = (10, 20, 220, 150)a_canvas.create_oval(enclosing_oval, fill="white")a_canvas.create_arc(enclosing_oval, start=start1_degrees, extent=extent_degrees, fill="red")start2_degrees = start1_degrees + extent_degrees + 10a_canvas.create_arc(enclosing_oval, start=start2_degrees, extent=extent_degrees, fill="blue")
...
Example04_7.py
L24
DEMO

Summary tkinter module includes classes, functions, and constants
used in GUI programming A GUI-based program is structured as a main window class A Canvas object can be used to draw simple shapes. Line Circle Rectangle Polygon Arc Text
42 L24