(lecture notes 2b) -...
TRANSCRIPT
CS608 Lecture Notes
Visual Basic.NET Programming
Object-Oriented Programming
Custom Classes & Objects – Advanced Topics
(Part II of III)
(Lecture Notes 2B)
Prof. Abel Angel Rodriguez
2
CHAPTER 6 CLASSES & OBJECTS -ADVANCED CONCEPTS....................................................... 3
6.1 Advanced Methods - Method Overloading ...................................................................................................................................... 3 6.1.1 Introduction to Method Overloading............................................................................................................................................. 3 6.1.2 Overloading Regular Methods ...................................................................................................................................................... 4 6.1.3 Overloading Constructor Methods ................................................................................................................................................ 5 6.1.4 Sample Program 1 – Method Overloading .................................................................................................................................... 8
Module-Driven Windows Application – Adding Method Overloading Constructors to the Person Class ........................................ 8
6.2 Creating Custom Events inside Our Custom Classes ................................................................................................................... 18 6.2.1 Events in Visual Basics.NET ...................................................................................................................................................... 18 6.2.2 Creating your own Events inside Objects ................................................................................................................................... 19
Step I – Declare the Event................................................................................................................................................................ 19 Step II – Raise or Trigger Event ...................................................................................................................................................... 21 Step III – (Outside the Class) Create Objects Using Keyword WithEvents .................................................................................... 22 Step IV (a,b) – (Optional & Outside the Class) a) Generate the Event-Handler and b) Enter Code in the Event-Handler.............. 23
6.2.3 Sample Program 2 – Creating Custom Events ............................................................................................................................ 24 Form Driven Application – Adding Events to the Person Class ...................................................................................................... 24
6.3 Working with Arrays and Objects ................................................................................................................................................. 34 6.3.1 The Array Class Revisited .......................................................................................................................................................... 34
Overview of Arrays.......................................................................................................................................................................... 34 6.3.2 Arrays handling of Objects ......................................................................................................................................................... 36
Custom Objects and Arrays ............................................................................................................................................................. 36 Creating Arrays of Objects .............................................................................................................................................................. 36 Populating Array Elements with Objects ......................................................................................................................................... 37 Accessing Object Elements .............................................................................................................................................................. 38 Searching and Setting Properties of all Objects in array .................................................................................................................. 39 Searching the Array Elements.......................................................................................................................................................... 39
6.3.4 Sample Program 3 – Working With Arrays & Objects ............................................................................................................... 40 Module-Driven Window Application – Arrays & Person Class ...................................................................................................... 40
6.3.5 Sample Program 4 – Working With Arrays & Objects (Part II) ................................................................................................. 54 Module-Driven Window Application – Arrays & Person Class ...................................................................................................... 54
5.3.5 Sample Program 5 – Small Business Application Example ........................................................................................................ 66 Windows Driven Application – Customer & Retail Management ................................................................................................... 66

3
Chapter 6 Classes & Objects -Advanced Concepts
6.1 Advanced Methods - Method Overloading
6.1.1 Introduction to Method Overloading
As we know, you cannot have two variables or methods with the same name within a block of code say Module, Form, and Class
etc.
Names are unique and cannot be duplicated.
Also, on a related topic, not only does a Method’s name must be unique, but when you call a method you must call it with the
same NUMBER of arguments and DATA TYPE as the NUMBER parameters and DATA TYPE of the declaration. For example:
If you declare a method named
Public Sub CalculateTotal (ByRef decTotal As Decimal, ByVal decTax As Deciaml)
decTotal = decSubTotal + (decSubTotal * decTax)
End Sub
When you call this Method you must call it with the same NUMBER of arguments & DATA TYPE as follows:
objInvoice.CalculateTotal(decTotalCharges, decSalesTax)
Any of the following statements will result in Compiler Errors:
objInvoice.CalculateTotal(decTotalCharges) „Error only one argument
objInvoice.CalculateTotal(decTotalCharges, decSalesTax, decAmount) „Error to many
argu.
objInvoice.CalculateTotal(intTotalCharges, decSalesTax) „Error wrong data type
objInvoice.CalculateTotal(decTotalCharges, strSalesTax) „Error wrong data type
Ok now we have reviewed the basic rules for naming and methods, lets take a look at what Method overloading does for us.
Method Overloading allows you to do the following:
Create Methods with the Same Name
Each one accepting different NUMBERS of parameters Each one accepting different DATA TYPE
In short Method Overloading allows us to create those statements which generated errors in the above examples
The rules to Method overloading is as follows:
1. You can create multiple methods with the same name, but the NUMBER of Parameters OR the data type must be
different for each one.
2. YOU CANNOT have two methods that are identical!!!! Same # of Parameters & Data Type
3. Each Method can perform what ever functionality you code it to do.
So pretty much the rules have not changes, since each methods parameter or data type must be different for each method with the
same name.
The only rule that has been broken is having methods with the same name, but their number of parameters and data type must be
different.
4
6.1.2 Overloading Regular Methods
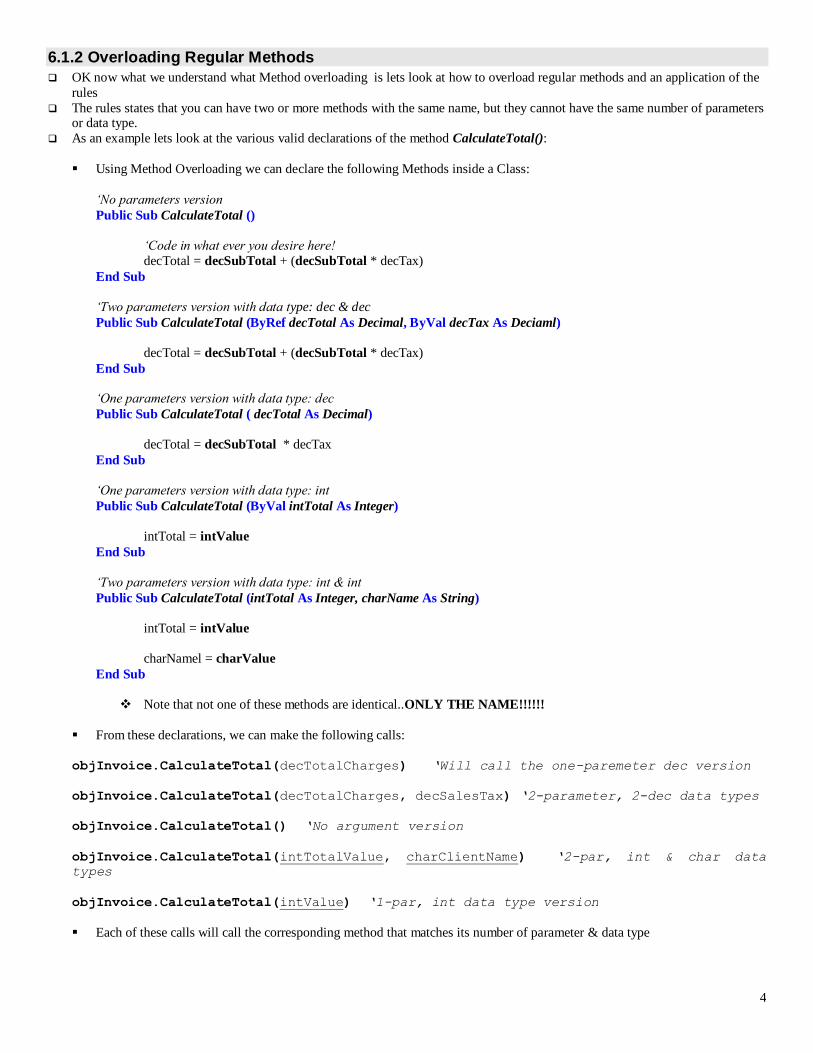
OK now what we understand what Method overloading is lets look at how to overload regular methods and an application of the
rules
The rules states that you can have two or more methods with the same name, but they cannot have the same number of parameters or data type.
As an example lets look at the various valid declarations of the method CalculateTotal():
Using Method Overloading we can declare the following Methods inside a Class:
„No parameters version
Public Sub CalculateTotal ()
„Code in what ever you desire here!
decTotal = decSubTotal + (decSubTotal * decTax)
End Sub
„Two parameters version with data type: dec & dec
Public Sub CalculateTotal (ByRef decTotal As Decimal, ByVal decTax As Deciaml)
decTotal = decSubTotal + (decSubTotal * decTax)
End Sub
„One parameters version with data type: dec
Public Sub CalculateTotal ( decTotal As Decimal)
decTotal = decSubTotal * decTax
End Sub
„One parameters version with data type: int
Public Sub CalculateTotal (ByVal intTotal As Integer)
intTotal = intValue
End Sub
„Two parameters version with data type: int & int
Public Sub CalculateTotal (intTotal As Integer, charName As String)
intTotal = intValue
charNamel = charValue
End Sub
Note that not one of these methods are identical..ONLY THE NAME!!!!!!
From these declarations, we can make the following calls:
objInvoice.CalculateTotal(decTotalCharges) „Will call the one-paremeter dec version
objInvoice.CalculateTotal(decTotalCharges, decSalesTax) „2-parameter, 2-dec data types
objInvoice.CalculateTotal() „No argument version
objInvoice.CalculateTotal(intTotalValue, charClientName) „2-par, int & char data
types
objInvoice.CalculateTotal(intValue) „1-par, int data type version
Each of these calls will call the corresponding method that matches its number of parameter & data type
5
6.1.3 Overloading Constructor Methods
One good place to use Method overloading is in the Constructor Method
As you recall, we can create default (no argument) Constructor or Parameterize (arguments) constructors.
But there was one draw back to using only a Parameterize Constructors was that once you crate one, you must always create the Object with those parameters, you cannot create Objects with no parameters. In order to do so you needed to explicitly also add a
Default Constructor.
For example, in the clsPerson class examples we covered, we needed to create both the default & the parameterized in order to be
able to declare empty objects and those populated. This is our only option, we can only create objects with no parameters or
three parameters ONLY!
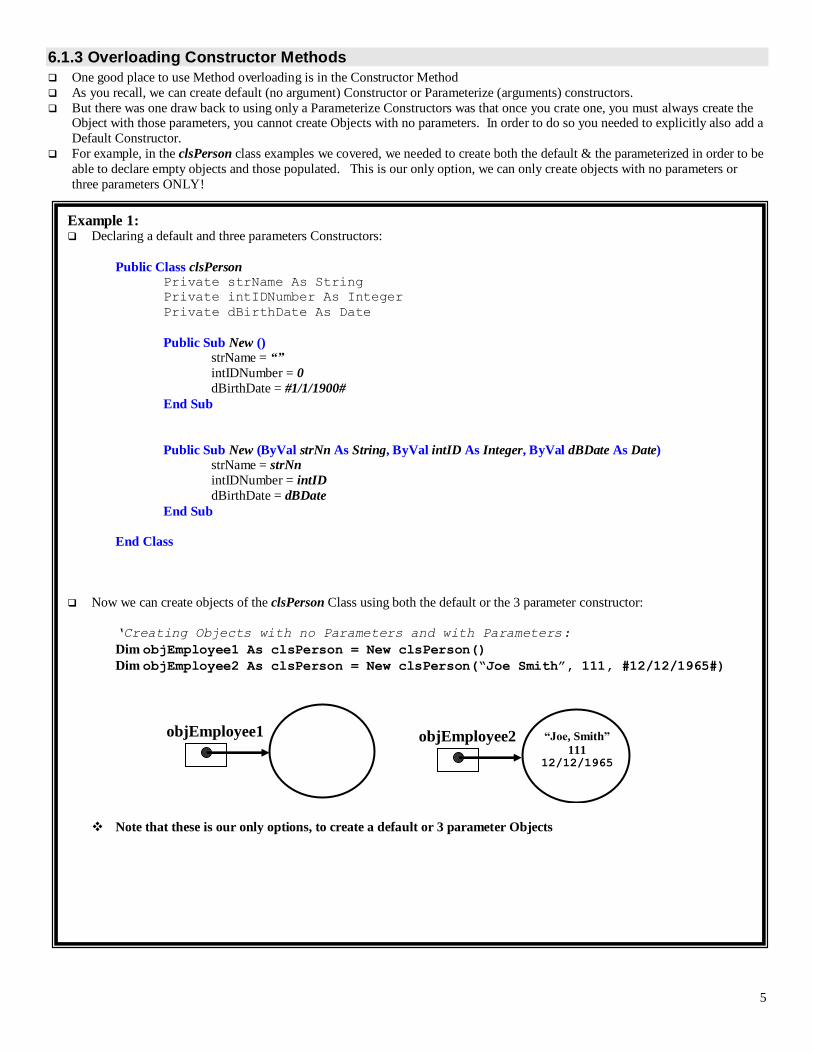
Example 1: Declaring a default and three parameters Constructors:
Public Class clsPerson Private strName As String
Private intIDNumber As Integer
Private dBirthDate As Date
Public Sub New () strName = “”
intIDNumber = 0
dBirthDate = #1/1/1900#
End Sub
Public Sub New (ByVal strNn As String, ByVal intID As Integer, ByVal dBDate As Date) strName = strNn
intIDNumber = intID
dBirthDate = dBDate
End Sub
End Class
Now we can create objects of the clsPerson Class using both the default or the 3 parameter constructor:
„Creating Objects with no Parameters and with Parameters:
Dim objEmployee1 As clsPerson = New clsPerson()
Dim objEmployee2 As clsPerson = New clsPerson(“Joe Smith”, 111, #12/12/1965#)
Note that these is our only options, to create a default or 3 parameter Objects
objEmployee2
“Joe, Smith”
111 12/12/1965
objEmployee1

6
But supposed we wanted to also be able to create objects using only on parameter, or two or with different data types.
In order to do this then we need to apply the rules to Method Overloading. Since a Constructor only has one name New, we
simply just need to create constructor with the number of parameters and data type we wish.
For example using method overloading we can create the following Constructors for the clsPerson Class:
The Overloaded Constructor Methods inside the clsPerson Class:
Example 2: Declaring various Constructor Overloaded Methods:
Public Class clsPerson Private strName As String
Private intIDNumber As Integer
Private dBirthDate As Date
Public Sub New () strName = “”
intIDNumber = 0
dBirthDate = #1/1/1900#
End Sub
Public Sub New (ByVal strNn As String) strName = strNn
intIDNumber = 0 dBirthDate = #1/1/1900#
End Sub
Public Sub New (ByVal intID As Integer) strName = “”
intIDNumber = intID
dBirthDate = #1/1/1900#
End Sub
Public Sub New (ByVal dBDate As Date) strName = “”
intIDNumber = 0
dBirthDate = dBDate
End Sub
Public Sub New (ByVal strNn As String, ByVal dBDate As Date) strName = strNn intIDNumber = CInt(Int((999 * Rnd()) + 111)) „Generates a random number between 999 and 111
dBirthDate = dBDate
End Sub
Public Sub New (ByVal strNn As String, ByVal intID As Integer, ByVal dBDate As Date) strName = strNn
intIDNumber = intID
dBirthDate = dBDate
End Sub
End Class

7
In the calling program, we can create the various versions of clsPerson Objects:
Example 1 (Continue): In this example we created various Objects of the Class clsPerson, using the Overloaded constructors:
„Creating Objects with using the Overloaded Constructors:
Dim objEmployee1 As clsPerson = New clsPerson()
Dim objEmployee2 As clsPerson = New clsPerson(“Joe Smith”)
Dim objEmployee3 As clsPerson = New clsPerson(111)
Dim objEmployee4 As clsPerson = New clsPerson(#12/12/1965#)
Dim objEmployee5 As clsPerson = New clsPerson(“Joe Smith”, #12/12/1965#)
Dim objEmployee6 As clsPerson = New clsPerson(“Joe Smith”, 111, #12/12/1965#)
objEmployee2
“Joe, Smith” objEmployee1
objEmployee4
12/12/1965
objEmployee3
111
objEmployee6
“Joe, Smith”
111 12/12/1965
objEmployee5
“Joe, Smith”
789 12/12/1965
8
6.1.4 Sample Program 1 – Method Overloading
Module-Driven Windows Application – Adding Method Overloading Constructors to the Person Class
Problem statement: Using a Module-Driven Application (Startup Object = Sub Main()) we will demonstrate method overloading in the Person Class
we created in previous examples.
This example is test program to test the clsPerson Class, but instead of using a Console Application, we will use a No-Form Module driven Windows Application.
We will reuse and keep all the features of the clsPerson Class from previous example, but we will overload the Constructor.
In addition enhance the clsPerson Class by adding a new private data member named TotalItemsPurchased, which represents the
total items a person Object has purchased.
In addition we will add a new method named Shop(), which makes a Person Object shop. This method will simply sum the total
number of items that the Person has purchased.
This project will contain NO forms, only a Module. In the module we will create various Objects to test each of the Overloaded
Constructors. In Sub Main() we will print each object to verify that the constructor worked.
In addition to the other topics covered in previous examples, this Example will demonstrate the following topics:
Using a No-Form Module Driven Windows Application Test Program
Method Overloading
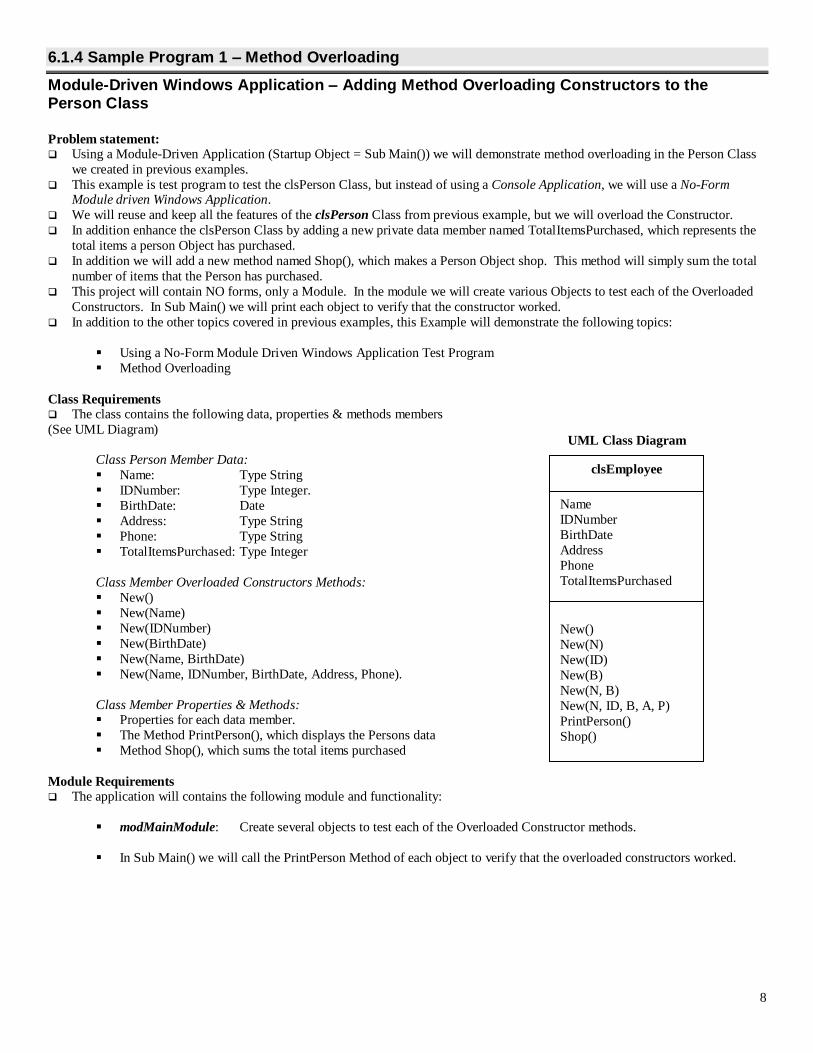
Class Requirements The class contains the following data, properties & methods members
(See UML Diagram)
Class Person Member Data:
Name: Type String
IDNumber: Type Integer.
BirthDate: Date
Address: Type String
Phone: Type String
TotalItemsPurchased: Type Integer
Class Member Overloaded Constructors Methods:
New()
New(Name)
New(IDNumber)
New(BirthDate)
New(Name, BirthDate)
New(Name, IDNumber, BirthDate, Address, Phone).
Class Member Properties & Methods: Properties for each data member.
The Method PrintPerson(), which displays the Persons data
Method Shop(), which sums the total items purchased
Module Requirements The application will contains the following module and functionality:
modMainModule: Create several objects to test each of the Overloaded Constructor methods.
In Sub Main() we will call the PrintPerson Method of each object to verify that the overloaded constructors worked.
clsEmployee
Name
IDNumber
BirthDate
Address
Phone
TotalItemsPurchased
New()
New(N)
New(ID)
New(B)
New(N, B)
New(N, ID, B, A, P)
PrintPerson()
Shop()
UML Class Diagram
9
HOW IT'S DONE:
Part I – Create The Class:
Step 1: Start a new Windows Application project:
Step 2: Add a Module to the project and set its properties as shown in the table:
Object Property Value
Module File Name modMainModule
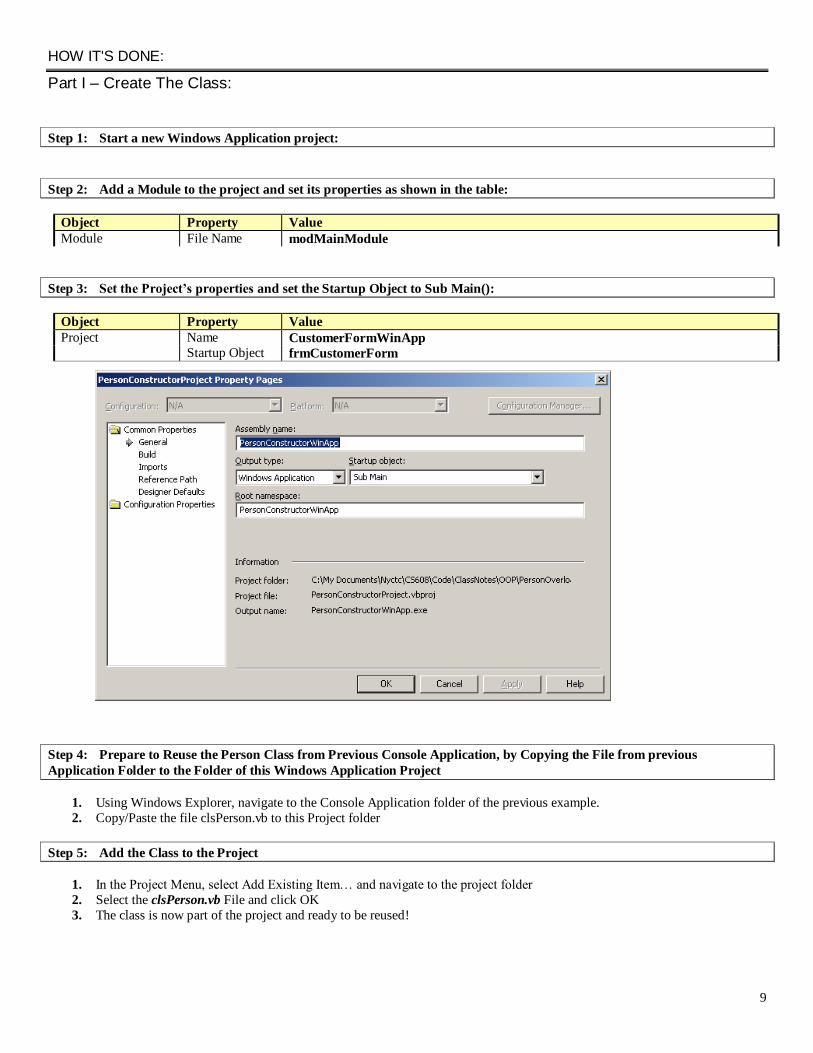
Step 3: Set the Project’s properties and set the Startup Object to Sub Main():
Object Property Value
Project Name CustomerFormWinApp Startup Object frmCustomerForm
Step 4: Prepare to Reuse the Person Class from Previous Console Application, by Copying the File from previous
Application Folder to the Folder of this Windows Application Project
1. Using Windows Explorer, navigate to the Console Application folder of the previous example.
2. Copy/Paste the file clsPerson.vb to this Project folder
Step 5: Add the Class to the Project
1. In the Project Menu, select Add Existing Item… and navigate to the project folder
2. Select the clsPerson.vb File and click OK
3. The class is now part of the project and ready to be reused!
10
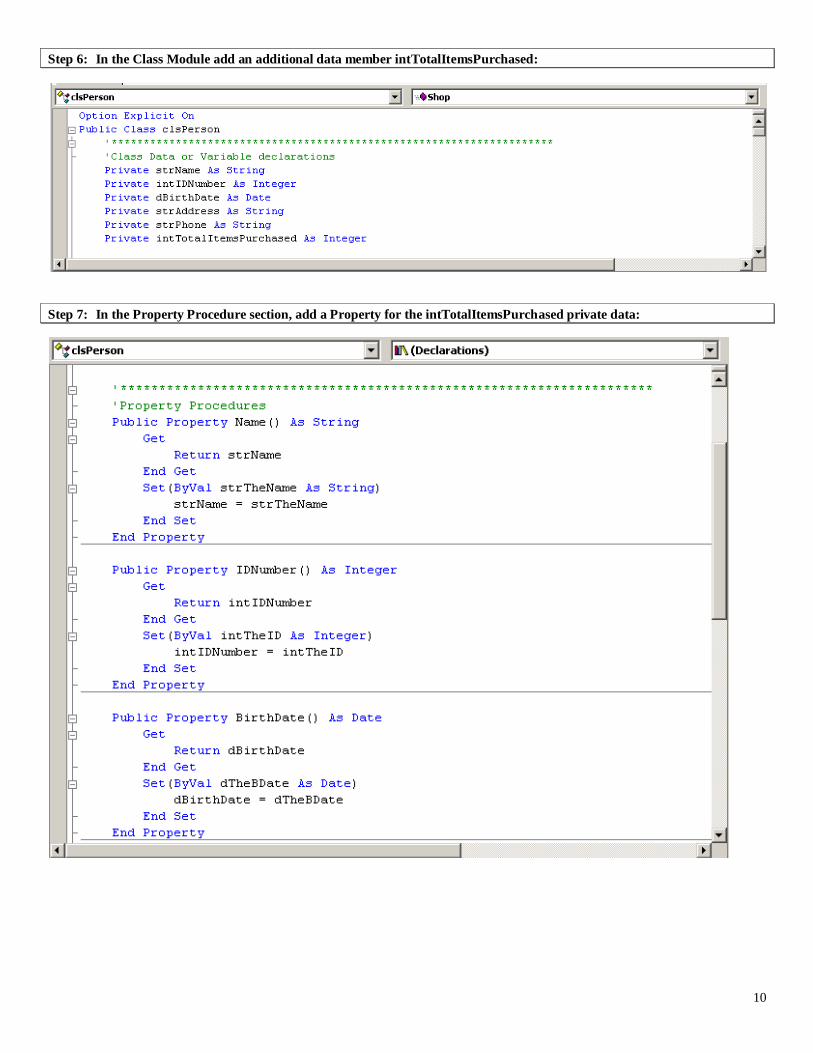
Step 6: In the Class Module add an additional data member intTotalItemsPurchased:
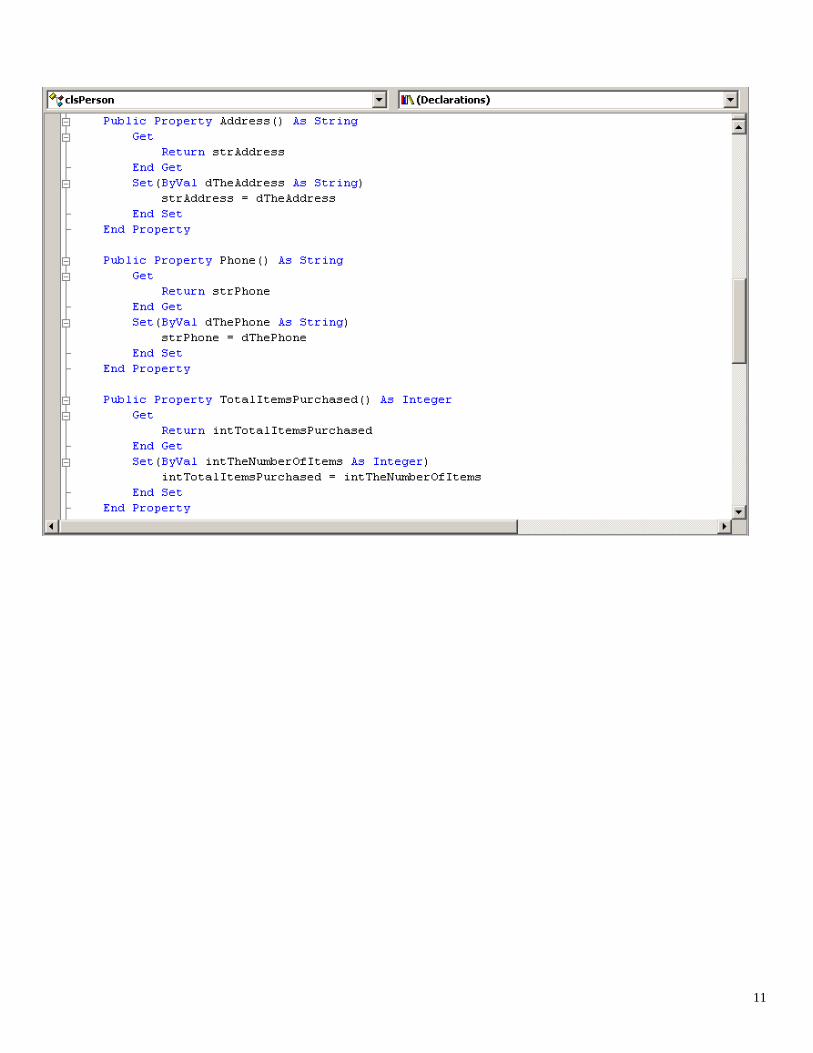
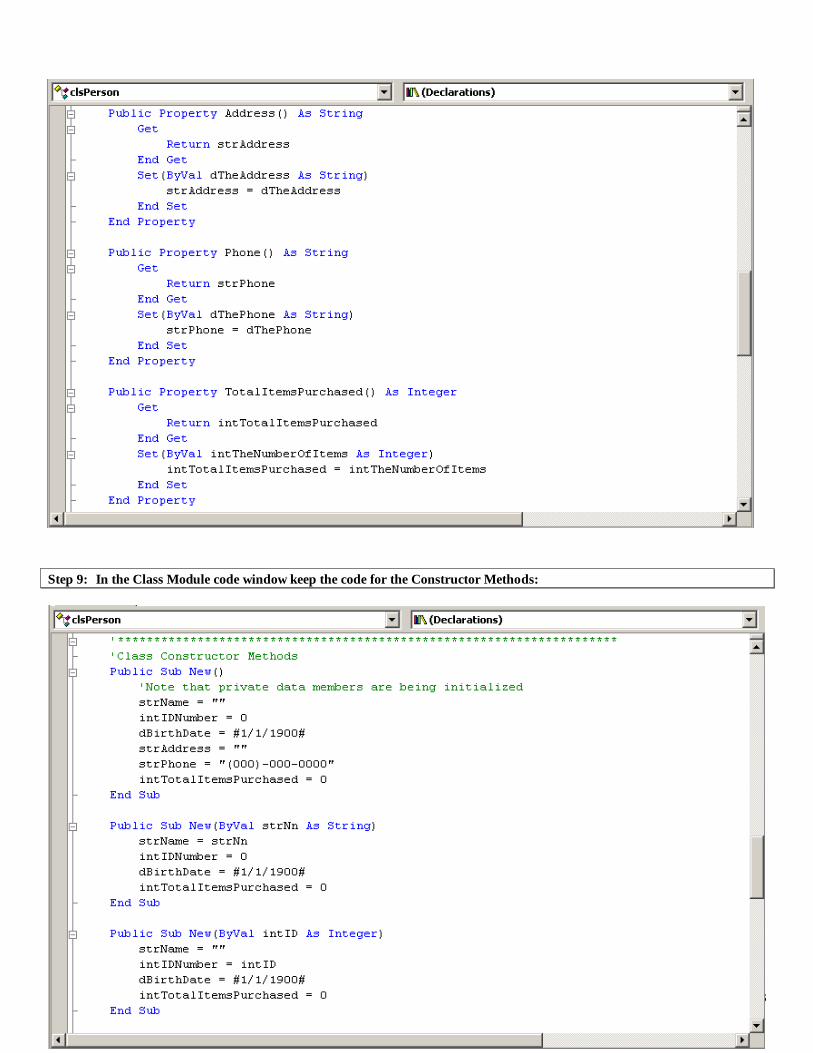
Step 7: In the Property Procedure section, add a Property for the intTotalItemsPurchased private data:
11
12
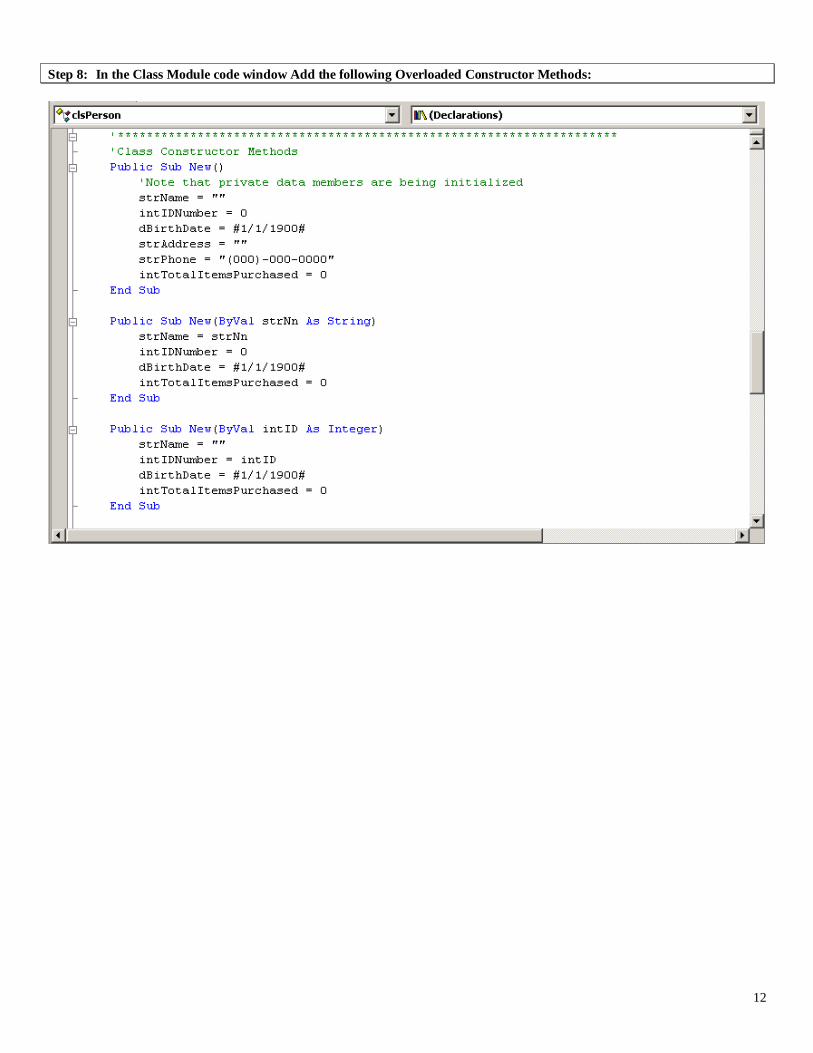
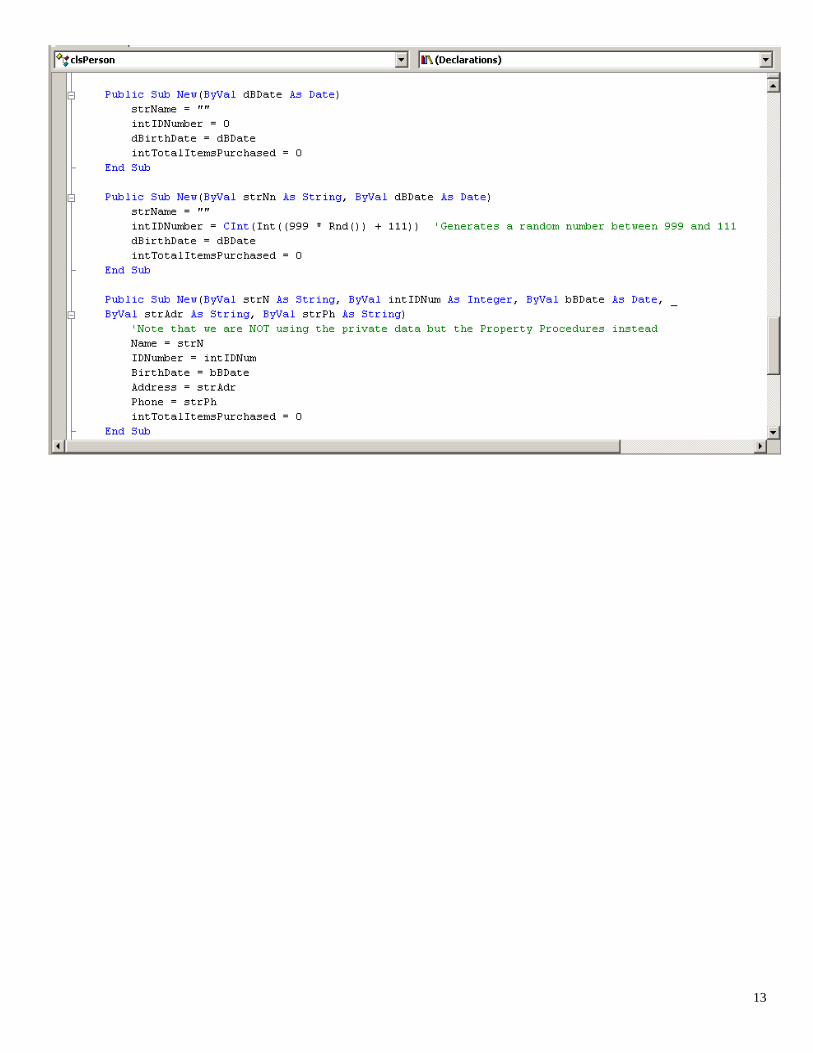
Step 8: In the Class Module code window Add the following Overloaded Constructor Methods:
13

14
Step 9: In the Class Module keep the PrintPerson() Method as is:
Remember that it is bad practice to display any forms or messages from
within a Class. I do this only for teaching purposes to demonstrate a
topic.
15
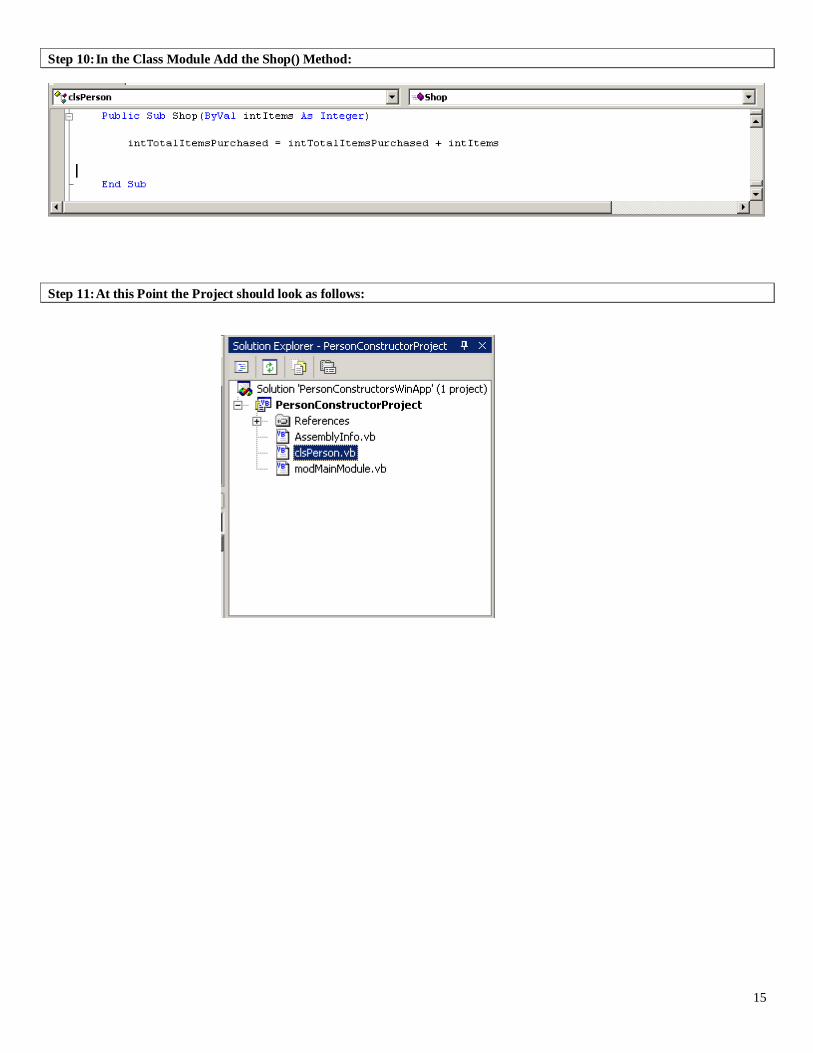
Step 10: In the Class Module Add the Shop() Method:
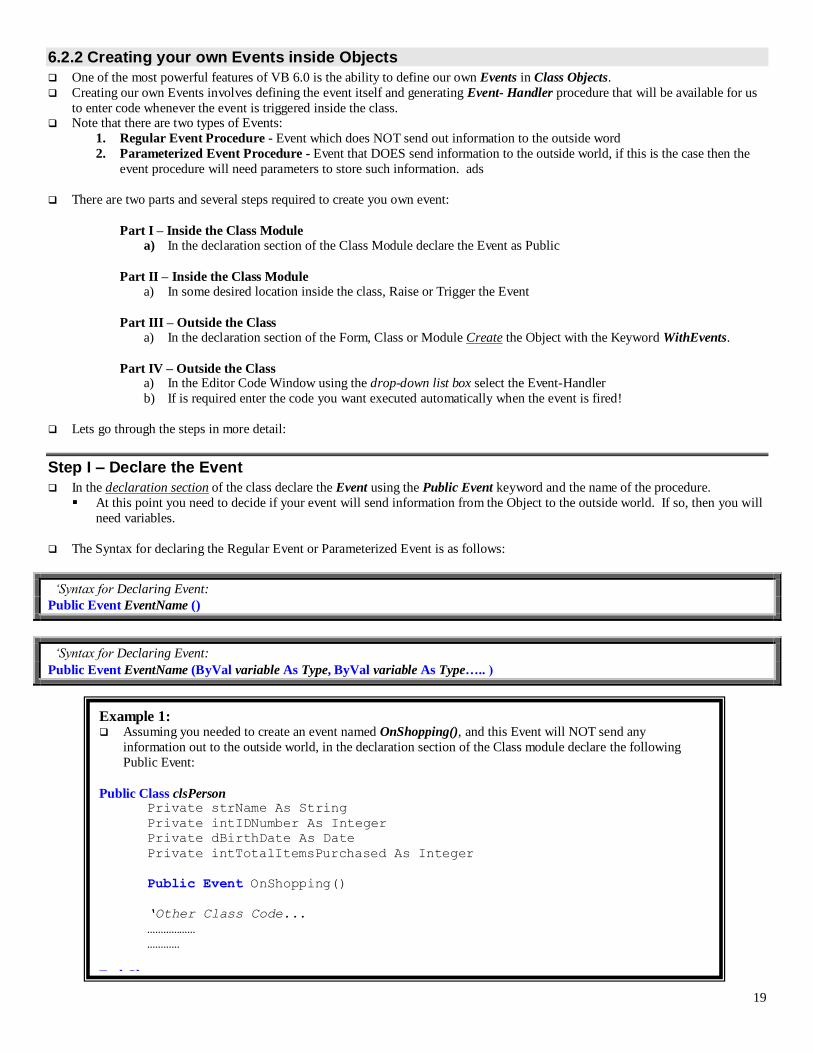
Step 11: At this Point the Project should look as follows:

16
Part II & III – Create The Object and Use it (The User Interface)
Step 12: Add the following Code in the Module:

17
Step 13: Compile & Run the program:

18
6.2 Creating Custom Events inside Our Custom Classes
6.2.1 Events in Visual Basics.NET
Events are actions taken upon the object by an outside force (User, Program code etc).
Events or actions upon the object will automatically trigger Outside of the Object a specialized Methods known as Event-
Handlers.
The key points here are automatically execution of the Event-Handler & that this Event-Handler is automatically created
Outside the Object in a Form, Module or another Object.
Using Events is a way of Objects communicating or sending notification of an activity or event inside the Object.
VB.NET comes with a variety of predefined Event-Handlers in the Controls & Forms already created and ready for you to use.
This was how you programmed in CS101 & 508 coding these Event-Handlers. Such programming is known as Event-Driven
Programming.
VB Controls and forms can respond to hundreds of different predefined events, but you don't have to write any code to an event
unless you want to. You only need to write event code, when you want something to happen in response to an event.
Event-Handlers are found in the invisible aspect of a form or control, which can be accessed by double-clicking on the form or
control. This will invoke the Object's Code Window.
In the Object’s Code Window select the Object Combo-box and the list of available Events will appear in the Event Combo-box.
Now all you need to do is to enter the code you wish to execute when the event is triggered inside the Event-Handler. Again, that
is if you want to, you don’t have to add any code to react to the event if you don’t want to.
Object selected Available events
19
6.2.2 Creating your own Events inside Objects
One of the most powerful features of VB 6.0 is the ability to define our own Events in Class Objects.
Creating our own Events involves defining the event itself and generating Event- Handler procedure that will be available for us
to enter code whenever the event is triggered inside the class. Note that there are two types of Events:
1. Regular Event Procedure - Event which does NOT send out information to the outside word
2. Parameterized Event Procedure - Event that DOES send information to the outside world, if this is the case then the
event procedure will need parameters to store such information. ads
There are two parts and several steps required to create you own event:
Part I – Inside the Class Module a) In the declaration section of the Class Module declare the Event as Public
Part II – Inside the Class Module a) In some desired location inside the class, Raise or Trigger the Event
Part III – Outside the Class a) In the declaration section of the Form, Class or Module Create the Object with the Keyword WithEvents.
Part IV – Outside the Class a) In the Editor Code Window using the drop-down list box select the Event-Handler
b) If is required enter the code you want executed automatically when the event is fired!
Lets go through the steps in more detail:
Step I – Declare the Event
In the declaration section of the class declare the Event using the Public Event keyword and the name of the procedure.
At this point you need to decide if your event will send information from the Object to the outside world. If so, then you will
need variables.
The Syntax for declaring the Regular Event or Parameterized Event is as follows:
„Syntax for Declaring Event:
Public Event EventName ()
„Syntax for Declaring Event:
Public Event EventName (ByVal variable As Type, ByVal variable As Type….. )
Example 1: Assuming you needed to create an event named OnShopping(), and this Event will NOT send any
information out to the outside world, in the declaration section of the Class module declare the following
Public Event:
Public Class clsPerson Private strName As String
Private intIDNumber As Integer
Private dBirthDate As Date
Private intTotalItemsPurchased As Integer
Public Event OnShopping()
„Other Class Code...
………………
…………
End Class
20
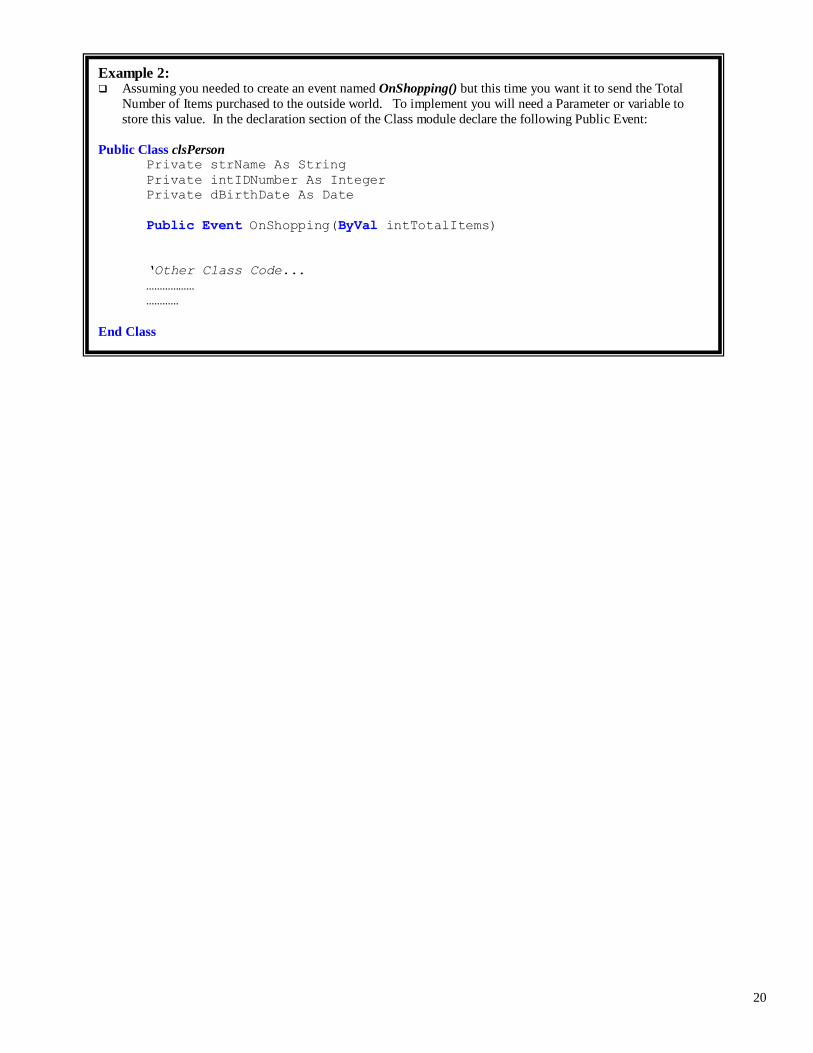
Example 2: Assuming you needed to create an event named OnShopping() but this time you want it to send the Total
Number of Items purchased to the outside world. To implement you will need a Parameter or variable to
store this value. In the declaration section of the Class module declare the following Public Event:
Public Class clsPerson Private strName As String
Private intIDNumber As Integer
Private dBirthDate As Date
Public Event OnShopping(ByVal intTotalItems)
„Other Class Code...
………………
…………
End Class
21
Step II – Raise or Trigger Event
At the location inside the class module either in a Property, Sub Procedure or Function, where ever you want the event to trigger,
use the RaiseEvent keyword using the following syntax:
„Syntax for Declaring Event:
RaiseEvent EventName ()
„Syntax for Declaring Event:
Public Event EventName (Argument1, Argument2….. )
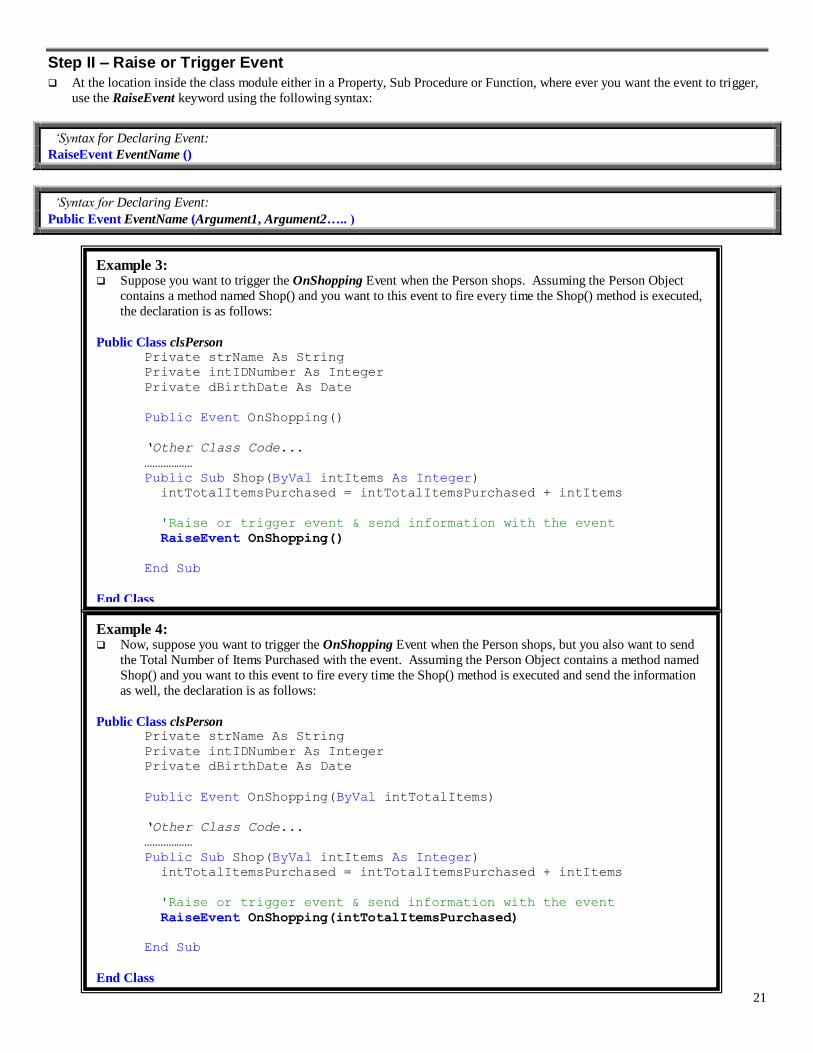
Example 3: Suppose you want to trigger the OnShopping Event when the Person shops. Assuming the Person Object
contains a method named Shop() and you want to this event to fire every time the Shop() method is executed,
the declaration is as follows:
Public Class clsPerson Private strName As String
Private intIDNumber As Integer
Private dBirthDate As Date
Public Event OnShopping()
„Other Class Code...
………………
Public Sub Shop(ByVal intItems As Integer)
intTotalItemsPurchased = intTotalItemsPurchased + intItems
'Raise or trigger event & send information with the event
RaiseEvent OnShopping()
End Sub
End Class
Example 4: Now, suppose you want to trigger the OnShopping Event when the Person shops, but you also want to send
the Total Number of Items Purchased with the event. Assuming the Person Object contains a method named
Shop() and you want to this event to fire every time the Shop() method is executed and send the information
as well, the declaration is as follows:
Public Class clsPerson Private strName As String
Private intIDNumber As Integer
Private dBirthDate As Date
Public Event OnShopping(ByVal intTotalItems)
„Other Class Code...
………………
Public Sub Shop(ByVal intItems As Integer)
intTotalItemsPurchased = intTotalItemsPurchased + intItems
'Raise or trigger event & send information with the event
RaiseEvent OnShopping(intTotalItemsPurchased)
End Sub
End Class

22
Step III – (Outside the Class) Create Objects Using Keyword WithEvents
In the Declaration Section of a Form or Class Module you need to create the Objects with the ability to trigger events
Use any of the methods shown in previous lectures to create object. Use Dim, Private, or Public but use the keyword
WithEvents. The syntax are as follows:
Public WithEvents ObjectName As ClassName = New ClassName()
Public WithEvents ObjectName As New ClassName()
Public WithEvents ObjectName As ClassName
„Inside a Method Procedure enter the following statement to create the object:
ObjectName = New ClassName()
Note only when you create an Object with the Keyword WithEvents will the Event Feature work. If you create an Object
using the regular methods as shown in previous sections, the object’s events will NOT WORK!
Example 5: Suppose you want to create Objects of the clsPerson Class, but you want these objects to trigger the events create
in the class. Assuming you create this Object inside a Form, the declaration is as follows:
Public Class frmEditForm
„Declaration of Object WithEvents using default constructor
Private WithEvents objPerson1 As clsPerson = New clsPerson()
„Declaration of Object WithEvents using parameterized constructor
Private WithEvents objPerson2 As clsPerson = New clsPerson("Joe Smith", _
111, #12/12/1965#, "192 East 8th, Brooklyn", "718-434-6677")
„Other Form Code...
………………
…………
End Class
23
Step IV (a,b) – (Optional & Outside the Class) a) Generate the Event-Handler and b) Enter Code in the Event-Handler
Step a) – Once you create the Object using the Keyword WithEvents, either in a Form, Module or Class, you now have the ability
to generate the Event-handler procedure that will execute automatically when the event is raised inside the object. This done as
follows:
1. In the Form Code Window using the Drop-Down List Box on the top left select the WithEvent Object.
2. On the Drop-Down List Box on the top Right select the Event.
3. The Event-handler will be AUTOMATICALLY GENERATED IN THE SAME LOCATION where the OBJECT
resides.
You now have the option to code in the Event handler in the same way that you would code and event handler from a Form or
Control. To do this, simply select the object from the Object Combo box & then the Event handler from the Event Combo Box
once you do this, the Event-Handler will appear inside the Form, Class or Module where the Object was created using WithEvents.
The syntax for the Event-handlers that Do Not pass information from the Object:
„Syntax for Event_handler Procedure with no arguments. Note that the Handles Keyword states that the object is handling the event:
Private Sub objObject_Event () Handles objObject.Event
„Body Code goes here!
End Sub
The syntax for the Event-handlers that pass information from the Object:
„Syntax for Event_handler Procedure with arguments:
Private Sub objObject_Event (ByVal variable As Object) Handles objObject.Event
„Body Code goes here!
End Sub
Note you that you DON’T have to memorize this Syntax, the method is generated AUTOMATICALLY!
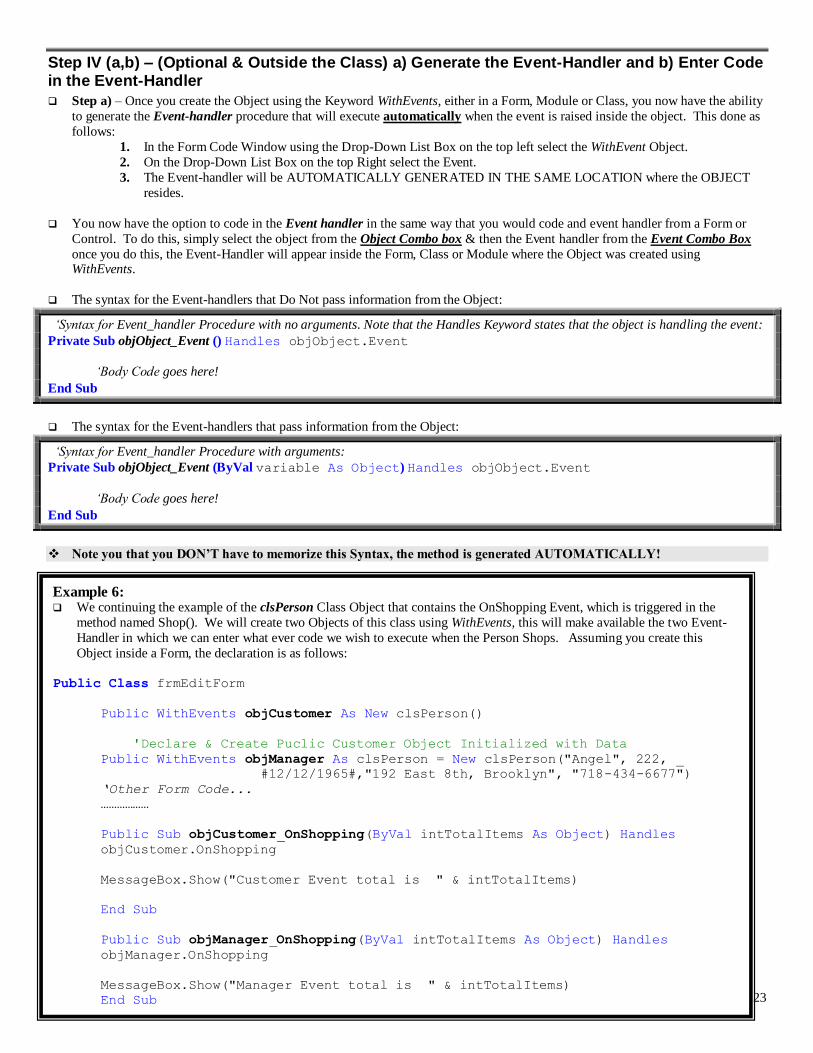
Example 6: We continuing the example of the clsPerson Class Object that contains the OnShopping Event, which is triggered in the
method named Shop(). We will create two Objects of this class using WithEvents, this will make available the two Event-
Handler in which we can enter what ever code we wish to execute when the Person Shops. Assuming you create this
Object inside a Form, the declaration is as follows:
Public Class frmEditForm
Public WithEvents objCustomer As New clsPerson()
'Declare & Create Puclic Customer Object Initialized with Data
Public WithEvents objManager As clsPerson = New clsPerson("Angel", 222, _
#12/12/1965#,"192 East 8th, Brooklyn", "718-434-6677")
„Other Form Code...
………………
Public Sub objCustomer_OnShopping(ByVal intTotalItems As Object) Handles
objCustomer.OnShopping
MessageBox.Show("Customer Event total is " & intTotalItems)
End Sub
Public Sub objManager_OnShopping(ByVal intTotalItems As Object) Handles
objManager.OnShopping
MessageBox.Show("Manager Event total is " & intTotalItems)
End Sub
24
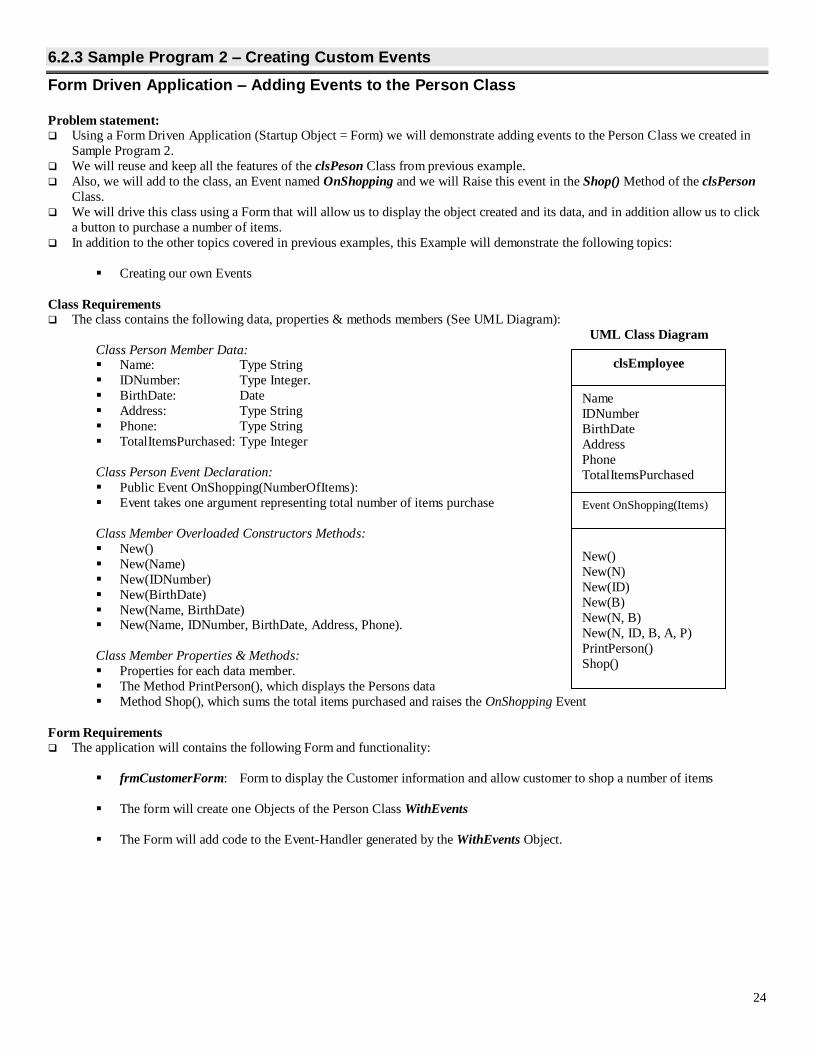
6.2.3 Sample Program 2 – Creating Custom Events
Form Driven Application – Adding Events to the Person Class
Problem statement: Using a Form Driven Application (Startup Object = Form) we will demonstrate adding events to the Person Class we created in
Sample Program 2.
We will reuse and keep all the features of the clsPeson Class from previous example.
Also, we will add to the class, an Event named OnShopping and we will Raise this event in the Shop() Method of the clsPerson
Class.
We will drive this class using a Form that will allow us to display the object created and its data, and in addition allow us to click
a button to purchase a number of items.
In addition to the other topics covered in previous examples, this Example will demonstrate the following topics:
Creating our own Events
Class Requirements The class contains the following data, properties & methods members (See UML Diagram):
Class Person Member Data: Name: Type String
IDNumber: Type Integer.
BirthDate: Date
Address: Type String
Phone: Type String
TotalItemsPurchased: Type Integer
Class Person Event Declaration:
Public Event OnShopping(NumberOfItems):
Event takes one argument representing total number of items purchase
Class Member Overloaded Constructors Methods:
New()
New(Name)
New(IDNumber)
New(BirthDate)
New(Name, BirthDate) New(Name, IDNumber, BirthDate, Address, Phone).
Class Member Properties & Methods:
Properties for each data member.
The Method PrintPerson(), which displays the Persons data
Method Shop(), which sums the total items purchased and raises the OnShopping Event
Form Requirements The application will contains the following Form and functionality:
frmCustomerForm: Form to display the Customer information and allow customer to shop a number of items
The form will create one Objects of the Person Class WithEvents
The Form will add code to the Event-Handler generated by the WithEvents Object.
clsEmployee
Name
IDNumber
BirthDate
Address
Phone
TotalItemsPurchased
New()
New(N)
New(ID)
New(B)
New(N, B)
New(N, ID, B, A, P)
PrintPerson()
Shop()
UML Class Diagram
Event OnShopping(Items)
25
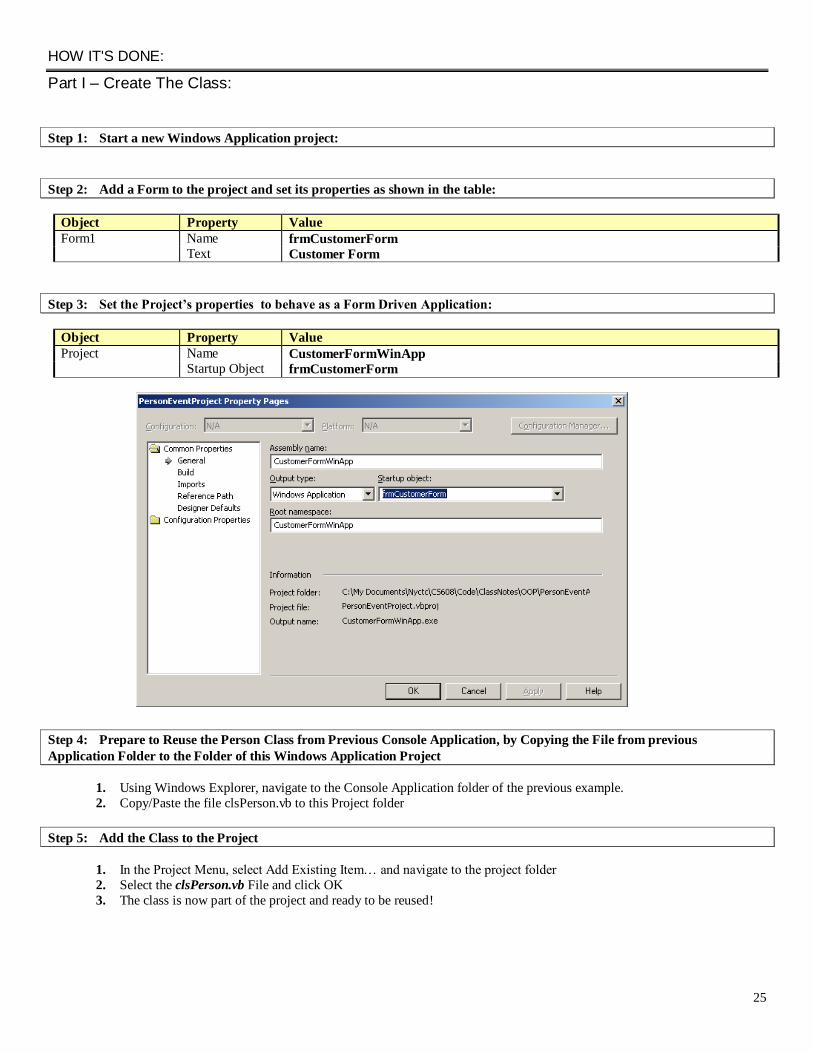
HOW IT'S DONE:
Part I – Create The Class:
Step 1: Start a new Windows Application project:
Step 2: Add a Form to the project and set its properties as shown in the table:
Object Property Value
Form1 Name frmCustomerForm Text Customer Form
Step 3: Set the Project’s properties to behave as a Form Driven Application:
Object Property Value
Project Name CustomerFormWinApp Startup Object frmCustomerForm
Step 4: Prepare to Reuse the Person Class from Previous Console Application, by Copying the File from previous
Application Folder to the Folder of this Windows Application Project
1. Using Windows Explorer, navigate to the Console Application folder of the previous example.
2. Copy/Paste the file clsPerson.vb to this Project folder
Step 5: Add the Class to the Project
1. In the Project Menu, select Add Existing Item… and navigate to the project folder
2. Select the clsPerson.vb File and click OK
3. The class is now part of the project and ready to be reused!
26
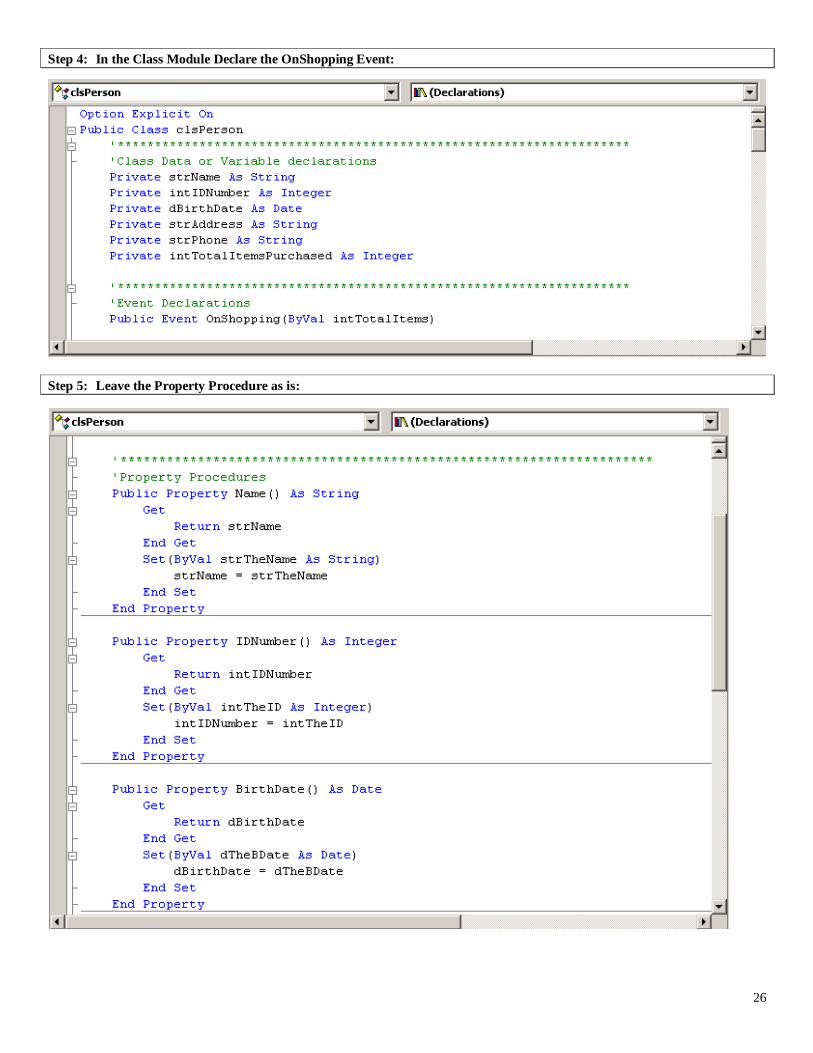
Step 4: In the Class Module Declare the OnShopping Event:
Step 5: Leave the Property Procedure as is:

27
Step 6: In the Class Module code window keep the code for the Constructor Methods:

28
29
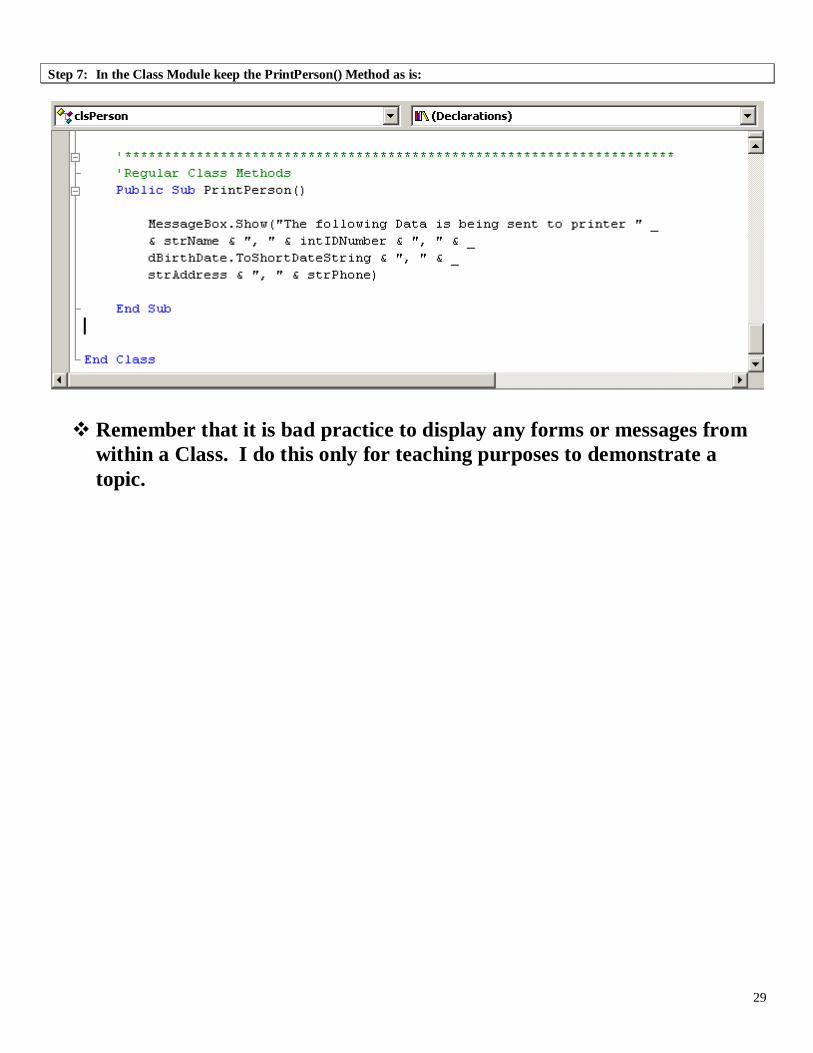
Step 7: In the Class Module keep the PrintPerson() Method as is:
Remember that it is bad practice to display any forms or messages from
within a Class. I do this only for teaching purposes to demonstrate a
topic.
30
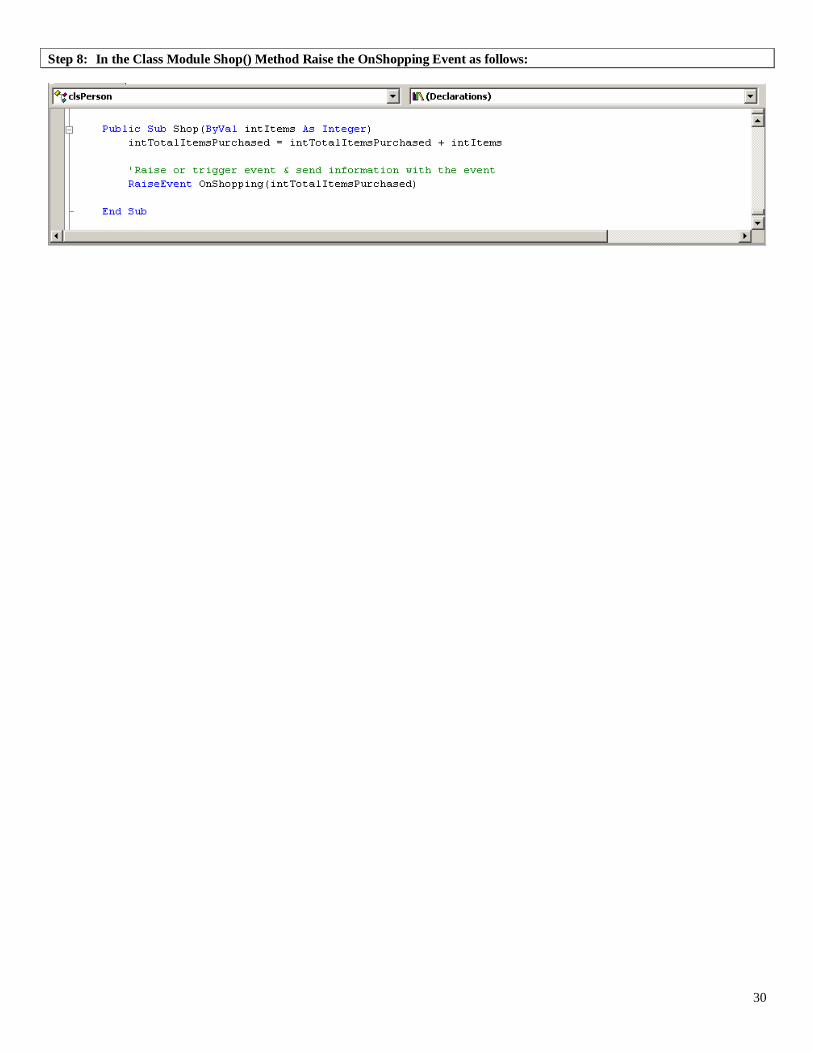
Step 8: In the Class Module Shop() Method Raise the OnShopping Event as follows:

31
Part II & III – Create The Object and Use it (The User Interface)
Step 9: Add the following indicated Controls to the frmCustomerForm. Set their properties accordingly:
Object Property Value
Form1 Name frmCustomerForm Text Customer Form
Step 10: At this Point the Project should look as follows:
32
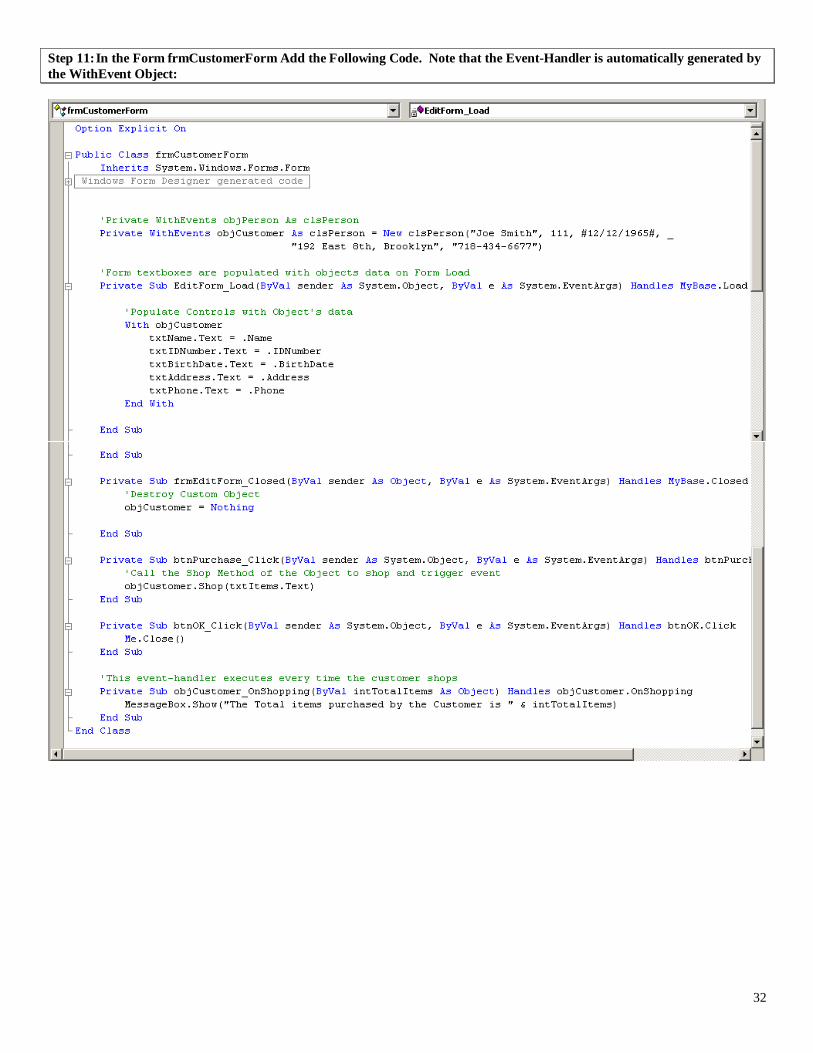
Step 11: In the Form frmCustomerForm Add the Following Code. Note that the Event-Handler is automatically generated by
the WithEvent Object:

33
Step 12: Compile & Run the program:
34
6.3 Working with Arrays and Objects
6.3.1 The Array Class Revisited
Overview of Arrays
In VB.NET the Array Class is defined in the System Namespace.
In previous lectures we defined an Arrays Class as follows: Array: An Array is a list of data of a single data type
We have also learned that when creating an object of a class we are creating a reference. Therefore when we create an array, we
create an array object in which the name of the array is the reference pointing to the object. Syntax:
Creating Arrays
We also learned that the syntax to declaring objects of the Array Class is:
„General Array Syntax: Accessibility ArrayName(Size) As Type
Where Accessibility:
-Dim
-Public
-Private
Where Size: Size of the array starting from 0 & each value representing the Size is know as the Index
Where Type: Data type of array
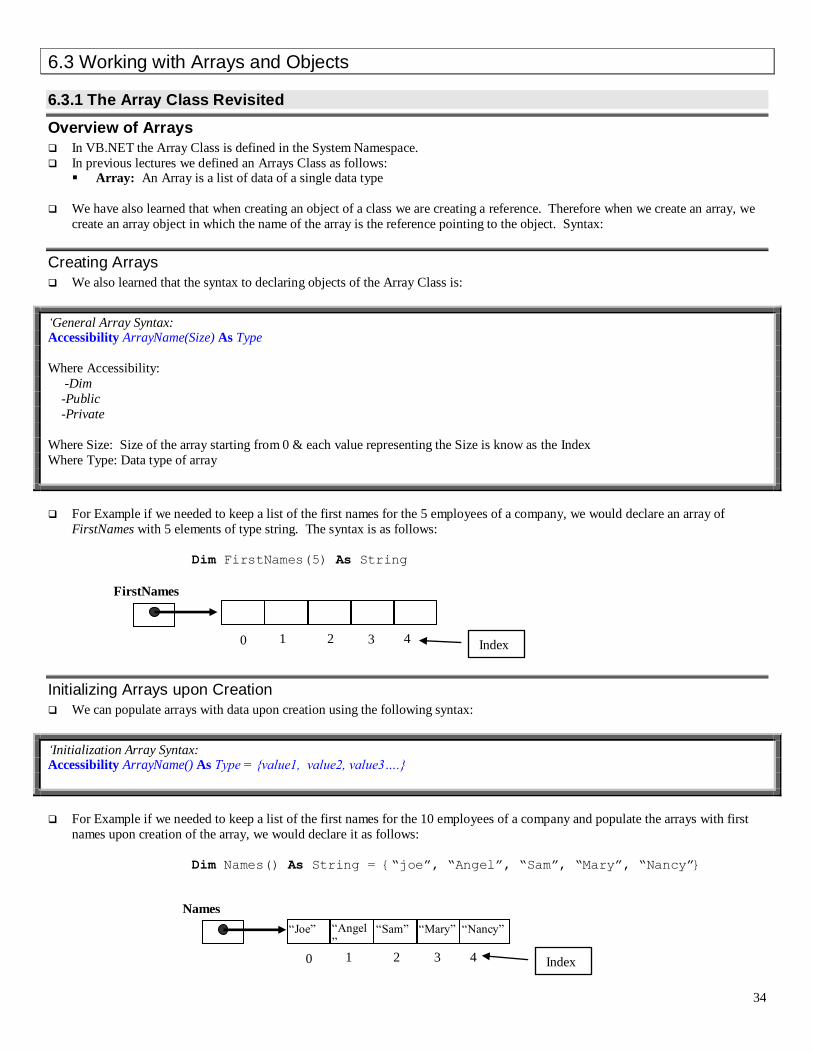
For Example if we needed to keep a list of the first names for the 5 employees of a company, we would declare an array of
FirstNames with 5 elements of type string. The syntax is as follows:
Dim FirstNames(5) As String
Initializing Arrays upon Creation
We can populate arrays with data upon creation using the following syntax:
„Initialization Array Syntax: Accessibility ArrayName() As Type = {value1, value2, value3….}
For Example if we needed to keep a list of the first names for the 10 employees of a company and populate the arrays with first
names upon creation of the array, we would declare it as follows:
Dim Names() As String = {“joe”, “Angel”, “Sam”, “Mary”, “Nancy”}
0 1 4 3 2 Index
FirstNames
“Joe” “Angel
” “Sam” “Mary” “Nancy”
0 1 4 3 2 Index
Names
35
Populating Array Elements
When you populate data to an array you do via the name of the array and the index. Syntax:
ArrayName(index) = value
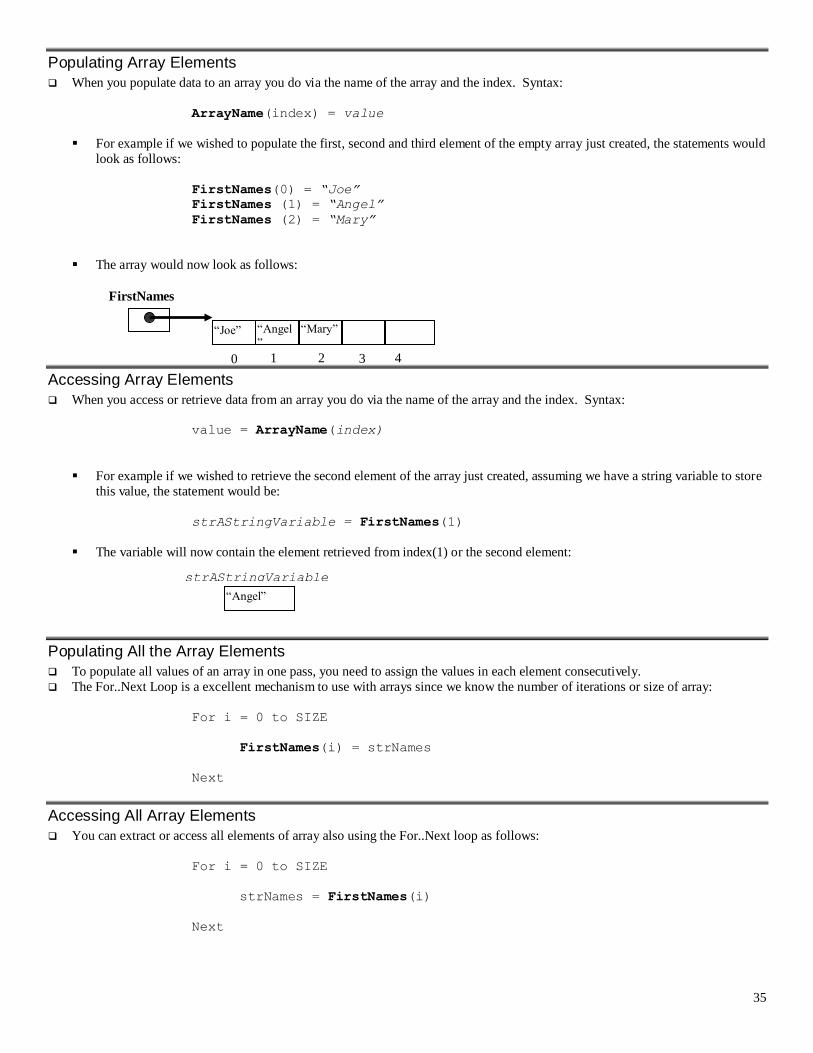
For example if we wished to populate the first, second and third element of the empty array just created, the statements would
look as follows:
FirstNames(0) = “Joe”
FirstNames (1) = “Angel”
FirstNames (2) = “Mary”
The array would now look as follows:
Accessing Array Elements
When you access or retrieve data from an array you do via the name of the array and the index. Syntax:
value = ArrayName(index)
For example if we wished to retrieve the second element of the array just created, assuming we have a string variable to store
this value, the statement would be:
strAStringVariable = FirstNames(1)
The variable will now contain the element retrieved from index(1) or the second element:
Populating All the Array Elements
To populate all values of an array in one pass, you need to assign the values in each element consecutively.
The For..Next Loop is a excellent mechanism to use with arrays since we know the number of iterations or size of array:
For i = 0 to SIZE
FirstNames(i) = strNames
Next
Accessing All Array Elements
You can extract or access all elements of array also using the For..Next loop as follows:
For i = 0 to SIZE
strNames = FirstNames(i)
Next
“Angel”
strAStringVariable
“Joe” “Angel
”
“Mary”
0 1 4 3 2
FirstNames
36
6.3.2 Arrays handling of Objects
Custom Objects and Arrays
In this section we look into how to use an array that stores our custom objects.
Working with arrays and the objects we create can be confusion, but it is not really very difficult, after all an Array is an Object.
Also, in the array examples we reviewed in previous lectures we were actually working with Arrays of Objects since the String
Data type is also an Object. So we were really storing objects in the arrays.
If you remember that the when we create a Class, we are actually introducing a new Data Type into our program.
Therefore, if an array is defined as: “arrays are a list of data of a same data type” and we know that when we create an Object
the name is really a reference or pointer to the object, then an array of Object is simply:
Array of Object: A list of references to Objects of the same data type or Class.
Creating Arrays of Objects
Syntax to declaring an Array of objects:
„General Array Syntax:
Accessibility ArrayName(Size) As ClassName
Where Accessibility:
-Dim
-Public
-Private
Where Size: Size of the array starting from 0 & each value representing the Size is know as the Index
Where Type: Data type of array
Note that when we create an array of objects, we are really creating an array of references to objects. Not until you being to add
Items or Objects to the array will the array really store Objects.
Lets look at the following example:
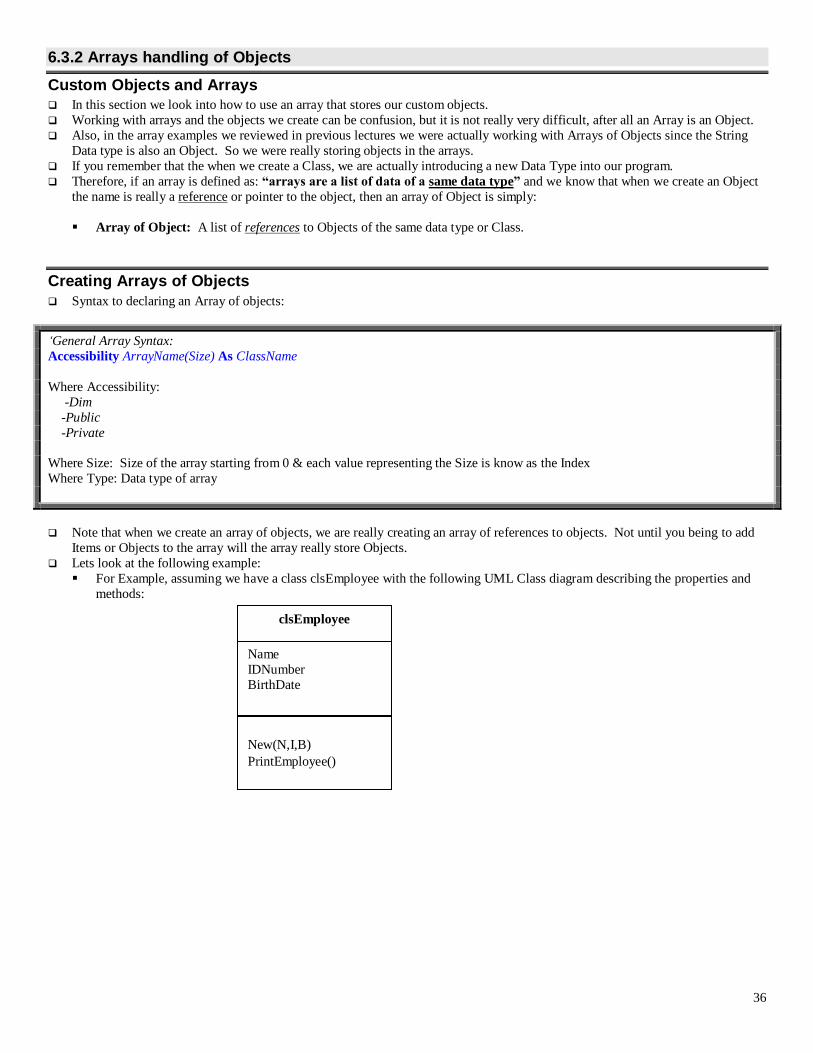
For Example, assuming we have a class clsEmployee with the following UML Class diagram describing the properties and
methods:
clsEmployee
Name
IDNumber
BirthDate
New(N,I,B)
PrintEmployee()
37
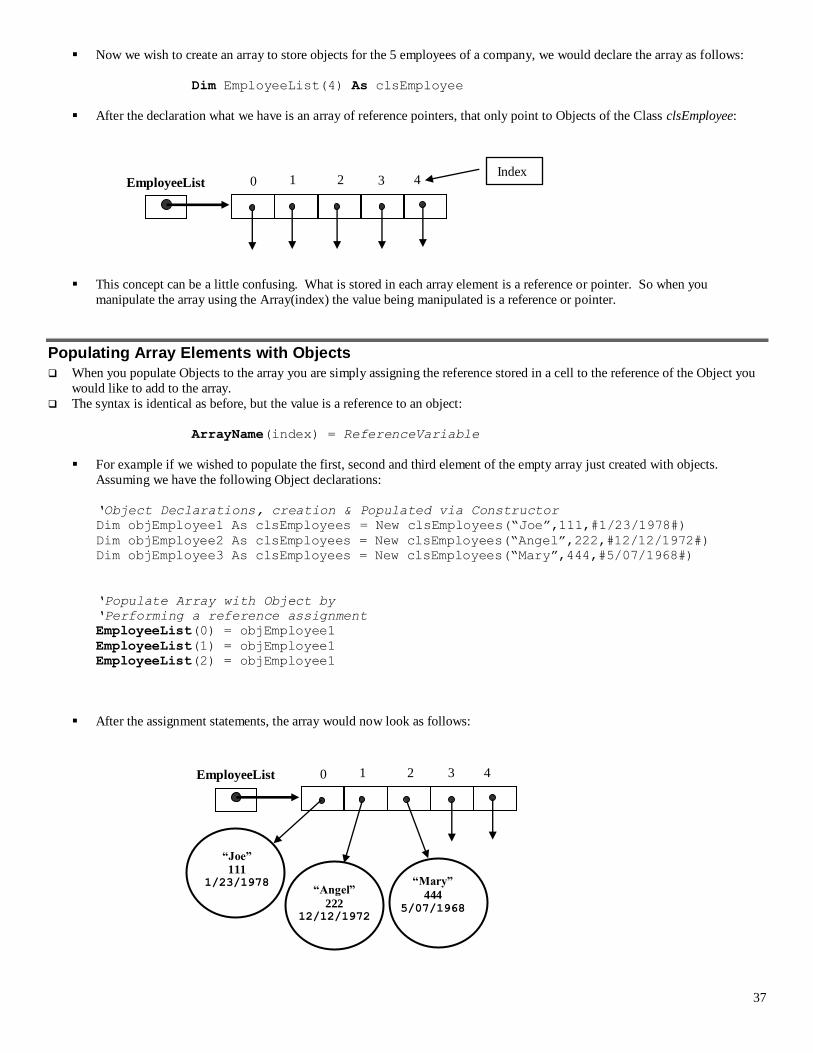
Now we wish to create an array to store objects for the 5 employees of a company, we would declare the array as follows:
Dim EmployeeList(4) As clsEmployee
After the declaration what we have is an array of reference pointers, that only point to Objects of the Class clsEmployee:
This concept can be a little confusing. What is stored in each array element is a reference or pointer. So when you
manipulate the array using the Array(index) the value being manipulated is a reference or pointer.
Populating Array Elements with Objects
When you populate Objects to the array you are simply assigning the reference stored in a cell to the reference of the Object you
would like to add to the array.
The syntax is identical as before, but the value is a reference to an object:
ArrayName(index) = ReferenceVariable
For example if we wished to populate the first, second and third element of the empty array just created with objects.
Assuming we have the following Object declarations:
„Object Declarations, creation & Populated via Constructor
Dim objEmployee1 As clsEmployees = New clsEmployees(“Joe”,111,#1/23/1978#)
Dim objEmployee2 As clsEmployees = New clsEmployees(“Angel”,222,#12/12/1972#)
Dim objEmployee3 As clsEmployees = New clsEmployees(“Mary”,444,#5/07/1968#)
„Populate Array with Object by
„Performing a reference assignment
EmployeeList(0) = objEmployee1
EmployeeList(1) = objEmployee1
EmployeeList(2) = objEmployee1
After the assignment statements, the array would now look as follows:
Index
0 1 4 3 2 EmployeeList
0 1 4 3 2 EmployeeList
“Joe”
111 1/23/1978
“Angel”
222 12/12/1972
“Mary”
444 5/07/1968
38
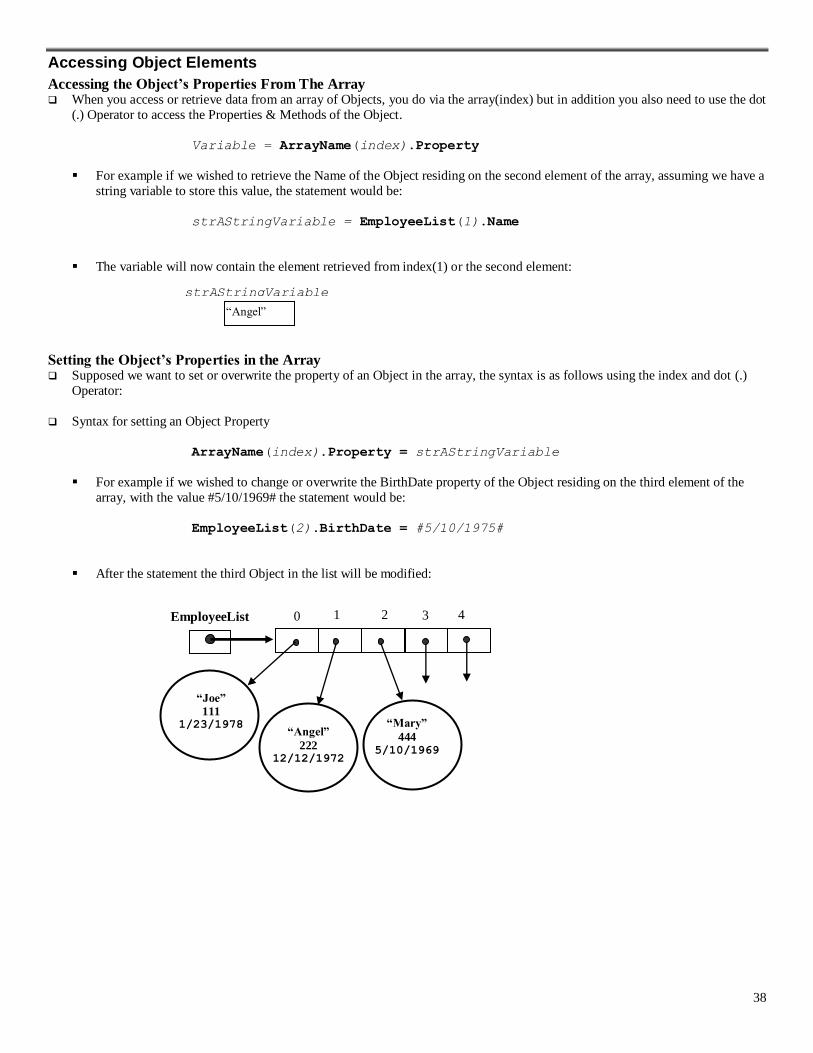
Accessing Object Elements
Accessing the Object’s Properties From The Array When you access or retrieve data from an array of Objects, you do via the array(index) but in addition you also need to use the dot
(.) Operator to access the Properties & Methods of the Object.
Variable = ArrayName(index).Property
For example if we wished to retrieve the Name of the Object residing on the second element of the array, assuming we have a
string variable to store this value, the statement would be:
strAStringVariable = EmployeeList(1).Name
The variable will now contain the element retrieved from index(1) or the second element:
Setting the Object’s Properties in the Array Supposed we want to set or overwrite the property of an Object in the array, the syntax is as follows using the index and dot (.)
Operator:
Syntax for setting an Object Property
ArrayName(index).Property = strAStringVariable
For example if we wished to change or overwrite the BirthDate property of the Object residing on the third element of the
array, with the value #5/10/1969# the statement would be:
EmployeeList(2).BirthDate = #5/10/1975#
After the statement the third Object in the list will be modified:
“Angel”
strAStringVariable
0 1 4 3 2 EmployeeList
“Joe”
111 1/23/1978
“Angel”
222 12/12/1972
“Mary”
444 5/10/1969
39
Executing an Object’s Method in the Array If we wanted to execute an method in the array, the syntax is as follows using the index and dot (.) Operator:
ArrayName(index).Method()
For example if we wished to execute the PrintEmployee() Method of the first element of the array the statement is:
EmployeeList(0).PrintEmployee()
Searching and Setting Properties of all Objects in array
To set the properties of all the objects in the array in one pass, you need to assign the values in each property consecutively.
You can use the For..Next Loop, the size of the array and the dot(.) operator:
For i = 0 to SIZE
EmployeeList(i).Name = strName
Next
Searching the Array Elements
You can extract or access all elements of array also using the For..Next loop and the dot(.) Operator as follows:
For i = 0 to SIZE
strName = EmployeeList(i).Name
Next
40
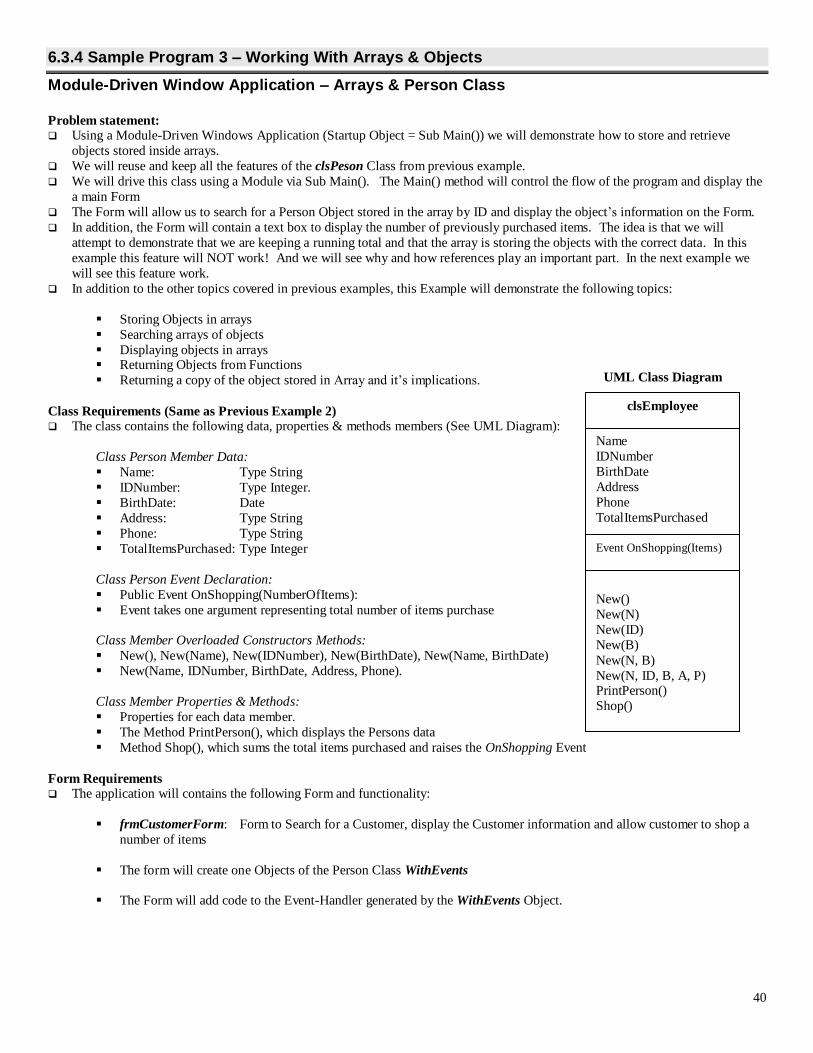
6.3.4 Sample Program 3 – Working With Arrays & Objects
Module-Driven Window Application – Arrays & Person Class
Problem statement: Using a Module-Driven Windows Application (Startup Object = Sub Main()) we will demonstrate how to store and retrieve
objects stored inside arrays.
We will reuse and keep all the features of the clsPeson Class from previous example.
We will drive this class using a Module via Sub Main(). The Main() method will control the flow of the program and display the
a main Form
The Form will allow us to search for a Person Object stored in the array by ID and display the object’s information on the Form.
In addition, the Form will contain a text box to display the number of previously purchased items. The idea is that we will
attempt to demonstrate that we are keeping a running total and that the array is storing the objects with the correct data. In this
example this feature will NOT work! And we will see why and how references play an important part. In the next example we
will see this feature work.
In addition to the other topics covered in previous examples, this Example will demonstrate the following topics:
Storing Objects in arrays
Searching arrays of objects
Displaying objects in arrays Returning Objects from Functions
Returning a copy of the object stored in Array and it’s implications.
Class Requirements (Same as Previous Example 2) The class contains the following data, properties & methods members (See UML Diagram):
Class Person Member Data:
Name: Type String
IDNumber: Type Integer.
BirthDate: Date
Address: Type String
Phone: Type String
TotalItemsPurchased: Type Integer
Class Person Event Declaration:
Public Event OnShopping(NumberOfItems):
Event takes one argument representing total number of items purchase
Class Member Overloaded Constructors Methods:
New(), New(Name), New(IDNumber), New(BirthDate), New(Name, BirthDate)
New(Name, IDNumber, BirthDate, Address, Phone).
Class Member Properties & Methods:
Properties for each data member.
The Method PrintPerson(), which displays the Persons data
Method Shop(), which sums the total items purchased and raises the OnShopping Event
Form Requirements The application will contains the following Form and functionality:
frmCustomerForm: Form to Search for a Customer, display the Customer information and allow customer to shop a
number of items
The form will create one Objects of the Person Class WithEvents
The Form will add code to the Event-Handler generated by the WithEvents Object.
clsEmployee
Name
IDNumber
BirthDate
Address
Phone
TotalItemsPurchased
New()
New(N)
New(ID)
New(B)
New(N, B)
New(N, ID, B, A, P) PrintPerson()
Shop()
UML Class Diagram
Event OnShopping(Items)

41
HOW IT'S DONE:
Part I – Create The Class:
Step 1: Start a new Windows Application project:
Step 2: Add a Form to the project and set its properties as shown in the table:
Object Property Value
Form1 Name frmCustomerForm Text Customer Form
Step 3: Add a Standard Module set its properties as shown in the table:
Object Property Value
Module1 Name modMainModule
Step 4: Set the Project’s properties to behave as a Module-Driven Windows Application:
Object Property Value
Project Name CustomerFormWinApp Startup Object Sub Main()
Step 5: Prepare to Reuse the Person Class from Previous Console Application, by Copying the File from previous
Application Folder to the Folder of this Windows Application Project
1. Using Windows Explorer, navigate to the Console Application folder of the previous example.
2. Copy/Paste the file clsPerson.vb to this Project folder
Step 6: Add the Class to the Project
1. In the Project Menu, select Add Existing Item… and navigate to the project folder
2. Select the clsPerson.vb File and click OK
3. The class is now part of the project and ready to be reused!

42
Step 7: In the Class Module keep private data section as is:
Step 8: Leave the Property Procedure as is:
43
Step 9: In the Class Module code window keep the code for the Constructor Methods:

44

45
Step 10: In the Class Module keep the PrintPerson() Method as is:
Remember that it is bad practice to display any forms or messages from
within a Class. I do this only for teaching purposes to demonstrate a
topic.
46
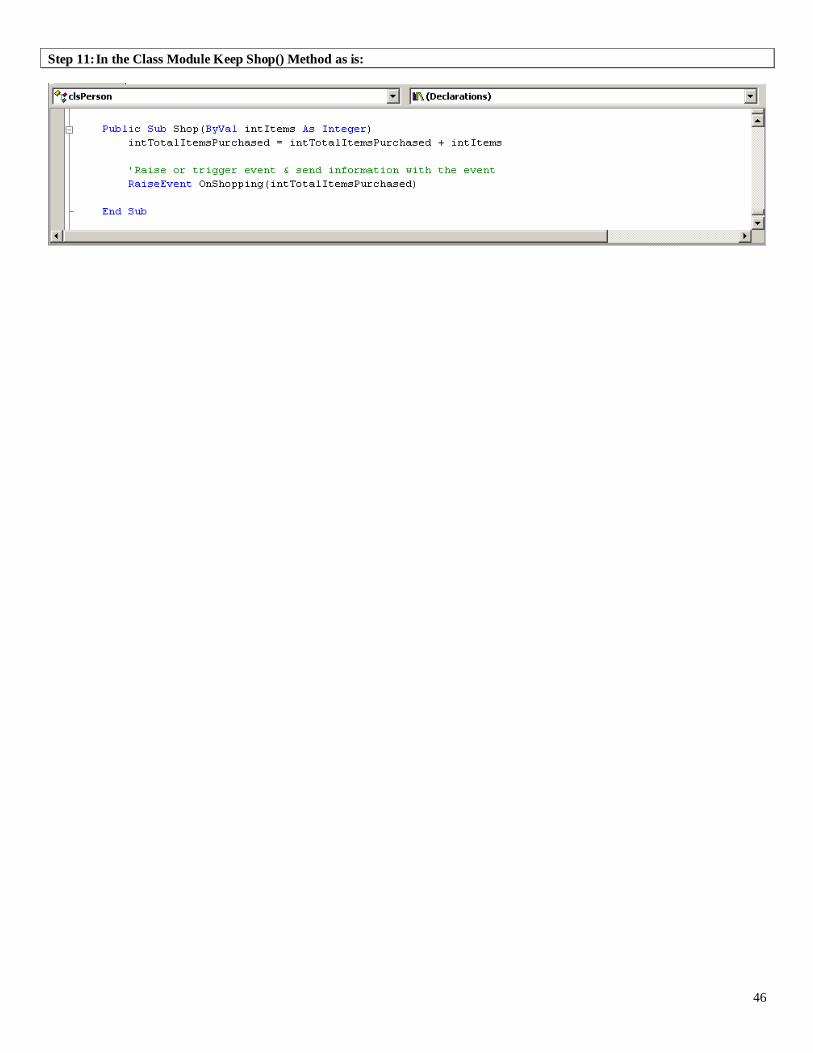
Step 11: In the Class Module Keep Shop() Method as is:

47
Part II & III – Create The Object and Use it (The User Interface)
Step 12: Add the following indicated Controls to the frmCustomerForm. Set their properties accordingly:
Object Property Value
Form1 Name frmCustomerForm Text Customer Form
Note that the Form now includes a button to initiate a search of the customer by the ID entered in the ID Number Text
Box.
Step 13: At this Point the Project should look as follows:
Displays Previous Number of Items
Purchased or running total
48
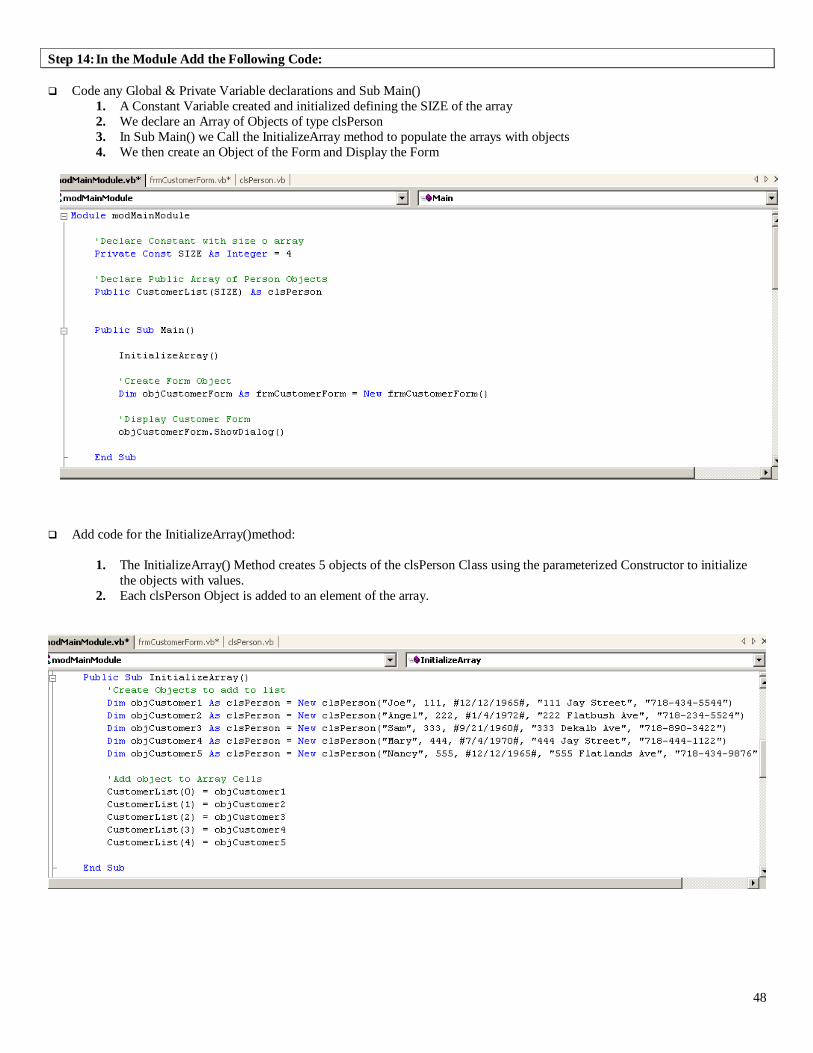
Step 14: In the Module Add the Following Code:
Code any Global & Private Variable declarations and Sub Main()
1. A Constant Variable created and initialized defining the SIZE of the array
2. We declare an Array of Objects of type clsPerson
3. In Sub Main() we Call the InitializeArray method to populate the arrays with objects
4. We then create an Object of the Form and Display the Form
Add code for the InitializeArray()method:
1. The InitializeArray() Method creates 5 objects of the clsPerson Class using the parameterized Constructor to initialize
the objects with values.
2. Each clsPerson Object is added to an element of the array.
49
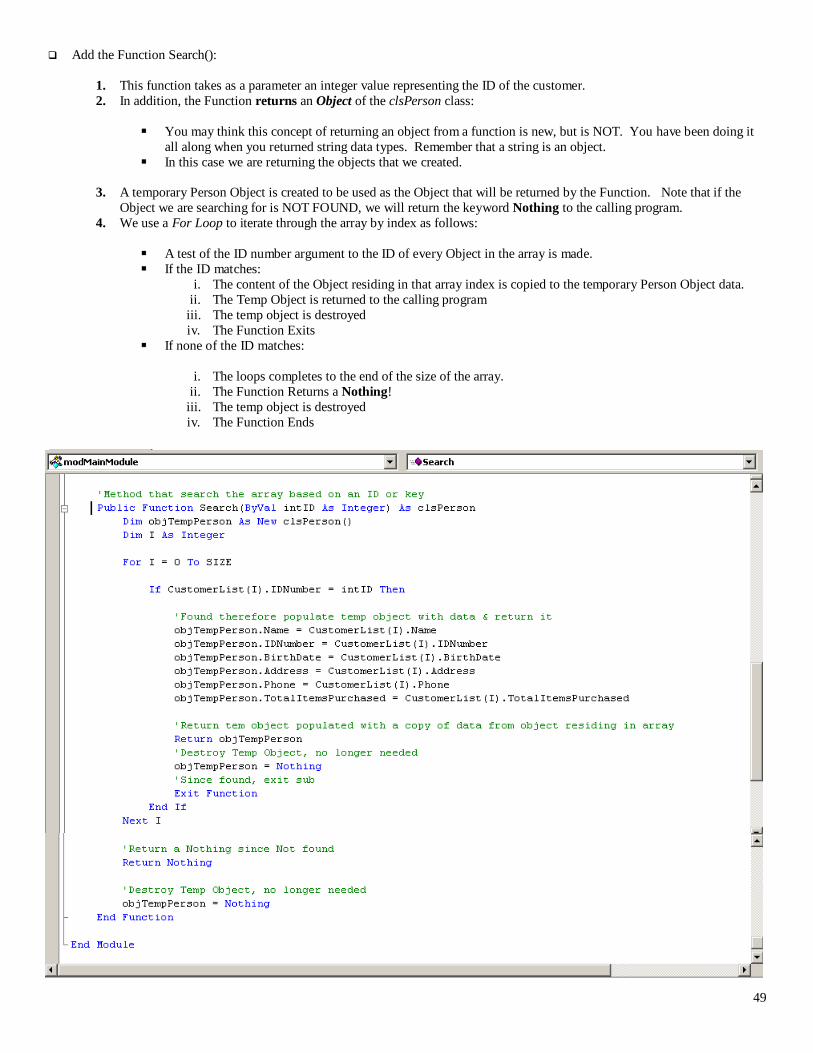
Add the Function Search():
1. This function takes as a parameter an integer value representing the ID of the customer.
2. In addition, the Function returns an Object of the clsPerson class:
You may think this concept of returning an object from a function is new, but is NOT. You have been doing it
all along when you returned string data types. Remember that a string is an object.
In this case we are returning the objects that we created.
3. A temporary Person Object is created to be used as the Object that will be returned by the Function. Note that if the
Object we are searching for is NOT FOUND, we will return the keyword Nothing to the calling program.
4. We use a For Loop to iterate through the array by index as follows:
A test of the ID number argument to the ID of every Object in the array is made.
If the ID matches:
i. The content of the Object residing in that array index is copied to the temporary Person Object data.
ii. The Temp Object is returned to the calling program
iii. The temp object is destroyed
iv. The Function Exits
If none of the ID matches:
i. The loops completes to the end of the size of the array.
ii. The Function Returns a Nothing!
iii. The temp object is destroyed
iv. The Function Ends

50
Step 15: In the Form frmCustomerForm Add the Following Code:
51
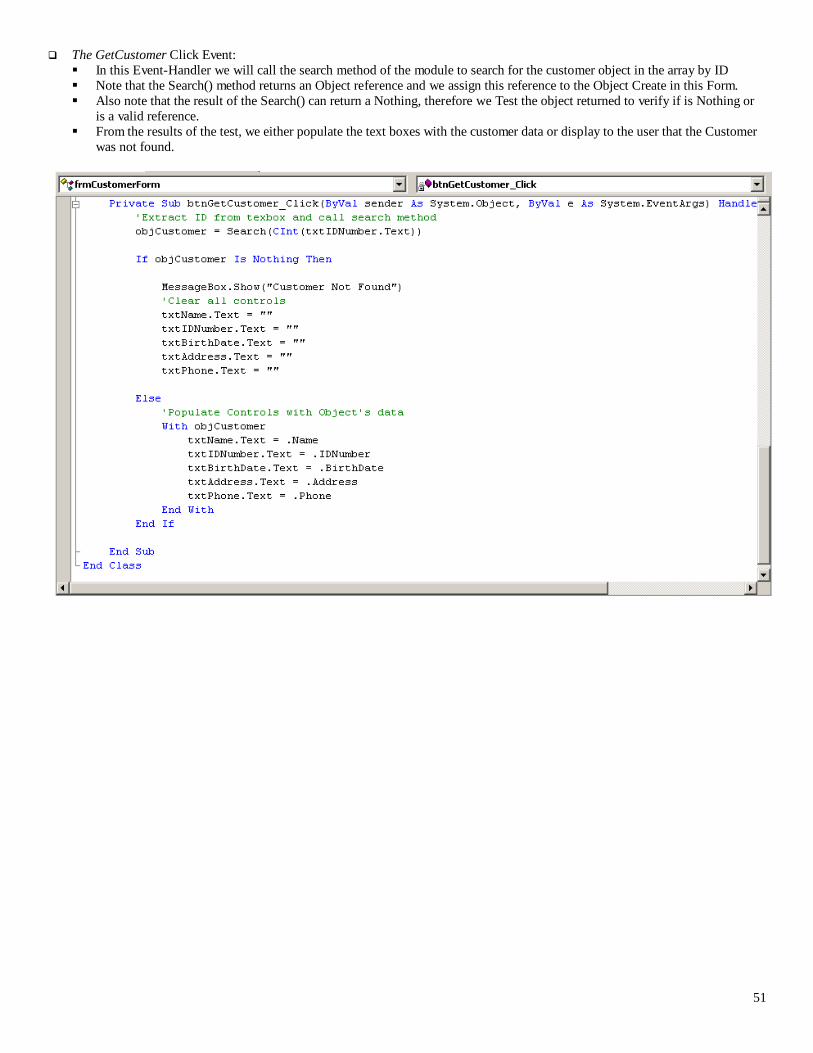
The GetCustomer Click Event:
In this Event-Handler we will call the search method of the module to search for the customer object in the array by ID
Note that the Search() method returns an Object reference and we assign this reference to the Object Create in this Form.
Also note that the result of the Search() can return a Nothing, therefore we Test the object returned to verify if is Nothing or
is a valid reference.
From the results of the test, we either populate the text boxes with the customer data or display to the user that the Customer
was not found.
52
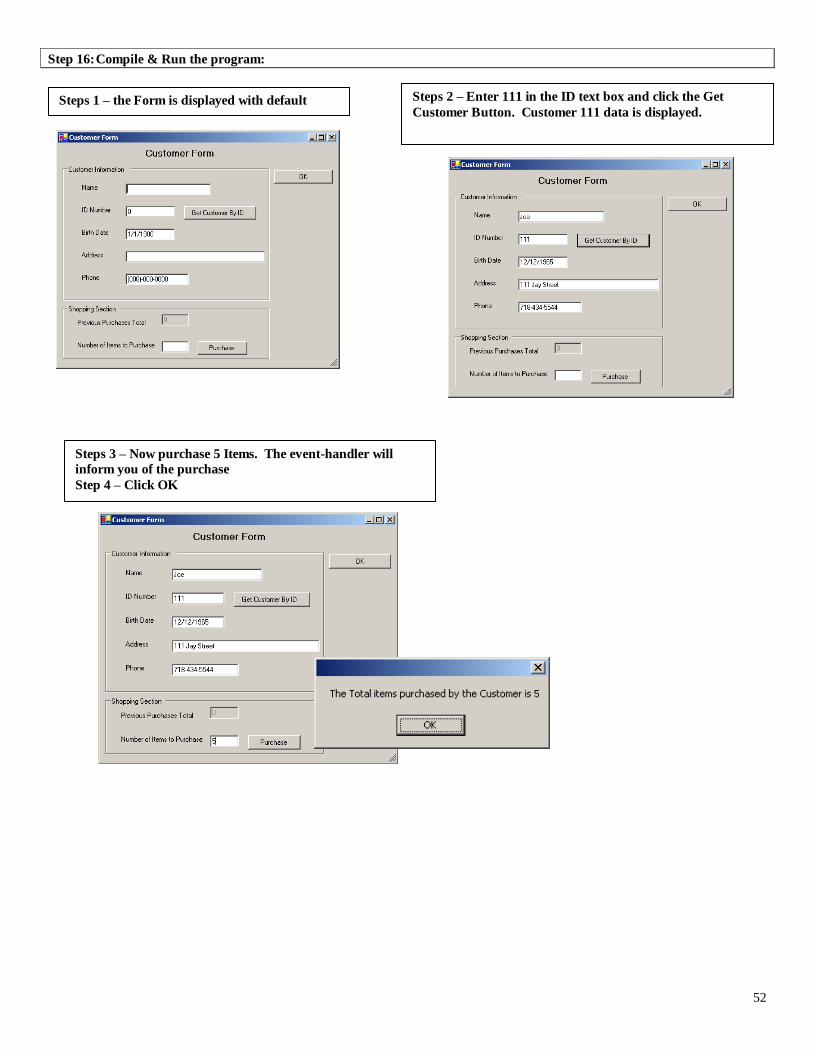
Step 16: Compile & Run the program:
Steps 1 – the Form is displayed with default
values
Steps 2 – Enter 111 in the ID text box and click the Get
Customer Button. Customer 111 data is displayed.
Steps 3 – Now purchase 5 Items. The event-handler will
inform you of the purchase
Step 4 – Click OK
53
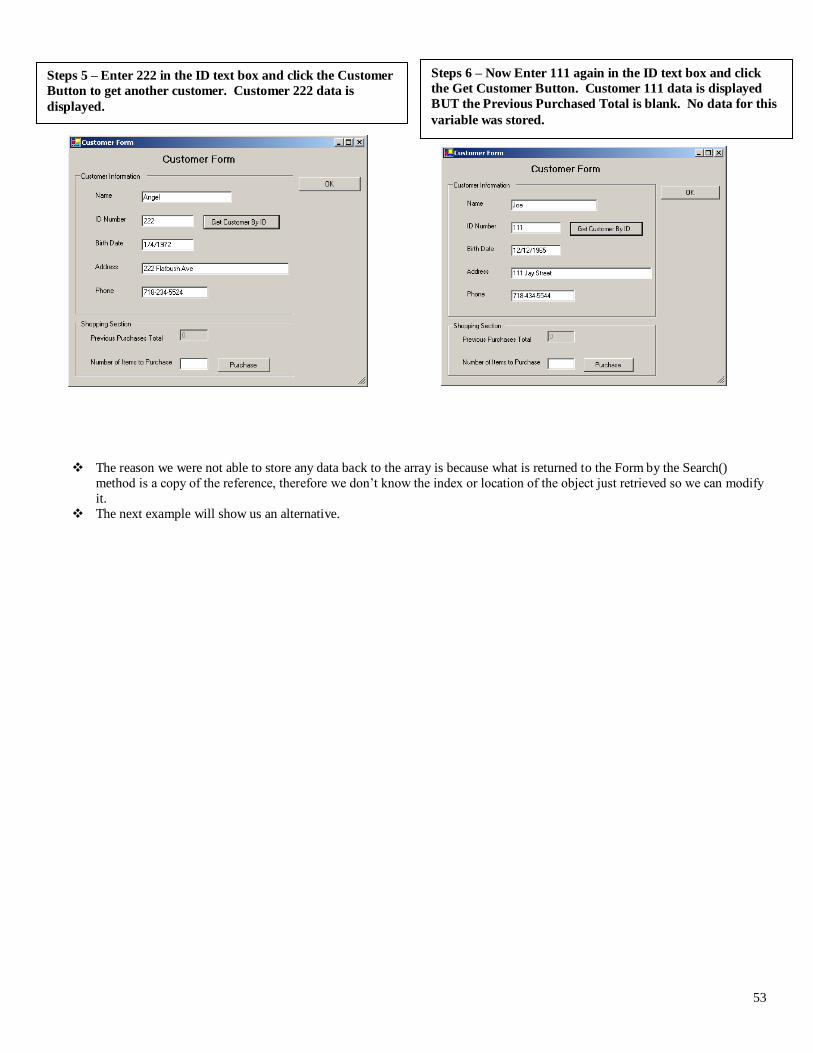
The reason we were not able to store any data back to the array is because what is returned to the Form by the Search()
method is a copy of the reference, therefore we don’t know the index or location of the object just retrieved so we can modify
it.
The next example will show us an alternative.
Steps 5 – Enter 222 in the ID text box and click the Customer
Button to get another customer. Customer 222 data is
displayed.
Steps 6 – Now Enter 111 again in the ID text box and click
the Get Customer Button. Customer 111 data is displayed
BUT the Previous Purchased Total is blank. No data for this
variable was stored.
54
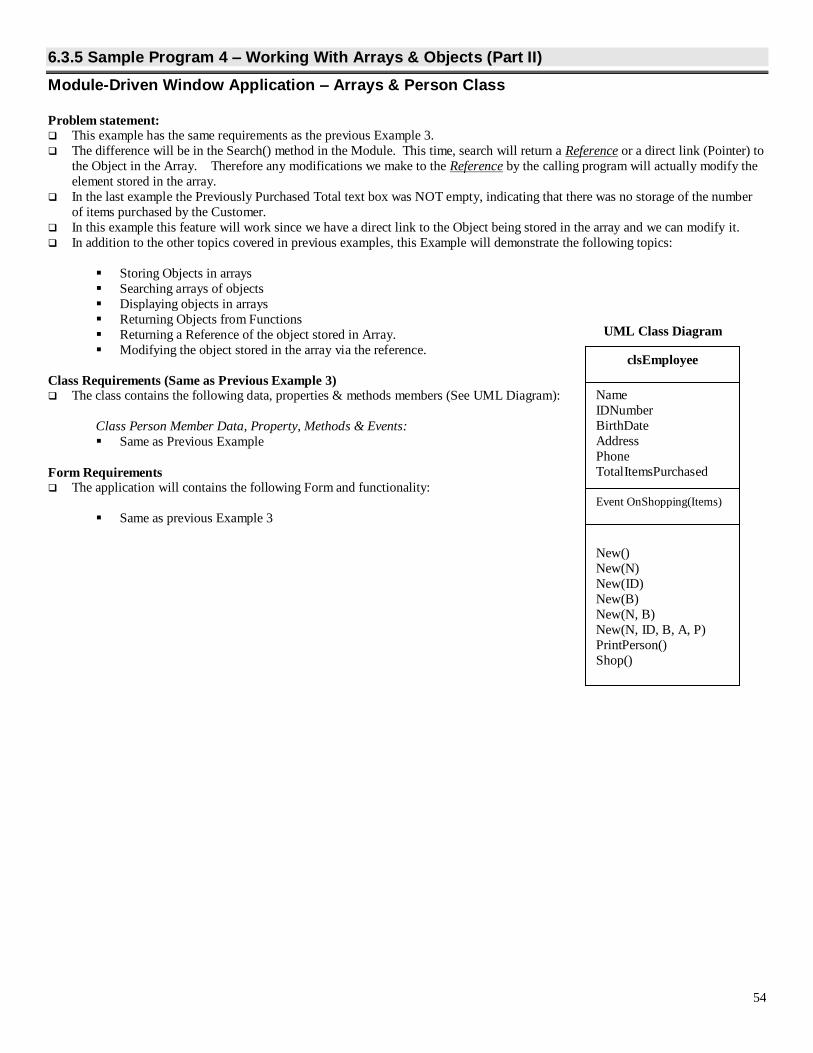
6.3.5 Sample Program 4 – Working With Arrays & Objects (Part II)
Module-Driven Window Application – Arrays & Person Class
Problem statement: This example has the same requirements as the previous Example 3.
The difference will be in the Search() method in the Module. This time, search will return a Reference or a direct link (Pointer) to
the Object in the Array. Therefore any modifications we make to the Reference by the calling program will actually modify the
element stored in the array.
In the last example the Previously Purchased Total text box was NOT empty, indicating that there was no storage of the number
of items purchased by the Customer.
In this example this feature will work since we have a direct link to the Object being stored in the array and we can modify it.
In addition to the other topics covered in previous examples, this Example will demonstrate the following topics:
Storing Objects in arrays
Searching arrays of objects
Displaying objects in arrays
Returning Objects from Functions
Returning a Reference of the object stored in Array.
Modifying the object stored in the array via the reference.
Class Requirements (Same as Previous Example 3) The class contains the following data, properties & methods members (See UML Diagram):
Class Person Member Data, Property, Methods & Events:
Same as Previous Example
Form Requirements The application will contains the following Form and functionality:
Same as previous Example 3
clsEmployee
Name
IDNumber
BirthDate
Address
Phone
TotalItemsPurchased
New()
New(N)
New(ID)
New(B)
New(N, B)
New(N, ID, B, A, P)
PrintPerson()
Shop()
UML Class Diagram
Event OnShopping(Items)

55
HOW IT'S DONE:
Part I – Create The Class:
Step 1: Start a new Windows Application project:
Step 2: Add a Form to the project and set its properties as shown in the table:
Object Property Value
Form1 Name frmCustomerForm Text Customer Form
Step 3: Add a Standard Module set its properties as shown in the table:
Object Property Value
Module1 Name modMainModule
Step 4: Set the Project’s properties to behave as a Module-Driven Windows Application:
Object Property Value
Project Name CustomerFormWinApp Startup Object Sub Main()
Step 5: Prepare to Reuse the Person Class from Previous Console Application, by Copying the File from previous
Application Folder to the Folder of this Windows Application Project
1. Using Windows Explorer, navigate to the Console Application folder of the previous example.
2. Copy/Paste the file clsPerson.vb to this Project folder
Step 6: Add the Class to the Project
1. In the Project Menu, select Add Existing Item… and navigate to the project folder
2. Select the clsPerson.vb File and click OK
3. The class is now part of the project and ready to be reused!

56
Step 7: In the Class Module keep private data section as is:
Same as before
Step 8: Leave the Property Procedure as is:
Same as before
Step 9: In the Class Module code window keep the code for the Constructor Methods:
Same as before
Step 10: In the Class Module keep the PrintPerson() Method as is:
Same as before
Step 11: In the Class Module Keep Shop() Method as is:
Same as before
57
Part II & III – Create The Object and Use it (The User Interface)
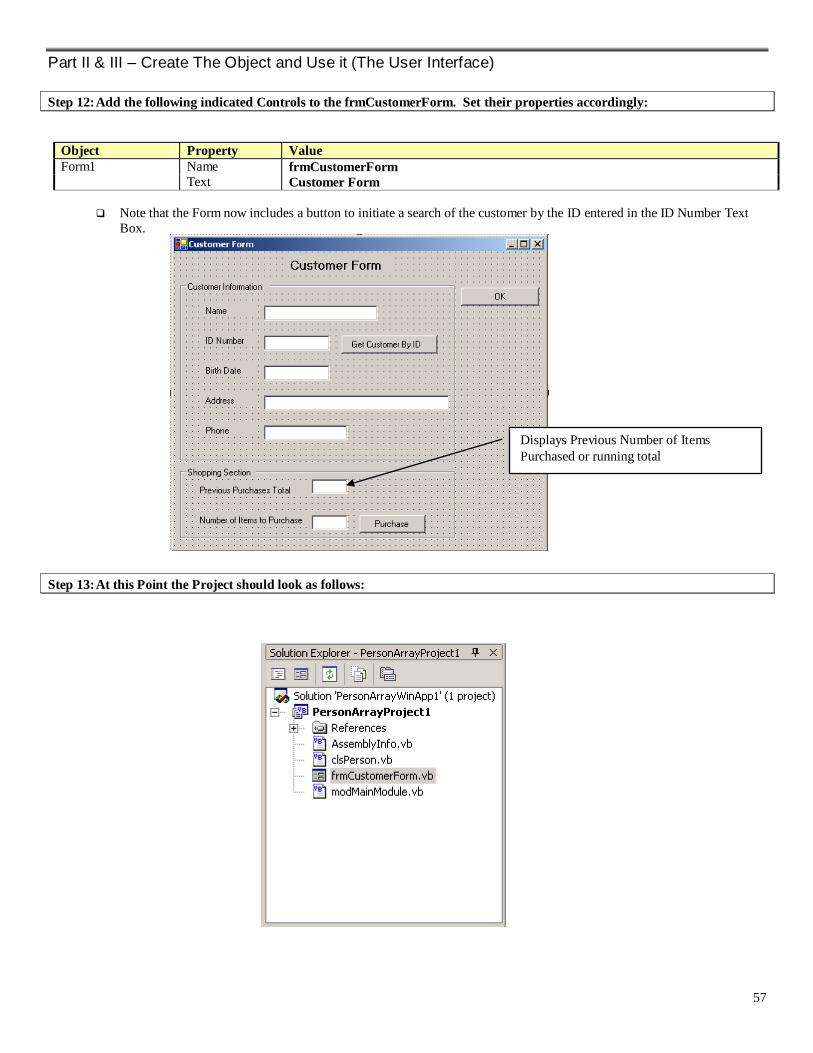
Step 12: Add the following indicated Controls to the frmCustomerForm. Set their properties accordingly:
Object Property Value
Form1 Name frmCustomerForm Text Customer Form
Note that the Form now includes a button to initiate a search of the customer by the ID entered in the ID Number Text
Box.
Step 13: At this Point the Project should look as follows:
Displays Previous Number of Items
Purchased or running total
58
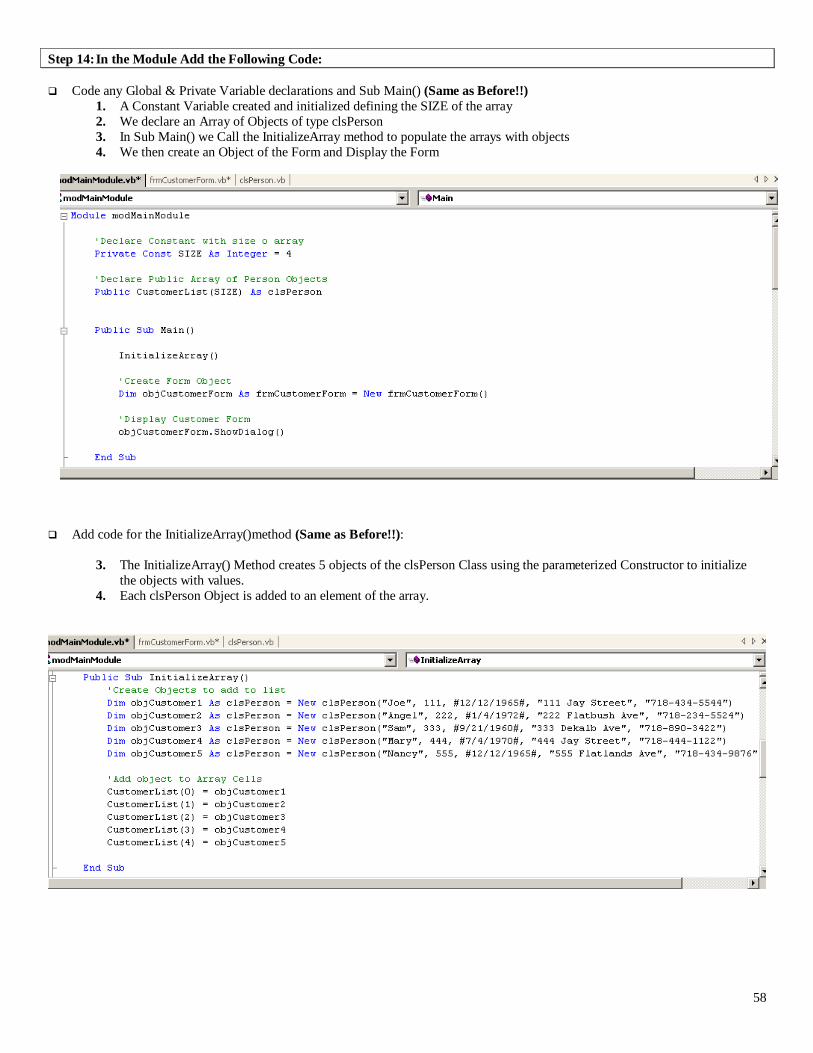
Step 14: In the Module Add the Following Code:
Code any Global & Private Variable declarations and Sub Main() (Same as Before!!)
1. A Constant Variable created and initialized defining the SIZE of the array
2. We declare an Array of Objects of type clsPerson
3. In Sub Main() we Call the InitializeArray method to populate the arrays with objects
4. We then create an Object of the Form and Display the Form
Add code for the InitializeArray()method (Same as Before!!):
3. The InitializeArray() Method creates 5 objects of the clsPerson Class using the parameterized Constructor to initialize
the objects with values.
4. Each clsPerson Object is added to an element of the array.

59
Add the Function Search(). Here things are different. Let’s look at the algorithm:
1. This function takes as a parameter an integer value representing the ID of the customer.
2. In addition, the Function returns a Reference to the Object stored inside the Array. If the Object is NOT Found, then a
Nothing is returned to the calling program.
3. We use a For Loop to iterate through the array by index as follows:
A test of the ID number argument to the ID of every Object in the array is made.
If the ID matches: i. Return the Reference or Pointer Element. Remember that what is being stored in the arrays are
pointers, so if we make the following statement: CustomerList(I) we are returning the pointer stored in
the (I) index.
ii. The Function Exits
If none of the ID matches:
i. The loops completes to the end of the size of the array.
ii. The Function Returns a Nothing!
iii. The Function Ends
0 1 4 3 2 CustomerList
“Joe”
111 1/23/1978
“Angel”
222 12/12/1972
“Mary”
444 5/10/1969
This is what is being returned by Search, the pointer stored
inside the array element
60
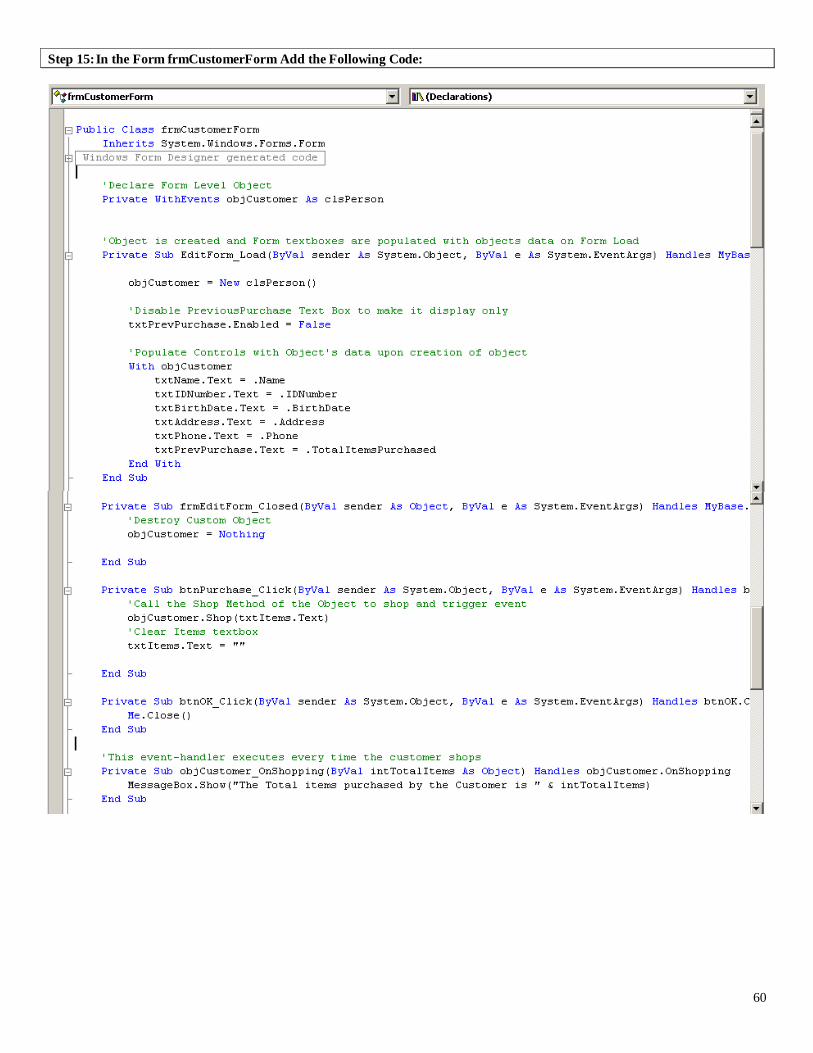
Step 15: In the Form frmCustomerForm Add the Following Code:
61
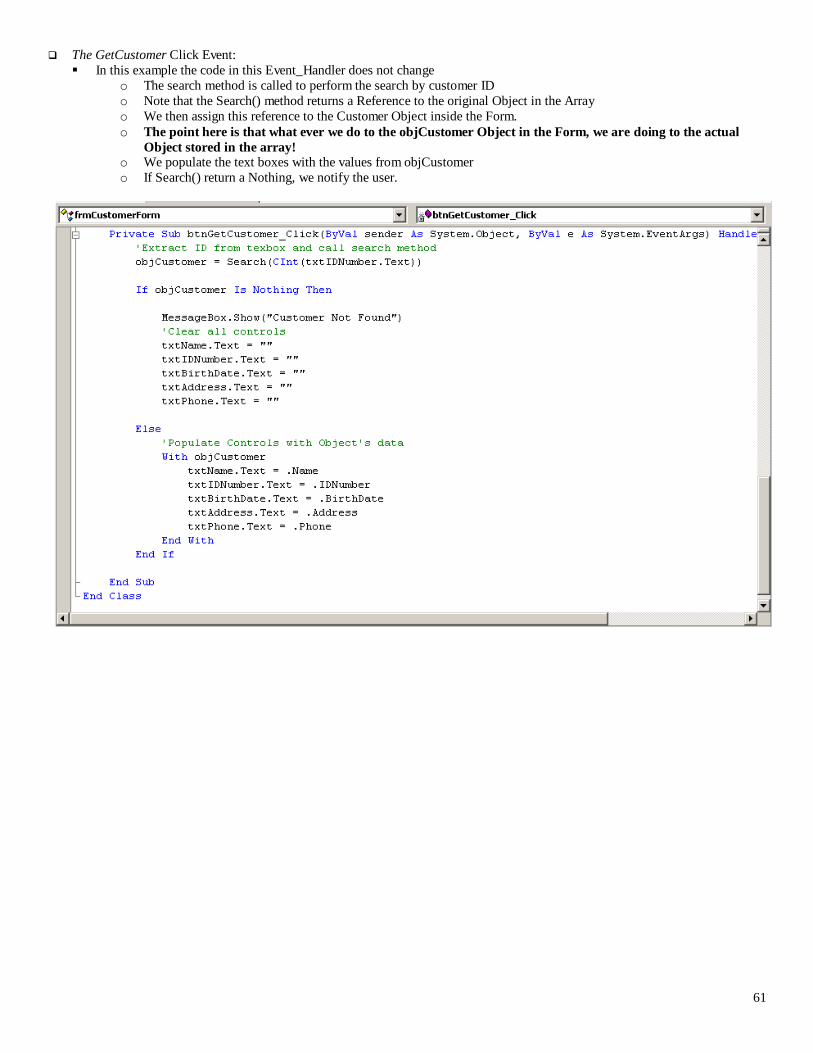
The GetCustomer Click Event:
In this example the code in this Event_Handler does not change
o The search method is called to perform the search by customer ID
o Note that the Search() method returns a Reference to the original Object in the Array
o We then assign this reference to the Customer Object inside the Form.
o The point here is that what ever we do to the objCustomer Object in the Form, we are doing to the actual
Object stored in the array! o We populate the text boxes with the values from objCustomer
o If Search() return a Nothing, we notify the user.
62
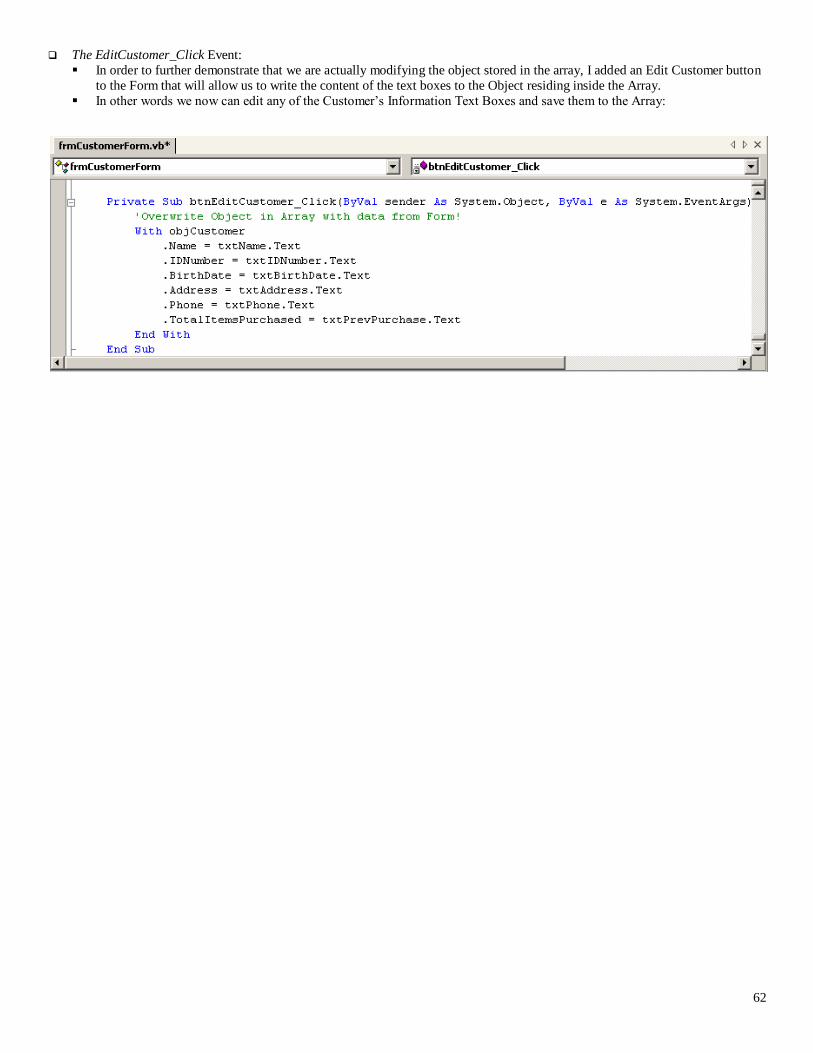
The EditCustomer_Click Event:
In order to further demonstrate that we are actually modifying the object stored in the array, I added an Edit Customer button
to the Form that will allow us to write the content of the text boxes to the Object residing inside the Array.
In other words we now can edit any of the Customer’s Information Text Boxes and save them to the Array:

63
Step 16: Compile & Run the program:
Steps 3 – Now purchase 5 Items. The event-handler will
inform you of the purchase
Step 4 – Click OK
Steps 1 – the Form is displayed with default
values
Steps 2 – Enter 111 in the ID text box and click the Get
Customer Button. Customer 111 data is displayed.
64
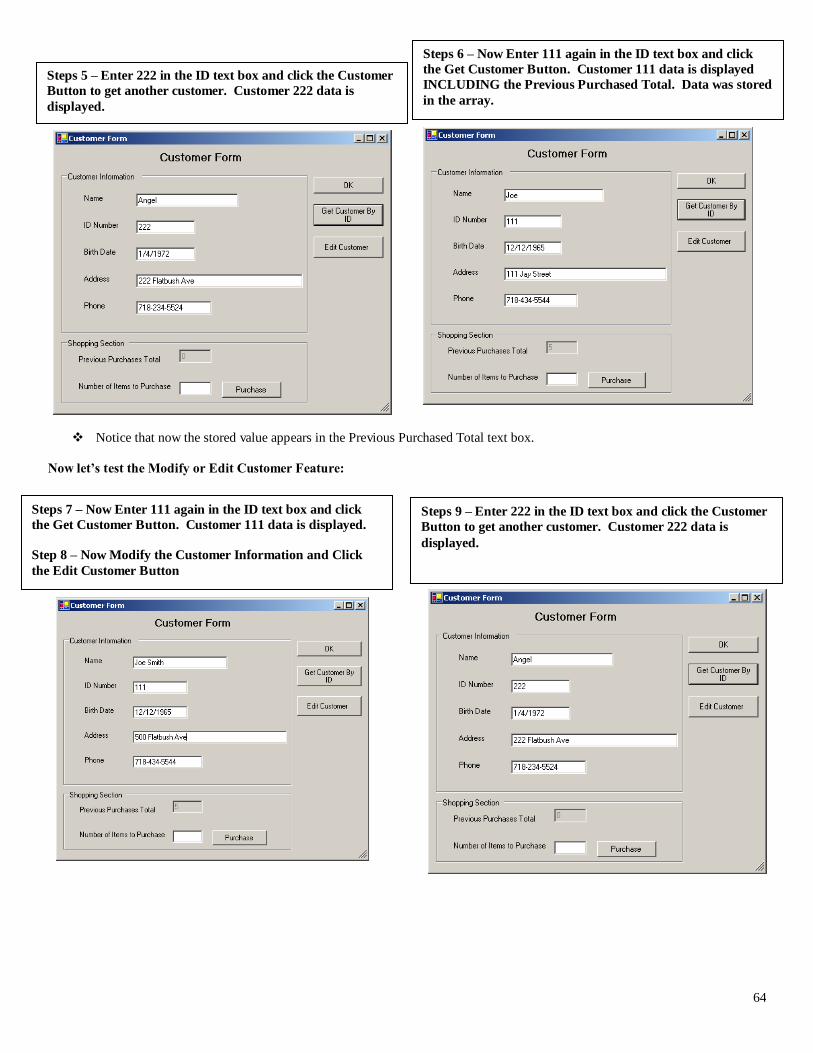
Notice that now the stored value appears in the Previous Purchased Total text box.
Now let’s test the Modify or Edit Customer Feature:
Steps 5 – Enter 222 in the ID text box and click the Customer
Button to get another customer. Customer 222 data is
displayed.
Steps 6 – Now Enter 111 again in the ID text box and click
the Get Customer Button. Customer 111 data is displayed
INCLUDING the Previous Purchased Total. Data was stored
in the array.
Steps 9 – Enter 222 in the ID text box and click the Customer
Button to get another customer. Customer 222 data is
displayed.
Steps 7 – Now Enter 111 again in the ID text box and click
the Get Customer Button. Customer 111 data is displayed.
Step 8 – Now Modify the Customer Information and Click
the Edit Customer Button
65
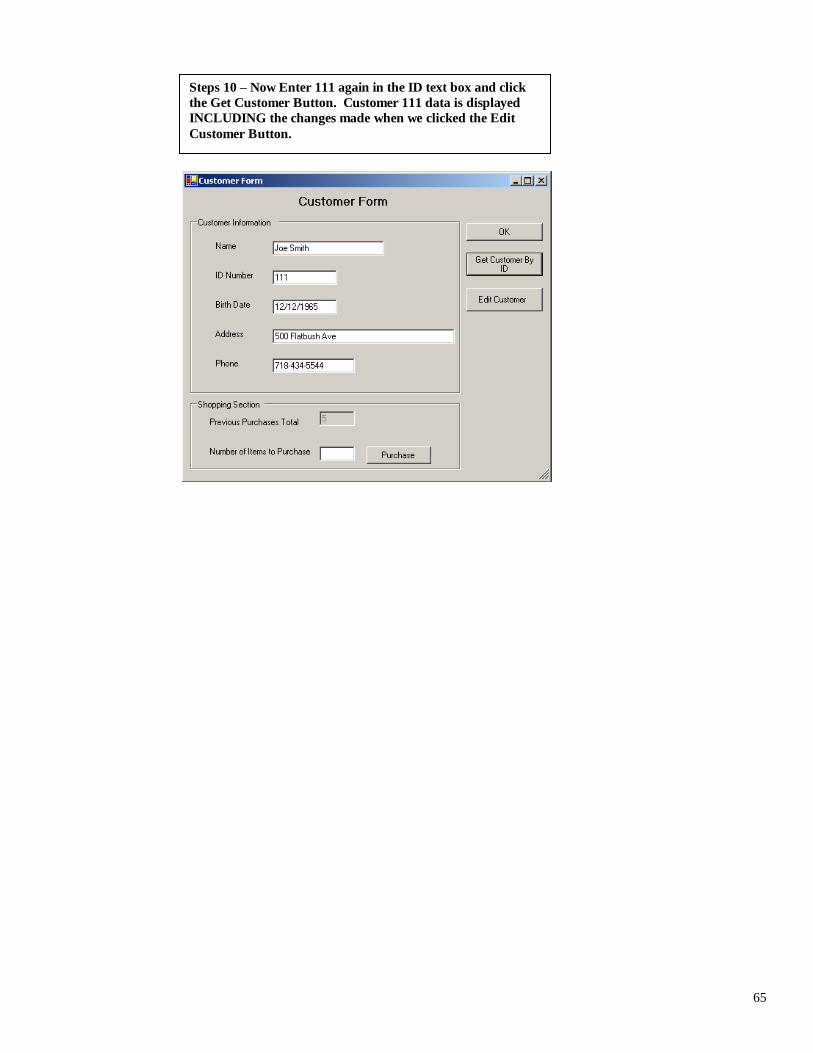
Steps 10 – Now Enter 111 again in the ID text box and click
the Get Customer Button. Customer 111 data is displayed
INCLUDING the changes made when we clicked the Edit
Customer Button.
66
5.3.5 Sample Program 5 – Small Business Application Example
Windows Driven Application – Customer & Retail Management
Problem statement: Use a Windows-Driven Application (Startup Object = Sub Main) to create a customer/retail management system for a small
business. The objectives of the application is to allow employees of the retail business to use the application for the following
tasks:
Sell products to customers – Customers can shop and purchase items by quantity. Example 5 items, 10 items etc.
Manage Customers – Search for customer records and do the following: Search for Customer, Add new Customer,
Edit Customer, Remove Customer, Print Customer and Print All Customers.
The application is to have the following FORM OR USER-INTERFACE to allow employees to manage the system:
Main Form – Main Portal for users to navigate to other forms for customer management and shopping
CUSTOMER MANAGEMENT – User-interface for managing customers
RETAIL MANAGEMENT FORM – User-interface for cashiers to sell the products to each customer.
NOTE that we will implement this application ONLY USING THE VB.NET LANGUAGE COMPONENTS WE HAVE
LEARNED UP TO THIS POINT. A realistic Business Application will use more appropriate technology to implement such
application. Nevertheless, this example will truly test our understanding of OBJECTS AND CLASSES up to this point.
Application Architecture Introduction (Separating Interface from Implementation) We will continue to implement proper application programming ARCHITECTURE and FORMATS adhering to BEST
PRACTICE by making all attempts to SEPARATE INTERFACE from IMPLEMENTATION. In other words SEPARATE USER-INTERFACE CODE with PROCESSING. This is done as follows:
Forms or User-interface code or the code in the FORMS will contain NO PROCESSING CODE!
FORMS will only contain User-Interface code or code to interact with USER ONLY!
FORM code includes MESSAGE BOXES, UI CONTROLS manipulation, getting data from user, displaying data to
user.
All PROCESSING CODE will reside in the MODULE INSIDE PROCESSING METHODS!
PROCESSING METHODS IN MODULE will be CALLED BY THE FORMS TO DO THE WORK!
PROCESSING MODULE will contain LITTLE or NO FORM CODE! SUCH AS CALLS to FORMS OR FORM
CONTROLS
FORM CODE WILL INTERACT WITH USER AND CALL PROCESSING METHODS IN MODULE TO DO THE
WORK!
Re-using Objects We will also review the OOP concept of Reusability by reusing the Person Class from the previous examples and modifying
the class for this project.
Database Requirements We will NOT use a real database but SIMMULATE the database using an ARRAY OF CUSTOMER OBJECTS.
Form, & Module Requirements The main or driver program will utilize several forms. A Main Form as a startup point to invoke the Customer Management
& Retail Management Forms. Each one of these Forms will perform their function and manage the objects created in the
program.
In addition the program will contain a Module where several global public Objects will reside that represent a
SIMMULATED DATABASE OF CUSTOMER OBJECTS.
67
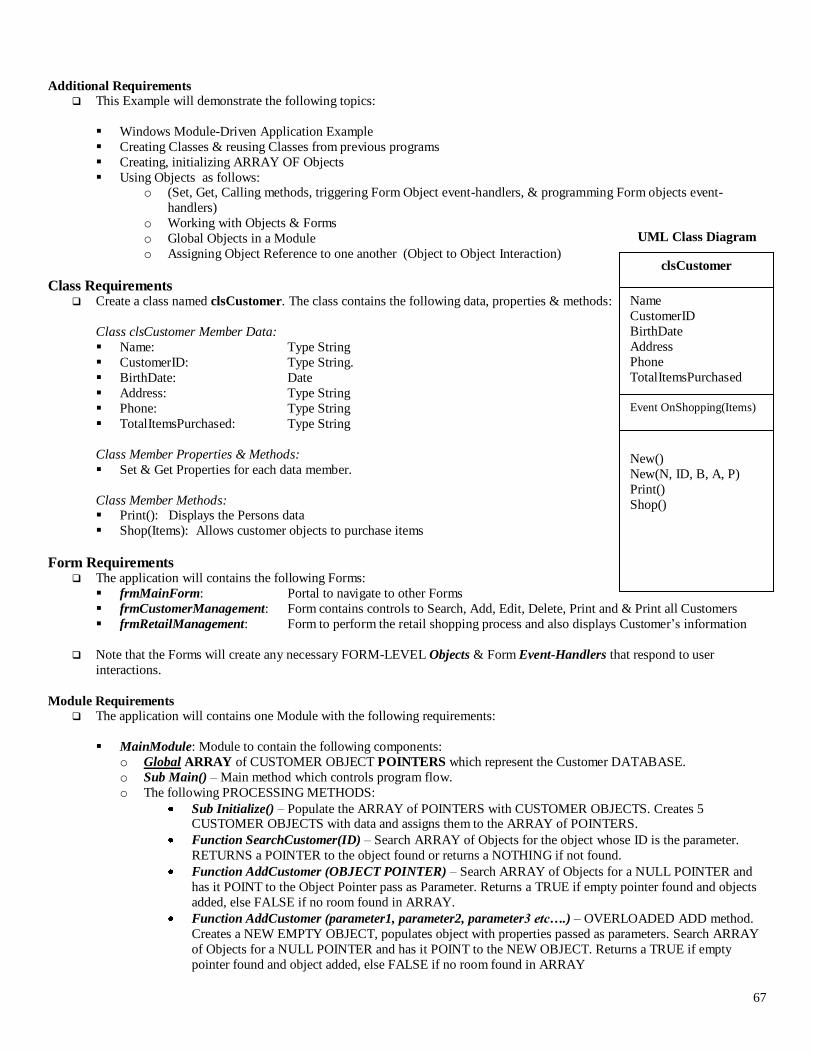
Additional Requirements This Example will demonstrate the following topics:
Windows Module-Driven Application Example
Creating Classes & reusing Classes from previous programs
Creating, initializing ARRAY OF Objects
Using Objects as follows: o (Set, Get, Calling methods, triggering Form Object event-handlers, & programming Form objects event-
handlers)
o Working with Objects & Forms
o Global Objects in a Module
o Assigning Object Reference to one another (Object to Object Interaction)
Class Requirements Create a class named clsCustomer. The class contains the following data, properties & methods:
Class clsCustomer Member Data:
Name: Type String
CustomerID: Type String.
BirthDate: Date
Address: Type String
Phone: Type String
TotalItemsPurchased: Type String
Class Member Properties & Methods:
Set & Get Properties for each data member.
Class Member Methods: Print(): Displays the Persons data
Shop(Items): Allows customer objects to purchase items
Form Requirements The application will contains the following Forms:
frmMainForm: Portal to navigate to other Forms
frmCustomerManagement: Form contains controls to Search, Add, Edit, Delete, Print and & Print all Customers
frmRetailManagement: Form to perform the retail shopping process and also displays Customer’s information
Note that the Forms will create any necessary FORM-LEVEL Objects & Form Event-Handlers that respond to user
interactions.
Module Requirements The application will contains one Module with the following requirements:
MainModule: Module to contain the following components:
o Global ARRAY of CUSTOMER OBJECT POINTERS which represent the Customer DATABASE.
o Sub Main() – Main method which controls program flow.
o The following PROCESSING METHODS:
Sub Initialize() – Populate the ARRAY of POINTERS with CUSTOMER OBJECTS. Creates 5 CUSTOMER OBJECTS with data and assigns them to the ARRAY of POINTERS.
Function SearchCustomer(ID) – Search ARRAY of Objects for the object whose ID is the parameter.
RETURNS a POINTER to the object found or returns a NOTHING if not found.
Function AddCustomer (OBJECT POINTER) – Search ARRAY of Objects for a NULL POINTER and
has it POINT to the Object Pointer pass as Parameter. Returns a TRUE if empty pointer found and objects
added, else FALSE if no room found in ARRAY.
Function AddCustomer (parameter1, parameter2, parameter3 etc….) – OVERLOADED ADD method.
Creates a NEW EMPTY OBJECT, populates object with properties passed as parameters. Search ARRAY
of Objects for a NULL POINTER and has it POINT to the NEW OBJECT. Returns a TRUE if empty
pointer found and object added, else FALSE if no room found in ARRAY
clsCustomer
Name
CustomerID
BirthDate
Address
Phone
TotalItemsPurchased
New()
New(N, ID, B, A, P)
Print()
Shop()
UML Class Diagram
Event OnShopping(Items)
68
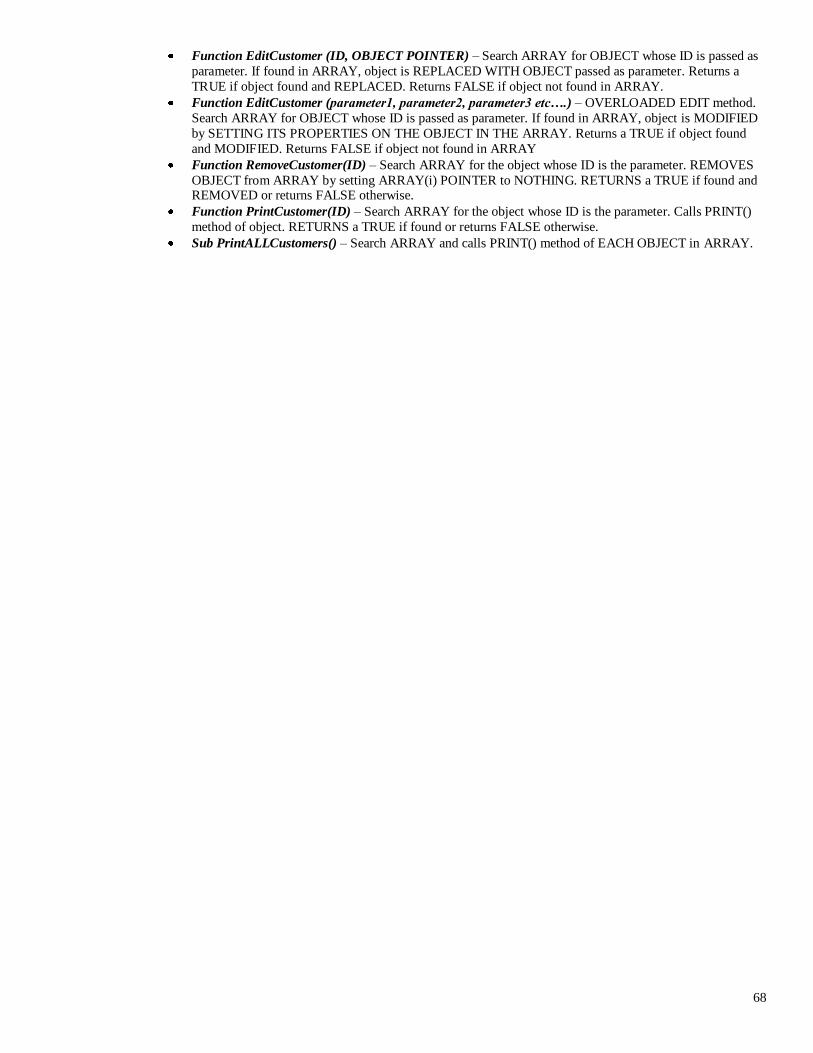
Function EditCustomer (ID, OBJECT POINTER) – Search ARRAY for OBJECT whose ID is passed as
parameter. If found in ARRAY, object is REPLACED WITH OBJECT passed as parameter. Returns a
TRUE if object found and REPLACED. Returns FALSE if object not found in ARRAY.
Function EditCustomer (parameter1, parameter2, parameter3 etc….) – OVERLOADED EDIT method.
Search ARRAY for OBJECT whose ID is passed as parameter. If found in ARRAY, object is MODIFIED
by SETTING ITS PROPERTIES ON THE OBJECT IN THE ARRAY. Returns a TRUE if object found
and MODIFIED. Returns FALSE if object not found in ARRAY
Function RemoveCustomer(ID) – Search ARRAY for the object whose ID is the parameter. REMOVES
OBJECT from ARRAY by setting ARRAY(i) POINTER to NOTHING. RETURNS a TRUE if found and REMOVED or returns FALSE otherwise.
Function PrintCustomer(ID) – Search ARRAY for the object whose ID is the parameter. Calls PRINT()
method of object. RETURNS a TRUE if found or returns FALSE otherwise.
Sub PrintALLCustomers() – Search ARRAY and calls PRINT() method of EACH OBJECT in ARRAY.

69
HOW IT'S DONE:
Part I – Create The Class:
Step 1: Start a new Windows Application. Set PROJECT PROPERTIES so that we have a Module-Driven Application:
Object Property Value
Project Name CustomerFormWinApp Startup Object Sub Main
Step 2: Prepare to Reuse the Person Class from Previous Example, by Copying the File from previous Application Folder to
the Folder of this Windows Application Project
3. Using Windows Explorer, navigate to the Folder of the previous example Console Application Sample Program 1.
4. Copy/Paste the file clsPerson.vb to this Project folder
Step 3: Add the Class to the Project
4. In the Project Menu, select Add| Existing Item… and navigate to the project folder
5. Select the clsPerson.vb File and click OK
6. The class is now part of the project and ready to be Reused!
Step 4: In the SOLUTION EXPLORE, RENAME the clsPerson Class to clsCustomer
70
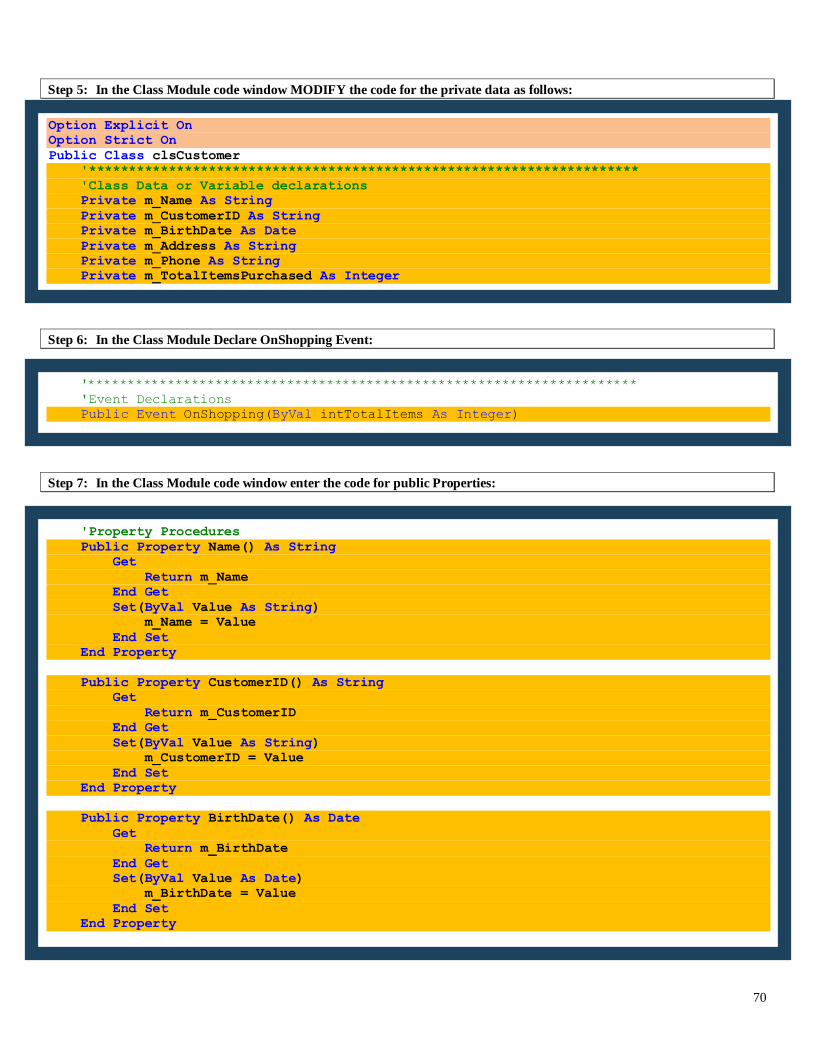
Step 5: In the Class Module code window MODIFY the code for the private data as follows:
Step 6: In the Class Module Declare OnShopping Event:
Step 7: In the Class Module code window enter the code for public Properties:
Option Explicit On
Option Strict On
Public Class clsCustomer
'*********************************************************************
'Class Data or Variable declarations
Private m_Name As String
Private m_CustomerID As String
Private m_BirthDate As Date
Private m_Address As String
Private m_Phone As String
Private m_TotalItemsPurchased As Integer
'Property Procedures
Public Property Name() As String
Get
Return m_Name
End Get
Set(ByVal Value As String)
m_Name = Value
End Set
End Property
Public Property CustomerID() As String
Get
Return m_CustomerID
End Get
Set(ByVal Value As String)
m_CustomerID = Value
End Set
End Property
Public Property BirthDate() As Date
Get
Return m_BirthDate
End Get
Set(ByVal Value As Date)
m_BirthDate = Value
End Set
End Property
'*********************************************************************
'Event Declarations
Public Event OnShopping(ByVal intTotalItems As Integer)

71
Step 8: In the Class Module code window enter the code for Constructor Methods (Non-Parameter and/or Parameterized):
'*********************************************************************
'Class Constructor Methods
'Default Constructor
Public Sub New()
'Note that private data members are being initialized
m_Name = ""
m_CustomerID = ""
m_BirthDate = #1/1/1900#
m_Address = ""
m_Phone = "(000)-000-0000"
m_TotalItemsPurchased = 0
End Sub
'Parameterized Constructor
Public Sub New(ByVal Name As String, ByVal IDNum As String, ByVal BDate As Date, _
ByVal Address As String, ByVal Phone As String)
'Note that as example we are NOT using the private data but
'the Property Procedures instead when setting the data via the constructor
Me.Name = Name
Me.CustomerID = IDNum
Me.BirthDate = BDate
Me.Address = Address
Me.Phone = Phone
'Not included in parameters, so we intialize it
Me.TotalItemsPurchased = 0
End Sub
'Property Procedures
Public Property Address() As String
Get
Return m_Address
End Get
Set(ByVal Value As String)
m_Address = Value
End Set
End Property
Public Property Phone() As String
Get
Return m_Phone
End Get
Set(ByVal Value As String)
m_Phone = Value
End Set
End Property
Public Property TotalItemsPurchased() As Integer
Get
Return m_TotalItemsPurchased
End Get
Set(ByVal Value As Integer)
m_TotalItemsPurchased = Value
End Set
End Property
72
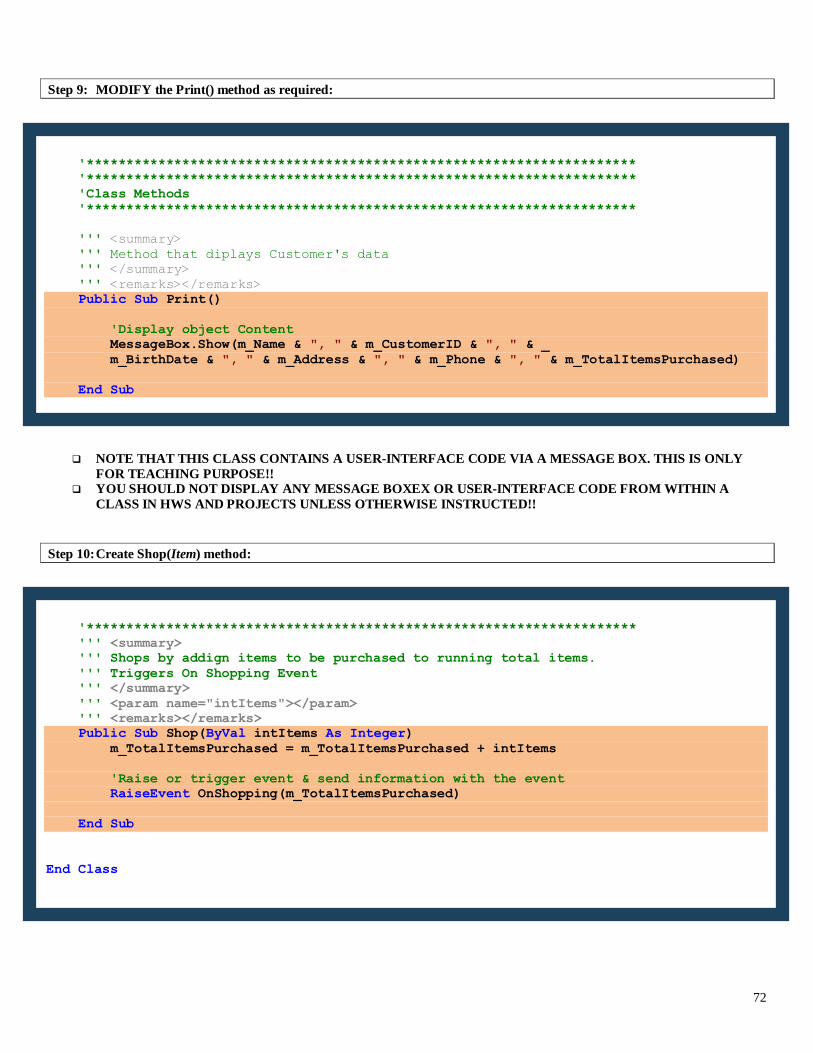
Step 9: MODIFY the Print() method as required:
NOTE THAT THIS CLASS CONTAINS A USER-INTERFACE CODE VIA A MESSAGE BOX. THIS IS ONLY
FOR TEACHING PURPOSE!! YOU SHOULD NOT DISPLAY ANY MESSAGE BOXEX OR USER-INTERFACE CODE FROM WITHIN A
CLASS IN HWS AND PROJECTS UNLESS OTHERWISE INSTRUCTED!!
Step 10: Create Shop(Item) method:
'*********************************************************************
'*********************************************************************
'Class Methods
'*********************************************************************
''' <summary>
''' Method that diplays Customer's data
''' </summary>
''' <remarks></remarks>
Public Sub Print()
'Display object Content
MessageBox.Show(m_Name & ", " & m_CustomerID & ", " & _
m_BirthDate & ", " & m_Address & ", " & m_Phone & ", " & m_TotalItemsPurchased)
End Sub
'*********************************************************************
''' <summary>
''' Shops by addign items to be purchased to running total items.
''' Triggers On Shopping Event
''' </summary>
''' <param name="intItems"></param>
''' <remarks></remarks>
Public Sub Shop(ByVal intItems As Integer)
m_TotalItemsPurchased = m_TotalItemsPurchased + intItems
'Raise or trigger event & send information with the event
RaiseEvent OnShopping(m_TotalItemsPurchased)
End Sub
End Class
73
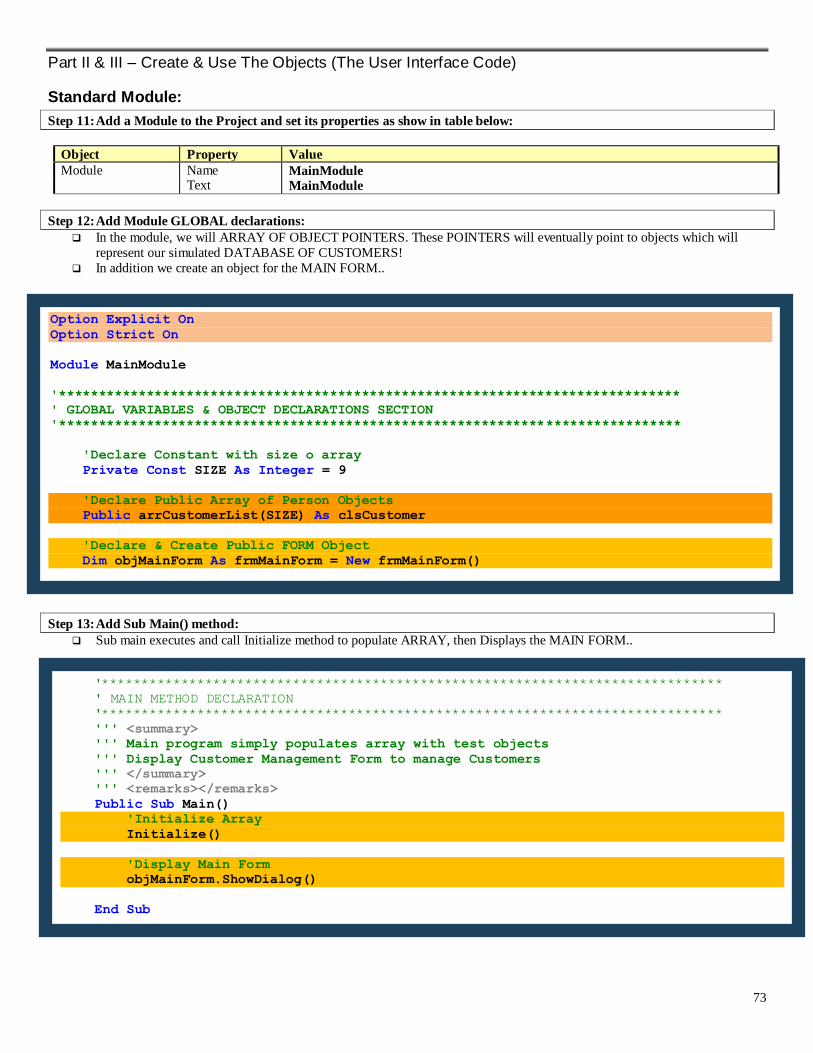
Part II & III – Create & Use The Objects (The User Interface Code)
Standard Module:
Step 11: Add a Module to the Project and set its properties as show in table below:
Object Property Value
Module Name MainModule Text MainModule
Step 12: Add Module GLOBAL declarations:
In the module, we will ARRAY OF OBJECT POINTERS. These POINTERS will eventually point to objects which will
represent our simulated DATABASE OF CUSTOMERS!
In addition we create an object for the MAIN FORM..
Step 13: Add Sub Main() method:
Sub main executes and call Initialize method to populate ARRAY, then Displays the MAIN FORM..
Option Explicit On
Option Strict On
Module MainModule
'******************************************************************************
' GLOBAL VARIABLES & OBJECT DECLARATIONS SECTION
'******************************************************************************
'Declare Constant with size o array
Private Const SIZE As Integer = 9
'Declare Public Array of Person Objects
Public arrCustomerList(SIZE) As clsCustomer
'Declare & Create Public FORM Object
Dim objMainForm As frmMainForm = New frmMainForm()
'******************************************************************************
' MAIN METHOD DECLARATION
'******************************************************************************
''' <summary>
''' Main program simply populates array with test objects
''' Display Customer Management Form to manage Customers
''' </summary>
''' <remarks></remarks>
Public Sub Main()
'Initialize Array
Initialize()
'Display Main Form
objMainForm.ShowDialog()
End Sub
74
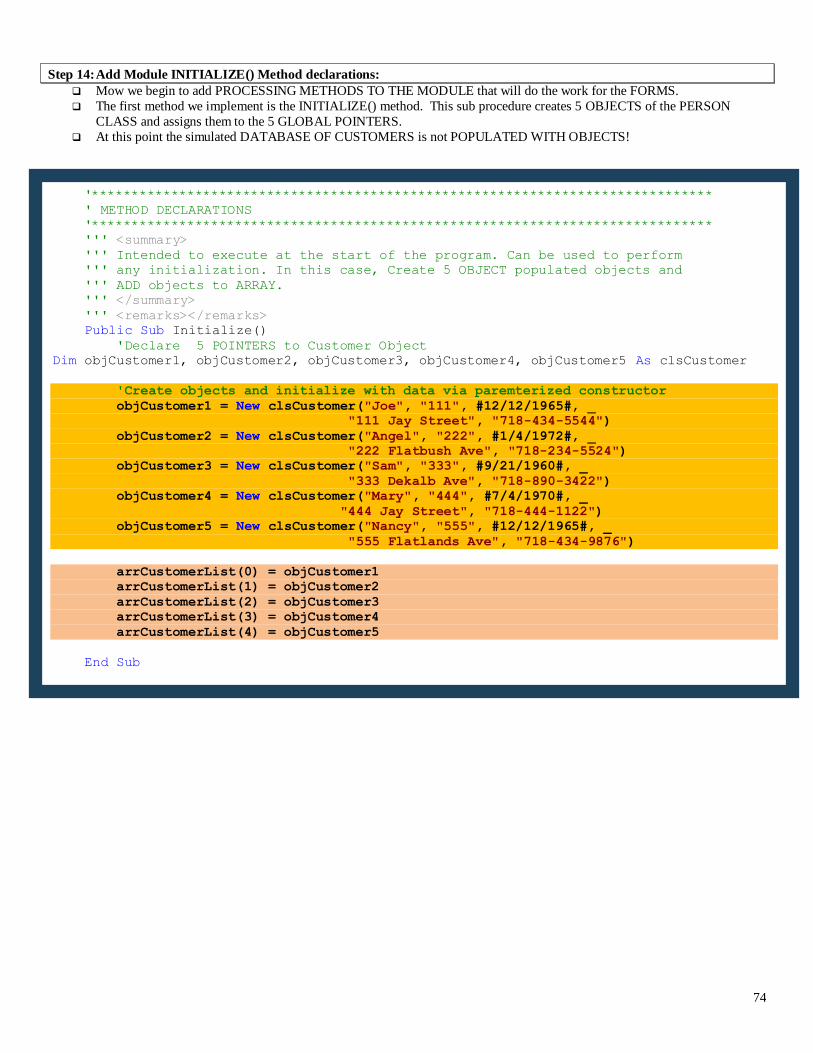
Step 14: Add Module INITIALIZE() Method declarations:
Mow we begin to add PROCESSING METHODS TO THE MODULE that will do the work for the FORMS.
The first method we implement is the INITIALIZE() method. This sub procedure creates 5 OBJECTS of the PERSON
CLASS and assigns them to the 5 GLOBAL POINTERS.
At this point the simulated DATABASE OF CUSTOMERS is not POPULATED WITH OBJECTS!
'******************************************************************************
' METHOD DECLARATIONS
'******************************************************************************
''' <summary>
''' Intended to execute at the start of the program. Can be used to perform
''' any initialization. In this case, Create 5 OBJECT populated objects and
''' ADD objects to ARRAY.
''' </summary>
''' <remarks></remarks>
Public Sub Initialize()
'Declare 5 POINTERS to Customer Object
Dim objCustomer1, objCustomer2, objCustomer3, objCustomer4, objCustomer5 As clsCustomer
'Create objects and initialize with data via paremterized constructor
objCustomer1 = New clsCustomer("Joe", "111", #12/12/1965#, _
"111 Jay Street", "718-434-5544")
objCustomer2 = New clsCustomer("Angel", "222", #1/4/1972#, _
"222 Flatbush Ave", "718-234-5524")
objCustomer3 = New clsCustomer("Sam", "333", #9/21/1960#, _
"333 Dekalb Ave", "718-890-3422")
objCustomer4 = New clsCustomer("Mary", "444", #7/4/1970#, _
"444 Jay Street", "718-444-1122")
objCustomer5 = New clsCustomer("Nancy", "555", #12/12/1965#, _
"555 Flatlands Ave", "718-434-9876")
arrCustomerList(0) = objCustomer1
arrCustomerList(1) = objCustomer2
arrCustomerList(2) = objCustomer3
arrCustomerList(3) = objCustomer4
arrCustomerList(4) = objCustomer5
End Sub
75
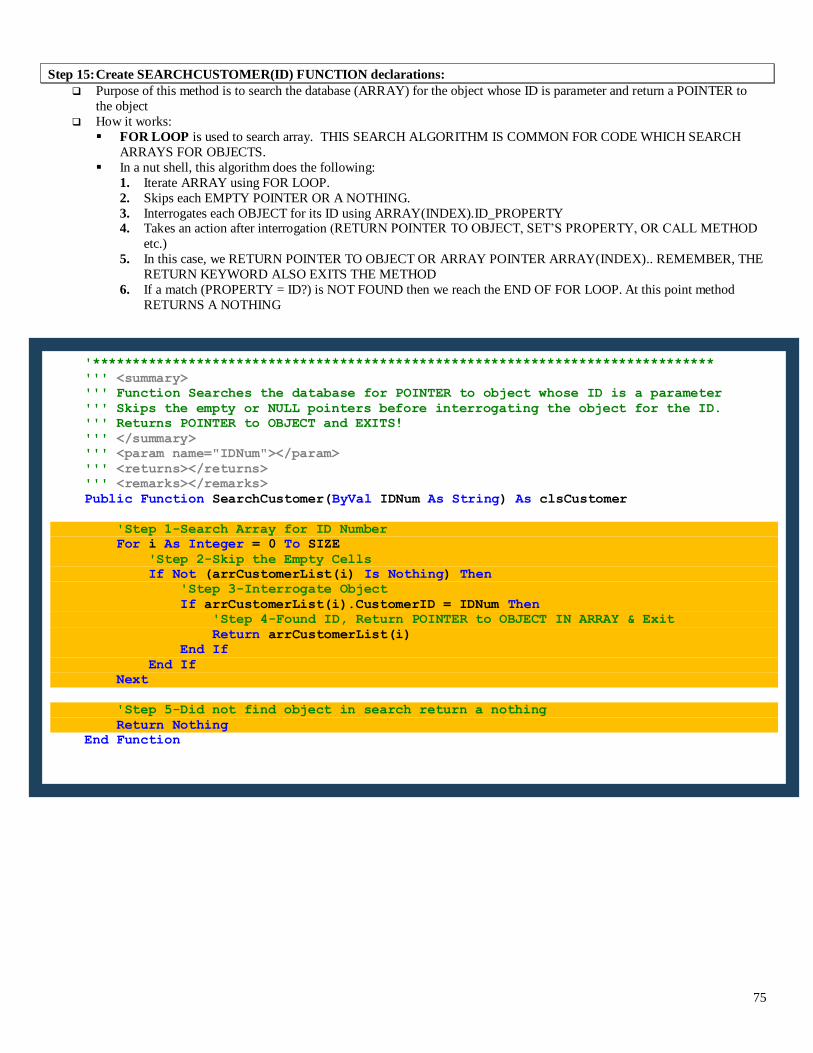
Step 15: Create SEARCHCUSTOMER(ID) FUNCTION declarations:
Purpose of this method is to search the database (ARRAY) for the object whose ID is parameter and return a POINTER to
the object
How it works:
FOR LOOP is used to search array. THIS SEARCH ALGORITHM IS COMMON FOR CODE WHICH SEARCH
ARRAYS FOR OBJECTS.
In a nut shell, this algorithm does the following:
1. Iterate ARRAY using FOR LOOP.
2. Skips each EMPTY POINTER OR A NOTHING.
3. Interrogates each OBJECT for its ID using ARRAY(INDEX).ID_PROPERTY 4. Takes an action after interrogation (RETURN POINTER TO OBJECT, SET’S PROPERTY, OR CALL METHOD
etc.)
5. In this case, we RETURN POINTER TO OBJECT OR ARRAY POINTER ARRAY(INDEX).. REMEMBER, THE
RETURN KEYWORD ALSO EXITS THE METHOD
6. If a match (PROPERTY = ID?) is NOT FOUND then we reach the END OF FOR LOOP. At this point method
RETURNS A NOTHING
'******************************************************************************
''' <summary>
''' Function Searches the database for POINTER to object whose ID is a parameter
''' Skips the empty or NULL pointers before interrogating the object for the ID.
''' Returns POINTER to OBJECT and EXITS!
''' </summary>
''' <param name="IDNum"></param>
''' <returns></returns>
''' <remarks></remarks>
Public Function SearchCustomer(ByVal IDNum As String) As clsCustomer
'Step 1-Search Array for ID Number
For i As Integer = 0 To SIZE
'Step 2-Skip the Empty Cells
If Not (arrCustomerList(i) Is Nothing) Then
'Step 3-Interrogate Object
If arrCustomerList(i).CustomerID = IDNum Then
'Step 4-Found ID, Return POINTER to OBJECT IN ARRAY & Exit
Return arrCustomerList(i)
End If
End If
Next
'Step 5-Did not find object in search return a nothing
Return Nothing
End Function

76
Step 16: Create ADDCUSTOMER(OBJECT) FUNCTION declarations:
Purpose of this method is to ADD a new Customer to the ARRAY. True is returned if successful, False if no EMPTY OR
NULL POINTERS ARE AVAILABLE.
How it works:
FOR LOOP is used to search array for EMPTY POINTER.
This algorithm does the following:
1. Iterate ARRAY using FOR LOOP.
2. Interrogate each ARRAY(i) POINTER if is an EMPTY POINTER OR A NOTHING.
3. SET ARRAY(i) POINTER to point to OBJECT POINTER passed as argument 4. RETURN a TRUE indicating object was added
5. If NO EMPTY POINTER IS FOUND, then we RETURN A FALSE indicating no room was found in array.
One important point here to note is that this ADD method ADDS A NEW OBJECT PASSED AS ARGUMENT TO THE
METHOD! Point here is that the FORM OR USER-INTERFACE NEEDS TO CREATE AND POPULATE THIS OBJECT
AND PASS IT TO THE METHOD.
'******************************************************************************
''' <summary>
''' Function Adds NEW objects passed as parameter to database.
''' Searches for the FIRST nothing or empty POINTER and adds object to that POINTER.
''' Returns a TRUE When OBJECT added OR FALSE when no more empty POINTERS and EXITS!!
''' THIS METHOD REQUIRES THAT WE CREATE AN OBJECT IN THE FORM OR USER-INTERFACE
''' OBJECT IS PASSED AS ARGUMENT TO METHOD CALL.
''' </summary>
''' <param name="objNewCustomer"></param>
''' <returns></returns>
''' <remarks></remarks>
Public Function AddCustomer(ByVal objNewCustomer As clsCustomer) As Boolean
'Step 1-Search Array for ID Number. Skip the Empty Cells
For i As Integer = 0 To SIZE
If arrCustomerList(i) Is Nothing Then
'Step 2-Add object to Array
arrCustomerList(i) = objNewCustomer
'Step 2-Return TRUE & Exit
Return True
End If
Next
'Step 3-Did not find EMPTY CELL in search return FALSE
Return False
End Function
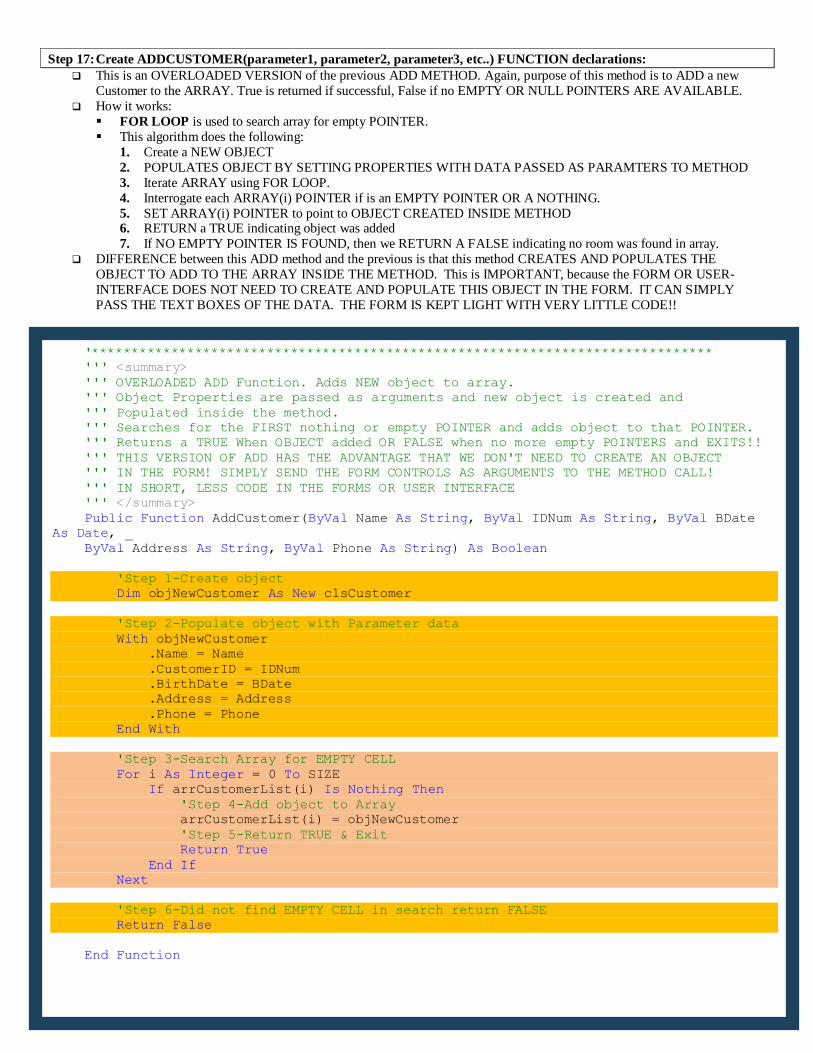
77
Step 17: Create ADDCUSTOMER(parameter1, parameter2, parameter3, etc..) FUNCTION declarations:
This is an OVERLOADED VERSION of the previous ADD METHOD. Again, purpose of this method is to ADD a new
Customer to the ARRAY. True is returned if successful, False if no EMPTY OR NULL POINTERS ARE AVAILABLE.
How it works:
FOR LOOP is used to search array for empty POINTER.
This algorithm does the following:
1. Create a NEW OBJECT
2. POPULATES OBJECT BY SETTING PROPERTIES WITH DATA PASSED AS PARAMTERS TO METHOD
3. Iterate ARRAY using FOR LOOP.
4. Interrogate each ARRAY(i) POINTER if is an EMPTY POINTER OR A NOTHING.
5. SET ARRAY(i) POINTER to point to OBJECT CREATED INSIDE METHOD 6. RETURN a TRUE indicating object was added
7. If NO EMPTY POINTER IS FOUND, then we RETURN A FALSE indicating no room was found in array.
DIFFERENCE between this ADD method and the previous is that this method CREATES AND POPULATES THE
OBJECT TO ADD TO THE ARRAY INSIDE THE METHOD. This is IMPORTANT, because the FORM OR USER-
INTERFACE DOES NOT NEED TO CREATE AND POPULATE THIS OBJECT IN THE FORM. IT CAN SIMPLY
PASS THE TEXT BOXES OF THE DATA. THE FORM IS KEPT LIGHT WITH VERY LITTLE CODE!!
'******************************************************************************
''' <summary>
''' OVERLOADED ADD Function. Adds NEW object to array.
''' Object Properties are passed as arguments and new object is created and
''' Populated inside the method.
''' Searches for the FIRST nothing or empty POINTER and adds object to that POINTER.
''' Returns a TRUE When OBJECT added OR FALSE when no more empty POINTERS and EXITS!!
''' THIS VERSION OF ADD HAS THE ADVANTAGE THAT WE DON'T NEED TO CREATE AN OBJECT
''' IN THE FORM! SIMPLY SEND THE FORM CONTROLS AS ARGUMENTS TO THE METHOD CALL!
''' IN SHORT, LESS CODE IN THE FORMS OR USER INTERFACE
''' </summary>
Public Function AddCustomer(ByVal Name As String, ByVal IDNum As String, ByVal BDate
As Date, _
ByVal Address As String, ByVal Phone As String) As Boolean
'Step 1-Create object
Dim objNewCustomer As New clsCustomer
'Step 2-Populate object with Parameter data
With objNewCustomer
.Name = Name
.CustomerID = IDNum
.BirthDate = BDate
.Address = Address
.Phone = Phone
End With
'Step 3-Search Array for EMPTY CELL
For i As Integer = 0 To SIZE
If arrCustomerList(i) Is Nothing Then
'Step 4-Add object to Array
arrCustomerList(i) = objNewCustomer
'Step 5-Return TRUE & Exit
Return True
End If
Next
'Step 6-Did not find EMPTY CELL in search return FALSE
Return False
End Function
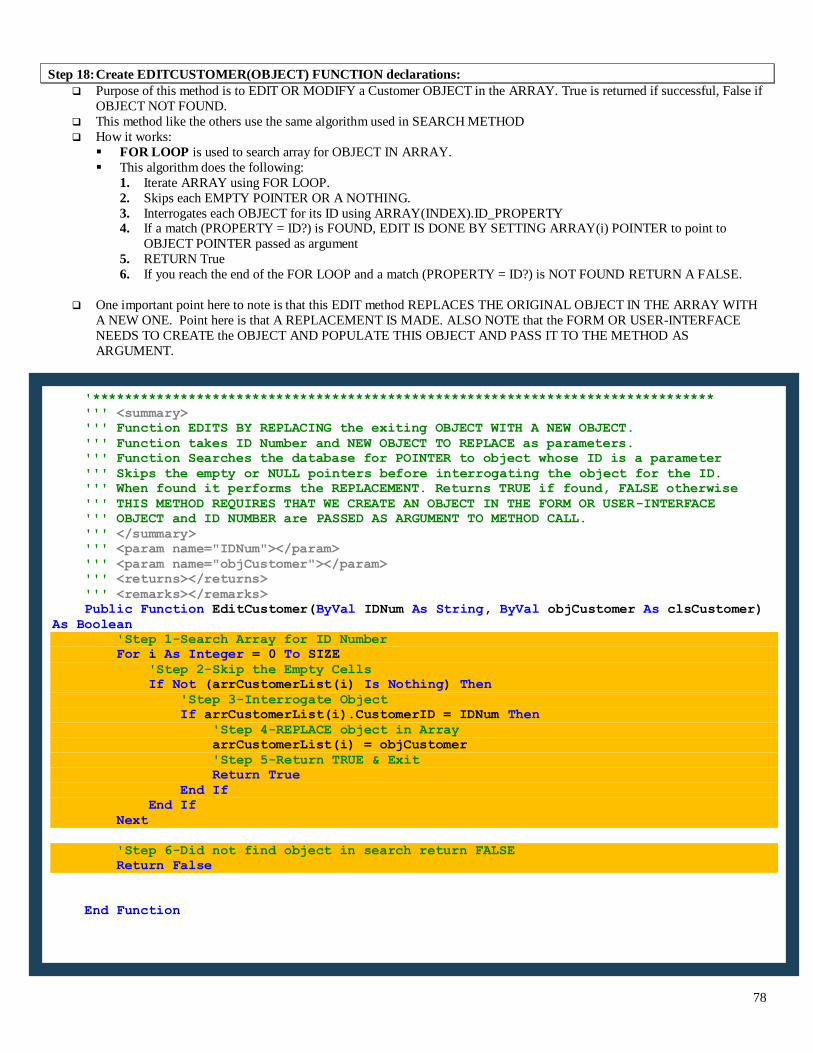
78
Step 18: Create EDITCUSTOMER(OBJECT) FUNCTION declarations:
Purpose of this method is to EDIT OR MODIFY a Customer OBJECT in the ARRAY. True is returned if successful, False if
OBJECT NOT FOUND.
This method like the others use the same algorithm used in SEARCH METHOD
How it works:
FOR LOOP is used to search array for OBJECT IN ARRAY.
This algorithm does the following:
1. Iterate ARRAY using FOR LOOP.
2. Skips each EMPTY POINTER OR A NOTHING.
3. Interrogates each OBJECT for its ID using ARRAY(INDEX).ID_PROPERTY 4. If a match (PROPERTY = ID?) is FOUND, EDIT IS DONE BY SETTING ARRAY(i) POINTER to point to
OBJECT POINTER passed as argument
5. RETURN True
6. If you reach the end of the FOR LOOP and a match (PROPERTY = ID?) is NOT FOUND RETURN A FALSE.
One important point here to note is that this EDIT method REPLACES THE ORIGINAL OBJECT IN THE ARRAY WITH
A NEW ONE. Point here is that A REPLACEMENT IS MADE. ALSO NOTE that the FORM OR USER-INTERFACE
NEEDS TO CREATE the OBJECT AND POPULATE THIS OBJECT AND PASS IT TO THE METHOD AS
ARGUMENT.
'******************************************************************************
''' <summary>
''' Function EDITS BY REPLACING the exiting OBJECT WITH A NEW OBJECT.
''' Function takes ID Number and NEW OBJECT TO REPLACE as parameters.
''' Function Searches the database for POINTER to object whose ID is a parameter
''' Skips the empty or NULL pointers before interrogating the object for the ID.
''' When found it performs the REPLACEMENT. Returns TRUE if found, FALSE otherwise
''' THIS METHOD REQUIRES THAT WE CREATE AN OBJECT IN THE FORM OR USER-INTERFACE
''' OBJECT and ID NUMBER are PASSED AS ARGUMENT TO METHOD CALL.
''' </summary>
''' <param name="IDNum"></param>
''' <param name="objCustomer"></param>
''' <returns></returns>
''' <remarks></remarks>
Public Function EditCustomer(ByVal IDNum As String, ByVal objCustomer As clsCustomer)
As Boolean
'Step 1-Search Array for ID Number
For i As Integer = 0 To SIZE
'Step 2-Skip the Empty Cells
If Not (arrCustomerList(i) Is Nothing) Then
'Step 3-Interrogate Object
If arrCustomerList(i).CustomerID = IDNum Then
'Step 4-REPLACE object in Array
arrCustomerList(i) = objCustomer
'Step 5-Return TRUE & Exit
Return True
End If
End If
Next
'Step 6-Did not find object in search return FALSE
Return False
End Function
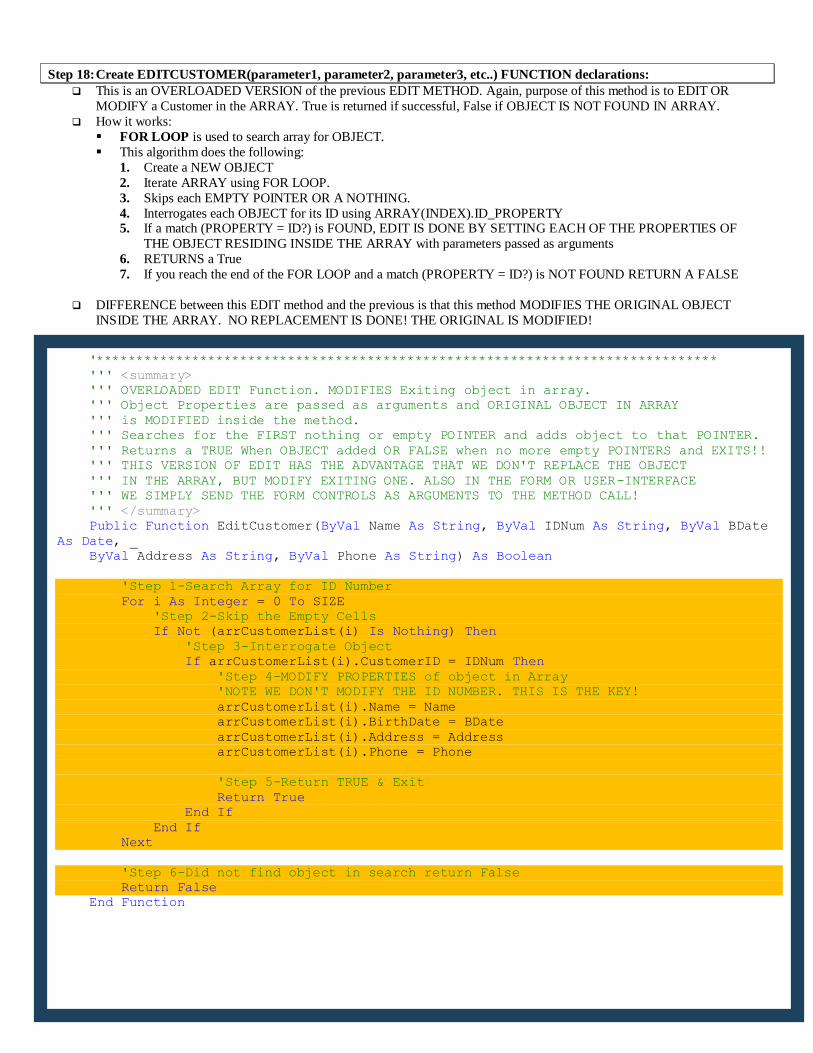
79
Step 18: Create EDITCUSTOMER(parameter1, parameter2, parameter3, etc..) FUNCTION declarations:
This is an OVERLOADED VERSION of the previous EDIT METHOD. Again, purpose of this method is to EDIT OR
MODIFY a Customer in the ARRAY. True is returned if successful, False if OBJECT IS NOT FOUND IN ARRAY.
How it works:
FOR LOOP is used to search array for OBJECT.
This algorithm does the following:
1. Create a NEW OBJECT
2. Iterate ARRAY using FOR LOOP.
3. Skips each EMPTY POINTER OR A NOTHING.
4. Interrogates each OBJECT for its ID using ARRAY(INDEX).ID_PROPERTY 5. If a match (PROPERTY = ID?) is FOUND, EDIT IS DONE BY SETTING EACH OF THE PROPERTIES OF
THE OBJECT RESIDING INSIDE THE ARRAY with parameters passed as arguments
6. RETURNS a True
7. If you reach the end of the FOR LOOP and a match (PROPERTY = ID?) is NOT FOUND RETURN A FALSE
DIFFERENCE between this EDIT method and the previous is that this method MODIFIES THE ORIGINAL OBJECT
INSIDE THE ARRAY. NO REPLACEMENT IS DONE! THE ORIGINAL IS MODIFIED!
'******************************************************************************
''' <summary>
''' OVERLOADED EDIT Function. MODIFIES Exiting object in array.
''' Object Properties are passed as arguments and ORIGINAL OBJECT IN ARRAY
''' is MODIFIED inside the method.
''' Searches for the FIRST nothing or empty POINTER and adds object to that POINTER.
''' Returns a TRUE When OBJECT added OR FALSE when no more empty POINTERS and EXITS!!
''' THIS VERSION OF EDIT HAS THE ADVANTAGE THAT WE DON'T REPLACE THE OBJECT
''' IN THE ARRAY, BUT MODIFY EXITING ONE. ALSO IN THE FORM OR USER-INTERFACE
''' WE SIMPLY SEND THE FORM CONTROLS AS ARGUMENTS TO THE METHOD CALL!
''' </summary>
Public Function EditCustomer(ByVal Name As String, ByVal IDNum As String, ByVal BDate
As Date, _
ByVal Address As String, ByVal Phone As String) As Boolean
'Step 1-Search Array for ID Number
For i As Integer = 0 To SIZE
'Step 2-Skip the Empty Cells
If Not (arrCustomerList(i) Is Nothing) Then
'Step 3-Interrogate Object
If arrCustomerList(i).CustomerID = IDNum Then
'Step 4-MODIFY PROPERTIES of object in Array
'NOTE WE DON'T MODIFY THE ID NUMBER. THIS IS THE KEY!
arrCustomerList(i).Name = Name
arrCustomerList(i).BirthDate = BDate
arrCustomerList(i).Address = Address
arrCustomerList(i).Phone = Phone
'Step 5-Return TRUE & Exit
Return True
End If
End If
Next
'Step 6-Did not find object in search return False
Return False
End Function
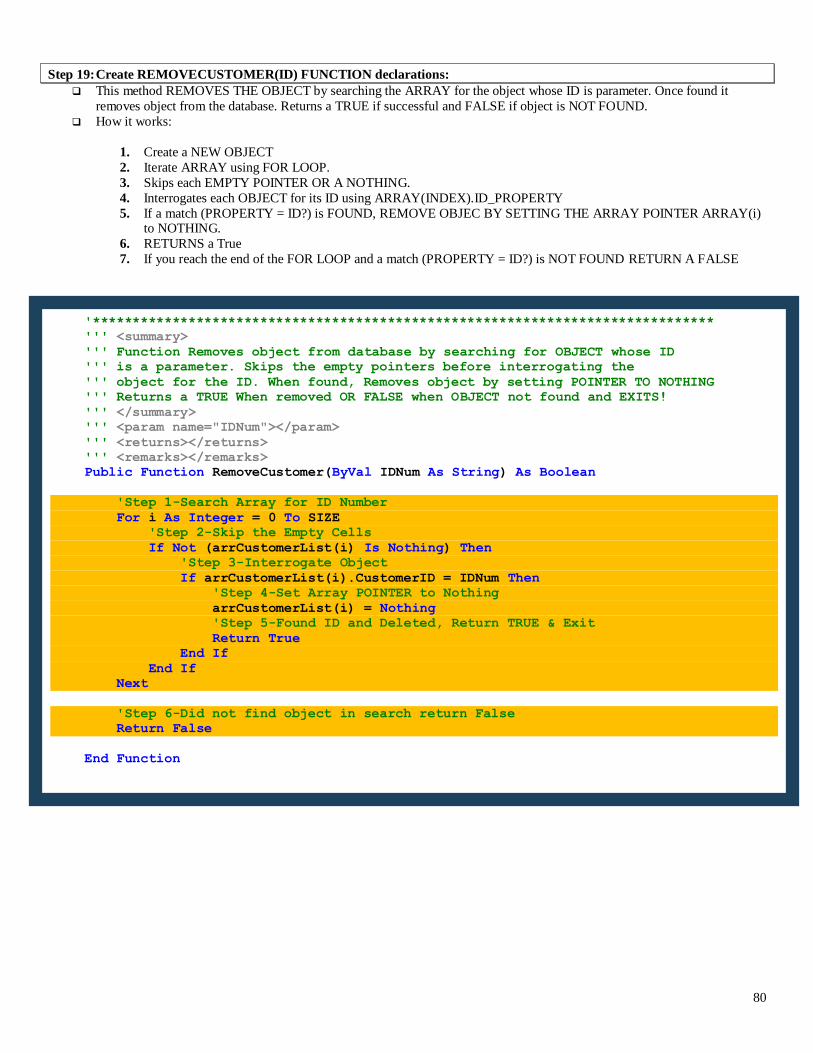
80
Step 19: Create REMOVECUSTOMER(ID) FUNCTION declarations:
This method REMOVES THE OBJECT by searching the ARRAY for the object whose ID is parameter. Once found it
removes object from the database. Returns a TRUE if successful and FALSE if object is NOT FOUND.
How it works:
1. Create a NEW OBJECT
2. Iterate ARRAY using FOR LOOP.
3. Skips each EMPTY POINTER OR A NOTHING.
4. Interrogates each OBJECT for its ID using ARRAY(INDEX).ID_PROPERTY
5. If a match (PROPERTY = ID?) is FOUND, REMOVE OBJEC BY SETTING THE ARRAY POINTER ARRAY(i) to NOTHING.
6. RETURNS a True
7. If you reach the end of the FOR LOOP and a match (PROPERTY = ID?) is NOT FOUND RETURN A FALSE
'******************************************************************************
''' <summary>
''' Function Removes object from database by searching for OBJECT whose ID
''' is a parameter. Skips the empty pointers before interrogating the
''' object for the ID. When found, Removes object by setting POINTER TO NOTHING
''' Returns a TRUE When removed OR FALSE when OBJECT not found and EXITS!
''' </summary>
''' <param name="IDNum"></param>
''' <returns></returns>
''' <remarks></remarks>
Public Function RemoveCustomer(ByVal IDNum As String) As Boolean
'Step 1-Search Array for ID Number
For i As Integer = 0 To SIZE
'Step 2-Skip the Empty Cells
If Not (arrCustomerList(i) Is Nothing) Then
'Step 3-Interrogate Object
If arrCustomerList(i).CustomerID = IDNum Then
'Step 4-Set Array POINTER to Nothing
arrCustomerList(i) = Nothing
'Step 5-Found ID and Deleted, Return TRUE & Exit
Return True
End If
End If
Next
'Step 6-Did not find object in search return False
Return False
End Function

81
Step 20: Create PRINTCUSTOMER(ID) FUNCTION declarations:
Purpose of this method is to search the database (5 Customer OBJECTS) for the object whose ID is parameter. Once found it
CALLS PRINT() METHOD of OBJECT. Returns a TRUE if successful and FALSE if object is NOT FOUND.
How it works:
1. Create a NEW OBJECT
2. Iterate ARRAY using FOR LOOP.
3. Skips each EMPTY POINTER OR A NOTHING.
4. Interrogates each OBJECT for its ID using ARRAY(INDEX).ID_PROPERTY
5. If a match (PROPERTY = ID?) is FOUND, PRINTS OBJECT BY CALLING PRINT() METHOD OF OBJECT
6. RETURNS a True 7. If you reach the end of the FOR LOOP and a match (PROPERTY = ID?) is NOT FOUND RETURN A FALSE
'******************************************************************************
''' <summary>
''' Function Prints object by searching for OBJECT whose ID is a parameter
''' Skips the empty pointers before interrogating the object for the ID.
''' When found, CALLS the PRINT() METHOD in the object
''' Returns a TRUE When printed OR FALSE when OBJECT not found and EXITS!
''' </summary>
''' <param name="IDNum"></param>
''' <returns></returns>
''' <remarks></remarks>
Public Function PrintCustomer(ByVal IDNum As String) As Boolean
'Step 1-Search Array for ID Number
For i As Integer = 0 To SIZE
'Step 2-Skip the Empty Cells
If Not (arrCustomerList(i) Is Nothing) Then
'Step 3-Interrogate Object
If arrCustomerList(i).CustomerID = IDNum Then
'Step 4-CALL METHOD
arrCustomerList(i).Print()
'Step 5-Found ID, Return TRUE & Exit
Return True
End If
End If
Next
'Step 6-Did not find object in search return False
Return False
End Function
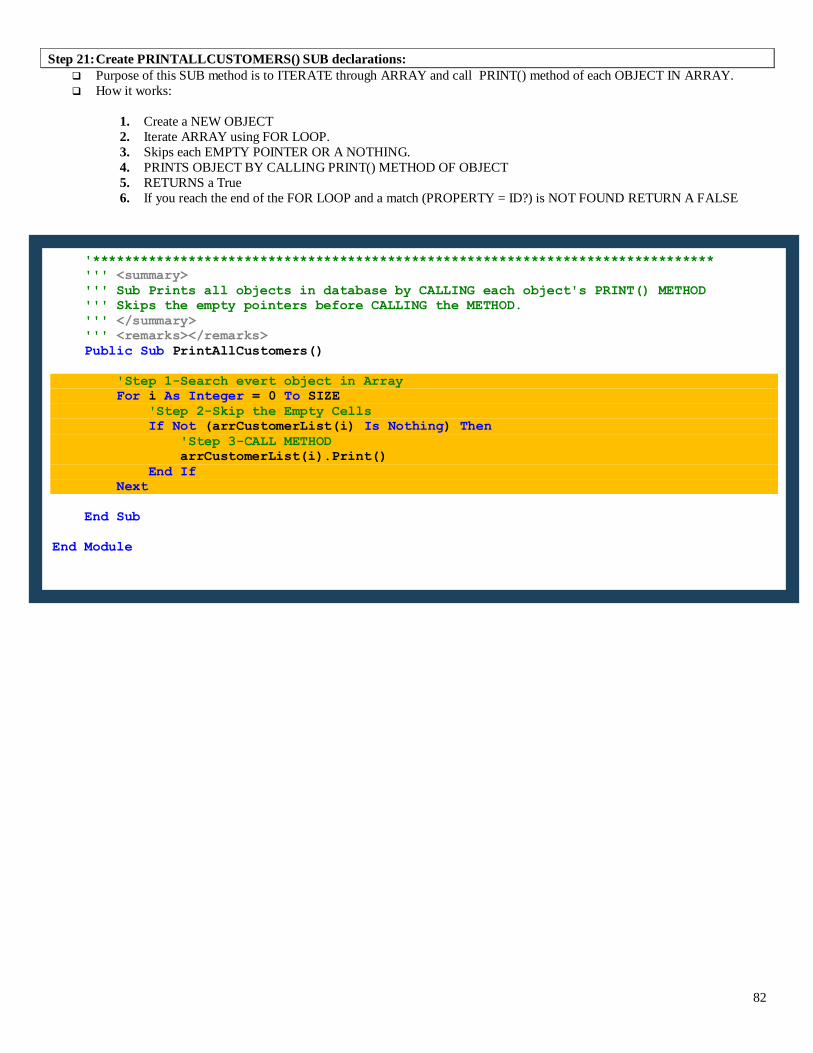
82
Step 21: Create PRINTALLCUSTOMERS() SUB declarations:
Purpose of this SUB method is to ITERATE through ARRAY and call PRINT() method of each OBJECT IN ARRAY.
How it works:
1. Create a NEW OBJECT
2. Iterate ARRAY using FOR LOOP.
3. Skips each EMPTY POINTER OR A NOTHING.
4. PRINTS OBJECT BY CALLING PRINT() METHOD OF OBJECT
5. RETURNS a True
6. If you reach the end of the FOR LOOP and a match (PROPERTY = ID?) is NOT FOUND RETURN A FALSE
'******************************************************************************
''' <summary>
''' Sub Prints all objects in database by CALLING each object's PRINT() METHOD
''' Skips the empty pointers before CALLING the METHOD.
''' </summary>
''' <remarks></remarks>
Public Sub PrintAllCustomers()
'Step 1-Search evert object in Array
For i As Integer = 0 To SIZE
'Step 2-Skip the Empty Cells
If Not (arrCustomerList(i) Is Nothing) Then
'Step 3-CALL METHOD
arrCustomerList(i).Print()
End If
Next
End Sub
End Module
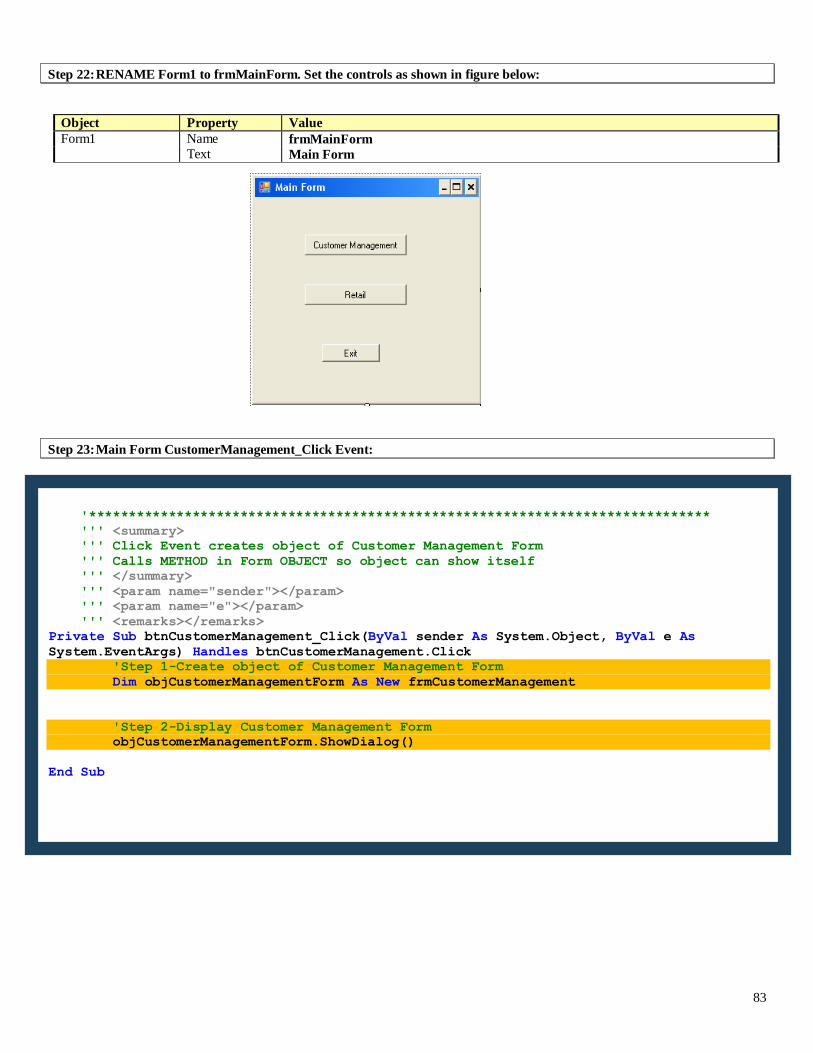
83
Step 22: RENAME Form1 to frmMainForm. Set the controls as shown in figure below:
Object Property Value
Form1 Name frmMainForm Text Main Form
Step 23: Main Form CustomerManagement_Click Event:
'******************************************************************************
''' <summary>
''' Click Event creates object of Customer Management Form
''' Calls METHOD in Form OBJECT so object can show itself
''' </summary>
''' <param name="sender"></param>
''' <param name="e"></param>
''' <remarks></remarks>
Private Sub btnCustomerManagement_Click(ByVal sender As System.Object, ByVal e As
System.EventArgs) Handles btnCustomerManagement.Click
'Step 1-Create object of Customer Management Form
Dim objCustomerManagementForm As New frmCustomerManagement
'Step 2-Display Customer Management Form
objCustomerManagementForm.ShowDialog()
End Sub
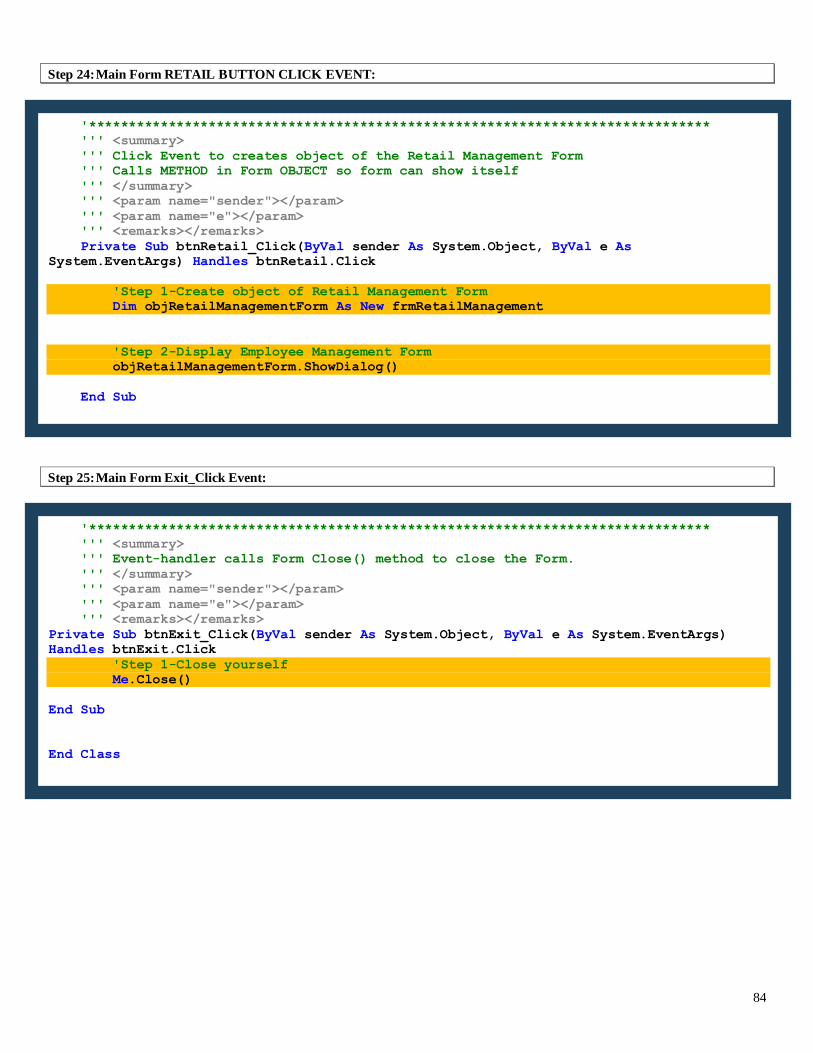
84
Step 24: Main Form RETAIL BUTTON CLICK EVENT:
Step 25: Main Form Exit_Click Event:
'******************************************************************************
''' <summary>
''' Event-handler calls Form Close() method to close the Form.
''' </summary>
''' <param name="sender"></param>
''' <param name="e"></param>
''' <remarks></remarks>
Private Sub btnExit_Click(ByVal sender As System.Object, ByVal e As System.EventArgs)
Handles btnExit.Click
'Step 1-Close yourself
Me.Close()
End Sub
End Class
'******************************************************************************
''' <summary>
''' Click Event to creates object of the Retail Management Form
''' Calls METHOD in Form OBJECT so form can show itself
''' </summary>
''' <param name="sender"></param>
''' <param name="e"></param>
''' <remarks></remarks>
Private Sub btnRetail_Click(ByVal sender As System.Object, ByVal e As
System.EventArgs) Handles btnRetail.Click
'Step 1-Create object of Retail Management Form
Dim objRetailManagementForm As New frmRetailManagement
'Step 2-Display Employee Management Form
objRetailManagementForm.ShowDialog()
End Sub
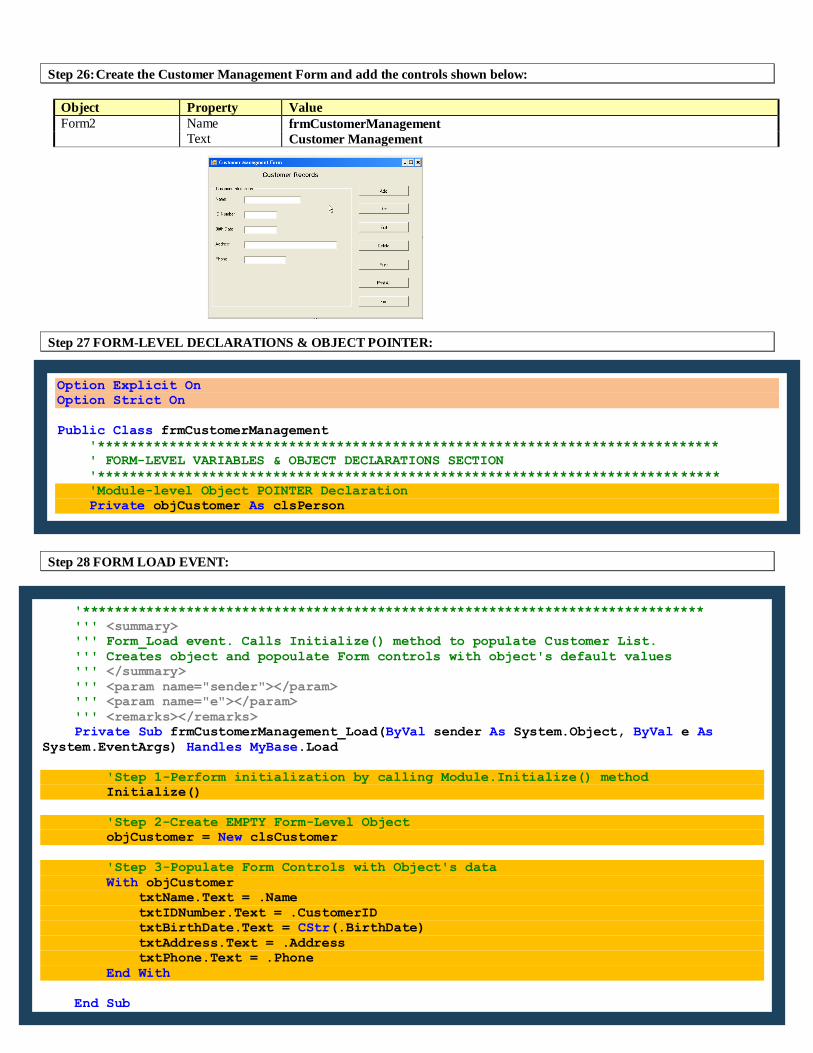
85
Step 26: Create the Customer Management Form and add the controls shown below:
Object Property Value
Form2 Name frmCustomerManagement Text Customer Management
Step 27 FORM-LEVEL DECLARATIONS & OBJECT POINTER:
Step 28 FORM LOAD EVENT:
Option Explicit On
Option Strict On
Public Class frmCustomerManagement
'******************************************************************************
' FORM-LEVEL VARIABLES & OBJECT DECLARATIONS SECTION
'******************************************************************************
'Module-level Object POINTER Declaration
Private objCustomer As clsPerson
'******************************************************************************
''' <summary>
''' Form_Load event. Calls Initialize() method to populate Customer List.
''' Creates object and popoulate Form controls with object's default values
''' </summary>
''' <param name="sender"></param>
''' <param name="e"></param>
''' <remarks></remarks>
Private Sub frmCustomerManagement_Load(ByVal sender As System.Object, ByVal e As
System.EventArgs) Handles MyBase.Load
'Step 1-Perform initialization by calling Module.Initialize() method
Initialize()
'Step 2-Create EMPTY Form-Level Object
objCustomer = New clsCustomer
'Step 3-Populate Form Controls with Object's data
With objCustomer
txtName.Text = .Name
txtIDNumber.Text = .CustomerID
txtBirthDate.Text = CStr(.BirthDate)
txtAddress.Text = .Address
txtPhone.Text = .Phone
End With
End Sub
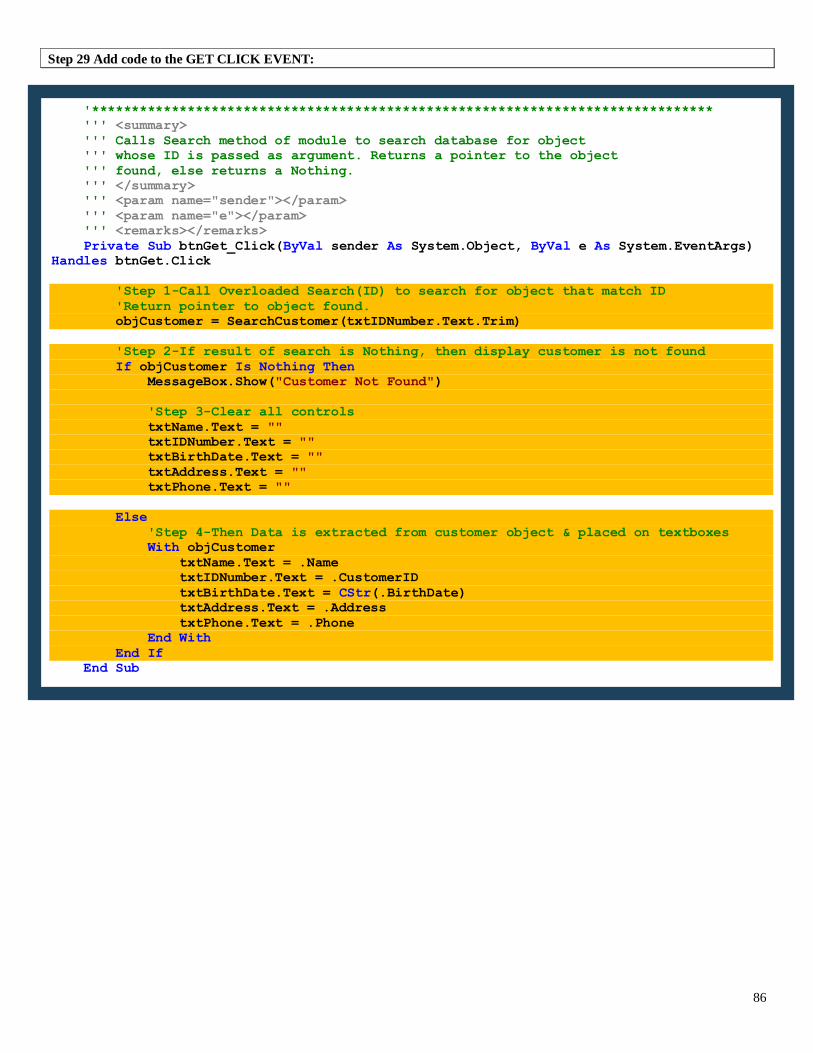
86
Step 29 Add code to the GET CLICK EVENT:
'******************************************************************************
''' <summary>
''' Calls Search method of module to search database for object
''' whose ID is passed as argument. Returns a pointer to the object
''' found, else returns a Nothing.
''' </summary>
''' <param name="sender"></param>
''' <param name="e"></param>
''' <remarks></remarks>
Private Sub btnGet_Click(ByVal sender As System.Object, ByVal e As System.EventArgs)
Handles btnGet.Click
'Step 1-Call Overloaded Search(ID) to search for object that match ID
'Return pointer to object found.
objCustomer = SearchCustomer(txtIDNumber.Text.Trim)
'Step 2-If result of search is Nothing, then display customer is not found
If objCustomer Is Nothing Then
MessageBox.Show("Customer Not Found")
'Step 3-Clear all controls
txtName.Text = ""
txtIDNumber.Text = ""
txtBirthDate.Text = ""
txtAddress.Text = ""
txtPhone.Text = ""
Else
'Step 4-Then Data is extracted from customer object & placed on textboxes
With objCustomer
txtName.Text = .Name
txtIDNumber.Text = .CustomerID
txtBirthDate.Text = CStr(.BirthDate)
txtAddress.Text = .Address
txtPhone.Text = .Phone
End With
End If
End Sub

87
Step 30 ADD code for the ADD CLICK EVENT:
Step 31 Add code to the EDIT CLICK EVENT:
'******************************************************************************
''' <summary>
''' Calls Module Add method to Add a new object to the object database
''' We use the OVERLOADED ADD(x,y,z..) which takes paramters. In this case
''' we pass text boxes directly. Note how lite the form code is in this case
''' </summary>
''' <param name="sender"></param>
''' <param name="e"></param>
''' <remarks></remarks>
Private Sub btnAdd_Click(ByVal sender As System.Object, ByVal e As System.EventArgs)
Handles btnAdd.Click
'Step 1-Call Add method to add with Customer Properties as arguments
'to ADD new Customer to database
Dim result As Boolean = AddCustomer(txtName.Text.Trim, txtIDNumber.Text.Trim, _
CDate(txtBirthDate.Text.Trim), _
txtAddress.Text.Trim, txtPhone.Text.Trim)
'Step 2-Test results & prompt user
If result Then
MessageBox.Show("Customer Added Successfully")
Else
MessageBox.Show("Database Full")
End If
End Sub
'******************************************************************************
''' <summary>
''' Calls Module EDIT(x,y,z..) method to modify object in list whose ID
''' is passed as argument. Note that OVERLOADED EDIT method is used and
''' form controls are passed as argument thus Form code is kept light.
''' Returns True or False
''' </summary>
''' <param name="sender"></param>
''' <param name="e"></param>
''' <remarks></remarks>
Private Sub btnEdit_Click(ByVal sender As System.Object, ByVal e As System.EventArgs)
Handles btnEdit.Click
'Step 1-Call Add method to add with Customer Properties as arguments
'to ADD new Customer to database
Dim result As Boolean = EditCustomer(txtName.Text.Trim, txtIDNumber.Text.Trim, _
CDate(txtBirthDate.Text.Trim), _
txtAddress.Text.Trim, txtPhone.Text.Trim)
'Step 2-Test results & prompt user
If result = False Then
MessageBox.Show("Customer Not Found")
End If
End Sub
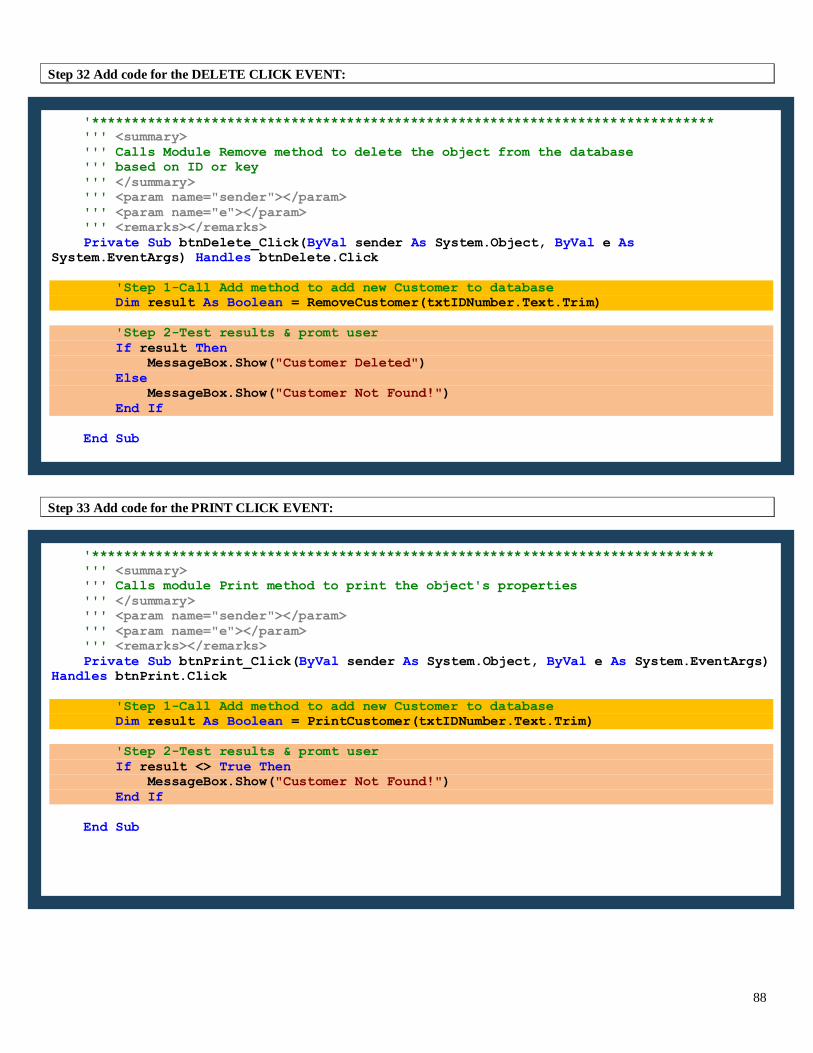
88
Step 32 Add code for the DELETE CLICK EVENT:
Step 33 Add code for the PRINT CLICK EVENT:
'******************************************************************************
''' <summary>
''' Calls Module Remove method to delete the object from the database
''' based on ID or key
''' </summary>
''' <param name="sender"></param>
''' <param name="e"></param>
''' <remarks></remarks>
Private Sub btnDelete_Click(ByVal sender As System.Object, ByVal e As
System.EventArgs) Handles btnDelete.Click
'Step 1-Call Add method to add new Customer to database
Dim result As Boolean = RemoveCustomer(txtIDNumber.Text.Trim)
'Step 2-Test results & promt user
If result Then
MessageBox.Show("Customer Deleted")
Else
MessageBox.Show("Customer Not Found!")
End If
End Sub
'******************************************************************************
''' <summary>
''' Calls module Print method to print the object's properties
''' </summary>
''' <param name="sender"></param>
''' <param name="e"></param>
''' <remarks></remarks>
Private Sub btnPrint_Click(ByVal sender As System.Object, ByVal e As System.EventArgs)
Handles btnPrint.Click
'Step 1-Call Add method to add new Customer to database
Dim result As Boolean = PrintCustomer(txtIDNumber.Text.Trim)
'Step 2-Test results & promt user
If result <> True Then
MessageBox.Show("Customer Not Found!")
End If
End Sub
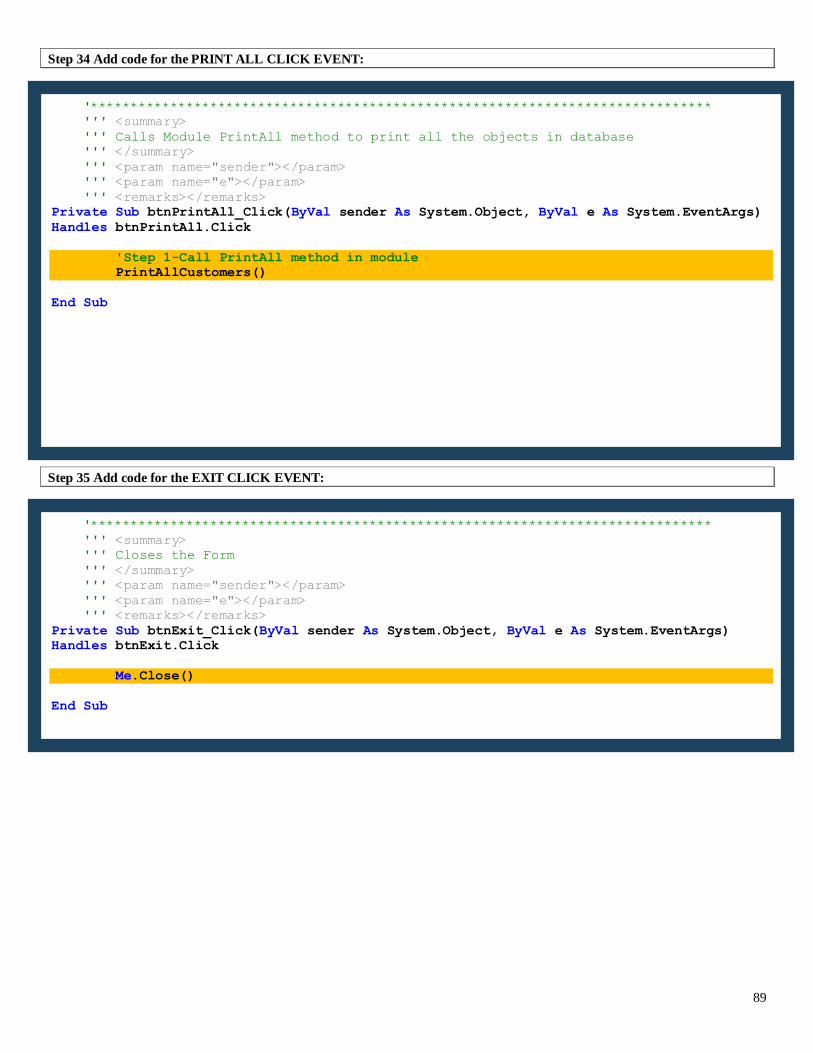
89
Step 34 Add code for the PRINT ALL CLICK EVENT:
Step 35 Add code for the EXIT CLICK EVENT:
'******************************************************************************
''' <summary>
''' Calls Module PrintAll method to print all the objects in database
''' </summary>
''' <param name="sender"></param>
''' <param name="e"></param>
''' <remarks></remarks>
Private Sub btnPrintAll_Click(ByVal sender As System.Object, ByVal e As System.EventArgs)
Handles btnPrintAll.Click
'Step 1-Call PrintAll method in module
PrintAllCustomers()
End Sub
'******************************************************************************
''' <summary>
''' Closes the Form
''' </summary>
''' <param name="sender"></param>
''' <param name="e"></param>
''' <remarks></remarks>
Private Sub btnExit_Click(ByVal sender As System.Object, ByVal e As System.EventArgs)
Handles btnExit.Click
Me.Close()
End Sub

90
Step 36 Create the RETAIL MANAGEMENT FORM and add the controls shown below:
Object Property Value
Form4 Name frmManagerInformationForm Text Manager Information Form
Step 37 FORM-LEVEL DECLARATIONS & OBJECT POINTER:
Option Explicit On
Option Strict On
Public Class frmRetailManagement
'******************************************************************************
' FORM-LEVEL VARIABLES & OBJECT DECLARATIONS SECTION
'******************************************************************************
'Module-level Object POINTER Declaration
Private WithEvents objCustomer As clsCustomer

91
Step 38 FORM LOAD EVENT:
Step 39 Add code to the PRINT CLICK EVENT:
'******************************************************************************
''' <summary>
''' Event-handler call PRINT() METHOD of Form-Level object.
''' </summary>
''' <param name="sender"></param>
''' <param name="e"></param>
''' <remarks></remarks>
Private Sub btnPrint_Click(ByVal sender As System.Object, ByVal e As System.EventArgs)
Handles btnPrint.Click
'Step 1-Tell object to print itself
objCustomer.Print()
End Sub
'******************************************************************************
' EVENT-HANDLER DECLARATIONS SECTION
'******************************************************************************
'******************************************************************************
''' <summary>
''' Form_Load event. Create object and popoulate Form controls
''' With object's default values. Also Sets text box to Read-only
''' in MODULE
''' </summary>
''' <param name="sender"></param>
''' <param name="e"></param>
''' <remarks></remarks>
Private Sub frmRetailManagement_Load(ByVal sender As System.Object, ByVal e As
System.EventArgs) Handles MyBase.Load
'Step 1-Create EMPTY Form-Level Object
objCustomer = New clsCustomer
'Step 2-Populate Form Controls with Object's data
With objCustomer
txtName.Text = .Name
txtIDNumber.Text = .CustomerID
txtBirthDate.Text = CStr(.BirthDate)
txtAddress.Text = .Address
txtPhone.Text = .Phone
End With
'Step 3-Disable txtTotalPurchases Text Box to make it Read-only
txtTotalPurchases.Enabled = False
End Sub
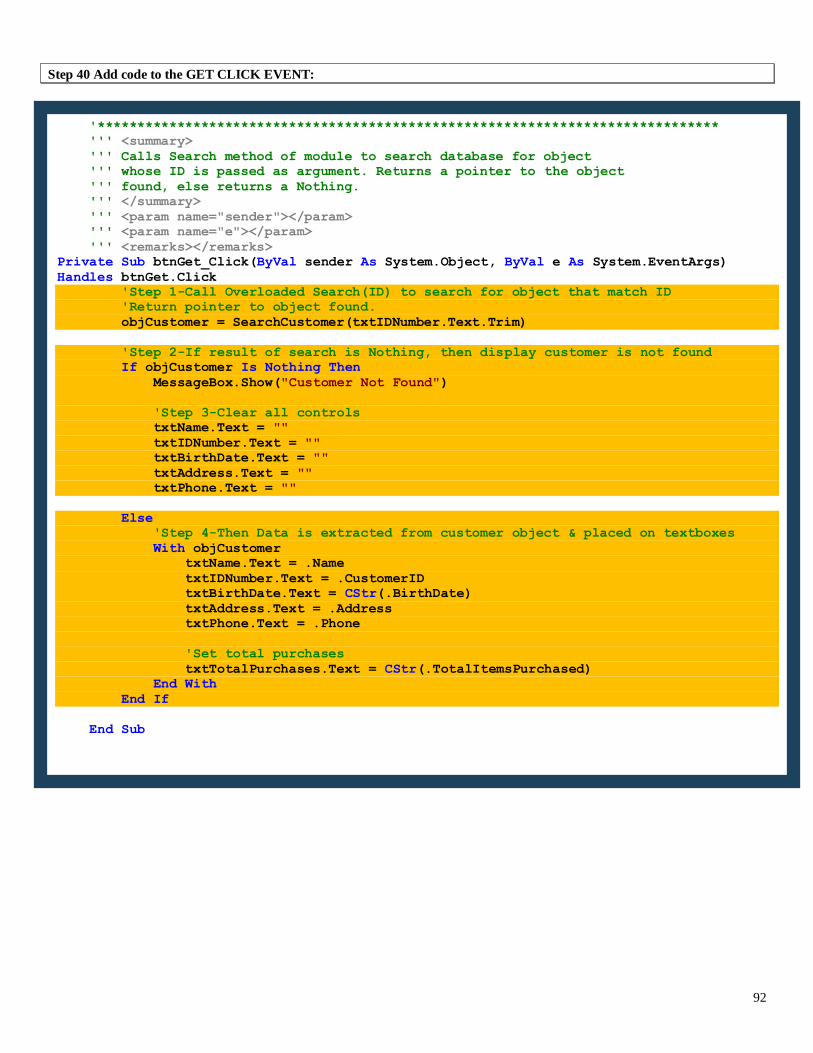
92
Step 40 Add code to the GET CLICK EVENT:
'******************************************************************************
''' <summary>
''' Calls Search method of module to search database for object
''' whose ID is passed as argument. Returns a pointer to the object
''' found, else returns a Nothing.
''' </summary>
''' <param name="sender"></param>
''' <param name="e"></param>
''' <remarks></remarks>
Private Sub btnGet_Click(ByVal sender As System.Object, ByVal e As System.EventArgs)
Handles btnGet.Click
'Step 1-Call Overloaded Search(ID) to search for object that match ID
'Return pointer to object found.
objCustomer = SearchCustomer(txtIDNumber.Text.Trim)
'Step 2-If result of search is Nothing, then display customer is not found
If objCustomer Is Nothing Then
MessageBox.Show("Customer Not Found")
'Step 3-Clear all controls
txtName.Text = ""
txtIDNumber.Text = ""
txtBirthDate.Text = ""
txtAddress.Text = ""
txtPhone.Text = ""
Else
'Step 4-Then Data is extracted from customer object & placed on textboxes
With objCustomer
txtName.Text = .Name
txtIDNumber.Text = .CustomerID
txtBirthDate.Text = CStr(.BirthDate)
txtAddress.Text = .Address
txtPhone.Text = .Phone
'Set total purchases
txtTotalPurchases.Text = CStr(.TotalItemsPurchased)
End With
End If
End Sub

93
Step 41 Add code to the SHOP CLICK EVENT:
Step 42 Add code to the ONSHOPPING EVENT HANDLER:
'******************************************************************************
''' <summary>
''' Calls customer object Shop() method to purchase items and cleas the text box.
''' Also displays total purchases of customer
''' </summary>
''' <param name="sender"></param>
''' <param name="e"></param>
''' <remarks></remarks>
Private Sub btnShop_Click(ByVal sender As System.Object, ByVal e As System.EventArgs)
Handles btnShop.Click
'Step 1-Call the Shop Method of the Object to shop and trigger event
objCustomer.Shop(CInt(txtItems.Text.Trim))
'Step 2-Clear Items textbox
txtItems.Text = ""
'Step 3-Set total purchases
txtTotalPurchases.Text = CStr(objCustomer.TotalItemsPurchased)
End Sub
'******************************************************************************
''' <summary>
''' Event-handler of Customer Objects. Triggered when Shop() method is called.
''' Displays a message every time customer shops.
''' </summary>
''' <param name="intTotalItems"></param>
''' <remarks></remarks>
Private Sub objCustomer_OnShopping(ByVal intTotalItems As Integer) Handles
objCustomer.OnShopping
MessageBox.Show("The Total items purchased by the Customer is " & intTotalItems)
End Sub
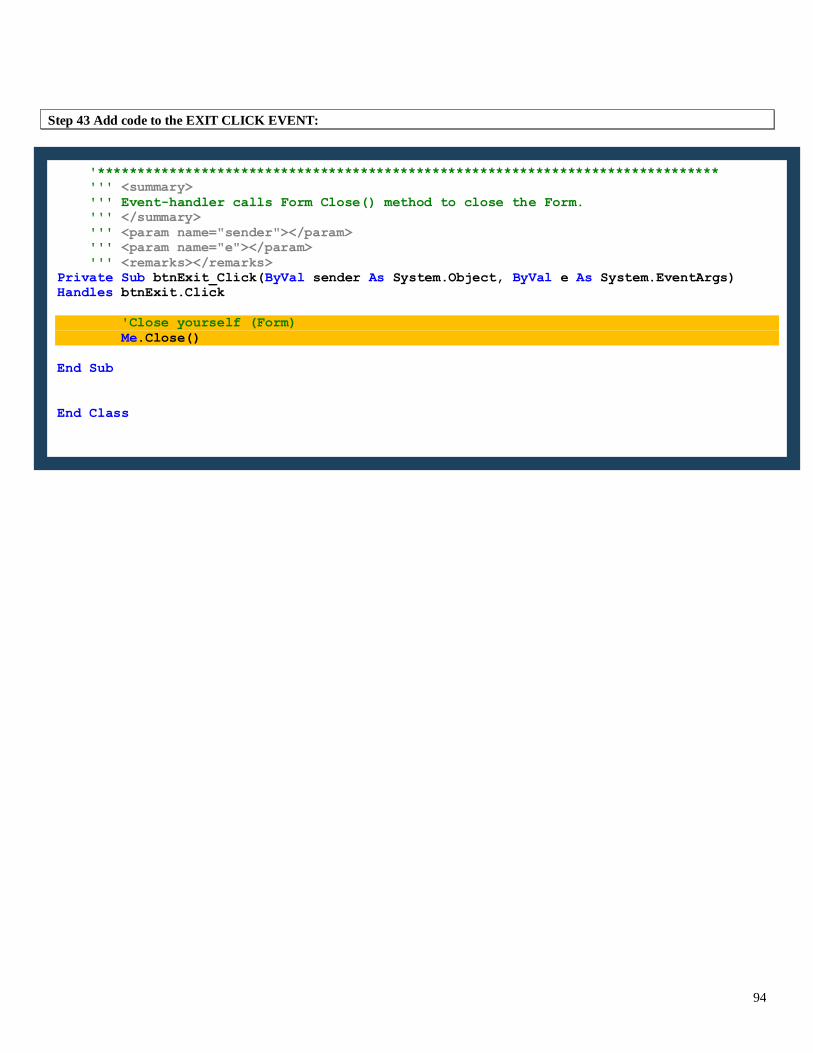
94
Step 43 Add code to the EXIT CLICK EVENT:
'******************************************************************************
''' <summary>
''' Event-handler calls Form Close() method to close the Form.
''' </summary>
''' <param name="sender"></param>
''' <param name="e"></param>
''' <remarks></remarks>
Private Sub btnExit_Click(ByVal sender As System.Object, ByVal e As System.EventArgs)
Handles btnExit.Click
'Close yourself (Form)
Me.Close()
End Sub
End Class
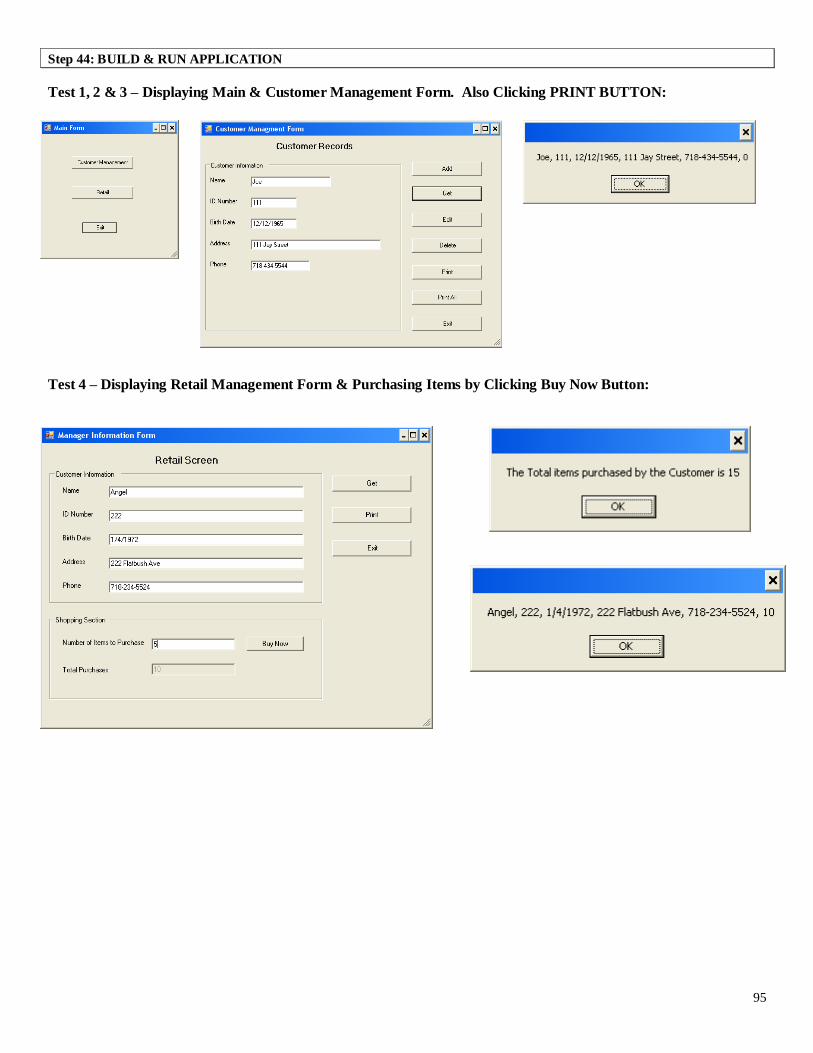
95
Step 44: BUILD & RUN APPLICATION
Test 1, 2 & 3 – Displaying Main & Customer Management Form. Also Clicking PRINT BUTTON:
Test 4 – Displaying Retail Management Form & Purchasing Items by Clicking Buy Now Button:
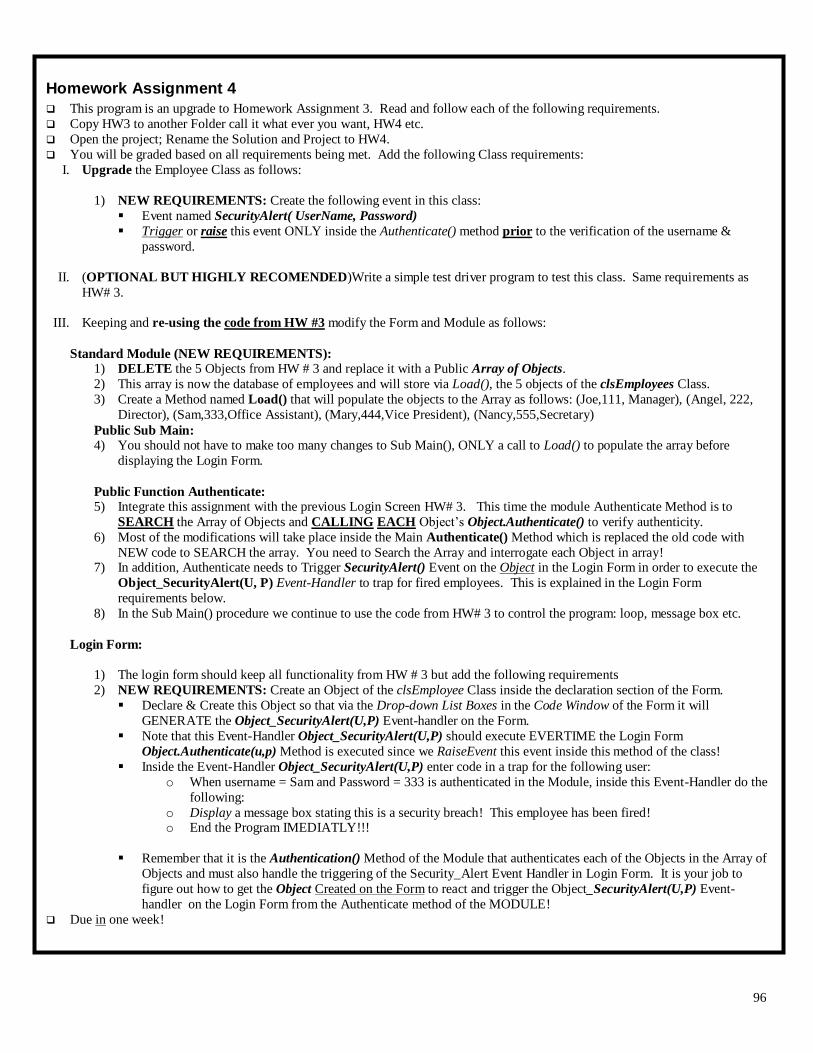
96
Homework Assignment 4
This program is an upgrade to Homework Assignment 3. Read and follow each of the following requirements.
Copy HW3 to another Folder call it what ever you want, HW4 etc.
Open the project; Rename the Solution and Project to HW4.
You will be graded based on all requirements being met. Add the following Class requirements:
I. Upgrade the Employee Class as follows:
1) NEW REQUIREMENTS: Create the following event in this class:
Event named SecurityAlert( UserName, Password)
Trigger or raise this event ONLY inside the Authenticate() method prior to the verification of the username &
password.
II. (OPTIONAL BUT HIGHLY RECOMENDED)Write a simple test driver program to test this class. Same requirements as
HW# 3.
III. Keeping and re-using the code from HW #3 modify the Form and Module as follows:
Standard Module (NEW REQUIREMENTS): 1) DELETE the 5 Objects from HW # 3 and replace it with a Public Array of Objects.
2) This array is now the database of employees and will store via Load(), the 5 objects of the clsEmployees Class.
3) Create a Method named Load() that will populate the objects to the Array as follows: (Joe,111, Manager), (Angel, 222,
Director), (Sam,333,Office Assistant), (Mary,444,Vice President), (Nancy,555,Secretary)
Public Sub Main: 4) You should not have to make too many changes to Sub Main(), ONLY a call to Load() to populate the array before
displaying the Login Form.
Public Function Authenticate: 5) Integrate this assignment with the previous Login Screen HW# 3. This time the module Authenticate Method is to
SEARCH the Array of Objects and CALLING EACH Object’s Object.Authenticate() to verify authenticity.
6) Most of the modifications will take place inside the Main Authenticate() Method which is replaced the old code with
NEW code to SEARCH the array. You need to Search the Array and interrogate each Object in array! 7) In addition, Authenticate needs to Trigger SecurityAlert() Event on the Object in the Login Form in order to execute the
Object_SecurityAlert(U, P) Event-Handler to trap for fired employees. This is explained in the Login Form
requirements below.
8) In the Sub Main() procedure we continue to use the code from HW# 3 to control the program: loop, message box etc.
Login Form:
1) The login form should keep all functionality from HW # 3 but add the following requirements
2) NEW REQUIREMENTS: Create an Object of the clsEmployee Class inside the declaration section of the Form.
Declare & Create this Object so that via the Drop-down List Boxes in the Code Window of the Form it will
GENERATE the Object_SecurityAlert(U,P) Event-handler on the Form.
Note that this Event-Handler Object_SecurityAlert(U,P) should execute EVERTIME the Login Form
Object.Authenticate(u,p) Method is executed since we RaiseEvent this event inside this method of the class!
Inside the Event-Handler Object_SecurityAlert(U,P) enter code in a trap for the following user:
o When username = Sam and Password = 333 is authenticated in the Module, inside this Event-Handler do the
following:
o Display a message box stating this is a security breach! This employee has been fired! o End the Program IMEDIATLY!!!
Remember that it is the Authentication() Method of the Module that authenticates each of the Objects in the Array of
Objects and must also handle the triggering of the Security_Alert Event Handler in Login Form. It is your job to
figure out how to get the Object Created on the Form to react and trigger the Object_SecurityAlert(U,P) Event-
handler on the Login Form from the Authenticate method of the MODULE!
Due in one week!