leethal chilli digital - leethalknits.com
TRANSCRIPT

C h i l l ib y L e e M e r e d i t h - l e e t h a l k n i t s . c o m
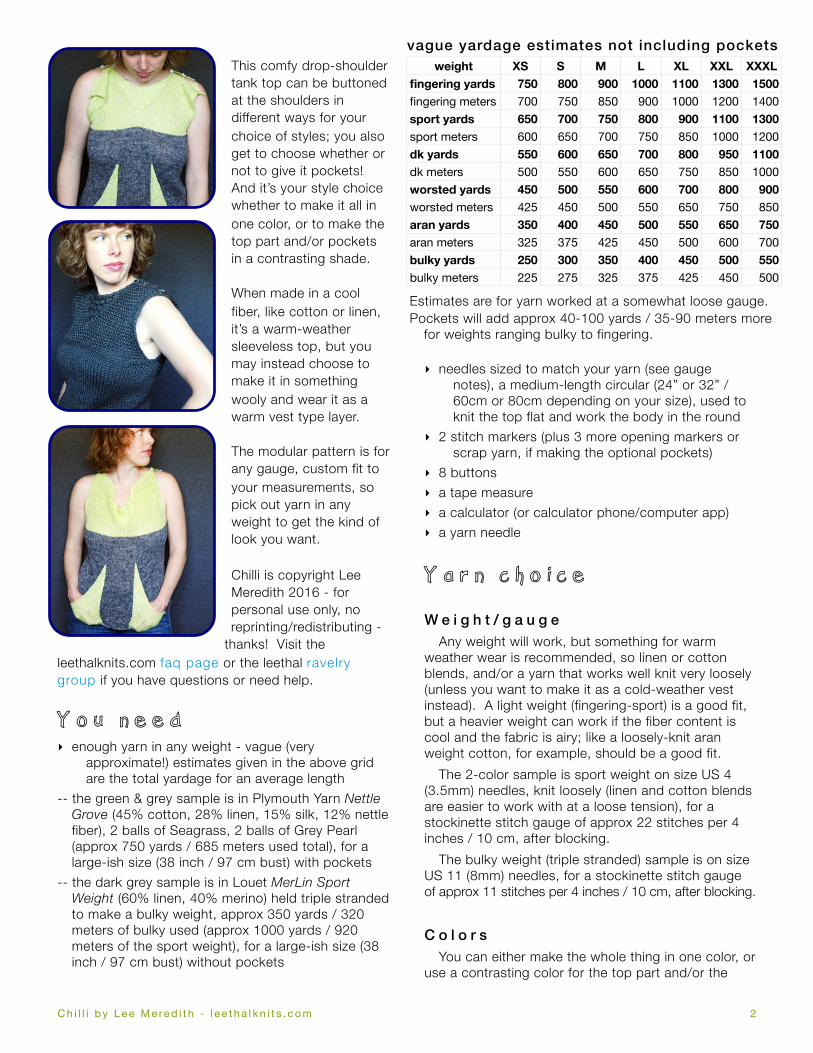
This comfy drop-shoulder tank top can be buttoned at the shoulders in different ways for your choice of styles; you also get to choose whether or not to give it pockets! And it’s your style choice whether to make it all in one color, or to make the top part and/or pockets in a contrasting shade.
When made in a cool fiber, like cotton or linen, it’s a warm-weather sleeveless top, but you may instead choose to make it in something wooly and wear it as a warm vest type layer.
The modular pattern is for any gauge, custom fit to your measurements, so pick out yarn in any weight to get the kind of look you want.
Chilli is copyright Lee Meredith 2016 - for personal use only, no reprinting/redistributing -
thanks! Visit the leethalknits.com faq page or the leethal ravelry group if you have questions or need help.
Y o u n e e d‣ enough yarn in any weight - vague (very
approximate!) estimates given in the above grid are the total yardage for an average length
-- the green & grey sample is in Plymouth Yarn Nettle Grove (45% cotton, 28% linen, 15% silk, 12% nettle fiber), 2 balls of Seagrass, 2 balls of Grey Pearl (approx 750 yards / 685 meters used total), for a large-ish size (38 inch / 97 cm bust) with pockets
-- the dark grey sample is in Louet MerLin Sport Weight (60% linen, 40% merino) held triple stranded to make a bulky weight, approx 350 yards / 320 meters of bulky used (approx 1000 yards / 920 meters of the sport weight), for a large-ish size (38 inch / 97 cm bust) without pockets
‣ needles sized to match your yarn (see gauge notes), a medium-length circular (24” or 32” / 60cm or 80cm depending on your size), used to knit the top flat and work the body in the round
‣ 2 stitch markers (plus 3 more opening markers or scrap yarn, if making the optional pockets)
‣ 8 buttons‣ a tape measure‣ a calculator (or calculator phone/computer app)‣ a yarn needle
Y a r n c h o i c e
W e i g h t / g a u g eAny weight will work, but something for warm
weather wear is recommended, so linen or cotton blends, and/or a yarn that works well knit very loosely (unless you want to make it as a cold-weather vest instead). A light weight (fingering-sport) is a good fit, but a heavier weight can work if the fiber content is cool and the fabric is airy; like a loosely-knit aran weight cotton, for example, should be a good fit.
The 2-color sample is sport weight on size US 4 (3.5mm) needles, knit loosely (linen and cotton blends are easier to work with at a loose tension), for a stockinette stitch gauge of approx 22 stitches per 4 inches / 10 cm, after blocking.
The bulky weight (triple stranded) sample is on size US 11 (8mm) needles, for a stockinette stitch gauge of approx 11 stitches per 4 inches / 10 cm, after blocking.
C o l o r sYou can either make the whole thing in one color, or
use a contrasting color for the top part and/or the
C h i l l i b y L e e M e re d i t h - l e e t h a l k n i t s . c o m 2
weight XS S M L XL XXL XXXLfingering yards 750 800 900 1000 1100 1300 1500fingering meters 700 750 850 900 1000 1200 1400sport yards 650 700 750 800 900 1100 1300sport meters 600 650 700 750 850 1000 1200dk yards 550 600 650 700 800 950 1100dk meters 500 550 600 650 750 850 1000worsted yards 450 500 550 600 700 800 900worsted meters 425 450 500 550 650 750 850aran yards 350 400 450 500 550 650 750aran meters 325 375 425 450 500 600 700bulky yards 250 300 350 400 450 500 550bulky meters 225 275 325 375 425 450 500
vague yardage estimates not including pockets
Estimates are for yarn worked at a somewhat loose gauge.Pockets will add approx 40-100 yards / 35-90 meters more
for weights ranging bulky to fingering.

(optional) pockets. The top uses 35-45% of the total yarn used in the top+body (this doesn’t include pockets yardage), but this can vary a lot depending on your length. For example, if your yardage total estimate is 600 yards, without pockets, then the top will use approx 210-270 yards (35-45%).
The top is worked sideways and the body worked in the round, so if you’re using a variegated or striping yarn, color patterns will run vertically on the top and horizontally on the body (including the pockets).
B u t t o n sYour button size needed will depend on the size of
your buttonhole loops, which varies based on yarn weight (and on how tightly you knit the loop stitches) but can also be adjusted by adding or subtracting loop stitches. So you can pretty much use any size buttons, and make your buttonhole loops to fit.
If you’re flexible with buttons, just follow the pattern, then buy buttons to fit your buttonholes. If you have buttons you want to use, get them ready before you start, then when you make the first buttonhole, after knitting a few stitches into the next row so the loop is attached, check if it’s a good size. If it’s not, make the loop 1 stitch bigger/smaller and check again.
The buttonhole loops are made like crochet chain stitches (but using your knitting needles) so they can be as many stitches as you want/need.
T e c h n i q u e s
S i d e w a y s e d g e c a s t - o nThe top part is worked with increases and short rows
to leave “sideways stitches” along the bottom edge, to be used for the body section; 1 sideways stitch is added on every right-side row. When working this technique, you’ll just turn your work, without wrapping.
B u t t o n h o l e l o o pThe buttonholes are worked by making a chain (like
a crochet chain) of a few stitches at the top edge, then joining back down to the stitches to begin the row. If you want a visual of how it works, there’s a tutorial video on leethalknits.com/tutorials.
C a b l e sThis pattern uses 4-stitch (2 over 2) cables, in a
basket-weave type of design, in the top section. The abbreviations are given for using a cable needle, but cabling without a cable needle is easy - see the tutorials on leethalknits.com for this technique.
C a b l e c a s t - o nTo start a brand new cast-on, begin by placing a
slip-knot on the needle, knitting a stitch into that (without dropping off slip-knot stitch), and slipping the new stitch onto the left-hand needle (so there are 2 cast-on stitches on the needle now). If you already have stitches on the needle, start at * below.
* Insert needle between first and second live stitches, and knit a stitch, pulling the yarn between the two stitches, but don't drop any stitches off the left-hand needle; slip the new stitch onto the left-hand needle without twisting it. Repeat from *, inserting the needle between the new stitch you've just made and the next stitch. Continue doing this for as many new stitches as you need.
C a b l e b i n d - o f fThis will create a bind-off edge that closely
resembles the cast-on edge on the opposite side.Knit the first stitch, * knit a stitch, pass first stitch
over as a normal bind-off, slip the stitch from the right-hand needle to the left-hand needle through the front loop, so it twists once, then back to the right-hand needle up through the back loop, so it twists once again in the same direction. Repeat from *. (See leethalknits.com/tutorials for a tutorial video.)
S i z i n g / f i tThe sizes given on page 2 are only for yardage
estimating; all sizing is based on a few measurements.Follow the instructions for finding your body
measurements and pattern numbers, to get a good fit, and the type of piece you want.
You can make minor adjustments to adapt the pattern for the fit you’d like. The numbers you use for “your measurements” may not be your actual exact measurements - for example, if you want more positive ease for an extra loose, baggy kind of fit, you may add a bit to your body circumference measurement.
The way it’s designed is to fit with zero ease at the bust, for a loose fit but not especially baggy. Adding to or subtracting from the body circumference measurement to adjust ease/fit around your body will also adjust the length across the top, making the drop shoulders more or less wide from end to end.
You may need to make changes to some of the worksheet variables to make the cable pattern numbers work out (instructions on how to do this are all on the worksheet). These adjustments may change the measurement across your neckline front, which only has to do with buttonhole placement and not really with the actual size or fit of the piece.
C h i l l i b y L e e M e re d i t h - l e e t h a l k n i t s . c o m 3