lego engineering conferences™engineering.nyu.edu/gk12/amps-cbri/pdf/nxt misc...
TRANSCRIPT

©2008 Tufts Center for Engineering Education Outreach 474 Boston Ave. Medford Ma 02155 Tel 17-627-5888 www.ceeo.tufts.edu
LEGO Engineering Conferences™ ROBOLAB and MINDSTORMS Education
Version 4.5 – March 2008
NXT-G Program Book II: Intermediate Robotics Activities for use with the NXT

©2008 Tufts Center for Engineering Education Outreach 474 Boston Ave. Medford Ma 02155 Tel 17-627-5888 www.ceeo.tufts.edu
NXT-G Program Book II: Intermediate Robotics Activities for use with the NXT
The purpose of this book is to introduce individuals to different ways of utilizing the NXT brick and the NXT-G Program software. Each activity in this book contains learning objectives, and step-by-step building and programming instructions that illustrate how to use the Complete programming palette in the NXT-G Program software. Additional pertinent information will be found at the end of the activities. The primary focus of these Intermediate activities will be on program your brick to utilize sensor data, print text, play music, and draw pictures. As in Book I, these Intermediate NXT-G Program activities progressively build on materials presented in the previous sections. Activities in this book, assume that the user has experience programming with blocks in the Common Palette in NXT-G. You should also be able to modify the blocks using the configuration panel. If you do not have experience programming in NXT-G, please use the “Introductory” book. Activities Level Page Billboard 3 II - 1 Line Follower 3 II - 11 LEGO Pitch Pipe 4 II - 17 NXTaSketch 4 II - 27 Relay Race Open-Ended II - 36 Around the Block Open-Ended II - 40 Building Instructions for NXT Section A NXT - 1 Section B NXT - 9 Section C NXT - 11 Section D NXT - 13 Section E NXT – 15

©2007 Tufts Center for Engineering Education Outreach 474 Boston Ave. Medford Ma 02155 Tel 17-627-5888 www.ceeo.tufts.edu
LEGO Engineering Conferences™ ROBOLAB and MINDSTORMS Education
Version 4.0 – October 2007
NXT-G Software Book II: Intermediate Robotics Activities for use with the NXT

©2007 Tufts Center for Engineering Education Outreach 474 Boston Ave. Medford Ma 02155 Tel 17-627-5888 www.ceeo.tufts.edu
NXT-G Software Book II: Intermediate Robotics Activities for use with the NXT
The purpose of this book is to introduce individuals to different ways of utilizing the NXT brick and the NXT-G software. Each activity in this book contains learning objectives, and step-by-step building and programming instructions that illustrate how to use the Complete Programming palette in the NXT-G software. Additional pertinent information will be found at the end of the activities. The primary focus of these Intermediate activities will be on program your brick to utilize sensor data, print text, play music, and draw pictures. As in Book I, these Intermediate NXT-G Program activities progressively build on materials presented in the previous sections. Activities in this book, assume that the user has experience programming with blocks in the Common Palette in NXT-G. You should also be able to modify the blocks using the configuration panel. If you do not have experience programming in NXT-G, please use the “Introductory” book. Activities Level Page Billboard 3 II - 1 Line Follower 3 II - 11 LEGO Pitch Pipe 4 II - 17 NXTaSketch 4 II - 27 Relay Race Open-Ended II - 36 Around the Block Open-Ended II - 40 Building Instructions for NXT Section A NXT - 1 Section B NXT - 9 Section C NXT - 11 Section D NXT - 13 Section E NXT – 15

Level 3 Billboard
Learning Objective: To learn to display text on NXT Screen.
Student Challenge: Program an NXT to print a message on the NXT screen that will disappear when you press the touch sensor. Building Procedure:
Step 1: Connect Touch Sensor to Input Port 1. OR
Step 1: Use a previously built NXT 2-motor vehicle with a Touch Sensor. (See Building Instructions for NXT – Section C.) Step 2: Connect one Touch Sensor to Input Port 1.
NXT Wiring Table
NOTE: You will not need to attach motors to your NXT for this program
Output Port Hardware Input Port Sensor A NONE 1 Touch Sensor B NONE 2 NONE C NONE 3 NONE 4 NONE
I WANT MY
NXT !

Billboard Book II: NXT-G Level 3
II - 2
Programming Procedure: Step 1: Open the LEGO MINDSTORMS program and start a new program called BillBoard.
Step 2: Click on the tab at the bottom on the bottom of the Common Block Palette to open the Complete Block Palette. The Complete Block Palette provides you access to ALL the programming blocks that come standard with MINDSTORMS. The Complete Block Palette also provides you with an expanded ability to configure the programming blocks than was available in the Common Block Palette. NOTE: Programming blocks from both the Common Block Palette and the Complete Block Palette can be used in the same NXT program. NOTE: The programming blocks available in the Common Block Palette can be accessed in two ways:
a) Clicking on the tab at the bottom of the Complete Block Palette will return you to the Common Block Palette.
b) Clicking on the icon at the top of the Complete Block Palette will open a submenu containing all the programming blocks from the Common Block Palette.
Billboard Book II: NXT-G Level 3
II - 3
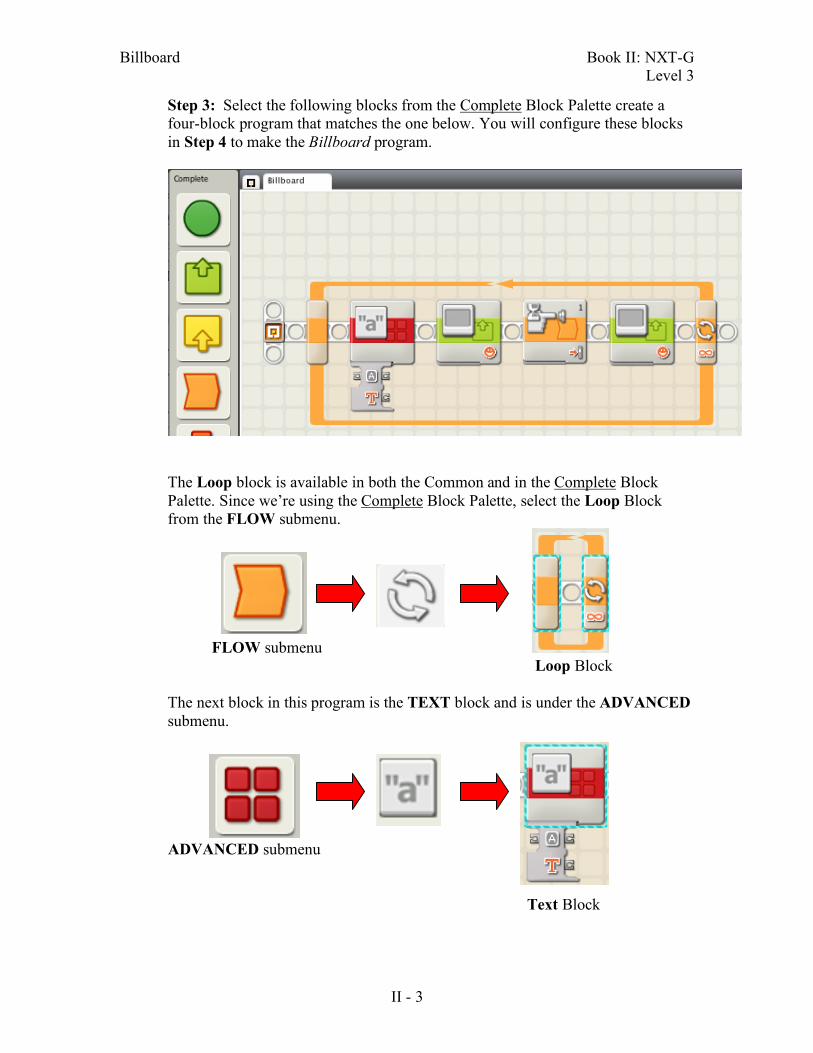
Step 3: Select the following blocks from the Complete Block Palette create a four-block program that matches the one below. You will configure these blocks in Step 4 to make the Billboard program.
The Loop block is available in both the Common and in the Complete Block Palette. Since we’re using the Complete Block Palette, select the Loop Block from the FLOW submenu.
FLOW submenu Loop Block
The next block in this program is the TEXT block and is under the ADVANCED submenu.
ADVANCED submenu
Text Block
Billboard Book II: NXT-G Level 3
II - 4
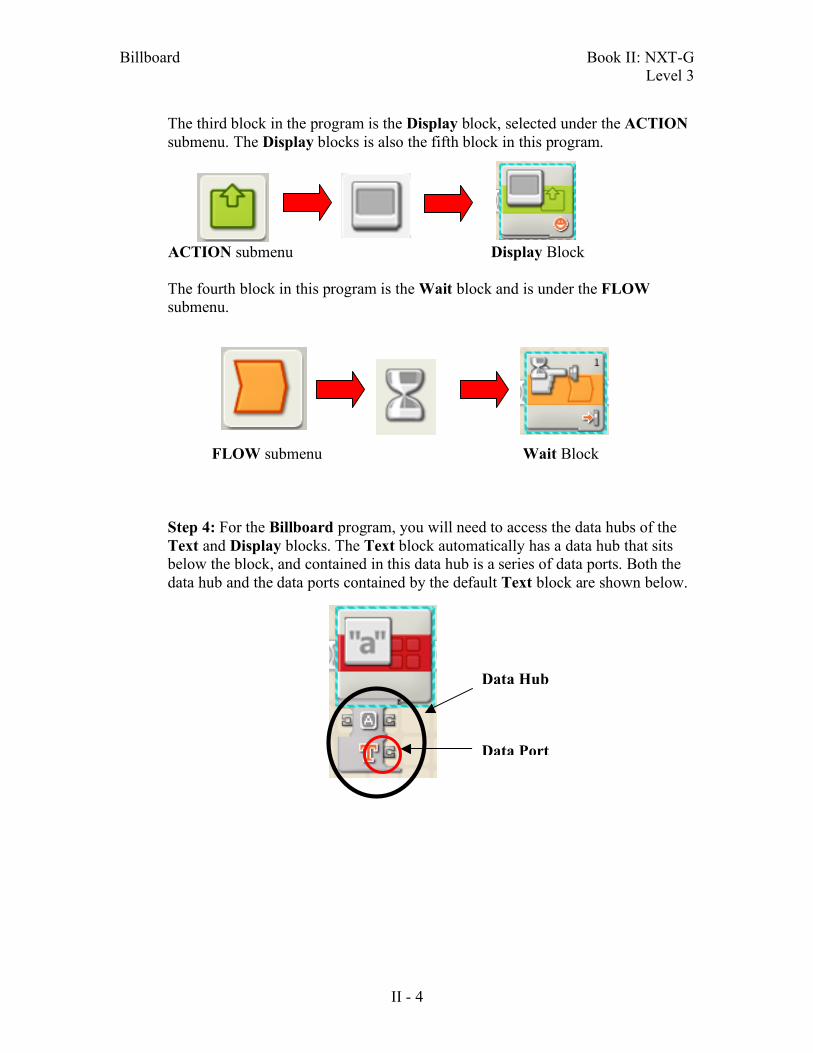
The third block in the program is the Display block, selected under the ACTION submenu. The Display blocks is also the fifth block in this program.
ACTION submenu Display Block
The fourth block in this program is the Wait block and is under the FLOW submenu.
FLOW submenu Wait Block
Step 4: For the Billboard program, you will need to access the data hubs of the Text and Display blocks. The Text block automatically has a data hub that sits below the block, and contained in this data hub is a series of data ports. Both the data hub and the data ports contained by the default Text block are shown below.
Data Port
Data Hub

Billboard Book II: NXT-G Level 3
II - 5
The data hub associated with the Display block will be hidden. To access this block, click on the double line on the bottom-left side of the Display Block. The hidden data hub will now appear.
Step 5: You will also need to wire together the data ports of the Text block to
the Display Block.
Wiring the data ports of data hubs together allows your program to directly pass information, such as sensor readings, from one block to another. The blocks can use this data to change how your program functions. The ports that will be wired together are show in the picture below.
Ports to be connected

Billboard Book II: NXT-G Level 3
II - 6
The first step is moving the pointer to the data hub indicated in the picture below. If the pointer is in the correct location, it will turn into a spool and a label that indicates the function of that port. In our case, the port is labeled “Combined Text”. With the pointer now in the shape of a spool, click and hold down the mouse button. The spool will turn into an arrow and if you move the pointer (while still keeping the mouse button), an orange data wire will follow the pointer.

Billboard Book II: NXT-G Level 3
II - 7
Drag the pointer over to the top data port in the Display block data hub (shown below) and the data wire should follow your pointer.
Release the mouse button and data hubs of the Text block and the Display block will be wired together. NOTE: If you release the mouse button and a data wire continues to follow the pointer, you did not connect the data wire properly. To correct this problem, just click on the port you wanted the data wire to connect to; you do not need to hold down the mouse button while dragging the wire to this port. NOTE: MINDSTORMS may automatically change the path of the data wire after you finish dragging it from one data hub to the other. As long as the data wire is connected to the intended ports, the data wire will function properly. NOTE: If the data wire continues to follow your pointer, pressing the Escape button on the top row of your keyboard will cancel the wiring process and erase the current wire.
Sample Configuration for LEGO Pitch Pipe
In this program, the text ‘I WANT MY NXT’ (block 2) will be displayed on the NXT brick. When you release the button on the touch sensor (block 4), the screen will clear (block 5) and the message will reappear.
(Continued on Next Page)

Billboard Book II: NXT-G Level 3
II - 8
1 2 3 4 5 Block # Block Configuration
1
Loop
2 Text
3 Display
4 Wait for
Touch
5 Display

Billboard Book II: NXT-G Level 3
II - 9
Step 5: Download this program to your NXT brick. (See previous programs for details.) Step 6: Run this program and watch your message appear and disappear on the NXT screen.

Billboard Book II: NXT-G Level 3
II - 10
Additional Information: In the Classroom: Age level: 10+ LEGO NXT building: None Materials NXT car Touch Sensor

Level 3 Line Follower
Learning Objective: You will program your LEGO vehicle to use a light sensor to follow a black line.
NXT Vehicle with Light Sensor
Student Challenge: A line made of black electrical tape will be laid down on the workshop floor. Your robot will have to follow that line from one end to another. Building Procedure:
Step 1: Build a NXT 2-motor vehicle with a Light Sensor. (See Building Instructions for NXT – Section B.)
Step 2: Connect one motor to Output Port B and another motor to Output Port C.
Step 3: Connect one Light Sensor to Input Port 2.
NXT Wiring Diagram
Output Port Hardware Input Port Sensor A NONE 1 NONE B Motor 2 Light Sensor C Motor 3 NONE 4 NONE

Line Follower Book II: NXT-G Level 3
II - 12
Programming Procedure: Step 1: Open the LEGO MINDSTORMS program and start a new program called LineFol.
Step 2: Click on the tab at the bottom to the Common Block Palette to open the Complete Block Palette. Step 3: Select blocks from the Complete Block Palette to
create a five-block NXT program that matches the one below.
Line Follower Book II: NXT-G Level 3
II - 13
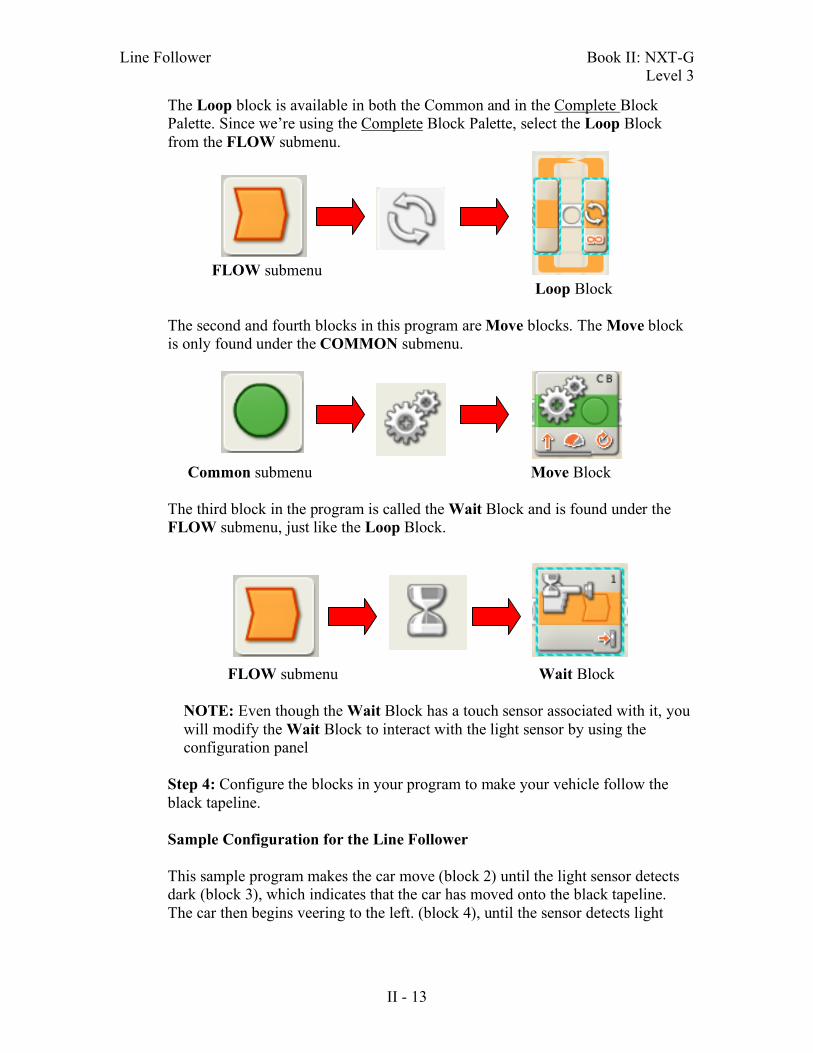
The Loop block is available in both the Common and in the Complete Block Palette. Since we’re using the Complete Block Palette, select the Loop Block from the FLOW submenu.
FLOW submenu Loop Block
The second and fourth blocks in this program are Move blocks. The Move block is only found under the COMMON submenu.
Common submenu Move Block
The third block in the program is called the Wait Block and is found under the FLOW submenu, just like the Loop Block.
FLOW submenu Wait Block NOTE: Even though the Wait Block has a touch sensor associated with it, you will modify the Wait Block to interact with the light sensor by using the configuration panel
Step 4: Configure the blocks in your program to make your vehicle follow the black tapeline.
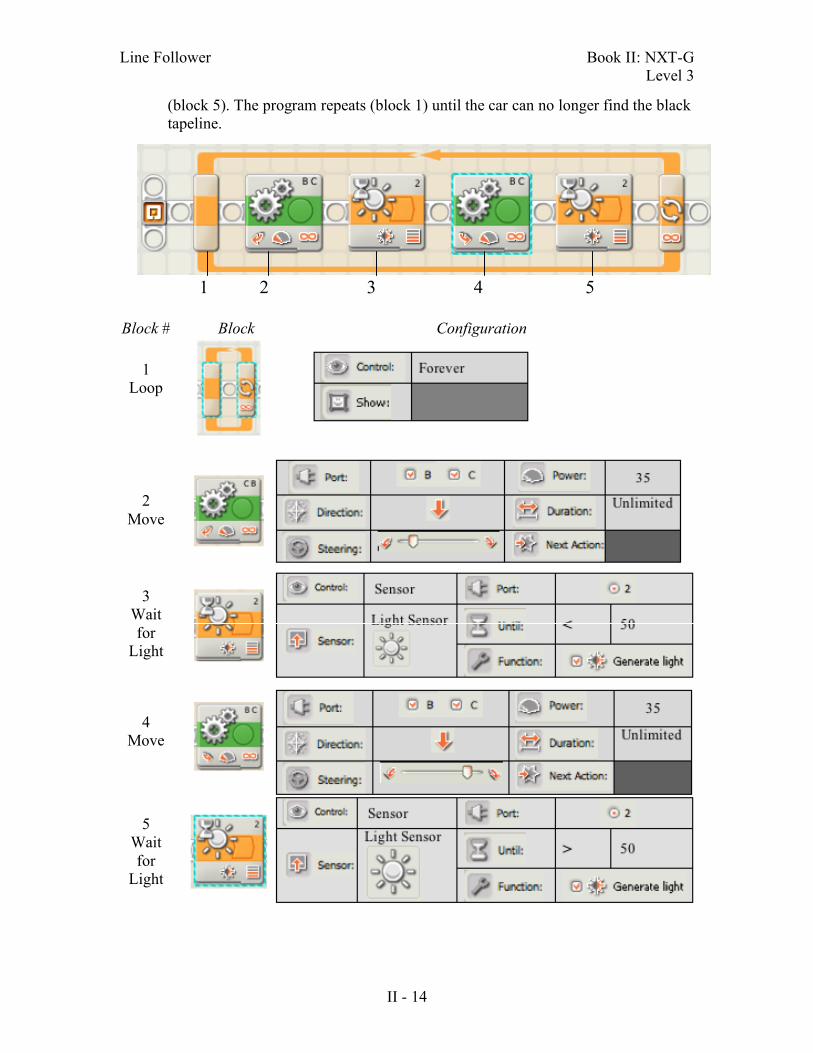
Sample Configuration for the Line Follower
This sample program makes the car move (block 2) until the light sensor detects dark (block 3), which indicates that the car has moved onto the black tapeline. The car then begins veering to the left. (block 4), until the sensor detects light
Line Follower Book II: NXT-G Level 3
II - 14
(block 5). The program repeats (block 1) until the car can no longer find the black tapeline.
1 2 3 4 5 Block # Block Configuration
1
Loop
2 Move
3 Wait for
Light
4 Move
5 Wait for
Light

Line Follower Book II: NXT-G Level 3
II - 15
NOTE: You will need to modify the light intensity value in Block 3 and Block 6 to represent the light reading when the light sensor is pointed at the floor.
Step 5: Download this program to your NXT brick. (See previous programs for details.) Step 6: Place your car on the ground, with the Light sensor on the left edge of the black line and run this program to see if the NXT vehicle travels down the line.
Line Follower Book II: NXT-G Level 3
II - 16
Additional Information: In the Classroom: Age level: 10+ LEGO NXT building: None Materials NXT car Black electrical tape line NOTE: When making the tape line, the NXT sensor has a difficult time with sharp corners. Therefore, do not make any turns in the tape line great than 65 degrees

Level 4 LEGO Pitch Pipe
Learning Objective: This activity introduces a way to expand the power of blocks through data hubs.
NXT with Light Sensor
Student Challenge: Program a LEGO Pitch Pipe that plays higher pitches when the light is bright and lower pitches when the light is dim. Building Procedure:
Step 1: Connect one Light Sensor to Input Port 2. OR
Step 1: Use a previously built NXT 2-motor vehicle with a Light Sensor. (See Building Instructions for NXT – Section B.) Step 2: Connect one Light Sensor to Input Port 2.
NXT Wiring Table
NOTE: You will not need to attach the motors of your NXT vehicle to the Output Ports for this activity.
Output Port Hardware Input Port Sensor A NONE 1 NONE B NONE 2 Light Sensor C NONE 3 NONE 4 NONE

LEGO Pitch Pipe Book II: NXT-G Level 4
II - 18
Programming Procedure:
Step 1: Open the LEGO MINDSTORMS program and start a new program called PitchPipe.
Step 2: Click on the tab at the bottom to the Common Block Palette to open the Complete Block Palette. Step 3: Select blocks from the Complete Block Palette to
create a four-block NXT-G program that matches the one below. You will use the directions in Step 4 to configure
these blocks to make the LEGO Pitch Pipe program. (Step 4 continued on next page)
LEGO Pitch Pipe Book II: NXT-G Level 4
II - 19
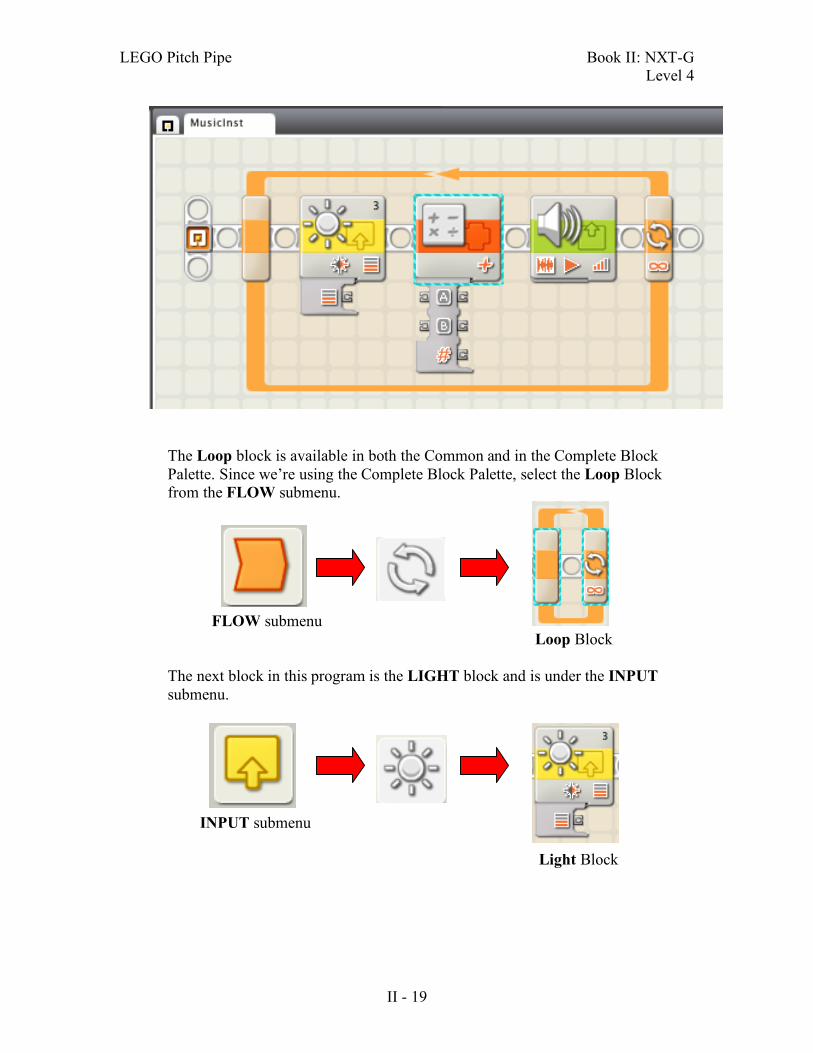
The Loop block is available in both the Common and in the Complete Block Palette. Since we’re using the Complete Block Palette, select the Loop Block from the FLOW submenu.
FLOW submenu Loop Block
The next block in this program is the LIGHT block and is under the INPUT submenu.
INPUT submenu Light Block
LEGO Pitch Pipe Book II: NXT-G Level 4
II - 20
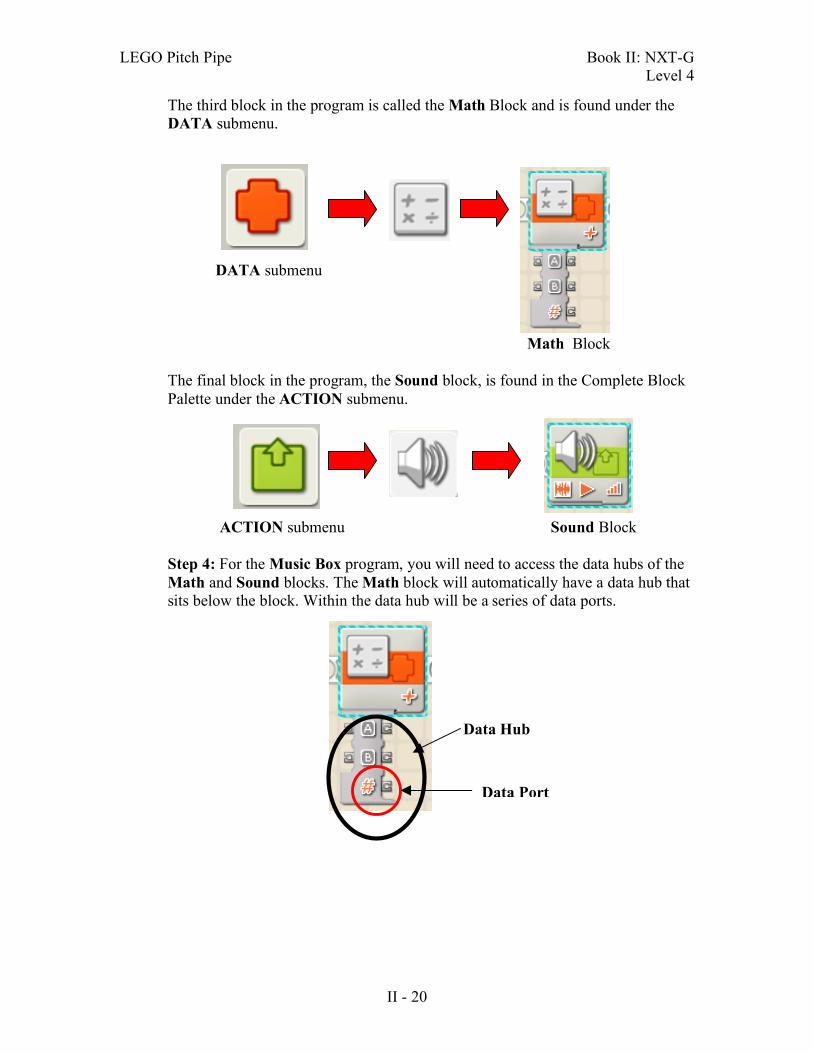
The third block in the program is called the Math Block and is found under the DATA submenu.
DATA submenu Math Block
The final block in the program, the Sound block, is found in the Complete Block Palette under the ACTION submenu.
ACTION submenu Sound Block
Step 4: For the Music Box program, you will need to access the data hubs of the Math and Sound blocks. The Math block will automatically have a data hub that sits below the block. Within the data hub will be a series of data ports.
Data Hub
Data Port

LEGO Pitch Pipe Book II: NXT-G Level 4
II - 21
Click on the double line on the bottom-left side of the Sound Block to reveal the hidden data hub.
Step 5: For this program, you will also need to wire together data ports on the data hubs of the Light block to the Math block. You will also wire together data ports of the data hub in the Math block and the Sound block.
Wiring data ports of data hubs together allows your program to pass information, such as sensor readings, directly from one block to another. The blocks can use this data to change how your program functions. In our case, the light intensity value recorded by the Light block, modified by the Math block, will adjust the pitch of the noise produced by the Sound block.
Data ports to be connected.

LEGO Pitch Pipe Book II: NXT-G Level 4
II - 22
Wiring Process To start the process of wiring, move the mouse pointer over the port on the Light block data hub, as shown below.
If the pointer is at the proper location, the pointer should turn into a spool shape. A small yellow box, describing the function of that port of the data hub, will also appear. In the example above, the selected port of the Light block’s data hub will return information about the light intensity detected by the light sensor.
With the pointer in the shape of a spool, click and hold down the mouse button. The spool will turn into an arrow and if you move the pointer (while still keeping the mouse button) the orange data wire will follow the pointer to the next data hub.
LEGO Pitch Pipe Book II: NXT-G Level 4
II - 23
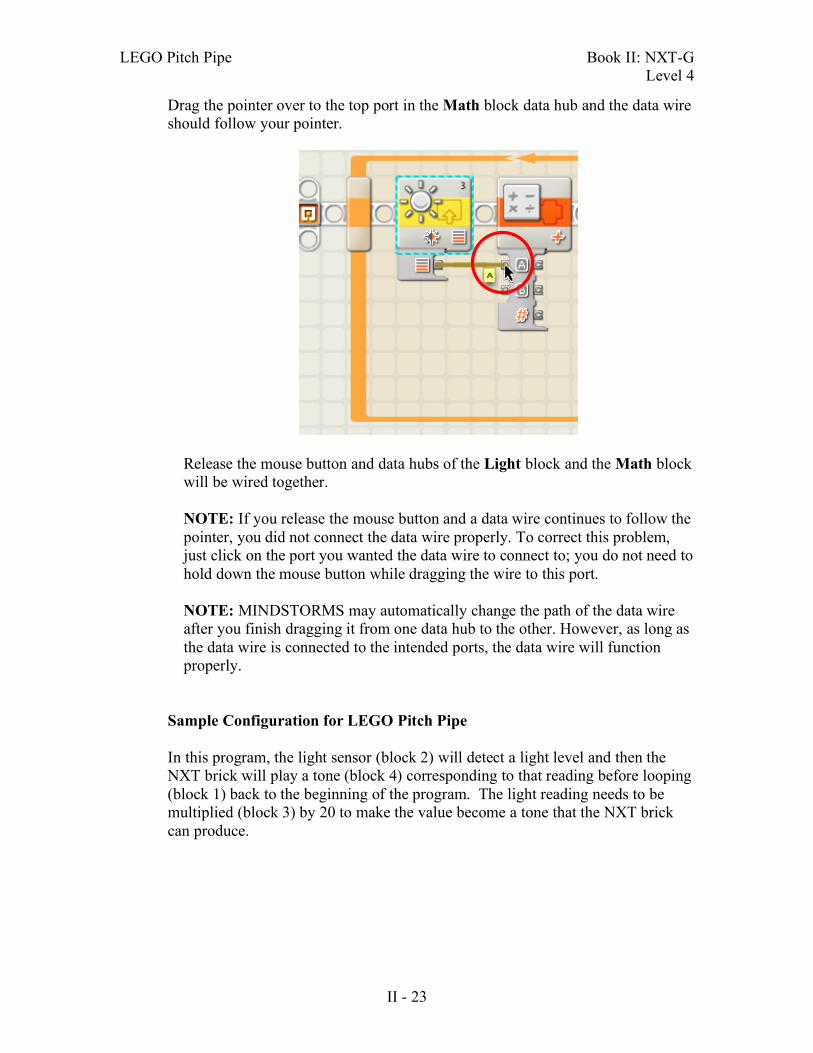
Drag the pointer over to the top port in the Math block data hub and the data wire should follow your pointer.
Release the mouse button and data hubs of the Light block and the Math block will be wired together. NOTE: If you release the mouse button and a data wire continues to follow the pointer, you did not connect the data wire properly. To correct this problem, just click on the port you wanted the data wire to connect to; you do not need to hold down the mouse button while dragging the wire to this port. NOTE: MINDSTORMS may automatically change the path of the data wire after you finish dragging it from one data hub to the other. However, as long as the data wire is connected to the intended ports, the data wire will function properly.
Sample Configuration for LEGO Pitch Pipe
In this program, the light sensor (block 2) will detect a light level and then the NXT brick will play a tone (block 4) corresponding to that reading before looping (block 1) back to the beginning of the program. The light reading needs to be multiplied (block 3) by 20 to make the value become a tone that the NXT brick can produce.

LEGO Pitch Pipe Book II: NXT-G Level 4
II - 24
1 2 3 4 Block # Block Configuration
LEGO Pitch Pipe Book II: NXT-G Level 4
II - 25
NOTE: This program will require you to connect the light value detected by the Light Sensor Block (block 2) using Math Block (block 3) and onto the Sound Block (block 4).
Step 5: Download this program to your NXT brick. (See previous programs for details.) Step 6: Run this program and listen to the music produced as you move your NXT brick around.
LEGO Pitch Pipe Book II: NXT-G Level 4
II - 26
Additional Information: In the Classroom: Age level: 10+ LEGO NXT building: None Materials NXT car Flashlight or Light Source

II - 27
Level 4 NXTaSketch
Learning Objective: Learn to program the NXT motors to work as rotation sensors.
Student Challenge: Build an NXTaSketch or a device to draw a picture on the screen of your NXT brick, where the rotation sensors in the NXT motors control the shape and direction of the lines. Building Procedure:
Step 1: Build a NXT 2-motor vehicle with a Touch sensor. (See Building Instructions for NXT – Section C.)
Step 2: Connect one motor to Output Port B and another motor to Output Port C.
Step 3: Connect one Touch Sensor to Input Port 1.
NXT Wiring Diagram
Output Port Hardware Input Port Sensor A NONE 1 Touch Sensor B Motor 2 NONE C Motor 3 NONE 4 NONE

NXTaSketch Book I: NXT-G Level 4
II - 28
Programming Procedure:
Step 1: Open MINDSTORMS and start a new program titled NXTSketch. (See previous sections for details.)
Step 2: Click on the tab at the bottom of the Common Block Palette to open the Complete Block Palette.
Step 3: Select blocks from the Complete Block Palette to create a 10-block NXT program that matches the one below. You will then use the directions in Step 4 to modify these blocks to create your NXTaSketch program.
The Loop Block is located in the FLOW submenu.
FLOW submenu
Loop Block
NXTaSketch Book I: NXT-G Level 4
II - 29
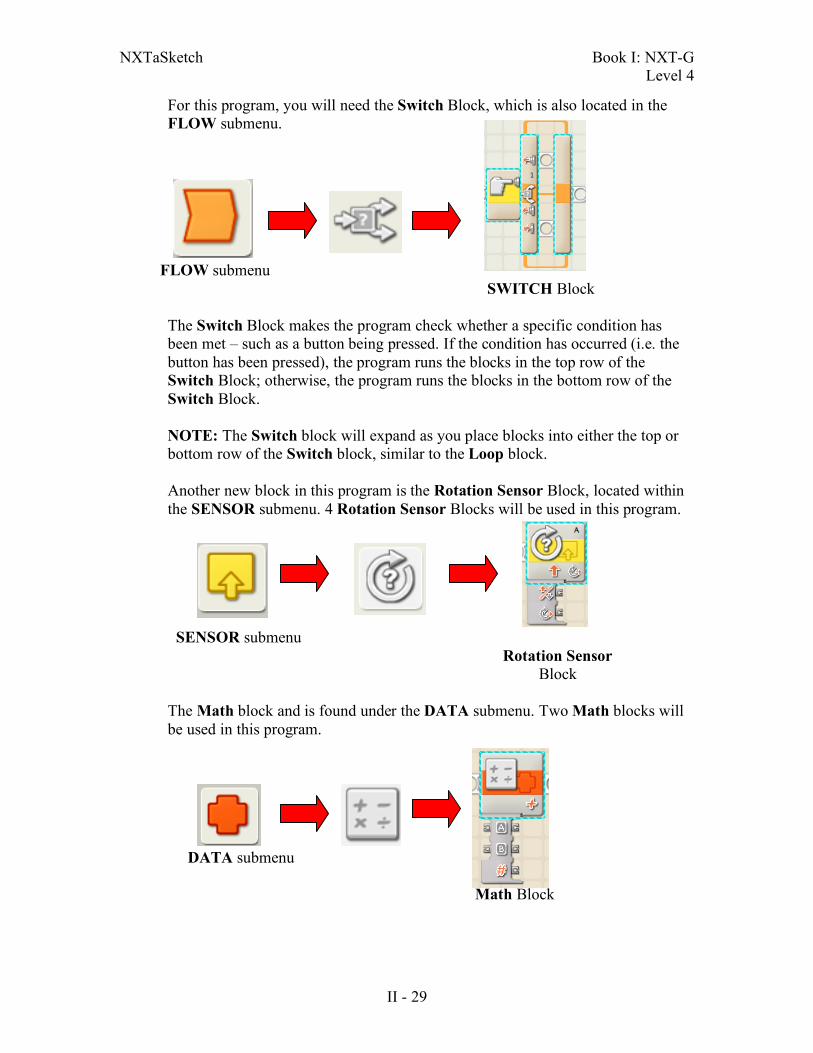
For this program, you will need the Switch Block, which is also located in the FLOW submenu.
FLOW submenu SWITCH Block
The Switch Block makes the program check whether a specific condition has been met – such as a button being pressed. If the condition has occurred (i.e. the button has been pressed), the program runs the blocks in the top row of the Switch Block; otherwise, the program runs the blocks in the bottom row of the Switch Block.
NOTE: The Switch block will expand as you place blocks into either the top or bottom row of the Switch block, similar to the Loop block.
Another new block in this program is the Rotation Sensor Block, located within the SENSOR submenu. 4 Rotation Sensor Blocks will be used in this program.
SENSOR submenu Rotation Sensor Block The Math block and is found under the DATA submenu. Two Math blocks will be used in this program.
DATA submenu
Math Block

NXTaSketch Book I: NXT-G Level 4
II - 30
The final block necessary for this program is the Display block, selected under the ACTION submenu. Two Display blocks will be used in this program.
ACTION submenu Display Block
Step 4: You will need to expand the Data Hub in the Display block for the NXTaSketch program. Step 5: You will need to wire together four data ports for the NXTaSketch program as indicated below. (Refer to previous sections in this manual for detailed data port wiring instructions.)
Step 6: After you have finished wiring your program, you will want to minimize the data hub associated with the Display block. Minimizing the data hub will cause all the unwired ports on the data hub to hide, reducing the amount of space the data hub take up on the screen.

NXTaSketch Book I: NXT-G Level 4
II - 31
After you have wired the ports in the data hub of the Display block, move the mouse pointer to the bottom, left corner of the Display block. When you have moved the pointer to the proper position, the pointer will change into a doubled-lined icon pictured below.
Once your mouse is moved into the proper position, click once to minimize the data hub down to only the data ports that are used in this program.
NOTE: Your program will resize itself when you minimize the data hub. Also, the path of the data wires in your program my change. If you properly connected the data wires, the new path of the wires will not impact your program – even if the wires now appear to connect to other data hubs.

NXTaSketch Book I: NXT-G Level 4
II - 32
Sample Configuration for NXTaSketch
A line will be drawn on the NXT screen (block 7) where the amount of rotation on motor B controls the Y coordinate of the line (block 3) and the rotation on motor C controls the X coordinate (block 4). If the touch sensor (block 2) is pressed and released, any drawing already on the screen will be erased (block 10) and the rotation sensor values are reset to zero (block 8 & block 9).
1 2 3 4 5 6 7
8 9 10
(Continued on next page)
Block # Block Configuration
1 Loop
Forever
2 Switch
Sensor
Touch Sensor

NXTaSketch Book I: NXT-G Level 4
II - 33
Block # Block Configuration
3 Rotation Sensor
360 Degrees
4 Math
Division
A B 20
5 Rotation Sensor
360 Degrees
6 Math
Division
A B 20
7 Display
Drawing
Point X 3 Y 20
(Continued on next page)

NXTaSketch Book I: NXT-G Level 4
II - 34
Block # Block Configuration
8 Rotation Sensor
360 Degrees
9 Rotation Sensor
360 Degrees
10 Display
NOTE: The division that occurs in blocks 4 and block 6 are necessary to scale the rotation of the motors to the size of the NXT screen. Change these values and see what happens. NOTE: When you reset your program (by pressing the touch sensor), the screen will briefly indicate that your NXTaSketch program is still running – rather than just clearing the screen.
Step 5: Save and download this program to your NXT brick Step 6: Run this program and draw a picture.

NXTaSketch Book I: NXT-G Level 4
II - 35
Additional Information: In the Classroom: Age level: 10+ LEGO NXT building: None Materials NXT car

Open-Ended Activity Relay Race
Learning Objective: Build an NXT car and program it to drive to another NXT vehicle, triggering the second NXT to perform a behavior.
NXT Car with a Touch Sensor
Student Challenge: You will need to work with a partner for this activity. Each partner will need to build a robotic NXT car with a Touch Sensor. Building Procedure:
Step 1: Build a NXT 2-motor vehicle with a Touch Sensor. (See Building Instructions for NXT – Section C.)
Step 2: Connect one motor to Output Port B and another motor to Output Port C.
Step 3: Connect a Touch sensor to Input Port 1.
Programming Procedure:
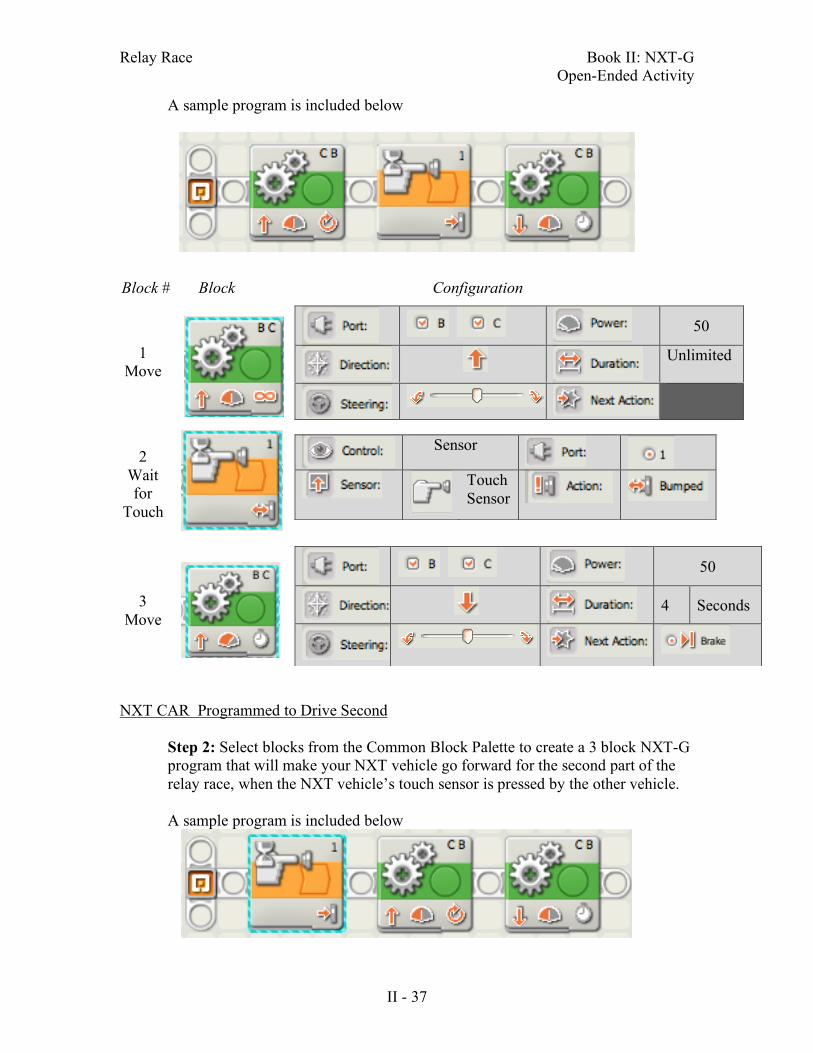
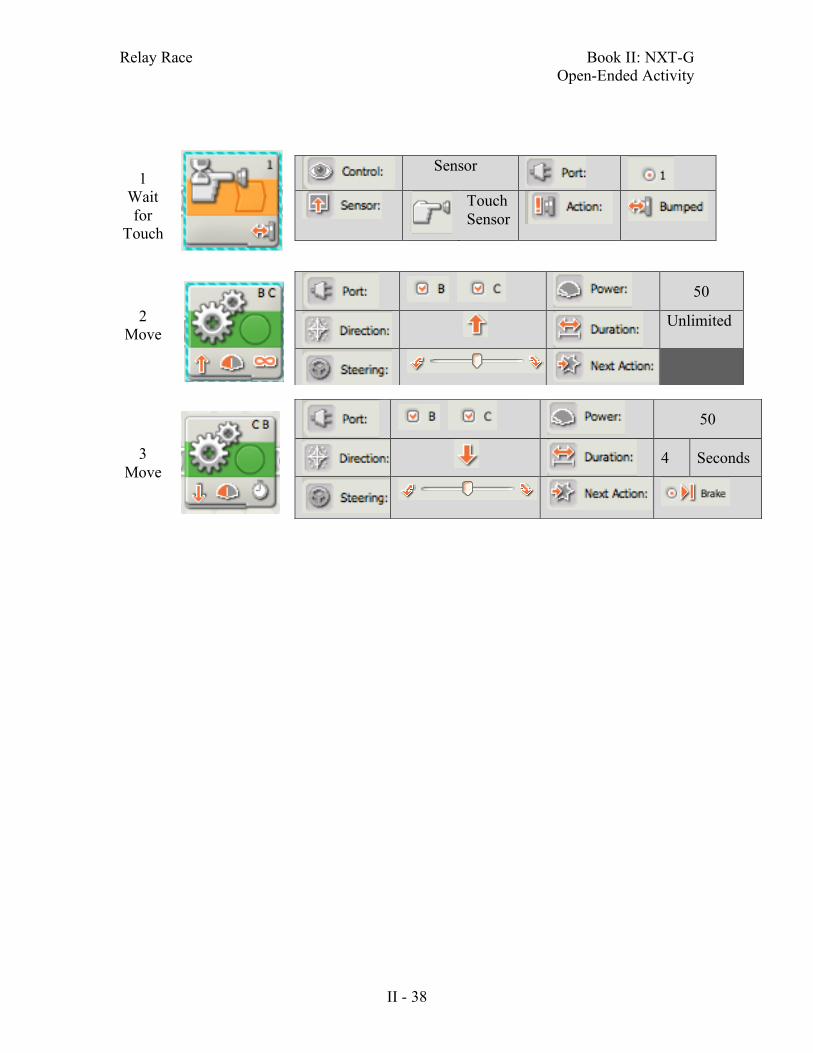
Step 1: Open LEGO MINDSTORMS and start a new program NXT CAR Programmed to Drive First Step 2: Select blocks from the Common Block Palette to create a 3 block NXT-G program that will make your NXT vehicle forward to start the relay race and then return to its starting point when it bumps into the second NXT vehicle.
Relay Race Book II: NXT-G Open-Ended Activity
II - 37
A sample program is included below
NXT CAR Programmed to Drive Second
Step 2: Select blocks from the Common Block Palette to create a 3 block NXT-G program that will make your NXT vehicle go forward for the second part of the relay race, when the NXT vehicle’s touch sensor is pressed by the other vehicle.
A sample program is included below
Block # Block Configuration
1 Move
50
Unlimited
2 Wait for
Touch
Sensor
Touch Sensor
3 Move
50
4 Seconds
Relay Race Book II: NXT-G Open-Ended Activity
II - 38
1
Wait for
Touch
Sensor
Touch Sensor
2 Move
50
Unlimited
3 Move
50
4 Seconds

Relay Race Book II: NXT-G Open-Ended Activity
II - 39
ADDITIONAL INFORMATION: Extension In the Classroom Age level: 11+ Programming level: Complete Block Palette LEGO building: Beginner Objective: Using Touch Sensor Materials NXT car NXT Touch Sensor

Open-Ended Activity Around the Block
Learning Objective: Build a robotic NXT LEGO car equipped with a light sensor and program it to drive and then turn based on light input.
NXT Car with Light Sensor
Student Challenge: Build and program a two-motor car equipped with a light sensor. The car should drive forward and then turn when a flashlight is pointed at the light sensor. The care should drive in a square so it ends up at the beginning position. Building Procedure:
Step 1: Build a NXT 2-motor vehicle with a Light sensor. (See Building Instructions for NXT – Section B.)
Step 2: Connect one motor to Output Port B and another motor to Output Port C.
Step 3: Connect one Light Sensor to Input Port 2.
Programming Procedure: This program will cause Motors B and C to drive forward until the light sensor on Port 2 sees light (the flashlight). This input will make the car to turn. When the light sensor sees darker (the flashlight is taken away), both motors will turn in the forward direction. The program will loop four times. See if you can make your NXT car make a square. . A sample program is provided below.
Around the Block Book II: NXT-G Open-Ended Activity
II - 41
1 Loop
Forever
Count 4
2 Move
50
Unlimited
3 Wait for
Light
Sensor
> 50
Light Sensor
4 Move
50
Unlimited
5 Wait for
Light
Sensor
< 50
Light Sensor
Around the Block Book II: NXT-G Open-Ended Activity
II - 42
ADDITIONAL INFORMATION: Extension Use the rotation sensor rather than the light sensor. In the Classroom Age level: 9+ Programming level: Inventor 4 LEGO building: Beginner Objective: Using light sensor and loops Materials RCX or NXT car Light sensor