lesson 16: managing your website introduction to adobe dreamweaver cs6 adobe certified associate:...
TRANSCRIPT

Lesson 16: Managing Your Website
Introduction to Adobe Dreamweaver CS6Adobe Certified Associate:
Web Communication using Adobe Dreamweaver CS6

© 2013 John Wiley & Sons, Inc. 2
Overview

3
6.4 Manage Assets, Links and Files for a
Website• In addition to serving as a useful file browser, the
Files panel also serves as a full-featured file transfer application and synchronization tool.
• From the Files panel, you can upload your site to a web server, synchronize local and remote files, and manage files and notes between multiple designers.
© 2013 John Wiley & Sons, Inc.

4
6.4 Manage Assets, Links and Files for a
Website• The Files panel uploads, retrieves, and
synchronizes files between your local site and a web server. Typically, this is done using File Transfer Protocol (FTP).
• Before you can transfer files, you first must establish a remote connection to the web server.
• A remote connection is a method used to enable the upload and download of files to and from your web server.
© 2013 John Wiley & Sons, Inc.

5
6.4 Manage Assets, Links and Files for a
Website• FTP is the default choice in Dreamweaver CS6;
however, data sent over FTP is not encrypted.• SFTP stands for “SSH File Transfer Protocol” and
represents a more secure version of FTP.• FTP over SSL/TLS is an even more secure version
of FTP that relies on encryption. For this option, a server must have previously been specifically set up as trusted.
© 2013 John Wiley & Sons, Inc.

6
6.4 Manage Assets, Links and Files for a
Website• Local/Network allows you to define a remote
folder on a network drive. Depending on the setup, this network may or may not also be connected to the Internet.
• WebDav is a technology that allows file access to a remote server. It is often used collaboratively with multiple users allowed access to the same file system.
• RDS is a security component of ColdFusion Server that permits users to access files and databases through a remote HTTP connection.
© 2013 John Wiley & Sons, Inc.

7
6.4 Manage Assets, Links and Files for a
WebsiteFollow these steps to create a remote connection:1. Choose Site > New Site. Name the site
dw16lessons and choose the dw16lessons folder for the Local Site Folder.
2. The Site Setup window appears (right). In the Site Setup window, click on the Servers button to access the server setup screen, then click on the Plus button in the lower left.
© 2013 John Wiley & Sons, Inc.

8
6.4 Manage Assets, Links and Files for a
Website3. Enter your FTP inform-
ation in the text fields. At right, we have used sample data. The Server Name should be a common sense label that will help you identify which site you are modifying. The FTP Address, Username, and Password are required information.
© 2013 John Wiley & Sons, Inc.

9
6.4 Manage Assets, Links and Files for a
Website4. Click the Test Connection button at the bottom of
the panel to verify that Dreamweaver can connect to your server. If your information is valid and you have an Internet connection, a dialog box appears, as shown below, confirming the connection.
© 2013 John Wiley & Sons, Inc.
10
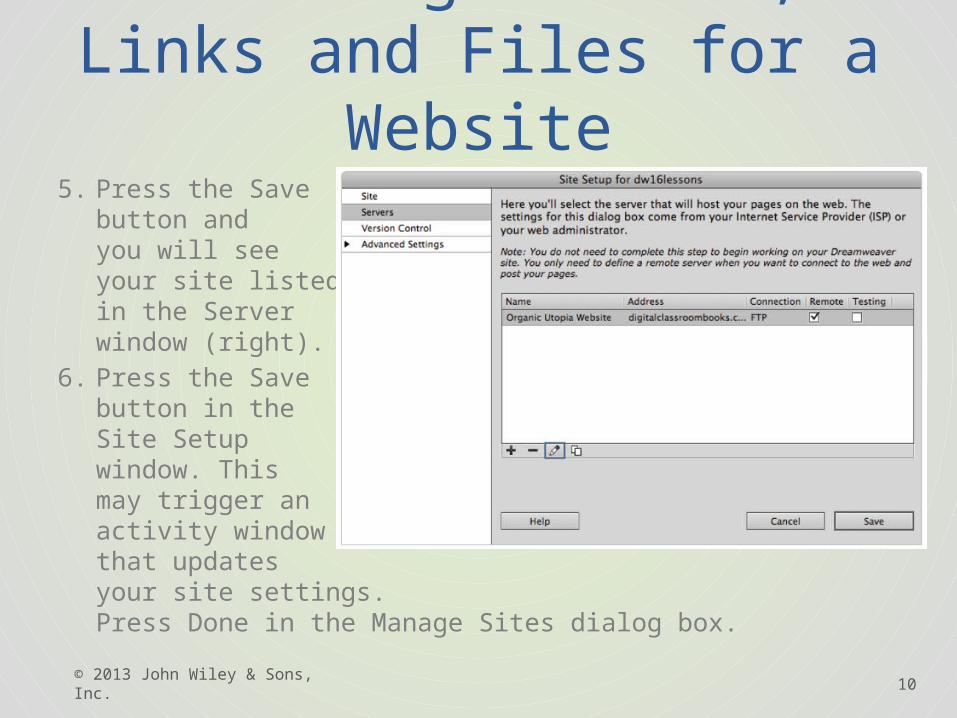
6.4 Manage Assets, Links and Files for a
Website5. Press the Save
button and you will see your site listedin the Server window (right).
6. Press the Save button in the Site Setup window. This may trigger an activity window that updates your site settings. Press Done in the Manage Sites dialog box.
© 2013 John Wiley & Sons, Inc.
11
6.5 Publish and Update Files to a Remote Server
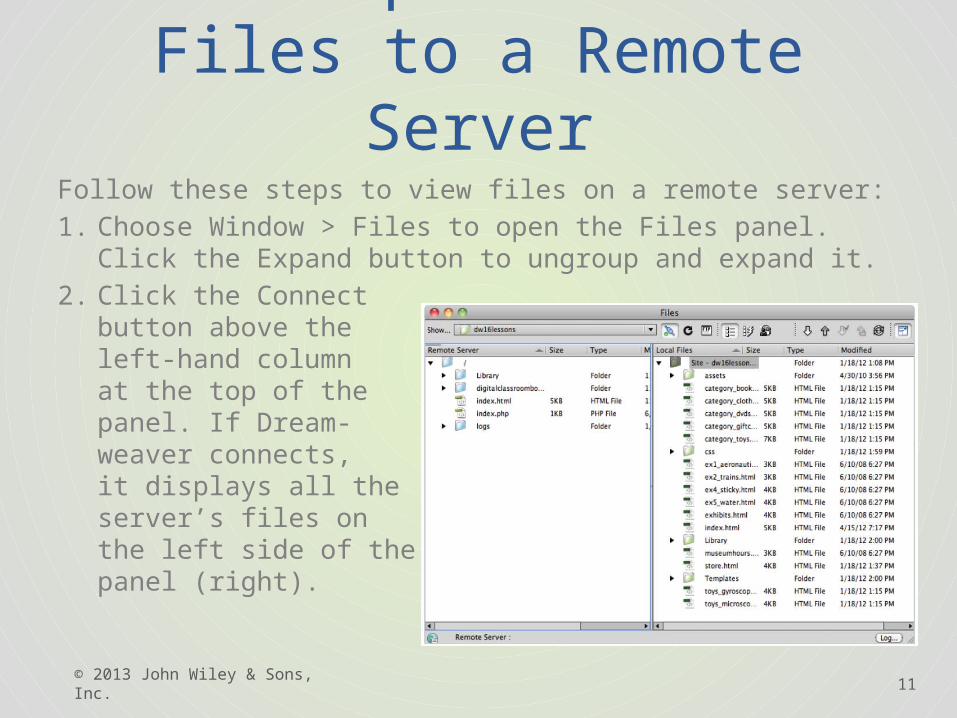
Follow these steps to view files on a remote server:1. Choose Window > Files to open the Files panel. Click
the Expand button to ungroup and expand it.2. Click the Connect
button above the left-hand column at the top of the panel. If Dream-weaver connects, it displays all the server’s files on the left side of the panel (right).
© 2013 John Wiley & Sons, Inc.

12
6.5 Publish and Update Files to a Remote Server
Follow these steps to transfer files to and from the server:1. Make sure you’ve connected to the remote
server, and that you can see your remote files in the left-hand column of the Files panel.
© 2013 John Wiley & Sons, Inc.

13
6.5 Publish and Update Files to a Remote Server
2. Select the index.html file from the local file listing on the right side of your Files panel, as you see at right, and press the Put button (up arrow). Choose No when asked if you would like to include dependent files.
© 2013 John Wiley & Sons, Inc.

14
6.5 Publish and Update Files to a Remote Server• When you check out a file, you are downloading it
from the remote server to your local root folder, and placing a lock on the remote copy.
• Both your local copy and the remote copy appear with check marks next to them, indicating the file is checked out for editing.
• When you check in a file, you are uploading the modified version to the remote server, and removing any locks on it.
© 2013 John Wiley & Sons, Inc.

15
6.5 Publish and Update Files to a Remote Server• Follow these steps to checking out a file:1. Launch the Files
panel and click the Expand button to expand it so that you can see your local and remote files (right).
2. Select the file in your local folder that you want to check out, and use the Check Out button at the top of the panel.
© 2013 John Wiley & Sons, Inc.

16
6.5 Publish and Update Files to a Remote Server
3. Open the checked file from your Local Files panel for editing. Make changes, then save and close it.
4. From the Files panel, select the file again in the local Files panel and check it back in, using the Check In button at the top of the panel. The file is uploaded to—and unlocked on—the remote server.
5. Collapse the Files panel to return it to the dock.
© 2013 John Wiley & Sons, Inc.

17
2.6 Communicate Design Plans with Others
• Design Notes store additional information about a file or media object in your site.
• These notes can be for your own use, or they can be shared with others using the same root folder.
• Design Notes can be set to appear automatically when the file is opened, making it easy to display up-to-date information to others working on the same site.
• All Design Notes are stored as separate files in a _notes folder inside of your site’s root directory.
© 2013 John Wiley & Sons, Inc.

18
2.6 Communicate Design Plans with Others
• By default, Design Notes are stored only in the local site folder, and are not automatically copied to the remote server.
• You can share Design Notes with other collaborators by having Dreamweaver upload and update them on the remote server.
© 2013 John Wiley & Sons, Inc.

19
2.6 Communicate Design Plans with Others
Follow these steps to share a Design Note:1. Choose Site > Manage Sites. Select your site
from the Sites panel and choose Edit. 2. Click on the Advanced Settings options and
choose Design Notes from the left.
© 2013 John Wiley & Sons, Inc.

20
2.6 Communicate Design Plans with Others
3. Under the Design Notes panel (right)check Enable Upload Design Notes for sharing. Design Notes are now copied and updated on the remote server so other users can share them.
4. Choose Save to update the site definition, then press Done to close the Manage Sites dialog box.
© 2013 John Wiley & Sons, Inc.

21
2.6 Communicate Design Plans with Others
• A convenient way to view and access Design Notes is by enabling the Design Notes column in the Files panel.
• An icon that can be used to open and edit Design Notes accompanies documents that have an associated Design Note. This feature also allows you to see all available.
© 2013 John Wiley & Sons, Inc.
22
2.6 Communicate Design Plans with Others
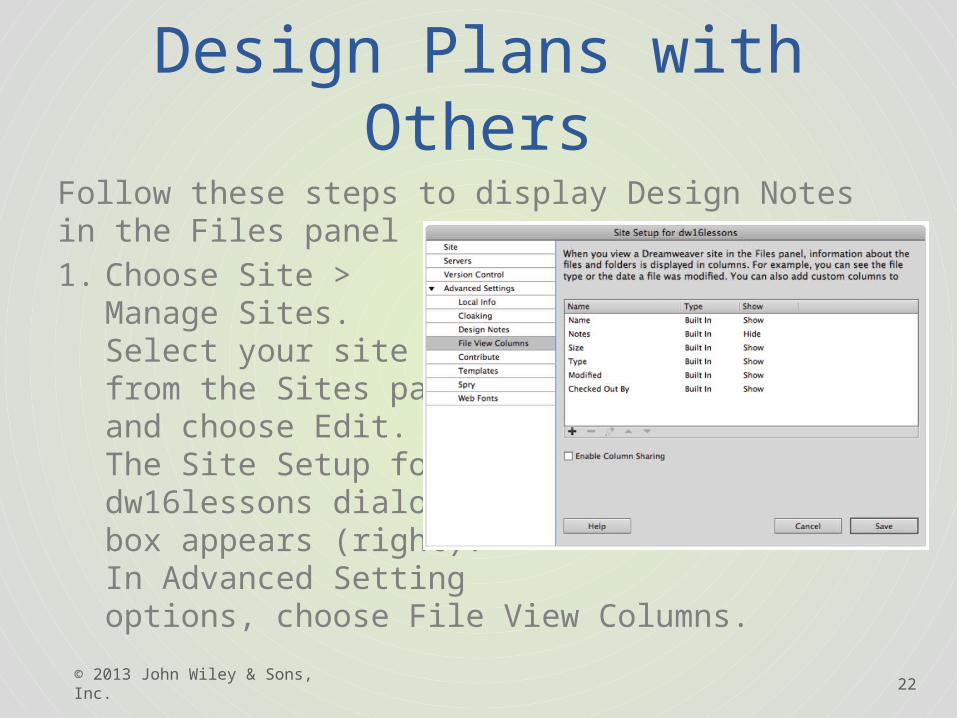
Follow these steps to display Design Notes in the Files panel1. Choose Site >
Manage Sites. Select your site from the Sites panel and choose Edit. The Site Setup for dw16lessons dialog box appears (right). In Advanced Setting options, choose File View Columns.
© 2013 John Wiley & Sons, Inc.

23
2.6 Communicate Design Plans with Others
2. Double-click the Notes item from the list and click the Show checkbox and then press Save.
3. Choose Save to update the site definition, then press Done to close the Manage Sites dialog box. A Notes column appears in the Files panel; a Notes icon is displayed next to each file that is associated with a Design Note.
© 2013 John Wiley & Sons, Inc.

24
6.1 Conduct Technical Tests
• If the Link Checker returns results, you can view and fix any problem document.
• The Link Checker panel’s Show menu (located at the top of the panel) toggles between three reports:
1. Broken Links lists links that point to files not found within the local site.
2. Orphaned Files are any pages, images, or media files not linked to, referenced, or used by any files in your site.
3. External Links lists any links to outside websites, pages, or files; and like the Broken Links panel, allows you to directly edit them or jump to the page that contains them.
© 2013 John Wiley & Sons, Inc.

25
6.1 Conduct Technical Tests
• Dreamweaver’s site reports feature can be used for detecting potential design and accessibility issues before publishing your site to the Web.
• Reports can be generated in several categories to give you a virtual picture of health, and the opportunity to fix issues.
• Reports can be generated for a single page, selected documents, or the entire current local site.
• Any results open and display in the Results panel, where you can see a list of issues and where they are located.
© 2013 John Wiley & Sons, Inc.

26
1.4 Know Website Accessibility Standards
• Consult the Checklist of Checkpoints for Web Content Accessibility Guidelines for more specifics. Published by the W3C, this is large checklist of accessibility features that you can use as a guideline for your sites.
• There are three levels of priorities: • Priority 1 are features that must be satisfied, • Priority 2 are features that should be satisfied, and• Priority 3 are features that could be satisfied. • For a full listing of the checklist visit:• http://www.w3.org/
TR/1999/WAI-WEBCONTENT-19990505/full-checklist
© 2013 John Wiley & Sons, Inc.

27
1.4 Know Website Accessibility Standards
• Although Dreamweaver’s site reports help identify page areas that can be read by screen readers, much of this information is gathered by experience (alt tags, headers, page titles, and captions for example, are all read by screen readers).
• A relatively new initiative aimed at standardizing accessibility practices is in development. It is known as the Accessible Rich Internet Applications Suite (WAIARIA for short).
• One portion of the specification, called landmark roles, is specifically designed to be used with HTML and XHTML elements.
• A landmark role is a way of categorizing and identifying different parts of a web page. For example, a role called banner identifies the region that contains the primary heading.
© 2013 John Wiley & Sons, Inc.

28
1.4 Know Website Accessibility Standards
• Some of the landmark roles have direct equivalents to HTML elements. For example, the role="form" attribute is used for form elements and the role="navigation" is used for the HTML5 <nav> element.
• You can use landmark roles today, but you might need to review your code in the future to ensure that it is aligned with the specification when it is finalized.
© 2013 John Wiley & Sons, Inc.

29
6.2 Basic Usability Tests• When you format page content or create layouts
with CSS, you’ll want to be certain that your pages appear consistently across a variety of browsers.
• Some combinations of HTML and CSS can unearth display bugs in specific browsers. In fact, some browsers may not support certain CSS properties at all.
• To find and fix potential CSS display problems, you can use Dreamweaver’s Browser Compatibility Check (BCC) reports in conjunction with the CSS Advisor.
© 2013 John Wiley & Sons, Inc.
30
6.2 Basic Usability Tests• Page optimization is by no means an
afterthought. • In addition to clean design and well-written
content, pages can be optimized through the use of keywords, descriptions, and often-overlooked tag attributes, such as alternate text (alt) for images and a page’s Title area.
• Combined, these pieces of information facilitate site usability and visibility in several essential ways.
© 2013 John Wiley & Sons, Inc.

31
5.7 Add Head Content • Search Engine Optimization (SEO) is a broad topic beyond
the scope of this Book, but good SEO methods begin at the design level.
• Search Engine Optimization is defined as the process of structuring your HTML and CSS to best expose the content to search engines.
• Search engines use a variety of factors, such as key word and descriptions, to rank and list web pages.
• The HTML <meta> tag enables you to associate any page with a specific list of search terms, as well as a brief description of the page or the website itself.
• Like the <title> tag, <meta> tags are placed in the <head> section of a page, and can be added from the Common Insert bar.
© 2013 John Wiley & Sons, Inc.

32
2.2 Sites that Work Equally
Well in Various Browsers• A web browser renders HTML, CSS, and JavaScript
files according to a set of rules built into the application.
• Although browser manufacturers use the World Wide Web Consortium’s specifications for HTML and CSS, they can interpret these rules as required for their own purposes.
• Browser manufacturers can also add their own rules to the specifications to add features to their browsers.
• Here is a quick review of the page elements that are historically worth investigating:
© 2013 John Wiley & Sons, Inc.

33
2.2 Sites that Work Equally
Well in Various Browsers• Form elements that have no styling look different on
Mac versus PC. Controls such as buttons and scrollbars use the operating system’s default.
• Rich media such as audio and video is dependent on the operating system capabilities and therefore may either use a different user interface for controls (such as a volume slider) or may simply not appear.
• There are a number of CSS selectors or properties that do not work consistently across all browsers.
• CSS fonts and CSS3 web fonts. Essentially the guidelines are to use only the most common web fonts if using standard CSS and to be aware of browser compatibility for the latest CSS3 web fonts functionality.
© 2013 John Wiley & Sons, Inc.

34
2.2 Sites that Work Equally
Well in Various Browsers• Adobe BrowserLab is an online service you can
use as a stand-alone product or in conjunction with Adobe applications, such as Dreamweaver CS6. BrowserLab lets you preview your page in a number of different browsers and platforms.
1. Open a page you would like to test in multiple browsers. Open the Adobe BrowserLab panel if it is not open.
2. Click on the Preview button. The first time you use BrowserLab you will have to enter an Adobe ID and password.
© 2013 John Wiley & Sons, Inc.

35
6.3 Identify Methods for Collecting Feedback
• Your website should not be static; part of maintaining a successful site requires continuously evolving it to meet users’ needs and keeping the content fresh and new.
• Be sure to solicit feedback from friends, family, and colleagues after you’ve launched. Alert a small and trusted group about the launch by sending out an e-mail, mailing a postcard, etc.
• Feedback and constructive criticism are the best ways to determine what needs improvement.
© 2013 John Wiley & Sons, Inc.

36
6.2 Basic Usability Tests • Focus groups are an excellent way to get non-
biased feedback on a major new site or product launch.
• A focus group is a group of individuals brought together to analyze, try out, and comment on a product—in this case, your website.
• Groups can be guided through certain portions or processes on the site, or be encouraged to navigate it on their own. They are then asked about their experience.
© 2013 John Wiley & Sons, Inc.

© 2013 John Wiley & Sons, Inc. 37
6.2 Basic Usability Tests
• Focus group questions can include the following:• Did you feel the website was easy to navigate?
How would you rate the difficulty level in locating specific pages or topics?
• Did the design, including graphics and color themes, effectively help communicate the website’s offerings?
• How would you rate the quality of the written content?

38
6.2 Basic Usability Tests • Focus groups are often interactive, encouraging
participants to talk with each other and share their opinions. In some cases, a moderator may be used to regulate group discussions, and hand out questionnaires.
• Participants can be composed of a focused demographic (for instance, 25- to 35-year-old technology professionals), or they can be diverse.
• Focus groups are reasonable for any size company to organize—even if it’s just you and five friends—and are a highly effective way to find out what’s working and what’s not.
© 2013 John Wiley & Sons, Inc.

© 2013 John Wiley & Sons, Inc. 39
Lesson Summary

Copyright 2013 John Wiley & Sons, Inc.. All rights reserved. Reproduction or translation of this work beyond that named in Section 117 of the 1976 United States Copyright Act without the express written consent of the copyright owner is unlawful. Requests for further information should be addressed to the Permissions Department, John Wiley & Sons, Inc.. The purchaser may make back-up copies for his/her own use only and not for distribution or resale. The Publisher assumes no responsibility for errors, omissions, or damages, caused by the use of these programs or from the use of the information contained herein.