lessons for learning -...
TRANSCRIPT

GRADE
2
PUBLIC SCHOOLS OF NORTH CAROLINAState Board of Education | Department of Public Instruction
FOR THE COMMON CORE STATE STANDARDS IN MATHEMATICSLESSONS FOR LEARNING
K-12 MATHEMATICShttp://www.ncpublicschools.org/curriculum/mathematics/

STATE BOARD OF EDUCATIONThe guiding mission of the North Carolina State Board of Education is that every public school student will graduate from high school, globally competitive for work and postsecondary education and prepared for life in the 21st Century.
NC DEPARTMENT OF PUBLIC INSTRUCTIONJune St. Clair Atkinson, Ed.D., State Superintendent301 N. Wilmington Street :: Raleigh, North Carolina 27601-2825
In compliance with federal law, the NC Department of Public Instruction administers all state-operated educational programs, employment activities and admissions without discrimination because of race, religion, national or ethnic origin, color, age, military service, disability, or gender, except where exemption is appropriate and allowed by law.
Inquiries or complaints regarding discrimination issues should be directed to:Dr. Rebecca Garland, Chief Academic Officer :: Academic Services and Instructional Support6368 Mail Service Center, Raleigh, NC 27699-6368 :: Telephone: (919) 807-3200 :: Fax: (919) 807-4065 Visit us on the Web :: www.ncpublicschools.org
WILLIAM COBEyChair :: Chapel Hill
A.L. COLLINSVice Chair :: Kernersville
DAN FORESTLieutenant Governor :: Raleigh
JANET COWELLState Treasurer :: Raleigh
JUNE ST. CLAIR ATkINSONSecretary to the Board :: Raleigh
BECky TAyLORGreenville
REGINALD kENANRose Hill
kEVIN D. HOWELLRaleigh
GREG ALCORNSalisbury
OLIVIA OxENDINELumberton
JOHN A. TATE IIICharlotte
WAyNE MCDEVITTAsheville
MARCE SAVAGEWaxhaw
PATRICIA N. WILLOUGHByRaleigh
M0713

operations and algebraiC thinKingrepresent and solve problems involving addition and subtraction.2.oa.1 Use addition and subtraction within 100 to solve one- and two-step
word problems involving situations of adding to, taking from, putting together, taking apart, and comparing, with unknowns in all positions, e.g., by using drawings and equations with a symbol for the unknown number to represent the problem. (Note: See Glossary, Table 1.)
add and subtract within 20.2.oa.2 Fluently add and subtract within 20 using mental strategies. (Note:
See standard 1.OA.6 for a list of mental strategies). By end of Grade 2, know from memory all sums of two one-digit numbers.
Work with equal groups of objects to gain foundations for multiplication.2.oa.3 Determine whether a group of objects (up to 20) has an odd or even
number of members, e.g., by pairing objects or counting them by 2s; write an equation to express an even number as a sum of two equal addends.
2.oa.4 Use addition to find the total number of objects arranged in rectangular arrays with up to 5 rows and up to 5 columns; write an equation to express the total as a sum of equal addends.
number and operations in base tenunderstand place value.2.nbt.1 Understand that the three digits of a three-digit number represent
amounts of hundreds, tens, and ones; e.g., 706 equals 7 hundreds, 0 tens, and 6 ones. Understand the following as special cases:
a. 100 can be thought of as a bundle of ten tens – called a “hundred.” b. The numbers 100, 200, 300, 400, 500, 600, 700, 800, 900 refer to one,
two, three, four, five, six, seven, eight, or nine hundreds (and 0 tens and 0 ones).
2.nbt.2 Count within 1000; skip-count by 5s, 10s, and 100s.2.nbt.3 Read and write numbers to 1000 using base-ten numerals, number
names, and expanded form.2.nbt.4 Compare two three-digit numbers based on meanings of the
hundreds, tens, and ones digits, using >, =, and < symbols to record the results of comparisons.
use place value understanding and properties of operations to add and subtract.2.nbt.5 Fluently add and subtract within 100 using strategies based on
place value, properties of operations, and/or the relationship between addition and subtraction.
2.nbt.6 Add up to four two-digit numbers using strategies based on place value and properties of operations.
2.nbt.7 Add and subtract within 1000, using concrete models or drawings and strategies based on place value, properties of operations, and/or the relationship between addition and subtraction; relate the strategy to a written method. Understand that in adding or subtracting three-digit numbers, one adds or subtracts hundreds and hundreds, tens and tens, ones and ones; and sometimes it is necessary to compose or decompose tens or hundreds.
2.nbt.8 Mentally add 10 or 100 to a given number 100-900, and mentally subtract 10 or 100 from a given number 100-900.
2.nbt.9 Explain why addition and subtraction strategies work, using place value and the properties of operations. (Note: Explanations may be supported by drawings or objects.)
measurement and datameasure and estimate lengths in standard units.2.md.1 Measure the length of an object by selecting and using appropriate
tools such as rulers, yardsticks, meter sticks, and measuring tapes.2.md.2 Measure the length of an object twice, using length units of
different lengths for the two measurements; describe how the two measurements relate to the size of the unit chosen.
2.md.3 Estimate lengths using units of inches, feet, centimeters, and meters.2.md.4 Measure to determine how much longer one object is than another,
expressing the length difference in terms of a standard length unit.
relate addition and subtraction to length.2.md.5 Use addition and subtraction within 100 to solve word problems
involving lengths that are given in the same units, e.g., by using drawings (such as drawings of rulers) and equations with a symbol for the unknown number to represent the problem.
2.md.6 Represent whole numbers as lengths from 0 on a number line diagram with equally spaced points corresponding to the numbers 0, 1, 2, ..., and represent whole-number sums and differences within 100 on a number line diagram.
Second Grade – Standards 1. extending understanding of base-ten notation – Students extend their
understanding of the base-ten system. This includes ideas of counting in fives, tens, and multiples of hundreds, tens, and ones, as well as number relationships involving these units, including comparing. Students understand multi-digit numbers (up to 1000) written in base-ten notation, recognizing that the digits in each place represent amounts of thousands, hundreds, tens, or ones (e.g., 853 is 8 hundreds + 5 tens + 3 ones).
2. building fluency with addition and subtraction – Students use their understanding of addition to develop fluency with addition and subtraction within 100. They solve problems within 1000 by applying their understanding of models for addition and subtraction, and they develop, discuss, and use efficient, accurate, and generalizable methods to compute sums and differences of whole numbers in base-ten notation, using their understanding of place value and the properties of operations. They select and accurately apply methods that are appropriate for the context and the numbers involved to mentally calculate sums and differences for numbers with only tens or only hundreds.
3. using standard units of measure – Students recognize the need for standard units of measure (centimeter and inch) and they use rulers and other measurement tools with the understanding that linear measure
involves iteration of units. They recognize that the smaller the unit, the more iterations they need to cover a given length.
4. describing and analyzing shapes – Students describe and analyze shapes by examining their sides and angles. Students investigate, describe, and reason about decomposing and combining shapes to make other shapes. Through building, drawing, and analyzing two- and three-dimensional shapes, students develop a foundation for understanding attributes of two- and three-dimensional shapes, students develop a foundation for understanding area, volume, congruence, similarity, and symmetry in later grades.
mathematiCal praCtiCes1. make sense of problems and persevere in solving them. 2. reason abstractly and quantitatively. 3. Construct viable arguments and critique the reasoning of others. 4. model with mathematics. 5. use appropriate tools strategically. 6. attend to precision. 7. look for and make use of structure. 8. look for and express regularity in repeated reasoning.
1

Work with time and money.2.md.7 Tell and write time from analog and digital clocks to the nearest five
minutes, using a.m. and p.m.2.md.8 Solve word problems involving dollar bills, quarters, dimes, nickels,
and pennies, using $ and ¢ symbols appropriately. Example: If you have 2 dimes and 3 pennies, how many cents do you have?
represent and interpret data.2.md.9 Generate measurement data by measuring lengths of several
objects to the nearest whole unit, or by making repeated measurements of the same object. Show the measurements by making a line plot, where the horizontal scale is marked off in whole-number units.
2.md.10 Draw a picture graph and a bar graph (with single-unit scale) to represent a data set with up to four categories. Solve simple put together, take-apart, and compare problems using information presented in a bar graph. (Note: See Glossary, Table 1.)
geometryreason with shapes and their attributes.2.g.1 Recognize and draw shapes having specified attributes, such as
a given number of angles or a given number of equal faces. (Note: Sizes are compared directly or visually, not compared by measuring.) Identify triangles, quadrilaterals, pentagons, hexagons, and cubes.
2.g.2 Partition a rectangle into rows and columns of same-size squares and count to find the total number of them.
2.g.3 Partition circles and rectangles into two, three, or four equal shares, describe the shares using the words halves, thirds, half of, a third of, etc., and describe the whole as two halves, three thirds, four fourths. Recognize that equal shares of identical wholes need not have the same shape.
2

NC DEPARTMENT OF PUBLIC INSTRUCTION SECOND GRADE
SECOND GRADE LESSONS FOR LEARNING
Table of Contents
Fluency Fun .......................................................................................................................................................... 1
Standard: 2.OA.2 | Additional/Supporting Standard(s): 2.OA.3 Mathematical Practice: 1, 2, 5, 6 Student Outcomes: I can use mental strategies (e.g., count on, make a ten) to add or subtract numbers within 20 with ease. I can begin to recall doubles from memory.
Number Relationships and Addition Facts .......................................................................................... 6
Standard: 2.OA.2
Mathematical Practice: 1, 4, 5, 6, 7
Student Outcomes: I can chart number facts I have memorized on an addition chart. I can use mental strategies to add numbers within 20 with ease. I can recall from memory all sums of two one-digit numbers.
Odds and Evens ................................................................................................................................................ 12
Standard: 2.OA.3
Mathematical Practice: 1, 2, 3, 6, 7, 8
Student Outcomes: I can write an equation to show that a number that is doubled has an even sum. I can explain why two even numbers have an even sum and why two odd numbers have an even sum and why an odd and even have an odd sum.
Partners Galore ................................................................................................................................................ 16
Standard: 2.OA.3
Mathematical Practice: 1, 3, 4, 7, 8
Student Outcomes: I can identify a group of objects as being even or odd using different strategies. I can understand and explain why a group of objects is odd or even.
Arrow Cards to 1000 ..................................................................................................................................... 19
Standard: 2.NBT.3 | Additional/Supporting Standard(s): 2.NBT.1
Mathematical Practice: 1, 2, 4, 6
Student Outcomes: I can read and write numbers up to 1000 using base-ten numerals. I can read and write numbers using expanded form. I can represent each digit in a three-digit number.
Spin to Win ......................................................................................................................................................... 25
Standard: 2.NBT.4 | Additional/Supporting Standard(s): 2.NBT.1
Mathematical Practice: 1, 2, 4, 5, 6, 7
Student Outcomes: I can build numbers with base ten blocks (or other materials). I can figure out which number is bigger (or smaller). I can read and write numbers using expanded form. I can explain how to determine whether a two or three-digit number is greater than, less than, or equal to another two or three-digit number. I can compare two and three-digit numbers and record this comparison by using the symbols >, <, and =.

NC DEPARTMENT OF PUBLIC INSTRUCTION SECOND GRADE
Arrow Cards ...................................................................................................................................................... 31
Standard: 2.NBT.5
Mathematical Practice: 1, 2, 3, 4, 5, 6, 7
Student Outcomes: I can add within 100 with ease by applying strategies (composing numbers into tens and ones, using mental strategies) based on the numbers being added. I can use arrow cards as a tool to help me add using place value strategies. I can use a number line to add within 100.
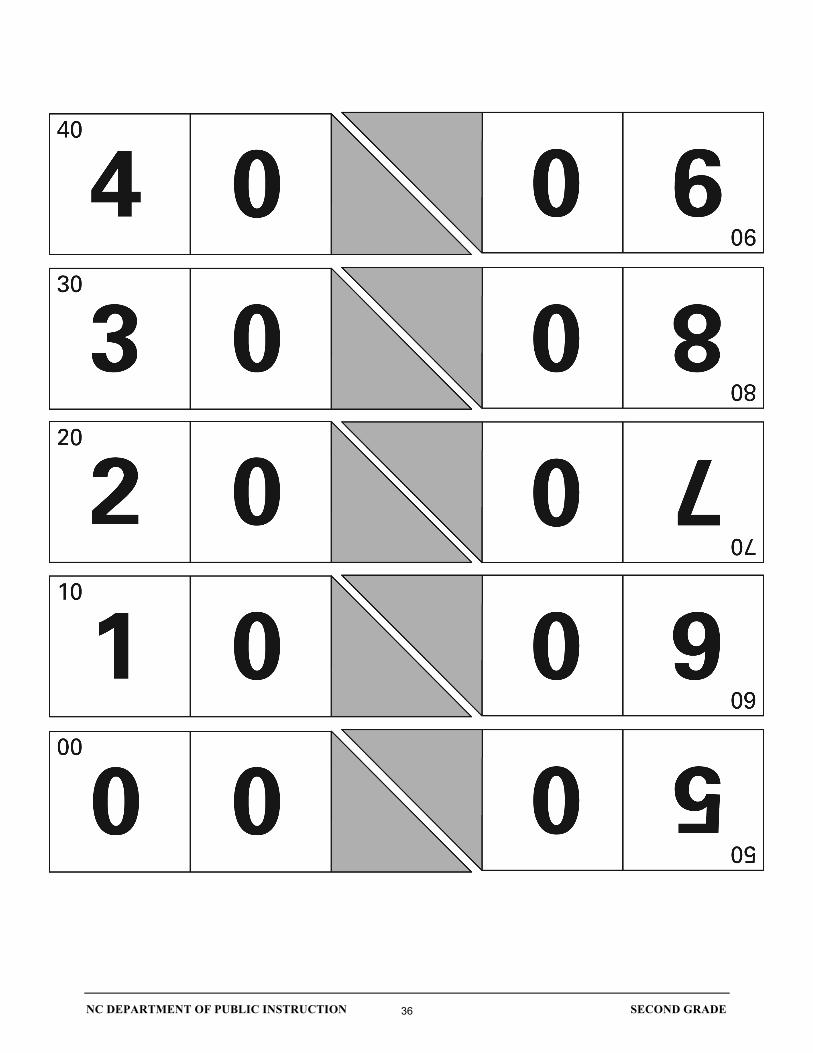
How Far to 100? ................................................................................................................................................ 37
Standard: 2.NBT.5 | Additional/Supporting Standard(s): 2.NBT.2, 2.NBT.6
Mathematical Practice: 1, 2, 3, 4, 5, 6, 7
Student Outcomes: I can add two numbers and explain my strategy to find the total. I can figure out how far away a number is from 100 and explain my strategy. I can use place value to add numbers to 100.
Skip Counting on a Sheet ............................................................................................................................ 42
Standard: 2.NBT.8 | Additional/Supporting Standard(s): 2.NBT.1
Mathematical Practice: 1, 2, 3, 4, 5, 6, 7, 8
Student Outcomes: I can add 10 to a given number from 100-900. I can mentally subtract 10 from a given number from 100-900. I can mentally add 100 to a given number from 100-900. I can mentally subtract 100 from a given number 100-900.
How Big is a Foot ............................................................................................................................................. 45
Standard: 2.MD.1
Mathematical Practice: 1, 4, 5, 6
Student Outcomes: I can create a ruler as a measurement tool. I can measure the length of an object using a standard ruler.
Measuring Me ................................................................................................................................................... 48
Standard: 2.MD.3 | Additional/Supporting Standard(s): 2.MD.1
Mathematical Practice: 1, 4, 5, 6
Student Outcomes: I can estimate a given object in centimeters. I can measure to compare my estimate to the actual measurement.
It’s Lengthy .......................................................................................................................................................... 51
Standard: 2.MD.4 | Additional/Supporting Standard(s): 2.MD.1
Mathematical Practice: 1, 4, 5, 6
Student Outcomes: I can measure the length of any object in a given unit. I can find the difference in length between two objects using standard units. I can record and draw a picture to show the measurement of the comparison of two objects.

NC DEPARTMENT OF PUBLIC INSTRUCTION SECOND GRADE
Arm Span Problems ....................................................................................................................................... 55
Standard: 2.MD.5 | Additional/Supporting Standard(s): 2.MD.1, 2.MD.9
Mathematical Practice: 1, 2, 5, 6
Student Outcomes: I can add and subtract lengths of the same unit within 100. I can measure and solve problems involving these measurements by using drawings and equations with a symbol for the unknown length. I can add my data to a line plot to represent a measurement I have found.
Creating a Number Line .............................................................................................................................. 59
Standard: 2.MD.6 | Additional/Supporting Standard(s): 1.MD.2
Mathematical Practice: 1, 4, 5, 6
Student Outcomes: I can create a number line to 200. I can measure accurately and mark numbers on the number line. I can solve addition and subtraction problems using a number line.
Human Number Line .................................................................................................................................... 64
Standard: 2.MD.6
Mathematical Practice: 1, 2, 3, 4, 5, 6, 7, 8
Student Outcomes: I can create a number line with whole number increments.( using equal spacing) I can represent whole numbers on a number line.
What Time is it Mr. Crocodile? ............................................................................................................... 66
Standard: 2.MD.7
Mathematical Practice: 4, 6
Student Outcomes: I can move the minute hand on the clock in five minute increments and say what time I am standing on. I can show the time on an analog clock when someone tells me the time in five minute increments.
Measuring Things in Our Classroom .................................................................................................... 68
Standard: 2.MD.9 | Additional/Supporting Standard(s): 2.MD.1
Mathematical Practice: 1, 4, 5, 6
Student Outcomes: I know which tool to use to measure objects in my desk. I know how to use a ruler to measure to the nearest inch. I can use a ruler to measure objects in my desk. I can make a line plot and record the measurement of objects in my desk.
What Pattern Block? ..................................................................................................................................... 71
Standard: 2.MD.10
Mathematical Practice: 1, 2, 3, 5, 6

NC DEPARTMENT OF PUBLIC INSTRUCTION SECOND GRADE
Polygon Riddles and Fun ............................................................................................................................ 75
Standard: 2.G.1 Mathematical Practice: 1, 2, 3, 4, 5 Student Outcomes: I can identify and explain the define attributes of a shape. I can use defining attributes (number of sides, angles) to name shapes (triangles, quadrilaterals, pentagons, and hexagons). I can create a given shape when given defining attributes.
Rectangle Riddles ............................................................................................................................................ 82
Standard: 2.G.2 | Additional/Supporting Standard(s): 2.OA.4 Mathematical Practice: 1, 3, 4, 5, 6
Student Outcomes: I can divide a rectangle into parts. I can count to find the total number of sections/part in the rectangle. I can divide rectangles into equal parts using rows or columns. I can write an equation to tell the total number of squares (or square-like sections) in a rectangle as a sum of equal addends.
Fraction Flowers .............................................................................................................................................. 89
Standard: 2.G.3 Mathematical Practice: 1, 4, 5, 6
Student Outcomes: I can partition a circle into halves, thirds and fourths. I can describe the whole flower as two halves, three thirds, four fourths.

NC DEPARTMENT OF PUBLIC INSTRUCTION SECOND GRADE
Fluency Fun Common Core Standards:
Add and subtract within 20. 2.OA.2 Fluently add and subtract within 20 using mental strategies. (Note: See standard 1.OA.6 for a list of mental strategies). By end of Grade 2, know from memory all sums of two one-digit numbers.
Additional/Supporting Standards:
Work with equal groups of objects to gain foundations for multiplication. 2. OA.3 Determine whether a group of objects (up to 20) has an odd or even number of members, e.g., by pairing objects or counting them by 2s; write an equation to express an even number as a sum of two equal addends.
Standards for Mathematical Practice:
1. Make sense of problems and persevere in solving them. 2. Reason abstractly and quantitatively. 5. Use appropriate tools strategically. 6. Attend to precision.
Student Outcomes:
• I can use mental strategies (e.g., count on, make a ten) to add or subtract numbers within 20 with ease.
• I can begin to recall doubles from memory. Materials:
• Chart Paper • Fluency Fun Game board for each player • Deck of number cards (1-10; 4 sets per pair) • Counters to cover numbers on game boards
Advance Preparation: Thinking:
In first grade students add and subtract within 20, demonstrating fluency for addition and subtraction within 10. Use strategies such as counting on; making ten (e.g., 8 + 6 = 8 + 2 + 4 = 10 + 4 = 14); decomposing a number leading to a ten (e.g., 13 – 4= 13 – 3 – 1 = 10 – 1 = 9); using the relationship between addition and subtraction (e.g., knowing that 8 + 4 = 12, one knows 12 – 8 = 4); and creating equivalent but easier or known sums (e.g., adding 6 + 7 by creating the known equivalent 6 + 6 + 1 = 12 + 1 = 13). In this task students are expanding on this knowledge of 10 to 20.
Materials:
Prepare game boards for each student and a set of cards for each set of partners.
1
NC DEPARTMENT OF PUBLIC INSTRUCTION SECOND GRADE
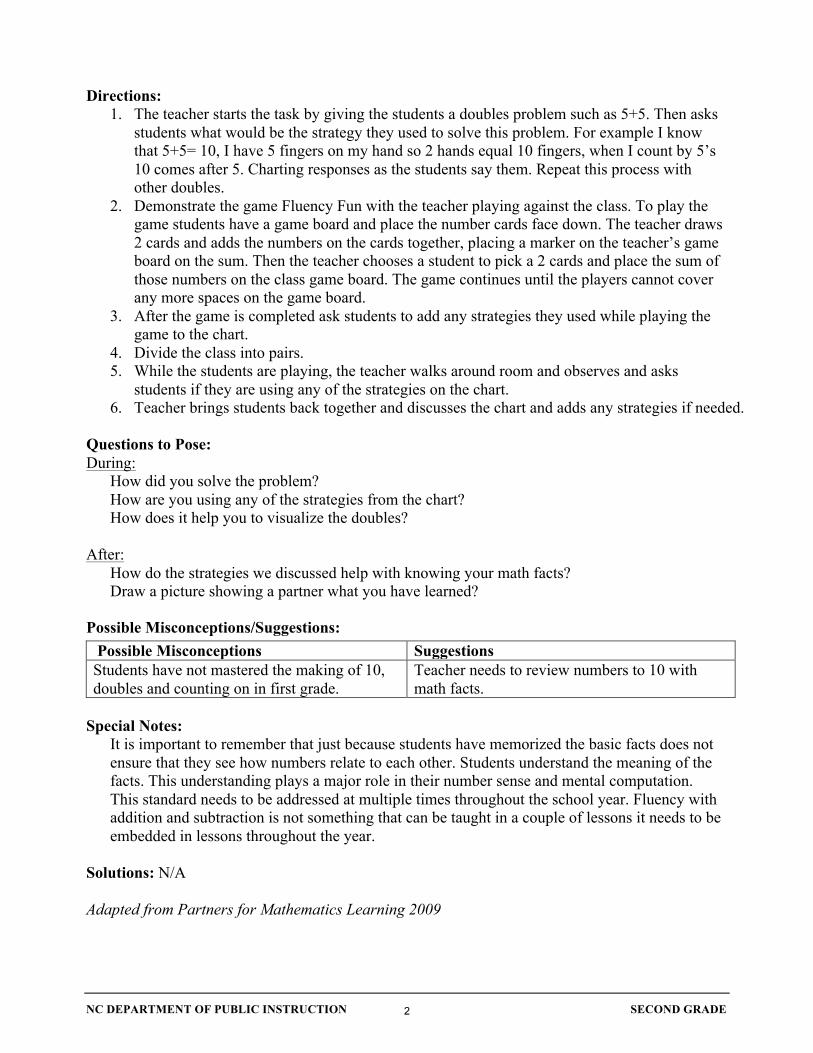
Directions: 1. The teacher starts the task by giving the students a doubles problem such as 5+5. Then asks
students what would be the strategy they used to solve this problem. For example I know that 5+5= 10, I have 5 fingers on my hand so 2 hands equal 10 fingers, when I count by 5’s 10 comes after 5. Charting responses as the students say them. Repeat this process with other doubles.
2. Demonstrate the game Fluency Fun with the teacher playing against the class. To play the game students have a game board and place the number cards face down. The teacher draws 2 cards and adds the numbers on the cards together, placing a marker on the teacher’s game board on the sum. Then the teacher chooses a student to pick a 2 cards and place the sum of those numbers on the class game board. The game continues until the players cannot cover any more spaces on the game board.
3. After the game is completed ask students to add any strategies they used while playing the game to the chart.
4. Divide the class into pairs. 5. While the students are playing, the teacher walks around room and observes and asks
students if they are using any of the strategies on the chart. 6. Teacher brings students back together and discusses the chart and adds any strategies if needed.
Questions to Pose: During:
How did you solve the problem? How are you using any of the strategies from the chart? How does it help you to visualize the doubles?
After:
How do the strategies we discussed help with knowing your math facts? Draw a picture showing a partner what you have learned?
Possible Misconceptions/Suggestions: Possible Misconceptions Suggestions Students have not mastered the making of 10, doubles and counting on in first grade.
Teacher needs to review numbers to 10 with math facts.
Special Notes:
It is important to remember that just because students have memorized the basic facts does not ensure that they see how numbers relate to each other. Students understand the meaning of the facts. This understanding plays a major role in their number sense and mental computation. This standard needs to be addressed at multiple times throughout the school year. Fluency with addition and subtraction is not something that can be taught in a couple of lessons it needs to be embedded in lessons throughout the year.
Solutions: N/A Adapted from Partners for Mathematics Learning 2009
2

NC DEPARTMENT OF PUBLIC INSTRUCTION SECOND GRADE
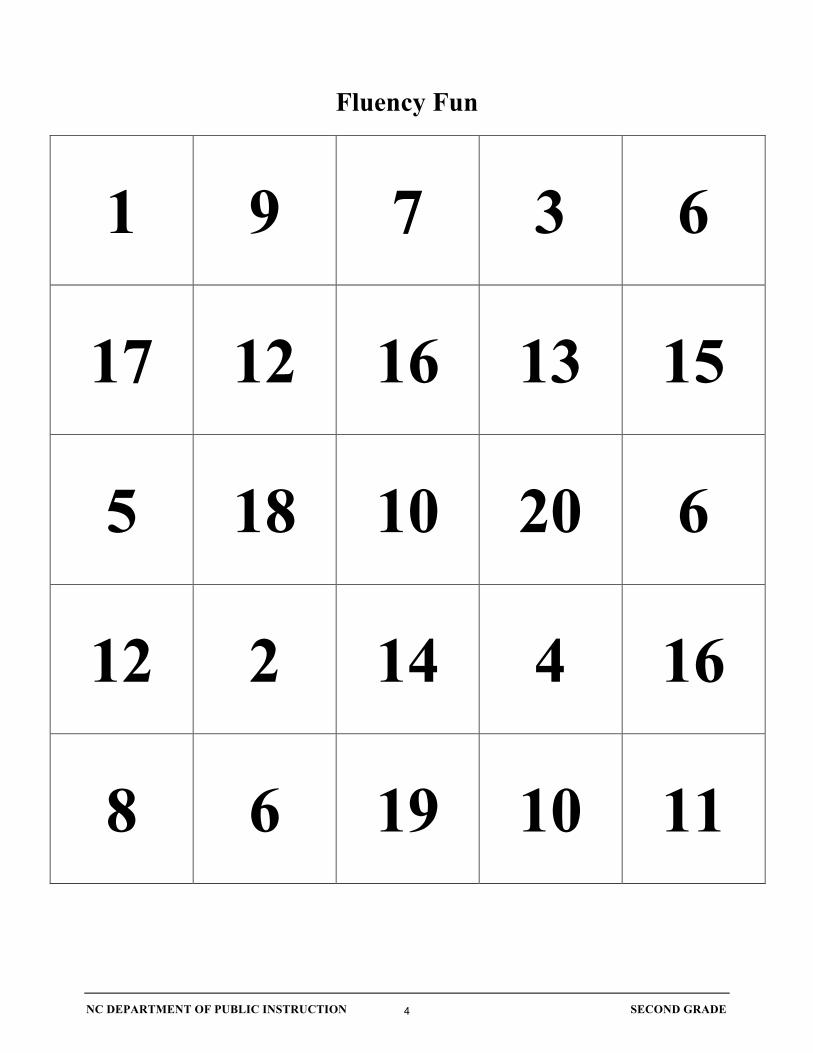
Fluency Fun
Concepts: • Develop fluency with addition within 20. • Explore patterns in odd and even numbers • Practice number combinations
Materials • Game board for each player • Deck of number cards (1-10; four sets per pair) • Counters to cover numbers on game boards
Rules
1. Each player has a game board. 2. Place the number cards face down. 3. Player One draws 2 cards from the deck. Cover the sum of the cards with a counter. 4. Player Two draws next. 5. Play continues until the players cannot cover any more spaces on the game board. 6. This game can be played so that there is no winner. The children just continue covering
numbers until there are none to cover. The game can have a winner. The person with the most spaces covered is the winner.
3
NC DEPARTMENT OF PUBLIC INSTRUCTION SECOND GRADE
Fluency Fun
1 9 7 3 6
17 12 16 13 15
5 18 10 20 6
12 2 14 4 16
8 6 19 10 11
4

NC DEPARTMENT OF PUBLIC INSTRUCTION SECOND GRADE
0 1 2
3 4 5
6 7 8
9 10 Wild Card
5

NC DEPARTMENT OF PUBLIC INSTRUCTION SECOND GRADE
Number Relationships and Addition Facts Common Core Standard:
Add and subtract within 20. 2.OA.2 Fluently add and subtract within 20 using mental strategies. (Note: See standard 1.OA.6 for a list of mental strategies). By end of Grade 2, know from memory all sums of two one-digit numbers.
Standards for Mathematical Practice:
1. Make sense of problems and persevere in solving them. 4. Model with mathematics. 5. Use appropriate tools strategically. 6. Attend to precision. 7. Look for and make use of structure.
Student Outcomes:
• I can chart number facts I have memorized on an addition chart. • I can use mental strategies to add numbers within 20 with ease. • I can recall from memory all sums of two one-digit numbers.
Materials:
• Addition chart for each student • Highlighter and pencil for each student • Optional- poster size chart or other way to display chart
Advance Preparation: Thinking:
• Students have had instruction in many types of strategies at a conceptual level before this task is introduced. (See Special Notes at the bottom of this task for first grade standard.)
• A focus on number relationships is important in building upon this task as student work toward fluency.
• Teacher will need to read the attached article Developing Number Sense including the Basic Facts
Materials: • Addition charts will need to be copied for each student and highlighters provided. • A poster of the Addition chart can be created if desired.
Directions: 1. For this task, the teacher must set up an environment so that students feel comfortable
looking at what they know and what they need to learn. Making student’s responsible for their own learning rather than comparing them to other students requires discussions and respect for each other and for building confidence.
2. Students store this chart in a math folder or inside a math journal and use it to record facts that they are comfortable in knowing “mentally”.
6

NC DEPARTMENT OF PUBLIC INSTRUCTION SECOND GRADE
3. As teachers work with mental strategies, students are given an opportunity to record the facts they know mentally and can recall without the use of fingers or extended thinking. When they feel confident that they know the facts, they highlight the box to create a visual that shows the facts they know and the facts they need to learn.
4. Student addition charts help teachers know where to focus instruction of strategies. For example after doubles are taught and practiced, students can fill in the doubles on their charts. When near doubles are taught they can fill in the facts they know “mentally.” Keeping a record of their thinking and the facts they know will help students see the chart beginning to fill.
5. A logical progression of strategy instruction that can be used to help students become fluent with the facts is one more and two more than facts, facts with zero, doubles facts, doubles plus one facts, facts that are left over after the strategies listed above. Also, always being aware of the relationship between the facts such as 7+4 and 4+7 being the same. This understanding will help students see that the number of total facts they must learn in really only half of what is showing on the chart.
6. This addition chart can also be an assessment task to guide instruction as teachers assess to see which facts students know “mentally” and which ones they need to learn. When working with students individually or in small groups teachers can note if students are using their fingers or needing more think time rather than “mentally” knowing the sums. If used this way, it would be given to students after all strategy instruction has been taught rather than spaced out and used after individual lessons. Additional assessment tasks can be found at http://commoncoretasks.wikispaces.com/.
Questions to Pose: Before:
What do we know about the relationship between two addends? How does that relationship help us know more facts?
During:
What strategy are you using to recall these facts? Which strategies are most helpful to you in recalling facts? What could you tell your classmates that would help them recall facts faster? How is the addition chart helpful to you?
After:
How will knowing my facts help me in other areas of math?
7

NC DEPARTMENT OF PUBLIC INSTRUCTION SECOND GRADE
Possible Misconceptions/Suggestions: Possible Misconceptions Suggestions Some students may have memory deficits that will cause this task to be very frustrating for them.
Provide two addition charts for these students so they can highlight facts as they are introduced with strategy instruction and another chart where they highlight facts they can quickly recall. This will help them have a visual of the facts they have been introduced to and the ones they know. Encourage strategy use even though they may not be able to memorize.
Some students may not realize the relationship between facts such as 4+7 and 7+4 have the same sum.
Have these students use counters and a mat to see that 4 and 7 is the same as 7 and 4. By flipping the chart upside down, they can visually see that it is the same fact.
Special Notes:
This second grade standard refers to the strategies listed in first grade. The first grade standard is listed below with the appropriate strategies that students will use in first grade and will continue to build upon in second as they work to build fluency to 20. 1.OA.6 Add and subtract within 20, demonstrating fluency for addition and subtraction within 10. Use strategies such as counting on; making ten (e.g., 8 + 6 = 8 + 2 + 4 = 10 + 4 = 14); decomposing a number leading to a ten (e.g., 13 – 4 = 13 – 3 – 1 = 10 – 1 = 9); using the relationship between addition and subtraction (e.g., knowing that 8 + 4 = 12, one knows 12 – 8 = 4); and creating equivalent but easier or known sums (e.g., adding 6 + 7 by creating the known equivalent 6 + 6 + 1 = 12 + 1 = 13). Some students may already be fluent with their facts and use of strategies and can spend this time doing tasks that are more appropriate for them. For example, this would be a good time to work on Marcy Cook task cards (www.marcycookmath.com), the Illuminations website (www.illumination.nctm.org) or other problem solving tasks. Also, it is very important that strategy instruction be paced over the course of the year. Integration of these strategies with problem solving tasks will help students see the importance of being fluent with number.
Solutions: N/A Article from: Partners for Mathematics Learning, 2009
8

NC DEPARTMENT OF PUBLIC INSTRUCTION SECOND GRADE
Developing Number Sense including the Basic Facts Composition of numbers is the foundation of computational fluency. Students must know all the parts that make up a number in order to be fluent with basic facts (Postlewait, Adams, Shih 2003, p. 354). These number relationships play a significant role in fact mastery. Children should master the basic facts of arithmetic that are essential components of fluency with paper-and-pencil and mental computation and with estimation. At the same time, however, mastery should not be expected too soon. Children will need many exploratory experiences, and the time to identify relationships among numbers and efficient thinking strategies to derive answers to unknown facts from known facts. Practice to improve speed and accuracy should be used but only under the right conditions; that is, practice with a cluster of facts should be used only after children have developed an efficient way to derive answers from those facts. (NCTM 1989, 47) According to John Van de Walle there are three components essential to promoting meaningful addition and subtraction fact mastery. These components are;
1. Help children develop a strong understanding of number relationships and of the operations. 2. Develop efficient strategies for fact retrieval through practice. 3. Provide drill in the use and selection of those strategies once they have been developed.
(Van de Walle, 2006, p. 95) Strategy practice must directly relate to one or more number relationships. Van de Walle suggests several number relationships that help children develop an understanding of basic facts. These strategies should be made explicit in the classroom. Strategies for addition facts are:
a. one-more-than and two-more-than facts or counting up b. facts with zero c. doubles d. near doubles e. make ten facts f. commutative property g. compensation
Van de Walle suggests using “think-addition” as a powerful strategy for developing fluency with subtraction facts. An example of the “think-addition” strategy is when solving 8-5, think “five and what makes 8?” Other strategies for subtraction mastery are:
a. counting back b. counting up c. doubles d. fact families e. subtracting from ten (Buchholz, 2004, p. 365)
Using strategies to solve problems develops over time. It is through class discussions that students begin to match strategies to numbers in problems. Helping students make the connections is a key objective of the classroom teacher. “Students do not immediately see these connections and may not see them at all unless they are examined and discussed.” (Huinker, 2003 p.352). Van de Walle writes that teachers need to plan lessons in which specific strategies are highlighted. These lessons include simple story problems designed to make certain strategies explicit. The second type of lesson revolves around a collection of
9

NC DEPARTMENT OF PUBLIC INSTRUCTION SECOND GRADE
facts for which a specific type of strategy is appropriate. (Van de Walle, p. 96). An example of this type of lesson is a series of problems where using doubles would help solve the problems. Knowledge of the addition combinations (facts) should be judged by fluency in use, not necessarily by instantaneous recall. Through repeated use and familiarity, students will come to know most of the addition combinations quickly and a few others by using some quick and comfortable strategy that is based on reasoning about numbers. (Russell and Economopoulos, 2008, p. 192) As students are working to develop understanding of the number combinations they are working on the part-part-whole relationship. They understand that there are parts within a number (7 include 6+1, 4 + 3, etc.). They also begin decomposing larger numbers. Teachers can develop number talks that focus on the connection between knowing “number facts” and knowing larger number combinations. For example a teacher could pose these problems (one at a time) on the board:
4 + 5 = ___ 4 + 2 = ___ 40 + 50 = ___ 40 + 20 = ___ 3 + 3 = ___ 6 + 2 = ___ 30 + 30 = ___ 60 + 20 = ___
After the class solves the first equation show the second related equation. They can solve with cubes until the connection is made. Do several similar problems so the children can start making the connection between knowing number combinations for one digit number and how they relate to two digit numbers. Sources: Buchholz, Lisa. “Learning Strategies for Addition and Subtraction Facts: The Road to
Fluency and the License to Think.” Teaching Children Mathematics (March 2004): 362-367.
Huinker, DeAnn, Janis L. Freckman, and Meghan B. Steinmeyer. “Subtractions Strategies from Children’s Thinking: Moving toward Fluency with Greater Numbers.” Teaching Children Mathematics (February 2003): 347-353.
National Council of Teachers of Mathematics (NCTM). Curriculum and Evaluation Standards for School Mathematics. Reston, Va.: NCTM.
Postlewait, Kristian B., MichelleR. Adams, and Jeffrey C. Shih. “Promoting Meaningful Mastery of Addition and Subtraction.” Teaching Children Mathematics (February 2003): 354-357.
Russell, Susan Jo and Karen Economopoulos. Investigations in Number, Data, and Space, : Counting, Coins and Combinations, grade 2. Pearson Education, Inc. 2008.
Van de Walle, John A. and LouAnn H. Lovin. Teaching Student-Centered Mathematics, Grades K-3. Boston: Pearson Education, Inc., 2006.
Partners for Mathematics Learning, 2009
10

NC DEPARTMENT OF PUBLIC INSTRUCTION SECOND GRADE
Addition Chart (blank)
+ 1 2 3 4 5 6 7 8 9 10
1
2
3
4
5
6
7
8
9
10
11

NC DEPARTMENT OF PUBLIC INSTRUCTION SECOND GRADE
Odds and Evens Common Core Standard:
Work with equal groups of objects to gain foundations for multiplication. 2.OA.3 Determine whether a group of objects (up to 20) has an odd or even number of members, e.g., by pairing objects or counting them by 2s; write an equation to express an even number as a sum of two equal addends.
Standards for Mathematical Practice:
1. Make sense of problems and persevere in solving them. 2. Reason abstractly and quantitatively. 3. Construct viable arguments and critique the reasoning of others.. 6. Attend to precision. 7. Look for and make use of structure. 8. Look for and express regularity in repeated reasoning.
Student Outcomes:
• I can write an equation to show that a number that is doubled has an even sum. • I can explain why two even numbers have an even sum and why two odd numbers have an
even sum and why an odd and even have an odd sum. Materials:
• Odds and Evens gameboard (one for partners) • Paperclip and pencil to use as spinner or a clear spinner to use on top of the gameboard • Pencil to record on gameboard • Color tiles or grid paper for students needing additional instruction • Two of Everything by Lily Toy Hong • Chart paper or a way to display the chart, marker • Index cards with 1+1=, 2+2=, 3+3=, etc. to 10+10, one card for each set of partners • Color tiles or grid paper to model
Advance Preparation: Thinking:
Students will need to have an understanding of odd and even numbers and know addition “doubles”. Materials:
Gameboards would need to be copied, index cards created, and materials listed above collected prior to this lesson.
12

NC DEPARTMENT OF PUBLIC INSTRUCTION SECOND GRADE
Directions: 1. Read Two of Everything to the class. Chart what happens when something is put in the pot.
For example, if 3 of something goes in the pot, then how many come out? 3+3=6. Continue this with at least five examples.
2. Give partners an index card with 1+1= or 2+2= or 3+3=, etc. Ask partners to find something or think of something in the real world that represents their equation. For example, 1+1= a pair of shoes, 4+4= the legs on an octopus (4 on each side), 5+5= the number of cents in a dime (nickel plus nickel)
3. Bring the cards back to the group and share the “doubles” found. Ask students about the sums. Do you notice what happens when you add two equal addends? Why do you think this happens? Brainstorm with the class and model with color tiles by creating rectangles to “prove” this concept.
4. Introduce the game Odds and Evens to the class by the teacher playing the game against the class. One player is Even Steven and one player is Odd Rod, each player spins one spinner and the two addends are added together. If the sum is even Steven records it by writing the equation on a blank sheet of paper or in their math journal, and then writing the sum in the box under Even Steven. If the sum is odd Rod records it by writing the equation on a blank sheet of paper or in their math journal, and then writing the sum in the box under Odd Rod and the number goes to Rod. The first player to fill all the blanks is the winner.
5. While the students are playing, the teacher should rotate around the room and see if students are starting to notice what is happening when an even and an even are added together, odd and odd, even and odd? Ask students if they played again if they would like to be Even Steven or Odd Rod and why.
6. After playing discuss the game and the generalizations students were able to construct about even and odd numbers and what happens when you have two equal addends. As students share what they learned, the teacher could chart their ideas such as “odd + odd = even, odd+ even= odd, even + even = even.”
Questions to Pose: Before:
What do you know about “doubles” facts? How do we know if a number is odd or even?
During:
What have you noticed about the sums you are getting while playing the game? What happens when you add two equal addends? Why do you think this happens? Are you starting to notice what is happening when an even and an even are added together, odd and odd, even and odd? If you played again would you like to be Even Steven or Odd Rod? Why?
After:
As a whole group discuss the questions listed above and focus on what student learned about odd and even addends.
13

NC DEPARTMENT OF PUBLIC INSTRUCTION SECOND GRADE
Possible Misconceptions/Suggestions: Possible Misconceptions Suggestions Students may think an odd and an odd will equal an odd.
Show students a rectangle made with color tiles of an odd number and make another rectangle of an odd number then match the two odd tiles together so that it becomes even.
Students may think an even and odd will equal an even.
Repeat the task above using an odd and even number so students can see that you still have an odd tile left over.
Special Notes:
This task addresses the second part of the standard. This task would need to come in a progression of lessons where an understanding of grouping to create an odd or even number has already been taught. This standard asks that students understand that two equal addends have an even sum, therefore, an extension of this lesson would be for students to understand why an even number and an odd number have an odd sum but this is not addressed in the standard.
Solutions: N/A
14

NC DEPARTMENT OF PUBLIC INSTRUCTION SECOND GRADE
Odds and Evens
Materials: Paper clips for the spinners, pencils, gameboard, blank sheet of paper or math journal Two players: One player is Even Steven and one player is Odd Rod, each player spins one spinner and the two addends are added together. If the sum is even Steven records it by writing the equation on a blank sheet of paper or in their math journal, and then writing the sum in the box under Even Steven, If the sum is odd Rod records it by writing the equation on a blank sheet of paper or in their math journal, and then writing the sum in the box under Odd Rod and the number goes to Rod. The first player to fill all the blanks is the winner.
4
67
8 5
9
4
67
8 5
9
ODD ROD
EVEN STEVEN
15

NC DEPARTMENT OF PUBLIC INSTRUCTION SECOND GRADE
Partners Galore Common Core Standard:
Work with equal groups of objects to gain foundations for multiplication. 2.OA.3 Determine whether a group of objects (up to 20) has an odd or even number of members, e.g., by pairing objects or counting them by 2s; write an equation to express an even number as a sum of two equal addends.
Standards for Mathematical Practice:
1. Make sense of problems and persevere in solving them. 3. Construct viable arguments and critique the reasoning of others. 4. Model with mathematics. 7. Look for and make use of structure. 8. Look for and express regularity in repeated reasoning.
Student Outcomes:
• I can identify a group of objects as being even or odd using different strategies. • I can understand and explain why a group of objects is odd or even.
Materials:
• Large number of Unifix cubes (or some type of manipulative students can grab) for each student. • Hundred board per student • Markers or chips in two different colors (crayons if using paper hundreds board) • Smartboard of hundreds board (optional) • Math journal to record and explain • My Odd Day or My Even Day by Doris Fisher or another literature book about odd and even numbers
Advance Preparation:
• Thinking: Students would need to be familiar with a hundred board and know how to group objects.
• Materials: Prepare large amounts of Unifix cubes or other manipulatives for each student.
Directions: 1. Have students come to the front of the room in groups such as everyone wearing glasses, or
everyone with a brother, everyone with a birthday this month, etc. Ask each group to form partners. Each time record on a hundred board whether everyone has a partner or if there is someone left over. If there is a partner color the number on the hundreds board in green, (or use a green marker) if there is not a partner, color the number red on the hundreds board ( or use a red marker).
2. After doing several of these examples with numbers from 1 to 20 ask students if they see a pattern in the structure of the numbers on the hundreds board. Have students write a prediction in their journals of what they think will happen when they work with larger numbers.
16

NC DEPARTMENT OF PUBLIC INSTRUCTION SECOND GRADE
3. When predictions are completed, students will grab a handful of cubes or other manipulatives and continue to record on the hundreds boards by coloring partner numbers green and no partner numbers red. They will repeat this several times.
4. Look back at the predictions with students and discuss what happened. Ask students to write what they have learned in their journals. Chart ideas from student responses looking for the words “odd” and “even” to come out of their discussion. Focus this discussion on rules about which numbers are odd and which numbers are even and how we know.
5. Close the lesson by reading My Odd Day or My Even Day by Doris Fisher. These books will help students deepen their understanding of odd and even.
Questions to Pose: During:
Discuss which group is odd/even. How do I know if a number is odd or even? What strategies can I use to determine if a number is odd or even?
After:
What patterns do you see in the structure of the numbers on the hundreds board? How does this structure relate to odd and even?
Possible Misconceptions/Suggestions: Possible Misconceptions Suggestions Students may not be able to partner up the manipulatives correctly.
Teacher would need to facilitate individual conversations with students that need help and model groups of two.
Students may not be able to generalize the pattern of the structure of number on the hundreds board.
These students may need the teacher to help them construct this understanding by asking additional questions and filling in more of their hundreds board.
Special Notes:
This task only addresses the first part of the standard taught. The progression of the next lesson should lead into an understanding of writing an equation to express an even number as a sum of two equal addends.
Solutions: N/A
17

NC DEPARTMENT OF PUBLIC INSTRUCTION SECOND GRADE
Hundreds Board
1 2 3 4 5 6 7 8 9 10
11 12 13 14 15 16 17 18 19 20
21 22 23 24 25 26 27 28 29 30
31 32 33 34 35 36 37 38 39 40
41 42 43 44 45 46 47 48 49 50
51 52 53 54 55 56 57 58 59 60
61 62 63 64 65 66 67 68 69 70
71 72 73 74 75 76 77 78 79 80
81 82 83 84 85 86 87 88 89 90
91 92 93 94 95 96 97 98 99 100
18
NC DEPARTMENT OF PUBLIC INSTRUCTION SECOND GRADE
Arrow Cards to 1000 Common Core Standard:
Understand place value. 2.NBT.3 Read and write numbers to 1000 using base-ten numerals, number names, and expanded form.
Additional/Supporting Standard:
Understand place value. 2.NBT.1 Understand that the three digits of a three-digit number represent amounts of hundreds, tens, and ones; e.g., 706 equals 7 hundreds, 0 tens, and 6 ones. Understand the following as special cases: a. 100 can be thought of as a bundle of ten tens – called a “hundred.” b. The numbers 100, 200, 300, 400, 500, 600, 700, 800, 900 refer to one, two, three, four, five,
six, seven, eight, or nine hundreds (and 0 tens and 0 ones). Standards for Mathematical Practice:
1. Make sense of problems and persevere in solving them. 2. Reason abstractly and quantitatively. 4. Model with mathematics. 6. Attend to precision.
Student Outcomes:
• I can read and write numbers up to 1000 using base-ten numerals. • I can read and write numbers using expanded form. • I can represent each digit in a three-digit number.
Materials:
• Arrow Cards • Math journals or paper
Advance Preparation:
• Arrow cards will be copied, cut and stored in bags prior to beginning this task. • Some students will have used arrow cards in previous grades and know how to line up the
arrows. If students have not used arrow cards before the teacher will need to allow time for exploration of the cards.
Directions: 1. If students have not used arrow cards before demonstrate that the arrows must always be on
top of each other when you are making a number. Students sort cards into groups of ones, tens, and hundreds. Students will be working with a partner.
2. After the students have sorted the cards the teacher begins by asking students in their pairs to show numbers such as 3, 6, 7, show me 50, 80, 30, show me 200,600,900.The teacher will also write the number on the board. When they show the number the teacher can say “how many tens in 20 to reinforce the idea of 20 as 2 tens. Some students may still be trying to
19
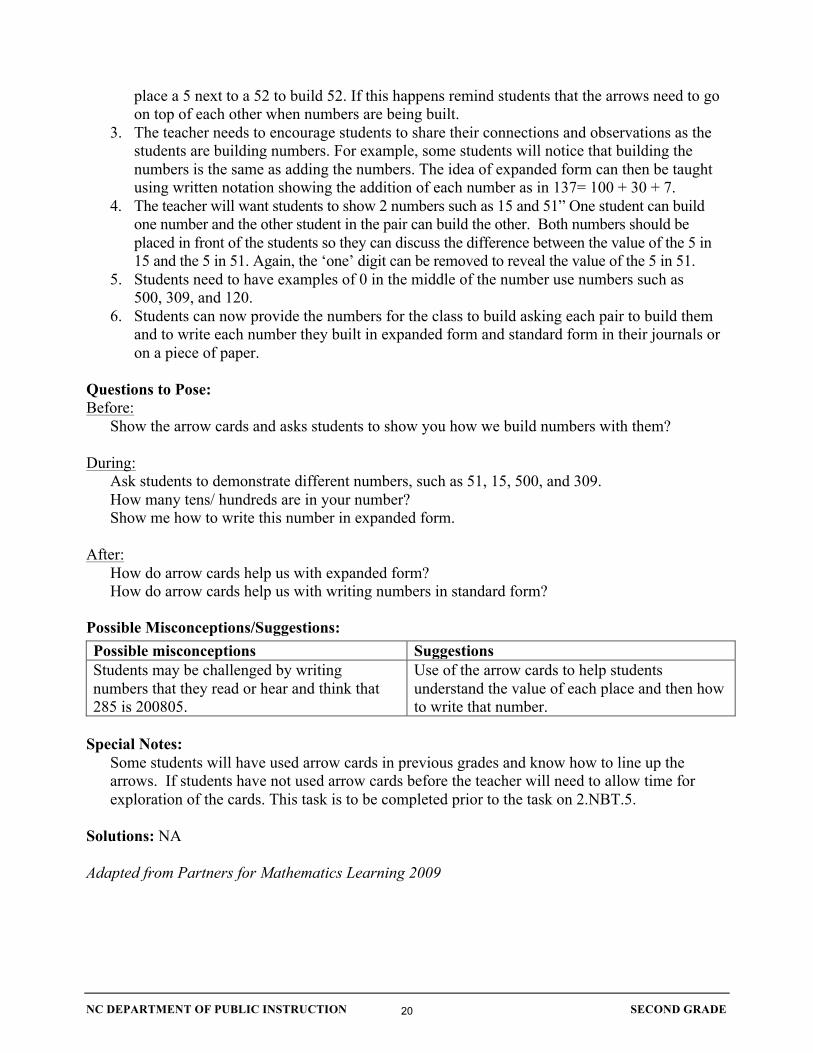
NC DEPARTMENT OF PUBLIC INSTRUCTION SECOND GRADE
place a 5 next to a 52 to build 52. If this happens remind students that the arrows need to go on top of each other when numbers are being built.
3. The teacher needs to encourage students to share their connections and observations as the students are building numbers. For example, some students will notice that building the numbers is the same as adding the numbers. The idea of expanded form can then be taught using written notation showing the addition of each number as in 137= 100 + 30 + 7.
4. The teacher will want students to show 2 numbers such as 15 and 51” One student can build one number and the other student in the pair can build the other. Both numbers should be placed in front of the students so they can discuss the difference between the value of the 5 in 15 and the 5 in 51. Again, the ‘one’ digit can be removed to reveal the value of the 5 in 51.
5. Students need to have examples of 0 in the middle of the number use numbers such as 500, 309, and 120.
6. Students can now provide the numbers for the class to build asking each pair to build them and to write each number they built in expanded form and standard form in their journals or on a piece of paper.
Questions to Pose: Before:
Show the arrow cards and asks students to show you how we build numbers with them? During:
Ask students to demonstrate different numbers, such as 51, 15, 500, and 309. How many tens/ hundreds are in your number? Show me how to write this number in expanded form.
After:
How do arrow cards help us with expanded form? How do arrow cards help us with writing numbers in standard form?
Possible Misconceptions/Suggestions: Possible misconceptions Suggestions Students may be challenged by writing numbers that they read or hear and think that 285 is 200805.
Use of the arrow cards to help students understand the value of each place and then how to write that number.
Special Notes:
Some students will have used arrow cards in previous grades and know how to line up the arrows. If students have not used arrow cards before the teacher will need to allow time for exploration of the cards. This task is to be completed prior to the task on 2.NBT.5.
Solutions: NA Adapted from Partners for Mathematics Learning 2009
20

NC DEPARTMENT OF PUBLIC INSTRUCTION SECOND GRADE
21

NC DEPARTMENT OF PUBLIC INSTRUCTION SECOND GRADE
22

NC DEPARTMENT OF PUBLIC INSTRUCTION SECOND GRADE
23

NC DEPARTMENT OF PUBLIC INSTRUCTION SECOND GRADE
24

NC DEPARTMENT OF PUBLIC INSTRUCTION SECOND GRADE
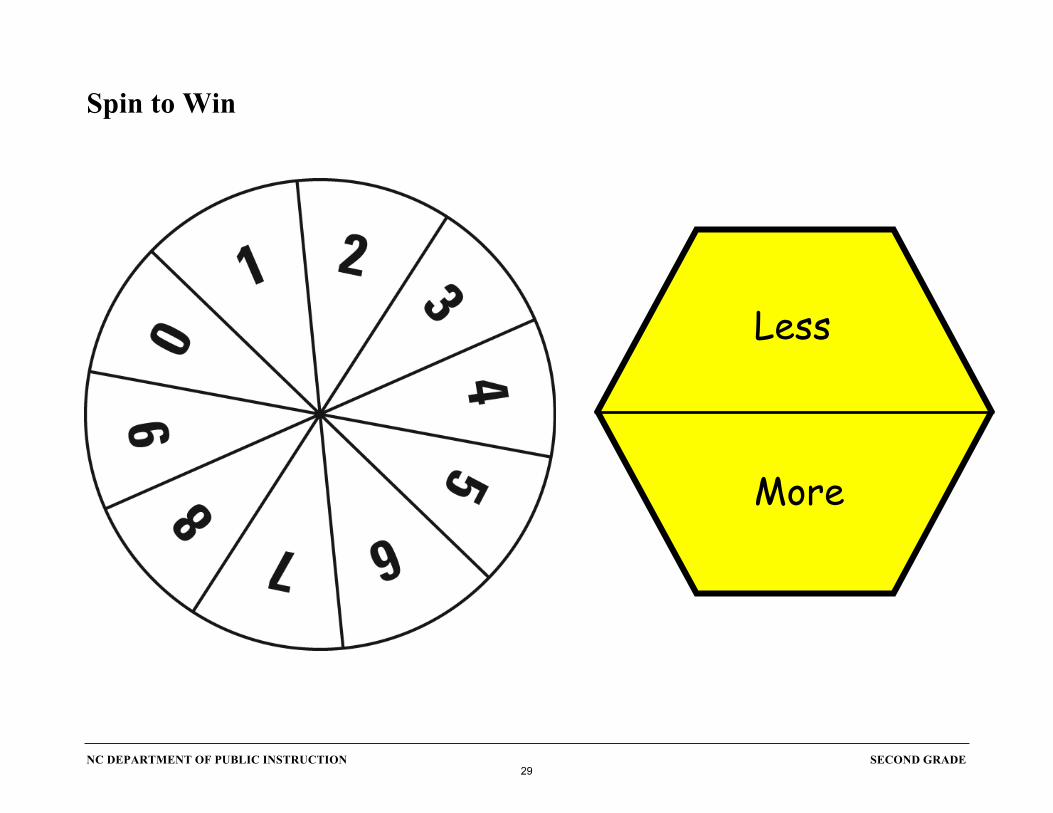
Spin to Win Common Core Standard:
Understand place value. 2.NBT.4 Compare two three-digit numbers based on meanings of the hundreds, tens, and ones digits, using >, =, and < symbols to record the results of comparisons.
Additional/Supporting Standard:
Understand place value. 2.NBT.1 Understand that the three digits of a three-digit number represent amounts of hundreds, tens, and ones; e.g., 706 equals 7 hundreds, 0 tens, and 6 ones. Understand the following as special cases: a. 100 can be thought of as a bundle of ten tens – called a “hundred.” b. The numbers 100, 200, 300, 400, 500, 600, 700, 800, 900 refer to one, two, three, four, five,
six, seven, eight, or nine hundreds (and 0 tens and 0 ones).
Standards for Mathematical Practice: 1. Make sense of problems and persevere in solving them. 2. Reason abstractly and quantitatively. 4. Model with mathematics. 5. Use appropriate tools strategically. 6. Attend to precision. 7. Look for and make use of structure.
Student Outcomes:
• I can build numbers with base ten blocks (or other materials). • I can figure out which number is bigger (or smaller). • I can read and write numbers using expanded form. • I can explain how to determine whether a two or three-digit number is greater than, less
than, or equal to another two or three-digit number. • I can compare two and three-digit numbers and record this comparison by using the symbols
>, <, and =.
Materials: • Recording sheet for each student • Spin to Win spinner for each pair of students • Base Ten blocks • Clear spinners or students can use a pencil with a paper clip to make a spinner
25

NC DEPARTMENT OF PUBLIC INSTRUCTION SECOND GRADE
Advance Preparation: • Before playing this game
- Students should build 2 and then 3-digit numbers using a variety of place value materials such as base ten blocks, Unifix cubes or any other place value material.
- Students should have used the >, < , = signs to record the comparison of two numbers.
• Duplicate the Spin to Win spinners for each pair of students. • Duplicate a recording sheet for each student.
Directions:
• Before introducing the game have students build numbers with base ten blocks. For example, the teacher tells them to build 45. After sharing the model for 45 the teacher has students build additional numbers.
• The teacher introduces the game, Spin to Win. The game can be introduced to the whole class or to small groups.
• First, spin the More/Less spinner to determine if the winning strategy for this game is to have more or less than your partner. Circle more or less on the recording sheet.
• Next Player 1 spins a number spinner. The teacher can spin or have a student spin. After the spin, decide if this spin is for 100s, 10s, or 1s. Take that many base ten pieces and place them in front of you. After the spin discuss how to determine if the spin should be 100s, 10s, or 1s. Talk about how larger numbers should be used for the 100s if you are trying to get the largest number possible. The larger numbers should be used for 10s or 1s if you are trying to get the smallest number possible.
• Record your amount in the correct place on the recording sheet. Continue to demonstrate recording the amount. It is important to have students share ideas about why a number should be 100s, 10s, or 1s.
• Spin for the second player and take the base ten pieces, record that amount on the recording sheet for Player 2.
• Continue taking turns until each person has had 3 turns. Once a number is placed you may not change that number or use that place again.
• After both players have taken three spins, total the amount and write it in standard and expanded form. If the terms standard and expanded form have not been introduced to the class, explain these terms. Determine as a class how to record the amounts in standard and expanded forms.
• Record your total on the recording sheet. • Record the comparison of the two numbers with the <, >, = symbols. • Circle the winning score. Discuss how to determine the winning score. • Play several games as a whole class. The discussion of why numbers spun should be 100s,
10s, or 1s is critical to developing student understanding. • The teacher may play this game for 2-3 class sessions with the whole class before having
partners play the game independently. It is important that the teacher and students justify why numbers are chosen to be 100s, 10s, or 1s.
26

NC DEPARTMENT OF PUBLIC INSTRUCTION SECOND GRADE
Questions to Pose: • Why did you decide to make this number 100s (or 10s or 1s)? • If you are trying to get the smallest number and you spin a 2 should you place that number
in the 100s or 1s place? Why? • If I spin a 5, 8 and 1 what is the largest (smallest) number I could make? How did you
decide on your answer? • How do you write (say a number) in expanded form? How do you write it in standard form? • If you played the round again, would you change your choices? Why? • How do you know that you won/lost? • So far we have 5 tens and 4 ones (tell whatever number has been built). We want to spin the
largest (or smallest number). Talk with your neighbor about what number would be great to spin and why. After students have talked with a partner have student share what number they are hoping to spin and why.
Possible Misconceptions/Suggestions: Possible Misconceptions Suggestions Students cannot build 3-digit numbers with place value materials.
Have students build 2-digit numbers with place value materials. After students are successful with building the numbers, play Spin to Win with 10s and 1s only.
Students do not understand that when you spin a large number you should place it in the 100s place (if the goal is making the largest number possible.)
Have students spin the spinner and take that many 100s, and 10s and 1s. For example, if you spin a 5 take five 100s, five 10s and five 1s. Discuss which is the largest amount. Do this for several spins.
Students do not understand that when you spin a large number you should place it in the 100s place (if the goal is making the largest number possible.
Tell students that you spun an 8 and you want to make the largest (or smallest) number. Discuss if we should make it 8 100s, 8 10s or 8 1s. Have the student make each number with place value materials. Discuss which made the largest (or smallest) amount.
Students do not understand the value of each digit.
Have students build two digit numbers with place value materials. Talk about what each digit represents.
Special Notes: Solutions:
Student papers will vary.
27

NC DEPARTMENT OF PUBLIC INSTRUCTION SECOND GRADE
Spin to Win Player 1________ Player 2________ Game 1 more or less 100s
10s 1s Player 1 Standard Form: _______________ Expanded Form: _____________________________________
100s 10s 1s Player 2 Standard Form: _______________ Expanded Form: _____________________________________
Use <, > or = to compare you number and your partner’s number: __________________________________________________
Game 2 more or less 100s
10s 1s Player 1 Standard Form: _______________ Expanded Form: _____________________________________
100s 10s 1s Player 2 Standard Form: _______________ Expanded Form: ____________________________________
Use <, > or = to compare you number and your partner’s number: __________________________________________________
28
NC DEPARTMENT OF PUBLIC INSTRUCTION SECOND GRADE
Spin to Win
Less
More
29

NC DEPARTMENT OF PUBLIC INSTRUCTION SECOND GRADE
Spin to Win – example of recording a game
Materials: Spin to Win spinner Base Ten pieces Recording Sheet Rules:
1. First, spin the More/Less spinner to determine if the winning strategy for this game is to have more or less than your partner. Circle this on the recording sheet.
2. Next each person spins a number spinner. Take turns spinning. After you spin, you decide if your spin is for 100s, 10s, or 1s. Take that many base ten pieces and place them in front of you
3. Record your amount in the correct place on the recording sheet. After your partner spins and takes his/her base ten pieces, record that amount on your recording sheet. You have a place to record your amount and a different to record your partner’s amount.
4. Continue taking turns until each person has had 3 turns. Once you have placed a number in a place you may not change that number or use that place again.
5. After you have both taken three spins, total your amount and write it in standard and expanded form. 6. Record your total on the recording sheet. Also compare your number and record them using the <, > or = symbols. 7. Circle the winning score.
Game 1 more or less 100s
10s
1s
Player 1 Standard From: 244 Expanded Form 200 + 40 + 4 = 244
100s
10s
1s
Player 2 Standard From: 382 Expanded Form 300 + 80 + 2 = 382
Use <, > or = to compare you number and your partner’s number: 244 < 382
30
NC DEPARTMENT OF PUBLIC INSTRUCTION SECOND GRADE
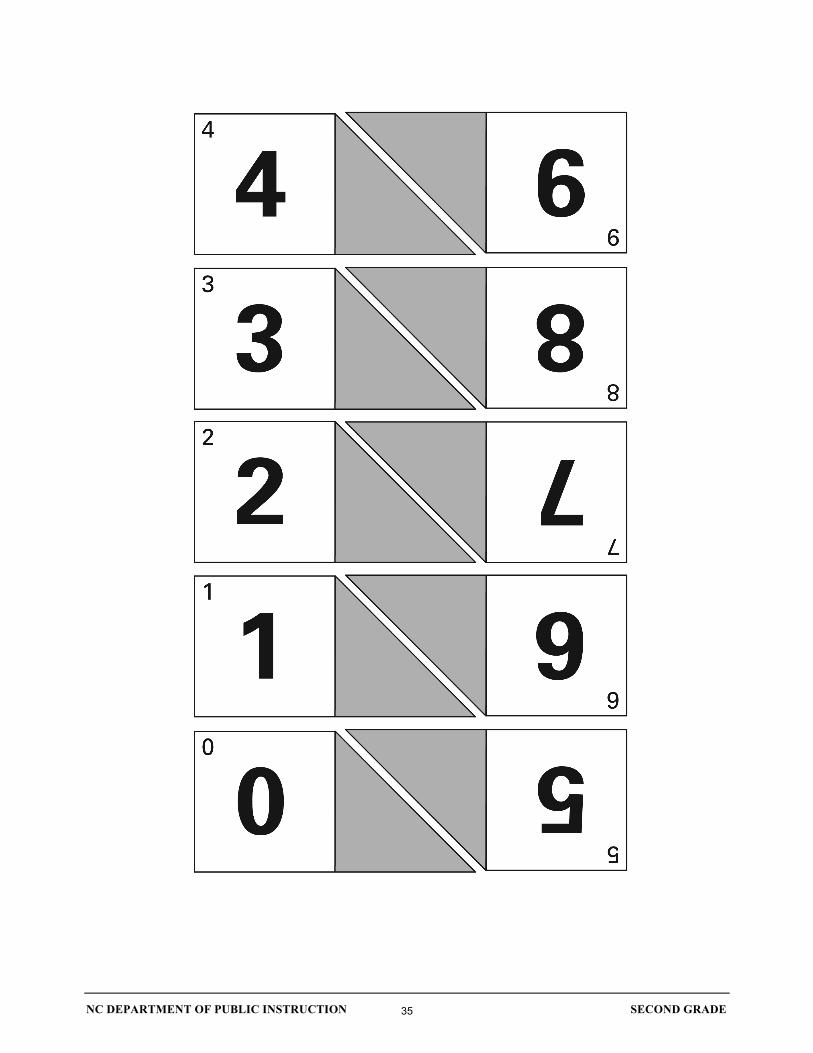
Arrow Cards Common Core Standard:
Use place value understanding and properties of operations to add and subtract. 2.NBT.5 Fluently add and subtract within 100 using strategies based on place value, properties of operations, and/or the relationship between addition and subtraction.
Standards for Mathematical Practice:
1. Make sense of problems and persevere in solving them. 2. Reason abstractly and quantitatively. 3. Construct viable arguments and critique the reasoning of others. 4. Model with mathematics. 5. Use appropriate tools strategically. 6. Attend to precision. 7. Look for and make use of structure.
Student Outcomes:
• I can add within 100 with ease by applying strategies (composing numbers into tens and ones, using mental strategies) based on the numbers being added.
• I can use arrow cards as a tool to help me add using place value strategies. • I can use a number line to add within 100.
Materials: • Arrow Cards (One set per partner on card stock if preferred) • Zip plastic bag to store cards • Paper to draw a number line • Paper to chart a problem to be displayed • Large paper or a way to display a number line
Advance Preparation:
• There is a growing body of research to suggest the importance of the number line as a tool for helping children develop greater flexibility in mental arithmetic as they construct mathematical meaning, develop number sense, come to understand number relationships, and develop powerful strategies for addition and subtraction. The number line can do much more than simply help children count to 100. The number line can be used as a tool to help children function well with the various operations. The number line is a powerful visual tool for adding and subtracting.
• Arrow cards will need to be copied, cut and stored in bags prior to beginning this task. This can be time consuming, but the value of these cards and the flexibility of their use is worth the time spent in preparation.
• Students may have had opportunities to use these cards in previous grades and may understand how to line the arrows up to show the value. If not, the teacher will need to spend time “playing” with these materials prior to instruction.
31
NC DEPARTMENT OF PUBLIC INSTRUCTION SECOND GRADE
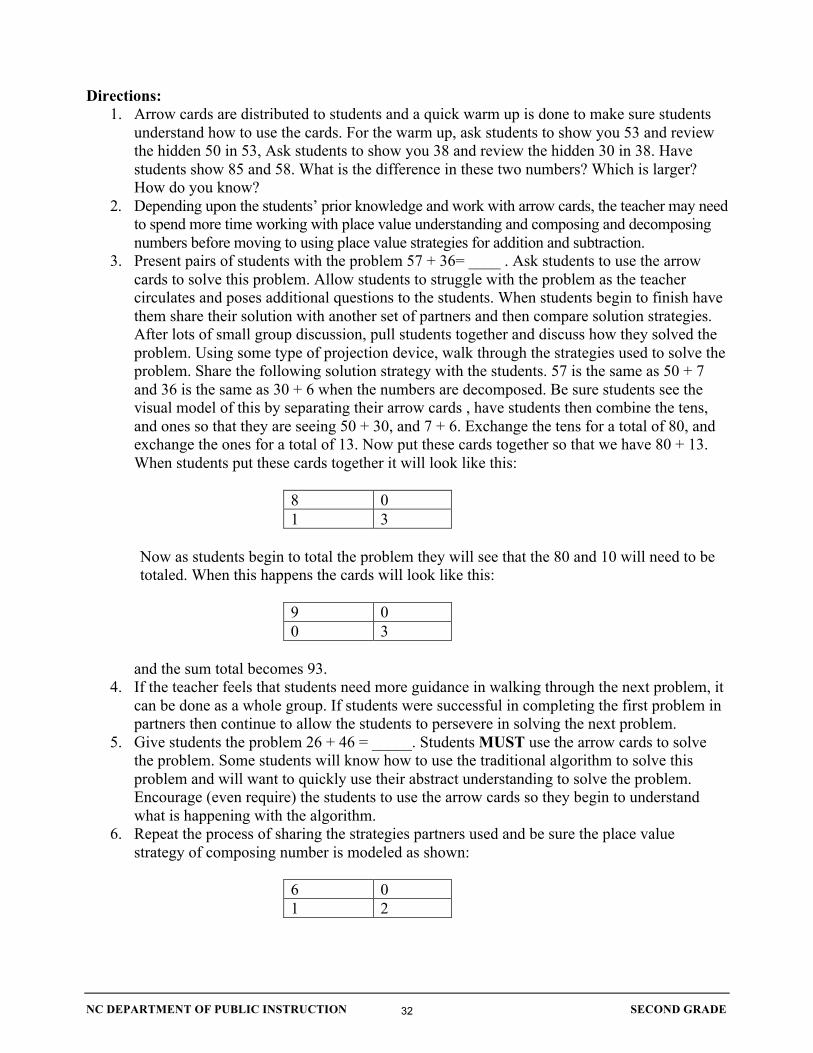
Directions: 1. Arrow cards are distributed to students and a quick warm up is done to make sure students
understand how to use the cards. For the warm up, ask students to show you 53 and review the hidden 50 in 53, Ask students to show you 38 and review the hidden 30 in 38. Have students show 85 and 58. What is the difference in these two numbers? Which is larger? How do you know?
2. Depending upon the students’ prior knowledge and work with arrow cards, the teacher may need to spend more time working with place value understanding and composing and decomposing numbers before moving to using place value strategies for addition and subtraction.
3. Present pairs of students with the problem 57 + 36= ____ . Ask students to use the arrow cards to solve this problem. Allow students to struggle with the problem as the teacher circulates and poses additional questions to the students. When students begin to finish have them share their solution with another set of partners and then compare solution strategies. After lots of small group discussion, pull students together and discuss how they solved the problem. Using some type of projection device, walk through the strategies used to solve the problem. Share the following solution strategy with the students. 57 is the same as 50 + 7 and 36 is the same as 30 + 6 when the numbers are decomposed. Be sure students see the visual model of this by separating their arrow cards , have students then combine the tens, and ones so that they are seeing 50 + 30, and 7 + 6. Exchange the tens for a total of 80, and exchange the ones for a total of 13. Now put these cards together so that we have 80 + 13. When students put these cards together it will look like this:
8 0 1 3
Now as students begin to total the problem they will see that the 80 and 10 will need to be totaled. When this happens the cards will look like this:
9 0 0 3
and the sum total becomes 93. 4. If the teacher feels that students need more guidance in walking through the next problem, it
can be done as a whole group. If students were successful in completing the first problem in partners then continue to allow the students to persevere in solving the next problem.
5. Give students the problem 26 + 46 = _____. Students MUST use the arrow cards to solve the problem. Some students will know how to use the traditional algorithm to solve this problem and will want to quickly use their abstract understanding to solve the problem. Encourage (even require) the students to use the arrow cards so they begin to understand what is happening with the algorithm.
6. Repeat the process of sharing the strategies partners used and be sure the place value strategy of composing number is modeled as shown:
6 0 1 2
32

NC DEPARTMENT OF PUBLIC INSTRUCTION SECOND GRADE
When cards are totaled:
7 0 0 2
for a sum total of 72. 7. Continue this process with several problems and continue to require the use of arrow cards. 8. Using the problem we began with of 57 + 36= ____ ask students how it could be modeled
on a number line. This should generate lots of discussion and again will depend on the prior experience students have had with number lines. Some good questions to lead this discussion would include, “Does our number line have to start at 1?” “Does a number line have to have every number marked on it?” “What could we begin with to solve this problem?” “What are the increments we could use to jump on the number line?” The teacher should model and “try” the suggestions the students give for ways to solve the problem. One efficient way to solve it problem would be:
57
30
33
87 90 93
After solving this problem, have students go back to the problems they solved earlier and create a number line to represent their solution strategy. Discuss the place value understandings used in both of these methods.
9. Ask pairs of students to come up with a problem they would like to solve, this problem would need to be approved by the teacher and may depend on the understanding of the students. It would need to be a problem that could be solved by using the arrow cards and could be represented on a number line. This would limit students in using a number over 100 (because of the arrow cards). Have pairs of students chart their problem and solution in a way that could be displayed in the classroom. Ask students to display the solution with the arrow cards and the number line on the walls and have students do a “Gallery Walk” to look at each others problems. Encourage students to make their solutions very clear and to include pictures, models, and words so that a second grader could understand how they solved the problem.
Questions to Pose: Before:
Can you show me how to make 25, 57, 89, 58, 99, etc. with the arrow cards. What does the hidden zero represent? Explain why the zero is important.
During:
How can you use your arrow cards to help you solve this problem? Is there more than one way to represent that number? Can you show me another way to make that number? Does our number line have to start at 1? Does a number line have to have every number marked on it?
33

NC DEPARTMENT OF PUBLIC INSTRUCTION SECOND GRADE
What could we begin with to solve this problem? What are the increments we could use to jump on the number line? What have we already learned that can help us with the number line? How is understanding place value going to help you solve this problem?
After:
What strategy did you find most helpful in solving the problems? How are the arrow cards and the number line alike as a strategy? What would you say to a first grader if you were trying to teach them how to add using arrow cards? What would you say to a first grader if you were trying to teach them to add using a number line?
Possible Misconceptions/Suggestions: Possible Misconceptions Suggestions Students may not have a conceptual understanding of place value so that they would think 34 is 3+4 rather than 30+4 and may not see the relevance of the zeros.
Have students build numbers with base ten blocks and compare those numbers to the arrow cards so that the students can see why the zero is important. This may take several conversations and a variety of models until students begin to understand.
Students with limited or no experience with an empty number line may want to put each number on the number line. Students may not know how to space the numbers on the number line so that they represent the quantity of the number correctly.
Begin with smaller numbers for these students so they can see the actual space between numbers on a number line that is marked with appropriate spacing.
Special Notes:
This task is very involved and may take several days depending on the prior experiences and the place value understandings of the students. This lesson only involves addition but the standard also addresses subtraction.
Adapted from Partners for Mathematical Learning, 2009
34
NC DEPARTMENT OF PUBLIC INSTRUCTION SECOND GRADE
35
NC DEPARTMENT OF PUBLIC INSTRUCTION SECOND GRADE
36

NC DEPARTMENT OF PUBLIC INSTRUCTION SECOND GRADE
How Far to 100? Common Core Standards:
Use place value understanding and properties of operations to add and subtract. 2.NBT.5 Fluently add and subtract within 100 using strategies based on place value, properties of operations, and/or the relationship between addition and subtraction.
Additional/Supporting Standard:
Understand place value. 2.NBT.2 Count within 1000; skip-count by 5s, 10s, and 100s. Use place value understanding and properties of operations to add and subtract. 2.NBT.6 Add up to four two-digit numbers using strategies based on place value and properties of operations.
Standards for Mathematical Practice:
1. Make sense of problems and persevere in solving them. 2. Reason abstractly and quantitatively. 3. Construct viable arguments and critique the reasoning of others. 4. Model with mathematics. 5. Use appropriate tools strategically. 6. Attend to precision. 7. Look for and make use of structure.
Student Outcomes:
• I can add two numbers and explain my strategy to find the total. • I can figure out how far away a number is from 100 and explain my strategy. • I can use place value to add numbers to 100.
Materials:
• Ten Frame cards – one color (These are the cards that are full ten frames. There are ten of these in a set.)
• Ten Frame cards – different color (These are the partial ten frames. There are ten of these in a set.) • Optional: calculators, 100 boards
Advance Preparation:
• Before playing this game students should be familiar with combinations to 10. Students should have developed strategies for determining how far away a number is from 10.
• Students should have worked with combinations that make a ten and have discussed strategies that they use to make a ten or other number combinations.
37

NC DEPARTMENT OF PUBLIC INSTRUCTION SECOND GRADE
• Students should be familiar with ten frames before playing this game. One possible preactivity is the teacher shows several full ten frames and a ten frame with 8 on the overhead/document camera for 2-3 seconds. Cover the ten frames, and ask the students how many dots were on the ten frames. Students share strategies such as, “I saw 4 ten frames and 8 ones. 10, 20, 30, 40, + 8. So it’s 48.” Another strategy might be “I saw 5 ten frames. One was missing two dots so that’s 8. It’s 48.” Continue “flashing” different ten frame amounts & discussing strategies.
• In first grade students mentally found 10 more or 10 less than a number. Students may need to review this concept before playing this game.
• Cut the ten frame cards and make sets of cards. One set of cards is 10 full ten frames and one each of the 0-9 ten frames. There should be two 5 frames in one set.
Directions: 1. Two students work together with one set of ten-frame cards. 2. One student makes a two-digit number with the cards. For example, 45 is built with 4 tens
and a 5 ten frame. 3. Both students work to determine what goes with the ten-frame amount (45) to make 100. 4. The students discuss their strategy for determining how far away the number is from 100.
Possible strategies used by students: “You made 45.” Student picks up 10 frames and counts up from 45. “55, 65, 75, 85, 95. Now I need to add ones. 96, 97, 98, 99, 100.” That’s 50 and 5 more. So it’s 55. 45 + 55 is 100. Another strategy: “You built 45. You need 5 more to make 50.” Student picks up the 5 ten frame. “Now I can count to 100.” Student lays out 5 more ten frames. “It’s 55. 45 + 55 = 100.” Students could count up using a 100 board.
5. Each student writes the solution on paper. The solution to the example would be 45 + 55 = 100. 6. Students take turns making the original number. 7. Students record the number sentences. 8. Students can use a calculator to check their number sentence. 9. After students have played the game have a class discussion on the strategies used. The
teacher shows 28 using ten frames. Ask the students how to determine how far 28 is from 100. Students share strategies. Have partners explain one of the problems they solved and how they solved the problem. See Questions to Pose (below) for possible questions.
Questions to Pose: Before the game:
• How will the ten frames help you figure out how far away the number is from 100? • How can you use skip counting by tens to help figure out how far away this number is from 100?
As students play game and during the class discussion:
• What was your strategy to figure out how far away this number was from 100? • How can you use skip counting by tens to help figure out how far away this number is from 100? • Look at the one’s place. How far away is that number from 10? Does that help you solve
this problem? • How did the hundreds board help you solve the problems. • How does knowing your “ten” facts help you with this game? • After several problems have been solved, ask what do you notice about the ten’s place of the
two numbers? (It will usually add to 9, unless both numbers in the one’s place are both zero.) • Show the mathematics you used and explain your reasoning.
38

NC DEPARTMENT OF PUBLIC INSTRUCTION SECOND GRADE
Possible Misconceptions/Suggestions: Possible Misconceptions Suggestions Students cannot count by 10s from any number.
Have students use a 100 board to see the pattern in skip counting by tens from any number.
Students do not fluently know the ten facts. Look at the ten frames that are not full. Discuss what they notice. For example, looking at the 8 ten frame card a student might notice that there are 5 dots on one side and 3 dots on the other side. Therefore 8 + 3 = 10 and 3 + 8 = 10. There are 2 dots missing on the 8 ten frame card so 10-2 = 8. Continue to discuss the other cards to help build fluency on number combinations.
Students think that the tens place must have ten tens. They forget to include the ones.
Have the students count the total number of dots by adding the tens and then the ones. Talk about why the total is more than 100.
Students have difficulty making a number with the ten frame cards.
Have students discuss what they notice about the ten frame. Lay different frames out and determine the total number of dots. Discuss ways of determining the number of dots without counting all dots individually.
Special Notes: Solutions:
Student papers will vary. Adapted from: Teaching Student-Centered Mathematics, Grade K-3 by John A. Van de Walle and LouAnn H. Lovin
39

NC DEPARTMENT OF PUBLIC INSTRUCTION SECOND GRADE
40
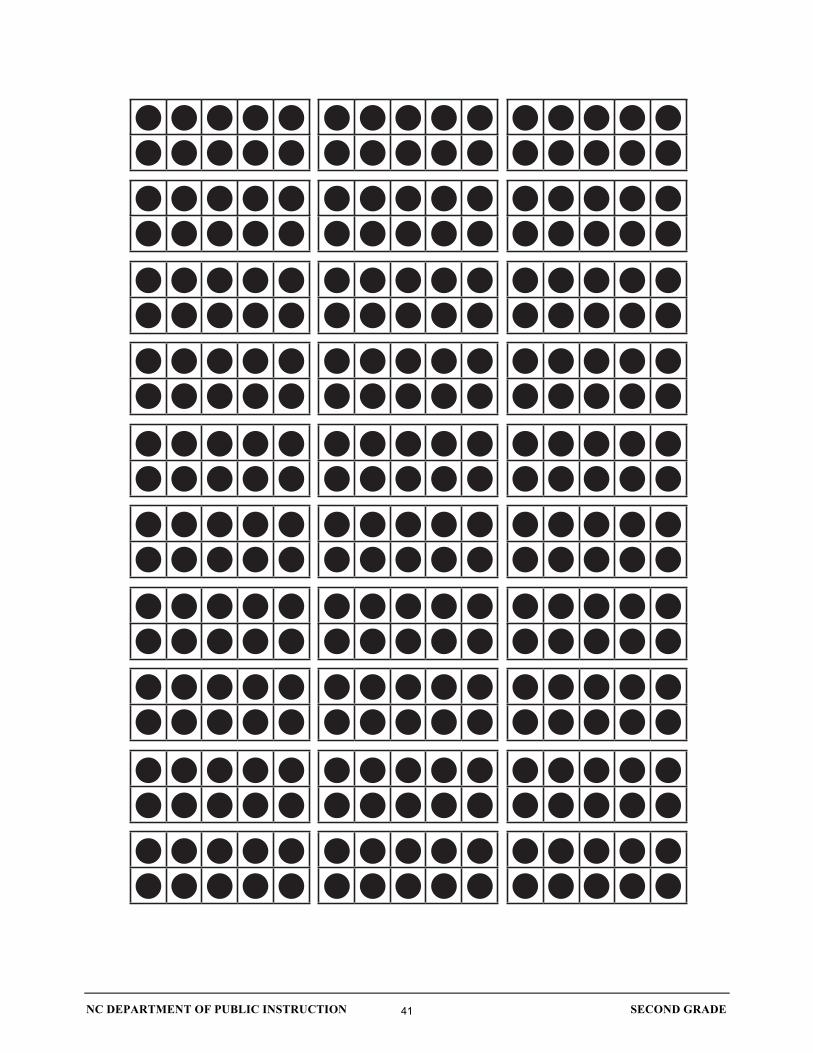
NC DEPARTMENT OF PUBLIC INSTRUCTION SECOND GRADE
41

NC DEPARTMENT OF PUBLIC INSTRUCTION SECOND GRADE
Skip Counting on a Sheet Common Core Standard:
Use place value understanding and properties of operations to add and subtract. 2. NBT.8 Mentally add 10 or 100 to a given number 100-900, and mentally subtract 10 or 100 from a given number 100-900.
Additional/Supporting Standard
2.NBT.1 Understand that the three digits of a three-digit number represent amounts of hundreds, tens, and ones; e.g., 706 equals 7 hundreds, 0 tens, and 6 ones. Understand the following as special cases: a. 100 can be thought of as a bundle of ten tens – called a “hundred.” b. The numbers 100, 200, 300, 400, 500, 600, 700, 800, 900 refer to one, two, three, four, five, six, seven, eight, or nine hundreds (and 0 tens and 0 ones).
Standards for Mathematical Practice:
1. Make sense of problems and persevere in solving them. 2. Reason abstractly and quantitatively. 3. Construct viable arguments and critique the reasoning of others. 4. Model with mathematics. 5. Use appropriate tools strategically. 6. Attend to precision. 7. Look for and make use of structure. 8. Look for and express regularity in repeated reasoning.
Student Outcomes:
• I can add 10 to a given number from 100-900. • I can mentally subtract 10 from a given number from 100-900. • I can mentally add 100 to a given number from 100-900. • I can mentally subtract 100 from a given number 100-900.
Materials:
• 101 to 200 black line master • Full or Queen size Sheet with 100 grid sections marked • Numbers 700-799 written on index cards, one number per card • 1000 chart found at www.allenteachers.com
Advance Preparation:
• Students understanding of place value will lead to efficient strategies for computing with numbers. • Teacher needs to have black line master copied for students. • The easiest way to mark the sheet into 100 grids is to use colored electrical tape and measure
into sections. This can be done as a problem solving task with students or prepared ahead of time. It is time consuming but can be used for many tasks and helps students visualize working with 10 mentally. It is well worth the time to make the sheet as it can be used for lots of place value understandings as well.
42

NC DEPARTMENT OF PUBLIC INSTRUCTION SECOND GRADE
Directions: 1. Have students sit around the sheet in the floor and talk about the grids on the sheet.
Compare these to a hundreds board and review structure in number on the hundreds board. Students should have had lots of experiences with the hundreds board in first grade.
2. Explain to the students that we will be beginning with 700 and will build to 799. Put the numbers 700 and 799 on the board in the correct place. Hand out a number card to each student.
3. Ask students if anyone know where their card needs to go on the sheet. If they do and can justify where it goes by explaining it to the class they can put the card on the sheet. They will take a new card after placing theirs on the sheet.
4. Continue giving students opportunities to place their cards on the sheet. Emphasize when students add or subtract 10 mentally.
5. When the chart is filled in talk about the structure of the numbers on the sheet and look at the patterns created within the columns. Help students make connections to the addition and subtraction of 10.
6. Pull up the 1000 chart found at the website above. The teacher can create various charts with this site. Students can see the same structures in number between 400 and 600 or 300 and 500 using this site.
7. By creating the larger charts students can also add and subtract 100 and see the structure of the number system.
8. Continue to review using these charts throughout the year. Questions to Pose: Before:
What do you know about the structure of numbers on a hundreds board? What have you already learned about hundreds boards?
During:
Ask questions as students add numbers to the board. Focus these questions on how did you know to place that number there with an emphasis on adding or subtracting 10 mentally.
After:
What did you learn about adding and subtracting 10 mentally? How can we apply what we learned about 10 when adding and subtracting 100?
Possible Misconceptions/Suggestions: Possible misconceptions Suggestions Students who are forced to rely on algorithms and procedural understanding of mathematics struggle with the ability to fluently add and subtract 10 and/or 100 to numbers.
Ask students to use the hundreds chart to add or subtract 10. Ensure that they understand that moving down a row means you are adding 10 and moving up a row means you are subtracting 10. If they have to count by ones to add the 10 they do not see this relationship. Hundred charts for numbers from 100-900 are available.
Special Notes:
This task takes quite a while to complete if students put all the numbers on the chart. You may want to assist students in filling in the numbers if they lose interest.
Solutions: N/A
43

NC DEPARTMENT OF PUBLIC INSTRUCTION SECOND GRADE
101 102 103 104 105 106 107 108 109 110
111 112 113 114 115 116 117 118 119 120
121 122 123 124 125 126 127 128 129 130
131 132 133 134 135 136 137 138 139 140
141 142 143 144 145 146 147 148 149 150
151 152 153 154 155 156 157 158 159 160
161 162 163 164 165 166 167 168 169 170
171 172 173 174 175 176 177 178 179 180
181 182 183 184 185 186 187 188 189 190
191 192 193 194 195 196 197 198 199 200
44

NC DEPARTMENT OF PUBLIC INSTRUCTION SECOND GRADE
How Big Is A Foot? Common Core Standards
Measure and estimate lengths in standard units. 2.MD.1 Measure the length of an object by selecting and using appropriate tools such as rulers, yardsticks, meter sticks, and measuring tapes.
Standards for Mathematical Practices
1. Make sense of problems and persevere in solving them. 4. Model with mathematics. 5. Use appropriate tools strategically 6. Attend to precision.
Student Outcomes:
• I can create a ruler as a measurement tool. • I can measure the length of an object using a standard ruler.
Materials:
• How Big is a Foot? By Rolf Myller • one inch color tiles • masking tape • one inch grid paper • scissors • crayons
Advance Preparation: Material Preparation:
• Have materials ready and have a model of the ruler ready to show the students. This is made by taping 12 one inch color tiles together to form a 12 inch ruler.
Thinking Preparation:
• This lesson is intended to be introduced after students have had opportunities to use non-standard measurement tools to measure objects. This is then the introductory lesson to using standard measurement when students are ready to understand the need for a standard unit.
Directions:
1. Read the book to the class as a whole group. 2. Discuss what happened with the bed so that all children understand the importance of
standard measurement. Make sure the discussion is clear as most second graders will understand but a few will need this discussion to help them see why standard measurement is important. Relate this discussion to prior experiences when students have used non-standard measurements.
3. Explain to the students that the King’s foot was 12 inches long and so we will make a copy of the King’s foot to use to measure. We will call it a “ruler” since he was a ruler or it can be referred to as a foot stick.
45

NC DEPARTMENT OF PUBLIC INSTRUCTION SECOND GRADE
4. Ask students to tape together the one inch color tiles in an AB pattern to make it easier to count the tiles when we measure. (Share the model you have created or make your ruler with the students so they will see how to tape it together.) When students have their rulers taped together, they can begin to measure items in the room while the teacher helps everyone complete the task.
5. When all rulers are completed, pull the group together and ask them to measure several specific items in the classroom. Ask students, “If you could write on your ruler, where would zero belong?” Make sure students understand that they must start at the beginning of the ruler and count each tile, demonstrate this using your shoe then have students measure their shoe.
6. After students measure several items and compare the measurements have them transfer the color tile ruler to the one inch grid paper. Students will color the squares to match their color tile ruler and write the numbers to represent inches in the squares. Again, question students about the location of zero.
7. Students then measure their shoe with the paper ruler again making sure to begin at the beginning of the ruler. Students measure several objects in the classroom and record in their journals while teacher observes to see if individual students are measuring correctly.
8. These rulers should be kept so that students can compare them to a regular ruler when they are introduced.
Questions to Pose: Before:
When would we measure anything in the real world? Why is it important to have a standard unit when measuring?
During: How do you know the measurement of an object? Can you show me how you measured this object?
After: What did you learn about using a ruler today? When will you use this? Why does “what” we measure help us decide “how” we measure?
Possible Misconceptions/Suggestions: Possible Misconceptions Suggestions Students will want to start on the second tile rather than the first tile and therefore their measurement will be incorrect.
When modeling be sure to discuss why the first tile must be counted as it is a part of the measuring tool. If necessary, take the tiles apart and have the student align them and count.
Special Notes:
After completing this task, students would create three rulers and tape them together to create a yardstick and use it to measure objects as well. These can be created just as their ruler (the twelfth tile being a different color than colors used previously), so that students can see the three rulers within the yardstick.
Solutions:
46
NC DEPARTMENT OF PUBLIC INSTRUCTION SECOND GRADE
47
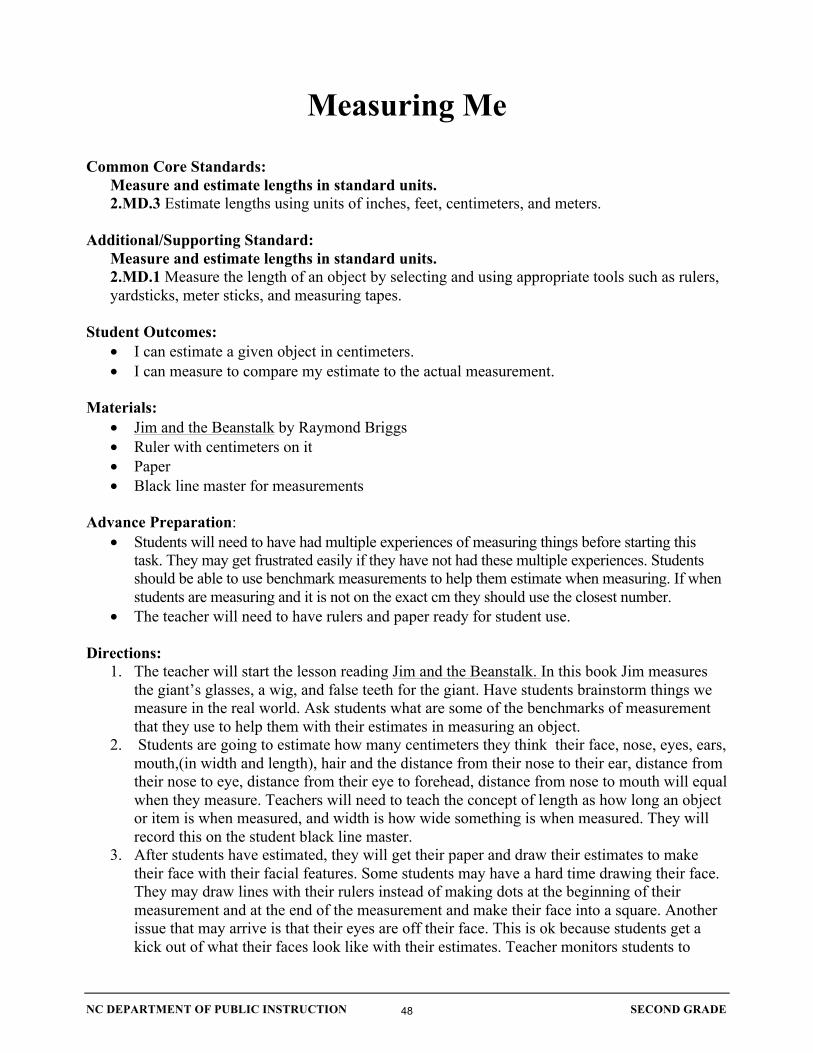
NC DEPARTMENT OF PUBLIC INSTRUCTION SECOND GRADE
Measuring Me Common Core Standards: Measure and estimate lengths in standard units.
2.MD.3 Estimate lengths using units of inches, feet, centimeters, and meters. Additional/Supporting Standard:
Measure and estimate lengths in standard units. 2.MD.1 Measure the length of an object by selecting and using appropriate tools such as rulers, yardsticks, meter sticks, and measuring tapes.
Student Outcomes:
• I can estimate a given object in centimeters. • I can measure to compare my estimate to the actual measurement.
Materials:
• Jim and the Beanstalk by Raymond Briggs • Ruler with centimeters on it • Paper • Black line master for measurements
Advance Preparation:
• Students will need to have had multiple experiences of measuring things before starting this task. They may get frustrated easily if they have not had these multiple experiences. Students should be able to use benchmark measurements to help them estimate when measuring. If when students are measuring and it is not on the exact cm they should use the closest number.
• The teacher will need to have rulers and paper ready for student use.
Directions: 1. The teacher will start the lesson reading Jim and the Beanstalk. In this book Jim measures
the giant’s glasses, a wig, and false teeth for the giant. Have students brainstorm things we measure in the real world. Ask students what are some of the benchmarks of measurement that they use to help them with their estimates in measuring an object.
2. Students are going to estimate how many centimeters they think their face, nose, eyes, ears, mouth,(in width and length), hair and the distance from their nose to their ear, distance from their nose to eye, distance from their eye to forehead, distance from nose to mouth will equal when they measure. Teachers will need to teach the concept of length as how long an object or item is when measured, and width is how wide something is when measured. They will record this on the student black line master.
3. After students have estimated, they will get their paper and draw their estimates to make their face with their facial features. Some students may have a hard time drawing their face. They may draw lines with their rulers instead of making dots at the beginning of their measurement and at the end of the measurement and make their face into a square. Another issue that may arrive is that their eyes are off their face. This is ok because students get a kick out of what their faces look like with their estimates. Teacher monitors students to
48

NC DEPARTMENT OF PUBLIC INSTRUCTION SECOND GRADE
make sure they are using their cm ruler correctly. If a student is getting frustrated ask student questions that will help them get back on track. Such as, if I put my ruler here and not on this side will that help you measure the space accurately?
4. Students measure all of their facial features and write them on the student black line master. Students draw their face with their actual measurements.
5. Have students get into small groups and compare and discuss their estimate drawings and their actual drawings. Students should use vocabulary such as about, a little less than, a little more than etc…
6. Display student drawings side by side somewhere in the room. Questions to Pose: Before:
What are some items that we measure in everyday life? Why is important to be able measure an item or object? When would you use measurement estimation in real life? What are some of the benchmark measurements do you to help your estimate when measuring?
During:
Does your nose length measure more or less than the width of your nose? (Use any of the other measurements to compare) Show me how you measure the length of your face? (Or any other facial parts you measured.)
After:
If you had to estimate your facial parts again what would you estimate differently? What other objects could we estimate and then draw?
Possible Misconceptions/Suggestions: Possible Misconceptions Suggestions Students will begin to measure an item at the one on the ruler.
Give students plenty of opportunity to practice using non standard measurement
Students sometimes think that estimations have to be "correct" to be good
Work with students to see how some estimates can be better than others. Use conversation and questions to explore what makes an estimate "better" or "best."
Special Notes:
It is important to use measurement benchmarks such as, shoulder to finger tips is a yard, knuckle to knuckle is an inch, a fingertip is a centimeter. Always have students estimate a measurement prior to actually measuring the objects. Estimation helps students focus on the attribute being measured. When students estimate, they are curious to see how close their estimate is to the actual measurement. Use language that describes the estimate such as about, a little less than, a little more than. Estimating length helps students develop benchmarks for how long something is. This task may need to be completed over a 2 day period.
Solutions: N/A
49

NC DEPARTMENT OF PUBLIC INSTRUCTION SECOND GRADE
Measuring Me
Estimate cm Actual cm Face width Face width Face length Face length Ears width Ears width Ears length Ears length Distance from nose to ear
Distance from nose to ear
Nose width Nose width Nose length Nose length Distance from nose to ear
Distance from nose to ear
Distance from eye to forehead
Distance from eye to forehead
Eye width Eye width Eye length Eye length Mouth width Mouth width Mouth length Mouth length Distance from nose to ear
Distance from nose to ear
Hair Hair
50
NC DEPARTMENT OF PUBLIC INSTRUCTION SECOND GRADE
It’s Lengthy Common Core Standard:
Measure and estimate lengths in standard units. 2.MD.4 Measure to determine how much longer one object is than another, expressing the length difference in terms of a standard length unit.
Additional/Supporting Standard(s): Measure and estimate lengths in standard units.
2.MD.1 Measure the length of an object by selecting and using appropriate tools such as rulers, yardsticks, meter sticks, and measuring tapes.
Standards for Mathematical Practice:
1. Make sense of problems and persevere in solving them. 4. Model with mathematics. 5. Use appropriate tools strategically. 6. Attend to precision.
Student Outcomes:
• I can measure the length of any object in a given unit. • I can find the difference in length between two objects using standard units. • I can record and draw a picture to show the measurement of the comparison of two objects.
Materials:
• Books (various sizes to measure) • Measuring tapes with inch increments (rulers can be used if preferred) • Twelve Snails and One Lizard by Susan Hightower • Blackline Master, Math journals or blank paper for recording
Advance Preparation: Thinking:
• Students need to know how to measure using a measuring tape (or ruler). This lesson should be taught after most students have an understanding of using a standard measurement tool.
Materials:
• Measuring tapes or rulers should be collected • Books need to be available • Copy the Blackline Master if it is being used for recording
Directions: 1. Read Twelve Snails and One Lizard to the whole class as a review of measuring in inches.
Discuss the book with the class and give students measuring tapes as you talk about how to measure objects.
51

NC DEPARTMENT OF PUBLIC INSTRUCTION SECOND GRADE
2. Ask students to put two books on their desk that are not the same length. They will be measuring the length of the book so make sure they understand the difference in the length and the width of the book.
3. In their math journal or on the blackline master, students will record the length of each book measured in inches. They will then write an equation to show which book is longer and how much longer it is than the other book. For example if one book is 8 inches long and one is 12 inches long they would write 12-8=4 and record one book is 4 inches longer than the other.
4. Repeat this process with their arm and their partners arm by helping each other measure their arm and their partner’s arm and then recording the difference in the length of the two arms using an equation.
5. Repeat by measuring your pencil and your partner’s pencil. Since we are only using complete units, you may have to direct students to use the measurement closest to the unit. For example if the pencil is a little over 7 it would still be 7 but if it is closer to 8 then it would be recorded as 8.
6. It is very important that the teacher monitor partners as they measure to be sure they are being precise in their measurements. This is also a good time to be sure students can articulate how they found the difference in the measurement of the two objects. As the teacher monitors and has conversations with students it is a good time to clarify if students have made a connection between the number line and the tape measure.
7. Discuss with the class when you may need to measure two objects and compare them in the real world. Some examples would include if you are purchasing a desk and it has to be moved through a doorway then the desk would have to be measured and the doorway would have to be measured. The doorway would have to be longer than the desk. Students should be able to give other examples.
Questions to Pose: Before:
How do we use a measuring tape? What do we know about a measuring tape as a number line? What is important about where this number line begins?
During:
Which object is longer? How much longer? How do you know? How is the measurement tape like a number line? How did you decide where to put the end of the measurement tape?
After:
Discuss the chart and ask when this would be useful?. Have students write what they learned from this task in their math journal. Can you draw a picture showing one of your measurement tasks? Be sure to include labels with your drawing.
52

NC DEPARTMENT OF PUBLIC INSTRUCTION SECOND GRADE
Possible Misconceptions/Suggestions: Possible Misconceptions Suggestions Students may be inaccurate in measuring objects as they may start measuring on the number one rather than the end of the measuring tape.
As the teacher monitors this misconception can be discussed with individual students as the teacher relates the measuring tape to a number line and helps students see where the number line must begin. If a more concrete model is needed the teacher may want students to measure using color tiles to see that they must start at the end.
Students may need help in recording the equation created when the measurements of the two objects are compared.
By placing the two objects beside each other and looking at the “difference” between the two objects the teacher can lead the students in recording one of the problems and then coach them as they record the others.
Special Notes:
This lesson merits being repeated with various objects in order for students to build understanding. Solutions: N/A
53

NC DEPARTMENT OF PUBLIC INSTRUCTION SECOND GRADE
It’s Lengthy
1. Book #1 _____ inches Book #2 _____ inches _____ - _____ = _____
2. My arm _______ inches My partner’s arm _____ inches _____ - _____ = _____
3. My pencil ______inches My partner’s pencil _____ inches _____ - _____ = _____
54

NC DEPARTMENT OF PUBLIC INSTRUCTION SECOND GRADE
Arm Span Problems Common Core Standard:
Relate addition and subtraction to length. 2.MD.5 Use addition and subtraction within 100 to solve word problems involving lengths that are given in the same units, e.g., by using drawings (such as drawings of rulers) and equations with a symbol for the unknown number to represent the problem.
Additional/Supporting Standard(s):
Measure and estimate lengths in standard units. 2.MD.1 Measure the length of an object by selecting and using appropriate tools such as rulers, yardsticks, meter sticks, and measuring tapes. Represent and interpret data. 2.MD.9 Generate measurement data by measuring lengths of several objects to the nearest whole unit, or by making repeated measurements of the same object. Show the measurements by making a line plot, where the horizontal scale is marked off in whole number units.
Standards for Mathematical Practice:
1. Make sense of problems and persevere in solving them. 2. Reason abstractly and quantitatively. 5. Use appropriate tools strategically. 6. Attend to precision.
Student Outcomes:
• I can add and subtract lengths of the same unit within 100. • I can measure and solve problems involving these measurements by using drawings and
equations with a symbol for the unknown length. • I can add my data to a line plot to represent a measurement I have found.
Materials:
• Measuring tapes or yardsticks • Math journal or blank paper for recording • Paper for creating a line plot • Blackline master attached
Advance Preparation:
• Students will need to have previous experiences using a measuring tape or yardstick • Students will need to understand line plots and be able to use them • Students should be able to add within 100 so they will be able to attack problems. • Teacher will need to copy the blackline master for each student or display the problems in
some way.
Directions:
55

NC DEPARTMENT OF PUBLIC INSTRUCTION SECOND GRADE
1. After students have had opportunities to use a measuring tape or yardstick and are comfortable using it, they will begin to use measurements to solve problems. This task involves measuring the arm span of each child in the classroom.
2. The teacher would need to model by spreading her arms and having a student measure the arm span. If there is an odd number of students the teacher would then measure for the student as well. The teacher would need to model recording the number of inches of her arm span on the board and label the length with inches.
3. Have the class pair up with students that work well together. Students will use the measuring tape to measure each other’s arm span and record it in a math journal or on paper.
4. Students will come back together to discuss the problems they will solve using their measurements. See the blackline master for four specific problems students are asked to solve. After the class briefly discusses the problems, the students find their partner and begin to work.
5. The teacher will circulate around the room as students work on the problems. Problems may need clarifying for some students but teachers should not provide answers for students but only leading questions as they work to solve the problems.
6. When most students have finished, discuss arm spans and how the problems were attacked. Discuss if the arm spans were close or if there was a lot of difference. As a group find the person with the shortest arm span and the longest arm span.
7. Have students with the shortest and longest arm span help create a line plot to display everyone’s arm span. Using chart paper or some type of display, start the range with the shortest arm span. Have the class help you decide how to create and label the line plot. End the range with the number representing the longest arm span. These students will indicate their arm span by adding an “X” to the line plot above the number representing their arm span.
8. Now that the line plot is created, call small groups of student to add their “X” to the line plot. 9. When all arm spans are recorded, discuss any clusters or other interesting things that may
occur on the line plot. Questions to Pose: Before:
• Look at the tape measure. If we are measuring our arm span where will we start on the tape measure? Where will we start on the arm span?
• After the teacher’s arm span is measured ask, “What do you think the shortest arm span in our room will be? What is the longest student arm span?
During:
• How will you find the difference in your arm span and your partner’s arm span? • What will your equation look like? • Is there any other way to write the equation? • Would an empty number line help you solve any of the problems? • How can you see if your answer is correct?
After:
• What did you learn from comparing your arm span to the arm span of someone else? • What do you notice about our line plot? • Do you see any clusters on our line plot? • Why do you think this happened?
56

NC DEPARTMENT OF PUBLIC INSTRUCTION SECOND GRADE
• What do you think the line plot would look like if we did it in a Kindergarten class? a fifth grade class? another second grade class?
• What do you think would happen if you measured your parents or another adult’s arm span?
Possible Misconceptions/Suggestions: Possible Misconceptions Suggestions Students may not be able to solve the problems and write an equation showing how they solved each one.
Allowing for partner or small group work may help students that are struggling.
Students may not make their “X” marks the same size and will then not interpret the line plot accurately.
Discuss making the “X” the same size as the ones on the line plot and observe as students add their mark so you can intervene and help if needed.
Special Notes:
This task allows students to apply what they have learned about measuring to the real world and then use a line plot to collect the data. It is important that students have experiences with measurement and line plots before this task.
Solutions: N/A
57

NC DEPARTMENT OF PUBLIC INSTRUCTION SECOND GRADE
Arm Span Task Name: ________________________________________________________
1. What is the difference in your arm span and your partner’s arm span? Write an equation that shows how you solved this problem.
2. Find another partner and compare your arm spans. Write an equation to show the
difference in your arm span and your new partner’s arm span. 3. Compare your arm span to the teacher’s arm span. Write an equation to show the
difference in your arm span the teacher’s arm span. 4. How many more inches would your arm span need to be to equal 100 inches?
Write an equation to show how you solve the problem.
58
NC DEPARTMENT OF PUBLIC INSTRUCTION SECOND GRADE
Creating a Number Line Common Core Standard:
Relate addition and subtraction to length. 2.MD.6 Represent whole numbers as lengths from 0 on a number line diagram with equally spaced points corresponding to the numbers 0, 1, 2, ..., and represent whole-number sums and differences within 100 on a number line diagram.
Related Standards:
Measure and estimate lengths in standard units. 1.MD.2 Express the length of an object as a whole number of length units, by laying multiple copies of a shorter object (the length unit) end to end; understand that the length measurement of an object is the number of same-size length units that span it with no gaps or overlaps. Limit to contexts where the object being measured is spanned by a whole number of length units with no gaps or overlaps.
Standards for Mathematical Practice:
1. Make sense of problems and persevere in solving them. 3. Model with mathematics 4. Use appropriate tools strategically 5. Attend to precision
Student Outcomes:
• I can create a number line to 200. • I can measure accurately and mark numbers on the number line. • I can solve addition and subtraction problems using a number line.
Materials:
• Adding machine tape • 100 Unifix cubes (or some type of connecting cubes) for each pair of students. Organize the
cubes in sticks of 10, alternating colors—10 of one color, 10 of a different color, etc. • Posted number line or meter stick or yard stick
Advance Preparation:
• There is a growing body of research to suggest the importance of the number line as a tool for helping children develop greater flexibility in mental arithmetic as they construct mathematical meaning, develop number sense, come to understand number relationships, and develop powerful strategies for addition and subtraction. The number line can do much more than simply help children count to 100. The number line can be used as a tool to help children function well with the various operations. The number line is a powerful visual tool for adding and subtracting.
• Cut strips of adding machine tape for each pair of students. The length should be a little longer than 200 Unifix cubes or whatever material is being used to measure.
• Student pairs work together to create a number line. Pair students who will work well together.
59

NC DEPARTMENT OF PUBLIC INSTRUCTION SECOND GRADE
• Students will need space to work on the adding machine number line. • Teachers may want to divide this lesson into two parts. The first day the students make a
number line to 100. The second day students continue the number line to 200. • Have students organize the Unifix cubes into sticks of 10 of the same color. • For day 2, Students will only have one ten stick to measure from 100 to 200. This helps
students use some of the foundation measurement concepts started in 1st grade (no gaps or overlaps, using same-size units, laying multiple copies of a shorter object end to end, iteration).
0 10 20 30
Directions: part 1 of this lesson 1. If there is a number line posted in the room have students look at it and ask, “What do you
notice about the number line?” (If there is not a number line posted in the room students could look at a yardstick or meter stick. Possible observations:
• It has numbers. • The numbers are in order. • The spaces between the numbers are all the same.
2. After discussing the number line explain that they are going to make a number line to 200 with a partner. Today they will make the number line to 100 and tomorrow continue it to 200. They will use adding machine tape and cubes. Students will have 100 cubes to measure the first 100 spaces. It may be helpful to have the Unifix cubes in sticks of 10. Students would have 10 cubes of one color and then 10 of a different color (or 5 of one color, five of a different color and then repeat the sequence.) This pattern continues to 100. Students will better be able to keep track of the numbers if the cubes are organized by 10s. Ask, “What do you need to think about before you begin the number line?” Possible comments:
• We need to cooperate. We need to take turns. We need to work together. (You might ask what that will look like?)
• Students may talk about measuring carefully. Have students demonstrate how to measure with the cubes. Students will not mark every number on the number line. They will mark each set of 10 or 5. So a number line will be labeled 10, 20, 30, etc. or 5, 10, 15, 20, etc.
3. As students describe marking the number line, have some students demonstrate on adding machine tape how to use the Unifix cubes (connected cubes) to mark the number line. Highlight marking the number line at the end of each 10th or 5th cube.
4. It may be best to create the number line in two sessions. Explain that they will finish the number lines tomorrow. Help students find locations in the room to make the number line.
5. As students work on number lines the teacher monitors working pairs. Refer to “Questions to Pose.” 6. After students have completed the number line to 100 reconvene the class as a whole group.
Discuss their process. Have pairs share the number line. Lay 2-3 number lines on the floor or attach to the board. The numbers on the number lines will probably not line up. Second graders do not measure accurately. Ask, “We all used Unifix cubes to measure. Why do you think the 30 is in a different spot on this number line?”
7. Lay one number line on the floor (or board). Ask questions about using the number line to solve problems. Questions to ask are listed in “Questions to Pose.”
60

NC DEPARTMENT OF PUBLIC INSTRUCTION SECOND GRADE
8. Let the students know that tomorrow they will extend their number line to 200 but they will only have 10 cubes. Ask them to be thinking about how they will use only 10 cubes to continue the number line.
Questions to Pose: for part 1 of this lesson. Before:
• What do you notice about a number line? • How will you work with your partner? • What do you need to think about before you make the number line? • Why do you think I had you organize your cubes in sticks of ten using different colors?
During:
• How are you and your partner sharing the work? • How do you know where to write the numbers? • How is your number line like the one we looked at earlier? • How is your number line different from the one we looked at earlier? • How many groups of ten do you have to make 100? • If we made our number line to 200 (300, 400, etc.) how many groups of ten will we need?
After:
• Compare number lines created by students. We all used Unifix cubes to measure. Why do you think the 30 is in a different spot on this number line?”
• How can we use this number line to solve 45 + 10? Students might say start at 45 and jump 10. Or start at 45, lay a ten stick and it will be on 10 more. Continue with several problem, adding ten from a multiple of 10 or 5.
• If students are successful with the task above, ask, “How can I use the number line to solve 23 + 10. Students may estimate where 23 is but ask them to use the cubes to mark 23 on the number line. Then they can use a 10 stick to find 23 + 10. Continue with several problems adding ten from a “nonmultiple” of 10 or 5.
Directions: part 2 of this lesson
1. Review what happened yesterday when partners made number lines to 100. Have students tell/demonstrate how they made the number line.
2. Lay one adding machine tape number line on the floor. Have one ten stick. Explain that they are going to use one ten stick to continue the number line to 200. Have students talk with a partner about how to do this. After a few minutes, ask for suggestions.
3. Have student volunteers show on the number line how they will mark the number line. Students may move the 10 stick and leave gaps between each group of ten or place a finger to keep track. Discuss how this will impact the placement of the numbers. After demonstration and discussion come to consensus on “how” to use the ten stick to measure to 100.
4. As students work on number lines the teacher monitors working pairs. Refer to “Questions to Pose.”
5. After students have completed the number line to 200 reconvene the class as a whole group. Discuss their process. Have pairs share the number line. Lay 2-3 number lines on the floor or attach to the board. The numbers on the number lines will probably not line up. Second graders do not measure accurately. Discuss why this happened.
61

NC DEPARTMENT OF PUBLIC INSTRUCTION SECOND GRADE
6. Have students talk about the process they used to make the number line to 200. Discuss how making the number line to 200 was different from the way they made it yesterday. Also discuss how making it on the different days was the same.
7. Have students use the number line to solve sums and differences. Questions to Pose: for part 2 of this lesson. Before:
• What do you notice about a number line? • We are using one ten stick to measure to 100. How will we use it to get to 200? • Our number line goes to 100. How far away is it from 200? • How many tens will it take us to get to 200? • When we finish, how long will our number line be? (200 cubes) • Why do not want to leave space between our tens? • What will happen if we overlap the cubes? • What will happen if we leave gaps between the ten sticks?
During:
• How are you and your partner sharing the work? • How do you know where to write the numbers? • How is making the number line today different from yesterday? • How many groups of ten do you have to make 200? • I see that you’ve made your number line to 150 (or other number). How would you find 128
on this number line? After:
• How was making the number line today the same/different from the way we made it yesterday?
• Compare number lines created by students. We all used Unifix cubes to measure. Why do you think the 150 is in a different spot on this number line?”
• How can we use this number line to solve 65 + 100? Students might say start at 45 and jump 10. Or start at 145, lay a ten stick and it will be on 10 more. Continue with several problems adding ten from a multiple of 10 or 5.
• If students are successful with the task above, ask, “How can I use the number line to solve 123 + 10. Students may estimate where 123 is but ask them to use the cubes to mark 123 on the number line. Then they can use a 10 stick to find 123 + 10. Continue with several problems adding ten from a “nonmultiple” of 10 or 5.
• Why do you think I wanted you to create this number line? How does this number line help you solve problems?
62

NC DEPARTMENT OF PUBLIC INSTRUCTION SECOND GRADE
Possible Misconceptions/Suggestions: Possible Misconceptions Suggestions Students do not measure accurately. Compare different number lines and discuss
possible reasons for the different placement of the numbers. Review what was discussed about accurate measurement. Practice measuring using 10-15 cubes.
Students may count by ones. Students may need additional work on 100 boards and with materials to group objects and count by 5s and 10s.
Students have difficulty using the number line to find answers to addition and subtraction problems.
Students start at 0 to solve problems rather than adding on. They may need to solve problems on the number line with numbers less than 20.
Students do not realize that a number on the number line represents that number of cubes. For example a student may lay 5 cubes on the number line and label it 10.
Lay the cubes on the number line. Label the number line by ones to up to 30. Circle the multiples of 10 in red. Talk about how many cubes the red numbers represent. Continue labeling the number line by ones and circling multiples of ten until students start internalizing the understanding that the 10 represents 10 cubes. Students may benefit from additional work with place value materials.
Special Notes:
• This lesson supports the 1st grade measurement standard. • This lesson can be modified. On day one students create a number line to 50 using 50 cubes.
On day two students have one ten stick and continue the number line to 100. • After students use the number line to solve problems introduce the empty number line. This
website http://www.k-5mathteachingresources.com/empty-number-line.html gives background information on empty number lines.
• Talk to the students about making a number line to 1000. How could we use the number lines already created? (put together 5 number lines.) How long would our number line be is we put all our number lines together? (200 x the number of student pairs) Students can line up number line in the hallway or other large space to see the length of their combined number lines.
Solutions:
63

NC DEPARTMENT OF PUBLIC INSTRUCTION SECOND GRADE
Human Number Line Common Core Standard:
Relate addition and subtraction to length. 2. MD.6 Represent whole numbers as lengths from 0 on a number line diagram with equally spaced points corresponding to the numbers 0, 1, 2, …, and represent whole-number sums and differences within 100 on a number line diagram.
Standards for Mathematical Practice: 1. Make sense of problems and persevere in solving them. 2. Reason abstractly and quantitatively. 3. Construct viable arguments and critique the reasoning of others. 4. Model with mathematics. 5. Use appropriate tools strategically. 6. Attend to precision. 7. Look for and make use of structure. 8. Look for and express regularity in repeated reasoning.
Student Outcomes:
• I can create a number line with whole number increments.( using equal spacing) • I can represent whole numbers on a number line.
Materials:
• Yarn or string • One Index card for each of the following numbers: 0, 20, 50, 100, 25, 75, 10, 80, 15, 90, 70,
60, 20, 30, 40, 5, 35, 45, 55, 65, 85, 95, 22, 64 • Clothespin • Adding machine tape or cut bulletin board paper into long strips
Advance Preparation:
• The teacher should have numbers that can be easily placed on the number line. • All materials should be ready to hand out to students.
Directions:
1. The task begins with the teacher asking two students to hold the yarn at each end, one student will have the card with the number 0 at one end and the other student will have the card with the number 100 at the other end.
2. The teacher passes out the rest of the numbers to the class. After all numbers have been passed out the teacher poses the question what number should we place next on the number line? She will continue to ask questions such as, “Who feels confident about putting their number in the correct place on the number line?” As students stand they place their number on the number line where they think it should be placed being very aware of not only the correct sequence but also of making sure the numbers are equally spaced on the line. For example, the number 50 would be a good number to begin with because it would go directly in the middle of the number line.
64

NC DEPARTMENT OF PUBLIC INSTRUCTION SECOND GRADE
3. The teacher calls on other numbers to place on the number line or allows students to volunteer their number if they think it is a good time to place their number. If there are numbers that need to be moved when placing the other numbers they can be moved with the teacher questioning such as which numbers do we need to move to be placed in a better position?
4. Continue until all numbers and students are placed on the human number line. Have students observe where they are standing and see if it is the best place for them to be. Discuss equal spacing on the number line and again ask students to move if they are not at the correct point as numbers are added.
5. After all students are satisfied with their placement have students hang the number with a clothespin and display the number line somewhere in the room.
6. Have students get a strip of paper and make their own number line with a range of at least 20 numbers between 0 and 100. For example, if a student starts at 40 they would need to go to at least 60.
7. Students share their number lines in small groups. Teacher monitors groups to see if number lines are precise and have equally spaced points and are labeled correctly. During this time teachers can take anecdotal notes of their understanding of the number lines.
8. After sharing in small groups the students take turns creating addition and subtraction problems for the different number lines. For example if the number line is from 20 to 100 a problem could be what is 52 + 8, or what 58-9 is. Students would show their work by drawing their hops on their number line and writing the equation on the back.
Questions to Pose: Before:
What number should we place on the number line next? Why is it important for numbers on a number line to have equal spaces from each other?
During:
Which numbers should we move to have better placement on our number line? Why did you choose to place your number where you did? If you were given a different end point would your number still be placed where you placed it?
After:
What other numbers could we place on the number line? Why did you choose the range of numbers you put on your number line?
Possible Misconceptions/Suggestions: Possible Misconceptions Suggestions Students may not be able to draw a number line that has equal spacing.
Give students a color tile, snapping cube, or ruler to use for equal spacing.
Students may not realize the spatial aspect of leaving equal spaces between numbers.
Use a measuring tape or large number line to show students the equal spacing between numbers.
Special Notes:
This human number line task could be repeated with different numbers at a later date. The small number lines could be displayed in the classroom and could be used for more problem solving tasks.
Solutions: NA
65
NC DEPARTMENT OF PUBLIC INSTRUCTION SECOND GRADE
What time is it Mr. Crocodile?
Common Core Standards:
Work with time and money 2. MD.7 Tell and write time from analog and digital clocks to the nearest five minutes, using a.m. and p.m.
Standards for Mathematical Practice:
4. Model with mathematics. 6. Attend to precision.
Student Outcomes:
• I can move the minute hand on the clock in five minute increments and say what time I am standing on.
• I can show the time on an analog clock when someone tells me the time in five minute increments.
Materials: • The book What Time is It, Mr. Crocodile? by Judy Sierra • Numbers 1-12 on individual 5x7 index cards—one number per card. • Numbers 1-5, 6-10, etc… on 3x5 index cards with the numbers 5, 10, 15, 20 etc. being in a
different color than the other numbers • red paper • green paper • individual clocks • hundreds board (for students having trouble counting by 5’s)
Advance Preparation:
• Have the 5x7 index cards arranged in a large clock pattern, with the numbers on the 3x5 index cards arranged inside the clock circle.
• Prior to this lesson, students should be familiar with the clock and the function of the hour hand. This game is played when introducing students to 5 minutes increments on an analog clock, so students have the understanding of the minute hand on the clock. Later on, the game can be played using minute and hour hand together.
Directions: 1. Read the book, What Time is it Mr. Crocodile to the class and discuss as a whole group. 2. To start the game off the teacher is the Crocodile. The students will partner up. 3. The students choose a five minute number on the face of the clock to stand by. 4. The Crocodile says a time, and the students have to move that number of 5 minute interval
steps from their place to the time that the Crocodile calls out. (For example if the Crocodile says15 minutes then all the students move 15 minutes from where they are standing.) The Crocodile holds up a green card, so the students know it is time to move to their next interval. Before the Crocodile holds up the green card, she/he allows the students thinking time.
66

NC DEPARTMENT OF PUBLIC INSTRUCTION SECOND GRADE
5. Now, the Crocodile holds up a red card and the students need to stop. They turn to their partner and tell their partner what time it is in minutes. The partner can tell them it is correct or to think again. If the time is incorrect, she/he can move one more time.
6. The partners now can switch roles. Steps 2-5 repeated. 7. This goes on for several times. The students that show understanding of the passing of
5 minute intervals then sit around the large clock with an individual clock. The students that are sitting will show the Crocodile the minutes moved on their clock, as the students that need more time to practice can use the larger clock.
Questions to Pose: Before:
What do you need to know to be able to read an analog clock? Why is it important to be able to tell time? What strategy are you going to use to go to the next 5 interval on the clock?
During:
How many groups of 5 did you move? How many minutes are there between each number on the large index card?
After:
What did you notice when you arrived at 60? How many minutes are on the clock if you go all the way around? Show the math you used to tell me the time on your analog clock? Why is important to know how to tell time?
Possible Misconceptions/Suggestions: Possible Misconceptions Suggestions Students will not be able to count by 5s from a given number.
Give those students a 100s board to follow along with.
The students may go counter-clockwise. The teacher may need to re-teach the movement of the hour hand.
Special Notes:
Telling time is a very abstract concept and this task helps students to see how a clock works in a concrete way but allows students to understand the function of each hand before putting the two hands together to tell time.
Solutions:
67

NC DEPARTMENT OF PUBLIC INSTRUCTION SECOND GRADE
Measuring Things in Our Classroom Common Core Standard:
Represent and interpret data. 2.MD.9 Generate measurement data by measuring lengths of several objects to the nearest whole unit, or by making repeated measurements of the same object. Show the measurements by making a line plot, where the horizontal scale is marked off in whole-number units.
Additional/Supporting Standard(s):
Measure and estimate lengths in standard units. 2.MD.1 Measure the length of an object by selecting and using appropriate tools such as rulers, yardsticks, meter sticks, and measuring tapes.
Standards for Mathematical Practice:
1. Make sense of problems and persevere in solving them 4. Model with mathematics 5. Use appropriate tools strategically 6. Attend to precision
Student Outcomes:
• I know which tool to use to measure objects in my desk. • I know how to use a ruler to measure to the nearest inch. • I can use a ruler to measure objects in my desk. • I can make a line plot and record the measurement of objects in my desk.
Materials:
• rulers • Each student measures10 items in the room that are less than or equal to a ruler • paper to record measurements and paper for a line plot
Advance Preparation:
• Students should have previous experiences measuring with an inch ruler. The directions for this lesson are written so that students measure in inches but the same lesson can be used and have students measure in centimeters.
• Students should have previous experiences creating a line plot. • When students record their data they will need to record the measurements of the objects.
You may want to talk about ideas for recording or let students develop this as they start the process. Sometimes it is good to let students struggle with a problem and develop their own method rather than solving the problem ahead of time.
68

NC DEPARTMENT OF PUBLIC INSTRUCTION SECOND GRADE
Directions: 1. Talk about what we have measured in the classroom. What tools have we used to measure? 2. Have students demonstrate how to measure objects in the classroom using a ruler. What unit
are we using when we use a ruler? Talk about starting at the zero on the ruler, leaving no gaps and not overlapping as we measure.
3. Explain that they are going to measure 10 items. They will measure ten objects that are shorter than a ruler.
4. As a class, brainstorm things in the room that they can measure. Remind them that they can measure things in their desks.
5. All things that they measure will not measure to the nearest inch. Show some examples of objects that measure beyond or less than a whole number. Talk about how to record this. For example, if an object is close to 5 inches how should we record this on the line plot?
6. Each student will create their own line plot. Discuss drawing this line plot. What will the numbers be on our line plot? (The numbers go from the smallest measure to the largest measure.) They can all make their line plots 1-12 inches. No number between the smallest and largest measure should be left out even if there is no object for that measurement. How will we label the line plot?
7. Use your ruler to measure each object to the nearest inch. 8. Record your measurements on a line plot. 9. Give your line plot a title and label the axis. 10. Record three facts about the data in your line plot. 11. As students measure 10 objects the teacher talks to students about how they are measuring.
Observe if students start at the zero point of the ruler. Do they line up the objects accurately? Are they recording the measurements accurately? Do they count the first mark on the ruler as 1 rather than 0? The teacher can make notes of student understanding. Do they draw a line plot accurately? When more than one item is a certain length do they record with the same size X? Does the title of the line plot match the data?
12. Reconvene the class as a whole group. Have the students share their line plot with a partner. 13. As students share their line plots with a partner listen to the students’ explanation.
Questions to Pose: Before:
• Why does "what" we measure influence "how" we measure? • Talk about what we’ve measured in the classroom. • What tools have we used to measure? • How do we decide which measurement tool to use? • Why display data in different ways? • What unit do we use when we use a ruler? • How will you label the line plot?
69

NC DEPARTMENT OF PUBLIC INSTRUCTION SECOND GRADE
During: • You just measured a pencil that’s 5 inches (or other length). Where will you record this data
on the line plot? • How did you know where to start on the ruler? object? • Looking at a student’s line plot—Why do you not have anything recorded for 8 inches?
(There were no objects measured that were 8 inches.) • You measured a pencil that is 9 inches and another pencil that is 5 inches. How much longer
is this pencil than the 5” pencil? • Why do you have 4 x’s on 3 inches on your line plot?
After:
• What does your line plot show? • How many objects did you find that were ____inches? • How many objects did you measure that were more than 5 inches? • How much longer was the pencil than the pencil sharpener? • If you measured objects that were longer than 12 inches, how would your line plot change? • If you measured the same objects in centimeters, how would your line plot change?
Possible Misconceptions/Suggestions: Possible Misconceptions Suggestions Students start at the 1 on the ruler to measure. Have students walk on a number line. As they
take a step, point out that they had to cover a space before they landed on 1. Relate this to measuring.
When students mark X’s on the line plot, the X’s are not the same size
Look at a line plot with various size X’s. Ask students to compare the number of objects in each column. They can see that it is difficult to compare the number of objects if the X’s are not the same size.
Special Notes:
The directions for this lesson are written so that students measure in inches but the same lesson can be used and have students measure in centimeters.
Solutions:
70
NC DEPARTMENT OF PUBLIC INSTRUCTION SECOND GRADE
What Pattern Block? Common Core Standards:
Represent and interpret data. 2. MD.10 Draw a picture graph and a bar graph (with single-unit scale) to represent a data set with up to four categories. Solve simple put together, take-apart, and compare problems using information presented in a bar graph. (Note: See Glossary, Table 1.)
Standards for Mathematical Practice
1. Make sense of problems and persevere in solving them. 2. Reason abstractly and quantitatively. 3. Construct viable arguments and critique the reasoning of others. 5. Use appropriate tools strategically. 6. Attend to precision.
Materials:
• Pattern Blocks • Half sheets of paper • Graph • Math Journals • Anecdotal note recording sheet
Advance Preparation:
• Collecting data to answer a question is an important skill. Once the data has been collected, representing it in a picture or bar graph helps us analyze what we have discovered. Using an appropriate graph to display data is an important part of this standard. Once the graph has been constructed, it is important that questions are asked to talk about the information that is displayed in the graph. Questions should be more than "How many?" Questions should focus on drawing conclusions, comparing, and make generalizations about the data that are represented in the graph.
• Students also need to have multiple experiences with using data. A way to incorporate this into your classroom is to have a daily question posted that students need to answer when arriving in the room. Displaying their data in different graphs throughout the year and posting these in the room.
• The teacher will need to have pattern blocks, half sheets of paper ready before the task, and pattern block recording sheets.
Directions: 1. The teacher instructs the students to make a pattern block design on their half sheet of paper.
While the students are creating their design the teacher should be walking around the room asking students questions such as which pattern block do you think you used the most? Is the block you used the most your favorite block? Do you think your favorite block is the class’s favorite block? How can we find out?
2. Rather than telling the students what to do to display their results have the students suggest ways to display. If students need help you may want to suggest that they group like blocks and count them. Have a pattern block recording sheet ready for the students if students wish
71

NC DEPARTMENT OF PUBLIC INSTRUCTION SECOND GRADE
to use it. Seeing different data displayed around the room will give the students ideas on how to display their data.
3. After students have made their individual graphs, talk about the results. Which block did you use the most in your design? Did anyone else use that shape the most? What else can you say about your graph? Look for a student who has not used one of the shapes. Use this as an example for the question, what does it mean when there are no squares colored for a shape? Have groups of students explore those ideas. As the teacher is monitoring they can assess students on the making of a graph, answering questions, and any other misconception need to be noted. Teacher monitors to make sure that students are noticing how many blocks were used by each person.
4. Ask the question after students have had time to explore others graphs in their groups, How could we organize ourselves to find out how many other students used the same block the most ? Let the students suggest ways to group and display their graphs so that all graphs are visible at the same time. A student may suggest making a class graph of all their results. If so ask how would we go about making this graph? Make the class graph with the students.
5. Ask students to write in their journals their comparisons of their individual graph to the class graph. 6. End the task with questions such as; do you think that you would use your favorite block in
every activity, why or why not, suppose that you are the people that are selling pattern blocks what number of pattern blocks would you put in the set, suppose that we had more triangles in our classroom, what would happen to our results. All of these types of questions will help students with interpreting their results.
Questions to Pose: Before:
How many people do you think will have a hexagon (other pattern blocks can be used) as their block used the most? Why? See directions for additional questions.
During: How did you decide to display your data? How could you display your data in another way? See directions for additional questions
After: How do the manufacturers decide on what blocks to put in a package?
Possible Misconceptions/Suggestions: Possible Misconceptions Suggestions Students may be challenged by reading a graph. They are used to reading from left to right. Reading a graph requires students to interpret the information both horizontally and vertically.
Students may need to put a finger on the horizontal axis and another finger on the vertical axis and then move the fingers until they intersect.
Students may be able to graph but not answer the questions related to their graph.
Teacher will have student bring individual graph and discuss questions.
Special Notes:
This task is based on the PCAI model for data. Students are posing a question, collecting data, analyzing the data, and interpreting the results.
Solutions: N/A Adapted from Teach-Stat Activities Grades 1-3
72

NC DEPARTMENT OF PUBLIC INSTRUCTION SECOND GRADE
73

NC DEPARTMENT OF PUBLIC INSTRUCTION SECOND GRADE
Recording Sheet Standard: __________
Graph
Questions
Other Notes
74

NC DEPARTMENT OF PUBLIC INSTRUCTION SECOND GRADE
Polygon Riddles and Fun Common Core Standard:
Reason with shapes and their attributes. 2.G.1 Recognize and draw shapes having specified attributes, such as a given number of angles or a given number of equal faces. (Note: Sizes are compared directly or visually, not compared by measuring.) Identify triangles, quadrilaterals, pentagons, hexagons, and cubes.
Standards for Mathematical Practice:
1. Make sense of problems and persevere in solving them. 2. Reason abstractly and quantitatively. 3. Construct viable arguments and critique the reasoning of others. 4. Model with mathematics. 5. Use appropriate tools strategically.
Student Outcomes:
• I can identify and explain the define attributes of a shape. • I can use defining attributes (number of sides, angles) to name shapes (triangles,
quadrilaterals, pentagons, and hexagons). • I can create a given shape when given defining attributes.
Materials:
• Geoboards • Geobands • The Greedy Triangle by Marilyn Burns • Folder or other material to use to cover • Vocabulary word bank
Advance Preparation:
• Teacher should refer to the “Parent, Teacher, and Other Adult” page in The Greedy Triangle for math content information before teaching this lesson.
• Students should be familiar with defining attributes such as number of sides, number of angles, equal, and vertices (corners) through introductory lessons that build understanding of this vocabulary. Also students should continue to use the vocabulary introduced in first grade which includes open, closed, rectangles, squares, trapezoids, triangles, half-circles, and quarter circles.
• A vocabulary Word Bank needs to be accessible to the students that they can use when describing their polygons. Examples for the word bank include but are not limited to: equal, sides, angles, vertices, square, rectangle, triangle, pentagon, hexagon, trapezoid
Directions: 1. Review vocabulary on the Word Bank by having students work in small groups to come up
with definition that can be explained in ten words or less for one of the words in the bank. Teacher can assign words or let groups choose the word they would like to define. Allow groups to share out with the definition they created. This should be a quick review.
75

NC DEPARTMENT OF PUBLIC INSTRUCTION SECOND GRADE
2. Distribute geoboards and geobands. It is easier to distribute these materials if the geobands are already placed on top of each geoboard or if the geobands are in the container that is shared with a small group. (It is important that students know the rules for using geoboards so that the lesson will not be interrupted by someone shooting the rubber bands. If the teacher addresses this and the students are familiar with using them distractions are minimized. Also, for those students who can not follow the rules, the teacher can have a paper copy of a geoboard and a pencil for them to use in place of the geoboard. If students know this is an option they are more likely to follow the rules so they can keep their geoboard like the rest of the class.)
3. Ask students to make two different polygons on their geoboard. Have them record the polygons on their geopaper. If this is the first time they are recording on geoboard paper the teacher may need to circulate and make sure they are accurate in their transcribing.
4. Now ask students to use the vocabulary we just reviewed to explain how the shapes are alike and how they are different.
5. As students work, the teacher would monitor and question students to help them think of other ideas. If students are struggling, the teacher may want to share a few similarities or differences that students have constructed. This would be a good time to take anecdotal notes on how comfortable the students are with using with the vocabulary. The attached recording sheets are provided as tools for assessment. One is a calendar grid where the students names are written in the squares and notes are added to each square. The other is a traditional recording sheet where check marks or other notations are used to document a student’s progress.
6. When students begin to finish, have them share with a partner or small group and then add to their similarities and differences any new ideas they learned from their group. Have students use a highlighter to highlight any words from the word bank they used in their work. If they used a new math word that needs to be added to the word bank they can highlight it with a new color and add it to the Word Bank.
7. Teachers can then collect these for assessment and they could be displayed. 8. Part 2 of this task may need to be completed on a different day. Begin Part 2 by having
students make a polygon on their geoboard. Students would use a folder to cover the shape so that others could not see it.
9. Students are then asked to write 4 clues to describe the polygon they created. Again they can use the Word Bank to help with their clues.
10. As students write clues the teacher will monitor and encourage students to use very clear mathematical vocabulary. This is another good time to assess student’s understanding of the shapes they are creating.
11. When they finish writing the four clues they find a partner that is finished and play “Polygon Riddle” by reading their clues to their partner and the partner guesses which polygon they created. Continue to play by finding additional partners when they finish. These can be collected and put in a “Polygon Riddle” book for continued review throughout the year.
Questions to Pose: Before:
What do we know about these words? What are the rules for using a geoboard? What do you know about polygons?
76
NC DEPARTMENT OF PUBLIC INSTRUCTION SECOND GRADE
During: What else do you know about this shape? Which words in the word bank would help you compare the shapes you made? Are there other math words you are using to help compare the shapes? What are they?
After:
Do we know more about the words in the word bank now they we did when we started with our definitions? If so what? Write in your math journal or on a blank sheet of paper what you learned today about shapes you or someone in your group made on your geoboard.
Possible Misconceptions/Suggestions: Possible Misconceptions Suggestions Avoid having students memorize the properties of the shapes.
Students need to have many experiences that allow them to explore, compare, and move shapes around..
Students may think that a hexagon always looks like the yellow pattern block.
Show regular and irregular pentagons and hexagons. The use of a geoboard is a good way to have students explore the various shapes.
Students should be required to use mathematical vocabulary.
Supplying the word bank will help with this as well as encouraging discussion among students.
Special Notes:
This task addresses only two-dimensional geometry and would require additional work for three-dimensional. It is important that students know the rules for using geoboards so that the lesson will not be interrupted by someone shooting the rubber bands. If the teacher addresses this and the students are familiar with using them distractions are minimized. Also, for those students who can not follow the rules, the teacher can have a paper copy of a geoboard and a pencil for them to use in place of the geoboard. If students know this is an option they are more likely to follow the rules so they can keep their geoboard like the rest of the class.
Solutions: N/A
77

NC DEPARTMENT OF PUBLIC INSTRUCTION SECOND GRADE
Recording Sheet Standard: __________
78

NC DEPARTMENT OF PUBLIC INSTRUCTION SECOND GRADE
––––––––––––––––––––––––––––––––––––––––––––––––––––––––––––––––––––
––––––––––––––––––––––––––––––––––––––––––––––––––––––––––––––––––––
––––––––––––––––––––––––––––––––––––––––––––––––––––––––––––––––––––
–––––––––––––––––––––––––––––––––––––––––––––––––––––––––––––––––––– ––––––––––––––––––––––––––––––––––––––––––––––––––––––––––––––––––––
–––––––––––––––––––––––––––––––––––––––––––––––––––––––––––––––––––– ––––––––––––––––––––––––––––––––––––––––––––––––––––––––––––––––––––
––––––––––––––––––––––––––––––––––––––––––––––––––––––––––––––––––––
–––––––––––––––––––––––––––––––––––––––––––––––––––––––––––––––––––– –––––––––––––––––––––––––––––––––––––––––––––––––––––––––––––––––––– ––––––––––––––––––––––––––––––––––––––––––––––––––––––––––––––––––––
–––––––––––––––––––––––––––––––––––––––––––––––––––––––––––––––––––– ––––––––––––––––––––––––––––––––––––––––––––––––––––––––––––––––––––
––––––––––––––––––––––––––––––––––––––––––––––––––––––––––––––––––––
79

NC DEPARTMENT OF PUBLIC INSTRUCTION SECOND GRADE
–––––––––––––––––––––––––––––––– –––––––––––––––––––––––––––––––– –––––––––––––––––––––––––––––––– –––––––––––––––––––––––––––––––– –––––––––––––––––––––––––––––––– –––––––––––––––––––––––––––––––– –––––––––––––––––––––––––––––––– –––––––––––––––––––––––––––––––– –––––––––––––––––––––––––––––––– –––––––––––––––––––––––––––––––– –––––––––––––––––––––––––––––––– –––––––––––––––––––––––––––––––– –––––––––––––––––––––––––––––––– –––––––––––––––––––––––––––––––– –––––––––––––––––––––––––––––––– –––––––––––––––––––––––––––––––– –––––––––––––––––––––––––––––––– –––––––––––––––––––––––––––––––– –––––––––––––––––––––––––––––––– –––––––––––––––––––––––––––––––– –––––––––––––––––––––––––––––––– –––––––––––––––––––––––––––––––– –––––––––––––––––––––––––––––––– –––––––––––––––––––––––––––––––– –––––––––––––––––––––––––––––––– –––––––––––––––––––––––––––––––– –––––––––––––––––––––––––––––––– –––––––––––––––––––––––––––––––– –––––––––––––––––––––––––––––––– –––––––––––––––––––––––––––––––– –––––––––––––––––––––––––––––––– –––––––––––––––––––––––––––––––– –––––––––––––––––––––––––––––––– ––––––––––––––––––––––––––––––––
80

NC DEPARTMENT OF PUBLIC INSTRUCTION SECOND GRADE
Nam
e of student is w
ritten in each space.
Standard(s)
81

NC DEPARTMENT OF PUBLIC INSTRUCTION SECOND GRADE
Rectangle Riddles Common Core Standard:
Work with equal groups of objects to gain foundations for multiplication. 2.G.2 Partition a rectangle into rows and columns of same-size squares and count to find the total number of them.
Additional/Supporting Standard(s):
Work with equal groups of objects to gain foundations for multiplication. 2.OA.4 Use addition to find the total number of objects arranged in rectangular arrays with up to 5 rows and up to 5 columns; write an equation to express the total as a sum of equal addends.
Standards for Mathematical Practice:
1. Make sense of problems and persevere in solving them 3. Construct viable arguments and critique the reasoning of others 4. Model with mathematics 5. Use appropriate tools strategically 6. Attend to precision
Student Outcomes:
• I can divide a rectangle into parts. • I can count to find the total number of sections/part in the rectangle. • I can divide rectangles into equal parts using rows or columns. • I can write an equation to tell the total number of squares (or square-like sections) in a
rectangle as a sum of equal addends. Materials:
• color tiles, square tiles • 1 inch grid paper or cm grid paper • index cards
Advance Preparation:
• This standard is the beginning of connecting a geometric representation to multiplication and area. Students can draw arrangements using materials and then count the total number of blocks. The focus is on the geometric representation not multiplication. The concept of multiplication is introduced in grade 3.
• The tasks described in this lesson can occur over several mathematics sessions.
Directions: 1. As a class discuss what are the attributes of a rectangle. Observations from students might be:
a. four straight lines b. four right angles or square corners. The children may need time to explore square
corners (right angles).
82

NC DEPARTMENT OF PUBLIC INSTRUCTION SECOND GRADE
c. 2 long sides and 2 short sides – This is a misconception that many students have. They do not recognize a square as a rectangle. As students refine their understanding of rectangles they should develop an understanding that a square is a rectangle.
2. As students tell attributes of a rectangle the teacher can show examples that match the verbal descriptions. For example, when a student says a rectangle has 4 straight sides the teacher could show the blue pattern block rhombus – it has 4 straight sides but is not a rectangle. Continue to show examples and have students refine their description of a rectangle.
3. Build a rectangle, 5 rows x 3 columns, with color tiles (square tiles) for the class to view. Ask students how this rectangle fits the attributes the class has developed.
4. Give each student about 20 color tiles (square tiles). Ask them to build a rectangle. They do not have to use all the tiles. Have them turn to a partner and explain why their shape is a rectangle.
5. As students share with a partner, the teacher listens to students’ descriptions. 6. After partners have shared with each other, the teacher has some student pairs share their
rectangles with the class. As students share ask them how they know they made a rectangle. 7. Explain to the class that we have a specific way of describing these rectangles. We can
describe them by rows and columns. Show a rectangle and demonstrate the rows and columns. Rows go across and columns go down. This rectangle has 3 rows and 4 columns. When describing a rectangle we say the rows first and columns next.
8. Have them look at the rectangle they made with a partner. Find out how many rows and columns are in your rectangle. The teacher listens to monitor student understanding of rows and columns.
9. Explain that they are going to solve rectangle riddles. They are going to build the rectangle described. Ask students to build a rectangle that has 2 rows and 4 columns.
10. Monitor student understanding. After most students have built the rectangle have someone share the answer. Some students may have built this rectangle, 4 rows and 2 columns.
11. Compare these two rectangles. They are congruent but have a different orientation. The 2nd rectangle is not 2 rows and 4 columns.
12. Continue to have students build rectangles that you describe. Examples are: a. 6 rows and 3 columns b. 5 rows and 5 columns c. 4 rows and 4 columns d. 1 row and 6 columns e. 8 rows and 3 columns
13. After you feel students are beginning to understand this concept have them build a rectangle, without their partner seeing it, and describe it to the partner. Give them a folder or
83

NC DEPARTMENT OF PUBLIC INSTRUCTION SECOND GRADE
something that hides what they are building. One partner builds a rectangle without the other partner seeing it. This partner describes the rectangle and the second partner builds the rectangle. Remove the barrier to see if the rectangles are congruent. The partners need to sit beside each other so they do not see a mirror image. Take turns describing the rectangles.
14. During a follow-up lesson have students build another rectangle described by the teacher. Example: have them build a rectangle with 2 columns and 5 rows. Explain that we can also describe this rectangle by writing an equation. This rectangle could be written as 2 + 2 + 2 + 2 + 2 = 10. Ask them what the 2s represent (rows) and what the 10 represents (the total number of tiles). This applies to the Common Core Standard write an equation to express the total as a sum of equal addends.
15. Continue to describe other rectangles and have the students build them. Describe them using the vocabulary, rows and columns, and then have students tell an equation that represents the rectangle.
16. During another lesson have students create rectangle riddles. Give students an index card. Fold the card in half. On the outside “cover” students write a description of a rectangle. On the inside of the folded index card (or a piece of paper) draw a picture of the rectangle.
17. Example: On the outside of the card the students writes: My rectangle has 2 rows and 6 columns. It is 2 + 2 + 2 + 2 + 2 + 2 = ____ When the card is opened the student sees:
18. The attached blackline master, “Making More Rectangles” can be used in centers.
Questions to Pose: Before:
• What do you know about rectangles? • What is a right angle/square corner? • How many sides does a rectangle have? • Where do we have rectangles in our classroom?
During Partner Work
• How do you know this is a rectangle? • Show me the right angles (square corners). • How many tiles did you use to make the rectangle? • Could you make a different rectangle with the same number of tiles? Show me.
After:
• Describe your rectangle. If the student does not use rows and columns ask how many rows and then how many columns are in the rectangle.
• How could you write an equation to describe this rectangle?
84
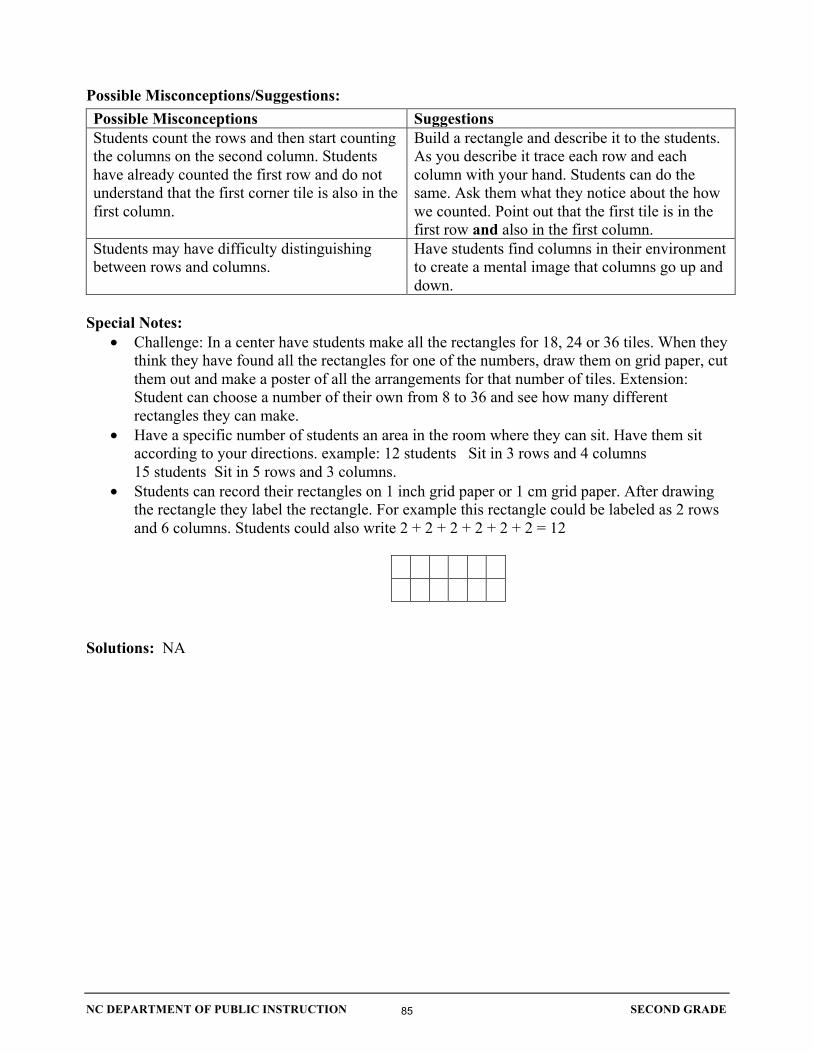
NC DEPARTMENT OF PUBLIC INSTRUCTION SECOND GRADE
Possible Misconceptions/Suggestions: Possible Misconceptions Suggestions Students count the rows and then start counting the columns on the second column. Students have already counted the first row and do not understand that the first corner tile is also in the first column.
Build a rectangle and describe it to the students. As you describe it trace each row and each column with your hand. Students can do the same. Ask them what they notice about the how we counted. Point out that the first tile is in the first row and also in the first column.
Students may have difficulty distinguishing between rows and columns.
Have students find columns in their environment to create a mental image that columns go up and down.
Special Notes:
• Challenge: In a center have students make all the rectangles for 18, 24 or 36 tiles. When they think they have found all the rectangles for one of the numbers, draw them on grid paper, cut them out and make a poster of all the arrangements for that number of tiles. Extension: Student can choose a number of their own from 8 to 36 and see how many different rectangles they can make.
• Have a specific number of students an area in the room where they can sit. Have them sit according to your directions. example: 12 students Sit in 3 rows and 4 columns 15 students Sit in 5 rows and 3 columns.
• Students can record their rectangles on 1 inch grid paper or 1 cm grid paper. After drawing the rectangle they label the rectangle. For example this rectangle could be labeled as 2 rows and 6 columns. Students could also write 2 + 2 + 2 + 2 + 2 + 2 = 12
Solutions: NA
85

NC DEPARTMENT OF PUBLIC INSTRUCTION SECOND GRADE
More Making Rectangles Materials: square pattern blocks or colored square tiles
Take some square tiles. Make a rectangle that has 3 rows and 2 columns. Record your rectangle on the grid paper. How many tiles did you use? ______
Take some square tiles. Make a rectangle that has 4 rows and 4 columns. Record your rectangle on the grid paper. How many tiles did you use? ______
Take some square tiles. Make a rectangle that has 5 rows and 3 columns. Record your rectangle on the grid paper. How many tiles did you use? ______
Take some square tiles. Make a rectangle that has 6 rows and 2 columns. Record your rectangle on the grid paper. How many tiles did you use? ______
Take 16 square tiles. Make as many different rectangles as you can. Record them on the grid paper. How many different rectangles did you make? _______
Take 20 square tiles. Make as many different rectangles as you can. Record them on the grid paper. How many different rectangles did you make? _______
86

NC DEPARTMENT OF PUBLIC INSTRUCTION SECOND GRADE
87

NC DEPARTMENT OF PUBLIC INSTRUCTION SECOND GRADE
88

NC DEPARTMENT OF PUBLIC INSTRUCTION SECOND GRADE
Fraction Flowers Common Core Standard:
Reason with shapes and their attributes. 2.G.3 Partition circles and rectangles into two, three, or four equal shares, describe the shares using the words halves, thirds, half of, a third of, etc., and describe the whole as two halves, three thirds, four fourths. Recognize that equal shares of identical wholes need not have the same shape.
Standards for Mathematical Practice:
1. Make sense of problems and persevere in solving them 4. Model with mathematics 5. Use appropriate tools strategically 6. Attend to precision
Student Outcomes:
• I can partition a circle into halves, thirds and fourths. • I can describe the whole flower as two halves, three thirds, four fourths.
Materials:
• 18” x 12” white paper for each student • Precut circles in a variety of colors—diameter of the circles about 3inches • Scraps of paper
Advance Preparation:
• Use a die cut or other way of cutting circles to cut 3-4 circles for each student • Student should have previous experiences with partitioning circles into two, three, or four equal shares. • Vocabulary to use during the lesson: partition, half, third, fourth, halves, thirds, half of,
a third of, a quarter of.
Directions: 1. Explain that they are going to create a garden of flowers. Their flowers will be circles that
are partitioned into halves, thirds or fourths. 2. Talk about ways to cut the circles into halves, thirds and fourths. Have students demonstrate
partitioning the circles. Demonstrate with circles. 3. They will use the partitioned parts to create flowers. Examples: one flower could be one half
yellow, one half pink. Another flower could be one half yellow, one fourth blue, one fourth purple. 4. After making flowers, glue the flowers on the paper and add stems, leaves and other things
to the picture using scrap paper. 5. Label the flowers with the appropriate words. An example, one flower might be labeled one
third pink, two thirds yellow, and the whole flower is three thirds. • After students have completed the flower pictures, reconvene the whole class. Show
two pictures. Ask students to talk about each picture using the vocabulary: partition, half, third, fourth, halves, thirds, half of, a third of, a quarter of. The vocabulary can be listed on the board/chart paper.
6. After modeling the discussion, pair students. Each student describes his/her partner’s flowers.
89

NC DEPARTMENT OF PUBLIC INSTRUCTION SECOND GRADE
Questions to Pose: Before:
• How could we partition this circle into halves? • How could we partition this circle into thirds? • How could we partition this circle into fourths? • How do we know we have partitioned the circles equally? • If a flower is one half red and one half blue how much of the circle have we used?
During:
• As students are making flowers ask how do you know this is one third?, one half?, one fourth? • If the circles are the same size, ask, “Which is larger one third or one fourth? • How did you figure out how to cut this circle into fourths?, thirds?, halves?
After:
• Which flower shows one fourth red? • If we changed this half to fourths how would the flower change? • How is one fourth of a flower like one fourth of a dollar?
Possible Misconceptions/Suggestions Possible Misconceptions Suggestions Students do not make equivalent fractions equal.
Have students lay the pieces together and compare sizes.
Students may have difficulty-cutting circles into thirds.
Have students make thirds on the geoboard. Have them look at the geoboard to help them determine how to cut the paper circle. Some students relate the third to the “peace sign” or an upside down Y.
Special Notes:
These websites have additional tasks: • Mr. Zed’s Cake is a geoboard task:
http://www.k-5mathteachingresources.com/support-files/mr-zeds-cakes.pdf • Additional geoboard tasks:
http://www.k-5mathteachingresources.com/support-files/geoboard-fourths-2g3.pdf http://www.k-5mathteachingresources.com/support-files/geoboard-fourths-2g3.pdf
Solutions:
90