let’s get it started! - katriders.com · © 2009 suzuki katana discussion forums © 2009 suzuki...
TRANSCRIPT
© 2009 http://katriders.com Suzuki Katana Discussion Forums
© 2009 http://katriders.com Suzuki Katana Discussion Forums
- 1 -
1
Carbs 102, Suzuki Katana 1998-2006 600 and 750 Carbs 102, Suzuki Katana 1998-2006 600 and 750............................................................ 1
Let’s get it started! .......................................................................................................... 1 Taking the carbs off the rail!......................................................................................... 14 Clean them up ............................................................................................................... 17 Visual Synch ................................................................................................................. 19
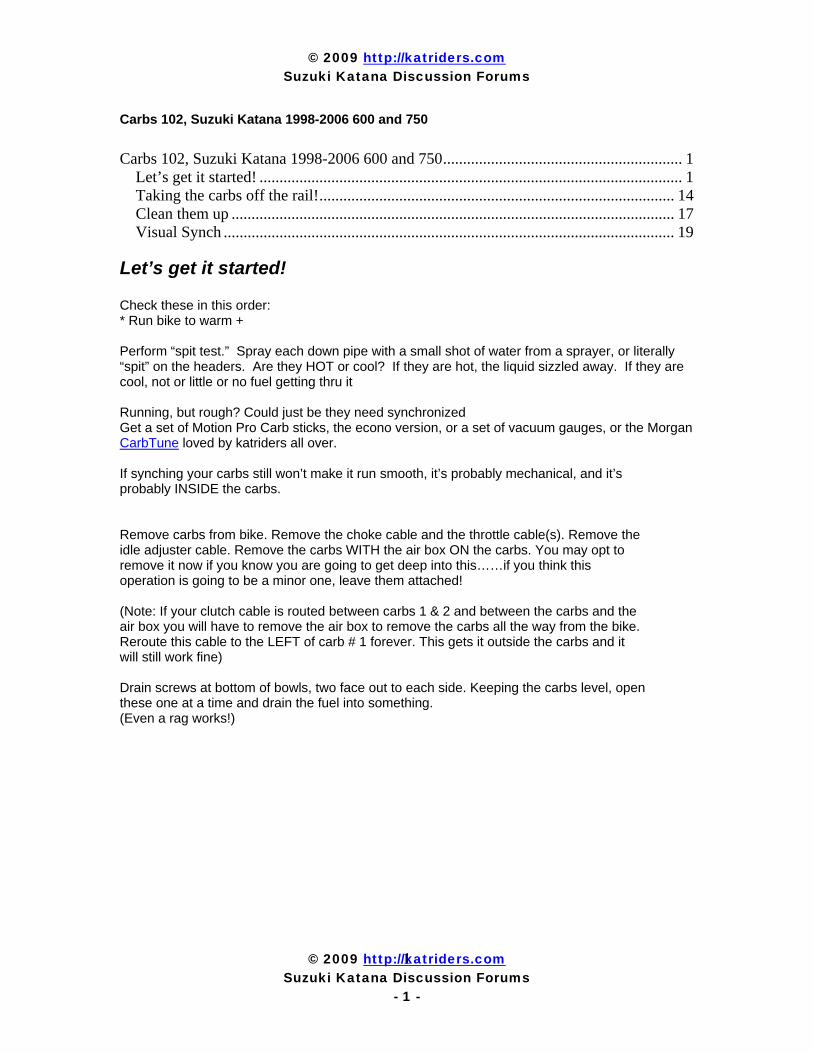
Let’s get it started! Check these in this order: * Run bike to warm + Perform “spit test.” Spray each down pipe with a small shot of water from a sprayer, or literally “spit” on the headers. Are they HOT or cool? If they are hot, the liquid sizzled away. If they are cool, not or little or no fuel getting thru it Running, but rough? Could just be they need synchronized Get a set of Motion Pro Carb sticks, the econo version, or a set of vacuum gauges, or the Morgan CarbTune loved by katriders all over. If synching your carbs still won’t make it run smooth, it’s probably mechanical, and it’s probably INSIDE the carbs. Remove carbs from bike. Remove the choke cable and the throttle cable(s). Remove the idle adjuster cable. Remove the carbs WITH the air box ON the carbs. You may opt to remove it now if you know you are going to get deep into this……if you think this operation is going to be a minor one, leave them attached! (Note: If your clutch cable is routed between carbs 1 & 2 and between the carbs and the air box you will have to remove the air box to remove the carbs all the way from the bike. Reroute this cable to the LEFT of carb # 1 forever. This gets it outside the carbs and it will still work fine) Drain screws at bottom of bowls, two face out to each side. Keeping the carbs level, open these one at a time and drain the fuel into something. (Even a rag works!)
© 2009 http://katriders.com Suzuki Katana Discussion Forums
© 2009 http://katriders.com Suzuki Katana Discussion Forums
- 2 -
2
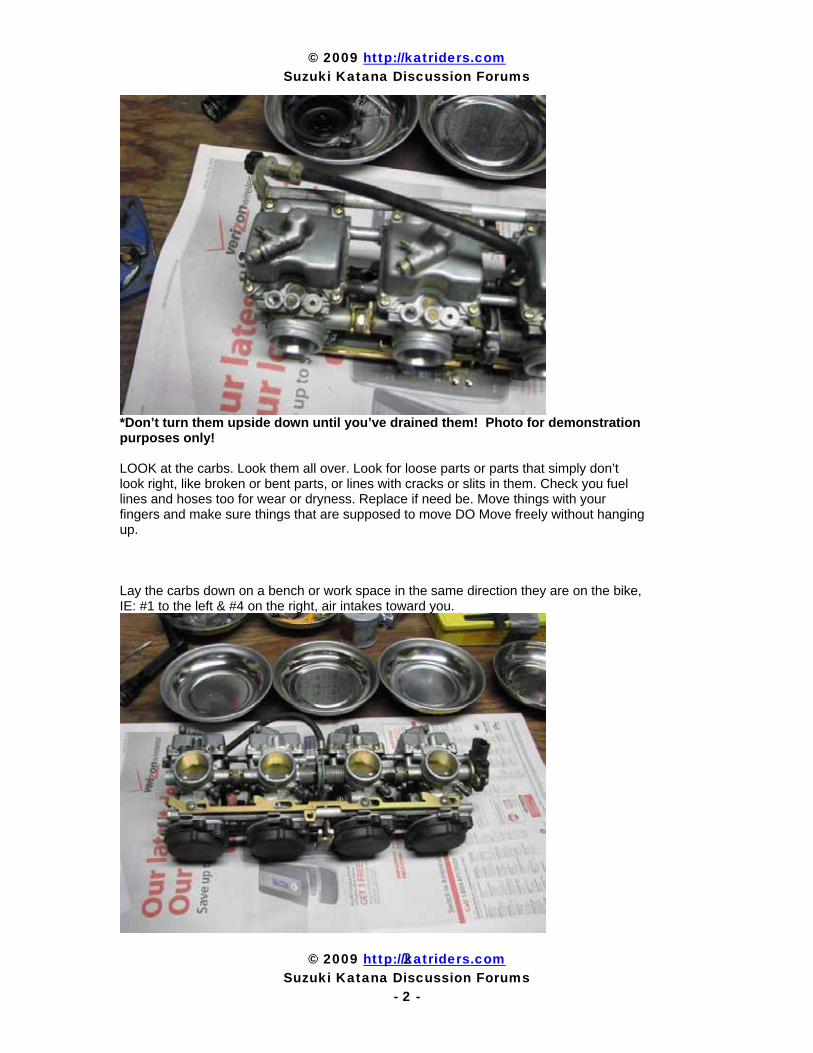
*Don’t turn them upside down until you’ve drained them! Photo for demonstration purposes only! LOOK at the carbs. Look them all over. Look for loose parts or parts that simply don’t look right, like broken or bent parts, or lines with cracks or slits in them. Check you fuel lines and hoses too for wear or dryness. Replace if need be. Move things with your fingers and make sure things that are supposed to move DO Move freely without hanging up. Lay the carbs down on a bench or work space in the same direction they are on the bike, IE: #1 to the left & #4 on the right, air intakes toward you.
© 2009 http://katriders.com Suzuki Katana Discussion Forums
© 2009 http://katriders.com Suzuki Katana Discussion Forums
- 3 -
3
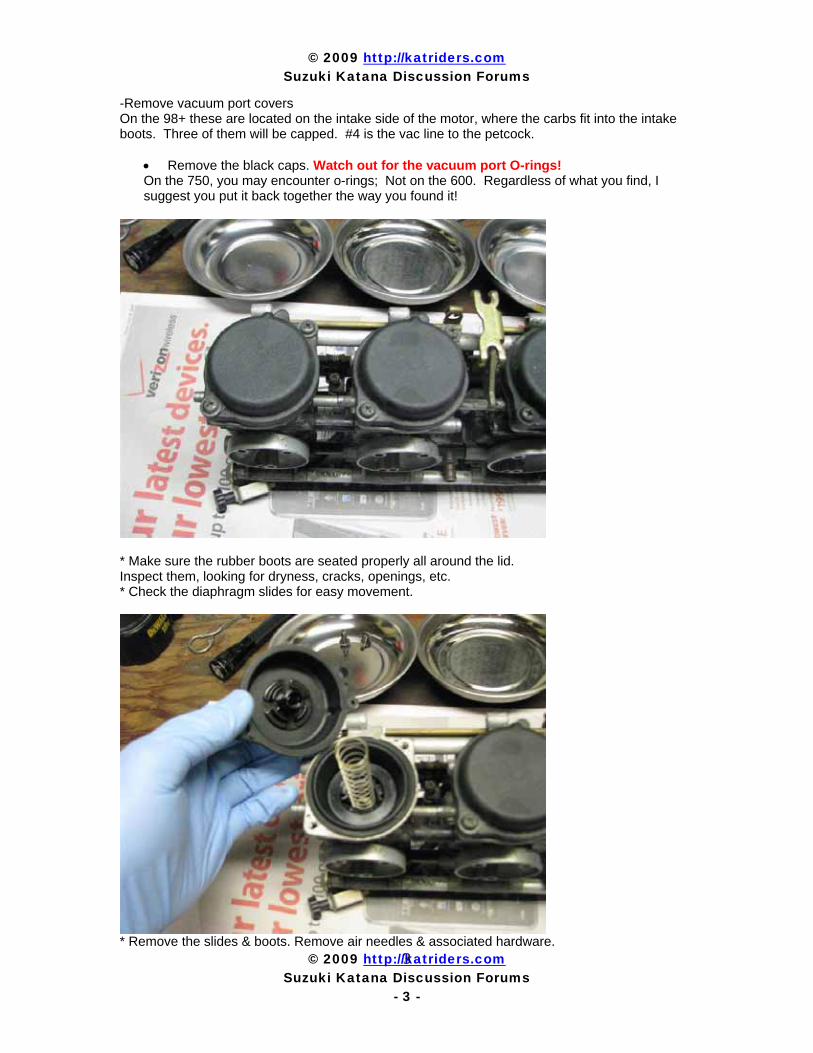
-Remove vacuum port covers On the 98+ these are located on the intake side of the motor, where the carbs fit into the intake boots. Three of them will be capped. #4 is the vac line to the petcock.
• Remove the black caps. Watch out for the vacuum port O-rings! On the 750, you may encounter o-rings; Not on the 600. Regardless of what you find, I suggest you put it back together the way you found it!
* Make sure the rubber boots are seated properly all around the lid. Inspect them, looking for dryness, cracks, openings, etc. * Check the diaphragm slides for easy movement.
* Remove the slides & boots. Remove air needles & associated hardware.
© 2009 http://katriders.com Suzuki Katana Discussion Forums
© 2009 http://katriders.com Suzuki Katana Discussion Forums
- 4 -
4
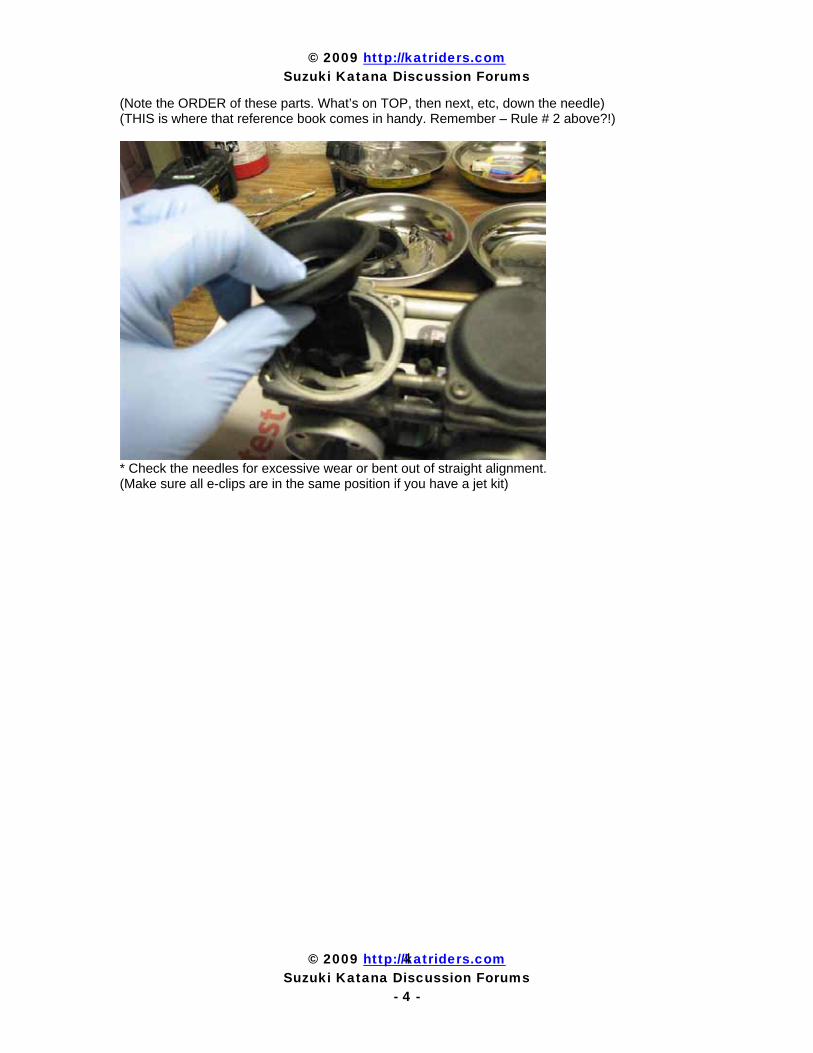
(Note the ORDER of these parts. What’s on TOP, then next, etc, down the needle) (THIS is where that reference book comes in handy. Remember – Rule # 2 above?!)
* Check the needles for excessive wear or bent out of straight alignment. (Make sure all e-clips are in the same position if you have a jet kit)
© 2009 http://katriders.com Suzuki Katana Discussion Forums
© 2009 http://katriders.com Suzuki Katana Discussion Forums
- 5 -
5
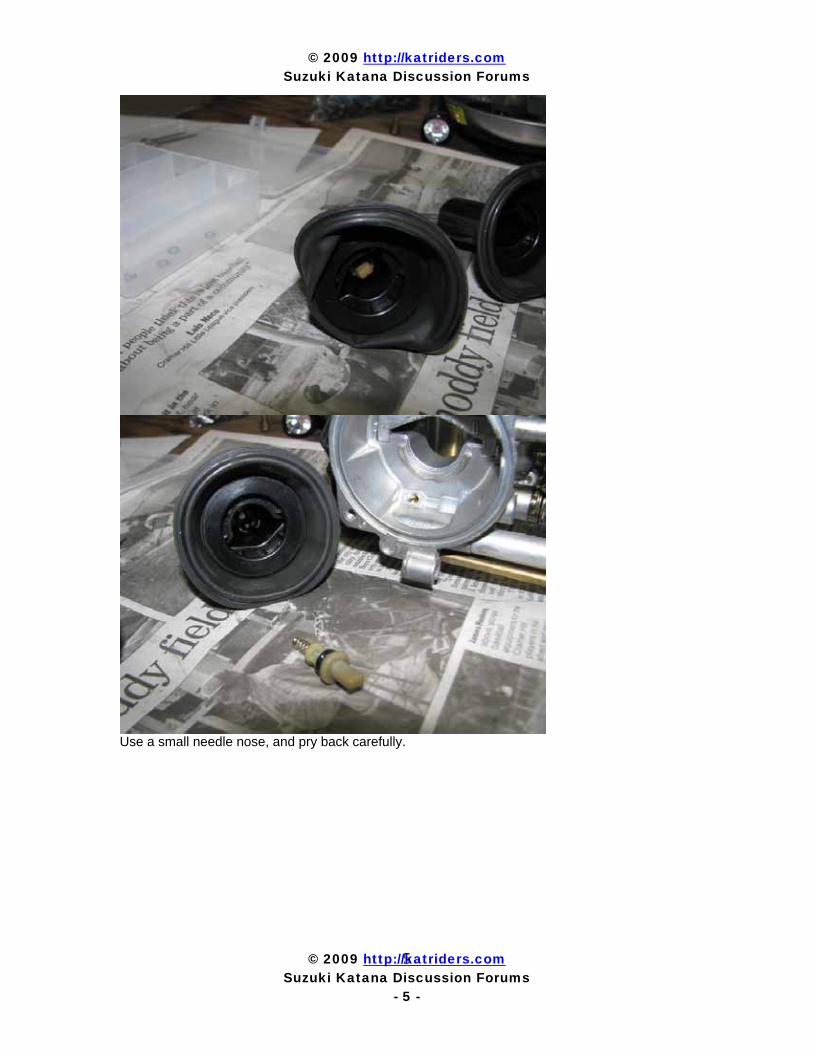
Use a small needle nose, and pry back carefully.
© 2009 http://katriders.com Suzuki Katana Discussion Forums
© 2009 http://katriders.com Suzuki Katana Discussion Forums
- 6 -
6
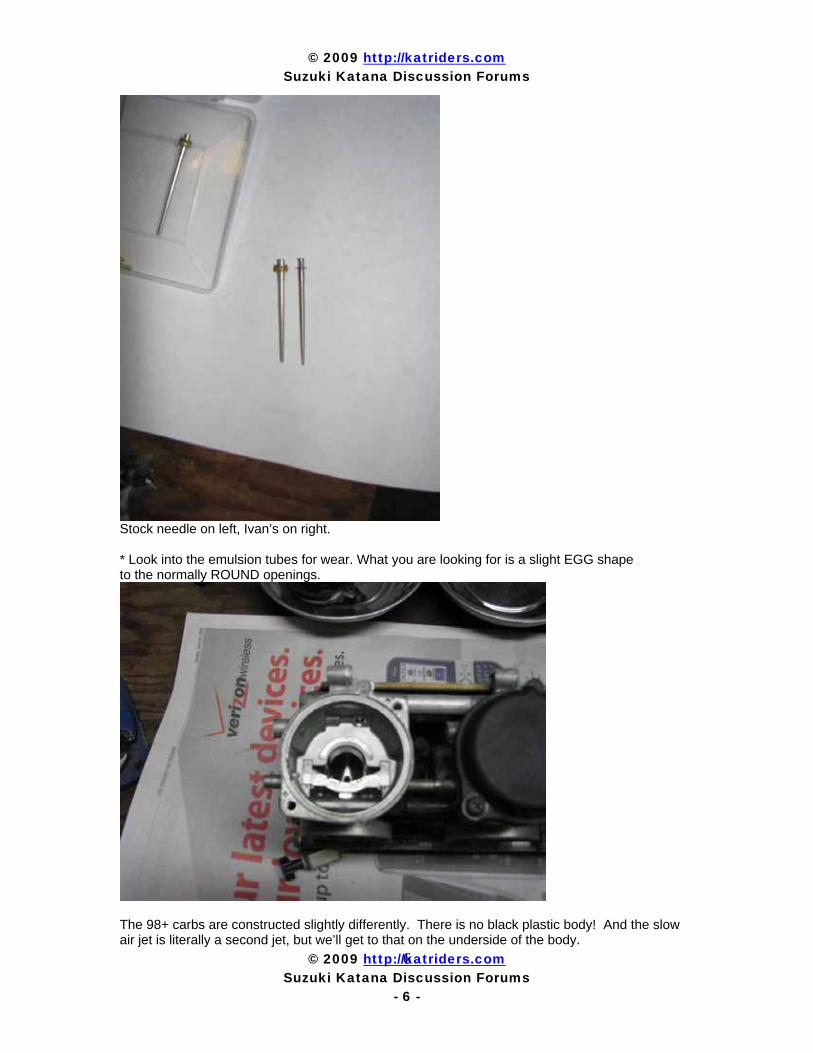
Stock needle on left, Ivan’s on right. * Look into the emulsion tubes for wear. What you are looking for is a slight EGG shape to the normally ROUND openings.
The 98+ carbs are constructed slightly differently. There is no black plastic body! And the slow air jet is literally a second jet, but we’ll get to that on the underside of the body.
© 2009 http://katriders.com Suzuki Katana Discussion Forums
© 2009 http://katriders.com Suzuki Katana Discussion Forums
- 7 -
7
If everything is fine here, clean everything and lay it aside for assembly later. Helps to keep things organized at this point!
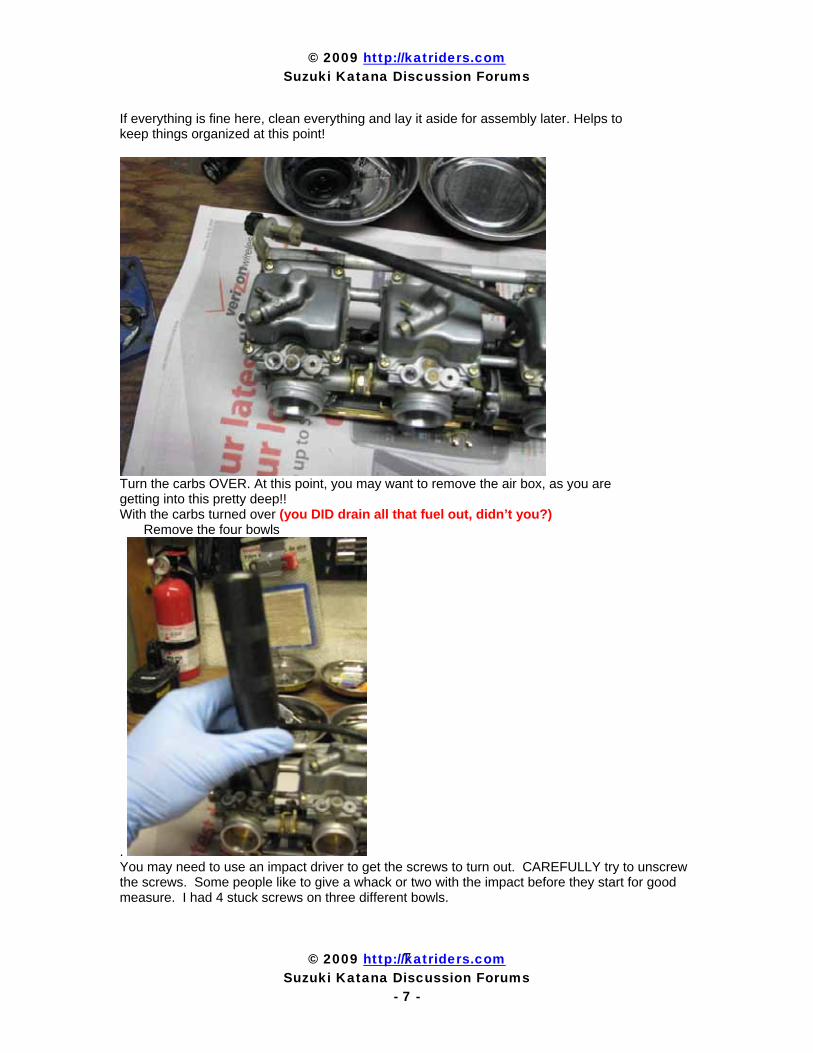
Turn the carbs OVER. At this point, you may want to remove the air box, as you are getting into this pretty deep!! With the carbs turned over (you DID drain all that fuel out, didn’t you?)
Remove the four bowls
. You may need to use an impact driver to get the screws to turn out. CAREFULLY try to unscrew the screws. Some people like to give a whack or two with the impact before they start for good measure. I had 4 stuck screws on three different bowls.
© 2009 http://katriders.com Suzuki Katana Discussion Forums
© 2009 http://katriders.com Suzuki Katana Discussion Forums
- 8 -
8
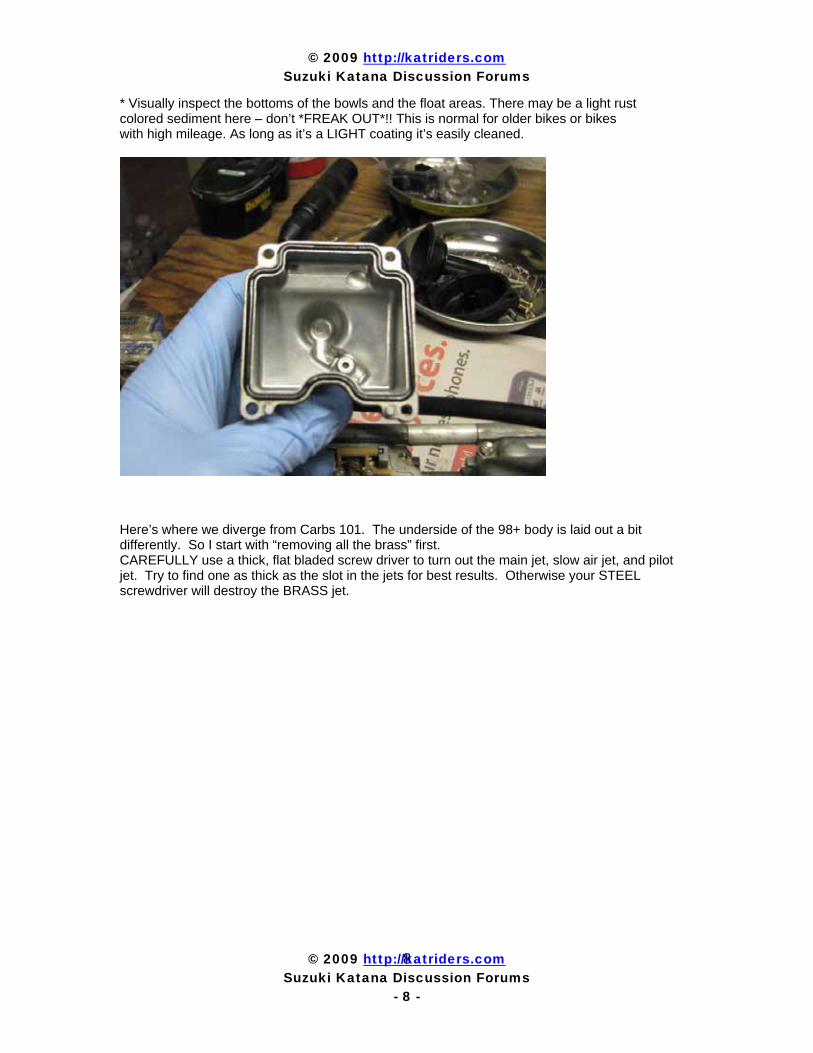
* Visually inspect the bottoms of the bowls and the float areas. There may be a light rust colored sediment here – don’t *FREAK OUT*!! This is normal for older bikes or bikes with high mileage. As long as it’s a LIGHT coating it’s easily cleaned.
Here’s where we diverge from Carbs 101. The underside of the 98+ body is laid out a bit differently. So I start with “removing all the brass” first. CAREFULLY use a thick, flat bladed screw driver to turn out the main jet, slow air jet, and pilot jet. Try to find one as thick as the slot in the jets for best results. Otherwise your STEEL screwdriver will destroy the BRASS jet.
© 2009 http://katriders.com Suzuki Katana Discussion Forums
© 2009 http://katriders.com Suzuki Katana Discussion Forums
- 9 -
9
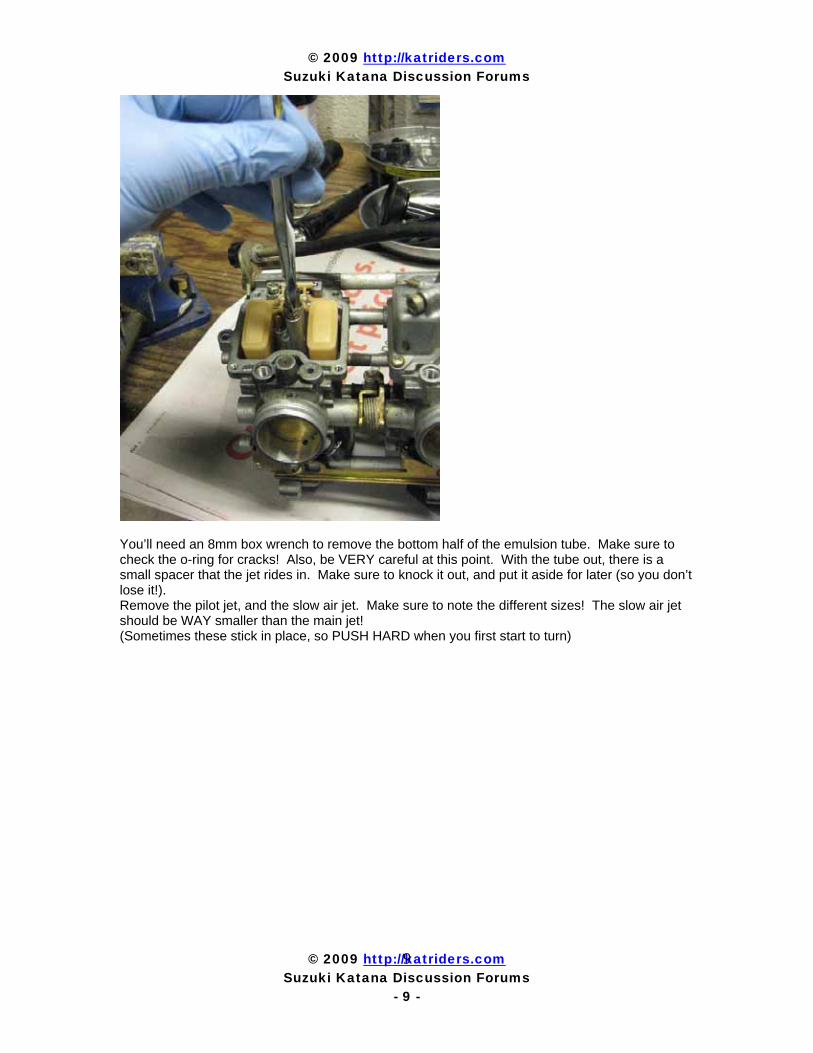
You’ll need an 8mm box wrench to remove the bottom half of the emulsion tube. Make sure to check the o-ring for cracks! Also, be VERY careful at this point. With the tube out, there is a small spacer that the jet rides in. Make sure to knock it out, and put it aside for later (so you don’t lose it!). Remove the pilot jet, and the slow air jet. Make sure to note the different sizes! The slow air jet should be WAY smaller than the main jet! (Sometimes these stick in place, so PUSH HARD when you first start to turn)
© 2009 http://katriders.com Suzuki Katana Discussion Forums
© 2009 http://katriders.com Suzuki Katana Discussion Forums
- 10 -
10
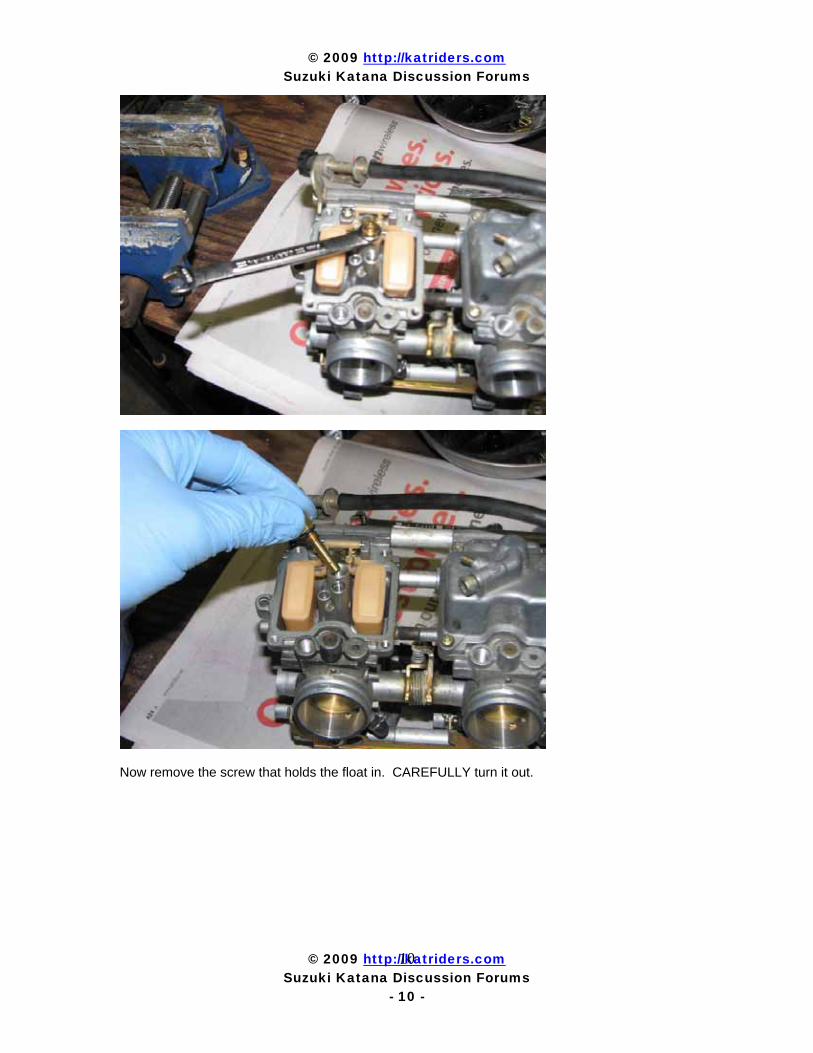
Now remove the screw that holds the float in. CAREFULLY turn it out.

© 2009 http://katriders.com Suzuki Katana Discussion Forums
© 2009 http://katriders.com Suzuki Katana Discussion Forums
- 11 -
11
* Inspect the float needles for freedom and ease of movement. Look for clogged seats or openings. Clean with carb cleaner and blow dry off with a can of air. (The computer geeks love this stuff! It’s only about $2 a can, and VERY HANDY!) Remove the needle seat. Inspect the o-ring. You may need to use a small pair of pliers to pull this free. Again, be CAREFUL. Your hardened tools will tear apart the brass fittings!
© 2009 http://katriders.com Suzuki Katana Discussion Forums
© 2009 http://katriders.com Suzuki Katana Discussion Forums
- 12 -
12
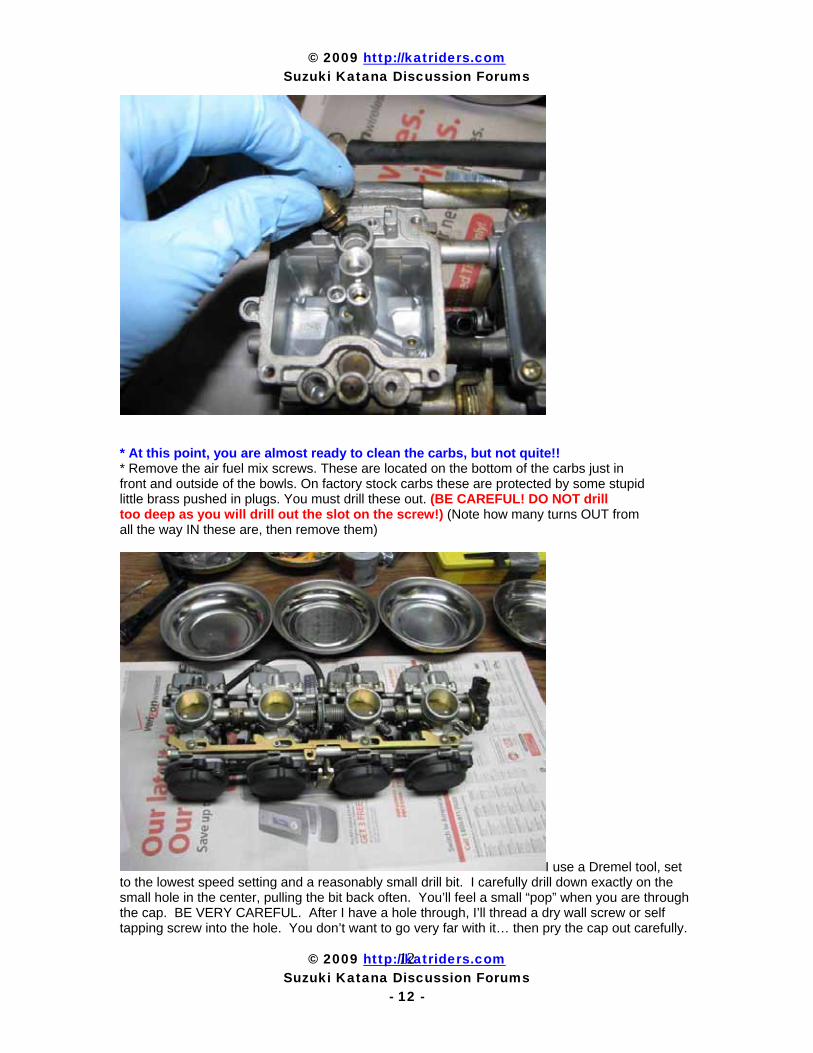
* At this point, you are almost ready to clean the carbs, but not quite!! * Remove the air fuel mix screws. These are located on the bottom of the carbs just in front and outside of the bowls. On factory stock carbs these are protected by some stupid little brass pushed in plugs. You must drill these out. (BE CAREFUL! DO NOT drill too deep as you will drill out the slot on the screw!) (Note how many turns OUT from all the way IN these are, then remove them)
I use a Dremel tool, set to the lowest speed setting and a reasonably small drill bit. I carefully drill down exactly on the small hole in the center, pulling the bit back often. You’ll feel a small “pop” when you are through the cap. BE VERY CAREFUL. After I have a hole through, I’ll thread a dry wall screw or self tapping screw into the hole. You don’t want to go very far with it… then pry the cap out carefully.
© 2009 http://katriders.com Suzuki Katana Discussion Forums
© 2009 http://katriders.com Suzuki Katana Discussion Forums
- 13 -
13
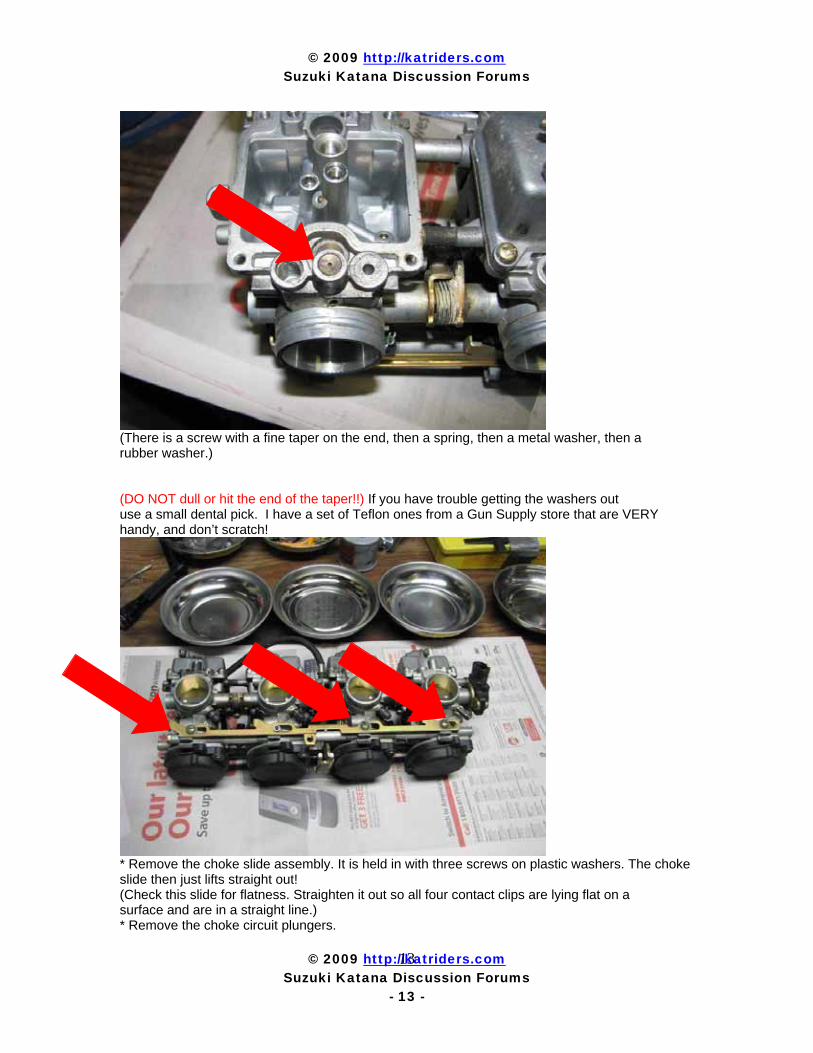
(There is a screw with a fine taper on the end, then a spring, then a metal washer, then a rubber washer.) (DO NOT dull or hit the end of the taper!!) If you have trouble getting the washers out use a small dental pick. I have a set of Teflon ones from a Gun Supply store that are VERY handy, and don’t scratch!
* Remove the choke slide assembly. It is held in with three screws on plastic washers. The choke slide then just lifts straight out! (Check this slide for flatness. Straighten it out so all four contact clips are lying flat on a surface and are in a straight line.) * Remove the choke circuit plungers.
© 2009 http://katriders.com Suzuki Katana Discussion Forums
© 2009 http://katriders.com Suzuki Katana Discussion Forums
- 14 -
14
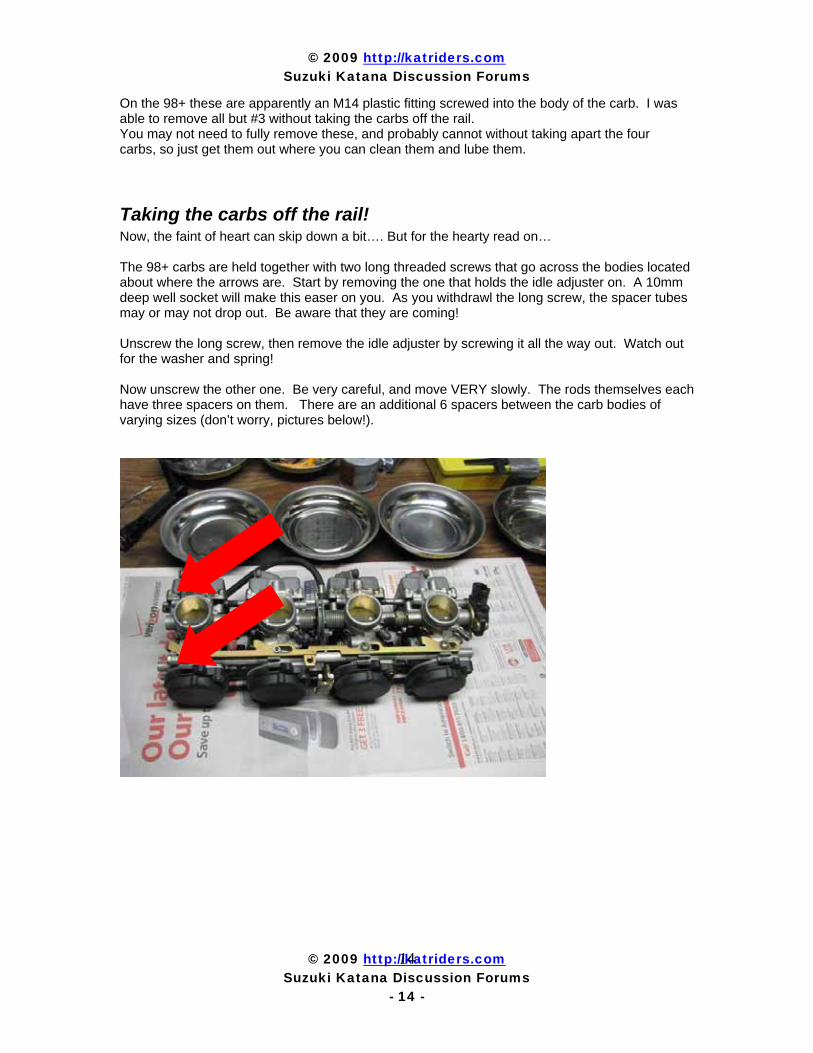
On the 98+ these are apparently an M14 plastic fitting screwed into the body of the carb. I was able to remove all but #3 without taking the carbs off the rail. You may not need to fully remove these, and probably cannot without taking apart the four carbs, so just get them out where you can clean them and lube them.
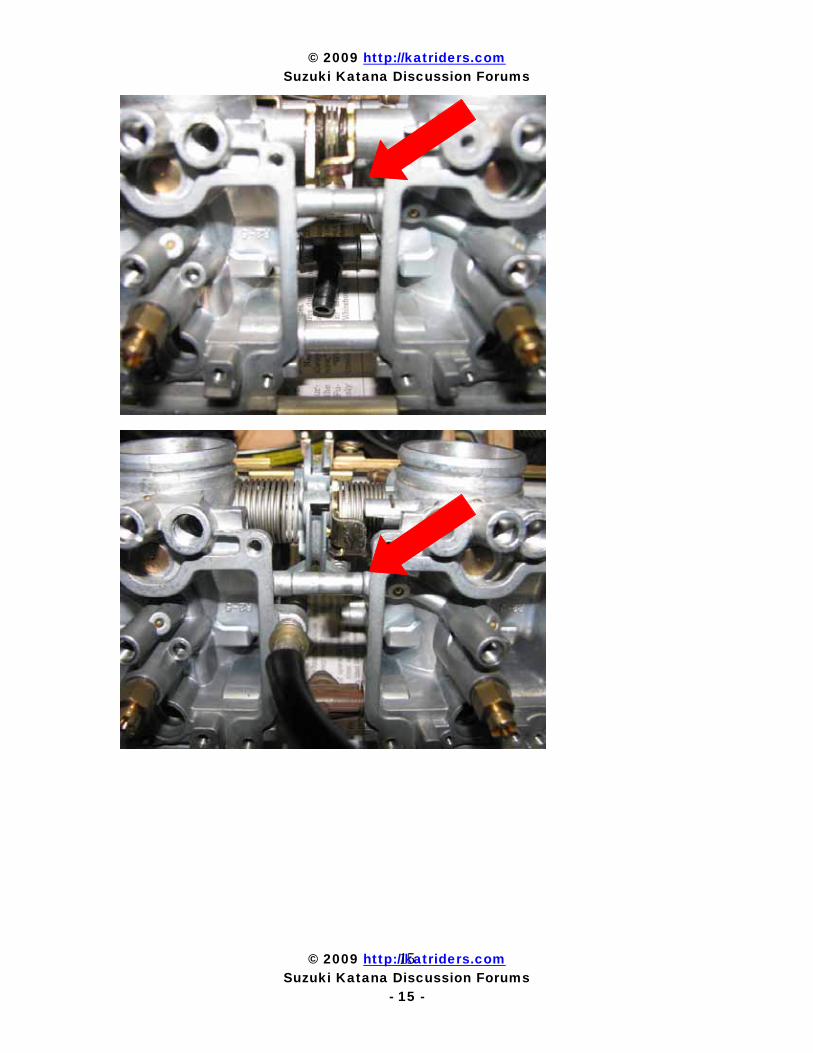
Taking the carbs off the rail! Now, the faint of heart can skip down a bit…. But for the hearty read on… The 98+ carbs are held together with two long threaded screws that go across the bodies located about where the arrows are. Start by removing the one that holds the idle adjuster on. A 10mm deep well socket will make this easer on you. As you withdrawl the long screw, the spacer tubes may or may not drop out. Be aware that they are coming! Unscrew the long screw, then remove the idle adjuster by screwing it all the way out. Watch out for the washer and spring! Now unscrew the other one. Be very careful, and move VERY slowly. The rods themselves each have three spacers on them. There are an additional 6 spacers between the carb bodies of varying sizes (don’t worry, pictures below!).
© 2009 http://katriders.com Suzuki Katana Discussion Forums
© 2009 http://katriders.com Suzuki Katana Discussion Forums
- 15 -
15
© 2009 http://katriders.com Suzuki Katana Discussion Forums
© 2009 http://katriders.com Suzuki Katana Discussion Forums
- 16 -
16
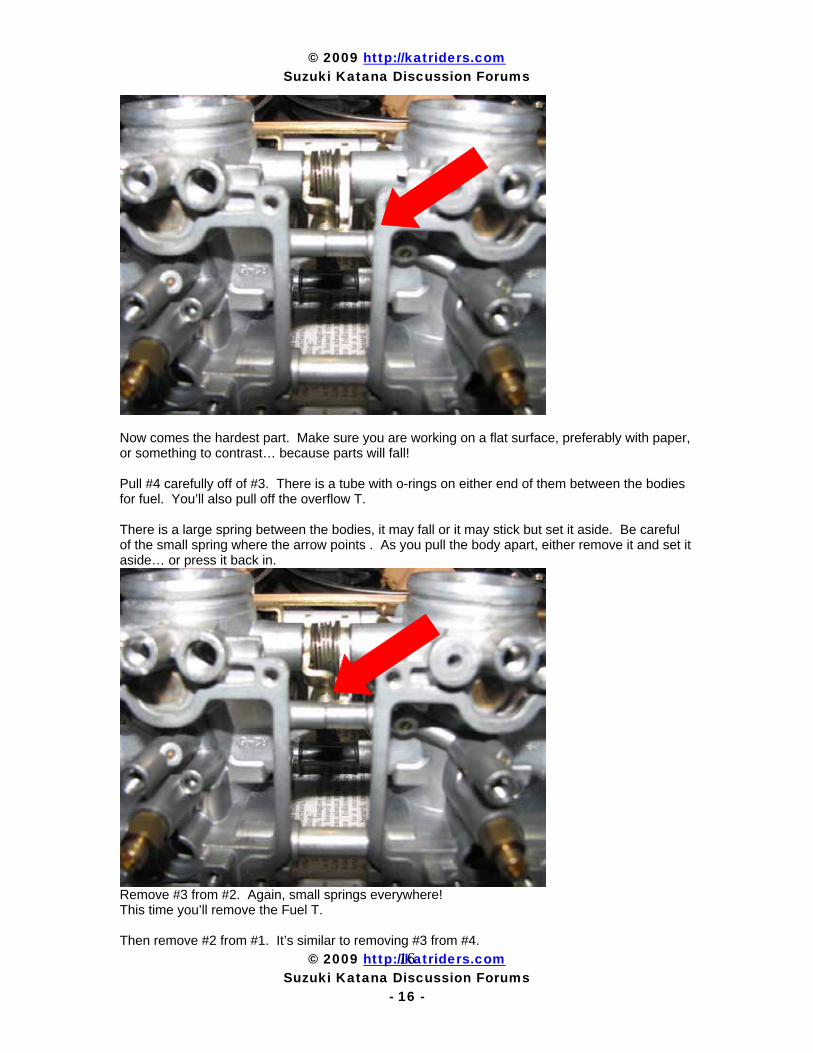
Now comes the hardest part. Make sure you are working on a flat surface, preferably with paper, or something to contrast… because parts will fall! Pull #4 carefully off of #3. There is a tube with o-rings on either end of them between the bodies for fuel. You’ll also pull off the overflow T. There is a large spring between the bodies, it may fall or it may stick but set it aside. Be careful of the small spring where the arrow points . As you pull the body apart, either remove it and set it aside… or press it back in.
Remove #3 from #2. Again, small springs everywhere! This time you’ll remove the Fuel T. Then remove #2 from #1. It’s similar to removing #3 from #4.
© 2009 http://katriders.com Suzuki Katana Discussion Forums
© 2009 http://katriders.com Suzuki Katana Discussion Forums
- 17 -
17
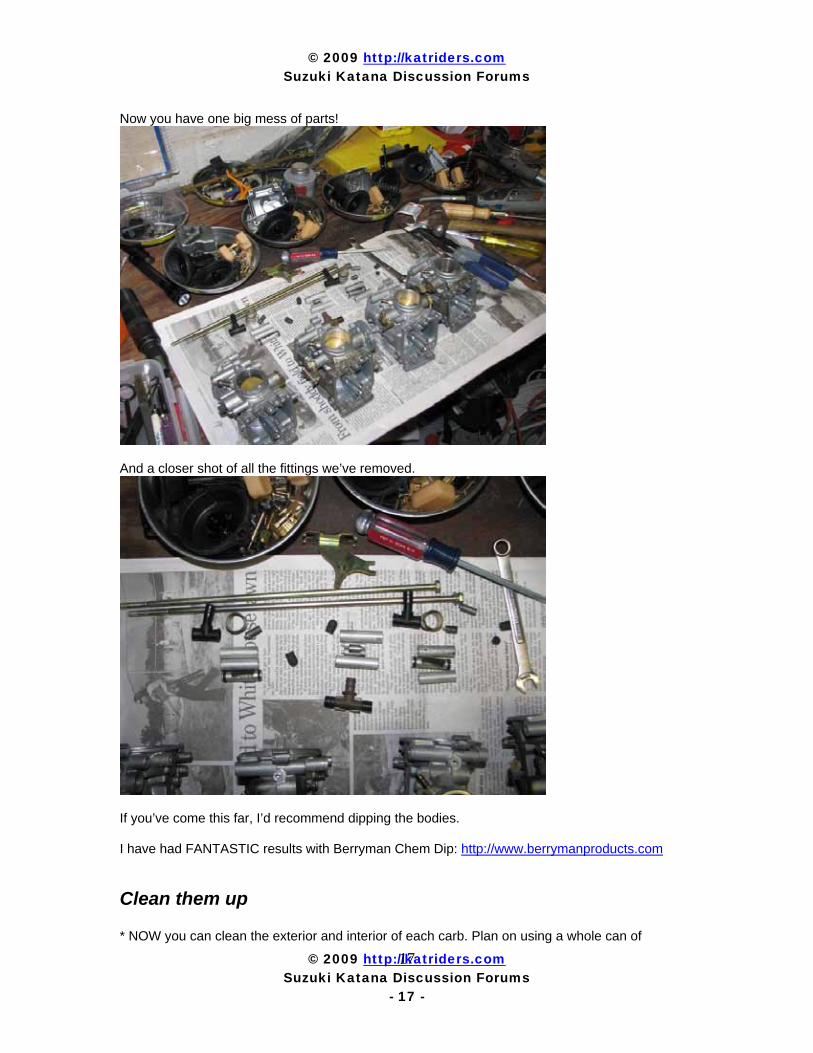
Now you have one big mess of parts!
And a closer shot of all the fittings we’ve removed.
If you’ve come this far, I’d recommend dipping the bodies. I have had FANTASTIC results with Berryman Chem Dip: http://www.berrymanproducts.com
Clean them up * NOW you can clean the exterior and interior of each carb. Plan on using a whole can of
© 2009 http://katriders.com Suzuki Katana Discussion Forums
© 2009 http://katriders.com Suzuki Katana Discussion Forums
- 18 -
18
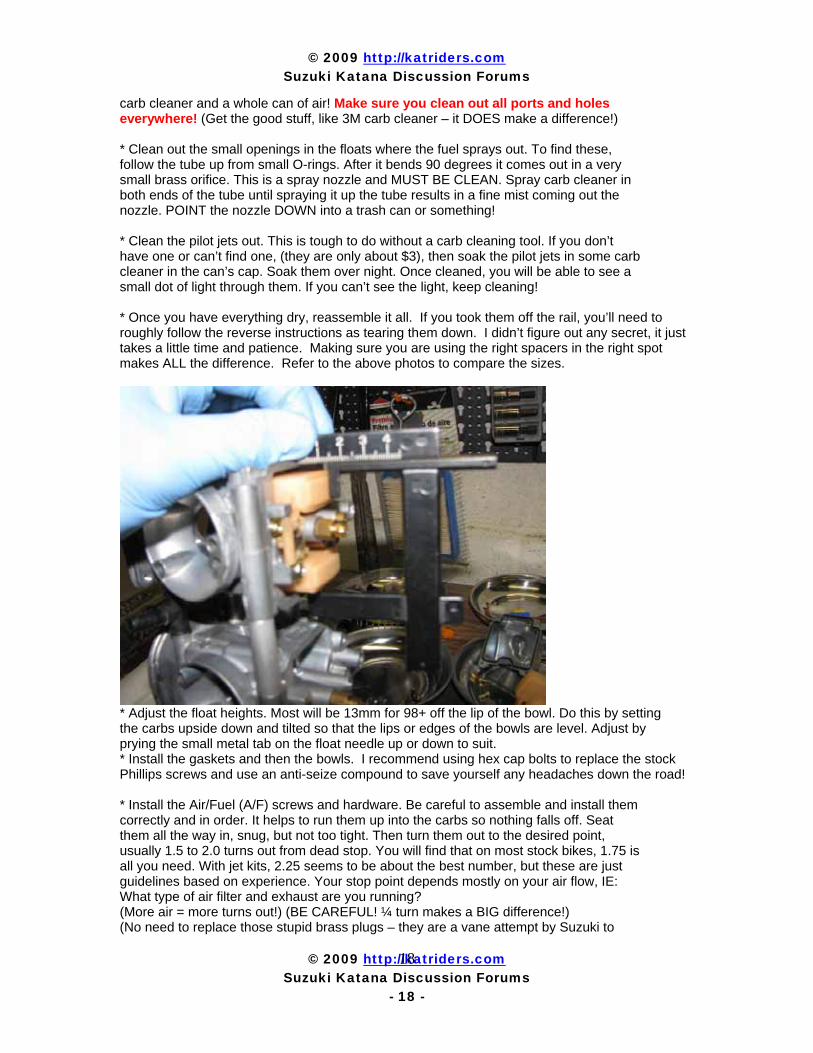
carb cleaner and a whole can of air! Make sure you clean out all ports and holes everywhere! (Get the good stuff, like 3M carb cleaner – it DOES make a difference!) * Clean out the small openings in the floats where the fuel sprays out. To find these, follow the tube up from small O-rings. After it bends 90 degrees it comes out in a very small brass orifice. This is a spray nozzle and MUST BE CLEAN. Spray carb cleaner in both ends of the tube until spraying it up the tube results in a fine mist coming out the nozzle. POINT the nozzle DOWN into a trash can or something! * Clean the pilot jets out. This is tough to do without a carb cleaning tool. If you don’t have one or can’t find one, (they are only about $3), then soak the pilot jets in some carb cleaner in the can’s cap. Soak them over night. Once cleaned, you will be able to see a small dot of light through them. If you can’t see the light, keep cleaning! * Once you have everything dry, reassemble it all. If you took them off the rail, you’ll need to roughly follow the reverse instructions as tearing them down. I didn’t figure out any secret, it just takes a little time and patience. Making sure you are using the right spacers in the right spot makes ALL the difference. Refer to the above photos to compare the sizes.
* Adjust the float heights. Most will be 13mm for 98+ off the lip of the bowl. Do this by setting the carbs upside down and tilted so that the lips or edges of the bowls are level. Adjust by prying the small metal tab on the float needle up or down to suit. * Install the gaskets and then the bowls. I recommend using hex cap bolts to replace the stock Phillips screws and use an anti-seize compound to save yourself any headaches down the road! * Install the Air/Fuel (A/F) screws and hardware. Be careful to assemble and install them correctly and in order. It helps to run them up into the carbs so nothing falls off. Seat them all the way in, snug, but not too tight. Then turn them out to the desired point, usually 1.5 to 2.0 turns out from dead stop. You will find that on most stock bikes, 1.75 is all you need. With jet kits, 2.25 seems to be about the best number, but these are just guidelines based on experience. Your stop point depends mostly on your air flow, IE: What type of air filter and exhaust are you running? (More air = more turns out!) (BE CAREFUL! ¼ turn makes a BIG difference!) (No need to replace those stupid brass plugs – they are a vane attempt by Suzuki to

© 2009 http://katriders.com Suzuki Katana Discussion Forums
© 2009 http://katriders.com Suzuki Katana Discussion Forums
- 19 -
19
appease the EPA!) -I like to put a small mark with sharpie on the opening to help me count the turns back out. * Turn the carbs over. * Lube the choke plungers with a little bit of WD-40 on each rod. Re-seat them all, then pull them out and let the springs suck them in a few times to make sure they work properly! (You can also put a drop in the port hole up inside the top of each carb and then pull the plunger out a ways to let it run in!) * Install the needles & their hardware in the center hole in the air slides, then install the air slides into the diaphragms. (Remember that reference book – Rule # 2? Now would be a good time to look at it!) (Make sure the rubber boots are seated all the way around in the lip of each carb.) * Install the caps. Make sure the rubber caps for the vacuum ports are OK. They should not be dry or cracked or split and they should have clamps. * Check the air slides to make sure they move freely, make the same “sucking” sound, like they’re drawing a vacuum, and to make sure they return to their seated position easily. * Make sure the throttle bodies move easily and the springs allow for quick return. If you pry them open and let them go you should here a thud or sharp stop.
Visual Synch * Reinstall the idle adjuster cable until it just barely touches the starter tab of the carbs. Now look into the engine side of the carbs at the butterfly valves. (There are three small holes – familiarize yourself with them.) Look at carb # 3 and adjust the idle cable until the first small hole (towards the outside of the carbs) on the bottom of the carbs is HALF VISIBLE. Then adjust carb # 4 using its idle adjustment screw, (located from the top between the carbs – it’s on the arm that moves when you twist the throttle). Take this carb to the same point by only adjusting the screw. DO NOT adjust the cable any more – it is only for carb # 3 at this point. Next, adjust carb # 1 to WHATEVER carb # 2 is, so they are equal. Then, adjust carb # 2 to the same point as 3 & 4 (first hole half open). Once all four carbs are equal and at the same point, (HALF the first small hole showing open) you have visually synchronized your carbs! You are now ready to reinstall them in the bike and synchronize them exactly. * Install the air box onto the carbs FIRST!! The clamps face down so that the screw heads can be reached from the bottom and the outside, 2 each, IE: 1 & 2 face left, 3 & 4 face right. You can also remove the air filter to PUSH the rubber seats on over the carbs by sticking your hand inside the air box to assist. Once you have the air box fully seated with all fours clamps back on the carbs then reinstall the filter. * Reinstall the throttle cable(s) while the carbs are still off the bike. (MUCH easier!) * Reinstall the carbs. Make darn sure that the clamps at the engine intakes are very loose and are up top! PUSH (HARD) on only the carbs themselves to seat them back into the engine. Crank down the clamps being careful to make sure the screws are at the top. * Reinstall the choke cable, and fuel line(s), and air lines and the main exhaust blow off hose from the top of the engine to the air box. * At this point, I’d suggest changing the plugs, then using a temporary bottle give the beast some gas! Don’t forget to plug the vacuum line coming from the left side of carb # 4 while you run the bike.

© 2009 http://katriders.com Suzuki Katana Discussion Forums
© 2009 http://katriders.com Suzuki Katana Discussion Forums
- 20 -
20
*Once the bike is warmed up, adjust the idle, and then shut it off to hook up your synchronization tool, then synch the carbs. Some words by Special K (thanks Keith!) Photos and text for 98+ by steves