level 16: useful functions to remember - amazon web...
TRANSCRIPT

Level 16: Useful Functions to Remember
Welcome to Level 16 of the RPG Maker VX Introductory Course. In the last Level we used Variables to
control a door Event.
In this Level we’ll introduce you to some useful functions for when you’re debugging and playtesting.
In the previous Level we executed Events with Variables. While you were playtesting it, did you feel at
anytime like you wanted to check what number the Variable “# of broken tablets” was currently set at?
There are no indications when Switches or Variables change, so they can be difficult to keep track of.
In RPG Maker VX, the playtest feature is equipped with a special debugging function.
Step 38: Playtest Functions
Checking Switches and Variables while Playtesting

*Debugging screen.
By pressing the F9 key during a playtest, you can cal up the debugging screen. Look familiar? This screen
lists all Switches and Variables, along with their current state. In the list on the left, the “S” stands for
Switch and “V” for variable. The numbers in the brackets list the numbers of either to be displayed on
the right, where you can check individual states.
*Controlling the state of a Switch.

You can change the state of Switches from this screen as well. Select the corresponding group of
Switches on the left and press the designated key. The cursor will switch to the right side where you can
choose the individual Switch. Pressing the designated key while an individual Switch is highlighted
changes the state of that Switch. Go ahead and select Switch “0001:Spoke with the King” and hit the
designated key.
*”0001:Spoken with the King” set to “ON”.
The Switch should now be in the “ON” state. Now you are able to not only check the current state of
Switches and Variables, but alter them as well.
*Altering the state of Variables.

You can check the state of Variables in the same way. Select the corresponding group of Variables from
the list on the left and press the designated key. The cursor will switch to the right side where you can
choose the individual Variable. Pressing the designated key while an individual Variable is highlighted
changes the state of that Variable. Go and ahead and select Variable “0001:# of broken tablets” and
press the “right” direction key.
*Altering the Variable.
The Variable should have increased by 1. Pressing the “left” key will take the Variable back down to 0.
Pressing the PgUp key will increase the value by 10, and the PgDn key will decrease the value by 10.
This feature allows you to test switches without having to play all the way through in a playtest. For
example, you can set the “0001:Spoke with the King” switch to “ON” from the very beginning of the
game and you will be able to get the ship without physically speaking with the King.
The same is true for Variables. For example, if you want to test the door we just set up in Level 15, but
don’t want to walk all the way around the Lair searching for the tablets, you can set the “0001:” of
broken tablets” to whatever number you choose and test the door’s reaction.
This feature is only available during playtests, and not during an actual game.

Oceans on a map and walls in a dungeon are terrific for guiding the flow of a game, but can become very
tiring very quickly when repeated endlessly during playtests.
*Travelling through regularly impassable terrain.
By holding the Ctrl key while moving around any map, your character can walk through walls, cross
oceans and basically go anywhere you’d like. To use an example from the game, this feature allows us to
walk across the ocean from Minato Port to the Cave of Demons without having to get the ship first.
*You can even pass through Events.
Pass Through Impassable Terrain

Events are no obstacle to the Ctrl key’s power. For example, the locked door in Level 2 of the Cave of
Demons is no match for a playtesting character and the Ctrl key.
Of course, this feature is also only available during a playtest.
Point: Saving during a playtest
A playtest has all the features of a regularly launched game, and that includes saving games. If you save
your game during a playtest, all of your character’s data like Level, location, gold and state of Switches
and Variables will be recorded and you can begin the next playtest from the place where you last left off.
It is worth mentioning here that it is possible to cause problems in your saved game data if you start
editing Switches and / or Variables in the game’s past. For example, in a game you’re currently
playtesting, an important Switch called A is set to ON. If you go back and edit Switch A to become Switch
B, what do you think will happen? The game will require you to have Switch B set to ON, but your saved
game data will only have the old Switch A set to on.
If some of your edits don’t appear to work properly, then it’s possible that your saved game data and
the current game are out of alignment. Here you can check all the relevant Switches and Variables to
ensure that all is going according to plan.
*Debugging screen.
Have you ever wanted to change the color of text messages in the game? RPG Maker VX allows you to
do that with something called control characters. These special characters always begin with a backslash
“\” and do not appear in the message displayed during the game.
It’s a little hard to understand from just an explanation, so here’s an example. Let’s go back to the Good
King’s Castle.
Step 39: Using Control Characters
Changing the Color of the Text

Switch to Event Mode
*Editing the King’s speech at the Good King’s Castle.
Double-click on the King to open the Event Editor.
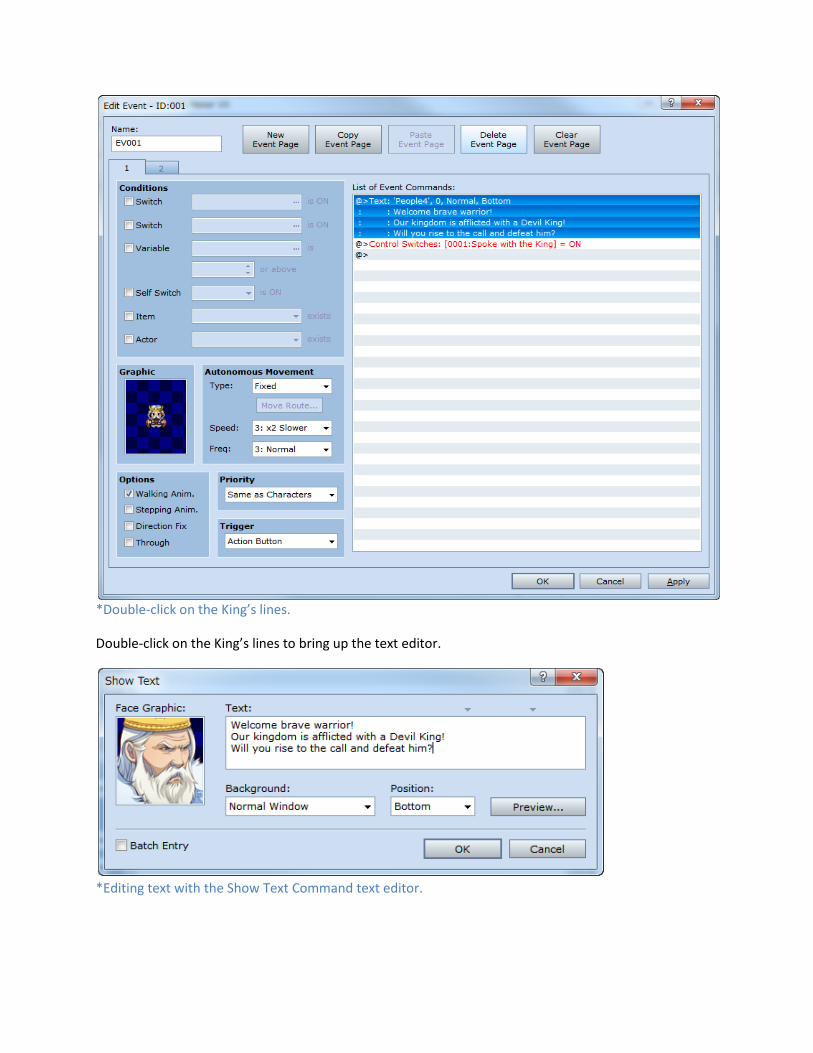
*Double-click on the King’s lines.
Double-click on the King’s lines to bring up the text editor.
*Editing text with the Show Text Command text editor.
Here we can add control characters directly to the text.
*Data from system graphic (Windows.png)
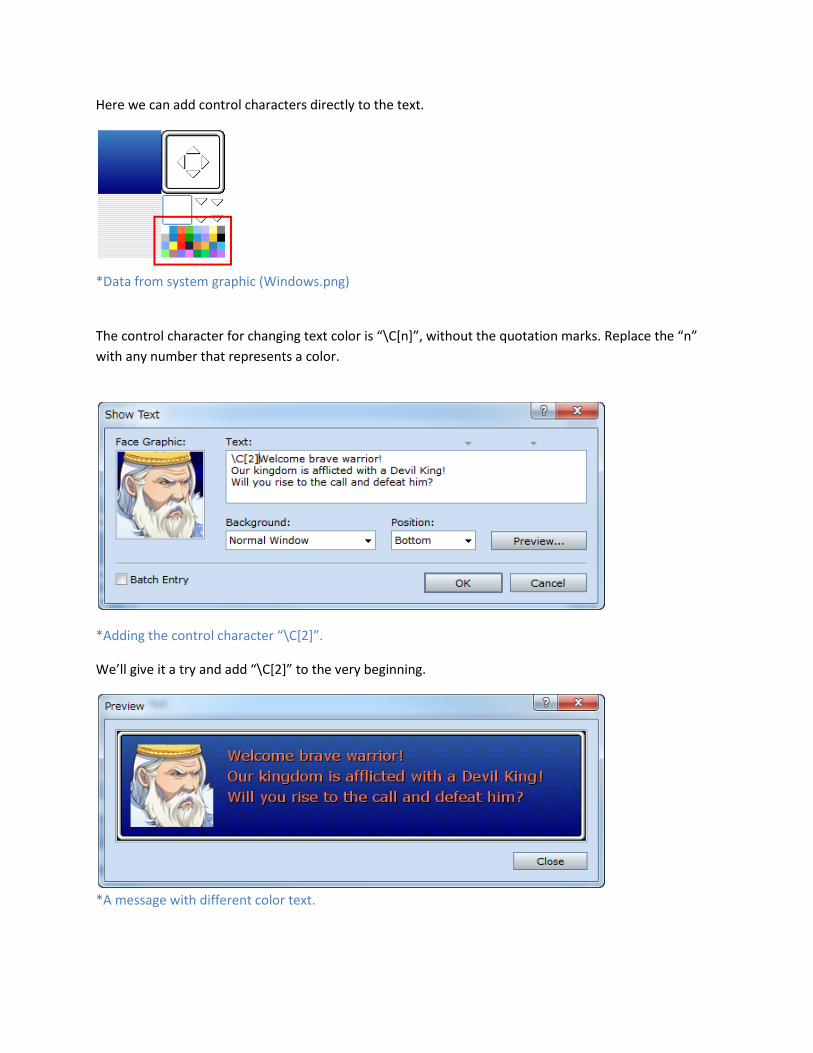
The control character for changing text color is “\C[n]”, without the quotation marks. Replace the “n”
with any number that represents a color.
*Adding the control character “\C[2]”.
We’ll give it a try and add “\C[2]” to the very beginning.
*A message with different color text.

Press the “Preview” button to see the result. The message now appears in orange thanks to the “2” in
the control character. As you can see, all the text has been affected. This is because a control character
affects everything that comes after it. If we only want to change a specific part of the text, we need to
make one small change.
*Surrounding text with a control character.
Let’s change just the “Devil King” part of the message to orange. To do this, we insert the control
character “\C[2]” in front of “Devil King” and “\C[0]” immediately after.
*Devil King in orange.
The Devil King portion of the text is now orange.

With control characters you can control the speed of messages and display the contents of Variables, in
addition to changing the color of text. Read more about them in the manual and help files.
Often used control characters:
\V[n] - Display the contents of Variable #n.
\N[n] - Display the name of character #n as registered in the database.
\G - Display a window showing the character’s remaining money.
\. - Stop the message for ¼ of a second.
\> - Display the remainder of the message instantly.
Congratulations! You have cleared Level 16. In the next level, we will create the Event in the Devil King’s
Lair Level 2.
Return to Table of Contents