lexmark e-260 360 460 toner cartridge & … · lexmark™ e-260 • 360 • 460 toner cartridge...
TRANSCRIPT

LEXMARK™ E-260 • 360 • 460 TONER CARTRIDGE& DRUM UNIT REMANUFACTURING INSTRUCTIONS
DRUM UNIT
TONER CARTRIDGE
3232 West El Segundo Blvd., Hawthorne, California 90250 USA • Ph +1 424 675 3300 • Fx +1 424 675 3400 • [email protected] • www.uninetimaging.com© 2009 UniNet Imaging Inc. All trademark names and artwork are property of their respective owners. Product brand names mentioned are intended to show compatibility only. UniNet Imaging does not warrant downloaded information.

The Lexmark E260/360/460 machines were introduced in January 2006. They are replacing the E250/350/450 series ofmachines. These cartridges are not backwards compatible with the E250/350/450series, they are all physically different. Thecartridges and chips (toner cartridges) are all new.
Figures above show the new cheese cloth type wrapper the new cartridges come in and the new plastic spacer. The plasticspacer keeps the PCR from flattening contacting the drum.
The new machines are based on a Lexmark 35 or 40ppm (depending on the printer), 1200 DPI engine. With a street price ofaround $199.00 USD (January 2009) for the E260, these machines continue to be very popular.
One major change in these cartridges is the way the drum is held into the cartridge. Gone are the days where there was just anE-ring you had to remove to be able to remove the drum. Now there is a plastic locking ring that can be tricky to remove withoutdamaging it. It can be done but you have to be careful. You also need to watch your fingers as you remove this ring. You can eas-ily slip and damage some fingers (trust me on this).
As with all the Lexmark E series machines, there are two cartridges used for this engine, a toner and drum unit. These instruc-tions cover the drum unit. While the toner cartridges are different for different regions of the world, the drum unit is the sameworldwide. A listing of all the cartridges available worldwide as well as US pricing follows.
NOTE: These cartridges are NOT backwards compatible with the E250/450/series. The cartridges are physically different andchips used in the toner cartridges are all new.
These cartridges also use chips that’s should be replaced each cycle for the cartridges to have full functionality.
LEXMARK E260/360/460 • TONER CARTRIDGE & DRUM UNIT REMANUFACTURING INSTRUCTIONS
REMANUFACTURING THE LEXMARK E260/360/460TONER CARTRIDGE & DRUM UNIT
By Mike Josiah
3232 West El Segundo Blvd., Hawthorne, California 90250 USA • Ph +1 424 675 3300 • Fx +1 424 675 3400 • [email protected] • www.uninetimaging.com© 2009 UniNet Imaging Inc. All trademark names and artwork are property of their respective owners. Product brand names mentioned are intended to show compatibility only. UniNet Imaging does not warrant downloaded information.

CARTRIDGES FOR USE IN THE E260/360/460 • USA & CANADAPart# Type Yield List PriceE260A11A Std. Return cartridge 3,500 $95.50 USD*E260A21A Standard cartridge 3,500 $122.50 USD*E360H11A HY Return E360/460 ONLY 9,000 $175.50 USD*E360H21A HY Standard E360/460 ONLY 9,000 $202.50 USD*E460X11A EHY Return cartridge E460 ONLY 15,000 $321.50 USD*E460X21A EHY Standard Cartridge E460 ONLY 15,000 $348.50 USD*E260X22G OPC Drum cartridge (All) 30,000 $37.50 USD*
*Pricing from January 2009CARTRIDGES FOR USE IN THE E260/360/460 • EUROPE & THE MIDDLE EASTPart# Type Yield0E260A11E Std. Return cartridge 3,5000E260A21E Standard cartridge 3,5000E360H11E HY Return E360/460 ONLY 9,0000E360H21E HY Standard E360/460 ONLY 9,0000E460X11E EHY Return cartridge E460 ONLY 15,0000E460X21E EHY Standard Cartridge E460 ONLY 15,0000E260X22G OPC Drum cartridge (All) 30,000
CARTRIDGES FOR USE IN THE E260/360/460 • LATIN AMERICAPart# Type YieldE260A11L Std. Return cartridge 3,500E260A21L Standard cartridge 3,500E360H11L HY Return E360/460 ONLY 9,000E360H21L HY Standard E360/460 ONLY 9,000E460X11L EHY Return cartridge E460 ONLY 15,000E460X21L EHY Standard Cartridge E460 ONLY 15,000E260X22G OPC Drum cartridge (All) 30,000The same drum cartridge as noted above is used worldwide.
MACHINES BASED ON THIS ENGINELexmark E260d, E260dn, E360d, E362dn, E460dn, E460dwHow to take test prints, resetting the printer* as well as cartridge troubleshooting are covered at the end of the article. *NOTE:These drum units do not use chips. They do however need to be reset when replaced. The reset procedure is listed at the end ofthis article.
LEXMARK E260/360/460 • TONER CARTRIDGE & DRUM UNIT REMANUFACTURING INSTRUCTIONS
3232 West El Segundo Blvd., Hawthorne, California 90250 USA • Ph +1 424 675 3300 • Fx +1 424 675 3400 • [email protected] • www.uninetimaging.com© 2009 UniNet Imaging Inc. All trademark names and artwork are property of their respective owners. Product brand names mentioned are intended to show compatibility only. UniNet Imaging does not warrant downloaded information.
SUPPLIES REQUIRED FOR TONER CARTRIDGE• Lexmark E260/460 toner:
120g (low yield E260)310g (high yield E360)514g (extra high yield E460)Preliminary weights testing is on-going.
• Toner magnet cloths• Lint-free synthetic cotton 4"x 4" pads• 99% pure isopropyl alcohol• Cotton Swabs
SUPPLIES REQUIRED FOR DRUM UNIT• New Replacement drum• New Wiper Blade• Cotton Swabs • Isopropyl Alcohol • Drum Padding Powder
TOOLS REQUIRED• Phillips head screw driver. • Small Common screw driver• Vacuum approved for toner• Needle Nose Pliers

1. Remove the developer roller screw & cover. Remove the screw and bend the cover out from the middle. There are 2 pins oneach side that will break if you just pull it off
2. Remove the encoder wheel. Pry it off from the back side. 3. Remove the fill plug, and dump out any remaining toner.
LEXMARK E260/360/460 • TONER CARTRIDGE & DRUM UNIT REMANUFACTURING INSTRUCTIONS
3232 West El Segundo Blvd., Hawthorne, California 90250 USA • Ph +1 424 675 3300 • Fx +1 424 675 3400 • [email protected] • www.uninetimaging.com© 2009 UniNet Imaging Inc. All trademark names and artwork are property of their respective owners. Product brand names mentioned are intended to show compatibility only. UniNet Imaging does not warrant downloaded information.
TONER CARTRIDGE INSTRUCTIONS

4. Remove the leaf spring. The doctor blade will come loose. Place the blade aside.
5. On the gear side of the cartridge, remove the developer roller drive gear. This gear is locked on the shaft. While holding theroller, turn the gear to the right to release the lock. The gear does not come off yet.
LEXMARK E260/360/460 • TONER CARTRIDGE & DRUM UNIT REMANUFACTURING INSTRUCTIONS
3232 West El Segundo Blvd., Hawthorne, California 90250 USA • Ph +1 424 675 3300 • Fx +1 424 675 3400 • [email protected] • www.uninetimaging.com© 2009 UniNet Imaging Inc. All trademark names and artwork are property of their respective owners. Product brand names mentioned are intended to show compatibility only. UniNet Imaging does not warrant downloaded information.
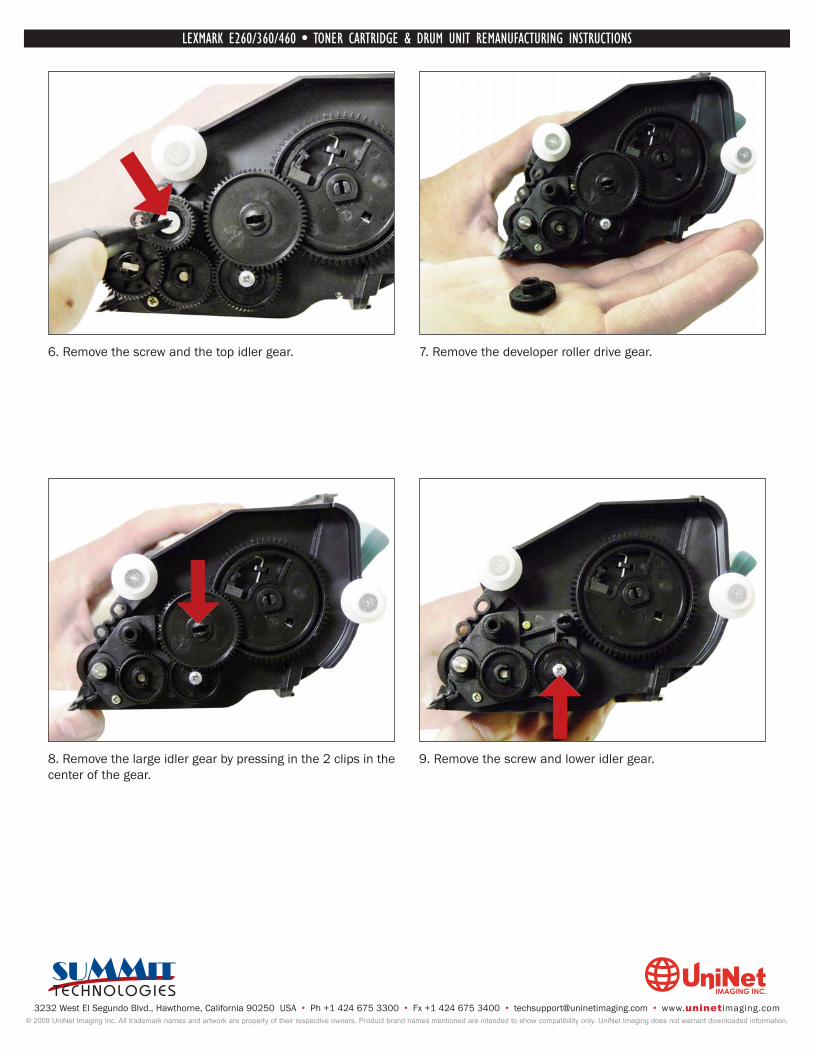
6. Remove the screw and the top idler gear. 7. Remove the developer roller drive gear.
8. Remove the large idler gear by pressing in the 2 clips in thecenter of the gear.
9. Remove the screw and lower idler gear.
LEXMARK E260/360/460 • TONER CARTRIDGE & DRUM UNIT REMANUFACTURING INSTRUCTIONS
3232 West El Segundo Blvd., Hawthorne, California 90250 USA • Ph +1 424 675 3300 • Fx +1 424 675 3400 • [email protected] • www.uninetimaging.com© 2009 UniNet Imaging Inc. All trademark names and artwork are property of their respective owners. Product brand names mentioned are intended to show compatibility only. UniNet Imaging does not warrant downloaded information.

10. Remove the feed roller gear. This has a tight fit. Pry offcarefully.
11. Remove the two screws and the gear plate.
12. Remove the developer roller. Clean the toner feed roller with compressed air.
LEXMARK E260/360/460 • TONER CARTRIDGE & DRUM UNIT REMANUFACTURING INSTRUCTIONS
3232 West El Segundo Blvd., Hawthorne, California 90250 USA • Ph +1 424 675 3300 • Fx +1 424 675 3400 • [email protected] • www.uninetimaging.com© 2009 UniNet Imaging Inc. All trademark names and artwork are property of their respective owners. Product brand names mentioned are intended to show compatibility only. UniNet Imaging does not warrant downloaded information.

13. Clean the white developer roller seals with a cotton swab. 14. Wipe the developer roller with a clean lint free cloth, andre-install the developer roller. At this point we do not recom-mend that any chemicals be used to clean this roller. Installthe keyed end of the roller to the gear side.
15. Install the gear plate and two screws. 16. Install the feed roller gear. This gear has a tight fit. Makesure it is fully seated.
LEXMARK E260/360/460 • TONER CARTRIDGE & DRUM UNIT REMANUFACTURING INSTRUCTIONS
3232 West El Segundo Blvd., Hawthorne, California 90250 USA • Ph +1 424 675 3300 • Fx +1 424 675 3400 • [email protected] • www.uninetimaging.com© 2009 UniNet Imaging Inc. All trademark names and artwork are property of their respective owners. Product brand names mentioned are intended to show compatibility only. UniNet Imaging does not warrant downloaded information.

17. Install the developer roller gear (lock it in place!), top idler gear and screw, the bottom Idler gear and screw, and the large idlergear (snaps in place).
18. Install the doctor blade making sure it is positioned correctly and install the leaf spring.
LEXMARK E260/360/460 • TONER CARTRIDGE & DRUM UNIT REMANUFACTURING INSTRUCTIONS
3232 West El Segundo Blvd., Hawthorne, California 90250 USA • Ph +1 424 675 3300 • Fx +1 424 675 3400 • [email protected] • www.uninetimaging.com© 2009 UniNet Imaging Inc. All trademark names and artwork are property of their respective owners. Product brand names mentioned are intended to show compatibility only. UniNet Imaging does not warrant downloaded information.

19. Re-install the developer roller cover and screw. 20. Fill the cartridge with the proper amount of E260 tonerand install fill plug.
21. Install the encoder wheel. 22. Replace the chip.
LEXMARK E260/360/460 • TONER CARTRIDGE & DRUM UNIT REMANUFACTURING INSTRUCTIONS
3232 West El Segundo Blvd., Hawthorne, California 90250 USA • Ph +1 424 675 3300 • Fx +1 424 675 3400 • [email protected] • www.uninetimaging.com© 2009 UniNet Imaging Inc. All trademark names and artwork are property of their respective owners. Product brand names mentioned are intended to show compatibility only. UniNet Imaging does not warrant downloaded information.

1. Remove the two screws from the handle as shown above. Remove the handle.
2. With a pair of needle nose pliers, push the inside of the retaining ring to the left while slightly bending the cartridge wall out.Turn the ring until the tabs are centered in the 2 slots. Turn slowly and watch your fingers. It is easy to slip and hurt yourself here.
LEXMARK E260/360/460 • TONER CARTRIDGE & DRUM UNIT REMANUFACTURING INSTRUCTIONS
3232 West El Segundo Blvd., Hawthorne, California 90250 USA • Ph +1 424 675 3300 • Fx +1 424 675 3400 • [email protected] • www.uninetimaging.com© 2009 UniNet Imaging Inc. All trademark names and artwork are property of their respective owners. Product brand names mentioned are intended to show compatibility only. UniNet Imaging does not warrant downloaded information.
DRUM UNIT INSTRUCTIONSAs stated in the introduction, the drum is held in place by a new type of plastic locking ring. This ring must be removed in orderto be able to remove the drum. Take your time and be careful with this.

3. From the inside of the cartridge, take a common screwdriver and gently pry up the locking ring/drive hub from the center. Thedrive hub will come off with it. Make sure you pry it off straight up. If it becomes deformed from prying it off at an angle, it maynot sit properly when re-installed.
4. Carefully remove the drum. 5. Carefully lift out the PCR. The PCR holders and springs willcome out with the PCR. Be very careful not to touch the rollerwith your skin. As with any PCR, the oils naturally present inyour skin will be absorbed by the roller and cause printingproblems (extra marks on the page).
LEXMARK E260/360/460 • TONER CARTRIDGE & DRUM UNIT REMANUFACTURING INSTRUCTIONS
3232 West El Segundo Blvd., Hawthorne, California 90250 USA • Ph +1 424 675 3300 • Fx +1 424 675 3400 • [email protected] • www.uninetimaging.com© 2009 UniNet Imaging Inc. All trademark names and artwork are property of their respective owners. Product brand names mentioned are intended to show compatibility only. UniNet Imaging does not warrant downloaded information.

6. Remove the two screws from the wiper blade. 7. Remove the wiper blade, and clean out any waste toner.
8. Install a new wiper blade coated with your preferred lubri-cant and two screws.
9. Clean the PCR with your preferred PCR cleaner, and cleanthe PCR holders with 99% pure isopropyl alcohol. Snap on tothe ends of the PCR.
LEXMARK E260/360/460 • TONER CARTRIDGE & DRUM UNIT REMANUFACTURING INSTRUCTIONS
3232 West El Segundo Blvd., Hawthorne, California 90250 USA • Ph +1 424 675 3300 • Fx +1 424 675 3400 • [email protected] • www.uninetimaging.com© 2009 UniNet Imaging Inc. All trademark names and artwork are property of their respective owners. Product brand names mentioned are intended to show compatibility only. UniNet Imaging does not warrant downloaded information.

10. Install the PCR and holders. Make sure the springs fit inthe proper place.
11. With the waste chamber facing away from you, install thedrum so that the large gear is on the left side, the tail of thespring should lock into the hole in the cartridge wall.
12. Install the locking ring making sure the tabs on the ring line up with the 2 slots in the cartridge wall. From the outside of thecartridge with the tips of the needle nose pliers in the two slots, press the ring in and turn the locking hub so it locks into the car-tridge wall. Turning the ring to the right is easier to do than the opposite direction.
LEXMARK E260/360/460 • TONER CARTRIDGE & DRUM UNIT REMANUFACTURING INSTRUCTIONS
3232 West El Segundo Blvd., Hawthorne, California 90250 USA • Ph +1 424 675 3300 • Fx +1 424 675 3400 • [email protected] • www.uninetimaging.com© 2009 UniNet Imaging Inc. All trademark names and artwork are property of their respective owners. Product brand names mentioned are intended to show compatibility only. UniNet Imaging does not warrant downloaded information.

13. Press in the drive hub. Make sure it fits properly and isflush with the locking ring when seated!
14. Install the handle and 2 screws.
Just to make sure that everything is meshing properly andlubricated properly, rotate the drum by the large gear in theproper direction. This is always a good idea for drum units asa final check before installing the cartridge in your testmachine.
15. After the cartridge has been tested, if the plastic drumspacer is available, install it now.
LEXMARK E260/360/460 • TONER CARTRIDGE & DRUM UNIT REMANUFACTURING INSTRUCTIONS
3232 West El Segundo Blvd., Hawthorne, California 90250 USA • Ph +1 424 675 3300 • Fx +1 424 675 3400 • [email protected] • www.uninetimaging.com© 2009 UniNet Imaging Inc. All trademark names and artwork are property of their respective owners. Product brand names mentioned are intended to show compatibility only. UniNet Imaging does not warrant downloaded information.

RESETTING THE E260 DRUM UNITInstall the toner cartridge into the new/remanufactured drum unit. With the front door still open, Press and hold the “X” Buttonfor 5 seconds. On the E260 the lights will cycle. Close the front door. On the E360 the display will read: “Resetting PC.” Close thefront door.
RESETTING THE E360/460 DRUM UNITInstall the toner cartridge into the new/remanufactured drum unit. With the front door still open, Press and hold the “X” Buttonfor 5 seconds. On the E360/E460 the display will read: “Resetting PC.” Close the front door.
PRINTING TEST PAGES E460 SERIES1. Press the “Key” button on the control panel2. Press the “Down arrow” until UTILITIES MENU appears on the display3. Press the Select button4. Press the “Down Arrow” until the PRINT MENUS, PRINT STATS, or PRINT FONTS appears on the display.
REPETITIVE DEFECT CHART38.8mm PCR48.3mm Developer Roller52.4mm Transfer Roller80.0mm Upper fuser Belt98.3mm OPC Drum
PRINTER ERROR CODESMost error codes are in plain English so we will not repeat them here, but a few are numeric.There are quite a few of the “XX” numbers under each category. We have just listed the basics here.
30.XX: cartridge errors: there is a mechanical issue with the cartridge or the chip is bad.
31.XX: defective cartridge errors: the cartridge is missing, the chip is bad/or missing or the chip reader in the printer is defective.
200.XX: paper jam.
920.XX, 921.XX, 922.XX: all various fuser errors.
LEXMARK E260/360/460 • TONER CARTRIDGE & DRUM UNIT REMANUFACTURING INSTRUCTIONS
3232 West El Segundo Blvd., Hawthorne, California 90250 USA • Ph +1 424 675 3300 • Fx +1 424 675 3400 • [email protected] • www.uninetimaging.com© 2009 UniNet Imaging Inc. All trademark names and artwork are property of their respective owners. Product brand names mentioned are intended to show compatibility only. UniNet Imaging does not warrant downloaded information.