lexmark e360 quick reference - university of … e360...lexmark e360 quick reference loading paper...
TRANSCRIPT
Lexmark™ E360Quick Reference
Loading paper
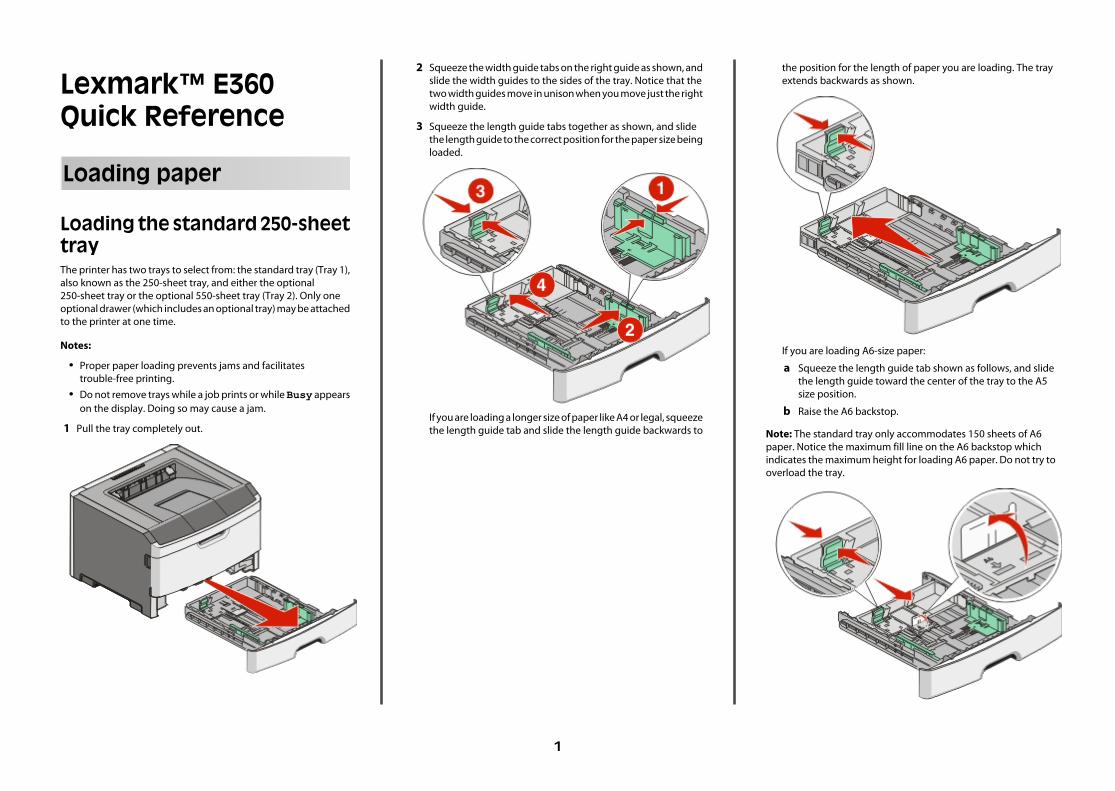
Loading the standard 250-sheettrayThe printer has two trays to select from: the standard tray (Tray 1),also known as the 250-sheet tray, and either the optional250-sheet tray or the optional 550-sheet tray (Tray 2). Only oneoptional drawer (which includes an optional tray) may be attachedto the printer at one time.
Notes:
• Proper paper loading prevents jams and facilitatestrouble-free printing.
• Do not remove trays while a job prints or while Busy appearson the display. Doing so may cause a jam.
1 Pull the tray completely out.
2 Squeeze the width guide tabs on the right guide as shown, andslide the width guides to the sides of the tray. Notice that thetwo width guides move in unison when you move just the rightwidth guide.
3 Squeeze the length guide tabs together as shown, and slidethe length guide to the correct position for the paper size beingloaded.
If you are loading a longer size of paper like A4 or legal, squeezethe length guide tab and slide the length guide backwards to
the position for the length of paper you are loading. The trayextends backwards as shown.
If you are loading A6-size paper:
a Squeeze the length guide tab shown as follows, and slidethe length guide toward the center of the tray to the A5size position.
b Raise the A6 backstop.
Note: The standard tray only accommodates 150 sheets of A6paper. Notice the maximum fill line on the A6 backstop whichindicates the maximum height for loading A6 paper. Do not try tooverload the tray.
1
Notes:
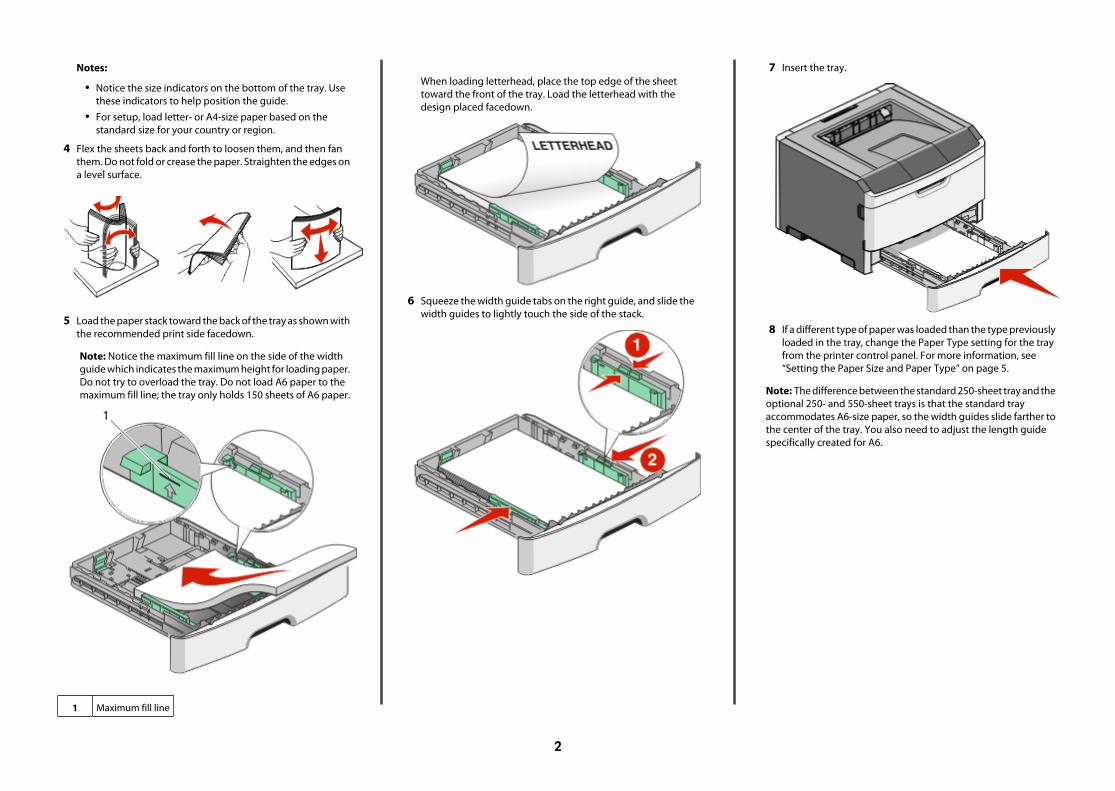
• Notice the size indicators on the bottom of the tray. Usethese indicators to help position the guide.
• For setup, load letter- or A4-size paper based on thestandard size for your country or region.
4 Flex the sheets back and forth to loosen them, and then fanthem. Do not fold or crease the paper. Straighten the edges ona level surface.
5 Load the paper stack toward the back of the tray as shown withthe recommended print side facedown.
Note: Notice the maximum fill line on the side of the widthguide which indicates the maximum height for loading paper.Do not try to overload the tray. Do not load A6 paper to themaximum fill line; the tray only holds 150 sheets of A6 paper.
1 Maximum fill line
When loading letterhead, place the top edge of the sheettoward the front of the tray. Load the letterhead with thedesign placed facedown.
6 Squeeze the width guide tabs on the right guide, and slide thewidth guides to lightly touch the side of the stack.
7 Insert the tray.
8 If a different type of paper was loaded than the type previouslyloaded in the tray, change the Paper Type setting for the trayfrom the printer control panel. For more information, see“Setting the Paper Size and Paper Type” on page 5.
Note: The difference between the standard 250-sheet tray and theoptional 250- and 550-sheet trays is that the standard trayaccommodates A6-size paper, so the width guides slide farther tothe center of the tray. You also need to adjust the length guidespecifically created for A6.
2
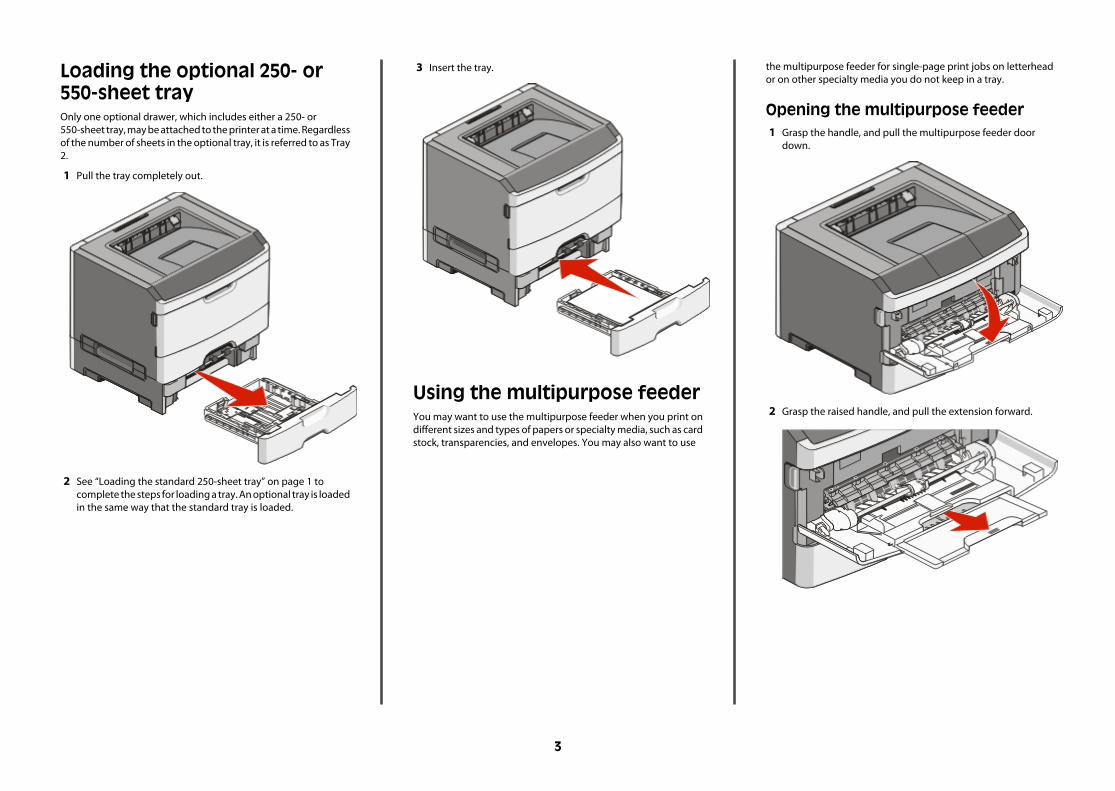
Loading the optional 250- or550-sheet trayOnly one optional drawer, which includes either a 250- or550-sheet tray, may be attached to the printer at a time. Regardlessof the number of sheets in the optional tray, it is referred to as Tray2.
1 Pull the tray completely out.
2 See “Loading the standard 250-sheet tray” on page 1 tocomplete the steps for loading a tray. An optional tray is loadedin the same way that the standard tray is loaded.
3 Insert the tray.
Using the multipurpose feederYou may want to use the multipurpose feeder when you print ondifferent sizes and types of papers or specialty media, such as cardstock, transparencies, and envelopes. You may also want to use
the multipurpose feeder for single-page print jobs on letterheador on other specialty media you do not keep in a tray.
Opening the multipurpose feeder1 Grasp the handle, and pull the multipurpose feeder door
down.
2 Grasp the raised handle, and pull the extension forward.
3
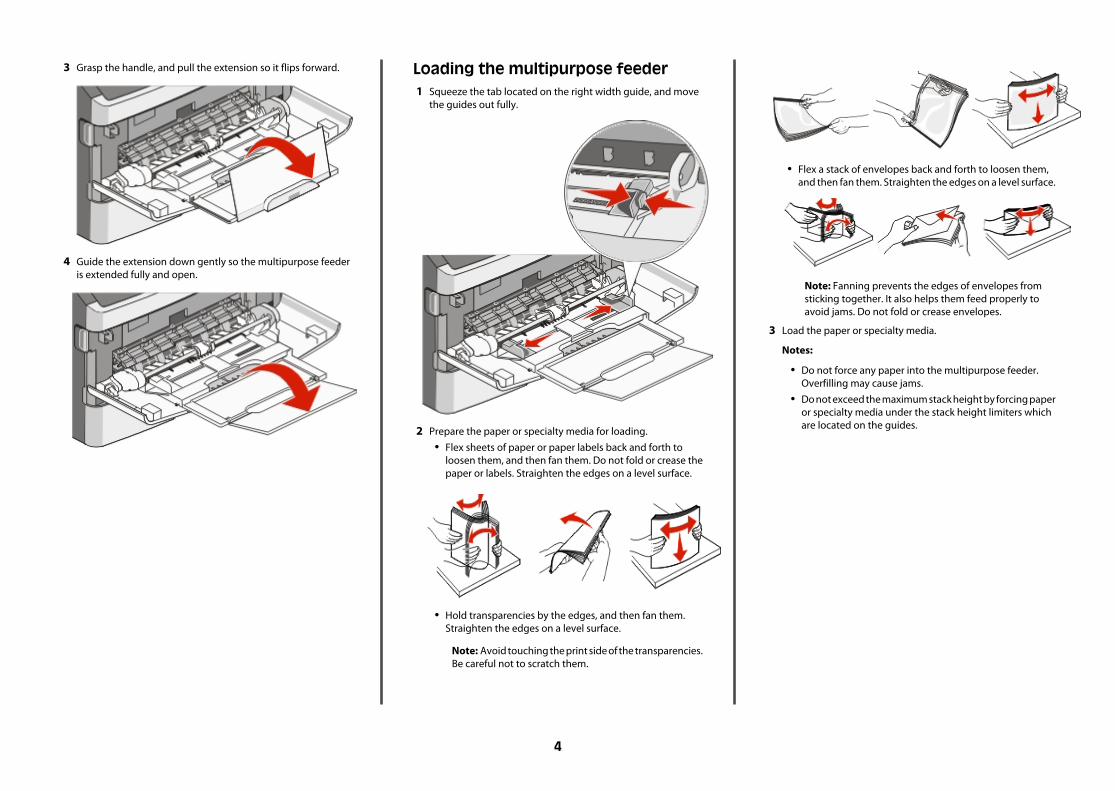
3 Grasp the handle, and pull the extension so it flips forward.
4 Guide the extension down gently so the multipurpose feederis extended fully and open.
Loading the multipurpose feeder1 Squeeze the tab located on the right width guide, and move
the guides out fully.
2 Prepare the paper or specialty media for loading.• Flex sheets of paper or paper labels back and forth to
loosen them, and then fan them. Do not fold or crease thepaper or labels. Straighten the edges on a level surface.
• Hold transparencies by the edges, and then fan them.Straighten the edges on a level surface.
Note: Avoid touching the print side of the transparencies.Be careful not to scratch them.
• Flex a stack of envelopes back and forth to loosen them,and then fan them. Straighten the edges on a level surface.
Note: Fanning prevents the edges of envelopes fromsticking together. It also helps them feed properly toavoid jams. Do not fold or crease envelopes.
3 Load the paper or specialty media.
Notes:
• Do not force any paper into the multipurpose feeder.Overfilling may cause jams.
• Do not exceed the maximum stack height by forcing paperor specialty media under the stack height limiters whichare located on the guides.
4

• Load paper, transparencies, and card stock with therecommended print side faceup and the top edge enteringthe printer first. For more information on loadingtransparencies, see the packaging the transparencies camein.
• Load letterhead with the logo faceup and the top edgeentering the printer first.
• Load envelopes with the flap side down and the stamplocation in the position shown. The stamp and address are
shown to illustrate the proper orientation for loadingenvelopes.
Warning—Potential Damage: Never use envelopeswith stamps, clasps, snaps, windows, coated linings, orself-stick adhesives. These envelopes may severelydamage the printer.
4 Squeeze the tab located on the right width guide to adjust theguides to lightly touch the sides of the stack.
5 Slide the paper gently into the multipurpose feeder until itcomes to a stop. Paper should lie flat in the multipurposefeeder. Make sure the paper fits loosely in the multipurposefeeder and is not bent or wrinkled.
6 From the printer control panel, set the Paper Size and PaperType.
Setting the Paper Size andPaper TypeAfter you set the Paper Size and Paper Type to the correct settingsfor the size and type used in the trays, then any trays containingthe same size and type are automatically linked by the printer.
Note: If the size of the paper being loaded now is the same size asthe previously loaded paper, do not change the Paper Size setting.
1 Make sure the printer is on and Ready appears.
2 From the printer control panel, press .
Paper Menu appears.
3 Press .
4 Press the arrow buttons until Size/Type appears, and then
press .
Select Source appears.
5 Press the arrow buttons until the correct source appears, and
then press .
Size appears under the source name.
6 Press .
5
7 Press the arrow buttons until the correct size appears, and then
press .
Submitting Changes appears, followed by Size.
8 Press the arrow buttons until Type appears, and then press
.
9 Press the arrow buttons until the correct type appears, and
then press .
Submitting Changes appears, followed by Type.
Printing
Printing a document1 Load paper into a tray or feeder.
2 From the Paper menu, set the Paper Type and Paper Size basedon the paper that is loaded.
3 Do one of the following:
For Windows usersa With a document open, click File ª Print.
b Click Properties, Preferences, Options, or Setup.
c From the Form Source list box, select the source containingthe paper you loaded.
d From the Form Type list box, select the paper type.
e From the Form Size list box, select the paper size.
f Click OK, and then click Print.
For Macintosh usersIn Mac OS X:
a Customize the settings as needed in the Page Setup dialog.1 With a document open, choose File > Page Setup.2 From the Paper Size pop-up menu, choose a paper size
or create a custom size to match the loaded paper.3 Click OK.
b Customize the settings as needed in the Print dialog:
1 With a document open, click File > Print.If necessary, click the disclosure triangle to see moreoptions.
2 From the print options or Copies & Pages pop-up menu,choose Printer Features.
3 From the Feature Sets pop-up menu, choose Paper.4 From the Paper type pop-up menu, choose a paper
type.5 Click Print.
In Mac OS 9:
a Customize the settings as needed in the Page Setup dialog:1 With a document open, choose File > Page Setup.2 From the Paper pop-up menu, choose a paper size or
create a custom size to match the loaded paper.3 Click OK.
b Customize the settings as needed in the Print dialog:1 With a document open, choose File > Print.2 Select a Paper Source option, and then choose the tray
loaded with the appropriate paper.3 Click Print.
Canceling a print job from theprinter control panelIf the job is formatting or already printing, and Cancel a jobappears:
1 Press the arrow buttons until Cancel appears.
A list of jobs appears.
2 Press the arrow buttons until the job you want to cancel
appears, and then press .
Note: Once a print job is sent, to cancel a job, press . TheStopped screen appears. Press the arrow buttons until Cancela job appears, and then press .
Maintaining the printer
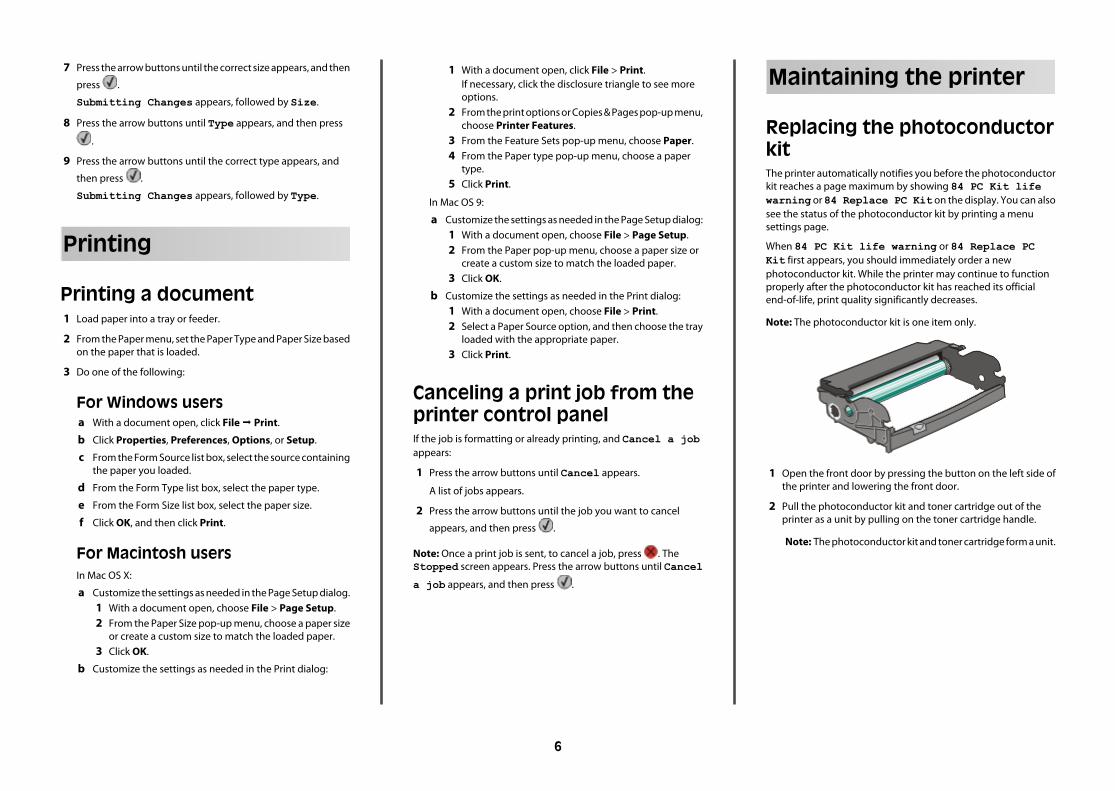
Replacing the photoconductorkitThe printer automatically notifies you before the photoconductorkit reaches a page maximum by showing 84 PC Kit lifewarning or 84 Replace PC Kit on the display. You can alsosee the status of the photoconductor kit by printing a menusettings page.
When 84 PC Kit life warning or 84 Replace PCKit first appears, you should immediately order a newphotoconductor kit. While the printer may continue to functionproperly after the photoconductor kit has reached its officialend-of-life, print quality significantly decreases.
Note: The photoconductor kit is one item only.
1 Open the front door by pressing the button on the left side ofthe printer and lowering the front door.
2 Pull the photoconductor kit and toner cartridge out of theprinter as a unit by pulling on the toner cartridge handle.
Note: The photoconductor kit and toner cartridge form a unit.
6
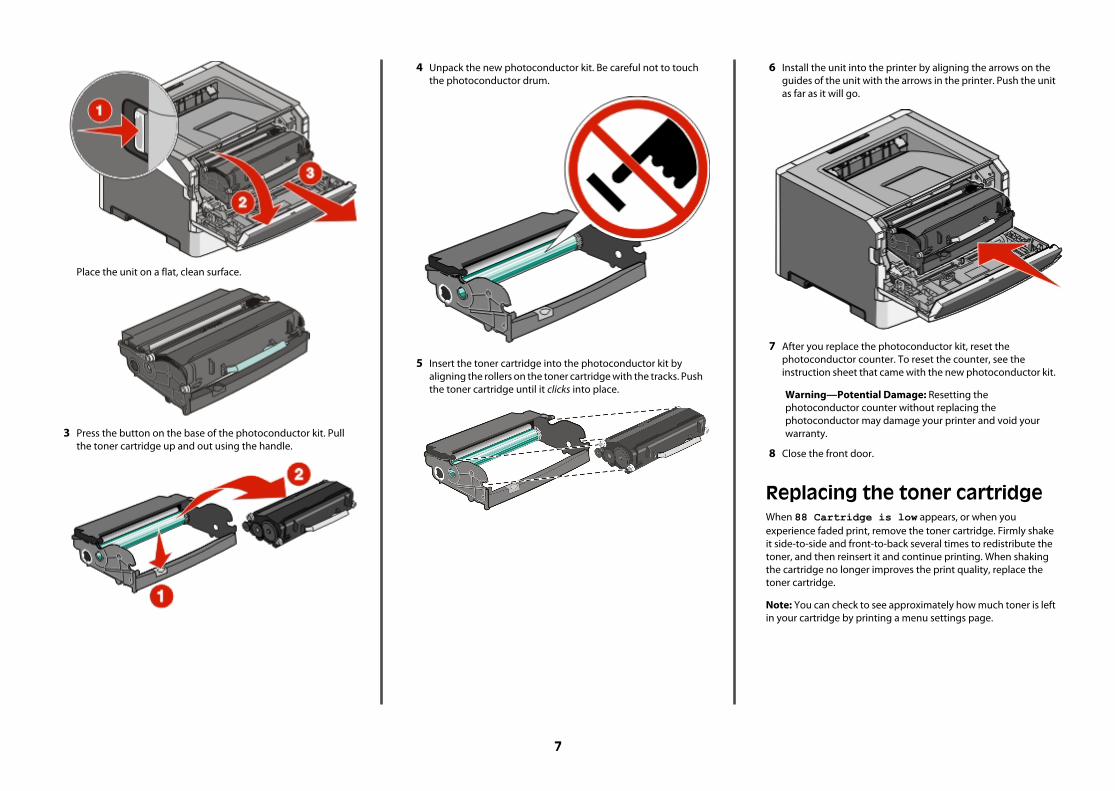
Place the unit on a flat, clean surface.
3 Press the button on the base of the photoconductor kit. Pullthe toner cartridge up and out using the handle.
4 Unpack the new photoconductor kit. Be careful not to touchthe photoconductor drum.
5 Insert the toner cartridge into the photoconductor kit byaligning the rollers on the toner cartridge with the tracks. Pushthe toner cartridge until it clicks into place.
6 Install the unit into the printer by aligning the arrows on theguides of the unit with the arrows in the printer. Push the unitas far as it will go.
7 After you replace the photoconductor kit, reset thephotoconductor counter. To reset the counter, see theinstruction sheet that came with the new photoconductor kit.
Warning—Potential Damage: Resetting thephotoconductor counter without replacing thephotoconductor may damage your printer and void yourwarranty.
8 Close the front door.
Replacing the toner cartridgeWhen 88 Cartridge is low appears, or when youexperience faded print, remove the toner cartridge. Firmly shakeit side-to-side and front-to-back several times to redistribute thetoner, and then reinsert it and continue printing. When shakingthe cartridge no longer improves the print quality, replace thetoner cartridge.
Note: You can check to see approximately how much toner is leftin your cartridge by printing a menu settings page.
7
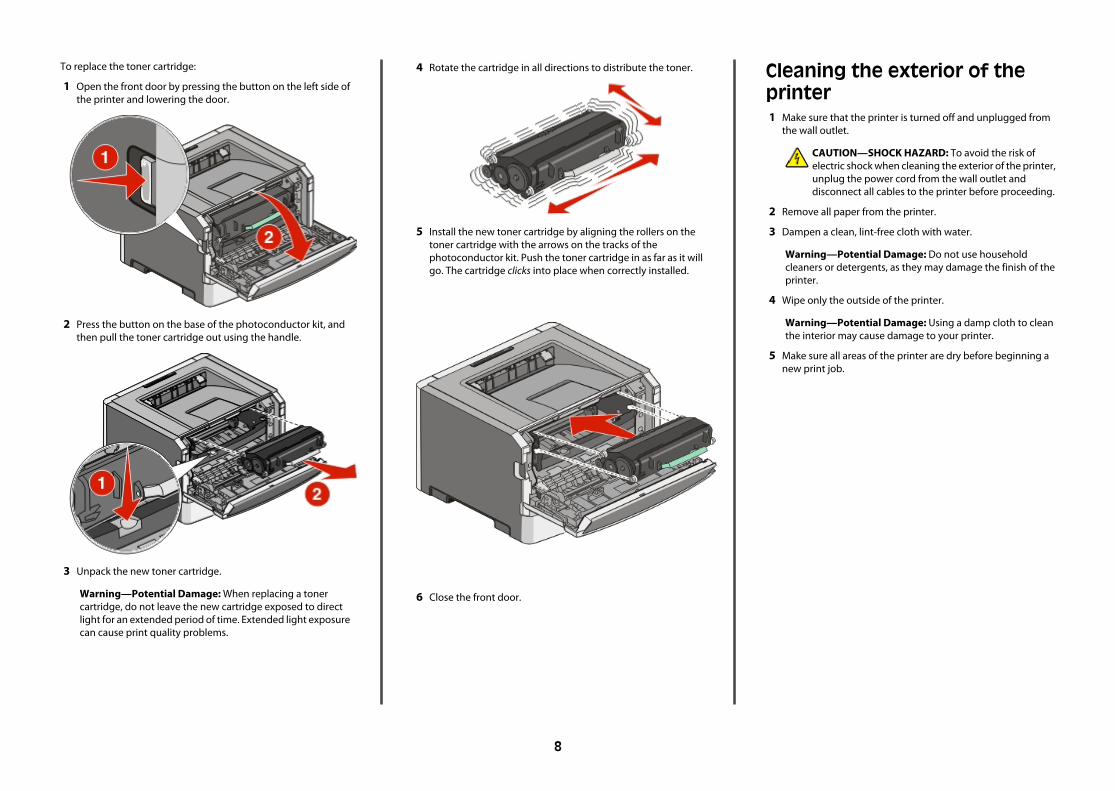
To replace the toner cartridge:
1 Open the front door by pressing the button on the left side ofthe printer and lowering the door.
2 Press the button on the base of the photoconductor kit, andthen pull the toner cartridge out using the handle.
3 Unpack the new toner cartridge.
Warning—Potential Damage: When replacing a tonercartridge, do not leave the new cartridge exposed to directlight for an extended period of time. Extended light exposurecan cause print quality problems.
4 Rotate the cartridge in all directions to distribute the toner.
5 Install the new toner cartridge by aligning the rollers on thetoner cartridge with the arrows on the tracks of thephotoconductor kit. Push the toner cartridge in as far as it willgo. The cartridge clicks into place when correctly installed.
6 Close the front door.
Cleaning the exterior of theprinter1 Make sure that the printer is turned off and unplugged from
the wall outlet.
CAUTION—SHOCK HAZARD: To avoid the risk ofelectric shock when cleaning the exterior of the printer,unplug the power cord from the wall outlet anddisconnect all cables to the printer before proceeding.
2 Remove all paper from the printer.
3 Dampen a clean, lint-free cloth with water.
Warning—Potential Damage: Do not use householdcleaners or detergents, as they may damage the finish of theprinter.
4 Wipe only the outside of the printer.
Warning—Potential Damage: Using a damp cloth to cleanthe interior may cause damage to your printer.
5 Make sure all areas of the printer are dry before beginning anew print job.
8