· lhs 1999-2001 pt cruiser 2001-2005 chrysler sebring 2001-2006 town & country 2001-2007...
TRANSCRIPT

CAUTION! All accessories, switches, climate controls panels, and especially air bag indicator lights must be connected before cycling the ignition. Also, do not remove the factory radio with the key in the on position, or while the vehicle is running.
Metra. The World’s Best Kits.® MetraOnline.com © COPYRIGHT 2018 METRA ELECTRONICS CORPORATION REV. 6/11/18 INST-99-650345
I N S TA L L AT I O N I N S T R U C T I O N S99-650345
INTRODUCTIONThis instruction booklet will cover (3) different kits, yet carry the same applications and dash disassembly. After dash disassembly is complete, refer to the appropriate page for the kit being used.
TOOLS REQUIRED• Phillips Screwdriver • T-20 Torx screwdriver • Panel removal tool
TABLE OF CONTENTS
Dash Disassembly ..................................................2Kit Assembly - 99-6503 ......................................................... 10-11- 99-6504 ......................................................... 12-13- 99-6505 ..........................................................14-15
Chrysler Multi-kit 1998-2010
APPLICATIONS
CHRYSLER300M 1999-2004Concorde 1998-2004LHS 1999-2001PT Cruiser 2001-2005
CHRYSLERSebring 2001-2006Town & Country 2001-2007Voyager 2001-2003
DODGECaravan/ Grand Caravan 2001-2007Dakota 2001-2004Durango 2001-2003Intrepid 1998-2004
DODGE (CONT)Neon 2000-2006Ram 2002-2005Stratus 2001-2006Viper 2003-2010
JEEPGrand Cherokee 1999-2004Liberty 2002-2007Wrangler 2003-2006
PLYMOUTHNeon 2000-2001
WIRING & ANTENNA CONNECTIONS (sold separately)
Wiring Harness: Please visit metraonline.com for harness optionsAntenna Adapter: Please visit metraonline.com for antenna adapter options

1.800.221.0932 | MetraOnline.com2
DASH DISASSEMBLY TABLE OF CONTENTS
CHRYSLER– 300M 1999-2004/Concorde 1998-2004 ........3 – LHS 1999-2001 ................................................3
– PT Cruiser 2001-2005 ....................................3
– Sebring 2001-2006 ........................................4
– Town & Country 2001-2007...........................4
– Voyager 2001-2003 .......................................4
DODGE
– Caravan/Grand Caravan 2001-2007 .............4
– Dakota 2001-2004/Durango 2001-2003 ......6
– Intrepid 1998-2004 ........................................3
– Neon 2000-2006 ...........................................5
– Ram 2002-2005 .............................................5
– Stratus 2001-2006 .........................................4
– Viper 2003-2010 ............................................8
JEEP– Grand Cherokee 1999-2004 ..........................6
– Liberty 2002-2007 .........................................7
– Wrangler 2003-2006.....................................7
PLYMOUTH
– Neon 2000-2001 ............................................5

REV. 6/11/2018 INST-99-650345 3
DASH DISASSEMBLY
Chrysler 300M 1999-2004 / Concorde 1998-2004 / LHS 1999-2001 Dodge Intrepid 1998-2004
1. Remove the ashtray by pressing down on the inner spring clip. (Concorde only)
2. Unclip the gear shifter trim panel and slide the trim panel toward the rear of the vehicle.
3. Unclip the dash trim panel and disconnect the wire to the trim panel.
4. Remove (4) Phillips screws securing the radio. Disconnect and remove the radio.
ContinuetoKitAssembly
Chrysler PT Cruiser 2001-2005
1. Unclip the power window control panel. Disconnect and remove the panel.
2. Pull off the climate control knobs.
3. Unclip and remove the dash trim panel.
4. Remove (4) Phillips screws securing the radio. Disconnect and remove the radio.
ContinuetoKitAssembly

1.800.221.0932 | MetraOnline.com4
DASH DISASSEMBLY
Chrysler Sebring 2001-2006 Dodge Stratus 2001-2006
1. Remove (2) Phillips screws from under the climate controls. (Coupe only)
2. Unclip and remove the radio trim panel.
3. Remove (4) Phillips screws securing the radio. Disconnect and remove the radio.
ContinuetoKitAssembly
Chrysler Town & Country 2001-2007 / Voyager 2001-2003 Dodge Caravan / Grand Caravan 2001-2007
1. Open the cup holder. Unclip and remove the trim above the cup holder.
2. Remove (2) Phillips screws from above the cup holder.
3. Unclip and remove the dash trim panel.
4. Remove (4) Phillips screws securing the radio. Disconnect and remove the radio.
ContinuetoKitAssembly

REV. 6/11/2018 INST-99-650345 5
Dodge Neon 2000-2006 Plymouth Neon 2000-2001
1. Pull off the climate control knobs.
2. Unclip and remove the ac / heater vents.
3. Remove (1) Phillips screw from each vent cavity.
4. Unclip and remove the dash trim panel.
5. Remove (4) Phillips screws securing the radio. Disconnect and remove the radio.
ContinuetoKitAssembly
Dodge Ram 2002-2005
1. Unclip the top edge of the trim panel below the steering column. (It is not necessary to completely remove this panel).
2. Remove (1) Phillips screw from below the right ac/heater vent.
3. Unclip and remove the dash trim panel.
4. Remove (4) Phillips screws securing the radio. Disconnect and remove the radio.
ContinuetoKitAssembly
DASH DISASSEMBLY

1.800.221.0932 | MetraOnline.com6
3 Screws
3 Screws
2 ScrewsDodge Dakota 2001-2004 / Durango 2001-2003
1. Remove (3) T-20 Torx screws from the bottom edge of the panel below the steering column and unsnap to remove the panel.
2. Remove (2) Phillips screws from the instrument cluster panel above the gauges.
3. Remove (3) T-20 Torx screws from the bottom of the steering column shroud. Unsnap and remove the top half of the shroud.
4. Unsnap and remove the entire panel surrounding the radio, a/c controls, and instrument cluster.
5. Remove (4) Phillips screws securing the radio. Disconnect and remove the radio.
ContinuetoKitAssembly
Jeep Grand Cherokee 1999-2004
1. Unclip and remove the radio trim panel.
2. Remove (4) Phillips screws securing the radio. Disconnect and remove the radio.
ContinuetoKitAssembly
DASH DISASSEMBLY
REV. 6/11/2018 INST-99-650345 7
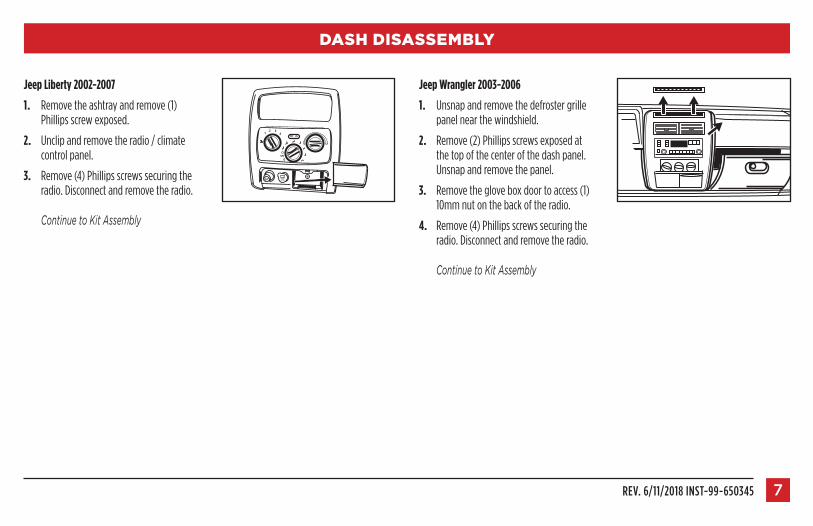
Jeep Wrangler 2003-2006
1. Unsnap and remove the defroster grille panel near the windshield.
2. Remove (2) Phillips screws exposed at the top of the center of the dash panel. Unsnap and remove the panel.
3. Remove the glove box door to access (1) 10mm nut on the back of the radio.
4. Remove (4) Phillips screws securing the radio. Disconnect and remove the radio.
ContinuetoKitAssembly
Jeep Liberty 2002-2007
1. Remove the ashtray and remove (1) Phillips screw exposed.
2. Unclip and remove the radio / climate control panel.
3. Remove (4) Phillips screws securing the radio. Disconnect and remove the radio.
ContinuetoKitAssembly
12 3
4
POWEROUTLET
DASH DISASSEMBLY

1.800.221.0932 | MetraOnline.com8
Dodge Viper 2003-2010
1. Using a panel removal tool, pry up on the center console trim panel. Be careful not to scratch the trim panel. (Figure A)
2. Loosen the shifter lock nut below the center console trim panel (Figure A), and unscrew the shifter knob. (Figure B)
3. Unplug the electrical connectors and remove the center console trim panel. (Figure C)
4. Remove (6) Allen screws from the radio / climate control trim panel, and (1) Phillips screw at the bottom of the panel.
5. Unplug the electrical connectors and remove the panel. (Figure D)
6. Remove (4) screws securing the radio. Disconnect and remove the radio.
ContinuetoKitAssembly
(FigureA) (FigureC)
(FigureB) (FigureD)
DASH DISASSEMBLY

REV. 6/11/2018 INST-99-650345 9

1.800.221.0932 | MetraOnline.com10
99-6503
• DIN radio provision
• A) Radio housing
KIT FEATURES
KIT COMPONENTS
Chrysler Multi-kit 1998-2010
A
WIRING & ANTENNA CONNECTIONS (sold separately)Wiring Harness: • Please visit metraonline.com for wiring harness optionsAntenna Adapter: • Please visit metraonline.com for antenna adapter options
• Phillips Screwdriver • T-20 Torx screwdriver • Panel removal tool
TOOLS REQUIRED

REV. 6/11/2018 INST-99-650345 11
KIT ASSEMBLY
DIN radio provision
1. Remove the metal DIN sleeve from the aftermarket radio.
2. Slide the sleeve into the radiohousing and secure by bending the metal locking tabs down.
3. Slide the radio into the sleeve until it clicks in. (Figure A)
4. Locate the factory wiring harness in the dash. Metra recommends using the proper mating adapter from Metra or AXXESS. Test the radio for proper operation.
5. Reassemble the dash in reverse order of disassembly. (Figure A)
(FigureA)
1.800.221.0932 | MetraOnline.com12
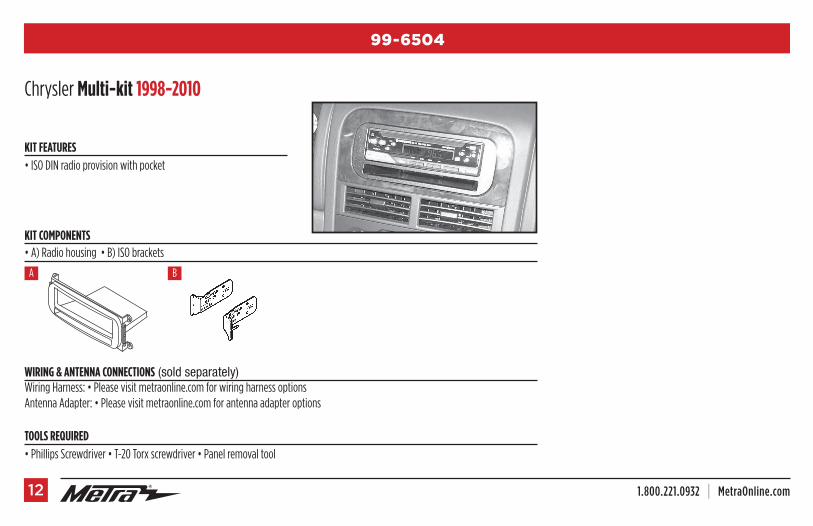
99-6504
• ISO DIN radio provision with pocket
• A) Radio housing • B) ISO brackets
KIT FEATURES
KIT COMPONENTS
WIRING & ANTENNA CONNECTIONS (sold separately)Wiring Harness: • Please visit metraonline.com for wiring harness optionsAntenna Adapter: • Please visit metraonline.com for antenna adapter options
• Phillips Screwdriver • T-20 Torx screwdriver • Panel removal tool
TOOLS REQUIRED
Chrysler Multi-kit 1998-2010
A B
REV. 6/11/2018 INST-99-650345 13
KIT ASSEMBLY
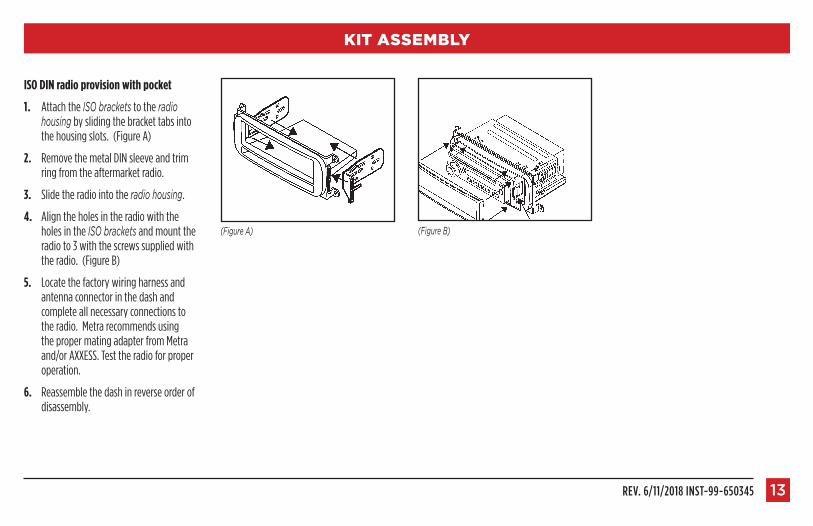
ISO DIN radio provision with pocket
1. Attach the ISObrackets to the radiohousing by sliding the bracket tabs into the housing slots. (Figure A)
2. Remove the metal DIN sleeve and trim ring from the aftermarket radio.
3. Slide the radio into the radiohousing.
4. Align the holes in the radio with the holes in the ISObrackets and mount the radio to 3 with the screws supplied with the radio. (Figure B)
5. Locate the factory wiring harness and antenna connector in the dash and complete all necessary connections to the radio. Metra recommends using the proper mating adapter from Metra and/or AXXESS. Test the radio for proper operation.
6. Reassemble the dash in reverse order of disassembly.
(FigureA) (FigureB)

1.800.221.0932 | MetraOnline.com14
99-6505
• DIN radio provision with pocket• ISO DIN radio provision with pocket
• A) Radio housing • B) ISO trim plate • C) ISO snap-in brackets
KIT FEATURES
KIT COMPONENTS
Chrysler Multi-kit 1998-2010
A B C
WIRING & ANTENNA CONNECTIONS (sold separately)Wiring Harness: • Please visit metraonline.com for wiring harness optionsAntenna Adapter: • Please visit metraonline.com for antenna adapter options
• Phillips Screwdriver • T-20 Torx screwdriver • Panel removal tool
TOOLS REQUIRED
REV. 6/11/2018 INST-99-650345 15
KIT ASSEMBLY
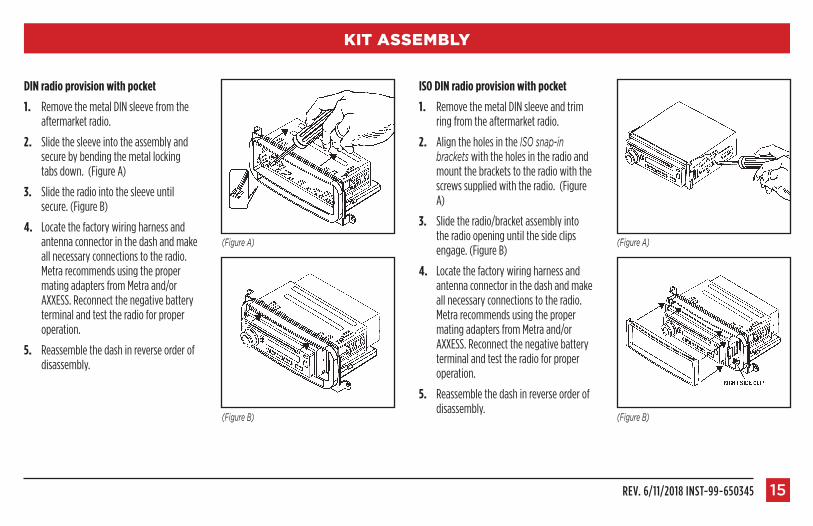
(FigureA) (FigureA)
(FigureB) (FigureB)
DIN radio provision with pocket
1. Remove the metal DIN sleeve from the aftermarket radio.
2. Slide the sleeve into the assembly and secure by bending the metal locking tabs down. (Figure A)
3. Slide the radio into the sleeve until secure. (Figure B)
4. Locate the factory wiring harness and antenna connector in the dash and make all necessary connections to the radio. Metra recommends using the proper mating adapters from Metra and/or AXXESS. Reconnect the negative battery terminal and test the radio for proper operation.
5. Reassemble the dash in reverse order of disassembly.
ISO DIN radio provision with pocket
1. Remove the metal DIN sleeve and trim ring from the aftermarket radio.
2. Align the holes in the ISOsnap-inbrackets with the holes in the radio and mount the brackets to the radio with the screws supplied with the radio. (Figure A)
3. Slide the radio/bracket assembly into the radio opening until the side clips engage. (Figure B)
4. Locate the factory wiring harness and antenna connector in the dash and make all necessary connections to the radio. Metra recommends using the proper mating adapters from Metra and/or AXXESS. Reconnect the negative battery terminal and test the radio for proper operation.
5. Reassemble the dash in reverse order of disassembly.

KNOWLEDGE IS POWEREnhance your installation and fabrication skills by enrolling in the most recognized and respected mobile electronics school in our industry.Log onto www.installerinstitute.com or call 800-354-6782 for more information and take steps toward a better tomorrow.
®
Metra recommends MECP certified technicians
IMPORTANTIf you are having difficulties with the installation of this product, please call our Tech Support line at 1-800-253-TECH. Before doing so, look over the instructions a second time, and make sure the installation was performed exactly as the instructions are stated. Please have the vehicle apart and ready to perform troubleshooting steps before calling.
Metra. The World’s Best Kits.® MetraOnline.com © COPYRIGHT 2018 METRA ELECTRONICS CORPORATION REV. 6/11/18 INST-99-650345
I N S TA L L AT I O N I N S T R U C T I O N S99-650345