lib“?s - extranet systems - world health organization
TRANSCRIPT

WORLD HEALTH ORGANIZATION BASIC RADIOLOGICAL SYSTEM
MANUAL OF DARKROOM TECHNIQUE

This manual has its origin in a work entitled Radiology and primary care prepared by Professor P. E. S. Palm er at the request of the Pan American Health Organization (PAHO) and published in 1978, as PAHO Scientific Publication No. 35 7, in the context of a long-established programme to promote simple, safe and economical diagnostic radiology appropriate for use in rural or isolated hospitals and clinics. A subsequent revision by the author with other members of the WHO-BRS Advisory Group was tested during field trials of the BRS machine in Colombia as an important contribution to the WHO Basic Radiological System.
!11(~ 6/=t-j
World Health Organization Basic Radiological System
Manual of Darkroom Technique
by
P.E.S. Palmer University of California','oavis,
California, United States of America
WORLD HEALTH ORGANIZATION GENEVA
1985
ISBN 92 4 154178 4
© World Health Organization 1985
Publications of the World Health Organization enjoy copyright protection in accordance "ith the provisions of Protocol 2 of the Universal Copyright Convention. For rights of reproduction or translation of WHO publications, in part or in toto, application should be made to the Office of Publications. World Health Organization, Geneva, Switzerland. The World Health Organization welcomes such applications.
The designations employed and the presentation of the material in this publication do not imply the expression of any opinion whatsoever on the part of the Secretariat of the World Health Organization concerning the legal status of any country, territory, city or area or of its authorities, or concerning the delimitation of its frontiers or boundaries.
The mention of specific companies or of certain manufacturers' products does not imply that they are endorsed or recommended by the World Health Organization in preference to others of a similar nature that are not mentioned. Errors and omissions excepted. the names of proprietary products are distinguished by initial capital letters.
The author alone is responsible for the views expressed in this publication.
PRINTED 1:--; S\liiTZJ:RLAND
84/6203 -Alar - 7()(Xl

•
CONTENTS
Preface .......... .
Introduction to processing
X-ray film ...... . Cassettes and screens The darkroom . . . . .
Safelights . . . . . . Fogging of films in the darkroom
Processing . . . . . . . . . . . . . . Maintenance of the processing tank Record-keeping and filing
The patient register X-ray film files
Illustrated instructions for the processing of X-ray films
X-ray films, film-boxes, and cassettes The darkroom . . . . . . . . . Loading the cassettes . . . . . . . Preparing the processing tank . . . Processing the exposed X-ray film Cleaning the cassettes and screens
Page
7
9
9 9
10 10 10 11 12 13 13 13
15
15 16 17 18 20 24

PREFACE
This manual is intended for use by operators working with the World Health Organization Basic Radiological System (WHO-BRS), but the principles and methods described can be used in the processing of X-ray films taken with any type of X-ray equipment.
The manual is a very simple step-by-step guide to darkroom techniques, and outlines all the basic requirements for the storage and handling of X-ray films and processing equipment; it is not intended to provide solutions for every problem that may arise in the drarkroom.
The introductory section is as important as the illustrated pages that follow, and must be read first because it describes many of the difficulties encountered in a darkroom. The operator should re-read the introduction after a month or two of working in the darkroom, by which time he or she will have become familiar with the techniques involved and may need to be reminded of some of the details.
The author and the WHO-BRS Advisory Group 1 are most grateful to all the many people who willingly read and criticized the early drafts of the manual and provided helpful advice. The comments received highlighted the variety of methods that are available for each step of processing. In this guide, an attempt has been made to present the most simple techniques in an easy-to-follow manner and to lay down principles which, if carefully and exactly followed, should result in high quality radiographs. Nevertheless, we are well aware that problems will arise locally, in which case help should be sought from the main X-ray department at the nearest large hospital.
Many of the errors in X-ray diagnosis arise because of faults in processing. In terms of patient care, a poor-quality radiograph may be more harmful than the patient not having an X-ray examination at all. Adherence to the routine process described in this manual is extremely important in providing radiographs of high quality and ensuring optimum health care.
The WHO-BRS Advisory Group would be most grateful for comments on the present manual, particularly where difficulties are experienced in using it. Such comments, preferably with suggestions as to how the manual may be improved, should be sent to: Chief, Radiation Medicine, World Health Organization, 1211 Geneva 27, Switzerland. In this way, subsequent editions may be revised, to the benefit of all patients who undergo X-ray examination.
1 The members of the WHO-BRS Advisory Group are as follows: Mr. E. Borg, Sana'a, Yemen; Professor W. P. Cockshon, MacMaster University, Hamilton, Ontario, Canada; Dr. V. HegedOs, University of Copenhagen, Glostrop, Denmark; Dr. T. Holm, University Hospital, Lund, Sweden; Dr. J. J. Lyimo, Kilimanjaro Christian Medical Centre, Moshi, United Republic of Tanzania; Professor P. E. S. Palmer, University of California. Davis, CA. United States of America; and Professor E. Samuel, Edinburgh. Scotland.
The Group was also responsible for compiling the technical specifications of the BRS, as well as a Manual of radiographic inrerpretation for general practitioners (published, 1985) and a Manual of radiographic techmque (in press, 1985) both of which are published by the '.Vorld Health Organization.
7

INTRODUCTION TO PROCESSING
Read this section before using the illustrated instructions (p. 15).
X-ray film
X-ray film is made of a transparent plastic sheet, coated on both sides with an emulsion. This emulsion is sensitive to white light and X-rays, and becomes black when exposed to either of these two types of radiation. The emulsion is soft and can easily be damaged if not handled in the correct way.
A film that has not been exposed to light or X-rays will be transparent and clear after processing; there should be no haziness or grey-bl~ck patches. To maintain the films in good condition, it is important that they are stored and handled properly. The following points should be remembered.
(a) Each packet of film has a date marked on the box. The date is printed by the manufacturer and informs you how long a film will last. After this date the film is too old to give satisfactory results. You cannot achieve good results with old films.
(b) Films should be kept in the coolest place available, both day and nigbt. If films are stored at a high temperature, they will be spoiled several months before the expiry date marked on the packet.
(c) Any film that has been accidentally exposed to X-rays will be spoiled (fogged). Never store films in or near the X-ray room. lt is quite safe to store X-ray films (in their boxes) with other items such as food or drugs. They should not be stored where they may get wet or where they are exposed to any sort of gas (ammonia, gas for heating, etc.).
(d) X-ray films are sensitive to pressure. Do not store the boxes of film lying on top of one another, but put them on a shelf in an upright position, like books on a bookshelf.
(e) X-ray film is easily marked or scratched. Do not touch the film surface with your fingernails or other hard objects such as scissors, knives or screwdrivers. Your hands must be clean and dry when you handle the film. Do not bend the film. Keep the film away from dust.
Cassettes and screens
The cassette protects the film from exposure to daylight but allows the passage of X-rays through the front cover on to the film.
The cassette holds two white "screens" in place on either side of the film. These screens glow when X-rays pass through them (inside the cassette), and the glow from the screens helps to make the image on the X-ray film. The screens should be handled with great care as they are expensive and very easily damaged.
lt is important that cassettes are maintained in good condition, otherwise X-ray films exposed inside them may be spoiled. The following are some causes of marks on processed film.
(a) Daylight or white light leaking into the cassette will spoil the film. This may occur as a result of damage to the locks of the cassette or because the edges of the cassette do not fit tightly. Marks thus caused appear dark or black on processed film and always occur in the same place and in the same shape on each film that has been exposed in the
9

1 0 MANUAL OF DARKROOM TECHNIQUE
damaged cassette. If marks occur on every film exposed in all cassettes of one size, then the film-box has been damaged (see (f) below).
(b) Daylight may leak into the cassette if the cassette itself is damaged; if it is dropped or stored under a heavy weight, it will bend and may let light on to the film even when the sides appear shut.
(c) Dirt (dust or grit) in the cassettes may scratch and damage the screens. Screens must be checked and cleaned regularly, using a mild solution (see "Cleaning the cassettes and screens", p. 24).
(d) Fingernails or other hard objects can easily damage the screens. When taking a film out of the cassette, do not use your fingernails, but turn the cassette over and let the film drop out. Never use a screwdriver, keys, scissors, knife, or anything similar near an open cassette, especially not inside it.
(e) Processing chemicals will damage the screens. Be careful not to splash chemicals or chemical powder on to the screens and make sure that there are no chemicals on your fingers or on the bench when you empty or reload the cassettes.
(f) If marks occur on every film exposed in cassettes of one size, then the film-box has been damaged. Check the first film out of every box by processing it in the usual way, but without previously exposing it to light or X-rays. lt should be clean, clear, and transparent, with no marks or shadows on it.
The darkroom
When the door of the darkroom is shut, there must not be any light coming into the darkroom. To check this, go into the darkroom, close the door, and stay inside without light for 10 minutes. (Set the processing timer to make sure you have really spent 10 minutes in the dark.) Then look around carefully for any light entering the room through holes or cracks; cover these holes, thus blocking out the light. If the darkroom has a "light-trap" instead of a door, make sure that light does not leak in through the trap. Check the darkroom at different times of the day, to allow for changes in the angle of the sun's rays.
The darkroom should be clean at all times. Both t~e bench (or table) and the floor must be kept clean and dry. There should be no dust, dirt, or moisture in the area where the X-ray films and cassettes are handled. The floor should be wiped with a damp mop or cloth every week.
The tanks containing the processing chemicals should also be kept very clean, and should be covered when not actually in use. The covers must by put on the tanks whenever you leave the darkroom, even if only for a short time.
Safelights
The lights used in the darkroom may be green, orange, yellow, or brown. Check the box containing the X-ray film: the manufacturer prints on the box the details of the colour filter needed for processing the film. If you receive a different make of film, you should immediately check which filter is needed and ensure that you are using the correct one. All safelights should be at least 1.3 m (4ft) above the working bench and should preferably be pointing upwards. The bulbs used in the safelights should never exceed 25 watts (25 W).
Fogging of films in the darkroom
If the processed films are hazy and you suspect that the fogging may be occurring in the darkroom, check that no light is entering the room from outside. If the room is lightproof, test the amount of light in the room itself in the following way. With the darkroom door closed and only the safelights on, place an X-ray film on the bench. Carefully place two or three
INTRODUCTION TO PROCESSING 11
metal objects (such as coins, keys, or a pair of scissors) on top of the film and leave the film there with only the safelights on for at least 5 minutes. Then process the film. If the film shows the shadows of the objects placed on it, there is too much light in the darkroom.
Ask yourself the following questions. - Is the coloured filter damaged? Check the filter to make sure it is not
blistered, scratched or losing its colour. - Is the bulb too strong? Make sure it is 25 W or less. - Are there too many safelights?
If there is any image on the film, there is too much light in the darkroom. You must find the source, or all the films processed in the darkroom will be spoiled.
Remember: Films can be fogged by light even when immersed in the processing chemicals. Never switch on the white light or open the door while films are being processed.
Processing
Processing is a series of actions by which exposed X-ray film yields an image. In processing a film, the sequence of actions should be as follows:
(a) Mark the patient's name on the film. (b) Develop the film. (c) Rinse developer from the film. (d) Fix the film. (e) Wash the fixer from the film. (f) Dry the film. (g) Check the name, date, and patient number on the film, and check for
left (L) and right (R) markers.
These steps are described in detail below. Steps a-d must be carried out with only the safelights on.
(a) Marking the film. The patient's name should be written on the film when it is taken out of the cassette before it is put into the developer. The film may be marked with pencil or ink.
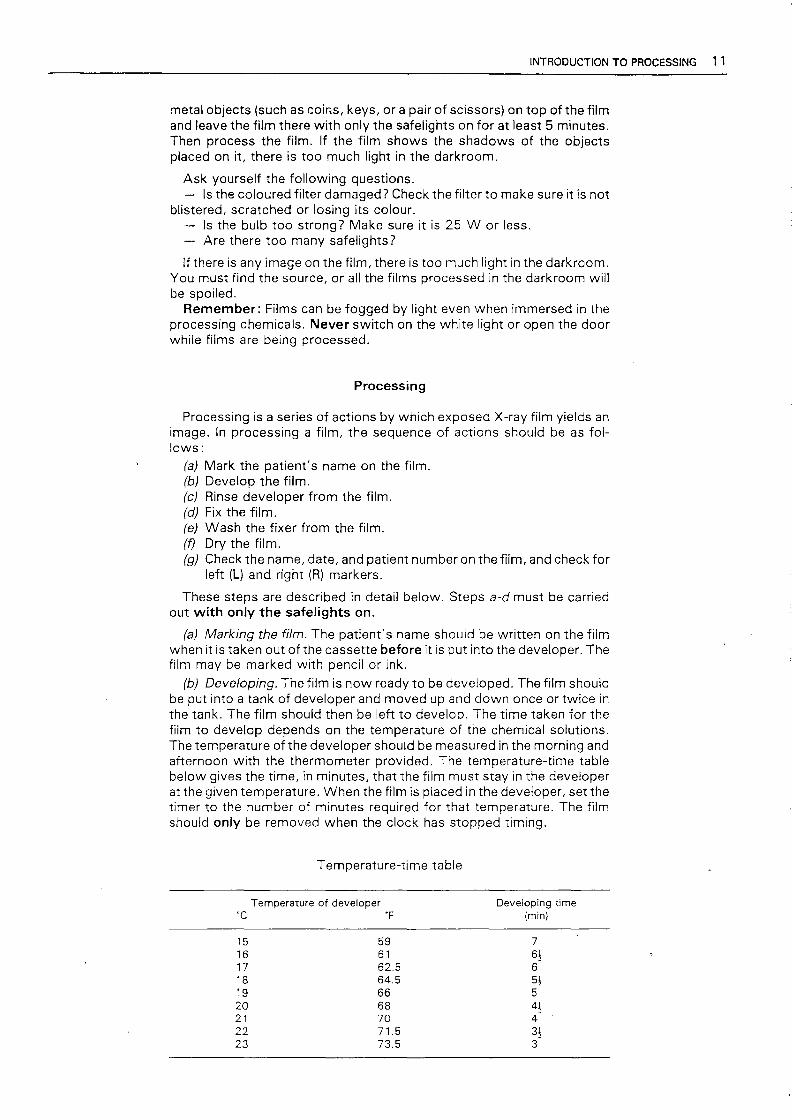
(b) Developing. The film is now ready to be developed. The film should be put into a tank of developer and moved up and down once or twice in the tank. The film should then be left to develop. The time taken for the film to develop depends on the temperature of the chemical solutions. The temperature of the developer should be measured in the morning and afternoon with the thermometer provided. The temperature-time table below gives the time, in minutes, that the film must stay in the developer at the given temperature. When the film is placed in the developer, set the timer to the number of minutes required for that temperature. The film should only be removed when the clock has stopped timing.
Temperature-time table
Temperature of developer ·c "F
15 16 17 18 19 20 21 22 23
59 61 62.5 64.5 66 68 70 71.5 73.5
Developing time (min)
7 6j 6 5j 5 4j 4 3j 3

12 MANUAL OF DARKROOM TECHNIQUE
The temperature-time table is correct for standard X-ray processing chemicals that have been changed regularly. Different chemicals may have different developing times, so check the instructions on the container.
(c) Rinsing. After developing, the film should be rinsed for about 30 seconds in clean water. During this time the film should be lifted up and down several times in the water tank. Remember: there should be no white light in the darkroom at this time.
(d) Fixing. Aher the film has been rinsed, it should be put in the fixing tank. The film should stay in this tank for at least 5 minutes (the film will not be damaged if it is left for longer than 5 minutes). There must be no white light in the darkroom for the first 3 minutes of fixing time.
(e) Washing. After it has been fixed, the film should be washed in the large washing tank. (This tank usually has clean running water.) The film should stay in the water tank for at least 30 minutes (it will not be damaged if it is left for longer than 30 minutes). At this time the white light may be on provided no other films are being processed.
(f) Drying. The film is now ready to be dried. The drying temperature must not exceed 35 ·c, and the film must be hung in a dust-free area.
(g) Checking. Finally, the dry developed film should be checked to ensure that the name of the patient, the hospital number, the date, and the L or R marker can all be read easily. After checking, the film can be put in a completed envelope and filed (see "X-ray film files", p. 13).
Maintenance of the processing tank
The processing tank holds the solutions Qf developer and fixer, and water for rinsing and washing the films. The developing and fixing solutions should be changed regularly, since they become weaker with use and age. Remember: These chemicals can damage skin and clothing. Rinse your hands immediately if you spill any chemicals on them.
The following notes describe the routine maintenance of the processing tank and its contents.
(a) Each day, before any films are processed, the developer and the fixer should be stirred using only the special rods provided for each solution. The slightest mixture of these two chemicals upsets the processing so never mix the tanks or the stirring rods used for the two chemical solutions. The developing rod should only be used for the developer and the fixing rod only for the fixer. The developing tank should contain only developer, and the fixing tank, only fixer.
(b) The developing tank and fixing tank should be kept full of developer and fixer, respectively, at all times. Extra developer and fixer should be kept in separate bottles in the darkroom for topping-up the tanks (see "Preparing the processing tank", p. 18).
(c) Both the developer and the fixer solutions in their respective tanks must be completely changed every 30 days (this 30-day interval may be shortened according to the advice of your instructor-radiographer if many X-ray films have been processed). Never keep chemical solutions that have been in use for more than one month, even if only a few films have been processed in them.
(d) The water used to rinse off developer from the film should be completely changed every day and the tank should be kept full.
(e) Running water should preferably be used to wash off fixer from the film. If this is not possible, the water tank must be large, and the water must be changed every day. (Dirty water contains chemicals, which will spoil the films-a waste of money and time).
INTRODUCTION TO PROCESSING 13
(f) The chemical solutions (developer and fixer) and rinsing and washing water should be kept at about the same temperature. Check that the water running into the tank in the afternoon is not too hot. If the water is hot, it will be better to change the water in the tank early in the morning and not to add any more water that day. The water coming into the tank should be as clean as possible. If the water is muddy or dirty ask for a filter. The filter should be cleaned every week. You should always be able to see the bottom of the tank through the water.
Record-keeping and filing
Every X-ray department should keep the following records.
(a) A register containing names and personal details of the patients, and the type of X-ray examinations made (see "The patient register" below). This register may also include the diagnosis if it is available.
(b) The X-rayfilms for each patient (the X-ray film file). The films should be kept for at least 5 years.
(c) Details of: the number and size of films used each month (a separate record for each size of film); the chemicals used each month; and the drugs used each month (the supply record).
The patient register
Patient records should be kept in a register; entries should be made under the series of column headings listed below. The register should be completed by the X-ray operator every day. The record of each day's work should include the names and personal details of every patient X-rayed, with details of every X-ray examination turned out in the 24-hour period.
The column headings should include:
the date of the examination; the patient's family name and first name; the patient's hospital number; the patient's birth-date and sex; the type of X-ray examination made; the name of the doctor requesting the X-ray; the number of films used of each size; and the diagnosis made from the films.
The records contained in the patient register are very important and can be helpful in tracing X-ray films (should they be needed) or a patient and his/her diagnosis. These records will also help you to calculate (i) how many films of each size are used every year; (ii) any change in the number of X-rays taken from one year to the next; and (iii) the types of X-ray examination that are most frequently requested. These records are very helpful to both doctors and the administration, and will help to ensure good care of the patients.
X-ray film files
All processed X-ray films should be kept in large envelopes. There must be one envelope for each patient; it should have the patient's name and hospital number clearly written on the outside. The number should be on the outside top corner of the envelope so that it is visible when the envelope is filed. The date and type of each examination should also be written on the outside of the envelope, for example:
26 January 1984, chest 1 February 1985, left wrist.
X-ray films should not be filed in the X-ray room or darkroom. The room chosen for filing should be dry and should contain strong shelves to hold

14 MANUAL OF DARKROOM TECHNIQUE
the films. The shelves must have upright supports every 45 cm ( 18 ·in), because X-ray films are very heavy. The envelopes should not lie flat but stand in an upright position, like books on a bookshelf. The envelopes should be filed in order, according to the patient's hospital number (not by name). The number should always be on the outside edge of the film envelope.
it is a good idea to categorize the envelopes by year. This can be done by sticking a small coloured tab on the outer bottom corner of each envelope using a different colour for each year. When the patient returns for more X-rays the tab is changed to indicate the current year. Only one colour code should show on any envelope, for example:
yellow green yellow and green red red and blue
1983, 1984, 1985, 1986, 1987.
This method makes it easy to recognize the envelope by year. The film files should be checked in January of each year and all the envelopes that are 5 years old (as indicated by the coloured tab) should be removed from the files (e.g., in January 1989 take out all the envelopes from 1983). These will contain the X-ray films of patients who have not been X-rayed for 5 years. These discarded films should be sent back to the head office of the hospital administration so that the materials can be reclaimed. (The 5-year interval may be altered to suit local requirements.)
When films are removed from the file for reference purposes and sent to the doctor or to another hospital, a clearly marked card showing the patient's name and hospital number should be put into the place from which the films were taken. This card should remain in place until the films are returned, when the card can be removed.
X-ray films are an important part of each patient's health record. They should be looked after carefully, filed properly, kept in order, and be available when the patient comes back to the hospital to be X-rayed again. Any new films should be filed with the patient's previous films; each time, the coloured tab indicating the year should be checked and changed if necessary, and the date and type of the latest examination should be recorded on the front of the envelope. The envelope should be refiled each time the doctor has used it. If the envelope becomes too full, a second one should be started and a note made on the front of each envelope that there are now two envelopes for that patient. If an envelope becomes damaged, the X-ray films inside should be transferred to a new envelope, making sure that all the information is recorded on the front of the new envelope from the old one before the old one is thrown away.
Keeping the X-ray film file up to date is hard work, but it is essential.
15
ILLUSTRATED INSTRUCTIONS FOR THE PROCESSING OF X-RAY FILMS
This section gives step-by-step illustrated instructions on how to process (develop, rinse, fix, and wash) exposed X-ray films in the darkroom. Instructions are also given on how to mix the developer and fixer solutions, and look after the equipment.
Read the "Introduction to processing" (p. 9) first and then follow the illustrated instructions very carefully .
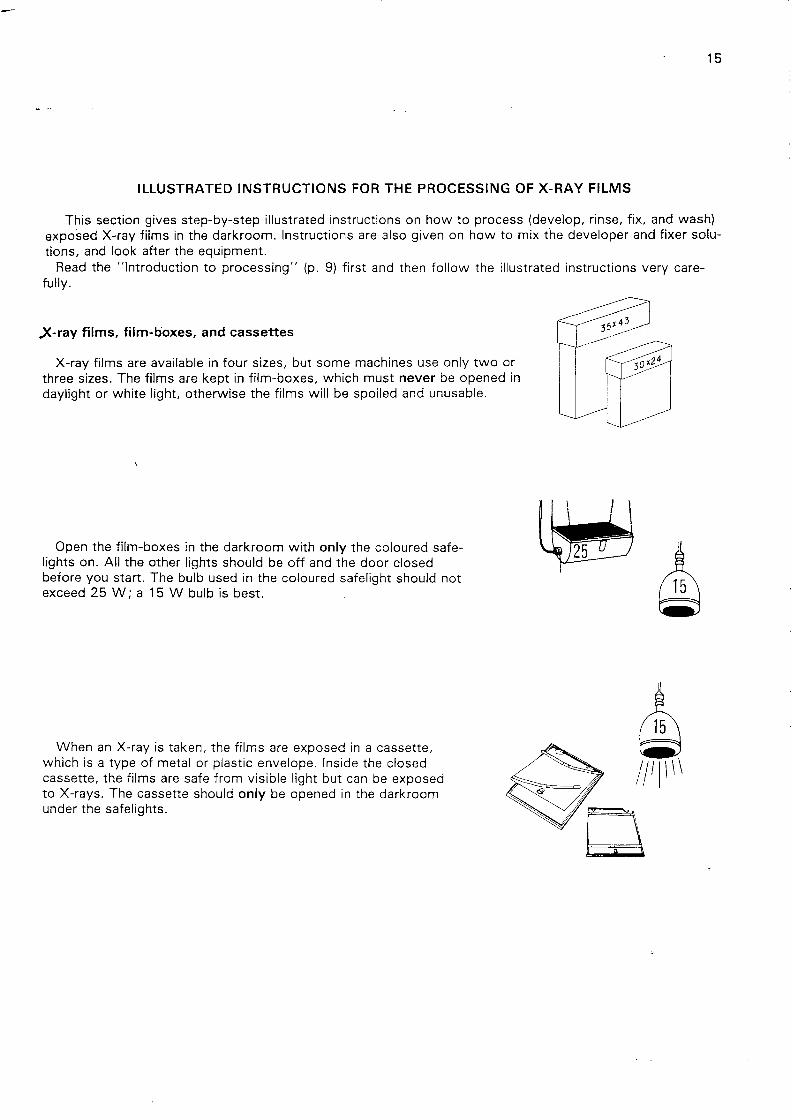
.X-ray films, film-boxes, and cassettes
X-ray films are available in four sizes, but some machines use only two or three sizes. The films are kept in film-boxes, which must never be opened in daylight or white light, otherwise the films will be spoiled and unusable.
Open the film-boxes in the darkroom with only the coloured safelights on. All the other lights should be off and the door closed before you start. The bulb used in the coloured safelight should not exceed 25 W; a 15 W bulb is best.
When an X-ray is taken, the films are exposed in a cassette, which is a type of metal or plastic envelope. Inside the closed cassette, the films are safe from visible light but can be exposed to X-rays. The cassette should only be opened in the darkroom under the safelights.
16 MANUAL OF DARKROOM TECHNIQUE
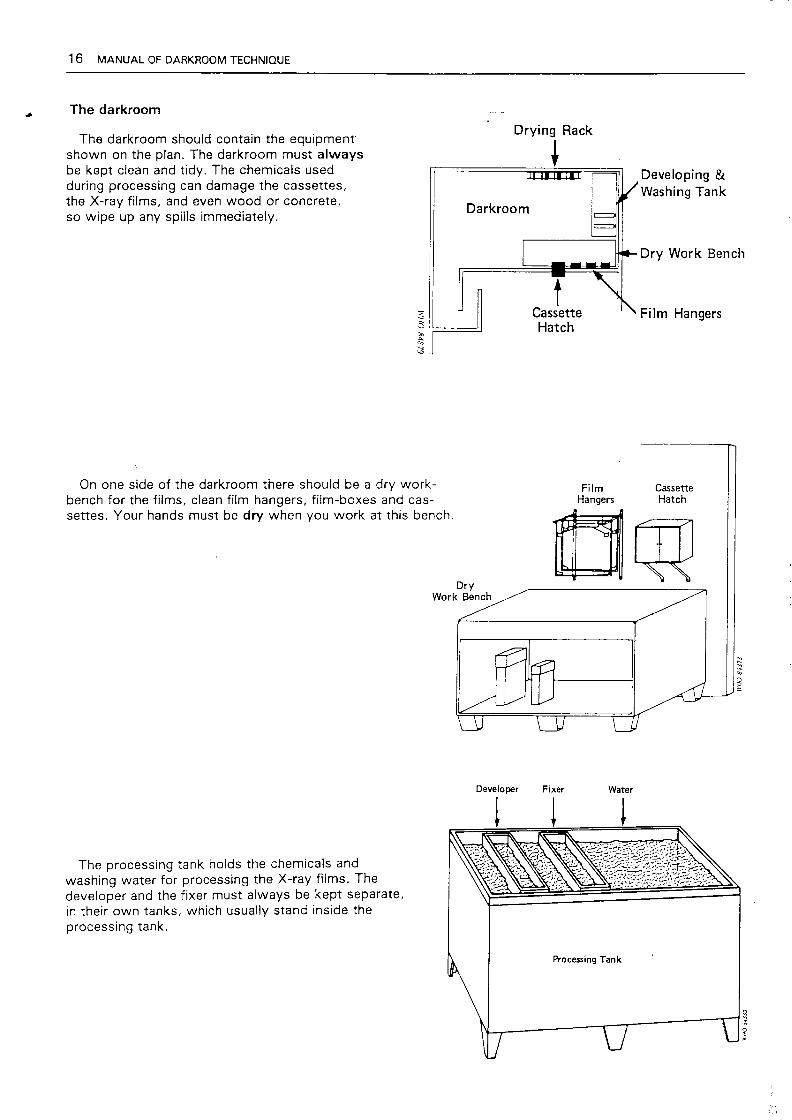
The darkroom
Drying Rack
• The darkroom should contain the equipment
shown on the plan. The darkroom must always be kept clean and tidy. The chemicals used during processing can damage the cassettes, the X-ray films, and even wood or concrete, so wipe up any spills immediately.
Darkroom
On one side of the darkroom there should be a dry workbench for the films, clean film hangers, film-boxes and cassettes. Your hands must be dry when you work at this bench.
The processing tank holds the chemicals and washing water for processing the X-ray films. The developer and the fixer must always be kept separate, in their own tanks, which usually stand inside the processing tank.
Dry Work Bench
Film Hangers
Fixer Water
Processing Tank
Developing & Washing Tank
Dry Work Bench
Film Hangers
Cassette Hatch
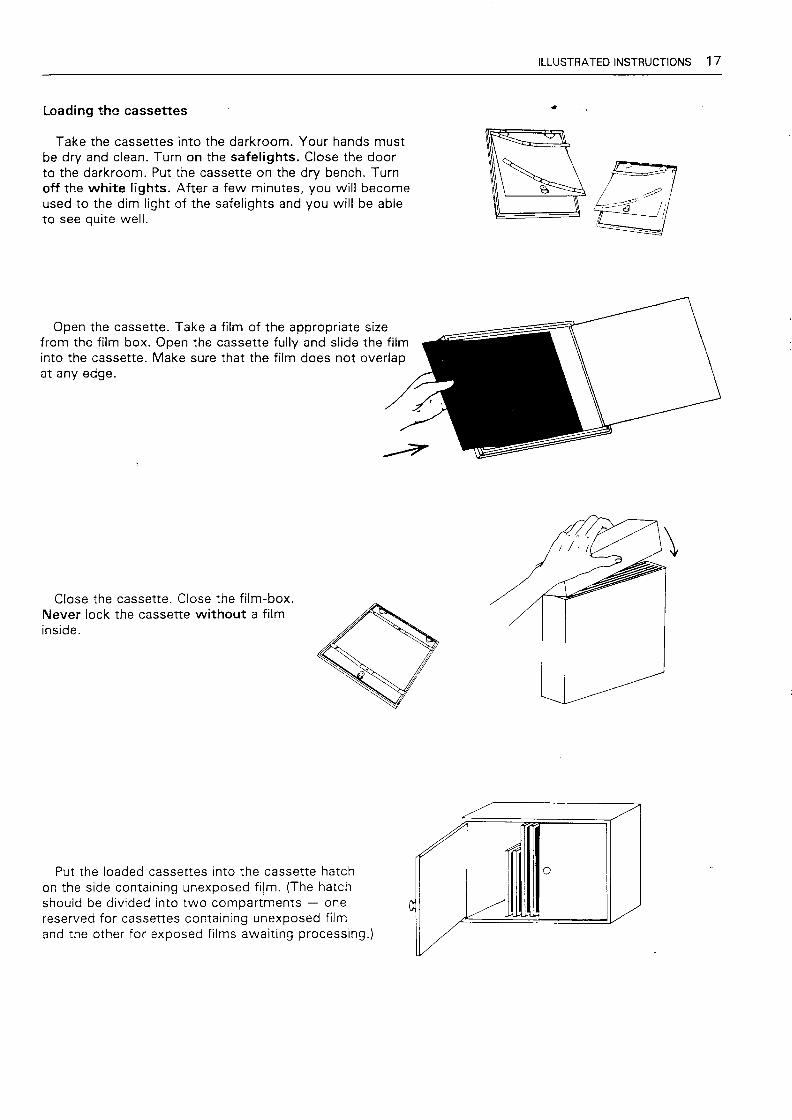
Loading the cassettes
Take the cassettes into the darkroom. Your hands must be dry and clean. Turn on the safelights. Close the door to the darkroom. Put the cassette on the dry bench. Turn off the white lights. After a few minutes, you will become used to the dim light of the safelights and you will be able to see quite well.
Open the cassette. Take a film of the appropriate size from the film-box. Open the cassette fully and slide the film into the cassette. Make sure that the film does not overlap at any edge.
Close the cassette. Close the film-box. Never lock the cassette without a film inside.
Put the loaded cassettes into the cassette hatch on the side containing unexposed film. (The hatch should be divided into two compartments - one reserved for cassettes containing unexposed film and the other for exposed films awaiting processing.)
ILLUSTRATED INSTRUCTIONS 1 7
0

18 MANUAL OF DARKROOM TECHNIQUE
Preparing the processing tank
The chemicals used to process the X-ray films are delivered in glass or plastic bottles if they are in solution (i.e., already mixed in water) or in boxes or tins if they are solid (not yet mixed with water). Each will be clearly marked "developer" (D) or "fixer" (F). Chemicals must be mixed outside the darkroom in a well-ventilated room because during mixing they give off fumes that can damage your lungs. Special buckets should be used for mixing the chemicals and special rods for stirring. Buckets and mixing rods should be marked with "D" for developer, and with "F" for fixer.
Read the instructions on the bottle or packet and then mix the chemicals as described there. Pay particular attention to when water should be added and how much should be added. Try not to splash the floor or your clothes as the chemicals can damage them. If you get any chemical on your skin, wash it off immediately.
The developing and fixing tanks in the darkroom must be clean. If the tanks are full of old developer and old fixer solutions, empty the tanks by pouring their contents down the special drain in the darkroom. Do not pour the chemical solutions on the ground or down an ordinary drain. Wash the chemical tanks with water. Do not use soap or washing solutions. When the tanks are clean, turn them upside down to drain until they are dry, then put them back into the processing tank.
Take the buckets containing fresh developer and fixer into the darkroom and fill up the developing and fixing tanks. Make sure that you always use the same tank for each chemical. Never put developer into a tank that has previously been used for fixer chemicals, and never put fixer into a tank that has previously been used for developing.
Put any extra developer or fixer into a storage bottle, marked D or F, as appropriate. These bottles can then be used to top up the tanks, as necessary. Always use the same bottle for the same chemical.

Top up the water tanks to 2 cm (/'2 in) from the top. Put the lid on the developing tank and put another lid on the fixing tank.
Wipe up any chemical solution that has spilt on the floor inside or outside the darkroom. Wipe the edges of the processing tank and the surrounding tiles with a clean cloth. Wash your hands with soap and water.
ILLUSTRATED INSTRUCTIONS 19
The level of the chemicals in the tanks should be replenished from the storage bottles every few days, as necessary. How often this is done depends on how much the processing tank is used.
Fresh chemicals must be made every month.

20 MANUAL OF DARKROOM TECHNIQUE
Processing the exposed X-ray film
Take the cassette containing the exposed film into the darkroom. If you have not already checked the temperature of the developer with the thermometer, do so now. (You should check the temperature in the morning and in the afternoon.) Look at the temperaturetime table to determine the number of minutes that are necessary for the film to be properly developed.
Temperature-time table
Temperature of developer ·c ·F
15 16 17 18 19 20 21 22 23.
59 61 62.5 64.5 66 68 70 71.5 73.5
Turn on the coloured safelights and turn off the white lights in the darkroom. Make sure that the door is closed.
Unlock the cassette, turn it over, then open it and take out the X-ray film. Make sure that you do not bend the film because this will mark it.
Put the film on the dry bench and write the patient's name and number in pencil in the top right-hand corner. If you have a special film-marker, follow the instructions on the marker.
Developing time (m in)
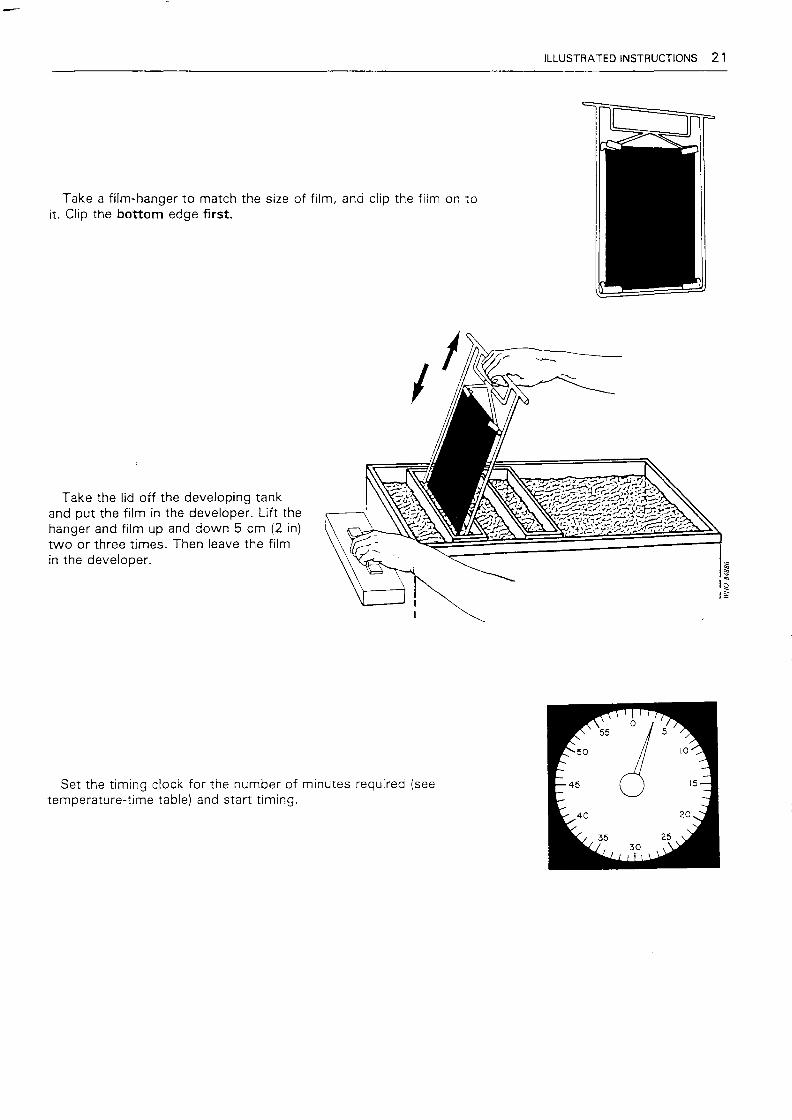
Take a film-hanger to match the size of film, and clip the film on to it. Clip the bottom edge first.
Take the lid off the developing tank and put the film in the developer. Lih the hanger and film up and down 5 cm (2 in) two or three times. Then leave the film in the developer.
Set the timing clock for the number of minutes required (see temperature-time table) and start timing.
ILLUSTRATED INSTRUCTIONS 2 1
22 MANUAL OF DARKROOM TECHNIQUE
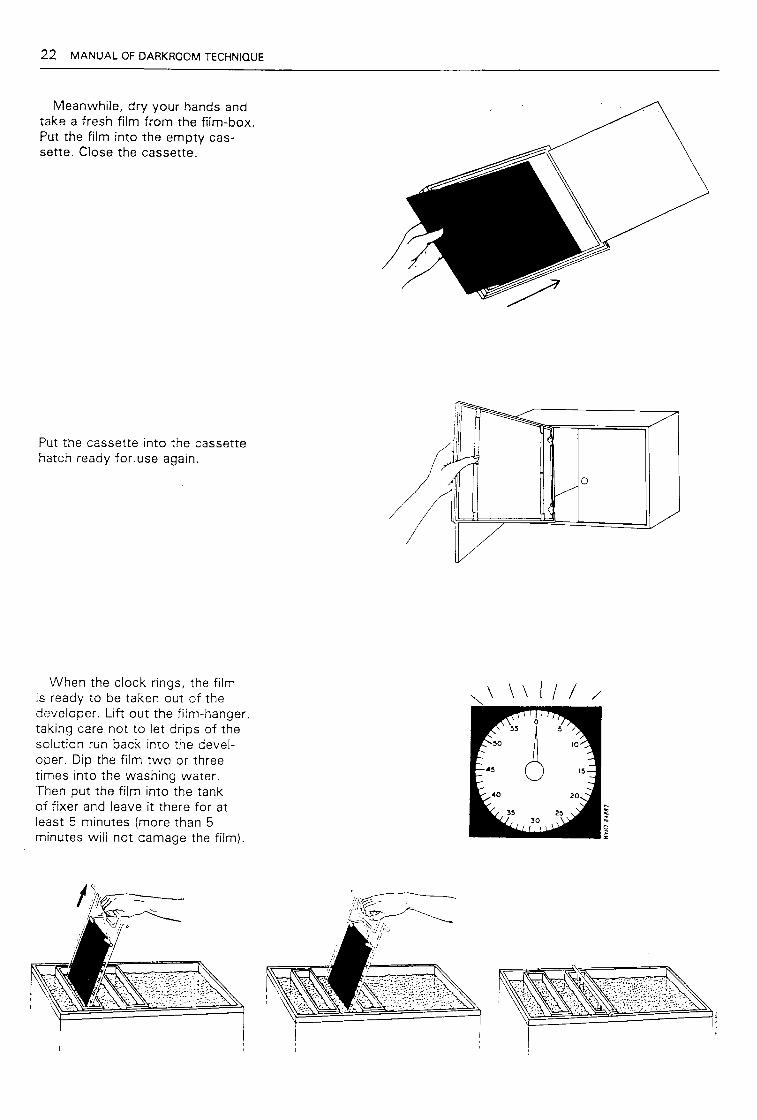
Meanwhile, dry your hands and take a fresh film from the film-box. Put the film into the empty cassette. Close the cassette.
Put the cassette into the cassette hatch ready for. use again.
When the clock rings, the film is ready to be taken out of the developer. Lift out the film-hanger, taking care not to let drips of the solution run back into the developer. Dip the film two or three times into the washing water. Then put the film into the tank of fixer and leave it there for at least 5 minutes (more than 5 minutes will not damage the film).

After 5 minutes, take the film-hanger out of the fixing tank and put it into the large washing tank. lt is now safe to turn on the white light in the darkroom but make sure that the lids are on all the X-ray film-boxes, all the X-ray cassettes are closed and no other X-ray films are in the developing or fixing tanks. Leave the film in the washing tank for about 30 minutes.
Take the film-hanger out of the washing tank,after 30 minutes and hang the film to dry either in the hanger from the drying-rack or from clips.
ILLUSTRATED INSTRUCTIONS 23
The films may be hung over concrete or tiled floors; if the floor is made of wood, an enamel or galvanized tray must be placed under the drying films. Wooden floors will be damaged by the drips of solution from the films.
\ I. /
··. -\~. ,-1 \\,,
·~ '
Enamel Tray
-,-I I --~~·\
Tiles Wood
24 MANUAL OF DARKROOM TECHNIQUE
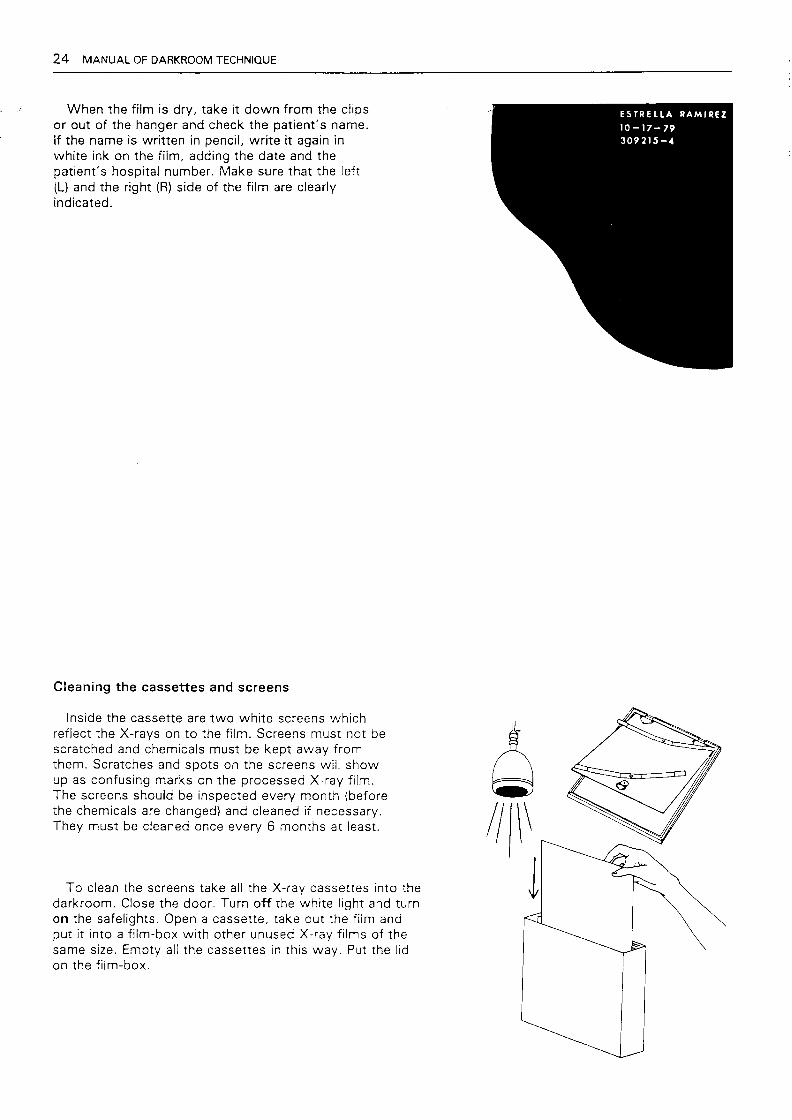
When the film is dry, take it down from the clips or out of the hanger and check the patient's name. If the name Is written in pencil, write it again in white ink on the film, adding the date and the patient's hospital number. Make sure that the left (L) and the right (R) side of the film are clearly indicated.
Cleaning the cassettes and screens
Inside the cassette are two white screens which reflect the X-rays on to the film. Screens must not be scratched and chemicals must be kept away from them. Scratches and spots on the screens will show up as confusing marks on the processed X-ray film. The screens should be inspected every month (before the chemicals are changed) and cleaned if necessary. They must be cleaned once every 6 months at least.
To clean the screens take all the X-ray cassettes into the darkroom. Close the door. Turn off the white light and turn on the safelights. Open a cassette, take out the film and put it into a film-box with other unused X-ray films of the same size. Empty all the cassettes in this way. Put the lid on the film-box.
Q I/ \\
l
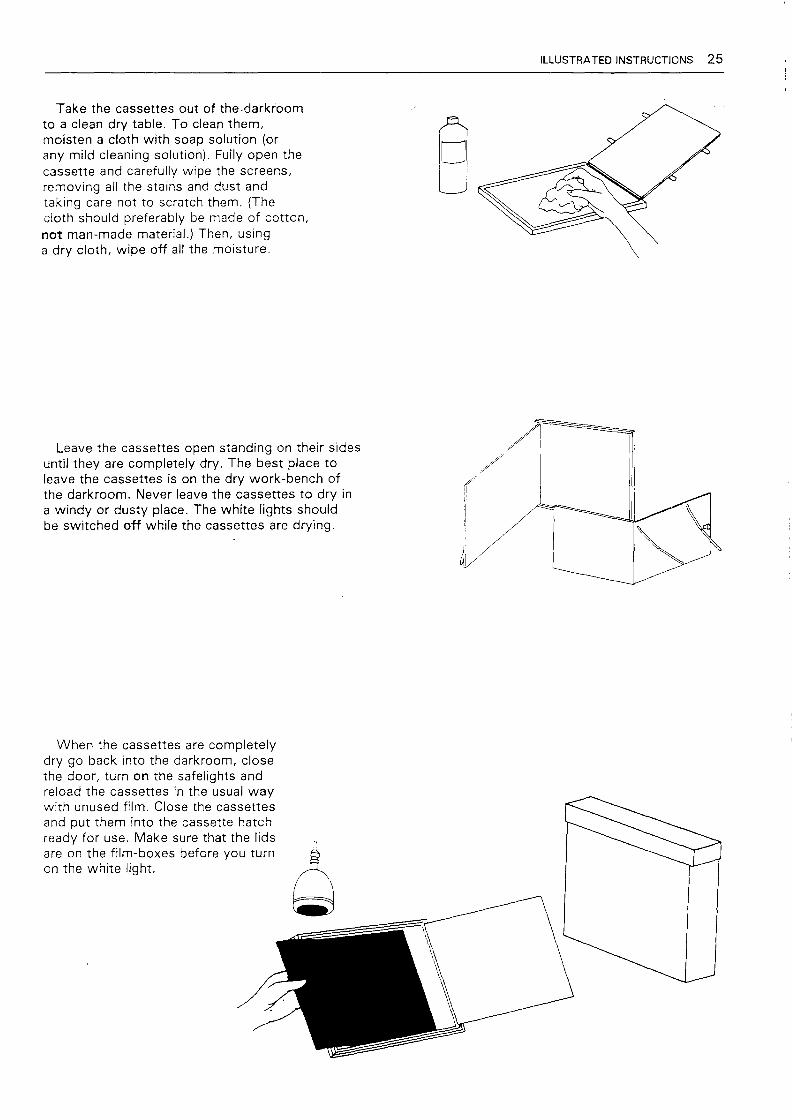
Take the cassettes out of the-darkroom to a clean dry table. To clean them, moisten a cloth with soap solution (or any mild cleaning solution). Fully open the cassette and carefully wipe the screens, removing all the stains and dust and taking care not to scratch them. (The cloth should preferably be made of cotton, not man-made material.) Then, using a dry cloth, wipe off all the moisture.
Leave the cassettes open standing on their sides until they are completely dry. The best place to leave the cassettes is on the dry work-bench of the darkroom. Never leave the cassettes to dry in a windy or dusty place. The white lights should be switched off while the cassettes are drying.
When the cassettes are completely dry go back into the darkroom, close the door, turn on the safelights and reload the cassettes in the usual way with unused film. Close the cassettes and put them into the cassette hatch ready for use. Make sure that the lids are on the film-boxes before you turn on the white light.
ILLUSTRATED INSTRUCTIONS 25
./'r,l. /I,
/' I ( I ~. I ·r ~--=--
V, a