liebert liqui-tect monitoring system - kele.com
TRANSCRIPT

Liebert® Liqui-tect® Monitoring SystemUser Manual


i
TABLE OF CONTENTS
1.0 INTRODUCTION
1.1 Equipment Inspection . . . . . . . . . . . . . . . . . . . . . . . . . . . . . . . . . . . . . . . . . . . . . . . . . . . . . . . . 11.2 Outside Enclosure Overview . . . . . . . . . . . . . . . . . . . . . . . . . . . . . . . . . . . . . . . . . . . . . . . . . . . 21.3 Typical Sequence . . . . . . . . . . . . . . . . . . . . . . . . . . . . . . . . . . . . . . . . . . . . . . . . . . . . . . . . . . . . 31.4 Controller Board Overview . . . . . . . . . . . . . . . . . . . . . . . . . . . . . . . . . . . . . . . . . . . . . . . . . . . . 41.5 LED Indicators . . . . . . . . . . . . . . . . . . . . . . . . . . . . . . . . . . . . . . . . . . . . . . . . . . . . . . . . . . . . . . 7
2.0 INSTALLATION
2.1 Installation Considerations . . . . . . . . . . . . . . . . . . . . . . . . . . . . . . . . . . . . . . . . . . . . . . . . . . . . 82.1.1 Unpacking and Preliminary Inspection . . . . . . . . . . . . . . . . . . . . . . . . . . . . . . . . . . . . . . . . . . . 8
2.2 Surface-Mounting the Liebert Liqui-tect Panel . . . . . . . . . . . . . . . . . . . . . . . . . . . . . . . . . . . . 92.2.1 Mounting the Panel . . . . . . . . . . . . . . . . . . . . . . . . . . . . . . . . . . . . . . . . . . . . . . . . . . . . . . . . . . . 9
2.3 Flush-Mounting the Liebert Liqui-tect Panel. . . . . . . . . . . . . . . . . . . . . . . . . . . . . . . . . . . . . 102.3.1 Mounting the Panel . . . . . . . . . . . . . . . . . . . . . . . . . . . . . . . . . . . . . . . . . . . . . . . . . . . . . . . . . . 11
2.4 Connect Power to the Liebert Liqui-tect Panel. . . . . . . . . . . . . . . . . . . . . . . . . . . . . . . . . . . . 122.4.1 Input Power Connections - Small Enclosure. . . . . . . . . . . . . . . . . . . . . . . . . . . . . . . . . . . . . . . 122.4.2 Input and Output Power Connections - Large Enclosure . . . . . . . . . . . . . . . . . . . . . . . . . . . . 13
3.0 CONNECTIONS AND CONFIGURATION
3.1 Connecting Leak Detection Cable Inputs . . . . . . . . . . . . . . . . . . . . . . . . . . . . . . . . . . . . . . . . 153.1.1 Attaching Leak Detection Connection Cable to the Panel . . . . . . . . . . . . . . . . . . . . . . . . . . . . 153.1.2 Connecting Leak Detection Cable to the Connection Cable. . . . . . . . . . . . . . . . . . . . . . . . . . . 16
3.2 Connecting Alarm Outputs . . . . . . . . . . . . . . . . . . . . . . . . . . . . . . . . . . . . . . . . . . . . . . . . . . . 183.3 Connecting to a Building Maintenance System or External Alarm System. . . . . . . . . . . . . 183.4 RS422 Liebert SiteScan® Web Connector . . . . . . . . . . . . . . . . . . . . . . . . . . . . . . . . . . . . . . . . 193.5 Disable the Audible Horn. . . . . . . . . . . . . . . . . . . . . . . . . . . . . . . . . . . . . . . . . . . . . . . . . . . . . 19
4.0 OVERVIEW OF MENUS
4.1 View Status Overview . . . . . . . . . . . . . . . . . . . . . . . . . . . . . . . . . . . . . . . . . . . . . . . . . . . . . . . 204.2 System and Control Overview . . . . . . . . . . . . . . . . . . . . . . . . . . . . . . . . . . . . . . . . . . . . . . . . . 20
5.0 VIEW STATUS OPTIONS
5.1 View Cable Status . . . . . . . . . . . . . . . . . . . . . . . . . . . . . . . . . . . . . . . . . . . . . . . . . . . . . . . . . . 225.1.1 Cable Status Screens . . . . . . . . . . . . . . . . . . . . . . . . . . . . . . . . . . . . . . . . . . . . . . . . . . . . . . . . . 22
5.2 View Alarm History . . . . . . . . . . . . . . . . . . . . . . . . . . . . . . . . . . . . . . . . . . . . . . . . . . . . . . . . . 235.2.1 Alarm History Log . . . . . . . . . . . . . . . . . . . . . . . . . . . . . . . . . . . . . . . . . . . . . . . . . . . . . . . . . . . 23
5.3 View Zone Trend. . . . . . . . . . . . . . . . . . . . . . . . . . . . . . . . . . . . . . . . . . . . . . . . . . . . . . . . . . . . 245.3.1 Zone Trend Log . . . . . . . . . . . . . . . . . . . . . . . . . . . . . . . . . . . . . . . . . . . . . . . . . . . . . . . . . . . . . . 24
6.0 SYSTEM AND CONTROL OPTIONS
6.1 Login . . . . . . . . . . . . . . . . . . . . . . . . . . . . . . . . . . . . . . . . . . . . . . . . . . . . . . . . . . . . . . . . . . . . . 256.2 Setup System - Overview . . . . . . . . . . . . . . . . . . . . . . . . . . . . . . . . . . . . . . . . . . . . . . . . . . . . . 276.3 Setup System - Setup ZN1 Zone 1 . . . . . . . . . . . . . . . . . . . . . . . . . . . . . . . . . . . . . . . . . . . . . . 27
6.3.1 Identify the Zone as Connected . . . . . . . . . . . . . . . . . . . . . . . . . . . . . . . . . . . . . . . . . . . . . . . . . 286.3.2 Change Zone Label . . . . . . . . . . . . . . . . . . . . . . . . . . . . . . . . . . . . . . . . . . . . . . . . . . . . . . . . . . . 286.3.3 Change Units Label . . . . . . . . . . . . . . . . . . . . . . . . . . . . . . . . . . . . . . . . . . . . . . . . . . . . . . . . . . 286.3.4 Auto Calibration . . . . . . . . . . . . . . . . . . . . . . . . . . . . . . . . . . . . . . . . . . . . . . . . . . . . . . . . . . . . . 296.3.5 Set Up Sensitivity for Water Detection. . . . . . . . . . . . . . . . . . . . . . . . . . . . . . . . . . . . . . . . . . . 296.3.6 Set Up Sensitivity for Contamination Detection . . . . . . . . . . . . . . . . . . . . . . . . . . . . . . . . . . . 30
6.4 Setup System - Setup ZN2 Zone 2 . . . . . . . . . . . . . . . . . . . . . . . . . . . . . . . . . . . . . . . . . . . . . . 30

ii
6.5 Setup System - Setup Alarm Outputs. . . . . . . . . . . . . . . . . . . . . . . . . . . . . . . . . . . . . . . . . . . 316.5.1 Specify Longest Cable Length . . . . . . . . . . . . . . . . . . . . . . . . . . . . . . . . . . . . . . . . . . . . . . . . . . 326.5.2 Define Relays as Normally Open or Normally Closed . . . . . . . . . . . . . . . . . . . . . . . . . . . . . . . 326.5.3 Define Alarms as Latched or Unlatched . . . . . . . . . . . . . . . . . . . . . . . . . . . . . . . . . . . . . . . . . . 32
6.6 Setup System - Setup Re-Alarm Delay . . . . . . . . . . . . . . . . . . . . . . . . . . . . . . . . . . . . . . . . . . 336.7 Setup System - Setup Mapmode . . . . . . . . . . . . . . . . . . . . . . . . . . . . . . . . . . . . . . . . . . . . . . . 34
6.7.1 View Last Map . . . . . . . . . . . . . . . . . . . . . . . . . . . . . . . . . . . . . . . . . . . . . . . . . . . . . . . . . . . . . . 356.8 Setup System - Setup System Info . . . . . . . . . . . . . . . . . . . . . . . . . . . . . . . . . . . . . . . . . . . . . 36
6.8.1 Change Password . . . . . . . . . . . . . . . . . . . . . . . . . . . . . . . . . . . . . . . . . . . . . . . . . . . . . . . . . . . 366.8.2 Change Date & Time/Automatic Daylight Saving Time . . . . . . . . . . . . . . . . . . . . . . . . . . . . . 376.8.3 Factory Defaults . . . . . . . . . . . . . . . . . . . . . . . . . . . . . . . . . . . . . . . . . . . . . . . . . . . . . . . . . . . . 37
6.9 Reset Latched Alarms . . . . . . . . . . . . . . . . . . . . . . . . . . . . . . . . . . . . . . . . . . . . . . . . . . . . . . . 386.10 Clear Alarm History. . . . . . . . . . . . . . . . . . . . . . . . . . . . . . . . . . . . . . . . . . . . . . . . . . . . . . . . . 396.11 Clear Zone Trend . . . . . . . . . . . . . . . . . . . . . . . . . . . . . . . . . . . . . . . . . . . . . . . . . . . . . . . . . . . 40
7.0 SPECIFICATIONS
FIGURESFigure 1 Small enclosure—external features . . . . . . . . . . . . . . . . . . . . . . . . . . . . . . . . . . . . . . . . . . . . . . . . . . 2Figure 2 Large enclosure—internal features . . . . . . . . . . . . . . . . . . . . . . . . . . . . . . . . . . . . . . . . . . . . . . . . . . 2Figure 3 Example of typical sequence: Analog input reaches high setpoint . . . . . . . . . . . . . . . . . . . . . . . . . 3Figure 4 Mounting dimensions . . . . . . . . . . . . . . . . . . . . . . . . . . . . . . . . . . . . . . . . . . . . . . . . . . . . . . . . . . . . 10Figure 5 Electrical connections to panel . . . . . . . . . . . . . . . . . . . . . . . . . . . . . . . . . . . . . . . . . . . . . . . . . . . . . 12Figure 6 Power wiring to TM115 . . . . . . . . . . . . . . . . . . . . . . . . . . . . . . . . . . . . . . . . . . . . . . . . . . . . . . . . . . 13Figure 7 Power wiring to TM230 . . . . . . . . . . . . . . . . . . . . . . . . . . . . . . . . . . . . . . . . . . . . . . . . . . . . . . . . . . 13Figure 8 Fittings on leak detection cable (LT500Y) and connection cable (CONNECT10) . . . . . . . . . . . . . 16Figure 9 Typical leak detection cable layout . . . . . . . . . . . . . . . . . . . . . . . . . . . . . . . . . . . . . . . . . . . . . . . . . 16Figure 10 Installation of hold-down clips in pairs . . . . . . . . . . . . . . . . . . . . . . . . . . . . . . . . . . . . . . . . . . . . . . 17Figure 11 Cable laid in straight patterns . . . . . . . . . . . . . . . . . . . . . . . . . . . . . . . . . . . . . . . . . . . . . . . . . . . . . 17Figure 12 Cable laid in circular patterns . . . . . . . . . . . . . . . . . . . . . . . . . . . . . . . . . . . . . . . . . . . . . . . . . . . . . 17Figure 13 90° turn in cable . . . . . . . . . . . . . . . . . . . . . . . . . . . . . . . . . . . . . . . . . . . . . . . . . . . . . . . . . . . . . . . . 17Figure 14 Menu overview . . . . . . . . . . . . . . . . . . . . . . . . . . . . . . . . . . . . . . . . . . . . . . . . . . . . . . . . . . . . . . . . . 20Figure 15 Menu overview - View Status menu . . . . . . . . . . . . . . . . . . . . . . . . . . . . . . . . . . . . . . . . . . . . . . . . 21Figure 16 Menu overview - System and Control menu . . . . . . . . . . . . . . . . . . . . . . . . . . . . . . . . . . . . . . . . . . 26
TABLESTable 1 Controller board components . . . . . . . . . . . . . . . . . . . . . . . . . . . . . . . . . . . . . . . . . . . . . . . . . . . . . . . 5Table 2 LED indicators summary . . . . . . . . . . . . . . . . . . . . . . . . . . . . . . . . . . . . . . . . . . . . . . . . . . . . . . . . . . 7Table 3 Packing manifest. . . . . . . . . . . . . . . . . . . . . . . . . . . . . . . . . . . . . . . . . . . . . . . . . . . . . . . . . . . . . . . . . 8Table 4 Wiring specifications. . . . . . . . . . . . . . . . . . . . . . . . . . . . . . . . . . . . . . . . . . . . . . . . . . . . . . . . . . . . . 14Table 5 Overall cable conditions . . . . . . . . . . . . . . . . . . . . . . . . . . . . . . . . . . . . . . . . . . . . . . . . . . . . . . . . . . 22Table 6 Alarm History Log conditions . . . . . . . . . . . . . . . . . . . . . . . . . . . . . . . . . . . . . . . . . . . . . . . . . . . . . 23Table 7 Valid characters for data entry . . . . . . . . . . . . . . . . . . . . . . . . . . . . . . . . . . . . . . . . . . . . . . . . . . . . 25Table 8 Default settings - Zone 1. . . . . . . . . . . . . . . . . . . . . . . . . . . . . . . . . . . . . . . . . . . . . . . . . . . . . . . . . . 27Table 9 Default settings - alarm outputs . . . . . . . . . . . . . . . . . . . . . . . . . . . . . . . . . . . . . . . . . . . . . . . . . . . 31Table 10 Operation of 4-20mA outputs . . . . . . . . . . . . . . . . . . . . . . . . . . . . . . . . . . . . . . . . . . . . . . . . . . . . . . 32Table 11 Default mapping values . . . . . . . . . . . . . . . . . . . . . . . . . . . . . . . . . . . . . . . . . . . . . . . . . . . . . . . . . . 34Table 12 Factory default settings . . . . . . . . . . . . . . . . . . . . . . . . . . . . . . . . . . . . . . . . . . . . . . . . . . . . . . . . . . 37Table 13 Liebert Liqui-tect Panel specifications . . . . . . . . . . . . . . . . . . . . . . . . . . . . . . . . . . . . . . . . . . . . . . 41

Introduction
1 Liebert® Liqui-tect®
1.0 INTRODUCTION
The Liebert Liqui-tect Monitoring System is the ultimate in leak detection and retrofitting capabilities for computer rooms and other large areas. The Liqui-tect Monitoring System provides direct-read at the control unit location, as well as the ability to communicate with the Liebert SiteScan Web enterprise monitoring system or a building management system.
The Liebert Liqui-tect Monitoring System features an easy-to-use liquid crystal display (LCD) panel with readout of normal and alarm conditions, as well as leak location. Display and measurement modules are contained in a single compact package.
The Liebert Liqui-tect Monitoring System can monitor up to 10,000 ft. (3048m) of Liebert LT500Y leak detection cable. Points along the cable may be mapped by one person, making it easy to configure within the critical space and pinpoint the location of leaks when they occur. The system determines the location of the water on the detection cable and reports the distance from the Liqui-tect panel in feet or meters. To ensure proper protection, the system continuously monitors operation, signaling system normal, leak detected and cable fault.
The Liebert Liqui-tect panel offers these and other features to protect your installation from leak damage:
• audible and visual alarms• adjustable sensitivity setpoints for leaks and contamination• continuous scrolling of data• history logs• connection to a building management system• automatic detection of broken cables and contaminated cables• password protection• retention of configuration after a power failure
Two interfaces permit easy access and configuration of the Liqui-tect panel:
• LCD on the front of the enclosure• Liebert’s SiteScan® Web enterprise monitoring system through a dedicated connection port
1.1 Equipment Inspection
Upon arrival of the unit, inspect all items for visible and concealed damage. Damage should be immediately reported to the carrier and a damage claim filed with a copy sent to Emerson Network Power® or to your sales representative.

Introduction
Liebert® Liqui-tect® 2
1.2 Outside Enclosure Overview
The enclosure for the Liebert Liqui-tect panel’s controller board comes in two sizes:
• The large enclosure is designed to accommodate the Transformer Module and future components, in addition to the controller board.
• The small enclosure is built to hold the controller board only.
Both enclosures are 2-3/4" deep.
Both enclosures have a built-in liquid crystal display (LCD) and a key lock, as shown in the example below. The metal enclosures accommodate secure conduit fittings and protect components against external forces and debris.
Figure 1 Small enclosure—external features
The enclosure must be secured to a wall, either flush-mounted or recessed in the wall, as described in 2.0 - Installation. Knockouts and access slots on the top and bottom allow easy connection of wires and cables (see 3.0 - Connections and Configuration) with either mounting type.
Figure 2 Large enclosure—internal features
LIQUI-TECT PANEL05-SEP-02 14:04:13
V5.100.0PRESS =STATUS/SETUP
ESC
Liqui-tectLiqui-tectMonitoring SystemMonitoring System
R
LCD for configuration and operation
Key lock
The enclosure has knockouts and access slots on top and bottom for cables and wires.
ON
R16
R17
R18
R15
DS3
DS4
K1
K2
K4
K5
TX RX
1
SW2
SW1
R4
O N
2 3 4 5 6 7 81
O N
2
R1
R40
R44 DS
7
DS8
R38
C26 C27
C40
C33
U15
U23C32
U22
C46
U29
U24
U24
U16
DS1
Pwr On 3 4 5 6 7 8
Faul
tLE
DO
DS6
Rese
t
Back of LCD
Transformer Module
Controller Board
Ground wire for LCD
On/Off switchfor Transformer Module
Knockouts and access slots(top and bottom)Power
receptacle

Introduction
3 Liebert® Liqui-tect®
1.3 Typical Sequence
Figure 3 shows a typical sequence of how the Liebert Liqui-tect Monitoring System functions after detecting a leak, contamination or cable break in either Zone 1 or Zone 2. Responses depend on configuration settings. This example shows what happens when a leak is detected.
Figure 3 Example of typical sequence: Analog input reaches high setpoint
LIQUI-TECT PANEL05-SEP-02 14:04:13
V5.100.0PRESS =STATUS/SETUP
ESCESC
Entry in Alarm History Log(if alarms defined as Latched)
ZONE 1LEAK @ 3495ft
29-AUG-03 09:29:10
Entry in Alarm History Log
The alarm is cleared(automatically if Unlatched; must be cleared manually if Latched)
The LCD stops flashing
RETURN TO NORMALThe leak is controlled.
The horn sounds (audible horn on the controller board—silence horn by pressing any key on the LCD keypad)
The LCD flashes
ALARM CONDITION DETECTEDA leak is sensed along the cable defining Zone 1.
RESPONSES TO AN ALARM RETURN-TO-NORMAL SEQUENCE
Entry in Zone Trend Log(if alarms defined as Unlatched)
The horn stops sounding(if user hasn’t silenced it)
ZONE 1ALARM RESET - LCD
29-AUG-03 09:42:11
ZONE 1NO LEAK
29-AUG-03 09:42:11
LIQUI-TECT PANEL05-SEP-02 14:04:13
V5.100.0PRESS =STATUS/SETUP
ESCESC

Introduction
Liebert® Liqui-tect® 4
1.4 Controller Board Overview
The Liebert Liqui-tect panel’s controller board, as shown below, has connectors for two digital outputs for leak detection alarms, two digital outputs for cable break alarms, two inputs for leak detection cables and two analog outputs for connecting to a building management system. The board comes complete with light-emitting diodes (LEDs) to display the status of monitored zones, power connections and other features necessary to monitor and protect your operation.
ON
TB3C28
R16
R17
R18
DS3
DS4
DS5
K1
K2
K4
K5
TX RX
A
1
SW2
SW1
R4
O N
2 3 4 5 6 7 81
O N
2
R1
R40
R44 DS
7
DS8
R38
C26 C27
C40
C33
U15
U23C32
U22
C46
U29
U24
U24
U16
DS1
Pwr On
24V PowLC
D In
terlf
ace
3 4 5 6 7 8
Faul
tLE
DO
DS6
Rese
t
A-Power On/Off LED
B-DIP switch 1
C-DIP switch 2
D-Audible horn
E-Digital alarmoutputs (Zone 1)
F-Alarm output LEDs (Zones 1&2)
G-Digital alarmoutputs (Zone 2)
H-Status LEDs
M-RS232 LEDs
I-4/20mA output(Zone 2)
J-4/20mA output(Zone 1)
K-Input cable connector (Zone 2)
L-Input cable connector (Zone 1)
N-RS232connector
O-Liebert SiteScan® Web connector
P-Liebert SiteScan Web LEDs
Q-RS485 LEDs
R-RS485 connector(not used)
V-LCDconnector
W-LCD contrast adjustment
X-Reset switch
Y-24VAC power connector
Z-Transformer Module
S-Power receptacle
T-Power On/Off switch
U-24VAC connector

Introduction
5 Liebert® Liqui-tect®
Table 1 Controller board components
Item Description More Information
A-Power On/Off LED Indicates when power is supplied to the panel.2.4: Connect Power to the Liebert Liqui-
tect Panel1.5: LED Indicators
B-DIP switch 1 DIP switch used for resetting password to default and disabling the audible alarm.
3.5: Disable the Audible Horn6.8.1: Change Password
C-DIP switch 2 Not used. N/A
D-Audible horn Provides audible notification when an alarm occurs. 3.5: Disable the Audible Horn
E-Digital alarm outputs (Zone 1)
andG-Digital alarm outputs (Zone 2)
The Cable Break output connection is a two-state point (ON/OFF, energized/de-energized). When the cable is broken or becomes contaminated, an alarm is created and the contact is energized.The Leak Detected output connection is a two-state point (ON/OFF, energized/de-energized). When water is detected, an alarm is created and the contact is energized.Each output can be used to connect to a secondary warning device such as a horn, light or building management system.
3.0: Connections and Configuration3.2: Connecting Alarm Outputs5.1: View Cable Status6.5: Setup System - Setup Alarm Outputs
F-Alarm output LEDs (Zones 1&2) Indicates the status of the alarm outputs. 1.5: LED Indicators
G-Digital alarm outputs (Zone 2)
(See description and references for E-Digital alarm outputs (Zone 1) above)
H-Status LEDs Indicates the operational status of the panel. 1.5: LED Indicators
I-4/20mA output (Zone 2)
Provides the distance liquid is detected, normal status and cable fault. Used to provide status to a building management system or remote monitoring system.
3.0: Connections and Configuration3.3: Connecting to a Building Maintenance
System or External Alarm System5.1: View Cable Status6.5: Setup System - Setup Alarm Outputs
J-4/20mA output (Zone 1)
Provides the distance liquid is detected, normal status and cable fault. Used to provide status to a building management system or remote monitoring system.
3.0: Connections and Configuration3.3: Connecting to a Building Maintenance
System or External Alarm System5.1: View Cable Status6.5: Setup System - Setup Alarm Outputs
K-Input cable connector (Zone 2) Connection to Liebert leak detection cable.
3.0: Connections and Configuration3.1: Connecting Leak Detection Cable
Inputs5.1: View Cable Status6.4: Setup System - Setup ZN2 Zone 2
L-Input cable connector (Zone 1) Connection to Liebert leak detection cable.
3.0: Connections and Configuration3.1: Connecting Leak Detection Cable
Inputs5.1: View Cable Status6.3: Setup System - Setup ZN1 Zone 1
M-RS232 LEDs Indicates the connection status between the Liebert Liqui-tect panel and an RS232 device.
1.5: LED Indicators
N-RS232 connectorConnection for a laptop. Used by factory personnel. Requires a null modem cable for connectivity(P/N 201258P1).
N/A
O-Liebert SiteScan® Web connector
Connection to monitor the Liebert Liqui-tect panel from Liebert’s SiteScan® Web enterprise monitoring system.
3.0: Connections and Configuration3.4: RS422 Liebert SiteScan® Web
Connector
P-Liebert SiteScan Web LEDs
Indicates the connection status between the Liebert Liqui-tect panel and Liebert SiteScan Web. 1.5: LED Indicators
Q-RS485 LEDs Not presently used. N/A
R-RS485 connector Not presently used. N/A

Introduction
Liebert® Liqui-tect® 6
S-Power receptacle (Transformer Module)
115VAC power receptacle to power laptop during configuration and diagnostics. Receptacle not available on 230VAC Transformer Module.
2.4.2: Input and Output Power Connections - Large Enclosure
3.0: Connections and Configuration
T-Power On/Off switch (Transformer Module)
Power switch to turn power On/Off to both Transformer Module 24VAC connectors and power receptacle.
2.4.2: Input and Output Power Connections - Large Enclosure
3.0: Connections and Configuration
U-24VAC connector (Transformer Module)
One of the two 24VAC connectors for power (the second is also on the right side of the Transformer Module near the top). Each connector is rated for 40VA.
2.4.2: Input and Output Power Connections - Large Enclosure
3.0: Connections and Configuration
V-LCD connector Connection for the LCD located on the front door. N/A
W-LCD contrast adjustment
Adjustment contrast for the LCD located on the front door.
N/A
X-Reset switchReset switch to reset the panel. Same as re-powering the panel. N/A
Y-24VAC power connector
Power connection for the controller. Requires 24VAC.
2.4: Connect Power to the Liebert Liqui-tect Panel
Z-Transformer Module
Transformer Module used to convert 115VAC or 230VAC to 24VAC. Available only in the large enclosure.
2.4.2: Input and Output Power Connections - Large Enclosure
Table 1 Controller board components (continued)Item Description More Information

Introduction
7 Liebert® Liqui-tect®
1.5 LED IndicatorsThe Liebert Liqui-tect panel’s controller board has LED indicators that show the status of inputs, outputs and other board components.
Table 2 LED indicators summary
LED Color Description
Power On/Off LED
Pwr On Green Indicates whether power is connected
Zone 1 & 2 Alarm Outputs LEDs
K1 – Zone 1 Leak Detected Green Indicates leak detected for Zone 1
K2 – Zone 1 Cable Break Green Indicates cable problem for Zone 1
K3 – Zone 2 Leak Detected Green Indicates leak detected for Zone 2
K4 – Zone 2 Cable Break Green Indicates cable problem for Zone 2
Status LEDs
LEDO Green Indicates the panel is working properly – will flash slowly when working
Fault Red Indicates an alarm is present
Reset Red Indicates the panel is being reset
RS232 LEDs
RS232 TX Green Liebert Liqui-tect panel is transmitting information via the RS232 port
RS232 RX Green Liebert Liqui-tect panel is receiving information via the RS232 port
RS422 LEDs
RS422 TX Green Liebert Liqui-tect panel is transmitting information over the RS422 port
RS422 RX Green Liebert Liqui-tect panel is receiving information over the RS422 port
RS485 LEDs
RS485 TX Green Not presently used
RS485 RS Green Not presently used
ON
TB3C28
R16
R17
R18
DS3
DS4
DS5
K1
K2
K4
K5
TX RX
A
1
SW2
SW1
R4
O N
2 3 4 5 6 7 81
O N
2
R1
R40
R44 DS
7
DS8
R38
C26 C27
C40
C33
U15
U23C32
U22
C46
U29
U24
U24
U16
DS1
Pwr On
24V Pow
LCD
Inte
rlfac
e
3 4 5 6 7 8
Faul
tLE
DO
DS6
Rese
t
TB2
R16
R17
R18
R15
DS3
DS4
DS5
DS2
K1
K2
K3
K4
R40
R44 DS
7
DS8
R38
Faul
tLE
DO
DS6
Rese
t
R82
R81
DS13
DS14
RX TX
DS9
R77
R80
DS11R79
DS10
R78
DS12
TX RXRX TX
Power On/Off LED
Alarm output LEDs (Zones 1&2)
Status LEDs
RS232 LEDsSiteScan Web RS422 LEDsRS485 LEDs

Installation
Liebert® Liqui-tect® 8
2.0 INSTALLATION
2.1 Installation Considerations
The Liebert Liqui-tect panel must be installed indoors and may be mounted on the surface of a wall or flush-mounted, depending on the user’s application and the type of wall the unit will be mounted on. The unit’s location must meet the following criteria:
• The panel must be placed close enough to the areas to be monitored to permit proper connection of the leak detection cable. The panel will monitor two zones; each zone can accommodate up to 5,000 ft. (1524m) of leak detection cable.
• The Liebert Liqui-tect panel should be mounted where it can be easily accessed. Personnel would access the unit through the LCD on its front cover or through Liebert SiteScan®.
• The site also must have electrical service and must permit connection of the panel’s four digital outputs, two inputs for leak detection cables and two analog outputs for connecting to a building management system or external alarm.
• The wall material must be capable of supporting the weight of the Liebert Liqui-tect panel: see 7.0 - Specifications.
2.1.1 Unpacking and Preliminary Inspection• Before unpacking the Liebert Liqui-tect panel, inspect the shipping carton for damage or signs of
mishandling, such as gashes or holes in the carton or severely flattened corners.• Open the shipping container carefully. Use care to avoid puncturing the container with sharp
objects that might damage the contents.• Inspect the Liebert Liqui-tect panel and all included components for damage.• If any damage from shipping or mishandling is observed, immediately file a damage claim with
the shipping agency and forward a copy to:Liebert Corporation1050 Dearborn DriveP.O. Box 29186Columbus, OH 43229
Packing Contents
NOTEThis equipment has been tested and found to comply with the limits for a Class A digital device, pursuant to part 15 of the FCC rules. These limits are designed to provide reasonable protection against harmful interference when the equipment is operated in a commercial environment. This equipment generates, uses, and can radiate radio frequency energy and, if not installed and used in accordance with the instruction manual, may cause harmful interference to radio communications. Operation of this equipment in a residential area is likely to cause harmful interference in which case the user will be required to correct the interference at his own expense.
Table 3 Packing manifest
Standard Components
Liebert Liqui-tect panel - large or small enclosure
User Manual
Keys (2) to panel door lock
Connection cables (2) (CONNECT10)
End terminators (2) (LT500-ET)

Installation
9 Liebert® Liqui-tect®
2.2 Surface-Mounting the Liebert Liqui-tect Panel
After determining where to place the unit, check to ensure that you have all the hardware required to install the panel on the surface of a wall. Obtain the needed tools and material.
Required tools• Electric drill (if surface is too hard to drive screws without pilot holes)• Screwdriver• Marker to denote layout of holes• Four screws, each #10
2.2.1 Mounting the Panel
NOTICERisk of improper installation. Can cause property damage.Check building plans and other relevant documents to determine whether mounting the Liebert Liqui-tect panel at the selected location might cause cutting or otherwise damaging electrical or communication wiring or pipes.
1. Mark the wall for mounting holes, using the back of the unit as a template (see Figure 4).2. Drill holes, if required, to install the four #10 screws that will secure the Liebert Liqui-tect panel
to the wall. Clean up the debris.3. If the wall material is not strong enough to hold the screws securely, use wall anchors.4. Install the top two screws—the screw heads must be small enough to slip through the larger,
bottom portion of the pear-shaped mounting slot in the Liebert Liqui-tect panel (see inset in illustration at right). The screws must also be large enough to extend over the edges of the top of the mounting slot.
5. Hang the Liebert Liqui-tect panel on the screws, letting the panel slip down until the screws are in the smaller, upper portion of the slot.
6. Tighten the screws until they are snug.7. Insert the remaining two screws in the bottom holes on the back of the panel and tighten.
NOTERemoving the conduit knockouts before mounting the Liebert Liqui-tect panel on the wall will ease installation and prevent strain on the mounting hardware and wall. It is imperative to remove the knockouts if the unit is to be flush-mounted.

Installation
Liebert® Liqui-tect® 10
Figure 4 Mounting dimensions
2.3 Flush-Mounting the Liebert Liqui-tect Panel
The Liebert Liqui-tect panel may be flush mounted according to company practices—either with screws through the sides of the panel into wall supports or with hanging hardware that attaches to the back of the panel. After determining how and where to place the unit, check to ensure that you have all the hardware required to install the panel in the wall. Obtain the needed tools.
Required tools• Saw• Electric drill• Screwdriver• Marker to denote layout of the hole to accommodate the Liebert Liqui-tect panel• Trim ring and associated hardware• Mounting hardware
NOTERemoving the conduit knockouts before mounting the Liebert Liqui-tect panel on the wall will ease installation and prevent strain on the mounting hardware and wall. It is imperative to remove the knockouts if the unit is to be flush-mounted.
The rectangular access doors on the top and bottom of the Liebert Liqui-tect panel must be removed from the outside of the panel and reinstalled on the inside of the panel. Leaving the doors as shipped from the factory prevents them from being opened when the panel is flush mounted in a wall.
SMALL ENCLOSURE
0.213"(5.4mm)
Mounting Slot
0.375"(9.6mm)
Liebert Liqui-tect panelback plate
12.5"(317.5mm)
0.213" (5.4mm)Bottom hole diameter
10"(254mm)
LARGE ENCLOSURE
0.213"(5.4mm)
Mounting Slot
0.375"(9.6mm)
Liebert Liqui-tect panelback plate
12"(304.8mm)
16"(406.4mm)
0.213" (5.4mm)Bottom hole diameter

Installation
11 Liebert® Liqui-tect®
2.3.1 Mounting the Panel
NOTICERisk of improper installation. Can cause property damage.Check building plans and other relevant documents to determine whether mounting the Liebert Liqui-tect panel at the selected location might cause cutting or otherwise damaging electrical or communication wiring or pipes.
1. Mark the wall for the cutout to accommodate the panel, using the back of the unit as a template.2. Drill a pilot hole for the saw blade, if required.3. Use the saw to cut out the marked section of the wall (if not new construction).4. Rest the Liebert Liqui-tect panel in the wall and mark where mounting screws will be inserted
into the wall studs or other support member.5. Remove the panel and drill the holes for the mounting screws or wall anchors. Clean up the
debris.6. Reverse the slide direction of the rectangular access doors on the top and bottom of the Liebert
Liqui-tect panel. Leaving the access doors as shipped from the factory prevents them from being opened when the panel is flush mounted in a wall.
7. Attach any field-supplied mounting hardware.8. Reinsert the assembly into the wall.9. Insert and tighten the screws or wall anchors.

Installation
Liebert® Liqui-tect® 12
2.4 Connect Power to the Liebert Liqui-tect Panel
The Liebert Liqui-tect panel requires 24VAC for proper operation. Liebert recommends using the optional Transformer Module manufactured by Liebert or another UL-approved Class 2 power unit to obtain proper voltage. If the power unit is not a Class 2 circuit, it must be protected with an IEC 5 x 20mm time lag 2A fuse. For information, consult your local dealer, Emerson representative or the Liebert Worldwide Support Group.
2.4.1 Input Power Connections - Small Enclosure
To connect electrical power:
1. Run conduit and electrical wiring from building to the Liebert Liqui-tect panel.2. Use copper wires only; proper wiring to use for 24VAC power is 18-22 AWG stranded and shielded
(18 AWG is recommended—see Table 4). Strip wires 1/2".
Figure 5 Electrical connections to panel
3. Secure the incoming electrical service wires to the Liebert Liqui-tect panel’s 24VAC input by sliding the wires into TB1, the 24VAC input terminal block. There is no polarity requirement when connecting to TB1. The ground wire must be connected to the earth ground terminal located on the side of the panel (see Figure 5).
!WARNINGCheck that power is removed from wires prior to installation.
!CAUTIONThe Liebert Liqui-tect panel is designed for use on properly grounded (earthed) 24VAC power, 50Hz or 60Hz. The ground wire for the power lead must be wired to the earth ground terminal (stud located next to the 24VAC terminal block).
This equipment is intended to be installed by a qualified and certified electrician who must review and approve customer supplied wiring and circuit breakers, verify correct input and grounded (earthed) connections to ensure compliance with technical standards and national and local electrical codes.
!WARNINGBe sure that the power wiring is disconnected from the Liebert Liqui-tect panel before connecting any wiring to this unit.
SW3EGND1
TVS3
TB1
FB2
R4
24V Power
Reset
24VAC input connector
24VAC wiring (red & white)
External wiring through knockout
Earth ground terminal
Ground wire (black)

Installation
13 Liebert® Liqui-tect®
2.4.2 Input and Output Power Connections - Large Enclosure
Input Power ConnectionsTo connect electrical power to the Transformer Module:
1. Install electrical wiring from utility power to the Transformer Module.2. Use copper wires only; proper wiring to use for power is 14/2 AWG copper wire with ground.3. For the TM230 only: strip wires 3/8" (9.6mm).
Note: For the TM115, wires are pre-stripped 0.4" (10.2mm) at the factory.4. Connect the wiring as follows:
5. Secure the incoming electrical service wires to the TM115 input wires with wire nuts as shown in Figure 6 or to the TM230 connectors as shown in Figure 7.
24 VAC Output Power ConnectionsTo connect to the 24VAC outputs:
1. Install electrical wiring from device requiring 24VAC power to the Transformer Module.2. Use copper wire only; proper wiring to use for power is 18, 20 or 22 AWG copper wire. Strip wire 1/4".3. There are two 24 VAC output connectors (TB1 and TB2). Terminate wires to the connector as
shown in Figures 6 and 7. TB1 and TB2 are NOT polarity sensitive.4. Secure the wires to the connector.
Troubleshooting - Transformer Module
A common problem and possible solution are shown in the table below. For further information or if you have other problems with the unit, consult your local dealer, Liebert representative or the Liebert Worldwide Support Group.
!CAUTIONThe 115VAC/230VAC Transformer Module must be connected to a branch circuit with 15A branch circuit protection.This equipment is intended to be installed by a qualified and certified electrician who must review and approve customer supplied wiring and circuit breakers, verify correct input and grounded connections to ensure compliance with the technical standards and national and local electrical codes.The Transformer Module shall be used only as indicated by the manufacturer.
!WARNINGBe sure that the power wiring is disconnected from the Liebert Liqui-tect panel before installing any wiring to this unit.
TM115 TM230 Connection Type
White wire Neutral (L2) NeutralBlack wire Line (L1) Power (Line)Green wire Ground lead Ground
Figure 6 Power wiring to TM115 Figure 7 Power wiring to TM230
Problem Possible Solution Replacement Fuse Part Numbers
24VAC power not availablefrom TB1 or TB2
Check fuse for respectiveoutput (TB1 or TB2).
• LITTLEFUSE 218002• BUSSMANN GDC-2A
Wire nuts connecting electrical wiring
24VAC output (TB1)
Ground
Knockout for external wiring
TM115
Neutral (L2)
24VAC output (TB1)
Ground
Knockout for external wiring
TM230
Line (L1)

Connections and Configuration
Liebert® Liqui-tect® 14
3.0 CONNECTIONS AND CONFIGURATION
Input and output connections to the Liebert® Liqui-tect® panel may be made in any order—it is not necessary, for example, to make all input connections before making any output connections. Use copper conductors only for all wiring.
!CAUTIONBe sure that the power wiring is disconnected from the Liebert Liqui-tect panel before connecting any wiring to this unit or changing input or output connections.
Table 4 Wiring specifications
Connection Supported Wire Type Maximum Wire Length Rating
CableInput
4-wire Liebert Connection Cable (CONNECT10) - furnished with Liebert Liqui-tect panel
Connection cable - 10 ft. (3m)Leak detection cable - 5000 ft. (1524m) N/A
AlarmOutput
18-22 AWG Stranded & Unshielded18 AWG* (recommended)Non Plenum - Belden 9740Plenum - Belden 89740
18 AWG* @ 1A 200 ft. (60m)
24VAC @ 1A20 AWG @ 1A 100 ft. (30m)
22 AWG @ 1A 75 ft. (23m)
Analog Output
18-22 AWG Stranded & Unshielded18 AWG* (recommended)Non Plenum - Belden 9740Plenum - Belden 89740
750 ft. (225m)4-20mA Signal Output
CommunicationRS232 Null Modem Cable 50 ft. (15m) N/A
CommunicationIGM422Liebert®
SiteScan®
18-22 AWG Stranded & Shielded22 AWG* (recommended)Non Plenum - Belden 9461Plenum - Belden 88761
1000 ft. (300m) N/A
24VAC PowerConnection
(TB7)
18-22 AWG Stranded & Unshielded18 AWG* (recommended)Non Plenum - Belden 8770Plenum - Belden 88770
150 ft. (45m) 24VAC @ 1A
* Recommended

Connections and Configuration
15 Liebert® Liqui-tect®
3.1 Connecting Leak Detection Cable Inputs
The leak detection cable inputs are found on the lower right side of the Liebert Liqui-tect panel’s printed wiring assembly board. There are two terminal blocks for the inputs; the lower terminal block is for the Zone 1 cable and the terminal block above it is for a second leak detection cable, Zone 2.
To determine the proper wire size, see Table 4 - Wiring specifications.
3.1.1 Attaching Leak Detection Connection Cable to the Panel
To attach a leak detection connection cable:
1. Disconnect electrical power to the Liebert Liqui-tect panel.
2. Locate the Zone 1 and Zone 2 cable connectors on the controller board. They can be found on the lower right corner of the board (see 1.4 - Controller Board Overview). The Zone 1 connector is Cable 1 or TB9. The Zone 2 connector (Cable 2 or TB6) is just above it.
3. If necessary, remove a conduit knockout to permit wire entry into the Liebert Liqui-tect panel enclosure.
4. Bring the white connection cable (CONNECT10) into the Liebert Liqui-tect panel enclosure through a conduit knockout or access slot.
5. Loosen a screw on the terminal block and slip the stripped end of the appropriate wire into the terminal block according to the color-coded wiring key (see illustration at right).Note that the WHITE wire connects to the “Y” slot. The red wire connects to the “R” slot, the green wire connects to the “G” slot and the black wire to the “B” slot.
6. Tighten the screw until it holds the wire snugly.7. Repeat for each of the four wire strands in the connection cable.
NOTEEach terminal block is a removable, two-part assembly to permit easier connection of more than one input at a time. If making multiple connections, grasp the upper portion of a block and pull firmly to the right until the assembly pulls apart.
After making the connections, push the removed piece back into the portion attached to the printed wiring assembly until the terminal block pieces lock together.
TB9
Cable 1
YBGR
YBGR
TB6
X6
Leak Detection Cable Terminal Blocks:
Zone 2
Zone 1
WIRINGCONNECTIONS
Black Wire
Red Wire
Green Wire
WHITE Wire

Connections and Configuration
Liebert® Liqui-tect® 16
3.1.2 Connecting Leak Detection Cable to the Connection Cable
The connection cable has a black fitting on one end that will fasten securely to the fitting on one end of the leak detection cable—see Figure 8. Push these ends together, being careful to insert the protruding ends of the leak detection cable into the holes in the connection cable connector. Twist the connector ring to securely link the cables.
Figure 8 Fittings on leak detection cable (LT500Y) and connection cable (CONNECT10)
After making this connection, lay the leak detection cable around the area to be monitored.
The monitored area would include any equipment or objects that might be damaged by water. Figure 9 shows one possible layout. In the example, the detection cable crosses between air conditioning units and computers to alert personnel when the electronic equipment is threatened by a leak. If there is a liquid source in the ceiling, the cable can be placed there. If a raised floor is used for cooling, the cable can be placed underneath the raised surface.
Figure 9 Typical leak detection cable layout
Follow these steps in laying the detection cable:1. Attach the end terminator to the last length of leak detection cable required to monitor the
selected area.2. Verify power is connected and test the detection cable by touching the detection cable with a
clean, moist cloth or paper towel.If the cables are connected properly, the audible horn should sound and the LCD screen should flash. Dry the detection cable to remove the alarm condition. (A hair dryer can be used to speed up the drying.)Note: Do not try to saturate the detection cable for testing! It requires only a small amount of water to alarm. The detection cable will have to dry for the alarm condition to clear.
NOTEMake sure the male end of the LT500Y leak detection cable is installed close enough to the Liebert Liqui-tect panel to reach the fitting on the CONNECT10 connection cable.
Connection fittings on connection cable and leak detection cable
Connectto leak
detection cable
Connect toLiebert
Liqui-tect panel
Leak detection connection cable (CONNECT10)
Leak detection cable (LT500Y)
Liebert Liqui-tect Monitoring System
A/C
A/C
A/C
A/C
A/C
Co
mp
uterC
om
pu
ter
Leak detectioncable terminus(attach end terminator here)
Leak detection cable(yellow)

Connections and Configuration
17 Liebert® Liqui-tect®
3. Once the cable passes the test, lay it in the pattern desired. Pay special attention to the following cable placement precautions.
4. Install the hold-down clips in pairs, as shown in Figure 10, with the following considerations:a. The adhesive used to install the hold-down clips must NOT come in contact with the detection
cable.b. One pair every 6 to 8 ft. (1.8-2.4m) in straight patterns (see Figure 11).c. One pair every 3 to 4 ft. (0.9-1.2m) in circular patterns (see Figure 12).d. One pair at the beginning and end of the arc when turning 90 degrees (see Figure 13).e. One pair as needed to maintain consistent uniform contact between the floor and detection
cable.
5. Once adhesive is completely dry, snap the cable into each hold-down clip.6. Check that there are no gaps between the floor and detection cable. (Add clips as required.)7. Be certain there are no alarms present on the module.8. Do final testing as per instruction in Step 2.
DETECTION CABLE PLACEMENT PRECAUTIONS
• Do not use detection cable that is damaged or dirty—for example, from plaster, spackle or debris.• Detection cable should not be dragged through contaminants (dirty or greasy areas). Floor must be clean
for the detection cable to function properly and for the hold-down clips to adhere to the floor surface.• Careful consideration should be taken to place detection cable out of the direct discharge airflow path of
environmental equipment. This type of equipment can discharge moisture into the airflow. Place cable 6 ft. (1.8m) from discharge to avoid nuisance alarms during humidification.
• Tools or heavy objects can do permanent damage when dropped, rolled, or set on the detection cable. Avoid foot traffic on the detection cable as well.
• Do not use any type of adhesive tape to secure the detection cable.• Do not allow soldering or welding near the detection cable without providing protection from heat and
contaminants. (Also avoid installing the detection cable in or near these type of areas.)• Mild dishwashing liquid can be used to clean the detection cable of many contaminants.
Figure 10 Installation of hold-down clips in pairs
Figure 11 Cable laid in straight patterns
Figure 12 Cable laid in circular patterns
Figure 13 90° turn in cable
Hold-down clipsevery 6-8 ft.
(1.8-2.4m)along straight
sections
Hold-down clipsevery 3-4 ft.
(0.9-1.2m)
Hold-down clipsat beginning &
end of arc

Connections and Configuration
Liebert® Liqui-tect® 18
3.2 Connecting Alarm Outputs
The Zone 1 and Zone 2 alarm outputs, found in the top right corner of the Liebert Liqui-tect panel, provide a contact output for a leak and a cable break for each zone. As an example, the outputs may provide alarms to an auxiliary alarm panel or building management system. To determine the proper wire size, see Table 4 - Wiring specifications.
A wiring key beside each terminal block indicates whether the connected output is wired for Normally Open (NO) or Normally Closed (NC).
An alarm relay wired as an unsupervised point (energized for alarm) must be wired to the Normally Open (NO) and Common (C) contacts.
An alarm relay wired as a supervised point (de-energized for alarm) must be wired to the Normally Closed (NC) and Common (C) contacts.
To connect an output:
1. Disconnect electrical power to the Liebert Liqui-tect panel.2. If necessary, remove a conduit knockout to permit wire entry into the Liebert Liqui-tect panel
enclosure.3. Bring the wire(s) into the Liebert Liqui-tect panel enclosure through a conduit knockout or access
slot.4. Loosen the appropriate screw and slip the stripped end of the wire into the terminal block.5. Tighten the screw until it holds the wire snugly.
3.3 Connecting to a Building Maintenance System or External Alarm System
Two analog output connector blocks permit the user to connect auxiliary notification equipment to monitor the distance of the leak and cable fault alarms. The terminal blocks are on the right side of the Liebert Liqui-tect panel printed circuit board, just above the leak detection cable connectors. To determine the proper wire size, see Table 4 - Wiring specifications.
To connect an input:
1. Disconnect electrical power to the Liebert Liqui-tect panel.2. If necessary, remove a conduit knockout to permit wire entry
into the Liebert Liqui-tect panel enclosure.3. Bring the wire(s) into the Liebert Liqui-tect panel enclosure through a conduit knockout or access
slot.4. Loosen the appropriate screw and slip the stripped end of the wire into the terminal block.5. Tighten the screw until it holds the wire snugly.
R17DS4
K4
NC
NC
NO
NO
C
C
NC
NC
NO
NO
C
C
Key to output status
Alarm outputsZone 1Zone 2
R18
lout Cable 1
C42
TB4
TB5
C38lout Cable 2
+-
+-
Analogoutputconnectors

Connections and Configuration
19 Liebert® Liqui-tect®
3.4 RS422 Liebert SiteScan® Web Connector
The Liebert Liqui-tect panel will interface with Liebert’s SiteScan Web enterprise monitoring system. Liebert SiteScan can be used to monitor the Liebert Liqui-tect panel from a host computer and silence the audible alarm. The terminal block connector, TB8, is on the bottom edge of the board, near the left corner.
To connect the Liebert SiteScan Web to the Liebert Liqui-tect panel:
1. Disconnect electrical power to the Liebert Liqui-tect panel.2. If necessary, remove a conduit knockout to permit wire entry into the
Liebert Liqui-tect panel enclosure.3. Bring the wire(s) into the Liebert Liqui-tect panel enclosure through a
conduit knockout or access slot.4. Loosen the appropriate screw and slip the stripped end of the wire into the terminal block. Note
that the wires are polarity sensitive.5. Tighten the screw until it holds the wire snugly.
3.5 Disable the Audible Horn
The panel’s audible horn is enabled by default. You may disable it as follows:
1. Set DIP switch 1, the first switch, to the ON position (up) to disable the audible horn.2. Press the reset button to initiate the change.
To re-enable the horn, set DIP switch 1, the first switch, to the OFF position (down) and press the reset button.
A B
RS422 SiteScan Web connector
R16
R17
R18
DS3
DS4
K1
K2
K4
A
1
SW2
SW1
R4
O N
2 3 4 5 6 7 81
O N
2
R1
DS1
Pwr On
24V Pow
3 4 5 6 7 8
DIP switch 1 Audible horn
Reset switch

Overview of Menus
Liebert® Liqui-tect® 20
4.0 OVERVIEW OF MENUS
The Liebert Liqui-tect panel displays the Opening Screen at startup, as shown in Figure 14.
If any alarms are active, the Current Alarm screen appears. (Pressing any key on the LCD keypad will silence the audible alarm.)
If no alarms are present, the LCD screen will alternately display the Opening Screen and a screen showing NO ALARMS PRESENT.
If no alarms are present and the Enter ↵ (Return) key is pressed, the Main Menu appears and presents two choices that lead to all functions within the panel:
• View Status (see 5.0 - View Status Options for step-by-step instructions)• System and Control (see 6.0 - System and Control Options for detailed instructions)
4.1 View Status OverviewThe View Status features are available to all users—no password is required. This permits all personnel to check on the status of any equipment or location being monitored. From this menu, any user may:
• View cable status, the monitored cable length and the amount of current present (both zones)• View data stored in the Alarm History Log• View data stored in the Zone Trend Log
4.2 System and Control OverviewThe System and Control options require a password. Authorized users may:
• Configure the Liebert Liqui-tect panel• Reset any latched alarms• Delete all records from the Alarm History Log• Delete all records from the Zone Trend Log
Figure 14 Menu overview
Opening ScreenLIQUI-TECT PANELDD-MON-YY HR:MM:SSVERSION X.X.X
PRESS ↵=STATUS/SETUP
(If any alarm is detected, it appears automatically)
Main MenuVIEW STATUSSYSTEM AND CONTROL
↑↓=NEXT ↵=SELECT“View Status” selected See Section “System & Control” selected See Section> VIEW STATUS
SYSTEM AND CONTROL
↑↓=NEXT ↵=SELECT
5.0 VIEW STATUS> SYSTEM AND CONTROL
↑↓=NEXT ↵=SELECT
6.0
View Status Menu(All users - no password) See Section
System & Control Menu(Password required) See Section
VIEW CABLE STATUSVIEW ALARM HISTORYVIEW ZONE TREND
5.15.25.3
SETUP SYSTEMRESET LATCHED ALARMCLEAR ALARM HISTORYCLEAR ZONE TREND
6.26.9
6.106.11

View Status Options
21 Liebert® Liqui-tect®
5.0 VIEW STATUS OPTIONS
The View Status menu allows any user to view the status of cables in both zones, an alarm history log and a trend log for both zones. The arrows ↑↓ are used to scroll through the menu. The Enter ↵ key is used to select the menu item.
This section presents step-by-step instructions for each of the following options:
• View Cable Status• View Alarm History• View Zone Trend
Figure 15 shows the main options available from the View Status menu.
Figure 15 Menu overview - View Status menuOpening Screen
LIQUI-TECT PANELDD-MON-YY HR:MM:SS
VERSION X.X.XPRESS ↵=STATUS/SETUP
Main Menu> VIEW STATUS
SYSTEM AND CONTROL
↑↓=NEXT ↵=SELECT
View StatusVIEW CABLE STATUSVIEW ALARM HISTORYVIEW ZONE TREND↑↓=NEXT ↵=SELECT
View Cable StatusSTATUS ZN1 ZONE 1
NORMAL↑↓=NEXT
SeeSection5.1
STATUS ZN1 ZONE 1LENGTH: 1000FTCURRENT: 0UA
↑↓=NEXT ↵=DONE
STATUS ZN2 ZONE 2
NORMAL↑↓=NEXT
STATUS ZN2 ZONE 2LENGTH: 3500FTCURRENT: 0UA
↑↓=NEXT ↵=DONE
View Zone Trend> ZONE TREND 288/288ZONE 1 0 UAZONE 2 0 UA29-AUG-03 12:04:00
SeeSection5.3
View Alarm History> ALARM RECORD 100/100ZONE 1CABLE OK29-AUG-03 12:04:00
SeeSection5.2
ZONE 1ALARM SILENCED - LCD29-AUG-03 12:00:00
ZONE 1LEAK @ 2007ft29-AUG-03 11:48:03
ZONE 1H/W RESET29-AUG-03 10:32:22
ZONE 2CABLE BREAK29-AUG-03 09:08:07
ZONE 1LOSS OF POWER29-AUG-03 07:15:41
View Status options

View Status Options
Liebert® Liqui-tect® 22
5.1 View Cable Status
The Cable Status screens display the overall status of the cable connected to each of the two zones monitored by the Liebert Liqui-tect panel, as well as the length of the cable being monitored and the amount of current present in each cable.
To view the status of the cable:
• From the Main Menu, use the arrows ↑↓ to choose View Status, as shown at right, and then press Enter ↵.
• From the View Status Menu, use the arrows ↑↓ to choose View Cable Status and press Enter ↵.
5.1.1 Cable Status Screens
Each Cable Status screen displays the zone name (ZN1 or ZN2) and its label (for example, ZONE 1 or ZONE 2) at the top.
Viewing Additional Screens
There are four Cable Status screens—two for each zone.
• To view additional screens, use the arrows ↑↓.• To return to the previous screen, press the ESC key.• When finished viewing the last screen, press Enter ↵.
Overall Condition
The first screen for each zone shows:
• the zone name (ZN1 or ZN2) and its label (for example, ZONE 1 or ZONE 2)
• the current overall condition of the cable (for example, NORMAL)
The cable conditions tracked by the Liebert Liqui-tect panel appear in Table 5.
Cable Length & Current Value
The second screen for each zone shows:
• the zone name (ZN1 or ZN2) and its label (for example, ZONE 1 or ZONE 2)• the length of cable being monitored (for example, 1000FT)—this value may change dynamically by
up to 0.5% as the panel is continuously calculating the distance of the connected cable• the current reading (0UA, where UA represents μA or microAmps)
Table 5 Overall cable conditions
SOURCE Cable
CONDITIONS RECORDED
NORMALCABLE BREAKLEAK DETECTED (& location, e.g., LEAK @ 99 FT)CONTAMINATED (& location, e.g., CONTAM @ 44 FT)NOT INSTALLED
Main Menu
> VIEW STATUSSYSTEM AND CONTROL
↑↓=NEXT ↵=SELECT
View Status Menu> VIEW CABLE STATUSVIEW ALARM HISTORYVIEW ZONE TREND↑↓=NEXT ↵=SELECT
Overall Condition (ZN1)STATUS ZN1 ZONE 1
NORMAL↑↓=NEXT
Length & Current (ZN1)STATUS ZN1 ZONE 1LENGTH: 1000FTCURRENT: 0UA
↑↓=NEXT ↵=DONE
Overall Condition (ZN2)STATUS ZN2 ZONE 2
NORMAL↑↓=NEXT
Length & Current (ZN2)STATUS ZN2 ZONE 2LENGTH: 3500FTCURRENT: 0UA
↑↓=NEXT ↵=DONE

View Status Options
23 Liebert® Liqui-tect®
5.2 View Alarm History
The Alarm History Log contains up to 100 records of alarms that have occurred. Records are added to this log as alarms occur.
To view the Alarm History Log:
• From the Main Menu, use the arrows ↑↓ to choose View Status, then press Enter ↵.
• From the View Status Menu, use the arrows ↑↓ to choose View Alarm History, then press Enter ↵.
5.2.1 Alarm History Log
The Alarm History Log screen displays up to 100 records showing alarms generated from the cable, panel operations, return from alarm and loss of power. If the log contains any alarm records, the Alarm History Log screen displays details for each alarm:
• the source of the alarm (for example, ZONE 1 or ZONE 2)• a brief description of the problem (CABLE OK)• the date and time the alarm occurred
Table 6 shows conditions that the alarm history log records for analog inputs and the panel itself.
If there are no alarms in the log, the screen displays the message:
HISTORY LOG EMPTY
Viewing Additional Screens
There may be up to 100 records of alarm data.
• To view additional records, use the arrows ↑↓.• To return to the previous screen, press the ESC key.
Table 6 Alarm History Log conditions
Source Cable Input Panel
CONDITIONS RECORDED
CABLE BREAKLEAK DETECTED (& location, e.g., LEAK @ 99 FT)CONTAMINATED (& location, e.g., CONTAM @ 44 FT)NO LEAKCABLE OK
LOSS OF POWERALARM SILENCEDH/W RESETALARM RESET
Main Menu
> VIEW STATUSSYSTEM AND CONTROL
↑↓=NEXT ↵=SELECT
View Status MenuVIEW CABLE STATUS
> VIEW ALARM HISTORYVIEW ZONE TREND↑↓=NEXT ↵=SELECT
Alarm History Log> ALARM RECORD 01/100ZONE 1CABLE OK
29-AUG-03 12:04:00

View Status Options
Liebert® Liqui-tect® 24
5.3 View Zone Trend
The Zone Trend Log contains up to 288 records that are recorded at regular intervals (every 24 hours) to assist users with verifying operational and troubleshooting problems. Records are added the beginning of the log as they occur.
To view the Zone Trend Log:
• From the Main Menu, use the arrows ↑↓ to choose View Status, then press Enter ↵.
• From the View Status Menu, use the arrows ↑↓ to choose View Zone Trend, then press Enter ↵.
5.3.1 Zone Trend Log
The Zone Trend Log screen displays up to 288 recent readings for each zone. If the log contains any records, the Zone Trend Log screen displays details for each zone:
• the name of the zone (for example, ZONE 1 or ZONE 2)• the value for the amount of current present on each cable (for
example, 0UA, where UA represents μA or microAmps)• the date and time of the reading
If there are no records in the log, the screen displays the message:
TREND DATA EMPTY
Viewing Additional Screens
There may be up to 288 records of trend data for each zone.
• To view additional records, use the arrows ↑↓.• To return to the previous screen, press the ESC key.
Main Menu
> VIEW STATUSSYSTEM AND CONTROL
↑↓=NEXT ↵=SELECT
View Status MenuVIEW CABLE STATUSVIEW ALARM HISTORY
> VIEW ZONE TREND↑↓=NEXT ↵=SELECT
Zone Trend Log> ZONE TREND 01/288ZONE 1 0UAZONE 2 0UA
29-AUG-03 12:04:00

System and Control Options
25 Liebert® Liqui-tect®
6.0 SYSTEM AND CONTROL OPTIONS
The System and Control menu allows you to configure the Liebert Liqui-tect panel—setting up inputs and outputs and system features such as date and time. This menu also provides a vehicle for mapping points, clearing latched alarms and deleting records from the Liebert Liqui-tect panel’s alarm and trend logs.
The arrows ↑↓ are used to scroll through the menu. The Enter ↵ key is used to select the menu item and enter new information. Table 7 shows characters that may be entered in labels and values.
The System and Control options require a password to prevent unauthorized users from making changes to the system.
This section presents step-by-step instructions for each of the following:
• Login - enter the password• Setup System - configure the Liebert Liqui-tect panel, system features• Reset Latched Alarm - clear and reset any latched alarms• Clear Alarm History - delete all records from the Alarm History Log• Clear Zone Trend - delete all records from the Zone Trend Log
6.1 Login
Users must enter a password to access any of the system and control options. The password consists of four characters (see Table 7 for valid characters).
The default password is AAAA. Changing the password to “0000” eliminates the login requirement and prevents the login screen from appearing. (To set up or change the password, see 6.8.1 - Change Password.)
To log in:
• From the Main Menu, use the arrows ↑↓ to choose System and Control, then press Enter ↵, as shown at right.
• Use the arrows ↑↓ to choose System and Control, and press Enter ↵. The Login menu appears.
• To enter your password:• Use the arrows ↑↓ to choose a character.• Press Enter ↵ to advance to the next character position.• When finished, press Enter ↵ again.
The System and Control Menu appears next, with these options that are described in the following sections:
• Setup System (Section 6.2 - Section 6.8)• Reset Latched Alarm (Section 6.9)• Clear Alarm History (Section 6.10)• Clear Zone Trend (Section 6.11)
Table 7 Valid characters for data entry
Alphanumeric Special characters
A-Z, 0-9 space ! " # $ % & ( ) * + - / , . ; < = > @
NOTEIf, after logging in, you press the ESC key to return to a previous screen that is not password-protected, you must log in again, including entering your password if you wish to access password-protected functions.
Main Menu
VIEW STATUS> SYSTEM AND CONTROL
↑↓=NEXT ↵=SELECT
LoginLOGIN
AAAA↑↓=SELECT ↵=NEXT/END
System & Control Menu> SETUP SYSTEMRESET LATCHED ALARMCLEAR ALARM HISTORY↑↓=NEXT ↵=SELECT CLEAR ZONE TREND

System and Control Options
Liebert® Liqui-tect® 26
Figure 16 shows the main options available from the System & Control menu.
Figure 16 Menu overview - System and Control menu
Opening ScreenLIQUI-TECT PANEL
DD-MON-YY HR:MM:SSVERSION X.X.X
PRESS ↵=STATUS/SETUP
Main MenuVIEW STATUS
> SYSTEM AND CONTROL
↑↓=NEXT ↵=SELECT
Login ScreenLOGIN
AAAA↑↓=SELECT ↵=NEXT/END
Setup System>SETUP SYSTEMRESET LATCHED ALARMCLEAR ALARM HISTORYCLEAR ZONE TREND
SeeSection6.2
SETUP ZN1 ZONE 1SETUP ZN2 ZONE 2SETUP ALARM OUTPUTSSETUP REALARM DELAYSETUP MAPMODESETUP SYSTEM INFO
Reset Latched AlarmSETUP SYSTEM
>RESET LATCHED ALARMCLEAR ALARM HISTORYCLEAR ZONE TREND
SeeSection6.9
Reset Latched AlarmsRESET LEAK & FAULTLATCHED ALARMS? Y
↑↓=Y/N ↵=END
System & Control options
Clear Zone TrendSETUP SYSTEMRESET LATCHED ALARMCLEAR ALARM HISTORY
>CLEAR ZONE TREND
SeeSection6.11
Clear Zone TrendCLEAR ZONE TRENDARE YOU SURE? Y
↑↓=Y/N ↵=END
Clear Alarm HistorySETUP SYSTEMRESET LATCHED ALARM
>CLEAR ALARM HISTORYCLEAR ZONE TREND
SeeSection6.10
Clear Alarm HistoryCLEAR ALARM HISTORYARE YOU SURE? Y
↑↓=Y/N ↵=END
Setup Zone 1 MenuSETUP ZN1 ZONE 1CONNECTED: NLABEL: ZONE 1UNITS: FTAUTO CALIBRATEWATER DETECT:150 UACONTAMINATED:050 UA
SeeSection6.3
Setup MapmodeSELECT ZONE TO MAP
>ZN1 ZONE 1ZN2 ZONE 2VIEW LAST MAP
SeeSection6.7
Mapping OptionsMAPPING ZN1 ZONE 1CURRENT: 0UADISTANCE: ----ENTRIES:0 ESC=EXIT
Setup System options
Setup System InfoSETUP SYSTEM INFO
CHANGE PASSWORDCHANGE DATE & TIMEFACTORY DEFAULTS
SeeSection6.8
Setup Zone 2 MenuSETUP ZN2 ZONE 2CONNECTED: NLABEL: ZONE 2UNITS: FTAUTO CALIBRATEWATER DETECT:150 UACONTAMINATED:050 UA
SeeSection6.4
Setup Alarm OutputsSELECT LONGESTCABLE CONNECTED
>0-500FT (0-152.4 M)0-1000FT (0-304.8M)0-1500FT (0-472.2M)0-2000FT (0-609.6M)0-2500FT (0-762.0M)0-3000FT (0-914.4M)0-4000FT(0-1219.2M)0-5000FT(0-1524.0M)
SeeSection6.5
Normally Open / ClosedARE LEAK & FAULTRELAYS NORMAL OPENOR NORMAL CLOSED? NO↑↓=NO/NC ↵=END
Latched / UnlatchedIS LEAK & FAULTALARM LATCHED? Y
↑↓=Y/N ↵=END
Change Password Change Date & Time Factory DefaultsCHANGE PASSWORD
AAAA
SeeSection6.8.1
CHANGE DATE & TIMEDAYLIGHT SVG TIME: Y 18-MAY-02 10:56:30
SeeSection6.8.2
RESTORE ALL DEFAULTSARE YOU SURE? N
SeeSection6.8.3
Change Realarm DelayCHANGE REALARM DELAY
5 MINUTES↑↓=SELECT ↵=END
SeeSection6.6
Setup System Info options

System and Control Options
27 Liebert® Liqui-tect®
6.2 Setup System - Overview
The Setup System screen displays six options that allow you to configure zones with cable, alarm outputs, the re-alarm delay time, log points to create a map and system details, such as changing the login password or the system date and time:
• Setup ZN1 Zone 1• Setup ZN2 Zone 2• Setup Alarm Outputs• Setup Re-Alarm Delay• Setup Mapmode• Setup System Info
6.3 Setup System - Setup ZN1 Zone 1
The Liebert Liqui-tect panel has two independent zones—ZN1 and ZN2—that may be configured individually. Each zone can monitor up to 5,000 ft. (1524m) of cable.
If neither zone is configured as connected, the screen displays the message:
WARNING! NO ZONES ARE INSTALLED
To configure the first zone:
Log In and Choose Setup System
• From the Main Menu, use the arrows ↑↓ to choose System and Control, then press Enter ↵ (see 6.1 - Login for help).
• Enter your password at the Login screen.• From the System and Control Menu, use the arrows ↑↓ to choose
Setup System, then press Enter ↵.
Select Zone 1 to Configure
• From the Setup System Menu, shown at right, use the arrows ↑↓ to choose Setup ZN1 Zone 1 and press Enter ↵.
• Use the steps following Table 8 to change the default settings for Zone 1.
Table 8 shows the features you may change for Zone 1, along with the default settings. By default, Zone 1 is not connected.
To activate Zone 1, you must specify it as connected. Other features that may be altered include the name of the zone, the measurement units, and the sensitivity for detection of water and of contamination. You may also initiate automatic calibration, during which the Liebert Liqui-tect panel determines the length of cable and parameters.
Table 8 Default settings - Zone 1
Feature Default Other Options
CONNECTED N (Not connected) Y (Connected)
LABEL ZONE 1 Any name (up to eight characters)
UNITS FT (feet) M (meters)
AUTO CALIBRATE Automatically calculates cable length Allows adjustment to calculated length of cable
SENSITIVITY FOR WATER DETECT 150 UA Can define between 25µA and 300µA
SENSITIVITY FOR CONTAMINATED
50 UA Can define between 20µA and 300µA
Setup System Menu
> SETUP ZN1 ZONE 1SETUP ZN2 ZONE 2SETUP ALARM OUTPUTS↑↓=NEXT ↵=SELECTSETUP REALARM DELAYSETUP MAPMODESETUP SYSTEM INFO
Setup Zone 1 MenuSETUP ZN1 ZONE 1
> CONNECTED: NLABEL: ZONE 1↑↓=NEXT ↵=SELECTUNITS: FTAUTO CALIBRATEWATER DETECT:150 UACONTAMINATED:050 UA

System and Control Options
Liebert® Liqui-tect® 28
6.3.1 Identify the Zone as Connected
To make use of the zone ZN1, you must specify it as Connected (Y). By default, ZN1 is Not connected (N). See 3.1 - Connecting Leak Detection Cable Inputs for instructions on connecting the cable to this zone.
• From the Setup Zone 1 Menu, choose Connected, as shown at right, and press Enter ↵.
• To change this feature, use the arrows ↑↓ to choose Y (Yes - Connected) or N (No - Not connected), then press Enter ↵.
6.3.2 Change Zone Label
ZN1 has a default label (Zone 1) that you may change to a more descriptive name, such as “SRVR RM1.” The label may consist of up to eight characters (see Table 7 for valid characters).
• From the Setup Zone 1 Menu, choose Label, then press Enter ↵. • To change the label, which may consist of up to eight characters:
• Use the arrows ↑↓ to choose a character. • Press Enter ↵ to advance to the next character position.• When finished, press Enter ↵ again.
6.3.3 Change Units Label
You may specify measurement units as feet (FT) or meters (M). The default designation is FT (feet). The same measurement unit will apply to both zones. For example, if you choose FT for Zone 1, Zone 2 will display in FT also.
• From the Setup Zone 1 Menu, choose Units, then press Enter ↵. • To change the units label:
• Use the arrows ↑↓ to choose FT (feet) or M (meters). • Press Enter ↵.
Setup Zone 1 Menu
SETUP ZN1 ZONE 1> CONNECTED: NLABEL: ZONE 1↑↓=NEXT ↵=SELECTUNITS: FTAUTO CALIBRATEWATER DETECT:150 UACONTAMINATED:050 UA
Zone ConnectedIS CABLE CONNECTEDTO THIS ZONE? Y
↑↓=Y/N ↵=END
Setup Zone 1 Menu
SETUP ZN1 ZONE 1CONNECTED: Y
> LABEL: ZONE 1↑↓=NEXT ↵=SELECTUNITS: FTAUTO CALIBRATEWATER DETECT:150 UACONTAMINATED:050 UA
Change Zone LabelCHANGE ZONE LABEL
LABEL: ZONE 1↑↓=SELECT ↵=NEXT/END
Setup Zone 1 Menu
SETUP ZN1 ZONE 1CONNECTED: YLABEL: ZONE 1↑↓=NEXT ↵=SELECT
> UNITS: FTAUTO CALIBRATEWATER DETECT:150 UACONTAMINATED:050 UA
Change Units LabelCHANGE UNITSUNITS: FT
↑↓=FT/M ↵=END

System and Control Options
29 Liebert® Liqui-tect®
6.3.4 Auto Calibration
The auto calibration feature is designed to allow compensation for the resistance tolerances in the two legs of the sensing wires.
As soon as cable is connected, the panel begins calculating the cable length. Initiating the auto calibration feature allows the user to modify the distance to account for any discrepancies. Once the new distance is entered, the panel adjusts for the required offset between the calculated value and the user value.
To initiate automatic calibration for ZN1:
• From the Setup Zone 1 Menu, choose Auto Calibrate, as shown at right, and press Enter ↵.
• At the Change Maximum Length screen, you may change the maximum length of cable protecting this zone:
• To begin calibration without changing this value, press Enter ↵.
• To change the value, press and hold one of the arrow keys ↑↓ to scroll through the numbers, then press Enter ↵.
• The next screen displays the progress of calibration.
6.3.5 Set Up Sensitivity for Water Detection
Each zone may be set up with a sensitivity level at which water is detected.
• The most sensitive setting is 25 μA—minimal water is required to trigger an alarm.
• The least sensitive setting is 300 μA. At this setting, the cable will be submerged in water for a longer period before an alarm is triggered.
To change the setting:
• From the Setup Zone 1 Menu, choose Water Detect, as shown at right, and press Enter ↵.
• The Water Detection Sensitivity screen displays the value for detection of water (in the example at right, 150 UA, where UA represents μA or microAmps):
• To change the value, press and hold one of the arrow keys ↑↓ to scroll through the numbers 25-300.
• Press Enter ↵.
Setup Zone 1 Menu
SETUP ZN1 ZONE 1CONNECTED: YLABEL: ZONE 1↑↓=NEXT ↵=SELECTUNITS: FT
> AUTO CALIBRATEWATER DETECT:150 UACONTAMINATED:050 UA
Change Maximum LengthCHANGE MAX LENGTH
1000 FT↑↓=SELECT ↵=ACCEPT
Auto Calibration ProgressTHIS SCREEN WILL SHOWAUTO CALIBRATIONTAKING PLACE
Setup Zone 1 Menu
SETUP ZN1 ZONE 1CONNECTED: YLABEL: ZONE 1↑↓=NEXT ↵=SELECTUNITS: FTAUTO CALIBRATE
> WATER DETECT:150 UACONTAMINATED:050 UA
Water Detection Sensitivity
CHANGE SENSITIVITYFOR WATER DETECT
150 UA↑↓=SELECT ↵=END

System and Control Options
Liebert® Liqui-tect® 30
6.3.6 Set Up Sensitivity for Contamination Detection
Each zone may be set up with a sensitivity level at which contamination on the cable is detected. Examples are construction debris and dust.
• The most sensitive setting is 20 μA—light contamination will trigger an alarm.
• The least sensitive setting is 300 μA. This setting requires heavy contamination to activate an alarm.
Increase the setting if nuisance alarms occur.
• From the Setup Zone 1 Menu, choose Contaminated, as shown above right, and press Enter ↵. • The Contaminated Detection Sensitivity screen displays the value for detection of contamination
(in the example at right, 50 UA, where UA represents μA or microAmps):• To change the value, press and hold one of the arrow keys ↑↓ to scroll through the numbers
20-300.• Press Enter ↵.
6.4 Setup System - Setup ZN2 Zone 2
The Liebert Liqui-tect panel has two independent zones—ZN1 and ZN2—that may be configured individually. Each zone can monitor up to 5,000 ft. (1524m) of leak detection cable.
To configure the second zone:
• In the Setup System Menu, choose Setup ZN2 Zone 2 (see above right).
• Follow the same procedures used in setting up Zone 1, as described in the previous section, 6.3 - Setup System - Setup ZN1 Zone 1.
NOTEDo not set this setting greater than the sensitivity for water detection setting—for example, if the water detection setting is 50 μA, do NOT set the contamination sensitivity level at 60 μA, or any value greater than 50 μA. If the contamination setting is greater than the water detection setting, contamination alarms will never occur.
NOTEThe setup options are identical for both zones, except that the name of the zone differs.
Setup Zone 1 Menu
SETUP ZN1 ZONE 1CONNECTED: YLABEL: ZONE 1↑↓=NEXT ↵=SELECTUNITS: FTAUTO CALIBRATEWATER DETECT:150 UA
> CONTAMINATED:050 UA
Contamination Detection Sensitivity
CHANGE SENSITIVITY FOR CONTAMINATED
50 UA↑↓=SELECT ↵=END
Setup System Menu
SETUP ZN1 ZONE 1> SETUP ZN2 ZONE 2SETUP ALARM OUTPUTS↑↓=NEXT ↵=SELECTSETUP REALARM DELAYSETUP MAPMODESETUP SYSTEM INFO
Setup Zone 2 MenuSETUP ZN2 ZONE 2
> CONNECTED: NLABEL: ZONE 2↑↓=NEXT ↵=SELECTUNITS: FTAUTO CALIBRATEWATER DETECT:150 UACONTAMINATED:050 UA

System and Control Options
31 Liebert® Liqui-tect®
6.5 Setup System - Setup Alarm Outputs
The Liebert Liqui-tect panel has six alarm outputs—three types for each zone:
• Digital alarm output for cable break detection - a change in state indicates a broken cable or contamination on the cable
• Digital alarm output for leak detection - a change in state indicates a leak on the cable• Analog alarm output for 4-20mA - the signal may indicate normal operation, the location of a
leak, a cable break or contamination
These outputs may have a wide variety of Liebert or other manufacturers’ equipment connected to receive alarm notification.
To configure all alarm outputs:
Log In and Choose Setup System
• From the Main Menu, use the arrows ↑↓ to choose System and Control, then press Enter ↵ (see 6.1 - Login for help).
• Enter your password at the Login screen.• From the System and Control Menu, use the arrows ↑↓ to choose
Setup System, then press Enter ↵.
Select Setup Alarm Outputs
• From the Setup System Menu, shown at right, use the arrows ↑↓ to choose Setup Alarm Outputs and press Enter ↵.
Table 9 shows alarm output features and their default settings: you may specify the maximum cable length of analog alarm outputs, define digital alarm output relays as Normally Open or Closed, and set up alarms as Latched or Unlatched.
To change the default settings, use the steps following Table 9.
Table 9 Default settings - alarm outputs
Feature Default Other Options
LONGEST CABLE LENGTH 0-1000 ft. (0-304.8m) Up to 5000 ft. (1524m)
LEAK & FAULT RELAYS:NORMALLY OPEN/CLOSED NO (Normally Open) NC (Normally Closed)
LEAK & FAULT ALARM:LATCHED/UNLATCHED
Y (Latched) N (Unlatched)
Setup System Menu
SETUP ZN1 ZONE 1SETUP ZN2 ZONE 2
> SETUP ALARM OUTPUTS↑↓=NEXT ↵=SELECTSETUP REALARM DELAYSETUP MAPMODESETUP SYSTEM INFO
Maximum Cable LengthSELECT LONGESTCABLE CONNECTED
> 0-500FT (0-152.4 M)↑↓=NEXT ↵=SELECT0-1000FT (0-304.8M)0-1500FT (0-472.2M)0-2000FT (0-609.6M)0-2500FT (0-762.0M)0-3000FT (0-914.4M)0-4000FT(0-1219.2M)0-5000FT(0-1524.0M)
Normally Open / ClosedARE LEAK & FAULTRELAYS NORMAL OPENOR NORMAL CLOSED? NO↑↓=NO/NC ↵=END
Latched / UnlatchedIS LEAK & FAULTALARM LATCHED? Y
↑↓=Y/N ↵=END

System and Control Options
Liebert® Liqui-tect® 32
6.5.1 Specify Longest Cable Length
You may specify the length of the longest cable connected to either of the 4-20mA alarm outputs. The default value is 0-1000 ft. (0-304.8m). Valid entries range from 0-500 ft. (0-152.4m) to 0-5000 ft. (0-1524m), as shown in the Maximum Cable Length screen, below right.
Select the longer cable length installed on either zone. For example, if Zone 1 has 2000 ft. (609.6m) of cable and Zone 2 has 3500 ft. (1066.8m), select 0-4000 ft. (0-1219.2m).
The chosen setting applies to both zones and is correlated to the 4-20mA output of each zone to provide the distance of the leak. Once the range is selected, the following correlation will be applied:
5mA = 0 ft. (0m)19mA = 4000 ft. (1219.2m)
Table 10 shows the operation of the 4-20mA outputs.
To specify the maximum cable length:
• From the Maximum Cable Length screen, below right, use the arrows ↑↓ to choose the correct range—for example, 0-4000FT(0-1219.2M).
• Press Enter ↵.
6.5.2 Define Relays as Normally Open or Normally Closed
All four digital alarm outputs may be set up as Normally Open (NO) or Normally Closed (NC). The default setting is NO (Normally Open). The chosen setting applies to all cable fault/contamination and leak relays for both zones.
To change the normal state:
• From the Normally Open / Closed screen, below right, use the arrows ↑↓ to choose NO (Normally Open) or NC (Normally Closed).
• For a non-supervised mode, select Normally Open. The relays energize for an alarm condition.
• For a supervised mode, select Normally Closed. The relays de-energize for an alarm condition or loss of power.
• Press Enter ↵.
6.5.3 Define Alarms as Latched or Unlatched
All four digital alarm outputs may be set up as Latched (Y) or Unlatched (N). When configured as Latched, alarms must be manually reset by an operator after they are cleared, as described in 6.9 - Reset Latched Alarms. The default setting is Latched (Y). The chosen setting applies to cable fault and leak relays for both zones.
To change this setting:
• From the Latched / Unlatched screen, shown at right, use the arrows ↑↓ to choose Y (Latched) or N (Unlatched).
• Press Enter ↵.
Table 10 Operation of 4-20mA outputs
Signal Operation
0mA Indicates cable cannot be monitored
4mA Indicates normal operation
5mA 0 ft. (0m)
19mA Longest cable length (ft.)—for example, 4000 ft. (1219.2m)
20mA Indicates cable fault / contamination
Setup System Menu
SETUP ZN1 ZONE 1SETUP ZN2 ZONE 2
> SETUP ALARM OUTPUTS↑↓=NEXT ↵=SELECTSETUP REALARM DELAYSETUP MAPMODESETUP SYSTEM INFO
Maximum Cable LengthSELECT LONGESTCABLE CONNECTED
> 0-500FT (0-152.4 M)↑↓=NEXT ↵=SELECT0-1000FT (0-304.8M)0-1500FT (0-472.2M)0-2000FT (0-609.6M)0-2500FT (0-762.0M)0-3000FT (0-914.4M)0-4000FT(0-1219.2M)0-5000FT(0-1524.0M)
Normally Open / ClosedARE LEAK & FAULTRELAYS NORMAL OPENOR NORMAL CLOSED? NO↑↓=NO/NC ↵=END
Latched / UnlatchedIS LEAK & FAULTALARM LATCHED? Y
↑↓=Y/N ↵=END

System and Control Options
33 Liebert® Liqui-tect®
Following are some similarities and differences between Latched and Unlatched alarms.
Liebert Liqui-tect System’s Response to Alarms - Both Latched and Unlatched
When a leak or cable break is detected:
• An alarm occurs, • A record is created in the Alarm History Log and • The leak-detected or cable-break alarm output contact changes state.
Latched Alarms Only
The user must reset latched alarms before another leak or cable break alarm can occur.
Unlatched Alarms Only
When an alarm output returns to its normal state, the alarms automatically clear and the system returns to normal.
If two leaks occur simultaneously on the same cable, the system creates a record with the distance of the first leak and displays an average distance for the two leaks. Always check the Alarm History Log (see 5.2 - View Alarm History) when leak detected alarms occur in unlatched mode.
6.6 Setup System - Setup Re-Alarm DelayThe re-alarm delay may be set to provide an audible, reminder alarm notification after an alarm has been silenced. The timer begins when the original alarm is silenced; the reminder alarm will occur after the specified delay time has expired. The default setting is 5 minutes. The delay time ranges from 0 to 999 minutes.
To set up the re-alarm delay:
Log In and Choose Setup System
• From the Main Menu, use the arrows ↑↓ to choose System and Control, then press Enter ↵ (see 6.1 - Login for help).
• Enter your password at the Login screen.• From the System and Control Menu, use the arrows ↑↓ to choose
Setup System, then press Enter ↵.
Select Setup Re-Alarm Delay
• From the Setup System Menu, shown at right, use the arrows ↑↓ to choose Setup Realarm Delay and press Enter ↵.
• From the Change Realarm Delay screen, shown at right, press and hold one of the arrow keys ↑↓ to scroll through the numbers, then press Enter ↵.
NOTEA contaminated cable alarm will never latch. Because this type of alarm serves only as a warning, it allows leak or cable break alarms to occur.
Setup System Menu
SETUP ZN1 ZONE 1SETUP ZN2 ZONE 2SETUP ALARM OUTPUTS↑↓=NEXT ↵=SELECT
> SETUP REALARM DELAYSETUP MAPMODESETUP SYSTEM INFO
Change Realarm DelayCHANGE REALARM DELAY
5 MINUTES↑↓=SELECT ↵=END

System and Control Options
Liebert® Liqui-tect® 34
6.7 Setup System - Setup MapmodeMapping involves measuring the exact location of various points along the leak detection cable. This greatly simplifies the use of the Liebert Liqui-tect Monitoring System to quickly pinpoint the location of a leak. The Liebert Liqui-tect Monitoring System determines the location of a leak by computing its distance along the leak detection cable. By setting off alarms with a damp paper towel or sponge and marking each reading on a map of the floor, you can define various points along the cable for later reference in finding a leak. Up to 254 points can be mapped.
After the leak detection cable has been laid and properly connected, as described in 3.1 - Connecting Leak Detection Cable Inputs, follow these steps to map the system:
1. Draw a floor plan that shows the routing of the leak detection cable, including any jumpers used (non-sensing cable).
2. Using the LCD on the front panel of the Liebert Liqui-tect Monitoring System:
Log In and Choose Setup System
a. From the Main Menu, use the arrows ↑↓ to choose System and Control, then press Enter ↵ (see 6.1 - Login for help).
b. Enter your password at the Login screen.c. From the System and Control Menu, use the arrows ↑↓ to
choose Setup System, then press Enter ↵.
Select Setup Mapmode
d. From the Setup System Menu, shown at right, use the arrows ↑↓ to choose Setup Mapmode and press Enter ↵.
e. Use the following instructions to set up the mapping of each zone.
Set Up Mapping for Zone 1 or Zone 2
f. Use the arrows ↑↓ to choose a zone—either ZN1 Zone 1 or ZN2 Zone 2—from the Select Zone to Map Menu, and press Enter ↵.
The Liebert Liqui-tect Monitoring System is now ready for you to short the cable, as described in steps 3 through 6.
3. Select the first point to be mapped and mark it on the floor map as point “X” (where X represents 1 for the first point, 2 for the second, and so on, up to 254). Determine the exact location of the point by measuring the distance from the panel to the point or otherwise describing its location (for example, “at front of chiller”).
4. Wrap a damp paper towel or sponge around the selected point on the cable to cause a short in the cable and trigger an alarm.
5. After about 30 seconds, the Liebert Liqui-tect panel annunciates a short beep. The LCD displays the computed distance to the leak.
6. Remove the paper towel and dry the cable. In approximately 20 seconds, the Liebert Liqui-tect panel annunciates a long beep indicating the short has been removed.
7. Go to the next point and repeat this process (steps 3 through 6) until the entire cable has been mapped. Up to 254 points can be mapped.
When complete, press the ESC key on the LCD to exit mapping mode and return to the previous screen.
Table 11 shows the default mapping settings for each zone.
NOTEYou must perform the automatic calibration steps in 6.3.4 - Auto Calibration before mapping can commence. The leak detection cable is 12 in. (30.48cm) to 18 in. (45.72cm) longer than the nominal length, which allows a service loop should the cable need to be replaced. Automatic calibration enables the Liebert Liqui-tect system to determine the cable’s exact length.
Table 11 Default mapping values
Option Default setting
Current 0UA, where UA represents µA or microAmps
Distance (none)
Setup System Menu
SETUP ZN1 ZONE 1SETUP ZN2 ZONE 2SETUP ALARM OUTPUTS↑↓=NEXT ↵=SELECTSETUP REALARM DELAY
> SETUP MAPMODESETUP SYSTEM INFO
Select Zone to MapSELECT ZONE TO MAP
> ZN1 ZONE 1ZN2 ZONE 2↑↓=NEXT ↵=SELECTVIEW LAST MAP
Mapping OptionsMAPPING ZN1 ZONE 1CURRENT: 0UADISTANCE: ----ENTRIES:0 ESC=EXIT

System and Control Options
35 Liebert® Liqui-tect®
6.7.1 View Last Map
The View Last Map option allows you to review the mapped points from the last mapping of a zone. This feature is the data logger for the mapmode process described in the previous section, 6.7 - Setup System - Setup Mapmode.
In the View Last Map mode, the Liebert Liqui-tect panel shows the mapped distance to a particular point along the leak detection cable, identifying each point with an entry number that corresponds to point “X” (where X represents 1 for the first point, 2 for the second, and so on).
The user may view the entry number for point “X” and see the corresponding distance to that point. This may be used either to record that distance on the floor map or to verify the distance already recorded on the map.
When a leak occurs, the Liebert Liqui-tect Monitoring System displays the distance of the leak. By referring to the final floor map, you can easily determine the location of the leak.
To view the last map:
• From the Setup System Menu, shown at right, use the arrows ↑↓ to choose Setup Mapmode and press Enter ↵.
• Use the arrows ↑↓ to choose View Last Map from the Select Zone to Map Menu, and press Enter ↵.(If no points have been mapped, the screen displays a message, as shown below right.)
• If you haven’t already done so, record the distance for each point on the final floor map next to the respective positions of each short labeled “X” (for points 1, 2, 3 and so on as described in step 3 in the previous section).
• Use the arrows ↑↓ to display the mapping data for the next point.• When finished, press Enter ↵.
Setup System Menu
SETUP ZN1 ZONE 1SETUP ZN2 ZONE 2SETUP ALARM OUTPUTS↑↓=NEXT ↵=SELECTSETUP REALARM DELAY
> SETUP MAPMODESETUP SYSTEM INFO
Select Zone to MapSELECT ZONE TO MAPZN1 ZONE 1ZN2 ZONE 2↑↓=NEXT ↵=SELECT
> VIEW LAST MAP
Mapping for Last MapMAPPING FOR LAST MAPCURRENT: 0UADISTANCE: ----ENTRIES:0 ESC=EXIT
Message if No Mapping
THERE ARE NOMAPPED POINTSLOGGED
ESC=EXIT
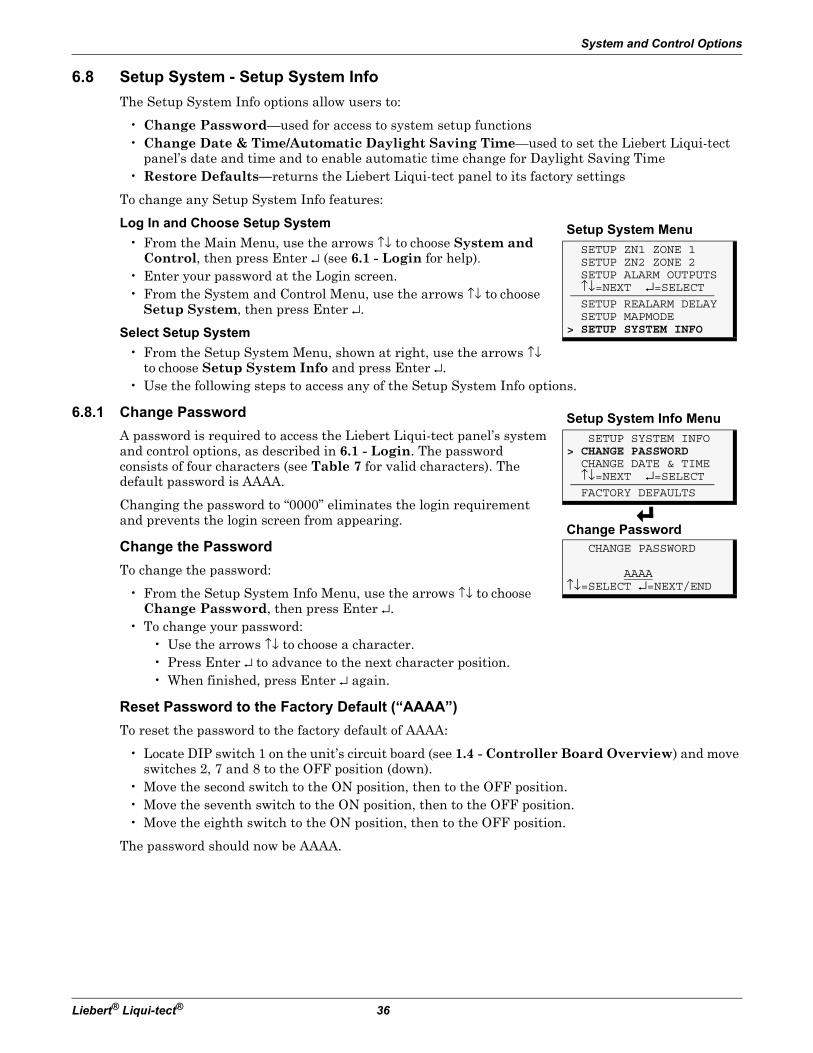
System and Control Options
Liebert® Liqui-tect® 36
6.8 Setup System - Setup System Info
The Setup System Info options allow users to:
• Change Password—used for access to system setup functions• Change Date & Time/Automatic Daylight Saving Time—used to set the Liebert Liqui-tect
panel’s date and time and to enable automatic time change for Daylight Saving Time• Restore Defaults—returns the Liebert Liqui-tect panel to its factory settings
To change any Setup System Info features:
Log In and Choose Setup System
• From the Main Menu, use the arrows ↑↓ to choose System and Control, then press Enter ↵ (see 6.1 - Login for help).
• Enter your password at the Login screen.• From the System and Control Menu, use the arrows ↑↓ to choose
Setup System, then press Enter ↵.
Select Setup System
• From the Setup System Menu, shown at right, use the arrows ↑↓ to choose Setup System Info and press Enter ↵.
• Use the following steps to access any of the Setup System Info options.
6.8.1 Change Password
A password is required to access the Liebert Liqui-tect panel’s system and control options, as described in 6.1 - Login. The password consists of four characters (see Table 7 for valid characters). The default password is AAAA.
Changing the password to “0000” eliminates the login requirement and prevents the login screen from appearing.
Change the Password
To change the password:
• From the Setup System Info Menu, use the arrows ↑↓ to choose Change Password, then press Enter ↵.
• To change your password:• Use the arrows ↑↓ to choose a character.• Press Enter ↵ to advance to the next character position.• When finished, press Enter ↵ again.
Reset Password to the Factory Default (“AAAA”)
To reset the password to the factory default of AAAA:
• Locate DIP switch 1 on the unit’s circuit board (see 1.4 - Controller Board Overview) and move switches 2, 7 and 8 to the OFF position (down).
• Move the second switch to the ON position, then to the OFF position.• Move the seventh switch to the ON position, then to the OFF position.• Move the eighth switch to the ON position, then to the OFF position.
The password should now be AAAA.
Setup System Menu
SETUP ZN1 ZONE 1SETUP ZN2 ZONE 2SETUP ALARM OUTPUTS↑↓=NEXT ↵=SELECTSETUP REALARM DELAYSETUP MAPMODE
> SETUP SYSTEM INFO
Setup System Info Menu
SETUP SYSTEM INFO> CHANGE PASSWORDCHANGE DATE & TIME↑↓=NEXT ↵=SELECTFACTORY DEFAULTS
Change PasswordCHANGE PASSWORD
AAAA↑↓=SELECT ↵=NEXT/END

System and Control Options
37 Liebert® Liqui-tect®
6.8.2 Change Date & Time/Automatic Daylight Saving Time
The Liebert Liqui-tect panel has a built-in, real-time clock that is backed up by an encapsulated lithium battery and set up to adjust automatically for daylight saving time twice a year. The Setup System Info menu allows you to change the date or time or automatic adjustment at any time.
To change the daylight saving time setting, date or time:
• From the Setup System Info Menu, use the arrows ↑↓ to choose Change Date & Time, then press Enter ↵.
• To change the daylight saving time setting: • To the right of Daylight Svg Time? use the arrows ↑↓ to
choose Y (Yes - automatically adjust for daylight saving time) or N (No), then press Enter ↵.
• The format of the date and time is DD-MMM-YY HR:MM:SS. To change the date or time:
• Press Enter ↵ to advance to the next character position you want to change.
• Use the arrows ↑↓ to choose from available entries:
• Press Enter ↵ to advance to the next character position.• When finished, press Enter ↵ again.
6.8.3 Factory Defaults
At any time, you may restore all default values for settings in the Liebert Liqui-tect panel as it was shipped, as shown in Table 12.
The password is the sole exception when reverting to the factory default settings. The password can be reset to the factory default of AAAA only through the DIP switches. For details, see Change Password on page 36.
Date Day (DD) 0-31
Month (MMM) JAN-DEC
Year (YY) 00-99
Time Hour (HR) 00-23
Minutes (MM) 00-59
Seconds (SS) 00-59
Table 12 Factory default settings
Feature Default
Zones1 & 2
CONNECTED N (Not connected)
LABEL ZONE 1
UNITS FT (feet)
AUTO CALIBRATE Automatic
SENSITIVITY FOR WATER DETECT
150 UA
SENSITIVITY FOR CONTAMINATED
50 UA
Alarmoutputs
LONGEST CABLE LENGTH 0-1000 ft. (0-304.8m)
LEAK & FAULT RELAYS:NORMALLY OPEN/CLOSED NO (Normally Open)
LEAK & FAULT ALARM:LATCHED/UNLATCHED Y (Latched)
Mapping values Current 0UA, where UA represents µA
or microAmps
Distance (none)
Re-alarm delay
Delay in minutes 5 minutes
Setup System Info Menu
SETUP SYSTEM INFOCHANGE PASSWORD
> CHANGE DATE & TIME↑↓=NEXT ↵=SELECTFACTORY DEFAULTS
Change Date & TimeCHANGE DATE & TIMEDAYLIGHT SVG TIME? Y30-APR-03 10:56:30
↑↓=SELECT ↵=NEXT/END
Setup System Info Menu
SETUP SYSTEM INFOCHANGE PASSWORDCHANGE DATE & TIME↑↓=NEXT ↵=SELECT
> FACTORY DEFAULTS
Factory DefaultsRESTORE ALL DEFAULTSARE YOU SURE? Y
↑↓=Y/N ↵=END

System and Control Options
Liebert® Liqui-tect® 38
6.9 Reset Latched Alarms
The Reset Latched Alarms menu allows you to clear any leak or fault alarms that have been defined as latched.
To clear latched alarms:
Log In and Choose Reset Latched Alarm
• From the Main Menu, use the arrows ↑↓ to choose System and Control, then press Enter ↵ (see 6.1 - Login for help).
• Enter your password at the Login screen.• From the System and Control Menu, use the arrows ↑↓ to choose
Reset Latched Alarm, then press Enter ↵.
Choose Y to Reset Alarms
• From the Reset Latched Alarms Menu, use the arrows ↑↓ to choose Y (Yes - reset all latched alarms) or N (No - do not reset alarms).(If no alarms have been set up as latched, the screen displays a message, as shown below right.)
• Press Enter ↵.
This is the only way to reset latched alarms. This step is required to return latched points to their normal state. (To set up digital alarm outputs as latched, see 6.5.3 - Define Alarms as Latched or Unlatched.)
Main Menu
VIEW STATUS> SYSTEM AND CONTROL
↑↓=NEXT ↵=SELECT
LoginLOGIN
AAAA↑↓=SELECT ↵=NEXT/END
System & Control MenuSETUP SYSTEM
> RESET LATCHED ALARMCLEAR ALARM HISTORY↑↓=NEXT ↵=SELECTCLEAR ZONE TREND
Reset Latched AlarmsRESET LEAK & FAULTLATCHED ALARMS? Y
↑↓=Y/N ↵=END
Message if No Latched Alarms
ALARMS ARE NOT SETFOR LATCHING
ESC=EXIT

System and Control Options
39 Liebert® Liqui-tect®
6.10 Clear Alarm History
The Clear Alarm History menu allows you to delete all records from the Alarm History Log, which contains up to 100 records of alarms that have occurred.
To delete all records from the Alarm History Log:
Log In and Choose Clear Alarm History
• From the Main Menu, use the arrows ↑↓ to choose System and Control, then press Enter ↵ (see 6.1 - Login for help).
• Enter your password at the Login screen.• From the System and Control Menu, use the arrows ↑↓ to choose
Clear Alarm History, then press Enter ↵.
Choose Y to Clear the Log
• From the Clear Alarm History Menu, use the arrows ↑↓ to choose Y (Yes - clear the Alarm History Log) or N (No - do not clear the log).(If there are no alarms or trends, the screen displays a message, as shown below right.)
• Press Enter ↵.
Main Menu
VIEW STATUS> SYSTEM AND CONTROL
↑↓=NEXT ↵=SELECT
LoginLOGIN
AAAA↑↓=SELECT ↵=NEXT/END
System & Control MenuSETUP SYSTEMRESET LATCHED ALARM
> CLEAR ALARM HISTORY↑↓=NEXT ↵=SELECTCLEAR ZONE TREND
Clear Alarm HistoryCLEAR ALARM HISTORYARE YOU SURE? Y
↑↓=Y/N ↵=END
Message if No Alarms
THERE ARE NO ALARMS
ESC=EXIT
Message if No Trends
THERE ARE NO TRENDS
ESC=EXIT

System and Control Options
Liebert® Liqui-tect® 40
6.11 Clear Zone Trend
The Clear Zone Trend menu allows you to delete all records from the Zone Trend Log, which contains up to 288 records. These records are created every 24 hours to assist in troubleshooting.
To delete all records from the Zone Trend Log:
Log In and Choose Clear Zone Trend
• From the Main Menu, use the arrows ↑↓ to choose System and Control, then press Enter ↵ (see 6.1 - Login for help).
• Enter your password at the Login screen.• From the System and Control Menu, use the arrows ↑↓ to choose
Clear Zone Trend, then press Enter ↵.
Choose Y to Clear the Log
• From the Clear Zone Trend Menu, use the arrows ↑↓ to choose Y (Yes - clear the Zone Trend Log) or N (No - do not clear the log).
• Press Enter ↵.
Main Menu
VIEW STATUS> SYSTEM AND CONTROL
↑↓=NEXT ↵=SELECT
LoginLOGIN
AAAA↑↓=SELECT ↵=NEXT/END
System & Control MenuSETUP SYSTEMRESET LATCHED ALARMCLEAR ALARM HISTORY↑↓=NEXT ↵=SELECT
> CLEAR ZONE TREND
Clear Zone TrendCLEAR ZONE TRENDARE YOU SURE? Y
↑↓=Y/N ↵=END

Specifications
41 Liebert® Liqui-tect®
7.0 SPECIFICATIONS
Table 13 Liebert Liqui-tect Panel specifications
Power Requirements
Small Enclosure Large Enclosure NOTE
LPS0240 115VACLPL1150
230VACLPL2300
If the equipment is used in a manner not specified by the manufacturer, the protection provided by the equipment may be impaired.
24VAC ±10%of nominal;
50/60 Hz, 0.3A, 8VA
115VAC ±10%of nominal;60 Hz, 4A,
460VA
230VAC ±10%of nominal;
50 Hz, 0.5A, 115VA
DimensionsW x D x H, in. (mm)
14-1/4 x 2-3/4 x 12(361.95 x 69.85 x 304.8)
18 x 2-3/4 x 18(457.2 x 69.85 x 457.2)
Weight (Assembled) 7.68 lb. (3.48 kg) 20.56 lb. (9.33 kg)
Enclosure Type NEMA 1
Liquid Crystal Display (LCD) Four line, 20 character, backlit
Mounting Surface Building Wall or Structural Member
Ambient OperatingEnvironment
32°F to 104°F (0°C to 40°C)0% RH to 95% RH (non-condensing)
Processor Specifics
Model MC68HC16Z1
Clock speed 20MHz
Total RAM 128Kb
Total FLASH 256Kb
Total NVRam 32Kb
A/D Resolution (Analog IN) 14 bits
Clock Type Real-Time Clock
Clock battery backup type Internal
Clock battery life 10 years, constant, no power
Communications
Lieber SiteScan® Web IGM Protocol, 422
Agency Listings No Transformer Module With Transformer Module
UL UL3121UL3121,UL1012
UL3121,UL1585
CSA C22.2 No. 1010 C22.2 No. 1010,C22.2 No. 66
C22.2 No. 1010, C22.2 No. 107.1
CE Yes Yes
FCC Compliance CFR 47 Part 15
Inputs & Outputs (Quantity)
Cable Input (2) N/A
Analog Output (2) 4-20mA signal output
Alarm Output (4) 24VAC, 1A

Specifications
Liebert® Liqui-tect® 42


While every precaution has been taken to ensure the accuracyand completeness of this literature, Liebert Corporation assumes noresponsibility and disclaims all liability for damages resulting from use ofthis information or for any errors or omissions.© 2014 Liebert CorporationAll rights reserved throughout the world. Specifications subject to changewithout notice.® Liebert is a registered trademark of Liebert Corporation.All names referred to are trademarksor registered trademarks of their respective owners.
Technical Support / ServiceWeb Site
www.liebert.comMonitoring
Outside North America: +00800 1155 4499Single-Phase UPS & Server Cabinets
Outside North America: +00800 1155 4499Three-Phase UPS & Power Systems
800-543-2378Outside North America: 614-841-6598
Environmental Systems800-543-2778
Outside the United States: 614-888-0246
LocationsUnited States
1050 Dearborn DriveP.O. Box 29186
Columbus, OH 43229Europe
Via Leonardo Da Vinci 8Zona Industriale Tognana
35028 Piove Di Sacco (PD) Italy+39 049 9719 111
Fax: +39 049 5841 257Asia
29/F, The Orient Square BuildingF. Ortigas Jr. Road, Ortigas Center
Pasig City 1605Philippines
+63 2 687 6615Fax: +63 2 730 9572
Emerson Network PowerLiebertwww.emerson.com
www.EmersonNetworkPower.com
SL-31000_REV2_01-14