life pulse high-frequency ventilator - …rtasap.com/ppt/lifepulsequickguide.pdf · 2 preparing...
TRANSCRIPT
01772-09.11
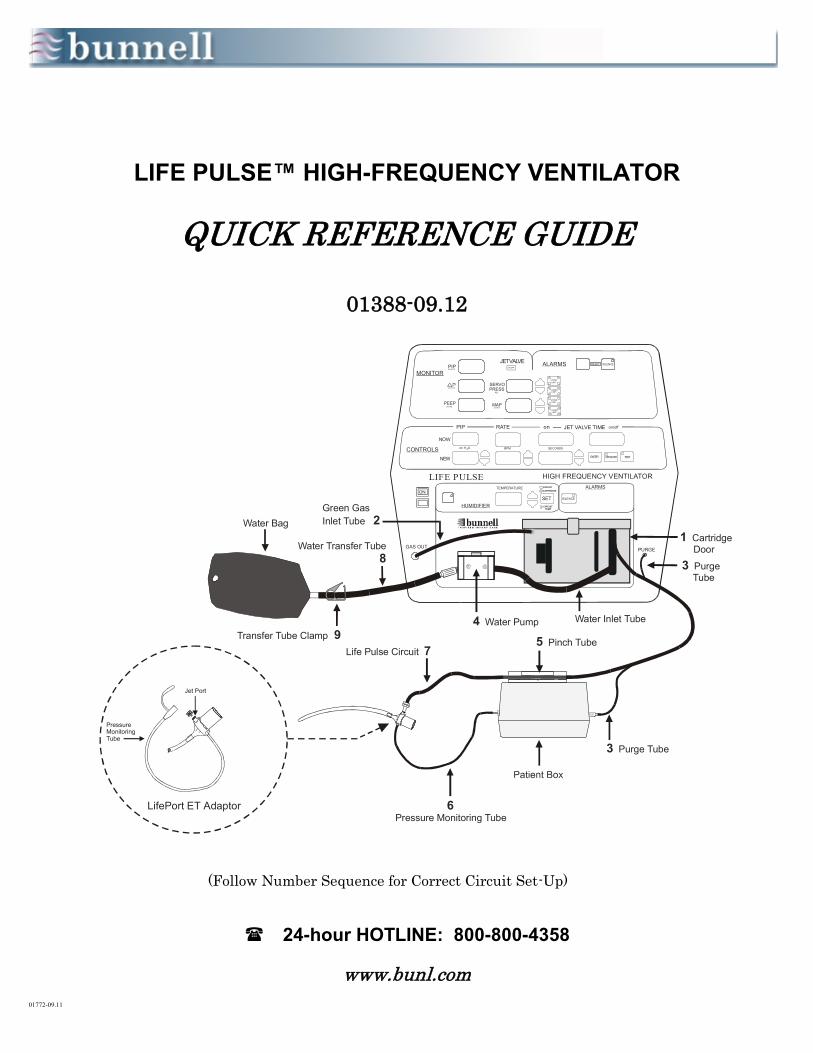
LIFE PULSE™ HIGH-FREQUENCY VENTILATOR
QUICK REFERENCE GUIDE
01388-09.12
(Follow Number Sequence for Correct Circuit Set-Up)
24-hour HOTLINE: 800-800-4358
www.bunl.com
PURGE
LIFE PULSE HIGH FREQUENCY VENTILATOR
JET VALVE TIME on/offPIP RATE on
NOW
NEWENTER STANDBY TEST
PIP ON OFF
UPPER
LIMIT
LOWERLIMIT
LOWERLIMIT
UPPERLIMITPEEP
SERVOPRESS
MAP
JET VALVE
TEMPERATURE
GAS OUT
SILENCEREADYALARMS
MONITOR
CONTROLS
HUMIDIFIER
ALARMS
PSI
BPM
cm H O2
cm H O2
cm H O2
cm HO2
SECONDScm H O2
ON
SILENCE
CIRCUIT
CIRCUITTEMP
CARTRIDGE
SET
3 Purge
Tube
3 Purge Tube
Transfer Tube Clamp 95 Pinch Tube
Life Pulse Circuit 7
Water Inlet Tube
Green Gas
Inlet Tube 2
4 Water Pump
Water Transfer Tube
8
Water Bag
1 Cartridge
Door
6Pressure Monitoring Tube
LifePort ET Adaptor
Pressure MonitoringTube
Jet Port
1
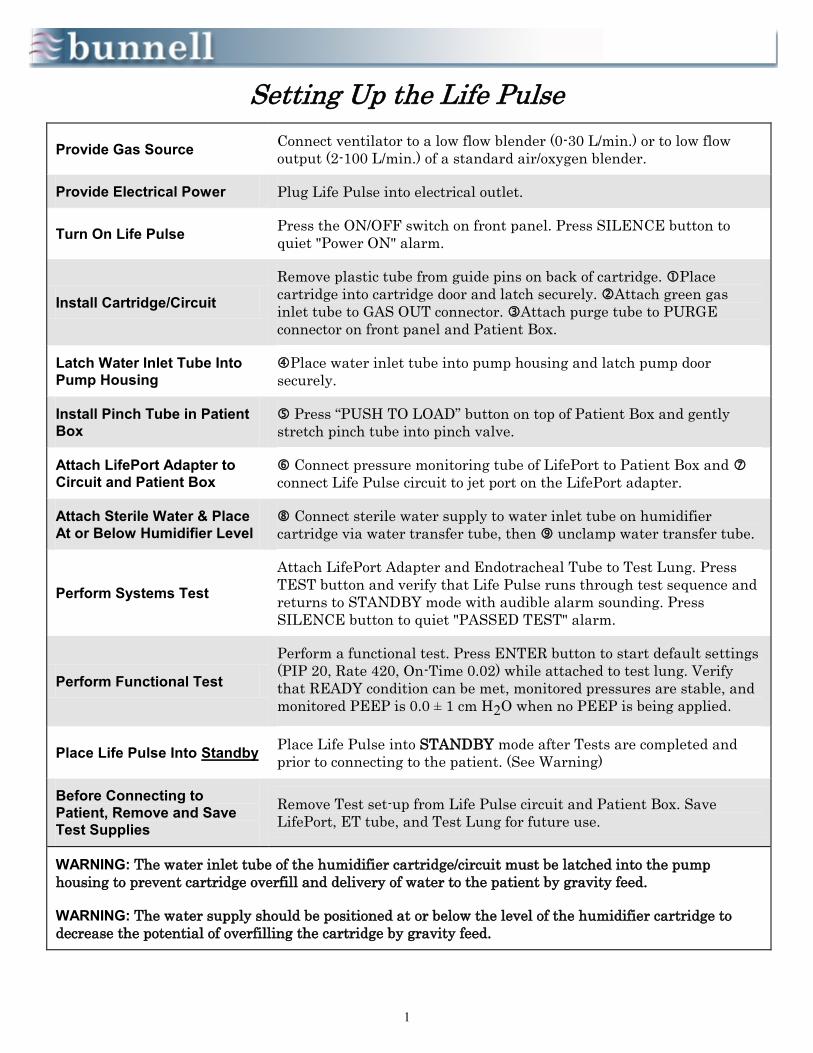
Setting Up the Life Pulse
Provide Gas Source Connect ventilator to a low flow blender (0-30 L/min.) or to low flow
output (2-100 L/min.) of a standard air/oxygen blender.
Provide Electrical Power Plug Life Pulse into electrical outlet.
Turn On Life Pulse Press the ON/OFF switch on front panel. Press SILENCE button to
quiet "Power ON" alarm.
Install Cartridge/Circuit
Remove plastic tube from guide pins on back of cartridge. Place
cartridge into cartridge door and latch securely. Attach green gas
inlet tube to GAS OUT connector. Attach purge tube to PURGE
connector on front panel and Patient Box.
Latch Water Inlet Tube Into
Pump Housing Place water inlet tube into pump housing and latch pump door
securely.
Install Pinch Tube in Patient
Box Press “PUSH TO LOAD” button on top of Patient Box and gently
stretch pinch tube into pinch valve.
Attach LifePort Adapter to
Circuit and Patient Box Connect pressure monitoring tube of LifePort to Patient Box and
connect Life Pulse circuit to jet port on the LifePort adapter.
Attach Sterile Water & Place
At or Below Humidifier Level Connect sterile water supply to water inlet tube on humidifier
cartridge via water transfer tube, then unclamp water transfer tube.
Perform Systems Test
Attach LifePort Adapter and Endotracheal Tube to Test Lung. Press
TEST button and verify that Life Pulse runs through test sequence and
returns to STANDBY mode with audible alarm sounding. Press
SILENCE button to quiet "PASSED TEST" alarm.
Perform Functional Test
Perform a functional test. Press ENTER button to start default settings
(PIP 20, Rate 420, On-Time 0.02) while attached to test lung. Verify
that READY condition can be met, monitored pressures are stable, and
monitored PEEP is 0.0 ± 1 cm H2O when no PEEP is being applied.
Place Life Pulse Into Standby Place Life Pulse into STANDBY mode after Tests are completed and
prior to connecting to the patient. (See Warning)
Before Connecting to
Patient, Remove and Save
Test Supplies
Remove Test set-up from Life Pulse circuit and Patient Box. Save
LifePort, ET tube, and Test Lung for future use.
WARNING: The water inlet tube of the humidifier cartridge/circuit must be latched into the pump
housing to prevent cartridge overfill and delivery of water to the patient by gravity feed.
WARNING: The water supply should be positioned at or below the level of the humidifier cartridge to
decrease the potential of overfilling the cartridge by gravity feed.
2
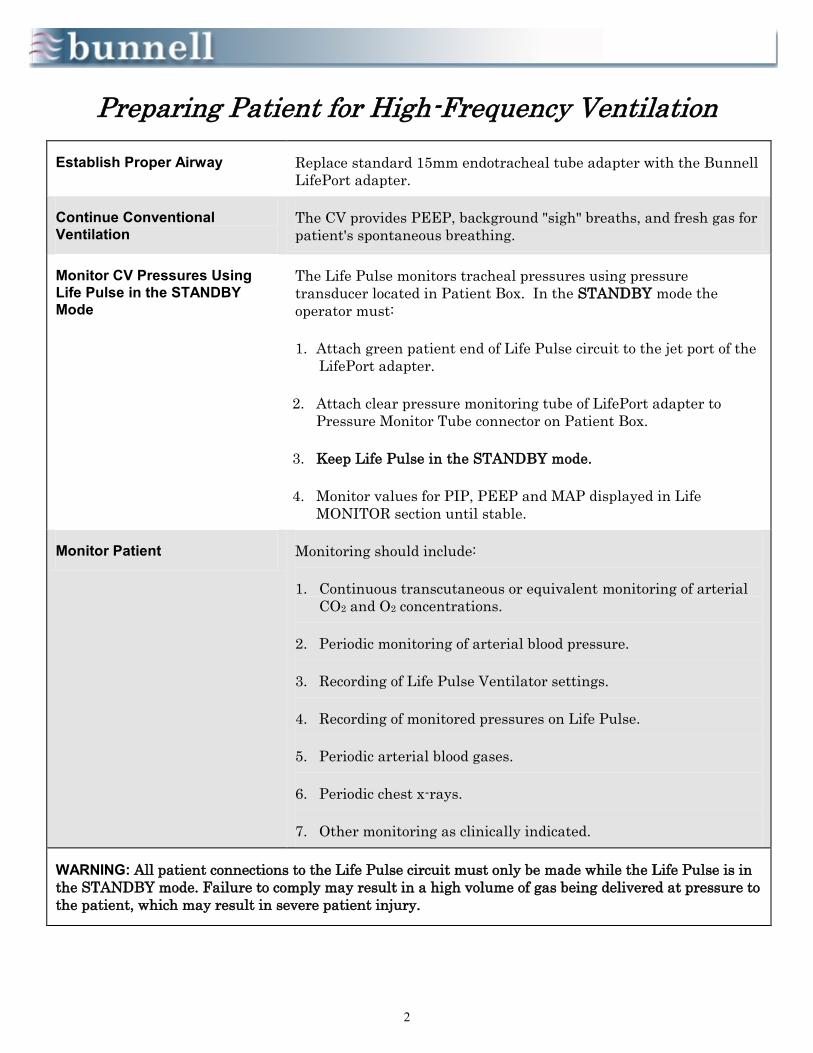
Preparing Patient for High-Frequency Ventilation
Establish Proper Airway Replace standard 15mm endotracheal tube adapter with the Bunnell
LifePort adapter.
Continue Conventional
Ventilation The CV provides PEEP, background "sigh" breaths, and fresh gas for
patient's spontaneous breathing.
Monitor CV Pressures Using
Life Pulse in the STANDBY
Mode
The Life Pulse monitors tracheal pressures using pressure
transducer located in Patient Box. In the STANDBY mode the
operator must:
1. Attach green patient end of Life Pulse circuit to the jet port of the
LifePort adapter.
2. Attach clear pressure monitoring tube of LifePort adapter to
Pressure Monitor Tube connector on Patient Box.
3. Keep Life Pulse in the STANDBY mode.
4. Monitor values for PIP, PEEP and MAP displayed in Life
MONITOR section until stable.
Monitor Patient Monitoring should include:
1. Continuous transcutaneous or equivalent monitoring of arterial
CO2 and O2 concentrations.
2. Periodic monitoring of arterial blood pressure.
3. Recording of Life Pulse Ventilator settings.
4. Recording of monitored pressures on Life Pulse.
5. Periodic arterial blood gases.
6. Periodic chest x-rays.
7. Other monitoring as clinically indicated.
WARNING: All patient connections to the Life Pulse circuit must only be made while the Life Pulse is in
the STANDBY mode. Failure to comply may result in a high volume of gas being delivered at pressure to
the patient, which may result in severe patient injury.

3
Beginning High-Frequency Ventilation
All infants treated with the Life Pulse must be connected to a conventional ventilator and continuous blood gas monitors (transcutaneous and/or pulse oximetry). They must have a Bunnell LifePort adapter on the standard ET tube and be intubated. The following steps may then be taken:
Monitor CV PIP with
Life Pulse in the
STANDBY Mode
Monitor PIP, PEEP, and MAP delivered by CV or HFV using Life Pulse in
STANDBY mode. (Wait at least 90 seconds for averaging of PIP and PEEP
samples to equilibrate.)
Record Baseline
Blood Gases Note blood gas monitor values and/or draw an arterial blood gas sample before
starting high-frequency ventilation.
Set Life Pulse PIP Adjust NEW PIP of Life Pulse to be equal to 90-100% of average CV PIP (90%
for air leaks; 100% for poor compliance) as displayed in MONITOR section of
the Life Pulse.
Set Life Pulse Rate Adjust NEW RATE of Life Pulse to intermediate frequency (420 b/m is recom-
mended).
Set Life Pulse On-
Time Adjust NEW ON-TIME of Life Pulse to 0.020 seconds.
Begin High-
Frequency
Ventilation
Press the ENTER button on Life Pulse to convert NEW settings to NOW
settings. PIP will quickly rise towards set NOW PIP. Life Pulse may pause
every time a breath is delivered by the conventional ventilator.
Eliminate Life Pulse
Interruptions If Life Pulse is pausing, reduce CV PIP until the high-frequency pulses are no
longer interrupted (when CV PIP is less than the Life Pulse NOW PIP).
Lower CV Rate Lower CV rate to between 0 and 10 b/m. (Use 0 to 4 b/m if air leak is patient's
primary problem. Use 5 to 10 b/m and/or higher PEEP if poor oxygenation is
main problem.)
Assure READY Light
is On Watch for READY light to illuminate, which indicates the pressures are stable
and the alarms are active.
Adjust PEEP Adjust CV gas flow and/or PEEP to obtain the desired PEEP. (Reduce Life
Pulse rate if monitored PEEP exceeds CV PEEP.)
Reassess Blood
Gases Note blood gas monitor values and/or draw arterial blood gas samples to
determine if ventilator adjustments are necessary.
WARNING: Before leaving the Life Pulse, during initial start-up and following a circuit change, a
properly trained person must observe the cartridge fill with sterile water for inhalation, USP, to the
second water level sensing pin and the pump stop pumping.

4
Patient Management During HFV
1. HFV ΔP (PIP - PEEP) is the primary determinant of PaCO2. HFV rate is secondary.
2. Resting lung volume (FRC supported by set PEEP) and mean airway pressure are crucial determinants of PO2 .
3. Avoid hyperventilation and hypoxemia by using optimal PEEP. (See When to Raise PEEP below.)
4. Minimize IMV at all times, using very low rates (typically 0 – 3 bpm), unless IMV is being used to dilate airways or
temporarily to recruit collapsed alveoli. In general, keep IMV PIP 20 – 50% < HFV PIP.
5. To overcome atelectasis, IMV rates up to 10 bpm can be used for 10 – 30 minutes. Thereafter, IMV rate should be
dropped back to 0 – 3 bpm. In general, keep IMV I-time = 0.4 – 0.6 sec.
6. If lowering IMV rate worsens oxygenation, PEEP is probably too low. Higher PEEPs and lower IMV rates reduce the risk
of iatrogenic lung injury.
7. Lower FIO2 before PEEP when weaning until FIO2 is less than 0.53.
SETTING USUAL WHEN TO RAISE WHEN TO LOWER
HFV PIP
whatever
produces
desired
PCO2
To lower PCO2.
To raise PCO2.
(Raise PEEP simultaneously to keep MAP and
PO2 constant.)
HFV Rate
420 bpm
(neonates)
300 bpm
(peds)
To decrease PCO2 in smaller
patients; or
To increase MAP and PO2.
To eliminate inadvertent PEEP by lengthening
exhalation time or
To increase PCO2 when weaning.
HFV
I-Time 0.02 sec
To enable Jet to reach PIP at
low HFJV rates in larger patients
( > 15 kg).
Keep at the minimum of 0.02in almost all
cases.
IMV Rate 0 – 3 bpm
To reverse atelectasis or dilate
restricted airways
(5-10 bpm)
To minimize volutrauma, especially when air
leaks are present, or
To decrease hemodynamic compromise.
IMV PIP
PIP
necessary to
get adequate
chest rise
To reverse atelectasis or
dilate airways; PIP may be >
or < HFJV PIP.
To minimize volutrauma, especially when air
leaks are present, or
To decrease hemodynamic compromise.
IMV
I-Time 0.4 sec
To reverse atelectasis or
dilate airways.
To minimize volutrauma, especially when air
leaks are present, or
To decrease hemodynamic compromise.
PEEP
7 – 12
cm H2O
(Neonates)
10 – 15
cm H2O
(Peds)
To improve oxygenation and
decrease hyperventilation.
To find optimal PEEP:
Raise PEEP until SaO2 stays
constant when switching from
IMV to CPAP.
Lower PEEP only:
when it appears that cardiac output is being
compromised; or
when oxygenation is adequate and
when lowering PEEP doesn't decrease PaO2.
FIO2 < 0.60 Raise as needed after optimizing
PEEP.
Lower FIO2 in preference to PEEP when
weaning until FIO2 < 0.3.
Special Air Leak Considerations
1. Minimize IMV by using HFV + adequate CPAP.
2. If oxygenation is compromised, raise PEEP, even if the lungs are overexpanded on xray.
(Rationale: you are going to have to raise something, and PEEP is less hazardous than IMV breaths.
It may also help interstitial gas find its way out of the lungs via more patent airways.)
5
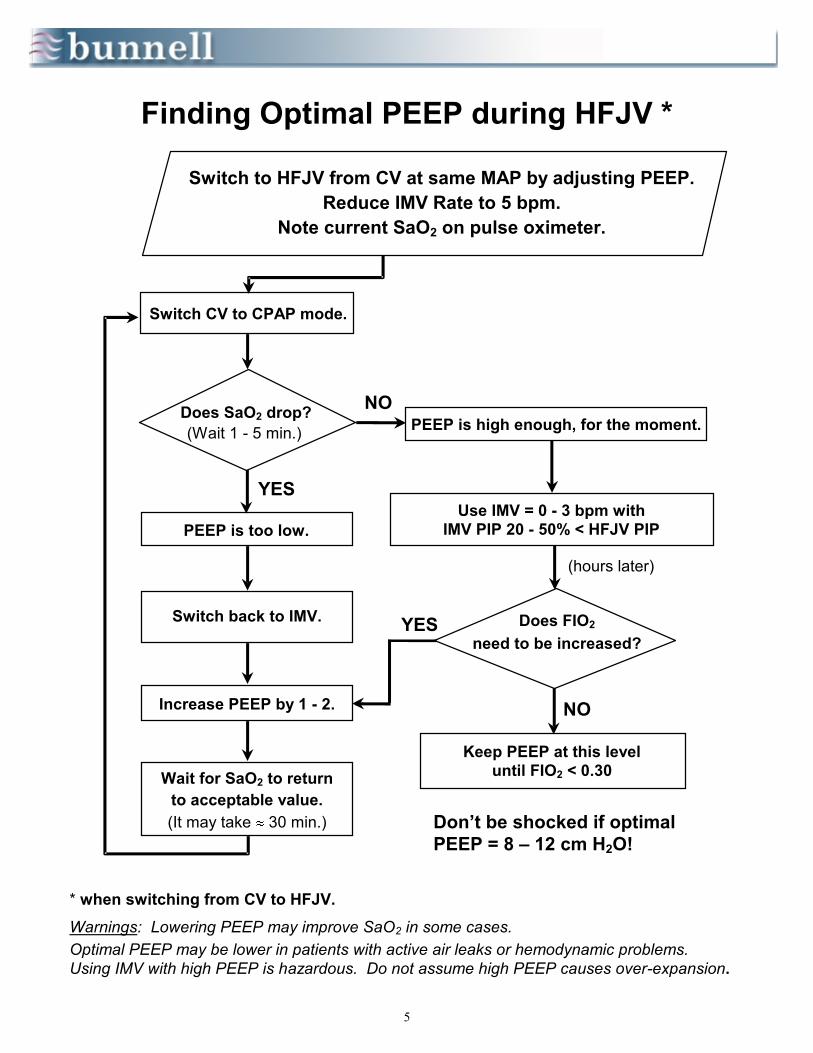
* when switching from CV to HFJV.
Warnings: Lowering PEEP may improve SaO2 in some cases.
Optimal PEEP may be lower in patients with active air leaks or hemodynamic problems.
Using IMV with high PEEP is hazardous. Do not assume high PEEP causes over-expansion.
Switch to HFJV from CV at same MAP by adjusting PEEP.
Reduce IMV Rate to 5 bpm.
Note current SaO2 on pulse oximeter.
Switch CV to CPAP mode.
PEEP is high enough, for the moment.
Use IMV = 0 - 3 bpm with
IMV PIP 20 - 50% < HFJV PIP
Wait for SaO2 to return
to acceptable value.
(It may take 30 min.)
PEEP is too low.
Switch back to IMV.
Increase PEEP by 1 - 2.
Does SaO2 drop?
(Wait 1 - 5 min.)
Finding Optimal PEEP during HFJV *
NO
YES
Keep PEEP at this level
until FIO2 < 0.30
Don’t be shocked if optimal
PEEP = 8 – 12 cm H2O!
Does FIO2
need to be increased?
NO
YES
(hours later)
6
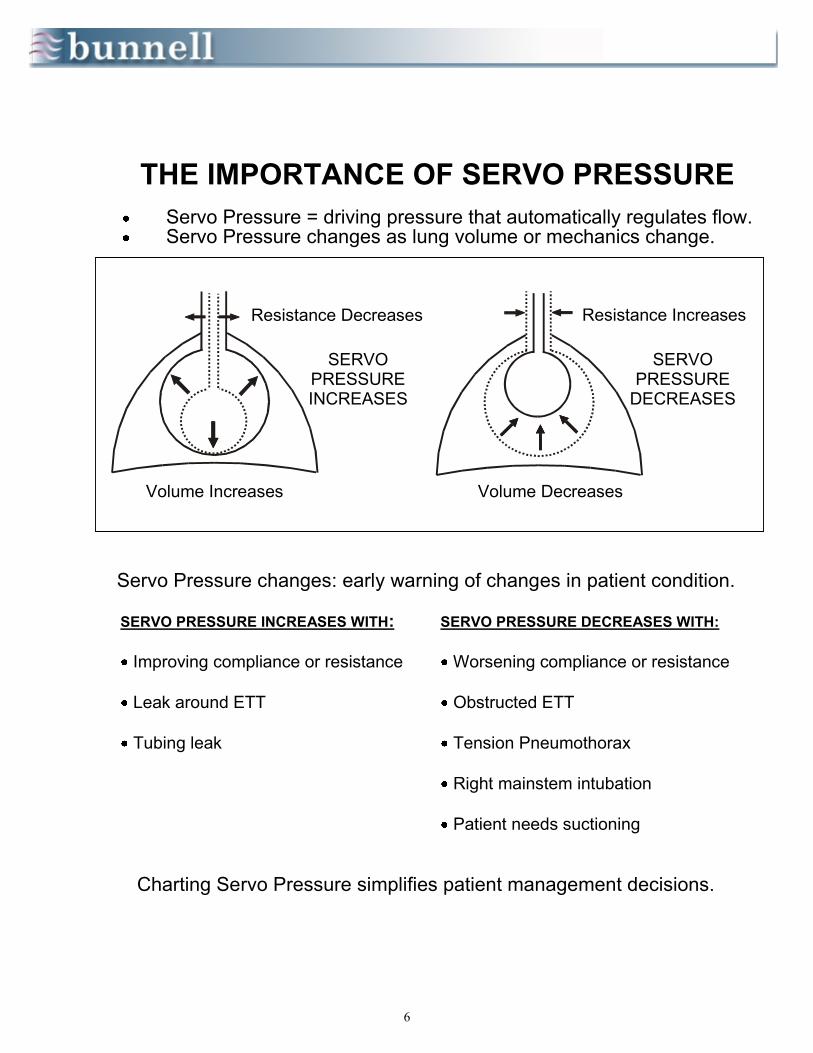
THE IMPORTANCE OF SERVO PRESSURE
Servo Pressure = driving pressure that automatically regulates flow.Servo Pressure changes as lung volume or mechanics change.
Resistance Decreases Resistance Increases
Volume Increases Volume Decreases
SERVO PRESSURE INCREASES
SERVO PRESSURE
DECREASES
Servo Pressure changes: early warning of changes in patient condition.
SERVO PRESSURE INCREASES WITH: SERVO PRESSURE DECREASES WITH:
Improving compliance or resistance Worsening compliance or resistance
Leak around ETT Obstructed ETT
Tubing leak Tension Pneumothorax
Right mainstem intubation
Patient needs suctioning
Charting Servo Pressure simplifies patient management decisions.
7
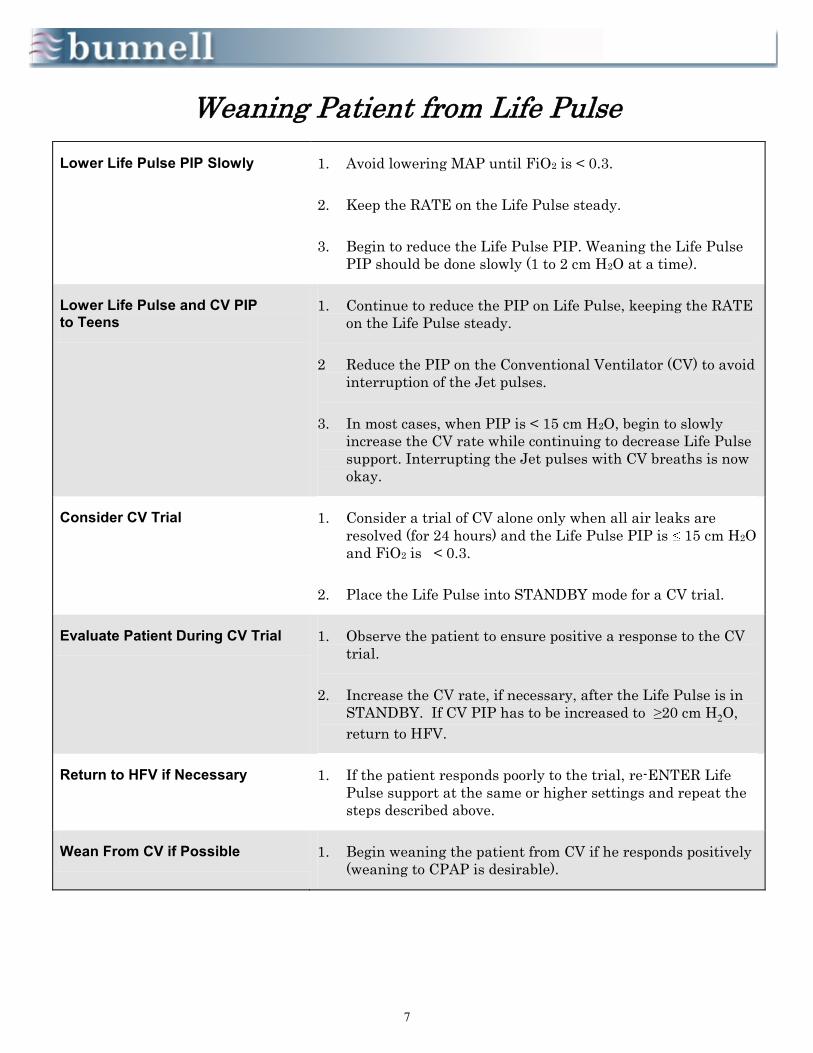
Weaning Patient from Life Pulse
Lower Life Pulse PIP Slowly 1. Avoid lowering MAP until FiO2 is < 0.3.
2. Keep the RATE on the Life Pulse steady.
3. Begin to reduce the Life Pulse PIP. Weaning the Life Pulse
PIP should be done slowly (1 to 2 cm H2O at a time).
Lower Life Pulse and CV PIP
to Teens 1. Continue to reduce the PIP on Life Pulse, keeping the RATE
on the Life Pulse steady.
2 Reduce the PIP on the Conventional Ventilator (CV) to avoid
interruption of the Jet pulses.
3. In most cases, when PIP is < 15 cm H2O, begin to slowly
increase the CV rate while continuing to decrease Life Pulse
support. Interrupting the Jet pulses with CV breaths is now
okay.
Consider CV Trial 1. Consider a trial of CV alone only when all air leaks are
resolved (for 24 hours) and the Life Pulse PIP is 15 cm H2O
and FiO2 is < 0.3.
2. Place the Life Pulse into STANDBY mode for a CV trial.
Evaluate Patient During CV Trial 1. Observe the patient to ensure positive a response to the CV
trial.
2. Increase the CV rate, if necessary, after the Life Pulse is in
STANDBY. If CV PIP has to be increased to ≥20 cm H2O,
return to HFV.
Return to HFV if Necessary 1. If the patient responds poorly to the trial, re-ENTER Life
Pulse support at the same or higher settings and repeat the
steps described above.
Wean From CV if Possible 1. Begin weaning the patient from CV if he responds positively
(weaning to CPAP is desirable).
8
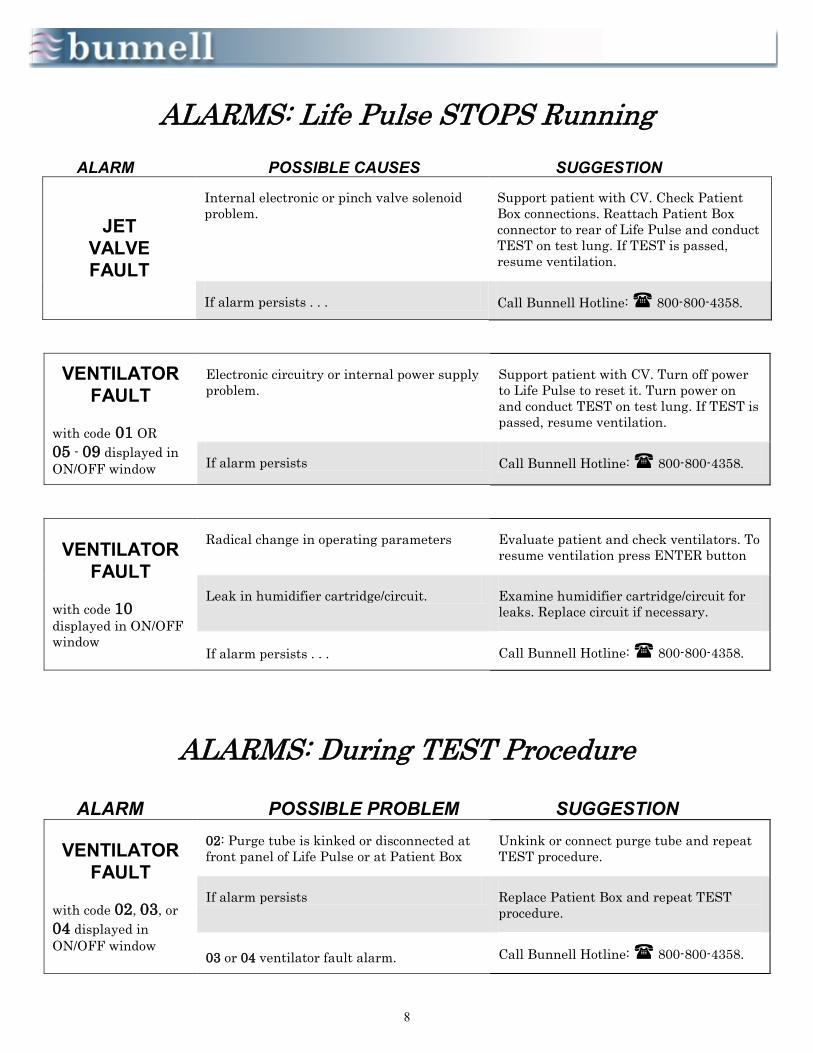
ALARMS: Life Pulse STOPS Running
ALARM POSSIBLE CAUSES SUGGESTION
JET
VALVE
FAULT
Internal electronic or pinch valve solenoid
problem. Support patient with CV. Check Patient
Box connections. Reattach Patient Box
connector to rear of Life Pulse and conduct
TEST on test lung. If TEST is passed,
resume ventilation.
If alarm persists . . . Call Bunnell Hotline: 800-800-4358.
VENTILATOR
FAULT
with code 01 OR
05 - 09 displayed in
ON/OFF window
Electronic circuitry or internal power supply
problem.
Support patient with CV. Turn off power
to Life Pulse to reset it. Turn power on
and conduct TEST on test lung. If TEST is
passed, resume ventilation.
If alarm persists Call Bunnell Hotline: 800-800-4358.
VENTILATOR
FAULT
with code 10
displayed in ON/OFF
window
Radical change in operating parameters Evaluate patient and check ventilators. To
resume ventilation press ENTER button
Leak in humidifier cartridge/circuit. Examine humidifier cartridge/circuit for
leaks. Replace circuit if necessary.
If alarm persists . . . Call Bunnell Hotline: 800-800-4358.
ALARMS: During TEST Procedure
ALARM POSSIBLE PROBLEM SUGGESTION
VENTILATOR
FAULT
with code 02, 03, or
04 displayed in
ON/OFF window
02: Purge tube is kinked or disconnected at
front panel of Life Pulse or at Patient Box
Unkink or connect purge tube and repeat
TEST procedure.
If alarm persists Replace Patient Box and repeat TEST
procedure.
03 or 04 ventilator fault alarm. Call Bunnell Hotline: 800-800-4358.

9
ALARMS: Life Pulse CONTINUES Running
ALARM POSSIBLE CAUSES SUGGESTION
HIGH
PIP
ET tube improperly positioned, kinked, or
obstructed. Reposition, unkink, or suction ET tube
(may require reintubation).
Pressure monitoring tube kinked or
obstructed. Unkink pressure monitoring tube or flush
pressure monitoring tube with 2-3 cc air.
Expiratory limb of conventional ventilator
circuit kinked or obstructed. Unkink expiratory limb of circuit and/or
clear obstruction (e.g., excess water).
If alarm persists . . . Call Bunnell Hotline: 800-800-4358.
LOSS
OF
PIP
Pressure monitoring tube obstructed, kinked
or disconnected.
Unkink or reconnect pressure monitoring
tube, or flush with 2-3 cc air while Life
Pulse is running and in READY mode.
May need to press ENTER to resume
ventilation if READY light is off. Re-
evaluate cartridge temp setting (e.g., lower
cartridge temp 1-2o C; repeat if necessary.
WARNING: do not under-humidify.)
Suction patient if necessary.
Life Pulse circuit is kinked or disconnected. Unkink or reconnect Life Pulse circuit to
Life Port adapter.
Humidifier cartridge/circuit leaking, kinked,
or improperly installed.
Inspect humidifier cartridge/circuit for
leaks, kinks, or poor connections; correct
condition (e.g., replace circuit).
Pinch Valve stopped cycling Place Life Pulse in STANDBY mode,
increase CV support, and call Bunnell
Hotline.
If alarm persists . . . Call Bunnell Hotline: 800-800-4358.
UNSTABLE
PIP
Water or secretions in or around tip of
pressure monitoring tube.
Flush pressure monitoring tube with 2-3 cc
air while Life Pulse is running and in
READY mode. Re-evaluate cartridge temp
setting (e.g., lower cartridge temp 1-2o C
and repeat if necessary. WARNING: do not
under-humidify.) Suction patient if
necessary.
Conventional ventilator breaths or patient's
active spontaneous breathing affecting
pressure monitoring.
Reduce CV rate (0-5 b/m for airleaks; 5-10
b/m for poor compliance). Consider
sedation.
If problem persists . . . Call Bunnell Hotline: 800-800-4358.

10
ALARM POSSIBLE CAUSES SUGGESTION
CANNOT
MEET
PIP
Patient "fighting" the Life Pulse. Patient may need comforting or sedation.
Patient too large for Life Pulse settings. Check Servo Pressure. If 19 psi, patient may be too large for Life Pulse settings. Decrease HFV rate, PIP, and/or increase CV support.
Humidifier cartridge/circuit leaking, kinked, or improperly installed.
Inspect humidifier cartridge/circuit for leaks, kinks, or poor connections; correct condition (e.g., replace circuit).
If alarm persists . . . Call Bunnell Hotline: 800-800-4358.
MEAN
AIRWAY
PRESSURE:
UPPER
LIMIT
(High MAP)
Conventional ventilator support has been increased.
Press RESET button on front panel.
Change in patient's condition. Evaluate patient and manage appropriately.
Pressure monitor tube kinked, or obstructed.
Unkink pressure monitoring tube or flush with 2-3 cc air while Life Pulse is running and in READY mode. Re-evaluate cartridge temp setting (e.g., lower cartridge temp 1-2o C; repeat if necessary. (NOTE: do not under-humidify.) Suction patient if necessary. Evaluate patient and manage appropriately.
Expiratory limb of conventional ventilator circuit kinked or obstructed.
Unkink expiratory limb of circuit and/or clear obstruction (e.g., excess water).
ET tube improperly positioned, kinked, or obstructed.
Reposition, unkink, or suction ET tube (may require
reintubation).
If alarm persists . . . Call Bunnell Hotline: 800-800-4358.
MEAN
AIRWAY
PRESSURE:
LOWER
LIMIT
(Low MAP)
Conventional ventilator support has been decreased.
Press RESET button on front panel.
Change in patient's condition. Evaluate patient and manage appropriately.
Humidifier cartridge/circuit leaking, kinked, or improperly installed.
Inspect humidifier cartridge/circuit for leaks, kinks, or poor connections; correct condition (e.g., replace circuit).
Leak around, or improperly positioned, ET tube.
Examine ET tube for improper positioning or air
leak. ET tube may need repositioning or patient may
require reintubation with larger ET tube.
If alarm persists . . . Call Bunnell Hotline: 800-800-4358.
11
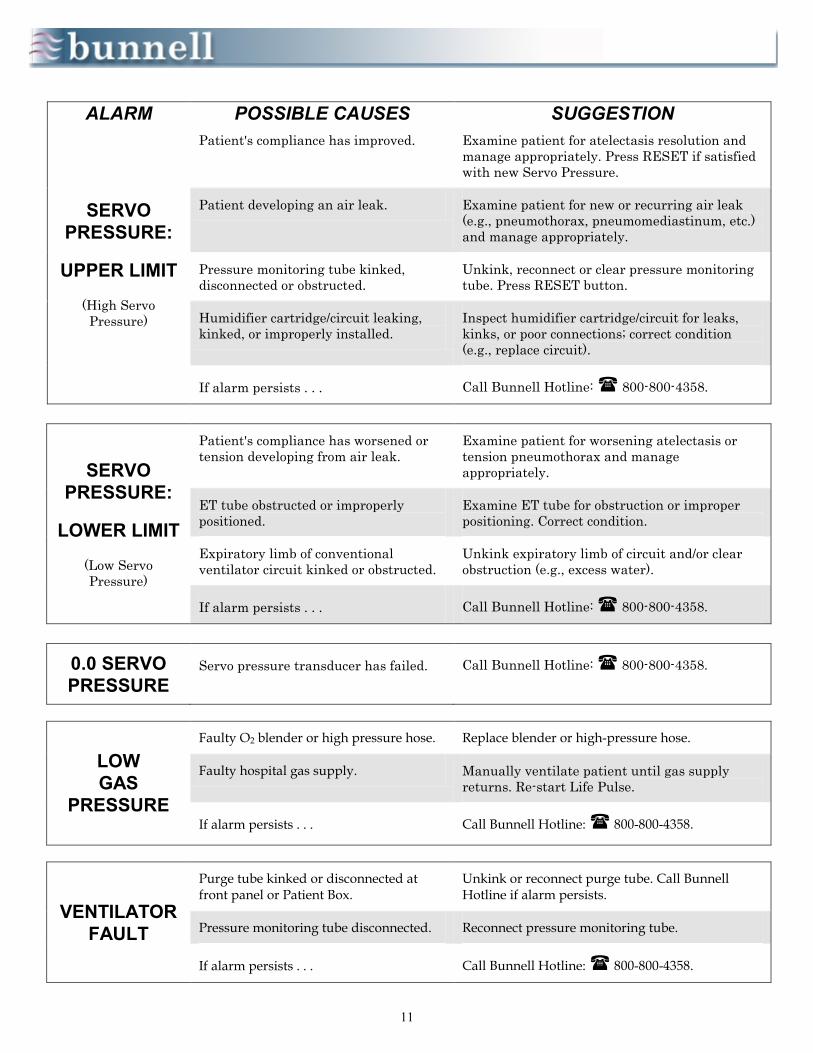
ALARM POSSIBLE CAUSES SUGGESTION
SERVO
PRESSURE:
UPPER LIMIT
(High Servo
Pressure)
Patient's compliance has improved. Examine patient for atelectasis resolution and
manage appropriately. Press RESET if satisfied
with new Servo Pressure.
Patient developing an air leak. Examine patient for new or recurring air leak
(e.g., pneumothorax, pneumomediastinum, etc.)
and manage appropriately.
Pressure monitoring tube kinked,
disconnected or obstructed.
Unkink, reconnect or clear pressure monitoring
tube. Press RESET button.
Humidifier cartridge/circuit leaking,
kinked, or improperly installed.
Inspect humidifier cartridge/circuit for leaks,
kinks, or poor connections; correct condition
(e.g., replace circuit).
If alarm persists . . . Call Bunnell Hotline: 800-800-4358.
SERVO
PRESSURE:
LOWER LIMIT
(Low Servo
Pressure)
Patient's compliance has worsened or
tension developing from air leak.
Examine patient for worsening atelectasis or
tension pneumothorax and manage
appropriately.
ET tube obstructed or improperly
positioned.
Examine ET tube for obstruction or improper
positioning. Correct condition.
Expiratory limb of conventional
ventilator circuit kinked or obstructed.
Unkink expiratory limb of circuit and/or clear
obstruction (e.g., excess water).
If alarm persists . . . Call Bunnell Hotline: 800-800-4358.
0.0 SERVO
PRESSURE Servo pressure transducer has failed. Call Bunnell Hotline: 800-800-4358.
LOW
GAS
PRESSURE
Faulty O2 blender or high pressure hose. Replace blender or high-pressure hose.
Faulty hospital gas supply. Manually ventilate patient until gas supply
returns. Re-start Life Pulse.
If alarm persists . . . Call Bunnell Hotline: 800-800-4358.
VENTILATOR
FAULT
Purge tube kinked or disconnected at front panel or Patient Box.
Unkink or reconnect purge tube. Call Bunnell Hotline if alarm persists.
Pressure monitoring tube disconnected. Reconnect pressure monitoring tube.
If alarm persists . . . Call Bunnell Hotline: 800-800-4358.
12
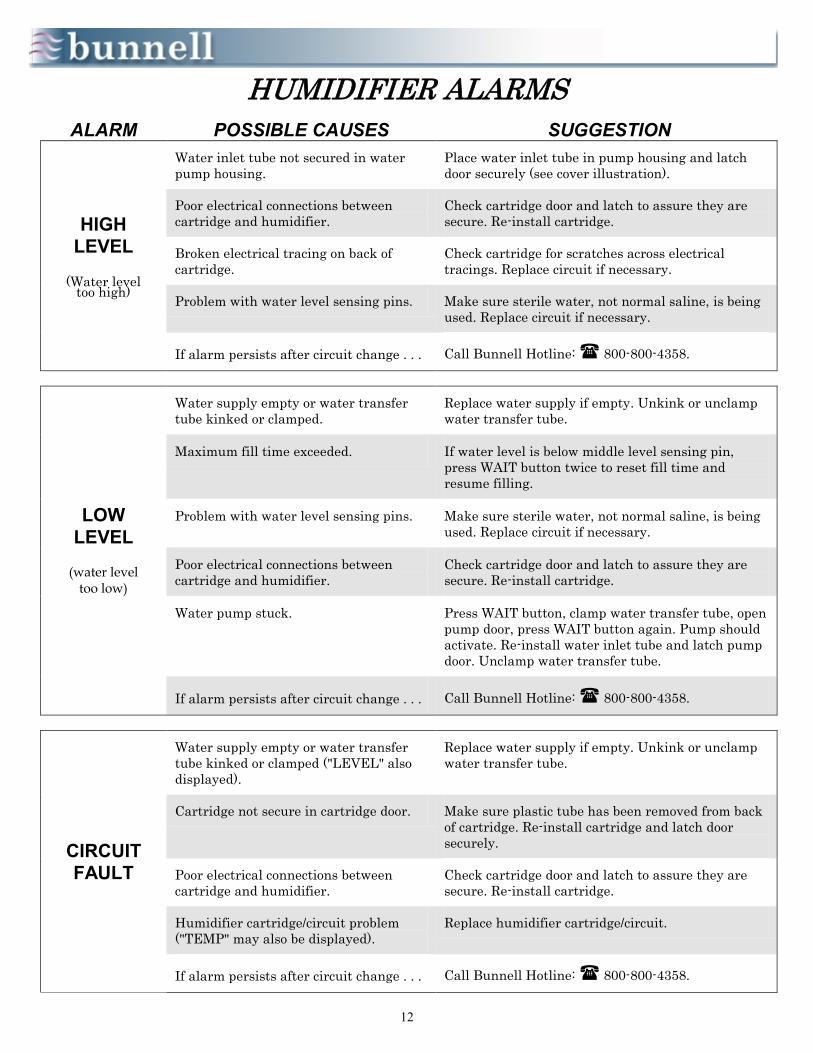
HUMIDIFIER ALARMS
ALARM POSSIBLE CAUSES SUGGESTION
HIGH
LEVEL
(Water level too high)
Water inlet tube not secured in water
pump housing.
Place water inlet tube in pump housing and latch
door securely (see cover illustration).
Poor electrical connections between
cartridge and humidifier.
Check cartridge door and latch to assure they are
secure. Re-install cartridge.
Broken electrical tracing on back of
cartridge.
Check cartridge for scratches across electrical
tracings. Replace circuit if necessary.
Problem with water level sensing pins. Make sure sterile water, not normal saline, is being
used. Replace circuit if necessary.
If alarm persists after circuit change . . . Call Bunnell Hotline: 800-800-4358.
LOW
LEVEL
(water level
too low)
Water supply empty or water transfer
tube kinked or clamped.
Replace water supply if empty. Unkink or unclamp
water transfer tube.
Maximum fill time exceeded. If water level is below middle level sensing pin,
press WAIT button twice to reset fill time and
resume filling.
Problem with water level sensing pins. Make sure sterile water, not normal saline, is being
used. Replace circuit if necessary.
Poor electrical connections between
cartridge and humidifier.
Check cartridge door and latch to assure they are
secure. Re-install cartridge.
Water pump stuck. Press WAIT button, clamp water transfer tube, open
pump door, press WAIT button again. Pump should
activate. Re-install water inlet tube and latch pump
door. Unclamp water transfer tube.
If alarm persists after circuit change . . . Call Bunnell Hotline: 800-800-4358.
CIRCUIT
FAULT
Water supply empty or water transfer
tube kinked or clamped ("LEVEL" also
displayed).
Replace water supply if empty. Unkink or unclamp
water transfer tube.
Cartridge not secure in cartridge door. Make sure plastic tube has been removed from back
of cartridge. Re-install cartridge and latch door
securely.
Poor electrical connections between
cartridge and humidifier.
Check cartridge door and latch to assure they are
secure. Re-install cartridge.
Humidifier cartridge/circuit problem
("TEMP" may also be displayed).
Replace humidifier cartridge/circuit.
If alarm persists after circuit change . . . Call Bunnell Hotline: 800-800-4358.
13
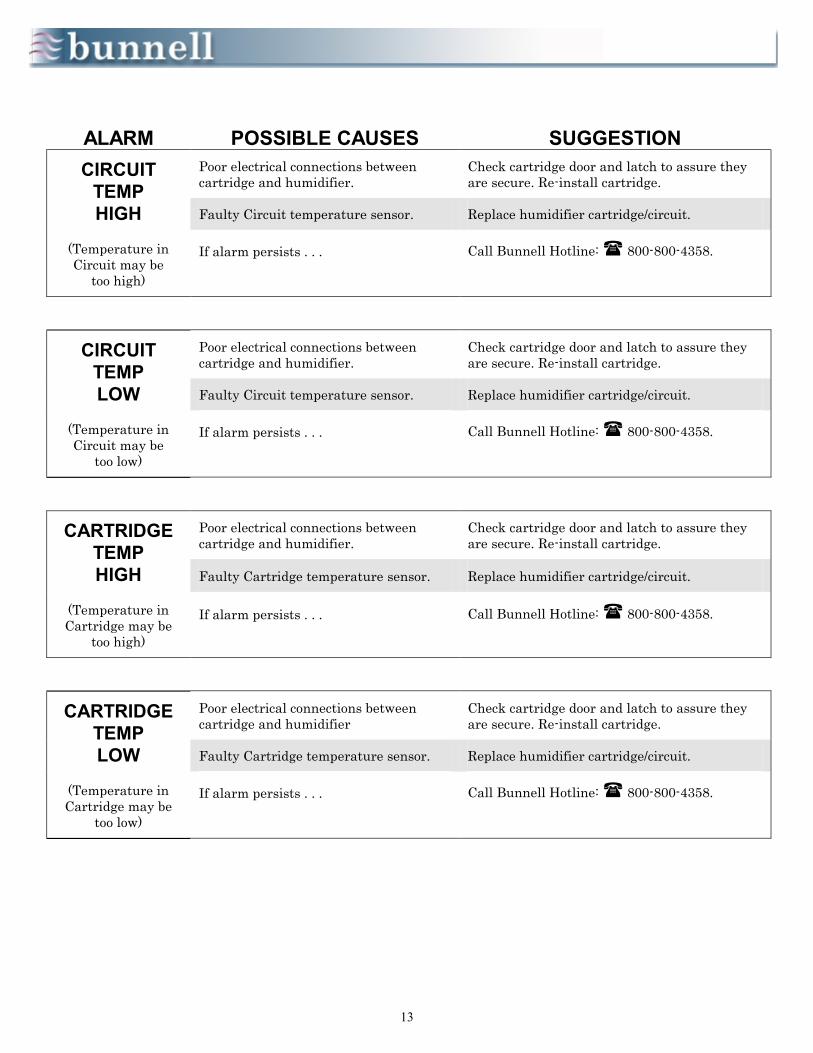
ALARM POSSIBLE CAUSES SUGGESTION
CIRCUIT
TEMP
HIGH
(Temperature in
Circuit may be
too high)
Poor electrical connections between
cartridge and humidifier. Check cartridge door and latch to assure they
are secure. Re-install cartridge.
Faulty Circuit temperature sensor. Replace humidifier cartridge/circuit.
If alarm persists . . . Call Bunnell Hotline: 800-800-4358.
CIRCUIT
TEMP
LOW
(Temperature in
Circuit may be
too low)
Poor electrical connections between
cartridge and humidifier. Check cartridge door and latch to assure they
are secure. Re-install cartridge.
Faulty Circuit temperature sensor. Replace humidifier cartridge/circuit.
If alarm persists . . . Call Bunnell Hotline: 800-800-4358.
CARTRIDGE
TEMP
HIGH
(Temperature in
Cartridge may be
too high)
Poor electrical connections between
cartridge and humidifier. Check cartridge door and latch to assure they
are secure. Re-install cartridge.
Faulty Cartridge temperature sensor. Replace humidifier cartridge/circuit.
If alarm persists . . . Call Bunnell Hotline: 800-800-4358.
CARTRIDGE
TEMP
LOW
(Temperature in
Cartridge may be
too low)
Poor electrical connections between
cartridge and humidifier Check cartridge door and latch to assure they
are secure. Re-install cartridge.
Faulty Cartridge temperature sensor. Replace humidifier cartridge/circuit.
If alarm persists . . . Call Bunnell Hotline: 800-800-4358.