lighthouse transaction manager · • compare ltm totals to their point-of-sale (pos) or property...
TRANSCRIPT

Join us for treats Thursday, Month Day, at 3:00 p.m. in the kitchen.
Auditing Transactions Guide
Copyright © 2019 Shift4 Payments, LLC. All rights reserved.
Lighthouse Transaction Manager

Auditing Transactions Guide
© 2019 Shift4 Payments, LLC. All rights reserved. Version 2.3 External Use NDA Page 2 of 57
Copyright Notice
Shift4 Payments 1491 Center Crossing Road Las Vegas, NV 89144 702.597.2480 www.shift4.com [email protected] Document Title: Auditing Transactions Guide Publication Date: 03/04/2019 Copyright © 2019 Shift4 Payments. All rights reserved worldwide. *Universal Transaction Gateway® (UTG)®, Lighthouse Transaction Manager, 4Go®, i4Go®, and 4Word® are covered by one or more of the following U.S. Pat. Nos.: 7770789; 7841523; 7891563; 8328095; 8688589; 8690056; 9082120; 9256874; 9495680. All trademarks, service marks, product names, and logos are the property of their respective owners. Shift4 Payments may have patents, patent applications, trademarks, copyrights, or other intellectual property rights covering subject matter in this document. The furnishing of this document does not give any license to these patents, trademarks, copyrights, or other intellectual property except as expressly provided in any written license agreement from Shift4 Payments. All graphics are property of Shift4 Payments. No part of this publication may be reproduced, stored in a retrieval system, or transmitted in any form or by any means without prior written permission of Shift4 Payments. The contents of this publication are the property of Shift4 Payments. Shift4 Payments reserves the right to revise this document and to periodically make changes to the content thereof without any obligation or notification to any organization of such revisions or changes unless required to do so by prior written agreement. Notice of Confidentiality This document contains information that is proprietary to Shift4 Payments. It carries the Shift4 classification “External Use NDA.” It is provided for the sole purpose of specifying instructions for Shift4 Payments products. The recipient agrees to maintain this information in confidence and not reproduce or otherwise disclose this information. Please refer to the signed Bilateral Non-Disclosure and Confidentiality Agreement for additional agreements and expectations. Notice to Governmental End Users If any Shift4 product is acquired under the terms of a Department of Defense contract: use, duplication, or disclosure by the US Government is subject to restrictions as set forth in subparagraph (c)(1)(ii) of 252.227.7013. Civilian agency contract: use, reproduction, or disclosure is subject to 52.227-19 (a) through (d) and restrictions set forth in the accompanying end user agreement. Unpublished rights reserved under the copyright laws of the United States.

Auditing Transactions Guide
© 2019 Shift4 Payments, LLC. All rights reserved. Version 2.3 External Use NDA Page 3 of 57
Auditing Transactions Guide The Auditing Transactions Guide reviews why it is important to audit, and it provides detailed instructions for auditing and submitting a batch in Lighthouse Transaction Manager (LTM).
Note: LTM will automatically sign users out after 20 minutes of inactivity. A warning message will appear five minutes before this automatic sign-out is set to occur; a final warning will appear one minute before.
The Importance of Auditing It is important to audit because it simplifies month-end accounting, saves money, and improves customer relationships. Auditing in LTM provides merchants with the ability to:
• Compare LTM totals to their point-of-sale (POS) or property management system (PMS) • Review transactions and correct errors by voiding duplicates • Edit inaccuracies • Add missing or inadvertently deleted transactions to a batch before submission to the processor • Identify fraudulent chargeback activity
Auditing Steps Auditing in LTM follows the steps below. It is important to note that the selections made during these steps define the transactions to include in the batch.
1. Select a Merchant
2. Select a Business Date
3. Set the Viewing Options
4. Reconcile the POS/PMS to LTM
5. Resolve All Problem Transactions in the Batch
6. Close the Batch
7. Sign Out
Important: A batch consists of the defined transactions. Closing a batch is the process of sending those transactions for financial settlement to the processor.
Most merchants submit one batch, per merchant, per day. Failure to define which transactions should be included in a batch makes reconciling statements at the end of the month much more difficult.

Auditing Transactions Guide
© 2019 Shift4 Payments, LLC. All rights reserved. Version 2.3 External Use NDA Page 4 of 57
Step 1 – Select a Merchant The first step in the auditing process is to select a merchant or merchants, which defines the transactions to be included in the batch.
In LTM, the term "merchant" distinguishes different and distinct revenue-generating centers within a single company or enterprise, and transactions will be separated by merchant.
Note: If there is only one merchant assigned to your user account, you may continue to the Step 2 – Select a Business Date section because your merchant is automatically selected.
To select a merchant, complete the following steps:
1. From the menu, select Transactions > Select Merchant. 2. On the Select Merchant page, select the merchant(s) for which you would like to audit. If needed,
click Submit.
Enabling the Selection of Multiple Merchants By default, the system only allows for the selection of one merchant at a time. To enable the selection of multiple merchants, complete the following steps:
1. From the menu, select User > Change Profile. 2. On the Change Profile page, in the Other Options area, select Multi-MID selection. 3. Click Apply.

Auditing Transactions Guide
© 2019 Shift4 Payments, LLC. All rights reserved. Version 2.3 External Use NDA Page 5 of 57
Step 2 – Select a Business Date The second step in the auditing process is to select a business date, which defines the scope of the batch.
To select a business date, complete the following steps:
1. From the menu, select Transactions > Current Transactions. 2. On the Current Transactions page, click Select Business Date.
3. In the Business Date window, complete the following steps:
• By default, the calendar has the previous day selected (highlighted in blue), while the current date is highlighted in yellow. Select a different day if needed.
• Select a batch range option:
o All transactions through the selected date – If selected, this option ensures all transactions through the selected business date are included in the batch. This is the default option and Shift4 strongly recommends it be used.
o Only transactions for the selected date – If selected, this option includes only transactions from the selected business date in the batch and does not interfere with transactions from previous dates.
o All transactions regardless of date – If selected, this option includes all past, present, and future transactions in the batch regardless of the date selected. Shift4 does not recommend this option.
o Only selected transactions – If selected, this option will allow you to batch selected transactions instead of batching all transactions that correspond to your selected business date and viewing options. This option will only be displayed if you have enabled Batch selected transactions on your Change Profile page. See Appendix C – Batching Selected Transactions for more details.

Auditing Transactions Guide
© 2019 Shift4 Payments, LLC. All rights reserved. Version 2.3 External Use NDA Page 6 of 57
• Click Apply.
Note: Since Authorization only transactions cannot be included in the batch, they will not be selectable when Only selected transactions is applied.
Changing the Selected Business Date To change the selected business date because it is not correct, complete the following steps:
1. On the Current Transactions page, click the displayed date. (For example, Monday, August 13, 2018.)

Auditing Transactions Guide
© 2019 Shift4 Payments, LLC. All rights reserved. Version 2.3 External Use NDA Page 7 of 57
2. In the Business Date window, click Release Settings.
Note: A business date is required to submit a batch, so ensure the correct date is selected. For additional information, see the Step 2 – Select a Business Date section.

Auditing Transactions Guide
© 2019 Shift4 Payments, LLC. All rights reserved. Version 2.3 External Use NDA Page 8 of 57
Step 3 – Set the Viewing Options The third step in the auditing process is to set the viewing options by applying filters.
Important: The viewing options will be reviewed in detail because the selections made control the transactions displayed and define the transactions to be included in the batch.
To set the viewing options, on the Current Transactions page, complete the following steps:
1. (Optional) Click to expand the Merchants display area; click to collapse the area. (This option is only available if a large number of merchants were selected in step 1.)
2. (If applicable) Click Selected Merchants to change the selected merchant(s).
WARNING! If a business date has already been selected, changing the selected merchant(s) at this point will cause the date to be reset.
3. (If applicable) To change the selected business date because it is not correct, see the Changing the Selected Business Date section.
4. Select the desired transaction types:
• Sales – When selected, transactions ready for settlement with positive values will be displayed and included in the batch.
• Authorizations – When selected, transactions set to authorization only will be displayed. Authorization only transactions are not sent to the processor when the batch is closed; they will remain in your current transactions until addressed.
• Refunds – When selected, transactions ready for settlement with negative values (displayed in red and within parenthesis) will be displayed and included in the batch.
• Voids – When selected, transactions that have been removed from the batch but are retained in the database for audit trail purposes will be displayed; however, they are not sent to the processor when the batch is closed, they are moved to archived transactions.

Auditing Transactions Guide
© 2019 Shift4 Payments, LLC. All rights reserved. Version 2.3 External Use NDA Page 9 of 57
5. Select the desired general filters:
• Non-Problems – If selected, non-problem transactions will be displayed and included in the batch.
• Problems – If selected, problem transactions (with displayed to the left of the transaction type) will be displayed and must be corrected to be included in the batch. A batch cannot be submitted with problem transactions.
• Duplicates Only – If selected, only potentially duplicate transactions will be displayed. • Modified Only – If selected, only transactions that have been modified will be displayed. This
setting is helpful because it allows you to see which transactions have been modified by users in LTM. (For example, if a sale transaction was voided, it is considered a modified transaction.)
• Referrals Only – If selected, only transactions with a referral will be displayed. (If only Non-Problems and Referrals Only are selected, transactions that required and received a referral will be displayed. If only Problems and Referrals Only are selected, transactions still requiring a referral will be displayed – as well as voided referral transactions.)
Tip: Filtering your transactions to show only those for which a voice authorization code was obtained is a valuable tool because fake codes are the number one cause of suspended batches.
By using the Referrals Only option to filter your transactions, you can quickly review the codes to identify any that look suspicious.
Fake codes typically look like 123456, 987654, 111111, or any other string of numbers that looks suspicious.
After those transactions are identified, the fake code can be replaced if you can get a valid code by calling to obtain it, or the transaction can be voided. This will help you to avoid settlement issues.
After reviewing these transactions and taking appropriate action, remove the filter and continue with the batch close process.

Auditing Transactions Guide
© 2019 Shift4 Payments, LLC. All rights reserved. Version 2.3 External Use NDA Page 10 of 57
• Errors Only – If selected, only transactions with an “e - Error” response will be displayed.
Note: The characters following e - Error represent the four-digit error code. The error code is formatted with two leading zeros, which are not a part of the error code. For example, if 009101 is displayed, the error code is 9101.
6. Select the desired card types or transaction methods to be displayed and included in the batch. You can also click Select All or Deselect All:
• VS - Visa • MC - MasterCard • AX - American Express • NS - Discover • JC - JCB • DB - Debit • YC - It's Your Card • AP - Alipay • WP - WeChat Pay
Note: The card types displayed are based on the selected merchant(s). If multiple merchants are selected, some card types displayed may be valid or invalid options for certain merchants.

Auditing Transactions Guide
© 2019 Shift4 Payments, LLC. All rights reserved. Version 2.3 External Use NDA Page 11 of 57
7. Select the desired entry modes to be displayed and included in the batch:
• S - Swiped • M - Manually Entered • E - EMV • R - Contactless or Mobile Wallet • C - Contactless EMV • Q - QR Code
8. Select the desired card security code (CSC) and Address Verification System (AVS) results to be displayed and included in the batch:
• CSC Matched • CSC Did Not Match • CSC Not Attempted • AVS Matched • AVS Did Not Match • AVS Not Attempted
Note: While you can make multiple CSC and AVS selections, selecting more than one option may not display the desired results. For example, if all CSC options were selected for a batch of 100 transactions, all 100 transactions would be displayed since they all fall into one of the options.
9. (Optional) From the Sort By Multiple Columns list, select the desired option
• Card Type, Card Number – If selected, transactions are sorted alphabetically by card type and then by card number.

Auditing Transactions Guide
© 2019 Shift4 Payments, LLC. All rights reserved. Version 2.3 External Use NDA Page 12 of 57
• Card Type, Customer Name – If selected, transactions are sorted alphabetically by card type and then alphabetically by customer name. Transactions without a customer name appear first.
• Card Type, Transaction Date/Time – If selected, transactions are sorted alphabetically by card type and then by transaction date and time.
• Clerk Number, Card Number – If selected, transactions are sorted by clerk number and then by card number, with a subtotal displayed for each clerk. (Authorization only transactions are not included in the subtotal.)
• Clerk Number, Transaction Date/Time – If selected, transactions are sorted by clerk number and then by transaction date and time, with a subtotal displayed for each clerk. (Authorization only transactions are not included in the subtotal.)
• Transaction Date/Time – If selected, transactions are sorted by transaction date and time. • Terminal ID, Card Number – If selected, transactions are sorted by terminal ID and then by card
number.
10. (Optional) To only display transactions from a particular terminal or clerk, under Filter By, complete the following steps:
• To only see transactions from a particular terminal, enter that terminal ID number into the Terminal ID field.
• To only see transactions from a particular clerk, enter that clerk ID number into the Clerk Number field.
Note: Options in the Filter By area related to Terminal ID are only available if enabled for your LTM account.

Auditing Transactions Guide
© 2019 Shift4 Payments, LLC. All rights reserved. Version 2.3 External Use NDA Page 13 of 57
11. (Optional) To see the Analysis section displayed in the subtotal and grand total areas, select Show Analysis. Based on the settings you have enabled in your viewing options, the Analysis column displays the number and percent of sales transactions for each entry mode and the number of sales transactions that were authorized electronically versus manually.
12. (Optional) To configure the maximum number of items to display per page, select the desired option:
• 50 • 100 • 500 • 1000 • All
13. (Optional) To configure which columns will be displayed, from the list, select the desired option:

Auditing Transactions Guide
© 2019 Shift4 Payments, LLC. All rights reserved. Version 2.3 External Use NDA Page 14 of 57
Tip: If your Internet connection is slow, you may want to reduce the number of items displayed per page by selecting a smaller option. In addition, if there are more items than the page is set to display, page navigation will automatically display at the top and bottom of each page.
14. Click Apply Filters.
Requirement: You must click Apply Filters to make your selections take effect on the page. These settings will remain in effect until other options are selected and applied. Shift4 recommends reviewing your viewing options each time you audit to ensure the correct options are displayed and included in your batch.
Step 4 – Reconcile the POS/PMS to LTM The fourth step in the auditing process is to reconcile the POS/PMS to LTM.

Auditing Transactions Guide
© 2019 Shift4 Payments, LLC. All rights reserved. Version 2.3 External Use NDA Page 15 of 57
Important: We will review the information displayed in detail on the Current Transactions and View Transaction page because the displayed transactions (based on your selected merchant(s), business date, and viewing options) will be the transactions included in the batch.
However, if you chose the Only selected transactions option and subsequently selected transactions, then only the selected, displayed transactions will be included in the batch. See Appendix C – Batching Selected Transactions for more details.
Note: You can change your selected merchant(s), business date, and viewing options if the transactions displayed should not be included in the batch.
Information Displayed on the Current Transactions Page
Merchant(s) Transactions are separated by merchant, and the fields displayed will depend on your selection. The following fields may be displayed per merchant:
• Merchant Name – Displays the name of the merchant. • MID – Displays the Merchant ID number. • Problem Transaction Count – Displays the total number of problem transactions. If there are no
problem transactions, then this field will not be displayed. • Transaction Type – Displays the transaction type. The following are possible transaction types:
o Sale – Denotes a transaction ready for settlement with a positive value amount.
Note: If is displayed, it is a problem sales transaction that must be corrected to be included in the batch.
o Auth – Denotes an authorization only transaction.
Note: The transaction must be changed to a sales transaction to be included in the batch. If is displayed, it is a problem authorization only transaction that must be corrected and changed to a sales transaction to be included in the batch.

Auditing Transactions Guide
© 2019 Shift4 Payments, LLC. All rights reserved. Version 2.3 External Use NDA Page 16 of 57
o Refund – Denotes a transaction ready for settlement with a negative value amount. o Void – Denotes a voided transaction.
Note: If is displayed, it was a problem transaction that was voided.
Note: If Highlight modified transactions has been enabled on your Change Profile page, any transactions that have been modified in LTM will be highlighted and will be displayed on the transaction line. If you do not want modified transactions highlighted, disable the option on your Change Profile page.
Note: The Auditing Options for Individual Transactions section reviews the four possible options available: (1) Delete/Void, (2) Clone, (3) Online Edit, and (4) Offline Edit; these options are based on your user permissions.
• Invoice – Displays the invoice number. • Clerk – Displays the clerk number. • Business Date – Displays the business date. • Type – Displays the card type. • Card Number – Displays the masked payment card number and expiration date. (The first four
and last four numbers of the payment card are not masked.) • Amount – Displays the total transaction amount. • Entry – Displays the entry mode. The following are possible entry modes:
o S – Denotes swiped payment card data. o M – Denotes manually entered payment card data. o E – Denotes EMV payment card data. o R – Denotes contactless or mobile wallet payment card data.
• Customer Name – Displays the customer's name, if provided.
• Terminal ID – Displays the terminal ID (if enabled for your LTM account and provided during the transaction process).
• Problems – For problem transactions, this column provides a description of the problem without having to click on the transaction.

Auditing Transactions Guide
© 2019 Shift4 Payments, LLC. All rights reserved. Version 2.3 External Use NDA Page 17 of 57
Tip: If a particular field is clear, it indicates the information does not exist for the transaction. In addition, you can sort the information displayed by clicking the column headers.
Subtotal(s) and Grand Total(s) Each merchant will have a subtotal, and a grand total will appear at the bottom of the Current Transactions page. If multiple currencies are in use, a grand total will appear for each currency type.
If Show Analysis is selected in the viewing options, there is also an Analysis section displayed in the subtotal and grand total areas, and it contains the following two subsections:
• Entry Mode – This subsection contains two columns, and the information displayed in each column is based on the settings you have enabled in your viewing options. The S/M/E/R column displays the number of sales transactions for each entry mode. The S/M/E/R % column displays the percent of sales transactions for each entry mode. The following are entry modes:
o S - Swiped o M - Manually Entered o E - EMV o R - Contactless or Mobile Wallet
• Authorization Type – This subsection contains two columns, and the information displayed in each column is based on the settings you have enabled in your viewing options. The Elec./Manual column displays the number of sales transactions that were authorized electronically versus manually. The Electronic % column displays the percent of sales transactions that were authorized electronically.

Auditing Transactions Guide
© 2019 Shift4 Payments, LLC. All rights reserved. Version 2.3 External Use NDA Page 18 of 57
Information Displayed on the View Transaction Page To access the View Transaction page, which allows you to view additional information associated with an individual transaction, complete the following steps:
1. On the Current Transactions page, click the transaction Invoice number.
2. The View Transaction page will load and display the additional information associated with the transaction, which is reviewed in detail in the following subsections.
Basic Transaction Information The Basic Transaction Information section contains the following fields:
• Invoice – Displays the invoice number. • Card Type – Displays the card type. • Business Date – Displays the business date associated with the transaction. • Token – Displays Shift4's TrueToken®, a unique ID to reference the actual payment card data
associated with the transaction. (The first four numbers are the last four numbers of the payment card number.)
• Card Number & Expiration – Displays the masked payment card number and expiration date. (The first four and last four numbers of the payment card are not masked.)
Note: If your profile has been configured to unmask payment card numbers, click Unmask to unmask the payment card number for 10 seconds. The payment card number will be masked again when the time runs out. If you added two-factor authentication to your account and it’s been five minutes since you’ve provided a passcode, you will be asked to enter a new passcode.

Auditing Transactions Guide
© 2019 Shift4 Payments, LLC. All rights reserved. Version 2.3 External Use NDA Page 19 of 57
Important: After clicking Unmask to unmask the payment card number, you will be prompted to enable multifactor authentication because this is a more secure way to verify your identity.
After two-factor authentication is enabled, you will need to enter the passcode (generated by the authenticator app on your smart device) after clicking Unmask to unmask the card number.
Each time you enter a passcode, you will be able to unmask card numbers for five minutes without entering a new passcode. (The unmasked card number is still only displayed for ten seconds at a time.) When the five minutes has elapsed, you will be prompted to enter a new passcode the next time you try to unmask a card number.
In addition, when two-factor authentication is enabled on your account, you will need to enter the passcode during the Sign-in process too.
Note: If you need to change the date to match your end-of-day process, simply click , select the appropriate business date from the calendar, and click Apply to save the change.
• Card Present – When selected, the payment card was present during the transaction. When cleared, the payment card was not present.
• Entry Mode – Next to the Card Present field, the entry mode is displayed in parenthesis. The following are possible entry modes:
o 1 – Denotes swiped Track 1 payment card data. o 2 – Denotes swiped Track 2 payment card data. o M – Denotes manually entered payment card data. o E – Denotes EMV payment card data. o R – Denotes contactless or mobile wallet payment card data.
• Auth only – When selected, the transaction is an authorization only transaction; when cleared, it is not.
• (signature) – Displays the customer's signature, if captured.
Note: If there is a customer associated with the transaction, their name will appear beneath the (signature) field.

Auditing Transactions Guide
© 2019 Shift4 Payments, LLC. All rights reserved. Version 2.3 External Use NDA Page 20 of 57
• Clerk – Displays the clerk number associated with the transaction. (If a clerk number was not provided, "00000" will be displayed.)
• Transaction Type – Sale, Auth, Refund, or Void. • Transaction Date – Displays the merchant's local date when the transaction was created and may
differ from the business date. • Transaction Time – Displays the merchant's local time when the transaction was created. • Terminal ID – Displays the terminal ID (if enabled for your Lighthouse GMS account and provided
during the transaction process). • Primary Amount – Displays the initial transaction amount. • Secondary Amount – Displays an additional transaction amount, like an added tip or fee.
Note: The field name ("Secondary Amount" or "Tip Amount") displayed is based on merchant type.
• Total Amount – Displays the total transaction amount.

Auditing Transactions Guide
© 2019 Shift4 Payments, LLC. All rights reserved. Version 2.3 External Use NDA Page 21 of 57
Miscellaneous Notes The Miscellaneous Notes section displays any information that was keyed in, either from the POS/PMS or LTM, and is editable.
To add or edit a note, complete the following steps:
1. Click add notes or edit notes.
Note: If a miscellaneous note has not been entered, add notes will be displayed. If one has been entered, edit notes will be displayed.
2. In the Transaction Notes window, enter or edit the note.
Note: If Use enhanced editor is selected in your user profile, you may use the formatting tools.
3. Click Save Notes.
Auditing Transactions Guide
© 2019 Shift4 Payments, LLC. All rights reserved. Version 2.3 External Use NDA Page 22 of 57
Authorization Information The Authorization Information section displays information associated with the transaction in the Date, Time, Amount, and Response fields. If available, it may also include information in the CPS/ICP Information field (which is specific to the issuing bank).
Note: CPS/ICP code is used by Visa (CPS) and MasterCard (ICP) to qualify merchants for lower transaction costs.
The Response field may contain the following responses:
• A - Authorized – Denotes an authorized transaction.
Note: The characters following A - Authorized represent the authorization code.
• C - Ceiling – Denotes an authorized transaction that was approved without requiring additional authorization because it was less than or equal to a ceiling amount.
• D - Declined – Denotes a declined transaction. • e - Error – Denotes there was an error.
Note: The characters following e - Error represent the four-digit error code. The error code is formatted with two leading zeros, which are not a part of the error code. For example, if 009101 is displayed, the error code is 9101.
• R - Referral – Denotes a referral.
Note: To approve the transaction, you will need to call the referral number to receive a voice authorization code. If the code has already been received, the characters following R - Referral represent it and may contain up to six characters.

Auditing Transactions Guide
© 2019 Shift4 Payments, LLC. All rights reserved. Version 2.3 External Use NDA Page 23 of 57
• X - Expired – Denotes the card is expired.
Tip: Rollover fields in the Authorization Information section to see if additional information is available.
Note: The following sections may or may not appear on your View Transaction page because they are based on account settings and merchant type.
Purchasing Card Information This feature must be enabled for your LTM account, and the information must be provided during the transaction process.
The Purchasing Card Information section contains the following fields:
• Customer Ref – Displays the merchant's internal invoice or customer reference number. • Destination Zip – Displays the postal/ZIP code that the goods were shipped to, or displays the
postal/ZIP code where the application is installed. • Sales Tax – Displays the sales tax for the transaction.
Note: The amount in the Sales Tax field is included in the Primary Amount field — it is not an additional transaction amount.

Auditing Transactions Guide
© 2019 Shift4 Payments, LLC. All rights reserved. Version 2.3 External Use NDA Page 24 of 57
• Product Descriptions – Displays the description for the transaction.
Cardholder Address and Security Code Verification The Cardholder Address and Security Code Verification section will appear if additional cardholder information was provided and checked during the transaction process.
The Cardholder Address and Security Code Verification section contains the following fields:
• Street Address – Displays the street address associated with the payment card. • Zip Code – Displays the postal/ZIP code associated with the payment card. • AVS Result – Displays the result of the address verification check. The following are possible
results:
o Not Attempted – Denotes AVS was not attempted. o X, Y, D, F, or M – Denotes the street address and postal or ZIP code have been verified. o A or B – Denotes the street address has been verified. o W, Z, or P – Denotes the postal or ZIP code has been verified. o N or C – Denotes the street address and postal or ZIP code failed to verify. o S – Denotes the service is not supported. o U – Denotes the address is unavailable. o R – Denotes a timeout occurred and you may retry. o G or I – Denotes a global non-AVS participant. o E – Denotes AVS is not allowed for the payment card type.
• Card Security Code – Due to payment card regulations, this field will only display one of the following:
o Not Provided o Present o Unreadable o Not Present
• Card Security Code Result – Due to credit card regulations, this field will only display one of the following:
o M – Match o N – No Match o P – Not Processed o S – Should Be Present o U – Issuer Unable to Process

Auditing Transactions Guide
© 2019 Shift4 Payments, LLC. All rights reserved. Version 2.3 External Use NDA Page 25 of 57
o Y – AMEX CID Match
Tip: Rollover fields in the Cardholder Address and Security Code Verification section to see if additional information is available.
Extended Auto Rental Information The Extended Auto Rental Information section will only appear for auto rental transactions, and the information displayed must be provided during the transaction process.
The Extended Auto Rental Information section contains the following fields:
• Agreement – Displays the merchant's internal agreement, invoice, or customer reference number. • Driver Name – Displays the driver's name. • Additional Charges – Displays the amount associated with the fields in the Late Charges field.
Note: The amount in the Additional Charges field is included in the Primary Amount field — it is not an additional transaction amount.
• Rental – Displays the start details associated with the rental. • Return – Displays the return details associated with the rental.

Auditing Transactions Guide
© 2019 Shift4 Payments, LLC. All rights reserved. Version 2.3 External Use NDA Page 26 of 57
• Late Charges – The value in the Primary Amount field increased due to the fields selected.
Extended Hospitality Information The Extended Hospitality Information section will only appear for hotel transactions, and the information displayed must be provided during the transaction process.
The Extended Hospitality Information section contains the following fields:
• Check-In Date – Displays the guest's check-in date. • # of Days – Displays the number of days the guest stayed at the hotel. • Charge Type – Displays a description for the transaction. • Late Charges – The value in the Primary Amount field increased due to the fields selected.
IIAS/FSA/HSA Information The IIAS/FSA/HSA information section will only appear if the IIAS feature has been enabled for the merchant by Shift4, and the information displayed must be provided during the transaction process. A single transaction can use up to four IIAS/FSA/HSA options from the following list:
• Qualified OTC • RX

Auditing Transactions Guide
© 2019 Shift4 Payments, LLC. All rights reserved. Version 2.3 External Use NDA Page 27 of 57
• Vision • Clinical • Dental • Qualified Transit • Cash Disbursement
The Total Qualified Medical field will contain the sum of all approved medical categories for an IIAS/FSA/HSA transaction.
Dynamic Currency Conversion (DCC) If enabled for the merchant, the Dynamic Currency Conversion section will display DCC information for the transaction.
The Dynamic Currency Conversion section will contain the following fields:
• Customer chose to use DCC – This field will be selected when the customer chose to use DCC when processing their purchase. It will not be selected if they did not, and no information will be displayed in any other DCC fields notated below.
If DCC was used, the following fields will be populated with the corresponding information provided:
• Finalized Amount
o Currency Code – This is the currency code returned from the customer’s card. The codes are taken from the ISO-4217 standard.
o Conversion Rate – This is the currency conversion exchange rate, which is updated frequently, and includes the margin rate.
o Date & Time – Displays the merchant's local date and time when the transaction was finalized.
o Margin Rate – This is the percent charged for processing the exchange. This is included in the conversion rate.

Auditing Transactions Guide
© 2019 Shift4 Payments, LLC. All rights reserved. Version 2.3 External Use NDA Page 28 of 57
o Transaction Amount – This is the total amount of the sale multiplied by the conversion rate.
If DCC is enabled for the merchant and Show Analysis is selected in your viewing options, a Dynamic Currency Conversion column will be included in the Analysis section (located in the sub and grand total areas). The following fields will be included:
• Opt In/Opt Out – This is the number of transactions where the cardholder opted in for DCC when presented with the option, and the number of cardholders who opted out.
• Opt in % – This is the percentage of the total transactions where cardholders opted in for DCC when presented with the option.
DCC Reporting If you have selected at least one merchant with DCC enabled, a DCC Report will be available with DCC transaction information. To view the DCC report, complete the following steps:
1. From the menu, select Transactions > DCC Report. 2. In the Date Range section, select a Begin Date and End Date for the report. 3. Select the Card Types you would like to be included in the report. Currently, only Visa and
MasterCard support DCC.

Auditing Transactions Guide
© 2019 Shift4 Payments, LLC. All rights reserved. Version 2.3 External Use NDA Page 29 of 57
4. Click Generate Report.
The Dynamic Currency Conversion (DCC) Report will be displayed, separated by merchant and currency type with the following columns:
• – Clicking the icon will open a new page with a breakdown of the information for the selected row. The header row provides a breakdown of all the currency codes for the merchant. Non-header rows provide a breakdown of that particular currency code for the merchant. Information includes the following:
Transaction Details section:
o Invoice – Displays the invoice number. o Business Date – Displays the business date associated with the transaction. o Type – Displays the payment card type. o Card Number – Displays the first and last four digits of the payment card. o Amount – Displays the amount of the transaction with the merchant’s currency symbol. o DCC Currency Code – Displays the numeric currency code for the transaction. This is the
currency the customer chose to process their transaction in. o Conversion Rate – Displays the conversion rate, including the margin rate. o Margin Rate – This is the percent charged for processing the exchange. This is included in
the conversion rate. o Initial Authorized Amount – Displays the amount with the customer’s currency abbreviation. o Final Transaction Amount – Displays the amount with the customer’s currency abbreviation.
Summary section:
o Count – Displays the number of transactions for each currency in the Transaction Details section.
o Amount – Displays the sum for each currency in the Transaction Details section. (Note the merchant’s currency symbol is used.)
o DCC Currency Code – Displays the numeric currency code for each currency in the Transaction Details section. This is the currency the customers chose to process their transactions in.
o Initial Authorized Amount – Displays the sum for each currency in the Transaction Details section. (Note the customer’s currency abbreviation is used.)
o Final Transaction Amount – Displays the sum for each currency in the Transaction Details section. (Note the customer’s currency abbreviation is used.)

Auditing Transactions Guide
© 2019 Shift4 Payments, LLC. All rights reserved. Version 2.3 External Use NDA Page 30 of 57
o Opt In / Opt Out – Displays the number of cardholders who opted in or opted out of using DCC when presented with the option.
o Opt In % – Displays the percentage of transactions where cardholders opted to use DCC.
Note: Click Show Opt-Outs to view the same details for cardholders who opted out of DCC when presented with the option.
Show Opt-Outs By default, the DCC report pages display the invoices of cardholders who chose to opt in for DCC when the option was presented to them.
It is important to note the Count column displays the total number of transactions where the option was provided to the cardholder, and the Opt Out column displays the number of cardholders who decided to opt out of using DCC when the option was presented to them.

Auditing Transactions Guide
© 2019 Shift4 Payments, LLC. All rights reserved. Version 2.3 External Use NDA Page 31 of 57
To hide invoices of cardholders who chose to opt out of DCC when the option was presented to them, click Hide Opt-Outs.
Audit Trail If Show audit trail is selected in your user profile, the Audit Trail section will display the activity received from the POS in the Date, Time, Source, API Function, Sale Flag, and Invoice Amount fields.

Auditing Transactions Guide
© 2019 Shift4 Payments, LLC. All rights reserved. Version 2.3 External Use NDA Page 32 of 57
Transaction History If Show CC history is selected in your user profile, the Transaction History for [Payment Card] section will display every transaction in which the payment card was used for the selected merchant.
The following information will be displayed for each transaction:
• Batch ID – Displays the LTM batch number in which the archived transaction is located, unless it's a current transaction.
• Business Date – Displays the business date associated with the transaction. • Merchant Name – Displays the merchant that processed the transaction. • Invoice – Displays the invoice number associated with the transaction. • Amount – Displays the total transaction amount. • Transaction – Displays the transaction type: sale, refund, auth, void, inquiry, load, or other. • Customer Name – Displays the customer's name, if provided.
Tip: If a particular field is clear, it indicates the information does not exist for the transaction.
Auditing Options for Individual Transactions The four possible auditing options available for individual transactions are based on your user permissions. They will be reviewed in detail in the following subsections because they will be used to reconcile your POS/PMS to LTM.
To view the auditing options you have permission to use, complete the following steps:
1. On the View Transaction page, click Edit from the side menu.

Auditing Transactions Guide
© 2019 Shift4 Payments, LLC. All rights reserved. Version 2.3 External Use NDA Page 33 of 57
2. The auditing options will be displayed.
Note: If a voided transaction is selected, only the Clone option will be displayed.
Delete/Void The Delete/Void option will void the selected transaction. When a Delete/Void is performed on a transaction, a reversal request is sent to the processor (if reversal is supported by the processor).

Auditing Transactions Guide
© 2019 Shift4 Payments, LLC. All rights reserved. Version 2.3 External Use NDA Page 34 of 57
For example, if there is a duplicate transaction of a valid transaction, on the View Transaction page, you may select Delete/Void to void and exclude one of the transactions, thereby leaving one valid transaction within the batch.
Requirement: Draft Printing must be enabled for your user profile, and the Shift4 Draft Printer program must be downloaded and installed. For additional information, see the Draft Printer Installation Guide located on the Shift4 website, www.shift4.com.
Clone The Clone option will produce an exact copy of the selected transaction for editing, and it retains the payment card information.
For example, if a refund needs to be processed to a transaction that has already been settled in a batch, on the archived View Transaction page, you may select Clone to copy the transaction. The transaction could then be edited to reflect the refund, and submitted to process the refund.
Another example might be if a transaction was voided by mistake, use the Clone option (available in the View Transaction page’s Edit menu) to create a new transaction. After the transaction has been created, you can use the populated Online Edit page to adjust any of its details (if needed) and submit it – this will cause the transaction to attempt to get a new authorization while leaving the voided transaction as is.
Please remember authorization attempts may result in additional fees.

Auditing Transactions Guide
© 2019 Shift4 Payments, LLC. All rights reserved. Version 2.3 External Use NDA Page 35 of 57
Online Edit The Online Edit option will allow the selected transaction to be manually edited and additional authorization attempted; however, not all fields are editable.
For example, if a customer left a tip that was greater than the authorized amount, on the View Transaction page, you may select Online Edit. The transaction could then be edited to include the tip in the Secondary/Tip Amount field, and submitted to obtain the additional authorization.
There are many examples of how the Online Edit option could be used; the following is another common example:
If a guest departed the hotel and their invoice needs to be adjusted to include an additional charge and changed to a sales transaction, on the View Transaction page, you may select Online Edit. The transaction could then be edited to include the additional amount in the Primary Amount field (ensuring to select what the additional amount corresponds to from the Additional Charges area), changed to a sales transaction by clearing the Auth Only field, and submitted to obtain the additional authorization.
Offline Edit The Offline Edit option will allow the selected transaction to be manually edited as well. Not all fields are editable, and additional authorization is not attempted.
For example, if the voice authorization code required to complete the transaction has been obtained, on the Current Transactions page, you may select Offline Edit. The transaction could then be edited to include the voice authorization code in the Auth Code field, and submitted to complete the transaction.
Another example of the Offline Edit option is if a customer was overcharged and the transaction has not been settled in a batch yet. You may select Offline Edit. The transaction could then be edited by changing the value in the appropriate amount field, and submitted to complete the transaction.
Note: Any changes you make while auditing transactions in LTM will not reflect in your POS/PMS system.
Step 5 – Resolve All Problem Transactions in the Batch The fifth step in the auditing process is to resolve all problem transaction in the batch. LTM will not allow a batch to be submitted when it contains problem transactions, so the goal of this step is to get all transactions ready for settlement while still reconciling the POS/PMS to LTM.
Please review these important details again:
• Authorization only transactions are not sent when the batch is closed; they will remain in your current transactions until addressed.
• Transactions that have been voided are not sent when the batch is closed; they are retained in the database for audit trail purposes and moved to archived transactions.

Auditing Transactions Guide
© 2019 Shift4 Payments, LLC. All rights reserved. Version 2.3 External Use NDA Page 36 of 57
Note: You can change your selected merchant(s), business date, and viewing options if the transactions displayed should not be included in the batch.
Duplicate Transactions The first type of transactions that should be addressed is possible duplicates, and these could very well be marked as transactions ready for settlement.
To audit for possibly duplicate transactions, complete the following steps:
1. On the Current Transactions page, in the viewing options area, select Duplicates Only and then click Apply.
2. Only possibly duplicate transactions will be displayed. 3. Review the transactions against the POS/PMS end-of-day totals. 4. (If applicable) Correct any transactions.
Tip: For additional information, see the Auditing Options for Individual Transactions section.
5. Remember, the viewing options control the transactions displayed and define the transactions to be included in the batch. Therefore, after possibly duplicate transactions have been addressed, clear the Duplicates Only filter in the viewing options area and then click Apply.

Auditing Transactions Guide
© 2019 Shift4 Payments, LLC. All rights reserved. Version 2.3 External Use NDA Page 37 of 57
Tip: Appendix A reviews the auditing options available with the transaction grid tool.
Authorization Only Transactions The next type of transactions that should be addressed is authorization only transactions, and these could also be marked as transactions ready for settlement. However, authorization only transactions are not sent when the batch is closed; they will remain in your current transactions until addressed.
Note: Authorization only transactions must be changed to sales transactions to be included in the batch. If is displayed, it is a problem authorization only transaction that must be corrected and changed to a sales transaction to be included in the batch.

Auditing Transactions Guide
© 2019 Shift4 Payments, LLC. All rights reserved. Version 2.3 External Use NDA Page 38 of 57
To audit for authorization only transactions, complete the following steps:
1. On the Current Transactions page, in the viewing options area, select Authorizations and clear Sales, Refunds, and Voids, and then click Apply.
2. Authorization only transactions will be displayed. 3. Review the transactions against the POS/PMS end-of-day totals. 4. (If applicable) Correct any transactions.
Tip: For additional information, see the Auditing Options for Individual Transactions section.
5. Remember, the viewing options control the transactions displayed and define the transactions to be included in the batch. Therefore, after authorization only transactions have been addressed, reselect the transaction types in the viewing options area to be displayed and included in the batch: Sales, Refunds, or Voids.
6. Click Apply.
Tip: Appendix A reviews the auditing options available with the transaction grid tool.

Auditing Transactions Guide
© 2019 Shift4 Payments, LLC. All rights reserved. Version 2.3 External Use NDA Page 39 of 57
Batch Authorization The Batch Authorization option is only available when problem transactions exist on the Current Transactions page, and it may be run to address problem transactions.
Running a batch authorization may save time since problem transactions could be resolved, thus reducing or eliminating the need to individually audit problem transactions.
Important: Shift4 recommends only running a batch authorization one time per batch because each reauthorization attempt may result in additional bank authorization fees.
To run a batch authorization, complete the following steps:
1. On the Current Transactions page, note if Authorizations is selected in the viewing options area. If these transactions should not attempt authorization, clear Authorizations and then click Apply.
Note: This will remove the authorization only transactions from being displayed and from the batch.
2. To initiate the reauthorization request for the listed problem transactions, click Batch Authorization.

Auditing Transactions Guide
© 2019 Shift4 Payments, LLC. All rights reserved. Version 2.3 External Use NDA Page 40 of 57
3. The following window will appear and close when finished.
4. The problem transactions left on the Current Transactions page will need to be individually audited and corrected to match the POS end-of-day totals, if possible.
Tip: For additional information, see the Auditing Options for Problem Transactions section.

Auditing Transactions Guide
© 2019 Shift4 Payments, LLC. All rights reserved. Version 2.3 External Use NDA Page 41 of 57
Auditing Options for Problem Transactions Depending on the merchant's auditing process, the first step to resolve any problem transaction that was not resolved by the actions described in the Duplicate Transactions, Authorization Only Transactions, or Batch Authorization sections may be to contact the customer to request a new form of payment (or updated payment card information) and enter a new transaction with the Online Entry option located under the Transactions menu.
Tip: For additional information, see the Entering Transactions document located in Lighthouse Transaction Manager Help.
The resolutions for problem transactions outlined here assume this has already taken place and new, valid sales transactions have been entered, and the original problem transaction needs to be resolved. Or, the customer was contacted to no avail and the problem transaction needs to be resolved.
To audit a problem transaction, complete the following steps:
1. On the Current Transactions page, click the Invoice number in the problem transaction's row.
2. On the View Transaction page, the problem and a brief description appear in red. The following are possible problems:
• Invalid Card Number – Denotes the payment card is invalid.
o To resolve this problem transaction, Edit > Delete/Void may be selected.
• Zero Dollar Amount Transaction – Denotes the transaction amount is zero.
o To resolve this problem transaction, Edit > Online Edit may be selected. Then the correct transaction amount can be entered into the appropriate amount field and submitted to obtain authorization.
o If the correct transaction amount is unknown, Edit > Delete/Void may be selected.
• Insufficient Authorization – Denotes the transaction amount is not fully authorized.
o To resolve this problem transaction, Edit > Online Edit may be selected. Then Submit can be clicked to initiate a reauthorization request.
o If the transaction amount cannot be authorized for the full amount, authorization for less can be attempted by selecting Edit > Online Edit. Then the transaction amount can be changed and submitted to attempt authorization.
o If the transaction cannot be authorized to the merchant's satisfaction, Edit > Delete/Void may be selected.

Auditing Transactions Guide
© 2019 Shift4 Payments, LLC. All rights reserved. Version 2.3 External Use NDA Page 42 of 57
Important: Each reauthorization attempt may result in additional bank authorization fees.
• Declined – Denotes the transaction has been declined by the payment card's issuing bank.
o To resolve this problem transaction, Edit > Delete/Void may be selected.
• Voice Referral – Denotes the transaction requires a voice authorization code.
o To resolve this problem transaction, the code must be obtained. Then Edit > Offline Edit may be selected. The code can be entered into the Auth Code field and submitted to complete the transaction.
• AVS Failure – Denotes the provided address and/or zip code for the payment card failed to verify.
o To resolve this problem transaction, Edit > Delete/Void may be selected. Then Edit > Clone may be selected to copy the transaction, allowing the street address and postal/ZIP code to be removed from the cloned transaction, and submitted to attempt authorization without the invalid information.
• Expired Card – Denotes the provided payment card is expired.
o To resolve this problem transaction, Edit > Delete/Void may be selected.
• Invalid Amount -- Transaction Cannot Exceed (Max Amount) - Denotes the transaction amount exceeds the maximum amount limit.
o To resolve this problem transaction, Edit > Online Edit may be selected. Then the correct transaction amount can be entered into the appropriate amount field and submitted to obtain authorization.
o If the transaction amount cannot be authorized for the full amount, authorization for less can be attempted by selecting Edit > Online Edit. Then the transaction amount can be changed and submitted to attempt authorization.
o If the correct transaction amount is unknown, Edit > Delete/Void may be selected.

Auditing Transactions Guide
© 2019 Shift4 Payments, LLC. All rights reserved. Version 2.3 External Use NDA Page 43 of 57
• Invalid Auth Code – Denotes the provided authorization code is invalid.
o To resolve this problem transaction, Edit > Clone may be selected to copy the transaction, allowing the cloned transaction to be submitted to attempt authorization without the invalid information. Then Edit > Delete/Void may be selected to resolve the original, invalid transaction.
3. After all problem transactions have been addressed, reconcile the POS end-of-day totals to LTM, ensuring everything matches and making any last edits.
Important: If problem transactions cannot be corrected, but the batch needs to be closed, clear Problems in the viewing options area and then click Apply. This will remove problem transactions from being displayed and from the batch. This setting will remain in effect until another is applied, causing problem transactions that may be able to be corrected to be hidden from view, potentially costing the merchant money.

Auditing Transactions Guide
© 2019 Shift4 Payments, LLC. All rights reserved. Version 2.3 External Use NDA Page 44 of 57
4. There should be no problems listed in the Grand Total area, and Close Batch is now available.
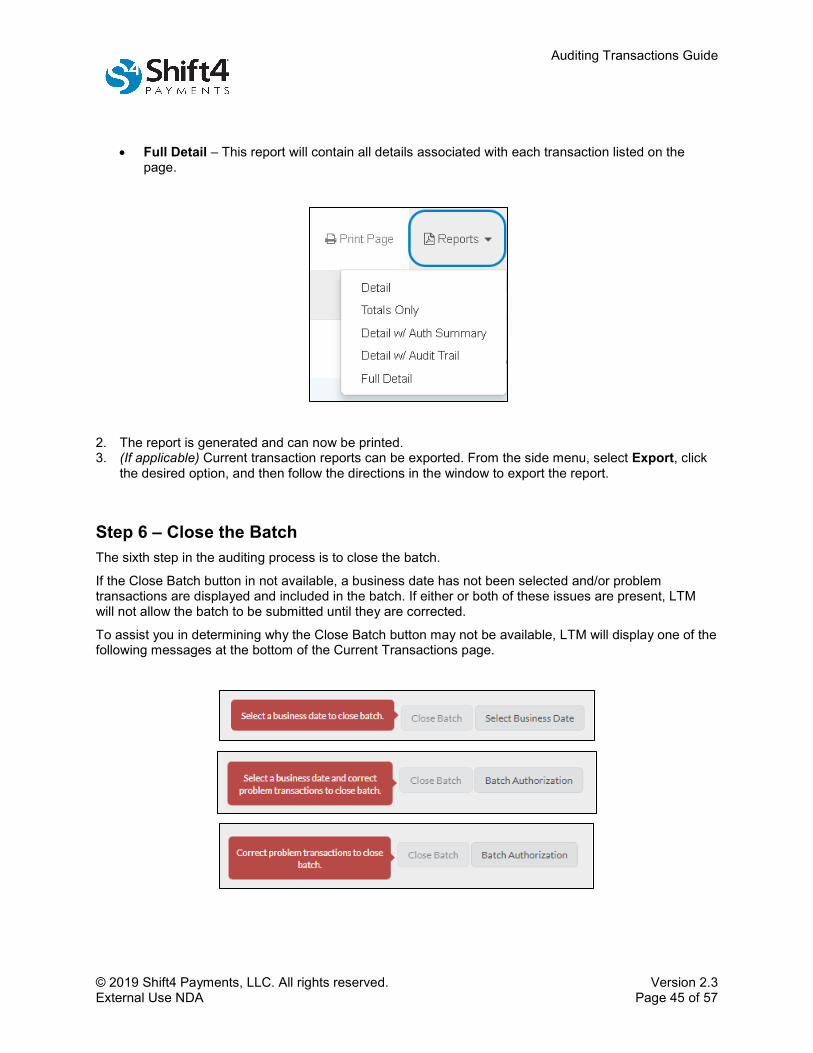
Reports Transaction reports are available in LTM at any time, but if a printed record of the batch is needed, complete the following steps:
Tip: Ensure pop-up blockers are turned off in your web browser. If they are turned on, the report may not be displayed.
1. From the menu, select Reports and then click the desired option:
• Detail – This report will contain all of the transactions listed on the page. • Totals Only – This report will only contain the subtotals and grand totals listed on the page. • Detail w/ Auth Summary – This report will contain all of the transactions listed on the page and
the authorization information for each transaction. • Detail w/ Audit Trail – This report will contain all of the transactions listed on the page and the
audit trail information for each transaction.
Auditing Transactions Guide
© 2019 Shift4 Payments, LLC. All rights reserved. Version 2.3 External Use NDA Page 45 of 57
• Full Detail – This report will contain all details associated with each transaction listed on the page.
2. The report is generated and can now be printed. 3. (If applicable) Current transaction reports can be exported. From the side menu, select Export, click
the desired option, and then follow the directions in the window to export the report.
Step 6 – Close the Batch The sixth step in the auditing process is to close the batch.
If the Close Batch button in not available, a business date has not been selected and/or problem transactions are displayed and included in the batch. If either or both of these issues are present, LTM will not allow the batch to be submitted until they are corrected.
To assist you in determining why the Close Batch button may not be available, LTM will display one of the following messages at the bottom of the Current Transactions page.

Auditing Transactions Guide
© 2019 Shift4 Payments, LLC. All rights reserved. Version 2.3 External Use NDA Page 46 of 57
If you chose the Only selected transactions option in step 2 of the auditing process, and have selected the transactions you want to batch, you will need to click the View Selected Only button to enable the Close Batch button. See Appendix C – Batching Selected Transactions for more details.
Please review these important details again:
• Authorization only transactions are not sent when the batch is closed; they will remain in your current transactions until addressed.
• Voids are not sent when the batch is closed; they are retained in the database for audit trail purposes and moved to archived transactions.
Note: You can change your selected merchant(s), business date, and viewing options if the transactions displayed should not be included in the batch.
To close the batch, which consists of submitting all the listed transactions to the processor (unless otherwise noted), complete the following steps:
1. At the bottom of the Current Transactions page, click Close Batch.
2. The Batch Close page will be displayed and LTM will begin to process the batch.

Auditing Transactions Guide
© 2019 Shift4 Payments, LLC. All rights reserved. Version 2.3 External Use NDA Page 47 of 57
WARNING! Do not navigate away from the page while the batch is processing.
3. If Fraud Sentry® settings were configured by the Account Administrator, LTM will scan the transactions at this time and respond according to the configured settings. If any issues were found, they will be displayed with a warning message. Review the issues. If there are no problems, enter your username and password on the Batch Close User Confirmation page, then click Close Batch. If you discover problems, click Cancel to cancel the batch, allowing you to audit the problem transactions.

Auditing Transactions Guide
© 2019 Shift4 Payments, LLC. All rights reserved. Version 2.3 External Use NDA Page 48 of 57
4. When the batch has been successfully submitted, the Batch Close page displays the merchant or merchants, a summary of the batch, and the batch process.
Tip: Submitting a daily batch will help ensure the merchant gets the best rate possible on their transactions. Transactions that are not submitted to the processor within 24 hours may be considered high risk because there is a greater chance of the cardholder disputing the charge. High risk transactions may result in additional fees by the processor.
Step 7 – Sign Out Shift4 recommends that you manually sign out of your account. You should never close your browser prior to logging out properly.
To log out, complete the following step:
1. Click Sign Out in the upper-right corner of any LTM page.
Note: LTM will automatically sign users out after 20 minutes of inactivity. A warning message will appear five minutes before this automatic sign-out is set to occur; a final warning will appear one minute before.

Auditing Transactions Guide
© 2019 Shift4 Payments, LLC. All rights reserved. Version 2.3 External Use NDA Page 49 of 57
Appendix A - Current Transactions in Grid Appendix A reviews auditing with the transaction grid, which is a helpful tool when a large number of transactions need to be audited; however, it must be enabled for your user profile.
Transactions can be individually selected or the quick select options can be used on the Current Transactions in Grid page. The following are quick select options:
• All - If clicked, all transactions will be selected for auditing. • None - If clicked, all transactions will be cleared. • Duplicates - If clicked, only possibly duplicate transactions will be selected for auditing. • Invert - If clicked, the selected transactions will be the reverse of what is currently selected for
auditing.
The following are the possible auditing options available on the Current Transactions in Grid page:
• Post Changes to Selected – If selected, this option will change all selected transactions to reflect the edits made to them.
• Change Selected to Auth Only – If selected, this option will change all selected transactions to authorization only transactions.
• Change Selected to Sale/Refund – If selected, this option will change all selected transactions to sale or refund transactions.

Auditing Transactions Guide
© 2019 Shift4 Payments, LLC. All rights reserved. Version 2.3 External Use NDA Page 50 of 57
• Change Selected to Void – If selected, this options will change all selected transactions to voided transactions.
Note: Any changes you make while auditing transactions in LTM will not reflect in your POS/PMS system.

Auditing Transactions Guide
© 2019 Shift4 Payments, LLC. All rights reserved. Version 2.3 External Use NDA Page 51 of 57
Auditing Duplicate Transactions If the transaction grid is enabled for your user profile, you may use it to audit possibly duplicate transactions by completing the following steps:
Note: The following example assumes the first four steps of the auditing process have been completed: (1) Select a Merchant, (2) Select a Business Date, (3) Set the Viewing Options, and (4) Reconcile the POS/PMS to LTM.
1. On the Current Transactions page, select Duplicates Only in the viewing options and click Apply Filters.
2. From the menu, select Transactions > Current Transactions in Grid. 3. On the Current Transactions in Grid page, select Duplicates.
4. Only possibly duplicate transactions are selected. 5. Review the transactions against the POS/PMS end-of-day totals. 6. (If applicable) To correct duplicate transactions by voiding the erroneous transactions, complete the
following steps:
• In the Transaction Type column, select Void for each transaction that needs to be voided.
WARNING! To avoid inadvertently changing the status of transactions, possibly making them invalid, ensure only the transactions you want to make changes to are selected.

Auditing Transactions Guide
© 2019 Shift4 Payments, LLC. All rights reserved. Version 2.3 External Use NDA Page 52 of 57
• Select Post Changes to Selected in the auditing options list. • Click Submit.
7. The selected transactions have been voided, and they will have a transaction type of Void. 8. (Alternative method to step 5) To correct duplicate transactions by voiding the erroneous
transactions, complete the following steps:
• Select the transactions to be voided, either individually or by using the quick select options.
WARNING! To avoid inadvertently changing the status of transactions, possibly making them invalid, ensure only the transactions you want to make changes to are selected.
• Select Change Selected to Void in the auditing options list. • Click Submit.
9. The selected transactions have been voided, and they will have a transaction type of Void.

Auditing Transactions Guide
© 2019 Shift4 Payments, LLC. All rights reserved. Version 2.3 External Use NDA Page 53 of 57
Auditing Authorization Only Transactions If the transaction grid is enabled for your user profile, you may use it to audit authorization only transactions by completing the following steps:
Note: The following example assumes the first four steps of the auditing process have been completed: (1) Select a Merchant, (2) Select a Business Date, (3) Set the Viewing Options, and (4) Reconcile the POS/PMS to LTM.
1. On the Current Transactions in Grid page, click . 2. On the Viewing Options screen, select Authorizations and click Apply.
3. Authorization only transactions will be displayed. 4. Review the transactions against the POS/PMS end-of-day totals. 5. (If applicable) To audit the authorization only transactions, complete the following steps:
• Select the authorization only transactions to be audited, either individually or by using the quick select options.
• Make any changes to the selected transactions, like changing the field selected under Transaction Type or changing the value under Amount.

Auditing Transactions Guide
© 2019 Shift4 Payments, LLC. All rights reserved. Version 2.3 External Use NDA Page 54 of 57
WARNING! To avoid inadvertently changing the status of transactions, possibly making them invalid, ensure only the transactions you want to make changes to are selected.
• Select the appropriate option from the auditing options list. • Click Submit.
6. The selected transactions will reflect the edits.
Important: There are many ways to use the transaction grid tool, and Shift4 advises caution when using it to avoid the creation of problem transactions.

Auditing Transactions Guide
© 2019 Shift4 Payments, LLC. All rights reserved. Version 2.3 External Use NDA Page 55 of 57
Appendix B – Viewing Modified Transactions If Highlight modified transactions has been enabled on your Change Profile page, any transactions that have been modified or created in LTM will display a on the transaction line.
For example, if a sale created on a POS/PMS was voided in LTM, it is considered to be a modified transaction and will display the . Another example would be if a sale was performed using Online Entry, it is considered to be a modified transaction and will display the .
If you do not want the displayed for modified transactions, disable the Highlight modified transactions selection on your Change Profile page.
Note: Hotel transactions with check-in dates that are more than 180 days prior to the current date will also display the symbol.
Modified transactions can still be viewed by selecting the Modified Only viewing option and clicking Apply.

Auditing Transactions Guide
© 2019 Shift4 Payments, LLC. All rights reserved. Version 2.3 External Use NDA Page 56 of 57
Appendix C – Batching Selected Transactions
Note: Batching selected transactions is only possible if you chose Only selected transactions in step 2 of the auditing process, which allows you to select transactions to be included in the batch.
To select transactions, complete the following steps:
Requirement: You must complete the first five steps of the auditing process before completing these steps: (1) Select a Merchant, (2) Select a Business Date, (3) Set the Viewing Options, (4) Reconcile the POS/PMS to LTM, and (5) Resolve All Problem Transactions in the Batch.
1. On the Current Transactions page, to the left of the Transaction column, select to include the transaction in the batch.
Note: Since Authorization only transactions cannot be included in the batch, they will not be selectable when Only selected transactions is applied.

Auditing Transactions Guide
© 2019 Shift4 Payments, LLC. All rights reserved. Version 2.3 External Use NDA Page 57 of 57
2. Repeat step 1 until all transactions that need to be included are selected.
3. Scroll to the bottom of the Current Transactions page and click View Selected Only.
4. Continue to the Step 6 – Closing the Batch section.