limited warranty - arctic cat warranty arctic cat inc. (hereinafter referred to as arctic cat)...
TRANSCRIPT


LIMITED WARRANTY Arctic Cat Inc. (hereinafter referred to as Arctic Cat) extends a limited warranty on each new ArcticCat Snowmobile it manufactures and on each part and accessory manufactured or sold by Arctic Cat.The warranty is extended to the original retail purchaser only on parts and accessories sold throughan authorized Arctic Cat Snowmobile dealer. Warranty on snowmobiles is extended to the originalretail purchaser; however, the balance of the unused warranty may be transferred to a second party.
Arctic Cat warrants only the products it manufactures and/or sells and does not warrant that otherproducts will function properly when used with an Arctic Cat Snowmobile or will not damage the ArcticCat Snowmobile. Arctic Cat does not assume any liability for incidental or consequential damages.
Arctic Cat will repair or replace, at its option, free of charge (including any related labor charges), anyparts that are found to be warrantable in material or workmanship. This repair work MUST be done byan authorized Arctic Cat Snowmobile dealer. No transportation charges, rental charges, orinconvenience costs will be paid by Arctic Cat. The warranty is validated upon examination of saidparts by Arctic Cat or an authorized Arctic Cat Snowmobile dealer. Arctic Cat reserves the right toinspect such parts at its factory for final determination if warranty should apply.
The warranty periods are as follows:
1. For snowmobiles used for recreational purposes:—If purchased between May 1 and November 30, warranty expires ONE (1) YEAR fromDecember 1 of the current year.—If purchased between December 1 and April 30, ONE (1) YEAR from the date of sale.
2. For snowmobiles used for commercial purposes (i.e. rental operations and power and lightcompanies), NINETY (90) DAYS from the date of sale.
3. SIX (6) MONTHS from date of sale for batteries on a full exchange basis and 50% exchange forthe remaining SIX (6) MONTHS of the first year.
4. THIRTY (30) DAYS from date of sale for all dealer installed parts and accessories.
5. UNTIL EXPIRATION OF THE NEW PRODUCT WARRANTY for all eligible replacement parts.
Exclusions to this warranty include normal wear, abuse (i.e. a track run on marginal snow conditionswithout proper lubrication or additional bogie wheels), and the following parts:
Fuel Filter Light Bulbs Windshield Minor Gelcoat Cracks (or
Drive Belt Wear Bars Water Pump Belt “stars” in fiberglass parts)
Brake Pads Fan Belt Spark Plugs Clutch Wear Parts (bushings, etc.)
Wear Strips
The following will VOID Arctic Cat’s warranty:
1. Failure to perform the proper break-in procedure and all operator related maintenance, storageprocedures, and service as recommended in the Operator’s Manual.
2. Repair by anyone other than an authorized Arctic Cat Snowmobile dealer.
3. Use of an improper fuel mixture ratio.
4. Use of improper carburetor main jets.
5. Use of improper gasoline, lubricating oils, or spark plugs.
6. An accident or subjecting the snowmobile to misuse, abuse, or negligent operation.
7. Any modification or removal of parts (i.e. air-intake silencer, muffler, etc.) unless instructed to doso by Arctic Cat.
8. Use of the snowmobile in any way for racing purposes.
9. Removal of the engine for use in another vehicle.
10. Removal or mutilation of the Vehicle Identification Number or Engine Serial Number.
11. Use of parts not sold or approved by Arctic Cat.
12. Track and tunnel damage resulting from either ice stud or hooker plate installation.
In consideration of the foregoing, any implied warranty is limited in duration to the various warrantyperiods set forth. This warranty gives you specific legal rights, and you may also have other rightswhich vary from state to state and country to country. Some states do not allow limitations on howlong an implied warranty lasts, so the above limitations may not apply to you.

Table of ContentsLimited Warranty .... Inside Front CoverForeword........................................... 1Declaration of Conformity.................. 2Snowmobile Safety Rules ..............3-4Specifications.................................... 5General Information .....................6-14
Snowmobile Identification .......... 6Control Locations....................... 6Gasoline - Oil ............................. 6Engine Break-In ......................... 8Speedometer/Tachometer ......... 8Diagnostic Codes....................... 9Handlebar Tilt ............................ 9Exhaust System....................... 10Air-Intake Silencer ................... 10Cooling System........................ 10Drive Clutch and Driven
Pulley .................................... 10Drive Clutch/Driven Pulley Alignment .................. 11Fuel Pump ............................... 11Shock Absorbers ..................... 11Track Studs .............................. 11Towing ..................................... 12High Altitude Operation............ 12Removable Seat ...................... 12Arctic Power Valve (APV)
System.................................. 13Operating Instructions................15-19
Starting and Stopping Engine .................................. 15
Braking.....................................16Emergency Stopping................18Throttle/Ignition Monitor Switch....................................18
Lubrication .................................20-21Gear Case................................20Front Suspension.....................21Rear Suspension .....................21
Maintenance ..............................22-36Periodic Maintenance Checklist................................22Gasoline Additives ...................23Checking Oil-Injection
System..................................23Spark Plugs .............................23Hydraulic Brake System...........24Drive Belt .................................27Track Tension ...........................29Track Alignment .......................30Suspension..............................31Lights .......................................33Ski Wear Bars ..........................35Adjusting Ski Stance ................35Rail Wear Strips .......................36
Performance Tips ............................37Preparation For Storage .............38-39Preparation After Storage................40Change of Address, Ownership,
or Warranty Transfer.................41Warranty Procedure/Owner
Responsibility.. Inside Back Cover
REFERENCE INFORMATIONWrite the appropriate information for your Arctic Cat Snowmobile in the spaces below. Always use these numbers when referring to your snowmobile.
Model: ________________________________________________Date of Purchase: _______________________________________Vehicle Identification Number: _____________________________Engine Serial Number: ___________________________________
Your Arctic Cat Dealer: ____________________________________Address: ________________________________________________Phone: __________________________________________________

PERSONAL INJURY• To avoid injury to yourself and others, NEVER operate thesnowmobile without first reading and understanding this manual and the Snowmobile Safety Handbook; then follow the instructionsand heed the warnings given.
• USE COMMON SENSE.
• DON’T DRINK and DRIVE.
• STAY IN CONTROL at ALL TIMES.
• TELL YOUR FRIENDS. If you see a friend operating a snowmobile recklessly, at excessive speeds, while intoxicated, or inother unsafe ways, don’t wait until it is too late to warn of theconsequences of snowmobile misuse. Such conduct endangerseveryone. TAKE AN ACTIVE ROLE IN THE SAFETY OF YOURSELF AND OTHERS.
PARTS AND ACCESSORIES When in need of replacement parts, oil, or accessories for your Arctic
Cat Snowmobile, be sure to only use GENUINE ARCTIC CATPARTS, OIL, AND ACCESSORIES. Only genuine Arctic Cat parts,oil, and accessories are engineered to meet the standards andrequirements of your Arctic Cat Snowmobile. For a complete list ofaccessories, refer to the current Arctic Cat Accessory Catalog. AnIllustrated Parts Manual is available through your local Arctic CatSnowmobile dealer.
! WARNINGA snowmobile is a very high performance vehicle. Because it doesaccelerate rapidly and is capable of very high speeds, it should not beoperated by a novice or an inexperienced operator. Never acceleraterapidly or drive at high speed beyond the limits of visibility or withoutbeing totally familiar with the terrain and what lies in front of you.Obey speed limits and never operate at speeds that do not allow ade-quate maneuvering and stopping distances. Read and study the entireOperator’s Manual and Safety Handbook.Failure to follow this warning could result in personal injury to your-self or others.

FOREWORD 1
FOREWORDCongratulations! You have chosen a quality Arctic Cat Snowmobile designedand manufactured to give dependable service. Be sure, as the owner/operator ofan Arctic Cat Snowmobile, to become thoroughly familiar with its basic opera-tion, maintenance, and off-season storage procedures. Read this manual and theaccompanying Snowmobile Safety Handbook before operating the snowmobileto learn safe and proper use of your new Arctic Cat Snowmobile. Always oper-ate the snowmobile within your level of skill and current terrain conditions.The Operator’s Manual, Snowmobile Safety Handbook, and SnowmobileDecals display the words Warning, Caution, and Note to emphasize importantinformation. The symbol ! WARNING identifies personal safety-relatedinformation. Be sure to follow the directive because it deals with the possibilityof severe personal injury or even death. The symbol ! CAUTION identifiesunsafe practices which may result in snowmobile-related damage. Follow thedirective because it deals with the possibility of damaging part or parts of thesnowmobile. The symbol NOTE: identifies supplementary information wor-thy of particular attention.This manual covers operator-related maintenance, operating instructions,and off-season storage instructions. If major repair or service is everrequired, contact an authorized Arctic Cat Snowmobile dealer for profes-sional service.At the time of publication, all information and illustrations were technically cor-rect. Some illustrations used in this manual are used for clarity purposes onlyand are not designed to depict actual conditions. Because Arctic Cat Inc. con-stantly refines and improves its products, no retroactive obligation is incurred.This Operator’s Manual should be considered a permanent part of the snowmo-bile and must remain with the snowmobile at the time of resale. If the snowmo-bile changes ownership more than once, contact Arctic Cat Inc., ServiceDepartment, P.O. Box 810, Thief River Falls, MN 56701, for proper registrationinformation. This manual was prepared by the Product Service and WarrantyDepartment of Arctic Cat Inc.Every Arctic Cat Snowmobile meets or exceeds the standards of the SnowmobileSafety and Certification Committee and displays the SSCC decal. Arctic Cat Inc.endorses and encourages the safe use of all snowmobiles. Always wear a helmetand eye protection. Drive with caution, observe all state and local regulations,and respect the rights of others. ISMA members like Arctic Cat do their part toimprove trails, sponsor events, and generally support the sport of snowmobiling.As a member of the National Snowmobile Foundation, Arctic Cat Inc. promotessnowmobiling through education, charity, and research programs.© 2005 Arctic Cat Inc. February 2005Printed in U.S.A.
TREAD LIGHTLY!ON PUBLIC AND PRIVATE LAND
OFFICIALSPONSOR
®

2 DECLARATION OF CONFORMITY
DECLARATION OF CONFORMITY
Application of council directives: EMC Directive 89/336/EEC
Date of Issue: October, 1993
EC Machinery Directive89/392/ECC
Date of Issue: June, 1993
Issued by European Commission.
Type of Equipment: Snowmobile
Brand Name: Arctic Cat
Model Number: S2006CFFWYUSB
S2006CFFWYUSO
Standards to which conformity is declared:
EMC: EN 50082-1/ 1992 EN 5501
IEC 801-2/ 1991 CISPR 12
IEC 801-3/ 1984
IEC 801-4/ 1998
IEC 1000-4-2/ 1995; EN 6100-4-2
IEC 1000-4-4/ 1995; EN 6100-4-4
ENV 50204/ 1995
Manufacurer (if not issuing agent): Arctic Cat Inc.
601 Brooks Ave. S.
Thief River Falls, MN
56701 USA
I, the undersigned, hereby declare that the equipment specified above conforms to the directive(s) and standard(s) as specified.
Fred Bernier
Manager, Product Testing & Certification

SNOWMOBILE SAFETY RULES 3
SNOWMOBILE SAFETY RULES

4 SNOWMOBILE SAFETY RULES
SNOWMOBILE SAFETY RULES (Cont)

CROSSFIRE 700 EFI SPECIFICATIONS 5
CROSSFIRE 700 EFI SPECIFICATIONS*
* Specifications subject to changewithout notice.
NOTE: The Crossfire 700 EFI has been initially set up at the factoryfor operation between 5-9000 feet.
ENGINE AND DRIVEBore x Stroke 79.7 x 70 mm
(3.137 x 2.756 in.)
Displacement 698 cc (42.59 cu in.)
Lighting Coil Out-put
190 W @ 3500 RPM
Ignition Type CDI/NOI
Spark Plug Type NGK BR9EYA
Spark Plug Gap 0.7-0.8 mm (0.028-0.031 in.)
Cooling System Liquid
Brake Type Hydraulic
Track Width 38 cm (15 in.)
Track Length (Overall)
345 cm (136 in.)
Track Deflection (Tension)
50.8-57.2 mm (2-2 1/4 in.) @ 20 lb
Track Style Standard Lug
Drive Clutch Spring
Yellow/White (p/n 0646-229)
Cam Arms 68.0 g (p/n 0746-703)
Driven Pulley Spring
Green (p/n 0648-732)
Torque Bracket 36° (p/n 0648-448)
Ring Gear 76T (p/n 0702-675)
Transfer Gear 60T/34T (p/n 0702-709)
Input Gear 60T (p/n 0702-691)
CARBURETION (Fuel Injection)Throttle Bodies 46 mm
Fuel Pump Electric
CHASSISLength (Overall) 345 cm (136 in.)
Height (Overall) 119 cm (47 in.)
Width (Overall) 121.9 cm (48 in.)
Ski Center-to-Center Distance (Stance)
107-112 cm (42-44 in.) (Adjustable)
MISCELLANYCurb Weight (Approx) 256 kg (565 lb)
Dry Weight (Approx) 225 kg (495 lb)
Gas Tank Capacity (Actual)
41.6 l (11.0 U.S. gal.)
Gas Tank Capacity (Rated)
37.8 l (10.0 U.S. gal.)
Gear Case Lubricant Level
89 ml (3 fl oz)
Injection Oil Reservoir Capacity
3.52 l (3.2 U.S. qt)
Gasoline (Recommended)
87 Octane Regular Unleaded
Engine Oil Arctic Cat Synthetic APV 2-Cycle Oil
Gear Case Lubricant Arctic Cat ACT Drive Fluid
Suspension Grease Low-Temperature
Brake Fluid High-Temp DOT 3
Break-In Fuel Mixture 100:1 Plus Oil Injection
Drive Belt p/n 0627-036
Drive Belt Width 34-36 mm(1 11/32-1 13/32 in.)
Drive Belt Circumference
113.9-114.8 mm(44 27/32-45 7/32 in.)
Taillight/Brakelight p/n 0409-056
Headlight p/n 0609-251 (High Beam)0609-693 (Low Beam)
Cooling System Capacity
3.8 l (4 U.S. qt)
Starting System Manual Recoil

6 GENERAL INFORMATION
GENERAL INFORMATIONSNOWMOBILE IDENTIFICATIONThe Arctic Cat Snowmobile has twoimportant identification numbers.The Vehicle Identification Number(VIN) is stamped into the tunnelnear the right-side footrest. TheEngine Serial Number (ESN) isstamped into the crankcase of theengine.
0726-383
These numbers are required by thedealer to complete warranty claimsproperly. No warranty wil l beallowed by Arctic Cat Inc. if theESN or VIN is removed or mutilatedin any way.Always provide the snowmobilename, VIN, and ESN when contact-ing an authorized Arctic Cat Snow-mobile dealer for parts, service,accessories, or warranty. If the com-plete engine must be replaced, askthe dealer to notify Arctic Cat forcorrect registration information.
CONTROL LOCATIONSShown are typical control locationsfor Arctic Cat snowmobiles. Loca-tions of a specific control will varyaccording to model.
739-609A
GASOLINE - OIL Recommended GasolineThe recommended gasoline to use is8 7 m in im u m o c t an e r e gu la runleaded, and the Fuel DesignationConnector at the ECU must be con-nected. In many areas, oxygenates(either ethanol or MTBE) are addedto the gasoline. Oxygenated gaso-lines containing up to 10% ethanolor up to 15% MTBE are acceptablegasolines; however, whenever usingoxygenated gasolines, the fuel des-ignation connector at the ECU mustbe disconnected.
NOTE: In order for the ECU tochange modes, the engine mustbe OFF when connecting or dis-connecting the fuel designationconnector.
! CAUTIONIf oxygenated gasoline is to beused, it is extremely importantthat the fuel designation con-nector at the ECU is discon-nected . I f not when us ingoxygenated gasoline, severeengine damage may occur.

GENERAL INFORMATION 7
Recommended Injection OilThe recommended oil to use in theoil injection system is Arctic CatSynthetic APV 2-Cycle Oil. This oilis also the recommended oil to useduring the break-in period. This oilis specially formulated to be usedeither as an injection oil or as a premix oil and meets all of the lubrica-tion requirements of the Arctic Catsnowmobile engine.
Filling Gas TankSince gasoline expands as its tem-perature increases, the gas tank mustbe filled to its rated capacity only.Expansion room must be maintainedin the tank particularly if the tank isfilled with cold gasoline and thenmoved to a warm area. Also, if thesnowmobile is to remain on a trailerafter filling the gas tank, the bed ofthe trailer must be maintained levelto prevent gasoline from drainingout through the gas tank vent hose.
Break In Gas/Oil Mixing InstructionsBefore mixing gasoline and oil,make sure the oil is at room temper-ature (20° C/68° F). Use a U.L.approved 22.7 l (6 U.S. gal.) gaso-line container for mixing the gaso-line and oil. To properly mix the fuelat a 100:1 ratio, use the followingprocedure:
1. Pour gasoline into the gasolinecontainer until approximatelyhalf full.
2. Pour 236 ml (8 fl oz) of ArcticCat Synthetic APV 2-Cycle Oilinto the gasoline container.
3. Install cap on gasoline con-tainer and shake the mixturevigorously.
4. Fill the gasoline container withgasoline; then cap the gasolinecontainer and shake the mixturevigorously.
5. Using a fine-mesh screenedfunnel, pour the fuel mixturefrom the gasoline container intothe snowmobile gas tank.
! CAUTIONAny oil used in place of the rec-ommended oil could cause seri-ous engine damage.
! WARNINGAlways fill the gas tank in a well-ventilated area. Never add gaso-line to the snowmobile gas tanknear any open flames or withthe engine running. DO NOTSMOKE while filling the gastank. Do not sit on the snowmo-bile without first installing thegas tank cap.
! CAUTIONNever mix oil and gasoline inthe snowmobile gas tank.
! WARNINGAlways fill the gas tank in a well-ventilated area. Never add gaso-line to the snowmobile gas tanknear any open flames or withthe engine running. DO NOTSMOKE while mixing fuel or fill-ing the gas tank.

8 GENERAL INFORMATION
ENGINE BREAK-INThe Arctic Cat engine (when new orrebuilt) requires a short break-inperiod before the engine is subjectedto heavy load conditions. Arctic Catrequires that the first tankful of fuelbe premixed at a 100:1 ratio. During the break in period, a maxi-mum of 1 /2 throt t le i s recom-mended; however, brief full throttleaccelerations and variations in driv-ing speeds contribute to good enginebreak in. After one (1) tankful ofgas/oil mixture has been used, thesnowmobile may be taken to anauthorized Arctic Cat Snowmobiledealer for a checkup. This checkupis at the discretion and the expenseof the snowmobile owner.
SPEEDOMETER/TACHOMETER Some models are equipped with acombination speedometer/tachome-ter. Also incorporated into thespeedometer/tachometer are a digi-tal readout screen and indicatorlights (battery, low oil, high beam,check engine, and high tempera-ture).
NOTE: The functions of the dig-ital readout and indicator lightswill vary from model to model.
Top ButtonBy pushing the top button once(lower right-hand side of the speed-ometer/tachometer), the RPM andMPH will be displayed (one on thereadout screen and one with the nee-dle). By pushing the button onceagain, the functions will be reversed. By pushing the top button (withspeed being displayed) for morethan two seconds, the display willshow between standard mph or met-ric kph. Release the button whendesired display appears.By pushing and holding the top but-ton, maximum RPM will be dis-played on the readout screen. Themaximum RPM readout will resetwhen the engine is shut off.
Bottom ButtonBy pushing the bottom button once,the readout screen will display hour-meter or trip-meter/odometer; bypushing the button once again, thetwo functions will be reversed. Thehour-meter readout will not reset.
Low Oil Warning LightThe Low Oil Warning Light isdesigned to alert the snowmobileoperator when the oil in the oil-injection reservoir gets below a pre-scribed level; however, it is highlyrecommended that a visual verifica-tion of the oil level in the reservoirbe done prior to operating the snow-mobile.
! CAUTIONDO NOT exceed the one (1) tank-ful limitation of a 100:1 gas/oilbreak in mixture. Continuoususe of a gas/oil mixture, unlessconsistently operating thissnowmobile in extremely coldcondit ions ( -26°C/ -15°F orcolder), could cause spark plugfouling and excessive carbonbuildup. A 100:1 gas/oil mixturemust be used in conjunctionwith the oil injection system toensure adequate engine lubrica-tion in extremely cold condi-tions.

GENERAL INFORMATION 9
Once the Low Oil Warning Lightilluminates during operation of thesnowmobile, the operator must peri-odically monitor the level of oil inthe reservoir and must fill the reser-voir the next time gasoline is addedto the gas tank. The “alert level” ofthe Low Oil Warning Light i sapproximately equal to 1 tankful ofgasoline under normal operatingconditions.
High BeamThe headlight HIGH/LOW beamswitch is incorporated into the left-side handlebar switch housing.Pushing the button inward will acti-vate the switch. When on HIGHbeam, the high beam indicator lightwill be illuminated.
DIAGNOSTIC CODESAdditional codes are flashed by thehigh temperature warning light.Refer to the following chart for diag-nostic code sequences.
HANDLEBAR TILTThe handlebar can be adjusted to theposition providing the operator withthe most comfort. To adjust the han-dlebar, use the following procedure:
NOTE: It may be necessary toremove the handlebar cover forthis procedure.
1. Loosen the four lock nuts secur-ing the handlebar caps andblock to the steering post.
0740-299
2. Adjust the handlebar up ordown to operator’s desired tilt;then t ighten the lock nutsevenly and securely. Checksteering for maximum right/leftturning capabilities.
3. Recheck lock nuts; tightensecurely.
NOTE: Recommended torquevalue of lock nuts is 2.5 kg-m (18ft-lb).
Number of Flashes Trouble
1 Open or short circuit in throttle position sensor.
2 Open or short circuit in water temperature sensor.
3 Open or short circuit in intake air temperature sensor.
4 Open or short circuit in barometric pressure sensor.
5 Failure in injector(s).
6 Failure in servomotor.
Steady Flash Coolant Temperature Above 80° C (176° F).
Constant On Coolant Temperature Above 93° C (200° F).
Number of Flashes Trouble

10 GENERAL INFORMATION
NOTE: Do not adjust the han-dlebar to a position that allowsthe brake fluid to be below thelow mark on either side of thebrake fluid reservoir.
EXHAUST SYSTEMThe exhaust system is designed toreduce noise and to improve the totalperformance of the engine. If anyexhaus t sys tem component i sremoved from the engine and theengine is run, severe engine damagewill result.
AIR-INTAKE SILENCERUsed in conjunction with the fuelintake system is a specially designedair-intake silencer. The purpose ofthe silencer is to quiet the intake offresh air. Since the fuel intake sys-tem is calibrated with the air-intakesilencer in place, the engine mustnever be run with the s i lencerremoved. Performance will not beimproved if the air-intake silencer isremoved. In contrast, severe enginedamage will occur.
COOLING SYSTEMThe cool ing system should beinspected daily for leakage and dam-age. Also, the coolant level shouldbe checked daily. If leakage or dam-age is detected, take the snowmobileto an authorized Arctic Cat Snow-mobile dealer for service.When filling the cooling system, usea coolant/water mixture which willsat isfy the coldest anticipatedweather conditions of your area inaccordance with the coolant manu-facturer's recommendations. Whilethe cooling system is being filled, airpockets may develop; therefore, runthe engine for five to ten minutesafter the initial fill, shut the engineoff, and then fill the cooling systemto approximately 51 mm (2 in.)below the filler neck.
NOTE: Use a good quality, gly-col based, automotive type anti-freeze.
DRIVE CLUTCH AND DRIVEN PULLEYThe drive clutch and driven pulleydo not require lubrication; there-fore, no special maintenance isrequired by the snowmobile owner.However, the drive clutch anddriven pulley should be disassem-bled, cleaned, and inspected by anauthorized Arctic Cat Snowmobiledealer after every 800 miles of oper-ation or at the end of the snowmobil-ing season whichever occurs first.
! WARNINGTighten lock nuts according tospecifications to prevent unex-pected “movement” of the han-dlebar during operation overrough terrain and DO NOT posi-tion handlebar so steering (max-imum r ight / le f t tu rn ingcapabilities) or throttle andbrake controls are affected.
! CAUTIONThe snowmobile is not designedto be operated in dusty condi-tions. Operating the snowmo-bile in dusty conditions willresult in severe engine damage.
! CAUTIONAfter operating the snowmobilefor the initial 5-10 minutes, stopthe engine, allow the engine tocool down, and check the cool-ant level. Add coolant as neces-sary.

GENERAL INFORMATION 11
When operating the snowmobile athigh altitudes, it may be necessary tochange certain component parts ofthe drive clutch. See an authorizedArctic Cat Snowmobile dealer forfurther information.
DRIVE CLUTCH/DRIVEN PULLEY ALIGNMENTThe parallel ism and the offsetbetween the drive clutch and drivenpulley are set at the factory. Nor-mally, no adjustment is necessary aslong as neither the drive clutch northe driven pulley is removed or dis-assembled. However, if prematuredrive belt wear is experienced or ifthe drive belt turns over, the driveclutch/driven pulley alignment mustbe checked. Take the snowmobile toan authorized Arctic Cat Snowmo-bile dealer for this service.
FUEL PUMPThe fuel pump is designed to pro-vide adequate amount of gas to thecarburetors at all throttle settings. Ifa fuel delivery problem is suspected,take the snowmobile to an autho-rized Arctic Cat Snowmobile dealer.
SHOCK ABSORBERSEach shock absorber should be visi-bly checked weekly for excessivefluid leakage, cracks or breaks in thelower case, or a bent plunger. If anyone of these conditions is detected,replacement is necessary. Take thesnowmobile to an authorized ArcticCat Snowmobile dealer for this ser-vice.
NOTE: When the snowmobile isoperated in ex t remely co ldweather (-23° C/ -10° F or colder),a small amount of leakage may bepresent. Unless the leakage isexcessive, replacement is notnecessary.Also, it is required that rebuildablegas shock absorbers be cleaned andrecharged after the initial 200 miles.This service is considered normalmaintenance and is the responsibil-ity of the owner. Take the snowmo-bile to an authorized Arctic CatSnowmobile dealer for this service.
TRACK STUDS
0726-207
Studs must only be installed on thecenter belt using the pattern illus-trated. For proper installation, usethe following procedure:
1. Measure 38 mm (1 1/2 in.) infrom the edge of the center belt;then drill the stud hole using theproper-sized hole drill.
2. Push the stud through the holefrom inside the track; then placethe domed support plate andlock nut on the exposed stud.
! CAUTIONDO NOT attempt to service thedrive clutch and driven pulley.The drive clutch and driven pul-ley must be serviced by anauthorized Arctic Cat Snowmo-bile dealer only.
! CAUTIONDo not use studs that are morethan 9.525 mm (0.375 in.) longerthan the track lug height. Also,do not install studs in the outertrack belts.

12 GENERAL INFORMATION
3. Using a wrench to secure thestud, tighten the lock nut on theexposed stud.
It is also recommended that when-ever studs are installed on a track,ca rb ide wea r ba r s shou ld b einstalled on the skis. Carbide wearbars complement the track studs tobalance steering control under theseconditions. The length of the carbideon the wear bars should be propor-tionate to the number of track studs(i.e. small number of track studs -short length of carbide...many trackstuds - long length of carbide). Theproper proportion between the num-ber of studs and carbide length onthe wear bar will maintain steeringbalance.
NOTE: Stud or hooker plateinstallation will void track andtunnel warranty.
TOWINGIf the snowmobile is to be towed byanother snowmobile, do not towusing the loops in the skis. The towrope should be attached to the spin-dles.
HIGH ALTITUDE OPERATIONOperating a snowmobile at varyingaltitudes requires changes in perfor-mance components. These changesaffect drive train.
NOTE: This snowmobile is ini-tially set up for operation between5-9000 feet.
NOTE: Drive train changes canbe made by the snowmobileowner if qualified to do so. If theowner does not feel qualified,take the snowmobile to an autho-rized Arctic Cat Snowmobiledealer for this service.
REMOVABLE SEATThis snowmobile is equipped with aremovable seat. To remove the seat,use the following procedure:
1. On the bottom of the seat-base,press the retaining clips awayfrom locking pins.
2. Lift on the back of the seat andmove it rearward to remove itfrom the tunnel.
To install the seat, use the followingprocedure:
1. Slide the front of the seat intoposition on the tunnel; thenlower the rear of the seat ontothe locking pins.
2. Press down on the rear of theseat until the retaining clipssnap into place on the lockingpins.
! WARNINGAlways balance the snowmo-bile with the proper proportionbetween the number of studsand carbide length on the wearbars. Do not “over drive” condi-tions; use common sense in alloperating conditions.
! WARNINGDo not operate a snowmobilewith loose studs as they may bethrown from the track. Alwaysuse a shielded safety standwhenever performing any main-tenance or adjustments. ! WARNING
Make sure the seat is securelylocked in place or personalinjury may result.

GENERAL INFORMATION 13
ARCTIC POWER VALVE (APV) SYSTEMThis RPM controlled servomotor(servo) actuated system adjusts thesize of the exhaust ports to providepeak performance throughout theRPM range. The system consists ofan exhaust valve assembly mountedto the exhaust side of each cylinderand connected by adjustable cablesto an electronic servo mountedbeneath the hood.
0739-152
At low RPM, the exhaust valves areheld in the DOWN position byreturn springs. This gives the enginea “low port” exhaust design cali-brated to provide maximum lowRPM power and improve fuel econ-omy at trail speeds.
739-152A
At high RPM, the exhaust valves areraised. This creates a “high port”exhaust design calibrated to providemaximum performance at highRPM.
739-152B
NOTE: The RPM ranges willvary from model to model.
NOTE: If the servomotor cyclesthree times and then shuts down,the exhaust valve cables are notadjusted correctly. The exhaustvalves may also be sticking.To adjust the APV system, use thefollowing procedure:
NOTE: APV cable adjustmentsmay be done by the snowmobileowner if qualified to do so. If theowner does not feel qualified,take the snowmobile to an autho-rized Arctic Cat Snowmobiledealer for this service.
1. Remove the cover from theservo; then remove the actuat-ing cables from the servo.
2. While holding the cable hous-ing, lightly pull on one cableend to remove any slack.
3. Measure the amount of exposedcable from the cable housing tothe end of the cable.
0735-516

14 GENERAL INFORMATION
4. Repeat steps 2 and 3 on theother cable; then compare themeasurements.
NOTE: The measurements mustbe equal and within the specifica-tions from the chart. If the mea-surements are wi th inspecifications, no adjustment isnecessary. If they are not withinspecifications, proceed to step 5.
5. Loosen the jam nut on the cablehousing to be adjusted; thenus ing t he ad ju s t i ng n u t s ,lengthen or shorten the housingas needed.
0739-715
6. While holding the adjusting nutin place, tighten the jam nutsecurely.
7. Install the actuating cables tothe servo; then install the servocover.
APV CABLE LENGTHENGINE MODEL
700 cc 34.5 ±1 mm(1.35 ± 0.039 in.)
OPERATING INSTRUCTIONS 15
OPERATING INSTRUCTIONSSTARTING AND STOPPING ENGINEIt is imperative that the hydraulicbrake system be checked for wearand proper operation and that allsafety checks found in the accompa-nying Snowmobile Safety Hand-boo k b e p e r f o rmed be fo reattempting to start the engine.
After the engine has been started,check the headlights (high and lowbeam), taillight, and brakelight to besure they are working properly andadjusted correctly. Make sure alllights are clean to provide maximumillumination. The headlight and tail-light must be clean and must be illu-minated whenever the engine isrunning.
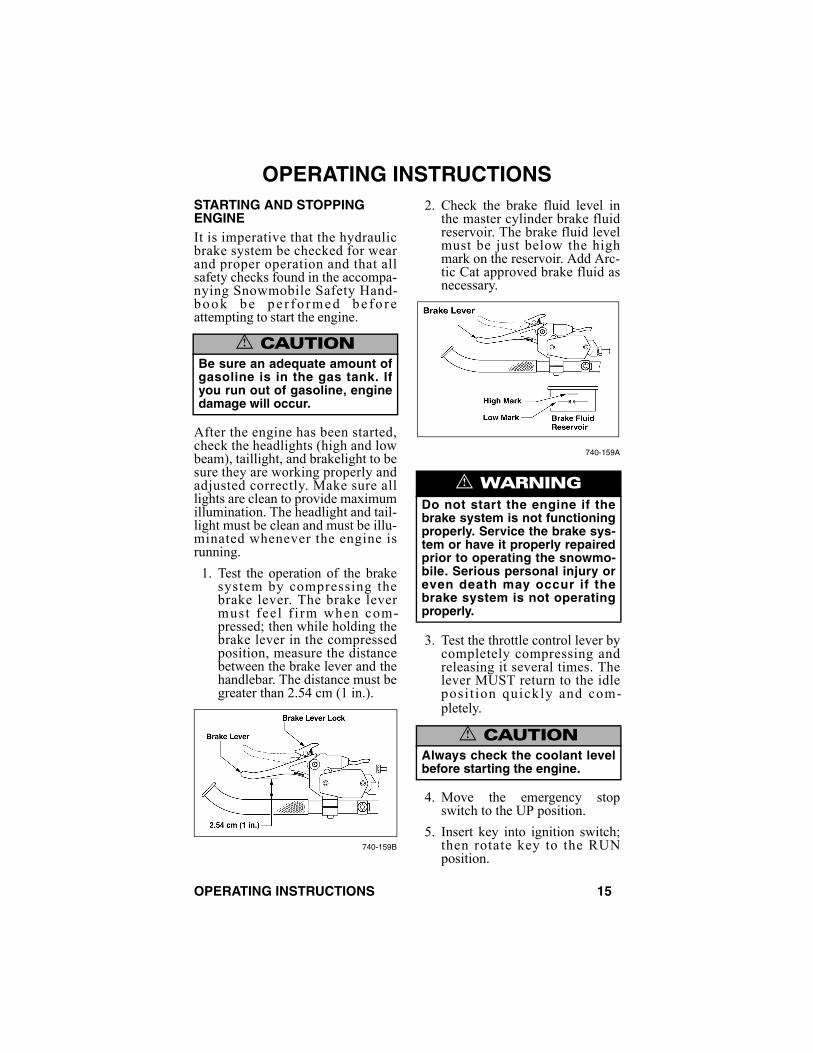
1. Test the operation of the brakesystem by compressing thebrake lever. The brake levermust fee l f i rm when com-pressed; then while holding thebrake lever in the compressedposition, measure the distancebetween the brake lever and thehandlebar. The distance must begreater than 2.54 cm (1 in.).
740-159B
2. Check the brake fluid level inthe master cylinder brake fluidreservoir. The brake fluid levelmust be just below the highmark on the reservoir. Add Arc-tic Cat approved brake fluid asnecessary.
740-159A
3. Test the throttle control lever bycompletely compressing andreleasing it several times. Thelever MUST return to the idleposi t ion quickly and com-pletely.
4. Move the emergency stopswitch to the UP position.
5. Insert key into ignition switch;then rotate key to the RUNposition.
! CAUTIONBe sure an adequate amount ofgasoline is in the gas tank. Ifyou run out of gasoline, enginedamage will occur.
! WARNINGDo not start the engine if thebrake system is not functioningproperly. Service the brake sys-tem or have it properly repairedprior to operating the snowmo-bile. Serious personal injury oreven death may occur if thebrake system is not operatingproperly.
! CAUTIONAlways check the coolant levelbefore starting the engine.

16 OPERATING INSTRUCTIONS
6. Pull the recoil handle slowlyuntil resistance is felt; then givea short quick pull. Repeat untilthe engine starts.
7. When the engine starts, allow itto warm up properly. Idle theengine several minutes until theengine has reached normaloperating temperature. Do notidle the engine for excessivelylong periods of time.
8. If the engine does not start butseems ready to start, engage thebrake lever lock; then compressthe throttle control lever fullyand try to start the engine.When the engine starts, releasethe throttle control lever imme-diately. After the warm-up,release the brake lever lock.
NOTE: If the engine fails to startduring the attempt with the throt-tle control lever compressed,remove the spark plugs and cleanand dry them thoroughly or installa new set of properly gapped, rec-ommended spark plugs.
9. To shut off the engine, turn theignition key to the OFF positionor push the emergency stopswitch to the DOWN position.
BRAKINGOperat ing a snowmobi le wi thhydraulic brakes is different fromopera t ing a snowmobi le wi thmechanical brakes. The followingitems are items that the operatormust be familiar with when operat-ing the snowmobile and its hydrau-l i c b r ak e s y s t e m . I m p o r t a n tadditional information on the propermaintenance of the brake system isfound in the maintenance section ofthis manual.
! CAUTIONTo avoid damaging the recoilstarter, DO NOT pull the recoilrope to its limit or release therecoil handle from an extendedposit ion. Al low the rope torewind slowly.
! CAUTIONIt is extremely important that theengine is properly warmed upbefore subjecting the engine tohigh speed operation or heavyloads. Do not idle the engine forexcessively long periods oftime. The engine should beallowed to idle at least 3-4 min-utes before it is operated atmore than 1 /2 thro t t le . Inextremely cold conditions, thewarm-up time will be longer.Cold seizure and piston scuffingcaused by insufficient warm-upwill not be covered by warranty.

OPERATING INSTRUCTIONS 17
1. Use the brakes wisely. Eachtime the brakes are applied inall hydraulic brake systems(including automotive applica-tions), heat is transferred to thebrake fluid. The amount of heattransferred during high speedstops and/or repetitive use maybe high enough to boil the brakefluid and cause the brakes toeither fade or may cause anunexpected loss of brakes. Ifthis occurs, the brake fluidrequires a cool down periodbefore the brakes will againfunction properly. This cooldown period will vary depend-ing upon the ambient air tem-perature and the temperature ofthe brake fluid. If loss of brakeshas occurred because of highfluid temperatures, do not oper-ate the snowmobile until thecool down period has expiredand brake lever firmness hasreturned.
2. Be sure to maintain the brakefluid at the proper level andtake care not to get any mois-ture in the system as moisture inthe brake fluid lowers the boil-ing point. If the brake fluid isever boiled (by high speed stopsor repetitive use) or if moistureis allowed to enter the system, itmust be changed. Never substi-tute or mix different types orgrades of brake fluid.
3. Never ride the brake. Evenmaintaining minimal pressureon the brake lever will cause thebrake pads to drag on the discand may overheat the brakefluid.
4. The brake lever lock is not aparking brake and should not beapplied for periods exceeding 5minutes. NEVER OPERATETHE SNOWMOBILE WITHTHE BRAKE LEVER LOCKENGAGED.
! WARNINGExcessive repetitive use of thehydraulic brake for high speedstops will cause overheating ofthe brake fluid and prematurebrake pad wear which will resultin an unexpected loss of brakes.
! WARNINGUse only Arctic Cat approvedbrake fluid. Never substitute ormix different types or grades ofbrake f luid. Brake loss canresult. Check brake fluid leveland pad wear before each use.Brake loss can result in severeinjury or even death.
! WARNINGThe brake lever lock is not aparking brake and should not beapplied for periods exceeding 5minutes. The brake lever lockmaintains the brake lever in thecompressed position and main-tains pressure against the brakedisc; however, after a period oftime, the pressure applied to thebrake disc may relax below theamount required to hold thesnowmobile stationary.

18 OPERATING INSTRUCTIONS
5. Pumping the brake lever is per-missible; however, if pumpingthe brake lever more than twiceis necessary to obtain the neces-sary stopping power, immedi-ately take the snowmobile to anauthorized Arctic Cat Snowmo-bile dealer for service.
6. When new brake pads areinstalled, a “burnishing” pro-cess is required. Drive thesnowmobile slowly and com-press the brake lever severaltimes until the pads just start toheat up; then allow them tothoroughly cool down. Thisprocess stabilizes the pad mate-rial and extends the life of thepads.
EMERGENCY STOPPINGThere are several methods of stop-ping or slowing the snowmobileunder a variety of situations. Identi-fied in the following chart are theways a snowmobile may be broughtto a stop and the effectiveness undernormal conditions.
THROTTLE/IGNITION MONITOR SWITCHThe throttle control is equipped witha monitor switch for safety purposeswhich will stop the engine when aloss of return spring force occurs. Ifice forms in the throttle system or ifthere is some other malfunction ofthe throttle system resulting in a lossof return spring force, the monitorswitch will stop the engine when thethrottle control lever is released.
If the engine stops abruptly when thethrottle control lever is released andthe activation of the monitor switchis suspected, use the following pro-cedure:
1. Rotate the ignition key to theOFF position.
2. Remove ice and snow from thethrottle system and wait 5-10minutes for the engine heat tothaw ice from the throttle sys-tem.
3. Test the throttle control lever bycompressing and releasing itseveral times. The lever MUSTreturn to the idle posi t ionquickly and completely.
ITEM FUNCTION CONDITIONEmergency Stop Switch
interrupts ignition circuit ALL
Throttle/ Ignition Monitor Switch
interrupts ignition circuit ALL
Ignition Switch
interrupts ignition circuit ALL
Brake slows the driven shaft ALL
! WARNINGIf any malfunction of the throttlesystem occurs (such as freezingin fluffy snow) and the monitorswitch does not shut off theengine, press down on theemergency stop switch IMMEDI-ATELY to stop the engine. DONOT start the engine until themalfunction in the throttle sys-tem has been located and cor-rected.

OPERATING INSTRUCTIONS 19
NOTE: If the throttle controllever operates properly and theengine does not start, compressthe throttle lever slightly (approxi-mately 1/8 throttle) and try start-ing the engine. If the engine nowstarts and stops when the throttlelever is released, take the snow-mobile to an authorized ArcticCat Snowmobile dealer for ser-vice.
4. If the throttle control leveroperates properly, rotate theignition key to the RUN posi-tion and go through normalstarting procedures.
NOTE: If the throttle controllever operates properly and theengine does not start, a malfunc-tioning monitor switch may be theproblem. Take the snowmobile toan authorized Arctic Cat Snow-mobile dealer for service. How-ever, if a dire emergency existswherein the engine must bestarted, disconnect the throttlecontrol wiring harness locatedbeneath the hood near the steer-ing post. If disconnection of thethrottle control wiring harness isneeded to start the engine, takethe snowmobile to an authorizedArctic Cat Snowmobile dealer forservice as soon as possible.
740-313A
NOTE: The monitor switch isnow bypassed. With exception ofthe monitor switch and the emer-gency stop switch, all other igni-tion/electrical features (ignitionswitch, headlight, taillight, andbrakelight) will operate properly.
! WARNINGIf the throttle control lever doesnot work proper ly, DO NOTATTEMPT TO START THEENGINE.
! WARNINGUnder no circumstances shoulddisconnection of the throttle con-trol wiring harness be used as asubstitute for the monitor switchduring normal operation of thesnowmobile. Personal injury anddamage could occur if the throt-tle system malfunctions or if theoperator is unable to stop theengine in an emergency. If thesnowmobile must be operatedwith a disconnected throttle con-trol wiring harness, EXTREMECAUTION MUST BE TAKEN.NEVER EXCEED 10 MPH WITHTHE THROTTLE CONTROL WIR-ING HARNESS DISCONNECTED.

20 LUBRICATION
LUBRICATIONGEAR CASE (Each Season Prior to Storage)
NOTE: Changing gear case fluidmay be done by the snowmobileowner if qualified to do so. If theowner does not feel qualified,take the snowmobile to an autho-rized Arctic Cat dealer for thisservice.
It is very important that the gear casefluid be changed after each season ofuse. Arctic Cat recommends that thefluid be changed prior to off-seasonstorage.To change the gear case lubricant,use the following procedure:
1. Place a drain pan beneath thegear case; then from the back-side of the case, remove thedrain/fill plug.
0739-688
NOTE: It is critical that thesnowmobile is on a level surfaceto ensure the fluid drains properlyand completely.
2. Tip the snowmobile onto its leftside and place a piece of card-board underneath to protect thefinish on the hood and bellypan.
NOTE: It is recommended thatthe gas tank be nearly empty(less than 1/4 full) when tippingthe snowmobile.
3. Secure the snowmobile in thisposition.
4. Pour the exact amount (seeSpecifications) of Arctic CatACT Dr ive F lu id in to thedrain/fill hole; then install theplug. Tighten securely.
5. Tip the snowmobile back to theupright position.
NOTE: If excessive oil depositsare noticed, take the snowmobileto an authorized Arctic Cat Snow-mobile dealer for service.
! CAUTIONDo not over-fill the gear case. Ifthe gear case is over-filled withfluid, damage to the gear casecould occur.
! CAUTIONThe correct lubricant to use inthe gear case is Arctic Cat ACTDrive Fluid. Any substitute maycause serious damage to thedrive system.
! CAUTIONIt is critical that all of the oldfluid be drained from the gearcase prior to filling with newfluid.
! CAUTIONDo Not add more or less thanthe recommended amount ofdrive fluid to the gear case ordamage to the gear case willoccur.

LUBRICATION 21
FRONT SUSPENSIONIt is very important that the frontsuspension is greased on a monthlybasis using a good low temperaturegrease. The front suspension shouldalso be greased after trailering thesnowmobile on an open trailer.Pump grease into the spindle greasefitting (both sides) until grease isnoted coming out of the top and bot-tom of the spindle. Wipe excessgrease from the spindle.
0737-294
REAR SUSPENSION (Every 40 Operating Hours)
1. Shut engine off and wait for allmoving parts to stop.
2. With the gas tank nearly empty(less than 1/4 full), lay thesnowmobile on its side. A pieceof cardboard should be used toprotect the finish on the hoodand belly pan.
3. Remove ice and snow buildupfrom the skid frame to exposethe grease fittings.
0739-638
4. Lubricate the grease fittingswith a low temperature grease.

22 MAINTENANCE
MAINTENANCEPERIODIC MAINTENANCE CHECKLIST
ITEM INTERVAL REFER TO REMARKSBrake System Daily Page 24 Check for binding, leakage, and proper
operation; lever firmness, travel, caliper, disc, and pads; fluid level
Cooling System Daily Page 10 Check for leakage, damage, obstructions, coolant level
Oil-Injection System Daily Page 23 Check for leakage, damage, and injection oil level
Stop Switch Daily — Check for proper operation
Hoses Daily — Check for damage, leakage, and routing
Headlight &Taillight/Brakelight
Daily Page 33 Check for proper operation and cleanliness
Steering System Daily — Check for proper operation, tightness of bolts, and binding
Throttle Control System Daily Page 18 Check for binding, sticking, proper operation, throttle cable tension, and routing
Drive Belt Daily Page 27 Check for wear, cracks, and fraying
Ski Wear Bars Daily Page 35 Check for wear and damage
Electrical Wiring Weekly — Check for wear, damage, tight connections, and routing
Exhaust System Weekly Page 10 Check for damage, leakage, and obtructions
Nuts, Bolts, Fasteners Weekly — Check tightness
Recoil Starter Weekly — Check rope for wear, fraying, and proper operation
Shock Absorbers Weekly Page 11 Check for fluid leakage and damage
Spark Plugs Weekly Page 23 Check center electrode insulator color, carbon, and gap
Suspension Weekly Page 31 Check for damage, loose components, and proper adjustment
Track Tension/Alignment Weekly Page 29Page 30
Check/adjust as necessary
Rail Wear Strips Weekly Page 36 Check for wear and damage
Wires & Cables Weekly — Check for wear and damage
Fuel System - Tank, Pump,& Vent Hose
Weekly — Check for damage, wear, obstructions, and leakage
APV System Monthly Page 13 Check/adjust as necessary
Gear Case Monthly Page 20 Check lube level and for leakage
Heat Exchangers Monthly — Check for wear, leakage, and damage
Drive Belt Monthly Page 27 Check length and width dimensions
Drive Clutch/Driven Pulley Monthly Page 10Page 11
Check for damage, abnormal noise, vibrations, binding, and sticking and clean off drive belt deposits
Front & Rear Suspension Monthly Page 21 Grease

MAINTENANCE 23
The longevity and safety of the Arc-t i c Ca t Sn owmo b i l e c an b eincreased by making per iodicchecks of the items in the precedingchecklist. If, at any time, abnormal noises,vibrations, or improper workingconditions of any component of thesnowmobile are detected, DO NOTOPERATE THE SNOWMOBILE.Take the snowmobile to an autho-rized Arctic Cat Snowmobile dealerfor inspection and adjustment orrepair.Your Arctic Cat Snowmobile shouldbe taken to an authorized Arctic CatSnowmobile dealer at the end ofeach snowmobiling season for gen-eral inspection and for off seasonstorage servicing. This inspectionand servicing is at the expense of thesnowmobile owner.
GASOLINE ADDITIVESFuel de-icer can be used on thismodel. Arctic Cat Fuel Stabilizer(p/n 0638-165) should be added tothe last tank of gas before storage.Periodic use of an injector cleaner isrecommended especially beforestorage.
CHECKING OIL-INJECTION SYSTEMThe oil-injection system has beensynchronized at the factory; how-ever, Arctic Cat recommends peri-odic checking of the oil-injectionsystem synchronization. The syn-chronization and maintenance mustbe done by an authorized Arctic CatSnowmobile dealer. To check theoil-injection system synchroniza-tion, use the following procedure:
NOTE: To access the oil pump,tip the snowmobile onto its lefts ide; then us ing a torx -b i t ,remove the screws securing thecenter belly pan (skid plate) to thefront end.
1. With the engine off and theignition key in the OFF posi-tion, move the throttle controllever to the full-open position.
2. In the full-open position, thealignment mark on the controlarm must align with the station-ary alignment mark on thepump boss.
727-185C
3. Make sure the cable jam nutsare tight.
SPARK PLUGSThe recommended spark plugs touse are NGK BR9EYA. Correct gapis 0.7-0.8 mm (0.028-0.031 in.).Varying terrain conditions and oper-ating usage may require spark plugsof a different heat range. For exam-ple, sustained cross-country ridingwill usually require colder heatrange spark plugs while trail ridingor other continual slow speed opera-tion will usually require hotter heatrange spark plugs.
! CAUTIONOnly an authorized Arctic CatSnowmobi le dealer shouldadjust the oil-injection systemsynchronizat ion. Improperadjustment of the oil-injectionpump cable may result in throt-tle/ignition monitor switch fail-ure creating a risk of personalinjury or may result in insuffi-cient oil flow causing severeengine damage.
24 MAINTENANCE
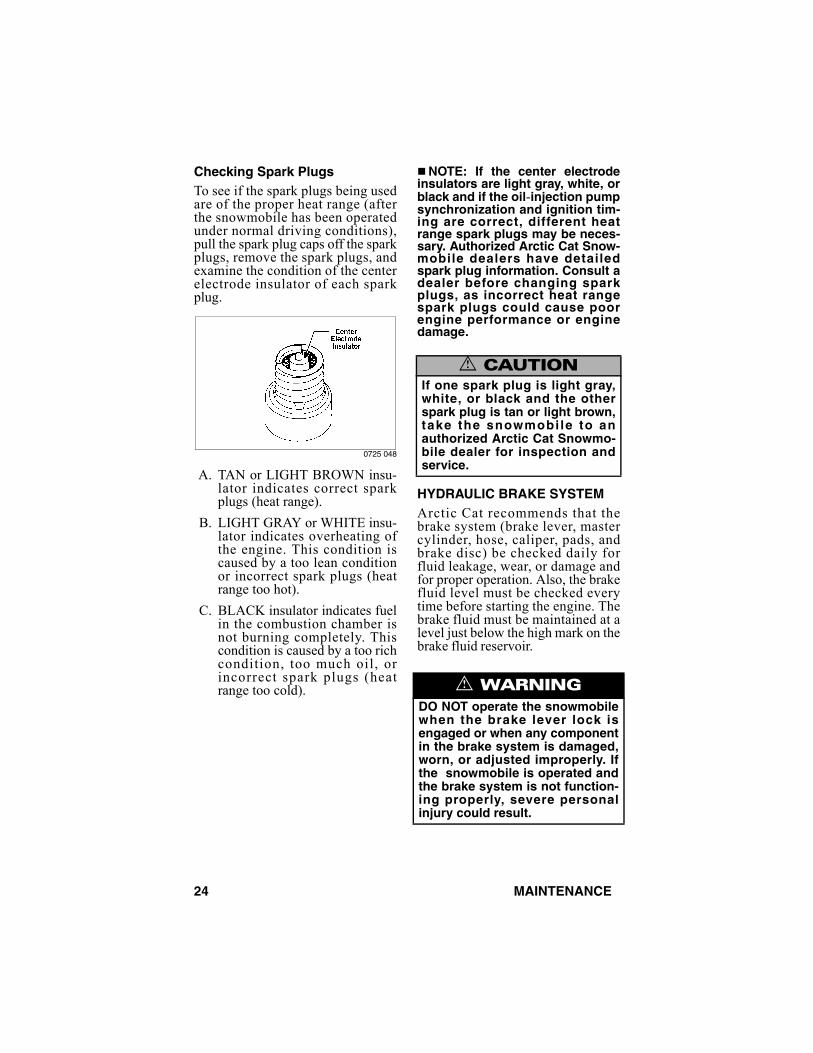
Checking Spark PlugsTo see if the spark plugs being usedare of the proper heat range (afterthe snowmobile has been operatedunder normal driving conditions),pull the spark plug caps off the sparkplugs, remove the spark plugs, andexamine the condition of the centerelectrode insulator of each sparkplug.
0725 048
A. TAN or LIGHT BROWN insu-lator indicates correct sparkplugs (heat range).
B. LIGHT GRAY or WHITE insu-lator indicates overheating ofthe engine. This condition iscaused by a too lean conditionor incorrect spark plugs (heatrange too hot).
C. BLACK insulator indicates fuelin the combustion chamber isnot burning completely. Thiscondition is caused by a too richcondition, too much oil, orincorrect spark plugs (heatrange too cold).
NOTE: If the center electrodeinsulators are light gray, white, orblack and if the oil-injection pumpsynchronization and ignition tim-ing are correct, different heatrange spark plugs may be neces-sary. Authorized Arctic Cat Snow-mobile dealers have detailedspark plug information. Consult adealer before changing sparkplugs, as incorrect heat rangespark plugs could cause poorengine performance or enginedamage.
HYDRAULIC BRAKE SYSTEMArctic Cat recommends that thebrake system (brake lever, mastercylinder, hose, caliper, pads, andbrake disc) be checked daily forfluid leakage, wear, or damage andfor proper operation. Also, the brakefluid level must be checked everytime before starting the engine. Thebrake fluid must be maintained at alevel just below the high mark on thebrake fluid reservoir.
! CAUTIONIf one spark plug is light gray,white, or black and the otherspark plug is tan or light brown,take the snowmobi le to anauthorized Arctic Cat Snowmo-bile dealer for inspection andservice.
! WARNINGDO NOT operate the snowmobilewhen the brake lever lock isengaged or when any componentin the brake system is damaged,worn, or adjusted improperly. Ifthe snowmobile is operated andthe brake system is not function-ing properly, severe personalinjury could result.

MAINTENANCE 25
Checking/Adding Brake Fluid1. With the brake fluid reservoir in
a level position, check the fluidlevel. The brake fluid levelmust be just below the highmark.
740-159A
2. If the brake fluid level is belowthe low mark, remove the reser-voir cover and add Arctic Catapproved brake fluid until thefluid level is just below the highmark. Install and secure the res-ervoir cover. Do not allowmoisture to contaminate thebrake system.
Changing Brake FluidThe brake fluid must be changed ona regular basis and whenever thebrake fluid has been overheated orcontaminated. The brake fluidshould be changed every 1000 milesor at the end of the snowmobilingseason, whichever occurs first. Takethe snowmobile to an authorizedArctic Cat Snowmobile dealer forthis service.
Checking Brake Lever TravelBefore each use, check the brakelever travel using the following pro-cedure:
1. Compress the brake lever fully.NOTE: Do not pump the brake
lever as it will produce an inaccu-rate reading.
2. Measure the distance betweenthe brake lever and the handle-bar. The dis tance must begreater than 2.54 cm (1 in.).
740-159B
3. If the resultant distance is lessthan specified, take the snow-mobile to an authorized ArcticCat Snowmobile dealer for ser-vice.
! CAUTIONBrake fluid is highly corrosive.Do not spill brake fluid on anysurface of the snowmobile.
! WARNINGDo not overfill the reservoir.Overfilling the reservoir maycause the brake system tohydraulically lock. Use only Arc-tic Cat approved brake fluid.Never substitute or mix differenttypes or grades of brake fluid.Brake loss can result. Brake losscan result in severe injury oreven death.

26 MAINTENANCE
Bleeding Brake SystemIf the brake lever feels spongy whenapplied, the brake system may needto be bled. To bleed the brake, usethe following procedure:
NOTE: The brake system maybe bled by the snowmobile ownerif qualified. If the owner does notfeel qualified, take the snowmo-bile to an authorized Arctic CatSnowmobile dealer for this ser-vice.
1. Remove the reservoir cover andfill the reservoir to the highmark with Arctic Cat approvedbrake fluid.
2. Slide a piece of flexible tubingover the ball of the bleedervalve and direct the other endinto a container.
0730-434
3. Slowly compress the brakel eve r and h o ld . Ope n thebleeder valve to release thefluid and air. When the fluidstops, close the bleeder valve;then release the brake lever.
4. Repeat step 3 until the brakefluid flows free of air bubbles.
NOTE: It may be necessary torefill the reservoir during thebleeding process.
5. When the brake fluid is free ofall air and the brake lever feelsfirm when compressed, fill thereservoir to a level just belowthe high mark; then install andsecure the cover. Remove thetube from the bleeder valve.
Checking/Changing Brake PadsThe condition of the brake padsmust be checked daily and changedif worn or damaged. To check andchange the brake pads, use the fol-lowing procedure:
NOTE: The brake pads may bechanged by the snowmobi leowner if qualified. If the ownerdoes not feel qualified, take thesnowmobile to an authorized Arc-tic Cat Snowmobile dealer for thisservice.
! WARNINGDo not operate the snowmobile ifthe compressed d is tancebetween the brake lever and thehandlebar is less than 2.54 cm (1in.). Brake loss may occur. Brakeloss can result in severe per-sonal injury.
! CAUTIONBrake fluid is highly corrosive.Do not spill brake fluid on anysurface of the snowmobile.
! WARNINGUse only Arctic Cat approvedbrake fluid. Any substitute mayresult in a loss of brakes.

MAINTENANCE 27
1. Measure the width of bothbrake pads. The brake padwidth must be greater than 5.0mm (0.20 in.). If the brake padwidth is less than specified,replacement of both pads isnecessary. Follow steps 2-6 toreplace brake pads.
0739-269
2. Remove the pin securing thebrake pads to the caliper assem-bly.
3. Remove the brake fluid reser-voir cover; then remove most ofthe brake fluid from the reser-voir. Replace the cover.
NOTE: The above procedurewill allow room for the fluid fromthe caliper when the pistons arepushed into the caliper for install-ing new brake pads. Replacingthe cover will prevent fluid spill-age.
4. Using a pair of pliers, pull onebrake pad out of the caliperassembly.
NOTE: Changing one pad at atime will prevent one piston frompushing out the other piston fromthe caliper.
5. Using a flat-blade tool, slowlyand carefully push the pistoninto the caliper.
6. Position the new brake pad intothe caliper.
7. Repeat steps 4-6 for the otherpad; then secure the pads withthe pin.
8. Remove the reservoir cover andremove the remaining fluid;then fill the reservoir with freshfluid.
9. Pump the brake lever to ensurecorrect positioning of the brakepads; then release.
10. Fill the reservoir to the properlevel with fresh brake fluid.
NOTE: When new brake padsare installed, a “burnishing” pro-cess is required. Drive the snow-mobile slowly and compress thebrake lever several times until thepads just start to warm up; thenallow them to cool down. Thisprocedure stabilizes the padmaterial and extends the life ofthe pads.
DRIVE BELTThe drive belt transfers power fromthe drive clutch to the driven pulley.If the belt is worn, cracked, orstretched, maximum power will notbe transmitted and the belt couldalso fail and, therefore, must bereplaced. Periodic checks (at leastonce a month under normal usage)of two drive belt specifications areessential.
1. Measure the outside circumfer-ence of the drive belt. The beltshould be within the range of113.9 - 114.8 cm (44 27/32 - 457/32 in.) in circumference.
2. Measure the outside width ofthe drive belt. The belt shouldbe 34-36 mm (1 11/32 - 113/32 in.) in width.
3. Check the belt for cracking,fraying, etc.
If any of the specifications or condi-tions are unsatisfactory, replace thedrive belt.

28 MAINTENANCE
NOTE: Drive belts should bepurchased from an authorizedArctic Cat Snowmobile dealer, asArctic Cat drive belts are made toexact specifications and of qual-ity material. Belts made by othermanufacturers may not be of thesame specifications or qualityand, therefore, usage could resultin poor performance and prema-ture belt failure.
Before starting the snowmobile inextremely cold temperatures, thedrive belt should be removed andwarmed up to room temperature.Once the drive belt is at room tem-perature, install the drive belt.Also, it is crucial that proper break-in procedure be followed. Drivebelts have a break-in period ofapproximately 20 miles. Afterinstalling a new drive belt, drive thesnowmobile for 20 miles at 1/2throttle or less. This will allow thedrive belt to gain its optimum flexi-bility and will extend drive belt life.
Removing Drive BeltNOTE: Changing a drive belt
may be done by the snowmobileowner if qualified to do so. If theowner does not feel qualified,take the snowmobile to an autho-rized Arctic Cat Snowmobiledealer for this service.
1. Turn ignition key to the OFFposition and wait for all movingparts to stop.
2. Set the brake lever lock.3. Open the hood; then open the
belt guard.4. Remove the access panel from
the belly pan.5. Using both hands, push inward
on the driven pulley cam coveruntil the drive belt falls into thepulley sheaves; then from thebottom, slide the belt out of thepulley sheaves.
6. Remove the belt.
Installing Drive Belt1. Place the belt (so the part num-
ber can be read) between thesheaves of the drive clutch first;then between the sheaves of thedriven pulley.
2. With the belt between thesheaves at the top of the drivenpulley, push inward on the camcover with both hands until thedrive belt drops into the pulley.
3. From the top to the bottom,slide the drive belt over theouter driven sheave until it iscompletely within the sheaves;then release the cam cover.
4. Work the drive belt back andforth until the driven pulleysheaves are fully closed.
5. After the belt is installed prop-erly, close and secure the beltguard, install the access panel,and close and secure the hood.
! CAUTIONNever run the engine with thedrive belt removed. Excessiverevving of the engine couldresult in serious engine damageand drive clutch failure.
! CAUTIONDo not exceed 50 MPH duringthe first 20 miles. Exceeding 50MPH during break-in period willgreatly shorten the life of thedrive belt.

MAINTENANCE 29
6. Release the brake lever lock.
TRACK TENSIONTrack tension is directly related tothe overall performance of thesnowmobile. If the track is tooloose, it may slap against the tunnelcausing wear or it may “ratchet” onth e t r a ck d r ive s p r o c k e t s . I fextremely loose, the idler wheelsmay climb over the track lugs forc-ing the track against the tunnel caus-ing the track to “lock.” Arctic Catrecommends that the track tensionbe checked daily during the first 300miles of operation and once a weekthereafter and adjusted according toneed. The track will stretch and takea “set” during break-in. After break-in, track deflection must be main-tained at 50.8-57.2 mm (2 - 2 1/4in.) @ 20 lb.
Checking Track Tension
1. Remove excess ice and snowbuildup from the track, trackdrive sprockets, and the insideof the skid frame.
2. With the gas tank nearly empty(less than 1/4 full), lay thesnowmobile on its side. A pieceof cardboard should be used toprotect the finish on the hoodand belly pan.
3. Exert moderate pressure(approximately 20 lb) at mid-span of the lower track section.Measure the distance betweenthe bottom of the wear strip andthe inside surface of the track.The measurement must bewithin specifications. If themeasurement is not withinspecifications, an adjustment isnecessary.
0740-329
Adjusting Track Tension1. Loosen the rear idler wheel
adjusting bolt jam nuts.
739-636A
NOTE: To ensure proper tracktension adjustment, perform alladjustments on both sides of thesnowmobile.
! WARNINGNever operate the snowmobilewithout the belt guard secured inplace.
! WARNINGTrack tension must be properlymaintained. Personal injurycould result if a track is allowedto become excessively loose.
! WARNINGDO NOT attempt to check oradjust track tension with enginerunning. Turn ignition key to theOFF position. Personal injurycould result from contact with arotating track.

30 MAINTENANCE
2. If the deflection (distancebetween the bottom of the wearstrip and the inside of the track)exceeds specifications, tightenthe adjusting bolts to take upexcessive slack in the track.
3. If the distance between the bot-tom of the wear strip and theinside surface of the track isless than specified, loosen theadjusting bolts to increase theslack in the track.
4. Check track alignment (seeTrack Alignment section).
5. When proper track tension isobtained, tighten the adjustingbolt jam nuts against the axlehousings.
NOTE: Since track tension andtrack alignment are interrelated,always check both even if onlyone adjustment seems neces-sary.
TRACK ALIGNMENTProper track alignment is obtainedwhen the rear idler wheels are equaldistance from the inner track drivelugs. Excessive wear to the idlerwheels, drive lugs, and track willoccur if the track is improperlyaligned. Arctic Cat recommends thatthe track alignment be checked oncea week or whenever the track ten-sion is adjusted.
Checking Track Alignment
1. Remove excess ice and snowbuildup from the track, trackdrive sprockets, and the insideof the skid frame.
2. Position the tips of the skisagainst a wall; then using ashielded safety stand, raise therear of the snowmobile off thefloor making sure the track isfree to rotate.
3. Start the engine and accelerateslightly. Use only enough throt-tle to turn the track several rev-olutions. SHUT ENGINE OFF.
NOTE: Allow the track to coastto a stop. DO NOT apply the brakebecause it could produce an inac-curate alignment condition.
4. When the track stops rotating,check the relationship of therear idler wheels and the innertrack drive lugs. If the distancefrom the rear idler wheels to theinner track drive lugs is thesame on both sides, no adjust-ment is necessary.
! WARNINGIf jam nuts are not tightenedproperly, the adjusting boltscould loosen causing the track tobecome extremely loose and,under some operating condi-tions, allow the idler wheels toclimb over the track lugs forcingthe track against the tunnel caus-ing the track to “lock.” If a track“locks” during operation, severepersonal injury could result.
! WARNINGMake sure the ignition key is inthe OFF position and the track isnot rotating before checking oradjusting track alignment. Per-sonal injury could result if con-tact is made with a rotating track.
! WARNINGThe tips of the skis must be posi-tioned against a wall or similarobject for safety.

MAINTENANCE 31
0727-729
5. If the distances from the rearidler wheels to the inner trackdrive lugs are not the same onboth sides, an adjustment isnecessary.
Adjusting Track Alignment1. On the side of the track which
has the inner track drive lugscloser to the rear idler wheel,loosen the adjusting bolt jamnut; then rotate the adjustingbolt clockwise 1 to 1 1/2 turns.
739-636A
2. Check track alignment and con-tinue adjustment until properalignment is obtained.
NOTE: Make sure correct tracktens ion is mainta ined a f teradjusting track alignment (seeTrack Tension section).
3. After proper track alignment isobtained, tighten the adjustingbolt jam nut against the axlehousing.
4. Field test the track under actualconditions.
5. After the field test, check thealignment of the track. If addi-tional adjustment is necessary,repeat Adjusting Track Align-ment procedure.
SUSPENSIONThe suspension should be adjustedfor the operational needs and ridingpreference of the operator.The front shock springs determinethe amount of ski pressure and thereaction of the front suspension torough terrain. The amount of skipressure can also be changed byadjusting the length of the skidframe front arm limiter straps.The rear springs influence the loadcarrying capability of the snowmo-bile and should be adjusted for theweight and riding preference of theoperator.
Adjusting Front Shock SpringsThe front shock springs on the spin-dle housings are individually adjust-able for the terrain conditions anddriving style of the operator. Thespring adjuster has been set at thefactory so the correct amount ofthreads are exposed between thespring adjuster and the shock hous-ing as an initial setting. Additionalski pressure can be obtained bytightening the spring tension; skipressure can be decreased by relax-ing spring tension.
! WARNINGIf a jam nut is not tightened prop-erly, the adjusting bolt couldloosen causing the track tobecome dangerously loose.

32 MAINTENANCE
To adjust spring tension, rotate theentire spring in whichever directionis desired. Equal adjustments shouldbe maintained on both sides of thesnowmobile. If after adjustingspring tension you note the snow-mobile front end wants to pitch,relax the spring tension on the sidethat is pitching. If both sides arepitching, relax the spring tension onboth sides.
NOTE: The spring adjuster willnormally rotate with the spring.
734-501B
Skid Frame Front ArmThe skid frame front arm shockspring and limiter straps are adjust-able. However, Arctic Cat recom-mends that the shock spring bemaintained as loose as possible.Tightening the skid frame front armshock spring may ruin the handlingfeatures of the snowmobile.The length adjustment of the frontarm limiter straps determines theweight distribution between thefront of the skid frame and the skis.Tightening the limiter strap (short-ening the strap) will pull up on thefront of the skid frame and willincrease ski pressure. Loosening thelimiter strap (lengthening the strap)lowers the front of the skid frameand decreases ski pressure.
When customizing the amount of skipressure, be sure to adjust bothstraps equally and do not over-adjustthe limiter straps to adversely affectsteering and operator control of thesnowmobile. Some experimentationmay be required until the properadjustment for the operator’s indi-vidual style is obtained.
Adjusting Rear Spring Pre-LoadProper adjustment of rear springpre-load is necessary to get the mostcomfortable r ide. The chart isdesigned to help in setting up rearspring pre-load; however, ridingstyle is the single greatest factor indetermining rear spring require-ments.
NOTE: These cam position set-tings are suggestions only. Per-sonal riding style will greatlyinfluence cam position settings.Spend time to determine settingpreferences.Rear spring pre-load adjustment isaccomplished by rotating the adjust-ing cams. Position 3 provides thestiffest ride, and position 1 is for thelight driver or slow-speed trailriding. Position 2 is for the averageoperator under normal conditions.Always rotate the cam from thelighter position to the heavier posi-tion.
! WARNINGDo not adjust the front arm lim-iter straps to a point at whichsteering and operator control ofthe snowmobile are adverselyaffected.
Rider Weight (lb) Cam Position
Up to 180 1
180-240 2
Over 240 3

MAINTENANCE 33
727-720A
To rotate an adjusting cam, use thespark plug wrench from the tool kit.Rotate the wrench until the cam is inthe desired position. To stiffen theride, rotate the cam so as to raise thespring end. Make the adjustment onthe other cam and be sure both camsare adjusted equally.
LIGHTSThe correct taillight/brakelight bulbis p/n 0109-460. The correct head-light bulbs are p/n 0609-251 for thehigh beam and p/n 0609-693 for thelow beam.
Removing and Installing Taillight/Brakelight Bulb
1. Remove the screw securing thetaillight/brakelight housing;then remove the housing.
739-712A
2. Push in on the bulb and rotate itcounterclockwise to remove itfrom the socket.
3. Install the new bulb in thesocket by pushing it in androtating it clockwise.
4. Install the housing and securewith the screw.
Removing Headlight BulbNOTE: The bulb portion of the
headlight is fragile. HANDLEWITH CARE. When replacing theheadlight bulb, the bulb assemblymust first be removed from thehousing. Do not touch the glassportion of the bulb. If the glass istouched, it must be cleaned with adry cloth before installing.To access the headlight bulbs, usethe following procedure.
1. With the hood closed, loosenthe headlight adjustment knobs.
2. Carefully push the headlightlenses rearward far enough toremove the torx-head screwssecuring the air silencer plenumto the hood.
3. Open the hood; then remove theO-rings securing the air silencerplenum to the hood and removethe ai r s i lencer plenum toaccess the bulbs.
4. Remove the bulb from theheadlight housing and discon-nect the wiring harness from thebulb.
0740-462
! CAUTIONNever force the adjustmentcams from the low position tothe high position. Cam damagemay occur.

34 MAINTENANCE
Installing Headlight Bulb
1. Plug the wiring harness into theheadlight bulb.
2. Insert the bulb into the head-light housing.
3. Press the air silencer plenuminto place on the hood andsecure with the O-rings; thenclose the hood.
4. Carefully push the headlightlenses rearward far enough toinstall the torx-head screws.Tighten the screws securely.
5. Tighten the headlight adjust-ment knobs.
6. Check headlight aim (seeAdjusting Headlight Aim in thissub-section).
Adjusting Headlight AimThe headlight can be adjusted forvertical aim of the HIGH/LOWbeam. The geometric center ofHIGH beam zone is to be used forvertical aiming.
1. Position the snowmobile on alevel floor so the headlight isapproximately 8 m (25 ft) froman aiming surface (wall or simi-lar surface).
NOTE: There should be an“average” operating load on thesnowmobile when adjust ingheadlight aim.
2. Measure the distance from thefloor to midpoint of the head-light.
3. Using the measurementobtained in step 2, make a hori-zontal mark on the aiming sur-face.
4. Make a vertical mark whichintersects the horizontal markon the aiming surface directlyin front of the headlight.
5. Engage the brake lever lock andstart the engine. Move the head-light dimmer switch to theHIGH beam position. DO NOTUSE LOW BEAM.
6. Observe the headlight beamaim. Proper aim is when themost intense beam is centeredon the vertical mark 5 cm (2 in.)below the horizontal mark onthe aiming surface.
740-153A
7. Adjust the headlight using theadjustment knobs until correctaim is obtained. Shut the engineoff; then disengage the brakelever lock.
! CAUTIONDo not touch the glass portionof the bulb. If the glass portionis touched, it must be cleanedwith a dry cloth before install-ing.
! WARNINGDo not operate the snowmobileunless headl ight beam isadjusted properly. An incorrectlyadjusted beam will not providethe operator the opt imumamount of light.

MAINTENANCE 35
SKI WEAR BARSThe ski wear bar is a replaceable barattached to the underside of the ski.The purpose of the wear bar is toassist in turning the snowmobile, tominimize ski wear, and to maintaingood steering control. If the snow-mobile is operated primarily in deepsnow, ski wear bar wear will be min-imal; however, if the snowmobile isoperated on terrain where the snowcover is minimal, the ski wear barwill wear faster. To maintain posi-tive steering characteristics, ArcticCat recommends that the ski wearbars be checked before each use andreplaced if worn beyond 1/2 of theoriginal diameter. Ski wear bars areavailable from an authorized ArcticCat Snowmobile dealer.
Removing Ski Wear Bar1. Remove ice and snow buildup
from the ski.2. With the gas tank nearly empty
(less than 1/4 full), lay thesnowmobile on its side. A pieceof cardboard should be used toprotect the finish on the hoodand belly pan.
3. Remove the lock nuts securingthe wear bar to the ski.
0739-596
4. Remove the wear bar from theski.
Installing Ski Wear Bar1. Move the wear bar into position
on the bottom of the ski.2. Align the wear bar studs with
the holes in the ski; then installthe lock nuts. Tighten to 1.5-2.1kg-m (11-15 ft-lb).
ADJUSTING SKI STANCE 1. Place the front of the snowmo-
bile on a support stand. 2. Remove the cotter pin; then
remove the slotted nut and capscrew securing the ski assemblyto the spindle. Remove the ski.Account for the rubber damper,inserts, and washers.
3. To increase ski stance to 112 cm(44 in.), place both ski stancespacers to the outside of thespindle.
4. To decrease ski stance to 107cm (42 in.), place both skistance spacers to the inside ofthe spindle.
5. Position the ski over the saddle.6. Apply a low-temperature grease
to the non-threaded portion ofthe cap screw; then slide the capscrew through the ski and sad-dle accounting for the rubberdamper, inserts, and washers.
NOTE: Install the cap screw sothe slotted nut will be located tothe inside of the ski.
7. Apply red Loctite #271 to thethreads of the cap screw; thentighten the nut to 6.2 kg-m (45ft-lb).
8. Place the cotter pin into the skicap screw and spread the pin.
9. Repeat procedure for the otherski.
! WARNINGOperating the snowmobile withexcessively worn ski wear barsmay result in a loss of steeringcontrol.

36 MAINTENANCE
RAIL WEAR STRIPSArctic Cat recommends that thewear strips be checked weekly andreplaced as necessary. Measure thewear strips at 25.4 cm (10 in.) inter-vals. Wear strips must be 10.7 mm(0.42 in.) thick or thicker. If wearstrip measurements are less thanspecified, replacement of both wearstrips is necessary to prevent prema-ture track clip wear and possibletrack damage. Take the snowmobileto an authorized Arctic Cat Snow-mobile dealer for this service.Each time a new set of wear stripsare installed, they should be tem-pered. Temper the wear strips bydriving the snowmobile for approxi-mately a mile on a hard pack trail;then immediately drive into deepsnow and allow the wear strips tocool. Repeat the procedure (warm-ing up the wear strips; then coolingthem down) two or three times.
NOTE: The rail wear strips willwear rapidly if the snowmobile isoperated on terrain on which thesnow cover is minimal. Loosesnow is required to cool andlubricate the wear strips and pre-vent accelerated wear.
0727-726

PERFORMANCE TIPS 37
PERFORMANCE TIPSOperating a high performance snow-mobile requires a special attentionthat is not required by a low perfor-mance snowmobile. Often, a minoradjustment will result in a largeincrease in performance. This sec-tion is intended to highlight minorconditions that adversely affect per-formance and the adjustmentsneeded to correct them. Be sure,however, to thoroughly read andunderstand this entire manual espe-cially the section on spark plugs,track tension and alignment, andsuspension.DRIVE BELT - The drive belt musthave the proper fit in the drive clutchand driven pulley. Proper fit is whenthe top surface of the drive belt isflush with the top or up to 1/16 in.h igher than the dr iven pul leysheaves (with the sheaves fullyclosed). If the belt sits below thislevel, the snowmobile will bog atslow speeds and will have a slowermaximum speed. To correct thiscondition, first determine if the drivebelt is within specifications (seeDrive Belt sub-section) and replaceif worn or too long. Secondly, on thedriven pulley, adding shim washerswill decrease belt deflection andr e m o v i n g s h i m w a s h e r s w i l lincrease belt deflection. Availableshim washers from Arctic Cat arep/n 0648-714 (0.090 in.), p/n 0648-715 (0.030 in.), and p/n 0648-716(0.060 in.). See an authorized ArcticCat Snowmobile dealer for this ser-vice.
NOTE: If the drive belt deflec-tion is above specifications, thesnowmobile will bog and lackpower at clutch engagement. Forgood performance, proper beltdeflection is critical.Finally, always install the drive beltso the part number can be read toensure that the drive belt is alwaysrun the same direction.
DRIVE CLUTCH AND DRIVENPULLEY - Keeping the drive clutchand driven pulley clean should bethe primary consideration of theoperator. The clutch sheaves can becleaned of any drive belt accumula-tion using a clean cloth and parts-cleaning solvent. All pivot pointscan be maintained clean using com-pressed air.The setting of the driven pulley pre-load will vary the peak engine RPM.Peak engine RPM is the RPM atwhich the engine develops its maxi-mum horsepower. Optimum snow-mobile performance will result if theengine RPM (full throttle) is within3% of the specifications. To increasethe peak RPM, increase the springtension of the driven pulley by rotat-ing the spring adjuster clockwise. Todecrease the peak RPM, decreasethe spring tension of the driven pul-ley by rotating the spring adjustercounterclockwise.
NOTE: The standard clearancefrom the face of the adjuster tothe outer face of the torquebracket is 6.4-9.4 mm (0.252-0.372in.).
740-290B
NOTE: It is recommended thatthe adjuster be rotated clockwiseno farther than a depth of 14.3mm (0.5625 in.) from the face ofthe adjuster to the outer face ofthe torque bracket.Spring tension is adjusted usingSpring Adjustment Tool (p/n 0644-413).

38 PREPARATION FOR STORAGE
PREPARATION FOR STORAGEPrior to storing the snowmobile, itmust be properly serviced to pre-vent corrosion and component dete-rioration. An authorized Arctic CatSnowmobile dealer should performthis service; however, the owner/operator can perform this service ifdesired. To prepare the snowmobilefor storage, Arctic Cat recommendsthe following procedure:
1. Clean the seat cushion with adamp cloth and Arctic CatVinyl Protectant (p/n 0638-313).
2. Clean the snowmobile thor-oughly by hosing dirt , oil ,grass, and other foreign matterfrom the skid frame, tunnel,hood, and belly pan. Allow thesnowmobile to dry thoroughly.DO NOT get water into anypart of the engine.
3. Place the rear of the snowmo-bile up on a shielded safetystand.
4. Start the engine and allow toidle. With the engine idling, prythe intake boot forward; thenspray Arctic Cat Engine Stor-age Preserver (p/n 0636-177)into the intakes until the engineexhaust starts to smoke heavilyor until the engine starts to dropin RPM. Turn engine off.
5. Plug the exhaust system outletwith a clean cloth.
6. With the ignition switch in theOFF position:A. Disconnect the high
tension leads from thespark plugs; then removethe plugs, connect them tothe leads, and ground themon the cylinder heads.
B. Pour 29.5 ml (1 fl oz) ofSAE #30 petroleum-basedoil into each spark plughole and pull the recoilstarter handle slowly about10 times.
C. Install the spark plugs andconnect the high tensionleads.
7. Fill the gas tank to its ratedcapacity; then add Arctic CatFuel Stabilizer (p/n 0638-165)to the gas tank following direc-tions on the container for thes t ab i l i z e r /ga s o l in e r a t i o .Ti gh t en t he ga s t an k capsecurely.
8. Change the gear case fluid (seeLubrication section).
9. Remove the drive belt from thedrive clutch/driven pulley. Laythe belt on a flat surface or slideit into a cardboard sleeve to pre-vent warping or distortion dur-ing storage.
10. Clean and inspect the driveclutch and driven pulley.
! CAUTIONNever crank the engine overwithout grounding the sparkplugs. Damage to coils and/orCDI unit may result.
! CAUTIONWhen storing a drive belt, donot twist, roll, or fold the belt.Do not store the belt in the rearstorage compartment.

PREPARATION FOR STORAGE 39
11. Apply light oil to the uppersteering post bushing, ski spin-dles and bolts, front and rearpivot bushings of the skidframe, and plungers of theshock absorbers.
12. Lubricate the rear suspension,spindles, and driven shaft sup-port bearing with a low-temper-ature grease.
13. Tighten all nuts, bolts, and capscrews making sure all cali-brated nuts, bolts, and capscrews are tightened to specifi-cations. Make sure all rivetsho ld i ng t he co mpon en t stogether are tight. Replace allloose rivets.
14. Clean and polish the hood, con-sole, and chassis with ArcticCat Hood and Windshie ldCleaner/ Polish (p/n 0636-174).DO NOT USE SOLVENTS ORSPRAY CLEANERS. THEPROPELLANT WILL DAM-AGE THE FINISH.
15. If possible, store the snowmo-bile indoors. Raise the track offthe floor by blocking up theback end making sure the snow-mobile is secure. Loosen thetrack adjusting bolts to reducetrack tension. Cover the snow-mobile with a machine cover ora heavy tarpaulin to protect itfrom dirt and dust.
16. If the snowmobile must bestored outdoors, position thesnowmobile out of direct sun-light; then block the entiresnowmobile off the groundmaking sure the snowmobile issecure. Loosen the track adjust-ing bolts to reduce track ten-sion. Cover with a machinecover or a heavy tarpaulin toprotect it from dirt, dust, andrain.
! CAUTIONAvoid storing in direct sunlightand using a plastic cover asmoisture may collect on thesnowmobile causing corrosion.

40 PREPARATION AFTER STORAGE
PREPARATION AFTER STORAGETaking the snowmobile out of stor-age and correctly preparing it foranother season will assure manymiles and hours of trouble-freesnowmobiling. Arctic Cat recom-mends the following procedure:
1. Clean the snowmobile thor-oughly. Polish the exterior ofthe snowmobile.
2. Clean the engine. Remove thecloth from the exhaust system.Check exhaust system and air-intake silencer for obstructions.
3. Inspect all control wires andcables for signs of wear or fray-ing. Replace if necessary. Usecable ties or tape to route wiresand cables away from hot orrotating parts.
4. Inspect the drive belt for cracksand tears. Check belt specifica-tions. Replace if damaged orworn. Install the drive belt.
NOTE: If the old belt is worn butin reasonable condition, retain itwith the snowmobile as a spare incase of emergency.
5. Inspect all fuel hoses and oilhoses for de ter iora t ion orcracks; replace if necessary.Make sure all connections aretight; then fill the oil-injectionreservoir with recommendedAPV oil.
NOTE: After prolonged storage,Arctic Cat recommends one tank-ful of 100:1 gas/oil mixture beused in conjunction with the oil-injection system to ensure properlubrication.
6. Check the coolant level and allcoolant hoses and connectionsfor deterioration or cracks. Addproperly mixed coolant as nec-essary.
7. Inspect the entire brake system(fluid level, pads, etc.), all con-trols, headlight, taillight, brake-light, ski alignment, ski wearbars, and headlight aim; adjustor replace as necessary.
8. Inspect the spark plugs.Replace, gap, or clean as neces-sary.
9. Adjust the track to the propertension and alignment. Lock thejam nuts.
10. Inspect the throttle cable forcondition and for proper adjust-ment.
11. Tighten all nuts, bolts, and capscrews making sure all cali-brated nuts, bolts, and capscrews are tightened to specifi-cations.
12. Lubricate the rear suspension,spindles, and driven shaft sup-port bearing with a low-temper-ature grease.
13. Place the rear of the snowmo-bile on a shielded safety stand;then start the engine. Allow theengine to idle; then using a longstiff wire with a hooked end,raise the oil-injection pumpcontrol arm to the wide-openposition until the engine startsto smoke heavily. Release thecontrol arm and turn off theengine.

41
CHANGE OF ADDRESS, OWNERSHIP, OR WARRANTY TRANSFER
Arctic Cat Inc. keeps on file the current name and address ofthe owner of this snowmobile. This will allow Arctic Cat toreach the current owner with any important safety informationwhich may be necessary to protect customers from personalinjury or property damage. Please make sure a copy of thisform is completed and returned to Arctic Cat Inc. if you moveor if the snowmobile is sold to another party.
This form may also be used to transfer the unused portion ofthe original warranty to a second party. In order to transferwarranty, fill out this form completely; then return a copy ofthis form to Arctic Cat Inc. Arctic Cat will then process theapplication and issue warranty for the balance of the timeremaining of the original warranty.
Address Change
Ownership Change
Warranty Transfer
CHANGE OF ADDRESS/OWNERSHIP/WARRANTY TRANSFER TO:
Name _________________________________________
Address _______________________________________
City/State (Province)/Zip Code (Postal Code)___________
Phone # ( )_____________________________________
Year and Model Snowmobile _______________________
Vehicle Identification Number (VIN) __________________

Fold Back Once
PlaceStampHere
CHANGE OF ADDRESS/OWNERSHIP
ARCTIC CAT INC.PRODUCT SERVICE AND
WARRANTY DEPT.P.O. BOX 810
THIEF RIVER FALLS, MN 56701

43
NOTES

44
NOTES

45
NOTES

46
NOTES

WARRANTY PROCEDURE/OWNER RESPONSIBILITYAt the time of sale, an Owner Registration form (included with eachnew snowmobile) is to be completed by the selling dealer andconsumer. The receipt of the registration form by Arctic Cat is acondition precedent to warranty coverage. It is the selling dealer’sresponsibility to retain and/or submit the appropriate copies of theform to the appropriate place(s) to initiate warranty coverage.
The dealer will furnish to the consumer a signed copy of the formwhich must be presented to the dealer when requesting warrantyservice. The registration form is the consumer’s proof ofownership and warranty eligibility. The form is used by thedealer to validate the warranty claim. Retain your copy of the formand keep it in a safe place.
When warranty repair is suspected, the snowmobile should be takento the selling dealer, who has the primary responsibility to performwarranty repairs. In the event the selling dealer has ceased to dobusiness, you have moved, or you are in a location away from yourselling dealer, warranty may be performed by any authorized ArcticCat Snowmobile dealer.
The authorized Arctic Cat Snowmobile dealer will examine thesnowmobile or part to determine if, in his opinion, a warrantablecondition exists. If a warrantable condition appears to exist, thedealer will repair or replace, at Arctic Cat’s option, free of charge,including any related labor costs, all parts that are found to bewarrantable and any other parts which the warrantable part causedto be damaged. You, the consumer, will then be asked to sign awarranty form to ensure Arctic Cat that the warranty work wasactually performed.
It is the consumer’s responsibility to maintain and service thesnowmobile in accordance with Arctic Cat’s recommendations in theOperator’s Manual. To protect yourself and your snowmobile, followall safety and service tips. Arctic Cat will NOT warrant repairsrequired as a result of not performing standard operatormaintenance, storage procedures, and service as outlined inthe Operator’s Manual.
Should you have any questions concerning the warranty, contact anauthorized Arctic Cat Snowmobile dealer.
Arctic Cat Inc., P.O. Box 810, Thief River Falls, MN 56701 (218) 681-8558

p/n 2257-405
Printed in the U.S.A. ®™ Trademarks of Arctic Cat Inc. Thief River Falls, MN 56701