lincoln continental rear 1995 - 2002 conversion kit systems
TRANSCRIPT

Lincoln Continental Rear 1995 - 2002
Conversion Kit Systems
[Type text]
INSTALL/REMOVAL INSTRUCTIONS: AIR SUSPENSION CONVERSION KIT
Air Suspension Conversion Kit
General Installation Instructions
When servicing any vehicle be sure to follow all safety procedures. First, make sure that when lifting the vehicle that you use an appropriate jack with a proper weight rating. Before going underneath any vehicle, make sure that it is properly supported with sturdy jack stands and on level ground so that the vehicle doesn’t fall or slide off of the jack and onto you. As with any automotive repair, make sure you have the appropriate tools to do the job so you don’t damage any parts on the vehicle. Safety glasses and mechanic’s gloves should also be worn for your protection. Take care not to exceed the Gross Vehicle Weight Rating (GVWR), or the maximum load recommended by the manufacturer. It is important that all the vehicle owner manuals recommendations are followed for your own safety and to prevent damage to the vehicle. Once you are ready to disable the ride light, you will need to disconnect the negative battery cable (-) to prevent electrical shock/malfunction. Detailed instructions by application are available at: https://www.dormanproducts.com If you have any further questions or concerns about this installation please give our Tech Support Line a call at 1-800-523-2492.
Disclaimer:
Even though every attempt is made to ensure this information is complete and accurate, it is impossible to account for all possible circumstances or situations. Please consult with a qualified auto technician
before attempting to perform any work you are not qualified to do. Automobiles can be hazardous to work on; be sure to take all necessary safety precautions. Failure to do so may result in property damage
or personal injury. Certain motor vehicle standards and performance requirements may apply to your motor vehicle (such as Federal Motor Vehicle Safety Standards by the National Highway Traffic Safety
Administration). Be sure that your work is performed in accordance with such standards and that you do not disable any motor vehicle safety feature.
©2018 Dorman Products, Inc. No reproductions in whole or in part without prior written approval.
1
ATTENTION: Refer to the appropriate shop manual for your vehicle to obtain specific service procedures for this part. If you do not have a service manual or lack the skill to install this part, it is recommended that you seek the services of a qualified technician. Pay special attention to all cautions and warnings included in the shop manual. Read and follow all instructions carefully.

Disclaimer:
Even though every attempt is made to ensure this information is complete and accurate, it is impossible to account for all possible circumstances or situations. Please consult with a qualified auto technician
before attempting to perform any work you are not qualified to do. Automobiles can be hazardous to work on; be sure to take all necessary safety precautions. Failure to do so may result in property damage
or personal injury. Certain motor vehicle standards and performance requirements may apply to your motor vehicle (such as Federal Motor Vehicle Safety Standards by the National Highway Traffic Safety
Administration). Be sure that your work is performed in accordance with such standards and that you do not disable any motor vehicle safety feature.
©2018 Dorman Products, Inc.
No reproductions in whole or in part without prior written approval.
Lincoln Continental 1995-2002
Quick Start Guide Lincoln Continental Rear Kit 1995 - 2002
Parts included in this kit
(2) #96 Coil Springs
(4) Mounting Plates
(2) # 96 Springs
(4) Mounting Plates
(2) Rear Shocks
Tools needed for installation
Metric socket set
Floor jack
Jack stands
Metric wrenches
Screwdrivers (Phillips and flat head)
Wire cutter/stripper/crimping tool
Level work surface
Spring compressor (if applicable)
Allen wrenches
ATTENTION: Refer to the appropriate shop manual for your vehicle to obtain specific service procedures for this part. If you do not have a service manual or lack the skill to install this part, it is recommended that you seek the services of a qualified technician. Pay special attention to all cautions and warnings included in the shop manual. Read and follow all instructions carefully.

Disclaimer:
Even though every attempt is made to ensure this information is complete and accurate, it is impossible to account for all possible circumstances or situations. Please consult with a qualified auto technician
before attempting to perform any work you are not qualified to do. Automobiles can be hazardous to work on; be sure to take all necessary safety precautions. Failure to do so may result in property damage
or personal injury. Certain motor vehicle standards and performance requirements may apply to your motor vehicle (such as Federal Motor Vehicle Safety Standards by the National Highway Traffic Safety
Administration). Be sure that your work is performed in accordance with such standards and that you do not disable any motor vehicle safety feature.
©2018 Dorman Products, Inc.
No reproductions in whole or in part without prior written approval.
Lincoln Continental 1995-2002
Air Spring Removal
Read instructions carefully before attempting installation
Turn "OFF" air suspension switch.
Raise the vehicle and remove the tire and wheel assembly.
Raise and support the vehicle.
Remove the air line from the solenoid.
ATTENTION: Refer to the appropriate shop manual for your vehicle to obtain specific service procedures for this part. If you do not have a service manual or lack the skill to install this part, it is recommended that you seek the services of a qualified technician. Pay special attention to all cautions and warnings included in the shop manual. Read and follow all instructions carefully.

Disclaimer:
Even though every attempt is made to ensure this information is complete and accurate, it is impossible to account for all possible circumstances or situations. Please consult with a qualified auto technician
before attempting to perform any work you are not qualified to do. Automobiles can be hazardous to work on; be sure to take all necessary safety precautions. Failure to do so may result in property damage
or personal injury. Certain motor vehicle standards and performance requirements may apply to your motor vehicle (such as Federal Motor Vehicle Safety Standards by the National Highway Traffic Safety
Administration). Be sure that your work is performed in accordance with such standards and that you do not disable any motor vehicle safety feature.
©2018 Dorman Products, Inc.
No reproductions in whole or in part without prior written approval.
Lincoln Continental 1995-2002
Air Spring Removal
Remove the Air Spring Solenoid. Rotate Solenoid to the first stop. Pull back to release the air from the spring. Rotate to the second stop and remove solenoid.
First stop
Solenoid removed Remove the 3 bolts from the lower Air Spring seat, and remove the Air Spring, by
releasing the top locking tabs.
ATTENTION: Refer to the appropriate shop manual for your vehicle to obtain specific service procedures for this part. If you do not have a service manual or lack the skill to install this part, it is recommended that you seek the services of a qualified technician. Pay special attention to all cautions and warnings included in the shop manual. Read and follow all instructions carefully.

Disclaimer:
Even though every attempt is made to ensure this information is complete and accurate, it is impossible to account for all possible circumstances or situations. Please consult with a qualified auto technician
before attempting to perform any work you are not qualified to do. Automobiles can be hazardous to work on; be sure to take all necessary safety precautions. Failure to do so may result in property damage
or personal injury. Certain motor vehicle standards and performance requirements may apply to your motor vehicle (such as Federal Motor Vehicle Safety Standards by the National Highway Traffic Safety
Administration). Be sure that your work is performed in accordance with such standards and that you do not disable any motor vehicle safety feature.
©2018 Dorman Products, Inc.
No reproductions in whole or in part without prior written approval.
Lincoln Continental 1995-2002
Air Spring Removal
Squeeze top locking tabs on Air Spring to release.
Bottom locking tabs—Press inwards to release.
Remove Air Spring from bottom mount.
ATTENTION: Refer to the appropriate shop manual for your vehicle to obtain specific service procedures for this part. If you do not have a service manual or lack the skill to install this part, it is recommended that you seek the services of a qualified technician. Pay special attention to all cautions and warnings included in the shop manual. Read and follow all instructions carefully.

Disclaimer:
Even though every attempt is made to ensure this information is complete and accurate, it is impossible to account for all possible circumstances or situations. Please consult with a qualified auto technician
before attempting to perform any work you are not qualified to do. Automobiles can be hazardous to work on; be sure to take all necessary safety precautions. Failure to do so may result in property damage
or personal injury. Certain motor vehicle standards and performance requirements may apply to your motor vehicle (such as Federal Motor Vehicle Safety Standards by the National Highway Traffic Safety
Administration). Be sure that your work is performed in accordance with such standards and that you do not disable any motor vehicle safety feature.
©2018 Dorman Products, Inc.
No reproductions in whole or in part without prior written approval.
Lincoln Continental 1995-2002
Coil Spring Install
The Coil Spring top and bottom bases are labeled to assist in this install.
Install the supplied bottom spring support by putting the bolt and washer through the bottom of the spring seat. Install the plate and hardware on top of the spring seat. Tighten nut and bolt.
Place the Coil Spring, hardware, and lower spring seat on a jack.
Lift into place in the original Air Spring location.
Clock the Coil Spring so that the writing is showing from the rear of the vehicle.
ATTENTION: Refer to the appropriate shop manual for your vehicle to obtain specific service procedures for this part. If you do not have a service manual or lack the skill to install this part, it is recommended that you seek the services of a qualified technician. Pay special attention to all cautions and warnings included in the shop manual. Read and follow all instructions carefully.

Disclaimer:
Even though every attempt is made to ensure this information is complete and accurate, it is impossible to account for all possible circumstances or situations. Please consult with a qualified auto technician
before attempting to perform any work you are not qualified to do. Automobiles can be hazardous to work on; be sure to take all necessary safety precautions. Failure to do so may result in property damage
or personal injury. Certain motor vehicle standards and performance requirements may apply to your motor vehicle (such as Federal Motor Vehicle Safety Standards by the National Highway Traffic Safety
Administration). Be sure that your work is performed in accordance with such standards and that you do not disable any motor vehicle safety feature.
©2018 Dorman Products, Inc.
No reproductions in whole or in part without prior written approval.
Lincoln Continental 1995-2002
Coil Spring Install
Guide the top plate ears into upper mounting holes
Continue jacking until you have compressed the spring enough to reinstall the three lower
spring seat mounting bolts. (When reinstalling bolts reverse the bolts so that the nuts are on the inside of the spring seat)
Note: If you are only replacing the springs, you may continue to the “Light Out” information.
ATTENTION: Refer to the appropriate shop manual for your vehicle to obtain specific service procedures for this part. If you do not have a service manual or lack the skill to install this part, it is recommended that you seek the services of a qualified technician. Pay special attention to all cautions and warnings included in the shop manual. Read and follow all instructions carefully.

Disclaimer:
Even though every attempt is made to ensure this information is complete and accurate, it is impossible to account for all possible circumstances or situations. Please consult with a qualified auto technician
before attempting to perform any work you are not qualified to do. Automobiles can be hazardous to work on; be sure to take all necessary safety precautions. Failure to do so may result in property damage
or personal injury. Certain motor vehicle standards and performance requirements may apply to your motor vehicle (such as Federal Motor Vehicle Safety Standards by the National Highway Traffic Safety
Administration). Be sure that your work is performed in accordance with such standards and that you do not disable any motor vehicle safety feature.
©2018 Dorman Products, Inc.
No reproductions in whole or in part without prior written approval.
Lincoln Continental 1995-2002
Rear Shock Removal
Remove the side trim panel in the trunk, and remove the mass damper retaining clip.
If so equipped, disconnect the shock absorber electrical connector and wiring routing retaining clips.
Remove the two upper shock absorber mounting bolts.
ATTENTION: Refer to the appropriate shop manual for your vehicle to obtain specific service procedures for this part. If you do not have a service manual or lack the skill to install this part, it is recommended that you seek the services of a qualified technician. Pay special attention to all cautions and warnings included in the shop manual. Read and follow all instructions carefully.

Disclaimer:
Even though every attempt is made to ensure this information is complete and accurate, it is impossible to account for all possible circumstances or situations. Please consult with a qualified auto technician before
attempting to perform any work you are not qualified to do. Automobiles can be hazardous to work on; be sure to take all necessary safety precautions. Failure to do so may result in property damage or personal injury.
Certain motor vehicle standards and performance requirements may apply to your motor vehicle (such as Federal Motor Vehicle Safety Standards by the National Highway Traffic Safety Administration). Be sure that
your work is performed in accordance with such standards and that you do not disable any motor vehicle safety feature.
©2018 Dorman Products, Inc.
No reproductions in whole or in part without prior written approval.
Lincoln Continental 1995-2002
Rear Shock Removal
Remove the bottom mounting bolt. Remove the electrical connector
(if equipped). Remove the shock.
Remove the top mounting hardware from the old shock.
ATTENTION: Refer to the appropriate shop manual for your vehicle to obtain specific service procedures for this part. If you do not have a service manual or lack the skill to install this part, it is recommended that you seek the services of a qualified technician. Pay special attention to all cautions and warnings included in the shop manual. Read and follow all instructions carefully.

Disclaimer:
Even though every attempt is made to ensure this information is complete and accurate, it is impossible to account for all possible circumstances or situations. Please consult with a qualified auto technician before
attempting to perform any work you are not qualified to do. Automobiles can be hazardous to work on; be sure to take all necessary safety precautions. Failure to do so may result in property damage or personal injury.
Certain motor vehicle standards and performance requirements may apply to your motor vehicle (such as Federal Motor Vehicle Safety Standards by the National Highway Traffic Safety Administration). Be sure that
your work is performed in accordance with such standards and that you do not disable any motor vehicle safety feature.
©2018 Dorman Products, Inc.
No reproductions in whole or in part without prior written approval.
Lincoln Continental 1995-2002
Rear Shock Installation
Install the factory mounting bracket to the new replacement shock using the provided hardware as shown in the illustration. Tighten nut.
Install the rear shock bottom mount first.
Install the top mount, tighten to factory specifications.
Reinstall the wheels and lower vehicle to the ground.
ATTENTION: Refer to the appropriate shop manual for your vehicle to obtain specific service procedures for this part. If you do not have a service manual or lack the skill to install this part, it is recommended that you seek the services of a qualified technician. Pay special attention to all cautions and warnings included in the shop manual. Read and follow all instructions carefully.

Disclaimer:
Even though every attempt is made to ensure this information is complete and accurate, it is impossible to account for all possible circumstances or situations. Please consult with a qualified auto technician
before attempting to perform any work you are not qualified to do. Automobiles can be hazardous to work on; be sure to take all necessary safety precautions. Failure to do so may result in property damage
or personal injury. Certain motor vehicle standards and performance requirements may apply to your motor vehicle (such as Federal Motor Vehicle Safety Standards by the National Highway Traffic Safety
Administration). Be sure that your work is performed in accordance with such standards and that you do not disable any motor vehicle safety feature.
©2018 Dorman Products, Inc.
No reproductions in whole or in part without prior written approval.
Lincoln Continental 1995-2002
Light Out Instructions
Note: Do not proceed to wiring repair if only installing 2 wheels. The new springs may soften and settle some during the first few weeks of use.
(2 wheel kit only) - Securely plug the two rear air lines with a tight fitting screw and epoxy. (2 wheel kit only) - Plug the air spring solenoids back into their electrical connector and tie
up securely underneath of the car. Turn the air ride switch in the trunk back "ON", and leave on, to control the electronic
struts. Set the ride control button on the dash to "Plush". (4 wheel kit only) - Disconnect compressor.
Note: The rear springs may settle some during the first couple of weeks of use. You may have to adjust the front torsion bars to match the level of your new rear springs. The rear springs can sit a little low if the rear shocks are bad. Test the rear shocks by pushing down on the rear of the car. If the rear bounces, the struts also need to be replaced. If equipped with electronic struts/shocks, remove the actuators from the struts/shocks and plug them into the vehicles harness. Secure the actuators to the body using a zip tie.
ATTENTION: Refer to the appropriate shop manual for your vehicle to obtain specific service procedures for this part. If you do not have a service manual or lack the skill to install this part, it is recommended that you seek the services of a qualified technician. Pay special attention to all cautions and warnings included in the shop manual. Read and follow all instructions carefully.

Disclaimer:
Even though every attempt is made to ensure this information is complete and accurate, it is impossible to account for all possible circumstances or situations. Please consult with a qualified auto technician
before attempting to perform any work you are not qualified to do. Automobiles can be hazardous to work on; be sure to take all necessary safety precautions. Failure to do so may result in property damage
or personal injury. Certain motor vehicle standards and performance requirements may apply to your motor vehicle (such as Federal Motor Vehicle Safety Standards by the National Highway Traffic Safety
Administration). Be sure that your work is performed in accordance with such standards and that you do not disable any motor vehicle safety feature.
©2018 Dorman Products, Inc.
No reproductions in whole or in part without prior written approval.
Lincoln Continental 1995-2002
Light Out Instructions
In order to disarm the air ride suspension warning message you must bypass the VDM (Vehicle Dynamic Module) that controls the air ride functions.
The VDM is located under the rear window on the driver's side in the trunk.
The wires for the module can be accessed under the rear seat.
The procedure is as follows:
To access the wiring, remove the rear seat cushion.
First locate the brackets the seat cushion locks onto.
Using both hands, first press down firmly then press back-towards trunk. This will release the seat lock.
Then lift out the seat cushion. This will need to be done on both sides of the seat.
ATTENTION: Refer to the appropriate shop manual for your vehicle to obtain specific service procedures for this part. If you do not have a service manual or lack the skill to install this part, it is recommended that you seek the services of a qualified technician. Pay special attention to all cautions and warnings included in the shop manual. Read and follow all instructions carefully.

Disclaimer:
Even though every attempt is made to ensure this information is complete and accurate, it is impossible to account for all possible circumstances or situations. Please consult with a qualified auto technician
before attempting to perform any work you are not qualified to do. Automobiles can be hazardous to work on; be sure to take all necessary safety precautions. Failure to do so may result in property damage
or personal injury. Certain motor vehicle standards and performance requirements may apply to your motor vehicle (such as Federal Motor Vehicle Safety Standards by the National Highway Traffic Safety
Administration). Be sure that your work is performed in accordance with such standards and that you do not disable any motor vehicle safety feature.
©2018 Dorman Products, Inc.
No reproductions in whole or in part without prior written approval.
Lincoln Continental 1995-2002
Light Out Instructions
Remove the sound insulation from under the seat.
The wiring harness is located on the driver’s side, under the insulation.
Separate the wires from the protective covering and locate the following:
2 wires that will be twisted together; Pink wire with a light blue stripe Tan wire with an orange stripe
ATTENTION: Refer to the appropriate shop manual for your vehicle to obtain specific service procedures for this part. If you do not have a service manual or lack the skill to install this part, it is recommended that you seek the services of a qualified technician. Pay special attention to all cautions and warnings included in the shop manual. Read and follow all instructions carefully.

Disclaimer:
Even though every attempt is made to ensure this information is complete and accurate, it is impossible to account for all possible circumstances or situations. Please consult with a qualified auto technician
before attempting to perform any work you are not qualified to do. Automobiles can be hazardous to work on; be sure to take all necessary safety precautions. Failure to do so may result in property damage
or personal injury. Certain motor vehicle standards and performance requirements may apply to your motor vehicle (such as Federal Motor Vehicle Safety Standards by the National Highway Traffic Safety
Administration). Be sure that your work is performed in accordance with such standards and that you do not disable any motor vehicle safety feature.
©2018 Dorman Products, Inc.
No reproductions in whole or in part without prior written approval.
Lincoln Continental 1995-2002
Light out Instructions
Cut both of these wires and tape both
ends.
Next, supply power to the power steering solenoid by locating the light green wire with the black stripe. Caution: Do not use if it is twisted with the light green with red striped wire. There is another light green/black wire that is larger gauge. This is the one needed.
The light green/black wire will need to be cut. The end that goes to the trunk will be taped off. The end that goes to the front of the vehicle will need to go to a body ground. Find a painted stud under the seat/door trim. Properly clean all paint from this area prior to making ground connection.
ATTENTION: Refer to the appropriate shop manual for your vehicle to obtain specific service procedures for this part. If you do not have a service manual or lack the skill to install this part, it is recommended that you seek the services of a qualified technician. Pay special attention to all cautions and warnings included in the shop manual. Read and follow all instructions carefully.

Disclaimer:
Even though every attempt is made to ensure this information is complete and accurate, it is impossible to account for all possible circumstances or situations. Please consult with a qualified auto technician
before attempting to perform any work you are not qualified to do. Automobiles can be hazardous to work on; be sure to take all necessary safety precautions. Failure to do so may result in property damage
or personal injury. Certain motor vehicle standards and performance requirements may apply to your motor vehicle (such as Federal Motor Vehicle Safety Standards by the National Highway Traffic Safety
Administration). Be sure that your work is performed in accordance with such standards and that you do not disable any motor vehicle safety feature.
©2018 Dorman Products, Inc.
No reproductions in whole or in part without prior written approval.
Lincoln Continental 1995-2002
Light out Instructions
Suggested body ground light green/black wire taken to ground point.
Next, supply power to the steering solenoid.
Do this by cutting the light blue with yellow striped wire, and splice it into the 10 amp VDM power wire. Ignition power source.
For 1995-1997 this is a purple wire with orange stripe. For 1998 and up this is a light green wire with purple stripe.
ATTENTION: Refer to the appropriate shop manual for your vehicle to obtain specific service procedures for this part. If you do not have a service manual or lack the skill to install this part, it is recommended that you seek the services of a qualified technician. Pay special attention to all cautions and warnings included in the shop manual. Read and follow all instructions carefully.
Disclaimer:
Even though every attempt is made to ensure this information is complete and accurate, it is impossible to account for all possible circumstances or situations. Please consult with a qualified auto technician
before attempting to perform any work you are not qualified to do. Automobiles can be hazardous to work on; be sure to take all necessary safety precautions. Failure to do so may result in property damage
or personal injury. Certain motor vehicle standards and performance requirements may apply to your motor vehicle (such as Federal Motor Vehicle Safety Standards by the National Highway Traffic Safety
Administration). Be sure that your work is performed in accordance with such standards and that you do not disable any motor vehicle safety feature.
©2018 Dorman Products, Inc.
No reproductions in whole or in part without prior written approval.
Lincoln Continental 1995-2002
Light out Instructions
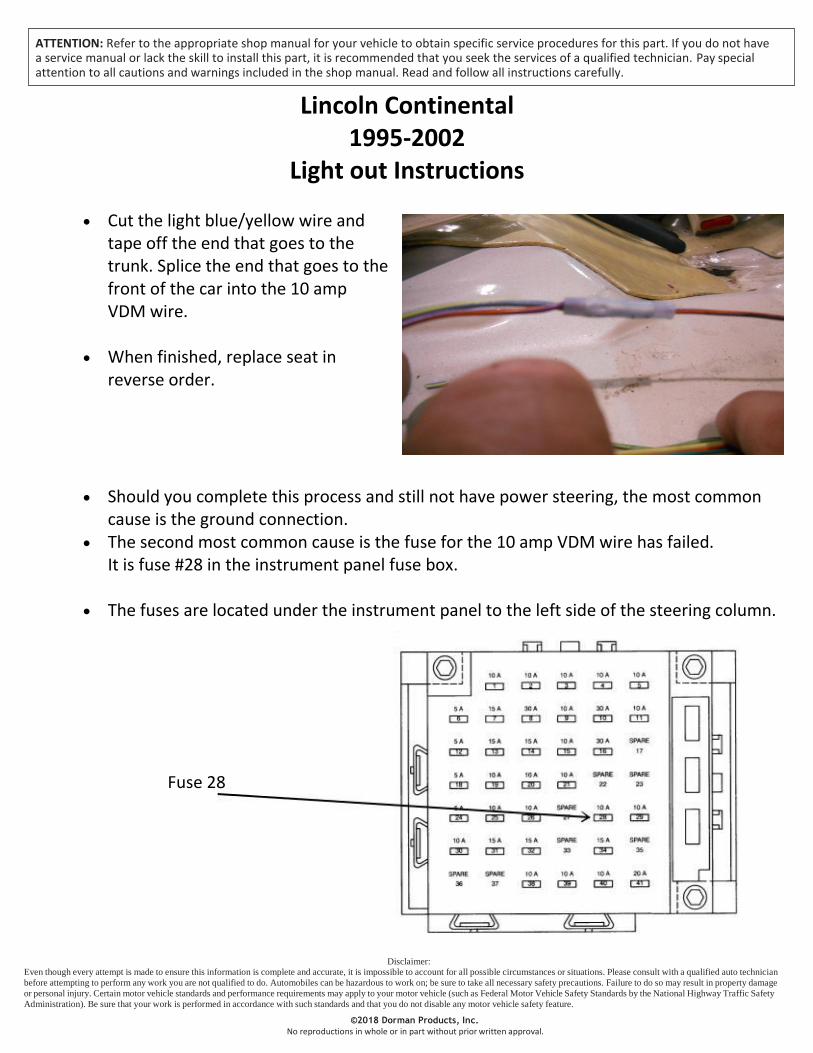
Cut the light blue/yellow wire and tape off the end that goes to the trunk. Splice the end that goes to the front of the car into the 10 amp VDM wire.
When finished, replace seat in reverse order.
Should you complete this process and still not have power steering, the most common
cause is the ground connection. The second most common cause is the fuse for the 10 amp VDM wire has failed.
It is fuse #28 in the instrument panel fuse box.
The fuses are located under the instrument panel to the left side of the steering column.
Fuse 28
ATTENTION: Refer to the appropriate shop manual for your vehicle to obtain specific service procedures for this part. If you do not have a service manual or lack the skill to install this part, it is recommended that you seek the services of a qualified technician. Pay special attention to all cautions and warnings included in the shop manual. Read and follow all instructions carefully.