linear bar grille · 2 linear bar grille - manual | priceindustries.com linear bar grille product...
TRANSCRIPT

MANUAL – INSTALLATION
Linear Bar GrilleLBP
v000 – Issue Date: 09/17/18© 2018 Price Industries Limited. All rights reserved.
Linear Bar GriLLeTABLE OF CONTENTS
Product Overview
Overview .......................................................................1
Before You Start ............................................................1
Getting Started ..............................................................1
Installation & Mounting Instructions
General Fastening
Countersunk ‘A’ and Straight Hole ‘H’ Mounting ........3
Spring Clip ‘B’ Mounting ............................................4
Concealed ‘C’ Mounting ............................................5
Fastening with Mounting Frame
Countersunk ‘A’ with Mounting Frame .......................8
Spring Clip ‘B’ Fastening with Mounting Frame .........9
Type ‘C’ Fastening with Mounting Frame .................10
Spring Clip ‘D’ Mounting ..........................................11
Parts List .................................................................12
1priceindustries.com | LINeAr BAr GrILLe - Manual
Linear Bar GriLLePRODUCT OVERVIEW
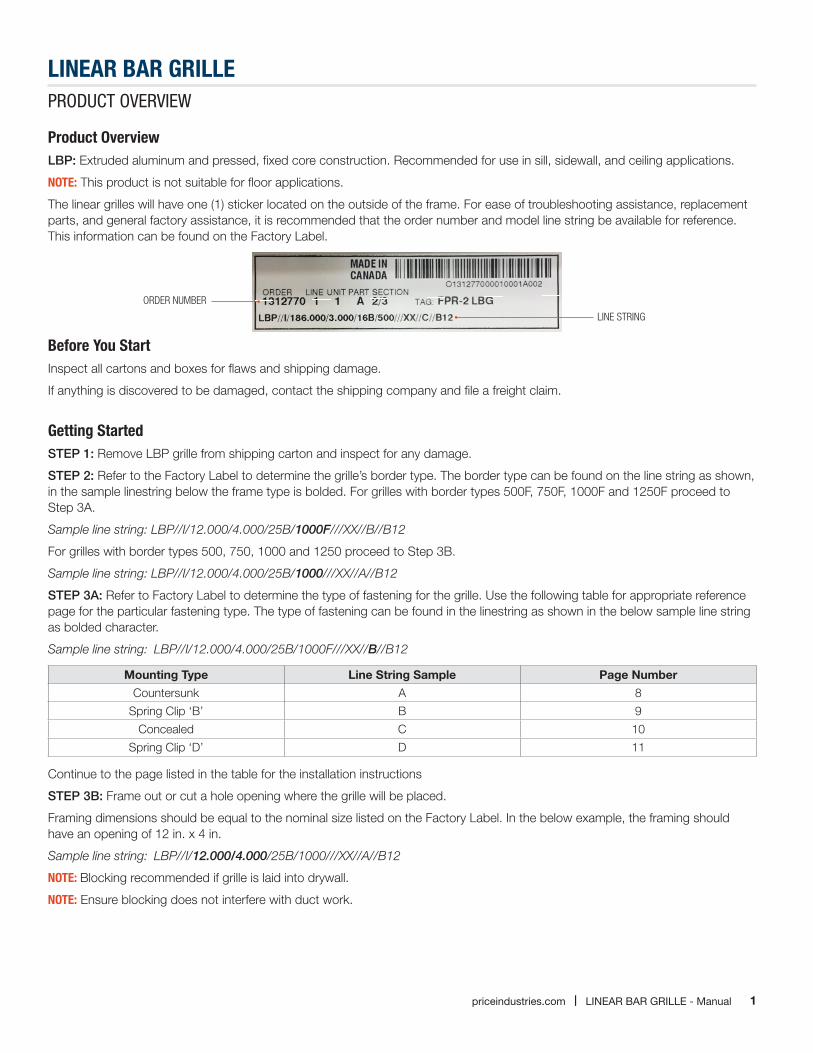
Product OverviewLBP: Extruded aluminum and pressed, fixed core construction. Recommended for use in sill, sidewall, and ceiling applications.
nOTe: This product is not suitable for floor applications.
The linear grilles will have one (1) sticker located on the outside of the frame. For ease of troubleshooting assistance, replacement parts, and general factory assistance, it is recommended that the order number and model line string be available for reference. This information can be found on the Factory Label.
Before You StartInspect all cartons and boxes for flaws and shipping damage.
If anything is discovered to be damaged, contact the shipping company and file a freight claim.
Getting StartedSTEP 1: Remove LBP grille from shipping carton and inspect for any damage.
STEP 2: Refer to the Factory Label to determine the grille’s border type. The border type can be found on the line string as shown, in the sample linestring below the frame type is bolded. For grilles with border types 500F, 750F, 1000F and 1250F proceed to Step 3A.
Sample line string: LBP//I/12.000/4.000/25B/1000F///XX//B//B12
For grilles with border types 500, 750, 1000 and 1250 proceed to Step 3B.
Sample line string: LBP//I/12.000/4.000/25B/1000///XX//A//B12
STEP 3A: Refer to Factory Label to determine the type of fastening for the grille. Use the following table for appropriate reference page for the particular fastening type. The type of fastening can be found in the linestring as shown in the below sample line string as bolded character.
Sample line string: LBP//I/12.000/4.000/25B/1000F///XX//B//B12
Mounting Type Line String Sample Page Number
Countersunk A 8
Spring Clip ‘B’ B 9
Concealed C 10
Spring Clip ‘D’ D 11
Continue to the page listed in the table for the installation instructions
STEP 3B: Frame out or cut a hole opening where the grille will be placed.
Framing dimensions should be equal to the nominal size listed on the Factory Label. In the below example, the framing should have an opening of 12 in. x 4 in.
Sample line string: LBP//I/12.000/4.000/25B/1000///XX//A//B12
nOTe: Blocking recommended if grille is laid into drywall.
nOTe: Ensure blocking does not interfere with duct work.
ORDER NUMBER
LINE STRING
2 LINeAr BAr GrILLe - Manual | priceindustries.com
Linear Bar GriLLeProduct overview
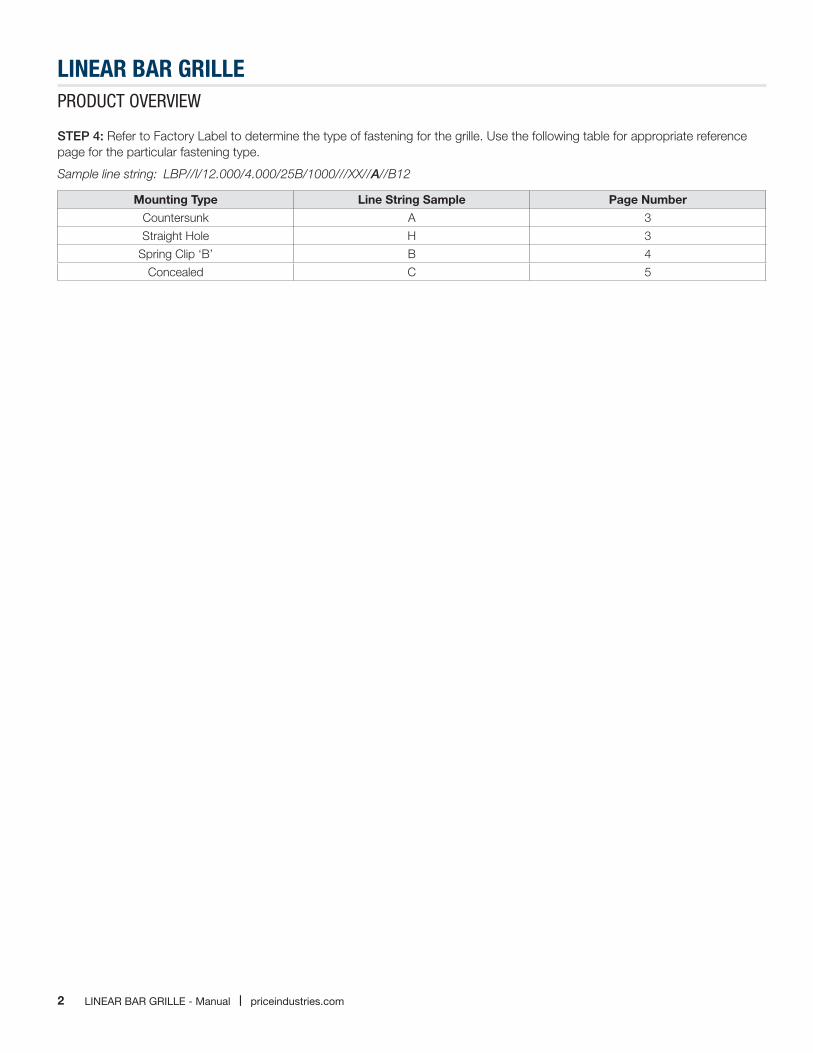
STEP 4: Refer to Factory Label to determine the type of fastening for the grille. Use the following table for appropriate reference page for the particular fastening type.
Sample line string: LBP//I/12.000/4.000/25B/1000///XX//A//B12
Mounting Type Line String Sample Page Number
Countersunk A 3
Straight Hole H 3
Spring Clip ‘B’ B 4
Concealed C 5
3priceindustries.com | LINeAr BAr GrILLe - Manual
Linear Bar GriLLeINSTALLATION & MOUNTING INSTRUCTIONS
General Fastening
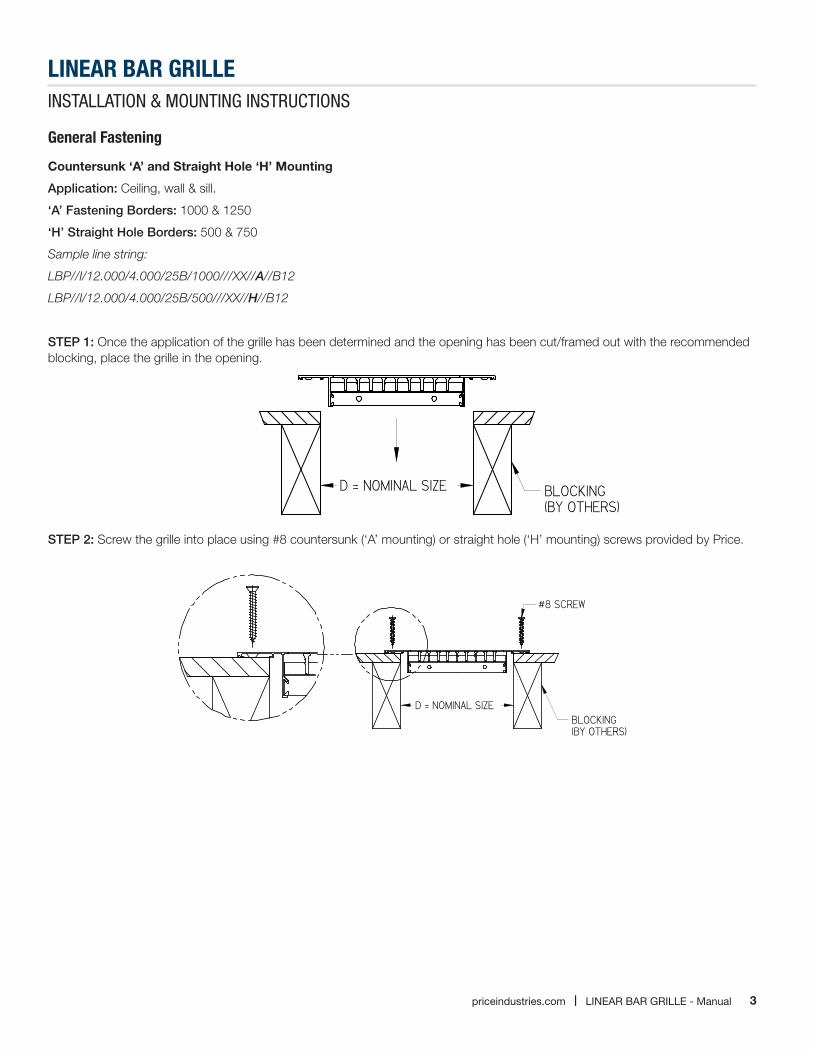
Countersunk ‘A’ and Straight Hole ‘H’ Mounting
Application: Ceiling, wall & sill.
‘A’ Fastening Borders: 1000 & 1250
‘H’ Straight Hole Borders: 500 & 750
Sample line string:
LBP//I/12.000/4.000/25B/1000///XX//A//B12
LBP//I/12.000/4.000/25B/500///XX//H//B12
STEP 1: Once the application of the grille has been determined and the opening has been cut/framed out with the recommended blocking, place the grille in the opening.
STEP 2: Screw the grille into place using #8 countersunk (‘A’ mounting) or straight hole (‘H’ mounting) screws provided by Price.
D = NOMINAL SIZE
D = NOMINAL SIZE
BLOCKING(BY OTHERS)
BLOCKING(BY OTHERS)
#8 SCREW
D = NOMINAL SIZE
D = NOMINAL SIZE
BLOCKING(BY OTHERS)
BLOCKING(BY OTHERS)
#8 SCREW

4 LINeAr BAr GrILLe - Manual | priceindustries.com
Linear Bar GriLLeINSTALLATION & MOUNTING INSTRUCTIONS
Spring Clip ‘B’ Mounting
Application: Sill only, not to be used for ceiling or sidewall installation
Applicable Frames: 500, 750, 1000 & 1250
Sample line string:
LBP//I/6.000/12.000/26B/1250///XX//B//B12
STEP 1: Once the application of the grille has been determined and the opening has been cut and framed out with the recommended blocking, lay the grille into the opening. Push the grille into the opening until the frame comes in contact with the sill.
D = NOMINAL SIZEBLOCKING(BY OTHERS)
5priceindustries.com | LINeAr BAr GrILLe - Manual
Linear Bar GriLLeINSTALLATION & MOUNTING INSTRUCTIONS
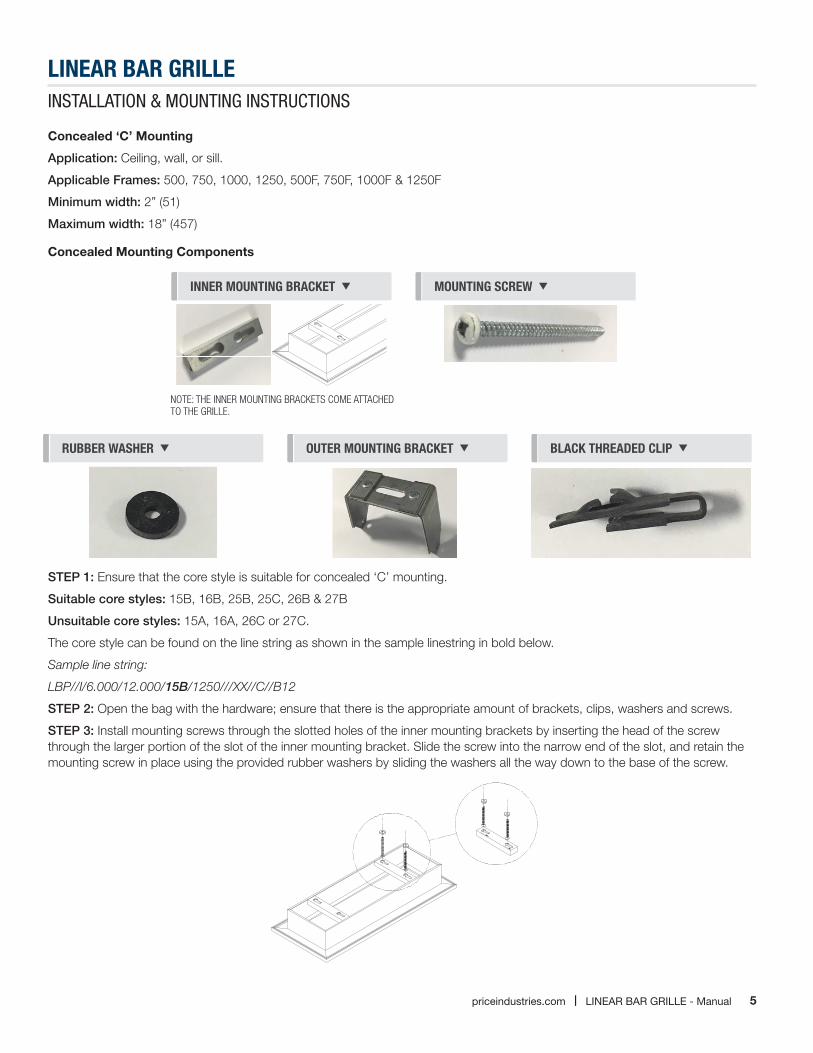
Concealed ‘C’ Mounting
Application: Ceiling, wall, or sill.
Applicable Frames: 500, 750, 1000, 1250, 500F, 750F, 1000F & 1250F
Minimum width: 2” (51)
Maximum width: 18” (457)
Concealed Mounting Components
STEP 1: Ensure that the core style is suitable for concealed ‘C’ mounting.
Suitable core styles: 15B, 16B, 25B, 25C, 26B & 27B
Unsuitable core styles: 15A, 16A, 26C or 27C.
The core style can be found on the line string as shown in the sample linestring in bold below.
Sample line string:
LBP//I/6.000/12.000/15B/1250///XX//C//B12
STEP 2: Open the bag with the hardware; ensure that there is the appropriate amount of brackets, clips, washers and screws.
STEP 3: Install mounting screws through the slotted holes of the inner mounting brackets by inserting the head of the screw through the larger portion of the slot of the inner mounting bracket. Slide the screw into the narrow end of the slot, and retain the mounting screw in place using the provided rubber washers by sliding the washers all the way down to the base of the screw.
MOUnTinG SCreW inner MOUnTinG BraCKeT
rUBBer WaSHer OUTer MOUnTinG BraCKeT BLaCK THreaDeD CLiP
NOTE: THE INNER MOUNTING BRACKETS COME ATTACHED TO THE GRILLE.

6 LINeAr BAr GrILLe - Manual | priceindustries.com
Linear Bar GriLLeINSTALLATION & MOUNTING INSTRUCTIONS
UP TO 3 in. OVer 3 in.
STEP 4: Place the black threaded clips on the slot(s) of the outer concealed bracket.
STEP 5: Place the outer brackets over the inner brackets, lining up the mounting screws with the black threaded clips of the outer brackets. With a screwdriver, turn each screw clockwise, alternating mounting screws to ensure that the outer bracket remains as parallel to the frame as possible. Keep turning the mounting screws until the outer brackets are approximately halfway down the length of the screws.

7priceindustries.com | LINeAr BAr GrILLe - Manual
Linear Bar GriLLeINSTALLATION & MOUNTING INSTRUCTIONS
STEP 6: Install the grille with the concealed mounting brackets into the hemmed duct or wall opening.
nOTe: Ensure that the outer bracket latches onto the hem of the duct or mounting frame before tightening the concealed mounting screws.
nOTe: If the ducting/plenum is not hemmed, a ledge may be added for installing the bracket. This may be formed by the drywall, a sheet metal hem or angle or, metal stud framing.
STEP 7: Tighten concealed mounting screws until the frame comes into contact with the surface.
8 LINeAr BAr GrILLe - Manual | priceindustries.com
Linear Bar GriLLeINSTALLATION & MOUNTING INSTRUCTIONS
Fastening with Mounting Frame
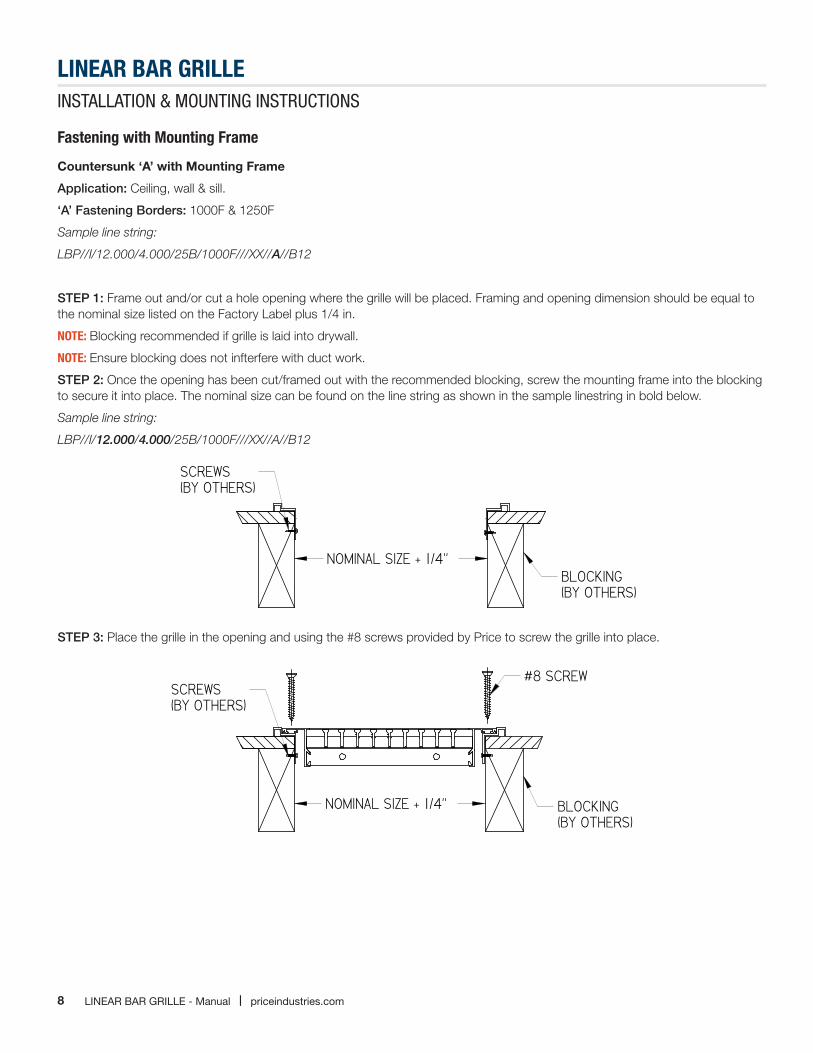
Countersunk ‘A’ with Mounting Frame
Application: Ceiling, wall & sill.
‘A’ Fastening Borders: 1000F & 1250F
Sample line string:
LBP//I/12.000/4.000/25B/1000F///XX//A//B12
STEP 1: Frame out and/or cut a hole opening where the grille will be placed. Framing and opening dimension should be equal to the nominal size listed on the Factory Label plus 1/4 in.
nOTe: Blocking recommended if grille is laid into drywall.
nOTe: Ensure blocking does not infterfere with duct work.
STEP 2: Once the opening has been cut/framed out with the recommended blocking, screw the mounting frame into the blocking to secure it into place. The nominal size can be found on the line string as shown in the sample linestring in bold below.
Sample line string:
LBP//I/12.000/4.000/25B/1000F///XX//A//B12
STEP 3: Place the grille in the opening and using the #8 screws provided by Price to screw the grille into place.
NOMINAL SIZE + 1/4"
NOMINAL SIZE + 1/4"
BLOCKING(BY OTHERS)
BLOCKING(BY OTHERS)
#8 SCREW
SCREWS(BY OTHERS)
SCREWS(BY OTHERS)
NOMINAL SIZE + 1/4"
NOMINAL SIZE + 1/4"
BLOCKING(BY OTHERS)
BLOCKING(BY OTHERS)
#8 SCREW
SCREWS(BY OTHERS)
SCREWS(BY OTHERS)
9priceindustries.com | LINeAr BAr GrILLe - Manual
Linear Bar GriLLeINSTALLATION & MOUNTING INSTRUCTIONS
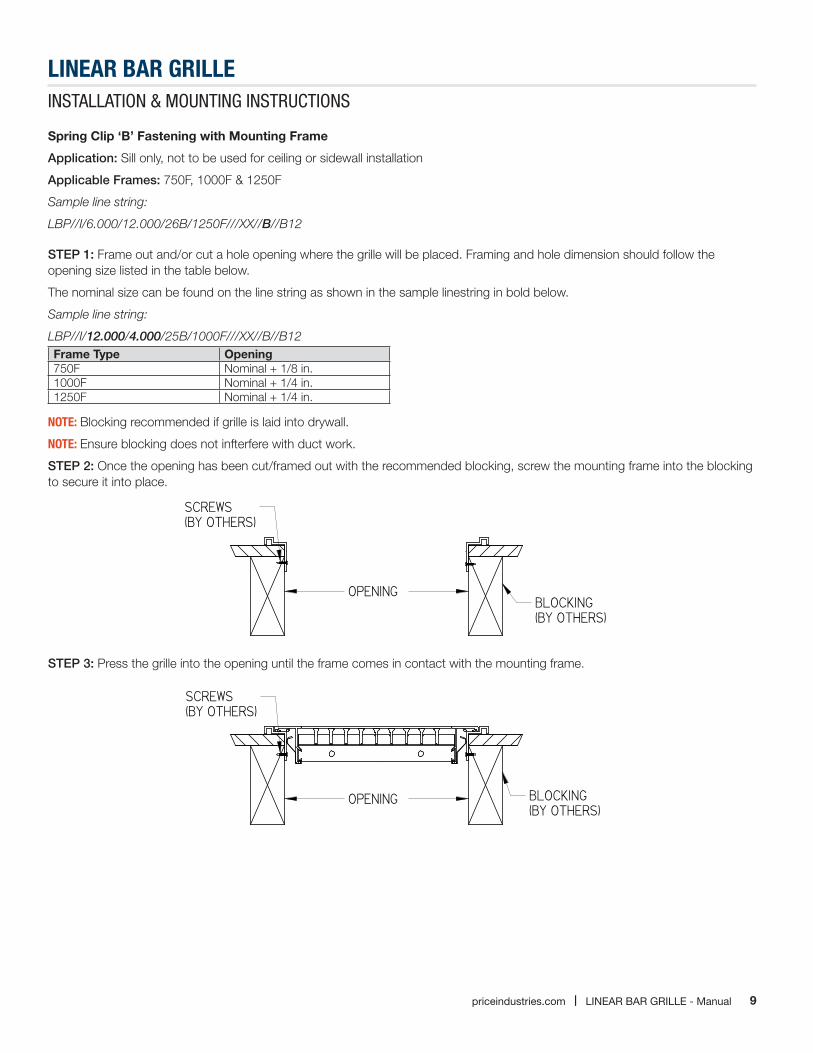
Spring Clip ‘B’ Fastening with Mounting Frame
Application: Sill only, not to be used for ceiling or sidewall installation
Applicable Frames: 750F, 1000F & 1250F
Sample line string:
LBP//I/6.000/12.000/26B/1250F///XX//B//B12
STEP 1: Frame out and/or cut a hole opening where the grille will be placed. Framing and hole dimension should follow the opening size listed in the table below.
The nominal size can be found on the line string as shown in the sample linestring in bold below.
Sample line string:
LBP//I/12.000/4.000/25B/1000F///XX//B//B12Frame Type Opening750F Nominal + 1/8 in.1000F Nominal + 1/4 in.1250F Nominal + 1/4 in.
nOTe: Blocking recommended if grille is laid into drywall.
nOTe: Ensure blocking does not infterfere with duct work.
STEP 2: Once the opening has been cut/framed out with the recommended blocking, screw the mounting frame into the blocking to secure it into place.
STEP 3: Press the grille into the opening until the frame comes in contact with the mounting frame.
OPENING
OPENING
BLOCKING(BY OTHERS)
BLOCKING(BY OTHERS)
SCREWS(BY OTHERS)
SCREWS(BY OTHERS)
OPENING
OPENING
BLOCKING(BY OTHERS)
BLOCKING(BY OTHERS)
SCREWS(BY OTHERS)
SCREWS(BY OTHERS)

10 LINeAr BAr GrILLe - Manual | priceindustries.com
Linear Bar GriLLeINSTALLATION & MOUNTING INSTRUCTIONS
Type ‘C’ Fastening with Mounting Frame
Application: Ceiling, wall, floor or sill.
Applicable Frames: 750F, 1000F & 1250F
Minimum width: 2” (51)
Maximum width: 18” (457)
STEP 1: Ensure that the core style is suitable for concealed ‘C’ mounting.
Unsuitable core styles: 15A, 16A, 26C or 27C.
Suitable core styles: 15B, 16B, 25B, 25C, 26B & 27B
Sample line string (suitable core style):
LBP//I/6.000/12.000/15B/1250///XX//C//B12
STEP 2: Frame out and/or cut a hole opening where the grille will be placed. Framing and hole dimension should follow the opening size listed in the table below.
The nominal size can be found on the line string as shown in the sample linestring in bold below.
Sample line string:
LBP//I/12.000/4.000/25B/1000F///XX//B//B12Frame Type Opening750F Nominal + 1/8 in.1000F Nominal + 1/4 in.1250F Nominal + 1/4 in.
nOTe: Blocking recommended if grille is laid into drywall.
nOTe: Ensure blocking does not infterfere with duct work.
STEP 3: Once the opening has been cut/framed out with the recommended blocking, screw the mounting frame into blocking to secure it into place.
STEP 4: Continue to page 5, step 3 of concealed ‘C’ mounting.

11priceindustries.com | LINeAr BAr GrILLe - Manual
Linear Bar GriLLeINSTALLATION & MOUNTING INSTRUCTIONS
Spring Clip ‘D’ Mounting
Application: Sill only, not to be used for ceiling or sidewall installation
Applicable Frames: 500F
Sample line string: LBP//I/6.000/12.000/26B/500F///XX//D//B12
STEP 1: Once the application of the grille has been determined and the opening has been cut/framed out with the recommended blocking, screw the mounting frame into blocking to secure it into place. The nominal size can be found on the line string as shown in the sample linestring in bold below.
Sample line string: LBP//I/12.000/4.000/25B/5000F///XX//D//B12
nOTe: Blocking recommended if grille is laid into drywall.
nOTe: Ensure blocking does not infterfere with duct work.
STEP 2: Press grille into opening until frame comes in contact with mounting frame and the spring clips engage..
D = NOMINAL SIZE
D = NOMINAL SIZE
BLOCKING(BY OTHERS)
BLOCKING(BY OTHERS)
SCREWS(BY OTHERS)
SCREWS(BY OTHERS)
D = NOMINAL SIZE
D = NOMINAL SIZE
BLOCKING(BY OTHERS)
BLOCKING(BY OTHERS)
SCREWS(BY OTHERS)
SCREWS(BY OTHERS)

12 LINeAr BAr GrILLe - Manual | priceindustries.com
Linear Bar GriLLeINSTALLATION & MOUNTING INSTRUCTIONS
Part List A & H Mounting Part Name Finish Part NumberA Mounting Screws B12 - White 900179-001
B15 - Metallic Gray 900179-002B17 - Black 900179-003MILL - Unpainted 900179-004
H Mounting Screws - 031948-999
B Mounting Part Name Part NumberB Spring Clip 026423-002
D Mounting Part Name Part NumberD Spring Clip 026425-001
Concealed Mounting Parts Part Name Description Part NumberInner Bracket 238079Outer Bracket 205798Hardware 205824Hardware Parts 205824Mounting Screw SMS #8-2.00 A Quad Fl ZP 031936-004Mounting Screw SMS #8x2.5 A PH PN PL 031949-001Threaded clips #8 J-Nut Tinn DC-8042-8-4 032160-001Washer Washer NPRN #2629 033363-001Sheet metal screws #6-20x.375 DS RB PN PL 031011-001
Accessories Part Name Description Part NumberSplice Plate Alignment Splice Plate for Frames 500 and 750 237964-001
Alignment Splice Plate for Fames 1000 and 1250 237964-002
13priceindustries.com | LINeAr BAr GrILLe - Manual
Linear Bar GriLLeNOTES

This document contains the most current product information as of this printing. For the most up-to-date product information, please go to priceindustries.com
© 2018 Price Industries Limited. All rights reserved.