linking the psunami camera - digital anarchy · linking the psunami camera use expressions to link...
TRANSCRIPT

[ from: Digital Anarchy ]f/x tools for revolutionaries
Linking the Psunami cameraUse expressions to link Psunami to a comp Camera
© 2007, Digital Anarchy : f/x tools for revolutionaries | Psunami: Photoreal 3D Water Simulation & Effects.2
psunami : camera linking via expressions
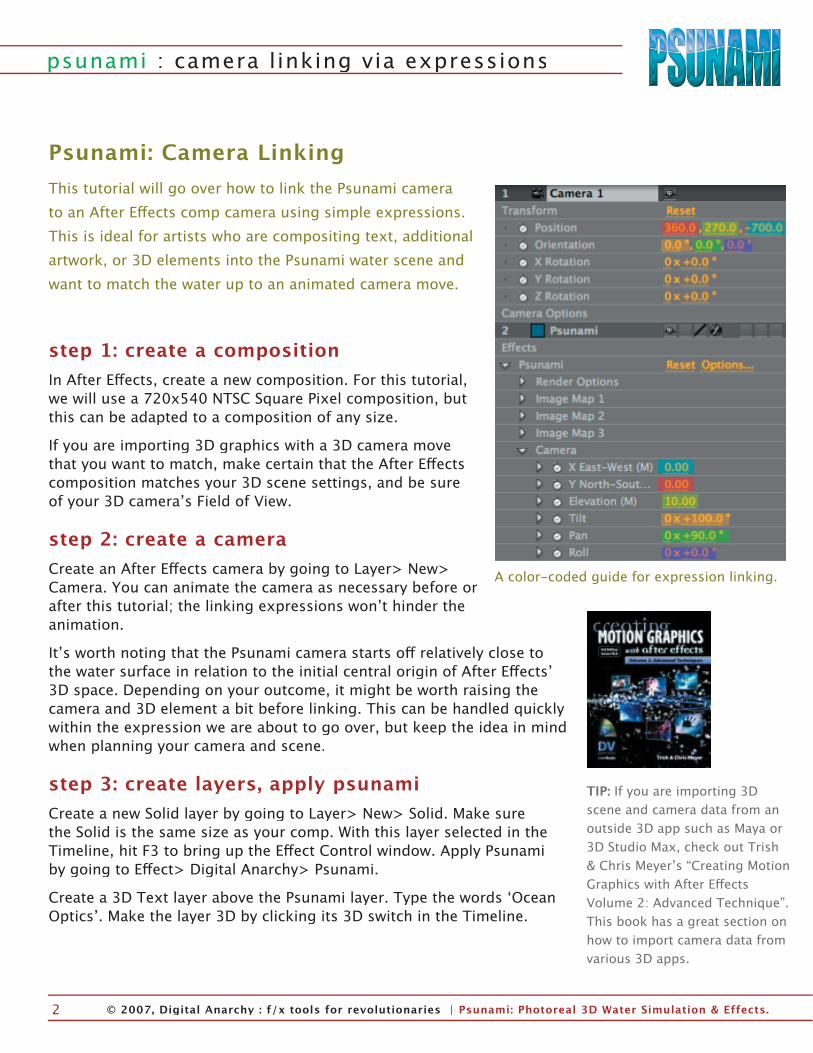
Psunami: Camera LinkingThis tutorial will go over how to link the Psunami camera to an After Eff ects comp camera using simple expressions. This is ideal for artists who are compositing text, additional artwork, or 3D elements into the Psunami water scene and want to match the water up to an animated camera move.
step 1: create a compositionIn After Eff ects, create a new composition. For this tutorial, we will use a 720x540 NTSC Square Pixel composition, but this can be adapted to a composition of any size.
If you are importing 3D graphics with a 3D camera move that you want to match, make certain that the After Eff ects composition matches your 3D scene settings, and be sure of your 3D cameraʼs Field of View.
step 2: create a cameraCreate an After Eff ects camera by going to Layer> New> Camera. You can animate the camera as necessary before or after this tutorial; the linking expressions wonʼt hinder the animation.
Itʼs worth noting that the Psunami camera starts off relatively close to the water surface in relation to the initial central origin of After Eff ectsʼ 3D space. Depending on your outcome, it might be worth raising the camera and 3D element a bit before linking. This can be handled quickly within the expression we are about to go over, but keep the idea in mind when planning your camera and scene.
step 3: create layers, apply psunamiCreate a new Solid layer by going to Layer> New> Solid. Make sure the Solid is the same size as your comp. With this layer selected in the Timeline, hit F3 to bring up the Eff ect Control window. Apply Psunami by going to Eff ect> Digital Anarchy> Psunami.
Create a 3D Text layer above the Psunami layer. Type the words ʻOcean Opticsʼ. Make the layer 3D by clicking its 3D switch in the Timeline.
A color-coded guide for expression linking.
TIP: If you are importing 3D scene and camera data from an outside 3D app such as Maya or 3D Studio Max, check out Trish & Chris Meyerʼs “Creating Motion Graphics with After Eff ects Volume 2: Advanced Technique”. This book has a great section on how to import camera data from various 3D apps.

psunami : camera linking via expressions
© 2007, Digital Anarchy : f/x tools for revolutionaries | Psunami: Photoreal 3D Water Simulation & Effects.3
step 4: prep the palettesTwirl down the Psunami layer in the Timeline, then twirl down the Psunami Eff ects. Open the Psunami Camera parameters in the Timeline. Twirl down the actual Camera layer as well, to expose its transformation information.
Now expand the Timeline window until you can see both the Psunami camera controls and the AE Camera controls at the same time. This makes the expression linking much easier. Alright, letʼs get to ʻwhippingʼ our parameters into shape!
step 5: pickwhip your positionUnder the Psunami camera section, Option+Click (Mac) or Alt+Click (Win) on the little keyframing clock next to the X East-West parameter. A section called ʻExpression: X East-Westʼ will open directly underneath. This contains the buttons for our expressions.
Left-click and hold down the pickwhip button (the little spiral) and drag the resulting whip line to the Position parameter for the AE Camera Z-axis. An expression will generate in the layer area of the Timeline that looks like this:
thisComp.layer(“Camera 1”).transform.position[2]
Once you let go of the pickwhip and this text appears, its text fi eld should be active and ready for text entry. We need to divide all of the Position parameters by 35 in order to translate them into the Psunami camera space. You can adjust this value later if you feel that you arenʼt getting good results, but 35 is a good approximation to start with. Add “/35” after the recently created expression in order to divide it by 35. Your text should look like this:
thisComp.layer(“Camera 1”).transform.position[2]/35
Continue this process for the Y North-South and Elevation parameters. Option/Alt+Click on the keyframing clock next to Y North-South and pickwhip it to the AE Cameraʼs X-Axis Position. Divide this by 35 as we did with the X East-West expression.
step 6: special whip for positionNow pickwhip the Elevation parameter to the AE Cameraʼs Y-axis Position. Thereʼs a little more math to this particular expression than just dividing it by 35. In our particular comp, the expression for Elevation should look like this:
7.714-(thisComp.layer(“Camera 1”).transform.position[1]/35)
Circled in red, the pickwhip button.

© 2007, Digital Anarchy : f/x tools for revolutionaries | Psunami: Photoreal 3D Water Simulation & Effects.4
psunami : camera linking via expressions
The 7.714 comes from dividing the height of our comp by 2, then dividing that result by 35. So (540/2)/35. You will need to recalculate this number and adjust the expression accordingly when using a diff erent composition size.
Why do we need to do this? The reason is that After Eff ects sees ʻ0ʼ as being at the top of the screen, but Psunami sees ʻ0ʼ as being in the middle of the screen. The Psunami unit equation is: Vertical Center of screen = (Height of Comp/2)/35
step 7: pickwhip the rotationʻRound and ʻround we go! Now that we have the Camera position linked up, we need to hook up the Rotation. Option/Alt+Click on the keyframe clock next to the Psunami Camera Tilt parameter. Pickwhip this parameter to the AE Camera X Orientation.
Tilt needs a bit of math added to the resulting expression. Add 90 to the AE Camera orientation, and subtract that result by 180. Be mindful of the parenthesis in this expression. It should look like:
180-(thisComp.layer(“Camera 1”).transform.orientation[0]+90)
Pickwhip the Pan parameter to the AE Camera Y Orientation. This expression only needs to have 90 added to it, so it should look like:
thisComp.layer(“Camera 1”).transform.orientation[1]+90
Pickwhip the Roll parameter to the AE Camera Z Orientation. No additional math is necessary on this expression. It should look like:
thisComp.layer(“Camera 1”).transform.orientation[2]
In this graphic, you can see the expression code manifesting itself as the overbearing burden of humanity on the soul of the camera path, juxtaposed with black to create a sense of wonder and awe at what lies beyond the tutorial...um...Oh wait. This is a screenshot of the cameraʼs path animating around the ocean optics graphic, along with a composite of the expression code.

psunami : camera linking via expressions
© 2007, Digital Anarchy : f/x tools for revolutionaries | Psunami: Photoreal 3D Water Simulation & Effects.5
If your animated camera isnʼt using the Orientation parameters for motion, you can substitute the Rotation parameters for them. Tilt links to X Rotation, Pan links to Y Rotation, and Roll links to Z Rotation. All of the math added to the Tilt and Pan expressions still applies.
step 8: tweak the codeAnd thatʼs it! With all of these expressions in place, your Psunami scene will move around as you adjust the AE camera. Again, all of these expression can be applied before or after you animate your AE camera. They can also be applied after you load in external camera data from a 3D application.
The initial expression for the Camera Elevation might prove to be too low for your composition. You can either raise the AE camera and your 3D elements before or after you pickwhip the expression, or you can add numbers to the Elevation expression yourself.
For example, letʼs say that we want to raise the Psunami camera 50 units (that is, lower the water surface away from the camera). To this, you can add 50 to the Elevation expression that was created in Step #6:
7.714-(thisComp.layer(“Camera 1”).transform.position[1]/35)+50
step 9: a real world exampleTo fi nish off this tutorial, you can download a QuickTime movie and After Eff ects project fi le. These fi les show a simple but ʻreal worldʼ example of Psunami camera linking.
If you havenʼt already, download this Zip fi le to follow along:http://www.anarchyunderground.net/tutes/psunami_camera-link.zip
The AE project fi le is a 720x540 NTSC Square Pixel 5-second composition.
The Text & Bars pre-comp contains the animated text and decorative bars. Collapse Transformations has been turned on in the Final Comp, allowing it to update in its own 3D space while the AE Comp camera is being animated.
step 8: before
step 8: after

© 2007, Digital Anarchy : f/x tools for revolutionaries | Psunami: Photoreal 3D Water Simulation & Effects.6
psunami : camera linking via expressions
The AE Comp Camera is animating in a clockwise arc around the text. The ʻOcean Opticsʼ text itself was animated using the built-in text animation features present in both After Eff ects 6.5 and After Eff ects 7.0.
In the fi nal comp, Psunami has been linked to the AE Comp Camera using the settings found in this tutorial. The comp camera and the text have been raised to give the AE Camera “clearance” over the water.
Have questions about this tutorial? Just email Marco at [email protected]. Thanks!
Our Psunami Camera composition.