linux home networking
TRANSCRIPT


Table of Contennts CHAPTER 1
Introduction to Networking What Is TCP/IP? What Do IP Addresses Look Like? What Is Localhost? What Is A Subnet Mask? How Many Addresses Do I Get With My Mask? What?s The Range Of Addresses On My Network? What Is Duplex? What Is A Hub? What Is A Switch? What Is A LAN? What Is A Router? What Is A Gateway? What Is A Route? What Is A Default Gateway? What Is A NIC? What Does The ?Link? Light On My NIC Indicate? What Is A MAC Address? What Is ARP? What Is A DTE? What Is A DCE? What Is A Straight Through / Crossover Cable? What Is A Firewall? What Is NAT? What Is Port Forwarding With NAT? What Is DHCP? What Is DNS? How Can I Check The IP Address For A Domain? How Do I Get My Own DNS Domain Name? What is FTP? Where is Linux Help?
CHAPTER 2
Linux Networking How To Configure Your NIC's IP Address How To Change Your Default Gateway How Configure Two Gateways How To Delete A Route How To View Your Current Routing Table How To Change The Duplex Setting Of Your NIC How To Convert Your Linux Server Into A Router Configuring Your /etc/hosts File
CHAPTER 3
Simple Network Troubleshooting How To See Your ARP Table How To Use "Ping" To Test Network Connectivity Using "traceroute" To Test Connectivity Viewing Packet Flow With TCPdump
Using Telnet for Troubleshooting Using NMAP Who Has Used My System?
CHAPTER 4 Troubleshooting Linux With Syslog
About syslog Activating Changes To The syslog Configuration File How To View New Log Entries As They Happen Logging Linux Syslog Messages to Another Linux Box Syslog and Firewalls Syslog Configuration & Cisco Devices Logrotate
CHAPTER 5
Installing RPM Software Where To Get Commonly Used RPMs How to Easily Access CD RPMs With Automount Getting RPMs Using Web Based FTP Getting RPMs Using Command Line Anonymous FTP Getting RPMs Using WGET Automatic Updates With yum Automatic Updates With Up2date How To Install The RPMs How to Install Source RPMs RPM Installation Errors How To List Installed RPMs How To List All The Files Inside An RPM How Uninstall RPMs Which RPMs Will Start Up At Boot Time?
CHAPTER 6
The Linux Boot Process The RedHat Boot Sequence Determining The Default Boot runlevel Get A GUI Console Without Changing runlevels Get A Basic Text Terminal Without Exiting The GUI Switching runlevels on the fly How To Set Which Programs Run At Each runlevel
CHAPTER 7
Configuring A Linux DHCP Server Download & Install The DHCP Package The /etc/dhcp.conf File Upgrading Your DHCP Server How to get DHCP started Modify Your Routes for DHCP on Linux Server Configuring Linux clients to use DHCP Error Found When Upgrading From Redhat 7.3 To 8.0
CHAPTER 8
Adding Linux Users

Who Is The Super User? How To Add Users How To Delete Users How To Tell The Groups To Which A User Belongs How To Change Your Password
CHAPTER 9
Configuring Samba Download and Install Packages How To Get SAMBA Started The Samba Configuration File How SWAT Makes Samba Simpler Creating A Starter Configuration Fine Tuning The Configuration How To Create A Samba PDC Administrator User How To Add Workstations To Your Samba Domain How To Add Users To Your Samba Domain Domain Groups And Samba How To Delete Users From Your Samba Domain
CHAPTER 10
Sharing Resources with Samba Adding A Printer To A Samba PDC Creating Group Shares in SAMBA Windows Drive Sharing With Your SAMBA Server
CHAPTER 11
Samba Security & Troubleshooting Testing The smb.conf file Samba and Firewall Software - iptables, Zone Alam, Windows XP Firewall Testing Basic Client / Server Network Connectivity Testing Samba Client / Server Connectivity Checking the Samba Logs Samba Network Troubleshooting Basic Samba Security
CHAPTER 12
Linux Wireless Networking Wireless Linux Compatible NICs Linux-WLAN Preparation Installing The Linux-WLAN Drivers Post Installation Steps Linux-WLAN Encryption For Security Troubleshooting Your Wireless LAN
CHAPTER 13
Using Sudo What is sudo? Download & Install The sudo Package

The visudo command The /etc/sudoers File How To Use sudo Using syslog To Track All sudo Commands
CHAPTER 14
Why Host Your Own Site? Network Diagram Alternatives To Home Web Hosting Factors To Consider Before Hosting Yourself How To Migrate From An External Provider
CHAPTER 15
Linux Firewalls Using iptables What Is iptables? Download And Install The Iptables Package How To Get iptables Started Packet Processing In iptables Iptables Packet Flow Diagram Processing For Packets Routed By The Firewall Packet Processing For Data Received By The Firewall Packet Processing For Data Sent By The Firewall Targets And Jumps Descriptions Of The Most Commonly Used Targets Important Iptables Command Switch Operations General Iptables Match Criteria Common TCP and UDP Match Criteria Common ICMP (Ping) Match Criteria Common Match Extensions Criteria Using User Defined Chains Sample iptables Scripts Basic Initialization Allowing DNS Access To Your Firewall Allowing WWW And SSH Access To Your Firewall Allowing Your Firewall To Access The Internet Allow Your Home Network To Access The Firewall IP Masquerade Regular Masquerading (Many to One Network Address Translation) Port Forwarding Type NAT Static NAT Logging & Troubleshooting
CHAPTER 16
Configuring a Linux FTP server FTP Overview Problems with FTP and firewalls How To Download And Install The VSFTP Package How To Get VSFTP Started Testing To See If VSFTP Is Running What Is Anonymous FTP? The /etc/vsftpd.conf File FTP Security Issues

CHAPTER 17
Telnet, TFTP and XINETD Telnet TFTP
CHAPTER 18
Secure Remote Logins & File Copying Using Secure Shell As A Replacement For Telnet Testing To See If SSH Is Running The etc/ssh/sshd_config File Using SSH To Login To A Remote Machine What You Should Expect To See When You Log In Deactivating Telnet once SSH is installed Using SCP as a more secure replacement for FTP Copying files using SCP without a password
CHAPTER 19
Configuring DNS What Is DNS? What Is BIND? When To Use A DNS Caching Name Server When To Use A Regular DNS Server How To Download & Install The BIND Packages How To Get BIND Started Configuring A Caching Name Server Configuring A Regular Name Server DHCP Considerations For DNS
CHAPTER 20
Dynamic DNS What Is DNS? What Is Dynamic DNS? Dynamic DNS And NAT Router/Firewalls Dynamic DNS Prerequisites Installing And Using ez-ipupdate Installing And Using DDclient Testing Your Dynamic DNS
CHAPTER 21
Configuring The Apache Web Server Download & Install The Apache Package How To Get Apache Started Configuring DNS For Apache General Configuration Steps File Permissions And Apache Single IP Address - Two Sites Apache Running On A Server Behind A Firewall How To Protect Web Page Directories With Passwords Issues When Upgrading To Apache 2.0

CHAPTER 22
Configuring Linux Mail Configuring Sendmail An Overview Of How Sendmail Works Configuring DNS Installing And Starting Sendmail Restart Sendmail After Editing Your Configuration Files The /var/log/maillog File The /etc/mail/sendmail.mc File The /etc/hosts File The /etc/mail/relay-domains File The /etc/mail/access File The /etc/mail/local-host-names File Which User Should Really Receive The Mail? The /etc/mail/virtusertable file The /etc/aliases File Simple Mailing Lists Using Aliases An Important Note About The /etc/aliases File Sendmail Masquerading Explained A Simple PERL Script To Help Stop SPAM Configuring Your POP Mail Server Installing Your POP Mail Server Configuring Your POP Mail Server How To Configure Your Windows Mail Programs How to handle overlapping email addresses
CHAPTER 23
Monitoring Server Performance (See Chapter 11 for advanced MRTG Topics)
SNMP What is SNMP? Doing SNMP Queries SNMP on a Linux Server SNMP On Other Devices Different SNMP Versions
MRTG What is MRTG? A Typical MRTG Server Bandwidth Graph Download and Install The MRTG Packages MRTG Differences Between Fedora and RedHat 9 Configuring MRTG Configuring Apache To Work With MRTG Using MRTG To Monitor Other Subsystems Troubleshooting MRTG Fedora Core 1 MRTG Errors With Net-SNMP Indexmaker MRTG_LIB Errors With RedHat 9 and 8.0 Precedence Bitwise Error With RedHat 9
Webalizer What Is Webalizer? How To View Your Webalizer Statistics The Webalizer Configuration File Make Webalizer run in Quiet Mode
TOP VMSTAT
CHAPTER 24
Advanced MRTG (CPU, Memory, Disk and TCP Connections Monitoring)
Locating And Viewing The Contents Of MIBs Differences In MIB And MRTG Terminology The CPU And Memory Monitoring MIB The TCP/IP Monitoring MIB Manually Configuring Your MRTG File Parameter Formats Legend Parameters Options Parameters Title Parameters Scaling Parameters Defining The MIB Target Parameters Comparing Two MIB Values Mapping MIBs To The Graph Legends Plotting Only One MIB Value Adding MIB Values Together For a Graph Sample Target: Total CPU Usage Sample Target: Memory Usage Sample Target: Newly Created Connections Sample Target: Total TCP Established Connections Sample Target: Disk Partition Usage Defining Global Variables Implementing Advanced Server Monitoring A Complete Sample Configuration Testing The Configuration Creating A New MRTG Index Page To Include This File Configuring CRON To Use The New MRTG File
CHAPTER 25
Configuring NTP What is NTP? Download & Install The NTP Package The /etc/ntp.conf File How To Get NTP Started Determining If NTP Is Synchronized Properly Configuring Cisco Devices To Use An NTP Server Firewalls and NTP
CHAPTER 26
Network Based Linux Installation Setting Up The Installation Server Creating Boot Diskettes The Network Installation Troubleshooting The Network Installation Automating Installation With Redhat Kickstart
CHAPTER 27
Linux Software RAID RAID Types Before You Start Configuring Software RAID
CHAPTER 28
Expanding Linux Partitions With LVM LVM Terminologies Configuring LVM Devices
CHAPTER 29
Managing Disk Usage With Quotas Setting Up Quotas Other Quota Topics
CHAPTER 30
Remote Disk Access With NFS Installing NFS How To Get NFS Started The /etc/exports File Activating Modifications The Exports File NFS And DNS Configuring The NFS Client Other NFS Considerations
CHAPTER 31
Centralized Linux Logins With NIS Scenario Configuring The NIS Server Configuring The NIS Client Adding New NIS Users Configuring The NIS Client
CHAPTER 32
Centralized Linux Logins With LDAP And RADIUS The LDAP Database Structure Scenario Configuring The LDAP Server Configuring The LDAP Client
CHAPTER 33
Controlling Web Usage With Squid Download and Install The Squid Package The /etc/squid/squid.conf File Configuring Web Browsers To Use Your Squid Server How To Get Squid Started Squid And Firewalls Squid Disk Usage Troubleshooting Squid Other Squid Capabilities
CHAPTER 34
Modifying The Kernel To Improve Performance Download and Install The Kernel Sources Package Creating A Custom Kernel Updating GRUB Creating A Boot Diskette For The New Kernel Updating The Kernel Using RPMs
CHAPTER 35
Basic MySQL Configuration Installing MySQL Starting MySQL A Common Fedora MySQL Startup Error The Location of MySQL Databases Creating a MySQL "root" Account Accessing The MySQL Command Line Creating and Deleting MySQL Databases Recovering Your MySQL Root Password MySQL Granting Privileges to Users MySQL Database Backup MySQL Database Restoration Very Basic MySQL Network Security
BETA TOPIC
Linux VPN Configuration Installing and configuring FreeS/WAN
CHAPTER I Configuring Cisco PIX Firewalls
Network Address Translation (NAT) Accessing the PIX command line Sample PIX Configuration: DSL - DHCP How To Get Static IPs For DSL Cheaply Sample PIX configuration: DSL - Static IPs
CHAPTER 2
Configuring Cisco DSL Routers An Introduction to Network Address Translation (NAT) Introduction to accessing the router command line Sample Configurations Other NAT Topics
CHAPTER 3
Cisco SOHO VPNs Cisco router VPN configuration example Cisco PIX VPN configuration example
APPENDIX I
Cisco Syslog Configurations

Cisco Routers Catalyst CAT Switches running CATOS Cisco Local Director Cisco PIX Filewalls Cisco CSS11000 (Arrowpoints) The Sample Cisco syslog.conf File
Chapter 1
Introduction To Networking = = = = = = = = = = = = = = = = = = = = = = = = = = = = = = = = = = = = = = = = = = =
In This Chapter
Chapter 1 Introduction To Networking
An Introduction To TCP/IP How IP Addresses Are Used To Access Network Devices How Subnet Masks Group IP addresses into Networks Networking Equipment Terminologies Additional Introductory Topics Conclusion (c) Peter Harrison, www.linuxhomenetworking.com
= = = = = = = = = = = = = = = = = = = = = = = = = = = = = = = = = = = = = = = = = = = Installing the Linux operating system is only the first step towards creating a fully functional departmental server or website. Almost all computers are now networked in some way to other devices therefore a basic understanding of networking and issues related to the topic will be essential to feeling comfortable with Linux servers. This introductory chapter will form the foundation on which the following network configuration and troubleshooting chapters will be built. These chapters will then introduce the remaining chapters that cover Linux troubleshooting, general software installation and the configuration of many of the most popular Linux applications. Familiarity with the concepts explained below will help to answer many of the daily questions often posed by coworkers, friends and even yourself. It will help to make the road to Linux mastery less perilous, a road that begins with an understanding of TCP/IP.
An Introduction To TCP/IP
TCP/IP is a universal standard suite of protocols used to provide connectivity between networked devices. It is part of the larger OSI model upon which most data communications is based.
One component of TCP/IP is the Internet Protocol (IP) which is responsible for ensuring that data is transferred between two addresses without being corrupted.

For manageability, the data is usually split into multiple pieces or "packets" each with its own error detection bytes in the control section or "header" of the packet. The remote computer then receives the packets and reassembles the data and checks for errors. It then passes the data to the program that expects to receive it.
How does the computer know what program needs the data? Each IP packet also contains a piece of information in its header called the "type" field. This informs the computer receiving the data about the type of transportation mechanism being used.
The two most popular transportation mechanisms used on the Internet are Transmission Control Protocol (TCP) and User Datagram Protocol (UDP).
TCP is a "Connection Oriented Protocol"
TCP opens up a connection between client and server programs running on separate computers so that multiple and/or sporadic streams of data can be sent over an indefinite period of time. TCP keeps track of the packets sent by giving each one a sequence number with the remote server sending back "acknowledgement" packets confirming correct delivery. Programs that use TCP therefore have a means of detecting connection failures and requesting the retransmission of missing packets. TCP is a good example of a "connection oriented" protocol.
UDP is TCP's "Connectionless" cousin
UDP is a connectionless protocol. Data is sent on a "best effort" basis with the machine that sends the data having no means of verifying whether the data was correctly received by the remote machine. UDP is usually used for applications in which the data sent is not "mission critical". It is also used when data needs to be broadcast to all available servers on a locally attached network where the creation of dozens of TCP connections for a short burst of data is considered resource hungry.
TCP And UDP Use "Ports" To Track Communication
So the data portion of the IP packet contains a TCP or UDP segment sandwiched inside. Only the TCP segment header contains sequence information, but both the UDP and the TCP segment headers track the "port" being used. The source/destination port and the source/destination IP addresses of the client & server computers are then combined to uniquely identify each data flow.
Certain programs are assigned specific ports that are internationally recognized. For example, port 80, is reserved for HTTP web traffic and port 25 is reserved for SMTP email. Ports below 1024 are reserved for privileged system functions, those above 1024 are generally reserved for non system third party applications.
Usually when a connection is made from a client computer requesting data to the server machine that contains the data:
the client selects a random previously unused "source" port greater than 1024 and queries the server on the "destination" port specific to the application. If it is an HTTP request, the client will use a source port of say, 1095 and query the server on port 80 (HTTP)
The server recognizes the port 80 request as an HTTP request and passes on the data to be handled by the web server software. When the web server software replies to the client, it tells the TCP application to respond back to port 1095 of the client using a source port of port 80.

The client keeps track of all its requests to the server's IP address and will recognize that the reply on port 1095 isn't a request initiation for "Nicelink" (See the Bibliography for a link to a TCP/IP port listing), but a response to the initial port 80 HTTP query.
The TCP/IP "Time To Live" Feature Eases Congestion
Each IP packet has a Time to Live (TTL) section that keeps track of the number of network devices the packet has passed through to reach its destination. The server sending the packet sets the TTL value and each network device that the packet passes through then reduces this value by "1". If the TTL value reaches "0", then the network device will discard the packet.
This mechanism helps to ensure that bad routing on the Internet won't cause packets to aimlessly loop around the network without being removed. TTLs therefore help to reduce the clogging of data circuits with unnecessary traffic.
Remember this concept as it will be helpful in understanding the "traceroute" troubleshooting technique outlined in Chapter 3 that covers Network Troubleshooting.
The ICMP Protocol And Its Relationship to TCP/IP
There is another commonly used protocol called the Internet Control Message Protocol (ICMP). It is not strictly a TCP/IP protocol, but TCP/IP based applications use it frequently.
ICMP provides a suite of error, control, and informational messages for use by the operating system. For example, IP packets will occasionally arrive at a server with corrupted data due to any number of reasons including; a bad connection; electrical interference or even misconfiguration. The server will usually detect this by examining the packet and correlating the contents to what it finds in the IP header's error control section. It will then issue an ICMP reject message to the original sending machine that the data should be resent as the original transmission was corrupted.
ICMP also includes echo and echo reply messages used by the Linux "ping" command to confirm network connectivity. ICMP "TTL expired" messages are also sent by network devices back to the originating server whenever the TTL in a packet is decremented to zero. More information on ICMP messages can be found in both the Appendix and the Chapter 3 on network troubleshooting.
How IP Addresses Are Used To Access Network Devices
All TCP/IP enabled devices connected to the Internet have an Internet Protocol (IP) address. Just like a telephone number, it helps to uniquely identify a user of the system.
IP addresses are in reality a string of 32 binary digits or "bits". For ease of use, network engineers often divide these 32 bits into four sets of eight bits (or octets), each representing a number from 0 to 255. Each number is then separated by a "." to create the familiar "dotted decimal" notation. An example of an IP address that follows these rules would be 97.65.25.12.
Note: Chapter 2, that covers Linux specific networking topics, explains how to configure the IP address of your Linux box.

Private IP Addresses
Some groups of IP addresses are reserved for use only in private networks and are not routed over the Internet. These are called "Private IP addresses" and have the following ranges: 10.0.0.0 - 10.255.255.255 172.16.0.0 - 172.31.255.255 192.168.0.0 - 192.168.255.255
Home networking equipment / devices usually are configured in the factory with an IP address in the range 192.168.1.1 to 192.168.1.255.
You may be wondering how devices using private addresses could ever access the Internet if the use of private addresses on the Internet is illegal. The situation gets even more confusing if you consider the fact that hundreds of thousands of office and home networks that use these same addresses. This must cause networking confusion. Don't worry, this problem is overcome by NAT.
The Localhost IP Address
Whether or not your computer has a network interface card it will have a "built in" IP address with which network aware applications can communicate with one another. This IP address is defined as 127.0.0.1 and is frequently referred to as "localhost". This concept is important to understand, and will be revisited in many later chapters.
Network Address Translation (NAT) Makes Private IPs Public
Your router / firewall will frequently be configured to give the impression to other devices on the Internet that all the servers on your Home network have a valid "public" IP address, and not a "private" IP address. This is called network address translation (NAT) and is often also called IP masquerading in the Linux world. There are many good reasons for this, the two most commonly stated are:
No one on the Internet knows your true IP address. NAT protects your home PCs by assigning them IP addresses from "private" IP address space that cannot be routed over the internet. This prevents hackers from directly attacking your home systems as packets sent to the "private" IP will never pass over the Internet.
Hundreds of PCs and servers behind a NAT device can masquerade as a single "public" IP address. This greatly increases the number of devices that can access the Internet without running out of "public" IP addresses.
You can configure NAT to be "one to one" in which you request your ISP to assign you a number of "Public" IP addresses to be used by the Internet facing interface of your firewall and then you pair each of these addresses to a corresponding server on your protected "Private" IP network. You can also use "many to one" NAT in which the firewall maps a single IP address to multiple servers on the network.
As a general rule, you won't be able to access the public NAT IP addresses from servers on your home network. Basic NAT testing will require you to ask a friend to try to connect to your home network from the Internet.

Examples of NAT may be found in the IP masquerade section of Chapter 15 that covers the Linux iptables firewall. Some of the terms mentioned above may be unfamiliar to you but they will be explained in later sections of this chapter.
Port Forwarding With NAT Facilitates Home Based Websites
In a simple home network, all servers accessing the Internet will appear to have the single "public" IP address of the router / firewall because of "many to one" NAT. As the router / firewall is located at the "border crossing" to the Internet it can easily keep track of all the various outbound connections to the Internet by monitoring:
o The IP addresses and TCP ports used by each home based server and mapping it to
o The TCP ports and IP addresses of the Internet servers with which they want to communicate.
This arrangement works well with a single NAT IP trying to initiate connections to many Internet addresses. The reverse isn't true. Connections initiated from the Internet to the "public" IP address of the router / firewall face a problem. As there normally has been no prior connection association between the Internet server and any protected server on the home network, the router / firewall has no way of telling which of the many home PCs behind it should receive the relayed data.
Port forwarding is a method of counteracting this. For example, you can configure your router / firewall to forward TCP port 80 (Web/HTTP) traffic destined to the outside NAT IP to be automatically relayed to a specific server on the inside home network
As you may have guessed, port forwarding is one of the most common methods used to host websites at home with DHCP DSL.
DHCP
According to www.dhcp.org, "The Dynamic Host Configuration Protocol (DHCP) is an Internet protocol for automating the configuration of computers that use TCP/IP. DHCP can be used to automatically assign IP addresses, (and) to deliver TCP/IP stack configuration parameters such as the subnet mask and default router".
The assignment usually occurs when the DHCP configured machine boots up, or regains connectivity to the network. The DHCP client sends out a query requesting a response from a DHCP server on the locally attached network. The DHCP server then replies to the client PC with its assigned IP address, subnet mask, DNS server and default gateway information.
The assignment of the IP address usually expires after a predetermined period of time, at which point the DHCP client and server renegotiate a new IP address from the server's predefined pool of addresses. Configuring firewall rules to accommodate access form machines who receive their IP addresses via DHCP is therefore more difficult as the remote IP address will vary from time to time. You'll probably have to allow access for the entire remote DHCP subnet.
Most home router / firewalls are configured in the factory to be DHCP servers for your home network. You can also make your Linux box into a DHCP server, once it has a fixed IP address.
The most commonly used form of DSL will also assign the outside interface of your router / firewall with a single DHCP provided IP address.

You can check the chapter 2 on Linux networking topics page on how to configure your Linux box to get its IP address via DHCP. You can also look at Chapter 7 on Configuring a DHCP Server, to make your Linux box provide the DHCP addresses for the other machines on your network.
How DNS Links Your IP Address To Your Web Domain
The domain name system (DNS) is a worldwide server network used to help translate easy to remember domain names like www.linuxhomenetworking.com into an IP address that can be used behind the scenes by your computer. Here step by step description of what happens with a DNS lookup.
1. Most home computers will get the IP address of their DNS server via DHCP from their router / firewall.
2. Home router / firewall providing DHCP services often provides its own IP address as the DNS name server address for home computers.
3. The router / firewall will then redirect the DNS queries from your computer to the DNS name server of your Internet service provider (ISP).
4. Your ISP's DNS server will then probably redirect your query to one of the 13 "root" name servers.
5. The root server will then redirect your query to one of the Internet's ".com" DNS name servers which will then redirect the query to the "linuxhomenetworking.com" domain's name server.
6. The "linuxhomenetworking.com" domain name server will then respond with the IP address?for www.linuxhomenetworking.com
As you can imagine, this process can cause a noticeable delay when you are browsing the web. Each server in the chain will store the most frequent DNS name to IP address lookups in a memory cache which helps to speed up the response. Chapter 19 explains how to you can make your Linux box into a caching or regular DNS server for your network or website if your ISP provides you with "fixed" IP addresses. Chapter 20 explains how to configure DNS for a website site housed on a DHCP DSL circuit.
How Subnet Masks Group IP addresses into Networks
Subnet masks are used to tell which part of the IP address represents the network on which the computer is connected (Network portion) and the computer's unique identifier on that network (Host portion).
A simple analogy would be a phone number, such as (808) 225-2468. The (808) represents the area code, the 225-2468 represents the telephone within that area code. Subnet masks allow you to specify how long you want the area code to be (network portion) at the expense of the number of telephones in that are in the area code (Host portion)
Most home networks use a subnet mask of 255.255.255.0. Each "255" means this octet is for the area code (network portion). So if your server has an IP address of 192.168.1.25 and a subnet mask of 255.255.255.0, then the network portion would be 192.168.1 and the server or host would be device #25 on that network.
In all cases, the first IP address in a network is reserved as the network's base address and the last one is reserved for broad cast traffic that is intended to be received by all devices on the

network. In our example 192.168.1.0 would be the network address and 192.168.1.255 would be used for broadcasts. This means you can then use IP addresses from #1 to #254 on your "Private" network.
Calculating The Number of Addresses Assigned to a Subnet
Most office and home networks use networks with 255 IP addresses or less in which the subnet mask start with the numbers "255.255.255". As this is not a pure networking text, I'll not discuss larger networks as that can become complicated, but in cases where less than 255 IP addresses are required a few apply. There are only 7 possible values for the last octet of a subnet mask. These are 0, 192, 128, 224, 240, 248 and 252. You can calculate the number of IP addresses for each of these by subtracting the value from 256.
In many cases the subnet mask isn't referred to by the "dotted decimal" notation, but rather by the actual number of bits in the mask. So for example a mask of 255.255.255.0 may be called a "/24" mask instead. Here is a list of the most commonly used masks in the office or home environment.
Table 1.1: The "Dotted Decimal" And "Slash" Subnet Mask Notations
Dotted Decimal Format Slash Format Available Addresses
255.255.255.0 /24 256
255.255.255.128 /25 192
255.255.255.192 /26 64
255.255.255.224 /27 32
255.255.255.240 /28 28
255.255.255.248 /29 18
255.255.255.252 /30 4
So for example, if you have a subnet mask of 255.255.255.192 then you have 64 IP addresses in your subnet (256 - 192)
Calculating The range Of Addresses On your Network
If someone gives you an IP address of 97.158.253.28 and a subnet mask of 255.255.255.248, how do you determine the network address and the broadcast address, in other words the boundaries of my network? Here are the steps to do this using both a manual and programmed methodology.

Manual Calculation
Take out your pencil and paper, manual calculation can be tricky. Here we go!
7. Subtract the last octet of the subnet mask from 256 to give the number of IP addresses in the subnet. (256 - 248) = 8
8. Divide the last octet of the IP address by the result of step 1, don't bother with the remainder , for example (28/8 = 3). This will give you the theoretical number of subnets of the same size that are below this IP address.
9. Multiply this result by the result of step 1 to get the network address (8 x 3 = 24). Think of it as "This is the third subnet with 8 addresses in it". The Network address is therefore 97.158.253.24
10. The broadcast address is the result of step 3 plus the result of step 1 minus 1. (24 + 8 -1 = 31). Think of it as "The broadcast address is always the network address plus the number of IP addresses in the subnet minus 1". The broadcast address is 97.158.253.31
Let's do this for 192.168.3.56 with a mask of 255.255.255.224
1. 256 - 224 = 32
2. 56 / 32 = 1
3. 32 x 1 = 32. Therefore the network base address is 192.168.3.32
4. 32 + 32 - 1 = 63. Therefore the broadcast address is 192.168.3.63
Let's do this for 10.0.0.75 with a mask of 255.255.255.240
1. 256 - 240 = 16
2. 75 / 16 = 4
3. 16 x 4 = 64. Therefore the network base address is 10.0.0.64
4. 64 + 16 -1 = 79. Therefore the broadcast address is 10.0.0.79
Note: As a rule of thumb, the last octet of your network base address must be divisible by the "256 minus the last octet of your subnet mask" and leave no remainder. If you are sub-netting a large chunk of IP addresses it's always a good idea to lay it out on a spreadsheet to make sure there are no overlapping subnets. Once again, this calculation exercise only works with subnet masks that start with "255.255.255".
Calculation Using A Script
There is a BASH script in the Appendix which will do this for you. Here is a sample of how to use it, just provide the IP address followed by the subnet mask as arguments. It will accept subnet masks in dotted decimal format or "/value" format

[root@bigboy tmp]# ./subnet-calc.sh 216.151.193.92 /28 IP Address : 216.151.193.92 Network Base Address : 216.151.193.80 Broadcast Address : 216.151.193.95 Subnet Mask : 255.255.255.240 Subnet Size : 16 IP Addresses [root@bigboy tmp]#
Subnet Masks for the typical Business DSL Line
If you purchased a DSL service from your Internet service provider (ISP) that gives you fixed IP addresses, then they will most likely provide you with a subnet mask of 255.255.255.248 that defines 8 IP addresses. For example if the ISP provides you with a "public" network address of 97.158.253.24, a subnet mask of 255.255.255.248 and a gateway of 97.158.253.25, then your IP addresses will be:
97.158.253.24 - Network base address 97.158.253.25 - Gateway 97.158.253.26 - Available 97.158.253.27 - Available 97.158.253.28 - Available 97.158.253.29 - Available 97.158.253.30 - Available 97.158.253.31 - Broadcast
Networking Equipment Terminologies
Up to this point we have covered many of the intangible aspects of networking. Now we'll cover concepts related to communications hardware.
Duplex Explained
Duplex refers to the ability of a device to transmit and receive data at the same time.
Full duplex uses separate pairs of wires for transmitting and receiving data so that incoming data flows don't interfere with outgoing data flows.
Half duplex uses the same pairs of wires for transmitting and receiving data. Devices that want to transmit information have to wait their turn until the "coast is clear" at which point they send the data. Error detection and retransmission mechanisms ensure that data reaches the destination correctly even if it were originally garbled by multiple devices starting to transmit at the same time.
Data transfer speeds will be low and error levels will be high if you have a device at one end of a cable set to full duplex, and another device at the other end of the cable set to half duplex.

Most modern network cards can auto-negotiate duplex with the device on the other end of the wire. It is for this reason that duplex settings aren't usually a problem for Linux servers.
Connectivity Using Hub
A hub is a device into which you can connect all devices on a home network so that they can talk together. Hubs physically cross-connect all their ports with one another which causes all traffic sent from a server to the hub to be blurted out to all other servers connected to that hub whether they are the intended recipient or not.
Hubs have none or very little electronics inside and therefore do not regulate traffic. It is possible for multiple servers to speak at once with all of them receiving garbled messages. When this happens the servers try again, after a random time interval, until the message gets through correctly.
It is for these reasons that devices that plug into hubs should be set to half duplex.
Note: Hubs can add a lot of delays to your network due to the message garbling "collisions" and retransmissions. A switch is a much more reliable and predictable alternative, and ones made for the home will often cost only a few dollars more.
Using Switches As A Faster Alternative To Hubs
A switch is also a device into which you can connect all devices on a home network so that they can talk together. Unlike a hub, traffic sent from Server A to Server B will only be received by Server B. The only exception is broadcast traffic which is blurted out to all the servers simultaneously.
Switches regulate traffic, thereby eliminating the possibility of message garbling and providing a more efficient traffic flow.
Devices that plug into switches should be set to full duplex to take full advantage of the dedicated bandwidth coming from each switch port.
Local Area Networks
A Local Area Network (LAN) is a grouping of ports on a hub, switch or tied to a wireless access point (WAP) that can only communicate with each other.
It is possible to have LANs that span multiple switches. Simple home switches can be connected in a chain formation to create a LAN with more ports. This is often called "daisy chaining".
Pure switches provide no access control between servers connected to the same LAN. This is why network administrators group trusted servers having similar roles on the same LAN. They will also ensure that they don't mix servers on different IP networks on the same LAN segment. A good rule of thumb is to have only one network per LAN.
Communication to devices on another LAN requires a router directly connected to both LANs. The router is also capable of filtering traffic passing between the two LANs therefore providing additional security.
Larger, more expensive switches can be configured to assign only certain ports to pre-specified Virtual LANs or (VLANs) chosen by the network administrator. In this case, the switch houses ports on multiple LANs. A router still needs to be connected to each VLAN for inter-network communication.

How Routers Interconnect LANs
As stated before, switches and hubs usually only have servers connected to them that have been configured as being part of the same network.
Routers will connect into multiple switches to allow these networks to communicate with one another.
Routers can also be configured to deny communication between specific servers on different networks. They can also filter traffic based on the TCP port section of each packet. For example, it is possible to deny communication between two servers on different networks that intend to communicate on TCP port 80, and allow all other traffic between them. Routers therefore direct and regulate traffic between separate networks, much like a traffic policeman.
If you intend to route between networks, then for each network, you must reserve an IP address for a router and make sure that the router is directly connected to the LAN associated with that network.
In home networks, routers most frequently provide connectivity to the Internet using network address translation or NAT. In other words routers act as gateways to the wider world and it won't be surprising to learn that routers are frequently referred to as "gateways".
How Simple Routing Works
In the broader networking sense, a "route" refers to the path data takes to traverse from its source to its destination. Each router along the way may also be referred to as a hop.
Usually when we speak about a route on a Linux box, we are referring to the IP address of the first hop needed to reach the desired destination network. It is assumed that this first hop will know how to automatically relay the packet.
Routers are designed to exchange routing information dynamically, and can therefore intelligently redirect traffic to bypass failed network links. Home Linux boxes frequently don't run a dynamic routing protocol and therefore rely on "static" routes issued by the system administrator at the command line or in configuration files to determine the next hop to all desired networks.
Chapter 2, which covers Linux network topics, shows how to add static routes to your Linux box and also how you can convert it into a simple router.
Default Gateways Are The Routers Of Last Resort
A default gateway is the router that is used when no alternative devices can be found to relay the traffic. They are often called "routers of last resort".
Say for example you have two routers R1 and R2. R1 is connected to both your SOHO home network (192.168.1.0) and the internet. R2 is connected to both your SOHO home network (192.168.1.0) and your credit card transaction payment the network (10.46.123.0) which is also connected to other corporate networks with addresses starting with 10.X.X.X
You could put a route on your SOHO servers that states:
o Go to network 10.0.0.0 255.0.0.0 via router R2

o Go to everything else via router R1. R1 therefore would be considered your default gateway
For most home networks, your default gateway would be the router / firewall connected to the Internet.
Chapter 2, which covers Linux network topics, shows how to configure the default gateway on your Linux box.
Firewalls Help Provide a Secure Routing Environment
Firewalls can be viewed as routers with more enhanced abilities to restrict traffic, not just by port and IP address like routers do. Specifically, firewalls can detect malicious attempts to subvert the TCP/IP protocol. A short list of capabilities includes:
o Throttling traffic to a server when too many unfulfilled connections are made to it
o Restricting traffic being sent to obviously bogus IP addresses
o Providing network address translation or NAT
Routers are designed to make packets flow as quickly as possible with the minimum amount of inspection. Firewalls are used as close to the source or target of data communication to try to ensure the data is hasn't been subverted.
Firewalls can often create an encrypted data path between two "Private" networks across the internet providing secure communication with a greatly reduced chance of eavesdropping. These communication channels are called Virtual Private Networks or VPNs and are frequently used to connect branch offices to the corporate headquarters and also to allow sales representatives to get access to sensitive pricing information when traveling from town to town.
Network Interface Cards
Your network interface card is frequently called a NIC. Currently, the most common types of NIC used in the home are Ethernet and wireless Ethernet cards.
The meaning of the NIC "Link" Light
The link light signifies that the NIC card has successfully detected a device on the other end of the cable. This would indicate that you are using the correct type of cable and that the duplex has been negotiated correctly between the devices at both ends.
What Is A MAC Address?
The media access control address (MAC) can be equated to the serial number of the NIC. Every IP packet is sent out of your NIC wrapped inside an Ethernet frame which uses MAC addresses to direct traffic on your locally attached network.
MAC addresses therefore only have significance on the locally attached network. As the packet hops across the Internet, its source/destination IP address stays the same, but the MAC addresses are reassigned by each router on the way using a process called ARP.

How ARP Maps The MAC Address To Your IP Address
The Address Resolution Protocol (ARP) is used to map MAC addresses to network IP addresses. When a server needs to communicate with another server it does the following steps:
1. The server first checks its routing table to see which router provides the next hop to the destination network.
2. If there is a valid router, let's say with an IP address of 192.168.1.1, the server checks it's ARP table to see whether it has the MAC address of the router's NIC. You could very loosely view this as the server trying to find the Ethernet serial number of the next hop router on the local network, thereby ensuring that the packet is sent to the correct device.
3. If there is an ARP entry, the server sends the IP packet to its NIC and tells the NIC to encapsulate the packet in a frame destined for the MAC address of the router.
4. If there is no ARP entry, the server will issue an ARP request asking that router 192.168.1.1 respond with its MAC address so that the delivery can be made. Once a reply is received, the packet is sent and the ARP table is subsequently updated with the new MAC address.
5. As each router in the path receives the packet, it will pluck the IP packet out of the Ethernet frame, leaving the MAC information behind. It will then inspect the destination IP address in the packet and use its routing table to determine the IP address of the next router on the path to this destination.
6. The router will then use the ARP-ing process to get the MAC address of this next hop router. It will then re-encapsulate the packet in an Ethernet frame with the new MAC address and will then send the frame to the next hop router. This relaying process continues until the packet reaches the target computer.
7. If the target server is on the same network as the source server, a similar process occurs. The ARP table is queried. If no entry is available, an ARP request is made asking the target server for its MAC address. Once a reply is received, the packet is sent and the ARP table is subsequently updated with the new MAC address.
8. The server will not send the data to its intended destination unless it has an entry in its ARP table for the next hop. If it doesn't, the application needing to communicate will issue a timeout or "time exceeded" error.
9. As can be expected, the ARP table only contains the MAC addresses of devices on the locally connected network. ARP entries are not permanent and will be erased after a fixed period of time depending on the operating system used.
Chapter 2, which covers Linux network topics, shows how to see your ARP table and the MAC addresses of your server's NICs.
The Two Broad Types Of Networking Equipment
There are two main types of networking equipment. Ones that are intended to act as the primary communications path and the other which act as the source or destination of the transmitted data, they are called DCEs and DTEs respectively.

Data Terminal Equipment
Data Terminal Equipment (DTE) is a terminology originally intended for computer terminals located at remote offices or departments that were directly connected modems. The terminals would have no computing power and only functioned as a screen / keyboard combination for data processing.
Nowadays most PCs have their COM and Ethernet ports configured as if they were going to be connected to a modem or other type of purely networking oriented equipment.
Data Communications Equipment
DCE is the acronym for Data Communications or Data Circuit-Terminating Equipment. Modems and other purely networking oriented equipment are usually referred to as DCEs.
Using Straight Through / Crossover Cables To Connect DTEs And DCEs
When a DCE is connected to a DTE, you will need a "straight-through" type cable. DCEs connected to DCEs or DTEs connected to DTEs will always require "crossover" cables. These are the terminologies generally used with Ethernet cables.
The terminologies can be different for cables used to connect serial ports together. When connecting a PC's COM port (DTE) to a modem (DCE) the "straight-through" cable is frequently called a "modem" cable. When connecting two PCs (DTE) together via their COM ports the "crossover" cable is often referred to as a "null modem" cable.
Unfortunately, some manufacturers configure the Ethernet ports of their networking equipment to be either of the DTE or the DCE type, so confusion can arise when selecting a cable. If you fail to get a "link" light when connecting your Ethernet devices together, try using the other type of cable.
A "straight-through" Ethernet cable is easy to identify. Hold the connectors side by side, pointing in the same direction with the clips facing away from you. The color of the wire in position #1 on connector #1 should be the same as that of position #1 on connector #2. The same would go for positions #2 to #8, ie. the same color for corresponding wires on each end. A cross over cable would have them mixed up.
Here is a good rule of thumb: PC to PC = crossover cable; PC to switch = straight through cable
Additional Introductory Topics
The last few topics of this chapter may not appear to be directly related to networking, but they cover Linux "help" which you'll use extensively and the File Transfer Protocol package which allows you to download all the software you need to get your Linux server operational as quickly as possible.
The File Transfer Protocol
The File Transfer Protocol (FTP) is one of the most popular applications used to copy files between computers via a network connection. Knowledge of FTP is especially important as is one of the primary method of downloading software for Linux systems.

There are a number of commercially available GUI based clients you can load on your PC to do this, such as WSFTP and CuteFTP. You can also use FTP from the command line as shown in Chapter 5 on RPM software installation.
From the remote user's perspective, there are two types of FTP. The first is "regular" FTP which is used primarily to allow specific users to download files to their systems. The remote FTP server will prompt you for a specific username and password to gain access to the data.
The second method, "anonymous" FTP is used primarily to allow any remote user to download files to their systems. The remote FTP server will prompt you for a username, at which point the user will type "anonymous" with the password being any valid email address.
From the systems administrator's perspective, there are another two categories. These are "active" and "passive" FTP which is covered in more detail in the Chapter 16.
It is good to remember that FTP isn't very secure as usernames, passwords and data are sent across the network unencrypted. More secure forms such as SFTP (Secure FTP) and SCP (Secure Copy) are available as a part of the Secure Shell package covered in Chapter 18 that is normally installed by default with Fedora.
Linux Help
Linux help files are accessed using the "man" or manual pages. From the command line you issue the man command followed by the Linux command or file you wish to get information about. If you want to get information on the ssh command, then you'd use the command "man ssh".
[root@bigboy tmp]# man ssh
If you want to search all the man pages for a keyword, then use the man command with the -k switch, for example "man -k ssh" which will give a list of all the man pages that contain the word "ssh".
[root@bigboy tmp]# man -k ssh
Linux help can sometimes be cryptic, but with a little practice the man pages can become your friend.
Conclusion
Congratulations! Now that you have an understanding of basic networking, it's time read Chapter 2 to learn how to configure Linux networking.
Feel free to return to this chapter whenever you need to refresh your memory on these foundation concepts.

Chapter 2
Linux Networking = = = = = = = = = = = = = = = = = = = = = = = = = = = = = = = = = = = = = = = = = = = In This Chapter Chapter 2
Linux Networking How To Configure Your NIC's IP Address How To Activate / Shutdown Your NIC How To Change Your Default Gateway How Configure Two Gateways How To Delete A Route How To View Your Current Routing Table How To Change The Duplex Setting Of Your NIC How To Convert Your Linux Server Into A Router Configuring Your /etc/hosts File Conclusion (c) Peter Harrison, www.linuxhomenetworking.com
= = = = = = = = = = = = = = = = = = = = = = = = = = = = = = = = = = = = = = = = = = =
Now that you have a firm grasp of many of the most commonly used networking concepts, it is time to apply them to the configuration of your server. Some of these activities are automatically covered during a Linux installation, but you will often find yourself having to know how modify these initial settings whenever you need to move your server to another network, add a new network interface card or use an alternative means of connecting to the Internet.
In Chapter 1 we started with an explanation of TCP/IP so we'll start this Linux networking chapter with a discussion on how to configure the IP address of your server.
How To Configure Your NIC's IP Address
It is very important be very familiar with all the steps needed to configure IP addresses on a NIC card. Website shopping cart applications frequently need an additional IP address dedicated to them, you may need to add an secondary NIC interface to your server to handle data backups and last but not least, you may just to play around with the server to test your skills.
This section will show you how to do the most common server IP activities with the least amount of headaches.
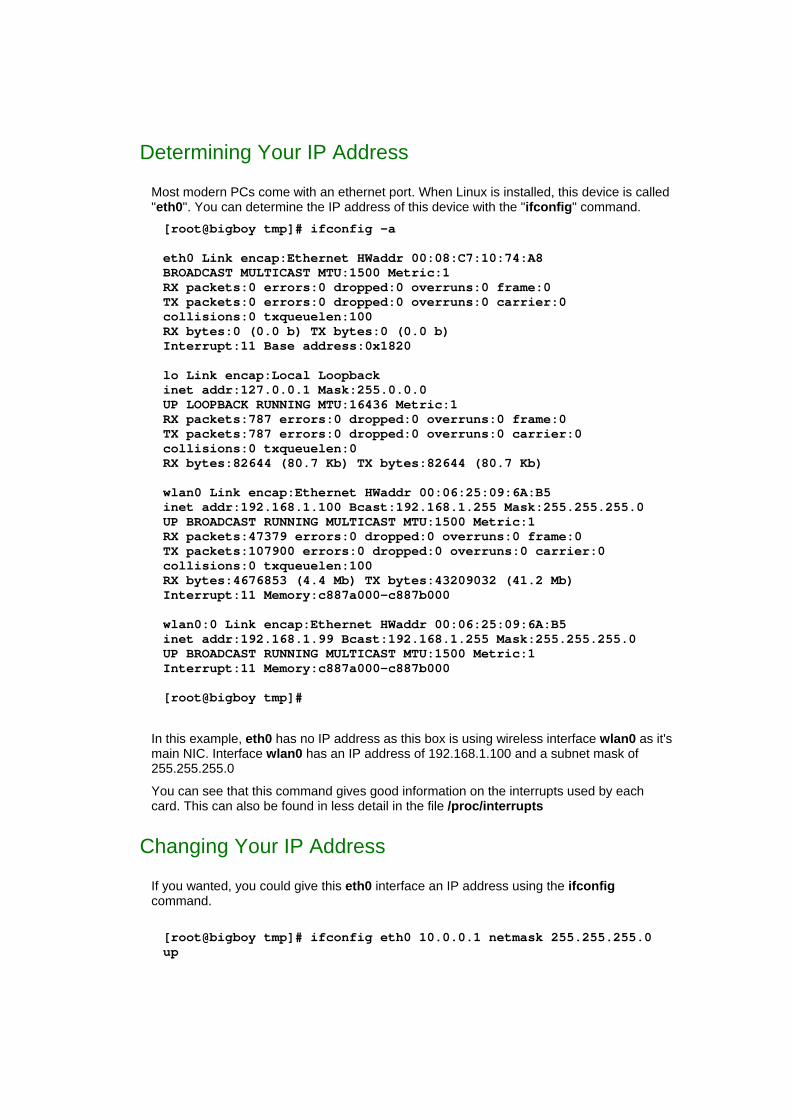
Determining Your IP Address
Most modern PCs come with an ethernet port. When Linux is installed, this device is called "eth0". You can determine the IP address of this device with the "ifconfig" command. [root@bigboy tmp]# ifconfig -a eth0 Link encap:Ethernet HWaddr 00:08:C7:10:74:A8 BROADCAST MULTICAST MTU:1500 Metric:1 RX packets:0 errors:0 dropped:0 overruns:0 frame:0 TX packets:0 errors:0 dropped:0 overruns:0 carrier:0 collisions:0 txqueuelen:100 RX bytes:0 (0.0 b) TX bytes:0 (0.0 b) Interrupt:11 Base address:0x1820 lo Link encap:Local Loopback inet addr:127.0.0.1 Mask:255.0.0.0 UP LOOPBACK RUNNING MTU:16436 Metric:1 RX packets:787 errors:0 dropped:0 overruns:0 frame:0 TX packets:787 errors:0 dropped:0 overruns:0 carrier:0 collisions:0 txqueuelen:0 RX bytes:82644 (80.7 Kb) TX bytes:82644 (80.7 Kb) wlan0 Link encap:Ethernet HWaddr 00:06:25:09:6A:B5 inet addr:192.168.1.100 Bcast:192.168.1.255 Mask:255.255.255.0 UP BROADCAST RUNNING MULTICAST MTU:1500 Metric:1 RX packets:47379 errors:0 dropped:0 overruns:0 frame:0 TX packets:107900 errors:0 dropped:0 overruns:0 carrier:0 collisions:0 txqueuelen:100 RX bytes:4676853 (4.4 Mb) TX bytes:43209032 (41.2 Mb) Interrupt:11 Memory:c887a000-c887b000 wlan0:0 Link encap:Ethernet HWaddr 00:06:25:09:6A:B5 inet addr:192.168.1.99 Bcast:192.168.1.255 Mask:255.255.255.0 UP BROADCAST RUNNING MULTICAST MTU:1500 Metric:1 Interrupt:11 Memory:c887a000-c887b000 [root@bigboy tmp]#
In this example, eth0 has no IP address as this box is using wireless interface wlan0 as it's main NIC. Interface wlan0 has an IP address of 192.168.1.100 and a subnet mask of 255.255.255.0
You can see that this command gives good information on the interrupts used by each card. This can also be found in less detail in the file /proc/interrupts
Changing Your IP Address
If you wanted, you could give this eth0 interface an IP address using the ifconfig command. [root@bigboy tmp]# ifconfig eth0 10.0.0.1 netmask 255.255.255.0 up

The "up" at the end of the command activates the interface. To make this permanent each time you boot up you'll have to add this command in your /etc/rc.d/rc.local file.
Linux also makes life a little easier with interface configuration files located in the /etc/sysconfig/network-scripts directory. Interface eth0 has a file called ifcfg-eth0, eth1 uses ifcfg-eth1 ... etc. You can place your IP address information in these files which are then used to auto-configure your NICs when Linux boots. See figure 2-1 for two samples for interface eth0, one assumes the interface has a fixed IP address, the other assumes it requires an IP address assignment using DHCP.
Figure 2-1 network-scripts File Formats
Fixed IP Address
[root@bigboy tmp]# cd /etc/sysconfig/network-scripts [root@bigboy network-scripts]# more ifcfg-eth0 DEVICE=eth0 IPADDR=192.168.1.100 NETMASK=255.255.255.0 ONBOOT=yes # # The following settings are optional # BROADCAST=192.168.1.255 NETWORK=192.168.1.0 [root@bigboy network-scripts]#
Getting the IP Address using DHCP
[root@bigboy tmp]# cd /etc/sysconfig/network-scripts [root@bigboy network-scripts]# more ifcfg-eth0 DEVICE=eth0 BOOTPROTO=dhcp ONBOOT=yes [root@bigboy network-scripts]#
As you can see eth0 will be activated on booting as the parameter ONBOOT has the value "yes" and not "no". You can read more about netmasks and DHCP on the introduction to networking chapter.
The default RedHat/Fedora installation will include the "broadcast" and "network" options in the network-scripts file. These are usually optional.

Once you change the values in the configuration files for the NIC you'll have to deactivate and activate it for the modifications to take effect. The ifdown and ifup commands can be used to do this. [root@bigboy network-scripts]# ifdown eth0 [root@bigboy network-scripts]# ifup eth0
How DHCP Affects The DNS Server You Use
Your DHCP server not only supplies the IP address your Linux box should use, but also the desired DNS servers. Make sure your /etc/resolv.conf file has the "servers" configuration lines commented out to prevent any conflicts.
Multiple IP Addresses On A Single NIC
In the previous "determining your IP address" section you may have noticed that there were two wireless interfaces. One's named wlan0 and the other wlan0:0. Interface wlan0:0 is actually a "child" of interface wlan0, a virtual sub-interface also known as an "IP alias". IP aliasing is one of the most common ways of creating multiple IP addresses associated with a single NIC. Aliases have the name format "parent-interface-name:X", where "X" is the sub-interface number of your choice.
The process for creating an IP alias is very similar to the steps outlined for the real interface in the previous "changing your IP address" section.
1. First ensure the "parent" real interface exists
2. Verify that no other IP aliases with the same name exists with the name you plan to use. In this we want to create interface wlan0:0
3. Create the virtual interface with the ifconfig command [root@bigboy tmp]# ifconfig wlan0:0 192.168.1.99 \ netmask 255.255.255.0 up
4. You should also create a /etc/sysconfig/network-scripts/ifcfg-wlan0:0 file so that the aliases will all be managed automatically with the ifup and ifdown commands. Here is a sample:
DEVICE=wlan0:0 ONBOOT=yes BOOTPROTO=static IPADDR=192.168.1.99 NETMASK=255.255.255.0
After completing these four simple steps you should be able to ping the new IP alias from other servers on your network.

IP Address Assignment For A Direct DSL Connection
If you are using a DSL connection with fixed or "static" IP addresses, then the configuration steps are the same as those outlined above. You plug your ethernet interface into the DSL modem, configure it with the IP address, subnet mask, broadcast address and gateway information provided by your ISP and you should have connectivity once you restart your interface. Remember that you may also need to configure your DNS server correctly.
If you are using a DSL connection with a DHCP or "dynamic" IP address assignment, then the process is different. Your ISP will provide you with a PPPoE "username" and "password" which will allow your computer to login transparently to the Internet each time it boots up. Fedora Linux installs the rp-pppoe RPM software package required to support this.
Downloading and installing RPMs isn't hard. If you need a refresher, the chapter on RPMs covers how to do this in detail. When searching for the file, remember that the PPPoE RPM's filename usually starts with the word "rp-pppoe" followed by a version number like this: rp-pppoe-3.5-8.i386.rpm.
After installing the RPM, you'll need to go through a number of steps to complete the connection. The PPPOE configuration will create a software based virtual interface named ppp0 that will use the physical Internet interface eth0 for connectivity. Here's what you need to do:
1. Make a backup copy of your ifcfg-eth0 file.
[root@bigboy tmp]# [root@bigboy tmp]# cd /etc/sysconfig/network-scripts/ [root@bigboy network-scripts]# ls ifcfg-eth0 ifcfg-eth0 [root@bigboy network-scripts]# cp ifcfg-eth0 DISABLED.ifcfg-eth0
2. Edit your ifcfg-eth0 file to have no IP information and also to be deactivated on boot time.
DEVICE=eth0 ONBOOT=no
3. Shutdown your eth0 interface. [root@bigboy network-scripts]# ifdown eth0 [root@bigboy network-scripts]#
4. Run the adsl-setup configuration script
[root@bigboy network-scripts]# adsl-setup
It will prompt you for your ISP username, the interface to be used (eth0) and whether you want to the connection to stay up indefinitely. We'll use defaults wherever possible.

Welcome to the ADSL client setup. First, I will run some checks on your system to make sure the PPPoE client is installed properly... LOGIN NAME Enter your Login Name (default root): bigboy-login@isp INTERFACE Enter the Ethernet interface connected to the ADSL modem For Solaris, this is likely to be something like /dev/hme0. For Linux, it will be ethX, where 'X' is a number. (default eth0): Do you want the link to come up on demand, or stay up continuously? If you want it to come up on demand, enter the idle time in seconds after which the link should be dropped. If you want the link to stay up permanently, enter 'no' (two letters, lower-case.) NOTE: Demand-activated links do not interact well with dynamic IP addresses. You may have some problems with demand-activated links. Enter the demand value (default no):
It will then prompt you for your DNS server information. This step will edit your /etc/resolv.conf file. If you're running BIND on your server in a caching DNS mode then you may want to leave this option blank. If you want your ISP to automatically provide the IP address of its DNS server then enter the word "server".
DNS Please enter the IP address of your ISP's primary DNS server. If your ISP claims that 'the server will provide dynamic DNS addresses', enter 'server' (all lower-case) here. If you just press enter, I will assume you know what you are doing and not modify your DNS setup. Enter the DNS information here:
The script will then prompt you for your ISP password PASSWORD Please enter your Password: Please re-enter your Password:
Then it will ask whether you want regular users (not superuser "root") to be able to activate/deactivate the new ppp0 interface. This may be required if non "root" members of your family or home office need to get access to the Internet.
USERCTRL

Please enter 'yes' (two letters, lower-case.) if you want to allow normal user to start or stop DSL connection (default yes):
The rp-pppoe package has two sample ipchains firewall scripts located in the /etc/ppp directory named firewall-standalone and firewall-masq. They are very basic and don't cover rules to make your Linux box a web server, DNS server nor mail server. I'd recommend selecting "none" and using a variant of the basic script samples in the firewall chapter, or the more comprehensive one found in the Appendix.
FIREWALLING Please choose the firewall rules to use. Note that these rules are very basic. You are strongly encouraged to use a more sophisticated firewall setup; however, these will provide basic security. If you are running any servers on your machine, you must choose 'NONE' and set up firewalling yourself. Otherwise, the firewall rules will deny access to all standard servers like Web, e-mail, ftp, etc. If you are using SSH, the rules will block outgoing SSH connections which allocate a privileged source port. The firewall choices are: 0 - NONE: This script will not set any firewall rules. You are responsible for ensuring the security of your machine. You are STRONGLY recommended to use some kind of firewall rules. 1 - STANDALONE: Appropriate for a basic stand-alone web-surfing workstation 2 - MASQUERADE: Appropriate for a machine acting as an Internet gateway for a LAN Choose a type of firewall (0-2): 0
You'll then be asked whether you want the connection to be activated upon booting. Most people would say "yes".
Start this connection at boot time Do you want to start this connection at boot time? Please enter no or yes (default no):yes
Just before exiting, you'll get a summary of the parameters you entered and the relevant configuration files will be updated to reflect your choices when you accept them.
** Summary of what you entered ** Ethernet Interface: eth0 User name: bigboy-login@isp Activate-on-demand: No DNS: Do not adjust
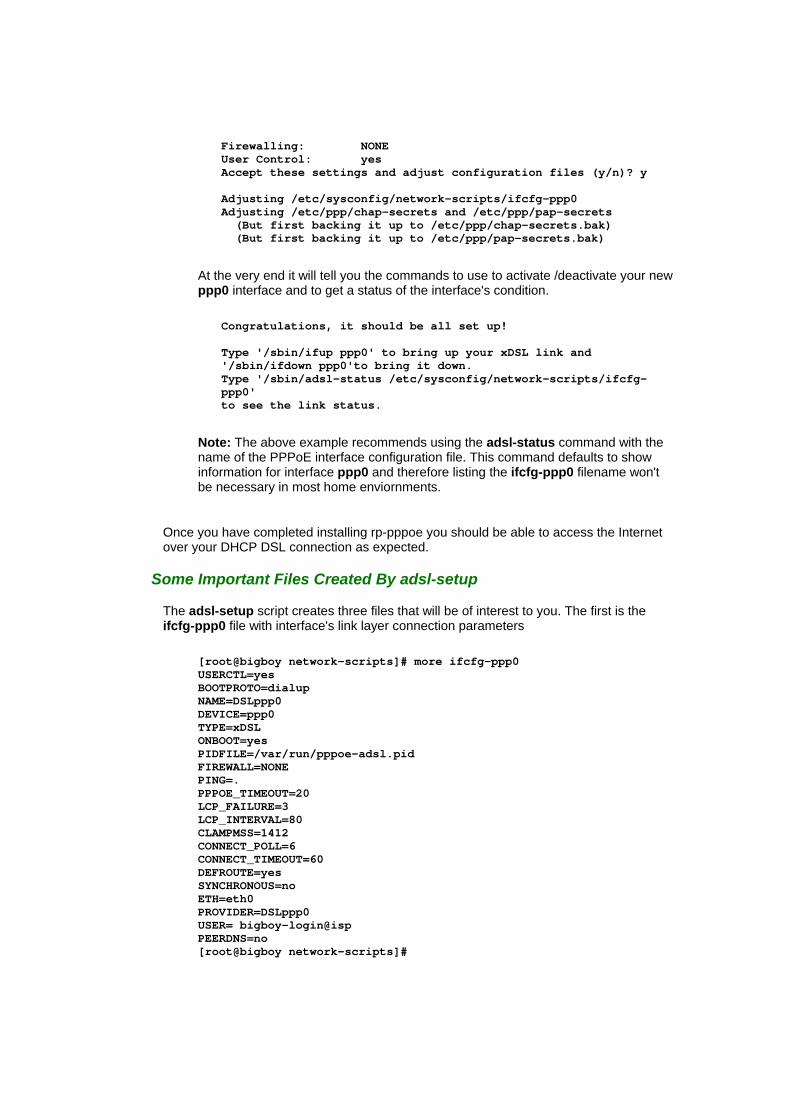
Firewalling: NONE User Control: yes Accept these settings and adjust configuration files (y/n)? y Adjusting /etc/sysconfig/network-scripts/ifcfg-ppp0 Adjusting /etc/ppp/chap-secrets and /etc/ppp/pap-secrets (But first backing it up to /etc/ppp/chap-secrets.bak) (But first backing it up to /etc/ppp/pap-secrets.bak)
At the very end it will tell you the commands to use to activate /deactivate your new ppp0 interface and to get a status of the interface's condition.
Congratulations, it should be all set up! Type '/sbin/ifup ppp0' to bring up your xDSL link and '/sbin/ifdown ppp0'to bring it down. Type '/sbin/adsl-status /etc/sysconfig/network-scripts/ifcfg-ppp0' to see the link status.
Note: The above example recommends using the adsl-status command with the name of the PPPoE interface configuration file. This command defaults to show information for interface ppp0 and therefore listing the ifcfg-ppp0 filename won't be necessary in most home enviornments.
Once you have completed installing rp-pppoe you should be able to access the Internet over your DHCP DSL connection as expected.
Some Important Files Created By adsl-setup
The adsl-setup script creates three files that will be of interest to you. The first is the ifcfg-ppp0 file with interface's link layer connection parameters
[root@bigboy network-scripts]# more ifcfg-ppp0 USERCTL=yes BOOTPROTO=dialup NAME=DSLppp0 DEVICE=ppp0 TYPE=xDSL ONBOOT=yes PIDFILE=/var/run/pppoe-adsl.pid FIREWALL=NONE PING=. PPPOE_TIMEOUT=20 LCP_FAILURE=3 LCP_INTERVAL=80 CLAMPMSS=1412 CONNECT_POLL=6 CONNECT_TIMEOUT=60 DEFROUTE=yes SYNCHRONOUS=no ETH=eth0 PROVIDER=DSLppp0 USER= bigboy-login@isp PEERDNS=no [root@bigboy network-scripts]#

> The others are the duplicate /etc/ppp/pap-secrets and /etc/ppp/chap-secrets files with the username and password needed to login to your ISP. [root@bigboy network-scripts]# more /etc/ppp/pap-secrets # Secrets for authentication using PAP # client server? secret IP addresses "bigboy-login@isp" * "password" [root@bigboy network-scripts]#
Simple Troubleshooting
You can run the adsl-status command to determine the condition of your connection. In this case the package has been installed but the interface hasn't been activated.
[root@bigboy tmp]# adsl-status Note: You have enabled demand-connection; adsl-status may be inaccurate. adsl-status: Link is attached to ppp0, but ppp0 is down [root@bigboy tmp]#
After activation, the interface appears to work correctly.
[root@bigboy tmp]# ifup ppp0 [root@bigboy tmp]# adsl-status adsl-status: Link is up and running on interface ppp0 ppp0: flags=8051<UP,POINTOPOINT,RUNNING,MULTICAST> mtu 1462 inet ... ... ... [root@bigboy tmp]#
For further troubleshooting information you can visit the website of rp-ppoe at Roaring Penguin (www.roaringpenguin.com). There are some good tips there on how to avoid problems with VPN clients.
IP Address Assignment For A Cable Modem Connection
Cable modems use DHCP to get their IP addresses so you can configure your server's ethernet interface accordingly.
How To Activate / Shutdown Your NIC
The ifup and ifdown commands can be used respectively to activate and deactivate a NIC interface. You must have an ifcfg file in the /etc/sysconfig/network-scripts directory these commands to work. Here is an example for interface eth0:
[root@bigboy tmp]# ifdown eth0 [root@bigboy tmp]# ifup eth0

How To Change Your Default Gateway
This can be done with a simple command. This example uses a newly installed wireless interface called wlan0, most PCs would be using the standard ethernet interface eth0. [root@bigboy tmp]# route add default gw 192.168.1.1 wlan0
In this case, make sure that the router / firewall with IP address 192.168.1.1 is connected to the same network as interface wlan0 !
Once done, you'll need to update your /etc/sysconfig/network file to reflect the change. This file is used to configure your default gateway each time Linux boots. NETWORKING=yes HOSTNAME=bigboy GATEWAY=192.168.1.1
Some people don't bother with this step and just place the "route add" command in the file /etc/rc.d/rc.local
How Configure Two Gateways
Some networks may have multiple router / firewalls providing connectivity. Here's a typical scenario:
> You have one router providing access to the Internet which you'd like to have as your default gateway (See the default gateway example above)
> You also have another router providing access to your corporate network using addresses in the range 10.0.0.0 to 10.255.255.255. Let's assume that this router has an IP address of 192.168.1.254
The Linux box used in this example uses interface wlan0 for its Internet connectivity. You may be most likely using interface eth0, please adjust your steps accordingly.
Add the new route as follows: route add -net 10.0.0.0 netmask 255.0.0.0 gw 192.168.1.254 wlan0
The file etc/sysconfig/static-routes will also have to updated so that the route is reinstated when you reboot. Here is a sample.
wlan0 net 10.0.0.0 netmask 255.0.0.0 gw 192.168.1.254
Some people don't bother with this step and just place the "route add" command in the file /etc/rc.d/rc.local. A more complicated /etc/sysconfig/static-routes file is located in a following section.

How To Delete A Route
Here's how to delete the routes added in the previous section. route del -net 10.0.0.0 netmask 255.0.0.0 gw 192.168.1.254 wlan0
The file etc/sysconfig/static-routes will also have to be updated so that when you reboot the server will not reinsert the route. Delete the line that reads:
wlan0 net 10.0.0.0 netmask 255.0.0.0 gw 192.168.1.254
How To View Your Current Routing Table
The netstat -nr command will provide the contents of the touting table. Networks with a gateway of 0.0.0.0 are usually directly connected to the interface. As no gateway is needed to reach your own directly connected interface then an address of 0.0.0.0 seems appropriate.
> In this example there are two gateways, the default and one to 255.255.255.255 which is usually added on DHCP servers. Server bigboy is a DHCP server in this case. [root@bigboy tmp]# netstat -nr Kernel IP routing table Destination Gateway Genmask Flags MSS Window irtt Iface 255.255.255.255 0.0.0.0 255.255.255.255 UH 40 0 0 wlan0 192.168.1.0 0.0.0.0 255.255.255.0 U 40 0 0 wlan0 127.0.0.0 0.0.0.0 255.0.0.0 U 40 0 0 lo 0.0.0.0 192.168.1.1 0.0.0.0 UG 40 0 0 wlan0 [root@bigboy tmp]#
> In this example, there are multiple gateways handling traffic destined for different networks
on different interfaces. [root@bigboy tmp]# netstat -nr Kernel IP routing table Destination Gateway Genmask Flags MSS Window irtt Iface 172.16.68.64 172.16.69.193 255.255.255.224 UG 40 0 0 eth1 172.16.11.96 172.16.69.193 255.255.255.224 UG 40 0 0 eth1 172.16.68.32 172.16.69.193 255.255.255.224 UG 40 0 0 eth1 172.16.67.0 172.16.67.135 255.255.255.224 UG

40 0 0 eth0 172.16.69.192 0.0.0.0 255.255.255.192 U 40 0 0 eth1 172.16.67.128 0.0.0.0 255.255.255.128 U 40 0 0 eth0 172.160.0 172.16.67.135 255.255.0.0 UG 40 0 0 eth0 172.16.0.0 172.16.67.131 255.240.0.0 UG 40 0 0 eth0 127.0.0.0 0.0.0.0 255.0.0.0 U 40 0 0 lo 0.0.0.0 172.16.69.193 0.0.0.0 UG 40 0 0 eth1 [root@bigboy tmp]#
> Here is what the static routes file looks like for this multi-homed (Multiple NICs) server
[root@bigboy tmp]# more /etc/sysconfig/static-routes eth0 net 172.16.0.0 netmask 255.240.0.0 gw 172.16.67.131 eth0 net 172.160.0 netmask 255.255.0.0 gw 172.16.67.135 eth0 net 172.16.67.0 netmask 255.255.255.224 gw 172.16.67.135 eth1 net 172.16.68.64 netmask 255.255.255.224 gw 172.16.69.193 eth1 net 172.16.68.32 netmask 255.255.255.224 gw 172.16.69.193 eth1 net 172.16.11.96 netmask 255.255.255.224 gw 172.16.69.193 [root@bigboy tmp]#
How To Change The Duplex Setting Of Your NIC
There is no better Linux investment than the purchase of a fully Linux compatible NIC card. Most Linux vendors will have a list of compatible hardware on their websites, read this carefully before you start hooking up you machine to the network. If you can't find any of the desired models in your local computer store, then a model in the same family or series should be sufficient. Most cards will work, but only the fully compatible ones will provide you with error free, consistent throughput.
My experience has been that Ethernet NICs built into motherboards (onboard NICs) frequently don't negotiate port speed and duplex correctly. An onboard NIC may be adequate for a home system, but you should invest in a compatible card when using Linux in a SOHO environment.
You can manage the duplex and speed settings of your NIC with the mii-tool command. It is best to use this command with compatible hardware.
In the example below, we can see the output of the command verbose "-v" mode. In this case, negotiation was OK, with the NIC selecting 100Mbps, full duplex mode (FD).
[root@bigboy tmp]# mii-tool -v eth1: negotiated 100baseTx-FD, link ok product info: vendor 00:10:18, model 33 rev 2 basic mode: autonegotiation enabled basic status: autonegotiation complete, link ok capabilities: 100baseTx-FD 100baseTx-HD 10baseT-FD 10baseT-HD advertising: 100baseTx-FD 100baseTx-HD 10baseT-FD 10baseT-HD

link partner: 100baseTx-FD 100baseTx-HD 10baseT-FD 10baseT-HD flow-control [root@bigboy tmp]#
You can set your NIC to force itself to a particular speed and duplex by using the "-F" switch with any of the following options: 100baseTx-FD, 100baseTx-HD, 10baseT-FD, or 10baseT-HD. Remember that you could lose all network connectivity to your server if you force your NIC to a particular speed/duplex that doesn't match that of your switch.
[root@bigboy tmp]# mii-tool -F 100baseTx-FD eth0
I have seen where NICs appear to work with failed negotiation, but this is usually accompanied by many "collision" type errors being seen on the NIC when using the ifconfig -a command and only marginal performance. The causes for this could include an incompatible NIC, incorrect settings on your switch port or a bad cable.
How To Convert Your Linux Server Into A Router
Router / firewall appliances that provide basic Internet connectivity for a small office or home network are becoming more affordable every day, but when budgets are tight you may seriously want to consider modifying an existing Linux server to do the job.
Details on how to configure Linux firewall security are covered in Chapter 15, but you'll need to understand how to activate routing through the firewall before it can become a functioning networking device.
Configuring IP Forwarding
For your Linux server to become a router, you have to enable packet forwarding. In simple terms packet forwarding lets packets flow through the Linux box from one network to another.
The configuration parameter to activate this is found in the file /etc/sysctl.conf. Remove the "#" from the line related to packet forwarding.
Before # Disables packet forwarding #net.ipv4.ip_forward=1
After # Enables packet forwarding net.ipv4.ip_forward=1
This will only enable it when you reboot at which time Linux will create a file in one of the subdirectories of the special RAM memory based /proc filesystem. To activate the feature
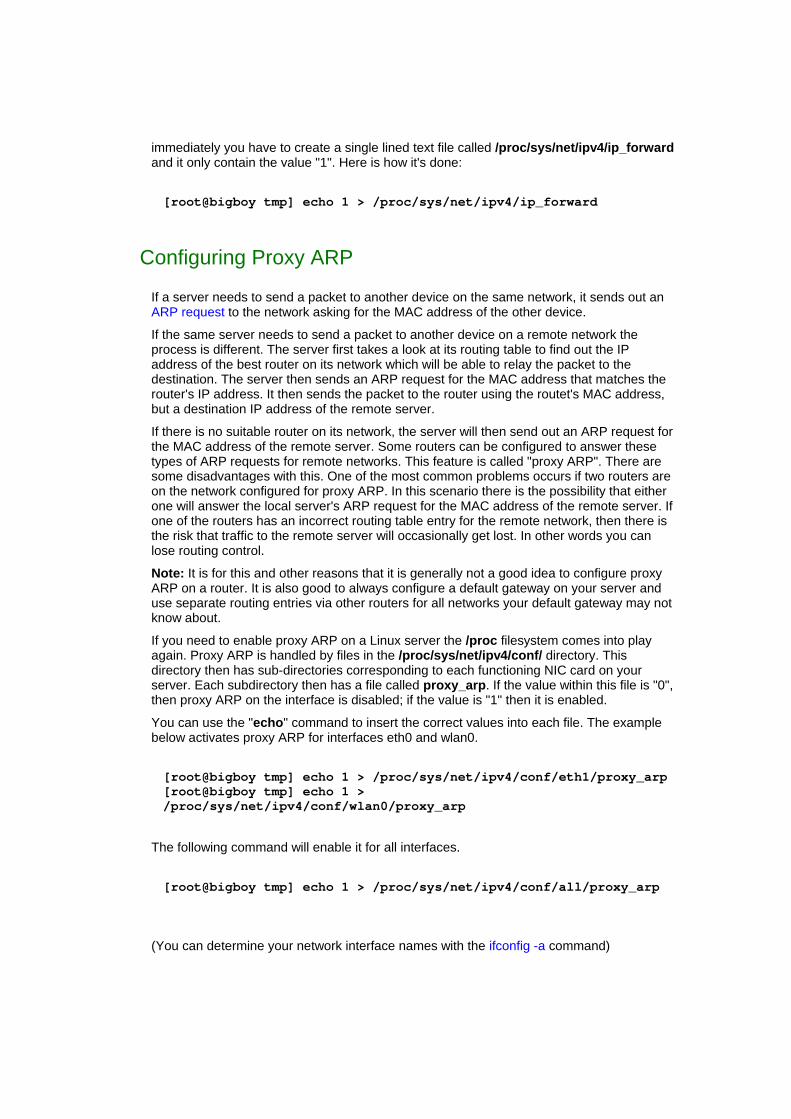
immediately you have to create a single lined text file called /proc/sys/net/ipv4/ip_forward and it only contain the value "1". Here is how it's done:
[root@bigboy tmp] echo 1 > /proc/sys/net/ipv4/ip_forward
Configuring Proxy ARP
If a server needs to send a packet to another device on the same network, it sends out an ARP request to the network asking for the MAC address of the other device.
If the same server needs to send a packet to another device on a remote network the process is different. The server first takes a look at its routing table to find out the IP address of the best router on its network which will be able to relay the packet to the destination. The server then sends an ARP request for the MAC address that matches the router's IP address. It then sends the packet to the router using the routet's MAC address, but a destination IP address of the remote server.
If there is no suitable router on its network, the server will then send out an ARP request for the MAC address of the remote server. Some routers can be configured to answer these types of ARP requests for remote networks. This feature is called "proxy ARP". There are some disadvantages with this. One of the most common problems occurs if two routers are on the network configured for proxy ARP. In this scenario there is the possibility that either one will answer the local server's ARP request for the MAC address of the remote server. If one of the routers has an incorrect routing table entry for the remote network, then there is the risk that traffic to the remote server will occasionally get lost. In other words you can lose routing control.
Note: It is for this and other reasons that it is generally not a good idea to configure proxy ARP on a router. It is also good to always configure a default gateway on your server and use separate routing entries via other routers for all networks your default gateway may not know about.
If you need to enable proxy ARP on a Linux server the /proc filesystem comes into play again. Proxy ARP is handled by files in the /proc/sys/net/ipv4/conf/ directory. This directory then has sub-directories corresponding to each functioning NIC card on your server. Each subdirectory then has a file called proxy_arp. If the value within this file is "0", then proxy ARP on the interface is disabled; if the value is "1" then it is enabled.
You can use the "echo" command to insert the correct values into each file. The example below activates proxy ARP for interfaces eth0 and wlan0.
[root@bigboy tmp] echo 1 > /proc/sys/net/ipv4/conf/eth1/proxy_arp [root@bigboy tmp] echo 1 > /proc/sys/net/ipv4/conf/wlan0/proxy_arp
The following command will enable it for all interfaces.
[root@bigboy tmp] echo 1 > /proc/sys/net/ipv4/conf/all/proxy_arp
(You can determine your network interface names with the ifconfig -a command)

There is no purpose built configuration file to force Linux to do proxy ARP on booting. The best way to do this is put the commands above in your /etc/rc.d/rc.local file
echo 1 > /proc/sys/net/ipv4/conf/eth1/proxy_arp echo 1 > /proc/sys/net/ipv4/conf/wlan0/proxy_arp
Configuring Your /etc/hosts File
The /etc/hosts file is just a list of IP addresses and their corresponding server names. Your server will typically check this file before referencing DNS, if the name is found with a corresponding IP address then DNS won't be queried at all. Unfortunately, if the IP address for that host changes, you'll have to update file. For ease of management, it is best to limit entries in this file to just the loopback interface, and also the server's own host name and use the centralized DNS server handle the rest.
192.168.1.101 smallfry
In the example above server "smallfry" has an IP address of 192.168.1.101. You can access 192.168.1.101 using the "ping", "telnet" or any other network aware program by referring to it as "smallfry" Here is an example using the "ping" to see if "smallfry" is alive and well on the network.
[root@bigboy tmp]# ping smallfry PING zero (192.168.1.101) 56(84) bytes of data. 64 bytes from smallfry (192.168.1.101): icmp_seq=0 ttl=64 time=0.197 ms 64 bytes from smallfry (192.168.1.101): icmp_seq=1 ttl=64 time=0.047 ms --- smallfry ping statistics --- 2 packets transmitted, 2 received, 0% packet loss, time 2017ms rtt min/avg/max/mdev = 0.034/0.092/0.197/0.074 ms, pipe 2 [root@bigboy tmp]#
You can also add "aliases" to the end of the line which will allow you to refer to the server using other names. Here we have set it up so that "smallfry" can also be accessed using the names "tiny" and "littleguy".
192.168.1.101 smallfry tiny littleguy
You should never have an IP address more than once in this file as Linux will only use the values in the first entry it finds.
192.168.1.101 smallfry # (Wrong) 192.168.1.101 tiny # (Wrong) 192.168.1.101 littleguy # (Wrong)

The Loopback Interface's Localhost Entry
Usually the very first entry in /etc/hosts defines the IP address of the server's virtual loopback interface. This is usually mapped to the name localhost.localdomain (the universal name used when a server refers to itself) and localhost (the shortened "alias" name). By default, Fedora inserts the hostname of the server between the 127.0.0.1 and the localhost entries like this:
127.0.0.1 bigboy localhost.localdomain localhost
When the server is connected to the Internet this first entry after the 127.0.0.1 needs to be the fully qualified domain name (FQDN) of the server. For example, bigboy.mysite.com, like this: 127.0.0.1 bigboy.my-site.com localhost.localdomain localhost
Some programs such as Sendmail are very sensitive to this and if they detect what they feel is an incorrect FQDN they will default to using the name "localhost.localdomain" when communicating with another server on the network. This can cause confusion, as the other server also feels it is "localhost.localdomain".
Note: You MUST always have a localhost and localhost.localdomain entry mapping to 127.0.0.1 for Linux to work properly.
Conclusion
As you can imagine, configuring Linux networking is just a first step in providing Internet access to your server. There always things that can go wrong that may be totally out of your control. Good systems administrators know the tools needed to be able to identify the probable causes of these types of problem which allows them to know the type of help they'll need need to fix it.
The next two chapters will show you how to confidently test your network and Linux server applications when things appear to go wrong. The skills you develop to identify and rectify these issues could prove to be invaluable to your company and career.

Chapter 3
Simple Network Troubleshooting
= = = = = = = = = = = = = = = = = = = = = = = = = = = = = = = = = = = = = = = = = = = In This Chapter Chapter 3
Simple Network Troubleshooting General Sources of Trouble Doing Basic Cable And Link Tests Testing Your NIC How To See MAC Addresses Using "Ping" To Test Network Connectivity Using Telnet To Test Network Connectivity Testing Website With The Curl And WGET Utilities The Netstat Command The Linux iptables Firewall Using "traceroute" To Test Connectivity Using MTR To Detect Network Congestion Viewing Packet Flow With TCPdump Basic DNS Troubleshooting Using NMAP Who Has Used My System? Conclusion
(c) Peter Harrison, www.linuxhomenetworking.com = = = = = = = = = = = = = = = = = = = = = = = = = = = = = = = = = = = = = = = = = = =
General Sources of Trouble
You will eventually find yourself trying to fix a network related problem which usually appear in one of two forms. The first is slow response times from the remote server, and the second is a complete lack of connectivity. These symptoms can be caused by:

Sources of Network Slowness
o NIC duplex and speed incompatibilities
o Network congestion
o Poor routing
o Bad cabling
o Electrical interference
o An overloaded server at the remote end of the connection
o Misconfigured DNS (Covered in the DNS chapter)
Sources of a lack of Connectivity
All sources of slowness can become so severe that connectivity is lost. Additional sources of disconnections are:
o Power failures
o The remote server or an application on the remote server being shutdown.
We'll discuss how to isolate these problems and more in the following sections.
Doing Basic Cable And Link Tests
Your server won't be able to communicate with any other device on your network unless the NIC's "link" light is on. This indicates that the connection between your server and the switch / router is functioning correctly.
In most cases a lack of link is due to the wrong cable type being used. As described in the "Introduction to Networking" chapter, there are two types of Ethernet cables "crossover" and "straight through". Always make sure you are using the correct type.
Other sources of link failure include:
> Bad cables
> The switch or router to which the server is connected is powered down
> The cables aren't plugged in properly
Testing Your NIC
Viewing Your Activated Interfaces
The ifconfig command, without any arguments will give you all the active interfaces on your system. Interfaces will not appear if they are shutdown. [root@bigboy tmp]# ifconfig

Note: Interfaces will appear if they are activated, but have no link. We'll soon discuss how to determine the link status using commands.
Viewing All Interfaces
The "ifconfig -a" command will provide all the network interfaces, whether they are functional or not. Interfaces that are "down" or non functional will not show an IP address line and the word "UP" will not show in the second line of the output. This can be seen below:
Shutdown Interface
wlan0 Link encap:Ethernet HWaddr 00:06:25:09:6A:D7 BROADCAST MULTICAST MTU:1500 Metric:1 RX packets:2924 errors:0 dropped:0 overruns:0 frame:0 TX packets:2287 errors:0 dropped:0 overruns:0 carrier:0 collisions:0 txqueuelen:100 RX bytes:180948 (176.7 Kb) TX bytes:166377 (162.4 Kb) Interrupt:10 Memory:c88b5000-c88b6000
Active Interface
wlan0 Link encap:Ethernet HWaddr 00:06:25:09:6A:D7 inet addr:216.10.119.243 Bcast:216.10.119.255 UP BROADCAST RUNNING MULTICAST MTU:1500 Metric:1 RX packets:2924 errors:0 dropped:0 overruns:0 frame:0 TX packets:2295 errors:0 dropped:0 overruns:0 carrier:0 collisions:0 txqueuelen:100 RX bytes:180948 (176.7 Kb) TX bytes:166521 (162.6 Kb) Interrupt:10 Memory:c88b5000-c88b6000
Testing Link Status From The Command Line
The mii-tool command will provide a very short report on the link status and duplex settings for supported NICs.
[root@bigboy tmp]# mii-tool eth0: 100 Mbit, full duplex, link ok [root@bigboy tmp]#
Viewing NIC Errors
The ifconfig command also shows the number of overrun, carrier, dropped packet and frame errors. Errors are a common source of slowness. The most common source of NIC errors are:

o Port speed / duplex mismatches: The speed and duplex of the NIC doesn't match that of the switch it is connected to. Once the port settings are the same, the errors frequently disappear.
o Faulty cabling: Poor connectors, cables and electromagnetic interference will frequently errors. The best solution is to consider replacing the cables and/or moving them to a less hostile environment.
How To See MAC Addresses
There are times when you lose connectivity with another server that is directly connected to your local network. Taking a look at the ARP table of the server from which you are troubleshooting will help determine whether or not the remote server's NIC is responding to any type of traffic from your Linux box. Lack of communication at this level may mean:
> Either server may be disconnected from the network
> There may be bad network cabling
> A NIC may be disabled or the remote server may be shut down
> The remote server may be running firewall software such as iptables or the Windows XP built in firewall.
Here is a description of the commands you may use to determine ARP values:
> The "ifconfig -a" command will show you both the NIC's MAC address and the associated IP addresses of the server which you are currently logged in to.
[root@bigboy tmp]# ifconfig -a wlan0 Link encap:Ethernet HWaddr 00:06:25:09:6A:B5 inet addr:192.168.1.100 Bcast:192.168.1.255 Mask:255.255.255.0 UP BROADCAST RUNNING MULTICAST MTU:1500 Metric:1 RX packets:47379 errors:0 dropped:0 overruns:0 frame:0 TX packets:107900 errors:0 dropped:0 overruns:0 carrier:0 collisions:0 txqueuelen:100 RX bytes:4676853 (4.4 Mb) TX bytes:43209032 (41.2 Mb) Interrupt:11 Memory:c887a000-c887b000 wlan0:0 Link encap:Ethernet HWaddr 00:06:25:09:6A:B5 inet addr:192.168.1.99 Bcast:192.168.1.255 Mask:255.255.255.0 UP BROADCAST RUNNING MULTICAST MTU:1500 Metric:1 Interrupt:11 Memory:c887a000-c887b000 [root@bigboy tmp]#
Here you can see the wlan0 interface has two IP addresses 192.168.1.100 and 192.168.1.99 tied to the NIC hardware MAC address of 00:06:25:09:6A:B5
> The "arp -a" command will show you the MAC addresses in your server's ARP table and all the other servers on the directly connected network. Here we see we have some form of connectivity with the router at address 192.168.1.1
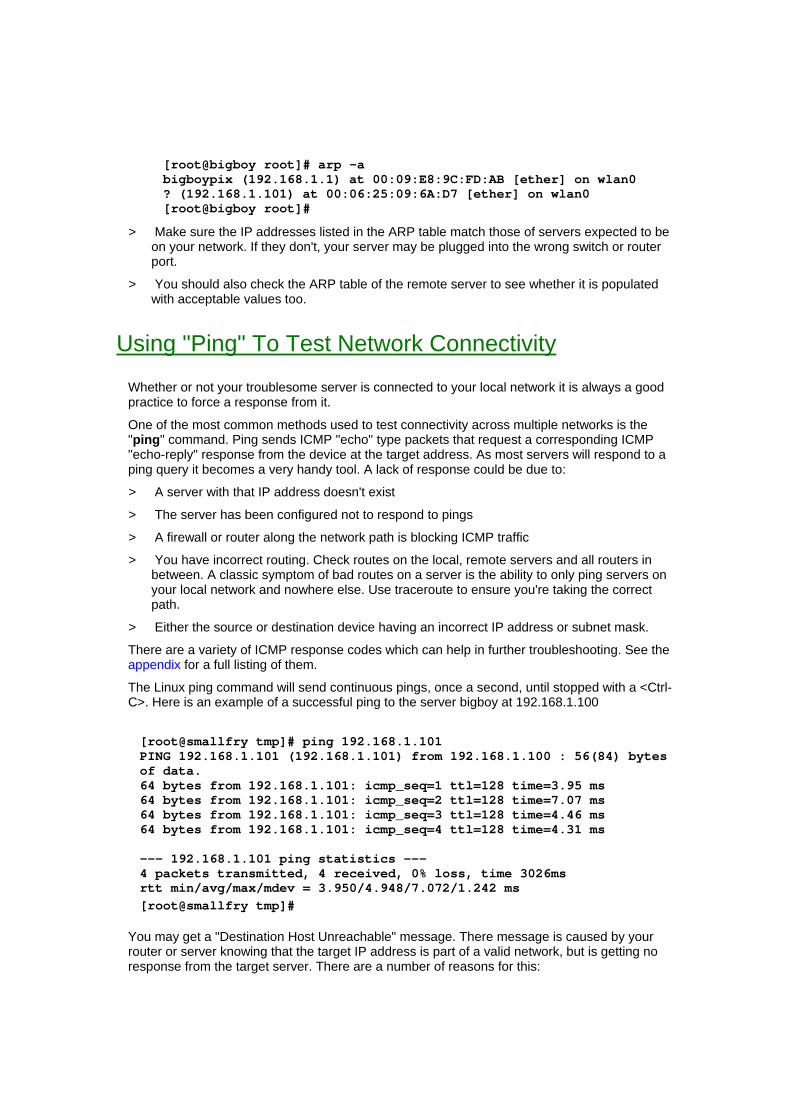
[root@bigboy root]# arp -a bigboypix (192.168.1.1) at 00:09:E8:9C:FD:AB [ether] on wlan0 ? (192.168.1.101) at 00:06:25:09:6A:D7 [ether] on wlan0 [root@bigboy root]#
> Make sure the IP addresses listed in the ARP table match those of servers expected to be on your network. If they don't, your server may be plugged into the wrong switch or router port.
> You should also check the ARP table of the remote server to see whether it is populated with acceptable values too.
Using "Ping" To Test Network Connectivity
Whether or not your troublesome server is connected to your local network it is always a good practice to force a response from it.
One of the most common methods used to test connectivity across multiple networks is the "ping" command. Ping sends ICMP "echo" type packets that request a corresponding ICMP "echo-reply" response from the device at the target address. As most servers will respond to a ping query it becomes a very handy tool. A lack of response could be due to:
> A server with that IP address doesn't exist
> The server has been configured not to respond to pings
> A firewall or router along the network path is blocking ICMP traffic
> You have incorrect routing. Check routes on the local, remote servers and all routers in between. A classic symptom of bad routes on a server is the ability to only ping servers on your local network and nowhere else. Use traceroute to ensure you're taking the correct path.
> Either the source or destination device having an incorrect IP address or subnet mask.
There are a variety of ICMP response codes which can help in further troubleshooting. See the appendix for a full listing of them.
The Linux ping command will send continuous pings, once a second, until stopped with a <Ctrl-C>. Here is an example of a successful ping to the server bigboy at 192.168.1.100 [root@smallfry tmp]# ping 192.168.1.101 PING 192.168.1.101 (192.168.1.101) from 192.168.1.100 : 56(84) bytes of data. 64 bytes from 192.168.1.101: icmp_seq=1 ttl=128 time=3.95 ms 64 bytes from 192.168.1.101: icmp_seq=2 ttl=128 time=7.07 ms 64 bytes from 192.168.1.101: icmp_seq=3 ttl=128 time=4.46 ms 64 bytes from 192.168.1.101: icmp_seq=4 ttl=128 time=4.31 ms --- 192.168.1.101 ping statistics --- 4 packets transmitted, 4 received, 0% loss, time 3026ms rtt min/avg/max/mdev = 3.950/4.948/7.072/1.242 ms [root@smallfry tmp]#
You may get a "Destination Host Unreachable" message. There message is caused by your router or server knowing that the target IP address is part of a valid network, but is getting no response from the target server. There are a number of reasons for this:

If you are trying to ping a host on a directly connected network:
> The server may be down, or disconnected for the network.
> Your NIC may not have the correct duplex settings, you may verify this with the mii-tool command.
> You may have the incorrect type of cable connecting your Linux box to the network. There are two basic types, "straight-through" and "cross-over".
> In the case of a wireless network, your SSID or encryption keys may be incorrect
If you are trying to ping a host on remote network:
> The network device doesn't have a route in its routing table to the destination network and sends an ICMP reply type 3 which triggers the message. The resulting message may be "Destination Host Unreachable" or "Destination Network Unreachable".
[root@smallfry tmp]# ping 192.168.1.105 PING 192.168.1.105 (192.168.1.105) from 192.168.1.100 : 56(84) bytes of data. From 192.168.1.100 icmp_seq=1 Destination Host Unreachable From 192.168.1.100 icmp_seq=2 Destination Host Unreachable From 192.168.1.100 icmp_seq=3 Destination Host Unreachable From 192.168.1.100 icmp_seq=4 Destination Host Unreachable From 192.168.1.100 icmp_seq=5 Destination Host Unreachable From 192.168.1.100 icmp_seq=6 Destination Host Unreachable --- 192.168.1.105 ping statistics --- 8 packets transmitted, 0 received, +6 errors, 100% loss, time 7021ms, pipe 3 [root@smallfry tmp]#
Using Telnet To Test Network Connectivity
An easy way to tell if a remote server is listening on a specific TCP port is to use the telnet command. By default, telnet will try to connect on TCP port 23, but you can specify other TCP ports by typing them in after the target IP address. HTTP uses TCP port 80, HTTPS uses port 443.
Here is an example of testing server 192.168.1.102 on the TCP port 22 reserved for SSH: [root@bigboy tmp]# telnet 192.168.1.102 22
Here are some useful guidelines to follow when using telnet troubleshooting which will help to isolate the source of the problem:
> Test connectivity from the remote PC or server.
> Test connectivity on the server itself. Try making the connection to the loopback address as well as the NIC IP address. If the server is running a firewall package such as the Linux iptables software, then all loopback connectivity is allowed, but connectivity to desired TCP ports on the NIC interface may be blocked sometimes. Further discussion of the Linux iptables packeage is covered in a section below.

> Test connectivity from another server on the same network as the target server. This will help to eliminate the influence of any firewalls protecting the entire network from outside.
Linux Telnet Troubleshooting
The following illustrate the use of Telnet troubleshooting from a Linux box.
Note: Always remember that many Linux servers have the iptables firewall package installed by default. This is often the cause of many connectivity problems and the firewall rules should be correctly updated. In some cases where the network is already protected by a firewall, iptables may be safely turned off. You can use the "/etc/init.d/iptables status" command on the target server to determine if iptables is running.
Successful Connection
With Linux a successful telnet connection is always greeted by a "Connected" message like the one seen below when trying to test connectivity to server 192.168.1.102 on the SSH port (TCP 22).
[root@bigboy tmp]# telnet 192.168.1.102 22 Trying 192.168.1.102... Connected to 192.168.1.102. Escape character is '^]'. SSH-1.99-OpenSSH_3.4p1 ^] telnet> quit Connection closed. [root@ bigboy tmp]#
To break out of the connection you have to hit the <CTRL> and "]" keys simultaneously, not the usual <CTRL>C.
Note: In many cases you can successfully connect on the remote server on the desired TCP port, yet the application doesn't appear to work. This is usually caused by there being correct network connectivity but a poorly configured application.
Connection Refused Messages
You will get a "connection refused" message for one of the following reasons:
> The application you are trying to test hasn't been started on the remote server.
> There is a firewall blocking and rejecting the connection attempt
Here is some sample output: [root@bigboy tmp]# telnet 192.168.1.100 22 Trying 192.168.1.100... telnet: connect to address 192.168.1.100: Connection refused [root@bigboy tmp]#

Telnet Timeout or Hanging
Telnet will abort the attempted connection after waiting a predetermined time for a response. This is called a "timeout". In some cases, telnet won't abort, but will just wait indefinitely. This is also known as "hanging". These symptoms can be caused by the one of the following reasons:
> The remote server doesn't exist on the destination network. It could be turned off.
> A firewall could be blocking and not rejecting the connection attempt, causing it to timeout instead of being quickly refused.
[root@bigboy tmp]# telnet 216.10.100.12 22 Trying 216.10.100.12... telnet: connect to address 216.10.100.12: Connection timed out [root@bigboy tmp]#
Telnet Troubleshooting Using Windows
You can also use a Windows PC to test connectivity with Telnet. Go to the command line and type the same telnet command as you would in Linux.
Screen Goes Blank - Successful Connection
If there is connectivity, your command prompt screen will go blank. Using <Ctrl-C> key sequence will make you exit the Telnet attempt.
"Connect Failed" Messages
These are the equivalent of the Linux "Connection refused" messages explained above and are caused for the same reasons. C:\>telnet 172.16.1.102 256 Connecting To 172.16.1.102...Could not open connection to the host, on port 256: Connect failed C:\>
Telnet Timeout or Hanging
As explained above, if there is no connectivity, then the session will appear to hang or timeout. This is usually caused by the target server being turned off or due to a firewall blocking the connection. C:\>telnet 216.10.100.12 22 Connecting To 216.10.100.12...
Testing Website With The Curl And WGET Utilities
Testing a website's performance using a web browser alone is sometimes insufficient to get a good idea of the source of slow webserver performance. Many useful HTTP error codes are often not displayed by browsers making troubleshooting difficult. A much better combination of

tools is to use telnet to test your site's TCP port 80 response time in conjunction with data from the Linux curl and wget HTTP utilities.
Rapid TCP response times, but slow curl and wget response times usually point, not to a network issue, but to slowness in the configuration of the web server or any supporting application or database servers it may use to generate the web page.
Using Curl
The curl utility acts like a text based web browser in which you can select to see either the header or complete body of a web page's HTML code.
A good start is to use the curl command with the "-I" flag to view just the web page's header and HTTP status code. By not using the "-I" command you will see all the web page's HTML code displayed on the screen. Either method can provide a good idea of your server's performance. [root@ bigboy tmp]# curl -I www.linuxhomenetworking.com HTTP/1.1 200 OK Date: Tue, 19 Oct 2004 05:11:22 GMT Server: Apache/2.0.51 (Fedora) Accept-Ranges: bytes Vary: Accept-Encoding,User-Agent Connection: close Content-Type: text/html; charset=UTF-8 [root@bigboy tmp]#
Using wget Wget is a program that allows you to recursively download a web site's web pages, including the entire directory structure of the web site, to a local directory.
By not using recursion, and activating the "time stamping" feature (the -N switch), you view not only the HTML content of the website's index page in your local directory, but also the download speed, file size and precise start and stop times for the download. This can be very helpful in providing very simple to obtain snapshots of your server's performance. [root@zippy tmp]# wget -N www.linuxhomenetworking.com --23:07:22-- http://www.linuxhomenetworking.com/ => `index.html' Resolving www.linuxhomenetworking.com... done. Connecting to www.linuxhomenetworking.com[65.115.71.34]:80... connected. HTTP request sent, awaiting response... 200 OK Length: unspecified [text/html] Last-modified header missing -- time-stamps turned off. --23:07:22-- http://www.linuxhomenetworking.com/ => `index.html' Connecting to www.linuxhomenetworking.com[65.115.71.34]:80... connected. HTTP request sent, awaiting response... 200 OK Length: unspecified [text/html] [ <=> ] 122,150 279.36K/s 23:07:22 (279.36 KB/s) - `index.html' saved [122150] [root@zippy tmp]# ?

The Netstat Command
Like curl and wget, netstat can be very useful in helping to determine the source of problems. Netstat, when used with the -an options, will list all the TCP ports on which your Linux server is listening including all the active network connections to and from your server. This can be very helpful in determining whether slowness is due to high traffic volumes.
[root@bigboy tmp]# netstat -an Active Internet connections (servers and established) Proto Recv-Q Send-Q Local Address Foreign Address State tcp 0 0 127.0.0.1:25 0.0.0.0:* LISTEN tcp 0 0 :::80 :::* LISTEN tcp 0 1124 ::ffff:65.115.71.34:80 ::ffff:24.4.97.110:2955 ESTABLISHED ... ... ... [root@bigboy tmp]#
Most TCP connections create permanent connections, HTTP is different in that the connections are shut down on their own after a pre defined inactive timeout or time_wait period on the web server. It is therefore good to focus on these types of short lived connections too. You can determine the number of "established" and "time_wait" TCP connections on your server using the netstat command filtered by the grep and egrep commands with the number of matches being counted by the wc command which in this case shows 14 connections. [root@probe-001 root]# netstat -an | grep tcp | egrep -i \ 'established|time_wait' | wc -l 14 [root@probe-001 root]#
The Linux iptables Firewall
An unexpected source of server connectivity issues for brand new servers is frequently the iptables firewall. This is installed by default under Fedora and RedHat and usually only allows a limited range of traffic.
Determining If iptables Is Running You can easily test if iptables is running by running the /etc/init.d/iptables script with the "status" qualifier as shown below. If it isn't running you'll get a very short listing of the firewall rules. Here are some sample outputs:
Fedora Core
[root@zero root]# /etc/init.d/iptables status Firewall is stopped. [root@zero root]#

RedHat 9 And Earlier
[root@bigboy tmp]# /etc/init.d/iptables status Table: filter Chain INPUT (policy ACCEPT) target prot opt source destination Chain FORWARD (policy ACCEPT) target prot opt source destination Chain OUTPUT (policy ACCEPT) target prot opt source destination [root@bigboy tmp]#
How To Stop iptables
If your Linux box is already protected by a firewall then you may want to temporarily disable iptables using the same /etc/init.d/iptables script with the "stop" qualifier.
[root@bigboy tmp]# /etc/init.d/iptables stop Flushing firewall rules: [ OK ] Setting chains to policy ACCEPT: filter [ OK ] Unloading iptables modules: [ OK ] [root@bigboy tmp]#
How To Configure iptables Rules
Stopping iptables may not be a good permanent solution especially if your network isn't protected by a firewall. You can read more about configuring iptables from the chapter on Linux firewalls.
Using "traceroute" To Test Connectivity Another tool for network troubleshooting is the traceroute command. It gives a listing of all the router hops between your server and the target server. This helps you verify that routing over the networks in between is correct.
Traceroute works by sending a UDP packet destined to the target with a TTL of "0". The first router on the route recognizes that the TTL has already been exceeded and discards or "drops" the packet, but also sends an ICMP "time exceeded" message back to the source. The traceroute program records the IP address of the router that sent the message and knows that that is the first hop on the path to the final destination. The traceroute program tries again, with a TTL of "1". The first hop, sees nothing wrong with the packet, decrements the TTL to 0 as expected, and forwards the packet to the second hop on the path. Router 2, sees the TTL of "0", drops the packet and replies with an ICMP time exceeded message. Traceroute now knows the IP address of the second router. This continues around and around until the final destination is reached.
Note: In Linux the traceroute command is "traceroute". In Windows it is "tracert".
Note: You will only receive traceroute responses from functioning devices. If a device responds it is less likely to be the source of your problems.

Sample Traceroute Output
Here is a sample output for a query to 144.232.20.158. Notice that all the hop times are under 50 milliseconds (ms) which is acceptable. [root@bigboy root]# traceroute -I 144.232.20.158 traceroute to 144.232.20.158 (144.232.20.158), 30 hops max, 38 byte packets 1 adsl-67-120-221-110.dsl.sntc01.pacbell.net (67.120.221.110) 14.408 ms 14.064 ms 13.111 ms 2 dist3-vlan50.sntc01.pbi.net (63.203.35.67) 13.018 ms 12.887 ms 13.146 ms 3 bb1-g1-0.sntc01.pbi.net (63.203.35.17) 12.854 ms 13.035 ms 13.745 ms 4 bb2-p11-0.snfc21.pbi.net (64.161.124.246) 16.260 ms 15.618 ms 15.663 ms 5 bb1-p14-0.snfc21.pbi.net (64.161.124.53) 15.897 ms 15.785 ms 17.164 ms 6 sl-gw11-sj-3-0.sprintlink.net (144.228.44.49) 14.443 ms 16.279 ms 15.189 ms 7 sl-bb25-sj-6-1.sprintlink.net (144.232.3.133) 16.185 ms 15.857 ms 15.423 ms 8 sl-bb23-ana-6-0.sprintlink.net (144.232.20.158) 27.482 ms 26.306 ms 26.487 ms [root@bigboy root]#
Possible Traceroute Messages
There are a number of possible message codes traceroute can give, these are listed in Table 3-1.
Table 3-1: Traceroute Return Code Symbols
Traceroute Symbol
Description
* * * Expected 5 second response time exceeded. Could be caused by: > A router on the path not sending back the ICMP "time exceeded"
messages
> A router or firewall in the path blocking the ICMP "time exceeded" messages
> The target IP address not responding
!H, !N, or !P Host, network or protocol unreachable
!X or !A Communication administratively prohibited. A router Access Control List (ACL) or firewall is in the way
!S Source route failed. Source routing attempts to force traceroute to use a certain path. Failure may be due to a router security setting

Traceroute Time Exceeded False Alarms
If there is no response within a 5 second timeout interval a "*" is printed for that probe as seen in the example below.
[root@bigboy root]# traceroute 144.232.20.158 traceroute to 144.232.20.158 (144.232.20.158), 30 hops max, 38 byte packets 1 adsl-67-120-221-110.dsl.sntc01.pacbell.net (67.120.221.110) 14.304 ms 14.019 ms 16.120 ms 2 dist3-vlan50.sntc01.pbi.net (63.203.35.67) 12.971 ms 14.000 ms 14.627 ms 3 bb1-g1-0.sntc01.pbi.net (63.203.35.17) 15.521 ms 12.860 ms 13.179 ms 4 bb2-p11-0.snfc21.pbi.net (64.161.124.246) 13.991 ms 15.842 ms 15.728 ms 5 bb1-p14-0.snfc21.pbi.net (64.161.124.53) 16.133 ms 15.510 ms 15.909 ms 6 sl-gw11-sj-3-0.sprintlink.net (144.228.44.49) 16.510 ms 17.469 ms 18.116 ms 7 sl-bb25-sj-6-1.sprintlink.net (144.232.3.133) 16.212 ms 14.274 ms 15.926 ms 8 * * * 9 * * * [root@bigboy root]#
Some devices will prevent traceroute packets directed at their interfaces, but will allow ICMP packets. Using traceroute with a "-I" flag forces traceroute to use ICMP packets that may go through. In this case the "* * *", status messages disappear.
[root@bigboy root]# traceroute -I 144.232.20.158 traceroute to 144.232.20.158 (144.232.20.158), 30 hops max, 38 byte packets 1 adsl-67-120-221-110.dsl.sntc01.pacbell.net (67.120.221.110) 14.408 ms 14.064 ms 13.111 ms 2 dist3-vlan50.sntc01.pbi.net (63.203.35.67) 13.018 ms 12.887 ms 13.146 ms 3 bb1-g1-0.sntc01.pbi.net (63.203.35.17) 12.854 ms 13.035 ms 13.745 ms 4 bb2-p11-0.snfc21.pbi.net (64.161.124.246) 16.260 ms 15.618 ms 15.663 ms 5 bb1-p14-0.snfc21.pbi.net (64.161.124.53) 15.897 ms 15.785 ms 17.164 ms 6 sl-gw11-sj-3-0.sprintlink.net (144.228.44.49) 14.443 ms 16.279 ms 15.189 ms 7 sl-bb25-sj-6-1.sprintlink.net (144.232.3.133) 16.185 ms 15.857 ms 15.423 ms 8 sl-bb23-ana-6-0.sprintlink.net (144.232.20.158) 27.482 ms 26.306 ms 26.487 ms [root@bigboy root]#
Traceroute Internet Slowness False Alarm
The traceroute below gives the impression that a web site at 80.40.118.227 may be slow because there is congestion along the way at hops "6" and "7" where the response time is over 200ms. C:\>tracert 80.40.118.227 1 1 ms 2 ms 1 ms 66.134.200.97 2 43 ms 15 ms 44 ms 172.31.255.253 3 15 ms 16 ms 8 ms 192.168.21.65

4 26 ms 13 ms 16 ms 64.200.150.193 5 38 ms 12 ms 14 ms 64.200.151.229 6 239 ms 255 ms 253 ms 64.200.149.14 7 254 ms 252 ms 252 ms 64.200.150.110 8 24 ms 20 ms 20 ms 192.174.250.34 9 91 ms 89 ms 60 ms 192.174.47.6 10 17 ms 20 ms 20 ms 80.40.96.12 11 30 ms 16 ms 23 ms 80.40.118.227 Trace complete. C:\>
This only indicates that the devices on hops 6 and 7 were slow to respond with ICMP TTL exceeded messages, but not and indication of congestion, latency, or packet loss. If any of those conditions existed all points past the problematic link would show high latency.
Many internet routing devices give very low priority to traffic related to traceroute in favor of revenue generating traffic.
Traceroute Dies At The Router Just Before The Server
In this case the last device to respond to the traceroute just happens to be the router that acts as the default gateway of the server. The problem is not with the router, but with the server. Remember, you will only receive traceroute responses from functioning devices.
Possible causes of this problem include:
o A server with a bad default gateway
o The server is running some type of firewall software which blocks traceroute
o The server is shutdown, disconnected from the network or has an incorrectly configured NIC.
C:\>tracert 80.40.100.18 Tracing route to 80.40.100.18 over a maximum of 30 hops 1 33 ms 49 ms 28 ms 192.168.1.1 2 33 ms 49 ms 28 ms 65.14.65.19 3 33 ms 32 ms 32 ms 81.25.68.252 4 47 ms 32 ms 31 ms 80.40.97.1 5 29 ms 28 ms 32 ms 80.40.96.114 6 * * * Request timed out. 7 ^C C:\>
Always Get A Bidirectional Traceroute
It is always best to get traceroutes from the source IP to the target IP and also from the target IP to the source IP. This is because the packet's return path from the target is sometimes not the same as the path taken to get there. A high traceroute time equates to the round trip time for both the initial traceroute query to each "hop" and the response of each "hop".
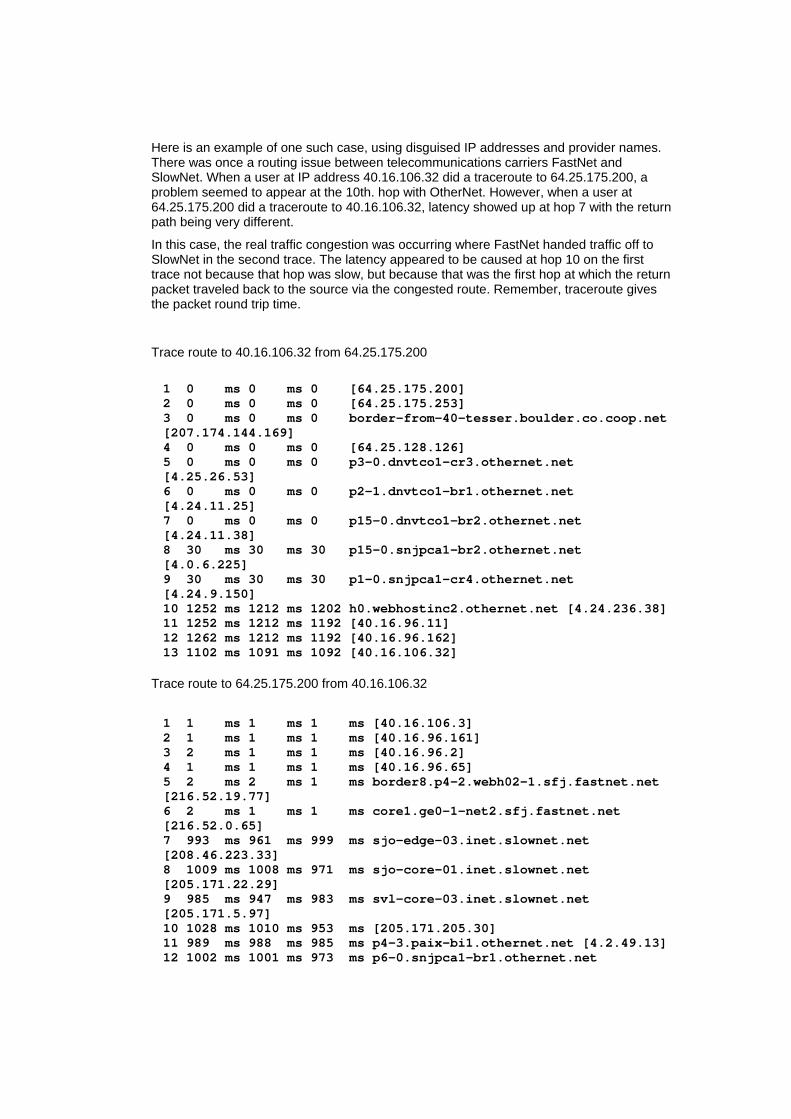
Here is an example of one such case, using disguised IP addresses and provider names. There was once a routing issue between telecommunications carriers FastNet and SlowNet. When a user at IP address 40.16.106.32 did a traceroute to 64.25.175.200, a problem seemed to appear at the 10th. hop with OtherNet. However, when a user at 64.25.175.200 did a traceroute to 40.16.106.32, latency showed up at hop 7 with the return path being very different.
In this case, the real traffic congestion was occurring where FastNet handed traffic off to SlowNet in the second trace. The latency appeared to be caused at hop 10 on the first trace not because that hop was slow, but because that was the first hop at which the return packet traveled back to the source via the congested route. Remember, traceroute gives the packet round trip time.
Trace route to 40.16.106.32 from 64.25.175.200 1 0 ms 0 ms 0 [64.25.175.200] 2 0 ms 0 ms 0 [64.25.175.253] 3 0 ms 0 ms 0 border-from-40-tesser.boulder.co.coop.net [207.174.144.169] 4 0 ms 0 ms 0 [64.25.128.126] 5 0 ms 0 ms 0 p3-0.dnvtco1-cr3.othernet.net [4.25.26.53] 6 0 ms 0 ms 0 p2-1.dnvtco1-br1.othernet.net [4.24.11.25] 7 0 ms 0 ms 0 p15-0.dnvtco1-br2.othernet.net [4.24.11.38] 8 30 ms 30 ms 30 p15-0.snjpca1-br2.othernet.net [4.0.6.225] 9 30 ms 30 ms 30 p1-0.snjpca1-cr4.othernet.net [4.24.9.150] 10 1252 ms 1212 ms 1202 h0.webhostinc2.othernet.net [4.24.236.38] 11 1252 ms 1212 ms 1192 [40.16.96.11] 12 1262 ms 1212 ms 1192 [40.16.96.162] 13 1102 ms 1091 ms 1092 [40.16.106.32]
Trace route to 64.25.175.200 from 40.16.106.32
1 1 ms 1 ms 1 ms [40.16.106.3] 2 1 ms 1 ms 1 ms [40.16.96.161] 3 2 ms 1 ms 1 ms [40.16.96.2] 4 1 ms 1 ms 1 ms [40.16.96.65] 5 2 ms 2 ms 1 ms border8.p4-2.webh02-1.sfj.fastnet.net [216.52.19.77] 6 2 ms 1 ms 1 ms core1.ge0-1-net2.sfj.fastnet.net [216.52.0.65] 7 993 ms 961 ms 999 ms sjo-edge-03.inet.slownet.net [208.46.223.33] 8 1009 ms 1008 ms 971 ms sjo-core-01.inet.slownet.net [205.171.22.29] 9 985 ms 947 ms 983 ms svl-core-03.inet.slownet.net [205.171.5.97] 10 1028 ms 1010 ms 953 ms [205.171.205.30] 11 989 ms 988 ms 985 ms p4-3.paix-bi1.othernet.net [4.2.49.13] 12 1002 ms 1001 ms 973 ms p6-0.snjpca1-br1.othernet.net

[4.24.7.61] 13 1031 ms 989 ms 978 ms p9-0.snjpca1-br2.othernet.net [4.24.9.130] 14 1031 ms 1017 ms 1017 ms p3-0.dnvtco1-br2.othernet.net [4.0.6.226] 15 1027 ms 1025 ms 1023 ms p15-0.dnvtco1-br1.othernet.net [4.24.11.37] 16 1045 ms 1037 ms 1050 ms p1-0.dnvtco1-cr3.othernet.net [4.24.11.26] 17 1030 ms 1020 ms 1045 ms p0-0.cointcorp.othernet.net [4.25.26.54] 18 1038 ms 1031 ms 1045 ms gw234.boulder.co.coop.net [64.25.128.99] 19 1050 ms 1094 ms 1034 ms [64.25.175.253] 20 1050 ms 1094 ms 1034 ms [64.25.175.200]
Ping & Traceroute Troubleshooting Example
In this example, a ping to 186.9.17.153 gave a "TTL timeout" message. Ping TTLs will usually only timeout if there is a routing loop in which the packet bounces between two routers on the way to the target. Each "bounce" causes the TTL to decrease by a count of one until the TTL reaches zero at which point you get the timeout.
The routing loop was confirmed by the traceroute in which the packet was proven to be bouncing between routers at 186.40.64.94 and 186.40.64.93. G:\>ping 186.9.17.153 Pinging 186.9.17.153 with 32 bytes of data: Reply from 186.40.64.94: TTL expired in transit. Reply from 186.40.64.94: TTL expired in transit. Reply from 186.40.64.94: TTL expired in transit. Reply from 186.40.64.94: TTL expired in transit. Ping statistics for 186.9.17.153: Packets: Sent = 4, Received = 4, Lost = 0 (0% loss), Approximate round trip times in milli-seconds: Minimum = 0ms, Maximum = 0ms, Average = 0ms G:\>tracert 186.9.17.153 Tracing route to lostserver.confusion.net [186.9.17.153] over a maximum of 30 hops: 1 <10 ms <10 ms <10 ms 186.217.33.1 2 60 ms 70 ms 60 ms rtr-2.confusion.net [186.40.64.94] 3 70 ms 71 ms 70 ms rtr-1.confusion.net [186.40.64.93] 4 60 ms 70 ms 60 ms rtr-2.confusion.net [186.40.64.94] 5 70 ms 70 ms 70 ms rtr-1.confusion.net [186.40.64.93]

6 60 ms 70 ms 61 ms rtr-2.confusion.net [186.40.64.94] 7 70 ms 70 ms 70 ms rtr-1.confusion.net [186.40.64.93] 8 60 ms 70 ms 60 ms rtr-2.confusion.net [186.40.64.94] 9 70 ms 70 ms 70 ms rtr-1.confusion.net [186.40.64.93] ... ... ... Trace complete.
This problem was solved by resetting the routing process on both routers. The problem was initially triggered by an unstable network link that caused frequent routing recalculations. The constant activity eventually corrupted the routing tables of one of the routers.
Possible Reasons For Failed Traceroutes
Traceroutes can fail to reach their intended destination for a number of reasons, these include:
o Traceroute packets are being blocked or rejected by a router in the path. The router immediately after the last visible one is usually the culprit. It's usually good to check the routing table and/or other status of this next hop device.
o The target server doesn't exist on the network. It could be disconnected, or turned off. (!H or !N messages may be produced.)
o The network on which you expect the target host to reside doesn't exist in the routing table of one of the routers in the path (!H or !N messages may be produced.)
o You may have a typographical error in the IP address of the target server
o You may have a routing loop in which packets bounce between two routers and never get to the intended destination.
o The packets don't have a proper return path to your server. The last visible hop being the last hop in which the packets return correctly. The router immediately after the last visible one is the one at which the routing changes. It's usually good to:
+ log on to the last visible router.
+ Look at the routing table to determine what the next hop is to your intended traceroute target.
+ Log on to this next hop router.
+ Do a traceroute from this router to your intended target server.
+ If this works: Routing to the target server is OK. Do a traceroute back to your source server. The traceroute will probably fail at the bad router on the return path.
+ If it doesn't work: Test the routing table and/or other status of all the hops between it and your intended target.
Note: If there is nothing blocking your traceroute traffic, then the last visible router of an incomplete trace is either the last good router on the path, or the last router that has a valid return path to the server issuing the traceroute.

Using MTR To Detect Network Congestion
"Matt's Traceoute" is an application you can use to do repeated traceroutes in real time and dynamically shows the round trip time to reach each hop along the traceroute path. The constant updates allow you to not only visually determine which hops are slow, but also when they appear to be slow. It is a good tool to use whenever you suspect there is some intermittent network congestion.
You type in the word "mtr" followed by the target IP address to get output similar to that below.
Matt's traceroute [v0.52] Bigboy Fri Feb 20 17:19:17 2004 Keys: D - Display mode R - Restart statistics Q - Quit Packets Pings Hostname %Loss Rcv Snt Last Best? Avg Worst 1. 192.168.1.1 0% 5 5 0 0 0 0 ?2. 192.168.2.254 0% 5 5 0 0 0 1 ?3. 192.168.3.15 0% 4 4 0 0 0 0 ?4. 192.168.18.35 0% 4 4 0 0 0 0 ?5. 192.168.25.26 0% 4 4 0 0 0 0
If MTR isn't installed on your system, then you can download the RPM from many of the Fedora download sites.
Viewing Packet Flow With TCPdump
Tcpdump is one of the most popular packages for viewing the flow of packets through your Linux box's NIC card. It is installed by default on RedHat/Fedora Linux and has very simple syntax, especially if you are doing simpler types of troubleshooting.
One of the most common uses of tcpdump is to determine whether you are getting basic two way communication. Lack of communication could be due to:
> Bad routing
> Faulty cables, interfaces of devices in the packet flow
> The server not listening on the port because the software isn't installed or started
> A network device in the packet path is blocking traffic. Common culprits are firewalls, routers with access control lists and even your Linux box running iptables.
Analyzing tcpdump in much greater detail is beyond the scope of this section.

Like most Linux commands, tcpdump uses command line switches to modify the output. Some of the more useful command line switches (listed in Table 3-2) would include:
Table 3-2 : Possible TCPdump Messages
tcpdump command
switch
Description
-c Stop after viewing count packets.
-i Listen on interface. If this is not specified, then tcpdump will use the lowest numbered interface that is UP
-t Don't print a timestamp at the beginning of each line
You can also add expressions after all the command line switches. These act as filters to limit the volume of data presented on the screen. You can also use keywords such as "and" or "or" between expressions to further fine tune your selection criteria. Some useful expressions are listed in Table 3-3.
Table 3-3 : Useful TCPdump Expressions
tcpdump command expression
Description
host host-address View packets from the IP address host-address
icmp View icmp packets
tcp port port-number View TCP packets with packets with either a source or destination TCP port of port-number
udp port port-number View UDP packets with either a source or destination UDP port of port-number
Example: tcpdump used to view ICMP "ping" packets going through interface wlan0

[root@bigboy tmp]# tcpdump -i wlan0 icmp
tcpdump: listening on wlan0 21:48:58.927091 smallfry > bigboy.my-site.com: icmp: echo request (DF) 21:48:58.927510 bigboy.my-site.com > smallfry: icmp: echo reply 21:48:58.928257 smallfry > bigboy.my-site.com: icmp: echo request (DF) 21:48:58.928365 bigboy.my-site.com > smallfry: icmp: echo reply 21:48:58.943926 smallfry > bigboy.my-site.com: icmp: echo request (DF) 21:48:58.944034 bigboy.my-site.com > smallfry: icmp: echo reply 21:48:58.962244 bigboy.my-site.com > smallfry: icmp: echo reply 21:48:58.963966 bigboy.my-site.com > smallfry: icmp: echo reply 21:48:58.968556 bigboy.my-site.com > smallfry: icmp: echo reply 9 packets received by filter 0 packets dropped by kernel [root@bigboy tmp]#
Explanation
o The first column of data is a packet time stamp.
o The second column of data shows the packet source then destination IP address or server name of the packet
o The third column shows the packet type
o Two way communication is occurring as each echo gets an echo reply
Example: tcpdump used to view packets on interface wlan0 to/from host 192.168.1.102 on TCP port 22 with no timestamps in the output ("-t" switch).
[root@bigboy root]# tcpdump -i wlan0 -t host 192.168.1.102 and tcp port 22
tcpdump: listening on wlan0 smallfry.32938 > bigboy.my-site.com.ssh: S 2013297020:2013297020(0) win 5840 <mss 1460,sackOK,timestamp 75227931 0,nop,wscale 0> (DF) [tos 0x10] bigboy.my-site.com.ssh > smallfry.32938: R 0:0(0) ack 2013297021 win 0 (DF) [tos 0x10] smallfry.32938 > bigboy.my-site.com.ssh: S 2013297020:2013297020(0) win 5840 <mss 1460,sackOK,timestamp 75227931 0,nop,wscale 0> (DF) [tos 0x10] bigboy.my-site.com.ssh > smallfry.32938: R 0:0(0) ack 1 win 0 (DF) [tos 0x10] smallfry.32938 > bigboy.my-site.com.ssh: S 2013297020:2013297020(0) win 5840 <mss 1460,sackOK,timestamp 75227931 0,nop,wscale 0> (DF) [tos 0x10] 7 packets received by filter 0 packets dropped by kernel [root@bigboy root]#
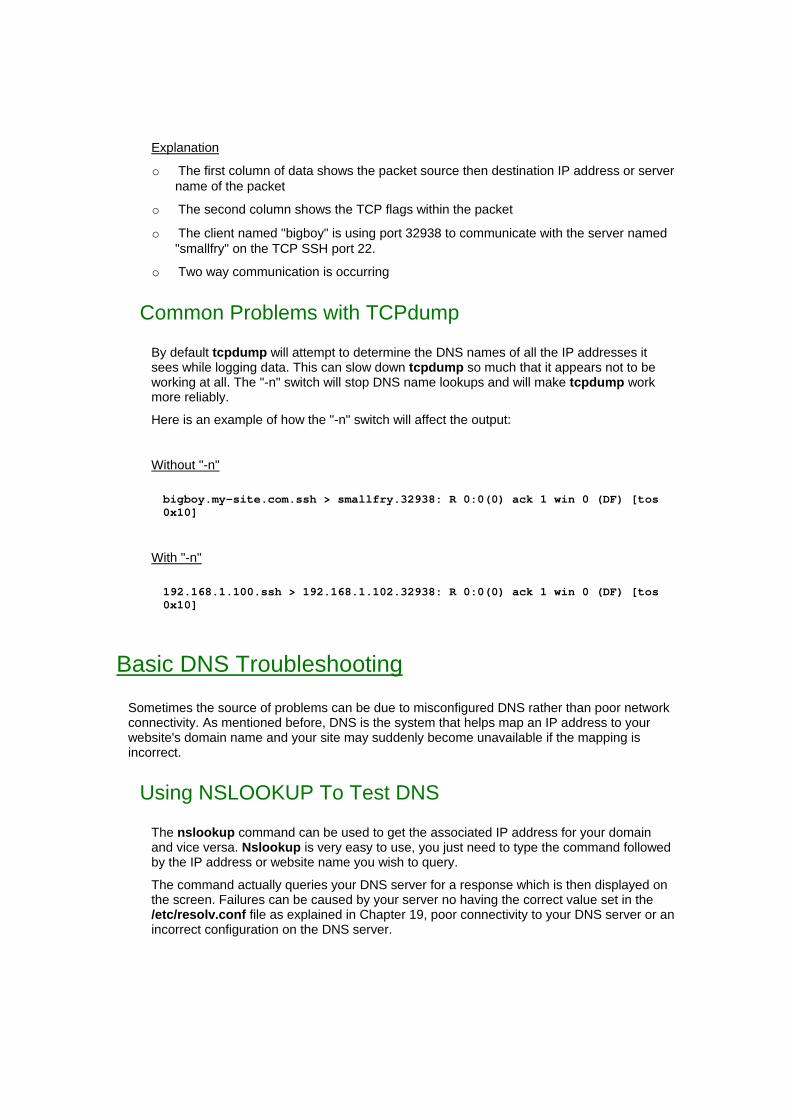
Explanation
o The first column of data shows the packet source then destination IP address or server name of the packet
o The second column shows the TCP flags within the packet
o The client named "bigboy" is using port 32938 to communicate with the server named "smallfry" on the TCP SSH port 22.
o Two way communication is occurring
Common Problems with TCPdump
By default tcpdump will attempt to determine the DNS names of all the IP addresses it sees while logging data. This can slow down tcpdump so much that it appears not to be working at all. The "-n" switch will stop DNS name lookups and will make tcpdump work more reliably.
Here is an example of how the "-n" switch will affect the output:
Without "-n" bigboy.my-site.com.ssh > smallfry.32938: R 0:0(0) ack 1 win 0 (DF) [tos 0x10]
With "-n" 192.168.1.100.ssh > 192.168.1.102.32938: R 0:0(0) ack 1 win 0 (DF) [tos 0x10]
Basic DNS Troubleshooting
Sometimes the source of problems can be due to misconfigured DNS rather than poor network connectivity. As mentioned before, DNS is the system that helps map an IP address to your website's domain name and your site may suddenly become unavailable if the mapping is incorrect.
Using NSLOOKUP To Test DNS
The nslookup command can be used to get the associated IP address for your domain and vice versa. Nslookup is very easy to use, you just need to type the command followed by the IP address or website name you wish to query.
The command actually queries your DNS server for a response which is then displayed on the screen. Failures can be caused by your server no having the correct value set in the /etc/resolv.conf file as explained in Chapter 19, poor connectivity to your DNS server or an incorrect configuration on the DNS server.

Using NSLOOKUP To Check Your Website Name
Here we see nslookup returning the IP address 216.151.193.92 for the site www.linuxhomenetworking.com. [root@bigboy tmp]# nslookup www.linuxhomenetworking.com ... ... Name: www.linuxhomenetworking.com Address: 216.151.193.92 [root@bigboy tmp]#
Using NSLOOKUP To Check Your IP Address
Nslookup can operate in the opposite way in which a query against the address 216.151.193.92 returns the website named www.linuxhomenetworking.com [root@bigboy tmp]# nslookup 216.151.193.92 ... ... Non-authoritative answer: 92.193.151.216.in-addr.arpa name = extra193-92.elan.net. Authoritative answers can be found from: 193.151.216.in-addr.arpa nameserver = dns1.elan.net. 193.151.216.in-addr.arpa nameserver = dns2.elan.net. dns1.elan.net internet address = 216.151.192.1 [root@bigboy tmp]#
Using NSLOOKUP To Query a Specific DNS Server
Sometimes you may want to test the DNS mapping against a specific DNS server, this can be achieved by adding the DNS server's IP address immediately after the IP address of website name you intend to query.
[root@bigboy tmp]# nslookup www.linuxhomenetworking.com 68.87.96.3 ... ... Server: 68.87.96.3 Address: 68.87.96.3#53 Name: www.linuxhomenetworking.com Address: 216.151.193.92 [root@bigboy tmp]#
Note: The nslookup command will probably be removed from future releases of Linux, but can still be used with Windows. The Linux "host" command can be used as a good replacement.

Using The "Host" Command To Test DNS
More recent versions of Linux have started to use the host command for basic DNS testing. Fortunately syntax is identical to that of nslookup and the resulting output is very similar.
[root@bigboy tmp]# host 216.151.193.92 92.193.151.216.in-addr.arpa domain name pointer extra193-92.elan.net. [root@bigboy tmp]# [root@bigboy tmp]# host www.linuxhomenetworking.com www.linuxhomenetworking.com has address 216.151.193.92 [root@bigboy tmp]# [root@zippy root]# host www.linuxhomenetworking.com 68.87.96.3 Using domain server: Name: 68.87.96.3 Address: 68.87.96.3#53 Aliases: www.linuxhomenetworking.com has address 65.115.71.34 [root@zippy root]#
Using NMAP
NMAP is program that you can use to determine all the TCP ports on which a remote server is listening. It isn't usually an important tool in the home environment but in a corporate environment it can be helpful in getting a better idea of the function of undocumented servers that have been found by your boss. You can also use it to run a vulnerability scan against your site as NMAP is one of the tools used by malicious surfers.
Here is a sample output:
> First we see all the available options by just typing the "nmap" command
[root@bigboy tmp]# nmap Nmap V. 3.00 Usage: nmap [Scan Type(s)] [Options] <host or net list> Some Common Scan Types ('*' options require root privileges) * -sS TCP SYN stealth port scan (default if privileged (root)) -sT TCP connect() port scan (default for unprivileged users) * -sU UDP port scan -sP ping scan (Find any reachable machines) * -sF,-sX,-sN Stealth FIN, Xmas, or Null scan (experts only) -sR/-I RPC/Identd scan (use with other scan types) Some Common Options (none are required, most can be combined): * -O Use TCP/IP fingerprinting to guess remote operating system -p <range> ports to scan. Example range: '1-1024,1080,6666,31337' -F Only scans ports listed in nmap-services -v Verbose. Its use is recommended. Use twice for greater effect.

-P0 Don't ping hosts (needed to scan www.microsoft.com and others) * -Ddecoy_host1,decoy2[,...] Hide scan using many decoys -T <Paranoid|Sneaky|Polite|Normal|Aggressive|Insane> General timing policy -n/-R Never do DNS resolution/Always resolve [default: sometimes resolve] -oN/-oX/-oG <logfile> Output normal/XML/grepable scan logs to <logfile> -iL <inputfile> Get targets from file; Use '-' for stdin * -S <your_IP>/-e <devicename> Specify source address or network interface --interactive Go into interactive mode (then press h for help) Example: nmap -v -sS -O www.my.com 192.168.0.0/16 '192.88-90.*.*' SEE THE MAN PAGE FOR MANY MORE OPTIONS, DESCRIPTIONS, AND EXAMPLES [root@bigboy tmp]#
> Then we scan by trying to make regular connections (-sT) in the extremely fast "insane"
mode (-T 5) from ports 1 to 5000.
[root@bigboy tmp]# nmap -sT -T 5 -p 1-5000 192.168.1.153 Starting nmap V. 3.00 ( www.insecure.org/nmap/ ) Interesting ports on whoknows.my-site-int.com (192.168.1.153): (The 4981 ports scanned but not shown below are in state: closed) Port State Service 21/tcp open ftp 25/tcp open smtp 139/tcp open netbios-ssn 199/tcp open smux 2105/tcp open eklogin 2301/tcp open compaqdiag 3300/tcp open unknown Nmap run completed -- 1 IP address (1 host up) scanned in 8 seconds [root@bigboy tmp]#
Who Has Used My System?
It is always important to know who has logged into your Linux box. This isn't just to help track the activities of malicious users, but mostly to figure out who made the mistake that crashed the system or blew up Apache with a typographical error in the httpd.conf file.
The "Last" Command
The most common command to do this is "last" which will list the last users who logged into the system. Here are some examples: [root@bigboy tmp]# last -100 root pts/0 reggae.simiya.co Thu Jun 19 09:26 still logged in
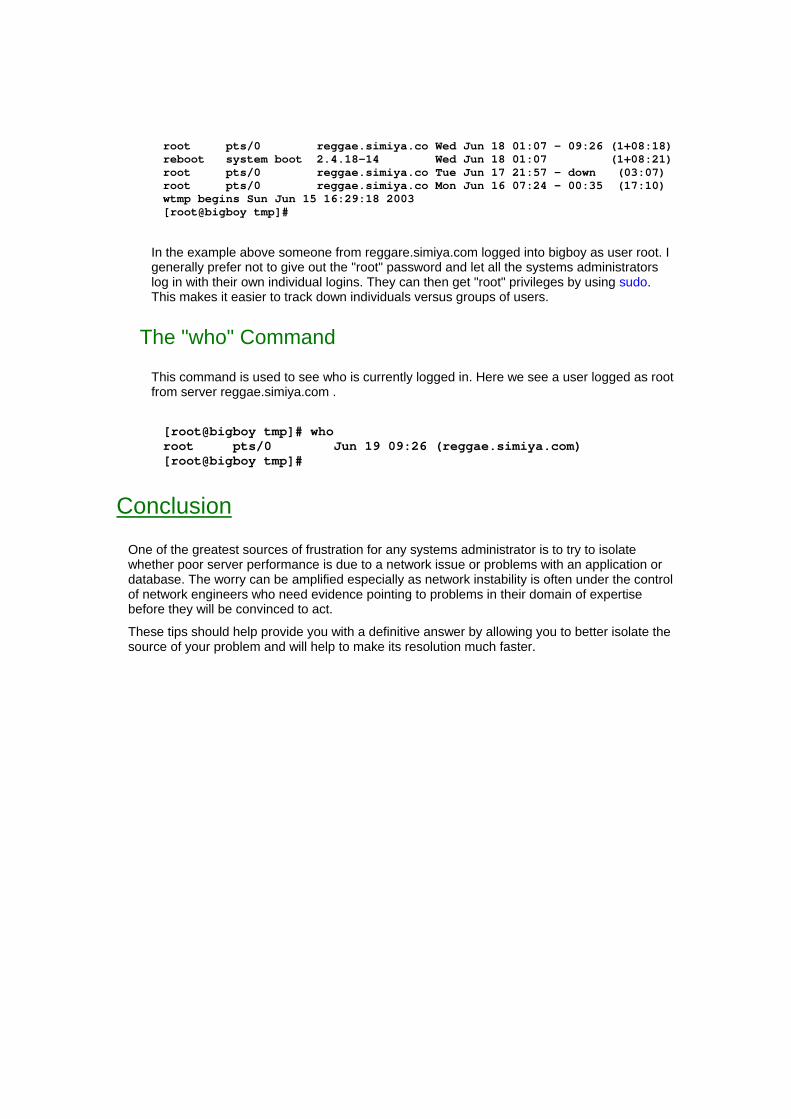
root pts/0 reggae.simiya.co Wed Jun 18 01:07 - 09:26 (1+08:18) reboot system boot 2.4.18-14 Wed Jun 18 01:07 (1+08:21) root pts/0 reggae.simiya.co Tue Jun 17 21:57 - down (03:07) root pts/0 reggae.simiya.co Mon Jun 16 07:24 - 00:35 (17:10) wtmp begins Sun Jun 15 16:29:18 2003 [root@bigboy tmp]#
In the example above someone from reggare.simiya.com logged into bigboy as user root. I generally prefer not to give out the "root" password and let all the systems administrators log in with their own individual logins. They can then get "root" privileges by using sudo. This makes it easier to track down individuals versus groups of users.
The "who" Command
This command is used to see who is currently logged in. Here we see a user logged as root from server reggae.simiya.com .
[root@bigboy tmp]# who root pts/0 Jun 19 09:26 (reggae.simiya.com) [root@bigboy tmp]#
Conclusion
One of the greatest sources of frustration for any systems administrator is to try to isolate whether poor server performance is due to a network issue or problems with an application or database. The worry can be amplified especially as network instability is often under the control of network engineers who need evidence pointing to problems in their domain of expertise before they will be convinced to act.
These tips should help provide you with a definitive answer by allowing you to better isolate the source of your problem and will help to make its resolution much faster.

Chapter 4
Troubleshooting With Syslog = = = = = = = = = = = = = = = = = = = = = = = = = = = = = = = = = = = = = = = = = = = In This Chapter Chapter 4
Troubleshooting With Syslog Syslog Logrotate Conclusion
(c) Peter Harrison, www.linuxhomenetworking.com = = = = = = = = = = = = = = = = = = = = = = = = = = = = = = = = = = = = = = = = = = =
There are hundreds of Linux applications on the market, each with their own configuration files and help pages. This variety makes Linux vibrant, but it also makes Linux system administration daunting. Fortunately, in most cases, Linux applications use the syslog utility to export all their errors and status messages to files located in the /var/log directory.
This can be invaluable in correlating the timing and causes of related events on your system. It is also important to know that applications frequently don't display errors on the screen, but will usually log them somewhere. Knowing the precise message that accompanies an error can be vital in researching malfunctions in product manuals, online documentation and web searches.
Syslog, and the logrotate utility that cleans up log files, are both relatively easy to configure but they frequently doesn't get their fair share of coverage in most texts. I've included it here as a dedicated chapter to both emphasize its importance to your Linux knowledge and prepare you with a valuable skill that will help you troubleshoot all the Linux various applications that will be presented throughout the book
Syslog
About syslog
Syslog is a utility for tracking and logging all manner of system messages from the merely informational to the extremely critical. Each system message sent to the syslog server has two descriptive labels associated with it that makes the message easier to handle.
o The first describes the function (facility) of the application that generated it. For example, applications such as mail and cron generate messages with easily identifiable facilities named "mail" and "cron".

o The second describes the degree of severity of the message. There are eight in all and they are listed in table 4-1:
Table 4-1 Syslog Facilities
Severity Level Keyword Description
0 emergencies System unusable
1 alerts Immediate action required
2 critical Critical condition
3 errors Error conditions
4 warnings Warning conditions
5 notifications Normal but significant conditions
6 informational Informational messages
7 debugging Debugging messages
The files to which syslog will write each type of message received is set in the /etc/syslog.conf configuration file. This file consists of two columns, the first lists the facilities and severities of messages to expect and the second lists the files to which they should be logged. By default, RedHat/Fedora's /etc/syslog.conf file is configured to put most of the messages the file /var/log/messages. Here is a sample:
.info;mail.none;authpriv.none;cron.none /var/log/messages
In this case, all messages of severity "info" and above are logged, but none from the mail, cron or authentication facilities/subsystems. You can make this logging even more sensitive by replacing the line above with one that captures all messages from debug severity and above in the /var/log/messages file. This may be more suitable for troubleshooting.
*.debug /var/log/messages
Certain applications will additionally log to their own application specific log files and directories independent of the syslog.conf file. Here are some common examples:
Files:

/var/log/maillog : Mail /var/log/httpd/access_log : Apache web server page access logs
Directories:
/var/log /var/log/samba : Samba messages /var/log/mrtg : MRTG messages /var/log/httpd : Apache webserver messages
NOTE: The /etc/syslog.conf file is very sensitive to spaces. Only use tabs on lines that don't start with the "#" comment character. Spaces in the file will cause unpredictable results.
Activating Changes To The syslog Configuration File
Changes to /etc/syslog.conf will not take effect until you restart syslog. Issue this command to do so: [root@bigboy tmp]# /etc/init.d/syslog restart
How To View New Log Entries As They Happen
If you want to get new log entries to scroll on the screen as they occur, then you can use this command: [root@bigboy tmp]# tail -f /var/log/messages
Similar commands can be applied to all log files. This is probably one of the best troubleshooting tools available in Linux. Another good command to use apart from "tail" is "grep". Grep will help you search for all occurrences of a string in a log file, you can pipe it through the "more" command so that you only get one screen at a time. Here is an example.
[root@bigboy tmp]# grep string /var/log/messages | more
You can also just use the plain old "more" command to see one screen at a time of the entire log file without filtering with "grep". Here is an example:
[root@bigboy tmp]# more /var/log/messages
Logging Syslog Messages To A Remote Linux Server
Configuring the Linux Syslog Server
By default syslog doesn't expect to receive messages from remote clients. Here's how to configure your Linux server to start listening for these messages.
As we saw previously, syslog checks its /etc/syslog.conf file to determine the expected names and locations of the log files it should create. It also checks the file
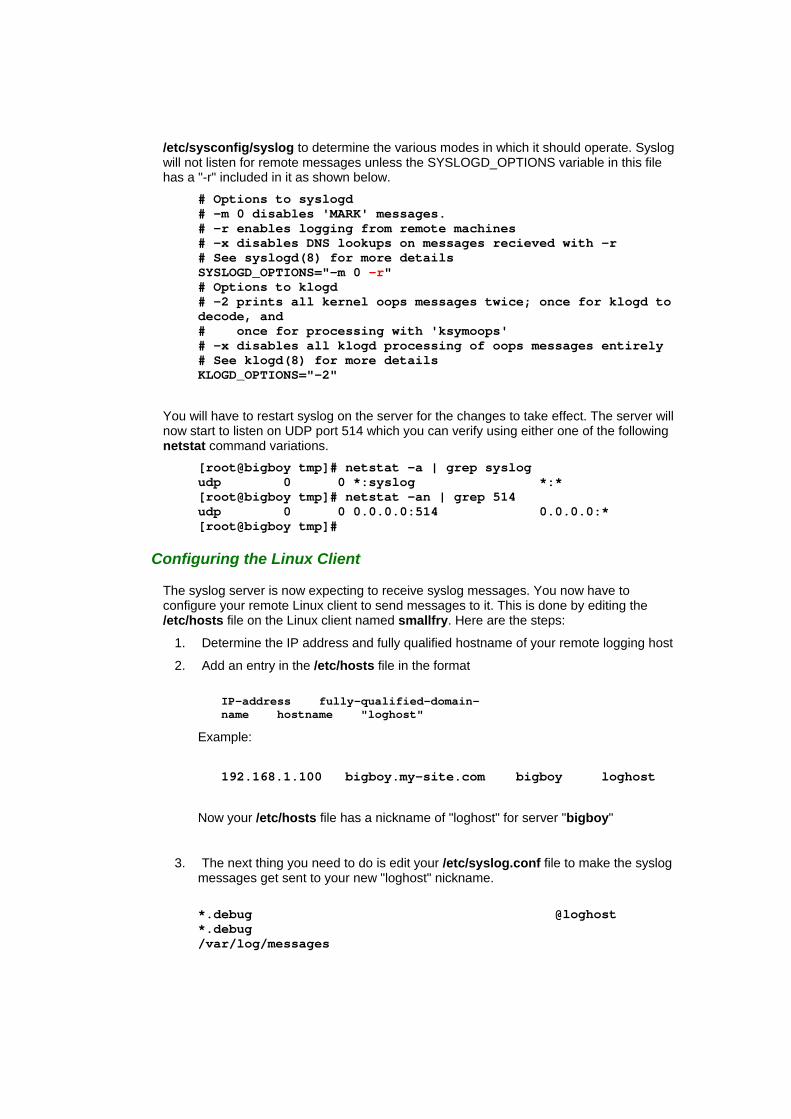
/etc/sysconfig/syslog to determine the various modes in which it should operate. Syslog will not listen for remote messages unless the SYSLOGD_OPTIONS variable in this file has a "-r" included in it as shown below.
# Options to syslogd # -m 0 disables 'MARK' messages. # -r enables logging from remote machines # -x disables DNS lookups on messages recieved with -r # See syslogd(8) for more details SYSLOGD_OPTIONS="-m 0 -r" # Options to klogd # -2 prints all kernel oops messages twice; once for klogd to decode, and # once for processing with 'ksymoops' # -x disables all klogd processing of oops messages entirely # See klogd(8) for more details KLOGD_OPTIONS="-2"
You will have to restart syslog on the server for the changes to take effect. The server will now start to listen on UDP port 514 which you can verify using either one of the following netstat command variations.
[root@bigboy tmp]# netstat -a | grep syslog udp 0 0 *:syslog *:* [root@bigboy tmp]# netstat -an | grep 514 udp 0 0 0.0.0.0:514 0.0.0.0:* [root@bigboy tmp]#
Configuring the Linux Client
The syslog server is now expecting to receive syslog messages. You now have to configure your remote Linux client to send messages to it. This is done by editing the /etc/hosts file on the Linux client named smallfry. Here are the steps:
1. Determine the IP address and fully qualified hostname of your remote logging host
2. Add an entry in the /etc/hosts file in the format
IP-address fully-qualified-domain-name hostname "loghost"
Example:
192.168.1.100 bigboy.my-site.com bigboy loghost
Now your /etc/hosts file has a nickname of "loghost" for server "bigboy"
3. The next thing you need to do is edit your /etc/syslog.conf file to make the syslog messages get sent to your new "loghost" nickname. *.debug @loghost *.debug /var/log/messages

We have now configured all debug messages and higher to be logged to both server bigboy ("loghost") and the local file /var/log/messages. Remember to restart syslog to get the remote logging started.
You can now test to make sure that the syslog server is receiving the messages with a simple test such as restarting the lpd printer daemon and making sure the remote server sees the messages.
Linux Client [root@smallfry tmp]# /etc/init.d/lpd restart Stopping lpd: [ OK ] Starting lpd: [ OK ] [root@smallfry tmp]#
Linux Server
[root@bigboy tmp]# tail /var/log/messages ... ... Apr 11 22:09:35 smallfry lpd: lpd shutdown succeeded Apr 11 22:09:39 smallfry lpd: lpd startup succeeded ... ... [root@bigboy tmp]#
Syslog Configuration and Cisco Network Devices
Syslog reserves facilities "local0" through "local7" for log messages received from remote servers and network devices. Routers, switches, firewalls and load balancers each logging with a different facility can each have their own log files for easy troubleshooting. The Cisco Home Networking companion guide has examples of how to configure syslog to do this with Cisco devices using separate log files for the routers, switches, PIX firewalls, CSS arrowpoints and LocalDirectors.
Syslog and Firewalls
Syslog listens by default on UDP port 514. If you are logging to a remote syslog server via a firewall, you'll have to allow traffic on this port to pass through the security device. Syslog messages usually have both their source and destination UDP ports being 514.
Logrotate
Logrotate is a Linux utility that renames and reuses system error log files on a periodic basis so that they don't occupy excessive disk space.
The /etc/logrotate.conf File
This is logrotate's general configuration file in which you can specify the frequency with which the files are reused.

o You can specify either "weekly" or "daily" rotation parameter. In the case below the weekly option is "commented out" with a "#", allowing for daily updates.
o The "rotate" parameter specifies the number of copies of log files logrotate will maintain. In the case below the 4 copy option is "commented out" with a "#", while allowing 7 copies.
o The "create" parameter creates a new log file after each rotation
Therefore our sample configuration file will create daily archives of ALL the logfiles and store them for seven days. The files will have the following names with "logfile" being current active version: logfile logfile.0 logfile.1 logfile.2 logfile.3 logfile.4 logfile.5 logfile.6
Sample contents of /etc/logrotate.conf
# rotate log files weekly #weekly
# rotate log files daily daily # keep 4 weeks worth of backlogs #rotate 4 # keep 7 days worth of backlogs rotate 7 # create new (empty) log files after rotating old ones create
The /etc/logrotate.d Directory
Most Linux applications that use syslog will put an additional configuration file in this directory to specify the names of the log files to be rotated. It is a good practice to verify that all new applications that you want to use the syslog log have configuration files in this directory. Here are some sample files which define the specific files to be rotated for each application.
The /etc/logrotate.d/syslog File (For General System Logging)
/var/log/messages /var/log/secure /var/log/maillog /var/log/spooler /var/log/boot.log /var/log/cron { sharedscripts postrotate /bin/kill -HUP `cat /var/run/syslogd.pid 2> /dev/null` 2>

/dev/null || true endscript }
The /etc/logrotate.d/apache File (For Apache)
/var/log/httpd/access_log /var/log/httpd/agent_log /var/log/httpd/error_log /var/log/httpd/referer_log { missingok sharedscripts postrotate /bin/kill -HUP `cat /var/run/httpd.pid 2>/dev/null` 2> /dev/null || true endscript }
The /etc/logrotate.d/samba File (for SAMBA)
/var/log/samba/*.log { notifempty missingok sharedscripts copytruncate postrotate /bin/kill -HUP `cat /var/lock/samba/*.pid 2> /dev/null` 2> /dev/null || true endscript }
Activating logrotate
The above logrotate settings will not take effect until you issue the following command to do so: [root@bigboy tmp]# logrotate -f
If you want logrotate to reload only a specifc configuration file, and not all of them, then issue the logrotate command with just that filename as the argument like this: [root@bigboy tmp]# logrotate -f /etc/logrotate.d/syslog
Conclusion
In the next chapter we'll be covering the installation of Linux applications, and the use of syslog will become increasingly important especially in the troubleshooting of; Linux based firewalls which can be configured to ignore and then log all undesirable packets; the Apache web server which logs all application programming errors generated by some of the popular scripting languages such as PERL and PHP; and finally, Linux mail whose configuration files are probably the most frequently edited system documents of all and which correspondingly suffer from the most mistakes.
This syslog chapter should make you more confident to learn more about these applications via experimentation because you'll at least know where to look at the first sign of trouble.

Chapter 5
Installing RPM Software = = = = = = = = = = = = = = = = = = = = = = = = = = = = = = = = = = = = = = = = = = = In This Chapter Chapter 5
Installing RPM Software Where To Get Commonly Used RPMs How to Easily Access CD RPMs With Automount Getting RPMs Using Web Based FTP Getting RPMs Using Command Line Anonymous FTP Getting RPMs Using WGET Automatic Updates With Yum How To Manually Install RPMs How to Install Source RPMs RPM Installation Errors How To List Installed RPMs How To List All The Files Inside An RPM How Uninstall RPMs Which RPMs Will Start Up At Boot Time? Installing Software Using TAR Files Conclusion
(c) Peter Harrison, www.linuxhomenetworking.com = = = = = = = = = = = = = = = = = = = = = = = = = = = = = = = = = = = = = = = = = = =
Fedora Linux software is primarily available using RPM package files for default installations, and source RPMs for non standard installations. As the procedure for installing source RPMs involves compiling source code, they are more easily installed on systems with customized Fedora Linux kernels or device drivers, thereby making life easier for the software developer who wrote the package. Both package types use standardized commands for installing the software contained inside.
Software developers who wish to use a universally recognizable file format across all flavors of Linux will also make their products available as TAR packages. TAR files are generally more difficult to work with than RPM packages as the archived files within them may or may not need to be compiled and the commands to install the software may vary from package to package.
This chapter focuses on the RPM format, which is the format of choice for Fedora Linux software, but also devotes a small section on TAR files near the end as they are still very important.

Where To Get Commonly Used RPMs
Here are three commonly used sources for RPMs:
RPMs On Your Installation CDs
This is usually easier than having to download files from a remote website. See the section about using Automount to easily access your CDROM drive to obtain RPM files.
RPMs Downloaded From Fedora
Using FTP Or Your Web Browswer
You can download RPMS from Fedora using the following link:
http://download.fedora.redhat.com/pub/fedora/linux/core/
You can also use FTP to download Fedora from the download.fedora.redhat.com site. Start your search in the /pub/fedora/linux/core/ directory and move down the directory tree. If you're new to FTP, don't worry, it'll be explained later.
Remember that Fedora RPMs may not work on RedHat operating systems.
Using YUM
The yum program is installed on Fedora systems by default. It allows you to keep the versions of your software up to date by downloading the required packages with the option of installing them afterwards. This is discussed in more detail in a later section.
RPMs Downloaded From rpmfind.net
RedHat and Fedora only has their approved software on their sites. A good general purpose source is RPMfind. Always remember to select the RPM that matches your version of Linux.
http://rpmfind.net/
How to Easily Access CD RPMs With Automount
Using the Linux installation CDs is usually easier, though you run the risk of some of the packages being obsolete due to newer releases on the RedHat or Fedora websites.
It is usually simplest to configure your system to Automount your CDROM. This makes the files on it immediately accessible whenever you access it without having to use the "mount" command. This will make your Linux system act more like Windows.

> Autofs is the package that supports Automount is installed by default with newer versions of RedHat / Fedora Linux. You can check this using the following commands. [root@bigboy tmp]# rpm -qa | grep autofs autofs-3.1.7-33 [root@bigboy tmp]#
> You can then ensure that it runs when the system boots using the chkconfig command. [root@bigboy tmp]# chkconfig autofs on [root@bigboy tmp]#
> There are two automount configuration files in /etc, one called auto.master and the other called auto.misc. My auto.master looks like this: /misc /etc/auto.misc --timeout 60
The default version of this file normally has this line commented out so you'll have to remove the "#" at the beginning of the line for the configuration to take effect when autofs is restarted. The first entry is not the mount point. It's where the set of autofs mount points will be. The second entry is a reference to the default map file /etc/auto.misc and the third option says that the mounted filesystems will automatically unmount themselves 60 seconds after use.
> Edit your auto.misc file to include the CDROM. It should have an entry like this. cdrom -fstype=iso9660,ro,nosuid,nodev :/dev/cdrom
You'll find other entries such as "floppy" and "zip" commented out with a "#". If you need them, just delete the "#". The first column (the "key") is the mount point under directory /misc, so in this case you'll be doing auto mounting when you access /misc/cdrom.
Note: some versions of linux may refer to the CDROM drive in auto.misc as just cd and not cdrom as in the example above. In this case, you may have to find yourself referring to your automounting CDROM as /misc/cd instead.
> Restart autofs. [root@bigboy tmp]# /etc/init.d/autofs restart Stopping automount:[ OK ] Starting automount:[ OK ] [root@bigboy tmp]#
> Insert the CDROM and take a look at the contents. Nothing will appear in /misc at first as the automounting isn't triggered until you actually access the CDROM drive. [root@bigboy tmp]# ll /misc total 0 [root@bigboy tmp]#
We access the drive, and everything appears. [root@bigboy tmp]# ll /misc/cdrom total 113 dr-xr-xr-x 2 root root 2048 Sep 15 1999 BonusChapter dr-xr-xr-x 8 root root 2048 Sep 15 1999 stage dr-xr-xr-x 3 root root 2048 Sep 15 1999 Translations [root@bigboy tmp]#
> When finished, eject the CDROM

[root@bigboy tmp]# eject cdrom
Getting RPMs Using Web Based FTP
There are numerous websites from which you can download Fedora RPM software, two of the most popular ones being the Fedora website and rpmfind.net. The methods used to get the software from either site are simple, but different enough to be treated separately.
Let's say you are running Fedora Core 2 and need to download an RPM for the DHCP server application, you can select either of these methods to get the software.
Using The Fedora Website
o Use your web browser to go to the Fedora link above
o Go to the pub/fedora/linux/core/2/i386/os/Fedora/RPMS directory
o Click on the dhcp-3.0pl2-6.16.i386.rpm link
o Save the file to your hard drive
Using The RPMfind Website
o Go to the rpmfind link
o Type in "dhcp" in the search box
o Click the search button
o Scroll down for the RPM that matches your version of Fedora
o The right hand column has the links with the actual names of the rpm files
o Click the link
o Save the file to Linux box's hard drive
It is best to download RPMs to a directory named "RPM", so you can find them later.
Getting RPMs Using Command Line Anonymous FTP
The Web based method above transparently uses anonymous File Transfer Protocol (FTP). Anonymous FTP allows you to log in and download files from a FTP server using the username "anonymous" and a password that matches your email address. This way anyone can access the data.
> Let's try to FTP the SSH package from download.fedora.redhat.com [root@bigboy tmp]# ftp download.fedora.redhat.com Trying 66.187.232.35... Connected to download.fedora.redhat.com (66.187.232.35). 220 Fedora FTP server ready. All transfers are logged.

Name (download.fedora.redhat.com:root): anonymous 331 Please specify the password. Password: 230 Login successful. Have fun. Using binary mode to transfer files. ftp> pwd 257 "/" ftp> ls 227 Entering Passive Mode (66,187,232,35,57,155) 150 Here comes the directory listing. drwxr-xr-x 3 ftp ftp 4096 Oct 29 15:59 pub 226 Directory send OK. ftp>
> Let's see the available help commands ftp> help Commands may be abbreviated. Commands are:
! $ account append ascii bell binary bye case cd cdup chmod close cr Delete
debug dir disconnect exit form get glob hash help idle image lcd ls macdef Mdelete
Mdir mget mkdir mls mode modtime mput newer nmap nlist ntrans open prompt passive proxy
sendport put pwd quit quote recv reget rstatus rhelp rename reset restart rmdir runique Send
site size status struct system sunique tenex tick trace type user umask verbose ?
ftp>
> The commands you'll most likely use are listed in table 5-1:
Table 5-1 FTP Commands
Command Description
binary Copy files in binary mode
cd Change directory on the FTP server
dir List the names of the files in the current

Command Description
remote directory
exit Bye bye
get Get a file from the FTP server
lcd Change the directory on the local machine
ls Same as dir
mget Same as get, but you can use wildcards like "*"
mput Same as put, but you can use wildcards like "*"
passive Make the file transfer passive mode
put Put a file from the local machine onto the FTP server
pwd Give the directory name on the local machine
> By using the web browsing feature on the website ahead of time, I know that the Fedora
Core 2 RPMs are located in the pub/fedora/linux/core/2/i386/os/Fedora/RPMS/ directory. ftp> cd pub/fedora/linux/core/2/i386/os/Fedora/RPMS/ 250 Directory successfully changed. ftp> ls open* ftp> ls open* 227 Entering Passive Mode (66,187,232,35,58,3) 150 Here comes the directory listing. ... ... -rw-r--r-- ... ... 184281 Oct 28 23:29 openssh-3.6.1p2-34.i386.rpm ... ... 226 Directory send OK. ftp>
> Get the file we need and place it in the local directory /usr/rpm. Also print "#" hash signs on the screen during the download. ftp> hash Hash mark printing on (1024 bytes/hash mark). ftp> lcd /usr/rpm Local directory now /usr/rpm ftp> get openssh-3.6.1p2-34.i386.rpm local: openssh-3.6.1p2-34.i386.rpm remote: openssh-3.6.1p2-34.i386.rpm

227 Entering Passive Mode (66,187,232,35,58,25) 150 Opening BINARY mode data connection for openssh-3.6.1p2-34.i386.rpm (184281 bytes). ################################################################################################################################################################################### 226 File send OK. 184281 bytes received in 3.41 secs (53 Kbytes/sec) ftp>
> You can also use wildcards to download the RPMS you need using the "mget" command. You'll be prompted for each of the matching RPM files. In the case below we just aborted this download by typing "n". ftp> mget openssh-3.6* mget openssh-3.6.1p2-34.i386.rpm? n ftp>
> Bye bye ftp> exit 221 Goodbye. root@bigboy tmp]#
Getting RPMs Using WGET
The "wget" command can be used to quickly download files when you already know the URL at which the RPM is located. This is especially convenient if you are logged into your Linux box from another machine running a web browser. You can browse the download site for the RPM you need, right click on the desired link and select "copy shortcut" (Windows) or "Copy Link Location" (Linux). Once you have done this, you can then select your SSH / Telnet / Linux Terminal login window and type in the command "wget URL". Here is an example downloading an DHCP update from Fedora. [root@bigboy tmp]# wget http://linux.stanford.edu/pub/mirrors/fedora/linux/core/2/i386/os/Fedora/RPMS/dhcp-3.0pl2-6.16.i386.rpm --17:38:36-- ftp://linux.stanford.edu/pub/mirrors/fedora/linux/core/2/i386/os/Fedora/RPMS/dhcp-3.0pl2-6.16.i386.rpm => `dhcp-3.0pl2-6.16.i386.rpm.5' Resolving linux.stanford.edu... done. Connecting to linux.stanford.edu[171.66.2.18]:21... connected. Logging in as anonymous ... Logged in! ==> SYST ... done. ==> PWD ... done. ==> TYPE I ... done. ==> CWD /pub/mirrors/fedora/linux/core/2/i386/os/Fedora/RPMS ... done. ==> PASV ... done. ==> RETR dhcp-3.0pl2-6.16.i386.rpm ... done. Length: 529,890 (unauthoritative) 100%[===============================>] 529,890 889.12K/s ETA 00:00 17:38:36 (889.12 KB/s) - `dhcp-3.0pl2-6.16.i386.rpm.5' saved [529890]

[root@bigboy tmp]#
Automatic Updates With Yum
The yum automatic RPM update program comes as a standard feature of Fedora Core. It has a number of advantages over more traditional up2date package. Here is a short lists of benefits.
> You can configure the URLs of download sites you wish to use. This provides the added advantage of you choosing the most reliable sites in your part of the globe.
> Yum makes multiple attempts to download RPMs before failing. The Fedora Core up2date program crashes after the first failure.
> The Fedora up2date servers seem to be overloaded, which makes download failures very likely.
> Like up2date, yum automatically figures out not only the RPMs packages that need updating, but also all the supporting RPMs. It then installs them all.
Note: Updating packages could cause programs written by you to stop functioning especially if they rely on the older version's features or syntax.
Configuring yum
All the configuration parameters for yum are stored in the /etc/yum.conf file. It has 3 basic sections listed in Table 5-2:
Table 5-2 File Format - yum.conf
Section Description
[main] Logging and fault tolerance parameters which can usually be left alone.
[base] Contains the URL (ftp:// or http://) of a mirror site that contains the Fedora base configuration RPMs.
[updates-released]
Contains the URL (ftp:// or http://) of a mirror site contains Fedora updated RPMs.
The easiest way to determine the exact URLs to use in the "baseurl" parameters of the [base] and [updates-released] sections of the file is to go to the http://fedora.redhat.com/download/mirrors.html website to get a listing of alternative download sites. Browse the sites to find the correct locations of the files.
o The "baseurl" URL for [base] would be that of the "fedora-version/i386/os" sub-directory of your version of Fedora. Make sure there is a "headers" sub-directory here, or else it won't work. There will not be RPMs in this sub-directory.
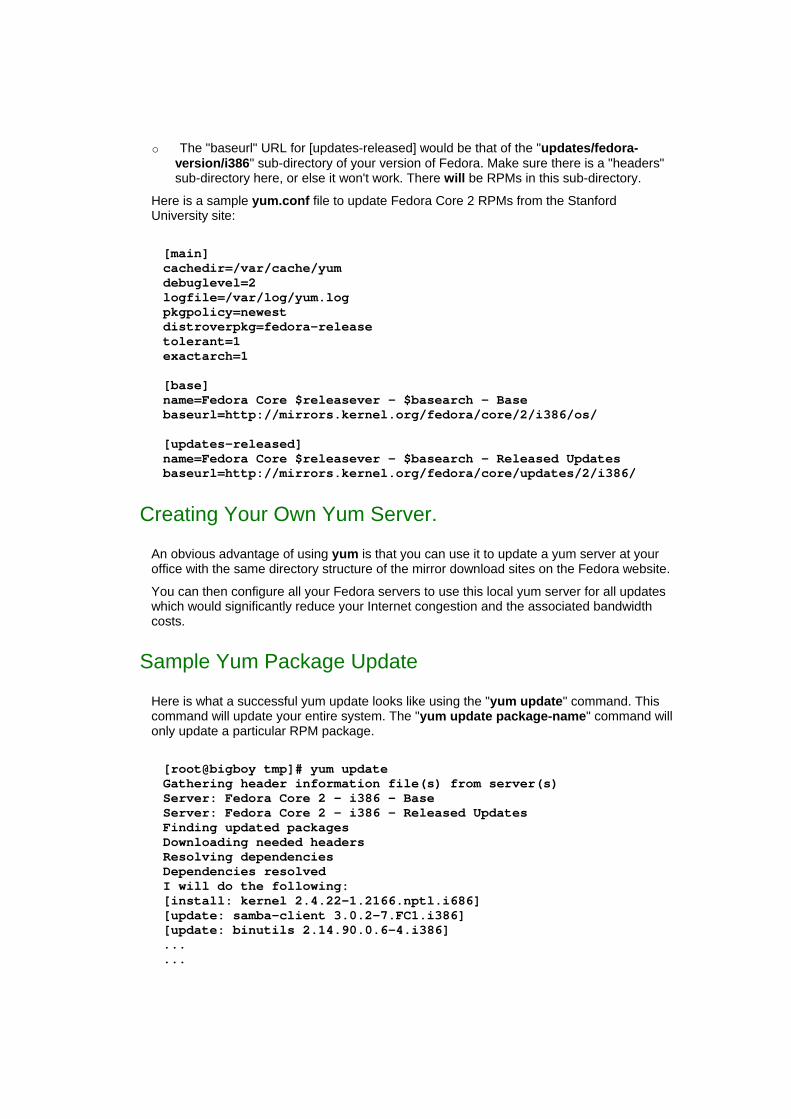
o The "baseurl" URL for [updates-released] would be that of the "updates/fedora-version/i386" sub-directory of your version of Fedora. Make sure there is a "headers" sub-directory here, or else it won't work. There will be RPMs in this sub-directory.
Here is a sample yum.conf file to update Fedora Core 2 RPMs from the Stanford University site:
[main] cachedir=/var/cache/yum debuglevel=2 logfile=/var/log/yum.log pkgpolicy=newest distroverpkg=fedora-release tolerant=1 exactarch=1 [base] name=Fedora Core $releasever - $basearch - Base baseurl=http://mirrors.kernel.org/fedora/core/2/i386/os/ [updates-released] name=Fedora Core $releasever - $basearch - Released Updates baseurl=http://mirrors.kernel.org/fedora/core/updates/2/i386/
Creating Your Own Yum Server.
An obvious advantage of using yum is that you can use it to update a yum server at your office with the same directory structure of the mirror download sites on the Fedora website.
You can then configure all your Fedora servers to use this local yum server for all updates which would significantly reduce your Internet congestion and the associated bandwidth costs.
Sample Yum Package Update
Here is what a successful yum update looks like using the "yum update" command. This command will update your entire system. The "yum update package-name" command will only update a particular RPM package.
[root@bigboy tmp]# yum update Gathering header information file(s) from server(s) Server: Fedora Core 2 - i386 - Base Server: Fedora Core 2 - i386 - Released Updates Finding updated packages Downloading needed headers Resolving dependencies Dependencies resolved I will do the following: [install: kernel 2.4.22-1.2166.nptl.i686] [update: samba-client 3.0.2-7.FC1.i386] [update: binutils 2.14.90.0.6-4.i386] ... ...

... Is this ok [y/N]: y Getting samba-client-3.0.2-7.FC1.i386.rpm samba-client-3.0.2-7.FC1. 100% |=========================| 128 kB 05:01 ... ... ... Running test transaction: Test transaction complete, Success! glibc-common 100 % done 1/127 glibc 100 % done 2/127 Stopping sshd:[ OK ] Starting sshd:[ OK ] bash 100 % done 3/127 mozilla-nspr 100 % done 4/127 sed 100 % done 5/127 ... ... ... Completing update for pango - 65/127 Completing update for samba-client - 66/127 Completing update for binutils - 67/127 ... ... ... Completing update for XFree86-font-utils - 127/127 Kernel Updated/Installed, checking for bootloader Grub found - making this kernel the default Installed: kernel 2.4.22-1.2166.nptl.i686 Updated: pango 1.2.5-4.i386 samba-client 3.0.2-7.FC1.i386 binutils 2.14.90.0.6-4.i386 XFree86-Mesa-libGLU 4.3.0-55.i386 initscripts [root@bigboy tmp]#
Sample Yum Package Installation
Here is a sample installation of an individual package using yum. In this case the RPM installed is the net-snmp-utils. [root@bigboy tmp]# yum install net-snmp-utils Gathering header information file(s) from server(s) Server: Fedora Core 2 - i386 - Base Server: Fedora Core 2 - i386 - Released Updates Finding updated packages Downloading needed headers Resolving dependencies Dependencies resolved I will do the following: [install: net-snmp-utils 5.1-2.1.i386] Is this ok [y/N]: y Getting net-snmp-utils-5.1-2.1.i386.rpm net-snmp-utils-5.1-2.1.i3 100% |=========================| 149 kB 00:00 Running test transaction:

Test transaction complete, Success! net-snmp-utils 100 % done 1/1 Installed: net-snmp-utils 5.1-2.1.i386 Transaction(s) Complete [root@bigboy tmp]#
Some Necessary Facts About Yum
o You can place a list of packages you never want automatically updated in the [main] section. The list must be separated by spaces. Kernel RPMs may be one of the first sets to go on this list as in the example below. [main] exclude=kernel
o Yum does it's updates using TCP port 80 for http:// update URLs and uses passive FTP for ftp:// update URLs in /etc/yum.conf. This will have importance for your firewall rules.
o More details on configuring yum can be obtained by running the "man yum.conf" command.
o Yum runs automatically each day. The cron file is located in /etc/cron.daily/.
o Don't limit yourself to the default yum.conf URLs as they can become overloaded with requests and make yum perform poorly.
How To Manually Install RPMs
There are generally two ways to manually install RPM files. The first method is using a file previously downloaded to your hard drive, and the other is to install the RPM from some sort of removable media such as a CDROM drive.
Using Downloaded Files
o Download the RPMs which usually have a file extension ending with (.rpm) into a temporary directory such as /tmp
o As user root, issue the following command:
[root@bigboy tmp]# rpm -Uvh filename.rpm
Using CDROMs
o Insert the CDROM and check the files in /misc/cdrom/Fedora/RPMS
[root@bigboy tmp]# cd /misc/cdrom/Fedora/RPMS [root@bigboy RPMS]# ls filename* filename.rpm [root@bigboy RPMS]# rpm -Uvh filename.rpm

o When finished, eject the CDROM
[root@bigboy RPMS]# cd /tmp [root@bigboy tmp]# eject cdrom [root@bigboy tmp]#
How to Install Source RPMs
Sometimes the packages you want to install need to be compiled in order to match your kernel version. This requires you to use source RPM files.
> Download the source RPMs or locate them on your CD collection. They usually have a file extension ending with (.src.rpm)
> Run the following commands as root:
Newer Linux Versions
Compiling and installing source RPMs with newer RedHat Linux and Fedora versions can be done simply with the rpmbuild command
[root@bigboy tmp]# rpmbuild --rebuild filename.src.rpm
Here is an example in which we install the tacacs plus package.
[root@bigboy rpm]# rpmbuild --rebuild tac_plus-4.0.3-2.src.rpm Installing tac_plus-4.0.3-2.src.rpm Executing(%prep): /bin/sh -e /var/tmp/rpm-tmp.61594 + umask 022 + cd /usr/src/redhat/BUILD + cd /usr/src/redhat/BUILD + rm -rf tac_plus-4.0.3 + /usr/bin/gzip -dc /usr/src/redhat/SOURCES/tac_plus-4.0.3.tgz + tar -xvvf - ... ... ... + umask 022 + cd /usr/src/redhat/BUILD + rm -rf tac_plus-4.0.3 + exit 0 [root@bigboy rpm]#
The compiled RPM file can now be found in one of the architecture subdirectories under /usr/src/redhat/RPMS directory. For example, if you compiled an i386 architecture version of the RPM it will placed in the i386 subdirectory.

You will then have to install the compiled RPMs found in their respective subdirectories as you normally would.
Older Linux Versions
The process is more complicated with older RedHat Linux versions. The source files are first exported into the directory /usr/src/redhat/SPECS with the rpm command. You then have to run the rpm command again to compile the source files into a regular RPM file which will be placed in either the /usr/src/packages/RPMS/i386/ or the /usr/src/redhat/RPMS/i386/ directories.
You then have to install the new RPM file from this directory. [root@bigboy tmp]# rpm -Uvh filename.src.rpm [root@bigboy tmp]# cd /usr/src/redhat/SPECS [root@bigboy SPECS]# rpm -ba filename [root@bigboy SPECS]# cd /usr/src/redhat/RPM/i386 [root@bigboy i386]# rpm -Uvh filename.rpm
RPM Installation Errors
Fedora digitally signs all their RPM files so it's best to import their public encryption key beforehand so that the RPM installation program will be able to correctly verify the validity of the RPM file. This can be done using the rpm command as seen below. It is a good idea to import both the RedHat and Fedora keys.
[root@bigboy tmp]# rpm --import /usr/share/rhn/RPM-GPG-KEY [root@bigboy tmp]# rpm --import /usr/share/rhn/RPM-GPG-KEY-fedora [root@bigboy tmp]#
If you don't install the keys you'll get a "DSA signature" warning that alerts you to the fact that the RPM file may be bogus.
[root@bigboy tmp]# rpm -Uvh dhcp-3.0pl2-6.16.i386.rpm warning: dhcp-3.0pl2-6.16.i386.rpm: V3 DSA signature: NOKEY, key ID 4f2a6fd2 Preparing... ########################################### [100%] 1:dhcp ########################################### [100%] [root@bigboy tmp]#
The RPM installation program will also alert you to bad keys if you download a corrupted file like the one below. [root@bigboy tmp]# rpm -Uvh dhcp-3.0pl2-6.16.i386.rpm

error: dhcp-3.0pl2-6.16.i386.rpm: V3 DSA signature: BAD, key ID 4f2a6fd2 error: dhcp-3.0pl2-6.16.i386.rpm cannot be installed [root@bigboy tmp]#
How To List Installed RPMs
> The rpm -qa command will list all the packages installed on your system [root@bigboy tmp]# rpm -qa perl-Storable-1.0.14-15 smpeg-gtv-0.4.4-9 e2fsprogs-1.27-9 libstdc++-3.2-7 audiofile-0.2.3-3 ... ... ... [root@bigboy tmp]#
> You can also pipe the output of this command through the grep command if you are interested in only a specific package. In this example we are looking for all packages containing the string "ssh" in the name, regardless of case ("-i" meaning ignore case) [root@bigboy tmp]# rpm -qa | grep -i ssh openssh-server-3.4p1-2 openssh-clients-3.4p1-2 openssh-askpass-gnome-3.4p1-2 openssh-3.4p1-2 openssh-askpass-3.4p1-2 [root@bigboy tmp]#
How To List All The Files Inside An RPM Listing Files For Already Installed RPMs
You can use the "-ql" qualifier to list all the files associated with an installed RPM. In this example we test to make sure that the NTP package is installed using the"-qa" qualifier, then we use the "-ql" qualifier to get the file listing.
[root@bigboy tmp]# rpm -qa ntp ntp-4.1.2-0.rc1.2 cd /tmp [root@bigboy tmp]# rpm -ql ntp /etc/ntp /etc/ntp.conf /etc/ntp/drift /etc/ntp/keys ... ... ...

/usr/share/doc/ntp-4.1.2/rdebug.htm /usr/share/doc/ntp-4.1.2/refclock.htm /usr/share/doc/ntp-4.1.2/release.htm /usr/share/doc/ntp-4.1.2/tickadj.htm [root@bigboy tmp]#
Listing Files In RPM Files
You can use the "-qpl" qualifier to list all the files in a RPM file. [root@bigboy updates]# rpm -qpl dhcp-3.0pl1-23.i386.rpm /etc/rc.d/init.d/dhcpd /etc/rc.d/init.d/dhcrelay /etc/sysconfig/dhcpd /etc/sysconfig/dhcrelay ... ... ... /usr/share/man/man8/dhcrelay.8.gz /var/lib/dhcp /var/lib/dhcp/dhcpd.leases [root@bigboy updates]#
How Uninstall RPMs
The rpm -e command will erase an installed package. The package name given must match that listed in the rpm -qa command as the version of the package is important.
[root@bigboy tmp]# rpm -e package-name
Which RPMs Will Start Up At Boot Time?
The best way to view and configure this is by using the chkconfig command. A more detailed explanation will be provided in Chapter 6 which covers the Linux boot process.
Installing Software Using TAR Files
Another popular software installation file format is the TAR file, which can frequently be obtained from the websites of software developers, and online software libraries such as www.sourceforge.net.
The Linux tar command is used to archive files and typically have a ".tar" file extension in the file name. These files are also frequently compressed in the gzip format and when they do, their file extensions will end with ".tar.gz" or ".tgz". The commands to extract the data from either type are similar. When a tar file is uncompressed the command to extract the data is "tar -xvf filename.tar". When the archive is compressed the command to use is "tar -xzvf filename.tar.gz".

The tar file installation process usually requires you to first uncompress and extract the contents of the archive in a local subdirectory, which frequently has the same name as the tar file. The subdirectory will usually contain a file called README or INSTALL which will outline all the customized steps to install the software.
Here are the initial steps to take to install tar based software:
1. Issue the tar command to extract the files. [root@bigboy tmp]# tar -xvzf linux-software-1.3.1.tar.gz linux-software-1.3.1/ linux-software-1.3.1/plugins-scripts/ ... ... ... linux-software-1.3.1/linux-software-plugins.spec [root@bigboy tmp]#
This will create a subdirectory with the installation files inside. [root@bigboy tmp]# ls linux-software-1.3.1 linux-software-1.3.1.tar.gz [root@bigboy tmp]#
2. Use the "cd" command to enter the subdirectory and follow the directions listed in the INSTALL and README files. [root@bigboy tmp]# cd linux-software-1.3.1 [root@bigboy linux-software-1.3.1]# ls COPYING install-sh missing plugins depcomp LEGAL mkinstalldirs plugins-scripts FAQ lib linux-software.spec README Helper.pm Makefile.am linux-software.spec.in REQUIREMENTS INSTALL Makefile.in NEWS subst.in [root@bigboy linux-software-1.3.1]#
Software installation with TAR files can be frustrating, frequently requiring the installation of other supporting TAR files each with their own customized installation commands. RPMs, with the single standardized command format, are usually easier to use and may be the better method to use for newer Linux users.
Conclusion
This is just the beginning. If the software you install is intended to make your Linux machine permanently run an application such as a web server, mail server, or any other type of server, then you will have to know how to get the software activated when the system reboots. This is covered in Chapter 6. Subsequent chapters will then cover the use, configuration, testing and troubleshooting of many of the most popular Linux server applications used today.

Chapter 6
The Linux Boot Process = = = = = = = = = = = = = = = = = = = = = = = = = = = = = = = = = = = = = = = = = = = In This Chapter Chapter 6
The Linux Boot Process The RedHat / Fedora Boot Sequence Determining The Default Boot runlevel Get A GUI Console Get A Basic Text Terminal Without Exiting The GUI System Shutdown And Rebooting How To Set Which Programs Run At Each runlevel Conclusion
(c) Peter Harrison, www.linuxhomenetworking.com = = = = = = = = = = = = = = = = = = = = = = = = = = = = = = = = = = = = = = = = = = = Learning how Linux boots up is critical. Once you have this information you can use it to alter the type of login screen you get as well as which programs start up. Read on for the details.
The RedHat / Fedora Boot Sequence When RedHat / Fedora boots, the boot process will run a number of scripts located in subdirectories under directory /etc/rc.d. The boot process first runs the scripts found in /etc/rc.d/rc1.d which provides only the most basic functionality and the ability to only handle a single user. This stage is known as "single user mode". After completing this first phase, the boot process will run scripts in only one of the other directories depending on the startup mode or "run level". These are listed in Table 6-1.
Table 6-1 Linux Runlevels
Mode/Run Level Directory Run Level Description
0 1 2 3 4 5 6
/etc/rc.d/rc0.d /etc/rc.d/rc1.d /etc/rc.d/rc2.d /etc/rc.d/rc3.d /etc/rc.d/rc4.d /etc/rc.d/rc5.d /etc/rc.d/rc6.d
Halt Single-user mode Not used (user-definable) Full multi-user mode (No GUI interface) Not used (user-definable) Full multi-user mode (With GUI interface) Reboot

Determining The Default Boot runlevel
The default boot runlevel is set in the file /etc/inittab with the "initdefault" variable. When set it to "3", the system boots up with the text interface on the VGA console; when set to "5", you get the GUI. Here is a sample snippet of the file: (Delete the initdefault line you don't need)
# Default runlevel. The runlevels used by RHS are: # 0 - halt (Do NOT set initdefault to this) # 1 - Single user mode # 2 - Multiuser, without NFS (The same as 3, if you do not have networking) # 3 - Full multiuser mode # 4 - unused # 5 - X11 # 6 - reboot (Do NOT set initdefault to this) # id:3:initdefault: # Console Text Mode id:5:initdefault: # Console GUI Mode
> Most home users boot up with a Windows like GUI (Run Level 5)
> Most techies will tend to boot up with a plain text based command line type interface (Run level 3)
> Changing "initdefault" from 3 to 5 or vice-versa will only have an effect upon your next reboot. See the section below on how to get a GUI login all the time until the next reboot.
Get A GUI Console You have two main options if your system comes up in a text terminal mode on the VGA console and you want to get the GUI.
> Manual Method: You can start the X terminal GUI application each time you need it by running the "startx" command at the VGA console. Remember that when you log out you will get the regular text based console again. [root@bigboy tmp]# startx
> Automatic Method: You can have Linux automatically start the X terminal GUI console for every login attempt until your next reboot by using the init command. You will need to edit your "initdefault" variable in your /etc/inittab file as mentioned in the preceding section to keep this functionality even after you reboot. [root@bigboy tmp]# init 5
When the CPU capacity or available memory on your server is low or you want to maximize all system resources then you may want to operate in text mode runlevel 3 most of the time only using the GUI only as necessary with the startx command.
Servers that double as personal workstations, or servers that may have to be operated for an extended period of time by relatively non technical staff, may need to be run at runlevel 5 all the time through the init 5 command. Remember you can make runlevel 5 permanent even after a reboot by editing the /etc/inittab file.

Get A Basic Text Terminal Without Exiting The GUI
Using A GUI Terminal Window
You can open a GUI based window with a command prompt inside by doing the following:
o Click on the "Red Hat" Start button in the bottom left hand corner of the screen.
o Click on Systems Tools, then Terminal
Using Virtual Terminals
Linux actually has seven virtual console sessions running on the VGA console.
o Sessions one through six are text sessions. If the GUI is running, it will run under session number seven.
o You can step through each text session by using the <CTL> <ALT> <F1> through <F6> key sequence. You'll get a new login prompt for each attempt.
o You can get the GUI login with the sequence <CTL> <ALT> <F7>, only in run level 5, or if the GUI is running after launching "startx"
System Shutdown And Rebooting
The "init" command will allow you to change the current runlevel.
Halt / Shutdown The System
[root@bigboy tmp]# init 0
Reboot The System
[root@bigboy tmp]# init 6
How To Set Which Programs Run At Each runlevel
Most RedHat / Fedora packages place a startup script in the directory /etc/init.d and place symbolic links (pointers) to this script in the appropriate /etc/rc.d/rc.X directory. The typical home/SOHO user doesn't have to be a scripting / symbolic linking guru to make sure everything works right because RedHat / Fedora comes with a nifty utility called "chkconfig" to do it for you.
Use this command to get a full listing of packages listed in /etc/init.d and the runlevels at which they will be "on" or "off"

[root@bigboy tmp]# chkconfig --list keytable 0:off 1:on 2:on 3:on 4:on 5:on 6:off atd 0:off 1:off 2:off 3:on 4:on 5:on 6:off syslog 0:off 1:off 2:on 3:on 4:on 5:on 6:off gpm 0:off 1:off 2:on 3:on 4:on 5:on 6:off kudzu 0:off 1:off 2:off 3:on 4:on 5:on 6:off wlan 0:off 1:off 2:on 3:on 4:on 5:on 6:off sendmail 0:off 1:off 2:off 3:on 4:off 5:on 6:off netfs 0:off 1:off 2:off 3:on 4:on 5:on 6:off network 0:off 1:off 2:on 3:on 4:on 5:on 6:off random 0:off 1:off 2:on 3:on 4:on 5:on 6:off ... ...
Chkconfig Examples
You can use chkconfig to change runlevels for particular packages. Here we see Sendmail will start with a regular startup at runlevel 3 or 5. Let's change it so that Sendmail doesn't startup at boot.
Use Chkconfig To Get A Listing Of Sendmail's Current Startup Options
[root@bigboy tmp]# chkconfig --list | grep mail sendmail 0:off 1:off 2:off 3:on 4:off 5:on 6:off [root@bigboy tmp]#
Switch Off Sendmail Starting Up In Levels 3 and 5
[root@bigboy tmp]# chkconfig --level 35 sendmail off [root@bigboy tmp]#
Doublecheck That Sendmail Will Not Startup
[root@bigboy tmp]# chkconfig --list | grep mail sendmail 0:off 1:off 2:off 3:off 4:off 5:off 6:off [root@bigboy tmp]#
Turn it back on again
[root@bigboy tmp]# chkconfig --level 35 mail on [root@bigboy tmp]# chkconfig --list | grep mail sendmail 0:off 1:off 2:off 3:on 4:off 5:on 6:off [root@bigboy tmp]#
Using chkconfig To Improve Security
A default Fedora installation automatically starts a number of daemons that you may not necessarily need for a web server. This usually results in your system listening on a variety of unexpected TCP/IP ports which could be used as doors into your system by hackers.
The screen output of the "netstat -an" command below shows a typical case. Some ports are relatively easy to recognize. TCP ports 25 and 22 are for mail and SSH respectively,

but some others are less obvious. Should you use the chkconfig command and the scripts in the /etc/init.d directory to shut these down permanently or not? [root@bigboy tmp]# netstat -an Active Internet connections (servers and established) Proto Recv-Q Send-Q Local Address Foreign Address State tcp 0 0 0.0.0.0:32768 0.0.0.0:* LISTEN tcp 0 0 127.0.0.1:32769 0.0.0.0:* LISTEN tcp 0 0 0.0.0.0:111 0.0.0.0:* LISTEN tcp 0 0 127.0.0.1:631 0.0.0.0:* LISTEN tcp 0 0 127.0.0.1:25 0.0.0.0:* LISTEN tcp 0 0 :::22 :::* LISTEN udp 0 0 0.0.0.0:32768 0.0.0.0:* udp 0 0 0.0.0.0:930 0.0.0.0:* udp 0 0 0.0.0.0:68 0.0.0.0:* udp 0 0 0.0.0.0:111 0.0.0.0:* udp 0 0 0.0.0.0:631 0.0.0.0:* ... ... [root@bigboy tmp]#
For example, how do you know which startup script is responsible for TCP port 111? The answer is to use the "lsof" command which lists all open or actively used files and can be given additional options to extend its scope to include the TCP/IP protocol stack.
In the examples below we see that TCP ports 111 and 32769, and UDP port 123 are being used by the portmap, xinetd and ntp daemons respectively. The portmap daemon is required for the operation of NFS and NIS, topics that are covered in Chapters 30 and 31. Portmap also has many known security flaws that makes it advisable to be run on a secured network If you don't need any of these three applications, then it's best to shutdown portmap permanently. NTP, which is covered in Chapter 25, is required for synchronizing your time with a reliable time source, and may be necessary. A number of network applications are reliant on xinetd, as explained in Chapter 17, and it may me required for their operation. [root@ bigboy tmp]# lsof -i tcp:111 COMMAND PID USER FD TYPE DEVICE SIZE NODE NAME portmap 1165 rpc 4u IPv4 2979 TCP *:sunrpc (LISTEN) [root@ bigboy tmp # [root@bigboy tmp]# lsof -i tcp:32769 COMMAND PID USER FD TYPE DEVICE SIZE NODE NAME xinetd 1522 root 5u IPv4 2764 TCP probe-001:32769 (LISTEN) [root@bigboy tmp]# [root@probe-002 root]# lsof -i udp:123 COMMAND PID USER FD TYPE DEVICE SIZE NODE NAME ntpd 1321 ntp 4u IPv4 3390 UDP *:ntp ... ... [root@probe-002 root]#
In some cases it's tricky to determine the application based on the results of the lsof command. In the example below, we've discovered that TCP port 32768 is being used by rpc.statd, but there is no rpc.statd file in the /etc/init.d directory. The simple solution is to use the grep command to search all the files for the string rpc.statd to determine which

one is responsible for its operation. We soon discover that the nfslock daemon uses it. If you don't need nfslock, then shut it down permanently. [root@bigboy tmp]# lsof -i tcp:32768 COMMAND PID USER FD TYPE DEVICE SIZE NODE NAME rpc.statd 1178 rpcuser 6u IPv4 2400 TCP *:32768 (LISTEN) [root@bigboy tmp]# ls /etc/init.d/rpc.statd ls: /etc/init.d/rpc.statd: No such file or directory [root@bigboy tmp]# grep -i statd /etc/init.d/* /etc/init.d/nfslock:[ -x /sbin/rpc.statd ] || exit 0 ... ... [root@bigboy tmp]#
As a rule of thumb, applications listening only on the loopback interface (IP address 127.0.0.1) are usually the least susceptible to network attack and probably don't need to be stopped for network security reasons. Those listening on all interfaces, depicted as IP address 0.0.0.0, are naturally more vulnerable and their continued operation should be dependent on your server's needs. I usually shutdown nfs, nfslock, netfs, portmap, and cups printing as standard practice on Internet servers. I keep sendmail running as it is always needed to send and receive mail (See Chapter 22 for details). Your needs may be different.
Remember to thoroughly research your options before choosing to shut down an application. Use the Linux "man" pages, reference books and the Internet for information. Unpredictable results are always undesirable.
Shutting down applications is only a part of server security, firewalls, physical access restrictions, password policies and patch updates need to be considered. Full coverage of server and network security is beyond the scope of this book, but you should always have a security reference guide on hand to guide your final decisions.
Final Tips On chkconfig o In most cases you'll want to modify runlevels 3 and 5 simultaneously AND with the
same values.
o Don't add/remove anything to other runlevels unless you absolutely know what you are doing. Don't experiment.
o Chkconfig doesn't start the programs in the /etc/init.d directory, it just configures them to be started or ignored when the system boots up. The commands for starting and stopping the programs covered in this book are covered in each respective chapter.
Conclusion The topics discussed in this chapter may seem simple, but like syslog that was covered in Chapter 4, they are an essential part of Linux administration that gets frequently overlooked especially when new software is installed.
Whenever possible, always try to reboot your system to make sure all the newly installed applications startup correctly. Sometimes they may start but give errors listed only in the /var/log directory. Taking the time to configure and test your startup scripts could prevent you from being woken up in the middle of the night while you are on vacation! It is really important.

Chapter 7
Configuring The DHCP Server = = = = = = = = = = = = = = = = = = = = = = = = = = = = = = = = = = = = = = = = = = = In This Chapter Chapter 7
Configuring The DHCP Server Download and Install The DHCP Package The /etc/dhcpd.conf File Upgrading Your DHCP Server How to get DHCP started Modify Your Routes for DHCP on Linux Server Configuring Linux clients to use DHCP Simple DHCP Troubleshooting
(c) Peter Harrison, www.linuxhomenetworking.com = = = = = = = = = = = = = = = = = = = = = = = = = = = = = = = = = = = = = = = = = = =
Normally if you have a cable modem or DSL you get your home PC's IP address dynamically assigned from your service provider. If you install a home cable/DSL router between your modem and home network your PC will most likely get its IP address at boot time from the home router instead. You can choose to disable the DHCP server feature on your home router and set up a Linux box as the DHCP server.
This chapter only covers the configuration of a DHCP server that provides IP addresses. The configuration of a Linux DHCP client that gets its IP address from a DHCP server is covered in Chapter 2 on Linux Networking.
Download and Install The DHCP Package Most RedHat and Fedora Linux software products are available in the RPM format. Downloading and installing RPMs isn't hard. If you need a refresher, Chapter 4, the RPM chapter, covers how to do this in detail.
When searching for the file, remember that the DHCP server RPM's filename usually starts with the word "dhcp" followed by a version number like this: dhcp-3.0.1rc14-1.i386.rpm.
The /etc/dhcpd.conf File When DHCP starts it reads the file /etc/dhcpd.conf. It uses the commands here to configure your network. Many RPM packages don't automatically install a /etc/dhcpd.conf file, but you can find a sample copy of dhcpd.conf in the following directory which you can always use as a guide.

/usr/share/doc/dhcp-<version-number>/dhcpd.conf.sample
You will have to copy the sample dhcpd.conf file to the /etc directory and then you'll have to edit it. Here is the command to do the copying for the version 3.0p11 RPM file: [root@bigboy tmp]# cp /usr/share/doc/dhcp-3.0pl1/dhcpd.conf.sample \ /etc/dhcpd.conf
Here is a quick explanation of the dhcpd.conf file: Most importantly, there must be a "subnet" section for each interface on your Linux box.
ddns-update-style interim # Redhat Version 8.0+ ignore client-updates # Fedora Core 1+ subnet 192.168.1.0 netmask 255.255.255.0 {
# The range of IP addresses the server # will issue to DHCP enabled PC clients # booting up on the network range 192.168.1.201 192.168.1.220; # Set the amount of time in seconds that # a client may keep the IP address default-lease-time 86400; max-lease-time 86400; # Set the default gateway to be used by # the PC clients option routers 192.168.1.1;
# Don't forward DHCP requests from this # NIC interface to any other NIC # interfaces option ip-forwarding off; # Set the broadcast address and subnet mask # to be used by the DHCP clients option broadcast-address 192.168.1.255; option subnet-mask 255.255.255.0; # Set the DNS server to be used by the # DHCP clients

option domain-name-servers 192.168.1.100; # Set the NTP server to be used by the # DHCP clients option nntp-server 192.168.1.100; # If you specify a WINS server for your Windows clients, # you need to include the following option in the dhcpd.conf file: option netbios-name-servers 192.168.1.100;
} # # List an unused interface here # subnet 192.168.2.0 netmask 255.255.255.0 { }
# You can also assign specific IP addresses based on the clients' # ethernet MAC address as follows (Host's name is "smallfry": host smallfry {
hardware ethernet 08:00:2b:4c:59:23; fixed-address 192.168.1.222;
}
There many more options statements you can use to configure DHCP. These include telling the DHCP clients where to go for services such as finger and IRC. Check the dhcp-options man page after you do your install. The command to do this follows:
[root@bigboy tmp]# man dhcp-options
Upgrading Your DHCP Server Always refer to this sample file after doing an upgrade as new required commands may have been added. For example, in Redhat Version 8.0 (dhcpd version 3.0b2pl11) you will need to add the line at the very top of the config file or else you will get errors: ddns-update-style interim
How to get DHCP started > Some older Fedora / RedHat versions of the DHCP server will fail unless there is an
existing dhcpd.leases file. Use the command "touch /var/lib/dhcp/dhcpd.leases" to create the file if it does not exist. [root@bigboy tmp]# touch /var/lib/dhcp/dhcpd.leases
> Use the chkconfig command to get DHCP configured to start at boot:

[root@bigboy tmp]# chkconfig dhcpd on
> Use the /etc/init.d/dhcpd script to start/stop/restart DHCP after booting [root@bigboy tmp]# /etc/init.d/dhcpd start [root@bigboy tmp]# /etc/init.d/dhcpd stop [root@bigboy tmp]# /etc/init.d/dhcpd restart
> Remember to restart the DHCP process every time you make a change to the conf file for the changes to take effect on the running process. You also can test whether the DHCP process is running with the following command, you should get a response of plain old process ID numbers: [root@bigboy tmp]# pgrep dhcpd
> Finally, always remember to set your PC to get its IP address via DHCP.
Modify Your Routes for DHCP on Linux Server
When a DHCP configured PC boots, it will request its IP address from the DHCP server. It does this by sending a standardized DHCP broadcast request packet to the DHCP server with a source IP address of 255.255.255.255.
You will have to add a route for this address on your Linux DHCP server so that it knows the interface on which to send the reply, if not, it sends it to the default gateway. (In both examples below, we're assuming that DHCP requests will be coming in on interface eth0).
Note: More information on adding Linux routes and routing may be found in Chapter 2 on Linux Networking.
Note: You can't run your DHCP sever on multiple interfaces as you can only have one route to network 255.255.255.255. If you try to do it, you'll discover that DHCP serving working on only one interface.
Temporary solution
o Add the route to 255.255.255.255 from the command line.
[root@bigboy tmp]# route add -host 255.255.255.255 dev eth0
o If the message 255.255.255.255: Unknown host appears then try adding the following entry to your /etc/hosts file: 255.255.255.255 dhcp
Then, try: route add -host dhcp dev eth0

Permanent Solution
o Edit /etc/sysconfig/static-routes, which is read on booting, and add the following line:
eth0 host 255.255.255.255
o Another permanent method is to add the "route add" statements to your /etc/rc.local file which is executed at the very end of the Linux boot process.
o If this doesn't work properly try adding the following entry to your /etc/hosts file:
255.255.255.255 dhcp
Then, try: eth0 host dhcp
Configuring Linux Clients To Use DHCP As we learnt in Chapter 2, Linux NIC cards can be configured to dynamically get their IP addresses from a DHCP server by editing the interface scripts in the /etc/sysconfig/network-scripts directory. Please refer to this chapter if you need a quick refresher on how to configure a Linux DHCP client.
Configuring Windows Clients To Use DHCP Fortunately Windows defaults to using DHCP for all its NIC cards so you don't have to worry about doing any reconfiguration.
Simple DHCP Troubleshooting The most common problems with DHCP usually isn't related to the server, once the server is configured correctly there is no need to change any settings and it therefore runs reliably. The problems usually occur at the DHCP client's end for a variety of reasons. Here are some simple troubleshooting steps you can go through to ensure that DHCP is working correctly on your network.
DHCP Clients Obtaining 169.254.0.0 Addresses Whenever Microsoft DHCP clients are unable to contact their DHCP server they default to selecting their own IP address from the 169.254.0.0 network until the DHCP server becomes available again. This is frequently referred to as Automatic Private IP Addressing (APIPA). Here are some steps you can go through to resolve the problem.
o Ensure your DHCP server is configured correctly and use the pgrep command discussed above to make sure the DHCP process is running. Pay special attention to your 255.255.255.255 route, especially if your DHCP server has multiple interfaces.
o Give your DHCP client a static IP address from the same range that the DHCP server is supposed to provide. See if you can ping the DHCP server. If you cannot, double check your cabling and your NIC cards.
Error Found When Upgrading From Redhat 7.3 To 8.0

This dhcpd startup error is caused by not having the following line at the very top of your /etc/dhcpd.conf file:
ddns-update-style interim
Sample error:
Starting dhcpd: Internet Software Consortium DHCP Server V3.0pl1 Copyright 1995-2001 Internet Software Consortium. All rights reserved. For info, please visit http://www.isc.org/products/DHCP ** You must add a ddns-update-style statement to /etc/dhcpd.conf. To get the same behaviour as in 3.0b2pl11 and previous versions, add a line that says "ddns-update-style ad-hoc;" Please read the dhcpd.conf manual page for more information. ** ... ... ... exiting. [FAILED]
Conclusion
In most home based networks, a DHCP server isn't necessary as the DSL router / firewall usually has DHCP capabilities, but is an interesting project to try. Just remember to make sure that the range of IP addresses issued by all DHCP servers on a network don't overlap as it could possibly cause unexpected errors. You may want to even disable the router / firewall's DHCP server capabilities to experiment with your new Linux server.
A DHCP server may be invaluable in an office environment where the time and cost of getting a network engineer to get the work done may make it simpler for Linux systems administrators to do it by themselves.
Creating a Linux DHCP server is straightforward and touches all the major themes in the previous chapters. Now it's time to try something harder, but before we do, we'll do a quick refresher on how to create the Linux users who'll be using many of the applications outlined in the rest of the book.

Chapter 8
Adding Linux Users = = = = = = = = = = = = = = = = = = = = = = = = = = = = = = = = = = = = = = = = = = = In This Chapter Chapter 8
Adding Linux Users Who Is The Super User? How To Add Users How To Change Passwords How To Delete Users How To Tell The Groups To Which A User Belongs Conclusion
(c) Peter Harrison, www.linuxhomenetworking.com = = = = = = = = = = = = = = = = = = = = = = = = = = = = = = = = = = = = = = = = = = =
One of the most important activities in administering a Linux box is the addition of users. Here you'll find some simple examples to provide a foundation for future chapters, though a more detailed description of the process is beyond the scope of this book. You may use the command "man useradd" to get the help pages on adding users with the useradd command or the "man usermod" to become more familiar with modifying users with the usermod command.
Who Is The Super User? The super user with unrestricted access to all system resources and files is the user named "root". You will need to log in as user root to add new users to your Linux box
How To Add Users Adding users takes some planning, read through the steps below before starting:
> Arrange your list of users into groups by function. In this example there are three groups "parents", "children" and "soho". Parents Children Soho Paul Alice Accounts Jane Derek Sales
> Add the Linux groups to your server: [root@bigboy tmp]# groupadd parents [root@bigboy tmp]# groupadd children [root@bigboy tmp]# groupadd soho

> Add the Linux users, assign them to their respective groups [root@bigboy tmp]# useradd -g parents paul [root@bigboy tmp]# useradd -g parents jane [root@bigboy tmp]# useradd -g children derek [root@bigboy tmp]# useradd -g children alice [root@bigboy tmp]# useradd -g soho accounts [root@bigboy tmp]# useradd -g soho sales
If you don't specify the group with the "-g", RedHat / Fedora Linux will create a group with the same name as the user you just created. When each new user first logs in, they will be prompted for their new permanent password.
> Each user's personal directory will be placed in the /home directory. The directory name will be the same as their user name. [root@bigboy tmp]# ll /home drwxr-xr-x 2 root root 12288 Jul 24 20:04 lost+found drwx------ 2 accounts soho 1024 Jul 24 20:33 accounts drwx------ 2 alice children 1024 Jul 24 20:33 alice drwx------ 2 derek children 1024 Jul 24 20:33 derek drwx------ 2 jane parents 1024 Jul 24 20:33 jane drwx------ 2 paul parents 1024 Jul 24 20:33 paul drwx------ 2 sales soho 1024 Jul 24 20:33 sales [root@bigboy tmp]# ll /home
How To Change Passwords
You'll need to create passwords for each account. This is done with the "passwd" command. You will be prompted once for your old password and twice for the new one.
> User "root" changing the password for user "paul" [root@bigboy root]# passwd paul Changing password for user paul. New password: Retype new password: passwd: all authentication tokens updated successfully. [root@bigboy root]#
> Users may wish to change their passwords at a future date. Here is how unprivileged user "paul" would change his own password. [paul@bigboy paul]$ passwd Changing password for paul Old password: your current password Enter the new password (minimum of 5, maximum of 8 characters) Please use a combination of upper and lower case letters and numbers. New password: your new password Re-enter new password: your new password Password changed. [paul@bigboy paul]$

How To Delete Users
> The userdel command is used. The "-r" flag removes all the contents of the user's home directory [root@bigboy tmp]# userdel -r paul
How To Tell The Groups To Which A User Belongs
> Use the "groups" command with the username as the argument [root@bigboy root]# groups paul paul : parents [root@bigboy root]#
Conclusion
It is important to know how to add users, not just so they can log in to our system. Most server based applications usually run via a dedicated unprivileged user account, for example the MySQL database application runs as user "mysql" and the Apache web server application runs as user "apache". These accounts aren't always created automatically, especially if the software is installed using TAR files.
Sometimes Linux users need to be created for unexpected reasons. For example, Linux servers can be configured to mimic the functionality of Windows file servers by the use of the Samba software suite. Samba, which will be covered in Chapter 9, sometimes requires the creation of a "machine" user account for each client PC on your network.
The next few chapters will become interesting for this very reason.

Chapter 9
Windows, Linux And Samba = = = = = = = = = = = = = = = = = = = = = = = = = = = = = = = = = = = = = = = = = = = In This Chapter Chapter 9
Windows, Linux And Samba Download and Install Packages How To Get SAMBA Started The Samba Configuration File How SWAT Makes Samba Simpler Creating A Starter Configuration How To Create A Samba PDC Administrator User How To Add Workstations To Your Samba Domain How To Add Users To Your Samba Domain Domain Groups And Samba How To Delete Users From Your Samba Domain How To Modify Samba Passwords Conclusion
(c) Peter Harrison, www.linuxhomenetworking.com = = = = = = = = = = = = = = = = = = = = = = = = = = = = = = = = = = = = = = = = = = = Samba is a suite of utilities that allows your Linux box to share files and other resources such as printers with Windows boxes. This chapter describes how you can make your Linux box into a Windows Primary Domain Controller (PDC) or a server for a Windows Workgroup. Either configuration will allow everyone at home to have:
> their own logins on all the home windows boxes while having their files on the Linux box appear to be located on a new Windows drive
> shared access to printers on the Linux box
> shared files accessible only to members of their Linux user group.
What's the difference between a PDC and Windows Workgroup member? A detailed description is beyond the scope of this chapter, but this simple explanation should be enough.
> A PDC stores the login information in a central database on its hard drive. This allows each user to have a universal username and password when logging in from all PCs on the network.
> In a Windows Workgroup, each PC stores the usernames and passwords locally so that they are unique for each PC.
This chapter will only cover the much more popular PDC methodology used at home. By default, Samba mimics a Windows PDC in almost every way needed for simple file sharing. Linux functionality doesn't disappear when you do this. Samba Domains and Linux share the

same usernames so you can log into the Samba based Windows domain using your Linux password and immediately gain access to files in your Linux user's home directory. For added security you can make your Samba and Linux passwords different.
When Samba starts up it reads the configuration file /etc/samba/smb.conf to determine its various modes of operation. You can create your own smb.conf using a text editor or using the easier web based SWAT utility. Keep in mind that you will lose all your comments inserted in /etc/samba/smb.conf with a text editor if you subsequently use SWAT to edit it. Explanations of how to use both SWAT and a text editor to configure Samba are given in this chapter.
Download and Install Packages
Most RedHat and Fedora Linux software products are available in the RPM format. Downloading and installing RPMs isn't hard. If you need a refresher, Chapter 5, the RPM chapter, covers how to do this in detail.
Samba is comprised of a suite of RPMs that come on the Fedora CDs and have the following names:
> samba
> samba-common
> samba-client
> samba-swat
When searching for the file, remember that the RPM's filename usually starts with the RPM name followed by a version number like this: samba-client-3.0.0-15.i386.
How To Get SAMBA Started
> You can configure Samba to start at boot time using the chkconfig command:
[root@bigboy tmp]# chkconfig smb on
> You can start/stop/restart Samba after boot time using the smb initialization script as in the
examples below:
[root@bigboy tmp]# /etc/init.d/smb start [root@bigboy tmp]# /etc/init.d/smb stop [root@bigboy tmp]# /etc/init.d/smb restart
> Remember to restart the smb process every time you make a change to the smb.conf file
for the changes to take effect on the running process.
> You can test whether the smb process is running with the pgrep command, you should get a response of plain old process ID numbers: [root@bigboy tmp]# pgrep smb

The Samba Configuration File
The /etc/samba/smb.conf file is the main configuration file you'll need to edit. It is split into five main sections. These are outlined in Table 9-1:
Table 9-1 : File Format - smb.conf
Section Description
[global] General Samba configuration parameters
[printers] Used for configuring printers
[homes] Defines treatment of user logins
[netlogon] A share for storing logon scripts. (Not created by default.)
[profile] A share for storing domain logon information such as "favorites" and desktop icons. (Not created by default.)
You can edit this file by hand, or more simply through Samba's SWAT web interface.
How SWAT Makes Samba Simpler
Samba has a web based configuration tool called SWAT that allows you configure your smb.conf file without you needing to remember all the formatting. Each SWAT screen is actually a form that covers a separate section of the smb.conf file into which you fill in the desired parameters. For ease of use, each parameter box has its own online help.
Basic SWAT Setup
You must always remember that SWAT saves your changes to the smb.conf file by overwriting it. No comments in your file will be saved. The original Samba smb.conf file has many worthwhile comments in it and should be saved as a reference before proceeding with SWAT.
This is very important. The original smb.conf file has very useful examples you may wish to use at a later date.
[root@bigboy tmp]# cp /etc/samba/smb.conf /etc/samba/smb.conf.old

As you can see, using SWAT requires some understanding of the smb.conf file parameters. It would be good practice to become familiar with command line Samba configuration.
SWAT doesn't encrypt your login password. This may be a security concern in a corporate environment. Because of this, you may want to create a Samba administrator user that has no root privileges and/or only enable SWAT access from the GUI console or localhost.
The enabling/disabling, starting and stopping of SWAT is controlled by xinetd, which is covered in Chapter 17, via a configuration file named /etc/xinetd.d/swat. Here is a sample.
service swat {
port = 901 socket_type = stream protocol = tcp wait = no user = root server = /usr/sbin/swat log_on_failure += USERID disable = no only_from = localhost
}
The formatting of the file is fairly easy to understand, especially as there are only two entries of interest.
o The "disable" parameter must be set to "no" to accept connections.
o The default configuration only allows SWAT web access from the VGA console as user "root" on port 901 with the Linux root password. This means you'll have to enter "http://127.0.0.0:901" in your browser to get the login screen.
You can make SWAT accessible from other servers by adding IP address entries to the only_from parameter of the SWAT configuration file. Here's an example of an entry to allow connections only from 192.168.1.3 and localhost. Notice there are no commas between the entries.
only_from = localhost 192.168.1.3
Therefore in this case you can also configure Samba on your Linux server "Bigboy" IP with address 192.168.1.100 from PC 192.168.1.3 using the URL http://192.168.1.100:901.
Remember that most firewalls don't allow TCP port 901 trough their filters. You may have to adjust your rules for this traffic to pass.
Encrypting SWAT
By default SWAT is configured via an unencrypted web link using the Linux "root" account. When running SWAT in the unsecured mode above you should take the added precaution of using it from the Linux console whenever possible.

You can configure SWAT to work only with securely encrypted HTTP (HTTPS) versus the regular HTTP method shown above. Here is how it's done.
Create An stunnel User
This can be done using the "useradd" command. [root@smallfry tmp]# useradd stunnel
Create The Certificates
Go to the /usr/share/ssl/certs directory and create the certificate using the "make" command. Use all the defaults when prompted, but make sure you use the server's IP address when prompted for your server's "Common Name" or "hostname".
[root@bigboy tmp]# cd /usr/share/ssl/certs [root@bigboy certs]# make stunnel.pem ... Common Name (eg, your name or your server's hostname) []: 172.16.1.200 ... [root@bigboy certs]#
Note: The certificate created only has a 365 day lifetime. Remember to repeat this process next year.
Modify Certificate File Permissions
The certificate needs to only be read by "root" and the "stunnel" user. Use the "chmod" and "chgrp" commands to do this.
[root@bigboy certs]# chmod 640 stunnel.pem [root@bigboy certs]# chgrp stunnel stunnel.pem [root@bigboy certs]# ll /usr/share/ssl/certs -rw-r----- 1 root stunnel 1991 Jul 31 21:50 stunnel.pem [root@bigboy certs]#
Create An /etc/stunnel/stunnel.conf Configuration File
The stunnel application can be configured to:
> Intercept encrypted SSL traffic received on any TCP port
> Decrypt this traffic
> Funnel the unencrypted data to any application listening on another port.

We'll now configure the /etc/stunnel/stunnel.conf file to intercept SSL traffic on the SWAT port 901 and funnel it decrypted to a SWAT daemon running on port 902. Here is a sample configuration.
# Configure stunnel to run as user "stunnel" placing temporary # files in the /home/stunnel/ directory chroot = /home/stunnel/ pid = /stunnel.pid setuid = stunnel setgid = stunnel # Log all stunnel messages to /var/log/messages debug = 7 output = /var/log/messages # Define where the SSL certificates can be found. client = no cert = /usr/share/ssl/certs/stunnel.pem key = /usr/share/ssl/certs/stunnel.pem # Accept SSL connections on port 901 and funnel it to # port 902 for swat. [swat] accept = 901 connect = 902
Create A New /etc/xinetd.d File For Secure SWAT
To do this we copy the swat file and name it swat-stunnel. We then configure the new file to be enabled, listening on port 902 and accepting connections only from localhost. We also make sure that the service is "swat-stunnel".
[root@bigboy certs]# cd /etc/xinetd.d [root@bigboy xinetd.d]# cp swat swat-stunnel
New swat-tunnel file service swat-stunnel { port = 902 socket_type = stream wait = no only_from = 127.0.0.1 user = root server = /usr/sbin/swat log_on_failure += USERID disable = no }

Disable SWAT In The /etc/xinetd.d/swat File
The stunnel daemon will actually intercept port 901 traffic on behalf of swat-stunnel. You'll need to disable SWAT to prevent a conflict.
Edit The /etc/services file To create a Secure SWAT entry
The xinetd daemon searches /etc/services file for ports and services that match those listed in each configuration file in the /etc/xinetd.d directory. If no match is found, the configuration file is ignored.
We now have to edit /etc/services to include our new swat-stunnel file like this. swat-stunnel 902/tcp # Samba Web Administration Tool (Stunnel)
Restart xinetd
You'll then need to restart xinetd for all the swat settings to take effect. [root@bigboy xinetd.d]# /etc/init.d/xinetd restart Stopping xinetd: [ OK ] Starting xinetd: [ OK ] [root@bigboy xinetd.d]#
Start stunnel
Now start stunnel for the encryption to take place. [root@bigboy xinetd.d]# stunnel
Possible Errors in Fedora Core 2
You may get a "cryptonet" error when starting stunnel like the one below. Unable to open "/dev/cryptonet"
This is caused by an incompatibility with the "hwcrypto" RPM used for hardware, not software based encryption. You will need to uninstall "hwcrypto" to get stunnel to work correctly. [root@bigboy xinetd.d]# rpm -e hwcrypto
You will then have to stop stunnel, restart xinetd and start stunnel again. After this, stunel should begin to function correctly.
[root@bigboy xinetd.d]# pkill stunnel [root@bigboy xinetd.d]# /etc/init.d/xinetd restart [root@bigboy xinetd.d]# stunnel

Test Secure SWAT
Your Samba server should now be listening on both port 901 & 902 as seen by the "netstat -an" command below. The server will only accept remote connections on port 901. [root@bigboy xinetd.d]# netstat -an ... ... tcp 0 0 0.0.0.0:901 0.0.0.0:* LISTEN tcp 0 0 0.0.0.0:902 0.0.0.0:* LISTEN ... ... [root@bigboy xinetd.d]#
Test The Secure SWAT Login
Point your browser to the Samba server to make and HTTPS connection on port 901. https://server-ip-address:901/
You will be prompted for the Linux root user username and password. There will be a delay of about 60 to 75 seconds with each login.
Troubleshooting Secure SWAT
Sometimes you'll make mistakes in the stunnel.conf file but changes to this file only take effect after stunnel has been restarted. Unfortunately, there is no stunnel script in the /etc/init.d directory to do this. You have to use the pkill command to stop it and the stunnel command to start it again. [root@bigboy tmp]# pkill stunnel ; stunnel
Make sure the file permissions and ownership on the stunnel.pem file are correct.
You can also refer to Chapter 3 on network troubleshooting to isolate connectivity issues between the SWAT client and Samba server on TCP port 901 amongst other things.
How To Make SWAT Changes Immediate
Swat only changes the contents of the smb.conf file which is only read when Samba starts up. You can force Samba to restart from SWAT by doing the following:
1. Click on the SWAT "Status" button
2. Click on the "Stop All" button
3. Click on the "Start All" button
Creating A Starter Configuration
I'll now illustrate how to set up a Samba server to be the PDC for a small network, and the easiest way to configure this is by using SWAT. You may use this to edit the various sections of the smb.conf file.

The "Global" Section
This section governs the general Samba settings and needs to have the following parameters set in order to create a PDC. Table 9-2 explains the purpose of each.
Table 9-2 : smb.conf Minimum Settings, "Global" Section
Parameter Value Description
domain logons Yes Tells Samba to become the PDC
preferred master Yes Makes the PDC act as the central store for the names of all windows clients, servers and printers on the network. Very helpful when you need to "browse" your local network for resources. Also known as a local master browser.
domain master Yes Tells Samba to become the master browser across multiple networks all over the domain. The local master browsers register themselves with the domain master to learn about resources on other networks.
os level 65 Sets the priority the Samba server should use when negotiating to become the PDC with other Windows servers. A value of 65 will usually make the Samba server win.
wins support Yes Allows the Samba server to provide name services for the network. In other words keeps track of the IP addresses of all the domain's servers and clients.
time server Yes Lets the samba server provide time updates for the domain's clients.
domain "homenet" The name of the Windows domain we'll create. The name you select is your choice. I've decided to use "homenet".
security user Make domain logins query the Samba password database located on the samba server itself.
Here's how to set the values using SWAT.
1. Log into SWAT and click on the "globals" section.
2. Click the "Advanced" button to see all the options.

3. Make your changes and click on the "Commit Changes" button when finished.
4. Your smb.conf file should resemble the example below when finished. You can view the contents of the configuration file by logging in to the samba server via a command prompt and using the "cat /etc/samba/smb.conf" to verify your changes as you do them. [global] workgroup = HOMENET time server = Yes domain logons = Yes os level = 65 preferred master = Yes domain master = Yes
Note: Security = "user" and WINS support = "yes" are default settings for Samba and may not show up in your smb.conf file, even though you may see them in SWAT.
The "Homes" Section
Part of the process of adding a user to a Samba domain requires you to create a Linux user on the Samba PDC itself. When you log into the Samba PDC, you'll see a new drive, usually "Z:\" added to your PC. This is actually a virtual drive which maps to the corresponding Linux users' login directory on the Linux PDC.
Samba considers all directories to be shares which can be configured with varying degrees of security. The "homes" share section governs how Samba handles default login directories.
Table 9-3 explains the minimum settings you need to create a functional [Homes] section.
Table 9-3 : smb.conf Minimum Settings, "Home" Section
Parameter Value Description
browseable No Doesn't allow others to browse the contents of the directory
read only No Allows the samba user to also write to their Samba Linux directory
create mask 0664 Makes new files created by the user to have "644" permissions. You want to change this to "0600" so that only the login user has access to files.
directory mask 0775 Makes new sub-directories created by the user to have "775" permissions. You want to change this to "0700" so that only the login user has access to directories.

Here's how to set the values using SWAT:
1. Use SWAT to proceed to the "shares" section where shared directories are configured.
2. Click the "Advanced" button to see all the options.
3. Choose the "Homes" share.
4. Make your changes and click on the "Commit Changes" button when finished.
5. Your smb.conf file should resemble this when finished. You can view the contents of the configuration file by logging in to the samba server via a command prompt and using the "cat /etc/samba/smb.conf" to verify your changes as you do them.
[homes] read only = No browseable = No create mask = 0644 directory mask = 0755
The "netlogon" and "profiles" shares
The "netlogon" share contains scripts that the windows clients may use when they log into the domain. The "profiles" share stores settings related to the "look and feel" of windows so that the user has the same settings no matter which Windows PC they log into. The "profiles" share stores things such as "favorites" and desktop icons.
Your smb.conf file should look like this when you're finished:
[netlogon] path = /home/samba/netlogon guest ok = Yes [profiles] path = /home/samba/profiles read only = No create mask = 0600 directory mask = 0700
Here's how to do it.
1. Click the "Shares" button.
2. Create a "netlogon" share.
3. Modify the "path" and "guest ok" settings.
4. Click on the "Commit Changes" button.
5. Create a "profiles" share.
6. Modify the "path", mask and "read only" settings. The mask settings only allow the owner of the netlogon subdirectory to be able to modify its contents.
7. Click on the "Commit Changes" button.

Remember to create these share directories from the command line afterwards. [root@bigboy tmp]# mkdir -p /home/samba/netlogon [root@bigboy tmp]# mkdir -p /home/samba/profile [root@bigboy tmp]# chmod -r 0755 /home/samba
The "Printers" Section
Samba has special "shares" just for printers, and these are configured in the "printers" section of SWAT. There is also a share under "printers" called "printers" which governs common printer settings. Print shares always have the "printable" parameter set to "yes". Here is what the default smb.conf "printers" share section looks like.
[printers] comment = All Printers path = /var/spool/samba printable = Yes browseable = No
Shares For Specific Groups Of Users
The default Samba Version 3 smb.conf file you saved at the beginning of this exercise has many varied examples that you may use and apply to your particular environment.
The steps needed to create a simple shared directory for home users is discussed in Chapter 10.
How To Create A Samba PDC Administrator User
To do both SWAT and user administration with Samba you'll need to create administrator accounts on the Samba PDC Linux server.
Home Environment
By default, the "root" user is the Samba administrator. SWAT requires the Linux "root" password to be used. Fortunately, you can add workstations to the Windows Domain by creating a Samba specific "root" password. This is done using the smbpasswd command. [root@bigboy tmp]# /usr/bin/smbpasswd -a root password
Note: Remember that regular Linux logins via the console, Telnet or SSH requires the Linux passwd command. Samba domain logins use the smbpasswd password. Samba passwords are stored in the /etc/samba/smbpasswd file.

Corporate Environment
In a corporate environment, you may want more than one person to administer Samba, each with their own usernames. Here are the steps to do this:
1. Create a Linux user group, such as "sysadmin" with the groupadd command.
2. Use SWAT to update your smb.conf file so that the "sysadmin" group is listed in the following [globals] parameter settings. domain admin group = @sysadmin admin users = @sysadmin printer admin = @sysadmin
3. Create individual Linux users that are part of this group.
4. Use the smbpasswd command to create Samba passwords for Domain logins for this group. For security reasons this password may be different from the Linux password used to log into the Linux system from the Console, via telnet or SSH. (Remember that Linux passwords are changed with the passwd command.)
How To Add Workstations To Your Samba Domain
This is a two step process involving the creation of workstation "trust accounts" on the Samba server and then logging into each workstation to add them to the domain.
Create Samba Trust Accounts For Each Workstation PDCs will only accept user logins from trusted PCs that have been placed in its PC client database. Samba can create these "Machine Trusts" in two ways, either manually or automatically.
Manual Creation Of Machine Trust Accounts (NT Only)
When manually creating a machine trust account you need to manually create the corresponding Unix account in /etc/passwd and /etc/smbpasswd files. Pay careful attention to the "$" at the end and replace machine_name with the name of the Windows client machine.
The commands below create a special Linux group for Samba clients and then adds a special "machine" user that's a member of the group. The password for this user is then disabled and the "machine" is then added to the smbpasswd file to help keep track of which devices are members of the domain. [root@zero tmp]# groupadd samba-clients [root@bigboy tmp]# /usr/sbin/useradd -g samba-clients \ -d /dev/null -s /bin/false machine_name$ [root@bigboy tmp]# passwd -l machine_name$ [root@bigboy tmp]# smbpasswd -a -m machine_name
This is the only way to configure machine trusts using Windows NT.

Dynamic Creation Of Machine Trust Accounts
The second (and recommended) way of creating machine trust accounts is simply to allow the Samba server to create them as needed when the Windows clients join the domain. This can be done by editing /etc/samba/smb.conf to automatically add the required users. This method is also referred to as making a machine account "on the fly".
It is probably easiest to do this using SWAT in the "Global" menu to modify the "add machine script" parameter. [global] # <...remainder of parameters...> add machine script = /usr/sbin/useradd -d /dev/null -g samba-clients -s /bin/false -M %u
Once completed, you'll need to create the "samba-clients" Linux group which will be used to help identify the all the domain's Windows clients listed in the /etc/passwd file.
[root@zero tmp]# groupadd samba-clients
In Samba version 2, you will also need to need add the client to the "smbpasswd" file also, whereas Samba version 3 does this automatically. The steps are outlined below.
Samba Version 2 (Additional steps) [root@bigboy tmp]# smbpasswd -a -m machine_name
Make Your PC Clients Aware Of Your Samba PDC
There are many types of Windows installed on people's PCs and each version has it's own procedure for joining a domain. Here's how to add the most popular versions of Windows clients to your domain:
Windows 95/98/ME and Windows XP Home
Windows 9x machines do not implement full domain membership and therefore don't require machine trust accounts. Here is how to do it:
1. Navigate to the Network section of the Control Panel (Start ->Settings->Control Panel->Network)
2. Select the Configuration tab
1. Highlight "Client for Microsoft Networks"
2. Click the Properties button.
3. Check "Log onto Windows NT Domain", and enter the domain name.
4. Click all the OK buttons and reboot!

Windows NT
Create a manual SAMBA machine trust account as explained above, then go through the following steps:
1. Navigate to the Network section of the Control Panel (Start ->Settings->Control Panel->Network )
2. Select the "identification" tab
3. Click the "change" button
4. Enter the domain name and computer name, do not check the box "Create a Computer Account in the Domain." In this case, the existing machine trust account is used to join the machine to the domain.
5. Click "OK"
6. You should then get a confirmation that you've been added with a "Welcome to <DOMAIN>" message.
7. Reboot.
8. Log in using any account in the /etc/smbpasswd file with your domain as the domain name.
Windows 200x and Windows XP Professional
Create a dynamic SAMBA machine trust account as explained above, then go through the following steps:
1. Press Windows-key Break-key simultaneously to get the System Properties dialogue box
2. Click on the 'Network Indentification' or 'Computer Name' tab on the top
3. Click the "Properties" button
4. Click on the "Member of Domain" button
5. Also enter your domain name and computer name and then click "OK"
6. You will now be prompted for a user account and password with rights to join a machine to the domain. This should be your Samba administrator. In our "home environment" scenario that would be user "root" with the corresponding smbpasswd password.
7. You should then get a confirmation that you've been added with a "Welcome to <DOMAIN>" message.
8. Reboot.
9. Log in using any account in the /etc/smbpasswd file with your domain as the domain name.
Note: With Samba version 2 you may also have to make the following changes to your systems registry using the "regedit" command and reboot before continuing. [HKEY_LOCAL_MACHINE\SYSTEM\CurrentControlSet\Services\Netlogon\Parameters] "requiresignorseal"=dword:00000000 "signsecurechannel"=dword:00000000

How To Add Users To Your Samba Domain
Adding users to a domain has three broad phases. The first is adding a Linux user on the Samba server, the second is creating a Samba smbpasswd that maps to the Linux user created previously, and final step is to map a Windows drive letter to the user's Linux home directory. This is all outlined below:
Adding The Users In Linux
First go through the process of adding users in Linux just like you would normally do. Passwords won't be necessary unless you want the users to log in to the Samba server via Telnet or SSH.
Create the user
[root@bigboy tmp]# useradd -g 100 peter
Give them a Linux Password
This is only necessary if the user needs to log into the Samba server directly. [root@bigboy tmp]# passwd peter Changing password for user peter. New password: Retype new password: passwd: all authentication tokens updated successfully. [root@bigboy tmp]#
Mapping The Linux Users To An smbpassword
Next you need to create Samba domain login passwords for the user
[root@bigboy tmp]# /usr/bin/smbpasswd -a username password
The -a adds the user to the /etc/smbpasswd file. Use a generic password then have users change it immediately from their workstation the usual way.
Remember the smbpasswd sets the Windows Domain login password for a user. This is different from the Linux login password to log into the Samba box.
Mapping A Private Windows Drive Share
By default, Samba will automatically give each user logged into the domain an H: drive that really maps to the /home/username directory on the Linux box.
Mapping Using "My Computer"
If the auto-mapping doesn't work then do the following:

1. Let the user log into the domain
2. Right click on the "My Computer" icon on the desktop
3. Click on "Map Network Drive"
4. Select a drive letter
5. Browse to the HOMENET domain, then the Samba server, then the user's home directory.
6. Click on the check box "Reconnect at Logon", to make the change permanent
Mapping From The Command Line
If you find the "My Computer" method too time consuming for dozens of users or if the PC doesn't have the feature available, then you can do the following and possibly make it into a script.
1. Create a master logon batch file for all users. We will add the contents of this file to all administrator's logon scripts.
[root@bigboy tmp]# vi /home/samba/netlogon/login.bat
2. Add the following contents to mount the user's share as drive P: (for 'private').
REM Drive Mapping Script net use P: \\bigboy\
3. Make the file world readable:
[root@bigboy tmp]# chmod +r /home/samba/netlogon/login.bat
4. Linux and Windows format text files slightly differently. As the file resides on a
Linux box, but will be interpreted bay a Windows machine, you'll have to convert the file to the Windows format. This requires the 'todos' program to be installed. (You can get this package from http://speakeasy.rpmfind.net ) [root@bigboy tmp]# todos /home/samba/netlogon/login.bat
Domain Groups And Samba
Samba supports domain groups which will allow users who are members of the group to be able to have Administrator rights on each PC in the domain. This will allow them to do such things as add software and configure network settings. In Windows, Domain Groups also have the ability to join machines to the domain, but this is not currently supported in Samba.
The domain admin group parameter specifies users who will have domain admin rights. The argument is a space-separated list of user names or group names (group names must have an @ sign prefixed). For example: domain admin group = <USER1> <USER2> @<GROUP>

How To Delete Users From Your Samba Domain
Deleting users from your Samba domain is a two stage process in which you have to remove the user from the Linux server and also remove the user's corresponding smbpasswd entry. Here's how:
1. Delete the users using the smbpasswd with the "-x" switch
[root@bigboy tmp]# smbpasswd -x zmeekins Deleted user zmeekins. [root@bigboy root]#
2. Delete The Linux User by going through the process of deleting users in Linux just like you would normally do. Here we are deleting the user zmeekins and all zmeekin's files from the Linux server: [root@bigboy tmp]# userdel -r zmeekins
How To Modify Samba Passwords
You can set your Samba server to allow users to make changes in their domain passwords to be mirrored automatically in their Linux login passwords. Table 9-4 explains the global smb.conf parameters that need to be changed to do this.
Table 9-4 : smb.conf Settings, Enabling Online Password Changes
Parameter Value Description
unix passwd sync Yes Enables Samba / Linux password synchronization
passwd program Use the SWAT defaults
Lists the location of the Linux password file which is usually /bin/passwd.
passwd chat Use the SWAT defaults
A short script to change the Linux password using the Samba password
Conclusion
By now you should have a fairly good understanding of adding users and PCs to a Samba domain. The next step is to take better advantage of Sambas' file sharing features which we'll discuss in Chapter 10.

Chapter 10
Sharing Resources With Samba = = = = = = = = = = = = = = = = = = = = = = = = = = = = = = = = = = = = = = = = = = = In This Chapter Chapter 10
Sharing Resources With Samba Adding A Printer To A Samba PDC Creating Group Shares in SAMBA Windows Drive Sharing With Your SAMBA Server Conclusion
(c) Peter Harrison, www.linuxhomenetworking.com = = = = = = = = = = = = = = = = = = = = = = = = = = = = = = = = = = = = = = = = = = =
Now that you have Samba up and running, you may want to allow users to share resources such as floppy drives, directories and printers via the Samba server. Here's how to do it all.
Adding A Printer To A Samba PDC
Sharing printers amongst all your PCs is one of the advantages of creating a home network. Here's how to connect your printer directly to your PDC and make it available to all your windows workstations. This makes your Samba PDC a print server too!
The method explained here requires the Windows printer driver to be loaded on every client machine. This may be OK for a small home network but may be impractical for a huge corporate network.
Adding The Printer To Linux
By far the easiest way to add a printer in Linux is to use the GUI from the VGA console. The way to get a GUI on the console is outlined in Chapter 6 on runlevels. We'll assume the printer is locally attached to the parallel port. Here are the steps to use:
1. Click on the Fedora / RedHat icon in the bottom left hand corner of the screen
2. Click on System Settings
3. Click on Printing
4. Click on New
5. You'll now get the "Add a New Print Queue" menu. Click "forward"

6. You'll get the "Set the Print Queue name and Type" menu. Give the printer an easy to remember name, click the local printer button and click "forward" once more.
7. You'll get the "Configure a Local Printer" menu. Select /dev/lp0 as I assume the printer is on the parallel port (not USB)
8. You'll now get the "Select Print Driver" menu. Scroll to the printer you created, double click on the name, select the driver, click "forward".
9. You'll now get the "Finish and Create the New Print Queue" menu. Click "finished", then click "Apply"
10. Do a test print to make sure all is OK
Make Samba Aware Of The Printer
The easiest way to do this is using the Samba SWAT web interface. Once you are in SWAT:
1. Select the "Printers" button
2. Find your printer in the drag down menu
3. If the printer name has a [*] beside it, then it has been auto configured by Samba, but may not be visible on your network because Samba hasn't been restarted since creating the printer. If this is the case, restart Samba and go to the next section.
4. If this isn't the case, edit/create the printer
5. Click on the "Commit Changes" button to create an updated /etc/samba/smb.conf file.
6. Click on the "Status" tab at the top of the screen and restart smbd and nmbd to restart Samba.
Configure The Printer Driver On The Workstations
1. Download the Windows printer driver from the manufacturer and install it.
2. Go to the Add printer menu. Click the "Next" button.
3. Select the "Network Printer" button to get the "Local or Network Printer" menu. Click the "Next" button.
4. You should be on the "Locate Your Printer" menu. Don't enter a name, click "next" so you can browse for your printer.
5. You should now be on the "Browse for Printer" menu. Double click on the name of your Linux Samba server. You should see the new printer. Click on the printer name, then click the "Next" button.
6. You may get a message stating "The server on which the printer resides does not have the correct printer driver installed. If you want to install the driver on your local computer, click OK". Fortunately, you pre installed the driver. Click the "OK" button.
7. The "Add Printer Wizard" will appear. Select the manufacturer of your printer, select the printer model and then click the "OK" button
8. The "Add Printer Wizard" will prompt you whether you want to use this new printer as the default printer. Select "Yes" or "No" depending on your preference. Click the "Next" button

9. The "Completing the Add Printer Wizard" menu will now appear. Click the "Finish"
button.
10. The new printer should now show up on the Windows Printers menu in "Control Panel".
11. Send a test print.
Creating Group Shares in SAMBA
On occasion, subgroups of a family need a share that is fully accessible by all members of the group. For example, parents working in a home office environment may need a place where they can share, distribute or collaboratively work on documents. Here's how it's done.
Create The Directory And User Group
1. Create a new Linux group parents: [root@bigboy tmp]# /usr/sbin/groupadd parents
2. Create a new directory for the group's files. If one user is designated as the leader, you might want to change the chown statement to make them owner [root@bigboy tmp]# mkdir /home/parent-files [root@bigboy tmp]# chown parents /home/parent-files [root@bigboy tmp]# chmod 0770 /home/parent-files
3. Next add the group members to the new group. For instance, let's add user "father" to the group. [root@bigboy tmp]# /usr/sbin/usermod -G parents father
Configure The Share In SWAT
Finally, create the share in Samba using SWAT.
1. Click on the shares button then enter the name of the share you want to create, let's say "only-parents".
2. Click on the "Create Share" button. Make sure the path maps to "/home/parent-files" and make the valid users be @parents, where parents is the name of the Linux user group.
3. Click on the "Commit Changes" button to create a new /etc/samba/smb.conf file.
4. Click on the "Status" tab at the top of the screen and restart smbd and nmbd to restart Samba.

5. Your /etc/samba/smb.conf file should have an entry like this at the end: # Parents Shared Area [only-parents] path = /home/parent-files valid users = @parents
Map The Directory Using "My Computer"
Finally, let the user log into the domain from a remote PC
1. Right click on the "My Computer" icon on the desktop
2. Click on "Map Network Drive"
3. Select a drive letter
4. Browse to the HOMENET domain, then the Samba server, then the share named only-parents
5. Click on the check box "Reconnect at Logon", to make the change permanent
Windows Drive Sharing With Your SAMBA Server
You can also access a CD, DVD, ZIP, floppy or hard drive installed on a Windows Client from the Samba server. In this section we'll attempt to share a CD ROM drive.
Windows Setup
The Windows client box should first be setup as a member of a Samba domain or workgroup. The next step is to make the CDROM drive shared.
Windows 98/ME
1. Double click 'My Computer'
2. Right click on the CDROM drive and choose 'Sharing'
3. Set the Share Name as 'cdrom' with the appropriate access control
4. Restart windows
Windows 2000
1. Double click 'My Computer'
2. Right click on the CDROM drive and choose 'Sharing'
3. Set the Share Name as 'cdrom' and the appropriate access control
4. Logout and login again as normal using your current login
Windows XP
1. Double click 'My Computer'

2. Right click on the CDROM drive and choose 'Sharing and Properties'
3. Set the Share Name as 'cdrom' and the appropriate access control
4. Logout and login again as normal using your current login
Test Your Windows Client Configuration
Use the smbclient command to test your share. You should substitute "WinClient" with the name of your Windows client PC and "username" with a valid workgroup/domain username that normally has access to the Windows client. You should get output like this when using the username's corresponding password: [root@bigboy tmp]# smbclient -L WinClient -U username added interface ip=192.168.1.100 bcast=192.168.1.255 nmask=255.255.255.0 added interface ip=127.0.0.1 bcast=127.255.255.255 nmask=255.0.0.0 Got a positive name query response from 192.168.1.253 ( 192.168.1.253 ) Password: Domain=[HOMENET] OS=[Windows 5.1] Server=[Windows 2000 LAN Manager] Sharename Type Comment --------- ---- ------- IPC$ IPC Remote IPC D$ Disk Default share print$ Disk Printer Drivers SharedDocs Disk cdrom Disk Printer2 Printer Acrobat PDFWriter ADMIN$ Disk Remote Admin C$ Disk Default share Server Comment --------- ------- Workgroup Master --------- -------
Note: You could have got the same result using the following command, though it is less secure: [root@bigboy tmp]# smbclient -L WinClient -U username%password
Create A CDROM Drive Mount Point On Your Samba Server
You'll now need to create the mount point on the Linux server in order to mount and access the CDROM drive. In this case we've named it /mnt/winclient-cdrom and we'll use the mount command to get access to this device from the Linux server.

Prompted For Password Method
The Linux mount command will try to access the CDROM device as user "username" by using the "username=" option. You will be prompted for a password.
[root@bigboy tmp]# mkdir /mnt/winclient-cdrom [root@bigboy tmp]# mount -t smbfs -o username=username //winclient/cdrom /mnt/winclient-cdrom
Not Prompted For Password Method
Linux won't prompt you for a password if you embed the access password into the mount command string along with username as in the example below.
[root@bigboy tmp]# mkdir /mnt/winclient-cdrom [root@bigboy tmp]# mount -t smbfs -o username=username,password=password //winclient/cdrom /mnt/cdrom
Using The smbmount Command Method
Some versions of Linux support the smbmount command to mount the remote drive. Incompatible versions will give errors like this: [root@bigboy tmp]# smbmount //winclient/cdrom /mnt/winclient-cdrom -o username=username Password: 27875: session setup failed: ERRDOS - ERRnoaccess (Access denied.) SMB connection failed
It is probably best to stick with using the Linux mount command to be safe.
Conclusion
Both Chapters 9 and 10 have given the steps needed to configure a Samba network that is adequate for a small office or home. There are many steps to take, each step isn't hard, but you run the risk of not getting Samba to work if you omit any of them. It is for this reason that I have created Chapter 11 as a separate troubleshooting guide to help you diagnose and recover from the most common Samba mistakes that we all tend to make.

Chapter 11
Samba Security & Troubleshooting
= = = = = = = = = = = = = = = = = = = = = = = = = = = = = = = = = = = = = = = = = = = In This Chapter Chapter 11
Samba Security & Troubleshooting Testing The smb.conf file Samba and Firewall Software Testing Basic Client / Server Network Connectivity Testing Samba Client / Server Connectivity Checking the Samba Logs Samba Network Troubleshooting Basic Samba Security
(c) Peter Harrison, www.linuxhomenetworking.com = = = = = = = = = = = = = = = = = = = = = = = = = = = = = = = = = = = = = = = = = = =
Configuring Samba for your office or home can provide many advantages. By encouraging users to store files on a central file server, you can simplify data backup and in some cases, software installation and maintenance.
Unfortunately, the initial configuration of Samba can be tricky in which many simple steps need to be executed in the correct order. This chapter will explore the ways in which you can recover from the mistakes that can sometimes happen.
Testing The smb.conf file Samba has a test utility called testparm which will alert you to any errors in the smb.conf file. This usually passes successfully if you used SWAT to edit the file. [root@bigboy tmp]# testparm -s Load smb config files from /etc/samba/smb.conf Processing section "[homes]" Processing section "[printers]" Loaded services file OK. ... ... [root@bigboy tmp]#
A successful test only means that Samba will load the configuration file. There are other causes for Samba problems.

Samba and Firewall Software
Firewall software installed on both your Windows PCs and the Samba server itself may cause Samba to not function. Here are some ways to solve the problem with two popular packages.
Linux iptables
The Fedora installation process configures the iptables firewall package by default. You'll have to ensure that this is either deactivated which may be desirable in the case of an secured network, or you could configure it to allow the Microsoft NetBIOS protocols through (UDP ports 137 and 138, TCP ports 139,445). Here is sample script snippet.
#!/bin/bash SAMBA_SERVER="192.168.1.100 " NETWORK="192.168.1.0/24" # Local area network BROADCAST="192.168.255.255" # Local area network Broadcast Address iptables -A INPUT -i lo -j ACCEPT iptables -A OUTPUT -o lo -j ACCEPT iptables -A INPUT -p udp -s $NETWORK -d $SAMBA_SERVER \ -m multiport --dports 137,138 -j ACCEPT iptables -A INPUT -p tcp -s $NETWORK -d $SAMBA_SERVER -m multiport \ --dports 139,445 -j ACCEPT iptables -A INPUT -p udp -s $NETWORK -d $BROADCAST --dport 137 \ -j ACCEPT iptables -A INPUT -p udp -d $SAMBA_SERVER -m multiport \ --dports 137,138 -j DROP iptables -A INPUT -p tcp -d $SAMBA_SERVER -m multiport \ --dports 139,445 -j DROP iptables -A OUTPUT -s $SAMBA_SERVER -d $NETWORK -m state --state \ ESTABLISHED,RELATED -j ACCEPT
Windows based Zone Alarm
The default installation of Zone Alarm assumes that your PC is directly connected to the Internet. This means that the software will deny all inbound connections that attempt to connect with your PC. The NetBIOS traffic that Samba uses to communicate with the PCs on the network will therefore be considered as hostile traffic. The easiest way around this is to configure Zone Alarm to consider your home network as a trusted network too.
This can be done by clicking on the firewall tab and editing the settings for your home network that will most likely have a 192.168.x.x/255.255.255.0 type entry. Make this network a trusted network, instead of an Internet network and ZoneAlarm should cease to interfere with Samba.

The Windows XP Built In Firewall
You may also need to disable the firewall feature of Windows XP by doing the following:
1. Bring up Control Panel
2. Go through the Network and Internet Connections and then Network Connections menus.
3. Right click your on your LAN connection icon and select Properties
4. Click on the Advanced tab.
5. Uncheck the Internet Connection Firewall box and it will be turned on.
Once you get SAMBA to work, you may want to experiment with the firewall software settings to optimize your security with the need to maintain a valid relationship with the SAMBA server
Testing Basic Client / Server Network Connectivity The next set of tests are designed to ensure that the Samba server and all its workstations can do basic communication with each other.
From the Samba Server If either of these fail, check your cabling, routing or the presence of a firewall running on either the server or client.
1. Ping the server's IP address and loopback address (127.0.0.1)
2. Ping the client's IP address
3. Ping the client using its DNS name
From the Samba Client If either of these fail, check your cabling, routing or the presence of a firewall running on either the server or client.
1. Ping the client's IP address and loopback address (127.0.0.1)
2. Ping the server's IP address
3. Ping the server using its DNS name
Testing Samba Client / Server Connectivity Once basic network connectivity has been confirmed between you'll need to go through a variety tests to determine whether Samba has been configured correctly both on the server and client. Follow these steps in sequence as part of a thorough troubleshooting procedure:
1. Make sure your Samba server can see all the shares available on the network with the smbclient -l samba_server command. Hit the<Enter> key when prompted for a password. Check your SWAT configuration for invalid "hosts allow", "hosts deny" and "invalid users" entries.
Failure of this test may mean that Samba isn't running on the server at all and may need to be started. [root@bigboy tmp]# smbclient -L silent Password:

Anonymous login successful Domain=[HOMENET] OS=[Unix] Server=[Samba 3.0.2-7.FC1] Sharename Type Comment --------- ---- ------- IPC$ IPC IPC Service (Samba Server) ADMIN$ IPC IPC Service (Samba Server) Anonymous login successful Domain=[HOMENET] OS=[Unix] Server=[Samba 3.0.2-7.FC1] Server Comment --------- ------- SILENT Samba Server Workgroup Master --------- ------- HOMENET BIGBOY OTHERNET SILENT [root@bigboy tmp]#
2. Use the nmblookup -B samba-server-IP-address _SAMBA_ command on the server to determine whether the samba software is running correctly. This should return the server's IP address if is running correctly.
[root@bigboy tmp]# nmblookup -B 192.168.1.100 __SAMBA__ querying __SAMBA__ on 192.168.1.100 192.168.1.100 __SAMBA__<00> [root@bigboy tmp]#
3. Use the nmblookup -B client-IP-address "*"command on the server to determine whether the client is accepting Samba queries. This should return the client's IP address if is running correctly. If this fails, check to see whether the client is running firewall software that could prevent communication. Another source of the problem could be that the "Client for Microsoft Windows" or "File and Printer Sharing for Microsoft Networks" settings on the client's NIC card haven't been selected. You could have also entered an incorrect IP address.
[root@bigboy tmp]# nmblookup -B 192.168.1.103 "*" querying * on 192.168.1.103 192.168.1.103 *<00> [root@bigboy tmp]#
4. Use the nmblookup -d 2 "*" command on the server to tell it broadcast a query message to the network. This should return answers from all locally connected clients and servers. This test actually sends out a broadcasted request for information, it usually fails if either you client or server has an incorrect subnet mask configured on their NIC cards.
[root@bigboy tmp]# nmblookup -d 2 '*' added interface ip=192.168.1.100 bcast=192.168.1.255 nmask=255.255.255.0 added interface ip=192.168.1.100 bcast=192.168.1.255 nmask=255.255.255.0 querying * on 192.168.1.255 Got a positive name query response from 192.168.1.100 ( 192.168.1.100 )

Got a positive name query response from 192.168.1.103 ( 192.168.1.103 ) Got a positive name query response from 192.168.1.100 ( 192.168.1.100 ) 192.168.1.100 *<00> 192.168.1.103 *<00> 192.168.1.100 *<00> [root@bigboy tmp]#
5. Use the smbclient //samba-server/tmp command to attempt a command line login to the Samba server. When prompted for a password, use the Linux password of the account you logged in with. Testing other accounts can be achieved by adding the "-U accountname" option at the end of the command line. This should return a "login successful" message. If you are doing this as user "root", hit the <Enter> key when prompted for a password. [root@bigboy tmp]# smbclient //bigboy/TMP Password: Anonymous login successful Domain=[HOMENET] OS=[Unix] Server=[Samba 3.0.2-7.FC1] tree connect failed: NT_STATUS_BAD_NETWORK_NAME [root@bigboy tmp]#
An "Invalid network name" or "bad network name" message could mean that the tmp service on the samba server hasn't been correctly configured.
Messages related to bad passwords could mean that the user's account doesn't exist; their smbpasswd hasn't been created or that the password entered is incorrect.
6. Log into the Windows workstation as a Samba user. In the example below, the username is "peter". Use the net view \\samba-server command to log into the Samba server from the command line and get a listing of your shares.
If it fails, then make sure your "hosts allow", "hosts deny" and "invalid users" parameters are set correctly in your smb.conf file.
This test attempts to login using the username and password with which you logged into the PC. Make sure the corresponding Samba user has been created.
A "Network name not found" message usually point to an incorrect netbios configuration on the client. Add the IP address of the samba server to the wins server settings, and enable Windows name resolution via DNS to the advanced TCP/IP settings on the PC. You may also need to add the name of the samba server to the PC's lmhosts file.
Success C:\>net view \\silent Shared resources at \\silent Samba Server Share name Type Used as Comment ------------------------------------------------ peter Disk Home Directories The command completed successfully. C:\>
Failure Due To No User Account C:\> net view \\silent System error 5 has occurred.

Access is denied. C:\>
7. Log into the Windows workstation as a Samba user. Try to map a drive letter to the user's default login directory on the Samba server. This is done with the net use x: \\samba-server\share command. Here we want user "peter" to have a DOS drive X: map to Peter's Linux home directory on the Samba server. C:\>net use x: \\bigboy\peter The command completed successfully. C:\>
Make sure your password encryption is set correctly in the smb.conf file. As stated in Chapter 9, newer versions of Windows only send encrypted passwords. Make sure you have correctly configured the "encrypt passwords" option in the [globals] section of smb.conf.
Failure could also mean that the server's smb.conf file hasn't been configured to automatically use the PC user's user name as the Samba login name. You can do this by setting the "user=username" option in the [tmp] section of the smb.conf file.
8. From the Samba server issue the nmblookup -M domain command to ensure that there is a master browser for the domain. Successful attempts should list the IP address of the master browser server. If not, you'll need to make sure that the "preferred master" parameter is set to "yes" in the [global] section of smb.conf. [root@silent home]# nmblookup -M homenet querying fedora on 192.168.1.255 192.168.1.100 homenet<1d> [root@silent home]#
This may fail with some Windows NT based clients if the Samba server has been configured not to use encrypted passwords. You will need to set the "encrypt passwords" option in the [globals] section of the smb.conf file to "yes". Remember that doing so may make logins from Windows 95/98/ME clients fail. As you can see, it is sometimes best to make all your clients run similar versions of the Windows operating system.
Once all this has tested positively, you should be able to see your domain under Window's "My Network Places" located in file manager or in the Start Menu. You should also be able to browse through the shares as well.
Checking the Samba Logs Samba stores all its log files in the /var/log/samba directory. If you find yourself having difficulties, try searching the nmbd.log and smbd.log files for clues.
Samba Network Troubleshooting It is always a good idea to use network troubleshooting tools such as tcpdump to do detailed troubleshooting, especially if you're not sure whether there is any bidirectional connectivity between the Samba server and the workstation.
Basic Samba Security You can restrict connections to your server on both a "per interface" and a "per network" basis in the [globals] section of the smb.conf file. Always remember to include your loopback interface "lo" and the loopback interface's network 127.0.0.0/8 in your configuration.

This type of security is activated by:
> Setting the "bind interfaces only" parameter to "yes"
> Configuring Samba to deny all connections by default and then allowing specified hosts through with the "hosts allow" and "hosts deny" settings. In this case the 192.168.1.0/24 has been included as a valid network. You can also include individual hosts IP addresses in this list.
> Specifying the interfaces on which Samba will be active. Interface eth0 is on the 192.168.1.0/24 network, so we have included it here.
[globals] ... bind interfaces only = Yes hosts deny = ALL hosts allow = 192.168.1.0/28 127. interfaces = eth0 lo...
Conclusion
By now you should have a fully functional Samba based network that is suitable for the small office or home. If the network is located in the home, you may want to hide your server where it is less intrusive due its physical presence or to the noise of its power supply fan or hard drive. A wireless network in some cases would be ideal. Chapter 12 discusses how to configure wireless NICs in Linux servers for this very reason.

Chapter 13
Linux Wireless Networking = = = = = = = = = = = = = = = = = = = = = = = = = = = = = = = = = = = = = = = = = = =
In This Chapter Chapter 13
Linux Wireless Networking Wireless Linux Compatible NICs Common Wireless Networking Terms Networking With Linux Wireless-Tools Networking With Linux-WLAN Troubleshooting Your Wireless LAN Conclusion
(c) Peter Harrison, www.linuxhomenetworking.com = = = = = = = = = = = = = = = = = = = = = = = = = = = = = = = = = = = = = = = = = = =
My very first Linux web server was an ancient desktop computer that I bought from a second hand store that advertised it as being "very obsolete". It was ugly and noisy; it was cheap and it worked. But it quickly became too loud to tolerate, so I spent more money than I should have on the antique and made it wireless. I did it for the challenge, and also because we all get stupid some of the time. I thought wireless Linux would be easy, but at the time it wasn't. I had so many headaches with it that I thought one of my very first web pages should be about my little nightmare warning people about how to do it right. This was how www.linuxhomenetworking.com was born. This is the chapter that started it all.
Wireless networks using the 802.1a/b standard have many advantages such as commonly available hardware, relatively easy and low cost deployment with security that's increasingly becoming better. Before you consider making a Linux server wireless capable make sure you purchase a NIC that is Linux compatible. You also need to decide on the wireless Linux package you intend to use, Linux-WLAN or Wireless Tools. Wireless tools is more convenient to use as there are less configuration steps and the RPM package doesn't have to be reinstalled every time you upgrade your kernel like Linux-WLAN does. This will all be explained later.
Wireless Linux Compatible NICs Not all wireless NIC cards work with Linux. It is for this reason it is best to check the Linux-WLAN group's website at www.linux-wlan.org for the latest hardware compatibility list for their product. Wireless-tools hardware compatibility lists can be found quite easily on popular search engines.
Wireless NIC manufacturers are notorious for changing the chipsets on their cards depending on the price of the components. They then supply different drivers with each new card to make them work. It is possible to buy cards with the same model number from the same vendor with very different circuitry. Frequently Linux drivers for the new cards are unavailable. Always check the compatibility lists before buying your wireless hardware.
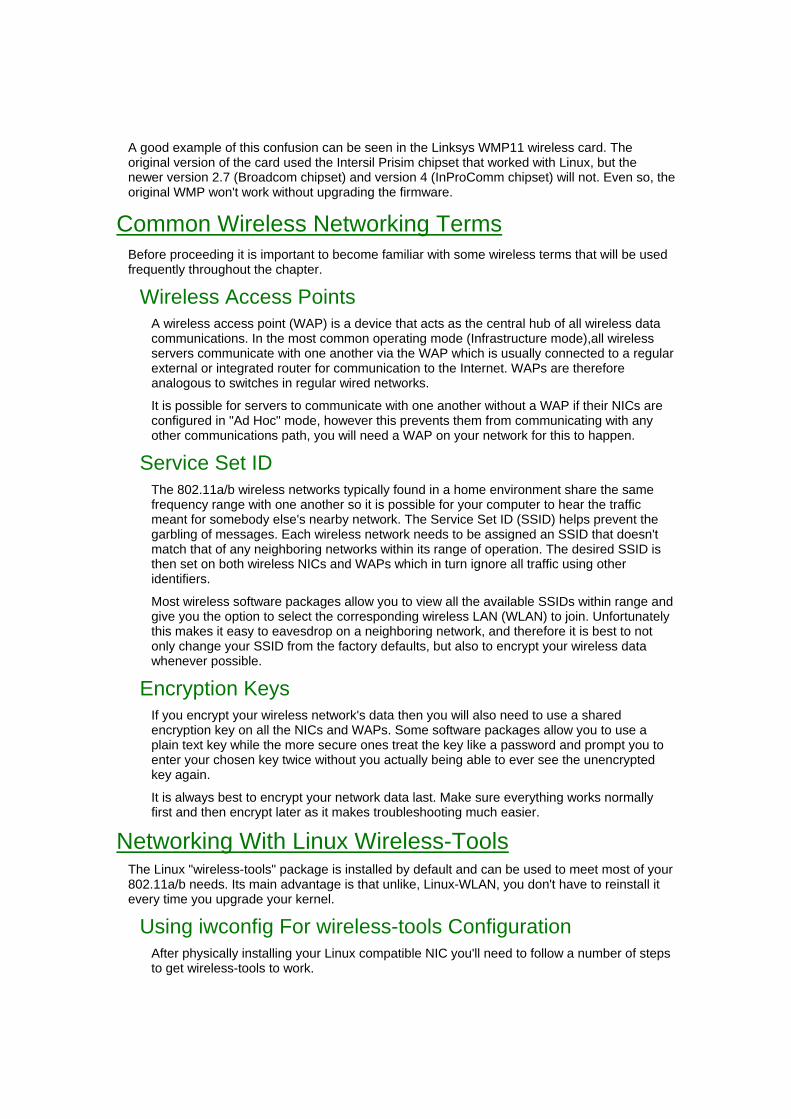
A good example of this confusion can be seen in the Linksys WMP11 wireless card. The original version of the card used the Intersil Prisim chipset that worked with Linux, but the newer version 2.7 (Broadcom chipset) and version 4 (InProComm chipset) will not. Even so, the original WMP won't work without upgrading the firmware.
Common Wireless Networking Terms Before proceeding it is important to become familiar with some wireless terms that will be used frequently throughout the chapter.
Wireless Access Points A wireless access point (WAP) is a device that acts as the central hub of all wireless data communications. In the most common operating mode (Infrastructure mode),all wireless servers communicate with one another via the WAP which is usually connected to a regular external or integrated router for communication to the Internet. WAPs are therefore analogous to switches in regular wired networks.
It is possible for servers to communicate with one another without a WAP if their NICs are configured in "Ad Hoc" mode, however this prevents them from communicating with any other communications path, you will need a WAP on your network for this to happen.
Service Set ID The 802.11a/b wireless networks typically found in a home environment share the same frequency range with one another so it is possible for your computer to hear the traffic meant for somebody else's nearby network. The Service Set ID (SSID) helps prevent the garbling of messages. Each wireless network needs to be assigned an SSID that doesn't match that of any neighboring networks within its range of operation. The desired SSID is then set on both wireless NICs and WAPs which in turn ignore all traffic using other identifiers.
Most wireless software packages allow you to view all the available SSIDs within range and give you the option to select the corresponding wireless LAN (WLAN) to join. Unfortunately this makes it easy to eavesdrop on a neighboring network, and therefore it is best to not only change your SSID from the factory defaults, but also to encrypt your wireless data whenever possible.
Encryption Keys If you encrypt your wireless network's data then you will also need to use a shared encryption key on all the NICs and WAPs. Some software packages allow you to use a plain text key while the more secure ones treat the key like a password and prompt you to enter your chosen key twice without you actually being able to ever see the unencrypted key again.
It is always best to encrypt your network data last. Make sure everything works normally first and then encrypt later as it makes troubleshooting much easier.
Networking With Linux Wireless-Tools The Linux "wireless-tools" package is installed by default and can be used to meet most of your 802.11a/b needs. Its main advantage is that unlike, Linux-WLAN, you don't have to reinstall it every time you upgrade your kernel.
Using iwconfig For wireless-tools Configuration After physically installing your Linux compatible NIC you'll need to follow a number of steps to get wireless-tools to work.

Configuring Your NIC's IP Settings This can be done as if the NIC were a regular Ethernet device. Once you use the "ifup" command the NIC will become active, but will not function correctly as its wireless settings haven't been configured yet.
Configuring Your NIC's Wireless Settings
The most commonly used command in this application is "iwconfig" which can be used to configure most of the wireless parameters. These usually are the:
> SSID
> The wireless mode, where "Managed" means that there is a wireless Access point (WAP) on the network and "Ad-Hoc" signifies that there is none.
For example, if your wireless NIC is named "eth0" and your "managed" network's ESSID is "homenet", then the commands would be: iwconfig eth0 mode Managed iwconfig eth0 essid homenet
Your NIC should now become fully functional, however you will need to run the commands above each time you use the "ifup" command which can be problematic if forgotten. The next section shows how to make this permanent.
Permanent wireless-tools Configuration Once your ad-hoc configuration has been completed you will need to make the changes permanent.
1. Configure your /etc/sysconfig/network-scripts file normally as if it were a regular Ethernet NIC. DHCP Version Fixed IP Version ============ ================= DEVICE=eth0 DEVICE=eth0 USERCTL=yes IPADDR=192.168.1.100 ONBOOT=yes NETMASK=255.255.255.0 BOOTPROTO=dhcp ONBOOT=yes BOOTPROTO=static
2. You'll then need to add following statements to the end topecify that the NIC is "Wireless"; provide the ESSID to use, (in this case "homenet") and finally tell the wireless mode, where "Managed" means that there is a wireless Access point (WAP) on the network and "Ad-Hoc" signifies that there is none. # # Wireless configuration # TYPE=Wireless MODE=Managed ESSID=homenet
These commands need only be on the main interface file. It is not needed for IP aliases. Your wireless NIC should function as if it were a regular Ethernet NIC using the "ifup" and "ifdown" commands.
Wireless-Tools Encryption

It is usually best to test your network in an unencrypted state before activating the additional security. This allows you to limit your troubleshooting activities to basic wireless settings without the additional complications of encryption provides.
Encryption requires an encryption key which you can make up yourself or generate with the /sbin/nwepgen command that comes with the kernel-wlan-ng RPM mentioned below. The advantage of the nwepgen command is that you can provide an easy to remember string that it will consistently encode in to an ESSID key. You can use any one of the rows of characters to create a 40 bit key.
If you don't have nwepgen, then remember to use hexadecimal numbers (ie. numeric values between 0 and 9 and alphabetic characters between A and F). [root@bigboy tmp]# /sbin/nwepgen ketchup 64:c1:a1:cc:db 2b:32:ed:37:16 b6:cc:9e:1b:37 d7:0e:51:3f:03 [root@bigboy tmp]#
Using iwconfig To Add Encryption
There should be colons or any other non hexadecimal characters between the characters of the key. There should be 10 characters in total. iwconfig eth0 key 967136deac
Using The /etc/sysconfig/network-scripts Files To Add Encryption
There should be colons or any other non hexadecimal characters between the characters of the key. There should be 10 characters in total. KEY=967136deac
Networking With Linux-WLAN
One of the original Linux wireless LAN projects developed a product called Linux-WLAN. It is generally more difficult to install than wireless-tools and has fewer troubleshooting tools. It is still quite popular and has been included for completeness.
Linux-WLAN Preparation
Here are some pointers you'll need to remember prior to using the Linux-WLAN product:
o All devices on a wireless network must use the same "Network Identifier" or SSID in order to communicate with each other. The default SSID for Linux-WLAN is "linux-wlan", the default SSID for your windows NIC cards may be different. It's a good idea to decide on a common SSID and stick with it.
o Once configured, Linux-WLAN doesn't identify the wireless NIC as an Ethernet "eth" device, but as a "wlan" device. This is good to know in order to avoid confusion when troubleshooting.

o Always be prepared to check your syslog /var/log/messages file for errors if things don't work. It is a good source of information. The syslog chapter will also show you how to set up syslog error logging to be more sensitive to errors.
o You may get "device unknown" or "no such device" errors related to the wlan device in the /var/log/messages file if you use older unpatched versions of the Linux-WLAN software. Always use the most recent versions to make the installation smoother.
o Before installing the linux-wlan software for PCMCIA type cards such as the (Linksys WPC11) you will need to install the RPM packages that support PCMCIA. This step isn't necessary for true PCI cards such as the Linksys WMP11.
In Fedora Core, the package name is "pcmcia-cs" and in RedHat 9 and older it is "kernel-pcmcia-cs". When searching for the RPMs, remember that the filename usually starts with the software package name by a version number like this: kernel-pcmcia-cs-3.1.31-13.i386.rpm.
Downloading and installing RPMs isn't hard. If you need a refresher, the RPM chapter covers how to do this in detail.
Identifying The Correct RPMs RPM versions of the driver files can be found at http://prism2.unixguru.raleigh.nc.us. Remember to download the files for the correct kernel type, OS version and kernel version. Downloading and installing RPMs isn't hard. If you need a refresher, Chapter 5 covers how to do this in detail.
Determining The Kernel Type: Use the "uname -p" command. The Bigboy server discussed in the Topology chapter is running an i686 version of Linux. The Linux version may not match the CPU you have installed, always use the uname version. [root@bigboy tmp]# uname -p i686 [root@bigboy tmp]#
Determining The OS Version: One of the easiest ways is to view the /etc/ redhat-release or the /etc/fedora-release file. In this case server "Bigboy" is running RedHat version 9.0 while "Zero" is running Fedora Core 1. You can also look at the /etc/issue file for other versions of Linux. [root@bigboy tmp]# more /etc/redhat-release Red Hat Linux release 9 (Shrike) [root@bigboy tmp]# [root@zero root]# more /etc/fedora-release Fedora Core release 1 (Yarrow) [root@zero root]#
Determining The Kernel Version: You can use the "uname -r" command to do this. In this case, "bigboy" is running version 2.4.20-8
[root@bigboy tmp]# uname -r 2.4.20-8 [root@bigboy tmp]#
Installing the RPMs Once you have all this Linux information, you'll need to download and install the base, module and interface packages. When searching for the RPMs, remember that the filename usually starts with the software package name by a version number like this:

kernel-wlan-ng-0.2.1-pre14.i686.rpm kernel-wlan-ng-modules-fc1.1.2115-0.2.1-pre14.i686.rpm kernel-wlan-ng-pci-0.2.1-pre14.i686.rpm kernel-wlan-ng-pcmcia-0.2.1-pre14.i686.rpm
Note: There are different RPMs for PCMCIA and PCI based NIC cards. The base and "modules" RPMs need to be installed in all cases.
Here is some sample output of the installation procedure, the sequence of installation is important. Double check your preparation steps and the RPM versions if the very last line of the installation gives a result code that is not "success". [root@bigboy tmp]# rpm -Uvh kernel-wlan-ng-0.2.1-pre14.i686.rpm Preparing... ##################################### [100%] 1:kernel-wlan-ng ##################################### [100%] [root@bigboy tmp]# rpm -Uvh kernel-wlan-ng-modules-fc1.1.2115-0.2.1-pre14.i686.rpm Preparing... ##################################### [100%] 1:kernel-wlan-ng-modules-##################################### [100%] [root@bigboy tmp]# [root@bigboy tmp]# rpm -Uvh kernel-wlan-ng-pcmcia-0.2.1-pre14.i686.rpm Preparing... ##################################### [100%] 1:kernel-wlan-ng-pci ##################################### [100%] Adding prism2_pci alias to /etc/modules.conf file... ***NOTE*** YOU MUST CHANGE THIS IF YOU HAVE A PLX CARD!!! The default wlan0 network configuration is DHCP. Adjust accordingly. ACHTUNG! ATTENTION! WARNING! YOU MUST configure /etc/wlan/wlan.conf to define your SSID! YOU ALSO must configure /etc/wlan/wlancfg-SSID to match WAP settings! (---> replace SSID in filename with the value of your SSID) If you get an error after this point, there is either a problem with your drivers or you don't have the hardware installed! If the former, get help! Starting WLAN Devices:message=dot11req_mibset mibattribute=dot11PrivacyInvoked=false resultcode=success message=dot11req_mibset mibattribute=dot11ExcludeUnencrypted=false resultcode=success [root@bigboy tmp]#
Under version 8.0 of RedHat I have seen the kernel-wlan-ng-pcmcia rpm installation give errors stating that the kernel-pcmcia-cs rpm hadn't been previously installed even when it had been. Installing the rpm with --force and --nodeps switches does the trick by forcing the installation while not checking for dependencies. Always remember that under normal circumstances this wouldn't be a good idea, error messages are there for a reason.
[root@bigboy tmp]# rpm -Uvh kernel-wlan-ng-pcmcia-0.1.15-6.i686.rpm error: Failed dependencies: kernel-pcmcia-cs is needed by kernel-wlan-ng-pcmcia-0.1.15-6 [root@bigboy tmp]# rpm -Uvh --force --nodeps kernel-wlan-ng-pcmcia-0.1.15-6.i686.rpm Preparing... ##################################### [100%]

1:kernel-wlan-ng-pcmcia ##################################### [100%] Adding prism2_cs alias to /etc/modules.conf file... Shutting down PCMCIA services: cardmgr modules. Starting PCMCIA services: modules cardmgr. The default wlan0 network configuration is DHCP. Adjust accordingly. ACHTUNG! ATTENTION! WARNING! YOU MUST configure /etc/pcmcia/wlan-ng.opts to match WAP settings!!! [root@bigboy tmp]#
Note: If you upgrade your Linux kernel you'll have to reinstall Linux-WLAN all over again. This will also create new versions of your /etc/sysconfig/network-scripts/ifcfg-wlan0, /etc/wlan/wlan.conf and /etc/pcmcia/wlan-ng.opts files which you may have to restore from the automatically saved versions.
Linux-WLAN Post Installation Steps
Once the RPMs are installed, you'll have to configure the new "wlan0" wireless NIC to be compatible with your network.
Configure The New wlan0 Interface
Edit /etc/sysconfig/network-scripts/ifcfg-wlan0 to include the following lines: DHCP Version Fixed IP Version ============ ================= DEVICE=wlan0 DEVICE=wlan0 USERCTL=yes IPADDR=192.168.1.100 ONBOOT=yes NETMASK=255.255.255.0 BOOTPROTO=dhcp ONBOOT=yes BOOTPROTO=static
In the fixed IP version you will also need to substitute your selected IP, netmask, network, broadcast address with those above. You will also need to make sure you have correct gateway statement in your /etc/sysconfig/network file. eg. GATEWAY=192.168.1.1
Disable Your Existing Ethernet NIC You may want to disable your existing eth0 Ethernet interface after installing the drivers. Edit /etc/sysconfig/network-scripts/ifcfg-eth0 file to have an "ONBOOT=no" entry. This will disable the interface on reboot or when /etc/init.d/network is restarted.
Select the Wireless mode and SSID This step varies according to the version of Linux you are using.
Using RedHat 8.0 WLAN RPMs
> Edit your /etc/wlan.conf file (PCI type NIC) or your /etc/pcmcia/wlan-ng.opts file (PCMCIA type NICs) configuration file. Locate the lines containing "ssid=linux_wlan"

and set the SSID to whatever value you've decided to use on your wireless LAN. In this case we have decided to use "homenet".
Also modify the IS_ADHOC option to make your NIC either support "adhoc" mode for peer to peer networks or "infrastructure" mode if you are using a WAP.
Here is a sample snippet. #=======SELECT STATION MODE=================== IS_ADHOC=n # y|n, y - adhoc, n - infrastructure #=======INFRASTRUCTURE STATION START=================== # SSID is all we have for now AuthType="opensystem" # opensystem | sharedkey (requires WEP) # Use DesiredSSID="" to associate with any AP in range DesiredSSID="homenet"
Using RedHat 9.0 / Fedora Core 1 WLAN RPMs
All the configuration files are located in the /etc/wlan directory. The RedHat 9.0 / Fedora Core 1 package allows your server to be connected to up to 3 wireless LANs. You specify the SSIDs (LAN IDs) for each wireless LAN in the /etc/wlan/wlan.conf file. In the example below, we make the wlan0 interface join the "homenet" WLAN. We are also making the WLAN driver scan all wireless channels for SSIDs. # # Specify all the wlan interfaces on the server # WLAN_DEVICES="wlan0" # # Specify whether the server should scan the network channels # for valid SSIDs # WLAN_SCAN=y # # Specify expected SSIDs and the wlan0 interface to which it should # be tied # SSID_wlan0="homenet" ENABLE_wlan0=y
Each WLAN specified in the /etc/wlan/wlan.conf file has it's own configuration file. Copy the /etc/wlan/wlancfg-DEFAULT file to a file named /etc/wlan/wlancfg-SSID (replace SSID with the actual SSID for your WAP). In the example below, we're configuring for the "homenet" SSID. [root@bigboy wlan]# cp wlancfg-DEFAULT wlancfg-homenet
Start Linux-WLAN Start the wlan process and test for errors in the file /var/log/messages. All the resultcodes in the status messages should be "success". You may receive the following error which the WLAN RPM website claims is "harmless". Error for wireless request "Set Encode" (8B2A) : SET failed on device wlan0 ; Function not implemented. Error for wireless request "Set ESSID" (8B1A) :
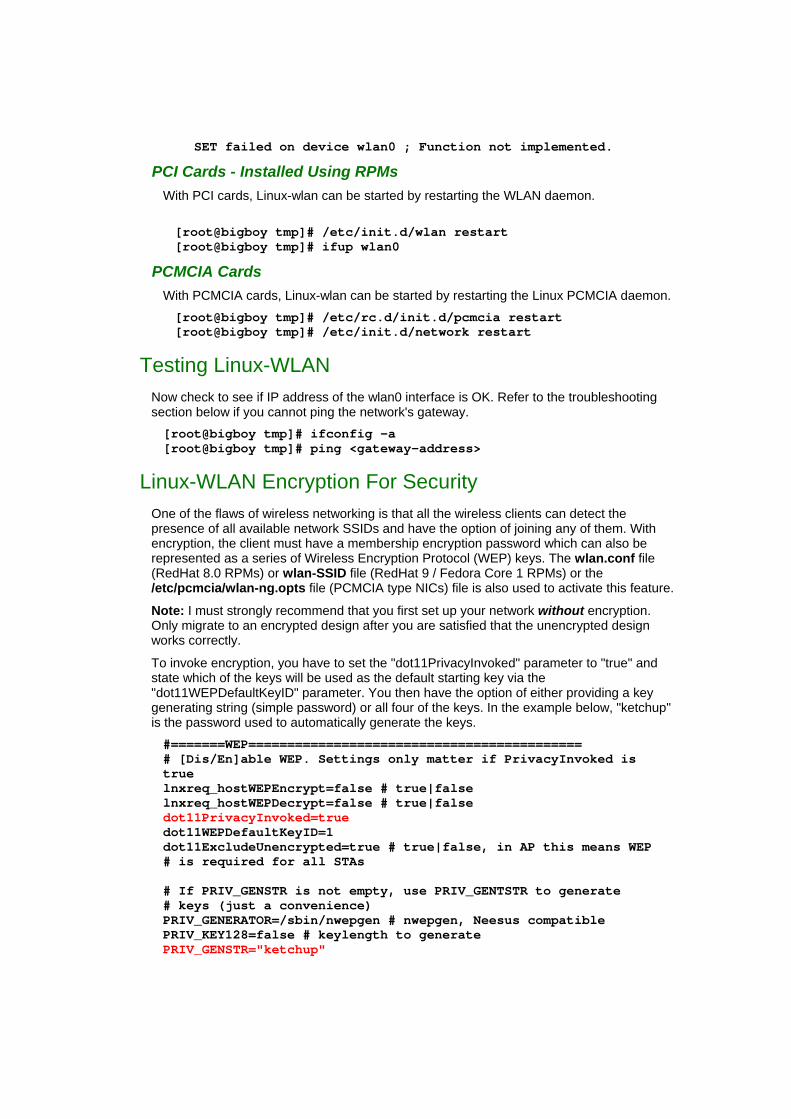
SET failed on device wlan0 ; Function not implemented.
PCI Cards - Installed Using RPMs With PCI cards, Linux-wlan can be started by restarting the WLAN daemon. [root@bigboy tmp]# /etc/init.d/wlan restart [root@bigboy tmp]# ifup wlan0
PCMCIA Cards With PCMCIA cards, Linux-wlan can be started by restarting the Linux PCMCIA daemon. [root@bigboy tmp]# /etc/rc.d/init.d/pcmcia restart [root@bigboy tmp]# /etc/init.d/network restart
Testing Linux-WLAN Now check to see if IP address of the wlan0 interface is OK. Refer to the troubleshooting section below if you cannot ping the network's gateway. [root@bigboy tmp]# ifconfig -a [root@bigboy tmp]# ping <gateway-address>
Linux-WLAN Encryption For Security One of the flaws of wireless networking is that all the wireless clients can detect the presence of all available network SSIDs and have the option of joining any of them. With encryption, the client must have a membership encryption password which can also be represented as a series of Wireless Encryption Protocol (WEP) keys. The wlan.conf file (RedHat 8.0 RPMs) or wlan-SSID file (RedHat 9 / Fedora Core 1 RPMs) or the /etc/pcmcia/wlan-ng.opts file (PCMCIA type NICs) file is also used to activate this feature.
Note: I must strongly recommend that you first set up your network without encryption. Only migrate to an encrypted design after you are satisfied that the unencrypted design works correctly.
To invoke encryption, you have to set the "dot11PrivacyInvoked" parameter to "true" and state which of the keys will be used as the default starting key via the "dot11WEPDefaultKeyID" parameter. You then have the option of either providing a key generating string (simple password) or all four of the keys. In the example below, "ketchup" is the password used to automatically generate the keys. #=======WEP=========================================== # [Dis/En]able WEP. Settings only matter if PrivacyInvoked is true lnxreq_hostWEPEncrypt=false # true|false lnxreq_hostWEPDecrypt=false # true|false dot11PrivacyInvoked=true dot11WEPDefaultKeyID=1 dot11ExcludeUnencrypted=true # true|false, in AP this means WEP # is required for all STAs # If PRIV_GENSTR is not empty, use PRIV_GENTSTR to generate # keys (just a convenience) PRIV_GENERATOR=/sbin/nwepgen # nwepgen, Neesus compatible PRIV_KEY128=false # keylength to generate PRIV_GENSTR="ketchup"

# or set them explicitly. Set genstr or keys, not both. dot11WEPDefaultKey0= # format: xx:xx:xx:xx:xx or dot11WEPDefaultKey1= # xx:xx:xx:xx:xx:xx:xx:xx:xx:xx:xx:xx:xx dot11WEPDefaultKey2= # e.g. 01:20:03:40:05 or dot11WEPDefaultKey3= # 01:02:03:04:05:06:07:08:09:0a:0b:0c:0d
Not all devices on your network will use the same algorithm method to generate the encryption keys. You may find the same generator string will not create the same keys, and intra-network communication will be impossible. If this is the case, you can use the /sbin/nwepgen program to generate the keys once you provide your easy to remember key generator string. Once you have the four sets of keys, you'll have to add them individually and in sequence to the wlan.conf, wlan-SSID or /etc/pcmcia/wlan-ng.opts file and set the PRIV_GENSTR parameter to "". Here is how you can use nwepgen to create the keys with a generator string of "ketchup". [root@bigboy tmp]# /sbin/nwepgen ketchup 64:c1:a1:cc:db 2b:32:ed:37:16 b6:cc:9e:1b:37 d7:0e:51:3f:03 [root@bigboy tmp]#
In this case your wlan.conf or wlan-SSID file would look like this: PRIV_GENSTR="" # or set them explicitly. Set genstr or keys, not both. dot11WEPDefaultKey0= 64:c1:a1:cc:db dot11WEPDefaultKey1= 2b:32:ed:37:16 dot11WEPDefaultKey2= b6:cc:9e:1b:37 dot11WEPDefaultKey3= d7:0e:51:3f:03
Remember that all devices on your network will need to have the same keys and default key for this to work. This includes all wireless NICs and WAPs
De-activating Encryption In some cases, NIC cards without full Linux-WLAN compatibility will freeze up after a number of hours of working with encryption. The steps to reverse encryption are:
1. Set the configuration file parameter "dot11PrivacyInvoked" to "false"
2. Stop Linux-WLAN and disable the wireless wlan0 interface [root@bigboy tmp]# /etc/init.d/wlan stop Shutting Down WLAN Devices:message=lnxreq_ifstate ifstate=disable resultcode=success [root@bigboy tmp]# ifdown wlan0
3. Even though you have done these two steps, the driver is still loaded in memory, though not active. Your next steps will be to list all the active drivers in memory with the lsmod command, and remove the Linux-WLAN related entries using rmmod [root@bigboy tmp]# lsmod Module Size Used by Not tainted ... ... prism2_pci 66672 1 (autoclean) p80211 20328 1 [prism2_pci]

...
... [root@bigboy tmp]# rmmod prism2_pci [root@bigboy tmp]# rmmod p80211
4. Restart Linux-WLAN and reactivate the wlan0 interface and you should be functional again.
[root@bigboy tmp]# /etc/init.d/wlan start Starting WLAN Devices:message=lnxreq_hostwep resultcode=no_value decrypt=false encrypt=false [root@bigboy tmp]# ifup wlan0
5. If you fail to reload the driver modules you'll get errors like these below in your /var/log/messages file. Jan 2 18:11:12 bigboy kernel: prism2sta_ifstate: hfa384x_drvr_start() failed,result=-110 Jan 2 18:11:18 bigboy kernel: hfa384x_docmd_wait: hfa384x_cmd timeout(1), reg=0x8021. Jan 2 18:11:18 bigboy kernel: hfa384x_drvr_start: Initialize command failed. Jan 2 18:11:18 bigboy kernel: hfa384x_drvr_start: Failed, result=-110
Troubleshooting Your Wireless LAN Always check the /var/log/messages file for possible errors arising from the software installation. The chapter on logging covers how to do this in more detail.
Check The NIC Status When using iwconfig WLAN methodology, the following commands can be useful.
The iwconfig Command
You can use the "ifconfig" command to check the status of your NIC. You can also use the "iwconfig" command without any parameters to view the state of your wireless network. Important information such as the link quality, WAP MAC address, data rate and encryption keys can be seen with this command and can be helpful in ensuring the parameters across your network are the same. [root@bigboy tmp]# iwconfig eth0 IEEE 802.11-DS ESSID:"homenet" Nickname:"bigboy" Mode:Managed Frequency:2.462GHz Access Point: 00:09:5B:C9:19:22 Bit Rate:11Mb/s Tx-Power=15 dBm Sensitivity:1/3 Retry min limit:8 RTS thr:off Fragment thr:off Encryption key:98D1-26D5-AC Security mode:restricted Power Management:off Link Quality:36/92 Signal level:-92 dBm Noise level:-148 dBm Rx invalid nwid:0 Rx invalid crypt:2 Rx invalid frag:0 Tx excessive retries:10 Invalid misc:0 Missed beacon:0 [root@bigboy tmp]#

The iwlist Command You can also use the "iwlist" command to get further information related to the entire network, not just the NIC. This includes the number of available frequency channels, the range of possible data rates and the signal strength. Further information can be obtained from the "man" pages.
Check For Interrupt Conflicts Before installing the software you should ensure that the wireless NIC card doesn't have an interrupt that clashes with another device in your computer. Insert the card in an empty slot in your Linux box and reboot. Inspect your /var/log/messages file again: [root@bigboy tmp]# tail -300 /var/log/messages
Look carefully for any signs that the card is interfering with existing card IRQs. If there is a conflict there will usually be a warning, or "IRQ also used by..." message. If that is the case, move the card to a different slot, or otherwise eliminate the conflict by disabling the conflicting device if you don't really need it.
After you've installed the software, you can also inspect your /proc/interrupts file for multiple devices having the same interrupt [root@bigboy tmp]# more /proc/interrupts 11: 4639 XT-PIC wlan0, eth0 (bad) [root@bigboy tmp]# more /proc/interrupts 11: 4639 XT-PIC wlan0 (good)
Interrupt conflicts are usually more problematic with old style PC-AT buses, newer PCI based systems generally handle conflicts better. The above (bad) /proc/interrupts example came from a functioning PCI based Linux box, the reason why it worked was that though the interrupt was the same, the base memory address which was used by Linux to communicate with the cards were different. You can check both the interrupts and base memory of your NIC cards after doing the software installation by using the "ifconfig -a" command: [root@bigboy tmp]# ifconfig -a eth0 Link encap:Ethernet HWaddr 00:08:C7:10:74:A8 BROADCAST MULTICAST MTU:1500 Metric:1 RX packets:0 errors:0 dropped:0 overruns:0 frame:0 TX packets:0 errors:0 dropped:0 overruns:0 carrier:0 collisions:0 txqueuelen:100 RX bytes:0 (0.0 b) TX bytes:0 (0.0 b) Interrupt:11 Base address:0x1820 wlan0 Link encap:Ethernet HWaddr 00:06:25:09:6A:B5 inet addr:192.168.1.100 Bcast:192.168.1.255 Mask:255.255.255.0 UP BROADCAST RUNNING MULTICAST MTU:1500 Metric:1 RX packets:215233 errors:0 dropped:0 overruns:0 frame:0 TX packets:447594 errors:0 dropped:0 overruns:0 carrier:0 collisions:0 txqueuelen:100 RX bytes:39394014 (37.5 Mb) TX bytes:126738425 (120.8 Mb) Interrupt:11 Memory:c887a000-c887b000 [root@bigboy tmp]#
Kernel Log Errors p80211 Kernel errors in /var/log/messages usually point to an incorrectly configured SSID or may also be due to a NIC card with an outdated firmware version.

Nov 13 22:24:54 bigboy kernel: p80211knetdev_hard_start_xmit: Tx attempt prior to association, frame dropped.
Can't Ping Default Gateway First check for kernel log errors.
If there are no errors in /var/log/messages and you can't ping your gateways or obtain an IP address, then check your /etc/sysconfig/network-scripts/ configuration files for a correct IP configuration and your routing table to make sure your routes are OK. You can also check to see if your Linux box is out or range of the WAP using the iwconfig command.
"Unknown Device" Errors Look for "unknown device" or "no such device" errors in your log files or on your screen during installation or configuration.
These may be due to:
o A NIC card that hasn't been correctly seated in the PCI slot
o Incompatible hardware.
Here are some sample incompatible hardware errors you may see.
Errors in /var/log/messages
00:0c.0 Network controller: BROADCOM Corporation: Unknown device 4301 (rev01) Subsystem: Unknown device 1737:4301 Flags: bus master, fast devsel, latency 64, IRQ 5 Memory at f4000000 (32-bit, non-prefetchable) [size=3D8K] Capabilities: [40] Power Management version 2
Errors On The Screen
Dec 1 01:28:14 bigboy insmod: /lib/modules/2.4.18-14/net/prism2_pci.o: init_module: No such device Dec 1 01:28:14 bigboy insmod: Hint: insmod errors can be caused by incorrect module parameters, including invalid IO or IRQ parameters. You may find more information in syslog or the output from dmesg Dec 1 01:28:14 bigboy insmod: /lib/modules/2.4.18-14/net/prism2_pci.o: insmod wlan0 failed
A Common Problem With Linux-WLan And Fedora Core 1 Fedora Core will auto detect Linux-WLAN compatible NIC cards and enter a line like this in the /etc/modules.conf file. In other words it detects them as an Ethernet "eth" device instead of a WLAN "wlan" device.
alias eth2 orinoco_pci
This seems to conflict with the WLAN RPMs and you'll get errors like this when starting Linux-WLAN.
Starting WLAN Devices: /etc/init.d/wlan: line 119: Error: Device wlan0 does not seem to be present.: command not found

/etc/init.d/wlan: line 120: Make sure you've inserted the appropriate: command not found /etc/init.d/wlan: line 121: modules or that your modules.conf file contains: command not found /etc/init.d/wlan: line 122: the appropriate aliase(s).: command not found
Use the following steps to fix the problem. The example below refers to a compatible Orinoco chipset card.
1. Remove the orinoco_pci line from the /etc/modules.conf file. DO NOT remove the entry for device wlan0.
2. Edit your /etc/sysconfig/hwconf file, search for "orinoco_pci " and remove the "orinoco_pci" section that refers to your wireless card. (Each section starts and ends with a single "-" on a new line)
3. Reboot.
4. The Linux boot process always runs "Kudzu", the program that detects new hardware. Kudzu will detect the wireless card and ask whether you want to configure it. Choose "ignore". This will reinsert the wireless card in the /etc/sysconfig/hwconf file, but not in the /etc/modules.conf file.
5. Your NIC card should start to function as expected as device wlan0 when you use the "ifconfig -a" command. Configure the IP address, and activate the NIC as shown earlier in this chapter.
Conclusion
With the knowledge gained in the chapters in Part 1 of the book you will be able to configure a Linux file and DHCP server on small network with relative ease. Part 2 will explore the possibility of making your server also become the core of your self managed dedicated website.

Chapter 12
Using Sudo = = = = = = = = = = = = = = = = = = = = = = = = = = = = = = = = = = = = = = = = = = = In This Chapter Chapter 12
Using Sudo What is sudo? Download and Install The sudo Package The visudo Command The /etc/sudoers File How To Use sudo Using syslog To Track All sudo Commands Conclusion
(c) Peter Harrison, www.linuxhomenetworking.com = = = = = = = = = = = = = = = = = = = = = = = = = = = = = = = = = = = = = = = = = = = If a server needs to be administered by a number of people it is normally not a good idea for them to all use the "root" account. This is because it becomes difficult to determine exactly who did what, when and where if everyone logs in with the same credentials. The sudo utility allows regular users to have temporary root privileges for a predefined period of time. All the commands issued by users using sudo are logged which leaves an audit trail which can be made difficult to alter if syslog logs to an external logging server. This chapter shows how it's all done.
What is sudo? Sudo is a command that allows users defined in the /etc/sudoers configuration file to have temporary root access to run certain privileged commands. The command you want to run must first begin with the word "sudo" followed by the regular command syntax.
When running the command you will be prompted for your regular password before it is executed.You may run other privileged commands using sudo within a five minute period without being re-prompted for a password. All commands run as sudo are logged in the log file /var/log/messages.
Download and Install The sudo Package
Fortunately the package is installed by default by RedHat / Fedora which eliminates the need to anything more in this regard.

The visudo Command "visudo" is a text editor that mimics the "vi" editor that is used to edit the /etc/sudoers configuration file. It is not recommended that you use any other editor to modify your sudo parameters as the sudoers file isn't located in the same directory on all versions of Linux. "visudo" uses the same commands as the "vi" text editor. "visudo" is best run as user "root" and should have no arguments as seen below. [root@aqua tmp]# visudo
The /etc/sudoers File The /etc/sudoers file contains all the configuration and permission parameters needed for sudo to work. There are a number of guidelines that need to be followed when editing it with visudo.
General Guidelines o The /etc/sudoers file has the general format:
usernames/group target-servername = command
o Groups are the same as user groups and are differentiated from regular users by a % at the beginning
o The "#" at the beginning of a line signifies a comment line
o You can have multiple usernames per line separated by commas
o Multiple commands can be separated by commas too. Spaces are considered part of the command.
o The keyword "ALL" can mean all usernames, groups, commands and servers.
o If you run out of space on a line, you can end it with a "\" and continue on the next line.
o The NOPASSWD keyword provides access without you being prompted for your password
Simple sudoers Examples o Users "paul" and "mary" have full access to all privileged commands
paul, mary ALL=(ALL) ALL
o Users with a groupid of "operator" has full access to all commands and won't be prompted for a password when doing so. %operator ALL=(ALL) NOPASSWD: ALL
How To Use sudo In this example, user "paul" attempts to view the contents of the /etc/sudoers file [paul@bigboy paul]$ more /etc/sudoers /etc/sudoers: Permission denied [paul@bigboy paul]$
Paul tries again using sudo and his regular user password and is successful

[paul@bigboy paul]$ sudo more /etc/sudoers Password: ... ... [paul@bigboy paul]$
Using syslog To Track All sudo Commands All sudo commands are logged in the log file /var/log/messages. Here is sample output from the above example in which we can see the first sudo failure followed by the successful attempt. As you can see, sudo's command logging can give a good idea of what everyone was doing. [root@bigboy tmp]# grep sudo /var/log/messages Nov 18 22:50:30 bigboy sudo(pam_unix)[26812]: authentication failure; logname=paul uid=0 euid=0 tty=pts/0 ruser= rhost= user=paul Nov 18 22:51:25 bigboy sudo: paul : TTY=pts/0 ; PWD=/etc ; USER=root ; COMMAND=/bin/more sudoers [root@bigboy tmp]#
Conclusion
The sudo utility provides a means of dispersing the responsibility of systems management to multiple people. You can even give some groups of users only partial access to privileged commands depending on their roles in the organization. This makes sudo a valuable part of any company's server administration and security policy.

Chapter 14
Why Host Your Own Site? = = = = = = = = = = = = = = = = = = = = = = = = = = = = = = = = = = = = = = = = = = =
In This Chapter
Chapter 14 Why Host Your Own Site?
Network Diagram Alternatives To Home Web Hosting Factors To Consider Before Hosting Yourself How To Migrate From An External Provider Conclusion
(c) Peter Harrison, www.linuxhomenetworking.com = = = = = = = = = = = = = = = = = = = = = = = = = = = = = = = = = = = = = = = = = = =
The decision as to whether or not to host your own website can be difficult. There are factors of cost and convenience that you have to consider as well as service and support. This chapter will briefly address the most common issues and outline the simple network architecture for use in a small office or home on which the focus of the rest of the book will be based.
Network Diagram
The typical small office or home network is usually quite simple with a router / firewall, connected to a broadband Internet connection, protecting a single network on which all servers and PCs are connected as seen in Figure 14-1.
The rest of the book will show you how you can make a simple layout like this become a functional low volume website, but before you do it would be best to weigh the pros and cons of doing this.

Figure 14-1 : Wireless Home Network Topology
Alternatives To Home Web Hosting
It is easy to find virtual hosting companies on the Web which will offer to host a simple website for about $10 per month.
The steps are fairly straight forward:
1. Sign up for the virtual hosting service. They will provide you with a login name and password, the IP address of your site plus the name of a private directory on a shared web server in which you'll place your web pages.
2. Register your domain name, such as www.my-site.com, with companies like Register.com, Verisign or RegisterFree.com. You must make sure your new domain name's DNS records point to the DNS server of the virtual hosting company.
3. Upload your web pages to your private virtual hosting directory.
4. Start testing your site using your IP address in your web browser. It takes about 3-4 days for DNS to propagate across the Web, so you'll probably have to wait at least that long before you'll be able to view your site using your domain, www.my-site.com.
The virtual hosting provider will also offer free backups of your site, technical support, a number of email addresses and an easy to use web based GUI to manage your settings. For an additional charge, many will also provide an e-commerce feature which will allow you to have a shopping cart and customer loyalty programs.
Factors To Consider Before Hosting Yourself
Virtual hosting is the ideal solution for many small websites but there are a number of reasons why you may want to move your website to your home or small office. The pros and cons of doing this are listed in Table 14-1.

Table 14-1 The Pros And Cons Of Web Hosting In-House
In-house Web Hosting
Savings
Costs
Risks
o Monthly out sourced
web hosting fee o Elimination of the
cost of delays to implement desired services.
o New hardware &
software o Possible new
application development.
o Training o The percentage of IT
staff's time installing and maintaining the site
o Potential cost of the risks (% likelihood of failure per month X cost of failure)
o Likelihood of a failure
and expected duration o The cost of both the
failure and post failure recovery (Hardware, software, data restoration, time)
Is In-House Hosting Is Preferred?
There are a number of advantages and disadvantages to hosting websites that are physically under your own control.
Pros
o Increased Control: You will be able to manage all aspects of your website if it is hosted on a server based either in-house or within your control at a remote data center.
o Cost: It is possible to host a website on most DSL connections. A website can be hosted on this data circuit for the only additional hardware cost of a network switch and a web server. You should be able to buy this equipment second hand for about $100. If your home already has DSL there would be no additional network connectivity costs. So for a savings of $10 per month the project should pay for itself in less than a year.
Also the cost of using an external web hosting provider will increase as you purchase more systems administration services. You will eventually be able to justify hosting your website in-house based on this financial fact.
o New Skills: There is also the additional benefit of learning the new skills required to set up the site. Changes can be made with little delay.
o Availability: Reliable virtual hosting facilities may not be available in your country and/or you may not have access to the foreign currency to host your site abroad.

Cons
o Lost Services: You lose the convenience of many of the services such as backups, security audits, load balancing, DNS, redundant hardware, data base services and technical support offered by the virtual hosting company.
o Security: One important factor to consider is the security of your new server. Hosting providers may provide software patches to fix security vulnerabilities on your web servers and may even provide a firewall to protect it. These services may be more difficult to implement in-house. Always weigh the degree of security maintained by your hosting provider with that which you expect to provide in-house. Proceed with the server migration only if you feel your staff can handle the job.
o Technical Ability: Your service provider may have more expertise in setting up your site than you do. You may also have to incur additional training costs to ensure that your IT staff has the necessary knowledge to do the job internally.
o Availability: In many cases the reliability of a data center's Internet connectivity is usually higher than that of your broadband connection.
How To Migrate From An External Provider
Chapter 19 that covers DNS has a detailed explanation of the steps involved in migrating your website from an external hosting provider to your home or small office. You should also read the Chapters 21 and 22 on web and mail server configuration to help provide a more rounded understanding of the steps involved.
Conclusion
The decision to manage your website in house can be difficult. If you decide to do it, then this book will be able to provide a lot of guidance in completing a successful project.

Chapter 15
Linux Firewalls Using iptables = = = = = = = = = = = = = = = = = = = = = = = = = = = = = = = = = = = = = = = = = = = In This Chapter Chapter 15
Linux Firewalls Using iptables What Is iptables? Download And Install The Iptables Package How To Get iptables Started Determining The Status of iptables Packet Processing In iptables Targets And Jumps Important Iptables Command Switch Operations Using User Defined Chains Sample iptables Scripts Troubleshooting iptables Fedora's iptables Script Generator Recovering From A Lost Script Conclusion
(c) Peter Harrison, www.linuxhomenetworking.com = = = = = = = = = = = = = = = = = = = = = = = = = = = = = = = = = = = = = = = = = = = Network security is a primary consideration in any decision to host a website as the threats are becoming more widespread and persistent every day. One means of providing additional protection is to invest in a firewall. Though prices are always falling, in some cases you may be able to create a comparable unit using the Linux iptables package on an existing server for little or no additional expenditure. This chapter shows how to convert a Linux server into:
> A firewall while simultaneously being your home website's mail, web and DNS server.
> A router that will use NAT and port forwarding to both protect your home network and have another web server on your home network while sharing the public IP address of your firewall.
The many steps to take in creating an iptables firewall script, but with the aid of sample tutorials, you should be able to complete a configuration relatively quickly.
What Is iptables? Originally, the most popular firewall / NAT package running on Linux was ipchains. It had a number of limitations, the primary one being that it ran as a separate program and not as part of the kernel. The Netfilter organization decided to create a new product called iptables in order to rectify this shortcoming. As a result of this, iptables is considered a faster and more secure alternative. iptables has now become the default firewall package installed under RedHat and Fedora Linux.

Download And Install The Iptables Package
Most RedHat and Fedora Linux software products are available in the RPM format. Downloading and installing RPMs isn't hard. If you need a refresher, chapter 5, on RPMs, covers how to do this in detail.
You will need to make sure that the iptables software RPM is installed. When searching for the RPMs, remember that the filename usually starts with the software package name by a version number like this: iptables-1.2.9-1.0.i386.rpm.
How To Get iptables Started You can start/stop/restart iptables after booting by using the following commands: [root@bigboy tmp]# /etc/init.d/iptables start [root@bigboy tmp]# /etc/init.d/iptables stop [root@bigboy tmp]# /etc/init.d/iptables restart
To get iptables configured to start at boot you can use the chkconfig command. [root@bigboy tmp]# chkconfig iptables on
Determining The Status of iptables You can determine whether iptables is running or not by running the init.d script with the "status" argument. Fedora Core will give a simple status message. RedHat 9 and older will give a short rule list in which all the firewall policies are set to "accept".
Fedora Core Status Messages [root@bigboy tmp]# /etc/init.d/iptables status Firewall is stopped. [root@bigboy tmp]#
RedHat 9 Status Messages [root@bigboy sysconfig]# /etc/init.d/iptables status Table: filter Chain INPUT (policy ACCEPT) target prot opt source destination Chain FORWARD (policy ACCEPT) target prot opt source destination Chain OUTPUT (policy ACCEPT) target prot opt source destination [root@bigboy sysconfig]#
Packet Processing In iptables All packets inspected by iptables pass through a sequence of built-in tables (queues) for processing. Each of these queues is dedicated to a particular type of packet activity and is controlled by an associated packet transformation / filtering chain. Don't worry if this all seems confusing, there'll be tables and examples of how the concepts are all interlinked.
For example, Figure 15-1 and Tables 15-1 through 15-3 describe the steps taken by iptables when a packet traverses the firewall.
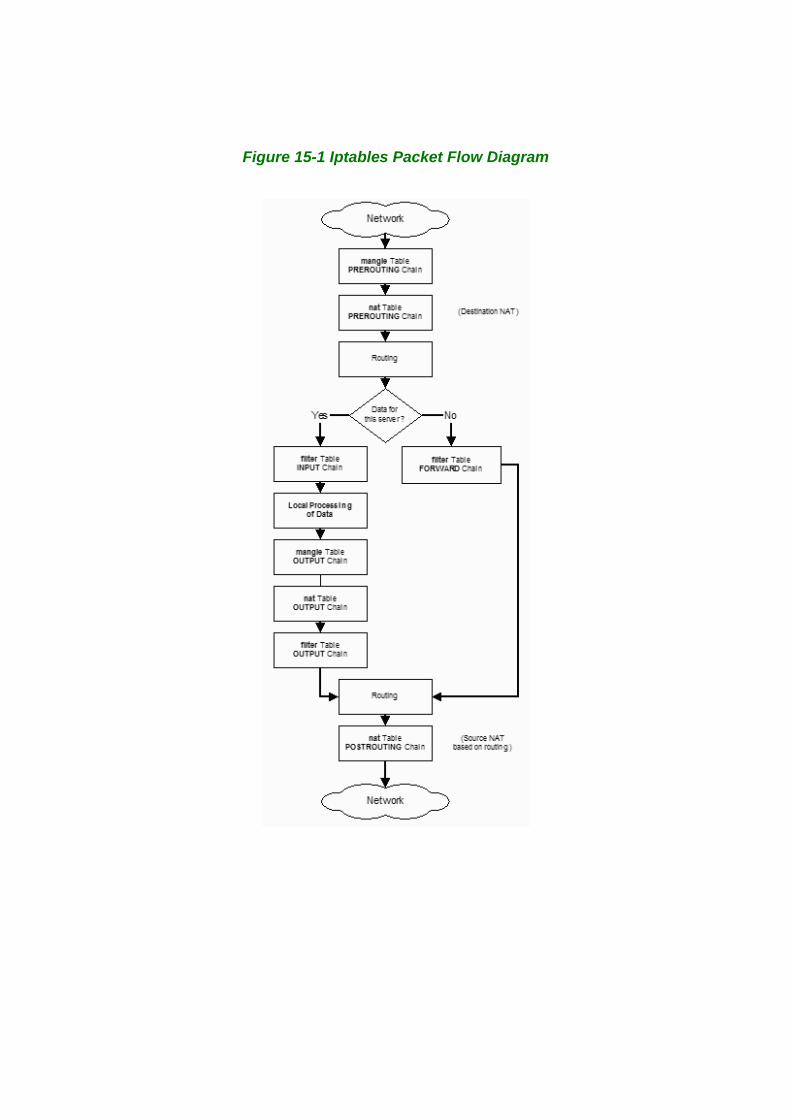
Figure 15-1 Iptables Packet Flow Diagram

Table 15-1 Processing For Packets Routed By The Firewall
Packet flow Intercepted by iptables
chain (Queue)
Packet transformation
table associated
with this queue
Description of possible modifications by
iptables using this transformation table
Packet enters the NIC and is passed to iptables
Mangle PREROUTING Modification of the TCP packet quality of service bits. (Rarely used)
Nat PREROUTING Destination network address translation (DNAT). Frequently used to NAT connections from the Internet to your home network
Packet passed to the Linux routing engine
N/A N/A N/A Determines whether the packet is destined to a local application or should be sent out another NIC interface
Packet passed back to iptables
Filter FORWARD Packet filtering: Packets destined for servers accessible by another NIC on the firewall.
Nat POSTROUTING Source network address translation (SNAT). Frequently used to NAT connections from your home network to the Internet
Packet transmitted out the other NIC
N/A N/A N/A

Table 15-2 Packet Processing For Data Received By The Firewall
Packet flow
Actions by Operating
System
Packet intercepted by iptables
table (Queue)
Packet transformation
chain associated
with this queue
Description of possible
modifications by iptables using
this transformation
table
Packet destined
for firewall
Packet enters the NIC from remote server. The packet is intercepted by the iptables mangle, then nat queues
mangle PREROUTING Modification of the TCP packet quality of service bits. (Rarely used)
nat PREROUTING Destination network address translation (DNAT)
The packet is then passed from iptables to the Linux routing engine. The routing engine passes the packet to the target application via the iptables filter queue
filter INPUT Packet filtering: Packets destined for the firewall.
The application receives the packet from iptables then processes it.

Table 15-3 Packet Processing For Data Sent By The Firewall
Packet flow Actions by Operating
System
Packet intercepted by iptables
table (Queue)
Packet transformation
chain associated
with this queue
Description of possible
modifications by iptables using
this transformation
table
The application sends data to a remote server
Packet originating from firewall
The packet is intercepted by iptables which then processes it in the mangle, nat and filter tables
mangle OUTPUT Modification of the TCP packet quality of service bits. (Rarely used)
nat OUTPUT
Source network address translation (Rarely used)
filter OUTPUT
Packet filtering: Packets destined for other servers / devices.
The packet is then passed to the Linux routing engine which forwards the packet out the correct NIC The packet is intercepted by the iptables nat table
nat POSTROUTING Source network address translation (SNAT)
Packet transmitted out a NIC

Targets And Jumps
You don't have to rely solely on the built-in chains provided by iptables, you can create your own chains. These can be accessed by making them the targets of "jumps" in the built-in chains. So in summary, the targets/jumps tell the rule what to do with a packet that matches the rule perfectly.
There are a number of built-in targets that most rules may use which are listed in Table 15-4.
Table 15-4 Descriptions Of The Most Commonly Used Targets
Target Description Most common options
ACCEPT > iptables stops further processing.
> The packet is handed over to the end application or the operating system for processing
N/A
DROP > iptables stops further processing.
> The packet is blocked
N/A
LOG > The packet information is sent to the syslog daemon for logging
> iptables continues processing with the next rule in the table
> As you can't LOG and DROP at the same time, it is common to have two similar rules in sequence. The first will LOG the packet, the second will DROP it.
--log-prefix "string" Tells iptables to prefix all log messages with a user defined string. Frequently used to tell why the logged packet was dropped
REJECT > Works like the DROP target, but will also return an error message to the host sending the packet that was blocked
--reject-with qualifier The qualifier tells what type of reject message is returned. These include: icmp-port-unreachable (default) icmp-net-unreachable icmp-host-unreachable icmp-proto-unreachable icmp-net-prohibited

Target Description Most common options
icmp-host-prohibited tcp-reset echo-reply
DNAT > Used to do Destination Network Address Translation. ie.rewriting the destination IP address of the packet
--to-destination ipaddress Tells iptables what the destination IP address should be
SNAT > Used to do Source Network Address Translation. ie.rewriting the source IP address of the packet
> The source IP address is user defined
--to-source <address>[-<address>][:<port>-<port>] Specifies the source IP address and ports to be used by SNAT.
MASQUERADE > Used to do Source Network
Address Translation. ie.rewriting the source IP address of the packet
> By default the source IP address is the same as that used by the firewall's interface
[--to-ports <port>[-<port>]] Specifies the range of source ports the original source port can be mapped to.
Important Iptables Command Switch Operations
Each line of an iptables script not only has a "jump", but they also have a number of command line options that are used to append rules that match certain packet criteria or to just clear to a chain so you can start all over again. The most common options can be seen in Tables 15-5 through 15-8.

Table 15-5 General Iptables Match Criteria
iptables command
Switch
Description
-t <table> If you don't specify a table, then the filter table is assumed. As discussed before, the possible built-in tables include: filter, nat, mangle
-A Append rule to end of a chain
-F Flush. Deletes all the rules in the selected table
-p <protocol-type> Match protocol. Types include, icmp, tcp, udp, all
-s <ip-address> Match source IP address
-d <ip-address> Match destination IP address
-i <interface-name> Match "input" interface on which the packet enters.
-o <interface-name> Match "output" interface on which the packet exits
Example:
iptables -A INPUT -s 0/0 -i eth0 -d 192.168.1.1 -p TCP -j ACCEPT
In this example, iptables is being configured to allow the firewall to accept TCP packets coming in on interface eth0 from any IP address destined for the firewall's IP address of 192.168.1.1

Table 15-6 Common TCP and UDP Match Criteria
switches used with
-p tcp
Description switches used with
-p udp
Description
--sport <port> TCP source port Can be a single value or a range in the format: start-port-number:end-port-number
--sport <port> TCP source port Can be a single value or a range in the format: starting-port:ending-port
--dport <port>
TCP destination port Can be a single value or a range in the format: starting-port:ending-port
--dport <port> TCP destination port Can be a single value or a range in the format: starting-port:ending-port
--syn Used to identify a new connection request ! --syn means, not a new connection request
Example:
iptables -A FORWARD -s 0/0 -i eth0 -d 192.168.1.58 -o eth1 -p TCP \ --sport 1024:65535 --dport 80 -j ACCEPT
In this example iptables is being configured to allow the firewall to accept TCP packets for routing when they enter on interface eth0 from any IP address and are destined for an IP address of 192.168.1.58 that is reachable via interface eth1. The source port is in the range 1024 to 65535 and the destination port is port 80 (www/http)

Table 15-7 Common ICMP (Ping) Match Criteria
Matches used with
---icmp-type
Description
--icmp-type <type> The most commonly used types are echo-reply and echo-request
Example:
iptables -A OUTPUT -p icmp --icmp-type echo-request -j ACCEPT iptables -A INPUT -p icmp --icmp-type echo-reply -j ACCEPT
In this example iptables is being configured to allow the firewall send ICMP echo-requests (pings) and in turn, accept the expected ICMP echo-replies.
Table 15-8 Common Multiport Match Criteria
TCP/UDP match extensions used with
-m multiport
Description
--sport <port, port> A variety of TCP/UDP source ports separated by commas
--dport <port, port> A variety of TCP/UDP destination ports separated by commas
--dport <port, port> A variety of TCP/UDP ports separated by commas. Source and destination ports are assumed to be the same.

Table 15-9 Common Connection State Match Criteria
Match extensions used with
-m state
Description
--state <state> The most frequently tested states are: ESTABLISHED The packet is part of a connection which has seen packets in both directions NEW The packet is the start of a new connection RELATED The packet is starting a new secondary connection. This is a common feature of protocols such as an FTP data transfer, or an ICMP error.
Example: iptables -A FORWARD -s 0/0 -i eth0 -d 192.168.1.58 -o eth1 -p TCP \ --sport 1024:65535 -m multiport --dport 80,443 -j ACCEPT iptables -A FORWARD -d 0/0 -o eth0 -s 192.168.1.58 -i eth1 -p TCP \ -m state --state ESTABLISHED -j ACCEPT
This is an expansion on the previous example. Here iptables is being configured to allow the firewall to accept TCP packets to be routed when they enter on interface eth0 from any IP address destined for IP address of 192.168.1.58 that is reachable via interface eth1. The source port is in the range 1024 to 65535 and the destination ports are port 80 (www/http) and 443 (https).
We are also allowing the return packets from 192.168.1.58 to be accepted too. Instead of stating the source and destination ports, it is sufficient to allow packets related to established connections using the -m state and --state ESTABLISHED options.
Using User Defined Chains As stated in the introduction, iptables can be configured to have user-defined chains. This feature is frequently used to help streamline the processing of packets. For example, instead of having a single chain for all protocols, it is possible to have a chain that determines the protocol type for the packet and then hands off the actual final processing to a protocol specific chain. In

other words, you can replace a long chain with a main stubby chain pointing to multiple stubby chains thereby shortening the total length of all chains the packet has to pass through.
Example: iptables -A INPUT -i eth0 -d 206.229.110.2 -j fast-input-queue iptables -A OUTPUT -o eth0 -s 206.229.110.2 -j fast-output-queue iptables -A fast-input-queue -p icmp -j icmp-queue-in iptables -A fast-output-queue -p icmp -j icmp-queue-out iptables -A icmp-queue-out -p icmp --icmp-type echo-request \ -m state --state NEW -j ACCEPT iptables -A icmp-queue-in -p icmp --icmp-type echo-reply -j ACCEPT
In this example we have six queues with the following characteristics to help assist in processing speed a summary of each of their functions can be seen in Table 15-10.
Table 15-10 Custom Queues Example Listing
Chain Description
INPUT The regular built-in INPUT chain in iptables
OUTPUT The regular built-in OUTPUT chain in iptables
fast-input-queue Input chain dedicated to specific protocols
fast-output-queue Output chain dedicated to specific protocols
icmp-queue-out Output queue dedicated to ICMP
icmp-queue-in Intput queue dedicated to ICMP
Sample iptables Scripts
Here are some sample scripts you can use to get iptables working for you. Pay special attention to the logging example at the end.
The "basic initialization" script snippet should also be included in all your scripts to ensure the correct initialization of your chains should you decide to restart your script after startup. This chapter also includes other snippets that will help you get basic functionality. It should be a good guide to get you started.
You then can use the Appendix to find a detailed script once you feel more confident. It shows you how to allow your firewall to:

> Be used as a Linux Web / Mail / DNS server
> Be the NAT router for your home network
> Prevent various types of attacks using corrupted TCP, UDP and ICMP packets.
> Outbound passive FTP access from the firewall
There are also simpler code snippets in the Appendix for:
> Inbound and outbound FTP connections to / from your firewall
Saving Your iptables Scripts
The "/etc/init.d/iptables save" command will permanently save the iptables configuration you create with your script in the /etc/sysconfig/iptables file. When the system reboots, the iptables-restore program reads the configuration and makes it immediately become the active configuration.
Unfortunately, this does not save the operating system specific parameters that are often additionally needed. Not to worry, you can place all the operating system based commands, the ones that echo values to files in the /proc file system, in the /etc/rc.d/rc.local script file which is always run when the system starts.
The format of the /etc/sysconfig/iptables file is slightly different from that of the scripts in the scripts in this section and it doesn't save any comments at all, which can make it extremely difficult to follow. I'd suggest that for more complicated configurations that you write scripts and then save them permanently once you have proven that they work.
Basic Operating System Defense
There are a number of things you can do at the very beginning of your firewall script to improve the resilience of your firewall to attack. Here are some sample commands you can use: #!/bin/bash #--------------------------------------------------------------- # Disable routing triangulation. Respond to queries out # the same interface, not another. Helps to maintain state # Also protects against IP spoofing #--------------------------------------------------------------- echo 1 > /proc/sys/net/ipv4/conf/all/rp_filter #--------------------------------------------------------------- # Enable logging of packets with malformed IP addresses #--------------------------------------------------------------- echo 1 > /proc/sys/net/ipv4/conf/all/log_martians #--------------------------------------------------------------- # Disable redirects #---------------------------------------------------------------

echo 0 > /proc/sys/net/ipv4/conf/all/send_redirects #--------------------------------------------------------------- # Disable source routed packets #--------------------------------------------------------------- echo 0 > /proc/sys/net/ipv4/conf/all/accept_source_route #--------------------------------------------------------------- # Disable acceptance of ICMP redirects #--------------------------------------------------------------- echo 0 > /proc/sys/net/ipv4/conf/all/accept_redirects #--------------------------------------------------------------- # Turn on protection from Denial of Service (DOS) attacks #--------------------------------------------------------------- echo 1 > /proc/sys/net/ipv4/tcp_syncookies #--------------------------------------------------------------- # Disable responding to ping broadcasts #--------------------------------------------------------------- echo 1 > /proc/sys/net/ipv4/icmp_echo_ignore_broadcasts
Basic iptables Initialization
It is a good policy, in any iptables script you write, to initialize your chain and table settings with known values. The "filter" table's INPUT, FORWARD and OUTPUT chains should DROP packets by default for the best security. However, it is not good policy to make your "nat" and "mangle" tables DROP packets by default. This is because these tables are queried before the "filter" table, and if all packets that don't match the "nat" and "mangle" rules are DROP-ped, then they will not reach the INPUT, FORWARD and OUTPUT chains and won't be processed.
Additional ALLOW rules should be added to the end of this script snippet.
#--------------------------------------------------------------- # Load modules for FTP connection tracking and NAT - You may need # them later #--------------------------------------------------------------- modprobe ip_conntrack_ftp modprobe iptable_nat #--------------------------------------------------------------- # Initialize all the chains by removing all the rules # tied to them #---------------------------------------------------------------

iptables --flush iptables -t nat --flush iptables -t mangle --flush #--------------------------------------------------------------- # Now that the chains have been initialized, the user defined # chains should be deleted. We'll recreate them in the next step #--------------------------------------------------------------- iptables --delete-chain iptables -t nat --delete-chain iptables -t mangle --delete-chain
#--------------------------------------------------------------- # If a packet doesn't match one of the built in chains, then # The policy should be to drop it #--------------------------------------------------------------- iptables --policy INPUT DROP iptables --policy OUTPUT DROP iptables --policy FORWARD DROP iptables -t nat --policy POSTROUTING ACCEPT iptables -t nat --policy PREROUTING ACCEPT #--------------------------------------------------------------- # The loopback interface should accept all traffic # Necessary for X-Windows and other socket based services #--------------------------------------------------------------- iptables -A INPUT -i lo -j ACCEPT iptables -A OUTPUT -o lo -j ACCEPT
Advanced iptables Initialization
There are more advanced initialization steps you may also want to add to your script. These include checks for invalid TCP flags and Internet traffic from RFC1918 private addresses. The sample script snippets below outline how to do this.
The script also uses multiple user defined chains to make the script shorter and faster as the chains can be repeatedly accessed. This removes the need to repeat the same statements over and over again.
You can take even more precautions to further protect your network. The complete firewall script in the appendix outlines most of them. #=#=#=#=#=#=#=#=#=#=#=#=#=#=#=#=#=#=#=#=#=#=#=#=#=#=#=#=#=#=#=#= # # Define networks: NOTE!! You may want to put these four "EXTERNAL" # definitions at the top of your script. # #=#=#=#=#=#=#=#=#=#=#=#=#=#=#=#=#=#=#=#=#=#=#=#=#=#=#=#=#=#=#=#=

EXTERNAL_INT="eth0" # Internet-connected # interface EXTERNAL_IP="97.158.253.25" # your IP address EXTERNAL_SUBNET_BASE="97.158.253.24" # ISP network segment # base address EXTERNAL_SUBNET_BROADCAST="97.158.253.31" # network segment # broadcast address #=#=#=#=#=#=#=#=#=#=#=#=#=#=#=#=#=#=#=#=#=#=#=#=#=#=#=#=#=#=#=#= # # The variables below should not normally be changed as they # are not site specific # #=#=#=#=#=#=#=#=#=#=#=#=#=#=#=#=#=#=#=#=#=#=#=#=#=#=#=#=#=#=#=#= LOOPBACK="127.0.0.0/8" # reserved for # loopback address RESERVED_IP_172_SPACE="172.16.0.0/12" # RFC1918 172 space # class B private networks RESERVED_IP_192_SPACE="192.168.0.0/16" # RFC1918 192 space # class C private networks RESERVED_IP_10_SPACE="10.0.0.0/8" # RFC1918 10 space # class A private networks RESERVED_IP_MULTICAST="224.0.0.0/4" # Multicast addresses RESERVED_IP_FUTURE="240.0.0.0/5" # IP addresses reserved # for future use #--------------------------------------------------------------- # Define our own user-defined chains #--------------------------------------------------------------- ADDITIONAL_CHAINS="valid-tcp-flags \ valid-source-address \ valid-destination-address \ LOG-and-drop" #--------------------------------------------------------------- # Initialize our user-defined chains #--------------------------------------------------------------- for i in $ADDITIONAL_CHAINS; do iptables -N $i done #--------------------------------------------------------------- # Check TCP packets for invalid state flag combinations #--------------------------------------------------------------- iptables -A INPUT -p tcp -j valid-tcp-flags iptables -A OUTPUT -p tcp -j valid-tcp-flags iptables -A FORWARD -p tcp -j valid-tcp-flags

#--------------------------------------------------------------- # Verify valid source and destination addresses for all packets #--------------------------------------------------------------- iptables -A INPUT -i $EXTERNAL_INT -p ! tcp \ -j valid-source-address iptables -A INPUT -i $EXTERNAL_INT -p tcp --syn \ -j valid-source-address iptables -A FORWARD -i $EXTERNAL_INT -p ! tcp \ -j valid-source-address iptables -A FORWARD -i $EXTERNAL_INT -p tcp --syn \ -j valid-source-address iptables -A OUTPUT -o $EXTERNAL_INT \ -j valid-destination-address iptables -A FORWARD -o $EXTERNAL_INT \ -j valid-destination-address #=#=#=#=#=#=#=#=#=#=#=#=#=#=#=#=#=#=#=#=#=#=#=#=#=#=#=#=#=#=#=# # # Check for incorrect TCP state flags # # All state bits zeroed # FIN set ACK cleared # PSH set ACK cleared # URG set ACK cleared # SYN and FIN set # SYN and RST set # FIN and RST set # #=#=#=#=#=#=#=#=#=#=#=#=#=#=#=#=#=#=#=#=#=#=#=#=#=#=#=#=#=#=#=# iptables -A valid-tcp-flags -p tcp --tcp-flags ALL NONE \ -j LOG-and-drop iptables -A valid-tcp-flags -p tcp --tcp-flags ACK,FIN FIN \ -j LOG-and-drop iptables -A valid-tcp-flags -p tcp --tcp-flags ACK,PSH PSH \ -j LOG-and-drop iptables -A valid-tcp-flags -p tcp --tcp-flags ACK,URG URG \ -j LOG-and-drop iptables -A valid-tcp-flags -p tcp --tcp-flags SYN,FIN SYN,FIN \ -j LOG-and-drop iptables -A valid-tcp-flags -p tcp --tcp-flags SYN,RST SYN,RST \ -j LOG-and-drop iptables -A valid-tcp-flags -p tcp --tcp-flags FIN,RST FIN,RST \ -j LOG-and-drop #=#=#=#=#=#=#=#=#=#=#=#=#=#=#=#=#=#=#=#=#=#=#=#=#=#=#=#=#=#=#=# # # Source and Destination Address Sanity Checks # # Drop packets from networks covered in RFC 1918 (private nets) # Drop packets from external interface IP # Drop directed broadcast packets # #=#=#=#=#=#=#=#=#=#=#=#=#=#=#=#=#=#=#=#=#=#=#=#=#=#=#=#=#=#=#=#

iptables -A valid-source-address -s $RESERVED_IP_10_SPACE -j DROP iptables -A valid-source-address -s $RESERVED_IP_172_SPACE -j DROP iptables -A valid-source-address -s $RESERVED_IP_192_SPACE -j DROP iptables -A valid-source-address -s $RESERVED_IP_MULTICAST -j DROP iptables -A valid-source-address -s $RESERVED_IP_FUTURE -j DROP iptables -A valid-source-address -s $LOOPBACK -j DROP iptables -A valid-source-address -s 0.0.0.0/8 -j DROP iptables -A valid-source-address -d 255.255.255.255 -j DROP iptables -A valid-source-address -s 169.254.0.0/16 -j DROP iptables -A valid-source-address -s 192.0.2.0/24 -j DROP iptables -A valid-source-address -s $EXTERNAL_IP -j DROP iptables -A valid-destination-address -d $EXTERNAL_SUBNET_BASE \ -j DROP iptables -A valid-destination-address -d $EXTERNAL_SUBNET_BROADCAST \ -j DROP iptables -A valid-destination-address -d $RESERVED_IP_MULTICAST \ -j DROP #=#=#=#=#=#=#=#=#=#=#=#=#=#=#=#=#=#=#=#=#=#=#=#=#=#=#=#=#=#=#=# # # Log and drop chain # #=#=#=#=#=#=#=#=#=#=#=#=#=#=#=#=#=#=#=#=#=#=#=#=#=#=#=#=#=#=#=# iptables -A LOG-and-drop -j LOG --log-ip-options --log-tcp-options \ --log-level debug iptables -A LOG-and-drop -j DROP
Allowing DNS Access To Your Firewall
You'll almost certainly want your firewall to make DNS queries to the Internet. This is not because it is required for the basic functionality of the firewall, but because of Fedora Linux's yum RPM updater which will help to keep the server up to date with the latest security patches. The following statements will apply not only for firewalls acting as DNS clients but also for firewalls working in a caching or regular DNS server role. #--------------------------------------------------------------- # Allow outbound DNS queries from the FW and the replies too # # - Interface eth0 is the internet interface # # Zone transfers use TCP and not UDP. Most home networks

# / websites using a single DNS server won't require TCP statements # #--------------------------------------------------------------- iptables -A OUTPUT -p udp -o eth0 --dport 53 --sport 1024:65535 \ -j ACCEPT iptables -A INPUT -p udp -i eth0 --sport 53 --dport 1024:65535 \ -j ACCEPT
Allowing WWW And SSH Access To Your Firewall
This sample snippet is for a firewall that doubles as a web server that is managed remotely by its system administrator via secure shell (SSH) sessions. Inbound packets destined for ports 80 and 22 are allowed thereby making the first steps in establishing a connection. It isn't necessary to specify these ports for the return leg as outbound packets for all established connections are allowed. Connections initiated by persons logged into the webserver will be denied as outbound NEW connection packets aren't allowed. #--------------------------------------------------------------- # Allow previously established connections # - Interface eth0 is the internet interface #---------------------------------------------------------------
iptables -A OUTPUT -o eth0 -m state --state ESTABLISHED,RELATED \ -j ACCEPT
#--------------------------------------------------------------- # Allow port 80 (www) and 22 (SSH) connections to the firewall #---------------------------------------------------------------
iptables -A INPUT -p tcp -i eth0 --dport 22 --sport 1024:65535 \ -m state --state NEW -j ACCEPT
iptables -A INPUT -p tcp -i eth0 --dport 80 --sport 1024:65535 \ -m state --state NEW -j ACCEPT
Allowing Your Firewall To Access The Internet
The following iptables sample script allows a user on the firewall to use a web browser to surf the Internet. TCP port 80 is used for HTTP traffic and port 443 is used for HTTPS (secure HTTP frequently used for credit card transactions).
Note: HTTPS is also used by RedHat Linux servers using up2date. FTP & HTTP are frequently used with yum. #--------------------------------------------------------------- # Allow port 80 (www) and 443 (https) connections from the firewall #---------------------------------------------------------------
iptables -A OUTPUT -j ACCEPT -m state --state NEW \

-o eth0 -p tcp -m multiport --dport 80,443 -m multiport \ --sport 1024:65535 #--------------------------------------------------------------- # Allow previously established connections # - Interface eth0 is the internet interface #--------------------------------------------------------------- iptables -A INPUT -j ACCEPT -m state --state ESTABLISHED,RELATED \ -i eth0 -p tcp
If you want all TCP traffic originating from the firewall to be accepted then you can remove the following section from the snippet above: -m multiport --dport 80,443 --sport 1024:65535
Allow Your Home Network To Access The Firewall
In this example, eth1 is directly connected to a home network using IP addresses from the 192.168.1.0 network. All traffic between this network and the firewall is simplistically assumed to be trusted and allowed.
Further rules will be needed for the interface connected to the Internet to allow only specific ports, types of connections and possibly even remote servers to have access to your firewall and home network. #--------------------------------------------------------------- # Allow all bidirectional traffic from your firewall to the # protected network # - Interface eth1 is the private network interface #--------------------------------------------------------------- iptables -A INPUT -j ACCEPT -p all -s 192.168.1.0/24 -i eth1 iptables -A OUTPUT -j ACCEPT -p all -d 192.168.1.0/24 -o eth1
Masquerading (Many to One NAT)
As explained in Chapter 1, masquerading is another word for what many call "many to one" NAT. In other words, traffic from all devices on one or more protected networks will appear as if it originated from a single IP address on the Internet side of the firewall.
Note: The masquerade IP address always defaults to the IP address of the firewall's main interface. The advantage of this is that you never have to specify the NAT IP address. This makes it much easier to configure iptables NAT with DHCP.
You can configure many to one NAT to an IP alias, using the POSTROUTING and not the MASQUERADE statement. An example of this can be seen in the static NAT section below.
iptables requires the iptables_nat module to be loaded with the "modprobe" command for the masquerade feature to work. Masquerading also depends on the Linux operating system being configured to support routing between the internet and private network interfaces of the firewall. This is done by enabling "IP forwarding" or routing by giving the file /proc/sys/net/ipv4/ip_forward the value "1" as opposed to the default disabled value of "0".

Once masquerading has been achieved using the POSTROUTING chain of the "nat" table, iptables will have to be configured to allow packets to flow between the two interfaces. This is done using the FORWARD chain of the "filter" table. More specifically, packets related to NEW and ESTABLISHED connections will be allowed outbound to the Internet, while only packets related to ESTABLISHED connections will be allowed inbound. This helps to protect the home network from persons trying to initiate connections from the Internet. An example follows: #--------------------------------------------------------------- # Load the NAT module #--------------------------------------------------------------- modprobe iptable_nat
#--------------------------------------------------------------- # Allow masquerading # Enable routing by modifying the ip_forward /proc filesystem file # - Interface eth0 is the internet interface # - Interface eth1 is the private network interface #--------------------------------------------------------------- iptables -A POSTROUTING -t nat -o eth0 -s 192.168.1.0/24 -d 0/0 \ -j MASQUERADE echo 1 > /proc/sys/net/ipv4/ip_forward
#--------------------------------------------------------------- # Prior to masquerading, the packets are routed via the filter # table's FORWARD chain. # Allowed outbound: New, established and related connections # Allowed inbound : Established and related connections #--------------------------------------------------------------- iptables -A FORWARD -t filter -o eth0 -m state \ --state NEW,ESTABLISHED,RELATED -j ACCEPT iptables -A FORWARD -t filter -i eth1 -m state \ --state ESTABLISHED,RELATED -j ACCEPT
Note: If you configure your firewall to do masquerading, then if should be the used as the default gateway for all your servers on the network.
Port Forwarding Type NAT (DHCP DSL)
In many cases home users may get a single DHCP public IP address from their ISP. If their Linux firewall is their interface to the Internet and they want to host a website on one of the NAT protected home servers then they will have to use the "port forwarding" technique.
Here the combination of the firewall's single IP address, the remote server's IP address and the source/destination port of the traffic can be used to uniquely identify a traffic flow. All traffic that matches a particular combination of these factors may then be forwarded to a single server on the private network.

Port forwarding is handled by the PREROUTING chain of the "nat" table. As in masquerading, the iptables_nat module will have to be loaded and routing enabled for port forwarding to work. Routing too will have to be allowed in iptables with the FORWARD chain, this would include all NEW inbound connections from the Internet matching the port forwarding port plus all future packets related to the ESTABLISHED connection in both directions. An example follows: #--------------------------------------------------------------- # Load the NAT module #--------------------------------------------------------------- modprobe iptable_nat
#--------------------------------------------------------------- # Get the IP address of the Internet interface eth0 (linux only) # # You'll have to use a different expression to get the IP address # for other operating systems which have a different ifconfig output # or enter the IP address manually in the PREROUTING statement # # This is best when your firewall gets its IP address using DHCP. # The external IP address could just be hard coded ("typed in # normally") #--------------------------------------------------------------- external_int="eth0" external_ip="`ifconfig $external_int | grep 'inet addr' | \ awk '{print $2}' | sed -e 's/.*://'`"
#--------------------------------------------------------------- # Allow port forwarding for traffic destined to port 80 of the # firewall's IP address to be forwarded to port 8080 on server # 192.168.1.200 # # Enable routing by modifying the ip_forward /proc filesystem file # - Interface eth0 is the internet interface # - Interface eth1 is the private network interface #--------------------------------------------------------------- echo 1 > /proc/sys/net/ipv4/ip_forward iptables -t nat -A PREROUTING -p tcp -i eth0 -d $external_ip \ --dport 80 --sport 1024:65535 -j DNAT --to 192.168.1.200:8080 #--------------------------------------------------------------- # After DNAT, the packets are routed via the filter table's # FORWARD chain. # Connections on port 80 to the target machine on the private # network must be allowed. #--------------------------------------------------------------- iptables -A FORWARD -p tcp -i eth0 -o eth1 -d 192.168.1.200 \

--dport 8080 --sport 1024:65535 -m state --state NEW -j ACCEPT iptables -A FORWARD -t filter -i eth1 -m state \ --state NEW,ESTABLISHED,RELATED -j ACCEPT iptables -A FORWARD -t filter -i eth0 -m state \ --state ESTABLISHED,RELATED -j ACCEPT
Static NAT
In this example, all traffic to a particular public IP address, not just to a particular port, is NAT-ted to a single server on the protected subnet. As the firewall has more than one IP address, MASQUERADE isn't recommended to be used as it will force masquerading as the IP address of the primary interface and not any of the alias IP addresses the firewall may have. SNAT is therefore used to specify the alias IP address to be used for connections initiated by all other servers in the protected net.
Note: Though the "nat" table NATs all traffic to the target servers (192.168.1.100 to 102), only connections on ports 80,443 and 22 are allowed through by the FORWARD chain. Also notice how you have to specify a separate "-m multiport" option whenever you need to match multiple non-sequential ports for both source and destination.
Note: In this example the firewall:
Uses 1:1 NAT to make the server 192.168.1.100 on your home network appear on the Internet as IP addresses 97.158.253.26.
Creates a Many to 1 NAT for the 192.168.1.0 home network in which all the servers appear on the Internet as IP address 97.158.253.29. This is different from masquerading
You will have to create alias IP addresses for each of these Internet IPs for 1:1 NAT to work.
#--------------------------------------------------------------- # Load the NAT module #--------------------------------------------------------------- modprobe iptable_nat
#--------------------------------------------------------------- # Enable routing by modifying the ip_forward /proc filesystem file #--------------------------------------------------------------- echo 1 > /proc/sys/net/ipv4/ip_forward #--------------------------------------------------------------- # NAT ALL traffic: ########### # REMEMBER to create aliases for all the internet IP addresses below ########### #

# TO: FROM: MAP TO SERVER: # 97.158.253.26 Anywhere 192.168.1.100 (1:1 NAT - Inbound) # Anywhere 192.168.1.100 97.158.253.26 (1:1 NAT - Outbound) # Anywhere 192.168.1.0/24 97.158.253.29 (FW IP) # # SNAT is used to NAT all other outbound connections initiated # from the protected network to appear to come from # IP address 97.158.253.29 # # POSTROUTING: # NATs source IP addresses. Frequently used to NAT connections from # your home network to the Internet # # PREROUTING: # NATs destination IP addresses. Frequently used to NAT # connections from the Internet to your home network # # - Interface eth0 is the internet interface # - Interface eth1 is the private network interface #--------------------------------------------------------------- # PREROUTING statements for 1:1 NAT # (Connections originating from the Internet) iptables -t nat -A PREROUTING -d 97.158.253.26 -i eth0 \ -j DNAT --to-destination 192.168.1.100
# POSTROUTING statements for 1:1 NAT # (Connections originating from the home network servers) iptables -t nat -A POSTROUTING -s 192.168.1.100 -o eth0 \ -j SNAT --to-source 97.158.253.26 # POSTROUTING statements for Many:1 NAT # (Connections originating from the entire home network) iptables -t nat -A POSTROUTING -s 192.168.1.0/24 \ -j SNAT -o eth1 --to-source 97.158.253.29 # Allow forwarding to each of the servers configured for 1:1 NAT # (For connections originating from the Internet. Notice how you # use the real IP addresses here) iptables -A FORWARD -p tcp -i eth0 -o eth1 -d 192.168.1.100 \ -m multiport --dport 80,443,22 \ -m state --state NEW -j ACCEPT # Allow forwarding for all New and Established SNAT connections # originating on the home network AND already established # DNAT connections iptables -A FORWARD -t filter -i eth1 -m state \ --state NEW,ESTABLISHED,RELATED -j ACCEPT

# Allow forwarding for all 1:1 NAT connections originating on # the Internet that have already passed through the NEW forwarding # statements above iptables -A FORWARD -t filter -i eth0 -m state \ --state ESTABLISHED,RELATED -j ACCEPT
Troubleshooting iptables There are a number of tools at your disposal that you can use to troubleshoot iptables firewall scripts. One of the best methods is to log all dropped packets to the /var/log/messages file.
Checking The Firewall Logs You track packets passing through the iptables list of rules using the LOG target. You should be aware that the LOG target:
o will log all traffic that matches the iptables rule in which it is located.
o automatically writes an entry to the /var/log/messages file and then executes the next rule.
Therefore if you want to log only unwanted traffic then you have to add a matching rule with a DROP target immediately after the LOG rule. If you don't, you'll find yourself logging both desired and unwanted traffic with no way of discerning between the two as by default iptables doesn't state why the packet was logged in its log message.
This example logs a summary of failed packets to the file /var/log/messages. You can use the contents of this file to determine what TCP/UDP ports you need to open to provide access to specific traffic that is currently stopped.
#--------------------------------------------------------------- # Log and drop all other packets to file /var/log/messages # Without this we could be crawling around in the dark #--------------------------------------------------------------- iptables -A OUTPUT -j LOG iptables -A INPUT -j LOG iptables -A FORWARD -j LOG iptables -A OUTPUT -j DROP iptables -A INPUT -j DROP iptables -A FORWARD -j DROP
Here are some examples of the output of this file:
o Firewall denying replies to DNS queries (UDP port 53) destined to server 192.168.1.102 on the home network.
Feb 23 20:33:50 bigboy kernel: IN=wlan0 OUT= MAC=00:06:25:09:69:80:00:a0:c5:e1:3e:88:08:00 SRC=192.42.93.30 DST=192.168.1.102 LEN=220 TOS=0x00 PREC=0x00 TTL=54 ID=30485 PROTO=UDP SPT=53 DPT=32820 LEN=200

o Firewall denying Windows NetBIOS traffic (UDP port 138)
Feb 23 20:43:08 bigboy kernel: IN=wlan0 OUT= MAC=ff:ff:ff:ff:ff:ff:00:06:25:09:6a:b5:08:00 SRC=192.168.1.100 DST=192.168.1.255 LEN=241 TOS=0x00 PREC=0x00 TTL=64 ID=0 DF PROTO=UDP SPT=138 DPT=138 LEN=221
o Firewall denying Network Time Protocol (NTP UDP port 123)
Feb 23 20:58:48 bigboy kernel: IN= OUT=wlan0 SRC=192.168.1.102 DST=207.200.81.113 LEN=76 TOS=0x10 PREC=0x00 TTL=64 ID=0 DF PROTO=UDP SPT=123 DPT=123 LEN=56
Note: The traffic in all these examples isn't destined for the firewall. Therefore you should check your INPUT, OUTPUT, FORWARD and NAT related statements. If the firewall's IP address is involved, then you should focus on the INPUT, OUTPUT statements
If nothing shows up in the logs, then follow the steps in Chapter 3 on Network Troubleshooting to determine whether the data is reaching your firewall at all, and if it is not, the location your network that could be causing the problem.
Troubleshooting NAT: As a general rule, you won't be able to access the public NAT IP addresses from servers on your home network. Basic NAT testing will require you to ask a friend to try to connect to your home network from the Internet.
You can then use the logging output in /var/log/messages to make sure that:
o the translations are occurring correctly and
o iptables isn't dropping the packets after translation occurs
Fedora Core 2, iptables Won't Start The iptables startup script that comes with Fedora Core 2 expects to find a file named /etc/sysconfig/iptables and will fail if it doesn't. Unfortunately the iptables RPM doesn't install it. Symptoms include the firewall "status" always being "stopped" and the /etc/init.d/iptables script running without the typical [OK] or [FAILED] messages.
Here are the commands to fix the problem. We first create the file and then change the permissions so that only the root user has access to it. [root@bigboy tmp]# touch /etc/sysconfig/iptables [root@bigboy tmp]# chmod 600 /etc/sysconfig/iptables
Fedora's iptables Script Generator Fedora comes with a program called "lokkit" which you can use to generate a very rudimentary firewall rule set. It prompts for the level of security and then gives you the option of customizing it. It is a good place for beginners to start on a test system so that they can see a general rule structure.
Like the "/etc/init.d/iptables save" command, lokkit saves the script it generates in the /etc/sysconfig/iptables file for use on the next reboot.
Once you have become familiar with the iptables syntax, it's best to write scripts which you can comment and then save it to /etc/sysconfig/iptables. It makes them much more manageable and readable. Firewall configuration written by lokkit # Manual customization of this file is not recommended. # Note: ifup-post will punch the current nameservers through the

# firewall; such entries will *not* be listed here. *filter :INPUT ACCEPT [0:0] :FORWARD ACCEPT [0:0] :OUTPUT ACCEPT [0:0] :RH-Lokkit-0-50-INPUT - [0:0] -A INPUT -j RH-Lokkit-0-50-INPUT -A FORWARD -j RH-Lokkit-0-50-INPUT -A RH-Lokkit-0-50-INPUT -p tcp -m tcp --dport 22 --syn -j ACCEPT -A RH-Lokkit-0-50-INPUT -i lo -j ACCEPT -A RH-Lokkit-0-50-INPUT -i eth0 -j ACCEPT -A RH-Lokkit-0-50-INPUT -p udp -m udp -s 192.168.1.100 --sport 53 -d 0/0 -j ACCEPT -A RH-Lokkit-0-50-INPUT -p udp -m udp -s 127.0.0.1 --sport 53 -d 0/0 -j ACCEPT -A RH-Lokkit-0-50-INPUT -p tcp -m tcp --syn -j REJECT -A RH-Lokkit-0-50-INPUT -p udp -m udp -j REJECT COMMIT
Recovering From A Lost Script Sometimes the script you created to generate iptables may get corrupted or lost. There are also times when you inherit a new system to administer and cannot find the original script used to protect it. In these situations you can use the iptables-save and iptables-restore commands to assist you with the continued management of the server.
Unlike the "/etc/init.d/iptables save" command which actually saves a permanent copy of the firewall's active configuration in the /etc/sysconfig/iptables file, iptables-save displays the active configuration to the screen in "lokkit" format. If you redirect the iptables-save screen output to a file with the ">" symbol, then you can edit the output and reload the updated rules when they meet your new criteria with the iptables-restore command.
The example below exports the iptables-save output to a text file named firewall-config. [root@bigboy tmp]# iptables-save > firewall-config [root@bigboy tmp]# more firewall-config # Generated by iptables-save v1.2.6a on Tue Oct 26 17:35:01 2004 *filter :INPUT ACCEPT [9812627:1197808235] :FORWARD ACCEPT [0:0] :OUTPUT ACCEPT [10938622:1451738561] :RH-Lokkit-0-50-INPUT - [0:0] -A INPUT -j RH-Lokkit-0-50-INPUT -A RH-Lokkit-0-50-INPUT -s 206.204.4.6 -p udp -m udp --sport 53 --dport 1025:65535 -j ACCEPT -A RH-Lokkit-0-50-INPUT -p tcp -m tcp --dport 80 --tcp-flags SYN,RST,ACK SYN -j ACCEPT -A RH-Lokkit-0-50-INPUT -p tcp -m tcp --dport 22 --tcp-flags SYN,RST,ACK SYN -j ACCEPT ... ... COMMIT [root@bigboy tmp]#

After editing the file firewall-config with the commands you need, you can and reload it into the active firewall rule set with the iptables-restore command as seen below. [root@bigboy tmp]# iptables-restore < firewall-config
Finally, you should permanently save the active configuration so that it will be loaded automatically when the system reboots. [root@bigboy tmp]# /etc/init.d/iptables save
Remember, it is always best to eventually convert the lokkit formatted files to regular iptables scripts as they are much easier to manage.
Conclusion
A firewall is a critical part of any establishment that connects to an unprotected network like the Internet, but a firewall will never be sufficient. Website security involves not just protection from corrupted packets or maliciously overwhelming volumes of traffic, but also involves daily data backups to help recovery from device failures; regular application patching; enforced password policies; restricted and monitored physical access to your servers; reliable power and cooling; secured cabling; redundant hardware; and probably most importantly, well trained and/or motivated employees. Security should be viewed as anything that contributes to the desired risk free functioning of your site and it is well worth the money to invest in and learn from a text that specializes in the topic.

Chapter 16
Linux FTP Server Setup = = = = = = = = = = = = = = = = = = = = = = = = = = = = = = = = = = = = = = = = = = = In This Chapter Chapter 16
Linux FTP Server Setup FTP Overview Problems With FTP And Firewalls How To Download And Install The VSFTP Package How To Get VSFTP Started Testing To See If VSFTP Is Running What Is Anonymous FTP? The vsftpd.conf File FTP Security Issues Tutorial Conclusion
(c) Peter Harrison, www.linuxhomenetworking.com = = = = = = = = = = = = = = = = = = = = = = = = = = = = = = = = = = = = = = = = = = =
The File Transfer Protocol (FTP) is used as one of the most common means of copying files between servers over the Internet. Most web based download sites use the built in FTP capabilities of web browsers and therefore most server oriented operating systems usually include an FTP server application as part of the software suite. Linux is no exception.
This chapter will show you how to convert your Linux box into an FTP server using the default VSFTP package included in Fedora.
FTP Overview FTP relies on a pair of TCP ports to get the job done and operates in two connection modes as I'll explain:
FTP Control Channel - TCP Port 21 All commands you send and the ftp server's responses to those commands will go over the control connection, but any data sent back (such as "ls" directory lists or actual file data in either direction) will go over the data connection.
FTP Data Channel - TCP Port 20 This port is used for all subsequent data transfers between the client and server.
Types of FTP
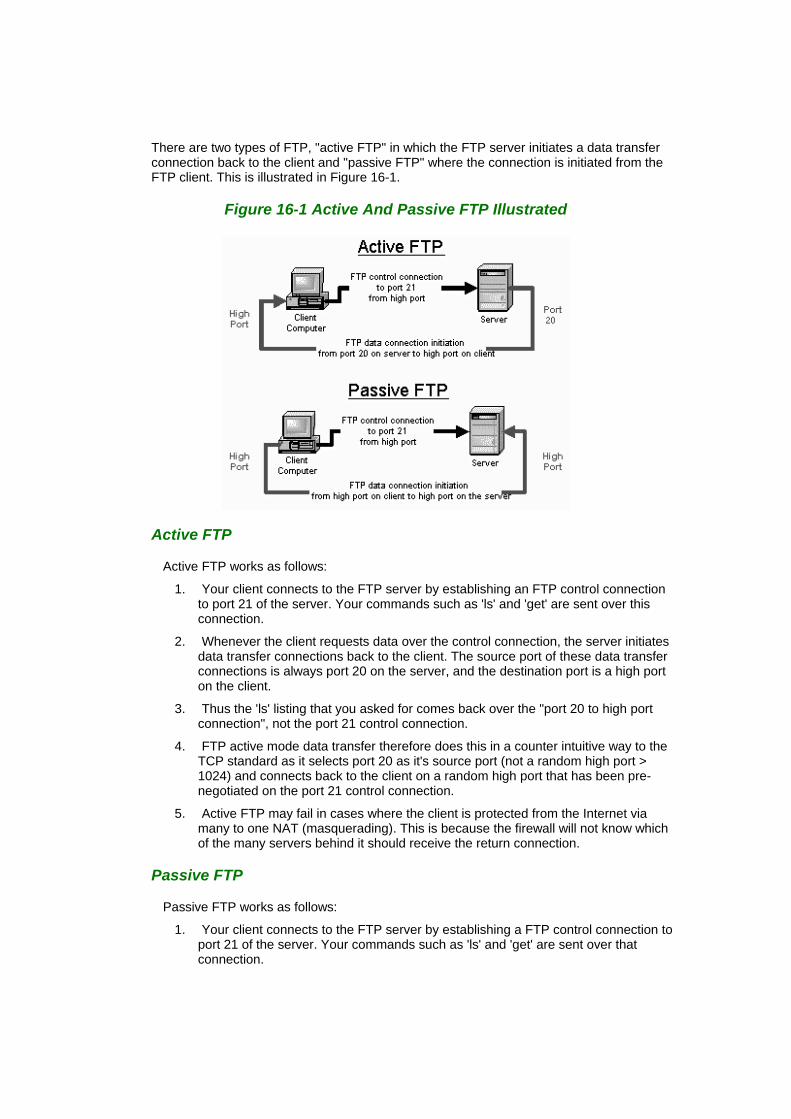
There are two types of FTP, "active FTP" in which the FTP server initiates a data transfer connection back to the client and "passive FTP" where the connection is initiated from the FTP client. This is illustrated in Figure 16-1.
Figure 16-1 Active And Passive FTP Illustrated
Active FTP
Active FTP works as follows:
1. Your client connects to the FTP server by establishing an FTP control connection to port 21 of the server. Your commands such as 'ls' and 'get' are sent over this connection.
2. Whenever the client requests data over the control connection, the server initiates data transfer connections back to the client. The source port of these data transfer connections is always port 20 on the server, and the destination port is a high port on the client.
3. Thus the 'ls' listing that you asked for comes back over the "port 20 to high port connection", not the port 21 control connection.
4. FTP active mode data transfer therefore does this in a counter intuitive way to the TCP standard as it selects port 20 as it's source port (not a random high port > 1024) and connects back to the client on a random high port that has been pre-negotiated on the port 21 control connection.
5. Active FTP may fail in cases where the client is protected from the Internet via many to one NAT (masquerading). This is because the firewall will not know which of the many servers behind it should receive the return connection.
Passive FTP
Passive FTP works as follows:
1. Your client connects to the FTP server by establishing a FTP control connection to port 21 of the server. Your commands such as 'ls' and 'get' are sent over that connection.

2. Whenever the client requests data over the control connection, the client initiates the data transfer connections to the server. The source port of these data transfer connections is always a high port on the client with a destination port of a high port on the server.
3. Passive FTP should be viewed as the server never making an active attempt to connect to the client for FTP data transfers.
4. Passive FTP works better for clients protected by a firewall as the client always initiates the required connections.
Problems With FTP And Firewalls FTP frequently fails when the data has to pass through a firewall as FTP uses a wide range of unpredictable TCP ports and firewalls are designed to limit data flows to predictable TCP ports. There are ways to overcome this as explained in the following sections.
The Appendix has examples of how to configure the vsftpd Linux filewall to function with both active and passive FTP.
Client Protected By A Firewall Problem Typically firewalls don't let any incoming connections at all, this will frequently cause active FTP not to function. This type of FTP failure has the following symptoms:
o The active ftp connection appears to work when the client initiates an outbound connection to the server on port 21. The connection appears to hang as soon as you do an "ls" or a "dir" or a "get". This is because the firewall is blocking the return connection from the server to the client. (From port 20 on the server to a high port on the client)
Solutions
Table 16-1 shows the general rules you'll need to allow FTP clients through a firewall:
Table 16-1 Client Protected by Firewall - Required Rules for FTP
Method Source Address
Source Port Destination Address
Destination Port
Connection Type
Allow outgoing control connections to server
Control Channel
FTP client/ network
High FTP server** 21 New
FTP server** 21 FTP client/ network
High Established*
Allow the client to establish data channels to remote server
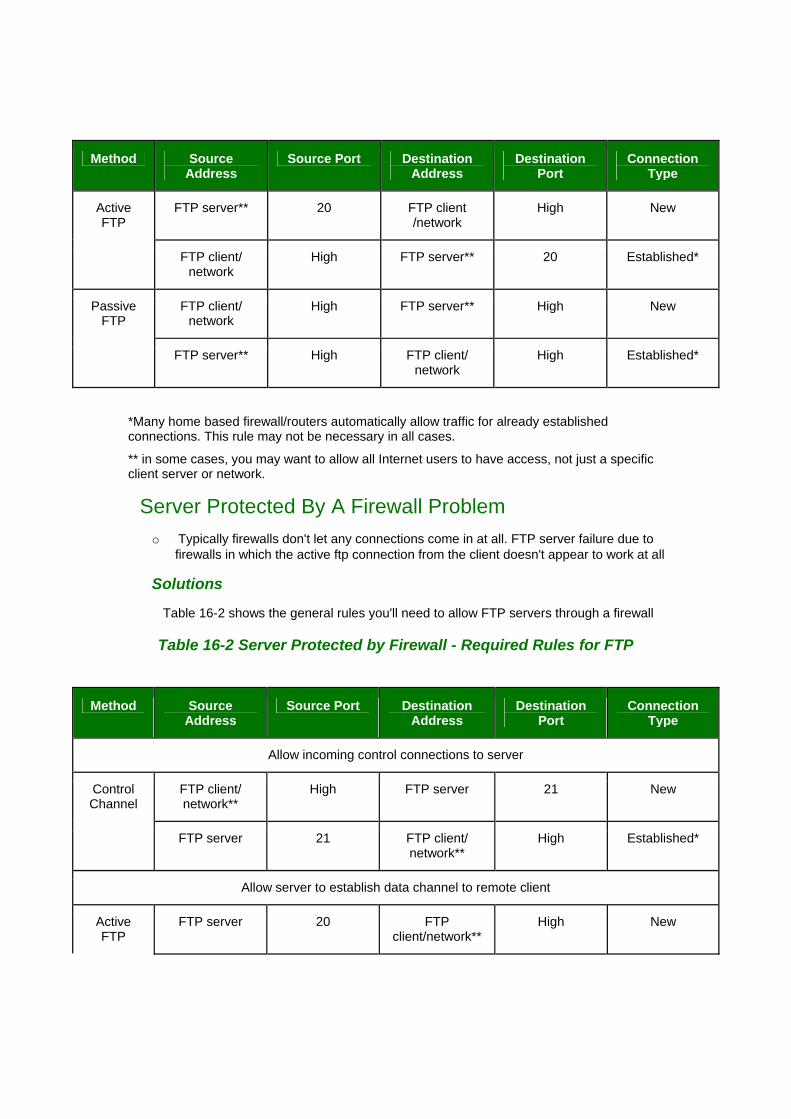
Method Source Address
Source Port Destination Address
Destination Port
Connection Type
Active FTP
FTP server** 20 FTP client /network
High New
FTP client/ network
High FTP server** 20 Established*
Passive FTP
FTP client/ network
High FTP server** High New
FTP server** High FTP client/ network
High Established*
*Many home based firewall/routers automatically allow traffic for already established connections. This rule may not be necessary in all cases.
** in some cases, you may want to allow all Internet users to have access, not just a specific client server or network.
Server Protected By A Firewall Problem o Typically firewalls don't let any connections come in at all. FTP server failure due to
firewalls in which the active ftp connection from the client doesn't appear to work at all
Solutions
Table 16-2 shows the general rules you'll need to allow FTP servers through a firewall
Table 16-2 Server Protected by Firewall - Required Rules for FTP
Method Source Address
Source Port Destination Address
Destination Port
Connection Type
Allow incoming control connections to server
Control Channel
FTP client/ network**
High FTP server 21 New
FTP server 21 FTP client/ network**
High Established*
Allow server to establish data channel to remote client
Active FTP
FTP server 20 FTP client/network**
High New

Method Source Address
Source Port Destination Address
Destination Port
Connection Type
FTP client/ network**
High FTP server 20 Established*
Passive FTP
FTP client/ network**
High FTP server High New
FTP server High FTP client/ network**
High Established*
*Many home based firewall/routers automatically allow traffic for already established connections. This rule may not be necessary in all cases.
** in some cases, you may want to allow all Internet users to have access, not just a specific client server or network.
How To Download And Install The VSFTP Package
Most RedHat and Fedora Linux software products are available in the RPM format. Downloading and installing RPMs isn't hard. If you need a refresher, chapter 5, on RPMs, covers how to do this in detail. It is best to use the latest version of VSFTP.
When searching for the file, remember that the VSFTP RPM's filename usually starts with the word "vsftpd" followed by a version number like this: vsftpd-1.2.1-5.i386.rpm.
How To Get VSFTP Started
Fedora Core And Redhat Version 9 o You can start/stop/restart vsftpd after booting by using the following commands:
[root@bigboy tmp]# /etc/init.d/vsftpd start [root@bigboy tmp]# /etc/init.d/vsftpd stop [root@bigboy tmp]# /etc/init.d/vsftpd restart
o To get vsftpd configured to start at boot:
[root@bigboy tmp]# chkconfig vsftpd on
Redhat Version 8.0 And Older
The starting and stopping of VSFTP is controlled by xinetd via the /etc/xinetd.d/vsftpd file. VSFTP is deactivated by default, so you'll have to edit this file to start the program. Make sure the contents look like this. The disable feature must be set to "no" to accept connections.

service ftp {
disable = no socket_type = stream wait = no user = root server = /usr/sbin/vsftpd nice = 10
}
You will then have to restart xinetd for these changes to take effect using the startup script in the /etc/init.d directory. [root@aqua tmp]# /etc/init.d/xinetd restart Stopping xinetd: [ OK ] Starting xinetd: [ OK ] [root@aqua tmp]#
Naturally, to disable VSFTP once again, you'll have to edit /etc/xinetd.d/vsftpd, set "disable" to "yes" and restart xinetd.
Testing To See If VSFTP Is Running You can always test whether the VSFTP process is running by using the netstat -a command which lists all the TCP and UDP ports on which the server is listening for traffic. The example below shows the expected output, there would be no output at all if VSFTP wasn't running. [root@bigboy root]# netstat -a | grep ftp tcp 0 0 *:ftp *:* LISTEN [root@bigboy root]#
What Is Anonymous FTP? Anonymous FTP is used by web sites that need to exchange files with numerous unknown remote users. Common uses include downloading software updates and MP3s to uploading diagnostic information for a technical support engineer's attention. Unlike regular FTP where you login with a preconfigured Linux username and password, anonymous FTP only requires a username of "anonymous" and your email address for the password. Once logged in to a VSFTP server, you'll automatically have access to only the default anonymous FTP directory /var/ftp and all its subdirectories.
As seen in Chapter 5 on RPMs, using anonymous FTP as a remote user is fairly straight forward. VSFTP can be configured to support user based and or anonymous FTP in its configuration file.
The vsftpd.conf File VSFTP only reads the contents of its vsftpd.conf configuration file when it starts, so you'll have to restart VSFTP each time you edit the file in order for the changes to take effect.
This file uses a number of default settings you need to know about.
> By default, VSFTP runs as an anonymous FTP server. Unless you want any remote user to log into to your default FTP directory using a username of "anonymous" and a password that's the same as their email address, I would suggest turning this off. The configuration file's anonymous_enable directive can be set to "NO" to disable this feature. You'll also want to simultaneously enable local users to be able to log in by uncommenting the local_enable instruction.
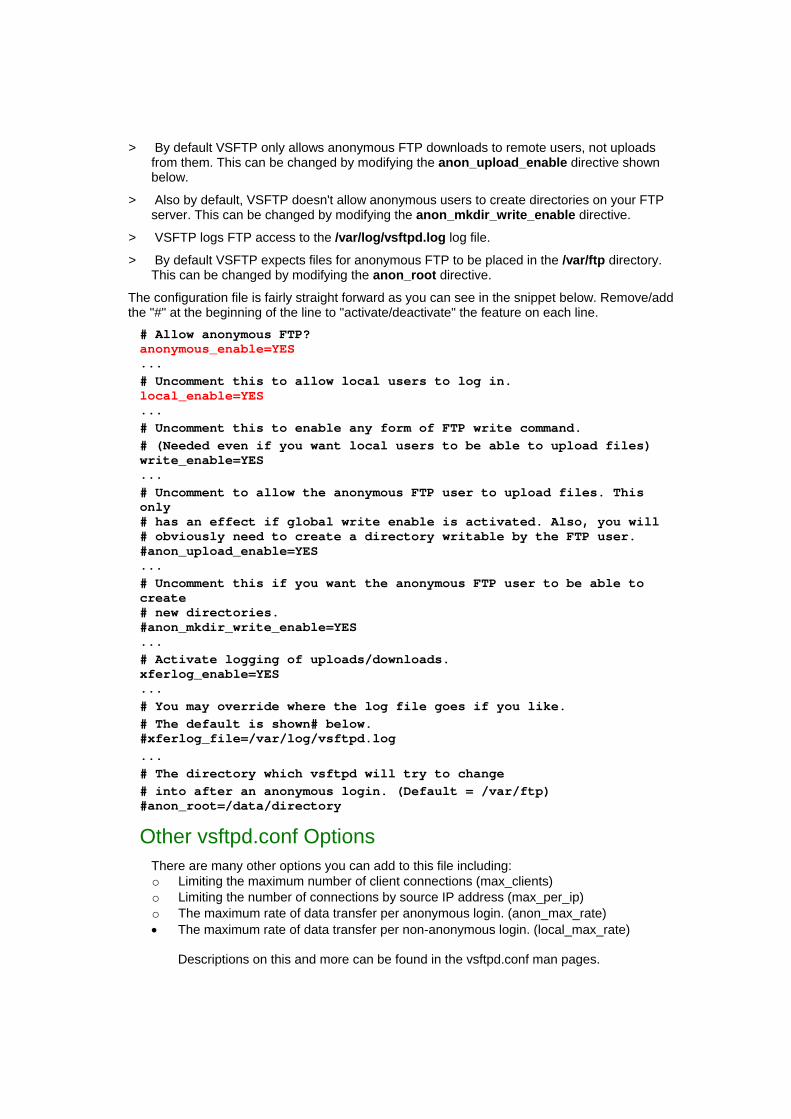
> By default VSFTP only allows anonymous FTP downloads to remote users, not uploads from them. This can be changed by modifying the anon_upload_enable directive shown below.
> Also by default, VSFTP doesn't allow anonymous users to create directories on your FTP server. This can be changed by modifying the anon_mkdir_write_enable directive.
> VSFTP logs FTP access to the /var/log/vsftpd.log log file.
> By default VSFTP expects files for anonymous FTP to be placed in the /var/ftp directory. This can be changed by modifying the anon_root directive.
The configuration file is fairly straight forward as you can see in the snippet below. Remove/add the "#" at the beginning of the line to "activate/deactivate" the feature on each line. # Allow anonymous FTP? anonymous_enable=YES ... # Uncomment this to allow local users to log in. local_enable=YES ... # Uncomment this to enable any form of FTP write command. # (Needed even if you want local users to be able to upload files) write_enable=YES ... # Uncomment to allow the anonymous FTP user to upload files. This only # has an effect if global write enable is activated. Also, you will # obviously need to create a directory writable by the FTP user. #anon_upload_enable=YES ... # Uncomment this if you want the anonymous FTP user to be able to create # new directories. #anon_mkdir_write_enable=YES ... # Activate logging of uploads/downloads. xferlog_enable=YES ... # You may override where the log file goes if you like. # The default is shown# below. #xferlog_file=/var/log/vsftpd.log ... # The directory which vsftpd will try to change # into after an anonymous login. (Default = /var/ftp) #anon_root=/data/directory
Other vsftpd.conf Options There are many other options you can add to this file including: o Limiting the maximum number of client connections (max_clients) o Limiting the number of connections by source IP address (max_per_ip) o The maximum rate of data transfer per anonymous login. (anon_max_rate) • The maximum rate of data transfer per non-anonymous login. (local_max_rate)
Descriptions on this and more can be found in the vsftpd.conf man pages.

FTP Security Issues FTP has a number of security drawbacks that in some cases can be overcome. You can restrict individual Linux user's access to "non-anonymous" FTP, and you can change the configuration to not display the FTP server's software version information, but unfortunately, though very convenient, FTP logins and data transfers are not encrypted.
The /etc/vsftpd.ftpusers File For added security you may restrict FTP access to certain users by adding them to the list of users in this file. Do not delete entries from the default list, it is best to add.
Anonymous Upload If you want remote users to write data to your FTP server then it is recommended you create a write-only directory within /var/ftp/pub. This will allow your users to upload, but not access other files uploaded by other users. Here are the commands to do this: [root@bigboy tmp]# mkdir /var/ftp/pub/upload [root@bigboy tmp]# chmod 733 /var/ftp/pub/upload
FTP Greeting Banner Change the default greeting banner in the vsftpd.conf file to make it harder for malicious users to determine the type of system you have. ftpd_banner= New Banner Here
Using SCP As Secure Alternative To FTP One of the disadvantages of FTP is that it does not encrypt your username and password. This could make your user account vulnerable to an unauthorized attack from a person eavesdropping on the network connection. Secure Copy (SCP) provides encryption and could be considered as an alternative to FTP for trusted users. SCP however does not support anonymous services, a feature that FTP does.
Tutorial As explained in the introduction, FTP has many uses, one of which is allowing numerous unknown users to download files. You have to be careful in doing this because you run the risk of accidentally allowing unknown persons to upload files to your server. This sort of unintended activity can quickly fill up your hard drive with illegal software, images and music for the world to download which can clog your server's Internet access and drive up your bandwidth charges.
FTP Users With Only Read Access To A Shared Directory In this example, anonymous FTP is not desired, but a group of trusted users need to have read only access to a directory for downloading files. Here are the steps:
o Disable anonymous FTP. Comment out the anonymous_enable line in the vsftpd.conf file like this: # Allow anonymous FTP? # anonymous_enable=YES
o Enable individual logins by making sure you have the local_enable line uncommented in the vsftpd.conf file like this:

# Uncomment this to allow local users to log in. local_enable=YES
o Start VSFTP.
o Create a user group and shared directory. In this case we'll use "/home/ftp-users" and a user group name of "ftp-users" for the remote users. [root@bigboy tmp]# groupadd ftp-users [root@bigboy tmp]# mkdir /home/ftp-docs
o Make the directory accessible to the ftp-users group.
[root@bigboy tmp]# chmod 750 /home/ftp-docs [root@bigboy tmp]# chown root:ftp-users /home/ftp-docs
o Add users, and make their default directory /home/ftp-docs
[root@bigboy tmp]# useradd -g ftp-users -d /home/ftp-docs user1 [root@bigboy tmp]# useradd -g ftp-users -d /home/ftp-docs user2 [root@bigboy tmp]# useradd -g ftp-users -d /home/ftp-docs user3 [root@bigboy tmp]# useradd -g ftp-users -d /home/ftp-docs user4 [root@bigboy tmp]# passwd user1 [root@bigboy tmp]# passwd user2 [root@bigboy tmp]# passwd user3 [root@bigboy tmp]# passwd user4
o Copy files to be downloaded by your users into the /home/ftp-docs directory
o Change the permissions of the files in the /home/ftp-docs directory for read only access by the group [root@bigboy tmp]# chown root:ftp-users /home/ftp-docs/* [root@bigboy tmp]# chmod 740 /home/ftp-docs/*
Users should now be able to log in via ftp to the server using their new user names and passwords. If you absolutely don't want any FTP users to be able to write to any directory then you should comment out the write_enable line in your vsftpd.conf file like this: #write_enable=YES
o Restart vsftp for the configuration file changes to take effect.
Sample Login Session To Test Functionality Here is a simple tst procedure you can use to make sure everything is working correctly:
o Check for the presence of a test file on the ftp client server.
[root@smallfry tmp]# ll total 1 -rw-r--r-- 1 root root 0 Jan 4 09:08 testfile [root@smallfry tmp]#
o Connect to bigboy via FTP
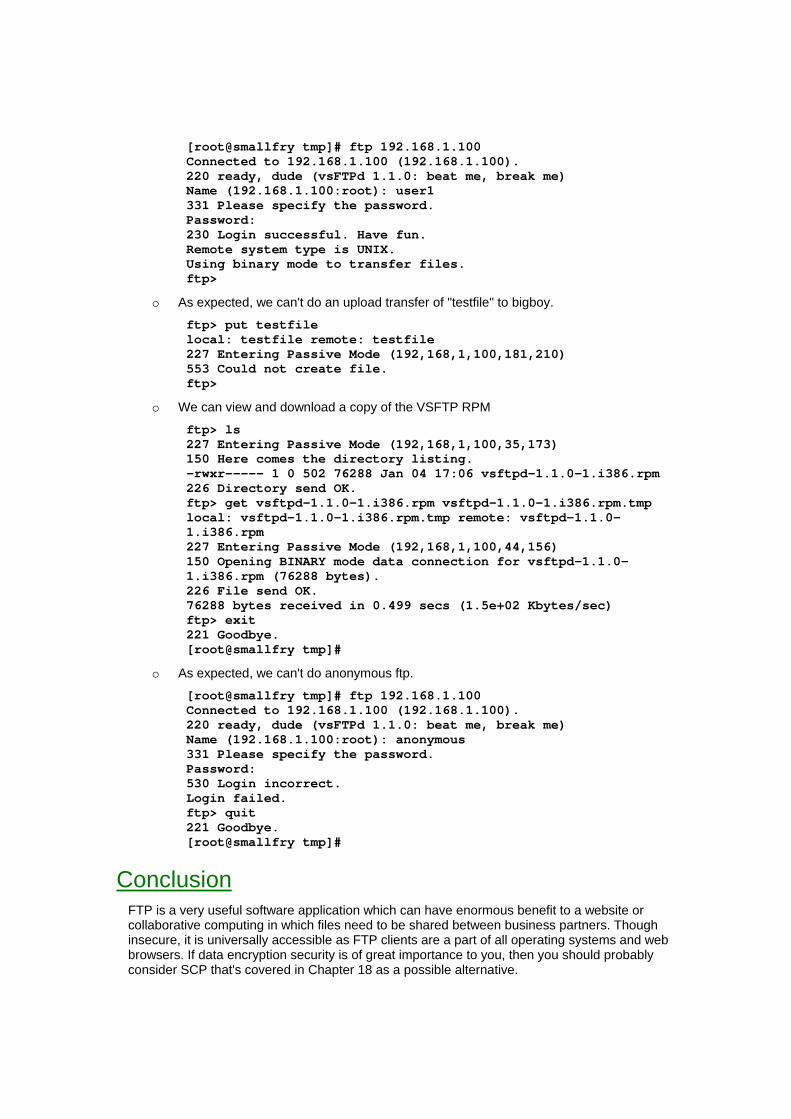
[root@smallfry tmp]# ftp 192.168.1.100 Connected to 192.168.1.100 (192.168.1.100). 220 ready, dude (vsFTPd 1.1.0: beat me, break me) Name (192.168.1.100:root): user1 331 Please specify the password. Password: 230 Login successful. Have fun. Remote system type is UNIX. Using binary mode to transfer files. ftp>
o As expected, we can't do an upload transfer of "testfile" to bigboy.
ftp> put testfile local: testfile remote: testfile 227 Entering Passive Mode (192,168,1,100,181,210) 553 Could not create file. ftp>
o We can view and download a copy of the VSFTP RPM
ftp> ls 227 Entering Passive Mode (192,168,1,100,35,173) 150 Here comes the directory listing. -rwxr----- 1 0 502 76288 Jan 04 17:06 vsftpd-1.1.0-1.i386.rpm 226 Directory send OK. ftp> get vsftpd-1.1.0-1.i386.rpm vsftpd-1.1.0-1.i386.rpm.tmp local: vsftpd-1.1.0-1.i386.rpm.tmp remote: vsftpd-1.1.0-1.i386.rpm 227 Entering Passive Mode (192,168,1,100,44,156) 150 Opening BINARY mode data connection for vsftpd-1.1.0-1.i386.rpm (76288 bytes). 226 File send OK. 76288 bytes received in 0.499 secs (1.5e+02 Kbytes/sec) ftp> exit 221 Goodbye. [root@smallfry tmp]#
o As expected, we can't do anonymous ftp.
[root@smallfry tmp]# ftp 192.168.1.100 Connected to 192.168.1.100 (192.168.1.100). 220 ready, dude (vsFTPd 1.1.0: beat me, break me) Name (192.168.1.100:root): anonymous 331 Please specify the password. Password: 530 Login incorrect. Login failed. ftp> quit 221 Goodbye. [root@smallfry tmp]#
Conclusion FTP is a very useful software application which can have enormous benefit to a website or collaborative computing in which files need to be shared between business partners. Though insecure, it is universally accessible as FTP clients are a part of all operating systems and web browsers. If data encryption security is of great importance to you, then you should probably consider SCP that's covered in Chapter 18 as a possible alternative.

Chapter 17
Telnet, TFTP and XINETD = = = = = = = = = = = = = = = = = = = = = = = = = = = = = = = = = = = = = = = = = = = In This Chapter Chapter 17
Telnet, TFTP and XINETD Telnet TFTP Conclusion
(c) Peter Harrison, www.linuxhomenetworking.com = = = = = = = = = = = = = = = = = = = = = = = = = = = = = = = = = = = = = = = = = = = Many network enabled Linux applications don't rely on themselves to provide restricted access or bind to a particular TCP port; instead they often offload a lot of this work to a program suite made just for this purpose, xinetd. Some xinetd enabled applications such as Telnet, a remote access program, are installed by default in RedHat and Fedora Core Linux. Others such as TFTP, a file transfer program for networking devices, need to be installed afterwards. Xinetd enabled applications all store their configuration files in the /etc/xinetd.d directory. Once you have edited the configuration files you'll have to restart xinetd to make the configurations take effect
[root@bigboy tmp]# /etc/init.d/xinetd restart Stopping xinetd: [ OK ] Starting xinetd: [ OK ] [root@bigboy tmp]#
Finally, remember that you will also be restarting all the other xinetd controlled processes when you restart xinetd. Therefore if you are logged into your Linux box via Telnet and then restart xinetd, you will become disconnected as Telnet would be restarted too.
Telnet
Telnet is a program that allows users to log into your server and get a command prompt just as if they were logged into the VGA console. Telnet is installed and enabled by default on RedHat and Fedora Linux.
One of the disadvantages of Telnet is that the data is sent as clear text. This means that it is possible for someone to use a network analyzer to peek into your data packets and see your username and password. A more secure method for remote logins would be via Secure Shell (SSH) which uses varying degrees of encryption.

Using Telnet The command to do remote logins via telnet from the command line is simple. You enter the word "telnet" and then the IP address or server name to which you want to connect.
Here is an example of someone logging into a remote server named "smallfry" from server "bigboy". The user looks at the routing table and then logs out. [root@bigboy root]# telnet 192.168.1.105 Trying 192.168.1.105... Connected to 192.168.1.105. Escape character is '^]'. Linux 2.4.18-14 (smallfry.my-site.com) (10:35 on Sunday, 05 January 2003) Login: peter Password: Last login: Fri Nov 22 23:29:44 on ttyS0 You have new mail. [peter@smallfry peter]$ [peter@smallfry peter]$ netstat -nr Kernel IP routing table Destination Gateway Genmask Flags MSS Window irtt Iface 255.255.255.255 0.0.0.0 255.255.255.255 UH 40 0 0 wlan0 192.168.1.0 0.0.0.0 255.255.255.0 U 40 0 0 wlan0 127.0.0.0 0.0.0.0 255.0.0.0 U 40 0 0 lo 0.0.0.0 192.168.1.1 0.0.0.0 UG 40 0 0 wlan0 [peter@smallfry peter]$ exit logout Connection closed by foreign host. [root@bigboy root]#
Installing The Telnet Server Software Older versions of RedHat had the Telnet server installed by default. Fedora Linux doesn't do this and you will have to install it yourself.
Most RedHat and Fedora Linux software products are available in the RPM format. Downloading and installing RPMs isn't hard. If you need a refresher, Chapter 5, on RPMs, covers how to do this in detail.
When searching for the file, remember that the Telnet server RPM's filename usually starts with the word "telnet-server" followed by a version number like this: telnet-server-0.17-28.i386.rpm.
Setting Up A Telnet Server o Telnet is installed disabled Fedora Linux. If you want to enable Telnet then edit the file
/etc/xinetd.d/telnet and set the disable parameter to "no".
# default: on # description: The telnet server serves telnet sessions; it

uses \ # unencrypted username/password pairs for authentication. service telnet { flags = REUSE socket_type = stream wait = no user = root server = /usr/sbin/in.telnetd log_on_failure += USERID disable = no }
o You'll then have to restart xinetd for the new settings to take effect.
[root@bigboy tmp]# /etc/init.d/xinetd restart Stopping xinetd: [ OK ] Starting xinetd: [ OK ] [root@bigboy tmp]#
o You can test whether the Telnet process is running with the following command which
is used to check the TCP/UDP ports on which your server is listening, if it isn't running then there will be no response.
[root@bigboy root]# netstat -a | grep telnet tcp 0 0 *:telnet *:* LISTEN [root@bigboy root]#
TFTP Many networking equipment manufacturers allow you to backup live configurations their devices to centralized servers via the TFTP protocol. TFTP can be used with great versatility as a network management tool and not just for saving files. TFTP servers can also used to upload new configurations to replacement devices after serious hardware failures. They can also be used for uploading new versions of software to be run network devices. Finally, they can be used to upload even partial configurations such as files containing updated access control lists (ACLs) that restrict access to networks and even the regular application of new passwords.
Installing The TFTP Server Software Most RedHat and Fedora Linux software products are available in the RPM format. Downloading and installing RPMs isn't hard. If you need a refresher, Chapter 5, on RPMs, covers how to do this in detail.
When searching for the file, remember that the Telnet server RPM's filename usually starts with the word "tftp-server" followed by a version number like this: tftp-server-0.33-3.i386.rpm.
Configuring The TFTP Server o The first step is to the configuration file /etc/xinetd.d/tftp and set disable to "no".

# default: off # description: The tftp server serves files using the trivial # file transfer \ # protocol. The tftp protocol is often used to boot diskless \ # workstations, download configuration files to # network-aware printers, \ # and to start the installation process for some operating systems. service tftp { socket_type = dgram protocol = udp wait = yes user = root only_from = 192.168.1.1 server = /usr/sbin/in.tftpd server_args = -s /tftpboot disable = no per_source = 11 cps = 100 2
}
In this example, xinetd will only allow the TFTP server to accept connections from the router / switch / firewall with an address of 192.168.1.1. You can extend this list with commas in between or just comment it out al together for global access.
o Create a /tftpboot directory with global read write privileges
[root@bigboy tmp]# chmod 777 /tftpboot
o Restart xinetd
[root@bigboy tmp]# /etc/init.d/xinetd restart Stopping xinetd: [ OK ] Starting xinetd: [ OK ] [root@bigboy tmp]#
o Each device must have a configuration file in the /tftpboot directory. Here's an example of what to do for a SOHO firewall with the name "pixfw" and a configuration filename that matches cisco's standard naming scheme of "devicename"-config [root@bigboy tmp]# touch /tftpboot/pixfw-config [root@bigboy tmp]# chmod 666 /tftpboot/pixfw-config [root@bigboy tmp]# ll /tftpboot/ total 1631 -rw-rw-rw- 1 root root 3011 Oct 29 14:09 pixfw-config [root@bigboy tmp]#
o You can test whether the TFTP process is running with the following command which is used to check the TCP/UDP ports on which your server is listening, if it isn't running then there will be no response. [root@bigboy root]# netstat -a | grep tftp udp 0 0 *:tftp *:* [root@bigboy root]#

Configuring Cisco Devices for TFTP You'll now have to configure your Cisco router / firewall to use the TFTP server. The following examples assume that the TFTP server's IP address is 192.168.1.100
Cisco PIX firewall
Follow theses steps on a PIX firewall:
1. Log onto the device, get into enable mode and then enter the TFTP commands pixfw> enable Password: ******** pixfw# configure terminal pixfw(config)# tftp-server inside 192.168.1.100 /pixfw-config pixfw(config)# exit
2. Save the configuration to non volatile memory pixfw# write memory Building configuration... Cryptochecksum: 3af43873 d35d6f06 51f8c999 180c2342 [OK] pixfw#
3. Save the configuration to the TFTP server pixfw# write network Building configuration... TFTP write '/pixfw-config' at 192.168.1.100 on interface 1 [OK] pixfw#
Cisco Switch Running CATOS
To save the configuration of a Catalyst series switch running CATOS you'll need to log onto the device, get into enable mode and then enter the "write net" TFTP command as show below.
ciscoswitch> (enable) wr net This command shows non-default configurations only. Use 'write network all' to show both default and non-default configurations. IP address or name of remote host? [192.168.1.100] Name of configuration file?[ciscoswitch-config] Upload configuration to ciscoswitch-config on 192.168.1.100 (y/n) [n]? y ......... Finished network upload. (30907 bytes) ciscoswitch> (enable)
Cisco Router
To save the configuration of a router, log onto the device, get into enable mode, then configure mode and then enter the TFTP commands as seen below:
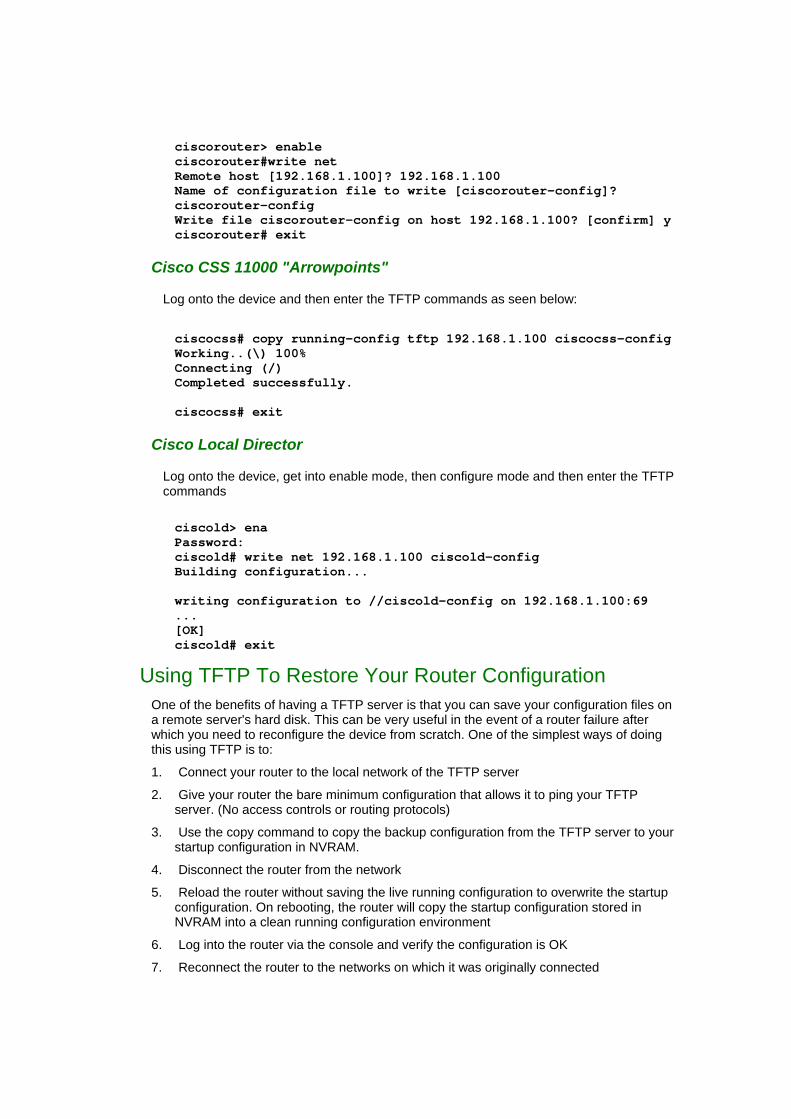
ciscorouter> enable ciscorouter#write net Remote host [192.168.1.100]? 192.168.1.100 Name of configuration file to write [ciscorouter-config]? ciscorouter-config Write file ciscorouter-config on host 192.168.1.100? [confirm] y ciscorouter# exit
Cisco CSS 11000 "Arrowpoints"
Log onto the device and then enter the TFTP commands as seen below:
ciscocss# copy running-config tftp 192.168.1.100 ciscocss-config Working..(\) 100% Connecting (/) Completed successfully. ciscocss# exit
Cisco Local Director
Log onto the device, get into enable mode, then configure mode and then enter the TFTP commands
ciscold> ena Password: ciscold# write net 192.168.1.100 ciscold-config Building configuration... writing configuration to //ciscold-config on 192.168.1.100:69 ... [OK] ciscold# exit
Using TFTP To Restore Your Router Configuration One of the benefits of having a TFTP server is that you can save your configuration files on a remote server's hard disk. This can be very useful in the event of a router failure after which you need to reconfigure the device from scratch. One of the simplest ways of doing this using TFTP is to:
1. Connect your router to the local network of the TFTP server
2. Give your router the bare minimum configuration that allows it to ping your TFTP server. (No access controls or routing protocols)
3. Use the copy command to copy the backup configuration from the TFTP server to your startup configuration in NVRAM.
4. Disconnect the router from the network
5. Reload the router without saving the live running configuration to overwrite the startup configuration. On rebooting, the router will copy the startup configuration stored in NVRAM into a clean running configuration environment
6. Log into the router via the console and verify the configuration is OK
7. Reconnect the router to the networks on which it was originally connected

Here are the commands: ciscorouter> enable Password: ******** ciscorouter# write erase ciscorouter# copy tftp:file-name startup-config ciscorouter# reload
Please be aware that the "write erase" command erases your NVRAM startup configuration and should always be used with great care.
Conclusion
Both Telnet and TFTP are important applications to be aware of as part of an overall systems administration strategy. They both have the shortcoming of not encrypting their data and therefore need to be used on secured networks for improved security. TFTP sessions don't even need a username and password, and the TFTP server process will overwrite any existing file beneath its "root" directory in keeping with the instructions of the network engineer. Making mistakes with TFTP can be fairly easy to do, and you may want to consider automating the process by using a helper application such as "expect".
Telnet is a greater security risk as the connections are longer, and valuable usernames and passwords are exchanged, making eavesdropping easier and more lucrative for the hacker. I'd suggest that, whenever possible that you use an encrypted telnet replacement whenever possible. One such product is SSH that will be covered in Chapter 18.

Chapter 18
Secure Remote Logins And File Copying
= = = = = = = = = = = = = = = = = = = = = = = = = = = = = = = = = = = = = = = = = = = In This Chapter Chapter 18
Secure Remote Logins And File Copying Starting OpenSSH Testing To See If SSH Is Running The etc/ssh/sshd_config File Using SSH To Login To A Remote Machine What You Should Expect To See When You Log In Deactivating Telnet once SSH is installed Using SSH To Execute Remote Commands On Demand Using SCP as a more secure replacement for FTP Using SSH and SCP without a password Conclusion
(c) Peter Harrison, www.linuxhomenetworking.com = = = = = = = = = = = = = = = = = = = = = = = = = = = = = = = = = = = = = = = = = = =
One of the most popular file transfer and remote login Linux applications is OpenSSH which provides a number of ways to creating encrypted connections between clients and servers. The OpenSSH Secure Copy (SCP) program is a secure replacement for FTP, while Secure Shell (SSH) is often used as a stealthy alternative to Telnet. OpenSSH isn't limited to Linux, SSH and SCP clients are available for most operating systems including Windows.
Starting OpenSSH OpenSSH is installed by default during Linux installations, and as they are part of the same application, both SSH and SCP share the same configuration file and are governed by the same /etc/init.d/sshd startup script.
You can get SSH configured to start at boot by using the chkconfig command. [root@bigboy tmp]# chkconfig --level 35 sshd on
You can also start/stop/restart SSH after booting by running the sshd initialization script. [root@bigboy tmp]# /etc/init.d/sshd start [root@bigboy tmp]# /etc/init.d/sshd stop [root@bigboy tmp]# /etc/init.d/sshd restart

Remember to restart the SSH process every time you make a change to the configuration files for the changes to take effect on the running process.
Testing To See If SSH Is Running You can test whether the SSH process is running with the following command. You should get a response of plain old process ID numbers: [root@bigboy tmp]# pgrep sshd
The etc/ssh/sshd_config File The SSH configuration file is called /etc/ssh/sshd_config. By default SSH listens on all your NICs and uses TCP port 22. See the configuration snippet below: # The strategy used for options in the default sshd_config shipped with # OpenSSH is to specify options with their default value where # possible, but leave them commented. Uncommented options change a # default value. #Port 22 #Protocol 2,1 #ListenAddress 0.0.0.0 #ListenAddress ::
This default port 22 value can be changed fairly easily for the sake of added security.
How To Change The TCP Port On Which SSH Listens
If you are afraid of people trying to hack in on a well known TCP port, then you can change port 22 to something else that won't interfere with other applications on your system, such as port 435. Here is how it can be done:
1. First make sure your system isn't listening on port 435, using the "netstat" command and using "grep" to filter out everything that doesn't have the string "435". [root@bigboy root]# netstat -an | grep 435 [root@bigboy root]#
2. No response, OK. Change the Port line in /etc/ssh/sshd_config to mention 435 and remove the "#" at the beginning of the line. If port 435 is being used, pick another port and try again. Port 435
3. Restart SSH [root@bigboy tmp]# /etc/init.d/sshd restart
4. Check to ensure SSH is running on the new port [root@bigboy root]# netstat -an | grep 435 tcp 0 0 192.168.1.100:435 0.0.0.0:* LISTEN [root@bigboy root]#
Next we'll discover how to actually login to systems using SSH.

Using SSH To Login To A Remote Machine
Using SSH is similar to Telnet. To login from another Linux box use the "ssh" command with a "-l" to specify the username you wish to login as. If you leave out the "-l", your username will not change. Here are some examples for a server named "smallfry" in your /etc/hosts file.
User "root" Logs In To smallfry As User "root" [root@bigboy tmp]# ssh smallfry
User "root" Logs In To smallfry As User "peter" The examples below assume that you have created a user called "peter" on smallfry.
Using default port 22
[root@bigboy tmp]# ssh -l peter smallfry
Using port 435
[root@bigboy tmp]# ssh -l peter -p 435 smallfry
What You Should Expect To See When You Log In The first time you log in, you will get a warning message saying that the remote host doesn't know about your machine and will prompt you to store a copy of the remote host's SSH identification keys on your local machine. It will look something like this: [root@bigboy tmp]# ssh smallfry Host key not found from the list of known hosts. !! If host key is new or changed, ssh1 protocol is vulnerable to an !! attack known as false-split, which makes it relativily easy to !! hijack the connection without the attack being detected. It is !! highly advisable to turn StrictHostKeyChecking to "yes" and !! manually copy host keys to known_hosts. Are you sure you want to continue connecting (yes/no)? yes Host 'smallfry' added to the list of known hosts. root@smallfry's password: Last login: Thu Nov 14 10:18:45 2002 from 192.168.1.98 No mail. [root@smallfry tmp]#
The first time you log into a remote server, a copy of the remote server's public encryption keys are stored in the user's ~/.ssh/known_hosts file. You should never be prompted for this again, unless the remote server has Linux reinstalled on the remote server and the keys are regenerated, or someone is attempting some sort of spoofing attack. If you feel the error is caused by a reinstallation, you can edit the ~/.ssh/known_hosts file and delete the corresponding entry for the remote host so that the correct key copying process can be attempted again.

Deactivating Telnet once SSH is installed
Now you need to switch off Telnet. The Telnet server is controlled by the xinetd network security program. Xinetd is installed by default in RedHat 7.3 and newer. The configuration files for each of the network programs it controls is located in the /etc/xinetd.d directory. Edit the file /etc/xinetd.d/telnet and set the disable parameter to "yes". # default: on # description: The telnet server serves telnet sessions; it uses \ # unencrypted username/password pairs for authentication. service telnet {
flags = REUSE socket_type = stream wait = no user = root server = /usr/sbin/in.telnetd log_on_failure += USERID disable = yes
}
Now restart xinetd. [root@bigboy tmp]# /etc/init.d/xinetd restart Stopping xinetd: [ OK ] Starting xinetd: [ OK ] [root@bigboy tmp]#
Using SSH To Execute Remote Commands On Demand
A nice feature of SSH is that it is capable of logging in and executing single commands on a remote system. You just have to place the remote command, enclosed in quotes, at the end of the ssh command of the local server. In the example below, a user on server "smallfry" who needs to know the version of the kernel running on server "bigboy" (192.168.1.100) remotely runs the "uname -a". The command returns the version of 2.6.8-1.521 and the server's name, "bigboy".
[root@smallfry tmp]# ssh 192.168.1.100 "uname -a" [email protected]'s password: Linux bigboy 2.6.8-1.521 #1 Mon Aug 16 09:01:18 EDT 2004 i686 i686 i386 GNU/Linux [root@smallfry tmp]#
This feature can be very useful. You can combine it with password-less login, explained later in this chapter, to get the status of a remote server whenever you need it. More comprehensive monitoring may best be left to purpose built programs like MRTG covered in Chapter 23.

Using SCP as a more secure replacement for FTP From a networking perspective, FTP isn't very secure as usernames, passwords and data are sent across the network unencrypted. More secure forms such as SFTP (Secure FTP) and SCP (Secure Copy) are available as a part of the Secure Shell package that is normally installed by default on RedHat and Fedora Core. There is a windows scp client called WinSCP which can be downloaded at:
http://winscp.vse.cz/eng/
Secure Copy (SCP) is installed in parallel with SSH and they always run simultaneously on the same TCP port. SCP doesn't support anonymous downloads like FTP.
Copying Files To The Local Linux Box Command Format: scp username@address:remotefile localdir
Examples:
o Copy file /tmp/software.rpm on the remote machine to the local directory /usr/rpm
[root@bigboy tmp]# scp root@smallfry:/tmp/software.rpm /usr/rpm
o Copy file /tmp/software.rpm on the remote machine to the local directory /usr/rpm using TCP port 435 [root@bigboy tmp]# scp -P 435 root@smallfry:/tmp/software.rpm /usr/rpm
Copying Files To The Remote Linux Box Command Format: scp filename username@address:remotedir
Examples:
o Copy file /etc/hosts on the local machine to directory /tmp on the remote server.
[root@bigboy tmp]# scp /etc/hosts [email protected]:/tmp
o Copy file /etc/hosts on the local machine to directory /tmp on the remote server using TCP port 435 [root@bigboy tmp]# scp -P 435 /etc/hosts [email protected]:/tmp
Using SSH and SCP without a password From time to time you may want to write scripts that will allow you to copy files to a server, or login, without being prompted for passwords. This can make them simpler to write and also prevents you from having to embed the password in your code.
SCP has a feature which allows you to do this. You no longer have to worry about prying eyes seeing your passwords nor worrying about your script breaking when someone changes the password. You can configure SSH to do this by generating and installing encryption keys for the data transfer that are tied to the IP addresses of the two servers. The servers then use these pre-installed keys to authenticate one another for each file transfer. As you may expect,

this feature doesn't work well with servers with IP addresses that periodically change such as those obtained via DHCP.
There are some security risks though. The feature is automatically applied to SSH as well. There is the possibility of someone using your account to login to the target server by entering the username alone. It is therefore best to implement this using unprivileged accounts on both the source and target servers.
In the case below, we'll be enabling this feature in one direction (from server "bigboy" to server "smallfry") and only using the unprivileged account called "filecopy".
Source Server Configuration Here are the steps you need to do on the server from which you will be sending the files:
1. Generate your SSH encryption keypair for the "filecopy" account. Hit the enter key each time you are prompted for a password to be associated with the keys. (ie. Do NOT enter a password.) [filecopy@bigboy filecopy]# ssh-keygen -t dsa Generating public/private dsa key pair. Enter file in which to save the key (/filecopy/.ssh/id_dsa): Enter passphrase (empty for no passphrase): Enter same passphrase again: Your identification has been saved in /filecopy/.ssh/id_dsa. Your public key has been saved in /filecopy/.ssh/id_dsa.pub. The key fingerprint is: 1e:73:59:96:25:93:3f:8b:50:39:81:9e:e3:4a:a8:aa filecopy@bigboy [filecopy@bigboy filecopy]#
2. These keyfiles are stored in the .ssh subdirectory of your home directory. View the contents of that directory. The file named "id_dsa" is your private key, and "id_dsa.pub" is the public key which you will be sharing with your target server. Non RedHat / Fedora versions may use different filenames, use the SSH man pages to verify this. [filecopy@bigboy filecopy]# cd .ssh [filecopy@bigboy filecopy]# ls id_dsa id_dsa.pub known_hosts [filecopy@bigboy .ssh]#
3. Copy the ONLY public key to the home directory of the account to which you will be sending the file. [filecopy@bigboy .ssh]# scp id_dsa.pub filecopy@smallfry:.ssh/public-key.tmp
Target Server Configuration Here are the steps you need to do on the server which will receive the file
1. Now log into smallfry. Create a ".ssh" sub directory in your home directory and then "cd" into it. [filecopy@smallfry home]# mkdir .ssh [filecopy@smallfry home]# chmod 700 .ssh [filecopy@smallfry home]# cd .ssh

2. Append the public-key.tmpfile to the end of the authorized_keys file. The authorized_keys file contains a listing of all the public keys from machines that are allowed to connect to your smallfry account without a password. Non RedHat / Fedora versions may use different filenames, use the SSH man pages to verify this. [filecopy@smallfry .ssh]# cat ~/.ssh/public-key.tmp>> authorized_keys
From now on you can ssh and scp as user "filecopy" from server bigboy to smallfry without being prompted for a password.
Conclusion
Most Linux security books will strongly recommend the use of SSH and SCP over Telnet and FTP due to the encryption capabilities of the former group. Despite this, there is still a place for FTP in the world due to its convenience in providing simple global access to files and telnet which is much easier to implement in price sensitive network appliances than SSH. Consider all options when choosing your file transfer and remote login programs of choice and select improved security whenever possible as the long term benefits eventually outweigh the additional cost over time.

Chapter 19
Configuring DNS = = = = = = = = = = = = = = = = = = = = = = = = = = = = = = = = = = = = = = = = = = = In This Chapter Chapter 19
Configuring DNS An Introduction to DNS How To Download and Install The BIND Packages How To Get BIND Started The /etc/resolv.conf File Configuring A Caching Nameserver Important File Locations - (Non Caching DNS) Configuring A Regular Nameserver Troubleshooting BIND How To Migrate Your Website In-House DHCP Considerations For DNS Conclusion
(c) Peter Harrison, www.linuxhomenetworking.com = = = = = = = = = = = = = = = = = = = = = = = = = = = = = = = = = = = = = = = = = = = As explained in Chapter 1, the Domain Name System (DNS) provides the means by which the name of a website like www.linuxhomenetworking.com is converted to an IP address. This is important as it is the IP address of a web site's server, not the website's name, that is used in routing traffic over the Internet. This chapter will explain how to configure your own DNS server to help guide web surfers to your website.
An Introduction to DNS Before we begin, it is best to understand a few foundation concepts in DNS on which the rest of the chapter will be built.
DNS Domains Everyone in the world has a first name and a last or "family" name. DNS is similar in that a family of websites can be loosely described as being a "domain". For example the domain linuxhomenetworking.com has a number of children such as www.linuxhomenetworking.com and mail.linuxhomenetworking.com for the web and mail servers respectively.
What Is BIND? BIND is an acronym for the "Berkeley Internet Name Domain" project which maintains the DNS related software suite that runs under Linux. The most well known program in BIND is "named", the daemon that responds to DNS queries from remote machines.

What's A DNS Client? A DNS client doesn't store DNS information; it always has to refer to a DNS server to get it. The only DNS configuration file for a DNS client is the /etc/resolv.conf file which defines the IP address of the DNS server it should use. You shouldn't need to configure any other files.
You can learn more about the /etc/resolv.conf file in the sections that follow.
What's An Authoritative DNS Server? These are the servers that provide the definitive information for your DNS domain such as the names of servers and websites in it.
How DNS Servers Find Out Your Site Information There are thirteen "root" (super duper) authoritative DNS servers which all DNS servers query first. These servers know all the authoritative DNS servers for all the main domains such as ".com", ".net" etc. These servers keep track of all the sub domains beneath them.
When you register a domain such as "my-site.com" you are actually inserting a record on the ".com" DNS servers that points to the authoritative DNS servers for your domain.
We'll discuss how to register you site later.
When To Use A DNS Caching Name Server Most servers don't ask authoritative servers for DNS directly, they usually ask a caching DNS server to do it on their behalf. The caching DNS servers then store (or cache), the most frequently requested information to reduce the lookup overhead of subsequent queries.
If you want to advertise your website www.my-site.com to the rest of the world, then a regular DNS server is what you require. Setting up a caching DNS server is fairly straightforward and will work whether or not your ISP provides you with a static or dynamic Internet IP address.
Once you have set up your caching DNS server you will then have to configure each of your home network PCs to use it as their DNS server. If your home PCs get their IP addresses using DHCP, then you will have to configure your DHCP server to make it aware of the IP address of your new DNS server so that it can advertise it to its PC clients. Off the shelf router/firewall appliances used in most home networks will usually act as both the caching DNS and DHCP server. In this case a separate DNS server is unnecessary.
When To Use A Static DNS Server If your ISP provides you with a "fixed" or "static" IP address, and you want to host your own website then a regular authoritative DNS server would be the way to go. A caching DNS name server is only used as a reference, regular name servers are used as the authoritative source of information for your website's domain.
Note: Regular name servers are also caching name servers by default.
When To Use A Dynamic DNS Server If your ISP provides your router/firewall with its Internet IP address using DHCP then you must consider dynamic DNS covered in Chapter 20. This chapter assumes that you are using "static" Internet IP addresses.

How To Get Your Own Domain
You will still need to register a domain whether or not you use static or dynamic DNS.
Dynamic DNS providers frequently offer you a sub-domain of their own site, such as "my-site.dnsprovider.com", in which you register your domain on their site.
If you choose to create your very own domain, such as "my-site.com", you will have to register with a company specializing in static DNS registration and then point your registration record to the intended authoritative DNS for your domain. Popular domain registrars include Verisign, Register Free and Yahoo.
If you want to use a dynamic DNS provider for your own domain then you will have to point your registration record to the DNS servers of your dynamic DNS provider.
Domain registration is covered in a later section, we'll cover how to configure Linux DNS first.
How To Download and Install The BIND Packages Most RedHat and Fedora Linux software products are available in the RPM format. Downloading and installing RPMs isn't hard. If you need a refresher, Chapter 5, on RPMs, covers how to do this in detail.
When searching for the file, remember that the BIND RPM's filename usually starts with the word "bind" followed by a version number like this: bind-9.2.2.P3-9.i386.rpm.
How To Get BIND Started > You can use the chkconfig command to get BIND configured to start at boot:
[root@bigboy tmp]# chkconfig named on
> To start/stop/restart BIND after booting [root@bigboy tmp]# /etc/init.d/named start [root@bigboy tmp]# /etc/init.d/named stop [root@bigboy tmp]# /etc/init.d/named restart
> Note: Remember to restart the BIND process every time you make a change to the configuration file for the changes to take effect on the running process.
RedHat 9 Errors When Restarting BIND RedHat 9 doesn't shutdown BIND cleanly and will give a "named: already running" error like the one below when you try to restart it. [root@bigboy tmp]# /etc/init.d/named restart Stopping named: named: already running[root@bigboy tmp]#
You may have to use brute force to get it restarted by using the "pkill" command followed by restarting the named init script. [root@bigboy tmp]# pkill -KILL named pkill: 29988 - No such process pkill: 29991 - No such process pkill: 29992 - No such process [root@bigboy tmp]# /etc/init.d/named start [root@bigboy tmp]#

The /etc/resolv.conf File
This file is used by DNS clients (servers not running BIND) to determine both the location of their DNS server and the domains to which they belong. It generally has two columns, the first contains a keyword and the second contains the desired value(s) separated by commas. A list of keywords can be found in Table 19-1.
Table 19-1 Keywords In /etc/resolv.conf
Keyword Value
Nameserver IP address of your DNS nameserver. There should be only one entry per "nameserver" keyword. If there is more than one nameserver, you'll need to have multiple "nameserver" lines.
Domain The local domain name to be used by default. If the server is bigboy.my-site.com, then the entry would just be my-site.com
Search If you refer to another server just by its name without the domain added on, DNS on your client will append the server name to each domain in this list and do an nslookup on each to get the remote servers' IP address. This is a handy time saving feature to have so that you can refer to servers in the same domain by only their servername without having to specify the domain. The domains in this list must separated by spaces.
Here is a sample configuration in which:
> The client server's main domain is my-site.com, but it also is a member of domains my-site.net and my-site.org which should be searched for short hand references to other servers.
> Two nameservers, 192.168.1.100 and 192.168.1.102 provide DNS name resolution. domain my-site.com search my-site.com net my-site.net my-site.org nameserver 192.168.1.100 nameserver 192.168.1.102
Configuring A Caching Nameserver The RedHat / Fedora default installation of BIND is configured to convert your Linux box into a caching name server. The only file you have to edit is /etc/resolv.conf in which you'll have to

comment out the reference to your previous DNS server (most likely your router) with a "#" or make it point to the server itself using the universal localhost IP address of 127.0.0.1
Old Entry nameserver 192.168.1.1
New Entry # nameserver 192.168.1.1
or: nameserver 127.0.0.1
The next step is to make all the other machines on your network point to the caching DNS server as their primary DNS server.
Important File Locations - (Non Caching DNS)
Before we go to the next step of configuring a regular name server, it is important to understand that the Fedora and RedHat 9 versions of BIND have greatly different file locations as can be seen in Table 19-2.
Table 19-2 Differences In Fedora And Redhat DNS File Locations
File Purpose Location Fedora Core
Location RedHat 9 and
Older
named.conf Tells the names of the zone files to be used for each of your website domains.
/var/named/chroot/etc /etc
rndc.key rndc.conf
Files used in named authentication
/var/named/chroot/etc /etc
zone files Links all the IP addresses in your domain to their corresponding server
/var/named/chroot/var/named /var/named
> Redhat BIND runs normally as the named process as the unprivileged named user.
> Fedora takes the added precaution of using Linux's chroot feature to not only run named as user named but also to limit the files named can see. In Fedora, named is fooled into thinking that the directory /var/named/chroot is actually the root or "/" directory. Therefore named files normally found in the /etc directory are found in /var/named/chroot/etc directory instead, and those you'd expect to find in /var/named are actually located in /var/named/chroot/var/named.
Fedora BIND adds to the confusion by correctly installing the files in their non chroot locations but never uses them.
Before starting Fedora BIND, copy the configuration files to their chroot locations like this:
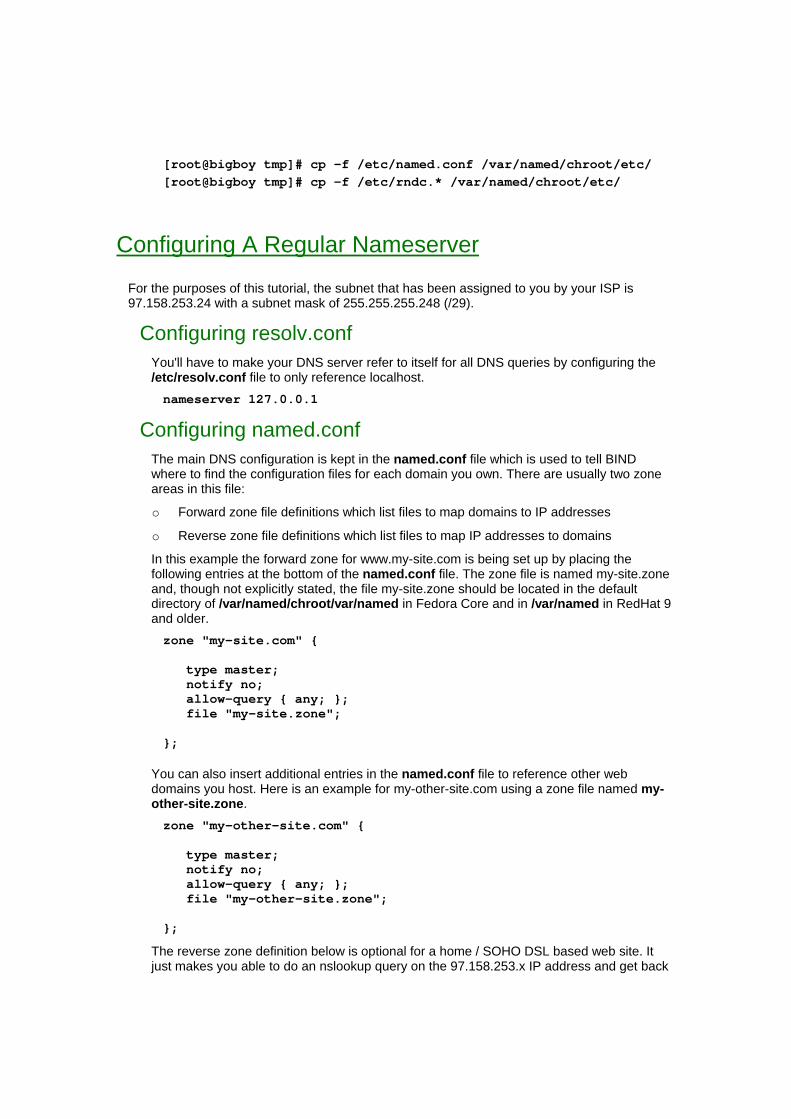
[root@bigboy tmp]# cp -f /etc/named.conf /var/named/chroot/etc/ [root@bigboy tmp]# cp -f /etc/rndc.* /var/named/chroot/etc/
Configuring A Regular Nameserver
For the purposes of this tutorial, the subnet that has been assigned to you by your ISP is 97.158.253.24 with a subnet mask of 255.255.255.248 (/29).
Configuring resolv.conf You'll have to make your DNS server refer to itself for all DNS queries by configuring the /etc/resolv.conf file to only reference localhost. nameserver 127.0.0.1
Configuring named.conf The main DNS configuration is kept in the named.conf file which is used to tell BIND where to find the configuration files for each domain you own. There are usually two zone areas in this file:
o Forward zone file definitions which list files to map domains to IP addresses
o Reverse zone file definitions which list files to map IP addresses to domains
In this example the forward zone for www.my-site.com is being set up by placing the following entries at the bottom of the named.conf file. The zone file is named my-site.zone and, though not explicitly stated, the file my-site.zone should be located in the default directory of /var/named/chroot/var/named in Fedora Core and in /var/named in RedHat 9 and older. zone "my-site.com" {
type master; notify no; allow-query { any; }; file "my-site.zone";
};
You can also insert additional entries in the named.conf file to reference other web domains you host. Here is an example for my-other-site.com using a zone file named my-other-site.zone. zone "my-other-site.com" {
type master; notify no; allow-query { any; }; file "my-other-site.zone";
};
The reverse zone definition below is optional for a home / SOHO DSL based web site. It just makes you able to do an nslookup query on the 97.158.253.x IP address and get back

the true name of the server assigned that IP address. This is rarely done for home based sites. It is especially difficult to do this with your DSL ISP if you have less than 256 static IP addresses (also known as a "Class C" block of addresses).
Note: the reverse order of the IP address in the zone section is important. zone "253.158.97.in-addr.arpa" {
type master; notify no; file "253.158.97";
};
Configuring The Zone Files
There are a number of things to keep in mind when configuring DNS zone files.
o In all zone files, you can place a comment at the end of any line by inserting a semi-colon ";" character then typing in the text of your comment.
o By default, your zone files are located in the directory /var/named.
o Each zone file contains a variety of records (eg. SOA, NS, MX, A and CNAME) which govern different areas of BIND. I'll explain of them below and then follow it all up with an example.
Time to Live Value
Caching DNS servers cache the responses to their queries from authoritative DNS servers. The authoritative servers not only provide the DNS answer but the valid lifetime or time to live (TTL) of the information.
The purpose of a TTL is to reduce the number of DNS queries the authoritative DNS server has to answer. If the TTL is set to three days, which is usually the default, then caching servers will use the original stored response for this length of time before making the query again.
The TTL value for the zone is usually the very first entry in the zone file. In the example below, it is set to three days. $TTL 3D
The SOA Record
The very first record is the Start of Authority (SOA) record which contains general administrative and control information about the domain. Though you would normally think a record would be a single line, the SOA format spans several. It is the most counter-intuitive zone file record of them all, the rest of the records are relatively straight forward.
Table 19-3 outlines the general structure of a zone file record.

Table 19-3 The SOA Record Format
Line #
Column #
Name Description
1 1, 2, 3 @ IN SOA > Signifies that the SOA record is about to begin
4 Nameserver > Fully qualified name of your primary nameserver.
> It's best to name your name servers ns1.domain.com and/or ns2.domain.com to prevent confusion.
> Must be followed by a "."
5 Email > The email address of the nameserver administrator.
> The regular "@" in the e-mail address must be replaced with a "." instead.
> The email address must also be followed by a "."
6 " ( " > Signifies that we're about to define some performance related
variables.
> Also signifies that the record is about to stretch to the next line
2 1 Serial > A serial number for the current configuration.
> Usually in the date format YYYYMMDD with single digit incremented number tagged to the end.
3 1 Refresh > Tells the slave DNS server how often it should check the master DNS server. Slaves aren't really used in home / SOHO environments.
4 1 Retry > The slave's retry interval to connect the master in the event of a connection failure. Slaves aren't really used in home / SOHO environments.
5 1 Expire > Total amount of time a slave will retry to contact the master
before expiring the data it contains. Slaves aren't really used in home / SOHO environments.
6 1 Minimum TTL > The amount of time the DNS server will cache negative
responses from the authoritative DNS server.
2 " ) " > Signifies that we're all finished with the variables.

NS, MX, A And CNAME Records
Unlike the SOA record, the NS, MX, A and CNAME records each occupy a single line and the records each have a very similar layout. Table 19-4 outlines the way they are laid out.
Table 19-4 NS, MX, A and CNAME Record Formats
Record Description First Column
Second Column
Third Column
Fourth Column
NS Lists the name of the name server for the domain
Blank "NS" IP address or CNAME of the name server
N/A
MX Lists the mail servers for your domain such as my-site.com
Domain, followed by a "."
"MX" Mail server priority
CNAME of mail server or the mail server's FQDN** followed by a "."
A Maps an IP address to each server in your domain. There must always be an entry for localhost 127.0.0.1
Server name
"A" IP address of server
N/A
CNAME Provides additional alternate "alias" names for servers listed in the "A" records.
"alias" or "nickname" for server
"CNAME" "A" record name for server
N/A
**The Fully Qualified Domain Name (FQDN) is the full DNS name of the server such as mail.my-site.com
o Note: If you don't put a "." at the end of a host name in a SOA, NS, A or CNAME
record, BIND will automatically tack on the domain name. So an "A" record with "www" will be assumed to refer to www.my-site.com. This may be OK in most cases, but if you forget to put the "." after the domain in the MX record for my-site.com, BIND will attach the my-site.com at the end, and you will find your mail server only accepting mail for the domain my-site.com.mysite.com.

Sample Forward Zone File
Here is a working example of the zone file for my-site.com. ; ; Zone file for my-site.com ; ; The full zone file ; $TTL 3D @ IN SOA ns1.my-site.com. hostmaster.my-site.com. ( 200211152 ; serial# 3600 ; refresh, seconds 3600 ; retry, seconds 3600 ; expire, seconds 3600 ) ; minimum, seconds ; NS www ; Inet Address of nameserver my-site.com. MX 10 mail ; Primary Mail Exchanger ; localhost A 127.0.0.1 www A 97.158.253.26 mail CNAME www ns1 CNAME www
Notice that in this example:
o Server ns1.my-site.com is the name server for my-site.com. In corporate environments there may be a separate name server for this purpose. Primary name servers are more commonly called "ns1" and secondary name servers "ns2".
o The minimum TTL is set to 3600 seconds, but the overriding $TTL value is 3 days. So remote DNS caching servers will store learned DNS information from your zone for 3 days before flushing it out of their caches.
o The MX record for my-site.com points to the server named mail.my-site.com
o "ns1" and "mail" are actually CNAMEs or "aliases" for the web server "www". So here we have an example of the name server, mail server and web server being the same machine. If they were all different machines, then you'd have an "A" record entry for each like the example below. www A 97.158.253.26 mail A 97.158.253.134 ns A 97.158.253.125
o The serial number is extremely important. You MUST increment it after editing the file or else BIND will not apply the changes you made when you restart "named".

Sample Reverse Zone File
Now we need to make sure that we can do an nslookup query on all our home network's PCs and get their correct IP addresses. This is very important if you are running a mail server on your network as sendmail typically will only relay mail from hosts whose IP addresses resolve correctly in DNS. Here is a sample reverse zone file for our network. ; ; Filename: 192-168-1.zone ; ; Zone file for 192.168.1.x ; $TTL 3D @ IN SOA www.my-site.com. hostmaster.my-site.com. ( 200303301 ; serial number 8H ; refresh, seconds 2H ; retry, seconds 4W ; expire, seconds 1D ) ; minimum, seconds ; NS www ; Nameserver Address ; 100 PTR bigboy.my-site.com. 103 PTR smallfry.my-site.com. 102 PTR ochorios.my-site.com. 105 PTR reggae.my-site.com. 32 PTR dhcp-192-168-1-32.my-site.com. 33 PTR dhcp-192-168-1-33.my-site.com. 34 PTR dhcp-192-168-1-34.my-site.com. 35 PTR dhcp-192-168-1-35.my-site.com. 36 PTR dhcp-192-168-1-36.my-site.com.
Note: I have included entries for addresses 192.168.1.32 to 192.168.1.36 which are the addresses our DHCP server issues. SMTP mail relay wouldn't work for PCs that get their IP addresses via DHCP if these lines weren't included.
You may also want to create a reverse zone file for the public NAT IP addresses for your home network. Unfortunately ISP's won't usually delegate this ability for anyone with less than a "Class C" block of 256 IP addresses. Most home DSL sites wouldn't qualify.
What You Need To Know About NAT And DNS
The above examples assume that the queries will be coming from the Internet with the zone files returning information related to the external 97.158.253.26 address of the web server.
What do the PCs on your home network need to see? They need to see DNS references to the real IP address of the web server, 192.168.1.100. This is because NAT won't work

properly if a PC on your home network attempts to connect to the external 97.158.253.26 NAT IP address of your web server.
Don't worry. BIND has a way around this called "views". The views feature allows you to force BIND to use pre-defined zone files for queries from certain subnets. This means it's possible to use one set of zone files for queries from the Internet and another set for queries from your home network.
Here's a summary of how it's done:
1. Place your zone statements in the /etc/named.conf file in one of two "views" sections. The first section will be called "internal" and will list the zone files to be used by your internal network. The second view called "external" will list the zone files to used for Internet users.
For example; you could have a reference to a zone file called my-site.zone for lookups related to the 97.158.253.X network which Internet users would see. This /etc/named.conf entry would be inserted in the "external" section. You could also have a file called my-site-home.zone for lookups by home users on the 192.168.1.0 network. This entry would be inserted in the "internal" section. The creation of the my-site-home.zone file is fairly easy. Just copy it form the my-site.zone file and replace all references to 97.158.253.X with references to 192.168.1.X
2. You must also tell the DNS server which addresses you feel are "internal" and "external". This is done by first defining access control lists (ACLs) and then referring to these lists within each view section with the match-clients statement. There are some built-in ACLs:
+ "localhost" which refers to the DNS server itself;
+ "localnets" which refers to all the networks to which the DNS server is directly connected;
+ "any" which is self explanatory.
Note: You must place your "localhost", "0.0.127.in-addr.arpa" and "." zone statements in the "internal" views section. Remember to increment your serial numbers!
Here is a sample configuration snippet for the /etc/named.conf file I use for my home network. All the statements below were inserted after the "options" and "controls" sections in the file.
// ACL statement acl "trusted-subnet" { 192.168.17.0/24; }; view "internal" { // What the home network will see match-clients { localnets; localhost; "trusted-subnet"; }; zone "." IN { type hint; file "named.ca"; }; zone "localhost" IN { type master; file "localhost.zone";

allow-update { none; }; }; zone "0.0.127.in-addr.arpa" IN { type master; file "named.local"; allow-update { none; }; }; zone "1.168.192.in-addr.arpa" IN { type master; file "192-168-1.zone"; allow-update { none; }; }; zone "my-site.com" { type master; notify no; file "my-site-home.zone"; allow-query { any; }; }; zone "my-other-site.com" { type master; notify no; file "my-other-site-home.zone"; allow-query { any; }; }; }; view "external" { // What the Internet will see match-clients { any; }; recursion no; zone "my-site.com" { type master; notify no; file "my-site.zone"; allow-query { any; }; }; zone "my-other-site.com" { type master; notify no; file "my-other-site.zone"; allow-query { any; }; }; };

Note: In the above example I included an ACL for network 192.168.17.0 /24 called "trusted-subnet" to help clarify the use of ACLs in more complex environments. Once the ACL was defined, I then inserted a reference to the "trusted-subnet" in the match-clients statement in the "internal" view. So in this case the local network (192.168.1.0 /24), the other trusted network (192.168.17.0) and localhost will get DNS data from the zone files in the "internal" view. Remember, this is purely an example. The home network we have been using doesn't need to have the ACL statement at all as the built in ACLs "localnets" and "localhost" are sufficient. Our network won't need the "trusted-subnet" section in the match-clients line either.
Loading Your New Configuration Files Here are the steps you need to follow to load your new configuration files.
1. Make sure your file permissions and ownership are OK in /var/named [root@bigboy tmp]# cd /var/named [root@bigboy named]# ll total 6 -rw-r--r-- 1 named named 195 Jul 3 2001 localhost.zone -rw-r--r-- 1 named named 2769 Jul 3 2001 named.ca -rw-r--r-- 1 named named 433 Jul 3 2001 named.local -rw-r--r-- 1 root root 763 Oct 2 16:23 my-site.zone [root@bigboy named]# chown named * [root@bigboy named]# chgrp named * [root@bigboy named]# ll total 6 -rw-r--r-- 1 named named 195 Jul 3 2001 localhost.zone -rw-r--r-- 1 named named 2769 Jul 3 2001 named.ca -rw-r--r-- 1 named named 433 Jul 3 2001 named.local -rw-r--r-- 1 named named 763 Oct 2 16:23 my-site.zone [root@bigboy named]#
2. The configuration files above will not be loaded until you issue the following command to restart the named process that controls DNS.
Note: (Make sure to increment your configuration file serial number before doing this). [root@bigboy tmp]# /etc/init.d/named restart
3. Last, but not least, take a look at the end of your /var/log/messages file to make sure there are no errors.
Make Sure Your /etc/hosts File Is Correctly Updated The chapter covering Linux networking topics explains how to do this. Some programs such as sendmail require a correctly configured /etc/hosts file even though DNS is correctly configured.
Configure Your Firewall The sample network we're using assumes that the BIND nameserver and Apache web server software run on the same machine protected by a router/firewall. The actual IP address of the server is 192.168.1.100, which is a private IP address. You'll have to employ NAT in order for Internet users to be able to gain access to the server via the Public IP address we chose, namely 97.158.253.26. If your firewall is a Linux box, you may want to consider taking a look on the iptables chapter on how to do the NAT and allow DNS traffic trough to your nameserver.

Fix Your Domain Registration Remember to edit your domain registration for "my-site.com", or whatever it is, so that at least one of the name servers is your new name server. ( 97.158.253.26 in this case ). Domain registrars such as Verisign and RegisterFree usually provide a web interface to help you manage your domain.
Once, you've logged in with the registrar's username and password. You'll have to do the following two steps:
1. First, you'll have to create a new name server record entry for the IP address 97.158.253.26 to map to ns.my-site.com or www.my-site.com or whatever your name server is called. (This screen will prompt you for both the server's IP address and name)
2. Then you'll have to assign ns.my-site.com to handle your domain. (This screen will prompt you for the server name only)
Sometimes, the registrar will require at least two registered name servers per domain. If you only have one, then you could either:
1. Create a second name server record entry with the same IP address, but different name.
2. Give your web server a second IP address using an IP alias, create a second NAT entry on your firewall and then create the second name server record entry with the new IP address, and different name.
It normally takes about 3-4 days for your updated DNS information to be propagated to all 13 of the world's root ("super duper") name servers. You'll therefore have to wait about this amount of time before you'll start noticing people hitting your new website site.
You can use the troubleshooting section below to test specific DNS servers for the information they have on your site. You'll most likely want to test your new DNS server (which should be up to date) plus a few well known ones (which should have delayed values).
Troubleshooting BIND There are a number of steps you can follow as part of a BIND troubleshooting procedure. The most common ones are outlined below:
1. The very first step is to determine whether your DNS server is accessible on DNS UDP / TCP port 53. Lack of connectivity could be caused by a firewall with incorrect, "permit", NAT or port forwarding rules to your DNS server. Failure could also be caused by the "named" process being stopped. It is best to test this from both inside your network and from the Internet.
Troubleshooting with Telnet is covered in the Network Troubleshooting chapter.
2. Linux status messages are logged to the file /var/log/messages. Use it to make sure all your zone files are loaded when you start BIND / named. Check your /etc/named.conf file if they fail to do so.
Linux logging is covered in the Syslog chapter. Feb 21 09:13:13 bigboy named: named startup succeeded Feb 21 09:13:13 bigboy named[12026]: loading configuration from '/etc/named.conf' Feb 21 09:13:13 bigboy named[12026]: no IPv6 interfaces found Feb 21 09:13:13 bigboy named[12026]: listening on IPv4 interface lo, 127.0.0.1#53 Feb 21 09:13:13 bigboy named[12026]: listening on IPv4 interface wlan0, 192.168.1.100#53

Feb 21 09:13:13 bigboy named[12026]: listening on IPv4 interface eth0, 172.16.1.100#53 Feb 21 09:13:14 bigboy named[12026]: command channel listening on 127.0.0.1#953 Feb 21 09:13:14 bigboy named[12026]: zone 0.0.127.in-addr.arpa/IN: loaded serial 1997022700 Feb 21 09:13:14 bigboy named[12026]: zone 1.16.172.in-addr.arpa/IN: loaded serial 51 Feb 21 09:13:14 bigboy named[12026]: zone 1.168.192.in-addr.arpa/IN: loaded serial 51 Feb 21 09:13:14 bigboy named[12026]: zone simiya.com/IN: loaded serial 2004021401 Feb 21 09:13:14 bigboy named[12026]: zone localhost/IN: loaded serial 42 Feb 21 09:13:14 bigboy named[12026]: zone simiya.com/IN: loaded serial 200301114 Feb 21 09:13:14 bigboy named[12026]: running
3. Use the nslookup command for both forward and reverse lookups to make sure the zone files were configured correctly. If nslookup fails, try some of the following:
o Double check for your updated serial numbers in the modified files and also inspect the individual records within the files for mistakes.
o Ensure there isn't a firewall that could be blocking DNS traffic on TCP and/or UDP port 53 between your server and the DNS server.
o Use the "dig" command as explained below to determine whether the name server for your domain is configured correctly.
4. The host command will probably replace nslookup in the near future. You can use it to query any DNS server for information on your site.
Here is an example of querying DNS server ns1.my-site.com for the IP address of www.linuxhomenetworking.com. (You can also replace the name server's name with its IP address.)
[root@bigboy named]# host www.linuxhomenetworking.com ns1.my-site.com
Here is an example of querying your default DNS server for the IP address of www.linuxhomenetworking.com. As you can see, the name of the specific DNS server to query has been left off the end. [root@bigboy named]# host www.linuxhomenetworking.com
5. The dig command can also be used to determine whether known DNS servers on the Internet have received a valid update for your zone. Remember if you decide to change the DNS servers for your domain that it could take up to 4 days for it to propagate across the Internet.
The format for the command is: dig "name-server" "zone" soa
The name server is optional. If you specify a name server, then "dig" queries that name server instead of the Linux server's default name server. It is sometimes good to query both your name server as well as a well known name server like ns1.yahoo.com to make sure your DNS records have propagated properly.
Successful "dig" for the zone Linuxhomenetworking.com
This command uses the local DNS server for the query. It returns the SOA record information and the addresses of the domain's DNS servers in the "Authority Section".

[root@bigboy tmp]# dig linuxhomenetworking.com SOA ... ... ;; AUTHORITY SECTION: linuxhomenetworking.com. 3600 IN NS ns1.homenet.net. linuxhomenetworking.com. 3600 IN NS ns2.homenet.net. ;; ADDITIONAL SECTION: ns1.homenet.net. 3600 IN A 65.115.70.68 ns2.homenet.net. 3600 IN A 65.115.70.69 ... ... [root@bigboy tmp]#
Successful "dig" using DNS server ns1.yahoo.com
This command uses the DNS server ns1.yahoo.com for the query. As before it returns the SOA record for the zone. [root@bigboy tmp]# dig ns1.yahoo.com linuxhomenetworking.com SOA ... ... ;; AUTHORITY SECTION: linuxhomenetworking.com. 3600 IN NS ns2.homenet.net. linuxhomenetworking.com. 3600 IN NS ns1.homenet.net. ;; ADDITIONAL SECTION: ns1.homenet.net. 3600 IN A 65.115.70.68 ns2.homenet.net. 3600 IN A 65.115.70.69 ... ...[root@bigboy tmp]#
Unsuccessful SOA "dig"
This command uses the DNS server ns1.yahoo.com for the query. In this case the "Authority Section" doesn't know of the domain and points to the name server for the entire ".com" domain at verisign. [root@bigboy tmp]# dig ns1.yahoo.com linuxhomeqnetworking.com SOA ... ... ;; QUESTION SECTION: ;linuxhomeqnetworking.com. IN SOA ;; AUTHORITY SECTION: com. 0 IN SOA a.gtld-servers.net. nstld.verisign-grs.com. 1077341254 1800 900 604800 900 ... ... [root@bigboy tmp]#
Possible causes of failure include:

o Typographical errors. In this case the misspelled "linuxhomeqnetworking.com" was entered on the command line.
o Incorrect domain registration.
o Correct domain registration, but there is a lag in the propagation of the domain information across the Internet. Delays of up to four days are not uncommon.
o Ensure there isn't a firewall that could be blocking DNS traffic on TCP and/or UDP port 53 between your server and the DNS server.
How To Migrate Your Website In-House
It is important to have a detailed migration plan if you currently use an external company to host your website and wish to move the site to a server at home or in your office. At the very least it should include the following steps:
1. There is no magic bullet which will allow you to tell all the caching DNS servers in the world to flush their caches of your zone file entries. Your best alternative will be to request your existing service provider to set the TTL on my-site.com in the DNS zone file to a very low value, say 1 minute. As the TTL is usually set to 3 days, it will take at least 3-5 days for all remote DNS servers to recognize the change. Once the propagation is complete, it will take only 1 minute to see the results of the final DNS configuration switch to your new server. If anything goes wrong, you can then revert to the old configuration, knowing it will rapidly recover within minutes rather than days.
2. Set up your test server in house. Edit the /etc/hosts file to make www.my-site.com refer to its own IP address, not that of the www.my-site.com site that is currently in production. This file is usually given a higher priority than DNS, therefore the test server will begin to think that www.my-site.com is really hosted on itself. You may also want to add an entry for mail.my-site.com if the new web server is going to also be your new mail server.
3. Test your applications on the server. Mail, web, etc.
Note: You can test the server running as www.my-site.com even though DNS hasn't been updated. Just edit your /etc/hosts file on your web browsing Linux PC to make www.my-site.com map to the IP address of the new server. In the case of Windows the file would be C:\WINDOWS\system32\drivers\etc. You may also want to add an entry for mail.my-site.com if the new web server is going to also be your new mail server.
4. Once testing is completed, coordinate with your web hosting provider to update your domain registration's DNS records for www.my-site.com to point to your new web server. As the TTLs were set to 1 minute previously, you'll be able to see results of the migration within minutes.
5. Once complete, you can set the TTL back to 3 days to help reduce the volume of DNS query traffic hitting your DNS server.
6. Fix your /etc/hosts files by deleting the test entries you had before.
7. Once completed, you may also want to take over your own DNS. Edit your my-site.com DNS entries with Verisign, RegisterFree or whoever you bought your domain from to point to your new DNS servers.
Remember, you don't have to host DNS or mail in-house, this could be left in the hands of your service provider. You can then migrate these services in-house as your confidence in hosting becomes greater.
Finally, if you have concerns that your service provider won't co-operate then you could explain to them that you want to test their failover capabilities to a duplicate server that you host in-

house. You can then decide whether the change will be permanent once you have failed over back and forth a few times.
DHCP Considerations For DNS
If you have a DHCP server on your network, you'll need to make it assign the IP address of the Linux box as the DNS server it tells the DHCP clients to use. If your Linux box is the DHCP server, then you may need to refer to Chapter 7 on DHCP server configuration.
Conclusion
DNS management is a critical part of the maintenance of any website. Fortunately though it can be a little complicated, DNS modifications are usually infrequent as the IP address of a server is normally fixed or static. This is not always the case. There are situations in which a server's IP address will change unpredictably and frequently, making DNS management extremely difficult. Dynamic DNS was created as a solution to this and is explained in Chapter 20

Chapter 20
Dynamic DNS = = = = = = = = = = = = = = = = = = = = = = = = = = = = = = = = = = = = = = = = = = = In This Chapter Chapter 20
Dynamic DNS Dynamic DNS Preparation Dynamic DNS And NAT Router/Firewalls DDNS Client Software - SOHO Router / Firewalls DDNS Client Software - Linux DDclient Testing Your Dynamic DNS Conclusion
(c) Peter Harrison, www.linuxhomenetworking.com = = = = = = = = = = = = = = = = = = = = = = = = = = = = = = = = = = = = = = = = = = = In many home networking environments, the DSL or cable modem IP address is provided by DHCP and therefore changes from time to time. This can cause problems with the DNS zone files explained in Chapter 19 which assume the IP address of a server won't change continuously. It is for this reason that there are two broad types of DNS:
Static DNS
This is used when your ISP provides you with unchanging "fixed" or "static" Internet IP addresses. Your DNS server acts as the authoritative source of information for your my-site.com domain. You can consider static DNS as the "traditional" or "regular" form of DNS.
Dynamic DNS (DDNS)
Used when you get a changing "dynamic" Internet IP addresses via DHCP from your ISP. You will have to use the services of a third party DNS provider to provide DNS information for your my-site.com domain.
This chapter will explain the details of dynamic DNS configuration.
Dynamic DNS Preparation Unlike DSL, most cable modem providers may not allow you to host sites at home by blocking inbound HTTP (TCP port 80) and SMTP mail (TCP port 25) while allowing most other TCP traffic through. Many DDNS providers are aware of this and provide a redirect service to bypass the problem. Under the system, web queries first hit their servers on the regular TCP ports and then these servers will automatically redirect the web clients to use the IP address of your server on a different TCP port. Though this works well, it has its disadvantages. The cost of the service can make hosting with a $10 /month virtual hosting service look very attractive and many search engines do not index redirected pages.

Testing ISP Connectivity For Your Website The very first thing you need to do is to determine whether your ISP allows inbound connections on your DSL / cable modem line. The easiest way to do this is to phone them and ask, but in some cases they'll say "no" when in fact the answer is "yes". Here is how you can test it out for yourself.
Setup
You need to do some basic setup tests before testing can begin.
1. Configure and start Apache on your Linux web server as described in Chapter 21 on the Apache webserver.
2. Connect your Linux server directly to your cable or DSL modem, configure the Ethernet NIC for DHCP as described in Chapter 2 on Linux networking.
3. Make sure you can ping your default gateway.
4. Use the "ipconfig" command to determine the new IP address of your web server. This command is also explained Chapter 2 also.
5. From the Linux web server itself, try to telnet to this IP address on port 80 as explained in Chapter 3 on network troubleshooting. If you can, then you most likely have Apache configured correctly
Testing From The Internet
You may be able to see web pages from the web server itself. Ask a friend somewhere else on the Internet to try to telnet to this IP address on port 80.
Port 80 Works
If this works then ask them to point their web browser to the IP address and see whether they get a valid web page. If your Linux server will eventually be placed behind a firewall, then adjust your network topology accordingly and test port 80 port forwarding to your web server.
Port 80 Fails
If this fails, your ISP probably doesn't allow HTTP access to their networks. Configure your web server to run on a different TCP port, preferably above 1024. The Apache httpd.conf file uses the "listen" directive to do this. Change it to your new value and restart httpd.
# httpd.conf listen directive, change "80" to some other value. Listen 80
Test again with telnet on this new port. If it works, try using a web browser to test too. If the test port is 1234, then use the following URL:
http://server-ip-address:1234
Note: If you are running iptables, remember to adjust the rules to match this new port, or stop iptables temporarily while doing this testing.

What to do if port 80 fails, but some other port works
If you can get a connection with correctly displayed pages on a non standard port then you can additionally sign up for a "redirect service" with your DDNS provider as explained in the dynamic DNS introduction above.
Test Port Forwarding
If your Linux server will eventually be placed behind a firewall, then adjust your network topology accordingly. Let Apache run on port 80 and test port forwarding from the non standard port to port 80 on your web server from the Internet.
You can determine the external IP address of your router / firewall by logging onto your Linux web server and issuing the curl command to query the DynDNS.org IP information server. In the example below the IP address is 24.4.97.110. [root@bigboy tmp]# curl -s http://checkip.dyndns.org/ | grep -i addr <html><head><title>Current IP Check</title></head><body>Current IP Address: 24.4.97.110</body></html> [root@bigboy tmp]#
Registering DDNS Once you have decided to go ahead with DDNS you'll need to choose between the broad categories of Dynamic DNS service.
o Free Dynamic DNS: Your website name will be a sub domain of the DDNS provider's domain. For example if the DDNS provider's domain is isp.net, then your site will become mysite.isp.net. All the steps to do this can be achieved on your DDNS service provider's website. Remember that this type of service may be undesirable for a company that wants to establish its own corporate identity.
o Paid Customized DNS: You can register the domain name of your choice and still host your website on a DHCP line.
If you choose to create your own domain and use a paid DDNS service then you'll need to follow these steps:
1. Register your domains with companies such as Verisign and RegisterFree. (eg. my-site.com
2. Create an account with the DDNS provider and register your websites (sometimes called hosts) as part of your domain (eg. www.my-site.com and mail.my-site.com) with them. Your DDNS registration process will provide you with a username and password which you'll need to use when configuring your DDNS client.
3. Update your domain information with your main DNS registrar (Verisign and RegisterFree) to tell them to direct queries to *.my-site.com to the DNS name servers of the DDNS provider.
4. Install a DDNS client on your web servers that continuously runs, only updating the DDNS provider's DNS servers with the most current DHCP IP address of the site whenever it detects a change.
Note: Many Small Office /Home Office (SOHO) router firewalls have built in DDNS clients. You should determine which providers your device supports. You may not have to install any DDNS client software on your web server at all.
You should also be prepared for slower response times for your home based site than if you were using a static IP and a regular DNS service.

Install a DDNS Client On Your Server All DDNS service providers require that you use a DDNS client on your web server that will periodically update the IP address information in your provider's DDNS record. A very popular one is DDclient that now comes in a RPM format.
Dynamic DNS And NAT Router/Firewalls As discussed in Chapter 1 that acted as an introduction to networking, in order to conserve the limited number of IP addresses available for internet purposes, most home router / firewalls will use Network Address translation (NAT) to map a single public DHCP obtained IP addresses to the many private IP addresses within your network.
NAT can fool the operation of some DDNS client software. In these cases, the software can only report the true IP address of the Linux box's NIC interface. If the Linux box is being protected behind a NAT router / firewall then the NIC will report in its data stream to the DDNS provider a private IP address which no one can reach directly via the Internet. The reported value is therefore invalid.
Some DDNS providers use more intelligent clients such as DDclient which can be configured to let the DDNS provider record the public IP address from which the data stream is originating. Once this is done, you'll have to also configure your router / firewall to do port forwarding to make all HTTP traffic destined for the IP address of the router / firewall to be exclusively NAT-ed and forwarded to a single server on your home network. If your firewall is Linux based, then the examples in Chapter 15 on iptables will be helpful. Many web based SOHO firewalls have easy interfaces to configure port forwarding, please refer to your manufacturer's manual on how to do this if you have one.
DDNS Client Software - SOHO Router / Firewalls Most new small office / home office (SOHO) router / firewalls have built in dynamic DNS clients for one or more of the major DDNS service providers. There is usually a Dynamic DNS web menu which will prompt for the name of the service provider and your DDNS username and password. With this support, there is no need to install software on your web server.
DDNS Client Software - Linux DDclient One of the most commonly used clients is DDclient which can overcome the NAT limitations of DDNS by actually logging into your SOHO firewall to determine the latest IP address information.
Installing DDclient
Most RedHat and Fedora Linux software products are available in the RPM format. Downloading and installing RPMs isn't hard. If you need a refresher, chapter 5, on RPMs, covers how to do this in detail.
The software can usually be downloaded from your DDNS provider and also can be found at rpmfind.net. The RPM name usually starts with the word "ddclient" followed by a version number line this: ddclient-3.6.3-1.noarch.rpm.
The /etc/ddclient.conf file
The ddclient.conf file is usually installed completely commented out, but provides many configuration examples for the most popular DDNS providers.
The most important parameters to configure are:

General Parameters
> Username: Your DDNS account's login name
> Password: Your DDNS account's password
> Use: The method used to determine the IP address to advertise to the DDNS server
DDNS Provider Parameters
> Server: The name of the DDNS provider's main DNS server
> Protocol: The methodology the DDNS client should use to communicate with the DDNS server
> Your domain
Determining The Best ddclient.conf "use" Parameter To Use.
The ddclient command can be used to determine the best "use" parameter to use in the ddclient.conf file. In the example below, only the "use=web" option gives a valid Internet IP address and should be considered as a first option. [root@bigboy tmp]# ddclient -daemon=0 -query use=if, if=lo address is 127.0.0.1 use=if, if=wlan0 address is 192.168.1.100 use=web, web=dyndns address is 97.158.253.26 [root@bigboy]#
Sample /etc/ddclient Configuration
In the example below, we have specified a username of "my-account-login-name" and a password of "my-account-password" using the dyndns DDNS service provider's settings to track the website named mysite-example.dnsalias.com. # General Parameter Section login=my-account-login-name password=my-account-password # DDNS Provider Parameters Section server=members.dyndns.org, \ protocol=dyndns2 \ mysite-example.dnsalias.com
You can add ONE of the following "use" lines to the "General Parameter Section" near the top of the file to define the method that will be used to determine the correct IP address:
Query A Well Known Internet Server
The web method queries two well known servers run by DynDNS.org and DNSpark to determine the public Internet IP address of the web server running the DDclient software. This method is the simplest as it requires no further information and handles NAT correctly. use=web
The DDclient configuration and README files show you how to specify other URLs in case you have servers you trust more.

Use The IP Address Of A Specific Server NIC
You can also use this option which will query the IP address of the DDclient web server's NIC interface of your choice. This is probably most valuable for servers connected directly to the Internet, and not via NAT use=if, if=eth0
Login To Your SOHO Firewall For Information
The ddclient.conf file has a list of "use" statements for various vendor's firewalls. If your model isn't listed, you can create your own parameters as outlined in the ddclient README file. This option is good for NAT environments where the "use=web" option isn't considered a good alternative.
How to Get DDclient Started
> You can configure DDclient to start at boot time using the chkconfig command: [root@bigboy tmp]# chkconfig ddclient on
> You can start/stop/restart DDclient after boot time using the ddclient initialization script as in the examples below: [root@bigboy tmp]# /etc/init.d/ddclient start [root@bigboy tmp]# /etc/init.d/ddclient stop [root@bigboy tmp]# /etc/init.d/ddclient restart
> Remember to restart the ddclient process every time you make a change to the ddclient.conf file for the changes to take effect on the running process.
> You can test whether the ddclient process is running with the pgrep command, you should get a response of plain old process ID numbers: [root@bigboy tmp]# pgrep ddclient
Finding DDclient Help
The DDclient README and ddclient.conf files aregood sources of information for doing custom configurations and troubleshooting. You can find the README file using one of the following two methods
Using DDcient RPMS
The rpm command can be used to get a list of installed ddclient files, one of which is the README file. [root@bigboy tmp]# rpm -ql ddclient ... /usr/doc/ddclient-3.6.3/README ... [root@bigboy tmp]#
Using All other software
You can use the locate command to find all the ddclient files as shown below. [root@bigboy tmp]# locate ddclient | grep READ /usr/doc/ddclient-3.6.3/README /usr/doc/ddclient-3.6.3/README.cisco [root@bigboy tmp]#

If the command doesn't work, try updating your locate database with the "locate -u" command followed by the "locate ddclient" command once more. [root@bigboy tmp]# locate -u
Testing Your Dynamic DNS
You can test your dynamic DNS by:
> Looking at the status page of your DNS provider and making sure the IP address that matches your "www" site is the same as your router / firewall's public IP address.
> Using the "host www.my-site.com" command from your Linux command prompt and see whether you are getting a valid response. If you failed to add your host record, you will get an error message like this: [root@bigboy tmp]# host www.my-site.com
Server: 127.0.0.1 Address: 127.0.0.1#53 ** server can't find www.my-site.com: NXDOMAIN
Note: This error could also be due to the fact that your domain hasn't propagated fully throughout the Internet. You can test to make sure everything is OK by forcing NS lookup to query the name servers directly. The example below queries the miniDNS name server ns1.minidns.net: [root@bigboy tmp]# host www.my-site.com ns1.minidns.net www.my-site.com has address 97.158.253.26 [root@bigboy tmp]#
Conclusion
Always remember that dynamic DNS works, but is frequently unreliable as residential class broadband data circuits are not monitored, maintained or managed as closely as business class lines. It is a good starting place to help you become familiar with web hosting, but as your website becomes busier and more financially important to you, you may need to consider a regular data center far away from spilt coffee and the washing machine that always trips the circuit breakers.

Chapter 21
The Apache Web Server = = = = = = = = = = = = = = = = = = = = = = = = = = = = = = = = = = = = = = = = = = = In This Chapter Chapter 21
The Apache Web Server Download and Install The Apache Package How To Get Apache Started Configuring DNS For Apache DHCP and Apache General Configuration Steps Configuration - Multiple Sites And IP Addresses Using Data Compression On Web Pages Apache Running On A Server Behind A NAT Firewall How To Protect Web Page Directories With Passwords The /etc/httpd/conf.d Directory Troubleshooting Apache Conclusion
(c) Peter Harrison, www.linuxhomenetworking.com = = = = = = = = = = = = = = = = = = = = = = = = = = = = = = = = = = = = = = = = = = = Apache is probably the most popular Linux based web server application in use. Once you have DNS correctly setup and your server has access to the Internet you'll need to have Apache configured to accept surfers wanting to access your web site. This chapter explains how to configure Apache in a number of commonly encountered scenarios for small web sites.
Download and Install The Apache Package Most RedHat and Fedora Linux software products are available in the RPM format. Downloading and installing RPMs isn't hard. If you need a refresher, Chapter 5, on RPMs, covers how to do this in detail. It is best to use the latest version of Apache.
When searching for the file, remember that the Apache RPM's filename usually starts with the word "httpd" followed by a version number like this: httpd-2.0.48-1.2.rpm.
How To Get Apache Started > Use the chkconfig command to configure Apache to start at boot:
[root@bigboy tmp]# chkconfig httpd on
> Use the httpd init script in the /etc/init.d directory to start/stop/restart Apache after booting

[root@bigboy tmp]# /etc/init.d/httpd start [root@bigboy tmp]# /etc/init.d/httpd stop [root@bigboy tmp]# /etc/init.d/httpd restart
> You can test whether the Apache process is running with the following command, you should get a response of plain old process ID numbers: [root@bigboy tmp]# pgrep httpd
Configuring DNS For Apache Remember that you will never receive the correct traffic unless you have configured DNS for your domain to make your new Linux box web server the target of the DNS domain's www entry. You'll need to refer to Chapter 19 on Static DNS or Chapter 20 on Dynamic DNS to do this.
DHCP and Apache As explained before, if your Internet connection uses DHCP to get its IP address then you'll need to use dynamic DNS to get the correct Internet DNS entry for your web server. If your web server and firewall are different machines, then you'll probably also need to set up port forwarding for your www traffic to reach the web server correctly. Port forwarding is also explained in Chapter 20 on Dynamic DNS.
DHCP on your protected home network is different. In our sample topology, the web server lives on the 192.168.1.0 home network protected by a firewall. The firewall uses NAT and port forwarding to pass Internet traffic on to the web server. Remember that the IP address of your web server can change if it gets its IP address using DHCP. This could cause your firewall port forwarding, not Dynamic DNS, to break.
In this case I recommend that your web server on the 192.168.1.0 network uses a fixed "static" IP address that is outside of the range of the DHCP server to prevent you from having this problem.
General Configuration Steps The configuration file used by Apache is /etc/httpd/conf/httpd.conf. Like most Linux applications you have to restart Apache before changes to the configuration file will take effect. Examples of how to configure this file will follow.
Where To Put Your Web Pages All the statements that define the features of each web site are grouped together inside their own VirtualHost section or "container" in the httpd.conf file. The most commonly used statements or "directives" inside a VirtualHost container would be:
o "servername" which defines the name of the website managed by the VirtualHost container. This is only needed in "Named Virtual Hosting" as I'll explain below.
o "DocumentRoot" which defines the directory in which the web pages for the site can be found.
By default, Apache will search the DocumentRoot directory for an index or "home" page named index.html. So for example, if you have a servername of www.my-site.com with a DocumentRoot directory of /home/www/site1/, Apache will display the contents of the file /home/www/site1/index.html when you enter http://www.my-site.com in your browser.
Some editors like Microsoft FrontPage will create files with an ".htm", not ".html" extension. This isn't usually a problem if all your HTML files have hyperlinks pointing to files ending in

".htm" as FrontPage does. The problem occurs with Apache not recognizing the topmost index.htm page. The easiest solution is to create a symbolic link ("shortcut" for Windows users) called index.html pointing to the file index.htm. This will then allow you to edit/copy the file index.htm with index.html being updated automatically. You'll almost never have to worry about index.html and Apache again!
In the example below we create a symbolic link to index.html in the /home/www/site1 directory. [root@bigboy tmp]# cd /home/www/site1 [root@bigboy site1]# ln -s index.htm index.html [root@bigboy site1]# ll index.* -rw-rw-r-- 1 root root 48590 Jun 18 23:43 index.htm lrwxrwxrwx 1 root root 9 Jun 21 18:05 index.html -> index.htm [root@bigboy site1]#
The "l" at the very beginning of the index.html entry signifies a link and the "->" the link target.
The Default File Location
By default, Apache expects to find all its web page files in the /var/www/html/ directory with a generic DocumentRoot statement at the beginning of httpd.conf. The examples in this chapter will use the /home/www directory to illustrate how you can place them in other locations successfully.
File Permissions And Apache
As a security measure, Apache will not display web pages owned by the user "root". You have to make sure you make all the files and sub-directories in your DocumentRoot are owned by a non unprivileged user.
In the example below we do this by:
1. Creating a user with a home directory of /home/www.
2. Recursively changing the file ownership permissions of the /home/www directory and all its sub-directories.
3. Changing the permissions on the /home/www directory to 755 which will allow all users, including the Apache's httpd daemon, to read the files inside. [root@bigboy tmp]# useradd -g users www [root@bigboy tmp]# chown -R www:users /home/www [root@bigboy tmp]# chmod 755 /home/www
Now we test for the new ownership with the "ll" command. [root@bigboy tmp]# ll /home/www/site1/index.* -rw-rw-r-- 1 www users 48590 Jun 25 23:43 index.htm lrwxrwxrwx 1 www users 9 Jun 25 18:05 index.html -> index.htm [root@bigboy tmp]#
Note: It is also a good practice to FTP or SCP new files to your web server as this new user. This will make all the transferred files automatically have the correct ownership.
If you browse your website after configuring Apache and get a "permissions" error on your screen, then your files or directories under your DocumentRoot most likely have incorrect permissions or "root" ownership.

The appendix has a short script that you can use to recursively set the file permissions in a directory to match those expected by Apache.
You may also have to use the "Directory" directive to make Apache serve the pages once the file permissions have been correctly set. If you have your files in the default /home/www directory then this second step becomes unnecessary.
Named Virtual Hosting You can make your web server host more than one site per IP address by using Apache's "named virtual hosting" feature. The NameVirtualHost directive in the /etc/httpd/conf/httpd.conf file is used to tell Apache the IP addresses which will participate in this feature.
The <VirtualHost> containers in the file then tell Apache where it should look for the web pages used on each web site. You must specify the IP address for which each <VirtualHost> container applies.
Named Virtual Hosting Example In the case below, the server is configured to provide content on 97.158.253.26. Notice that within each <VirtualHost> container you specify the primary website domain name for that IP address with the ServerName directive. The directory where the index page for that site is located is defined with the DocumentRoot directive.
You can also list secondary domain names which will serve the same content as the primary ServerName using the ServerAlias directive.
Apache will search for a perfect match of NameVirtualHost, <VirtualHost> and ServerName when making a decision as to which content to send to the remote user's web browser. If there is no match, then Apache will use the first <VirtualHost> in the list that matches the target IP address of the request.
This is why we have placed a "*" <VirtualHost> at the very beginning which will be used for all other web queries. NameVirtualHost 97.158.253.26 <VirtualHost *> Default Directives. (In other words, not site #1 or site #2) </VirtualHost> <VirtualHost 97.158.253.26> servername www.my-site.com Directives for site #1 </VirtualHost> <VirtualHost 97.158.253.26> servername www.my-other-site.com Directives for site #2 </VirtualHost>
Be careful with using "*" in other containers. A <VirtualHost> with a specific IP address will always get higher priority than a <VirtualHost> statement with a "*" intended to cover the same IP address, even if the ServerName directive doesn't match. To get consistent results, try to limit the use of your "*" <VirtualHost> statements to the beginning of the list to cover any other IP addresses your server may have.
You can also have multiple NameVirtualHost directives, each with a single IP address, in cases where your web server has more than one IP address

IP Based Virtual Hosting The other virtual hosting option is to have one IP address per website which is also known as IP based virtual hosting. In this case you will NOT have a NameVirtualHost directive for the IP address, and you must only have a single <VirtualHost> container per IP address.
Also, as there is only one website per IP address, the ServerName directive isn't needed in each <VirtualHost> container unlike in named virtual hosting.
Example IP Virtual Hosting : Single Wild Card
In this example, Apache listens on all interfaces, but gives the same content. Apache will display the content in the first <VirtualHost *> directive even if you add another right after it. Apache also seems to enforce the single <VirtualHost> container per IP address requirement by ignoring any ServerName directives you may use inside it. <VirtualHost *> DocumentRoot /home/www/site1 </VirtualHost>
Example IP Virtual Hosting : Wild Card and IP addresses
In this example, Apache listens on all interfaces, but gives different content for addresses 97.158.253.26 and 97.158.253.27. Web surfers will get the "site1" content if they try to access the web server on any of its other IP addresses. <VirtualHost *> DocumentRoot /home/www/site1 </VirtualHost> <VirtualHost 97.158.253.26> DocumentRoot /home/www/site2 </VirtualHost> <VirtualHost 97.158.253.27> DocumentRoot /home/www/site3 </VirtualHost>
A Note On Virtual Hosting And SSL It is common for system administrators to replace the IP address in the <VirtualHost> and NameVirtualHost directives with the "*" (all IP addresses) wildcard character. This makes configuration easier.
If you installed Apache with support for secure HTTPS / SSL, which is used frequently in credit card and shopping cart web pages, then wild cards won't work. The Apache SSL module demands at least one explicit <VirtualHost> directive for IP based virtual hosting. When you use wild cards, Apache interprets it as an overlap of name based and IP based <VirtualHost> directives and will give errors like this because it can't make up its mind about which method to use: Starting httpd: [Sat Oct 12 21:21:49 2002] [error] VirtualHost _default_:443 -- mixing * ports and non-* ports with a NameVirtualHost address is not supported, proceeding with undefined results
If you try to load any webpage on your web server you'll also notice an error like this:

Bad request! Your browser (or proxy) sent a request that this server could not understand. If you think this is a server error, please contact the webmaster
The best solution to this problem is to use wild cards more sparingly. Don't use virtual hosting statements with wild cards except for the very first <VirtualHost> directive which defines the web pages to be displayed when matches to the other <VirtualHost> directives cannot be found. Here is an example.
NameVirtualHost * <VirtualHost *> Directives for other sites </VirtualHost>
<VirtualHost 97.158.253.28> Directives for site that also run on SSL </VirtualHost>
Configuration - Multiple Sites And IP Addresses
What follows are snippets of the section of the /etc/httpd/conf/httpd.conf file you'll need to edit to create websites that fit this typical scenario which is summarized in Table 21-1:
> The web site's systems administrator has previously created DNS entries for www.my-site.com, my-site.com, www.my-cool-site.com and www.default-site.com to map to an IP address 97.158.253.26 on this web server. The domain www.my-other-site.com was also configured to point to alias IP address 97.158.253.27. The administrator wants to be able to get to www.test-site.com on all the IP addresses.
> Traffic to www.my-site.com, my-site.com, www.my-cool-site.com must get content from sub-directory site2. Hitting these URLs will cause Apache to display the contents of file index.html in this directory.
> Traffic to www.test-site.com must get content from sub-directory site3.
> Named virtual hosting will be required for 97.158.253.26 as in this case we have a single IP address serving different content for a variety of domains. A NameVirtualHost directive for 97.158.253.26 is therefore required.
> Traffic going to www.my-other-site.com will get content from directory site4.
> There is no ServerName directive for www.default-site.com and so traffic going to this domain
> All other domains pointing to this server that don't have a matching ServerName directive will get web pages from the directory defined in the very first <VirtualHost> container. In this case is directory site1. Site www.default-site.com falls in this category.

Table 21-1 Web Hosting Scenario Summary
Domain IP address Directory Type of Virtual Hosting
www.my-site.com
my-site.com
www.my-cool-site.com
97.158.253.26 Site2 Name Based
www.test-site.com 97.158.253.27 Site3 Name Based
(Wild card)
www.my-other-site.com
All other domains
97.158.253.27 Site1 Name Based
www.default-site.com
97.158.253.26 Site1 Name Based
A sample snippet or a working httpd.conf file is listed below. The statements listed would normally be found at the very bottom of the file where virtual hosting statements normally reside. The last section of this configuration snippet has some additional statements to ensure read-only access to your web pages with the exception of web based forms using POSTs (pages with "submit" buttons). Remember to restart Apache every time you update the httpd.conf file for the changes to take effect on the running process.
ServerName localhost NameVirtualHost 97.158.253.26 NameVirtualHost 97.158.253.27 # # Match a webpage directory with each website # <VirtualHost *>
DocumentRoot /home/www/site1 </VirtualHost> <VirtualHost 97.158.253.26>
DocumentRoot /home/www/site2 ServerName www.my-site.com ServerAlias my-site.com, www.my-cool-site.com
</VirtualHost> <VirtualHost 97.158.253.27>
DocumentRoot /home/www/site3 ServerName www.test-site.com
</VirtualHost> <VirtualHost 97.158.253.27>

DocumentRoot /home/www/site4 ServerName www.my-other-site.com
</VirtualHost> # # Make sure the directories specified above # have restricted access to read-only. # <Directory "/home/www/*">
Order allow,deny Allow from all AllowOverride FileInfo AuthConfig Limit Options MultiViews Indexes SymLinksIfOwnerMatch IncludesNoExec <Limit GET POST OPTIONS> Order allow,deny Allow from all </Limit>
<LimitExcept GET POST OPTIONS> Order deny,allow Deny from all </LimitExcept>
</Directory>
A Note On Virtual Hosting And DNS You will have to configure your DNS server to point to the correct IP address used for each of the websites you host. Chapter 19 on static DNS shows you how to configure multiple domains such as my-site.com and my-other-site.com on your DNS server.
Testing Your Website Before DNS Is Fixed You may not be able to wait for DNS to be configured correctly before starting your project. The easiest way to temporarily bypass this is to modify the hosts file on the web developer's client PC (Not the Apache server). PCs query the hosts file first before checking DNS, so if a value for www.my-site.com is listed, that's what the PC will use.
The file name is C:\WINDOWS\system32\drivers\etc\hosts and needs to be opened and edited with a text editor like "Notepad". In Linux it's the /etc/hosts file.
Here you could add an entry like this: 97.158.253.26 www.my-site.com
Note: Do not remove the localhost entry in this file
Disabling Directory Listings Be careful if you create subdirectories under your DocumentRoot directory. Apache will run as expected if you link to files in the subdirectory. Be careful if you have designed your site without index.html pages in each subdirectory.
Say for example we create a subdirectory named /home/www/site1/example under www.my-site.com's DocumentRoot of /home/www/site1/. Now we'll be able to view the contents of the file my-example.html in this subdirectory if we point our browser to:

http://www.my-site.com/example/my-example.html
If a curious surfer decides to see what the index page is for www.my-site.com/example, they would type the link: http://www.my-site.com/example
Apache will list all the contents of the files in the "example" directory if it can't find the index.html file. You can disable the directory listing by using a "-Indexes" option in the <Directory> directive for the DocumentRoot like this: <Directory "/home/www/*">
...
...
... Options MultiViews -Indexes SymLinksIfOwnerMatch IncludesNoExec
Remember to restart Apache after the changes. Users attempting to access the nonexistent index page will now get a "403 Access denied" message.
Handling Missing Pages You can tell Apache to display a pre-defined HTML file whenever a surfer attempts to access a non-index page that doesn't exist. You can place this statement in the httpd.conf file which will make Apache display the contents of missing.htm instead of a generic "404 file Not Found" message. ErrorDocument 404 /missing.htm
Remember to put a file with this name in each DocumentRoot directory. You can see the missing.htm file I use by clicking the non-existent link below. You'll notice that this gives the same output as http://www.linuxhomenetworking.com/missing.htm.
http://www.linuxhomenetworking.com/bogus-file.htm
Using Data Compression On Web Pages Apache also has the ability to dynamically compress static web pages into gzip format and then send the result to the remote web surfers' web browser. Most current web browsers support this format and will transparently uncompress the data and present it on the screen. This can significantly reduce bandwidth charges if you are paying for internet access by the megabyte.
First you need to load Apache version 2's deflate module in your httpd.conf file and then use Location directives to specify what type of files to compress. After making these modifications and restarting Apache you will be able to verify from your /var/log/httpd/access_log file that the sizes of the transmitted HTML pages has shrunk.
Here is a comparison of the file sizes in the Apache logs and the document directory, 78,350 bytes shrunk to 15,190 bytes, almost 80% compression.
Log File 67.119.25.115 - - [15/Feb/2003:23:06:51 -0800] "GET /dns-static.htm HTTP/1.1" 200 15190 "http://www.siliconvalleyccie.com/sendmail.htm" "Mozilla/4.0 (compatible; MSIE 5.5; Windows NT 4.0; AT&T CSM6.0; YComp 5.0.2.6)"
Corresponding Directory Listing [root@ bigboy tmp]# ll /web-dir/dns-static.htm

-rw-r--r-- 1 user group 78350 Feb 15 00:53 /home/www/ccie/dns-static.htm [root@bigboy tmp]#
Compression Configuration Example
You can insert these statements just before your virtual hosting section of your httpd.conf file to activate the compression of static pages. Remember to restart Apache when you do.
The compression module mod_deflate is loaded by default Fedora's version of httpd.conf. This means that the first line listed below won't be required for this operating system. The location statements will. LoadModule deflate_module modules/mod_deflate.so <Location /> # Insert filter SetOutputFilter DEFLATE # Netscape 4.x has some problems... BrowserMatch ^Mozilla/4 gzip-only-text/html # Netscape 4.06-4.08 have some more problems BrowserMatch ^Mozilla/4\.0[678] no-gzip # MSIE masquerades as Netscape, but it is fine BrowserMatch \bMSIE !no-gzip !gzip-only-text/html # Don't compress images SetEnvIfNoCase Request_URI \ \.(?:gif|jpe?g|png)$ no-gzip dont-vary # Make sure proxies don't deliver the wrong content Header append Vary User-Agent env=!dont-vary </Location>
Apache Running On A Server Behind A NAT Firewall
If your webserver is behind a NAT firewall, and you are logged on a machine behind the firewall as well, then you may find problems when trying to access www.mysite.com of www.my-other-site.com. The reason for this is that due to NAT (Network Address translation), firewalls frequently won't allow access from their protected network to IP addresses that they masquerade on the outside.
For example, in this case, Linux web server bigboy has an internal IP address of 192.168.1.100, but the firewall presents it to the world with an external IP address of 97.158.253.26 via NAT/masquerading. If you are on the inside, 192.168.1.X network, you may find it impossible to hit URLs that resolve in DNS to 97.158.253.26.
There is a two part solution to this problem:

Step 1: Configure Virtual Hosting on Multiple IPs You can configure Apache to serve the correct content when accessing www.mysite.com or www.my-other-site.com from the outside, and also when accessing the specific IP address 192.168.1.100 from the inside. Fortunately Apache allows you to specify multiple IP addresses in the <VirtualHost> statements to help you overcome this problem.
Here is an example:
NameVirtualHost 192.168.1.100 NameVirtualHost 97.158.253.26 <VirtualHost 192.168.1.100 97.158.253.26> DocumentRoot /www/server1 ServerName www.my-site.com ServerAlias bigboy, www.my-site-192-168-1-100.com </VirtualHost>
Step 2: Configure DNS "Views" You now need to fix the DNS problem that NAT creates. Users on the Internet need to access IP address 97.158.253.26 when visiting www.my-site.com and users on your home network need to access IP address 192.168.1.100 when visiting the same site.
You can configure your DNS server to use "views" which makes your DNS server give different results depending on the source IP address of the web surfer's PC doing the query. Chapter 20 on DNS explains how to do this in detail.
Note: If you have to rely on someone else to do the DNS change then editing your PC's "hosts" file can be used as a "quick and dirty" temporary solution to this problem. Remember that this will only fix the problem on your PC alone.
How To Protect Web Page Directories With Passwords
You can password protect content in both the main and sub-directories of your DocumentRoot fairly easily. I know of cases where persons will allow normal access to their regular web pages, but require passwords for directories / pages that show MRTG or Webalizer data. In this example we'll show how to password protect the /home/www directory.
1. Apache has a password utility called "htpasswd" which can create "username password" combinations independent of your system login password for web page access. You have to specify the location of the password file, and if it doesn't yet exist, you'll have to include a "-c" or "create" switch on the command line. I recommend placing the file in your /etc/httpd/conf directory, away from the DocumentRoot tree where web users could possibly view it. Here is an example for a first user named "peter" and a second named "paul":
[root@bigboy tmp]# htpasswd -c /etc/httpd/conf/.htpasswd peter New password: Re-type new password: Adding password for user peter [root@bigboy tmp]#

[root@bigboy tmp]# htpasswd /etc/httpd/conf/.htpasswd paul New password: Re-type new password: Adding password for user paul [root@bigboy tmp]#
2. Make the .htpasswd file readable by all users. [root@bigboy tmp]# chmod 644 /etc/httpd/conf/.htpasswd
3. Create a .htaccess file in the directory to which you want password control with the following entries. Remember this will password protect this directory and all its sub directories. AuthUserFile /etc/httpd/conf/.htpasswd AuthGroupFile /dev/null AuthName EnterPassword AuthType Basic require user peter
> The AuthUserFile tells Apache to use the ".htpasswd" file
> The "require user" tells Apache that only user "peter" in the ".htpasswd" file should have access. If you wanted all ".htpasswd" users to have access then you'd replace this line with require valid-user
> "AuthType Basic" instructs Apache to accept basic unencrypted passwords from the remote users web browser.
4. Set the correct file protections on your new .htaccess file in the directory /home/www. [root@bigboy tmp]# chmod 644 /home/www/.htaccess
5. Make sure your /etc/httpd/conf/http.conf file has an AllowOverride statement in a <Directory> directive for any directory in the tree above /home/www. In the example below, we want all directories below /var/www/ to require password authorization. <Directory /home/www/*> AllowOverride AuthConfig </Directory>
6. You must also ensure that you have a <VirtualHost> directive that defines access to /home/www or another directory higher up in the tree. <VirtualHost *> ServerName 97.158.253.26 DocumentRoot /home/www </VirtualHost>
7. Restart Apache. Try accessing the web site and you'll be prompted for a password.
The /etc/httpd/conf.d Directory
Files in the /etc/httpd/conf.d directory are read and automatically appended to the configuration in the httpd.conf file every time Apache is restarted. In complicated configurations, in which a web server has to host many web sites, it is possible to create one configuration file per website each with its own set of VirtualHost and Directory containers. This can make website management much simpler.
Follow the following steps to do this correctly.

1. Backup your httpd.conf file, in case you make a mistake.
2. Create the files located in this directory that contain the Apache required VirtualHost and Directory containers and directives.
3. If each site has a dedicated IP address, then you should place the NameVirtualHost statements in the corresponding /etc/httpd/conf.d directory file. If it is shared, it'll need to remain in the main httpd.conf file.
4. Remove the corresponding directives from the httpd.conf file.
5. Restart Apache and test.
Note: The files located in the /etc/httpd/conf.d directory don't have to have any special names, and you don't have to refer to them in the httpd.conf file.
Troubleshooting Apache Troubleshooting a basic Apache configuration is fairly straight forward, with errors normally being found in the /var/log/httpd/error_log file during normal operation or displayed on the screen when Apache starts up. Most of the errors you'll encounter related to this Chapter will probably be related to incompatible syntax in the VirtualHosts statement due to typographical errors.
Testing Basic HTTP Connectivity The very first step is to determine whether your web server is accessible on TCP port 80 (HTTP).
o Lack of connectivity could be caused by a firewall with incorrect, "permit", NAT or port forwarding rules to your web server. Other sources of failure include Apache not being started at all, the server could be down, or there could be a network related failure.
o If you can connect on port 80, but no pages are being served, then the problem is usually due to a bad web application, not the web server software itself.
It is best to test this from both inside your network and from the Internet. Troubleshooting with Telnet is covered in Chapter 3 on network troubleshooting.
Incompatible /etc/httpd/conf/http.conf Files When Upgrading
Your old configuration files will be incompatible when upgrading from Apache version 1.3 to Apache 2.X. The new version 2.X default configuration file is stored in /etc/httpd/conf/httpd.conf.rpmnew. For the simple virtual hosting example above, it would be easiest to:
o Save the old httpd.conf file with another name, httpd.conf-version-1.x for example. Copy the ServerName, NameVirtualHost, and VirtualHost containers from the old file and place them in the new file httpd.conf.rpmnew
o Copy the httpd.conf.rpmnew file an name it httpd.conf
o Restart Apache
Server Name Errors All ServerName directives must list a domain that is resolvable in DNS or else you'll get an error like the ones below when starting httpd.

Starting httpd: httpd: Could not determine the server's fully qualified domain name, using 127.0.0.1 for ServerName Starting httpd: [Wed Feb 04 21:18:16 2004] [error] (EAI 2)Name or service not known: Failed to resolve server name for 192.16.1.100 (check DNS) -- or specify an explicit ServerName
You can avoid this by adding a default generic ServerName directive at the top of the httpd.conf file that references "localhost" instead of the default "new.host.name:80". #ServerName new.host.name:80 ServerName localhost
Conclusion
Websites both personal and commercial can be very rewarding exercises as they share your interests with the world and allow you to meet new people with whom to develop friendships or transact business.
Unfortunately, even the best websites can be impersonal as they frequently only provide information that the designer expects the visitor to need. Email, though ancient in comparison to newer personalized interactive Internet technologies such as IP telephony and instant messaging, has the advantage of being able to relay documents and other information without interrupting the addressee. This allows them to schedule a response when they are better prepared to answer, a valuable quality when replies need to be complex.
Chapter 22 explains how to configure a Linux email server to reduce SPAM and provide personalized addresses across multiple domains. No website should be without one.

Chapter 22
Configuring Linux Mail Servers = = = = = = = = = = = = = = = = = = = = = = = = = = = = = = = = = = = = = = = = = = = In This Chapter Chapter 22
Configuring Linux Mail Servers Configuring Sendmail Fighting SPAM Configuring Your POP Mail Server Conclusion
(c) Peter Harrison, www.linuxhomenetworking.com = = = = = = = = = = = = = = = = = = = = = = = = = = = = = = = = = = = = = = = = = = =
Email is an important part of any website you create. In a home environment, a free web based email service may be sufficient, but if you are running a business, then a dedicated mail server will probably be required.
This chapter will help to show you how to use sendmail to create a mail server that will relaying your mail to a remote user's mailbox or incoming mail to a local mail box and also POP mail which is used to retrieve the mail from the mail server's mail box to your local PC via a mail client such as outlook Express.
Configuring Sendmail One of the tasks in setting up DNS for your domain (my-site.com) is to use the MX record in the configuration zone file to state the IP address of the server that will handle the mail for the domain. Sendmail is the most popular applications used to convert a Linux box into a mail server and will be explained here.
How Sendmail Works As stated before, Sendmail can handles both incoming and outgoing mail for your domain. An explanation of how it handles each is provided below.
Incoming Mail
Usually each user in your home will have a regular Linux account on your mail server. Mail sent each of these users ([email protected]) will eventually arrive at your mail server and sendmail will then process it and deposit it in the mailbox file of the user's Linux account.
Mail isn't actually sent directly to the user's PC. They retrieve it from the mail server using client software such as Outlook or Outlook Express that supports either the POP or IMAP mail retrieval protocols.

Linux users logged into the mail server can read their mail directly using a text based client such as "mail" or a GUI client such as Evolution. Linux workstation users can use the same programs to access their mail remotely.
Outgoing Mail
The process is different when sending mail via the mail server. Each PC and Linux workstation user configures their email software to make the mail server their outbound SMTP mail server.
> If the mail is destined for a local user in the mysite.com domain, then sendmail will place the message in that person's mailbox so that they can retrieve it using one of the methods above.
> If the mail is being sent to another domain, sendmail will first use DNS to get the MX record for the other domain. It will then attempt to relay the mail to the appropriate destination mail server using the Simple Mail Transport Protocol or SMTP. One of the main advantages of mail relaying is that when a PC user "A" sends mail to another user "B" on the Internet, the PC of user "A" can delegate the SMTP processing to the mail server.
Note: If mail relaying is not configured properly then your mail server could end up relaying SPAM. Simple sendmail security is outlined on this page.
Installing Sendmail Most RedHat and Fedora Linux software products are available in the RPM format. Downloading and installing RPMs isn't hard. If you need a refresher, Chapter 5, on RPMs, covers how to do this in detail.
You will need to make sure that the sendmail, sendmail-cf and m4 software RPMs are installed. When searching for the RPMs, remember that the filename usually starts with the software package name by a version number like this: sendmail-8.12.10-1.1.1.i386.rpm.
Starting Sendmail o You can use the chkconfig command to get Sendmail configured to start at boot:
[root@bigboy tmp]# chkconfig sendmail on
o To start/stop/restart sendmail after booting
[root@bigboy tmp]# /etc/init.d/sendmail start [root@bigboy tmp]# /etc/init.d/sendmail stop [root@bigboy tmp]# /etc/init.d/sendmail restart
o Remember to restart the sendmail process every time you make a change to the configuration files for the changes to take effect on the running process. You can also test whether the sendmail process is running with the pgrep command, you should get a response of plain old process ID numbers: [root@bigboy tmp]# pgrep sendmail

How To Restart Sendmail After Editing Your Configuration Files
In this chapter we'll see that Sendmail uses a variety of configuration files which require different treatments in order for their commands to take effect. This little script encapsulates all the required post configuration steps. #!/bin/bash cd /etc/mail make m4 /etc/mail/sendmail.mc > /etc/sendmail.cf # RH Ver 7.3- m4 /etc/mail/sendmail.mc > /etc/mail/sendmail.cf # RH Ver 8.0+ newaliases /etc/init.d/sendmail restart
Once completed, use this command to make the script executable. chmod 700 filename
You'll need to run the script each time you change any of the sendmail configuration files described in the sections to follow.
The line in the script that restarts sendmail is only needed if you have made changes to the /etc/mail/sendmail.mc file, but it has been included so that you don't forget. This may not be a good idea in a production system. Delete the appropriate "m4" line depending on your version of Linux.
Note: When sendmail starts, it reads the file sendmail.cf for its configuration. sendmail.mc is a more user friendly configuration file and really is much easier to fool around with without getting burned. The sendmail.cf file is located in different directories dependent on the version of RedHat you use. The /etc/sendmail.cf file is used for versions up to 7.3, and /etc/mail/sendmail.cf is used for versions 8.0 and higher and Fedora Core.
The /etc/mail/sendmail.mc File Most of sendmail's configuration parameters are set in this file with the exception of mailing list and mail relay security features. It is often viewed as an intimidating file with its series of structured "directive" statements that get the job done. Fortunately in most cases you won't have to edit this file very often.
How to Put Comments in sendmal.mc In most Linux configuration files a "#" is used at the beginning of a line convert it into a comment line or to deactivate any commands that may reside on that line.
The sendmail.mc file doesn't use the "#" for commenting, but instead uses the string "dnl". Here are some valid examples of comments used with this configuration file.
Disabled statements due to "dnl" commenting dnl DAEMON_OPTIONS(`Port=smtp,Addr=127.0.0.1, Name=MTA') dnl # DAEMON_OPTIONS(`Port=smtp,Addr=127.0.0.1, Name=MTA')
Incorrectly disabled statement # DAEMON_OPTIONS(`Port=smtp,Addr=127.0.0.1, Name=MTA')
Active statement DAEMON_OPTIONS(`Port=smtp,Addr=127.0.0.1, Name=MTA')

Configuring DNS for sendmail Remember that you will never receive mail unless you have configured DNS for your domain to make your new Linux box mail server the target of the DNS domain's MX record. See either Chapter 19 on Static DNS or Chapter 20 on Dynamic DNS on how to do this.
Configure Your Mail Server's Name In DNS You'll first need to make sure that your mail server's name resolves in DNS correctly. For example, if your mail server's name is "bigboy" and it you intend for it to mostly handle mail for the domain my-site.com, then bigboy.my-site.com must correctly resolve to the IP address of one of the mail server's interfaces. You can test this using the host command like this: [root@smallfry tmp]# host bigboy.my-site.com bigboy.my-site.com has address 172.16.1.100 [root@smallfry tmp]#
You will need to fix your DNS server's entries if the resolution isn't correct.
Configure The /etc/resolv.conf File
As stated above, the sendmail program expects DNS to be configured correctly on the DNS server. The MX record for your domain must point to the IP address of the mail server.
Sendmail also expects the files used by the mail server's DNS client to be configured correctly. The first one is the /etc/resolv.conf file in which there must be a "domain" directive that matches one of the domains the mail server is expected to handle mail for.
Sendmail also expects a "nameserver" directive which points to the IP address of the DNS server the mail server should use to get its DNS information.
For example, if the mail server is handling mail for my-site.com, and the IP address of the DNS server is 192.168.1.100, there must be directives that looks like this: domain my-site.com nameserver 192.168.1.100
And incorrectly configured resolv.conf file can lead to errors like this when running the m4 command to process the information in your sendmail.mc file. WARNING: local host name (smallfry) is not qualified; fix $j in config file
The /etc/hosts File
Another file used by DNS clients is the /etc/hosts file which needs to be correctly configured. Here is a brief example of the very first line you should expect to see in it:
127.0.0.1 bigboy.my-site.com bigboy localhost.localdomain localhost
The entry for 127.0.0.1 must always be followed by the fully qualified domain name (FQDN) of the server. In the case above it would be bigboy.my-site.com. You can then add any aliases or nicknames the server may have. Finally, at the very end, you MUST have an entry for localhost and localhost.localdomain. Linux will not function properly if the 127.0.0.1 entry in /etc/hosts doesn't also include localhost and localhost.localdomain.

How To Configure Linux Sendmail Clients All Linux mail clients in your home or company need to know which server is the mail server. This is configured in the sendmail.mc file by setting the SMART_HOST statement to include the mail server. In the example below, the mail server has been set to mail.my-site.com, the mail server for the my-site.com domain. define(`SMART_HOST',`mail.my-site.com')
If you don't have a mail server on your network, you can either create one, or use the one offered by your ISP.
Once this is done, the sendmail.mc file needs to be processed and sendmail must be restarted. This step can be accomplished by running the script we created at the beginning of the chapter.
If the Sendmail is a Linux server, then the /etc/hosts file will also have to be correctly configured too.
Converting From a Mail Client to a Mail Server All Linux systems have a virtual loopback interface that only lives in memory with an IP address of 127.0.0.1. As mail must be sent to a target IP address even when there is no NIC in the box, Sendmail therefore uses the loopback address to send mail between users on the same Linux server. To become a mail server, and not a mail client, Sendmail needs to be also configured to listen for messages on NIC interfaces.
Determine Which NICs Sendmail Is Running On We can verify that sendmail is running by first using the pgrep command. If sendmail is running, this command will return the sendmail process ID. If it isn't running, then the return value will be blank. [root@bigboy tmp]# pgrep sendmail 22131 [root@bigboy tmp]#
We can also see the interfaces on which Sendmail is listening with the "netstat" command. Sendmail listens on TCP port 25, so we use "netstat" and "grep" for "25" to see a default configuration listening only on IP address 127.0.0.1 (loopback). [root@bigboy tmp]# netstat -an | grep :25 | grep tcp tcp 0 0 127.0.0.1:25 0.0.0.0:* LISTEN [root@bigboy tmp]#
Edit sendmail.mc To Make Sendmail Listen On All Interfaces If sendmail is only listening on the loopback interface you'll have to comment out the daemon_options line in the /etc/mail/sendmail.mc file with "dnl" statements. It is also good practice to take precautions against SPAM by not accepting mail from domains that don't exist by commenting out the "accept_unresolvable_domains" feature too. See the italicized lines in the example below. dnl This changes sendmail to only listen on the loopback device 127.0.0.1 dnl and not on any other network devices. Comment this out if you want dnl to accept email over the network. dnl DAEMON_OPTIONS(`Port=smtp,Addr=127.0.0.1, Name=MTA') dnl NOTE: binding both IPv4 and IPv6 daemon to the same port

requires dnl a kernel patch dnl DAEMON_OPTIONS(`port=smtp,Addr=::1, Name=MTA-v6, Family=inet6') dnl We strongly recommend to comment this one out if you want to protect dnl yourself from spam. However, the laptop and users on computers that do dnl not have 24x7 DNS do need this. dnl FEATURE(`accept_unresolvable_domains')dnl dnl FEATURE(`relay_based_on_MX')dnl
You need to be careful with the accept_unresolvable_names feature. In our sample network, bigboy the mail server will not accept email relayed from any of the other PCs on your network if they are not in DNS. Chapter19 static DNS shows how to create your own internal domain just for this purpose.
Comment out the "SMART_HOST" Entry In sendmal.mc The mail server doesn't need a SMART_HOST entry in its sendmail.mc file and this must be commented out with a "dnl" at the beginning. dnl define(`SMART_HOST',`mail.my-site.com')
Regenerate The sendmail.cf File & Restart sendmail
This step can be accomplished by running the script we created at the beginning of the chapter.
Now Make Sure Sendmail Is Listening On All Interfaces
Sendmail should start listening on all interfaces (0.0.0.0) [root@bigboy tmp]# netstat -an | grep :25 | grep tcp tcp 0 0 0.0.0.0:25 0.0.0.0:* LISTEN [root@bigboy tmp]#
A General Guide To Using The sendmail.mc File
The sendmail.mc file can seem jumbled. To make it less cluttered I usually create two easily identifiable sections in it with all the custom commands I've ever added.
The first section is near the top where the FEATURE statements usually are, and the second section is at the very bottom.
Sometimes sendmail will archive this file when you do a version upgrade. Having easily identifiable modifications in this file will make post upgrade reconfiguration much easier. Here is a sample: dnl ***** Customised section 1 start ***** dnl dnl FEATURE(delay_checks)dnl FEATURE(masquerade_envelope)dnl FEATURE(allmasquerade)dnl FEATURE(masquerade_entire_domain)dnl dnl dnl dnl ***** Customised section 1 end *****

The /etc/mail/relay-domains File The /etc/mail/relay-domains file is used to determine domains from which it will relay mail. The contents of the relay-domains file should be limited to those domains that can be trusted not to originate spam. By default, this file does not exist in a standard RedHat / Fedora install. In this case, all mail sent from my-super-duper-site.com and not destined for this mail server will be forwarded. my-super-duper-site.com
One disadvantage of this file is that it can only control mail based on the source domain which can be spoofed by SPAM email servers. The /etc/mail/access file has more capabilities, such as restricting relaying by IP address or network range and is more commonly used. If you delete /etc/mail/relay-domains, then relay access is fully determined by the /etc/mail/access file.
The sendmail script we configured at the beginning of the chapter will need to be run for these changes to take effect.
The /etc/mail/access File You can make sure that only trusted PCs on your network have the ability to relay mail via your mail server by using the /etc/mail/access file. That is to say, the mail server will only relay mail for those PCs on your network that have their email clients configured to use the mail server as their "outgoing SMTP mail server". (In Outlook Express you set this using: Tools Menu -> Accounts -> Properties -> Servers)
If you don't take the precaution of using this feature, you may find your server being used to relay mail for SPAM email sites. Configuring the /etc/mail/access file will not stop SPAM coming to you, only spam flowing through you.
The /etc/mail/access file has two columns. The first lists IP addresses and domains from which the mail is coming or going. The second lists the type of action to be taken when mail from these sources / destinations is received. Keywords include RELAY, REJECT, OK (not ACCEPT) and DISCARD. There is no third column to state whether the IP address or domain is the source or destination of the mail, Sendmail assumes it could be either and tries to match both. Sendmail will REJECT all other attempted relayed mail that doesn't match any of the entries in the /etc/mail/access file. Despite this, my experience has been that control on a per email address basis is much more intuitive via the /etc/mail/virtusertable file.
In the sample file below, we allow relaying for only the server itself (127.0.0.1, localhost), two client PCs on your home 192.168.1.X network, everyone on your 192.168.2.X network and everyone passing email through the mail server from servers belonging to my-site.com. Remember that a server will only be considered a part of my-site.com if its IP address can be found in a DNS reverse zone file: localhost.localdomain RELAY localhost RELAY 127.0.0.1 RELAY 192.168.1.16 RELAY 192.168.1.17 RELAY 192.168.2 RELAY my-site.com RELAY
You'll then have to convert this text file into a Sendmail readable database file named /etc/mail/access.db. Here are the commands to do that: [root@bigboy tmp]# cd /etc/mail [root@bigboy mail]# make

The sendmail script we configured at the beginning of the chapter does this for you too.
Remember that the relay security features of this file may not work if you don't have a correctly configured /etc/hosts file.
The /etc/mail/local-host-names File When sendmail receives mail, it needs a way of determining whether it is responsible for the mail it receives. It uses the /etc/mail/local-host-names file to do this. This file has a list of hostnames and domains for which sendmail will accept responsibility. For example, if this mail server was to accept mail for the domains my-site.com and my-other-site then the file would look like this: my-site.com my-other-site.com
In this case, remember to modify the MX record of the "my-other-site.com" DNS zonefile point to my-site.com. Here is an example (Remember each "." is important): my-other-site.com. MX 10 mail.my-site.com. ; Primary Mail Exchanger ; for my-other-site.com
Which User Should Really Receive The Mail? Sendmail checks the contents of the virtusertable and then the aliases files to determine who the ultimate recipient of mail will be.
The /etc/mail/virtusertable file This file contains a set of simple instructions on what to do with received mail. The first column lists the target email address and the second column lists the local user's mail box, a remote email address, or a mailing list entry in the /etc/aliases file to which the email should be forwarded.
If there is no match in the virtusertable file, sendmail will check for the full email address in the /etc/aliases file.
In the example below; mail sent to:
> [email protected] will go to local user (or mailing list) "webmasters", all other mail to my-other-site.com will go to local user "marc".
> "sales" at my-site.com will go to the sales department at my-othersite.com.
> "paul" and "finance" at my-site.com goes to local user (or mailing list) "paul"
> all other users at my-site.com receive a "bounce back" message stating "User unknown" [email protected] webmasters @my-other-site.com marc [email protected] [email protected] [email protected] paul [email protected] paul @my-site.com error:nouser User unknown
After editing this file you'll have to convert it into a sendmail readable database file named /etc/mail/virtusertable.db. Here are the commands to do that:

[root@bigboy tmp]# cd /etc/mail [root@bigboy mail]# make
The sendmail script we configured at the beginning of the chapter does this for you too.
The /etc/aliases File
This file could be viewed as a mailing list file. The first column has the mailing list name (sometimes called a virtual mailbox) and the second column has the members of the mailing list separated by commas.
> Sendmail searches the first column of the file for a match. If there is no match, then sendmail assumes the recipient is a regular user on the local server and deposits the mail in their mailbox.
> If it finds a match in the first column it notes the "nickname" entry in the second column. It then searches for the nickname again in the first column to see if the recipient isn't on yet another mailing list.
> If it doesn't find a duplicate, it assumes the recipient is a regular user on the local server and deposits the mail in their mailbox.
> If the recipient is a mailing list, then it goes through the process all over again to determine if any of the members is yet another list, and when it is all finished, they all get a copy of the email message.
In the example below, you can see that mail sent to users "bin", "daemon", "lp", "shutdown", "apache", "named"... etc by system processes will all be sent to user (or mailing list) "root". In this case "root" is actually an alias for a mailing list consisting of user "marc" and [email protected].
Note: The default /etc/aliases file installed with RedHat / Fedora has the last line of this sample commented out with a "#", you may want to delete the comment and change user "marc" to another user. # Basic system aliases -- these MUST be present. mailer-daemon: postmaster postmaster: root # General redirections for pseudo accounts. bin: root daemon: root ... ... abuse: root # trap decode to catch security attacks decode: root # Person who should get root's mail root: marc,[email protected]
Notice that there are no spaces between the mailing list entries for "root". This is important as you will get errors if you add spaces.

After editing this file you'll have to convert it into a sendmail readable database file named /etc/aliases.db. Here is the command to do that: [root@bigboy tmp]# newaliases
Simple Mailing Lists Using Aliases
In the simple mailing list example above, mail sent to "root" actually goes to user account "marc" and [email protected]. Here are a few more list examples for your /etc/aliases file.
Mail to "[email protected]" goes to users "peter", "paul" and "mary".
# Directors of my SOHO company directors: peter,paul,mary
Mail sent to "[email protected]" goes to users "grandma", "brother" and "sister"
# My family family: grandma,brother,sister
Mail sent to admin-list gets sent to all the users listed in the file /home/mailings/admin-list. The advantage of using mailing list files is that the admin-list file can be a file that trusted users can edit, user "root" is only needed update the aliases file. Despite this, there are some problems with mail reflectors. One is that bounce messages from failed attempts to broadcast goes to all users. Another is that all subscriptions and unsubscriptions have to be done manually by the mailing list administrator. If either of these are a problem for you, then consider using a mailing list manager like majordomo.
# My mailing list file admin-list: ":include:/home/mailings/admin-list"
After editing this file, you'll have to convert it into a sendmail readable database file named /etc/aliases.db. Here is the command to do that: [root@bigboy tmp]# newaliases
An Important Note About The /etc/aliases File
By default your system uses sendmail to mail system messages to local user "root". When sendmail sends email to a local user, it will have no "to:" in the email header. If you then use a mail client like Outlook Express with a spam mail filtering rule to reject mail with no to: in the header, you may find yourself dumping legitimate mail.
To get around this, try making root have an alias for a user with a fully qualified domain name, this will force sendmail to insert the correct fields in the header. Here is an example: # Person who should get root's mail root: [email protected]

Sendmail Masquerading Explained
If you want your mail to appear to come from [email protected] and not [email protected] then you have two choices:
o Configure your email client, such as Outlook Express, to set your email address to [email protected]. This explained later in this chapter in the POP Mail section.
o Set up masquerading to modify the domain name of all traffic originating from and passing trough your mail server.
Configuring masquerading
In the DNS configuration, we made bigboy the mailserver for the domain my-site.com. You now have to tell bigboy in the sendmail configuration file sendmail.mc that all outgoing mail originating on bigboy should appear to be coming from my-site.com, if not, based on our settings in the /etc/hosts file, it will appear to come from mail.my-site.com. This isn't terrible, but you may not want your website site to be remembered with the word "mail" in front of it. In other words you may want your mail server to handle all email by assigning a consistent return address to all outgoing mail, no matter which server originated the email.
This can be solved by editing your sendmail.mc configuration file and adding some masquerading commands and directives. These are explained below: FEATURE(always_add_domain)dnl FEATURE(`masquerade_entire_domain')dnl FEATURE(`masquerade_envelope')dnl FEATURE(`allmasquerade')dnl MASQUERADE_AS(`my-site.com')dnl MASQUERADE_DOMAIN(`my-site.com.')dnl MASQUERADE_DOMAIN(localhost)dnl MASQUERADE_DOMAIN(localhost.localdomain)dnl
> The MASQUERADE_AS directive will make all mail originating on bigboy appear to come from a server within the domain my-site.com by rewriting the email header.
> The MASQUERADE_DOMAIN directive will make mail relayed via bigboy from all machines in the my-other-site.com and localdomain domains appear to come from the MASQUERADE_AS domain of my-site.com. Sendmail uses DNS to check the domain name associated with the IP address of the mail relay client sending the mail to help it determine whether it should do masquerading or not.
> Feature "masquerade_entire_domain" makes sendmail masquerade servers named *my-site.com, and *my-other-site.com as my-site.com. In other words, mail from sales.my-site.com would be masqueraded as my-site.com. If this wasn't selected, then only servers named my-site.com and my-othersite.com would be masqueraded. Use this with caution when you are sure you have the authority to do this.
> Feature "allmasquerade" will make sendmail rewrite both recipient addresses and sender addresses relative to the local machine. If you cc: yourself on an outgoing mail, the other recipient will see a cc: to an address he knows instead of one on localhost.localdomain.
Note: Use this with caution if your mail server handles email for many different domains and the mailboxes for the users in these domains reside on the mail server.

The allmasquerade statement will cause all mail destined for these mailboxes to appear to be destined for users in the domain defined in the MASQUERADE_AS statement. In other words, if MASQUERADE_AS is "my-site.com" and allmasquerade is used, then mail for [email protected] will enter the correct mailbox but sendmail will rewrite the "to" to make it appear as if the email was originally sent to [email protected].
> Feature "always_add_domain" will always masquerade email addresses, even if the mail is sent from a user on the mail server to another user on the same mail server.
> Feature "masquerade_envelope" will rewrite the email envelope just as "MASQUERADE_AS" rewrote the header.
The email header is what email clients, such as Outlook Express, say the "to:" and "from:" should be. The "to:" and "from:" in the header is what is used when you use Outlook Express to do a "reply" or "reply all". It is easy to fake the header, as Spammers often do, it is detrimental to email delivery to fake the envelope.
The email envelope contains the "to:" and "from:" used by mailservers for protocol negotiation. It is the envelope's "from:" which is used when email rejection messages are sent between mail servers.
Testing Masquerading
The best way of testing masquerading from the Linux command line is to use the "mail -v username" command. I have noticed that "sendmail -v username" ignores masquerading altogether. You should also tail the /var/log/maillog file to verify that the masquerading is operating correctly and check the envelope and header of test email received by test email accounts.
Other Masquerading Notes
By default, user "root" will not be masqueraded. This is achieved with the: EXPOSED_USER(`root')dnl
command in /etc/mail/sendmail.mc. You can comment this out if you like with a "dnl" at the beginning of the line and recompiling / restarting sendmail
Using Sendmail to Change the Sender's Email Address Sometimes masquerading isn't enough. There are times when you may need to change not only the domain of the sender but also the username portion of the sender's email address.
For example, the need to do this could occur after buying a program for your SOHO office that sends out notifications to your staff, but the sender's address inserted by the program is its own, and not that of the IT person.
Sendmail allows you to change both the domain and username on a case by case basis using the genericstable feature.
To do this you need to:
1. Add these statements to your /etc/mail/sendmail.mc file to activate the feature:

FEATURE(`genericstable',`hash -o /etc/mail/genericstable.db')dnl GENERICS_DOMAIN_FILE(`/etc/mail/generics-domains')dnl
2. Create a /etc/mail/generics-domains file that is just a list of all the domains that should be inspected. This should include your server's canonical domain name which can be obtained by using the command: sendmail -bt -d0.1 </dev/null
Here is a sample /etc/mail/generics-domains file: my-site.com my-other-site.com bigboy.my-site.com
3. Create your /etc/mail/genericstable file. First sendmail searches the /etc/mail/generics-domains file mentioned in the previous step for a list of domains to reverse map. It then looks at the /etc/mail/genericstable file for an individual email address from a matching domain. The format of the file is linux-username [email protected]
Here is an example: alert [email protected] peter [email protected]
4. Run the sendmail restart script I mentioned at the beginning of the chapter and then test.
Troubleshooting Sendmail There are a number of ways to test sendmail when it doesn't appear to work correctly. Here are a few methods you can use to fix some of the most common problems.
Testing TCP connectivity
The very first step is to determine whether your mail server is accessible on the sendmail SMTP TCP port 25. Lack of connectivity could be caused by a firewall with incorrect, "permit", NAT or port forwarding rules to your mail server. Failure could also be caused by the "sendmail" process being stopped. It is best to test this from both inside your network and from the Internet.
Troubleshooting with Telnet is covered in Chapter 3 on network troubleshooting.
The /var/log/maillog File
Sendmail writes all its status messages in the /var/log/maillog file. It is always good to monitor this file whenever you are doing changes. Open two telnet, SSH or console windows. Work in one of them and monitor the sendmail status output in the other using the command [root@bigboy tmp]# tail -f /var/log/maillog
Common Errors Due To Incomplete RPM Installation
Both the newaliases and m4 commands require the sendmail-cf and m4 RPM packages. These must be installed, if not, you'll get errors like this when running various sendmail related commands.

> Sample Errorors when running newaliases [root@bigboy mail]# newaliases Warning: .cf file is out of date: sendmail 8.12.5 supports version 10, .cf file is version 0 No local mailer defined QueueDirectory (Q) option must be set [root@bigboy mail]#
> Sample errors when processing the sendmail.mc file [root@bigboy mail]# m4 /etc/mail/sendmail.mc > /etc/mail/sendmail.cf /etc/mail/sendmail.mc:8: m4: Cannot open /usr/share/sendmail-cf/m4/cf.m4: No such file or directory [root@bigboy mail]#
> Sample errors when restarting sendmail [root@bigboy mail]# /etc/init.d/sendmail restart Shutting down sendmail: [ OK ] Shutting down sm-client: [FAILED] Starting sendmail: 554 5.0.0 No local mailer defined 554 5.0.0 QueueDirectory (Q) option must be set [FAILED] Starting sm-client: [ OK ] [root@bigboy mail]#
Incorrectly Configured /etc/hosts Files
By default, Fedora inserts the hostname of the server between the 127.0.0.1 and the localhost entries in /etc/hosts like this: 127.0.0.1 bigboy localhost.localdomain localhost
Unfortunately in this configuration, sendmail will think that the server's FQDN is "bigboy" which it will identify as being invalid because there is no extension at the end like a ".com" or ".net". It will then default to sending emails in which the domain is localhost.localdomain.
The /etc/hosts file is also important for configuring mail relay. You can create problems if you fail to place the server name in the FDQN for 127.0.0.1 entry. In the example below sendmail will think that the server's FDQN was "my-site" and that the domain was all of ".com". 127.0.0.1 my-site.com localhost.localdomain localhost (Wrong!!!)
The server would therefore be open to relay all mail from any ".com" domain and would ignore the security features of the access and relay-domains files we'll describe below.
Symptoms Of A Bad /etc/hosts File
As discussed above, a poorly configured /etc/hosts file can make mail sent from your server to the outside world appear as if it came from users at localhost.localdomain and not bigboy.my-site.com.
Use the sendmail program to send a sample email to someone in verbose mode. Enter some text after issuing the command and end your message with a single "." all by itself on the last line.

[root@bigboy tmp]# sendmail -v [email protected] test text test text . [email protected]... Connecting to mail.another-site.com. via esmtp... 220 ltmail.another-site.com LiteMail v3.02(BFLITEMAIL4A); Sat, 05 Oct 2002 06:48:44 -0400 >>> EHLO localhost.localdomain 250-mx.another-site.com Hello [67.120.221.106], pleased to meet you 250 HELP >>> MAIL From:<[email protected]> 250 <[email protected]>... Sender Ok >>> RCPT To:<[email protected]> 250 <[email protected]>... Recipient Ok >>> DATA 354 Enter mail, end with "." on a line by itself >>> . 250 Message accepted for delivery [email protected]... Sent (Message accepted for delivery) Closing connection to mail.another-site.com. >>> QUIT [root@bigboy tmp]#
Localhost.localdomain is the domain that all computers use to refer to themselves, it is therefore an illegal internet domain. If mail sent from computer PC1 to PC2 appears to come from a user at localhost.localdomain on PC1 and is rejected, the rejected email will be returned to localhost.localdomain. PC2 will see that the mail originated from localhost.localdomain and will think that the rejected email should be sent to a user on PC2 that may not exist. You will probably get an error like this in /var/log/maillog if this happens: Oct 16 10:20:04 bigboy sendmail[2500]: g9GHK3iQ002500: SYSERR(root): savemail: cannot save rejected email anywhere Oct 16 10:20:04 bigboy sendmail[2500]: g9GHK3iQ002500: Losing ./qfg9GHK3iQ002500: savemail panic
Note: You may also get this error if you are using a SPAM prevention program, for example a script based on the PERL module Mail::Audit. An error in the script could cause this type of message too.
Another set of tell tale errors caused by the same problem can be generated when trying to send mail to a user , in this example "root", or creating a new alias database file. (The newalias command will be explained later): [root@bigboy tmp]# sendmail -v root WARNING: local host name (bigboy) is not qualified; fix $j in config file [root@bigboy tmp]# newaliases WARNING: local host name (bigboy) is not qualified; fix $j in config file [root@bigboy tmp]#
With the accompanying error in /var/log/maillog log file that looks like this: Oct 16 10:23:58 bigboy sendmail[2582]: My unqualified host name (bigboy) unknown; sleeping for retry

Fighting SPAM
Unsolicited Commercial Email (UCE or SPAM) can be annoying, time consuming to delete and in some cases dangerous when they contain viruses and worms. Fortunately there are ways you can use your mail server to combat SPAM.
Using Public SPAM Blacklists With Sendmail There are many publicly available lists of known open mail relay servers and spam generating mail servers on the Internet. Some are maintained by volunteers, others are managed by public companies, but in all cases they rely heavily on complaints from spam victims. Some spam blacklists simply try to determine whether the email is coming from a legitimate IP address.
The IP addresses of offenders usually remain on the list for six months to two years. In some cases, to provide additional pressure on the spammers, the blacklists will include not only the offending IP address but also the entire subnet or network block to which it belongs. This prevents the spammers from easily switching their server's IP address to the next available one on their network. Also, if the spammer uses a public datacenter, it is possible that their activities would also cause the IP addresses of legitimate emailers to be black listed too. It is hoped that these legitimate users will pressure the datacenter's management to evict the spamming customer.
You can configure sendmail to use its `dnsbl' feature to both query these lists and reject the mail if a match is found. Here are some sample entries you can add to your /etc/sendmail.mc file, they should all be on one line. You can visit the URLs listed to learn more about the individual services.
RFC-Ignorant Valid IP address checker. FEATURE(`dnsbl', `ipwhois.rfc-ignorant.org',`"550 Mail from " $&{client_addr} " refused. Rejected for bad WHOIS info on IP of your SMTP server - see http://www.rfc-ignorant.org/"')
Easynet Open proxy list. FEATURE(`dnsbl', `proxies.blackholes.easynet.nl', `"550 5.7.1 ACCESS DENIED to OPEN PROXY SERVER "$&{client_name}" by easynet.nl DNSBL (http://proxies.blackholes.easynet.nl/errors.html)"', `')dnl
The Open Relay Database Open mail relay list. FEATURE(`dnsbl', `relays.ordb.org', `"550 Email rejected due to sending server misconfiguration - see http://www.ordb.org/faq/\#why_rejected"')dnl
Spamcop
Spammer blacklist.

FEATURE(`dnsbl', `bl.spamcop.net', `"450 Mail from " $`'&{client_addr} " refused - see http://spamcop.net/bl.shtml"')
Spamhaus
Spammer blacklist. FEATURE(`dnsbl',`sbl.spamhaus.org',`Rejected - see http://spamhaus.org/')dnl
Spamassassin Once Sendmail receives an email message, it hands it over to procmail which is the application that actually places the email in mailboxes of the users on the mail server. It is possible to make procmail temporarily hand over control to another program such as a SPAM filter, the most commonly used one being Spamassassin.
Note: Spamassassin doesn't delete SPAM, it merely adds the word "SPAM" to the beginning of the subject line of suspected SPAM emails. You can then configure the email filter rules in Outlook Express or any other mail client to either delete it or store it in a special SPAM folder.
Downloading & Installing Spamassassin
Most RedHat and Fedora Linux software products are available in the RPM format. Downloading and installing RPMs isn't hard. If you need a refresher, Chapter 5, on RPMs, covers how to do this in detail.
When searching for the RPMs, remember that the filename usually starts with the software package name by a version number like this: spamassassin-2.60-2.i386.rpm.
Starting Spamassassin
> You can use the chkconfig command to get Spamassassin configured to start at boot: [root@bigboy tmp]# chkconfig --level 35 spamassassin on
> To start/stop/restart Spamassassin after booting: [root@bigboy tmp]# /etc/init.d/spamassassin start [root@bigboy tmp]# /etc/init.d/spamassassin stop [root@bigboy tmp]# /etc/init.d/spamassassin restart
Configuring Procmail for Spamassassin
The /etc/procmailrc file is used by Procmail to determine the Procmail helper programs that should be used to filter mail. This file isn't created by default.
Spamassassin has a template you can use called /etc/mail/spamassassin/spamassassin-spamc.rc. Copy the template to the /etc directory. This file will force all mail arriving for your mail server's users to be forced through Spamassasin. [root@bigboy tmp]# cp /etc/mail/spamassassin/spamassassin-spamc.rc /etc/procmailrc

Configuring Spamassassin
The Spamassassin configuration file is named /etc/mail/spamassassin/local.cf. A fully commented sample is listed below and should be customized to meet your needs before you restart Spamassassin for the changes to take effect.
################################################################### # See 'perldoc Mail::SpamAssassin::Conf' for # details of what can be adjusted. ################################################################### # # These values can be overridden by editing # ~/.spamassassin/user_prefs.cf (see spamassassin(1) for details) # # How many hits before a message is considered spam. The lower the # number the more sensitive it is. required_hits 5.0 # Whether to change the subject of suspected spam (1=Yes, 0=No) rewrite_subject 1 # Text to prepend to subject if rewrite_subject is used subject_tag *****SPAM***** # Encapsulate spam in an attachment (1=Yes, 0=No) report_safe 1 # Use terse version of the spam report (1=Yes, 0=No) use_terse_report 0 # Enable the Bayes system (1=Yes, 0=No) use_bayes 1 # Enable Bayes auto-learning (1=Yes, 0=No) auto_learn 1 # Enable or disable network checks (1=Yes, 0=No) skip_rbl_checks 0 use_razor2 1 use_dcc 1 use_pyzor 1

# Mail using languages used in these country codes will not be marked # as being possibly spam in a foreign language. # - english ok_languages en # Mail using locales used in these country codes will not be marked # as being possibly spam in a foreign language. ok_locales en
Startup Spamassassin
The final step is to configure Spamassassin to startup on booting and then you also need to start it up. [root@bigboy tmp]# chkconfig spamassassin on [root@bigboy tmp]# /etc/init.d/spamassassin start Starting spamd: [ OK ] [root@bigboy tmp]#
A Simple PERL Script To Help Stop SPAM Blacklists won't stop everything.
It is possible to limit the amount of unsolicited SPAM you receive by writing a small script to intercept your mail before it is written to your mailbox.
This is fairly simple to do as sendmail always checks the ".forward" file in your home directory for the name of this script. Sendmail then looks for the filename in the directory /etc/smrsh and executes it.
By default, PERL doesn't come with modules that are able to check email headers and envelopes so you will have to download them from CPAN (www.cpan.org). The most important modules are:
o MailTools
o IO-Stringy
o MIME-tools
o Mail-Audit
I have written a script called mail-filter.pl that effectively filters out SPAM email for my home system. There are a few steps required to make the script work:
o Install PERL and the PERL modules listed above.
o Place an executable version of the script in your home directory and modify the script's $FILEPATH variable point to your home directory
o Update the two configuration files:
+ mail-filter.accept, which specifies the subjects and email addresses to accept,
+ mail-filter.reject that specifies those that you should reject.

o Update your ".forward" file and place an entry in /etc/smrsh
Mail-filter will first reject all email based on the "reject" file and will then accept all mail found in the "accept" file. It will then deny everything else.
I have included a simple script with instructions on how to install the PERL modules in the Appendix.
Configuring Your POP Mail Server Sendmail will just handle mail sent to your "my-site.com" domain. Each user on your Linux box will get mail sent to their account's mail folder. If you want to retrieve this mail from your Linux box's user account, using a mail client such as Microsoft Outlook or Outlook Express, then you have a few more steps. You'll also have to make your Linux box a POP mail server.
Installing Your POP Mail Server You need to install the imap RPM in which the POP server software can be found. It isn't yet a part of the Fedora RPM set and you will probably have to download it from rpmfind.net.
Most RedHat and Fedora Linux software products are available in the RPM format. Downloading and installing RPMs isn't hard. If you need a refresher, the chapter on RPMs covers how to do this in detail.
When searching for the RPMs, remember that the filename usually starts with the software package name by a version number like this: imap-2002d-3.i386.rpm.
Starting Your POP Mail Server o POP mail is started by xinetd. Therefore to get POP mail configured to start at boot
you have to use the chkconfig command to make sure xinetd starts up on booting. [root@bigboy tmp]# chkconfig xinetd on
o To start/stop/restart POP mail after booting you can use the xinetd init script located in the directory /etc/init.d like this: [root@bigboy tmp]# /etc/init.d/xinetd start [root@bigboy tmp]# /etc/init.d/xinetd stop [root@bigboy tmp]# /etc/init.d/xinetd restart
Remember to restart the POP mail process every time you make a change to the configuration files for the changes to take effect on the running process
Configuring Your POP Mail Server The starting and stopping of POP Mail is controlled by xinetd via the /etc/xinetd.d/ipop3 file. POP Mail is deactivated by default, so you'll have to edit this file to start the program. Make sure the contents look like this. The disable feature must be set to "no" to accept connections.
Follow the steps below and set the "disable" parameter to "no". [root@bigboy tmp]# cd /etc/xinetd.d [root@bigboy xinetd.d]# vi ipop3 # default: off # description: The POP3 service allows remote users

# to access their mail \ # using an POP3 client such as Netscape Communicator, mutt, \ # or fetchmail. service pop3 {
socket_type = stream wait = no user = root server = /usr/sbin/ipop3d log_on_success += HOST DURATION log_on_failure += HOST disable = no
}
You will then have to restart xinetd for these changes to take effect using the startup script in the /etc/init.d directory.
Naturally, to disable POP Mail once again, you'll have to edit the /etc/xinetd.d/ipop3 file, set "disable" to "yes" and restart xinetd.
How To Configure Your Windows Mail Programs All your POP email accounts are really only regular Linux user accounts in which Sendmail has deposited mail. You can now configure your email client such as Outlook Express to use your use your new POP / SMTP Mail Server quite easily. Here's how:
POP Mail
Set your POP mail server to be the IP address of your Linux mail server. Use your Linux user username and password when prompted.
SMTP
Set your SMTP mail server to be the IP address / domain name of your Linux mail server.
Configuring Secure POP Mail If you need to access your email from the mail server via the internet or some other insecure location, you may want to configure POP over SSL. This is configured using the /etc/xinetd.d/pop3s file instead of /etc/xinetd.d/ipop3.
Most POP clients support secure POP. For example, Windows configures it in the "Advanced" menu of the Outlook Express account configuration window.
How to handle overlapping email addresses. If you have a user overlap, eg. John Smith ([email protected]) and John Brown ([email protected]), by default, both users will get sent to the Linux user account "john". You have two choices:
o Make the user part of the email address is different. For example: [email protected] and [email protected]. Create Linux accounts "john1" and "john2". If the users insist on overlapping names then you may need to modify your virtusertable file.
o Create the user accounts "john1" and "john2". Have virtusertable entries for [email protected] pointing to account "john1" and [email protected] pointing to account

"john2". The POP configuration in Outlook Express for each user should POP using "john1" and "john2" respectively.
Troubleshooting POP Mail The very first step is to determine whether your POP server is accessible on the POP TCP port 110 or the secure POP port of 995. Lack of connectivity could be caused by a firewall with incorrect, "permit", NAT or port forwarding rules to your server. Failure could also be caused by the "xinetd" process being stopped or the configuration files being disabled. It is best to test this from both inside your network and from the Internet. Troubleshooting TCP with Telnet is covered in Chapter 3 on network troubleshooting.
Linux status messages are logged to the file /var/log/messages. Use it to make sure all your files are loaded when you start xined. Check your configuration files if it fails to do so. The example below shows xinetd being started followed by a successful secure POP query being made from a remote POP client. Linux logging is covered in Chapter 4 on Syslog. Aug 11 23:20:33 bigboy xinetd[18690]: START: pop3s pid=18693 from=172.16.1.103 Aug 11 23:20:33 bigboy ipop3d[18693]: pop3s SSL service init from 172.16.1.103 Aug 11 23:20:40 bigboy ipop3d[18693]: Login user=labmanager host=172-16-1-103.simiya.com [172.16.1.103] nmsgs=0/0 Aug 11 23:20:40 bigboy ipop3d[18693]: Logout user=labmanager host=172-16-1-103.simiya.com [172.16.1.103] nmsgs=0 ndele=0 Aug 11 23:20:40 bigboy xinetd[18690]: EXIT: pop3s pid=18693 duration=7(sec) Aug 11 23:20:52 bigboy xinetd[18690]: START: pop3s pid=18694 from=172.16.1.103 Aug 11 23:20:52 bigboy ipop3d[18694]: pop3s SSL service init from 172.16.1.103 Aug 11 23:20:52 bigboy ipop3d[18694]: Login user=labmanager host=172-16-1-103.simiya.com [172.16.1.103] nmsgs=0/0 Aug 11 23:20:52 bigboy ipop3d[18694]: Logout user=labmanager host=172-16-1-103.simiya.com [172.16.1.103] nmsgs=0 ndele=0 Aug 11 23:20:52 bigboy xinetd[18690]: EXIT: pop3s pid=18694 duration=0(sec)
Conclusion
Email is an important part of any website and its configuration needs to be planned carefully to make it a seamless part of the web experience of your visitors. Without it, your website won't seem complete.
A fully functioning website is just the beginning. It needs to be maintained, to reduce the risk of failure, and monitored to help detect potential problems. Chapter 23 discusses many Linux based tools that can be used to track the health of your Linux server.

Chapter 23
Monitoring Server Performance = = = = = = = = = = = = = = = = = = = = = = = = = = = = = = = = = = = = = = = = = = = In This Chapter Chapter 23
Monitoring Server Performance SNMP MRTG Webalizer TOP VMSTAT FREE Conclusion
(c) Peter Harrison, www.linuxhomenetworking.com = = = = = = = = = = = = = = = = = = = = = = = = = = = = = = = = = = = = = = = = = = =
Monitoring your system's web performance can be done quite easily with a number of graphical tools available for Linux. These include MRTG for raw network traffic which is based on SNMP and Webalizer that monitors web site hits.
SNMP Most routers and firewalls keep their operational statistics in Management Information Blocks (MIBs). Each statistic has an Object Identifier (OID) and can be remotely retrieved from the MIB via the Simple Network Management Protocol (SNMP). However, as a security measure, you need to know the SNMP password or "community string" to do so. There are a number of types of community strings, the most commonly used ones are the "Read Only" community string that only provides access for viewing statistics and system parameters. In many cases the "Read Only" community string or password is set to "public". There is also a "Read Write" community string for not only viewing statistics and system parameters but also for updating the parameters too.
Doing SNMP Queries Configuring SNMP on a server isn't hard, but it does require a number of detailed steps.
Installing SNMP Utilities on a Linux Server If you intend to use your Linux box to query your network devices, other servers or even itself using MRTG or any other tool, you will need to have the SNMP utility tools package net-snmp-utils installed.
Most RedHat and Fedora Linux software products are available in the RPM format. Downloading and installing RPMs isn't hard. If you need a refresher, Chapter 5, on RPMs, covers how to do this in detail.

When searching for the file, remember that the SNMP utility tools RPM's filename usually starts with the word "net-snmp-utils" followed by a version number like this: net-snmp-utils-5.1.1-2.i386.rpm.
Configuring SNMP on a Linux Server By default, RedHat Linux has the NetSNMP server package installed to provide SNMP services. NetSNMP uses a configuration file /etc/snmp/snmpd.conf in which the community strings may be set. The version of the configuration file that comes with Net-SNMP is quite complicated. I suggest archiving it and using a much simpler version with only a single line containing the keyword "rocommunity" followed by the community string. Here is an example of how to do that.
1. Save the old configuration file [root@bigboy snmp]# cd /etc/snmp/ [root@bigboy snmp]# mv snmpd.conf snmpd.conf.old [root@bigboy snmp]# vi snmpd.conf
2. Enter the following line in the new configuration file to set the Read Only community string to "craz33guy" rocommunity craz33guy
3. Configure Linux to start SNMP services on each reboot with the chkconfig command: [root@bigboy root]# chkconfig snmpd on [root@bigboy root]#
4. You can then start SNMP to load the current configuration file. [root@bigboy root]# /etc/init.d/snmpd start Starting snmpd: [ OK ] [root@bigboy root]#
5. Test whether SNMP can read the "system" and "interface" information MIB [root@bigboy snmp]# snmpwalk -v 1 -c craz33guy localhost system SNMPv2-MIB::sysDescr.0 = STRING: Linux bigboy 2.4.18-14 #1 Wed Sep 4 11:57:57 EDT 2002 i586 SNMPv2-MIB::sysObjectID.0 = OID: NET-SNMP-MIB::netSnmpAgentOIDs.10 SNMPv2-MIB::sysUpTime.0 = Timeticks: (425) 0:00:04.25 SNMPv2-MIB::sysContact.0 = STRING: root@localhost SNMPv2-MIB::sysName.0 = STRING: bigboy ... ... [root@bigboy snmp]# snmpwalk -v 1 -c craz33guy localhost interface IF-MIB::ifNumber.0 = INTEGER: 3 IF-MIB::ifIndex.1 = INTEGER: 1 IF-MIB::ifIndex.2 = INTEGER: 2 IF-MIB::ifIndex.3 = INTEGER: 3 IF-MIB::ifDescr.1 = STRING: lo IF-MIB::ifDescr.2 = STRING: wlan0 IF-MIB::ifDescr.3 = STRING: eth0 ... ... [root@bigboy snmp]#

Now that we know SNMP is working correctly on your Linux server, we can configure a SNMP statistics gathering software package such as MRTG to create online graphs of your traffic flows.
SNMP On Other Devices In case above we were polling localhost. You can poll any SNMP aware network device that has SNMP enabled. All you need is the IP address and SNMP read only string and you'll be able to get similar results. Here is an example of a query of a device with an IP address of 192.168.1.1. [root@bigboy snmp]# snmpwalk -v 1 -c chir1qui 192.168.1.1 interface
Different SNMP Versions There are currently three versions of SNMP; versions 1, 2 and 3. The Linux snmpwalk and snmpget commands have "-v 1", "-v 2c" and "-v 3" switches for specifying the SNMP version to be used for queries. Always make sure you are using the correct one.
Basic SNMP Security SNMP doesn't encrypt your community string password so you shouldn't do queries over insecure networks such as the Internet. You should also make sure that you use all reasonable security measures to only allow queries from trusted IP addresses either via a firewall and/or the SNMP security features available via the snmp.conf file.
In case you need it, the snmpd.conf file can support limiting MIB access to trusted hosts and networks.
The snmpd.conf file has two security sections, one with very restrictive access at the top of the file, followed by a less restrictive one immediately below it. The example below is a modification of the less restrictive section. You will have to comment out the more restrictive statements above it for it to work correctly.
In our example:
> Only three networks, localhost 172.16.1.0/24 and 192.168.1.0/24 are allowed to access the server with the "craz33guy" community string.
> Each network is matched to a group called "MyROGroup" using SNMP version 1 and all the MIBs on the server are defined by the view named "all-mibs".
> An "access" statement ensures that only the defined networks have read only access to all the MIBs.
> Finally, modification of the MIBs via SNMP has been denied as we have used word "none" in the "write" section of the access statement.
## sec.name source community ## ======== ====== ========= com2sec local localhost craz33guy com2sec network_1 172.16.1.0/24 craz33guy com2sec network_2 192.16.1.0/24 craz33guy ## Access.group.name sec.model sec.name ## ================= ========= ======== group MyROGroup v1 local group MyROGroup v1 network_1 group MyROGroup v1 network_2

## MIB.view.name incl/excl MIB.subtree mask ## ============== ========= =========== ==== view all-mibs included .1 80 ## MIB ## group.name context sec.model sec.level prefix read write notif ## ========== ======= ========= ========= ====== ==== ===== ===== access MyROGroup "" v1 noauth 0 all-mibs none none
These precautions are probably unnecessary in a home environment where access is generally limited to devices on the home network by a NAT firewall.
Simple SNMP Troubleshooting If your SNMP queries this fail, then verify the following:
o The snmpd.conf file is only read by the snmpd daemon when it starts up. You will have to restart your snmp for you configuration settings to become active.
o Make sure you are using the correct community string.
o Confirm that firewalls aren't preventing SNMP queries from the SNMP client to the SNMP target.
o Double check that your SNMP security policy allows the query from your network.
o Ensure that any TCP wrappers configuration on your SNMP target machine allows SNMP queries from your SNMP client. Generally speaking in a home environment protected by NAT your TCP wrappers files, /etc/hosts.allow and /etc/hosts.deny should be blank.
o Verify that network routing between the client and target devices is correct. A simple "ping" or "traceroute" test should be sufficient.
o Make sure the snmpd daemon is running on the SNMP client.
o Confirm that you are querying using the correct SNMP version.
o Double check your /var/log/messages file for any errors that may have occurred while starting snmpd.
MRTG MRTG (Multi Router Traffic Grapher) is a public domain package for producing graphs of various types of router statistics via a web page. You can easily create graphs of traffic flow statistics through your home network's firewall / router or even your Linux box's NIC cards using MRTG. The product is available from the MRTG website and also on your distribution CDs. A sample MRTG graph is shown in Figure 23-1.

Figure 23-1 A Typical MRTG Server Bandwidth Graph
Software Download And Installation
You will to install the MRTG, Apache web server software before proceeding. You will also need to install the SNMP utility tools as explained above.
MRTG Software
Most RedHat and Fedora Linux software products are available in the RPM format. Downloading and installing RPMs isn't hard. If you need a refresher, chapter 5, on RPMs, covers how to do this in detail.
When searching for the file, remember that the MRTG RPM's filename usually starts with the word "mrtg" followed by a version number like this: mrtg-2.10.5-3.i386.rpm.
Apache Webserver
You will also need to have a webserver package installed for MRTG to work. RedHat Linux usually comes with the Apache webserver software preinstalled. The easiest way to tell if Apache is installed is to see if the file /etc/init.d/httpd exists on your server. If not you can refer to Chapter 21 on Apache on how to install it. By default Apache expects the HTML files for your website to be located in /var/www/html. MRTG will place its HTML files in /var/www/mrtg.
MRTG Differences Between Fedora and RedHat 9 You will need to take the following differences into account when configuring MRTG for Fedora versus RedHat 9.
RedHat 9 All MRTG files are located in /var/www/html/mrtg/ and can be accessed via a default Apache installation via the URL http://server-ip-address/mrtg. Remember to modify the directory path in all the examples below if you are running RedHat 9 or earlier.
Fedora Core All MRTG files are located in /var/www/mrtg/ and can be accessed via a default Apache installation via the URL http://server-ip-address/mrtg.

Configuring MRTG By default, MRTG will map the inbound and outbound data throughput rates on the device it is polling. There are ways to specify other OIDs such as CPU and memory usage, but this is beyond the scope of this book. We'll be discussing the default configuration.
When the MRTG RPM is installed it creates a directory called /etc/mrtg in which all future configuration files are stored. Here are the steps you need to go through to create a replacement default /etc/mrtg/mrtg.cfg configuration file for the server.
1. First we'll use MRTG's cfgmaker command to create a configuration file named mrtg.cfg for the server "bigboy" using a read only community string of craz33guy. All data files will be placed in the directory /var/www/mrtg. [root@bigboy tmp]# cfgmaker --output=/etc/mrtg/mrtg.cfg \ --global "workdir: /var/www/mrtg" -ifref=ip \ --global 'options[_]: growright,bits' \ craz33guy@localhost --base: Get Device Info on craz33guy@localhost: --base: Vendor Id: --base: Populating confcache --snpo: confcache craz33guy@localhost: Descr lo --> 1 --snpo: confcache craz33guy@localhost: Descr wlan0 --> 2 ... ... ... --base: Walking ifAdminStatus --base: Walking ifOperStatus --base: Writing /etc/mrtg/mrtg.cfg [root@bigboy tmp]#
Note (Fedora Core 1 Error): By using the "-ifref=ip" cfgmaker command option, MRTG will use the interface's IP address as the title for each graph. Unfortunately this causes errors with Fedora Core 1, when polling another Fedora Core 1 server, that prevent the graphs from being created correctly. You can avoid this problem by removing the option to get graph titles using the much less recognizable MAC address of the interfaces.
Troubleshooting Tip: As explained in the SNMP section, there are different versions of SNMP. If your query doesn't work, check to make sure you are using the required version and then other SNMP configuration parameters on the target device. You can specify MRTG's SNMP query version with the --snmp-options cfgmaker option. Here is an example of cfgmaker using an SNMP version 2 query of a router with an IP address of 192.168.1.3. The --snmp-options option's five colons before the number "2" are important. [root@bigboy tmp]# cfgmaker --output=/etc/mrtg/192.168.1.3.cfg \ -ifref=ip --global "workdir: /var/www/mrtg" \ --snmp-options=:::::2 [email protected]
2. Edit /etc/mrtg/mrtg.cfg and remove the sections related to interfaces you don't need
to monitor. This would most likely include the loopback interface Lo: with the IP address of 127.0.0.1

3. Run MRTG using /etc/mrtg/mrtg.cfg as your argument three times. You'll get an error the two times as MRTG tries to move old data files, and naturally, the first time it is run, MRTG has no data files to move. [root@bigboy mrtg]# env LANG=C /usr/bin/mrtg /etc/mrtg/mrtg.cfg Rateup WARNING: /usr/bin/rateup could not read the primary log file for localhost_192.168.1.100 Rateup WARNING: /usr/bin/rateup The backup log file for localhost_192.168.1.100 was invalid as well Rateup WARNING: /usr/bin/rateup Can't remove localhost_192.168.1.100.old updating log file Rateup WARNING: /usr/bin/rateup Can't rename localhost_192.168.1.100.log to localhost_192.168.1.100.old updating log file [root@bigboy mrtg]# env LANG=C /usr/bin/mrtg /etc/mrtg/mrtg.cfg Rateup WARNING: /usr/bin/rateup Can't remove localhost_192.168.1.100.old updating log file [root@bigboy mrtg]# env LANG=C /usr/bin/mrtg /etc/mrtg/mrtg.cfg [root@bigboy mrtg]#
4. You'll then want to use MRTG's indexmaker command to create a Web index page using your new mrtg.cfg file as a guide.
MRTG expects to find this file in the default MRTG web directory of /var/www/mrtg/, so the format of the command would be: [root@bigboy tmp]# indexmaker --output=/var/www/mrtg/index.html \ /etc/mrtg/mrtg.cfg
5. MRTG is run every 5 minutes by default and the file that governs this is /etc/cron.d/mrtg. You will need to edit this file and replace all occurrences of "/usr/bin/mrtg" with "env LANG=C /usr/bin/mrtg" for MRTG to work correctly. The explanation for changing the language character set for MRTG is given in the Troubleshooting MRTG section.
Getting MRTG To Poll Multiple Devices The Fedora Core 1 MRTG installation process creates a cron file named /etc/crond.d/mrtg. This file tells the cron daemon to run MRTG using the /etc/mrtg/mrtg.cfg file every five minutes to poll your network devices. You can configure MRTG to poll multiple devices, each with a separate configuration file. Here's how to do it:
1. Create the new configuration file using the steps from the previous section, but using a configuration filename that is not "mrtg.cfg".
2. Add a new MRTG line in /etc/cron.d/mrtg for each new configuration file you create. 0-59/5 * * * * root env LANG=C /usr/bin/mrtg /etc/mrtg/mrtg.cfg 0-59/5 * * * * root env LANG=C /usr/bin/mrtg /etc/mrtg/device1.cfg 0-59/5 * * * * root env LANG=C /usr/bin/mrtg /etc/mrtg/device2.cfg
3. Run the indexmaker command, and include all of your /etc/mrtg configuration files, to regenerate your web index page.

[root@bigboy tmp]# indexmaker --output=/var/www/mrtg/index.html \ /etc/mrtg/mrtg.cfg /etc/mrtg/device1.cfg /etc/mrtg/device2.cfg
4. Other versions of Linux keep their MRTG cron entries in /etc/crontab. In this case you have to edit this file using the same syntax like the Fedora /etc/cron.d/mrtg file and then restart the cron daemon to re-read the configuration like this: [root@bigboy tmp]# /etc/init.d/crond restart
You could also create a script with the "/usr/bin/mrtg /etc/mrtg/device.cfg" entries in it and make cron run it every five minutes. This way you can just edit the script each time you add a device without having to restart crond.
Configuring Apache To Work With MRTG The reason why we use MRTG is because it can provide a graphical representation of your server's performance statistics via a web browser. The Apache web server configuration to do this depends on the version of Linux you are running.
RedHat 8.0 and 9 In Redhat 8.0 and 9, the MRTG web pages are placed in a sub directory under the default /var/www/html directory and therefore no further configuration is necessary to access the graphs via a browser.
Fedora Core With Fedora Core, MRTG creates an "add-on" configuration file named /etc/httpd/conf.d/mrtg.conf which includes all the necessary Apache commands for MRTG to work.
Some configuration may need to be done as it is configured to only accept requests from the Linux console. You can add your home network to the file by inserting the network on the "Allow from" line, or you could allow universal access by commenting it out along with the "Deny from" line. In this example, we've added access from the 192.168.1.0 network. <Location /mrtg> Order deny,allow Deny from all Allow from localhost 192.168.1.0/24 </Location>
If you want to access MRTG from the Internet, then you'll have to comment out the "deny" statement and allow from "all" IP addresses like this: <Location /mrtg> Order deny,allow Allow from all </Location>
Note: Remember to restart Apache once you have made these modifications in order for these changes to take effect.
A Note for Fedora Core 1
With newer versions of Fedora, Apache automatically reads in the "add-on" files in the /etc/httpd/conf.d/ directory. With Fedora Core 1 you have to specifically configure the Apache configuration file /etc/httpd/conf/httpd.conf to find it. You' can do this yourself by inserting this line at the very bottom of the main Apache configuration file before restarting Apache for the change to take effect.

include "/etc/httpd/conf.d/mrtg.conf"
Basic Security
If you are accessing MRTG graphs from the Internet, you may want to add password protection to the directory by using a .htaccess file as described in Chapter 21 on Apache.
How To View The MRTG Graphs In Your Web Browser You can now access your MRTG graphs by pointing your browser to the URL:
http://server-ip-address/mrtg/
Using MRTG To Monitor Other Subsystems MRTG will generate HTML pages with daily, weekly, monthly and yearly statistics for your interfaces. By default MRTG provides only network interface statistics. Chapter 24 on advanced MRTG chapter that follows has detailed examples and explanations on how to monitor Linux disk, CPU, memory and web connection data. The MRTG website, www.mrtg.org, also has links to other sites that show you how to monitor many other sub-systems on a variety of devices and operating systems.
Troubleshooting MRTG There are many simple steps you can use to troubleshoot MRTG, the most common ones of which are listed below.
Basic Steps MRTG won't work if SNMP queries don't work. Make sure you follow the SNMP troubleshooting steps above if you have any difficulties.
Setting The Correct Character Set MRTG will usually only work if your system uses an ASCII based (Western European) character set. If it isn't set, then you'll get errors like this every time you run MRTG from the command line or as part of a cron job: [root@bigboy tmp]# mrtg /etc/mrtg/mrtg.cfg ------------------------------------------------------------------- ERROR: Mrtg will most likely not work propperly when the environment variable LANG is set to UTF-8. Please run mrtg in an envir.. where this is not the case: env LANG=C /usr/bin/mrtg ... ---------------------------------------------------------------- [root@bigboy tmp]#
Your system's character set is defined in the /etc/sysconfig/i18n, and the current Fedora default of "en_US.UTF-8" won't work while "en_US.UTF-8" will (after a system reboot). This is not necessarily a good idea, especially if the native language Linux uses on your system is non ASCII based, other things may fail to work.

A better solution would be to always run MRTG using this command instead of using just plain /usr/bin/mrtg. env LANG=C /usr/bin/mrtg
This will modify the character set used by MRTG alone and shouldn't affect anything else.
Fedora Core 1 MRTG Errors With Net-SNMP
There seems to be a flaw in the MRTG implementation for some Fedora Core 1 versions when polling another Fedora Core 1 server. You will get errors like those below if you use a "-ifref=ip" statement with the cfgmaker command. Normally, this statement would provide graphs sorted by the IP addresses of the interfaces instead of the default MAC address. ### Interface 6 >> Descr: '' | Name: '' | Ip: '192.168.1.100' ### ### The following interface is commented out because: ### * has a speed of which makes no sense ### * got 'Received SNMP response with error code ### error status: noSuchName ### index 1 (OID: 1.3.6.1.2.1.2.2.1.10.6) ### SNMPv1_Session (remote host: "localhost" [127.0.0.1].161) ### community: "craz33guy" ### request ID: 824482716 ### PDU bufsize: 8000 bytes ### timeout: 2s ### retries: 5 # # Target[localhost_192.168.1.100]: /192.168.1.100:craz33guy@localhost: # SetEnv[localhost_192.168.1.100]: MRTG_INT_IP="192.168.1.100" MRTG_INT_DES # MaxBytes[localhost_192.168.1.100]: 0 # Title[localhost_192.168.1.100]: Traffic Analysis for 192.168.1.100 # PageTop[localhost_192.168.1.100]: <H1>Traffic Analysis for 192.168.1.100 # <TABLE> # <TR><TD>System:</TD> <TD>bigboy in Unknown</TD></TR> # <TR><TD>Maintainer:</TD> <TD>root@localhost</TD></TR> # <TR><TD>Description:</TD><TD> </TD></TR> # <TR><TD>ifType:</TD> <TD> ()</TD></TR> # <TR><TD>ifName:</TD> <TD></TD></TR> # <TR><TD>Max Speed:</TD> <TD>0.0 bits/s</TD></TR> # </TABLE>
As all the lines in the configuration file are commented out with a "#", indexmaker fails to create an index.html file and gives errors like this when indexmaker is run. [root@bigboy tmp]# indexmaker --output=/var/www/mrtg/stats/index.html /etc/mrtg/mrtg.cfg Use of uninitialized value in hash element at /usr/bin/indexmaker line 307. [root@bigboy tmp]#
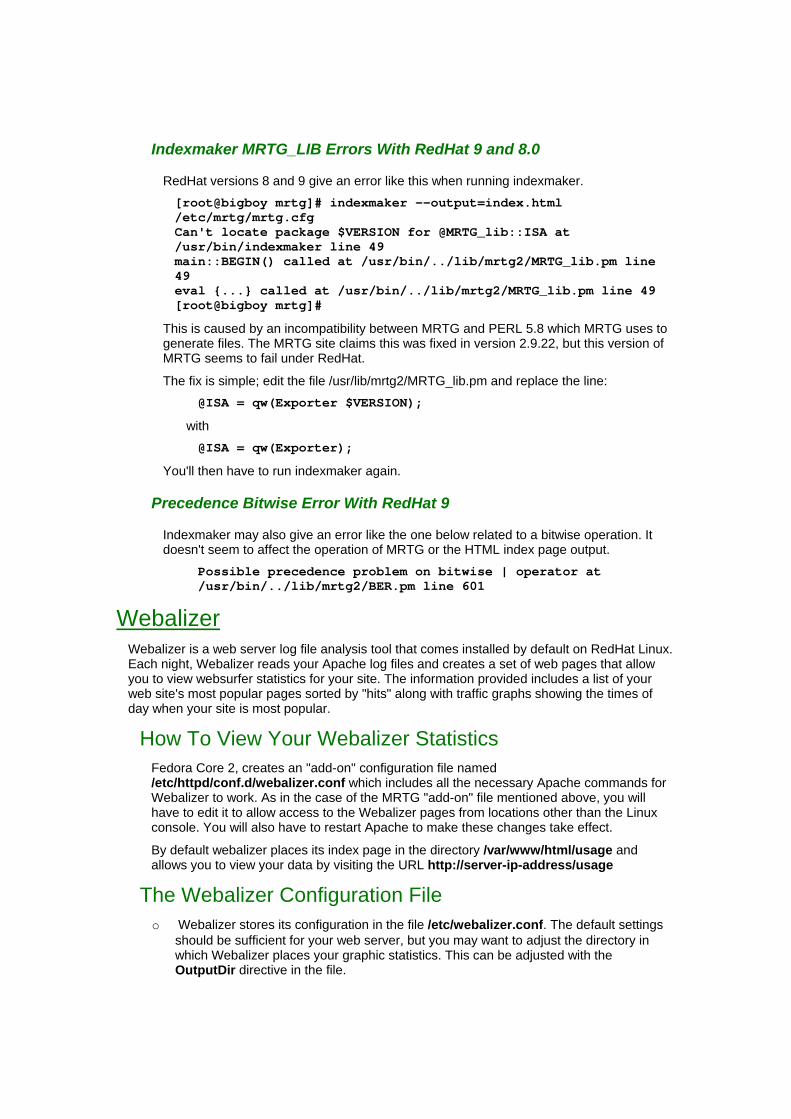
Indexmaker MRTG_LIB Errors With RedHat 9 and 8.0
RedHat versions 8 and 9 give an error like this when running indexmaker. [root@bigboy mrtg]# indexmaker --output=index.html /etc/mrtg/mrtg.cfg Can't locate package $VERSION for @MRTG_lib::ISA at /usr/bin/indexmaker line 49 main::BEGIN() called at /usr/bin/../lib/mrtg2/MRTG_lib.pm line 49 eval {...} called at /usr/bin/../lib/mrtg2/MRTG_lib.pm line 49 [root@bigboy mrtg]#
This is caused by an incompatibility between MRTG and PERL 5.8 which MRTG uses to generate files. The MRTG site claims this was fixed in version 2.9.22, but this version of MRTG seems to fail under RedHat.
The fix is simple; edit the file /usr/lib/mrtg2/MRTG_lib.pm and replace the line: @ISA = qw(Exporter $VERSION);
with @ISA = qw(Exporter);
You'll then have to run indexmaker again.
Precedence Bitwise Error With RedHat 9
Indexmaker may also give an error like the one below related to a bitwise operation. It doesn't seem to affect the operation of MRTG or the HTML index page output.
Possible precedence problem on bitwise | operator at /usr/bin/../lib/mrtg2/BER.pm line 601
Webalizer Webalizer is a web server log file analysis tool that comes installed by default on RedHat Linux. Each night, Webalizer reads your Apache log files and creates a set of web pages that allow you to view websurfer statistics for your site. The information provided includes a list of your web site's most popular pages sorted by "hits" along with traffic graphs showing the times of day when your site is most popular.
How To View Your Webalizer Statistics Fedora Core 2, creates an "add-on" configuration file named /etc/httpd/conf.d/webalizer.conf which includes all the necessary Apache commands for Webalizer to work. As in the case of the MRTG "add-on" file mentioned above, you will have to edit it to allow access to the Webalizer pages from locations other than the Linux console. You will also have to restart Apache to make these changes take effect.
By default webalizer places its index page in the directory /var/www/html/usage and allows you to view your data by visiting the URL http://server-ip-address/usage
The Webalizer Configuration File o Webalizer stores its configuration in the file /etc/webalizer.conf. The default settings
should be sufficient for your web server, but you may want to adjust the directory in which Webalizer places your graphic statistics. This can be adjusted with the OutputDir directive in the file.

Make Webalizer run in Quiet Mode
o Older versions of Webalizer, especially those found with RedHat 8.0 and older, have a tendency to create this message in your logs which according to the Webalizer site's documentation is non-critical. Error: Unable to open DNS cache file /var/lib/webalizer/dns_cache.db
You can make the software run in quiet mode by editing the configuration file and editing the "Quiet" parameter to say "yes". Quiet yes
Once you've done this, Webalizer will function with few annoyances, however be aware that running in quiet mode could hide deeper problems that could occur in future.
TOP You can monitor the amount of memory and CPU resources your system is using the "top" command. In the case below, the CPU usage is under 1.0% and 14% of memory (57536K) is free. The amount of free memory may appear low, but in this case, the server doesn't seem to be "swapping" idle processes from memory to the swap disk partition as it isn't being used at all. [root@bigboy tmp]# top 3:04pm up 25 days, 23:23, 2 users, load average: 0.00, 0.02, 0.00 78 processes: 76 sleeping, 2 running, 0 zombie, 0 stopped CPU states: 0.9% user, 0.5% system, 0.0% nice, 0.8% idle Mem: 384716K av, 327180K used, 57536K free, 0K shrd, 101544K buff Swap: 779112K av, 0K used, 779112K free 130776K cached PID USER PRI NI SIZE RSS SHARE STAT %CPU %MEM TIME COMMAND 27191 root 15 0 1012 1012 780 R 5.6 0.2 0:00 top 4545 root 16 0 5892 5888 4956 S 0.9 1.5 169:26 magicdev 1 root 15 0 476 476 432 S 0.0 0.1 0:05 init 2 root 15 0 0 0 0 SW 0.0 0.0 0:00 keventd 5 root 15 0 0 0 0 SW 0.0 0.0 0:41 kswapd 6 root 25 0 0 0 0 SW 0.0 0.0 0:00 bdflush [root@bigboy tmp]#
Excessive swapping can cause your system to slow down dramatically, the simplest ways to avoid this is to add more RAM and / or reduce the number of processes or users that are active on your system. Further discussion of system tuning is beyond the scope of this book.
If your system seems slow but the CPU and memory usage is low, then start looking at networking problems such as poor duplex negotiation, bad cables and network congestion due to excessive traffic.
VMSTAT

You can also determine memory and swap usage with the "vmstat" command which provides a summary of what "top" produces. In the case below, memory is still 14% free (57,452 MB used from a total of 130,780) and swap isn't being used at all. [root@bigboy tmp]# vmstat procs memory swap io system cpu r b w swpd free buff cache si so bi bo in cs us sy id 0 0 0 0 57452 101584 130780 0 0 0 4 18 1 3 1 1 [root@bigboy tmp]#
As your memory fills up, your system will temporarily store programs and data on your hard disk's "swap" partition. Excess swapping of programs and data between disk and memory can cause your system to slow down significantly and memory usage should be monitored to allow you to plan ways to either increase RAM or tune the way your system operates. System tuning is beyond the scope of this book, but there are many reference guides which can show you how to do this.
FREE "Free" is the name of a utility you can use to determine the amount of free RAM on your system. The output is easier to understand than vmstat. Here is some sample output. [root@bigboy tmp]# free total used free shared buffers cached Mem: 126060 119096 6964 0 58972 40028 -/+ buffers/cache: 20096 105964 Swap: 522072 15496 506576 [root@bigboy tmp]#
Conclusion
Server monitoring is always a good thing to do as it can help you predict when things are going to go wrong or long term trends in your web traffic.
MRTG can be expanded not only to monitor traffic on your server's NIC cards, but it can also graphically illustrate many of the statistics listed in "top", "free" and "vmstat". Chapter 24 shows you how.

Chapter 24
Advanced MRTG For Linux = = = = = = = = = = = = = = = = = = = = = = = = = = = = = = = = = = = = = = = = = = = In This Chapter Chapter 24
Advanced MRTG For Linux Locating And Viewing The Contents Of MIBs Differences In MIB And MRTG Terminology The CPU And Memory Monitoring MIB The TCP/IP Monitoring MIB Manually Configuring Your MRTG File Implementing Advanced Server Monitoring Conclusion
(c) Peter Harrison, www.linuxhomenetworking.com = = = = = = = = = = = = = = = = = = = = = = = = = = = = = = = = = = = = = = = = = = = In many cases using MRTG in a basic configuration to monitor the volume of network traffic to your server isn't enough. You may also want to see graphs of CPU, disk and memory usage. This chapter will provide details on how to do this by first explaining how to find the values you need to monitor in the SNMP MIB files and then by showing you how to use this information to configure MRTG. Note: All the examples in this chapter assume that the SNMP read only string is "craz33guy" and that you have already installed the net-snmp-utils RPM package as explained in Chapter 23.
Locating And Viewing The Contents Of MIBs MIBs are data structures that reside in memory that are constantly updated via the SNMP daemon. The MIB configuration text files are located on your hard disk and loaded into memory each time SNMP is restarted.
You can easily find your Fedora Linux MIBs by using the "locate" command and filtering the output to only include values with the word "snmp" in them. As you can see in this case, the MIBs are located in the /usr/share/snmp/mibs directory. [root@bigboy tmp]# locate mib | grep snmp /usr/share/doc/net-snmp-5.0.6/README.mib2c /usr/share/snmp/mibs /usr/share/snmp/mibs/DISMAN-SCHEDULE-MIB.txt ... ... [root@bigboy tmp]#
As the MIB configurations are text files you search for keywords in them using the "grep" command. Here we are searching for the MIBs that keep track of TCP connections. The results show the RFC1213 MIB and the TCP MIB do so.

[root@silent mibs]# grep -i tcp *.txt | grep connections ... RFC1213-MIB.txt: "The limit on the total number of TCP connections RFC1213-MIB.txt: "The number of times TCP connections have made a ... TCP-MIB.txt: "The number of times TCP connections have made a ... ... [root@silent mibs]#
You can use the "vi" editor to look at the MIBs. Don't change them as this could make SNMP fail to work. MIBs are very complicated, but fortunately the key sections are commented.
Each value tracked in a MIB is called an "object" and is often referred to by its object ID or OID. In this snippet of the RFC1213-MIB.txt file we can see that querying the "tcpActiveOpens" object in this MIB would return the number of active open TCP connections to the server. The "SYNTAX" field shows that this is a "counter" value.
MIBs usually track two types of values, "counter" values which continuously increase with time such as the amount of packets passing through a NIC or amount of time CPU not been idle since boot time. The other type of value are "integer" values which change instant by instant such as the amount of memory currently being used. tcpActiveOpens OBJECT-TYPE SYNTAX Counter ACCESS read-only STATUS mandatory DESCRIPTION "The number of times TCP connections have made a direct transition to the SYN-SENT state from the CLOSED state." ::= { tcp 5 }
Now it's time to explore differences between SNMP and MRTG terminologies. This will be important in understanding how to use MRTG to track MIB values.
Differences In MIB And MRTG Terminology It is always important to keep in mind that MRTG refers to MIB "counter" values as "counter" values. It refers to MIB "integer" values as "gauge". By default, MRTG considers all values to be counters.
MRTG doesn't plot counter values as a constantly increasing graph, it only plots how much the value has changed since the last polling cycle. CPU usage is typically tracked by MIBs as a counter value, fortunately, you can edit your MRTG configuration file to make it graph this information in a percentage utilization format. This will be shown later.
The syntax type, the MIB object name and the description of what it does are the most important things you need to know when configuring MRTG these will be all explained later.
The CPU And Memory Monitoring MIB The UCD-SNMP-MIB MIB keeps track of a number of key performance MIB objects these include the commonly used ones in Table 24-1.

Table 24-1 Important Objects In The UCD-SNMP-MIB MIB
UCD-SNMP-MIB Object Variable
MIB Type
MRTG Type
Description
ssCpuRawUser Counter Counter Total CPU usage by applications run by non privileged users since the system booted.
ssCpuRawSystem Counter Counter Total CPU usage by applications run by non privileged users since the system booted.
ssCpuRawIdle Counter Counter The percentage time the CPU is running idle
ssCpuRawNice Counter Counter Total CPU usage by applications running at a non default priority level.
memAvailReal Integer Gauge Available Physical Memory Space On The Host
The TCP/IP Monitoring MIB The TCP-MIB MIB keeps track of data connection information. One of the most commonly used apart from the object that defines the amount of data passing through a NIC, which MRTG polls by default, is the tcpActiveOpens object which is described in Table 24-2.
Table 24-2 Important Objects In The TCP-MIB MIB
TCP-MIB Object Variable
MIB Type
MRTG Type
Description
tcpActiveOpens Counter Counter Measures the number of completed TCP connections.
Manually Configuring Your MRTG File The MRTG cfgmaker program only creates configuration files for network interfaces, simultaneously tracking two OIDs, the NIC's input and output data statistics. The mrtg program then uses these configuration files to know the type of data to record in its data directory. The indexmaker program also uses this information to create the overview "summary view" web page for the MIB OIDs you're monitoring.
This "summary view" page only shows daily statistics. You then have to click on the summary view graphs to get the "detailed view" page behind it with the daily, weekly, monthly and annual graphs. Some of the parameters in the configuration file refer to the "detailed view", other refer to the "overview" view.
If you want to monitor any other pairs OIDs, you have to manually create the configuration files as cfgmaker isn't aware of any other OIDs other than those related to a NIC. The mrtg and

indexmaker program can be fed individual OIDs from a cusomized configuration file and will function as expected if you edit it correctly.
Parameter Formats MRTG configuration parameters are always followed by a graph name surrounded by square brackets "[ ]" and a colon ":". The format looks like this:
Parameter[graph name]: value
For ease of editing, the parameters for a particular graph are usually grouped together. Each graph can track two OIDS listed in the "Target" parameter that's usually placed at the very top of the "graph name" list. The two OID values are separated by a "&" symbol, the first one can be referred to as the "input OID" and the second one as the "output OID".
Legend Parameters On the "detailed view" webpage, each graph has a legend that shows the "Max", "Average" and "Current" values of the graph's OID statistics. You can use the "legendI" parameter is for the description of the input graph (first graph OID) and the "legendO" for the output graph (second graph OID).
The space available under each graph's legend is tiny so MRTG also has "legend1" and "legend2" parameters that are placed at the very bottom of the page to provide more details. Parameter "legend1" is the expansion of "legendI" and "legend2" is the expansion of "legendO".
The "Ylegend" is the legend for the "Y-axis", the value you are trying to compare. In the case of a default MRTG configuration this would be the data flow through the interface in bits or bytes per second. Here is an example of the legends of a default MRTG configuration: YLegend[graph1]: Bits per second Legend1[graph1]: Incoming Traffic in Bits per Second Legend2[graph1]: Outgoing Traffic in Bits per Second LegendI[graph1]: In LegendO[graph1]: Out
You can prevent MRTG from printing the legend its numeric values at the bottom of the graph by leaving the value of the legend blank like this: LegendI[graph1]:
We'll later revisit how to match the legends to the OIDs in more detail for a variety of situations.
Options Parameters Options parameters provide MRTG with graph formatting information. The "growright" option makes sure the data at the right of the screen is for the the most current graph values. This usually makes the graphs more intuitively easy to read. MRTG defaults to growing from the left.
The "nopercent" option prevents MRTG from printing percentage style statistics in the legends at the bottom of the graph. The "gauge" option alerts MRTG to the fact that the graphed values are gauge type. If the value you are monitoring is in "bytes", then you can convert the output to "bits" using the "bits" option. Likewise, you can convert "per second" values to "per minute" graphs using the "perminute" option. Here are some examples for two different graphs:

options[graph1]: growright,nopercent,perminute options[graph2]: gauge,bits
If you place this parameter at the top with a label of "_" it gets applied to all the graphs defined in the file. Here's an example. options[_]: growright
Title Parameters The title on the "summary page" is provided by the "Title" parameter, the "PageTop" parameter tells the title for the "detailed view" page. The PageTop string must start with a <H1> and end with a </H1>. Title[graph1]: Interface eth0 PageTop[graph1]: <H1>Detailed Statistics For Interface eth0</H1>
Scaling Parameters The "MaxBytes" parameter is the maximum amount of data MRTG will plot on a graph. Anything more than this will seem to disappear over the edge of the graph.
MRTG will also try to adjust its graphs so that the largest value plotted on the graph is always close to the top. This is so even if you set the "MaxBytes" parameter.
When you are plotting a value that has a known maximum, and you always want to have this value at the top of the vertical legend you may want to turn off MRTG's auto scaling. If you are plotting percentage CPU usage, and the server reaches a maximum of 60%, with scaling, MRTG will have a vertical plot of 0% to 60%, so that the vertical peak is near the top of the graph image.
When scaling is off, and MaxBytes is set to "100", then the peak will only be 60% of the way up as the graph will plot from 0% to 100%. In the example below we unscale the yearly, monthly, weekly and daily views on the "detailed view" page and give them a maximum value of 100 as seen below. Unscaled[graph1]: ymwd MaxBytes[graph1]: 100
Defining The MIB Target Parameters As stated before, MRTG always tries to compare two MIB OID values which are defined by the "Target" parameter. You have to specify the two MIB OID objects separated by a "&", the SNMP password and the IP address of the device you are querying in this parameter using the following format: Target[graph1]: mib-object-1.0&mib-object-2.0:SNMP-password@IP-address
The ".0" at the end of the MIB is required. In the example below we're using the SNMP command to return the user mode CPU utilization of a Linux server. Notice how the ".0" is tagged onto the end of the output. [root@silent mibs]# snmpwalk -v 1 -c craz33guy localhost ssCpuRawUser UCD-SNMP-MIB::ssCpuRawUser.0 = Counter32: 926739 [root@silent mibs]#
The MRTG legends map to the MIBs listed in the target as shown in Table 24-3.

Table 24-3 Mapping MIBs To The Graph Legends
Legend Maps To Target MIB
Legend1 #1
Legend2 #2
LegendI #1
LegendO #2
So in the example below, legend1 and legendI describe mib-object-1.0 and legend2 and legendO describe mib-object-2.0. Target[graph1]: mib-object-1.0&mib-object-2.0:SNMP-password@IP-address
Plotting Only One MIB Value If you only want to plot one MIB value, you can just repeat the target MIB in the definition. as in the example below where we're plotting only mib-object-1. The resulting MRTG graph actually superimposes the input and output graphs one on top of the other. Target[graph1]: mib-object-1.0&mib-object-1.0:SNMP-password@IP-address
If you only want to plot one MIB value, you can just repeat the target MIB in the definition. as in the example below where we're plotting only mib-object-1. The resulting MRTG graph actually superimposes the input and output graphs one on top of the other.
Adding MIB Values Together For a Graph
You can use the "+" sign between the pairs of MIBs to add them together. In the case below we are adding mib-object-1.0 and mib-object-3.0 for one graph, and adding mib-object-2.0 and mib-object-4.0 for the other.
If you only want to plot one MIB value, you can just repeat the target MIB in the definition. as in the example below where we're plotting only mib-object-1. The resulting MRTG graph actually superimposes the input and output graphs one on top of the other. The example below should be all placed on a single line. Target[graph1]: mib-object-1.0&mib-object-2.0:SNMP-password@IP-address + mib-object-3.0&mib-object-4.0:SNMP-password@IP-address
Sample Target: Total CPU Usage
Linux CPU usage is occupied by "system" processes, "user" mode processes and a few processes running in "nice" mode. The example below adds them all together in a single plot. The example below should be all placed on a single line. Target[graph1]:ssCpuRawUser.0&ssCpuRawUser.0:public@localhost + ssCpuRawSystem.0&ssCpuRawSystem.0:public@localhost + ssCpuRawNice.0&ssCpuRawNice.0:public@localhost

Sample Target: Memory Usage Here is an example for the plotting the amount of free memory versus the total RAM installed in the server. Notice how this is a gauge type variable. Target[graph1]: memAvailReal.0&memTotalReal.0:public@localhost options[graph1]: nopercent,growright,gauge
Sample Target: Newly Created Connections HTTP traffic caused by web browsing usually consists of many very short lived connections. The tcpPassiveOpens MIB object tracks newly created connections and is suited for this type of data transfer. The tcpActiveOpens MIB object monitors new connections originating from the server. On smaller websites you may want to use the "perminute" option to make the graphs more meaningful. Target[graph1]: tcpPassiveOpens.0& tcpPassiveOpens.0:public@localhost MaxBytes[graph1]: 1000000 Options[graph1]: perminute
Sample Target: Total TCP Established Connections Other protocols such as FTP and SSH create longer established connections while people download large files or stay logged into the server. The tcpCurrEstab MIB object measures the total number of connections in the "established" state and is a gauge value. Target[graph1]: tcpCurrEstab.0&tcpCurrEstab.0:public@localhost MaxBytes[graph1]: 1000000 Options[graph1]: gauge
Sample Target: Disk Partition Usage
In this example we'll be monitoring the /var and /home disk partitions on the system.
1. First use the "df -k" command to get a list of the partitions in use.
[root@bigboy tmp]# df -k Filesystem 1K-blocks Used Available Use% Mounted on /dev/hda8 505605 128199 351302 27% / /dev/hda1 101089 19178 76692 21% /boot /dev/hda5 1035660 122864 860188 13% /home /dev/hda6 505605 8229 471272 2% /tmp /dev/hda3 3921436 890092 2832140 24% /usr /dev/hda2 1510060 171832 1261520 73% /var [root@bigboy tmp]#
2. Add the following entries to your snmpd.conf file. disk /home disk /var
3. Restart the SNMP daemon to reload the values. [root@bigboy tmp]# /etc/init.d/snmpd restart

4. Use the snmpwalk command to query the make sure the dskPercent MIB. Object dskPercent.1 will refer to the first "disk" entry in snmpd.conf (/home) and dskPercent.2 will refer to the second (/var).
[root@bigboy tmp]# snmpwalk -v 1 -c craz33guy localhost dskPercent.1 UCD-SNMP-MIB::dskPercent.1 = INTEGER: 13 [root@bigboy tmp]# snmpwalk -v 1 -c craz33guy localhost dskPercent.2 UCD-SNMP-MIB::dskPercent.2 = INTEGER: 73 [root@bigboy tmp]#
5. Your MRTG target for these gauge MIB objects should look like this: Target[graph1]: dskPercent.1& dskPercent.1:public@localhost options[graph1]: growright,gauge
Defining Global Variables
You have to make sure MRTG knows where the MIBs you are using are located. The default location MRTG uses may not be valid. This is done with the global LoadMIBs parameter. The other thing you need to do define where the HTML files will be located, in this case we have specified the default Fedora MRTG HTML directory. LoadMIBs: /usr/share/snmp/mibs/UCD-SNMP-MIB.txt, /usr/share/snmp/mibs/TCP-MIB.txt workdir: /var/www/mrtg/
Implementing Advanced Server Monitoring We can now combine all we have learned to create a configuration file that monitors all these variables and then integrate it into the existing MRTG configuration.
A Complete Sample Configuration Here is a sample configuration file that is used to query server "localhost" for CPU, memory, disk and TCP connection information. # # File: /etc/mrtg/server-info.cfg # # Configuration file for non bandwidth server statistics # # # Define global options # LoadMIBs: /usr/share/snmp/mibs/UCD-SNMP-MIB.txt,/usr/share/snmp/mibs/TCP-MIB.txt workdir: /var/www/mrtg/
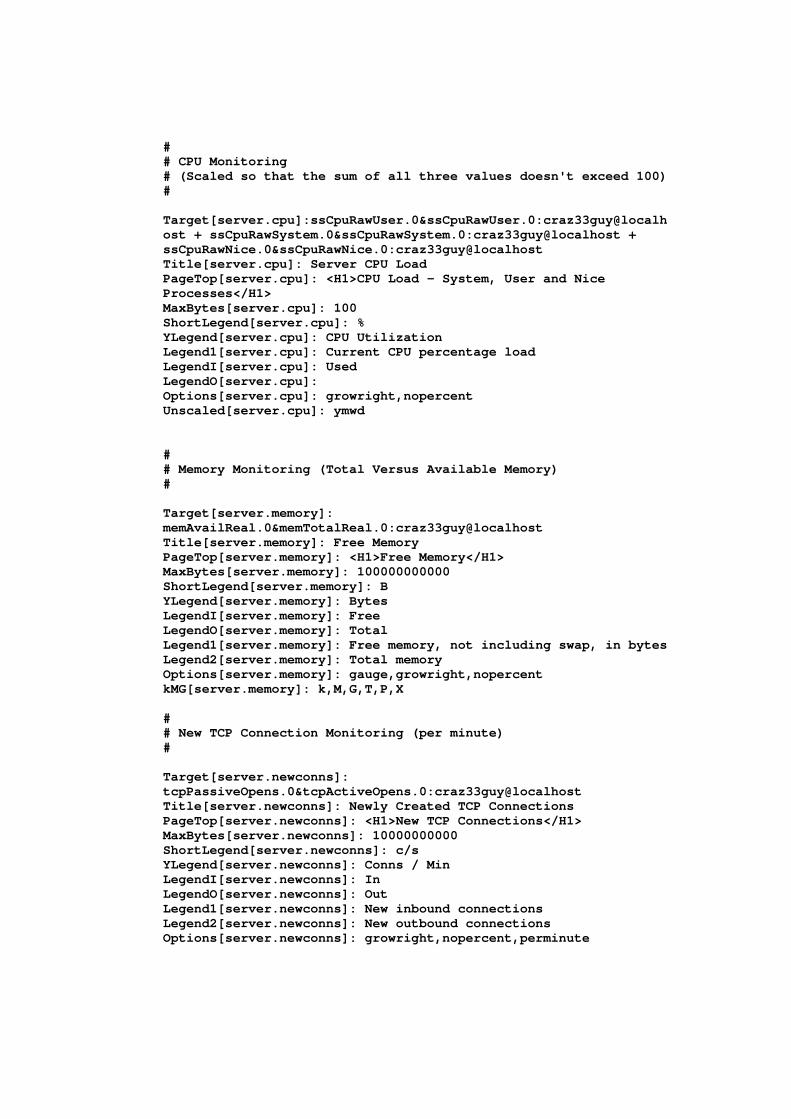
# # CPU Monitoring # (Scaled so that the sum of all three values doesn't exceed 100) # Target[server.cpu]:ssCpuRawUser.0&ssCpuRawUser.0:craz33guy@localhost + ssCpuRawSystem.0&ssCpuRawSystem.0:craz33guy@localhost + ssCpuRawNice.0&ssCpuRawNice.0:craz33guy@localhost Title[server.cpu]: Server CPU Load PageTop[server.cpu]: <H1>CPU Load - System, User and Nice Processes</H1> MaxBytes[server.cpu]: 100 ShortLegend[server.cpu]: % YLegend[server.cpu]: CPU Utilization Legend1[server.cpu]: Current CPU percentage load LegendI[server.cpu]: Used LegendO[server.cpu]: Options[server.cpu]: growright,nopercent Unscaled[server.cpu]: ymwd # # Memory Monitoring (Total Versus Available Memory) # Target[server.memory]: memAvailReal.0&memTotalReal.0:craz33guy@localhost Title[server.memory]: Free Memory PageTop[server.memory]: <H1>Free Memory</H1> MaxBytes[server.memory]: 100000000000 ShortLegend[server.memory]: B YLegend[server.memory]: Bytes LegendI[server.memory]: Free LegendO[server.memory]: Total Legend1[server.memory]: Free memory, not including swap, in bytes Legend2[server.memory]: Total memory Options[server.memory]: gauge,growright,nopercent kMG[server.memory]: k,M,G,T,P,X # # New TCP Connection Monitoring (per minute) # Target[server.newconns]: tcpPassiveOpens.0&tcpActiveOpens.0:craz33guy@localhost Title[server.newconns]: Newly Created TCP Connections PageTop[server.newconns]: <H1>New TCP Connections</H1> MaxBytes[server.newconns]: 10000000000 ShortLegend[server.newconns]: c/s YLegend[server.newconns]: Conns / Min LegendI[server.newconns]: In LegendO[server.newconns]: Out Legend1[server.newconns]: New inbound connections Legend2[server.newconns]: New outbound connections Options[server.newconns]: growright,nopercent,perminute

# # Established TCP Connections # Target[server.estabcons]: tcpCurrEstab.0&tcpCurrEstab.0:craz33guy@localhost Title[server.estabcons]: Currently Established TCP Connections PageTop[server.estabcons]: <H1>Established TCP Connections</H1> MaxBytes[server.estabcons]: 10000000000 ShortLegend[server.estabcons]: YLegend[server.estabcons]: Connections LegendI[server.estabcons]: In LegendO[server.estabcons]: Legend1[server.estabcons]: Established connections Legend2[server.estabcons]: Options[server.estabcons]: growright,nopercent,gauge # # Disk Usage Monitoring # Target[server.disk]: dskPercent.1&dskPercent.2:craz33guy@localhost Title[server.disk]: Disk Partition Usage PageTop[server.disk]: <H1>Disk Partition Usage /home and /var</H1> MaxBytes[server.disk]: 100 ShortLegend[server.disk]: % YLegend[server.disk]: Utilization LegendI[server.disk]: /home LegendO[server.disk]: /var Options[server.disk]: gauge,growright,nopercent Unscaled[server.disk]: ymwd
Testing The Configuration The next step is to test to make sure MRTG can load the configuration file correctly.
Restart SNMP to make sure the disk monitoring commands in the snmpd.conf file are activated. You should then run the /usr/bin/mrtg command followed by the name of the configuration file three times. If all goes well, MRTG will only complain about the fact that certain database files don't exist which it then creates, by the third run all the fields are created and MRTG will operate smoothly. [root@bigboy tmp]# /etc/init.d/snmpd restart [root@bigboy tmp]# env LANG=C /usr/bin/mrtg /etc/mrtg/server-stats.cfg
Creating A New MRTG Index Page To Include This File Use the indexmaker command and include your original MRTG configuration file from the previous chapter (/etc/mrtg/mrtg.cfg) plus the new one you created (/etc/mrtg/server-stats.cfg). [root@bigboy tmp]# indexmaker --output=/var/www/mrtg/index.html \ /etc/mrtg/mrtg.cfg /etc/mrtg/server-stats.cfg

Configuring CRON To Use The New MRTG File
The final step is to make sure that MRTG is configured to poll your server every five minutes using this new configuration file. You can do this by adding the following line to your /etc/cron.d/mrtg file.
0-59/5 * * * * root env LANG=C /usr/bin/mrtg /etc/mrtg/server-stats.cfg
Some versions of Linux require you to edit your /etc/crontab file instead. See Chapter 23 for more details.
Conclusion
Using the guidelines in this chapter you should be able to graph most SNMP MIB values available on any type of device. MRTG is an excellent, flexible monitoring tool and should considered as a part of any systems administrator's server management plans.

Chapter 25
The NTP Server = = = = = = = = = = = = = = = = = = = = = = = = = = = = = = = = = = = = = = = = = = = In This Chapter Chapter 25
The NTP Server Download and Install The NTP Package The /etc/ntp.conf File How To Get NTP Started Testing And Troubleshooting NTP Configuring Cisco Devices To Use An NTP Server Firewalls and NTP Conclusion
(c) Peter Harrison, www.linuxhomenetworking.com = = = = = = = = = = = = = = = = = = = = = = = = = = = = = = = = = = = = = = = = = = = The Network Time Protocol (NTP) is a protocol used to help synchronize your Linux system's clock with an accurate time source. There are a number of "Stratum 1" (NTP sites using an atomic clock for timing) and "Stratum 2" (NTP sites with slightly less accurate time sources) sites that allow the general public to synchronize with them. It is good practice to have at least one server on your network be the local time server for all your other devices, this makes the correlation of system events on different systems much easier. A list of available stratum 1 and 2 servers may be found at: http://www.eecis.udel.edu/~mills/ntp/servers.html There are a number of freely available NTP client programs for Windows. You can use them to practice with your new NTP server.
Download and Install The NTP Package Most RedHat and Fedora Linux software products are available in the RPM format. Downloading and installing RPMs isn't hard. If you need a refresher, Chapter 5, on RPMs, covers how to do this in detail.
When searching for the file, remember that the NTP RPM's filename usually starts with the word "ntp" followed by a version number like this: ntp-4.1.2-5.i386.rpm.
The /etc/ntp.conf File This is the main configuration file for Linux NTP in which you place the IP addresses of the stratum 1 and stratum 2 servers you want to use. Here are the steps to create a configuration file using a pair of sample Internet based NTP servers:

1. First we specify the servers we're interested in: server otherntp.server.org # A stratum 1 server at server.org server ntp.research.gov # A stratum 2 server at research.gov
2. Then we restrict the type of access you allow these servers. In this example we're not allowing them to modify or query our Linux NTP server. restrict otherntp.server.org mask 255.255.255.255 nomodify notrap noquery restrict ntp.research.gov mask 255.255.255.255 nomodify notrap noquery
The mask statement 255.255.255.255 is really a subnet mask limiting access to the single IP address of the remote NTP servers.
3. If this server is also going to provide time for other computers, such as PCs, other Linux servers and networking devices, then you'll have to define the networks from which this server will accept NTP synchronization requests.
This is done with a modified restrict statement with the "nomodify" replaced with a "notrust" keyword. restrict 192.168.1.0 mask 255.255.255.0 notrust nomodify notrap
In this case the mask statement has been expanded to include all 255 possible IP addresses on our local network.
4. We also want to make sure that localhost (The universal IP address used to refer to a Linux server itself) has full access without any restricting keywords: restrict 127.0.0.1
5. Save the file and restart NTP for these settings to take effect.
How To Get NTP Started You have to restart the NTP process every time you make a change to the configuration file for the changes to take effect on the running process.
> To get NTP configured to start at boot: [root@bigboy tmp]# chkconfig ntpd on
> To start/stop/restart NTP after booting: [root@bigboy tmp]# /etc/init.d/ntpd start [root@bigboy tmp]# /etc/init.d/ntpd stop [root@bigboy tmp]# /etc/init.d/ntpd restart
Testing And Troubleshooting NTP After configuring and starting NTP, you'll have to test it to make sure it is working. Here are some guidelines you can follow to get NTP working correctly.
Verifying NTP is Running You can test whether the NTP process is running with the following command, you should get a response of plain old process ID numbers: [root@bigboy tmp]# pgrep ntpd

Doing An Initial Synchronization
If the time on the local server is very different from that of its primary time server your NTP daemon will eventually terminate itself leaving an error message in the /var/log/messages file. You should run the "ntpdate -u" command to rapidly force it to synchronize before starting the NTP daemon for the first time. The ntpdate command doesn't run continuously in the background, you will still have to run the ntpd daemon to get continuous NTP updates.
Here is some sample output of the ntpdate command in which a server whose initial time was set to midnight, was correctly set to 08:03 am.
o The date was originally set to midnight which h was verified by using the "date" command. [root@smallfry tmp]# date Thu Aug 12 00:00:00 PDT 2004 [root@smallfry tmp]#
o The ntpdate command is run three times to synchronize smallfry's clock to server 192.168.1.100, but must be run while the ntpd process is stopped. So you'll have to stop ntpd, run ntpdate and then start ntpd again. [root@smallfry tmp]# /etc/init.d/ntpd stop [root@smallfry tmp]# ntpdate -u 192.168.1.100 Looking for host 192.168.1.100 and service ntp host found : bigboy.my-site.com 12 Aug 08:03:38 ntpdate[2472]: step time server 192.168.1.100 offset 28993.084943 sec [root@smallfry tmp]# ntpdate -u 192.168.1.100 Looking for host 192.168.1.100 and service ntp host found : bigboy.my-site.com 12 Aug 08:03:40 ntpdate[2472]: step time server 192.168.1.100 offset 2.467652 sec [root@smallfry tmp]# ntpdate -u 192.168.1.100 Looking for host 192.168.1.100 and service ntp host found : bigboy.my-site.com 12 Aug 08:03:42 ntpdate[2472]: step time server 192.168.1.100 offset 0.084943 sec [root@smallfry tmp]# /etc/init.d/ntpd start [root@smallfry tmp]#
o The date is now corrected
[root@smallfry tmp]# date Thu Aug 12 08:03:45 PDT 2004 [root@smallfry tmp]#
Determining If NTP Is Synchronized Properly Use the ntpq command to see the servers with which you are synchronized. It will provide you with a list of configured time servers and the delay, offset and jitter that your server is experiencing with them. For correct synchronization, the delay and offset values should be non-zero and the jitter value should be under 100. [root@bigboy tmp]# ntpq -p
Here is some sample output of the command:

remote refid st t when poll reach delay offset jitter ============================================================================== -jj.cs.umb.edu gandalf.sigmaso 3 u 95 1024 377 31.681 -18.549 1.572 milo.mcs.anl.go ntp0.mcs.anl.go 2 u 818 1024 125 41.993 -15.264 1.392 -mailer1.psc.edu ntp1.usno.navy. 2 u 972 1024 377 38.206 19.589 28.028 -dr-zaius.cs.wis ben.cs.wisc.edu 2 u 502 1024 357 55.098 3.979 0.333 +taylor.cs.wisc. ben.cs.wisc.edu 2 u 454 1024 347 54.127 3.379 0.047 -ntp0.cis.strath harris.cc.strat 3 u 507 1024 377 115.274 -5.025 1.642 *clock.via.net .GPS. 1 u 426 1024 377 107.424 -3.018 2.534 ntp1.conectiv.c 0.0.0.0 16 u - 1024 0 0.000 0.000 4000.00
Your Linux NTP clients cannot Synchronize Properly A telltale sign that you haven't got proper synchronization is when all the remote servers have jitters of 4000 with delay and reach values of zero.
remote refid st t when poll reach delay offset jitter ========================================================================= LOCAL(0) LOCAL(0) 10 l - 64 7 0.000 0.000 0.008 ntp-cup.externa 0.0.0.0 16 u - 64 0 0.000 0.000 4000.00 snvl-smtp1.trim 0.0.0.0 16 u - 64 0 0.000 0.000 4000.00 nist1.aol-ca.tr 0.0.0.0 16 u - 64 0 0.000 0.000 4000.00
This could be caused by the following:
o Older versions of the NTP package don't work correctly if you use the DNS name for the NTP servers. In these cases you will want to use the actual IP addresses instead.
o A firewall blocking access to your Stratum 1 and 2 NTP servers. This could be located on one of the networks between the NTP server and its time source, or firewall software such as iptables could be running on the server itself.
o Fedora Core 2 has a bug in which NTP clients will not be able to synchronize with a Fedora Core 2 time server unless the "notrust nomodify notrap" keywords in the restrict statement for the NTP client network is removed.
The example below shows a restrict statement that only has the client network defined without any keywords. The configuration line that works with other NTP versions has been commented out. # -- CLIENT NETWORK ------- #restrict 172.16.1.0 mask 255.255.255.0 notrust nomodify notrap restrict 172.16.1.0 mask 255.255.255.0

Fedora Core 2 File Permissions All the Fedora / RedHat NTP daemons write temporary files to the /etc/ntp directory. Unfortunately, in Fedora Core 2, the permissions on this directory don't allow this to be done. You will have to set the group and owner of the directory to be "ntp" [root@bigboy tmp]# chown ntp:ntp /etc/ntp
You'll get errors like this in the /var/log/messages file if you don't. Aug 12 00:29:45 smallfry ntpd[2097]: can't open /etc/ntp/drift.TEMP: Permission denied
Configuring Cisco Devices To Use An NTP Server NTP can be used to synchronize time on a variety of devices including networking equipment. I have included the necessary NTP commands for a variety of Cisco Systems products as it is one of the most popular manufacturers of networking equipment and would feature in the overall architectures of many Linux environments.
Cisco IOS Here are the commands you would use to make your router synchronize with NTP servers with IP addresses 192.168.1.100 and 192.168.1.201. An explanation of the commands used follows. ciscorouter> enable password: ********* ciscorouter# config t ciscorouter(config)# ntp update-calendar ciscorouter(config)# ntp server 192.168.1.100 ciscorouter(config)# ntp server 192.168.1.201 ciscorouter(config)# exit ciscorouter# wr mem
o ntp server: Forms a server association with another system.
o ntp update-calendar: Configures the system to update its hardware clock from the software clock at periodic intervals.
CAT OS Here are the commands you would use to make your router synchronize with NTP servers with IP addresses 192.168.1.100 and 192.168.1.201. An explanation of the commands used follows. ciscoswitch> enable password: ********* ciscoswitch# set ntp client enable ciscoswitch# ntp server 192.168.1.100 ciscoswitch# ntp server 192.168.1.100 ciscoswitch# exit
o ntp server: Forms a server association with another system.
o set ntp client enable: Activate the NTP client
Firewalls and NTP
NTP servers communicate with one another using UDP with a destination port of 123. Unlike most UDP protocols, the source port isn't a high port (ie. greater than 1023), but 123 also. You'll have to allow UDP traffic on source/destination port 123 between your server and the Stratum 1/2 server with which you are synchronizing.
A sample Linux iptables firewall script snippet is in the Appendix.
Conclusion
It is important that all the systems under your control all have the same accurate time. It can help to give a very clear indication of a chain of events that involve multiple devices and it can also help in the synchronization of time sensitive transactions to name a few examples.
An NTP server on your local network can make this easier to do. Sometimes it isn't desirable for all your NTP clients to have access to the Internet to synchronize with stratum 1 and 2 servers, even when they all have access there is the risk of them losing synchronization if the central connection to the Internet is lost. The maintenance of firewall rules for multiple NTP connections to the Internet can also be daunting especially if the management of the firewall is handled by another group.
A local NTP server can ensure that the clients all have the same time relative to the server even when Internet connectivity is temporarily lost thereby reducing the problems of them being out of synchronization with each other. The firewall rules can also be greatly simplified. A local NTP server is frequently a good thing to have for these reasons.

Chapter 26
Network Based Linux Installation
= = = = = = = = = = = = = = = = = = = = = = = = = = = = = = = = = = = = = = = = = = = In This Chapter Chapter 26
Network Based Linux Installation Setting Up The Installation Server Creating Bootable Media The Network Installation Troubleshooting The Network Installation Differences Between Fedora and RedHat Installation Automating Installation With Kickstart Conclusion
(c) Peter Harrison, www.linuxhomenetworking.com = = = = = = = = = = = = = = = = = = = = = = = = = = = = = = = = = = = = = = = = = = = Fedora Linux allows you to do operating system installations via a network connection using a Kickstart server. It is frequently much faster than using CDs and the process can be automated. The procedure is fairly simple:
> Connect the new server (installation client) to the same network as the server with the pre-loaded installation files (installation server).
> Boot the installation client from a specially created boot CD
> Enter your preferred installation method (FTP, HTTP, NFS) and the needed network parameters to do this
> The installation procedure will then continue with the more familiar Fedora Linux installation screens. Enter your selections and then complete the installation.
This chapter will briefly explain how to set this up using all three methods using a single installation server (bigboy) with an IP address of 192.168.1.100.
Setting Up The Installation Server Kickstart can be configured on an FTP, NFS or Apache server. Each method is explained below, but my experience has been that the Apache server has a number of advantages over the other two.
Using a web server for kickstart is generally easier because:
> Sometimes a kickstart server has to be located on a remote network, often passing through a firewall. Strict firewall rules for HTTP are generally easier to configure than those for FTP or NFS.

> The http:// nomenclature used by kickstart for accessing files is more familiar to users than that used for NFS and FTP. This may be important for you when configuring files for automated kickstart installation.
Basic Preparation In this example we are going to set up a kickstart server that will be used in Fedora Core 2 installations. All the necessary files will be placed in the /data/network-install directory.
Create The Installation Directories We'll first create the directories /data/network-install/Fedora/base and /data/network-install/ISO in which we will copy the necessary files.
[root@bigboy tmp]# mkdir -p /data/network-install/Fedora/base [root@bigboy tmp]# mkdir -p /data/network-install/ISO
You now need to place the network installation driver files into the base directory.
Copying The Files The HTTP, NFS and FTP kickstart methods all require the base set of Fedora files to be installed on the kickstart server. Here's how to do it:
1. Mount your first Fedora CD ROM. [root@bigboy tmp]# mount /dev/cdrom /mnt/cdrom
2. Copy the files from the CD ROM base directory to the one on the hard disk [root@bigboy tmp]# cd /mnt/cdrom/Fedora/base [root@bigboy base]# cp * /data/network-install/base
3. Dismount your CD ROM. [root@bigboy base]# cd /tmp [root@bigboy tmp]# umount /dev/cdrom [root@bigboy tmp]# eject cdrom
Note: You also have the option to FTP all the files from the base directory of the desired version of Fedora from the Fedora website to the /data/network-install/base directory.
HTTP & FTP Preparation
Copy all the contents of the /Fedora directory of each of the installation CDs to the /data/network-install/ directory. This will require about 2GB of space. When this is completed, your /data/network-install/Fedora/ directory should look like this: [root@silent tmp]# ls /data/network-install/Fedora/ base RPMS TRANS.TBL [root@silent tmp]#
NFS Preparation
Create ISO images of the installation CDs and place them in the /data/network-install/ISO directory. This will require about 2GB of space too. You can download the ISO images from the Fedora website or use the Fedora CDs as shown below.
Preparation Using CDs - First CD [root@bigboy tmp]# cd /data/network-install/ISO [root@bigboy ISO]# mount /mnt/cdrom

[root@bigboy ISO]# mkisofs -J -r -T -o FC2-i386-disc1.iso /mnt/cdrom ... ... ... [root@bigboy ISO]# eject cdrom
Second CD [root@bigboy ISO]# mount /mnt/cdrom [root@bigboy ISO]# mkisofs -J -r -T -o FC2-i386-disc2.iso /mnt/cdrom [root@bigboy ISO]# eject cdrom
Third CD [root@bigboy ISO]# mount /mnt/cdrom [root@bigboy ISO]# mkisofs -J -r -T -o FC2-i386-disc3.iso /mnt/cdrom [root@bigboy ISO]# eject cdrom
Fourth CD [root@bigboy ISO]# mount /mnt/cdrom [root@bigboy ISO]# mkisofs -J -r -T -o FC2-i386-disc4.iso /mnt/cdrom [root@bigboy ISO]# eject cdrom
Setup Your Webserver You will now have to setup Apache to give the file listings of your /data/network-install/Fedora and /data/network-install/ISO directories by pointing your browser to the URL http://192.168.1.100/network-install/Fedora/RPMS/ or http://192.168.1.100/network-install/Fedora/ISO/ respectively. A sample httpd.conf configuration is below. Remember to restart Apache to make these settings take effect NameVirtualHost 192.168.1.100 # # For HTTP Installations # <VirtualHost 192.168.1.100> DocumentRoot /data/ </VirtualHost> <Directory /data/network-install> Options +Indexes AllowOverride AuthConfig order allow,deny allow from all </Directory>
Setup Your FTP Server You'll also have to set up your VSFTP server to make incoming anonymous FTP connections log in to the /data/network-install directory by default. Here is a sample snippet of the vsftpd.conf file. Remember to restart VSFTP to make these settings take effect # # Anonymous FTP Root Directory # anon_root=/data/network-install/ #
Create A Special FTP User

You can also create a special user for non anonymous FTP installations with its home directory as "/". You must also make sure that the user has read access to the /data/network-install directory. An example is below. [root@bigboy tmp]# useradd -g users ftpinstall [root@bigboy tmp]# passwd ftpinstall Changing password for user ftpinstall. New password: Retype new password: passwd: all authentication tokens updated successfully. [root@bigboy tmp]# [root@bigbot tmp]# usermod -d / ftpinstall [root@bigbot tmp]#
Setup Your NFS Server The steps for setting up an NFS server are more complicated.
1. Create a /etc/exports file with the following entry in it. You must use tabs, not spaces between the entries /data/network-install *(ro,sync)
2. Make sure that the portmap, nfs, nfslock and netfs daemons are all running to create an NFS server. The startup scripts for these are found in the /etc/init.d directory. Chapter 30, which covers NFS, will explain this in more detail.
3. Run the exportfs command to add this directory to the NFS database of network available directories. You should also add this command to your /etc/rc.local file so that this is repeated after every reboot. [root@bigboy tmp]# exportfs -ra
4. The installation client must have a matching pair of forward and reverse DNS entries on your DNS server. In other words, a DNS lookup on the IP address of the installation client must return a server name that will map back to the original IP address when a DNS lookup is done on that same server name. [root@bigboy tmp]# host 192.168.1.96 96.1.168.192.in-addr.arpa domain name pointer 192-168-1-96.my-site.com. [root@bigboy tmp]# [root@bigboy tmp]# host 192-168-1-96.my-site.com 192-168-1-96.my-site.com has address 192.168.1.96 [root@bigboy tmp]#
This may mean that you will have to create entries for all your DHCP IP addresses if you choose to use a DHCP method of assigning IP addresses during installation.
Configure Your DHCP Server
During the installation procedure, the installation client will prompt you for the IP address it should use for the installation process. I recommend selecting the option that makes the Installation Client get its address via DHCP. This will automate the installation more and will therefore make it faster. It will also reduce the possibility of human error.
Setting up the Installation Server as a DHCP server is fairly straight forward and can be found in Chapter 7.

Creating Bootable Media
You will also need either a bootable CD or bootable diskette for your installation client.
Creating Boot CDs The first CD in your set of Fedora CDs will work. You can either copy an existing disk, or burn a copy of the FC2-i386-disc1.iso file onto a CD.
I'd recommend using CDs as they are much more reliable and commonly used than floppy disks.
Creating Boot Diskettes The first step is to insert the first Linux installation CD in your CD ROM drive and the blank boot diskette into your floppy drive. The next steps depend on whether you are creating the diskettes using a Windows or a Linux box.
Using Windows 1. Execute the rawrite.exe file in the CDROM's \dosutils directory. The program will
then prompt you for a filename. Enter the name of the boot image file bootdisk.img in the CDROM's \images directory Enter disk image source file name: \images\bootdisk.img Enter target diskette drive: a: Please insert a formatted diskette into drive A: and press -ENTER-:
2. Remove the boot diskette and insert the blank network driver diskette into your floppy drive.
3. Execute the rawrite.exe once again. Enter the name of the network driver image file drvnet.img in the CDROM's \images directory Enter disk image source file name: \images\drvnet.img Enter target diskette drive: a: Please insert a formatted diskette into drive A: and press -ENTER-:
4. Remove the network driver diskette from your floppy drive.
5. Remove the network driver diskette from your floppy drive and eject the CDROM [root@bigboy tmp]# eject cdrom [root@bigboy tmp]#
The Network Installation From here on, the installation procedure mimics the regular Linux installation, except for the first couple steps.
1. Connect your client Linux box to the DHCP network.
2. Boot your system using the first Fedora installation CD. This is the only CD you'll need for future network installations.
3. Enter the command "linux askmethod" at the boot: prompt
4. Hit the <Enter> key

5. Go through the usual steps until it prompts for the "Installation Method". You will see a number of choices
Local CDROM Hard Drive NFS Image FTP HTTP
6. Select the network option of your choice (NFS, FTP, HTTP)
7. You will then get a "No Driver Found" screen at which point you should remove the boot diskette and replace it with the driver diskette.
8. Select the "Use a Driver Disk" option, choose the floppy device "fd0" as the source of the files and then proceed to the "Networking Device" menu
9. Select the Ethernet device to which the installation client is connected to the installation server network. This would most likely be interface "eth0".
10. Select "DHCP" in the following "Configure TCP/IP" screen. This will make the Installation client use DHCP during the installation.
If You Selected The NFS Method You will now reach the "NFS setup" menu. Enter the IP address of the installation server as the "NFS Server Name". The "Red Hat directory" will be "/data/network-install/ISO". The following menus will be the usual Fedora GUI installation screens.
If You Selected The HTTP Method You will now reach the "HTTP Setup" menu. Enter the IP address of the installation server when prompted for a "Web site name".The "Red Hat directory" will be "/network-install". The following menus will be text based versions of the usual Fedora installation screens.
If You Selected The FTP Method You will now reach the "FTP Setup" menu. Enter the IP address of the installation server as the "FTP Site Name".
"Not Selecting" The Non-Anonymous FTP Box The "Red Hat directory" will be "/". The following menus will be text based versions of the usual Fedora installation screens.
"Selecting" The Non-Anonymous FTP Box The "Red Hat directory" will be "/data/network-install". Enter the username and password of your special FTP user account. The following menus will be text based versions of the usual RedHat installation screens.
Troubleshooting The Network Installation You can do some basic troubleshooting by accessing the various installation status screens available.
> The installation logs can always be viewed by hitting <CTRL-ALT-F3>
> Kernel messages can be seen by hitting <CTRL-ALT-F4>
> Access to a limited BASH shell Kernel can be gained by hitting <CTRL-ALT-F2>

> You can return to the main installation screen at any time by hitting <CTRL-ALT-F1>
Differences Between Fedora and RedHat Installation The RPM file locations have to be different when using the HTTP or FTP methods.
> Fedora expects the files to be placed in a "Fedora" directory under /data/network-install.
> RedHat expects the files to be placed in a "RedHat" directory under /data/network-install.
This is the only difference between both operating systems when configuring network installations.
Automating Installation With Kickstart Both Fedora and RedHat Linux save all the parameters you used during installation in the /root/anaconda-ks.cfg kickstart configuration file. You can use this file to create an automated installation of a duplicate system which can be useful if you have a large number of servers to install.
This section shows you how to automate network installations using the kickstart application and NFS. You can use HTTP and FTP but they have been omitted to keep the discussion brief.
How To Create New Kickstart Configuration Files You can create a customized kickstart configuration file by using the "ksconfig" command from a GUI console. It will bring up a menu from which you can select all your installation options. When finished, you save the configuration with the filename of your choice.
You may want to then edit the configuration file and comment out certain parameters that may change from system to system with a "#". These could include things like the system's name and IP address. During the kickstart process you will be prompted for these unspecified values.
Note: Do not change the order of the entries in the kickstart configuration file.
Adding Post Installation Commands You may want to run some commands on the newly created Linux installation after kickstart is complete. Some processes that are activated by default by Fedora may not be suitable for your server and may need to be disabled.
This can be done by placing a %post section at the end of the kicksrart file with all the post installation commands you wish to run. Here is an example: %post chkconfig isdn off chkconfig pcmcia off chkconfig portmap off chkconfig apmd off chkconfig nfslock off chkconfig nfs off
A Note About Using anaconda-ks.cfg It is possible to use the /root/anaconda-ks.cfg file as a template for future installations. RedHat comments out the partitioning information in this file, so you will either have to uncomment it and then make your partitioning modifications or be prepared to be prompted for your portioning information.

How To Run A Kickstart Installation It is best to place your kickstart files in a subdirectory under the /data/network-install directory. The examples below assume the subdirectory is called /data/network-install/kickstart.
Remember that you may want to remove the "#" comments from the partition section of the file. If not, you will be prompted for this information.
Using a NFS Server Verify that the first two lines of the file look like this or else you may be prompted for NFS ISO file location information. install nfs --server=192.16.1.100 --dir=/data/network-install/ISO
Using a Web Server Verify that the first two lines of the file look like this or else you may be prompted for RPM base file location information. install url --url http://192.168.1.100/network-install/
Booting With Your Kickstart Files There are two ways to specify the name of the kickstart file to use. The first is to enter it manually from the LILO boot: prompt when you insert the boot CD or floppy. The second is to have your DHCP server automatically tell the Kickstart client about the name of the kickstart file to use when it assigns the IP address. Both methods are listed below:
Manually Specifying the Kickstart Filename
Once you have booted from your boot floppy or CDROM, you'll need to use the following command at the lilo boot: prompt to continue with the installation. The ks.cfg file is the kickstart configuration file we want to use.
NFS Method boot: linux ks=nfs:192.168.1.100:/kickstart/ks.cfg
HTTP Method boot: linux ks=http://192.168.1.100/network-install/kickstart/ks.cfg
Configuring The Filename Automatically
Whenever you have to create lots of cloned Linux servers, then you may want to configure your DHCP server to specify the single kickstart configuration file you wish to use. Here is how it's done:
1. Place your kickstart file in the /data/network-install/kickstart directory.
2. Edit your dhcpd.conf file and add the following lines to the section for the interface that will be serving DHCP IP addresses. filename "/data/network-install/kickstart/ks.cfg"; next-server 192.168.1.100
3. Insert the boot floppy or CD into the kickstart client Linux box and connect it to the DHCP network. At the boot: prompt type in the following command: boot: linux ks

Kickstart will first search for a configuration file named ks.cfg on either the boot CD / floppy. It will then automatically attempt to get a DHCP IP address and see if the DHCP server will specify a configuration file.
Kickstart will then use NFS to get both the configuration file and the installation ISOs. The rest should be automatic.
Conclusion
The Kickstart method of Fedora Linux installation can greatly reduce the length of time it takes to install the operating system. Time is saved not only because a network connection can be faster than using CDs, but also because it can be left unattended to install a predetermined Linux configuration. A Kickstart server connected to an isolated wireless network dedicated to the purpose may be a good idea for data centers with hundreds of Linux servers.
A recent standard called PXE allows you to run kickstart without a CD ROM if you configure the NIC card to do a network boot from a specially configured DHCP server. The topic is beyond the scope of this book, but it may be interesting for readers with more complex projects to research this option more.

Chapter 27
Linux Software RAID = = = = = = = = = = = = = = = = = = = = = = = = = = = = = = = = = = = = = = = = = = = In This Chapter Chapter 27
Linux Software RAID RAID Types Before You Start Configuring Software RAID Conclusion
(c) Peter Harrison, www.linuxhomenetworking.com = = = = = = = = = = = = = = = = = = = = = = = = = = = = = = = = = = = = = = = = = = = The main goals of using Redundant Arrays of Inexpensive Disks (RAID) is to either improve disk data performance and/or provide data redundancy. RAID can be handled either by the operating system software or it may be implemented via a purpose built RAID disk controller card without having to configure the operating system at all. This chapter will attempt to explain how to configure the software RAID schemes supported by RedHat / Fedora Linux. For the sake of simplicity, this chapter focuses on using RAID for partitions that include neither the /boot or the root (/) filesystems.
RAID Types Whether hardware or software based, RAID can be configured using a variety of standards. The most popular ones are listed below.
Linear Mode RAID In this scheme, the RAID controller views the RAID set as a "chain" of disks. Data is only written to the next device in the chain after the previous one has been filled.
The aim of Linear RAID is to accommodate large filesystems spread over multiple devices with no data redundancy. A drive failure will corrupt your data.
Linear mode RAID is supported by Fedora Linux.
RAID 0 The RAID controller tries to evenly distribute data across all disks in the RAID set. A good analogy would be to envisage a file as if it were a book. In RAID 0, the system will try to sequentially place each "page" of the file on a different disk. In reality, the pages are called "chunks" whose size is determined when you initially configure RAID. So for example, in a RAID set of 3 disks, the first "chunk" of data in a file will be placed on disk 1, the second

chunk will be on disk 2, the third chunk will on disk 3, the fourth chunk will then be placed on disk 1, etc. It is for this reason that RAID 0 is often called "striping".
Like Linear RAID, RAID 0 aims to accommodate large file systems spread over multiple devices with no data redundancy. The advantage of RAID 0 is data access speed. A file that is spread over three disks can be read three times as fast.
RAID 0 can accommodate disks of unequal sizes. When RAID runs out of "striping space" on the smallest device, it then continues the striping using the available space on the remaining drives. When this occurs, the data access speed is lower for this portion of data as the total number of RAID drives available is reduced. It is for this reason that RAID 0 is best used with equal sized drives.
RAID 0 is supported by Fedora Linux.
RAID 1 With RAID 1, data is cloned on a duplicate disk. This RAID method is therefore frequently called "disk mirroring".
When one of the disks in the RAID set fails, the other one continues to function. When the failed disk is replaced, the data is automatically cloned to the new disk from the surviving disk. RAID 1 also offers the possibility of using a "hot standby" spare disk which will be automatically cloned in the event of a disk failure on any of the primary RAID devices.
RAID 1 offers data redundancy, without the speed advantages of RAID 0. A disadvantage of software based RAID 1 is that the server has to send data twice to be written to each of the mirror disks. This can saturate data busses and CPU utilization. With a hardware based solution, the server CPU sends the data to the RAID disk controller once, and the disk controller then duplicates the data to the mirror disks. This makes fact often makes RAID capable disk controllers the preferred solution when implementing RAID 1.
A limitation of RAID 1 is that the total RAID size in Gigabytes is equal to that of the smallest disk in the RAID set. Unlike RAID 0, the extra space on the larger device isn't used.
RAID 1 is supported by Fedora Linux.
RAID 4 Let's return to the book analogy from our description of RAID 0. RAID 4 operates similarly, but inserts a special error correcting or parity "page" on an additional disk dedicated to this purpose.
RAID 4 requires at least three disks in the RAID set and can only survive the loss of a single drive. When this occurs, the data in can be recreated "on the fly" with the aid of the information on the RAID set's parity disk. When the failed disk is replaced, is repopulated with the "lost data" with the help of the parity disk's information.
RAID 4 combines the goal of high speed provided by RAID 0 with the redundancy goal of RAID 0. Its major disadvantage is that the data is striped, but the parity information is not. In other words, any data written to the any section of the data portion of the RAID set must be followed by an update of the parity disk. The parity disk can therefore act as a bottleneck. It is for this reason that RAID 4 isn't used very frequently.
RAID 4 is not supported by Fedora Linux.
RAID 5 RAID 5 improves on RAID 4 by striping the parity data between all the disks in the RAID set, This avoids the parity disk bottleneck while maintaining many of the speed features of

RAID 0 and the redundancy of RAID 1. Like RAID 4, RAID 5 can only survive the loss of a single disk.
RAID 5 is supported by Fedora Linux.
Linux RAID 5 requires a minimum of three disks / partitions
Before You Start There are some basic guidelines you may want to follow when setting up RAID.
IDE Drives Most home & SOHO systems will probably use IDE disks They do have some limitations.
o The total length of an IDE cable can only be a few feet long which generally limits their use to small home systems.
o IDE drives do not "hot swapping". You cannot replace them while your system is running.
o Only two devices can be attached per controller.
o The performance of the IDE bus can be degraded by the presence of a second device on the cable.
o The failure of one drive on an IDE bus often causes the malfunctioning of the second device. This can be fatal if you have two IDE drives of the same RAID set attached to the same cable.
It is for these reasons that it is recommended to use only one IDE drive per controller when using RAID, especially in a corporate environment. In a home or SOHO setting, IDE based software RAID may be adequate.
SCSI Drives SCSI hard disks have a number of features that make them more attractive for RAID use.
o SCSI controllers are more tolerant of disk failures. The failure of a single drive is less likely to disrupt the remaining drives on the bus.
o SCSI cables can be several meters long, making them suitable for data center applications.
o Much more than two devices may be connected to a SCSI cable bus.
o Some models of SCSI devices support "hot swapping" which allows you to replace them while the system is running.
However SCSI drives tend to be more expensive than IDE drives which may make them less attractive for home use.
Should I Software RAID Partitions Or Entire Disks? It is generally a not a good idea to share RAID configured partitions with non RAID partitions. The reason for this is obvious as a disk failure could still incapacitate a system.
If you decide to use RAID, all the partitions on each RAID disk should be part of a RAID set. Many people simplify this problem by filling each disk of a RAID set with only one partition.

Backup Your System First Software RAID creates the equivalent of a single RAID virtual disk drive made up of all the underlying regular partitions used to create it. You will have to format this new RAID device before your Linux system will be able to store files on it. This will cause all the old data on the underlying RAID partitions to be lost.
It is best to backup the data on these and any other partitions on the disk drive on which you want implement RAID. A mistake could unintentionally corrupt valid data.
Configure RAID In Single User Mode As you will be modifying the disk structure of your system you should also consider configuring RAID while your system is running in single user mode from the VGA console. This will make sure that most applications and networking will be shutdown and that all other users will not be able to access the system. This will reduce the risk of data corruption during the exercise. [root@bigboy tmp]# init 1
Once finished, you can issue the "exit" command and your system will boot right up in the default runlevel provided in the /etc/inittab file.
Configuring Software RAID Configuring RAID using Fedora Linux requires a number of steps that need to be followed carefully. In our tutorial example we'll be configuring RAID 5 using a system with three pre-partitioned hard disks. The partitions to be used will be:
> /dev/hde1
> /dev/hdf2
> /dev/hdg1
You'll need to adapt the various stages outlined below to your particular environment.
RAID Partitioning You will first need to identify two or more partitions, each on a separate disk. If you are doing RAID 0 or RAID 5, the partitions should be of approximately the same size, as in this scenario, RAID will limit the extent of data access on each partition to an area no larger than that of the smallest partition in the RAID set.
Determining Available Partitions First use the "fdisk -l" command to view all the mounted and unmounted filesystems available on your system. You may then also want to use the "df -k" command which only shows mounted filesystems, but has the big advantage of giving you the mount points too.
These two commands should help you to easily identify the partitions you want to use. Sample output of these commands can be seen below.
[root@bigboy tmp]# fdisk -l Disk /dev/hda: 12.0 GB, 12072517632 bytes 255 heads, 63 sectors/track, 1467 cylinders Units = cylinders of 16065 * 512 = 8225280 bytes

Device Boot Start End Blocks Id System /dev/hda1 * 1 13 104391 83 Linux /dev/hda2 14 144 1052257+ 83 Linux /dev/hda3 145 209 522112+ 82 Linux swap /dev/hda4 210 1467 10104885 5 Extended /dev/hda5 210 655 3582463+ 83 Linux ... ... /dev/hda15 1455 1467 104391 83 Linux [root@bigboy tmp]#
[root@bigboy tmp]# df -k Filesystem 1K-blocks Used Available Use% Mounted on /dev/hda2 1035692 163916 819164 17% / /dev/hda1 101086 8357 87510 9% /boot /dev/hda15 101086 4127 91740 5% /data1 ... ... ... /dev/hda7 5336664 464228 4601344 10% /var [root@bigboy tmp]#
Unmount the Partitions You'll need to make sure no one else is accessing these partitions while you are creating the RAID set, so you'll need to make sure they are unmounted. [root@bigboy tmp]# umount /dev/hde1 [root@bigboy tmp]# umount /dev/hdf2 [root@bigboy tmp]# umount /dev/hdg1
Prepare The Partitions With FDISK You have to change each partition in the RAID set to be of type FD (Linux raid autodetect). This can be done using fdisk. Here is an example using /dev/hde1 [root@bigboy tmp]# fdisk /dev/hde The number of cylinders for this disk is set to 8355. There is nothing wrong with that, but this is larger than 1024, and could in certain setups cause problems with: 1) software that runs at boot time (e.g., old versions of LILO) 2) booting and partitioning software from other OSs (e.g., DOS FDISK, OS/2 FDISK) Command (m for help):
Use FDISK Help We now use the fdisk "m" command to get some help Command (m for help): m ... ... p print the partition table q quit without saving changes s create a new empty Sun disklabel t change a partition's system id ...

... Command (m for help):
Set The ID Type To FD Partition /dev/hde1 is the 1st partition on disk /dev/hde. We now modify its "type" using the "t" command and then specifying the partition number and type code. We also use the "L" command to get a full listing of ID types in case we forget. Command (m for help): t Partition number (1-5): 1 Hex code (type L to list codes): L ... ... ... 16 Hidden FAT16 61 SpeedStor a9 NetBSD f2 DOS secondary 17 Hidden HPFS/NTF 63 GNU HURD or Sys ab Darwin boot fd Linux raid auto 18 AST SmartSleep 64 Novell Netware b7 BSDI fs fe LANstep 1b Hidden Win95 FA 65 Novell Netware b8 BSDI swap ff BBT Hex code (type L to list codes): fd Changed system type of partition 1 to fd (Linux raid autodetect) Command (m for help):
Make Sure The Change Occurred Use the "p" command to get the new proposed partition table Command (m for help): p Disk /dev/hde: 4311 MB, 4311982080 bytes 16 heads, 63 sectors/track, 8355 cylinders Units = cylinders of 1008 * 512 = 516096 bytes Device Boot Start End Blocks Id System /dev/hde1 1 4088 2060320+ fd Linux raid autodetect /dev/hde2 4089 5713 819000 83 Linux /dev/hde4 6608 8355 880992 5 Extended /dev/hde5 6608 7500 450040+ 83 Linux /dev/hde6 7501 8355 430888+ 83 Linux Command (m for help):
Save The Changes Use the "w" command to permanently save the changes to disk /dev/hde. Command (m for help): w The partition table has been altered! Calling ioctl() to re-read partition table. WARNING: Re-reading the partition table failed with error 16: Device or resource busy. The kernel still uses the old table. The new table will be used at the next reboot. Syncing disks. [root@bigboy tmp]#
The error above will occur if any of the other partitions on the disk is mounted.

Repeat For The Other Partitions
For the sake of brevity, I won't show the process to do this, but the steps for changing the IDs for /dev/hdf2 and /dev/hdg1 are very similar.
Format The Partitions
Software RAID requires that all the underlying partitions be formatted with the "ext3" formatting type. If you are not sure whether this has been done you can do so with the "mkfs" command as seen below. [root@bigboy tmp]# mkfs -t ext3 -b 4096 /dev/hde1 [root@bigboy tmp]# mkfs -t ext3 -b 4096 /dev/hdf2 [root@bigboy tmp]# mkfs -t ext3 -b 4096 /dev/hdg1
Edit The RAID Configuration File
The Linux RAID configuration file is /etc/raidtab. A good template file for /etc/raidtab can be found in the man pages, simply issue the command "man raidtab". Just search for the example that matches the type of RAID you need.
General Guidelines
> When configuring RAID 5 a "parity-algorithm" setting must be used.
> The "raid-disk" parameters for each partition in the /etc/raidtab file are numbered starting at "0". For example, if you have four partitions for RAIN, they would be numbered 0, 1, 2 & 3.
> For RAID 5 /etc/raidtab "persistent-superblock" must be set to "1" in order for the RAID autodetect feature (partition type FD) to work.
> For all RAID versions, "persistent-superblock" must be set to "0"
In our example: We configure RAID 5 on using each of the desired partitions on the 3 disks. The set of 3 RAID disks will be called /dev/md0. # # sample raiddev configuration file # 'old' RAID0 array created with mdtools. # raiddev /dev/md0 raid-level 5 nr-raid-disks 3 persistent-superblock 1 chunk-size 32 parity-algorithm left-symmetric device /dev/hde1 raid-disk 0 device /dev/hdf2 raid-disk 1 device /dev/hdg1 raid-disk 2

Create the RAID Set The mkraid command creates the RAID set by reading the /etc/raidtab file. In this case we want to create the logical RAID device /dev/md0 [root@bigboy root]# mkraid /dev/md0 analyzing super-block disk 0: /dev/hde1, 104391kB, raid superblock at 104320kB disk 1: /dev/hdf2, 104391kB, raid superblock at 104320kB disk 2: /dev/hdg1, 104391kB, raid superblock at 104320kB [root@bigboy root]#
Format The New RAID Set Your new RAID device will now have to be formatted. In the example below:
o We use the "-j" qualifier to ensure that a journaling file systems is created.
o A block size of 4KB (4096 bytes) is used with each chunk being comprised of 8 blocks. It is very important that the "chunk-size" parameter in the /etc/raidtab file match the value of the block size multiplied by the stride value in the command below. Note: If the values don't match, then you will get parity errors. [root@bigboy root]# mke2fs -j -b 4096 -R stride=8 /dev/md0 mke2fs 1.32 (09-Nov-2002) Filesystem label= OS type: Linux Block size=4096 (log=2) Fragment size=4096 (log=2) 516096 inodes, 1030160 blocks 51508 blocks (5.00%) reserved for the super user First data block=0 32 block groups 32768 blocks per group, 32768 fragments per group 16128 inodes per group Superblock backups stored on blocks: 32768, 98304, 163840, 229376, 294912, 819200, 884736 Writing inode tables: done Creating journal (8192 blocks): done Writing superblocks and filesystem accounting information: done This filesystem will be automatically checked every 26 mounts or 180 days, whichever comes first. Use tune2fs -c or -i to override. [root@bigboy root]#
Load The RAID Driver For The New RAID Set The next step is make the Linux operating system fully aware of the RAID set by loading the driver for the new RAID set using the raidstart command. [root@bigboy root]# raidstart /dev/md0 [root@bigboy root]#
Create A Mount Point For The RAID Set

The next step is to create a mount point for /dev/md0. In this case we'll create one called /mnt/raid [root@bigboy mnt]# mkdir /mnt/raid
Edit The /etc/fstab File The /etc/fstab file lists all the partitions that need to be mounted when the system boots.
Add An Entry For The RAID set We'll now add an entry for the /dev/md0 device. Here is an example of a line that could be used: /dev/md0 /mnt/raid ext3 defaults 1 2
Note: It is very important that you DO NOT use labels in the /etc/fstab file for RAID devices, just use the real device name such as "/dev/md0". On startup, the /etc/rc.d/rc.sysinit script checks the /etc/fstab file for device entries that match RAID set names in the /etc/raidtab file. It will not automatically start the RAID set driver for the RAID set if it doesn't find a match. Device mounting then occurs later on in the boot process. Mounting a RAID device that doesn't have a loaded driver can corrupt your data giving the error below. Starting up RAID devices: md0(skipped) Checking filesystems /raiddata: Superblock has a bad ext3 journal(inode8) CLEARED. ***journal has been deleted - file system is now ext 2 only*** /raiddata: The filesystem size (according to the superblock) is 2688072 blocks. The physical size of the device is 8960245 blocks. Either the superblock or the partition table is likely to be corrupt! /boot: clean, 41/26104 files, 12755/104391 blocks /raiddata: UNEXPECTED INCONSISTENCY; Run fsck manually (ie without -a or -p options).
Remove Any Entries For The Old Filesystems
The /dev/hde1, /dev/hdf2 and /dev/hdg1 partitions have now been replaced by the combined /dev/md0 partition. You therefore don't want the old partitions to be mounted again. Make sure that any reference to them in this file has either been commented a "#" at the beginning of each line or deleted entirely. #/dev/hde1 /data1 ext3 defaults 1 2 #/dev/hdf2 /data2 ext3 defaults 1 2 #/dev/hdg1 /data3 ext3 defaults 1 2
Start The New RAID Set's Driver This is done using the raidstart command. This command is run automatically at boot time so you'll only have to do this once. [root@bigboy root]# raidstart /dev/md0
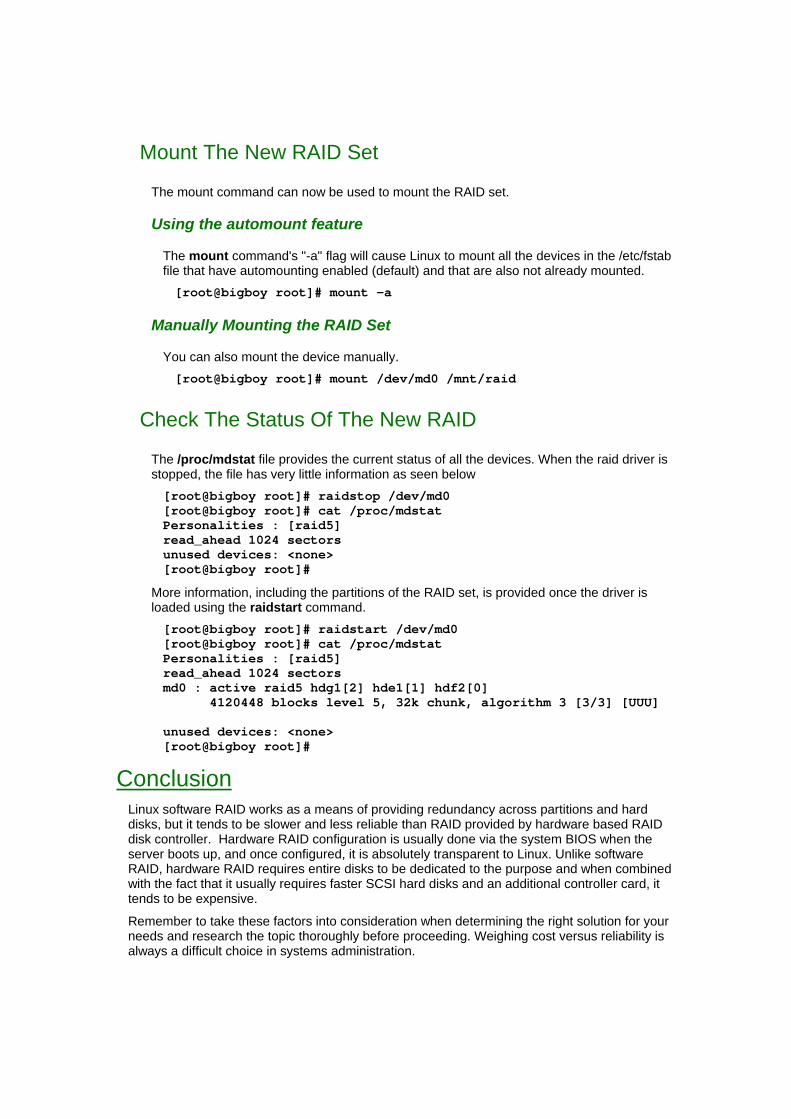
Mount The New RAID Set
The mount command can now be used to mount the RAID set.
Using the automount feature
The mount command's "-a" flag will cause Linux to mount all the devices in the /etc/fstab file that have automounting enabled (default) and that are also not already mounted. [root@bigboy root]# mount -a
Manually Mounting the RAID Set
You can also mount the device manually. [root@bigboy root]# mount /dev/md0 /mnt/raid
Check The Status Of The New RAID
The /proc/mdstat file provides the current status of all the devices. When the raid driver is stopped, the file has very little information as seen below [root@bigboy root]# raidstop /dev/md0 [root@bigboy root]# cat /proc/mdstat Personalities : [raid5] read_ahead 1024 sectors unused devices: <none> [root@bigboy root]#
More information, including the partitions of the RAID set, is provided once the driver is loaded using the raidstart command. [root@bigboy root]# raidstart /dev/md0 [root@bigboy root]# cat /proc/mdstat Personalities : [raid5] read_ahead 1024 sectors md0 : active raid5 hdg1[2] hde1[1] hdf2[0] 4120448 blocks level 5, 32k chunk, algorithm 3 [3/3] [UUU] unused devices: <none> [root@bigboy root]#
Conclusion Linux software RAID works as a means of providing redundancy across partitions and hard disks, but it tends to be slower and less reliable than RAID provided by hardware based RAID disk controller. Hardware RAID configuration is usually done via the system BIOS when the server boots up, and once configured, it is absolutely transparent to Linux. Unlike software RAID, hardware RAID requires entire disks to be dedicated to the purpose and when combined with the fact that it usually requires faster SCSI hard disks and an additional controller card, it tends to be expensive.
Remember to take these factors into consideration when determining the right solution for your needs and research the topic thoroughly before proceeding. Weighing cost versus reliability is always a difficult choice in systems administration.

Chapter 28
Expanding Disk Capacity = = = = = = = = = = = = = = = = = = = = = = = = = = = = = = = = = = = = = = = = = = = In This Chapter Chapter 28
Expanding Disk Capacity Adding Disks To Linux Expanding Partitions With LVM Conclusion
= = = = = = = = = = = = = = = = = = = = = = = = = = = = = = = = = = = = = = = = = = = The lack of available disk storage frequently plagues Linux systems administrators. The most common reasons for this are expanding databases, increasing numbers of users and the larger number of tasks your Linux server is expected to perform until a replacement is found. This chapter explores how to add a disk to a Linux system in one of two ways. The first is by moving directories from a full partition to an empty one made available by the new disk and then linking the directory structures of the two disks together. The second is by merging the partitions together to create a combined partition using the Linux Logical Volume Manager (LVM).
Adding Disks To Linux At some stage you'll be faced with the task of installing an additional hard drive into your Linux server. This may be because an existing device has failed or you have run out of available space. This section will cover the latter scenario in which a hard disk with only one partition will be added and will then explain how to migrate data from the full disk to the new one.
Determining The Disk Types Linux stores the names of all known disk partitions in the /proc/partitions file. The entire hard disk will be represented by an entry with a minor number of "0" and all the partitions on the drive will be sequentially numbered after that. In the example below, the system has two hard disks; disk /dev/hda has been partitioned, while disk /dev/hdb needs to be prepared to accept data. [root@bigboy tmp]# cat /proc/partitions major minor #blocks name 3 0 7334145 hda 3 1 104391 hda1 3 2 1052257 hda2 3 3 2040255 hda3 3 4 1 hda4 3 5 3582463 hda5 3 6 554211 hda6 22 0 78150744 hdb [root@bigboy tmp]#
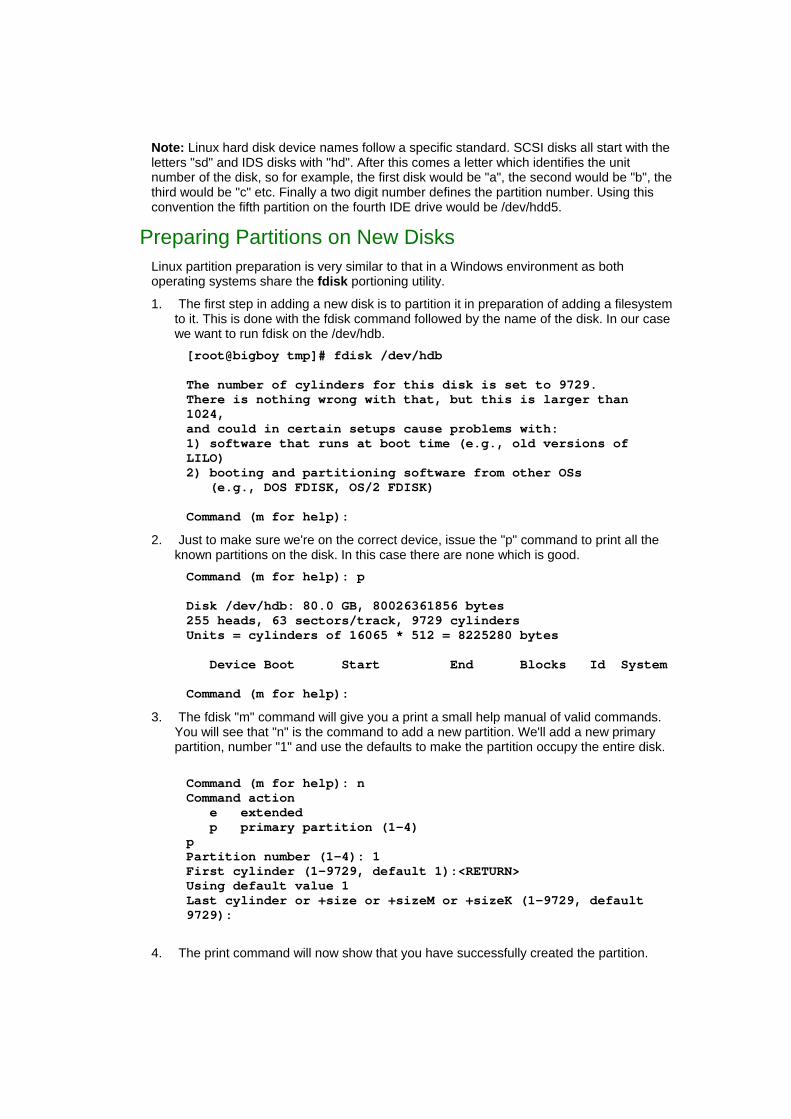
Note: Linux hard disk device names follow a specific standard. SCSI disks all start with the letters "sd" and IDS disks with "hd". After this comes a letter which identifies the unit number of the disk, so for example, the first disk would be "a", the second would be "b", the third would be "c" etc. Finally a two digit number defines the partition number. Using this convention the fifth partition on the fourth IDE drive would be /dev/hdd5.
Preparing Partitions on New Disks Linux partition preparation is very similar to that in a Windows environment as both operating systems share the fdisk portioning utility.
1. The first step in adding a new disk is to partition it in preparation of adding a filesystem to it. This is done with the fdisk command followed by the name of the disk. In our case we want to run fdisk on the /dev/hdb. [root@bigboy tmp]# fdisk /dev/hdb The number of cylinders for this disk is set to 9729. There is nothing wrong with that, but this is larger than 1024, and could in certain setups cause problems with: 1) software that runs at boot time (e.g., old versions of LILO) 2) booting and partitioning software from other OSs (e.g., DOS FDISK, OS/2 FDISK) Command (m for help):
2. Just to make sure we're on the correct device, issue the "p" command to print all the known partitions on the disk. In this case there are none which is good. Command (m for help): p Disk /dev/hdb: 80.0 GB, 80026361856 bytes 255 heads, 63 sectors/track, 9729 cylinders Units = cylinders of 16065 * 512 = 8225280 bytes Device Boot Start End Blocks Id System Command (m for help):
3. The fdisk "m" command will give you a print a small help manual of valid commands. You will see that "n" is the command to add a new partition. We'll add a new primary partition, number "1" and use the defaults to make the partition occupy the entire disk. Command (m for help): n Command action e extended p primary partition (1-4) p Partition number (1-4): 1 First cylinder (1-9729, default 1):<RETURN> Using default value 1 Last cylinder or +size or +sizeM or +sizeK (1-9729, default 9729):
4. The print command will now show that you have successfully created the partition.

Command (m for help): p Disk /dev/hdb: 80.0 GB, 80026361856 bytes 255 heads, 63 sectors/track, 9729 cylinders Units = cylinders of 16065 * 512 = 8225280 bytes Device Boot Start End Blocks Id System /dev/hdb1 1 9726 78148161 83 Linux Command (m for help):
Note: If you make a mistake you can use the "d" command to delete the partition and start over. The "t" command can be used to change partition type from the default of "83" for regular Linux partitions to something else, such as "82" for swap space. In most cases, this won't be necessary, the default value is sufficient.
You may have noticed that when we were creating the new partition that fdisk prompted us as to whether it was going to be a primary or secondary partition. Linux only allows 4 primary partitions, if you need more there is the option of converting one of the primary ones into an extended one. Here is an example of a partition table that includes an extended partition followed by two regular partitions within it. Command (m for help): p Disk /dev/hda: 7510 MB, 7510164480 bytes 255 heads, 63 sectors/track, 913 cylinders Units = cylinders of 16065 * 512 = 8225280 bytes Device Boot Start End Blocks Id System /dev/hda1 * 1 13 104391 83 Linux /dev/hda2 14 144 1052257+ 83 Linux /dev/hda3 145 398 2040255 82 Linux swap /dev/hda4 399 913 4136737+ 5 Extended /dev/hda5 399 844 3582463+ 83 Linux /dev/hda6 845 913 554211 83 Linux Command (m for help):
Adding additional partitions is just a question of repeating the previous steps the required number of times, while remembering that at some stage you may need to add an extended partition.
5. Changes won't be made to the disk's partition table until you use the "w" command to "write", or save the changes. When finished, the "q" command will allow you to exit. Command (m for help): w Command (m for help): q
Verifying Your New Partition You can take a look at the /proc/partitions file or use the "fdisk -l" command to see the new changes to the disk partition structure of your system as shown here: [root@bigboy tmp]# cat /proc/partitions major minor #blocks name

...
...
... 22 0 78150744 hdb 22 1 78150744 hdb1 [root@bigboy tmp]# [root@bigboy tmp]# fdisk -l ... ... ... Disk /dev/hdb: 80.0 GB, 80026361856 bytes 255 heads, 63 sectors/track, 9729 cylinders Units = cylinders of 16065 * 512 = 8225280 bytes Device Boot Start End Blocks Id System /dev/hdb1 1 9729 76051710 83 Linux [root@bigboy tmp]#
Putting A Directory Structure On Your New Partition You'll now need to format the partition giving it a new directory structure by using the mkfs command. The Fedora installation procedure defaults to an "ext3" type, which is what we'll use here. [root@bigboy tmp]# mkfs ext3 /dev/hdb1
We'll now need to create special "mount point" directory, to which the new partition will be attached. We'll create /mnt/hdb1 for this purpose. [root@bigboy tmp]# mkdir /mnt/hdb1
When Linux boots up, it searches the /etc/fstab file for a list of all partitions and their mounting characteristics, and then it mounts the partitions automatically. We'll have to add an entry for our new partition that looks like this: /dev/hdb1 /mnt/hdb1 ext3 default 2 1
You don't have to wait for a reboot to mount your partition. You can use the mount command with the "-a" to read the /etc/fstab file for new entries. [root@bigboy tmp]# mount -a
You'll now be able to access your new partition as /mnt/hdb1
Migrating Data Over To your New Partition Based on previous investigations using the "df -k" command, it was seen that the /var partition was almost full. [root@bigboy tmp]# df -k Filesystem 1K-blocks Used Available Use% Mounted on

/dev/hda3 505636 118224 361307 25% / /dev/hda1 101089 14281 81589 15% /boot none 63028 0 63028 0% /dev/shm /dev/hda5 248895 6613 229432 3% /tmp /dev/hda7 3304768 2720332 416560 87% /usr /dev/hda2 3304768 3300536 4232 99% /var [root@bigboy tmp]#
The "du -sk *" command will show the disk usage of all subdirectories in a directory. You can recursively use the command by using the "cd" command to step down through all the subdirectories until you discover the one with the greatest file usage. In this case, we only had to go to the /var directory to see that the /var/transactions directory was the culprit. [root@bigboy tmp]# cd /var [root@bigboy var]# du -sk * 2036 cache 4 db 8 empty ... ... 133784 transactions ... ... [root@bigboy var]#
Migrating the data can be done using the following steps:
1. After requesting your users to log off and backing up the data, log into the VGA console and enter single user mode. [root@bigboy tmp]# init 1
2. Rename the /var/transactions directory /var/transactions-save. To make sure you have an easy to restore backup of the data, not just the tapes. [root@bigboy tmp]# mv /var/transactions /var/transactions-save
3. Copy the contents of the /var/transactions-save directory a new directory named /mnt/hdb1/transactions [root@bigboy tmp]# cp -r /var/transactions /mnt/hdb1/transactions
4. Create a symbolic link named /var/transactions to the /mnt/hdb1/transactions directory. This will point all queries to the /var/transactions directory to /mnt/hdb1/transactions. [root@bigboy tmp]# ln -s /mnt/hdb1/transactions /var/transactions
5. Test to make sure that the contents of the new /var/transactions is identical to /var/transactions-save.
6. Return to multi-user mode by typing "exit". [root@bigboy tmp]# exit

7. Make sure your applications are working correctly and delete the contents of /var/transactions-save at some later date.
Expanding Partitions With LVM The RedHat Linux Logical Volume Manager (LVM) allows you to resize your partitions without having to modify the partition tables on your hard disk. This is most useful when you find yourself running out of space on a filesystem and want to expand into a new disk partition versus migrating all or a part of the filesystem to a new disk.
LVM Terminologies In this section we'll run through an LVM tutorial , but before we begin, we'll need to become familiar with some LVM concepts.
Physical Volume A physical Volume (PV) is another name for a regular physical disk partition that is used or will be used by LVM.
Volume Group Any number of partitions (PVs) on different disk drives can be lumped together into a volume group (VG). Under LVM, volume groups are analogous to a "virtual disk drive".
Logical Volumes Volume groups must then be subdivided into logical volumes. Each logical volume can be individually formatted as if it were a regular Linux partition. A logical volume is therefore like a "virtual partition" on your "virtual disk drive".
This may seem complicated but it allows you to create new virtual partitions with sizes you can change from groups of real disk partitions whose sizes you probably cannot change. Another advantage of LVM is that this can all be done without disturbing other partitions on your hard disks.
Physical Extent Real disk partitions are divided into chunks of data called physical extents (PEs) when you add them to a logical volume. PEs are important as you usually have to specify the size of your volume group not in Gigabytes, but as a number of physical extents.
Configuring LVM Devices In our tutorial example, our /home filesystem which resides on /dev/hde5 has become too full. We've just added a new hard drive /dev/hdf with 50% of the capacity of /dev/hde5 into which we want to expand /home. The device /dev/hdf has a single partition named /dev/hdf1 into which /dev/hde5 will be merged. Here are the steps to do this:
Backup Your Data Use the tar command or some other method to backup your data in /home. The LVM process will destroy the data on all physical volumes.
Unmount your /home filesystem
As /home stores most users' data, you'll need to ensure they are all logged off by:

1. Logging into the system video console
2. Going into single user mode [root@bigboy tmp]# init 1
3. And finally unmounting the file system [root@bigboy tmp]# umount /home
Determine The Partition Types
You have to change each LVM partition used to be of type 8e (Linux LVM). You can test this with the "fdisk -l" command. Here is an example using /dev/hde showing that our target partitions are of the incorrect type. [root@bigboy tmp]# fdisk -l /dev/hde Disk /dev/hde: 4311 MB, 4311982080 bytes 16 heads, 63 sectors/track, 8355 cylinders Units = cylinders of 1008 * 512 = 516096 bytes Device Boot Start End Blocks Id System /dev/hde1 1 4088 2060320+ fd Linux raid autodetect /dev/hde2 4089 5713 819000 83 Linux /dev/hde3 5714 6607 450576 83 Linux /dev/hde4 6608 8355 880992 5 Extended /dev/hde5 6608 7500 450040+ 83 Linux /dev/hdf1 7501 8355 430888+ 83 Linux [root@bigboy tmp]#
Start FDISK
You can change the partition type using fdisk too. Here is an example in which we change /dev/hde5 and /dev/hdf1. [root@bigboy tmp]# fdisk /dev/hde The number of cylinders for this disk is set to 8355. There is nothing wrong with that, but this is larger than 1024, and could in certain setups cause problems with: 1) software that runs at boot time (e.g., old versions of LILO) 2) booting and partitioning software from other OSs (e.g., DOS FDISK, OS/2 FDISK) Command (m for help):
Set The ID Type To 8e
We now need to set the partition types to the LVM value of 8e. Partitions /dev/hde5 and /dev/hdf1 are the 5th and 6th partitions on disk /dev/hde. We now modify their "type" using the "t" command and then specifying the partition number and type code. We can also use the "L" command to get a full listing of ID types in case we forget. Command (m for help): t Partition number (1-6): 5 Hex code (type L to list codes): 8e Changed system type of partition 5 to 8e (Linux LVM)

Command (m for help): t Partition number (1-6): 6 Hex code (type L to list codes): 8e Changed system type of partition 6 to 8e (Linux LVM) Command (m for help):
Make Sure The Change Occurred
Use the "p" command to get the new proposed partition table Command (m for help): p Disk /dev/hde: 4311 MB, 4311982080 bytes 16 heads, 63 sectors/track, 8355 cylinders Units = cylinders of 1008 * 512 = 516096 bytes Device Boot Start End Blocks Id System /dev/hde1 1 4088 2060320+ fd Linux raid autodetect /dev/hde2 4089 5713 819000 83 Linux /dev/hde3 5714 6607 450576 83 Linux /dev/hde4 6608 8355 880992 5 Extended /dev/hde5 6608 7500 450040+ 8e Linux LVM /dev/hdf1 7501 8355 430888+ 8e Linux LVM Command (m for help):
Save The Partition Changes
Use the "w" command to permanently save the changes to disk /dev/hde. Command (m for help): w The partition table has been altered! Calling ioctl() to re-read partition table. WARNING: Re-reading the partition table failed with error 16: Device or resource busy. The kernel still uses the old table. The new table will be used at the next reboot. Syncing disks. [root@bigboy updates]#
The error above will occur if any of the other partitions on the disk is mounted. This shouldn't be grave as we are already in single user mode in which most of the system's processes that would be accessing the partition have been shutdown.
Define Each Physical Volume You then initialize the target partitions with the pvcreate command. This will wipe out all the data on them in preparation for the next step. If you haven't backed up your data yet, do it now! [root@bigboy tmp]# pvcreate /dev/hde5 pvcreate -- physical volume "/dev/hde5" successfully created [root@bigboy tmp]# pvcreate /dev/hdf1

pvcreate -- physical volume "/dev/hdf1" successfully created [root@bigboy tmp]#
Run VGscan The next step is to make Linux scan for any new LVM disk partitions and automatically create the LVM configuration files in the /etc directory. The vgscan command is used to do this. [root@bigboy tmp]# vgscan vgscan -- reading all physical volumes (this may take a while...) [root@bigboy tmp]#
Create A Volume Group For the PVs The vgcreate command is then used to combine the two physical volumes into a single unit called a "volume group". The LVM software effectively tricks the operating system into thinking the volume group is a new hard disk. In our example, we've decided to call the volume group "lvm-hde". [root@bigboy tmp]# vgcreate lvm-hde /dev/hdf1 /dev/hde5 Volume group "lvm-hda" successfully created [root@bigboy tmp]#
Create A Logical Volume From The Volume Group The next step is to partition the volume group into "logical volumes" with the lvcreate command. Like hard disks, which are divided into blocks of data, logical volumes are divided into units called physical extents (PEs).
You'll have to know the number of available PEs before creating the logical volume. This is done with the vgdisplay command. [root@bigboy tmp]# vgdisplay lvm-hde --- Volume group --- VG Name lvm-hde VG Access read/write VG Status available/resizable VG # 0 MAX LV 256 Cur LV 0 Open LV 0 MAX LV Size 255.99 GB Max PV 256 Cur PV 2 Act PV 2 VG Size 848 MB PE Size 4 MB Total PE 212 Alloc PE / Size 0 / 0 Free PE / Size 212 / 848 MB VG UUID W7bgLB-lAFW-wtKi-wZET-jDJF-8VYD-snUaSZ [root@bigboy tmp]#
Here you can see we have 212 PEs available as "free". We can now use all 212 of them to create a logical volume named lvm0 from volume group lvm-hde.

[root@bigboy tmp]# lvcreate -l 212 lvm-hde -n lvm0 Logical volume "lvm0" created [root@bigboy tmp]#
Format The Logical Volume
Once the logical volume is created, we can now format it as if it were a regular partition. [root@bigboy tmp]# mkfs -j /dev/lvm-hde/lvm0 mke2fs 1.32 (09-Nov-2002) Filesystem label= OS type: Linux Block size=4096 (log=2) Fragment size=4096 (log=2) 108640 inodes, 217088 blocks 10854 blocks (5.00%) reserved for the super user First data block=0 7 block groups 32768 blocks per group, 32768 fragments per group 15520 inodes per group Superblock backups stored on blocks: 32768, 98304, 163840 Writing inode tables: done Creating journal (4096 blocks): done Writing superblocks and filesystem accounting information: done This filesystem will be automatically checked every 38 mounts or 180 days, whichever comes first. Use tune2fs -c or -i to override. [root@bigboy tmp]#
Create A Mount Point
Now we need to prepare for the mounting of the newly created logical volume. We can make this be /mnt/lvm. [root@bigboy tmp]# mkdir /mnt/lvm
Update The /etc/fstab File
The /etc/fstab file lists all the partitions that need to be auto-mounted when the system boots. In this snippet, we configure the newly labeled partition to be mounted on the /mnt/lvm mount point. /dev/lvm-hde/lvm0 /mnt/lvm ext3 defaults 1 2
The /dev/hde5 and /dev/hdf1 partitions have now been replaced by the combined /lvm0 logical volume. You therefore don't want the old partitions to be mounted again. Make sure that any reference to them in this file has either been commented a "#" at the beginning of each line or deleted entirely. #/dev/hde5 /data1 ext3 defaults 1 2 #/dev/hdf1 /data2 ext3 defaults 1 2

Mount The Volume
The "mount -a" command reads the /etc/fstab file and mounts all the devices that haven't been mounted already. After mounting we test the volume by listing its directory contents. [root@bigboy tmp]# mount -a [root@bigboy tmp]# ls /mnt/lvm lost+found [root@bigboy tmp]#
Create A Logical Link For /home
You now need to create a logical link for /home that points to /mnt/lvm. [root@bigboy tmp]# ln -s /mnt/lvm /home
Restore Your Data
You can now restore your backed up data to /home.
Get Out Of Single User Mode
Return to your original run state by using either the "init 3" or "init 5" commands.
Conclusion
The demise of the hard disk has been predicted for many years. Faster, denser memory chips were supposed to eliminate their need, but the hard disk technology has evolved, dramatically increasing their speed and capacity too. They will be around for a long time to come. It seems as if when drives get bigger, so does the data they are intended to store. Expanding the existing disk capacity of your server may become an everyday occurrence and the tools described in this chapter should make task easier.

Chapter 29
Managing Disk Usage With Quotas
= = = = = = = = = = = = = = = = = = = = = = = = = = = = = = = = = = = = = = = = = = = In This Chapter Chapter 4
Managing Disk Usage With Quotas Setting Up Quotas Other Quota Topics
(c) Peter Harrison, www.linuxhomenetworking.com = = = = = = = = = = = = = = = = = = = = = = = = = = = = = = = = = = = = = = = = = = =
You may eventually need to restrict the amount of disk space used on each partition by each user or group of users. RedHat / Fedora Linux allows this to occur by using its disk quota feature. The setup is fairly simple.
Setting Up Quotas
In our example, the family Linux server is running out of space in the /home filesystem due to a lot of MP3 downloads.
Enter Single User Mode As we'll need to remount the /home filesystem it's best to ensure that no other users or processes are using it. This is best achieved by entering single user mode from the console. This may be unnecessary if you are certain that you're the only user on the system. [root@bigboy tmp]# init 1
Edit Your /etc/fstab File The /etc/fstab file lists all the partitions that need to be auto-mounted when the system boots. You have to alert Linux that quotas are enabled on the filesystem by editing the /etc/fstab file and modifying the options for the /home directory. You'll need to add the usrquota option. In case you forget the name, the usrquota option is mentioned in the fstab man pages.

Old fstab
LABEL=/home /home ext3 defaults 1 2
New fstab
LABEL=/home /home ext3 defaults,usrquota 1 2
Remount The Filesystem
Editing the /etc/fstab file isn't enough, Linux needs to reread the file to get its instructions for /home. This can be done using the mount command with the "-o remount" qualifier. [root@bigboy tmp]# mount -o remount /home [root@bigboy tmp]#
Create The Partition Quota Configuration Files The topmost directory of the filesystem needs to have a aquota.user file (Defines quotas by user) and/or a aquota.group file (Defines quotas by user). The man page for "quota" lists them at the bottom.
In this case we'll just enable "per user " quotas. [root@bigboy tmp]# touch /home/aquota.user [root@bigboy tmp]# chmod 600 /home/aquota.user [root@bigboy tmp]#
Make Linux Read The Quota Config File This is done using the quotacheck command. You'll get an error the first time you enter the command as Linux will realize that the file wasn't created using one of the quota commands. [root@bigboy tmp]# quotacheck -vagum quotacheck: WARNING - Quotafile /home/aquota.user was probably truncated. Can't save quota settings... quotacheck: Scanning /dev/hda3 [/home] done quotacheck: Checked 185 directories and 926 files [root@bigboy tmp]#
Edit The User's Quota Information Now we need to edit the user's quota information. This is done with the edquota command which allows you to selectively edit a portion of the aquota.user file on a per user basis. [root@bigboy tmp]# edquota -u mp3user
The command will invoke the vi editor which will allow you to edit a number of fields. Disk quotas for user mp3user (uid 503): Filesystem blocks soft hard inodes soft hard /dev/hda3 24 0 0 7 0 0

Blocks: The amount of space in 1K blocks the user is currently using.
Inodes: The number of files the user is currently using.
Soft Limit: The maximum blocks/inodes a quota user may have on a partition. The role of a soft limit changes if grace periods are used. When this occurs, the user is only warned that their soft limit has been exceeded. When the grace period expires, the user is barred from using additional disk space or files. When set to zero, limits are disabled.
Hard Limit: The maximum blocks/inodes a quota user may have on a partition when a grace period is set. Users may exceed a soft limit, but they can never exceed their hard limit.
In the example below we limit user mp3user to a maximum of 5 MB of data storage on /dev/hda3 (/home).
Disk quotas for user mp3user (uid 503): Filesystem blocks soft hard inodes soft hard /dev/hda3 24 5000 0 7 0 0
Get Out Of Single User Mode
Return to your original run state by using either the "init 3" or "init 5" commands.
Other Quota Topics
Enforcing Quotas
Once Linux is aware of users who have exceeded their quotas, the operating system subsequently prevents these users from creating more files or using more disk space in the partition.
Linux doesn't check quota usage each time a file is opened, you have to force it to process the aquota.user and aquota.group files periodically with the quotacheck command.
You can setup a cron job to run a script similar to the one below to achieve this. #!/bin/bash quotacheck -vagu
Editing Grace Periods
The "edquota -t" command sets the grace period for each filesystem. Like the edquota command, it invokes the vi editor.
The grace period is a time limit before the soft limit is enforced for a quota enabled file system. Time units of seconds, minutes, hours, days, weeks and months can be used. This is what you'll see with the command "edquota -t":

Note: There should be no spaces between the number and the unit of time measure. Therefore in this example, "7days" is correct and "7 days" is wrong.
[root@bigboy tmp]# edquota -t Grace period before enforcing soft limits for users: Time units may be: days, hours, minutes, or seconds Filesystem Block grace period Inode grace period /dev/hda3 7days 7days
Editing Group Quotas
Editing quotas on a per group basis can be done similarly with the "edquota -g" command.
Getting Quota Reports
The repquota command lists quota usage limits of all users on the system. Here is an example. [root@bigboy tmp]# repquota /home *** Report for user quotas on device /dev/hda3 Block grace time: 7days; Inode grace time: 7days Block limits File limits User used soft hard grace used soft hard grace ---------------------------------------------------------------------- root -- 52696 0 0 1015 0 0 ... ... ... mp3user -- 24 0 0 7 0 0 [root@bigboy tmp]#

Chapter 30
Remote Disk Access With NFS = = = = = = = = = = = = = = = = = = = = = = = = = = = = = = = = = = = = = = = = = = = In This Chapter Chapter 30
Remote Disk Access With NFS Installing NFS Configuring NFS on The Server Configuring NFS on The Client Activating Modifications To The /etc/exports File Troubleshooting NFS Other NFS Considerations Conclusion
(c) Peter Harrison, www.linuxhomenetworking.com = = = = = = = = = = = = = = = = = = = = = = = = = = = = = = = = = = = = = = = = = = =
Samba is usually the solution of choice when you want to share disk space between Linux and Windows machines. NFS is used when disks need to be shared between Linux servers. Basic configuration is a fairly simple process and this chapter will explain all the essential steps.
Installing NFS RedHat Linux installs NFS by default and also by default it is activated when the system boots up. As seen below, you can determine whether you have NFS installed using the RPM command in conjunction with the "grep" command to search for all installed "nfs" packages. A blank list means that you'll have to install the required packages. [root@bigboy tmp]# rpm -qa | grep nfs redhat-config-nfs-1.1.3-1 nfs-utils-1.0.1-3.9 [root@bigboy tmp]#
You will also need to have the RPC portmap package installed as well. You can use the rpm command to determine whether it's installed on your system. When used in conjunction with the "grep" command you can determine all the portmap applications installed as seen below. A blank list means that you'll have to install the required packages. [root@bigboy tmp]# rpm -qa | grep portmap portmap-4.0-57 [root@bigboy tmp]#
If NFS and portmap are not installed, they can be added fairly easily. Most RedHat and Fedora Linux software products are available in the RPM format. Downloading and installing RPMs isn't hard. If you need a refresher, Chapter 5,on RPMs, covers how to do this in detail.

You will need to make sure that the nfs-utils, and portmap software RPMs are installed. When searching for the RPMs, remember that the filename usually starts with the software package name by a version number like this: nfs-utils-1.1.3-1.i386.rpm.
Configuring NFS on The Server Both the NFS server and NFS client will have to have parts of the NFS package installed and running. The server will need portmap, nfs and nfslock operational and have a correctly configured /etc/exports file. Here's how to do it.
The /etc/exports File This is the main NFS configuration file and consists of two columns. The first column lists the directories you want to make available to the network. The second column has two parts. The first part lists the networks or DNS domains that can get access to the directory, the second part lists NFS options in brackets.
In the case below we have provided:
o Read only access to the /data/files directory to all networks
o Read/write access to the /home directory from all servers on the 192.168.1.0 /24 network, that is all addresses from 192.168.1.0 to 192.168.1.255
o Read/write access to the /data/test directory from servers in the my-site.com DNS domain
o Read/write access to the /data/database directory from a single server 192.168.1.203.
In all cases we have used the "sync" option to ensure that file data cached in memory is automatically written to the disk after the completion of any disk data copying operation. #/etc/exports /data/files *(ro,sync) /home 192.168.1.0/24(rw,sync) /data/test *.my-site.com(rw,sync) /data/database 192.168.1.0/32(rw,sync)
Once you have configured your /etc/exports file, you'll need to activate the settings, but first you'll have to make sure NFS is running correctly.
Starting NFS on the Server Configuring an NFS server is straightforward with the easy to follow steps outlined below.
1. Use the chkconfig command to configure the required NFS and RPC portmap daemons to start at boot. You will also have to activate NFS file locking to reduce the risk of corrupted data. [root@bigboy tmp]# chkconfig --level 35 nfs on [root@bigboy tmp]# chkconfig --level 35 nfslock on [root@bigboy tmp]# chkconfig --level 35 portmap on
2. Use the init scripts in the /etc/init.d directory to start the NFS and RPC portmap daemons. In the examples below we're using the "start" option, but when needed, you can also stop and restart the processes with the "stop" and "restart" options. [root@bigboy tmp]# /etc/init.d/portmap start [root@bigboy tmp]# /etc/init.d/nfs start [root@bigboy tmp]# /etc/init.d/nfslock start
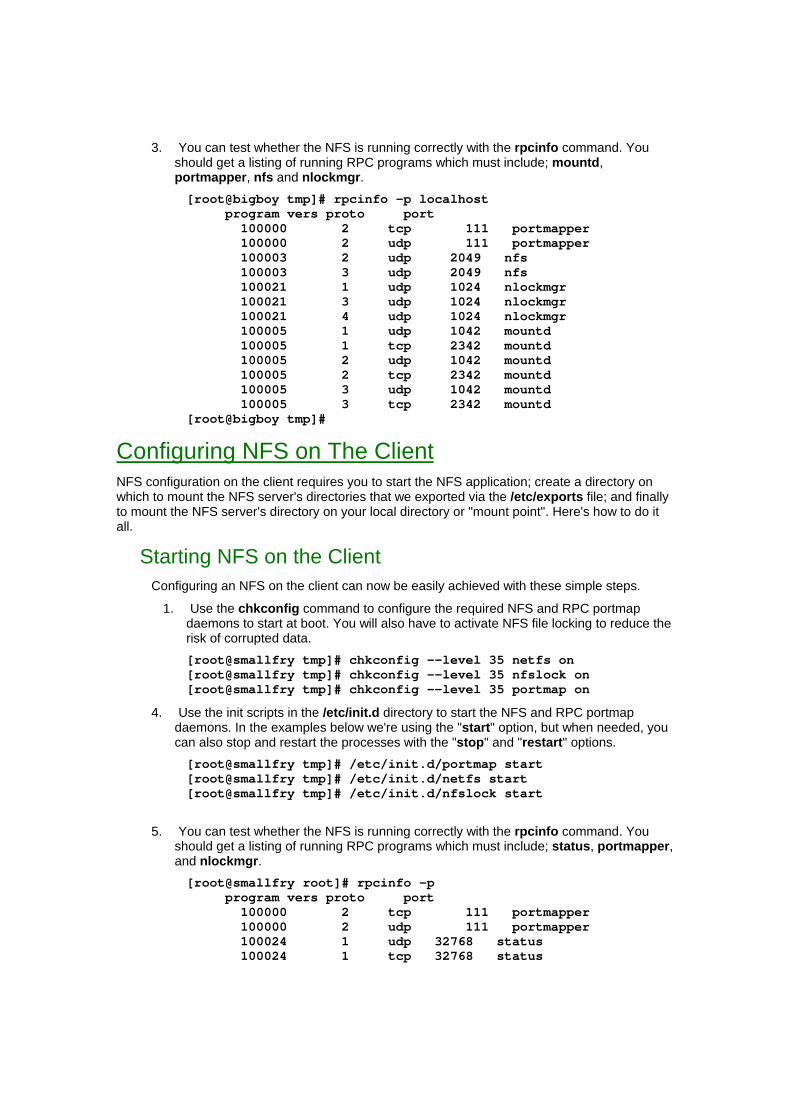
3. You can test whether the NFS is running correctly with the rpcinfo command. You should get a listing of running RPC programs which must include; mountd, portmapper, nfs and nlockmgr. [root@bigboy tmp]# rpcinfo -p localhost program vers proto port 100000 2 tcp 111 portmapper 100000 2 udp 111 portmapper 100003 2 udp 2049 nfs 100003 3 udp 2049 nfs 100021 1 udp 1024 nlockmgr 100021 3 udp 1024 nlockmgr 100021 4 udp 1024 nlockmgr 100005 1 udp 1042 mountd 100005 1 tcp 2342 mountd 100005 2 udp 1042 mountd 100005 2 tcp 2342 mountd 100005 3 udp 1042 mountd 100005 3 tcp 2342 mountd [root@bigboy tmp]#
Configuring NFS on The Client NFS configuration on the client requires you to start the NFS application; create a directory on which to mount the NFS server's directories that we exported via the /etc/exports file; and finally to mount the NFS server's directory on your local directory or "mount point". Here's how to do it all.
Starting NFS on the Client Configuring an NFS on the client can now be easily achieved with these simple steps.
1. Use the chkconfig command to configure the required NFS and RPC portmap daemons to start at boot. You will also have to activate NFS file locking to reduce the risk of corrupted data. [root@smallfry tmp]# chkconfig --level 35 netfs on [root@smallfry tmp]# chkconfig --level 35 nfslock on [root@smallfry tmp]# chkconfig --level 35 portmap on
4. Use the init scripts in the /etc/init.d directory to start the NFS and RPC portmap daemons. In the examples below we're using the "start" option, but when needed, you can also stop and restart the processes with the "stop" and "restart" options. [root@smallfry tmp]# /etc/init.d/portmap start [root@smallfry tmp]# /etc/init.d/netfs start [root@smallfry tmp]# /etc/init.d/nfslock start
5. You can test whether the NFS is running correctly with the rpcinfo command. You should get a listing of running RPC programs which must include; status, portmapper, and nlockmgr. [root@smallfry root]# rpcinfo -p program vers proto port 100000 2 tcp 111 portmapper 100000 2 udp 111 portmapper 100024 1 udp 32768 status 100024 1 tcp 32768 status

100021 1 udp 32769 nlockmgr 100021 3 udp 32769 nlockmgr 100021 4 udp 32769 nlockmgr 100021 1 tcp 32769 nlockmgr 100021 3 tcp 32769 nlockmgr 100021 4 tcp 32769 nlockmgr 391002 2 tcp 32770 sgi_fam [root@smallfry root]#
NFS And DNS The NFS client must have a matching pair of forward and reverse DNS entries on the DNS server used by the NFS server. In other words, a DNS lookup on the NFS server for the IP address of the NFS client must return a server name that will map back to the original IP address when a DNS lookup is done on that same server name. [root@bigboy tmp]# host 192.168.1.102 201.1.168.192.in-addr.arpa domain name pointer 192-168-1-102.my-site.com. [root@bigboy tmp]# host 192-168-1-102.my-site.com 192-168-1-102.my-site.com has address 192.168.1.102 [root@bigboy tmp]#
This is a security precaution added into the NFS package that lessens the likelihood of unauthorized servers from gaining access to files on the NFS server.
Making NFS Mounting Permanent In most cases, users want their NFS directories to be permanently mounted. This requires an entry in the /etc/fstab file in addition to the creation of the "mount point directory" as seen below.
The /etc/fstab File The /etc/fstab file lists all the partitions that need to be auto-mounted when the system boots. Therefore you need to edit the /etc/fstab file if you need the NFS directory to be made permanently available to users on the NFS. In this case we're mounting the /data/files directory on server "bigboy" (IP address 192.16801.100) as an NFS type filesystem using the local /mnt/nfs mount point directory. #/etc/fstab #Directory Mount Point Type Options Dump FSCK 192.168.1.100:/data/files /mnt/nfs nfs soft,nfsvers=2 0 0
The steps to mount the directory are explained below.
Permanently Mounting The NFS Directory We'll now create a mount point directory /mnt/nfs on which to mount the remote NFS directory and then use the "mount -a" command activate the mount. Notice how before mounting there were no files visible in the /mnt/nfs directory, this changes after the mounting is completed, [root@smallfry tmp]# mkdir /mnt/nfs [root@smallfry tmp]# ls /mnt/nfs [root@smallfry tmp]# mount -a [root@smallfry tmp]# ls /mnt/nfs
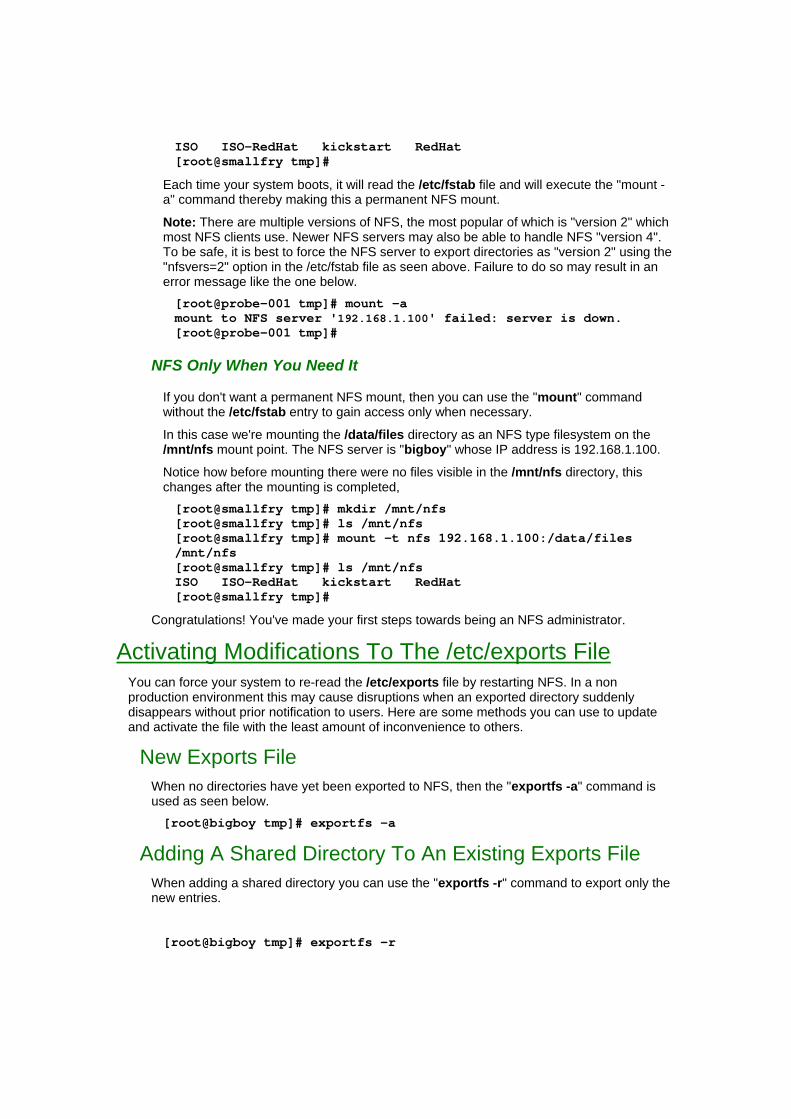
ISO ISO-RedHat kickstart RedHat [root@smallfry tmp]#
Each time your system boots, it will read the /etc/fstab file and will execute the "mount -a" command thereby making this a permanent NFS mount.
Note: There are multiple versions of NFS, the most popular of which is "version 2" which most NFS clients use. Newer NFS servers may also be able to handle NFS "version 4". To be safe, it is best to force the NFS server to export directories as "version 2" using the "nfsvers=2" option in the /etc/fstab file as seen above. Failure to do so may result in an error message like the one below. [root@probe-001 tmp]# mount -a mount to NFS server '192.168.1.100' failed: server is down. [root@probe-001 tmp]#
NFS Only When You Need It
If you don't want a permanent NFS mount, then you can use the "mount" command without the /etc/fstab entry to gain access only when necessary.
In this case we're mounting the /data/files directory as an NFS type filesystem on the /mnt/nfs mount point. The NFS server is "bigboy" whose IP address is 192.168.1.100.
Notice how before mounting there were no files visible in the /mnt/nfs directory, this changes after the mounting is completed, [root@smallfry tmp]# mkdir /mnt/nfs [root@smallfry tmp]# ls /mnt/nfs [root@smallfry tmp]# mount -t nfs 192.168.1.100:/data/files /mnt/nfs [root@smallfry tmp]# ls /mnt/nfs ISO ISO-RedHat kickstart RedHat [root@smallfry tmp]#
Congratulations! You've made your first steps towards being an NFS administrator.
Activating Modifications To The /etc/exports File You can force your system to re-read the /etc/exports file by restarting NFS. In a non production environment this may cause disruptions when an exported directory suddenly disappears without prior notification to users. Here are some methods you can use to update and activate the file with the least amount of inconvenience to others.
New Exports File When no directories have yet been exported to NFS, then the "exportfs -a" command is used as seen below. [root@bigboy tmp]# exportfs -a
Adding A Shared Directory To An Existing Exports File When adding a shared directory you can use the "exportfs -r" command to export only the new entries.
[root@bigboy tmp]# exportfs -r

Deleting, Moving Or Modifying A Share Removing an exported directory from the /etc/exports file requires work on both the NFS client and server. The steps are as follows.
1. Unmount the mount point directoty on the NFS client using the "umount" command. In this case we're unmounting the /mnt/nfs mount point. [root@smallfry tmp]# umount /mnt/nfs
Note: You may also need to edit the /etc/fstab file of any entries related to the mount point if you want to make the change permanent even after rebooting.
6. Comment out the corresponding entry in the NFS server's /etc/exports file and reload the modified file as seen below. [root@bigboy tmp]# exportfs -ua [root@bigboy tmp]# exportfs -a
You will have now completed a seamless removal of the exported directory with much less chance of having critical errors.
Troubleshooting NFS A basic NFS configuration, like the one shown above, usually works without problems when the client and server are on the same network. The most common problems being caused by you forgetting to start NFS, edit the /etc/fstab file or export the /etc/exports file. Another common cause of failure is the iptables firewall daemon running on either the server or client without the administrator realizing it.
When the client and server are on different networks, these checks still apply, but you'll also have to make sure basic connectivity has been taken care of as outlined in Chapter 3 on network troubleshooting. Sometimes a firewall being present on the path between the client and server can cause difficulties.
As always, no troubleshooting plan would be complete without frequent reference to the /var/log/messages file in the search for additional clues. Follow these guidelines and your problems should be shortlived.
Other NFS Considerations NFS can be temperamental. An incorrect configuration can cause it to be non responsive, its security is relatively weak and you have to be aware of the file permissions on both the NFS client and server to get it to work correctly. These can often be resolved with some basic guidelines outlined in this section.
Security NFS and portmap have had a number of known security deficiencies in the past and as a result, it is not recommended to use NFS over insecure networks. NFS doesn't encrypt data and it is possible for root users on NFS clients to have root access the server's filesystems. You can exercise security related caution with NFS by following the guidelines below:
o Restrict its use to secure networks
o Export only the most needed data
o Consider using read only exports whenever data updates aren't necessary.

o Use the root_squash option in /etc/exports file (default) to reduce the risk of the possibility of a root user on the NFS client having root file permission access on the NFS server.
NFS Hanging Most NFS transactions use the UDP protocol which doesn't keep track of the state of a connection. If the remote server fails, the NFS client will sometimes not be aware of the disruption in service. If this occurs, the NFS client will wait indefinitely for the return of the server. This will also force programs relying on the same client server relationship to wait indefinitely too.
It is for this reason that it's recommended to use the "soft" option in the NFS client's /etc/fstab file this will cause NFS to report I/O error to the calling program after a long timeout.
You can reduce the risk of NFS hanging by taking a number of precautions:
o Run NFS on a reliable network.
o Avoid having NFS servers that NFS mount each other's filesystems or directories.
o Always use the sync option whenever possible.
o Mission critical computers shouldn't rely on an NFS server to operate unless its reliability can be guaranteed.
o A hung NFS connection to a directory in your search path could cause your shell to pause at that point in the search path until the NFS session is regained. As a result of this, NFS mounted directories shouldn't be part of your search path.
File Locking NFS allows multiple clients to mount the same directory but NFS has a history of not handling file locking well, though more recent versions are said to have rectified the problem. Test your network based applications thoroughly before considering using NFS.
Nesting Exports NFS doesn't allow you to export directories that are subdirectories of directories that have already been exported unless they are on different partitions.
Limiting "root" Access NFS doesn't allow a "root" user on a NFS client to have "root" privileges on the NFS server. This can be disabled with the no_root_squash export option in the /etc/exports file.
Restricting Access to the NFS server NFS doesn't provide restrictions on a per user basis. If a user named "nfsuser" exists on the NFS client, then they will have access to all the files of a user named "nfsuser" on the NFS server. It is therefore best to use the /etc/exports file to limit access to certain trusted servers or networks.
You may also want to use a firewall to protect access to the NFS server. A main communication control channel is usually created between the client and server on TCP port 111, but the data is frequently transferred on a randomly chosen TCP port negotiated between them. There are ways to limit the TCP ports used, but that is beyond the scope of this book.

You may also want to eliminate any wireless networks between your NFS server and client, and it is not wise to mount an NFS share across the Internet.
File Permissions
The NFS file permissions on the NFS server are inherited by the client. It can become complicated especially if the users and user groups on the NFS client that are expected to access data on the NFS server don't exist on the NFS server.
For simplicity, make the key users and groups on both systems match and make sure the permissions on the NFS client mount point and the exported directories of the NFS server are in keeping with the your operational objectives.
Conclusion
As you have seen NFS can be a very powerful tool in providing clients with access to large amounts of data such as a database stored on a centralized server. Many of the new network attached storage products currently available on the market rely on NFS which attests to its popularity, increasing stability and improving security.

Chapter 31
Centralized Logins Using NIS = = = = = = = = = = = = = = = = = = = = = = = = = = = = = = = = = = = = = = = = = = = In This Chapter Chapter 31
Centralized Logins Using NIS Scenario Configuring The NFS Server Configuring The NFS Client Configuring The NIS Server Adding New NIS Users Configuring The NIS Client Conclusion
(c) Peter Harrison, www.linuxhomenetworking.com = = = = = = = = = = = = = = = = = = = = = = = = = = = = = = = = = = = = = = = = = = = Network Information Services (NIS) allows you to create user accounts that can be shared across all systems on your network. The user account is created only on the NIS server. NIS clients download the necessary username and password data from the NIS server to verify each user login. An advantage of NIS is that users only need to change their passwords on the NIS server, instead of every system on the network. This makes NIS popular in computer training labs, distributed software development projects or any other situation where groups of people have to share many different computers. The disadvantage is that NIS doesn't encrypt the username/password information sent to the clients with each login and all users have access to the encrypted passwords stored on the NIS server. A detailed analysis of NIS security is beyond the scope of this book, but I would suggest that you restrict its use to highly secure networks or networks where access to non NIS networks is highly restricted.
Scenario A school wants to set up a small computer lab for its students.
> The main Linux server, "bigboy", has a large amount of disk space and will be used as both the NIS server and NFS based file server for the Linux PCs in the lab.
> Users logging into the PCs will be assigned "home" directories on bigboy and not on the PCs themselves.
> Each user's "home" directory will be automatically mounted with each user login on the PCs using NFS.
> The lab instructor wants to practice with a Linux PC named "smallfry" before implementing NIS on all the remaining PCs.

> The suite of NIS RPMs have been installed on the server and client. These are: ypserv yp-tools ypbind
Downloading and installing RPMs isn't hard. If you need a refresher, the chapter on RPMs in the Linux Home Networking eBook covers how to do this in detail. When searching for the RPMs, remember that the filename usually starts with the software package name by a version number like this: yp-tools-2.8-3.i386.rpm.
The lab instructor has done some research and has created the following implementation plan.
1. Configure bigboy as an NFS server which will make its /home directory available to the Linux workstations.
2. Configure smallfry as an NFS client that can access bigboy's /home directory.
3. Configure bigboy as an NIS server.
4. Create a user account on bigboy called "nisuser" that doesn't exist on smallfry. Convert the account to a NIS user account.
5. Configure smallfry as an NIS client.
6. Test a remote login from bigboy to smallfry using the username and password of the account nisuser.
Here is how it's done.
Configuring The NFS Server Here are the steps to configure the NFS server in this scenario:
1. Edit the /etc/exports file to allow NFS mounts of the /home directory with read/write access. /home *(rw,sync)
2. Let NFS read the /etc/exports file for the new entry and make /home available to the network with the exportfs command. [root@bigboy tmp]# exportfs -a [root@bigboy tmp]#
3. Make sure the required NFS, NFS lock and port mapper daemons are both running and configured to start after the next reboot. [root@bigboy tmp]# chkconfig nfslock on [root@bigboy tmp]# chkconfig nfs on [root@bigboy tmp]# chkconfig portmap on [root@bigboy tmp]# /etc/init.d/portmap start Starting portmapper: [ OK ] [root@bigboy tmp]# /etc/init.d/nfslock start Starting NFS statd: [ OK ] [root@bigboy tmp]# /etc/init.d/nfs start Starting NFS services: [ OK ] Starting NFS quotas: [ OK ] Starting NFS daemon: [ OK ] Starting NFS mountd: [ OK ] [root@bigboy tmp]#

Configuring The NFS Client You'll also need to configure the NFS clients to mount their /home directories on the NFS server.
1. Keep a copy of the old /home directory, and create a new directory /nfs/home which will be a logical link to a new /home directory. [root@smallfry tmp]# mv /home /home.save [root@smallfry tmp]# mkdir -p /nfs/home [root@smallfry tmp]# ln -s /nfs/home /home [root@smallfry tmp]# ll / total 201 drwxr-xr-x 2 root root 4096 Nov 15 11:19 bin ... ... lrwxrwxrwx 1 root root 11 Nov 16 20:22 home -> /nfs/home/ drwxr-xr-x 2 root root 4096 Jan 24 2003 home.save ... ... drwxr-xr-x 3 root root 4096 Nov 16 20:19 nfs [root@smallfry tmp]#
2. Make sure you can mount bigboy's /home directory on the new /nfs/home directory we just created. Unmount it once everything looks correct. [root@smallfry tmp]# mount 192.168.1.200:/home /nfs/home/ [root@smallfry tmp]# ls /home ftpinstall nisuser quotauser smallfry www [root@smallfry tmp]# umount /nfs/home/ [root@smallfry tmp]#
3. Start configuring autofs automounting. Edit your /etc/auto.master file to refer to file /etc/auto.nfs for mounting information whenever the /nfs directory is accessed. After five minutes, autofs will unmount the directory. #/etc/auto.master /nfs /etc/auto.nfs --timeout 600
4. Edit file /etc/auto.nfs to do the NFS mount whenever the /home directory is accessed. #/etc/auto.nfs home -fstype=nfs 192.168.1.200:/home
5. Start autofs and make sure it will start after the next reboot with the chkconfig command. [root@smallfry tmp]# chkconfig autofs on [root@smallfry tmp]# /etc/init.d/autofs restart Stopping automount:[ OK ] Starting automount:[ OK ] [root@smallfry tmp]#
6. Test to see whether accessing the /home directory will allow you to see the contents of /home on bigboy.

[root@smallfry tmp]# ls /home ftpinstall nisuser quotauser smallfry www [root@smallfry tmp]#
All newly added Linux users receive are assigned a home directory under the /home directory. This scheme will make the users feel their home directories are local, when in reality they are automatically mounted and accessed over your network.
Configuring The NIS Server In the early days, NIS was called "Yellow Pages". The developers had to change the name after a copyright infringement lawsuit, yet many of the key programs associated with NIS have kept their original names beginning with "yp".
Edit Your /etc/sysconfig/network File You need to add the NIS domain you wish to use in the /etc/sysconfig/network file. In the case below, we've called the domain "NIS-HOME_NETWORK".
#/etc/sysconfig/network NISDOMAIN="NIS-HOME-NETWORK"
Edit Your etc/yp.conf File NIS servers also have to be NIS clients themselves, so you'll have to edit the NIS client configuration file /etc/yp.conf to list the domain's NIS server as being the server itself or "localhost". # /etc/yp.conf - ypbind configuration file ypserver 127.0.0.1
Start The Key NIS Server Related Daemons Start the necessary NIS daemons in the /etc/init.d directory and use the chkconfig command to ensure they start after the next reboot. A summary of their functions is listed in Table 31-1.
Table 31-1 Required NIS Server Daemons
Daemon Name Purpose
portmap The foundation RPC daemon upon which NIS runs.
yppasswdd Lets users change their passwords on the NIS server from NIS clients
ypserv Main NIS server daemon
ypbind Main NIS client daemon
ypxfrd Used to speed up the transfer of very large NIS maps

[root@bigboy tmp]# /etc/init.d/portmap start [root@bigboy tmp]# /etc/init.d/yppasswdd start [root@bigboy tmp]# /etc/init.d/ypserv start [root@bigboy tmp]# [root@bigboy tmp]# chkconfig portmap on [root@bigboy tmp]# chkconfig yppasswdd on [root@bigboy tmp]# chkconfig ypserv on [root@bigboy tmp]#
Make sure they are all running before continuing to the next step. You can use the rpcinfo command to do this. [root@bigboy tmp]# rpcinfo -p localhost program vers proto port 100000 2 tcp 111 portmapper 100000 2 udp 111 portmapper 100009 1 udp 681 yppasswdd 100004 2 udp 698 ypserv 100004 1 udp 698 ypserv 100004 2 tcp 701 ypserv 100004 1 tcp 701 ypserv [root@bigboy tmp]#
Note: The ypbind and ypxfrd daemons won't start properly until after you initialize the NIS domain. We'll start these daemons after this has been completed.
Initialize Your NIS Domain Now that you have decided on the name of the NIS domain, you'll have to use the ypinit command to create the associated authentication files for the domain. You will be prompted for the name of the NIS server, which in this case is "bigboy".
With this procedure, all non privileged accounts will automatically be accessible via NIS. [root@bigboy tmp]# /usr/lib/yp/ypinit -m At this point, we have to construct a list of the hosts which will run NIS servers. bigboy is in the list of NIS server hosts. Please continue to add the names for the other hosts, one per line. When you are done with the list, type a <control D>. next host to add: bigboy next host to add: The current list of NIS servers looks like this: bigboy Is this correct? [y/n: y] y We need a few minutes to build the databases... Building /var/yp/NIS-HOME-NETWORK/ypservers... Running /var/yp/Makefile... gmake[1]: Entering directory `/var/yp/NIS-HOME-NETWORK' Updating passwd.byname... Updating passwd.byuid... Updating group.byname... Updating group.bygid... Updating hosts.byname... Updating hosts.byaddr...

Updating rpc.byname... Updating rpc.bynumber... Updating services.byname... Updating services.byservicename... Updating netid.byname... Updating protocols.bynumber... Updating protocols.byname... Updating mail.aliases... gmake[1]: Leaving directory `/var/yp/NIS-HOME-NETWORK' bigboy has been set up as a NIS master server. Now you can run ypinit -s bigboy on all slave server. [root@bigboy tmp]#
Note: Make sure portmapper is running before doing this or you'll get errors like the one below. You will have to delete the /var/yp/NIS-HOME-NETWORK directory and restart portmapper, yppasswd and ypserv before you'll be able to do this again successfully. failed to send 'clear' to local ypserv: RPC: Port mapper failureUpdating group.bygid...
Start The ypbind and ypxfrd Daemons You can now start these daemons now that the NIS domain files have been created. [root@bigboy tmp]# /etc/init.d/ypbind start [root@bigboy tmp]# /etc/init.d/ypxfrd start [root@bigboy tmp]# chkconfig ypbind on [root@bigboy tmp]# chkconfig ypxfrd on
Make Sure The Daemons Are Running All the NIS daemons use RPC port mapping and therefore will be listed using the "rpcinfo" command when they are running correctly. [root@bigboy tmp]# rpcinfo -p localhost program vers proto port 100000 2 tcp 111 portmapper 100000 2 udp 111 portmapper 100003 2 udp 2049 nfs 100003 3 udp 2049 nfs 100021 1 udp 1024 nlockmgr 100021 3 udp 1024 nlockmgr 100021 4 udp 1024 nlockmgr 100004 2 udp 784 ypserv 100004 1 udp 784 ypserv 100004 2 tcp 787 ypserv 100004 1 tcp 787 ypserv 100009 1 udp 798 yppasswdd 600100069 1 udp 850 fypxfrd 600100069 1 tcp 852 fypxfrd 100007 2 udp 924 ypbind 100007 1 udp 924 ypbind 100007 2 tcp 927 ypbind 100007 1 tcp 927 ypbind [root@bigboy tmp]#

Adding New NIS Users New NIS users can be created by logging into the NIS server and creating the new user account. In this case we'll create a user account called "nisuser" and give it a new password.
Once this is complete, you will then have to update the NIS domain's authentication files by executing the make command in the /var/yp directory.
This procedure will make all NIS enabled, non privileged accounts become automatically accessible via NIS, not just newly created ones. It will also export all the user's characteristics stored in the /etc/passwd and /etc/group files such as the login shell, the user's group and home directory. [root@bigboy tmp]# useradd -g users nisuser [root@bigboy tmp]# passwd nisuser Changing password for user nisuser. New password: Retype new password: passwd: all authentication tokens updated successfully. [root@bigboy tmp]# cd /var/yp [root@bigboy yp]# make gmake[1]: Entering directory `/var/yp/NIS-HOME-NETWORK' Updating passwd.byname... Updating passwd.byuid... Updating netid.byname... gmake[1]: Leaving directory `/var/yp/NIS-HOME-NETWORK' [root@bigboy yp]#
You can check to see if the user's authentication information has been updated by using the ypmatch command which should return the user's encrypted password sting. [root@bigboy tmp]# ypmatch nisuser passwd nisuser:$1$Cs2GMe6r$gRVB1hohkyG7ALrDLjH1:505:100::/home/nisuser:/bin/bash [root@bigboy tmp]
Configuring The NIS Client Now that the NIS server has been configured, it's time to configure the NIS clients. There are a number of related configuration files that you'll need to edit to get it to work. The procedure can be seen below:
Run authconfig The authconfig program will automatically configure your NIS files after prompting you for the IP address and domain of the NIS server. [root@smallfry tmp]# authconfig
Once finished, it should create a /etc/yp.conf file that defines, amongst other things, the IP address of the NIS server for a particular domain. It will also edit the /etc/sysconfig/network file to define the NIS domain to which the NIS client belongs: # /etc/yp.conf - ypbind configuration file domain NIS-HOME-NETWORK server 192.168.1.200 #/etc/sysconfig/network NISDOMAIN=NIS-HOME-NETWORK
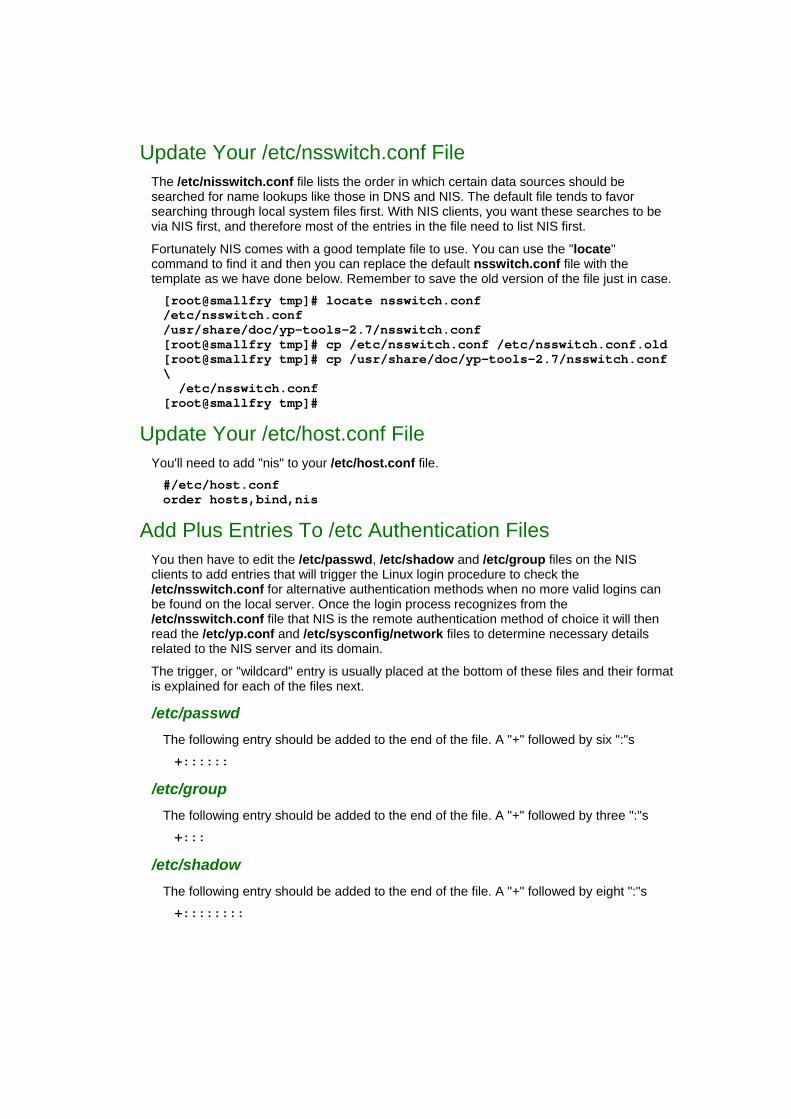
Update Your /etc/nsswitch.conf File The /etc/nisswitch.conf file lists the order in which certain data sources should be searched for name lookups like those in DNS and NIS. The default file tends to favor searching through local system files first. With NIS clients, you want these searches to be via NIS first, and therefore most of the entries in the file need to list NIS first.
Fortunately NIS comes with a good template file to use. You can use the "locate" command to find it and then you can replace the default nsswitch.conf file with the template as we have done below. Remember to save the old version of the file just in case. [root@smallfry tmp]# locate nsswitch.conf /etc/nsswitch.conf /usr/share/doc/yp-tools-2.7/nsswitch.conf [root@smallfry tmp]# cp /etc/nsswitch.conf /etc/nsswitch.conf.old [root@smallfry tmp]# cp /usr/share/doc/yp-tools-2.7/nsswitch.conf \ /etc/nsswitch.conf [root@smallfry tmp]#
Update Your /etc/host.conf File You'll need to add "nis" to your /etc/host.conf file. #/etc/host.conf order hosts,bind,nis
Add Plus Entries To /etc Authentication Files You then have to edit the /etc/passwd, /etc/shadow and /etc/group files on the NIS clients to add entries that will trigger the Linux login procedure to check the /etc/nsswitch.conf for alternative authentication methods when no more valid logins can be found on the local server. Once the login process recognizes from the /etc/nsswitch.conf file that NIS is the remote authentication method of choice it will then read the /etc/yp.conf and /etc/sysconfig/network files to determine necessary details related to the NIS server and its domain.
The trigger, or "wildcard" entry is usually placed at the bottom of these files and their format is explained for each of the files next.
/etc/passwd The following entry should be added to the end of the file. A "+" followed by six ":"s +::::::
/etc/group The following entry should be added to the end of the file. A "+" followed by three ":"s +:::
/etc/shadow The following entry should be added to the end of the file. A "+" followed by eight ":"s +::::::::

Start The NIS Client Related Daemons Start the ypbind NIS client, yppasswd and portmap daemons in the /etc/init.d directory and use the chkconfig command to ensure they start after the next reboot. Remember to use the "rpcinfo" command to ensure they are running correctly. [root@smallfry tmp]# /etc/init.d/portmap start [root@smallfry tmp]# /etc/init.d/ypbind start [root@smallfry tmp]# /etc/init.d/yppasswdd start [root@smallfry tmp]# chkconfig ypbind on [root@smallfry tmp]# chkconfig portmap on [root@smallfry tmp]# chkconfig yppasswdd on
Note: Remember to use the "rpcinfo -p localhost" command to make sure they all started correctly.
Troubleshooting NIS No amount of configuration would be sufficient without adequate testing. There are a number of tools at your disposal to do this.
Using the ypcat And getent Commands A good test of NIS functionality is to see whether you can get a listing of user records from the NIS server using the "ypcat" command. [root@smallfry tmp]# ypcat passwd nisuser:$1$Cs2GMe6r$gRZ3VB1hohkyG7ALrDLjH1:505:100::/home/nisuser:/bin/bash quotauser:!!:503:100::/home/quotauser:/bin/bash ftpinstall:$1$8WjAVtes$SnRh9S1w07sYkFNJwpRKa.:502:100::/:/bin/bash www:$1$DDCi/OPI$hwiTQ.L0XqYJUk09Bw.pJ/:504:100::/home/www:/bin/bash smallfry:$1$qHni9dnR$iKDs7gfyt..BS9Lry3DAq.:501:100::/:/bin/bash [root@smallfry tmp]#
The getent command will also provide similar information on a "per user" basis. If "ypcat" works and "getent" fails, then you have probably failed to put the "plus entries" to your /etc/passwd, /etc/shadow, and /etc/group files. [root@smallfry tmp]# getent passwd nisuser nisuser:$1$Cs2GMe6r$gRZ3VB1hohkyG7ALrDLjH1:505:100::/home/nisuser:/bin/bash [root@smallfry tmp]#
Other possible sources of error would include:
> Failure to run the ypinit command on the NIS server
> NIS not being started on the NIS server or client.
> Errors in the /etc/yp.conf and /etc/sysconfig/network files.
> Poor routing between the server and client, or the existence of a firewall that's blocking traffic
Try to eliminate these areas as sources of error and refer to the syslog /var/log/messages file on the client and server for entries that may provide additional clues.

Test Logins Via The NIS Server You should next try to test a remote login once your basic NIS functionality testing is complete. Failures in this area could be due to firewalls blocking telnet or SSH access and the telnet and SSH server process not being started on the clients.
Logging In Via Telnet Try logging into the NIS client via telnet if it is enabled [root@bigboy tmp]# telnet 192.168.1.201 Trying 192.168.1.201... Connected to 192.168.1.201. Escape character is '^]'. Red Hat Linux release 9 (Shrike) Kernel 2.4.20-6 on an i686 login: nisuser Password: Last login: Sun Nov 16 22:03:51 from 192-168-1-100.simiya.com [nisuser@smallfry nisuser]$
Logging In Via SSH Try logging into the NIS client via SSH. [root@bigboy tmp]# ssh -l nisuser 192.168.1.201 [email protected]'s password: [nisuser@smallfry nisuser]$
Note: Sometimes SSH logins on the client will fail right after activating NIS. SSH on the NIS client will need to be restarted so that it can read the new nsswitch.conf file and know that it should use NIS as an authentication option. Typical errors can be seen below:
Failed SSH login attempt [root@bigboy tmp]# ssh -l nisuser 192.168.1.201 [email protected]'s password: Permission denied, please try again. [email protected]'s password:
Syslog Error for failed login attempt Nov 16 15:29:59 smallfry sshd[3379]: Illegal user nisuser from 192.168.1.100
Changing Your NIS Passwords You should also test to make sure your users can change their NIS passwords from the NIS clients with the yppasswd command.
Possible Errors
The yppasswdd daemon must be running for this to be done or else you will get the error below. [root@smallfry etc]# yppasswd -p nisuser yppasswd: yppasswdd not running on NIS master host ("silent"). [root@smallfry etc]#

There is also a known bug with this program which can cause a segmentation fault. An alternative would be to let your users change their passwords on the NIS server followed by the root user running the make command in the /var/yp directory as was done in the "Adding Users" section above. [root@smallfry root]# yppasswd -p nisuser Segmentation fault [root@smallfry root]#
Conclusion
NIS is a very useful tool for centralized login management, but it has two shortcomings. NIS clients are typically limited to UNIX / Linux operating systems, and the password information passes over the network unencrypted.
Newer authentication schemes exist that overcome these issues. For example, LDAP, which is discussed in Chapter 32, provides both encryption and the ability to be used on varied types of equipment. Unfortunately older operating systems don't support it, making NIS the preferred option in some cases.
As always, explore your options when deciding on a centralized login scheme. A wrong decision could haunt you for a log time.

Chapter 32
Centralized Logins Using LDAP and Radius
= = = = = = = = = = = = = = = = = = = = = = = = = = = = = = = = = = = = = = = = = = = = = = = = = = In This Chapter Chapter 32
Centralized Logins Using LDAP and Radius The LDAP Database Structure Scenario Downloading And Installing The LDAP Packages Configuring The LDAP Server Configuring The LDAP Client Configuring Encrypted LDAP Communication Troubleshooting LDAP Logins Common LDAP Administrative Tasks Configuring RADIUS for LDAP Conclusion
(c) Peter Harrison, www.linuxhomenetworking.com = = = = = = = = = = = = = = = = = = = = = = = = = = = = = = = = = = = = = = = = = = Many centralized database programs have been developed to allow users to login on multiple computers using a single password. NIS was one of the first, but it doesn't encrypt the password transaction and it also uses the portmapper daemon which uses an unpredictable range of TCP ports which are difficult for firewalls to track. LDAP (Lightweight Directory Access Protocol) was designed to overcome many of the NIS shortcomings with features such as:
> The use of a single TCP port (389) for regular communication, and another port (636) for encrypted transactions.
> The ability to interact with many login authentication, authorization and accounting programs external to Linux and UNIX.
LDAP is now used as a part of the Windows Active Directory login process and can also interact with other login programs such as RADIUS that is used by the network equipment of many ISPs to manage dialup Internet access. This chapter will first show you how to install and use LDAP on Fedora Linux systems and then it will extend its use to interact with RADIUS.

The LDAP Database Structure LDAP database entries are arranged in a tree structure. Under the "root", there are branches that represent countries, organizations, organizational units and people. In complicated LDAP deployments, in which you have to exchange information with the LDAP databases of other companies, you may want to get a formal organization number from the Internet Assigned Numbers Authority (IANA) to reduce any data conflicts. In our example this won't be necessary as there will be no data sharing, we'll just make up our own.
Scenario The I.T. department in a small organization "example.com" has many Linux servers they need to administer.
1. They want a simple, secure, centralized login scheme for all of them.
2. They have decided to use the LDAP domain "example.com" for their LDAP database in which one domain component (DC) will be "example", and the other will be "com".
3. The database will only have one organizational unit simply called "People" which is the LDAP default.
4. Each person will have attributes such as a username (User ID or UID), password, Linux "home" directory and login shell.
5. The Fedora Linux server named "bigboy" will act as the LDAP server containing the database and has the IP address 192.168.1.100.
6. The Fedora Linux server named "smallfry" will be used to test the system as the LDAP client and has the IP address 192.168.1.102.
7. Server "bigboy" has a special user account named "ldapuser" that will be used to test the LDAP logins.
Here is how it's done.
Downloading And Installing The LDAP Packages Most RedHat and Fedora Linux software products are available in the RPM format. Downloading and installing RPMs isn't hard. If you need a refresher, Chapter 5, on RPMs, covers how to do this in detail.
When searching for the file, remember that the FreeRADIUS RPM's filename usually starts with the word "openldap" followed by a version number like this: openldap-servers-2.1.22-8.i386.rpm.
Required LDAP Server RPMS You will have to make sure the following packages are installed on your LDAP server. openldap openldap-clients openldap-devel nss_ldap openldap-servers

Required LDAP Client RPMS You will have to make sure the following packages are installed on your LDAP client. openldap openldap-clients openldap-devel nss_ldap
Configuring The LDAP Server The first stage of the project is to correctly configure the LDAP server which will involve the creation of an LDAP database and into which the /etc/passwd file will be imported as seen below:
Create a database directory Fedora LDAP, defaults to putting all databases in the /var/lib/ldap directory. We'll create a dedicated "example.com" directory owned by the user "ldap". (The "ldap" user is always created during the RPM installation process.) [root@bigboy tmp]# mkdir /var/lib/ldap/example.com [root@bigboy tmp]# chown ldap:ldap /var/lib/ldap/example.com
Create an LDAP "root" password Only the LDAP "root" user can create, import data, export data into an LDAP database. We'll now need to create an encrypted password for this user using the "slappasswd" command and use the result in the LDAP configuration file. [root@bigboy tmp]# slappasswd New password: Re-enter new password: {SSHA}v4qLq/qy01w9my60LLX9BvfNUrRhOjQZ [root@bigboy tmp]#
Edit the slapd.conf file The main LDAP server configuration file is the /etc/openldap/slapd.conf file. We'll now update it with the following information:
o A database of the default type "ldbm" using the domain suffix "example.com" made up of domain components (dc) "example" and "com"
o The "root" user will have a common name (cn) or nickname of "Manager" who, as expected, is part of the "example" and "com" DCs.
o The encrypted version of the LDAP "root" password is also included as well as the location of the LDAP database. database ldbm suffix "dc=example,dc=com" rootdn "cn=Manager,dc=example,dc=com" rootpw {SSHA}v4qLq/qy01w9my60LLX9BvfNUrRhOjQZ directory /var/lib/ldap/example.com

Start the LDAP daemon The /etc/init.d/ldap script uses the options "start", "stop" and "restart" to control the LDAP server's operation. We'll use the "start" option to load the contents of the slapd.conf file. [root@bigboy tmp]# /etc/init.d/ldap start Starting slapd: [ OK ] [root@bigboy tmp]#
Convert the /etc/passwd file to LDIF format
The data on the server's /etc/passwd file now need to be converted to an LDAP Data Interchange Files (LDIF) format before it can be imported into the LDAP database. You don't need to import all of the usernames, just the ones you need.
Create the "ldapuser" test account We'll now create the "ldapuser" account we'll use for testing. root@bigboy tmp]# useradd -g users ldapuser [root@bigboy tmp]# passwd ldapuser Changing password for user ldapuser. New password: Retype new password: passwd: all authentication tokens updated successfully. [root@bigboy tmp]#
Extract the desired records from /etc/passwd We'll need to extract the "ldapuser" information from the /etc/passwd file using the "grep" command and save it by appending the information to the a file called /etc/openldap/passwd.ldapusers file with the ">>" brackets. [root@bigboy tmp]# grep ldapuser /etc/passwd > \ /etc/openldap/passwd.ldapusers [root@bigboy tmp]#
If this is your first time creating the LDAP database, you will also want to extract the information for the Linux "root" account from the /etc/passwd file too. in a brand new file called /etc/openldap/passwd.root [root@bigboy tmp]# grep root /etc/passwd > \ /etc/openldap/passwd.root [root@bigboy tmp]#
Find the conversion script The /etc/passwd conversion program is called "migrate_passw.pl" and can be found using the "locate" command. The "locate" utility updates its database every night and may not be able to find newly installed files. You can use the "slocate" command to do the update ahead of schedule. [root@bigboy tmp]# slocate -u [root@bigboy tmp]# locate migrate ... /usr/share/openldap/migration/migrate_passwd.pl ... [root@bigboy tmp]#
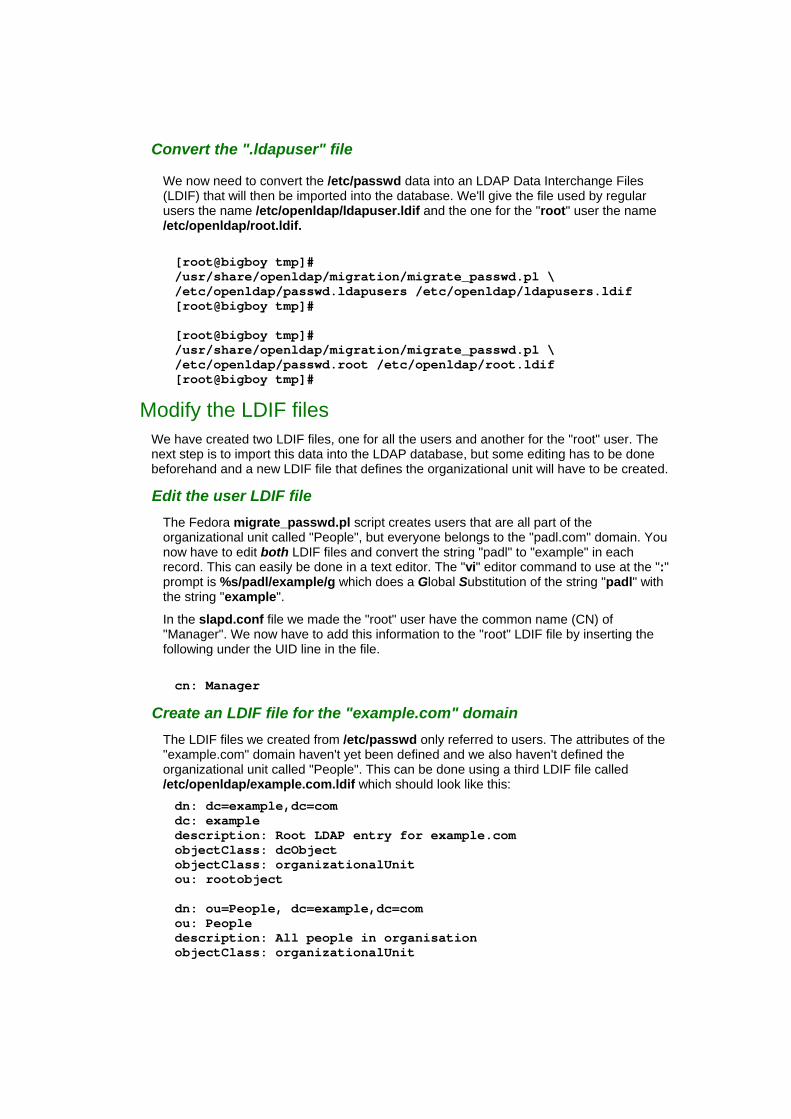
Convert the ".ldapuser" file
We now need to convert the /etc/passwd data into an LDAP Data Interchange Files (LDIF) that will then be imported into the database. We'll give the file used by regular users the name /etc/openldap/ldapuser.ldif and the one for the "root" user the name /etc/openldap/root.ldif. [root@bigboy tmp]# /usr/share/openldap/migration/migrate_passwd.pl \ /etc/openldap/passwd.ldapusers /etc/openldap/ldapusers.ldif [root@bigboy tmp]# [root@bigboy tmp]# /usr/share/openldap/migration/migrate_passwd.pl \ /etc/openldap/passwd.root /etc/openldap/root.ldif [root@bigboy tmp]#
Modify the LDIF files We have created two LDIF files, one for all the users and another for the "root" user. The next step is to import this data into the LDAP database, but some editing has to be done beforehand and a new LDIF file that defines the organizational unit will have to be created.
Edit the user LDIF file The Fedora migrate_passwd.pl script creates users that are all part of the organizational unit called "People", but everyone belongs to the "padl.com" domain. You now have to edit both LDIF files and convert the string "padl" to "example" in each record. This can easily be done in a text editor. The "vi" editor command to use at the ":" prompt is %s/padl/example/g which does a Global Substitution of the string "padl" with the string "example".
In the slapd.conf file we made the "root" user have the common name (CN) of "Manager". We now have to add this information to the "root" LDIF file by inserting the following under the UID line in the file. cn: Manager
Create an LDIF file for the "example.com" domain The LDIF files we created from /etc/passwd only referred to users. The attributes of the "example.com" domain haven't yet been defined and we also haven't defined the organizational unit called "People". This can be done using a third LDIF file called /etc/openldap/example.com.ldif which should look like this: dn: dc=example,dc=com dc: example description: Root LDAP entry for example.com objectClass: dcObject objectClass: organizationalUnit ou: rootobject dn: ou=People, dc=example,dc=com ou: People description: All people in organisation objectClass: organizationalUnit

Import the LDIF files into the database Use the LDAP add command to import all three LDIF files into the database starting with the example.com.ldif file, followed by root.ldif and lastly by ldapusers.ldif.
Enter the LDAP "root" password you created when you are prompted. [root@bigboy tmp]# ldapadd -x -D "cn=Manager,dc=example,dc=com" \ -W -f /etc/openldap/example.com.ldif [root@bigboy tmp]# ldapadd -x -D "cn=Manager,dc=example,dc=com" \ -W -f /etc/openldap/root.ldif [root@bigboy tmp]# ldapadd -x -D "cn=Manager,dc=example,dc=com" \ -W -f /etc/openldap/ldapusers.ldif [root@bigboy tmp]#
Test the LDAP database The "ldapsearch" command can be used to view all the LDAP database entries all at once. It is a good test to make sure you have all the correct functionality. [root@bigboy tmp]# ldapsearch -x -b 'dc=example,dc=com' \ '(objectclass=*)' [root@bigboy tmp]#
Configuring The LDAP Client Now that the LDAP server is configured properly, you can now turn your attention to configuring and testing the clients.
Edit the ldap.conf configuration file LDAP clients are configured using the /etc/openldap/ldap.conf file. You need to make sure that the file refers to the LDAP server's IP address for the domain "example.com". The file should look like this:
HOST 192.168.1.100 BASE dc=example,dc=com
Edit the /etc/nsswitch file The /etc/nsswitch.conf file defines the order in which the Linux operating system will search login databases for login information.
We want to configure it to first search its /etc/passwd file and if it doesn't find the user password information there, it will go to the LDAP server. The easiest way to do this is to use the /usr/bin/authconfig command. Here's how:
1. Run /usr/bin/authconfig
2. Select LDAP
3. Give the LDAP server's IP address which in this case is 192.168.1.100
4. Give the base DN as "dc=example,dc=com" (no quotes).

5. Do not select TLS.
6. Use MD5 and shadow passwords.
The screen should look like this:
[*] Use Shadow Passwords [*] Use MD5 Passwords [*] Use LDAP [ ] Use TLS Server: 192.168.1.100 Base DN: dc=example,dc=com
When finished, look at the /etc/nsswitch.conf file and make sure it has references to LDAP.
Restart SSH On The LDAP Client The SSH daemon needs to be restarted so that it can re-read the modified nsswitch.conf file and refer to the LDAP server when necessary. [root@smallfry tmp]# /etc/init.d/sshd restart Stopping sshd:[ OK ] Starting sshd:[ OK ] [root@smallfry tmp]#
Create Home Directories On The LDAP Client We previously created a user named "ldapuser" in the group "users" on server bigboy. We now need to make sure that this user has a home directory on the LDAP client smallfry. In the example below, we create the directory and make ldapuser the owner. As we can see, server smallfry correctly gets its user information about ldapuser from bigboy as the chown command doesn't complain about ldapuser not existing in smallfry's /etc/passwd file.
Check To See If Ldapuser Is Not In The /Etc/Passwd File. This can be done with the grep command to search the/etc/passwd file. There should be no response. [root@smallfry tmp]# grep ldapuser /etc/passwd [root@smallfry tmp]#
Create The Home Directory For ldapuser On The LDAP Client Here we create the home directory, copy a BASH login profile file into it and modify the ownership of the directory and all the files to user "ldapuser".
Note: If the "chown" command fails, it is probably due to an incorrect LDAP configuration as the LDAP client cannot read the user information from the LDAP server.
In some cases, you may want to use NFS mounts to provide home directories for your users which will significantly reduce the need to do this step. The benefits and disadvantages of NFS are covered in Chapter 30 on NFS and Chapter 31 on NIS covers using NFS for home directories.

[root@smallfry tmp]# mkdir /home/ldapuser [root@smallfry tmp]# chmod 700 /home/ldapuser/ [root@smallfry tmp]# chown ldapuser:users /home/ldapuser/ [root@smallfry tmp]# ll /home total 2 drwx------ 2 ldapuser users 1024 Aug 4 08:05 ldapuser [root@smallfry tmp]# [root@smallfry tmp]# cp /etc/skel/.* /home/ldapuser/ cp: omitting directory `/etc/skel/.' cp: omitting directory `/etc/skel/..' cp: omitting directory `/etc/skel/.kde' [root@smallfry tmp]# chown ldapuser /home/ldapuser/.* [root@smallfry tmp]#
Testing You will now need to do basic testing which is covered in the troubleshooting section.
Configuring Encrypted LDAP Communication The secure tunnel ("stunnel") utility can be used to intercept regular LDAP communications and encrypt it over an SSL tunnel using the TCP port of your choice. Fortunately, stunnel is installed by default on Fedora Linux which makes it even easier to use.
Note: Only add the SSL encryption once basic LDAP has been proven to work without encryption. This makes troubleshooting much easier.
Here's how to encrypt LDAP with Fedora Linux:
Configuring the stunnel LDAP client First we'll configure the LDAP client to use stunnel.
Edit the ldap.conf file We have to trick the LDAP client into thinking that the LDAP server is actually running locally as a daemon, so we need to set the "HOST" entry to "localhost". We will then configure the stunnel utility to intercept this traffic and relay it to the real LDAP server. HOST localhost BASE dc=example,dc=com
Create an stunnel user This can be done using the "useradd" command. [root@smallfry tmp]# useradd stunnel
Edit the configuration file The stunnel.conf file file is located in the /etc/stunnel directory. You'll need to configure it as follows: # Configure stunnel to run as user "stunnel" placing temporary

# files in the /usr/var/run/stunnel/ directory chroot = /home/stunnel pid = /stunnel.pid setuid = stunnel setgid = stunnel # Configure logging debug = 7 output = /var/log/messages # Use it for client mode client = yes # Service-level configuration [ldap] accept = 389 connect = 192.168.1.100:636
Most importantly we can see at the very end of the file where any traffic on the LDAP TCP port 389 is specifically redirected to the LDAP server on TCP port 636 over the secure tunnel.
Start stunnel This can be done with the stunnel command [root@smallfry tmp]# stunnel
Check the log files You should check the last 100 lines of the error log file /var/log/messages to make sure there are no errors. If there are, double check your stunnel configuration file for mistakes. [root@smallfry tmp]# tail -100 /var/log/messages
Make sure stunnel runs on the next reboot
The script /etc/rc.local is run at the end of every boot sequence. Use the "locate" command to find out where the stunnel program is and then place your stunnel command in /etc/rc.local like this: # Run stunnel for LDAP (Fedora file location) /usr/sbin/stunnel
Configuring the stunnel LDAP server Once the client has been configured, it's time to setup stunnel on the LDAP server.
Create an stunnel user
This can be done using the "useradd" command. [root@bigboy tmp]# useradd stunnel
Edit the configuration file
The stunnel.conf file file is located in the /etc/stunnel directory. You'll need to configure it as follows:
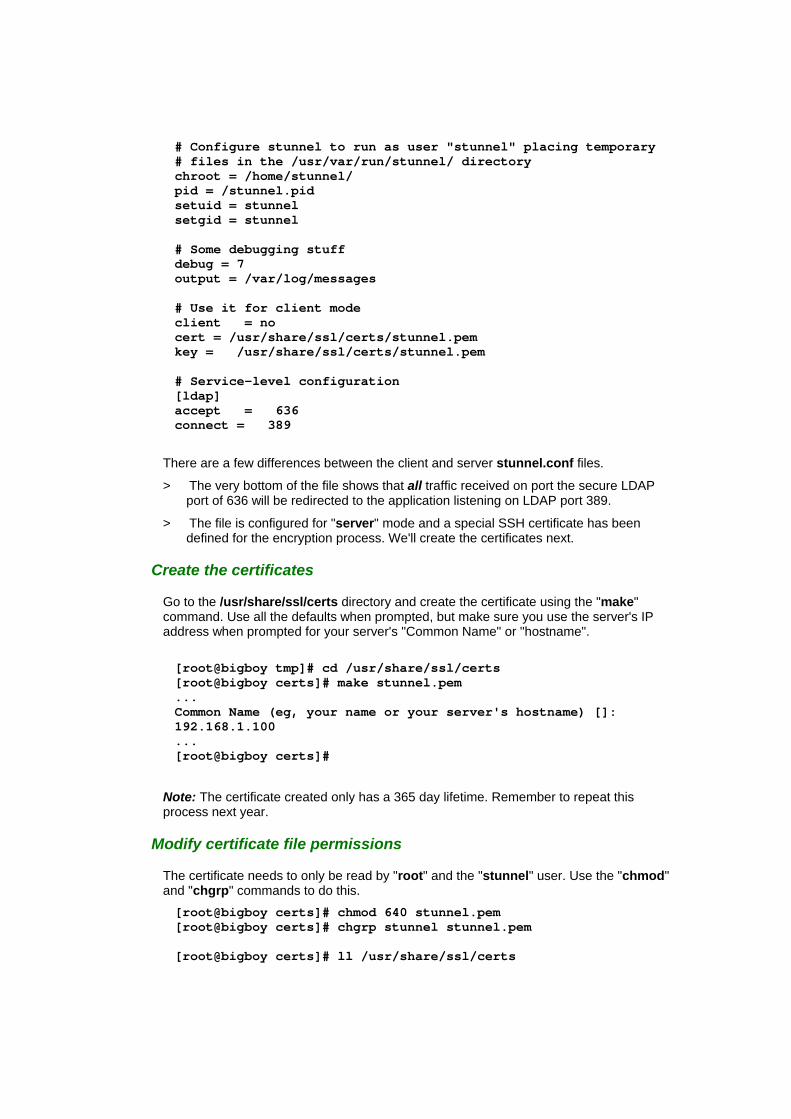
# Configure stunnel to run as user "stunnel" placing temporary # files in the /usr/var/run/stunnel/ directory chroot = /home/stunnel/ pid = /stunnel.pid setuid = stunnel setgid = stunnel # Some debugging stuff debug = 7 output = /var/log/messages # Use it for client mode client = no cert = /usr/share/ssl/certs/stunnel.pem key = /usr/share/ssl/certs/stunnel.pem # Service-level configuration [ldap] accept = 636 connect = 389
There are a few differences between the client and server stunnel.conf files.
> The very bottom of the file shows that all traffic received on port the secure LDAP port of 636 will be redirected to the application listening on LDAP port 389.
> The file is configured for "server" mode and a special SSH certificate has been defined for the encryption process. We'll create the certificates next.
Create the certificates
Go to the /usr/share/ssl/certs directory and create the certificate using the "make" command. Use all the defaults when prompted, but make sure you use the server's IP address when prompted for your server's "Common Name" or "hostname". [root@bigboy tmp]# cd /usr/share/ssl/certs [root@bigboy certs]# make stunnel.pem ... Common Name (eg, your name or your server's hostname) []: 192.168.1.100 ... [root@bigboy certs]#
Note: The certificate created only has a 365 day lifetime. Remember to repeat this process next year.
Modify certificate file permissions
The certificate needs to only be read by "root" and the "stunnel" user. Use the "chmod" and "chgrp" commands to do this. [root@bigboy certs]# chmod 640 stunnel.pem [root@bigboy certs]# chgrp stunnel stunnel.pem [root@bigboy certs]# ll /usr/share/ssl/certs

-rw-r----- 1 root stunnel 1991 Jul 31 21:50 stunnel.pem [root@bigboy certs]#
Start stunnel
This can be done with the stunnel command [root@bigboy stunnel]# stunnel
Check the log files
You should check the last 100 lines of the error log file /var/log/messages to make sure there are no errors. If there are, double check your stunnel configuration file for mistakes. [root@bigboy stunnel]# tail -100 /var/log/messages
The key things to look for are the loading of the certificate, the binding of LDAP to the 636 secure LDAP port and the creation of the temporary stunnel.pid file. 2004.08.02 08:50:18 LOG7[12102:3210052320]: Certificate: /usr/share/ssl/certs/stunnel.pem 2004.08.02 08:50:18 LOG7[12102:3210052320]: Key file: /usr/share/ssl/certs/stunnel.pem 2004.08.02 08:50:18 LOG7[12102:3210052320]: ldap bound to 0.0.0.0:636 2004.08.02 08:50:18 LOG7[12103:3210052320]: Created pid file /stunnel.pid
Make sure stunnel runs on the next reboot
The script /etc/rc.local is run at the end of every boot sequence. Use the "locate" command to find out where the stunnel program is and then place your stunnel command in /etc/rc.local like this: # Run stunnel for LDAP (Fedora file location) /usr/sbin/stunnel
User Preparation There are two final steps you'll need to do before testing. Both are outlined in the guidelines mentioned in the unsecured LDAP section
> You will have to restart SSH on the LDAP server for it to reread the modified /etc/nsswitch.conf file you created previously.
> You will also need to create a home directory for each user.
Testing You will now need to do basic testing which is covered in the troubleshooting section.

Troubleshooting LDAP Logins You can never be certain about the functioning of any application unless you test it. LDAP is fairly complicated to install and should be as thoroughly tested as possible before you deploy it. Here are some steps you can take to help you sleep better at night.
Testing Using ldapsearch The ldapsearch command should always be run on both the LDAP client and server to test your LDAP configuration. When LDAP is configured correctly, the command sends a full database listing to your screen.
[root@smallfry tmp]# ldapsearch -x -b 'dc=example,dc=com'\ '(objectclass=*)'
Using SSH or the Linux console Try to log in as user ldapuser to the LDAP client Linux system as an alternative test. If it fails, try restarting SSH on the LDAP client so that the /etc/nsswitch.conf file can be reread with the new LDAP information.
Using The tcpdump Command If the LDAP configuration files appear correct, and yet LDAP still doesn't work, then you should try using the tcpdump command, outlined in Chapter 3, to see whether your systems can correctly communicate with one another. A failure to communicate could be due to poor routing, misconfigured firewalls along the way, or possibly LDAP being turned off on the server.
Testing Secure LDAP
On the LDAP server use the TCP dump command to listen for traffic on the secure LDAP port 636 or "ldaps". Run the "ldapsearch" command on the LDAP client and if everything is configured correctly, you should see packet flows like this. [root@bigboy tmp]# tcpdump -n tcp port ldaps tcpdump: listening on eth0 09:20:02.281257 192.168.1.102.1345 > 192.168.1.100.ldaps: S 1665037104:1665037104(0) win 5840 <mss 1460,sackOK,timestamp 74401362 0,nop,wscale 0> (DF) 09:20:02.281356 192.168.1.100.ldaps > 192.168.1.102.1345: S 1911175072:1911175072(0) ack 1665037105 win 5792 <mss 1460,sackOK,timestamp 20737195 74401362,nop,wscale 0> (DF) ... ... [root@bigboy tmp]#
Testing Regular LDAP
On the LDAP server use the TCP dump command to listen for traffic on the regular LDAP port 389 or "ldap". Run the "ldapsearch" command on the LDAP client and if everything is configured correctly, you should see LDAP packet flows similar to the ones above. [root@bigboy tmp]# tcpdump -n tcp port ldap

Testing Basic Connectivity The very first step is to use telnet to determine whether your LDAP server is accessible on TCP port 389 (LDAP) or 636 (LDAPS).
o Lack of connectivity could be caused by a firewall in the path between the LDAP server and client or there could be firewall software running on the servers themselves.
o Other sources of failure include LDAP not being started at all, the server could be down, or there could be a network related failure.
Troubleshooting with Telnet is covered in Chapter 3 on network troubleshooting.
LDAP works but is not using LDAPS An LDAPS configuration will default to using regular LDAP if there is an error with the SSL keys. This is usually caused by incorrect permissions and ownerships on the key file.
Stunnel Doesn't Appear To Work Changes to the stunnel.conf file only take effect after stunnel has been restarted. Unfortunately, there is no stunnel script in the /etc/init.d directory to do this. You have to use the pkill command to stop it and the stunnel command to start it again. [root@bigboy tmp]# pkill stunnel ; stunnel [root@bigboy tmp]#
LDAP_BIND Errors The LDAP bind utility is used for each login and can give failure errors which are usually not very descriptive. I've listed some of the main ones I've encountered below which usually occur when running the ldapadd command.
Can't contact LDAP server (81) This is usually caused by not configuring the correct IP address in the LDAP client's ldap.conf file.
Invalid credentials (49) This is usually caused by incorrect "dc=" statements in the configuration files or in commands used.
Possible stunnel Errors in Fedora Core 2 You may get a "cryptonet" error when starting stunnel like the one below. Unable to open "/dev/cryptonet"
This is caused by an incompatibility with the "hwcrypto" RPM used for hardware, not software based encryption. You will need to uninstall "hwcrypto" to get stunnel to work correctly. [root@bigboy tmp]# rpm -e hwcrypto

Common LDAP Administrative Tasks
Here are some explanations of how to do many common LDAP tasks. They are all based on our sample organization (dn=example,dn=com).
Note: You need to always make sure that there are no entries for regular users in the /etc/passwd files of the LDAP clients. These should only reside on the LDAP server.
Starting and Stopping LDAP
o You can use the chkconfig command to get openldap configured to start at boot:
[root@bigboy tmp]# chkconfig openldap on
o To start/stop/restart openldap after booting
[root@bigboy tmp]# /etc/init.d/openldap start [root@bigboy tmp]# /etc/init.d/openldap stop [root@bigboy tmp]# /etc/init.d/openldap restart
Note: Remember to restart the openldap process every time you make a change to the LDAP database file for the changes to take effect on the running process.
LDAP users changing their own passwords LDAP users can modifytheir LDAP passwords using the regular passwd command. [ldapuser@smallfry ldapuser]$ passwd Changing password for user ldapuser. Enter login(LDAP) password: New password: Retype new password: LDAP password information changed for ldapuser passwd: all authentication tokens updated successfully. [ldapuser@smallfry ldapuser]$
Modifying LDAP users by user "root" One easy way for the system administrator to manage LDAP users is to modify the regular Linux users' characteristics on the LDAP server in the regular way and then run a script to automatically modify the LDAP database.
The Modify LDAP user script This is a very simple sample script /usr/local/bin/modifyldapuser which you can use to extract a particular user's information from /etc/passwd and import it into our LDAP database.
The script works by using the grep command to extract the /etc/passwd user record to a temporary file. It then runs the migrate_passwd script on this data and outputs the result to temporary LDIF file. The next step it does is to replace the default "padl" DC with our "example" DC and export this to the final LDIF file. Finally the ldapmodify command is used to do the update and then the temporary files are deleted.

#!/bin/bash grep $1 /etc/passwd > /tmp/modifyldapuser.tmp /usr/share/openldap/migration/migrate_passwd.pl \ /tmp/modifyldapuser.tmp /tmp/modifyldapuser.ldif.tmp cat /tmp/modifyldapuser.ldif.tmp | sed s/padl/example/ \ > /tmp/modifyldapuser.ldif ldapmodify -x -D "cn=Manager,dc=example,dc=com" -W -f \ /tmp/modifyldapuser.ldif rm -f /tmp/modifyldapuser.*
Note: You need to remember to make the script executable and usable only by user "root" with the chmod command like this. [root@bigboy tmp]# chmod 700 /usr/local/bin/modifyldapuser [root@bigboy tmp]#
Script usage sample
Here is how to use the script.
> Modify the Linux user. In this case we're modifying the password for user "ldapuser"
> Run the modifyldapuser script using "ldapuser" as the argument.
> You will be prompted for the LDAP root password.
[root@bigboy tmp]# passwd ldapuser Changing password for user ldapuser. New password: Retype new password: passwd: all authentication tokens updated successfully. [root@bigboy tmp]# modifyldapuser ldapuser Enter LDAP Password: modifying entry "uid=ldapuser,ou=People,dc=example,dc=com" [root@bigboy tmp]#
Adding new LDAP users I've included a short script you can use to add LDAP users to your database. An example of how to use it is also provided.
Create a LDAP add user script You can create a /usr/local/bin/addldapuser script like the one below based on the modifyldapuser script we created before. #!/bin/bash grep $1 /etc/passwd > /tmp/changeldappasswd.tmp

/usr/share/openldap/migration/migrate_passwd.pl \ /tmp/changeldappasswd.tmp /tmp/changeldappasswd.ldif.tmp cat /tmp/changeldappasswd.ldif.tmp | sed s/padl/example/ \ > /tmp/changeldappasswd.ldif ldapadd -x -D "cn=Manager,dc=example,dc=com" -W -f \ /tmp/changeldappasswd.ldif rm -f /tmp/changeldappasswd.*
Add the user to the database There are three steps in doing this:
1. Create the Linux user on the LDAP server.
2. Run the addldapuser script with the username as the only argument. In the example below we are importing a previously created Linux user named ldapuser. The script prompts you for your LDAP "root" password. [root@bigboy tmp]# addldapuser ldapuser Enter LDAP Password: adding new entry "uid=ldapuser,ou=People,dc=example,dc=com" [root@bigboy tmp]#
3. Create home directories for the user on all the LDAP client Linux boxes.
Deleting LDAP users Here is a simple script, plus an example of its usage, to delete LDAP users from your database.
Create a LDAP add user script You can create a /usr/local/bin/deleteldapuser script like the one below. #!/bin/bash ldapdelete -x -W -D "cn=Manager,dc=example,dc=com" \ "uid=$1,ou=People,dc=example,dc=com"
Delete the user from the database Run the deleteldapuser script with the username as the only argument. In the example below, we are deleting a previously created Linux user named ldapuser. The script prompts you for your LDAP "root" password. [root@bigboy tmp]# deleteldapuser ldapuser Enter LDAP Password: [root@bigboy tmp]#
Configuring RADIUS for LDAP Many network equipment manufacturers use an authorization scheme called RADIUS to filter the types of activities a user can do. The Linux FreeRADIUS server can be configured to talks to a Linux LDAP server to handle login authentication services. In other words, the user logs into the equipment, which then sends a username/password combination to the RADIUS server, the RADIUS server queries the LDAP server to see if the user is a valid one, and then

replies to the network equipment with the desired login privileges if the LDAP query is successful.
You'll have to refer to your manufacturer's manuals on how to configure RADIUS, but fortunately researching how the FreeRADIUS server interacts with the Linux LDAP server is much simpler. Here are the steps.
How To Download and Install The FreeRADIUS Packages Most RedHat and Fedora Linux software products are available in the RPM format. Downloading and installing RPMs isn't hard. If you need a refresher, the chapter on RPMs covers how to do this in detail.
When searching for the file, remember that the FreeRADIUS RPM's filename usually starts with the word "freeradius" followed by a version number like this: freeradius-0.9.1-1.i386.rpm.
Starting and Stopping FreeRADIUS o You can use the chkconfig command to get the FreeRADIUS daemon radiusd
configured to start at boot: [root@bigboy tmp]# chkconfig radiusd on
o To start/stop/restart radiusd after booting
[root@bigboy tmp]# /etc/init.d/radiusd start [root@bigboy tmp]# /etc/init.d/radiusd stop [root@bigboy tmp]# /etc/init.d/radiusd restart
Note: Remember to restart the radiusd process every time you make a change to the configuration files for the changes to take effect on the running process.
Configuring The /etc/raddb/radiusd.conf File The /etc/radius.conf file stores the main radius configuration parameters. You'll have to update some of the settings to allow LDAP queries from RADIUS.
o Activate the use of the LDAP module in the "authorization" section of the file by uncommenting the word "ldap"
o Activate the use of the LDAP module in the "authenticate" section by uncommenting the "Auth-Type" block for LDAP like this: Auth-Type LDAP { ldap
}
o Define the LDAP domain, LDAP server and password methodologies to be used in the "ldap" block. In our example, the LDAP and RADIUS server is the machine, so we set the LDAP server IP address to "localhost". ldap { # Define the LDAP server and the base domain name server = "localhost" basedn = "dc=example,dc=com" # Define which attribute from an LDAP "ldapsearch" query # is the password. Create a filter to extract the password

# from the "ldapsearch" output password_attribute = "userPassword" filter = "(uid=%{Stripped-User-Name:-%{User-Name}})" # The following are RADIUS defaults start_tls = no dictionary_mapping = ${raddbdir}/ldap.attrmap ldap_connections_number = 5 timeout = 4 timelimit = 3 net_timeout = 1
}
Configuring The /etc/raddb/users File The /etc/raddb/users file defines the types of attributes a user will receive upon login. In the case of a router, this may include allowing some user groups to login to a device in a privileged mode, while only allowing other basic access.
One of the first entries in this file is to check the local server's /etc/passwd file. The very next entry should be one referring to your LDAP server with a "fall through" statement which will allow additional authorizations to be granted to the LDAP user further down the file based on other sets of criteria. # # First setup all accounts to be checked against the UNIX /etc/passwd. # DEFAULT Auth-Type = System
Fall-Through = 1 # # Defaults for LDAP # DEFAULT Auth-Type := LDAP
Fall-Through = 1
Configuring The /etc/raddb/clients.conf File You can define a shared secret password key to be used by the RADIUS server and its clients in the /etc/raddb/clients.conf file.
Passwords can be allocated for ranges of IP addresses in each network "block" using the secret keyword. The example below, defines the password "testing123" for all queries from localhost, but "s3astar" for the 192.168.1.0/24 and "shrtp3nc1l" for the 172.16.1.0/24 network. All RADIUS clients will have to peer with the RADIUS server from these networks using the correct password before logins will be correctly accepted. client 127.0.0.1 {
secret = testing123 shortname = localhost
} client 192.168.1.0/24 {
secret = s3astar shortname = home-network
}

client 172.16.1.0/24 { secret = shrtp3nc1l shortname = office-network
}
Troubleshooting And Testing RADIUS You can now test the RADIUS setup using the steps below:
Server Setup You can test the server by running radiusd in debug mode which will give very verbose messages about the status of the RADIUS queries. There messages are much more informative than those provided in the /var/log/messages and /var/log/radius/radius.log files. [root@bigboy tmp]# /usr/sbin/radiusd -X -A
Note: After testing is complete, you'll need to start the radiusd daemon in the normal manner using the command "/etc/init.d/radiusd start"
Linux Client Setup The radtest command can be used to do radius queries. The arguments are the LDAP username, LDAP user's password, LDAP server IP address, a NAS port value (any value between 1 and 100 will work here) and the RADIUS client-server shared secret password key. Successful queries will show an "Access-Accept" message.
A successful test from the RADIUS server [root@bigboy tmp]# radtest ldapuser "ldapuser-password" localhost 2 testing123 ... rad_recv: Access-Accept packet from host 127.0.0.1:1812, id=99, length=20 ... [root@bigboy tmp]#
A successful test from a Linux RADIUS client.
In this case freeradius was installed solely for the purposes of testing the shared secret password key from another network. This is a good troubleshooting tip to verify remote client access before deploying network equipment. [root@smallfry bin]# radtest ldapuser "ldapuser-password" 192.168.1.100 2 s3astar ... rad_recv: Access-Accept packet from host 192.168.1.100:1812, id=51, length=20 ... [root@smallfry bin]#
Cisco Client Setup This is a sample snippet of how to set up a Cisco device to use a Radius server. Full coverage Cisco authentication, authorization and accounting (AAA) setup using RADIUS can be found on their corporate website.
The important thing to note in relation to our setup is that the radius-server statements define the RADIUS server's IP address and the shared secret password key.

aaa new-model aaa authentication login default radius enable aaa authentication ppp default radius aaa authorization network radius radius-server host 192.168.1.100 radius-server timeout 10 radius-server key shrtp3nc1l
Errors With Fedora Core 2
The interaction between LDAP and RADIUS on Fedora Core 2 seems to be plagued with a segmentation fault error which can be seen on the RADIUS server when run in debug mode. The error looks like this: ldap_get_conn: Got Id: 0 rlm_ldap: attempting LDAP reconnection rlm_ldap: (re)connect to localhost:389, authentication 0 rlm_ldap: bind as / to localhost:389 Segmentation fault
The only solution I have found is to install the Fedora Core 1 versions of the RADIUS and LDAP RPMs and editing the /etc/yum.conf file to prevent them from being automatically updated to newer versions.
Conclusion
LDAP is rapidly becoming a defacto standard for remote authentication and authorization of users, not only in the realm of Linux, but also in that of Windows where it is a key component of Active Directory. Usage of LDAP is also becoming increasingly widespread in the use of wireless networking systems such as hot spots, where for the sake of convenience, ISPs will sacrifice data security by not using encryption but use LDAP to restrict access to the Internet to persons who have purchased a pre-paid access code with a predefined lifetime.
Chapter 33 covers the use of the Linux Squid application to cache web content, restrict web access by the time of day and via password prompts. Though it is beyond the scope of this book, it is good to know that LDAP can be used to complement the functionality of Squid in larger implementations

Chapter 33
Controlling Web Access With Squid = = = = = = = = = = = = = = = = = = = = = = = = = = = = = = = = = = = = = = = = = = = In This Chapter Chapter 33
Controlling Web Access With Squid Download and Install The Squid Package How To Get Squid Started The /etc/squid/squid.conf File Forcing Users To Use Your Squid Server Squid Disk Usage Troubleshooting Squid Other Squid Capabilities Conclusion
(c) Peter Harrison, www.linuxhomenetworking.com = = = = = = = = = = = = = = = = = = = = = = = = = = = = = = = = = = = = = = = = = = =
Two important goals of many small businesses are to:
> Reduce Internet bandwidth charges
> Limit access to the Web to only authorized users.
The Squid web caching proxy server can achieve both these goals fairly easily.
Users configure their web browsers to use the Squid proxy server instead of going to the web directly. The Squid server then checks its web cache for the web information requested by the user. It will return any matching information that finds in its cache, and if not will go to the web to find it on behalf of the user. Once it finds the information, it will populate its cache with it and also forward it to the user's web browser.
As you can see, this reduces the amount of data accessed from the web. Another advantage is that you can configure your firewall to only accept HTTP web traffic from the Squid server and no one else. Squid can then be configured to request usernames and passwords for each user that users its services. This provides simple access control to the Internet.Download and Install The Squid Package
Most RedHat Linux software products are available in the RPM format. Downloading and installing RPMs isn't hard. If you need a refresher, Chapter 5, on RPMS, covers how to do this in detail. It is best to use the latest version of Squid.
How To Get Squid Started > Use the chkconfig configure Squid to start at boot:
[root@bigboy tmp]# chkconfig --level 35 squid on

> Use the squid init script in the /etc/init.d directory to start/stop/restart Squid after booting [root@bigboy tmp]# /etc/init.d/squid start [root@bigboy tmp]# /etc/init.d/squid stop [root@bigboy tmp]# /etc/init.d/squid restart
> You can test whether the Squid process is running with the following command, you should get a response of plain old process ID numbers: [root@bigboy tmp]# pgrep squid
The /etc/squid/squid.conf File The main Squid configuration file is squid.conf. Squid must be restarted each time you make changes to this file for them to come into effect.
Activating Configuration Changes Like most Linux applications, Squid needs to be restarted in order for changes to the configuration file can take effect.
The Visible Host Name Note: Older versions of Squid will fail to start if you don't give your server a hostname. You can set this with the "visible_hostname" parameter. Here we set it to the real name of our server "bigboy". visible_hostname bigboy
Access Control Lists You can limit users' ability to browse the Internet with access control lists (ACLs). Each ACL line defines a particular type of activity, such as an access time or source network, they are then linked to an http_access statement that tells squid whether or not to deny or allow traffic that matches the ACL.
Here are some guide lines that may be helpful.
o Squid matches each web access request it receives by checking the http_access list from top to bottom. If it finds a match, it enforces the "allow" or "deny" statement and stops reading further. You will have to be careful not to place a "deny" statement in the list that blocks a similar "allow" statement below it. The final http_access statement denies everything, so it is best to place new http_access statements above it.
o Squid has a minimum required set of ACL statements in the ACCESS_CONTROL section of the squid.conf file. It is best to put new customized entries right after this list to make the file easier to read.
Restricting Web Access By Time Access control lists can be created with time parameters. Here are some quick examples. Remember to restart Squid for the changes to take effect.
Only Allow Business Hour Access From The Home Network
# # Add this to the bottom of the ACL section of squid.conf # acl home_network src 192.168.1.0/24

acl business_hours time M T W H F 9:00-17:00 # # Add this at the top of the http_access section of squid.conf # http_access allow home_network business_hours
Only Allow Access In The Morning # # Add this to the bottom of the ACL section of squid.conf # acl mornings time 08:00-12:00 # # Add this at the top of the http_access section of squid.conf # http_access allow mornings
Restricting Web Access By IP Address You can create an access control list (ACL) that restricts web access to users on certain networks. In this case we're creating an ACL that defines our home network of 192.168.1.0. # # Add this to the bottom of the ACL section of squid.conf # acl home_network src 192.168.1.0/255.255.255.0
You will also have to add a corresponding http_access statement that allows traffic that matches the ACL. # # Add this at the top of the http_access section of squid.conf # http_access allow home_network
Remember to restart Squid for the changes to take effect.
Password Authentication Using NCSA Squid can be configured to prompt users for a username and password. Squid comes with a program called "ncsa_auth" that will read any NCSA compliant encrypted password file. The "htpasswd" program that comes installed with Apache can be used to create your passwords. Here is how it's done:
Create The Password File The name of the password file we'll create is /etc/squid/squid_passwd and we' need to make sure that it's universally readable. [root@bigboy tmp]# touch /etc/squid/squid_passwd [root@bigboy tmp]# chmod o+r /etc/squid/squid_passwd
Add Users To The Password File Use the htpasswd program to add users to the password file. In this case we add a username called "www". You can add users at anytime without having to restart Squid.

[root@bigboy tmp]# htpasswd /etc/squid/squid_passwd www New password: Re-type new password: Adding password for user www [root@bigboy tmp]#
Locate Your ncsa_auth File Now you need to locate where ncsa_auth is located with the locate command. [root@silent RPMS]# locate ncsa_auth /usr/lib/squid/ncsa_auth [root@silent RPMS]#
Edit squid.conf Now you need to define the authentication program in squid.conf, which is in this case ncsa_auth. This is done by creating an "http_access" entry that allows traffic that matches a special access control list (ACL) entry we'll call "ncsa_users". Then you'll need to create the ACL named "ncsa_users" with the REQUIRED keyword that forces Squid to use the NCSA auth_param method we defined.
Simple User Authentication Example # # Add this to the auth_param section of squid.conf # auth_param basic program /usr/lib/squid/ncsa_auth /etc/squid/squid_passwd # # Add this to the bottom of the ACL section of squid.conf # acl ncsa_users proxy_auth REQUIRED # # Add this at the top of the http_access section of squid.conf # http_access allow ncsa_users
Password Authentication, Access only during Business hours # # Add this to the auth_param section of squid.conf # auth_param basic program /usr/lib/squid/ncsa_auth /etc/squid/squid_passwd # # Add this to the bottom of the ACL section of squid.conf # acl ncsa_users proxy_auth REQUIRED acl business_hours time M T W H F 9:00-17:00 # # Add this at the top of the http_access section of squid.conf # http_access allow ncsa_users business_hours

Restart Squid Remember to restart Squid for the changes to take effect.
Forcing Users To Use Your Squid Server If you are using access controls on Squid, you may also want to configure your firewall to only allow HTTP Internet access to only the Squid server. This will force your users to browse the web through the squid proxy.
Making Your Squid Server Transparent To Users It is possible to limit HTTP internet access to only the Squid server without having to modify the browser settings on your client PCs.
Firewall configuration This is called a "transparent proxy" configuration. It is usually achieved by configuring a firewall between the client PCs and the Internet to redirect all HTTP (TCP port 80) traffic to the Squid server on TCP port 3128 (which is Squid server default TCP port).
The examples below are based on the discussion of Linux iptables that can be found in the firewall chapter of the Linux Websites book. Additional commands may be necessary for you particular network topology.
In both cases below:
The firewall is connected to the internet on interface eth0 and to the home network on interface eth1. The firewall is also the default gateway for the home network and NATs all the network's traffic to the Internet.
Only the squid server has access to the internet on port 80 (HTTP). This happens because all HTTP traffic, except that coming from the squid server, is redirected.
Squid Server And Firewall Are The Same Server
Here all HTTP traffic from the home network is redirected to the firewall itself on the squid port of 3128.
iptables -t nat -A PREROUTING -i eth1 -p tcp --dport 80 \ -j REDIRECT --to-ports 3128 iptables -A OUTPUT -j ACCEPT -m state --state NEW -o eth0 \ -p tcp --dport 80
Squid Server And Firewall Are Different Servers
Here all HTTP traffic from the home network except from the squid server at IP address 192.168.1.100 is redirected to the Squid server on the squid port of 3128.
iptables -t nat -A PREROUTING -i eth1 -p tcp --dport 80 \ -j DNAT --to 192.168.1.100:8080 -s ! 192.168.1.100/32 iptables -A OUTPUT -j ACCEPT -m state --state NEW -o eth0 \ -p tcp --dport 80
Squid.conf configuration
You will also need to make the following "transparent proxy" modifications to your squid.conf file. Remember to restart squid afterwards to make these changes take effect.

httpd_accel_host virtual httpd_accel_port 80 httpd_accel_with_proxy on httpd_accel_uses_host_header on
Manually Configuring Web Browsers To Use Your Squid Server
If you don't have a firewall that supports redirection then you'll need to:
o Configure your firewall to only accept HTTP Internet access from the Squid server
o Configure your PC browser's proxy server settings manually to use the squid server using the following methods:
Internet Explorer Here's how to make these changes using Internet Explorer.
1. Click on the "Tools" item on the menu bar of the browser.
2. Click on "Internet Options"
3. Click on "Connections"
4. Click on "LAN Settings"
5. Configure with the address and TCP port (3128 default) used by your Squid server.
Mozilla / Netscape Here's how to make these changes using Mozilla.
Click on the "Edit" item on the menu bar of the browser.
1. Click on "Preferences"
2. Click on "Advanced"
3. Click on "Proxies"
4. Configure with the address and TCP port (3128 default) used by your Squid server under "Manual Proxy Configuration"
Squid Disk Usage Squid uses the /var/spool/squid directory to store its cache files. High usage squid servers will most likely need a large amount of disk space in the /var partition to get optimum performance.
Every webpage and image accessed via the Squid server is logged in the /var/log/squid/access.log file. This can get quite large on high usage servers. Fortunately, the logrotate program automatically purges this file.
Troubleshooting Squid Squid logs both informational and error messages to files in the /var/log/squid/ directory. It is best to review these files first whenever you have difficulties.
Another source of errors could be due to unintended statements in the squid.conf file that cause no errors, these would include mistakes in the configuration of hours of access and permitted networks that were forgotten to be added.

By default squid operates on port 3128, so if you are having connectivity problems, you'll need to follow the troubleshooting steps in Chapter 3 to help recify them.
Other Squid Capabilities The following capabilities are beyond the scope of this eBook, but have been included to provide a broader understanding.
> For performance reasons, you can configure "child" Squid servers on which certain types of content are exclusively cached.
> You can restrict the amount of disk space and bandwidth used by Squid.
Conclusion
Tools like Squid are liked a lot by the managerial staff of companies. By caching images and files on a server shared by all, Internet bandwidth charges can be reduced.
The password authentication feature is liked as it only allows authorized users to access the Internet as a means of reducing usage fees and non work distractions in the office. Unfortunately, an Internet access password is usually not viewed as a major security concern by most users who will often be willing to share it with their colleagues. Though it is beyond the scope of this book, you should consider automatically tying the squid password to the user's regular login password. This will make them think twice about giving their passwords away. Internet access is one thing, letting your friends have full access to your email and computer files is quite another.

Chapter 34
Modifying The Kernel To Improve Performance
= = = = = = = = = = = = = = = = = = = = = = = = = = = = = = = = = = = = = = = = = = =
In This Chapter
Chapter 34 Modifying The Kernel To Improve Performance
Download and Install The Kernel Sources Package Creating A Custom Kernel Updating GRUB Creating A Boot Diskette For The New Kernel Updating The Kernel Using RPMs Conclusion
(c) Peter Harrison, www.linuxhomenetworking.com = = = = = = = = = = = = = = = = = = = = = = = = = = = = = = = = = = = = = = = = = = =
Like a government that rules a nation and all its provinces, the Linux kernel is the central program that not only governs how programs should interact with one another, but also provides the guidelines on how they should use the computer's core infrastructure such as memory, disks and other input/output (I/O) devices for the benefit of the user.
Linux drivers, the programs that manage each I/O device, could be viewed as being the staff that keeps all the government departments running. Continuing with the analogy, the more departments you make the kernel manage, the slower Linux becomes. Large kernels also reduce the amount of memory left over for user applications. These may then be forced to juggle their memory needs between RAM and the much slower swap partitions of disk drives causing the whole system to become sluggish.
The Fedora installation CDs have a variety of kernel RPMs, and the installation process autodetects the one most suited for your needs. It is for this reason that the RedHat Linux kernel installed on your system is probably sufficient. The installation process chooses one of a number of pre built kernel types depending on the type of CPU and configuration you intend to use as seen in Table 8-1.
However, there are times when you may want to rebuild it. For example, there is no installation RPM for multiprocessor systems with large amounts of memory. You may also want to experiment in making a high speed Linux router without support for SCSI, USB, Bluetooth and sound but with support for a few NIC drivers, an IDE hard drive, and a basic VGA console. This would require a kernel rebuild.

Table 8-1: Kernels Found On Redhat Installation CDs
Processor Type Configuration
i386
i586
i686
Athlon
Multiprocessor (SMP)
Single processor, Large memory
Single processor
This chapter provides an overview of how to rebuild your kernel. Always practice on a test system, and keep a backup copy of your old kernel when you decide to update a production system.
Download and Install The Kernel Sources Package Most RedHat Linux software products are available in the RPM format. Downloading and installing RPMs isn't hard. If you need a refresher, Chapter 5, on RPMS, covers how to do this in detail.
> Start with a Linux system that has a standard kernel. This should be true if you have only used RPMs or the yum utility for kernel updates.
> Determine what version of the kernel you are using with the uname command. In this case we are running version 2.6.5-1.358. [root@silent tmp]# uname -r 2.6.5-1.358 [root@silent tmp]#
> Install the matching kernel-source package using the rpm command from your CDs or by using the yum utility. You may also have to also install the prerequisite gcc32 package too.
Creating A Custom Kernel The installation of the kernel sources creates a file called README in the /usr/src/linux-2.6.5-1.358 directory which briefly outlines the steps needed to create a new kernel. A more detailed explanation of the required steps is described below.
Make Sure Your Source Files Are In Order Cleaning up the various source files is the first step that needs to be done. This isn't so important for a first time rebuild, but is vital for subsequent attempts. The "make mrproper" command is used to do this and must be executed in the Linux kernel version's subdirectory located under /usr/src. In this case the sub-directory's name /usr/src/linux-2.6.5-1.358. [root@smallfry tmp]# cd cd /usr/src/linux-2.6.5-1.358/ [root@smallfry linux-2.6.5-1.358]# make mrproper ... ... ... [root@smallfry linux-2.6.5-1.358]#

The ".config" File
You'll then need to run scripts to create a kernel configuration file called /usr/src/linux-2.6.5-1.358/.config which lists all the kernel options you wish to use.
Backup Your Configuration
Your First Time Creating A Custom Kernel
The .config file won't exist if you've never created a custom kernel on your system before but fortunately, RedHat stores a number of default .config files in the /usr/src/linux-2.6.5-1.358/configs directory. You can be automatically copy the .config file that matches your installed kernel by running the "make oldconfig" command in the /usr/src/linux-2.6.5-1.358 directory as seen below. [root@smallfry tmp]# cd /usr/src/linux-2.6.5-1.358 [root@smallfry linux-2.6.5-1.358]# ls .config ls: .config: No such file or directory [root@smallfry linux-2.6.5-1.358]# make oldconfig ... ... ... [root@smallfry linux-2.6.5-1.358]#
You've Created A Custom Kernel Before
The .config file used by the previous custom kernel build will already exist. Copy it to a safe location before proceeding.
Customizing The ".config" File
There are a number of commands listed in Table 8-3 that you can run in the /usr/src/linux-2.6.5-1.358 directory to update the .config file.
Table 8-2 Scripts For Modifying The .config File
Command Description
make config Text based utility that prompts you line by line. This method can become laborious.
make menuconfig Text menu based utility.
make xconfig X-Windows based utility.
Each command will prompt you in different ways for each kernel option, each of which will generally provide you with the three choices shown in Table 8-3. A brief description of each kernel option is given in Table 8-4.

Table 8-3 Kernel Option Choices
Kernel Option Choice
Description
M The kernel will load the drivers for this option on an as needed basis. Only the code required to load the driver on demand will be included in the kernel.
Y Include all the code for the drivers needed for this option into the kernel itself. This will generally make the kernel larger and slower but will make it more self sufficient. The "Y" option is frequently used in cases in which a stripped down kernel is one of the only programs Linux will run, such as purpose built home firewall appliances you can buy in a store.
There is a limit to the overall size of a kernel. It will fail to compile if you select parameters that will make it too big.
N Don't make the kernel support this option at all.
Table 8-4 Kernel Configuration Options
Option Description
Code maturity level options Determines whether Linux will prompt you for certain types of development code or drivers.
Loadable module support Support for loadable modules versus a monolithic kernel. Most of the remaining kernel options use loadable modules by default. It is best to leave this alone in most cases.
Processor type and features SMP, Large memory, BIOS and CPU type settings.
General setup Support for power management, networking, systems buses such as PCI, PCMCIA, EISA, ISA
Memory technology devices
Parallel port support Self explanatory
Plug and Play configuration Self explanatory
Block devices Support for a number of parallel port based and ATAPI type devices. Support for your loopback interface and RAM disks can be found here too.
Multi-device support (RAID, LVM)
Support for RAID, 0, 1 and 5 as well as LVM.
Cryptography support (CryptoAPI)
Networking options TCP/IP, DECnet, Appletalk, IPX, ATM/LANE
Telephony support Support for voice to data I/O cards

Option Description
ATA/IDE/MFM/RLL support Support for a variety of disk controller chipsets
SCSI support Support for a variety of disk controller chipsets. Also sets limits on the maximum number of supported SCSI disks and CDROMs.
Fusion MPT support High speed SCSI chipset support.
I2O device support Support for specialized Intelligent I/O cards
Network device support Support for Ethernet, Fibre Channel, FDDI, SLIP, PPP, ARCnet, Token Ring, ATM, PCMCIA networking, specialized WAN cards.
Amateur Radio support Support for packet radio
IrDA subsystem support Infrared wireless network support
ISDN subsystem Support for ISDN
Old CD-ROM drivers (not SCSI, not IDE)
Support for non SCSI, non IDE, non ATAPI CDROMs
Input core support Keyboard, mouse, joystick support in addition to the default VGA resolution.
Character devices Support for virtual terminals and various serial cards for modems, joysticks and basic parallel port printing.
Multimedia devices Streaming video and radio I/O card support
Crypto Hardware support Web based SSL hardware accelerator card support
Console drivers Support for various console video cards
Filesystems Support for all the various filesystems and strangely, the native languages supported by Linux.
Sound Support for a variety of sound cards
USB support Support for a variety of USB devices
Additional device driver support Miscellaneous driver support
Bluetooth support Support for a variety of Bluetooth devices
Kernel hacking Support for detailed error messages for persons writing device drivers
Configure Dependencies
As stated before, the .config file you just created lists the options you'll need in your kernel. The next step is to prepare the needed source files for compiling with the "make dep" command. [root@smallfry linux-2.6.5-1.358]# make dep ... ... ... [root@smallfry linux-2.6.5-1.358]#

Edit The Makefile To Give The Kernel A Unique Name Edit the file Makefile and change the line "EXTRAVERSION =" to create a unique suffix at the end of the default name of the kernel.
For example, if your current kernel version is 2.6.5-1.358, and your EXTRAVERSION is set to "-6-new", your new additional kernel will have the name "vmlinuz-2.6.5-1.358-new"
Remember to change this for each new version of the kernel you create.
Compile A New Kernel The "make bzImage" command can now be used to create a compressed version of your new kernel. This could take several hours on a 386 or 486 system. It will take about 20 minutes on a 400MHz Celeron. [root@smallfry linux-2.6.5-1.358]# make bzImage ... ... ... [root@smallfry linux-2.6.5-1.358]#
Build The Kernel's Modules The "make modules" command can now be used to create all the modules the kernel will need. [root@smallfry linux-2.6.5-1.358]# make modules ... ... ... [root@smallfry linux-2.6.5-1.358]#
Install the Kernel Modules You'll now need to install the kernel modules you previously created once the new kernel is in place. [root@smallfry linux-2.6.5-1.358]# make modules_install ... ... ... [root@smallfry linux-2.6.5-1.358]#
Copy The New Kernel To The /boot Partition The kernel you just created needs to be copied to the /boot partition where all your systems active kernel files normally reside. This is done with the "make install" command.
This partition has a default size of 100 MB which is enough to hold a number of kernels. You may have to delete some older kernels in order to create enough space. [root@smallfry linux-2.6.5-1.358]# make install ... ... ... [root@smallfry linux-2.6.5-1.358]#
Here you can see that the new kernel "vmlinuz-2.6.5-1.358-new" has been installed in the /boot directory.

[root@smallfry linux-2.6.5-1.358]# ls -l /boot/vmlinuz* lrwxrwxrwx 1 root root 22 Nov 28 01:20 /boot/vmlinuz -> vmlinuz-2.6.5-1.358-new -rw-r--r-- 1 root root 1122363 Feb 27 2003 /boot/vmlinuz-2.6.5-1.358 -rw-r--r-- 1 root root 1122291 Nov 28 01:20 /boot/vmlinuz-2.6.5-1.358-new [root@smallfry linux-2.6.5-1.358]#
Updating GRUB You should now update your /etc/grub.conf file to include an option to boot the new kernel. The "make install" command will do this for you automatically.
In this example, "default" is set to "1", which means the system will boot the second kernel entry, which happens to be that of the original kernel 2.6.5-1.358. You can set this value to "0" which will make it boot your newly compiled kernel which is the first entry.
default=1 timeout=10 splashimage=(hd0,0)/grub/splash.xpm.gz title Red Hat Linux (2.6.5-1.358-new) root (hd0,0) kernel /vmlinuz-2.6.5-1.358-new ro root=LABEL=/ initrd /initrd-2.6.5-1.358-new.img title Red Hat Linux (2.6.5-1.358) root (hd0,0) kernel /vmlinuz-2.6.5-1.358 ro root=LABEL=/ initrd /initrd-2.6.5-1.358.img
Creating A Boot Diskette For The New Kernel You can create a rescue diskette with your new kernel with the mkbootdisk command. [root@smallfry tmp]# mkbootdisk 2.6.5-1.358-new
Updating The Kernel Using RPMs It is also possible to install a new standardized kernel from an RPM file. As you can see, it is much It is much simpler than crea
Creating an additional kernel using RPMs [root@smallfry tmp]# rpm -ivh kernel-file.rpm
Replacing an existing kernel using RPMs [root@smallfry tmp]# rpm -Uvh kernel-file.rpm
Conclusion
Building a customized Linux kernel is probably something that most systems administrators won't do themselves. The risk of having a kernel that may fail in some unpredictable way is higher when you modify it and therefore many will hire experts to do the work for them. This chapter was written so that you'd at least have an idea of what is going on when the expert arrives which can help considerably when things don't go according to plan.

Chapter 35
Basic MySQL Configuration = = = = = = = = = = = = = = = = = = = = = = = = = = = = = = = = = = = = = = = = = = = In This Chapter Chapter 35
Basic MySQL Configuration Preparing MySQL For Applications Installing MySQL Starting MySQL The /etc/my.cnf File The Location of MySQL Databases Creating a MySQL "root" Account Accessing The MySQL Command Line Creating and Deleting MySQL Databases Granting Privileges to Users Running MySQL Scripts To Create Data Tables Viewing Your New MySQL Databases Configuring Your Application Recovering / Changing Your MySQL Root Password MySQL Database Backup MySQL Database Restoration Very Basic MySQL Network Security Basic MyQL Troubleshooting Conclusion
(c) Peter Harrison, www.linuxhomenetworking.com = = = = = = = = = = = = = = = = = = = = = = = = = = = = = = = = = = = = = = = = = = =
ost home / SOHO administrators don't do any database programming, but they sometimes need to install applications that require a MySQL database. This chapter explains the basic
steps of configuring MySQL for use with a MySQL based application in which the application runs on the same server as the database.
Preparing MySQL For Applications In most cases the developers of database applications expect the systems administrator to be able to independently prepare a database for their application to use. The steps to do this include:
1. Installing and starting MySQL
2. Creating a MySQL "root" user
3. Creating a regular MySQL user which will be used by the application to access the database
4. Creating your application's database
5. Creating your database's data tables
M

6. Doing basic testing of your database structure
The rest of the chapter will be based on a scenario in which a Linux based application named "sales-test" needs to be installed. After reading the "sales-test" manuals, you realize that you first have to first create a MySQL database, data tables and a database user for it to use before you can start the application. Fortunately "sales-test" comes with a script to create the tables, but you have to do the rest yourself. Finally, as part of the planning for the installation, you have decided to name the database "salesdata" and let the application use the MySQL user "mysqluser" to access it.
We'll cover all these common tasks in detail in the sections below.
Installing MySQL In most cases you'll probably want to install the MySQL server and MySQL client RPMs. The client RPM gives you the ability to test the server connection and will also be used by any MySQL application to communicate with the server, even if the server software is running on the same Linux box.
Downloading and installing RPMs isn't hard. If you need a refresher, Chapter 5, on RPMs, covers how to do this in detail.
You will need to make sure that the mysql-server and mysql software RPMs are installed. When searching for the RPMs, remember that the filename usually starts with the software package name by a version number like this: mysql-server-3.23.58-4.i386.rpm.
There are a number of supporting RPMs that mey be needed and it is for this reason that the "yum" utility may be the best RPM installation method to use.
Starting MySQL You'll now have to start the MySQL process before you can create your databases. Here is how:
> To configure MySQL to start at boot time, use the chkconfig command: [root@bigboy tmp]# chkconfig --level mysqld on
> You can start/stop/restart MySQL after boot time using the mysqld initialization script as in the examples below: [root@bigboy tmp]# /etc/init.d/mysqld start [root@bigboy tmp]# /etc/init.d/mysqld stop [root@bigboy tmp]# /etc/init.d/mysqld restart
> Remember to restart the mysqld process every time you make a change to the conf file for the changes to take effect on the running process.
> You can test whether the mysqld process is running with the following command, you should get a response of plain old process ID numbers: [root@bigboy tmp]# pgrep mysqld
The /etc/my.cnf File
The /etc/my.cnf file is the main MySQL configuration file. It sets the default MySQL database location and other parameters. The typical home / SOHO user won't need to edit this file at all.
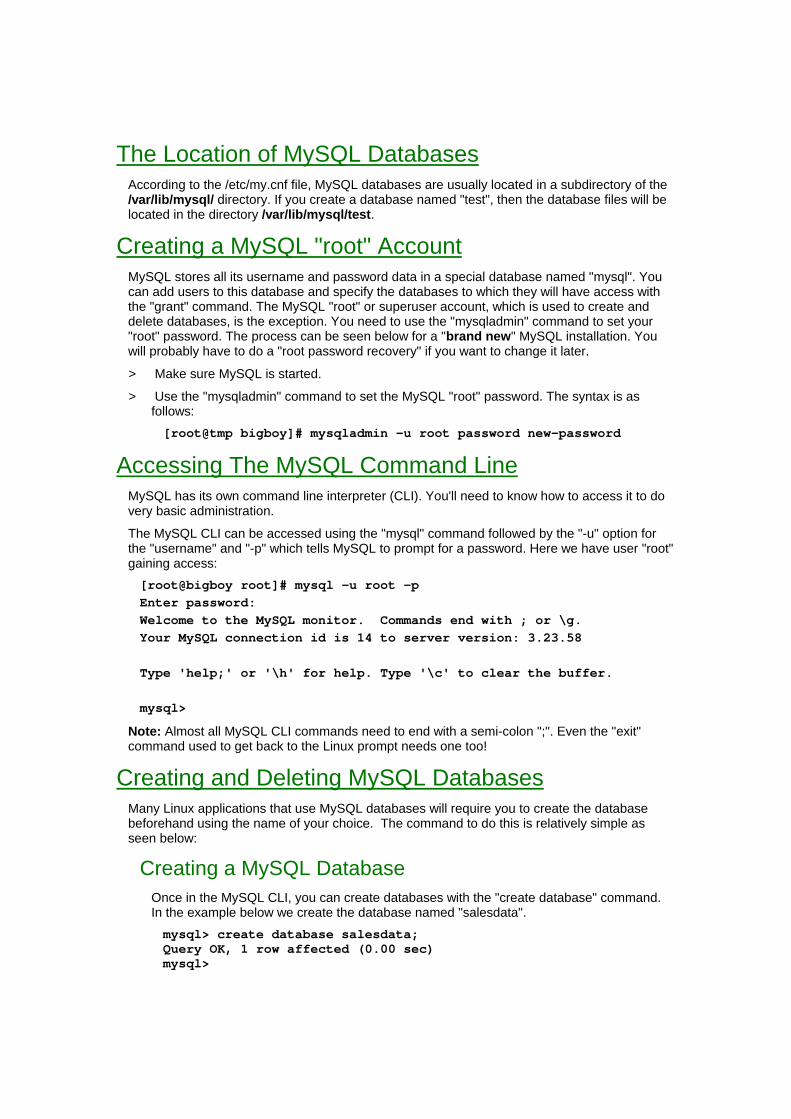
The Location of MySQL Databases According to the /etc/my.cnf file, MySQL databases are usually located in a subdirectory of the /var/lib/mysql/ directory. If you create a database named "test", then the database files will be located in the directory /var/lib/mysql/test.
Creating a MySQL "root" Account MySQL stores all its username and password data in a special database named "mysql". You can add users to this database and specify the databases to which they will have access with the "grant" command. The MySQL "root" or superuser account, which is used to create and delete databases, is the exception. You need to use the "mysqladmin" command to set your "root" password. The process can be seen below for a "brand new" MySQL installation. You will probably have to do a "root password recovery" if you want to change it later.
> Make sure MySQL is started.
> Use the "mysqladmin" command to set the MySQL "root" password. The syntax is as follows: [root@tmp bigboy]# mysqladmin -u root password new-password
Accessing The MySQL Command Line MySQL has its own command line interpreter (CLI). You'll need to know how to access it to do very basic administration.
The MySQL CLI can be accessed using the "mysql" command followed by the "-u" option for the "username" and "-p" which tells MySQL to prompt for a password. Here we have user "root" gaining access: [root@bigboy root]# mysql -u root -p Enter password: Welcome to the MySQL monitor. Commands end with ; or \g. Your MySQL connection id is 14 to server version: 3.23.58 Type 'help;' or '\h' for help. Type '\c' to clear the buffer. mysql>
Note: Almost all MySQL CLI commands need to end with a semi-colon ";". Even the "exit" command used to get back to the Linux prompt needs one too!
Creating and Deleting MySQL Databases Many Linux applications that use MySQL databases will require you to create the database beforehand using the name of your choice. The command to do this is relatively simple as seen below:
Creating a MySQL Database Once in the MySQL CLI, you can create databases with the "create database" command. In the example below we create the database named "salesdata". mysql> create database salesdata; Query OK, 1 row affected (0.00 sec) mysql>

Deleting a MySQL Database If you make a mistake during the installation process and need to delete the database then you can delete it with the "drop database" command. In the example below we delete the database named "salesdata". mysql> drop database salesdata; Query OK, 0 rows affected (0.00 sec) mysql>
Note: Sometimes a dropped database may still appear listed when using the "show databases" command explained further below. This may happen even if your "root" user has been granted full privileges to the database and is usually caused by the presence of not database files in your database directory. In such a case you may have to physically delete the database sub-directory in /var/lib/mysql from the Linux command line.
Granting Privileges to Users On many occasions you will not only have to create a database, but also create a MySQL username and password that will have privileges to access it. It is not a good idea to use the "root" account to do this due to its universal privileges.
MySQL stores all its username and password data in a special database named "mysql". You can add users to this database and specify the databases to which they will have access with the "grant" command which has the following syntax. sql> grant all privileges on database.* to username@"servername" identified by 'password';
So you can create a user named "mysqluser" with a password of "pinksl1p" to have full access to the database named "salesdata" on the local server (localhost) with the grant command. If the database application's client resides on another server, then you'll want to replace the "localhost" address with the actual IP address of that client. sql> grant all privileges on salesdata.* to mysqluser@"localhost" identified by 'pinksl1p';
The next step is to write the privilege changes to the mysql.sql database using the "flush privileges" command. sql> flush privileges;
Running MySQL Scripts To Create Data Tables Another common feature of pre-packaged applications written in MySQL is that they may require you to not only create the database, but also create the tables of data inside them as part of the setup procedure. Fortunately many of these applications come with scripts you can use to create them automatically.
Usually you have to run the script by logging into MySQL as the MySQL "root" user and automatically importing all the script file's commands with a "<" on the command line.
In the example below we are running a script named create_mysql.script whose commands will be applied to our newly created database named salesdata. MySQL prompts for the MySQL "root" password before completing the transaction.
Note: You will have to create the database first before you will be able successfully run this command.

[root@bigboy tmp]# mysql -u root -p salesdata < create_mysql.script Enter password: [root@bigboy tmp]#
Viewing Your New MySQL Databases There are a number of commands you can use to get information about your newly created database. Here are some examples:
Login As The Database User It is best to do all your database testing as the MySQL user you want the application to eventually use. This will make your testing mimic the actions of the application and results in better testing in a more "production like" environment than using the "root" account. [root@bigboy tmp]# mysql -u mysqluser -p salesdata
Listing All Your MySQL Databases The show databases command will give you a list of all your available MySQL databases. In the example below, we can see that the salesdata database has been successfully created. mysql> show databases; +-----------+ | Database | +-----------+ | salesdata | +-----------+ 1 row in set (0.00 sec) mysql>
Listing The Data Tables In Your MySQL Database The show tables command will give you a list of all the tables in your MySQL database, but you have to use the use command first to let MySQL know the database on which to apply the show tables command.
In the example below, we use the salesdata database and see that it has a table named "test". mysql> use salesdata; Reading table information for completion of table and column names You can turn off this feature to get a quicker startup with -A Database changed mysql> show tables; +---------------------+ | Tables_in_salesdata | +---------------------+ | test | +---------------------+ 1 row in set (0.00 sec) mysql>

Viewing Your MySQL Database's Table Structure The describe command will give you a list of all the data fields used in your database table. In the example below, we see that the table named test in the salesdata database keeps track of four fields named "name", "description", "num" and "date_modified". mysql> describe test; +---------------+--------------+------+-----+------------+----------------+ | Field | Type | Null | Key | Default | Extra | +---------------+--------------+------+-----+------------+----------------+ | num | int(11) | | PRI | NULL | auto_increment | | date_modified | date | | MUL | 0000-00-00 | | | name | varchar(50) | | MUL | | | | description | varchar(75) | YES | | NULL | | +---------------+--------------+------+-----+------------+----------------+ 6 rows in set (0.00 sec) mysql>
Viewing The Contents Of A Table You can view all the data contained in the table named "test" by using the select command. In this example we want to see all the data contained in the very first row in the table. With a brand new database this will give a blank listing, but once the application has started and you have entered data, you may want to run this command again as a rudimentary database sanity check. mysql> select * from test limit 1;
Configuring Your Application Once the database has been created and tested, you'll need to inform your application of the database name, the IP address of the database client server, and the username and password of the application's special MySQL user that will be accessing the data.
Frequently this registration process is done by the editing of a special application specific configuration file either via a web GUI or from the command line. Read your application's installation guide for details.
Recovering / Changing Your MySQL Root Password Sometimes you may have to recover the MySQL "root" password because it was either forgotten or misplaced. The steps to doing this are as follows:
1. Stop MySQL [root@bigboy tmp]# /etc/init.d/mysqld stop Stopping MySQL: [ OK ] [root@bigboy tmp]#
2. Start MySQL in safe mode with the "safe_mysqld" command and tell it not to read the "grant" tables with all the MySQL database passwords.

[root@bigboy tmp]# safe_mysqld --skip-grant-tables & [1] 4815 [root@bigboy tmp]# Starting mysqld daemon with databases from /var/lib/mysql [root@bigboy tmp]#
3. Use the "mysqladmin" command to reset the root password. In this case we are setting it to "sp33kerbox". [root@bigboy tmp]#mysqladmin -u root flush-privileges password "sp33kerbox" [root@bigboy tmp]#
4. Restart MySQL normally. [root@bigboy tmp]# /etc/init.d/mysqld restart Stopping MySQL: 040517 09:39:38 mysqld ended [ OK ] Starting MySQL: [ OK ] [1]+ Done safe_mysqld --skip-grant-tables [root@bigboy tmp]#
MySQL Database Backup The syntax for backing up a MySQL database is as follows: mysqldump --add-drop-table -u [username] -p[password] [database] > [backup_file]
In the previous section user "mysqluser" was been given full access to the database named "salesdata" when the password of "pinksl1p" was used. We can now backup this database to a single file called "/tmp/salesdata-backup.sql" with the following command. (Make sure there are no spaces between the "-p" switch and the password.) [root@bigboy tmp]# mysqldump --add-drop-table -u mysqluser -ppinksl1p salesdata > /tmp/salesdata-backup.sql
Note: It is important to always backup the database named "mysql" too as it contains all the database user access information.
MySQL Database Restoration The syntax for backing up a MySQL database is as follows: mysql -u [username] -p[password] [database] < [backup_file]
So using our previous example, we can restore the contents of the database like this: [root@bigboy tmp]# mysql -u mysqluser -ppinksl1p salesdata < /tmp/salesdata-backup.sql
Note: You may have to restore the database named "mysql" also as it contains all the database user access information.
Very Basic MySQL Network Security By default MySQL listens on all your interfaces for database queries from remote MySQL clients. This can be seen using the "netstat -an" where your server will be seen to be listening on IP address 0.0.0.0 (all) on TCP port 3306.

[root@bigboy tmp]# netstat -an Active Internet connections (servers and established) Proto Recv-Q Send-Q Local Address Foreign Address State ... ... tcp 0 0 0.0.0.0:3306 0.0.0.0:* LISTEN ... ... [root@bigboy tmp]#
The problem with this is that this exposes your database to MySQL queries from the Internet. If your SQL database is only going to be accessed by applications running on the server itself, then you can force it to listen only to the equivalent of its loopback interface.
Here's how to do it.
1. Edit the /etc/my.cnf file and use the "bind-address" directive in the [mysqld] section to define the specific IP address on which MySQL will listen for connections. [mysqld] bind-address=127.0.0.1
2. Restart MySQL. The "netstat -an" command will show MySQL listening on only the loopback address on TCP port 3306, and your application should continue to work as expected.
Basic MyQL Troubleshooting You can confirm whether your MySQL installation has succeeded by performing these few simple steps.
Connectivity Testing In our scenario, network connectivity between the database and the application will not be an issue as they are running on the same server.
In cases where they are not, you will have to use the troubleshooting techniques in Chapter 3 on Network Troubleshooting to test both basic connectivity and access on the MySQL TCP port of 3306.
Test Database Access The steps outlined earlier are a good test of database access. If the application fails, then retrace your steps to create the database and register the database information into the application. MySQL errors are logged automatically in the /var/log/mysqld.log file and should be investigated at the first sign of trouble.
A Common Fedora Core 1 MySQL Startup Error You may notice that you can start MySQL correctly only once under Fedora. All subsequent attempts will give a "Timeout error occurred trying to start MySQL Daemon" error. [root@zippy root]# /etc/init.d/mysqld start Timeout error occurred trying to start MySQL Daemon.

Starting MySQL: [FAILED] [root@zippy root]#
This is caused by the MySQL startup script incorrectly attempting to do a TCP port "ping" to contact the server. The solution to this is to:
o Edit the script /etc/rc.d/init.d/mysqld
o Search for the two "mysqladmin" lines with the word "ping" in them and insert the string "-u $RANDOM" before the word "ping" like this: if [ -n "`/usr/bin/mysqladmin -u $RANDOM ping 2> /dev/null`" ]; then if !([ -n "`/usr/bin/mysqladmin -u $RANDOM ping 2> /dev/null`" ]); then
o Restart MySQL
Conclusion
MySQL has become one of the most popular Linux databases on the market and it continues to improve each day. If you have a large project that requires the installation of a database, then I'd suggest seeking the services of a database administrator (DBA) to help install and fine tune the operation of MySQL. I'd also suggest, no matter the size of the project, that you practice an application installation on a test Linux system to be safe. It doesn't necessarily have to be the same application. Free MySQL based applications can be found using a web search engine and you can use these to be come familiar with the steps outlined in this chapter before beginning your larger project.

Chapter 9
Configuring Linux VPNs
NOTE: THIS CHAPTER COVERS AN UNSUPPORTED RPM AND HAS BEEN
REMOVED FROM THE PDF. I'M RESEARCHING A REPLACEMENT THAT WILL WORK ON FEDORA CORE 2.
= = = = = = = = = = = = = = = = = = = = = = = = = = = = = = = = = = = = = = = = = = = In This Chapter Chapter 9
Configuring Linux VPNs VPN Guidelines Scenario Download And Install The FreeS/WAN Package FreeS/WAN Configuration Steps Testing Your FreeS/WAN VPN Possible Changes To IP Tables NAT/Masquerade Rules How To Ensure FreeS/WAN Starts When Rebooting Using Pre-Shared Keys (PSK)
(c) Peter Harrison, www.linuxhomenetworking.com = = = = = = = = = = = = = = = = = = = = = = = = = = = = = = = = = = = = = = = = = = =
As your SOHO grows, you'll eventually need to establish some form of VPN link with a supplier, vendor, business partner or customer so that you can directly and freely access all their servers behind their firewall. A VPN can be really convenient as you'll be able refer to the remote servers, not by their public NAT-ted IP addresses, but by their real private IP addresses. This avoids problems inherent in connecting to servers behind a "many to one" NAT configuration. This chapter will outline the configuration of a permanent site to site VPN link or "tunnel" using FreeS/WAN, one of the most popular VPN packages for Linux.
VPN Guidelines There are some recommended guidelines I'd suggest before attempting a simple SOHO Linux VPN.
> Make sure that the VPN traffic will not pass through a firewall that does NAT. Having a firewall as the VPN "start" or "end" point is OK, just don't make the tunnel pass through NAT as NAT breaks VPNs.

> Life will be much easier if you make your Linux VPN box also function as a firewall. Configure and test the firewall first and then configure the VPN. The chapter on the iptables firewall should help a lot.
> Take a quick refresher on the main VPN terms found in the Appendix.
Scenario In this example we have two SOHO offices. For simplicity, both sites use IP addressing schemes on their protected networks that do not overlap.
> A VPN needs to be created between the two sites so that they can communicate with each other without the fear of eavesdropping.
> For simplicity, neither site is site wants to invest in a CA certificate service or infrastructure. The RSA key encryption methodology will be used for key exchange. An alternative Cisco compatible "shared secret" (also known as a "pre-shared" or even a "symmetric" key) method will also be discussed at the end of the chapter.
> The network administrators at both sites are aware that permanent site-to-site VPNs require fixed Internet IP addresses and have upgraded from their basic DHCP services originally provided by their ISPs.
Site 1 o uses a private network of 172.168.1.0
o has a Linux VPN / firewall device default gateway with an external Internet IP address of 97.158.253.25
Site 2 o uses a private network of 10.0.0.0
• has a Linux VPN / firewall device default gateway with an external Internet IP address of 6.25.232.1

Download And Install The FreeS/WAN Package The FreeS/WAN RPM can be downloaded from the website http://www.freeswan.org which has good instructions on how to install the product on RedHat and other versions of Linux. One of the requirements for downloading the RedHat RPM version of FreeS/WAN is to have the ncftp RPM package installed on your system.
Note: Most RedHat Linux software products are available in the RPM format. Downloading and installing RPMs isn't hard. If you need a refresher, the chapter on RPMs covers how to do this in detail.
Installing the Prerequisite ncftp RPM Package Use the rpm -qa command to see whether you have the package installed. You'll need to install it if you get no response from the command below.
ncftp Installed [root@vpn1 tmp]# rpm -qa | grep ncftp ncftp-3.1.3-6 [root@vpn1 tmp]#
ncftp not Installed [root@vpn1 tmp]# rpm -qa | grep ncftp [root@vpn1 tmp]#
> The latest version of the RPM for RedHat 9.0 is: ncftp-3.1.5-4.i386.rpm
> Install the package using the following command: [root@bigboy tmp]# rpm -Uvh ncftp-3.1.5-4.i386.rpm
Installing The FreeS/WAN RPM Once you have installed ncftp, you can install FreeS/WAN using the recommended commands on the website.
Downloading Make sure you are in the directory you normally use to download RPMs and then execute the command below. (The command is actually all on one line) [root@vpn2 tmp]# ncftpget ftp://ftp.xs4all.nl/pub/crypto/freeswan/binaries/RedHat-RPMs/`uname -r | tr -d 'a-wy-z'`/\* freeswan-allkeys: 132.14 kB 88.72 kB/s freeswan-allkeys.sig: 460.00 B 2.46 kB/s freeswan-module-2.00_2.4.18_14-0.i386.rpm:871.71 kB 138.08 kB/s freeswan-rpmsign.asc: 1.05 kB 5.78 kB/s freeswan-sigkey.asc: 1.62 kB 8.75 kB/s freeswan-userland-2.00_2.4.18_14-0.i386.rpm: 1.18 MB 143.17 kB/s [root@vpn2 tmp]#

Installing Use the rpm -ivh command to install the two RPM packages you just downloaded. [root@vpn2 tmp]# rpm -ivh freeswan*.rpm warning: freeswan-module-2.00_2.4.18_14-0.i386.rpm: V3 RSA/MD5 signature: NOKEY, key ID 5a7e4731 Preparing... ###################################### [100%] 1:freeswan-module ###################################### [ 50%] do not forget to install the userland utilities 2:freeswan-userland ################################### [100%] invoke "service ipsec start" or reboot to begin [root@vpn2 tmp]#
Starting FreeS/WAN For The First Time The command below will start FreeS/WAN, but remember you can use the scripts in the /etc/init.d directory to do the same. [root@vpn2 tmp]# service ipsec start ipsec_setup: Starting FreeS/WAN IPsec 2.00... ipsec_setup: insmod: ipsec: no module by that name found ipsec_setup: insmod failed, but found matching template module 30ae280d. ipsec_setup: Copying /lib/modules/2.4.18-14/kernel/net/ipsec/30ae280d to /lib/modules/2.4.18-14/kernel/net/ipsec/ipsec.o. ipsec_setup: /sbin/insmod /lib/modules/2.4.18-14/kernel/net/ipsec/ipsec.o ipsec_setup: Using /lib/modules/2.4.18-14/kernel/net/ipsec/ipsec.o ipsec_setup: Symbol version prefix '' ipsec_setup: WARNING: changing route filtering on wlan0 (changing /proc/sys/net/ipv4/conf/wlan0/rp_filter from 1 to 0) [root@vpn2 tmp]#
Get The Status Of The FreeS/WAN Installation The ipsec verify command should give an [OK] status for most of its checks like the one below: [root@vpn2 tmp]# ipsec verify Checking your system to see if IPsec got installed and started correctly Version check and ipsec on-path [OK] Checking for KLIPS support in kernel [OK] Checking for RSA private key (/etc/ipsec.secrets) [OK] Checking that pluto is running [OK] DNS checks. Looking for forward key for vpn2 [NO KEY] Does the machine have at least one non-private address [OK] Two or more interfaces found, checking IP forwarding [OK] Checking NAT and MASQUERADING [OK] [root@vpn2 tmp]#

FreeS/WAN Configuration Steps FreeS/WAN is very forgiving when it establishes a tunnel. It will automatically go through all the various combinations of IKE & IPSec settings with the remote VPN box until it finds a match. You don't have to configure most of these settings explicitly as you often have to do in the case of routers & firewall/VPN appliances.
Preparation work requires you to draw a basic network diagram like the one above. The VPN box on the left will be called "the left hand side" and the one on the right will be called "the right hand side".
Parameter
Description
Left
Internet IP address of the left hand side VPN device
Leftsubnet
The network protected by the left hand side VPN device
Leftid
Fully Qualified Domain Name in DNS of the left hand side VPN device preceded by an "@" sign. They can be fictitious, as long as the "left" and "right" ones are unique.
Leftrsasigkey
The entire "left" RSA sig public key for the left hand side VPN device. This can be obtained by using the "ipsec showhostkey -left" command.
Leftnexthop
The next hop router from the left hand side VPN device when trying to reach the right hand side VPN device. You may use an auto-generated variable "%defaultroute" which will be valid in most cases, or the actual IP address of the next hop router in cases where the next hop is not the default router.
Right
Internet IP address of the right hand side VPN device
Rightsubnet
The network protected by the right hand side VPN device
Rightid
Fully Qualified Domain Name in DNS of the right hand side VPN device preceded by an "@" sign. They can be fictitious, as long as the "left" and "right" ones are unique.
The entire "right" RSA sig public key for the right hand side VPN device. This

Rightrsasigkey
can be obtained by using the "ipsec showhostkey -right" command.
Rightnexthop
The next hop router from the right hand side VPN device when trying to reach the right hand side VPN device. You may use an auto-generated variable "%defaultroute" which will be valid in most cases, or the actual IP address of the next hop router in cases where the next hop is not the default router.
Once you have all this information you'll have to enter it in the /etc/ipsec.conf configuration file. The steps to do this will follow.
Get The RSA Keys In order to configure the /etc/ipsec.conf file you'll need to get the "left" RSA public key for the "left" VPN device and the "right" key for the "right" VPN device. You'll need to take note of these and insert them in the /etc/ipsec.conf file.
The FreeS/WAN installation automatically generates the keys, but if you want to change them you can do so by issuing the following command: [root@vpn2 tmp]# ipsec rsasigkey --verbose 2048 > keys.tmp getting 128 random bytes from /dev/random... looking for a prime starting there (can take a while)... found it after 129 tries. getting 128 random bytes from /dev/random... looking for a prime starting there (can take a while)... found it after 662 tries. computing modulus... computing lcm(p-1, q-1)... computing d... computing exp1, exp1, coeff... output... [root@vpn2 tmp]#
You can then edit the /etc/ipsec.secrets file and replace the contents between the "RSA: {" and the final "}" with the contents of the keys.tmp file generated from the ipsec command above.
Note: If you cut and paste these keys from the screen into Microsoft "notepad" you'll find that it may automatically insert carriage return and line feed characters at the end of each line where the text would normally wrap around on the screen. This will corrupt the keys. My experience has been much better cutting and pasting into Microsoft Word or Linux "vi" which behave better. To be safe, just make sure that the all the characters are there especially those at the far left and far right of the "cut" screen and "paste" screen.
Get The Left Key [root@vpn1 tmp]# ipsec showhostkey --left # RSA 2192 bits vpn1 Mon Jun 16 21:15:31 2003 leftrsasigkey=0sAQNrV9AYdaW94FXvIxu5p54+MRaW0wy0+HHQrdGofklZYQ4TCBlL+Ym00Ahfc8mqXlerZY12Os41G8SIV+zzIO04WZ4wmOvEr8DZaldTbfCuvUvMhrTtCpZdm53yF5rCaUbg+Vmx71jcIVZqwd2AAocrthuC1riwI8yK9HrSVHzpNQxfRX+F9B//gwWEu1UVcEPkAuY2+Q2tBjg/wmFLEhOrdey7X3NRKyEa6LqgM2Igjhx6vflQg1ImFFyUAL37ie4YSpDnUVzy3tzBVgyPuFHOGyqZtuD/+YkNIhrHfgyVmGu8/kuhzB7nWtOYqDFO8OHDGePOyOVPQi73KfRoDbdb3ND0EtfnRhRPblKJ239OlIq1 [root@vpn1 tmp]#

Get The Right Key
[root@vpn2 tmp]# ipsec showhostkey --right # RSA 2192 bits vpn2 Mon Jun 16 21:06:20 2003 rightrsasigkey=0sAQNNdxFPWCga+E/AnDgIM+uIDq4UXcZzpomwMFUpyQ9+rhUHT9w8nr3rjUR/qTZOKR2Vqd4XoBd1HkPDBQ8oNjtA3Oz+UQOU3KTMHN5ydFwe6MpTJV/hL6LvhB0OXQad/NhjMIx8vVotlIyZJQVZlHwUevO9/C7W6+8YCfJHJitPOF2aXDT2EKdch/Dn/4p4aiuzy/g8iwjJ+DDBxBYya9aC4GvPqSJhIiX1BwxMOOV+y5FVGs5j9wvOVpF4PJC5tayFuSagDFuuuNELQlQSm9gRRr/ji47xDXsmrzXOnhM8g8SPRnj7pL3abgu7Sg7eFREV1MJSVBhp0DJ0EbVMVV+Xvwlm9++9zbY3mlc+cSXMPAJZ [root@vpn2 tmp]#
Edit The /etc/ipsec.conf Configuration File
Here we have created a sub-section called "net-to-net" in which we have inserted all the needed parameters. You need to add a new sub-section for each new VPN tunnel.
conn net-to-net left=97.158.253.25 # Public Internet IP address of the # LEFT VPN device leftsubnet=172.16.1.0/24 # Subnet protected by the LEFT VPN device [email protected] # FQDN of Public Internet IP address of the # LEFT VPN device with an "@" leftrsasigkey=0sAQNrV9AYdaW94FXvIxu5p54+MRaW0wy0+HHQrdGofklZYQ4TCBlL+Ym00Ah fc8mqXlerZY12Os41G8SIV+zzIO04WZ4wmOvEr8DZaldTbfCuvUvMhrTtCpZdm53yF5rCaUbg+Vmx71 fgyVmGu8/kuhzB7nWtOYqDFO8OHDGePOyOVPQi73KfRoDbdb3ND0EtfnRhRPblKJ239OlIq1 leftnexthop=%defaultroute # correct in many situations right=6.25.232.1 # Public Internet IP address of # the RIGHT VPN device rightsubnet=10.0.0.0/24 # Subnet protected by the RIGHT VPN device [email protected] # FQDN of Public Internet IP address of the # RIGHT VPN device with an "@" rightrsasigkey=0sAQNNdxFPWCga+E/AnDgIM+uIDq4UXcZzpomwMFUpyQ9+rhUHT9w8nr3rjU R/qTZOKR2Vqd4XoBd1HkPDBQ8oNjtA3Oz+UQOU3KTMHN5ydFwe6MpTJV/hL6LvhB0OXQad/NhjMIx8v OnhM8g8SPRnj7pL3abgu7Sg7eFREV1MJSVBhp0DJ0EbVMVV+Xvwlm9++9zbY3mlc+cSXMPAJZ rightnexthop=97.158.253.25 # correct in many situations auto=start # authorizes and starts this connection # on booting

Some Important Notes About The /etc/ipsec.conf File
> Note: It is important to maintain the indentation before each parameter as shown below.
Right conn net-to-net left=x.x.x.x leftsubnet=y.y.y.y/24
Wrong conn net-to-net left=x.x.x.x leftsubnet=y.y.y.y/24
> Note: The "net-to-net" sub sections must be the same in the /etc/ipsec.conf for
both the left and right hand side VPN devices.
Restart FreeS/WAN This will need to be done on both VPN devices in order for the new /etc/ipsec.conf settings to take effect. [root@vpn2 tmp]# /etc/init.d/ipsec restart ipsec_setup: Stopping FreeS/WAN IPsec... ipsec_setup: Starting FreeS/WAN IPsec 2.00... ipsec_setup: Using /lib/modules/2.4.18-14/kernel/net/ipsec/ipsec.o [root@vpn2 tmp]#
Initialize The New Tunnel You can use the ipsec command to start the tunnel "net-to-net" we created in the /etc/ipsec.conf file. You'll have to issue the command simultaneously on the VPN boxes at both ends of the tunnel or else you may get a timeout error as seen below. [root@vpn2 tmp]# ipsec auto --up net-to-net 104 "net-to-net" #1: STATE_MAIN_I1: initiate 106 "net-to-net" #1: STATE_MAIN_I2: sent MI2, expecting MR2 108 "net-to-net" #1: STATE_MAIN_I3: sent MI3, expecting MR3 003 "net-to-net" #1: discarding duplicate packet; already STATE_MAIN_I3 010 "net-to-net" #1: STATE_MAIN_I3: retransmission; will wait 20s for response 010 "net-to-net" #1: STATE_MAIN_I3: retransmission; will wait 40s for response 031 "net-to-net" #1: max number of retransmissions (2) reached STATE_MAIN_I3. Possible authentication failure: no acceptable response to our first encrypted message 000 "net-to-net" #1: starting keying attempt 2 of an unlimited number, but releasing whack [root@vpn2 tmp]#
Retrying the command should get it to work. The "IPsec SA established" message signifies success.

[root@vpn2 tmp]# ipsec auto --up net-to-net 112 "net-to-net" #4: STATE_QUICK_I1: initiate 004 "net-to-net" #4: STATE_QUICK_I2: sent QI2, IPsec SA established [root@vpn2 tmp]#
Testing Your FreeS/WAN VPN Check The Routes
You'll need to check the routes once the VPN tunnel is up. As you can see there is a route to the 172.16.1.0 network via the new "virtual" ipsec0 interface pointing to the VPN device at the other end of the tunnel. [root@vpn2 tmp]# netstat -nr Kernel IP routing table Destination Gateway Genmask Flags MSS Window irtt Iface 10.0.0.0 0.0.0.0 255.255.255.0 U 40 0 0 eth0 6.25.232.0 0.0.0.0 255.255.255.248 U 40 0 0 wlan0 6.25.232.0 0.0.0.0 255.255.255.248 U 40 0 0 ipsec0 172.16.1.0 97.158.253.25 255.255.255.0 UG 40 0 0 ipsec0 127.0.0.0 0.0.0.0 255.0.0.0 U 40 0 0 lo 0.0.0.0 6.25.232.6 128.0.0.0 UG 40 0 0 ipsec0 128.0.0.0 6.25.232.6 128.0.0.0 UG 40 0 0 ipsec0 0.0.0.0 6.25.232.6 0.0.0.0 UG 40 0 0 wlan0 [root@vpn2 tmp]#
The "ipsec look" Command You can also issue the ipsec look command to see whether the tunnel is up and running. You'll have to double check your keys in /etc/ipsec.secrets and all the values in your /etc/ipsec.conf file if any of these three sections doesn't appear.
o A section describing the existence of a phase 1 IKE connection that looks like this:
0.0.0.0/0 -> 0.0.0.0/0 => %trap (0) 10.0.0.0/24 -> 172.16.1.0/24 => [email protected] [email protected] (4) 6.25.232.1/32 -> 0.0.0.0/0 => %trap (4)
Here we can see some form of connectivity between the two networks at either end of the tunnel namely 10.0.0.0/24 and 172.16.1.0/24.
o A section that describes the state of the phase 2 IPSEC tunnel. There will be many "esp" references involving the IP addresses of the VPN devices at either end of the tunnel. [email protected] ESP_3DES_HMAC_MD5: dir=out src=6.25.232.1 iv_bits=64bits iv=0x7ba1ee06ec8458fe ooowin=64 alen=128 aklen=128 eklen=192 life(c,s,h)=addtime(45,0,0) refcount=4 ref=15

o A section whose output is very similar to the netstat -nr section above.
Other causes for failure could include having:
o A firewall blocking traffic
o A firewall NAT-ing traffic. This is bad, please see the Chapter introduction.
o bad cables
Test The VPN Connectivity You can test the VPN connectivity by sending a simple "ping" from one private network to the other. In this case we're sending from the Windows server 10.0.0.105 protected by "vpn2" to server 172.16.1.1 which is protected by "vpn1". C:\>ping 172.16.1.1 Pinging 172.16.1.1 with 32 bytes of data: Reply from 172.16.1.1: bytes=32 time=20ms TTL=253 Reply from 172.16.1.1: bytes=32 time<10ms TTL=253 Reply from 172.16.1.1: bytes=32 time=10ms TTL=253 Reply from 172.16.1.1: bytes=32 time<10ms TTL=253 Ping statistics for 172.16.1.1: Packets: Sent = 4, Received = 4, Lost = 0 (0% loss), Approximate round trip times in milli-seconds: Minimum = 0ms, Maximum = 20ms, Average = 7ms C:\>
Protected Interface TCPDUMP Output From "vpn2" Here we see unencrypted traffic successfully passing back and forth between the two servers. 23:46:46.536831 10.0.0.105 > 172.16.1.1: icmp: echo request 23:46:46.544844 172.16.1.1 > 10.0.0.105: icmp: echo reply 23:46:47.536292 10.0.0.105 > 172.16.1.1: icmp: echo request 23:46:47.543361 172.16.1.1 > 10.0.0.105: icmp: echo reply
Unprotected Interface TCPDUMP Output From "vpn2" Here we see encrypted ESP traffic which is encapsulating the "pings" passing back and forth between the two VPN boxes. The true source and destination IP addresses (10.0.0.105 and 172.16.1.1) are hidden. 00:00:31.665730 vpn2.site2.com > vpn1.site1.com: ESP(spi=0xcbf056ff,seq=0x9) 00:00:31.668408 vpn2.site2.com > vpn1.site1.com: ESP(spi=0xcbf056ff,seq=0x9) 00:00:31.672554 vpn1.site1.com > vpn2.site2.com: ESP(spi=0x2bc459c8,seq=0x9) 00:00:31.673793 vpn1.site1.com > vpn2.site2.com: ESP(spi=0x2bc459c8,seq=0x9)
Possible Changes To IP Tables NAT/Masquerade Rules If you are running iptables with masquerading/NAT the VPN devices then you will have to exclude packets traversing the tunnel from the NAT operation. This example assumes that interface eth0 is the Internet facing interface on your Linux VPN/firewall.

Left Hand Side VPN Device Old iptables -t nat -A POSTROUTING -o eth0 -s 172.168.1.0/24 -j MASQUERADE
New iptables -t nat -A POSTROUTING -o eth0 -s 172.168.1.0/24 -d \! 10.0.0.0/24 -j MASQUERADE
Right Hand Side VPN Device Old iptables -t nat -A POSTROUTING -o eth0 -s 10.0.0.0/24 -j MASQUERADE
New iptables -t nat -A POSTROUTING -o eth0 -s 10.0.0.0/24 -d \! 176.16.1.0/24 -j MASQUERADE
How To Ensure FreeS/WAN Starts When Rebooting The "sample" subsection in /etc/ipsec.conf will have a line: auto=add
This will only authorize ipsec, but won't establish the connection at startup. You'll need to change this in the "real" section to: auto=start
Once this is done, ipsec will start automatically on rebooting.
Using Pre-Shared Keys (PSK) Create The PSK o You can create a random pre-shared key by a key using the ipsec command below:
[root@vpn2 tmp]# ipsec ranbits --continuous 128 0x33893a081b34d32a362a46c404ca32d8 [root@vpn2 tmp]#
o You can also create them out of your head. It is best to make them long (over 20 bytes). We'll use this one from now on. nonebutourselvescanfreeourminds
Update /etc/ipsec.secrets You then have to add text in the following format at the beginning of the /etc/ipsec.secrets file vpn1-ip-address vpn2-ip-address : PSK "key in quotations"
So in our example it would be: 97.158.253.25 6.25.232.6 : PSK "nonebutourselvescanfreeourminds"

Update /etc/ipsec.conf The PSK configuration is very similar to the RSA configuration with exception that the leftid, rightid, leftrsasigkey and rightrsasigkey fields are omitted from the relevant "conn" subsection. You also need to add the authtype=secret command to the configuration. conn net-to-net authby=secret # Key exchange method left=97.158.253.25 # Public Internet IP address of the # LEFT VPN device leftsubnet=172.16.1.0/24 # Subnet protected by the LEFT VPN device leftnexthop=%defaultroute # correct in many situations right=6.25.232.1 # Public Internet IP address of # the RIGHT VPN device rightsubnet=10.0.0.0/24 # Subnet protected by the RIGHT VPN device rightnexthop=97.158.253.25 # correct in many situations auto=start # authorizes and starts this connection # on booting
Remember to have the same configuration on the Linux VPN boxes on either side of the tunnel.
Restart FreeS/WAN You'll then have to restart FreeS/WAN to activate the new settings.

Chapter I
Configuring Cisco PIX Firewalls = = = = = = = = = = = = = = = = = = = = = = = = = = = = = = = = = = = = = = = = = = = In This Chapter Chapter I
Configuring Cisco PIX Firewalls Network Address Translation (NAT) Accessing the PIX command line Sample PIX Configuration: DHCP How To Get Static IPs For DSL Cheaply Sample PIX configuration: DSL - Static IPs How To Configure Your PIX To Accept Telnet How To Make Your PIX A DHCP Server Basic PIX Troubleshooting
(c) Peter Harrison, www.linuxhomenetworking.com = = = = = = = = = = = = = = = = = = = = = = = = = = = = = = = = = = = = = = = = = = =
Sometimes you may have a Cisco PIX 501 firewall protecting your DSL based home network. This chapter covers how to configure it and in addition, there are a number of fully commented sample PIX configurations in the appendix in which each line is explained.
It is important to remember that the PIX 501 has two Ethernet interfaces. The named "outside" should always be connected to the Internet and the one labeled "inside" should be connected to your home network. The "outside" interface may sometimes be referred to as the "unprotected" interface and the "inside" interface is frequently referred to as the "protected" one.
Network Address Translation (NAT) Network address translation is a method used to help conserve the limited number of IP addresses available for internet purposes. The introduction to networking page explains the concept in more detail in addition to other fundamental topics. We will return to the NAT discussion, specifically how to configure it, later on this page, but first a very basic introduction on how to configure and use the PIX.
Accessing the PIX command line
Via The Console Port
Your Cisco PIX will come with a console cable that will allow you to configure your PIX using terminal emulation software such as Hyperterm. Once you've set up your PIX with an IP address you'll be able to access it via Telnet.

Via Telnet o One easy way to get access to any device on your network is using the /etc/hosts file.
Here you list all the IP addresses of important devices that you may want to access with a corresponding nickname. Here is a sample in which the PIX firewall "pixfw" has the default IP address of 192.168.1.1 on its inside protected interface: # # Do not remove the following line, or various programs # that require network functionality will fail. # 127.0.0.1 localhost.localdomain localhost 192.168.1.1 pixfw 192.168.1.100 bigboy mail.my-site.com
o Once connected to the network you can access the PIX via telnet
[root@bigboy tmp]# telnet pixfw Trying 192.168.1.1... Connected to pixfw. Escape character is '^]'.
o You'll be prompted for a password and will need another password to get into the privileged "enable" mode. If you are directly connected to the console, you should get a similar prompt too. There is no password in a fresh out of the box PIX and simply hitting the "Enter" key will be enough. User Access Verification Password: Type help or '?' for a list of available commands. pixfw> enable Password: ******** pixfw#
o Use the "write terminal" command to see the current configuration. You will want to change your "password" and "enable password" right after completing your initial configuration, this will be covered later. # wr term Building configuration... : Saved : PIX Version 6.2(2) nameif ethernet0 outside security0 nameif ethernet1 inside security100 enable password dsjf5sdfgsjrgjwk encrypted passwd sdffg8324dgrggjd encrypted hostname pixfw fixup protocol ftp 21 ... ...
o ALL PIX configuration commands need to be done in configuration mode, by issuing the "configure terminal" command from enable mode prompt. pixfw# conf t pixfw(config)# "Enter commands here" pixfw(config)# exit pixfw#

o You can usually delete commands in the configuration by adding the word "no" to the beginning of the command you want to delete. Some commands that can only have a single value won't accept a "no" to change them and will just be over-written when you issue the new command.
In the example below, we change the PIX's name and then delete one of many access control list (ACL) entries attached to the outside (Internet) interface. pixfw# conf t pixfw(config)# no access-list inbound permit tcp any any eq www pixfw(config)# hostname firewall firewall(config)# exit firewall#
o One of the first things you should do is change the default passwords for the PIX.
pixfw# conf t pixfw(config)# enable password enable-password-here pixfw(config)# passwd telnet-password-here pixfw(config)# exit pixfw#
Note: The console password is the one used to gain access from the console or through telnet.
o When you've finished configuring, you can permanently save your changes by using the "write memory" command: pixfw# wr mem Building configuration... Cryptochecksum: 3af43873 d35d6f06 51f8c999 180c2342 [OK] pixfw#
Sample PIX Configuration: DHCP
Configuring DSL PPPoE DHCP o DHCP and DSL require you to get a pppoe password and username from your ISP.
Most ISPs have a homepage where you can register to get the username and password, ask customer service for the URL. You should substitute this username and password for "dsl-username" and "dsl-password" below. The VPDN group statements just assign a username, password, authentication type to a profile, in this case "ISP". The configuration steps are relatively straight forward. (Remember to be in config mode) ip address outside pppoe setroute ip address inside 192.168.1.1 255.255.255.0 vpdn group ISP request dialout pppoe vpdn group ISP localname dsl-username vpdn group ISP ppp authentication pap vpdn username dsl-username password dsl-password
In this example, the IP address of the PIX is 192.168.1.1. As the PIX will be acting as your default gateway to the internet, you will have to set the default gateway on all your servers to be 192.168.1.1 You must be using PIX IOS version 6.2 or greater for this to work.

Configuring Cable Modem DHCP o DHCP configuration for cable modems is much simpler, there is no password
requirement like with regular DSL. The command to let your PIX get a DHCP IP address from your ISP is as follows: ip address outside dhcp setroute ip address inside 192.168.1.1 255.255.255.0
In this example, the IP address of the PIX is 192.168.1.1. As the PIX will be acting as your default gateway to the internet, you will have to set the default gateway on all your servers to be 192.168.1.1
NAT Configuration with DHCP Here we allow any traffic coming in on the inside (private/protected) interface to be NAT-ted to the IP address of the outside (Public/unprotected) interface of the firewall. If DSL - DHCP has assigned an address of 97.158.253.12 to your firewall then the traffic passing through the firewall, from your protected PCs, will appear to be coming from address 97.158.253.12. This is frequently called many-to-one NAT.
global (outside) 1 interface nat (inside) 1 0.0.0.0 0.0.0.0 0 0
Dynamic DNS Port Forwarding Entries It is possible to host your own website on a DHCP DSL / cable modem connection using dynamic DNS. There are many providers to choose from.
Once you have registered with a dynamic DNS provider, you will need to configure your firewall. Here we allow all incoming www traffic (on TCP port 80) destined for the firewall's interface to be forwarded to the web server at 192.168.1.100 on port 80 (www).
access-list inbound permit icmp any any access-list inbound permit tcp any any eq www access-group inbound in interface outside static (inside,outside) tcp interface www 192.168.1.100 www netmask 255.255.255.255
Once configured, you will be able to hit your webserver using the firewall's outside interface's IP address as the destination. eg: http://firewall-outside-ip-address. Remember, it's not possible to hit your firewall's public NAT IP address from servers on your home network. You'll have to ask a friend to check it out.
How To Get Static IPs For DSL Cheaply
Many ISP DSL providers offer cheap DHCP (dynamic IP) service. Due to competition they'll even throw in a DSL modem and even a router for free. This service frequently isn't available for users with static IPs which the ISPs frequently feel are businesses. If you really want static IP addresses and are willing to pay the higher monthly fee, then you can reduce your installation costs by:
> Ordering DHCP DSL first with the free modem and/or router
> Upgrade to static IPs a week later. They probably won't ask about the modem and/or router, and it becomes bundled in free.

Sample PIX configuration: DSL - Static IPs PPOE authentication is only required for DSL DHCP. Once you go for static IPs, the vpdn statements won't be required. In this example, the ISP has assigned the Internet subnet 97.158.253.24 with a mask of 255.255.255.248 (/29). The IP address selected for the PIX is 97.158.253.25, the default gateway is 97.158.253.30
If you are converting from dynamic to static IP addresses, you do not need the vpdn PIX command statements for static IPs ip address outside 97.158.253.25 255.255.255.248 ip address inside 192.168.1.1 255.255.255.0 route outside 0.0.0.0 0.0.0.0 97.158.253.30
In this example, the IP address of the PIX is 192.168.1.1. As the PIX will be acting as your default gateway to the internet, you will have to set the default gateway on all your servers to be 192.168.1.1
Outgoing Connections NAT Configuration Here we allow connections originating from servers connected to the inside (private/protected) interface with an IP address in the range 192.168.1.0 to 192.168.1.255 to be NAT-ted to the IP address of the outside (Public/unprotected) interface of the firewall which is 97.158.253.25 : global (outside) 1 interface nat (inside) 1 192.168.1.0 255.255.255.0 0 0
This is another application of many-to-one NAT.
Incoming Connections NAT Configuration
It is possible to dedicate a single public IP address to a single server on your home network. This is called one-to-one NAT.
Here we allow the firewall to handle traffic to a second IP address, namely 97.158.253.26. We then allow all incoming traffic to be forwarded to the protected web server which has an IP address of 192.168.1.100. Only www and DNS (Port 53) traffic is allowed to access it via an access control list applied to the outside interface. access-list inbound permit icmp any any access-list inbound permit tcp any host 97.158.253.26 eq www access-list inbound permit tcp any host 97.158.253.26 eq 53 access-list inbound permit udp any host 97.158.253.26 eq 53 access-group inbound in interface outside static (inside,outside) 97.158.253.26 192.168.1.100 netmask 255.255.255.255 0 0
Once configured, you will be able to hit your webserver using the firewall's outside interface's IP address as the destination. eg: http://one-to-one-NAT-ip-address. Remember, it's not possible to hit your firewall's public NAT IP address from servers on your home network. You'll have to ask a friend to check it out.
Here are some additional TCP ports you may be interested in:

Protocol Port
FTP 20, 21
SMTP Mail 25
POP3 Mail 110
HTTPS / SSL 443
How To Configure Your PIX To Accept Telnet The telnet command can be used to configure your PIX to accept telnet sessions. By default, it allows connections on the inside interface from the 192.168.1.0 network, as seen below:
telnet 192.168.2.0 255.255.255.0 inside
Of course, if you change the IP address of the inside interface, you may have to change the statement above.
You can also allow access to the outside interface with a similar command. In the case below we're allowing access from the network 64.251.19.0. I generally wouldn't recommended this, but in some cases the need to do it is unavoidable.
telnet 64.251.19.0 255.255.255.0 outside
As an added precaution, you can set the PIX to automatically log out telnet sessions that have been inactive for a period of time. Here is an example of a 15 minute timeout period.
telnet timeout 15
How To Make Your PIX A DHCP Server
Enabling your PIX to be a DHCP server for your home network requires very few statements. First you have to enable the feature on the desired interface, which is usually the "inside" interface. The next step is to set the range of IP addresses the PIX's "inside" interface will manage, and finally, you need to state the IP address of the DNS server the DHCP clients will use.
The default DNS address the PIX provides its DHCP clients is the IP address of the "inside" protected interface. If the PIX is configured to get it's Internet IP address from your ISP, then the PIX will automatically become a caching DNS server for your home network. This means that in this case you don't have to use the DNS statement.
dhcpd enable inside dhcpd address 192.168.1.20-192.168.1.30 inside dhcpd dns 192.168.1.100
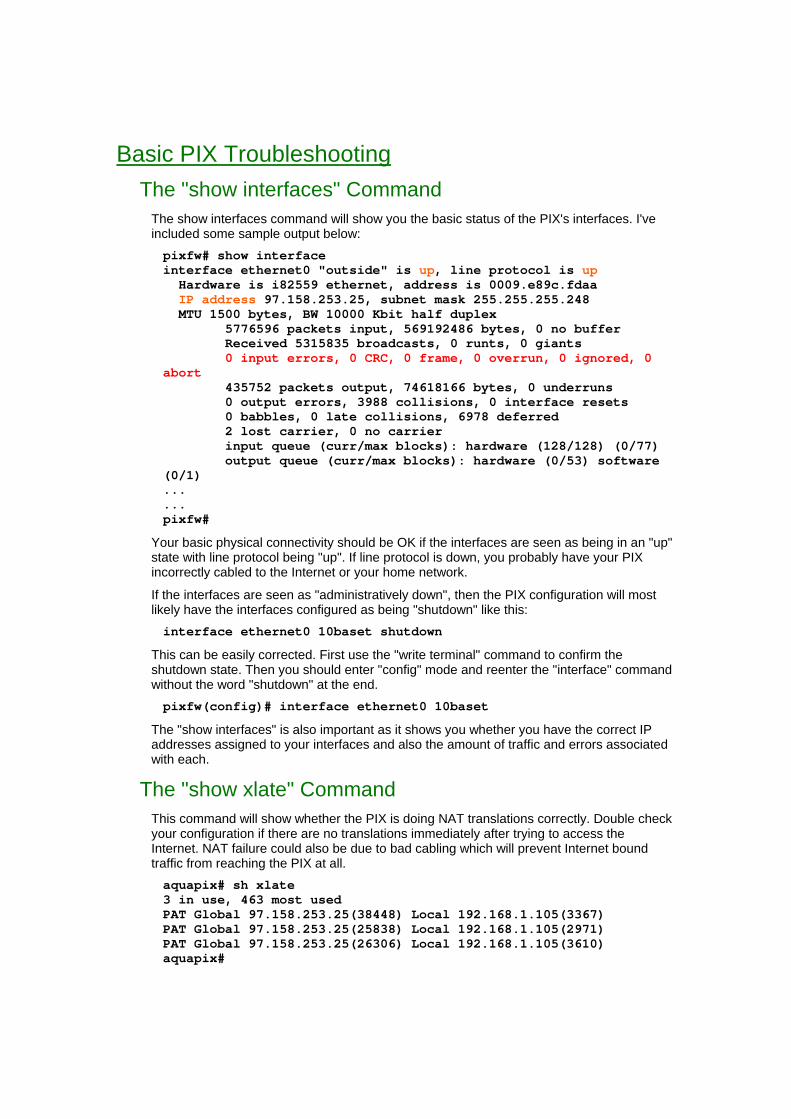
Basic PIX Troubleshooting The "show interfaces" Command
The show interfaces command will show you the basic status of the PIX's interfaces. I've included some sample output below: pixfw# show interface interface ethernet0 "outside" is up, line protocol is up Hardware is i82559 ethernet, address is 0009.e89c.fdaa IP address 97.158.253.25, subnet mask 255.255.255.248 MTU 1500 bytes, BW 10000 Kbit half duplex 5776596 packets input, 569192486 bytes, 0 no buffer Received 5315835 broadcasts, 0 runts, 0 giants 0 input errors, 0 CRC, 0 frame, 0 overrun, 0 ignored, 0 abort 435752 packets output, 74618166 bytes, 0 underruns 0 output errors, 3988 collisions, 0 interface resets 0 babbles, 0 late collisions, 6978 deferred 2 lost carrier, 0 no carrier input queue (curr/max blocks): hardware (128/128) (0/77) output queue (curr/max blocks): hardware (0/53) software (0/1) ... ... pixfw#
Your basic physical connectivity should be OK if the interfaces are seen as being in an "up" state with line protocol being "up". If line protocol is down, you probably have your PIX incorrectly cabled to the Internet or your home network.
If the interfaces are seen as "administratively down", then the PIX configuration will most likely have the interfaces configured as being "shutdown" like this: interface ethernet0 10baset shutdown
This can be easily corrected. First use the "write terminal" command to confirm the shutdown state. Then you should enter "config" mode and reenter the "interface" command without the word "shutdown" at the end. pixfw(config)# interface ethernet0 10baset
The "show interfaces" is also important as it shows you whether you have the correct IP addresses assigned to your interfaces and also the amount of traffic and errors associated with each.
The "show xlate" Command This command will show whether the PIX is doing NAT translations correctly. Double check your configuration if there are no translations immediately after trying to access the Internet. NAT failure could also be due to bad cabling which will prevent Internet bound traffic from reaching the PIX at all. aquapix# sh xlate 3 in use, 463 most used PAT Global 97.158.253.25(38448) Local 192.168.1.105(3367) PAT Global 97.158.253.25(25838) Local 192.168.1.105(2971) PAT Global 97.158.253.25(26306) Local 192.168.1.105(3610) aquapix#

Using syslog
A really good method for troubleshooting access control lists (ACLs) and also to view the types of methods people are using to access your site is to use syslog. The Appendix has sample configurations for the PIX.
Other Things To Check
Always make sure your PIX has a:
o correct default route. The default is the one with the lots of zeros. aquapix# show route outside 0.0.0.0 0.0.0.0 97.158.253.30 1 DHCP static outside 12.210.24.0 255.255.252.0 12.210.27.161 1 CONNECT static inside 192.168.1.0 255.255.255.0 192.168.1.1 1 CONNECT static aquapix#
o default gateway that you can "ping". In the case above the gateway is 97.158.253.30.

Chapter 2
Configuring Cisco DSL Routers
= = = = = = = = = = = = = = = = = = = = = = = = = = = = = = = = = = = = = = = = = = = In This Chapter Chapter 2
Configuring Cisco DSL Routers An Introduction to Network Address Translation (NAT) Introduction to accessing the router command line Sample Configurations Other NAT Topics Basic Troubleshooting Topics
(c) Peter Harrison, www.linuxhomenetworking.com = = = = = = = = = = = = = = = = = = = = = = = = = = = = = = = = = = = = = = = = = = =
This is a simple guide on how to set up your Cisco DSL router for DHCP using PPPoE. The examples in this chapter also show how to configure NAT so you can also have a home / SOHO based website. This page should be suitable for the following Cisco routers:
With Built In DSL Modems
> 800 series > 1700 / 2600 / 3600 series with the ADSL WIC installed
With External DSL Modems
> 1700 / 2600 / 3600 series
An Introduction to Network Address Translation (NAT) Network address translation is a method used to help conserve the limited number of IP addresses available for internet purposes. The introduction to networking page explains the concept in more detail in addition to other fundamental topics. We will return to the NAT discussion, specifically how to configure it, later in this chapter, but first a very basic introduction on how to configure and use Cisco DSL routers.
Introduction to accessing the router command line
Via The Console Port
Your Cisco router will come with a console cable that will allow you to configure it using terminal emulation software such as Hyperterm. Once you've set up your router with an IP address you'll be able to access it via Telnet.

Via Telnet o One easy way to get access to any device on your network is using the /etc/hosts file.
Here you list all the IP addresses of important devices that you may want to access with a corresponding nickname. Here is a sample in which the router "ciscorouter" has the IP address 192.168.1.1: # Do not remove the following line, or various programs # that require network functionality will fail. # 127.0.0.1 localhost.localdomain localhost 192.168.1.1 ciscorouter 192.168.1.100 bigboy mail.my-site.com
o Once connected to the network you can access the router via telnet
[root@bigboy tmp]# telnet ciscorouter Trying 192.168.1.1... Connected to ciscorouter. Escape character is '^]'.
o You'll be prompted for a password and will need another password to get into the privileged "enable" mode. If you are directly connected to the console, you should get a similar prompt too. There is no password in a fresh out of the box Cisco router and simply hitting the "Enter" key will be enough. User Access Verification Password: Type help or '?' for a list of available commands. ciscorouter> enable Password: ******** ciscorouter#
o Use the "show running" command to see the current configuration. You will want to change your "password" and "enable password" right after completing your initial configuration. ciscorouter# show run Building configuration... ! version 12.1 no service pad service timestamps debug uptime service timestamps log datetime localtime service password-encryption ! hostname ciscorouter ! no logging console no logging monitor logging trap debugging ... ... ...
o ALL router configuration commands need to be done in configuration mode, by issuing the "configure terminal" command from enable mode prompt.

ciscorouter# conf t ciscorouter(config)# "Enter commands here" ciscorouter(config)# exit ciscorouter#
o You can usually delete commands in the configuration by adding the word "no" to the beginning of the command you want to delete. Some commands that can only have a single value, won't accept a "no" to change them and will just be over-written when you issue the new command.
In the example below, we change the router's name and then delete one of its many access control list (ACL) entries. ciscorouter# conf t ciscorouter(config)# no access-list 150 deny ip host 10.1.2.1 host 10.3.2.5 ciscorouter(config)# hostname soho-router soho-router(config)# exit soho-router #
o One of the first things you should do is change the default paswords for the router.
ciscorouter# conf t ciscorouter(config)# enable secret "enable password here" ciscorouter(config)# line con 0 ciscorouter(config-line)# password "console password here" ciscorouter(config-line)# line vty 0 4 ciscorouter(config-line)# password "telnet password here" ciscorouter(config-line)# ^z ciscorouter#
o When you've finished configuring, you can permanently save your changes by using the "write memory" command: ciscorouter# wr mem Building configuration... Cryptochecksum: 3af43873 d35d6f06 51f8c999 180c2342 [OK] ciscorouter#
Sample Configurations DSL Router With Built-In Modem - DHCP o DHCP and DSL requires you to get a pppoe password and username from your ISP.
Most ISPs have a homepage where you can register to get the username and password, ask customer service for the URL. You should substitute this username and password for PPP "username" and "password" listed below.
o Cisco IOS doesn't support DHCP DSL and NAT. If this is so, then putting an Internet accessible web server on your home network would be impossible using the routers mentioned above in this configuration.
o Here is a sample configuration for a Cisco home router. Some of the commands listed are part of Cisco's default settings. Do the "show run" command before starting to configure your router to see what commands you'll really need.

o Remember to be in "config" mode to enter these commands and remember to do a "write memory" at the end to permanently save the configuration
Cisco DSL Router With Built-in Modem Configuration
(DHCP) ! vpdn enable no vpdn logging !--- Configure the router's PPPoE client so that it !--- can setup a session with the ISP ! vpdn-group pppoe request-dialin protocol pppoe !--- Configure the home / SOHO network interface's !--- IP address !--- The "ip nat" statement tells your router that !--- this interface: !--- 1) uses NAT !--- 2) is the inside "private" interface ! interface FastEthernet0 ip address 192.168.1.1 255.255.255.0 ip nat inside !--- Configure the DSL interface !--- Your ISP may provide you with a different pvc !--- value not necesarily "1/1" ! interface ATM0 no ip address no atm ilmi-keepalive bundle-enable dsl operating-mode auto hold-queue 224 in ! interface ATM0.1 point-to-point pvc 1/1 pppoe-client dial-pool-number 1 !--- Cisco prefers to run the PPPoE client on a virtual

!--- "dialer" interface !--- This is tied to the real ATM DSL interface with the !--- "dialer pool" command. The default ethernet MTU !--- size has been reduced from 1500 to accommodate !--- the PPPoE header overhead. ! !--- The "ip nat" statement tells your router that !--- this interface: !--- 1) uses NAT !--- 2) is the outside "public" interface ! interface Dialer1 ip address negotiated ip mtu 1492 ip nat outside encapsulation ppp dialer pool 1 !--- Here are the commands to configure authentication !--- with with your ISP. This example uses the "CHAP" !--- method. !--- Commands for using the "PAP" method are included at !--- the end of this box ! ppp authentication chap callin ppp chap hostname <username> ppp chap password <password> ! !--- Tells the router to NAT all traffic that passes !--- through it: !--- 1) From the inside to the outside, !--- 2) And whose IP address is in the 192.168.1.0 network !--- as given in access list 1 !--- 3) Giving it an outside "public" address that is the !--- same as interface Dialer1 gets from the PPPoE !--- connection ! ip nat inside source list 1 interface Dialer1 overload ip classless ip route 0.0.0.0 0.0.0.0 dialer1 no ip http server ! access-list 1 permit 192.168.1 0.0.0.255
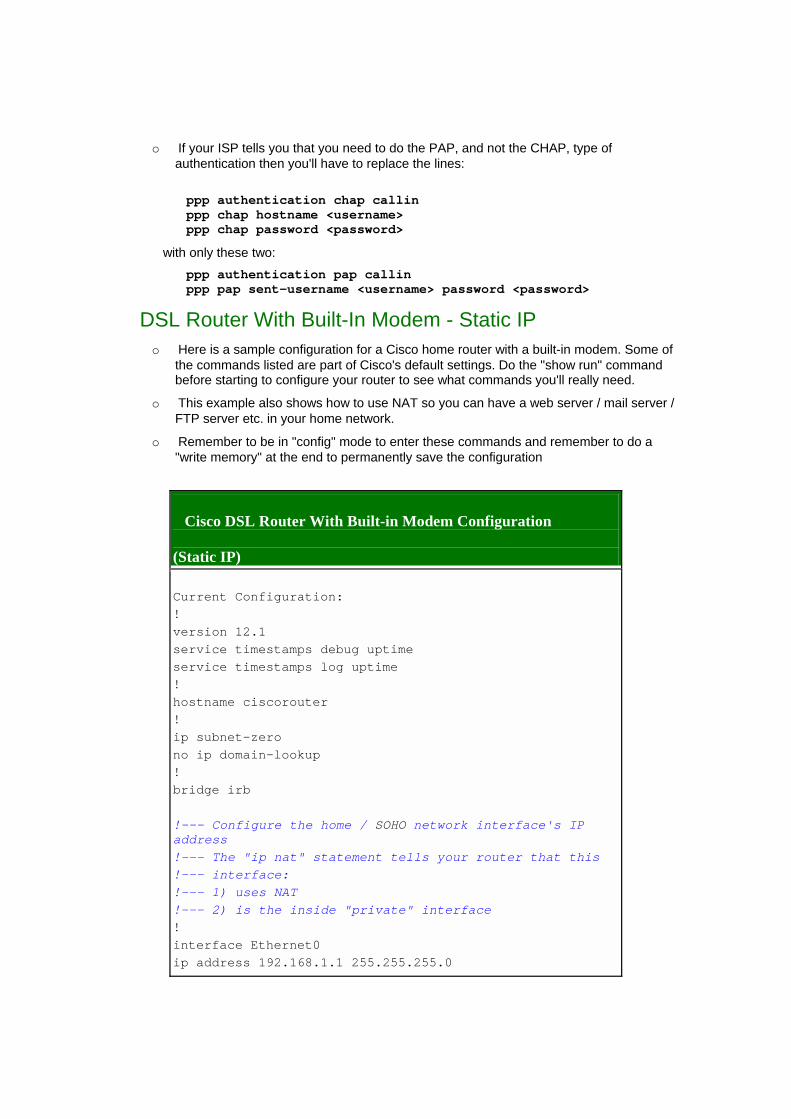
o If your ISP tells you that you need to do the PAP, and not the CHAP, type of authentication then you'll have to replace the lines: ppp authentication chap callin ppp chap hostname <username> ppp chap password <password>
with only these two: ppp authentication pap callin ppp pap sent-username <username> password <password>
DSL Router With Built-In Modem - Static IP o Here is a sample configuration for a Cisco home router with a built-in modem. Some of
the commands listed are part of Cisco's default settings. Do the "show run" command before starting to configure your router to see what commands you'll really need.
o This example also shows how to use NAT so you can have a web server / mail server / FTP server etc. in your home network.
o Remember to be in "config" mode to enter these commands and remember to do a "write memory" at the end to permanently save the configuration
Cisco DSL Router With Built-in Modem Configuration (Static IP) Current Configuration: ! version 12.1 service timestamps debug uptime service timestamps log uptime ! hostname ciscorouter ! ip subnet-zero no ip domain-lookup ! bridge irb !--- Configure the home / SOHO network interface's IP address !--- The "ip nat" statement tells your router that this !--- interface: !--- 1) uses NAT !--- 2) is the inside "private" interface ! interface Ethernet0 ip address 192.168.1.1 255.255.255.0

ip nat inside ! interface ATM0 no ip address no atm ilmi-keepalive pvc 0/35 encapsulation aal5snap ! bundle-enable dsl operating-mode auto bridge-group 1 ! !--- Cisco prefers to run the PPPoE client on a virtual !--- "BVI" interface !--- This is tied to the real ATM DSL interface with the !--- "bridge-group" command above. !--- (The BVI number always matches the bridge-group number) !--- The "ip nat" statement tells your router that !--- this interface: !--- 1) uses NAT !--- 2) is the outside "public" interface ! interface BVI1 ip address 97.158.253.25 255.255.255.248 ip nat outside !--- Tells the router to NAT all traffic that passes !--- through it: !--- 1) From the inside to the outside, !--- 2) And whose IP address is in the 192.168.1.0 network !--- as given in access list 1 !--- 3) Must get an outside "public" address that is the !--- same as interface BVI1 ! ip nat inside source list 1 interface BVI1 overload !--- This statement performs the static address !--- translation for the Web server. With this statement, !--- users trying to reach 97.158.253.26 port 80 (www) will be !--- automatically redirected to 192.168.1.100 port 80 !--- (www), which in this case is the Web server. !--- ! ip nat inside source static tcp 192.168.1.100 80

97.158.253.26 80 extendable !--- Set your default gateway as provided by your ISP ! ip classless ip route 0.0.0.0 0.0.0.0 97.158.253.30 ! access-list 1 permit 192.168.1.0 0.0.0.255 bridge 1 protocol ieee bridge 1 route ip ! end
DSL Router With External Modem - Static IP
o Here is a sample configuration for a Cisco home router with an external modem. Some of the commands listed are part of Cisco's default settings. Do the "show run" command before starting to configure your router to see what commands you'll really need.
o This example also shows how to use NAT so you can have a web server / mail server / FTP server etc. in your home network.
o Remember to be in "config" mode to enter these commands and remember to do a "write memory" at the end to permanently save the configuration
Cisco Router Connected to DSL via External Modem Configuration
(Static IP) Current Configuration: ! version 12.1 service timestamps debug uptime service timestamps log uptime ! hostname ciscorouter ! ip subnet-zero no ip domain-lookup ! !--- Configure the home / SOHO network interface's IP address !--- The "ip nat" statement tells your router that !--- this interface:

!--- 1) uses NAT !--- 2) is the inside "private" interface ! interface Ethernet0 ip address 192.168.1.1 255.255.255.0 ip nat inside ! interface Ethernet1 ip address 97.158.253.25 255.255.255.248 ip nat outside !--- Tells the router to NAT all traffic that passes !--- through it: !--- 1) From the inside to the outside, !--- 2) And whose IP address is in the 192.168.1.0 network !--- as given in access list 1 !--- 3) Must get an outside "public" address that is the !--- same as interface ethernet1 ! ip nat inside source list 1 interface ethernet1 overload !--- This statement performs the static address translation !--- for the Web server. !--- With this statement, users trying to reach 97.158.253.26 !--- port 80 (www) will be automatically redirected to !--- 192.168.1.100 port 80 (www), which in this case !--- is the Web server. !--- ! ip nat inside source static tcp 192.168.1.100 80 97.158.253.26 80 extendable !--- Set your default gateway as provided by your ISP ! ip classless ip route 0.0.0.0 0.0.0.0 97.158.253.30 ! access-list 1 permit 192.168.1.0 0.0.0.255 ! end

Other NAT Topics
Commonly Used TCP And UDP Ports
Here are some additional TCP ports you may be interested in for NAT "ip nat inside source static" statements:
Protocol
Port
Type
FTP
20, 21
TCP
SMTP Mail
25
TCP
POP3 Mail
110
TCP
HTTPS / SSL
443
TCP
DNS
53
UDP
o So for example, the command for SMTP mail would be:
ip nat inside source static tcp 192.168.1.100 25 97.158.253.26 25
o DNS requires a UDP type NAT statement such as:
ip nat inside source static udp 192.168.1.100 53 97.158.253.25 53
o To have all traffic trying to reach 97.158.253.26, regardless of port, to be NAT-ted to 192.168.1.100, then you can use the command: ip nat inside source static 192.168.1.100 97.158.253.25
How To Verify That NAT Is Working Correctly
You can use the show ip nat translation command to determine whether NAT is actually occurring as expected:

ciscorouter> enable Password: ******** ciscorouter#show ip nat translation Pro Inside global Inside local Outside local Outside global tcp 97.158.253.26:80 192.168.1.100:80 --- --- tcp 97.158.253.26:80 192.168.1.100:80 67.34.217.6:5698 67.34.217.6:5698 ciscorouter#
Cisco uses the following terms for the various IP addresses you'll find in any NAT translation process.
o The Inside local address is the actual IP address of the local server on your home network.
o The Inside global address is the IP address of the server presented to the Internet after NAT.
o The Outside local the actual IP address of the remote computer on its local network.
o The Outside global the IP address of the remote computer as presented on the Internet.
As you can see, in this case, NAT seems to be functioning properly for the web server 192.168.1.100 on the home network
How To Troubleshoot NAT To troubleshoot NAT after you have logged into the router via Telnet requires you to first activate logging to the telnet terminal with the terminal monitor command and then using the debug ip nat detailed command to visualize the translation process. The example below shows that translation occurs for port 80 traffic (HTTP / www) from address 97.158.253.26 to 192.168.1.100, and more specifically that remote host 67.34.217.6 was communicating with the inside global address of 97.158.253.26. ciscorouter> enable Password: ******** ciscorouter#term mon ciscorouter#debug ip nat detailed IP NAT detailed debugging is on ciscorouter# 03:29:49: NAT: creating portlist proto 6 globaladdr 97.158.253.26 03:29:49: NAT: Allocated Port for 192.168.1.100 -> 97.158.253.26: wanted 80 got 80 03:29:49: NAT: o: tcp (198.133.219.1, 5698) -> (97.158.253.26, 80) [0] ... ... ...
Basic Troubleshooting Topics
The "show interfaces" Command
The show interfaces command will show you the basic status of the router's interfaces. I've included some sample output below:

ciscorouter>show interface Ethernet0/0 is up, line protocol is up Hardware is AmdP2, address is 0008.e3a0.7e80 (bia 0008.e3a0.7e80) Internet address is 172.16.1.1/24 MTU 1500 bytes, BW 10000 Kbit, DLY 1000 usec, Encapsulation ARPA, loopback not set Keepalive set (10 sec) ARP type: ARPA, ARP Timeout 04:00:00 Last input 00:00:00, output 00:00:00, output hang never Last clearing of "show interface" counters never Input queue: 1/75/0/0 (size/max/drops/flushes); Total output drops: 0 Queueing strategy: fifo Output queue :0/40 (size/max) 5 minute input rate 0 bits/sec, 1 packets/sec 5 minute output rate 0 bits/sec, 0 packets/sec 303 packets input, 19256 bytes, 0 no buffer Received 13 broadcasts, 0 runts, 0 giants, 0 throttles 1 input errors, 1 CRC, 1 frame, 0 overrun, 0 ignored 0 input packets with dribble condition detected 60718 packets output, 5770201 bytes, 0 underruns 0 output errors, 0 collisions, 2 interface resets 0 babbles, 0 late collision, 0 deferred 0 lost carrier, 0 no carrier 0 output buffer failures, 0 output buffers swapped out ... ... ... ciscorouter>
Your basic physical connectivity should be OK if the interfaces are seen as being in an "up" state with line protocol being "up". If line protocol is down, you probably have your router incorrectly cabled to the Internet or your home network.
If the interfaces are seen as "administratively down", then the router configuration will most likely have the interfaces configured as being "shutdown" like this: ... ... ... interface ethernet0 ?shutdown ... ...
This can be easily corrected. First use the "show running" command to confirm the shutdown state. Then you should enter "config" mode and enter the "no shutdown" command. Here is an example for interface ethernet0. ciscorouter(config)# interface ethernet0 ciscorouter(config-if)# no shutdown ciscorouter(config-if)#end ciscorouter# write memory
The "show interfaces" is also important as it shows you whether you have the correct IP addresses assigned to your interfaces and also the amount of traffic and errors associated with each.

Using syslog A really good method for troubleshooting access control lists (ACLs) and also to view the types of methods people are using to access your site is to use syslog. The Appendix has sample configurations for Cisco routers.
Other Things To Check Always make sure your router has a:
o correct default route. The default is the one with the lots of zeros.
ciscorouter>sh ip route Codes: C - connected, S - static, I - IGRP, R - RIP, M - mobile, B - BGP D - EIGRP, EX - EIGRP external, O - OSPF, IA - OSPF inter area N1 - OSPF NSSA external type 1, N2 - OSPF NSSA external type 2 E1 - OSPF external type 1, E2 - OSPF external type 2, E - EGP i - IS-IS, L1 - IS-IS level-1, L2 - IS-IS level-2, ia - IS-IS inter area * - candidate default, U - per-user static route, o - ODR P - periodic downloaded static route Gateway of last resort is 97.158.253.30 to network 0.0.0.0 192.168.0.0/24 is subnetted, 1 subnets C 192.168.1.0 is directly connected, Ethernet1 S* 0.0.0.0/0 [1/0] via 97.158.253.30 ciscorouter>
o default gateway that you can "ping". In the case above the gateway is 97.158.253.30.

Chapter 3
Configuring Cisco SOHO VPNs = = = = = = = = = = = = = = = = = = = = = = = = = = = = = = = = = = = = = = = = = = = In This Chapter Chapter 3
Configuring Cisco SOHO VPNs Scenario VPN Terminologies Site 1 - Router VPN Configuration Steps Site 2 - Router VPN Configuration Steps (Scenario A) Site 2 ? PIX Firewall VPN Config. Steps (Scenario B)
(c) Peter Harrison, www.linuxhomenetworking.com = = = = = = = = = = = = = = = = = = = = = = = = = = = = = = = = = = = = = = = = = = =
Here is a brief explanation on how to configure a "permanent" Small Office / Home Office (SOHO) VPN using low end Cisco routers and PIX firewalls.
There is a sample PIX configuration in the appendix in which remote users can use Windows based VPN software on their notebook computers to access the SOHO site by first dialing into their ISP and then connecting to the PIX with the software such as Cisco's EasyVPN suite. As you can imagine, this "temporary" VPN setup can be quite useful.
Scenario In this example we have two SOHO offices.
> A VPN needs to be created between the two sites so that they can communicate with each other without the fear of eavesdropping.
> For simplicity, neither site is site wants to invest in a CA certificate service or RSA infrastructure. They prefer to use pre-shared keys.
> The network administrators at both sites are aware that permanent site ? to ? site VPNs require fixed Internet IP addresses and have upgraded from their basic DHCP services originally provided by their ISPs.

Site1
o uses a private network of 192.168.1.0
o has a router with an external Internet IP address of 97.158.253.25
o uses a Cisco DSL router with a built in DSL modem like the Cisco 800 series of routers.
Site2 o uses a private network of 192.168.2.0
o uses a Cisco router with an external DSL modem or a PIX firewall.
o uses a router (Scenario A) or firewall (Scenario B) with an external Internet IP address of 6.25.232.1
Other Information The administrator at Site 1 wants to be able to access all the protected servers at site 2 by using their real IP addresses and vice versa. For example; Site 1 will refer to Site 2 servers with their 192.168.2.X IP addresses, not the Internet NAT addresses on the 6.25.232.X network.
VPN Terminologies Before we begin, it is best to review some basic VPN terminologies in the Linux Home Networking guide.
Site 1 - Router VPN Configuration Steps There are a number of steps that need to be done to create the VPN.
IKE Phase 1 of the creation of a VPN tunnel first requires an exchange of the encryption capabilities of the VPN devices at both ends of the tunnel. The second phase involves encrypting the data by either using either:
o Pre-shared keys known to both VPN devices (This is what we'll be using in all the examples below) or
o Keys generated via the RSA methodology or
o Keys obtained from Certification Authorities (CAs)
Cisco router / firewall devices usually require you to configure each of the various combinations of key encryption capabilities available. The device will then send all of the combinations to the remote VPN as part of the negotiation to decide which one to use.
o Create an IKE key policy. The policy number "9" identifies it from all other IKE policies that may be configured. This policy requires a pre-shared key. crypto isakmp policy 9 hash md5 authentication pre-share

I've chosen only one combination for the sake of simplicity, but you could add more like this. If your device is licensed appropriately, and you intend to establish a connection with a Linux VPN device, then you should consider a 3DES option which Linux FreeS/WAN prefers. Here is a snippet that includes 3DES and may other policy capabilities. crypto isakmp policy 1 encr 3des authentication pre-share ! crypto isakmp policy 4 encr 3des authentication pre-share group 2 ! crypto isakmp policy 5 encr 3des hash md5 authentication pre-share group 2 ! crypto isakmp policy 10 authentication pre-share group 2 ! crypto isakmp policy 12 authentication pre-share ! crypto isakmp policy 20 hash md5 authentication pre-share group 2 ! crypto isakmp policy 23 encr 3des hash md5 authentication pre-share
o You'll then need to configure a VPN shared key that can be used between this site and the VPN site at 6.25.232.1 crypto isakmp key VPNsecretPASSWORD address 6.25.232.1
IPSec o Set a lifetime for the IPSec Security Associations. A security association is the
equivalent of a site ? to ? site VPN relationship.
crypto ipsec security-association lifetime seconds 86400
o Configure an access list to define the valid traffic to be directed through the VPN from 192.168.1.0 to 192.168.2.0 access-list 101 permit ip 192.168.1.0 0.0.0.255 192.168.2.0 0.0.0.255
o Define which encryption transformations will be used to shield the VPN traffic as it passes over the Internet with the "crypto ipsec transform-set" command. Each "single

line" set can be given its own name. In this case we've chosen set s1s2trans to use one of the most common combinations, esp-des and esp-md5-hmac. crypto ipsec transform-set s1s2trans esp-des esp-md5-hmac
If the remote site prefers to use the more secure 3DES method, (Linux FreeS/WAN only does 3DES) then you may want to replace the above statement with this one: crypto ipsec transform-set s1s2trans esp-3des esp-md5-hmac
You can create multiple transform sets depending on your security requirements. For example; you could create a transform set named "weak" with regular DES encryption and another named "strong" using the better 3DES method.
o Create a crypto-map to match the valid traffic defined by the ACL with the transform set we want to use with VPN peer router/firewall at the other site. This example is creating a map entry of priority "10".
crypto map to-site2 10 ipsec-isakmp set peer 6.25.232.1 set transform-set s1s2trans match address 101
You can add additional map entries to correspond with tunnels to other remote sites with additional priorities. Just remember to create the appropriate access control lists and pre-shared keys. Here is an example of additional map entries using two different transform sets:
crypto map to-site2 150 ipsec-isakmp set peer 108.112.44.95 set transform-set s1s2trans match address 101 crypto map to-site2 153 ipsec-isakmp set peer 4.21.116.23 set transform-set s1s2trans-strong match address 102 crypto map to-site2 158 ipsec-isakmp set peer 223.52.37.25 set transform-set s1s2trans-strong set pfs group2 match address 103
o Bind the crypto-map to the external interface of the router.
interface BVI1 ?crypto map to-site2
This example assumes you are using a router with a built in DSL modem. In such a case, the external Internet facing interface would most likely be called BVI1 with a "sister" interface ATM0. Make sure both are configured correctly.
If you are using a router with an external DSL / Cable modem, then there will only be one Internet facing interface to configure. This interface would be usually named either Ethernet0 or Ethernet1 depending on the type of router. The Site 2 configuration uses an external DSL / Cable modem.
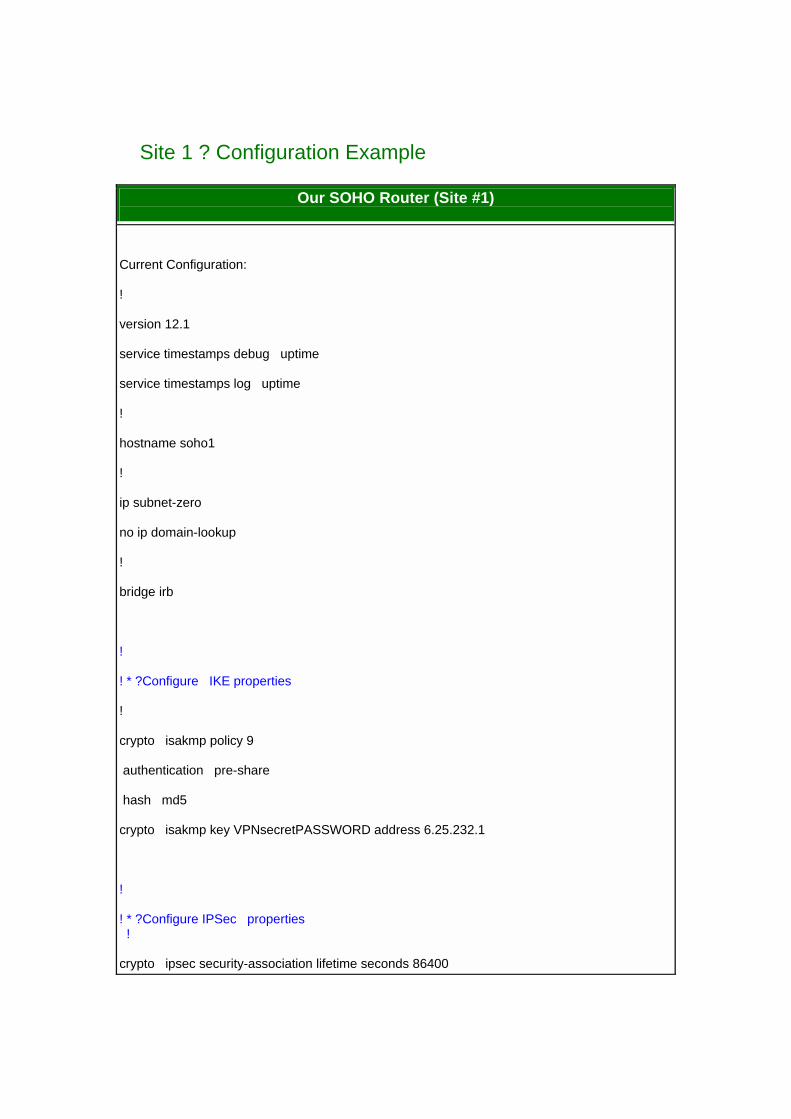
Site 1 ? Configuration Example
Our SOHO Router (Site #1) Current Configuration: ! version 12.1 service timestamps debug uptime service timestamps log uptime ! hostname soho1 ! ip subnet-zero no ip domain-lookup ! bridge irb ! ! * ?Configure IKE properties ! crypto isakmp policy 9 authentication pre-share hash md5 crypto isakmp key VPNsecretPASSWORD address 6.25.232.1 ! ! * ?Configure IPSec properties ! crypto ipsec security-association lifetime seconds 86400

crypto ipsec transform-set s1s2trans esp-des esp-md5-hmac ! ! * If the remote site prefers to use 3DES, (Linux FreeS/WAN only does 3DES) then you may want to ! * replace the above statement with this one: ! ! crypto ipsec transform-set s1s2trans esp-3des esp-md5-hmac ! ! ! * ?Define the Site1 to Site2 traffic to be encrypted ! crypto map to-site2 10 ipsec-isakmp set peer 6.25.232.1 set transform-set s1s2trans match address 101 ! ! * ?Give the protected interface an IP address and ! * ?and let it know that it should do NAT as a protected ! * ?"inside" interface ! interface Ethernet0 ?ip address 192.168.1.1 255.255.255.0 ?ip nat inside

interface ATM0 ?no ip address ?no atm ilmi-keepalive ?pvc 0/35 ?encapsulation aal5snap ?bundle-enable ?dsl operating-mode auto ?bridge-group 1 ! * ?Encryption will be done on interface BVI1 according to ! * ?the crypto map statement interface BVI1 ip address 97.158.253.25 255.255.255.248 ?ip nat outside crypto map to-site2 ip mtu 1412 ! * ?Tells the router to NAT all traffic that passes through it: ! * ?1) From the inside to the outside, ! * ?2) And whose IP address matches those in route map "nonat" ! * ?3) Must get an outside "public" address that is the same as ! * interface BVI1 ! * ! * ?Replaces the following command used on the basic DSL router page ! * ! * ?ip nat inside source list 1 interface BVI1 overload

ip nat inside source route-map nonat interface BVI1 overload ! * ?This statement performs the static address translation ! * ?for the Web server. ! * ?With this statement, users trying to reach 97.158.253.26 ! * ??will be automatically redirected to 192.168.1.100 ! * ?which in this case is the Web server. ! ip nat inside source static 192.168.1.100 97.158.253.26 ! * ?Set your default gateway as provided by your ISP ! * ?Set a route to Site2 via the Tunnel IP of the ! * ?router at Site2 ! ip classless ip route 0.0.0.0 0.0.0.0 97.158.253.30 ! * ?Encrypt all traffic passing over the tunnel ! * ?interface between the two sites ! access-list 101 permit ip 192.168.1.0 0.0.0.255 192.168.2.0 0.0.0.255 ! ! * ?ACL used by route map "nonat" to exclude traffic ! * ?between Site1 and Site2 from NAT process as this ! * ?will pass through the VPN tunnel ! access-list 150 deny ip 192.168.1.0 0.0.0.255 192.168.2.0 0.0.0.255

access-list 150 permit ip 192.168.1.0 0.0.0.255 any ! * ?Use a route map to define which traffic from the private ! * ?network should be included in the NAT process: route-map nonat permit 10 ?match ip address 150
Site 2 - Router VPN Configuration Steps (Scenario A) IKE o Create an IKE key policy. The policy number "9" identifies it from all other IKE policies
that may be configured. This policy requires a pre-shared key crypto isakmp policy 9 hash md5 authentication pre-share
o Configure a VPN shared key that can be used between this site and the VPN site at 97.158.253.25
crypto isakmp key VPNsecretPASSWORD address 97.158.253.25
IPSec o Set a lifetime for the IPSec Security Associations
crypto ipsec security-association lifetime seconds 86400
o Configure an access list to define the valid traffic to be directed through the VPN from 192.168.1.0 to 192.168.2.0 access-list 101 permit ip 192.168.1.0 0.0.0.255 192.168.2.0 0.0.0.255
o Define which transformations will be used to shield the VPN traffic with the "crypto ipsec transform-set" command. Each set can be given its own name. crypto ipsec transform-set s2s1trans esp-des esp-md5-hmac
If the remote site prefers to use the more secure 3DES method, (Linux FreeS/WAN only does 3DES) then you may want to replace the above statement with this one: crypto ipsec transform-set s1s2trans esp-3des esp-md5-hmac
o Create a crypto-map to match the valid traffic, the transform set, the security-association lifetime with the VPN peer router/firewall at the other site
crypto map to-site1 10 ipsec-isakmp set peer 6.25.232.1

set transform-set s1s2trans match address 101
o Bind the crypto-map to the external interface of the router interface Ethernet1 ?crypto map to-site1
Site 2 ? Configuration Example (Scenario A)
Their SOHO Router (Site #2)
Current Configuration: ! version 12.1 service timestamps debug uptime service timestamps log uptime ! hostname soho2 ! ip subnet-zero no ip domain-lookup ! * ?Configure IKE properties ! crypto isakmp policy 9 authentication pre-share hash md5 crypto isakmp key VPNsecretPASSWORD address 97.158.253.25 ! ! * ?Configure IPSec properties ! crypto ipsec security-association lifetime seconds 86400 crypto ipsec transform-set s2s1trans esp-des esp-md5-hmac ! ! * If the remote site prefers to use 3DES, (Linux FreeS/WAN only does 3DES) then you may want to ! * replace the above statement with this one:

! * ! * crypto ipsec transform-set s2s1trans esp-3des esp-md5-hmac ! ! ! * ?Define the Site1 to Site2 traffic to be encrypted ! crypto map to-site1 10 ipsec-isakmp set peer 97.158.253.25 set transform-set s2s1trans match address 101 ! ! * ?Encryption will be done according to the crypto ! * ?map statement ! interface Ethernet1 ip address 6.25.232.1 255.255.255.248 ?ip nat outside crypto map to-site1 ! ! * ?Give the protected interface an IP address and ! * ?and let it know that it should do NAT as a protected ! * ?"inside" interface ! interface Ethernet0 ?ip address 192.168.1.1 255.255.255.0

?ip nat inside ! ! * ?Tells the router to NAT all traffic that passes through it: ! * ?1) From the inside to the outside, ! * ?2) And whose IP address matches those in route map "nonat" ! * ?3) Must get an outside "public" address that is the same as ! * interface ethernet1 ! * ! * ?Replaces the following command used on the basic DSL router page ! * ! * ?ip nat inside source list 1 interface ethernet1 overload ! ip nat inside source route-map nonat interface ethernet1 overload ! ! * ?Set your default gateway as provided by your ISP ! * ?Set a route to Site2 via the Tunnel IP of the router ! * ?at Site2 ! ip classless ip route 0.0.0.0 0.0.0.0 6.25.232.6 ! ! ?* ?Encrypt all traffic passing over the tunnel interface ! * ?between the two sites ! access-list 101 permit ip 192.168.2.0 0.0.0.255 192.168.1.0 0.0.0.255

! ! * ?ACL used by route map "nonat" to exclude traffic between ! * ?Site1 and Site2 ! * ?from NAT process as this will pass through the VPN tunnel ! access-list 150 deny ip 192.168.2.0 0.0.0.255 192.168.1.0 0.0.0.255 access-list 150 permit ip 192.168.2.0 0.0.0.255 any ! ! * ?Use a route map to define which traffic from the private ! * ?network should be included in the NAT process: ! route-map nonat permit 10 ?match ip address 150
Site 2 ? PIX Firewall VPN Config. Steps (Scenario B) IKE o Plan on creating an IPSec policy with a unique identifier number. The PIX will check
each set of configured numbered policies for IKE till it achieves success. In this case we'll only use one policy "20".
o Define the type of encryption to be used (DES or 3DES) isakmp policy 20 encryption des
o Define the hashing method for authentication (SHA or MD5) isakmp policy 20 hash md5
o Define the overall authentication method (Pre-shared key or rsa-sig). We'll use the simpler pre-shared method. isakmp policy 20 authentication pre-share
o Define the shared key to be used. isakmp key VPNsecretPASSWORD address 97.158.253.25 netmask 255.255.255.255
o Specify how the hosts will identify themselves to one another (By address or hostname). The same method should be used on both ends.
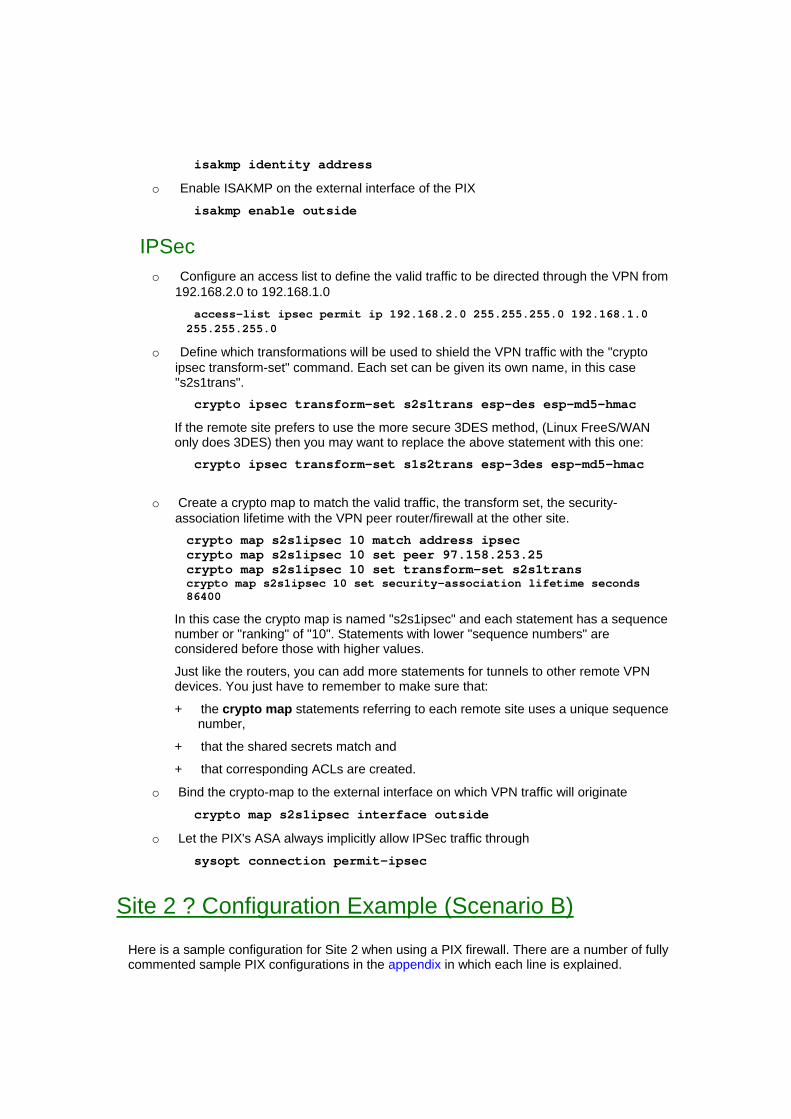
isakmp identity address
o Enable ISAKMP on the external interface of the PIX isakmp enable outside
IPSec o Configure an access list to define the valid traffic to be directed through the VPN from
192.168.2.0 to 192.168.1.0 access-list ipsec permit ip 192.168.2.0 255.255.255.0 192.168.1.0 255.255.255.0
o Define which transformations will be used to shield the VPN traffic with the "crypto ipsec transform-set" command. Each set can be given its own name, in this case "s2s1trans". crypto ipsec transform-set s2s1trans esp-des esp-md5-hmac
If the remote site prefers to use the more secure 3DES method, (Linux FreeS/WAN only does 3DES) then you may want to replace the above statement with this one: crypto ipsec transform-set s1s2trans esp-3des esp-md5-hmac
o Create a crypto map to match the valid traffic, the transform set, the security-association lifetime with the VPN peer router/firewall at the other site. crypto map s2s1ipsec 10 match address ipsec crypto map s2s1ipsec 10 set peer 97.158.253.25 crypto map s2s1ipsec 10 set transform-set s2s1trans crypto map s2s1ipsec 10 set security-association lifetime seconds 86400
In this case the crypto map is named "s2s1ipsec" and each statement has a sequence number or "ranking" of "10". Statements with lower "sequence numbers" are considered before those with higher values.
Just like the routers, you can add more statements for tunnels to other remote VPN devices. You just have to remember to make sure that:
+ the crypto map statements referring to each remote site uses a unique sequence number,
+ that the shared secrets match and
+ that corresponding ACLs are created.
o Bind the crypto-map to the external interface on which VPN traffic will originate
crypto map s2s1ipsec interface outside
o Let the PIX's ASA always implicitly allow IPSec traffic through
sysopt connection permit-ipsec
Site 2 ? Configuration Example (Scenario B)
Here is a sample configuration for Site 2 when using a PIX firewall. There are a number of fully commented sample PIX configurations in the appendix in which each line is explained.

Our SOHO PIX (Site #2)
PIX Version 6.2(2) nameif ethernet0 outside security0 nameif ethernet1 inside security100 enable password uR0ZSMuMGz09CMpz encrypted passwd uR0ZSMuMGz09CMpz encrypted hostname ciscopix domain-name stcla1.sfba.home.com fixup protocol ftp 21 fixup protocol http 80 fixup protocol h323 h225 1720 fixup protocol h323 ras 1718-1719 fixup protocol ils 389 fixup protocol rsh 514 fixup protocol rtsp 554 fixup protocol smtp 25 fixup protocol sqlnet 1521 fixup protocol sip 5060 fixup protocol skinny 2000 names ! ! * ?Allow IPSec traffic from Site2's private ! * ?network to Site1's private network ! access-list ipsec permit ip 192.168.2.0 255.255.255.0 192.168.1.0 255.255.255.0

! ! * ?Do not Network Address Translate (NAT) traffic ! * ?originating on Site2's private network destined ! * ?to Site1's private network. This ACL is the first ! * ?step. ! access-list nonat permit ip 192.168.2.0 255.255.255.0 192.168.1.0 255.255.255.0 pager lines 25 logging on logging timestamp logging trap warnings logging history warnings logging facility 22 logging host inside 192.168.2.237 interface ethernet0 10baset interface ethernet1 10full icmp deny any outside mtu outside 1500 mtu inside 1500 ! * ?Setup the IP addresses of the interfaces ip address outside 6.25.232.1 255.255.255.248 ip address inside 192.168.2.1 255.255.255.0 ip audit info action alarm ip audit attack action alarm
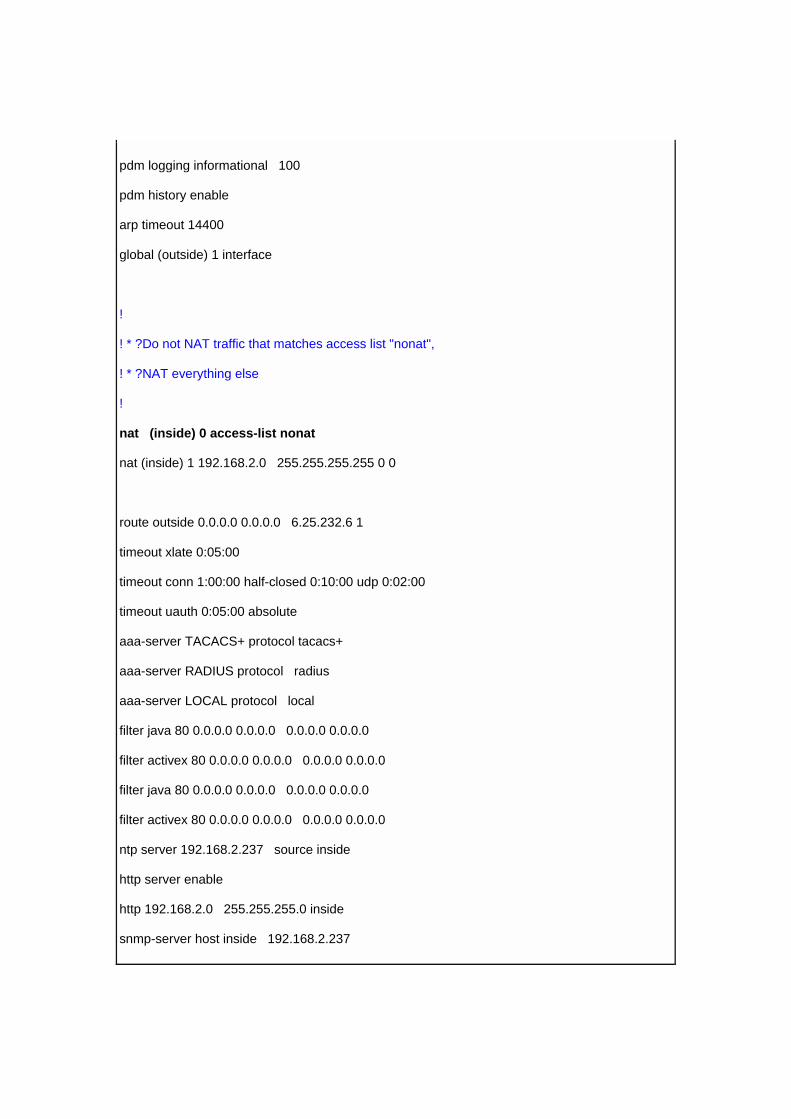
pdm logging informational 100 pdm history enable arp timeout 14400 global (outside) 1 interface ! ! * ?Do not NAT traffic that matches access list "nonat", ! * ?NAT everything else ! nat (inside) 0 access-list nonat nat (inside) 1 192.168.2.0 255.255.255.255 0 0 route outside 0.0.0.0 0.0.0.0 6.25.232.6 1 timeout xlate 0:05:00 timeout conn 1:00:00 half-closed 0:10:00 udp 0:02:00 timeout uauth 0:05:00 absolute aaa-server TACACS+ protocol tacacs+ aaa-server RADIUS protocol radius aaa-server LOCAL protocol local filter java 80 0.0.0.0 0.0.0.0 0.0.0.0 0.0.0.0 filter activex 80 0.0.0.0 0.0.0.0 0.0.0.0 0.0.0.0 filter java 80 0.0.0.0 0.0.0.0 0.0.0.0 0.0.0.0 filter activex 80 0.0.0.0 0.0.0.0 0.0.0.0 0.0.0.0 ntp server 192.168.2.237 source inside http server enable http 192.168.2.0 255.255.255.0 inside snmp-server host inside 192.168.2.237

no snmp-server location no snmp-server contact snmp-server community passwdboo snmp-server enable traps tftp-server inside 192.168.2.237 /ciscopix-confg floodguard enable no sysopt route dnat telnet 192.168.2.0 255.255.255.0 inside telnet timeout 15 ssh 192.168.2.0 255.255.255.0 inside ssh timeout 15 dhcpd address 192.168.2.20-192.168.2.30 inside dhcpd lease 3600 dhcpd ping_timeout 750 dhcpd auto_config outside ! ! * ?IPSec policies: ! ?sysopt connection permit-ipsec crypto ipsec transform-set s2s1trans esp-des esp-md5-hmac ! ! * If the remote site prefers to use the more secure 3DES method, (Linux FreeS/WAN only does 3DES) ! * then you may want to replace the above statement with this one: ! ! * crypto ipsec transform-set s2s1trans esp-3des esp-md5-hmac

! crypto map s2s1ipsec 10 set security-association lifetime seconds 86400 crypto map s2s1ipsec 10 ipsec-isakmp crypto map s2s1ipsec 10 match address ipsec crypto map s2s1ipsec 10 set peer 97.158.253.25 crypto map s2s1ipsec 10 set transform-set s2s1trans crypto map s2s1ipsec interface outside ! ! * ?IKE policies: ! isakmp enable outside isakmp key VPNsecretPASSWORD address 97.158.253.25 netmask 255.255.255.255 isakmp identity address isakmp policy 20 authentication pre-share isakmp policy 20 encryption des isakmp policy 20 hash md5 isakmp policy 20 group 1 terminal width 80 Cryptochecksum:3af43873d35d6f0651f8c999180c2342 : end
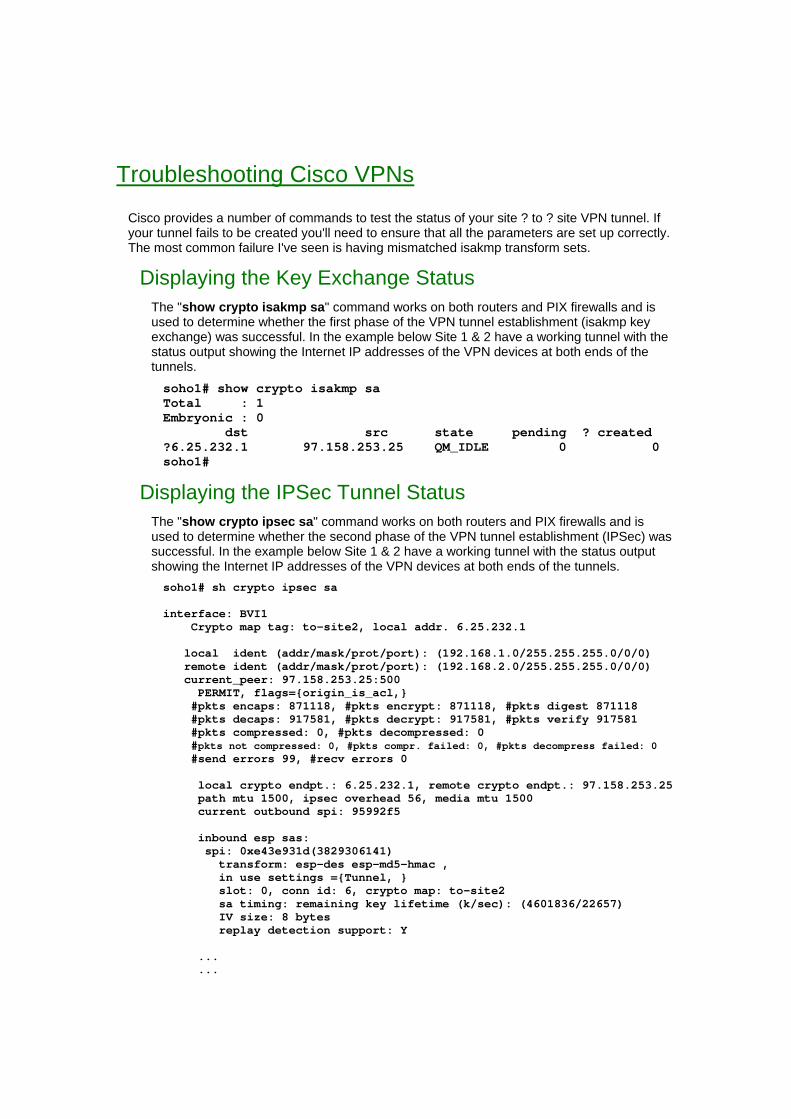
Troubleshooting Cisco VPNs
Cisco provides a number of commands to test the status of your site ? to ? site VPN tunnel. If your tunnel fails to be created you'll need to ensure that all the parameters are set up correctly. The most common failure I've seen is having mismatched isakmp transform sets.
Displaying the Key Exchange Status The "show crypto isakmp sa" command works on both routers and PIX firewalls and is used to determine whether the first phase of the VPN tunnel establishment (isakmp key exchange) was successful. In the example below Site 1 & 2 have a working tunnel with the status output showing the Internet IP addresses of the VPN devices at both ends of the tunnels. soho1# show crypto isakmp sa Total : 1 Embryonic : 0 dst src state pending ? created ?6.25.232.1 97.158.253.25 QM_IDLE 0 0 soho1#
Displaying the IPSec Tunnel Status The "show crypto ipsec sa" command works on both routers and PIX firewalls and is used to determine whether the second phase of the VPN tunnel establishment (IPSec) was successful. In the example below Site 1 & 2 have a working tunnel with the status output showing the Internet IP addresses of the VPN devices at both ends of the tunnels. soho1# sh crypto ipsec sa interface: BVI1 Crypto map tag: to-site2, local addr. 6.25.232.1 local ident (addr/mask/prot/port): (192.168.1.0/255.255.255.0/0/0) remote ident (addr/mask/prot/port): (192.168.2.0/255.255.255.0/0/0) current_peer: 97.158.253.25:500 PERMIT, flags={origin_is_acl,} #pkts encaps: 871118, #pkts encrypt: 871118, #pkts digest 871118 #pkts decaps: 917581, #pkts decrypt: 917581, #pkts verify 917581 #pkts compressed: 0, #pkts decompressed: 0 #pkts not compressed: 0, #pkts compr. failed: 0, #pkts decompress failed: 0 #send errors 99, #recv errors 0 local crypto endpt.: 6.25.232.1, remote crypto endpt.: 97.158.253.25 path mtu 1500, ipsec overhead 56, media mtu 1500 current outbound spi: 95992f5 inbound esp sas: spi: 0xe43e931d(3829306141) transform: esp-des esp-md5-hmac , in use settings ={Tunnel, } slot: 0, conn id: 6, crypto map: to-site2 sa timing: remaining key lifetime (k/sec): (4601836/22657) IV size: 8 bytes replay detection support: Y ... ...

outbound esp sas: spi: 0x95992f5(156865269) transform: esp-des esp-md5-hmac , in use settings ={Tunnel, } slot: 0, conn id: 5, crypto map: to-site2 sa timing: remaining key lifetime (k/sec): (4605007/22656) IV size: 8 bytes replay detection support: Y ... ... soho1#
Debugging
Cisco has the very useful debug set of commands which you can use to follow the sequence of events that occur during the establishment of the VPN tunnel. Unfortunately the use of the debug command is beyond the scope of this book.

Appendix I
Miscellaneous Cisco Topics
= = = = = = = = = = = = = = = = = = = = = = = = = = = = = = = = = = = = = = = = = = = In This Chapter Appendix I
Miscellaneous Cisco Topics Syslog Configuration and Cisco Devices
? Peter Harrison, www.linuxhomenetworking.com = = = = = = = = = = = = = = = = = = = = = = = = = = = = = = = = = = = = = = = = = = =
We briefly discuss some miscellaneous topics in this chapter that are beyond the scope of this book with the intention that you will be stimulated to consider utilizing some of the technologies discussed to improve your website and / or your SOHO network.
Syslog Configuration and Cisco Devices Syslog reserves facilities "local0" through "local7" for log messages received from remote servers and network devices. Routers, switches, firewalls and load balancers each logging with a different facility can each have their own log files for easy troubleshooting. The following examples will show how to have a different log file for each class of device.
If you have a large data center, then you may also want to switch off all logging to /var/log/messages as suggested above for the home/SOHO environment. In all the network device configuration examples below we are logging to the remote Linux logging server 192.168.1.100 which we set up in the previous section.
Cisco Routers By default Cisco routers send syslog messages to their logging server with a default facility of local7. We won't set the facility in this case, but we can tell the router to timestamp the messages and make the messages have the source IP address of the loopback interface. service timestamps log datetime localtime no logging console no logging monitor logging 192.168.1.100
Catalyst CAT Switches running CATOS By default Cisco switches also send syslog messages to their logging server with a default facility of local7. We won't change this facility either, therefore making routers and switches log to the same file.

set logging server enable set logging server 192.168.1.100 set logging level all 5 set logging server severity 6
Cisco Local Director
Local Directors use the "syslog output" command to set their logging facility and severity. The value provided must be in the format FF.SS (facility.severity) using the numbering scheme below:
Facility FF Value Severity SS Value
local 0 16 System unusable 0
local 1 17 Immediate action required 1
local 2 18 Critical condition 2
local 3 19 Error conditions 3
local 4 20 Warning conditions 4
local 5 21 Normal but significant conditions 5
local 6 22 Informational messages 6
local 7 23 Debugging messages 7
Here we using facility LOCAL4 and logging debugging messages and above.
syslog output 20.7 no syslog console syslog host 192.168.1.100
Cisco PIX Filewalls
PIX firewalls use the following numbering scheme to determine their logging facilities.

Facility Logging Facility Command Value
local 0 16
local 1 17
local 2 18
local 3 19
local 4 20
local 5 21
local 6 22
local 7 23
This configuration example assumes that the logging server is connected on the side of the "inside" protected interface. We're sending log messages to facility LOCAL3 with a severity level of 5 (Notification) set by the "logging trap" command. logging on logging standby logging timestamp logging trap notifications logging facility 19 logging host inside 192.168.1.100
Cisco CSS11000 (Arrowpoints) This configuration for this is more straight forward. You specify the facility with an intuitive number using the "logging host" command and set the severity with the "logging subsystem" command. This example shows the CSS11000 logging facility LOCAL 6 and severity level 6 (Informational) logging host 192.168.1.100 facility 6 set logging subsystem all info-6 logging commands enable
The Sample Cisco syslog.conf File # # All LOCAL3 messages (debug and above) go to the firewall file ciscofw # local3.debug /var/log/cisco/ciscofw
# # All LOCAL4 messages (debug and above) go to the Local Director file ciscold #

local4.debug /var/log/cisco/ciscold # # All LOCAL6 messages (debug and above) go to the CSS file ciscocss # local6.debug /var/log/cisco/ciscocss
# # All LOCAL7 messages (debug and above) go to the ciscoacl # This includes ACL logs which are logged at severity debug # local7.debug /var/log/cisco/ciscoacl ? # # LOCAL7 messages (notice and above) go to the ciscoinfo # This excludes ACL logs which are logged at severity debug # local7.notice /var/log/cisco/ciscoinfo