lionel pennsylvania railroad 4-4-4-4 t1 duplex steam ... · pdf filelionel pennsylvania...
TRANSCRIPT

72-8063-2505/00
®featuring and
INSTRUCTION SH
EET
LionelPennsylvania Railroad
4-4-4-4 T1 DuplexSteam Locomotive and Tender
Owner’s Manual

2
Table of contentsTransformer operationsRunning your Lionel T1 with a Lionel transformer 3Locking your T1 into a single operational state 4Using your T1 tender-mounted ElectroCoupler 4Your T1 RailSounds system—the basics 5Experiencing the range of your T1 RailSounds system 6Notes on RailSounds 6Installing the Lionel Sound Activation Button 7
TrainMaster Command operationsYour T1 in the TrainMaster Command environment 8CAB-1 commands for your T1 9RailSounds in the Command environment 10CAB-1 numeric keypad commands for your T1 10Tuning your T1 performance 11Maintaining your T1 handrail antenna 11Assigning your T1 a new ID# 12Reprogramming the R2IR circuit board to restore features 12
Maintaining and servicing your T1Lubricating your T1 13Replacing your T1 lamps 14Tire-Traction™ 15Adding fluid to your T1 smoke generator 15Installing the ‘O’ gauge front coupler 15Lionel Service 16
• Powerful Pittman® motor • R2IR reverse unit for use with the
Lionel TrainMaster® CommandTM
model railroad control system• Smoke generator that produces
clean, safe and realistic smoke• Die-cast ElectroCoupler
(rear of tender)• Wireless Tether
• Lighted cab interior• RailSoundsTM digital sound system • Brilliant Headlight and Marker Lights• CrewTalk (in Command)• TowerCom (in Command)• Tire-Traction™• Directional lighting• Fire Box Glow
You own one of the most sophisticatedmodel trains ever built—the Lionel
TrainMaster® Command-equipped T1. Fromits hand-applied scale details to the
advanced technology found inside, your T1is ready for duty on your model railroad lay-out. Experience the superiority of today’sLionel.
Congratulations!

Transformer operations
3
Running your Lionel T1 with a Lionel transformer
Place your T1 on Lionel or Lionel-compatible O-72 or larger track.
• With track power OFF, connect the drawbar between locomotive and tender.That’s all you have to do with Lionel’s new Wireless Tether®, an infrared communi-cation system that eliminates the plugs and wires of the past.
NOTE: Your T1 is designed to operate on minimum 0-72 diameter track.
22
33
Power up your T1 with your transformer.• Your T1 is designed to operate on 8-18 volts alternating current.
Virtually all Lionel and Lionel-compatible alternating-current transformers aresuitable; we recommend the TrainMaster Command model railroad control system.
• Do not power your T1 with direct current (DC). Damage to sensitive elec-tronic components may occur.
• When you first power up your track, the T1 will wait between threeand eight seconds as it “listens” for digital language from the TrainMasterCommand Base (available separately). When it’s determined that it’s on a conven-tional (non-Command) railroad, the T1 headlight will illuminate and RailSoundswill start up. At this point, the T1 is in neutral. (This occurs when placing the loco-motive on your railroad for the first time. Thereafter, it starts in forward after everythree-second power interrupt.)
Note!
Move ‘em out!• Get your T1 moving. Press the DIR button on your CAB-1 remote or Lionel
transformer. This sequences the R2IR to the next operating state. • Adjust track voltage until your T1 moves at your desired speed.
11
Using your T1 tender’s ElectroCoupler in the non-Command environment
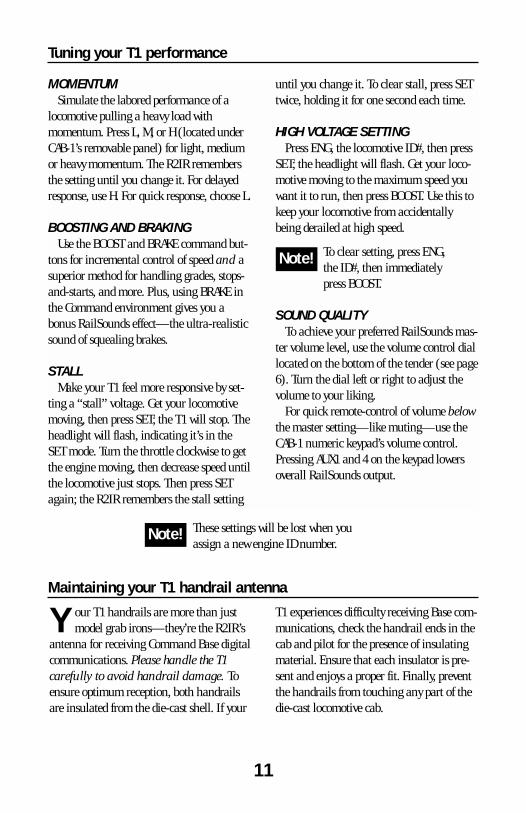
To use your T1 tender’s ElectroCoupler inthe non-Command environment, you
must first couple a piece of rolling stockequipped with Lionel magnetic couplersdirectly to your T1 tender’s rear
ElectroCoupler. The magnetic coupler on therolling stock will then react to the magneticfield generated by a Lionel remote-controltrack section (available separately). Placeyour rolling stock’s coupler “trigger disc”over the central coil of a remote-controltrack section and press “uncouple” on thecontroller. The magnetic field pulls the discdownward, and the coupler opens.
Your T1 tender’s ElectroCouplerwill NOT open manually or byusing a remote-control tracksection.
Magnetic coupler on the rolling stock coupledto the rear of your T1 tender
Note!Remote-controltrack section
4
Transformer operations
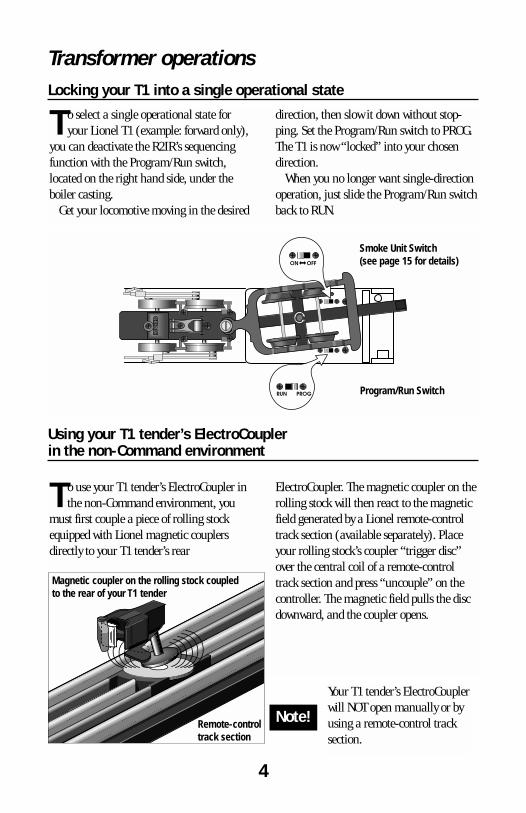
To select a single operational state foryour Lionel T1 (example: forward only),
you can deactivate the R2IR’s sequencingfunction with the Program/Run switch,located on the right hand side, under theboiler casting.
Get your locomotive moving in the desired
direction, then slow it down without stop-ping. Set the Program/Run switch to PROG.The T1 is now “locked” into your chosendirection.
When you no longer want single-directionoperation, just slide the Program/Run switchback to RUN.
Locking your T1 into a single operational state
Program/Run Switch
Smoke Unit Switch(see page 15 for details)

5
Note!
Note!
Note!
Note!
Your T1 RailSounds system—the basics
L ionel RailSounds is the most realisticmodel railroad sound system in the
world. Your T1 features digital samples fromreal-life steam locomotives for the ultimatein realism.
Begin by installing a 9-volt alkaline bat-tery in the tender. This ensures interruption-free operation of RailSounds. The battery clipis located in the tender. To remove the tenderbody, refer to the diagram on page 6 for loca-tion of mounting screws.
When you first apply track power, the T1RailSounds system produces sounds of the
locomotive at rest. As the T1 moves, chuffingbegins, increasing with the locomotive’sspeed.
To silence the steam chuffing sound (whis-tle/bell are unaffected), slide the RailSoundsswitch, located on the underside of the tender(see page 6 for location), to the OFF positionbefore powering up the locomotive. Thewhistle is activated by using the lever or but-ton on your transformer or CAB-1. The vol-ume control knob to raise or lower the levelof sound is located on the underside of thetender near the front truck (see page 6).
Installing a 9-volt alkaline bat-tery in your T1 tender.
Please remove protective cover from battery clip
Although RailSounds is powered by track voltage, the battery is required foruninterrupted operation and shutdown sequences. Use only alkaline batteries.
Discontinue locomotive power for 10 seconds before changing the RailSoundsON/OFF switch position.
If RailSounds “drops out” during track power interrupts (direction change),replace the battery.

6
W ith RailSounds, you experience thesounds of real railroading like never
before. Simply put, it’s the most sophisticat-ed, authentic model railroad sound system inthe world. And remember—coming frominside your Lionel T1 tender are the authen-tic sounds of the RailSounds digital soundsystem. No other electric train can offer youauthentic sounds. That’s the power ofLionel.• Variable chuff rate. Your T1 speed
determines the steam chuff rate. • MultiWhistleTM. Different whistles
every time—a RailSounds exclusive.• Authentic bell. Press BELL on your
CAB-1 or transformer to begin the effect,again to discontinue. Even the final “hit”is muted like the real thing.
• Reverse unit reset sound. Powerdown your track, wait for 3-5 seconds,and listen for the air-release sound—that’s the T1 telling you its R2IRCommand reverse unit has just reset toforward operation.
• Shutdown sequence. No other modelrailroad sound system shuts down likeRailSounds. Turn off track power, andafter the air-release reset sound, you havetwo seconds to restart your T1. If you’redone with operations, RailSounds willcommence with an authentic shutdownsequence about two seconds after the air-release reset occurs.
NOTE: Battery must be installed for shut-down sequence.
Experiencing the range of your T1 RailSounds system
Notes on RailSounds• Use the volume control dial, located on the
underside of the tender, to adjust soundoutput.
• Listen for incidental engine sounds duringRailSounds operation. They’re automaticand, of course, authentic.
• The 9-volt alkaline battery you installedensures continuous sounds, even duringshort track-power interrupts.
• Longer track-power interruptions (includ-ing locomotive derailments) cause Rail-Sounds to shut down after about 7 seconds.
• For even more authentic RailSoundseffects, operate your T1 in the TrainMasterCommand environment. See page 8-10 fordetails.
Transformer operations
Tender BodyScrew
Tender BodyScrew
Tender BodyScrew
Tender BodyScrew
Rear
Front
RailSoundsOn/OffSwitch
RailSoundsvolume control
TenderBody
Screw
TenderBody
Screw

Installing the Lionel Sound Activation Button
LIONEL SOUNDACTIVATION BUTTON
1 2
1 2
LIONEL SOUND
ACTIVATION BUTTON
LIONEL SOUND
ACTIVATION BUTTON
For AC transformers with a horn/whistle button
For AC transformers lacking a horn/whistle button
Attach to ground terminal
Attach to power terminal
Customer’s wireBlack wire
Red wire
Lionel no. 610-5906-001Sound Activation Button foractivating the bell
To your transformer
Lionel no.610-5906-001Sound ActivationButton for whistle
Lionel no. 610-5906-001Sound Activation Button for bell
Black wire
Red wireRed wire
Attach to groundterminal
Attach topowerterminal
To your transformer
The no. 610-5906-001 button works with any Lionel AC transformer except no. 6-4690 Type MW. Transformers made by other manufacturers may not becompatible with RailSounds.
Note!
To operate the bell and whistle soundswhen operating your T1 with convention-
al transformers, you’ll need to install the
Lionel no. 610-5906-001 Sound ActivationButton (available separately). Connect thebutton(s) as shown below.
7
Note! All track power mustfeed through SoundActivation Button. Donot bypass button.
Customer’s wire

8
Your T1 in the TrainMaster Command environment
Lionel TrainMaster Command is the fun and sophisticated model railroad con-
trol system from Lionel. Your T1 features theR2IR reverse unit, which acts as both a con-ventional reverse unit as well as the key tounlocking many extra features when youoperate in Command mode.
TrainMaster Command gives you thepower to operate multiple Command-
equipped locomotives on the same track, atthe same time. It’s the most fun you canhave with electric trains, and it’s incrediblyeasy too! Just follow the directions below andyou’ll be on your way.
To operate in Command mode, youneed a Command Base and a CAB-1remote. Find them both at your authorizedLionel retailer.
Place your T1 on Lionel or Lionel-compatible O-72 or larger track.• Make sure track power is OFF before placing it on track.• Make sure your Lionel Command Base is ON and its communica-
tions wire is connected to the COMMON post on your Lionel transformer orthe U terminal on any of your installed PowerMasters.
• Once positioned on the track, increase track voltage to FULL (onPowerMaster, slide the CMD/CONV switch to CMD).
Address your T1 with CAB-1.
• Press ENG and 1 on the numeric keypad of your CAB-1 remote. Thiscommand is sent by CAB-1 to the Command Base, which then translatesyour commands into digital code. That code is sent around your railroad’soutside rails in the form of a digital “halo.” All Command-equipped Lionelslisten to this digital communication, but they do not respond until theyhear their own ID number.
• The digital language of TrainMaster Command—and not track power—controls the actions of Command-equipped Lionels. Track power is simplylike gasoline in the tank of your car—it gives you the power to go places,but it doesn’t tell you where to go or how fast to get there.
• All Command-equipped Lionels come factory-programmedwith an ID# of “1.” To change your T1 ID#, see page 12.
Move ‘em out!• Throttle up or press any command button on CAB-1. Your T1 will
respond to your every command. Read on. The fun is just beginning!
11
22
33
TrainMaster Command operations

Tender rear couplerreleases. Coupler releasesounds.
9
Press AUX2 to turnyour T1 headlight onand off.
Press WSTL/HRN toactivate the T1 whistle,release to discontinue.Multi Whistlesteam whistlesound.
Press DIR—the loco-motive decelerates to acomplete stop; turn thethrottle up, and the loco-motive moves in theopposite direction. Thereis no neutral. Steamair-release sound.
Press BELL once to activate the bell, againto discontinue.Traditional bellsound.
PressHALT to shut downall PowerMaster electricaloutput on your railroad.Stops all Command-equipped Lionels in operation.
Turn the THROTTLE tothe right to accelerate,left to decelerate.Speed-dependentvariable steamchuffing.DynaChuff dynamicchuffing effect.
CAB-1 commands for your T1
Press and hold BOOST forextra power. ReleaseBOOST and return to thelocomotive’s previousspeed. Labored chuff.
Press and hold BRAKE to slow down or stop. Release BRAKE andreturn to the previous speed. Squealing brake sounds.
T1 RailSounds effectsin bold italic
Running your T1 in the TrainMaster Command environment
Y our Command-equipped T1comes factory-programmed
with an ID# of “1.” To get yourT1 into action, set PowerMastersto CMD or set all power supplieson full. Press ENG and “1” onCAB-1. Turn the throttle or pressany command button;RailSounds starts up. Your T1 isready for Command operations.
Address Locomotive #1
PowerMasters set to CMD or traditionalpower supplies ON FULL
Press ENG
Press 1 (the ID#)
Throttle up/press any command button
Example

10
W hen you press AUX1 on CAB-1,you turn the numeric key-
pad into 10 command buttons.The keypad “stays open” and givesyou access to extra command fea-tures until you press any top-rowbutton (SW, ACC, RTE, TR, or
ENG). The CAB-1 keypad overlay includ-ed with your T1 is designed to helpyou learn the auxiliary featuresspecific to this classic locomotive.T1 RailSounds effects inbold italic.
CAB-1 numeric keypad commands for your T1
STEAMENGINERESET
VOLUME
SMOKE
➠ BLOWOFF
SHUTDOWN
OFF ON
STEAMRELEASE
PRESS& HOLDSMOKEBOOST
➠
START-UPCREWTALK
TOWERCOM
0Stops and resets the T1 to FORWARD.Whistle blows. Headlight
flickers.
1Raises the volume of RailSounds.Sound volume increases.
2CrewTalk™ is the sound of unintelligi-ble walkie-talkie communication.
3Starts up RailSounds. Start-upsequence commences. Steam
blowoff sound.
4Lowers the volume of RailSounds.Sound volume decreases.
5Activates the RailSounds steam shut-down sequence. Just like the real thing,
your T1 must be idle for shutdown tooccur. Steam shutdown commences.
Remember, the whistle and bell will notsound until you restart RailSounds.CrewTalk sounds
6Steam release sound.
7TowerCom™ is an audible announce-ment that includes that engine’s road
number and/or name. There is a four sec-ond delay in this function.
8Turns off the smoke generator.CrewTalk sounds
9Turns on the smoke generator. Press andhold 9 (10 seconds maximum) to initi-
ate Smoke Boost™—it superheats the smokegenerator and enhances smoke output whenyou start running your T1. CrewTalksounds
RailSounds in the Command environment
Y our T1 RailSounds system gives youeven more in the TrainMaster
Command environment.• DynaChuff TM. Real steam locomotivechuffing depends on the locomotive’s load.DynaChuff simulates both labored andrelaxed chuffing sounds. Highball down themainline and hear the labored chuffing of alocomotive battling inertia. Reduce yourthrottle setting, and chuffing relaxes to a
more sedate sound, as though the loadplaced on the T1 has decreased. ExperienceDynaChuff on steep grades, at yard crawls,and at speed. Another RailSounds exclusive.• Bonus sounds like squealing brakeswith the CAB-1 BRAKE command.• Incidental sounds you control withCAB-1 numeric keypad commands, likesteam let-off and steam release effects.
TrainMaster Command operations
11
Tuning your T1 performance
MOMENTUMSimulate the labored performance of a
locomotive pulling a heavy load withmomentum. Press L, M, or H (located underCAB-1’s removable panel) for light, mediumor heavy momentum. The R2IR remembersthe setting until you change it. For delayedresponse, use H. For quick response, choose L.
BOOSTING AND BRAKINGUse the BOOST and BRAKE command but-
tons for incremental control of speed and asuperior method for handling grades, stops-and-starts, and more. Plus, using BRAKE inthe Command environment gives you abonus RailSounds effect—the ultra-realisticsound of squealing brakes.
STALLMake your T1 feel more responsive by set-
ting a “stall” voltage. Get your locomotivemoving, then press SET; the T1 will stop. Theheadlight will flash, indicating it’s in theSET mode. Turn the throttle clockwise to getthe engine moving, then decrease speed untilthe locomotive just stops. Then press SETagain; the R2IR remembers the stall setting
until you change it. To clear stall, press SETtwice, holding it for one second each time.
HIGH VOLTAGE SETTINGPress ENG, the locomotive ID#, then press
SET; the headlight will flash. Get your loco-motive moving to the maximum speed youwant it to run, then press BOOST. Use this tokeep your locomotive from accidentallybeing derailed at high speed.
To clear setting, press ENG, the ID#, then immediately press BOOST.
SOUND QUALITYTo achieve your preferred RailSounds mas-
ter volume level, use the volume control diallocated on the bottom of the tender (see page6). Turn the dial left or right to adjust thevolume to your liking.
For quick remote-control of volume belowthe master setting—like muting—use theCAB-1 numeric keypad’s volume control.Pressing AUX1 and 4 on the keypad lowersoverall RailSounds output.
Maintaining your T1 handrail antenna
Y our T1 handrails are more than justmodel grab irons—they’re the R2IR’s
antenna for receiving Command Base digitalcommunications. Please handle the T1carefully to avoid handrail damage. Toensure optimum reception, both handrailsare insulated from the die-cast shell. If your
T1 experiences difficulty receiving Base com-munications, check the handrail ends in thecab and pilot for the presence of insulatingmaterial. Ensure that each insulator is pre-sent and enjoys a proper fit. Finally, preventthe handrails from touching any part of thedie-cast locomotive cab.
These settings will be lost when youassign a new engine ID number.
Note!
Note!
12
Assign a new ID# to yourCommand-equipped locomotive
Command Base ONPlace the locomotive on trackPowerMasters set to CMD or
traditional power supplies ON FULLSet the locomotive PROGRAM/RUN Switch
to PROGRAM (see page 4 for location)Turn track power on (PowerMasters):
Press BOOSTProgram the locomotive with a new ID#:
Press ENGPress a number you choose (theID#)Press SET
Set PROGRAM/RUN Switch to RUN (see page 4 for location)
Your locomotive remembers its ID# forever; change it any time with these steps.
Example As your fleet of Command-equipped Lionels grows, give
your T1 locomotive its own ID#.Choose from any between 1 and 99.Plug-in the Command Base andplace the locomotive on track. Powerup, then slide the locomotive’sPROGRAM/RUN switch to PRO-GRAM. (See page 4 for location)
Using CAB-1, press ENG, the loco-motive ID#, then press the SET but-ton located under CAB-1’s removablepanel. See the locomotive’s head-light flash; that’s your signal thatthe programming has been accept-ed. Now slide the switch to RUN.
We recommend that you choose an easy-to-remember ID# for your locomotives. Somepossibilities are part of the locomotive roadnumber, your age, or any two-digit numberthat is not used by another locomotive. Ifyou like, write the number on a small pieceof tape and put this on the bottom of theframe to aid in remembering.
Reprogramming R2IR circuit boards to restore features
STEP 1: Move switch on locomotive fromRUN to PROGRAM.
STEP 2: Plug-in Command Base.
STEP 3: Place locomotive on track, thenturn on power to track.
STEP 4: Press “ENG” then input locomo-tive’s ID#. Press “SET”
STEP 5: Press “ENG,” then the ID#,“AUX1”, then press the number 74.
STEP 6: Turn off power to track, wait tenseconds.
STEP 7: Remove locomotive from track,move switch from PROGRAM to RUN.
STEP 8: Place locomotive back on track,turn power on to track.
STEP 9: Press “ENG” and ID#, then oper-ate as normal.
Assigning your locomotive a new ID#
Due to the inevitable derailments, static,and the nature of electricity, it is possi-
ble that your R2IR could someday lose itssetup program.The symptoms of this condi-
tion would be unresponsiveness in Commandmode. This can be easily remedied by “repro-gramming” your R2IR using the followingsteps.
TrainMaster Command operations

13
H elp your Lionel T1 lead a long andproductive life on your railroad by
maintaining it properly. We recommend you purchase a
Lionel Lubrication andMaintenance Kit (part no. 6-62927), available from yourLionel dealer. Two basic rules tokeep in mind: never over-lubricate (a small amount willdo), and avoid getting grease oroil on the T1 wheels, contactrollers, or your track.
You’ll know your T1 requires lubricationwhen visual inspection reveals dryness on theparts indicated in the illustration. Remove
accumulated dirt and dust beforelubricating, and always lubricateany locomotive emerging fromprolonged storage. Also, lightlylubricate the T1 side rods, drive rods,linkage, front and rear truck pivotpoints, and tender wheel bearingsafter each 25 hours of operation.
Lubricating your T1
Maintaining and servicing your Locomotive
Grease
Grease
Oil both sidesof the locomotive
Oil both sidesof the locomotive
Oil rods andpivot points onboth sides ofthe locomotive
Oil rods andpivot points onboth sides ofthe locomotive
Cab Screws
Cab Screws
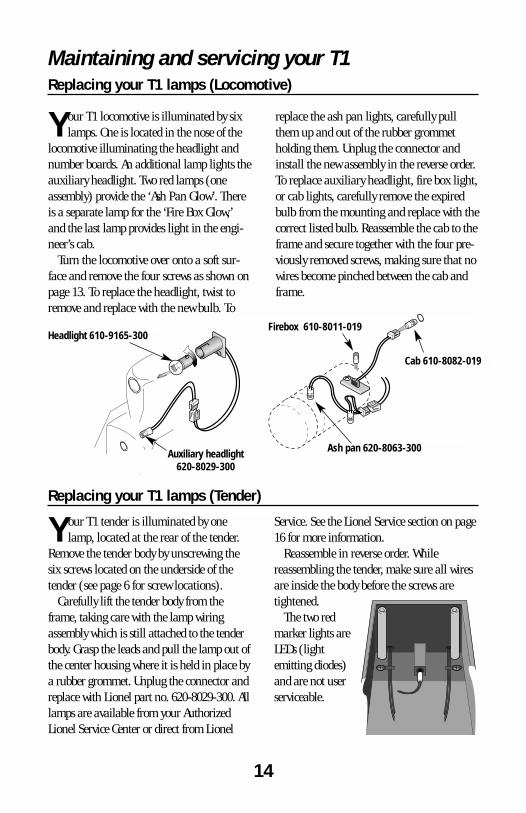
Your T1 tender is illuminated by onelamp, located at the rear of the tender.
Remove the tender body by unscrewing thesix screws located on the underside of thetender (see page 6 for screw locations).
Carefully lift the tender body from theframe, taking care with the lamp wiringassembly which is still attached to the tenderbody. Grasp the leads and pull the lamp out ofthe center housing where it is held in place bya rubber grommet. Unplug the connector andreplace with Lionel part no. 620-8029-300. Alllamps are available from your AuthorizedLionel Service Center or direct from Lionel
Service. See the Lionel Service section on page16 for more information.
Reassemble in reverse order. Whilereassembling the tender, make sure all wiresare inside the body before the screws aretightened.
The two red marker lights areLEDs (light emitting diodes)and are not userserviceable.
Your T1 locomotive is illuminated by sixlamps. One is located in the nose of the
locomotive illuminating the headlight andnumber boards. An additional lamp lights theauxiliary headlight. Two red lamps (oneassembly) provide the ‘Ash Pan Glow’. Thereis a separate lamp for the ‘Fire Box Glow,’and the last lamp provides light in the engi-neer’s cab.
Turn the locomotive over onto a soft sur-face and remove the four screws as shown onpage 13. To replace the headlight, twist toremove and replace with the new bulb. To
replace the ash pan lights, carefully pullthem up and out of the rubber grommetholding them. Unplug the connector andinstall the new assembly in the reverse order.To replace auxiliary headlight, fire box light,or cab lights, carefully remove the expiredbulb from the mounting and replace with thecorrect listed bulb. Reassemble the cab to theframe and secure together with the four pre-viously removed screws, making sure that nowires become pinched between the cab andframe.
14
Replacing your T1 lamps (Locomotive)
Maintaining and servicing your T1
Replacing your T1 lamps (Tender)
Headlight 610-9165-300Firebox 610-8011-019
Cab 610-8082-019
Ash pan 620-8063-300Auxiliary headlight 620-8029-300
15
Adding fluid to your T1 smoke generator
Your T1 is equipped with a smoke genera-tor that produces safe, clean, white
smoke during operation.The smoke generator requires the periodic
addition of Lionel smoke fluid in order tofunction. Pierce the fluid tube’s end with apin, then add 10 to 15 drops of fluid directlyinto the T1 stack. Smoke production willcommence momentarily, faster if you runyour T1 at speed. When smoke productionwanes, add more fluid (10 to 15 drops).
In Command Control, when the locomo-tive is first placed on the track and powered
up, the smoke generator will be in a default“OFF” position. Using any function key onyour CAB-1 remote will turn the smoke gen-erator on. Turning off the sound (AUX1-5) orresetting the engine (AUX1-0) will return thesmoke unit to the initial “OFF” position.Always keep a small amount of smoke fluidin the T1 smoke generator; the generator’selement can become damaged if operatedwithout fluid. Smoke production is greater athigher voltages and when the T1 is pulling aheavy load or long consist.
Note! Always keep smoke fluid in your T1 smoke generator. If not, turn it off when smoke isnot desired using the switch shown on page 4 or the AUX1-8 command if you are run-ning in Command mode. Using Smoke Boost with depleted fluid can damage the gen-erator’s element.
Maintaining and servicing your T1
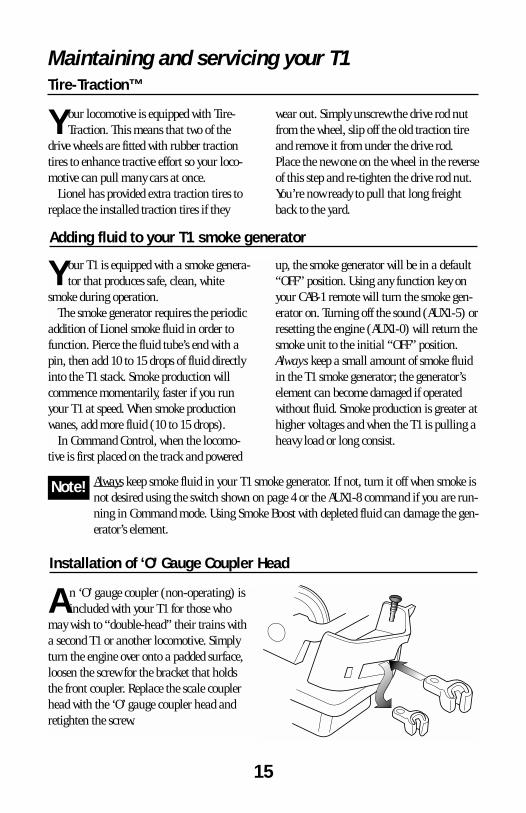
An ‘O’ gauge coupler (non-operating) isincluded with your T1 for those who
may wish to “double-head” their trains witha second T1 or another locomotive. Simplyturn the engine over onto a padded surface,loosen the screw for the bracket that holdsthe front coupler. Replace the scale couplerhead with the ‘O’ gauge coupler head andretighten the screw.
Installation of ‘O’ Gauge Coupler Head
Your locomotive is equipped with Tire-Traction. This means that two of the
drive wheels are fitted with rubber tractiontires to enhance tractive effort so your loco-motive can pull many cars at once.
Lionel has provided extra traction tires toreplace the installed traction tires if they
wear out. Simply unscrew the drive rod nutfrom the wheel, slip off the old traction tireand remove it from under the drive rod.Place the new one on the wheel in the reverseof this step and re-tighten the drive rod nut.You’re now ready to pull that long freightback to the yard.
Tire-Traction™

Limited Warranty/Lionel Service
T his Lionel product, including all mechani-cal and electrical components, movingparts, motors and structural components,
except for light bulbs, is warranted to the originalconsumer-purchaser, for one year against originaldefects in materials or workmanship when pur-chased through an authorized Lionel merchant.
This warranty does NOT cover normal wearand tear, light bulbs, defects appearing in thecourse of commercial use, or damage resultingfrom abuse or misuse of the product by the pur-chaser. Transfer of this product by the originalconsumer-purchaser to another person voids thiswarranty. Modification of this product voids thiswarranty.
Any warranted product which is defective inoriginal materials or workmanship and is deliveredby the original consumer-purchaser to Lionel L.L.C.or an Authorized Lionel L.L.C. Service Center,together with proof of original purchase, will at theoption of Lionel L.L.C. be repaired or replaced,without charge for parts or labor. In the event thedefective product cannot be repaired, and a replace-ment is not available, a refund of the original pur-chase price will be granted. Any products on whichwarranty service is sought must be sent freight orpostage prepaid, as transportation and shippingcharges are not covered by the warranty.
In no event shall Lionel L.L.C. beliable for incidental or consequen-tial damages.
Some states do not allow the exclusion or limi-tation of incidental or consequential damages, sothe above exclusion may not apply to you.
This limited warranty gives you specific legalrights, and you may have other rights which varyfrom state to state.
Instructions for Obtaining ServiceIf service for this Lionel L.L.C. product is
required, bring the item, along with your datedsales receipt and completed warranty information
to the nearest Authorized Lionel Service Center.Your nearest Lionel Service Center can be found bycalling 1-800-4-Lionel, or by contacting ourWebsite at www.lionel.com.
If you prefer to send it back to Lionel L.L.C. forfactory repair, you must first call 810-949-4100 orFAX 810-949-5429 or write to Customer Service,P.O. Box 748, New Baltimore, MI 48047-0748 stat-ing what the item is, when it was purchased andwhat seems to be the problem. You will be sent areturn authorization letter and label to assure yourmerchandise will be properly handled upon receipt.
Once you have received your return authoriza-tion and label, make sure that the item is packedto prevent damage during shipping and handling.We suggest that you use the product’s originalpackaging. This shipment must be prepaid and werecommend that it be insured.
Please make sure you have followed all of theabove instructions carefully before returning anymerchandise for service.
Warranty InformationPlease complete the information below and
keep it, along with your dated sales receipt. Youmust present this and your dated sales receipt whenrequesting warranty service.
Name ____________________________
Address ____________________________
Place of Purchase ____________________
Date of Purchase ______________________
Product Number ______________________
Product Description ____________________
________________________________
© 2000 Lionel LLC, Chesterfield MI 48051-2493United States of America