liquid crystal display digital telephone user guidepdf.textfiles.com/manuals/telecom-s-z/toshiba...
TRANSCRIPT

Telecommunication Systems Division
Digital Business Telephone System
Release 3
Liquid Crystal Display Digital Telephone User Guide

. ‘ . . . . .
Strata General End User Information
The Strata Digital Business Telephone System is registered in accordance with the provisions of Part 68 of the Federal Communications Commission’s Rules and Regulations.
Important Notice - Music-On-Hold In accordance with U.S. Copyright Law, a license may be required from the American Society of Composers, Authors and Publishers, or other similar organization, if radio or TV broadcasts are transmitted through the music-on-hold feature of this telecommunication system. Toshiba America Information Systems, Inc., hereby disclaims any liability arising out of the failure to obtain such a license.
_
Publication Information Toshiba America Information Systems, Inc., Telecommunication Systems Division, reserves the right, without prior notice, to revise this information publication for any reason, including, but not limited to, utilization of new advances in the state of technical arts or to simply change the design of this document. Further, Toshiba America Information Systems, Inc., Telecommunication Systems Division, also reserves the right, without prior notice, to make such changes in equipment design or components as engineering or manufacturing methods may warrant.
0 Copyright 1996 Toshiba America Information Systems, Inc. Telecommunication Systems Division All rights reserved. No part of this manual, covered by the copyrights hereon, may be reproduced in any form or by any means-graphic, electronic, or mechanical, including recording, taping, photocopying, or information retrieval systems-without express written permission of the publisher of this material. Strata is a registered trademark of Toshiba America Information Systems, Inc. Trademarks, registered trademarks, and service marks are the property of their respective owners.

. . .
Contents
Introduction Organization ..................................................................................................................................................... V
Conventions .................................................................................................................................................... vi
How to Use This Guide ................................................................................................................................... vi
Chapter 1 - The Grand Tour Liquid Crystal Display ...................................................................................................................................... 3
LCD Function Overview .................................................................................................................................... 5
Condition Creating Display .................................................................................................................... 5
Chapter 2 - Feature Operation Date/Time/Day Adjustment ............................................................................................................................ 19
Call Forward Display ..................................................................................................................................... 20
Call Forward-All Calls ..................................................................................................................... 20 ... Call Forward-Busy ............................................................................................................................. 20
Call Forward-No Answer ................................................................................................................... 21
Call Forward-Busy/No Answer ......................................................................................................... .21
Call Forward-Fixed ............................................................................................................................ 21
Call Forward-External ........................................................................................................................ 21
Call Forwarding From a Phantom Directory Number ......................................................................... .22
Park/Park and Page ...................................................................................................................................... 23
Parked Call Retrieval ........................................................................................................................... 24
Park Orbit List Display ................................................................................................................................... 25
Retrieve and Auto Dial Lost Calls .................................................................................................................. 25
Station-to-Station Message Waiting ............................................................................................................... 26
i

._
Chapter 2 - Feature Operation (continued)
Voice Mail (VM) .................................................................................................................................... 27
Assign a Voice Mail Message Mailbox ............................................................................................... .28
Assign Voice Mail Retrieval Digits ....................................................................................................... 28
Retrieve Voice Mail Messages ............................................................................................................. 28 Busy Field Display ............................................................................................................................... 29
Mode Exit .............................................................................................................................................. 29
Chapter 3 - Soft Key Operation How to Use Soft Keys .................................................................................................................................. .31
Using Soft Keys to Make a Conference Call ...................................................................................... .32
Soft Key Prompt Definitions .......................................................................................................................... 35
Soft Key Activation ......................................................................................................................................... 36
Soft Key Deactivation .................................................................................................................................... 37
Chapter 4 - Messages and Memos Storing a Message in Memory ....................................................................................................................... 39
Recording a Message .................................................................................................................................... 40
Recording a Message, Name, or Memo .............................................................................................. 40
Preprogramming System Messages ............................................................................................................ .41
Adding to Preprogrammed Messages ................................................................................................ .41
Messaging ..................................................................................................................................................... 42
Calling Station Messaging ................................................................................................................... 42 Canceling a Calling Station Message ................................................................................................. .42
Setting/Changing Calling Station Messages ....................................................................................... .43
Storing LCD Name/Number Display .............................................................................................................. 43
Speed Dial Memo .......................................................................................................................................... 46
Timed Reminders with Memo ........................................................................................................................ 48
Message Sending .......................................................................................................................................... 49
Called Station Messaging .................................................................................................................... 49
Group Called Station Messaging ......................................................................................................... 50
Remote Calling Station Messaging.. .................................................................................................... .51 Busy Station Messaging ...................................................................................................................... 51 Return a Busy Station Message .......................................................................................................... .52
Index . . . . . . . . . . . . . . . . . . . . . . . . . . . . . . . . . . . . . . . . . . . . . . . . . . . . . . . . . . . . . . . . . . . . . . . . . . . . . . . . . . . . . . . . . . . . . . . . . . . . . . . . . . . . . . . . . . . . . . . . ...................................... 53
ii

( Figures 1 Sample Page.. ....................................................................................................................................... vii 2 20-button Digital Speakerphone with Liquid Crystal Display.. ............................................................... .2 3 Mode, Page, and Scroll Buttons ............................................................................................................. 3 4 Dial Pad Information.. ........................................................................................................................... 40
Table 1 Paging Group and Zone Codes ............................................................................................................ 24

: ,:.: . .
iv

Introduction
This guide is for users of the 2000-series LCD telephones (models DKT2010- SD, DKT2020-SD, and DKTI 020-SD), and 1 OOO-series LCD telephones.
This guide only covers the LCD functions of the digital telephone. Use it with the Strata DK Digital Telephone User Guide.
Organization This user guide is divided into the following chapters:
n Chapter l-The Grand Tour explains the Liquid Crystal Display (LCD), including a summary of LCD functions and sample screens.
n Chapter 2-Feature Operation provides step-by-step instructions for using LCD-related features.
H Chapter 3-Soft Key Operation explains the operation and use of the Soft Key feature and includes a list of Soft Key prompt definitions.
n Chapter 4-Memos and Messages explains how to create LCD alphanumeric messages, names, and memos, and how to store them in memory. It also describes how to send, edit, and cancel LCD messages.

Conventions Letters in [brackets] represent buttons which have Directory Numbers on them. For example:
[DN] = any Directory Number button (also known as an Extension or Intercom Number).
[PDN] = Primary Directory Number button (the Extension Number for your telephone).
[PhDN] = Phantom Directory Number button (an additional Directory Number).
Extra bold letters represent telephone buttons.
Your telephone may not have all of the buttons mentioned in this guide. See your Telephone System Administrator for more information on buttons and access codes.
means “through.”
+ is used for multiple key entries. Example: Press Speed Dial + XX + Redial + Spkr (Xx=08-60 seconds).
l denotes the step in a one-step procedure.
Notes: Elaborate specific items or reference other information. Within some tables,
IMPORTANT! Calls attention to important instructions or information.
How to Use This Guide The information in this user guide is divided into two distinct areas of content. Step-by-step instructions appear in the left-hand column of the page. Explanations of these procedures appear in the right-hand column. (See Figure 1).
vi

Chapter Titles -
First Level Headings
Action Text - Specific instructions on how to perform a procedure are numbered and entered in the left- hand column.
Results or Details Explanations or details of the Action Text.
Figure 1 Sample Page
vii

. . . VIII

The Grand Tour provides a detailed overview of the visual and operational features of your Toshiba phone system.
The Strata DK 2000-series Digital Liquid Crystal Display (LCD) telephone provides you with display information and feature prompting to make call handling more efficient.
The LCD Feature Prompting with Soft Keys provides an easy way to access frequently-used features. If this feature is activated at your station, abbreviated feature prompts guide you through the steps to performing specific tasks.
In addition, the LCD telephones provide you with Alphanumeric Messaging, Busy Lamp Field (BLF) Identification, Central Office (CO) Line Identification, Timed Reminders with Messaging, Speed Dial Memo Directory Dialing, User Name/Number Display, Call Duration Display, and Date/Time of Day Display.
Mode, Page, and Scroll functions of the LCD are summarized in addition to the hardware and button options of the phone itself.
This overview will quickly familiarize you with the various LCD and phone features that may best match your telephonic needs.
1
, . I
: : . . .
1: : : : . : i ‘.

Handset
Red/Green LED Indicators
Dial Pad T
Message Waiting Button and LED Indicator i&i i
Speaker ON/OFF - Button and LED Indicator
Last Number Redial Button
- LCD Display
- LCD Control/Soft Key Buttons
- Flexible Feature Control Buttons
I III - Microphone Location
I I k Volume Up/Down Control Buttons
Conference/Transfer Button I -Hold Button
Figure 2 Xl-button Digital Speakerphone with Liquid Crystal Display
2

Liquid Crystal Display In its idle state, the 32-character Liquid Crystal Display (LCD) feature on your digital telephone gives you an accurate desk clock and calendar combination. When you have an outside call in progress, an elapsed time display gives a constant reminder of the call duration. In addition, a variety of information displays and feature prompting makes your call handling more efficient. Alphanumeric messaging capability is also provided. All display functions occur automatically as call processing proceeds.
MO& Page SWOll
III
DK0622
Figure 3 Mode, Page, and Scroll Buttons
The uses of the three buttons shown above are:
Mode:
n To enter/exit various mode functions (see “Mode Definitions” later in this chapter).
n To cancel the beeping tone when using timed reminders.
Page:
4 Changes Busy Field groups.
H Used by station 200 to record a user NAME/NUMBER for another station. Station 200 must be an LCD telephone to record a NAME/NUMBER display for any other station type.
n Changes displays (date/time, elapsed time, message, call forward, dialed number).
n Scrolls through speed dial numbers when in Mode 8.
3

.:- ._
Scroll:
n Scrolls through message waiting numbers.
n Scrolls through the speed dial digits (if more than 16 digits) when in Mode 8.
Note: If your telephone has the Soft Key feature turned on (Mode + 7 I), the Mode, Page, and Scroll functions are not active when the telephone is busy on a CO line or internal call. Mode, Page, and Scroll are only used when the telephone is idle.
See Chapter 3-Soft Key Operation for more information on Soft Keys.
Mode Definitions
Mode 0
Mode 1
Mode 2
Mode 4
Mode 5
Mode 8
Mode 6 0
Mode 6 1
Mode 6 2
Mode 6 4
Mode 7 1
Mode 7 0
Mode 9 4
Mode 9 5
Used to exit another mode and return to clock/calendar display.
Busy Field display.
Busy station messaging.
Called station messaging.
Displays LCD message number NN, where NN can be personal messages (10 - 19) or system messages (60 - 99). Mode 5 only displays the selected message. It cannot be used to edit or create a new message.
Speed dial number check and memo dialing.
Caller ID/ANI/DNIS information mode OFF.
Caller ID/ANI/DNIS information mode ON.
Caller ID/ANI/Lost Call stored information display.
View Call Park Orbit list.
Soft key ON.
Soft key OFF.
Remote called station messaging.
Remote calling station messaging.
4

Account Codes:
[iiYizLz] m*mn
[-iiizzy] Urn.
[EilOt] CLrn.E
[iTiiz?j mx
[iiYzxz-] D<_
LCD Function Overview
IMPORTANT ! All Liquid Crystal Display (LCD) examples in this user guide are shown with soft keys turned OFF: If your telephone has soft keys turned ON, the displays may be different, but they will still allow you to follow the steps in this guide. When the soft keys are on, generally, the information on rows 1 and 2 will be reversed.
Note: In the following examples:
NNN = the Directory Number of the party
MMM = the called patty.
Condition Creating Display
When you press a Central Office (CO) line that requires a forced (verified or nonverified) account code, or Speed Dial + 5 0, or Account Code to enter a voluntary (verified or nonverified) account code.
When you dial a verified voluntary account code that is not valid.
When you correctly dial a verified voluntary account code that is set in the system account code memory.
When you dial a verified forced account code that is not valid.
After you dial a verified forced account code that is valid.
5

Automatic Number Identification (ANI) and Caller ID calls:
ANI Example
lF!iFzLl
CN:7145876782 ANSWERED LINE 3 I
HOLD LINE 3 1 ISEP 9 TUE 18:301
If your telephone has been programmed with ANI capability, you may:
n Activate ANI and/or Caller ID display mode by pressing Mode + 6 1. (System default is ON.)
n Deactivate ANI and/or Caller ID display mode by pressing Mode + 6 0.
Note: ANI information cannot co-exist on the same telephone LCD with Dialed Number Identification Service (DNIS) information. (See DNIS.) If your system is programmed to receive both ANI and DNIS information on incoming calls, then when an ANFDNIS call is ringing, press Page to alternate between DNIS and ANI LCD displays.
If your telephone has been programmed with ANI capability and you have activated the ANI display feature, the calling party’s telephone number (up to 10 digits) will be displayed when the call arrives at your station.
Notes: 1. The following examples show ANI. If Caller ID was activated, then
the caller’s name or number would appear on the first line.
2. If CN: is displayed, the calling number is an (ANI) number; CN: does not precede Caller ID numbers.
When you answer the incoming call. After you answer a call, call duration will display on LCD.
When you place the call on hold.
Held call automatically recalls your station after a programmed period of time.
The display changes to indicate calling status.
Station 201 is transferring an ANI (or Caller ID) call to you (station 200). For the purpose of demonstration, following screens depict different displays of your station.
6

CN:7145876782 ANSWERED LINE 3
Caller ID Example
I MR. JONES LINE 3 RINGING
Auto Busy Redial (ABR):
I NO. 202 ABR SET
I NO. NNN P583 3700
Automatic Callback (ACB):
INNN ACB No’ NNNJ Wm.2
/,,,,,,l
After the transferring station (station 201) hangs up.
When you answer the transferred call.
If you do not answer the transferred call within a programmed period of time, the held call will automatically recall the transferring station (i.e., station 201). This screen shows the display of the transferring station (i.e., station 201) as the call recalls.
If your telephone is programmed with Caller ID capability and you have activated the Caller ID display feature, the telephone number (up to 10 digits) or name (up to 15 characters) of the calling party will be displayed when the call arrives at your station.
After setting Auto Busy Redial, your display prompts you that it has been set.
When the system dials the call, your display shows the dialed number. The system inserts a pause (P) before redialing the number.
When the called telephone is ringing, your station’s CO Line LED (or [DN] LED) and Spkr LED will flash, and a warning beep will sound 30 seconds after the call is completed. You must go off-hook or press Spkr to prevent disconnection.
When you set Automatic Callback at a busy station, its number is displayed.
When you receive an Automatic Callback, the station number you called is displayed.
When you set ACB at a busy line group, its access code number is displayed.
7

When you receive an automatic callback for a CO Line, the seized line’s number
Automatic line Selection:
1. [DN]
i r -
2. CO Line
USING
3. Dial Access Code
/,,,,,I
If your station automatically accesses a [PDN] when you go off-hook, the three character designation, “[NT” (Internal Dial Tone), displays to confirm this status.
If your station automatically accesses a CO line when you go off-hook, the number of the seized CO line is displayed.
When you access a CO line by dialing a CO line group access code, the accessed CO line number is displayed.
Alphanumeric Messages:
[iTF%RT-] El_
Busy Field:
Messages up to 32 characters can be used in alphanumeric messaging. Messages can either be programmed or set as one-time messages. (Messages can also be used with a timed reminder.)
I::: 0::::::;::: ] /<wa
The Busy Field (BLF) display indicates, in groups of IO, the last two digits of the station Primary Directory Numbers that are busy on any type of [DN] ([PDN], [SDN], or [PhDN]) or set for Do Not Disturb (DND). Also, if a telephone’s [PDNs] are busy because they are in use on other telephones, the telephone will show busy on the BLF, even though it may be idle. The top display indicates that stations 200, 205, and 217 are either in use or in DND mode; the bottom display indicates the same for stations 217, 222, 224, and 229.
If Page is pressed, the 200/210 group will change to 21 O/220, and the busy/DND states of that group of stations will be displayed. The station groups will increment each time Page is pressed, thereby eventually displaying all stations.
8

Call Forward for [DNsl:
Call Forward for
In the Call Forward examples:
LLL = the calling [DN] PPP, TTT, VVV = the “Call-Forward-From” Directory Number.
RRR, SSS, UUU = the “Call Forward Destination” Directory Number.
NO. NNN CALL FORWARD TO
This LCD display appears when you begin to set any type of call forward.
CF-BN:PPP.RRR
1
RRR I
After you set Call Forward, the “forwarded” Directory Number (PPP) and the “forwarded to” Directory Number (MMM) is displayed, along with one of the following abbreviations:
“CF-A” (Call Forward-All Calls) “f-J=-9” (Call Forward-Busy) “CF-NA” (Call Forward-No Answer) “CF-BN” (Call Forward-Busy/No Answer) “CF-F” (Call Forward-Fixed) “CF-EXT” (Call Forward External)
Note: The CF-EXT display has priority over all other Call Forward displays. Press Scroll to display other Call Forward settings.
When you call a [DN] that is forwarded (PPP), the [DN] you called is shown first.
It then changes to the [DN] to which your call was forwarded (MMM).
NO. NNN LLL CALL PPP I
When a call is forwarded to your [DN], the calling [DN] (LLL) is displayed on the left and the [DN] called is displayed on the right (PPP).
Call Forward for [PhDNs]: If your telephone has more than one Directory Number, you can assign Call Forward destinations for each [DN] on your telephone (up to one [PDN] and four [PhDNs]). After setting different Call Forward Destinations, you can confirm them by pressing Scroll. A “+” sign indicates more than one [DN] has Call Forward on your telephone.
9

Caller ID Calls:
See Automa tic Number ldentifica tion on page 6.
Call Pickup:
[-Y-ZZj
[ti] aa,
Calling Number-Internal:
[ELLL] aws
CO Line Identification:
“CF-A” denotes Call Forward-All Calls from PPP to RRR.
Press Scroll.
“CF-8” denotes Call Forward-Busy from PPP to SSS.
Press Scroll.
“CF-NA” denotes Call Forward-No Answer from TTT to UUU.
Press Scroll.
“CF-BN” denotes Call Forward-Busy/No Answer from VVV to UUU.
Press Scroll.
When you pick up an internal ringing call, the calling station’s [PDN] is displayed on the left and the station number called is displayed on the right.
Your LCD telephone displays information noting that your call to station (MMM) was picked up by station (WWW).
When you receive an internal call, the calling station’s [PDN] (LLL) is displayed, even if you were called from a [PhDN] on that station.
The Central Office (CO) lines can be programmed to display an identifying name of up to 16 characters. The name will be displayed on outgoing and incoming calls.
IO
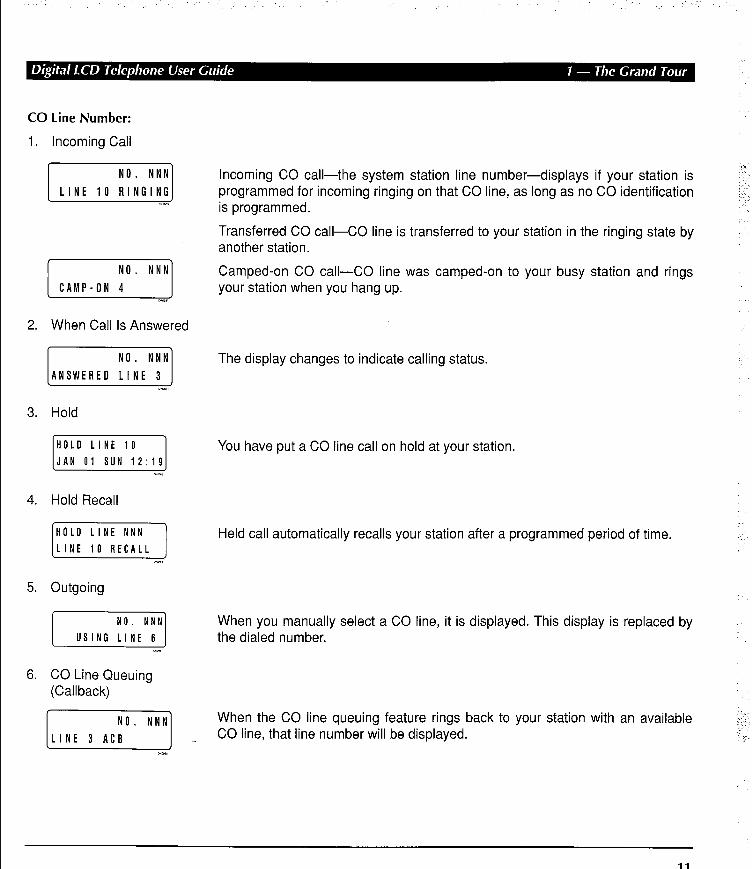
CO line Number:
1.
2.
3.
4.
5.
6.
Incoming Call
I NO. NNN LINE 10 RINGING 1
I NO. NNN CAMP-ON 4 1
When Call Is Answered
Hold
[::I;“,:‘::,‘:,:,,] m>
Hold Recall
Outgoing
[,,,,,I --
CO Line Queuing (Callback)
[LINE 3 AC!‘. ‘,,]
Incoming CO call-the system station line number-displays if your station is programmed for incoming ringing on that CO line, as long as no CO identification is programmed.
Transferred CO call-CO line is transferred to your station in the ringing state by another station.
Camped-on CO call-CO line was camped-on to your busy station and rings your station when you hang up.
The display changes to indicate calling status.
You have put a CO line call on hold at your station.
Held call automatically recalls your station after a programmed period of time.
When you manually select a CO line, it is displayed. This display is replaced by the dialed number.
When the CO line queuing feature rings back to your station with an available CO line, that line number will be displayed.
11

J :
Date/Time:
Dialed Number:
1. CO Line
2. Internal [DN]
Dialed Number identification Service (DNIS) Calls:
1. Press Page to display date/time when talking on a Central Office (CO) line (Soft Keys must be off before the call is started).
2. The date/time is adjusted on a system-wide basis by the station located in port 00 (usually station 200).
3. Continued pressing of Page toggles the display in succession among: Date/Time, Number Dialed, and Elapsed Time of the present call.
The digits are displayed as you dial when connected to either a CO Line or the [DN] using:
n Manual dialing
n Automatic dialing
H Repeat Last Number Dialed
n Saved Number Redial Note: If you are calling on a CO line, the display automatically changes from dialed number to elapsed time after a programmed period.
Incoming DNIS telephone numbers can be correlated in the system database with assigned DNIS names. These names can have up to 16 alphanumeric characters, and will display on your telephone’s LCD. This allows incoming calls to be instantly identified and appropriately answered.
Note: DNIS information cannot co-exist on the same telephone LCD with Automatic Number Identification (ANI) information. (See ANI.) When an ANUDNIS incoming call is ringing, press the Page button to alternate between ANI and DNIS displays when both types of information is received on an incoming call.
To activate the DNIS display mode, press Mode + 6 1.
To deactivate the DNIS display mode, press Mode + 6 0.
For ACD calls.
12

TOSHIBA TSD LINE 3 CALLING
For DNIS calls.
I TOSHIBA TSD LN 3 CALL 201 1
When the call was forwarded to your station.
When the call is transferred.
I TOSHIBA TSD ANSWERED LINE 3 I
When the call is answered.
For calls that recall the transferring station
Held call automatically recalls your station after a programmed period of time.
Directory Number Display:
r-Z-L-1
Door Phone/Monitor:
I DOOR PHONE IA El-
/000RPHON:D;INNNI
To find out the actual Directory Number of a [DN] button if it does not appear on your display or telephone keystrip label, press the [DN] you want to display and dial # 4 0 7. The number will display.
To find out the Primary Directory Number [PDN] of a telephone, press a [DN] + # 4 0 1. “INT=” will display, followed by the [PDN].
When you are called from a door phone, its designating characters are displayed.
When you make call to a door phone, its designating characters are displayed.
Note: The door phone designators are NA, NB, and/or NC (N = 1 - 4, and indicate which of the 12 possible door phones is calling or is being called).
13
L-
: , . - ‘: . .
, .
:
; . i’ : : .‘Y

Elapsed Time:
LCD Name/Number Display:
1. Idle Station
2. Called Station
least Cost Routing (LCR):
While you are making an outgoing Central Office (CO) line call, the call’s elapsed time is displayed. Elapsed time automatically replaces the dialed number on the display after a programmed period of time. (Timing begins when a Line button is pressed.)
Notes: 1. On a CO line call, the display can be alternated between date/time,
elapsed time, and dialed number by pressing Page (Soft Keys must be off before the call is started).
2. Elapsed time is displayed for 15 seconds after you hang up, and then changes automatically to date/time.
A name or title can be set in memory for each station. When an LCD station is idle, the name displays on the top line of the LCD. When a station calls an LCD station, the name of the calling station displays on the bottom line of the called station’s LCD.
When you are making a call via Least Cost Routing (LCR), your display will prompt you to dial a number by displaying “Dial Tel Number”.
As you dial the number, it is shown on your display.
14

Message Waiting:
Message Waiting/Voice Mail:
Off-hook Call Announce:
[,,,,::I:::] nssl
[,,,,::;:::I OKMOJ
Overrides:
1. Busy Override
[,.,,::;:::I mobw
When you set message waiting at another station, the number of that station is displayed.
When you hang up after setting Message Waiting at another station, a reminder is shown on the top row of your display. A “+” indicates there are more messages in memory. Press Scroll to rotate through more messages.
The display will show the numbers of up to three stations that have left messages for you. Four numbers may be stored in message memory (see Recalling Station). The corresponding LCD display example shows: Station 201 has left a message for station 203. A ‘(+I’ indicates there are more messages in memory. Press Scroll to rotate.
When a message waiting voice mail is displayed, a “V” will follow the station number. A “+” indicates there are more messages in memory. Press Scroll to rotate through more numbers. To answer the message, press Msg to call the station which is displayed.
When you off-hook call announce to a busy station (MMM), your LCD displays the number of that station.
When another station (MMM) off-hook call announces to your station, your LCD displays the number of that station.
When you activate the Busy Override feature after calling a busy station, the station number and the feature are displayed.
15

:
2. Executive Override
I NO. NNN MMM EXEC OVRD
I NO. MMM NNN EXEC OVRD
3. Do Not Disturb (DND) Override
NO. NNN MMM DND OVR
4. Privacy Override
Recalling Station:
[mj au-a
Your LCD telephone displays the number of a station (MMM) initiating executive override when you are on the telephone. The number will remain displayed until override is disconnected.
When you initiate Executive Override, your LCD telephone displays the number of the station that is overridden (MMM). The station that receives the override displays your station number. The number will remain displayed until the call is ended.
The station you have called (MMM) is in the Do Not Disturb (DND) mode.
When you initiate DND override, the station number (MMM) you have overridden is displayed.
When another station (MMM) overrides DND at your station, its number is displayed. (The display remains until the end of override.)
When DND override is not allowed, “DND OVR DENY” is displayed.
When a station presses a busy Line button to enter an existing conversation, the station that initiates the override displays the CO line identification on the LCD. The overridden station’s LCD displays the initiating station’s number. (The display remains until the end of the call.) Privacy override does not apply to [DN] buttons.
When a transferred call goes unanswered, it will recall to the station that transferred it. The display shows the CO line number and the station number to which it was originally transferred.
16

Speed Dial Memo:
*ll TOSHIBA 7145833700
Toll Restriction and Traveling Class Override Codes:
G] El,,*
Two-CO Line Calls:
1. Tandem
[JA;“:;‘~:,“:lr:,j EljlY
2. Conference
NO. NNN CONF LINE N1 N2 1
When using Speed Dial Memo (Mode + 8 + the speed dial number), the name and number are displayed. Press Page to display more.
TOSHIBA is the memo (up to 12 characters).
714 583 3700 is the number (up to 16 digits).
After you access a CO Line and press Cnfmn + # 4 7 to dial a complete toll restriction override or traveling class code, your LCD display will prompt you to dial a code.
After you establish a two-Central Office (CO) line conference call and then release. NI and NZ identify the connected CO lines.
When you are talking with two external parties on two CO lines. NI and NZ identify the connected CO lines.
17

18

Feature Operation .
To Set the Date:
1. Place handset on-hook.
2. Press a [DN] + # 6 5 1.
3. Enter the date.
4. Press Redial.
5. Press Spkr.
To Set the Time:
1. Place handset on-hook.
2. Press a [DN] + # 6 5 2.
3. Enter the time.
4. Press Redial.
5. Press Spkr.
This chapter provides instructions for LCD telephone features. Consult the Strata DK280 Digital Telephone User Guide for instructions about features that apply to both non-LCD and LCD telephones.
Date/Time/Day Adjustment This operation is possible from port 00 (usually station 200) or attendant consoles, and enables you to set the date, time, and day.
Dial year/month/day in the format YYMMDD. Enter a leading 0 for any single- digit month or day.
You will hear a confirmation tone.
Dial hour/minute/second in the 24-hour clock format HHMMSS. Enter a leading 0 for any single digit entered.
You will hear a confirmation tone.
19

To Set the Day:
1. Place handset on-hook.
2. Press a [DN] + #653.
3. Enter the day (see codes on the right).
4. Press Redial.
5. Press Spkr.
In the following examples,
NNN = Directory Number which is being forwarded.
MMM = the forward-to number.
Call Forward Displays:
1. Call Forward-All Calls
2. Call Forward-Busy
CF-B :NNN-MMM JAN 26 TUE 01:43
I I
1 = Sunday 2 = Monday 3 = Tuesday 4 = Wednesday 5 = Thursday 6 = Friday 7 = Saturday
You will hear a confirmation tone.
Call Forward Display When any type of call forward is initiated, the “CALL FORWARD TO” prompt displays on the lower row of the LCD. When your station has call forward set, the LCD appears as shown in the following examples. For instructions on setting call forward, refer to the Digital Telephone User Guide.
Call Forward-All Calls
If your station is idle or busy and has this feature activated, all calls to it will forward immediately. The station will not ring. A I’+” indicates more than one [DN] is forwarded on your telephone, press Scroll to rotate through all Forwarded [DN] displays.
Call Forward-Busy
Calls to your telephone while you are busy on another call or in the Do Not Disturb mode will forward immediately if this feature is set. Calls will ring as normal if your telephone is idle.
20

3. Call Forward-No Answer
4. Call Forward-Busy/No Answer
CF-BN:NNN-MMM JAN 26 TUE 01:43
5. Call Forward-Fixed
6. Call Forward-External
[::iE:: TUE Bl:43] :‘*,,I
Call Forward-No Answer
All calls to your station when set with this feature will forward to a selected station if you fail to answer within a time that you designate.
Call Forward-Busy/No Answer
All calls to your station set with this feature will forward immediately to a selected station whenever you are busy on another call or in the Do Not Disturb mode. Calls will also forward if you do not answer the call within a time that you designate.
Call Forward-Fixed
If you activate this feature, all internal, private or Direct Inward Dialed CO line calls to your station will forward immediately to a station set in system programming. Your station must be assigned with the Call Forward to- button in system programming to activate this feature.
Call Forward-External
This feature enables you to forward new incoming calls to a destination outside of the system. Internal calls and transferred calls to your [PDN] will not forward with Call Forward-External, and only incoming calls over CO lines dedicated to immediate or delay ring only at your station ([PDN], private CO Line, and/or Direct In Dial line calls) will forward. Any of the other Call Forward modes can be set for your [PDNs] or [PhDNs] simultaneously with Call Forward-External.
Notes: 1. Central Office (CO) lines that ring at your station only will forward.
(CO lines that ring into more than one station will not forward.)
2. CO line calls transferred to your station will forward (except Call Forward-External).
3. Auto Attendant calls to your station will forward (except Call Forward-External).
4. Call forward redirects the station hunt feature.
21

Call Forwarding a Primary or Phantom Directory Number:
1. Press the [PDN] or [PhDN] that you want to Call Forward.
[iii5ZF-] 1,;,,,
2. Enter a Call Forward Access Code (# 6 0 I- # 6 0 4).
[pTTGGGE]
mm.*
3. Dial the number to which calls will forward.
4. Press Speed Dial and then Spkr.
Call Forwarding a Primary and/or Phantom Directory Number
Your telephone has a Primary Directory Number [PDN] which can only be call forwarded from your telephone.
To set call forward for a Phantom [DN], your phone must be programmed as the owner of [PhDNs].
Your telephone can be programmed to have up to eight [PhDNs]. Up to eight [PhDNs] can be set to Call Forward by entering a specific access code, but only four of them can have dedicated message waiting buttons/LEDs. [PDNs] and [PhDNs] can be independently set for Call Forward-All Calls, Call Forward-Busy, Call Forward-No Answer, and Call Forward-Busy/No Answer. Calls to your [PDN] or [PhDN] will be forwarded to the destination phone number according to the call forwarding mode you have chosen.
You will hear a steady dial tone and see a steady LED.
#601 Call Forward-All Calls #602 Call Forward-Busy #603 Call Forward-No Answer #604 Call Forward-Busy/No Answer
The dial tone will go silent, and the LED will flash intermittently.
The screen will display the number you are forwarding to and you will hear a short, steady confirmation tone followed by a pulsing Re-order tone. The LED will continue to flash intermittently.
The dial tone will go silent and the LED will go off. The LCD will display a message indicating call forwarding, the call forward type, the Phantom Directory Number that the call is being forwarded from, and the destination number to which the call is forwarded.
22

To Cancel a Call Forward:
1. Press the [PDN] or [PhDN] you want to cancel Call Forwarding on.
2. Dial # 6 0 1.
3. Press Spkr.
You will hear a steady dial tone and see a steady LED light.
The dial tone will go silent, and the LED will flash intermittently.
The LED will go off. Call forwarding for the selected [PDN] or [PhDN] is now canceled.
To Park and Park/Page
(Automatic Orbit Selection):
1. While connected to a calling party, press Park and Page.
c 1 ENTER ORBIT NO.
:<:.,.
2. Enter 9 9 9 and the system will park the call on an Orbit (9 0 0 - 919).
3. To Page, enter a Page Zone access code (see Table 1) or Directory Number.
Park/Park and Page If you have an LCD telephone, you can use code 9 9 9 to let the system automatically select an available orbit when you park a call. The selected orbit number will be shown on your LCD. You can use the Park feature with the Page feature.
If your telephone does not have a Park in Orbit button, press Cnf/Trn + # 3 3 2 to park the call. If your telephone does not have a Park and Page button, press Cnf/Trn + # 3 3 1 to park and page.
When you press 9 9 9, the system will automatically select the lowest vacant Orbit Number for your parked call.
4 If you pressed Park in Orbit in Step 1, your telephone LCD will display the orbit number in which the call is parked.
n If you pressed Park and Page in Step 1, you will hear a short burst of dial tone to prompt you to enter the Page access code. Your telephone LCD will display the orbit number in which your call is parked.
23

Table 1 Paging Group and Zone Codes
Paging Group Codes Paging Zone Codes
# 3 1 l-Group A # 3 15-Group E # 3 5-Zone A # 3 12-Group B # 3 1 6-Group F # 3 6-Zone B # 3 I E-Group C # 3 17-Group G # 3 7-Zone C # 3 14-Group D # 3 1 &-Group H # 3 &-Zone D
Enter code # 3 0 to page stations assigned to the All Call Page group. Enter code # 3 9 to page stations assigned to the All Call Page group and possibly external page zones, depending on system programming.
The LCD will show the 9 9 9 Auto Park entry plus the entered Page Zone number.
The LCD shows the line number which is being held on a particular orbit number. In this example, Line 2 is held on orbit number 900.
If you do not retrieve the parked call within a specified amount of time, the call will ring back to your phone. When a parked call recalls and rings back to your phone, the LCD will show the line or [DN] that is recalling and the orbit number.
To Retrieve a Parked Call:
1. Press the parked Line or press Park in Orbit or Park and Page.
2. Enter the Orbit Number or valid [PDN] on which the call is parked. -
Parked Call Retrieval
The Orbit Number is usually provided in the paging announcement. The CO line LED or [PDN] LED will flash at the in-use rate when the call is picked up or retrieved.
24

TO Display Parked Calls:
1. Press Mode.
[MOOE NO. ] r. .i
2. Press 6 4.
ILN NN ORBIT XXX 1
3. Press Scroll to monitor the next parked call.
4. Press Scroll to monitor the next parked call.
[LN 8 ORBIT 901t DID723
Park Orbit list Display This feature enables you to monitor (view) the calls that are parked at your station.
If your telephone has an Orbit List button, press it and go to Step 3.
Your telephone must be idle to use the Mode button when displaying the Park Orbit List.
The display shows that Line N N (where N N represents the Line number) is parked by you on Orbit XXX (where XXX represents the orbit number). The “+I’ sign indicates that there is more than one parked call at your station.
This display indicates that CO Line 003 is parked by you at Orbit 900 (where 900 represents a different Orbit number).
The first parked call is displayed again, indicating there are only two parked calls at your station.
To Retrieve Lost Calls:
1. Press Mode + 6 2.
ANI Display
[Ti?Ezc-] OKOn> -
Caller ID Display
Retrieve and Auto Dial Lost Calls The system automatically saves the number for all ANI and Caller ID calls that ring at your telephone, but are unanswered (abandoned calls). You may view and Auto Dial the saved numbers by following the steps for retrieving lost calls.
The Caller ID lost call displays the telephone number and name (if provided by the Central Office). To see what date and time the Caller ID lost call was received, press the Page button. This will change the display to the date and time of the call. If desired, press the Page button again to return to the telephone number display.
25

2. Press Scroll to view the saved information on the LCD display.
n Press # to delete information on the LCD display.
n Press * to go back to previous LCD screen.
If your telephone is equipped with a Lost Call Auto Dial button, you may auto dial a saved number by performing any of the following:
H Enter Class/AN1 Information display Mode + 6 2, and choose the number or name of the lost caller you want to contact.
H Press Pooled Line Crp*, and then Lost Call Auto Dial.
H Press a [DN] button, enter the appropriate CO or LCR access code>, then press Lost Call Auto Dial.
n Press the CO Line button”, and press Lost Call Auto Dial.
Note: 1. The ANI/Caller ID received telephone numbers always include area
codes on local calls as well as long distance calls. The DK280 system will always auto dial the digit “1” before the saved, outgoing telephone number.
2. If your telephone requires an account code be entered before dialing outside telephone numbers, enter the account code after access LCR or a CO line, then press the Lost Call Auto Dial button.
3. Press Lost Call Auto Dial.
Station-to-Station Message Waiting If there is no answer (or if the telephone is busy or DND), press the Msg button (or 7). This causes the Msg LED on the called station to flash. The called station’s LCD displays the calling station’s number. When the returned call is answered, the flashing Msg LED will turn off
To Use Station-to-Station Message Waiting:
1. Lift the handset or press a [DN] to receive internal dial tone.
2. Dial the desired station number.
3. The calling station user presses the Msg (or 7) to set the Msg LED on _ the called station.
The [DNs] after SENT are the [DNs] which received your message waiting indication signal, if you set a message waiting indication signal.
26

4. To answer the Msg LED indication from the called station, press the flashing Msg button.
5. To clear the Msg LED that you set on some other telephone’s [DN] from the [DN] that sent the Message Waiting signal, press the [DN] button, dial the Directory Number that you set the MW signal on and press Msg twice (or 7 7).
6. To clear the Msg LED from the [DN] that received the Message Waiting signal, press the [DN] + # 4 0 9.
Note: Up to five message waiting displays may be stored on the LCD per each [DN] owned by the telephone ([PDNs] and [PhDNs]). The station [DN] in the display will be called when the flashing Msg (fixed) or [PhDN] Msg (flexible) button is pressed. To rotate the station numbers, press Scroll. The fourth message for each [DN] is reserved for the Message Center. The “+” sign on the LCD indicates that more than one message waiting signal was sent to your telephone.
CALL XXX-YYY+: Indicates which [DN] on your telephone received a message waiting signal (XXX) and which [DN] sent the message waiting signal (YYY). In this example, [201] received a message signal from [500].
This clears all messages recorded to this station.
Voice Mail (VM) Whenever your station is call forwarded to voice mail, certain digits will automatically be sent to the voice mail unit to direct the call to your mailbox. These codes require storage one time since they remain in memory until changed. They do not have to be stored each time you Call Forward your telephone. Your Primary Directory Number [PDN] and up to four Phantom Directory Numbers [PhDNs] can be independently Call Forwarded to unique or to the same voice mailboxes from your telephone.
Telephones must be programmed as the owners of a [PhDN] to be able to call forward the [PhDN] to a voice mailbox number.
27

:-
Assigning a mailbox to store messages:
1. Press a [DN].
2. Press # 6 5 6.
I 656 ID CODE SET . 1
Assign a Voice Mail Message Mailbox
Press the [DN] that you want to assign a mailbox number. When you assign a mailbox for a [DN], calls to that [DN] will be able to forward directly to the [DN]‘s voice mailbox on the Toshiba voice mail system.
3. Dial the digits (up to 16) and pauses to be sent.
4. Press Redial to store data.
The LCD displays the digits and pauses. These digits include special voice mail codes and the [DN] voice mailbox number. For example, for Toshiba voice mail systems dial 91 NNN, where NNN is the mailbox number of the [DN] you pressed in Step 1.
You will hear a confirmation tone.
Assigning a mailbox for message retrieval for a Directory Number:
1. Press a [DN].
2. Dial # 6 5 7.
3. Dial the required digits and pauses to be sent.
4. Press Redial to store data.
To Retrieve Messages:
l Press the flashing Msg button assigned to the UW
Assign Voice Mail Retrieval Digits
When you want to retrieve your messages from voice mail, certain digits will automatically be sent to the voice mail unit to play back your messages.
Press the [DN] for which you want to retrieve messages.
The LCD displays “6 5 7 ID CODE SET”.
The LCD displays the data as it is entered. These digits include special voice mail codes and the [DN] mailbox number. For example, for Toshiba Systems dial 92NNN, where NNN is the [DN] mailbox number.
You will hear a confirmation tone-the LCD displays “DATA PROGRAMMED”.
Retrieve Voice Mail Messages
When a voice message is received for a [DN], the voice mail system will cause the Msg button/LED to flash.
28

To Clear All Digits:
1. Press a [DN].
2. Dial # 6 5 6 or #657.
3. Press Redial.
To Display Busy Field Status:
1. Press Mode.
[no] m111
Press 1. 2.
3. Enter the first 1 or 2 digits of a [DN]. Press #.
I
4. Press Page to rotate Busy Field groups.
To Exit Any Mode:
1. Press Mode.
2. Press 0.
:_; : :
Busy Field Display
Your telephone must be idle to use the Mode button when Soft Keys are turned ON.
Note: The Busy Lamp field (BLF) mode will stop all other displays from appearing on your telephone LCD.
Enter the first digit of a 3-digit [DN] (e.g., 2 for 200) or the first two digits of a 4- digit [DN] (e.g., 21 for 2100).
Mode Exit
: - ; .
: . . ; ‘.:
The LCD displays “MODE NO.?” Your telephone must be idle to use the Mode button when Soft Keys are turned ON.
The LCD displays date/day/time.

.: .~ .:.. . . . .
30

Soft Key Operation 3, ro
.’
The Soft Key feature provides a quick and easy way to access frequently-used features. If the Soft Key feature is activated at your station, abbreviated feature prompts will appear on the LCD above the Mode, Page, and Scroll keys while you are on a call (or you are ringing another station or outside telephone number). You can access the feature represented by the feature prompt just by pressing the Mode, Page, and Scroll key beneath the prompt.
If the Soft Key feature is activated at your station, you can still access features with feature buttons (fixed or flexible) or with access codes.
When your telephone is idle, Soft Keys do not display and the Mode, Page, and Scroll keys function as normal. If your telephone is in use, Soft Key functions replace the Mode, Page, and Scroll functions.
How to Use Soft Keys This section provides an example of how to use Soft Keys to make a Conference call by adding a station to an outside call. Other features that can be accessed with Soft Keys include Transfer, Paging, and more.
31

Using Soft Keys to Make a Conference Call
1. While on an outside call with CO line (line 3 for this example) your LCD will display the following prompts:
TALK ON LINE 3 TRNS CONF PGE
Mode Page SCKJII
0 I I
Note: Once the Soft Key prompts appear (in this case, the Soft Keys are TRNS, CONF, and PGE for Transfer, Conference, and Page), the buttons below them now stand for Transfer, Conference, and Page instead of Mode, Page, and Scroll. In the following steps of this example, only the Soft Key displays will be shown since Mode, Page, and Scroll no longer apply while Soft Keys are active.
n If you initiated the call, the “TRNS” prompt will appear 30 seconds after the first digit of the telephone number is dialed-the “ABR” prompt for Automatic Busy Redial (ABR) will appear during this first 30 seconds (if it does not appear, then this feature was not assigned in system programming). If the call is an incoming call, the “TRNS” prompt will appear immediately when you answer the call.
2. Press the CONF Soft Key to initiate the Conference.
TALK ON LINE 3 TRNS CONF PGE I
n The outside call will be placed on hold and the LCD will appear as follows after you press the CONF Soft Key in Step 2.
32

. . “ . - - .
3. To transfer to a station, press the STA. Soft Key.
\ LINE OR STATION? LINE STA. RTRN
n Whenever the RTRN Soft Key appears, you can terminate the operation and return to the outside call by pressing the RTRN Soft Key.
4. Dial a station number when the following LCD appears:
DIAL STATION NO. RTRN
5. After you dial the station number (203 in this example), you will see one of the displays below for about three seconds. The display will then change to the display in Step 6.
Called Station (203) has “user Called station (203) has “user name” turned off. name” turned on.
33

6. After three seconds the user’s name (or number) is replaced with the following display and you can voice announce to station 203:
ANNOUNCE TO 203 TRNS RING RTRN
or, when in TONE mode the following is displayed:
RINGING 203 MESG TALK RTRN
W You could stop the called station voice announce and make station 203 ring by pressing the RING Soft Key.
n Instead of proceeding with the Conference, you could transfer the call by pressing the TRNS Soft Key.
H You could terminate the operation and return to the outside call by pressing the RTRN Soft Key.
7. The LCD will appear as follows after the called station answers. Your station is connected to Station 203 and the outside call remains on hold. Press the JOIN Soft Key to join all parties in a Conference.
TALK WITH 203 TRNS JOIN RTRN
H Instead of proceeding with the Conference, you could transfer the call by pressing the TRNS Soft Key.
n You could terminate the operation and return to the outside call by pressing the RTRN Soft Key.
34

8. The LCD will appear as follows after you press the JOIN Soft Key in Step 5 and all parties will be conferenced.
I LN3t203 EXIT CONF
H “LN 3 + 203” indicates that you are in a Conference with CO line 3 and Station 203.
n You can exit the Conference and the other parties will remain connected if you press the EXIT Soft Key.
H You can add another station or CO line by pressing the CONF Soft Key.
Note: If the Soft Key feature is activated at your station, incoming call information will not display on your LCD while your station is busy. To display this information, you must either disconnect the existing call or place it on hold.
Soft Key Prompt Definitions The following list provides definitions of all of the Soft Key prompts that could appear on your LCD.
TRNS-Press to initiate or complete a Transfer while on an outside call. TRNS can cause an immediate or announced transfer, depending on how the feature is set in system programming. After initializing transfer, pressing TRNS again will complete the transfer.
CONF-Press to initiate or complete a conference.
PGE-Press to park an outside call and to gain access to a menu of page options.
RING-Press to make a called station ring when making a voice announce call to the station.
TALK-Press to make a voice announcement to a called station that is ringing.
MESG-Press to set a message waiting indication at a busy or unanswered station.
OVRD-Press to gain access to override options or to override a station that is busy or in the Do Not Disturb mode.
BUSY-(Busy Override) Press to send a call-waiting tone to a busy station.
35

EXEC-(Executive Override) Press to break into the conversation of a busy called station.
ACB-Press to activate Automatic Callback after reaching a busy station, CO line, or CO Line group.
ABR-Press to activate Automatic Busy Redial after dialing a busy outside telephone number.
RLS-Press to disconnect a call and to return to the idle state.
RTRN-Press to terminate a feature operation and to return to a previously displayed state.
LINE-Press to add a CO line to an existing call while in the Conference mode. The LCD will prompt you to access a CO line after you press this key.
STA.-Press to add a station to an existing call while in the Conference mode. The LCD will prompt you to dial a station number after you press this key.
JOIN-Press while on a conference call to join all parties to a conference.
EXIT-Press to exit from a conference and to leave the remaining parties connected.
To activate Soft Keys at your station:
1. Make sure your telephone is idle. Do not lift the handset.
2. Press the Mode key below the LCD.
3. Press 7 1.
Soft Key Activation
Your telephone must be idle before you follow the steps on the left to activate or deactivate the Soft Key feature at your station.
Soft Keys are now activated and the appropriate feature prompts will display when your phone is in use. The Soft Key feature will remain on until you turn it off. In short, you can perform numerous telephone functions and the Soft Keys will not be cancelled unless you deactivate them.

Soft Key Deactivation To deactivate Soft Keys at your station:
1. Make sure your telephone is idle. Do not lift the handset.
Your telephone must be idle before you follow the steps on the left to activate or deactivate the Soft Key feature at your station.
2. Press the Mode key below the LCD.
3. Press 7 0. Once you deactivate the Soft Keys, the feature prompts will no longer appear on the telephone display.
37

: : . .

Messages and Memos
To Store a Message in Memory:
1. Press LCD Msg Select
- or -
a rPDN1 + # 6 8.
The LCD on your telephone can be used to send or receive messages to or from other LCD telephone users. It can also display the names/numbers of the person calling your telephone or the name of the person you are calling. Names and memos can also be set to display with speed dial numbers and timed reminders.
Storing a Message in Memory
The LCD Msg Select LED flashes.
2. Enter the two-digit message number to be stored.
3. Use the Recording a Message procedure to enter the message characters.
4. Press the LCD Msg Select (or Spkr).
Personal message (10 w 19); system message (60 w 99 port 00 only). The current message, if any, will be displayed.
The LCD Msg Select LED lights steadily, and the LCD displays the message. The message will now be stored in system memory.
39

:-
To Record a Message:
1. Press the # button to access alpha characters. Refer to Figure 4 for an explanation of the dial pad buttons.
2. Press * or 1 to move the cursor (-) to the desired position (the left edge of the display for a new message, or two spaces to the right of the preprogrammed message to add information).
3. Press the button that has the letter you want to enter. Use the 0 button to shift from letter to letter on the button.
4. If you want to enter a number, press the # _ button to change to numeric characters. Press the # button again to return to alpha characters.
Recording a Message
Recording a Message, Name, or Memo
Use this procedure to enter the characters of a personal message (10 m 19) or system message (60 N 99, Station 200 only), to add to a preprogrammed message, or to edit and set a new message. After calling up a message on your display (see Storing a Message in Memory, Steps 1 and 2 on the previous page), perform one of the following procedures:
1 button moves cursor to the right
Each button has three letters that are used in
the alpha mode)
0 button is used to shift between the three letters on each alpha button (also used to access special characters)
Figure 4 Dial Pad Information
For example: If you press 3, a “D” is displayed. By pressing 0, the “D” is changed to “E”. By pressing 0 again, the “E” is changed to “F”. Press 0 again and the “F” changes to “D”. To enter a space, press 1.
Numbers are also entered on the dialpad.
40

.:-
5. The following special characters are set by pressing 1 and then pressing 0 to step through the available characters: Q, Z, :, -, +, /.
Preprogramming System Messages
/. . . ,,. : : 1: .,..
System messages can only be programmed or permanently changed at port 000, station number (usually 200). Five preprogrammed messages are automatically stored in memory when the Alphanumeric Messaging with LCD feature is initialized.
60) OUT TO LUNCH
61) IN A MEETING
62) CALL
63) BACK AT
64) RETURN ON
You can use these messages and add 3.5 more messages designed specifically for your system, or you can overwrite the initialized messages and program up to 10 of your own. Any messages programmed at port 000 will remain in memory until canceled from port 000 or until the system is reinitialized. After reinitialization, only the original five messages will remain in memory. System messages are written and stored in memory as explained in Storing a Message.
Adding to Preprogrammed Messages
When you select a message, it appears on your station display. A cursor (-) also appears immediately to the right of the last letter in the message. You can now input additional information (up to a total of 32 digits for each message). Some system messages may expect you to add more information. For example:
1. CALL q Add a station or outside telephone number.
2. BACK AT !
n Add the time you will return. i:.~- i ,:
- 3. RETURN AT
n Add the date you will return.
Note: Refer to Recording a Message for adding to a preprogrammed message.
41

. . .~. ::: . .
To Create an LCD Message for Phones that Call Yours:
1. Press the LCD Msg Select
- or -
press a [PDN] + # 6 8).
[iLiZ--] W>.‘>
2. Dial the number of the message you want.
3. Press LCD Msg Select
- or -
Spkr.
To Cancel a Message that Has Been Set at Your Station:
l Press LCD Msg Select.
- or -
1. Press a [PDN] + # 6 8.
2. Press Spkr.
Messaging
Calling Station Messaging
You can set a message that will appear on the LCD of telephones that call your telephone by following the instructions on the left.
The LCD Msg Select LED flashes, and the LCD displays “MSG NO.?”
Personal message (10 N 19) and system message (60 = 99). The selected message is displayed. (To add to this message, use the procedure for “Recording A Message,” found earlier in this chapter.)
The LCD Msg Select LED lights continuously, and the selected message will be set. The message will be sent to LCD telephones that call your telephone. If you have CF set on your telephone, press the Page button to display the message instead of CF.
Canceling a Calling Station Message
The LCD Msg Select LED goes out.
The LED lights.
The LED goes out. A personal message (10 Y 19) will remain stored in memory.
42

Setting/Changing Calling Station Messages
You can set a completely new, personalized message by overwriting any of the existing preprogrammed messages. To do this, simply call up one of the messages as explained previously. When the cursor appears to the right of the message, shift it to the left margin and write your new message over the preprogrammed one. The new message will remain on your station until canceled. It will then be erased and the original preprogrammed message will be restored.
Notes: 1. Refer to Recording a Message for leaving a new message at your
station.
2. Messages will remain in memory until changed. The preprogrammed messages are never erased; only the user-added messages are erased.
Storing LCD Name/Number Display This feature allows you to use your telephone to store a title (such as your name, telephone number, location, etc.) in system memory. This title (e.g., LOBBY) will display on your station’s LCD while it is idle, and it will appear at other stations’ LCDs when they are called from your station. Your name will display on other telephone LCDs when they are used to call your telephone (Soft Keys must be turned on).
To Enter Name/Number Information:
Name display information for non-LCD telephones or voice mail/auto attendant devices may be stored from station 200. When name/number is recorded for non-LCD telephones or other devices, their name/number is displayed on LCD telephones when called.
1. Press a [DN] + Current information will appear on the lower line of the LCD. #621.
2. Enter the new - information via the dial
Refer to “Recording a Message” earlier in this chapter for dialpad instructions.
pad. Up to 16 characters can be recorded. It is recommended that you enter the station number along with the user’s name (as shown in Step 3).
43

: I
3. Press Spkr.
To Clear Name/Number Display:
1. Press a [DN] + #620.
2. Press Spkr.
During clear:
After clear:
To Erase Name/Number Information:
1. Press a [DN] + #621.
2. Press 1 in the alpha mode to enter blanks.
3. Press Spkr.
The new information is stored and will appear on the top line of the display. For example, if you entered “TOSHIBA EXT. 200”, that will appear above the date/day/time on the display.
You will hear a confirmation tone, then a busy tone.
Notes: 1. When user name is set, your title will appear on the LCD during
direct, forwarded, and hunted calls. On override or OCA calls, the LCD will not display the title.
2. After a name is cleared, it may be redisplayed at any time by pressing a [DN] + # 6 2 1.
3. A name is displaced by message and call forward settings if they are set.
Current information will appear on the lower line of the LCD.
To erase name/number information from memory, enter blanks at the ‘User Name” prompt. Refer to “Recording a Message” earlier in this chapter for more information. ;, : The erased name/number information should be gone.
!) /
44

To Enter Name/Number Information for Other Stations/Devices
1. Turn off Soft Keys by pressing Mode + 7 0, when your telephone is idle.
2. Press a [DN] + #6Zl.
r”““““l EIOlj
3. Press Page.
G] EmI-
4. Dial the [PDN] of the station for which the name/number information is to be recorded.
[iiixz-] o.aiy
5. Press Page.
lystn mm-s>
6. Enter the new information via the dial pad (refer to Recording a Message for method).
7. Press the Spkr button.
.‘. Entering Name/Number information for other stations or devices is only allowed from Station 200.
Current information for station 200 will appear on the lower line of the LCD.
In this particular display, “EKT” stands for the Primary Directory Number of the digital, electronic or standard telephone.
“USER NAME?” will appear on the upper line of the LCD, and current information for station NNN will appear on the lower line of the LCD.
Up to 16 characters can be recorded. It is recommended that you enter the station number along with the user’s name.
The new information is stored and appears on the top line of station NNN’s LCD. Station 200’s LCD returns to the normal idle display.
45

8. Repeat Steps 2 m 7 to enter more names/numbers.
9. To turn Soft Keys on again, press Mode + 7 1 when your telephone is idle.
Notes: 1. To erase the name/number information of another station from
station 200, repeat Steps I - 6 above and enter blanks in Step 5. Blanks are entered by pressing 1 in the alpha mode.
2. Station NNN may set and clear the NAME/NUMBER feature anytime:
R Set: Press a [DN] + # 6 2 1.
n Clear: Press a [DN] + # 6 2 0. “Clear” eliminates the display when calling, but does not erase it from memory.
To Erase Other Station’s Name/Number Display:
) From station 200, repeat Steps 1 through 6 of the previous procedure and press 1, in the alpha mode in Step 5.
Speed Dial Memo This feature allows you to program a 12-character name for each of his/her 40 personal speed dial numbers. The memo pad of names may be stepped through to select the appropriate party. Memos may also be added to the 40 or 100 system speed dial codes, depending on your system’s size, via the station connected to port 000, station number (usually 200).
To Program Speed Dial Names and Numbers:
1. Press Redial, then press Speed Dial.
2. Dial the desired speed dial code.
[i-zzJ /<OZY
3. Press Mode.
Press SDS or * if your telephone is not equipped with a Speed Dial button.
NN or NNN = Speed Dial Code. (10 w 49 from any station) or (60 m 99 or 600 - 699, depending on your particular system size, from station 200 only)
If a name was previously stored on this code, it will display on the top line of the LCD.
46

:- :
4. Enter the name or memo (refer to Recording a Message for method).
5. Press Mode.
6. Enter the desired telephone number (16 digits maximum).
7. Press Redial to record data in memory.
To Dial a Speed Dial Number:
1.
2.
3.
4.
5.
Press Mode when telephone is idle.
Dial 8 NN or NNN.
Press Page to scan the directory for the appropriate number/memo.
Press any available Line button
- or -
press [DN] and press the CO line access code.
The number is dialed.
The name will appear on the bottom line of the LCD as you enter it.
The number will appear on the top line of the LCD as you enter it.
The name can be up to 12 characters.
The LCD displays “MODE NO.?“.
The speed dial number appears with name or memo. NN or NNN = personal or system speed dial codes. Personal speed dial code numbers are 10 m 49, and system numbers, stored from station 200 only, are 60 N 99 or 600 * 699, depending on your system size.
:
:
47

. . . . . - . -
‘_ : : : .
To Check a Speed Dial Number:
1. Press Mode + 8 when telephone is idle.
2. Dial a two-digit speed dial number.
3. Press Page to scan the directory for the appropriate number/memo.
Note: The station must be enabled via system programming for LCD message memory
Personal speed dial number (10 * 49) or system number (600 N 699).
If the number is longer than 16 digits, a ‘(+‘I will appear in the far right corner of the display. Press Scroll to display the remaining digits.
Timed Reminders with Memo This feature allows five separate messages to be set at each LCD station. These messages will be displayed at the times (hour and minute) set by the station user. They can either be displayed just once or repeated on a daily basis.
To Set a Timed Reminder with Memo:
1.
2.
3.
4.
5.
6.
Press a [DN].
Dial a three-digit reminder number (# 6 0 5 - # 6 0 9).
Enter the desired time for the message to be displayed.
Dial 0 if the message is to be repeated every day, or 1 if it is a one- time message only.
Enter the desired message number, or 00 if no message should be stored.
Press Redial to record the data in memory.
The message time must be in 24-hour clock format (i.e., HHMM).
Personal message (10 m 19) and system (60 m 99). The message does not display when setting a timed reminder-it displays when the reminder activates. Messages are set using the Record a Message method.
The LCD displays “DATA PROGRAMMED”. You will hear a confirmation tone. The message will be displayed at the specified time, and a beeping tone will be heard for 30 seconds (or until it is canceled by pressing Mode + 0).
48

To Set a Called Station Message:
1. Press MODE + 7 0 to ensure that Soft Keys are off.
2. Dial the station Directory Number (station does not answer or is busy).
3. Press Mode.
4. Press 4.
5. Enter the desired message number.
6. Press Msg.
7. Press Spkr or hang up to release.
Message Sending The Alphanumeric Messaging feature on your LCD digital telephone enables you to set short text (up to 32 characters) at your station to ensure that you do not miss important calls. Any station may record a message; however, only stations with the LCD are able to display messages. Stations that do not use Soft Keys (Soft Keys Off: Mode + 7 0) may send messages “live” to other LCD station users. To record messages, see the Recording a Message section in this guide.
Your system has up to 40 preprogrammed messages that may be sent to other LCD digital or electronic telephones. In order to leave a personalized message at your station, you can temporarily add or change any of these messages.
Some stations may record and save up to 10 personal messages to be used for all types of station messaging. This is a station option that is enabled in system programming.
Called Station Messaging
Your station number and a message indication may be sent to another LCD station. When that station responds, it will receive the message. Soft Keys must be off (Mode + 7 0) at the sending station for this feature to operate.
The LCD displays “MODE?“.
The LCD displays “MW TO STNNN MSG NO?“.
Personal message (IO * 19), system message (60 = 99). The LCD displays the message.
“CALL XXX-YYYM” is displayed at the called station and the Msg LED flashes; “SENT MMM” is displayed at your station. XXX = the called [DN], YYY = the [PDN] of the station that sent the message, M indicates that a message has been sent.
49

To Receive a Called Station Message:
) Press the Msg button.
To Set a “Called Station” Message for Another Station or Group of Stations:
1. Press Mode.
2. Press 9 4.
3. Dial the “destination” Directory Number (or enter # 3 Ofor all stations, or # 3 1 - # 3 8 for groups).
4. Press Page.
5. Dial the “originating” [PDN].
6. Press Page.
7. Enter the desired message’s number.
8. Press Page.
9. Press Mode.
IO. Press 0.
Press these buttons when your telephone Msg LED is flashing
Group Called Station Messaging
This feature allows a station to set a Called Station Message for a group of stations.
The LCD displays “MODE?”
The LCD displays “MODE 94 DEST EKT NO. NNN?“.
The LCD displays “MODE 94 DEST EKT NO.NNN” or the Station Group number. Enter #30 for all call page stations, or #31 - #38 to send the message to a group of stations.
Station groups correspond to the same stations that are in respective Page groups assigned in system programming.
The LCD displays “MODE 94 ORG EKT NO.?”
Your number or another station number. The LCD displays “MODE 94 ORG EKT NO.NN”.
The LCD displays “MSG NO.?“.
The LCD displays the message.
The LCD displays “MSG NO.?“.
The LCD displays “MODE NO.?“.
At originating station, the LCD displays date/day/time, and then displays “SENT NNNM”. At the destination station, the LCD displays the originating station number and a message indication.
To Receive a Called Station Message:
l Press Msg.
50

: :. .
To Set a Calling Station Message for Another Station:
I. Press Mode when your telephone is idle.
2. Press 9 5.
3. Dial the destination [PDN].
4. Press Page.
5. Enter the desired message number.
6. Press Page.
7. Press Mode.
8. Press 0.
To Send a Message to a Busy Station:
1. Call the desired station
2. Press Mode.
3. Press 2.
4. Enter the desired message number.
Remote Calling Station Messaging
The LCD displays “MODE?”
The LCD displays “MODE 95 DEST EKT NO.NNN.” This is the [PDN] to which the Calling Station message will be set.
The LCD displays “MSG NO.?“.
The LCD displays the message.
The LCD displays “MSG NO.?“.
Note: Remote calling station messaging allows you to set a calling station message for only one station at a time.
The LCD displays “MODE NO.?“.
Your LCD shows the time and date. The message is displayed at the “destination” station. Any station calling the “destination” station receives the message.
Busy Station Messaging
When reaching a busy LCD station, a message can be sent to that station (an audible tone will be heard). The busy station may also return a message to the calling station’s LCD. The two stations may continue this procedure to carry on a “silent” conversation. Soft Keys must be off (Mode + 7 0) at the sending and receiving stations for this feature to operate.
Listen for a busy tone.
The LCD displays “MODE NO.?“.
The LCD displays “OVER TO STNN MSG NO?“.
Personal message (10 - 19) and system message (60 - 99). The LCD displays the message.
51

5. Press Page.
To Return a Busy Station Message:
1. Press Mode.
2. Press 2.
3. Enter the desired message number.
4. Press Page.
The LCD displays “MSG SEND”. The destination station beeps four times and the message is displayed for 30 seconds, or until the originating station hangs up.
Return a Busy Station Message
You can return a Busy Station message after receiving a Busy Station message by following the steps on the left.
The LCD displays “MODE NO?“.
The LCD displays “OVER TO STNN MSG NO?“.
Personal message (10 - 19) and system message (60 - 99). The LCD displays the message.
The LCD displays “MSG SEND”.

Index
20-button digital speakerphone with liquid crystal display, 2
A account codes, 5 alphanumeric messages, 8
ANI, 4, 6, 12,25-26 auto dial lost calls, 25
auto busy redial, 7 automatic callback, 7-8, 36
automatic line selection, 8
B busy field, 3-4, 8, 29
busy lamp field, 1, 29 busy override, 15, 35
busy station messaging, 4, 5 return a busy station
message, 52
C call forward, 3, 9, 20-23, 27, 44
all calls, 9-10, 22
for [DNs], 9 for [PhDNs], 9 -
busy, 9-10, 22
busy/no answer, IO, 21 call forward-external, 21
call forward-fixed, 9
call forwarding a primary and/or phantom directory number, 9, 21, 22
cancel a call forward, 23 no answer, g-10,21
settings, 9, 44
call park/park and page, 23-24 paging group and zone codes,
24
parked call retrieval, 24
call pickup, 10 caller ID, 4, 6-7, 10, 25-26
calling number-internal, 10 calling station messaging, 4, 42,
51
camped-on CO call, 11 CO line identification, 1, 10, 16
CO line number, 8, 11, 16 conference, 17, 32
conventions, iv
D date/time, 12 date/time/day adjustment, 19 dialed number, 3, 6-7, 11-12, 14
DNIS, 4, 6, 12-13 dialpad information, 40
directory number display, 13
[DN], 7-9, 12-13, 16, 19-20,22, 24,26-29,43-49
Do Not Disturb (DND) override, 16
door phone/monitor, 13
E elapsed time, 3, 12, 14
executive override, 16, 36
G group called station messaging,
50
I incoming CO call, 11
L LCD function overview, 5
condition creating display, 5
LCD name/number display, 14
least cost routing, 14
liquid crystal display, 5 lost call, 4, 25-26
M message sending, 49
busy station messaging, 4, 51
:/ y:
53

called station messaging, 4, 49-50
group called station messaging, 50
remote calling station messaging, 4, 51
return a busy station message, 52
message waiting, 4, 15, 22, 26-27,35
messages and memos, 39-52 adding to preprogrammed
message, 41
calling station messaging, 4, 42,51
canceling a calling station message, 42
group called station, 50 preprogramming system
messages, 41
recording a message, 39-45, 47,49
remote calling station messaging, 4, 51
setting/changing calling station messages, 43
storing a message in memory, 39-40
storing LCD name/number display, 43
system messages, 4,41
mode, 1, 3-4, 6, 8, 12, 16-17, 20-22,25-26,29,31-32,34-37, 44-52
definitions, 3-4
msg, 15,26-28,39,42,49-52
0 off-hook call announce, 15
override, 15-l 7, 35-36, 44
P Page button, 3, 6, 8, 12, 14, 17,
23-25, 29, 31-32, 35, 40, 42, 45, 47-48,50-52
paging group and zone codes, 23-24
park/park and page, 23-24 parked call retrieval, 24
park orbit list display, 25 [PDN], 8-10, 13, 21-24, 27,39,
42,45,49-51
[PhDN], 8, IO, 22-23,27
preprogramming system messages, 41
adding to preprogrammed messages, 41
privacy override, 16
R redial, 7, 12, 19-20, 28-29, 32, 36,
46-48
recalling station, 15-l 6 recording a message, 39-45, 47,
49 recording a message, name, or
memo, 40 retrieve and auto dial lost calls, 25
retrieve voice mail messages, 28
S scroll, 1, 3-4, 9-10, 15, 20, 25-27,
31-32, 48
[SW, 8 SDS button, 46
soft keys, 1, 4-5, 12, 14, 29, 31-32,36-37,43,45-46,49,51
soft key prompt, 35 activation, 36 deactivation, 37
definitions, 3-4, 35
speed dial, 1, 3-5, 17, 22, 39, 46-48
speed dial memo, 1, 17, 46 Spkr, 7, 19-20,22-23,39,42,
44-45,49 station-to-station message waiting,
26
storing a message in memory, 39-40
T timed reminders, 1, 3, 39, 48 toll restriction, 17 transferred CO call, 11
traveling class override codes, 17 two-CO line calls, 17
V verified forced account code, 5 verified voluntary account code, 5
voice mail, 15, 27-28, 43 assign a voice mail message
mailbox, 28 assign voice mail retrieval
digits, 28
54

TOSHIBA C. Toshiba America Information Systems, In-. Telecommunication Systems Division 9740 Irvine Boulevard, Irvine, CA 92718
Item Number: 4 0 1 6 1 10 D26-UG-DKTLCDR,a