load pilot driver code - nz transport agency · this book is for people wanting to be class 2...
TRANSCRIPT


NZ Transport Agency (NZTA) First published May 2003, revised April 2009 ISBN 978-0-478-33447-0 (print) ISBN 978-0-478-33448-7 (online)
Copyright informationCopyright ©NZ Transport Agency Material in it may be reproduced for personal or in-house use without formal permission or charge, provided suitable acknowledgement is made to this publication and the NZTA as the source. Requests and enquiries about the reproduction of material in this publication for any other purpose should be made to: Manager – Information, NZTA, Private Bag 6995, Wellington 6141, New Zealand.The permission to reproduce material in this publication doesn't extend to any material for which the copyright is identified as being held by a third party. Authorisation to reproduce material belonging to a third party must be obtained from the copyright holder(s) concerned.
For more information …National Office, NZTA, Private Bag 6995, Wellington 6141, New ZealandT 64 4 894 5400F 64 4 894 6100
This document is available at www.nzta.govt.nz

This book is for people wanting to be class 2 certified load pilot drivers.It contains:
information on the law for load pilots•information on different ways of warning and controlling traffic while escorting an oversize vehicle•information on controlling traffic while overweight vehicles cross bridges•information on the state highway location reference system•a test, which if successfully completed will allow you to become an NZ Transport Agency• (NZTA) approved class 2 load pilot driver.
You must complete the test at the back of this book. Follow the instructions in part 9.1 to have it assessed by the Overdimension Permit Issuing Agency.The agency will let you know the result. If you’ve passed the course, they’ll send you a pilot certification card that you should carry whenever you’re piloting to show you’ve done a course approved by the NZTA.Good luck!
To help you understand specific legal requirements, we’ve included excerpts from the Land Transport Rule: Vehicle Dimensions and Mass 2002 (the Rule).
These are shown in a box like this.
The number in front of the text is the same as the section in the Rule.
Note: Images and figures in this book aren't to scale.
Note: This book paraphrases the requirements of the Land Transport Rule: Vehicle Dimensions and Mass 2002. However, the police and the courts use the full, exact language of any acts, regulations, rules and codes of practice. This means the explanations in this book aren't a proper legal authority and shouldn't be relied on in a court of law.
Load pilot driver code

2
PART 1 An introduction to load piloting 1.1 Introduction 41.2 How we safely manage the movement of
oversize vehicles 41.3 How to become a class 2 load pilot 51.4 What you need 51.5 How to complete a load pilot driver's course 5
PART 2 Definitions 6
PART 3 The legal requirements for piloting and how to meet them
3.1 A load pilot’s job 83.2 Safe driving practices 83.3 Planning 83.4 Warning traffic 9
3.4.1 General 93.4.2 Piloting from the front
at normal road speed 103.4.3 Piloting from the rear
at normal road speed 123.4.4 Positioning your pilot vehicle 143.4.5 Piloting to allow excess front or
rear overhang 14
3.4.6 Piloting if the oversize vehicle is stopped 163.4.7 Directing traffic 183.4.8 Clearances with signs and
roadside furniture 213.4.9 Summary of managing traffic
around stopped oversize loads 22
PART 4 Pilot equipment4.1 Pilot vehicles 23
4.1.1 What the Rule says 234.1.2 Pilot vehicle size summary 23
4.2 Pilot signs 234.2.1 What the Rule says 234.2.2 Pilot sign summary 23
Specifications for signs 244.3 Pilot lights 26
4.3.1 What the Rule says 264.3.2 Pilot lighting summary 26
4.4 Communications between pilot vehicles and oversize vehicles 26
4.5 Other useful equipment 274.6 Pilot equipment checklist 28
Contents

3
PART 5 Traffic control at bridges being crossed by overweight vehicles
5.1 Introduction 305.2 Equipment specifications 30
5.2.1 Overweight vehicle 305.2.2 Traffic control vehicles 305.2.3 Lights 315.2.4 Communications 315.2.5 Mandatory safety equipment 31
5.3 Traffic control procedures 315.3.1 Traffic control 315.3.2 Traffic control vehicles 315.3.3 Stop or Stop/Go paddle 315.3.4 Where to stand 315.3.5 Slowing traffic 325.3.6 Stopping traffic 325.3.7 How to move traffic 325.3.8 Never wave the sign 325.3.9 With opposing traffic
(vehicle in own lane) 325.3.10 Without opposing traffic
(overweight vehicle needs all bridge traffic stopped) 33
5.4 Safety issues 33
PART 6 Location referencing on state highways (route position markers) 34
PART 7 Emergency procedures in case of a crash involving an oversize and/or overweight vehicle 36
PART 8 Maximum vehicle size limits for class 2 load pilots
8.1 Introduction 378.2 Definitions of dimensions 378.3 Size limits 41
PART 9 The class 2 load pilot test 9.1 Introduction 449.2 Load pilot assessment 45
PART 10 How to become a class 1 load pilot 10.1 Introduction 4910.2 What you need 49
PART 11 Other sources of information 49

4
1.1 IntroductionLoad pilots play an important part in making sure that unusually large or wide vehicles travel New Zealand’s roads safely. They are responsible for warning other road users of an approaching vehicle, managing any problems and keeping any traffic delays to a minimum.So why do we need load pilots?New Zealand’s roads are designed to fit standard vehicles with standard dimensions – and a lot of thought goes into designing them to ensure that vehicles can travel safely. For example, the layout of the lanes, the placing of traffic islands and roundabouts and the turns into and out of buildings and driveways are just a few things that have to be designed so vehicles can fit safely. In addition, road markings help drivers position their vehicles on a road and keep a safe distance from other vehicles.However, sometimes vehicles (or vehicles carrying large loads) have to exceed the standard sizes. These are called overdimension (or oversize) vehicles.
Oversize vehicles are often too wide or too long for the standard road markings. This can cause problems, especially as most of New Zealand’s roads have only two lanes divided by the painted centre line. Load pilots ensure that other road users are aware of the potential danger and know what to do so they can pass safely.
1.2 How we safely manage the movement of oversize vehicles
There are several ways to ensure oversize vehicles travel safely:
Travel restriction periods •– Oversize vehicles can't travel at
normal peak traffic times.Highlighting the hazard •– Hazard warning flags and Oversize
signs let other road users know about the size of the vehicle so they can judge their way safely past.
– Lighting around the extremities of the vehicle means other road users can clearly judge their way safely past.
Advance warnings and instructions to• road users.
PART 1
An introduction to load piloting

5
Vehicles of a certain size are legally •required to be piloted by a minimum number and class of pilot. The operator must make sure there are enough pilots, particularly if the road conditions are unusually difficult or restrictive.
This book is approved by the NZTA as a guide on how to provide advance warnings and meet minimum safety requirements. However, it’s important to remember that road controlling authorities (such as councils or, for state highways, the NZTA) may have additional requirements for guiding road users past unusual or disruptive road activities. Make sure you contact the road controlling authority responsible for the roads you are using to find out if they have other requirements for warning road users of an oversize vehicle.
1.3 How to become a class 2 load pilot Since 31 January 2004, all load pilots must have completed a load pilot driver’s course approved by the NZTA.
1.4 What you needTo be a load pilot, you need:
a current New Zealand driver licence for •the vehicle you’re driving to complete an NZTA approved load •pilot driver's course (learning the information in this book and passing the test at the back is one way of completing an approved course).
1.5 How to complete a load pilot driver's course
This book covers the requirements for a class 2 load pilot. Read it carefully, and then complete the test in part 9. Once you’ve done the test, post it to:
Transport Registry CentreOverdimension Permit Issuing AgencyPrivate Bag 11 777Palmerston North 4442.
The Overdimension Permit Issuing Agency will mark the test. If you pass, they’ll send you a pilot certification card. Make sure you carry the card with your driver licence whenever you’re piloting, so you can show it to the police if they ask you for evidence that you’ve completed a course approved by the NZTA.
What the Rule says:7.2 (1) A person who, immediately before 1 July 2002, operated
as an a-grade or b-grade certified pilot may continue to operate as a class 1 certified pilot on or after 1 July 2002, provided that the person complies with the requirements in 7.2 (3).
7.2 (2) A person who, immediately before 1 July 2002, operated as a c-grade certified pilot may continue to operate as a class 2 certified pilot on or after 1 July 2002, provided that the person complies with the requirements in 7.2 (3).
7.2 (3) The requirements are:a) the completion of a pilot driver’s course, approved by
the Director, by 31 January 2004b) compliance with the requirements in this section.
7.2 (4) The operator of a pilot vehicle must either be an enforcement officer or have completed a class 1 or class 2 pilot driver’s course approved by the NZTA.
7.2 (5) A pilot vehicle must display adequate warning and information concerning the overdimension hazard to approaching drivers.

6
Central on beam (For vehicles travelling with an overweight permit) the overweight vehicle travels centrally on the bridge’s beam structure. Choke-points Points on the road network that require special attention, eg roads with a narrow restriction where oncoming vehicles must be stopped to allow the oversize vehicle past. Craw (For vehicles travelling with an overweight permit) not exceeding a uniform speed of 10 km/h on bridge crossings.Emergency services The NZ Police, NZ Fire Service, ambulance services and Civil Defence.Flashing light (or beacon) (see also revolving amber light) A light that either flashes (strobe) or appears to flash.Frangible Breakable or easily deformed.
Hazard Any activity that changes the normal operating conditions of any road and/or could affect road users’ safety.Indivisible load A load that can't reasonably (without a lot of effort, expense or risk of damage to the load) have its size reduced or be divided into two or more sections for road transport. Lane A width of roadway intended for the movement of vehicles that is separated from other parts of the roadway by a line or lines of paint or raised studs. Metres (m) The standard international unit for measuring distance, which is often abbreviated to m (eg 4 m = 4 metres). Offset (For vehicles travelling with an overweight permit) the overweight vehicle’s centre is at the indicated distance from the kerb on its left.Opposite lane (For vehicles travelling with an overweight permit) the overweight vehicle travels in the lane usually used by traffic coming from the opposite direction.
PART 2
Definitions
An explanation of some of the words and terms used often in this book follows. Part 8 includes terms used for vehicle dimensions.

7
Overdimension (or oversize) vehicle A motor vehicle that exceeds the dimension limits for standard vehicles. A vehicle may be oversize if it is:
a standard vehicle carrying an •overdimension indivisible loada specialist vehicle carrying equipment •that can't be made smaller than the standard vehicle dimension limits (such as a mobile crane, harvester or tractor) a vehicle designed primarily to carry •oversize and/or overweight loads.
This book uses the term oversize vehicle to cover:
a vehicle with a load that exceeds the •dimension limitsa vehicle that doesn’t carry a load but •has specialist equipment that makes it oversize, eg a combine harvesteran oversize vehicle such as a wide •low-loader, whether it’s empty or carrying an oversize load, eg a dump truck.
Own lane (For vehicles travelling with an overweight permit) the overweight vehicle travels in its own lane as far as practicable.Pilot (load escort, load pilot) a person accompanying an oversize or overweight load for the purposes of managing traffic.
Revolving amber light An amber warning light mounted on a vehicle. A flashing amber light can be used instead of a revolving amber light.Revolving purple and revolving amber lights A warning light system mounted on a vehicle escorting loads more than 5 m wide. Flashing purple and flashing amber lights can be used instead of revolving lights.
During daylight, there are two revolving •amber lights on the vehicle’s right (driver side) and two revolving purple lights on the left.During darkness, there is one revolving •amber light on the vehicle’s right (driver side) and two revolving purple lights on the left.
Road All sealed and unsealed pavements, the shoulder, footpath, verge, drainage channels and any other areas within the road reserve.Road controlling authority An organisation (typically the NZTA for state highways and city or district councils for other roads) that manages and controls roads.
Road reserve The area between the legal boundaries (usually fence line to fence line) dedicated to allow the passage of road users, including any safety runoff areas. The road reserve also includes a 6 m airspace directly above the road’s surface.Road user All users affected by the oversize vehicle (such as drivers, riders, pedestrians, passengers, vehicles and traffic). Shoulder The pavement surface to the left of the extreme left-hand edge line or seal edge if there is no edge line.

8
3.1 A load pilot’s jobA load pilot’s main role is to manage traffic safely. They are responsible for:
providing advance warning to •approaching road users of the hazard created by an oversize vehicle; if necessary, they also give instructions to ensure road users can pass safelywarning the load driver of any unusual •conditions that may prevent the oversize vehicle fitting the routeminimising delays to road users by •working with the load driver to let other road users past, and/or working with other pilots to make sure everyone in the load convoy is aware that traffic is getting held up and action can be taken to allow other road users to pass safely.
3.2 Safe driving practices As a load pilot driver escorting an oversize vehicle, you must always:
obey all traffic laws, rules and regulations – •don’t assume that other road users will give way to an oversize vehicledrive defensively – good drivers can •anticipate potential incidents and plan for themplan the trip so you don’t get tired while •driving or having to control road users.
3.3 PlanningTips on planning your escortA safe move requires good teamwork. Before beginning the journey, make sure you discuss and plan it with the oversize vehicle driver and any other pilots or teams involved.
Plan and agree on the destination •and route.Identify any choke-points on the road, •and how you’ll manage the traffic. For example, if oncoming vehicles will have to be stopped to allow the oversize vehicle to pass, plan a suitable place for directing road users. And remember, power, phone and water companies and councils may impose special requirements – such as power line companies requiring lines to be temporarily lifted, or councils imposing special conditions on bridge crossings. Plan places where the oversize vehicle •can pull over to allow following vehicles to pass.Agree on common radio communications.• All pilots and the oversize vehicle driver must be in radio communication with each other.
Be aware of situations that put other •road users at risk – such as travelling down the wrong side of a two-lane median-divided road or the wrong way around roundabouts. You’re likely to have to meet special requirements. For example, at least one class 1 pilot (who has extra experience) must escort the oversize vehicle and you must get council permission first. The council may also require special traffic management systems for these situations.
PART 3
The legal requirements for piloting and how to meet them

9
3.4 Warning traffic3.4.1 GeneralThe key to being a good load pilot is always thinking about what you’re there to do.Each situation is different – some systems will work better than others. It’s your job to provide the best quality information to road users at the earliest opportunity. If you’re the only pilot escorting the load, make sure you’re in a position that will give approaching road users the best warning. This will depend on two things – the road and the load.1. The road. For example:
You should pilot from the front if road •users approaching the vehicle from the rear can see the load with plenty of time and don’t need advance warning or instructions on how to pass.You should pilot from the rear if the •road has a divided median strip or if traffic heading towards the load from the opposite direction isn’t going to be put at risk by the oversize vehicle.
2. The load. For example:Over-width loads are usually piloted •from the front because road users approaching from the opposite direction are at higher risk than those following.A load with excess rear overhang is •usually piloted from behind because it’s usually more of a hazard for road users approaching from the rear than for those approaching from the front.
The following sections suggest some effective traffic management methods.Instructing/directing traffic from your vehicle You may need to signal other road users to stop, slow down or pull over while you’re piloting. This involves:
attracting their attention•getting them to understand what they •need to do.
This can be done using revolving amber lights and a sign on your vehicle describing the oversize vehicle – but sometimes additional advice is helpful and necessary. If it’s not practical or safe to stop your vehicle and use the Stop paddle, you’ll need to provide some instruction while you drive. In this case, make sure you slow down – this helps get the attention of approaching road users. Ways to do this include:
using a red flag• (or red torch/wand at night)using the standard arm warning signal for •slowing traffic down (see section 3.4.7)using the Stop/Slow paddle.•
What the Rule says:7.1 (8) An overdimension load or overdimension
motor vehicle that is travelling in the lane for opposing traffic on a median-divided road or at a controlled intersection must be escorted by at least one class 1 pilot vehicle and must have road controlling authority permission.
7.2 (5) A pilot vehicle must display adequate warning and information concerning the overdimension hazard to approaching drivers.

10
3.4.2 Piloting from the front at normal road speed
Road users heading towards the front of an oversize vehicle usually have a higher closing speed than if they were approaching from the rear. Here are two examples:a) If the oversize vehicle is travelling at
80 km/h and a motorist approaching it head-on is travelling at 100 km/h, the closing speed is 180 km/h.
b) If the oversize vehicle is travelling at 80 km/h and a motorist following it is travelling at 100 km/h, the closing speed is 20 km/h.
This means that if the oversize vehicle moves into the lane for opposing traffic, road users approaching it head-on have far less time to react than those following it, and have a greater risk of serious harm in any collision. So it’s really important that you give these road users enough warning to take any necessary precautions to pass the load safely. When to use this approachIf the oversize vehicle is able to travel at normal highway speed, you should be able to provide enough warning by leading it from a safe distance.
Positioning your vehicle (See section 3.4.4 for examples.) Here are some key points about positioning your vehicle:
Drive in the same lane as the oversize •vehicle.Position yourself as far as possible to •the left of the lane. If approaching traffic sees the oversize •vehicle at the same time as they see you, you’re too close to the oversize vehicle. The only exception is when you’re travelling on a long, straight section of road with very good visibility ahead, or in 50 km/h speed limit environments.If you’re travelling at open road •speeds (100 km/h) 500 m ahead of the oversize vehicle, road users have approximately 10 seconds to understand any information you’ve given them and take appropriate action before the oversize vehicle draws level. Avoid travelling too far ahead of the •vehicle, as approaching drivers may think there’s no hazard and forget your warning. Traffic travelling in the opposite direction should see your vehicle 5–10 seconds before meeting the oversize vehicle.

11
You also need to make sure that •approaching road users can see you in enough time to understand your advance warning. They need to see you from a distance of at least three times the speed limit (or three times the speed of that section of road) in metres. So, on the open road at 100 km/h, drivers approaching you head-on should see you from at least 300 m. If the oversize vehicle is on a section of winding road where approaching traffic has poor visibility, move forward to a section of the road where road users can see you clearly. Sometimes, other parties will be involved• in your move (such as service vehicles to manage overhead power lines). These vehicles should only be included in the convoy if absolutely necessary, and a pilot should always be the leading vehicle. The most experienced pilot in the convoy should lead from the front, unless the most important traffic management has to be done from behind the oversize vehicle.
Don't drive your vehicle at approaching• road users or on the wrong side of the road. If you’ve asked or signalled a road user to stop and they haven’t, let the oversize vehicle driver know immediately.
It’s very important that you’re familiar with the route. Discuss any issues with the oversize vehicle driver before you leave and keep each other updated during the journey. Remember, large vehicles (particularly truck-trailer or B-train combinations) usually need more warning to slow down and find a place to pull over. You may be able to confirm that the driver of a large vehicle has seen you by using the CB radio. If possible, let them know what the load is, so they have an idea of how much room is required for both vehicles to pass safely. Providing warnings Don’t rely just on your lights and sign as your warning equipment – use whatever you need to make sure other road users see your warning and act on it. For example, if they need to slow down and pull over, use hand signals, a flag, radio communications (to truck drivers via CB), a red wand or the Stop/Slow paddle.
Passing trafficPay attention to the road conditions. For example, if you’re leading the oversize vehicle and you’ve passed through a section of restrictive road, let the load driver know of any cars heading towards them. The driver will then have time to allow for the oncoming vehicle.Providing helpful advice to the load driver Let the load driver know immediately about:
unexpected hazards such as slips or •overhead obstructions that might cause problems to the loadparked vehicles, cyclists or pedestrians •they may have to slow down for and/or move over to pass.
This will help them prepare to take action. Temporary stopsThe load may need to stop during the journey to allow traffic to pass or for servicing and checking breaks. Identify suitable places before you start the journey and make sure you, the load driver and other pilots are all familiar with these points along the route. Radio the convoy if the places are no longer suitable, eg because vehicles are parked there.

12
3.4.3 Piloting from the rear at normal road speed
Tail pilot vehicles provide warnings to road users approaching from behind the oversize vehicle.When to use this approachYou must pilot the oversize vehicle from the rear if you’re travelling on a median-divided or one-way road where the only risk is to road users approaching from behind.It’s also better to pilot from the rear if the oversize vehicle has a rear overhang and other road users need warning or guidance to keep them safe from tailswing (see section 3.4.5). Positioning your vehicleHere are some key points about positioning your vehicle:
Drive in the same lane as the oversize •vehicle. Position yourself as far left as possible •so road users can pass you easily. If approaching traffic sees the oversize• vehicle at the same time as they see you, you’re too close to the oversize vehicle. The only exception is when you’re travelling on a long, straight section of
road with very good visibility ahead, or in 50 km/h speed limit environments.You also need to make sure approaching• road users can see you in enough time to understand your advance warning. Drivers coming from behind need to see you from a distance of at least three times the speed limit (or three times the speed of that section of road) in metres. So, on the open road at 100 km/h, drivers should see you from at least 300 m. This practice is particularly important •when the oversize vehicle is travelling slowly through a narrow, winding section of road, as road users don’t expect to round a bend and be confronted by a load blocking the way. In this case, increase the distance between you and the oversize vehicle so you’re on a section of road where you can be seen clearly. Once the oversize vehicle is past the difficult section, reposition yourself with a 5–10 second gap and good visibility to the rear. Leave enough of a gap for following •traffic to pass you without having to pass the oversize vehicle in the same manoeuvre.

13
It’s very important that you’re familiar with the route. Discuss any issues with the oversize vehicle driver before you leave and keep each other updated during the journey. Providing warnings Don’t rely just on your lights and sign as your warning equipment – use whatever you need to make sure other road users see your warning and act on it. For example, if they need to slow down and pull over, use hand signals, a flag, radio communications (to truck drivers via CB), a red wand or the Stop/Slow paddle.Reducing traffic build-upOversize load drivers often can’t see what’s happening behind them, particularly if they’re driving a wide vehicle. Load pilots play an important role in keeping them informed. So if a queue of 10 vehicles builds up, let the load driver know about it. Or, if you’re helping a class 1 pilot and they’re leading the oversize convoy, let them know if a queue’s forming behind the convoy so you can help it pass.
Make sure you know about suitable places for the oversize vehicle and pilot vehicles to slow down and let the traffic pass. This should only happen on straight sections of road with good visibility, so that following drivers can safely see their way past the oversize vehicle. Passing If you’re piloting from the rear and road users pass you, advise the oversize load driver so they know someone is trying to pass them.If the oversize vehicle has to pass others, move into the passing lane before the load driver starts to pass – this will prevent road users behind you trying to pass. Stay in the passing lane until the load vehicle has finished the manoeuvre.
What the Rule says:6.6 (7) An overdimension motor vehicle must be operated with
due consideration for other road users and where it is safe to do so, other road users must be allowed to pass the vehicle at the earliest opportunity.

14
3.4.4 Positioning your pilot vehicle Figures 1–3 are examples of pilot vehicle positioning. They aren't compulsory and are shown for guidance only.Urban areas (figure 1)
Urban areas require special attention and planning because other road users often have to stay out of the traffic lanes they would normally use so that the oversize vehicle can pass safely. For example, if you’re approaching an intersection where the oversize vehicle requires two lanes, you should stay closer to the oversize vehicle than you would at open road speed. This will help other road users know exactly what vehicle you’re escorting and why you’re using the lane. Rural areas (figure 2)
In rural areas, pilot vehicles are normally positioned either well ahead of or well behind the oversize vehicle. The distance between you and the oversize vehicle will depend on speed and road conditions (see sections 3.4.2 and 3.4.3).Motorways and multi-lane roads divided by a median barrier (figure 3)
Oversize vehicles travelling on multi-lane roads with median barriers should be
no risk to road users approaching from the opposite direction. Oversize vehicles or loads must never overhang the median barrier or go onto lanes available to traffic travelling in the opposite direction. The main risk is to road users following the oversize vehicle. If you are the only pilot, you must follow the oversize vehicle. If there is more than one pilot available, the most experienced should be at the rear.
3.4.5 Piloting to allow excess front or rear overhang (See section 8.2 for definitions of front and rear overhang.)The previous section gave some examples of positioning your vehicle when following an oversize vehicle. However, these examples assume there is more than one pilot vehicle in the convoy. What happens when you’re the only one?If you’re the only pilot escorting the oversize vehicle, you must make sure you know all the oversize vehicle’s dimensions before you start the journey. This is important because different dimensions have different effects on manoeuvring and where the oversize vehicle might overhang into other lanes.
O/D loadpilot
median (barrier)
pilot O/D load
shoulder
shoulder pilot
5-10 second gap
other traffic
300 metres visibility
Figure 1. Piloting in urban areas
O/D load
pilot
pilot
pilot
O/D load
pilot
O/D load
pilot
pilot
pilot
O/D load
pilot
Figure 3. Piloting on motorways & multi-lane roads with a median barrier
Figure 2. Piloting in rural areas
right turn
left turn

15
A vehicle with excess front overhang poses a different risk from a vehicle with excess rear overhang – and they must be piloted differently.Piloting for excess front overhang (figure 4)Excess front overhang means that the furthest forward part of the vehicle, or load, is well forward of the load driver’s seat. This is a risk when the oversize vehicle approaches an intersection, as the driver won’t be able to see if the way is clear before the forward-most point of the vehicle moves into the intersection. In this situation, make sure you pilot from the front. Make sure you also know when the driver is having to cut the corner so you can manage road users and keep the lanes clear.
Piloting for excess rear overhang (figure 5)Excess rear overhang means that the furthest rearward part of the vehicle, or load, is well behind the rear of the vehicle (and therefore well behind the point on which the vehicle turns). This is a risk when the vehicle starts to make a turn and the excess overhang swings into an adjacent lane. This is commonly called tailswing.The vehicle driver focuses mainly on positioning the vehicle on the road so the rear overhang can swing clear of roadside objects. Other motorists are unlikely to be aware of the risk of tailswing and, unless told otherwise, are likely to pull alongside the oversize vehicle. Figure 5 shows an oversize vehicle turning at an intersection. The tailswing sweeps into the adjacent lane, which means any road users will be hit by the excess rear overhang. In this situation, you need to pilot from the rear and make sure road users stay clear of the tailswing area.
Figure 4. Piloting for excess front overhang
Figure 5. Piloting for excess rear overhang
pilot
excess front overhang
1
2
3
pilot
loadswings intothislane
rear overhang

16
Figure 6. Signs commonly used when controlling traffic
3.4.6 Piloting if the oversize vehicle is stopped (or where traffic has to be stopped)
Oversize vehicles sometimes have to travel extremely slowly to negotiate tight parts of the route. These are commonly referred to as choke-points and can be things like a narrow bridge, an overhead obstruction or a tight bend.Make sure you know about any choke-points before you start your journey, and let everyone in the convoy know how traffic will be managed. If the oversize vehicle driver is driving on a road that’s too narrow for two-way traffic, go ahead to a point where two-way traffic is possible and stop any oncoming road users there. When the oversize vehicle reaches you, it should stop and allow traffic to clear in both directions. As a general rule, road users shouldn't be delayed for more than five minutes.Make sure you park your vehicle far enough away from the choke-point that road users have enough time to see the oversize vehicle and take urgent action if they haven’t stopped for you. Radio the oversize vehicle driver immediately if a road user has ignored your request to stop and passed you.
Park your vehicle so approaching road users will see it but be in no danger of crashing into it. If it’s parked in an unusual place (such as partway into a traffic lane), turn your hazard lights on.Positioning you and your vehicle to manage traffic when the load is stopped and blocks some or all of a traffic laneFigures 7, 8A and 8B show situations where the load is stopped and road users must be managed so they can pass safely.Your traffic management will depend on:
how long the load will be parked•the amount of traffic•traffic speeds•the road type.•
The examples have different levels of complexity – the more complex ones might be used when you’re helping a class 1 pilot. However, the general principles of providing enough warning to road users don’t change, no matter what the situation.If the oversize vehicle breaks down or has to stop unexpectedly and road users can't pass the oversize vehicle safely, contact the police. It’s also helpful to inform the road controlling authority.

17
oversizevehicle
edge
line
edge
of s
eal
tail pilotvehicle
WIDE LOAD AHEAD
clear
visib
ility
mor
e tha
n3x
pos
ted
spee
d lim
it in
m
5 to
10 se
cond
s tra
vel t
ime
100–
600m
clear
visib
ility
mor
e tha
n3x
pos
ted
spee
d lim
it in
m
edge
line
edge
of s
eal
oversizevehicle
tail pilotvehicle
WIDE LOAD AHEAD
lead pilotvehicle
WIDE LOAD AHEAD
5 to
10 se
cond
s tra
vel t
ime
100–
600m
5 to
10 se
cond
s tr
avel
time
clear
visib
ility
mor
e tha
n3x
pos
ted
spee
d lim
it in
mcle
ar vi
sibili
tym
ore t
han
3x p
oste
d sp
eed
limit
in m
Figure 8A. Two pilot layout with low-volume traffic and good approach visibility
Note: 2-way 2-lane road, operation in left lane
Figure 7. One-pilot layout with low-volume traffic and good approach visibility
Note: 2-way 2-lane road, operation in left lane
tail pilotvehicle
WIDE LOAD AHEAD
tail pilotvehicle
D
E F
GO
STOP
G
GO
STOP
Eoversize
vehicle
clear
visib
ility
mor
e tha
n 3x
pos
ted
spee
d lim
it in
m
5 to
10 se
cond
s tra
vel t
im5
to 10
seco
nds t
rave
l tim
cones
cones
cones
30m
WIDE LOAD FOLLOWS
clear
visib
ility
mor
e tha
n 3x
pos
ted
spee
d lim
it in
m
edge
line
edge
of s
eal
TW-33
TW-33
Figure 8B. Two-pilot layout with low-volume traffic and good approach visibility
Note: 2-way 2-lane road, 1-lane closure of traffic, manual traffic controllers

18
3.4.7 Directing traffic Before you stand in or beside a lane to direct traffic, make sure you slow approaching road users down by using cones and/or signs. It keeps you safe and will help ensure the road users understand your directions.Where to stand on the roadStand where you can see as many approaching road users as possible. Remember, it’s risky to stand on or near traffic lanes, so you should always wear a high-visibility safety vest. Stand somewhere where approaching road users have as much time as possible to see you and respond to your directions. At an intersection, this will normally be in the exact centre (where the centre lines of the roads meet). At a T intersection, stand at the centre of the intersection facing the leg of the T (figure 10).
On a straight road, stand on the shoulder of your lane facing road users travelling in the same direction as the load. Keep close to your vehicle so you can hear your radio and instructions from the load driver or other pilots. Make sure you have an escape path – don’t stand where you would have nowhere to go if a vehicle lost control and headed for you. Always face approaching traffic and never turn your back on it.Make sure your vehicle is out of the way, so that approaching road users can see you clearly.
Figure 9. Manual traffic controller signals
To move traffic, turn sideways, then turn the paddle to Go. Use your arm nearest to the traffic to wave users on with a sweeping movement across your body in the direction of travel.
To stop traffic, turn the paddle to Stop, face the traffic and raise your other hand into the stop position with your palm towards the traffic.

19
Slowing traffic when directing from the road (figure 11)Face the traffic head-on, but don’t stand directly in its path, in case it doesn’t slow down in time. Then either:
use your right arm to direct road users• (keep your left arm by your side) – extend your right arm out to your shoulder in a straight line and then move it in a slow up and down arc, oruse the Slow paddle.•
Slowing traffic when directing from your vehicleSignalling from a moving vehicle isn't as effective as standing on the road. It's also more risky as it can distract you from driving, so take extra care.
If you’re driving and leading an oversize •load and want to signal approaching road users to slow down, use the right-arm arc motion described in figure 11 or use the Slow paddle. Try to make eye contact so the road •user knows your directions are for them. Use a white glove, red flag or red wand to attract approaching road users’ attention.If you want a road user to slow down •and pull over, the right-arm arc method probably won’t work. Ideally, road users should be brought to a stop so you can direct them to a safe parking area.
Don’t expect a road user to pull over, particularly if there are no obvious places to do so. It’s better to plan where traffic can be stopped safely and then stop and direct traffic at these points. Never leave road users in any doubt about what they’re meant to be doing.
Figure 10. Directing traffic at intersections
Figure 11. Signalling traffic from the road
Position at T intersection
Position at intersection

20
Stopping traffic when standing on the road (figure 12)
Choose the road user you wish to stop, allowing plenty of time for them to do it safely. Ideally, the road user you stop should also be able to move off smartly when the time comes. Avoid stopping large vehicles that are first in the queue, as:
you’ll find it hard to see what’s •happening behind the vehicleroad users behind it may not understand •why it has stopped and may pass it and travel into the danger zone.
Stand facing the road users but out of the traffic lane. Try to make direct eye contact so they know your signal is for them. Using a Stop sign is strongly recommended. It’s the most effective way of showing your intention to stop road users, and is widely used in other types of traffic management. Other options include wearing a white glove or using a red flag. If you don’t have any of these, face the traffic and hold your arms out horizontally, with your elbow bent at right angles and your palms facing the approaching traffic.
When an approaching road user slows down, move from the kerb or shoulder to the centre of the road so other road users can see you clearly. If time permits, tell stopped road users why there is a delay. Be courteous and brief.
Moving traffic from the right (figure 13)
Stand with the right-hand side of your body facing the traffic. Turn your head and face the line of traffic you wish to move. Start your signal with your right arm straight out from the shoulder towards the approaching traffic. Then bend the elbow, keeping your upper arm at shoulder level and your upper arm and hand in a straight line, with the back of the hand showing to the traffic you are signalling. Move your hand behind your head. Keep your left arm at your side so that road users clearly read your signals. Keep your feet slightly apart so that you’re stable but able to move quickly if necessary. Try to stay on the spot you chose as the centre of the intersection or road.
Once the first vehicle has started to move, keep your head moving so that you’re aware of any other road users around you, including in lanes that are supposed to be empty. Make eye contact with anyone you’re directing.
Moving traffic from the left (figure 14)
This signal uses similar movements to those for moving traffic from the right. The differences are:
You stand with the left-hand side of •your body facing the traffic; turn your head to the traffic you wish to move and signal with your left arm. When you bring your hand up to your •face, pass it in front of your face (don’t move your hand behind your head, as this may be misinterpreted as a signal to change lanes).
Remember, keep your signals at shoulder level so road users behind the front vehicle can see you. This helps prevent a stop-start traffic flow as each driver arrives at your spot and sees the signals for the first time.
Figure 12. Stopping traffic Figure 14. Moving traffic from the leftFigure 13. Moving traffic from the right

Figure 15. Directing traffic into another lane
Directing traffic into another lane (figure 15)
If you need to move traffic into a path it wouldn’t usually take (such as moving traffic from the left lane into the outer lane so it can pass a load), use the guide and beckon approach:
Make sure traffic approaching from •the other direction has been stopped first, or is far enough away to not cause problems.Stand with the stopped or approaching •traffic to your right, then turn your head and face the traffic you’re directing. Keep your left arm straight out across the path of the opposing traffic, so that it’s pointing toward the area where you want the traffic to go.Beckon the road user by bringing your• right hand around in an arc to meet the outstretched left hand. Repeat this movement as often as necessary to clear the traffic, or use the bent arm with palm facing the traffic to stop the flow when required.
Always turn traffic across your front so you can see the vehicle throughout the turn and make sure it’s doing as directed. Keep your signals at shoulder height for maximum visibility to road users. When detouring traffic, make sure the detour route is clearly marked.
3.4.8 Clearances with signs and roadside furniture
As a pilot, your first priority is to warn other road users. Once you have ensured their safety, you can help by advising the load driver if clearances become critically close between the vehicle and roadside furniture, such as traffic lights, poles and signs. If signs have to be temporarily removed to allow the oversize vehicle to pass, you must first get permission from the road controlling authority and the signs must be replaced immediately afterwards.
What the Rule says:6.6 (4) Subject to 6.6 (5), an overdimension motor vehicle
must not interfere with or damage a traffic control device, bridge, tunnel or other structure, or trees or other foliage, without the road controlling authority’s or owner’s permission.
6.6 (5) A traffic control device may be removed temporarily, with the road controlling authority’s or owner’s permission, to allow safe passage of an overdimension motor vehicle, provided that, when the vehicle has passed by the point on the road from which the traffic control device was removed, the traffic control device is immediately re-erected in its original position.
21

22
3.4.9 Summary of managing traffic around stopped oversize loads
As you can see, road users can be given many different types of warning. However, the same principles apply to all of them: the earlier road users see your signals and the more time they have to understand what they need to do to pass, the better chance they have of doing so safely.It’s important to consider each situation. If the load is parked up for a short time and little traffic is likely to approach, you may not need as much traffic control as on a busy road with a longer stop. Whatever the situation, it’s important to place signs and/or controls appropriately to give road users enough warning to pass safely.If you’re planning stops on a road where traffic will be disrupted, the operator in charge of the convoy must consult the road controlling authority and agree on a traffic management plan. The length and width of any road under temporary traffic management should be the minimum required for safety. If possible, tell delayed road users why they’re being stopped and for how long. For example, you might say, ‘A large excavator is crossing the bridge and it will take two or three minutes. Thanks for your patience’.
If you’ve had to remove road signs temporarily to allow the oversize vehicle past, put them back as soon as the vehicle has passed. Pilot safety when directing traffic while standing on the roadWhen you’re managing traffic while standing on a road:
Remember, you’re standing close to •moving vehicles and are at risk of being struck – always be alert and aware.Minimise the risk of harm to yourself by• using advance warning signs, direction signs and cones.Stay on the lookout, especially for •road users who might ignore your instructions – remember, you may surprise road users who travel the route daily, so they may act in unusual ways.Stand in the correct position and out of •the traffic flow.Wear a high-visibility jacket at all times •– you never know when you might have to work from outside your vehicle.Wear white gloves to make it easier •for other road users to see your hand signals.
Use the most effective gear you have •available, eg a Stop paddle is easier to understand than hand signals and directing traffic at night will be clearer with a red wand. Have a positive and helpful attitude to •road users – you will be inconveniencing them and they may be angry at being stopped; don’t let them upset you.Keep your signals clear and concise.•Always have an escape path.•

23
4.1 Pilot vehicles 4.1.1 See 'What the Rule says'.
4.1.2 Pilot vehicle size summaryPilot vehicles need to be manoeuvrable – especially those at the front of an oversize convoy – so there are limits on their size. It’s also important that road users don’t get confused and think the pilot vehicle is the oversize vehicle. An oversize vehicle, particularly one carrying a very large load, may also require an extensive support crew – often with specialist equipment that can only be carried on a large motor vehicle. It makes sense if one of these accompanying vehicles can pilot the load, but these operational requirements need to be balanced with safety considerations. If the vehicle is too large, it won’t be manoeuvrable enough and may be mistaken by road users as the oversize vehicle.
4.2 Pilot signs (figure 16)The signs on a pilot vehicle:
indicate to other road users that the •hazard you are piloting is wide or long give an indication of what other road •users should do.
Schedule 4 of the Rule (specifications for signs) is reproduced on the following pages.
4.2.1 See 'What the Rule says' (following page).
4.2.2 Pilot sign summarySigns are the easiest way to give road users advance warning of the hazard you’re escorting. Make sure your sign suitably describes the oversize load – the first message an approaching road user gets is often the most important one, because it makes them aware and prepares them to take action.
PART 4
Pilot equipment
What the Rule says:7.3 Pilot vehicles
7.3 (1) A pilot vehicle must have sufficient manoeuvrability and dynamic performance to enable it to carry out its primary duty of providing adequate warning to road users.
7.3 (2) A pilot vehicle must be clearly identifiable as a vehicle that is providing warning of the overdimension motor vehicle that it is escorting.
7.3 (3) A pilot vehicle may not carry an overdimension load or tow a trailer with an overdimension load.
7.3 (7) A class 2 pilot vehicle at the front of an overdimension motor vehicle must be a motor vehicle with a gross vehicle mass not exceeding 7000 kg and a wheel rim diameter not exceeding 17 inches.
7.3 (8) A pilot vehicle at the front of an over-dimension motor vehicle may not tow another vehicle.
7.3 (10) Except as provided in 7.3 (11), a pilot vehicle at the rear of an overdimension motor vehicle must be a rigid motor vehicle with not more than three axles.
7.3 (11) A pilot vehicle at the rear on an overdimension motor vehicle may tow a simple trailer with a maximum of two axles.
Figure 16.

24
Table 1. Wording, size and colour specifications for warning signs
What the Rule says:7.3 (9) A pilot vehicle at the front of an overdimension motor
vehicle must display above its roof a warning sign as specified in Schedule 4 describing the load behind it.
7.3 (12) A pilot vehicle (or its trailer) at the rear of an overdimension motor vehicle must display a warning sign as specified in Schedule 4 that faces towards the rear of the vehicle (or the trailer, if the pilot vehicle is towing a trailer) and describes the load ahead of it.
7.3 (15) A class 2 pilot vehicle may display on its front doors a pilot logo that is approved by the NZTA.
7.3 (16) A pilot warning sign must comply with the size and colour specifications in Schedule 4, and must be frangible.
7.3 (17) The pilot warning sign specified in Schedule 4 may be displayed only when the vehicle is escorting an overdimension vehicle.
The following specifications for signs tables are from Schedule 4, the Rule. Choose the sign that best suits the load you’re piloting.
Wording of warning sign
Letter size & stroke width (all upper case) (mm)
Size of sign (mm)
Colour of background Day/night
Colour of wording
Size & colour of border (mm)
DANGER SLOW DOWN
200/28 1 100 x 600
day
Fluorescent yellow-greenMatt black None
nigh
t Fluorescent yellow-green retro-reflective
WIDE LOAD FOLLOWS or WIDE LOAD AHEAD
150/21 1 100 x 520
day
Fluorescent yellow-green
Matt black Black 12
nigh
t Fluorescent yellow-green retro-reflective
HOUSE FOLLOWS or HOUSE AHEAD
150/21 1 100 x 520
day
Fluorescent yellow-greenMatt black Black 12
nigh
t Fluorescent yellow-green retro-reflective
LONG LOAD FOLLOWS or LONG LOAD AHEAD
150/21 1 100 x 520
day
Fluorescent yellow-green
Matt black Black 12
nigh
t Fluorescent yellow-green retro-reflective
PILOT VEHICLEThis face to be displayed on the reverse of all the above signs
150/211 100 x 600 1 100 x 520
Matt black
White. If used at night, white retro-reflective
White 12. If used at night, white retro-reflective

Figure 17. Warning sign for pilot vehicle
Table 2. Order of display of pilot signs for various size loads
Width
Greater than 3.1 m and up to and including 5 m wide
Greater than 5 m wide Less than 3.1 m, but requires pilot because of excess rear overhang or because it's greater than 25 m overall length
First pilot WIDE LOAD FOLLOWS DANGER SLOW DOWN LONG LOAD FOLLOWS
Second pilot (if required)
WIDE LOAD FOLLOWS
WIDE LOAD FOLLOWS or HOUSE FOLLOWS (as appropriate)
LONG LOAD FOLLOWS
OVERSIZE VEHICLE/LOAD
Rear pilot (if required)
WIDE LOAD AHEAD
WIDE LOAD AHEAD or HOUSE AHEAD (as appropriate)
LONG LOAD AHEAD
520 mm
150 mm/21mm
150 mm/21mm
25

26
4.3 Pilot lightsThe lights on a pilot vehicle:
draw road users’ attention to you •give an indication of the load size, •eg revolving purple and revolving amber lights are used for escorting loads over 5 m wide.
4.3.1 See ‘What the Rule says’.
4.3.2 Pilot lighting summaryDuring the day, all pilots must operate with their headlamps on low beam. At night-time, front pilot signs must be lit from the front with white light. However, this white light mustn't shine past the sign and into the view of road users travelling behind the oversize vehicle. Piloting oversize vehicles up to 5 m wide The pilot vehicle must have either one or two revolving amber lights on its roof.Piloting oversize vehicles over 5 m wide The pilot vehicles must have revolving purple and revolving amber lights on theirs roofs:
During daylight, use two amber on the right •and two purple on the left.During darkness, use one amber on the right •and two purple on the left.
In addition, the pilot vehicle leading the convoy must use a pair of purple alternately flashing auxiliary lamps. During daylight, the pilot leading the convoy may use a pair of alternately flashing (wig wag) headlamps.
4.4 Communications between pilot vehicles and oversize vehiclesRadios are necessary so all drivers in the convoy can quickly communicate and keep each other informed of what’s happening. Many trucks have CB radios. If you’re using one of these, you can:
let approaching trucks know about the •oversize vehicle, eg ‘Wide house up ahead, please slow down and pull over so we can get past’provide early warning before arriving •at choke-points, eg ‘Whirokino Trestle Bridge will be closed for the next three minutes while a large house crosses’.
General tips when using radio equipment
Consider safety. •Do you need to pull over and stop?Think about what you want to say •before you start.Be accurate and specific about locations. •Check the message is understood.•Before you leave, make sure all radios in •the convoy are on the same channel.Before sending a message, listen to •check no-one else is speaking.After depressing the switch to speak, •pause for a second to avoid the start of your sentence being clipped off.Speak slowly, clearly and directly into •the microphone, keeping it about 25 mm away from your mouth.If you’re transmitting a lengthy message, •pause every now and then to enable the person to repeat it, if necessary.

27
4.5 Other useful equipmentThe rule doesn't specifically require you to carry the following equipment, but it’s recommended by the NZTA, and your employer may require you to use it. You may also be required to use it by other organisations, such as Occupational Safety and Health or road controlling authorities (eg under the NZTA's Code of practice for temporary traffic management). Some items provide a clearer message to approaching traffic, while others will be useful in an emergency.
High-visibility vest. If you’re working on •the road directing traffic, it’s vital for your safety that you’re seen by road users.White glove• (s).Stop/Slow paddle.• Torch fitted with red cone for night-time •piloting.Fluorescent red flag.•Fire extinguisher.•Road flares.•Road cones• (with retro-reflectorised collars for use during the hours of darkness).Safety hazard triangles.•First aid kit.•
What the Rule says:7.3 (18) Except as provided in 7.3 (23), the headlamps of a
pilot vehicle must be operated on low beam when the pilot vehicle is escorting an overdimension motor vehicle during daylight hours.
7.3 (19) The lighting in 7.3 (20) to 7.3 (24) may be operated only when a pilot vehicle is escorting an overdimension motor vehicle.
7.3 (20) Except as in 7.3 (21), a class 2 pilot vehicle must have fitted to its roof one or two flashing or revolving amber lights.
7.3 (21) An overdimension motor vehicle whose load exceeds 5 m in width must be escorted by at least one class 1 pilot vehicle and at least two class 2 pilot vehicles, each of which has fitted to its roof and operates:a) during daylight hours, two amber flashing or
revolving beacons on the right, and two purple flashing or revolving beacons on the left, and
b) during the hours of darkness, one amber flashing or revolving beacon on the right, and two purple flashing or revolving beacons on the left.
7.3 (22) In addition to the beacons required under 7.3 (21), the pilot vehicle that is travelling furthest ahead of an overdimension motor vehicle whose width exceeds 5 m must display one pair of alternately flashing auxiliary lamps that emit a purple light.
7.3 (23) During daylight hours, the pilot vehicle travelling furthest ahead of an overdimension motor vehicle whose width exceeds 5 m may operate with one pair of alternately flashing headlamps, which must be operated on low beam.
7.3 (24) During the hours of darkness, a pilot vehicle must be fitted with one or two lamps that emit a white light to illuminate a roof-mounted sign, provided that the light is not directly visible from the rear of the vehicle.
What the Rule says:7.3 (4) All pilot vehicles and overdimension motor vehicles in a convoy must be in radio communication with each other.

28
4.6 Pilot equipment checklistMake sure you have everything you need before piloting an oversize load.
Piloting scenario 1Load up to 5 m wide•Front pilot (loads exceeding 4.5 m wide •require at least one class 1 pilot and one class 2 pilot)
Minimum equipment requirements:Vehicle type: A gross vehicle mass •no greater than 7000 kg and a wheel diameter no greater than 17 inches.Sign (vehicle up to 3.1 m wide):•
Wide Load Follows or Long Load Follows -(if piloting required due to excess rear overhang or overall length exceeds 25 m) (facing to the front) Pilot Vehicle (facing to the rear). -
Sign (load greater than 3.1 m, up to •5 m wide): Wide Load Follows (facing forward and appropriate to the load). Lights:•
1 or 2 amber lights on the vehicle’s roof -headlamps on low beam. -
Radio communication.•
Piloting scenario 2Load up to 5 m wide•Rear pilot (loads exceeding 4.5 m wide •require at least one class 1 pilot and one class 2 pilot)
Minimum equipment requirements:Vehicle type: A gross vehicle mass •no greater than 7000 kg and a wheel diameter no greater than 17 inches.Sign (vehicle up to 3.1 m wide):•
Wide Load Ahead or Long Load Ahead -(if piloting required due to excess rear overhang or overall length exceeds 25 m).Pilot Vehicle (facing to the front). -
Sign (load greater than 3.1 m, up to 5 m •wide): Wide Load Ahead (facing to the rear and appropriate to the load). Lights:•
1 or 2 amber lights on the vehicle’s roof -headlamps on low beam. -
Radio communication.•

29
4.6 Pilot equipment checklistMake sure you have everything you need before piloting an oversize load.
Piloting scenario 3Load more than 5 m wide•1• st (lead) front pilot (usually a class 1 pilot)
Minimum equipment requirements:Vehicle type: •
class 2 pilot: A gross vehicle mass -no greater than 7000 kg and a wheel diameter no greater than 17 inchesclass 1 pilot: A gross vehicle mass no -greater than 3500 kg.
Sign:•Danger Slow Down (facing forward -and, during the dark, a white light must illuminate the sign but not be directly visible from the rear) Pilot Vehicle (to the rear). -
Roof-mounted lights•(during the day) 2 revolving amber lights -on the right and 2 revolving purple lights on the left; headlamps on low beam(during the dark) 1 revolving amber light -on the right and 2 purple revolving lights on the left.
Lights: (at all times) a pair of purple •alternately flashing auxiliary lamps; (during the day) headlamps on low beam, or one pair of alternatively flashing headlamps operated on low beam. Radio communication.•
Piloting scenario 4Load more than 5 m wide•2• nd front pilot*
Minimum equipment requirements:Vehicle type. Class 2 pilot: A gross •vehicle mass no greater than 7000 kg and a wheel diameter no greater than 17 inches.Sign:•
Wide Load Follows or House Follows -(if appropriate) (facing forward and, during the dark, a white light must illuminate the sign but not be directly visible from the rear)Pilot Vehicle (facing to the rear). -
Lights:•(during the day) 2 revolving amber lights -on the right and 2 revolving purple lights on the left of the vehicle's roof; headlamps on low beam(during the dark) 1 revolving amber light -on the right and 2 revolving purple lights on the left of the vehicle's roof.
Radio communication.•
* (A class 1 pilot will usually escort as the lead pilot and will travel in the forward-most position of the convoy. In these cases the class 2 pilot will travel between the class 1 pilot and the load.)
Piloting scenario 5Load more than 5 m wide•Rear pilot•
Minimum equipment requirements:Vehicle type:•
a rigid vehicle of no more than 3 axles, -ora rigid vehicle of no more than 3 axles -towing a simple trailer with no more than 2 axles.
Sign:•Wide Load Ahead or House Ahead -(if appropriate) (facing the rear and, if towing a trailer, mounted on the trailer)Pilot Vehicle (to the front). -
Lights:•(during the day) 2 revolving amber lights -on the right and 2 revolving purple lights on the left of the vehicle's roof; headlamps on low beam(during the dark) 1 revolving amber light -on the right and 2 revolving purple lights on the left of the vehicle's roof.
Radio communication.•

30
5.1 IntroductionExtremely heavy vehicles can have devastating effects on New Zealand’s road network, particularly on bridge structures. The NZTA administers a permit system that allows overweight vehicles to travel on the road as long as the risk of damage is managed. In the case of bridges, this may mean that overweight vehicles have to:
travel outside their normal lane• (such as on the centre line) to access the bridge’s strongest partrestrict their speed.•
Other road users may therefore be affected. As a class 2 pilot, you can control the traffic on bridges as long as you comply with the permit conditions, equipment specifications and traffic control procedures covered in this section. Many of the basic skills and requirements already covered in this book also apply to controlling traffic at bridge crossings. However, Transit New Zealand (now the NZTA), the New Zealand Heavy Haulage Association and the Power Crane
Association of New Zealand have also agreed on specific traffic control requirements for bridge crossings. These are covered in the Code of practice for traffic control at bridges being crossed by overweight vehicles, published by the Heavy Haulage Association and the Power Crane Association.The remainder of part 5 is a copy of the traffic control requirements from the code.
5.2 Equipment specifications5.2.1 Overweight vehicleThe overweight vehicle must have a revolving amber light on the roof of the cab that is illuminated while carrying out the bridge crossing. The revolving amber light must be visible to road users approaching from the rear.
5.2.2 Traffic control vehicles A car, utility, station wagon, van or •support truck travelling with the overweight vehicle.Any colour permitted.•
5.2.3 LightsAll vehicle lights to meet whichever •standard is appropriate: warrant of fitness or certificate of fitness. One or more revolving amber lights •mounted on the roof of the vehicle.
5.2.4 CommunicationsEffective radio communication between •the driver of the overweight vehicle and traffic control personnel must be maintained. (This must be separate from CB radio Channel 11.)
5.2.5 Mandatory safety equipment High-visibility jacket and, if used at night, •must be fitted with retro-reflective tape.Stop paddle or a Stop/Go paddle• (standard road works sign).Torch fitted with a red cone for •night-time use.
PART 5
Traffic control at bridges being crossed by overweight vehicles
31
5.3 Traffic control procedures 5.3.1 Traffic controlThe bridges at which traffic control is required can be located by examining the NZTA overweight permit. Traffic control is required at a rail overbridge only if it's stated on the overweight permit.Traffic controllers will perform their duties in the following manner:
Be alert at all times.•Don't stand with a group where you •can't be easily seen by motorists.Always stand while waiting for traffic.•Don't leave your position until it's safe.•
5.3.2 Traffic control vehicles The vehicles are to be safely positioned to warn traffic of the hazard created by the overweight vehicle crossing the bridge. Revolving amber lights must be operating at all times when carrying out traffic control duties.When the bridge is obstructed from the motorist’s view by a cutting, hill, hollow, bend or any other obstruction, place the traffic control vehicles in a safe place
beside the traffic lane (giving ample room for traffic to stop or pull over and park) with all warning lights operating, including vehicle hazard lights, and headlights on dip.
5.3.3 Stop or Stop/Go paddleThe stop face of the paddle may be displayed when the traffic controller considers that this is the most appropriate method to instruct oncoming or following traffic to stop and park due to the road or bridge being blocked by the overweight vehicle. The Stop/Go paddle can confuse motorists if the Go side is displayed inadvertently. The Go side should be covered if such a situation could arise.
5.3.4 Where to stand In rural or high-speed areas, traffic controllers should be located at a safe distance before the hazard so traffic will have sufficient time to reduce speed and come to a stop.
Stand facing traffic, on the edge of the •shoulder of the road, just outside the traffic lane, close to your vehicle (so you can hear your radio and instructions
from the driver of the overweight vehicle). Note: Hand-held radios are much more effective in these situations.Always stand where you can be seen •by traffic.Always ensure you have an escape path. •
5.3.5 Slowing traffic (see 3.4.7)To slow traffic, signal with an up and down motion of an extended arm.
5.3.6 Stopping traffic (see 3.4.7)Stand facing traffic, but clear of the• traffic lane.When about to stop traffic, wait for •a suitable break and hold the sign horizontal, with stop facing oncoming traffic. When approaching traffic is slowing, move from the kerb to the centre of the roadway. Your free arm should be raised with the palm of your hand toward approaching traffic. If time permits, drivers may be told of •the reasons for the delay. Be courteous and brief, eg ‘A large vehicle is crossing the bridge’.

32
5.3.7 How to move traffic (see 3.4.7)When signalling traffic to move ahead, signal with your free hand, using a sweeping motion in the direction the traffic is to move. Ensure that the Stop sign isn't being displayed.
5.3.8 Never wave the sign Signals must be clear and distinct.•Don't make drivers guess what they •should do.Never wave your sign, either to stop •or slow traffic or to inform motorists to proceed.
5.3.9 With opposing traffic (vehicle in own lane)
If the position is specified as own lane and there is sufficient width for vehicles in the opposing direction, take up a position behind the overweight vehicle:
to warn vehicles that are travelling in •the same direction of the restriction in their laneto prevent heavy vehicles coming closer •than 30 m to the overweight vehicle (cars may be closer, if necessary).
The traffic controller will then:allow all vehicles in the opposing •direction to proceed unhinderedadvise the driver of the overweight •vehicle to travel at a crawl in the left-hand lane as far as practicable (providing that is in accordance with the overweight permit)follow behind the overweight vehicle •at the required distance with warning lights operating.

33
5.3.10 Without opposing traffic (overweight vehicle needs all bridge traffic stopped)
If offset, central or opposite is specified, or where there is insufficient width for opposing vehicles, two traffic controllers are required. (One of these could be the accompanying load escort pilot.)
The first controller will:prevent all traffic travelling in the •opposing direction from crossing the bridge while the overweight vehicle is on itstop the opposing traffic• (using standard procedures) a sufficient distance before the bridge to allow the crossing manoeuvre to be safely completed. (This can be achieved by placing the vehicle, with lights displayed, on the side of the road just past the far end of the bridge and physically controlling the traffic using the Stop paddle.)advise the driver of the overweight •vehicle to proceed only when all opposing traffic has stopped.
The second controller will direct the following traffic as for 'overweight vehicle in own lane'.One method of stopping oncoming traffic is to position the traffic control vehicle at the opposite end of the bridge, on the same side of the road (clear of the lane) as the traffic is travelling towards the overweight vehicle. This is safer for the traffic controller, who can then stand beside the traffic control vehicle rather than have to cross the road.Motorists will be attracted in the first instance to the revolving amber lights. If the traffic control vehicle is parked on the other side of the road, they may not see the traffic controller and Stop sign until it's too late.
5.4 Safety issuesIf the bridge is long and the overweight •vehicle is travelling at crawl speed, the numbers of approaching vehicles held prior to the bridge can be large. Care must be taken to prevent vehicles from stopping close to a bend (particularly in a 100 km/h area). If fog, heavy rain or other factors restrict •visibility to less than 500 m, a bridge crossing shouldn't proceed until visibility has improved.If a crash occurs, warn traffic of the •problem, contact the emergency services and assist as required.Under no circumstances should the •traffic controller's vehicle be used as an emergency vehicle.

34
Route position markers are signs located throughout New Zealand’s state highway network. Load pilots use them to:
identify reference points along a route •when planning a moveidentify points on the highway specified •in overweight permitsfind out where they are on a state highway.•
The following markers are used.
Reference station (RS) (figure 18)You’ll find reference stations about every 16 km along a state highway (see page 35 for an explanation of how the route position system works). They are the points from which other marker posts are measured. The point they refer to is a 300 mm yellow square on the road’s centre line.
Established route position (ERP) (figure 19)Established route positions are intermediate reference posts that show the distance from a reference station.
Kilometre marker post (KMP) (figure 20)Kilometre marker posts are approximate location guides showing the distance from a reference station.
Bridge structure number (figure 21)Bridge structure numbers are mainly used on overweight permits. Each bridge has a unique number.
Figure 18. Reference station RS 262 is 262 km from the northern beginning of State Highway 1
Figure 19. Established route position ERP 262/3 is 3 km from RS 262
Figure 20. Kilometre marker post KMP 262/1 is 1 km from RS 262
Figure 21. Bridge structure number
PART 6
Location referencing on state highways (using route position markers)

35
PART 6
Location referencing on state highways (using route position markers)
How the route position system works Route positions are measured as their distance from a reference station, with the numbering usually starting at the northernmost points (North and South Islands) of the highway – so the numbers increase the further south the points are located. The numbering for highways running across New Zealand generally starts from the easternmost points and increases as the route tracks west.
Figure 22. Location referencing
Figure 23. Location referencing method on the road
The increasing direction of the highway is indicated by the arrow.
Movement against the increasing direction is known as the decreasing direction.

36
Tips on what to doTurn on your hazard lights and find a •safe place to park, preferably off the road to reduce the chance of creating another hazard. Check the vehicles and area for injured •people. Phone emergency services and tell them:– what exactly is happening– the precise location– if there are any injuries and, if so, how
many and how serious– what emergency vehicles are required
(ambulance, fire)– whether tow trucks or cranes will be
needed to clear the road. To reduce the fire hazard, turn the •ignition off in damaged vehicles. Keep people who are smoking away.As soon as you’ve made sure any •life-threatening situations are being looked after, manage the approaching traffic. Never leave approaching traffic without any warning.
When trained people arrive (police, fire, ambulance), give them a brief summary of what you’ve done and offer more help, but don’t interfere with their efforts to care for the injured or control the site.
PART 7
Emergency procedures in case of a crash involving an oversize and/or overweight vehicle

37
Class 2 pilots can only escort vehicles of certain sizes by themselves.
8.1 Introduction The larger the oversize vehicle, the greater the road space it needs – and the more often other road users will need help to get past safely. Class 1 load pilots receive more intensive traffic control training than class 2 pilots. Oversize vehicles that are above certain size limits must be escorted by at least one class 1 pilot. Class 1 and one, two or more class 2 pilots usually team up to ensure the oversize vehicle reaches its destination safely. (A class 1 pilot may be helped by class 1 pilots rather than class 2 pilots.) The Rule sets the size limits for when a class 1 pilot becomes compulsory. As a class 2 pilot, you must know the maximum dimensions an oversize vehicle can have before a class 1 pilot must also be included in the convoy.
8.2 Definitions of dimensionsThe rules defining the vehicles a class 2 pilot can escort before requiring a class 1 pilot are based on vehicle dimensions. The following definitions will help. (figures 24–28)
Definitions of forward distance (FD) For a rigid vehicle, the distance from thea) rear axis to the front of the vehicle or its load, whichever is furthest forward. For a full trailer, the distance from b) the rear axis to the front of the trailer (excluding the drawbar and front axle set with its associated carriage) or its load, whichever is furthest forward.For a simple trailer, the distance from c) the rear axis to the centre of the point of attachment to the towing vehicle. For a semi-trailer, the distance from the d) rear axis to the centre of the kingpin.For a pole trailer with only one axle set, e) the distance (excluding the load) from the trailer’s rear axis to the centre of the point of attachment on the towing vehicle with the drawbar fully extended. For a pole trailer with two axle sets, f) the distance (excluding the load) from the trailer’s front axis to the centre of the point of attachment on the towing vehicle with the drawbar fully extended.
PART 8
Maximum vehicle size limits for class 2 load pilots
Figure 24. Examples of measuring forward distance (FD)
38
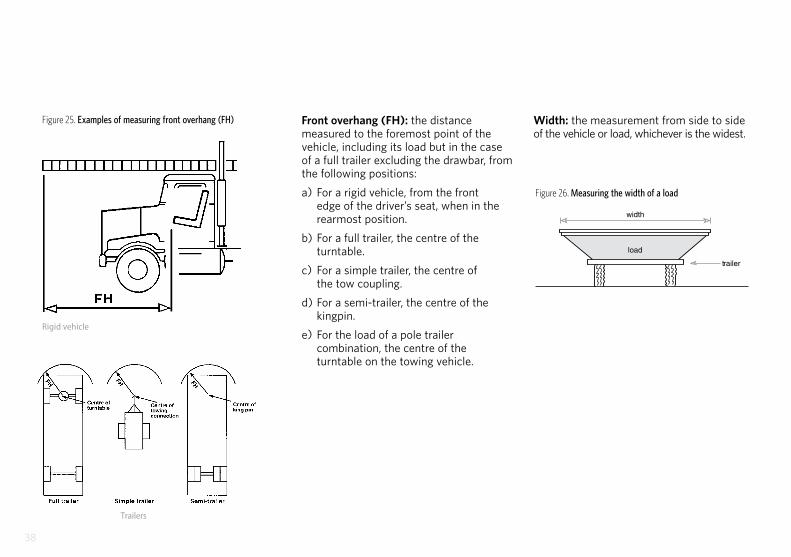
Front overhang (FH): the distance measured to the foremost point of the vehicle, including its load but in the case of a full trailer excluding the drawbar, from the following positions:a) For a rigid vehicle, from the front
edge of the driver’s seat, when in the rearmost position.
b) For a full trailer, the centre of the turntable.
c) For a simple trailer, the centre of the tow coupling.
d) For a semi-trailer, the centre of the kingpin.
e) For the load of a pole trailer combination, the centre of the turntable on the towing vehicle.
Width: the measurement from side to side of the vehicle or load, whichever is the widest.
Figure 25. Examples of measuring front overhang (FH)
width
load
trailer
Figure 26. Measuring the width of a load
Rigid vehicle
Trailers

39
Figure 27a Figure 27b
Figure 27d
Figure 27c
Figure 27e
Figure 27f
Definitions of rear axis (RA)a) In relation to a vehicle with only one
non-steering axle, means that axle.b) In relation to a vehicle with a non-
steering axle set of two axles, means:i) midway between those axles, if each
axle as an equal number of tyres on itii) two-thirds of the distance from
the lesser-tyred axle towards the greater-tyred axle, if one axle has twice as many tyres on it as the other axle.
Locating the rear axis (RA)
If the vehicle has only one non-steering axle, then the RA is at the centre of that axle. (figure 27a)
If the vehicle has a tandem axle set with only non-steering axles in its rear axle set and:
each axle has an equal number of tyres •on it, then the RA is midway between the centres of the axles (figure 27b) one axle has twice as many tyres on •it as the other axle, then the RA is positioned two-thirds of the distance from the lesser-tyred axle towards the greater-tyred axle. (figure 27c).
If the vehicle has a non-steering tri-axle set in its rear axle set, then the RA is midway between the extreme axles of the set. (figure 27d)
If the vehicle has one steering axle in its rear set together with:
one non-steering axle, the RA is at the •non-steering axle (figure 27e)two non-steering axles, the RA •is midway between the extreme non-steering axles of the set. (figure 27f)

40
Truck and pole trailers
Rigid truck
Tractor semi-trailer
Truck and simple trailer
Truck and full trailer
Rear overhang (RO)a) the distance from the rear axis to the
rear of the vehicle or its load, whichever is furthest back
b) for a pole trailer, the distance from the rear axis or the centre of the rear bolster to the rear of the vehicle or its load, whichever is greater.
Figure 28. Examples of measuring rear overhang (RO)

41
8.3 Size limits The vertical axis on the graph shows the width, and the horizontal axis shows the forward distance of the oversize vehicle. Dimensions are in metres.Road space requirements generally depend on a combination of width and forward distance. Below 4.5 m width, the width decreases as the forward distance increases up to 13.3 m. Here are some simple rules in using the graph to determine the category of an oversize vehicle:
All vehicles wider than 4.5 m need at •least one class 1 pilot.All vehicles with a forward distance •greater than 13.3 m need at least one class 1 pilot.Vehicles with a width of 2.5–4.5 m •have the maximum allowable forward distance (shown on the sloping line between category 2 and category 3). (Category 3 vehicles need at least one class 1 pilot, but category 1 and 2 only need class 2 pilot(s).)
Figure 29. Swept path requirements for width/forward distance thresholds
8.5 9.5 10.5 11 .4 13 .3 15 202.5
3.1
3.7
4.5
5.0
11
FD (forward distance) (m)
wid
th (m
) Category 1No pilot unless exceeds: · 3.1m wide & 40km/h.· 3.1m wide & travels during hours of darkness.
Category 2One class 2 pilot.Additional class 2 pilot required if rear overhang exceeds 7m.
Category 3One class 2 pilot plus one class 1 pilot.Additional class 2 pilot required if rear overhang exceeds 7m.
Category 4Two class 2 pilots plus one class 1 pilot.

42
Here are some examples of using the graph to find out what pilots and how many are required.
Question: What pilots are required for an oversize vehicle with the width/FD combination 3.5 m/13 m?Method: First find the 3.5 m mark on the width axis (left-hand vertical line). Next, draw an imaginary horizontal line from the 3.5 m mark across the page and stop at an imaginary line rising from 13 m on the forward distance axis (bottom horizontal line). (Figure 30)
Question: What is the maximum FD of a vehicle 3.5 m wide before a class 1 pilot is also required to escort the oversize vehicle?Method: First find the 3.5 m mark on the width axis (left-hand vertical line). Next, draw an imaginary horizontal line from the 3.5 m mark across the page and stop at the boundary between category 2 and 3. Drop an imaginary vertical line down. (Figure 31)
8.5 9.5 10.5 11 .4 13 .3 15 202.5
3.1
3.7
4.5
5.0
11
FD (m)
wid
th (m
)
13
3.5
Category 4
Category 3
Category 1
Category 2
Figure 30. Example 1
8.5 9.5 10.5 11 .4 13 .3 15 202.5
3.1
3.7
4.5
5.0
11
FD (m)
wid
th (m
)
Category 4
Category 3
12.3
2.9
3.5
Category 1
9
Category 2
11
Figure 31. Example 2
Category 1
No pilot unless: • exceeds3.1 mwide
and 40 km/h • exceeds3.1 mwideand
travels during hours of darkness.
Category 2
One class 2 pilot (3.1, 10.5).
Additional class 2 pilot required if rear overhang exceeds7 m.
Category 3
One class 2 pilot plus one class 1 pilot.
Additional class 2 pilot required if rear overhang exceeds7 m.
Category 4
Two class 2 pilots plus one class 1 pilot.

43
Category 1
No pilot unless: • exceeds3.1 mwide
and 40 km/h • exceeds3.1 mwideand
travels during hours of darkness.
Category 2
One class 2 pilot (3.1, 10.5).
Additional class 2 pilot required if rear overhang exceeds7 m.
Category 3
One class 2 pilot plus one class 1 pilot.
Additional class 2 pilot required if rear overhang exceeds7 m.
Category 4
Two class 2 pilots plus one class 1 pilot.
Question: What pilots are required for an oversize vehicle with the width/FD combination 3.7 m/15 m?Method: First, find the 3.7 m mark on the width axis (left-hand vertical line). Next, draw an imaginary horizontal line from the 3.7 m mark across the page and stop at an imaginary line rising from 15 m on the forward distance axis (bottom horizontal line). (Figure 32)
Question: What pilots are required for an oversize vehicle with the width/FD combination 2.7 m/12 m and 8 m of rear overhang?Method: First, find the 2.7 m mark on the width axis (left-hand vertical line). Next, draw an imaginary horizontal line from the 2.7 m mark across the page and stop at an imaginary line rising from 12 m on the forward distance axis (bottom horizontal line). (Figure 33)
8.5 9.5 10.5 11 .4 13 .3 15 202.5
3.1
3.7
4.5
5.0
11
FD (m)
wid
th (m
)
13
Category 4
Category 3
Category 1
Category 2
Figure 32. Example 3
8.5 9.5 10.5 11 .4 13 .3 15 202.5
3.1
3.7
4.5
5.0
11
FD (m)
wid
th (m
)
Category 4
Category 3
12
2.7
3.5
Category 1
9
Category 2
Figure 33. Example 4

44
9.1 IntroductionIf you wish to be eligible for consideration as having completed a course approved by the NZTA:
complete the candidate details section •on page 45answer questions 1–24•tear the pages out and post to: •Transport Registry Centre Overdimension Permit Issuing Agency Private Bag 11 777 Palmerston North 4442.
This test aims to ensure you understand the legal requirements of piloting oversize loads. It also assesses your ability to think about what you’re trying to achieve and then apply the basic principles of traffic warning methods. You must answer at least 20 of the questions correctly to pass this test. It's an open book assessment – all the answers to the questions are contained in this book.
This test works on an honesty basis. While it’s a good idea to discuss the methods and rules of piloting with friends, co-workers and other industry partners, you must complete the test yourself. If you don’t understand the requirements and go on to pilot a load, you are not only breaking the law but also placing yourself, the oversize vehicle you are piloting and other road users in danger.
PART 9
The class 2 load pilot test

45
1. Who is a load pilot?a) an off-duty police officer b) any person over the age of 16 years c) a person who directs traffic
for their own safety d) a person certified by an appropriate
authority to carry out piloting or traffic management
2. A load pilot driver escorting an oversize vehicle needs to be registered with which regulatory body?a) the local district council b) the police c) the NZ Transport Agency d) the road and bridge
controlling authorities
3. What is the primary role of a load pilot?a) to manage traffic safety b) to minimise disruption to other traffic c) to minimise the time the
oversize vehicle is on the road d) to ensure the load can move
as quickly as possible
4. Which safety equipment is best for a traffic controller/pilot?a) boots, hard hat, gloves and
sunglasses b) high-visibility jacket, white glove,
stop/slow paddle, red cones and red wand
c) any equipment supplied by the load driver
d) signs, traffic cones and spotlight
5. Where would you stand when controlling traffic?a) in the middle of the oncoming lane b) on the centre line of the road c) at the side of the road d) in a position where you can best see
approaching traffic, but not standing in the direct path of the traffic
6. When you are standing ready to control traffic, what safety precautions should you take?a) watch the oversize vehicle b) turn your back to approaching traffic
so they can see you easily c) stand in a safe place with an
escape path d) stand on the centre line of the road
9.2 Class 2 load pilot assessment
Candidate details
Name: Organisation:
Address:
In each question, tick only one answer that you consider to be correct.

46
7. Where should you park your vehicle if you need to stand on the road to control traffic?a) up the nearest side road b) clear of the roadway lines c) in a safe place away from traffic,
but near enough to listen to your radio d) positioned so the oversize vehicle
can safely pass
8. When do you use one or two revolving amber lights?a) at any time when piloting a load b) when piloting loads up to 5 m wide c) when travelling on the road in an
emergency d) only when the route is difficult to cross
9. Where should pilot warning lights be positioned on the pilot vehicle?a) on the bonnet at the front of the vehicle b) on the right-hand side mudguard of
the vehicle c) on the roof of the vehicle d) on the rear bumper of the vehicle
10. What should you do first if piloting at the front of an oversize vehicle and you see a tree has fallen that the oversize vehicle will not be able to pass? a) stay very close to the oversize vehicle b) tell the driver of the oversize vehicle
about the problem and find a safe place to park the convoy so arrangements can be made
c) call the police d) call the road controlling authority and tell
them to remove the tree immediately
11. How do you determine what traffic control is required?a) it depends on how the oversize vehicle
fits on the road and what impact it will have on approaching motorists
b) it's up to the police and highway patrol to say
c) ask the customer who owns the load being transported
d) rely on the road signs and only use traffic control if road signs are present
12. What should a traffic controller do first if a crash occurs?a) turn on the hazard lights and find a
safe place to park, check for injuries and assess the situation
b) immediately call the police, fire service and ambulance
c) leave the load driver to sort it out and keep travelling forward until you meet another motorist and send them to seek help
d) stop piloting and return to base
13. What should you do if a motorist refuses to stop when signalled?a) chase them until they stop b) radio the oversize vehicle driver of
the hazard c) call the police and let them take action d) leave the oversize vehicle in the lane
so it blocks any further traffic

47
14. Should a traffic controller talk to motorists?a) yes – if time permits, politely advise
them of the delay b) no – don’t talk to anyone while
controlling traffic as this may distract your attention
c) yes – use a raised voice to make motorists do whatever you want
d) yes – find out how far they are going and what for
15. How should you perform duties?a) be aggressive and shout commands b) be alert and act safely at all times c) stand with others so you know
what is happening d) once the first motorist has stopped,
sit in your vehicle
16. When do you wave the Stop sign?a) when a motorist refuses to stop b) when you want traffic to move on c) not at any time d) only when required
17. What would you do if the oversize vehicle breaks down on the road?a) go and help repair the vehicle b) go to the nearest garage for assistance c) stay at your station and
control the traffic d) ring the nearest police station and
get them to ring a tow truck
18. What safety equipment would you use to stop traffic at night?a) vehicle headlights and hazard lights b) revolving amber lights and headlights c) high-visibility jacket, stop sign and
red wand d) flashing headlights
19. Does a pilot have to obey the road rules as set out in the Road code?a) not if they are conducting pilot escort
duties b) only while driving to or
leaving the oversize vehicle c) at all times d) only when directed
20. What vehicle lights do you use when performing pilot duties for oversize vehicles up to 5 m wide during the hours of darkness?a) indicators and revolving amber light b) headlights and sidelights c) headlights on full and amber light d) headlights on dip and
revolving amber light
21. What sign is displayed when escorting an oversize vehicle greater than 3.1 m and up to 5 m wide on a front pilot?a) OVERSIZE b) WIDE LOAD FOLLOWS c) LONG LOAD d) WIDE LOAD AHEAD
22. What sign is displayed when escorting an oversize vehicle greater than 3.1 m and up to 5 m wide on a rear pilot?a) OVERSIZE b) WIDE LOAD FOLLOWS c) LONG LOAD d) WIDE LOAD AHEAD

48 Load pilot driver code
23. What is the maximum width load a class 2 pilot can escort without a class 1 pilot being present?a) 3 m b) 4.5 m c) 6 m d) 5 m
24. What is the maximum width load a class 2 pilot can escort without a class 1 pilot also escorting the oversize vehicle if the forward distance of the oversize vehicle is 13.3 m? (refer to figure 34)a) 2.5 m b) 4.5 m c) 5 m d) 11 m
8.5 9.5 10.5 11 .4 13 .3 15 202.5
3.1
3.7
4.5
5.0
11
FD (forward distance) (m)
wid
th (m
) Category 1No pilot unless exceeds: · 3.1m wide & 40km/h.· 3.1m wide & travels during hours of darkness.
Category 2One class 2 pilot.Additional class 2 pilot required if rear overhang exceeds 7m.
Category 3One class 2 pilot plus one class 1 pilot.Additional class 2 pilot required if rear overhang exceeds 7m.
Category 4Two class 2 pilots plus one class 1 pilot.
Figure 34. Swept path requirements for width/forward distance thresholds
forward distance (m)
wid
th (m
)

Transport Registry Centre Overdimension Permit Issuing Agency Private Bag 11 777 Palmerston North 4442T 0800 683 774 F 06 953 6313The following information relating to vehicle dimension and mass limits and operating vehicles over the normal limits can be found on the NZTA's website www.nzta.govt.nz
Land Transport Rule Vehicle Dimensions •and Mass (follow the legislation link)Factsheet series 13• (go to Publications, then the Factsheet link) Factsheet 53• (go to Publications, then the Factsheet link)
Alternatively, hard copies are available from the NZTA's regional offices (listed on the back cover).
10.1 IntroductionThe rule requires pilots trained to a higher level than class 2 pilots to escort the very large loads. Although this book has covered a number of traffic management methods, smaller loads won't have such a large impact on other road users – so, in general, the degree of traffic management skills required will be less.Class 1 pilots are given intensive training on technical and practical issues associated with managing traffic.
10.2 What you needYou need:
a current driver licence•to complete the class 2 load pilot course•at least three years’ piloting experience since •gaining class 2 certification, or to have helped a class 1 pilot on at least 25 loads. You need to supply written evidence of this when you apply for a class 1 pilot driver course.
To apply for a class 1 pilot driver course, contact: Transport Registry Centre
Overdimension Permit Issuing Agency Private Bag 11 777 Palmerston North 4442
PART 10
How to become a class 1 load pilot PART 11
Other sources of information
49

ISBN 978-0-478-33447-0 (print) ISBN 978-0-478-33448-7 (online)
National OfficeVictoria Arcade 44 Victoria Street Wellington 6011 New ZealandPrivate Bag 6995 Wellington 6141 New ZealandT 64 4 894 5400F 64 4 894 6100
Transport Registry Centre (TRC)Private Bag 11 777 Manawatu Mail Centre Palmerston North 4442 New ZealandT 0800 108 809
motor vehicle registrationF 0800 822 422
driver licensing
WhangareiLevel 1, ANZ Centre 16 Rathbone Street PO Box 1899 Whangarei 0140T 09 430 4355F 09 459 6944
AucklandLevel 13, Qantas House 191 Queen Street PO Box 1459, Shortland Street Auckland 1140T 04 368 2000F 04 368 2059Level 6, HSBC House 1 Queen Street Private Bag 10 6602 Auckland 1143T 09 969 9800F 09 969 9813
Hamilton183 Collingwood Street Private Bag 3081 Hamilton 3240 T 07 958 7840F 07 958 7866Level 4, BNZ Centre 354 Victoria Street PO Box 973, Waikato Mail Centre Hamilton 3240T 07 903 5100F 07 957 1437
Tauranga405 Cameron Road PO Box 430, Seventh Avenue Tauranga 3140T 07 927 6009F 07 578 2909
NapierLevel 2, Napier Library Building 22 Station Street PO Box 740 Napier 4140T 06 835 1750F 06 835 0283Level 3, Dunvegan House 215 Hastings Street PO Box 972 Napier 4140T 06 974 5520F 06 974 5529
WanganuiLevel 1, Seddon House Park Place PO Box 345 Wanganui Mail Centre Wanganui 4540T 06 349 6520F 06 345 7151
Palmerston NorthLevel 3, 43 Ashley Street PO Box 1747 Palmerston North Central Palmerston North 4440T 06 953 6396F 06 953 6203
WellingtonLevel 9, PSIS House 20 Ballance Street PO Box 5084, Lambton Quay Wellington 6145T 04 894 5200F 04 496 6666
Marlborough RoadsLevel 1, The Forum Unit 2.4, Market Street PO Box 1031 Blenheim 7240T 03 577 1850F 03 577 53090800 627 573 0800 MARLANDS
ChristchurchLevel 5, BNZ House 129 Hereford Street PO Box 133 64, Armagh Christchurch 8141T 03 964 2866F 03 964 2855Level 7, Pacific Brands House 123 Victoria Street PO Box 1479 Christchurch Mail Centre Christchurch 8140T 03 366 4455F 03 365 6576
DunedinBroadbase House 62 Tennyson Street PO Box 5241, Moray Place Dunedin 9058T 03 477 8527F 03 477 9237Level 1, AA Centre 450 Moray Place PO Box 5245, Moray Place Dunedin 9058T 03 951 3009F 03 951 3013
For general enquiries or more information about the NZTA visit www.nzta.govt.nz or contact us at T 64 4 894 5400, F 64 4 894 6100, [email protected]