lockpicking - simplified.pdf
DESCRIPTION
Lockpicking SimplifiedTRANSCRIPT

Look to the leader, Desert Publications,for the finest in locksmithing, survival, self-defense, firearm, military & police science, natural healing and first aid and alternate energy books.
Desert PublicationsA Division of Th« Delta Group, Ltd.
P. O. BOX 1751 215 S. Washington
El Dorado, AR 71731 U.S.A. 501-862-2077
ISBN 0-87947-101-89 0 0 0 0
9 780879 471019
LOCK PICKING
SIMPLIFIED


Lock Picking Simplified
© 1974 by Desert Publications P.O. Box 1751
El Dorado, AR 71731-1751 501-862-2077
ISBN 0-87947-101-8 12 11 10 9 8 7
Printed in U. S. A.
Desert Publication is a division of The DELTA GROUP, Ltd.
Direct all inquires & orders to the above address.
Ail rights reserved. Except for use in a review > no portion of this book may be reproduced by any means known or unknown without the express written permission' of the publisher.
Neither the author nor the publisher assumes any responsibility for the use or misuse of the information contained in this book.
TABLE OF CONTENTS
PageGeneral.............................................................................................. 1
Practice S et-u p ........................................................................ 1
Picking Practice............................................................................5
Pick G uns......................................................................................13
Snap Picks......................................................................................19
How to Pick a Schlage Disc Tumbler L o ck .......................... 21
Schlage Picking Process.......................................................21


«*&
GENERAL
Lock picking, like all facets of ^ocksmithin^ requires knowledge of the lock itself, a certain amount of manual dexterity, and a lot of practice. In this manual, you will learn about the construction o f a pin tumbler lock and gain practical experience by following through on actual picking practice. You will progress from an easy to pick setup to more difficult ones as you gain more experience.
To practice picking, you will need the following tools and supplies:
1. A pin cylinder lock as illustrated in Figure 1 & 2. This type of cylinder is found in most common night latches^ All locksmithing suppliers and many large
"hardware stores carry them for about $3.00 each. Try to get one as near like the ones illustrated as possible with the plug retainedby a round plate and 2 screws. You will be removing and replacing the plug many times, and its ease o f removal and installation is important.
2. A plug follower as illustrated in Figure 5. This can beeither purchased from a locksmith supply house, or simply made from a short length of 1/2 inch diameter wooden dowel. i r
3. A pair of large tweezers for removing and inserting the tumbler pins. These can be purchased at most hardware suppliers. You may wish to file the tips as shown in Figure 7 to further aid holding the small pins.
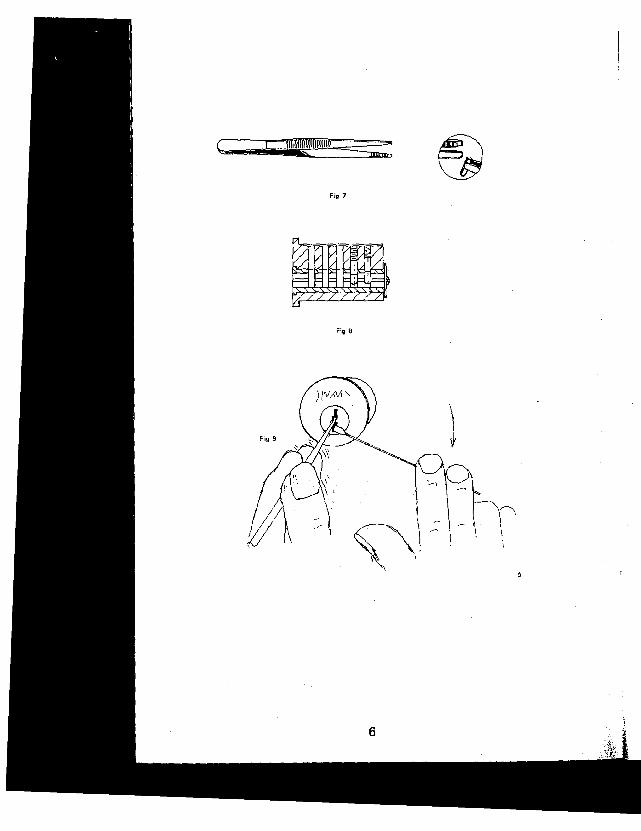
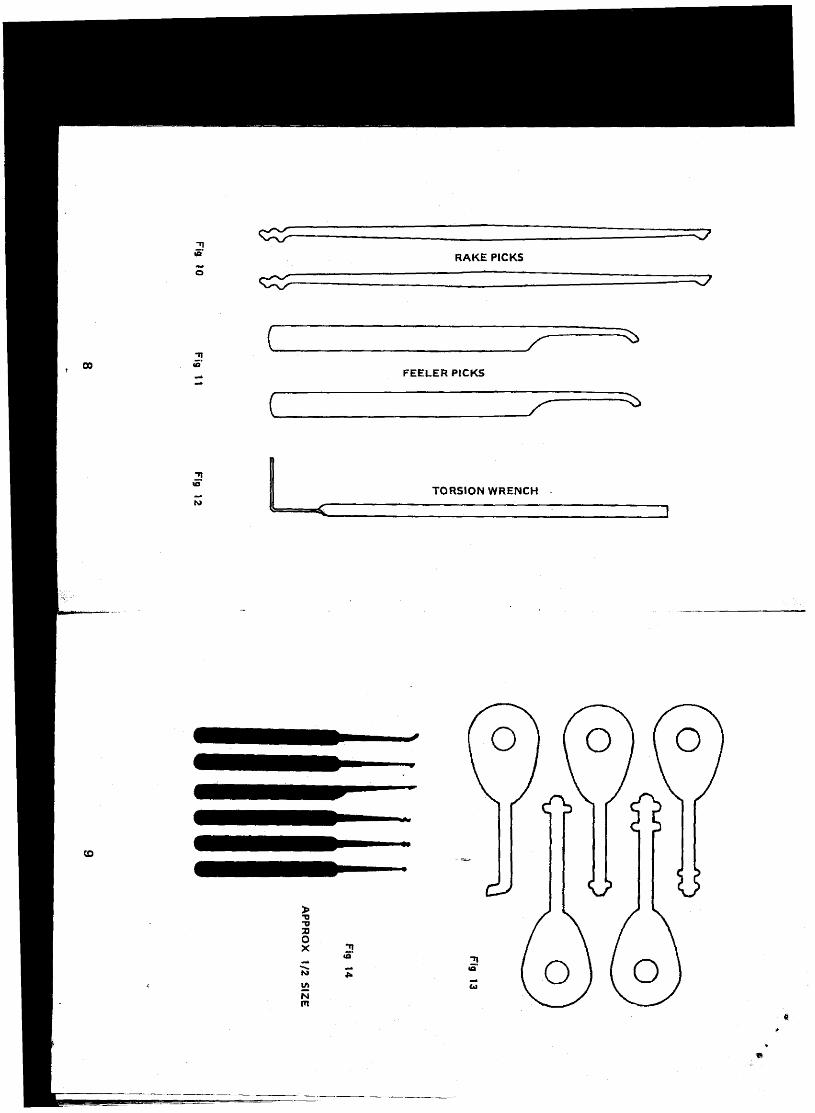
4. A small set of lock picks and torsion wrench. These can be purchased from a locksmith supply house or made yourself. In Figure 10, 11, & 12 you will find full size templets, for two of the most popular picks, and a standard shape torsion wrench. Any source of steel that is approximately .025 inch thick may be
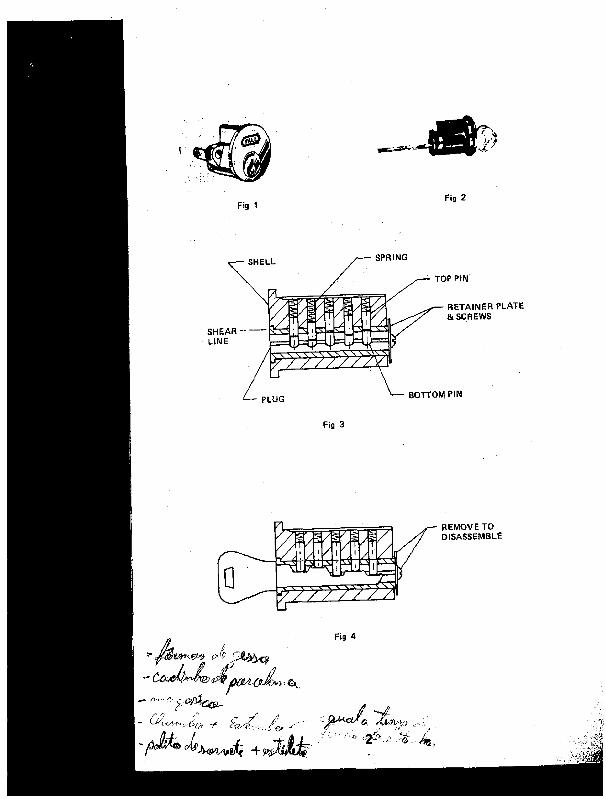
Fig 2
Fig 3
ah®r
, <
M Ap i ““
^ / / y y / ’zz'
Fig 4
*■ <?■&
' £<W/WC
y r s ' - '
+ sA
REMOVE to d isa s se m b le
yIX AJUMy) ^ r .'i
4 ,
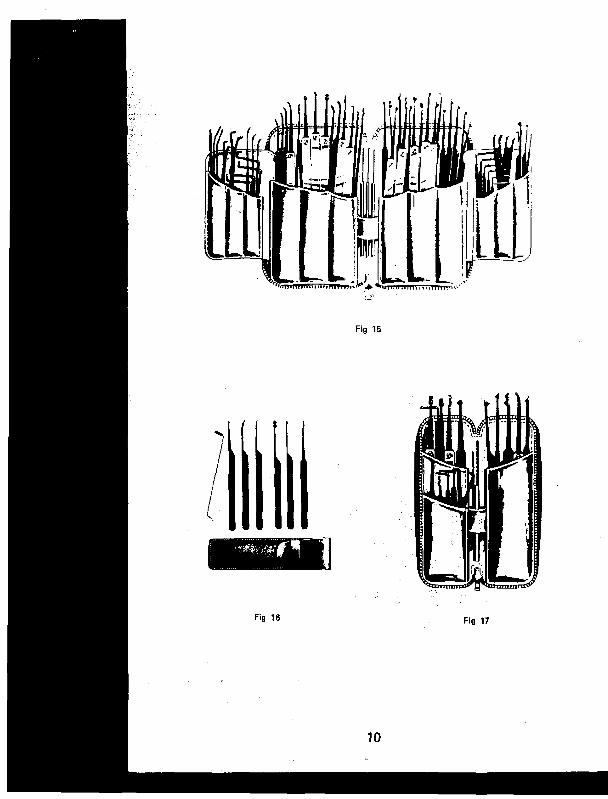
used. Just transfer the templet shape onto the steel and gnpd-^f-ijlejo shape. The torsion wrench is made fromfC025 x .12§3tat stock steel. Again, you may use any available^source. Your flat piece should not be so hard that it breaks when bending to shape. As you gain experience, you will soon be designing picks that fit your style best. A look at Figures 1 5 ,1 6 , & 17 will give you a good idea as to the many types of picks that are available from locksmithing supply houses.
5. You should also have a small vice to hold the cylinder as you practice on it.
Needless to say, a small, well-lighted work area will be of great help. Also, a small tray to hold pins, springs, etc. is a necessity.
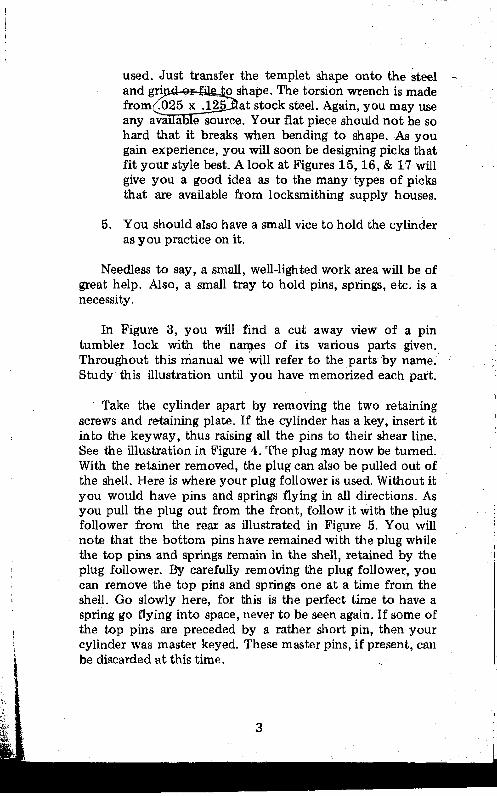
In Figure 3, you will find a cut away view of a pin tumbler lock with the nances of its various parts given. Throughout this manual we will refer to the parts by name. Study this illustration until you have memorized each part.
Take the cylinder apart by removing the two retaining screws and retaining plate. If the cylinder has a key, insert it into the key way, thus raising all the pins to their shear line. See the illustration in Figure 4. The plug may now be turned. With the retainer removed, the plug can also be pulled out of the shell. Here is where your plug follower is used. Without it you would have pins and springs flying in all directions. As you pull the plug out from the front, follow it with the plug follower from the rear as illustrated in Figure 5. You will note that the bottom pins have remained with the plug while the top pins and springs remain in the shell, retained by the plug follower. By carefully removing the plug follower, you can remove the top pins and springs one at a time from the shell. Go slowly here, for this is the perfect time to have a spring go flying into space, never to be seen again. If some of the top pins are preceded by a rather short pin, then your cylinder was master keyed. These master pins, if present, can be discarded at this time.
3

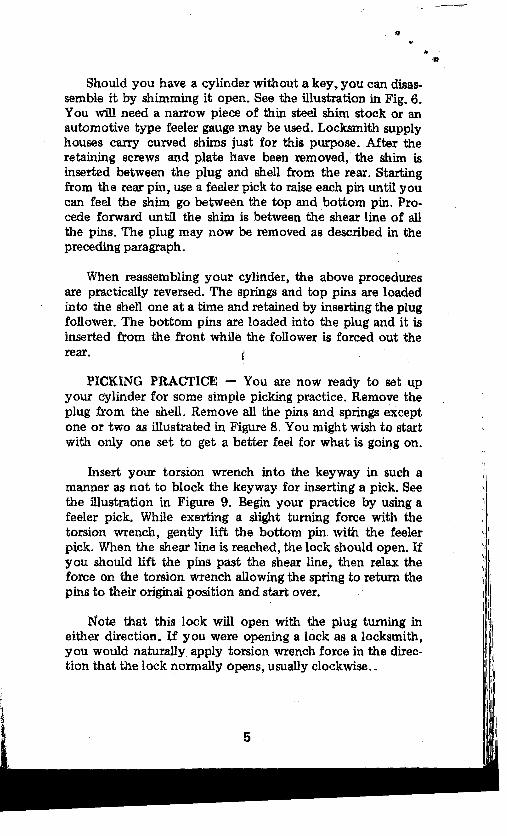
Should you have a cylinder without a key, you can disassemble it by shimming it open. See the illustration in Fig. 6. You will need a narrow piece o f thin steel shim stock or an automotive type feeler gauge may be used. Locksmith supply houses carry curved shims just for this purpose. After the retaining screws and plate have been removed, the shim is inserted between the plug and shell from the rear. Starting from tiie rear pin, use a feeler pick to raise each pin until you can feel the shim go between the top and bottom pin, Pro- cede forward until the shim is between the shear line of all the pins. The plug may now be removed as described in the preceding paragraph.
When reassembling your cylinder, the above procedures are practically reversed. The springs and top pins are loaded into the shell one at a time and retained by inserting the plug follower. The bottom pins are loaded into the plug and it is inserted from the front while the follower is forced out the rear. I
PICKING PRACTICE — You are now ready to set up your cylinder for some simple picking practice. Remove the plug from the shell. Remove all the pins and springs except one or two as illustrated in Figure 8. You might wish to start with only one set to get a better feel for what is going on.
Insert your torsion wrench into the keyway in such a manner as not to block the keyway for inserting a pick. See the illustration in Figure 9. Begin your practice by using a feeler pick. While exerting a slight turning force with the torsion wrench, gently lift the bottom pin with the feeler pick. When the shear line is reached, the lock should open. If you should lift the pins past the shear line, then relax the force on the torsion wrench allowing the spring to return the pins to their original position and start over.
Note that this lock will open with the plug turning in either direction. If you were opening a lock as a locksmith, you would naturally apply torsion wrench force in the direction that the lock normally opens, usually clockwise. „
*
5
With your cylinder still set up with one pin, try using your rake pick. This pick can be used similar to a feeler pick, and also by inserting it past the pins and quickly raking it out toward you. This type of picking requires less torsion wrench force than while using your feeler pick. The most common mistake is to use too much force.
Another picking technique is to move the rake pick in and out really fast rather than just raking it out. The wavy end of your rake pick is well suited for this technique.
While practicing the above techniques, try using various amounts of torsion wrench force until you have a good feel for the best amount to use with each different method of picking:
When you feel ready, add one or two more sets o f pins and springs to your cylinder, and again practice all of the picking techniques previously practiced with one set of pins.
While using your feeler piclj. this time, you will notice an important short coming of pin tumbler locks that aid their being picked: ONE OF THE PINS WILL CATCH ON THE SHEAR LINE BEFORE THE OTHERS. You will feel the plug turn ever so slightly. If using two sets o f pins, when the last pin is raised to the shear line, the lock will open.
This “short coming” of locks is due to the tolerance inherent in their manufacture. It would be both difficult and expensive to manufacture a lock with all o f the holes drilled the same diameter and in a perfect line. They may look so to the naked eye, but using precision measuring equipment, you would discover that such was not the case.
Therefore, when picking a cylinder lock having say five tumblers, one of the five will catch first, allowing the plug to turn a small amount. This will be true with each o f the remaining pins until the last one reaches the shear line. Then the lock will open.
7

Usually, the cheaper the lock the easier it is to pick. There are some exceptions however. The pin tumbler padlock made by Master Lock Co. is a good example of a cheap lock that is hard to pick, due to the precision of their cylinder. The key-in-knob locks in most homes are very easy to pick due to their cheap construction and also due to the fact that most o f them are master keyed, which simply creates more shear lines.
Continue practicing with two sets of pins until you feel proficient, then add another set and continue practicing with a total of three tumblers in your cylinder. Continue with four sets and then finally replace all five sets. If you have progressed well with the preceding setups, uou will have little trouble picking it open. You will now feel confident to try to open other locks. You will find some easier than others for reasons previously discussed. ’
Our study and practice iji this manual has been centered around the pin tumbler. If you understand opening procedures with this lock, you will have little difficulty with other types. In the illustration in Figure 13, several pick keys for simple warded locks are shown full size. Cut them out of .032 thick steel, and you will have a set that will open most of the simple padlocks that you will encounter as a locksmith.
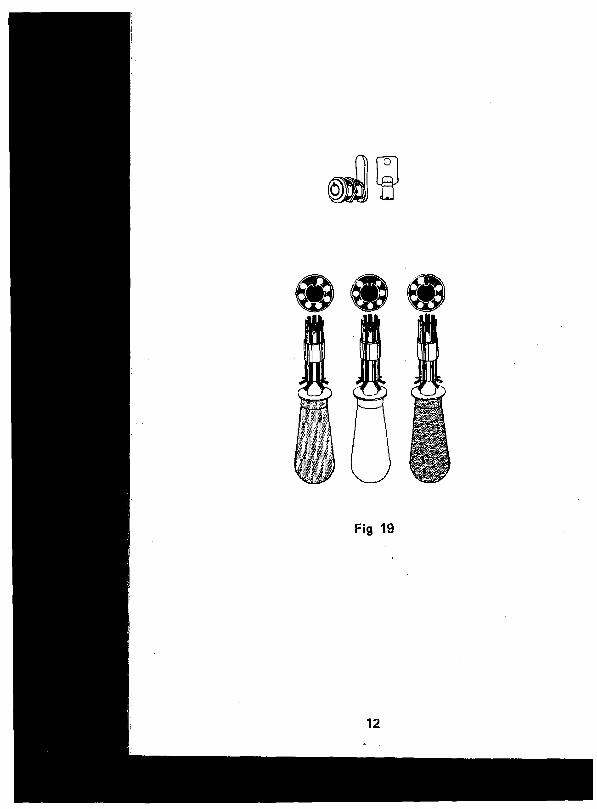
Another type of lock that you will find is the tubular key type, as found on most vending machines. This is a pin tumbler lock with all the pins radially located around the axis of the plug. Special picks are available from locksmith supply houses for these locks. See the illustration in Figure 19. These tools provide a turning force and also allow you to work each tumbler until the shear line is reached.
11
*4» -
PICK GUNS
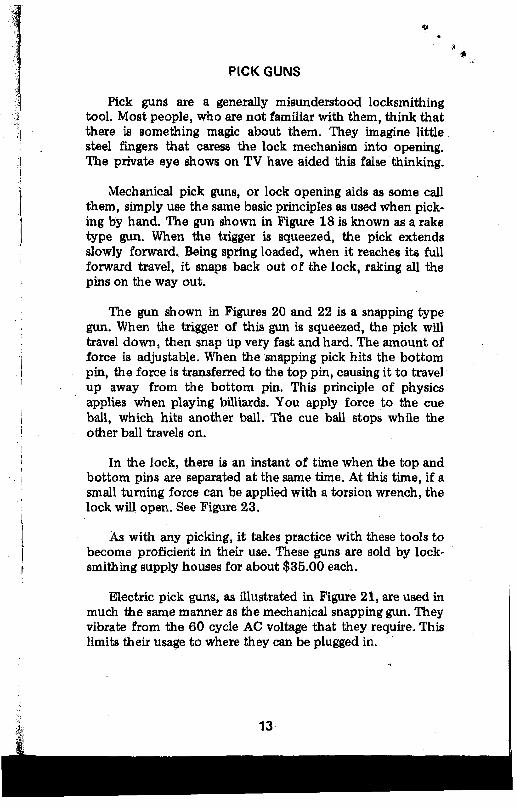
Pick guns are a generally misunderstood locksmithing tool. Most people, who are not familiar with them, think that there is something magic about them. They imagine little steel fingers that caress the lock mechanism into opening. The private eye shows on TV have aided this false thinking.
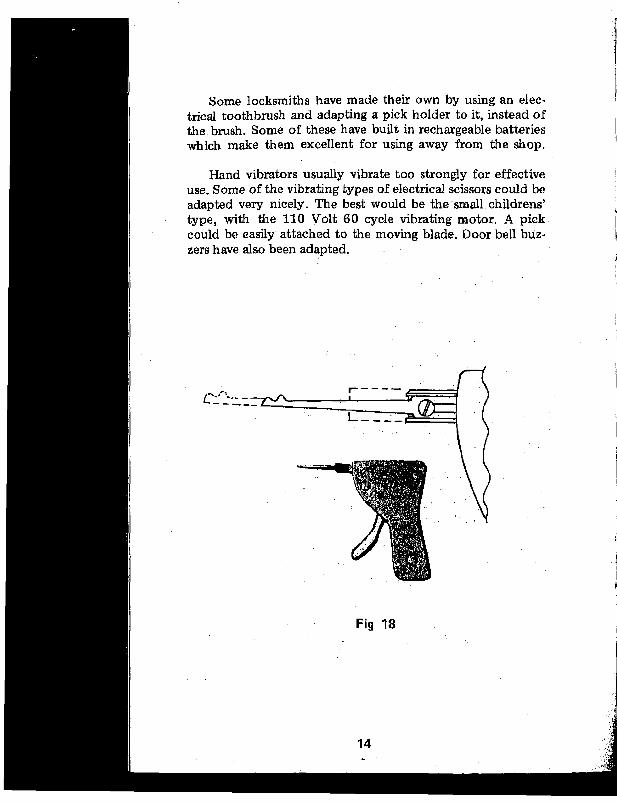
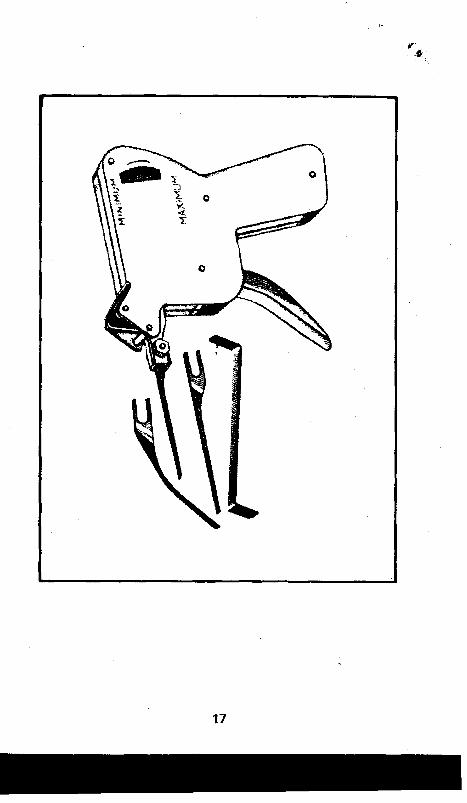
Mechanical pick guns, or lock opening aids as some call them, simply use the same basic principles as used when picking by hand. The gun shown in Figure 18 is known as a rake type gun. When the trigger is squeezed, the pick extends slowly forward. Being spring loaded, when it reaches its full forward travel, it snaps back out of the lock, raking all the pins on the way out.
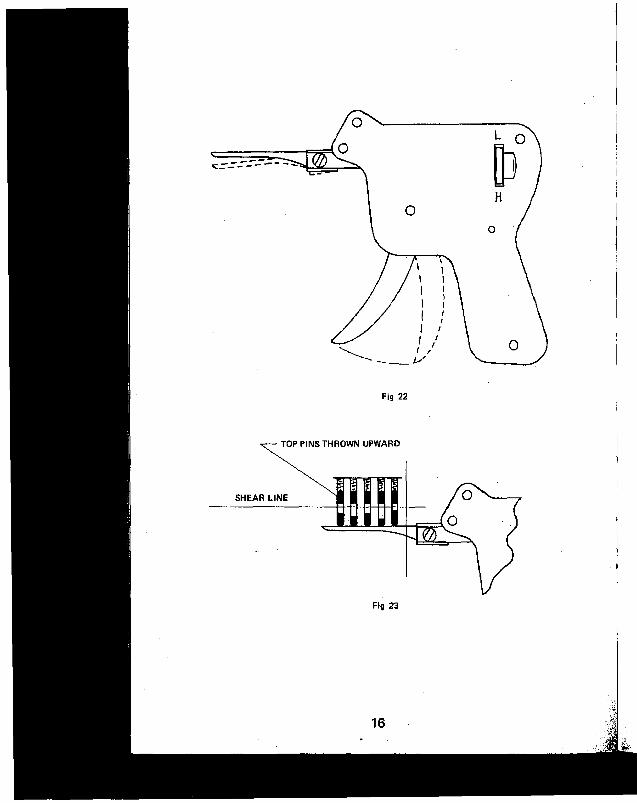
The gun shown in Figures 20 and 22 is a snapping type gun. When the trigger of this gun is squeezed, the pick will travel down, then snap up very fast and hard. The amount of force is adjustable. When the snapping pick hits the bottom pin, the force is transferred to the top pin, causing it to travel up away from the bottom pin, This principle of physics applies when playing billiards. You apply force to the cue ball, which hits another ball. The cue ball stops while the other ball travels on.
In the lock, there is an instant o f time when the top and bottom pins are separated at the same time. At this time, if a small turning force can be applied with a torsion wrench, the lock will open. See Figure 23.
As with any picking, it takes practice with these tools to become proficient in their use. These guns are sold by lock- smithing supply houses for about $35.00 each.
Electric pick guns, as illustrated in Figure 21, are used in much the same manner as the mechanical snapping gun. They vibrate from the 60 cycle AC voltage that they require. This limits their usage to where they can be plugged in.
13
Some locksmiths have made their own by using an electrical toothbrush and adapting a pick holder to it, instead of the brush. Some of these have built in rechargeable batteries which make them excellent for using away from the shop.
Hand vibrators usually vibrate too strongly for effective use. Some of the vibrating types of electrical scissors could be adapted very nicely. The best would be the small childrens’ type, with the 110 Volt 60 cycle vibrating motor. A pick could be easily attached to the moving blade. Door bell buzzers have also been adapted.
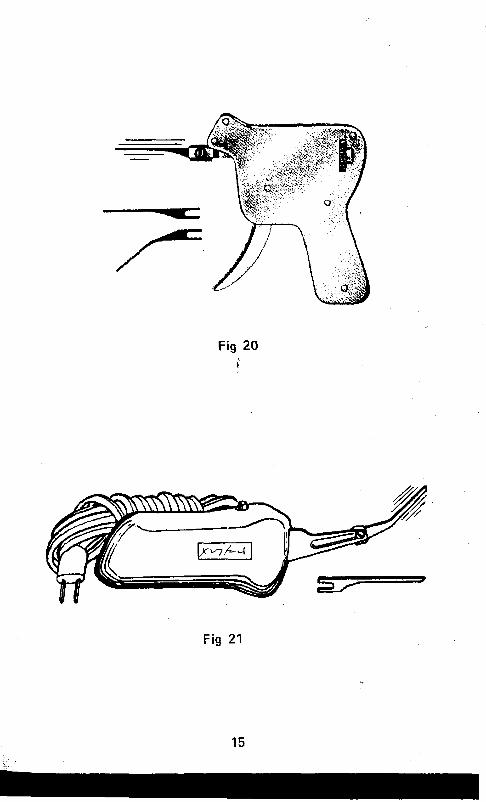
Fig 20I
18
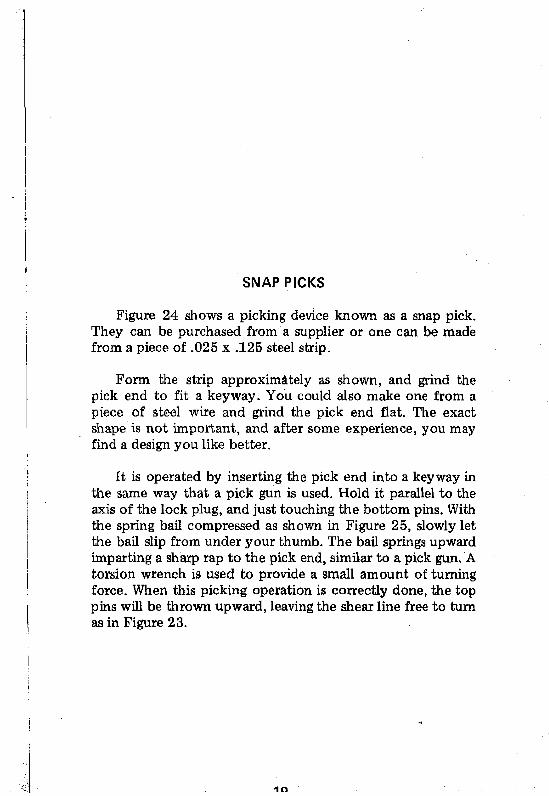
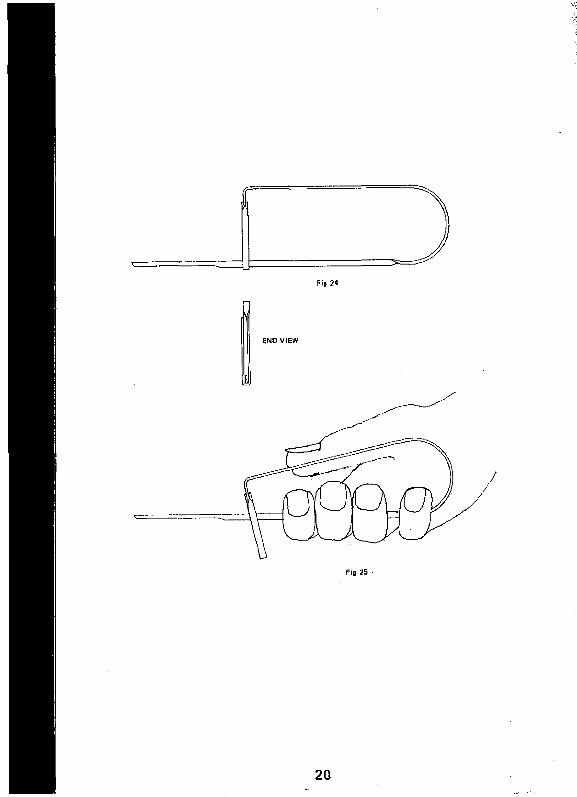
SNAP PICKS
Figure 24 shows a picking device known as a snap pick. They can be purchased from a supplier or one can be made from a piece o f .025 x .125 steel strip.
Form the strip approximately as shown, and grind the pick end to fit a key w ay. You could also make one from a piece o f steel wire and grind the pick end flat. The exact shape is n ot important, and after som e experience, you may find a design you like better.
It is operated by inserting the pick end into a key way in the same way that a pick gun is used. Hold it parallel to the axis o f the lock plug, and just touching the bottom pins. With the spring bail compressed as shown in Figure 25, slowly let the bail slip from under your thumb. The bail springs upward imparting a sharp rap to the pick end, similar to a pick gun. A torsion wrench is used to provide a small am ount of turning force. When this picking operation is correctly done, the top pins will be thrown upward, leaving the shear line free to turn as in Figure 23.

HOW TO PICK A SCHLAGE DISC TUMBLER LOCK
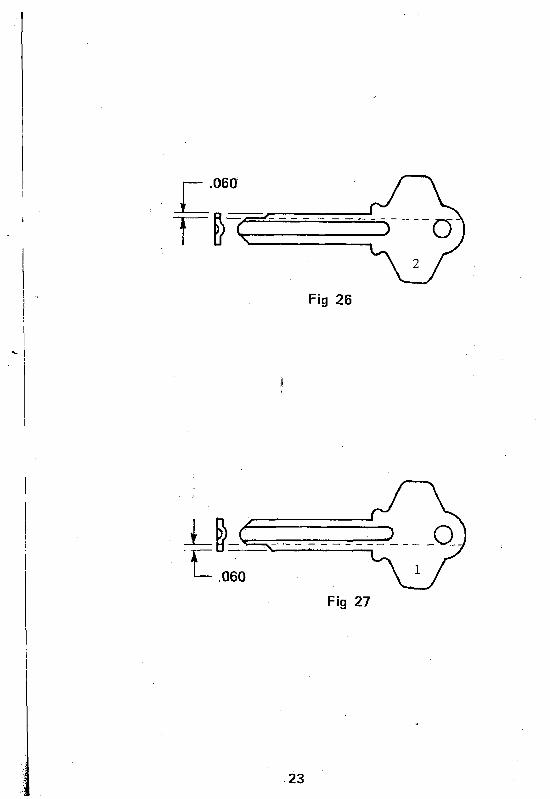
Before studying how to pick these locks, you should be familiar with the mechanism. You will find that there are two types o f key way units or plugs: a type 1 and a type 2. Each type requires a different tip cut. Figure 27 shows a tip cut for a type 1, and Figure 26 shows one for a type 2. Both are cut from the same basic blank.
If you examine the tumblers, you will find that there are three different types in the keyway unit: 1 master (always the farthest tumbler in the plug); 3 series tumblers; and 4 com bination tumblers.
The master tumbler is spring loaded so as to extend from the plug, preventing its turning. When the proper key blank is inserted, the master tumbler is withdrawn into the plug.
The series tumblers are al#o spring loaded so as to extend from the plug. When an uncut key blank is inserted into the key w ay , they are all four withdrawn into the plug.
The com bination tumblers are spring loaded so as to be normally withdrawn into the plug. If an uncut key blank is inserted into the key way, these tumblers extend from the plug.
These explanations may at first seem confusing, however, if you will disassemble and study the mechanism, it should be quite clear. This knowledge will now enable you to better understand how to pick these locks.
SCHLAGE PICKING PROCESS - You must first make yourself a set o f picking keys. This is accomplished by altering a No. 1 and 2 key blank as shown in Figures 28 & 29. These key blanks both receive a .060 deep cut on both sides. On the side o f the tip cut, the entire key is removed to the same level as the tip cut. On the opposite side, a .060 deep cut is made to the dimensions given.
21

A 2 to 3 inch length o f material is soldered to the remaining portion o f the bow. In the picking operation, this lever provides a means o f imparting a turning force to the plug.
You will also need a pick as shown in Figure 30. This is made from a .060 diameter wire with the tip beveled as shown.
From the outside appearance o f a lock, you cannot tell whether it is a type 1 or a type 2. Insert one o f your pick keys into the key way. The correct pick key withdraws the master tumbler and also the com bination tumblers. Hold the pick key in place, and slide the wire pick into a position as shown in Figure 31. The resistance you feel while inserting the pick is the series tumblers being withdrawn into the plug. If you feel a resistance near the end o f the rearward travel of the pick, it is the master tumbler indicating that you have chosen the wrong pick key. Using the other pick key, repeat the above procedure.
Inserting the .060 diameter wire pick withdraws the series tumblers into the plug. The plug w ould now turn if it were not for the fact that while the wire pick withdraws the series tumblers, it also forces the com bination tumblers out o f the plug. This is overcome by the follow ing procedure: Apply a small am ount o f clockwise turning force to the lever soldered to your pick key. While holding this force, withdraw the wire pick and lay it aside. Slowly reduce the turning force until you hear the com bination tumblers click back in to the plug. The plug is now picked and can be turned clockwise to open the lock.
As with other picking techniques, picking a Schlage disc tumbler lock requires practice for proficiency.
4=LS[ _ .060
Fig 27
23
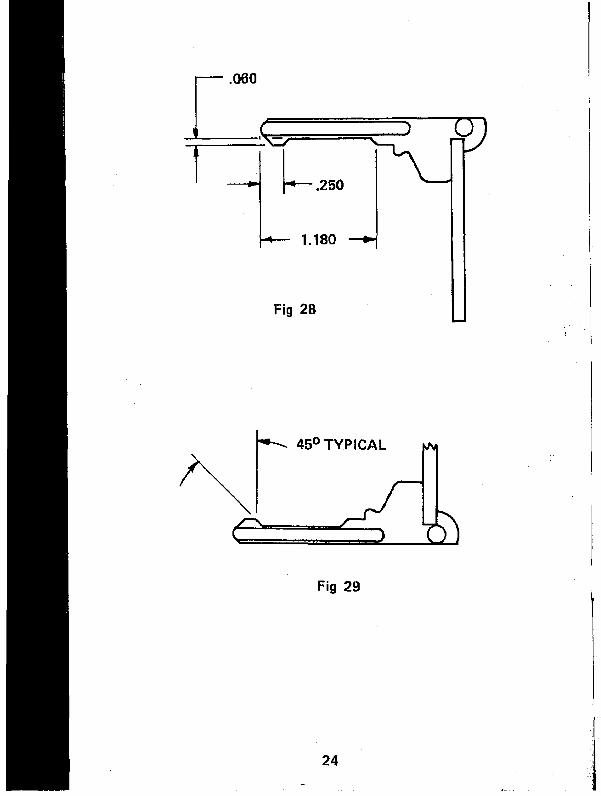
Fig 29
24
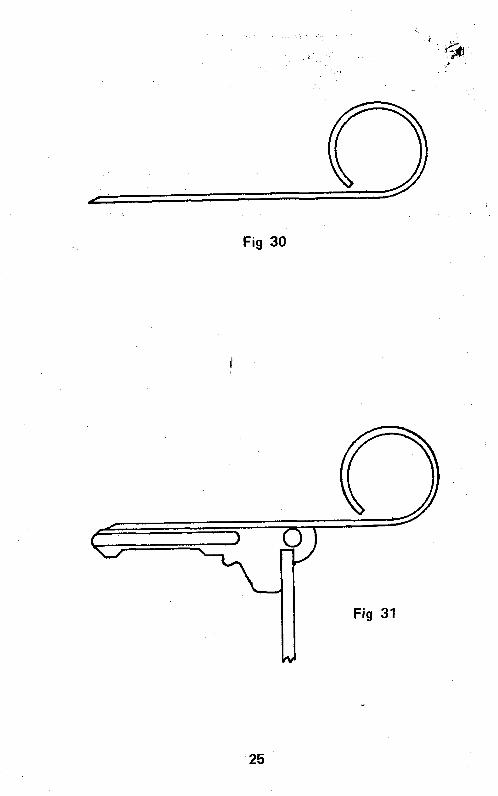
Fig 30
25