logix5000 controllers - vendulkaenter and edit rung comments using microsoft excel . . . . 103 ......
TRANSCRIPT

Logix5000 Controllerscatalog numbers 1756-L1, 1756-L1M1, 1756-L1M2, 1756-L1M3, 1756-L55M12, 1756-L55M13, 1756-L55M14, 1756-L55M16, 1756-L55M22, 1756-L55M23, 1756-L55M24, 1756-LSP, 1756-L61, 1756-L61S, 1756-L62, 1756-L62S, 1756-L63, 1756-L64, 1768-L43, 1769-L31, 1769-L32C, 1769-L32CR, 1769-L32E, 1769-L35E, 1789-L60, 1794-L34, PowerFlex with DriveLogix Controllers
Quick Start

Important User Information
Allen-Bradley, CompactLogix, ControlLogix, DriveLogix, FlexLogix, GuardLogix, Logix5000, PowerFlex, RSLinx, ESNetWorx, RSLogix 5000, SoftLogix, and Rockwell Automation are trademarks of Rockwell Automation.Microsoft, Windows and Windows NT are either registered trademarks or trademarks of Microsoft Corporation in the United States and/or other countries.
Trademarks not belonging to Rockwell Automation are property of their respective companies.
Solid state equipment has operational characteristics differing from those of electromechanical equipment. Safety Guidelines for the Application, Installation and Maintenance of Solid State Controls (publication SGI-1.1 available from your local Rockwell Automation sales office or online at http://literature.rockwellautomation.com) describes some important differences between solid state equipment and hard-wired electromechanical devices. Because of this difference, and also because of the wide variety of uses for solid state equipment, all persons responsible for applying this equipment must satisfy themselves that each intended application of this equipment is acceptable.
In no event will Rockwell Automation, Inc. be responsible or liable for indirect or consequential damages resulting from the use or application of this equipment.
The examples and diagrams in this manual are included solely for illustrative purposes. Because of the many variables and requirements associated with any particular installation, Rockwell Automation, Inc. cannot assume responsibility or liability for actual use based on the examples and diagrams.
No patent liability is assumed by Rockwell Automation, Inc. with respect to use of information, circuits, equipment, or software described in this manual.
Reproduction of the contents of this manual, in whole or in part, without written permission of Rockwell Automation, Inc., is prohibited.
Throughout this manual, when necessary, we use notes to make you aware of safety considerations.
WARNING Identifies information about practices or circumstances that can cause an explosion in a hazardous environment, which may lead to personal injury or death, property damage, or economic loss.
IMPORTANT Identifies information that is critical for successful application and understanding of the product.
ATTENTION Identifies information about practices or circumstances that can lead to personal injury or death, property damage, or economic loss. Attentions help you to identify a hazard, avoid a hazard, and recognize the consequences.
SHOCK HAZARD Labels may be on or inside the equipment, for example, a drive or motor, to alert people that dangerous voltage may be present.
BURN HAZARD Labels may be on or inside the equipment, for example, a drive or motor, to alert people that surfaces may be dangerous temperatures.

Summary of Changes
This document describes changes to Logix5000 controllers as a result of the release of RSLogix 5000 Software, version 16.
Revision bars in the margin identify updated information. Changes for this version of the document include:
Change Page
Added reference to 1768 CompactLogix and 1756 GuardLogix controllers
Throughout document
Updated RSLogix 5000 screen shots to accurately reflect the software’s appearance in version 16
Throughout document
Use Add-on Instructions 29
Use PhaseManager to Create and Configure an Equipment Phase 37
3 Publication 1756-QS001D-EN-P - February 2007

Summary of Changes 4
Notes:
Publication 1756-QS001D-EN-P - February 2007
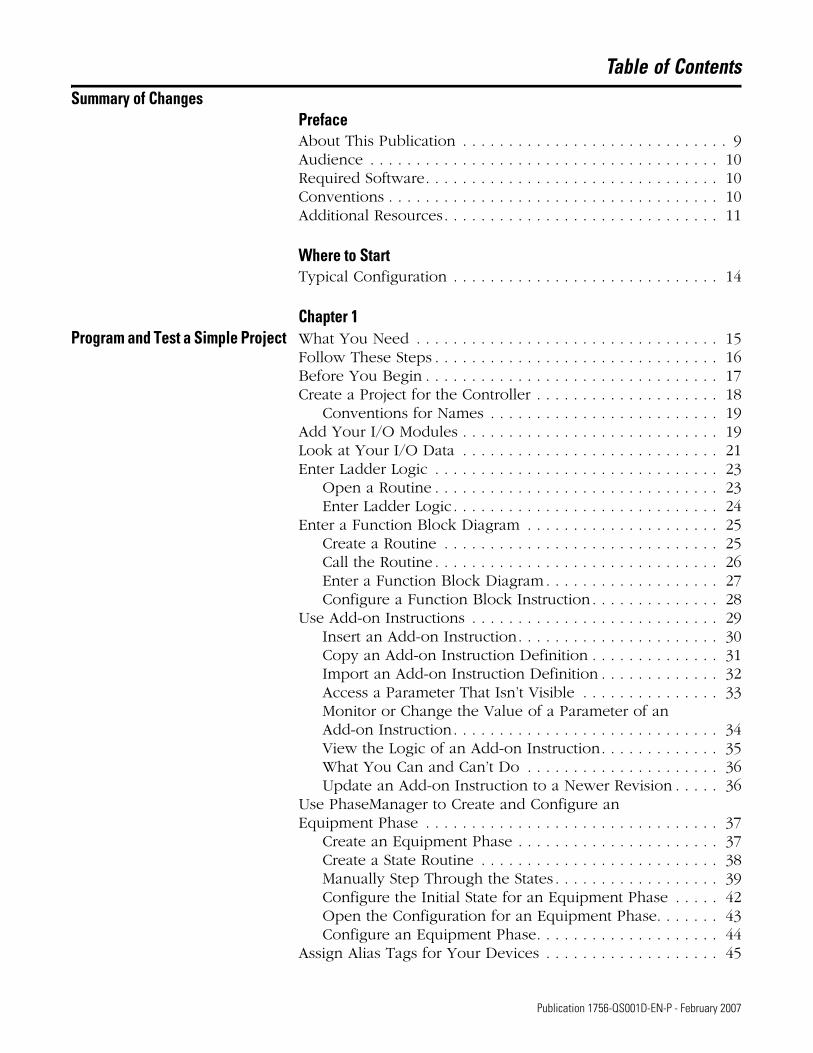
Table of ContentsSummary of Changes
PrefaceAbout This Publication . . . . . . . . . . . . . . . . . . . . . . . . . . . . . 9Audience . . . . . . . . . . . . . . . . . . . . . . . . . . . . . . . . . . . . . . 10Required Software. . . . . . . . . . . . . . . . . . . . . . . . . . . . . . . . 10Conventions . . . . . . . . . . . . . . . . . . . . . . . . . . . . . . . . . . . . 10Additional Resources. . . . . . . . . . . . . . . . . . . . . . . . . . . . . . 11
Where to StartTypical Configuration . . . . . . . . . . . . . . . . . . . . . . . . . . . . . 14
Chapter 1Program and Test a Simple Project What You Need . . . . . . . . . . . . . . . . . . . . . . . . . . . . . . . . . 15
Follow These Steps . . . . . . . . . . . . . . . . . . . . . . . . . . . . . . . 16Before You Begin . . . . . . . . . . . . . . . . . . . . . . . . . . . . . . . . 17Create a Project for the Controller . . . . . . . . . . . . . . . . . . . . 18
Conventions for Names . . . . . . . . . . . . . . . . . . . . . . . . . 19Add Your I/O Modules . . . . . . . . . . . . . . . . . . . . . . . . . . . . 19Look at Your I/O Data . . . . . . . . . . . . . . . . . . . . . . . . . . . . 21Enter Ladder Logic . . . . . . . . . . . . . . . . . . . . . . . . . . . . . . . 23
Open a Routine . . . . . . . . . . . . . . . . . . . . . . . . . . . . . . . 23Enter Ladder Logic . . . . . . . . . . . . . . . . . . . . . . . . . . . . . 24
Enter a Function Block Diagram . . . . . . . . . . . . . . . . . . . . . 25Create a Routine . . . . . . . . . . . . . . . . . . . . . . . . . . . . . . 25Call the Routine . . . . . . . . . . . . . . . . . . . . . . . . . . . . . . . 26Enter a Function Block Diagram . . . . . . . . . . . . . . . . . . . 27Configure a Function Block Instruction . . . . . . . . . . . . . . 28
Use Add-on Instructions . . . . . . . . . . . . . . . . . . . . . . . . . . . 29Insert an Add-on Instruction. . . . . . . . . . . . . . . . . . . . . . 30Copy an Add-on Instruction Definition . . . . . . . . . . . . . . 31Import an Add-on Instruction Definition . . . . . . . . . . . . . 32Access a Parameter That Isn’t Visible . . . . . . . . . . . . . . . 33Monitor or Change the Value of a Parameter of an Add-on Instruction. . . . . . . . . . . . . . . . . . . . . . . . . . . . . 34View the Logic of an Add-on Instruction. . . . . . . . . . . . . 35What You Can and Can’t Do . . . . . . . . . . . . . . . . . . . . . 36Update an Add-on Instruction to a Newer Revision . . . . . 36
Use PhaseManager to Create and Configure an Equipment Phase . . . . . . . . . . . . . . . . . . . . . . . . . . . . . . . . 37
Create an Equipment Phase . . . . . . . . . . . . . . . . . . . . . . 37Create a State Routine . . . . . . . . . . . . . . . . . . . . . . . . . . 38Manually Step Through the States . . . . . . . . . . . . . . . . . . 39Configure the Initial State for an Equipment Phase . . . . . 42Open the Configuration for an Equipment Phase. . . . . . . 43Configure an Equipment Phase. . . . . . . . . . . . . . . . . . . . 44
Assign Alias Tags for Your Devices . . . . . . . . . . . . . . . . . . . 45
5 Publication 1756-QS001D-EN-P - February 2007

6 Table of Contents
Show or Hide Alias Information . . . . . . . . . . . . . . . . . . . 47Establish a Serial Connection to the Controller . . . . . . . . . . . 48Download a Project to the Controller . . . . . . . . . . . . . . . . . . 51Select the Operating Mode of the Controller. . . . . . . . . . . . . 53
Chapter 2Organize a Project What You Need . . . . . . . . . . . . . . . . . . . . . . . . . . . . . . . . . 55
Follow These Steps . . . . . . . . . . . . . . . . . . . . . . . . . . . . . . . 56Before You Begin . . . . . . . . . . . . . . . . . . . . . . . . . . . . . . . . 57
Configure the Task Execution. . . . . . . . . . . . . . . . . . . . . 57Create Additional Programs . . . . . . . . . . . . . . . . . . . . . . . . . 59Create User-defined Data Types. . . . . . . . . . . . . . . . . . . . . . 61Define Your Routines . . . . . . . . . . . . . . . . . . . . . . . . . . . . . 64
Define a Routine for Each Section of Your Machine or Process . . . . . . . . . . . . . . . . . . . . . . . . . . . . . . . . . . . 64Identify the Programming Languages That Are Installed. . 65Assign a Programming Language to Each Routine . . . . . . 65Divide Each Routine Into More Meaningful Increments . . 66
Assign Main Routines . . . . . . . . . . . . . . . . . . . . . . . . . . . . . 67Configure the Controller . . . . . . . . . . . . . . . . . . . . . . . . . . . 68Configure I/O Modules . . . . . . . . . . . . . . . . . . . . . . . . . . . . 69
Chapter 3Program a Project Offline What You Need . . . . . . . . . . . . . . . . . . . . . . . . . . . . . . . . . 71
Follow These Steps . . . . . . . . . . . . . . . . . . . . . . . . . . . . . . . 72Before You Begin . . . . . . . . . . . . . . . . . . . . . . . . . . . . . . . . 72Enter Ladder Logic . . . . . . . . . . . . . . . . . . . . . . . . . . . . . . . 73
Drag and Drop an Element . . . . . . . . . . . . . . . . . . . . . . 74Use the Keyboard to Add an Element . . . . . . . . . . . . . . . 75Enter Logic Using ASCII Text . . . . . . . . . . . . . . . . . . . . . 75Enable Quick Keys . . . . . . . . . . . . . . . . . . . . . . . . . . . . 76
Export/Import Ladder Logic. . . . . . . . . . . . . . . . . . . . . . . . . 77When You Import Rungs . . . . . . . . . . . . . . . . . . . . . . . . 77Export Rungs. . . . . . . . . . . . . . . . . . . . . . . . . . . . . . . . . 79Import Rungs. . . . . . . . . . . . . . . . . . . . . . . . . . . . . . . . . 80Check Alias Tags . . . . . . . . . . . . . . . . . . . . . . . . . . . . . . 80
Enter a Function Block Diagram . . . . . . . . . . . . . . . . . . . . . 81Use the Keyboard to Add an Element . . . . . . . . . . . . . . . 82Connect Elements . . . . . . . . . . . . . . . . . . . . . . . . . . . . . 82Resolve a Loop . . . . . . . . . . . . . . . . . . . . . . . . . . . . . . . 83Add Sheet . . . . . . . . . . . . . . . . . . . . . . . . . . . . . . . . . . . 83
Use a Faceplate for a Function Block . . . . . . . . . . . . . . . . . . 84Set Up a Topic. . . . . . . . . . . . . . . . . . . . . . . . . . . . . . . . 85Add a Faceplate to Microsoft Excel Software . . . . . . . . . . 85
Enter Structured Text. . . . . . . . . . . . . . . . . . . . . . . . . . . . . . 86
Publication 1756-QS001D-EN-P - February 2007

Table of Contents 7
Browse For an Instruction . . . . . . . . . . . . . . . . . . . . . . . 87Assign Operands to an Instruction . . . . . . . . . . . . . . . . . 87
Enter a Sequential Function Chart . . . . . . . . . . . . . . . . . . . . 88Enter an SFC . . . . . . . . . . . . . . . . . . . . . . . . . . . . . . . . . 89
Assign Operands. . . . . . . . . . . . . . . . . . . . . . . . . . . . . . . . . 90Create a Tag . . . . . . . . . . . . . . . . . . . . . . . . . . . . . . . . . 91Select an Existing Tag . . . . . . . . . . . . . . . . . . . . . . . . . . 92
Verify a Project . . . . . . . . . . . . . . . . . . . . . . . . . . . . . . . . . . 93Guidelines for Tags . . . . . . . . . . . . . . . . . . . . . . . . . . . . . . . 95
Chapter 4Document a Project What You Need . . . . . . . . . . . . . . . . . . . . . . . . . . . . . . . . . 97
Follow These Steps . . . . . . . . . . . . . . . . . . . . . . . . . . . . . . . 98Describe a User-defined Data Type . . . . . . . . . . . . . . . . . . . 99
Turn Pass-Through and Append Descriptions On or Off 100Paste a Pass-Through Description . . . . . . . . . . . . . . . . . 101
Add Rung Comments . . . . . . . . . . . . . . . . . . . . . . . . . . . . 102Enter and Edit Rung Comments Using Microsoft Excel . . . . 103
Export the Existing Comments . . . . . . . . . . . . . . . . . . . 104Edit the Export File . . . . . . . . . . . . . . . . . . . . . . . . . . . 105Import the New Comments . . . . . . . . . . . . . . . . . . . . . 105
Add Comments to a Function Block Diagram or SFC . . . . . 106Set the Word Wrap Option. . . . . . . . . . . . . . . . . . . . . . 106Add a Text Box . . . . . . . . . . . . . . . . . . . . . . . . . . . . . . 107
Add Comments to Structured Text . . . . . . . . . . . . . . . . . . . 108
Chapter 5Go Online to the Controller What You Need . . . . . . . . . . . . . . . . . . . . . . . . . . . . . . . . 109
Follow These Steps . . . . . . . . . . . . . . . . . . . . . . . . . . . . . . 109Establish EtherNet/IP Communication with the Controller . . 110
Equipment and Information That You Need . . . . . . . . . 111Connect Your EtherNet/IP Device and Computer . . . . . 112Assign an IP Address to the Controller or Communication Module . . . . . . . . . . . . . . . . . . . . . . . . . . . . . . . . . . . . 113Assign an IP Address to Your Computer . . . . . . . . . . . . 114Configure an Ethernet Driver . . . . . . . . . . . . . . . . . . . . 115
Go Online to a Controller . . . . . . . . . . . . . . . . . . . . . . . . . 115If Your Computer Has the Project For the Controller . . . 116If Your Computer Does Not Have the Project For the Controller . . . . . . . . . . . . . . . . . . . . . . . . . . . . . . . . . . 117
Chapter 6Program a Project Online What You Need . . . . . . . . . . . . . . . . . . . . . . . . . . . . . . . . 119
Follow These Steps . . . . . . . . . . . . . . . . . . . . . . . . . . . . . . 119Edit Logic While Online . . . . . . . . . . . . . . . . . . . . . . . . . . 120
Publication 1756-QS001D-EN-P - February 2007

8 Table of Contents
Start a Pending Edit . . . . . . . . . . . . . . . . . . . . . . . . . . . 122Make and Accept Your Edits . . . . . . . . . . . . . . . . . . . . 122Test the Edits. . . . . . . . . . . . . . . . . . . . . . . . . . . . . . . . 123Assemble and Save the Edits . . . . . . . . . . . . . . . . . . . . 123
Finalize All Edits in a Program . . . . . . . . . . . . . . . . . . . . . . 124
Chapter 7Troubleshoot the Controller What You Need . . . . . . . . . . . . . . . . . . . . . . . . . . . . . . . . 125
Follow These Steps . . . . . . . . . . . . . . . . . . . . . . . . . . . . . . 126Troubleshoot I/O Communication . . . . . . . . . . . . . . . . . . . 127Clear a Major Fault . . . . . . . . . . . . . . . . . . . . . . . . . . . . . . 128Search a Project . . . . . . . . . . . . . . . . . . . . . . . . . . . . . . . . 129
Search for All Occurrences of a Tag, Instruction, etc.. . . 130Go to an Instruction. . . . . . . . . . . . . . . . . . . . . . . . . . . 131
Browse Logic . . . . . . . . . . . . . . . . . . . . . . . . . . . . . . . . . . 132Force an I/O Value . . . . . . . . . . . . . . . . . . . . . . . . . . . . . . 133
Install an I/O Force (Force an I/O Value) . . . . . . . . . . . 135Remove an Individual Force. . . . . . . . . . . . . . . . . . . . . 136Disable All I/O Forces . . . . . . . . . . . . . . . . . . . . . . . . . 136
Create and Run a Trend (Histogram) . . . . . . . . . . . . . . . . . 137Run a Trend for a Tag . . . . . . . . . . . . . . . . . . . . . . . . . 138Add More Tags to the Trend. . . . . . . . . . . . . . . . . . . . . 138Optional—Save the Trend . . . . . . . . . . . . . . . . . . . . . . 139
View Scan Time . . . . . . . . . . . . . . . . . . . . . . . . . . . . . . . . 140View Task Scan Time. . . . . . . . . . . . . . . . . . . . . . . . . . 140View Program Scan Time . . . . . . . . . . . . . . . . . . . . . . . 140
Index
Publication 1756-QS001D-EN-P - February 2007
Preface
About This Publication
Use this manual to get started programming and maintaining Logix5000 controllers.
This manual describes the necessary tasks to do the following.
• establish communication with a Logix5000 controller
• program a Logix5000 controller
• perform online maintenance tasks such a search and edit logic, run a histogram, clear faults, and force I/O values.
The beginning of each chapter contains the following information. Read these sections carefully before beginning work in each chapter.
• Before You Begin - This section lists the steps that must be completed and decisions that must be made before starting that chapter. The chapters in this quick start do not have to be completed in the order in which they appear, but this section defines the minimum amount of preparation required before completing the current chapter.
• What You Need - This section lists the tools that are required to complete the steps in the current chapter. This includes, but is not limited to, hardware and software.
• Follow These Steps - This illustrates the steps in the current chapter and identifies which steps are required to complete the examples using specific networks.
9 Publication 1756-QS001D-EN-P - February 2007

10
Audience
This manual is for programmers and maintenance personnel who will be using one of the following Logix5000 controllers.
• 1756 ControlLogix controllers
• 1756 GuardLogix controllers
• 1768 CompactLogix controllers
• 1769 CompactLogix controllers
• 1789 SoftLogix5800 controllers
• 1794 FlexLogix controllers
• PoweFlex700S with DriveLogix controllers
To use this manual, you must already have experience with the following.
• Programmable controllers
• Industrial automation systems
• Personal computers
• Microsoft Windows95/98, NT, 2000, and XP operating systems
Required Software
To complete this quick start, the following software is required:
• RSLogix 5000 Software, version 16
• RSLinx Classic Software, version 2.51
Conventions
Text in the courier font identifies example programming code, shown in a monospace font so you can identify each character and space.
Publication 1756-QS001D-EN-P - February 2007

11
Additional Resources
To view or download manuals, visit http://www.rockwellautomation.com/literature.
To obtain a hard copy of a manual, contact your local Rockwell Automation distributor or sales representative.
Resource Description
Logix5000 Controllers Quick Start, publication 1756-QS001 Get started with a Logix5000 controller
Logix5000 Controllers System Reference, publication 1756-QR007
Look up abbreviated information and procedures regarding programming languages, instructions, communications, and status
Logix5000 Controllers Common Procedures, publication 1756-PM001
Program a Logix5000 controller—detailed and comprehensive information
• Logix5000 Controllers General Instructions Reference Manual, publication 1756-RM003
• Logix5000 Controllers Process and Drives Instructions Reference Manual, publication 1756-RM006
• Logix5000 Controllers Motion Instruction Set Reference Manual, publication 1756-RM007
Program a specific Logix5000 programming instruction
Logix5000 Controllers Import/Export Reference Manual, publication 1756-RM084
Import or export a Logix5000 project or tags from or to a text file
Logix5550 Controller Converting PLC-5 or SLC 500 Logic to Logix5550 Logic Reference Manual, publication 1756-6.8.5
Convert a PLC-5 or SLC 500 application to a Logix5000 project
• CompactLogix System User Manual, publication1769-UM007
• ControlLogix System User Manual, publication 1756-UM001
• DriveLogix Controller User Manual, publication 20D-UM002
• FlexLogix System User Manual, publication1794-UM001
• GuardLogix Controllers User Manual, publication 1756-UM020
• SoftLogix5800 System User Manual, publication 1789-UM002
Integrate a specific Logix5000 controller within a system of controllers, I/O modules, and other devices
EtherNet/IP Modules in Logix5000 Control Systems User Manual, publication ENET-UM001
Control devices over an EtherNet/IP network
ControlNet Modules in Logix5000 Control Systems User Manual, publication CNET-UM001
Control devices over a ControlNet network
DeviceNet Modules in Logix5000 Control Systems User Manual, publication DNET-UM004
Control devices over a DeviceNet network
Publication 1756-QS001D-EN-P - February 2007

12
Notes:
Publication 1756-QS001D-EN-P - February 2007

Where to Start
Chapter 1
Program and Test a Simple Project
Chapter 2
Organize a Project
Chapter 3
Program a Project Offline
Chapter 4
Document a Project
Chapter 5
Go Online to the Controller
Chapter 6
Program a Project Online
Chapter 7
Troubleshoot the Controller
13 Publication 1756-QS001D-EN-P - February 2007

14
Typical Configuration
You will need the following basic components to begin working with RSLogix 5000 software. This is a typical configuration; yours may vary.
Typical Configuration
IMPORTANT In this publication, we do not tell you how to install or maintain any component shown here, nor any other referenced component. For intallation and maintenance information for the components in your configuration, refer to the publications shipped with the component.
Reference Component
A 1769 CompactLogix Controller
B 1756 ControlLogix controller with 1756-CNBR module
C 1794 Flex I/O with 1788-CNC module
D Personal computer running RSLogix 5000 Software, version 16
30566-M
AB
CD
Publication 1756-QS001D-EN-P - February 2007

Chapter 1
Program and Test a Simple Project
This chapter introduces the basic programming sequence for a Logix5000 controller.
• It covers the steps required to develop and test a ladder or function block diagram.• The examples in the chapter show how to control a digital or analog output based on the
state of a digital or analog input.
The rest of the chapters in this publication provide more detailed information on how to program, edit, and troubleshoot a project.
What You Need
You need these items to complete the tasks in this manual.
• Personal Computer running RSLogix 5000 Software, version 16• A layout of the system for which you are creating a project
15 Publication 1756-QS001D-EN-P - February 2007

16 Program and Test a Simple Project
Follow These Steps
Use this diagram to program and test a simple project.
Add I/O Modules
Page 19
Look at I/O Data
Page 21
Enter Ladder Logic
Page 23
Use Add-on Instructions
Page 29
Assign Alias Tags for Your Devices
Page 45
Establish a Serial Connection to the ControllerPage 48
Download a Project to the ControllerPage 51
Select the Operating Mode of the ControllerPage 53
Before You Begin
Page 17
START
Enter a Function Block Diagram
Page 25
Configure an Equipment Phase
Page 37
Create a Project for the Controller
Page 18
Publication 1756-QS001D-EN-P - February 2007

Program and Test a Simple Project 17
Before You Begin
To configure and program a Logix5000 controller, you use RSLogix 5000 software to create and manage a project for the controller.
Project – The file on your workstation (or server) that stores the logic, configuration, data, and documentation for a controller.
• The file for the project has an .acd extension.
• When you create a project, the project name is the same as the name of the controller.
• The controller name is independent of the project name. You can rename either the project name or the controller name.
Name of the project
If you rename the project or controller, both names are shown.
Name of the controller
Controller organizer – graphical overview of the project. Use the controller organizer to navigate to the various components of a project.
To open a folder and show its contents, either:
• double-click the folder.
• click the + sign.
To close a folder and hide its contents, either:
• double-click the folder.
• click the – sign.
Publication 1756-QS001D-EN-P - February 2007

18 Program and Test a Simple Project
Create a Project for the Controller
1. Start RSLogix 5000 software.
3. Specify the general configuration for the controller (some items apply to only certain controllers).
a. Choose the type of controller.
b. Choose the major revision of firmware for the controller.
c. Type a name for the controller.
d. Choose the chassis type for the controller.
e. Select the slot number of the controller.
f. Specify the path where the project will be stored.
g. Click OK.
2. Click the New button.
Publication 1756-QS001D-EN-P - February 2007
Program and Test a Simple Project 19
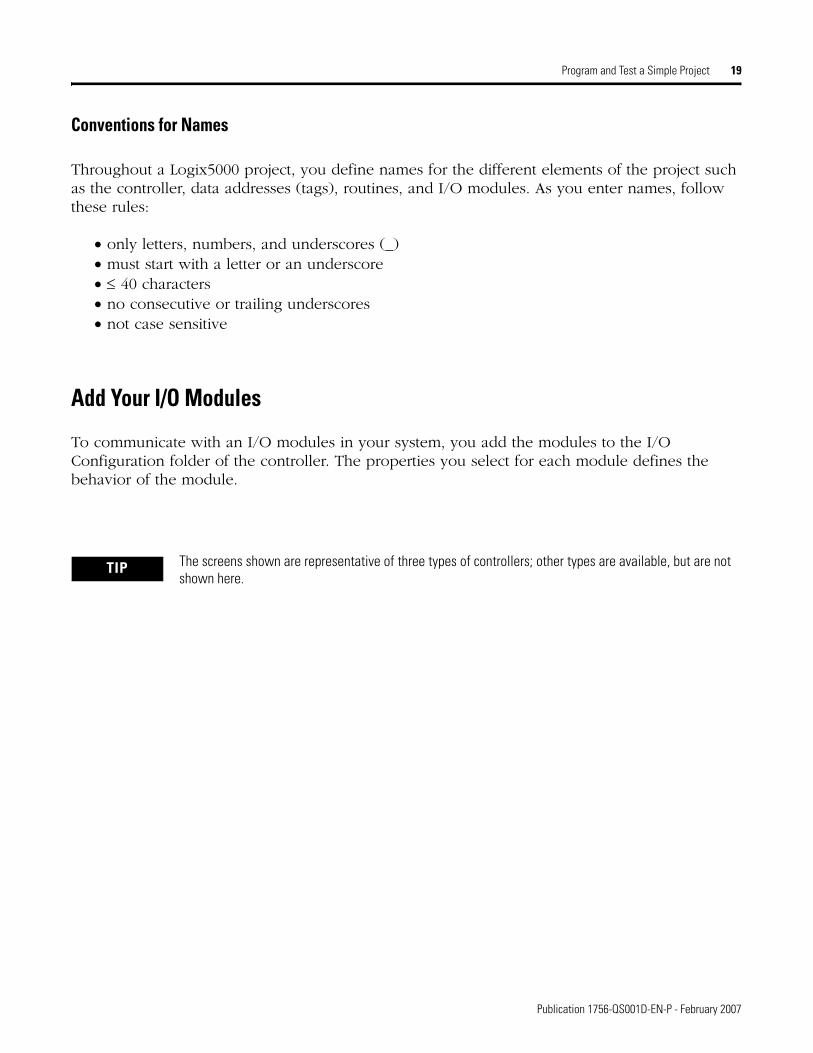
Conventions for Names
Throughout a Logix5000 project, you define names for the different elements of the project such as the controller, data addresses (tags), routines, and I/O modules. As you enter names, follow these rules:
• only letters, numbers, and underscores (_)• must start with a letter or an underscore• ≤ 40 characters• no consecutive or trailing underscores• not case sensitive
Add Your I/O Modules
To communicate with an I/O modules in your system, you add the modules to the I/O Configuration folder of the controller. The properties you select for each module defines the behavior of the module.
TIP The screens shown are representative of three types of controllers; other types are available, but are not shown here.
Publication 1756-QS001D-EN-P - February 2007

20 Program and Test a Simple Project
CompactLogix Controller
ControlLogix Controller
FlexLogix Controller
1. Right-click and choose New Module.
2. Select the type of module.
4. Type a name for the module (up to 40 characters with no spaces).
5. Select the location of the module in the chassis or rail.
6. Accept the default configuration for the module.
3. Select the revision of the module.
P
ublication 1756-QS001D-EN-P - February 2007
Program and Test a Simple Project 21
Look at Your I/O Data
I/O information is presented as a set of tags.
An I/O address follows this format.
Location :Slot :Type .Member .SubMember .Bit
= Optional
Where Is
Location Network location
LOCAL = same chassis or DIN rail as the controller
ADAPTER_NAME = identifies remote communication adapter or bridge module
Slot Slot number of I/O module in its chassis or DIN rail
Type Type of data
I = input
O = output
C = configuration
S = status
Member Specific data from the I/O module; depends on what type of data the module can store.
• For a digital module, a Data member usually stores the input or output bit values.
• For an analog module, a Channel member (CH#) usually stores the data for a channel.
SubMember Specific data related to a Member.
Bit Specific point on a digital I/O module; depends on the size of the I/O module (0-31 for a 32-point module)
When you add a module to the I/O Configuration folder…
…the software automatically creates controller-scoped tags for the module.
Publication 1756-QS001D-EN-P - February 2007

22 Program and Test a Simple Project
1. Right-click and choose Monitor Tags.
Values are shown in the following styles:
A blue arrow indicates that when you change the value, it immediately takes effect.
Style Base Notation
Binary 2 2#
Decimal 10 NA
Hexadecimal 16 16#
Octal 8 8#
Exponential NA 0.0000000e+000
Float NA 0.0
1. o see a value in a different style, select the desired style.
2. To change a value, click the Value cell, type the new value, and press the Enter key.
3. To expand a tag and show its members, click the + sign.
Publication 1756-QS001D-EN-P - February 2007

Program and Test a Simple Project 23
Enter Ladder Logic
For a Logix5000 controller, you enter your logic in routines.
Open a Routine
When you create a project, the software automatically creates a main routine that uses the ladder diagram programming language.
Routine – provide the executable code (logic) for a program (similar to a program file in a PLC or SLC controller).
Main routine – for each program, you assign a main routine.
• When the program executes, its main routine automatically executes.
• Use the main routine to control the execution of the other routines in the program.
• To call (execute) another routine (subroutine) within the program, use a Jump to Subroutine (JSR) instruction.
Subroutine – any routine other than the main routine or fault routine. To execute a subroutine, use a Jump to Subroutine (JSR) instruction in another routine, such as the main routine.
To open a folder and show its contents, either:
• double-click the folder.
• click the + sign.
To open a routine, double-click the routine.
Publication 1756-QS001D-EN-P - February 2007

24 Program and Test a Simple Project
Enter Ladder Logic
One way to enter logic is to drag buttons from a toolbar to the desired location.
EXAMPLE In the following example, an Examine If Closed (XIC) instruction checks the on/off state of a pushbutton. If the pushbutton is on, the Output Energize (OTE) instruction turns on a light.
A green dot shows a valid placement location (drop point).
To add ladder logic, drag the button for the rung or instruction directly to the desired location.
You can enter your logic and leave the operands undefined. After you enter a section of logic, go back and assign the operands.
XICIf this bit is on…
OTE…turn on this bit. Otherwise,
turn off this bit.
Publication 1756-QS001D-EN-P - February 2007

Program and Test a Simple Project 25
Enter a Function Block Diagram
Follow these steps to add a Function Block Diagram to your project.
Create a Routine
Each routine in your project uses a specific programming language. To program in a different language, such as function block diagram, create a new routine.
1. Right-click and the program and choose New Routine.
2. Type a name for the routine.
3. Choose the programming language.
4. Click OK.
Publication 1756-QS001D-EN-P - February 2007

26 Program and Test a Simple Project
Call the Routine
To execute a routine other than the main routine, use a Jump to Subroutine (JSR) instruction to call the routine.
2. Select the Program Control tab.
1. Add a rung.
3. Add a JSR instruction.
4. Select the name of the routine that you want to execute.
5. To simply call the routine, remove the rest of the parameters for the JSR instruction. To remove a parameter, right-click the parameter and choose Remove Instruction Parameter.
Publication 1756-QS001D-EN-P - February 2007

Program and Test a Simple Project 27
Enter a Function Block Diagram
EXAMPLE In the following example, an Input Reference (IREF) reads the value of an analog input and sends the value to a Scale (SCL) instruction. The SCL instruction converts the value to engineering uses and sends it to an Output Reference (OREF). The OREF writes the value to an analog output.
2. Drag elements from the toolbar to the sheet.
3. To connect elements, click corresponding pins (green dot = valid connection point).
1. Click the tab for the desired instructions.
Publication 1756-QS001D-EN-P - February 2007

28 Program and Test a Simple Project
Configure a Function Block Instruction
Follow these steps to assign specific values (parameters) to a function block.
1. Click the configuration button.
2. To change the value of a parameter, click the value cell, type the new value, and press Enter.
For example, in the SCL instruction, specify the following parameters:• InRawMax – maximum input value • InRawMin – minimum input value • InEUMax – maximum engineering
value • InEUMin – minimum engineering
value
3. Click OK.
Publication 1756-QS001D-EN-P - February 2007

Program and Test a Simple Project 29
Use Add-on Instructions
With version 16 of RSLogix 5000 programming software, you can design and configure sets of commonly used instructions to increase project consistency. Similar to the built-in instructions contained in Logix5000 controllers, these instructions you create are called Add-On Instructions.
With Add-on Instructions, you can:
• insert your own instruction.• copy an Add-on Instruction definition from another RSLogix 5000 project.• import an Add-on Instruction definition from another RSLogix 5000 project.
Publication 1756-QS001D-EN-P - February 2007

30 Program and Test a Simple Project
Insert an Add-on Instruction
Follow this procedure when you want to use an add-on instruction in one of your routines.
1. Open the routine that will use the instruction.
2. Click the Add-On tab of the Language Element toolbar
3. Drag the instruction from the toolbar to the routine.
4. Fill in the parameters.
TIP For help with an instruction, select the instruction and then press [F1]. In structured text, make sure the cursor is in the blue instruction name.
Single question mark — Required parameter. Enter a tag.
Single and double question marks — Required parameter. Enter a tag.
Only double question marks — Not a required parameter. You can either:
• leave it blank and use the default value.
• if it’s an input value, enter a diffent value.
Ladder Diagram
Nub on the end of a pin — Required parameter. Wire the pin to an IREF, OREF, connector, or another block.
No nub on the end of a pin — Not a required parameter.
Single question mark — Required parameter. Enter a tag.
Function Block Diagram
The instruction takes only the required parameters. Enter a tag foreach parameter.
Structured Text
Publication 1756-QS001D-EN-P - February 2007

Program and Test a Simple Project 31
Copy an Add-on Instruction Definition
Do this procedure when another RSLogix 5000 project has an add-on instructon that you want to use. After you copy the definition, you can use the instruction in your programs.
1. Open the RSLogix 5000 project that has the add-on instruction definition.
2. Find the definition in the Add-On Instructions folder.
3. Right-click the definition and choose Copy.
4. Go to the project that gets the definition.
5. Right-click the Add-On Instructions folder and choose Paste.
Publication 1756-QS001D-EN-P - February 2007

32 Program and Test a Simple Project
Import an Add-on Instruction Definition
Do this procedure when you want to use the definition for an add-on instruction that was exported from another RSLogix 5000 project. Once the project has the definition, you can use the instruction in your programs.
Does the RSLogix 5000 project already have a revision of this add-on instruction?
• No — use this procedure to import the instruction.
• Yes — see Update an Add-on Instruction to a Newer Revision on page 36.
1. Right-click the Add-On Instructions folder and choose Import Add-On Instruction.
2. Find the instruction.
3. Select the instruction and click Import.
Publication 1756-QS001D-EN-P - February 2007

Program and Test a Simple Project 33
Access a Parameter That Isn’t Visible
Do this procedure when you want to read or write to a parameter of an add-on instruction that isn’t visible on the instruction.
If the programming language is Then
Function block diagram 1. Click the Properties button for the instruction.
2. Check the Vis box for the parameter.
Example: Check the Vis box of the Jog parameter to use it in your diagram.
3. Click OK.
4. Wire to the pin for the parameter.
Ladder diagram
Structured text
Use another instruction, an assignment, or an expression to read or write to the tag name of the parameter.
Use this format for the tag name of the parameter.
Add_On_Tag.Parameter
Where Is
Add_On_Tag Add-on-defined tag for the add-on instruction
Parameter Name of the parameter
Publication 1756-QS001D-EN-P - February 2007

34 Program and Test a Simple Project
Monitor or Change the Value of a Parameter of an Add-on Instruction
Do this procedure when you want to see or change a parameter value of an add-on instruction.
2. Do you want to change a value?
• No — Go to step 5.
• Yes — Continue with step 3.
3. Click and type the new value.
4. Click Apply.
5. When you’re done, click OK.
1. Decide which programming language you are using.
• Function block or ladder diagram
• Structured text
Click the Properties button for the instruction.
Motor_Starter(Motor_Starter_ST,Stop_PB,Start_PB,Motor_Out_ST);
Right-click the instruction and choose Properties.
Values of the parameters
Publication 1756-QS001D-EN-P - February 2007

Program and Test a Simple Project 35
View the Logic of an Add-on Instruction
Do this procedure when you want to see the logic that an add-on instruction is using.
It’s possible to protect an add-on instruction so that you can’t see its logic.
Do this to see if an add-on instruction is protected.
Do this to see the instruction logic.
1. Select the add-on instruction.
2. Look in the Quick View pane for Source Protection. If it isn’t listed, then the routine isn’t protected.
Right-click the instruction and choose Open Instruction Logic.
Motor_Starter(Motor_Starter_ST,Stop_PB,Start_PB,Motor_Out_ST);
Publication 1756-QS001D-EN-P - February 2007

36 Program and Test a Simple Project
What You Can and Can’t Do
You can’t:
• edit logic online.
• edit logic for just this instruction.
To edit the logic, you must edit the definition.
Update an Add-on Instruction to a Newer Revision
Do this procedure when you want to change the definition of an add-on instruction to a newer revision.
Example
Suppose your project uses a certain add-on instruction 5 times. In that case, all 5 instances change when you change the definition.
1. Right-click the Add-On Instructions folder and choose Import Add-On Instruction.
2. Find the instruction and choose Import.
3. Decide how to handle the conflict with the existing revision (probably overwrite).
4. Use a cross-reference list to check each use of the instruction in your logic.
IMPORTANT Before you change the definition of an add-on instruction, make sure the change won’t cause problems with existing instances of that instruction. When you change the definition of an add-on instruction, the change affects all the instances of that instruction in your project.
You can:
• see the logic as it executes
• see tag values
• change tag and parameter values
Publication 1756-QS001D-EN-P - February 2007

Program and Test a Simple Project 37
Use PhaseManager to Create and Configure an Equipment Phase
Follow this procedure to use PhaseManager to create an Equipment Phasease and change the default settings for the Equipment Phase.
Create an Equipment Phase
1. Right-click Main Task and choose New Equipment Phase.
2. Type a name for the Equipment Phase.
3. Click OK.
Publication 1756-QS001D-EN-P - February 2007

38 Program and Test a Simple Project
Create a State Routine
2. Choose New Phase State Routine.
4. Select the programming language.
5. Click OK.
1. Right-click Main Task and choose the Equipment Phase.
3. Selecta name for the Equipment Phase state routine.
Publication 1756-QS001D-EN-P - February 200
7
Program and Test a Simple Project 39
Manually Step Through the States
Before you do this procedure, do the following:
• Download the project to the controller.• Put the controller in run or remote run mode.
Step Notes
1. Right-click the Equipment Phase and choose Monitor Equipment Phase.
2. Click the ownership button and then Yes—take ownership. This lets you use this window to step through the states.
Publication 1756-QS001D-EN-P - February 2007

40 Program and Test a Simple Project
3. Click Start. • The Equipment Phase goes to the Running state.
• Any code in the Running state routine starts running. This is where you put the code for the normal production sequence of your equipment.
4. Click Stop. • The Equipment Phase goes to the Stopped state.
• The Running state routine stops running.
• The Stopping state routine is optional. Without it, the Equipment Phase goes directly to the Stopped state.
Step Notes
Publication 1756-QS001D-EN-P - February 2007

Program and Test a Simple Project 41
5. Click Reset. • The Equipment Phase goes to the Idle state.
• The Resetting state routine is optional. Without it, the Equipment Phase goes directly to the Idle state.
6. Click the ownership button. This releases the Equipment Phase from control by this window.
Step Notes
Publication 1756-QS001D-EN-P - February 2007

42 Program and Test a Simple Project
Configure the Initial State for an Equipment Phase
The initial state is the first state to which the Equipment Phase goes after you apply power.
2. Choose the Configuration tab.
4. Click OK.
1. Right-click the Equipment Phase and choose Properties.
3. Choose the initial state.
P
ublication 1756-QS001 D-EN-P - F ebruary 2007
Program and Test a Simple Project 43
Open the Configuration for an Equipment Phase
2. Choose the Configuration tab.
1. Right-click the Equipment Phase and choose Properties.
Publication 1756-QS001D-EN-P - February 2007

44 Program and Test a Simple Project
Configure an Equipment Phase
Use the following settings to configure an Equipment Phase.
Setting Choices
Prestate
The prestate routine runs all the time, even when the Equipment Phase is in the idle state. It runs before each scan of a state.
Do you want to run a prestate routine?
• Yes — Select the routine that you want to run.
• No — Leave this box set to <none>
Fault A fault routine lets you clear a major fault made by an instruction.
Do you want to set up a fault routine for the instructions in this Equipment Phase?
• Yes — Select the routine that you want as your fault routine.
• No — Leave this box set to <none>
Inhibit Equipment Phase Do you want the controller to inhibit this Equipment Phase?
• Yes — Check this box.
• No — Leave this box unchecked or uncheck it.
Initial State Which state do you want the Equipment Phase to go to when you turn on the controller?
• Idle
• Complete
• Stopped
• Aborted
Complete State Immediately If not Implemented
Do you want the Equipment Phase to skip any states that you aren’t using?
• Yes — Leave this box checked or check it.
• No — Uncheck this box.
current state routine
prestate routine
Publication 1756-QS001D-EN-P - February 2007

Program and Test a Simple Project 45
Assign Alias Tags for Your Devices
While you can use the input and output tags of a module directly in your logic, it is easier to use alias tags.
Initial Step Index A. Are any of the state routines in ladder diagram or structured text?
• No — Skip this box.
• Yes — Go to step B.
B. Do any of those state routines use step numbers?
• Yes — Type the number for the first step of each state.
• No — Skip this box.
The tag for the Equipment Phase has a StepIndex number. The controller resets the StepIndex each time the Equipment Phase changes states. The controller resets the StepIndex to the number you put in the Initial Step Index box.
External Sequencer Loss of Communication Command
A. Are you using RSBizWare Batch software to command this Equipment Phase?
• No — Skip this box.
• Yes — Go to step B.
B. If the controller loses communication with RSBizWare Batch software, what do you want the Equipment Phase to do?
• Continue in its current state — Select None.
• Go to aborting — Select Abort.
• Go to holding — Select Hold.
• Go to stopping — Select Stop.
The Equipment Phase must still follow the state model. For example, it goes to holding only if it is in running or restarting when communication fails.
External Request Hold Action A. Are you using any PXRQ instructions?
• No — Skip this box.
• Yes — Go to step B.
B. What do you want to do if an Equipment Phase goes to holding while a PXRQ instruction is in process?
• Nothing — Select None.
• Stop the request — Select Clear.
Setting Choices
Publication 1756-QS001D-EN-P - February 2007

46 Program and Test a Simple Project
Alias tag – a tag that represents another tag.
• Both tags share the same data.
• When the data changes, both tags change.
• An alias tag provides a descriptive name for data, such as DeviceNet input or output data.
• If the location of the data changes, simply point the alias tag goes to the new location without editing your logic.
As an option, create tags that describe each device without pointing them to the actual addresses of the devices. Later, convert the tags to aliases for the data of the devices.
Select the address of thedata. To select a bit, click the .
3. Right-click the tag name and choose New…
4. Select Alias from the menu.
6. Select the scope for the alias tag.
Look in thecontroller-scoped tags.
5. Select the tag that this alias tag represents.
7. Choose OK.
1. Enter your logic. 2. Type a descriptive tag name for the device.
Publication 1756-QS001D-EN-P - February 2007

Program and Test a Simple Project 47
Show or Hide Alias Information
Follow these steps to show or hide that alias information for a tag.1. Choose Tools ⇒ Options.
2. Select the Ladder Editor Display category.
3. Check or uncheck this box.
4. Click OK.
Publication 1756-QS001D-EN-P - February 2007

48 Program and Test a Simple Project
Establish a Serial Connection to the Controller
RSLinx Classic software handles communication between Logix5000 controllers and your software programs, such as RSLogix 5000 software. To communicate with a controller (for example, download, monitor data), configure RSLinx Classic software for the required communication.
Use a serial cable to establish a point-to-point connection between the serial ports on your computer and controller
Logix5000 Controller RSLinx Classic Software RSLogix 5000 Software
Driver – establish communication over a specific network
Path – communication route to a device. To define a path, you expand a driver and select the device.
Publication 1756-QS001D-EN-P - February 2007

Program and Test a Simple Project 49
.
Logix5000 Controller
1756-CP3 or 1747-CP3 serial cable
1. Connect a serial cable to your controller and computer.
WARNING If you connect or disconnect the serial cable with power applied to this module or the serial device on the other end of the cable, an electrical arc can occur. This could cause an explosion in hazardous location installations.
Be sure that power is removed or the area is nonhazardous before proceeding.
Publication 1756-QS001D-EN-P - February 2007

50 Program and Test a Simple Project
a. Start RSLinx Classic software.
b. Click .
c. Select RS-232 DF1 devices and click
.
d. Accept the default name.
2. Configure an RS-232 driver.
The driver is successfully configured and running.
e. Select the COM port of your computer.
f. Select Logix 5550/CompactLogix.
g. Click .
h. When the auto-configuration completes, click OK.
Publication 1756-QS001D-EN-P - February 2007

Program and Test a Simple Project 51
Download a Project to the Controller
To execute a project in a controller, download the project to the controller.
ATTENTION When you download a project or update firmware, all active servo axes are turned off. Before you download a project or update firmware, make sure that this will not cause any unexpected movement of an axis.
IMPORTANT To update the firmware of a controller, first install a firmware upgrade kit.• An upgrade kit ships on a supplemental CD along with RSLogix 5000 software.
• To download an upgrade kit, go to http://www.ab.com. Choose Product Support. Choose Firmware Updates.
Logix5000 Controller
Project
Download
Download – transfer a project from your computer to the controller so you can run the project.
• when you download a project, you lose the project and data that is currently in the controller, if any.
• if the revision of the controller does not match the revision of the project, you are prompted to update the firmware of the controller. RSLogix 5000 software lets you update the firmware of the controller as part of the download sequence.
Publication 1756-QS001D-EN-P - February 2007

52 Program and Test a Simple Project
b. Click .
c. Browse to the controller.• To open a level, click the + sign.• When you see the controller, select it.
2. Define the path to the controller.
a. Open the RSLogix 5000 project that you want to download.
1. Turn the keyswitch of the controller to:
3. Download the project.
a. Click .
b. Click . b. Choose .
Which response did RSLogix 5000 software give?
Download to the controller.
Failed to download to the controller. The revision of the offline project and controller’s firmware are not compatible.
c. Choose the revision for the controller.
d. Choose and then .
Publication 1756-QS001D-EN-P - February 2007

Program and Test a Simple Project 53
Select the Operating Mode of the Controller
To execute or stop executing the logic in a controller, change the operating mode of the controller.
Do you want to execute the logic in the controller?
Do you want the logic to control the output devices?
Choose program mode.
Yes
Choose run mode.
No
No
Yes
RUN REM PROG
Choose test mode.
Do you want the logic to control the output devices?
1. Determine which mode you want for the controller.
2. Turn the keyswitch to
3. Go online with the controller.
4. Select the mode.
Publication 1756-QS001D-EN-P - February 2007

54 Program and Test a Simple Project
Notes:
Publication 1756-QS001D-EN-P - February 2007

Chapter 2
Organize a Project
This chapter provides more detailed information on how to organize the program layout and data structures for the controller.
What You Need
You need these items to complete the tasks in this manual.
• Personal Computer running RSLogix 5000 Software, version 16• A layout of the system for which you are creating a project
55 Publication 1756-QS001D-EN-P - February 2007

56 Organize a Project
Follow These Steps
Use this diagram to organize a project.
Configure the Task Execution
Page 57
Create Additional Programs
Page 59
Define Your Routines
Page 64
Assign Main Routines
Page 67
Configure the Controller
Page 68
Configure I/O Modules
Page 69
Before You Begin
Page 57
START
Create User-defined Data TypesPage 61
Publication 1756-QS001D-EN-P - February 2007

Organize a Project 57
Before You Begin
A new project contains a default task for the execution of your logic. Before you can create programs, you must first configure the task execution.
Configure the Task Execution
In this quick start, we limit the project to a single task with one of the following types of execution.
If you want to execute your logic Then configure the task for this type of execution
All of the time Continuous
This is the default configuration of MainTask.
At a specific period Periodic
You define the period at which the task executes.
Task – define scheduling and priority information for the execution (scan) of your logic.
Executionof Logic
task automatically restarts
task automatically restarts
task automatically restarts
task automatically restarts
period expirestask restarts
period expirestask restarts
Executionof Logic
task finishes
task finishes
task finishes
Publication 1756-QS001D-EN-P - February 2007

58 Organize a Project
To use multiple tasks or execute a task when a specific event (trigger) occurs, see Logix5000 Controllers Common Procedures, publication 1756-PM001.
3. Choose Periodic.
1. Right-click and choose Properties.
4. Type the period for the task.
5. Click OK.
2. Click the Configuration tab.
Publication 1756-QS001D-EN-P - February 2
007
Organize a Project 59
Create Additional Programs
A Logix5000 controller lets you divide your application into multiple programs, each with its own tags (data).
There is no need to manage conflicting tag names between the programs.
Tag – store data. There is no fixed data table or numeric format for data addresses. The tag name is the address (no cross-reference to a physical address). You create the tags that you want to use.
Program – isolate logic and data from other logic and data. Each program contains one or more logic routines as associated data.
Scope – define whether a tag is accessible to all programs (controller tag) or limited to a specific program (program tag). Data at the program scope is isolated from other programs.
Controller Tags (Global Data)
Program_A
Other routinesMain Routine Tag_4
Tag_5Tag_6
Program Tags (Local Data)
Tag_1Tag_2Tag_3
Program_B
Other Main Routine Tag_4
Tag_5Tag_6
Program Tags (Local Data)
Data at the program scope is isolated from other programs.
• Routines cannot access data that is at the program scope of another program.
• You can re-use the tag name of a program-scoped tag in multiple programs.
Data
All programs have access to datathat is at the controller scope.
Publication 1756-QS001D-EN-P - February 2007

60 Organize a Project
Certain tags must be controller scope.
TIP Names follow these conventions:• only letters, numbers, and underscores (_)• must start with a letter or an underscore• ≤ 40 characters• no consecutive or trailing underscores• not case-sensitive
If you want to use a tag Use this scope
In more than one program in the project
Controller TagsIn a Message (MSG) instruction
To produce or consume data
To communicate with a PanelView terminal
In a single program only Program Tags for the program
3. Click OK.
1. Right-click and choose New Program.
2. Type a name for the program.
Do you have multiple machines, stations, or processes that use identical logic but different data?
Create a program for each machine, station, or process.
• You can re-use both code and tag names in the programs.
• There is no need to manage conflicting tag names between the programs.
Yes
No
Skip this section. A single program is sufficient for now.
Publication 1756-QS001D-EN-P - February 2
007
Organize a Project 61
Create User-defined Data Types
User-defined data types let you organize your data to match your machine or process. This streamlines program development and creates self-documenting code that is easier to maintain.
Tag – store data. There is no fixed data table or numeric format for data addresses. The tag name is the address. You create the tags that you want to use.
Structure – combine a group of data types into a re-usable format (template for tags). Use a structure as the basis for multiple tags with the same data layout.
User-defined data type – create your own structure that emulates your devices. A user-defined data type stores all the data related to a specific aspect of your system. This keeps related data together and easy to locate, regardless of its data type.
Member – describe an individual piece of data within a structure.
Array – define a block of data (file). The entire block uses the same data type. It can have 1, 2, or 3 dimensions.
Data type – define the type of data that a tag stores, such as a bit, integer, floating-point value, or string.
Publication 1756-QS001D-EN-P - February 2007

62 Organize a Project
As you create user-defined data types, follow these guidelines.
Guideline Details
1. Consider the pass-through of descriptions.
See Describe a User-defined Data Type on page 99.
2. Data that represents an I/O device requires additional programming.
If you include members that represent I/O devices, you must use logic to copy the data between the members in the user-defined data type and the corresponding I/O tags.
3. If you include an array as a member, limit the array to a single dimension.
Multi-dimension arrays are not permitted in a user-defined data type.
4. When you use the BOOL, SINT, or INT data types, place members that use the same data type in sequence:
Logix5000 controllers allocate memory in 4-byte chunks. If you sequence smaller data types together, the controller packs as many as it can fit into a 4-byte chunk.
More Efficient
BOOL
BOOL
BOOL
DINT
DINT
Less Efficient
BOOL
DINT
BOOL
DINT
BOOL
Publication 1756-QS001D-EN-P - February 2007

Organize a Project 63
Follow these steps to create a user-defined data type and tags that use the data type.
a. Right-click and choose New Data Type.
b. Type a name for the data type (not the name of a tag that will use the data type).
c. Enter the members.
As an option, type a description for each member.
d. Click OK.
1. Create a user-defined data type.
2. Create a tag that uses the user-defined data type.
a. Right-click the scope that you want for the tag and choose Edit Tags.
b. Type a name for the tag.
c. Type the name of the user-defined data type from step 1.
3. Do the following if you want the tag to be an array (multiple instances of the data type).
c. Select the data type and click .
d. Specify the array dimensions.
e. Click OK.
Publication 1756-QS001D-EN-P - February 2007

64 Organize a Project
Define Your Routines
Once your project has the required programs, you have to define and create the routines for each program.
Define a Routine for Each Section of Your Machine or Process
To make your project easier to develop, test, and troubleshoot, divide it into routines (subroutines).
1. Identify each physical section of your machine or process.
2. Assign a routine for each of those sections.
Routine – provide the executable code (logic) for a program (similar to a program file in a PLC or SLC controller).
Main routine – For each program, you assign a main routine.
• When the program executes, its main routine automatically executes.
• Use the main routine to control the execution of the other routines in the program.
• To call (execute) another routine (subroutine) within the program,
Subroutine – Any routine other than the main routine or fault routine. To execute a subroutine, use a Jump to Subroutine (JSR) instruction in another routine, such as the main routine.
Description of Your Machine or Process
Xxxxx xxxxx Xxxxx xxxxx Xxxxx xxxxx
Xxxxx xxxxx Xxxxx xxxxx Xxxxx xxxxx
Xxxxx xxxxx Xxxxx xxxxx Xxxxx xxxxx
First Section = Routine 1
Second Section = Routine 2
Third Section = Routine 3
Publication 1756-QS001D-EN-P - February 2007

Organize a Project 65
Identify the Programming Languages That Are Installed
Follow these steps to determine which programming languages are installed on your version of RSLogix 5000 software.
1. Start RSLogix 5000 software.
2. From the Help menu, choose About RSLogix 5000.
To add a programming language, see the ControlLogix Selection Guide, publication 1756-SG001.
Assign a Programming Language to Each Routine
For each routine, choose a programming language.
• Logix5000 controllers let you use the following languages:– ladder logic– function block diagram– sequential function chart– structured text
• Use any combination of the languages in the same project.
In general, if a routine represents Use this language
Continuous or parallel execution of multiple operations (not sequenced) Ladder logic
Boolean or bit-based operations
Complex Logical operations
Message And Communication Processing
Machine interlocking
Operations that service or maintenance personnel may have to interpret in order to troubleshoot the machine or process.
Continuous process and drive control Function block diagram (FBD)
Loop control
Calculations in circuit flow
High-level management of multiple operations Sequential function chart (SFC)
Repetitive sequences of operations
Batch process
Motion control using structured text
State machine operations
Complex mathematical operations Structured text
Specialized array or table loop processing
ASCII string handling or protocol processing
Publication 1756-QS001D-EN-P - February 2007

66 Organize a Project
Divide Each Routine Into More Meaningful Increments
If a routine uses this language
Then Example
Ladder logic
Structured text
Break up large routines into several smaller routines
To continuously execute several complex boolean operations…
…create a separate routine for each operation.
Function block diagram (FBD)
To control 4 valves, where each valve requires feedback that it is in its commanded position…
…make a separate sheet for each valve.
Sequential function chart (SFC)
To perform the following sequence:1. Fill a tank.2. Mix the ingredients in the
tank.3. Empty the tank…
…make each section (fill, mix, empty) a separate step.
routine
routineWithin the FBD routine, make
a sheet for each functionalloop for a device, such as a
motor or valve. sheet
routine
step
step
step
Break the SFC into steps.
Publication 1756-QS001D-EN-P - February 2007

Organize a Project 67
Assign Main Routines
Each program requires a main routine. Once you create your routines, assign a main routine for each program.
Follow these steps to assign a main routine.
IMPORTANT In the default project, MainProgram already has a main routine (MainRoutine). You have to assign a main routine only for each additional program that you create.
3. Select the main routine.
1. Right-click and choose Properties.
4. Click OK.
2. Click the Configuration tab.
Publication 1756-QS001D-EN-P - February 2007

68 Organize a Project
Configure the Controller
If you want to change the configuration of the controller, such as name, chassis size, or slot number, use the Controller Properties dialog box.
a. Select the type of controller.
2. Change the required properties (some items apply only to certain controllers).
c. Select the chassis size for the controller
b. Type the name of the controller.
d. Select the slot number of the controller
3. Click OK.
1. Click the Controller Properties button.
Publication 1756-QS001D-EN-P - February 2007

Organize a Project 69
Configure I/O Modules
To change the behavior of a module, use the Module Properties window for the module. The configuration options vary from module to module.
1. Right-click the module and choose Properties.
2. To change the name or slot number, use the General tab.
Scaling
Range
3. To change the configuration, click the Configuration tab. Some modules have several configuration tabs.
Name of the module
Location of the module in the chassis or rail
Publication 1756-QS001D-EN-P - February 2007

70 Organize a Project
Notes:
Publication 1756-QS001D-EN-P - February 2007

Chapter 3
Program a Project Offline
This chapter provides more detailed information on how to program the logic for a routine and create tags for the logic.
What You Need
You need these items to complete the tasks in this manual.
• Personal Computer running RSLogix 5000 Software, version 16• A plan for the project you are programming
71 Publication 1756-QS001D-EN-P - February 2007

72 Program a Project Offline
Follow These Steps
Use this diagram to program a project offline.
Before You Begin
In this chapter, you program the project while offline. Online programming requires additional steps. See chapter 6, Program a Project Online.
Enter Ladder Logic
Page 73
Export/Import Ladder Logic
Page 77
Enter a Function Block Diagram
Page 81
Use a Faceplate for a Function Block Page 84
Enter Structured Text
Page 86
Enter a Sequential Function Chart
Page 88
Assign Operands
Page 90
Verify a Project
Page 93
Review Guidelines for Tags
Page 95
Before You Begin
Page 72
START
Publication 1756-QS001D-EN-P - February 2007

Program a Project Offline 73
Enter Ladder Logic
To enter ladder logic, you have the following options:
Quick keys – Assign a logic element (rung, branch, instruction) to a keyboard key. To add an element to the right or below the cursor, press the designated key for the element.
ASCII text – Use ASCII text to enter or edit logic. A tool tip helps you enter the required operands. ASCII text typically uses the following format:
mnemonic operand_1 operand_2
Rung XICBranch
Branch Level
XIO OTE OTU OTLMore Instructions Drag and drop logic elements – Use the
Language Element toolbar to drag and drop a rung, branch, or instruction to your routine.
Interlace input and output instructions – The last instruction on the rung must be an output instruction.
Outputs in series – Place multiple output instructions in sequence (serial) on a rung.
Leave operands undefined – enter logic without defining operands. RSLogix 5000 software lets you enter and save logic without assigning operands. This lets you develop your logic in iterations and save libraries of code for re-use.
Parallel branches – No limit to the number of parallel branches on a rung (nest up to 6 levels).
Publication 1756-QS001D-EN-P - February 2007

74 Program a Project Offline
Drag and Drop an Element
To Do this
Add a rung
Add an instruction
Drag the button for the rung or instruction directly to the desired location.
Add a branch 1. Drag the branch button to where the branch starts. A green dot shows a valid placement location (drop point).
Add a level to a branch
Delete an element
A green dot shows a valid placement location (drop point).
2. Drag a branch rail to the desired location.
Right-click the branch and choose Add Branch Level.
1. Select (click) the element.
2. Press Delete.
Publication 1756-QS001D-EN-P - February 2007

Program a Project Offline 75
Use the Keyboard to Add an Element
Enter Logic Using ASCII Text
1. Press [Insert].
2. Type the mnemonic for the instruction.Or type Rung, Branch, or Branch Level.
3. Press Enter.
A green dot shows a valid placement location (drop point).
4. To move an instruction, branch, or rung to a different location, use the mouse to drag it there.
Tip: Click here to enter custom add-on instructions. See Chapter 1 for more information.
2. Enter the ASCII text for the rung.
1. Double-click the rung.
Publication 1756-QS001D-EN-P - February 2007

76 Program a Project Offline
Enable Quick Keys1. Choose Tools ⇒ Options.
2. Select (click) Ladder Editor.
3. Select (check) these checkboxes.
4. To assign a key to an element:
a. Click .
b. For the desired key, select the element.
c. When you have assigned the desired keys, click
.
Publication 1756-Q
S001D-EN-P - February 2007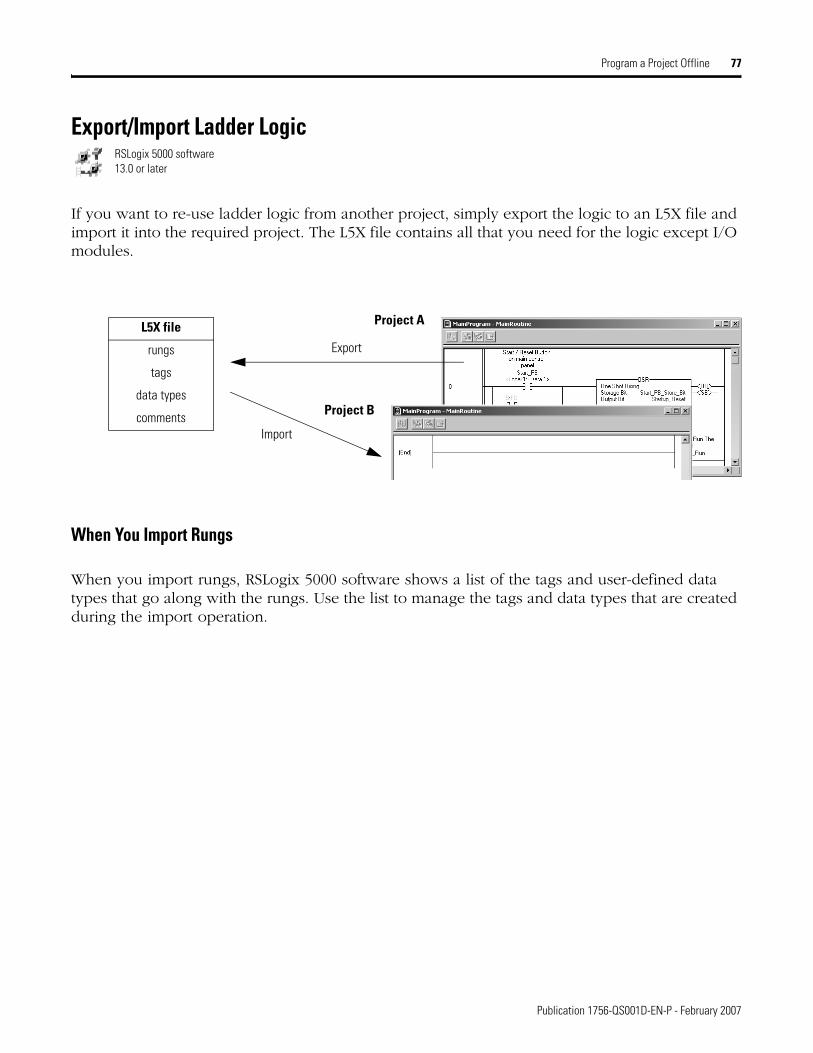
Program a Project Offline 77
Export/Import Ladder Logic
If you want to re-use ladder logic from another project, simply export the logic to an L5X file and import it into the required project. The L5X file contains all that you need for the logic except I/O modules.
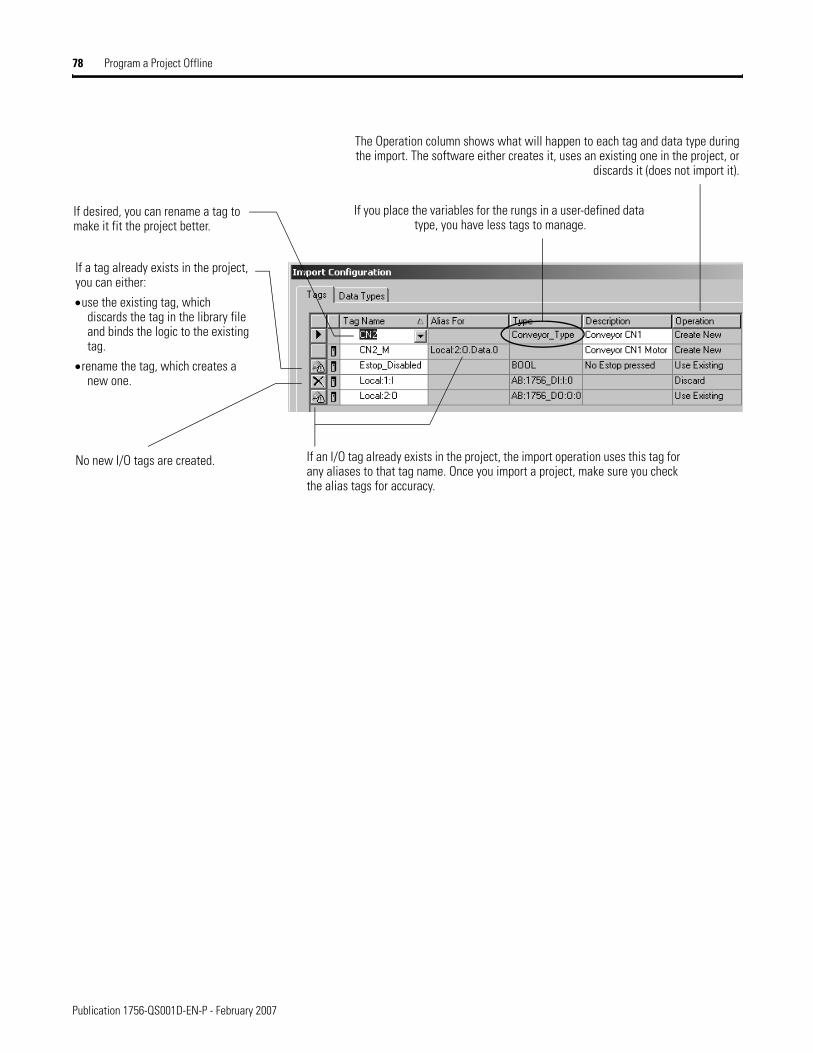
When You Import Rungs
When you import rungs, RSLogix 5000 software shows a list of the tags and user-defined data types that go along with the rungs. Use the list to manage the tags and data types that are created during the import operation.
RSLogix 5000 software 13.0 or later
L5X file
rungs
tags
data types
comments
Project A
Export
Import
Project B
Publication 1756-QS001D-EN-P - February 2007
78 Program a Project Offline
If you place the variables for the rungs in a user-defined data type, you have less tags to manage.
If desired, you can rename a tag to make it fit the project better.
If a tag already exists in the project, you can either:
•use the existing tag, which discards the tag in the library file and binds the logic to the existing tag.
•rename the tag, which creates a new one.
If an I/O tag already exists in the project, the import operation uses this tag for any aliases to that tag name. Once you import a project, make sure you check the alias tags for accuracy.
No new I/O tags are created.
The Operation column shows what will happen to each tag and data type during the import. The software either creates it, uses an existing one in the project, or
discards it (does not import it).
Publication 1756-QS001D-EN-P - February 2007

Program a Project Offline 79
Export Rungs. Select the rungs to export:
If rungs are Do this
In sequence Click the first rung and then [Shift] + click the last rung.
Out Of sequence Click the first rung and then [Ctrl] + click each additional rung.
3. Choose a location and name for the file.
4. Create the file.
. Right-click the selection and choose Export Rung.
1
2
Publication 1756-QS001D-EN-P - February 2007

80 Program a Project Offline
Import Rungs
Check Alias Tags
1. Right-click the location for the rungs and choose Import Rung.
2. Select the file to import.
3. Check for conflicts in names.
4. Import the file.
If you import an alias tag, make sure it points to the correct base tag. When a tag is an alias for a tag that already exists in the project, the software sets up the relationship between the alias and base tags.
Rungs That You Imported
If the project does not have the base tag, you have to either create the base tag or point the alias to a different base tag.
Publication 1756-QS001D-EN-P - February 2007

Program a Project Offline 81
Enter a Function Block Diagram
A function block diagram lets you visually define the flow of data between instructions. The data flow then drives the execution order of the instructions.
Sheet – divide the diagram into sections without affecting execution. When the routine executes, all sheets execute.
Instruction – produce output values based on input values
Output wire connector (OCON) – write a value to one or more ICONs
Output reference (OREF) – write a value to a tag
Input wire connector (ICON) – read a value from an OCON on the same sheet or a different sheet in the routine. To read a value from another routine, use an OREF/IREF combination.
Wire – transfer a value between elements
Input reference (IREF) – read a value from a tag or set a constant value
1 2 3
This input pin uses the output that block 3 produced on the previous scan.
Assume data available indicator – define the data flow within the loop. The arrow indicates that the data serves as input to the first block in the loop.
If a group of blocks are in a loop, you have to identify which block to execute first. Use the Assume Data Available indicator to mark the input wire that creates the loop (the feedback wire).
This input pin uses the output that block 3 produced on the previous scan.
This input pin uses the output that block 3 produced on the previous scan.
Publication 1756-QS001D-EN-P - February 2007

82 Program a Project Offline
Use the Keyboard to Add an Element
Connect Elements
1. Press Insert.
2. Type the mnemonic for the element and press Enter.
3. Drag the element to the desired location.
To connect elements, click corresponding pins (green dot = valid connection point).
Publication 1756-QS001D-EN-P - February 2007

Program a Project Offline 83
Resolve a Loop
Add Sheet
To resolve a loop (define a wire as an input), right-click the wire and choose Assume Data Available.
1. Click the New Sheet button.
2. Type a name for the sheet.
Publicati
on 1756-QS001D-EN-P - February 2007
84 Program a Project Offline
Use a Faceplate for a Function Block
RSLogix 5000 software includes faceplates (controls) for some of the function block instructions.Faceplate – Active-X control that lets you interact with a function block instruction.
• Your RSLogix 5000 Enterprise Series software package includes the faceplates but does not automatically install them. To use the faceplates, locate them on your software CD and install them separately.
• Use faceplates in an Active-X container, such as the following software:
• RSView 32
• RSView SE
• Microsoft Excel
• RSLogix 5000 software is not a valid Active-X container.
• Faceplates communicate with the controller via DDE/OPC topics in RSLinx Classic software. To use RSLinx Classic software for DDE/OPC topics, purchase either:
• RSLinx Classic software as a separate package
• RSLogix 5000 professional edition software, which includes RSLinx Classic professional edition software
RSLinx Classic Lite software, which comes with the other RSLogix 5000 software packages, does not provide DDE/OPC communication.
Faceplates are available for the following instructions:• Alarm (ALM)• Enhanced Select (ESEL)• Totalizer (TOT)• Ramp/Soak (RMPS)• Discrete 2-State Device (D2SD)• Discrete 3-State Device (D3SD)• Enhanced PID (PIDE)
Topic – In RSLinx Classic software, a topic represents a specific path to a controller.
RSLogix 5000 software, revision 10.0 or later, automatically creates an RSLinx topic whenever you:
• create a project.
• save a project.
• change the revision of a project to 10.0 or later.
In some cases, you have to update the data source for the topic in RSLinx software.
Publication 1756-QS001D-EN-P - February 2007

Program a Project Offline 85
Set Up a Topic
Add a Faceplate to Microsoft Excel Software
1. Use RSLogix 5000 software to create the topic.
a. Set the project path (communication route to the controller).
b. Save the project.
2. In RSLinx Classic software, check the topic.
a. choose DDE/OPC ⇒ Topic Configuration.
b. Select your project.
c. Make sure the data source points to your controller.
d. Click Done.
1. Start Microsoft Excel software.
2. Choose View ⇒ Toolbars ⇒ Control Toolbox.
3. Click and select the Logix 5000…Faceplate Control that you want.
4. In the location for the faceplate, drag the pointer to the desired size of the faceplate.
5. Right-click the faceplate and choose Logix 5000…Faceplate Control Object ⇒ Properties.
6. Click and browse to the tag that the faceplate controls.
7. Select the update period for the control.
8. Click OK.
9. To exit design mode and use the control, click here.
Publication 1756-QS001D-EN-P - February 2007

86 Program a Project Offline
Enter Structured Text
Structured text is a textual programming language that uses statements to define what to execute. Structured text can contain these components:
As you enter structured text, follow these guidelines:
Guideline Description
1. Structured text is not case sensitive. Use any combination of upper-case and lower-case letters that makes your text easiest to read. For example, these three variations of “IF” are the same: IF, If, if.
2. Use tabs, spaces, and carriage returns (separate lines) to make your structured text easier to read.
Tabs, spaces, and carriage returns have no effect on the execution of the structured text.
This Executes the same as this
If Bool1 thenBool2 := 1;
End_if;
If Bool1 then Bool2 := 1; End_if;
Bool2 := 1; Bool2:=1;
3. Write BOOL expressions as either true or false
Use a BOOL expression to determine if specific conditions are true (1) or false (0).
• A BOOL tag is already true (1) or false (0). Do not use an “=” sign to check its state.
This is OK This is NOT OK
If Bool1 … If Bool1 = 1 …
If Not(Bool2) … If Bool2 = 0 …
• To check an integer, REAL, or string, make a comparison (=, <, <=, >, >=, <>).
This is OK This is NOT OK
If Dint1 > 5 … If Dint1 …
4. For an assignment, start with the destination.
Write an assignment as follows:
Destination := Source;
Construct – define logical conditions for the execution of other structured text code (other statements). In this example, the construct is If…Then…Else…End_if.
BOOL expression – check if a tag or equation is true or false. A BOOL expression typically serves as the condition for an action (the if, while, or until of a construct).
Assignment – write a value to a tag. The value moves from the right side of the := to the left side.
Numeric expression– calculate a value.
Semicolon “;”– terminate an assignment, instruction, or end of a construct.
data
Publication 1756-QS001D-EN-P - February 2007

Program a Project Offline 87
Browse For an Instruction
Assign Operands to an Instruction
1. Press [Alt] + [Insert].
2. Type the mnemonic for the instruction and press Enter.
1. Right-click the instruction and choose Argument List.
2. For each parameter, select a tag or type an immediate value.
3. Close the dialog box.
Publication 1756-QS001D-EN-P - February 2007

88 Program a Project Offline
Enter a Sequential Function Chart
A sequential function chart (SFC) lets you define a sequence of states (steps) through which your machine or process progresses. The steps can execute structured text, call subroutines, or simply serve as signals for other logic.
Step – major function of your process. It contains the actions that occur at a particular time, phase, or station.
Branch – execute more than 1 step at the same time (simultaneous) or choose between different steps (selective).
Wire – connect one element to another anywhere on the chart.
Transition – true or false condition that tells the SFC when to go to the next step. To specify the condition, either enter a BOOL expression in structured text or call a subroutine.
Action – one of the functions that a step performs. To program the action, either enter structured text or call a subroutine.
Publication 1756-QS001D-EN-P - February 2007

Program a Project Offline 89
Enter an SFC
1. Drag elements from the toolbar to the chart.
• A green dot shows a point to which the element will automatically connect if you release the mouse button.
• Some toolbar buttons are active only after you select a corresponding element on the SFC. For example, to add an action, first select a step.
• Drag an action until it is on top of the required step and then release the mouse button.
2. To manually connect elements, click corresponding pins. A green dot shows a valid connection point.
3. To enter structured text, double-click a ? symbol. Then type the structured text and press Ctrl + Enter.
Publication 1756-QS001D-EN-P - February 2007

90 Program a Project Offline
Assign Operands
RSLogix 5000 software lets you program according to your workflow. You can enter logic without assigning operands or defining tags. Later, you can go back and assign or define the operands to complete the logic.
A tag name follows this format:
Name [Element] .Member [Element] .Bit
or
.[Index]
= Optional
Where Is
Name Name that identifies this specific tag.
Element Subscript or subscripts that point to a specific element within an array.
• Use the element identifier only if the tag or member is an array.
• Use one subscript for each dimension of the array. For example: [5], [2,8], [3,2,7].
To indirectly (dynamically) reference an element, use a tag or numeric expression that provides the element number. For example, MyArray[Tag_1], MyArray[Tag_2-1], MyArray[ABS(Tag_3)].
Missing operand – enter logic without defining operands. RSLogix 5000 software lets you enter and save logic without assigning operands. This lets you develop your logic in iterations and save libraries of code for re-use.
Undefined tag – enter a tag name without defining the tag. RSLogix 5000 software lets you enter and save logic without defining all the operands. This lets you develop your logic in iterations.
Publication 1756-QS001D-EN-P - February 2007

Program a Project Offline 91
Create a Tag
Member Specific member of a structure.
• Use the member identifier only if the tag is a structure.
• If the structure contains another structure as one of its members, use additional levels of the .Member format to identify the required member.
Bit Specific bit of an integer data type (SINT, INT, or DINT).
Index To indirectly (dynamically) reference a bit of an integer, use a tag or numeric expression that provides the bit number. For example, MyTag.[Tag_1], MyTag.[Tag_2-1], MyTag.[ABS(Tag_4)].
Where Is
1. Double-click the tag area.
2. Type a name for the tag and press Enter.
Use underscores “_” in place of spaces.
3. Right-click the tag name and choose New “Tag_Name”
4. Type the data type.
To browse for a data type or assign array dimensions, click .
5. Choose the scope for the tag.
6. Click OK.
Publication 1756-QS001D-EN-P - February 2007

92 Program a Project Offline
Select an Existing Tag
1. Double-click the tag area.
2. Click the .
3. .Select the desired tag. To select a bit, click the .
4. .To change the scope of tags in which to look, click the appropriate button.
Publication 1756-QS001D-EN-P - February 2007

Program a Project Offline 93
Verify a Project
As you program your project, periodically verify your work.
Verify – check a routine or project for programming errors or incomplete configuration.
Error – situation that you must correct before you download the project. Errors include situations such as missing operands or undefined tags.
Warning – situation that may prevent the project from executing as expected. RSLogix 5000 software lets you download a project that contains warnings. Warnings include situations such as duplicate destructive bits and unassigned main routines.
Duplicate destructive bit detection – determine if other logic (bit instruction, OREF, ST assignment) also clears or sets the value of a bit that you use in a OTE, ONS, OSF, or OSR instruction. RSLogix 5000 software detects duplicate destructive bits only if all of the following conditions are met:
• You enable duplicate destructive bit detection. (It’s off by default.)
• You use the bit in a ladder logic OTE, ONS, OSF, or OSR instruction.
• Another logic element such as a bit instruction, OREF, or ST assignment also references that same bit and can change its value.
If you do not use a bit in an OTE, ONS, OSF, or OSR instruction, the software does not detect any duplicate destructive bits, even if they exist.
By default, duplicate destructive bit detection is turned off.
Publication 1756-QS001D-EN-P - February 2007

94 Program a Project Offline
Follow these steps to verify a routine or project:
3. To close the Errors tab, click here.
4. To turn off duplicate destructive bit detection (it’s on by default), choose Tools ⇒ Options.
1. Choose a verify option:
Verify routine in view
Verify entire project
1. Choose a verify option:
2. Go to an error or warning.
To go to Do this
Specific error or warning
Double-click the error or warning.
Cycle through the list of errors and warnings
Press [F4].
Publication 1756-QS001D-EN-P - February 2007

Program a Project Offline 95
Guidelines for Tags
Use the following guidelines to create tags for a Logix5000 project.
Guideline Details
Create user-defined data types. User-defined data types (structures) let you organize your data to match your machine or process. A user-defined data type provides these advantages:
• One tag contains all the data related to a specific aspect of your system. This keeps related data together and easy to locate, regardless of its data type.
• Each individual piece of data (member) gets a descriptive name. This automatically creates an initial level of documentation for your logic.
• You can use the data type to create multiple tags with the same data lay-out.
For example, use a user-defined data type to store all the parameters for a tank, including temperatures, pressures, valve positions, and preset values. Then create a tag for each of your tanks based on that data type.
Use arrays to quickly create a group of similar tags.
An array creates multiple instances of a data type under a common tag name.
• Arrays let you organize a block of tags that use the same data type and perform a similar function.
• You organize the data in 1, 2, or 3 dimensions to match what the data represents.
For example, use a 2 dimension array to organize the data for a tank farm. Each element of the array represents a single tank. The location of the element within the array represents the geographic location of the tank.
Important: Minimize the use of BOOL arrays. Many array instructions do not operate on BOOL arrays. This makes it more difficult to initialize and clear an array of BOOL data.
• Typically, use a BOOL array for the bit-level objects of a PanelView screen.
• Otherwise, use the individual bits of a DINT tag or an array of DINTs.
Take advantage of program-scoped tags. If you want multiple tags with the same name, define each tag at the program scope (program tags) for a different program. This lets you re-use both logic and tag names in multiple programs.
Avoid using the same name for both a controller tag and a program tag. Within a program, you cannot reference a controller tag if a tag of the same name exists as a program tag for that program.
Certain tags must be controller scope (controller tag).
If you want to use the tag Assign this scope
In more than one program in the project
controller scope (controller tags)In a Message (MSG) instruction
To produce or consume data
To communicate with a PanelView terminal
None of the above program scope (program tags)
Publication 1756-QS001D-EN-P - February 2007

96 Program a Project Offline
For integers, use the DINT data type. To increase the efficiency of your logic, minimize the use of SINT or INT data types. Whenever possible, use the DINT data type for integers.
• A Logix5000 controller typically compares or manipulates values as 32-bit values (DINTs or REALs).
• The controller typically converts a SINT or INT value to a DINT or REAL value before it uses the value.
• If the destination is a SINT or INT tag, the controller typically converts the value back to a SINT or INT value.
• The conversion to or from SINTs or INTs occurs automatically with no extra programming. But it takes extra execution time and memory.
Limit a tag name to 40 characters. Here are the rules for a tag name:
• Only alphabetic characters (A-Z or a-z), numeric characters (0-9), and underscores (_)
• Must start with an alphabetic character or an underscore
• No more than 40 characters
• No consecutive or trailing underscore characters (_)
• Not case sensitive
Use mixed case. Although tags are not case sensitive (upper case A is the same as lower case a), mixed case is easier to read.
These tags are easier to read Than these tags
Tank_1 TANK_1
Tank1 TANK1
tank_1
tank1
Consider the alphabetical order of tags. RSLogix 5000 software displays tags of the same scope in alphabetical order. To make it easier to monitor related tags, use similar starting characters for tags that you want to keep together.
Guideline Details
Starting each tag for a tank with Tank keeps the tags together.
Tag Name
Tank_North
Tank_South
…
Otherwise, the tags may end up separated from each other.
Tag Name
North_Tank
…
…
…
South_Tank
other tags that start with the letters o, p, q,and so on.
Publication 1756-QS001D-EN-P - February 2007

Chapter 4
Document a Project
Use this chapter to document your RSLogix 5000 project. This makes the system easier to debug, maintain, and troubleshoot.
What You Need
You need these items to complete the tasks in this manual.
• Personal Computer running RSLogix 5000 Software, version 16
• The project you are documenting
97 Publication 1756-QS001D-EN-P - February 2007

98 Document a Project
Follow These Steps
Use this diagram to document a project.
Add Rung Comments
Page 102
Enter and Edit Rung Comments Using Microsoft ExcelPage 103
Add Comments to a Function Block Diagram or SFCPage 106
Add Comments to Structured Text
Page 108
Describe a User-defined Data TypePage 99
START
Publication 1756-QS001D-EN-P - February 2007

Document a Project 99
Describe a User-defined Data Type
RSLogix 5000 software lets you automatically build descriptions out of the descriptions in your user-defined data types. This greatly reduces the amount of time you have to spend documenting your project.
As you organize your user-defined data types, keep in mind the following features of RSLogix 5000 software:
RSLogix 5000 software 13.0 or later
Pass through of descriptions – When possible, RSLogix 5000 software looks for an available description for a tag, element, or member.
• Descriptions in user-defined data types ripple through to the tags that use that data type.
• Description of an array tag ripples through to the elements and members of the array.
Paste pass-through description – Use the data type and array description as a basis for more specific descriptions.
In this example, Tank became West Tank.
Append description to base tag – RSLogix 5000 software automatically builds a description for each member of a tag that uses a user-defined data type. It starts with the description of the tag and then adds the description of the member from the data type.
Publication 1756-QS001D-EN-P - February 2007

100 Document a Project
RSLogix 5000 software uses different colors for descriptions:
Turn Pass-Through and Append Descriptions On or Off
A description in this color Is a
Gray Pass-through description
Black Manually entered description
1. In RSLogix 5000 software, choose Tools ⇒ Options.
2. Select the Application ⇒ Display.
3. Turn on (check) or turn off (uncheck) the desired options.
Publication 1756-QS001D-EN-P - February 2007

Document a Project 101
Paste a Pass-Through Description
To use a pass-through description as the starting point for a more specific description:
1. Right-click the pass-through description and choose Paste Pass-Through.
2. Edit the description and press Ctrl + Enter.
Publication 1756-QS001D-EN-P - February 2007

102 Document a Project
Add Rung Comments
Use a rung comment to describe the operation of a rung of ladder logic. You can also start the routine with a rung that contains only a No Operation (NOP) instruction. Add a comment to this initial rung that describes the routine in general.
1. Right-click the rung and choose Edit Rung Comment.
2. Type your comments.
3. Close the entry window.
Publication 1756-Q
S001D-EN-P - February 2007
Document a Project 103
Enter and Edit Rung Comments Using Microsoft Excel
You can also use spreadsheet software such as Microsoft Excel to create and edit rung comments. This lets you take advantage of the editing features in the spreadsheet software.
IMPORTANT Rung comments export in the CSV (comma delimited) format. Make sure you keep that format when you save and close the export file.
RSLogix 5000 software 13.0 or later
Publication 1756-QS001D-EN-P - February 2007

104 Document a Project
Export the Existing Comments1. In RSLogix 5000 software, add at least 1 rung
comment. This helps to format the export file.
2. Choose Tools ⇒ Export.
3. Note the location and name of the export file.
4. Choose what to export.
5. Export.
Publication 1756-QS001D-EN-P - February 2007

Document a Project 105
Edit the Export File
Import the New Comments
1. In Microsoft Excel software, open the export file.
2. Enter rung comments in the following format:
RCOMMENT program that contains the rung
routine that contains the rung
comments for the rung
leave blank
rung number
3. Save and close the file. (Keep it in the CSV format.)
1. In RSLogix 5000 software, choose Tools ⇒ Import.
2. Select the file that has the comments you entered (the export file).
3. Import.
Check the Errors tab for the results of the import operation. To refresh the view of the ladder logic and see the comments, close and open the routine.
Publication 1756-QS001D-EN-P - February 2007

106 Document a Project
Add Comments to a Function Block Diagram or SFC
Use Text boxes to add notes about the diagram or chart in general or a specific element. Or use a text box to capture information that you will use later on as you develop the project.
Set the Word Wrap Option
Use the word wrap option to control the width of the text box as you type. You set the option for function block diagrams and SFC independent of each other.
To set the word wrap option:
If you want text boxes to Choose this option
Automatically grow to the width of the longest line of text in the box.
Retain a fixed width and wrap the text. You can always manually resize the box.
1. In RSLogix 5000 software, choose Tools ⇒ Options.
2. Select the editor.
3. Select or clear the word wrap option.
Publication 1756-QS001D-EN-P - February 2007

Document a Project 107
Add a Text Box
1. Drag the text box button from the toolbar to the chart.
2. Type the comment and press Ctrl + Enter.
3. To attach the text box to a specific element, click the pin symbol and then the corresponding element. A green dot shows a valid connection point.
Publication 1756-QS001D-EN-P - February 2007

108 Document a Project
Add Comments to Structured Text
To make your structured text easier to interpret, add comments. Comments:
• let you use plain language to describe how your structured text works.
• download to the controller and upload from the controller.
• do not affect the execution of the structured text.
Follow these steps to add comments to your structured text.
Here is an example.
To add a comment Use one of these formats
On a single line //comment
(*comment*)
/*comment*/
At the end of a line of structured text
Within a line of structured text (*comment*)
/*comment*/
That spans more than one line (*start of comment . . . end of comment*)
/*start of comment . . . end of comment*/
Format Example
//comment At the beginning of a line//Check conveyor belt directionIF conveyor_direction THEN...
At the end of a lineELSE //If conveyor isn’t moving, set alarm lightlight := 1;END_IF;
(*comment*) Sugar.Inlet[:=]1;(*open the inlet*)
IF Sugar.Low (*low level LS*)& Sugar.High (*high level LS*)THEN...
(*Controls the speed of the recirculation pump. The speed depends on the temperature in the tank.*)IF tank.temp > 200 THEN...
/*comment*/ Sugar.Inlet:=0;/*close the inlet*/
IF bar_code=65 /*A*/ THEN...
/*Gets the number of elements in the Inventory array and stores the value in the Inventory_Items tag*/SIZE(Inventory,0,Inventory_Items);
Publication 1756-QS001D-EN-P - February 2007
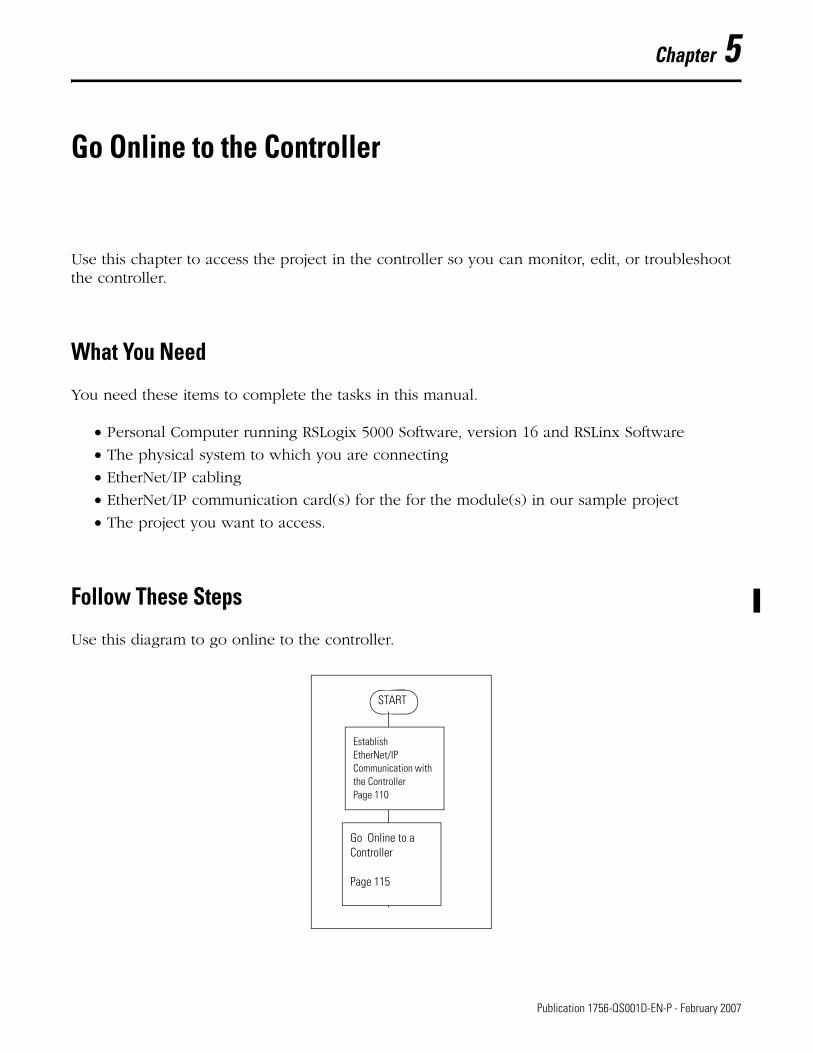
Chapter 5
Go Online to the Controller
Use this chapter to access the project in the controller so you can monitor, edit, or troubleshoot the controller.
What You Need
You need these items to complete the tasks in this manual.
• Personal Computer running RSLogix 5000 Software, version 16 and RSLinx Software
• The physical system to which you are connecting
• EtherNet/IP cabling
• EtherNet/IP communication card(s) for the for the module(s) in our sample project
• The project you want to access.
Follow These Steps
Use this diagram to go online to the controller.
Go Online to a Controller
Page 115
Establish EtherNet/IP Communication with the ControllerPage 110
START
109 Publication 1756-QS001D-EN-P - February 2007

110 Go Online to the Controller
Establish EtherNet/IP Communication with the Controller
RSLinx Classic software handles communication between Logix5000 controllers and your software programs, such as RSLogix 5000 software. To communicate with a controller (download or monitor data), configure RSLinx Classic software for the required communication.
Logix5000 Controller or Communication Module
RSLinx Classic Software RSLogix 5000 software
Driver – establish communication over a specific network.
Path – communication route to a device. To define a path, you expand a driver and select the device.
Ethernet address (MAC) – address that is assigned to a module at the factory.
• The module always keeps its ethernet address.
• To determine the ethernet address of a device, look for a sticker on the device.
• An ethernet address uses this format:xx:xx:xx:xx:xx:xx
IP address – address that you assign to a module for communication over a specific ethernet network. An IP address uses this format:xxx.xxx.xxx.xxx
BOOTP – configure a device to request an IP address over an ethernet network from a BOOTP server. Out of the box, Allen-Bradley EtherNet/IP devices are configured for BOOTP.
BOOTP server – software program that receives BOOTP requests from ethernet devices and assigns IP addresses. RSLinx software revision 2.40 and later includes BOOTP server software.
xx:xx:xx:xx:xx:xxEthernet…
BOOTP Server Software
Your Computer
EtherNet/IP network
Publication 1756-QS001D-EN-P - February 2007

Go Online to the Controller 111
Equipment and Information That You Need
1. Depending on your controller, you may need a communication module or daughter card:
2. Determine if your EtherNet/IP network is connected to the Internet or if it is a standalone network that does not connect to the Internet?
The graphic shows a simple standalone network.
3. For the EtherNet/IP device (controller, bridge module, or daughter card), obtain the following:
If you have this controller Install this In this location
1756 ControlLogix controller 1756-ENBT 10/100 Mbps EtherNet/IP Bridge module open slot in the same chassis as the controller
1769-L35E CompactLogix controller no additional communication module or card is required.
1794 FlexLogix controller 1788-ENBT communication daughter card open slot in the controller
Obtain this If your network is connected to the Internet, from this source
If your network is a standalone network that does not connect to the Internet, from this source
Ethernet address Sticker on the device Sticker on the device
IP address Network administrator 192.168.1.x, where x = any value between 1 and 254(1)
(1) In this case, your computer must use an IP address that is close to the EtherNet/IP device’s IP address. For example, if the EtherNet/IP device uses the 192.168.1.x addressing, the computer must also use that addressing but with a different x value.
Subnet mask 255.255.255.0(2)
(2) In this case, your computer must use the same subnet mask value as the EtherNet/IP device.
Gateway address (may not be required) Not needed
Publication 1756-QS001D-EN-P - February 2007

112 Go Online to the Controller
Connect Your EtherNet/IP Device and Computer
Logix5000 Controller or
Communication Module
Crossover Ethernet Cable With RJ-45 Connector
Connect your EtherNet/IP device and computer via ethernet cable.
ATTENTION If you connect or disconnect the communications cable with power applied to this module or any device onthe network, an electrical arc can occur. This could cause an explosion in hazardous location installations.
Logix5000 Controller or
Communication Module
Standard Ethernet Cables With RJ-45 Connector
Ethernet Switch
– or –
Publication 1756-QS001D-EN-P - February 2007

Go Online to the Controller 113
Assign an IP Address to the Controller or Communication Module
1. Start BOOTP server software:
Start ⇒ Programs ⇒ Rockwell Software ⇒ BOOTP-DHCP Server ⇒ BOOTP-DHCP Server– or –Start ⇒ Programs ⇒ Rockwell Software ⇒ RSLinx Tools ⇒ BOOTP-DHCP Server.
2. If this is the first time you are using the software, type the subnet mask and gateway (if required) for your network and then click OK.
3. Double-click the ethernet address of the controller/communication module.
Follow these steps if you do not have a serial connection to the controller.
4. Type the IP address and click OK.
5. In the Relation List (lower section), select the device and choose
.
This lets the device keep the address even after a power cycle.
6. When you close the BOOTP server software, you are prompted to save your changes.
• If you want a record of the IP address that you assigned to the device, save the changes.• Regardless of whether you save the changes, the device keeps the IP address.
Publication 1756-QS001D-EN-P - February 2007

114 Go Online to the Controller
Assign an IP Address to Your Computer
If your EtherNet/IP network is a standalone network and your EtherNet/IP device uses IP address and subnet mask values listed on page 111, you may need to change the IP address and subnet mask values for your computer.
1. Start RSLinx software.
2. Click .
3. Browse to the EtherNet/IP device.
To open a level, click the + sign.
4. Right-click the device and choose Module Configuration.
5. Click the Port Configuration tab.
If you have a serial connection to the controller…
6. Depending on your device, either:• Select the Static button.
• Clear (uncheck) the Obtain IP Address from Bootp Server check box.
7. Type the:• IP address• subnet mask• gateway address (if required).
8. Click OK and then (yes—change IP address).
1. Access the Network and Dial-up Connections
Start ⇒ Settings ⇒ Network and Dial-up Connections
2. Right-click on Local Area Connection.
3. Choose Properties.
4. Select Internet Protocol (TCP/IP).
5. Choose Properties.
6. Select Use the following IP address.
7. Change the IP address and subnet mask.
8. Click OK.
Publication 1756-QS001D-EN-P - February 2007

Go Online to the Controller 115
Configure an Ethernet Driver
Go Online to a Controller
To monitor a project that is executing in a controller, go online with the controller. The procedure that you use depends on whether you have a copy of the project on your computer.
1. Start RSLinx software.
2. Click .
The driver is successfully configured and running.
3. Select Ethernet devices and choose .
4. Accept the default name.
5. Type the IP address of the controller or communication module.
6. Click OK.
Publication 1756-QS001D-EN-P - February 2007

116 Go Online to the Controller
If Your Computer Has the Project For the Controller
Logix5000 Controller
Project
Online
Online – monitor a project that a controller is executing.
Project
2. Define the path to the controller.
a. Click .
b. Select the controller.
• To open a level, click the + sign.
• If a controller is already selected, make sure that it is the correct controller.
3. Click .
1. Open the RSLogix 5000 project for the controller.
Operating Mode of theController
Publication 1756-QS001D-EN-P - February 2007

Go Online to the Controller 117
If Your Computer Does Not Have the Project For the Controller
Logix5000 Controller
Project
Upload
upload – transfer a project from a controller to your computer so you can monitor the project.
1. Define the path to the controller.
a. Click .
b. Select the controller.
• To open a level, click the + sign.
• If a controller is already selected, make sure that it is the correct controller.
2. Click .
Operating Mode of theController
b. Click and then
3. Create the project file on your computer.
a. Click .
Publication 1756-QS001D-EN-P - February 2007

118 Go Online to the Controller
Notes:
Publication 1756-QS001D-EN-P - February 2007

Chapter 6
Program a Project Online
Use this chapter to edit your logic while the controller continues to control your machine or process.
What You Need
You need these items to complete the tasks in this manual.
• Personal Computer running RSLogix 5000 Software, version 16 and RSLinx Software• The physical system to which you are connecting• The project you want to access
Follow These Steps
Use this diagram to program a project online.
Finalize All Edits in a Program
Page 124
Edit Logic While Online
Page 120
START
119 Publication 1756-QS001D-EN-P - February 2007

120 Program a Project Online
Edit Logic While Online
Online edits let you change your logic while your machine or process continues to run.
As you perform online edits, RSLogix 5000 software uses markers to show the state of your edits.
ATTENTION Use extreme caution when you edit logic online. Mistakes can injure personnel and damage equipment. Before you edit online:
• assess how machinery will respond to the changes.• notify all personnel of the changes.
IMPORTANT When you edit an SFC online:
• the SFC resets to the initial step.• stored actions turn off.
This marker Means Description
Relay ladder Original logic When online, RSLogix 5000 software continues to show you the original logic while you edit a copy of the logic (pending edit). A green border or side rail shows which logic the controller is currently running.
In function block, structured text, or SFC, use the buttons above the routine to switch between different views.
Function blockStructured textSFC
Relay Ladder Function Block, Structured Text, SFC
- or -
Publication 1756-QS001D-EN-P - February 2007

Program a Project Online 121
Relay ladder Pending edits This is a copy of the original logic for you to edit. Any changes remain on your computer until you accept the edits.
• In relay ladder, you edit individual rungs within a routine.• In function block, structured text, or SFC, you edit an entire routine.
Function blockStructured textSFC
Relay ladder Test edits When you accept your pending edits, the software downloads them to the controller and marks them as test edits but the controller continues to execute the original logic. You then manually switch execution to the test edits or back to the original logic (test and untest the edits).
In relay ladder, if you delete a rung the software immediately marks it as a test edit (upper-case “D” character).
Function blockStructured textSFC
This marker Means Description
- or -
- or -
If you Then
Test the edits • Execution switches to the test edits (all test edits execute).
• Outputs in the original logic stay in their last state unless executed by the test edits (or other logic).
• In an SFC, the chart resets to the initial step and stored actions turn off.
Untest the edits • Execution switches back to the original logic.• Outputs in the test edits stay in their last state
unless executed by the original logic (or other logic).I SFC h h h i i i l
Publication 1756-QS001D-EN-P - February 2007

122 Program a Project Online
Start a Pending Edit
Make and Accept Your Edits
1. For relay ladder, click (select) the rung that you want to edit.
Relay Ladder Function Block, Structured Text, SFC
2. Start a pending edit.
1. Make your changes.
Relay Ladder
function block, structured text, SFC
2. Accept your changes.
The changes download to the controller and become test edits.
Pub
lication 1756-QS001D-EN-P - February 2007
Program a Project Online 123
Test the Edits
Assemble and Save the Edits
1. Test the edits to see if they execute as intended.2. Yes—test the edits.
3. If the edits are NOT OK, switch execution back to your original logic (untest the edits). To make changes, start another pending edit.
1. Assemble the edits.
The edits become permanent and the original logic is removed.
2. Save the project.
Publication 1756-QS001D-EN-P - February 2007

124 Program a Project Online
Finalize All Edits in a Program
The Finalize All Edits in Program option lets you make an online change to your logic without testing the change.
Follow these steps to use the Finalize All Edits in Program option.
1. Start a pending edit.
2. Make your change.
3. Choose Finalize All Edits in Program.
ATTENTION Use extreme caution when you edit logic online. Mistakes can injure personnel and damage equipment. Before you edit online:
• assess how machinery will respond to the changes.• notify all personnel of the changes.
When you choose Finalize All Edits in Program:
• all edits in the program (pending and test), immediately download to the controller and begin execution.
• the original logic is permanently removed from the controller.• outputs that were in the original logic stay in their last state unless executed by the new logic (or other
logic).If your edits include an SFC:
• the SFC resets to the initial step.• stored actions turn off.
RSLogix 5000 software 13.0 or later
Finalize All Edits in Program
Publication 1756-QS001D-EN-P - February 2007

Chapter 7
Troubleshoot the Controller
Use this chapter to obtain basic diagnostic information about your system and perform basic tasks.
What You Need
You need these items to complete the tasks in this manual.
• Personal Computer running RSLogix 5000 Software, version 16 and RSLinx Software
• The physical system you are troubleshooting
• The project you want to troubleshoot
125 Publication 1756-QS001D-EN-P - February 2007

126 Troubleshoot the Controller
Follow These Steps
Use this diagram to troubleshoot the controller.
You want to find a specific element, such as a tag or instruction, within a project
You want to browse the project for a specific element, such as a tag or instruction
You want to override input data or logic, or check wiring to an output device
Troubleshoot I/O Communication
Page 127
Clear a Major Fault
Page 128
Search a Project
Page 129
Browse Logic
Page 132
Force an I/O Value
Page 133
A problem exists with several devices in your system, communication with an I/O module may have failed
IF SEE
You want to sample the data of one or more tags over a specific period
You want to see the scan time of a task or program
Create and Run a Trend (Histogram)
Page 137
View Scan Time
Page 140
Your entire process unexpectedly shuts down, the controller may have experienced a major fault
Publication 1756-QS001D-EN-P - February 2007

Troubleshoot the Controller 127
Troubleshoot I/O Communication
If there is a problem with several of the devices in your system, communication with an I/O module may have failed.
front of the controller
I/O
Status of I/O Communication
If the LED indicator is
Then
Off Either:• There are no modules in the I/O configuration
of the controller.• The controller does not contain a project
(controller memory is empty).
Solid green The controller is communicating with all the modules in its I/O configuration.
Flashing green One or more modules in the I/O configuration of the controller are not responding.
Connection – communication link between 2 devices, such as between a controller and I/O module, PanelView terminal, or another controller. Logix5000 controllers use connections to communicate with the modules in its I/O configuration.
Module fault – communication with a module has failed.
A over a module means that the controller is not communicating with the module.
!
Publication 1756-QS001D-EN-P - February 2007

128 Troubleshoot the Controller
Clear a Major Fault
If your entire process unexpectedly shuts down, the controller may have experienced a major fault.
Major fault – the controller detected a fault condition that is severe enough for it to shut down.
Front of the Controller
Flashing Red OK
1. Go online with the controller.
2. Choose Go To Faults.
3. Use this information to correct the cause of the fault.
For more information about a fault code, see Logix5000 Controllers System Reference, publication 1756-QR107.
4. After you correct the cause of the fault, click
.
Publication 1756-QS001D-EN-P - February 2007

Troubleshoot the Controller 129
Search a Project
You can find an element of your logic (such as a tag, instruction, or comment) based on the characters that you search for:
To find a(n) Specify Example
Tag Full or partial tag name MyTag_1
Comment/description Text within the comment/description fan
Instruction Mnemonic of the instruction OTE
Instruction and tag Mnemonic and tag OTE MyTag_1
Publication 1756-QS001D-EN-P - February 2007

130 Troubleshoot the Controller
1. Open the RSLogix 5000 project that you want to search.
2. Choose Search ⇒ Find.
3. Specify the search criteria.
b. Choose Text Only.
c. Choose All Routines.
d. Select each language and check the options in which to search.To display this section of the dialog box, click
.
4. Click .
a. Type the characters to find.
To browse for a tag, click , select the tag, and click OK.To select a bit number, click the .
Search for All Occurrences of a Tag, Instruction,
Publication 1756-QS001D-EN-P - February 2007

Troubleshoot the Controller 131
1. To go to an instruction, double-click it.
Go to an Instruction
2. To show a list of cross-references to a tag, right-click and choose Go To Cross Reference.
A “Y” means this instruction changes the value of the tag.
3. To go to an instruction, double-click it.
Pub
lication 1756-QS001D-EN-P - February 2007
132 Troubleshoot the Controller
Browse Logic
To browse the logic of a routine for a specific item (such as an instruction, element, tag, or comment), use the Browse Logic window.
RSLogix 5000 software 13.0 or later
1. In RSLogix 5000 software, choose Search ⇒ Browse Logic.
2. To expand an entry and see its contents:• double-click the entry.• click the + sign.• right-click the entry and choose Expand All.
3. To collapse an entry and hide its contents, either:• double-click the entry.• click the - sign.
4. To go to the location of a element in logic, select the element and choose Go To.
Publication 1756-QS001D-EN-P - February 2007

Troubleshoot the Controller 133
Force an I/O Value
Use a force to override input data or logic when you need to:
• test and debug your logic.
• check wiring to an output device.
• temporarily keep your process functioning when an input device has failed.
ATTENTION Forcing can cause unexpected machine motion that could injure personnel. Before you install, disable, or remove a force, determine how the change will effect your machine or process and keep personnel away from the machine area.
Enabling I/O forces causes input, output, produced, or consumed values to change.
If you remove an individual force, forces remain in the enabled state.
If forces are enabled and you install a force, the new force immediately takes effect.
If you want to Then
Override a value Install an I/O Force (Force an I/O Value)
Stop an individual force but leave other forces enabled and in effect
Remove an Individual Force
Stop all I/O forces but leave the I/O forces in the project
Disable All I/O Forces
Publication 1756-QS001D-EN-P - February 2007

134 Troubleshoot the Controller
Force – override a value from an input device or logic
• forcing an input tag overrides the value from the input device.
• forcing an output tag overrides your logic and sends the force value to the output device.
When forces are in effect (enabled), a appears next to the forced element.
t
front of the controller
FORCE
Status of I/O forces
If the LED indicator is
Then
Off • No tags contain I/O force values.• I/O forces are inactive (disabled).
Flashing amber • One or more tags contain a force value.• I/O forces are inactive (disabled).• When you enable I/O forces, all existing I/O
forces take effect.
Solid amber • I/O forces are active (enabled).• Force values may or may not exist.• When you install (add) a force, it immediately
takes effect.
Publication 1756-QS001D-EN-P - February 2007

Troubleshoot the Controller 135
Install an I/O Force (Force an I/O Value)1. Go online with the controller and open the routine that contains the tag that you
want to force.
2. Right-click the tag and choose Monitor.
3. If necessary, click the + sign of the tag to show the value that you want to force (for example, the BOOL value of a DINT tag).
4. Install the force value:
5. Choose I/O Forcing ⇒ Enable All I/O Forces. and click (yes—enable I/O forces).
To force a Do this
BOOL value Right-click the tag and choose Force ON or Force OFF.
Integer or REAL value
In the Force Mask column for the tag, type the value to which you want to force the tag and press [Enter}.
Publication 1756-QS001D-EN-P - February 2007

136 Troubleshoot the Controller
Remove an Individual Force1. Go online with the controller and open the routine that contains the tag that you
want to force.
2. Right-click the tag and choose Monitor.
3. If necessary, click the + sign of the tag to show its members (for example, the BOOL value of a DINT tag).
4. Right-click the tag and choose Remove Force.
1. Go online with the controller.
2. Choose I/O Forcing ⇒ Disable All I/O Forces. and choose (yes—disable I/O forces).
Disable All I/O Forces
Publication 1756-QS001D-EN-P - February 2007

Troubleshoot the Controller 137
Create and Run a Trend (Histogram)
Trends let you view sampled tag data over a period of time on a graphical display. Tag data is sampled by the controller and then displayed as point(s) on a trend chart.
Trend – sample specific tags over time and show the data on a graphical display
Tags that you want to look at
Time
Values of the tags
Publication 1756-QS001D-EN-P - February 2007

138 Troubleshoot the Controller
Run a Trend for a Tag
Right-click the first tag that you want to trend and choose Trend.
Add More Tags to the Trend
1. Right-click the chart and choose Chart Properties.
2. Click the Pens tab.
3. Click .
4. Select a tag to add and click .
To change the scope, select a scope.
5. To select a bit number, click .
6. When you have added the required tags, click OK.
Publication 1756-QS001D-EN-P - February 2007

Troubleshoot the Controller 139
6. Click the Y-Axis tab.
8. Click OK.
9. To resume the trend, click .
7. Choose the type of graphing.
Optional—Save the Trend
1. When you close the trend, you have the option save the trend for future use.
2. Type a name for the trend and click .
Trend
Publication 1756-QS001D-EN-P - February 2007

140 Troubleshoot the Controller
View Scan Time
A Logix5000 controller provides two types of scan times. Each serves a different purpose.
Elapsed time (task scan time) – time that has elapsed from the start of a task to the end of the task, in milliseconds. The elapsed time of a task includes the time that the task is interrupted to service communications or other tasks.
Execution time (program scan time) –time to execute the logic of a program (its main routine and any subroutines that the main routine calls), in microseconds.The scan time of a program includes only the execution time of the logic. It does not include any interrupts.
View Task Scan Time
1. Right-click and choose Properties.
2. Click the Monitor tab.
Maximum Elapsed Time of the Task
Elapsed Time of The Last Execution of This Task
View Program Scan Time
1. Right-click and choose Properties.
2. Click the Configuration tab.
Maximum Execution Time of This Program
Execution Time of the Last Execution of This Program
Publication 1756-QS001D-EN-P - February 2007

Index
Aadd
phase state routine 38Add-on Instructions 29alias tags
use 45array
create 61organize 95use of 61
ASCII textenter logic using 73
assume data available indicatoruse of 81
BBOOTP
use of 110browse
logic 132
Cclear
major fault 128command
give with RSLogix 5000 software 39comment
add to function block diagram 106add to rung 102, 103add to SFC 106add to structured text 108search for 129
communicatewith controller via EtherNet/IP network
110with controller via serial cable 48
communicationfault 127
configurecontroller 18, 68driver for EtherNet/IP communication
110driver for serial communication 48I/O module 19, 69task 57trend 137
continous taskexecution 57
controller
communicate via EtherNet/IP network 110
communicate via serial cable 48configure 18, 68download project 51faulted 128go online with 115mode 53monitor 118monitor execution 115revision 51
controller organizeradd I/O module 19navigate 18open routine 23
controller-scope tagswhen to use 59
conventions 10create
phase state routine 38program 59project 18routine 64sheet 81text box 106trend 137
Ddata
I/O module 21trend 137
descriptionrung 102, 103search for 129tag 99user-defined data type 99
documentfunction block diagram 106rung 102, 103SFC 106structured text 108tag 99user-defined data type 99
downloadproject 51
driverconfigure for EtherNet/IP communication
110configure for serial communication 48
duplicate destructive bit detectionuse of 93
Publication 1756-QS001D-EN-P - February 2007

142 Index
Eelapsed time
task 140enter
function block diagram 81ladder logic 73logic while online 120, 124rung comment 102SFC 88structured text 86
comments 108equipment phase
create a phase state routine 38inhibit 44initial state 42monitor 39phase state routine 38set initial step index 44set the initial state 42test states 39
errorscheck routine for 93
EtherNet/IP networkassign IP address 110communicate with controller 110
executionchoose controller mode 53task 57time 140
exportladder logic 77rung comment 103
external requesthold action 45respond to lost communication 45
Ffaceplate
add 84fault
controller 128I/O module 127
fileSee array
finalize all edits in program 124find
See searchfirmware
update during download 51force
I/O value 133
function block diagramcreate sheet 81document 106edit online 120, 124enter 81resolve loop 81use for 64
function block instructionuse of faceplate 84
Hhistogram
See trend
II/O device
access data 21I/O module
add to project 19address format 21communication failure 127configure 19, 69faulted 127force value 133
importladder logic 77rung comment 103
inhibitequipment phase 44
initial stateset 42
initial step indexset 44
instructionsearch for 129
IP addressassign to module 110
Lladder logic
add rung comment 102, 103edit online 120, 124enter 73export 77import 77use for 64use of quick keys 73
library of logiccreate and use 77
logic
Publication 1756-QS001D-EN-P - February 2007

Index 143
check for errors 93edit online 120, 124
Mmain routine
assign 67use of 64
major faultclear 128
modecontroller 53
monitorcontroller 115equipment phase 39project in controller 118
Nname
guidelines for tag 95limitations 18
Oonline
edit logic 120, 124finalize all edits 124with controller 115
openroutine 23
operandassign 90
Ppass-through description 99period
define for task 57periodic task
execution 57phase state routine
add 38PhaseManager 37program
assign main routine 67create 59finalize all edits 124scan time 140
program mode 53programming language
choose 64RSLogix 5000 software 65
program-scope tagswhen to use 59
projectcreate 18download 51monitor in controller 115organize routines 64upload 118verify 93
PXRQ instructionhold action 45lost communication 45
Qquick keys
enter ladder logic 73
Rrelated documentation ??-11revision
controller firmware 51routine
add phase state routine 38check for errors 93create 64create tag 90edit logic online 120, 124import ladder logic 77open 23organize 64program ladder logic 73program using a function block diagram
81program using an SFC 88program using structured text 86
RSLogix 5000 softwaregive command 39monitor an equipment phase 39
run mode 53rung comment
add 102, 103export/import 103
Sscan time
view 140scope
choose for tag 59guidelines 95
search
Publication 1756-QS001D-EN-P - February 2007

144 Index
browse 132comments or descriptions 129instruction 129tag 129
sequential function chartSee SFC
serial communicationwith controller 48
sethold action for a PXRQ instruction 45initial step index 44
SFCdocument 106edit online 120, 124enter 88use for 64
sheetuse of 81
source protectionuse of 23
state routineSee phase state routine
statesset the initial state 42step through 39
structurecreate 61organize 95
structured textdocument 108edit online 120, 124enter 86use for 64
subroutineSee routine
Ttag
create 90description 99force value 133format 90
guidelines 95I/O module 21organize 61, 95reuse of names 59scope 59search for 129trend value 137
taskconfigure 57scan time 140
testequipment phase 39
test mode 53text box
add to function block diagram 106add to SFC 106
transitionstep through 39
trendcreate and run 137
troubleshootcheck wiring to output device 133communication with I/O module 127entire system is shut down 128override logic 133see data history 137several devices not responding 127
Uupdate
controller firmware 51upload
project 118user-defined data type
create 61use of 61
Vverify
project 93
Publication 1756-QS001D-EN-P - February 2007

How Are We Doing?Your comments on our technical publications will help us serve you better in the future.Thank you for taking the time to provide us feedback.
You can complete this form and mail (or fax) it back to us or email us at
[email protected]Please complete the sections below. Where applicable, rank the feature (1=needs improvement, 2=satisfactory, and 3=outstanding).
Pub. Title/Type Logix5000 Controllers Quick Start
Cat. No. Various Pub. No. 1756-QS001D-EN-P Pub. Date February 2007 Part No. 953014-89
Overall Usefulness 1 2 3 How can we make this publication more useful for you?
Completeness(all necessary information
is provided)
1 2 3 Can we add more information to help you?
procedure/step illustration feature
example guideline other
explanation definition
Technical Accuracy(all provided information
is correct)
1 2 3 Can we be more accurate?
text illustration
Clarity(all provided information is
easy to understand)
1 2 3 How can we make things clearer?
Other Comments You can add additional comments on the back of this form.
Your Name
Your Title/Function Would you like us to contact you regarding your comments?
Location/Phone ___No, there is no need to contact me
___Yes, please call me
___Yes, please email me at _______________________
___Yes, please contact me via _____________________
Return this form to: Rockwell Automation Technical Communications, 1 Allen-Bradley Dr., Mayfield Hts., OH 44124-9705
Fax: 440-646-3525 Email: [email protected]
Publication CIG-CO521C-EN-P- May 2003 PN953014-89957782-91
Other Comments
PLEASE FOLD HERE
NO POSTAGE NECESSARY IF MAILED
IN THE UNITED STATES
BUSINESS REPLY MAILFIRST-CLASS MAIL PERMIT NO. 18235 CLEVELAND OH
POSTAGE WILL BE PAID BY THE ADDRESSEE
1 ALLEN-BRADLEY DR MAYFIELD HEIGHTS OH 44124-9705
PLEASE FASTEN HERE (DO NOT STAPLE)
PLEA
SE R
EMOV
E


Publication 1756-QS001D-EN-P - February 2007 148 PN 953014-89Supersedes Publication 1756-QS001C-EN-P - May 2005 Copyright © 2007 Rockwell Automation, Inc. All rights reserved. Printed in the U.S.A.
Rockwell Automation Support
Rockwell Automation provides technical information on the Web to assist you in using its products. At http://support.rockwellautomation.com, you can find technical manuals, a knowledge base of FAQs, technical and application notes, sample code and links to software service packs, and a MySupport feature that you can customize to make the best use of these tools.
For an additional level of technical phone support for installation, configuration, and troubleshooting, we offer TechConnect Support programs. For more information, contact your local distributor or Rockwell Automation representative, or visit http://support.rockwellautomation.com.
Installation Assistance
If you experience a problem with a hardware module within the first 24 hours of installation, please review the information that's contained in this manual. You can also contact a special Customer Support number for initial help in getting your module up and running.
New Product Satisfaction Return
Rockwell tests all of its products to ensure that they are fully operational when shipped from the manufacturing facility. However, if your product is not functioning, it may need to be returned.
United States 1.440.646.3223Monday – Friday, 8am – 5pm EST
Outside United States
Please contact your local Rockwell Automation representative for any technical support issues.
United States Contact your distributor. You must provide a Customer Support case number (see phone number above to obtain one) to your distributor in order to complete the return process.
Outside United States
Please contact your local Rockwell Automation representative for return procedure.