logix5000 security
TRANSCRIPT

Programming Manual
Logix5000 Controllers SecurityCatalog Numbers 1756 ControlLogix, 1769 CompactLogix, 1789 SoftLogix, 1794 FlexLogix, PowerFlex 700S with DriveLogix

Important User InformationSolid-state equipment has operational characteristics differing from those of electromechanical equipment. Safety Guidelines for the Application, Installation and Maintenance of Solid State Controls (publication SGI-1.1 available from your local Rockwell Automation sales office or online at http://www.rockwellautomation.com/literature/) describes some important differences between solid-state equipment and hard-wired electromechanical devices. Because of this difference, and also because of the wide variety of uses for solid-state equipment, all persons responsible for applying this equipment must satisfy themselves that each intended application of this equipment is acceptable.
In no event will Rockwell Automation, Inc. be responsible or liable for indirect or consequential damages resulting from the use or application of this equipment.
The examples and diagrams in this manual are included solely for illustrative purposes. Because of the many variables and requirements associated with any particular installation, Rockwell Automation, Inc. cannot assume responsibility or liability for actual use based on the examples and diagrams.
No patent liability is assumed by Rockwell Automation, Inc. with respect to use of information, circuits, equipment, or software described in this manual.
Reproduction of the contents of this manual, in whole or in part, without written permission of Rockwell Automation, Inc., is prohibited.
Throughout this manual, when necessary, we use notes to make you aware of safety considerations.
Allen-Bradley, Rockwell Automation, Rockwell Software, CompactLogix, ControlLogix, DriveLogix, FactoryTalk, FactoryTalk Administration Console, FactoryTalk AssetCentre, FactoryTalk Batch, FactoryTalk Directory, FactoryTalk Integrator, FactoryTalk Security, FactoryTalk Services Platform; FactoryTalk View ME, FactoryTalk View SE, Logix5000, RSLinx Classic, RSLogix 5000, SoftLogix5800, and TechConnect are trademarks of Rockwell Automation, Inc.
Trademarks not belonging to Rockwell Automation are property of their respective companies.
WARNING: Identifies information about practices or circumstances that can cause an explosion in a hazardous environment, which may lead to personal injury or death, property damage, or economic loss.
ATTENTION: Identifies information about practices or circumstances that can lead to personal injury or death, property damage, or economic loss. Attentions help you identify a hazard, avoid a hazard, and recognize the consequence.
SHOCK HAZARD: Labels may be on or inside the equipment, for example, a drive or motor, to alert people that dangerous voltage may be present.
BURN HAZARD: Labels may be on or inside the equipment, for example, a drive or motor, to alert people that surfaces may reach dangerous temperatures.
IMPORTANT Identifies information that is critical for successful application and understanding of the product.
Summary of Changes
This manual contains new and updated information. Changes throughout this revision are marked by change bars, as shown to the right of this paragraph.
New and Updated Information
Refer to page 30 for enhancements to configuring source protection withsource keys.
Rockwell Automation Publication 1756-PM016D-EN-P - September 2010 3

Summary of Changes
Notes:
4 Rockwell Automation Publication 1756-PM016D-EN-P - September 2010
Table of Contents
Preface Purpose of This Manual . . . . . . . . . . . . . . . . . . . . . . . . . . . . . . . . . . . . . . . . . . . . 7
Chapter 1Security Introduction. . . . . . . . . . . . . . . . . . . . . . . . . . . . . . . . . . . . . . . . . . . . . . . . . . . . . . . 9
FactoryTalk Security . . . . . . . . . . . . . . . . . . . . . . . . . . . . . . . . . . . . . . . . . . . . . . . 9FactoryTalk Directories . . . . . . . . . . . . . . . . . . . . . . . . . . . . . . . . . . . . . . . . . 9RSSecurity Server. . . . . . . . . . . . . . . . . . . . . . . . . . . . . . . . . . . . . . . . . . . . . 10
Chapter 2Configure FactoryTalk Security with RSLogix 5000 Software
Introduction. . . . . . . . . . . . . . . . . . . . . . . . . . . . . . . . . . . . . . . . . . . . . . . . . . . . . 11Install the Rockwell Software Security Emulator . . . . . . . . . . . . . . . . . . . . 11Enable Security for RSLogix 5000 Software. . . . . . . . . . . . . . . . . . . . . . . . . 12Install FactoryTalk Service Platform Software . . . . . . . . . . . . . . . . . . . . . . 14Secure an RSLogix 5000 Software Project File . . . . . . . . . . . . . . . . . . . . . . 15Apply Security to a Controller Resource. . . . . . . . . . . . . . . . . . . . . . . . . . . . 19
Chapter 3Migrate from a Security Server Database to a FactoryTalk Server
Introduction. . . . . . . . . . . . . . . . . . . . . . . . . . . . . . . . . . . . . . . . . . . . . . . . . . . . . 23Import a Security Server Database . . . . . . . . . . . . . . . . . . . . . . . . . . . . . . . . . 23
Import Status Text File . . . . . . . . . . . . . . . . . . . . . . . . . . . . . . . . . . . . . . . 27Organizer Import Result . . . . . . . . . . . . . . . . . . . . . . . . . . . . . . . . . . . . . . 27Resource Editor . . . . . . . . . . . . . . . . . . . . . . . . . . . . . . . . . . . . . . . . . . . . . . 28
Chapter 4Configure Source Protection in RSLogix 5000 Software
Introduction. . . . . . . . . . . . . . . . . . . . . . . . . . . . . . . . . . . . . . . . . . . . . . . . . . . . . 29Installation . . . . . . . . . . . . . . . . . . . . . . . . . . . . . . . . . . . . . . . . . . . . . . . . . . . . . . 29Configure Source Protection . . . . . . . . . . . . . . . . . . . . . . . . . . . . . . . . . . . . . . 30
Specify a Source Key File . . . . . . . . . . . . . . . . . . . . . . . . . . . . . . . . . . . . . . 30Protect Components . . . . . . . . . . . . . . . . . . . . . . . . . . . . . . . . . . . . . . . . . 32View Components Without a Key . . . . . . . . . . . . . . . . . . . . . . . . . . . . . 35
Source Key File . . . . . . . . . . . . . . . . . . . . . . . . . . . . . . . . . . . . . . . . . . . . . . . . . . 38Remove Access to a Protected Routine . . . . . . . . . . . . . . . . . . . . . . . . . . . . . 41Disable Routine Source Protection . . . . . . . . . . . . . . . . . . . . . . . . . . . . . . . . 42
Chapter 5RSLogix 5000 Software CPU Security Tool
Introduction. . . . . . . . . . . . . . . . . . . . . . . . . . . . . . . . . . . . . . . . . . . . . . . . . . . . . 43Installation . . . . . . . . . . . . . . . . . . . . . . . . . . . . . . . . . . . . . . . . . . . . . . . . . . . . . . 43Securing a ControlLogix Controller with Logix CPU Security Tool . . 44
Accessing a Secured Controller . . . . . . . . . . . . . . . . . . . . . . . . . . . . . . . . 47Removing Security from a Controller with CPU Security Tool . . . 49Removing a Password . . . . . . . . . . . . . . . . . . . . . . . . . . . . . . . . . . . . . . . . . 51
Index . . . . . . . . . . . . . . . . . . . . . . . . . . . . . . . . . . . . . . . . . . . . . . . . . . . . . . . . . . . . . . . . . 53
Rockwell Automation Publication 1756-PM016D-EN-P - September 2010 5
Table of Contents
Notes:
6 Rockwell Automation Publication 1756-PM016D-EN-P - September 2010

Preface
Purpose of This Manual This manual explains how to configure security for RSLogix 5000 software. It also explains how to setup source protection for your logic and projects.
This manual is one of a set of related manuals that show common procedures for programming and operating Logix5000 controllers. For a complete list of common procedures manuals, see the Logix5000 Controllers Common Procedures Programming Manual, publication 1756-PM001.
The term Logix5000 controller refers to any controller that is based on the Logix5000 operating system, such as the following:
• CompactLogix controllers• ControlLogix controllers• DriveLogix controllers• SoftLogix5800 controllers
Rockwell Automation Publication 1756-PM016D-EN-P - September 2010 7

Preface
Notes:
8 Rockwell Automation Publication 1756-PM016D-EN-P - September 2010
Chapter 1
Security
Introduction This chapter explains what FactoryTalk Security is and how you can implement security.
The Logix platform, version 18 or later, provides Data Access Control through two new tag attributes: External Access and Constant. Together, these attributes let you control access to tag data and help to safeguard tags by preventing unwanted changes to their values. For more information about Data Access Control, see the Logix5000 Controllers I/O and Tag Data Programming Guide, publication 1756-PM004.
FactoryTalk Security FactoryTalk Security integrates a common security model across all FactoryTalk enabled products. FactoryTalk Services Platform (FTSP) includes the FactoryTalk Administration Console (FTAC) that provides the interface for configuring your system.
FactoryTalk Directories
An important aspect to implementing FactoryTalk Security is the multiple FactoryTalk Directories. In the FactoryTalk architecture there are two separate Directory types, Local and Network. A FactoryTalk Local directory is utilized when all the Rockwell Automation Software products run on a single computer. The Local FactoryTalk Directory is used for products such as FactoryTalk View Machine Edition (ME) and FactoryTalk View Site Edition (SE) Station (Standalone).
The FactoryTalk Network Directory is used when multiple Rockwell Automation Software products need to share information across multiple computer systems. The FactoryTalk Network Directory allows these systems to share a common FactoryTalk Directory for products, such as FactoryTalk View SE, FactoryTalk Integrator, FactoryTalk Batch, and FactoryTalk AssetCenter.
Rockwell Automation Publication 1756-PM016D-EN-P - September 2010 9

Chapter 1 Security
When securing controllers using the RSLogix 5000 software, you can use either the FactoryTalk Local or the Network Directories. If you are trying to coordinate security across multiple computers, you will need a Network Directory implementation of FactoryTalk Security. If all of your products reside on a single computer, you will want to utilize Local FactoryTalk Directory.
For more information about FactoryTalk Security, see the FactoryTalk Security Quick Start, publication FTSEC-QS001.
RSSecurity Server
Security implemented in existing products will be migrated into the new FactoryTalk Security system by utilities in those specific products. For those products currently using RSSecurity, it is possible to coexist with FactoryTalk Security. Alternatively, you can migrate to the new system. If migrating to the new system is desirable, then any product that referenced the RSSecurity Server can interface to the FactoryTalk Security system via the RSSecurity Emulator. This Security Emulator can be installed once FTSP is installed on any computer that will host products such as RSLogix 5000 and RSLinx Classic.
For installation information, see Install the Rockwell Software Security Emulator on page 11.
10 Rockwell Automation Publication 1756-PM016D-EN-P - September 2010

Chapter 2
Configure FactoryTalk Security with RSLogix 5000 Software
Introduction FactoryTalk Security Service Platform (FTSP) software is installed during the installation of RSLogix 5000 software.
Install the Rockwell Software Security Emulator
RSLogix 5000 software uses the Rockwell Software Security Emulator to communicate with FactoryTalk Security. Follow these instructions to install the Rockwell Software Security Emulator.
1. From the Start menu select Programs>Rockwell Software>FactoryTalk Tools>RSSecurity Emulator Install
2. Follow the installation prompts to complete the installation.
IMPORTANT In order to enable the security, you must first install the Rockwell Software Security Emulater. Refer to Install the Rockwell Software Security Emulator on page 11 and Enable Security for RSLogix 5000 Software on page 12.
Rockwell Automation Publication 1756-PM016D-EN-P - September 2010 11

Chapter 2 Configure FactoryTalk Security with RSLogix 5000 Software
Enable Security for RSLogix 5000 Software
If the Security menu is dimmed, as shown in this picture, you need to enable security.
The SetSecKeys utility must be executed to enable security for RSLogix 5000 software.
1. On your computer, browse to C:\Program Files\Rockwell Software\RSLogix 5000\ENU\v17\Security and double-click the SetSecKeys.exe file.
2. Select the RS5000Keys.ini file and click Open.
ATTENTION: Once you have enabled security, only Rockwell Automation Technical Support can turn off RSLogix 5000 security.
12 Rockwell Automation Publication 1756-PM016D-EN-P - September 2010
Configure FactoryTalk Security with RSLogix 5000 Software Chapter 2
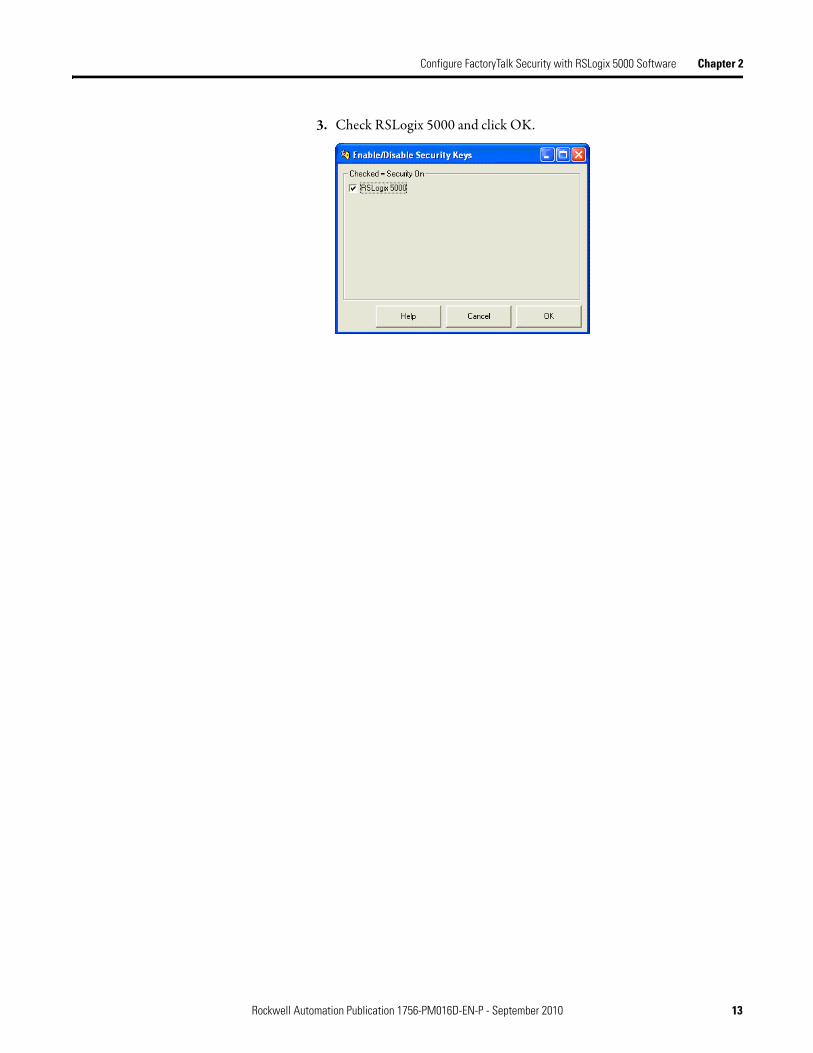
3. Check RSLogix 5000 and click OK.
Rockwell Automation Publication 1756-PM016D-EN-P - September 2010 13

Chapter 2 Configure FactoryTalk Security with RSLogix 5000 Software
Install FactoryTalk Service Platform Software
If you find that the Security feature is not enabled in RSLogix 5000 software as shown in this screen, you will need to make sure FactoryTalk Service Platform (FTSP) software is installed properly.
Follow these instructions to install the FTSP software.
1. On the installation disk, browse to D:\System\FTSP and double-click the Setup.exe file.
2. Follow the installation prompts to complete the installation.
During the installation, all existing local and network FactoryTalk Directory files are automatically configured and backed up. For new installations, the pre-configured FactoryTalk Directory files are backed up. The backups let you restore the Factory Talk Directory files to a previous software version.
After the installation is complete, refer back to Enable Security for RSLogix 5000 Software on page 12.
If you still are having problems, refer to The FactoryTalk Security Quick Start, publication FTSEC-QS001.
14 Rockwell Automation Publication 1756-PM016D-EN-P - September 2010

Configure FactoryTalk Security with RSLogix 5000 Software Chapter 2
Secure an RSLogix 5000 Software Project File
Once you have configured the RSLogix 5000 software to be security aware, the next step is to enable security in a RSLogix 5000 software project file. Follow these steps to secure a project file.
1. Launch RSLogix 5000.
The default FactoryTalk Security configuration has Single Sign On enabled, so you will not be prompted to Log On to FactoryTalk. Customers upgrading from versions prior to 16.03 or customers that have modified the default FactoryTalk Security configuration will be prompted to Log On to FactoryTalk.
2. If prompted to Log On to FactoryTalk, enter a valid set for FactoryTalk credentials. In the example below, the FactoryTalk Directory (FTD) was configured with an account called FTADMIN.
3. Open the RSLogix 5000 project file that you want to secure.
In this example, the DayOf Week example project file was opened.
Rockwell Automation Publication 1756-PM016D-EN-P - September 2010 15
Chapter 2 Configure FactoryTalk Security with RSLogix 5000 Software
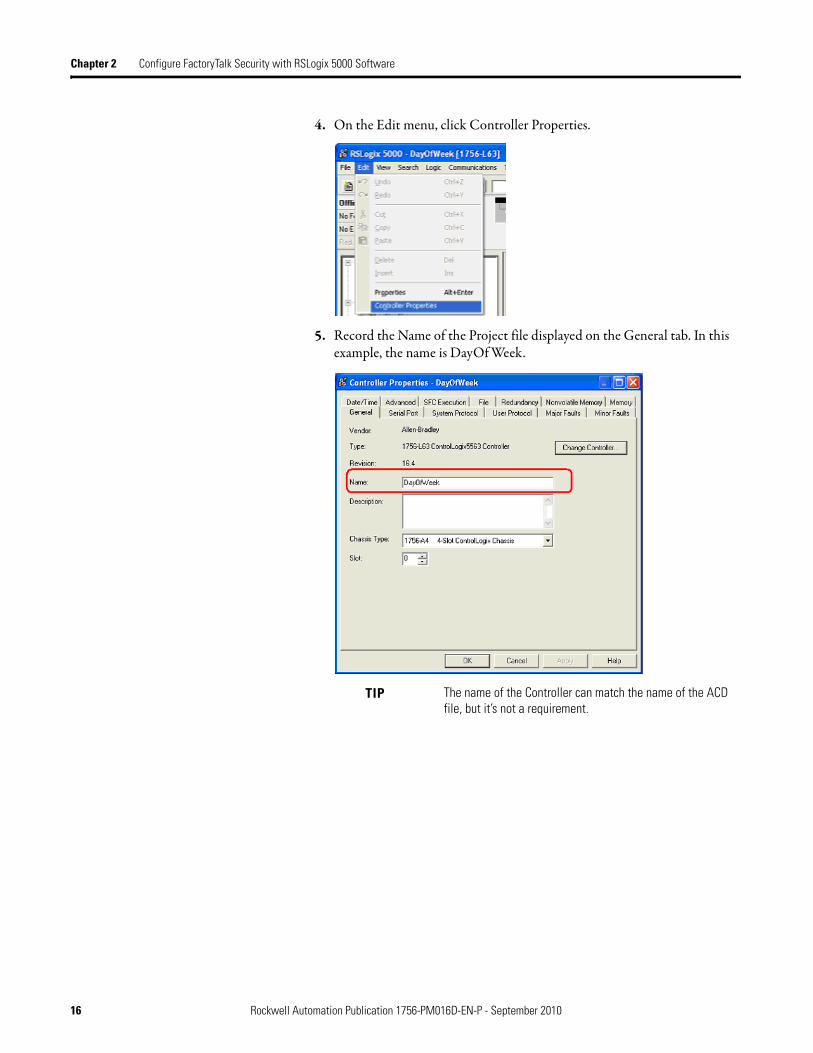
4. On the Edit menu, click Controller Properties.
5. Record the Name of the Project file displayed on the General tab. In this example, the name is DayOf Week.
TIP The name of the Controller can match the name of the ACD file, but it’s not a requirement.
16 Rockwell Automation Publication 1756-PM016D-EN-P - September 2010
Configure FactoryTalk Security with RSLogix 5000 Software Chapter 2
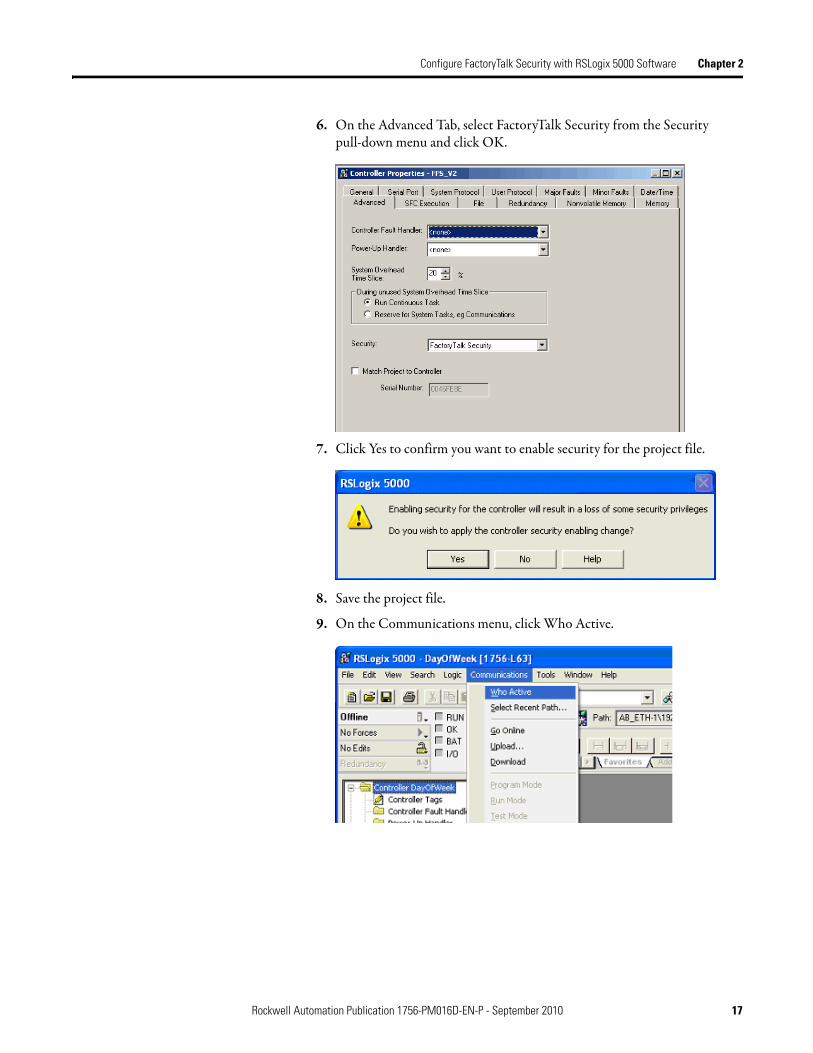
6. On the Advanced Tab, select FactoryTalk Security from the Securitypull-down menu and click OK.
7. Click Yes to confirm you want to enable security for the project file.
8. Save the project file.
9. On the Communications menu, click Who Active.
Rockwell Automation Publication 1756-PM016D-EN-P - September 2010 17

Chapter 2 Configure FactoryTalk Security with RSLogix 5000 Software
10. In the Who Active window, locate and select the controller resource.
11. Click Download to continue.
12. After the download completes, close RSLogix 5000 software.If prompted, save changes.
18 Rockwell Automation Publication 1756-PM016D-EN-P - September 2010
Configure FactoryTalk Security with RSLogix 5000 Software Chapter 2
Apply Security to a Controller Resource
Follow these steps to apply security to a controller resource.
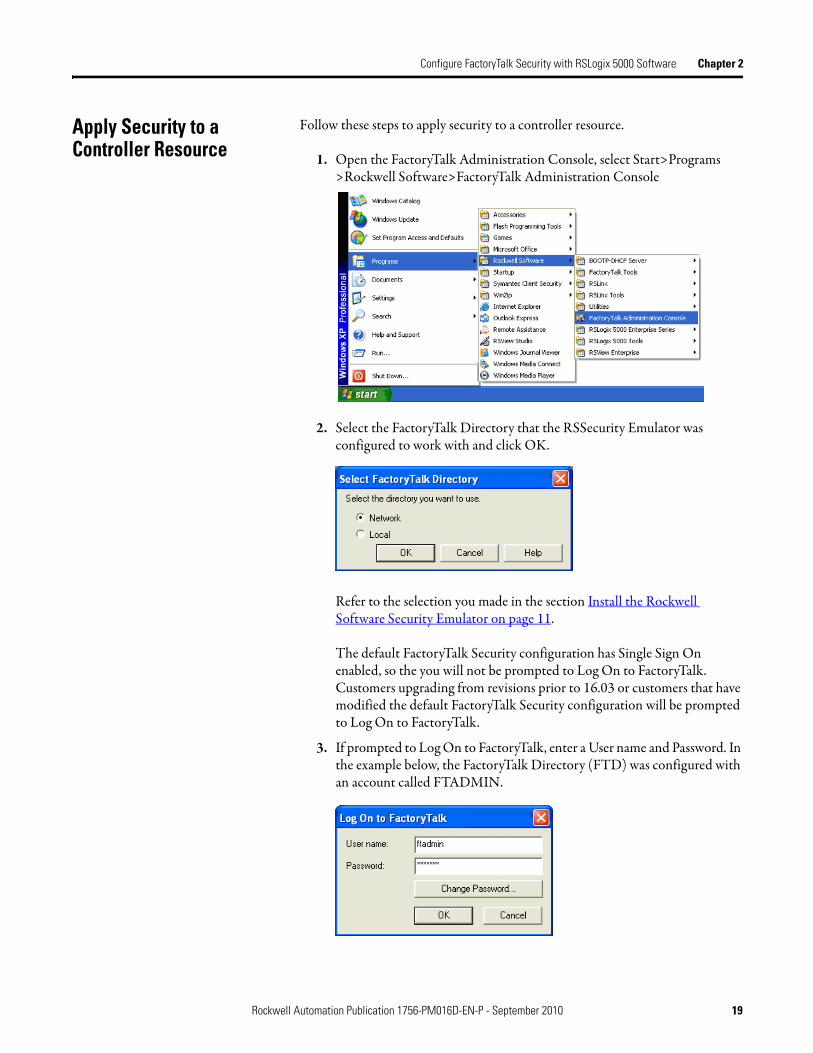
1. Open the FactoryTalk Administration Console, select Start>Programs >Rockwell Software>FactoryTalk Administration Console
2. Select the FactoryTalk Directory that the RSSecurity Emulator was configured to work with and click OK.
Refer to the selection you made in the section Install the Rockwell Software Security Emulator on page 11.
The default FactoryTalk Security configuration has Single Sign On enabled, so the you will not be prompted to Log On to FactoryTalk. Customers upgrading from revisions prior to 16.03 or customers that have modified the default FactoryTalk Security configuration will be prompted to Log On to FactoryTalk.
3. If prompted to Log On to FactoryTalk, enter a User name and Password. In the example below, the FactoryTalk Directory (FTD) was configured with an account called FTADMIN.
Rockwell Automation Publication 1756-PM016D-EN-P - September 2010 19

Chapter 2 Configure FactoryTalk Security with RSLogix 5000 Software
4. Navigate to the controller resource the secured project file was downloaded to.
Refer to the section Secure an RSLogix 5000 Software Project File on page 15.
5. Right-click on the controller resource and select Properties.
6. In the Logical Name pull-down menu, choose the Controller name.
This name should match the settings from the Controller Properties page that you created during the Secure an RSLogix 5000 Software Project File
20 Rockwell Automation Publication 1756-PM016D-EN-P - September 2010
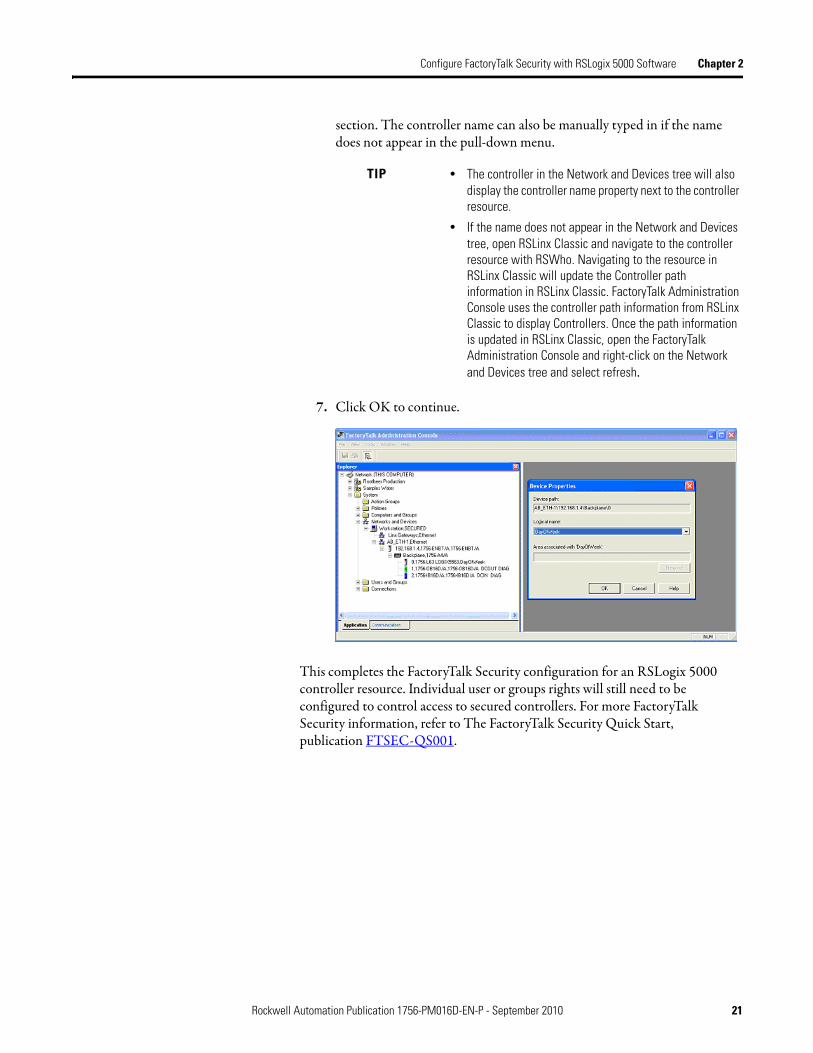
Configure FactoryTalk Security with RSLogix 5000 Software Chapter 2
section. The controller name can also be manually typed in if the name does not appear in the pull-down menu.
7. Click OK to continue.
This completes the FactoryTalk Security configuration for an RSLogix 5000 controller resource. Individual user or groups rights will still need to be configured to control access to secured controllers. For more FactoryTalk Security information, refer to The FactoryTalk Security Quick Start,publication FTSEC-QS001.
TIP • The controller in the Network and Devices tree will also display the controller name property next to the controller resource.
• If the name does not appear in the Network and Devices tree, open RSLinx Classic and navigate to the controller resource with RSWho. Navigating to the resource in RSLinx Classic will update the Controller path information in RSLinx Classic. FactoryTalk Administration Console uses the controller path information from RSLinx Classic to display Controllers. Once the path information is updated in RSLinx Classic, open the FactoryTalk Administration Console and right-click on the Network and Devices tree and select refresh.
Rockwell Automation Publication 1756-PM016D-EN-P - September 2010 21
Chapter 2 Configure FactoryTalk Security with RSLogix 5000 Software
Notes:
22 Rockwell Automation Publication 1756-PM016D-EN-P - September 2010

Chapter 3
Migrate from a Security Server Database to a FactoryTalk Server
Introduction To migrate to a FactoryTalk Security Server you must first export the security server database and then import the database into FactoryTalk.
Import a Security Server Database
Follow these steps to import a security server database into FactoryTalk Security.
1. From the Start menu, select Programs>Rockwell Software>FactoryTalk Tools>Import RSSecurity Configuration
2. Select Import File.
3. Browse to the import file and Destination directory from thepull-down menu.
Rockwell Automation Publication 1756-PM016D-EN-P - September 2010 23

Chapter 3 Migrate from a Security Server Database to a FactoryTalk Server
4. Click Yes at the Warning message.
5. Type your username and password and click OK.
The import status appears.
6. Select how you want action and resource groups to be imported into FactoryTalk and click OK.
24 Rockwell Automation Publication 1756-PM016D-EN-P - September 2010

Migrate from a Security Server Database to a FactoryTalk Server Chapter 3
7. Review the import issue resolution and click Continue.
8. Select a group to import.
9. Right-click the selected group, select Add Area, and browse to theresource location.
10. Click OK.
Rockwell Automation Publication 1756-PM016D-EN-P - September 2010 25
Chapter 3 Migrate from a Security Server Database to a FactoryTalk Server
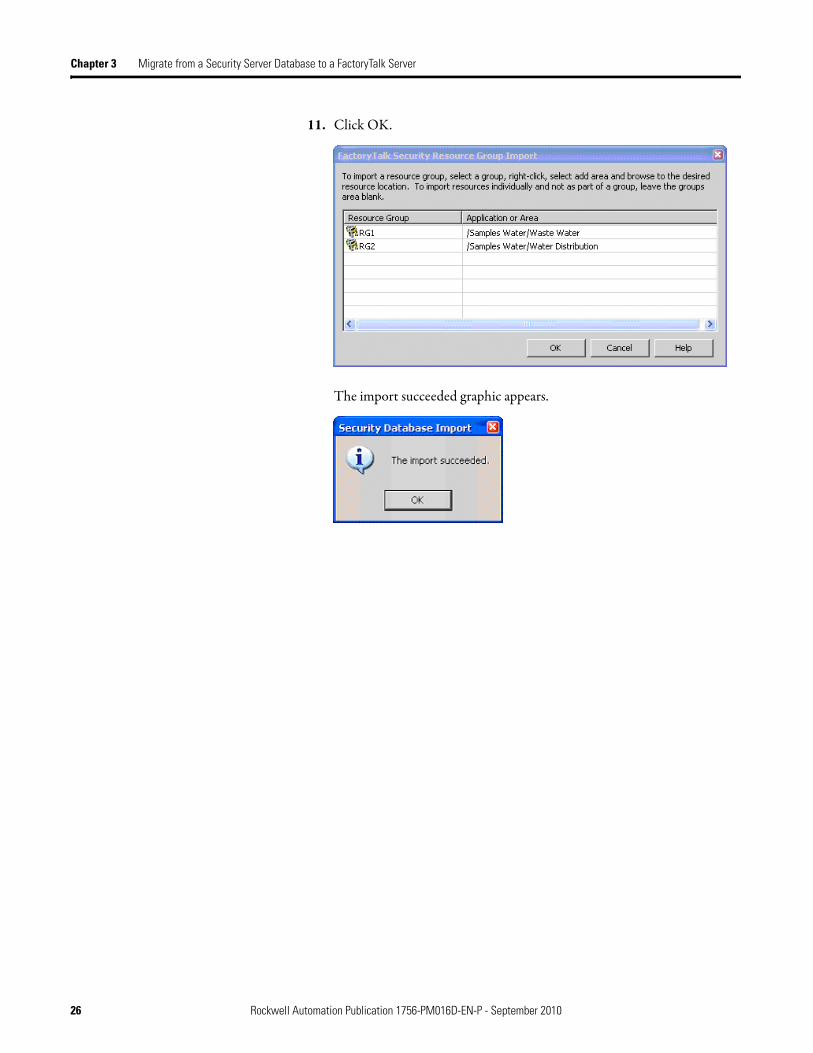
11. Click OK.
The import succeeded graphic appears.
26 Rockwell Automation Publication 1756-PM016D-EN-P - September 2010

Migrate from a Security Server Database to a FactoryTalk Server Chapter 3
Import Status Text File
This graphic shows an example of the Import Status text file that is created when an import is completed.
Organizer Import Result
This graphic shows the results of the import process in the Organizer.
Rockwell Automation Publication 1756-PM016D-EN-P - September 2010 27
Chapter 3 Migrate from a Security Server Database to a FactoryTalk Server
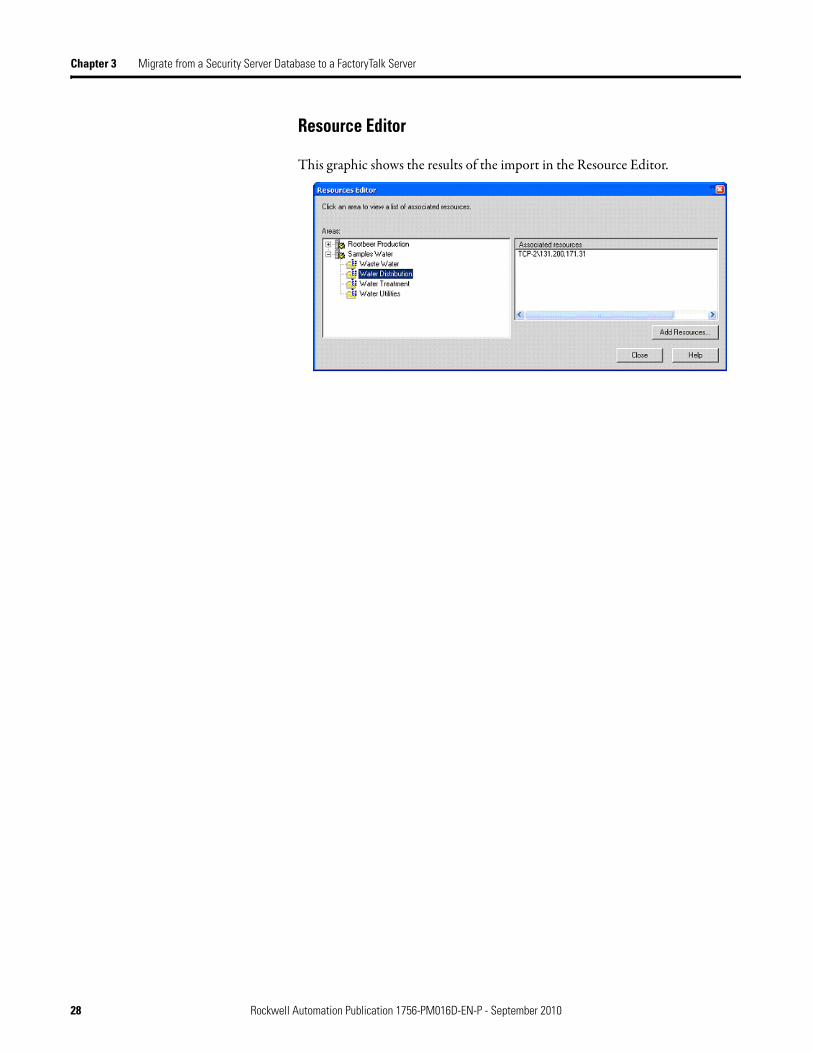
Resource Editor
This graphic shows the results of the import in the Resource Editor.
28 Rockwell Automation Publication 1756-PM016D-EN-P - September 2010

Chapter 4
Configure Source Protection in RSLogix 5000 Software
Introduction This chapter describes how to install and configure source protection for your RSLogix 5000 routines and Add-On Instructions.
Installation Do these steps to install RSLogix 5000 source protection.
1. On the RSLogix 5000 installation CD, browse to D:\ENU\Tools\Source Protection Tool and double-click on the RS5KSrcPtc.exe.
A dialog box appears.
2. Click Yes.
Rockwell Automation Publication 1756-PM016D-EN-P - September 2010 29

Chapter 4 Configure Source Protection in RSLogix 5000 Software
Configure Source Protection
This procedure lets you configure source protection on a project file. When a source key is applied to a component, that component is source-protected. Source keys are user-generated, case-sensitive passwords that lock RSLogix 5000 components from being viewed or modified by third parties.
Specify a Source Key File
Do these steps to configure a file location.
1. Open an offline project file.
2. From the Tools menu, click Tools and choose Configure Source Protection.
Source Protection requires a Source Key File location to be specified on your workstation. You are prompted to configure a file location.
3. Click Yes.
4. Click Browse to specify a Source Key File location.
IMPORTANT Source Protection can be configured only on an offline project file.
TIP This menu option is not available until you have run RS5KSrcPtc.exe on your workstation.
30 Rockwell Automation Publication 1756-PM016D-EN-P - September 2010

Configure Source Protection in RSLogix 5000 Software Chapter 4
5. Navigate to the folder location to store the Key File.
The key file can be saved in any accessible folder. In this example, C:\RSLogix 5000\Projects folder is specified as the Key File location.
6. Click OK to continue.
If a Key File is not found in the specified location, you will be prompted to create a new Key File.
7. Click Yes to create a new key file.
TIP To check for a specific location, click the Specify button on the Source Protection Configuration dialog box. A window appears with the location, if one exists on your workstation.
Rockwell Automation Publication 1756-PM016D-EN-P - September 2010 31

Chapter 4 Configure Source Protection in RSLogix 5000 Software
Protect Components
The Source Protection Configuration dialog box lists all Program Routines,Add-On Instructions, and Equipment Phase State Routines in the project file. These components are protected by applying source keys to them. Source keys are user-generated passwords used to lock components. Users that do not have the source key for a component are not able to modify the component and may not be able to view the component.
About Source Keys
In version 18 and earlier of RSLogix 5000 software, only IEC-61131 compliant source keys are recognized. Each source key must begin with a lowercase character a-z or underscore character ( _ ), and contain only characters lowercase a-z, 0-9, and an underscore character ( _ ). Uppercase A-Z may be entered inRSLogix 5000 software or in the source key file, but the uppercase characters will be converted to lowercase. Source keys are limited to 40 characters in length.
In version 19 and later of RSLogix 5000 software, source keys arecase-sensitive and may contain any printable ASCII character, excluding the space character. This includes uppercase A-Z, lowercase a-z, numbers 0-9, and symbols such as "!@#$%. Source keys are limited to 40 characters in length.
Source Key Names
Version 19 and later of RSLogix 5000 software supports associating names with source keys. Source key names are descriptive text that help identify source keys. Where appropriate, RSLogix 5000 software will display the source key name in place of the source key itself. This provides an additional layer of security for the source key.
32 Rockwell Automation Publication 1756-PM016D-EN-P - September 2010

Configure Source Protection in RSLogix 5000 Software Chapter 4
Descriptive names should be used to help identify the purpose of the source. For instance, a source key used to secure components that field engineers require access might be named, ‘Field Engineer’.
Do these steps to apply a source key to one or more components.
1. Select one or more components that require protection and click Protect.
The Apply Source Key dialog box appears.
For version 19 and later of RSLogix 5000 software, the entered source keys on the Apply Source Key dialog box are masked by default, but you have an option to display readable text. If you have version 18 and earlier ofRSLogix 5000 software, your source keys are in a readable, text-only format.
IMPORTANT If the same source keys will be used with version 18 and earlier and version 19 and later of RSLogix 5000 software, begin each source key with a lowercase character a-z, or an underscore character ( _ ), and use only characters lowercase a-z, 0-9 , or an underscore character ( _ ) within the source keys.
If you use source key names in version 19 and later of RSLogix 5000 software, and your source keys are IEC61131-3 compliant, your source keys still will work in version 18 and earlier.
Readable text option
Rockwell Automation Publication 1756-PM016D-EN-P - September 2010 33

Chapter 4 Configure Source Protection in RSLogix 5000 Software
2. Complete the Apply Source Key dialog box to designate a new source key.
3. Click OK.
The Source Protection Configuration dialog box reappears.
For version 19 and later of RSLogix 5000 software, source keys may have names. Where appropriate, the source key name is displayed instead of the source key. This further protects the source key from being seen.
In the example, the name ‘Field Engineer’ is displayed instead of asource key.
Element Description
Source Key to apply to selected component(s)
Type a new key. Source keys cannot exceed 40 characters.The Confirm New Source Key and Source Key Name boxes become active forversion 19 and later of RSLogix 5000 software.
To select an existing key, click the drop-down arrow. When the source key is selected, the Confirm New Source Key and Source Key Names boxes become read-only. The Confirm New Source Key box will be empty, and the Source Key Name box will contain the name of the selected source key, ifone exists.
Show Source Key For version 19 and later of RSLogix 5000 software, click the checkbox to display source keys in a readable format.
Confirm New Source Key Re-type exactly the characters for the new key. This box is disabled when an existing source key is selected or when the source key is being displayed in cleartext.
Source Key Name Type a name for the source key; do not exceed 40 characters. Box displays the name of a selected, existing source key if one is defined.
Allow viewing of component(s) You can set a protected routine to allow or deny viewing of the routine from a system that does not have the key required to access the routine. Click the checkbox to allow viewing of a routine in read-only mode. Protected routines that do not allow viewing cannot be viewed by systems that do not have the required key.
34 Rockwell Automation Publication 1756-PM016D-EN-P - September 2010

Configure Source Protection in RSLogix 5000 Software Chapter 4
For version 19 and later of RSLogix 5000 software, unnamed source keys are obfuscated. Three black circles appear after the last character or any character beyond the fifth character to provide security.
4. Close the Source Protection Configuration dialog box and save theproject file.
View Components Without a Key
This procedure lets you flag source-protected components to be available in a read-only format on a system that does not have the source keys.
1. Enter a source key on the Apply Source Key dialog box.
2. Optionally name the source key.
3. Click the ‘Allow viewing of components’ checkbox.
4. Click OK.
IMPORTANT Source key names can not be added to existing source keys through RSLogix 5000 software.
See page 38 to learn how to associate a name to an existing source key.
Rockwell Automation Publication 1756-PM016D-EN-P - September 2010 35

Chapter 4 Configure Source Protection in RSLogix 5000 Software
The Test_DOW routine in the example is source-protected and can be viewed (as indicated by ‘Yes’) in a read-only format on workstations thatdo not have the source key.
5. Click Close.
6. Save the project file and download it to the controller.
When the project file is opened on a system that does not contain the keys used to secure the routines and Add-On Instructions, the components will be protected based on the setting in the Source Protection Configuration dialog box.
Test_DOW was protected and set to viewable on the Source Protection Configuration dialog box. You can open the routine as read-only on a system that does not contain the key for the routine, but you will not be able to modify the routine.
Routines or Add-On Instructions that are protected, but are not configured as viewable, cannot be opened. The Dayof Week routine cannot be opened on a system that does not have the key used to protect the routine. In the example, the icon for the routine is dimmed, indicating the routine cannot be opened.
Inactive icons are dimmed.
36 Rockwell Automation Publication 1756-PM016D-EN-P - September 2010
Configure Source Protection in RSLogix 5000 Software Chapter 4
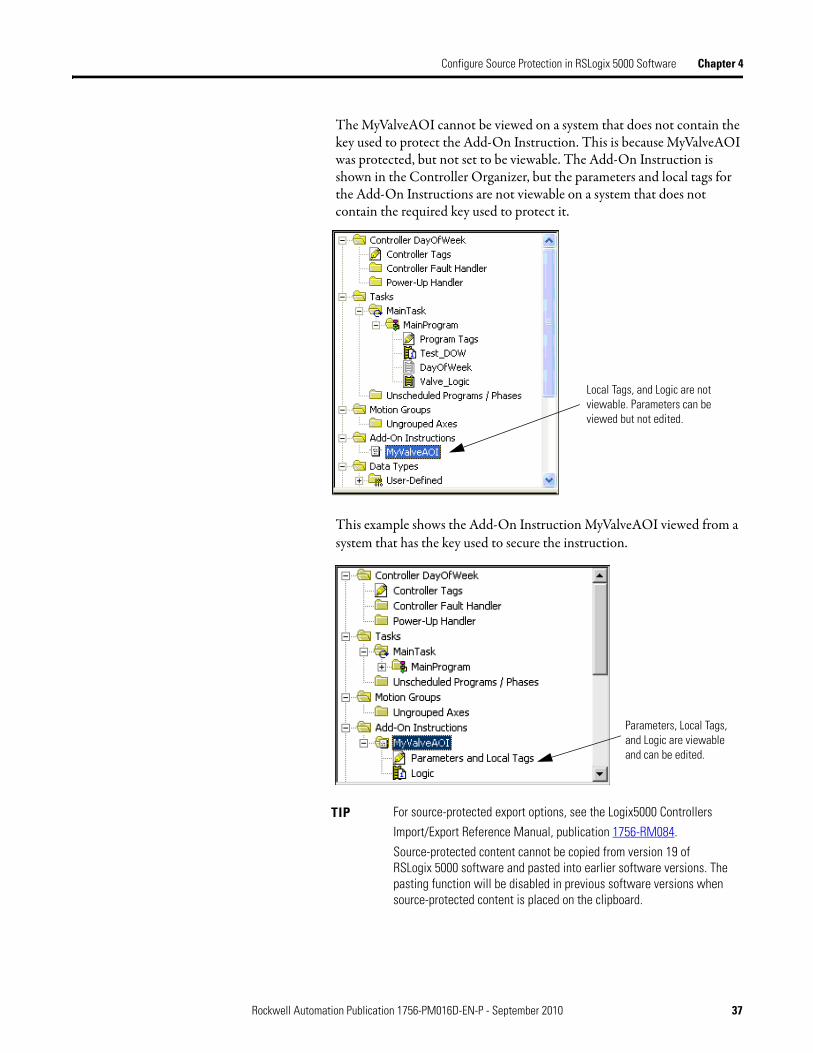
The MyValveAOI cannot be viewed on a system that does not contain the key used to protect the Add-On Instruction. This is because MyValveAOI was protected, but not set to be viewable. The Add-On Instruction is shown in the Controller Organizer, but the parameters and local tags for the Add-On Instructions are not viewable on a system that does not contain the required key used to protect it.
This example shows the Add-On Instruction MyValveAOI viewed from a system that has the key used to secure the instruction.
TIP For source-protected export options, see the Logix5000 Controllers
Import/Export Reference Manual, publication 1756-RM084.
Source-protected content cannot be copied from version 19 ofRSLogix 5000 software and pasted into earlier software versions. The pasting function will be disabled in previous software versions when source-protected content is placed on the clipboard.
Local Tags, and Logic are not viewable. Parameters can be viewed but not edited.
Parameters, Local Tags, and Logic are viewable and can be edited.
Rockwell Automation Publication 1756-PM016D-EN-P - September 2010 37

Chapter 4 Configure Source Protection in RSLogix 5000 Software
Source Key File Source keys made available to RSLogix 5000 software through an sk.dat file are unencrypted. We recommend that you back up and store the key in a secure location. If necessary, the individual keys can be distributed or provided to the necessary parties.
Do these steps to assign a name to an existing source key.
1. Close the RSLogix 5000 software program.
2. Locate the sk.dat file on your workstation.
3. Open the file with a text editor, such as Notepad or WordPad.
4. Click the mouse at the end of an existing source key and press Enter.
Note that our example, P@ssWOrd, shows that source keys are case sensitive and may use special characters like @#$%(){}[].
5. Click the space bar once and type a name for the source key.
Text must be in first line.
IMPORTANT Source key files are created in an ANSI format in RSLogix 5000 software version 18 and earlier. Software version 19, and later, creates UTF-8 formatted sk.dat files. ANSI sk.dat files modified in software version 19, and later, are converted to UTF-8 sk.dat files.
Source keys must not appear on the first line of a UTF-8 formattedsk.dat file. The first line of UTF-8 formatted sk.dat files is ignored by RSLogix 5000 software version 18 and earlier. Versions 19 and later insert a header on the first line of the sk.dat file if one is notalready present.
38 Rockwell Automation Publication 1756-PM016D-EN-P - September 2010
Configure Source Protection in RSLogix 5000 Software Chapter 4
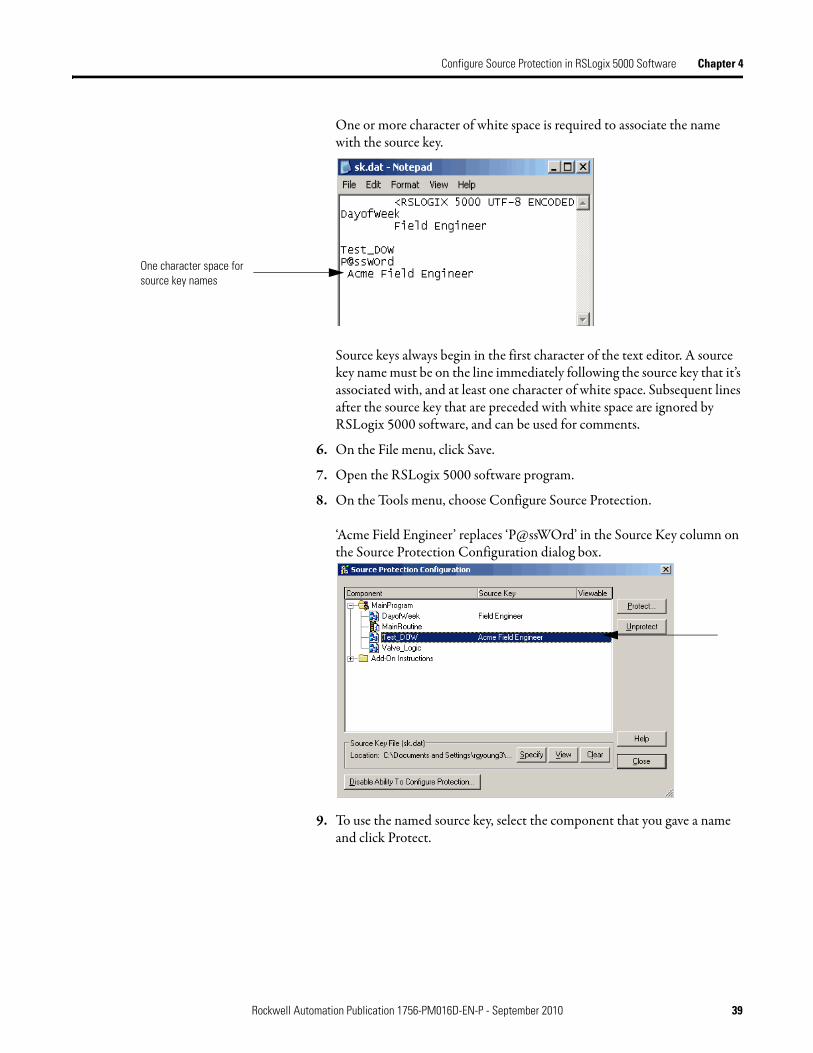
One or more character of white space is required to associate the name with the source key.
Source keys always begin in the first character of the text editor. A source key name must be on the line immediately following the source key that it’s associated with, and at least one character of white space. Subsequent lines after the source key that are preceded with white space are ignored by RSLogix 5000 software, and can be used for comments.
6. On the File menu, click Save.
7. Open the RSLogix 5000 software program.
8. On the Tools menu, choose Configure Source Protection.
‘Acme Field Engineer’ replaces ‘P@ssWOrd’ in the Source Key column on the Source Protection Configuration dialog box.
9. To use the named source key, select the component that you gave a name and click Protect.
One character space for source key names
Rockwell Automation Publication 1756-PM016D-EN-P - September 2010 39
Chapter 4 Configure Source Protection in RSLogix 5000 Software
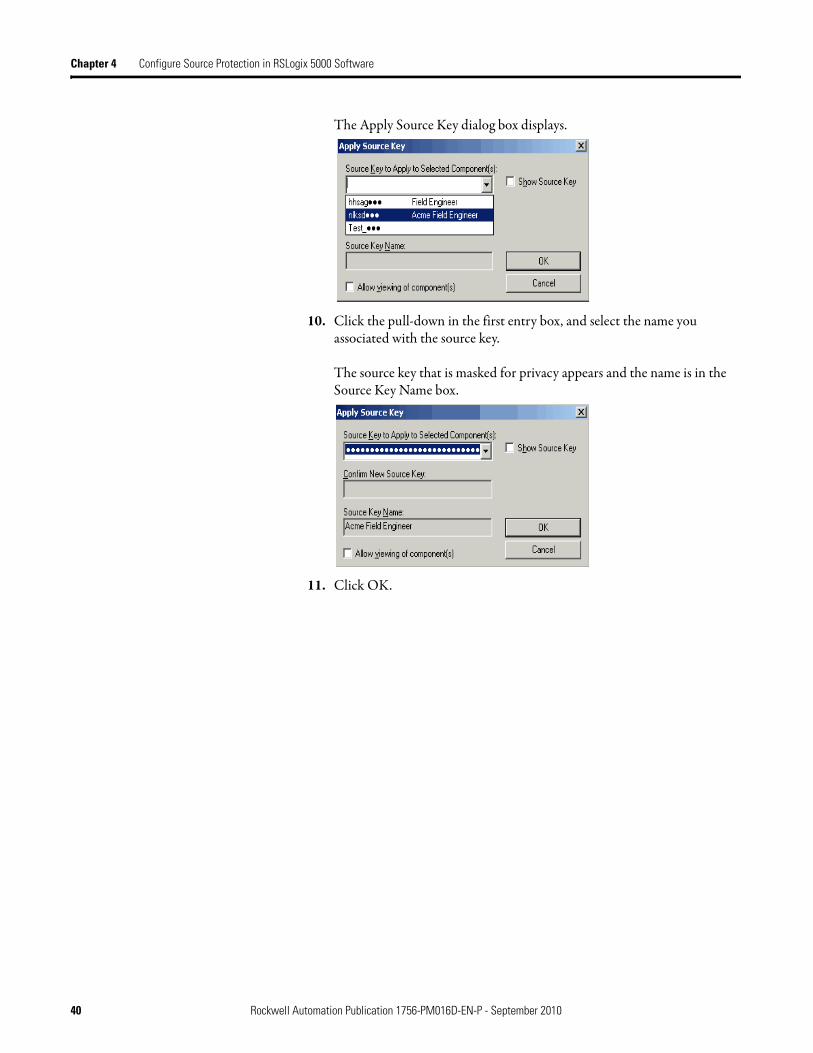
The Apply Source Key dialog box displays.
10. Click the pull-down in the first entry box, and select the name you associated with the source key.
The source key that is masked for privacy appears and the name is in the Source Key Name box.
11. Click OK.
40 Rockwell Automation Publication 1756-PM016D-EN-P - September 2010

Configure Source Protection in RSLogix 5000 Software Chapter 4
Remove Access to a Protected Routine
Before you remove a source key file (sk.dat) from a workstation, write down the source keys or make a copy of the file and store in a secure location.
1. Open the RSLogix 5000 project that is protected.
2. From the Tools menu, click Security and choose ConfigureSource Protection.
3. Click Clear.
A dialog box asks if you want to delete the source key file (sk.dat).
4. Select Yes to remove, or No not to remove the source key file from the workstation.
Rockwell Automation Publication 1756-PM016D-EN-P - September 2010 41
Chapter 4 Configure Source Protection in RSLogix 5000 Software
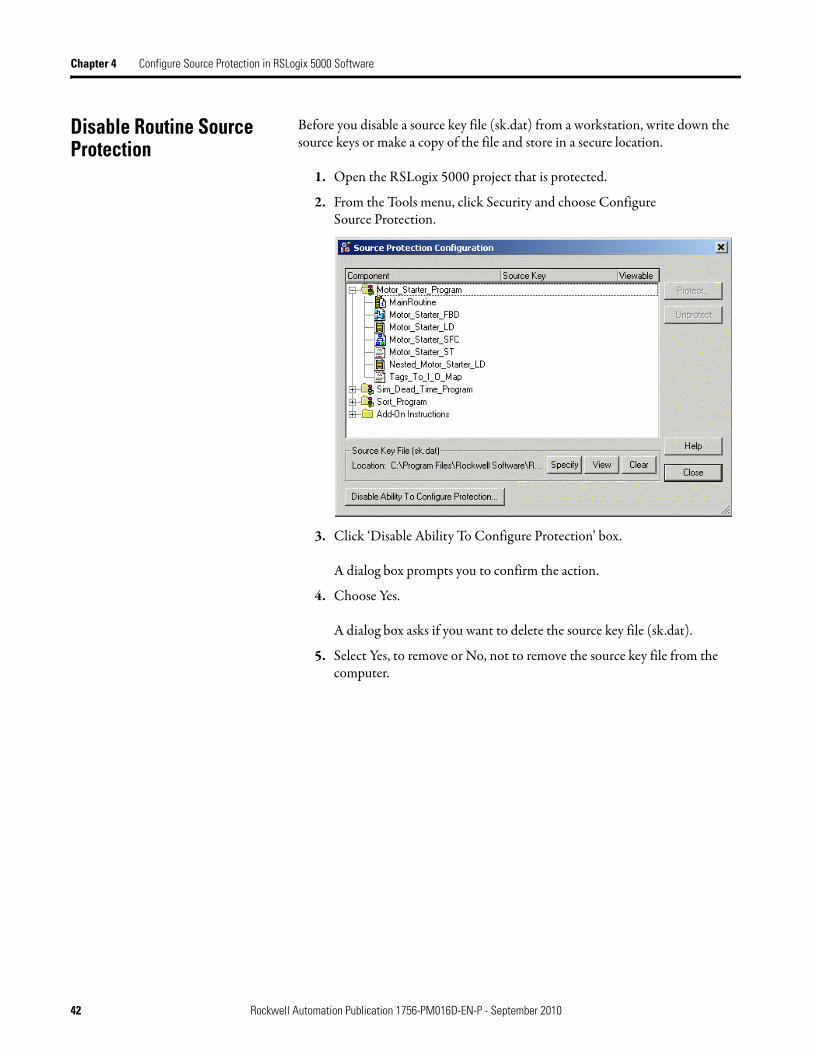
Disable Routine Source Protection
Before you disable a source key file (sk.dat) from a workstation, write down the source keys or make a copy of the file and store in a secure location.
1. Open the RSLogix 5000 project that is protected.
2. From the Tools menu, click Security and choose ConfigureSource Protection.
3. Click ‘Disable Ability To Configure Protection’ box.
A dialog box prompts you to confirm the action.
4. Choose Yes.
A dialog box asks if you want to delete the source key file (sk.dat).
5. Select Yes, to remove or No, not to remove the source key file from the computer.
42 Rockwell Automation Publication 1756-PM016D-EN-P - September 2010
Chapter 5
RSLogix 5000 Software CPU Security Tool
Introduction This chapter describes how to use the RSLogix 5000 CPU Security Tool to lock a controller. When a controller is locked, no one can access until it is unlocked.
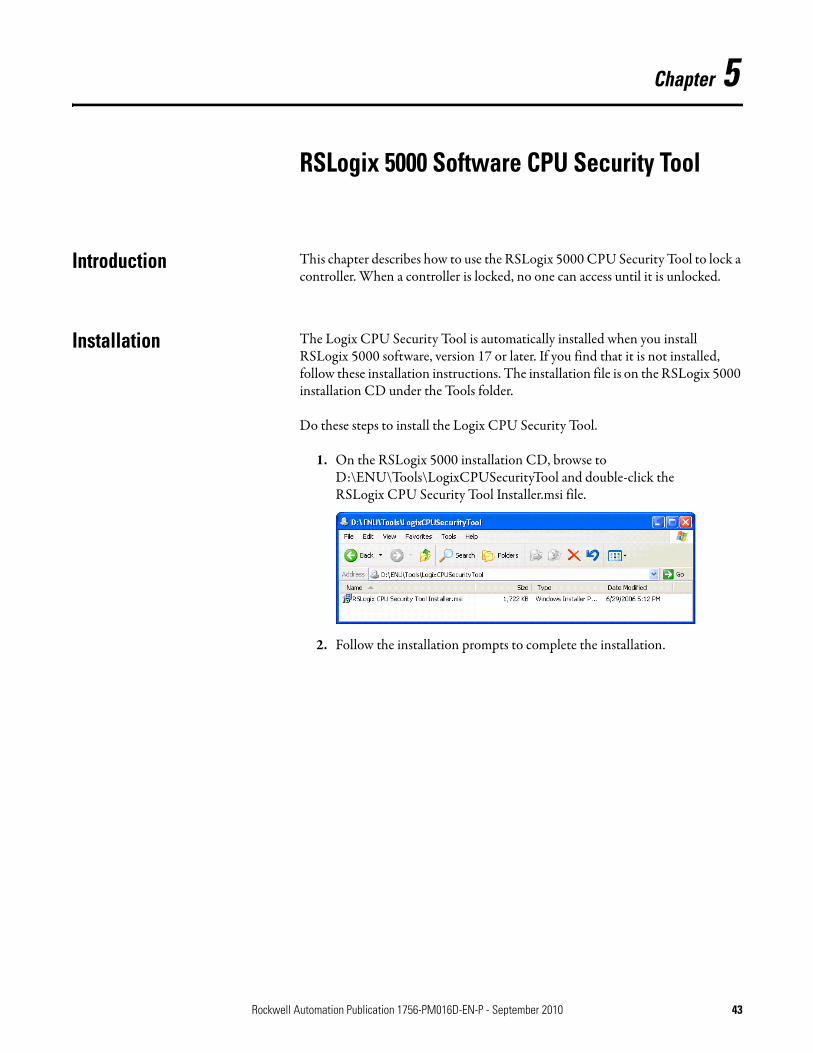
Installation The Logix CPU Security Tool is automatically installed when you install RSLogix 5000 software, version 17 or later. If you find that it is not installed, follow these installation instructions. The installation file is on the RSLogix 5000 installation CD under the Tools folder.
Do these steps to install the Logix CPU Security Tool.
1. On the RSLogix 5000 installation CD, browse to D:\ENU\Tools\LogixCPUSecurityTool and double-click the RSLogix CPU Security Tool Installer.msi file.
2. Follow the installation prompts to complete the installation.
Rockwell Automation Publication 1756-PM016D-EN-P - September 2010 43

Chapter 5 RSLogix 5000 Software CPU Security Tool
Securing a ControlLogix Controller with Logix CPU Security Tool
You can secure a controller with the Logix CPU Security Tool. The tool is installed under the RSLogix 5000 Tools menu.
1. Start the Logix CPU Security Tool.
2. To specify a path to the controller, click the RSWho button.
Use the RSWho button to locate the controller that you want to secure.
44 Rockwell Automation Publication 1756-PM016D-EN-P - September 2010

RSLogix 5000 Software CPU Security Tool Chapter 5
3. Select the controller that you want to secure and click OK.
The Logix CPU Security Tool displays the current status of the controller.
4. Click Change Password.
5. Enter a password in the new password field and confirm the password and click OK.
Notice that the controller you selected is currently unsecured and there is no password set in the controller.
Rockwell Automation Publication 1756-PM016D-EN-P - September 2010 45

Chapter 5 RSLogix 5000 Software CPU Security Tool
The Password Status for the controller now indicates a Password exists in the controller, but the controller is not secured yet.
6. Click Secure Controller.
7. Enter the password for the controller and click Secure.
The controller is now secured.
If the controller has Nonvolatile Memory installed, this check box would save the security state of the controller to Nonvolatile Memory.Refer to the RSLogix 5000 Help for additional information on how to Save to Nonvolatile Memory.
46 Rockwell Automation Publication 1756-PM016D-EN-P - September 2010

RSLogix 5000 Software CPU Security Tool Chapter 5
Accessing a Secured Controller
When you try to access a controller that has been secured by the Logix CPU Security Tool and you don’t have a local copy of the project file on your computer, you will be prompted to select the proper file.
To access a secured controller, do the following.
1. From the Communications menu, select Who Active
2. Select the secured controller and click Go Online.
If you don’t have a local copy of the project file on your computer, you will be prompted to select a file.
Rockwell Automation Publication 1756-PM016D-EN-P - September 2010 47

Chapter 5 RSLogix 5000 Software CPU Security Tool
3. Click Select file to find the project file or to identify a location to savethe project file.
4. Identify a file and click Select.
5. Click Yes.
An unspecified communications dialog box appears.
6. Click OK to continue.
48 Rockwell Automation Publication 1756-PM016D-EN-P - September 2010

RSLogix 5000 Software CPU Security Tool Chapter 5
If the project file already exists on your system, an error message is displayed that indicates that the controller is secured and you cannotgo online.
Removing Security from a Controller with the CPU Security Tool
Do these steps to remove security from a controller.
1. Launch the Logix CPU Security Tool.
2. Use RSWho to specify the path to the controller.
3. Select the controller that you want to be unsecured and click OK.
Rockwell Automation Publication 1756-PM016D-EN-P - September 2010 49
Chapter 5 RSLogix 5000 Software CPU Security Tool
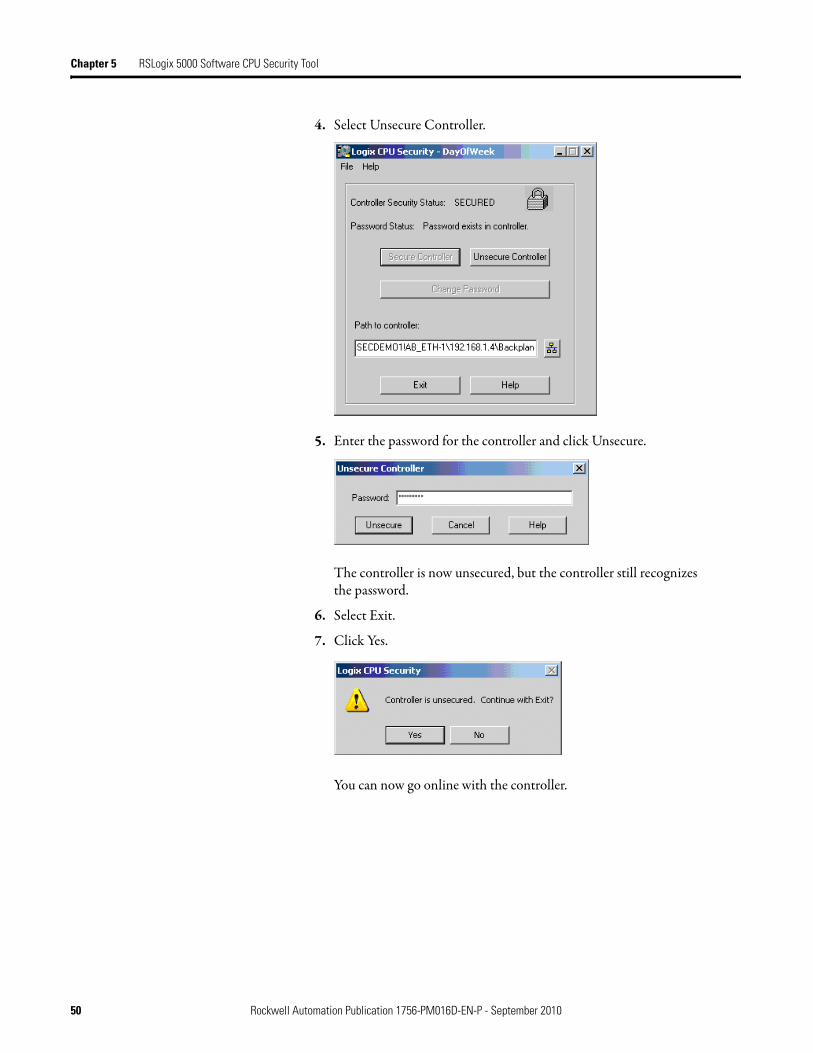
4. Select Unsecure Controller.
5. Enter the password for the controller and click Unsecure.
The controller is now unsecured, but the controller still recognizesthe password.
6. Select Exit.
7. Click Yes.
You can now go online with the controller.
50 Rockwell Automation Publication 1756-PM016D-EN-P - September 2010
RSLogix 5000 Software CPU Security Tool Chapter 5
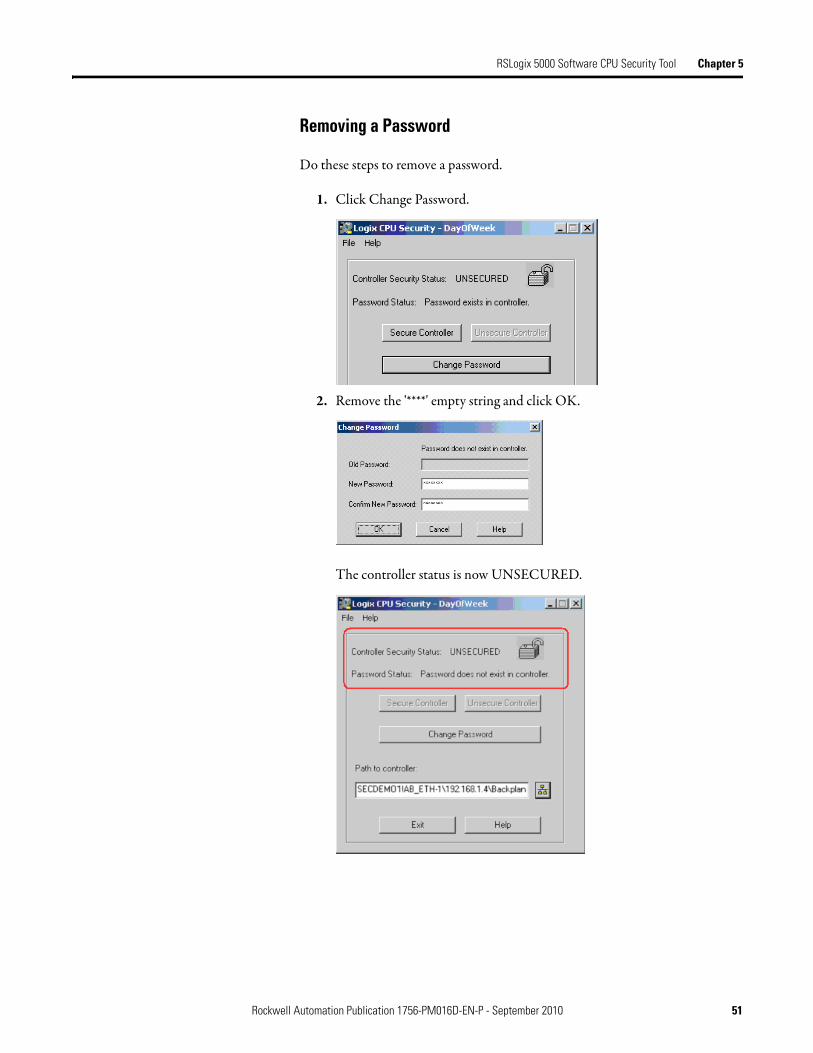
Removing a Password
Do these steps to remove a password.
1. Click Change Password.
2. Remove the '****' empty string and click OK.
The controller status is now UNSECURED.
Rockwell Automation Publication 1756-PM016D-EN-P - September 2010 51

Chapter 5 RSLogix 5000 Software CPU Security Tool
Notes:
52 Rockwell Automation Publication 1756-PM016D-EN-P - September 2010

Index
Aaccess
locked controller 47Add-On Instructions
source protection 30
Ccontroller
accessing locked files 47locked 43organizer import 27remove security 49
controller resourceapply security 19
CPU Security Toolinstall 43
Ddelete
source key file 41directory
FactoryTalk 9disable
source protection 42
Eemulator
install 11enable security
RSLogix 5000 12
FFactoryTalk
directory 9security 9Service Platform software 14
filesk.dat 38source protection 30
Iimport
security server database 23install
CPU Security Tool 43emulator 11FTSP software 14source protection 29
Llocking controller 43
Oorganizer
import result 27
Ppassword
removal 51project
protect 11, 23, 29, 43secure files 15source protect files 30
protectproject 11, 23, 29, 43
Rremove
password 51resource
editor 28routine
source protection 30RSLogix 5000
enable security 12secure project file 15
RSSecurityserver 10
Ssecure
RSLogix 5000 project 15security
controller resource 19FactoryTalk 9import server database 23technical support 12
serverRSSecurity 10
sk.datfile 38
source keydelete file 41
source protectiondisable routine 42install 29
Rockwell Automation Publication 1756-PM016D-EN-P - September 2010 53

Index
Notes:
54 Rockwell Automation Publication 1756-PM016D-EN-P - September 2010


Rockwell Otomasyon Ticaret A.Ş., Kar Plaza İş Merkezi E Blok Kat:6 34752 İçerenköy, İstanbul, Tel: +90 (216) 5698400
Publication 1756-PM016D-EN-P - September 201056Supersedes Publication 1756-PM016C-EN-P - October 2009 Copyright © 2010 Rockwell Automation, Inc. All rights reserved. Printed in the U.S.A.
Rockwell Automation Support
Rockwell Automation provides technical information on the Web to assist you in using its products. At http://www.rockwellautomation.com/support/, you can find technical manuals, a knowledge base of FAQs, technical and application notes, sample code and links to software service packs, and a MySupport feature that you can customize to make thebest use of these tools.
For an additional level of technical phone support for installation, configuration, and troubleshooting, we offer TechConnect support programs. For more information, contact your local distributor or Rockwell Automation representative, or visit http://www.rockwellautomation.com/support/.
Installation Assistance
If you experience a problem within the first 24 hours of installation, review the information that is contained in this manual.You can contact Customer Support for initial help in getting your product up and running.
New Product Satisfaction Return
Rockwell Automation tests all of its products to ensure that they are fully operational when shipped from the manufacturing facility. However, if your product is not functioning and needs to be returned, follow these procedures.
Documentation Feedback
Your comments will help us serve your documentation needs better. If you have any suggestions on how to improve this document, complete this form, publication RA-DU002, available at http://www.rockwellautomation.com/literature/.
United States or Canada 1.440.646.3434
Outside United States or Canada
Use the Worldwide Locator at http://www.rockwellautomation.com/support/americas/phone_en.html, or contact your local Rockwell Automation representative.
United States Contact your distributor. You must provide a Customer Support case number (call the phone number above to obtain one) to your distributor to complete the return process.
Outside United States Please contact your local Rockwell Automation representative for the return procedure.