lorawan gateway - compact edition - 1-gate, lora gateways-+1-gate+-+gateway+lorawan... · lorawan...
TRANSCRIPT

LoRaWAN Gateway - Compact EditionUser guide
LoRaWAN Gateway / Compact Edition
Optional Embedded LoRaWAN Server
User guide
1GATE SAS V1.0 - 18/10/17 1/43
Micro-SD8GB
UKPlug
EuropePlug
Power Supply5V / 2,5A
LoRaAntenna
GNSSAntenna
EthernetCable
LoRaWANGateway

LoRaWAN Gateway - Compact EditionUser guide
Table of contents1 / History :...........................................................................................................................................3
2 / Introduction :..............................................................................................................................43 / Compact Gateway Features :...........................................................................................................54 / Overview of the Gateway :..............................................................................................................8
4.1 / Hardware :...............................................................................................................................84.2 / Software :...............................................................................................................................10
5 / Starting the gateway :....................................................................................................................115.1 / Check the contents of the kit : ..............................................................................................115.2 / Pre-installation requirements :..............................................................................................115.3 / Preparing the gateway :..........................................................................................................115.4 / Power On :.............................................................................................................................115.5 / Connect to the gateway: ........................................................................................................11
5.5.1 / Connect in local mode :.................................................................................................125.5.2 / Connect in network mode :............................................................................................13
6 / Enable WiFi :.................................................................................................................................177 / Enable Bluetooth :.........................................................................................................................188 / LoRaWAN gateway administration :............................................................................................199 / LoRaWAN Compact Server for private networks :.......................................................................2110 / LoRaWAN Server Administration :............................................................................................22
10.1 / Web Admin :........................................................................................................................2210.2 / REST API :..........................................................................................................................2210.3 / Infrastructure Administration :............................................................................................26
10.3.1 / Gateways :....................................................................................................................2610.3.2 /Multicast Channels :.....................................................................................................2810.3.3 / Ignored Nodes :............................................................................................................2910.3.4 / Events :.........................................................................................................................30
10.4 / Device Administration :.......................................................................................................3110.4.1 / General :.......................................................................................................................3110.4.2 / ADR :...........................................................................................................................32
10.5 / Node Administration :..........................................................................................................3310.5.1 / General :.......................................................................................................................3310.5.2 / ADR :...........................................................................................................................3410.5.3 / Status :..........................................................................................................................34
10.6 / Backend Administration :....................................................................................................3510.6.1 / Handlers :.....................................................................................................................3510.6.2 / Parse Uplink :...............................................................................................................3610.6.3 / Build Downlink :..........................................................................................................3610.6.4 / Connectors :.................................................................................................................37
11 / Software Update :........................................................................................................................39
1GATE SAS V1.0 - 18/10/17 2/43

LoRaWAN Gateway - Compact EditionUser guide
1 / History :
Date Note(s) Author Version
27/07/2017 Stéphane David Draft
18/10/2017 More about LoRa concentratorApple Bonjour ServiceWiFi Settings (Client / Access Point)
Stéphane David V1.0
1GATE SAS V1.0 - 18/10/17 3/43
LoRaWAN Gateway - Compact EditionUser guide
2 / Introduction :
LoRaWan (Long Range Wide Area Network) is an LPWAN network based on LoRa radiotechnology.
Developed by Cycleo in 2009 and acquired 3 years later by the American Semtech - LoRa uses aspread spectrum technique for the transmission of radio signals.
LoRa technology across the LoRaWan network is driven by a consortium of industrialists andoperators called LoRa Alliance.
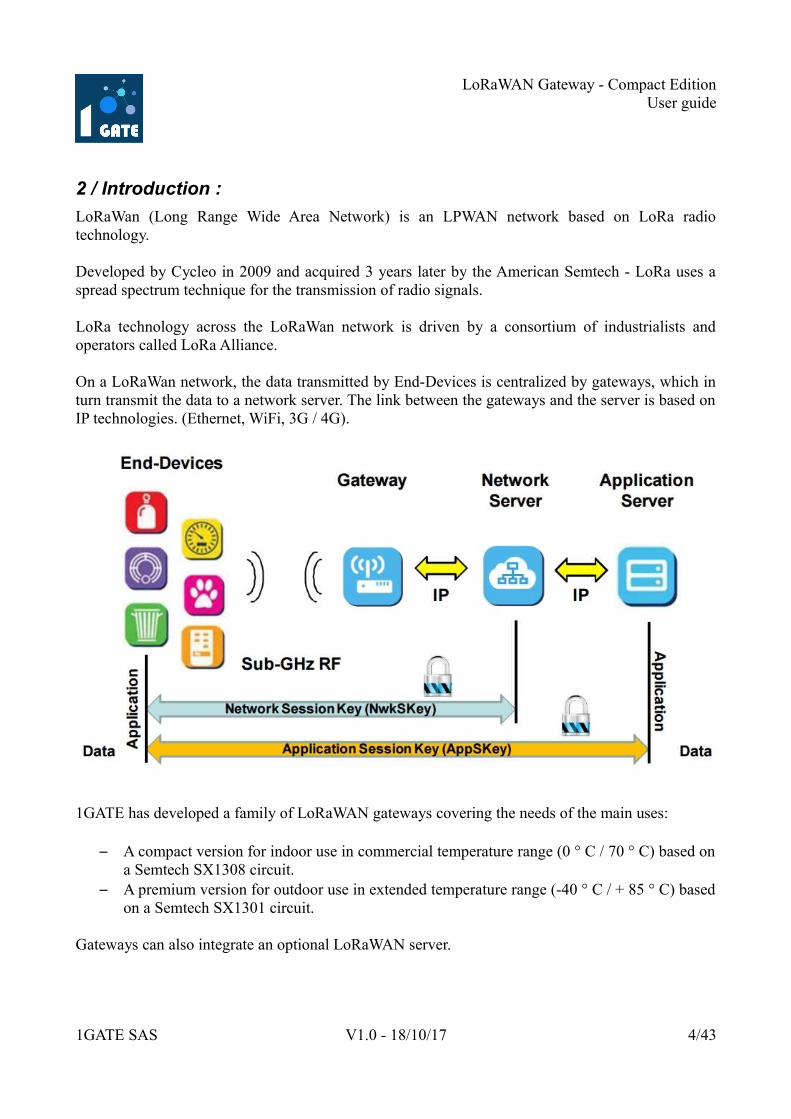
On a LoRaWan network, the data transmitted by End-Devices is centralized by gateways, which inturn transmit the data to a network server. The link between the gateways and the server is based onIP technologies. (Ethernet, WiFi, 3G / 4G).
1GATE has developed a family of LoRaWAN gateways covering the needs of the main uses:
– A compact version for indoor use in commercial temperature range (0 ° C / 70 ° C) based ona Semtech SX1308 circuit.
– A premium version for outdoor use in extended temperature range (-40 ° C / + 85 ° C) basedon a Semtech SX1301 circuit.
Gateways can also integrate an optional LoRaWAN server.
1GATE SAS V1.0 - 18/10/17 4/43
LoRaWAN Gateway - Compact EditionUser guide
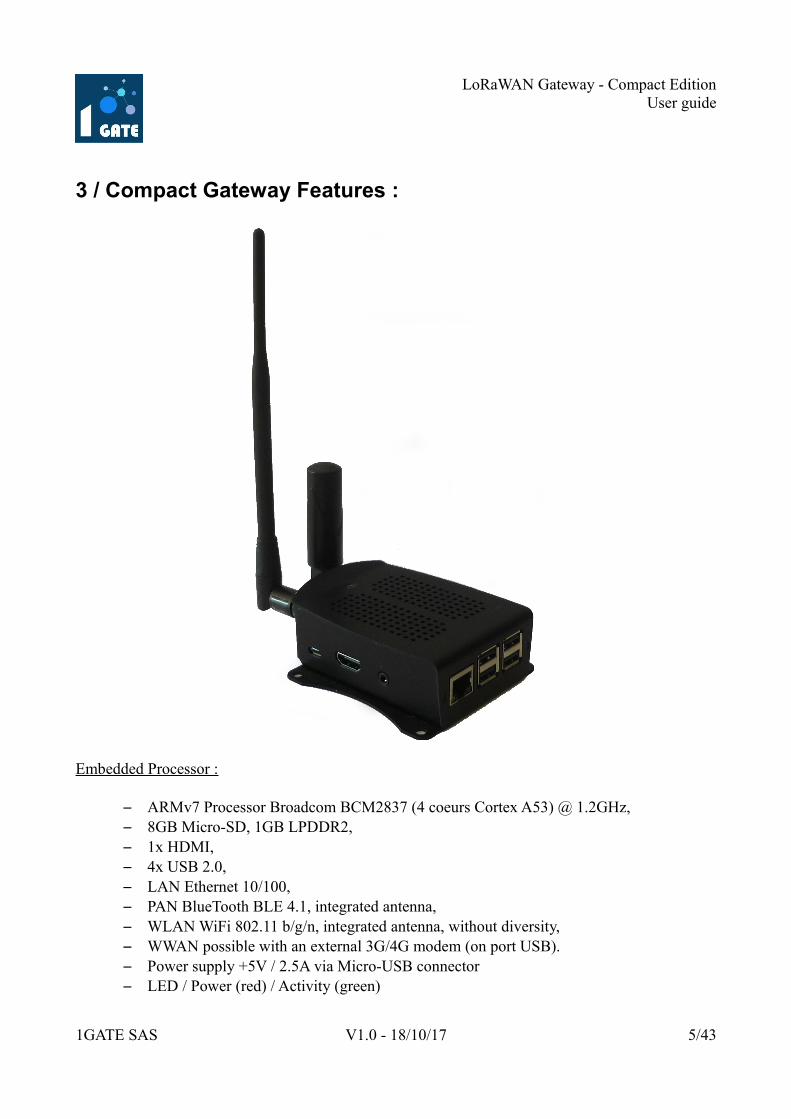
3 / Compact Gateway Features :
Embedded Processor :
– ARMv7 Processor Broadcom BCM2837 (4 coeurs Cortex A53) @ 1.2GHz,– 8GB Micro-SD, 1GB LPDDR2,– 1x HDMI,– 4x USB 2.0,– LAN Ethernet 10/100,– PAN BlueTooth BLE 4.1, integrated antenna,– WLAN WiFi 802.11 b/g/n, integrated antenna, without diversity,– WWAN possible with an external 3G/4G modem (on port USB).– Power supply +5V / 2.5A via Micro-USB connector– LED / Power (red) / Activity (green)
1GATE SAS V1.0 - 18/10/17 5/43

LoRaWAN Gateway - Compact EditionUser guide
Radio :
– Physical Layer : LoRa,– MAC Layer : LoRaWAN,– Base Band Processor : Semtech SX1301 (industrial) or SX1308 (consumer),– Transceiver : Semtech SX1257,– Frequency Range : 863 to 870MHz,– Power Transmission : max 14dBm,– Sensivity Rx : -137dBm,– LoRa Antenna : external, SMA connector (2dBi),– GNSS Antenna : external, SMA connector (option), – Power supply provided by the ECU,– LED Power (Blue) & Radio activity RBNE (Green), RXSP (Red), BKPT (Yellow),
RXFP (Red), TXPKT (Green).
Software :
– Operating System– Debian Linux Jessie 8.0,– DHCP Client, OpenSSH, Webmin,– OpenVPN, Iptables, Fail2ban, Monit, logwatch,– Node.js, Node.RED,– Mosquitto, Mosquitto Clients,
– LoRaWAN– Driver/HAL Semtech (https://github.com/Lora-net/lora_gateway)– Packet Forwarder Semtech (https://github.com/Lora-net/packet_forwarder)– Packet Forwarder Loriot (https://www.loriot.io/)– Packet Forwarder The Things Network (https://www.thethingsnetwork.org/)– LoRaWAN Server Petr Gotthard (https://github.com/gotthardp/lorawan-server)
Mechanical :
– Enclosure : Aluminium Black anodized with aeration vents on top and bottom ,– Dimension : 98 x 84 x 36 mm (without antennas),– Weight : 152grs,– Mounting : table top or wall mount (4 fixing holes VESA 75 x 75),– Connectors : USB, Ethernet, HDMI, Micro-USB (Power Supply), SMA (LoRa), SMA
(GNSS).
Environment :
– Operating temperature : 0°C / +70°C,
1GATE SAS V1.0 - 18/10/17 6/43

LoRaWAN Gateway - Compact EditionUser guide
– Storage temperature : -40°C / -85°C,– Humidity : 5% à 95% without condensation,– Ingress protection rating : IP30,– Flammability rating : UL94 V-0.
Certification :
– CE / RED.
1GATE SAS V1.0 - 18/10/17 7/43

LoRaWAN Gateway - Compact EditionUser guide
4 / Overview of the Gateway :
4.1 / Hardware :
The gateway is built around 2 main boards :
– the embedded computer,
1GATE SAS V1.0 - 18/10/17 8/43
ETHERNET 10/100
HMDI Micro USB
Broadcom BCM2837
SMSC LAN 9514
GPIO Header (ID, I2C, SPI, UART...)
RUN
Audio Video
DUAL USB
HOST
DUAL USB
HOST
Camera Connector
Quad Core Cortex A53 @ 1.2GHz
RAM 1GB LPDDR2
Chip Antenna WiFi / BT
Power LED
Status LED
Micro-SD Connector
(Bottomside)
Display Connector
Power In +5V 2.5A
SDIO UART
USB
PWM
CSI DSI
SDIO
HDMI
LoRaWAN Gateway - Compact EditionUser guide
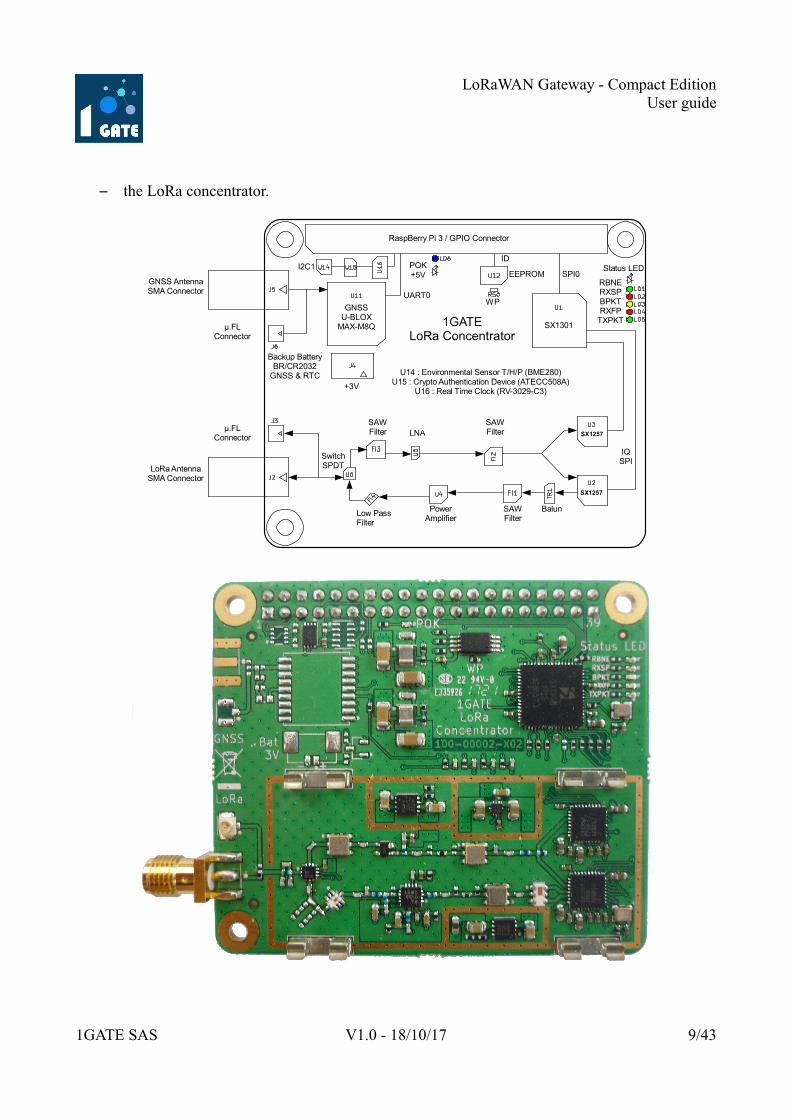
– the LoRa concentrator.
1GATE SAS V1.0 - 18/10/17 9/43
Switch SPDT
Low Pass Filter
SAW Filter
SX1257
SX1257
Balun SAW Filter
Power Amplifier
LNA
LoRa Antenna SMA Connector
µ.FL Connector
µ.FL Connector
GNSS Antenna SMA Connector
SX1301
GNSS U-BLOX
MAX-M8Q
EEPROM I2C1
RaspBerry Pi 3 / GPIO Connector
UART0
SPI0
SAW Filter
POK +5V
Backup Battery BR/CR2032
GNSS & RTC
Status LED
RBNE RXSP BPKT RXFP
TXPKT
ID
IQ SPI
WP
U14 : Environmental Sensor T/H/P (BME280) U15 : Crypto Authentication Device (ATECC508A)
U16 : Real Time Clock (RV-3029-C3) +3V
1GATE LoRa Concentrator
LoRaWAN Gateway - Compact EditionUser guide
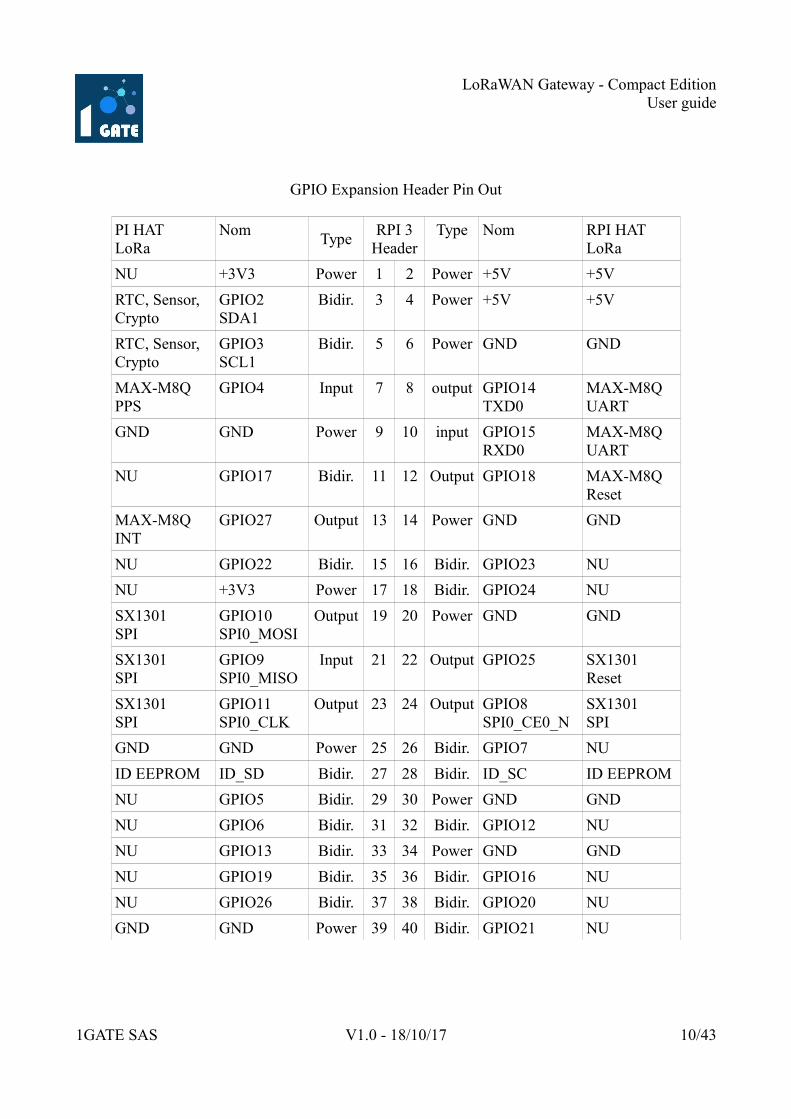
GPIO Expansion Header Pin Out
PI HATLoRa
NomType
RPI 3Header
Type Nom RPI HATLoRa
NU +3V3 Power 1 2 Power +5V +5V
RTC, Sensor,Crypto
GPIO2SDA1
Bidir. 3 4 Power +5V +5V
RTC, Sensor,Crypto
GPIO3SCL1
Bidir. 5 6 Power GND GND
MAX-M8QPPS
GPIO4 Input 7 8 output GPIO14TXD0
MAX-M8QUART
GND GND Power 9 10 input GPIO15RXD0
MAX-M8QUART
NU GPIO17 Bidir. 11 12 Output GPIO18 MAX-M8QReset
MAX-M8QINT
GPIO27 Output 13 14 Power GND GND
NU GPIO22 Bidir. 15 16 Bidir. GPIO23 NU
NU +3V3 Power 17 18 Bidir. GPIO24 NU
SX1301SPI
GPIO10SPI0_MOSI
Output 19 20 Power GND GND
SX1301SPI
GPIO9SPI0_MISO
Input 21 22 Output GPIO25 SX1301Reset
SX1301SPI
GPIO11SPI0_CLK
Output 23 24 Output GPIO8SPI0_CE0_N
SX1301SPI
GND GND Power 25 26 Bidir. GPIO7 NU
ID EEPROM ID_SD Bidir. 27 28 Bidir. ID_SC ID EEPROM
NU GPIO5 Bidir. 29 30 Power GND GND
NU GPIO6 Bidir. 31 32 Bidir. GPIO12 NU
NU GPIO13 Bidir. 33 34 Power GND GND
NU GPIO19 Bidir. 35 36 Bidir. GPIO16 NU
NU GPIO26 Bidir. 37 38 Bidir. GPIO20 NU
GND GND Power 39 40 Bidir. GPIO21 NU
1GATE SAS V1.0 - 18/10/17 10/43

LoRaWAN Gateway - Compact EditionUser guide
The LoRa SX1301 (or SX1308) concentrator is connected to the main computer by a SPI port (spidev0.0).The calculator controls the reset signal of the SX1301 via the GPIO25.
The MAX-M8Q GNSS is connected to the main processor via a UART port (ttyS0).The computer controls the reset signal of the MAX-M8Q via the GPIO18.
Devices on port I2C1 (i2c-1) :– a temperature, pressure and humidity sensor Bosch BM280 (option) (address 0x77),– a RTC Micro Crystal RV-3029-C3 (optional) (address 0xAC, 0xAD),– an Atmel ATECC508A cryptoprocessor (address 0xC8).
Devices on port I2C0 :– an EEPROM ID.
The board also has 5 status lights and a power LED (blue LED) :
– RBNE / Rx Buffer Not Empty (green LED),– RXSP / Rx Sensor Packet (red LED),– BKPT / Backhaul Packet (yellow LED),– RXFP / Rx FSK Packet (red LED),– Tx Packet (green LED).
The two boards are then assembled in an aluminum box to form the basic gateway.
1GATE SAS V1.0 - 18/10/17 11/43
ETHERNET USB USB
GNSS LORA
Micro-SD
ACT
PWR WiFi / BT

LoRaWAN Gateway - Compact EditionUser guide
4.2 / Software :
Our gateways come with an 8GB Micro-SD pre-installed with a full Debian distribution(development tools, network configuration tools...), the LoRAWAN gateway software andoptionally a LoRaWAN network server.
You do not have to install any software. You just have to configure the gateway part, ie choose andlaunch the packet-forwarder at startup (Semtech, Loriot, The Things Network ...).If you have chosen a gateway with the integrated LoRaWAN server, there is nothing to installeither. The Semtech packet-forwarder and Petr Gotthard's LoRaWAN server launch automaticallywhen the gateway is started.
1GATE SAS V1.0 - 18/10/17 12/43
HDMI AUDIO POWER
5V / 2.5A

LoRaWAN Gateway - Compact EditionUser guide
5 / Starting the gateway :
5.1 / Check the contents of the kit :
– a LoRaWAN Gateway, compact edition,– a pre-installed Micro-SD,– a power supply 5V / 2.5A,– a LoRa antenna,– a GNSS antenna (option),– an ethernet cable.
5.2 / Pre-installation requirements :
– The gateway must be able to access the Internet via a modem / router ADSL, 4G or other,– The router's firewall must not block traffic,– There must be on your local network a DHCP server, a local DNS, – The management PC and the gateway must be on the same network,
5.3 / Preparing the gateway :
– Insert the Micro-SD into the reader,– mount the LoRa antenna,– mount the GNSS antenna (option),– Connect the gateway to the local Ethernet network with the supplied cable.
!!! Never turn on the gateway without first mounting the antennas !!!
5.4 / Power On :
– Plug the power cable, – The operating system (Linux) starts after a few seconds.
5.5 / Connect to the gateway:
– local mode (with keyboard, mouse and HDMI display)– network mode (via Ethernet or WiFi)
The first connection must be made in local mode or in Ethernet mode in order to be able to configure the wifi link (SSID, Key) before it can be used.
1GATE SAS V1.0 - 18/10/17 13/43

LoRaWAN Gateway - Compact EditionUser guide
5.5.1 / Connect in local mode :
In local mode, you are directly connected to the LoRaWAN gateway. As soon as the calculator hasstarted you can open a working session with the following identifiers:
login : ogatepassword : ogate
or
login : rootpassword : gaKE8raMuker8hAY
You can now configure and manage the LoRaWAN gateway in command mode.
1GATE SAS V1.0 - 18/10/17 14/43
Internet
Ethernet Switch
LoRaWAN Network Server
Modem / Router DHCP server DNS Local
Keyboard / Mouse USB
HDMI Display
GNSS (option)
* Embedded LoraWAN Server (option)
Gateway*

LoRaWAN Gateway - Compact EditionUser guide
5.5.2 / Connect in network mode :
In network mode, you can log on to the gateway from a remote workstation (Linux, Windows).
The hostname of the gateway is unique: 1gate-address_mac
example : 1gate-b827eb569c16
The MAC address is visible on one of the labels on the LoRaWAN gateway.
Establishing an SSH connection with the local address
ssh ogate@1gate-addresse_mac.local
If your working station is a PC/Windows, you need to install Apple Bonjour Service to be able to use local address. Nothing to do on Linux or Mac OS X.
1GATE SAS V1.0 - 18/10/17 15/43
Internet
Ethernet Switch
LoRaWAN Network server
Modem / Router DHCP server DNS Local
GNSS (option)
* Embedded LoraWAN Server (option)
Working Station (Linux, Windows...)
Gateway*

LoRaWAN Gateway - Compact EditionUser guide
https://support.apple.com/kb/DL999?viewlocale=en_US&locale=fr_FR
If the local DNS of your modem / router does not work, then you will need to connect to the gateway using its IP address.
There are several ways to find the IP address of the gateway:
– On your modem / router (Connect to see addresses allocated by the DHCP server),
– Using an "IP scanner" from your workstation,(Angry IP Scanner on Windows or Linux, nmap on Linux...),
– Using an "IP scanner" application on your mobile phone (IOS or Android).
Once you have found the IP address of the gateway, you will be able to establish an SSH connection.
ssh ogate@gateway_ip_address
example: ssh [email protected]
With the SSH connection established, you can log on to the gateway with the following credentials:
login : ogatepassword : ogate
or
login : rootpassword : gaKE8raMuker8hAY
You can now configure and manage the LoRaWAN gateway in command mode.
Note: The LoRaWAN gateway does not have a GUI (Linux in console mode only) so no webbrowser on the machine. To configure the gateway via webmin (see below) or to administer theLoRaWAN network server, you must establish a connection via the web browser of your remotestation.
1GATE SAS V1.0 - 18/10/17 16/43

LoRaWAN Gateway - Compact EditionUser guide
You also have the option of managing the gateway from a web browser. The gateway is deliveredwith the pre-installed webmin application.
Webmin is a tool that allows to simply manage a Linux server remotely via a simple web browser.
Webmin is very useful for system and network administrators, almost everything can be configuredwith Webmin.
From the remote workstation, simply launch a web browser with the IP address of the gateway onport 10000.
https://gateway_ip_address:10000
example : https:192.168.0.31:10000
It is possible (and even probable) that your browser refuses to connect to Webmin because thecertificate (SSL) is not recognized. Just ignore this message.
You can log on to the gateway with the following credentials:
login : ogatepassword : ogate
1GATE SAS V1.0 - 18/10/17 17/43

LoRaWAN Gateway - Compact EditionUser guide
Logging in "root" mode is not possible (for security reasons).You can now configure and manage the gateway in graphical mode.
We recommend that you do not start Webmin automatically when the gateway is started (forsecurity reasons). Instead, we suggest that you connect via SSH and start the webmin servicemanually.
sudo systemctl start webmin
Une fois que vous avez terminé de gérer la passerelle, penser à arrêter le service webmin.
sudo systemctl stop webmin
Pour voir l'état du service webmin :
sudo systemctl status webmin
Pour autoriser le lancement du service webmin au démarrage de la passerelle :
sudo systemctl enable webmin
Pour interdire le lancement du service webmin au démarrage de la passerelle :
sudo systemctl disable webmin
1GATE SAS V1.0 - 18/10/17 18/43

LoRaWAN Gateway - Compact EditionUser guide
6 / Enable WiFi :1GATE uses connman to manage network connections.
sudo connmanctl
Enable WiFi
connmanctl > enable wifi
Setup as WiFi Client :
connmanctl > scan wifi
connmanctl > services
connmanctl > agent on
connmanctl > connect <service name>
example : connect wifi_0013ef20018a_4d6f7468_managed_psk
connmanctl > exit
Setup as WiFi Access Point :
connmanctl > tether wifi on <ssid> <passphrase>
example : tether wifi on 1GATE-03C943 FB569C16
To exit the access point mode and return to client mode
connmanctl > tether wifi off
To return to access point mode
connmanctl > tether wifi on
connmanctl > exit
The configuration files are in /var/lib/connman.
To modify the network usage order or use a single network, you need to edit the /etc/connman/main.conf file.
1GATE SAS V1.0 - 18/10/17 19/43
LoRaWAN Gateway - Compact EditionUser guide
Sudo nano /etc/connman/main.conf
[General] AllowHostnameUpdates=falseSingleConnectedTechnology=falsePreferredTechnologies = ethernet, wifi, cellularPersistentTetheringMode=true
1GATE SAS V1.0 - 18/10/17 20/43

LoRaWAN Gateway - Compact EditionUser guide
7 / Enable Bluetooth :1GATE uses connman to manage network connections.
To add or change network interfaces:
Sudo connmanctl
Connmanctl> enable bluetootth
Connmanctl> exit
Now you need to run the command:
bluetoothctl
[Bluetooth] # scan on
[Bluetooth] # agent on
[Bluetooth] # pair followed by device id
[Bluetooth] # trust followed by device id
[Bluetooth] # exit
1GATE SAS V1.0 - 18/10/17 21/43

LoRaWAN Gateway - Compact EditionUser guide
8 / LoRaWAN gateway administration :
!!! Warning there should be only one "packet forwarder" active at a time !!!
The "Driver" and "HAL" of the radio card (SX1301 / SX1308, SX1255 / SX1257) are installed inthe / opt / semtech / lora_gateway directory.
There is in this directory the "libloragw" library, test tools and utilities.
The packet forwarder of Semtech, Loriot and The Things Network are installed on the gateway.
By default, the gateway starts Semtech's packet forwarder.
Semtech's "packet forwarder" is installed in the / opt / semtech / packet_forwarder directory
The configuration files (local_conf.json and global_conf.json) as well as the startup scripts areinstalled in the / opt / semtech / bin directory.
The Loriot packet forwarder is installed in the / opt / loriot directory
The Things Network packet forwarder is installed in the / opt / ttn directory
The systemctl tool is used to configure the services that are launched at the gateway startup
To configure a service to run automatically at system startup, use the command:
Sudo systemctl enable service_name.service
Example: sudo systemctl enable semtech
Packet forwarders: semtech, loriot, ttn
To start, stop, restart, or know the status of a service in the current session:
Sudo systemctl start | stop | restart | status service_name.service
Example: sudo systemctl start semtech
To change packet forwarder:
Sudo systemctl stop semtech
Sudo systemctl disable semtech
1GATE SAS V1.0 - 18/10/17 22/43

LoRaWAN Gateway - Compact EditionUser guide
Sudo systemctl start loriot (or ttn)
Sudo systemctl enable loriot (or ttn)
!!! Warning there should be only one "packet forwarder" active at a time !!!
1GATE SAS V1.0 - 18/10/17 23/43

LoRaWAN Gateway - Compact EditionUser guide
9 / LoRaWAN Compact Server for private networks :Open-source LoRaWAN Server that integrates both the network-server and the application-server.This is useful for application providers that operate their own LoRa network, or for device andapplication developers.
The server:
• Implements the LoRaWAN Specification v1.0.1 • Communicates with (any number of) remote LoRaWAN gateways.• Performs all required encryption and integrity checks.
• Supports relaxed frame-counter check for simple ABP devices. • Invokes internal modules with application logic.• Invokes external applications. It currently supports connections via:
• WebSocket protocol RFC6455 • MQTT v3.1/v3.1.1, including applications hosted in Amazon AWS IoT, IBM Watson
IoT Platform, Microsoft Azure IoT Hub• HTTP(S)
• Handles (any number of) Class A or Class C devices. • Supports both the node activation by personalization (ABP) and the over-the-air
activation (OTAA). • Supports both unconfirmed and confirmed data uplink and downlink. • Supports multicast to user-defined groups. • Supports EU 863-870, US 902-928, CN 779-787, EU 433, AU 915-928, CN 470-510
and KR 920-923 band. • Provides a network management interface.
• Displays device battery and connectivity status. • Supports both manual and automatic configuration of TX power and data rate
(ADR).• Does not crash as it's implemented in Erlang, which is designed for building fault-tolerant
systems. • Is free, distributed under the MIT license.
The server aims to be an all-in-one software package for small private LoRa networks. However:
• You still need to buy your LoRaWAN Gateway. • You will need to deploy and maintain it yourself. (With our support.) • It will probably never support the sophisticated management features of the commercial-
grade network-servers.
The maximum amount of gateways, devices and nodes the server can support depends on the serverload and hardware performance. There are no hard limits.
1GATE SAS V1.0 - 18/10/17 24/43

LoRaWAN Gateway - Compact EditionUser guide
10 / LoRaWAN Server Administration :
You can administrate and manage the server via a set of web-pages or via a REST API. By default,the server listens on HTTP port 8080 and expects "admin" as both username and password. You canaccess it via a web browser by entering the URL http://server:8080, where server is the IP or thehostname of your server.
The port and default credentials (which are set when the server database is created) can be changedin the sys.config. The credentials can be then altered via the admin interface.
sys.config path : /usr/lib/lorawan-server/releases/<version>/sys.config
example : /usr/lib/lorawan-server/releases/0.4.10/sys.config
sudo nano /usr/lib/lorawan-server/releases/0.4.10/sys.config
10.1 / Web Admin :
The management web-pages are available under /admin. It is a wrapper around the REST API described below.
The server Dashboard shows:
• List of Gateways, Devices and Nodes. • Seven most recent Events and seven most recent frames received.
The following configuration pages are available:
• Users contain a list of user identities that can manage the server. All have the same access rights.
• Infrastructure covers configuration of LoRa Gateways, Multicast Channels and the list of Ignored Nodes.
• Devices contain a list of devices that are allowed to join using the over-the-air-activation (OTAA).
• Nodes contain a list of active network nodes, both activated by personalization (ABP) as well as those that joined as OTAA.
• Backends at remote servers that shall receive the application data.
You (at least) have to:
• Add LoRaWAN gateways you want to use to the Gateways list. • Configure each device you want to use:
• To add a device activated by personalization (ABP), create a new Nodes list entry. • To add an OTAA device, create a new Devices list entry and start the device. The
Nodes list will be updated automatically once the device joins the network.
10.2 / REST API :
1GATE SAS V1.0 - 18/10/17 25/43

LoRaWAN Gateway - Compact EditionUser guide
The following REST resources are made available:
Resource Methods Explanation
/applications GET Supported LoRaWAN applications
/users GET, POST Users of the admin interface
/users/ABC GET, PUT, DELETE User ABC
/gateways GET, POST LoRaWAN gateways
/gateways/123 GET, PUT, DELETE Gateway with MAC=123
/multicast_channels GET, POST Class C multicast channels
/multicast_channels/123 GET, PUT, DELETE Multicast channel with DevAddr=123
/ignored_nodes GET, POST Nodes ignored by the server
/ignored_nodes/123 GET, PUT, DELETE Ignored node with DevAddr=123
/devices GET, POST Devices registered for over-the-air activation (OTAA)
/devices/123 GET, PUT, DELETE Device with DevEUI=123
/nodes GET, POST Active network nodes, both ABP and activated OTAA
/nodes/123 GET, PUT, DELETE Active network node with DevAddr=123
/txframes GET Frames scheduled for transmission
/txframes/123 GET, DELETE Frame with ID=123
/rxframes GET Recent received frames
/handlers GET Backend handlers
/handlers/ABC GET, DELETE Backend handler for the Group ABC
/connectors GET Backend connectors
/connectors/ABC GET, DELETE Backend connector ABC
/events GET Recent errors and warnings
There is a 1:1 mapping between the REST API and the Web Admin. Parameters that are in the Web Admin indicated as optional doesn't need to be provided in the REST API either.
As a rule, POST should be used to create new entries and PUT should be used to update existing
1GATE SAS V1.0 - 18/10/17 26/43

LoRaWAN Gateway - Compact EditionUser guide
entries.
For example:
Get a list of all users by:
GET /users HTTP/1.1
HTTP/1.1 200 OKContent-Type: application/json[{"name":"admin","pass":"admin"},{"name":"backup","pass":"backup"}]
Create or update a set of users by:
POST /users HTTP/1.1Content-Type: application/json[{"name":"admin","pass":"admin"},{"name":"backup","pass":"backup"}]
HTTP/1.1 204 No Content
Get one user by:
GET /users/backup HTTP/1.1
HTTP/1.1 200 OKContent-Type: application/json{"name":"backup","pass":"backup"}
Update one user by:
PUT /users/backup HTTP/1.1Content-Type: application/json{"name":"backup","pass":"backup"}
HTTP/1.1 204 No Content
Delete one user by:
DELETE /users/backup HTTP/1.1
HTTP/1.1 204 No Content
Filtering
To list only some items the REST API accepts the _filters query parameter, which shall contain URL encoded JSON. For instance:
1GATE SAS V1.0 - 18/10/17 27/43

LoRaWAN Gateway - Compact EditionUser guide
http://server:8080/rxframes?_filters={"devaddr":"22222222"}
Sorting
The REST API accepts _sortField and _sortDir query parameters to sort the list. The _sortDir can beeither ASC or DESC. For instance:
http://server:8080/rxframes?_sortField=datetime&_sortDir=ASC
Pagination
The REST API accepts _page and _perPage query parameters to paginate lists, for instance:
http://server:8080/rxframes?_page=2&_perPage=20
The server also inserts the HTTP header X-Total-Count indicating the total item count.
Proxy Configuration
When the lorawan-server is installed behind a HTTP proxy you may need to adjust the proxy configuration as follows.
Apache HTTP
<VirtualHost *:80> ProxyPass /ws ws://localhost:8080/ws ProxyPass / http://localhost:8080/ ProxyPassReverse / http://localhost:8080/ ProxyPreserveHost On ServerName lorawan.example.com</VirtualHost>
Backup and Restore
Use the dbexport script to backup your list of users, gateways, devices and nodes. This will create several db*.json files. Use the dbimport script to write these files back to the server database.
The database is stored in the Mnesia.lorawan@localhost directory. To upgrade the database structure or recover from database errors you should do dbexport, then shutdown the server, update the server binaries, delete the Mnesia directory, start the server and do dbimport.
1GATE SAS V1.0 - 18/10/17 28/43

LoRaWAN Gateway - Compact EditionUser guide
10.3 / Infrastructure Administration :
10.3.1 / Gateways :
For each LoRaWAN gateway you can set and view:
• MAC address of the gateway • NetID of the network. Private networks should use 000000 or 000001. • SubID in the format HexValue:Length specifies the (optional) fixed bits in the DevAddr (see
below). • TX Chain identifies the gateway "radio chain" used for downlinks (usually 0). It shall
correspond to a radio_x (e.g. radio_0) with tx_enable: true in gateway'sglobal_conf.json.
• TX Power (dBm) defines transmission power for downlinks • Antenna Gain (dBi) can be set to ensure the TX Power + Antenna Gain is below the maximal
allowed Equivalent Isotropic Radiated Power (EIRP) for the given region. • Description for your convenience. • Location and Altitude of the gateway
1GATE SAS V1.0 - 18/10/17 29/43

LoRaWAN Gateway - Compact EditionUser guide
For the status:
• Last RX contains a timestamp of the last received packet. A gateway is considered dead if itdidn't sent anything for more than 60 seconds.
• Delays graph shows network (LAN) delay between the gateway and the server measuredduring the PULL_RESP sequence. Note this requires packet_forwarder v3.0 or higher.
The NetID and SubID are used to create DevAddr of OTAA devices. Each DevAddr is composed of7 LSB of NetID, followed by X SubID bits, followed by 25-X random bits. This allows operator todefine separate private sub-networks using the same NetID.
The gateway power is always a minimum of TX Power and (max EIRP - Antenna Gain).
To clone an existing gateway, simply save it under a different MAC.
1GATE SAS V1.0 - 18/10/17 30/43
LoRaWAN Gateway - Compact EditionUser guide
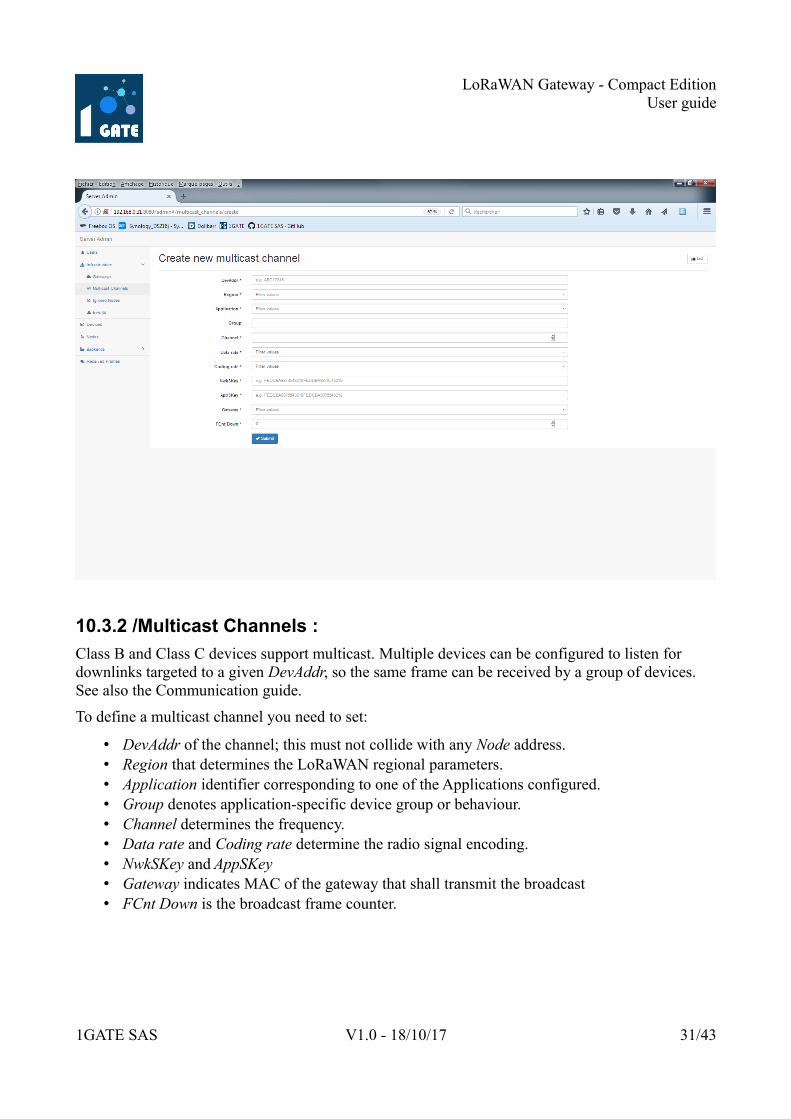
10.3.2 /Multicast Channels :
Class B and Class C devices support multicast. Multiple devices can be configured to listen for downlinks targeted to a given DevAddr, so the same frame can be received by a group of devices. See also the Communication guide.
To define a multicast channel you need to set:
• DevAddr of the channel; this must not collide with any Node address. • Region that determines the LoRaWAN regional parameters. • Application identifier corresponding to one of the Applications configured. • Group denotes application-specific device group or behaviour. • Channel determines the frequency. • Data rate and Coding rate determine the radio signal encoding. • NwkSKey and AppSKey • Gateway indicates MAC of the gateway that shall transmit the broadcast • FCnt Down is the broadcast frame counter.
1GATE SAS V1.0 - 18/10/17 31/43

LoRaWAN Gateway - Compact EditionUser guide
10.3.3 / Ignored Nodes :
If two networks operate in the same area the server will receive frames from devices using the othernetwork. Each time such device sends a frame, the unknown_devaddr error will be displayed.
To suppress warnings from a specific device, enter its DevAddr and FFFFFFFF as the Mask.
To suppress warnings from all devices in a given network, enter a DevAddr of one device and FE000000 as the Mask. The 7 upper bits (MSB) match in the address match the 7 lower bits (LSB)in the network identifier.
1GATE SAS V1.0 - 18/10/17 32/43

LoRaWAN Gateway - Compact EditionUser guide
10.3.4 / Events :
This list includes an overview of errors and warnings that have occurred during the last 24 hours. See Event List guide for more details.
1GATE SAS V1.0 - 18/10/17 33/43

LoRaWAN Gateway - Compact EditionUser guide
10.4 / Device Administration :
This list contains devices that can join the LoRaWAN network using the over-the-air activation (OTAA). The active network nodes that either have already joined or have been activated-by-personalization (ABP) are listed on the Nodes page.
10.4.1 / General :
For each device, which may connect to your network, you can set:
• DevEUI of the device • Region that determines the LoRaWAN regional parameters • Application identifier corresponding to one of the Applications configured. • Group denotes application-specific device group or behaviour. • Arguments, which is an opaque string with application-specific settings. • AppEUI and AppKey • FCnt Check to be used for this device
• Strict 16-bit (default) or Strict 32-bit indicate a standard compliant counter. • Reset on zero behaves like a "less strict 16-bit", which allows personalised (ABP)
devices to reset the counter. This weakens device security a bit as more reply attacks
1GATE SAS V1.0 - 18/10/17 34/43
LoRaWAN Gateway - Compact EditionUser guide
are possible. • Disabled disables the check for faulty devices. This destroys the device security.
• TX Window to be used for downlinks to this device: • Auto to choose the earliest feasible option, either RX1 or RX2 • RX1 to always use RX1 • RX2 to always use RX2
• Can Join? flag that allows you to prevent the device from joining. • Last Join is a timestamp of the last successful Join request.
To clone an existing device, simply save it under a different DevEUI.
Once the device joins the network, the Node field will contain a reference to the Nodes list.
10.4.2 / ADR :
Optionally, you can also define a set of ADR parameters. Once the device joins the network, the server will attempt to configure the device accordingly.
1GATE SAS V1.0 - 18/10/17 35/43
LoRaWAN Gateway - Compact EditionUser guide
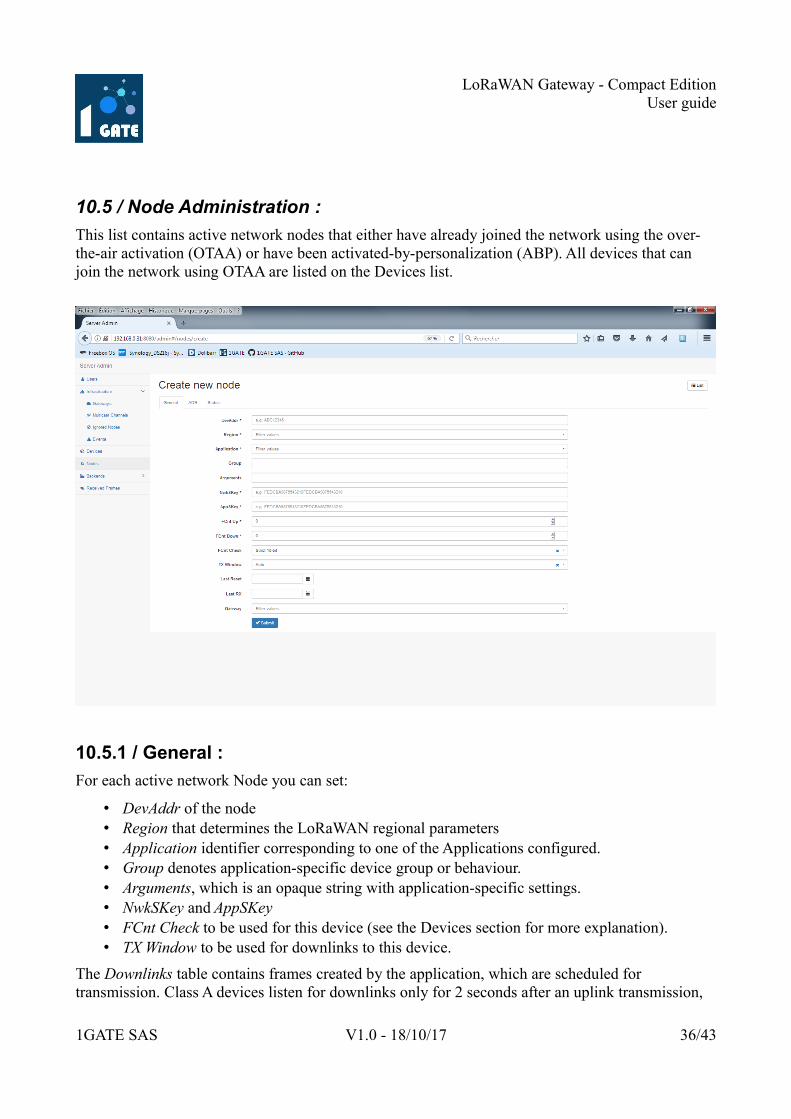
10.5 / Node Administration :
This list contains active network nodes that either have already joined the network using the over-the-air activation (OTAA) or have been activated-by-personalization (ABP). All devices that can join the network using OTAA are listed on the Devices list.
10.5.1 / General :
For each active network Node you can set:
• DevAddr of the node • Region that determines the LoRaWAN regional parameters • Application identifier corresponding to one of the Applications configured. • Group denotes application-specific device group or behaviour. • Arguments, which is an opaque string with application-specific settings. • NwkSKey and AppSKey • FCnt Check to be used for this device (see the Devices section for more explanation). • TX Window to be used for downlinks to this device.
The Downlinks table contains frames created by the application, which are scheduled for transmission. Class A devices listen for downlinks only for 2 seconds after an uplink transmission,
1GATE SAS V1.0 - 18/10/17 36/43

LoRaWAN Gateway - Compact EditionUser guide
so it may take a while until all messages are transmitted. Class C downlinks are not listed there as these are scheduled immediately.
To clone an existing node, simply save it under a different DevAddr.
10.5.2 / ADR :
Optionally, you can also set the ADR parameters. The server will attempt to configure the device accordingly.
Below the configuration options you can monitor the performance of the node. You can see the assumed ADR parameters and two graphs that display the last 50 received frames.
10.5.3 / Status :
Device status indicates the recent device Battery level (0-255) and the Signal-to-Noise-Ratio (SNR) of received downlinks.
The Status Time and Status FCnt indicate when was the status last received by the server.
The server requests the device status upon join or reset and then at given time/fcnt intervals defined by the devstat_gap parameter. By default {devstat_gap, {86400, 24}}, which requests the status every 24 hours or every 24 frames (whatever occurs first).
The server also requests device status when the ADR parameters change.
1GATE SAS V1.0 - 18/10/17 37/43

LoRaWAN Gateway - Compact EditionUser guide
10.6 / Backend Administration :
To use this functionality you have to set Device/Node Application to backend and enter some Group name for this device/node. The device/node Group must correspond to the Handler Group name.
10.6.1 / Handlers :
To create a new handler you need to set:
• Group name • Format of the message payload, which can be:
• Raw to receive and send raw application data only, without ant port numbers nor flags.
• JSON to use the JSON structures described in the JSON Payload documentation. • Web Form to use query strings like NameOne=ValueOne&NameTwo=ValueTwo.
• Uplink Fields that will be sent in the JSON payload. • Parse Uplink and Build Downlink functions (for the JSON format only) • Connector identifier (see the next chapter)
1GATE SAS V1.0 - 18/10/17 38/43

LoRaWAN Gateway - Compact EditionUser guide
If the Connector is not defined, this Handler will be applied to WebSocket connections only.
10.6.2 / Parse Uplink :
The Parse Uplink is an Erlang function that converts a binary to a list that gets JSON encoded into the fields attribute. It shall be a Fun Expression with two parameters, which matches the binary data and returns an Erlang representation of JSON.
For example:
fun(_Port, <<LED, Press:16, Temp:16, AltBar:16, Batt, Lat:24, Lon:24, AltGps:16>>) -> #{led => LED, pressure => Press, temp => Temp/100, alt_bar => AltBar, batt => Batt}end.
The <<A, B, C>> is a binary pattern, where A, B, C are "variables" corresponding to the values encoded in the binary. Erlang matches the incoming binary data against this pattern and fills the "variables" with the values in the binary. Here are some examples:
• <<A>> matches 1 value, 1 byte long. • <<A, B>> matches 2 values, each 1 byte long. • <<A:16>> matches 1 unsigned int value, 2 bytes long in big-endian • <<A:16/little-signed-integer>> matches 1 signed int value, 2 byes long in
little-endian • <<A:2/binary>> matches an array of 2 bytes
To match a variable sized array of bytes you can do:
fun(_Port, <<Count, Data:Count/binary>>) -> #{data => binary_to_list(Data)}end.
Once you have the matched variables, you put them in a structure that gets encoded in JSON. The #{name1 => A, name2 => B, name3 => C} creates a fields attribute with the JSON {"name1":A, "name2":B, "name3":C}.
10.6.3 / Build Downlink :
Build Downlink works in the opposite direction. It takes whatever is in the "fields" attribute and converts that into a binary. It shall be a Fun Expression with two parameters, which gets an Erlang representation of JSON and returns binary data. If you send {"fields":{"led":1}}, you can have a function like this:
fun(_Port, #{led := LED}) -> <<LED>>end.
The #{name1 := A, name2 := B, name3 := C} matches the fields attribute containing a JSON structure {"name1":A, "name2":B, "name3":C}. The order is not
1GATE SAS V1.0 - 18/10/17 39/43
LoRaWAN Gateway - Compact EditionUser guide
significant, but all fields are mandatory.
The binary is then built using similar approach as the pattern matching explained above. For example, <<A, B, C>> builds a binary of three 1-byte integers.
To build a variable sized array you can do:
fun(_Port, #{data := Data}) -> <<(length(Data)), (list_to_binary(Data))/binary>>end.
10.6.4 / Connectors :
To create a new connector you set:
• Connector Name • Enabled flag that allows you to temporarily disable an existing connector. • URI defines the target host, which can be
• For MQTT mqtt://host:port or mqtts://host:port if SSL shall be used• For HTTP POST http://host:port or https://host:port
• Published Topic, which is a server pattern for constructing the publication topic, e.g. out/{devaddr}.
• Subscribe, which is a topic to be subscribed, e.g. in/#. It may include broker specific wilcards.
• Consumed Topic, which is is a server pattern for parsing topics of consumed messages, e.g. in/{devaddr}.
On the Authentication tab:
• Client ID is the MQTT parameter • Auth identifies the type of authentication:
• Username+Password for common servers • Shared Access Signature for Microsoft servers
• Name and Password/Key for plain authentication • User Certificate and Private Key if SSL authentication is needed
To include node-specific attributes the published and consumed topic may include following patterns:
• {deveui} that matches the DevEUI of the node • {devaddr} that matches the DevAddr of the node • {group} that matches the node group
If the Connector is Enabled and a Subscribe topic is defined the server will automatically connect tothe MQTT broker and subscribe this topic.
You can generate a self-signed User Certificate (cert.pem) and corresponding Private Key (key.pem) by:
openssl req -x509 -newkey rsa:4096 -keyout privkey.pem -out cert.pem -days 365
1GATE SAS V1.0 - 18/10/17 40/43

LoRaWAN Gateway - Compact EditionUser guide
openssl rsa -in privkey.pem -out key.pem
Please read the Integration Guide for detailed information on how to connect to a generic MQTT server like RabbitMQ or an IoT Platform like AWS IoT, IBM Watson IoT, Azure IoT Hub.
1GATE SAS V1.0 - 18/10/17 41/43

LoRaWAN Gateway - Compact EditionUser guide
11 / Software Update :For the Linux system the update is done either on the command line or from a web browser via thewebmin administration interface.
For the LoRaWAN gateway & network server, we have set up a Github repository at the followingaddress:
https://github.com/1gate
The "tools" repository contains utilities for :
– Automate the installation of LoRaWAN gateways and servers (reserved 1-GATE),– Switch the main file system (/ root) to read mode or read / write mode.
The "1G-LWG-COM-868-XXX" repository contains utilities for :
– Install and update the gateway part.
The "1G-LWS-COM-868-XXX" repository contains utilities for :
– Install and update the server part.
Before you can update the LoRaWAN gateway / server, you must switch the main file system to read / write mode using the command :
sudo ./tools/rfw_rw.shsudo reboot
For information, the boot partition is also mounted in read-only mode at startup.
The user partition "/home/ogate" remains in read /write mode.
Once the updates have been completed, you should consider restoring the system to read-only modeusing the command :
sudo ./tools/rfw_ro.shsudo reboot
The log files and the Mnesia database of the LoRaWAN server are in the /home/ogate/lorawan-server directory.
To update the LoRaWAN part, you must go to the git directory concerned, update it and then restart the installation.
1GATE SAS V1.0 - 18/10/17 42/43

LoRaWAN Gateway - Compact EditionUser guide
cd 1G-LWS-COM-868-XXXsudo git pull cd gotthardpsudo ./install_lws.sh
1GATE SAS V1.0 - 18/10/17 43/43