low voltage landscape lighting design - pdhonline.com · low voltage landscape lighting system –...
TRANSCRIPT

An Approved Continuing Education Provider
PDHonline Course E150 (4 PDH)
________________________________________________________________
Low Voltage Landscape Lighting Design
Kevin A. Mussmacher, P.E.
2007
(Updated 2019)
PDH Online | PDH Center 5272 Meadow Estates Drive
Fairfax, VA 22030-6658 Phone: 703-988-0088 www.PDHonline.com
www.PDHcenter.org
www.PDHcenter.org PDHonline Course E150 www.PDHonline.com
Page 2 of 25
Low Voltage Landscape Lighting Design
Kevin A. Mussmacher, P.E.
Course Content
Section 1 - Definitions and Theory
To effectively understand the theory and practicalities of Low Voltage Landscape Lighting, it is necessary to define and explain some commonly used terminology. Low Voltage - "Low Voltage" is a basic term used to describe electrical systems that operate on less than 30 volts. In the case of low voltage lighting, the voltage level is 12 volts, which is the same as a car battery. Low voltage lighting is safer to have in exterior environments, more efficient to use, and affords much more flexibility in fixture design and placement. Do not be under the impression that low voltage means low light. After all, a car's headlights operate on 12 volts and they pack quite a punch of light. Low Voltage Landscape Lighting System – This is a collection and installation of a group of individual elements comprising the system to produce effective and attractive lighting for a building or property. Layout or Lighting Plan – This is a drawing or computer file showing the property to be illuminated. The key elements on this plan are the house or other structure, paths, drives, plant areas, trees and pools. It will also indicate the type and location of light fixtures as well as the location of all wiring and transformers used. It is the master source of lighting information on a project. Coverage or pattern – the area and/or shape of illumination from a particular light source or fixture. These shapes can be spherical, conical, pie-shaped or flooded depending on the fixture, bulb and application. Cutoff – this is a term related to the amount of light blocked by a reflector on a lighting fixture. This typically refers to a reflector in the horizontal plane such as the top of a path or accent light. “Full cutoff “ means that no light (less than 2.5% of lamp lumens) is directed beyond the reflector; meant to significantly reduce or eliminate glare. “Semi-cutoff” means that slightly more light (less than 5% of lamp lumens) is permitted at horizontal plane than in full cutoff distribution. “Non-cutoff” means that considerable light exists in all directions. System Elements - individual pieces used in a system. In this case the elements are fixtures, bulbs, wire, transformer(s), timer(s) and mounting. Lamp – a halogen, fluorescent or incandescent lighting element referred to simply as a “bulb” or lamp. These come in various voltages and wattage. For Low voltage applications, the voltage is 12 volts. LED – Light Emitting Diode. This is a solid-state replacement for incandescent or halogen light bulbs. (See course content for a more detailed explanation). Fixture - This is the metal or plastic casing that holds the socket and bulb and provides protection from the elements and prevents a shock hazard to people and pets.
www.PDHcenter.org PDHonline Course E150 www.PDHonline.com
Page 3 of 25
Lumen – a measure of light intensity of a source. Typically, the more watts, the more lumens and therefor more light. Mounting – the mechanism or method for fixing a fixture into position. Ground mounting usually involves stake mounts where fixtures may be alternately hung from wire or hard mounted with a bracket.
Photocell – a light sensitive switch used to turn a lighting system or other device “on” at dusk and “off” at dawn. It may be used in conjunction with a timer for more flexibility in system control. Timer – a mechanical or electronic device used to turn electrical power on or off a specific time of the day or night. In this application, it is an automatic way of controlling light illumination times and duration. Transformer – an electrical device that converts one voltage or impedance into another. In this case the transformer would convert the normal house line voltage of 120 volts AC to 12 volts AC for low voltage applications. (NOTE: LED bulbs and fixtures require DC voltage. See course content for details and alternatives). Wattage – them measure of electrical power consumed by a device such as a light bulb. The higher the wattage, the brighter the bulb (a.k.a. more lumens). It can also be a measure of electric power capable of being supplied by a transformer or power supply. Wire – the copper conductor usually insulated with some sort of rubber or plastic composite that is used to interconnect electrical devices. It comes in different thickness or gauges and has different current carrying capacities dependent on the wire gauge. The higher the gauge numbers the thinner the wire and the less the current carrying capacity.
END OF SECTION 1
www.PDHcenter.org PDHonline Course E150 www.PDHonline.com
Page 4 of 25
Section 2 - Types of Lighting Fixtures and Techniques
To fully understand the range of effects landscape lighting can provide, it is important to see the multitude of professional quality fixtures that are available. Styles range from large overhead cylindrical floodlights to minute spot or accent lights used for highlighting specific features. Spread and diffused units set low to the ground, line paths, flowerbeds and driveways and cast a broader glow. The latest looks in such path lights depend on fixtures that can be placed further apart to create a more attractive glow. The quality of fixtures and bulbs has improved significantly. It is not uncommon to get a 10-year warranty or better on some of the mid or high-end fixtures. Even the “home improvement store grade” of fixture and transformer has improved significantly in recent years.
Types of Light Fixtures
The main type of low voltage landscape fixtures types are spot (bullet), flood, path, well, step or brick, underwater, accent, and post lights. Many variations of these are available as well as some pretty special configurations. I will confine this course to discussing the “normal” types just listed. The proper use of these fixtures in a comprehensive design provides many benefits to the property owner as well as the landscape contractor in that it will greatly increase the visibility of their work after dark, calling more attention to it than the next property. Well-planned and installed landscape lighting can provide beauty, safety, and security. With today's efficient low voltage systems, these many benefits can be had for a reasonable budget. Before I get into the details of each type of fixture, let’s discuss available materials and finishes. Fixtures come in a wide array of styles but are usually either painted or anodized metal or plastic. Typical metal finishes are black, white, brown, brass, brushed aluminum, copper, something called architectural bronze, and of course the ever-popular Verdi - green. Plastic fixtures are usually confined to black, white and Verdi, but there are surely some pretty special finishes available. Spot and well light fixtures have gaskets and are covered with a lens to ensure being weatherproof. Most accent and path lighting are the same with the possible exception of some tulip shaped path lighting that points downward.
Bullet or Spotlights
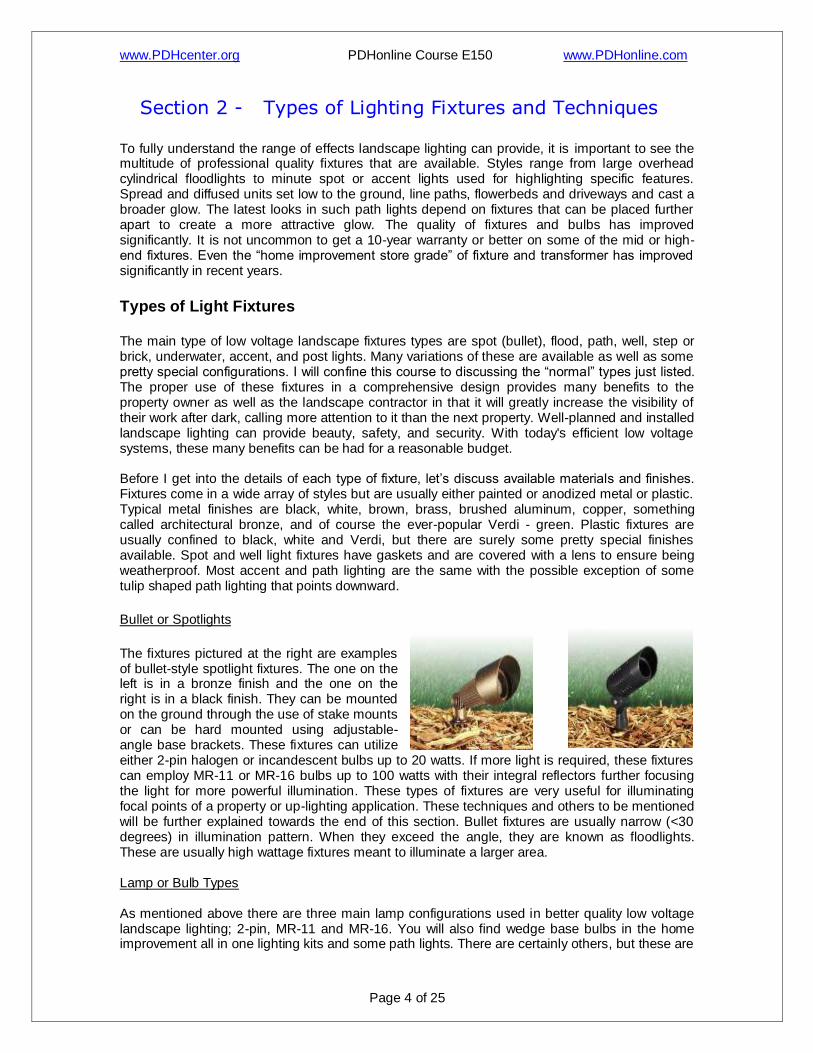
The fixtures pictured at the right are examples of bullet-style spotlight fixtures. The one on the left is in a bronze finish and the one on the right is in a black finish. They can be mounted on the ground through the use of stake mounts or can be hard mounted using adjustable- angle base brackets. These fixtures can utilize either 2-pin halogen or incandescent bulbs up to 20 watts. If more light is required, these fixtures can employ MR-11 or MR-16 bulbs up to 100 watts with their integral reflectors further focusing the light for more powerful illumination. These types of fixtures are very useful for illuminating focal points of a property or up-lighting application. These techniques and others to be mentioned will be further explained towards the end of this section. Bullet fixtures are usually narrow (<30 degrees) in illumination pattern. When they exceed the angle, they are known as floodlights. These are usually high wattage fixtures meant to illuminate a larger area. Lamp or Bulb Types As mentioned above there are three main lamp configurations used in better quality low voltage landscape lighting; 2-pin, MR-11 and MR-16. You will also find wedge base bulbs in the home improvement all in one lighting kits and some path lights. There are certainly others, but these are
www.PDHcenter.org PDHonline Course E150 www.PDHonline.com
Page 5 of 25
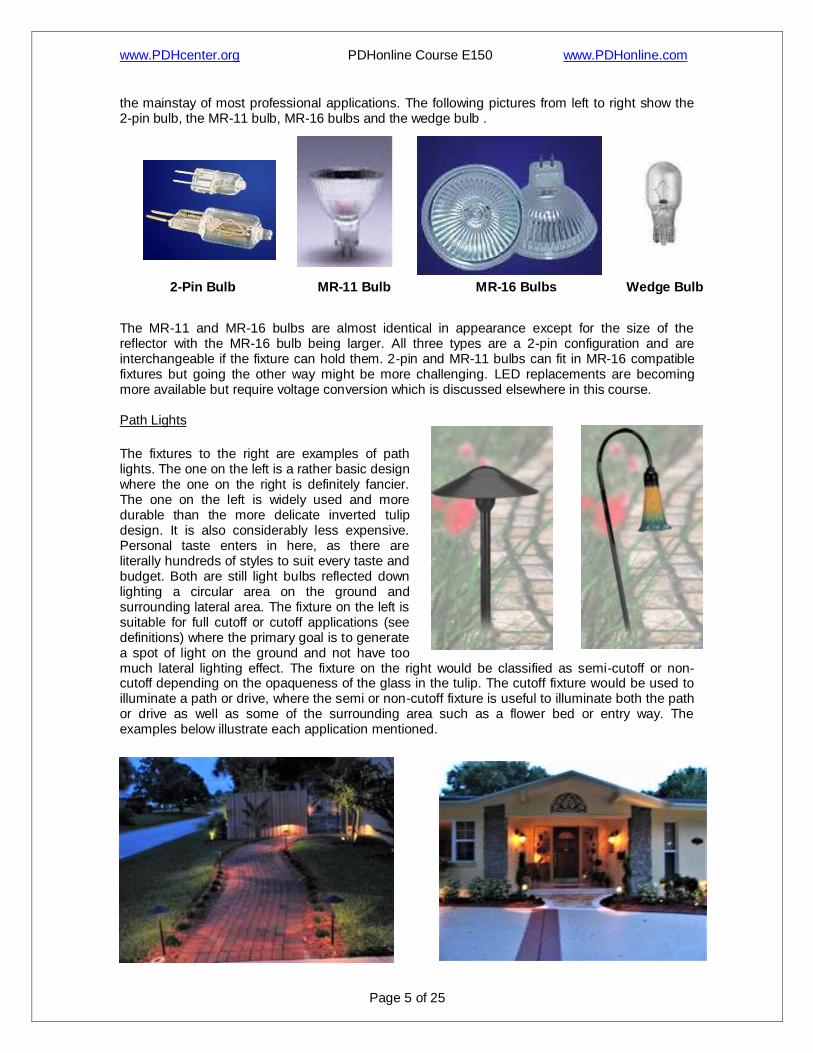
the mainstay of most professional applications. The following pictures from left to right show the 2-pin bulb, the MR-11 bulb, MR-16 bulbs and the wedge bulb .
The MR-11 and MR-16 bulbs are almost identical in appearance except for the size of the reflector with the MR-16 bulb being larger. All three types are a 2-pin configuration and are interchangeable if the fixture can hold them. 2-pin and MR-11 bulbs can fit in MR-16 compatible fixtures but going the other way might be more challenging. LED replacements are becoming more available but require voltage conversion which is discussed elsewhere in this course. Path Lights
The fixtures to the right are examples of path lights. The one on the left is a rather basic design where the one on the right is definitely fancier. The one on the left is widely used and more durable than the more delicate inverted tulip design. It is also considerably less expensive. Personal taste enters in here, as there are literally hundreds of styles to suit every taste and budget. Both are still light bulbs reflected down lighting a circular area on the ground and surrounding lateral area. The fixture on the left is suitable for full cutoff or cutoff applications (see definitions) where the primary goal is to generate a spot of light on the ground and not have too much lateral lighting effect. The fixture on the right would be classified as semi-cutoff or non-cutoff depending on the opaqueness of the glass in the tulip. The cutoff fixture would be used to illuminate a path or drive, where the semi or non-cutoff fixture is useful to illuminate both the path or drive as well as some of the surrounding area such as a flower bed or entry way. The examples below illustrate each application mentioned.
2-Pin Bulb MR-11 Bulb MR-16 Bulbs Wedge Bulb
www.PDHcenter.org PDHonline Course E150 www.PDHonline.com
Page 6 of 25
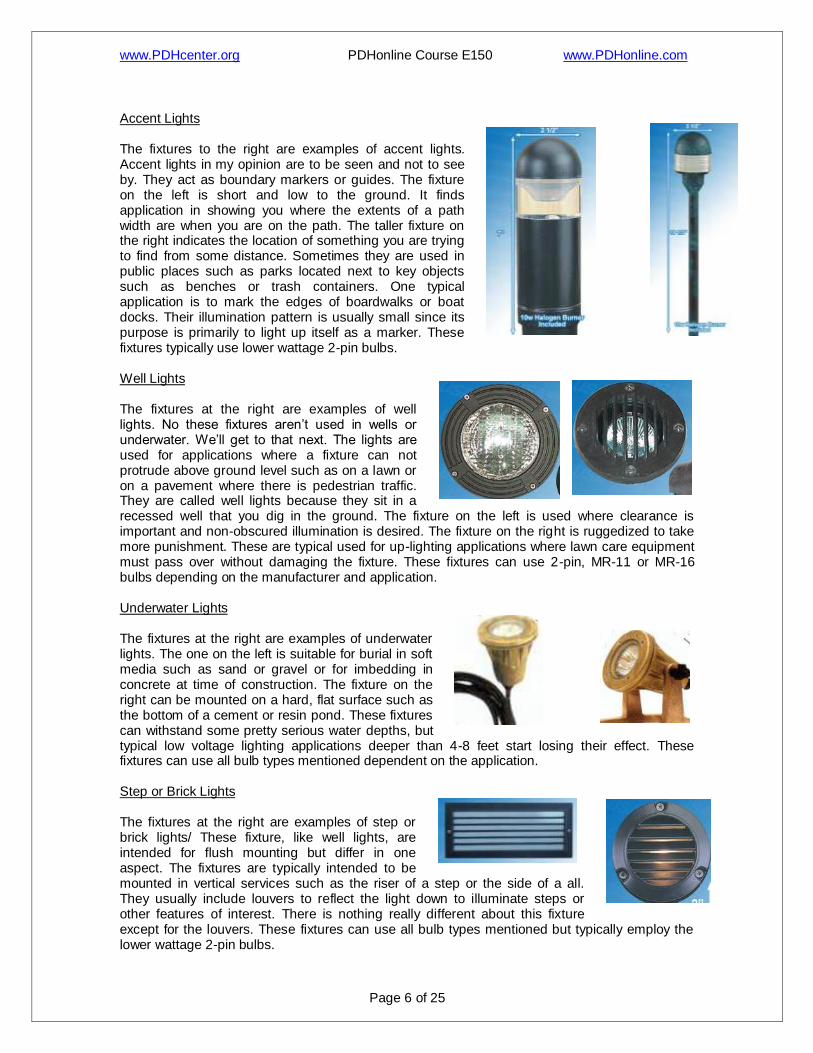
Accent Lights The fixtures to the right are examples of accent lights. Accent lights in my opinion are to be seen and not to see by. They act as boundary markers or guides. The fixture on the left is short and low to the ground. It finds application in showing you where the extents of a path width are when you are on the path. The taller fixture on the right indicates the location of something you are trying to find from some distance. Sometimes they are used in public places such as parks located next to key objects such as benches or trash containers. One typical application is to mark the edges of boardwalks or boat docks. Their illumination pattern is usually small since its purpose is primarily to light up itself as a marker. These fixtures typically use lower wattage 2-pin bulbs. Well Lights The fixtures at the right are examples of well lights. No these fixtures aren’t used in wells or underwater. We’ll get to that next. The lights are used for applications where a fixture can not protrude above ground level such as on a lawn or on a pavement where there is pedestrian traffic. They are called well lights because they sit in a recessed well that you dig in the ground. The fixture on the left is used where clearance is important and non-obscured illumination is desired. The fixture on the right is ruggedized to take more punishment. These are typical used for up-lighting applications where lawn care equipment must pass over without damaging the fixture. These fixtures can use 2-pin, MR-11 or MR-16 bulbs depending on the manufacturer and application. Underwater Lights The fixtures at the right are examples of underwater lights. The one on the left is suitable for burial in soft media such as sand or gravel or for imbedding in concrete at time of construction. The fixture on the right can be mounted on a hard, flat surface such as the bottom of a cement or resin pond. These fixtures can withstand some pretty serious water depths, but typical low voltage lighting applications deeper than 4-8 feet start losing their effect. These fixtures can use all bulb types mentioned dependent on the application. Step or Brick Lights The fixtures at the right are examples of step or brick lights/ These fixture, like well lights, are intended for flush mounting but differ in one aspect. The fixtures are typically intended to be mounted in vertical services such as the riser of a step or the side of a all. They usually include louvers to reflect the light down to illuminate steps or other features of interest. There is nothing really different about this fixture except for the louvers. These fixtures can use all bulb types mentioned but typically employ the lower wattage 2-pin bulbs.

www.PDHcenter.org PDHonline Course E150 www.PDHonline.com
Page 7 of 25
Post Lights The fixture at the right is an example of a post light. It can function as an accent light or a path light but is primarily used on fence posts to subtly light areas adjacent to fences or gates. They are typically low wattage and full cutoff or cutoff in configuration. They are usually used in a series with a post light being mounted on every post or every other post on a portion of the length of a fence. They are usually used on wooden fences as hey lose a lot of their effect of a chain link or other see-through type of barrier. These typically employ the lower wattage 2-pin bulbs. Pagoda Lights The fixtures at the right are examples of Pagoda lights. Yes, you guessed it. They get their name from their resemblance to the Japanese and other oriental structures with the trademark rook and side lighting. These are only mentioned because of their unique shape and enormous popularity during the Japanese garden phase, which is probably still in full swing. Depending on the amount of cutoff provided and the wattage of bulb used, these can act as path lights or accent lights. You’ll see these everywhere.
Mounting Techniques
There are four (4) basic methods for landscape lighting fixtures: Ground stakes, brackets or hard mount, pole mounting and burying. Ground stakes – this technique is the most common for path, accent and spotlights mounted a ground level. The fixture is equipped with a metal stake and is “stuck” directly into the soil. Brackets or hard mounting – these techniques are used for mounting fixtures to walls, eaves, fence posts or other locations off the ground. The fixture or bracket that holds the fixture is screwed, nailed or otherwise fastened to the desired surface. This technique can be used for spot or flood lights and post lights for uplighting, downlighting, spot lighting and, in the case of the post lights, accent lighting. Pole mounting – this technique is a variation of hard mounting. The fixture is mounted on a pole similar to a lamppost used in higher voltage applications. This is generally used for area or limited path lighting. Burying – this technique is associated with wells lights in uplighting applications. As implied by the name, the fixture is recessed in a hole in the ground to be flush with the surface to avoid interference with operations such as walking or lawn mowing.
www.PDHcenter.org PDHonline Course E150 www.PDHonline.com
Page 8 of 25
Lighting Techniques
That’s enough already with the types of fixtures. As I said, there are hundreds if not thousands to choose from. At least now you have familiarity with the basic types. Let’s talk about different types of lighting techniques and when to use what type of fixture. Uplighting Architectural and landscape elements become dramatic features when illuminated from below. Fixtures can be camouflaged by the use of glare shields. Uplighting focuses light and attention on an object from a low fixture location. The object can be a shrub, tree or architectural feature like a gazebo, arbor or wall sculpture. Bullet or well type fixtures are specified according to the mature size of the plant or the size of the hardscape area to be illuminated. Well lights are extremely effective for aiming light up a tree or column. They should be located 2 to 4 feet from the trunk base. Downlighting Another technique is downlighting, or moonlighting. Usually accomplished with bullet type fixtures placed above eye level on a structure (or even in a tree), this technique illuminates general areas for safety, security and aesthetics. Fixtures and lamps are chosen for the required brightness and width of illumination. Special hanging fixtures known as “tree” fixtures are also available. You can also use downlighting to highlight a smaller area or single feature, or to create a sense of perspective. Lighting from above can provide both security and aesthetics. Spot lighting This technique uses a strong, narrowly focused beam of light. Spotlighting is great for sculptures, statues, address number signs, landscape features and flagpoles. Bullet fixtures are ideal for this application. Path Lighting Path lighting uses low fixtures, which direct illumination downward and outward. These fixtures are shielded on top to prevent glare. They are used along walks, stairs and anywhere else that safe night access is required. Resist the tendency to “over light”. You want to take advantage of the beauty of the separate circles of light generated without overlap. Path lights are commonly used for small pathways, walkways, flowerbeds and ground cover areas, with spacing of 6 to 10 feet. With a narrow sidewalk, stagger the lighting from one side to the other; however, a uniform row of fixtures works well for a wide walkway or driveway. There’s plenty of light there and during the day you don’t want to look like you were invaded by a bunch of bronze soldiers marching down your front walk. Less is more and daytime curb appeal counts big time.
Shadowing or Silhouette Lighting Shadowing or silhouette lighting provides a special effect by illuminating objects in front a fairly large surface (like a wall) using a wide flood or wash light fixture. This causes objects in front of the lighting to appear as silhouettes. An example of this would be generating a large shadow or silhouette of a small sculpture on a wall.
www.PDHcenter.org PDHonline Course E150 www.PDHonline.com
Page 9 of 25
Backlighting Backlighting is a technique where a aura or corona is generated around an object by projecting a light on the back of it. Most of the direct light is blocked from view by the object itself but some of the light leaks around to outline the object with a “glowing” effect.
Underwater lighting Lighting of swimming pools, ponds, fountains and waterfalls can add a dramatic effect to your yard or commercial property but there are some tricks to watch out for. When dealing with a submerged light source, expected results may differ from the actual effect. There are 3 main conditions that will modify or change your beam spread as well as light intensity. These are listed and explained below.
Depth: the deeper the water, the more the light will widen or spread. Not recommended for applications deeper than 4 feet. The impact or effects will be greatly sacrificed or reduced.
Clarity: clean or clear water will produce maximum quantity of light. Dirty water will
reduce the light dramatically. The dirtier the water, the more wattage or tighter beam spread will be needed to see the impact of the light source and its effect.
Movement: water movement will distort or increase the beam spread. The top of the water acts as the lens. Clear lens or no movement, the beam will remain more true or accurate. The more movement, the larger increase in spread, not to mention constant light movement.
Numerous other techniques, and combinations of techniques, are available to increase your home security, safety, enjoyment and value. The practical and aesthetic effects created by landscape lighting are limited only by the existing features of the architecture and landscaping and by the creativity of the designer. Areas Enhanced by Night Landscape Lighting
Trees
Shrubs
Planting Beds
Pathways
Architectural Features
Home Facade
Steps
Decks
Driveways
Statuary Features
Water Features/Ponds Benefits of installing a Low Voltage Landscape Lighting System
That "Magic Look at Night" Drama for Your Home
Enhanced Home Security
Added Hours to Enjoy Your Yard at Night
Safer Walk and Stair Ways
A Finished Look for Your Landscaping
END OF SECTION 2
www.PDHcenter.org PDHonline Course E150 www.PDHonline.com
Page 10 of 25
Section 3 - The Low Voltage Landscape Lighting Plan The planning process should begin with a plan or site map. It should be drawn to scale, showing all landscape features and areas that need lighting. Fixtures and lamps are chosen for each area based on the desired effects ...path lights for safe passage along walks and stairs, wash fixtures for silhouette effects against a wall, etc. While its important to start drawing the lighting plan, its more important to think about what you want as far as lighting effects, areas and features to be illuminated, how much you have to spend and what your overall goal is. Consider some or all of the following: Illuminate steps, paths, and driveways to increase foot traffic safety in the dark. For outdoor activity areas, consider a strong-beam light to illuminate over the area. Conceal
the light behind the feature you're illuminating, whether it's a tree, shrub, or fountain. One exception is if the fixture is decorative.
If you entertain outdoors frequently, consider low-voltage lights under handrails, stairs and
bench seating. One common mistake is to over light; low levels of light create subtle beauty and are often
also sufficient for safety and security. Use brighter lighting effects for focal points and consider the effects that different light intensities will have on the overall design.
Focus more on the desired effect of the lighting, rather than the specific fixtures you use. If
the fixture is not featured as a design element, opt for less obtrusive fixtures that can be concealed or discreetly placed.
Poor design or installation can make for disappointing lighting, but components are important,
too. Component failure (transformers, fixtures and wiring) can be a real problem. While you don't want extremely cheap fixtures that will fail within two or three years, you don't necessarily need to buy the most expensive either.
The key consideration when assessing quality is durability. How long will a component last
given the harsh conditions that exist outside a home throughout the course of the year? Wind, rain, sleet, snow, blistering heat or freezing cold are just some of the hazards your components need to withstand.
The lighting system should easily adapt to changes. New landscaping is typically dotted with
young plants, bushes and trees. Does your lighting plan allow for adequate flexibility in the system for easy repositioning of lighting as your landscaping matures, grows or changes? Being able to move a fixture to the correct lighting position as bushes grow, or plants get repositioned, without needing to reinstall part of the system, is an important consideration.
Achieve the desired effect with the correct light bulb. There are two variables to be decided
upon when working on your landscape lighting plan: the distance the light must project; and the diameter and shape of the area the light will illuminate. The distance a lamp must project is a function of the fixture's distance from the tree, wall or sculpture. The diameter and shape of the area the light will illuminate is a function of the bulb's beam spread. Directional fixtures offer a range of lamp wattage and beam spreads from Very Narrow Spotlight to Wide Flood.
OK, you’ve thought about what you really want, so let’s get started with the plan. No, don’t start drawing yet but get ready to make plenty of notes. Begin by walking around the property with an objective eye. The front sidewalk or driveway is a natural starting point. Sketch the structure (house or office building) in context of the lot, and make note of trees for uplighting, interesting
www.PDHcenter.org PDHonline Course E150 www.PDHonline.com
Page 11 of 25
textures, signs or address markers and colorful flower beds. Lighting invites people into a space by making it reassuring and alluring. Both interior and exterior spaces will benefit from the sparkle of properly selected and placed lighting sources. Note areas for lighting. Make a list of all the areas and items that are candidates for lighting
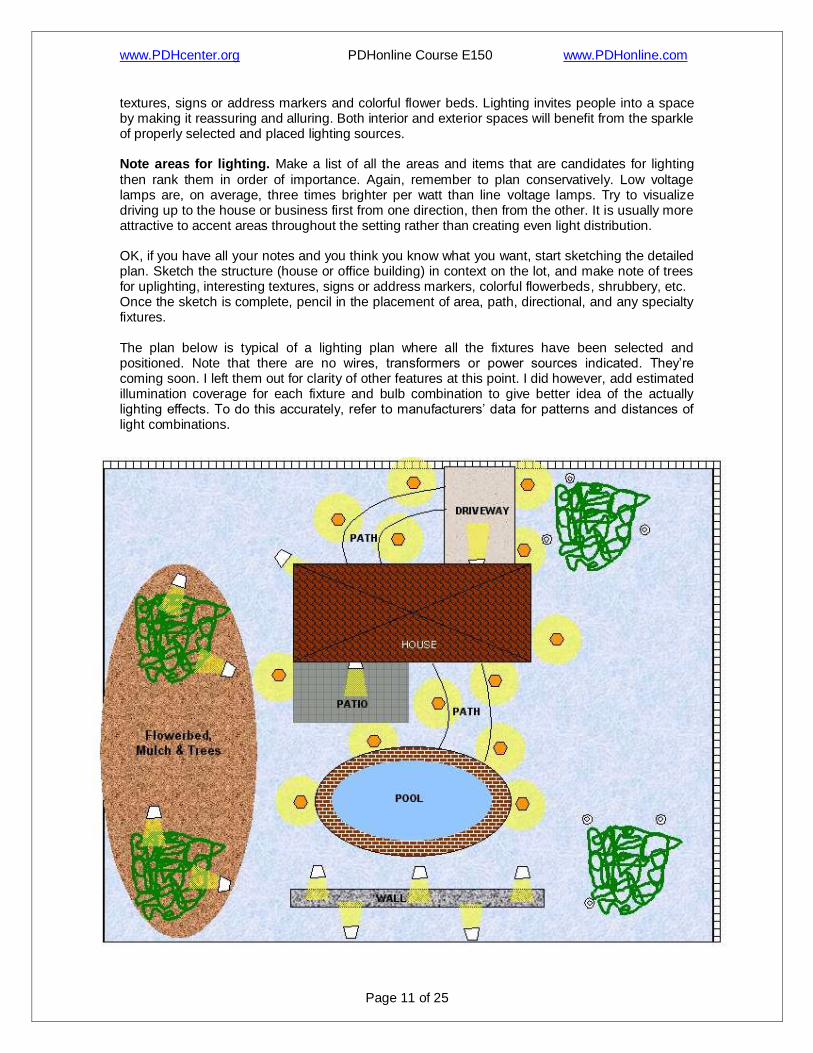
then rank them in order of importance. Again, remember to plan conservatively. Low voltage lamps are, on average, three times brighter per watt than line voltage lamps. Try to visualize driving up to the house or business first from one direction, then from the other. It is usually more attractive to accent areas throughout the setting rather than creating even light distribution. OK, if you have all your notes and you think you know what you want, start sketching the detailed plan. Sketch the structure (house or office building) in context on the lot, and make note of trees for uplighting, interesting textures, signs or address markers, colorful flowerbeds, shrubbery, etc. Once the sketch is complete, pencil in the placement of area, path, directional, and any specialty fixtures. The plan below is typical of a lighting plan where all the fixtures have been selected and positioned. Note that there are no wires, transformers or power sources indicated. They’re coming soon. I left them out for clarity of other features at this point. I did however, add estimated illumination coverage for each fixture and bulb combination to give better idea of the actually lighting effects. To do this accurately, refer to manufacturers’ data for patterns and distances of light combinations.
www.PDHcenter.org PDHonline Course E150 www.PDHonline.com
Page 12 of 25
OK, now we have the beginning of the plan. We have located fixtures and now we have to do the technical stuff. We have to figure out optimum wire sizes and run lengths, calculate voltage drops and select the correct type and number of transformers. And also, we have to figure out if the electrical circuits in the house can take it. And maybe we’ll see if we can afford it (See Section 5).
Determining Cable Length and Design Options for Cable Runs
Wire cable is the final component to be ordered. The length of the cable is dependent on the number of fixtures which, when added up, give you your total system wattage. There is an inverse relationship between watts and distance: the greater the wattage total, the shorter the cable runs.
Most low voltage landscape fixtures have a 3’ - 6' long cable with a connector that provides for quick and easy connection to the cable. This connector design allows the nickel-plated beryllium copper connector pins to pierce the cable and make electrical contact inside the insulation. No moisture ever intrudes into the contact area. One of the main advantages of the low voltage (12V) system is that you don't have to cut and splice the main cable, eliminating voltage drop and conductor corrosion.
In standardizing the 12V low-voltage system, manufacturers have made available various sizes of step-down transformers to convert a standard 120V source to a 12V supply. The components of the system may be easier to work with, but voltage drop must be considered and understood to effectively service the customer’s landscape lighting needs. Depending on its size and length, the conductor serving the fixtures of a low-voltage lighting system acts as a resistor. As current runs through the conductor, a voltage drop occurs: the voltage at the end of the conductor is lower than at the source. The voltage drops for 10 gauge or 12 gauge copper wire are proportional to the current flowing through it. This is directly proportional to the power required by the load. Smaller wires and higher currents will increase the voltage drop by raising resistance and increasing the fixture load respectively.
Why worry about it? Voltage drop on a lighting circuit in a 120V system isn’t considered a major issue. The branch circuit currents are relatively low—usually 20A or below—and the standard wire sizes are usually large enough to minimize resistance problems. When working with 12V systems, however, the line current for any given load increases by a factor of 10. For example, a 100W 120V
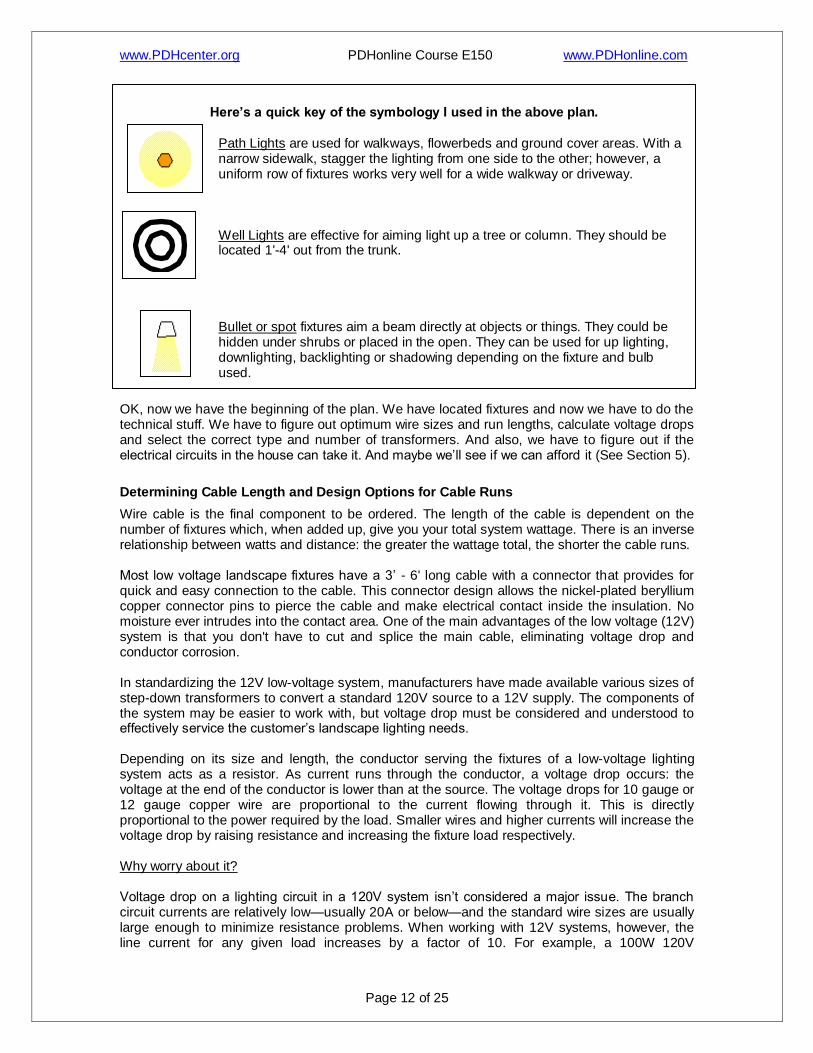
Here’s a quick key of the symbology I used in the above plan.
Path Lights are used for walkways, flowerbeds and ground cover areas. With a narrow sidewalk, stagger the lighting from one side to the other; however, a uniform row of fixtures works very well for a wide walkway or driveway.
Well Lights are effective for aiming light up a tree or column. They should be located 1'-4' out from the trunk.
Bullet or spot fixtures aim a beam directly at objects or things. They could be hidden under shrubs or placed in the open. They can be used for up lighting, downlighting, backlighting or shadowing depending on the fixture and bulb used.
www.PDHcenter.org PDHonline Course E150 www.PDHonline.com
Page 13 of 25
incandescent lamp draws .83A, but an equivalent load of two 50W MR16 12V lamps draws 8.3A. If you use the same size and length of wire in both systems, the voltage drop in the 12V system will be 10 times greater than in the 120V system. In this case, voltage drop becomes a significant consideration. When the actual voltage delivered to a given bulb or lamp is lower than the lamp’s rated voltage, the light output will be reduced. This relationship isn’t linear. When the voltage decreases to about 85% of its rated value, the visible light output is only about 50%. It continues to drop quickly from this point forward.
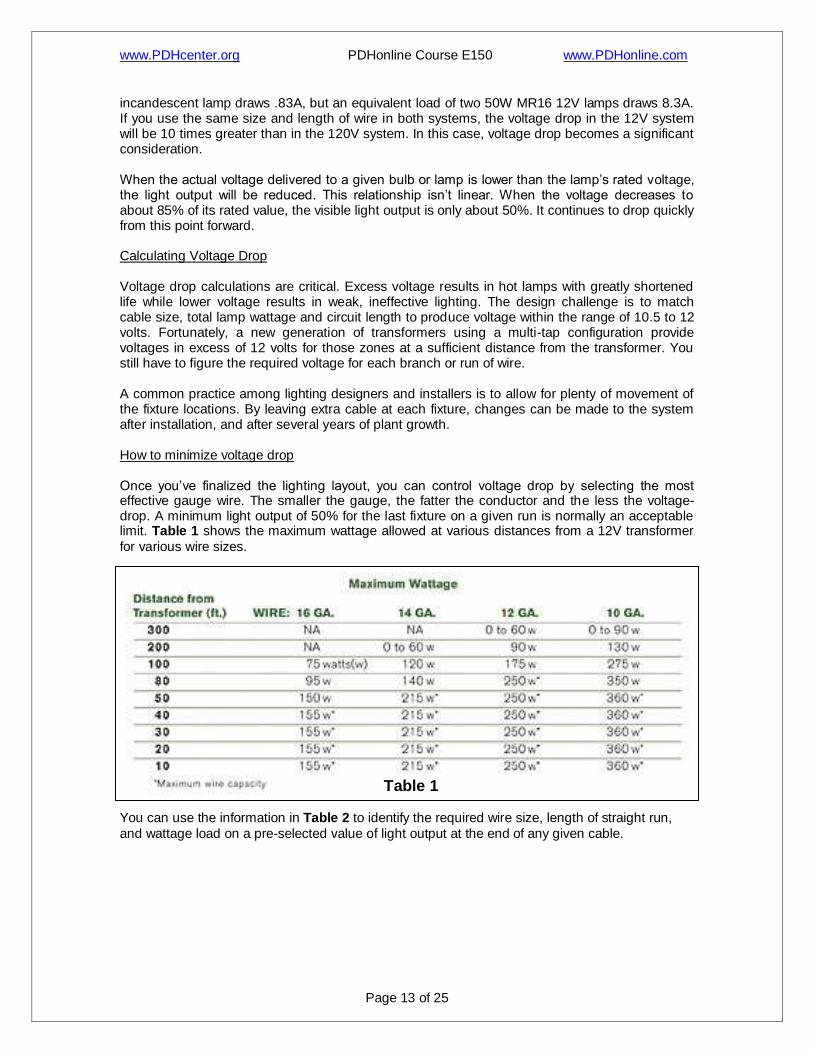
Calculating Voltage Drop Voltage drop calculations are critical. Excess voltage results in hot lamps with greatly shortened life while lower voltage results in weak, ineffective lighting. The design challenge is to match cable size, total lamp wattage and circuit length to produce voltage within the range of 10.5 to 12 volts. Fortunately, a new generation of transformers using a multi-tap configuration provide voltages in excess of 12 volts for those zones at a sufficient distance from the transformer. You still have to figure the required voltage for each branch or run of wire. A common practice among lighting designers and installers is to allow for plenty of movement of the fixture locations. By leaving extra cable at each fixture, changes can be made to the system after installation, and after several years of plant growth. How to minimize voltage drop Once you’ve finalized the lighting layout, you can control voltage drop by selecting the most effective gauge wire. The smaller the gauge, the fatter the conductor and the less the voltage- drop. A minimum light output of 50% for the last fixture on a given run is normally an acceptable limit. Table 1 shows the maximum wattage allowed at various distances from a 12V transformer
for various wire sizes.
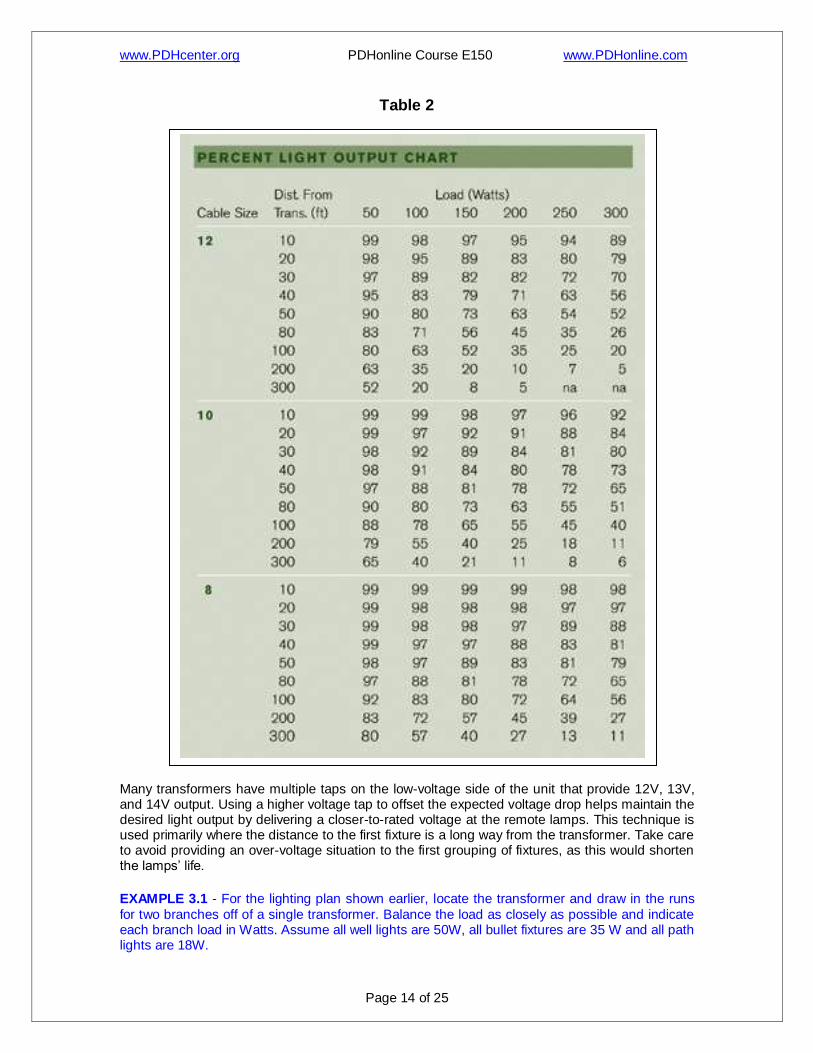
You can use the information in Table 2 to identify the required wire size, length of straight run,
and wattage load on a pre-selected value of light output at the end of any given cable.
Table 1
www.PDHcenter.org PDHonline Course E150 www.PDHonline.com
Page 14 of 25
Table 2
Many transformers have multiple taps on the low-voltage side of the unit that provide 12V, 13V, and 14V output. Using a higher voltage tap to offset the expected voltage drop helps maintain the desired light output by delivering a closer-to-rated voltage at the remote lamps. This technique is used primarily where the distance to the first fixture is a long way from the transformer. Take care to avoid providing an over-voltage situation to the first grouping of fixtures, as this would shorten the lamps’ life.
EXAMPLE 3.1 - For the lighting plan shown earlier, locate the transformer and draw in the runs
for two branches off of a single transformer. Balance the load as closely as possible and indicate each branch load in Watts. Assume all well lights are 50W, all bullet fixtures are 35 W and all path lights are 18W.
www.PDHcenter.org PDHonline Course E150 www.PDHonline.com
Page 15 of 25
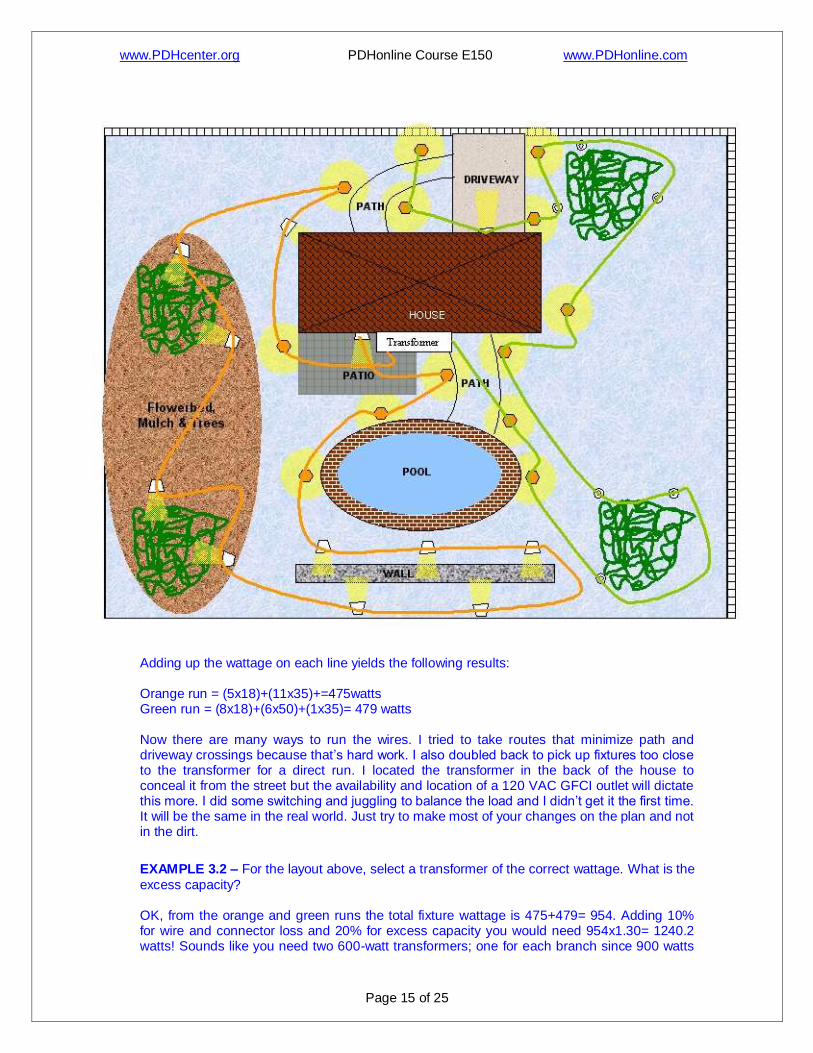
Adding up the wattage on each line yields the following results: Orange run = (5x18)+(11x35)+=475watts Green run = (8x18)+(6x50)+(1x35)= 479 watts Now there are many ways to run the wires. I tried to take routes that minimize path and driveway crossings because that’s hard work. I also doubled back to pick up fixtures too close to the transformer for a direct run. I located the transformer in the back of the house to conceal it from the street but the availability and location of a 120 VAC GFCI outlet will dictate this more. I did some switching and juggling to balance the load and I didn’t get it the first time. It will be the same in the real world. Just try to make most of your changes on the plan and not in the dirt.
EXAMPLE 3.2 – For the layout above, select a transformer of the correct wattage. What is the
excess capacity?
OK, from the orange and green runs the total fixture wattage is 475+479= 954. Adding 10% for wire and connector loss and 20% for excess capacity you would need 954x1.30= 1240.2 watts! Sounds like you need two 600-watt transformers; one for each branch since 900 watts

www.PDHcenter.org PDHonline Course E150 www.PDHonline.com
Page 16 of 25
is the biggest standard transformer available for normal residential use. You can always go with a large commercial unit but remember you have to have a household circuit to power it. Better to get another GFCI outlet put in on a different circuit breaker and keep them separate. If you chose two 600-watt units, the excess capacity on the orange run would be 600-475x1.1=77.5 watts. This includes wire and connector loss. Similarly, the green run has excess capacity of 600-479x1.1=73.1 watts.
END OF SECTION 3
www.PDHcenter.org PDHonline Course E150 www.PDHonline.com
Page 17 of 25
Section 4 - Transformer Selection and Placement
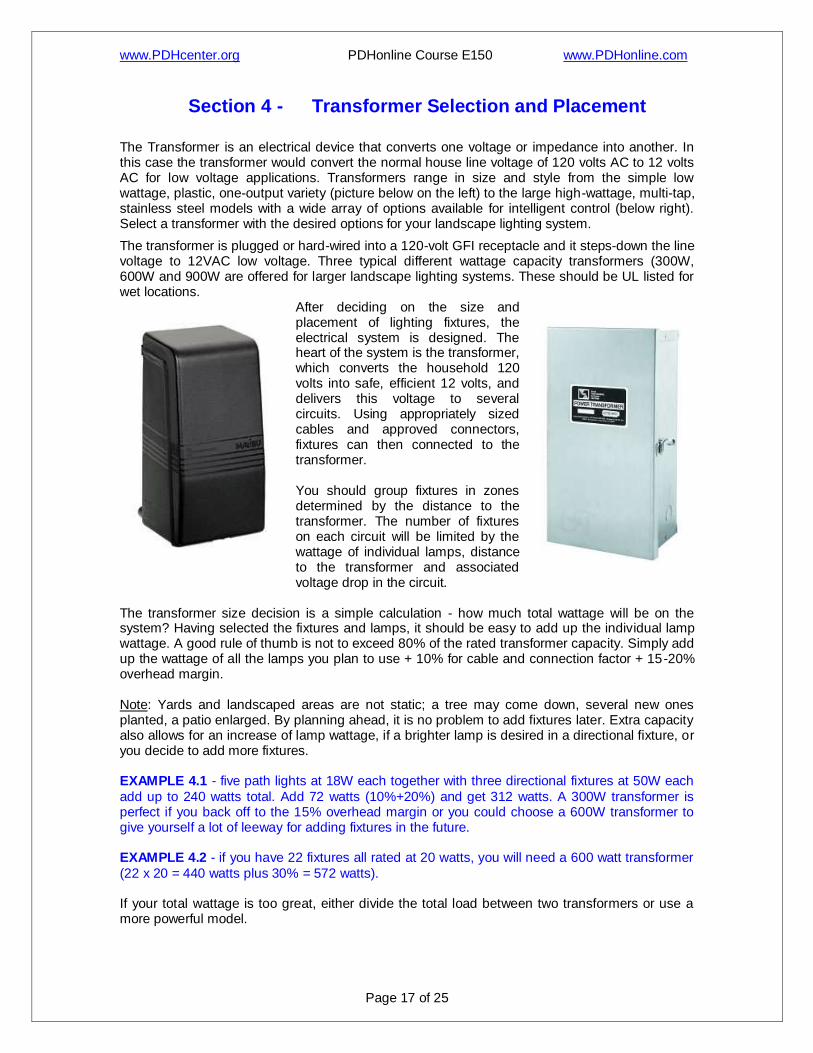
The Transformer is an electrical device that converts one voltage or impedance into another. In this case the transformer would convert the normal house line voltage of 120 volts AC to 12 volts AC for low voltage applications. Transformers range in size and style from the simple low wattage, plastic, one-output variety (picture below on the left) to the large high-wattage, multi-tap, stainless steel models with a wide array of options available for intelligent control (below right). Select a transformer with the desired options for your landscape lighting system.
The transformer is plugged or hard-wired into a 120-volt GFI receptacle and it steps-down the line voltage to 12VAC low voltage. Three typical different wattage capacity transformers (300W, 600W and 900W are offered for larger landscape lighting systems. These should be UL listed for wet locations.
After deciding on the size and placement of lighting fixtures, the electrical system is designed. The heart of the system is the transformer, which converts the household 120 volts into safe, efficient 12 volts, and delivers this voltage to several circuits. Using appropriately sized cables and approved connectors, fixtures can then connected to the transformer. You should group fixtures in zones determined by the distance to the transformer. The number of fixtures on each circuit will be limited by the wattage of individual lamps, distance to the transformer and associated voltage drop in the circuit.
The transformer size decision is a simple calculation - how much total wattage will be on the system? Having selected the fixtures and lamps, it should be easy to add up the individual lamp wattage. A good rule of thumb is not to exceed 80% of the rated transformer capacity. Simply add up the wattage of all the lamps you plan to use + 10% for cable and connection factor + 15-20% overhead margin. Note: Yards and landscaped areas are not static; a tree may come down, several new ones planted, a patio enlarged. By planning ahead, it is no problem to add fixtures later. Extra capacity also allows for an increase of lamp wattage, if a brighter lamp is desired in a directional fixture, or you decide to add more fixtures. EXAMPLE 4.1 - five path lights at 18W each together with three directional fixtures at 50W each
add up to 240 watts total. Add 72 watts (10%+20%) and get 312 watts. A 300W transformer is perfect if you back off to the 15% overhead margin or you could choose a 600W transformer to give yourself a lot of leeway for adding fixtures in the future. EXAMPLE 4.2 - if you have 22 fixtures all rated at 20 watts, you will need a 600 watt transformer
(22 x 20 = 440 watts plus 30% = 572 watts). If your total wattage is too great, either divide the total load between two transformers or use a more powerful model.
www.PDHcenter.org PDHonline Course E150 www.PDHonline.com
Page 18 of 25
Multi-tap Transformers
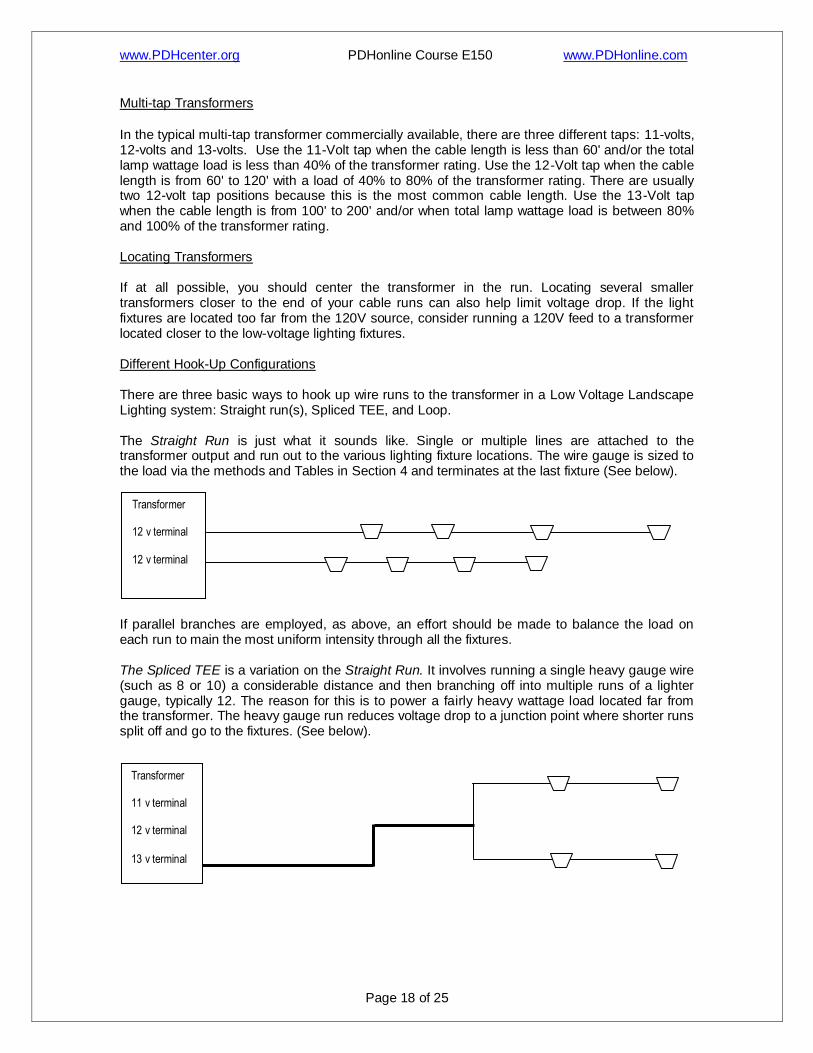
In the typical multi-tap transformer commercially available, there are three different taps: 11-volts, 12-volts and 13-volts. Use the 11-Volt tap when the cable length is less than 60' and/or the total lamp wattage load is less than 40% of the transformer rating. Use the 12-Volt tap when the cable length is from 60' to 120' with a load of 40% to 80% of the transformer rating. There are usually two 12-volt tap positions because this is the most common cable length. Use the 13-Volt tap when the cable length is from 100' to 200' and/or when total lamp wattage load is between 80% and 100% of the transformer rating. Locating Transformers If at all possible, you should center the transformer in the run. Locating several smaller transformers closer to the end of your cable runs can also help limit voltage drop. If the light fixtures are located too far from the 120V source, consider running a 120V feed to a transformer located closer to the low-voltage lighting fixtures. Different Hook-Up Configurations There are three basic ways to hook up wire runs to the transformer in a Low Voltage Landscape Lighting system: Straight run(s), Spliced TEE, and Loop. The Straight Run is just what it sounds like. Single or multiple lines are attached to the transformer output and run out to the various lighting fixture locations. The wire gauge is sized to the load via the methods and Tables in Section 4 and terminates at the last fixture (See below). If parallel branches are employed, as above, an effort should be made to balance the load on each run to main the most uniform intensity through all the fixtures. The Spliced TEE is a variation on the Straight Run. It involves running a single heavy gauge wire (such as 8 or 10) a considerable distance and then branching off into multiple runs of a lighter gauge, typically 12. The reason for this is to power a fairly heavy wattage load located far from the transformer. The heavy gauge run reduces voltage drop to a junction point where shorter runs split off and go to the fixtures. (See below).
Transformer 12 v terminal 12 v terminal
Transformer 11 v terminal 12 v terminal
13 v terminal
www.PDHcenter.org PDHonline Course E150 www.PDHonline.com
Page 19 of 25
Warning - Figures are shown as single line runs but actually consist of two conductors. One is connected to one voltage terminal and one to the other voltage terminal on the transformer. d of the cable are not crisscrossed. This would short out the system and possibly damage equipment. Transformer Options Various accessories are available for use with almost any transformer. Higher end transformers have sockets where a timer can be plugged in and/or photocell can be attached. There are also some models that have circuit breakers for each terminal of the output. Transformers are available in every quality grade depending on cost. The low-end models have few features or options and are usually made of plastic and carry a minimal warranty. Higher end models have all the bells and whistles, come in a NEMA style cabinet either powder coat painted or stainless steel and carry warranties up to 10 years. It all depends on expected life of the system and the budget available.
END OF SECTION 4
www.PDHcenter.org PDHonline Course E150 www.PDHonline.com
Page 20 of 25
Section 5 - Implementation Tips
The American Lighting Association recommends following these rules:
Conceal the light source behind shrubs, etc., whenever possible - except when the fixture itself is a decorative feature.
Don't overdo it - a little light goes a long way.
Be creative - use a mixture of lighting techniques for dramatic effect.
Use lighting controls like timers and photocells to turn lights on and off automatically. Tools - It will be very helpful to have the following tools close at hand: hammer, pliers, slotted-head screwdriver, Phillips screwdriver, wire cutters, sharp knife, wire stripper, hack saw, drill and flat shovel.
Here are some other considerations:
Plan for long-term plant growth. Leave extra wire length and choose your transformer with some room for expansion or wattage changes. A common practice among lighting designers and installers is to allow for plenty of movement of the fixture locations. By leaving extra cable at each fixture, changes can be made to the system after installation, and after several years of plant growth.
You might even want to purchase a few basic fixtures say a path light, a flood/spotlight and a small accent light. Use these on your own property at night and play. Experimenting with light is one of the best ways to learn how it behaves and how you can burial low energy cable, usually 12/2 stranded. This special wire comes with a jacket that is moisture proof and sunlight resilient.
Consider the effect of climate when choosing fixtures (Cold weather and some plastic don’t get along).
The relationship between light and plant life is sometimes ignored. Don’t have high wattage fixtures directly contacting foliage to prevent damaging plants. Some of these halogen fixtures get hot.
Demonstration of lamps and lighting techniques; experiments with lamps and fixtures
Be considerate of your neighbors - aim lights so they don't shine in others' windows.
Keep in mind that outdoor wiring must always be grounded, and the fixtures should be rated as "water-resistant/UL approved for outdoor use." Also remember that lighting rated for indoor use should never be used outdoors.
Always use watertight connectors
You can minimize voltage drop by altering your cable layout design. There are several options you can use other than a straight run:
Multiple straight runs can be made in several directions.
Tee connections reduce voltage drop by using heavier gage cable for the primary feed.
A loop design reduces voltage drop and allows the lighting units to give off a more uniform light output. It’s important to match the wire polarity at the transformer connection in a loop layout.
Another way to minimize voltage drop is to use lower wattage lamps in your design. For example, 18W lamps are the preferred choice for spread lights, but you can also use 12W lamps. If you do decide to use lower wattage lamps, however, recheck your illumination levels so you don’t wind up with an inferior lighting design.

www.PDHcenter.org PDHonline Course E150 www.PDHonline.com
Page 21 of 25
Voltage drop calculations are critical; excess voltage results in hot lamps with greatly shortened life - insufficient voltage results in weak, ineffective lighting. The design challenge is to match cable size, total lamp wattage and circuit length to produce voltage within the range of 10.5 to 12 volts. (The excess voltage is reduced by the length of run to the first fixture). This allows greater design freedom and efficiency.
Looping back wire to the beginning of the run is a way to prevent having a high voltage getting to a fixture near the transformer. Just plant the fixture but don’t connect it until you loop the end of the wire back to the first fixture. Take advantage of the drop in the entire run to lower the voltage to the fixture.
Testing and Troubleshooting Low-voltage lighting installations require a great deal of care during installation due to the high currents in the system. Placing too many fixtures on the circuit or using the wrong wire size can lead to a system overload. Therefore, it’s important to troubleshoot the system after installation. The most common problems encountered in low-voltage landscape lighting installations are poor wire connections, too many fixtures on one transformer (overloading), and cables that are too small for the load.
Section 5A – Retrofitting your Landscape Lighting with LEDs
Retrofitting existing low voltage Landscape Lighting systems with LED fixtures or bulb assemblies sounds like a good idea but requires special attention to the
voltages used. The benefits of using LEDs instead of incandescent lights bulbs are numerous.
LEDs last longer than incandescent bulbs because they run cooler and are solid state electronic devices. Although they cost more, their long life equals out the expense. Since LEDs are powered off a voltage converter, they are isolated from
the effects of AC input line voltages and therefore produce a consistent light level regardless of these input variations. Also, LEDs use less power and therefore cost less to operate over the many hours that your system will be on.
Now for the issues. LEDs run off of 5-12 VDC. Typical low voltage landscape lighting transformers output 12 VAC, which is incompatible with LED light
assemblies. An incandescent bulb doesn’t care about AC or DC because it is just a filament wire that heats up and glows to emit light.
An LED however is an electronic device sensitive to the input voltage type and magnitude. Some LED assemblies have their own voltage converters built in to rectify and filter the AC input produce a DC output. Another approach is to use
your existing transformer and lighting fixtures and replace the incandescent bulbs with LED assemblies.
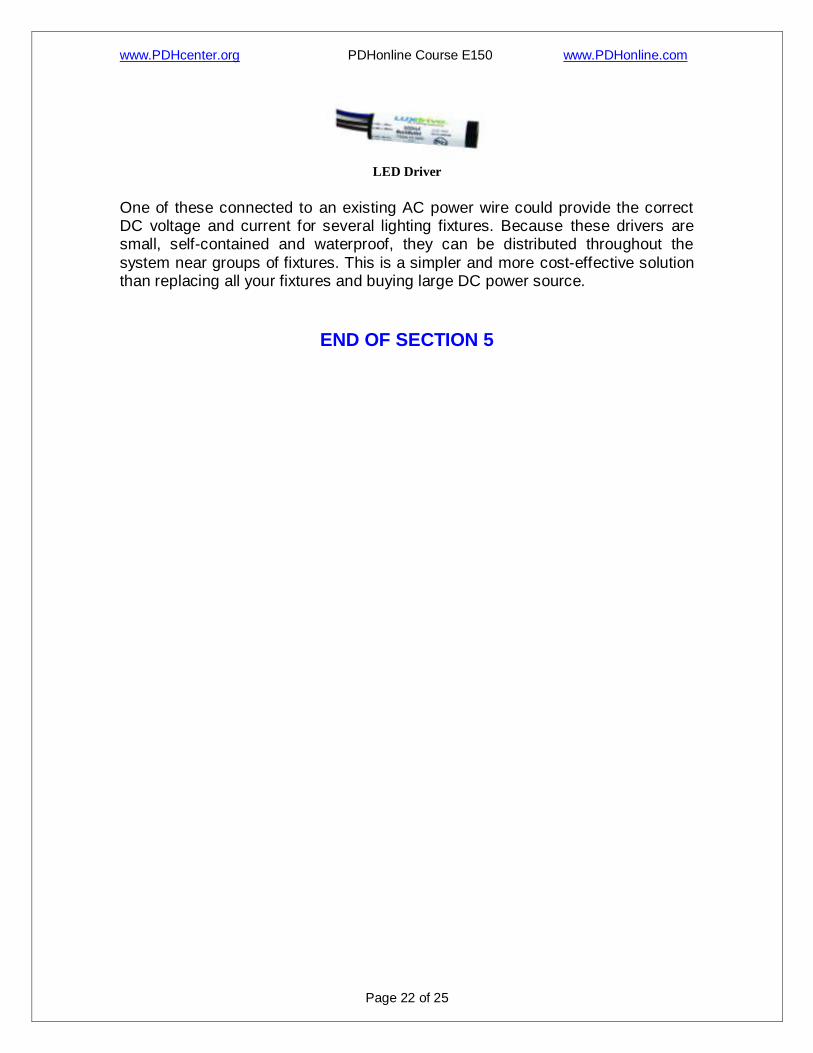
To do this, you can purchase and install in line voltage converter modules or Driver similar to the one pictured below.
www.PDHcenter.org PDHonline Course E150 www.PDHonline.com
Page 22 of 25
LED Driver
One of these connected to an existing AC power wire could provide the correct DC voltage and current for several lighting fixtures. Because these drivers are small, self-contained and waterproof, they can be distributed throughout the
system near groups of fixtures. This is a simpler and more cost-effective solution than replacing all your fixtures and buying large DC power source.
END OF SECTION 5
www.PDHcenter.org PDHonline Course E150 www.PDHonline.com
Page 23 of 25
Section 6 - Cost Estimating and Budgeting
This section addresses elements involved in the cost estimating of a Low Voltage Landscape Lighting system. There are five major components contributing to the cost. They are: Fixture Cost – these can range from a few dollars to hundreds of dollars (your choice). Also
don’t forget the mounting stakes or brackets Lamp or Bulb Cost – some fixtures come with bulbs, some don’t. Make a list of what you
have to buy separately. Transformer cost – small and unsophisticated: not too bad. Robust, large capacity with bells
and whistles; hundreds of dollars and you may need more than one. Don’t forget the timers. They are usually optional.
Wire cost - 10 gauge is heavier and costs more that 12 gauge. How much of each do you
need? That’s for you to gauge! (Sorry for the pun). Don’t forget connectors. Some fixtures come with them, some don’t. You can also hard wire the lights with wire nuts and waterproof sealing compound.
Labor – who’s installing this system? Sure, you’re free but you also may be mortal and need
some help. Anyway, it’s going to either cost you money or years off your life. Again, you choose.
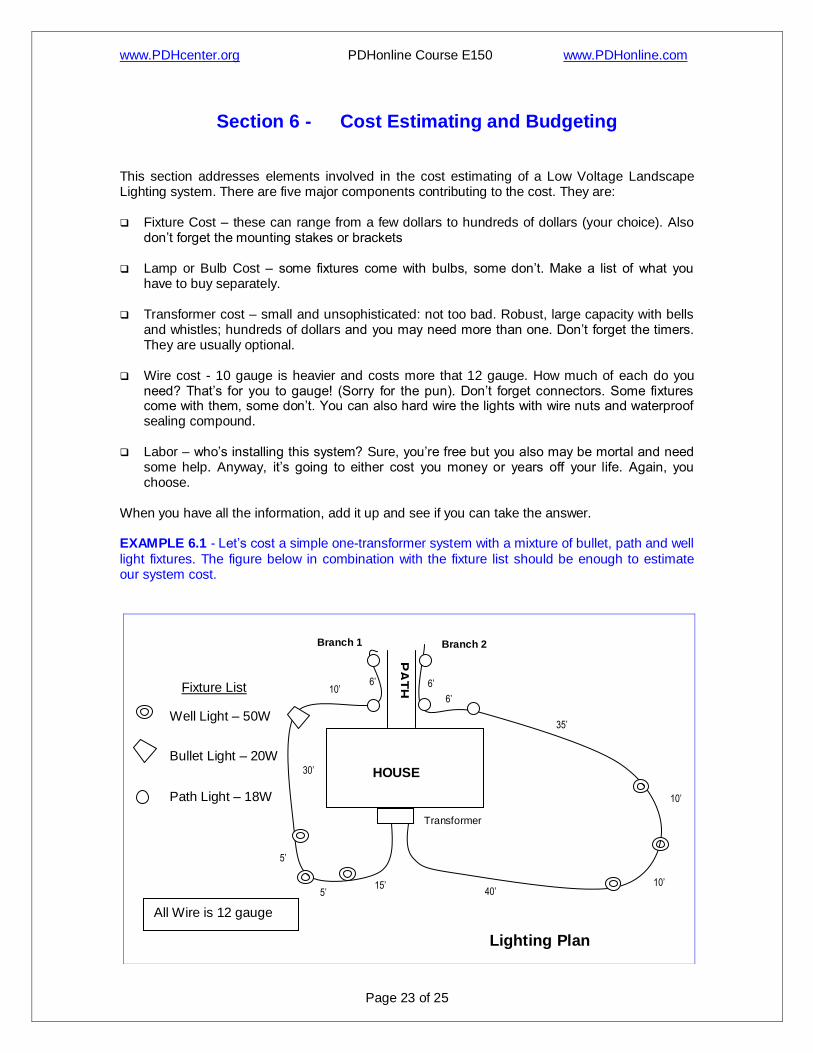
When you have all the information, add it up and see if you can take the answer. EXAMPLE 6.1 - Let’s cost a simple one-transformer system with a mixture of bullet, path and well
light fixtures. The figure below in combination with the fixture list should be enough to estimate our system cost.
HOUSE
PA
TH
Transformer
Fixture List
Well Light – 50W
Bullet Light – 20W
Path Light – 18W
30’
5’
5’ 15’
40’
10’ 6’ 6’
6’
35’
10’
10’
All Wire is 12 gauge
Lighting Plan
Branch 1 Branch 2
www.PDHcenter.org PDHonline Course E150 www.PDHonline.com
Page 24 of 25
First let’s add up the wattage so we can pick a transformer. Branch 1 has 3 – 50W well lights, 1 – 20W bullet light and 2 – 18W path lights for a total of 206 Watts. Branch 2 has 3 – 50W well lights and 3 – 18-Watt path lights for a total of 204 Watts. So there is a total lamp load of 410 Watts. Well that’s easy, a 600-Watt transformer it is, but should it be a single voltage or multi-tap? My recommendation here is that if you can stand a little more cost, you get a lot more flexibility in installation and growth with a multi-tap configuration. You don’t have to do so many wire loop tricks to get the right voltage and if you change your landscaping, your lighting system has the flexibility to adapt and keep up. Let’s assume that this transformer is $ 595.00. Let’s move on to the fixtures. Lets say we select well lights that are $ 35.00 each, path lights that are $40.00 each and a bullet fixture that costs $30.00. Assume they come with mounting brackets and connectors (Not always true). Let’s also say the 50 MR-16 bulbs are $5.00 each and that they are used in the bullet fixtures and well lights. Let’s also say that the path lights use 2-pin bulbs costing $3.00 each. Ok now lets look at the wire. The total length shown equals 178 feet of 12/2 wire. So we buy 200 feet to be safe. Assume that costs $60.00. The last element contributing to cost is the labor to actually run the wires and install the fixtures and transformer(s). If you can do it yourself, great! If not, some rules of thumb will help you estimate or validate estimate you receive. If you allocate $20 - $25 per simple fixture installation and treat each transformer as two fixtures, this should give you a decent estimate of the installation labor. This figure includes running the wire and basic validation of system operation. OK for this example, there are 12 fixtures and 1 transformer. This equates to 14 fixture installations at say $25 each. This gives a labor cost of 14 x 25 or $350. Somehow this number is always low so let’s pad it to $400.
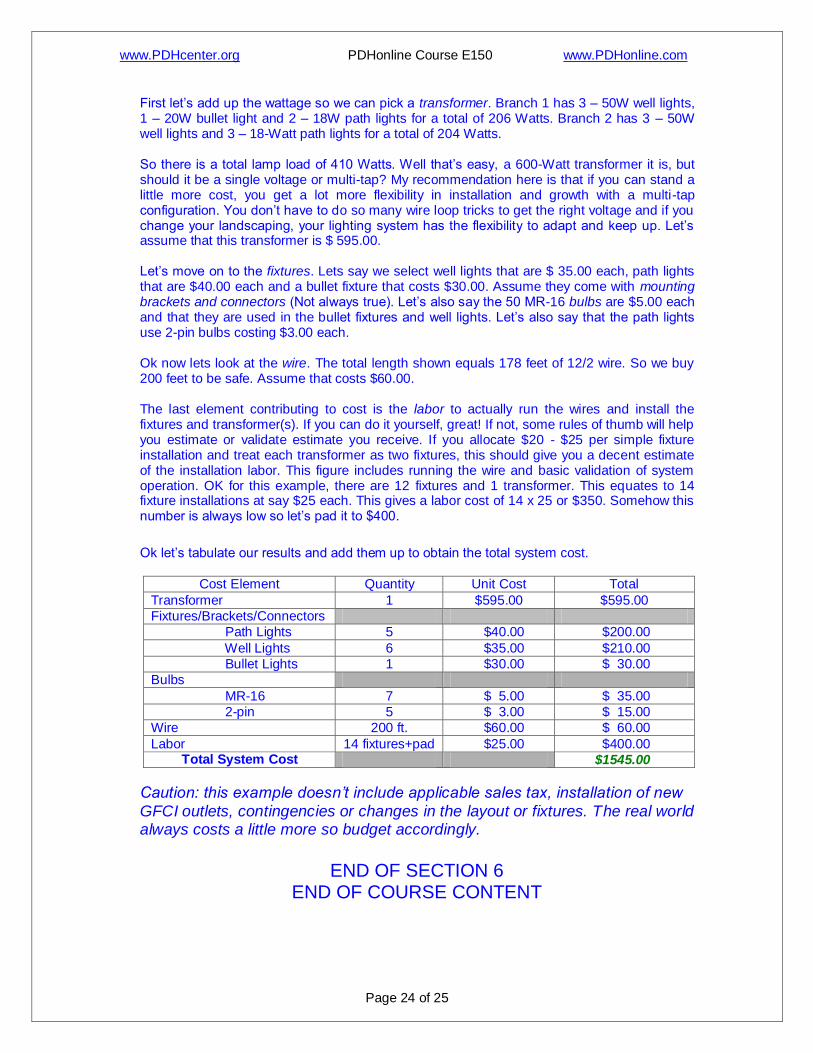
Ok let’s tabulate our results and add them up to obtain the total system cost.
Cost Element Quantity Unit Cost Total
Transformer 1 $595.00 $595.00
Fixtures/Brackets/Connectors
Path Lights 5 $40.00 $200.00
Well Lights 6 $35.00 $210.00
Bullet Lights 1 $30.00 $ 30.00
Bulbs
MR-16 7 $ 5.00 $ 35.00
2-pin 5 $ 3.00 $ 15.00
Wire 200 ft. $60.00 $ 60.00
Labor 14 fixtures+pad $25.00 $400.00 Total System Cost $1545.00
Caution: this example doesn’t include applicable sales tax, installation of new
GFCI outlets, contingencies or changes in the layout or fixtures. The real world always costs a little more so budget accordingly.
END OF SECTION 6
END OF COURSE CONTENT
www.PDHcenter.org PDHonline Course E150 www.PDHonline.com
Page 25 of 25
ACKNOWLEDGEMENTS
This course is a compilation and combination of original work, experience, readings from reference books and articles as well as advice, information and product pictures borrowed from various manufacturers’ web sites, I will attempt to list them all to give credit where credit is due. Thanks to all my references. Photographs
Articles
The Fundamentals of a Successful Low-Voltage Lighting Design - By Dick Liepold, Progress Lighting (Source for Tables 1 and 2).
Advice or Information
Installation Tip(s) - George Gregorian, President of Landscape Lighting Concepts, Inc., Carnston, RI. http://www.landscapelightingconcepts.com Information and Tips - Residential Landscape Lighting & Design http://www.residential-landscape-lighting-design.com/ Tips and Information - Ruudlighting http://www.ruudlighting.com/landscape/5_step.asp#Determine%20Cable%20Length
Books
The Art of Outdoor Lighting : Landscapes with the Beauty of Lighting by Randall Whitehead The Landscape Lighting Book by Janet Lennox Moyer