lpg dispensers ocean euro lpg - tatsuno europe stazeni-en/in026-en_00... · lpg dispensers ocean...
TRANSCRIPT
Document: LPG dispensers OCEAN EURO LPG, Installation and User Manual
File: IN026‐EN_00_OceanLPGInstalInstrukceRev00
Revision & Date: Revision 00, April 1st, 2014
Pages: 71 (including cover)
Created by: Ing. Milan Berka & Karel Viktorin (translation)
TATSUNO EUROPE a.s., Pražská 2325/68, 678 01 Blansko, Czech Republic, tel.+420 516 428 411, http://www.tatsuno‐europe.com
LLPPGG DDIISSPPEENNSSEERRSS
OOCCEEAANN EEUURROO LLPPGG
Installation and User Manual

TATSUNO EUROPE a.s. Pražská 2325/68 • 67801 Blansko
Czech Republic Tel: +420 516 428 411 • Fax: +420 516 428 410
e‐mail: info@tatsuno‐europe.com, http://www.tatsuno‐europe.com
©© CCooppyyrriigghhtt
Neither this manual nor any of its parts may be copied without the consent of
TATSUNO EUROPE a. s.
LPG dispensers OCEAN EURO LPG ‐ Installation and User Manual
3
TABLE OF CONTENTS
TABLE OF CONTENTS ........................................................................................................................... 3
INTRODUCTION ................................................................................................................................... 5
1. INTRODUCTORY INFORMATION .................................................................................................. 7
1.1. STUDY THE MANUAL FIRST ......................................................................................................................................... 8
1.2. AUTHORIZED USAGE ................................................................................................................................................. 8
1.3. BRIEF CHARACTERISTICS OF THE USED MEDIUM ............................................................................................................. 9
2. OCEAN EURO LPG DISPENSERS ................................................................................................... 10
2.1. DISPENSER DESCRIPTION .................................................................................................................................... 10 2.1.1. Basic Parts of the Dispenser .................................................................................................................................................................. 12
2.2. CERTIFICATES AND APPROVALS ............................................................................................................................ 13 2.2.1. Metrology .............................................................................................................................................................................................. 13 2.2.2. Safety .................................................................................................................................................................................................... 13 2.2.3. Electromagnetic Compatibility (EMC) .................................................................................................................................................... 13
2.3. BASIC TECHNICAL DATA ..................................................................................................................................... 14 2.3.1. Hydraulic Unit of LPG Dispensers........................................................................................................................................................... 14 2.3.2. Electronic Counter ................................................................................................................................................................................. 14 2.3.3. Ambient Conditions ............................................................................................................................................................................... 14
2.4. DISPENSER MODEL IDENTIFICATION ..................................................................................................................... 15 2.4.1. Additional Abbreviations in the Dispenser Marking .............................................................................................................................. 16 2.4.2. Standard Models of LPG Dispensers ...................................................................................................................................................... 16 2.4.3. Size & Weight ........................................................................................................................................................................................ 17 2.4.4. Pictures of LPG Dispensers..................................................................................................................................................................... 18
2.5. TYPE LABEL ..................................................................................................................................................... 22
3. DISPENSER INSTALLATION .......................................................................................................... 23
3.1. INSTRUCTIONS FOR SAFE WORK .......................................................................................................................... 23
3.2. RECEIPT, TRANSPORT, UNPACKING ...................................................................................................................... 23
3.3. DISPENSER LOCATION ........................................................................................................................................ 23 3.3.1. Generally ............................................................................................................................................................................................... 24 3.3.2. Single‐Sided Dispenser Orientation ....................................................................................................................................................... 24 3.3.3. Distance of the Dispenser from the Tank ............................................................................................................................................... 24
3.4. MECHANICAL MOUNTING OF THE DISPENSER ......................................................................................................... 24
3.5. ELECTRICAL WIRING OF THE FUEL DISPENSER ......................................................................................................... 25 3.5.1. On/Off Switching of the LPG Pump Motor contactor............................................................................................................................. 26 3.5.2. Powering the Electronic Counter and Switching Elements ..................................................................................................................... 26 3.5.3. Data (Communication) Line ................................................................................................................................................................... 27 3.5.4. Service Lines .......................................................................................................................................................................................... 29 3.5.5. Cable Characteristics ............................................................................................................................................................................. 29
4. BASIC FUNCTIONS AND DISPENSER SETTINGS ............................................................................. 35
4.1. PDEX COUNTER ............................................................................................................................................... 35 4.1.1. PDERT Remote Controller Description ................................................................................................................................................... 35 4.1.2. Displaying Data in the Setup Mode ....................................................................................................................................................... 37 4.1.3. Operator Mode ...................................................................................................................................................................................... 37 4.1.4. Manager Mode ..................................................................................................................................................................................... 38 4.1.5. Non‐Resettable Volume Totalizers (Code 01) ........................................................................................................................................ 39 4.1.6. Daily Totalizers (Code 02) ...................................................................................................................................................................... 40 4.1.7. Unit Prices of Fuel Products (Code 03) ................................................................................................................................................... 40 4.1.8. Current Time and Date (Code 04) .......................................................................................................................................................... 41 4.1.9. Displaying the Program Version and Check Sums (Code 05) .................................................................................................................. 41 4.1.10. Error Message History (Code 06) ......................................................................................................................................................... 42
TATSUNO EUROPE a.s., www.tatsuno‐europe.com
4
4.1.11. Latest Fuel Delivery History (Code 07) ................................................................................................................................................. 42 4.1.12. Access Password to the Manager Mode (Code 08) ............................................................................................................................. 43 4.1.13. Maintenance History (Code 09) ........................................................................................................................................................... 43 4.1.14. Operating Mode of the Fuel Dispenser (Code 12) ................................................................................................................................ 43 4.1.15. Error Statistics (Code 13) ..................................................................................................................................................................... 44 4.1.16. Current Operating Temperature (Code 14).......................................................................................................................................... 44 4.1.17. Resetting Daily Totalizers (Code 15) .................................................................................................................................................... 45 4.1.18. Manufacturer’s Lock Code (Code 16) ................................................................................................................................................... 45 4.1.19. Display Backlight Intensity (Code 17) .................................................................................................................................................. 45 4.1.20. Graphic Display Text Messages (Code 18) ........................................................................................................................................... 45 4.1.21. Displaying the Display Segment Error (Code 19) ................................................................................................................................. 46
4.2. TBELTX COUNTER ............................................................................................................................................ 46 4.2.1. Setting the Fuel Unit Price ..................................................................................................................................................................... 47 4.2.2. Reading the Electronic Totalizers .......................................................................................................................................................... 47 4.2.3. Changing the Operating Mode .............................................................................................................................................................. 48
5. OPERATION ............................................................................................................................... 49
5.1. INSTRUCTIONS FOR SAFE OPERATION ................................................................................................................... 49
5.2. PUTTING THE DISPENSER INTO OPERATION ............................................................................................................ 50
5.3. OPERATION OF THE LPG DISPENSER .................................................................................................................... 51 5.3.1. Delivery of LPG into Motor Vehicles ...................................................................................................................................................... 51 5.3.2. Safety of LPG Dispenser Operation ........................................................................................................................................................ 52 5.3.3. Electromechanical Liter Totalizers ......................................................................................................................................................... 53 5.3.4. Dispenser Operating Modes .................................................................................................................................................................. 53 5.3.5. Pre‐Setting Keyboars ............................................................................................................................................................................. 54 5.3.6. Turning the Dispenser Off ...................................................................................................................................................................... 55
6. MAINTENANCE AND SERVICE ..................................................................................................... 55
6.1. KEY PRINCIPLES FOR THE MAINTENANCE OF DISPENSERS .......................................................................................... 55 6.1.1. Maintenance of the Dispenser’s Covers................................................................................................................................................. 56 6.2.1. Dispenser Error Messages ..................................................................................................................................................................... 56
6.2. SERVICE OF OCEAN EURO LPG DISPENSERS ........................................................................................................ 59 6.3.1. Warranty and Claims ............................................................................................................................................................................ 59 6.3.2. Attachments .......................................................................................................................................................................................... 60
APPENDIX 1 ‐ FOUNDATION PLANS .................................................................................................... 63
APPENDIX 1.1 – FOUNDATION PLANS OF BMP4011.OEL(R)/LPG & BMP4012.OED/LPG .................................................... 63
APPENDIX 1.2 – FOUNDATION PLAN OF BMP4022.OED/LPG ............................................................................................ 64
APPENDIX 1.3 – FOUNDATION PLANS OF BMP4022.OEL(R)/LPG‐2C & BMP4034.OED/LPG‐4C ......................................... 65
APPENDIX 2 – CLASSIFICATION AND SCOPE OF DISPENSER ZONES PURSUANT TO EN 60079‐10‐1 ....... 67
APPENDIX 2.1 – OCEAN EURO LPG DISPENSER ZONES IN BASIC MODEL .............................................................................. 67
APPENDIX 2.2 – OCEAN EURO LPG DISPENSER ZONES IN CUBE MODEL ............................................................................. 68
PŘÍLOHA 2.1 – OCEAN EURO LPG DISPENSER ZONES IN FIN MODEL .................................................................................. 69
PŘÍLOHA 2.1 – OCEAN EURO LPG DISPENSER ZONES IN WAVE MODEL .............................................................................. 70
LPG dispensers OCEAN EURO LPG ‐ Installation and User Manual
5
INTRODUCTION
This manual is for users of TATSUNO OCEAN EURO LPG dispensers as well as for designer studios who design
fuel stations. The company TATSUNO recommends thorough studying of the manual, including all of its
attachments. The manual must be available to the dispenser operators during installation and regular
maintenance of dispensers.
Keep this manual along with its attachments over the whole life time of the dispenser
Make it available to other owners and users as well
Perform updates of regulations – see http://www.tatsuno‐europe.com/_en/download/
The attachments properly reflect reality at the time of publishing. The producer reserves the right to change
technical conditions of the equipment or its attributes without written notice, due to continuous development
and improvements.
All rights are reserved. No part of this manual may be reproduced or transmitted without the written consent
of the company TATSUNO EUROPE a. s.
TATSUNO EUROPE a.s., www.tatsuno‐europe.com
6
Document revisions
Revision No. / Date Change description Made by
Revision 00 / 1. 4. 2014 Basic version of the document Ing. Milan Berka
LPG dispensers OCEAN EURO LPG ‐ Installation and User Manual
7
1. INTRODUCTORY INFORMATION
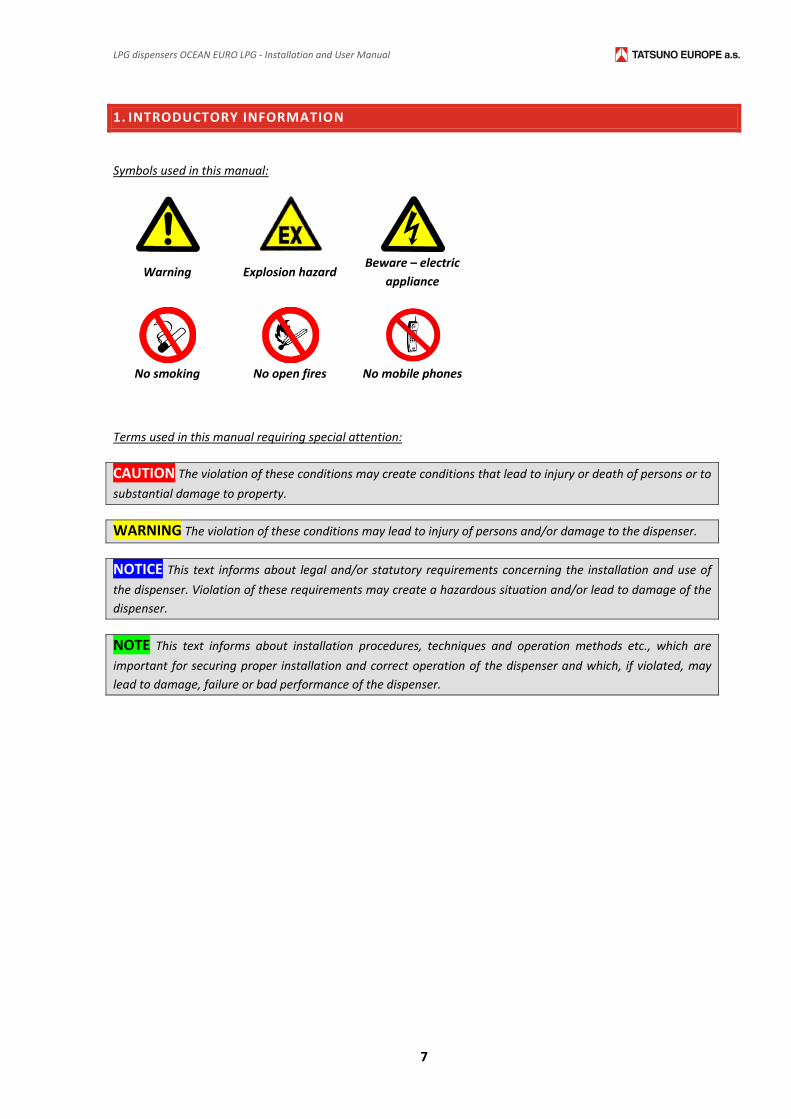
Symbols used in this manual:
Warning Explosion hazard Beware – electric
appliance
No smoking No open fires No mobile phones
Terms used in this manual requiring special attention:
CAUTION The violation of these conditions may create conditions that lead to injury or death of persons or to
substantial damage to property.
WARNING The violation of these conditions may lead to injury of persons and/or damage to the dispenser.
NOTICE This text informs about legal and/or statutory requirements concerning the installation and use of
the dispenser. Violation of these requirements may create a hazardous situation and/or lead to damage of the
dispenser.
NOTE This text informs about installation procedures, techniques and operation methods etc., which are
important for securing proper installation and correct operation of the dispenser and which, if violated, may
lead to damage, failure or bad performance of the dispenser.
TATSUNO EUROPE a.s., www.tatsuno‐europe.com
8
1.1. STUDY THE MANUAL FIRST
Before installation or operation of the dispenser, first study the relevant parts of the Installation and
User Manual. Consider all the hazards, warnings and notes in the manual.
The producer provides this Installation and User Manual in order to present all the necessary
information and instructions for full and efficient installation, use and maintenance of our dispensers of
the OCEAN EURO LPG type series.
This manual was created by the producer and forms an inseparable part of the dispenser accessories.
The use of this manual is done at the full responsibility of the user; any operations not described here
must be considered forbidden. Any operator who performs such operations will take all responsibility
for the results of such actions.
The manual is organized into individual sections, which have their subsections, so each topic is
independent and also corresponds to operational logic (learn – prepare – use – maintain).
The manual properly reflects the technical situation at the moment of sale of the dispenser and it
cannot be deemed inadequate as a result of any subsequent changes and updates according to the
latest circumstances.
NOTICE Keep this manual and enclosed documents over the whole service life of the appliance for future
reference!
1.2. AUTHORIZED USAGE
The dispensers of the BMP4000.O/LPG, series are intended for stationary use for dispensing of liquefied
petroleum gas (hereinafter only LPG) in specified quantities from the storage tank into motor vehicles.
ATTENTION The dispenser is a complicated appliance that carries out a number demanding functions.
Before commissioning, the tanks and pipes must therefore be cleaned and the cleanliness of the fuel must be
verified (dirty filters in the dispenser cannot be considered as a reason for warranty repairs!). Before
commissioning, the electrical wiring and proper connections must be reviewed to prevent electric shock
injury and to ensure explosion protection (the fuel is class I flammable material).
NOTICE Any changes to the dispenser may revoke the validity of the device certification. See the
certification documents and the manufacturer’s instructions every time when considering any
modification of the electrical wiring and/or the whole device.
Every fuel dispenser is tested at the production plant concerning its function, safety and metrology. The
delivery of each fuel dispenser includes certificates which the producer must provide to relevant authorities
upon request.

LPG dispensers OCEAN EURO LPG ‐ Installation and User Manual
9
1.3. BRIEF CHARACTERISTICS OF THE USED MEDIUM
LPG is the trade name for a liquefied mixture of light carbohydrates (Liquefied Petroleum Gas), mainly with
three to four atoms of carbon in a molecule. LPG is harvested in synthetic production of gasoline and lately
also in the processing of natural gas. LPG is a colorless, easily volatile liquid with a specific odor.
After releasing the overpressure, LPG evaporates quickly and produces a flammable gas approximately twice
as heavy as air. Evaporating 1 m3 of LPG (approx. 550 kg) into the air results, after the gas dilution into the
lower explosion limit, in about 12.400 ÷ 83.330 m3 of an explosive mixture heavier than air that cumulates on
the ground.
Table 1 – Physical properties of the main components of an LPG mixture
Physical properties in liquid state propane butane
formula C3H8 C4H10
molecule mass 44,09 58,12
boiling point (°C) ‐42,6 ‐0,6
density (kg/m3 at 20°C) 502 579
Physical properties in gaseous state
density (kg/m3 at atmospheric pressure) 1,865 2,76
consistency (air = 1) 1,562 2,091
calorific value (MJ/m3 at 0°C and atmospheric pressure) 93,57 123,76
Explosion limit in air mixture in % of volume
lower 1,7 1,3
upper 10,9 9,3
ignition temperature in °C 465 365
The physical properties of the LPG mixture are within the scope of the properties of its individual constituents.
Liquid LPG has similar properties to gasoline, i.e. dissolves and dries seals made of natural rubber, organic
lubricants, varnish and other related substances. In contrast, some of the substances that withstand the
effects of LPG are synthetic rubber, graphite plugs, Teflon material etc. For sealing threaded connections for
both liquid and gaseous LPG the used material is Teflon tape or the LOCTITE mixture. Usage of sealing fillers or
fillers made of lampblack (HERMETIC, HERMOSAL) results in the connections being difficult to dismantle. For
connections with flanges, the suitable sealing rings are made of Teflon or Klingerit suitable for LPG.
Gaseous LPG has a slight narcotic effect on the human organism. After a certain amount of time, inhaling
gaseous LPG causes headaches, nausea, dizziness, reduced attention, and drowsiness. Unless it leads to a fire
and burns of the victim, gaseous LPG can cause the suffocation of workers, even though it isn’t directly
poisonous, unlike for example coal gas. Because it is heavier than air, it cumulates on the ground and in
hollows and a lying unconscious person (as a result of injury etc.) may be in an unbreathable atmosphere.
Gaseous LPG further causes degreasing of the skin.
In case of a sharp decrease in pressure to atmospheric pressure (e.g. in case of an LPG leak from the device),
LPG vaporizes at the temperature of ‐42°C, so in case of contact with skin it causes frostbite.
TATSUNO EUROPE a.s., www.tatsuno‐europe.com
10
2. OCEAN EURO LPG DISPENSERS
2.1. DISPENSER DESCRIPTION
The OCEAN EURO LPG dispensers serve for pumping LPG into vehicles and for commercial purposes.
The dispensers are equipped with high quality Japanese hydraulics of the company TATSUNO Corporation
(also referred to as TATSUNO) and an efficient and reliable electronic counter of the Czech company TATSUNO
EUROPE a. s. All fuel dispensers can operate in the manual mode (individually, off‐line) or in the automated
mode, remotely controlled from the fuel station kiosk and connected to the cash desk (POS) via a data line.
Fuel dispensers of the OCEAN EURO LPG series have their enclosure (cover, door, lid etc.) made of a
varnished steel sheet, stainless metal sheet or nonflammable laminate approved for this use by the state
testing authority (Statement of FTZÚ 04ST 0083). The supporting elements of the dispenser framework are
made of varnished steel sheets of 0.8 ‐ 2.5 mm thickness or of stainless metal sheet. The standard color of the
OCEAN EURO LPG dispensers is white.
Every dispenser is equipped with hydraulics (pumping mono block + piston measuring transducer) of
the Japanese company TATSUNO Corporation. It is a worldwide‐proven type of hydraulics with a high
reliability and a long service life. A two‐channel pulser TATSUNO is fitted on the piston meter. In the lower part
of the module’s hydraulics on the meter console there is a measuring device consisting of the meter, a filter, a
separator, a check valve for the liquid phase and a safety valve of the gaseous phase. The safety valve is
adjusted to the pressure of 1.8 MPa and prevents exceeding the max. operational pressure by letting the
liquid phase back into the storage tank. The outlet of the meter contains a TATSUNO differential valve that
keeps the medium in the meter in the liquid phase. This is a result of the gradual evening out of pressures
after the beginning of dispensing. The measuring device inlet is fitted with a closing ball valve G ¾". The
pumped medium progresses through the meter, the differential valve and a sight‐glass and breakaway safety
coupling into the dispensing hose and through the dispensing hose into the fuel tank of the vehicle. Any gas
phase constituents are separated in the separator and are returned through the check valve into the return
pipe (DN 16), which is connected to the storage tank. A ball valve G ½" is part of the return piping. The filling
pressure can be checked on the manometer located under the nozzle hanger.
The rotary four‐piston meter is of a horizontal design with a vertical crankshaft. The liquid enters the
top part of the meter and is distributed to each piston by a rotary slide valve fixed on the crankshaft. The
pistons move under pressure in the graduated cylinders and this motion is converted by the crankshaft into
rotary motion (one meter shaft revolution = 0.5 dm3). The opto‐electronic pulse generator registers this
motion and converts it into el. pulses, which are processed by the electronic register. The measured liquid is
led away via the rotary slide valve and the crankcase. The meter is calibrated by adjusting the handwheel on
the graduated cylinder cover. Measurement error can be eliminated by adjusting the piston stroke. Turning
the wheel clockwise reduces the delivered volume, and vice versa (turning counterclockwise increases the
delivered volume). One wheel division represents setting by 0.08 % of the delivered volume. The flow meter
accuracy lies in the range of ± 1 % of the delivered volume. The pumped medium (LPG) is delivered by a pump
placed outside the fuel dispenser area; it flows through a safety electromagnetic valve (if installed), through
the ball valve and filter into the separator. If the medium comprises gaseous constituents, they are separated
and returned from the top part of the separator by the return piping, which has to be opened if the dispenser
is running, back to the storage tank. The ID of the return piping must be DN 16. The zone of the gaseous
LPG dispensers OCEAN EURO LPG ‐ Installation and User Manual
11
differential valve phase is connected with the return piping. From the separator the liquid flows via a return
valve into the piston meter and flows through the differential valve and the sight glass with the break‐through
coupling into the dispensing hose and nozzle.
LPG dispensers are, as a standard, equipped with a PDE or TBELTx calculator of the company
TATSUNO EUROPE a. s., which are fitted into the counter module. The electronic counter processes pulses
from the generator (pulser) and transmits them to the display, where the dispensed volume, price and volume
unit price is displayed. In case of power failure, the data on LCD displays are maintained for min. 15 minutes.
Dispensers can be operated in a Manual mode without a control system, or an Automatic mode connected
via a communication line to the cash system of the fuel station.
Presetting. All types of dispensers can be fitted with electromagnetic slowdown valves that ensure a
precise preset of price and volume of the delivered fuel and an easy‐to‐use four‐button keyboard that allows
controlling the fuel price or volume preset by the customer directly from the dispenser.
Temperature compensation system. BMP4000.O/LPG dispensers can be fitted with a device for
temperature compensation of the dispensed volume. The separator contains a PT100 thermal sensor that
continuously monitors the medium temperature. This information is continuously sent to the electronic
counter, which “recalibrates” the meter depending on the volume/temperature rate.
The main advantages of OCEAN EURO LPG fuel dispensers are:
High efficiency and guaranteed quality
High variability – a low‐cost basic version can, through the addition of a wide range of accessories and
additional modules, be turned into a comfortable dispenser with a personalized design
Easy maintenance and service – simple construction
wide temperature range of operation (‐20°C / +40°C)
possibility for temperature compensation of the dispensed medium to the reference temperature
15°C (20°C)
TATSUNO EUROPE a.s., www.tatsuno‐europe.com
12
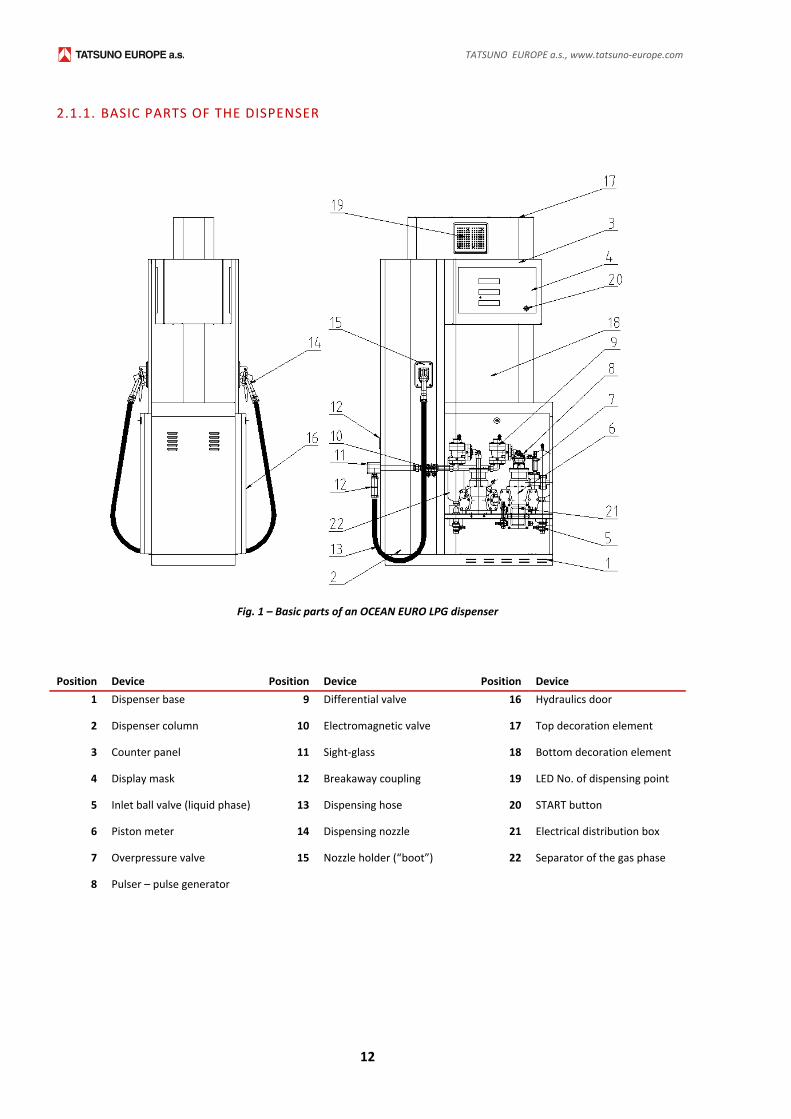
2.1.1. BASIC PARTS OF THE DISPENSER
Fig. 1 – Basic parts of an OCEAN EURO LPG dispenser
Position Device Position Device Position Device
1 Dispenser base 9 Differential valve 16 Hydraulics door
2 Dispenser column 10 Electromagnetic valve 17 Top decoration element
3 Counter panel 11 Sight‐glass 18 Bottom decoration element
4 Display mask 12 Breakaway coupling 19 LED No. of dispensing point
5 Inlet ball valve (liquid phase) 13 Dispensing hose 20 START button
6 Piston meter 14 Dispensing nozzle 21 Electrical distribution box
7 Overpressure valve 15 Nozzle holder (“boot”) 22 Separator of the gas phase
8 Pulser – pulse generator
LPG dispensers OCEAN EURO LPG ‐ Installation and User Manual
13
2.2. CERTIFICATES AND APPROVALS
OCEAN EURO LPG dispensers are in conformity with all European regulations related to metrology and safety.
2.2.1. METROLOGY
The appliance has been certified by the Czech Metrology Institute in Brno, a notified body No. 1383. The
assessment of appliance conformity used the procedure “B” (type testing) + “D” (ensuring production quality)
according to government decree No. 464/2005 Coll., which sets technical requirements for measuring
apparatuses and implements in the Czech Republic the directive of the European Parliament and European
Council No. 2004/22/ES. A new ES type certificate (MID certificate) for fuel dispensers (petrol, diesel oil,
ethanol and their mixtures) for LPG dispensers No. TCM 141/07‐4493 has been issued. Type tests have been
carried out according to OIML R117‐1, OIML R118 and OIML D11.
The company TATSUNO EUROPE a. s. received a Certificate of the Quality Management System No. 0119‐SJ‐
C006‐07 from the Czech Metrology Institute and thus met the requirement of qualification for declarations of
conformity of type, based on ensuring measuring apparatus production quality according to attachment No. 2,
procedure “D” (Chapter 6) of the government decree No. 464/2005 Coll. The validity of the certificate is
reviewed by audits in one‐year intervals.
2.2.2. SAFETY
The dispensers have been certified by the authorized entity No. 210 – The Physics‐Technical Testing Institute
in Ostrava – Radvanice, notified body No. 1026, for the use in areas with an explosion hazard according to the
directive 94/9/ES. The fuel dispensers are confirmed to comply with the European norm on the construction
of fuel dispensers no. EN 13617‐1. A new ES type certificate (ATEX certificate) for fuel dispensers No.
FTZÚ 14 ATEX 0064X has been issued. All parts of dispensers located in areas with an explosion hazard comply
with the European directive ATEX no. 94/9/ES.
The company TATSUNO EUROPE a. s. has received an Acknowledgement of quality insurance
No. FTZÚ 02 ATEX Q030 from the Physical Technical Testing Institute in Ostrava – Radvanice for fuel dispensers
and accessories. The validity of this certificate is reviewed by audits on a yearly basis.
2.2.3. ELECTROMAGNETIC COMPATIBILITY (EMC)
The dispensers have been tested by the Czech Metrology Institute in Brno, notified body No. 1383. The
assessment of appliance conformity was carried out according to the directive of the European Parliament and
European Council No. 2004/108/ES and in accordance with OIML R117‐1, OIML R118.
TATSUNO EUROPE a.s., www.tatsuno‐europe.com
14
2.3. BASIC TECHNICAL DATA
2.3.1. HYDRAULIC UNIT OF LPG DISPENSERS
Pumping output: 50 L/min
Minimum flow rate and volume (Qmin; MMQ) 5 L/min, 5L (at Qmax = 50 L/min)
Type of dispensed liquid: LPG, liquefied propane‐butane
Accuracy class: 1.0 %
Maximum operating pressure: 1.8 MPa (18 bar)
Minimum operating pressure: 0.7 MPa (7 bar)
Solenoid valves: two‐state ON/OFF +24VDC/max. 1A
2.3.2. ELECTRONIC COUNTER
Power source: 230 VAC; +10% ‐15%; 50 Hz ± 5 Hz
Output: max. 300 VA
Displaying units (displays): ‐ volume from 0.01 to 9999.99 L
‐ monetary amount from 0.1 to 99999.9 CZK
‐ unit price from 0.01 to 99.99 CZK/L
2.3.3. AMBIENT CONDITIONS
Operating temperature: from ‐ 20°C to +40°C for standard dispenser models
from ‐ 40°C to +50°C special model with heating
Temperature range of medium: from ‐ 20°C to +50°C
Class of mechanic environment: M1
Electromagnetic environment class: E1
Relative humidity: from 5% to 95%, non‐condensing
LPG dispensers OCEAN EURO LPG ‐ Installation and User Manual
15
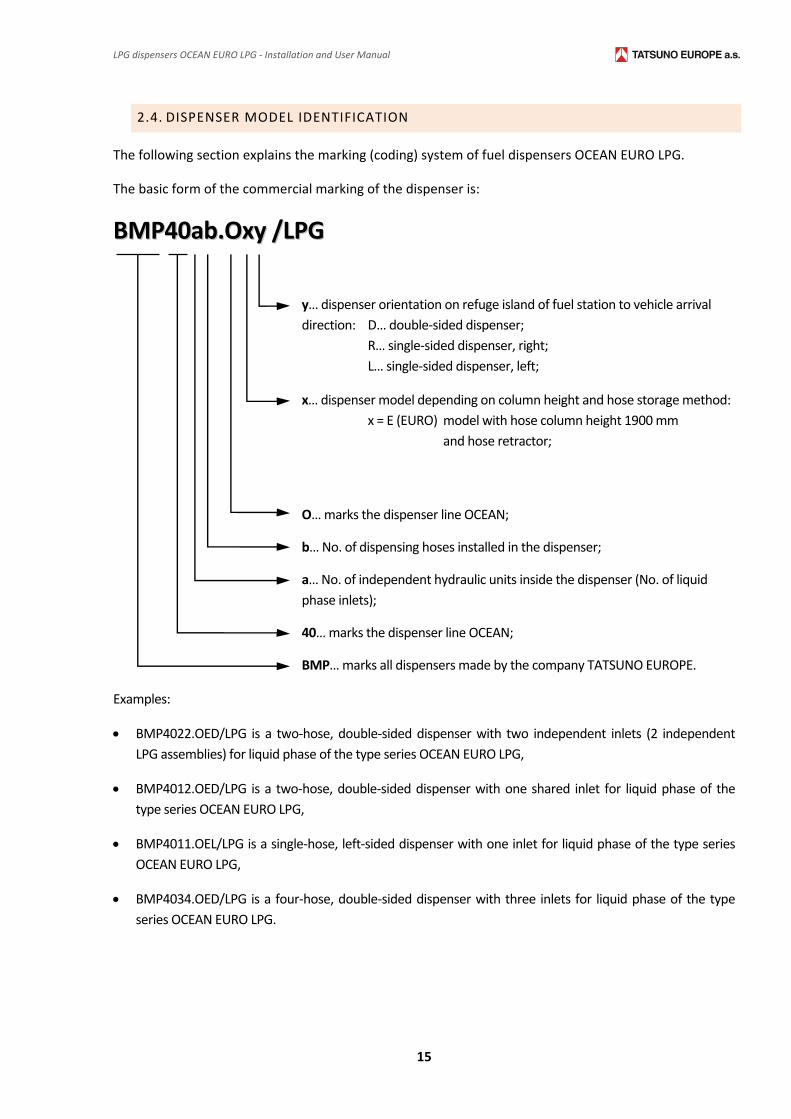
2.4. DISPENSER MODEL IDENTIFICATION
The following section explains the marking (coding) system of fuel dispensers OCEAN EURO LPG.
The basic form of the commercial marking of the dispenser is:
BBMMPP4400aabb..OOxxyy //LLPPGG
y… dispenser orientation on refuge island of fuel station to vehicle arrival
direction: D… double‐sided dispenser;
R… single‐sided dispenser, right;
L… single‐sided dispenser, left;
x… dispenser model depending on column height and hose storage method:
x = E (EURO) model with hose column height 1900 mm
and hose retractor;
O… marks the dispenser line OCEAN;
b… No. of dispensing hoses installed in the dispenser;
a… No. of independent hydraulic units inside the dispenser (No. of liquid
phase inlets);
40… marks the dispenser line OCEAN;
BMP… marks all dispensers made by the company TATSUNO EUROPE.
Examples:
BMP4022.OED/LPG is a two‐hose, double‐sided dispenser with two independent inlets (2 independent
LPG assemblies) for liquid phase of the type series OCEAN EURO LPG,
BMP4012.OED/LPG is a two‐hose, double‐sided dispenser with one shared inlet for liquid phase of the
type series OCEAN EURO LPG,
BMP4011.OEL/LPG is a single‐hose, left‐sided dispenser with one inlet for liquid phase of the type series
OCEAN EURO LPG,
BMP4034.OED/LPG is a four‐hose, double‐sided dispenser with three inlets for liquid phase of the type
series OCEAN EURO LPG.
TATSUNO EUROPE a.s., www.tatsuno‐europe.com
16
2.4.1. ADDITIONAL ABBREVIATIONS IN THE DISPENSER MARKING
There may be additional abbreviations after the basic dispenser code:
Abbreviation Description
/CUBE, /FIN, /WAVE Dispenser with decorative elements
/LON, /DART, /LOG Data line with the interface IFSF‐LON, DART or Logitron PUMALAN
/ER4, /TATPL, /ATCL Data line with the interface Kienzle ER4, TATSUNO Party Line or Autotank ATCL
/TA2331 Outlet of pulses, nozzle and RELEASE signal to connect to Tankautomat TA2331
/ALX Outlet of pulses and nozzle signal to connect to the terminal ALX (ALX‐308)
‐ZV1 Hose at side of dispenser / Position of delivery nozzle on side of dispenser
‐ZV2 Hose at side of dispenser / Position of delivery nozzle on front of dispenser
‐PV Hose at front cover of dispenser / Position of delivery nozzle on front of dispenser
‐2C Two simultaneous deliveries in single‐sided dispenser (2 displays on same side)
‐4C Two simultaneous deliveries in double‐sided dispenser (4 displays on same side)
‐C1x LED site number, 1 digit (0 to 9), x is a color (č‐black, b‐white, z‐green)
‐C2xx LED site number, 2 digits (10 to 29), x is a color (č‐black, b‐white, z‐green)
2.4.2. STANDARD MODELS OF LPG DISPENSERS
All models of fuel dispensers OCEAN EURO LPG can be categorized into a few groups, sorted by:
a) Access to the dispenser
- Double‐sided dispensers; access to dispenser from both sides (TWO‐SIDED)
- Single‐sided dispensers; access to dispenser from one sides (ONE‐SIDED)
b) Number of dispensing hoses
1, 2 or 4 dispensing hoses
- Every dispensing point of a dispenser is equipped with one or two dispensing hoses ended in
dispensing nozzles. A dispenser can have 1, 2 or 4 dispensing hoses/nozzles.
c) Dispenser design
- BASIC model; basic model of dispenser with no additional decoration elements
- WAVE model; dispenser with decoration elements in the shape of a wave ‐ marking /WAVE
- CUBE model; dispenser with decoration elements in the shape of a wave ‐ marking /CUBE
- FIN model; dispenser with decoration elements in the shape of a wave ‐ marking /FIN
LPG dispensers OCEAN EURO LPG ‐ Installation and User Manual
17
Dispenser type Number of
sides
Number of
hoses
Number of LPG
inlets
Number of
displays
Pumping output
[L/min]
BMP4011.OEL /LPG 1 1 1 1 50
BMP4011.OER /LPG 1 1 1 1 50
BMP4012.OED /LPG 2 2 1 2 2 x 50 (2 x 35)*
BMP4022.OED /LPG 2 2 2 2 2 x 50
BMP4022.OEL /LPG‐2C 1 2 2 2 2 x 50
BMP4022.OER /LPG‐2C 1 2 2 2 2 x 50
BMP4034.OED /LPG‐4C 2 4 3 4 2 x 50 + 2 x 50 (2 x 35)*
* For single pumping the output is 50 L/min; for simultaneous pumping from both hoses the output is 2 x 35 L/min.
2.4.3. SIZE & WEIGHT
Dispenser type Height
[mm]
Width
[mm]
Length
[mm]
Mass
[kg]
BMP4011.OEL(R) /LPG
1900
520
900
150
BMP4012.OED / LPG 185
BMP4022.OED / LPG 195
BMP4022.OEL(R) /LPG‐2C 1300
180
BMP4034.OED / LPG‐4C 245
BMP4011.OEL(R) / LPG /WAVE
2160
900
155
BMP4012.OED / LPG /WAVE 190
BMP4022.OED / LPG /WAVE 200
BMP4022.OEL(R) / LPG ‐2C/WAVE 1300
185
BMP4034.OED / LPG ‐4C/WAVE 250
BMP4011.OEL(R) / LPG /CUBE
2156
900
154
BMP4012.OED / LPG /CUBE 189
BMP4022.OED / LPG /CUBE 199
BMP4022.OEL(R) / LPG‐2C/CUBE 1300
184
BMP4034.OED / LPG ‐4C/CUBE 249
BMP4011.OEL(R) / LPG /FIN
900
153
BMP4012.OED / LPG /FIN 188
BMP4022.OED / LPG /FIN 198
BMP4022.OEL(R) / LPG ‐2C/FIN 1300
183
BMP4034.OED / LPG ‐4C/FIN 248
TATSUNO EUROPE a.s., www.tatsuno‐europe.com
18
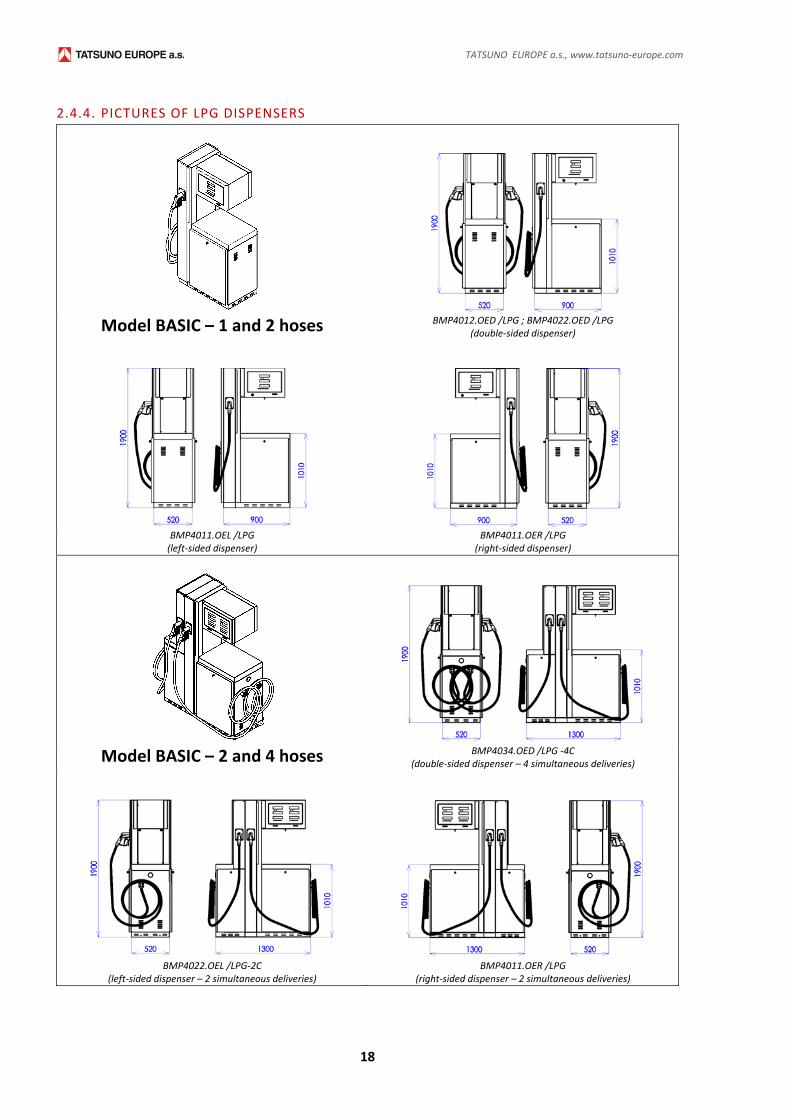
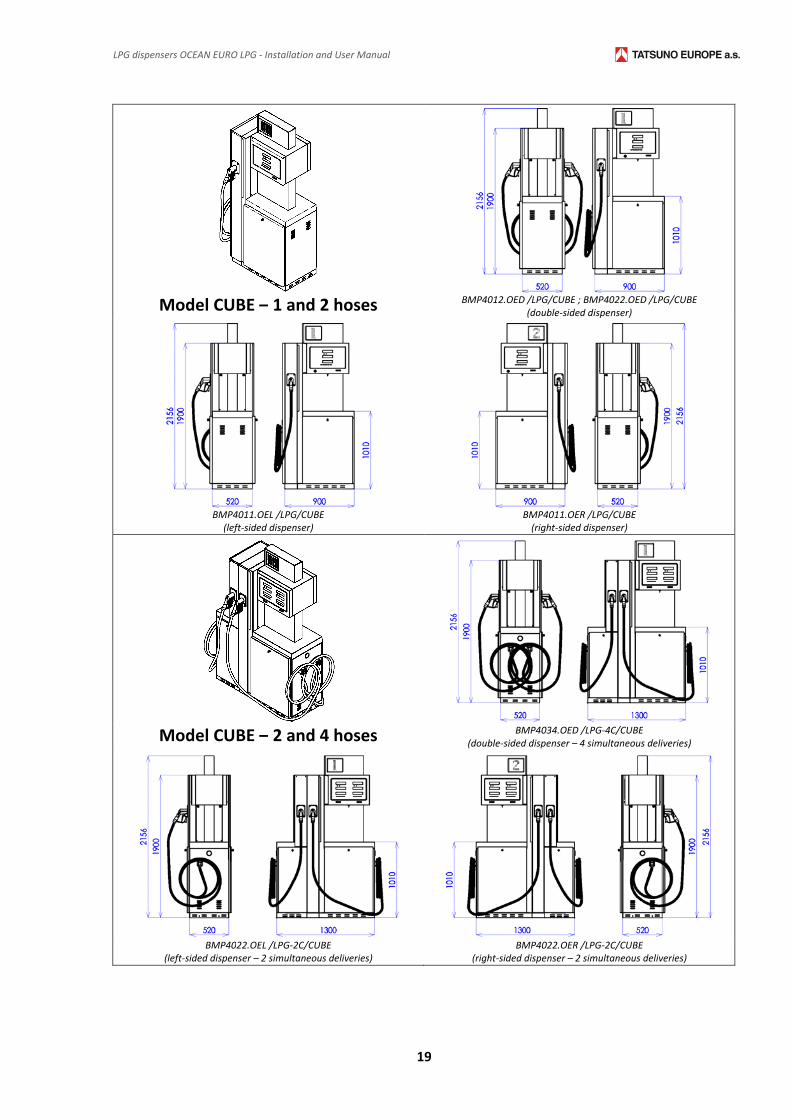
2.4.4. PICTURES OF LPG DISPENSERS
Model BASIC – 1 and 2 hoses BMP4012.OED /LPG ; BMP4022.OED /LPG (double‐sided dispenser)
BMP4011.OEL /LPG (left‐sided dispenser)
BMP4011.OER /LPG (right‐sided dispenser)
Model BASIC – 2 and 4 hoses BMP4034.OED /LPG ‐4C (double‐sided dispenser – 4 simultaneous deliveries)
BMP4022.OEL /LPG‐2C
(left‐sided dispenser – 2 simultaneous deliveries) BMP4011.OER /LPG
(right‐sided dispenser – 2 simultaneous deliveries)
LPG dispensers OCEAN EURO LPG ‐ Installation and User Manual
19
Model CUBE – 1 and 2 hoses BMP4012.OED /LPG/CUBE ; BMP4022.OED /LPG/CUBE(double‐sided dispenser)
BMP4011.OEL /LPG/CUBE (left‐sided dispenser)
BMP4011.OER /LPG/CUBE (right‐sided dispenser)
Model CUBE – 2 and 4 hoses BMP4034.OED /LPG‐4C/CUBE (double‐sided dispenser – 4 simultaneous deliveries)
BMP4022.OEL /LPG‐2C/CUBE(left‐sided dispenser – 2 simultaneous deliveries)
BMP4022.OER /LPG‐2C/CUBE (right‐sided dispenser – 2 simultaneous deliveries)
TATSUNO EUROPE a.s., www.tatsuno‐europe.com
20
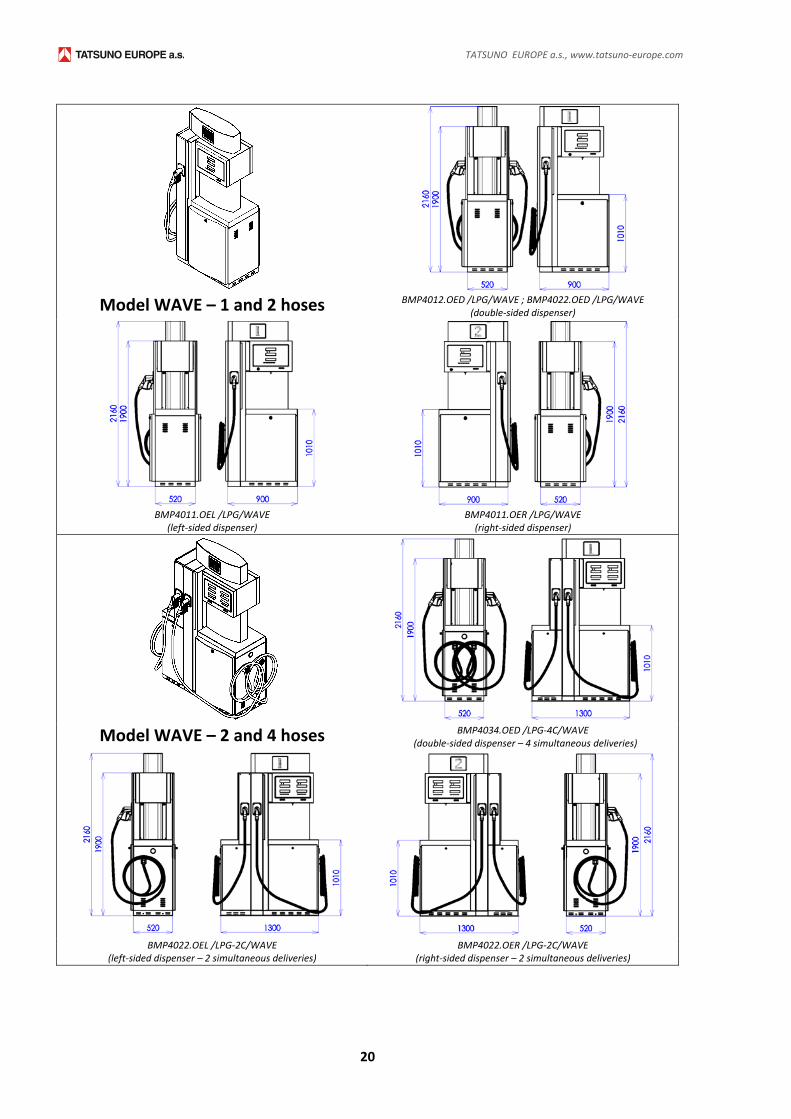
Model WAVE – 1 and 2 hoses BMP4012.OED /LPG/WAVE ; BMP4022.OED /LPG/WAVE (double‐sided dispenser)
BMP4011.OEL /LPG/WAVE
(left‐sided dispenser) BMP4011.OER /LPG/WAVE (right‐sided dispenser)
Model WAVE – 2 and 4 hoses BMP4034.OED /LPG‐4C/WAVE (double‐sided dispenser – 4 simultaneous deliveries)
BMP4022.OEL /LPG‐2C/WAVE (left‐sided dispenser – 2 simultaneous deliveries)
BMP4022.OER /LPG‐2C/WAVE (right‐sided dispenser – 2 simultaneous deliveries)
LPG dispensers OCEAN EURO LPG ‐ Installation and User Manual
21
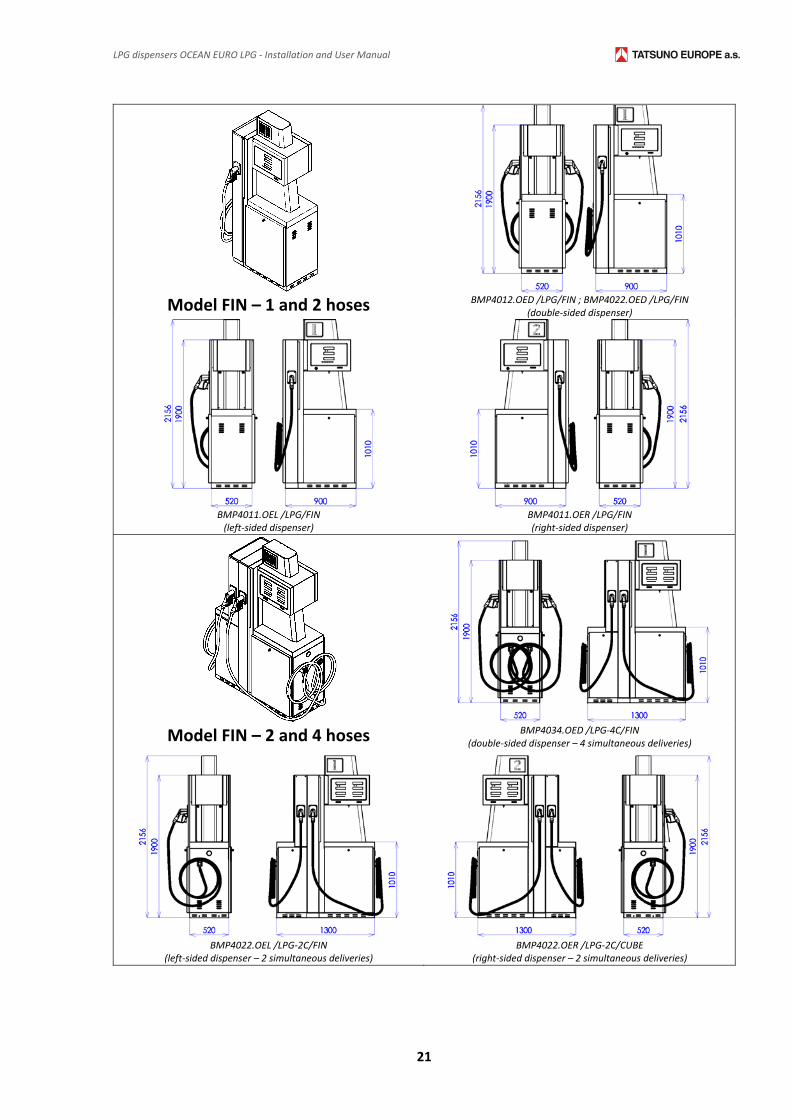
Model FIN – 1 and 2 hoses BMP4012.OED /LPG/FIN ; BMP4022.OED /LPG/FIN(double‐sided dispenser)
BMP4011.OEL /LPG/FIN (left‐sided dispenser)
BMP4011.OER /LPG/FIN (right‐sided dispenser)
Model FIN – 2 and 4 hoses BMP4034.OED /LPG‐4C/FIN (double‐sided dispenser – 4 simultaneous deliveries)
BMP4022.OEL /LPG‐2C/FIN(left‐sided dispenser – 2 simultaneous deliveries)
BMP4022.OER /LPG‐2C/CUBE (right‐sided dispenser – 2 simultaneous deliveries)
TATSUNO EUROPE a.s., www.tatsuno‐europe.com
22
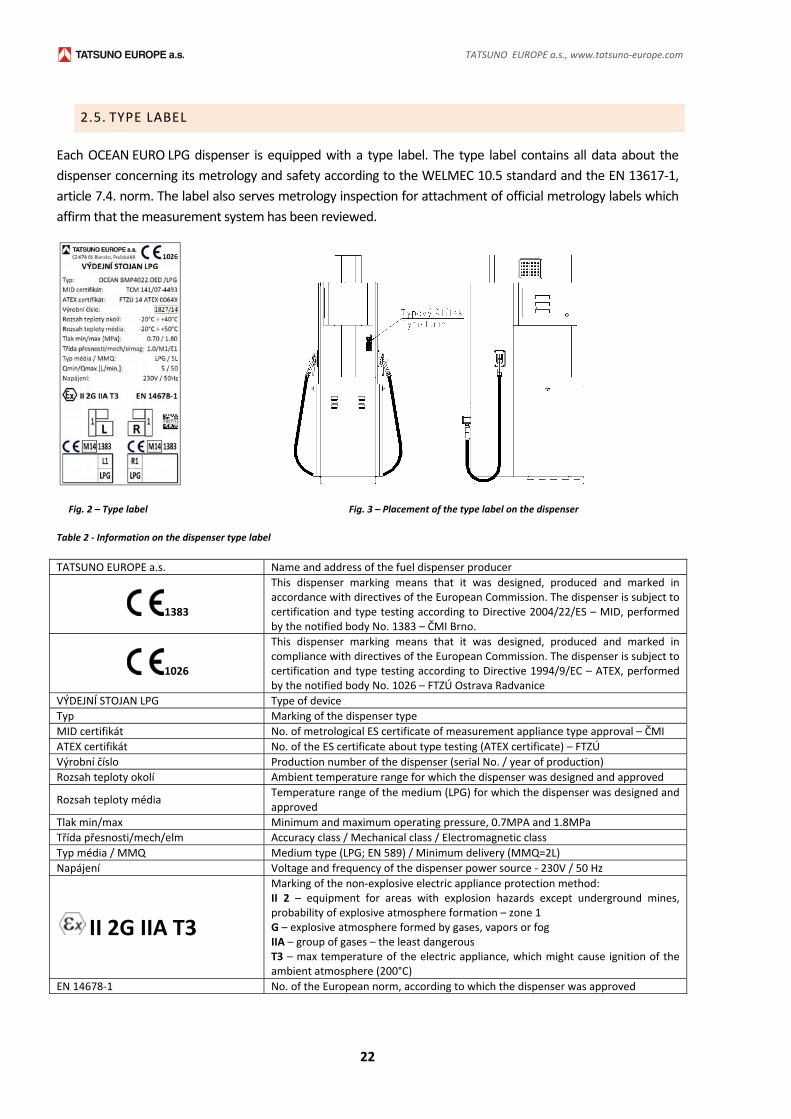
2.5. TYPE LABEL
Each OCEAN EURO LPG dispenser is equipped with a type label. The type label contains all data about the
dispenser concerning its metrology and safety according to the WELMEC 10.5 standard and the EN 13617‐1,
article 7.4. norm. The label also serves metrology inspection for attachment of official metrology labels which
affirm that the measurement system has been reviewed.
Fig. 2 – Type label Fig. 3 – Placement of the type label on the dispenser
Table 2 ‐ Information on the dispenser type label
TATSUNO EUROPE a.s. Name and address of the fuel dispenser producer
1383
This dispenser marking means that it was designed, produced and marked in accordance with directives of the European Commission. The dispenser is subject to certification and type testing according to Directive 2004/22/ES – MID, performed by the notified body No. 1383 – ČMI Brno.
1026
This dispenser marking means that it was designed, produced and marked in compliance with directives of the European Commission. The dispenser is subject to certification and type testing according to Directive 1994/9/EC – ATEX, performed by the notified body No. 1026 – FTZÚ Ostrava Radvanice
VÝDEJNÍ STOJAN LPG Type of device
Typ Marking of the dispenser type
MID certifikát No. of metrological ES certificate of measurement appliance type approval – ČMI
ATEX certifikát No. of the ES certificate about type testing (ATEX certificate) – FTZÚ
Výrobní číslo Production number of the dispenser (serial No. / year of production)
Rozsah teploty okolí Ambient temperature range for which the dispenser was designed and approved
Rozsah teploty média Temperature range of the medium (LPG) for which the dispenser was designed and approved
Tlak min/max Minimum and maximum operating pressure, 0.7MPA and 1.8MPa
Třída přesnosti/mech/elm Accuracy class / Mechanical class / Electromagnetic class
Typ média / MMQ Medium type (LPG; EN 589) / Minimum delivery (MMQ=2L)
Napájení Voltage and frequency of the dispenser power source ‐ 230V / 50 Hz
II 2G IIA T3
Marking of the non‐explosive electric appliance protection method: II 2 – equipment for areas with explosion hazards except underground mines, probability of explosive atmosphere formation – zone 1 G – explosive atmosphere formed by gases, vapors or fog IIA – group of gases – the least dangerous T3 – max temperature of the electric appliance, which might cause ignition of the ambient atmosphere (200°C)
EN 14678‐1 No. of the European norm, according to which the dispenser was approved
LPG dispensers OCEAN EURO LPG ‐ Installation and User Manual
23
3. DISPENSER INSTALLATION
3.1. INSTRUCTIONS FOR SAFE WORK
CAUTION This appliance must be installed only by qualified authorized staff in compliance with relevant norms,
directives and local limitations and according to this manual.
In the immediate vicinity of the dispenser it is forbidden to smoke or use open fire.
Always follow the procedures set for manipulation with LPG.
Monitor all possible leakage in the dispenser. In case of fuel leakage resulting from insufficient tightness,
disconnect the power supply and contact the service organization.
Electric installation must be performed by qualified experts.
Make sure that a properly working fire extinguisher is available.
When manipulating with the equipment, use proper protection aids.
3.2. RECEIPT, TRANSPORT, UNPACKING
The customer will conclude a contract with the producer to organize the dispenser delivery. If the delivery is
ensured by the company TATSUNO EUROPE a. s., the company will transport the product to the agreed
location. The producer has sufficient experience with manipulation and transportation. If the delivery is
ensured by the customer in another manner, the producer will ensure professional loading, but will not be
responsible for the transport. In general, the dispenser must be transported properly packed and always fixed
to the frame. In the transport vehicle the dispenser must be secured against damage (covers, paints), motion
and tipping. Any manipulation and transport must be done in a vertical position; the dispenser must not be
placed on its covers.
WARNING During manipulation, only forklift vehicles may be used. If other manipulation methods are used,
TATSUNO EUROPE a. s. does not provide warranty for any sustained damage!
3.3. DISPENSER LOCATION
NOTICE Danger zones are determined according to ČSN EN 60079‐10 in the dispenser’s surroundings.
OCEAN EURO LPG dispensers may not be located in a danger zone. Electronic counters used in these dispensers
are uncovered, located in areas with no explosion hazard and are separated from other areas by a partition of
type 1 according to ČSN EN 13617‐1.
TATSUNO EUROPE a.s., www.tatsuno‐europe.com
24
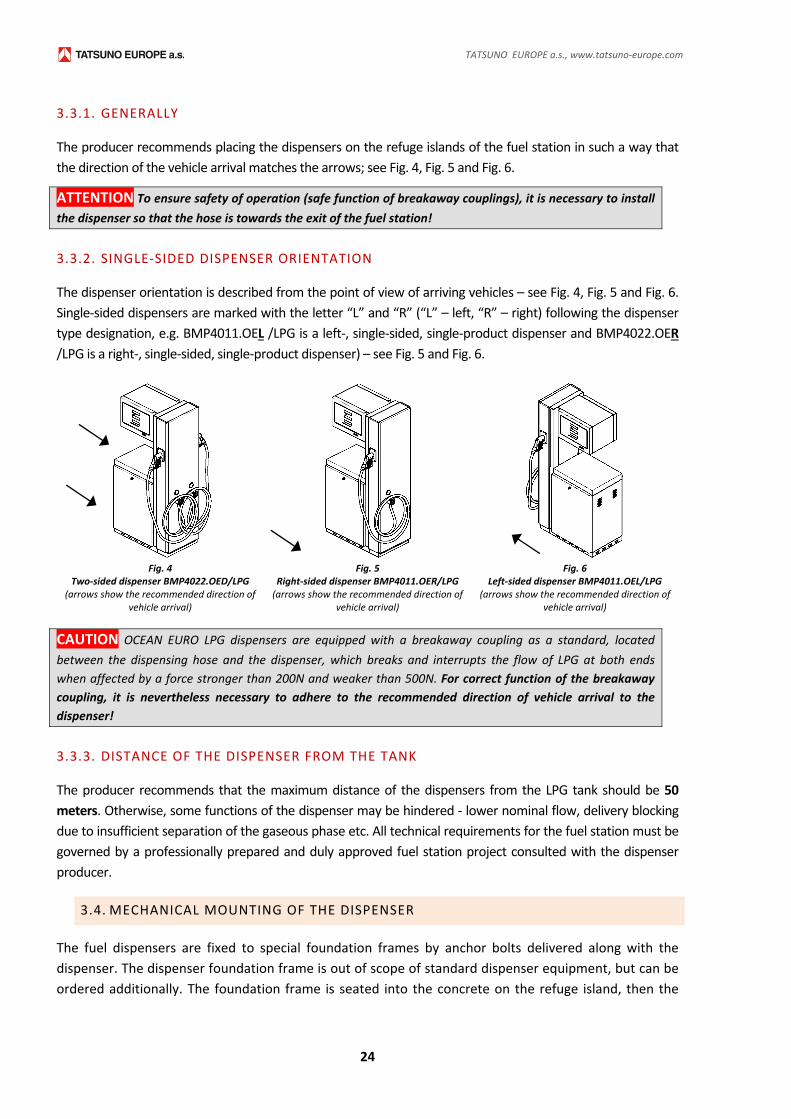
3.3.1. GENERALLY
The producer recommends placing the dispensers on the refuge islands of the fuel station in such a way that
the direction of the vehicle arrival matches the arrows; see Fig. 4, Fig. 5 and Fig. 6.
ATTENTION To ensure safety of operation (safe function of breakaway couplings), it is necessary to install
the dispenser so that the hose is towards the exit of the fuel station!
3.3.2. SINGLE‐SIDED DISPENSER ORIENTATION
The dispenser orientation is described from the point of view of arriving vehicles – see Fig. 4, Fig. 5 and Fig. 6.
Single‐sided dispensers are marked with the letter “L” and “R” (“L” – left, “R” – right) following the dispenser
type designation, e.g. BMP4011.OEL /LPG is a left‐, single‐sided, single‐product dispenser and BMP4022.OER
/LPG is a right‐, single‐sided, single‐product dispenser) – see Fig. 5 and Fig. 6.
Fig. 4
Two‐sided dispenser BMP4022.OED/LPG (arrows show the recommended direction of
vehicle arrival)
Fig. 5Right‐sided dispenser BMP4011.OER/LPG (arrows show the recommended direction of
vehicle arrival)
Fig. 6 Left‐sided dispenser BMP4011.OEL/LPG
(arrows show the recommended direction of vehicle arrival)
CAUTION OCEAN EURO LPG dispensers are equipped with a breakaway coupling as a standard, located
between the dispensing hose and the dispenser, which breaks and interrupts the flow of LPG at both ends
when affected by a force stronger than 200N and weaker than 500N. For correct function of the breakaway
coupling, it is nevertheless necessary to adhere to the recommended direction of vehicle arrival to the
dispenser!
3.3.3. DISTANCE OF THE DISPENSER FROM THE TANK
The producer recommends that the maximum distance of the dispensers from the LPG tank should be 50
meters. Otherwise, some functions of the dispenser may be hindered ‐ lower nominal flow, delivery blocking
due to insufficient separation of the gaseous phase etc. All technical requirements for the fuel station must be
governed by a professionally prepared and duly approved fuel station project consulted with the dispenser
producer.
3.4. MECHANICAL MOUNTING OF THE DISPENSER
The fuel dispensers are fixed to special foundation frames by anchor bolts delivered along with the
dispenser. The dispenser foundation frame is out of scope of standard dispenser equipment, but can be
ordered additionally. The foundation frame is seated into the concrete on the refuge island, then the
LPG dispensers OCEAN EURO LPG ‐ Installation and User Manual
25
front and rear fuel dispenser casings are removed, the dispenser is placed on the foundation frame and
fixed by fixing screws.
ATTENTION Driving LPG out of the fuel dispenser and its piping, e.g. during dispenser disassembly, is carried
out by nitrogen or an inert gas. Driving LPG out by air or oxygen is prohibited!
NOTICE According to the norm EN 14678‐1:2013, section 4.5.1.2, the inlet of the liquid phase and the outlet
of the gaseous phase of the dispenser must be protected by a device (shear valve or breaking point), which will
ensure, in case of a pipe fracture, the interruption of LPG fluid or LPG gases into the air. The shear valve or
breaking point must be firmly attached to the dispenser or to the ground. Shear valves are not part of the
standard supply package of LPG dispensers!
3.5. ELECTRICAL WIRING OF THE FUEL DISPENSER
The wiring of fuel OCEAN EURO LPG dispensers requires protection against accidental el. shock
(pursuant to the standard ČSN 33 2000‐4‐41 „Electro‐technical regulations – Electrical appliances – Part 4:
Safety – Chapter 41: Protection from electrocution“, issued: August 2007, which is in compliance with the
international standard HD 60364‐4‐41:2007) and distribution of relevant el. cables to each individual fuel
dispenser.
It is imperative that all fuel dispensers in the filling station be interconnected by a grounding conduit and
connected to the grounding network. The yellow‐green conductor of min. cross‐section 4 mm2 or a special
ribbon conductor can be used as the grounding conduit. The grounding conduit must be connected to the
central grounding terminal of the fuel dispenser placed on the foundation (screw M10), marked
correspondingly.
ATTENTION All electrical cables must be chemically resistant and must have good isolation properties,
because they are perpetually subject to an aggressive explosion hazard environment. In the hazardous area it
is required to use only power and data cables that comply with the requirements of regulations EN 60079‐14
and EN 50525‐2‐51, or EN 60079‐14 and EN 50525‐2‐21 (see regulation EN 14678‐1, article 4.2.3). For these
purposes, the manufacturer recommends using harmonized cables of type H05VV5‐F and H05VVC4V5‐K. For an
example of electrical wiring of dispensers, see Fig. 8.
NOTE For simple installation (terminating the cable in the distribution box) it is necessary that the ends of all
cables entering the dispensers have sufficient length – each end must be a min. of 3 m above the ground.
NOTE The dangerous zones of the OCEAN EURO LPG dispenser require harmonized power and data lines of
the type H05VV5‐F (power) and H05VVC4V5‐K (data) that comply with the requirements of the regulations
EN 60079‐14 and EN 50525‐2‐51.
From the point of view of applied voltage and function, cables can be broken down to power (supply and
switching) and signal cables.
Power cables:
on/off switching of LPG dispenser
TATSUNO EUROPE a.s., www.tatsuno‐europe.com
26
powering the counter and switching elements
Signal cables:
communication line
additional service lines (pulser output etc.)
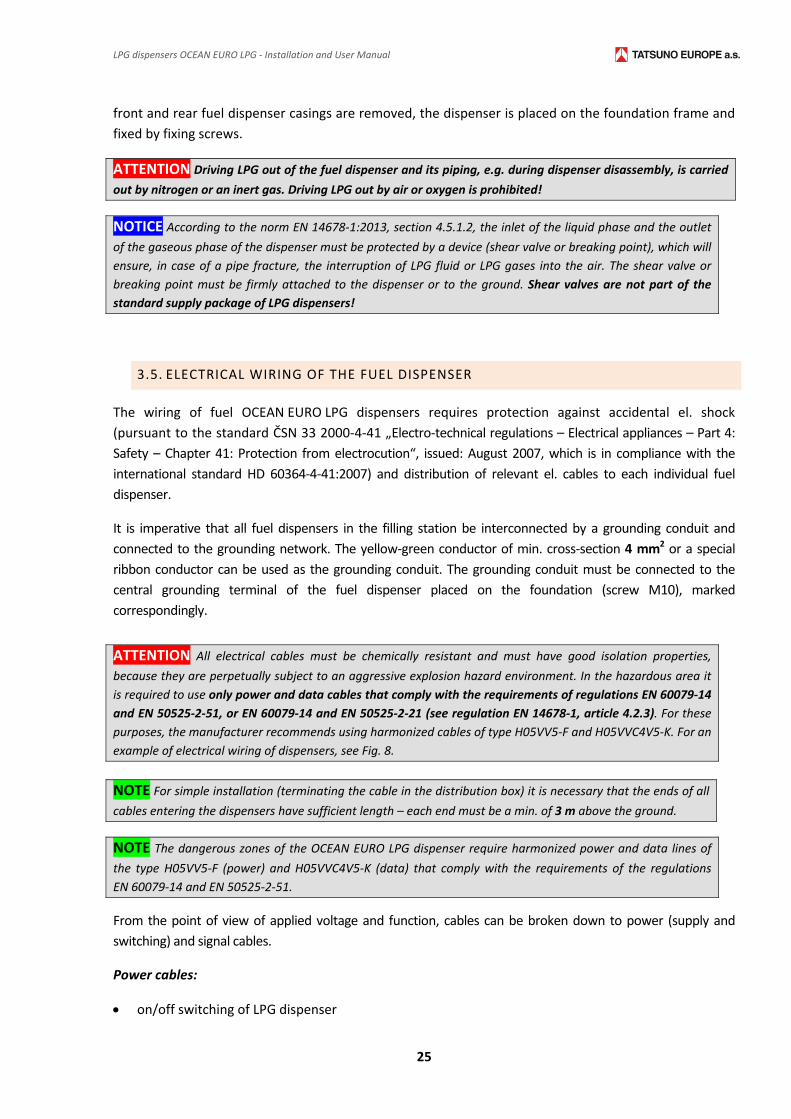
3.5.1. ON/OFF SWITCHING OF THE LPG PUMP MOTOR CONTACTOR
Switching the liquid gas pump motor on/off is carried out by a 3‐core cable H05VV5‐F 3x1,5 (for
BMP4011.OEL(R)/LPG and BMP4012.OED/LPG dispensers) or by a 4‐core cable H05VV5‐F 4x1,5 (for
BMP4022.OED/LPG dispensers). The switcher cable is connected from the main switchboard in the kiosk to
the power distribution box XP01 or XP02 of the dispenser – see Fig. 9.
Table 3 – Marking of conductors in the switching cable of the LPG pump motor
Marking of conductors in cable H05VV5‐F 3x1,5
marking color description
S1 black 1 switching phase
N black 2 zero conductor
PE green‐yellow protective conductor
Marking of conductors in cable H05VV5‐F 4x1,5
marking color description
S1 black 1 switching phase 1
S2 black 2 switching phase 2
N black 3 zero conductor
PE green‐yellow protective conductor
NOTE A relay or motor contactor is used for on/off switching of the pump motor in LPG dispensers. The
switching voltage should not exceed 250V and the switching current should not exceed 1A.
3.5.2. POWERING THE ELECTRONIC COUNTER AND SWITCHING ELEMENTS
Powering of the calculator and switching circuits is done by a 3‐core power cable H05VV5‐F 3x1,5 (see Table
4), which is led from the main switchboard in the kiosk into the first dispenser power box XP01 or XP02 in the
dispenser – see Fig. 9. From the distribution box, the powering cable H05VV5‐F 3x1,5 is led into the dispenser
electronics head, where it ensures stabilized powering of the electronic counter, switching elements, and
heaters where used.
LPG dispensers OCEAN EURO LPG ‐ Installation and User Manual
27
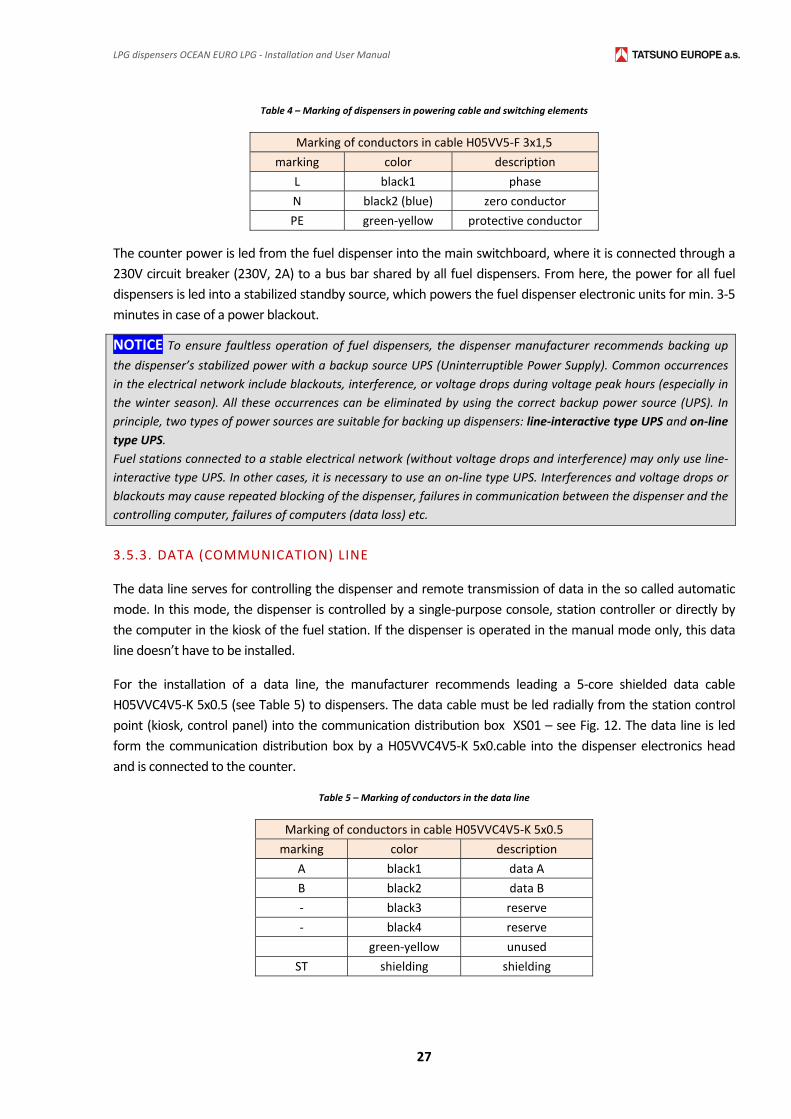
Table 4 – Marking of dispensers in powering cable and switching elements
Marking of conductors in cable H05VV5‐F 3x1,5
marking color description
L black1 phase
N black2 (blue) zero conductor
PE green‐yellow protective conductor
The counter power is led from the fuel dispenser into the main switchboard, where it is connected through a
230V circuit breaker (230V, 2A) to a bus bar shared by all fuel dispensers. From here, the power for all fuel
dispensers is led into a stabilized standby source, which powers the fuel dispenser electronic units for min. 3‐5
minutes in case of a power blackout.
NOTICE To ensure faultless operation of fuel dispensers, the dispenser manufacturer recommends backing up
the dispenser’s stabilized power with a backup source UPS (Uninterruptible Power Supply). Common occurrences
in the electrical network include blackouts, interference, or voltage drops during voltage peak hours (especially in
the winter season). All these occurrences can be eliminated by using the correct backup power source (UPS). In
principle, two types of power sources are suitable for backing up dispensers: line‐interactive type UPS and on‐line
type UPS.
Fuel stations connected to a stable electrical network (without voltage drops and interference) may only use line‐
interactive type UPS. In other cases, it is necessary to use an on‐line type UPS. Interferences and voltage drops or
blackouts may cause repeated blocking of the dispenser, failures in communication between the dispenser and the
controlling computer, failures of computers (data loss) etc.
3.5.3. DATA (COMMUNICATION) LINE
The data line serves for controlling the dispenser and remote transmission of data in the so called automatic
mode. In this mode, the dispenser is controlled by a single‐purpose console, station controller or directly by
the computer in the kiosk of the fuel station. If the dispenser is operated in the manual mode only, this data
line doesn’t have to be installed.
For the installation of a data line, the manufacturer recommends leading a 5‐core shielded data cable
H05VVC4V5‐K 5x0.5 (see Table 5) to dispensers. The data cable must be led radially from the station control
point (kiosk, control panel) into the communication distribution box XS01 – see Fig. 12. The data line is led
form the communication distribution box by a H05VVC4V5‐K 5x0.cable into the dispenser electronics head
and is connected to the counter.
Table 5 – Marking of conductors in the data line
Marking of conductors in cable H05VVC4V5‐K 5x0.5
marking color description
A black1 data A
B black2 data B
‐ black3 reserve
‐ black4 reserve
green‐yellow unused
ST shielding shielding
TATSUNO EUROPE a.s., www.tatsuno‐europe.com
28
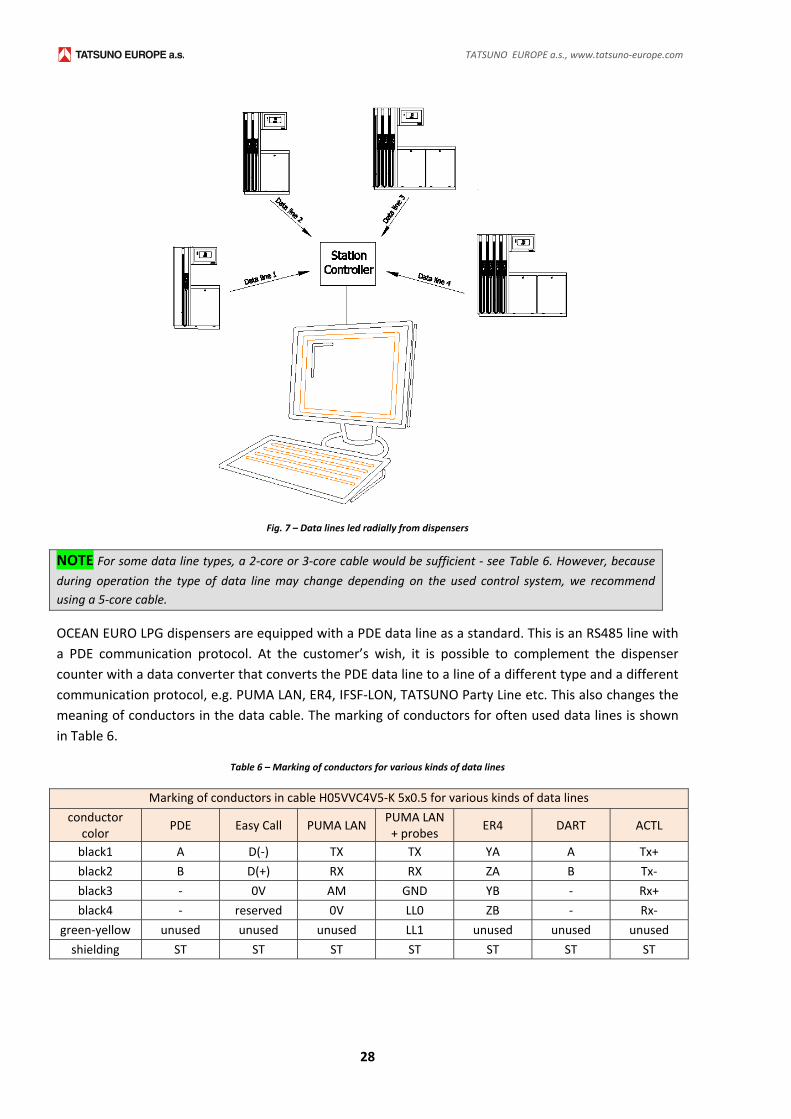
Fig. 7 – Data lines led radially from dispensers
NOTE For some data line types, a 2‐core or 3‐core cable would be sufficient ‐ see Table 6. However, because
during operation the type of data line may change depending on the used control system, we recommend
using a 5‐core cable.
OCEAN EURO LPG dispensers are equipped with a PDE data line as a standard. This is an RS485 line with
a PDE communication protocol. At the customer’s wish, it is possible to complement the dispenser
counter with a data converter that converts the PDE data line to a line of a different type and a different
communication protocol, e.g. PUMA LAN, ER4, IFSF‐LON, TATSUNO Party Line etc. This also changes the
meaning of conductors in the data cable. The marking of conductors for often used data lines is shown
in Table 6.
Table 6 – Marking of conductors for various kinds of data lines
Marking of conductors in cable H05VVC4V5‐K 5x0.5 for various kinds of data lines
conductor color
PDE Easy Call PUMA LAN PUMA LAN+ probes
ER4 DART ACTL
black1 A D(‐) TX TX YA A Tx+
black2 B D(+) RX RX ZA B Tx‐
black3 ‐ 0V AM GND YB ‐ Rx+
black4 ‐ reserved 0V LL0 ZB ‐ Rx‐
green‐yellow unused unused unused LL1 unused unused unused
shielding ST ST ST ST ST ST ST
LPG dispensers OCEAN EURO LPG ‐ Installation and User Manual
29
3.5.4. SERVICE LINES
Service lines serve special purposes. These lines are not indispensable for the dispenser’s function per
se, but are used in cases when it’s necessary to control some of the dispenser’s functions or lead some
signals out of the dispenser remotely. Always consult the necessity of the service line installation with a
TATSUNO EUROPE a. s. technician. For service lines, we recommend using multiple‐core shielded cables
H05VVC4V5‐K (0.5 mm2).
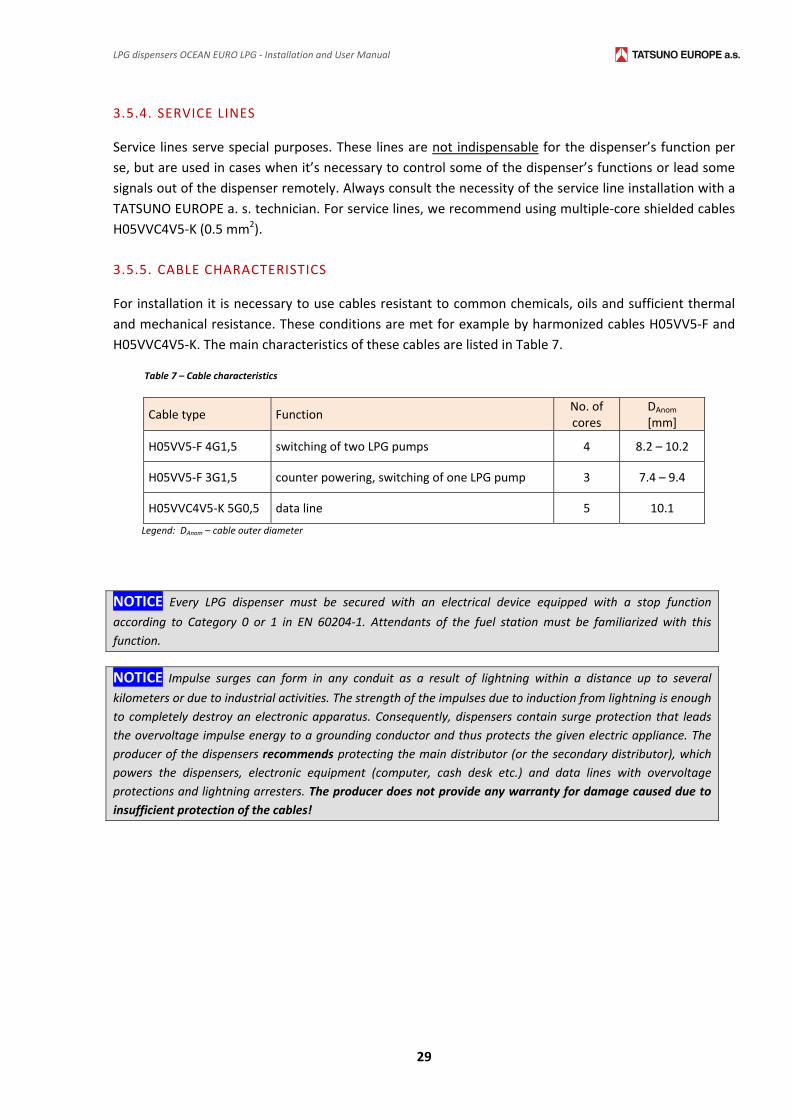
3.5.5. CABLE CHARACTERISTICS
For installation it is necessary to use cables resistant to common chemicals, oils and sufficient thermal
and mechanical resistance. These conditions are met for example by harmonized cables H05VV5‐F and
H05VVC4V5‐K. The main characteristics of these cables are listed in Table 7.
Table 7 – Cable characteristics
Cable type Function No. of cores
DAnom
[mm]
H05VV5‐F 4G1,5 switching of two LPG pumps 4 8.2 – 10.2
H05VV5‐F 3G1,5 counter powering, switching of one LPG pump 3 7.4 – 9.4
H05VVC4V5‐K 5G0,5 data line 5 10.1
Legend: DAnom – cable outer diameter
NOTICE Every LPG dispenser must be secured with an electrical device equipped with a stop function
according to Category 0 or 1 in EN 60204‐1. Attendants of the fuel station must be familiarized with this
function.
NOTICE Impulse surges can form in any conduit as a result of lightning within a distance up to several
kilometers or due to industrial activities. The strength of the impulses due to induction from lightning is enough
to completely destroy an electronic apparatus. Consequently, dispensers contain surge protection that leads
the overvoltage impulse energy to a grounding conductor and thus protects the given electric appliance. The
producer of the dispensers recommends protecting the main distributor (or the secondary distributor), which
powers the dispensers, electronic equipment (computer, cash desk etc.) and data lines with overvoltage
protections and lightning arresters. The producer does not provide any warranty for damage caused due to
insufficient protection of the cables!
TATSUNO EUROPE a.s., www.tatsuno‐europe.com
30
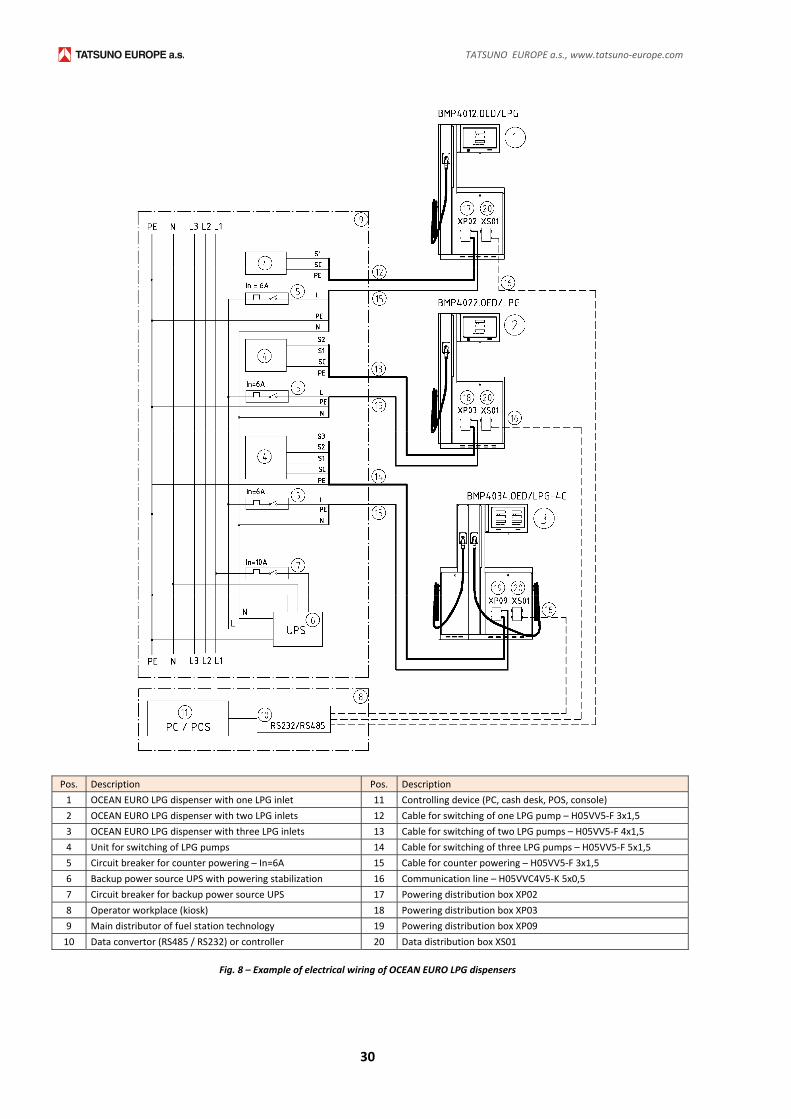
Pos. Description Pos. Description
1 OCEAN EURO LPG dispenser with one LPG inlet 11 Controlling device (PC, cash desk, POS, console)
2 OCEAN EURO LPG dispenser with two LPG inlets 12 Cable for switching of one LPG pump – H05VV5‐F 3x1,5
3 OCEAN EURO LPG dispenser with three LPG inlets 13 Cable for switching of two LPG pumps – H05VV5‐F 4x1,5
4 Unit for switching of LPG pumps 14 Cable for switching of three LPG pumps – H05VV5‐F 5x1,5
5 Circuit breaker for counter powering – In=6A 15 Cable for counter powering – H05VV5‐F 3x1,5
6 Backup power source UPS with powering stabilization 16 Communication line – H05VVC4V5‐K 5x0,5
7 Circuit breaker for backup power source UPS 17 Powering distribution box XP02
8 Operator workplace (kiosk) 18 Powering distribution box XP03
9 Main distributor of fuel station technology 19 Powering distribution box XP09
10 Data convertor (RS485 / RS232) or controller 20 Data distribution box XS01
Fig. 8 – Example of electrical wiring of OCEAN EURO LPG dispensers
LPG dispensers OCEAN EURO LPG ‐ Installation and User Manual
31
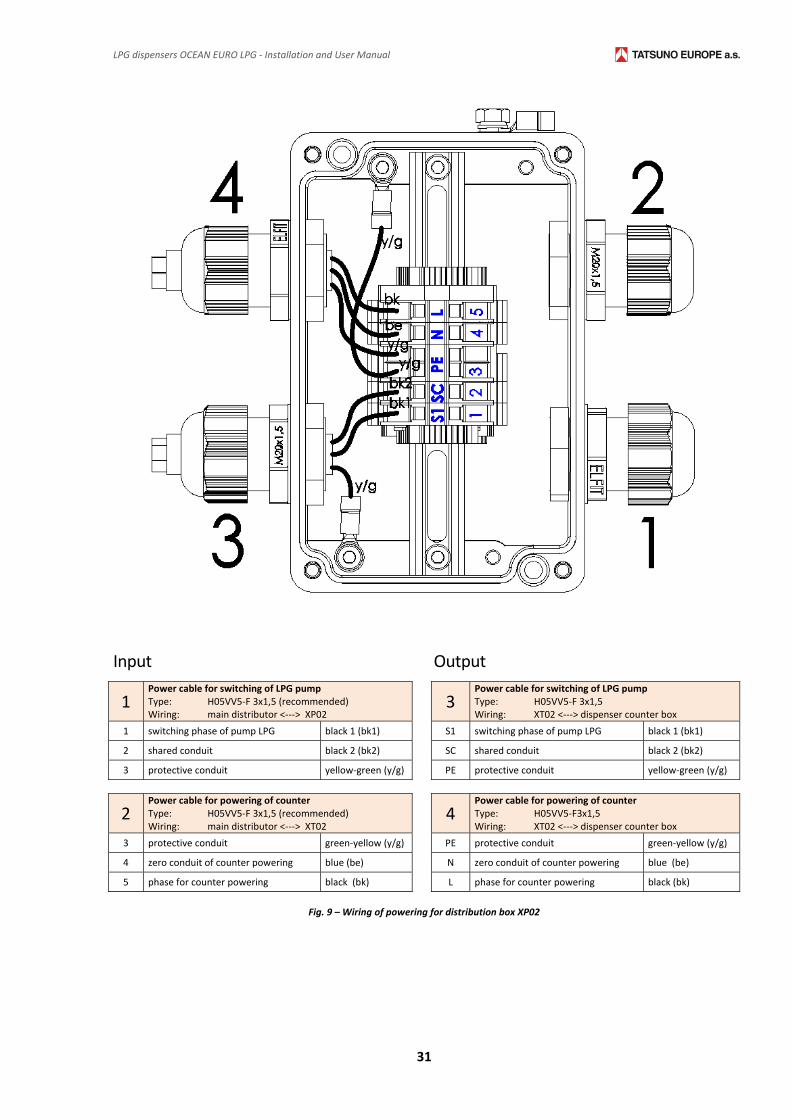
Input Output
1 Power cable for switching of LPG pump Type: H05VV5‐F 3x1,5 (recommended) Wiring: main distributor <‐‐‐> XP02
3 Power cable for switching of LPG pump Type: H05VV5‐F 3x1,5 Wiring: XT02 <‐‐‐> dispenser counter box
1 switching phase of pump LPG black 1 (bk1) S1 switching phase of pump LPG black 1 (bk1)
2 shared conduit black 2 (bk2) SC shared conduit black 2 (bk2)
3 protective conduit yellow‐green (y/g) PE protective conduit yellow‐green (y/g)
2 Power cable for powering of counter Type: H05VV5‐F 3x1,5 (recommended) Wiring: main distributor <‐‐‐> XT02
4 Power cable for powering of counter Type: H05VV5‐F3x1,5 Wiring: XT02 <‐‐‐> dispenser counter box
3 protective conduit green‐yellow (y/g) PE protective conduit green‐yellow (y/g)
4 zero conduit of counter powering blue (be) N zero conduit of counter powering blue (be)
5 phase for counter powering black (bk) L phase for counter powering black (bk)
Fig. 9 – Wiring of powering for distribution box XP02
TATSUNO EUROPE a.s., www.tatsuno‐europe.com
32
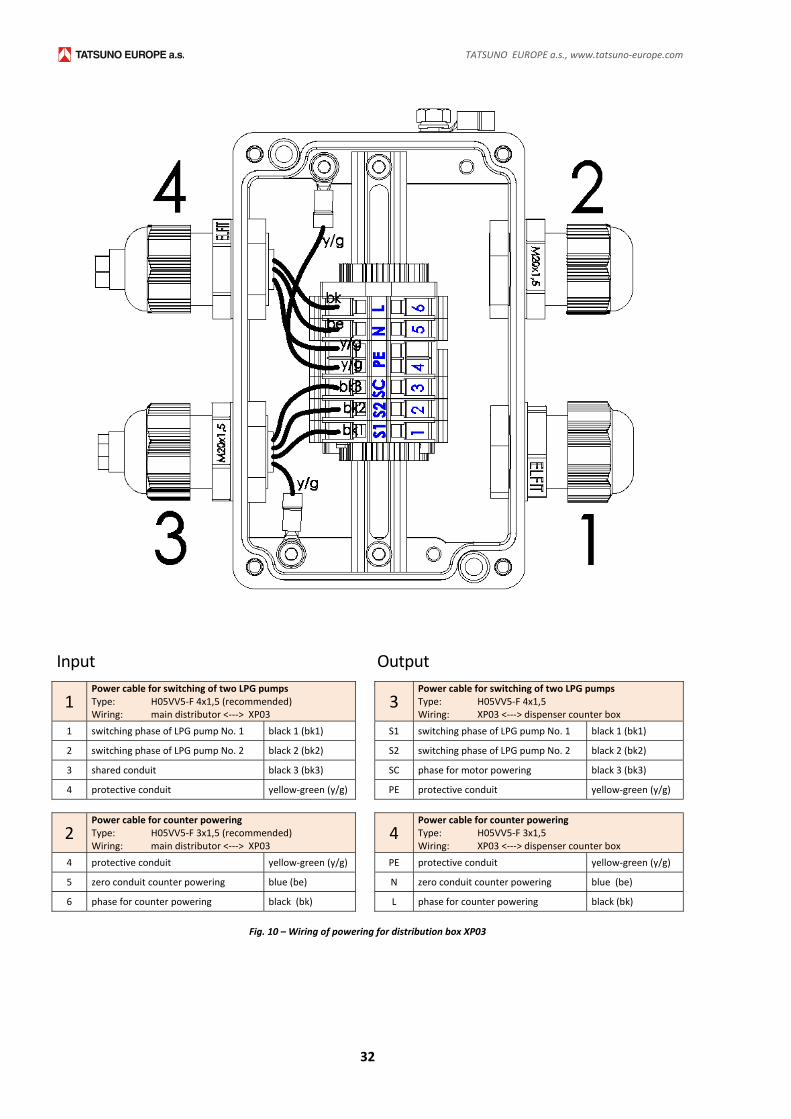
Input Output
1 Power cable for switching of two LPG pumps Type: H05VV5‐F 4x1,5 (recommended) Wiring: main distributor <‐‐‐> XP03
3 Power cable for switching of two LPG pumps Type: H05VV5‐F 4x1,5 Wiring: XP03 <‐‐‐> dispenser counter box
1 switching phase of LPG pump No. 1 black 1 (bk1) S1 switching phase of LPG pump No. 1 black 1 (bk1)
2 switching phase of LPG pump No. 2 black 2 (bk2) S2 switching phase of LPG pump No. 2 black 2 (bk2)
3 shared conduit black 3 (bk3) SC phase for motor powering black 3 (bk3)
4 protective conduit yellow‐green (y/g) PE protective conduit yellow‐green (y/g)
2 Power cable for counter poweringType: H05VV5‐F 3x1,5 (recommended) Wiring: main distributor <‐‐‐> XP03
4 Power cable for counter powering Type: H05VV5‐F 3x1,5 Wiring: XP03 <‐‐‐> dispenser counter box
4 protective conduit yellow‐green (y/g) PE protective conduit yellow‐green (y/g)
5 zero conduit counter powering blue (be) N zero conduit counter powering blue (be)
6 phase for counter powering black (bk) L phase for counter powering black (bk)
Fig. 10 – Wiring of powering for distribution box XP03
LPG dispensers OCEAN EURO LPG ‐ Installation and User Manual
33
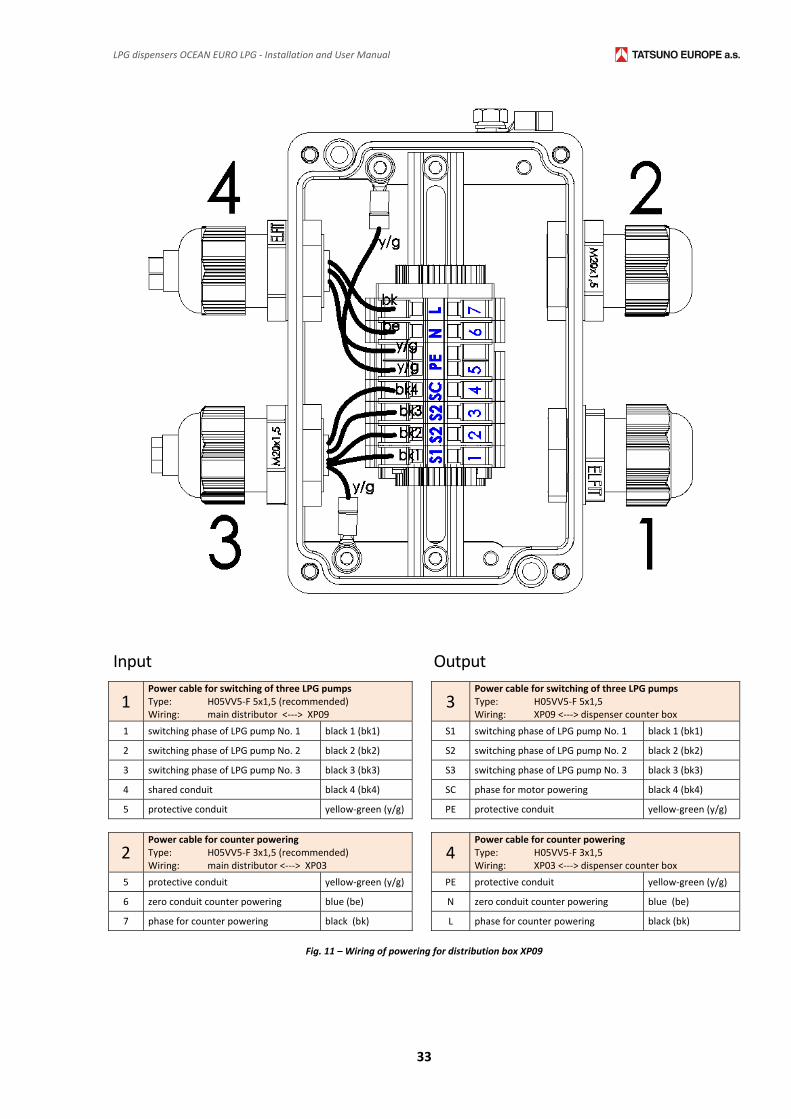
Input Output
1 Power cable for switching of three LPG pumpsType: H05VV5‐F 5x1,5 (recommended) Wiring: main distributor <‐‐‐> XP09
3 Power cable for switching of three LPG pumpsType: H05VV5‐F 5x1,5 Wiring: XP09 <‐‐‐> dispenser counter box
1 switching phase of LPG pump No. 1 black 1 (bk1) S1 switching phase of LPG pump No. 1 black 1 (bk1)
2 switching phase of LPG pump No. 2 black 2 (bk2) S2 switching phase of LPG pump No. 2 black 2 (bk2)
3 switching phase of LPG pump No. 3 black 3 (bk3) S3 switching phase of LPG pump No. 3 black 3 (bk3)
4 shared conduit black 4 (bk4) SC phase for motor powering black 4 (bk4)
5 protective conduit yellow‐green (y/g) PE protective conduit yellow‐green (y/g)
2 Power cable for counter powering Type: H05VV5‐F 3x1,5 (recommended) Wiring: main distributor <‐‐‐> XP03
4 Power cable for counter powering Type: H05VV5‐F 3x1,5 Wiring: XP03 <‐‐‐> dispenser counter box
5 protective conduit yellow‐green (y/g) PE protective conduit yellow‐green (y/g)
6 zero conduit counter powering blue (be) N zero conduit counter powering blue (be)
7 phase for counter powering black (bk) L phase for counter powering black (bk)
Fig. 11 – Wiring of powering for distribution box XP09
TATSUNO EUROPE a.s., www.tatsuno‐europe.com
34
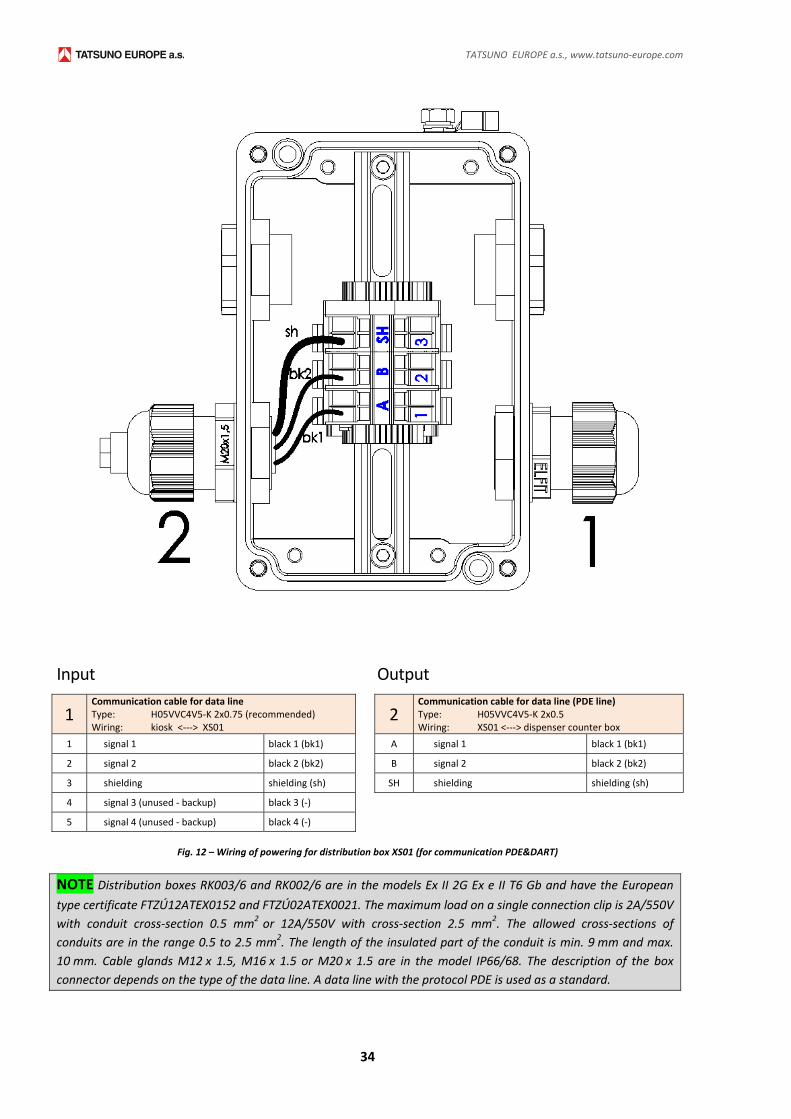
Input Output
1 Communication cable for data lineType: H05VVC4V5‐K 2x0.75 (recommended) Wiring: kiosk <‐‐‐> XS01
2 Communication cable for data line (PDE line) Type: H05VVC4V5‐K 2x0.5 Wiring: XS01 <‐‐‐> dispenser counter box
1 signal 1 black 1 (bk1) A signal 1 black 1 (bk1)
2 signal 2 black 2 (bk2) B signal 2 black 2 (bk2)
3 shielding shielding (sh) SH shielding shielding (sh)
4 signal 3 (unused ‐ backup) black 3 (‐)
5 signal 4 (unused ‐ backup) black 4 (‐)
Fig. 12 – Wiring of powering for distribution box XS01 (for communication PDE&DART)
NOTE Distribution boxes RK003/6 and RK002/6 are in the models Ex II 2G Ex e II T6 Gb and have the European
type certificate FTZÚ12ATEX0152 and FTZÚ02ATEX0021. The maximum load on a single connection clip is 2A/550V
with conduit cross‐section 0.5 mm2 or 12A/550V with cross‐section 2.5 mm2. The allowed cross‐sections of
conduits are in the range 0.5 to 2.5 mm2. The length of the insulated part of the conduit is min. 9 mm and max.
10 mm. Cable glands M12 x 1.5, M16 x 1.5 or M20 x 1.5 are in the model IP66/68. The description of the box
connector depends on the type of the data line. A data line with the protocol PDE is used as a standard.

LPG dispensers OCEAN EURO LPG ‐ Installation and User Manual
35
4. BASIC FUNCTIONS AND DISPENSER SETTINGS
The setup of fuel dispensers is carried out by means of a set of setup parameters that regulate the
functional parameters of the dispenser and which can change the mode and behavior of the dispenser
in various situations. According to the type of the installed electronic counter, parameter values can be
viewed and changed by a remote IR (infrared) controller, a service keyboard or by preset keys on the
dispenser.
The setup methods of the dispensers differ depending on the counter in the head of the dispenser. The
following chapter describes the basic functions and setup procedures for the PDEX and TBELTx counters.
4.1. PDEX COUNTER
The electronic counter PDEX for fuel dispensers made by the company TATSUNO EUROPE a. s. is set up
by a remote IR controller. Service technicians authorized by the dispenser producer use the yellow
service remote controller PDERT‐5S, which allows full setup of all parameters of the dispenser.
Managers of fuel stations use the white remote controller PDERT‐5O, which enables:
reading of non‐resettable liter totalizers of all dispensing hoses
reading and reset of daily electronic liter and money totalizers of all hoses
setting of individual product prices (in case of manual operation)
reading and setup of the dispenser’s operating parameters
The setup mode can be triggered in the dispenser by the above method only while the fuel dispenser is
idle – i.e. when fuel pumping has been completed, all nozzles are hung in their nozzle boots and all sales
(transactions) have been completed. There are two access modes:
Operator mode, intended for fuel station staff – allows only reading of values from the electronic
totalizers and values of the basic parameters of the dispenser. The values cannot be changed or
reset.
Manager mode, intended for the fuel station manager – allows not only reading of values from the
dispensers, but also resetting the daily totalizers and setting basic operational parameters of the
dispensers. Access to the manager mode is protected by a password.
4.1.1. PDERT REMOTE CONTROLLER DESCRIPTION
Dispensers with a PDEX counter must be controlled by an IR remote controller to read values from the
dispenser’s displays (totalizers), to change the dispenser’s operating mode or to set various parameters
of the counter. The keyboard of the remote controller has the following keys and layout (Fig. 13):
TATSUNO EUROPE a.s., www.tatsuno‐europe.com
36
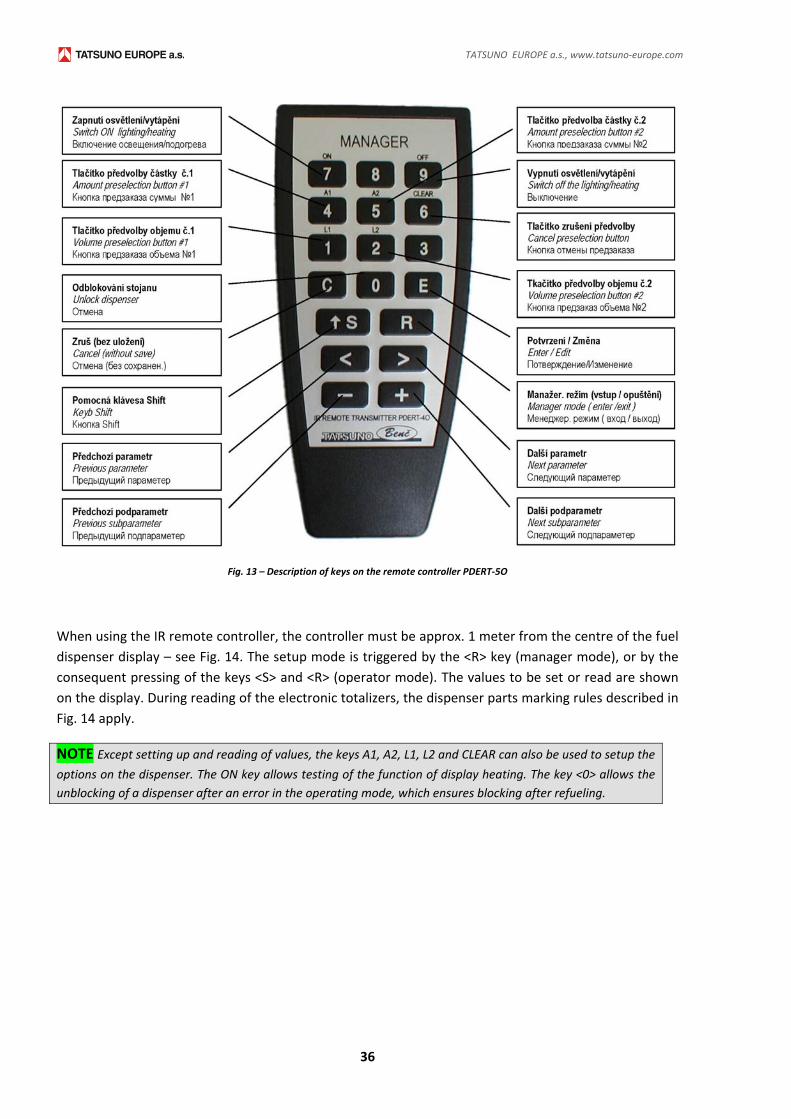
Fig. 13 – Description of keys on the remote controller PDERT‐5O
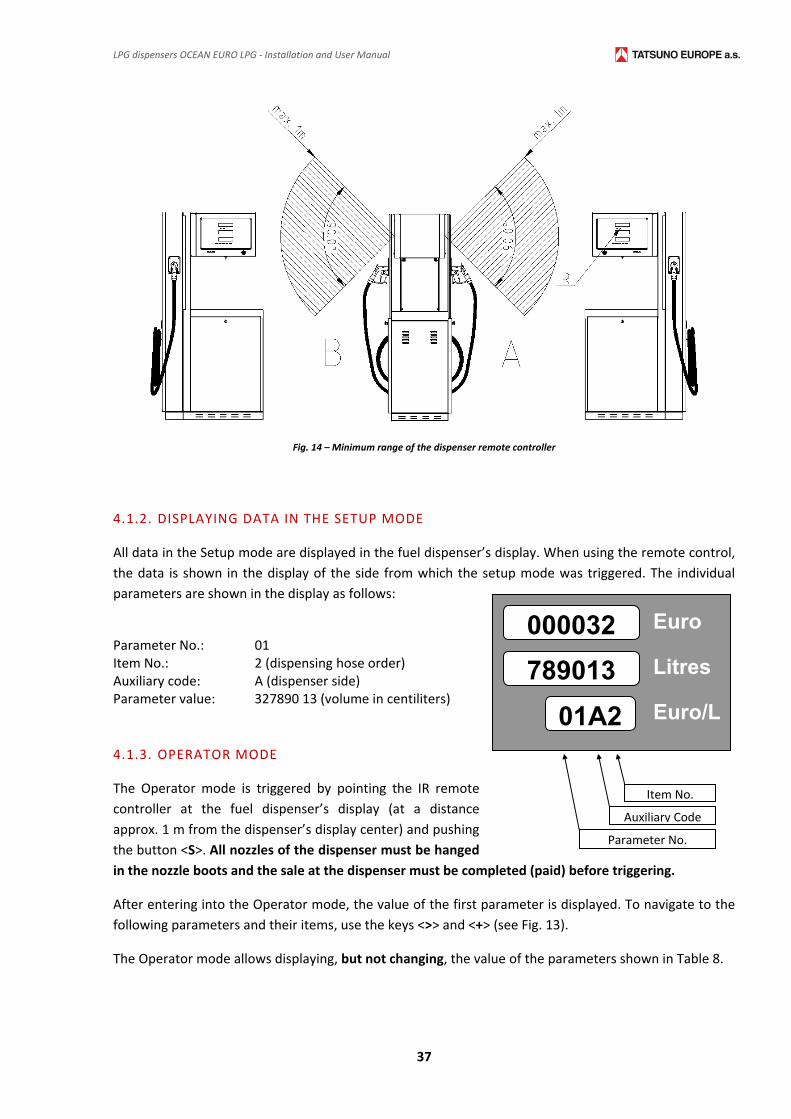
When using the IR remote controller, the controller must be approx. 1 meter from the centre of the fuel
dispenser display – see Fig. 14. The setup mode is triggered by the <R> key (manager mode), or by the
consequent pressing of the keys <S> and <R> (operator mode). The values to be set or read are shown
on the display. During reading of the electronic totalizers, the dispenser parts marking rules described in
Fig. 14 apply.
NOTE Except setting up and reading of values, the keys A1, A2, L1, L2 and CLEAR can also be used to setup the options on the dispenser. The ON key allows testing of the function of display heating. The key <0> allows the
unblocking of a dispenser after an error in the operating mode, which ensures blocking after refueling.
LPG dispensers OCEAN EURO LPG ‐ Installation and User Manual
37
Fig. 14 – Minimum range of the dispenser remote controller
4.1.2. DISPLAYING DATA IN THE SETUP MODE
All data in the Setup mode are displayed in the fuel dispenser’s display. When using the remote control,
the data is shown in the display of the side from which the setup mode was triggered. The individual
parameters are shown in the display as follows:
Parameter No.: 01 Item No.: 2 (dispensing hose order) Auxiliary code: A (dispenser side) Parameter value: 327890 13 (volume in centiliters)
4.1.3. OPERATOR MODE
The Operator mode is triggered by pointing the IR remote
controller at the fuel dispenser’s display (at a distance
approx. 1 m from the dispenser’s display center) and pushing
the button <S>. All nozzles of the dispenser must be hanged
in the nozzle boots and the sale at the dispenser must be completed (paid) before triggering.
After entering into the Operator mode, the value of the first parameter is displayed. To navigate to the
following parameters and their items, use the keys <>> and <+> (see Fig. 13).
The Operator mode allows displaying, but not changing, the value of the parameters shown in Table 8.
000032
789013
Euro
Litres
Euro/L01A2
Auxiliary Code
Parameter No.
Item No.
TATSUNO EUROPE a.s., www.tatsuno‐europe.com
38
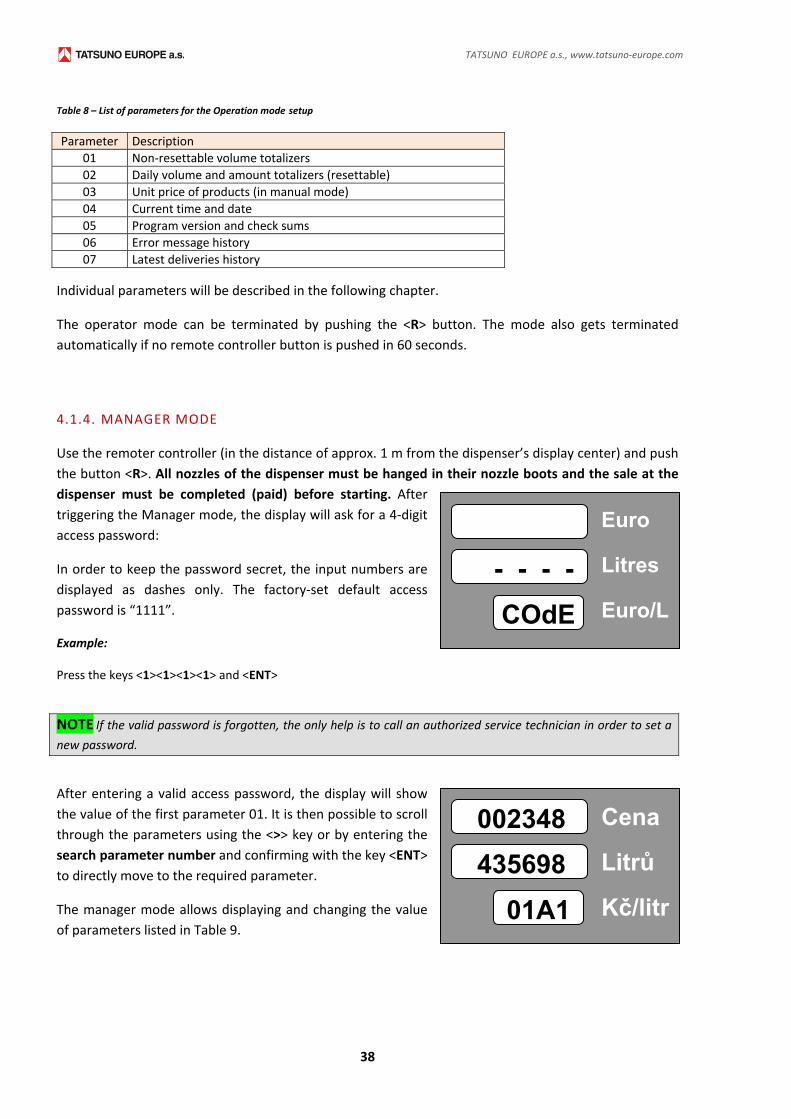
Table 8 – List of parameters for the Operation mode setup
Parameter Description
01 Non‐resettable volume totalizers
02 Daily volume and amount totalizers (resettable)
03 Unit price of products (in manual mode)
04 Current time and date
05 Program version and check sums
06 Error message history
07 Latest deliveries history
Individual parameters will be described in the following chapter.
The operator mode can be terminated by pushing the <R> button. The mode also gets terminated
automatically if no remote controller button is pushed in 60 seconds.
4.1.4. MANAGER MODE
Use the remoter controller (in the distance of approx. 1 m from the dispenser’s display center) and push
the button <R>. All nozzles of the dispenser must be hanged in their nozzle boots and the sale at the
dispenser must be completed (paid) before starting. After
triggering the Manager mode, the display will ask for a 4‐digit
access password:
In order to keep the password secret, the input numbers are
displayed as dashes only. The factory‐set default access
password is “1111”.
Example:
Press the keys <1><1><1><1> and <ENT>
NOTE If the valid password is forgotten, the only help is to call an authorized service technician in order to set a new password.
After entering a valid access password, the display will show
the value of the first parameter 01. It is then possible to scroll
through the parameters using the <>> key or by entering the
search parameter number and confirming with the key <ENT>
to directly move to the required parameter.
The manager mode allows displaying and changing the value
of parameters listed in Table 9.
- - - -
Euro
Litres
Euro/LCOdE
002348
435698
Cena
Litrů
Kč/litr01A1
LPG dispensers OCEAN EURO LPG ‐ Installation and User Manual
39
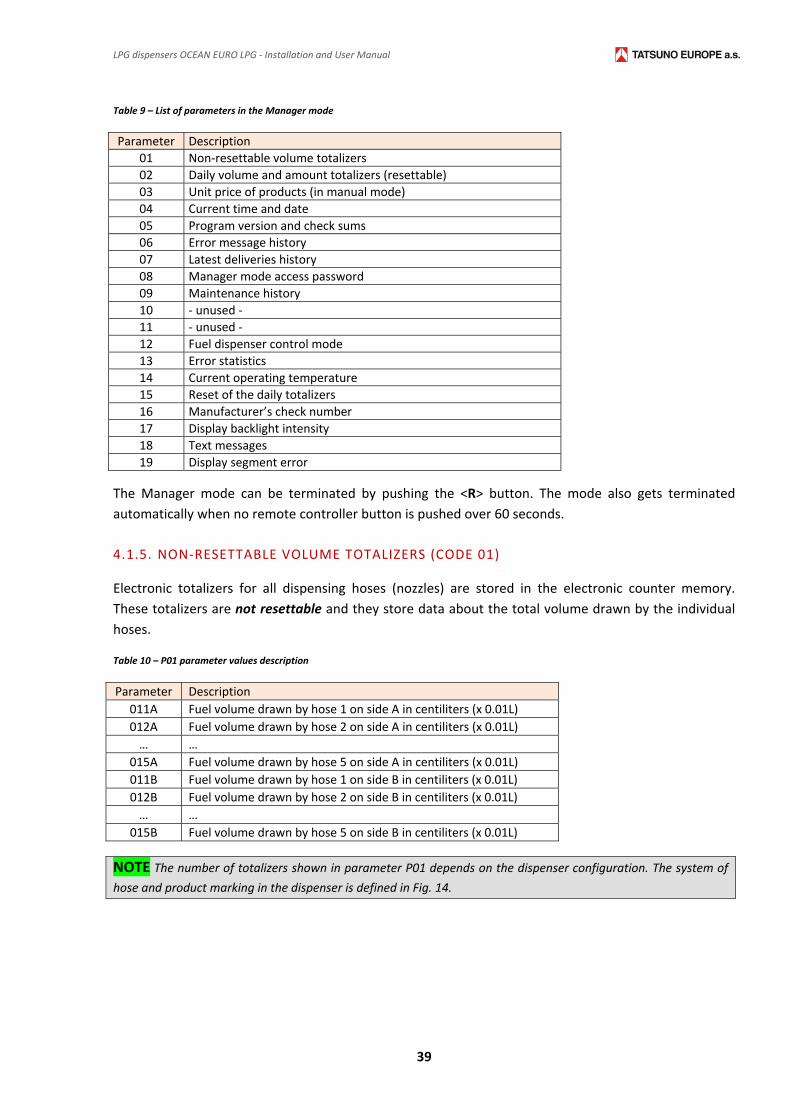
Table 9 – List of parameters in the Manager mode
Parameter Description
01 Non‐resettable volume totalizers
02 Daily volume and amount totalizers (resettable)
03 Unit price of products (in manual mode)
04 Current time and date
05 Program version and check sums
06 Error message history
07 Latest deliveries history
08 Manager mode access password
09 Maintenance history
10 ‐ unused ‐
11 ‐ unused ‐
12 Fuel dispenser control mode
13 Error statistics
14 Current operating temperature
15 Reset of the daily totalizers
16 Manufacturer’s check number
17 Display backlight intensity
18 Text messages
19 Display segment error
The Manager mode can be terminated by pushing the <R> button. The mode also gets terminated
automatically when no remote controller button is pushed over 60 seconds.
4.1.5. NON‐RESETTABLE VOLUME TOTALIZERS (CODE 01)
Electronic totalizers for all dispensing hoses (nozzles) are stored in the electronic counter memory.
These totalizers are not resettable and they store data about the total volume drawn by the individual
hoses.
Table 10 – P01 parameter values description
Parameter Description
011A Fuel volume drawn by hose 1 on side A in centiliters (x 0.01L)
012A Fuel volume drawn by hose 2 on side A in centiliters (x 0.01L)
… …
015A Fuel volume drawn by hose 5 on side A in centiliters (x 0.01L)
011B Fuel volume drawn by hose 1 on side B in centiliters (x 0.01L)
012B Fuel volume drawn by hose 2 on side B in centiliters (x 0.01L)
… …
015B Fuel volume drawn by hose 5 on side B in centiliters (x 0.01L)
NOTE The number of totalizers shown in parameter P01 depends on the dispenser configuration. The system of
hose and product marking in the dispenser is defined in Fig. 14.
TATSUNO EUROPE a.s., www.tatsuno‐europe.com
40
4.1.6. DAILY TOTALIZERS (CODE 02)
The electronic daily totalizers for all dispensing hoses (nozzles) are stored in the memory of the
electronic counter. These totalizers can be reset anytime using the P15 parameter (see description
below). They show the total volume and total amount of money drawn by the individual hoses since
their latest reset.
Table 11 – P02 parameter value description
Parameter Description
02L1 (A) Fuel volume drawn by hose 1 on side A in centiliters (x 0.01L)
02C1 (A) Amount drawn by hose 1 on side A in the currency unit
… …
02L5 (A) Fuel volume drawn by hose 5 on side A in centiliters (x 0.01L)
02C5 (A) Amount drawn by hose 5 on side A in the currency unit
02L1 (B) Fuel volume drawn by hose 1 on side B in centiliters (x 0.01L)
02C1 (B) Amount drawn by hose 1 on side B in the currency unit
… …
02L5 (B) Fuel volume drawn by hose 5 on side B in centiliters (x 0.01L)
02C5 (B) Amount drawn by hose 5 on side B in the currency unit
NOTE The number of daily totalizers shown in parameter P02 depends from the dispenser configuration. The
system of hose and products marking in the dispenser is defined in Fig. 14.
4.1.7. UNIT PRICES OF FUEL PRODUCTS (CODE 03)
This function enables displaying and setting of the current unit price (i.e. the price of one liter of fuel) for
all fuel products. These fuel unit prices are set on the display after the nozzle is lifted and the display is
reset, in case the dispenser works in manual mode.
Setup is carried out by pressing the <Ent> key, entering the price in the PPPP format and confirming with
the <Ent> key again. No decimal point is used. For instance, the price 1.03 Euro/L will be written as
0103, the price 34.15 CZK/L as 3415, etc.
Table 12 – P03 parameter value description
Parameter Description Default setting
03 1 Unit price of fuel product 1 0,000 Eur / L
03 2 Unit price of fuel product 2 0,000 Eur / L
03 3 Unit price of fuel product 3 0,000 Eur / L
03 4 Unit price of fuel product 4 0,000 Eur / L
03 5 Unit price of fuel product 5 0,000 Eur / L
NOTE The number of fuel products listed in parameter 03 depends on the dispenser configuration. The system of
fuel product marking is described in Fig. 14. When the unit price setting is changed, it will take effect only after the
subsequent lifting of the nozzle.
NOTICE The values set in the P03 parameter are valid only in the dispenser’s manual mode. If the fuel dispenser
is connected to the station’s central control system, the fuel unit price is set directly by the control system prior to
every fuel delivery. The P03 parameter value is not functional in this case.
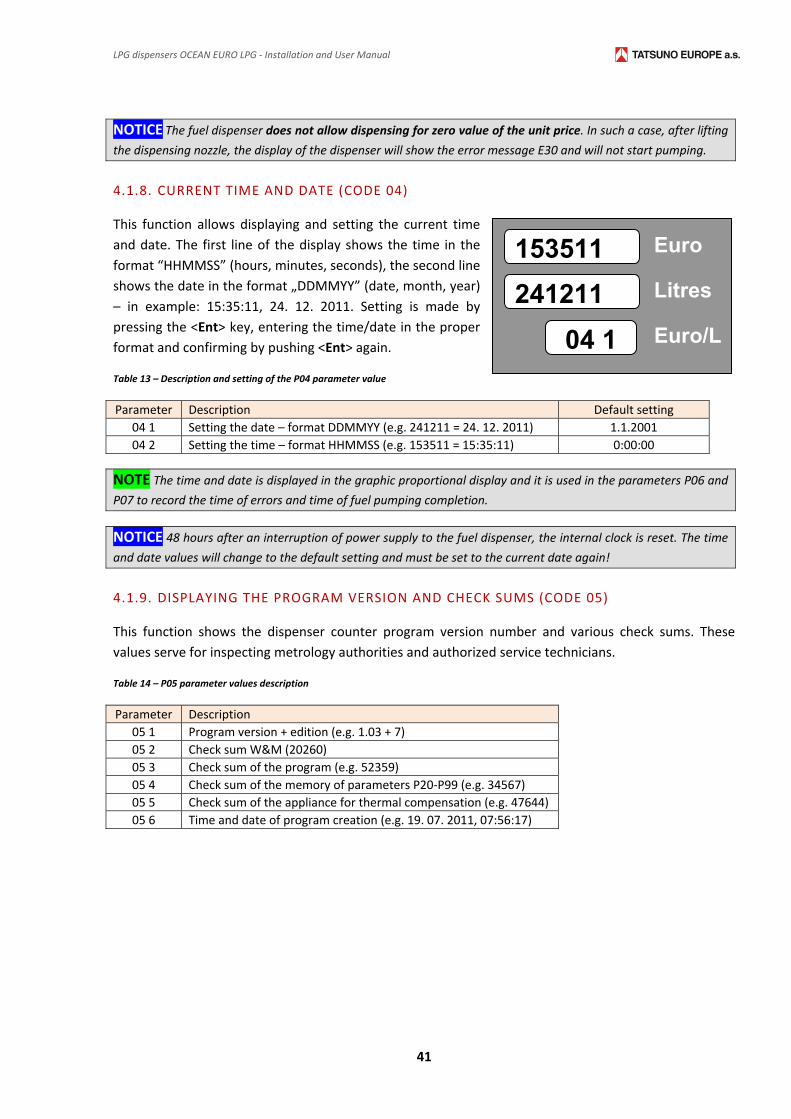
LPG dispensers OCEAN EURO LPG ‐ Installation and User Manual
41
NOTICE The fuel dispenser does not allow dispensing for zero value of the unit price. In such a case, after lifting
the dispensing nozzle, the display of the dispenser will show the error message E30 and will not start pumping.
4.1.8. CURRENT TIME AND DATE (CODE 04)
This function allows displaying and setting the current time
and date. The first line of the display shows the time in the
format “HHMMSS” (hours, minutes, seconds), the second line
shows the date in the format „DDMMYY” (date, month, year)
– in example: 15:35:11, 24. 12. 2011. Setting is made by
pressing the <Ent> key, entering the time/date in the proper
format and confirming by pushing <Ent> again.
Table 13 – Description and setting of the P04 parameter value
Parameter Description Default setting
04 1 Setting the date – format DDMMYY (e.g. 241211 = 24. 12. 2011) 1.1.2001
04 2 Setting the time – format HHMMSS (e.g. 153511 = 15:35:11) 0:00:00
NOTE The time and date is displayed in the graphic proportional display and it is used in the parameters P06 and
P07 to record the time of errors and time of fuel pumping completion.
NOTICE 48 hours after an interruption of power supply to the fuel dispenser, the internal clock is reset. The time
and date values will change to the default setting and must be set to the current date again!
4.1.9. DISPLAYING THE PROGRAM VERSION AND CHECK SUMS (CODE 05)
This function shows the dispenser counter program version number and various check sums. These
values serve for inspecting metrology authorities and authorized service technicians.
Table 14 – P05 parameter values description
Parameter Description
05 1 Program version + edition (e.g. 1.03 + 7)
05 2 Check sum W&M (20260)
05 3 Check sum of the program (e.g. 52359)
05 4 Check sum of the memory of parameters P20‐P99 (e.g. 34567)
05 5 Check sum of the appliance for thermal compensation (e.g. 47644)
05 6 Time and date of program creation (e.g. 19. 07. 2011, 07:56:17)
153511
241211
Cena
Litrů
Kč/litr04 1
153511
241211
Euro
Litres
Euro/L04 1
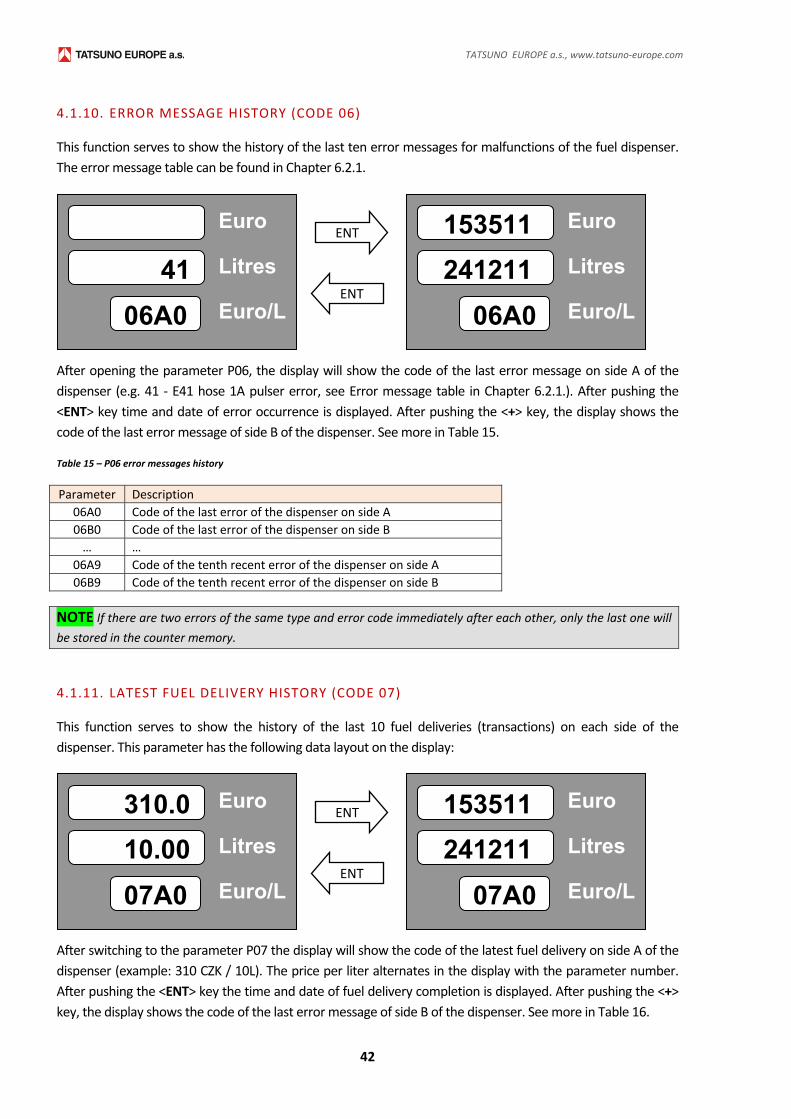
TATSUNO EUROPE a.s., www.tatsuno‐europe.com
42
4.1.10. ERROR MESSAGE HISTORY (CODE 06)
This function serves to show the history of the last ten error messages for malfunctions of the fuel dispenser.
The error message table can be found in Chapter 6.2.1.
After opening the parameter P06, the display will show the code of the last error message on side A of the
dispenser (e.g. 41 ‐ E41 hose 1A pulser error, see Error message table in Chapter 6.2.1.). After pushing the
<ENT> key time and date of error occurrence is displayed. After pushing the <+> key, the display shows the
code of the last error message of side B of the dispenser. See more in Table 15.
Table 15 – P06 error messages history
Parameter Description
06A0 Code of the last error of the dispenser on side A
06B0 Code of the last error of the dispenser on side B
… …
06A9 Code of the tenth recent error of the dispenser on side A
06B9 Code of the tenth recent error of the dispenser on side B
NOTE If there are two errors of the same type and error code immediately after each other, only the last one will
be stored in the counter memory.
4.1.11. LATEST FUEL DELIVERY HISTORY (CODE 07)
This function serves to show the history of the last 10 fuel deliveries (transactions) on each side of the
dispenser. This parameter has the following data layout on the display:
After switching to the parameter P07 the display will show the code of the latest fuel delivery on side A of the
dispenser (example: 310 CZK / 10L). The price per liter alternates in the display with the parameter number.
After pushing the <ENT> key the time and date of fuel delivery completion is displayed. After pushing the <+>
key, the display shows the code of the last error message of side B of the dispenser. See more in Table 16.
41
Euro
Litres
Euro/L 06A0
153511
241211
Euro
Litres
Euro/L 06A0
ENT
ENT
310.0
10.00
Euro
Litres
Euro/L 07A0
153511
241211
Euro
Litres
Euro/L 07A0
ENT
ENT
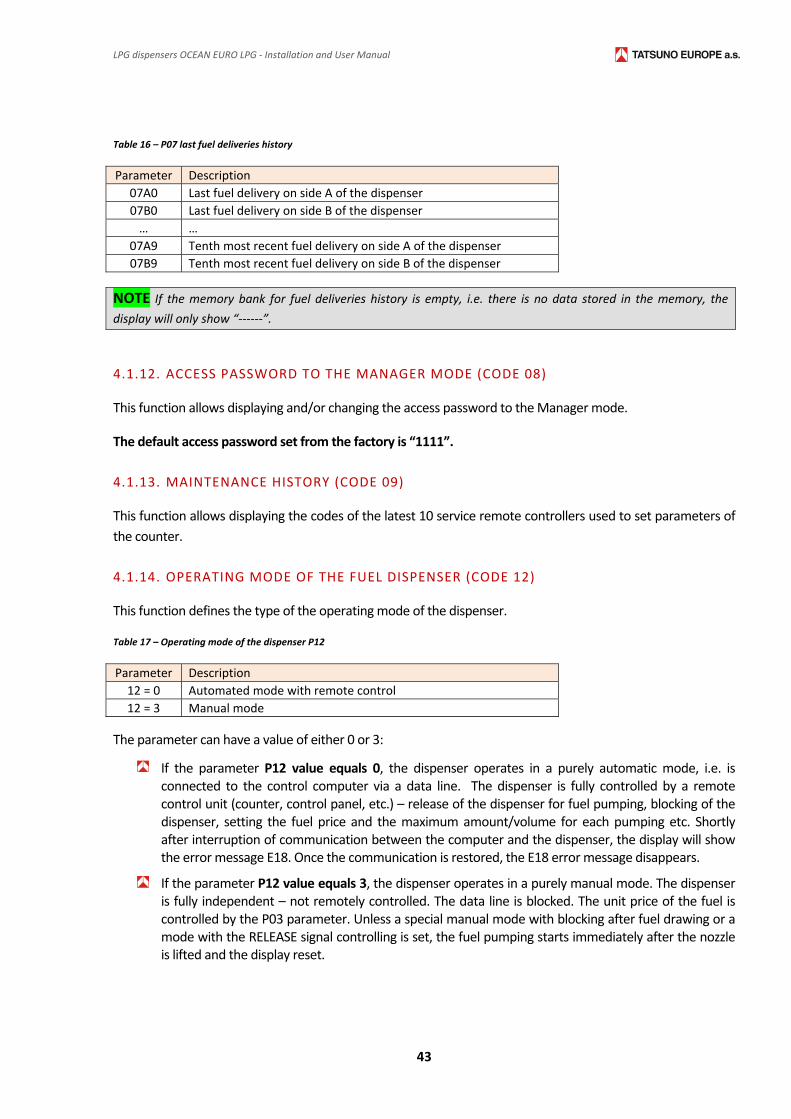
LPG dispensers OCEAN EURO LPG ‐ Installation and User Manual
43
Table 16 – P07 last fuel deliveries history
Parameter Description
07A0 Last fuel delivery on side A of the dispenser
07B0 Last fuel delivery on side B of the dispenser
… …
07A9 Tenth most recent fuel delivery on side A of the dispenser
07B9 Tenth most recent fuel delivery on side B of the dispenser
NOTE If the memory bank for fuel deliveries history is empty, i.e. there is no data stored in the memory, the
display will only show “‐‐‐‐‐‐”.
4.1.12. ACCESS PASSWORD TO THE MANAGER MODE (CODE 08)
This function allows displaying and/or changing the access password to the Manager mode.
The default access password set from the factory is “1111”.
4.1.13. MAINTENANCE HISTORY (CODE 09)
This function allows displaying the codes of the latest 10 service remote controllers used to set parameters of
the counter.
4.1.14. OPERATING MODE OF THE FUEL DISPENSER (CODE 12)
This function defines the type of the operating mode of the dispenser.
Table 17 – Operating mode of the dispenser P12
Parameter Description
12 = 0 Automated mode with remote control
12 = 3 Manual mode
The parameter can have a value of either 0 or 3:
If the parameter P12 value equals 0, the dispenser operates in a purely automatic mode, i.e. is connected to the control computer via a data line. The dispenser is fully controlled by a remote control unit (counter, control panel, etc.) – release of the dispenser for fuel pumping, blocking of the dispenser, setting the fuel price and the maximum amount/volume for each pumping etc. Shortly after interruption of communication between the computer and the dispenser, the display will show the error message E18. Once the communication is restored, the E18 error message disappears.
If the parameter P12 value equals 3, the dispenser operates in a purely manual mode. The dispenser is fully independent – not remotely controlled. The data line is blocked. The unit price of the fuel is controlled by the P03 parameter. Unless a special manual mode with blocking after fuel drawing or a mode with the RELEASE signal controlling is set, the fuel pumping starts immediately after the nozzle is lifted and the display reset.
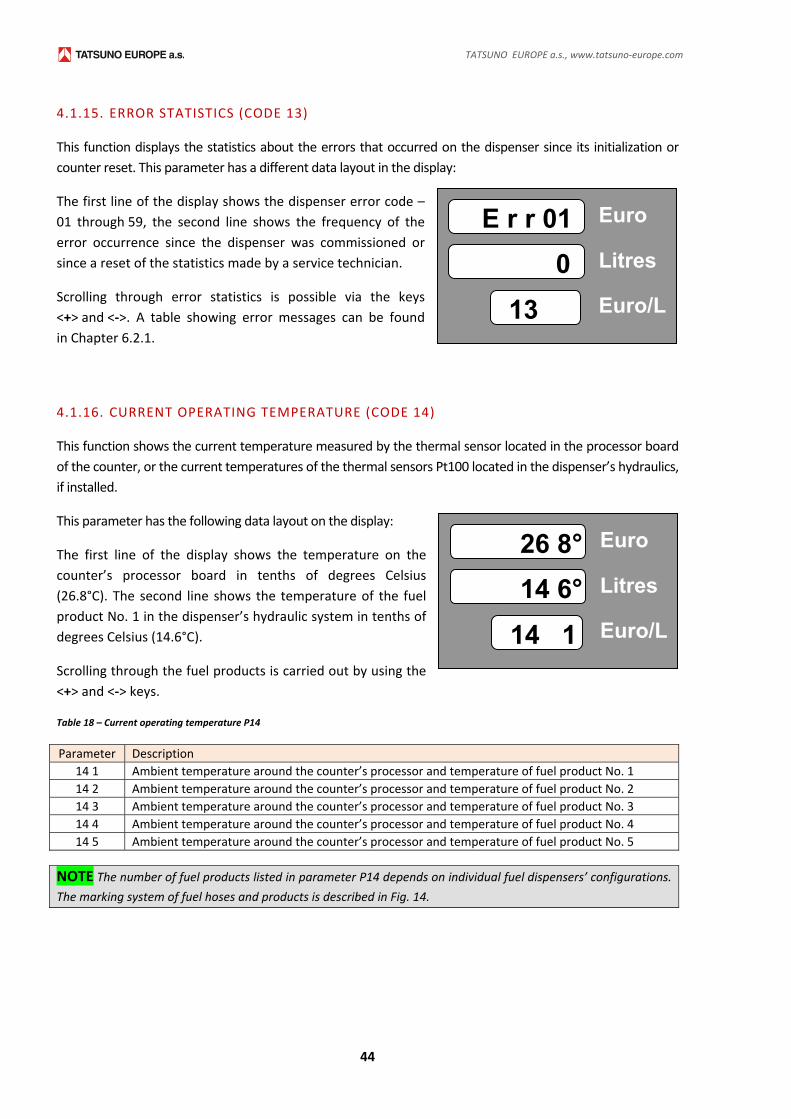
TATSUNO EUROPE a.s., www.tatsuno‐europe.com
44
4.1.15. ERROR STATISTICS (CODE 13)
This function displays the statistics about the errors that occurred on the dispenser since its initialization or
counter reset. This parameter has a different data layout in the display:
The first line of the display shows the dispenser error code –
01 through 59, the second line shows the frequency of the
error occurrence since the dispenser was commissioned or
since a reset of the statistics made by a service technician.
Scrolling through error statistics is possible via the keys
<+> and <‐>. A table showing error messages can be found
in Chapter 6.2.1.
4.1.16. CURRENT OPERATING TEMPERATURE (CODE 14)
This function shows the current temperature measured by the thermal sensor located in the processor board
of the counter, or the current temperatures of the thermal sensors Pt100 located in the dispenser’s hydraulics,
if installed.
This parameter has the following data layout on the display:
The first line of the display shows the temperature on the
counter’s processor board in tenths of degrees Celsius
(26.8°C). The second line shows the temperature of the fuel
product No. 1 in the dispenser’s hydraulic system in tenths of
degrees Celsius (14.6°C).
Scrolling through the fuel products is carried out by using the
<+> and <‐> keys.
Table 18 – Current operating temperature P14
Parameter Description
14 1 Ambient temperature around the counter’s processor and temperature of fuel product No. 1
14 2 Ambient temperature around the counter’s processor and temperature of fuel product No. 2
14 3 Ambient temperature around the counter’s processor and temperature of fuel product No. 3
14 4 Ambient temperature around the counter’s processor and temperature of fuel product No. 4
14 5 Ambient temperature around the counter’s processor and temperature of fuel product No. 5
NOTE The number of fuel products listed in parameter P14 depends on individual fuel dispensers’ configurations.
The marking system of fuel hoses and products is described in Fig. 14.
E r r 01
0
Euro
Litres
Euro/L 13
26 8°
14 6°
Euro
Litres
Euro/L 14 1
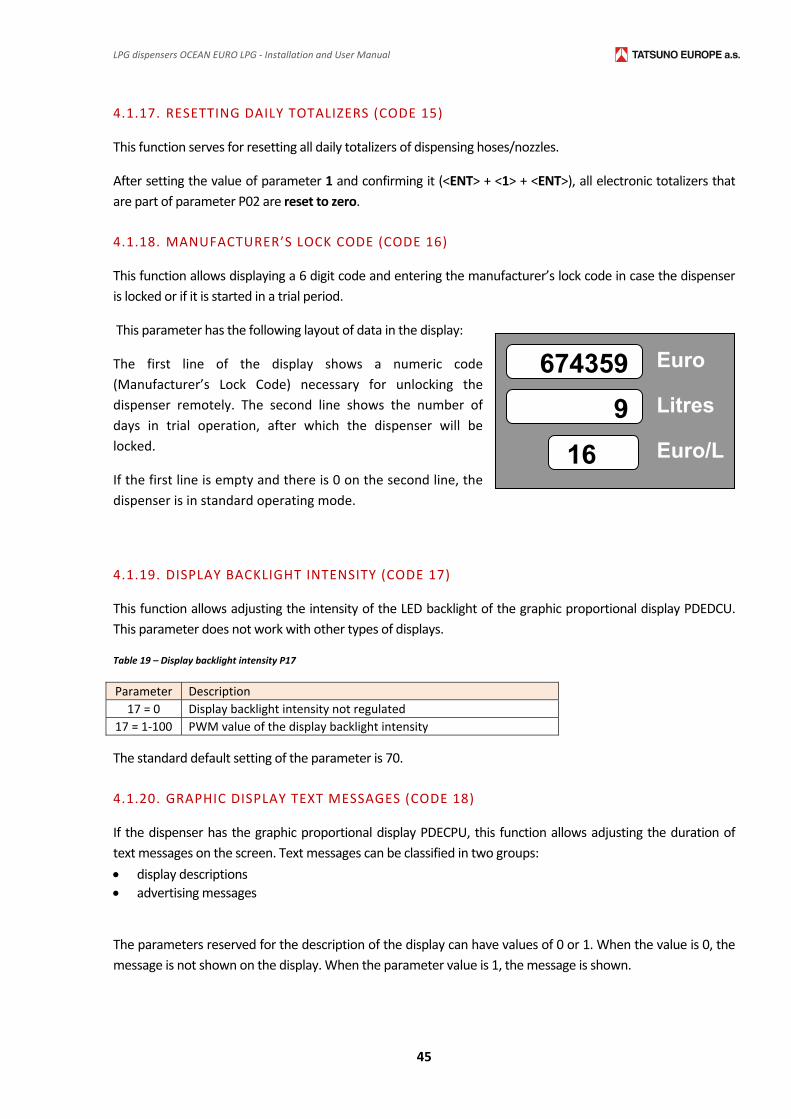
LPG dispensers OCEAN EURO LPG ‐ Installation and User Manual
45
4.1.17. RESETTING DAILY TOTALIZERS (CODE 15)
This function serves for resetting all daily totalizers of dispensing hoses/nozzles.
After setting the value of parameter 1 and confirming it (<ENT> + <1> + <ENT>), all electronic totalizers that
are part of parameter P02 are reset to zero.
4.1.18. MANUFACTURER’S LOCK CODE (CODE 16)
This function allows displaying a 6 digit code and entering the manufacturer’s lock code in case the dispenser
is locked or if it is started in a trial period.
This parameter has the following layout of data in the display:
The first line of the display shows a numeric code
(Manufacturer’s Lock Code) necessary for unlocking the
dispenser remotely. The second line shows the number of
days in trial operation, after which the dispenser will be
locked.
If the first line is empty and there is 0 on the second line, the
dispenser is in standard operating mode.
4.1.19. DISPLAY BACKLIGHT INTENSITY (CODE 17)
This function allows adjusting the intensity of the LED backlight of the graphic proportional display PDEDCU.
This parameter does not work with other types of displays.
Table 19 – Display backlight intensity P17
Parameter Description
17 = 0 Display backlight intensity not regulated
17 = 1‐100 PWM value of the display backlight intensity
The standard default setting of the parameter is 70.
4.1.20. GRAPHIC DISPLAY TEXT MESSAGES (CODE 18)
If the dispenser has the graphic proportional display PDECPU, this function allows adjusting the duration of
text messages on the screen. Text messages can be classified in two groups:
display descriptions
advertising messages
The parameters reserved for the description of the display can have values of 0 or 1. When the value is 0, the
message is not shown on the display. When the parameter value is 1, the message is shown.
674359
9
Euro
Litres
Euro/L 16
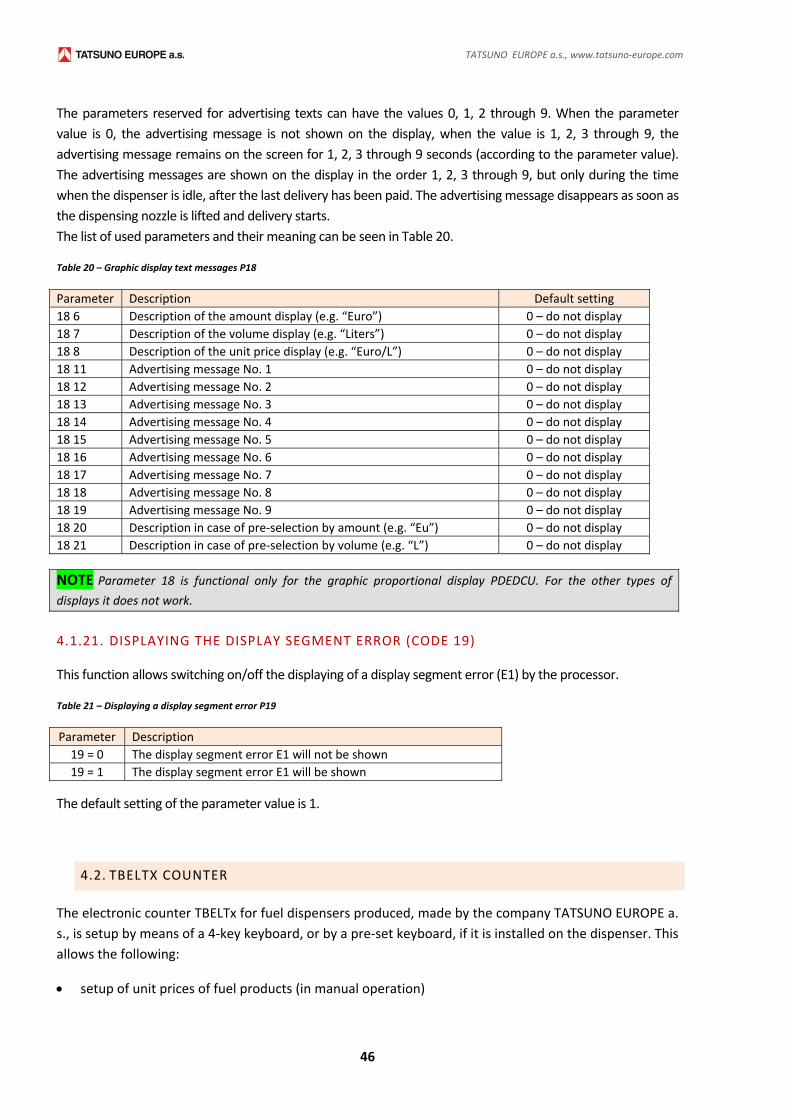
TATSUNO EUROPE a.s., www.tatsuno‐europe.com
46
The parameters reserved for advertising texts can have the values 0, 1, 2 through 9. When the parameter
value is 0, the advertising message is not shown on the display, when the value is 1, 2, 3 through 9, the
advertising message remains on the screen for 1, 2, 3 through 9 seconds (according to the parameter value).
The advertising messages are shown on the display in the order 1, 2, 3 through 9, but only during the time
when the dispenser is idle, after the last delivery has been paid. The advertising message disappears as soon as
the dispensing nozzle is lifted and delivery starts.
The list of used parameters and their meaning can be seen in Table 20.
Table 20 – Graphic display text messages P18
Parameter Description Default setting
18 6 Description of the amount display (e.g. “Euro”) 0 – do not display
18 7 Description of the volume display (e.g. “Liters”) 0 – do not display
18 8 Description of the unit price display (e.g. “Euro/L”) 0 – do not display
18 11 Advertising message No. 1 0 – do not display
18 12 Advertising message No. 2 0 – do not display
18 13 Advertising message No. 3 0 – do not display
18 14 Advertising message No. 4 0 – do not display
18 15 Advertising message No. 5 0 – do not display
18 16 Advertising message No. 6 0 – do not display
18 17 Advertising message No. 7 0 – do not display
18 18 Advertising message No. 8 0 – do not display
18 19 Advertising message No. 9 0 – do not display
18 20 Description in case of pre‐selection by amount (e.g. “Eu”) 0 – do not display
18 21 Description in case of pre‐selection by volume (e.g. “L”) 0 – do not display
NOTE Parameter 18 is functional only for the graphic proportional display PDEDCU. For the other types of
displays it does not work.
4.1.21. DISPLAYING THE DISPLAY SEGMENT ERROR (CODE 19)
This function allows switching on/off the displaying of a display segment error (E1) by the processor.
Table 21 – Displaying a display segment error P19
Parameter Description
19 = 0 The display segment error E1 will not be shown
19 = 1 The display segment error E1 will be shown
The default setting of the parameter value is 1.
4.2. TBELTX COUNTER
The electronic counter TBELTx for fuel dispensers produced, made by the company TATSUNO EUROPE a.
s., is setup by means of a 4‐key keyboard, or by a pre‐set keyboard, if it is installed on the dispenser. This
allows the following:
setup of unit prices of fuel products (in manual operation)
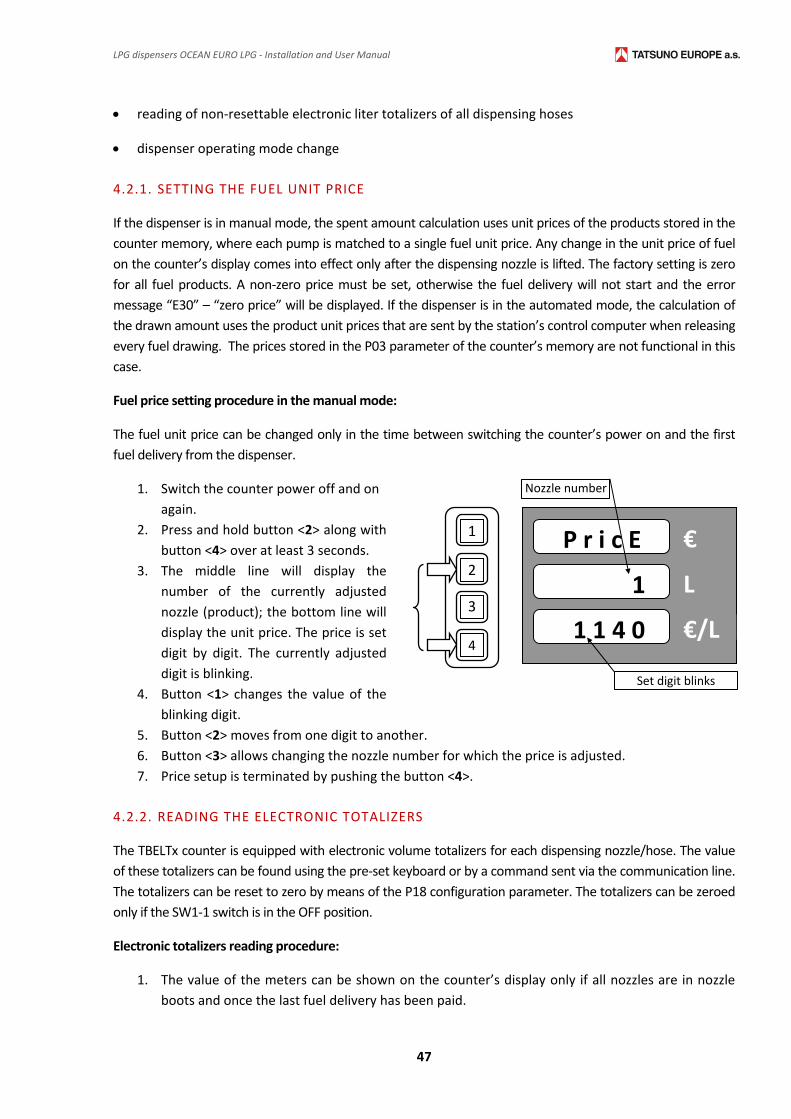
LPG dispensers OCEAN EURO LPG ‐ Installation and User Manual
47
P r i c E
1
€
L
€/L 1 1 4 0
Nozzle number
Set digit blinks
1
2
3
4
reading of non‐resettable electronic liter totalizers of all dispensing hoses
dispenser operating mode change
4.2.1. SETTING THE FUEL UNIT PRICE
If the dispenser is in manual mode, the spent amount calculation uses unit prices of the products stored in the
counter memory, where each pump is matched to a single fuel unit price. Any change in the unit price of fuel
on the counter’s display comes into effect only after the dispensing nozzle is lifted. The factory setting is zero
for all fuel products. A non‐zero price must be set, otherwise the fuel delivery will not start and the error
message “E30” – “zero price” will be displayed. If the dispenser is in the automated mode, the calculation of
the drawn amount uses the product unit prices that are sent by the station’s control computer when releasing
every fuel drawing. The prices stored in the P03 parameter of the counter’s memory are not functional in this
case.
Fuel price setting procedure in the manual mode:
The fuel unit price can be changed only in the time between switching the counter’s power on and the first
fuel delivery from the dispenser.
1. Switch the counter power off and on
again.
2. Press and hold button <2> along with
button <4> over at least 3 seconds.
3. The middle line will display the
number of the currently adjusted
nozzle (product); the bottom line will
display the unit price. The price is set
digit by digit. The currently adjusted
digit is blinking.
4. Button <1> changes the value of the
blinking digit.
5. Button <2> moves from one digit to another.
6. Button <3> allows changing the nozzle number for which the price is adjusted.
7. Price setup is terminated by pushing the button <4>.
4.2.2. READING THE ELECTRONIC TOTALIZERS
The TBELTx counter is equipped with electronic volume totalizers for each dispensing nozzle/hose. The value
of these totalizers can be found using the pre‐set keyboard or by a command sent via the communication line.
The totalizers can be reset to zero by means of the P18 configuration parameter. The totalizers can be zeroed
only if the SW1‐1 switch is in the OFF position.
Electronic totalizers reading procedure:
1. The value of the meters can be shown on the counter’s display only if all nozzles are in nozzle
boots and once the last fuel delivery has been paid.
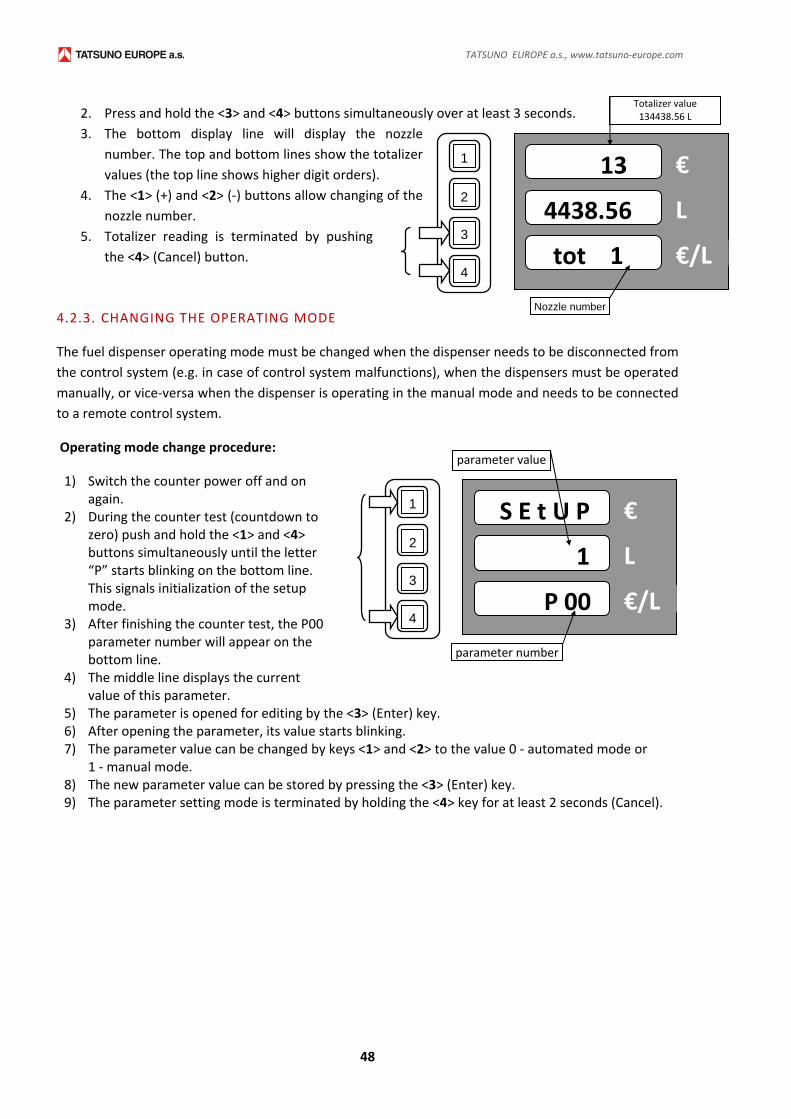
TATSUNO EUROPE a.s., www.tatsuno‐europe.com
48
13
4438.56
€
L
€/L tot 1
Totalizer value134438.56 L
Nozzle number
1
2
3
4
2. Press and hold the <3> and <4> buttons simultaneously over at least 3 seconds.
3. The bottom display line will display the nozzle
number. The top and bottom lines show the totalizer
values (the top line shows higher digit orders).
4. The <1> (+) and <2> (‐) buttons allow changing of the
nozzle number.
5. Totalizer reading is terminated by pushing
the <4> (Cancel) button.
4.2.3. CHANGING THE OPERATING MODE
The fuel dispenser operating mode must be changed when the dispenser needs to be disconnected from
the control system (e.g. in case of control system malfunctions), when the dispensers must be operated
manually, or vice‐versa when the dispenser is operating in the manual mode and needs to be connected
to a remote control system.
Operating mode change procedure:
1) Switch the counter power off and on again.
2) During the counter test (countdown to zero) push and hold the <1> and <4> buttons simultaneously until the letter “P” starts blinking on the bottom line. This signals initialization of the setup mode.
3) After finishing the counter test, the P00 parameter number will appear on the bottom line.
4) The middle line displays the current value of this parameter.
5) The parameter is opened for editing by the <3> (Enter) key. 6) After opening the parameter, its value starts blinking. 7) The parameter value can be changed by keys <1> and <2> to the value 0 ‐ automated mode or
1 ‐ manual mode. 8) The new parameter value can be stored by pressing the <3> (Enter) key. 9) The parameter setting mode is terminated by holding the <4> key for at least 2 seconds (Cancel).
S E t U P
1
€
L
€/L P 00
parameter value
parameter number
1
2
3
4
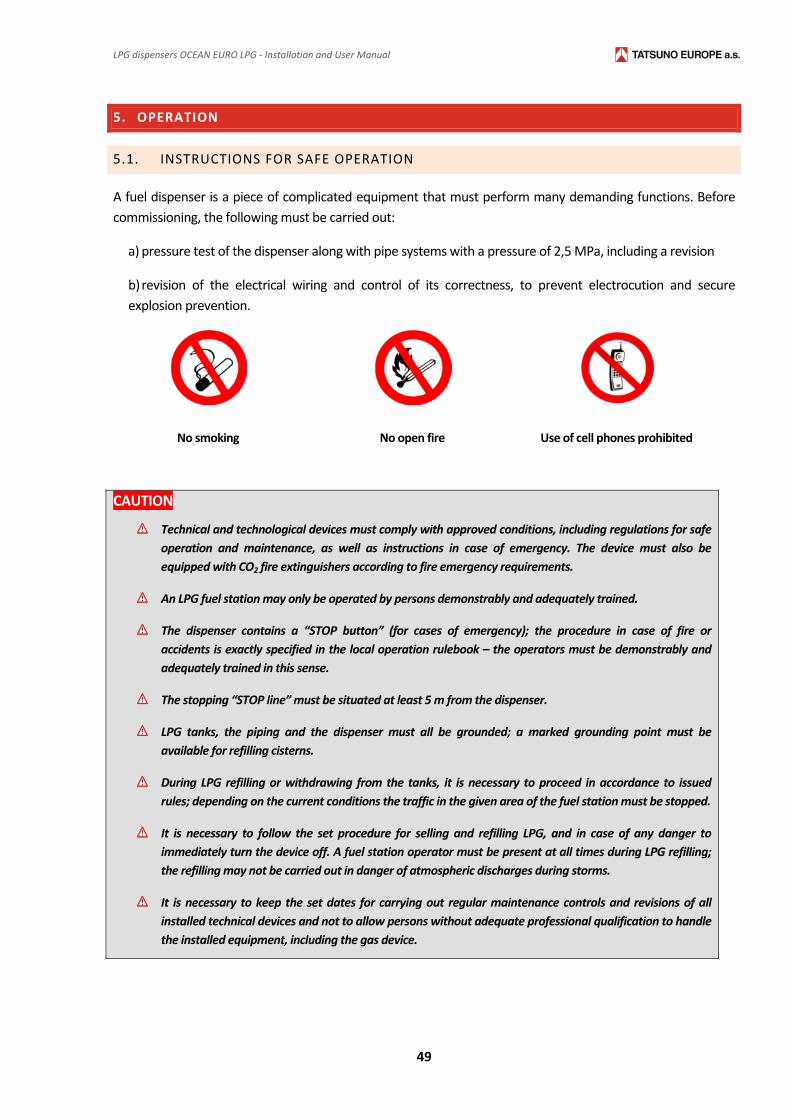
LPG dispensers OCEAN EURO LPG ‐ Installation and User Manual
49
5. OPERATION
5.1. INSTRUCTIONS FOR SAFE OPERATION
A fuel dispenser is a piece of complicated equipment that must perform many demanding functions. Before
commissioning, the following must be carried out:
a) pressure test of the dispenser along with pipe systems with a pressure of 2,5 MPa, including a revision
b) revision of the electrical wiring and control of its correctness, to prevent electrocution and secure
explosion prevention.
No smoking No open fire Use of cell phones prohibited
CAUTION
Technical and technological devices must comply with approved conditions, including regulations for safe
operation and maintenance, as well as instructions in case of emergency. The device must also be
equipped with CO2 fire extinguishers according to fire emergency requirements.
An LPG fuel station may only be operated by persons demonstrably and adequately trained.
The dispenser contains a “STOP button” (for cases of emergency); the procedure in case of fire or
accidents is exactly specified in the local operation rulebook – the operators must be demonstrably and
adequately trained in this sense.
The stopping “STOP line” must be situated at least 5 m from the dispenser.
LPG tanks, the piping and the dispenser must all be grounded; a marked grounding point must be
available for refilling cisterns.
During LPG refilling or withdrawing from the tanks, it is necessary to proceed in accordance to issued
rules; depending on the current conditions the traffic in the given area of the fuel station must be stopped.
It is necessary to follow the set procedure for selling and refilling LPG, and in case of any danger to
immediately turn the device off. A fuel station operator must be present at all times during LPG refilling;
the refilling may not be carried out in danger of atmospheric discharges during storms.
It is necessary to keep the set dates for carrying out regular maintenance controls and revisions of all
installed technical devices and not to allow persons without adequate professional qualification to handle
the installed equipment, including the gas device.
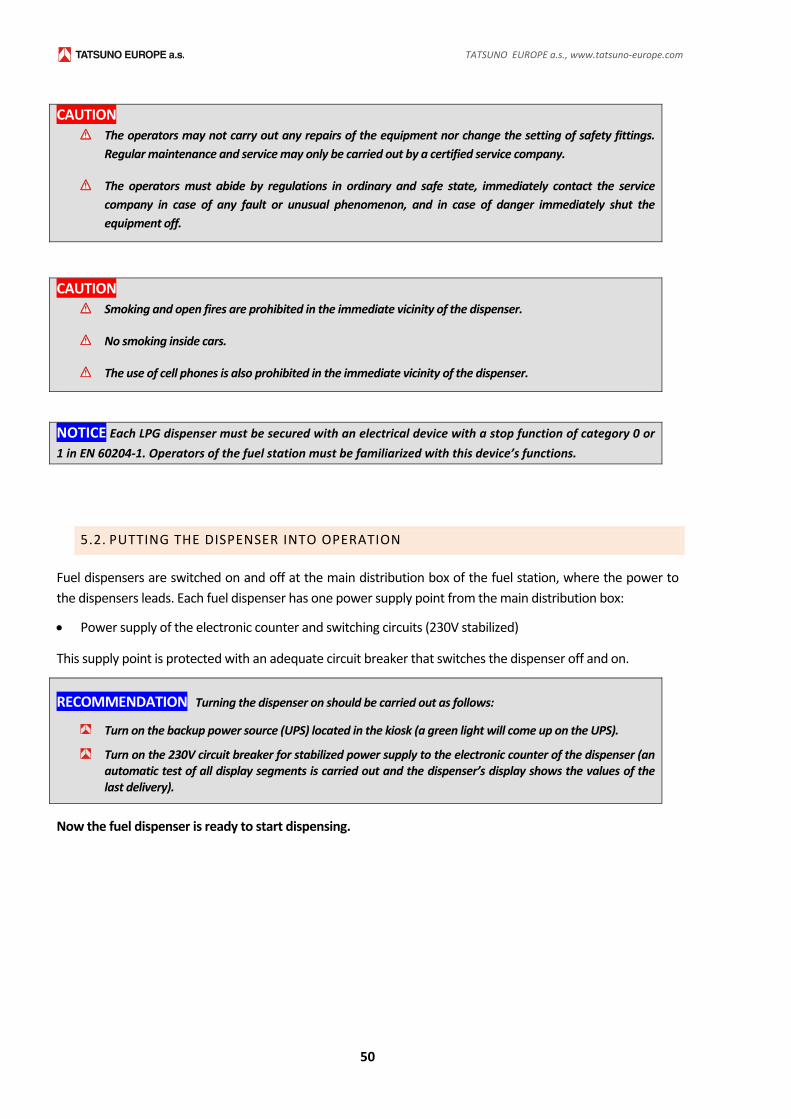
TATSUNO EUROPE a.s., www.tatsuno‐europe.com
50
CAUTION The operators may not carry out any repairs of the equipment nor change the setting of safety fittings.
Regular maintenance and service may only be carried out by a certified service company.
The operators must abide by regulations in ordinary and safe state, immediately contact the service
company in case of any fault or unusual phenomenon, and in case of danger immediately shut the
equipment off.
CAUTION Smoking and open fires are prohibited in the immediate vicinity of the dispenser.
No smoking inside cars.
The use of cell phones is also prohibited in the immediate vicinity of the dispenser.
NOTICE Each LPG dispenser must be secured with an electrical device with a stop function of category 0 or
1 in EN 60204‐1. Operators of the fuel station must be familiarized with this device’s functions.
5.2. PUTTING THE DISPENSER INTO OPERATION
Fuel dispensers are switched on and off at the main distribution box of the fuel station, where the power to
the dispensers leads. Each fuel dispenser has one power supply point from the main distribution box:
Power supply of the electronic counter and switching circuits (230V stabilized)
This supply point is protected with an adequate circuit breaker that switches the dispenser off and on.
RECOMMENDATION Turning the dispenser on should be carried out as follows:
Turn on the backup power source (UPS) located in the kiosk (a green light will come up on the UPS).
Turn on the 230V circuit breaker for stabilized power supply to the electronic counter of the dispenser (an automatic test of all display segments is carried out and the dispenser’s display shows the values of the last delivery).
Now the fuel dispenser is ready to start dispensing.
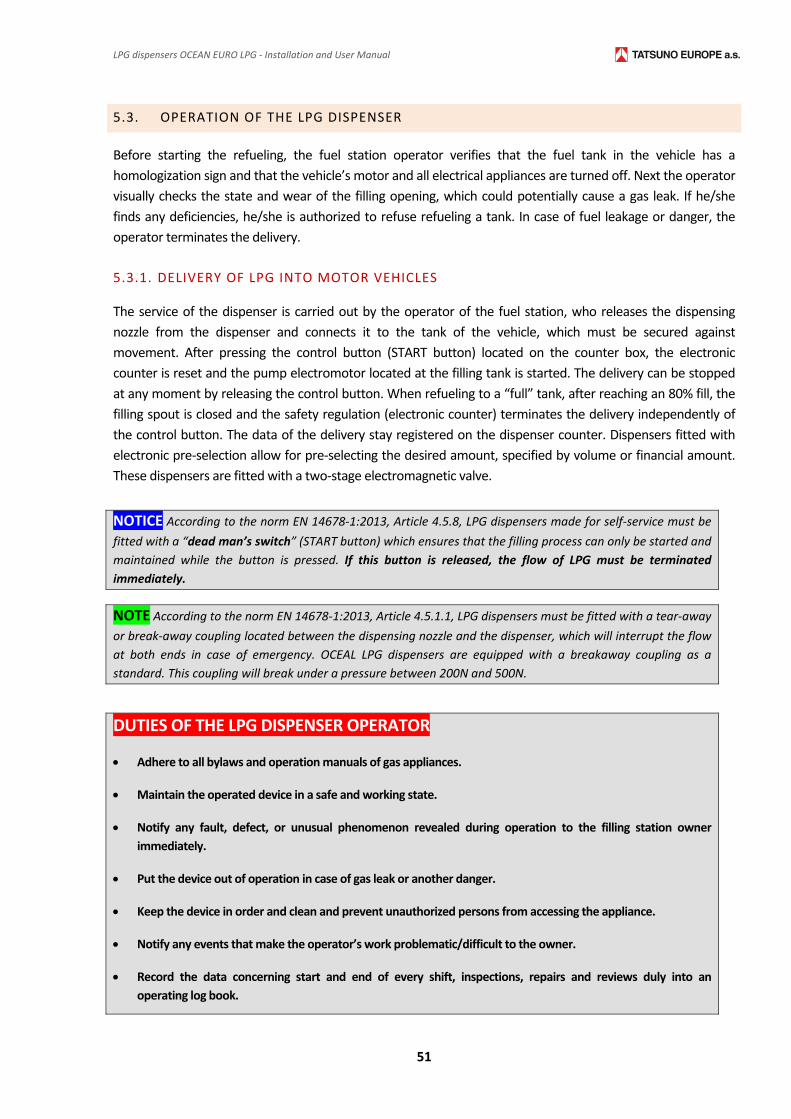
LPG dispensers OCEAN EURO LPG ‐ Installation and User Manual
51
5.3. OPERATION OF THE LPG DISPENSER
Before starting the refueling, the fuel station operator verifies that the fuel tank in the vehicle has a
homologization sign and that the vehicle’s motor and all electrical appliances are turned off. Next the operator
visually checks the state and wear of the filling opening, which could potentially cause a gas leak. If he/she
finds any deficiencies, he/she is authorized to refuse refueling a tank. In case of fuel leakage or danger, the
operator terminates the delivery.
5.3.1. DELIVERY OF LPG INTO MOTOR VEHICLES
The service of the dispenser is carried out by the operator of the fuel station, who releases the dispensing
nozzle from the dispenser and connects it to the tank of the vehicle, which must be secured against
movement. After pressing the control button (START button) located on the counter box, the electronic
counter is reset and the pump electromotor located at the filling tank is started. The delivery can be stopped
at any moment by releasing the control button. When refueling to a “full” tank, after reaching an 80% fill, the
filling spout is closed and the safety regulation (electronic counter) terminates the delivery independently of
the control button. The data of the delivery stay registered on the dispenser counter. Dispensers fitted with
electronic pre‐selection allow for pre‐selecting the desired amount, specified by volume or financial amount.
These dispensers are fitted with a two‐stage electromagnetic valve.
NOTICE According to the norm EN 14678‐1:2013, Article 4.5.8, LPG dispensers made for self‐service must be
fitted with a “dead man’s switch” (START button) which ensures that the filling process can only be started and
maintained while the button is pressed. If this button is released, the flow of LPG must be terminated
immediately.
NOTE According to the norm EN 14678‐1:2013, Article 4.5.1.1, LPG dispensers must be fitted with a tear‐away
or break‐away coupling located between the dispensing nozzle and the dispenser, which will interrupt the flow
at both ends in case of emergency. OCEAL LPG dispensers are equipped with a breakaway coupling as a
standard. This coupling will break under a pressure between 200N and 500N.
DUTIES OF THE LPG DISPENSER OPERATOR
Adhere to all bylaws and operation manuals of gas appliances.
Maintain the operated device in a safe and working state.
Notify any fault, defect, or unusual phenomenon revealed during operation to the filling station owner
immediately.
Put the device out of operation in case of gas leak or another danger.
Keep the device in order and clean and prevent unauthorized persons from accessing the appliance.
Notify any events that make the operator’s work problematic/difficult to the owner.
Record the data concerning start and end of every shift, inspections, repairs and reviews duly into an
operating log book.
TATSUNO EUROPE a.s., www.tatsuno‐europe.com
52
The operator of the fuel dispenser and fuel tank may neither carry out any repairs by himself/herself nor
change the setting of the equipment or safety fittings.
Regularly control the state of dispensing hoses and their proper hanging in the dispenser, protect them from
harm; mainly if the dispenser does not have a retractor and the hose is laid freely on the ground.
THE OPERATOR’S OUTFIT
soap (foamy) solution + brush for detection of leaks
leather gloves
a first‐aid‐kit, the log book, writing utensils, the operating and safety rules, the wiring diagram of the fittings
and a fire extinguisher must be available in the fuel station kiosk
5.3.2. SAFETY OF LPG DISPENSER OPERATION
The owner of the filling station is responsible for its operation; he/she entrusts its operation only to trained
staff with relevant authorization. The operators refuel LPG vehicle tanks professionally, check the state of the
fuel dispenser and other technology in set intervals, checks the operation of the whole unit and maintains
operating records. The no smoking and no open fire within 10 m signs must be installed in a visible place in the
vicinity of the fuel dispenser. A motor switch‐off sign, max. volume of refueling (80%) sign and preventing the
vehicle from undesirable motion sign also must be placed here.
From a design point of view, fuel dispensers and all components that might initiate an explosion are approved
by the state authorized institution – the State Testing Laboratory No. 210 FTZÚ Ostrava‐Radvanice, which
issues the relevant certificates. Environmental safety is certified by the ČIŽP Certificate
No. 90/00/895/01/TOM. For detection of gas leaks, sensors can be installed in the fuel dispenser area, which
are however outside the scope of the basic offer. From a hygienic point of view, the device is harmless for the
operator and the owner. When operating the device and carrying out maintenance, it is advisable to protect
the hands with gloves.
FIRST AID Poisoning – gaseous LPG
When refueling, avoid LPG vapor inhalation – danger of suffocation. In case of injury, the afflicted
person must be taken out of the contaminated area. Attention! Fire and explosion hazard! LPG is not
poisonous, but it is suffocating. In case of breathing failure carry out mouth‐to‐mouth resuscitation
immediately, in case of blood circulation failure combine mouth‐to‐mouth resuscitation with an
indirect heart massage. Transfer the affected person to a medical facility without delay.
Frostbite – liquid LPG
During a rapid drop of pressure to atmospheric pressure, liquid LPG evaporates at the temperature of
‐42°C. If it comes into contact with skin, e.g. during a liquid LPG spill, frostbite may occur. Do not rub
the affected area; cover it with a sterile bandage and seek medical assistance.
In case LPG enters the eyes, rinse them with copious amounts of water and seek medical attention.
LPG dispensers OCEAN EURO LPG ‐ Installation and User Manual
53
Burns – fire
In case of a burn, cool the wound with cold water, do not rub, cover with a sterile bandage and
secure medical assistance. Do not remove clothing. In case of burning clothes, do not run; but douse
with water, put the fire out with a blanket etc., or stop, drop and roll.
5.3.3. ELECTROMECHANICAL LITER TOTALIZERS
Upon request, OCEAN EURO LPG dispensers can be equipped with electromechanical totalizers to monitor the
total consumed fuel in each dispensing hose. The meters are on the display of the fuel dispenser. For each
dispensing hose or nozzle there is one seven‐digit totalizer that states the quantity of whole liters pumped
through the given hose.
5.3.4. DISPENSER OPERATING MODES
The fuel dispenser has two basic operation modes:
1) manual mode 2) automatic (remote) mode
The Manual mode is a mode when the dispenser works independently, separately, without remote control.
Delivery process: The customer comes to the dispenser. The operator inserts the dispensing nozzle into the
vehicle’s tank and presses the START button. The display resets (ca 1.5 seconds), the LPG pump engine
switches on and the delivery starts. After refueling the vehicle’s tank, the operator releases the START button
and hangs the nozzle back into the dispenser, and the customer pays for the fuel. The dispenser is ready for
the next delivery immediately. Because in the manual mode the dispenser is not controlled in any way, the
fuel unit price must be set manually at the dispenser (see chapters 4.1.7 and 4.2.1.). The quantity of pumped
liters per work shift is measured as the difference between the electronic (or electromechanical) totalizers
status at the beginning and at the end of the shift.
The Automatic mode is a mode in which the dispenser is remotely controlled (via PC program, control
console, station controller etc.). The Automatic mode allows remote regulation of pumping from the fuel
station kiosk. The kiosk contains a control device that‘s used by the operator to allow pumping at the
dispenser and – after the end of the pumping – collects information about the quantity of the consumed fuel
and its price.
Delivery process: The operator inserts the dispensing nozzle into the vehicle tank and presses the START
button. The display resets (ca 1.5 seconds), the LPG pump engine switches on and the delivery starts. After
filling the vehicle’s tank, the operator releases the START button and hangs the nozzle back, and the customer
goes into the kiosk to pay the price and receives a tax document (receipt) for the payment. After payment, the
dispenser is immediately ready for the next customer. Because in the automated mode the dispenser is
remotely controlled, the fuel unit price does not need to be set manually. The proper unit price is
automatically set by the controlling computer for all dispensers of the station.
Switching from the automated mode to the manual mode. By default, dispensers are installed and set
according to the expected mode used at the individual fuel station, i.e. if the fuel station has a control system,
the dispensers are set in the automatic mode; if the fuel station does not have a control system, dispensers
are set in the manual mode.
TATSUNO EUROPE a.s., www.tatsuno‐europe.com
54
In case it is necessary to switch the dispensers from the automatic mode to the manual mode – e.g. due to a
malfunction of the control system – proceed as follows:
PDEX Counter. Using the IR controller, change the P12 parameter value from 0 to 3 and set the unit prices in parameter P03, see chapter 4.1.14.
TBELTx Counter. Using the 4‐key keyboard, change the P00 parameter value from 0 to 1 and set the unit prices, see chapter 4.2.3.
NOTICE Switching from the automated mode to the manual mode must always be consulted with a service technician
in advance!
5.3.5. PRE‐SETTING KEYBOARS
OCEAN EURO LPG dispensers can be equipped with a “pre‐set keyboard”, which allows the customer to
pre‐set the desired monetary amount or fuel quantity directly at the dispenser. Before starting the delivery,
the operator can set the volume of fuel or amount of money to be dispensed.
The pre‐set value can be cancelled by pushing the <Zruš> (i.e. Cancel) button before the delivery starts. Then it
is possible to choose a different pre‐set value or dispense fuel normally without a pre‐set.
NOTE If the pre‐set keyboard is used, the dispensers must be equipped with slow‐down valves that ensure safe
slowdown of the fuel flow rate in advance before reaching the pre‐set target value.
a) Example of pre‐set in Czech crowns
The customer comes to the dispenser and wants to spend CZK 250 on fuel.
On the pre‐set keyboard the operator uses the keys to enter the value 250 (by pushing the <100 CZK> key twice and the <10 CZK> key five times).
The operator takes the nozzle off the dispenser, inserts it into the vehicle’s fuel tank and presses the START button.
The dispenser pumps fuel worth exactly the pre‐set amount and then stops automatically.
The operator puts the nozzle back in the dispenser. The customer goes to pay the amount to the cash desk.
b) Example of pre‐set in liters
The customer comes to the dispenser and wants to get 20 liters of fuel.
On the pre‐set keyboard the operator enters 20 (by pushing the <10 liters> button twice).
The operator takes the nozzle off the dispenser, inserts it into the vehicle’s fuel tank and presses the START button.
The dispenser pumps fuel in the pre‐set volume and then stops automatically.
The operator releases the START button and puts the nozzle back in the dispenser. The customer goes to pay for the delivered volume to the cash desk.
LPG dispensers OCEAN EURO LPG ‐ Installation and User Manual
55
5.3.6. TURNING THE DISPENSER OFF
RECOMMENDATION When turning the dispenser off, the producer recommends proceeding as follows:
Turn off the 230V circuit breakers of the stabilized power supply to the dispenser’s electronic counter.
Turn off the UPS backup power source located in the kiosk using the switch on its rear panel (the green light on the UPS will go out).
6. MAINTENANCE AND SERVICE
ATTENTION Before carrying out any maintenance interventions on the mechanic, hydraulic or electric
parts, it is always necessary to turn off the power supply and safely secure it against accidental turn‐on.
ATTENTION
DO NOT OPEN THE COVER OF THE DISTRIBUTION BOX WHILE THE DISPENSER IS ENERGIZED!
ATTENTION Every manipulation and deconstruction, even opening the filter cap, is conditioned by
displacing the entire medium by nitrogen or an inert gas from the hydraulic system of the dispenser!
Interventions into the electric and electronic parts may only be carried out by a specialist who is responsible
for the device safety. After finishing the service intervention, all conduits must be re‐secured into their
original positions. Correct conduit placement prevents their contact with moving parts of the retractor
module.
Attention! During every service intervention, it is necessary to visually check the tightness of all hydraulic
parts and remove possible mixing of media.
ATTENTION Any modification of the dispenser may revoke the validity of its certification. Check the
certification documents and the manufacturer’s manual when considering any modification of the electric
installation and/or the device.
6.1. KEY PRINCIPLES FOR THE MAINTENANCE OF DISPENSERS
Keep all functional units of the dispenser clean so that any malfunction can easily be identified and
repaired.
Regularly check the condition of dispensing hoses. In case of mechanical damage of the dispensing hose
coating, ensure its immediate replacement.
Check the function of locks and mechanisms for hanging the dispensing nozzle.
Maintain outer cleanliness of the dispenser; take special care to clean the glass of the counter.
TATSUNO EUROPE a.s., www.tatsuno‐europe.com
56
Twice a week, lubricate the dispensing nozzle with silicone oil.
6.1.1. MAINTENANCE OF THE DISPENSER’S COVERS
The covers of the dispenser (the “bodywork”) made of laminate, varnished steel or stainless steel require
regular maintenance. Special attention must be paid to them during the winter season, when chloride
aerosols from road sprinkling salts can permanently damage the bodywork varnish if it is not treated properly.
Covers made of stainless steel can undergo inter‐crystalline corrosion. Regular maintenance of bodywork
elements is done with water or a solution of detergent and with normally available automotive cosmetics.
THE DISPENSER OPERATOR MUST:
Appoint an operator responsible for the operation and technical state of the dispenser.
Ensure controls, tests, repairs and maintenance in a professional fashion.
Keep all documents and maintain an operation journal.
All activities related to attending, operating and servicing of the LPG dispenser may only be carried out by
personnel with the appropriate authorization.
PRINCIPLES FOR CHECKING THE LPG DISPENSER
Checks of the equipment, tanks, piping and dispenser are carried out in intervals set by the operation rules of
the fuel station, in accordance with valid regulations.
Test the tightness of the dispenser’s hydraulic system with a soap solution.
Test the machinery.
Test the function of the check and safety valves.
The control, calibration and official verification of an LPG dispenser is carried out by the Czech
Inspectorate for Metrology (ČMI) according to valid regulations; in foreign countries they are secured by
local authorities. The dates for calibration of the measuring device are set by the Law No. 505/1990 Coll.
All controls are preceded by cleaning of the whole device from dust, removing water and other impurities
from the tanks.
6.2.1. DISPENSER ERROR MESSAGES
After each error in a dispenser with a PDEX or TBELTX counter, fuel delivery is suspended and the display
shows an error (“E” + error code). Based on the message type, either the whole dispenser gets blocked (fatal
error) or only one part where the error occurred is blocked. Important error messages are recorded in the
counter’s memory, where they can be recalled using the P06 (Error history) and P13 (Error statistics)
parameters.
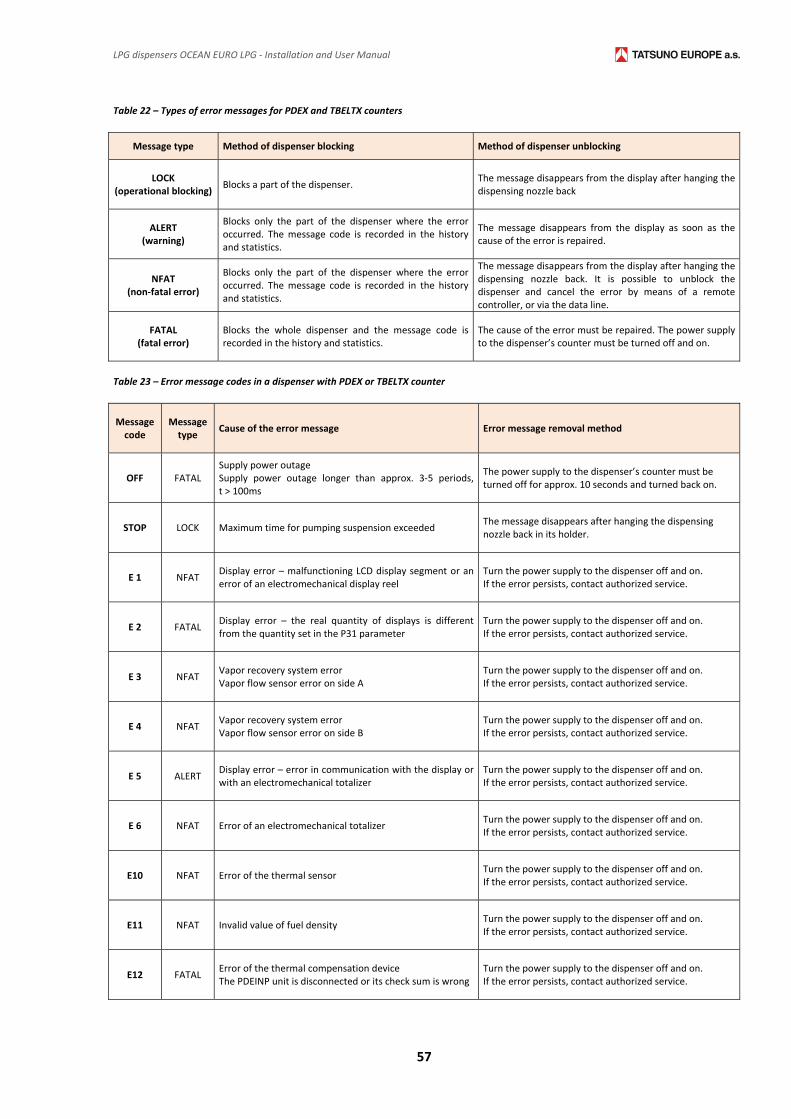
LPG dispensers OCEAN EURO LPG ‐ Installation and User Manual
57
Table 22 – Types of error messages for PDEX and TBELTX counters
Message type Method of dispenser blocking Method of dispenser unblocking
LOCK (operational blocking)
Blocks a part of the dispenser. The message disappears from the display after hanging the dispensing nozzle back
ALERT (warning)
Blocks only the part of the dispenser where the error occurred. The message code is recorded in the history and statistics.
The message disappears from the display as soon as the cause of the error is repaired.
NFAT (non‐fatal error)
Blocks only the part of the dispenser where the error occurred. The message code is recorded in the history and statistics.
The message disappears from the display after hanging the dispensing nozzle back. It is possible to unblock the dispenser and cancel the error by means of a remote controller, or via the data line.
FATAL (fatal error)
Blocks the whole dispenser and the message code is recorded in the history and statistics.
The cause of the error must be repaired. The power supply to the dispenser’s counter must be turned off and on.
Table 23 – Error message codes in a dispenser with PDEX or TBELTX counter
Message code
Message type
Cause of the error message Error message removal method
OFF FATAL Supply power outage Supply power outage longer than approx. 3‐5 periods, t > 100ms
The power supply to the dispenser’s counter must be turned off for approx. 10 seconds and turned back on.
STOP LOCK Maximum time for pumping suspension exceeded The message disappears after hanging the dispensing nozzle back in its holder.
E 1 NFAT Display error – malfunctioning LCD display segment or an error of an electromechanical display reel
Turn the power supply to the dispenser off and on. If the error persists, contact authorized service.
E 2 FATAL Display error – the real quantity of displays is different from the quantity set in the P31 parameter
Turn the power supply to the dispenser off and on. If the error persists, contact authorized service.
E 3 NFAT Vapor recovery system error Vapor flow sensor error on side A
Turn the power supply to the dispenser off and on. If the error persists, contact authorized service.
E 4 NFAT Vapor recovery system error Vapor flow sensor error on side B
Turn the power supply to the dispenser off and on. If the error persists, contact authorized service.
E 5 ALERT Display error – error in communication with the display or with an electromechanical totalizer
Turn the power supply to the dispenser off and on. If the error persists, contact authorized service.
E 6 NFAT Error of an electromechanical totalizer Turn the power supply to the dispenser off and on. If the error persists, contact authorized service.
E10 NFAT Error of the thermal sensor Turn the power supply to the dispenser off and on. If the error persists, contact authorized service.
E11 NFAT Invalid value of fuel density Turn the power supply to the dispenser off and on. If the error persists, contact authorized service.
E12 FATAL Error of the thermal compensation device The PDEINP unit is disconnected or its check sum is wrong
Turn the power supply to the dispenser off and on. If the error persists, contact authorized service.
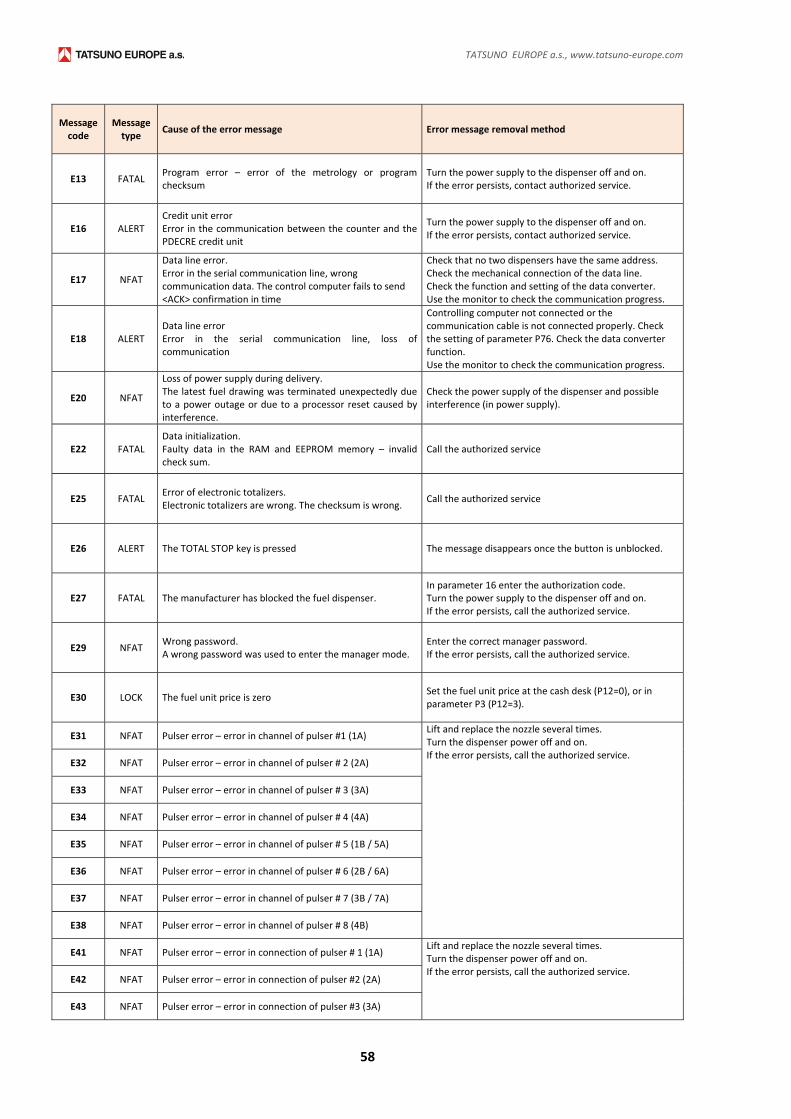
TATSUNO EUROPE a.s., www.tatsuno‐europe.com
58
Message code
Message type
Cause of the error message Error message removal method
E13 FATAL Program error – error of the metrology or program checksum
Turn the power supply to the dispenser off and on. If the error persists, contact authorized service.
E16 ALERT Credit unit error Error in the communication between the counter and the PDECRE credit unit
Turn the power supply to the dispenser off and on. If the error persists, contact authorized service.
E17 NFAT
Data line error. Error in the serial communication line, wrong communication data. The control computer fails to send <ACK> confirmation in time
Check that no two dispensers have the same address.Check the mechanical connection of the data line. Check the function and setting of the data converter. Use the monitor to check the communication progress.
E18 ALERT Data line error Error in the serial communication line, loss of communication
Controlling computer not connected or the communication cable is not connected properly. Check the setting of parameter P76. Check the data converter function. Use the monitor to check the communication progress.
E20 NFAT
Loss of power supply during delivery. The latest fuel drawing was terminated unexpectedly due to a power outage or due to a processor reset caused by interference.
Check the power supply of the dispenser and possible interference (in power supply).
E22 FATAL Data initialization. Faulty data in the RAM and EEPROM memory – invalid check sum.
Call the authorized service
E25 FATAL Error of electronic totalizers. Electronic totalizers are wrong. The checksum is wrong.
Call the authorized service
E26 ALERT The TOTAL STOP key is pressed The message disappears once the button is unblocked.
E27 FATAL The manufacturer has blocked the fuel dispenser. In parameter 16 enter the authorization code. Turn the power supply to the dispenser off and on. If the error persists, call the authorized service.
E29 NFAT Wrong password. A wrong password was used to enter the manager mode.
Enter the correct manager password. If the error persists, call the authorized service.
E30 LOCK The fuel unit price is zero Set the fuel unit price at the cash desk (P12=0), or in parameter P3 (P12=3).
E31 NFAT Pulser error – error in channel of pulser #1 (1A) Lift and replace the nozzle several times. Turn the dispenser power off and on. If the error persists, call the authorized service.
E32 NFAT Pulser error – error in channel of pulser # 2 (2A)
E33 NFAT Pulser error – error in channel of pulser # 3 (3A)
E34 NFAT Pulser error – error in channel of pulser # 4 (4A)
E35 NFAT Pulser error – error in channel of pulser # 5 (1B / 5A)
E36 NFAT Pulser error – error in channel of pulser # 6 (2B / 6A)
E37 NFAT Pulser error – error in channel of pulser # 7 (3B / 7A)
E38 NFAT Pulser error – error in channel of pulser # 8 (4B)
E41 NFAT Pulser error – error in connection of pulser # 1 (1A) Lift and replace the nozzle several times. Turn the dispenser power off and on. If the error persists, call the authorized service.
E42 NFAT Pulser error – error in connection of pulser #2 (2A)
E43 NFAT Pulser error – error in connection of pulser #3 (3A)
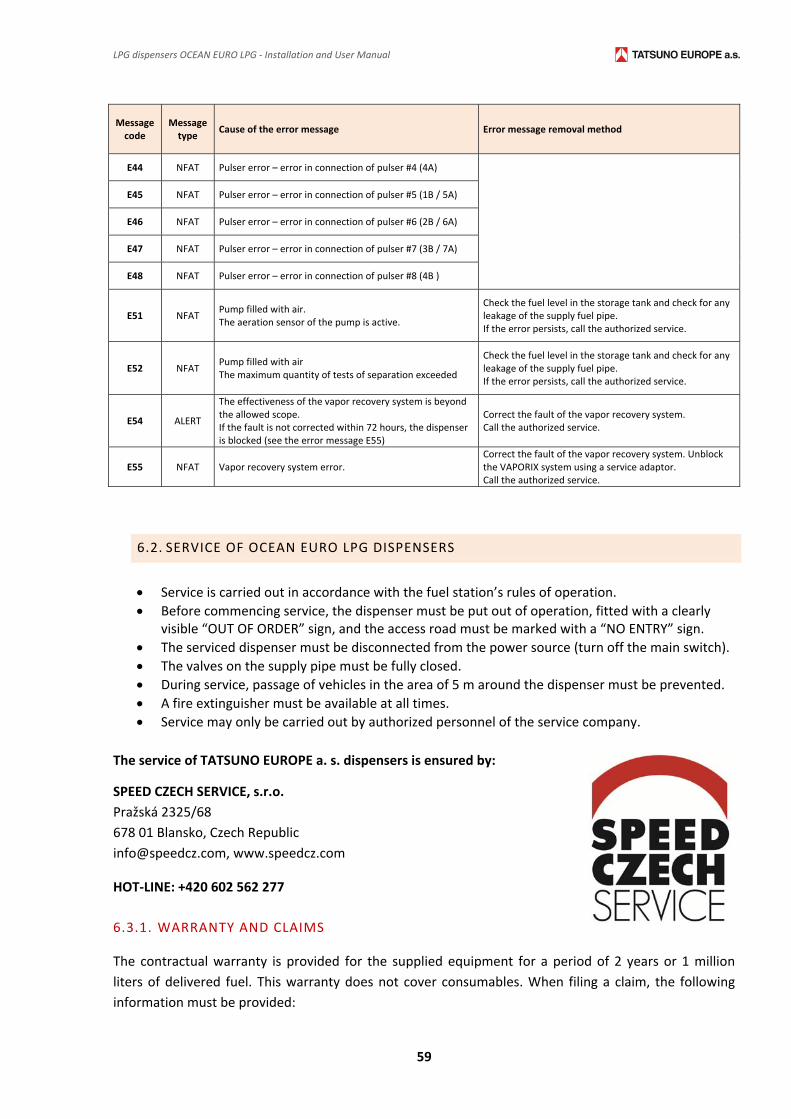
LPG dispensers OCEAN EURO LPG ‐ Installation and User Manual
59
Message code
Message type
Cause of the error message Error message removal method
E44 NFAT Pulser error – error in connection of pulser #4 (4A)
E45 NFAT Pulser error – error in connection of pulser #5 (1B / 5A)
E46 NFAT Pulser error – error in connection of pulser #6 (2B / 6A)
E47 NFAT Pulser error – error in connection of pulser #7 (3B / 7A)
E48 NFAT Pulser error – error in connection of pulser #8 (4B )
E51 NFAT
Pump filled with air. The aeration sensor of the pump is active.
Check the fuel level in the storage tank and check for any leakage of the supply fuel pipe. If the error persists, call the authorized service.
E52 NFAT
Pump filled with air The maximum quantity of tests of separation exceeded
Check the fuel level in the storage tank and check for any leakage of the supply fuel pipe. If the error persists, call the authorized service.
E54 ALERT
The effectiveness of the vapor recovery system is beyond the allowed scope. If the fault is not corrected within 72 hours, the dispenser is blocked (see the error message E55)
Correct the fault of the vapor recovery system. Call the authorized service.
E55 NFAT Vapor recovery system error.
Correct the fault of the vapor recovery system. Unblock the VAPORIX system using a service adaptor. Call the authorized service.
6.2. SERVICE OF OCEAN EURO LPG DISPENSERS
Service is carried out in accordance with the fuel station’s rules of operation.
Before commencing service, the dispenser must be put out of operation, fitted with a clearly visible “OUT OF ORDER” sign, and the access road must be marked with a “NO ENTRY” sign.
The serviced dispenser must be disconnected from the power source (turn off the main switch).
The valves on the supply pipe must be fully closed.
During service, passage of vehicles in the area of 5 m around the dispenser must be prevented.
A fire extinguisher must be available at all times.
Service may only be carried out by authorized personnel of the service company.
The service of TATSUNO EUROPE a. s. dispensers is ensured by:
SPEED CZECH SERVICE, s.r.o.
Pražská 2325/68
678 01 Blansko, Czech Republic
[email protected], www.speedcz.com
HOT‐LINE: +420 602 562 277
6.3.1. WARRANTY AND CLAIMS
The contractual warranty is provided for the supplied equipment for a period of 2 years or 1 million
liters of delivered fuel. This warranty does not cover consumables. When filing a claim, the following
information must be provided:

TATSUNO EUROPE a.s., www.tatsuno‐europe.com
60
Serial number and name – see the type label
Exact description of the fault and the circumstances under which it formed
A claim is invalid if the sealing is broken or there was any unauthorized manipulation with the device. Defects
and deficiencies which arise as a result of incorrect or unauthorized usage or maintenance are outside the
scope of the warranty (i.e. problems that arise because of the presence of water and impurities in the tank
and hydraulic system). During operation, it is necessary to regularly check for the presence of water and
impurities, and clean the systems if necessary.
6.3.2. ATTACHMENTS
Installation and User Manual
Certificate of the Quality and Completeness of the Product
ES Declaration of Conformity
Base Certificate
Base Certificates of all meters installed in the dispenser
Protocol of Pressure test
IR controller for operation and setup of the calculator
(upon request for dispensers equipped with the PDEX counter)
Base frame (upon request)
Spare parts catalogue
This document is issued and distributed only to service companies and service technicians.
LPG dispensers OCEAN EURO LPG ‐ Installation and User Manual
61
NOTES:
TATSUNO EUROPE a.s., www.tatsuno‐europe.com
62
NOTES:

Appendix 1 ‐ Foundation plans of dispensers OCEAN LPG
63
APPENDIX 1 ‐ FOUNDATION PLANS
APPENDIX 1.1 – FOUNDATION PLANS OF BMP4011.OEL(R)/LPG & BMP4012.OED/LPG
Plan is valid for models OCEAN EURO LPG with one LPG liquid phase input:
BMP4011.OEL(R) /LPG
BMP4012.OED /LPG
BMP4011.OEL(R) /LPG/CUBE
BMP4012.OED /LPG/CUBE
BMP4011.OEL(R) /LPG/FIN
BMP4012.OED /LPG/FIN
BMP4011.OEL(R) /LPG/WAVE
BMP4012.OED /LPG/WAVE
Pos. Description Pos. Description
1 Input Pipe Axis of the liquid phase LPG 5 Input Pipe for liquid phase LPG terminated by LPG Ball Valve with inner thread G ¾"
2 Backward Pipe Axis of the vapor phase LPG 6 Backward Pipe for vapor phase LPG terminated by LPG Ball Valve with inner thread G ½"
3 Anchoring holes
4 Outlets of electric cables and data line Recommended direction of vehicle arrival to the LPG dispenser
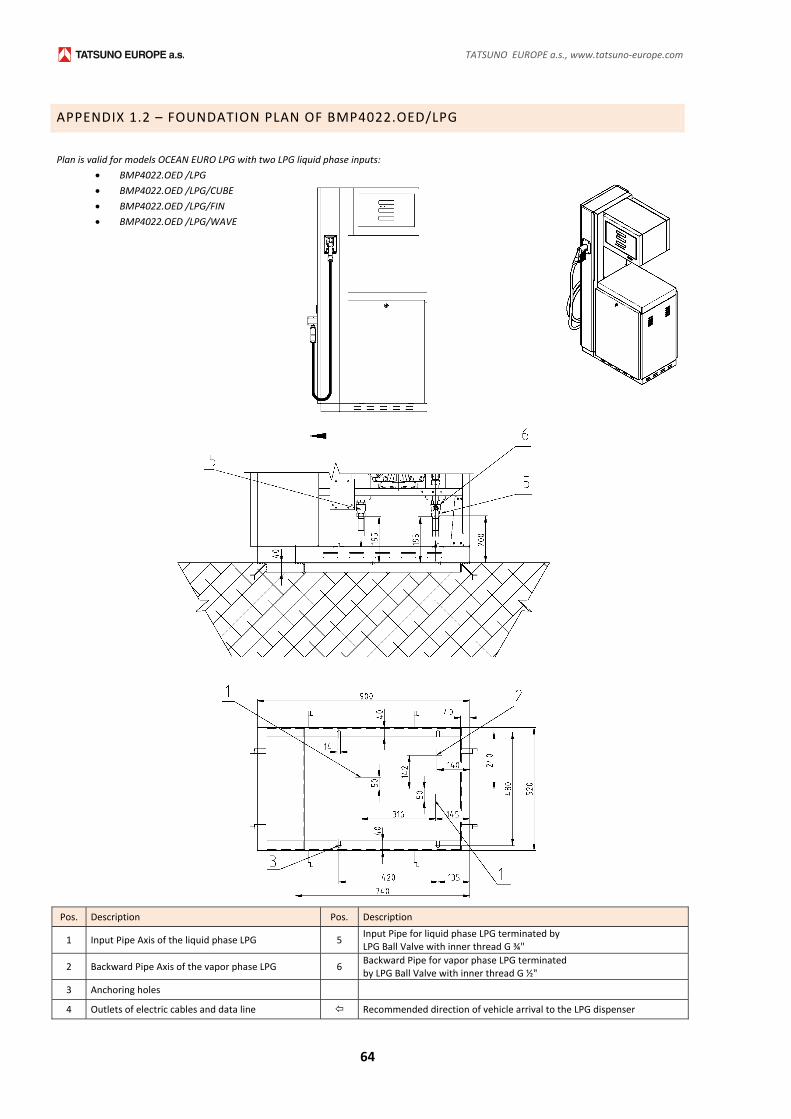
TATSUNO EUROPE a.s., www.tatsuno‐europe.com
64
APPENDIX 1.2 – FOUNDATION PLAN OF BMP4022.OED/LPG
Plan is valid for models OCEAN EURO LPG with two LPG liquid phase inputs:
BMP4022.OED /LPG
BMP4022.OED /LPG/CUBE
BMP4022.OED /LPG/FIN
BMP4022.OED /LPG/WAVE
Pos. Description Pos. Description
1 Input Pipe Axis of the liquid phase LPG 5 Input Pipe for liquid phase LPG terminated by LPG Ball Valve with inner thread G ¾"
2 Backward Pipe Axis of the vapor phase LPG 6 Backward Pipe for vapor phase LPG terminated by LPG Ball Valve with inner thread G ½"
3 Anchoring holes
4 Outlets of electric cables and data line Recommended direction of vehicle arrival to the LPG dispenser

Appendix 1 ‐ Foundation plans of dispensers OCEAN LPG
65
APPENDIX 1.3 – FOUNDATION PLANS OF BMP4022.OEL(R)/LPG‐2C & BMP4034.OED/LPG‐4C
Plan is valid for models OCEAN EURO LPG with two and three LPG liquid phase inputs:
BMP4022.OEL(R) /LPG‐2C
BMP4034.OED /LPG‐4C
BMP4022.OEL(R) /LPG‐2C/CUBE
BMP4034.OED /LPG‐4C/CUBE
BMP4022.OEL(R) /LPG‐2C/FIN
BMP4034.OED /LPG‐4C/FIN
BMP4022.OEL(R) /LPG‐2C/WAVE
BMP4034.OED /LPG‐4C/WAVE
Pos. Description Pos. Description
1 Input Pipe Axis of the liquid phase LPG 5 Input Pipe for liquid phase LPG terminated by LPG Ball Valve with inner thread G ¾"
2 Backward Pipe Axis of the vapor phase LPG 6 Backward Pipe for vapor phase LPG terminated by LPG Ball Valve with inner thread G ½"
3 Anchoring holes
4 Outlets of electric cables and data line Recommended direction of vehicle arrival to the LPG dispenser

TATSUNO EUROPE a.s., www.tatsuno‐europe.com
66
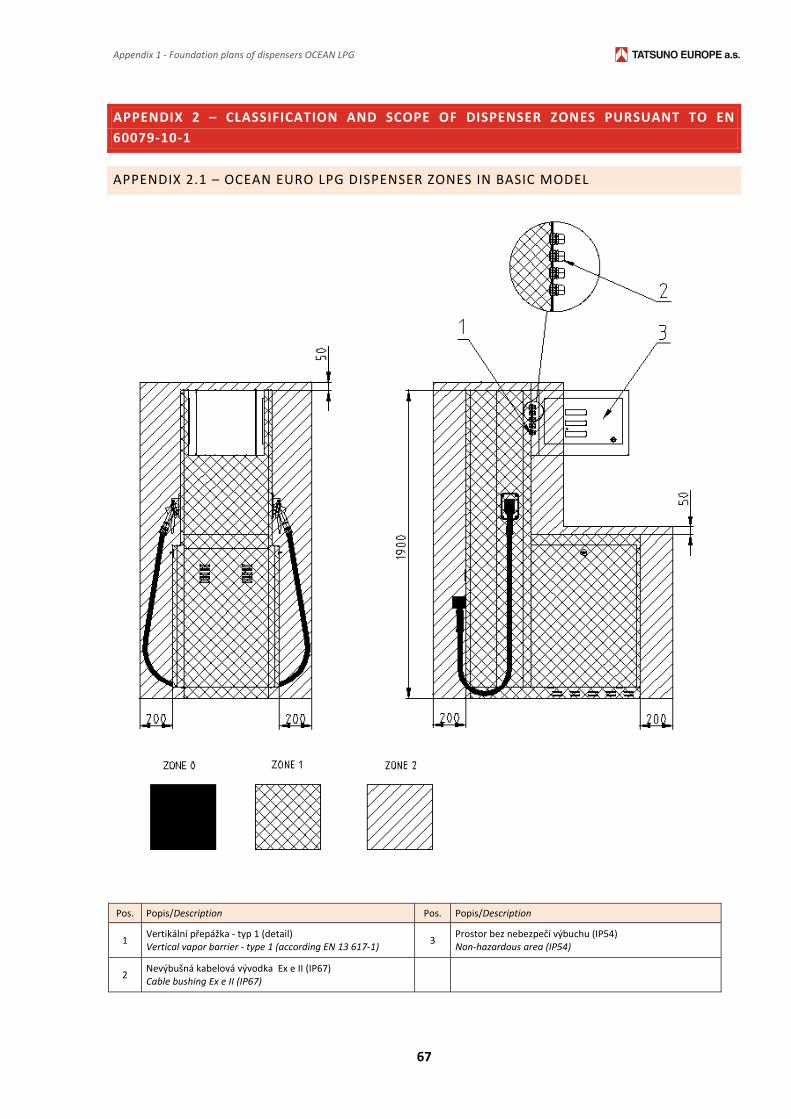
Appendix 1 ‐ Foundation plans of dispensers OCEAN LPG
67
APPENDIX 2 – CLASSIFICATION AND SCOPE OF DISPENSER ZONES PURSUANT TO EN
60079‐10‐1
APPENDIX 2.1 – OCEAN EURO LPG DISPENSER ZONES IN BASIC MODEL
Pos. Popis/Description Pos. Popis/Description
1 Vertikální přepážka ‐ typ 1 (detail) Vertical vapor barrier ‐ type 1 (according EN 13 617‐1)
3 Prostor bez nebezpečí výbuchu (IP54) Non‐hazardous area (IP54)
2 Nevýbušná kabelová vývodka Ex e II (IP67) Cable bushing Ex e II (IP67)
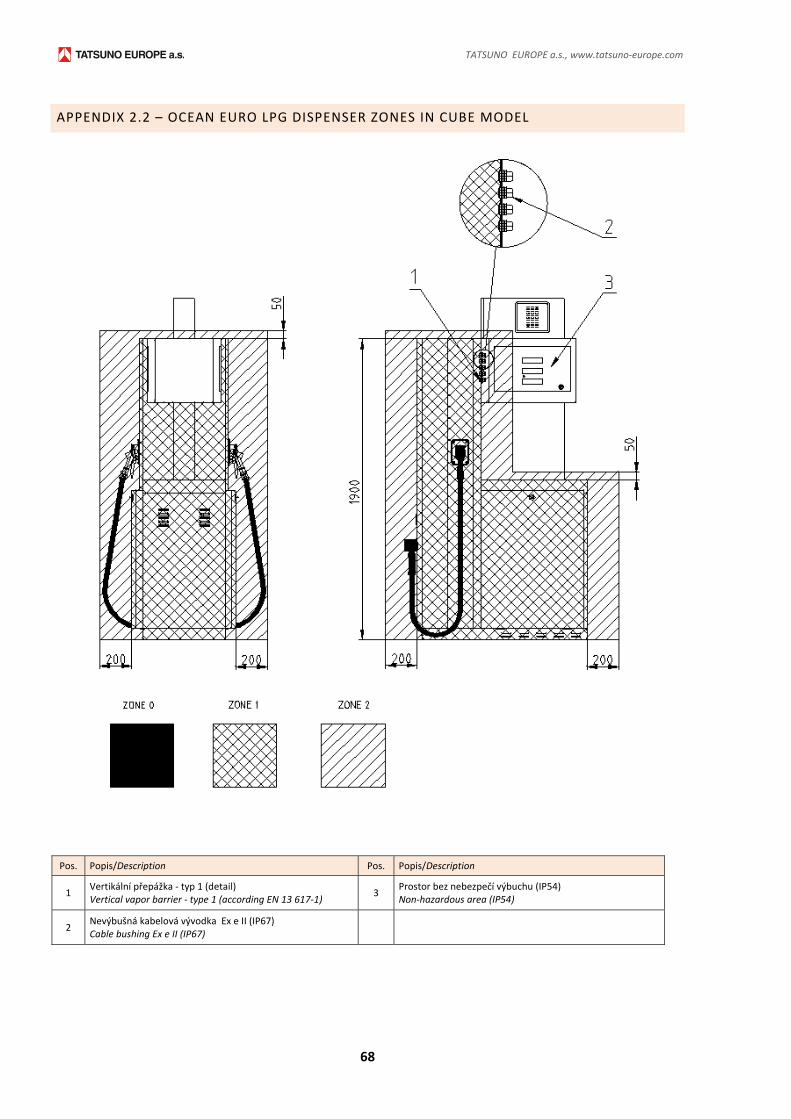
TATSUNO EUROPE a.s., www.tatsuno‐europe.com
68
APPENDIX 2.2 – OCEAN EURO LPG DISPENSER ZONES IN CUBE MODEL
Pos. Popis/Description Pos. Popis/Description
1 Vertikální přepážka ‐ typ 1 (detail) Vertical vapor barrier ‐ type 1 (according EN 13 617‐1)
3 Prostor bez nebezpečí výbuchu (IP54) Non‐hazardous area (IP54)
2 Nevýbušná kabelová vývodka Ex e II (IP67) Cable bushing Ex e II (IP67)
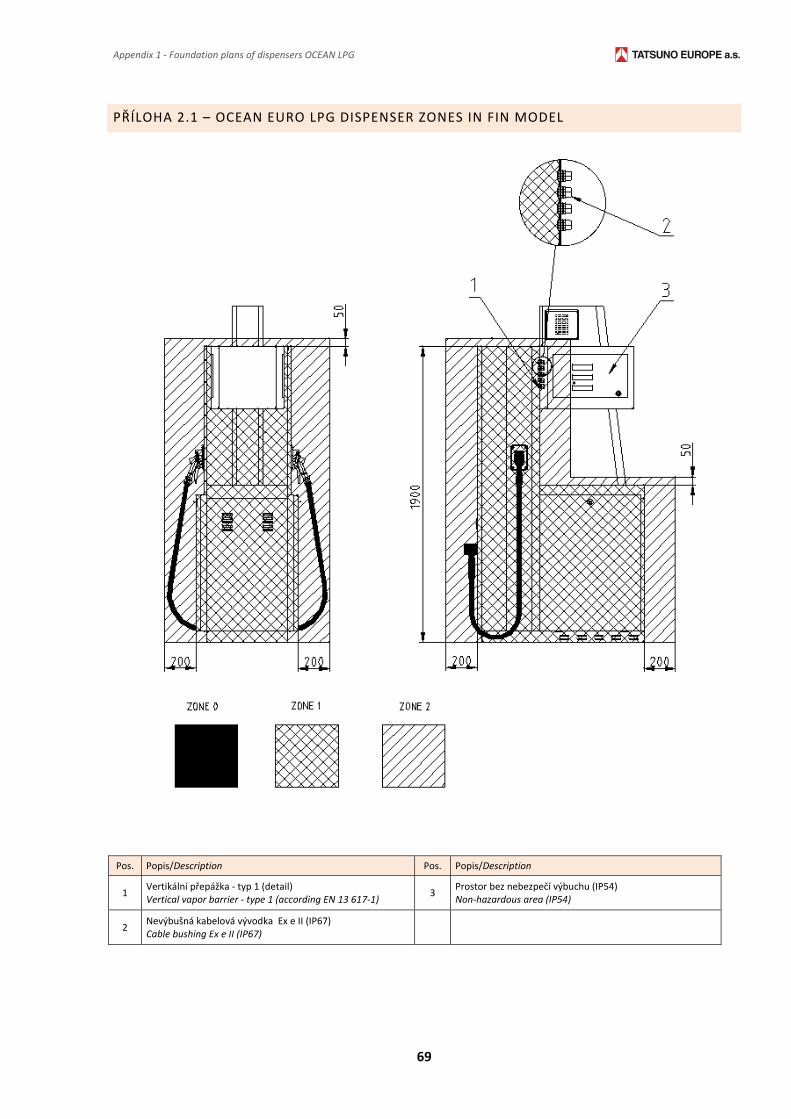
Appendix 1 ‐ Foundation plans of dispensers OCEAN LPG
69
PŘÍLOHA 2.1 – OCEAN EURO LPG DISPENSER ZONES IN FIN MODEL
Pos. Popis/Description Pos. Popis/Description
1 Vertikální přepážka ‐ typ 1 (detail) Vertical vapor barrier ‐ type 1 (according EN 13 617‐1)
3 Prostor bez nebezpečí výbuchu (IP54) Non‐hazardous area (IP54)
2 Nevýbušná kabelová vývodka Ex e II (IP67) Cable bushing Ex e II (IP67)
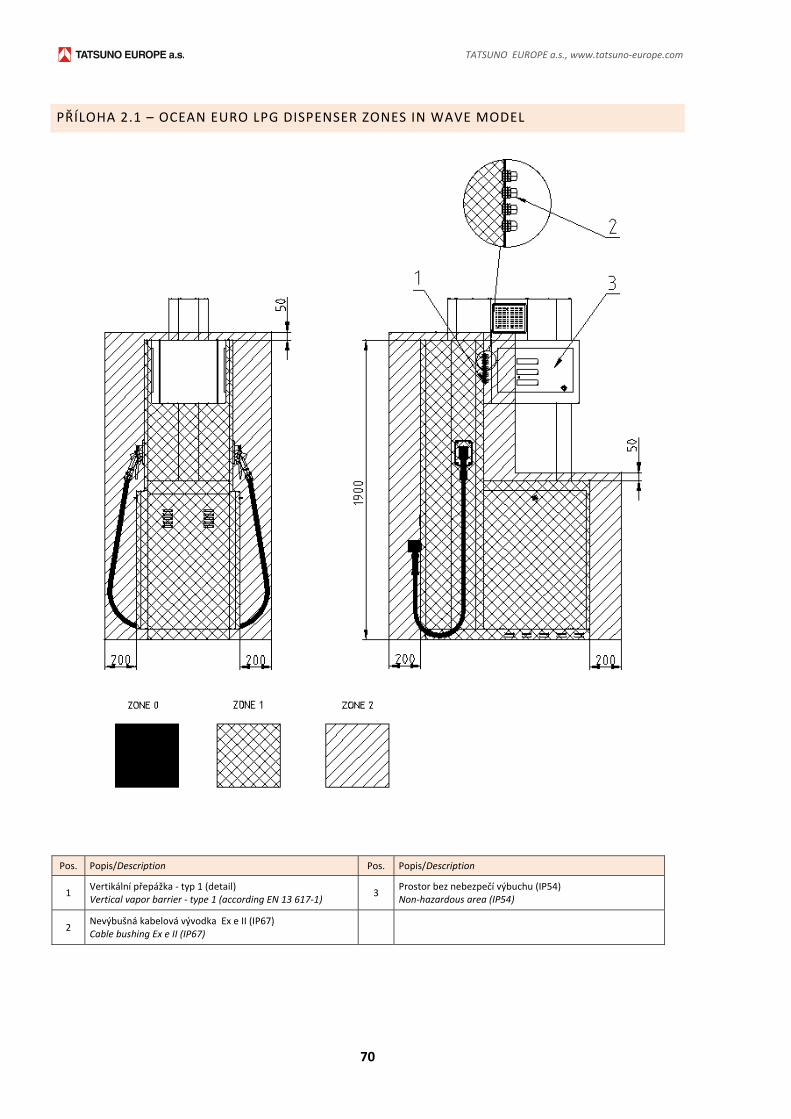
TATSUNO EUROPE a.s., www.tatsuno‐europe.com
70
PŘÍLOHA 2.1 – OCEAN EURO LPG DISPENSER ZONES IN WAVE MODEL
Pos. Popis/Description Pos. Popis/Description
1 Vertikální přepážka ‐ typ 1 (detail) Vertical vapor barrier ‐ type 1 (according EN 13 617‐1)
3 Prostor bez nebezpečí výbuchu (IP54) Non‐hazardous area (IP54)
2 Nevýbušná kabelová vývodka Ex e II (IP67) Cable bushing Ex e II (IP67)
