lt-5 sm tb - justanswer
TRANSCRIPT

NO power eq duals. Th experi-en follow all uct’s Op is pub-lica How-eve will be ma rvicing or notice an s and illu rts.
For Discount White Outdoor Parts Call 606-678-9623 or 606-561-4983
Service Manual
LT-5 Lawn Tractor
MTD Products Inc - Product Training and Education Department
TE: These materials are for use by trained technicians who are experienced in the service and repair of outdoor uipment of the kind described in this publication, and are not intended for use by untrained or inexperienced indiviese materials are intended to provide supplemental information to assist the trained technician. Untrained or inced individuals should seek the assistance of an experienced and trained professional. Read, understand, andinstructions and use common sense when working on power equipment. This includes the contents of the proderators Manual, supplied with the equipment. No liability can be accepted for any inaccuracies or omission in thtion, although care has been taken to make it as complete and accurate as possible at the time of publication.r, due to the variety of outdoor power equipment and continuing product changes that occur over time, updates de to these instructions from time to time. Therefore, it may be necessary to obtain the latest materials before se
repairing a product. The company reserves the right to make changes at any time to this publication without priord without incurring an obligation to make such changes to previously published versions. Instructions, photographstrations used in this publication are for reference use only and may not depict actual model and component pa
© Copyright 2005 MTD Products Inc. All Rights Reserved
FORM NUMBER - 769-01415
2/2005
www.mymowerparts.com

For Discount White Outdoor Parts Call 606-678-9623 or 606-561-4983
www.mymowerparts.com

0
TABLE OF CONTENTS
General Information ....................................................................................................................1Operator Controlled Reverse (OCR) ..........................................................................................1Numbering System .....................................................................................................................2Deck Removal ............................................................................................................................2Blade Drive Belt Removal ..........................................................................................................3Deck Idler Bracket Removal .......................................................................................................3Spindle Removal ........................................................................................................................4Fender Removal .........................................................................................................................5Upper Drive Belt Removal ..........................................................................................................6Lower Drive Belt Removal. .........................................................................................................8Variable Speed Pulley Removal .................................................................................................8Variable Speed Idler Bracket Removal ......................................................................................9Transmission Removal – 618-04072 ........................................................................................10Deck Lift Assembly ..................................................................................................................11Removal of the Steering Shaft and Sector Gear ......................................................................12Pedal Support Bracket Removal ..............................................................................................13Speed Control Latch Removal .................................................................................................137-Speed Shift Lever Removal ..................................................................................................14Parking Brake and Shift Control Adjustments ..........................................................................15Toe-In Adjustment ....................................................................................................................15
www.mymowerparts.com
For Discount White Outdoor Parts Call 606-678-9623 or 606-561-4983

Servicing the LT-5 Lawn Tractor
For Discount White Outdoor Parts Call 606-678-9623 or 606-561-4983
LT-5 LAWN TRACTOR (TROY-BILT MODEL SHOWN)
GENERAL INFORMATION
Model used in the Service Manual - 13AN779G766
17.5 hp Briggs & Stratton engine - 42” cutting deck
• RMC - “Reverse Mowing Control” technology
• Greaseable Spindles.
• Square Shoulder Tires.
• Wider tires 15X6 and 20X8 .
• 18” Turning Radius
• Improved Independent Controls.
• Operational Controls on Fender and Dash.
• Cup Holder.
• Fully Welded Frame.
• 38” and 42” decks with Fast Attach.
• All decks are “Wash Kit” ready
• Enhanced Hour Meter Package
RMC - “REVERSE MOWING CONTROL”
The operator can choose to over-ride our “No Cut In Reverse” safety system.
The revised ANSI Standard B71.1 taking effect Sep-tember 1, 2004 states:
1
www.mymow
“A means shall be provided that prevents reverse drive operation at a ground speed greater than 1 ft./sec.with powered blade(s).
An override capability may be provided to permit reverse drive with powered blades temporarily. If an override capability is provided, it shall automatically reset when one or more of the following actions occurs:
The blade(s) is (are) re-engaged or (2) the engine is restarted or (3) the directional control is moved from reverse.”
How It Works:
• Operator turns the key from the run position #3 to position #2. See Figure 1.
• Presses RMC button.
• Light indicator gives visual confirmation to the operator.
Operator may mow in forward or reverse until:
• Leaves the tractor seat.
• Turns the key back to right (position #3).
• Turns the engine off (position #1).
Incorporated on 2005 LT-5 and RT99.
Figure 1
#1 #2#3
#4
erparts.com

For Discount White Outdoor Parts Call 606-678-9623 or 606-561-4983
NUMBERING SYSTEM
The LT-5 will follow the same model number configura-tion as the BFR which was the 600 series (frame size) but now in the fifth position there will be a ( 7 ) to signify transition to the new platform.
Example: 13AD789G790
1. DECK REMOVAL
1.1. Place the unit on a firm and level surface.
1.2. Remove the key from the ignition.
1.3. Lower the deck to its lowest cutting position.
1.4. Using needle nose pliers, remove the hairpin clips securing the deck hanger brackets to the deck. Release the hanger links from the deck. See Figure 2.
1.5. Using a 1/2” socket, remove the hex head cap screw securing the belt keeper to the frame. Remove the belt keeper. See Figure 3.
NOTE: Note the location of the belt keeper dur-ing removal. There are two holes in the side frame. Use the forward hole during assembly.
1.6. Slide the deck forward and remove the deck belt from around the engine pulley. See Figure 4.
1.7. Lift the front stabilizer from the front stabilizer bracket.
1.8. Remove front stabilizer adjustment rod by sliding rod forward untill the flat area is in line with stabi-lizer bracket notch. Turn the rod 90 degrees and remove it from the tractor.
1.9. Raise the deck lift lever to its highest cutting position.
Figure 2
Deck Hanger Bracket
Hairpin Clip
Figure 3
Belt Keeper
Hex Cap Screw
Figure 4
Front Stabilizer Engine Pulley
2
www.mymowerparts.com

For Discount White Outdoor Parts Call 606-678-9623 or 606-561-4983
1.10. Using needle nose pliers, remove the hairpin clip securing the deck engagement cable to the deck flange. See Figure 5.
1.11. Slip the oval plastic retainer ring from the con-nector. Pull the connector rearward, lining the grooves in the connector with the deck flange and slide it up and out of the flange. See Figure 6.
1.12. Remove the tension spring from the deck idler bracket.
NOTE: Depending on which deck is installed on the unit, it may be necessary to remove the spin-dle brake connecting rod between the two spin-dles in order to remove the deck engagement spring.
1.13. Slide the deck out from under the unit.
Figure 5
Deck Engagement Cable
Deck Bracket
Figure 6
Deck Bracket
Oval Retainer
3
www.mymow
2. BLADE DRIVE BELT REMOVAL
NOTE: The 38” deck has a single pulley on the idler. The 42” deck has two pulleys on the idler. Disassembly procedures are similar.
2.1. Remove the cutting deck from the unit.
2.2. Using a ½” socket, remove the three screws securing the belt cover to the deck. Repeat for the other belt cover. See Figure 7.
NOTE: The belt covers are interchangeable.
2.3. Using a 9/16” socket and an open-end wrench, loosen but do not remove the nuts securing both idler pulleys to the idler bracket. See Figure 8.
2.4. Remove the belt from around the idler pulleys and spindles.
Figure 7
Belt Covers
Figure 8
Idler Pulleys
Idler Bracket
Belt Guides
erparts.com

For Discount White Outdoor Parts Call 606-678-9623 or 606-561-4983
3. DECK IDLER BRACKET REMOVAL
NOTE: The 38” deck has a single pulley on the idler. The 42” deck has two pulleys on the idler. Disassembly procedures are similar.
3.1. Remove the deck from the unit.
3.2. Remove the deck drive belt.
3.3. Remove the deck idler bracket spring. See Fig-ure 9.
3.4. Remove the cotter pin holding the brake rod to the idler bracket and remove the brake rod con-nected to the idler bracket. See Figure 10.
3.5. Using a 9/16” socket and a 9/16” wrench, remove the bolt and nut securing the idler bracket to the frame. There is a shoulder spacer under the idler bracket. Remove the idler bracket. Inspect the idler bracket for wear or damage. Inspect the brake puck at the end of the idler bracket for wear or damage. The brake puck is riveted to the idler bracket. See Figure 11.
NOTE: The 38” and 42” deck share the same idler bracket. They each use unique mounting holes. Correct holes are marked on the bracket. This is also true for the tension springs. The hole in the center of the bracket has a step washer in it. See Figure 12.
3.6. Using two 9/16” wrenches remove the idler pul-leys.
Figure 9
Deck Idler Bracket Spring
Figure 10
Brake Rod
Cotter Pin
Figure 11
Shoulder Spacer
Lower Spacer
Figure 12
Shoulder Spacer
4
www.mymowerparts.com

For Discount White Outdoor Parts Call 606-678-9623 or 606-561-4983
3.7. Inspect the pulleys and pulley bearings for dam-age and wear. Replace as needed.
NOTE: When reassembling be sure to install the spacer under the pulley and the thinner flat washer on top.
NOTE: Lubricate the idler bracket with a small amount of lithium grease during assembly. Per-form this lubrication on a yearly basis.
4. RIGHT SPINDLE BRAKE
4.1. Remove the brake spring attached from the deck frame to the brake assembly at the right spindle. See Figure 13.
NOTE: Although similar, this spring is different from the spring on the Idler arm. This spring may be painted yellow.
Figure 13
Brake Assembly
Brake Spring
5
www.mymow
4.2. Using a ½ inch socket and a ½” wrench remove the brake assembly bracket. Inspect the brake puck for wear or damage. The brake puck is riv-eted to the bracket and must be replaced as an assembly. See Figure 14.
5. SPINDLE REMOVAL
5.1. Remove the deck from the unit. See DECK REMOVAL Section.
5.2. Remove the blade drive belt. See BLADE DRIVE BELT REMOVAL Section.
5.3. Remove the deck Idler bracket and spindle brake bracket. See DECK IDLER BRACKET REMOVAL Section.
Figure 14
Riveted Brake Puck
erparts.com

For Discount White Outdoor Parts Call 606-678-9623 or 606-561-4983
5.4. Using an impact wrench and a 15/16” socket remove the pulley and blade from the spindle assembly. See Figure 15.
NOTE: Use a blade stop to secure the blade and prevent it from rotating during disassembly.
5.5. Using a ½” socket remove the spindle housing for inspection or replacement. See Figure 16.
5.6. Assemble the spindle in reverse order of disas-sembly. See Figure 17.
NOTE: During assembly, align the two bearing spacers inside the spindle as you insert the spin-dle shaft.
6. FENDER REMOVAL
6.1. Tip the seat forward.
6.2. Remove the battery and battery tray. See Figure 18.
Figure 15
Pulley
Spindle
Blade Stop
Figure 16
Figure 17
Figure 18
6
www.mymowerparts.com
For Discount White Outdoor Parts Call 606-678-9623 or 606-561-4983
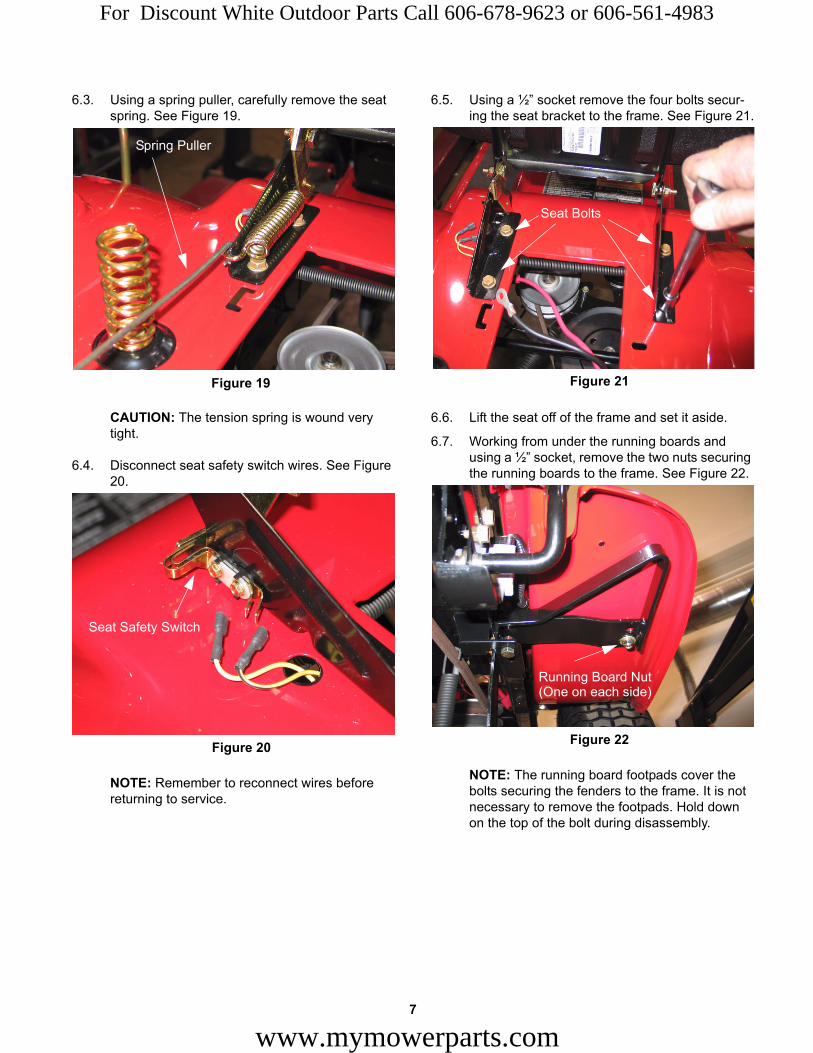
6.3. Using a spring puller, carefully remove the seat spring. See Figure 19.
CAUTION: The tension spring is wound very tight.
6.4. Disconnect seat safety switch wires. See Figure 20.
NOTE: Remember to reconnect wires before returning to service.
Figure 19
Spring Puller
Figure 20
Seat Safety Switch
7
www.mymow
6.5. Using a ½” socket remove the four bolts secur-ing the seat bracket to the frame. See Figure 21.
6.6. Lift the seat off of the frame and set it aside.
6.7. Working from under the running boards and using a ½” socket, remove the two nuts securing the running boards to the frame. See Figure 22.
NOTE: The running board footpads cover the bolts securing the fenders to the frame. It is not necessary to remove the footpads. Hold down on the top of the bolt during disassembly.
Figure 21
Seat Bolts
Figure 22
Running Board Nut(One on each side)
erparts.com

For Discount White Outdoor Parts Call 606-678-9623 or 606-561-4983
6.8. Using a heat gun, carefully heat the warning label and peel it from the fender panel. Set it aside to be re-installed during assembly. See Figure 23.
6.9. Using 3/8” socket, remove the two screws secur-ing the center section of the fender to the frame. See Figure 24.
6.10. Remove the shifter knob, deck lift grip, and deck engagement grip.
NOTE: You can use an air gun placed in the hole at the top of each grip to ease disassembly.
6.11. Lift up on the rear of the fender to clear the seat support springs, slide the fender towards the rear and remove it from the tractor. See Figure 25.
NOTE: During removal, slip the seat safety switch wires through the hole in the fender. Remember to route these wires through the same hole during assembly.
7. UPPER DRIVE BELT REMOVAL
NOTE: It is recommmended that both the upper and lower drive belts be replaced as a set.
7.1. Tip the seat forward.
7.2. Disconnect the battery cables, remove the bat-tery and the battery tray from the unit.
Figure 23
Heat Gun
Figure 24
Figure 25
8
www.mymowerparts.com

For Discount White Outdoor Parts Call 606-678-9623 or 606-561-4983
7.3. Using a spring puller or length of starter cord, remove the large spring attached between the variable speed idler arm and the rear of the trac-tor frame. See Figure 26.
CAUTION: This is a very strong spring. Be care-ful when removing and installing it.
7.4. Remove the small tension spring attached between the long bolt extending up from the frame and the transmission idler pulley. See Fig-ure 27.
Figure 26
Figure 27
9
www.mymow
7.5. Using a 7/8” socket and extension, remove the nut securing the transmission pulley to the trans-mission. See Figure 28.
NOTE: Place a phillips screwdriver through the hole in the pulley as a stop to ease removal of the pulley nut.
7.6. Lift the pulley off the transmission and remove the belt from around the pulley. See Figure 29.
7.7. Remove the drive belt up and over the variable speed pulley. Replace in the reverse order of disassembly.
NOTE: Replace both the upper and lower drive belt as a set. See the LOWER DRIVE BELT REMOVAL Section.
Figure 28
Transmission Pulley
Figure 29
Transmission Pulley
erparts.com

For Discount White Outdoor Parts Call 606-678-9623 or 606-561-4983
8. LOWER DRIVE BELT REMOVAL.
NOTE: It is recommmended that both the upper and lower drive belts be replaced as a set. The following directions cover replacement of the lower belt only. If both belts are being replaced, refer to the upper drive belt removal section first and then continue with the lower drive belt removal instructions.
8.1. Remove the cutting deck. Refer to the section on removing the cutting deck.
8.2. Using a spring puller or length of starter cord, remove the large spring attached between the variable speed idler arm and the rear of the trac-tor frame. See Figure 30.
CAUTION: This is a very strong spring. Be care-ful when removing and installing it.
8.3. Remove the small tension spring attached between the long bolt extending up from the frame and the transmission idler pulley. See Fig-ure 31.
8.4. Remove the upper drive belt from around the idler pulley. See Figure 32.
8.5. Remove the upper drive belt from around the upper sheeve of the Variable Speed Pulley.
Figure 30
Spring Puller
Figure 31
Transmission Idler Tension Spring
Starter Cord Spring Puller
Figure 32
Upper Belt
Idler Pulley
10
www.mymowerparts.com
For Discount White Outdoor Parts Call 606-678-9623 or 606-561-4983
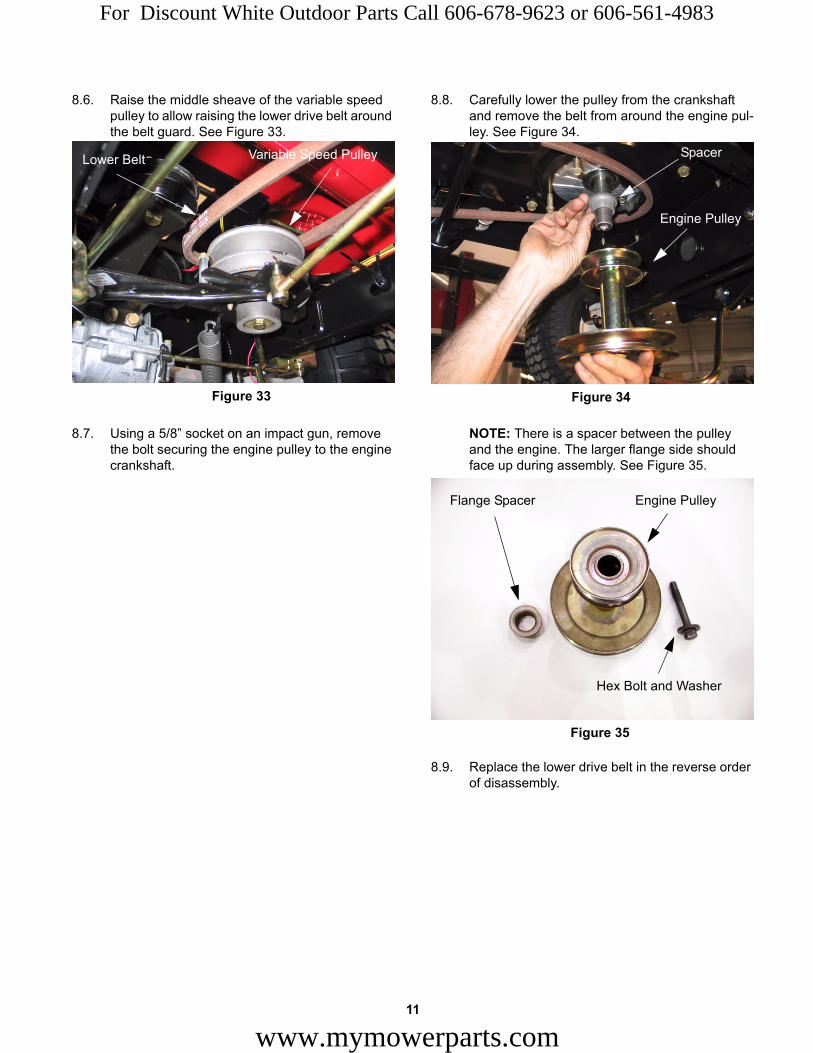
8.6. Raise the middle sheave of the variable speed pulley to allow raising the lower drive belt around the belt guard. See Figure 33.
8.7. Using a 5/8” socket on an impact gun, remove the bolt securing the engine pulley to the engine crankshaft.
Figure 33
Variable Speed PulleyLower Belt
11
www.mymow
8.8. Carefully lower the pulley from the crankshaft and remove the belt from around the engine pul-ley. See Figure 34.
NOTE: There is a spacer between the pulley and the engine. The larger flange side should face up during assembly. See Figure 35.
8.9. Replace the lower drive belt in the reverse order of disassembly.
Figure 34
Engine Pulley
Spacer
Figure 35
Flange Spacer Engine Pulley
Hex Bolt and Washer
erparts.com

For Discount White Outdoor Parts Call 606-678-9623 or 606-561-4983
9. VARIABLE SPEED PULLEY REMOVAL
9.1. Remove the cutting deck.
9.2. Using a spring puller or length of starter cord, remove the large spring attached between the variable speed idler arm and the rear of the trac-tor frame. See Figure 36.
CAUTION: This is a very strong spring. Be care-ful when removing and installing it.
9.3. Remove the small tension spring attached between the long bolt extending up from the frame and the transmission idler pulley. See Fig-ure 37.
9.4. Remove the upper drive belt from around the idler pulley.
9.5. Remove the upper drive belt from around the upper sheeve of the Variable Speed Pulley.
9.6. Raise the middle sheave of the variable speed pulley to allow raising the lower drive belt around the belt guard. See Figure 38.
9.7. Using a ½” socket, remove the bolt securing the variable speed pulley to the idler bracket.
9.8. Raise the variable speed pulley up and out of the idler bracket. See Figure 39.
9.9. Replace the pulley in the reverse order of disas-sembly.
10. VARIABLE SPEED IDLER BRACKET REMOVAL
10.1. Follow steps 9.1 to 9.6 in the Variable Speed Pulley Removal Section. Then continue with the following steps.
Figure 36
Spring Puller
Figure 37
Transmission Idler Tension Spring
Starter Cord Spring Puller
Figure 38
Middle Sheave of Variable Speed Pulley
Lower Drive Belt
Hex Bolt
Figure 39
12
www.mymowerparts.com

er
For Discount White Outdoor Parts Call 606-678-9623 or 606-561-4983
10.2. Remove the cotter pin securing the variable speed control rod to the variable speed idler bracket. Remove the ferrule from the bracket and let the rod hang down out of the way. See Figure 40.
10.3. Using a ½” socket, remove the two screws securing the torque bracket to the frame. See Figure 41.
NOTE: If you are using air tools you can remove the right rear tire to gain better access to the hex screws.
Figure 40
Variable Speed Control Rod
Ferrule
Cotter Pin
Figure 41
Hex Screws
Deck Hang
13
www.mymow
10.4. Using a ½” socket, remove the two screws securing the torque bracket to the transmission. See Figure 42.
NOTE: Pivot the idler bracket away from the transmission to allow better access to the mounting screws.
10.5. Remove the torque bracket and variable speed idler assembly from the unit.
10.6. Inspect all components of the variable speed assembly. See Figure 43.
10.7. Replace any warn or damaged parts.
10.8. Lubricate all moving parts before assembly.
Figure 42
Torque Bracket Mounting Screws
Figure 43
Bracket
erparts.com

For Discount White Outdoor Parts Call 606-678-9623 or 606-561-4983
11. TRANSMISSION REMOVAL – 618-04072
11.1. Remove the cutting deck.
11.2. Using a ½” socket, loosen the bolts securing the wheels to the axles.
11.3. Support the unit at the rear with the wheels off the ground. Leave room to lower the transmis-sion from the unit. See Figure 44.
11.4. Remove the axle bolts from both rear wheels. Remove the rear wheels.
11.5. Using a spring puller or length of starter cord, remove the large spring attached between the variable speed idler arm and the rear of the trac-tor frame. See Figure 45.
11.6. Remove the small tension spring attached between the long bolt extending up from the
frame and the transmission idler pulley. See Fig-ure 46.
11.7. Remove the hairpin clip securing the shift rod to the transmission. Move the shift rod out of the way. See Figure 47.
11.8. Using a ½” socket, remove the two screws securing the torque bracket to the transmission.
Figure 44
Figure 45
Metal Spring Puller
Figure 46
Starter cord used as spring puller
Figure 47
Hairpin Clip Shift Rod
Torque Bracket Hex Bolts
14
www.mymowerparts.com

For Discount White Outdoor Parts Call 606-678-9623 or 606-561-4983
11.9. Using a ½” socket, remove the four bolts, lock washers and nuts securing the transmission to the frame. See Figure 48.
NOTE: Support the transmission during this pro-cedure to keep it from falling from the unit.
11.10. As you remove the transmission, slip the upper drive belt from around the transmission pulley. See Figure 49.
11.11. Disconnect the brake rod spring from the brake arm. See Figure 49.
11.12. Service the transmission and install in the reverse order of disassembly.
NOTE: During assembly, route the upper drive belt around the transmission pulley as you install the transmission into the tractor.
Figure 48
Support Straps
Transmission Mounting Bolts
Figure 49
Brake Rod and Spring
Upper Drive Belt
15
www.mymow
12. DECK LIFT ASSEMBLY
NOTE: You might be inclined to try to remove the deck lift assembly without removing the fender assembly. While it can be done, it is much easier to take the few minutes to remove the fender.
12.1. Remove the fender assembly as described in section 5.
12.2. Remove E-clips from both ends of deck lift shaft. See Figure 50.
12.3. Remove plastic hex bushings. Inspect for wear and damage replace as needed. See Figure 51.
Figure 50
Right “E” Clip Plastic Bushing
Left “E” ClipPlastic Bushing
Figure 51
erparts.com
For Discount White Outdoor Parts Call 606-678-9623 or 606-561-4983
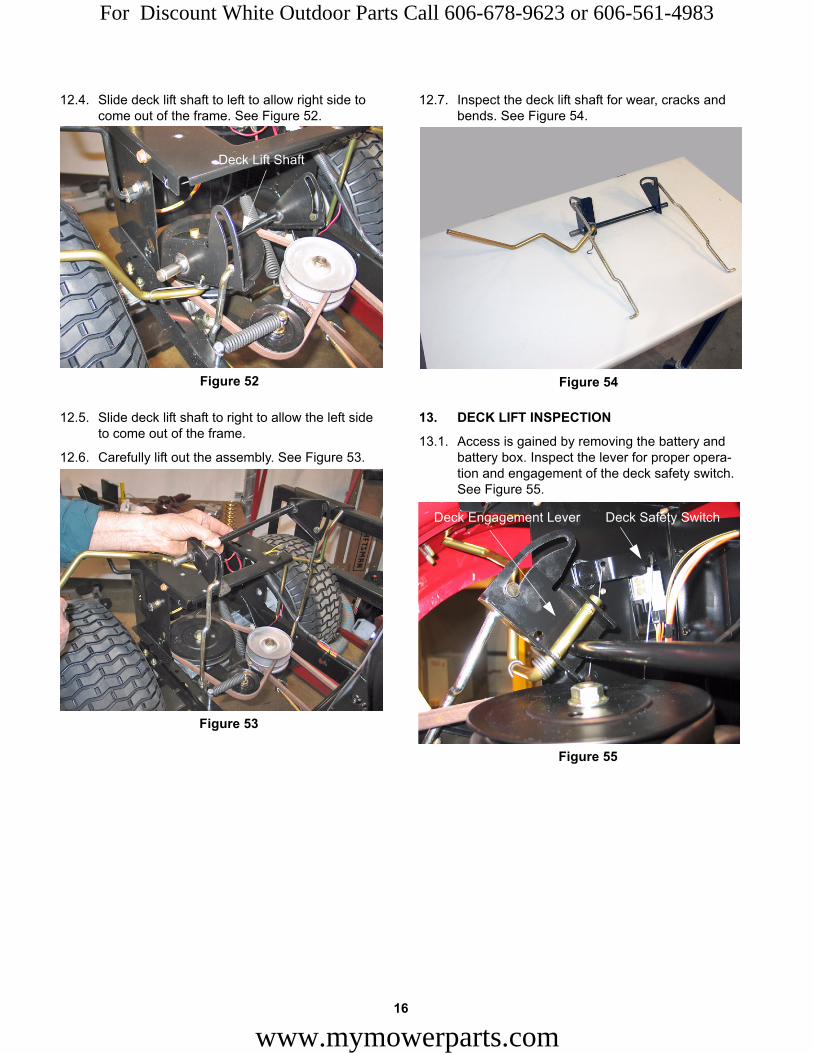
12.4. Slide deck lift shaft to left to allow right side to come out of the frame. See Figure 52.
12.5. Slide deck lift shaft to right to allow the left side to come out of the frame.
12.6. Carefully lift out the assembly. See Figure 53.
12.7. Inspect the deck lift shaft for wear, cracks and bends. See Figure 54.
13. DECK LIFT INSPECTION
13.1. Access is gained by removing the battery and battery box. Inspect the lever for proper opera-tion and engagement of the deck safety switch. See Figure 55.
Figure 52
Deck Lift Shaft
Figure 53
Figure 54
Figure 55
Deck Engagement Lever Deck Safety Switch
16
www.mymowerparts.com

For Discount White Outdoor Parts Call 606-678-9623 or 606-561-4983
14. SERVICING THE SOLENOID.
14.1. The solenoid can be inspected and serviced by removing the battery and battery box. See Fig-ure 56.
15. REMOVAL OF THE STEERING SHAFT AND SECTOR GEAR
15.1. Engage the parking brake on the tractor. This will ease disassembly later.
15.2. Remove the cutting deck.
15.3. Raise the hood or remove the hood.
15.4. Remove the right side panel. See Figure 57.
Figure 56
Solenoid
Figure 57
Panel Mounting Fasteners
17
www.mymow
15.5. Working from under the tractor, use a #4 phillips bit on a socket to remove the screw securing the steering shaft through the frame. See Figure 58.
15.6. Using a 9/16” socket on the bottom and a 9/16” wrench on the top, remove the center bolt on the sector gear bracket. See Figure 59.
15.7. Order of parts is: bolt, bell washer, top plate, spacer through sector gear, frame and flange lock nut.
15.8. Using a 9/16” socket on the bottom and a 7/16” wrench on the top, remove the flange lock nut and shoulder bolt passing through the groove of the sector gear.
Figure 58
Plillips Head Screw
Center Bolt
Shoulder Bolt
Steering Shaft
Center Bolt
Shoulder Bolt
Figure 59
erparts.com

For Discount White Outdoor Parts Call 606-678-9623 or 606-561-4983
15.9. Using a ½” wrench on the top and a 9/16” wrench on the bottom, remove the nut securing the drag link to the steering arm. See Figure 60.
15.10.Remove the sector gear and drag link from the unit.
15.11. Inspect all components for wear or damage. See Figure 61.
15.12.Apply lithium grease to the sector gear and worm gear during assembly.
16. PEDAL SUPPORT BRACKET REMOVAL
16.1. Remove the cutting deck.
16.2. Remove the left side panel.
16.3. Working from under the tractor, remove the cot-ter pin securing the speed control rod to the vari-able speed idler bracket. Remove the ferrule from the bracket the let the rod hang down. See Figure 62.
NOTE: Mark the position of the ferrule on the rod with some whiteout. This will aid assembly and allow you to maintain the proper position of the ferrule.
16.4. Using a ½’ socket, remove the hex screws securing the left side of the pedal support bracket to the frame. See Figure 63.
16.5. Lower the left side of the bracket from the tractor as you slide the rod out of the mounting bracket on the right side of the frame.
16.6. Disconnect the brake rod spring from the brake arm.
Figure 60
Drag Link Nut
Figure 61
Figure 62
Variable Speed Control Rod
Cotter PIn
Ferrule
Figure 63
Hex Screws
18
www.mymowerparts.com

For Discount White Outdoor Parts Call 606-678-9623 or 606-561-4983
16.7. Inspect the bracket for wear or damage. Pay close attention to the notched teeth on the bracket. See Figure 64.
16.8. Assemble in reverse order of disassembly
17. SPEED CONTROL LATCH REMOVAL
17.1. Remove the cutting deck.
17.2. Remove the cotter pin securing the speed con-trol selector rod to the speed control latch. Slide the ferrule from the latch. See Figure 65.
NOTE: Mark the position of the ferrule on the rod with some whiteout. This will aid assembly and allow you to maintain the proper position of the ferrule.
Figure 64
Figure 65
Speed Control Selector Rod
Cotter Pin
White Out
19
www.mymow
17.3. Using a 9/16” socket and an open-end wrench, remove the nut securing the speed control latch assembly to the frame. See Figure 66.
17.4. Inspect the latch for any wear or damage. Pay close attention to the flange that mates with the
Figure 66
Locking Hex Flange Nut
Figure 67
View of latch assembly from under the unit.
erparts.com
For Discount White Outdoor Parts Call 606-678-9623 or 606-561-4983
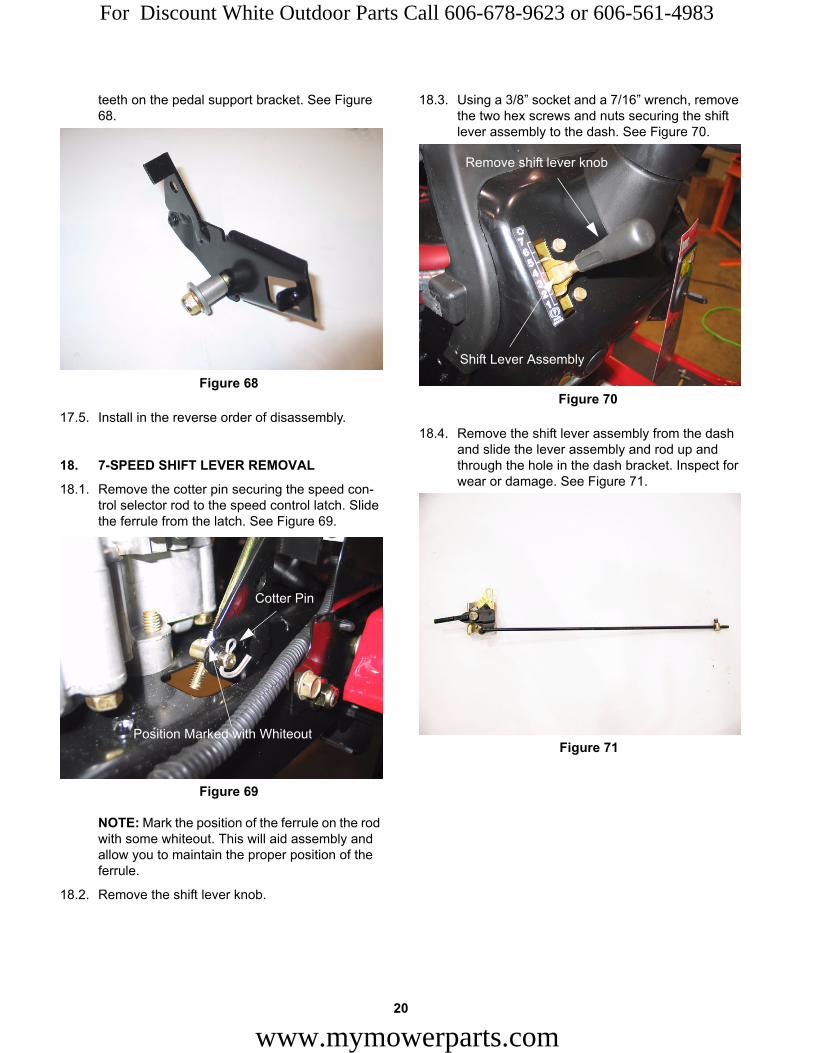
teeth on the pedal support bracket. See Figure 68.
17.5. Install in the reverse order of disassembly.
18. 7-SPEED SHIFT LEVER REMOVAL
18.1. Remove the cotter pin securing the speed con-trol selector rod to the speed control latch. Slide the ferrule from the latch. See Figure 69.
NOTE: Mark the position of the ferrule on the rod with some whiteout. This will aid assembly and allow you to maintain the proper position of the ferrule.
18.2. Remove the shift lever knob.
18.3. Using a 3/8” socket and a 7/16” wrench, remove the two hex screws and nuts securing the shift lever assembly to the dash. See Figure 70.
18.4. Remove the shift lever assembly from the dash and slide the lever assembly and rod up and through the hole in the dash bracket. Inspect for wear or damage. See Figure 71.
Figure 68
Figure 69
Cotter Pin
Position Marked with Whiteout
Figure 70
Shift Lever Assembly
Remove shift lever knob
Figure 71
20
www.mymowerparts.com

For Discount White Outdoor Parts Call 606-678-9623 or 606-561-4983
18.5. Inspect the detents in the assembly for any wear or damage. See Figure 72.
19. PARKING BRAKE AND SHIFT CONTROL ADJUSTMENTS
19.1. With the parking brake engaged and the unit in neutral, try rolling the unit forward or back. The brake should hold the unit in place. If not, adjust the parking brake.
19.2. With the unit on a level surface and the brake released, place a .010” feeler gauge between the brake puck and brake disk on the right side of the transmission. Using a ½” wrench, adjust the elastic stop nut until there is slight tension on the gauge but it can be easily removed. Test the parking brake. It should hold the unit in place.
19.3. If the brake still fails to hold the unit in place, check the alignment of the 7-speed cam and the speed control latch.
19.4. When in the park position, the speed control latch should engage the 7-speed cam in its low-est position. The parking brake on the transmis-sion should be engaged and the unit should not roll with the transmission in the neutral position.
19.5. To adjust the alignment of these components, make sure the engine drive belt is in the outer-most position of the variable speed pulley sheave. This will give you full range of move-ment of the shift mechanism.
19.6. Press down on the speed control/brake foot pedal and place the shift lever in the 7th speed position. Release the foot pedal. The speed con-trol latch should line up with the highest cam on the 7-speed cam bracket.
Figure 72
Detents
21
www.mymow
19.7. Repeat this procedure as you shift through each gear. The cam bracket and latch should step through each of the cam positions for each gear.
19.8. The final position should be the parking brake.
19.9. If there is a misalignment between the shift lever detent positions and the latch/cam positions, remove the hairpin clip on the ferrule securing the speed selector rod to the speed control latch.
19.10.Loosen or tighten the ferrule to adjust the latch to line up with the cam notch.
19.11. Assemble the ferrule and hairpin clip and check operation of the shift lever. Make sure the brake still works properly after making changes to the shift mechanism.
20. TOE-IN ADJUSTMENT
20.1. Point the tractor tires straight ahead. Measure the distance between the front wheels at the front of the rim and the rear of the rim. The toe-in should be between 1/16” to 5/16” closer at the front then the rear.
20.2. To adjust the toe-in of the front wheels remove the cotter pin securing the tie rod to the right front axle and adjust the ferrule on the tie rod to set the correct toe-in.
erparts.com