lumenera infinity camera user's manual v3.3 - … · infinity camera user’s manual. ......
TRANSCRIPT

Lumenera Scientific 2470 Don Reid Drive, Ottawa, Ontario, Canada. K1H 1E1
Tel: (613) 736-4077 • Fax: (613) 736-4071 www.lumenera-scientific.com
Lumenera Scientific Infinity Camera User’s Manual
Lumenera Scientific Infinity Camera User’s Manual Release 3.3
Page ii Copyright 2004
Copyright Notice:
Release 3.3
Copyright © 2004 Lumenera Corporation. All rights reserved.
The contents of this document may not be copied nor duplicated in any form, in whole or in part, without prior written consent from Lumenera Corporation. Lumenera makes no warranties as to the accuracy of the information contained in this document or its suitability for any purpose. The information in this document is subject to change without notice.
License Agreement (Software):
This Agreement states the terms and conditions upon which Lumenera Corporation ("Lumenera") offers to license to you (the "Licensee") the software together with all related documentation and accompanying items including, but not limited to, the executable programs, drivers, libraries, and data files associated with such programs (collectively, the "Software").
The Software is licensed, not sold, to you for use only under the terms of this Agreement.
Lumenera grants to you the right to use all or a portion of this Software provided that the Software is used only in conjunction with Lumenera's family of products.
In using the Software you agree not to:
a) decompile, disassemble, reverse engineer, or otherwise attempt to derive the source code for any Product (except to the extent applicable laws specifically prohibit such restriction);
b) remove or obscure any trademark or copyright notices.
Limited Warranty (Hardware and Software):
ANY USE OF THE SOFTWARE OR HARDWARE IS AT YOUR OWN RISK. THE SOFTWARE IS PROVIDED FOR USE ONLY WITH LUMENERA'S HARDWARE AND OTHER RELATED SOFTWARE. THE SOFTWARE IS PROVIDED FOR USE "AS IS" WITHOUT WARRANTY OF ANY KIND. TO THE MAXIMUM EXTENT PERMITTED BY LAW, LUMENERA DISCLAIMS ALL WARRANTIES OF ANY KIND, EITHER EXPRESS OR IMPLIED, INCLUDING, WITHOUT LIMITATION, IMPLIED WARRANTIES OR CONDITIONS OF MERCHANTABILITY, QUALITY AND FITNESS FOR A PARTICULAR PURPOSE. LUMENERA IS NOT OBLIGATED TO PROVIDE ANY UPDATES OR UPGRADES TO THE SOFTWARE OR ANY RELATED HARDWARE.
Limited Liability (Hardware and Software):
In no event shall Lumenera or its Licensor's be liable for any damages whatsoever (including, without limitation, incidental, direct, indirect, special or consequential damages, damages for loss of business profits, business interruption, loss of business information, or other pecuniary loss) arising out of the use or inability to use this Software or related Hardware, including, but not limited to, any of Lumenera's family of products.
Trademarks and Proprietary Names:
Lumenera Scientific, Infinity X, Infinity 1, Infinity 2 and DeltaVU are trademarks of Lumenera Corporation. This manual may refer to other product names, which may be trademarked by their respective companies, and are used herein for identification purposes only.

Lumenera Scientific Infinity Camera Release 3.3 User’s Manual
Copyright 2004 Page iii
Federal Communications Commission (FCC) Statement This equipment has been tested and found to comply with the limits of a Class B digital device, pursuant to Part 15 of the FCC Rules. These limits are designed to provide reasonable protection against harmful interference when the equipment is operated in a residential environment. This equipment generates, uses, and radiates radio frequency energy, and if not installed and used in accordance with the instructions, may cause harmful interference. However, there is no guarantee that interference will not occur. If this equipment does cause interference to radio or television reception, which can be determined by turning the equipment off and on, the user is encouraged to correct the interference by one of the following measures:
• Reorient or relocate the receiving antenna. • Increase separation between the equipment and receiver. • Connect the equipment into an outlet on a circuit different from which the receiver is connected. • Consult the dealer or an experienced radio/TV technician.
Any changes or modification to said product not expressly approved by Lumenera could void the user's authority to operate this device. Shielded and grounded cables and connectors must be used to meet FCC emission limits. Lumenera takes no responsibility for any radio or television interference caused by using cables or connectors other than those recommended. This device complies with part 15 of the FCC Rules. Operation is subject to the following two conditions: (1) This device may not cause harmful interference, and (2) this device must accept any interference received, including interference that may cause undesired operation.
European Community (CE) Statement Products: Infinity 1, 2, 3, 4, 5, X, Lu1175, Lu1175X, Lu1205, Lu1135, Lu1165, Lu1275, Lu1335 and Lu1375 USB Scientific Cameras. Directives: 2001/59/EC (General Product Safety Directive) Self-declared 89/336/EEC (EMC Directive). Standards to which conformity is declared: EN55024: 1998
EN55022: 1998 (Class B) EN61000-3-2: 1995 EN61000-3-3: 1995
Manufacturer’s Name and Address: Lumenera Corporation
2470 Don Reid Drive. Ottawa, ON K1H 1E1 Canada
Type of Equipment: USB 2.0 Scientific Digital Camera First Year of CE Conformity: 2003 This is to certify that the Lumenera USB 2.0 Scientific Cameras meet or exceed the standards for CE compliance per the Council Directives noted above. All equipment is built at Lumenera Corporation, and pertinent testing documentation is available for verification.

Lumenera Scientific Infinity Camera User’s Manual Release 3.3
Page iv Copyright 2004
Table of Contents INTRODUCTION.........................................................................................................................1
1.1 THE LUMENERA SCIENTIFIC INFINITY CAMERA FAMILY ..................................................1
GETTING STARTED ..................................................................................................................2 2.1 SOFTWARE INSTALLATION ...............................................................................................2
2.1.1 System Requirements...............................................................................................2 2.1.2 Installation Procedure.............................................................................................3
2.2 TECHNICAL SUPPORT .......................................................................................................4 2.3 INSTALLED SOFTWARE.....................................................................................................4 2.4 THE INFINITY CAMERA.....................................................................................................5
USING THE CAMERA................................................................................................................6 3.1 INFINITY CAPTURE ...........................................................................................................6 3.2 LAUNCHING THE APPLICATION ........................................................................................6
3.2.1 Main Window ..........................................................................................................6 3.3 SELECTING IMAGE SIZE....................................................................................................7
3.3.1 Image Preview Size .................................................................................................7 3.3.2 Capture Resolution..................................................................................................8
3.4 IMAGE OPTIMIZATION ......................................................................................................8 3.4.1 Exposure..................................................................................................................8 3.4.2 Gain.........................................................................................................................9 3.4.3 Selecting the Light Source.......................................................................................9 3.4.4 White Balance Target............................................................................................10 3.4.5 White Balance .......................................................................................................11 3.4.6 Hue and Saturation ...............................................................................................13 3.4.7 Contrast / Brightness / Gamma.............................................................................14
3.5 CAPTURING AN IMAGE ...................................................................................................15 3.5.1 Capture Image.......................................................................................................15
3.6 OTHER OPTIONS .............................................................................................................16 3.6.1 Light Source Frequency ........................................................................................16 3.6.2 Preview Quality.....................................................................................................16 3.6.3 Preview Zoom Level ..............................................................................................17 3.6.4 Generate Flat Field Correction ............................................................................17 3.6.5 Enable Flat Field Correction................................................................................17 3.6.6 Image Flipping ......................................................................................................17 3.6.7 Multiple Image Averaging.....................................................................................17 3.6.8 Preview Histogram................................................................................................18 3.6.9 Highlight Saturated Pixels ....................................................................................18 3.6.10 Load Overlay Bitmap ............................................................................................18 3.6.11 Load Alpha Blending Bitmap ................................................................................18 3.6.12 Load Settings / Save Settings / Save Settings As ...................................................19
3.7 USING INFINITY CAMERAS WITH TWAIN......................................................................20
Lumenera Scientific Infinity Camera Release 3.3 User’s Manual
Copyright 2004 Page 1
1 1 Introduction
1.1 The Lumenera Scientific Infinity Camera Family
Lumenera Scientific Infinity Cameras are designed to be flexible microscopy imaging tools for Clinical, Research, Life Science, Materials Science and Educational Professionals. Infinity cameras are compatible with any USB 2.0 equipped desktop, laptop or embedded computer. Infinity cameras are designed with flexibility in mind. Each camera model has its own distinct advantage over the others. Whether your application demands speed, resolution or sensitivity, there is an affordable Infinity Camera to meet the requirements. Because they are USB based, there is no need for a frame grabber. Instead, a single cable provides power*, full command and control and data transfer at speeds of up to 24 MB/s resulting in real-time video preview. All cameras have a provision to be externally powered for cases where the USB cable does not supply power (e.g. some USB cards on laptop computers.) * The Infinity 2, 4, 5 and X models should be used with an external power adapter (supplied) due to their higher current requirements.
Lumenera Scientific Infinity Camera User’s Manual Release 3.3
Page 2 Copyright 2004
2 Getting Started
2.1 Software Installation
The Infinity High-Speed USB 2.0 camera you have just purchased is designed to operate out of the box with minimal set-up. Prior to plugging the camera into the computer, you must first install the software. The software can be found on the CD-ROM that shipped with your product.
2.1.1 System Requirements We recommend that your PC is equipped with one of the following Microsoft Windows operating systems:
• Windows 2000 (Service Pack 3), or
• Windows XP (Service Pack 1)
• Microprocessor: Recommended: Pentium® 4, 1.3 GHz or more Minimum: 600 Mhz
• Memory: Recommended: 512 Mb of RAM Minimum: 256 Mbytes of RAM
• USB 2.0 Port. Note: A USB 2.0 Port is required. The camera will not work on a standard USB 1.1 port. USB 2.0 cards for desktop and laptop computers are available as accessories through your camera distributor or most electronics stores.
Lumenera Scientific Infinity Camera Release 3.3 User’s Manual
Copyright 2004 Page 3
2.1.2 Installation Procedure Please install your new Infinity camera in the following order:
Note: Do not connect your infinity camera before installing the infinity camera software.
1. USB 2.0 add-in card.
• If you are using a 3rd party USB 2.0 PCI add-in card, please ensure the add-in card is properly installed on your computer before proceeding
• We recommend that you use the built-in operating systems USB 2.0 Enhanced Host Controller Interface (EHCI) drivers provided by Microsoft rather than the device drivers supplied with your 3rd party card
• The built-in operating systems USB 2.0 Enhanced Host Controller Interface (EHCI) drivers provided by Microsoft are built-in when using Windows XP with Service Pack 1.
• Windows 2000 users should first upgrade to Service Pack 4, and then go to the Windows upgrade site: http://windowsupdate.microsoft.com to obtain the USB 2.0 Enhanced Host Controller Interface (EHCI) drivers
2. Infinity Camera Software • You must be logged into the computer with administrator privileges prior to
continuing the installation.
• Close all application software that is running and then insert the Infinity Installer CD into your CD-ROM drive.
• Wait a few moments for the auto-play function to run the set-up program automatically. If the installation doesn’t start automatically, double click on the executable file on the CD.
• Follow the onscreen prompts to install the Infinity Camera software. 3. Infinity Camera Installation
i. After the software has been installed, plug your Infinity Camera into a free USB 2.0 High-Speed port. For the Infinity X, power the camera using the supplied wall power adapter.
ii. The Window’s New Hardware Wizard will pop-up detecting a new “Infinity Unconfigured Device”. Select Install the software automatically from the options that are presented to you and click Next. A warning may appear notifying you that the drivers have not been digitally signed by Microsoft. Click Continue Anyway to continue with the driver installation. This will not affect the camera’s performance. Then click Finish to complete the installation of the drivers.
iii. After a few seconds the Window’s New Hardware Wizard will pop-up again (if it doesn’t, disconnect and reconnect the USB cable to the
Lumenera Scientific Infinity Camera User’s Manual Release 3.3
Page 4 Copyright 2004
camera), detecting an “Infinity USB 2.0 Camera” device. Select Install the software automatically from the options that are presented to you and click Next. A warning may appear notifying you that the drivers have not been digitally signed by Microsoft. Click Continue Anyway to continue with the driver installation. Then click Finish to complete the installation of the drivers.
Note: Windows will require you to re-run steps ii & iii each time you plug the camera into a new USB 2.0 port. You must have administrator privileges the first time the camera is used on any given USB 2.0 port. You may wish to repeat the installation steps at this time for all USB 2.0 ports on your computer.
iv. Run the application software from your Start menu and enjoy!
2.2 Technical Support
If you have problems installing or using the software, or with general camera operation, please contact your place of purchase. To obtain the latest software release and other technical information you may also visit our technical support website at:
www.lumenera-scientific.com/support.htm To register for automatic notification of new software releases you may send an email to: [email protected]. You will be notified by email when free software upgrades are available. Your privacy is important to us. Your email address will not be used for any other purpose than to notify you of available upgrades.
2.3 Installed Software
All of the necessary software and device drivers are contained in an installation program on the CD-ROM that comes with the camera. The following files are installed when you run the installation program: Infinity Capture Application: Lumenera Scientific provides a free, easy to use capture application with all of the features required for basic camera functionality and image capture.
Lumenera Scientific Infinity Camera Release 3.3 User’s Manual
Copyright 2004 Page 5
Infinity TWAIN Interface: A plug-in driver will be installed by the installation program that will allow all Infinity cameras to be used with any 3rd party software application that supports a TWAIN device. Infinity Direct Show Interface: Filter drivers will also be installed by the installation program that will allow all Infinity cameras to be used with any 3rd party software application that supports Direct Show capture devices.
2.4 The Infinity Camera
All Infinity cameras have a power jack and a high-speed USB port found on the back of the camera. After powering the camera, simply plug it into a USB 2.0 (high-speed) compatible port and the camera will be functional. An LED light between the power jack and USB port will indicate power is reaching the camera and that the camera is running. The Infinity 1 can be powered via the USB cable alone, which nominally supplies 5 volts. For this model, the power adapter is only required in cases where the USB cable does not supply power (as is the case with some laptops.) For all other Infinity models, the supplied power adapter should be used to power the camera, as the power supplied by the USB bus is not sufficient for optimum performance. The power adapter supplied has the following specifications:
1. 6 Volts DC Regulated 2. 900 mA Minimum Current Rating 3. 2.1 mm tip, Center positive (+)
The camera is equipped with an industry standard C-Mount lens mount, which is compatible with standard lenses or microscope mounts. In some cases, a C-mount adaptor may be required to optimize the field of view between your microscope’s eyepieces and the image viewed on the computer monitor. Your sales representative will recommend an adaptor to suit your requirements. The Infinity X camera is unique in that it utilizes DeltaVU™ a patent-pending technology that increases the resolution of captured images to as much as 21 megapixels (5120 x 4096) with true non-interpolated color at each pixel location.
Lumenera Scientific Infinity Camera User’s Manual Release 3.3
Page 6 Copyright 2004
3 Using the Camera
3.1 Infinity Capture
Infinity Capture is a powerful and flexible yet simple software application for the Live Preview, Optimization and Capture of digital images from any of the Infinity cameras. It is supported by Windows and has a graphical user interface with standard pull down menus, an icon based toolbar and keyboard commands, which make it very simple to control the camera and take images. The following sections describe the usage of the software and explain the various camera settings and how they relate to the changes viewed in the live and captured images.
3.2 Launching the Application
To launch Infinity Capture from your Windows Start menu:
or Select: Programs > Infinity Camera > Infinity Capture. (If you installed the software at a different location, the above instruction will be different based on the location you chose.) Only one camera may be controlled by each instance of Infinity Capture, but several instances of the application may be run simultaneously. If more than one camera is detected by the application, a list of cameras and their corresponding serial numbers is displayed allowing you to select the camera you wish to control.
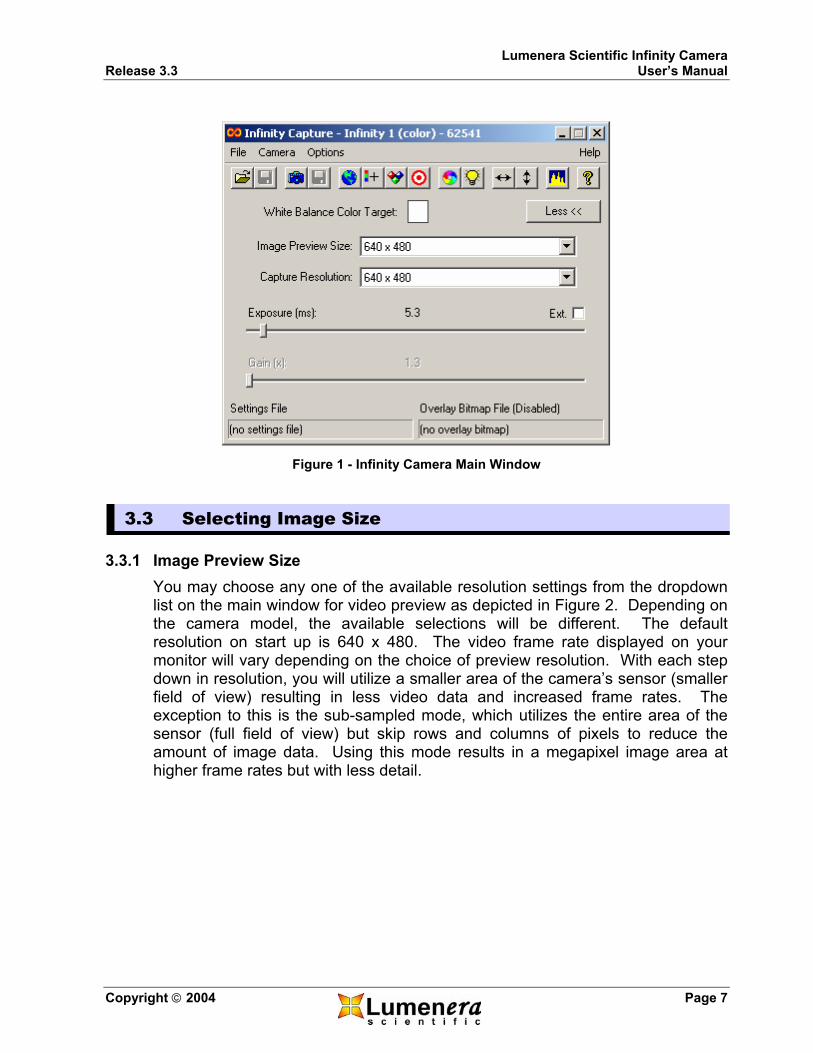
3.2.1 Main Window The main window can be seen in Figure 1. When Infinity Capture starts up, the program’s live preview window also starts. The main window has the toolbar with the most common program actions available for quick access.
Lumenera Scientific Infinity Camera Release 3.3 User’s Manual
Copyright 2004 Page 7
Figure 1 - Infinity Camera Main Window
3.3 Selecting Image Size
3.3.1 Image Preview Size You may choose any one of the available resolution settings from the dropdown list on the main window for video preview as depicted in Figure 2. Depending on the camera model, the available selections will be different. The default resolution on start up is 640 x 480. The video frame rate displayed on your monitor will vary depending on the choice of preview resolution. With each step down in resolution, you will utilize a smaller area of the camera’s sensor (smaller field of view) resulting in less video data and increased frame rates. The exception to this is the sub-sampled mode, which utilizes the entire area of the sensor (full field of view) but skip rows and columns of pixels to reduce the amount of image data. Using this mode results in a megapixel image area at higher frame rates but with less detail.

Lumenera Scientific Infinity Camera User’s Manual Release 3.3
Page 8 Copyright 2004
Figure 2 - Image Preview Size
3.3.2 Capture Resolution Image capture resolution is selected through the drop down list in the main window similarly to the Image Preview Size. Capture resolution is independent of preview resolution. This represents the resolution of the image that is captured. The Infinity X camera has 3 different DeltaVU™ resolutions available for each preview resolution in addition to the standard (Demosaic) method used by all other cameras.
3.4 Image Optimization
3.4.1 Exposure Optimizing the exposure of your Infinity camera is achieved through moving the exposure slider, Figure 3. Based on the camera model, you have different exposure ranges available. Fine exposure slider adjustments can be made using the left and right arrow keys on your keyboard. As exposure is adjusted, the frame rate is kept at the maximum possible. Some cameras have an extended exposure range, indicated by an Ext. check box on the right side of the exposure slider. When not in extended exposure mode, the exposure is limited but has high granularity so that very precise exposure settings can be made. When the option is selected, the exposure can be increased to the maximum allowed by the camera, but with less granularity.
Lumenera Scientific Infinity Camera Release 3.3 User’s Manual
Copyright 2004 Page 9
For the Infinity 2 only, the live video display will not show the extended exposure (it will only show the maximum available when the extended option is not selected), however, when you capture an image, the extended exposure will be used for the capture.
Note: If you have image averaging turned on and are using long exposures, you may have to wait a long time to capture an image.
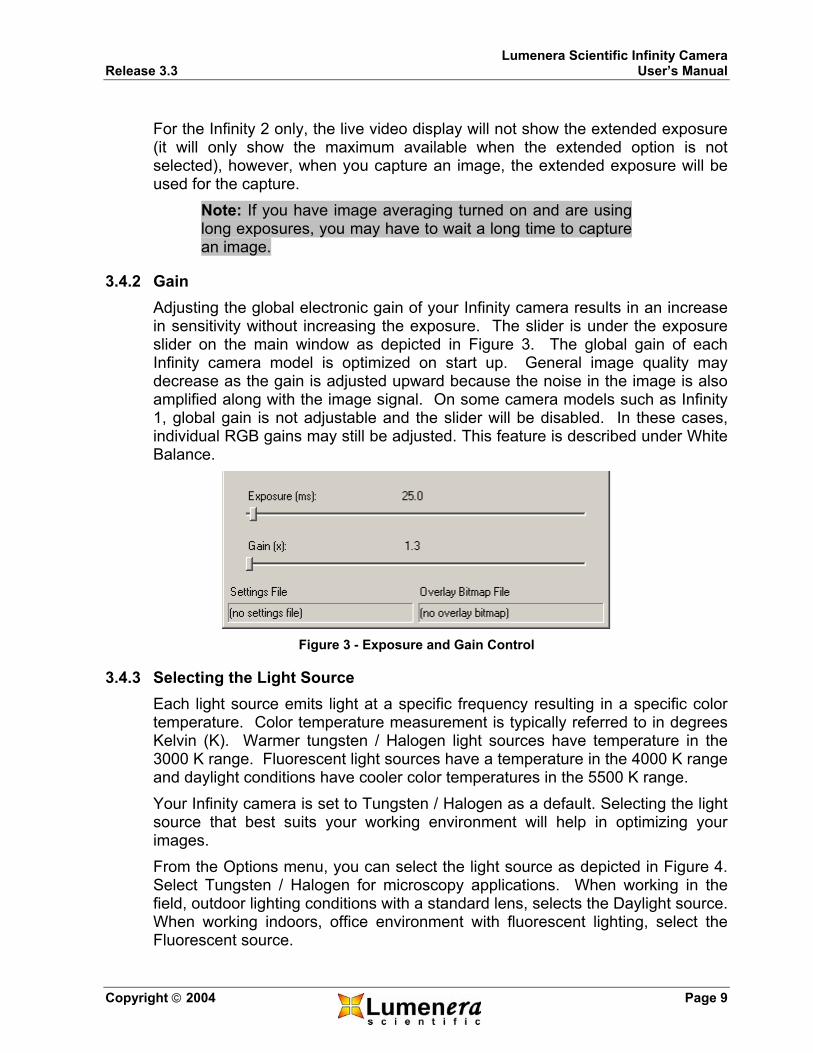
3.4.2 Gain Adjusting the global electronic gain of your Infinity camera results in an increase in sensitivity without increasing the exposure. The slider is under the exposure slider on the main window as depicted in Figure 3. The global gain of each Infinity camera model is optimized on start up. General image quality may decrease as the gain is adjusted upward because the noise in the image is also amplified along with the image signal. On some camera models such as Infinity 1, global gain is not adjustable and the slider will be disabled. In these cases, individual RGB gains may still be adjusted. This feature is described under White Balance.
Figure 3 - Exposure and Gain Control
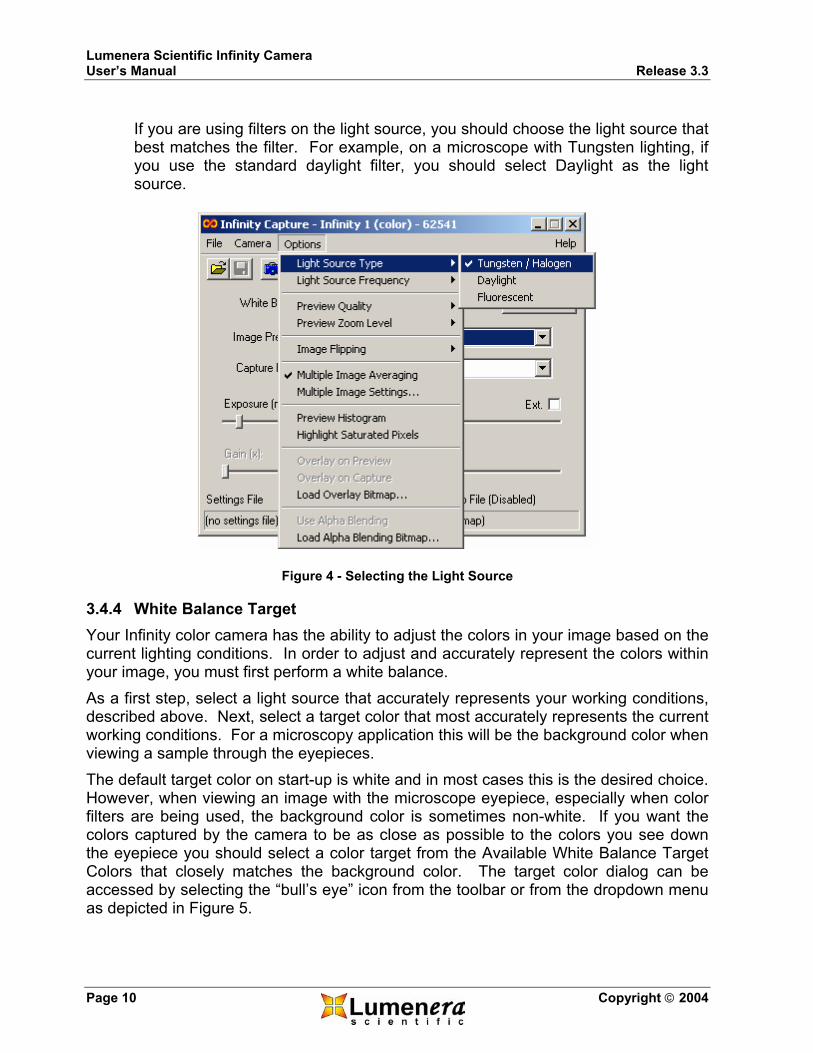
3.4.3 Selecting the Light Source Each light source emits light at a specific frequency resulting in a specific color temperature. Color temperature measurement is typically referred to in degrees Kelvin (K). Warmer tungsten / Halogen light sources have temperature in the 3000 K range. Fluorescent light sources have a temperature in the 4000 K range and daylight conditions have cooler color temperatures in the 5500 K range. Your Infinity camera is set to Tungsten / Halogen as a default. Selecting the light source that best suits your working environment will help in optimizing your images. From the Options menu, you can select the light source as depicted in Figure 4. Select Tungsten / Halogen for microscopy applications. When working in the field, outdoor lighting conditions with a standard lens, selects the Daylight source. When working indoors, office environment with fluorescent lighting, select the Fluorescent source.
Lumenera Scientific Infinity Camera User’s Manual Release 3.3
Page 10 Copyright 2004
If you are using filters on the light source, you should choose the light source that best matches the filter. For example, on a microscope with Tungsten lighting, if you use the standard daylight filter, you should select Daylight as the light source.
Figure 4 - Selecting the Light Source
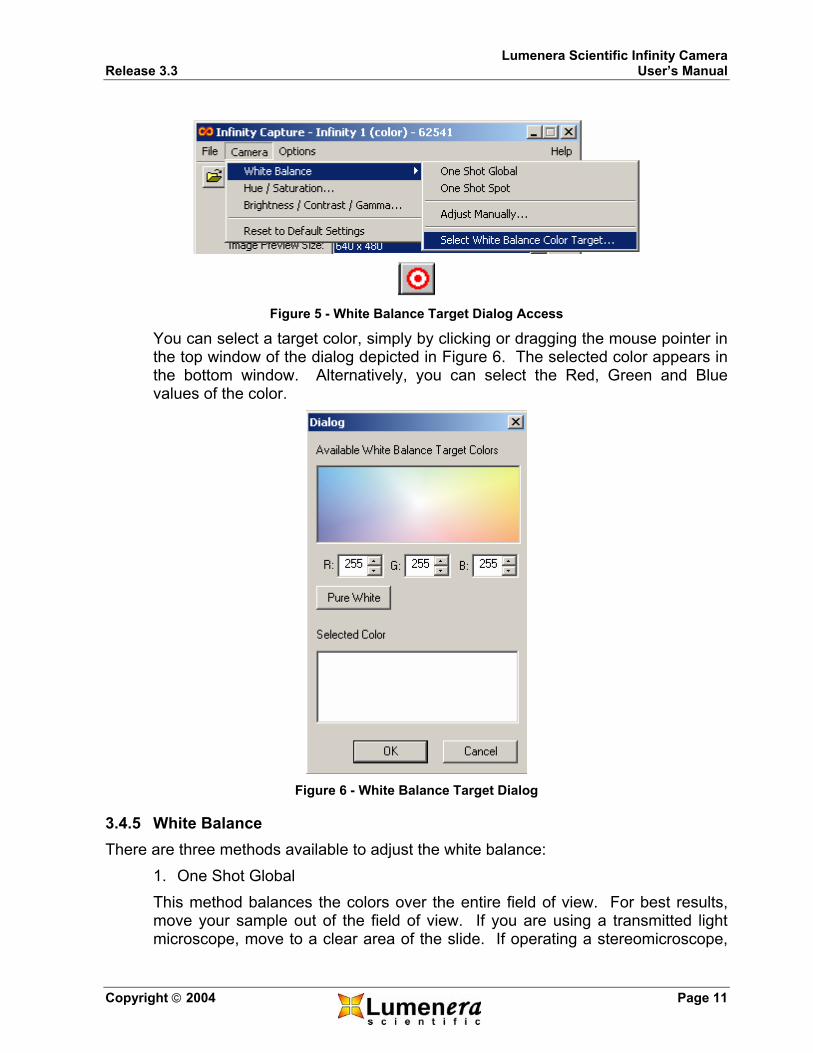
3.4.4 White Balance Target Your Infinity color camera has the ability to adjust the colors in your image based on the current lighting conditions. In order to adjust and accurately represent the colors within your image, you must first perform a white balance. As a first step, select a light source that accurately represents your working conditions, described above. Next, select a target color that most accurately represents the current working conditions. For a microscopy application this will be the background color when viewing a sample through the eyepieces. The default target color on start-up is white and in most cases this is the desired choice. However, when viewing an image with the microscope eyepiece, especially when color filters are being used, the background color is sometimes non-white. If you want the colors captured by the camera to be as close as possible to the colors you see down the eyepiece you should select a color target from the Available White Balance Target Colors that closely matches the background color. The target color dialog can be accessed by selecting the “bull’s eye” icon from the toolbar or from the dropdown menu as depicted in Figure 5.
Lumenera Scientific Infinity Camera Release 3.3 User’s Manual
Copyright 2004 Page 11
Figure 5 - White Balance Target Dialog Access
You can select a target color, simply by clicking or dragging the mouse pointer in the top window of the dialog depicted in Figure 6. The selected color appears in the bottom window. Alternatively, you can select the Red, Green and Blue values of the color.
Figure 6 - White Balance Target Dialog
3.4.5 White Balance There are three methods available to adjust the white balance:
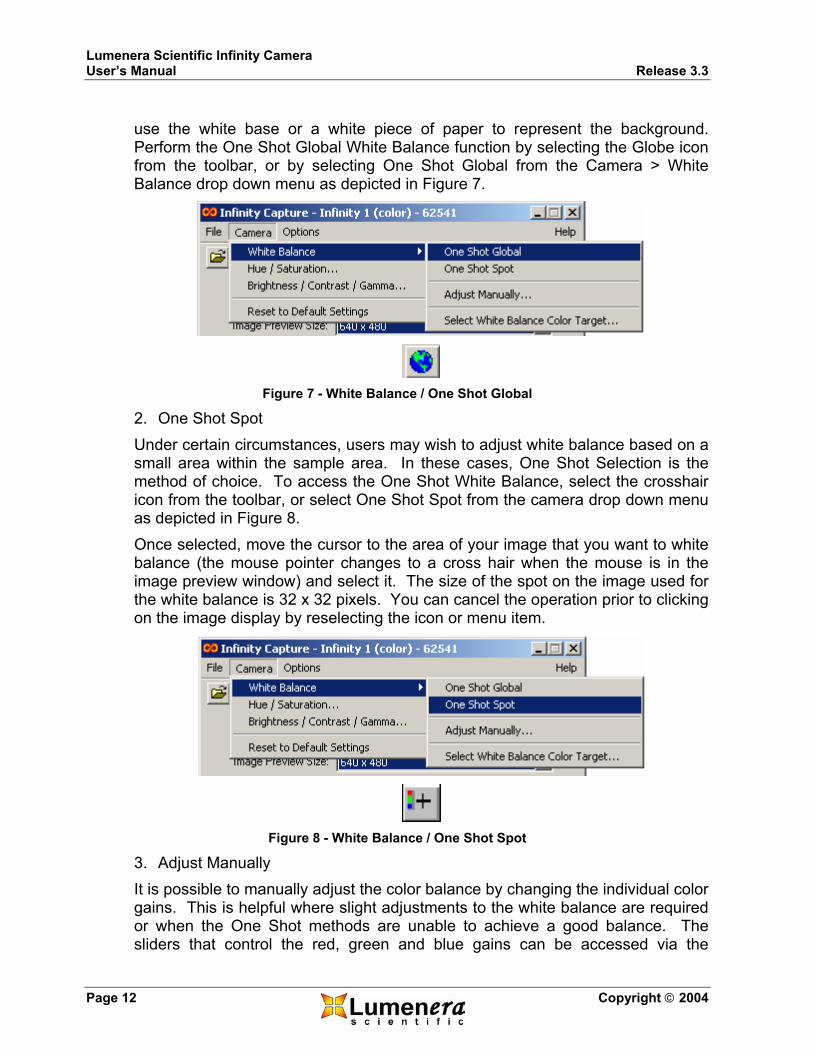
1. One Shot Global This method balances the colors over the entire field of view. For best results, move your sample out of the field of view. If you are using a transmitted light microscope, move to a clear area of the slide. If operating a stereomicroscope,
Lumenera Scientific Infinity Camera User’s Manual Release 3.3
Page 12 Copyright 2004
use the white base or a white piece of paper to represent the background. Perform the One Shot Global White Balance function by selecting the Globe icon from the toolbar, or by selecting One Shot Global from the Camera > White Balance drop down menu as depicted in Figure 7.
Figure 7 - White Balance / One Shot Global
2. One Shot Spot Under certain circumstances, users may wish to adjust white balance based on a small area within the sample area. In these cases, One Shot Selection is the method of choice. To access the One Shot White Balance, select the crosshair icon from the toolbar, or select One Shot Spot from the camera drop down menu as depicted in Figure 8. Once selected, move the cursor to the area of your image that you want to white balance (the mouse pointer changes to a cross hair when the mouse is in the image preview window) and select it. The size of the spot on the image used for the white balance is 32 x 32 pixels. You can cancel the operation prior to clicking on the image display by reselecting the icon or menu item.
Figure 8 - White Balance / One Shot Spot
3. Adjust Manually It is possible to manually adjust the color balance by changing the individual color gains. This is helpful where slight adjustments to the white balance are required or when the One Shot methods are unable to achieve a good balance. The sliders that control the red, green and blue gains can be accessed via the
Lumenera Scientific Infinity Camera Release 3.3 User’s Manual
Copyright 2004 Page 13
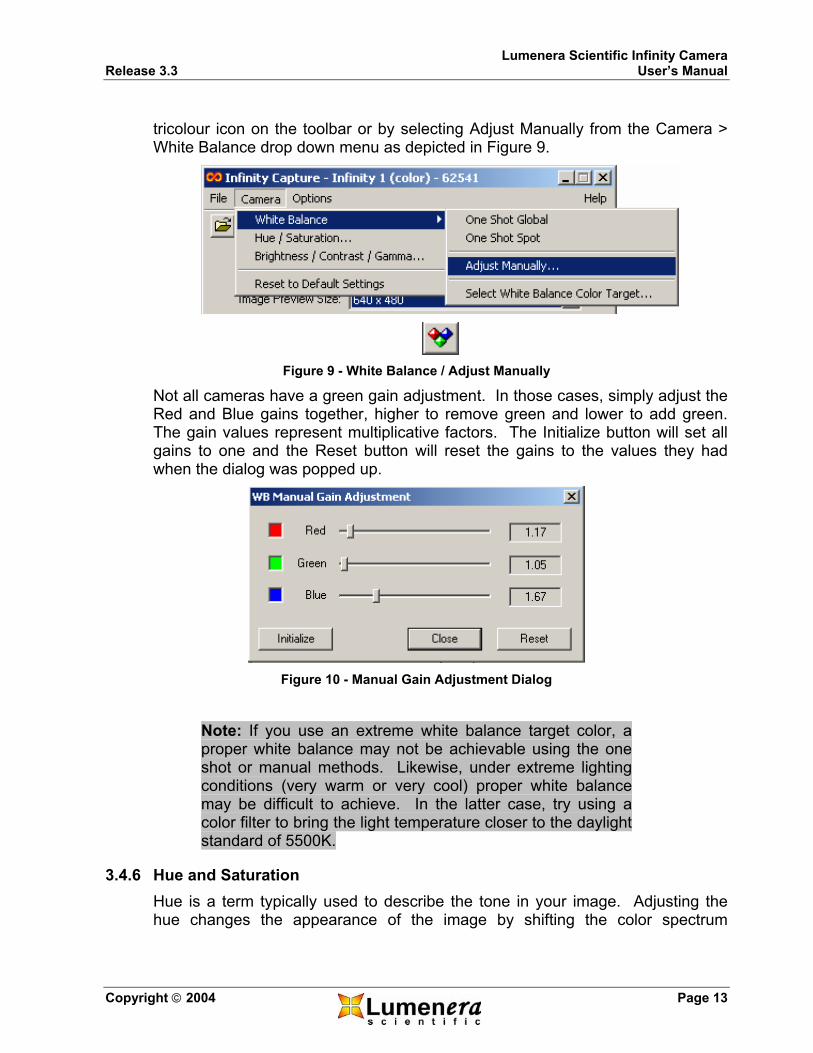
tricolour icon on the toolbar or by selecting Adjust Manually from the Camera > White Balance drop down menu as depicted in Figure 9.
Figure 9 - White Balance / Adjust Manually
Not all cameras have a green gain adjustment. In those cases, simply adjust the Red and Blue gains together, higher to remove green and lower to add green. The gain values represent multiplicative factors. The Initialize button will set all gains to one and the Reset button will reset the gains to the values they had when the dialog was popped up.
Figure 10 - Manual Gain Adjustment Dialog
Note: If you use an extreme white balance target color, a proper white balance may not be achievable using the one shot or manual methods. Likewise, under extreme lighting conditions (very warm or very cool) proper white balance may be difficult to achieve. In the latter case, try using a color filter to bring the light temperature closer to the daylight standard of 5500K.
3.4.6 Hue and Saturation Hue is a term typically used to describe the tone in your image. Adjusting the hue changes the appearance of the image by shifting the color spectrum
Lumenera Scientific Infinity Camera User’s Manual Release 3.3
Page 14 Copyright 2004
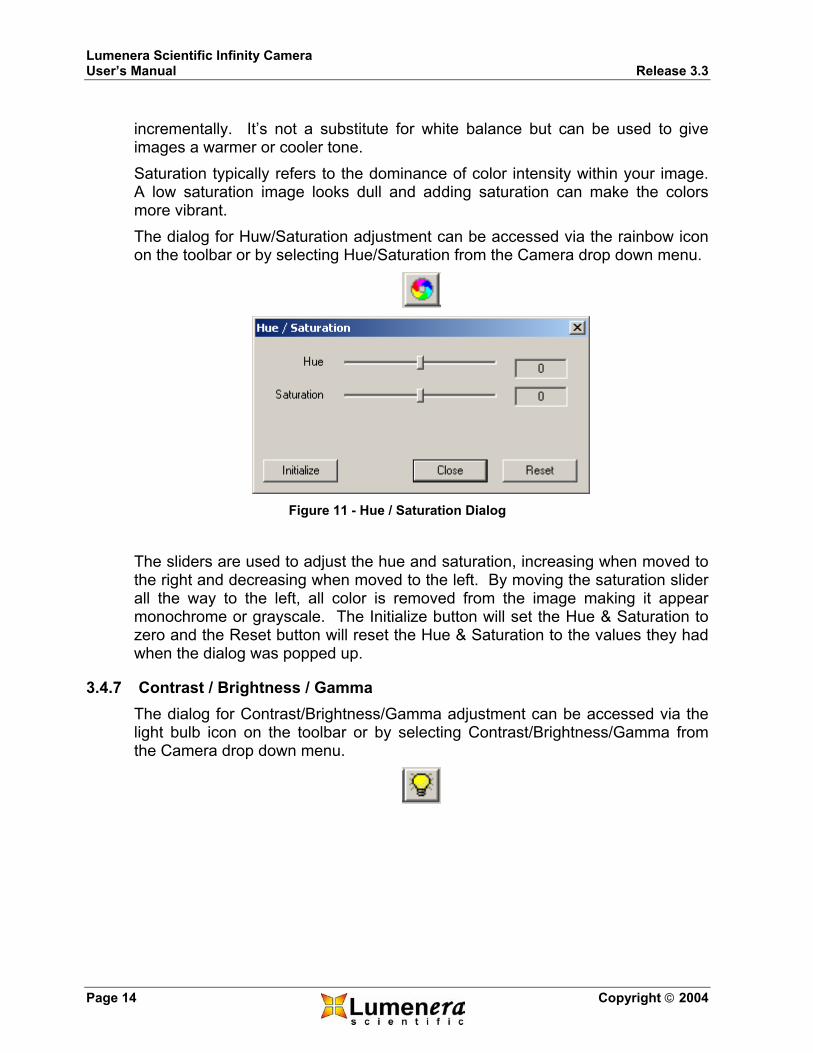
incrementally. It’s not a substitute for white balance but can be used to give images a warmer or cooler tone. Saturation typically refers to the dominance of color intensity within your image. A low saturation image looks dull and adding saturation can make the colors more vibrant. The dialog for Huw/Saturation adjustment can be accessed via the rainbow icon on the toolbar or by selecting Hue/Saturation from the Camera drop down menu.
Figure 11 - Hue / Saturation Dialog
The sliders are used to adjust the hue and saturation, increasing when moved to the right and decreasing when moved to the left. By moving the saturation slider all the way to the left, all color is removed from the image making it appear monochrome or grayscale. The Initialize button will set the Hue & Saturation to zero and the Reset button will reset the Hue & Saturation to the values they had when the dialog was popped up.
3.4.7 Contrast / Brightness / Gamma The dialog for Contrast/Brightness/Gamma adjustment can be accessed via the light bulb icon on the toolbar or by selecting Contrast/Brightness/Gamma from the Camera drop down menu.

Lumenera Scientific Infinity Camera Release 3.3 User’s Manual
Copyright 2004 Page 15
Figure 12 - Contrast / Brightness / Gamma Dialog
Adjusting the contrast affects the brightness relationship between the dark and light areas in your image. Adjusting the slider to the right increases contrast, making dark areas darker, bright areas brighter and eliminating brightness levels in between. Moving the slider to the left decreases contrast causing the brightness of the image to become more uniform and flat. Adjusting the brightness affects the overall image intensity. Moving the slider to the right and left makes the image brighter and darker respectively. Gamma adjustment affects the bright, dark and between areas of your image in a non-linear fashion. The purpose of gamma is to correct the non-linearity in most display devices. Gamma values greater than 1.0, will brighten the darker areas of an image without over brightening the bright areas. For most monitors, a good gamma value will be lie in the range 1.3 to 2.0. The Initialize button will set the Contrast and Brightness to zero and the Gamma to one. The Reset button will reset the Contrast, Brightness and Gamma to the values they had when the dialog was popped up.
3.5 Capturing an Image
3.5.1 Capture Image There are two steps to capture and save an image.
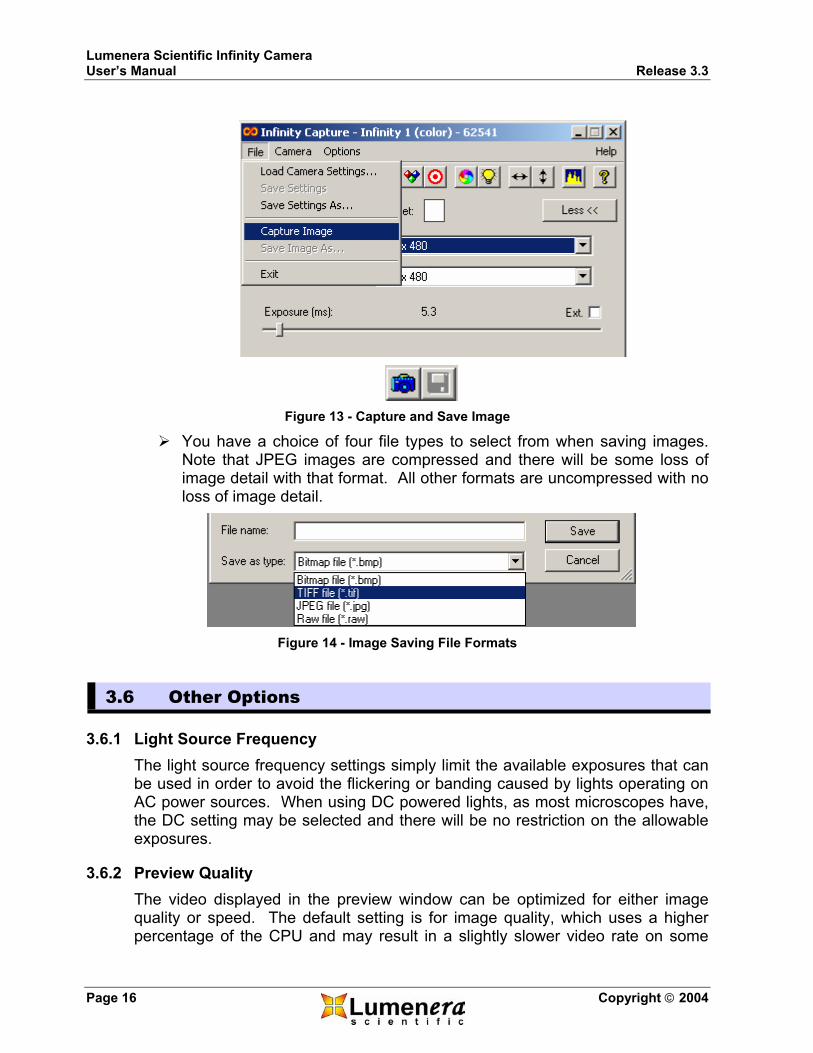
First, select the Capture Image Icon to capture the image and display it on screen.
Next, select the Save Captured Image Icon to save it to disk. These commands are also available from the drop down menu.
Lumenera Scientific Infinity Camera User’s Manual Release 3.3
Page 16 Copyright 2004
Figure 13 - Capture and Save Image
You have a choice of four file types to select from when saving images. Note that JPEG images are compressed and there will be some loss of image detail with that format. All other formats are uncompressed with no loss of image detail.
Figure 14 - Image Saving File Formats
3.6 Other Options
3.6.1 Light Source Frequency The light source frequency settings simply limit the available exposures that can be used in order to avoid the flickering or banding caused by lights operating on AC power sources. When using DC powered lights, as most microscopes have, the DC setting may be selected and there will be no restriction on the allowable exposures.
3.6.2 Preview Quality The video displayed in the preview window can be optimized for either image quality or speed. The default setting is for image quality, which uses a higher percentage of the CPU and may result in a slightly slower video rate on some
Lumenera Scientific Infinity Camera Release 3.3 User’s Manual
Copyright 2004 Page 17
slower computers. When the “optimized for speed” option is selected, the image quality is noticeably poorer, but CPU usage is minimized and frame rates are always at their maximum. This setting does not affect how images are captured. Captured images always use the highest quality algorithms to process the raw data from the camera into full color images.
3.6.3 Preview Zoom Level The preview window can be set to “Actual Size (100%)”, which will display the full field of view at its actual size. Selecting “Half Size (50%)” will shrink the display 50% in each direction while maintaining the full field of view. This option is useful when previewing large resolutions that are larger than the monitor’s display size.
3.6.4 Generate Flat Field Correction Flat Field Correction is used to correct for uneven lighting and other fixed pattern non-uniformity in the image. This action is used to generate the correction to be applied to the image. Before selecting it, you should make all your imaging adjustments (exposure, gain, etc.) and then remove any sample from the field of view so that you only have an empty “background” image. Once the correction is generated, it can be applied using the next action.
3.6.5 Enable Flat Field Correction This action applies the flat field correction that was generated in the previous action. When enabled, the correction will be automatically applied to both the live preview and the captured image. If you change the resolution of the preview, the correction will be reset and disabled. If you change the field of view, by selecting a different objective lens, for example, you should re-generate the correction for the new field of view.
3.6.6 Image Flipping
Image flipping (vertical) and mirroring (horizontal) are available from the Options drop down menu or the left-right, up-down arrow icons on the toolbar. Selecting these options will flip the preview image 180° either vertically or horizontally. This option also affects the captured image.
3.6.7 Multiple Image Averaging This feature is accessed through the Options drop down menu. Image averaging is an effective tool to reduce random noise in your images. To enable this feature, you select the Multiple Image Averaging option from the Options Menu. You can change the number of images that are averaged together using the Multiple Image Settings Dialog, which is accessed by selecting the Multiple Image Settings option in the Options menu.

Lumenera Scientific Infinity Camera User’s Manual Release 3.3
Page 18 Copyright 2004
When enabled, every time you capture an image the number of images you selected will automatically be collected and averaged together. This feature is not supported by the Infinity X when capturing high-resolution (DeltaVU™) images.
3.6.8 Preview Histogram
A real-time intensity histogram can be overlaid on the preview window. This histogram can be used as a guide to setting the image properties such that the full dynamic range of the image sensor is being utilized. To display the preview histogram, select Preview Histogram from the drop down Options Menu or select the histogram icon from the toolbar.
3.6.9 Highlight Saturated Pixels This option allows you to highlight the pixels in the image that are at or near saturation. Saturation in this case refers to the brightness of the pixel. Starting at a value of 240 (out of 255) the pixels will be changed to light red and as they get closer to their saturated value of 255 will get progressively darker red. In the case of a monochrome camera, the pixels will turn black, not red.
3.6.10 Load Overlay Bitmap Any arbitrary bitmap can be overlaid on the live preview display or captured image. A set of digital reticles is included with the application that can be used for measurements or to aid object indexing and alignment. Once the bitmap is loaded, you select from the Options Menu to overlay on the preview image and/or the captured image. You can also create your own bitmaps to overlay, using any paint program. The bitmap must have a width that is evenly divisible by four and must be in RGB24 format, but other than that, there are no restrictions. Any part of the bitmap that is pure white (RGB = 255, 255, 255) will be transparent with any other color overlaying and replacing the image data. If the bitmap is smaller than the image display resolution, the bitmap will be placed in the upper left corner of the image. If either of the width or height of the bitmap is larger than the image display resolution, the bitmap will be centered. Currently, overlays are not supported for monochrome cameras.
3.6.11 Load Alpha Blending Bitmap An alpha blending bitmap can be used whenever an overlay bitmap is being used. This bitmap affects the way the overlay bitmap is actually overlaid. It is often undesirable to have the bitmap completely obscure the image data. The
Lumenera Scientific Infinity Camera Release 3.3 User’s Manual
Copyright 2004 Page 19
alpha blending bitmap will cause the overlay to blend with the image data making it less obtrusive. It can also be used to make a solid bitmap, like a logo for example, into a watermark that can be used to tag images without hiding the image underneath it. The alpha bitmap has the same restrictions as the overlay bitmap, and must be the same size as the overlay bitmap. The way it works is as follows: The value of each pixel in the alpha bitmap indicates the level of transparency of the pixel at the same location in the overlay bitmap. Pixels that have a value of 255 are treated as completely transparent so that only the pixel from the original image is used. Pixels that have a value of zero are treated as completely opaque so that only the pixel from the overlay bitmap is used. The transparencies of the pixels in-between vary linearly with their value. The blending is done independently for each of the three color-channels (R, G & B), which allows for some interesting effects, such as changing the color of the overlay, not just blending it with the image. The reticles bitmaps included with the application can be used as their own alpha blending bitmaps. If you use any one of the gray reticles, they will simply blend the colored reticles into the image to varying degrees. The dark gray will blend a little bit, the gray will blend half and half and the light gray will blend a lot. For interesting effects, try experimenting with using the color reticles as alpha bitmaps. Currently, overlays are not supported for monochrome cameras.
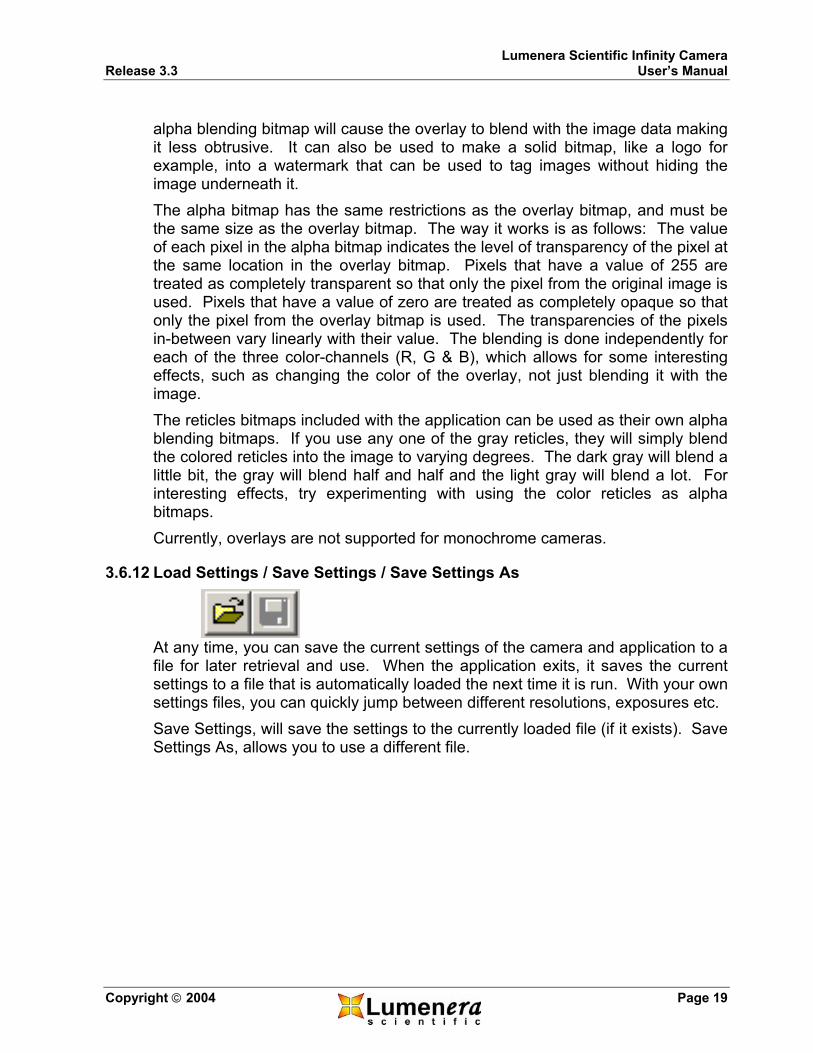
3.6.12 Load Settings / Save Settings / Save Settings As
At any time, you can save the current settings of the camera and application to a file for later retrieval and use. When the application exits, it saves the current settings to a file that is automatically loaded the next time it is run. With your own settings files, you can quickly jump between different resolutions, exposures etc. Save Settings, will save the settings to the currently loaded file (if it exists). Save Settings As, allows you to use a different file.
Lumenera Scientific Infinity Camera User’s Manual Release 3.3
Page 20 Copyright 2004
3.7 Using Infinity Cameras with TWAIN
Many programs support camera control and image capture directly using the standard TWAIN protocol. Paint programs, Microsoft Office applications as well as a wide variety of scientific software applications identify and run the Infinity cameras through the supplied TWAIN interface. The operation of the TWAIN interface is virtually identical to the Infinity Capture application. The only difference is that when you capture an image, instead of displaying in on screen, it passes it to the underlying TWAIN enabled application. There is no facility to save images directly using the TWAIN interface.