lvm new features in hp-ux 11i...
TRANSCRIPT
1
11i v3 LVM New Features in HP-UX
Abstract ........................................................................................................................................................................................................................................................................................................................................
3 4 4 4 4 8 8 9
........................ 9
........................ 9
...................... 10
...................... 10
...................... 14
...................... 14
...................... 15
...................... 16
...................... 16
...................... 16
...................... 17
...................... 17
...................... 17
...................... 18
...................... 18
...................... 19
...................... 19
...................... 19
...................... 20
...................... 20 pvdisplay – Displays user data offset and checks if disk is under HP-UX LVM control...................................... 21 vgscan - Scans Faster, Per Volume Group Scanning and Supports Persistent DSF .......................................... 22 vgcfgrestore – Enhanced Listing of Backup File Contents ................................................................................ 25 Error Management Technology (EMT).............................................................................................................. 26 Long Host Name Support for Display Commands............................................................................................. 26 lvmadm Command ........................................................................................................................................... 27 vgremove – Removal of Volume Group Device Files ........................................................................................ 28 vgdisplay – Displays More Information ............................................................................................................ 28
New functionality ........................................................................................................................ of Mass StorageSupport for Agile View .....................................................................................
Multipathing and Alternate Links (PVlinks) .................................................................................Dynamic LUN Expansion (DLE) ..................................................................................................Modification of Volume Group Settings ......................................................................................Modification of Physical Volume Type (Boot/Non-Boot) .............................................................SLVM Online Reconfiguration .....................................................................................................LVM Device Online Replacement (OLR)......................................................................................Volume Group Quiesce and Resume ..........................................................................................Boot Resiliency ...........................................................................................................................Striped and Mirrored Logical Volumes ........................................................................................Better Coexistence with Other Disk Users ..................................................................................Better Utilization of Disk Space – No Bad Block Reserve Area ...................................................Elimination of maxvgs Tunable ................................................................................................ ..Proactive Polling of Alternate links .............................................................................................Version 2.x Volume Groups ........................................................................................................Boot Disk Configuration Self Healing ..........................................................................................
Performance Improvements ......................................................................................................Mirror Write Cache (MWC) Enhancements .................................................................................LVM Support for Large I/O Sizes ................................................................................................Parallel Resynchronization of Stale Extents ................................................................................Parallel Open of Physical Volumes..............................................................................................
Increased Limits ..........................................................................................................................Maximum Logical Volume Size Increased up to 16TB ................................................................Increased Limits for Version 2.x Volume Groups........................................................................
Usability Enhancements .............................................................................................................Compact, Parsable Command Output ........................................................................................
2
...................... 30
...................... 30
...................... 32
...................... 32
...................... 32
...................... 33
...................... 35 Call to Action...................................................................................................................................................... 35
Auto Creation of Volume Group File ...........................................................................................pvmove Enhancements ..............................................................................................................
Miscellaneous...............................................................................................................................Commands enhanced to prevent misconfigurations through alternate links ..............................Mirror Disk Installation No Longer Requires a Reboot................................................................
Glossary ........................................................................................................................................For More Information .................................................................................................................
3
Abstract d availability
007, there have been three updates of HP-UX 11i v3:September 2007, March 2008, and September 2008. This whitepaper lists
Some features have their own whitepaper; this document only summarizes them. For more information, see the
In HP-UX 11i v3 (11 .31), LVM delivers significant performance, scalability, usability, anenhancements. After the initial release of HP-UX 11i v3 in February 2
all the new LVM features in the initial release and the three updates of HP-UX 11i v3.
referenced documents in the For More Information section. Other features are presented in moincluding their use and
re detail, benefits.
The document is intended for system administrators, operators, and customers who want to use and know about new LVM features in HP-UX 11i v3.
4
y
le view. In this nk) information. The
s to it. The legacy continues to exist. You can use both the DSF types to access a given
r more information, see the The Next
New functionalit
Support for Agile View of Mass Storage
HP-UX 11i v3 introduces a new representation of mass storage devices called the agirepresentation, the device special file (DSF) name for each disk no longer contains path (or limultipathed disk has a single persistent DSF regardless of the number of physical pathview, represented by the legacy DSF, mass storage device independently and both can coexist on a system. FoGeneration Mass Storage Stack whitepaper.
configuration commands support both DSF naming models.
ombination of
HP recommends the use of persistent DSFs for LVM configurations and encourages configuring new volume e all the capabilities of the new mass storage stack, HP recommends
migrating volume groups from legacy DSFs to persistent DSFs. HP provides /usr/contrib/bin/vgdsf to ore information, see the
Wherever applicable, LVM
LVM enables you to configure volume groups with all persistent DSFs, all legacy DSFs, or a cpersistent DSFs and legacy DSFs.
groups using persistent DSFs. To fully utiliz
facilitate this migration. The script works for both root and non-root volume groups. For mLVM Migration from Legacy to Agile Naming Model whitepaper.
Multipathing and Alternate Links (PVlinks)
mass storage stack. istent DSF for each mass storage device regardless of the number of
e transparent
Management of multipathed devices is available outside of LVM using the next generationAgile addressing creates a single pershardware paths to the disk. The mass storage stack in HP-UX 11i v3 uses that agility to providmultipathing. For more information, see the The Next Generation Mass Storage Stack whitepaper.
ty is now redundant, but this functionality is still supported with legacy they did in previous releases when the mass storage stack native multipathing
feature is disabled with the scsimgr command.
the use of persistent sf script, vgscan -N command, or vgimport -s -N commands perform this
conversion. For more information, see the LVM Migration from Legacy to Agile Naming Model
The LVM Alternate Link functionaliDSFs. Alternate links behave as
HP recommends converting volume groups with alternate links to use native multipathing by DSFs. The /usr/contrib/bin/vgd
whitepaper.
Some disk arrays allow the dynamic resizing of their LUNs. With HP-UX 11i v3, LVM detects and handles physical for Version 1.0
VM supports, see the
Dynamic LUN Expansion (DLE)
volume size changes on invocation of the vgmodify command. This command is supportedvolume groups only. For more information on different versions of volume groups that L“Version 2.x Volume Groups” section.
vgmodify(1M)
The vgmodify command provides a method to alter the attributes of a physical volume and volume group after pvcreate and vgcreate operations, respectively. You must run the vgmodify command to update the LVM configuration to reflect any change to the physical volume size.
Prior to September 2008 release of HP-UX 11i v3, you can alter the attributes of a physical volume or a volume group using the vgmodify command only when the volume group is deactivated. Starting with the September 2008 release of HP-UX 11i v3, LVM supports handling dynamic LUN expansion of physical volumes using the vgmodify command when the volume group is active. This is referred to as online DLE. To support online DLE,
5
LVM introduces two new options: -a (to indicate an online operation) and -E (to handle a DLE operation
information, see vgmodify(1M) and the - LVM Volume Group Dynamic LUN expansion (DLE)/vgmodify
explicitly).
For more
as enhanced in the February 2007 release of HP-UX 11i v3 to allow relocation of just the pand the LVM’s on-
the existing allocation policy of a logical volume containing the extent that is considered for relocation.
For more information, see pvmove(1M)
t to any free extent within the same physical volume, enter:
t to any free extent in the volume group, enter: :0
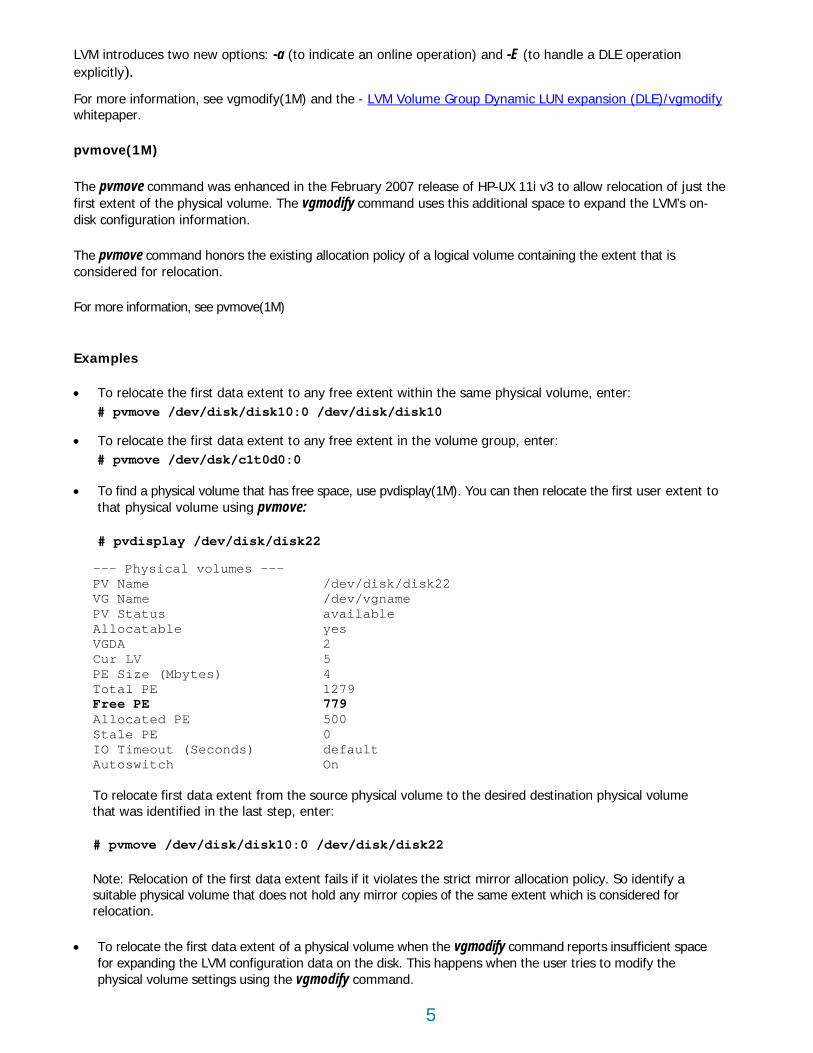
a physical volume that vdisplay(1M). You can then relocate the first user extent to sical volume using p
/dev/disk/disk22 /dev/vgname available
VGDA 2
4
meout (Seconds) default Autoswitch On
ation physical volume
# pvmove /dev/disk/disk10:0 /dev/disk/disk22
Note: Relocation of the first data extent fails if it violates the strict mirror allocation policy. So identify a suitable physical volume that does not hold any mirror copies of the same extent which is considered for relocation.
• To relocate the first data extent of a physical volume when the vgmodify command reports insufficient space for expanding the LVM configuration data on the disk. This happens when the user tries to modify the physical volume settings using the vgmodify command.
whitepaper.
pvmove(1M)
The pvmove command wfirst extent of the physical volume. The vgmodify command uses this additional space to exdisk configuration information.
The pvmove command honors
Examples
• To relocate the first data exten # pvmove /dev/disk/disk10:0 /dev/disk/disk10
• To relocate the first data exten # 0d0 pvmove /dev/dsk/c1t
• To find has free space, use pthat phy vmove:
# pv /ddisplay /dev/disk isk22
--- Physical volumes --- PV Name
e VG NamPV Status Allocatable yes
Cur LV 5 PE Size (Mbytes) Total PE 1279 Free PE 779 Allocated PE 500 Stale PE 0 IO Ti
To relocate first data extent from the source physical volume to the desired destinthat was identified in the last step, enter:
6
as follows:
abase roups ---
v/vgdatabase e Access
atus available V 255 V 1
1 16
1 per PV 2559
2 (Mbytes) 4
2559 10 2549
T T in use 0
al volumes -ame /dev/vgtest/lvol1
LV Status available/syncd
t LE ed PE 0
V 1
atus available Total PE 2559
2549 On
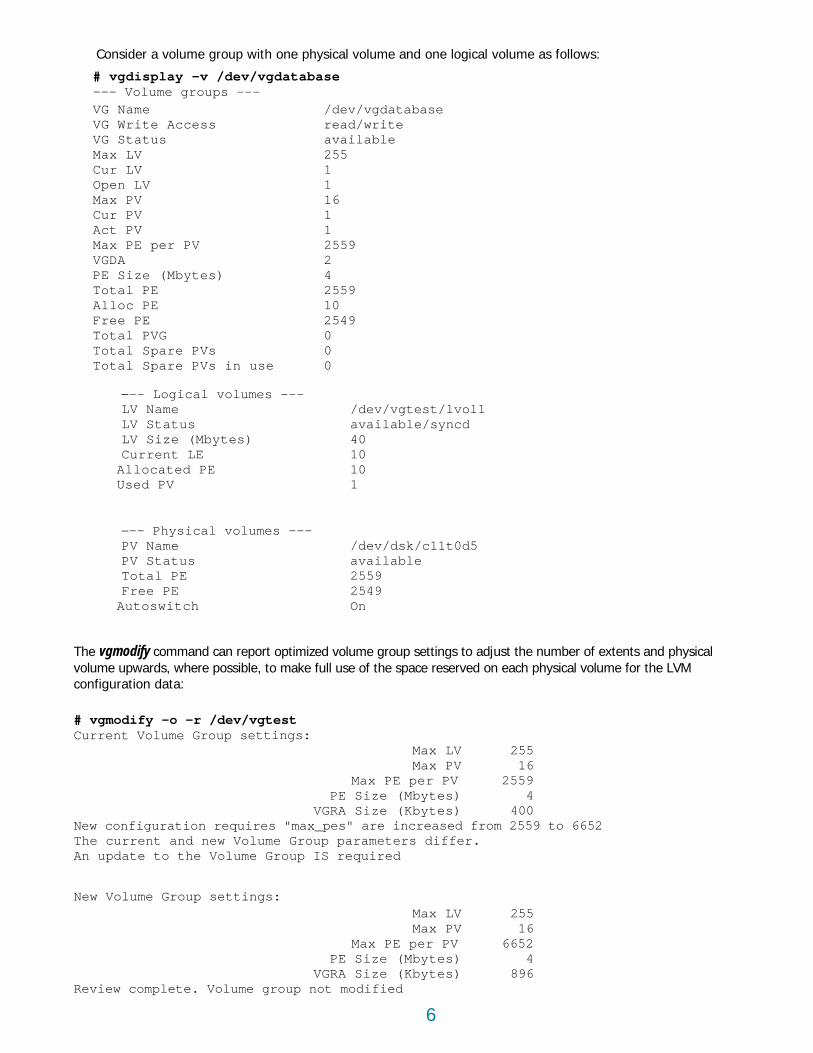
The vgmodify command can report up s to adjust the number of extents and physical volume upwards, where possible spac rved on each physical volume for the LVM
ettings:
V 2559 Mb ) 4
) 400 " are increased from 2559 to 6652
The current and new Volume Group parameters differ. An update to the Volume Group IS required
New Volume Group settings: Max LV 255 Max PV 16
Max PE per PV 6652 PE Size (Mbytes) 4
VGRA Size (Kbytes) 896 Review complete. Volume group not modified
Consider a volume group with on
# vgdisplay -v /dev/vgdat
e physical volume and one logical volume
--- Volume g eVG Name /d
read/write VG WritVG StMax LCur LOpen LVMax PV Cur PV 1 Act PV Max PEVGDA PE SizeTotal PE Alloc PE Free PE
G Total PV 0 otal Spare P 0 Vs
e PVs otal Spar
−-- --LV N
Logic
LV Size (Mbytes) 40 0 Curren 1
t 1AllocaPUsed
−-- Physical volumes --- PV Name /dev/dsk/c11t0d5 PV St
Free PE Autoswitch
optimized volume gro ing sett, to make full use of the e rese
configuration data:
# vgmodify -o -r /dev/vgtest Current Volume Group s Max LV 255 Max PV 16
Max PE per PPE Size ( ytes
VGRA Size (KbytesNew configuration requires "max_pes

7
value of “Max PV” figuration data), it
ify command to check atively, you can relocate
the “Max PV” value without mmand.
aximum physical volume setting in the volume group to a value greater than 16
st
Current Volume Group setLV 255 PV 16
Max PE per PV 2559
VGRA Size (Kbytes) 400 only be completed if PE number zero on
freed
st data extent. Use the pvmove command to s follows:
up
0d5:0 me "/dev/vgtest/lvol1"...
uccessfully moved. n for /dev/vgtest has been saved in
ccessfully changed.
PE V 2559 ) 4 400 r.
New Volume Group settings: Max LV 255 Max PV 64 Max PE per PV 2559 PE Size (Mbytes) 4 VGRA Size (Kbytes) 1488 New Volume Group configuration for "vgtest" has been saved in "/etc/lvmconf/vgtest.conf" Old Volume Group configuration for "vgtest" has been saved in "/etc/lvmconf/vgtest.conf.old"
The previous output shows that you can change the “Max PE per PV” value to 6652 with theretained at 16. To increase the value of “Max PV” (with the current available space for LVM conmight be necessary to reduce the value of “Max PE per PV”. Use the –t option of the vgmodif the “Max PV” value can be increased by changing the value of “Max PE per PV”. Alternthe first data extent to create more space for LVM configuration data and increase reducing the “Max PE per PV” value. To achieve this, use the –n option of the vgmodify co Any attempt to increase the mresults in a failure as follows:
# vgchange -a n /dev/vgteVolume group "vgtest" has been successfully changed.
# vgmodify -n -p 64 /dev/vgtest t
ings:
Max Max PE Size (Mbytes) 4 vgmodify: This operation can"/dev/rdsk/c11t0d5" is
Note that the last output message indicates you must free the firrelocate the first data extent a
# vgchange -a y /dev/vgtest Activated volume groVolume group "/dev/vgtest" has been successfully changed.
# pvmove /dev/dsk/c11tTransferring logical extents of logical volu
k/c11t0d5" has been sPhysical volume "/dev/dsVolume Group configuratio/etc/lvmconf/vgtest.conf
Use the vgmodify command to increa ph volume setting. This time it succeeds: se the maximum ysical
# vgchange -a n /dev/vgtest Volume group "vgtest" has been su
# vgmodify -n -p 64 /dev/vgtest Current Volume Group settings: Max LV 255 Max PV 16
Max r PpePE Size byte (M s
VGRA Size (Kbytes)The current and new Volume Group parameters diffeAn update to the Volume Group IS required
8
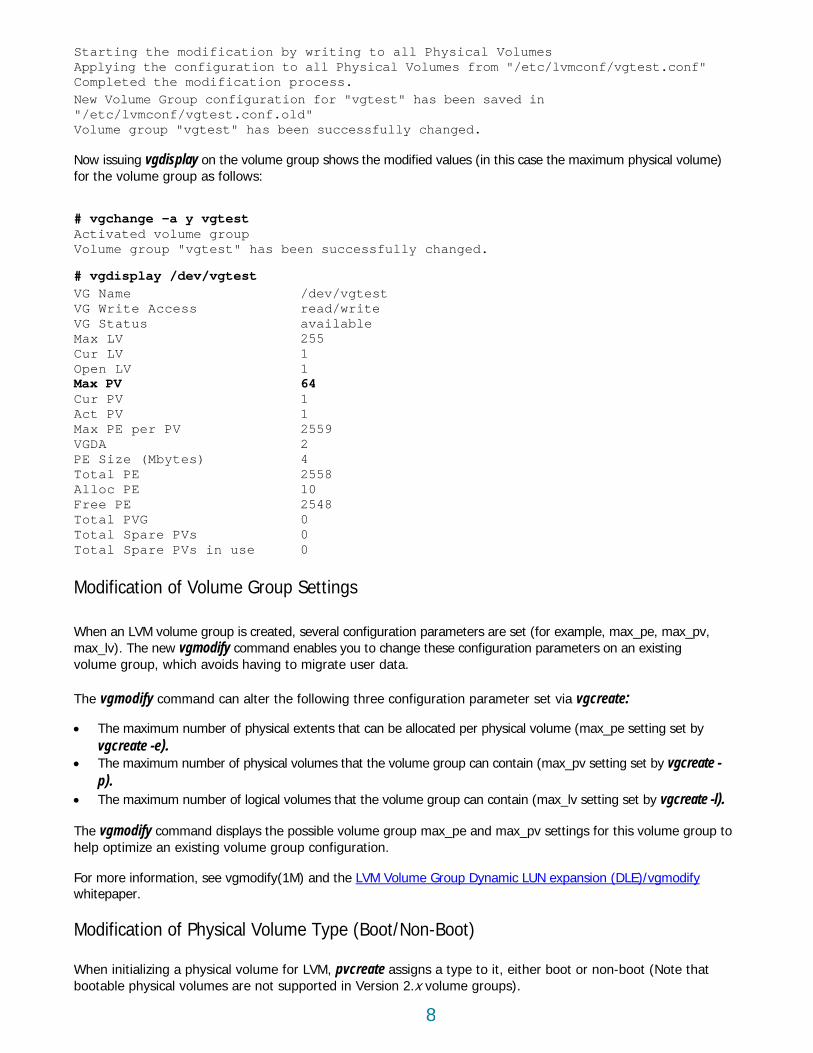
Starting the modification by writing to all Physical Volumes Applying the configuration to all Physical Volumes from "/etc/lvmconf/vgtest.conf"
has been saved in
Now issuing vgdisplay on the volume group shows the modified values (in this case the maximum physical volume) follows:
est
"vgtest" uccessfully changed.
e /dev/vgtest te Access read/write
atus available 255
64 1 1
V 2559 2 4 2558 10
Free PE 2548
Modification of Volume Group Settings
max_pe, max_pv, on an existing
ing three configuration parameter set via vgcreate:
ax_pe setting set by vgcreate -e).
lume group can contain (max_pv setting set by vgcreate - p).
tting set by vgcreate -l).
The vgmodify command displays the possible volume group max_pe and max_pv settings for this volume group to help optimize an existing volume group configuration.
For more information, see vgmodify(1M) and the LVM Volume Group Dynamic LUN expansion (DLE)/vgmodify
Completed the modification process. New Volume Group configuration for "vgtest""/etc/lvmconf/vgtest.conf.old" Volume group "vgtest" has been successfully changed.
for the volume group as
# vgchange -a y vgtActivated volume group
sVolume group has been
# vgdisplay /dev/vgtest VG Nam
riVG WVG StMax LV Cur LV 1
1 Open LV Max PV
Cur PV Act PV Max PE per PVGDA PE Size (Mbytes) Total PE Alloc PE
Total PVG 0 Total Spare PVs 0 Total Spare PVs in use 0
When an LVM volume group is created, several configuration parameters are set (for example,max_lv). The new vgmodify command enables you to change these configuration parametersvolume group, which avoids having to migrate user data.
The vgmodify command can alter the follow
• The maximum number of physical extents that can be allocated per physical volume (m
• The maximum number of physical volumes that the vo
• The maximum number of logical volumes that the volume group can contain (max_lv se
whitepaper.
Modification of Physical Volume Type (Boot/Non-Boot)
When initializing a physical volume for LVM, pvcreate assigns a type to it, either boot or non-boot (Note that bootable physical volumes are not supported in Version 2.x volume groups).

9
boot or vice versa.
pvcreate(1M) for the -B option. Also see the LVM Volume Group Dynamic LUN expansion
The vgmodify command enables you to change a physical volume type from boot to non-
See vgmodify(1M) and (DLE)/vgmodify whitepaper.
g a physical volume non-bootable increases the space available on that device for LVM configuration data. However, to take advantage of the additional space, you must mark every disk in a volume
Starting with the HP-UX 11i v3 September 2009 release, you can change the configuration of an active shared s stay available on all
nge -x option, the SLVM SNOR feature to change
the configuration of a shared volume group, while keeping it active only on a single node. Using this procedure, in available during the volume group reconfiguration.
(OLR) feature provides the following new methods for replacing or isolating path
s to a physical replacing disks in an active
ire deactivating the volume group, modifying the volume group
gnostics against them.
sing pvchange -a N command, in order to perform an online disk replacement, is still supported. The behavior is the same for both legacy and
ith previous releases.
roup, the pvchange - a , use the scsimgr
sical volume paths. For more information, see scsimgr(1M).
Note that makin
group non-bootable.
SLVM Online Reconfiguration
volume group in a cluster without deactivating the volume group on any node. Applicationnodes sharing the volume group. This applies to Version 2.1 and higher volume groups.
For Version 1.0 and 2.0 volume groups, you can use the vgcha
applications on at least one node rema
For more information, see the SLVM Online Reconfiguration whitepaper.
LVM Device Online Replacement (OLR)
The LVM Online Disk Replacement components or LVM disks within an active volume group:
• Using -n and -N options with pvchange command, you can detach a specific path or all pathvolume, respectively. LVM OLR enables you to follow a simpler procedure for volume group. The procedure does not requconfiguration, or moving any user data.
• Using LVM OLR, you can easily isolate troublesome paths or disks to allow running dia
In HP-UX 11i v3, the option of detaching an entire physical volume u
persistent DSFs and is compatible w
Unless native multipathing is disabled and only legacy DSFs are configured for the volume gn command does not stop I/O operations for that path as they did in earlier releases. Insteadcommand with the disable option to disable phy
For more information, see the LVM Online Disk Replacement (LVM OLR) whitepaper.
Volume Group Quiesce and Resume
The LVM volume group Quiesce/Resume feature allows quiescing I/O operations to the disks in a volume group to facilitate creating a consistent snapshot of an otherwise active volume group for backup purposes. This feature works with backup management and disk array management software to enable them to create a consistent snapshot of the disks that make up an LVM volume group.
The Quiesce/Resume feature prevents the disk images from changing and allows a snapshot of the disks to be taken without having to unmount or close the open logical volumes and deactivate the volume group.
The vgchange command provides new options -Q and -R to allow quiescing the volume group prior to creating a snapshot and to resume the volume group afterward. Optionally, both reads and writes or just writes to the volume group can be quiesced.
10
For more information, see the LVM Volume Group Quiesce/Resume whitepaper.
Boot Resiliency
Root volume group scanning is a new LVM feature in HP-UX 11i v3. The feature can prevent boot failures that can
n information is incorrect or out-s are:
• The root volume group is configured using legacy DSFs representing the devices in a Storage Area
ch situations; LVM now scans all the disks to identify the ones belonging to the root volume group and retries activation. If the activation succeeds, it is
ut of sync with the river prints a warning :
“LV activation required a scan. The PV information in the on-disk BDRA from the system's current IO configuration. To update the
ate the on-disk
root VG name is /dev/vg00:
ot volume group are not available but the quorum is met, no root volume group scan is performed. Also, during a single user mode boot with -is or maintenance mode boot with -lm, root
Note: This feature is enhanced further in the September 2008 release of HP-UX 11i v3. For more information, nfiguration Self Healing
occur on prior HP-UX releases.
During boot, the root volume group activation can fail if the LVM boot configuratioauseof-date with the systems current I/O configuration. Two possible c
Network(SAN) and the SAN is reconfigured such that DSFs of the devices changed. • The root disk is relocated to a different slot such that the DSF name changes.
With the new root volume group scanning, LVM automatically handles su
likely that the LVM in-memory boot configuration information for the root volume group is oDSF in the /etc/lvmtab for the root volume group. To assist recovery in this case, the LVM dmessage to the console and logs into /var/adm/syslog/syslog.log to the effect as follows
M: WARNING: Root VG may be out-of-date
on-disk BDRA, first update /etc/lvmtab using vgscan(1M), then updBDRA using lvlnboot(1M). For example, if the
vgscan -k -f /dev/vg00 lvlnboot -R /dev/vg00”
In case some physical volumes in the ro
volume group scanning is skipped.
see the “Boot Disk Co ” section.
an the t possible stripe size).
monly referred to as striping, refers to the segmentation of logical sequences of data across disks. RAID 1, commonly referred to as mirroring, refers to creating exact copies of logical sequences of data. When implemented in a device hardware, RAID 10 (or RAID 1+0) and RAID 01 (or RAID 0+1) are nested RAID levels. The difference between RAID 0+1 and RAID 1+0 is the location of each RAID system — RAID 0+1 is a mirror of stripes whereas RAID 1+0 is a stripe of mirrors. Figure 1 shows the RAID 10 and RAID 01 configurations (A1, A2...Ax are stripe chunks of a logical volume).
With a hardware-based RAID 10 configuration, I/O operations are striped first then each strip is mirrored. With hardware-based RAID 01, I/Os are mirrored first then striped. RAID 10 and RAID 01 can have the same physical disk layout.
Striped and Mirrored Logical Volumes
HP-UX LVM now introduces support for striped and mirrored logical volumes at a smaller granularity thextent size (4KB is the smalles
RAID 1+0 and RAID 0+1
RAID 0, com

Figure 1: RAID 1+0 and RAID 0+1
The advantages of hardware-based RAID 10 over RAID 01:
11
• When one disk fails and is replaced, only the amount of data on this disk needs to be copied or re-
before data becomes unavailable.
The advantages of hardware-based RAID 01 over RAID 10:
ecause it does not ut processes them simultaneously. Typically with hardware solutions, you create a LUN with
a RAID level and the RAID functions are stacked. LVM provides more flexibility on how logical volumes are
stripe width multiplied by the d striped across two disks, extents of a single set are irrored to obtain the data
irroring in LVM combines the advantages of the hardware implementation of RAID 1+0 and RAID 0+1, and provides the following benefits:
• Better write performance. Write operations take place in parallel and each physical write operation is directed to a different physical volume.
• Excellent performance for read. Even in the case where several disks are out of service, the read of a stripe can be done in parallel on different physical volumes with one I/O operation per physical volume.
• High availability of data. With multiple copies of the user data residing on different physical volumes, LVM avoids single point of failure ensuring high availability.
Configuration
synchronized. • RAID 10 is more tolerant to multiple disk failures
• Simpler to configure striped volumes and then extend mirroring. • Able to split the mirror copy and have two usable volume sets.
LVM Implementation of RAID levels in HP-UX
LVM implementation of RAID management is different from the hardware based solutions bnest the RAID levels, b
created amongst a set of disks as compared to hardware solutions.
LVM allocates the physical extents for striped and mirrored logical volumes in sets ofnumber of copies of the data. For example, if the logical volume is 1-way mirrored anextents are allocated to the logical volume, four at a time. LVM enforces that the physicalfrom different physical volumes. Within this set, the logical extents are stripped and mlayout displayed in Figure 1.
Striping and m
12
irror to) an existing ing can be directed to
are based RAID g the striping and mirroring processing, which allows LVM to provide the best of both
RAID 10 and RAID 01.
size and stripe width you to create a
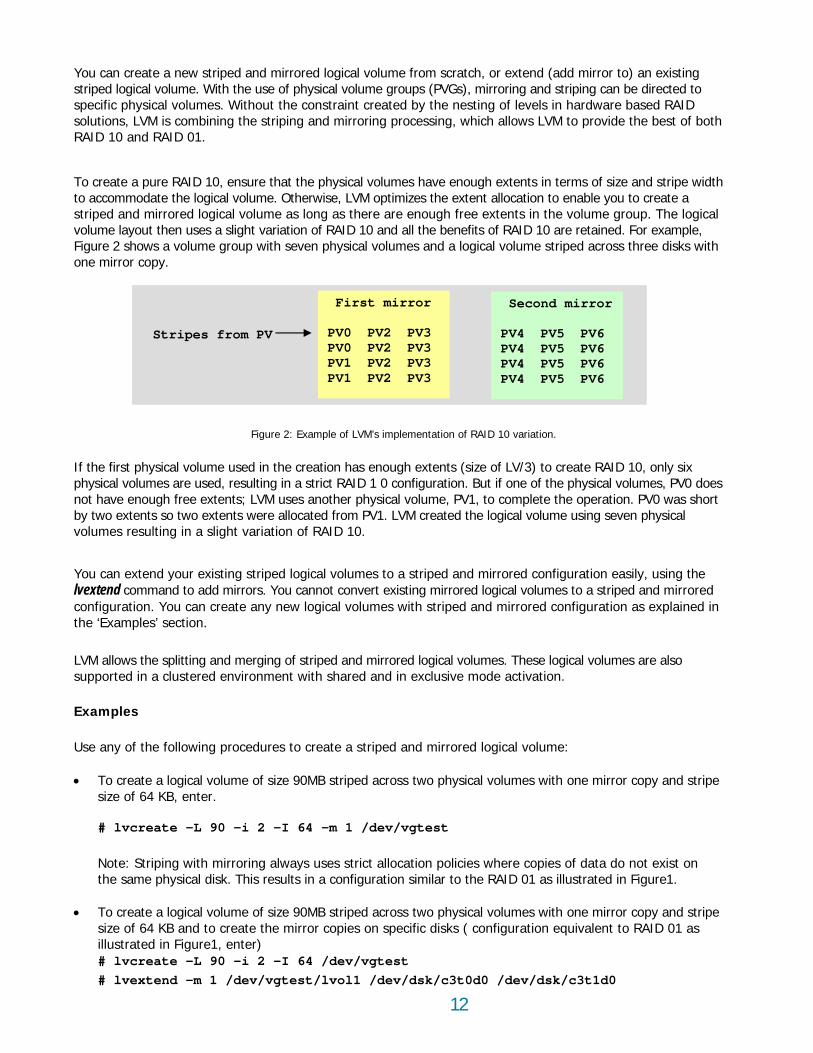
irrored logical volume as long as there are enough free extents in the volume group. The logical volu layout then uses a slight variation of RAID 10 and all the benefits of RAID 10 are retained. For example, Figure 2 shows a volume group with seven physical volumes and a logical volume striped across three disks with one mirror copy.
RAID 10, only six al volumes, PV0 does ation. PV0 was short
two extents were allocated from PV1. LVM created the logical volume using seven physical volumes resulting in a slight variation of RAID 10.
You can extend your existing striped logical volumes to a striped and mirrored configuration easily, using the command to add mirrors. You cannot convert existing mirrored logical volumes to a striped and mirrored
configuration as explained in
ing and merging of striped and mirrored logical volumes. These logical volumes are also s d in exclusive mode activation.
E
d across two physical volumes with one mirror copy and stripe
# lvcreate -L 90 -i 2 -I 64 -m 1 /dev/vgtest
Note: Striping with mirroring always uses strict allocation policies where copies of data do not exist on the same physical disk. This results in a configuration similar to the RAID 01 as illustrated in Figure1.
• To create a logical volume of size 90MB striped across two physical volumes with one mirror copy and stripe size of 64 KB and to create the mirror copies on specific disks ( configuration equivalent to RAID 01 as illustrated in Figure1, enter) # lvcreate -L 90 -i 2 -I 64 /dev/vgtest # lvextend -m 1 /dev/vgtest/lvol1 /dev/dsk/c3t0d0 /dev/dsk/c3t1d0
You can create a new striped and mirrored logical volume from scratch, or extend (add mstriped logical volume. With the use of physical volume groups (PVGs), mirroring and stripspecific physical volumes. Without the constraint created by the nesting of levels in hardwsolutions, LVM is combinin
To create a pure RAID 10, ensure that the physical volumes have enough extents in terms ofto accommodate the logical volume. Otherwise, LVM optimizes the extent allocation to enablestriped and m
me
Figure 2: Example of LVM’s implementation of RAID 10 variation.
First mirror
PV0 PV2 PV3 PV0 PV2 PV3
Second
PV1 PV2 PV3 PV1 PV2 PV3
mirror
PV4 PV5 PV6 PV4 PV5 PV6 PV4 PV5 PV6
PV6
Stripes from PV
PV4 PV5
If the first physical volume used in the creation has enough extents (size of LV/3) to createphysical volumes are used, resulting in a strict RAID 1 0 configuration. But if one of the physicnot have enough free extents; LVM uses another physical volume, PV1, to complete the operby two extents so
lvextendconfiguration. You can create any new logical volumes with striped and mirrored the ‘Examples’ section.
LVM allows the splittupported in a clustered environment with shared an
xamples
Use any of the following procedures to create a striped and mirrored logical volume:
• To create a logical volume of size 90MB stripesize of 64 KB, enter.

13
mpvg test
0d0 1d0
e has the striped property as shown by the lvdisplay output:
l volumes -/dev/vgtest/lvol1
read/write available/syncd
striped 1024 256
64 on
IO Timeout (Seconds) default
onfiguration, extend the logical volume as follows:
v/vgtest/lvol1
e volume group physical volumes and extents to accommodate the mirror copy.
put sho e logical volume is striped and mirrored:
dev/vgtes l1
lvol1 /dev/vgtest read/write available/syncd
Mirror copies 1 Consistency Recovery MWC Schedule striped LV Size (Mbytes) 1024 Current LE 256 Allocated PE 256 Stripes 2 Stripe Size (Kbytes) 64 Bad block on Allocation strict IO Timeout (Seconds) default
Contents of /etc/lvVG /dev/vgPVG PVG0 /dev/dsk/c2t/dev/dsk/c2tPVG PVG1 /dev/dsk/c3t0d0 /dev/dsk/c3t1d0
• Adding a mirror to existing striped logical volumes.
The existing logical volum
# lvdisplay /dev/vgtest/lvol1
−-- Logica -- LV Name VG Name /dev/vgtest LV PermissionLV StatusMirror copies 0
overy MWC Consistency Rece Schedul
LV Size (Mbytes) Current LE Allocated PE 256 Stripes 2 Stripe Size (Kbytes) Bad block Allocation strict
To get a striped and mirrored c
# lvextend -m 1 /de
Note that th must have enough
Now the lvdisplay out ws th
# lvdisplay / t/lvo
−-- Logical volumes --- /dev/vgtest/LV Name
VG NameLV Permission LV Status
14
ot support combination g and striping is
ed on HP-UX 11i v3, attempts to import or activate its associated volume group fails on a previous HP-UX
To import the volume group with striped and mirrored logical volume to releases prior to HP-UX 11i v3, you must
iped and mirrored logical volume is supported on HP-UX 11i v2 with the PHCO_36744, PHKL_36745 tches or superseding patches installed on a HP-UX 11i v2 system, volume group with striped and mirrored logical volume created on
HP-UX 11i v3.
Other Disk Users
s. The LVM commands pvcreate and vgcfgrestore now check if their target
nmark a LVM disk. This is facilitated by the pvremove command. For more ion, see the pvremove(1M) man page.
the disk, overwriting any other scripts or during initializing a
command.
isk – If the disk /dev/dsk/c3t1d1 is marked for use by Oracle ASM, an ngs to some other subsystem as follows:
pvcreate: Could not perform LVM operation on Oracle ASM disk "/dev/rdsk/c3t1d1"
e command as follows:
sk/disk26
removed.
Software bad block relocation refers to capability of LVM to handle I/O errors on disk blocks that are bad. In previous releases of HP-UX, when a media failure occurs (detection of a bad block of data on disk), LVM marks the failed block in the Bad Block Directory and attempts to relocate the block to a new location in the Bad Block Reserve Area(BBRA) on the disk.
The BBRA was created when the disk was initialized using the pvcreate command.
All modern disks now offer hardware based bad sector relocation and do not trigger the LVM software relocation. With HP-UX 11i v3, LVM does not reserve a BBRA at the end of disk to allocate more space for user data.
Compatibility Note
Releases prior to HP-UX 11i v3 only support striped or mirrored logical volumes and do nof striped and mirrored logical volumes. If a logical volume using simultaneous mirrorincreatrelease.
remove the incompatible logical volumes or reduce them to no mirrors.
NOTE: Strand PHCO_36746 patches. With these payou can successfully import and activate a
Better Coexistence with
LVM coexists better with other disk userdevice is in use by other subsystems.
LVM has a provision to disown or uinformat
Note: pvcreate with the force option -f overrides this check and takes ownership ofsubsystems data. HP recommends NOT using the -f option by default in any of yourphysical volume using pvcreate
Example
Coexistence with Oracle ASM dinitialization operation on this disk identifies that the disk belo
# pvcreate /dev/rdsk/c3t1d1
To disown or unmark an LVM disk that is not part of any volume group, use the pvremov
# pvremove /dev/rdi
The physical volume associated with "/dev/rdisk/disk26" has been
Better Utilization of Disk Space – No Bad Block Reserve Area
15
block directory. For has bad blocks relocated
a HP-UX 11i v3 release, LVM continues to support this e relocated blocks from the BBRA.
256, which could be e system. With HP-UX 11i v3 release, the maxvgs tunable was removed. Users can
now create up to 256 Version 1.0 volume groups and 2048 Version 2.x volume groups (the combined number of g setting this kernel
M supports, see the “Version 2.x Volume
Compatibility Note
In HP-UX 11i v3, LVM is compatible with physical volumes that already have entries in the badexample, a disk device is configured for LVM on HP-UX 11i v2 and this physical volumeto the BBRA. On importing such a physical volume ontophysical volume and can read th
Elimination of maxvgs Tunable
This static tunable specified the maximum number of LVM volume groups in the range 1 to created or activated on th
Version 2.0 and Version 2.1 volume groups cannot exceed 2048) in a system without requirintunable, thus avoiding a reboot. For more information on different versions of volume groups that LVGroups” section and the “LVM Version 2.0 Volume Groups in HP-UX 11i v3” whitepaper.
ge scripts that use or modify maxvgs tunable for HP-UX 11i v3.
g
:
# kct
NOTE following change(s) ll be held for
oma configuration currently contains the i as in use before the last reboot of this
rent configuration re making the requested change? y
iguration has been updated. hanges have been saved, and will take effect at
Tunable Value Expression maxvgs (now) 10 Default
(next boot) 64 64
On a HP-UX 11i v3 system, no reboot is required as the maxvgs tunable is removed:
# kctune maxvgs ERROR: There is no tunable named 'maxvgs'.
For more information, see maxvgs(5).
Note: You must chan
Example
On a HP-UX 11i v2 system:
# kctune maxvgsTunable Value Expression maxv s 10 Default
Modifying the maxvgs tunable on a HP-UX 11i v2 release results in a reboot
une maxvgs=64
: The configuration being loaded contains thethat cannot be applied immediately and which withe next boot:
-- The tunable maxvgs cannot be changed in a dynamic fashion. WARNIN ackup'G: The aut tic 'b
configurat on that wsystem.
==> Do you wish to update it to contain the curbefo
* The automatic 'backup' conf* The requested cnext boot.

16
e links
line option in the pvchange command, which controls the way LVM monitors alternate links to a multipathed physical volume.
By default, LVM proactively monitors the health of all configured links. If auto-switchback is enabled (by
If proactive polling of alternate links is undesirable, you can disable polling using pvchange –p n. For more 1M).
p- Version 2.0.
at of Version 1.0 ps. Version 2.0 enables the configuration of larger volume groups (up to 512), logical volumes (up
to 511), physical volumes (up to 511), and several other volume group parameters. You can manage a Version ace. But features upported on Version ted on Version 2.0
e group- version 2.1. p, using the same
user interface. Version 2.1 is similar to version 2.0, but allows configuration of much greater number of volume s (up to 2048), and logical volumes (up to 2047). With this release, cluster
lock is supported on Version 2.x volume groups.
ps in HP-UX 11i v3
Proactive Polling of Alternat
With September 2007 release of HP-UX 11i v3, LVM supports a new -p command
default), this polling helps LVM detect and switch to a better link when it becomes available.
information, see pvchange(
Version 2.x Volume Groups
With the March 2008 release of HP-UX 11i v3, LVM supports a new version of volume grouVersion 1.0 is the version supported on all current and previous versions of HP-UX 11i.
A Version 2.0 volume group is a volume group whose metadata layout is different from thvolume grou
2.0 volume group the same way as a Version 1.0 volume group, using the same user interfsuch as sparing, bad block relocation, cluster lock, boot, dump, and primary swap are not s2.0 volume groups. Also, vgmodify, pvck, lvlnboot, and lvrmboot commands are not supporvolume groups.
With the September 2008 release of HP-UX 11i v3, LVM supports another version of volumYou can also manage a Version 2.1 volume group the same way as a Version 1.0 volume grou
groups (up to 2048), physical volume
For more information on Version 2.x volume groups, see the LVM Version 2.0 Volume Grou x volume groups, see whitepaper. For more information on the supported limits of Version 1.0 and Version 2.
the LVM Limits White Paper.
Boot Disk Configuration Self Healing
With the September 2008 release of HP-UX 11i v3, LVM supports self healing of boot disk configurations. If the device special file for a LVM boot disk changes because its hardware path changed, LVM scans for the boot disk during the boot process. After successfully booting, LVM automatically updates the /etc/lvmtab LVM configuration file and the LVM metadata on each bootable disk in the root volume group with the new boot path. Future system boots will not need to scan. This behavior is configurable, and is enabled by default.
For more information, see lvmadm(1M) and lvm(7).

17
Mirror Write Cache (MWC) Enhancements
ly records this activity in an on-disk data structure. An extra disk write is required for every mirrored write not already recorded
WC to resynchronize
logical volume I/O performance by allowing more concurrent writes. MWC has also been enhanced to support large I/O sizes.
nd, respectively. For ange(1M).
ted with vgchange –a s) of version 1.0 and 2.0 must have the consistency recovery set to NOMWC or NONE. Versions 1.0 and 2.0 do not support MWC for
longing to shared volume groups.
es belonging to version
the MWC is activated v3, its MWC format is converted. Any subsequent activation of this volume group on previous
n of the entire logical d, activation of the
is happens during a Serviceguard rolling eleases might be enhanced to recognize the new MWC format; contact your tative for up-to-the-moment information, or consult the Hewlett-Packard IT
Performance Improvements
The MWC allows a fast resynchronization of data following a system crash or failure.
The MWC keeps track of where I/O writes are occurring on the volume group and periodical
on the physical volume. Upon system reboot after crash, the operating system uses the Minconsistent data blocks quickly.
In HP-UX 11i v3, the MWC is larger in size than in previous releases. This leads to a better
To enable or disable MWC, use the -M y or -M n option with lvcreate or lvchange commamore information on MWC, see lvcreate(1M) and lvch
Logical volumes belonging to shared volume groups (those activa
logical volumes be
With the September 2008 release of HP-UX 11i v3, LVM supports MWC for logical volum2.1 shared volume groups. This ensures faster recovery following a system crash.
Compatibility Note:
When a volume group containing a logical volume (created on pre-11i v3 releases) using on HP-UX 11ireleases do not recognize the new MWC format and LVM performs a full resynchronizatiovolume. But if the logical volumes are marked “NOMWC” and the logical volume is syncevolume group on previous releases avoids full resynchronization. Note thupdate configuration. Previous rHewlett-Packard support represenResource Center site: http://itrc.hp.com (Americas and Asia Pacific) or http://europe.itrc.hp.com (Europe) for
orted on HP-UX 11i v2 with the patch PHKL_36244 or any superseding patch. With the patch PHKL_36244 or any superseding patch installed on HP-
O sizes (up to the extent size). As I/O requests do not need to be split into smaller chunks, the I/O throughput is improved by issuing reads and writes of larger sizes through LVM.
Note that the actual I/O size might be limited by the interface card.
For more information, see the “HP-UX System Administrator's Guide: Logical Volume Management” available at http://docs.hp.com/en/oshpux11iv3.html#LVM%20Volume%20Manager
LVM patches.
NOTE: The new format of MWC introduced in HP-UX 11i v3 is supp
UX 11i v2, the new format of MWC is recognized and used to perform the recovery.
LVM Support for Large I/O Sizes
LVM now supports larger I/
Also see the The Next Generation Mass Storage Stack whitepaper. HP recommends you see the whitepaper for information on benefits and capabilities introduced in the New Mass Storage Stack in HP-UX 11i v3.
18
Parallel Resynchronization of Stale Extents
command line options to the lvextend,
s the automatic done by using the lvsync command. A new option,
onizes the specified logical volumes in parallel rather than serially. This reduces the time taken to synchronize the stale extents.
For more information, see lvextend(1M), lvmerge(1M) and lvsync(1M).
new command line option –T is introduced in the vgchange VM activates a volume group. Normally, when a volume group is activated, all
p are attached sequentially. Activating the volume group using –T option of the vgchange command attaches all the physical volumes in parallel. This reduces the time taken to activate multiple volume groups with large number of physical volumes.
For more information, see vgchange(1M).
With September 2007 release of HP-UX 11i v3, LVM provides newlvmerge,, and lvsync commands that control the synchronization of stale extents.
A new option, –s, is introduced in the lvextend and lvmerge commands, which suppressesynchronization of stale extents. This synchronization can be–T, is introduced in the lvsync command, which resynchr
Parallel Open of Physical Volumes
In the September 2007 release of HP-UX 11i v3, a command that controls the way Lthe physical volumes of the volume grou
19
ts
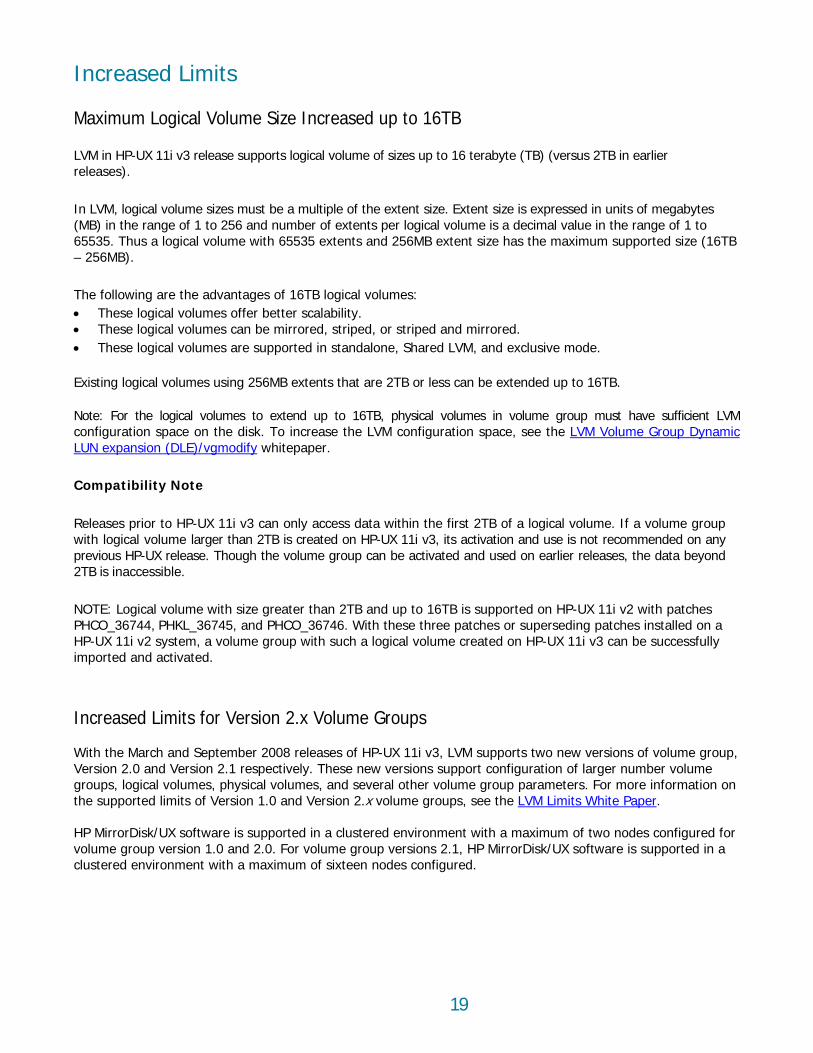
Maximum Logical Volume Size Increased up to 16TB
LVM in HP-UX 11i v3 release supports logical volume of sizes up to 16 terabyte (TB) (versus 2TB in earlier
logical volume sizes must be a multiple of the extent size. Extent size is expressed in units of megabytes (MB) in the range of 1 to 256 and number of extents per logical volume is a decimal value in the range of 1 to
ts and 256MB extent size has the maximum supported size (16TB
The following are the advantages of 16TB logical volumes:
• These logical volumes can be mirrored, striped, or striped and mirrored.
Existing logical volumes using 256MB extents that are 2TB or less can be extended up to 16TB.
Note: For the logical volumes to extend up to 16TB, physical volumes in volume group must have sufficient LVM olume Group Dynamic
Increased Limi
releases).
In LVM,
65535. Thus a logical volume with 65535 exten– 256MB).
• These logical volumes offer better scalability.
• These logical volumes are supported in standalone, Shared LVM, and exclusive mode.
configuration space on the disk. To increase the LVM configuration space, see the LVM VLUN expansion (DLE)/vgmodify whitepaper.
Compatibility Note
e. If a volume group larger than 2TB is created on HP-UX 11i v3, its activation and use is not recommended on any
previous HP-UX release. Though the volume group can be activated and used on earlier releases, the data beyond 2TB is inaccessible.
2 with patches tches installed on a an be successfully
s
With the March and September 2008 releases of HP-UX 11i v3, LVM supports two new versions of volume group, Version 2.0 and Version 2.1 respectively. These new versions support configuration of larger number volume groups, logical volumes, physical volumes, and several other volume group parameters. For more information on the supported limits of Version 1.0 and Version 2.x volume groups, see the LVM Limits White Paper
Releases prior to HP-UX 11i v3 can only access data within the first 2TB of a logical volumwith logical volume
NOTE: Logical volume with size greater than 2TB and up to 16TB is supported on HP-UX 11i vPHCO_36744, PHKL_36745, and PHCO_36746. With these three patches or superseding paHP-UX 11i v2 system, a volume group with such a logical volume created on HP-UX 11i v3 cimported and activated.
Increased Limits for Version 2.x Volume Group
.
HP MirrorDisk/UX software is supported in a clustered environment with a maximum of two nodes configured for volume group version 1.0 and 2.0. For volume group versions 2.1, HP MirrorDisk/UX software is supported in a clustered environment with a maximum of sixteen nodes configured.
20
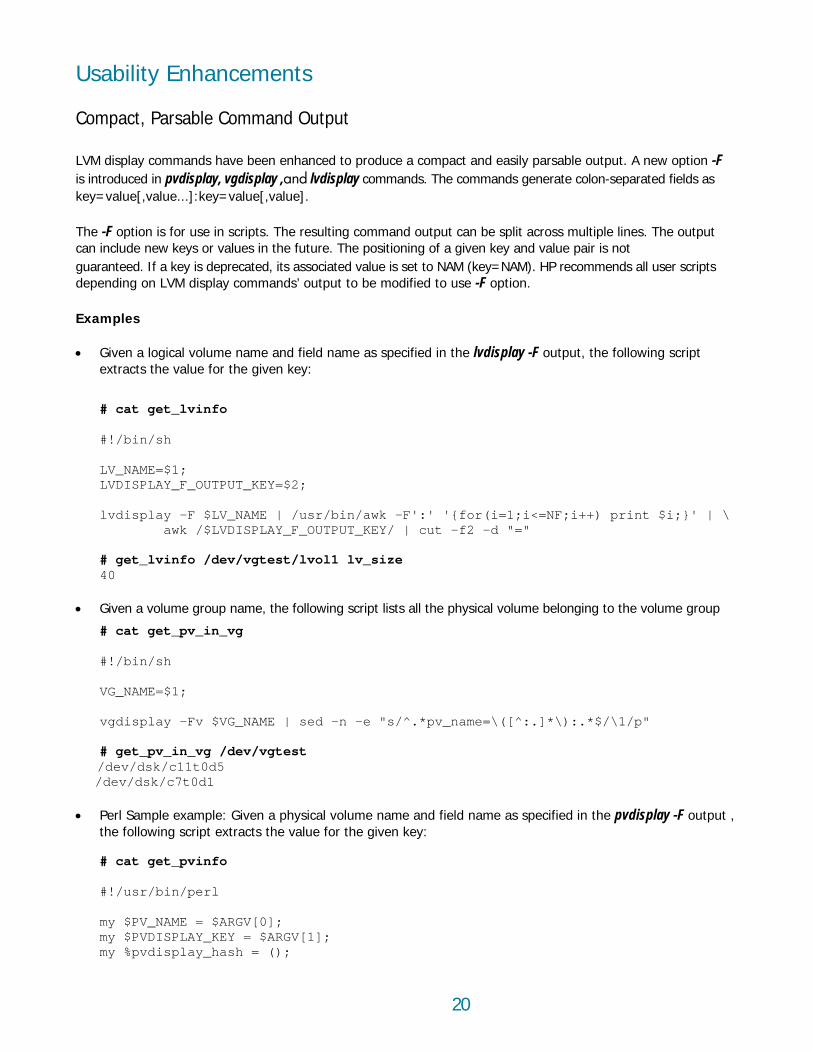
Compact, Parsable Command Output
en enhanced to produce a compact and easily parsable output. A new option -F is introduced in pvdisplay, vgdisplay ,and lvdisplay commands. The commands generate colon-separated fields as
ut can be split across multiple lines. The output can include new keys or values in the future. The positioning of a given key and value pair is not
ed. If a key is deprecated, its associated value is set to NAM (key=NAM). HP recommends all user scripts
Examples
• ogical volume name and field name as specified in the lvdisplay -F output, the following script the value for the given key:
LVDISPLAY_F_OUTPUT_KEY=$2;
LV_NAME | /usr/bin/awk -F':' '{for(i=1;i<=NF;i++) print $i;}' | \
info /dev/vgtest/lvol1 lv_size
, the following script lists all the physical volume belonging to the volume group
_in_vg
vgdisplay -Fv $VG_NAME | sed -n -e "s/^.*pv_name=\([^:.]*\):.*$/\1/p" # get_pv_in_vg /dev/vgtest
• Perl Sample example: Given a physical volume name and field name as specified in the pvdisplay -F output , the following script extracts the value for the given key: # cat get_pvinfo #!/usr/bin/perl my $PV_NAME = $ARGV[0]; my $PVDISPLAY_KEY = $ARGV[1]; my %pvdisplay_hash = ();
Usability Enhancements
LVM display commands have be
key=value[,value...]:key=value[,value].
The -F option is for use in scripts. The resulting command outp
guarantedepending on LVM display commands’ output to be modified to use -F option.
Given a lextracts
# cat get_lvinfo #!/bin/sh _NAME=$1; LV
lvdisplay -F $ awk /$LVDISPLAY_F_OUTPUT_KEY/ | cut -f2 -d "=" # get_lv40
• Given a volume group name
# cat get_p
v
#!/bin/sh VG_NAME=$1;
/dev/dsk/c11t0d5 /dev/dsk/c7t0d1
21
`;
n"); Provide a PV which belong to a VG\n");
fore rs) { my @pair = ();
e);
$pvdisplay_hash{$PVDISPLAY_KEY}\n";
t and checks if disk is under HP-UX LVM control
The ced to list additional deta
The
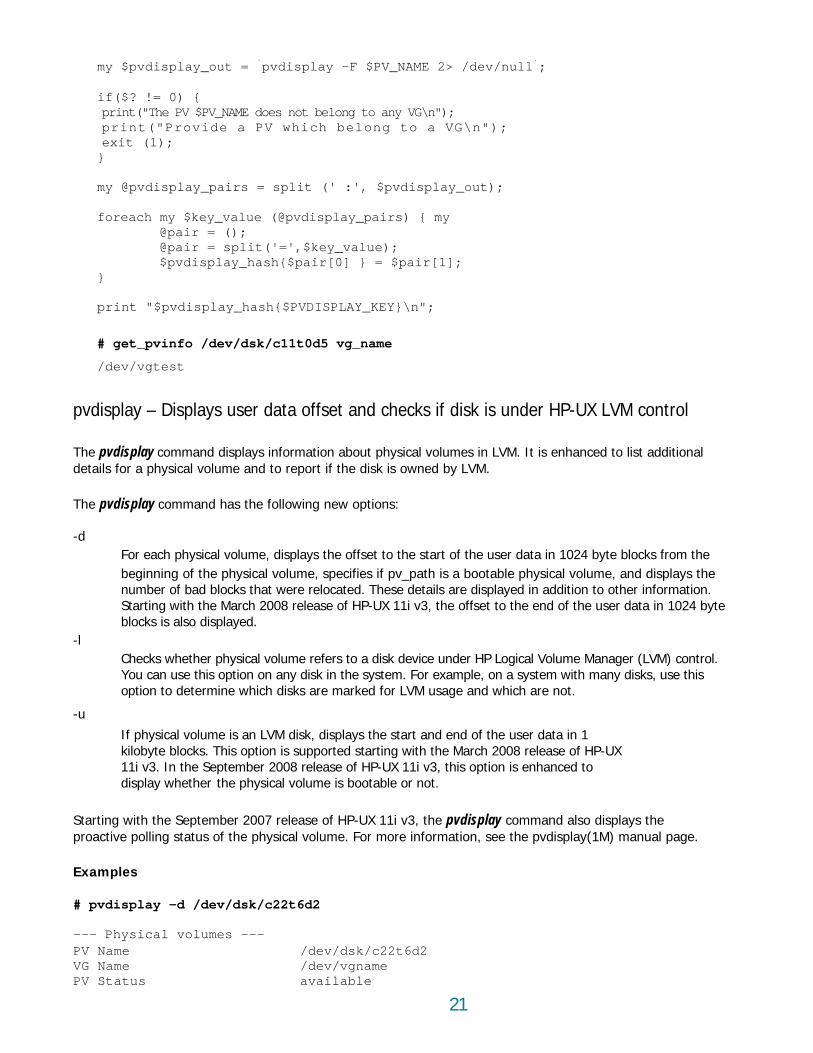
-d byte blocks from the
table physical volume, and displays the number of bad blocks that were relocated. These details are displayed in addition to other information.
to the end of the user data in 1024 byte
-l Checks whether physical volume refers to a disk device under HP Logical Volume Manager (LVM) control.
with many disks, use this
M disk, displays the start and end of the user data in 1 is supported starting with the March 2008 release of HP-UX
ember 2008 release of HP-UX 11i v3, this option is enhanced to display whether the p otable or not.
Starting with the September 2007 release of HP-UX 11i v3, the pvdisplay command also displays the proactive polling status of the physical volume. For more information, see the pvdisplay(1M) manual page.
Examples
# pvdisplay -d /dev/dsk/c22t6d2
--- Physical volumes --- PV Name /dev/dsk/c22t6d2 VG Name /dev/vgname PV Status available
my $pvdisplay_out = `pvdisplay -F $PV_NAME 2> /dev/null
if($? != 0) { print("The PV $PV_NAME does not belong to any VG\print("exit (1); }
my @pvdisplay_pairs = split (' :', $pvdisplay_out);
ach my $key_value (@pvdisplay_pai
@pair = split('=',$key_valu$pvdisplay_hash{$pair[0] } = $pair[1];
}
print "
# get_pvinfo /dev/dsk/c11t0d5 vg_name
/dev/vgtest
pvdisplay – Displays user data offse
pvdisplay command displays information about physical volumes in LVM. It is enhanils for a physical volume and to report if the disk is owned by LVM.
pvdisplay command has the following new options:
For each physical volume, displays the offset to the start of the user data in 1024beginning of the physical volume, specifies if pv_path is a boo
Starting with the March 2008 release of HP-UX 11i v3, the offsetblocks is also displayed.
You can use this option on any disk in the system. For example, on a systemoption to determine which disks are marked for LVM usage and which are not.
-u
If physical volume is an LVkilobyte blocks. This option11i v3. In the Sept
hysical volume is bo
22
2 5
e (Mbytes) 4 1279
n 1024
ume is owned by LVM, do the following:
/c4t3d0
VM, do the following:
Bootable=yes
Group Scanning and Supports Persistent DSF
introduced in March 200 ds entries for volume grou vers volume group info searching for LVM disks.
-f <
all the volume groups. oups in /etc/lvmtab or /etc/lvmtab_p
m to /etc/lvmtab or
ot search for additional volume groups other than the one specified with the
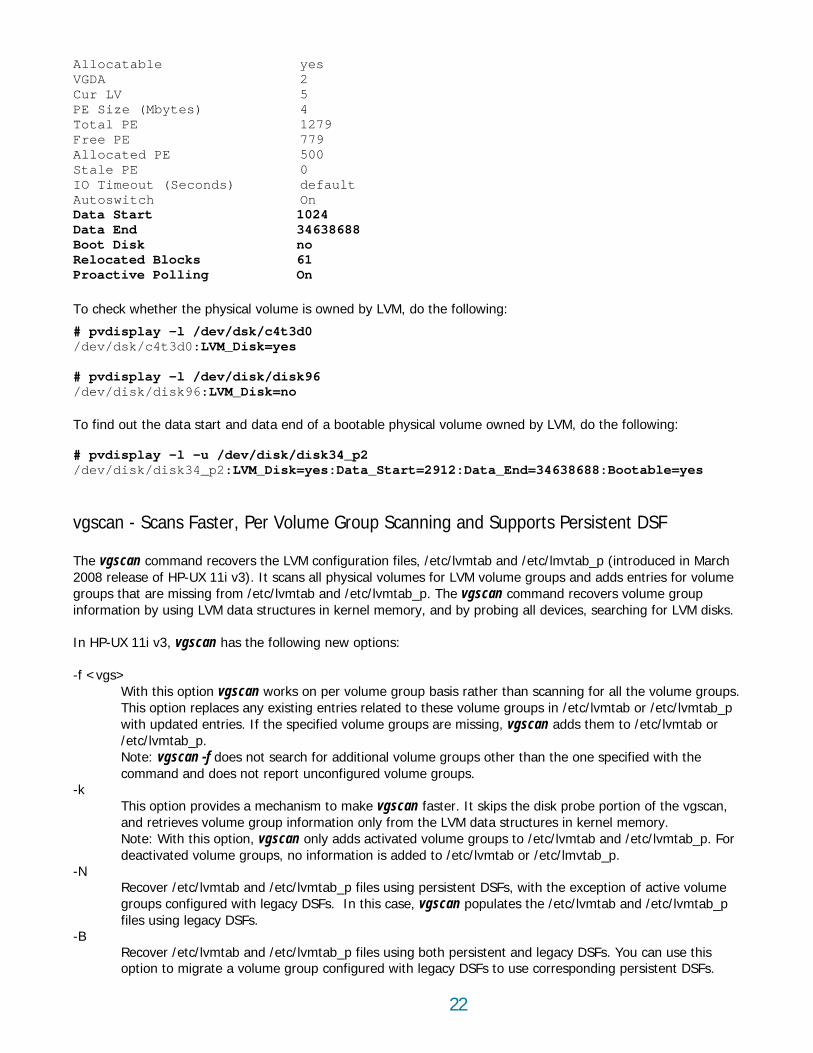
-k This option provides a mechanism to make vgscan faster. It skips the disk probe portion of the vgscan, and retrieves volume group information only from the LVM data structures in kernel memory. Note: With this option, vgscan only adds activated volume groups to /etc/lvmtab and /etc/lvmtab_p. For deactivated volume groups, no information is added to /etc/lvmtab or /etc/lmvtab_p.
-N Recover /etc/lvmtab and /etc/lvmtab_p files using persistent DSFs, with the exception of active volume groups configured with legacy DSFs. In this case, vgscan populates the /etc/lvmtab and /etc/lvmtab_p files using legacy DSFs.
-B Recover /etc/lvmtab and /etc/lvmtab_p files using both persistent and legacy DSFs. You can use this option to migrate a volume group configured with legacy DSFs to use corresponding persistent DSFs.
Allocatable yes VGDA
Cur LVzPE Si
Total PE Free PE 779 Allocated PE 500
0 Stale PE eo t (S condIO Tim u e s) default
OAutoswitch Data Start Data End 34638688
Boot Disk no Relocated Blocks 61
On Proactive Polling To check whether the physical vol
# pvdisplay –l /dev/dsk/dev/dsk/c4t3d0:LVM_Disk=yes # pvdisplay -l /dev/disk/disk96 /dev/disk/disk96:LVM_Disk=no
To find out the data start and data end of a bootable physical volume owned by L # pvdisplay –l –u /dev/disk/disk34_p2 /dev/disk/disk34_p2:LVM_Disk=yes:Data_Start=2912:Data_End=34638688:
vgscan - Scans Faster, Per Volume The vgscan command recovers the LVM configuration files, /etc/lvmtab and /etc/lmvtab_p (
8 release of HP-UX 11i v3). It scans all physical volumes for LVM volume groups and adps that are missing from /etc/lvmtab and /etc/lvmtab_p. The vgscan command reco
rmation by using LVM data structures in kernel memory, and by probing all devices,
v3, vgscan has the following new options: In HP-UX 11i
vgs> With this option vgscan works on per volume group basis rather than scanning for This option replaces any existing entries related to these volume grwith updated entries. If the specified volume groups are missing, vgscan adds the/etc/lvmtab_p. Note: vgscan -f does ncommand and does not report unconfigured volume groups.
s,
23
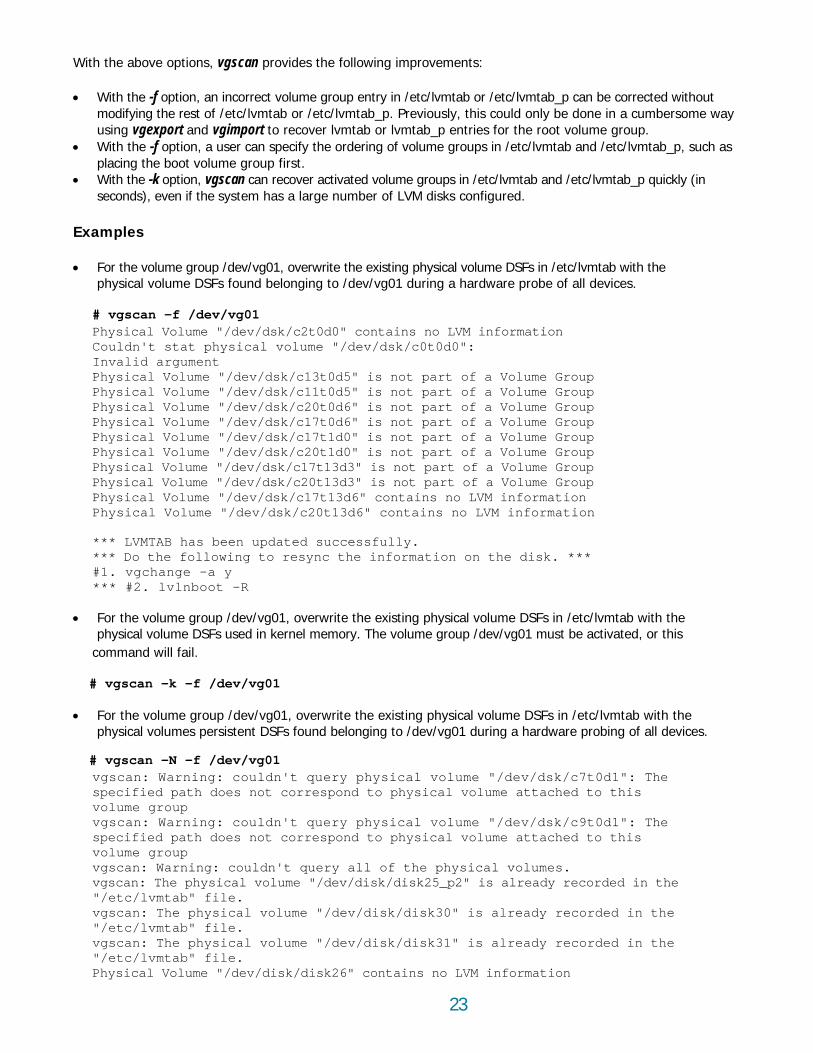
With the above option vgscan provides the following improvements:
corrected without in a cumbersome way
. d /etc/lvmtab_p, such as
the -k option, vgscan can recover activated volume groups in /etc/lvmtab and /etc/lvmtab_p quickly (in ds), even if the system has a large number of LVM disks configured.
lume DSFs in /etc/lvmtab with the rdware probe of all devices.
ormation
Volume Group Volume Group lume Group
Volume Group is not part of a Volume Group
Volume Group olume Group
"/dev/dsk/c20t13d3" is not part of a Volume Group
ion
to resync the information on the disk. ***
ev/vg01, overwrite the existing physical volume DSFs in /etc/lvmtab with the t be activated, or this
/etc/lvmtab with the re probing of all devices.
/c7t0d1": The lume attached to this
vgscan: Warning: couldn't query physical volume "/dev/dsk/c9t0d1": The specified path does not correspond to physical volume attached to this volume group vgscan: Warning: couldn't query all of the physical volumes. vgscan: The physical volume "/dev/disk/disk25_p2" is already recorded in the "/etc/lvmtab" file. vgscan: The physical volume "/dev/disk/disk30" is already recorded in the "/etc/lvmtab" file. vgscan: The physical volume "/dev/disk/disk31" is already recorded in the "/etc/lvmtab" file. Physical Volume "/dev/disk/disk26" contains no LVM information
• With the -f option, an incorrect volume group entry in /etc/lvmtab or /etc/lvmtab_p can bemodifying the rest of /etc/lvmtab or /etc/lvmtab_p. Previously, this could only be done using vgexport and vgimport to recover lvmtab or lvmtab_p entries for the root volume group
• With the -f option, a user can specify the ordering of volume groups in /etc/lvmtab anplacing the boot volume group first.
• Withsecon
Examples
• For the volume group /dev/vg01, overwrite the existing physical vophysical volume DSFs found belonging to /dev/vg01 during a ha # vgscan -f /dev/vg01 Physical Volume "/dev/dsk/c2t0d0" contains no LVM infCouldn't stat physical volume "/dev/dsk/c0t0d0": Invalid argument Physical Volume "/dev/dsk/c13t0d5" is not part of a Physical Volume "/dev/dsk/c11t0d5" is not part of a Physical Volume "/dev/dsk/c20t0d6" is not part of a VoPhysical Volume "/dev/dsk/c17t0d6" is not part of a Physical Volume "/dev/dsk/c17t1d0"Physical Volume "/dev/dsk/c20t1d0" is not part of a Physical Volume "/dev/dsk/c17t13d3" is not part of a VPhysical Volume Physical Volume "/dev/dsk/c17t13d6" contains no LVM information Physical Volume "/dev/dsk/c20t13d6" contains no LVM informat
*** LVMTAB has been updated successfully. *** Do the following#1. vgchange -a y *** #2. lvlnboot -R
• For the volume group /dphysical volume DSFs used in kernel memory. The volume group /dev/vg01 mus
command will fail.
# vgscan -k -f /dev/vg01
• For the volume group /dev/vg01, overwrite the existing physical volume DSFs inphysical volumes persistent DSFs found belonging to /dev/vg01 during a hardwa
# vgscan -N -f /dev/vg01 vgscan: Warning: couldn't query physical volume "/dev/dskspecified path does not correspond to physical vovolume group
physical volume "/dev/dis
24
k/disk27":
rt of a Volume Group /disk80":
Volume Group of a Volume Group f a Volume Group
"/dev/disk/disk96" contains no LVM information een updated successfully.
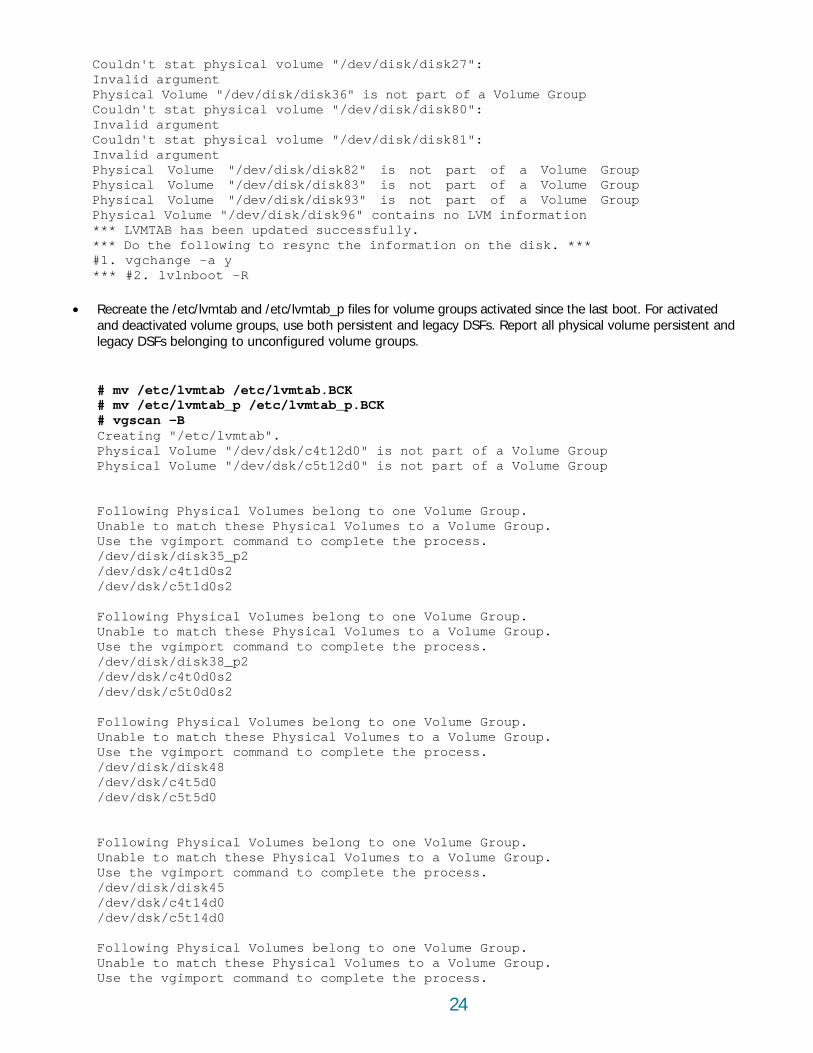
• b_p files for volume groups activated since the last boot. For activated h persistent and legacy DSFs. Report all physical volume persistent and volume groups.
# mv /etc/lvmtab_p /etc/lvmtab_p.BCK
t part of a Volume Group "/dev/dsk/c5t12d0" is not part of a Volume Group
e Group. lume Group.
e process. k35_p2 d0s2
Volume Group. ch these Physical Volumes to a Volume Group. port command to complete the process. sk38_p2
/dev/dsk/c4t0d0s2
Volume Group. ch these Physical Volumes to a Volume Group. ort command to complete the process.
Following Physical Volumes belong to one Volume Group. Unable to match these Physical Volumes to a Volume Group. Use the vgimport command to complete the process. /dev/disk/disk45 /dev/dsk/c4t14d0 /dev/dsk/c5t14d0 Following Physical Volumes belong to one Volume Group. Unable to match these Physical Volumes to a Volume Group. Use the vgimport command to complete the process.
Couldn't statInvalid argument
me "/dev/disk/disk36" is not paPhysical VoluCouldn't stat physical volume "/dev/disk
ent Invalid argumCouldn't stat physical volume "/dev/disk/disk81": Invalid argument Physical Volume "/dev/disk/disk82" is not part of a
3" is not part Physical Volume "/dev/disk/disk8Physical Volume "/dev/disk/disk93" is not part oPhysical Volume*** LVMTAB has b*** Do the following to resync the information on the disk. *** #1. vgchange -a y *** #2. lvlnboot –R
Recreate the /etc/lvmtab and /etc/lvmtaand deactivated volume groups, use bot
s belonging to unconfiguredlegacy DSF
# mv /etc/lvmtab /etc/lvmtab.BCK
# vgscan –B Creating "/etc/lvmtab".
"/dev/dsk/c4t12d0" is noPhysical VolumemePhysical Volu
Following Physical Volumes belong to one Volum
to a VoUnable to match these Physical Volumes t command to complete thUse the vgimpor
/dev/disk/dis/dev/dsk/c4t1/dev/dsk/c5t1d0s2 Following Physical Volumes belong to oneUnable to matUse the vgim/dev/disk/di
/dev/dsk/c5t0d0s2
ysical Volumes belong to oneFollowing PhUnable to matUse the vgimp/dev/disk/disk48 /dev/dsk/c4t5d0 /dev/dsk/c5t5d0
25
k46 k47 3d0 3d0 0d0
d with any Physical Volumes.
e configured in the system. ion on disk.
/disk44":
k/disk49":
sk/disk40":
physical volume "/dev/dsk/c5t4d0":
":
physical volume "/dev/dsk/c0t0d0": ment
e Group. o a Volume Group.
ort command to complete the process. k33 1d0
ysical Volumes belong to one Volume Group.
/dev/dsk/c4t9d0
Volumes. olumes.
al Volumes. olumes.
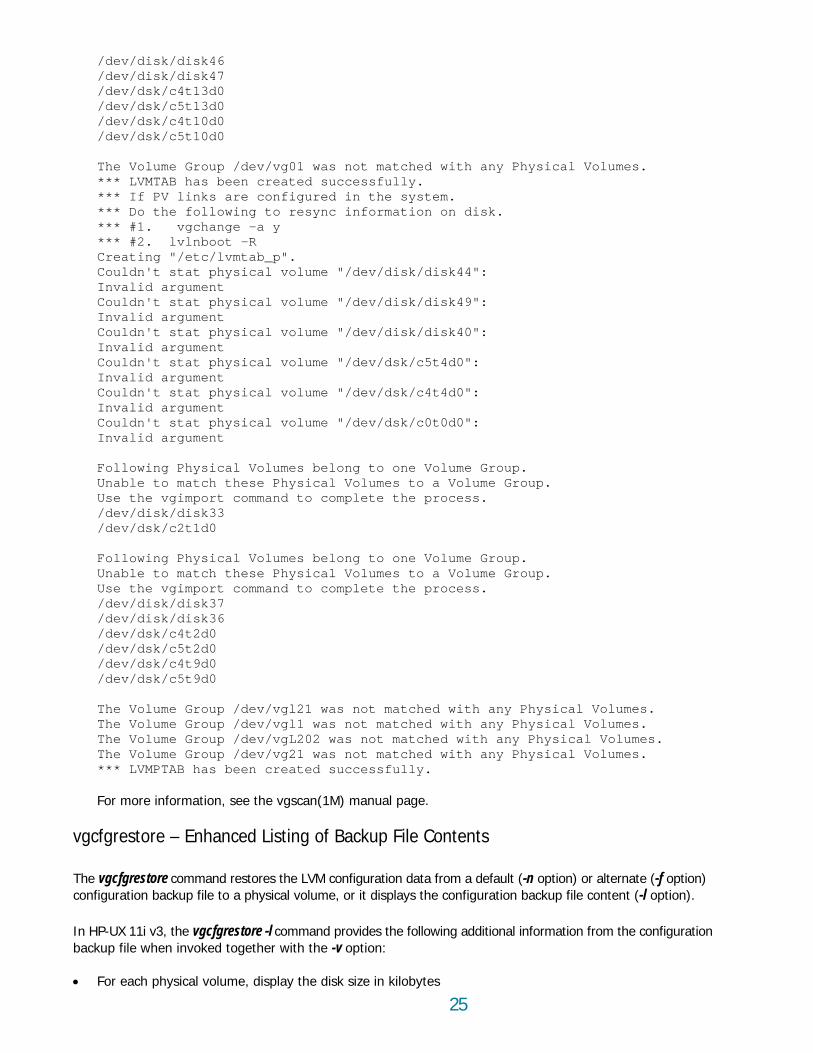
nual page.
vgcfgrestore – Enhanced Listing of Backup File Contents
The vgcfgrestore command restores the LVM configuration data from a default (-n option) or alternate (-f option) configuration backup file to a physical volume, or it displays the configuration backup file content (-l option).
In HP-UX 11i v3, the vgcfgrestore -l command provides the following additional information from the configuration backup file when invoked together with the -v option:
• For each physical volume, display the disk size in kilobytes
/dev/disk/dis/dev/disk/dis/dev/dsk/c4t1/dev/dsk/c5t1/dev/dsk/c4t1/dev/dsk/c5t10d0 The Volume Group /dev/vg01 was not matche
n created successfully.*** LVMTAB has beear*** If PV links
*** Do the following to resync informatchange -a y *** #1. vg
*** #2. lvlnboot -R tc/lvmtab_p". Creating "/e
Couldn't stat physical volume "/dev/diskInvalid argument
t physical volume "/dev/disCouldn't staInvalid argument
physical volume "/dev/diCouldn't statInvalid argument Couldn't statInvalid argument Couldn't stat physical volume "/dev/dsk/c4t4d0Invalid argument Couldn't stInvalid argu
at
Following Physical Volumes belong to one VolumUnable to match these Physical Volumes tUse the vgimp
is/dev/disk/d/dev/dsk/c2t Following PhUnable to match these Physical Volumes to a Volume Group.Use the vgimport command to complete the process. /dev/disk/disk37 /dev/disk/disk36 /dev/dsk/c4t2d0 /dev/dsk/c5t2d0
/dev/dsk/c5t9d0 The Volume Group /dev/vgl21 was not matched with any PhysicalThe Volume Group /dev/vgl1 was not matched with any Physical VThe Volume Group /dev/vgL202 was not matched with any PhysicThe Volume Group /dev/vg21 was not matched with any Physical V*** LVMPTAB has been created successfully. For more information, see the vgscan(1M) ma
26
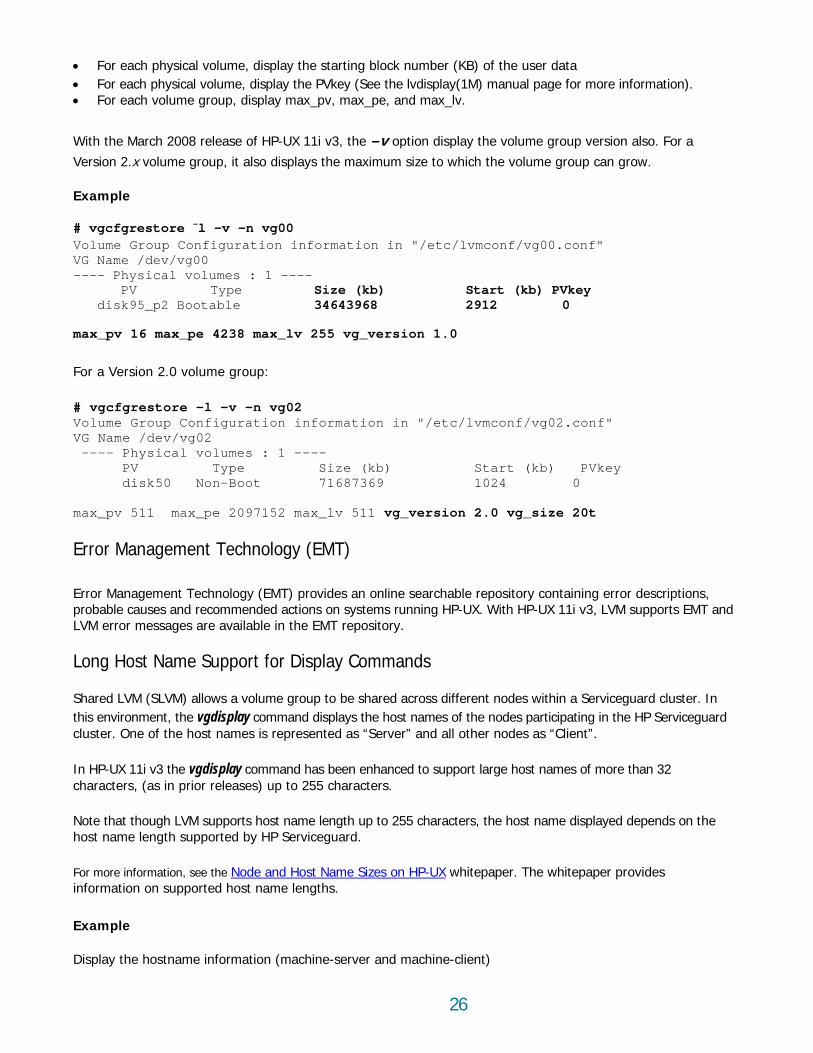
he lvdisplay(1M) manual page for more information).
• For each volume group, display max_pv, max_pe, and max_lv.
e group version also. For a x volume group, it also displays the maximum size to which the volume group can grow.
V 0.conf"
PV Type Size (kb) Start (kb) PVkey e 34643968 2912 0
ax_lv 255 vg_version 1.0
onf/vg02.conf"
---- PV Type Size (kb) Start (kb) PVkey
1 vg_version 2.0 vg_size 20t
error descriptions, X 11i v3, LVM supports EMT and
Long Host Name Support for Display Commands
Shared LVM (SLVM) allows a volume group to be shared across different nodes within a Serviceguard cluster. In cipating in the HP Serviceguard
presented as “Server” and all other nodes as “Client”.
In HP-UX 11i v3 the vgdisplay command has been enhanced to support large host names of more than 32
Note that though LVM supports host name length up to 255 characters, the host name displayed depends on the host name length supported by HP Serviceguard.
For more information, see the Node and Host Name Sizes on HP-UX
• For each physical volume, display the starting block number (KB) of the user data• For each physical volume, display the PVkey (See t
With the March 2008 release of HP-UX 11i v3, the –v option display the volumVersion 2.
Example
# vg –cfgrestore l -v -n vg00 iguratolume Group Conf ion information in "/etc/lvmconf/vg0
VG Name /dev/vg00 ---- Physical volumes : 1 ----
disk95_p2 Bootabl
max_pv 16 max_pe 4238 m
For a Version 2.0 volume group: # vgcfgrestore -l -v -n vg02 Volume Group Configuration information in "/etc/lvmcVG Name /dev/vg02 ---- Physical volumes : 1
disk50 Non-Boot 71687369 1024 0 max_pv 511 max_pe 2097152 max_lv 51
Error Management Technology (EMT)
Error Management Technology (EMT) provides an online searchable repository containing probable causes and recommended actions on systems running HP-UX. With HP-ULVM error messages are available in the EMT repository.
this environment, the vgdisplay command displays the host names of the nodes particluster. One of the host names is re
characters, (as in prior releases) up to 255 characters.
whitepaper. The whitepaper provides information on supported host name lengths.
Example
Display the hostname information (machine-server and machine-client)
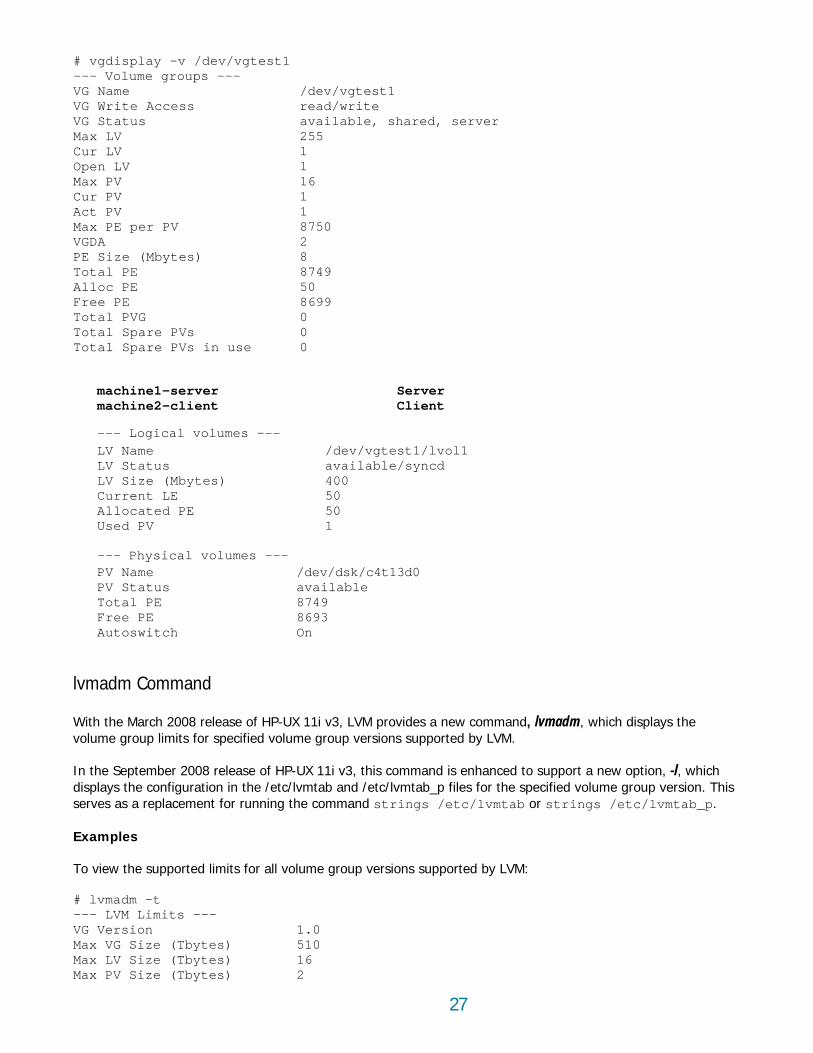
# vgdisplay -v /dev/vgtest1
27
e Access atus available, shared, server 255
V 1 1
16
1 per PV 8750
2 (Mbytes) 8
8749 50
Free PE 8699 TTT e 0
ver Server t Client
ogical volumes -/dev/vgtest1/lvol1
lable/syncd (Mbytes)
t LE 50
l volumes --- PV Name /dev/dsk/c4t13d0
Free PE 8693
Command
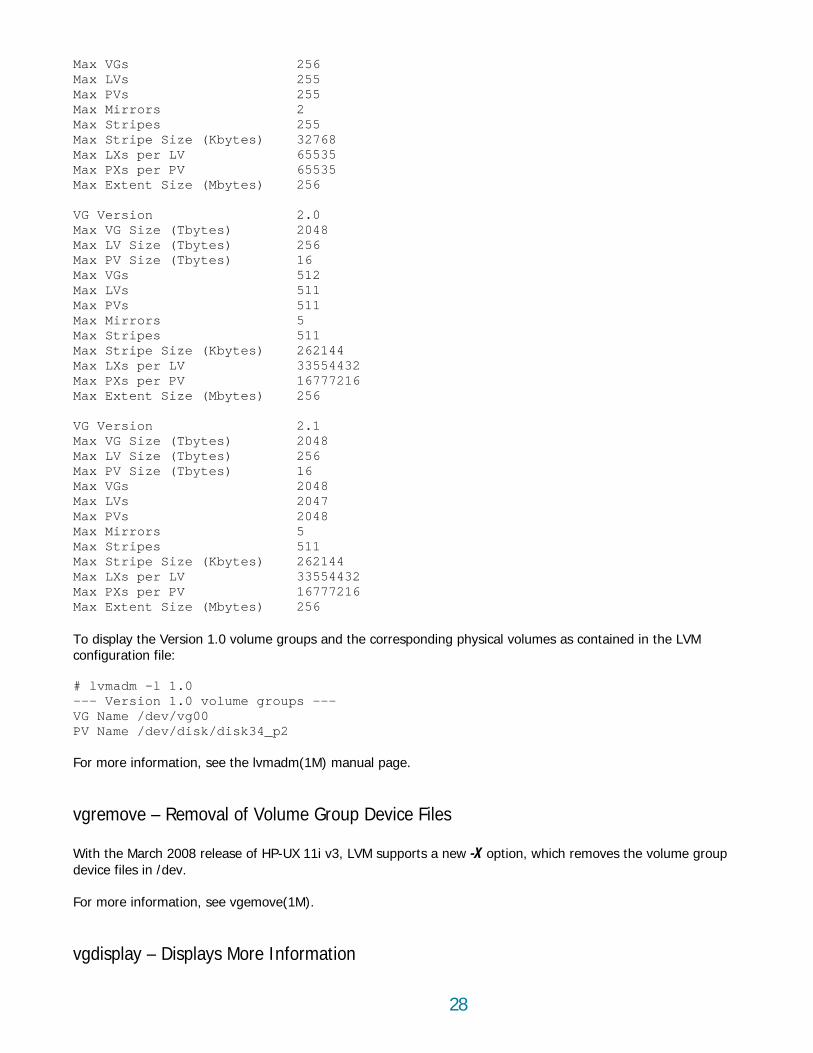
With the March 2008 release of HP-UX 11i v3, LVM provides a new command, lvmadm, which displays the p limits for specified volume group versions supported by LVM.
HP-UX 11i v3, this command is enhanced to support a new option, -l, which etc/lvmtab and /etc/lvmtab_p files for the specified volume group version. This
ning the command strings /etc/lvmtab or strings /etc/lvmtab_p. Examples To view the supported limits for all volume group versions supported by LVM: # lvmadm -t --- LVM Limits --- VG Version 1.0 Max VG Size (Tbytes) 510 Max LV Size (Tbytes) 16 Max PV Size (Tbytes) 2
--- Volume groups --- VG Name /dev/vgtest1
rit read/write
VG WVG StMax LVCur LOpen LVMax PV Cur PV 1 Act PV Max PEVGDA PE SizeTotal PE Alloc PE
otal PVG 0 otal Spare PVs 0 otal Spare PVs in us
machine1-serlienmachine2-c
--- L -- LV Name
atus LV St avai400 LV Size
CurrenAllocated PE 50 Used PV 1
--- Physica
PV Status available Total PE 8749
Autoswitch On
lvmadm
volume grou In the September 2008 release of
/displays the configuration in the serves as a replacement for run
28
256 255 255 2 255 32768
65535 65535 256
2.0 2048 256 16
512 11 11
262144 33554432 16777216 256
2.1 2048
256 6 048
2047
Max Stripes 511 262144 33554432
16777216 s) 256
To display the Version 1.0 volume groups and the corresponding physical volumes as contained in the LVM
# lvmadm -l 1.0
v/vg00 _p2
For more information, see the lvmadm(1M) manual page.
vgremove – Removal of Volume Group Device Files With the March 2008 release of HP-UX 11i v3, LVM supports a new -X option, which removes the volume group device files in /dev. For more information, see vgemove(1M).
vgdisplay – Displays More Information
Max VGs Max LVs Max PVs Max Mirrors Max Stripes Max Stripe Size (Kbytes) Max LXs per LV Max PXs per PV Max Extent Size (Mbytes) VG Version Max VG Size (Tbytes) Max LV Size (Tbytes)
Max PV Size (Tbytes) Max VGs Max LVs 5Max PVs 5
5Max Mirrors Max Stripes 511 Max Stripe Size (Kbytes)
Max LXs per LV Max PXs per PV
Max Extent Size (Mbytes) VG Version Max VG Size (Tbytes) Max LV Size (Tbytes) Max PV Size (Tbytes) 1Max VGs 2Max LVs Max PVs 2048 Max Mirrors 5
Max Stripe Size (Kbytes) Max LXs per LV Max PXs per PV Max Extent Size (Mbyte
configuration file:
--- Version 1.0 volume groups --- VG Name /dePV Name /dev/disk/disk34

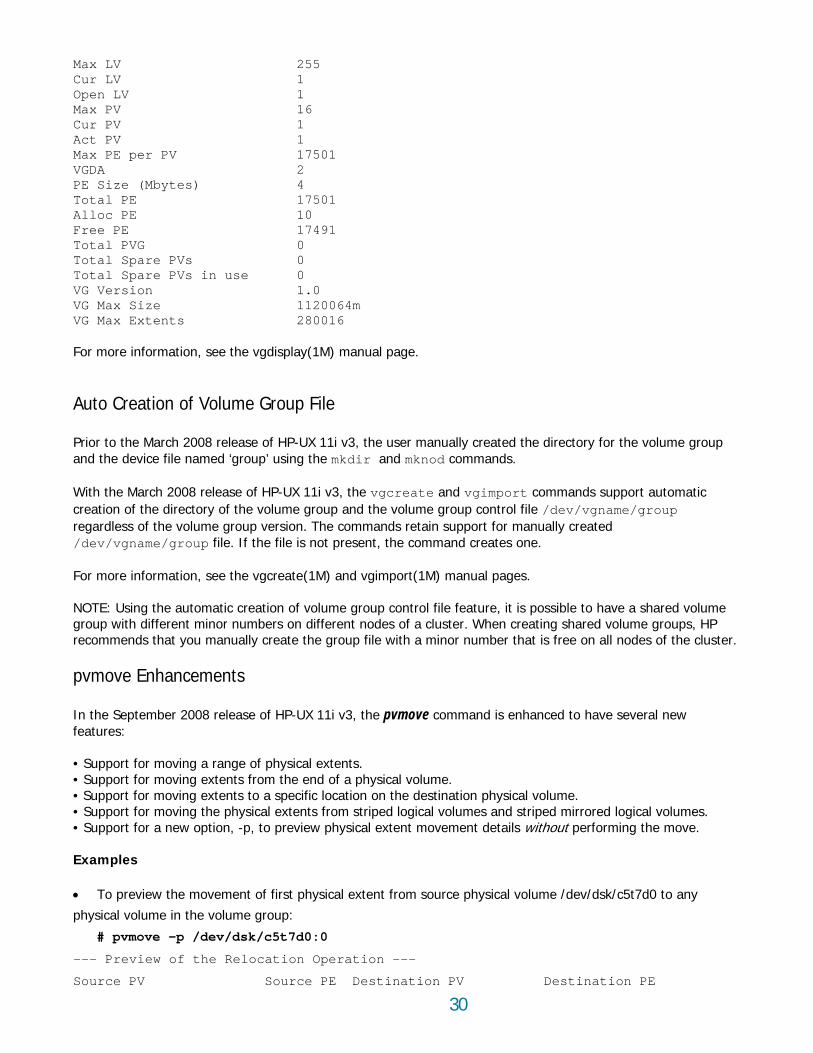
With the March 2008 release of HP-UX 11i v3, vgdisplay displays the volume g
29
roup version, the maximum size to which the volume group can grow and the maximum number of physical extents.
LVM supports a new –V option, which displays the volume formation for all volume groups of the specified version.
/dev/vg00 read/write available 255 4 4
16 1 1 4238
2 8
4228 029
2199
in use 0 1.0
464m 08
groups on the system:
/dev/vg00 read/write available 255 4
4 16 1
4238
8
Free PE 2199 Total PVG 0 Total Spare PVs 0 Total Spare PVs in use 0 VG Version 1.0 VG Max Size 542464m VG Max Extents 67808 VG Name /dev/vg01 VG Write Access read/write VG Status available
With the September 2008 release of HP-UX 11 iv3, group in
Examples # vgdisplay vg00 --- Volume groups --- VG Name VG Write Access VG Status Max LV Cur LV
Open LV Max PV Cur PV Act PV Max PE per PV VGDA PE Size (Mbytes) Total PE
2Alloc PE Free PE Total PVG 0 Total Spare PVs 0 Total Spare PVsVG Version VG Max Size 542
8VG Max Extents 67
e To display all Version 1.0 volum # vgdisplay -V 1.0 --- Volume groups --- VG Name VG Write Access VG Status Max LV Cur LV Open LV Max PV Cur PV Act PV 1Max PE per PV VGDA 2 PE Size (Mbytes) 8
2Total PE 42Alloc PE 2029
30
255 1 1 16
1 1
17501 2 4 17501
10 17491
Total Spare PVs in use 0
VG Max Size 1120064m 280016
For more information, see the vgdisplay(1M) manual page.
y created the directory for the volume group group’ using the mkdir and mknod commands.
upport automatic name/group
file. If the file is not present, the command creates one.
Using the automatic creation of volume group control file feature, it is possible to have a shared volume different nodes of a cluster. When creating shared volume groups, HP
with a minor number that is free on all nodes of the cluster.
-UX 11i v3, the pvmove command is enhanced to have several new
ysical extents. physical volume.
ume. d mirrored logical volumes.
• Support for a new option, -p, to preview physical extent movement details without performing the move. Examples • To preview the movement of first physical extent from source physical volume /dev/dsk/c5t7d0 to any
physical volume in the volume group:
# pvmove -p /dev/dsk/c5t7d0:0
--- Preview of the Relocation Operation ---
Source PV Source PE Destination PV Destination PE
Max LV Cur LV
Open LV Max PV Cur PV Act PV Max PE per PV
VGDA PE Size (Mbytes)
Total PE Alloc PE Free PE Total PVG 0
0Total Spare PVs
VG Version 1.0
VG Max Extents
Auto Creation of Volume Group File Prior to the March 2008 release of HP-UX 11i v3, the user manualland the device file named ‘ With the March 2008 release of HP-UX 11i v3, the vgcreate and vgimport commands screation of the directory of the volume group and the volume group control file /dev/vgregardless of the volume group version. The commands retain support for manually created/dev/vgname/group For more information, see the vgcreate(1M) and vgimport(1M) manual pages. NOTE: group with different minor numbers on recommends that you manually create the group file
pvmove Enhancements In the September 2008 release of HPfeatures: • Support for moving a range of ph• Support for moving extents from the end of a• Support for moving extents to a specific location on the destination physical vol• Support for moving the physical extents from striped logical volumes and stripe
/
31
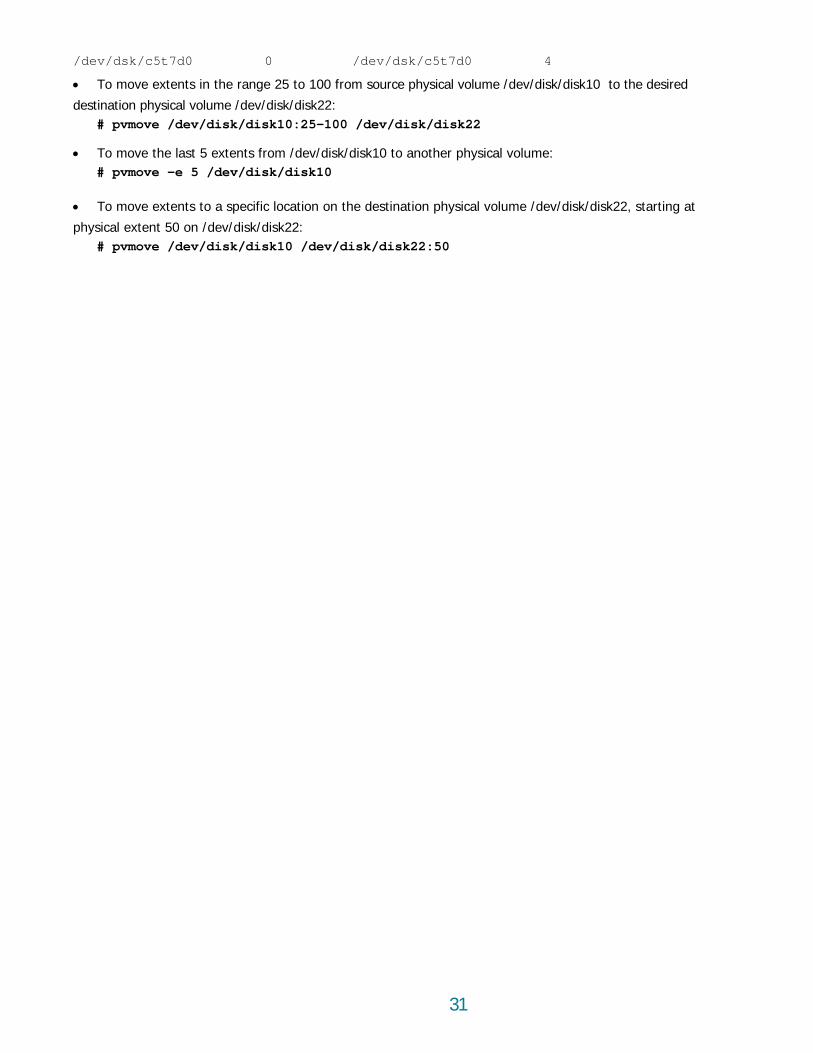
5 to 100 from source physical volume /dev/disk/disk10 to the desired
22
/dev/disk/disk10 to another physical volume:
stination physical volume /dev/disk/disk22, starting at
physical extent 50 on /dev/disk/disk22: # pvmove /dev/disk/disk10 /dev/disk/disk22:50
dev/dsk/c5t7d0 0 /dev/dsk/c5t7d0 4
• To move extents in the range 2
destination physical volume /dev/disk/disk22: # pvmove /dev/disk/disk10:25-100 /dev/disk/disk
• To move the last 5 extents from # pvmove –e 5 /dev/disk/disk10
• To move extents to a specific location on the de
32
Miscellaneous
s
ry 2007 release of HP-UX 11i v3, LVM commands were enhanced to avoid overwriting LVM configuratio n p sical volumes that already belong to a volume group and are recorded in the
s not present in /etc/lvmt eded even though the corresponding physical volume belonged to a volume group recorded in
ary 2007 release of HP-UX 11i v3 so that pvcreate or is the same for both legacy and persistent DSFs of the physical volume.
In addition to pvcreate the following commands have been enhanced similarly:
t1d0 and c9t1d0.
ases prior to HP-UX 11i v3. But on HP-UX 11i v3 pvcreate fails and prints the following:
"/dev/dsk/c9t1d0" is already present in the "/etc/lvmtab" file and represents an alternate link to "/dev/dsk/c6t1d0".”
Mirror Disk Installation No Longer Requires a Reboot
With the HP-UX 11i v3 release, the Mirror Disk product installation is much easier. Unlike previous releases, Mirror Disk product installation does not require a reboot.
Commands enhanced to prevent misconfigurations through alternate link
Starting with the Februan data o hy
/etc/lvmtab or /etc/lvmtab_p.
In prior releases, pvcreate with -f (force) option on an alternate physical volume path that waab succe
/etc/lvmtab. This behavior has been changed with the Februfails in such situations. The behavi
vgcreate, pvremove, vgimport, and vgchgid.
Example
As an example, consider a multipathed physical volume whose DSFs are /dev/dsk/c9/dev/dsk/c6t1d0. Let the volume group be configured with only /dev/dsk/
‘pvcreate –f /dev/rdsk/c6t1d0’ succeeds on rele
“pvcreate: The physical volume
33
Agihysical location of the
LUN remains the ved from one HBA to another, moved from one switch/hub port to another,
presented via a different target port to the host, or configured with multiple hardware paths. Also referred as persistent LUN binding.
Agile View The representation of LUNs using lunpath hardware paths, LUN hardware paths, and persistent DSFs,
Hardware Path ies of numbers representing the physical or virtualized location of a device. The path is a sequence
ight not correspond to ght represent only a “handle” to a device rather than a physical path
Leges prior to HP-UX 11i v3.
xists in releases prior to HP-UX 11i v3. It is composed of a series of bus-nexus addresses separated by ‘/’ leading to the HBA; beneath the HBA, additional address elements (such as domain, area, port, target, and LUN) are separated by ‘.’. The string
y DSF ded in the file’s
minor name and file name, such as /dev/dsk/c2t3d4.
LUrefers to an end storage device such as a disk, tape, floppy, or CD. This is the
gical unit itself and does not represent the path to the logical unit.
The physical hardware path leading to a SCSI logical unit. A SCSI LUN can have more than one lunpath.
Persistent DSF A DSF conforming to the naming model introduced in HP-UX 11i v3 to support agile addressing. The device file name contains an instance number, such as /dev/disk/disk#, and the minor number has no hardware path information.
Metadata The on-disk structures that LVM uses to manage a volume group. This space is not available for application data.
Glossary
le Addressing The ability to address a LUN with the same device special file regardless of the pLUN or the number of paths leading to it. In other words, the device special file for asame even if the LUN is mo
to
introduced in HP-UX 11i v3.
DSF Device Special File. A file associated with an I/O device. DSFs are read and written the same as ordinary files, but requests to read or write are sent to the associated device.
A serof I/O addresses that share a hierarchical relationship. The address elements mphysical hardware addresses, and mito it.
acy View The representation of legacy hardware paths and legacy DSFs, as in releas
Legacy Hardware Path The representation of a hardware path as it e
“0/2/1/0.1.4.0.0.2.7” is an example of a legacy hardware path.
LegacA DSF with the hardware path information such as SCSI bus, target, and LUN embed
N A SCSI logical unit. This lo
Lunpath
34
h type of volume group assigned a version to distinguish from another type, based on the metadata format maintained by
LVM.
Volume group version Based on the metadata format, LVM supports three types of volume groups. Eac
is
For More Information
g documents on HP documentation website: To learn more about some of the LVM features, see the followinhttp://docs.hp.com (Use search with the given name of the whitepaper)
20Volume%20Managerhttp://www.docs.hp.com/en/oshpux11iv3#LVM%
SNOR)
nsion (DLE)/vgmodify • LVM Volume Group Quiesce/Resume
ume group configuration from legacy to agile on HP documentation website:
• SLVM Single-Node Online Reconfiguration (SLVM tLVM Online Disk Replacemen
Dynamic LUN expa•• LVM Volume Group
• LVM Version 2.0 Volume Groups in HP-UX 11i v3 • LVM Limits White Paper To learn more about configuring LVM and migration of LVM volnaming model, see the following documents http://docs.hp.com (Use search with the given name of the whitepaper) http://www.docs.hp.com/en/oshpux11iv3#LVM%20Volume%20Manager
ide Logical Volume Management
document on HP 20Area%20Management
• LVM Migration from Legacy to Agile Naming Model • HP-UX System Administrator's Gu
To learn more about the agile view and the new mass storage stack, see the followingdocumentation website: http://docs.hp.com/en/netsys.html#Storage%
rage Stack
t supported node and host name sizes on HP-UX, see the following document on HP
• The Next Generation Mass Sto
To learn more aboudocumentation website: http://www.docs.hp.com/en/oshpux11iv3#White%20Papers
• Node and Host Name Sizes on HP-UX
Call to Action HP welcomes your input. Please give us comments about this whitepaper, or suggestions through our technical documentation feedback website: http://docs.hp.com/en/feedback.html.
© 2008 Hewlett-Packard Development Company, L.P. The information contained herein is subject to change without notice. The only warranties for HP products and services are set forth in the express warranty statements accompanying such products and services. Nothing herein should be construed as constituting an additional warranty. HP shall not be liable for technical or editorial errors or omissions contained herein.
35