&lwul[ ;hq$ss ;hq'hvnwrs 6huyhu - assets.cdngetgo.com · $gplqlvwudwru¶v *xlgh iru...
TRANSCRIPT
Citrix® XenApp™ XenDesktop Server™
Presentation Server™
Administrator’s Guide Installing GoToMeeting

1 Administrator’s Guide for Installing GoToMeeting
Contents Introduction --------------------------------------------------------------------------------------------------------- 2 Terms ----------------------------------------------------------------------------------------------------------------- 3 Using GoToMeeting with XenApp, XenDesktop Server and XenApp ---------------------------------------------- 3 GoToMeeting Account Setup ---------------------------------------------------------------------------------------- 4 Finding Documentation----------------------------------------------------------------------------------------------- 5 Getting Support ------------------------------------------------------------------------------------------------------- 5 Installation ------------------------------------------------------------------------------------------------------------ 6
Installation Requirements -------------------------------------------------------------------------------------- 6 I. Manually Running GoToMeeting for XenApp Installer ------------------------------------------------------ 7 Server Scenarios --------------------------------------------------------------------------------------------- 12 Server Scenario Details -------------------------------------------------------------------------------------- 12 II. Deploying GoToMeeting Integration Installation Using an MSI Install Script (Server) ------------------ 14 III. Manually Running GoToMeeting XENAPP Client Setup MSI installer ---------------------------------- 18 IV. Deploying GoToMeeting Integration Installation Using an MSI Install Script (Client) ------------------ 18
End-User Setup ---------------------------------------------------------------------------------------------------- 19 Adding the Microsoft Outlook Toolbar ----------------------------------------------------------------------- 19
Installation Issues -------------------------------------------------------------------------------------------------- 20 Uninstall GoToMeeting --------------------------------------------------------------------------------------------- 21 Uninstall GoToMeeting XenApp Client Setup using Add/Remove Programs -------------------------- 22

2 Administrator’s Guide for Installing GoToMeeting
Introduction
Welcome to GoToMeeting GoToMeeting is the most cost-effective, accessible and easily managed online collaboration solution ever. GoToMeeting includes two great products that make up one total solution: GoToWebinar for large Web events and GoToMeeting for smaller, more interactive meetings. GoToMeeting users can collaborate on documents, deliver presentations, perform product demonstrations and securely share confidential information from anywhere, at any time. GoToMeeting’s rapid download, quick meeting setup and intuitive user interface has meeting organizers and attendees up and running in a matter of seconds. GoToWebinar users can hold a Webinar, or “Web seminar,” to facilitate communication between a small number of presenters to a large remote audience of up to 1,000. GoToWebinar is the only do-it-yourself Web conferencing product designed to quickly increase your qualified target audience, lower your marketing cost-per-lead and reduce your overall presentation costs. GoToMeeting incorporates industry-standard security features and end-to-end SSL encryption to ensure that login information and meeting data are secure. The GoToMeeting architecture is the most advanced security foundation available on the market and offers meeting organizers and attendees true end-to-end data security. With GoToMeeting, travel costs can be dramatically reduced or eliminated because meetings and Webinars can be held online with anyone, anywhere. Spend time meeting, training and pitching online rather than dealing with the hassles of traveling or worrying about the costs of reserving conference space. GoToMeeting’s All You Can Meet™ pricing model provides easy-to-understand billing that helps you effectively budget and manage online meeting costs with no unexpected overage charges or additional fees. A new breed in online meeting and Webinar technology, GoToMeeting is designed to make it easier for everyone to organize and participate in online meetings and Webinars.

3 Administrator’s Guide for Installing GoToMeeting
Terms XenApp, XenDesktop Server and XenApp – This installation guide is intended to support XenApp as well as XenApp and XenDesktop Server. All references and screenshots of XenApp are equally relevant to XenDesktop Server and XenApp. XenApp Administrator – The person(s) responsible for administering XenApp, and in this instance, for installing the GoToMeeting XenApp installer on Presentation Server. Organizer – Organizers have accounts with GoToMeeting that enable them to schedule, start and conduct meetings. Attendee – An attendee is any person who attends a meeting – including organizers and presenters. Presenter – A presenter is any attendee who is giving a presentation and shares his or her computer screen with all the attendees. GoToMeeting Administrator – The person(s) responsible for setting up and managing GoToMeeting organizers using the GoToMeeting Administration Center.
Using GoToMeeting with XenApp, XenDesktop Server and XenApp GoToMeeting can be installed on Presentation Server without using the GoToMeeting XenApp Installer. Installing GoToMeeting on Presentation Server without using the Installer results in all meetings being executed on Presentation Server and all invitation and scheduling activities defaulting to published scheduling and email clients. Using the GoToMeeting Installation Wizard to install GoToMeeting on Presentation Server allows Presentation Server administrators to install GoToMeeting on the server but have GoToMeeting redirect all meetings to the local client desktop while still allowing integration with published applications such as Microsoft® Outlook® and IBM® Lotus Notes®. Running GoToMeeting on the client device provides the following benefits: 1) allows a GoToMeeting organizer or attendee to present both published applications and locally installed applications; 2) it avoids any impact to the Presentation Server resources; 3) it allows Presentation Server administrators the ability to configure the GoToMeeting installment to best suit the specific server/client environment – like having GoToMeeting running on the local client and integrate with published email clients.
4 Administrator’s Guide for Installing GoToMeeting
Intended Audience: XenApp administrator with either of the following objectives:
1. You want to install GoToMeeting on a Presentation Server and have all meetings redirect to the local client desktop. You may also want to set up integration with published Microsoft Outlook or IBM Lotus Notes. 2. You want to install GoToMeeting on a Presentation Server and continue to have meetings execute on the server, but want to be able to set the integration with Microsoft Outlook or IBM Lotus Notes for all GoToMeeting organizers.
GoToMeeting Account Setup Once you have completed the GoToMeeting installation on Presentation Server and you are ready to set up GoToMeeting organizers to host meetings, contact GoToMeeting Sales at (800) 372-6207 (U.S.) or +1 (805) 690-5729 to set up a GoToMeeting account. When creating a corporate account, GoToMeeting will set up one or more administrators within your company. The GoToMeeting administrator is the person who signs up meeting organizers and manages licenses using the GoToMeeting Administration Center. Be sure to install GoToMeeting on XenApp before signing up organizers from the GoToMeeting Administration Center. Refer to the Admin Center Getting Started article for more information about signing up organizers, creating groups and managing GoToMeeting licenses.
5 Administrator’s Guide for Installing GoToMeeting
Finding Documentation To view, search and print PDF documentation for Presentation Server, you need Adobe® Reader®. You can download Adobe Reader for free from the Adobe Systems Web site. Documentation is available on the Citrix Knowledge Center Web site (see Product Documentation). Updates to Citrix technical manuals are posted on the site as well.
Document Center Install the Document Center as a single point of access for all documentation relating to Presentation Server. Browse the table of contents for information about a task you want to accomplish and get point-and-click access to all pertinent sections across the guides. After installing the Document Center, choose Start > Programs > Citrix > MetaFrame Presentation Server > Documentation and then double-click document_center.pdf. Note: You cannot update the Document Center with newer manuals or other files. Replacing any of the files in the installed \Documentation\docs folder impairs Document Center functionality. If you want to reinstall the Document Center, you must first remove the installed copy from your system using Add/Remove Programs.
GoToMeeting Administrator Help The Admin Center help is available online on the GoToMeeting Support site.
GoToMeeting User Help The GoToMeeting User Help for GoToMeeting organizers and attendees is available online at https://support.logmeininc.com/gotomeeting. The help file includes instructions on how to use the GoToMeeting feature set and schedule and start meetings. It also contains instructions on how to configure GoToMeeting organizer preferences for optimal Presentation Server Integration under Getting Started -> Set Up GoToMeeting for use with XenApp.
GoToWebinar User Help The GoToWebinar User Help for GoToWebinar organizers and attendees is available online at https://support.logmeininc.com/gotowebinar. The help file includes instructions on how to use the GoToWebinar feature set and schedule and start Webinars. It also contains instructions on how to configure GoToWebinar Organizer preferences for optimal Presentation Server Integration under Getting Started -> Set Up GoToWebinar for use with XenApp.
Getting Support GoToMeeting provides technical support 24/7. For questions on GoToMeeting integration with XenApp, please visit our support center for contact information. https://support.logmeininc.com/gotomeeting

6 Administrator’s Guide for Installing GoToMeeting
Installation
Installation Requirements
Server Requirements XenApp 4.0, XenApp or XenDesktop Server
http://support.citrix.com/kb/entry.jspa?externalID=CTX106319&categoryID=619 Or Citrix Access Essentials 1.0 or higher http://support.citrix.com/kb/entry.jspa?externalID=CTX107071&categoryID=745
Server to Client Content Redirection Enabled (refer to the index of the
Administrator’s Guide) http://support.citrix.com/kb/entry.jspa?externalID=CTX106319&categoryID=619
Client Requirements To implement optimal integration, client devices must be running a Windows-based operating system have a Win32 desktop environment and the ICA client must support server to client content redirection. ICA clients that support server to client redirection are Win32 9.00, CE WBT 9.x, CE HPC 9.x, and Java 8.00. More information regarding ICA Clients that support server to client redirection can be found at http://www.citrix.com/clientfeaturematrix.
Recommended XenApp settings Set published applications to use “Seamless Windows” mode and require explicit “Log in type” on the XenApp Web interface.
Running the GoToMeeting Installation Wizard Note: You need to have local administrator rights to run this installation wizard. There are two methods for running the GoToMeeting Installation Wizard:
I. Manually – GoToMeeting for Presentation Server Installer (ideal for running the GTM Installer on a single Presentation Server) II. MSI Package – Installation Manager or other industry-standard deployment tool (ideal for deploying the GoToMeeting Installer on multiple Presentation Servers at the same time)
7 Administrator’s Guide for Installing GoToMeeting
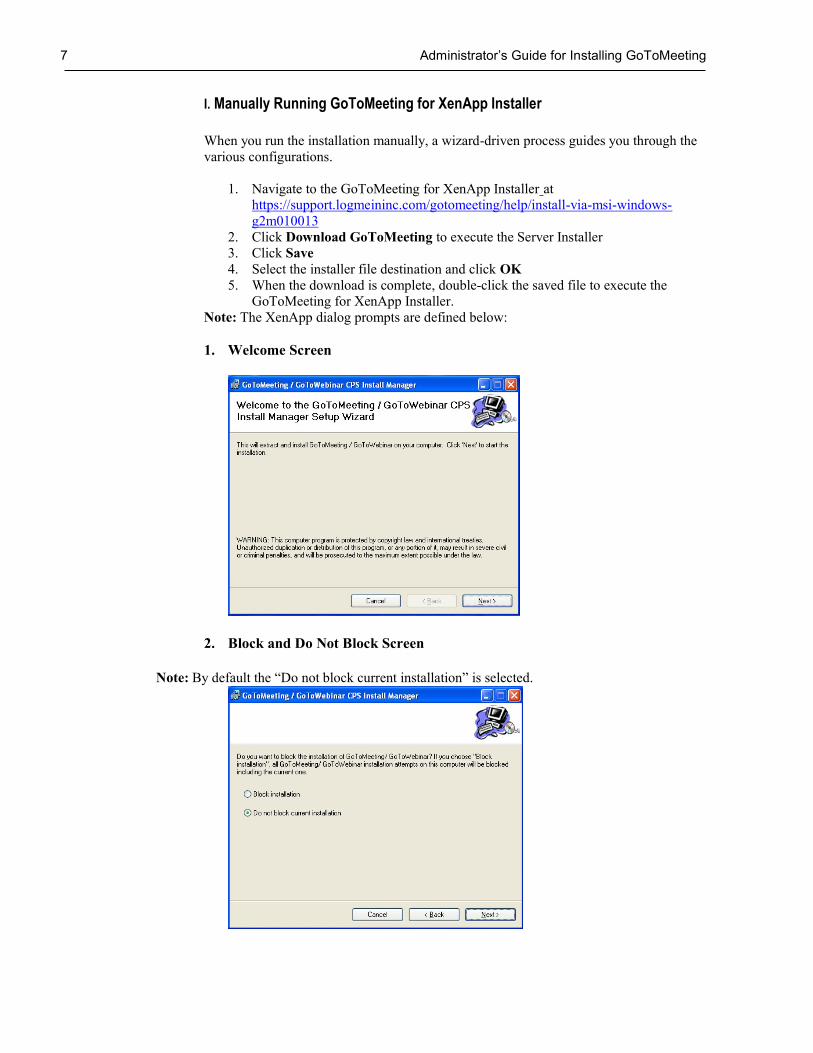
I. Manually Running GoToMeeting for XenApp Installer When you run the installation manually, a wizard-driven process guides you through the various configurations.
1. Navigate to the GoToMeeting for XenApp Installer at
https://support.logmeininc.com/gotomeeting/help/install-via-msi-windows-g2m010013
2. Click Download GoToMeeting to execute the Server Installer 3. Click Save 4. Select the installer file destination and click OK 5. When the download is complete, double-click the saved file to execute the
GoToMeeting for XenApp Installer. Note: The XenApp dialog prompts are defined below:
1. Welcome Screen
2. Block and Do Not Block Screen
Note: By default the “Do not block current installation” is selected.

8 Administrator’s Guide for Installing GoToMeeting
3. Progress Bar
4. If “Block Installation” was selected, the installation is complete.
9 Administrator’s Guide for Installing GoToMeeting
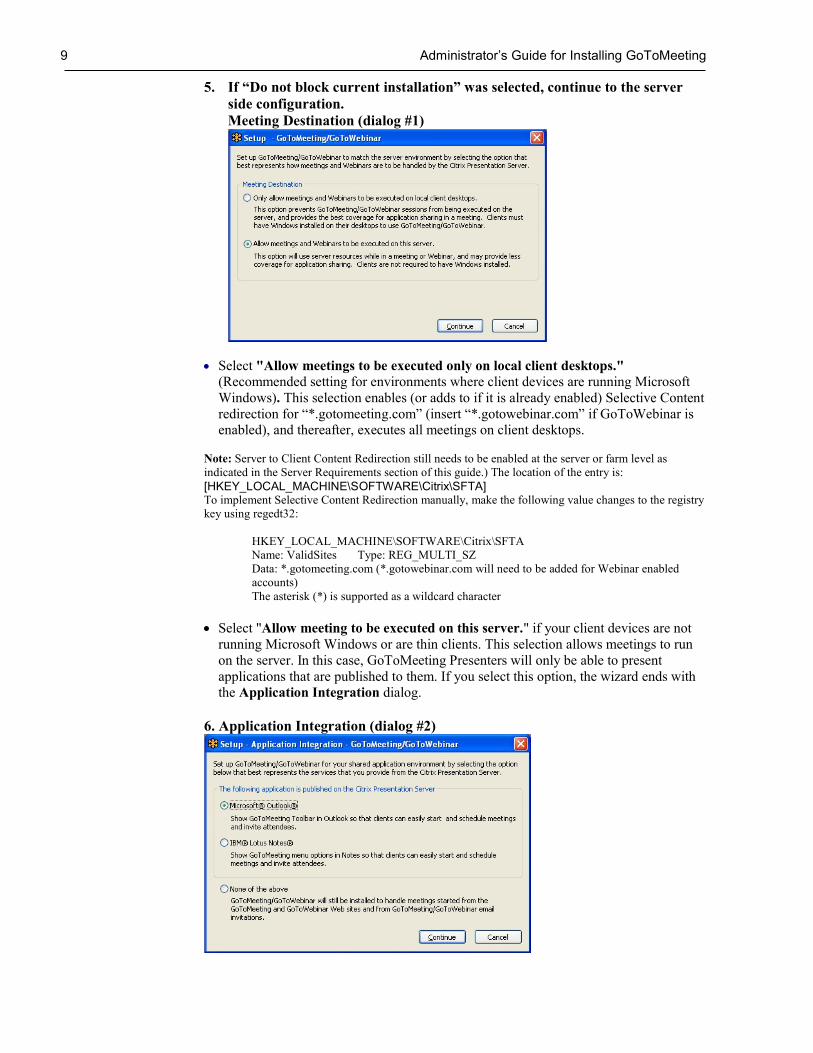
5. If “Do not block current installation” was selected, continue to the server side configuration. Meeting Destination (dialog #1)
Select "Allow meetings to be executed only on local client desktops."
(Recommended setting for environments where client devices are running Microsoft Windows). This selection enables (or adds to if it is already enabled) Selective Content redirection for “*.gotomeeting.com” (insert “*.gotowebinar.com” if GoToWebinar is enabled), and thereafter, executes all meetings on client desktops.
Note: Server to Client Content Redirection still needs to be enabled at the server or farm level as indicated in the Server Requirements section of this guide.) The location of the entry is: [HKEY_LOCAL_MACHINE\SOFTWARE\Citrix\SFTA] To implement Selective Content Redirection manually, make the following value changes to the registry key using regedt32:
HKEY_LOCAL_MACHINE\SOFTWARE\Citrix\SFTA Name: ValidSites Type: REG_MULTI_SZ Data: *.gotomeeting.com (*.gotowebinar.com will need to be added for Webinar enabled accounts) The asterisk (*) is supported as a wildcard character
Select "Allow meeting to be executed on this server." if your client devices are not
running Microsoft Windows or are thin clients. This selection allows meetings to run on the server. In this case, GoToMeeting Presenters will only be able to present applications that are published to them. If you select this option, the wizard ends with the Application Integration dialog.
6. Application Integration (dialog #2)

10 Administrator’s Guide for Installing GoToMeeting
Select the option that best represents the services that you provide from the Presentation Server. GoToMeeting invitation emails and calendar events will be created by the application that is selected in this field. Select “Microsoft® Outlook®” if Outlook is published from this server. Selecting
this option will place a GoToMeeting Toolbar in published Outlook so that users can start meetings and invite attendees
Select “None of the above” if Microsoft Outlook nor IBM Lotus Notes is published from this server. In this case, GoToMeeting users can start meetings and invite attendees from the www.gotomeeting.com or by clicking on a meeting invitation link received by email. For instructions on how to do this visit the GoToMeeting User Help at https://support.logmeininc.com/gotomeeting.
7. Client Configuration (dialog #3)
Note: You will only see this dialog box if you selected "Only allow meetings and Webinars to be executed only on local client desktops.” in the Meeting Destination dialog box. Select the option that is most appropriate for your server/client environment. Selecting “Prompt the client about recommended settings” displays the following dialog to the organizer the first time the organizer hosts a meeting from a server. This setting is the recommended setting. For an optimal organizer experience, it is recommended that local email integration be disabled and periodic reminder synchronization be enabled. Selecting “Force the recommended settings” disables the local email and forces
synchronization to be enabled. Also, if a client does not have the GoToMeeting XENAPP Client installer installed this option sets GoToMeeting to periodically synchronize with “My Meetings” and “My Webinars” on the client computer, allowing the GoToMeeting reminder feature to maintain the most up-to-date meeting information
Selecting “Do Nothing” leaves client settings unchanged and does not prompt users to
make any changes Upon completion of the installation, the following dialog will be displayed.

11 Administrator’s Guide for Installing GoToMeeting
Below are screenshots of the GoToMeeting preferences dialogs as they appear to GoToMeeting organizers. Start Up Tab
Integrations Menu

12 Administrator’s Guide for Installing GoToMeeting
4. Toolbar Advanced - Integration (dialog #4)
Select “My email application is published on a XenApp” if you would like GoToMeeting to integrate with a published email client instead of the local email client. Input the server address and the name of the email application that you would like GoToMeeting to integrate with (for example: “Outlook”). Note: The type of email client pointed by “Application Name” should match the option chosen under “Use GoToMeeting with…” unless “My default email application” is selected.
Server Scenarios 1. Server has no applications that will launch GoToMeeting (e.g., a server dedicated to legacy applications with no published browsers or email applications). 2. Server has Microsoft Outlook and/or IBM Lotus Notes (possibly among other applications). 3. Server has a Web browser, but doesn't have Microsoft Outlook or Lotus Notes.
Server Scenario Details 1. Server has no applications that will launch GoToMeeting
No action needs to be taken on this server regarding GoToMeeting optimization.
2. Server has Microsoft Outlook and/or IBM Lotus Notes. Run the GoToMeeting Installation Wizard and make the following recommended selections:
Meeting Destination (Dialog #1) Select "Allow meetings and Webinars to be
executed on local client desktops." if your client devices are running Microsoft Windows and you want all meetings to be executed on local client desktops.
Application Integration (Dialog #2) Select the option that best represents the services that you provide from Presentation Server. If Microsoft Outlook and IBM Lotus Notes are both in this server, select the application that the majority of clients are using. If “None” is selected, no toolbars will be created in Outlook or Notes and users will be allowed to start or join meetings from www.gotomeeting.com or by clicking a meeting link in an invitation email.
Client Configuration (Dialog #3) Select either “Prompt the client about recommended settings” or “Force the client recommended settings”.
Notes Integration (Dialog #4) If you selected Microsoft Outlook in dialog #2, dialog #4 will not appear. If you selected IBM Lotus Notes, copy and paste the
13 Administrator’s Guide for Installing GoToMeeting
information in dialog #4 to Notes.ini file for each user who has a GoToMeeting organizer account.
Note: You will see a similar dialog recommending that you remove the entry from Notes.ini file if you disable the Lotus Notes Integration.
3. Server has a Web browser but doesn't have Microsoft Outlook or Lotus Notes. Run the GoToMeeting Installation Wizard and make the following recommended selections:
Meeting Destination (Dialog #1) Select "Allow meetings to be executed only on local client desktops." if your client devices are running Microsoft Windows and you want all meetings to be executed on local client desktops.
Application Integration (Dialog #2) Select "None of the above". Client Configuration (Dialog #3) Select either “Prompt the client about
recommended settings” or “Force the client recommended settings”. Notes Integration (Dialog #4) If you selected "None of the above" in dialog
#2, dialog #4 will not appear.
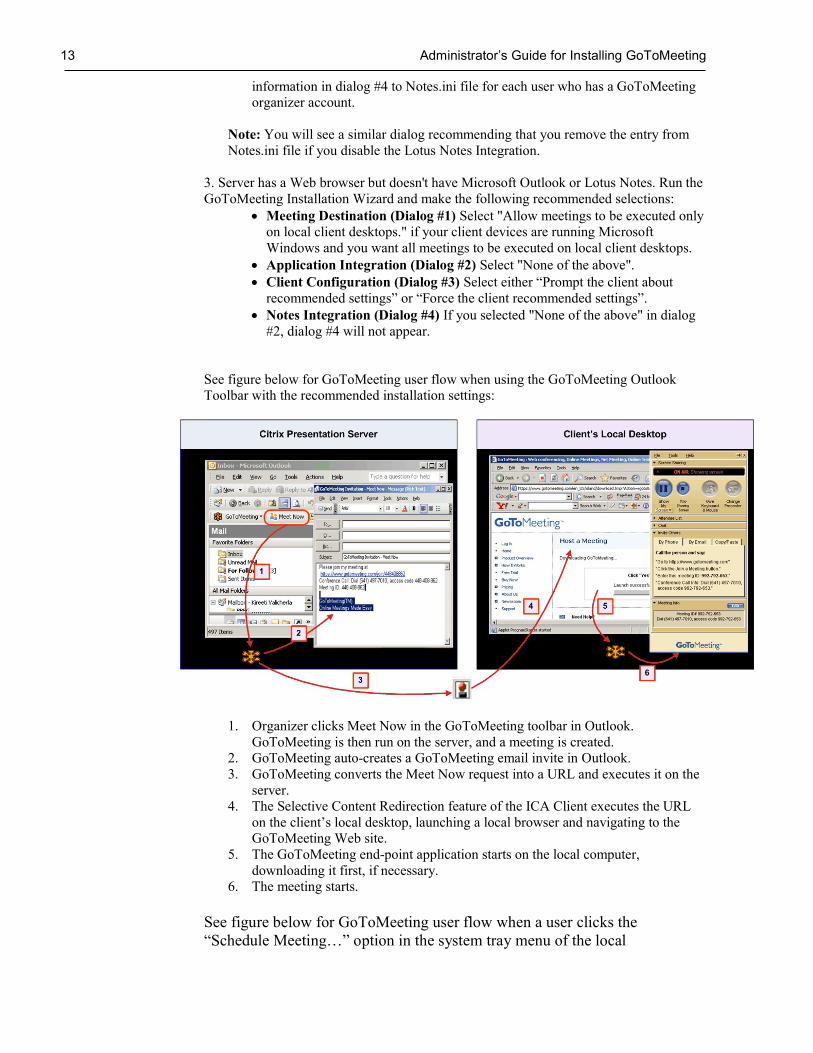
See figure below for GoToMeeting user flow when using the GoToMeeting Outlook Toolbar with the recommended installation settings:
1. Organizer clicks Meet Now in the GoToMeeting toolbar in Outlook. GoToMeeting is then run on the server, and a meeting is created.
2. GoToMeeting auto-creates a GoToMeeting email invite in Outlook. 3. GoToMeeting converts the Meet Now request into a URL and executes it on the
server. 4. The Selective Content Redirection feature of the ICA Client executes the URL
on the client’s local desktop, launching a local browser and navigating to the GoToMeeting Web site.
5. The GoToMeeting end-point application starts on the local computer, downloading it first, if necessary.
6. The meeting starts. See figure below for GoToMeeting user flow when a user clicks the “Schedule Meeting…” option in the system tray menu of the local

14 Administrator’s Guide for Installing GoToMeeting
GoToMeeting and the user has the “Published email client” option in the “Integrations” tab of “Preferences” dialog checked.
Note: The illustration below assumes that the default published email client is Outlook.
1. The user chooses “Schedule Meeting” from the system tray menu of the locally installed GoToMeeting.
2. GoToMeeting presents the “Schedule Meeting” dialog. 3. The user sets the various fields in the dialog and clicks the “Schedule”
button. 4. GoToMeeting sends a message to the new client side component of the
GoToMeeting virtual channel, g2mXenAppclient.dll. 5. g2mXenAppclient.dll sends the message to the ICA channel. 6. The server side component of the virtual channel, g2mXenAppserver.exe,
receives the message on the server. 7. g2mXenAppserver.exe sends the message to the GoToMeeting software
installed on the server and creates the Outlook calendar event.
II. Deploying GoToMeeting Integration Installation Using an MSI Install Script (Server) Select the appropriate property values and initiate the MSI installation using the following command line parameter template: msiexec.exe /i c:\G2M_XENAPP_Helper_Build_xxx.msi G2MADMINSETUP=[True|False] G2MADMINREDIR=[True|False] G2MINTEGRATION=[Outlook|Notes|Email] G2MADMINCLIENT=[Setup|Force|Ignore]
15 Administrator’s Guide for Installing GoToMeeting
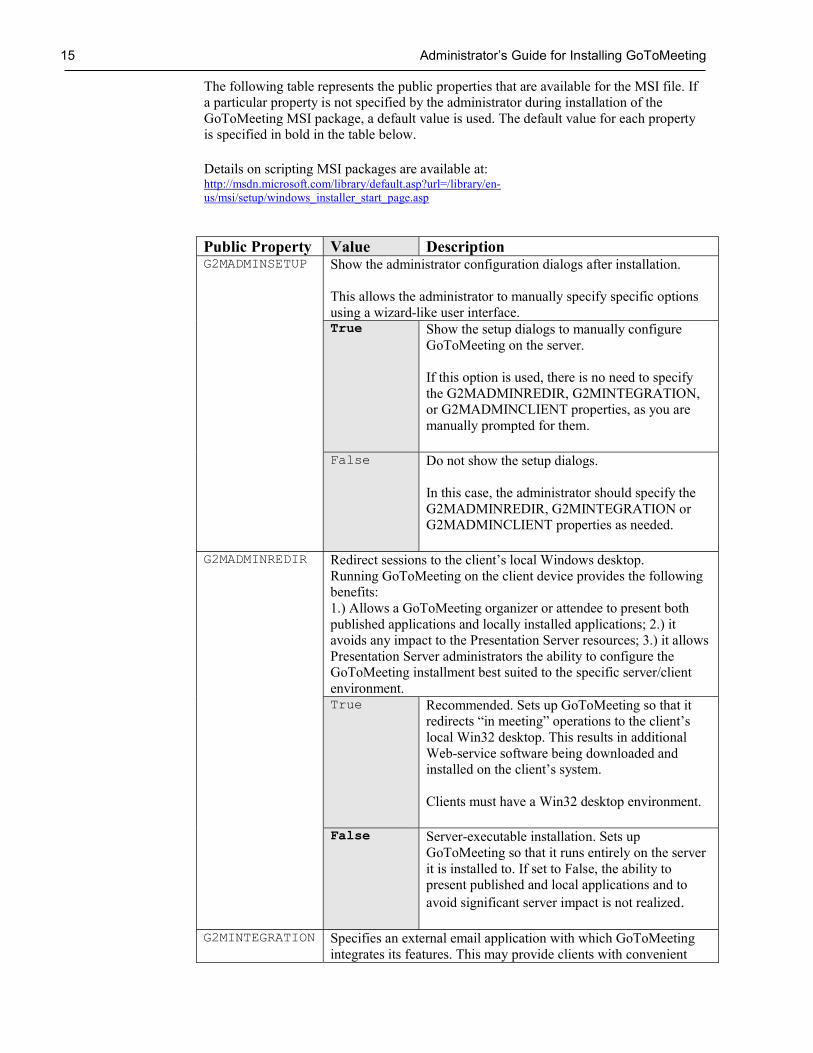
The following table represents the public properties that are available for the MSI file. If a particular property is not specified by the administrator during installation of the GoToMeeting MSI package, a default value is used. The default value for each property is specified in bold in the table below. Details on scripting MSI packages are available at: http://msdn.microsoft.com/library/default.asp?url=/library/en-us/msi/setup/windows_installer_start_page.asp Public Property Value Description G2MADMINSETUP Show the administrator configuration dialogs after installation.
This allows the administrator to manually specify specific options using a wizard-like user interface. True Show the setup dialogs to manually configure
GoToMeeting on the server. If this option is used, there is no need to specify the G2MADMINREDIR, G2MINTEGRATION, or G2MADMINCLIENT properties, as you are manually prompted for them.
False Do not show the setup dialogs. In this case, the administrator should specify the G2MADMINREDIR, G2MINTEGRATION or G2MADMINCLIENT properties as needed.
G2MADMINREDIR Redirect sessions to the client’s local Windows desktop. Running GoToMeeting on the client device provides the following benefits: 1.) Allows a GoToMeeting organizer or attendee to present both published applications and locally installed applications; 2.) it avoids any impact to the Presentation Server resources; 3.) it allows Presentation Server administrators the ability to configure the GoToMeeting installment best suited to the specific server/client environment. True Recommended. Sets up GoToMeeting so that it
redirects “in meeting” operations to the client’s local Win32 desktop. This results in additional Web-service software being downloaded and installed on the client’s system. Clients must have a Win32 desktop environment.
False Server-executable installation. Sets up GoToMeeting so that it runs entirely on the server it is installed to. If set to False, the ability to present published and local applications and to avoid significant server impact is not realized.
G2MINTEGRATION Specifies an external email application with which GoToMeeting integrates its features. This may provide clients with convenient

16 Administrator’s Guide for Installing GoToMeeting
access to GoToMeeting from within Microsoft Outlook or IBM Lotus Notes. None No explicit integration is desired.
Outlook Specify this value if you publish a Web browser
and Outlook on the destination server. This installs the GoToMeeting integrated toolbar into Outlook for all your clients. To take advantage of Outlook integration, GoToMeeting must be installed after Outlook has been installed.
G2MADMINCLIENT Specify how clients’ local installations of GoToMeeting will be configured with regard to local email integration and reminder synchronization. You only need to specify this option if you are setting “G2MADMINREDIR=True”. Additionally, this does not need to be specified unless you also specified “G2MINTEGRATION=Outlook”.
Setup Prompt the client with a dialog recommending
certain setting changes to his/her local installation of GoToMeeting. This allows the client to choose the best settings for his/her local environment. Client Dialog:
This dialog will be shown to a meeting organizer the first time the organizer starts a meeting via one of the following methods: The integrated toolbar from published
Outlook; or Your clients will be recommended to change the following settings to their local installations of GoToMeeting: Local email integration should be disabled.
Since the email client is published, local email integration is likely inappropriate.

17 Administrator’s Guide for Installing GoToMeeting
Reminders should be synchronized periodically. Meetings and Webinars scheduled on the server-executed instance of GoToMeeting need to be periodically synchronized with the client’s local instance of GoToMeeting to allow for timely Reminders.
Force This option allows administrators to disable the
dialog described above. Instead, it silently forces clients to accept the following changes to their local GoToMeeting configurations: Local email integration is turned off. Periodic reminder synchronization is turned
on.
Ignore This option allows administrators to disable the dialog described above. No changes are made to the client installation of GoToMeeting.

18 Administrator’s Guide for Installing GoToMeeting
III. Manually Running GoToMeeting XENAPP Client Setup MSI installer When running the installation manually, a wizard-driven process will guide you through
the installation: 1. Navigate to the GoToMeeting XenApp Client setup installer at
https://support.logmeininc.com/gotomeeting/help/install-via-msi-windows-g2m010013.
2. Click Download XenApp Client Installer to execute the GoToMeeting XenApp Client Setup Installer.
3. Select Save and choose the installer file destination and click OK. 4. When the download is complete, double click the saved file to execute the
GoToMeeting XenApp Client Setup Installer.
IV. Deploying GoToMeeting Integration Installation Using an MSI Install Script (Client)
The MSI installer will make it easy for XenApp administrators to deploy the new GoToMeeting Coporate client-side virtual driver on client machines. The MSI installer will install the virtual driver component on the client side. It will make the necessary changes to the module.ini file in the ICA client directory. The MSI installer will also install the component which would enable GoToMeeting and the virtual driver component to communicate with each other. The installer will also create the necessary registry keys which store the information about the XenApp and the published application name with which the client side of GoToMeeting will be integrated. Note: It is recommended to install GoToMeeting XenApp client first before GoToMeeting is installed. If GoToMeeting XenApp client is installed after GoToMeeting, then some of the integration settings set through MSI properties might not be used by GoToMeeting.
The following table represents the public properties that are available for the MSI file. If a particular property is not specified by the administrator during installation of the GoToMeeting MSI package, a default value is used. The default value for each property is specified in bold in the table below. Details on scripting MSI packages are available at: http://msdn.microsoft.com/library/default.asp?url=/library/en-us/msi/setup/windows_installer_start_page.asp
Public Property Value Description ICACLIENTDIR Takes the path of the ICA client directory. If not set, the
MSI will assume the directory as [PROGRAMFILES]\Citrix\ICA Client.
PUBLISHEDINTEGRATION Specifies the local GoToMeeting to integrate with published email client. This will check the checkbox in the Advanced button dialog. True The local GoToMeeting is enabled to
integrate with a published email client.
False The local GoToMeeting is not enabled to integrate with a published email client.
SERVER Blank by default. Takes the XenApp address where published application is available. The value given here will set HKLM\Software\Citrix\GoToMeeting\XENAPP

19 Administrator’s Guide for Installing GoToMeeting
Client\ Server value. PUBLISHEDAPPNAME Blank by default. Takes the published application name
to which the local GoToMeeting will integrate with. The value given here will set HKLM\Software\Citrix\GoToMeeting XENAPP Client\ Name value.
MODIFYMODULINI Specifies the GoToMeeting installer to modify the module.ini file in the ICACLIENTDIR True The installer will modify the module.ini file
in the ICACLIENTDIR.
False The installer will not modify the module.ini file in the ICACLIENTDIR .
INTEGRATION Specifies whether or not email integration should be enabled. The value given here will set HKLM\Software\Citrix\GoToMeeting XENAPP Client\ Integration value. True Integration is enabled. When set to true, the
PUBLISHEDINTEGRATION value is also set to true no matter what value is given to it.
False Integration is not enabled. INTEGRATIONTYPE Specifies the type of email client published on the server.
Can take “Outlook” | “Notes” | “Email” The value given here will set HKLM\Software\Citrix\GoToMeeting XENAPP Client\ Integration Type value.
The following is a sample command to execute the MSI for installation and set the above properties: msiexec /i G2M_XENAPP_Client_Setup_Build_XXX.msi PUBLISHEDINTEGRATION="true" SERVER="Ortega" PUBLISHEDAPPNAME="Outlook" ICACLIENTDIR="C:\Program Files\ICA Client” INTEGRATION=“true” INTEGRATIONTYPE=”Outlook”
End-User Setup
Adding the Microsoft Outlook Toolbar GoToMeeting organizers using a published version of Microsoft Outlook may need to manually add the Outlook toolbar from the Outlook tools menu. Instructions for displaying the toolbar can be found in the GoToMeeting User help at: https://support.logmeininc.com/gotomeeting/help/prerequisites-for-outlook-windows-installs-g2m020004. Be sure to provide this information to your GoToMeeting organizers.

20 Administrator’s Guide for Installing GoToMeeting
Installation Issues If you provide both Outlook and Lotus Notes, select the application that the majority of
clients are using. There is currently no solution for both applications published from the same server. The option that is selected in “Preferences” under “Integrations” must match the option that is selected in the “Advanced” section of the “Integrations”.
In some instances, when installing GoToMeeting on XenApp and enabling Outlook
integration, the Outlook toolbar appears for all users in their published Outlook without having to manually add it; however, users cannot schedule or start meetings until they have been signed up as GoToMeeting organizers by a GoToMeeting administrator.
If a user would like to remove the toolbar:
1. Open outlook 2. Select Customize from the Tools menu 3. Deselect GoToMeeting from the list of toolbars
For more information about removing the Outlook toolbar please visit the GoToMeeting User Help at: http://www.support.gotomeeting.com under Getting Started -> Set Up GoToMeeting for use with XenApp. Using the embedded ICA client with GoToMeeting Because the embedded ICA client is downloaded each time a published application is launched from the XenApp website, the module.ini file in the ICA client directory is overwritten. This erases the virtual channel information that GoToMeeting needs to create an email in a published application. Please use the following steps to modify the ICA client’s .cab file on the XenApp that contains the module.ini file:
1. Find the embedded client cab file on the XenApp. Usually this is located at C:\Inetpub\wwwroot\Citrix\MetaFrame\ICAWEB\en\ica32\wficat.cab
2. Create a backup copy of the wficat.cab file 3. Use an archive tool to extract the contents of the wficat.cab file. 4. Install the GoToMeeting XenApp Client installer and copy the g2mXenAppclient.dll
file from C:\Program Files\Citrix\[ica client dir]\ 5. Uninstall the XenApp client after the file is copied. 6. Copy the G2mXenAppclient.dll file into the directory that the wficat.cab file was
extracted. 7. Locate the module.ini file in the extracted files. 8. Modify the module.ini file by adding the following entries:
[ICA 3.0] VirtualDriver = G2M [VirtualDriver] G2M = [G2M] DriverNameWin32=G2MXenAppClient.DLL
9. Download the Microsoft Cabinet Software Development Kit located at: http://support.microsoft.com/kb/310618
10. use the cabar utility to create a new cab file that will contain the original extracted files and the new g2mXenAppclient.dll file and the module.ini file. The command looks similar to: cabarc –s N wficat.cab *
11. Place the modified wficat.cab file in the correct client directory on the XenApp.
21 Administrator’s Guide for Installing GoToMeeting
Uninstall GoToMeeting
GoToMeeting is uninstalled via the Windows "Add or Remove Programs" Control Panel function. Any administrator can uninstall GoToMeeting by selecting it from the list of installed applications. Click "Remove" to start the uninstall process. The uninstall process can only be completed when: 1. The administrator should log in to a console session (either physically sitting in front of the computer or using a remote desktop console connection (mstsc /v:servername/console).
Note: g2mXenAppserver.exe does not run in the console session. 2. Log off all users from the server (either manually force them to log off or disable the login and wait for users to log out (this will cause all instances of g2mXenAppserver.exe to terminate). 3. Block users from logging in during the uninstall (Uninstalling will only take a few minutes). 4. Uninstall G2M from the "Add or Remove Programs". 5. Once the uninstall is completed, if login was disabled, allow users to log in to the server. If Lotus Notes integration was enabled for some clients, be sure to remove the following line from the "Notes.ini" file for each user: AddInMenus=c:\progra~1\citrix\gotome~1\{BUILD}\g2mnot~1.dll

22 Administrator’s Guide for Installing GoToMeeting
Uninstall GoToMeeting XenApp Client Setup using Add/Remove Programs
1. Right click the GoToMeeting daisy icon in the system tray of Windows and select Exit. 2. Go to the Windows Add/Remove Programs within the Control Panel (Start Control Panel Add/Remove Programs).
3. Find and select the GoToMeeting XenApp Client Setup entry in the list of installed programs.