m-net user instructions … · ethernet socket connect the unit to the network permanently with...
TRANSCRIPT

User InstructionsM-NET

AVIS: RISQUE DE CHOC ELECTRIQUE-NE PAS OUVRIR WARNING: SHOCK HAZARD-DO NOT OPEB
1: Important Safety Information Page 1
This lightning flash with arrowhead symbol within an equilateral triangle is intended to alert the user to the presence of non-insulated “dangerous voltage” within the product’s enclosure that may be of sufficient magnitude to constitute a risk of electric shock.
WARNING: To reduce the risk of electric shock, do not remove cover (back) as there are no user-serviceable parts inside. Refer servicing to qualified personnel.
The exclamation point wi thin an equilateral triangle is intended to alert the user to the presence of important operating and maintenance instructions in the literature accompanying the appliance.
Do not install near any heat sources such as radiators, heat registers, stoves, or other apparatus (including amplifiers) that produce heat.
Do not defeat the safety purpose of the polarized or grounding-type plug. A polarized plug has two lades with one wider than the other. A grounding plug has two blades and a third grounding prong. The wide blade or the third prong is provided for your safety. If the provided plug does not fit into your outlet, consult an electrician for replacement of the obsolete outlet.
Protect the power cord from being walked on or pinched particularly at the plugs, convenience receptacles, and the point where they exit from the apparatus.
Use only with the cart, stand, tripod, bracket, or table specified by the manufacturer, or sold with the apparatus. When a cart or rack is used, use caution when moving the
cart/apparatus combination to avoid injury from tip-over.
Unplug the apparatus during lightning storms or when unused for long periods of time.
Refer all servicing to qualified service personnel. Servicing is required when the apparatus has been damaged in any way, such as power supply cord or plug is damaged, liquid has been spilled or objects have fallen into the apparatus, the apparatus has been exposed to rain or moisture, does not operate normally, or has been dropped.
CAUTION: These servicing instructions are for use by qualified service personnel only. To reduce the risk of electric shock, do not perform any servicing other than that contained in the operating instructions unless you are qualified to do so.
Do not install this equipment in a confined or building-in space such as a book case or similar unit, and remain a well ventilation conditions at open site. The ventilation should not be impeded by covering the ventilation openings with items such as newspaper, table-cloths, curtains etc.
WARNING: Only use attachments/accessories specified or provided by the manufacturer (such as the exclusive supply adapter, battery etc).
WARINING: To reduce the risk of fire or electric shock, do not expose this apparatus to rain or moisture. The apparatus shall not be exposed to dripping or splashing and that objects filled with liquids, such as vases, shall not be placed on apparatus. No naked flame sources, such as lighted candles, should be placed on the apparatus.
CAUTION: Danger of explosion if battery is incorrectly replaced. Replace only with the same or equivalent type.
WARNING: The battery (battery or batteries or battery pack) shall not be exposed to excessive heat such as sunshine, fire or the like.
WARNING: The mains plug is used as disconnect device shall remain readily operable.The all-pole mains switch and all-pole circuit breakers are not provided with the apparatus, the installation shall be carried out in accordance with all applicable installation rules.
Read these instructions.Keep these instructions.Heed all warnings.Follow all instructions.Do not use this apparatus near water.Clean only with dry cloth.Do not block any ventilation openings. Install in accordance with the manufacturer’s instructions.

2: Getting Started Page 2
The Audiolab M-NET is a network audio player incorporating the outstanding level of quality and design you’ve come to expect in all Audiolab products. Before installing your M-NET please take a few minutes to read this manual carefully. This will get you on the road to a quick and easy set up with full functionality.
Inputs:
Ethernet socket for connecting a local area network (LAN)
Wi-Fi socket to allow the wireless connection to networks
USB input to connect a USB storage device
Outputs:
Optical and coaxial digital outputs
Unpacking
Unpack the product fully. The carton should contain:
The Audiolab M-NET
One power pack
Four switchover plugs
One aerial
Remote handset
Warranty Card
If an item is missing or damaged report this to your dealer as soon as possible. Retain the packing for safe transport of your unit. If you dispose of the packing, do so with regard to any recycling regulations in your area.
Placement
Place the unit on a sturdy shelf or table. If you use an equipment rack, ensure the unit has adequate ventilation and is on its own shelf. To minimize any interference place the power supply in a stable location as far from sensitive analogue inputs as possible.
Make sure you locate the unit so that the front panel is in view otherwise the infrared-remote handset will not work.

3: Controls and Connectors Page 3

4: Remote Handset Page 4
1. Press for the Preset recall/save 2. Browse up 3. Press to move to next track. Hold to fast forward 4. Browse down 5. Press to go back to previous menu 6. Press to view more information of station or tracking playing 7. Play/Pause 8. Press to show menu for the current mode 9. Press to select a song, station or submenu10. Press to move to previous track. Hold to fast reverse11. Source selection
How to load battery
Put your finger on the battery cover claw located behind the remote handset. The battery cover can be opened by sliding downwards.
Put a battery (CR2025) in the battery case as shown in the illustration.
Slide the cover back into the case.
●
●
●
* When the battery starts to lose power, the effective distance becomes shorter or the unit will not function properly. Replace the existing battery with new one to restore functionality.
* If the remote handset is not used for a long time, the battery should be removed from the case.

5: Inputs and Outputs Page 5
DIGITAL (SPDIF) OUTPUTS
Coaxial and optical outputs are provided for connecting the M-NET to an external D/A converter (DAC) like Audiolab Q-DAC or digital recorder. Connect an optical or a digital cable from the appropriate output to the input of your DAC, etc.
USB INPUT
A USB memory device can be connected to the USB input of this unit to play music files stored on the memory device.
POWER INPUT
The M-NET should only be connected to a power supply designed exclusively for this unit. Connect the output from the AC adaptor to the power connector at the rear panel of the M-NET and then the adaptor to the mains supply.
Plug in any of the switchover plugs in below way:
* Use the appropriate plug for your own region.
ETHERNET SOCKET
Connect the unit to the network permanently with RJ45-RJ45 “straight through” (not “crossover”) networking cable.
Use cable suited to the network type, e.g. 10/100 base-T (most home networks).
Wi-Fi SOCKET
Connect the supplied aerial to the SMA connector on the back panel. The aerial should be in the upright position as shown. This allows connection to 802.11a/b/g or n.

6: System Setup Page 6
When the M-NET is first turned on, please do the system setup.
Press MENU and then select System settings, you should find below items:Network: This allows you to do below settings:
a) Network wizard: Simplifies the setup of your radio’s internet connection by taking you through step-by-step instructions.
b) PBC Wlan setup: Used to pair your radio with a router that uses WPS security.
c) View settings: View the MAC address, Wlan region, etc.
d) Wlan region: Where you are using your radio - Europe, USA etc.
e) Manual settings: Detailed control of wired and wireless connections.
f) NetRemote PIN Setup: Used to setup a PIN number which the radio will request when the Remote Control App is first used.
g) Network profile: Shows the names of the last four wireless networks the M-NET has been connected to.
h) Keep network connected: Allows you to specify whether Wi-Fi should remain active while in Standby or in non Wi-Fi modes. This should be set to YES if you use the Remote Control App.
Time/Date: This allows you to set time/date, format, auto update.
Language: This allows you to change the display language used. Select your preferred one and press SEL.
Factory Reset: Puts all the settings back to their default as they were when they left the factory.
●
●
●
●
Software update: Use this option to download new firmware for the M-NET. If you select this item, the M-NET will contact our server and see if a newer version of software is available.
If new software is found the M-NET will prompt you if you want to download it or not. It is highly suggested to update the firmware from time to time to take advantage of any bug fixes or new features. A software update may take several minutes.
Setup wizard: This guides you through the essential settings: Date/Time, Auto update, Set Tim/Date, Network wizard.
Info: This shows you the details of the current system including
a) SW Version: Software version number
b) Radio ID: Unique code used to identify this particular radio device.
c) Friendly name: Name by which the radio is identified on a network.
Backlight: This allow you to modify the brightness of display.
●
●
●
●

7: Network Setup -1 Page 7
When the M-NET is first turned on, or when the network is changed, the unit will require setting up before network functions such as internet radio or streaming music player are available. This should only need to be done once (per network), as the unit will remember the settings even when switched off and unplugged.
Connecting to the network through the LAN interface
By connecting this unit to the network via the LAN interface, you can play back audio files stored on the components on the network, including your PC, and listen to internet radio stations.
Connect the LAN terminal on this unit to the LAN terminal on your router with a straight LAN cable (CAT 5 or higher).
Switch on the M-NET. Press MENU and select Systems settings->Network ->Network wizard. It will start searching all wired and wireless network. You can use //SEL/BACK on the remote handset or CONTROL KNOB on the unit to browse the menu. You will also find the other settings under Network settings menu.
Select Wired from Service Set Identifier (SSID) list.
●
●
●

7: Network Setup -2 Page 8
Connecting using wireless LAN
Wireless connection to the network is possible through a wireless LAN connection.
Plug in the aerial into the Wi-Fi socket.
Switch on the M-NET. Press MENU and select Systems settings->Network->Network wizard. It will start searching all wired and wireless network.
Select the appropriate SSID you expect.
Type in the password and press OK. A message of “Connected” will be shown on the screen if successfully connected.
Note: When using wireless, please note that for reliable and sound audio performance, a strong signal is required. Move and position the aerial for best possible reception.
External interference and/or signal absorption will also affect performance of the receiver and in extreme cases a wired connection should be considered.
●
●
●
●
8: Internet Radio -1
The M-NET brings over 15, 000 internet radio stations and podcasts to you. The sheer choice available on the internet allows you to find new music, listen to stations in your native language, from your home town or your Genre of choice.
Listening to the internet radio
Press SOURCE on the front panel or remote handset to select Internet radio as the input source.
Press MENU to enter the menu
★ Last listened: the previous stations listened.
★ Station list: different categorized stations folders: My Favorites, Local, Stations, Podcasts, My Added Stations, Help.
Use //BACK/SEL buttons or CONTROL KNOB to browse and select the preferred stations.
Press Station List to select more stations
★ My Favorites: Used to navigate to your favorite stations.
★ Local: A comprehensive list of all the stations being broadcast from within your own geographical area (or country).
★ Stations: Find stations using a number of search criteria such as: location,
●
●
●
●

Page 9
Adding the stations to the Favorites
You can register up to 10 of your favorite internet radio stations in the My Favorites->Stations folder
Tune into a specific station.
Press and hold SEL for a few seconds. A message of “Favorite added” will be shown to inform you the process completed.
To delete the stations from the list
Go to the folder of My Favorites->Stations.
Use/ to select the station you want to delete, then press and hold SEL.
Press YES or NO to confirm or cancel the selection.
●
●
●
●
●
★ Podcasts: Find Podcasts or ‘Listen-Again’ broadcasts by location, genre or search by name.
★ My Added Stations: Shows stations that you have personally added to your radio’s station list via the Radio Portal.
★ Help: Find your radio’s access code here.
Press INFO to show different information of the station playing.●
Radio Portal
You will be allowed to browse all stations and edit your M-NETs My Favorites in the Radio Portal using the web browser in PC/MAC. To do this, you should first register your M-NET.
Press SOURCE to select Internet radio.
Press Menu->Station list->Help->Get access code. Write down access code.
Using your PC or MAC, visit the portal website at –www.wifiradio-frontier.com
Click on the Register here link to begin the registration process.
If you have found a station that is not in our list, you can add it yourself. This will then appear in the folder of My Added Stations of your M-NET.
●
●
●
●
8: Internet Radio -2

Page 109: Music Player -1This unit can play the audio files stored on the PCs or other components on a Local Area Network. These PCs or components should have UPnP servers built in. The most common examples are:
PCs running Microsoft Windows Vista or XP with Windows Media Player (WMP) 11 installed
PCs running Microsoft Windows 7 with Windows Media Player 12 installed
Apple Mac with OS X 10 or later and a UPnP application installed
DLNA-compatible digital media servers on your Android, Windows or IOS phones.
Note: iTunes does not currently operate as an UPnP media server, but there are a number of third party software add-ons available that allow you to access your iTunes library.
●
●
●
●
Windows Media Player 11 Setup
The most common UPnP server is Window Media Player. To set up for media sharing, perform the following steps:
Ensure your PC and the M-NET are connected to the same network
Start Windows Media Player 11 on your PC.
Select Library and then Media Sharing.
Check the button to box, select the Audiolab M-NET icon and then click Allow.
Click OK to exit.
●
●
●
●
●
Playback with Music Player
Press SOURCE to select Music player.
Select folder of Shared media.
Select the shared PC or other components.
There are numerous ways of selecting tracks, including: Album, Artist, Composer, Genre, etc. Use / to select the files you want to play is stored on, then press SEL to start playing.
●
●
●
●
Note: The WMP UPnP service runs in the background, there is no need to start WMP explicitly.
9: Music Player -2 Page 11
My Playlist
The M-NET holds a queue of up to 500 tracks in My playlist. Playlist tracks can be a mixture from multiple available UPnP servers and an attached USB device
To view the playlist, Press MENU->My playlist.
Press SEL to start the playing.
Hold SEL to erase a track from the playlist.
●
●
●
Buttons/ Menu What it does
Toggle play/pause the selected track
/ Press to skip forward/backward.Hold to fast/back forward
BACK Press to back to previous folder
SEL Press to select the folder or track. Hold it while playing a track will add the track to playlists.
INFO Press to view more track information
Repeat /shuffle menu
Select on option to enable/disable track repeat function/shuffle
You can also perform the following operations:
10: Play to in Windows 7 and 8
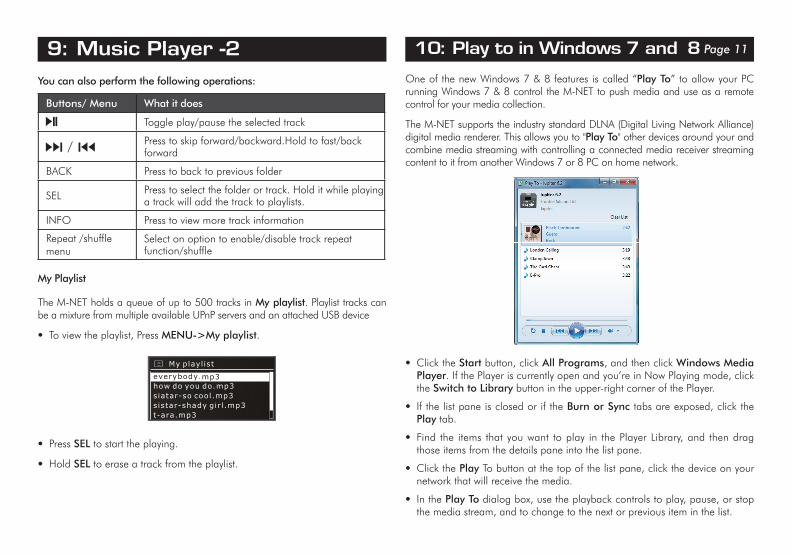
One of the new Windows 7 & 8 features is called “Play To” to allow your PC running Windows 7 & 8 control the M-NET to push media and use as a remote control for your media collection.
The M-NET supports the industry standard DLNA (Digital Living Network Alliance) digital media renderer. This allows you to "Play To" other devices around your and combine media streaming with controlling a connected media receiver streaming content to it from another Windows 7 or 8 PC on home network.
Click the Start button, click All Programs, and then click Windows Media Player. If the Player is currently open and you’re in Now Playing mode, click the Switch to Library button in the upper-right corner of the Player.
If the list pane is closed or if the Burn or Sync tabs are exposed, click the Play tab.
Find the items that you want to play in the Player Library, and then drag those items from the details pane into the list pane.
Click the Play To button at the top of the list pane, click the device on your network that will receive the media.
In the Play To dialog box, use the playback controls to play, pause, or stop the media stream, and to change to the next or previous item in the list.
●
●
●
●
●

Page 1211: USB Playback
USB memory stick must be in Windows/DOS format (FAT/FAT32) to be used with the M-NET.
Insert memory stick into the M-NET USB input.
The unit will pop up a window to ask if to open the stick. Press Yes to open it.
Or press SOURCE to select Music player, then select the folder of USB playback.
Use //SEL/BACK to or CONTROL KNOB browse the folders/tracks.
Once selected, press SEL to start playing.
●
●
●
●
●
You can also perform the following operations:
Buttons/ Menu What it does
Toggle play/pause the selected track
/ Press to skip forward/backward.Hold to fast/back forward
BACK Press to back to previous folder
SEL Press to select the folder or track. Hold it while playing a track will add the track to playlists.
INFO Press to view more track information
Repeat/shuffle menu
Select on option to enable/disable track repeat function/shuffle
Auto standby feature
For energy saving purposes, the unit will automatically turn to the standby mode after 30 minutes of non-use and where there is no output signal.
After this period you may press any buttons to power on.
Auto Dimming
The unit allows you to enable the auto dimming to save the energy. Go to System settings->Backlight, you can select the option of Auto to enable auto dimming or manually change the backlight to different levels: High, Medium, Low.
iOS and Android Remote Control Application (DOK)
The DOK App is an application for Android smart devices and iOS devices. You can download it from Apple store or Google Play.
The DOK App offers comprehensive remote control functionality for the M-NET capable of wired and/or wireless connection with an iOS or Android smart device. Dependent on the capabilities of the connected radio it enables users to navigate between audio modes, browse content and control playback volume. The application synchronises automatically with the M-NET.
12: Additional Features

Page 13
Unless you are familiar with the operation of your M-NET, you may experience occasional difficulties. This guide will help you overcome the most likely issues.
No lights on the unit
Check that:
The mains lead is plugged fully.
You are using the supplied power pack.
No response/poor response to remote handset commands
Check that:
There are fresh batteries in the remote handset.
You are pointing the remote directly at the M-NET.
No sound
Check that:
The correct source is selected.
All system units are correctly connected and switched on.
Cannot connect to the network
Check that:
The network is not down.
The M-NET is in the accessible MAC address of the router.
The distance between the M-NET and the router should be close enough for reliable signal strength.
●
●
●
●
●
●
●
●
●
13: Troubleshooting -1
Cannot play particular internet radio station
Check that:
The station is broadcasting.
The station is using known codec.
Cannot detect the digital media server (PC)
Check that:
Windows Media Player 11 or above has been installed on PC.
The sharing setting of Windows Media Player is incorrect.
Access to the PC is blocked by the Antivirus software installed on the PC.
●
●
●
●
●

Page 1413: Troubleshooting -2
Message Description Example
Failed to connect Correct key entered, but router rejects request
MAC filtering enabled on router
Format errorCannot recognize file format- independent of network
Received .wma, but found that the stream wasn’t WMA when trying to decode
Network errorProblem past router- incorrect data being received from network
Data obtained from server is unreadable.
Network not ready
Problem with connection to router
Router switched off internet radio
Network timeoutProblem past router- no response being received from network
Streaming internet radio station and suddenly station becomes unavailable
No UPnP media found No UPnP servers found
No USB device found
Trying to access USB menu, but no USB plugged in
Unauthorized Access not granted by UPnP server
Allow access for the M-NET in UPnP settings
Update failed Software update failedUSB device unsupported
Unsupported USB device plugged in
USB error General USB problems
USB read error Unable to read particular data from memory
Bad memory sector found on USB device
USB underpowered
Power failure to USB device- user have to remove the device
Error Message Care & Cleaning
While cleaning is in progress the AC power adaptor must be unplugged from the AC power supply socket.
Grease or dirt on the equipment may be removed with a soft, lint-free cloth slightly moistened with a mild solution of warm water and detergent or washing-up liquid. Do not use any other solutions or solvents.
If you have any queries regarding the use of Audiolab equipment, consult your dealer.
Servicing
Servicing of Audiolab products should only be carried out by authorized service agents. If services is required the equipment should be returned, securely packaged, preferably using original packaging, to your dealer. In UK equipment may be returned to the IAG Service Centre.
Please always telephone before returning any equipment.
A note should be enclosed with your name, address, telephone number , and a brief description of the reason for return.
If you require service outside the warranty period, do not hesitate to contact your dealer.
14: Care and Servicing
Service Address
IAG House, 13/14 Glebe Road, Huntingdon, Cambridgeshire, PE29 7DL, UKTel: + 44 (0) 1480 452561Fax: + 44 (0) 1480 413403

15: Specifications and Features Page 15
General Specifications Audio Samples Frequencies
The M-NET supports samples frequencies in the range of 6 KHz to 48 KHz in 1 Hz increments. Any stream which contains samples frequencies outside this range will not be supported.
Audio Codec Sample Resolution
All decoders use 32-bit internal precision and output 16-bit PCM except FLAC and MP3 which output 24-bit PCM.
The FLAC decoder supports up to 24-bits/sample (not relevant for other decoders since they represent the data in a different format).
Features
Internet radio supported over Wi-Fi and Ethernet, with the service provided by vTuner
Audio streaming with DLNA compatible server
Playback of music file with USB memory stick
2.7’’ high contrast OLED display
iOS and Android Apps for the remote control
●
●
●
●
●
SPDIF Outputs Coaxial and Optical
Audio Formats AAC, AAC+, MP3. WAV, WMA, FLAC, LPCM
Display OLED 128 x 64 Pixels, dot matrix
Wi-Fi IEEE 802.11a/b/g or n
Wi-Fi Encryption WEP, WPA, WPA2
Ethernet IEEE 802.3, 10 Base T or 100 Base T
USB USB 1.1, <1A
File Format FAT/FAT32
Internet Radio provider vTuner
DLNA V1.5, DMP & DMR supported
Power adaptor input 12V DC, 1.0A
Power Consumption2.0W (Power On) <1W (Standby)
Dimensions (L x W x H) 396 x 344 x 153mm
Weight Net: 1.9kg / Shipping: 2.9kg
Audio Maximum Bit-rate Specification
LPCM 1.536mbit/s
FLAC 1.5mbit/s
AAC/AAC+ 320kbit/s
MP3 320kbit/s
WMA 320kbit/s

16: Warranty Page 16
Audiolab Ltd. warrants this product, subject to the terms and conditions below, to be free from defects in materials and workmanship. During the warranty period Audiolab will repair or replace (at Audiolab’s option) this product, or any defective part in this product, if it is found to be defective due to faulty materials, workmanship or function. The warranty period may vary from country to country.
Terms and conditions
The warranty starts on the date of purchase (or the date of delivery if this is later).
You must provide proof of purchase/delivery before work can be carried out. Without this proof, any work carried out will be chargeable to you.
All work will be carried out by Audiolab or its authorized agents or distributors.
Any unauthorized repair or modification will void this warranty.
If any part is no longer available it will be replaced with a functional replacement part.
Any parts that are replaced will become the property of Audiolab.
Any repair or replacement under this warranty will not extend the period of warranty.
This warranty is valid only in the county of purchase, applies only to the first purchaser and is not transferable.
The following are not covered:1. Products which the serial number have been removed, altered or otherwise
made illegible.2. Normal wear tear and cosmetic damage.3. Transportation or installation of the product. Accidental damage, fault caused by commercial use, acts of God, incorrect
installation, connection or packing, misuse, neglect or careless operation or handling of the product which is not in accordance with Audiolab’s user instructions.
4. Repairs or alterations carried out by parties other than Audiolab or its authorized agents or distributors.
5. Products not purchased from an Audiolab authorized dealer.6. Products that were not new at the time of original purchase.7. Products sold ‘as is’, ‘as seen’ or ‘with all faults’.
Repairs or replacements as provided under this warranty are the exclusive remedy of the consumer. Audiolab shall not be liable for any incidental or consequential damages for breach of any express or implied warranty in this product. Except to the extent prohibited by law, this warranty is exclusive and in lieu of all other warranties whatsoever, both express and implied, including, but not limit to, the warranty of merchantability and fitness for a practical purpose.
This warranty provides benefits that are additional to and do not affect your statutory rights as a consumer.
Some countries and US states do not allow the exclusion or limitation of incidental or consequential damages or implied warranties so the exclusions in the paragraph above may not apply to you. This warranty gives you specific legal rights, and you may have other statutory rights, which vary from state to state or county to county.
How to claim:
To obtain warranty service contact the Audiolab authorized dealer from which you purchased this product. Do not dispatch goods without the prior agreement of the dealer, Audiolab or their authorized distributors.
If asked to return products for inspection and/or repair, pack carefully, preferably in the original cartons or packing affording an equal degree of protection, and return prepaid. If unsuitable packaging is used, Audiolab may make a charge for the supply of new packaging.
Insurance is recommended ad goods are returned at owner’s risk. Audiolab or their authorized distributors can not be held liable for loss or damage in transit.


IAG House, 13/14 Glebe Road, Huntingdon, Cambridgeshire, PE29 7DL, UKTel: + 44 (0) 1480 452561 Fax: + 44 (0) 1480 413403 http://www.audiolab.co.ukIAG reserves the right to alter the design and specifications without notice. All rights reserved IAG Group Ltd.Audiolab is a member of the International Audio Group. CODE: AH13-MNL0002a