m-schedule/m-calendar user's guide - johnson controls
TRANSCRIPT

Table of Contents M-Schedule/M-Calendar User’s Guide
Table of Contents M-Schedule/M-Calendar User’s Guide ........................ 1
Chapter 1 Using This Guide.................................................................1-1
Introduction...................................................................................................... 1-1
Chapter Organization .....................................................................................................1-2
Chapter 2 Working with M-Schedule Objects ...................................2-1
Introduction...................................................................................................... 2-1
Key Concepts................................................................................................... 2-2
Schedule Object.............................................................................................................2-2 Time/Value Pairs............................................................................................................2-2 Event ..............................................................................................................................2-2 Event Colors...................................................................................................................2-2 Exceptions......................................................................................................................2-3 Wildcard Date Fields ......................................................................................................2-3 BACnet Schedule...........................................................................................................2-3 Project Builder................................................................................................................2-3
Procedure Overview........................................................................................ 2-4
Detailed Procedures........................................................................................ 2-6
Viewing a Schedule Object ............................................................................................2-6 Editing a Schedule Object..............................................................................................2-7 Setting General Properties of a Schedule......................................................................2-8 Adding Objects to a Schedule........................................................................................2-9
© August 10, 2004 Johnson Controls, Inc. www.johnsoncontrols.com Code No. LIT-1153605
2 M-Schedule/M-Calendar User’s Guide
Adding Events to a Weekly Schedule Using the M-Schedule Tab...............................2-11 Adding Events to a Weekly Schedule Using the M-Schedule Property Page..............2-12 Copying a Day’s Events to Other Days........................................................................2-16 Editing a Day’s Events .................................................................................................2-16 Adding Exceptions to a Weekly Schedule Using the M-Schedule Tab ........................2-18 Adding Exceptions to a Weekly Schedule Using the M-Schedule Property Page .......2-20
Chapter 3 Working with M-Calendar Objects.....................................3-1
Introduction...................................................................................................... 3-1
Key Concepts................................................................................................... 3-2
Calendar Object .............................................................................................................3-2 Exception Types.............................................................................................................3-2 Wildcard Date Fields ......................................................................................................3-2 Project Builder................................................................................................................3-2
Procedure Overview........................................................................................ 3-3
Detailed Procedures........................................................................................ 3-4
Viewing a Calendar Object.............................................................................................3-4 Editing a Calendar Object ..............................................................................................3-5 Setting General Properties of a Calendar ......................................................................3-7 Adding Dates to a Calendar Using the M-Calendar Tab................................................3-8 Adding Dates to a Calendar Using the M-Calendar Control Property Page...................3-9
Chapter 4 Working with LN Schedule Objects...................................4-1
Introduction...................................................................................................... 4-1
Key Concepts................................................................................................... 4-2
LN Scheduling................................................................................................................4-2 OPC Tag ........................................................................................................................4-2 LN Schedule Objects .....................................................................................................4-2 Occupancy Modes .........................................................................................................4-5 Object Lists ....................................................................................................................4-5 Event ..............................................................................................................................4-7 Weekly Schedule Pop-up Menu.....................................................................................4-7 Add Event Mode.............................................................................................................4-8

Table of Contents 3
Daily Schedule Pop-up Menus.......................................................................................4-9 Exception Schedules....................................................................................................4-10 Exception Schedule Pop-up Menu...............................................................................4-11 Exception Schedule Definition Dialog Box ...................................................................4-12 L-Schedule Tool ...........................................................................................................4-14 L-Schedule Task ..........................................................................................................4-18
Procedure Overview...................................................................................... 4-20
Detailed Procedures...................................................................................... 4-21
Creating a New Schedule Object .................................................................................4-21 Viewing a Schedule Object ..........................................................................................4-22 Editing a Schedule Object............................................................................................4-22 Setting General Properties of a Schedule....................................................................4-23 Adding OPC Tags to the Object Lists of a Schedule ...................................................4-24 Adding Events to a Daily Schedule ..............................................................................4-25 Copying a Daily Schedule to Other Daily Schedules ...................................................4-26 Editing a Daily Schedule’s Events................................................................................4-27 Adding Exception Schedules to a Schedule Object .....................................................4-28 Commanding a Schedule Object .................................................................................4-29

M-Schedule/M-Calendar User’s Guide 1-1
Chapter 1 Using This Guide
Introduction The M-Schedule/M-Calendar User’s Guide provides information about accessing M-Schedule objects and M-Calendar objects through the M-Inspector application or as embedded ActiveX® controls in an M-Graphics display. This chapter outlines the guide’s organization and content.
© January, 2001 Johnson Controls, Inc. www.johnsoncontrols.com

M-Schedule/M-Calendar User’s Guide 1-2
Chapter Organization Each chapter in the M-Schedule/M-Calendar User’s Guide is divided into four main sections; however, each chapter may not contain all sections.
Table 1-1: Chapter Organization Section Description Introduction Briefly outlines the contents of the chapter. Key Concepts Describes background information necessary to
perform specific tasks. Procedure Overview Describes general steps for performing the tasks
described in the chapter. This section is geared toward users already experienced in working with M-Schedule and M-Calendar objects.
Detailed Procedures Lists the steps needed to complete the tasks described within the chapter. This section is geared toward users who are new to working with M-Schedule and M-Calendar objects.
If a section is not necessary for a particular chapter, it is omitted. For example, this chapter, Using This Guide, does not contain a Detailed Procedures section.

M-Schedule/M-Calendar User’s Guide 2-1
Chapter 2 Working with M-Schedule Objects
Introduction M-Inspector provides access to Schedule objects from an N30 Supervisory Controller and BACnet® compliant controllers that support schedule objects. This data is provided by the BACnet Object Linking and Embedding (OLE) for Process Controls (OPC) data access server. This chapter describes how to:
• view a Schedule object
• edit a Schedule object
• set general properties of a schedule
• add objects to a schedule
• add events to a weekly schedule - use the M-Schedule Tab - use the M-Schedule Property Page
• copy a day’s events to other days
• edit a day’s events
• add exceptions to a weekly schedule - use the M-Schedule Tab - use the M-Schedule Property Page
© January, 2001 Johnson Controls, Inc. www.johnsoncontrols.com Code No. LIT-1153610

M-Schedule/M-Calendar User’s Guide 2-2
Key Concepts Schedule Object
The Schedule object allows you to update object attributes at specified times, days, and dates. Using schedules allows you to automate events for specific times. For example, you can have a fan turn on every day at 7:00 a.m. and turn off every day at 6:00 p.m. Notes: Schedule objects and M-Schedule objects refer to both
N30 Schedule objects and BACnet Schedule objects, unless otherwise noted. All N30 and BACnet objects referenced by a Schedule object must reside on the same supervisory controller. The N30 Schedule object itself may or may not be located on the same supervisory controller as the objects being referenced. The BACnet Schedule object must reside on the same supervisory controller as the objects being referenced.
Time/Value Pairs Time/value pairs describes the time that an attribute changes to a defined state.
Event An event is a way of describing a time/value pair. When a time and a value are entered, they show up on a schedule as an event. An event begins at a specified time and ends at the next defined event for that day.
Event Colors Events (time/value bars) appearing on the M-Schedule tab are color coded (text on background) following this color scheme:
• black on cyan (light blue) for integer value 0 or Boolean false
• white on blue for integer value 1 or Boolean true
• black on green for integer value 2
• black on yellow for integer value 3 Table 2-1 describes how events are color coded.

Working with M-Schedule Objects 2-3
Table 2-1: Event Color Coding Values Appear as Boolean true/false Same color as indicated above Integer 0, 1 Same color as indicated above Multistate 0, 1, 2, 3 Same color as indicated above Analog First instance is one color, second is another,
repeating the four colors for more than four different analog values.
Exceptions Exceptions allow you to further refine your control of objects by preempting the weekly schedule with other instructions on specified days. In the example above, you could create exceptions to the fan schedule so that the fan would not turn on during weekends or holidays. There are several types of exceptions available.
Table 2-2: Exception Types Exception Type Used For Date Exception to selected schedule on a specific date Date Range Specifies a string of consecutive dates to change in the selected schedule. Week and Day Allows an exception to the selected schedule on a specified day of each
week or month. For example, the second Friday of each month or every Monday.
Calendar Reference A calendar reference refers to a Calendar object. A Calendar object allows the creation of a more detailed exception schedule; for example, holidays that are not working days in a building. This Calendar object then can be referenced by one or more schedules as an exception to the normal schedule. See the Working with M-Calendar Objects chapter in this guide.
Wildcard Date Fields Any unspecified date field is considered to be a wildcard date field. For more information, refer to the Schedule chapter in the Object Dictionary (FAN 694).
BACnet Schedule The N30 Schedule object is compatible with the BACnet schedule object. Johnson Controls has added some proprietary attributes to extend functionality.
Project Builder Add and download Schedule objects from Project Builder. For more information, refer to Project Builder User’s Guide (LIT-693200).

M-Schedule/M-Calendar User’s Guide 2-4
Procedure Overview Table 2-3: Working with M-Schedule Objects To Do This Follow These Steps: View a Schedule Object On the M-Explorer application, select a Schedule object. From the Actions
menu, select Inspect. Click the M-Schedule tab. Move the cursor over an event (time/value bar) to view time/value details. Select a button from the bottom of the tab. Click Close to exit M-Inspector.
Edit a Schedule Object On the M-Explorer application, select a Schedule object. From the Actions menu, select Inspect. Click the M-Schedule tab. Click Edit or right-click the M-Schedule tab and select Edit from the pop-up menu. Edit the Schedule object as desired.
Set General Properties of a Schedule
In Edit mode on the M-Schedule tab, click Details. Edit the fields. Click OK. On the M-Schedule tab, click Save to save the changes. Click Close to exit M-Inspector.
Add Objects to a Schedule In Edit mode on the M-Schedule tab, click Details. On the M-Schedule Property Page, select the Object tab. Click Add and enter the object reference for the object to be scheduled. Select the attribute for the object from the drop-down list that appears. Click Add to add additional objects (or select an object and click Delete to remove objects from the schedule). Click OK. On the M-Schedule tab, click Save to save the changes. Click Close to exit M-Inspector.
Add Events to a Weekly Schedule
Use the M-Schedule Tab On the left side of the M-Schedule tab in Edit mode, right-click on a day of the week. Select Add Event. On the left side of the M-Schedule tab, select the day of the week in which you want to add an event. Move the cursor over the time for that day that you want the event to take place, and left-click. Enter the time/value pair as desired and press Enter. After all events have been added, click Save on the M-Schedule tab. Click Close to exit M-Inspector.
Use the M-Schedule Property Page
In Edit mode on the M-Schedule tab, click Details or right-click between any two days of the week and select Details from the pop-up menu. On the M-Schedule Property page, select the Weekly Schedule tab. Select the day of the week in which you want to schedule events. Click Add Event. Enter the time/value pair as desired and press Enter. Click OK. After all events have been added, click Save on the M-Schedule tab. Click Close to exit M-Inspector.
Copy a Day’s Events to Other Days
On the left side of the M-Schedule tab in Edit mode, select the day with the events that you want to duplicate. Right-click and select Copy Events. On the left side of the M-Schedule tab, select the day that you want to have the same schedule of events. Right-click and select Paste Events. On the M-Schedule tab, click Save to save the changes. Click Close to exit M-Inspector.
Edit a Day’s Event In Edit mode on the M-Schedule tab, move the cursor over an event (time/value bar) and left-click the mouse. Use the arrow keys to adjust the event by five minute increments. On the M-Schedule tab, click Save to save the changes. Click Close to exit M-Inspector.
Continued on next page . . .

Working with M-Schedule Objects 2-5
To Do This (Cont.) Follow These Steps: Add Exceptions to a Weekly Schedule
Use the M-Schedule Tab In Edit mode on the M-Schedule tab, click Exception or right-click between any two days of the week and select Exception from the pop-up menu. Click New Exception or right-click in the timeline grid on the right and select Add New Exception. Fill in the fields of the Exception Schedule Creation dialog box. Click OK. Add additional exception schedules as needed. On the M-Schedule tab, click Save to save the changes. Click Close to exit M-Inspector.
Use the M-Schedule Property Page
In Edit mode on the M-Schedule tab, click Details or right-click between any two days of the week and select Details from the pop-up menu. On the M-Schedule Property page, select the Exception Schedule tab. Click Add. Fill in the fields of the Exception Schedule Creation dialog box. Click OK. Add additional exception schedules as needed. Click OK. Click Save. Click Close to exit M-Inspector.

M-Schedule/M-Calendar User’s Guide 2-6
Detailed Procedures Viewing a Schedule Object
To view a Schedule object: 1. In the M-Explorer application, select a Schedule object. 2. From the Actions menu, select Inspect. The M-Inspector window
appears with the M-Command tab selected and the complete hierarchical path of the object appearing in the Title bar.
Note: Right-clicking on a selected item in either the Tree view or Focus view also brings up the Inspect option on a pop-up menu.
3. Click the M-Schedule tab. The M-Schedule tab appears in the M-Inspector window (Figure 2-1).
Note: Resize the window to display all available button options.
Figure 2-1: M-Inspector Window with Visible M-Schedule Tab 4. Move the cursor over an event (time/value bar) to view time/value
details. In Figure 2-1, the time value details for Friday are Time: 06:00, Value: Occupied.
Note: Refer to Table 2-1 for a description of the color coding used for events (time/value bars).
Working with M-Schedule Objects 2-7
5. Select a button from the bottom of the tab. Refer to Table 2-4 for a description of functions of the buttons on the M-Schedule tab.
Note: A pop-up menu appears after right-clicking the Schedule tab in View mode. Only select pop-up menu options correspond to the buttons listed in Table 2-4. The About M-Schedule Ctrl option from the pop-up menu displays copyright and version information.
6. Click the Close button to exit M-Inspector.
Table 2-4: M-Schedule Tab Button Options Button Description Close Closes the M-Inspector window. Help Brings up information specifically about the object being inspected. Edit/View The Edit button allows the visible attributes to be edited. Edit the schedule when
the Edit button is clicked, even though the button name changes to View. The View button switches to view-only mode for the attributes. View the schedule when the View button is clicked, even though the button name changes to Edit. This button toggles between the Edit and View modes.
Save Saves any changes to the attributes after editing. Refresh Updates any changes to attributes on the Schedule tab since M-Inspector opened.
(Values do not automatically refresh.) Details Opens the M-Schedule Property Page. Exception Opens the exception schedule. This button toggles between the exception and
weekly schedules. New Exception Opens the Exception Schedule Creation dialog box to create a new exception
schedule. The exception schedule must be open and in Edit mode to create a new schedule.
Editing a Schedule Object To edit a Schedule object: 1. In the M-Explorer application, select a Schedule object. 2. From the Actions menu, select Inspect. The M-Inspector window
appears with the M-Command tab selected and the complete hierarchical path of the object appearing in the Title bar.
Note: Right-clicking on a selected item in either Tree view or Focus view also brings up the Inspect option on a pop-up menu.
3. Click the M-Schedule tab. The M-Schedule tab appears (Figure 2-1).
Note: Resize the window to display all available button options.
4. Click Edit or right-click the M-Schedule tab and select Edit from the pop-up menu. The Edit button on the M-Schedule tab now toggles to the View button. Edit the Schedule object as desired.

M-Schedule/M-Calendar User’s Guide 2-8
Setting General Properties of a Schedule To set the general properties of a schedule: Note: The M-Schedule tab must be in Edit mode to set the general
properties of a schedule. To enter Edit mode, refer to Editing a Schedule Object in this chapter.
1. In Edit mode on the M-Schedule tab, click Details. The M-Schedule Property Page appears with the General tab selected (Figure 2-2).
Figure 2-2: M-Schedule Property Page Dialog Box – General Tab
2. Edit the fields according to Table 2-5.

Working with M-Schedule Objects 2-9
Table 2-5: M-Schedule Property Page - General Tab Fields Field Value Schedule Name Contains the full reference name of the Schedule object being inspected.
This field cannot be edited. Schedule Description Enter a description for the schedule (optional). Effective Period - From Enter a date and day for the schedule to begin. By default, the schedule is
always active. Effective Period - To Enter an end date and day for the schedule (optional). Enabled* Select True to enable the schedule; False to disable the schedule; and
Hold to place the schedule on hold. Execution Priority* Select a priority for the schedule: normal, urgent, critical, or life safety. Object Category* Select the object category under which the schedule falls: HVAC, fire,
security, services, or administrative. * Field applies only to N30 Schedule objects.
3. Click OK. The M-Schedule Property Page closes. 4. On the M-Schedule tab, click the Save button to save the changes. 5. Click the Close button to exit M-Inspector.
Adding Objects to a Schedule To add objects to a schedule: Note: The M-Schedule tab must be in Edit mode to add objects to a
schedule. To enter Edit mode, refer to Editing a Schedule Object in this chapter.
1. In Edit mode on the M-Schedule tab, click Details or right-click the M-Schedule tab and select Details from the pop-up menu. The M-Schedule Property Page appears with the General tab selected (Figure 2-2).
2. On the M-Schedule Property Page, select the Object tab. The M-Schedule Property Page - Object tab dialog box appears (Figure 2-3).

M-Schedule/M-Calendar User’s Guide 2-10
Figure 2-3: M-Schedule Property Page Dialog Box - Object Tab 3. Click Add and enter the object reference (name) for the object to
be scheduled.
IMPORTANT: All N30 and BACnet objects referenced by a Schedule object must reside on the same supervisory controller. The N30 Schedule object itself may or may not be located on the same supervisory controller as the objects being referenced. When a valid N30 object is entered, the device where it resides is listed in the Objects in Device field located above the Reference Object/Attribute grid. The BACnet Schedule object must reside on the same supervisory controller as the objects being referenced.
4. Select the attribute for the object from the drop-down list that appears. In the example in Figure 2-3, the Present Value attribute of a Binary Value object named Gym Occupancy is scheduled to receive the schedule value at the times and dates specified by the current schedule.

Working with M-Schedule Objects 2-11
5. Click Add to add additional objects to the schedule (or select an object and click Delete to remove objects from the schedule).
Note: The data type and range of the Schedule, as shown in the graphical view, is determined by the first object reference in this list. The first object reference may not be removed while online.
6. Click OK to close the M-Schedule Property Page. 7. On the M-Schedule tab, click the Save button to save the changes. 8. Click the Close button to exit M-Inspector.
Adding Events to a Weekly Schedule Using the M-Schedule Tab To add events to a weekly schedule using the M-Schedule tab: Note: The M-Schedule tab must be in Edit mode to add events to a
weekly schedule using the M-Schedule tab. To enter Edit mode, refer to Editing a Schedule Object in this chapter.
1. On the left side of the M-Schedule tab in Edit mode, right-click on a day of the week. A pop-up menu for weekly schedule events appears. Figure 2-4 shows the pop-up menu after right-clicking over Friday on the M-Schedule tab.
Figure 2-4: Right-click Pop-up Menu Over a Day on the M-Schedule Tab
2. Select Add Event. Note: If Add Event is already checked, click somewhere else on
the left side of the screen to close the pop-up menu.
3. On the left side of the M-Schedule tab, select the day of the week in which you want to add an event.
4. Left-click on the time you want the event to take place. The Input Value dialog box appears (Figure 2-5) with the time you selected.
Note: The cursor appears as a plus sign (+) if Add Event has been checked in the pop-up menu and you have the cursor over the selected day’s timeline.

M-Schedule/M-Calendar User’s Guide 2-12
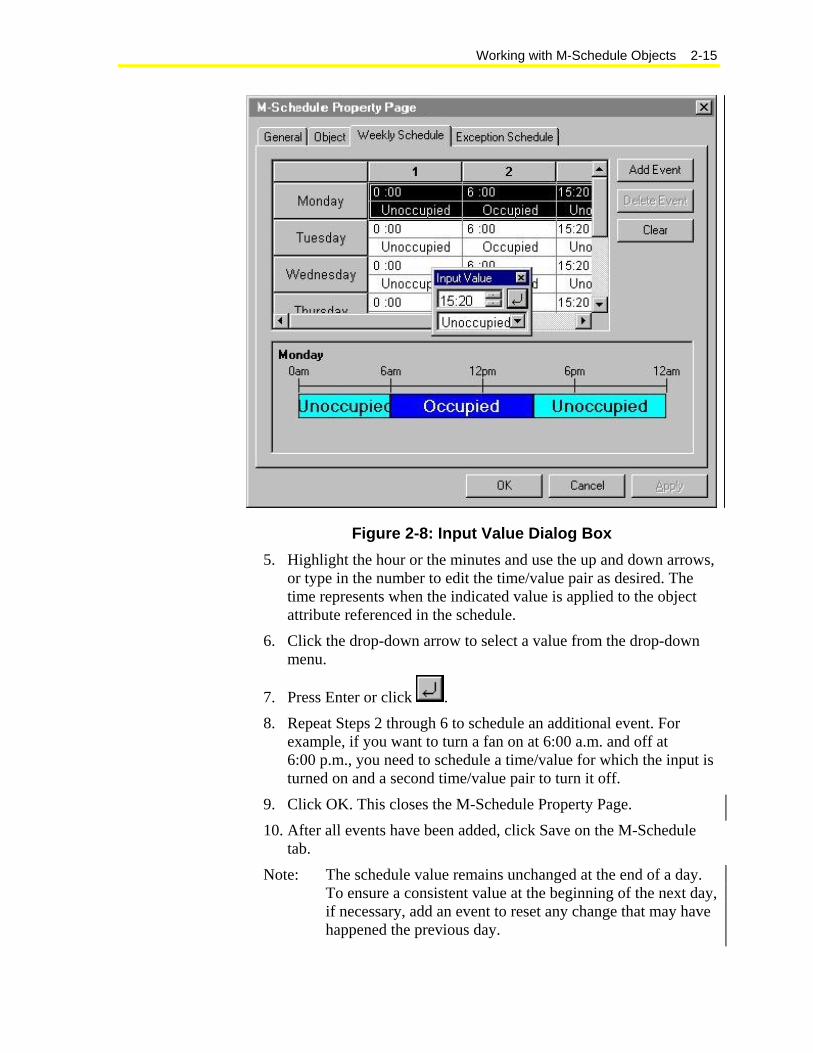
Figure 2-5: Input Value Dialog Box 5. Highlight the hour or the minutes and use the up and down arrows
or type in the number to edit the time/value pair as desired. The time represents when the indicated value is applied to the object attribute referenced in the schedule.
6. Click the drop-down arrow to select a value from the drop-down menu.
7. Press Enter or click . 8. Repeat Steps 3 through 7 to schedule an additional change.
For example, if you want to turn a fan on at 6:00 a.m. and off at 6:00 p.m., you need to schedule a time/value for which the input is turned on and a second time/value pair to turn it off.
9. After all events have been added, click Save on the M-Schedule tab.
10. Click the Close button to exit M-Inspector.
Adding Events to a Weekly Schedule Using the M-Schedule Property Page
To add events to a weekly schedule using the M-Schedule Property Page: Note: The M-Schedule tab must be in Edit mode to add events to a
weekly schedule using the M-Schedule Property Page. To enter Edit mode, refer to Editing a Schedule Object in this chapter.
1. In Edit mode on the M-Schedule tab, click Details or right-click between any two days of the week, and select Details from the pop-up menu. The M-Schedule Property Page appears (Figure 2-2).
2. On the M-Schedule Property Page, select the Weekly Schedule tab. The M-Schedule Property Page dialog box-Weekly Schedule tab appears (Figure 2-6).

Working with M-Schedule Objects 2-13
Figure 2-6: M-Schedule Property Page Dialog Box – Weekly Schedule Tab
3. Select the day of the week in which you want to schedule events (Figure 2-7). If creating a schedule for the whole week, you can copy the events from one day to the rest of the days of the week when your schedule is complete. See Copying a Day’s Events to Other Days in this chapter.

M-Schedule/M-Calendar User’s Guide 2-14
Figure 2-7: Selected Day of the Week 4. Click Add Event. The Input Value dialog box appears (Figure 2-8). Note: To delete events, select a value for a day of the week and
click Delete Event. To delete an event in Figure 2-7, for example, click the cell containing Unoccupied in Column 1 on Tuesday. This activates the Delete Event button. Click Delete to delete the entry in the cell.
Working with M-Schedule Objects 2-15
Figure 2-8: Input Value Dialog Box 5. Highlight the hour or the minutes and use the up and down arrows,
or type in the number to edit the time/value pair as desired. The time represents when the indicated value is applied to the object attribute referenced in the schedule.
6. Click the drop-down arrow to select a value from the drop-down menu.
7. Press Enter or click . 8. Repeat Steps 2 through 6 to schedule an additional event. For
example, if you want to turn a fan on at 6:00 a.m. and off at 6:00 p.m., you need to schedule a time/value for which the input is turned on and a second time/value pair to turn it off.
9. Click OK. This closes the M-Schedule Property Page. 10. After all events have been added, click Save on the M-Schedule
tab. Note: The schedule value remains unchanged at the end of a day.
To ensure a consistent value at the beginning of the next day, if necessary, add an event to reset any change that may have happened the previous day.

M-Schedule/M-Calendar User’s Guide 2-16
Copying a Day’s Events to Other Days To copy a day’s events to other days: Note: The M-Schedule tab must be in Edit mode to copy events to
other days using the M-Schedule Property Page. To enter Edit mode, refer to Editing a Schedule Object in this chapter.
1. On the left side of the M-Schedule tab in Edit mode, select the day with the events you want to duplicate.
2. Right-click and select Copy Events. 3. On the left side of the M-Schedule tab, select the day that you want
to have the same schedule of events. 4. Right-click and select Paste Events. 5. On the M-Schedule tab, click Save to save the changes. 6. Click the Close button to exit M-Inspector. Note: Any existing events in the weekly schedule for that day are
overwritten.
Editing a Day’s Events To edit a day’s events: Note: The M-Schedule tab must be in Edit mode to edit a day’s
events using the M-Schedule Property Page. To enter Edit mode, refer to Editing a Schedule Object in this chapter.
1. In Edit mode on the M-Schedule tab, move the cursor over an event (time/value bar) and left-click the mouse. Black squares appear on the left side of the time/value bar (Figure 2-9).

Working with M-Schedule Objects 2-17
Figure 2-9: Left-Click Selected Time/Value Bar 2. Use the arrow keys to adjust the event by five minute increments.
The incremental time change appears in the time/value pair details. (Adjusting the time of the event also can be accomplished by clicking and dragging the end of a time bar with the mouse.)
Note: Right-click the time/value bar to bring up a pop-up menu (Figure 2-10). From this menu, you can add an event, modify the event using the Input Value dialog box, or delete an event.
Figure 2-10: Right-click Pop-Up Menu Over a Time/Value Bar on the M-Schedule Tab
3. On the M-Schedule tab, click Save to save the changes. 4. Click the Close button to exit M-Inspector.

M-Schedule/M-Calendar User’s Guide 2-18
Adding Exceptions to a Weekly Schedule Using the M-Schedule Tab
To add an exception to a schedule using the M-Schedule tab: Note: The M-Schedule tab must be in Edit mode to add an
exception to a schedule using the M-Schedule tab. To enter Edit mode, refer to Editing a Schedule Object in this chapter.
1. In Edit mode on the M-Schedule tab, click Exception or right-click between any two days of the week, and select Exception from the pop-up menu. The exception schedule appears (Figure 2-11).
Figure 2-11: Exception Schedule Note: In Figure 2-11, the first three exceptions shown are calendar
references. When the value of any of the calendars is true, the events for that calendar exception are used for building operations instead of the normal events for that day (as defined in the weekly table). The last exception shown is a date exception for every Fourth of July regardless of the year.
2. Click New Exception or right-click in the timeline grid on the right and select Add New Exception. The Exception Schedule Creation dialog box appears (Figure 2-12).

Working with M-Schedule Objects 2-19
Figure 2-12: Exception Schedule Creation Dialog Box 3. Fill in the fields of the Exception Schedule Creation dialog box
according to Table 2-6.
Table 2-6: Exception Schedule Creation Fields Field Value/Options Priority Select a priority to determine when this exception should run in relation to other
exceptions. Period Type - Date Enter a specific date and day (optional) to run the exception to the weekly schedule. Period Type - Date Range
Enter a range of dates and days to run the exception to your weekly schedule.
Period Type - Week and Day
Enter a month, week, and day to run the exception to your weekly schedule. For example, the second Wednesday of August or the last Friday of every (any) month.
Period Type – Calendar Reference
Enter a reference to a Calendar object you have created to use it as an exception to a weekly schedule. See Setting General Properties of a Calendar in the Working with M-Calendar Objects chapter of this guide for more information.
Week and Day - any month*
Enter a specific month to run an exception schedule or leave it on any month to run the exception every month.
Week and Day - any week*
Enter the week of the specified month that you want to run the exception schedule. Choices are: any, 1st, 2nd, 3rd, 4th, 5th, or last.
Week and Day - any day*
Enter the day of the specified week to run the exception schedule or leave it on any day to run the exception on any day with a specific date or on every day.
* The Week and Day fields change depending on the selected period type. 4. Click OK. This closes the Exception Schedule Creation dialog box. 5. Add additional exception schedules as needed. 6. On the M-Schedule tab, click the Save button to save the changes. 7. Click Close to exit M-Inspector.

M-Schedule/M-Calendar User’s Guide 2-20
Adding Exceptions to a Weekly Schedule Using the M-Schedule Property Page
To add an exception to a schedule using the M-Schedule Property Page: Note: The M-Schedule tab must be in Edit mode to add an
exception to a schedule using the M-Schedule Property Page. To enter Edit mode, refer to Editing a Schedule Object in this chapter.
1. In Edit mode on the M-Schedule tab, click Details or right-click between any two days of the week, and select Details from the pop-up menu. The M-Schedule Property Page appears.
2. On the M-Schedule Property Page, select the Exception Schedule tab. The M-Schedule Property Page dialog box - Exception Schedule tab appears (Figure 2-13).
Figure 2-13: M-Schedule Property Page Dialog Box - Exception Schedule Tab
3. Click Add. The Exception Schedule Creation dialog box appears (Figure 2-12).

Working with M-Schedule Objects 2-21
4. Fill in the fields of the Exception Schedule Creation dialog box using Table 2-6.
5. Click OK. This closes the Exception Schedule Creation dialog box. 6. Add additional exception schedules as needed. 7. Click OK. This closes the M-Schedule Property Page. 8. On the M-Schedule tab, click Save to save the changes. 9. Click Close to exit M-Inspector.

M-Schedule/M-Calendar User’s Guide 2-22

M-Schedule/M-Calendar User’s Guide 3-1
Chapter 3 Working with M-Calendar Objects
Introduction M-Inspector provides access to Calendar objects from an N30 Supervisory Controller and BACnet compliant controllers that support Calendar objects. This data is provided by the BACnet OPC data access server. This chapter describes how to:
• view a Calendar object
• edit a Calendar object
• set general properties of a calendar
• add dates to a calendar - use the M-Calendar tab - use the M-Calendar Control Property Page
© January, 2001 Johnson Controls, Inc. www.johnsoncontrols.com Code No. LIT-1153615

M-Schedule/M-Calendar User’s Guide 3-2
Key Concepts Calendar Object
The Calendar object maintains a list of dates designated as exceptions to the normal schedule. A Schedule object working from a chosen Calendar will read the Present Value of the Calendar object to determine if the current day is within the Date List of the Calendar. Working with this object allows a user to accommodate for a special day or days, like a holiday, in which the building controls should run differently from usual, in accordance with the change in the number of people and the amount of activity in the building. Calendars are normally used when the same list of dates are to be shared by multiple schedules. Note: Calendar objects and M-Calendar objects refer to both
N30 Calendar objects and BACnet Calendar objects unless otherwise noted.
Exception Types
Single Date This type defines a single day on which the exception to the schedule is to be run.
Date Range This type defines a range of days on which the exception to the schedule is to be run.
Week and Day This type defines a Week and Day wildcard on which the exception to the schedule is to be run. For example, you could choose Friday of the last seven days in any month. See Figure 3-4 for an example of a Week and Day exception calendar entry.
Wildcard Date Fields Any unspecified date field is considered to be a wildcard date field. For more information, refer to the Calendar chapter in the Object Dictionary (FAN 694).
Project Builder Add and download Calendar objects from Project Builder. For more information, refer to Project Builders User’s Guide (LIT-693200).

Working with M-Calendar Objects 3-3
Procedure Overview Table 3-1: Working with M-Calendar Objects To Do This Follow These Steps: View a Calendar Object On the M-Explorer application, select a Calendar object. From the Actions
menu, select Inspect. Click the M-Calendar tab. Use the << and >> buttons to change the year and the < and > buttons to change the month. Select a button from the bottom of the tab. Click Close to exit M-Inspector.
Edit a Calendar Object On the M-Explorer application, select a Calendar object. From the Actions menu, select Inspect. Click the M-Calendar tab. Click Edit or right-click the M-Calendar tab and select Edit from the pop-up menu. Edit the Calendar object as desired.
Set General Properties of a Calendar
In Edit mode on the M-Calendar tab, click Details or right-click on the calendar and select Details from the pop-up menu. On the M-Calendar Control Property Page, fill in the fields. Click OK. On the M-Calendar tab, click Save to save the changes. Click Close to exit M-Inspector.
Add Dates to a Calendar Use the M-Calendar Tab In Edit mode on the M-Calendar tab, click a date square on a calendar
month. Use the Shift key to select a range of dates, or click and drag the mouse over a range of dates. Click Save to save the changes. Click Close to exit M-Inspector.
Use the M-Calendar Control Property Page
In Edit mode on the M-Calendar tab, click Details or right-click on the calendar and select Details from the pop-up menu. On the M-Calendar Control Property Page, select the Dates tab to add specific dates or date ranges to a calendar, or select the Week and Day tab to set a specific day without knowing the date (for example, the third Tuesday in January) or a repeating day (for example, the last Friday of every month). For each date, range, or Week and Day definition, select the days and click Add. Click OK. On the M-Calendar tab, click Save to save the changes. Click Close to exit M-Inspector.

M-Schedule/M-Calendar User’s Guide 3-4
Detailed Procedures Viewing a Calendar Object
To view a Calendar object: 1. In the M-Explorer application, select a Calendar object. 2. From the Actions menu, select Inspect. The M-Inspector window
appears with the M-Command tab visible and the complete hierarchical path of the object appearing in the Title bar.
Note: Right-clicking on a selected item in either Tree view or Focus view also brings up the Inspect option on a pop-up menu.
3. Click the M-Calendar tab. The M-Calendar tab appears in the M-Inspector window (Figure 3-1).
Notes: Resize the window to display all available button options. Highlight date squares in a calendar month (February 21 in Figure 3-1) to indicate dates to add to a Calendar.
Figure 3-1: M-Inspector Window with Visible M-Calendar Tab

Working with M-Calendar Objects 3-5
4. Use the << and >> buttons to change the year and the < and > buttons to change the month.
5. Select a button from the bottom of the tab. Refer to Table 3-2 for a description of the functions of the buttons on the M-Calendar tab.
Note: A pop-up menu appears after right-clicking the M-Calendar tab in View or Edit mode. Only select pop-up menu options correspond to the buttons listed in Table 3-2. The About M-Calendar Ctrl option from the pop-up menu displays copyright and version information.
6. Click Close to exit M-Inspector.
Table 3-2: M-Calendar Tab Button Options Button Description Close Closes the M-Inspector window. Help Displays information specifically about the object being inspected. Edit/View The Edit button allows the visible attributes to be edited. Edit the calendar when the Edit
button is clicked, even though the button name changes to View. The View button switches to View-only mode for the attributes. View the calendar when the View button is clicked, even though the button name changes to Edit. This button toggles between the Edit and View modes.
Save Saves any changes to the attributes after editing. Refresh Updates any changes to attributes on the Schedule tab since M-Inspector opened. (Values
do not automatically refresh.) Details Opens the M-Calendar Property Page.
Editing a Calendar Object To edit a Calendar object: 1. In the M-Explorer application, select a Calendar object. 2. From the Actions menu, select Inspect. The M-Inspector window
appears with the M-Command tab visible and the complete hierarchical path of the object appearing in the Title bar.
Note: Right-clicking on a selected item in either Tree view or Focus view also brings up the Inspect option on a pop-up menu.
3. Click the M-Calendar tab. The M-Calendar tab appears (Figure 3-1).
Note: Resize the window to display all available button options. Refer to Table 3-2 for a description of the functions of the buttons on the M-Calendar tab.
4. Click Edit or right-click the M-Calendar tab and select Edit from the pop-up menu. The Edit button on the M-Calendar tab now toggles to the View button. Edit the Calendar object as desired.
M-Schedule/M-Calendar User’s Guide 3-6

Working with M-Calendar Objects 3-7
Setting General Properties of a Calendar To set the general properties of a calendar: Note: The M-Calendar tab must be in Edit mode to set the general
properties of a calendar. To enter Edit mode, refer to Editing a Calendar Object in this chapter.
1. In Edit mode on the M-Calendar tab, click the Details button or right-click on the Calendar and select Details from the pop-up menu. The M-Calendar Control Property Page appears with the General tab selected (Figure 3-2).
Figure 3-2: M-Calendar Control Property Page Dialog Box - General Tab
2. Fill in the fields according to Table 3-3.
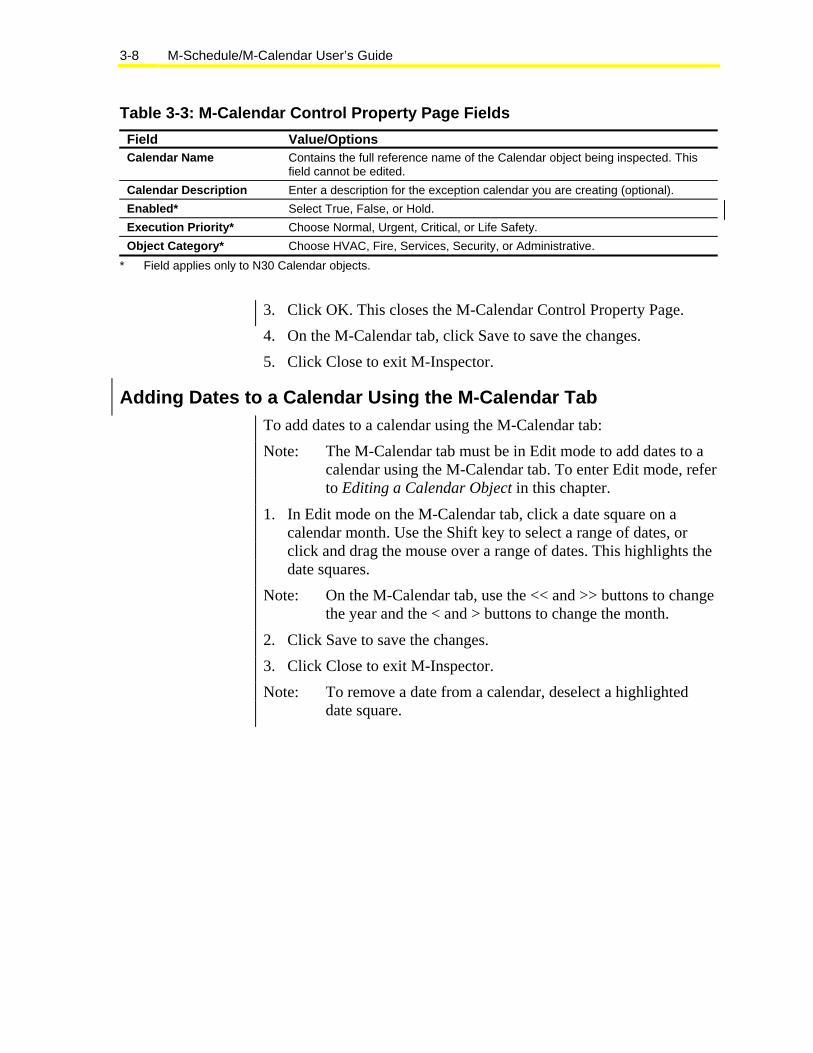
M-Schedule/M-Calendar User’s Guide 3-8
Table 3-3: M-Calendar Control Property Page Fields Field Value/Options Calendar Name Contains the full reference name of the Calendar object being inspected. This
field cannot be edited. Calendar Description Enter a description for the exception calendar you are creating (optional). Enabled* Select True, False, or Hold. Execution Priority* Choose Normal, Urgent, Critical, or Life Safety. Object Category* Choose HVAC, Fire, Services, Security, or Administrative.
* Field applies only to N30 Calendar objects. 3. Click OK. This closes the M-Calendar Control Property Page. 4. On the M-Calendar tab, click Save to save the changes. 5. Click Close to exit M-Inspector.
Adding Dates to a Calendar Using the M-Calendar Tab To add dates to a calendar using the M-Calendar tab: Note: The M-Calendar tab must be in Edit mode to add dates to a
calendar using the M-Calendar tab. To enter Edit mode, refer to Editing a Calendar Object in this chapter.
1. In Edit mode on the M-Calendar tab, click a date square on a calendar month. Use the Shift key to select a range of dates, or click and drag the mouse over a range of dates. This highlights the date squares.
Note: On the M-Calendar tab, use the << and >> buttons to change the year and the < and > buttons to change the month.
2. Click Save to save the changes. 3. Click Close to exit M-Inspector. Note: To remove a date from a calendar, deselect a highlighted
date square.
Working with M-Calendar Objects 3-9
Adding Dates to a Calendar Using the M-Calendar Control Property Page
To add dates to a calendar using the M-Calendar Control Property Page: Note: The M-Calendar tab must be in Edit mode to add dates to a
calendar using the M-Calendar Property Page. To enter Edit mode, refer to Editing a Calendar Object in this chapter.
1. In Edit mode on the On the M-Calendar tab, click Details or right-click within the tab and select Details from the pop-up menu. The M-Calendar Control Property Page appears.
2. On the M-Calendar Control Property Page, select the Dates tab (Figure 3-3) to add specific dates or date ranges to a calendar, or select the Week and Day tab (Figure 3-4) to set a specific day without knowing the date (for example, the third Tuesday in January) or a repeating day (for example, the last Friday of every month).
3. For each date, range, or Week and Day definition, select the days and click Add.
Note: To remove a date from a calendar, select the date in the Dates table or the Week and Day table and click Delete.
4. Click OK. This closes the M-Calendar Control Property Page. 5. On the M-Calendar tab, click Save to save the changes. 6. Click Close to exit M-Inspector.

M-Schedule/M-Calendar User’s Guide 3-10
Figure 3-3: M-Calendar Control Property Page Dialog Box – Dates Tab

Working with M-Calendar Objects 3-11
Figure 3-4: M-Calendar Control Property Page Dialog Box - Week and Day Tab
Controls Group 507 E. Michigan Street P.O. Box 423 www.johnsoncontrols.comMilwaukee, WI 53201 Printed in U.S.A.

M-Schedule/M-Calendar User’s Guide 4-1
Chapter 4 Working with LN Schedule Objects
Introduction M-Inspector provides access to LONWORKS® Network (LN) Schedule objects, which implement workstation based scheduling for devices on the LONWORKS network. The software components and tools described in this chapter are supplied with the Metasys® system Connectivity to LONWORKS network (MCL) software package. Note: For simplicity, LN Schedule objects may be referred to as
just Schedule objects in this chapter. Keep in mind, however, that there are differences in the way LN Schedule objects are created and configured compared with the Schedule objects of the other subsystems described in this manual.
This chapter describes how to:
• create new Schedule objects
• view a Schedule object
• edit a Schedule object
• set general properties of a schedule
• add OLE for Process Control (OPC) tags to the object lists of a schedule
• add events to a daily schedule
• copy a daily schedule to other daily schedules
• edit a daily schedule’s events
• add exception schedules to the Schedule object
• command a Schedule object
© June 30, 2004 Johnson Controls, Inc. www.johnsoncontrols.com Code No. LIT-1201123
M-Schedule/M-Calendar User’s Guide 4-2
Key Concepts LN Scheduling
The MCL software provides workstation-based scheduling for LONWORKS devices, meaning that scheduled events are issued as commands from the workstation to the devices on the LONWORKS network. Note that this is different from controller-based or device-based scheduling provided by special LONWORKS timer devices. LN Scheduling is implemented with the following components:
• L-Schedule Tool that you use to create new LN Schedule objects
• LN Scheduling OPC Server (JC.LNSchedOPC) that gives access to LN Schedule objects in M-Explorer
• Schedule tab in the M-Inspector window that you use to configure LN Schedule objects
• L-Schedule Task (background task) that sends scheduled commands to the LONWORKS network
OPC Tag An OPC tag is a named object in an OPC server database that can be accessed from an OPC client, such as M-Explorer. An LN OPC tag represents an entire LONWORKS Network Variable (NV) if the variable has a single value, or the tag can represent an individual field of a structured network variable. For simplicity, the rest of this chapter uses the term network variable to mean both single-valued network variables and the fields of structured network variables. Note: An LN OPC tag can also represent an entire structured
network variable. In this case, the Value displayed in M-Explorer and M-Inspector is a byte string showing the individual bytes of all fields of the variable (in decimal) separated by commas, for example, 16, 255, 123, 74. Due to their ambiguous nature, these OPC tags cannot be commanded in M-Inspector or by an LN Schedule object.
LN Schedule Objects LN Schedule objects allow you to command the OPC tags representing LONWORKS network variables at specified times, days, and dates. Schedules allow you to automate events for specific times. For example, you can have a fan turn on every day at 7:00 a.m. and turn off every day at 6:00 p.m., and also have it remain off on weekends and specific holidays.
Working with LN Schedule Objects 4-3
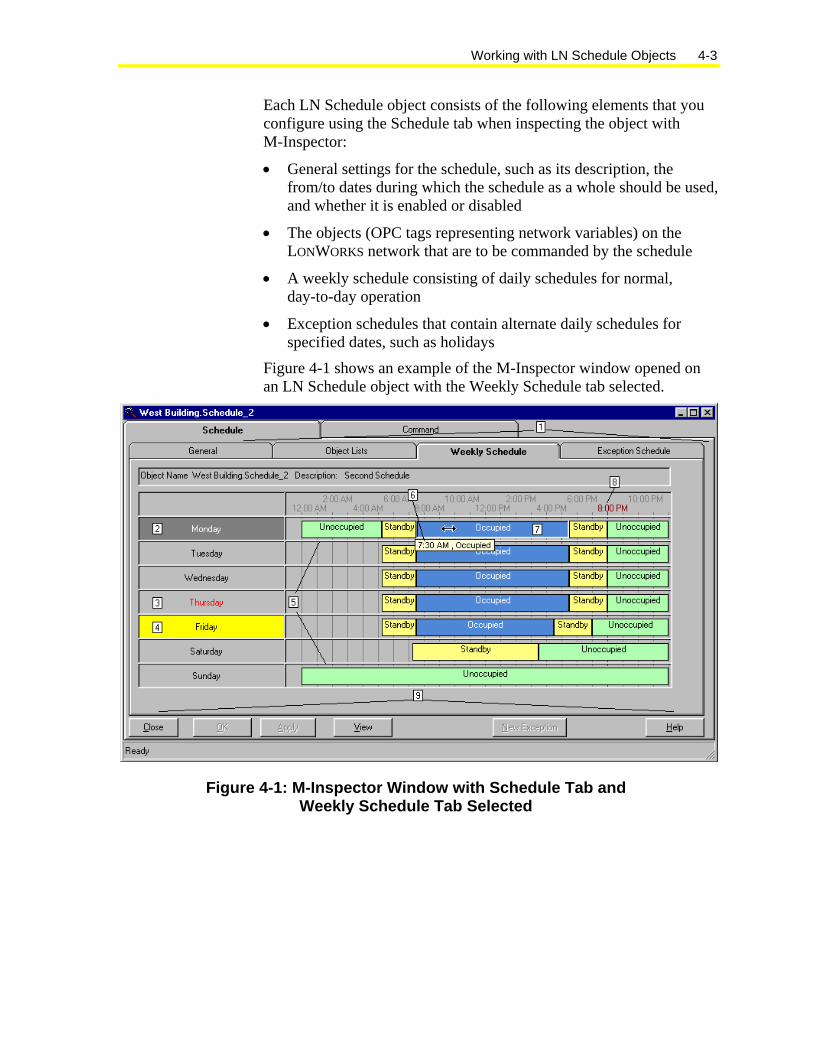
Each LN Schedule object consists of the following elements that you configure using the Schedule tab when inspecting the object with M-Inspector:
• General settings for the schedule, such as its description, the from/to dates during which the schedule as a whole should be used, and whether it is enabled or disabled
• The objects (OPC tags representing network variables) on the LONWORKS network that are to be commanded by the schedule
• A weekly schedule consisting of daily schedules for normal, day-to-day operation
• Exception schedules that contain alternate daily schedules for specified dates, such as holidays
Figure 4-1 shows an example of the M-Inspector window opened on an LN Schedule object with the Weekly Schedule tab selected.
Figure 4-1: M-Inspector Window with Schedule Tab and Weekly Schedule Tab Selected

M-Schedule/M-Calendar User’s Guide 4-4
Table 4-1 below describes the numbered callouts in Figure 4-1.
Table 4-1: Schedule Tab Callouts Callout Item Description 1 Schedule tabs Select a tab (General, Object Lists, Weekly Schedule, or Exception
Schedule) to configure various aspects of the LN Schedule object being inspected.
2 Monday selected in Edit mode
In Edit mode, left click on a weekday to highlight it for editing.
3 Thursday Today is shown with red text. 4 Friday highlighted
with yellow background
Yellow background indicates that there is an exception schedule that falls on this day. The exception schedule takes precedence over the daily schedule shown.
5 Daily Schedules The schedules that are defined for each weekday, displayed in a timeline format.
6 Tool tip below mouse pointer
When the mouse pointer hovers over a defined event block of a daily schedule, a tool tip with the block’s beginning time and occupancy mode appears below the block.
7 Block highlighted for editing
When a weekday is highlighted for editing (callout 2), left click on an event block of the daily schedule to highlight the block for editing. The block takes on the appearance of a button that is pressed down, and the mouse pointer changes to a double arrow ( ) to indicate that you can drag the block horizontally (see Editing a Daily Schedule’s Events).
8 Time in red text Red text indicates the hour of the current time of day. 9 Buttons Close
Closes the M-Inspector window. Prompts if changes have not been saved.
OK Saves changes and closes the M-Inspector window.
Apply Saves changes, but leaves the M-Inspector window open.
Edit/View* Toggles between View and Edit modes. The button text changes to the opposite mode, for example, when Edit mode is active, the button shows View.
New Exception Adds a new exception to the Exception schedule. It is enabled only when Edit mode is active and the Exception Schedule tab is displayed.
Help Displays help for the LN Schedule tab.
Note: A locking function prevents a Schedule object from being edited simultaneously in two applications, such as M-Inspector and the L-Schedule Tool application, or in two instances of the same application. The Edit button is disabled (appears dimmed) if the locking function detects that the Schedule object is already being edited in another application.

Working with LN Schedule Objects 4-5
Occupancy Modes LN Schedules work with three occupancy modes that you can use to divide a day into periods of Occupied, Unoccupied, and Standby status (see Figure 4-1). Associated with each mode is an Object List that contains the commands (OPC tags and command values) you want to have executed when the occupancy mode begins, for example, at the time when the mode is scheduled.
Object Lists Figure 4-2 shows the Object Lists tab on the M-Inspector Schedule tab. There are again tabs for the lists of each occupancy mode: Occupied, Unoccupied, and Standby. A list is a table of the LN OPC tags that are to be commanded when the occupancy mode becomes active, the value to which the tag is to be commanded, and the units (or description) of the value. Command priorities are not supported, meaning that scheduled commands are issued at the same priority as manual commands or commands from any other workstation feature.
Figure 4-2: Object Lists Tab on M-Inspector Schedule Tab

M-Schedule/M-Calendar User’s Guide 4-6
Table 4-2: Object Lists Tab Options Option Description Occupied, Unoccupied, and Standby Tabs
Click a tab to view or define the object list for the respective occupancy mode.
OPC Tag The list of OPC tags that are to be commanded when the respective occupancy mode becomes active. In Edit mode, you can click on a tag to highlight it, as shown in the third row of Figure 4-2. Click on the Replace button ( ) that appears to open the OPC Universal Tag Browser window (Figure 4-3), from which you can select a different OPC tag to replace the tag shown.
Value The value to which the OPC tag is commanded when the respective occupancy mode becomes active. In Edit mode, double-click on the field to enter the command value, or if the OPC tag has enumerated values, click on the field to highlight it and click on the down arrow button to select a command value from the drop-down list of values.
Units The engineering units of the OPC tag. This field cannot be edited. Add Tag Button In Edit mode, click the Add Tag button to open the OPC Universal Tag Browser
window (Figure 4-3), from which you can select a new OPC tag to add to the object list. When you click OK in the tag browser, a new row with the selected tag is added to the list. This button is disabled in View mode. Instead of clicking the Add Tag button, you can use the mouse to drag and drop tags from the Focus pane of the M-Explorer window directly into the Object List (drag and drop does not work from the tag browser).
Delete Tag Button In Edit mode, click on an OPC tag to highlight it, then click the Delete Tag button to remove the tag from the object list. This button is disabled in View mode.
When you click the Add Tag button, the OPC Universal Tag Browser window appears (Figure 4-3), which allows you to select OPC tags for the Object Lists.
Figure 4-3: OPC Universal Tag Browser
Working with LN Schedule Objects 4-7
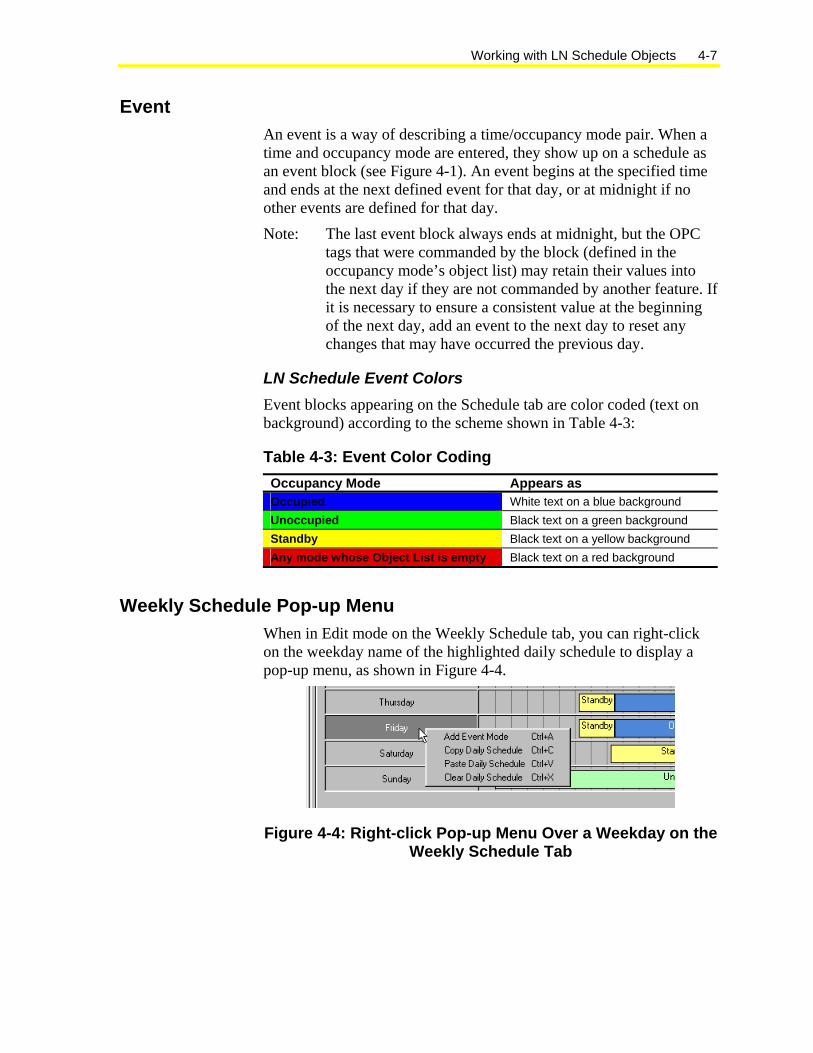
Event An event is a way of describing a time/occupancy mode pair. When a time and occupancy mode are entered, they show up on a schedule as an event block (see Figure 4-1). An event begins at the specified time and ends at the next defined event for that day, or at midnight if no other events are defined for that day. Note: The last event block always ends at midnight, but the OPC
tags that were commanded by the block (defined in the occupancy mode’s object list) may retain their values into the next day if they are not commanded by another feature. If it is necessary to ensure a consistent value at the beginning of the next day, add an event to the next day to reset any changes that may have occurred the previous day.
LN Schedule Event Colors Event blocks appearing on the Schedule tab are color coded (text on background) according to the scheme shown in Table 4-3:
Table 4-3: Event Color Coding Occupancy Mode Appears as Occupied White text on a blue background Unoccupied Black text on a green background Standby Black text on a yellow background Any mode whose Object List is empty Black text on a red background
Weekly Schedule Pop-up Menu When in Edit mode on the Weekly Schedule tab, you can right-click on the weekday name of the highlighted daily schedule to display a pop-up menu, as shown in Figure 4-4.
Figure 4-4: Right-click Pop-up Menu Over a Weekday on the Weekly Schedule Tab

M-Schedule/M-Calendar User’s Guide 4-8
Table 4-4: Weekday Pop-up Menu Options Option Description Add Event Mode Click on this option to begin adding events to the daily schedule (see the Add Event
Mode heading below). The mouse pointer changes to a crosshair ( ) when positioned over the timeline of the selected schedule. Add Event mode is active until you turn it off by clicking on the highlighted weekday or on another weekday. While active, you can add events, one after the other, until you turn off Add Event mode.
Copy Daily Schedule Copies the selected weekday’s daily schedule to an internal buffer. Paste Daily Schedule Pastes the previously copied daily schedule from the internal buffer to the selected
weekday. This overwrites the daily schedule currently defined for this weekday. Clear Daily Schedule Deletes the daily schedule defined for the selected weekday.
Add Event Mode When you are in Add Event mode, click anywhere on the timeline to begin inserting a new event block. If you hold the left mouse button down, you can drag the beginning of the block to the desired time, as illustrated in Figure 4-5.
Figure 4-5: Add Event Mode Block Sizing When you release the left mouse button, the Event Definition dialog box appears (Figure 4-6), which allows you to select the Occupancy Mode for the event, and adjust the begin time of the event, either by typing in the hours and minutes, or by highlighting the hours or minutes and clicking on the up and down spin buttons ( ) to the right of the time. Press the Enter key or click the Enter button ( ) to finish creating the event. Press the Esc key or click the Close button ( ) to cancel the event definition.
Figure 4-6: Event Definition Dialog Box

Working with LN Schedule Objects 4-9
Daily Schedule Pop-up Menus The next two figures show the pop-up menus that appear when you right-click on different areas of the selected daily schedule, and Table 4-5 describes the menu options.
Figure 4-7: Pop-up Menu Over an Undefined Area of a Daily Schedule
Figure 4-8: Pop-up Menu Over a Selected Event Block
Table 4-5: Daily Schedule Pop-up Menu Options Option Description Add Event Opens the Event Definition dialog box (Figure 4-6) for the time
over which the mouse pointer was positioned on the timeline when you right-clicked.
Modify Event Opens the Event Definition dialog box (Figure 4-6) for the selected event. You can change the event’s begin time and occupancy mode in the dialog box.
Delete Event Removes the selected event from the daily schedule. If there is an earlier event, it’s block is stretched to fill the hole.

M-Schedule/M-Calendar User’s Guide 4-10
Exception Schedules Exception schedules allow you to further refine your control of objects by preempting the weekly schedule with different events on specified dates. For the fan example mentioned previously under LN Schedule Objects, you could create exceptions to the fan schedule so that the fan would not turn on during holidays. Figure 4-9 shows the Exception Schedule tab for an LN Schedule object.
Figure 4-9: Exception Schedule Tab on M-Inspector Schedule Tab In contrast to the way Schedule objects for other subsystems work, LN Schedule objects define events as time/occupancy mode pairs rather than time/value pairs. This means that for each event you define, you have only the choice of the time and one of the three possible occupancy modes (unoccupied, occupied, or standby). The mode you choose then causes all of the commands defined in its Object List to be executed at the specified time. This is particularly important to remember for Exception Schedules, which within one Schedule object, can only be used to reschedule occupancy modes, but cannot send command values other than those contained in the object lists of the three modes. You can, however, create separate Schedule objects that define, for example, only exception schedules with the desired commands and the weekly schedule left blank. Note: The MCL software does not support Calendar object
references for exception schedules.

Working with LN Schedule Objects 4-11
Exception Schedule Pop-up Menu When in Edit mode on the Exception Schedule tab, you can right-click on the exception date of the highlighted exception schedule to display a pop-up menu, as shown in Figure 4-10 and described in Table 4-6.
Figure 4-10: Right-click Pop-up Menu Over the Exception Date on the Exception Schedule Tab
Table 4-6: Exception Date Pop-up Menu Options Option Description First four options (Add Event Mode, etc.)
These options for working with the daily schedule are identical to those described earlier in Table 4-4 under Weekly Schedule Pop-up Menu.
Modify Exception Displays the Exception Schedule Definition dialog box (Figure 4-11), which allows you to change the type and dates of the highlighted exception schedule.
Delete Exception Removes the highlighted exception schedule from the Exception Schedule tab.
Add New Exception Displays the Exception Schedule Definition dialog box (Figure 4-11), which allows you to define the type and dates for a new exception schedule, that is subsequently added to the Exception Schedule tab.
In addition to the exception date pop-up menu, the same two pop-up menus shown earlier in Figure 4-7 and Figure 4-8 under the Daily Schedule Pop-up Menus heading appear when you right-click on different areas of the selected exception daily schedule’s timeline. These pop-up menu options are described in Table 4-5.

M-Schedule/M-Calendar User’s Guide 4-12
Exception Schedule Definition Dialog Box When you add a new exception, or modify an existing exception, the Exception Schedule Definition dialog box appears, as shown in Figure 4-11.
Figure 4-11: Exception Schedule Definition Dialog Box Note: This release of the MCL software supports only the Date
Range Period Type. The Period Types Date and Day, and Month, Week and Day are disabled in the dialog box and cannot be selected.

Working with LN Schedule Objects 4-13
Table 4-7 describes the options in the Exception Schedule Definition dialog box:
Table 4-7: Exception Schedule Definition Dialog Box Options Option Description Period Type: Date Range Specifies a range of consecutive dates (from/to, inclusive) during which the
exception schedule applies. To specify a single exception day, set the same date in both the From and To Date Range fields at the bottom of the dialog box.
Calendar Control: Dates on Month Page Click on a date to highlight it, which also copies the entire date (month, day,
year) to the From or To field, whichever was last selected (the word From or To is shown in blue text to indicate which field was last selected).
and Buttons Move to the previous or next month.
and Buttons Move to the previous or next year. Note that if you select a date in a year before the current year, or more than 20 years in the future, then the Year fields are automatically set to the wildcard entry (****); see the Year field below for an explanation of what this entry means.
Today Moves the date highlight to today’s date, and copies the entire date to the From or To field, whichever was last selected (indicated by blue text).
Date Range From and To Fields: Day Select a day’s date from the drop-down list. Month Select a month from the drop-down list. Year Select a year from the drop-down list. The list also contains a special wildcard
entry of four asterisks (****) that means all years, since the year is not specified. When you select the wildcard entry in either the From or To date fields, the other Year field is automatically changed to the wildcard entry to avoid the ambiguity of how to interpret the date range, for example, does the exception schedule start in a specific year and then remain active for several years. By the same token, when the Year fields contain the wildcard entry and you change one to a specific year, the other is also changed to the same year. You can then select a different year, if required.
OK Button Copies the selected period type and dates to the exception schedule, and closes the dialog box.
Cancel Button Closes the dialog box without changing or creating the exception schedule.
M-Schedule/M-Calendar User’s Guide 4-14
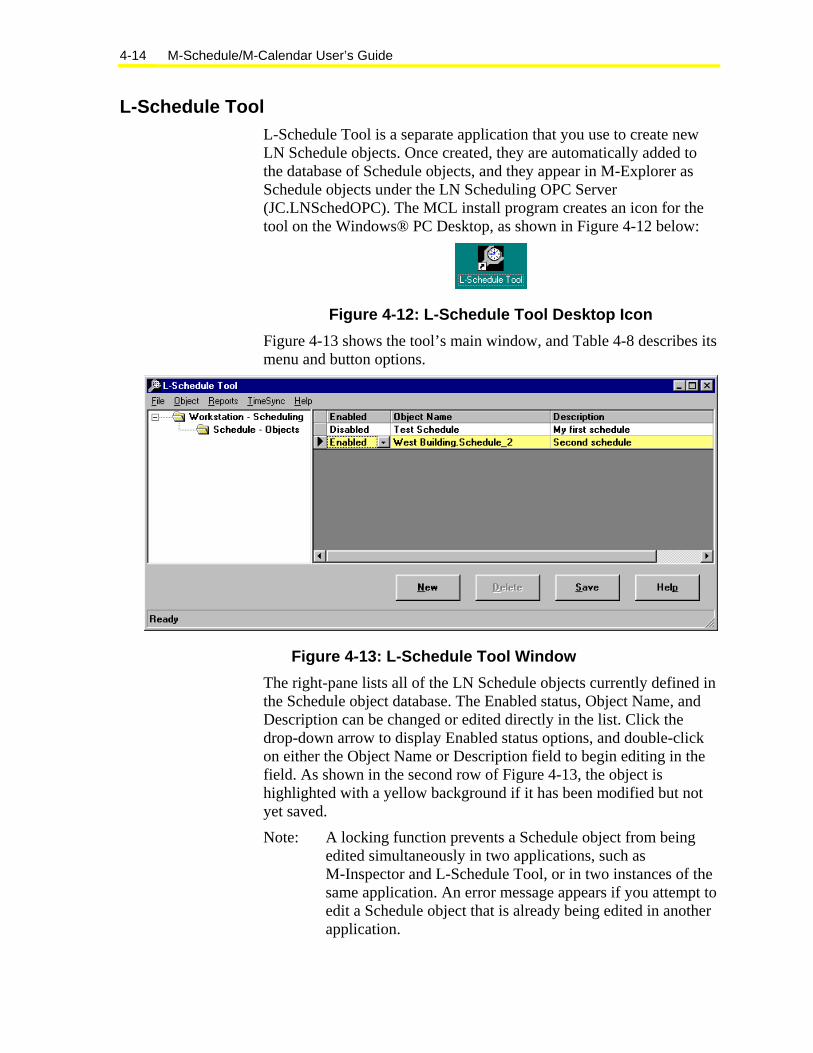
L-Schedule Tool L-Schedule Tool is a separate application that you use to create new LN Schedule objects. Once created, they are automatically added to the database of Schedule objects, and they appear in M-Explorer as Schedule objects under the LN Scheduling OPC Server (JC.LNSchedOPC). The MCL install program creates an icon for the tool on the Windows® PC Desktop, as shown in Figure 4-12 below:
Figure 4-12: L-Schedule Tool Desktop Icon Figure 4-13 shows the tool’s main window, and Table 4-8 describes its menu and button options.
Figure 4-13: L-Schedule Tool Window The right-pane lists all of the LN Schedule objects currently defined in the Schedule object database. The Enabled status, Object Name, and Description can be changed or edited directly in the list. Click the drop-down arrow to display Enabled status options, and double-click on either the Object Name or Description field to begin editing in the field. As shown in the second row of Figure 4-13, the object is highlighted with a yellow background if it has been modified but not yet saved. Note: A locking function prevents a Schedule object from being
edited simultaneously in two applications, such as M-Inspector and L-Schedule Tool, or in two instances of the same application. An error message appears if you attempt to edit a Schedule object that is already being edited in another application.

Working with LN Schedule Objects 4-15
Table 4-8: L-Schedule Tool Menu and Button Options Menu/Button Option Description File Menu: Compress Database Compresses the database of Schedule objects, which may free up disk space
and improve performance when the objects are accessed. This may only be done when the L-Schedule background task is shut down (see L-Schedule Task later in this chapter).
Exit Terminates the L-Schedule Tool program. Prompts to save changes if they have not yet been saved.
Object Menu: New Opens the New Schedule Object dialog box (Figure 4-14) that allows you to
create a new Schedule object. Copy Prepares to make a copy of the selected Schedule object. Paste Opens the Copy of “Schedule object” dialog box (Figure 4-15). You must edit the
name of the original Schedule object shown in the Object Name field to make it unique for the new object. Note that the OK button remains disabled until you edit the Object Name. When you click OK, the dialog box closes, and a new Schedule object is added to the list of objects shown in the L-Schedule Tool window. The new Schedule object is an exact copy of the object from which it was copied, including all of the definitions for the Weekly Schedule, Exception Schedule, etc. Note that you do not have to move the highlight away from the original schedule when you select Paste, because the function creates new schedules rather than pasting into an existing schedule.
Delete Deletes the highlighted Schedule object from the Schedule object database. Save Saves the Schedule object after you have edited its name or description, or
changed its enabled status. Reports Menu: Report Selected Creates a report of the selected Schedule object. The report is a plain text file,
and after it is created, it is automatically opened in Notepad. Report All Creates a report of all Schedule objects, and opens Notepad on the report. TimeSync Menu: Define Opens the LN Time Synchronization Definition dialog box (Figure 4-16) that
allows you to define which OPC tags on the LONWORKS network are to be synchronized, when synchronization is to begin, and the synchronization interval.
Synchronize Now Forces a time synchronization now. Help Menu: Contents Opens Help contents for the L-Schedule Tool. About Displays version and copyright information. New Button Same as the Object > New menu option (see above). Delete Button Same as the Object > Delete menu option (see above). Save Button Same as the Object > Save menu option (see above). Help Button Same as the Help > Contents menu option (see above).

M-Schedule/M-Calendar User’s Guide 4-16
New Schedule Object and Copy of “Schedule object” Dialog Boxes Figure 4-14 shows the New Schedule Object dialog box and Figure 4-15 shows the Copy of “Schedule object” dialog box.
Figure 4-14: New Schedule Object Dialog Box
Table 4-9: Fields in the New Schedule Object Dialog Box Field Description Object Name Enter a name for the new Schedule object. You can simultaneously create branch items for
grouping Schedule objects in M-Explorer. First type one or more branch names separated by dots (.), then type the name you want to give the Schedule object itself following the last dot. For example: West Building.Reception.Schedule 3 If a branch doesn’t exist, it is created, otherwise, the schedule is added under the existing branch. Schedule object names must not exceed 80 characters, which includes the dot characters and the server name (JC.LNSchedOPC\\).
Description Freely-definable descriptive text for the Schedule object, that is also displayed in M-Explorer.
Figure 4-15: Copy of “Schedule object” Dialog Box The fields in this dialog box are the same as in the New Schedule Object dialog box (see Table 4-9). Note that the OK button appears dimmed until you edit the Object Name to make it unique for the new Schedule object.

Working with LN Schedule Objects 4-17
Note: When you click OK in either the New Schedule Object dialog box or the Copy of “Schedule object” dialog box, the Schedule object is automatically saved in the database of Schedule objects. You do not have to click Save in the L-Schedule tool window. The Save option is required only for modifications to existing Schedule objects.
LN Time Synchronization Definition Dialog Box Figure 4-16 shows the LN Time Synchronization Definition dialog box.
Figure 4-16: LN Time Synchronization Definition Dialog Box
Table 4-10: Options in the LN Time Synchronization Definition Dialog Box Option Description Begin Time Enter the time of day when time synchronization should start. Interval Enter the time interval (frequency) for the time synchronization
commands. OPC Tags… Lists the OPC tags representing LONWORKS network variables of
type SNVT_time_stamp that should be synchronized. Add Button Opens the OPC Universal Tag Browser (Figure 4-3), so that you
can select LN OPC tags for inclusion in the list of tags to be synchronized.
Delete Button
Deletes the highlighted OPC tag from the list.
M-Schedule/M-Calendar User’s Guide 4-18
Notes: The only way to disable time synchronization is to clear (delete) the list of OPC tags. Time synchronization is executed by the L-Schedule background task. If the task is shut down, then time synchronization is also no longer executed (see L-Schedule Task later in this chapter).
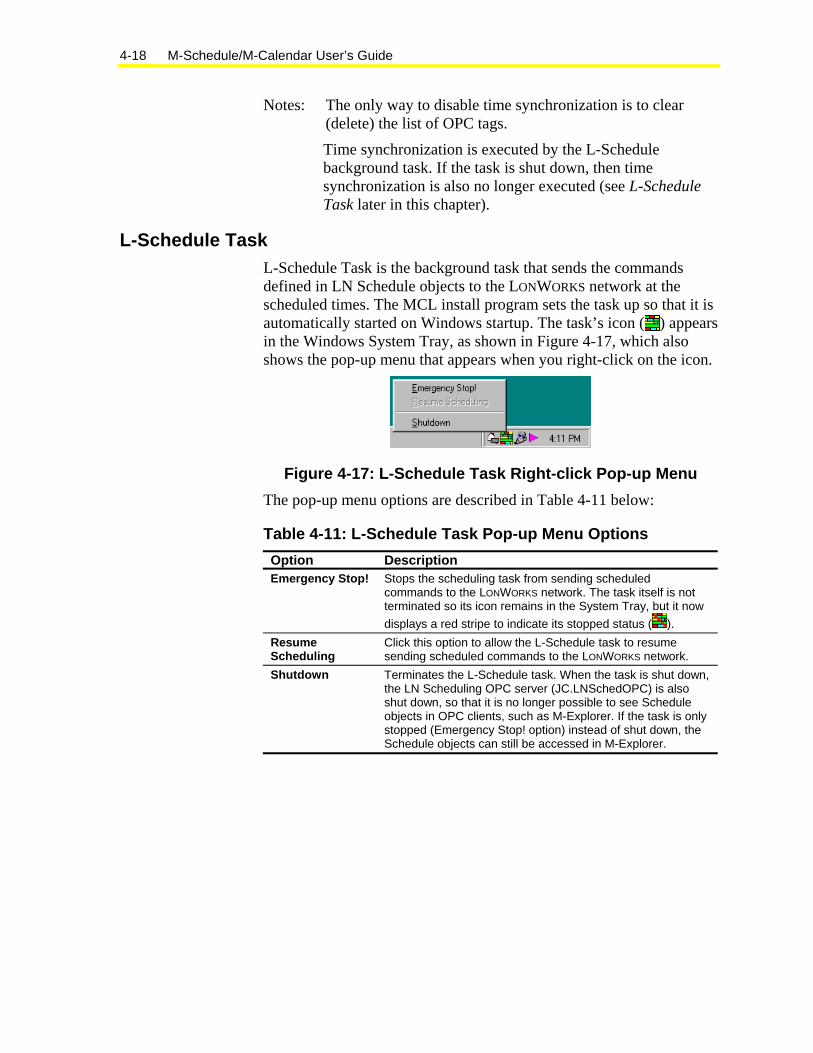
L-Schedule Task L-Schedule Task is the background task that sends the commands defined in LN Schedule objects to the LONWORKS network at the scheduled times. The MCL install program sets the task up so that it is automatically started on Windows startup. The task’s icon ( ) appears in the Windows System Tray, as shown in Figure 4-17, which also shows the pop-up menu that appears when you right-click on the icon.
Figure 4-17: L-Schedule Task Right-click Pop-up Menu The pop-up menu options are described in Table 4-11 below:
Table 4-11: L-Schedule Task Pop-up Menu Options Option Description Emergency Stop! Stops the scheduling task from sending scheduled
commands to the LONWORKS network. The task itself is not terminated so its icon remains in the System Tray, but it now displays a red stripe to indicate its stopped status ( ).
Resume Scheduling
Click this option to allow the L-Schedule task to resume sending scheduled commands to the LONWORKS network.
Shutdown Terminates the L-Schedule task. When the task is shut down, the LN Scheduling OPC server (JC.LNSchedOPC) is also shut down, so that it is no longer possible to see Schedule objects in OPC clients, such as M-Explorer. If the task is only stopped (Emergency Stop! option) instead of shut down, the Schedule objects can still be accessed in M-Explorer.

Working with LN Schedule Objects 4-19
How the L-Schedule Task Works Under Various Situations There are various situations, such as changing the system (Windows) time, or stopping and starting the L-Schedule task, where it may be important to know how the task handles the scheduled commands. Table 4-12 describes these situations.
Table 4-12: L-Schedule Task Behavior in Various Situations Situation L-Schedule Task’s Response The system time is changed by less than 2 hours into the future.
The task runs three times as fast, and issues scheduled commands until it catches up with the current time.
The system time is set back by less than 2 hours.
The task waits and does not re-send scheduled commands that have already been sent. The task resumes normal scheduling when the system time catches up with the time at which the change occurred.
The system time is changed by more than 2 hours forwards or backwards.
The task behaves as if it were just started, for example, it neither speeds up nor waits, but just begins sending the commands scheduled for the new time.
An LN Schedule object is disabled. When a Schedule object is disabled, its commands are no longer sent. However, if the task is in the middle of sending a series of commands for the object, the task continues the series until all commands have been sent. This is to avoid an incomplete series of commands, such as turning half of the lights on and leaving the rest off. After the series is completed, the task sends no more commands for the object until the object is enabled again.
The task is switched to Emergency Stop!
The task immediately stops sending commands, even if it is in the middle of a series of commands.
The task is switched to Resume Scheduling.
The task acts as if it has just been started, for example, it does not try to finish a series of commands that were pending when it was stopped.
The task is started automatically on a reboot of the computer, or manually after being shut down.
The task begins with the next scheduled command. It does not remember any past commands that it may have missed while it was stopped.
An LN Schedule object is changed (edited).
As soon as the user presses the OK or Apply button to save the changes, they are written to the Schedule object database, and the task is informed that changes have occurred. The task takes the changes into account the next minute after the change occurs. If the task is in the middle of a series of commands when the change occurs, the series is completed regardless of whether the change affected the series.
Note: A programming error in the Windows Control Panel’s Date/Time Properties dialog box can lead to unexpected behavior of the L-Schedule Task. If you change the date in the calendar control, the dialog box immediately changes the system clock to the new date, even if you do not click OK or Apply. If you click Cancel to close the dialog box, it sets the date back to the original date. This may cause L-Schedule Task to see two time changes of greater than 2 hours.

M-Schedule/M-Calendar User’s Guide 4-20
Procedure Overview Table 4-13: Working with LN Schedule Objects To Do This Follow These Steps: Create a New Schedule Object
Start the L-Schedule Tool application, open Workstation - Scheduling, and select Schedule - Objects. Select Object > New or click the New button, or select an existing schedule and select Object > Copy followed by Object > Paste. Fill in the fields of the dialog box that appears and click OK.
View a Schedule Object In M-Explorer, select an LN Schedule object listed under the JC.LNSchedOPC server. From the Actions menu, select Inspect, or click the Inspect toolbar button ( ), or right-click on the object to bring up the Inspect option on a pop-up menu. Select one of the Schedule object’s tabs (General, Object Lists, Weekly Schedule, or Exception Schedule). On the Weekly Schedule or Exception Schedule tab, move the cursor over an event to view a tool tip with event details.
Edit a Schedule Object Open a Schedule object for viewing in the M-Inspector window as described under Viewing a Schedule Object. Click the Edit button. Edit the Schedule object as desired.
Set General Properties of a Schedule
In Edit mode on the Schedule tab, click the General tab. Edit the fields as described in Table 4-14. Click OK or Apply to save the changes.
Add OPC Tags to the Object Lists of a Schedule
In Edit mode on the Schedule tab, click the Object Lists tab. On the Object Lists tab, select the tab for the occupancy mode you want to configure (Occupied, Unoccupied, or Standby). Click the Add Tag button to open the OPC Universal Tag Browser, and select the LN OPC tag you want to add to the list. Click OK in the tag browser to close it, which also copies the tag to the object list. Double-click on the Value field of the tag to enter the command value, or if the tag has enumerated values, click on the Value field to highlight it and click on the down arrow button to select a command value from the drop-down list of values. Click Add Tag again to add additional tags. Click OK or Apply to save the changes.
Add Events to a Daily Schedule
On the left side of the Weekly Schedule or Exception Schedule tab in Edit mode, click on a weekday name or exception date to highlight it for editing. Right-click on the highlight and select Add Event Mode from the pop-up menu, or right-click on a blank area of the timeline and select Add Event. Move the cursor over the time of day that you want the event to take place, and left-click. In the Event Definition dialog box that appears, enter or adjust the starting time, select an occupancy mode, and press the Enter key or click the Enter button. After all events have been added, click OK or Apply to save the changes.
Copy a Daily Schedule to Other Daily Schedules
On the left side of the Weekly Schedule or Exception Schedule tab in Edit mode, click on the weekday name or exception date that has the daily schedule events you want to duplicate. The weekday or date is highlighted for editing. Right-click on the highlight and select Copy Daily Schedule. On the left side of the tab, click on the weekday or exception date that is to receive the copy of the daily schedule. The weekday or date is highlighted for editing. Right-click on the highlight and select Paste Daily Schedule. Click OK or Apply to save the changes.
Edit a Daily Schedule’s Events
In Edit mode, on the left side of the Weekly Schedule or Exception Schedule tab, click on a weekday name or exception date to highlight it for editing. Left-click on an event block of the daily schedule to highlight the block for editing. Drag the block with the mouse to reposition it, or drag the starting time of the block, or use the arrow keys to adjust the starting time by three minute increments, or right-click on the block and select Modify Event to display the Event Definition dialog box. Click OK or Apply to save the changes.
Continued on next page . . .

Working with LN Schedule Objects 4-21
To Do This (Cont.) Follow These Steps: Add Exception Schedules to a Schedule Object
In Edit mode on the Exception Schedule tab, click New Exception, or left-click on the exception date of an existing schedule to highlight it, right-click on the highlight, and select Add New Exception. Fill in the fields of the Exception Schedule Definition dialog box that appears. Click OK in the dialog box to add the new exception schedule. Add events to the new exception schedule’s daily schedule, as described under Adding Events to a Daily Schedule. Add additional exception schedules as needed. Click OK or Apply to save the changes.
Command a Schedule Object
Open the Schedule object in M-Inspector. Click the Command tab at the top of the M-Inspector window. Select Enabled or Disabled from the Command Value To drop-down list. Click the Execute button.
Detailed Procedures Creating a New Schedule Object
To create a new Schedule object: 1. Start the L-Schedule Tool application by clicking on the Windows
Start menu and selecting Programs> Johnson Controls> L-Tools> L-Schedule Tool, or by double-clicking on the L-Schedule Tool desktop icon (Figure 4-12). The L-Schedule Tool main window opens (Figure 4-13).
2. In the left-pane Tree view, open Workstation - Scheduling, and select Schedule Objects. The right-pane Focus view displays a list of the workstation Schedule objects that already exist in the Schedule object database.
3. From the Object menu, select New, or click the New button at the bottom of the window. The New Schedule Object dialog box appears (Figure 4-14). Note: If you want to create a new Schedule object that is based
on an existing schedule, including the Weekly Schedule, Exception Schedules, etc. defined in the existing Schedule object, first select the existing schedule, then select Object> Copy followed by Object> Paste. For details, see Table 4-8.
4. Fill in the fields of the New Schedule Object dialog box, as described in Table 4-9.
5. Click OK in the dialog box to save the new schedule in the Schedule object database. The dialog box closes and you are returned to the L-Schedule Tool window.
6. From the File menu, select Exit to close the L-Schedule Tool application. The new Schedule object can now be accessed for viewing and editing in the M-Explorer application, where it is listed under the JC.LNSchedOPC server (Figure 4-18).
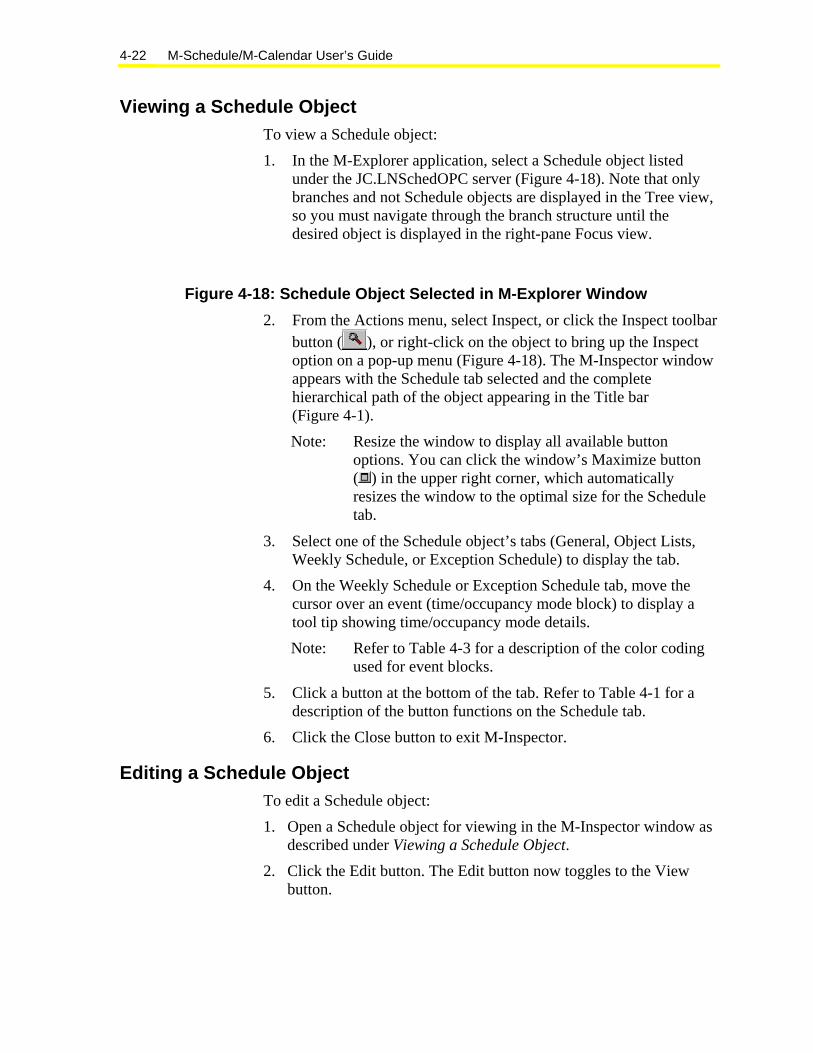
M-Schedule/M-Calendar User’s Guide 4-22
Viewing a Schedule Object To view a Schedule object: 1. In the M-Explorer application, select a Schedule object listed
under the JC.LNSchedOPC server (Figure 4-18). Note that only branches and not Schedule objects are displayed in the Tree view, so you must navigate through the branch structure until the desired object is displayed in the right-pane Focus view.
Figure 4-18: Schedule Object Selected in M-Explorer Window 2. From the Actions menu, select Inspect, or click the Inspect toolbar
button ( ), or right-click on the object to bring up the Inspect option on a pop-up menu (Figure 4-18). The M-Inspector window appears with the Schedule tab selected and the complete hierarchical path of the object appearing in the Title bar (Figure 4-1). Note: Resize the window to display all available button
options. You can click the window’s Maximize button ( ) in the upper right corner, which automatically resizes the window to the optimal size for the Schedule tab.
3. Select one of the Schedule object’s tabs (General, Object Lists, Weekly Schedule, or Exception Schedule) to display the tab.
4. On the Weekly Schedule or Exception Schedule tab, move the cursor over an event (time/occupancy mode block) to display a tool tip showing time/occupancy mode details. Note: Refer to Table 4-3 for a description of the color coding
used for event blocks.
5. Click a button at the bottom of the tab. Refer to Table 4-1 for a description of the button functions on the Schedule tab.
6. Click the Close button to exit M-Inspector.
Editing a Schedule Object To edit a Schedule object: 1. Open a Schedule object for viewing in the M-Inspector window as
described under Viewing a Schedule Object. 2. Click the Edit button. The Edit button now toggles to the View
button.

Working with LN Schedule Objects 4-23
Note: If the Edit button is disabled, the Schedule object is already open for editing in another application, or in another instance of M-Inspector. Close the other application or instance to enable the Edit button.
3. Edit the Schedule object as desired.
Setting General Properties of a Schedule Note: The Schedule tab must be in Edit mode to set the general
properties. To enter Edit mode, refer to Editing a Schedule Object in this chapter.
To set the general properties of a schedule: 1. In Edit mode on the Schedule tab, click the General tab. The
General tab appears, as shown in Figure 4-19.
Figure 4-19: General Tab on the M-Inspector Schedule Tab 2. Edit the fields according to Table 4-14.

M-Schedule/M-Calendar User’s Guide 4-24
Table 4-14: General Tab Fields Field Value Schedule Name Contains the full reference name of the Schedule object being inspected.
This field cannot be edited. Schedule Type Shows the type of the Schedule object being inspected. Only Workstation
schedules are supported, so this field always shows Workstation. This field cannot be edited.
Schedule Description Enter a description for the schedule (optional). Effective Period From – Active Place a check mark in this option to enable the From date fields so you
can enter an explicit starting date for the schedule. If Active is not checked, the date fields behave as wildcard fields, meaning that the schedule starts immediately.
Effective Period – From* Select the date on which the schedule is to begin. Effective Period To – Active Place a check mark in this option to enable the To date fields so you can
enter an explicit ending date for the schedule. If Active is not checked, the date fields behave as wildcard fields, meaning that the schedule never ends.
Effective Period – To* Select the date on which the schedule is to end. Enabled Status Select Enabled to enable the schedule, or Disabled to disable the
schedule. Note that this is the same as commanding the Schedule object to either state, see Commanding a Schedule Object later in this chapter.
*: The Year drop-down list boxes also contain a special wildcard entry of four asterisks (****) that means all years, since the year is not specified. If both the From and To dates are Active, and you select the wildcard entry in either Year field, the other Year field is automatically changed to the wildcard entry. By the same token, when the Year fields contain the wildcard entry and you change one to a specific year, the other is also changed to the same year. You can then select a different year, if required.
3. Click OK to save the changes and close the M-Inspector window, or click Apply to save the changes and leave the M-Inspector window open.
4. Click the Close button to exit M-Inspector.
Adding OPC Tags to the Object Lists of a Schedule To add OPC tags to the Object Lists of a schedule:
Note: The Schedule tab must be in Edit mode to add objects to a schedule. To enter Edit mode, refer to Editing a Schedule Object in this chapter.
1. In Edit mode on the Schedule tab, click the Object Lists tab. The Object Lists tab appears with the Occupied tab selected, as shown in Figure 4-2.
2. On the Object Lists tab, select the tab for the occupancy mode you want to configure (Occupied, Unoccupied, or Standby). The corresponding object list appears.
3. Click the Add Tag button, which opens the OPC Universal Tag Browser (Figure 4-3).

Working with LN Schedule Objects 4-25
4. In the tag browser, navigate to and select the LN OPC tag to which you want to send a command when the occupancy mode is scheduled. LN OPC tags represent Network Variables, or individual fields of structured Network Variables, of the devices on the LONWORKS network.
5. Click OK in the tag browser to close its window and copy the selected OPC tag to the Object List. The tag must be commandable (writable), otherwise an error message appears and the tag is not added to the list. Note: Alternatively to opening and closing the tag browser for
each tag you want to add, you can use the mouse to drag and drop tags from the Focus pane of the M-Explorer window directly into the Object List (drag and drop does not work from the tag browser).
6. Double-click on the Value field of the OPC tag to enter the value to which the tag should be commanded when the occupancy mode becomes active, or if the tag has enumerated values, click on the Value field to highlight it and click on the down arrow button to select a command value from the drop-down list of values.
7. Click Add Tag again to add additional OPC tags to the occupancy mode’s object list, or select an object and click Delete Tag to remove it from the list (see Table 4-2 under Object Lists for additional information on using the Object Lists tab).
8. Click OK to save the changes and close the M-Inspector window, or click Apply to save the changes and leave the M-Inspector window open.
9. Click the Close button to exit M-Inspector.
Adding Events to a Daily Schedule Note: The Schedule tab must be in Edit mode to add events to a daily
schedule. To enter Edit mode, refer to Editing a Schedule Object in this chapter.
To add events to a daily schedule on either the Weekly Schedule or Exception Schedule tab: 1. On the M-Inspector Schedule tab, select either the Weekly
Schedule tab (Figure 4-1) or the Exception Schedule tab (Figure 4-9).
2. On the left side of the selected tab in Edit mode, click on a weekday name or exception date to highlight it for editing.

M-Schedule/M-Calendar User’s Guide 4-26
3. Right-click on the highlighted weekday or date to display a pop-up menu for working with daily schedules, (Figure 4-4 weekly schedules, and Figure 4-10 exception schedules).
4. Select Add Event Mode, which allows you to begin adding events to the selected daily schedule. Notes: Alternatively to right-clicking on the weekday or date,
you can right-click on a blank area of the timeline of the highlighted daily schedule to display a pop-up menu that also has an Add Event option (see Figure 4-7 under Daily Schedule Pop-up Menus).
5. Add one or more events to the daily schedule, as described earlier in this chapter in the Add Event Mode section.
6. Repeat Steps 2 through 5 for the other weekdays or exception dates.
7. Click OK to save the changes and close the M-Inspector window, or click Apply to save the changes and leave the M-Inspector window open.
8. Click the Close button to exit M-Inspector.
Copying a Daily Schedule to Other Daily Schedules Note: The Schedule tab must be in Edit mode to copy daily
schedules. To enter Edit mode, refer to Editing a Schedule Object in this chapter.
To copy a daily schedule to other daily schedules on either the Weekly Schedule or Exception Schedule tab: 1. On the left side of the Weekly or Exception Schedule tab in Edit
mode, click on the weekday name or exception date that has the daily schedule events you want to duplicate. The weekday or date is highlighted for editing.
2. Right-click on the highlight, and select Copy Daily Schedule from the pop-up menu that appears.
3. On the left side of the tab, click on the weekday or exception date that is to receive the copy of the daily schedule. The weekday or date is highlighted for editing. Note that you can also copy a daily schedule from the Weekly Schedule tab to the Exception Schedule tab, or vice versa, if desired, by clicking the respective tab before executing this step.
4. Right-click on the highlight, and select Paste Daily Schedule from the pop-up menu that appears. Any existing daily schedule is overwritten with the copied daily schedule.

Working with LN Schedule Objects 4-27
5. Click OK to save the changes and close the M-Inspector window, or click Apply to save the changes and leave the M-Inspector window open.
6. Click the Close button to exit M-Inspector.
Editing a Daily Schedule’s Events Note: The Schedule tab must be in Edit mode to edit a daily
schedule’s events. To enter Edit mode, refer to Editing a Schedule Object in this chapter.
To edit a daily schedule’s events: 1. In Edit mode, on the left side of either the Weekly Schedule or
Exception Schedule tab, click on a weekday name or exception date to highlight it for editing.
2. Left-click on an event block of the daily schedule to highlight the block for editing. The block takes on the appearance of a button that is pressed down (Figure 4-1), and the mouse pointer changes to a double arrow ( ) to indicate that you can drag the entire block horizontally. If you move the mouse pointer so that it hovers just over the dividing line at the beginning of the block, the mouse pointer changes to the drag line cursor ( ) to indicate that you can stretch or shrink the block by dragging just its starting time. Note: The last block always ends at midnight, as noted
previously under the Event heading, and this time cannot be edited (dragged).
3. Do one of the following to edit the selected event:
• Right-click on the highlighted block and select Modify Event from the pop-up menu that appears. This opens the Event Definition dialog box (Figure 4-6), which allows you to select a different Occupancy Mode for the event, and adjust the starting time of the event. Press the Enter key or click the Enter button ( ) to finish modifying the event.
• Left-click in the middle of the block ( cursor) and hold the mouse button down to drag the block left or right horizontally. The block’s size stays unchanged, but the surrounding blocks stretch or shrink to accommodate the block’s new position. While you are moving the block, a tool tip appears below the block showing the new starting time. Release the mouse button to leave the block at its new position. Note that this method does not work for the last block of the day, since you cannot move a block over other blocks.

M-Schedule/M-Calendar User’s Guide 4-28
• Left-click on the dividing line at the beginning of the block ( cursor) and hold the mouse button down to drag the starting time of the block (Figure 4-20). The block stretches or shrinks accordingly, and the block to the left of the selected block also shrinks or stretches. Again, a tool tip appears below the block showing the new starting time. Release the mouse button when the block has the desired starting time. Note that you can also use the arrow keys to adjust the starting time by three minute increments.
Figure 4-20: Dragging the Starting Time of an Event Block 4. Click OK to save the changes and close the M-Inspector window,
or click Apply to save the changes and leave the M-Inspector window open.
5. Click the Close button to exit M-Inspector.
Adding Exception Schedules to a Schedule Object Note: The Schedule tab must be in Edit mode to add an exception
schedule. To enter Edit mode, refer to Editing a Schedule Object in this chapter.
To add an exception schedule to a Schedule object: 1. On the M-Explorer Schedule tab, select the Exception Schedule
tab. The Exception Schedule tab appears (Figure 4-9). 2. In Edit mode on the Exception Schedule tab, click the New
Exception button, or left-click on the exception date at the left of an existing schedule to highlight it for editing, right-click on the highlight to display a pop-up menu (Figure 4-10), then select Add New Exception from the menu. The Exception Schedule Definition dialog box appears (Figure 4-11). Note: For information on the other options of the pop-up menu,
see Table 4-6 under the Exception Schedule Pop-up Menu heading earlier in this chapter.
3. Fill in the fields of the Exception Schedule Definition dialog box as described in Table 4-7 under the Exception Schedule Definition Dialog Box heading earlier in this chapter.
Working with LN Schedule Objects 4-29
4. Click OK in the dialog box to close it and add the new exception schedule to the Exception Schedule tab.
5. Add events to the new exception schedule’s daily schedule, as described under Adding Events to a Daily Schedule.
6. Repeat Steps 2 through 5 to add additional exception schedules, as required.
7. Click OK to save the changes and close the M-Inspector window, or click Apply to save the changes and leave the M-Inspector window open.
8. Click the Close button to exit M-Inspector.
Commanding a Schedule Object To command a Schedule object: 1. In the M-Explorer application, select a Schedule object listed
under the JC.LNSchedOPC server (Figure 4-18). 2. From the Actions menu, select Inspect, or click the Inspect toolbar
button ( ), or right-click on the object to bring up the Inspect option on a pop-up menu (Figure 4-18). The M-Inspector window appears with the Schedule tab selected (Figure 4-1). Note: Your login name and password must grant you
command authority, otherwise the Command tab is not displayed.
3. Click the Command tab at the top of the M-Inspector window to display the command options for the Schedule object (Figure 4-21).

M-Schedule/M-Calendar User’s Guide 4-30
Figure 4-21: Command Tab for a Schedule Object in M-Inspector
4. Select Enabled or Disabled from the Command Value To drop-down list.
5. Click the Execute button to execute the command. 6. Click the Close button to exit M-Inspector.
Metasys® is a registered trademark of Johnson Controls, Inc. All other marks herein are the marks of their respective owners. © 2004 Johnson Controls, Inc.
Controls Group 507 E. Michigan Street P.O. Box 423 www.johnsoncontrols.comMilwaukee, WI 53201 Published in U.S.A.