m1_ideation presentation (updated)
DESCRIPTION
virtual environments ideation presentation patchTRANSCRIPT

Ronald WongStudent number: 610134 Semester 1/2013 Group 8

the Kiwi FruitEver eaten a kiwi fruit? Everytime we slice open a kiwi fruit, we can see a flowery shaped pattern formed by the seeds. This seed arrangement became the basis to my chosen pattern.


Rhino TutorialsToturials on the rhinoceros 3D modelling software were uploaded onto the lms. The following are several screenshots of the learning outcome of the software.

Paul Loh’s lecture on the introduction to patterns. gave me a new insight on how I would see the world, to see everything in patterns. Flight paths, telecommunications, body movements and many other things can be seen or summarized into a pattern. Though patterns that emerge from nature might seem random, but they are actually governed by a simple set of laws. For example, during the lecture we were taught that trees and plants followed a very simple law, that is, to grow and divide, in order to gain the maximum amount of sunlight needed for photosynthesis. This ‘grow and divide’ pattern can even be produced as an algorithm in comput-ers to generated life-like trees in softwares. To sum it all up, nature can be simplified into patterns and we use and recreate the patterns from nature to shape our urban world.
The reading on Analytical Drawings helps us ‘decode’ the patterns of our world. It gives many examples on how to produce patterns from random objects or from a combination of random objects and the lines and points drawn and choosen are based on the artists’ inituition. This just shows how much freedom there is in art, not restricted or governed by strict laws. On the other hand, the article presents the relationship between the laws of physics and art. For instance, tensions and stress in a structure are presented by lines or thick lines to emphasize on the magnitude of force applied.
Aranda and Lasch’s article on tooling really helped me on creating recipes for the pattern in made. There were many examples on how to create a recipe for a pattern. Additionally, it gave us some clue on how pat-terns in nature might be created. For example in the article, the recipe for ‘Packing’ could be related to the baking process of bread in which the yeast creates ‘holes’ in the bread to make it puff up. The yeast creates air bubbles of random size, just as the recipe of ‘packing’ teaches us to choose a shape of random size and continue filling the empty spaces.

The basic pattern that I have taken from the kiwi fruit was 2-dimensional. It was flat, uninteresting. Then, I looked at stacked slices of kiwi fruit and saw how the 2-dimensional patterns allign vertically to form a 3-dimensional pattern. The concept was simple, just simple vertical extrusion yet the outcome was unique. Then from there I developed my first model.

The concept of the first model was just simple vertical extrusion as where I had gotten my idea from. It shows how simple and simply patterns can be arranged to form a 3-dimensional object.

The steps taken in creating the paper model was rather simple. I cut strips of paper, folding them into equally divided parts, then taping the folded edges together to form an arch. I con-tinued the process until the strips of paper meet each other at both ends, creating a cylinder-like object.

The second paper model is a transformation of the first model. We learned about the different kinds of transfor-mations such as scaling, rotating, moving and mirroring, and such techniques will recreate an object into some-thing new and bizzare. The reading on the ‘Pattern Formation in Nature’ by Ball inspired me to take push the boundaries of the transformation process.
I decided to use ‘scaling’ as my transformation method. However, I did not want to just scale my model to cre-ate a second model, I wanted to take inspiration from the formation of the first model and adapt it into making my second model. I combined the idea of extrusion and scaling into developing my model. The model would be extrusions of the pattern at different scales, different lengths. This scaling extrusions will create an effect of randomness on my model and give it a wavy feeling to it.

Instead of cutting horizontal strips of paper, for my second model i cut wavy strips of paper. The amplitude and wavelengths were random. Then, much like my previous model, I taped the folded parts together to achieve a beautiful creatiion that was based on extruding and scaling.

We then digitalised our creations into the rhinoceros software.
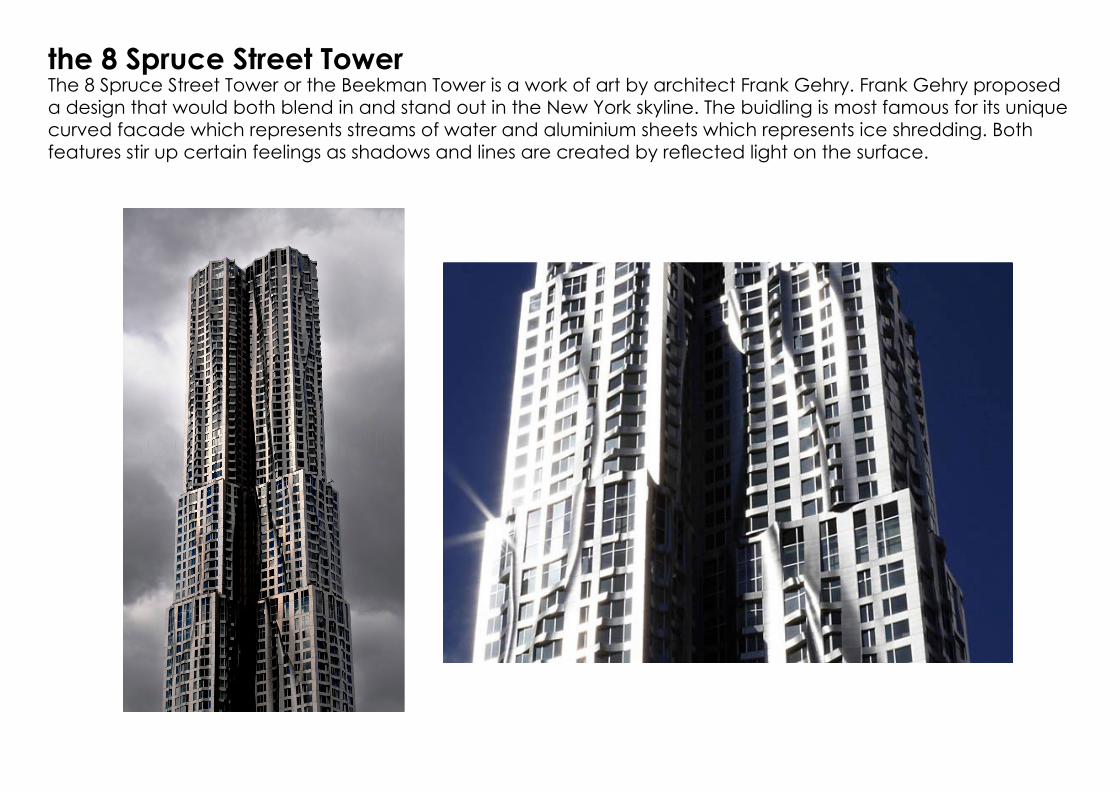
the 8 Spruce Street TowerThe 8 Spruce Street Tower or the Beekman Tower is a work of art by architect Frank Gehry. Frank Gehry proposed a design that would both blend in and stand out in the New York skyline. The buidling is most famous for its unique curved facade which represents streams of water and aluminium sheets which represents ice shredding. Both features stir up certain feelings as shadows and lines are created by reflected light on the surface.

I feel that the design of the building greatly relates to the concept of my design. The randomness of extrusions on the surface of the building is similiar to my idea of random vertical extrusions. Both designs explore the concept of random scaling extrusions to create bizzare and unique effects.

Wangjing SOHOThe Wangjing SOHO, designed by architect Zaha Hadid is a structure that fluidly blends the three buildings together. The three mountain-like sturcture also takes upon a fish-like from the makes it an elegant masterpiece.

The Wangjing SOHO also utilises the concept of scaling. The levels of the building follows a uniform scaling which brings about the slick and smooth feeling to the structure. The concept of scaling and smoothness was also used in my design to produce wave-like patterns.

During the tutorial, we made clay models of our imaginary lantern based on the concept of our emerging forms. The idea was to develop a rough idea of how our lantern would fill space and to bring out the ideas from our emerging form.
The first model was made by my partner who moulded the plasticine based on my verbal desription of my imaginary lantern. He created a sturcture that had many layers, making the whole thing tree-like.
The second and third model was made by myself. The models were based on my emerging form at different scales.

I future developed the idea of my lantern using what I had learned from the tutorial and the previous weeks. I brought forth my ideas through sketchs, drawing ideas from my emerging form.
My emerging form had many curvy and wavy edges that inspired me. I decided to adapt these concepts into the structure of a candelier.
The curvy and wavy forms of my emerging form de-veloped the skeleton for my candelier.
The final form of my first model. This idea combines the wave-like nature of my emerging form with the structure of a candelier.

The model I sketched was then put into physical form in order to have a clearer idea of the lantern.

The first model had a weakness, it was not a very good vessel for light. In order words, it could not contain light well. I further developed the my idea, preserving the nature of the previous model while improving its functionality as a lantern.
The DNA dou-ble helix strain is a spiral shaped structure. I took inspiration from the spiral pattern into my model
This is my sketch of the spiral shape which serves as the skeleton to my model.
The spiral shaped structure was introduced into my emerging form, creating the above model. This model could contain light perfectly while preserving the nature of my emerging form.

Clay model of second sketch

For the third model, the approach I used was rather different. This time I focused on the effect the lat-tern could produce. I wanted the lantern to be able to project the elements contained within my emerging form. Therefore, I created a model that could bring out the nature of my emerging form into an intangible form —light.
I wanted to create an effect of wavy lights with my lantern.
In order to achieve such effects, I had to make several lantern, each producing the same effect. They will each produce the pattern on the wall through the curving holes of the lantern. The many lights from many lanterns would interfere with each other and produce an interesting effect.

Sketch of proposed model and effect produced
Wavy patterns will appear on wall.
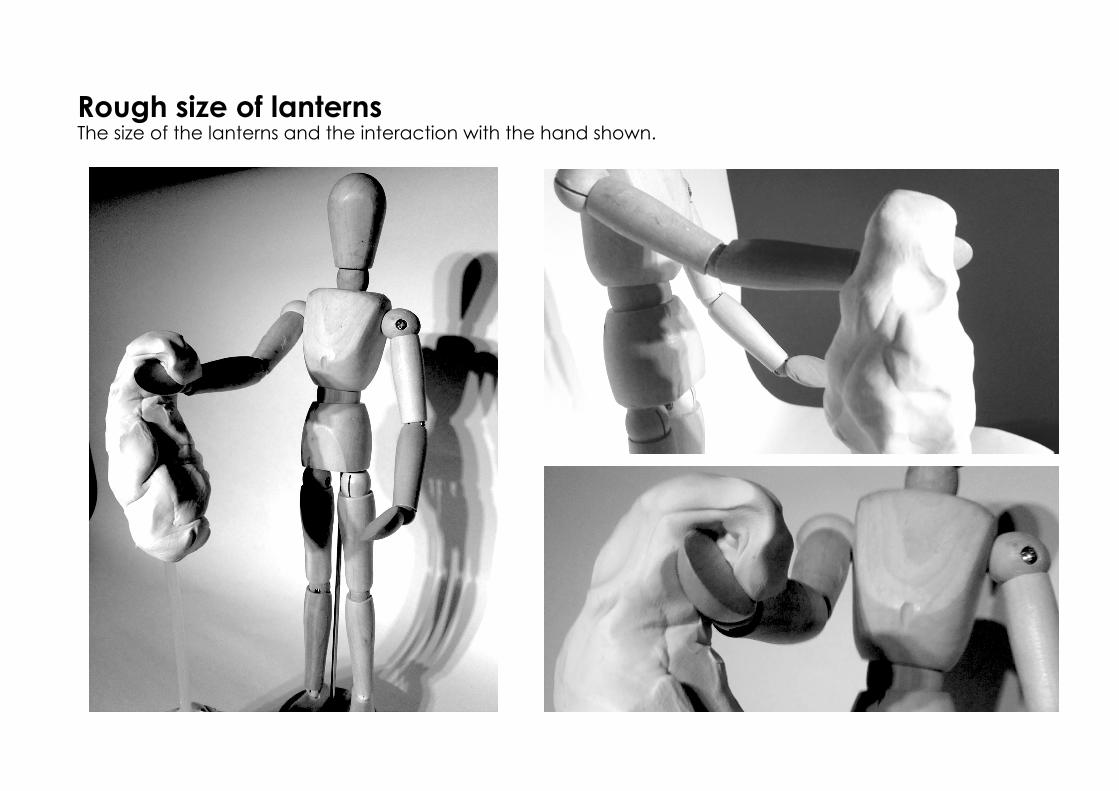
Rough size of lanternsThe size of the lanterns and the interaction with the hand shown.

Aurora Borealis
The Aurora lights is a natural light display in the skies which is usually seen in the Artic and Antarc-tic regions. They are formed when highly charged electrons from the solar wind interact with ele-ments in the earth’s atmosphere. I have always been fascinated by this natural phenomena. The lights are smooth, flowing, wild and majestic, elements that can evoke certain feelings for the viewer.

I have choosen this effect mainly because of one reason, it is beautiful. Also, the flow of the lights greatly resembles the nature of my emerging form. The Aurora lights are like a river of light flowing in the sky. One of the ideas of my lanterns also creates light of similiar nature.

In order to recreate the effects of the Aurora Borealis lights onto my lantern, I decided to use three methods of manipulating light —layering, cutting and diffusion. All three techniques will combine with my the structure of my emerging form to produce and effect similiar to that of the Aurora lights.
Allowing light to filter through many layers cre-ates light of different in-tensities. This attribute is clearly visible in the Aurora lights where some parts are shades of different bright-ness.
Cutting light creates a glaring effect of lights. This gives the produced light different depths.
When light enters a hole that allows diffusion to happen, the light spreads out in different directions. This weak-ens the intensity of the light but sof-tens the light. The Aurora lights also seem to have many layers of hard-ness or softness, as if the lights were drawn by hand.

The sketch above is an illustration of how the three methods would combine to produce the desired effect. Long wavy diffusion holes allow for the Aurora effect. The holes that combine the methods of ‘cutting’ and ‘diffusing’ light will be paired with ‘layering’ in which many other holes will be cut to form the Aurora lights.
The desired effect when light shines through the holes.

References
http://www.guideto.com/art-entertainment/architecture-design/building-architecture/8-spruce-street-tower.html
http://www.zaha-hadid.com/architecture/wangjing-soho/
http://wangjingsoho.sohochina.com/en
http://www.designboom.com/architecture/zaha-hadid-wangjing-soho-construction-update/
http://science.howstuffworks.com/nature/climate-weather/atmospheric/question471.htm