m400 manual 2 11 11 - digital control systems, inc. manual_2_11_11_.pdfmodel 400 co2 concentration...
TRANSCRIPT
MODEL 400
CO2 Concentration Sensor
user’s Manual
DIGITAL CONTROL SYSTEMS 7401 SW Capitol Hwy. Portland, OR 97219 USA 503/246-8110 ♦ 503/246-6747 (fax)
www.dcs-inc.net © 2007
Revision Date 3/14/02
10/23/02 6/3/04 5/9/05 8/8/05 1/16/06 3/13/07
03/18/09 11/2/2011

Model 400 CO2 Concentration Sensor
3/13/07 Digital Control Systems Page: iii
TABLE of CONTENTS INTRODUCTION ..................................................................1 SPECIFICATIONS................................................................2 SENSOR MODULE ..............................................................3
Mechanical.......................................................................3 Diffusion Style Sensor...............................................3 Sample Draw Sensor ................................................4
Pumped Sample Draw Considerations ..............4 Measurements at High Humidity ....................................4
Electrical Connections .....................................................5 Mating Connectors ....................................................6 Operating Power Requirements................................8
Split Power Supply..............................................8 Behavior at Power Up......................................................8
Measurement and Control Interface.....................................9 Analog Interface...............................................................9 Contact closure interface.................................................9
TTL control ..............................................................10 Switch Control .........................................................10 Calibration Modes ...................................................10 PWM Output............................................................11
Command interface .......................................................11 Master mode and the Expansion Board..................11 I2c Data Format .......................................................12
Command packets............................................12 Response Behavior ..........................................12 Response Packet Format .................................13
Implemented Commands ........................................14 ‘A’ (Address) Command ...................................14 ‘B’ Command ....................................................14 ‘J’ and ‘K’ Commands.......................................14 ‘M’ (Mode) Command .......................................16 ‘P’ and ‘T’ Commands.......................................16
Expansion Board ................................................................18 Power Supply.................................................................18 Digital Display ................................................................19 Current Output ...............................................................19 High Limit Contact Closure............................................19 Alarms............................................................................19 User Adjustable Parameters..........................................20
Disclaimers and Notices .....................................................21 Safety Critical Applications ............................................21 Limited Warranty and Remedies. ..................................21

INTRODUCTION The model 400 is a 2nd generation gas sensor for measuring carbon dioxide concentration. Advanced design provides a very stable, drift-free output to provide one of the most accurate low-cost CO2 measurement systems available today. The Model 400’s dual beam optics provide a sensor highly resistant to drift. The dual beam principle uses a second wavelength of light that is outside the absorption band of interest to null out any changes in intensity of the source. Any source drift will affect both the reference and measurement wavelengths and be canceled out by the signal processor. The Model 400 also incorporates an improved temperature compensation system that cancels out not only temperature sensitivity in the measurement system but compensates for thermal shifts due to gas law effects. The basic Model 400 sensor module is a cost effective measurement component for a variety of scientific and industrial products. All power, control and signal connections to the module are via a single cable. Applications that require a wider range of acceptable power supply voltages, a physical control/connection panel, local display of concentration, set point relay and/or a current loop measurement output can be accommodated with the expansion option. The Model 400 is available in two basic versions: a bulkhead mounted configuration, intended primarily for measuring CO2 concentration in enclosed spaces and with hose nipples (as shown on cover) for pumped sample draw applications.

SPECIFICATIONS Sensor Module
Sensing Technique Non-dispersive infrared (NDIR) dual wavelength detector.
Measurement Range 0 - 20% CO2 Response Time Default: 20 sec (see ‘B’ command page 14)
(95% response to step change) Maximum Drift (annual) ± 1% of full scale Accuracy ±5% of reading or 0.1% CO2,
whichever is greater Repeatability better than 0.1% CO2 Measurement Outputs Linear Voltage 0 - 1 volt PWM Logic level pulse whose width is
linearly proportional to CO2 concentration
Operating Temperature 0 - 50o C Operating Humidity 0 - 100% RH, non-condensing Storage Temperature -20 to +70o C Power Requirement 7.5-15 VDC @ 170 mA max (125 mA
AVG.). Approx. 1.0W with 12 V. input
Sensor Module with Expansion Board Power Requirements 12-36 VDC
10-28 VAC Optional Digital Display 4 digit, .50" LCD
displays concentration to .01% Alarms field adjustable high and low alarm
thresholds contact closure N.O. or N.C. user selectable
contacts are rated at 1A/24V visual indicator tri-color LED indicates low alarm,
normal and hi alarm conditions Measurement Outputs current loop 4 - 20 milliamp (linear) voltage 0 to 1 volts (linear)
SENSOR MODULE This section describes the installation and operation of the Model 400 sensor module in the stand-alone configuration where it is connected directly to the end user’s equipment.
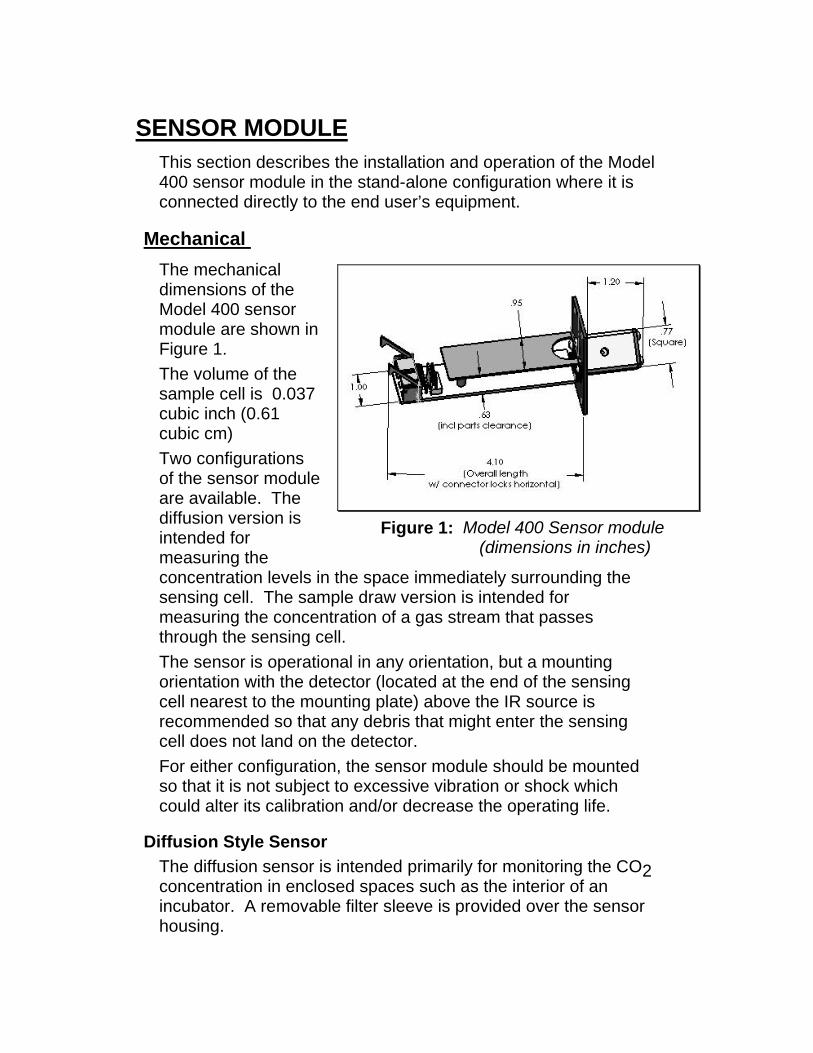
Mechanical The mechanical dimensions of the Model 400 sensor module are shown in Figure 1. The volume of the sample cell is 0.037 cubic inch (0.61 cubic cm) Two configurations of the sensor module are available. The diffusion version is intended for measuring the concentration levels in the space immediately surrounding the sensing cell. The sample draw version is intended for measuring the concentration of a gas stream that passes through the sensing cell. The sensor is operational in any orientation, but a mounting orientation with the detector (located at the end of the sensing cell nearest to the mounting plate) above the IR source is recommended so that any debris that might enter the sensing cell does not land on the detector. For either configuration, the sensor module should be mounted so that it is not subject to excessive vibration or shock which could alter its calibration and/or decrease the operating life.
Diffusion Style Sensor The diffusion sensor is intended primarily for monitoring the CO2 concentration in enclosed spaces such as the interior of an incubator. A removable filter sleeve is provided over the sensor housing.
Figure 1: Model 400 Sensor module
(dimensions in inches)

For thru-wall mounting, a hole pattern similar to Figure 2 is required in the wall, and the sensor assembly is installed with either the sensing cell or the circuit board passing thru the cutout. A suitable gasket material to prevent gas exchange is usually necessary.
Sample Draw Sensor In the sample draw configuration the sensing cell has two 1/8 inch tube barb fittings for connection to the gas stream being monitored The sensor location is usually not critical so it can be mounted on a bracket in a convenient location. The sensor is connected with flexible tubing through a pump to the volume to be measured.
Pumped Sample Draw Considerations To avoid excessive pressure build-up in the sensing cell, place filters or other flow restricting devices upstream of the sample cell between the pump and sensor. In very high flow systems a shunt tube should be provided, to avoid turbulence in the sample chamber that may cause unstable readings when the flow rate exceeds .25 l/min (0.5 ft3/Hr). Whenever possible the sensor should be installed so that the sensing chamber is at positive gauge pressure so that any leaks discharge sample gas rather than drawing-in ambient air and altering the concentration of the sample gas. When sampling high humidity gas, the detector chamber temperature must be kept above the dew point of the sample stream to avoid condensation. Any moisture condensing in or carried into the sensing cell by the sample stream will cause measurement errors.
Measurements at High Humidity The Model 400 is designed to operate in high humidity environments up to and including 100% RH. But it is critically important to keep liquid water (i.e. condensation) out of the
Figure 2: Detector Mounting
Dimensions
sensing cell. Liquid water strongly absorbs IR radiation at the same wavelengths as CO2, so even very small water droplets anywhere in the sensing cell will cause erroneously high gas concentration readings. In diffusion sampling systems, ensuring that the sensing cell is always above the dew point of the monitored gas suffices to keep water out of the sensor. In sample draw systems condensation can occur at any point in the sample stream’s path where the temperature is below the dew point of the sample stream. Once condensation has occurred, the liquid water droplets can be carried into the sensor by the moving gas and cause measurement errors even if the sensor itself is at or slightly above the dew point.
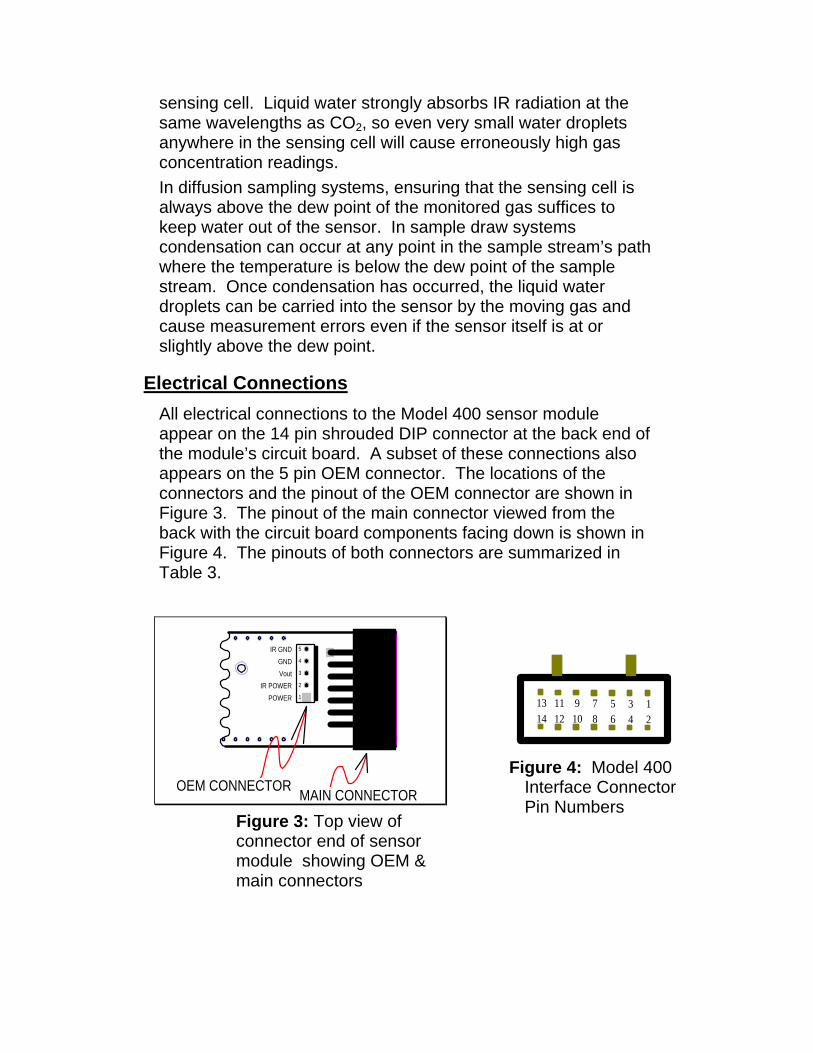
Electrical Connections All electrical connections to the Model 400 sensor module appear on the 14 pin shrouded DIP connector at the back end of the module’s circuit board. A subset of these connections also appears on the 5 pin OEM connector. The locations of the connectors and the pinout of the OEM connector are shown in Figure 3. The pinout of the main connector viewed from the back with the circuit board components facing down is shown in Figure 4. The pinouts of both connectors are summarized in Table 3.
POWERIR POWER
VoutGND
IR GND
1
2
3
4
5
OEM CONNECTOR MAIN CONNECTOR Figure 3: Top view of connector end of sensor module showing OEM & main connectors
13579111314 12 10 8 6 4 2
Figure 4: Model 400
Interface Connector Pin Numbers

Mating Connectors The Model 400 is supplied without mating plugs for the two connectors. The mating plug for the OEM connector is a female, in-line, 5 position, 0.1” pitch, .025” square pin receptacle. An IDC (insulation displacement connector) style is recommended for ease of cable fabrication. Part numbers for several vendors are shown in Table 1.
The mating plug for the main connector is a female, 2 x 5, 0.1” pitch, DIP (dual in-line pin) socket. An insulation displacement style ribbon cable connector is highly recommended. Part numbers for several vendors are shown in Table 2.
ITW Pancon PN AMP PN Description
CE100F26-05 640442-5 5 position IDC connector for 26 AWG wire
CE100F24-05 640441-5 5 position IDC connector for 24 AWG wire
Table 1: Mating plugs for OEM connector
Table 2: Mating plugs for main connector
ITW Pancon PN
AMP PN Description
050-010-455A 746285-1 10 position IDC connector for 26 or 28 AWG flat cable

Pin #
OEM Main Signal Name
Signal Description Comments
3 1
Vout 0-1 volt measurement output
Voltage is linearly proportional to gas concentration
2
PWM Logic level PWM measurement output.
PWM duty cycle is linearly proportional to gas concentration.
4 3
GND Measurement system ground connection
Should be connected to users analog GND for best results.
4 SCK Serial interface clock
For i2C bus communication
5 UP ‘UP’ signal Active low control line
6 DOWN ‘DOWN’ signal Active low control line
7 MODE Calibration mode. Enters cal mode when low
8 PROG Factory programming pin
Do not connect to this pin
2 9 IR power
Power input for IR source
7.5-15 volt DC input relative to pin 10
5 10
IR GND Current return pin for IR source
Connect as directly as possible to power supply
11
+5 Out Regulated +5volt output
For user accessories; limited to 10 mA
12 reserved
Future use Do not connect
1 13 Power Measurement system power
7.5-15 volt DC input relative to pin 3.
14 SDI Serial interface data pin
For i2C bus communication
Table 3: Sensor Module Connector Pinouts

Operating Power Requirements Separate pins are provided for IR-source and circuit power inputs. The IR source draws about 100 mA at a 50% duty cycle. The rest of the circuit draws a steady current of under 5 mA. Normally the two power inputs (IR power and Power) as well as the two grounds are internally connected so that the sensor can be powered with a two conductor cable. The additional pins are provided for flexibility in connection to the end-use equipment. Maintaining adequate power supply voltage is critical; voltages below 7.5 volts will result in erroneous readings.
Split Power Supply For specialty applications where the large fluctuating current for the IR source must be supplied from a separate source, the sensor can be supplied with the two power and ground inputs electrically separate. In this configuration both power pins 9 and 13 must be connected to DC sources of 7.5 to 15 VDC and the two grounds (IR GND and GND) must be electrically connected. Improper connection of power can potentially damage the sensor.
Behavior at Power Up The Model 400 performs a checksum test of its non-volatile memory at startup. If a checksum error is detected, the unit will not start normal operation, but instead: 1. The analog output is at its maximum value slightly above 1.0
volts 2. All reads of the i2c interface will return the error packet with
error code of 65,222 decimal. 3. If the expansion board is attached the display will show ‘Err’.

MEASUREMENT AND CONTROL INTERFACE The Model 400 interacts through several interfaces. The simplest is the analog interface which supports only power, ground and measurement reporting signal connections. All these connections appear on the OEM connector. There is no ability to control any aspect of the sensor’s operation using this interface. The next level of complexity is the contact closure interface, which supports switches or TTL level control signals to calibrate the measurement system and the analog measurement reporting signals. The command interface allows the user to receive measurement results and control many aspects of the Model 400 using commands sent to the sensor via an i2c interface.
Analog Interface The Model 400 CO2 sensor indicates the measured CO2 concentration as a DC voltage on pins 1 and 3 of the main connector, and pins 3 & 4 of the OEM connector. The nominal output voltage range is from 0 to 1.0 volts as CO2 concentration ranges from zero to full scale. All connections required for the analog interface appear on the OEM connector. The minimal wiring to operate a Model 400 as an analog sensor requires only three signals: Power (at pins 1 or 2), ground (at pins 4 or 5) and the DC output reporting signal (on pin 3). Neither the measurement system nor the measurement reporting signal can be calibrated using this interface.
Contact closure interface Three control lines called UP, DOWN, and MODE (at pins 5, 6 & 7 of the main connector) are used to calibrate the measurement system and the measurement reporting signals at pins 1 & 2 of the main connector. These control lines are active low, internally pulled-up TTL level logic input lines. The inputs are referenced to the GND pin.

TTL control When driven by an active source, the applied voltage on these control lines must never go below ground or above 5 volts. Logic low voltage is less than .1 volt, logic high voltage is between 4.5 and 5.0 volts. When the control lines are being driven by a processor, the following setup times must be observed: 1. The UP and DOWN pins must be held stable for 10 mS
before the MODE pin is brought low and cannot be released for 500 mS after MODE goes low.
2. While adjusting values the UP or DOWN pin must be held low for 1 mS minimum to be debounced.
3. UP or DOWN pin held low for greater than 500 mS will begin stepping the calibration in the appropriate direction. The rate of stepping will increase every few seconds.
Switch Control The control lines can also be used as switch inputs. Each control line is at logic high when not connected, and at logic low when connected to ground. The simplest contact closure interface implementation connects each control line to a normally-open switch to ground. Closing the switch then asserts the corresponding control line. When they are not being used all three control lines must be kept disconnected or driven to logic high levels.
Calibration Modes Three calibration parameters can be adjusted: measurement system calibration, analog output span and analog output zero. In all cases the operation of calibration is the same: the UP and DOWN pin logic levels are set to indicate the desired parameter to calibrate (See Table 4) and the MODE pin is held low to enable that calibration. A half second or more later, the UP & DOWN pins can been released and then begin operating as up or down adjustments to the calibration value. A momentary (low going) pulse on the UP or DOWN pin will move the value one internal unit, while holding the pin/button low will cause the value to accelerate in the desired direction (see note on pin timing above when driving the control lines with a processor).

Once the parameter has been adjusted to the desired value, the MODE pin is returned to logic high causing the sensor to resume normal operation.
‘DOWN’ ‘UP’ Calibration Mode H H No calibration normal display mode L L Calibrate Gas Measurement System
(single point user gas calibration) H L Calibrate analog output span
(target value is 1.00 V) L H Calibrate analog output offset
(target value is .0625 V) Note: Observe appropriate setup timing for MODE pin.
PWM Output The Model 400 CO2 sensor provides a digital TTL logic-level output on pins 2 and 3 of the main connector that indicates the CO2 concentration measured by the sensor by its duty cycle (i.e. ratio of time at logic high to time at logic low) that ranges from 0 to 100% as CO2 concentration ranges from zero to full scale.
Command interface The Model 400 has an i2c bus connection at pins 4 (clock) and 14 (data) of the main connector (see Table 3 on Page 7). When shipped from the factory the sensor is configured as a slave with an address of 60 (decimal). The Model 400 has a command processor that responds to the single letter commands shown in Table 8. There are two classes of commands: queries and directives. The Class column of Table 8 contains a Q or D to identify the class. Directive commands instruct the sensor to perform an action and always have a single positive decimal integer value less than 65536 as a parameter. Query commands request information from the sensor and are always associated with a 2 byte numeric value which must be read by the i2c master.
Master mode and the Expansion Board Unless explicitly ordered otherwise, the Model 400 is shipped with the expansion board interface enabled. This means that the sensor periodically switches to master mode and attempts to
Table 4: Logic levels for Selecting Parameter to Adjust
communicate with two slaves at addresses 20 and 3A (32 and 58 decimal) on the i2c bus. If the bus to which the Model 400 is attached has an active slave at either of these addresses, undesirable results are almost certain. To disable master write attempts bit 4 of the mode byte (see Table 9) must be cleared using the ‘M’ command. To leave the Model 400 in its factory configuration but without the expansion board enabled, send the ‘M’ command with a parameter value of 17445 (decimal).
I2c Data Format The data formats described in this section refer only to the data portion of the i2c packet. The correct i2c header byte (consisting of the unit’s i2c address and the ‘read/write’ bit) is assumed to precede the bytes shown in the tables.
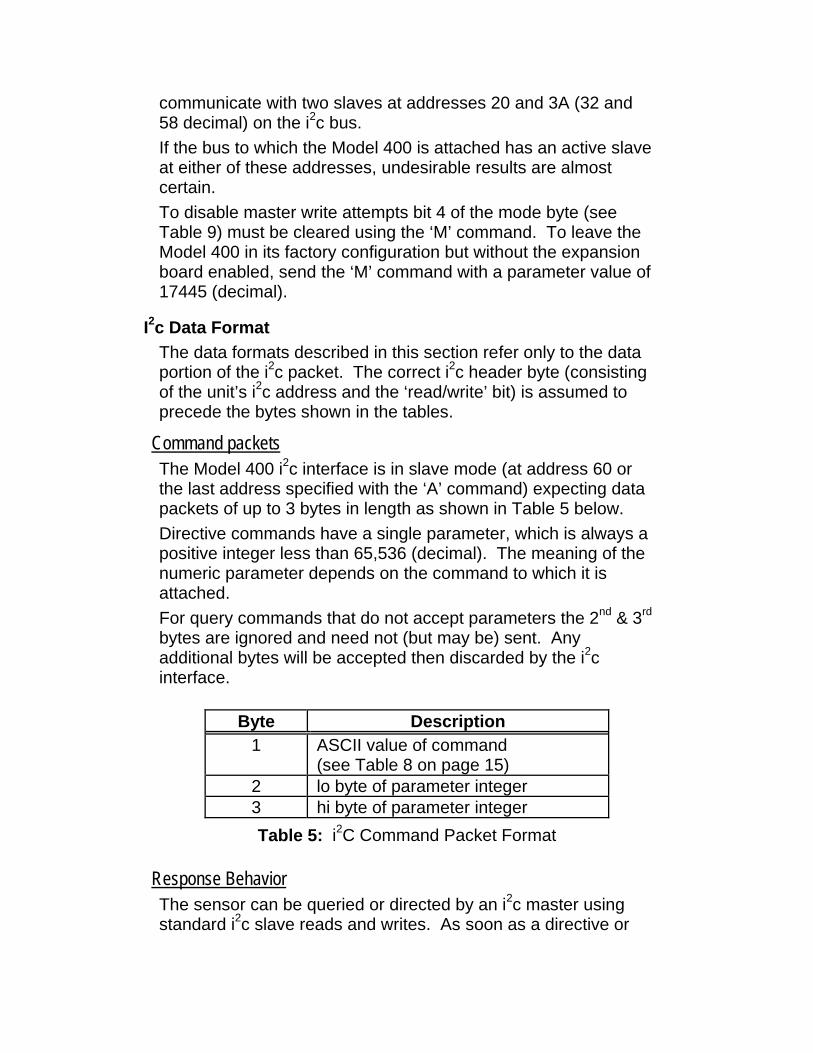
Command packets The Model 400 i2c interface is in slave mode (at address 60 or the last address specified with the ‘A’ command) expecting data packets of up to 3 bytes in length as shown in Table 5 below. Directive commands have a single parameter, which is always a positive integer less than 65,536 (decimal). The meaning of the numeric parameter depends on the command to which it is attached. For query commands that do not accept parameters the 2nd & 3rd bytes are ignored and need not (but may be) sent. Any additional bytes will be accepted then discarded by the i2c interface.
Byte Description 1 ASCII value of command
(see Table 8 on page 15) 2 lo byte of parameter integer 3 hi byte of parameter integer
Response Behavior The sensor can be queried or directed by an i2c master using standard i2c slave reads and writes. As soon as a directive or
Table 5: i2C Command Packet Format

query command has been received the interface responds to subsequent reads with one of the following response packets:
1. appropriate response data for previous command 2. busy response (an error packet with error code
65,000 decimal) to indicate that the command is still being processed and the output is not yet ready
3. error response (an error packet with error code 65,111 or 65,222 decimal) to indicate other errors (see table 6)
The interface always returns a response packet for the most recent command received. For example: after a ‘C’ command has been sent, subsequent CO2 readings can be requested by simply reading the sensor without having to first send a query command. A master can request a response immediately by issuing a restart followed by the read request, but most commands (except ‘C’, ‘P’ , and ‘T’) need some time to be processed and the initial response may be a busy packet. When a busy response is received, additional read requests should be performed (without any intervening writes) until appropriate response data received.
Response Packet Format When the M400 receives a read command from a master it always responds with a three byte response packet as shown Table 6.
Byte Description 1 ASCII value of processed command
mnemonic (see Table 8 on page 15) or “?” if error response or “!” if busy response
2 lo byte of response integer 3 hi byte of response integer
If the first byte is the ASCII value of the command mnemonic, the following two bytes are the response to that command (if command was a query) or a copy of parameter integer (if command was a directive).
Table 6: i2c Command Response Format
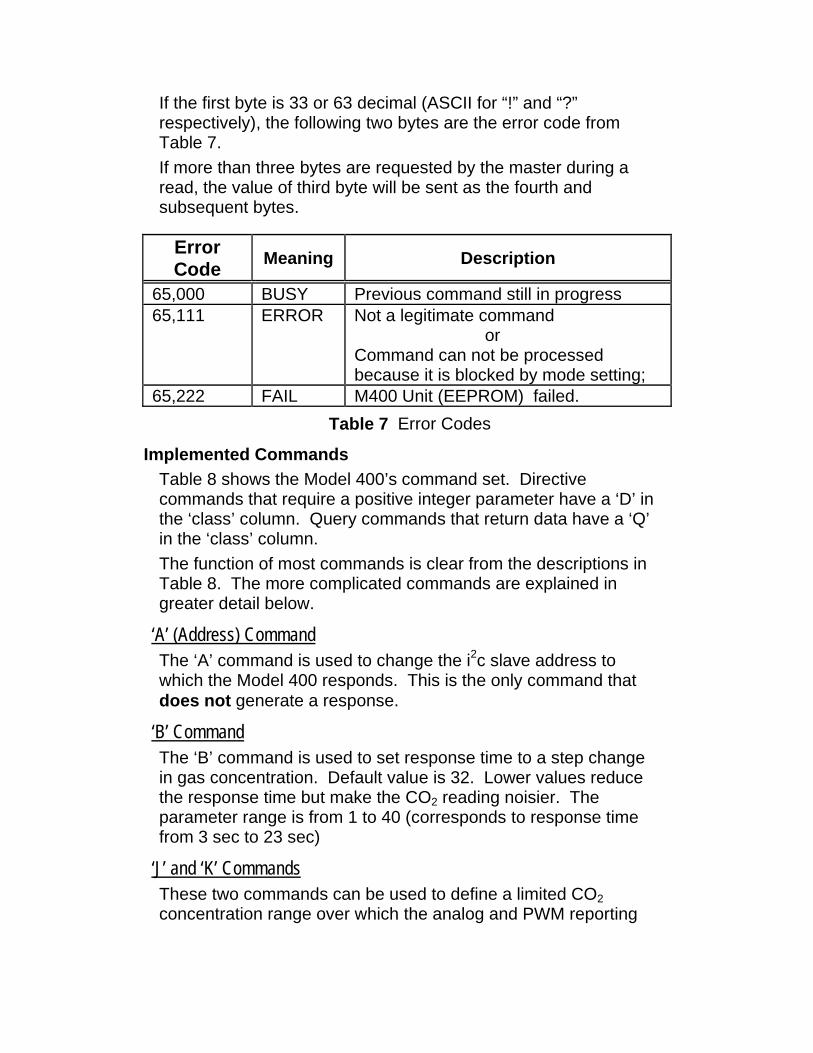
If the first byte is 33 or 63 decimal (ASCII for “!” and “?” respectively), the following two bytes are the error code from Table 7. If more than three bytes are requested by the master during a read, the value of third byte will be sent as the fourth and subsequent bytes.
Error Code Meaning Description
65,000 BUSY Previous command still in progress 65,111 ERROR Not a legitimate command
or Command can not be processed because it is blocked by mode setting;
65,222 FAIL M400 Unit (EEPROM) failed.
Implemented Commands Table 8 shows the Model 400’s command set. Directive commands that require a positive integer parameter have a ‘D’ in the ‘class’ column. Query commands that return data have a ‘Q’ in the ‘class’ column. The function of most commands is clear from the descriptions in Table 8. The more complicated commands are explained in greater detail below.
‘A’ (Address) Command The ‘A’ command is used to change the i2c slave address to which the Model 400 responds. This is the only command that does not generate a response.
‘B’ Command The ‘B’ command is used to set response time to a step change in gas concentration. Default value is 32. Lower values reduce the response time but make the CO2 reading noisier. The parameter range is from 1 to 40 (corresponds to response time from 3 sec to 23 sec)
‘J’ and ‘K’ Commands These two commands can be used to define a limited CO2 concentration range over which the analog and PWM reporting
Table 7 Error Codes

signals respond. Both parameter values are percent CO2 times 100. The parameter to the ‘J’ command defines the CO2 concentration below which the reporting signal will always be zero. The parameter to the ‘K’ command defines the CO2 concentration above which the reporting signal stays at its maximum value. The reporting signal responds linearly between the two values.
When shipped from the factory the ‘J’ parameter value is 0 and the ‘K’ parameter value is 2000. This implies that the reporting signal varies linearly from 0 to its maximum value as the concentration increases from 0 to 20%. To make the concentration reporting signal remain at 0 until the gas concentration reaches 3%, then rise linearly and reach full
Cmnd Description Class A Set new i2c address.
For example: A62 sets i2c address equal to 62 NOTE: This command has no response.
D
B Set response time (in arbitrary units) to a step change in gas concentration
D
C Return current CO2 reading in percent x100. For example returned reading 1000 means 10.00 %CO2
Q
J Set starting %CO2 for analog output D K Set max %CO2 for analog output D M Set mode word value. See Table 9 for bit
assignments. D
P Return raw detector power reading in arbitrary units
Q
Q Return serial number Q U Calibrate. Parameter is known applied gas
concentration x100 For example: U500 adjusts reading to 5.00% NOTE: This command needs up to 1 min to be processed
D
T Return temperature in arbitrary units Q
Table 8: Digital Interface Commands
scale when the gas concentration reaches 5% use the following parameters for the ‘J’ and ‘K’ commands:
J 300 K 500
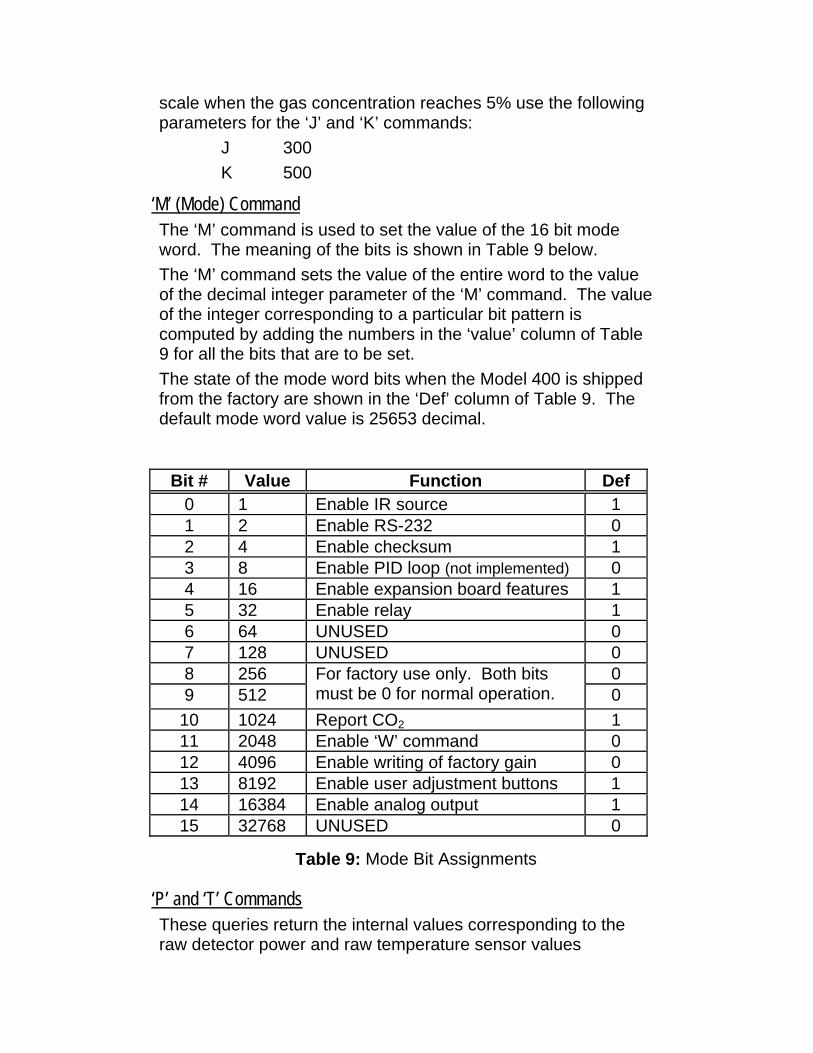
‘M’ (Mode) Command The ‘M’ command is used to set the value of the 16 bit mode word. The meaning of the bits is shown in Table 9 below. The ‘M’ command sets the value of the entire word to the value of the decimal integer parameter of the ‘M’ command. The value of the integer corresponding to a particular bit pattern is computed by adding the numbers in the ‘value’ column of Table 9 for all the bits that are to be set. The state of the mode word bits when the Model 400 is shipped from the factory are shown in the ‘Def’ column of Table 9. The default mode word value is 25653 decimal.
Bit # Value Function Def 0 1 Enable IR source 1 1 2 Enable RS-232 0 2 4 Enable checksum 1 3 8 Enable PID loop (not implemented) 0 4 16 Enable expansion board features 1 5 32 Enable relay 1 6 64 UNUSED 0 7 128 UNUSED 0 8 256 0 9 512
For factory use only. Both bits must be 0 for normal operation. 0
10 1024 Report CO2 1 11 2048 Enable ‘W’ command 0 12 4096 Enable writing of factory gain 0 13 8192 Enable user adjustment buttons 1 14 16384 Enable analog output 1 15 32768 UNUSED 0
‘P’ and ‘T’ Commands These queries return the internal values corresponding to the raw detector power and raw temperature sensor values
Table 9: Mode Bit Assignments

respectively. The units for these values are completely arbitrary and uncalibrated. The same value from two different units does not necessarily mean that the underlying values (i.e. temperature or detector power) are the same (or even close). After each calibration the relationship between detector power and indicated gas concentration is altered. These commands are intended primarily for factory and service diagnostic use. Their usefulness during normal operation is limited.

EXPANSION BOARD The Model 400 expansion board, shown in Figure 5, adds a display, a button and jumper control panel, alarm functions, wider range power supply and current loop analog output.
The expansion board is connected to the Model 400 sensor module with a 14 pin ribbon cable that connects the main connector on the sensor module circuit board to the connector on the back of the display board.
Power Supply The expansion board can be powered with a 6 to 24 Vrms AC or 8 to 30 volts DC power supply. The power is connected to the two position ‘POWER INPUT’ connector as shown in Figure 5. For AC power the polarity markings can be ignored.
VR1
R8
R5 R2
R1
J7
D1
C1
C19
J2
D3
R14
D14
SW3
SW2
SW1
DIS1
U14
C22
K1
J5
R17
C17
R13
DCS 2000
32-0
450-
00
V
OU
TPU
T S
EL
SET
CAL
10V OPT
NO
RLY
SE
TNC
JP5
JP3
JP2
JP1
JP4
DOWN
UP
-IN
+
+OU
T-
RLY
'UP' BUTTON
'DOWN' BUTTON
'MODE' JUMPERRELAY POLARITY
MEASUREMENTOUTPUT
RELAY CONTACT +-
CURRENT LOOPOFFSET
CURRENT LOOPSPAN
ANALOG OUTPUTSELECTOR
POWER INPUT
+-
JUMPER JP5
JUMPER JP1
Figure 5: Model 400 Expansion Board
LED

Digital Display The CO2 concentration is displayed on the four digit LCD display. The displayed concentration is calibrated with the measurement calibration procedure. Analog calibration has no effect on the displayed value. During parameter adjustment mode, target or prompt values are displayed.
Current Output The expansion board supplies a current ranging linearly from 4 to 20 milliamps as the CO2 concentration varies from 0 to full scale. The current flows out of the ‘+’ terminal and returns through the "-" terminal. The maximum load resistance through which the full scale current can be driven increases at higher supply voltages. With a 12 volt input the maximum resistance is about 500 Ohms. Excessive loop resistance will result in low reading errors at higher concentrations.
High Limit Contact Closure The optional contact closure provides a dry (i.e. unpowered) contact at the two terminals of the ‘RELAY CONTACT’ terminal strip. The set point is adjustable over the full range of the unit as described in the User Adjustable Parameters section below. The polarity of the relay is adjusted with the ‘RELAY POLARITY’ jumper as shown in Figure 5. In the ‘NO’ position the relay is open below the setpoint. In the ‘NC’ position the relay is closed below the setpoint. Relay contacts are rated at 2A and 24V.
Alarms The alarm LED indicates three CO2 levels:
• LED Yellow – co2 level below Lower Alarm set point (default value 4.50% CO2)
• LED Green – co2 level between Lower and Upper Alarms (default values 4.50% CO2 and 5.50% CO2)
• LED Red – co2 level above Upper Alarm set point (default value 5.50% CO2)

User Adjustable Parameters The parameters shown in Table 10 below are adjustable using the buttons and jumpers on the expansion board. To change a parameter proceed as follows: 1. Select the parameter to be adjusted from Table 10 on page
20. 2. Close the jumpers or hold down the button(s) as indicated in
the table, and close the MODE jumper. The LED will go out when the parameter setting mode is enabled, and the display will indicate the value associated with the parameter to be adjusted. If the parameter was selected by holding down one or both buttons, the LED will not go out until the button(s) are released.
3. Adjust the parameter using the UP & DOWN buttons. 4. When the desired value has been set, open the MODE
jumper to return to normal operation.
Parameter Button(s) or Jumper(s)s to
Select
Display Shows
Comments
Gas measurement
cal
both UP & DOWN buttons
Measured CO2
Adjust display to read cal gas concentration
Analog span UP button 20.0 (default)
Adjust output voltage to correspond to
Analog zero DOWN button 1.25 (default)
displayed concentration
Lower alarm JP1 Lower alarm limit
Adjust lower alarm limit value
Upper alarm JP2 Upper alarm limit
Adjust upper alarm limit value
Relay Setpoint
JP3 Relay setpoint
Adjust relay setpoint
Table 10: Selecting Parameter to Adjust

DISCLAIMERS AND NOTICES
Safety Critical Applications DCS products are not designed, intended or authorized for use in life safety systems or devices where failure of the Model 400 to perform to specification may be reasonably expected to result in significant risk of injury or death.
Limited Warranty and Remedies. Unless otherwise stated, DCS warrants to Buyer that for two years from the date of shipment of Products to the Buyer that Products will substantially conform with the product specifications agreed to by DCS. This warranty is not transferable. This warranty does not cover:
Defects due to misuse, abuse, or improper or inadequate care, service or repair of Products; Defects due to modification of Products, or due to
alteration or repair by anyone other than DCS; or Problems that arise from lack of compatibility between
DCS' Products and other components used with those Products or the design of the product into which Products are incorporated. Buyer is solely responsible for determining whether Products are appropriate for Buyer's purpose, and for ensuring that any product into which Products are incorporated, other components used with DCS' Products, and the purposes for which DCS' Products are used are appropriate and compatible with those Products.
THE WARRANTY IN THIS SECTION IS IN LIEU OF ALL OTHER WARRANTIES, EXPRESS OR IMPLIED. DCS EXPRESSLY DISCLAIMS ALL IMPLIED WARRANTIES, INCLUDING THE WARRANTIES OF MERCHANTABILITY AND FITNESS FOR A PARTICULAR PURPOSE. DCS IS NOT RESPONSIBLE IN ANY WAY FOR DAMAGE TO A PRODUCT, PROPERTY DAMAGE OR PHYSICAL INJURY RESULTING IN WHOLE OR IN PART FROM (1) IMPROPER OR CARELESS USE, (2) UNAUTHORIZED MODIFICATIONS, OR (3) OTHER CAUSES BEYOND DCS' CONTROL. IN NO EVENT IS DCS

LIABLE TO THE BUYER OR ANY OTHER PERSON FOR COST OF PROCUREMENT OF SUBSTITUTE GOODS, LOSS OF PROFITS, OR FOR ANY OTHER SPECIAL, INCIDENTAL OR CONSEQUENTIAL DAMAGES. To obtain service under this warranty, unless DCS agrees otherwise, Buyer must obtain a returned material authorization (RMA) number, pack any nonconforming Product carefully, and ship it, postpaid or freight prepaid, to the address provided when the RMA number is issued. Buyer must include a brief description of the nonconformity. Any actions for breach of this warranty must be brought within six months of the expiration of this warranty. If DCS determines that a returned Product does not conform to the warranty in this section, it will either repair or replace that Product, at DCS's discretion, and will ship the Product back to Buyer free of charge. At DCS's option, DCS may choose to refund to Buyer the purchase price for a nonconforming Product instead of repairing or replacing it. Units returned for service under this warranty and determined on examination to be operating properly are subject to a service charge.