macromedia dreamweaver mx tutorial - york university · macromedia dreamweaver mx tutorial ......
TRANSCRIPT

Making Your First Website Using Macromedia Dreamweaver MX
Dreamweaver MX is the latest version of the web site creation program by Macromedia. This program will enable you more flexible formatting your web pages. It also enables one to make rollovers, navigation bars, and insert other advanced features. In addition, Dreamweaver has an excellent site navigation tool that enables one to view and organize an entire site.
In creating a web site the information is generated by HTML codes, very similar to the way programs worked in the early days of word processing. The code tells the browser what kind of formatting to apply to the text or image, follows with the text or image, and then tells the browser to stop the formatting. With Dreamweaver, as with modern word processing programs, we no longer have to know code. The program works as WSYWIG - what you see is what you get.
Getting Started With Dreamweaver MX
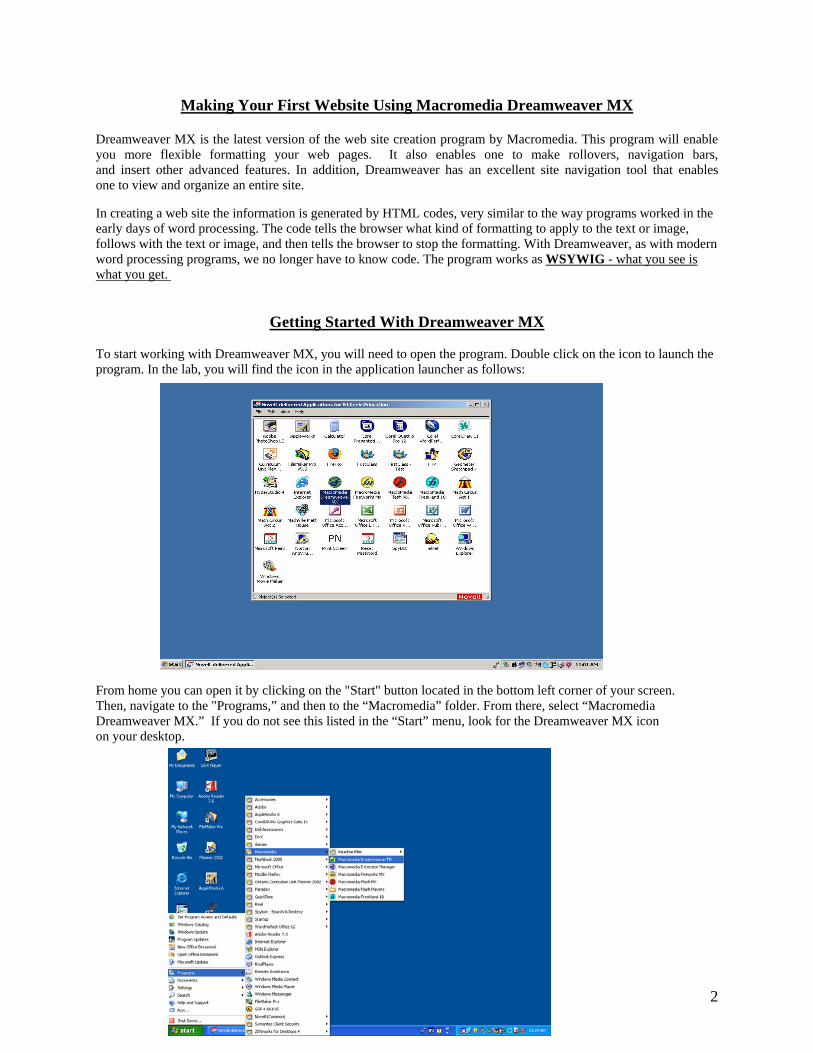
To start working with Dreamweaver MX, you will need to open the program. Double click on the icon to launch the program. In the lab, you will find the icon in the application launcher as follows: From home you can open it by clicking on the "Start" button located in the bottom left corner of your screen. Then, navigate to the "Programs,” and then to the “Macromedia” folder. From there, select “Macromedia Dreamweaver MX.” If you do not see this listed in the “Start” menu, look for the Dreamweaver MX icon on your desktop.
2
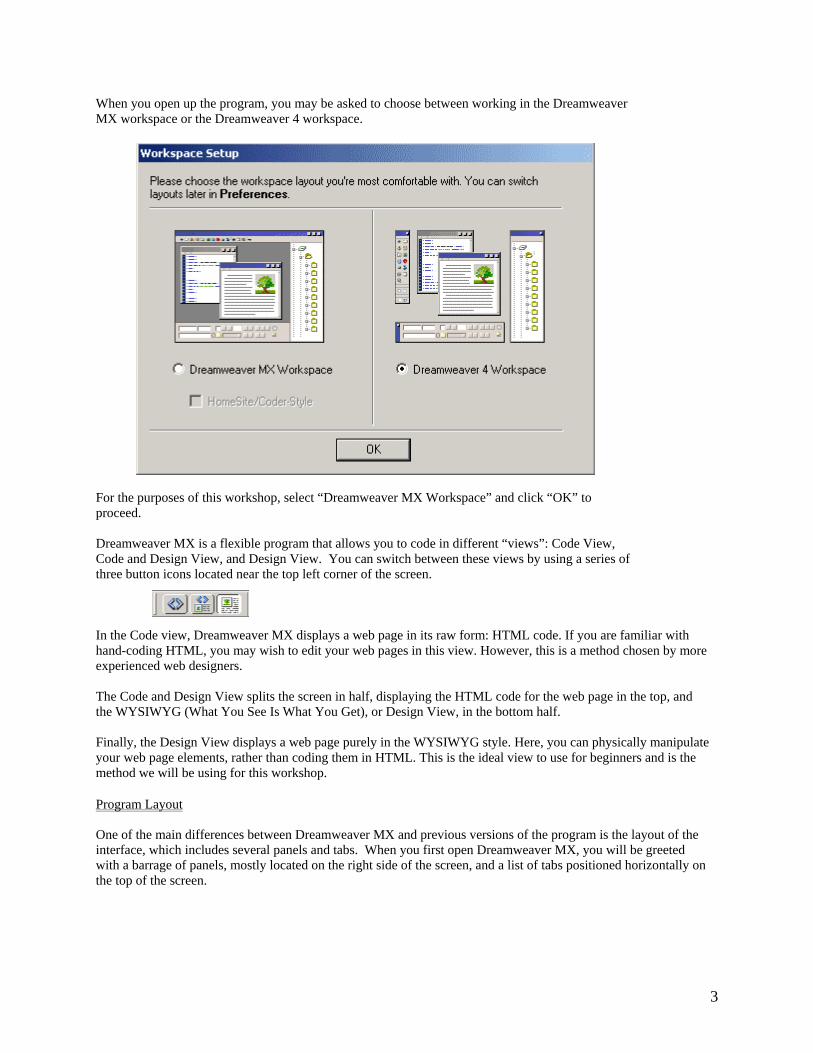
When you open up the program, you may be asked to choose between working in the Dreamweaver MX workspace or the Dreamweaver 4 workspace.
For the purposes of this workshop, select “Dreamweaver MX Workspace” and click “OK” to proceed. Dreamweaver MX is a flexible program that allows you to code in different “views”: Code View, Code and Design View, and Design View. You can switch between these views by using a series of three button icons located near the top left corner of the screen.
In the Code view, Dreamweaver MX displays a web page in its raw form: HTML code. If you are familiar with hand-coding HTML, you may wish to edit your web pages in this view. However, this is a method chosen by more experienced web designers. The Code and Design View splits the screen in half, displaying the HTML code for the web page in the top, and the WYSIWYG (What You See Is What You Get), or Design View, in the bottom half. Finally, the Design View displays a web page purely in the WYSIWYG style. Here, you can physically manipulate your web page elements, rather than coding them in HTML. This is the ideal view to use for beginners and is the method we will be using for this workshop. Program Layout
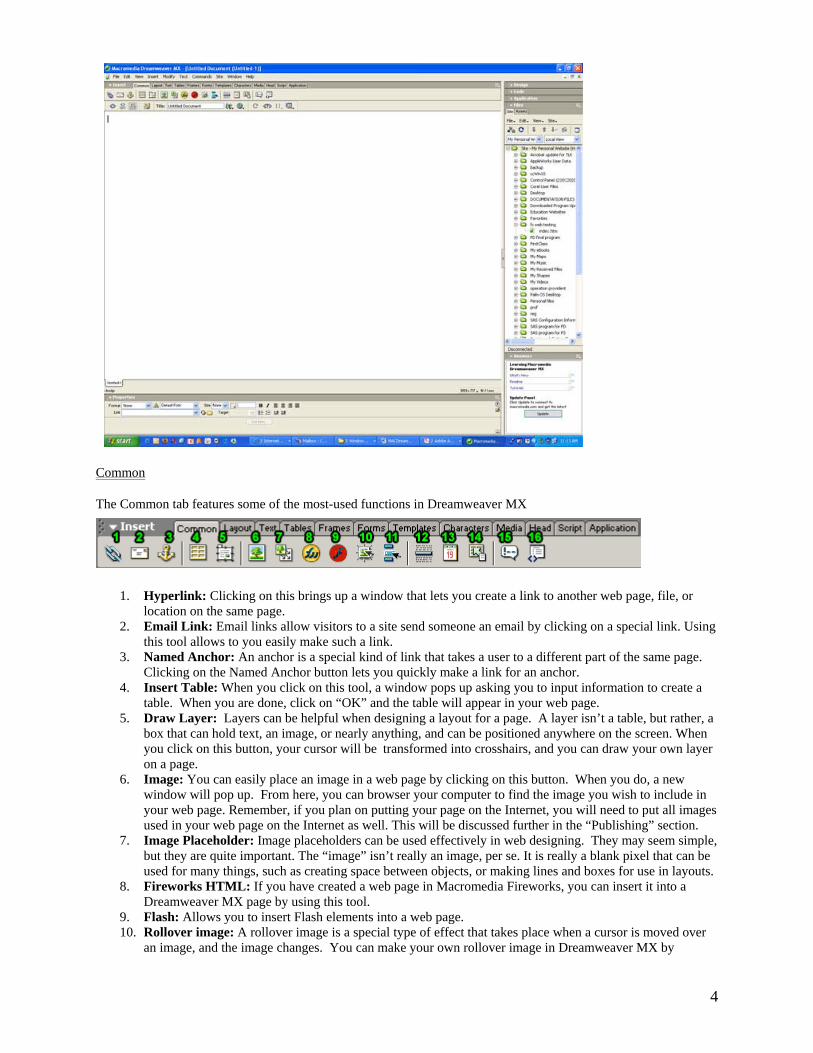
One of the main differences between Dreamweaver MX and previous versions of the program is the layout of the interface, which includes several panels and tabs. When you first open Dreamweaver MX, you will be greeted with a barrage of panels, mostly located on the right side of the screen, and a list of tabs positioned horizontally on the top of the screen.
3
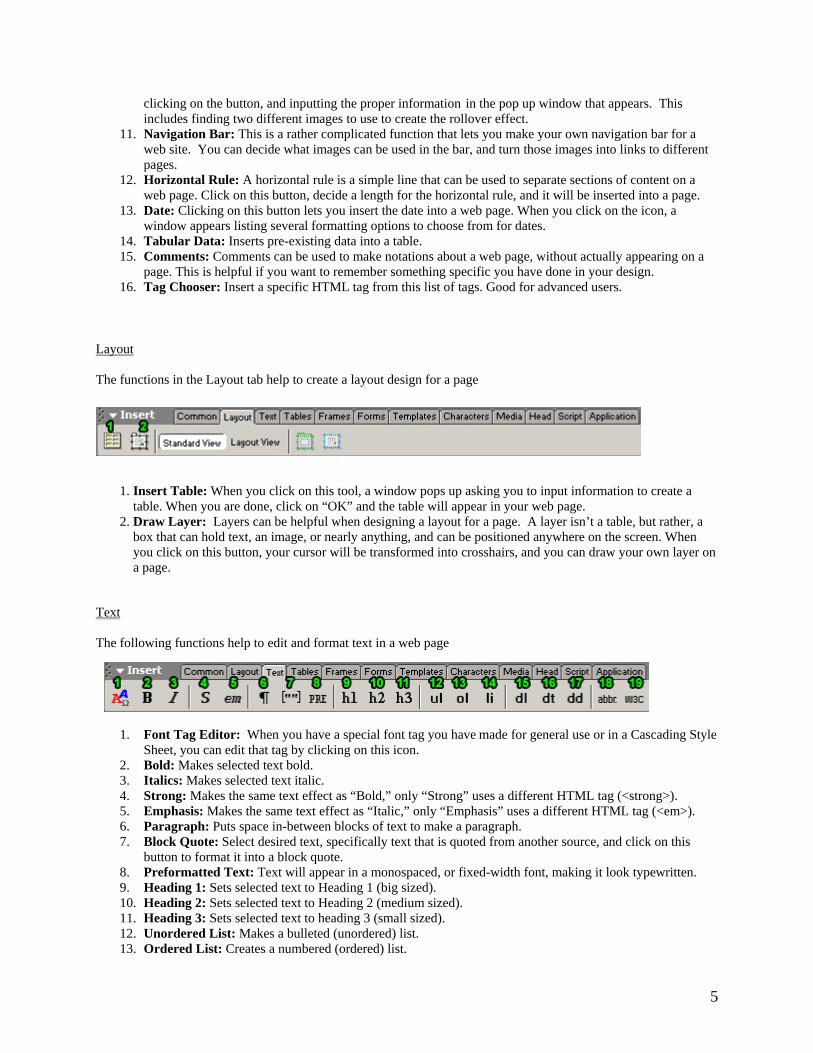
Common The Common tab features some of the most-used functions in Dreamweaver MX
1. Hyperlink: Clicking on this brings up a window that lets you create a link to another web page, file, or location on the same page.
2. Email Link: Email links allow visitors to a site send someone an email by clicking on a special link. Using this tool allows to you easily make such a link.
3. Named Anchor: An anchor is a special kind of link that takes a user to a different part of the same page. Clicking on the Named Anchor button lets you quickly make a link for an anchor.
4. Insert Table: When you click on this tool, a window pops up asking you to input information to create a table. When you are done, click on “OK” and the table will appear in your web page.
5. Draw Layer: Layers can be helpful when designing a layout for a page. A layer isn’t a table, but rather, a box that can hold text, an image, or nearly anything, and can be positioned anywhere on the screen. When you click on this button, your cursor will be transformed into crosshairs, and you can draw your own layer on a page.
6. Image: You can easily place an image in a web page by clicking on this button. When you do, a new window will pop up. From here, you can browser your computer to find the image you wish to include in your web page. Remember, if you plan on putting your page on the Internet, you will need to put all images used in your web page on the Internet as well. This will be discussed further in the “Publishing” section.
7. Image Placeholder: Image placeholders can be used effectively in web designing. They may seem simple, but they are quite important. The “image” isn’t really an image, per se. It is really a blank pixel that can be used for many things, such as creating space between objects, or making lines and boxes for use in layouts.
8. Fireworks HTML: If you have created a web page in Macromedia Fireworks, you can insert it into a Dreamweaver MX page by using this tool.
9. Flash: Allows you to insert Flash elements into a web page. 10. Rollover image: A rollover image is a special type of effect that takes place when a cursor is moved over
an image, and the image changes. You can make your own rollover image in Dreamweaver MX by
4
clicking on the button, and inputting the proper information in the pop up window that appears. This includes finding two different images to use to create the rollover effect.
11. Navigation Bar: This is a rather complicated function that lets you make your own navigation bar for a web site. You can decide what images can be used in the bar, and turn those images into links to different pages.
12. Horizontal Rule: A horizontal rule is a simple line that can be used to separate sections of content on a web page. Click on this button, decide a length for the horizontal rule, and it will be inserted into a page.
13. Date: Clicking on this button lets you insert the date into a web page. When you click on the icon, a window appears listing several formatting options to choose from for dates.
14. Tabular Data: Inserts pre-existing data into a table. 15. Comments: Comments can be used to make notations about a web page, without actually appearing on a
page. This is helpful if you want to remember something specific you have done in your design. 16. Tag Chooser: Insert a specific HTML tag from this list of tags. Good for advanced users.
Layout The functions in the Layout tab help to create a layout design for a page
1. Insert Table: When you click on this tool, a window pops up asking you to input information to create a table. When you are done, click on “OK” and the table will appear in your web page. 2. Draw Layer: Layers can be helpful when designing a layout for a page. A layer isn’t a table, but rather, a box that can hold text, an image, or nearly anything, and can be positioned anywhere on the screen. When you click on this button, your cursor will be transformed into crosshairs, and you can draw your own layer on a page.
Text The following functions help to edit and format text in a web page
1. Font Tag Editor: When you have a special font tag you have made for general use or in a Cascading Style Sheet, you can edit that tag by clicking on this icon.
2. Bold: Makes selected text bold. 3. Italics: Makes selected text italic. 4. Strong: Makes the same text effect as “Bold,” only “Strong” uses a different HTML tag (<strong>). 5. Emphasis: Makes the same text effect as “Italic,” only “Emphasis” uses a different HTML tag (<em>). 6. Paragraph: Puts space in-between blocks of text to make a paragraph. 7. Block Quote: Select desired text, specifically text that is quoted from another source, and click on this
button to format it into a block quote. 8. Preformatted Text: Text will appear in a monospaced, or fixed-width font, making it look typewritten. 9. Heading 1: Sets selected text to Heading 1 (big sized). 10. Heading 2: Sets selected text to Heading 2 (medium sized). 11. Heading 3: Sets selected text to heading 3 (small sized). 12. Unordered List: Makes a bulleted (unordered) list. 13. Ordered List: Creates a numbered (ordered) list.
5
14. List Item: Allows you to edit the text of a listed item. 15. Definition List: Automatically formats a list for definitions. 16. Definition Term: Automatically formats a definition term. 17. Definition Description: Automatically formats a definition description. 18. Abbreviation: Enter in the full meaning of an abbreviation (i.e.:Cont’d). 19. Acronym: Enter in the full meaning of an acronym (i.e.: NBA).
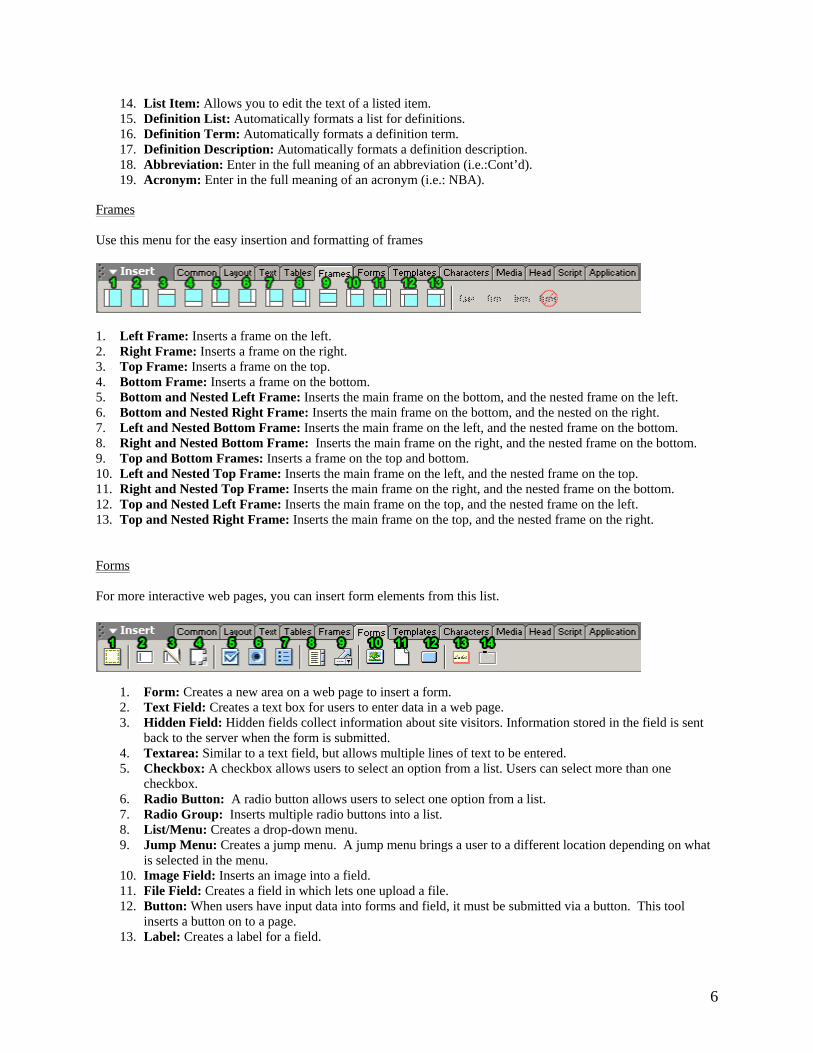
Frames Use this menu for the easy insertion and formatting of frames
1. Left Frame: Inserts a frame on the left. 2. Right Frame: Inserts a frame on the right. 3. Top Frame: Inserts a frame on the top. 4. Bottom Frame: Inserts a frame on the bottom. 5. Bottom and Nested Left Frame: Inserts the main frame on the bottom, and the nested frame on the left. 6. Bottom and Nested Right Frame: Inserts the main frame on the bottom, and the nested on the right. 7. Left and Nested Bottom Frame: Inserts the main frame on the left, and the nested frame on the bottom. 8. Right and Nested Bottom Frame: Inserts the main frame on the right, and the nested frame on the bottom. 9. Top and Bottom Frames: Inserts a frame on the top and bottom. 10. Left and Nested Top Frame: Inserts the main frame on the left, and the nested frame on the top. 11. Right and Nested Top Frame: Inserts the main frame on the right, and the nested frame on the bottom. 12. Top and Nested Left Frame: Inserts the main frame on the top, and the nested frame on the left. 13. Top and Nested Right Frame: Inserts the main frame on the top, and the nested frame on the right. Forms For more interactive web pages, you can insert form elements from this list.
1. Form: Creates a new area on a web page to insert a form. 2. Text Field: Creates a text box for users to enter data in a web page. 3. Hidden Field: Hidden fields collect information about site visitors. Information stored in the field is sent
back to the server when the form is submitted. 4. Textarea: Similar to a text field, but allows multiple lines of text to be entered. 5. Checkbox: A checkbox allows users to select an option from a list. Users can select more than one
checkbox. 6. Radio Button: A radio button allows users to select one option from a list. 7. Radio Group: Inserts multiple radio buttons into a list. 8. List/Menu: Creates a drop-down menu. 9. Jump Menu: Creates a jump menu. A jump menu brings a user to a different location depending on what
is selected in the menu. 10. Image Field: Inserts an image into a field. 11. File Field: Creates a field in which lets one upload a file. 12. Button: When users have input data into forms and field, it must be submitted via a button. This tool
inserts a button on to a page. 13. Label: Creates a label for a field.
6
14. Fieldset: Creates a tag for a group of form elements.
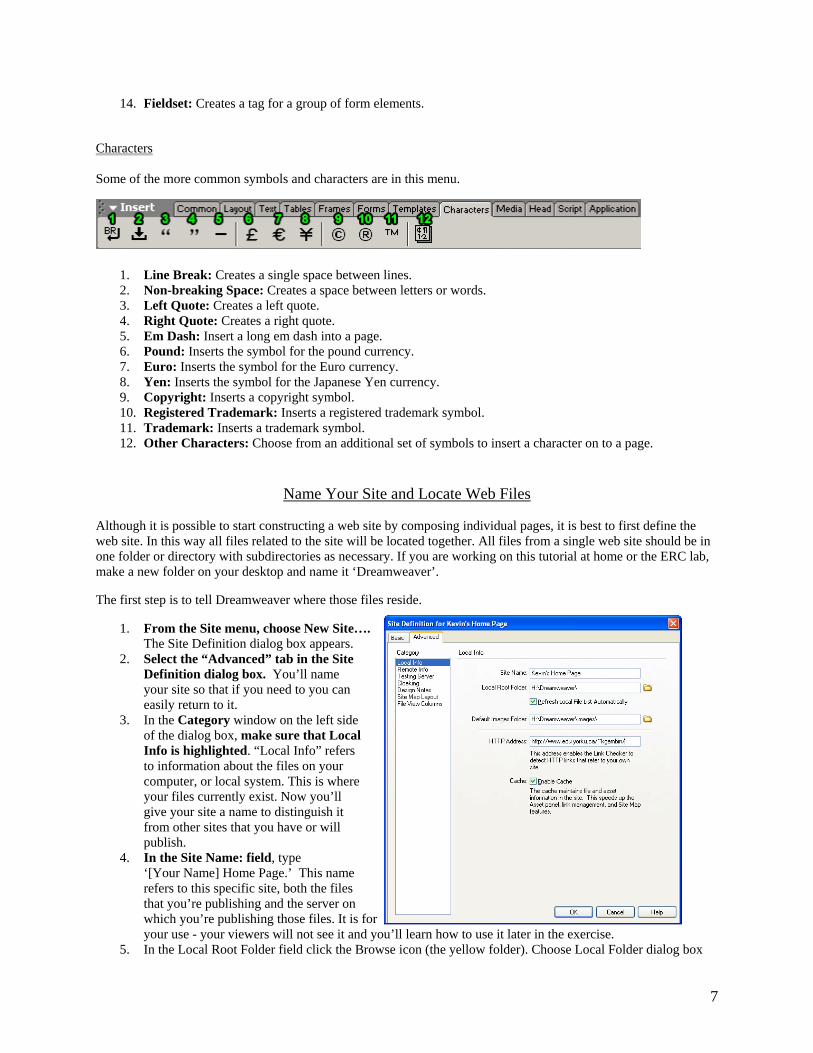
Characters Some of the more common symbols and characters are in this menu.
1. Line Break: Creates a single space between lines. 2. Non-breaking Space: Creates a space between letters or words. 3. Left Quote: Creates a left quote. 4. Right Quote: Creates a right quote. 5. Em Dash: Insert a long em dash into a page. 6. Pound: Inserts the symbol for the pound currency. 7. Euro: Inserts the symbol for the Euro currency. 8. Yen: Inserts the symbol for the Japanese Yen currency. 9. Copyright: Inserts a copyright symbol. 10. Registered Trademark: Inserts a registered trademark symbol. 11. Trademark: Inserts a trademark symbol. 12. Other Characters: Choose from an additional set of symbols to insert a character on to a page.
Name Your Site and Locate Web Files Although it is possible to start constructing a web site by composing individual pages, it is best to first define the web site. In this way all files related to the site will be located together. All files from a single web site should be in one folder or directory with subdirectories as necessary. If you are working on this tutorial at home or the ERC lab, make a new folder on your desktop and name it ‘Dreamweaver’.
The first step is to tell Dreamweaver where those files reside.
1. From the Site menu, choose New Site…. The Site Definition dialog box appears.
2. Select the “Advanced” tab in the Site Definition dialog box. You’ll name your site so that if you need to you can easily return to it.
3. In the Category window on the left side of the dialog box, make sure that Local Info is highlighted. “Local Info” refers to information about the files on your computer, or local system. This is where your files currently exist. Now you’ll give your site a name to distinguish it from other sites that you have or will publish.
4. In the Site Name: field, type ‘[Your Name] Home Page.’ This name refers to this specific site, both the files that you’re publishing and the server on which you’re publishing those files. It is for your use - your viewers will not see it and you’ll learn how to use it later in the exercise.
5. In the Local Root Folder field click the Browse icon (the yellow folder). Choose Local Folder dialog box
7
appears. 6. Using the dialog box, find and highlight the Dreamweaver folder on your local drive, and click Select. 7. Default Images Folder is optional. 8. In the HTTP address area, type the following address to tell Dreamweaver where the root of your Web site
is on the server: http://www.edu.yorku.ca/~[username]/ Next: 1. In the Category window on the left side of
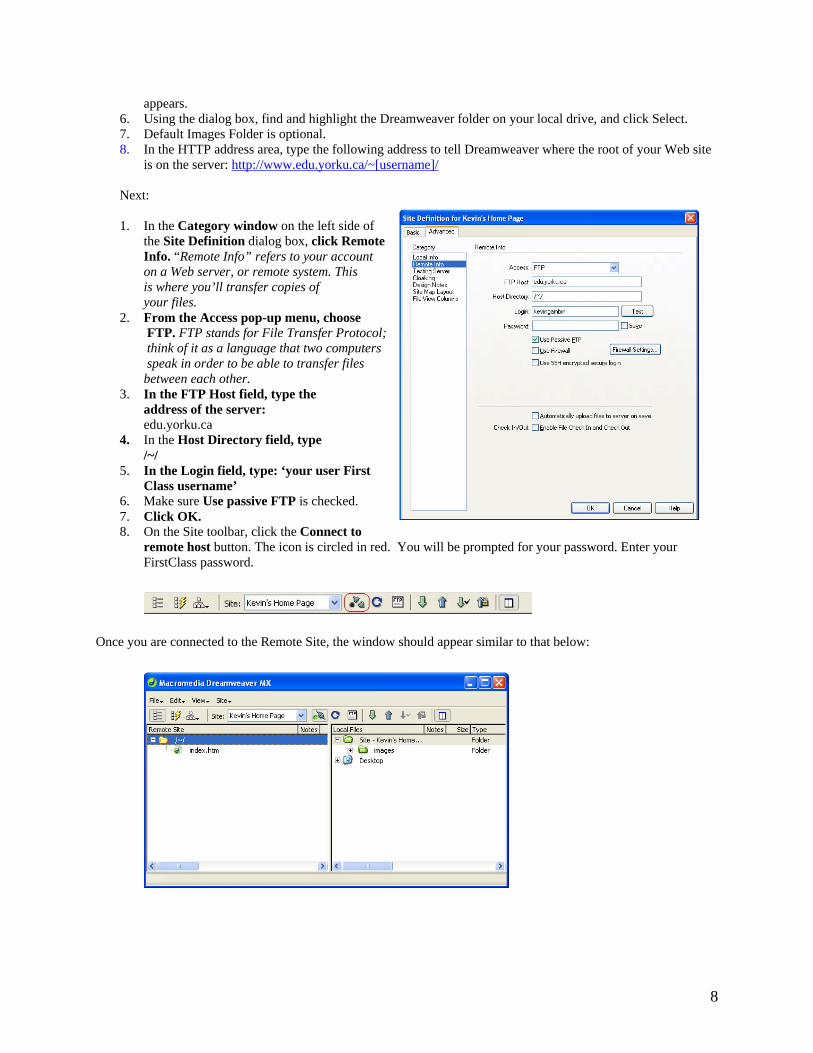
the Site Definition dialog box, click Remote Info. “Remote Info” refers to your account on a Web server, or remote system. This is where you’ll transfer copies of your files.
2. From the Access pop-up menu, choose FTP. FTP stands for File Transfer Protocol; think of it as a language that two computers speak in order to be able to transfer files between each other.
3. In the FTP Host field, type the address of the server: edu.yorku.ca
4. In the Host Directory field, type /~/
5. In the Login field, type: ‘your user First Class username’
6. Make sure Use passive FTP is checked. 7. Click OK. 8. On the Site toolbar, click the Connect to
remote host button. The icon is circled in red. You will be prompted for your password. Enter your FirstClass password.
Once you are connected to the Remote Site, the window should appear similar to that below:
8
Create a New Web Page
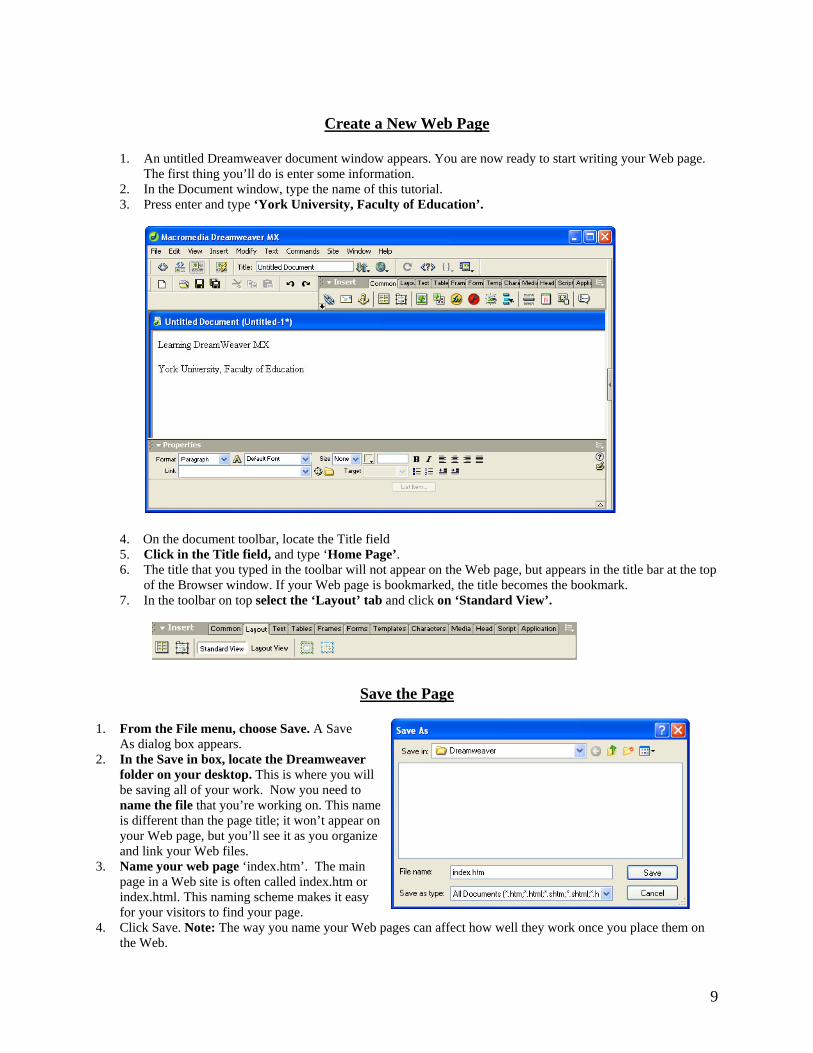
1. An untitled Dreamweaver document window appears. You are now ready to start writing your Web page.
The first thing you’ll do is enter some information. 2. In the Document window, type the name of this tutorial. 3. Press enter and type ‘York University, Faculty of Education’.
4. On the document toolbar, locate the Title field
5. Click in the Title field, and type ‘Home Page’. 6. The title that you typed in the toolbar will not appear on the Web page, but appears in the title bar at the top
of the Browser window. If your Web page is bookmarked, the title becomes the bookmark. 7. In the toolbar on top select the ‘Layout’ tab and click on ‘Standard View’.
Save the Page 1. From the File menu, choose Save. A Save As dialog box appears. 2. In the Save in box, locate the Dreamweaver
folder on your desktop. This is where you will be saving all of your work. Now you need to
name the file that you’re working on. This name is different than the page title; it won’t appear on your Web page, but you’ll see it as you organize and link your Web files.
3. Name your web page ‘index.htm’. The main page in a Web site is often called index.htm or index.html. This naming scheme makes it easy for your visitors to find your page.
4. Click Save. Note: The way you name your Web pages can affect how well they work once you place them on the Web.
9

Rules of Thumb - Naming Web Files
• Do not use spaces or special characters, such as those found about the number keys on the keyboard, in
your file names. • You can use dashes and underscores. (e.g., my_page.html) • Always use a 3 or 4 character file extension for every file • In the case of a regular Web page, always use .html or .htm. • We recommend you use all lower-case letters because most Web servers are case-sensitive.
Page Lay Out With Tables
Create a Table
Many web sites use tables in order to organize the information on the page. The Faculty of Education home page (http://www.yorku.ca/foe/Home/index.html) uses a table with columns to organize text and pictures on the page. Tables provide great layout flexibility.
We will place a table with 2 rows and 4 columns on the page. The far left column will be a margin. In this way the words do not butt up against the left side of the screen. The next left column will hold the links to the major areas of your web site such as Home, Resume/Background, Teaching Philosophy and Teaching Accomplishments. The center column will contain the relevant information. The right column can hold additional information or act as a margin. This column format can be copied onto each page
10
so that there is good navigation from each page and the site looks consistent from page to page.
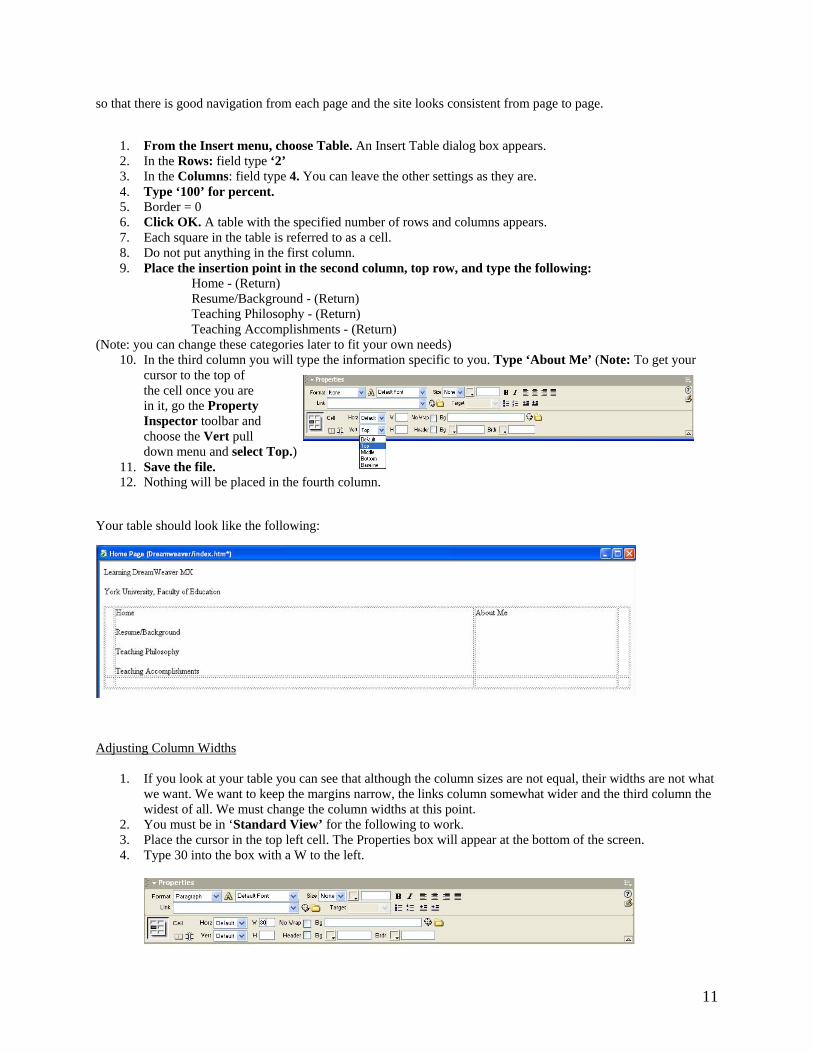
1. From the Insert menu, choose Table. An Insert Table dialog box appears. 2. In the Rows: field type ‘2’ 3. In the Columns: field type 4. You can leave the other settings as they are. 4. Type ‘100’ for percent. 5. Border = 0 6. Click OK. A table with the specified number of rows and columns appears. 7. Each square in the table is referred to as a cell. 8. Do not put anything in the first column. 9. Place the insertion point in the second column, top row, and type the following:
Home - (Return) Resume/Background - (Return) Teaching Philosophy - (Return) Teaching Accomplishments - (Return)
(Note: you can change these categories later to fit your own needs) 10. In the third column you will type the information specific to you. Type ‘About Me’ (Note: To get your
cursor to the top of the cell once you are in it, go the Property Inspector toolbar and choose the Vert pull down menu and select Top.)
11. Save the file. 12. Nothing will be placed in the fourth column.
Your table should look like the following:
Adjusting Column Widths
1. If you look at your table you can see that although the column sizes are not equal, their widths are not what we want. We want to keep the margins narrow, the links column somewhat wider and the third column the widest of all. We must change the column widths at this point.
2. You must be in ‘Standard View’ for the following to work. 3. Place the cursor in the top left cell. The Properties box will appear at the bottom of the screen. 4. Type 30 into the box with a W to the left.
11
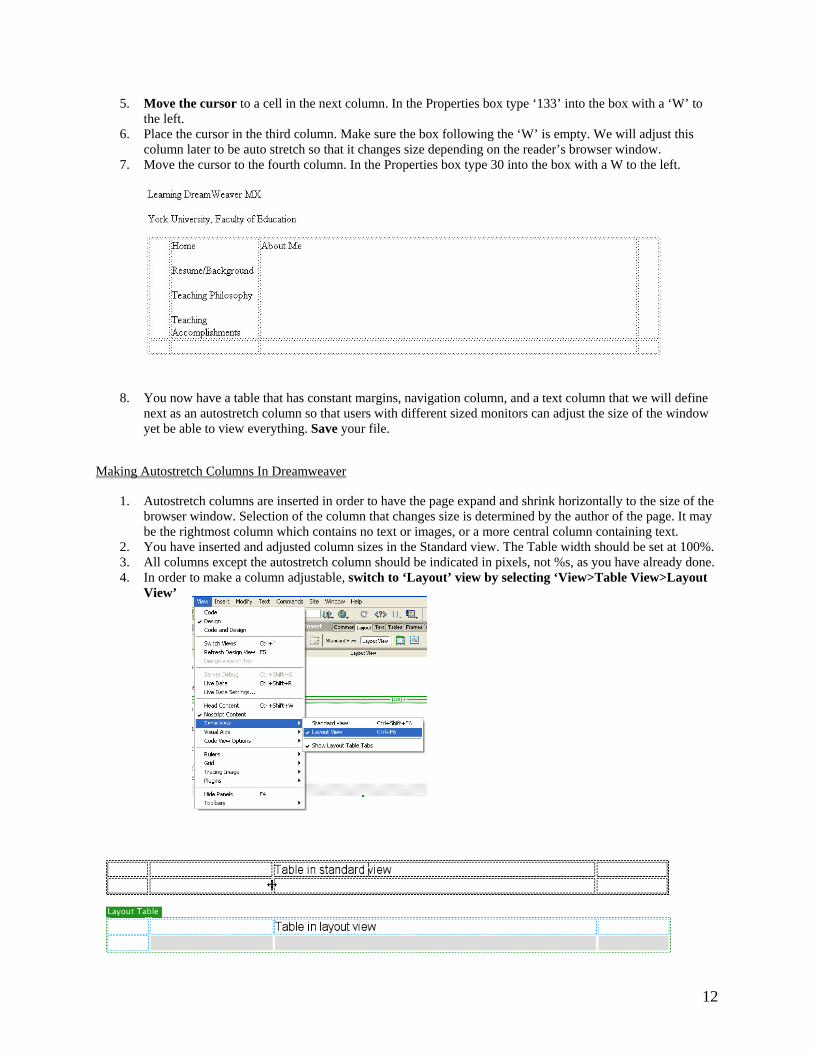
5. Move the cursor to a cell in the next column. In the Properties box type ‘133’ into the box with a ‘W’ to the left.
6. Place the cursor in the third column. Make sure the box following the ‘W’ is empty. We will adjust this column later to be auto stretch so that it changes size depending on the reader’s browser window.
7. Move the cursor to the fourth column. In the Properties box type 30 into the box with a W to the left.
8. You now have a table that has constant margins, navigation column, and a text column that we will define next as an autostretch column so that users with different sized monitors can adjust the size of the window yet be able to view everything. Save your file.
Making Autostretch Columns In Dreamweaver
1. Autostretch columns are inserted in order to have the page expand and shrink horizontally to the size of the browser window. Selection of the column that changes size is determined by the author of the page. It may be the rightmost column which contains no text or images, or a more central column containing text.
2. You have inserted and adjusted column sizes in the Standard view. The Table width should be set at 100%. 3. All columns except the autostretch column should be indicated in pixels, not %s, as you have already done. 4. In order to make a column adjustable, switch to ‘Layout’ view by selecting ‘View>Table View>Layout
View’
12
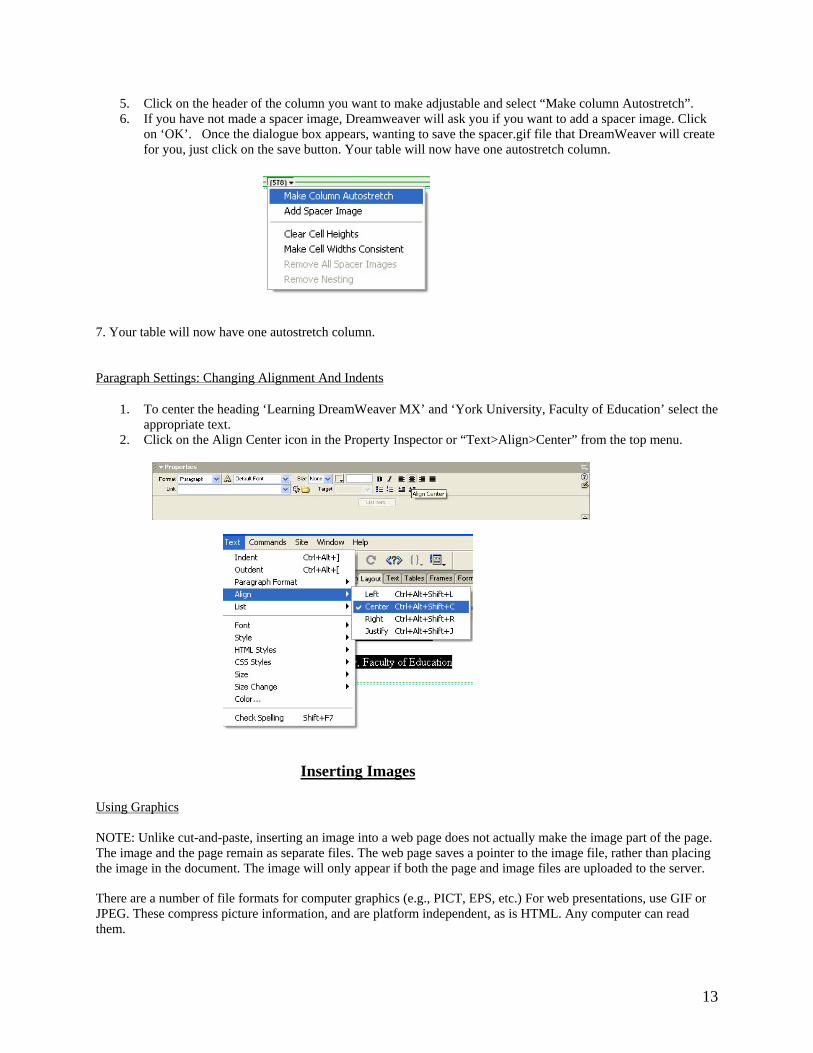
5. Click on the header of the column you want to make adjustable and select “Make column Autostretch”. 6. If you have not made a spacer image, Dreamweaver will ask you if you want to add a spacer image. Click on ‘OK’. Once the dialogue box appears, wanting to save the spacer.gif file that DreamWeaver will create for you, just click on the save button. Your table will now have one autostretch column.
7. Your table will now have one autostretch column.
Paragraph Settings: Changing Alignment And Indents
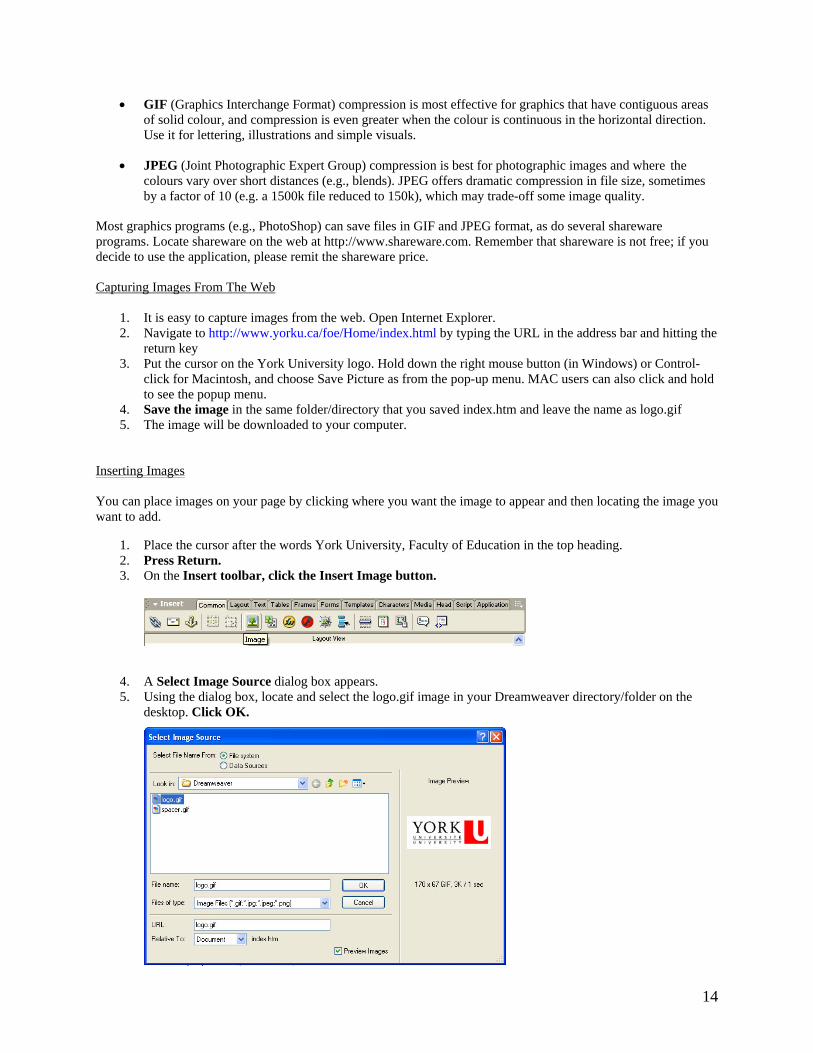
1. To center the heading ‘Learning DreamWeaver MX’ and ‘York University, Faculty of Education’ select the appropriate text.
2. Click on the Align Center icon in the Property Inspector or “Text>Align>Center” from the top menu.
Inserting Images Inserting Images
Using Graphics NOTE: Unlike cut-and-paste, inserting an image into a web page does not actually make the image part of the page. The image and the page remain as separate files. The web page saves a pointer to the image file, rather than placing the image in the document. The image will only appear if both the page and image files are uploaded to the server.
There are a number of file formats for computer graphics (e.g., PICT, EPS, etc.) For web presentations, use GIF or JPEG. These compress picture information, and are platform independent, as is HTML. Any computer can read them.
13
• GIF (Graphics Interchange Format) compression is most effective for graphics that have contiguous areas of solid colour, and compression is even greater when the colour is continuous in the horizontal direction. Use it for lettering, illustrations and simple visuals.
• JPEG (Joint Photographic Expert Group) compression is best for photographic images and where the colours vary over short distances (e.g., blends). JPEG offers dramatic compression in file size, sometimes by a factor of 10 (e.g. a 1500k file reduced to 150k), which may trade-off some image quality.
Most graphics programs (e.g., PhotoShop) can save files in GIF and JPEG format, as do several shareware programs. Locate shareware on the web at http://www.shareware.com. Remember that shareware is not free; if you decide to use the application, please remit the shareware price.
Capturing Images From The Web
1. It is easy to capture images from the web. Open Internet Explorer. 2. Navigate to http://www.yorku.ca/foe/Home/index.html by typing the URL in the address bar and hitting the
return key 3. Put the cursor on the York University logo. Hold down the right mouse button (in Windows) or Control-
click for Macintosh, and choose Save Picture as from the pop-up menu. MAC users can also click and hold to see the popup menu.
4. Save the image in the same folder/directory that you saved index.htm and leave the name as logo.gif 5. The image will be downloaded to your computer.
Inserting Images You can place images on your page by clicking where you want the image to appear and then locating the image you want to add.
1. Place the cursor after the words York University, Faculty of Education in the top heading. 2. Press Return. 3. On the Insert toolbar, click the Insert Image button.
4. A Select Image Source dialog box appears. 5. Using the dialog box, locate and select the logo.gif image in your Dreamweaver directory/folder on the
desktop. Click OK.
14
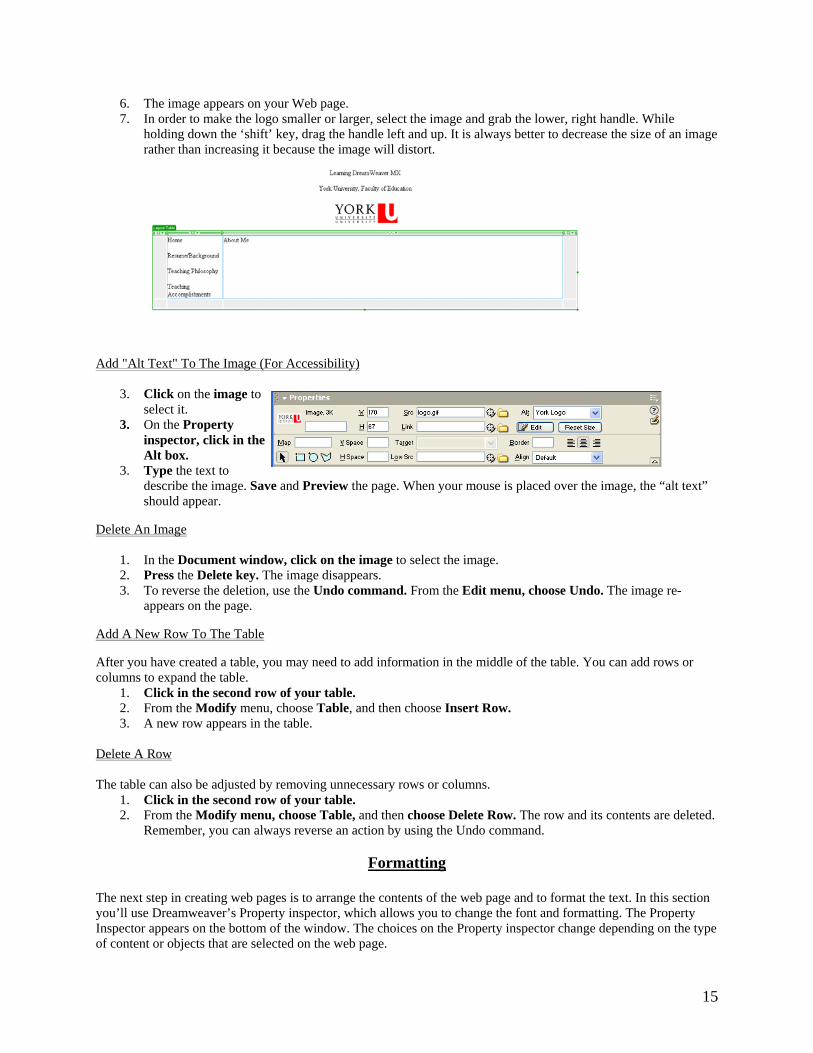
6. The image appears on your Web page. 7. In order to make the logo smaller or larger, select the image and grab the lower, right handle. While
holding down the ‘shift’ key, drag the handle left and up. It is always better to decrease the size of an image rather than increasing it because the image will distort.
Add "Alt Text" To The Image (For Accessibility)
3. Click on the image to select it.
3. On the Property inspector, click in the Alt box.
3. Type the text to describe the image. Save and Preview the page. When your mouse is placed over the image, the “alt text” should appear.
Delete An Image
1. In the Document window, click on the image to select the image. 2. Press the Delete key. The image disappears. 3. To reverse the deletion, use the Undo command. From the Edit menu, choose Undo. The image re-
appears on the page.
Add A New Row To The Table
After you have created a table, you may need to add information in the middle of the table. You can add rows or columns to expand the table.
1. Click in the second row of your table. 2. From the Modify menu, choose Table, and then choose Insert Row. 3. A new row appears in the table.
Delete A Row The table can also be adjusted by removing unnecessary rows or columns.
1. Click in the second row of your table. 2. From the Modify menu, choose Table, and then choose Delete Row. The row and its contents are deleted.
Remember, you can always reverse an action by using the Undo command.
Formatting
The next step in creating web pages is to arrange the contents of the web page and to format the text. In this section you’ll use Dreamweaver’s Property inspector, which allows you to change the font and formatting. The Property Inspector appears on the bottom of the window. The choices on the Property inspector change depending on the type of content or objects that are selected on the web page.
15
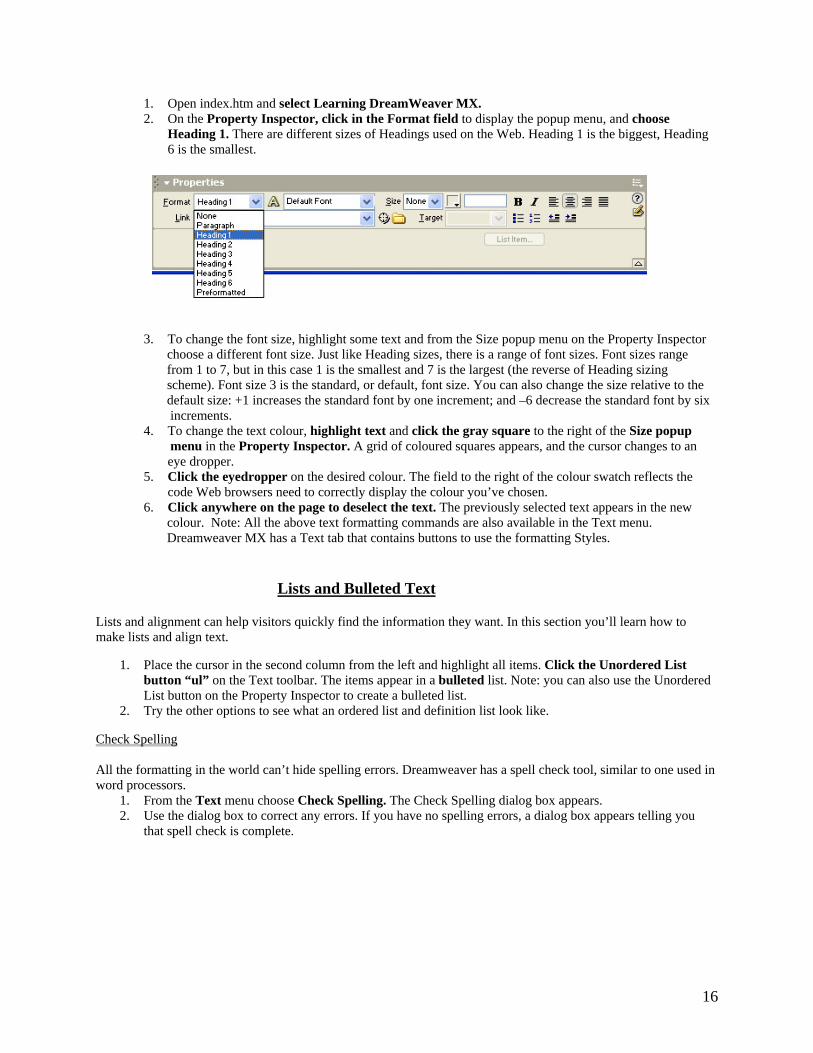
1. Open index.htm and select Learning DreamWeaver MX. 2. On the Property Inspector, click in the Format field to display the popup menu, and choose
Heading 1. There are different sizes of Headings used on the Web. Heading 1 is the biggest, Heading 6 is the smallest.
3. To change the font size, highlight some text and from the Size popup menu on the Property Inspector choose a different font size. Just like Heading sizes, there is a range of font sizes. Font sizes range from 1 to 7, but in this case 1 is the smallest and 7 is the largest (the reverse of Heading sizing scheme). Font size 3 is the standard, or default, font size. You can also change the size relative to the default size: +1 increases the standard font by one increment; and –6 decrease the standard font by six increments. 4. To change the text colour, highlight text and click the gray square to the right of the Size popup menu in the Property Inspector. A grid of coloured squares appears, and the cursor changes to an eye dropper. 5. Click the eyedropper on the desired colour. The field to the right of the colour swatch reflects the code Web browsers need to correctly display the colour you’ve chosen. 6. Click anywhere on the page to deselect the text. The previously selected text appears in the new colour. Note: All the above text formatting commands are also available in the Text menu. Dreamweaver MX has a Text tab that contains buttons to use the formatting Styles.
Lists and Bulleted Text and Bulleted Text
Lists and alignment can help visitors quickly find the information they want. In this section you’ll learn how to make lists and align text.
1. Place the cursor in the second column from the left and highlight all items. Click the Unordered List button “ul” on the Text toolbar. The items appear in a bulleted list. Note: you can also use the Unordered List button on the Property Inspector to create a bulleted list.
2. Try the other options to see what an ordered list and definition list look like.
Check Spelling All the formatting in the world can’t hide spelling errors. Dreamweaver has a spell check tool, similar to one used in word processors.
1. From the Text menu choose Check Spelling. The Check Spelling dialog box appears. 2. Use the dialog box to correct any errors. If you have no spelling errors, a dialog box appears telling you
that spell check is complete.
16
Change Text and Background Colours for a Paget
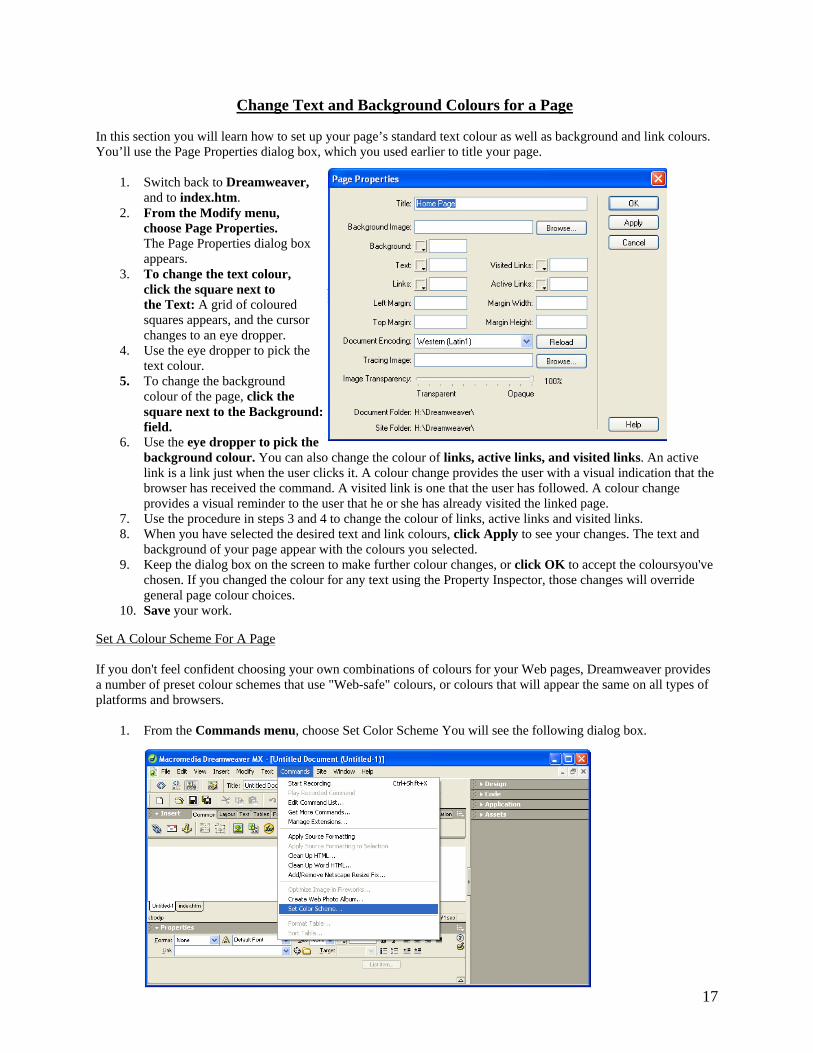
In this section you will learn how to set up your page’s standard text colour as well as background and link colours. You’ll use the Page Properties dialog box, which you used earlier to title your page.
1. Switch back to Dreamweaver, and to index.htm.
2. From the Modify menu, choose Page Properties. The Page Properties dialog box appears.
3. To change the text colour, click the square next to the Text: A grid of coloured squares appears, and the cursor changes to an eye dropper.
4. Use the eye dropper to pick the text colour.
5. To change the background colour of the page, click the square next to the Background: field.
6. Use the eye dropper to pick the background colour. You can also change the colour of links, active links, and visited links. An active link is a link just when the user clicks it. A colour change provides the user with a visual indication that the browser has received the command. A visited link is one that the user has followed. A colour change provides a visual reminder to the user that he or she has already visited the linked page.
7. Use the procedure in steps 3 and 4 to change the colour of links, active links and visited links. 8. When you have selected the desired text and link colours, click Apply to see your changes. The text and
background of your page appear with the colours you selected. 9. Keep the dialog box on the screen to make further colour changes, or click OK to accept the coloursyou've
chosen. If you changed the colour for any text using the Property Inspector, those changes will override general page colour choices.
10. Save your work.
Set A Colour Scheme For A Page If you don't feel confident choosing your own combinations of colours for your Web pages, Dreamweaver provides a number of preset colour schemes that use "Web-safe" colours, or colours that will appear the same on all types of platforms and browsers.
1. From the Commands menu, choose Set Color Scheme You will see the following dialog box.
17
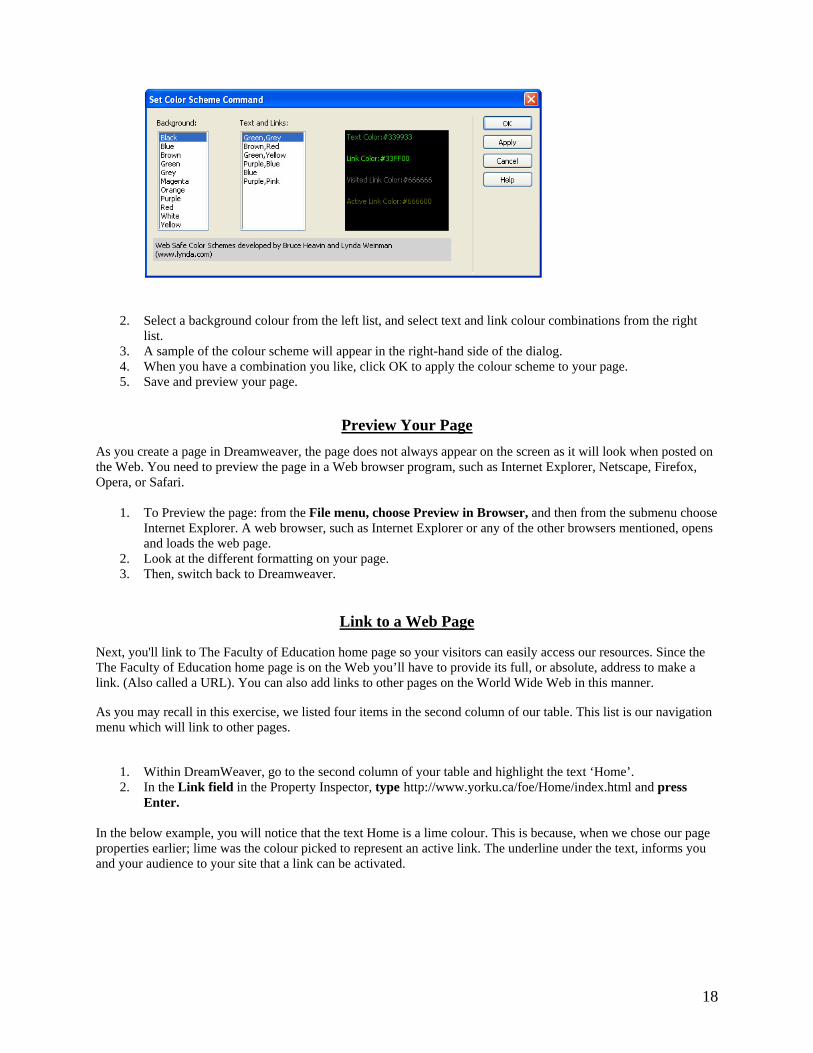
2. Select a background colour from the left list, and select text and link colour combinations from the right list.
3. A sample of the colour scheme will appear in the right-hand side of the dialog. 4. When you have a combination you like, click OK to apply the colour scheme to your page. 5. Save and preview your page.
Preview Your Page As you create a page in Dreamweaver, the page does not always appear on the screen as it will look when posted on the Web. You need to preview the page in a Web browser program, such as Internet Explorer, Netscape, Firefox, Opera, or Safari.
1. To Preview the page: from the File menu, choose Preview in Browser, and then from the submenu choose Internet Explorer. A web browser, such as Internet Explorer or any of the other browsers mentioned, opens and loads the web page.
2. Look at the different formatting on your page. 3. Then, switch back to Dreamweaver.
Link to a Web Page
Next, you'll link to The Faculty of Education home page so your visitors can easily access our resources. Since the The Faculty of Education home page is on the Web you’ll have to provide its full, or absolute, address to make a link. (Also called a URL). You can also add links to other pages on the World Wide Web in this manner.
As you may recall in this exercise, we listed four items in the second column of our table. This list is our navigation menu which will link to other pages.
1. Within DreamWeaver, go to the second column of your table and highlight the text ‘Home’. 2. In the Link field in the Property Inspector, type http://www.yorku.ca/foe/Home/index.html and press
Enter. In the below example, you will notice that the text Home is a lime colour. This is because, when we chose our page properties earlier; lime was the colour picked to represent an active link. The underline under the text, informs you and your audience to your site that a link can be activated.
18
Home becomes a link to the Faculty of Education website. This is the same technique used to add a link to any page on the Web. To check if the links work properly, you have to preview the page in a browser.
3. Save your work and preview. 4. Test the link. 5. Switch back to Dreamweaver for more additions to your page. 6. You can add links to images just as you did for text.
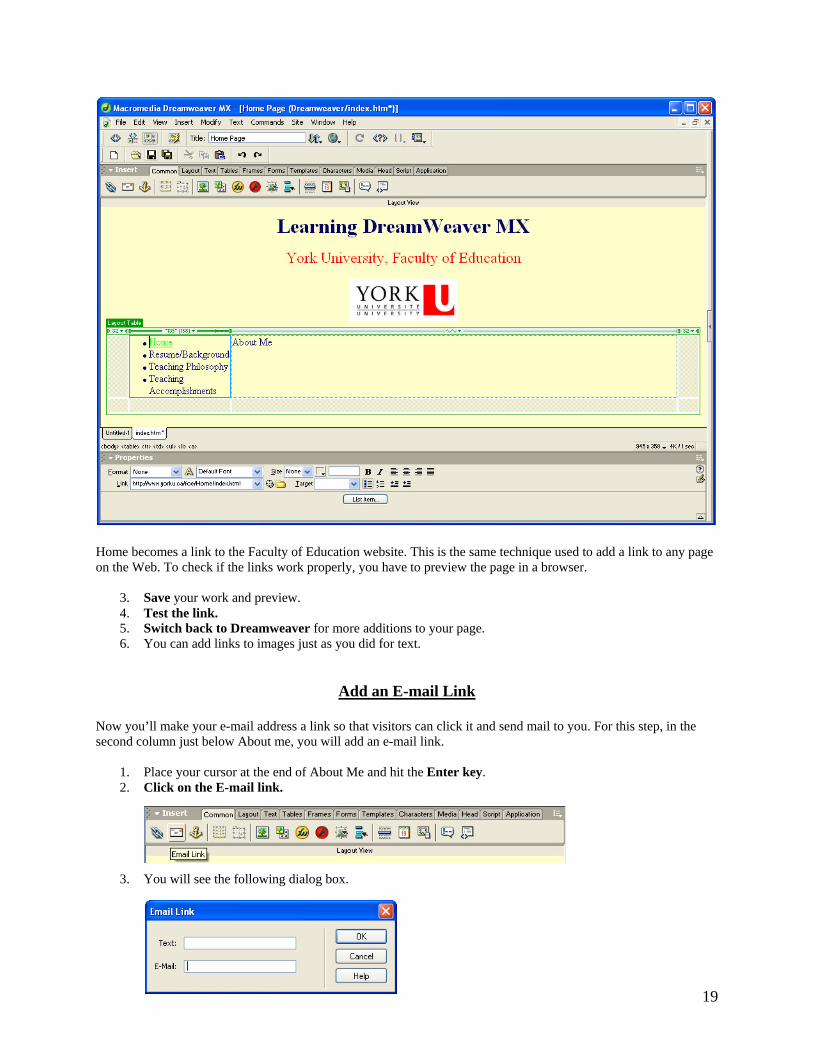
Add an E-mail Link Now you’ll make your e-mail address a link so that visitors can click it and send mail to you. For this step, in the second column just below About me, you will add an e-mail link.
1. Place your cursor at the end of About Me and hit the Enter key. 2. Click on the E-mail link.
3. You will see the following dialog box.
19
4. Enter the text you want to appear on your page: mailto:your E-mail address 1. Press Enter. Your e-mail address appears as a link. 2. Save your work. 3. Preview and test in a web browser. If your link does not work, repeat the steps above. Double-check the
information in the Link field. If the E-mail link doesn’t work, it might be because your Web browser is not configured to send email.
Page Navigation
Next, you will create additional pages for your Web site.
TIP: The below steps explain how to create additional pages. However, if you would like to create additional pages while still maintaining the page layout and content, you can simply use the Save As option under the File menu and save the index.htm page as teaching_philosophy.htm. Using this method is the quickest way of creating additional pages while maintaining consistency of the pages you create.
1. From the File menu, choose New…The New page dialog box appears. 2. Click the Create button. 3. Click in the Title field, and type ‘Teaching Philosophy’. You’ll want to give your new document a clear
and descriptive title so your viewers can find it in a search for related information. 4. Save your new page in Dreamweaver. Name your document ‘teaching_philosophy.htm’ and save to the
Dreamweaver folder. 5. Repeat steps 1 – 3 to create a new page for Teaching Accomplishments. 6. Once again save the new page in Dreamweaver, naming the file that uniquely identifies it. 7. You will have to use the File menu and select the Open command in order to open the index.htm and
teaching_philosophy.htm files. You should now have 3 tabs open at the bottom of your Dreamweaver program.
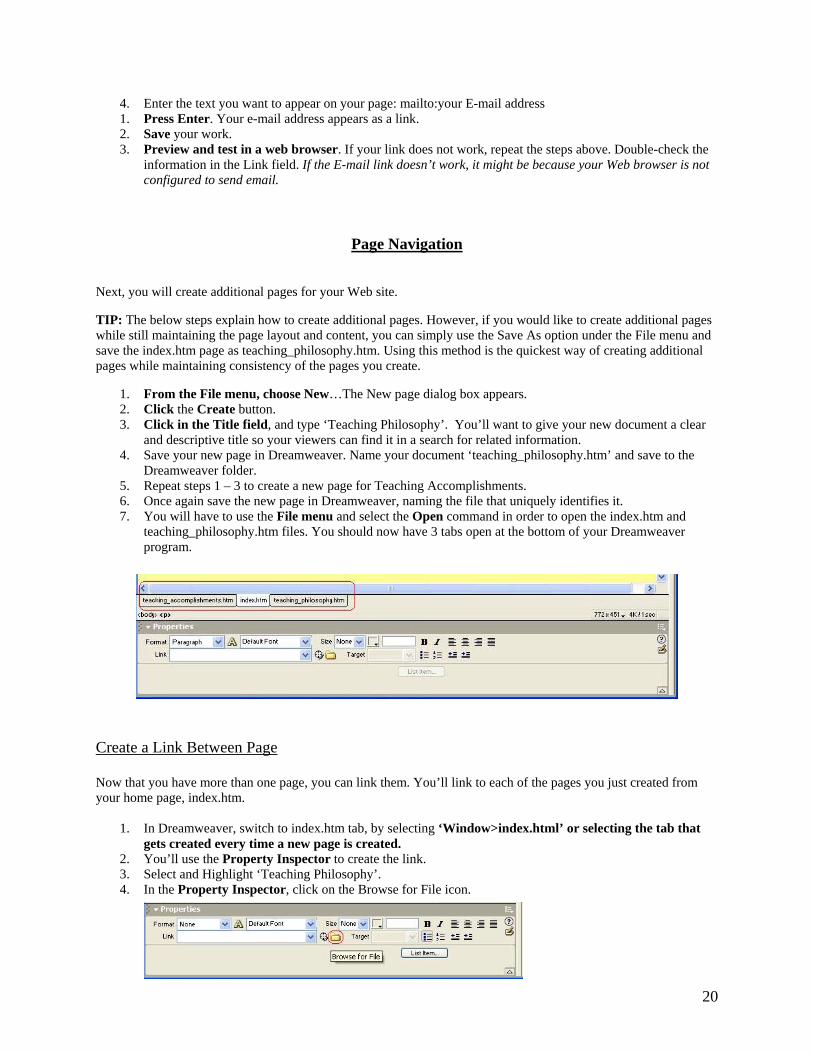
Create a Link Between Page Now that you have more than one page, you can link them. You’ll link to each of the pages you just created from your home page, index.htm.
1. In Dreamweaver, switch to index.htm tab, by selecting ‘Window>index.html’ or selecting the tab that gets created every time a new page is created.
2. You’ll use the Property Inspector to create the link. 3. Select and Highlight ‘Teaching Philosophy’. 4. In the Property Inspector, click on the Browse for File icon.
20

5. A Select File dialog box appears. 6. Using the Dialog box, locate and select the file ‘teaching_philosophy.htm’ 7. Click the OK button. The selected ‘teaching_philosophy.htm’ text is underlined and appears in the link
colour you chose. In the Property Inspector, the Link field reads: ‘teaching_philosophy.htm’. 8. Repeat step 7 and do the same for Teaching Accomplishments. Remember you are now linking to the
appropriate file which in this case is teaching_accomplishments.htm.
You’re now ready for transferring your files to the Web. In the previous step, you previewed your pages on your local drive using Internet Explorer to see what they’d look like on the Web. In this part, you’ll actually transfer copies of your Web files to a Web server, a computer that stores Web files, so that others can view your pages on the Web.
In order to put your files on the Web, you need space, or an account, on a Web server. This server could be in your department or organization. Accounts on the FirstClass server are available to you. As a matter of fact, you are automatically setup with web space right from the moment you are given a FirstClass email account.
Transfer Files to a Web Server using DreamWeaver MX
You saved all of your Web files to the Dreamweaver folder on your desktop, and Dreamweaver linked your supporting images and HTML documents based on the relative locations of the files. In order for your page to work properly, you need to maintain this same structure when you put your files on the server. In this section, you’ll transfer all of your files from your Dreamweaver folder to your folder on the FirstClass server.
1. In the Site panel, highlight the files in the Course Web Site in the Local View. To highlight more than one file: Hold the Ctrl key on a PC or the Shift key on a Mac and click on each of your files. You cannot move the individual files as a group by selecting just the folder.
2. On the Site panel toolbar, click the Put Files button. 3. A Dependent files dialog box appears asking if you want to include dependent files. 4. Click No. Dreamweaver transfers copies of the highlighted files to your directory on the server. If you transfer a file and include dependent files, Dreamweaver will transfer all local files that the selected file references. In some cases, this feature may slow the file transfer process by retransferring files that already exist on the server. You may also inadvertently replace files on your server. 5. On the Site panel toolbar, click the Expand/Collapse button to see the files on the Remote view. Although you now have copies of your files on both your local and remote system, in the future you may need
21
to download files from the Web in order to update them. To get files from the server (downloadfiles), click Get Files button (instead of Put files button).
View Your Files on the Web
Up until now, you have viewed only your local files using Internet Explorer or another browser. Now that you have transferred your files to a Web server, you can use Internet Explorer or another browser to view your files on the Web.
1. Switch to or launch Internet Explorer. 2. In the Location: field, type (all on one line, no spaces or Returns)
http://www.edu.yorku.ca/~kgambin (Replace ~kgambin with ~your username) 3. Press Enter. Your Web page appears. Notice that you didn’t have to indicate the exact HTM document
that you wanted to view. Since a file name wasn’t specified, Internet Explorer looked in the directory for a file called index.htm. The FC server knows that is the ‘default’ document to display in a directory, it just does it without having to call the specific file in the URL. This why the file had to be named index.htm or index.html
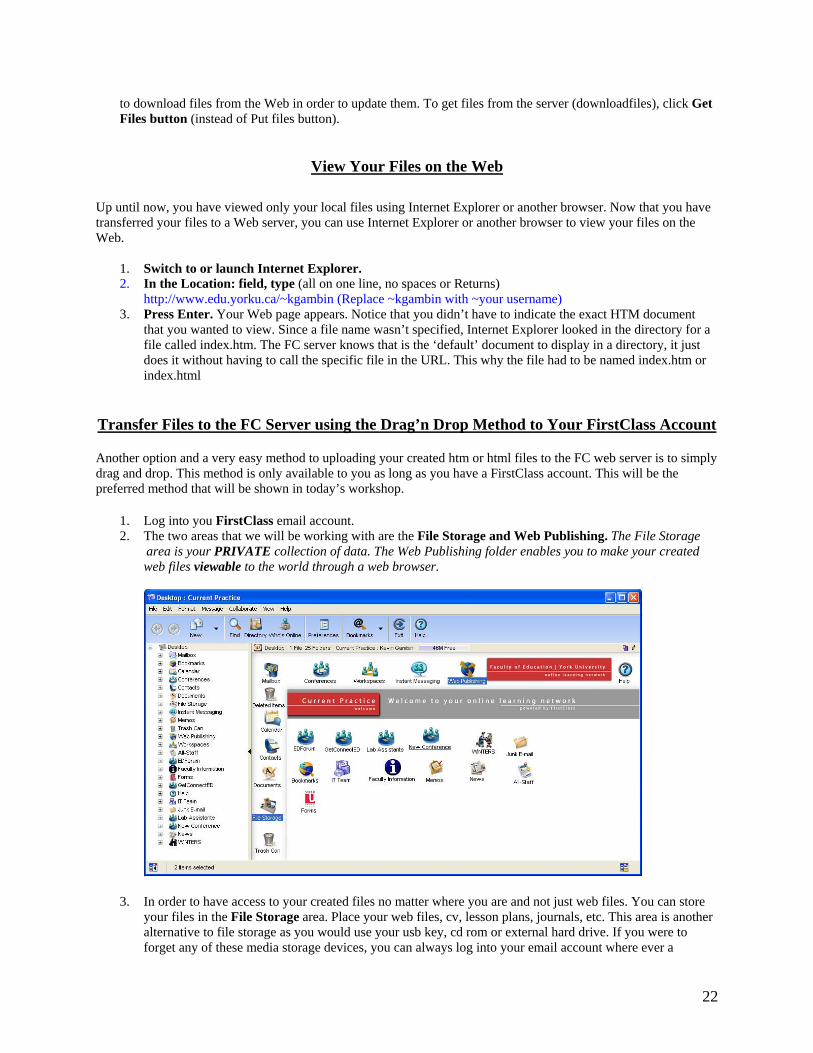
Transfer Files to the FC Server using the Drag’n Drop Method to Your FirstClass Account
Another option and a very easy method to uploading your created htm or html files to the FC web server is to simply drag and drop. This method is only available to you as long as you have a FirstClass account. This will be the preferred method that will be shown in today’s workshop.
1. Log into you FirstClass email account. 2. The two areas that we will be working with are the File Storage and Web Publishing. The File Storage area is your PRIVATE collection of data. The Web Publishing folder enables you to make your created web files viewable to the world through a web browser.
3. In order to have access to your created files no matter where you are and not just web files. You can store your files in the File Storage area. Place your web files, cv, lesson plans, journals, etc. This area is another alternative to file storage as you would use your usb key, cd rom or external hard drive. If you were to forget any of these media storage devices, you can always log into your email account where ever a
22

computer is and gain instant access to your PRIVATE FILES. 4. From your local drive (if in a lab setting this would be your H:\ drive or C:\ drive from home), locate the Dreamweaver folder you created. Highlight the files in the DreanWeaver folder. To highlight more than one file: Hold the Ctrl key on a PC or the Shift key on a Mac and click on each of your files. While the files are highlighted click in the highlighted area with the left mouse button and don’t let go. 5. While still holding down on the left mouse button, drag the files to the File Storage area in your First Class
account and let go of the button. You will find this process a little tricky but once you get the hang of it, it will save you a lot of time.
6. Files that you intend to publish to your website, will need to be dragged from the File Storage folder and placed in the Web Publishing Folder. 7. Repeat steps 4 & 5, but this time you are to be in the File Storage folder and highlighting only those files
that you want to publish to your web site and drag them to the Web Publishing Folder. IMPORTANT: Hold the CTRL key while dragging the files over so that you are COPYING the files over and NOT MOVING them.
Take a look at the below picture to show you how step 7 is done.
Checklist for Creating Your Web Pages
Now, that you have completed the workshop you are ready to create the pages for your Web site. Here are some things to keep in mind:
• Plan the content and design of your Web site. Organize the course content and information by dividing your site into separate pages. You may also want to plan how often the pages would need to be updated.
• Gather materials for your Web pages. Information in a word processor can be converted into an HTML file. • Documents may also be converted into a PDF (Portable Document Format) and linked to your pages.
Images need to be digitized, usually with a scanner. • Organize your files into a folder (directory) on your computer. Place all image and multimedia files in the
23
folder. Then, save your HTM or HTML files created in Dreamweaver to this folder. • Test your site for functionality. Once you have created your course Web site, test all the links and make
sure all the images load correctly. • Set up an account on a server. This server could be in your department or organization, or it could be the
FC server. At the beginning of your course, introduce the course Web site to your students. Explain the function and contents of the course Web site and how often to visit it.
24